-
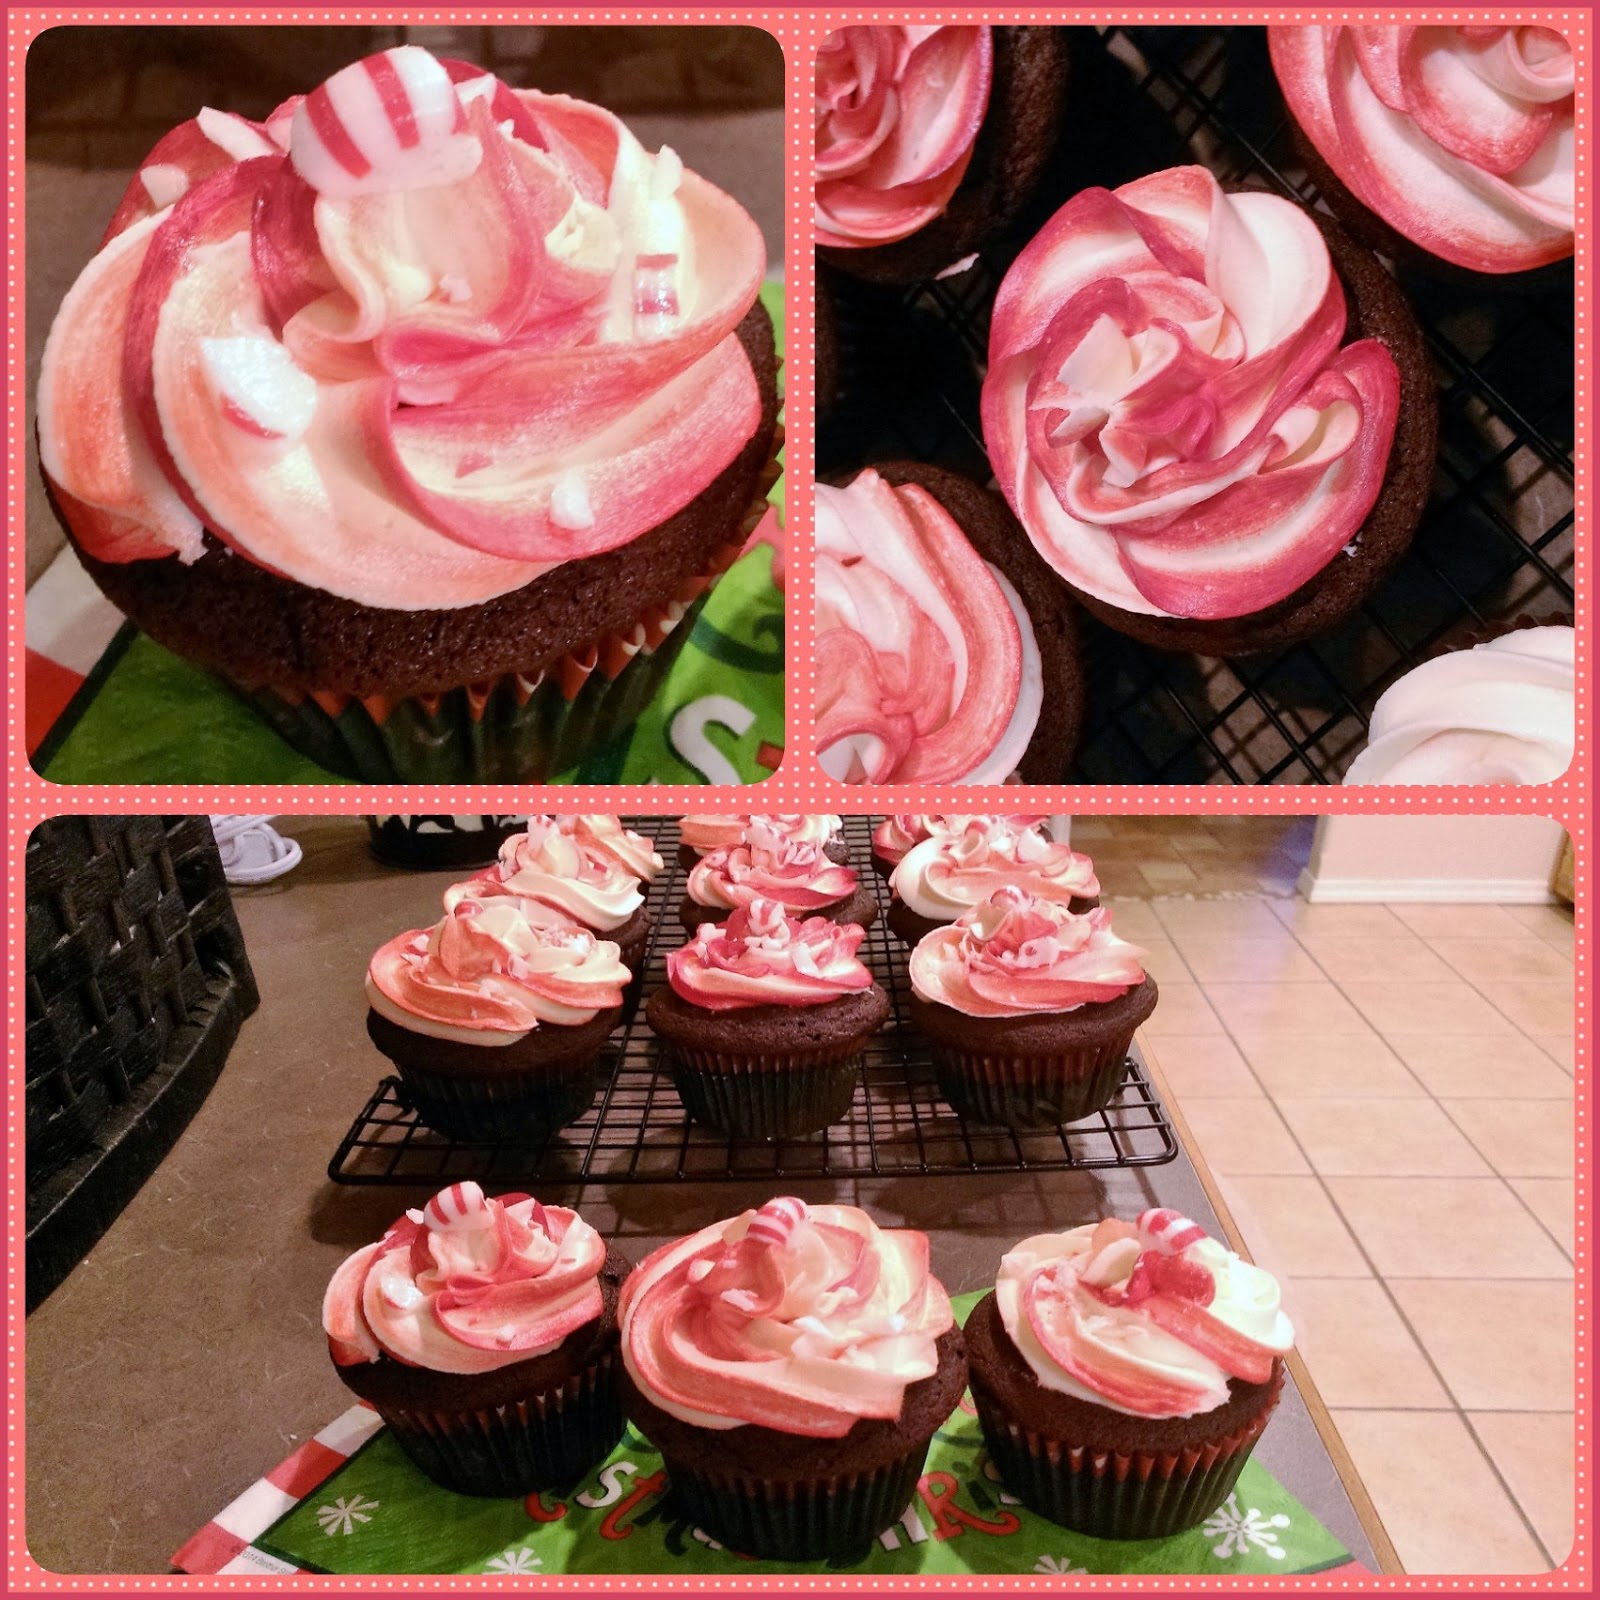
Tis the Season to Be Minty
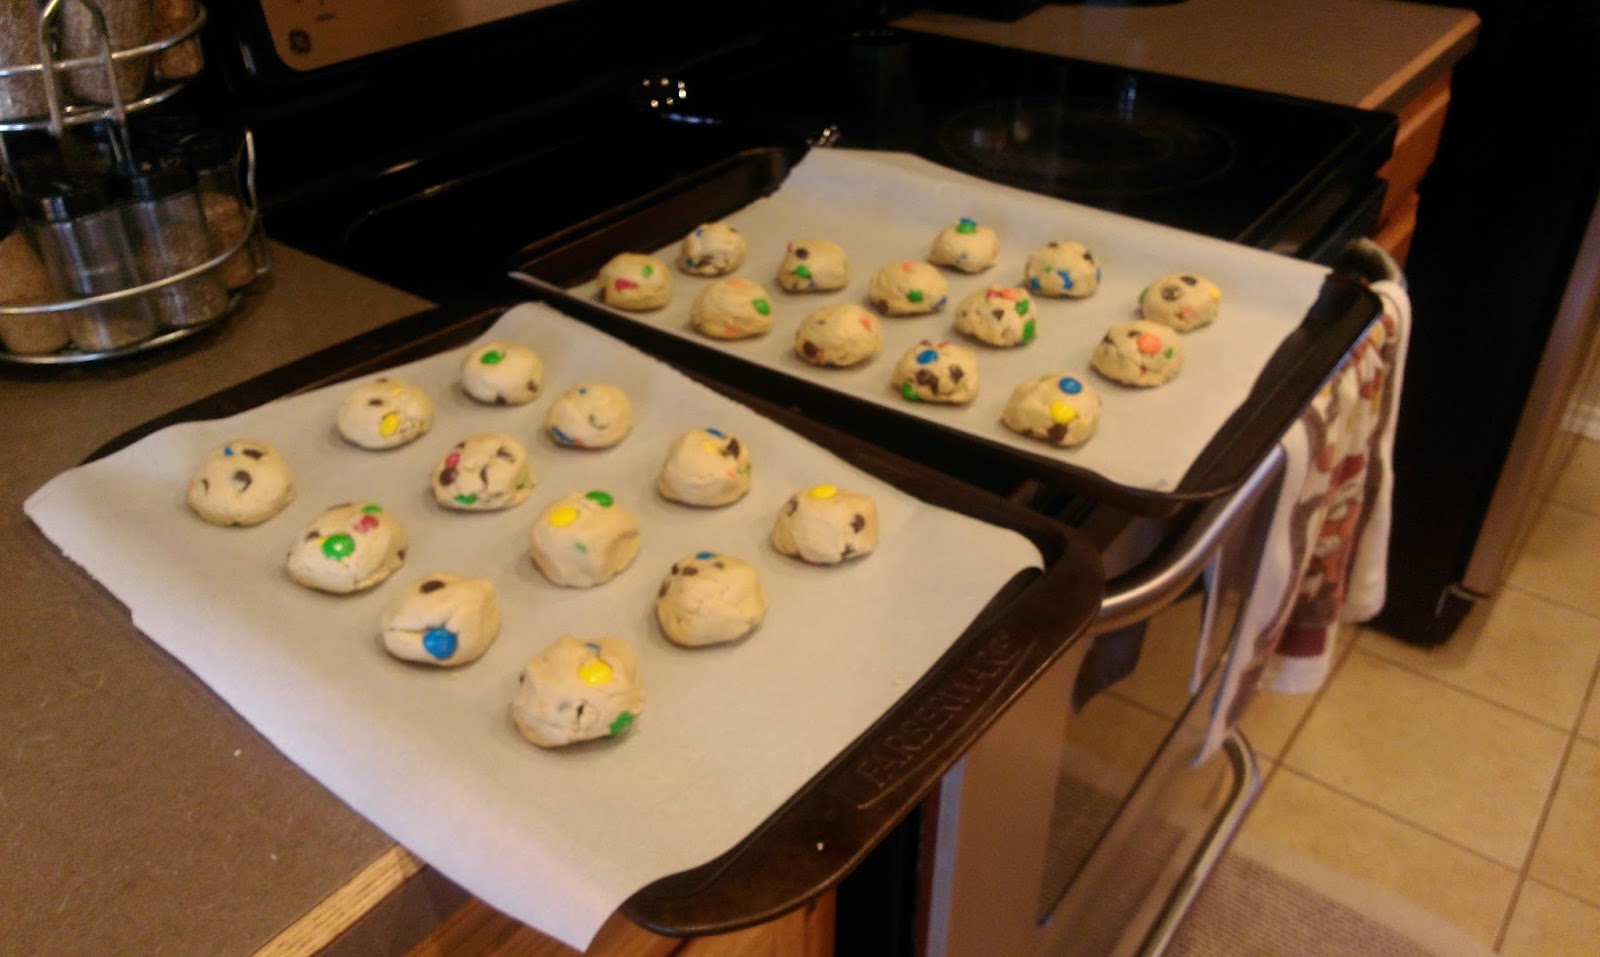
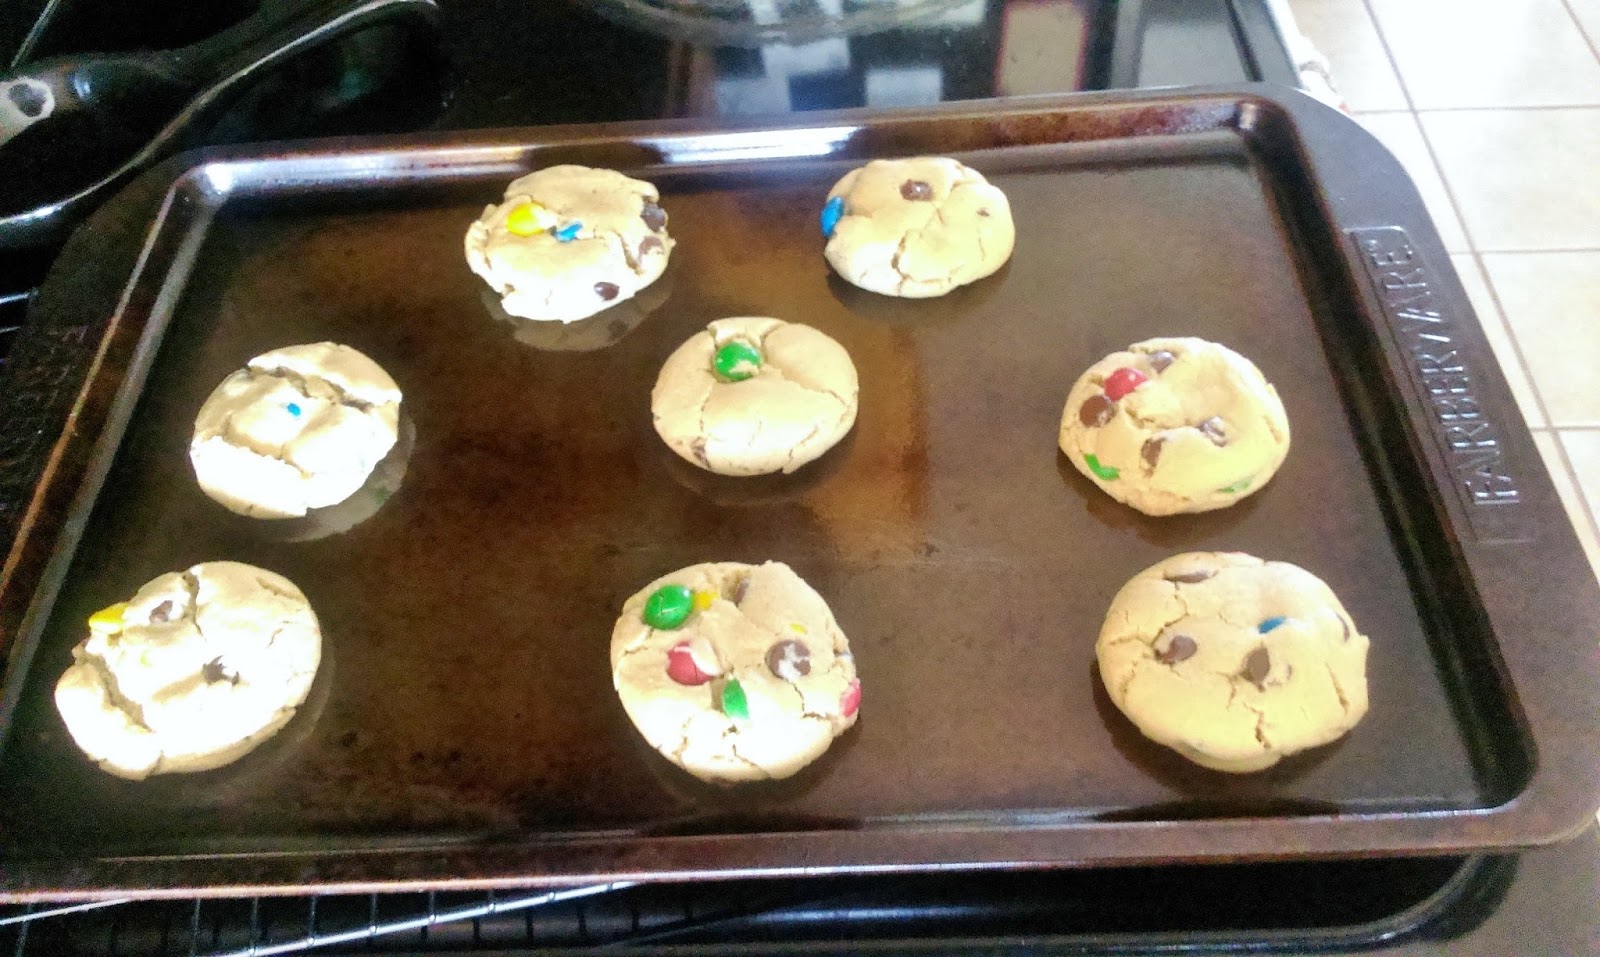
Peppermint does for winter what pumpkin spice does for fall…it gives it flavor. It was a very cold and snowy Thanksgiving for us when we visited family in Colorado, and all I wanted was a some spiked hot chocolate. Thankfully, my brother pulled through for me and made a delicious hot chocolate and peppermint Schnapps combo. Heaven, I tell you (both the drink and the fact that being the baby of the family means other people will always do stuff for me). It was in that moment that I decided this flavor needed to be made into a dessert of some sort. Mint chocolate is definitely one of my favorites, but peppermint and chocolate just takes things the extra dessert mile. My mom used to be able to find these fantastically amazing chocolates with crushed peppermint in them at Macy’s. It was quite literally one of the most enjoyable parts of my annual Christmas pig out. Sadly, they no longer make them, so I was left with a peppermint chocolatey void in my life and/or mouth. I couldn’t face a second Christmas in a row without them, and thus, the peppermint chocolate cupcake with peppermint butter cream frosting and crushed peppermint topped cupcake was born. I really, really like peppermint, y’all. I always failed at turning my candy canes into fake vampire or walrus teeth like every other normal child does because I could never resist just chomping the damn things into pieces and eating them as fast as possible. Most people savor a candy cane for like an hour; I’m done with one in about 43 seconds.

Let me tell you about how amazing my house smelled after making these. Winter Wonderland has a smell, and it is peppermint chocolate cupcakes. Drool factor is a 10 out of 10. We had a small gathering last night to play Cards Against Humanity and mini beer pong, and I wasn’t planning on serving these up but instead saving them for myself because I am both greedy and a glutton (just checking those Seven Deadly Sins right off the list). I put these in my cake safe and placed them on top of the fridge. I sorta figured that was the international symbol for “off limits,” but considering most of our friends (and my husband) are extremely tall, this was like precisely at eye-level for practically everyone except me. There was oogling, and quite a few people managed to snake a cupcake. When you come to my house, it is pretty much assumed there will be dessert, so this was my mistake really. But I channeled my inner-Grinch and ended up hiding them so I would actually get to eat one before they all disappeared. Don’t look at me like that…the recipe only makes 12, and I have to be able to taste test my work so I can bring you these delightfully insightful blogs every week after all. So let me give you the recipe for these delicious cupcakes so you, too, can also hide dessert from the people you love. Tis the season to be selfish, fa la la la la la la la greed.

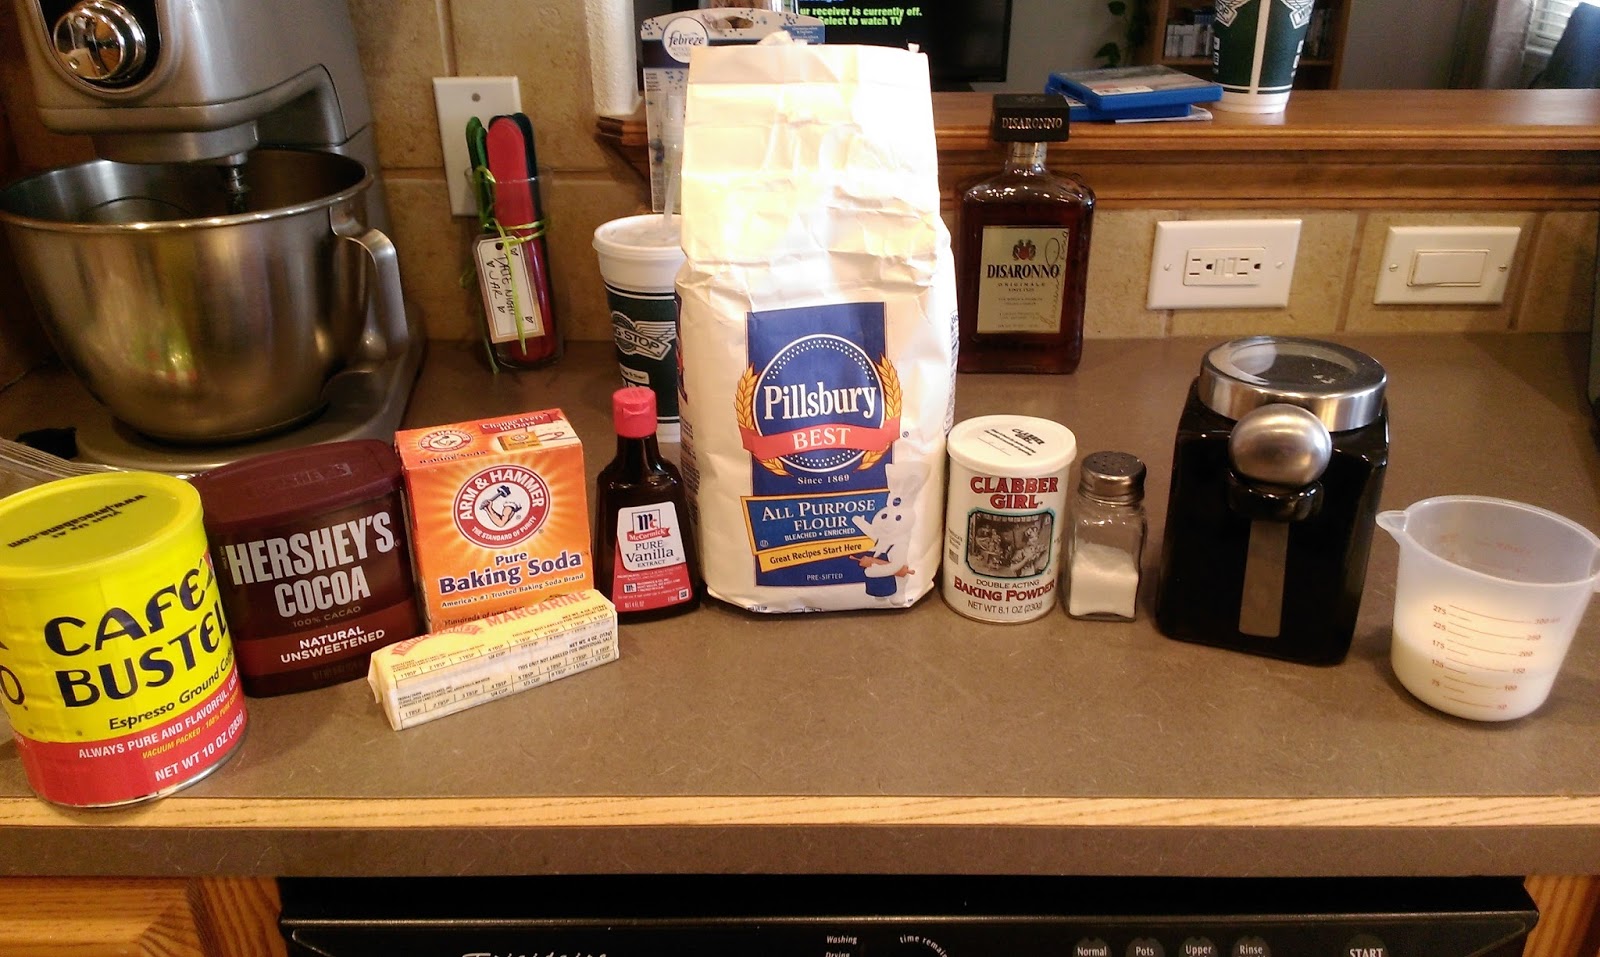
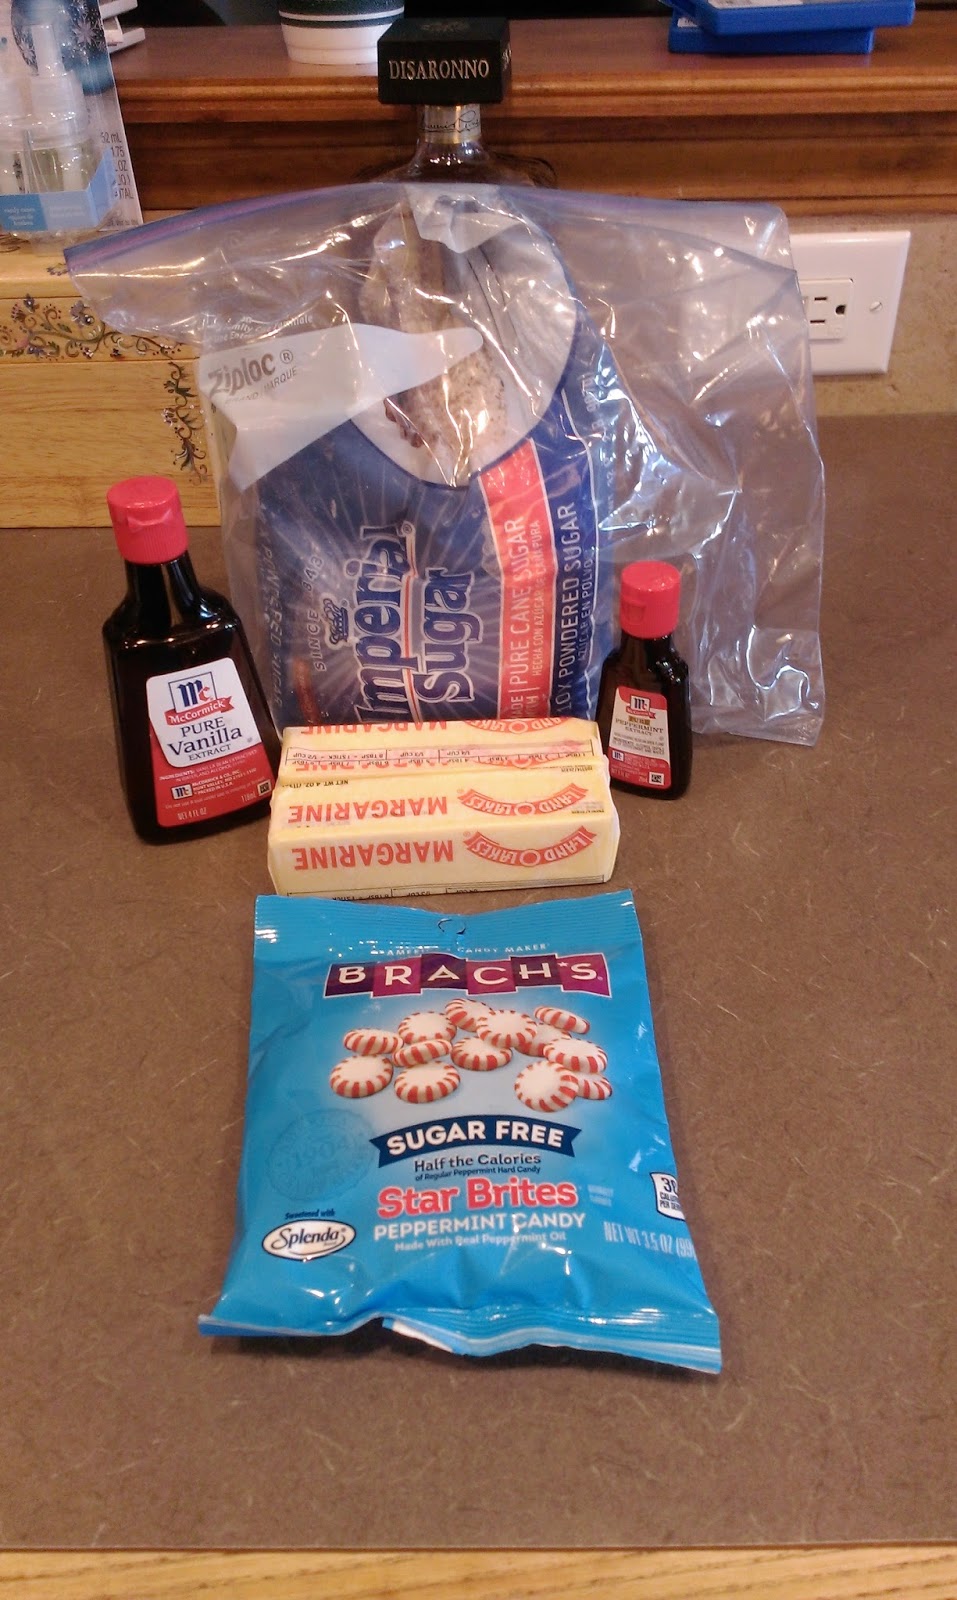
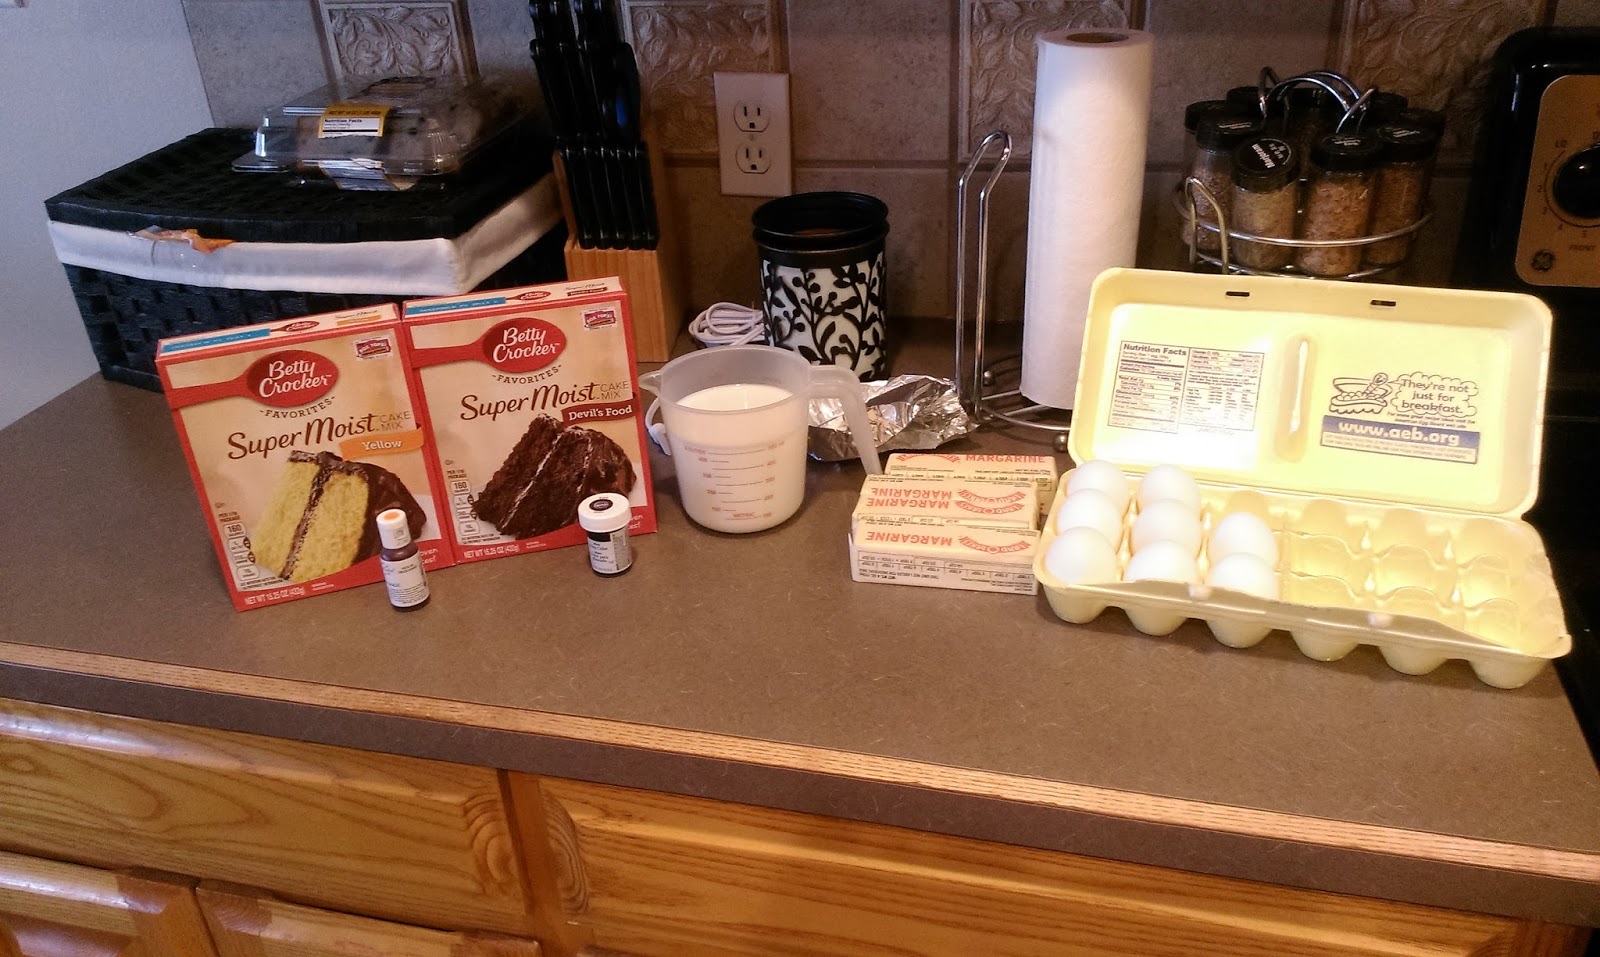
I know, looks like a lot, but they are so easy! I found and adapted this recipe to make things even peppermintier. Not a real word, but fun to say. So gather up:
- 3/4 cup plus 2 TBS of flour
- 3/4 tsp of baking soda
- 1/2 tsp baking powder
- 1 cup of sugar
- 1/4 cup plus 2 TBS of unsweetened cocoa
- 1/2 tsp salt
- 1/2 cup room temp butter
- 1 room temp egg
- 1/2 cup buttermilk
- 2 tsp vanilla extract
- 1/4 tsp peppermint extract
- 1 tsp espresso powder dissolved into 1/2 cup of boiling water
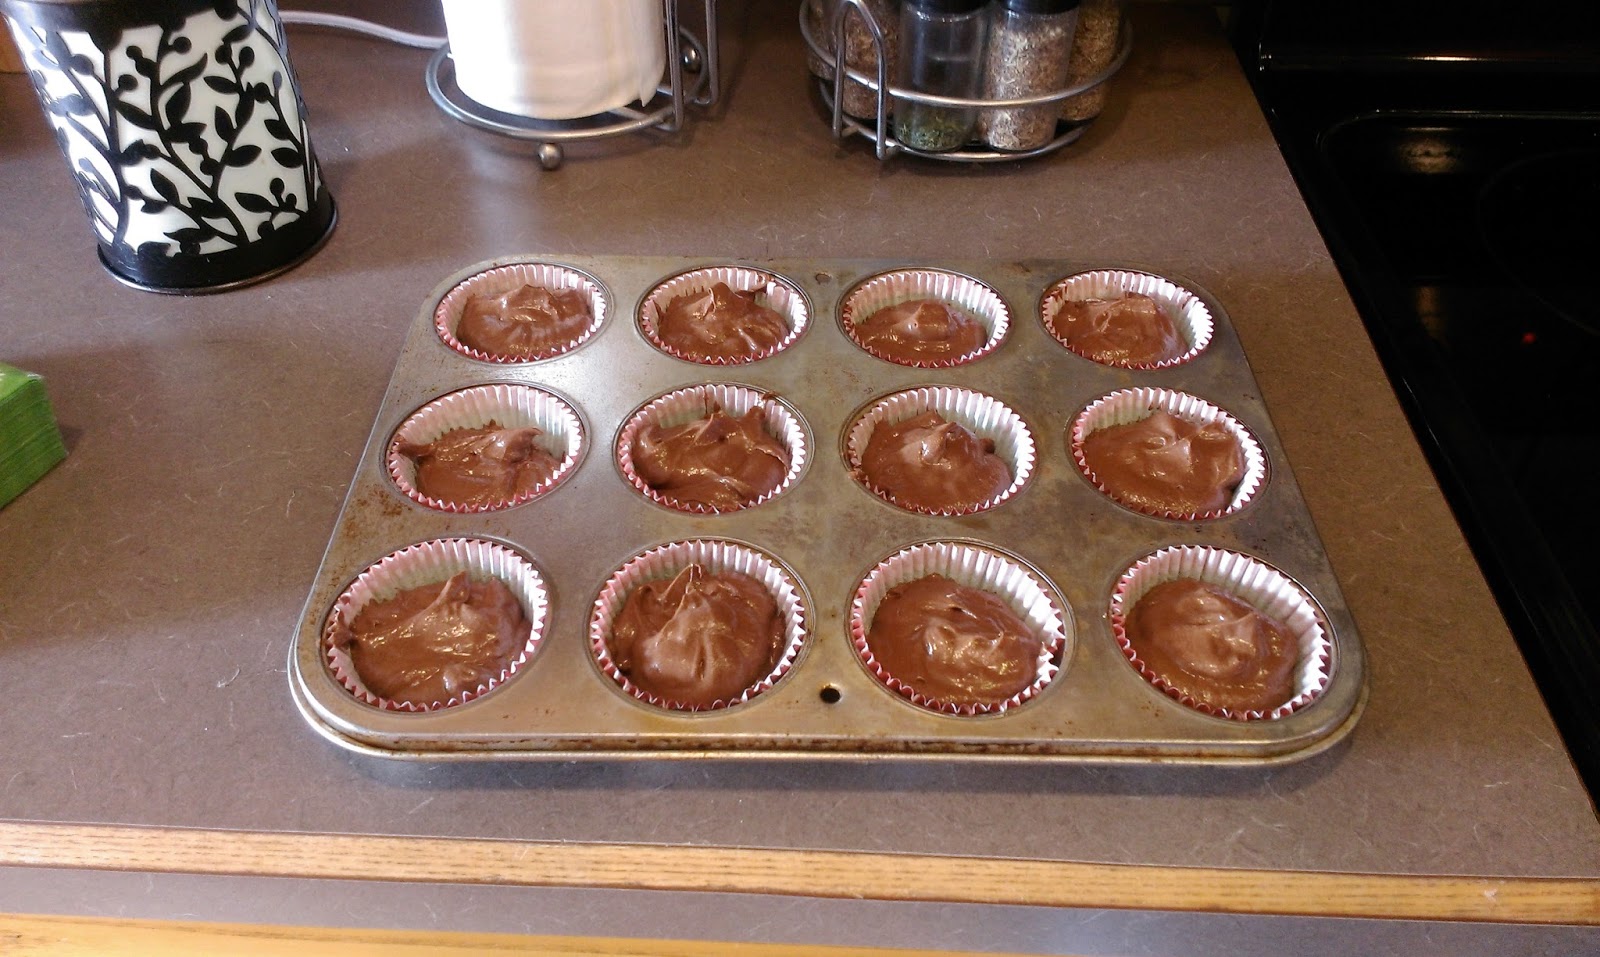
Preheat the oven to 350, and start by mixing together the flour, baking soda, baking powder, sugar, cocoa, and salt in a large bowl. In a stand mixer, cream the butter until fluffy. Add in the egg and extracts and mix well. Add in half the dry mix and all of the buttermilk and blend well. Add in the other half of the dry mix and the espresso and blend well. Don’t worry fellow coffee-haters, this tastes absolutely nothing like coffee, but instead the espresso gives the chocolate a nice, dark taste.

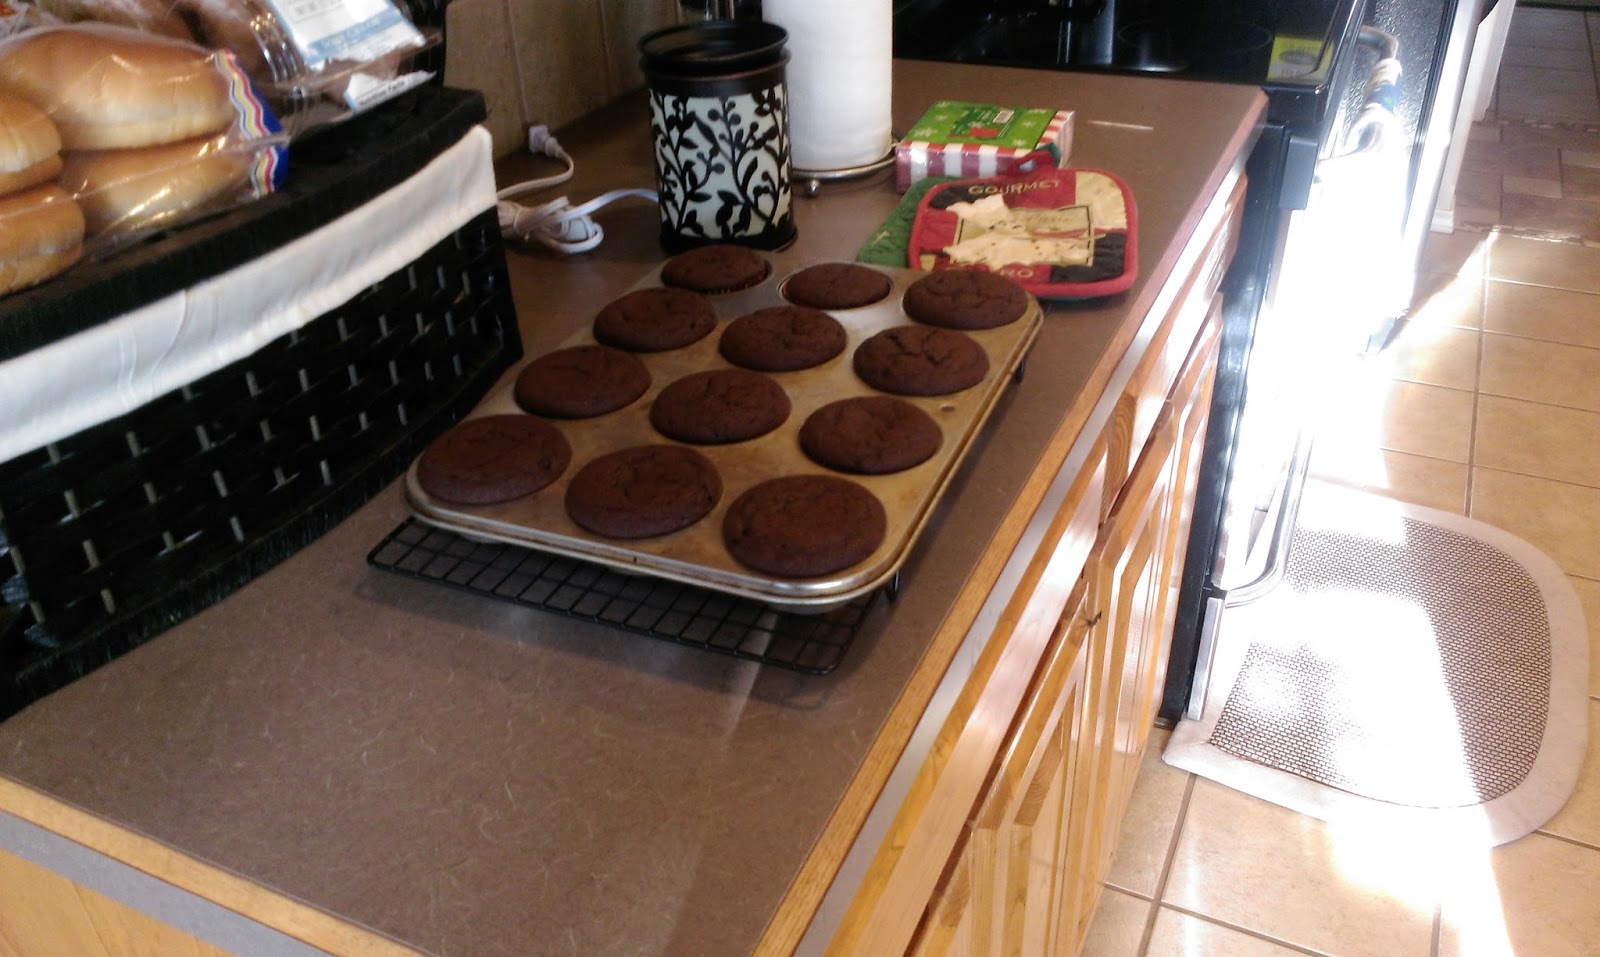
Throw the batter into a lined muffin tin and bake for 18-20 minutes. Your house will begin to smell like what dreams are made of. 
Once done, place on a cooling rack to cool for 10 minutes and then remove from the pan and continue to allow them to come to room temp. Drool all over yourself due to the smell. Christmas isn’t really my thing. I hate Christmas music, I hate red and green in combination, and I really, really hate sappy Christmas movies (exception being A Christmas Story, because leg lamp). I will say though that Christmas is a joy when it comes to baking. My house smells amazing for the entire month of December, but if I could bottle the smell that these cupcakes filled my house with and sell it, I would be a very, very rich Scrooge.
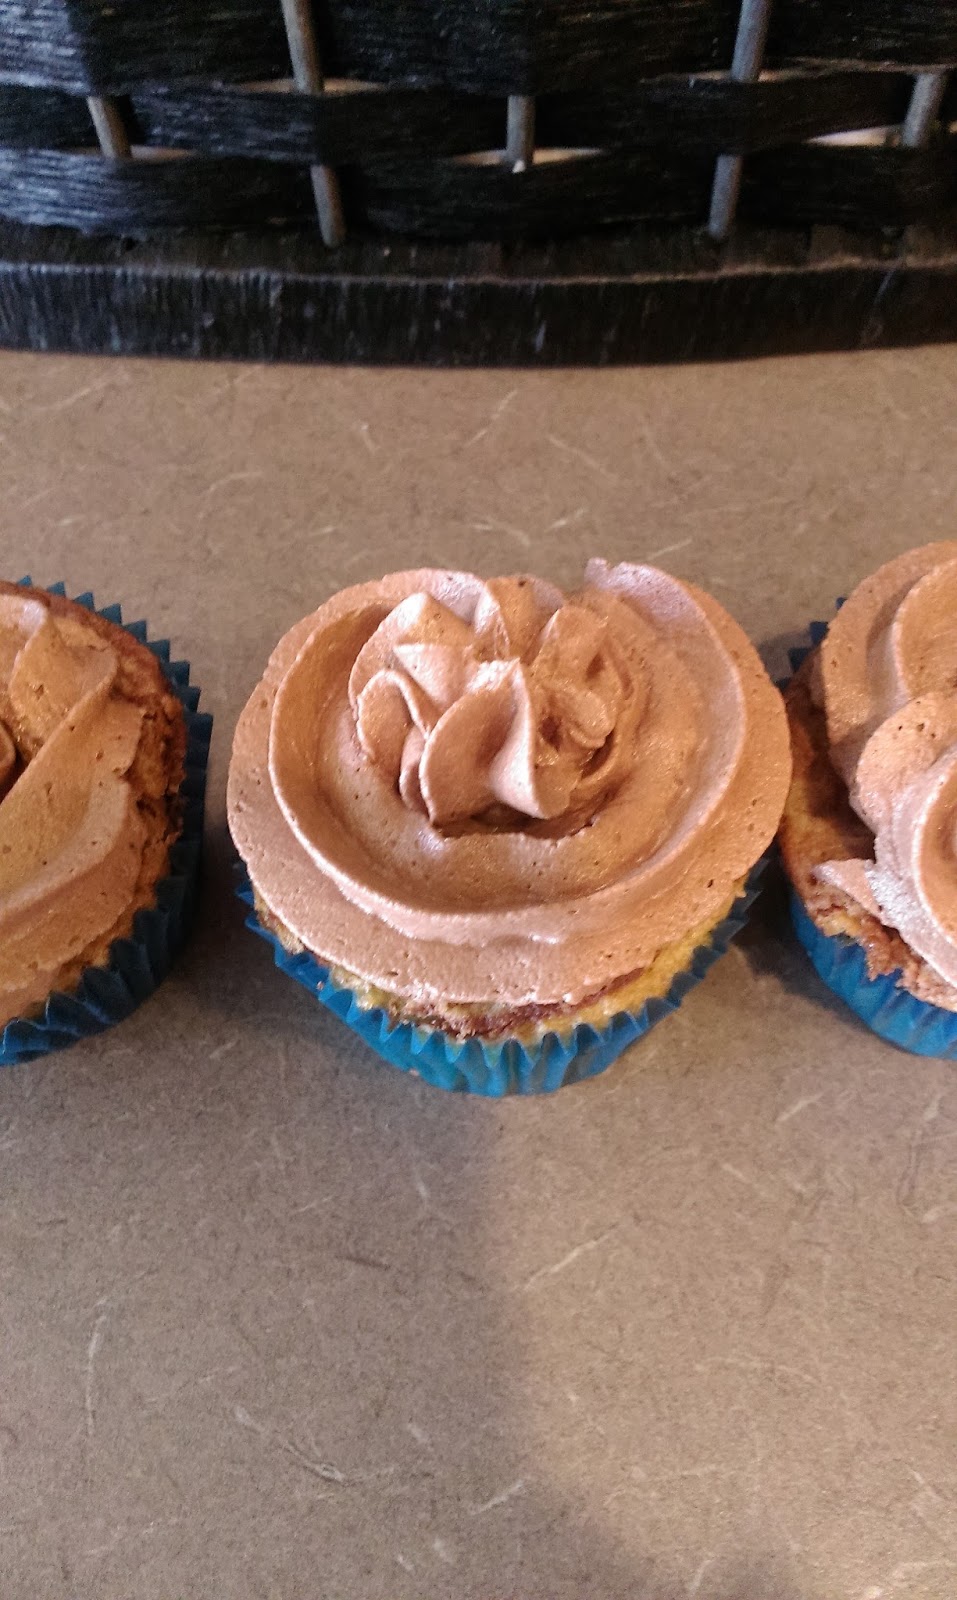
There’s a peppermintception occurring with this frosting. Once the cupcakes are cooled and you’re nearing your ability to resist eating all 12 at once, make the peppermint butter cream frosting:
- 1 cup of room temp butter
- 5 cups of powdered sugar
- 1 tsp of vanilla
- 1 tsp of peppermint extract
- 5 TBS of the forgot-to-be-pictured heavy cream or milk
- Handful of crushed peppermint candy canes/peppermint candies to top frosting with
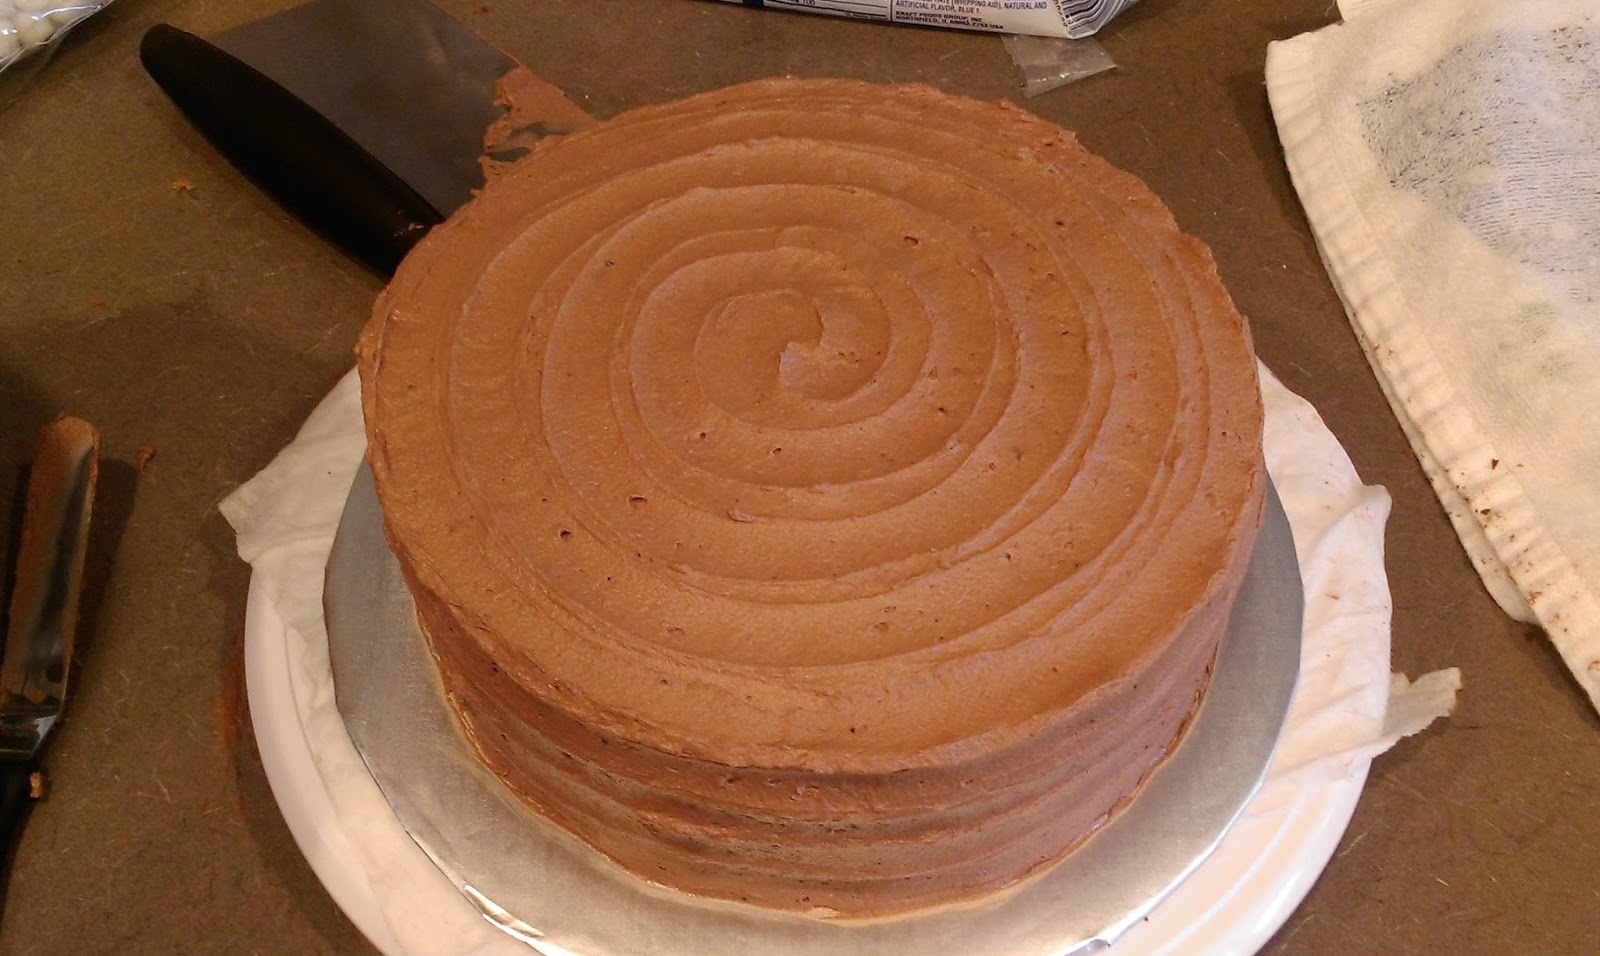
Cream the butter until fluffy and then add in 2 cups of powdered sugar, the vanilla, the peppermint, and 2 TBS of heavy cream and blend. Add in another 2 cups of sugar and 2 TBS of cream and mix well. Add the final cup of sugar and TBS of cream and finish blending. Now that I think about it, you could probably omit the peppermint extract and change one or two TBS of heavy cream to peppermint Schnapps and make this frosting boozy. Clearly I’m going to have to make these cupcakes again to try that because apparently like most of my best ideas, this one came far too late in the game. Sadness, thy name is Kate.

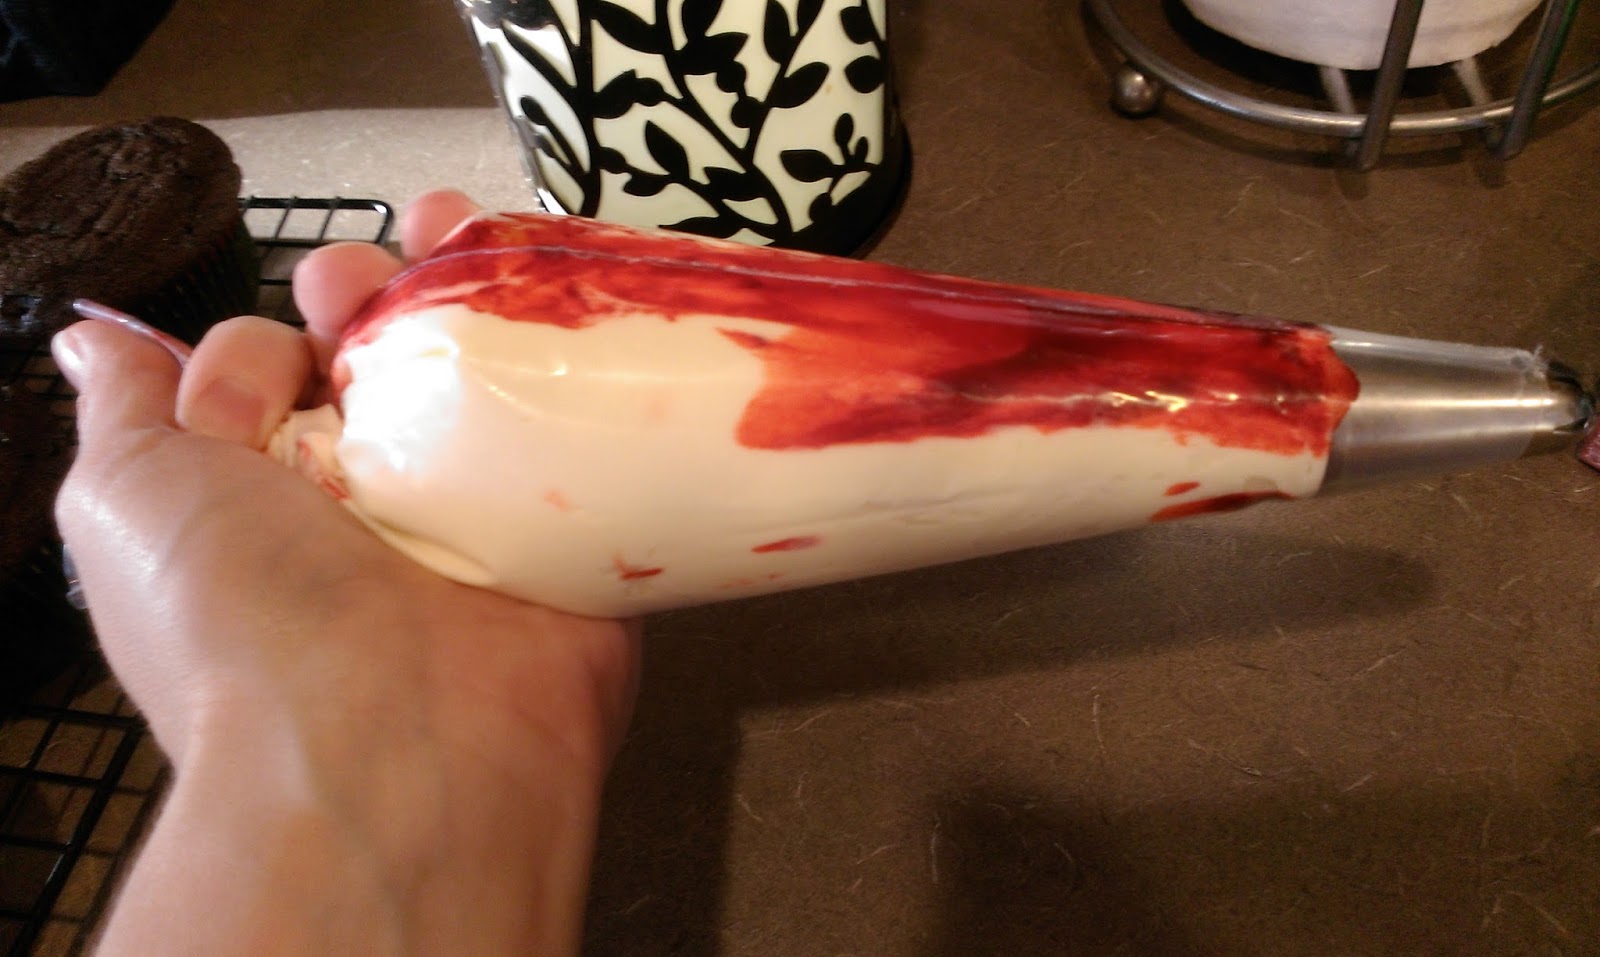
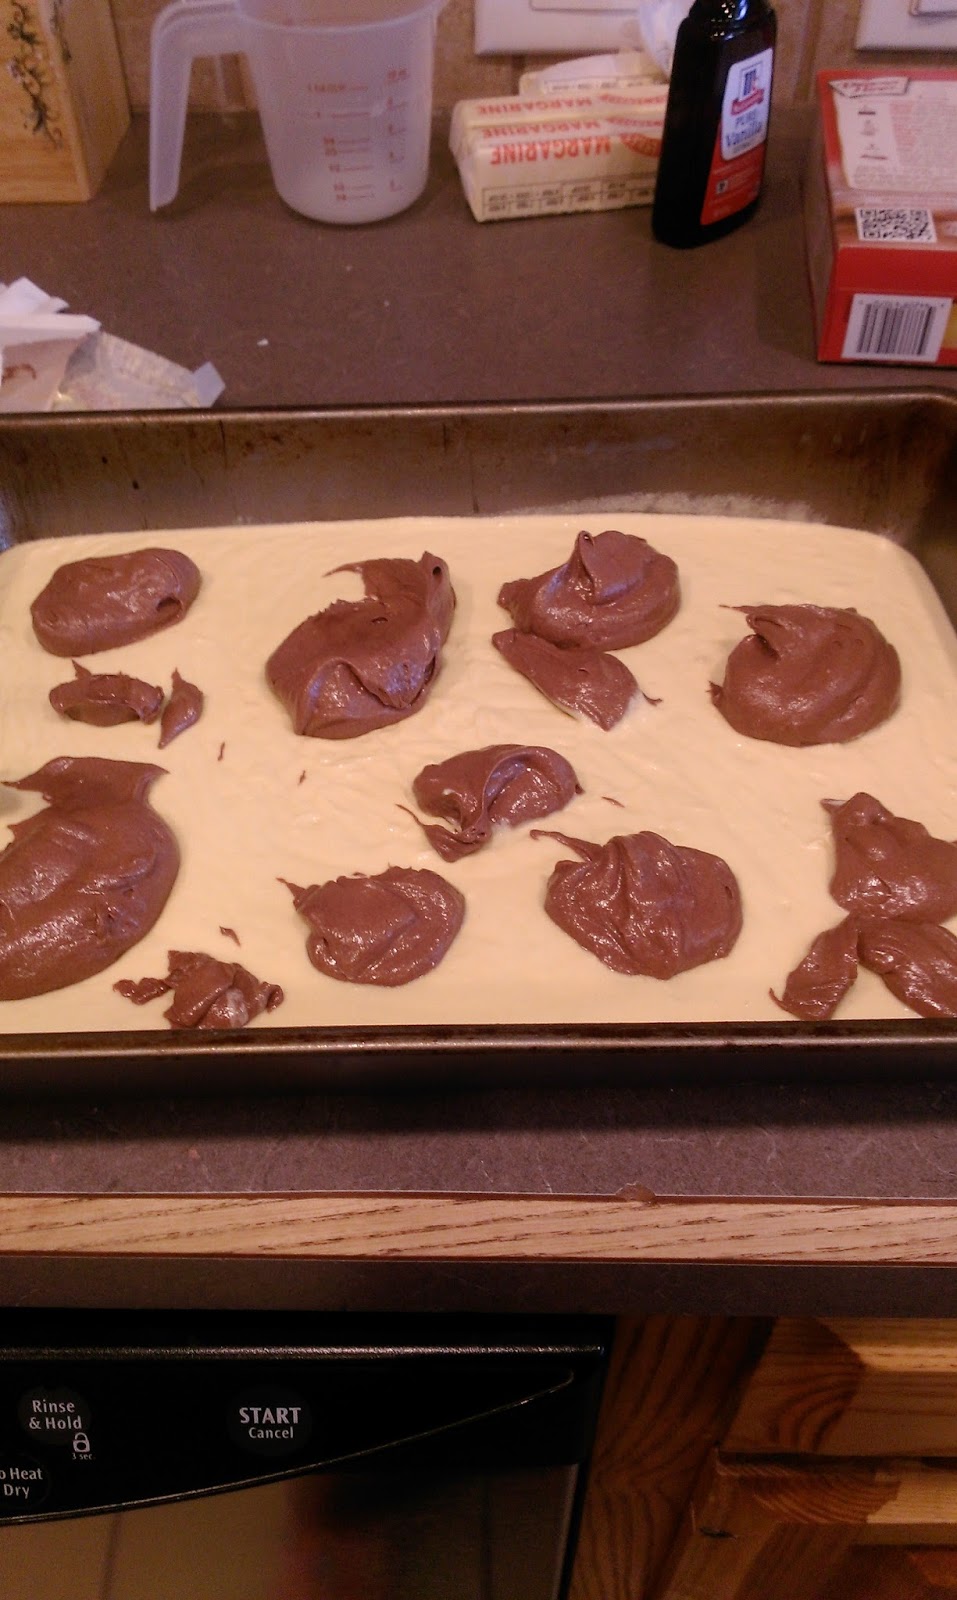
Not blood. Promise. To get the cool two-toned effect, paint a thick line of red gel frosting dye on each side of the piping bag fitted with the tip of your choice (I used one bag with a 2D for half and another bag with a 1M for the rest because I am an adult and I do what I want). Carefully load up the bag with frosting, and it will look something like this:

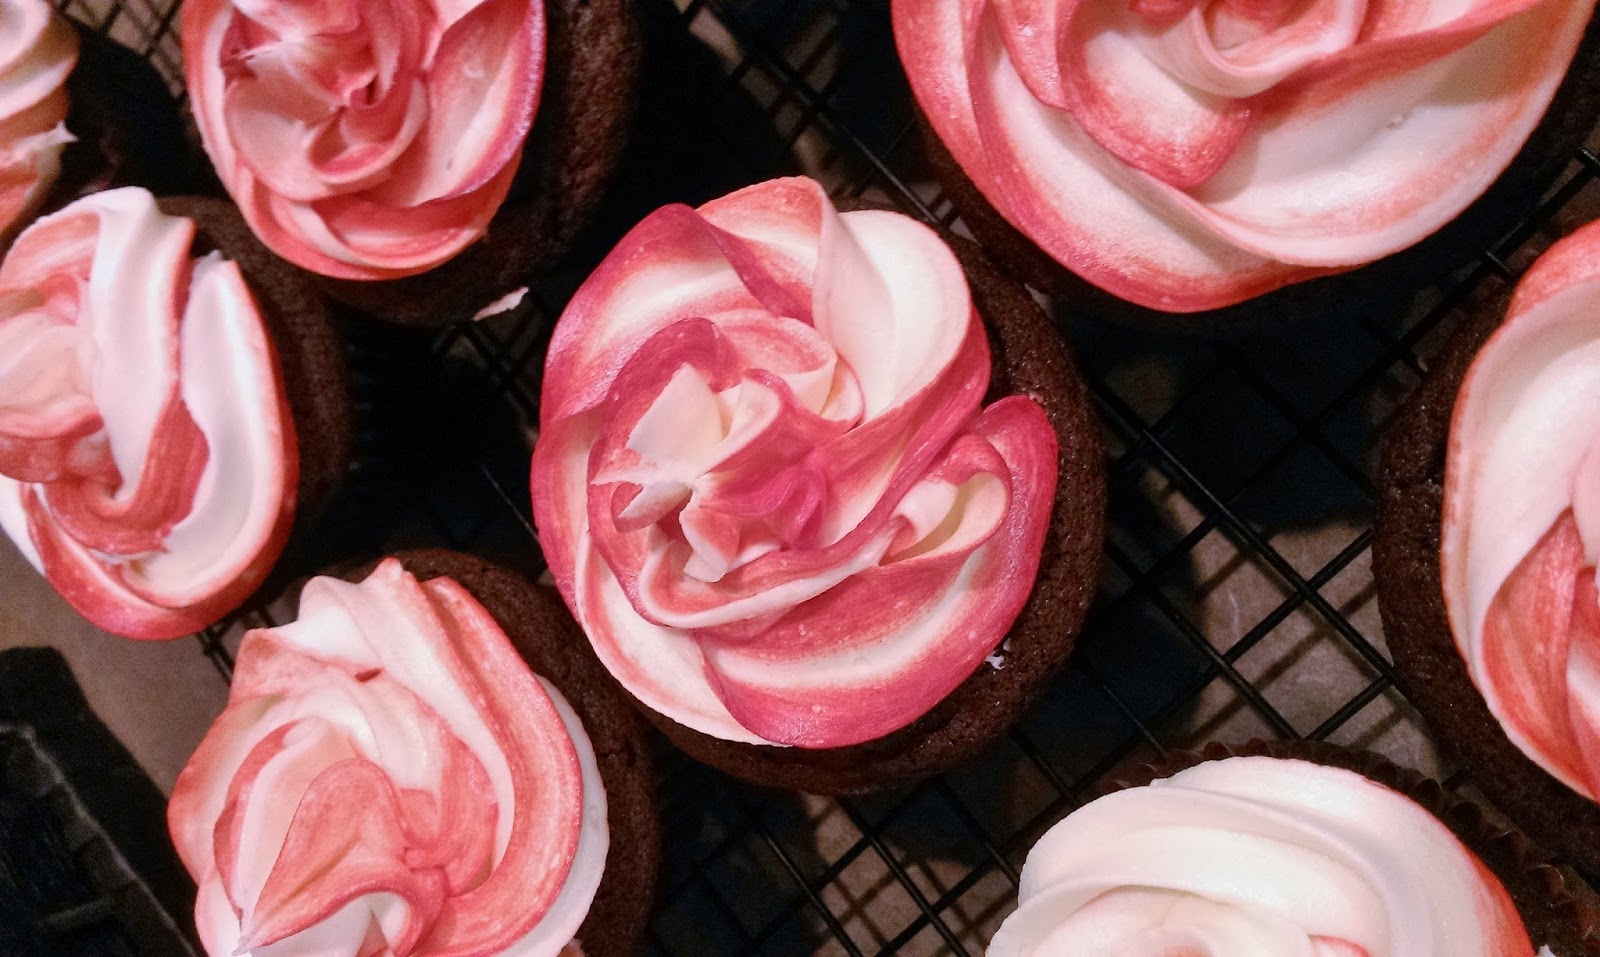
Why are my wrists so veiny? Am I dying? Now pipe away! I did a traditional swirl like so:

Okay, this kinda gives me the Christmas spirit. I get it…it’s nice to feel full of joy and hope, but I always feel that way when dessert is involved. Unless it’s flan, and then you’ve filled me with rage and scientific questions about its consistency somehow being edible. 
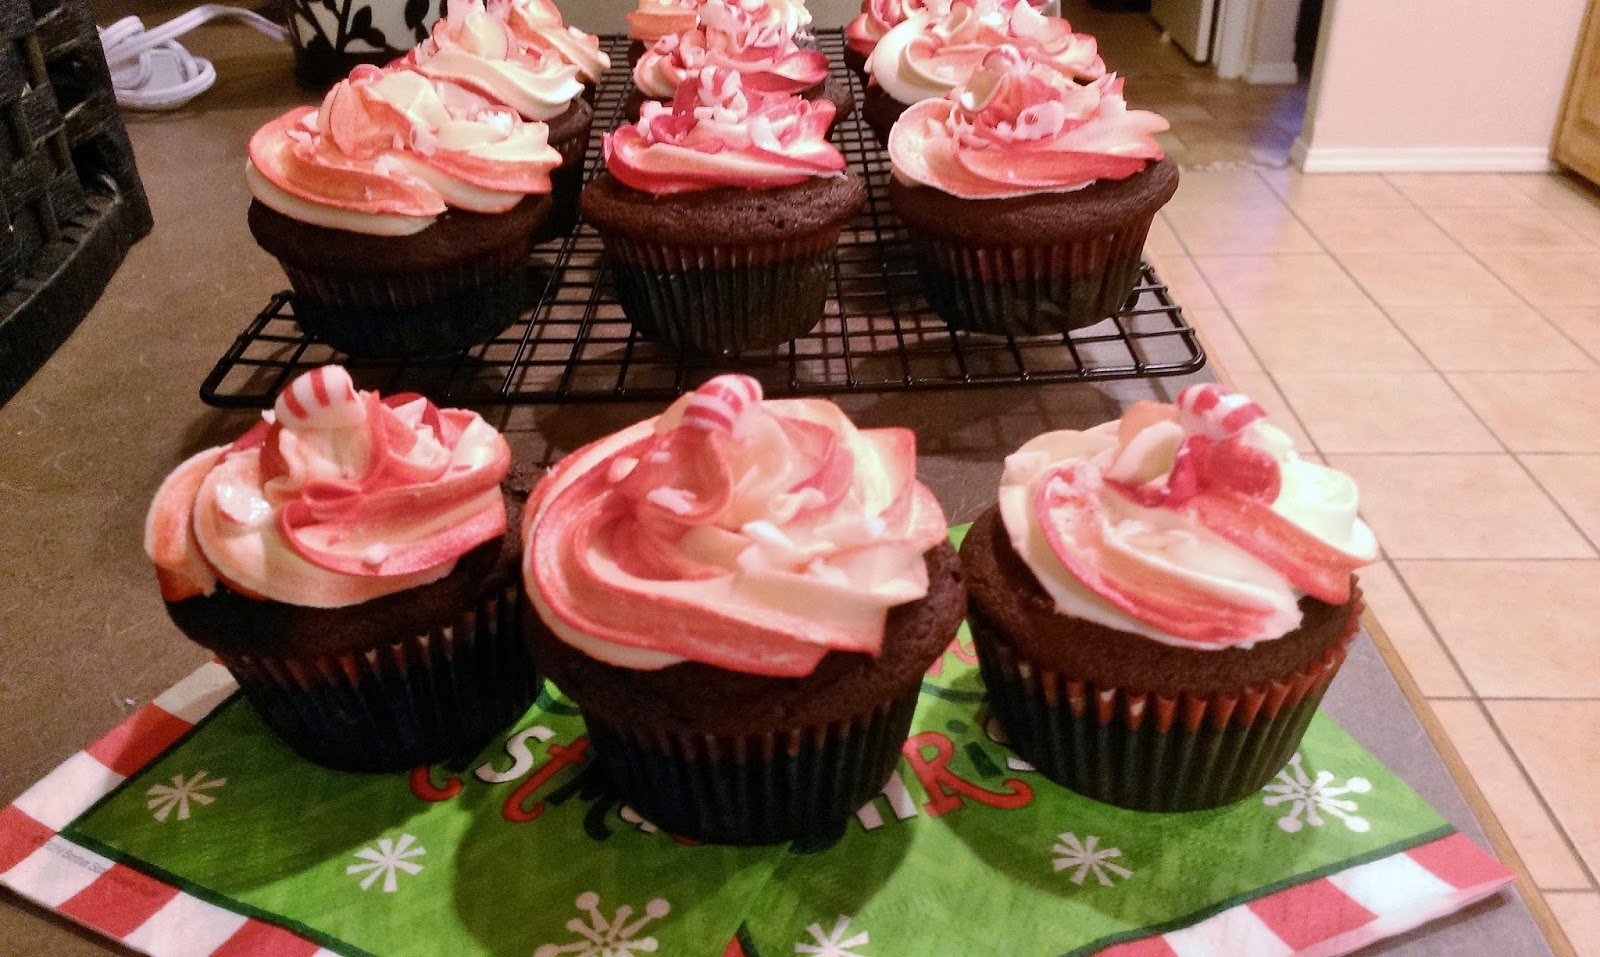
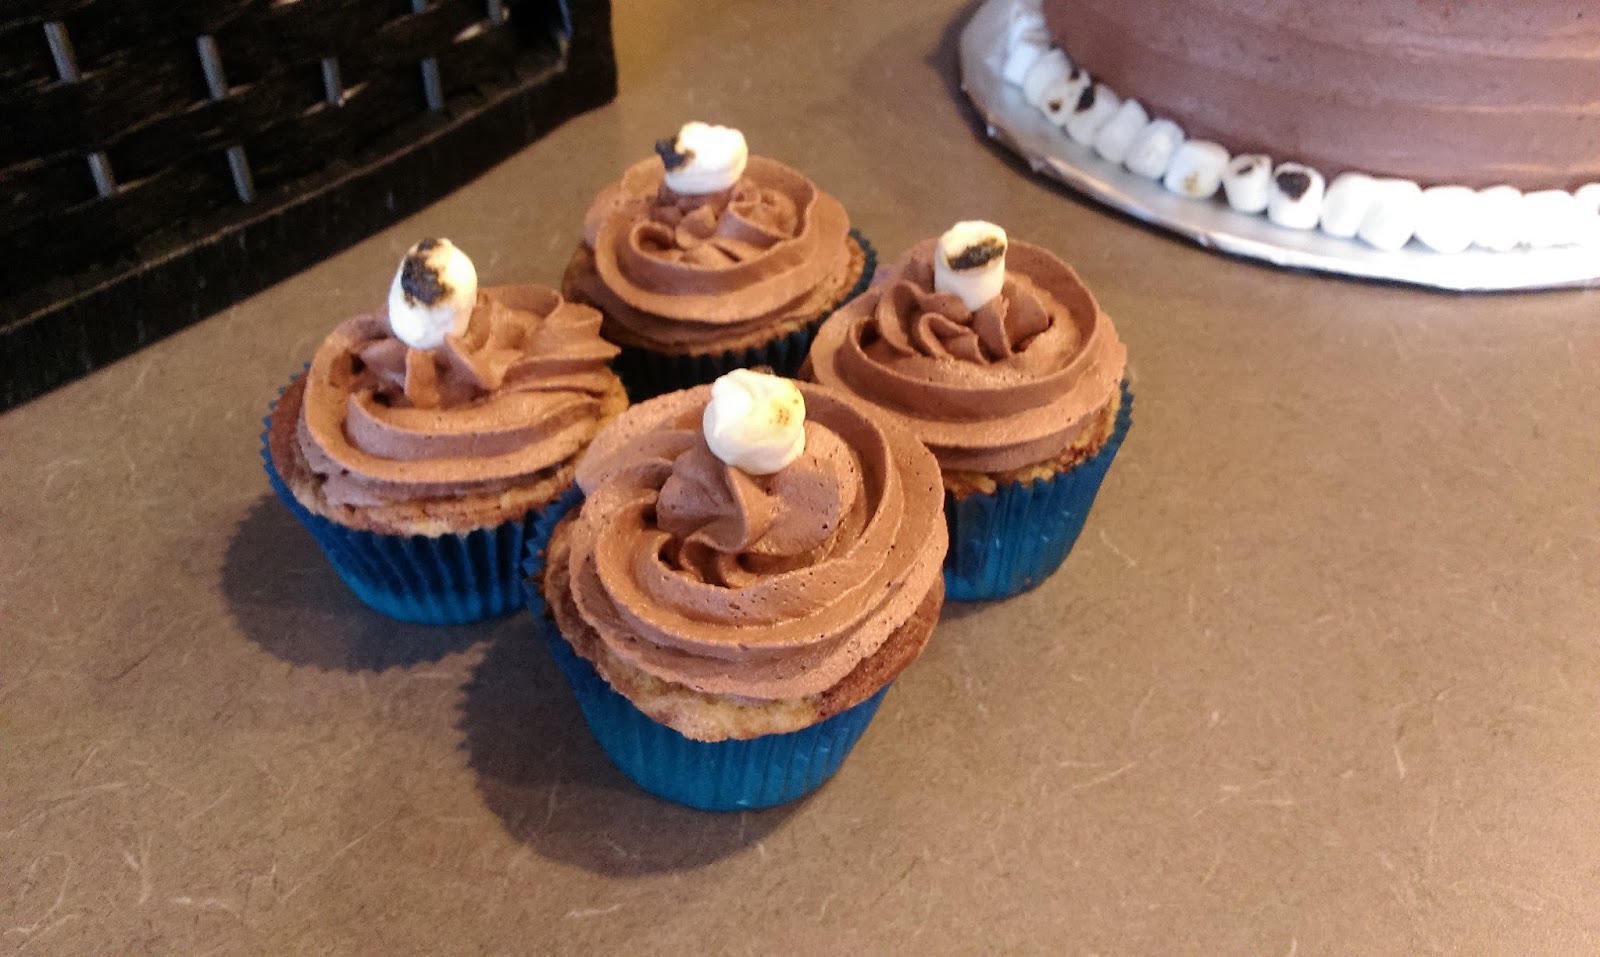
Aren’t these gorgeous? Aren’t you surprised I can take an accidentally artsy photo on occasion? Me too. Don’t forget to add the peppermint candies on top when you’re done applauding my creativity. I am super happy to report that these taste even better than they smell. It isn’t easy being a Grinch (lies), but I had to do it in the name of blogging (also lies). Although my heart did not grow three sizes upon consumption, my butt may very well have. These definitely aren’t low on calories, but anything crammed with this much chocolate and peppermint simply is worth that extra hundred sit ups or five miles of jogging…try eating them while working out and it’s a two-fer! I’m always here to offer you reasonable solutions to life’s simplest of problems. I am a blogger with heart. A heart that is probably loaded with cupcake remnants and fried chicken. All I want for Christmas is to be able to eat anything I want without gaining an ounce. Is that so hard, Santa? If you can make reindeer fly, I feel like this is a pretty simple request. While I continue to place my faith in a fat, bearded man who really appears to enjoy his own fair share of cupcakes, I hope everyone is having a wonderful holiday season. We’re off to gallivant in Tahoe soon and then host family for Christmas, so I’ll be back with some more delicious minty recipes soon. ‘Til next time, my fellow eaters!

Just load these up in a stocking, and you’re set on gift giving until next year…we wish you a merry cupcake and a happy cheat day! -
Do the Dip
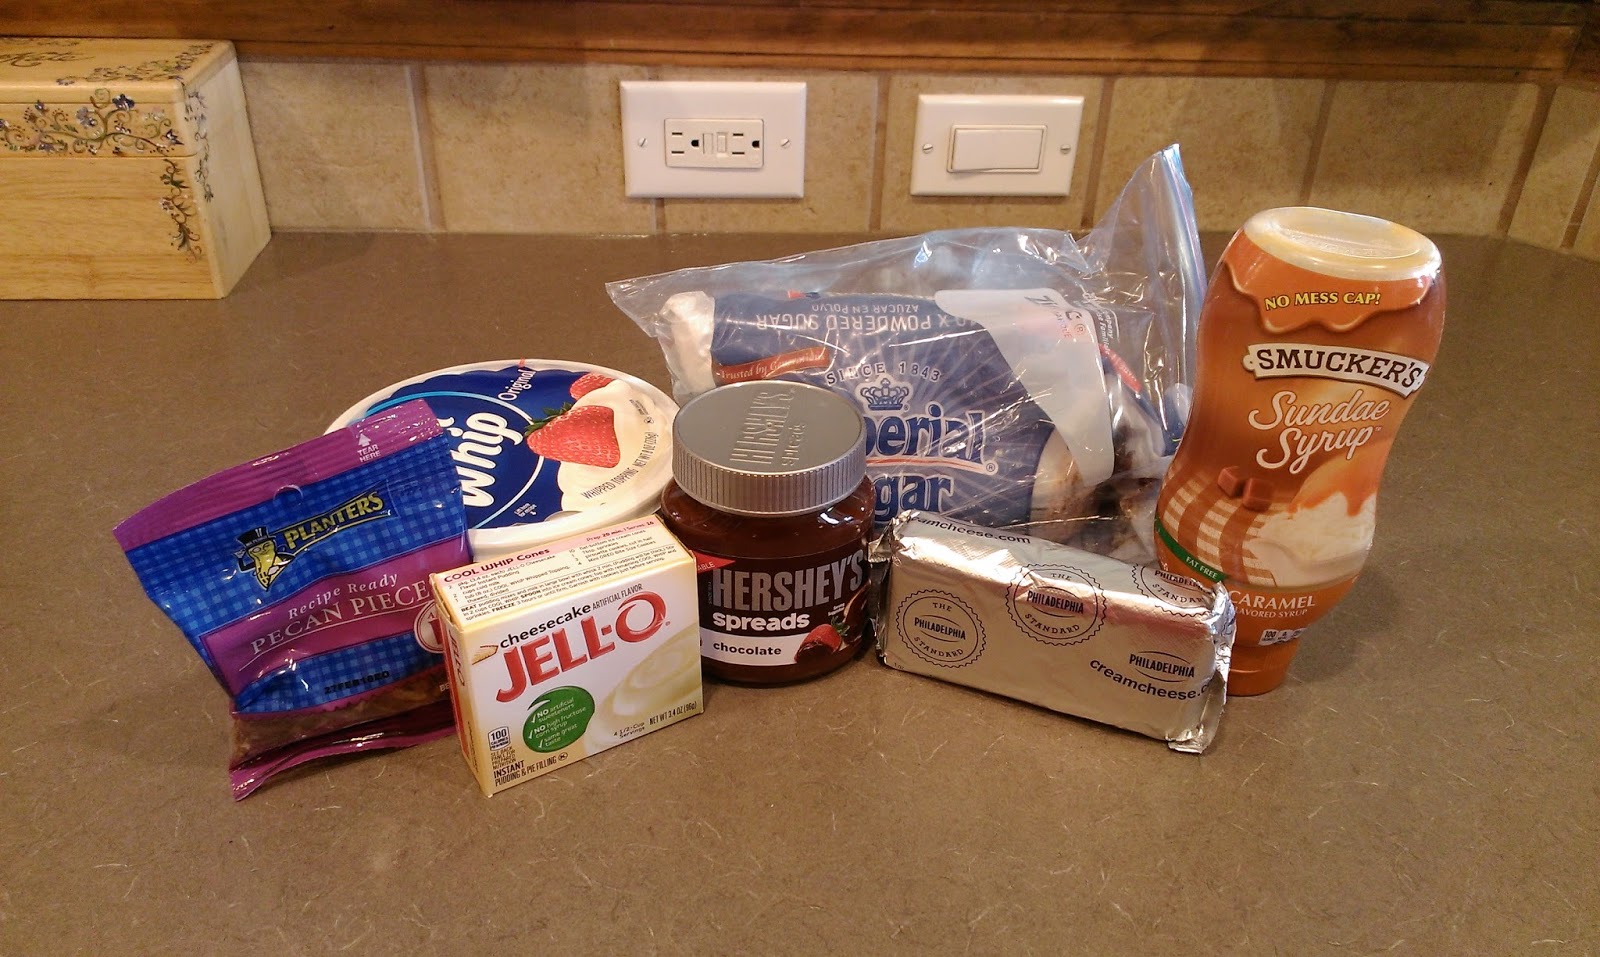
We live in a world where a lot of people disagree just for the sake of disagreeing. I believe that one of the only things everyone can truly agree on is that chips and dip are the perfect precursor to just about any meal. That’s why we all fill up on a ridiculous amount of chips and salsa every time we go to a Mexican restaurant. It’s why we stay near the snack table at every bbq to eat the host out of house and chip. We eat chips and dip with reckless abandon because hey, a few chips can’t hurt, right? It’s only until you demolish the whole bag and hate yourself a little that it’s a problem. So this got me thinking…if people love chips and dip so much, would they love cookies and dessert dip, too? Could it be possible to bookend a meal with dips? Could I start a dessert revolution? Pure madness! So naturally, I had to try because I’m a crazy person who knows absolutely no limit when it comes to finding new ways to fill my body with a borderline stupid amount of sugar. If you cut me open, blood would not pour out…but chocolate cake might. Yesterday I prepared to attend a party and set my plans for dessert domination in play. Meet my dessert dips, and revel in my glory (I may or may not have delusions of grandeur, but I still think I’m pretty awesome either way).

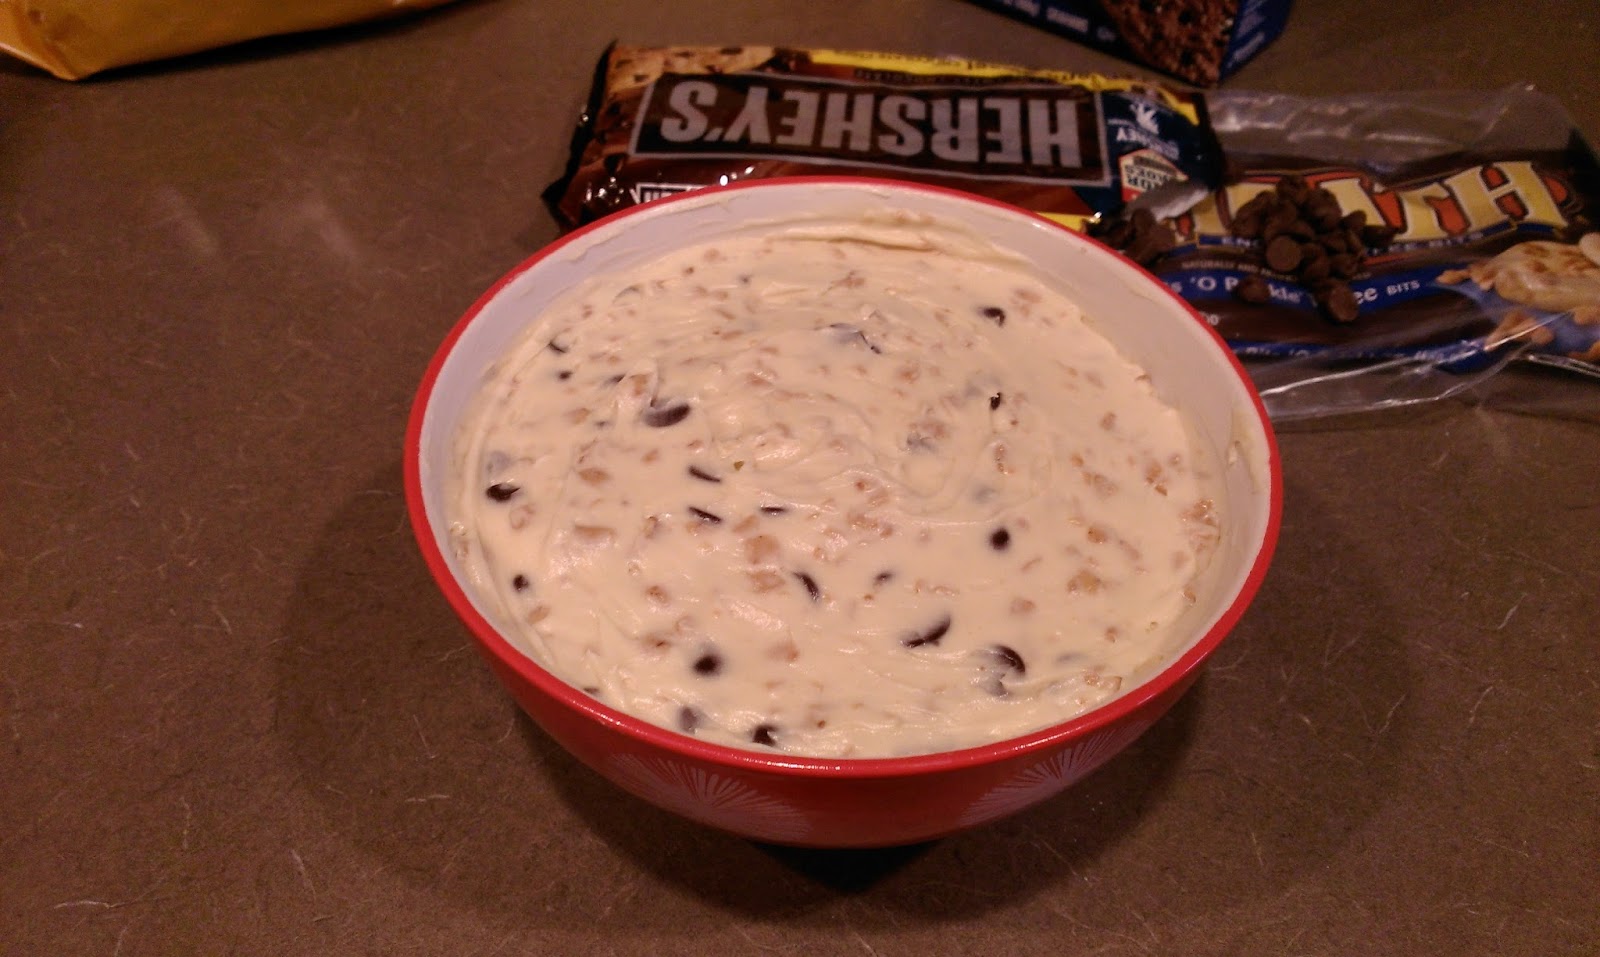
When I dip, you dip, we dip. Heellllooooo my pretties. Did you know Jello makes a cheesecake pudding? Because I did not, and it has officially changed my life. I was able to put together a turtle cheesecake dip centered solely around it, and for that the wonderful people of Jello will forever be in my good graces. The other cute little dish (literally, look at how cute my bowls are) is a toffee cookie dough dip. It is both a mouthful to say and eat! So how well did these dips go over at the party? I was told that these dips were some “Nobel Prize level stuff.” Suffice it to say, everyone you know will love you twice as much if you bring one of these desserts to your Thanksgiving festivities. And this is also one of those wonderfully fortuitous moments when the dessert both looks and tastes insanely impressive but is amazingly easy to throw together.

Case in point. The turtle cheesecake dip shall open your world to endless possibilities. Could it achieve world peace? It’s a distinct possibility. No one can argue over a good dip. So gather up:
- 1 box of Jello cheesecake pudding
- 1 8 oz. container of Cool Whip
- 1 8 oz. brick of room temp cream cheese (use the full fatty fat fat kind, or the dip will be weird and not the right consistency)
- 1/3 cup of powdered sugar
- Chopped pecans
- Caramel sauce
- Chocolate sauce (I used Hershey’s chocolate spread)
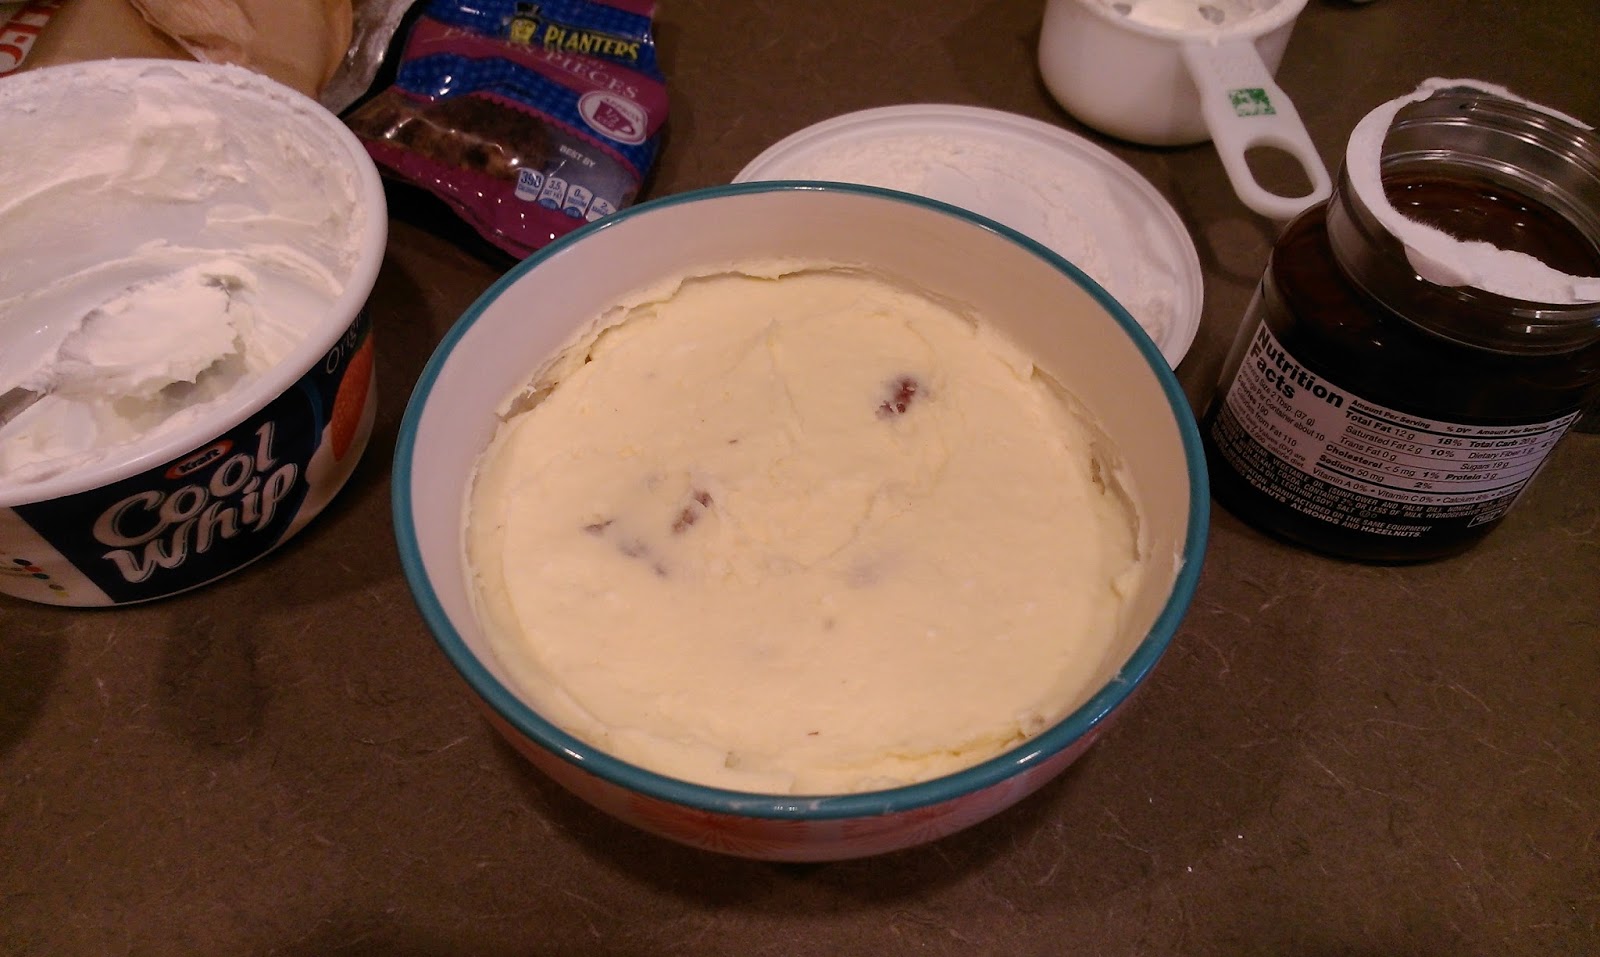
Start by creaming together the powdered sugar, Cool Whip, pudding mix, and cream cheese. Once well blended, add in your desired amount of pecans. I used half of a small bag and saved the rest for topping.

Put that amazingness into a medium-sized bowl. Smooth it out with a spatula. Revel in your greatness. 
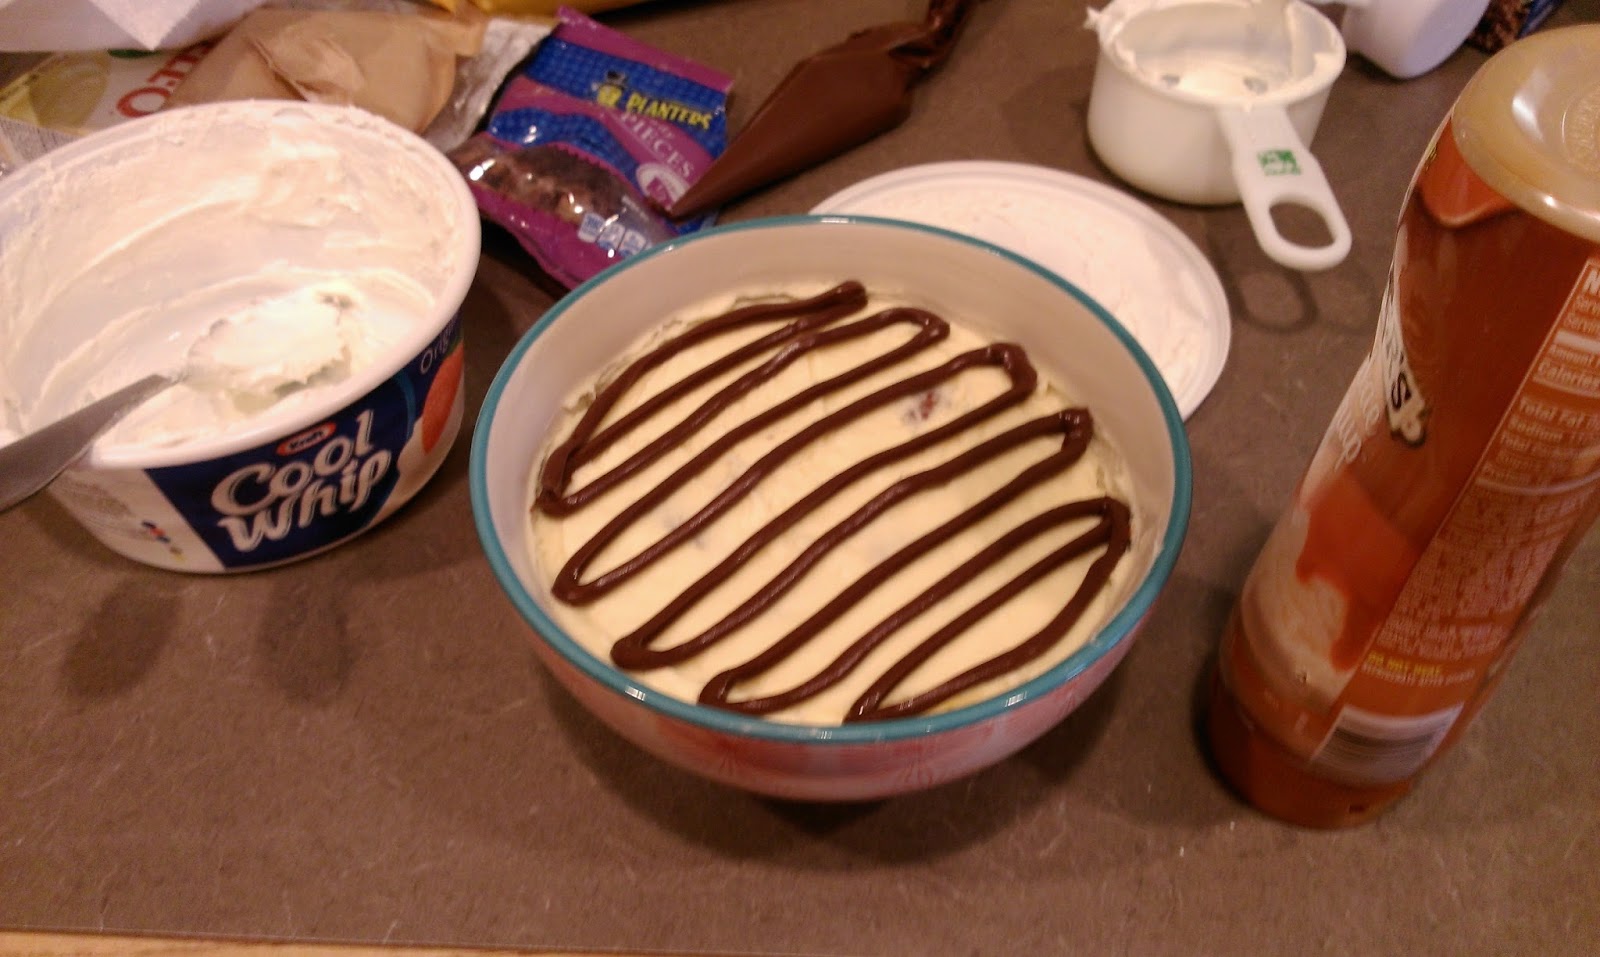
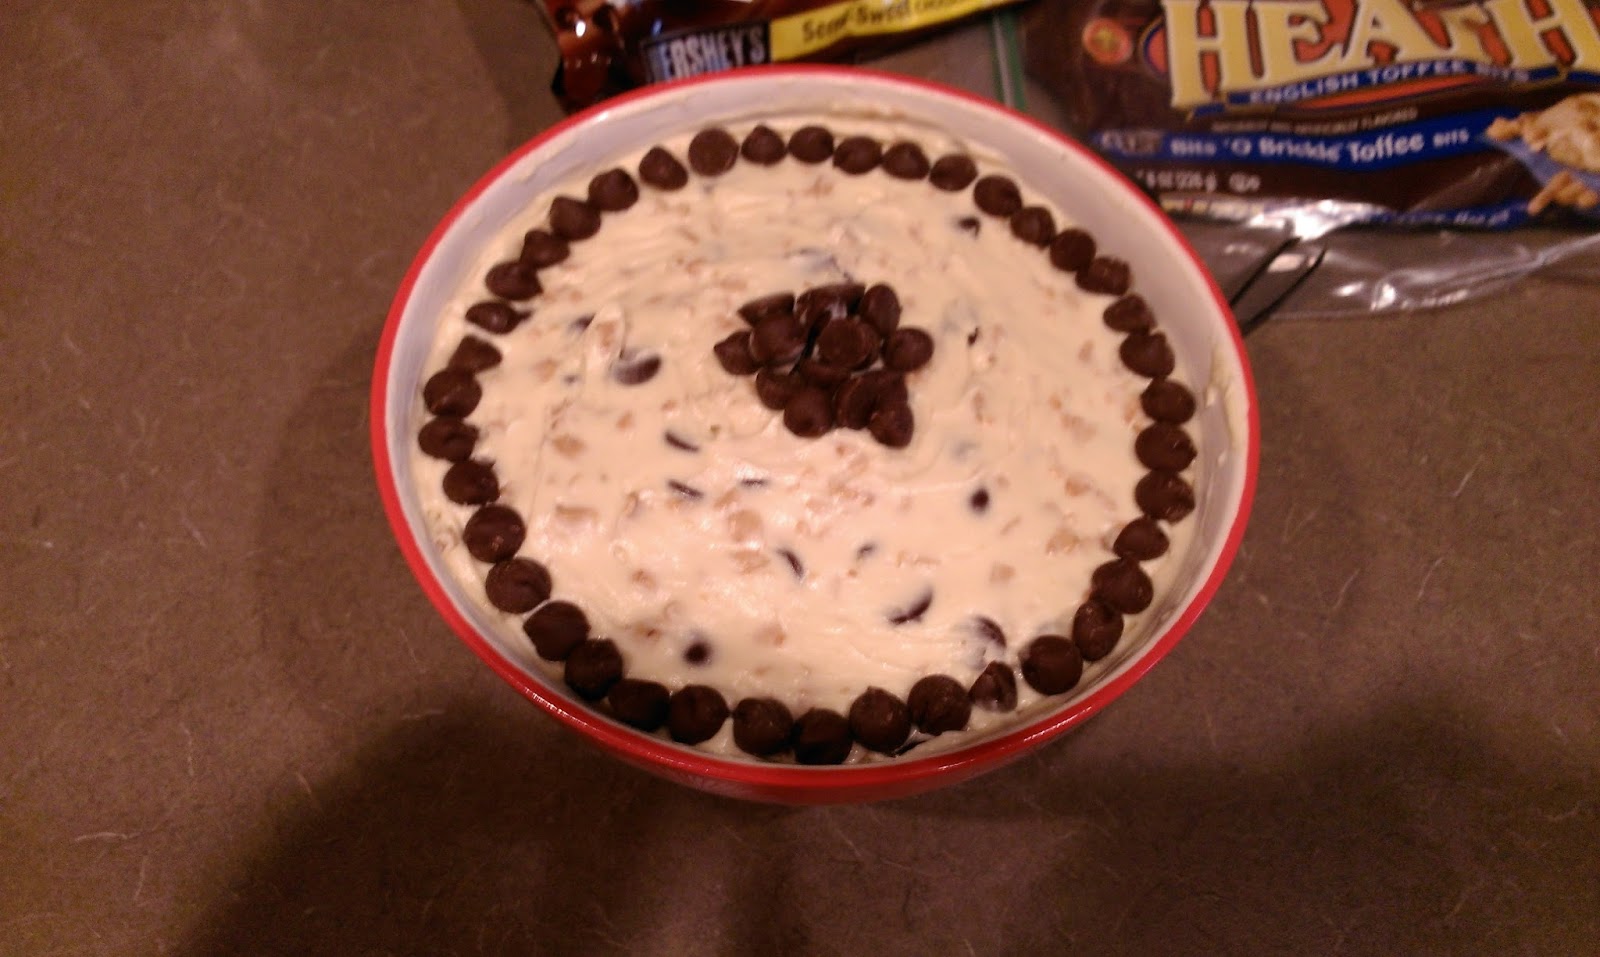
Then eat a little of the chocolate sauce before you start to pipe it on your dip. 
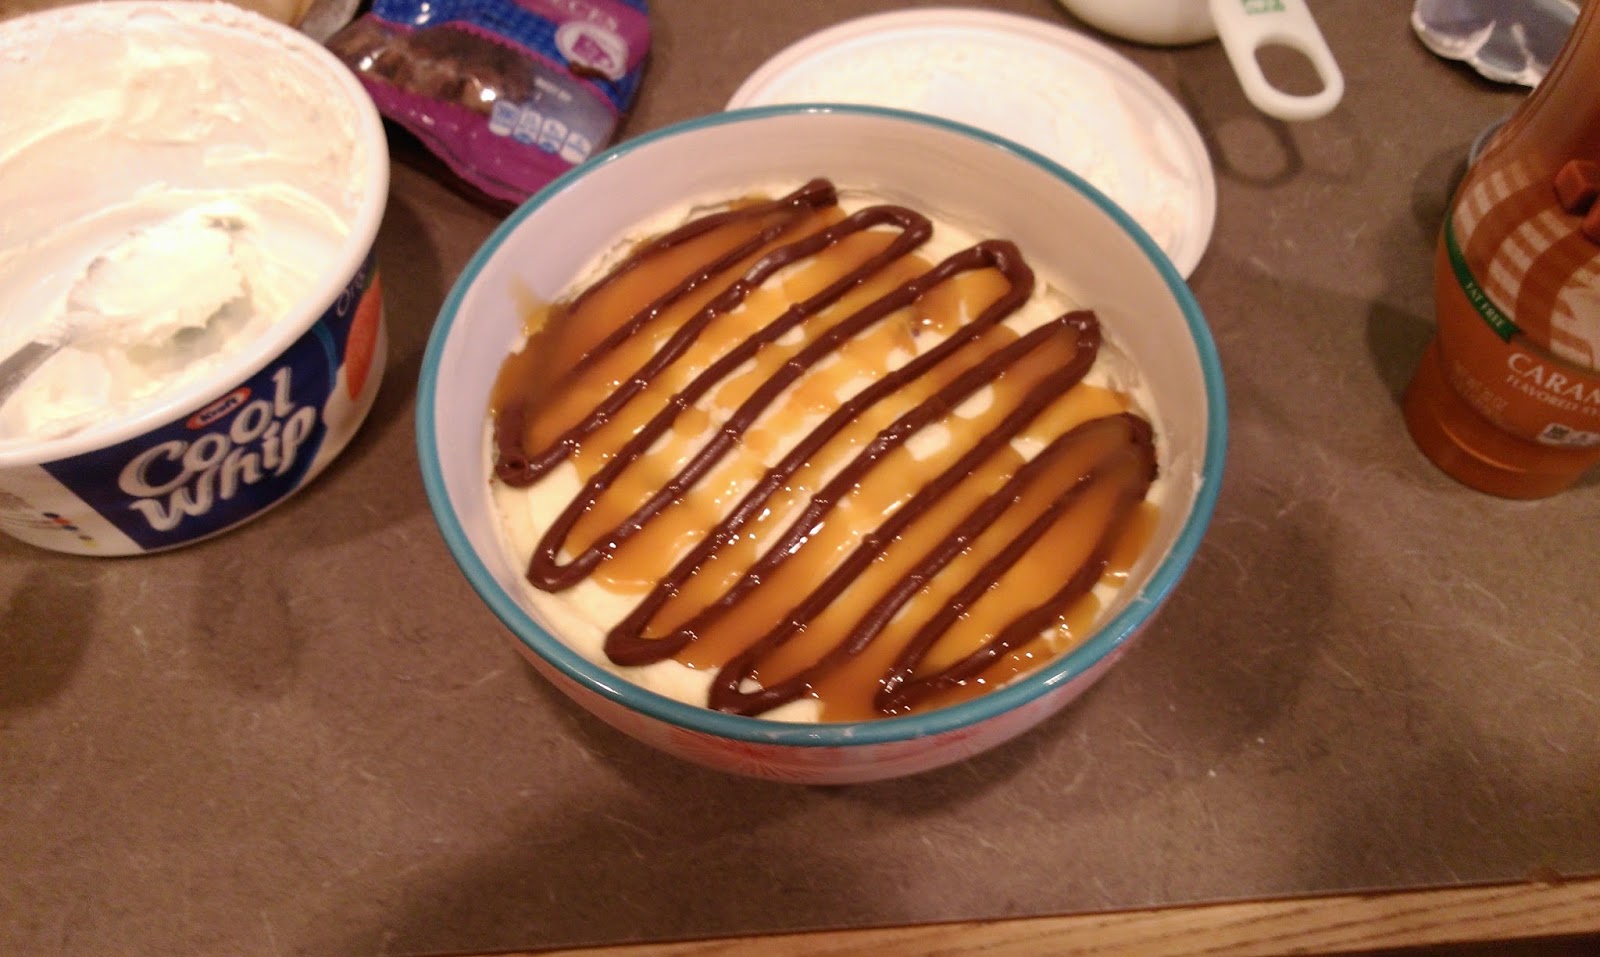
Then add a nice layer of caramel sauce. Feel free to eat some of that, too. Caramel is delicious. 
And finish your layering with another pass of chocolate sauce. 
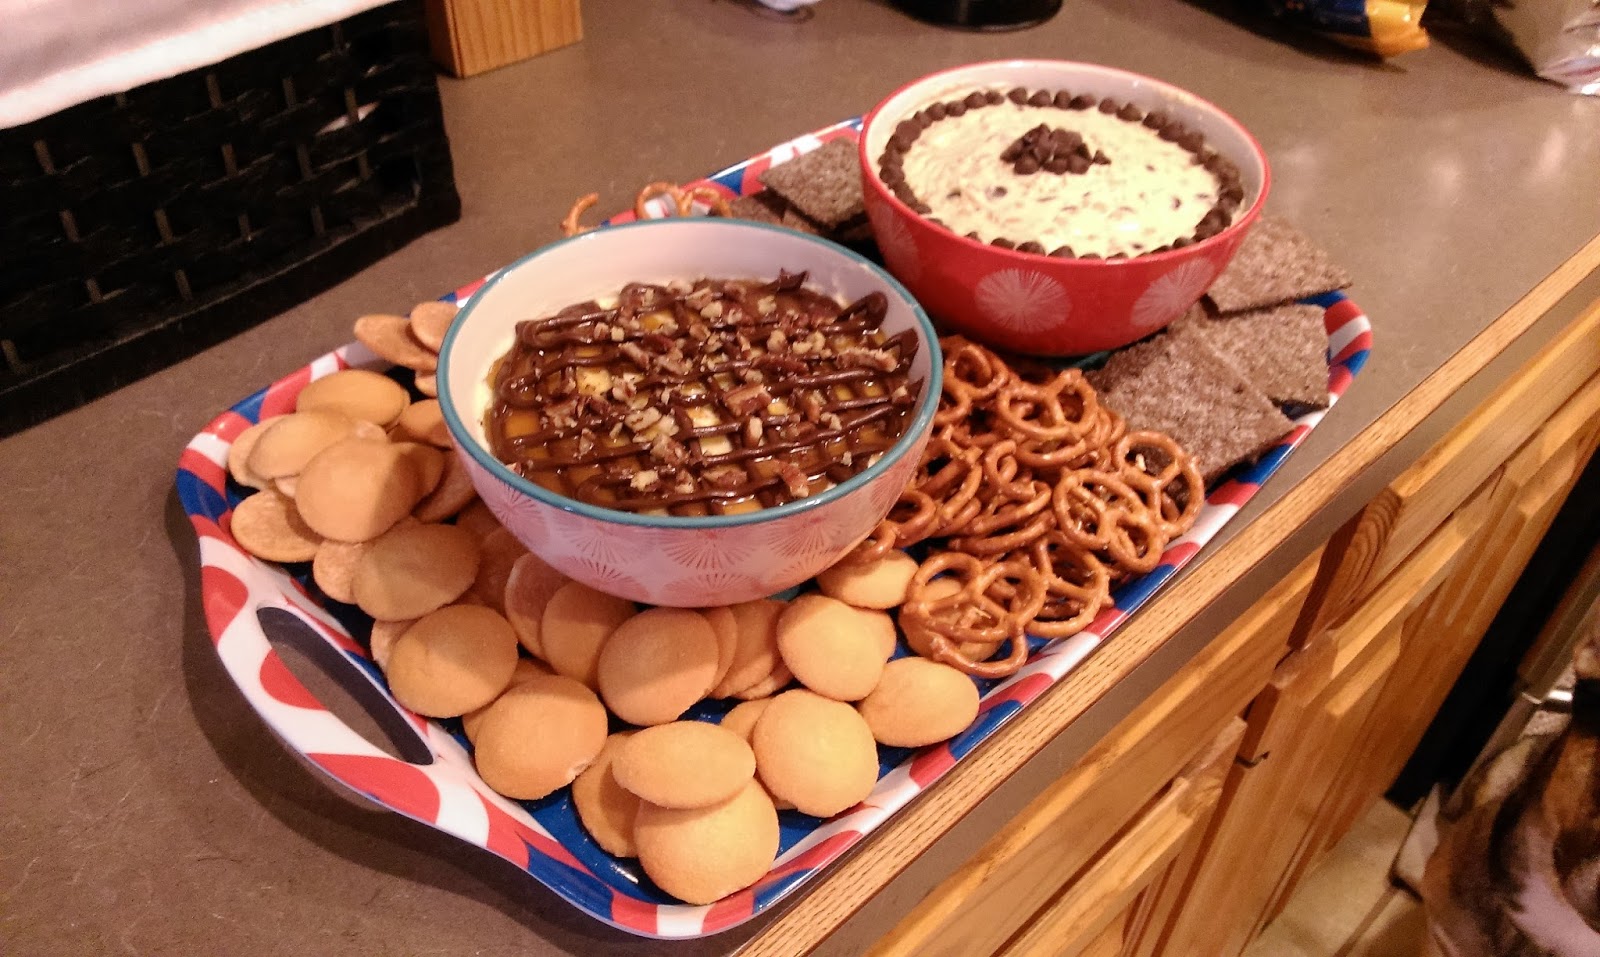
Top with remaining crushed pecans and place in fridge to set! That’s it. You’re done. This will take ten minutes of your life from start to finish, and people will praise your name for an entire party. Totally worth it. This was definitely the crowd favorite, but I am not a fan of nuts in food. I will eat every cashew, pecan, or peanut you can find me, just not if it’s encased in another food. Nuts do not belong in brownies, can we all just finally come to terms with that? I want to bite into a warm, gooey brownie without fear that a crunchy nut is going to ruin the experience for me (this is also another reason why I bake–I call the brownie shots!). Since I am opposed to nutty foods, I also made the toffee cookie dough dip so I could enjoy dessert, too. If you’re an anti-nut nut (see what I did there), this is the dip for you.
Not a nut in sight! Can we talk about how underrated Heath bars and toffee are? Bless the soul who thought to mix butter and sugar together at a high heat. We need more innovators like that. For this dip, gather up:
- 1 8 oz. block of room temp cream cheese
- 1/2 cup of room temp butter
- 2 teaspoons of vanilla
- 3 heaping tablespoons of brown sugar
- 1 cup of powdered sugar
- 1 cup of chocolate chips
- 1 cup of toffee bits
Hold on tight, people, this recipe is a wild ride, too. Mix together the cream cheese and butter until nice and fluffy. Then add in the vanilla, both sugars, and mix well. Finish up by adding in the chips and bits (new idea: open cookie store named chips and bits).

Place into a medium-sized bowl. Smooth it out with a spatula. Continue to revel in greatness. 
You could leave it at that, but I like to make everything pretty, so I topped my dip with some extra chocolate chips before placing in the fridge to set. Yet another ten minutes of time for a night of ooh’s and aah’s directed your way. Even if you suck at baking, this is foolproof. And man alive, is it worth it. Each of these dips has something to offer. So much so that I have permanently placed these on the dessert rotation list, for sure. I will be dreaming of eating the minimal leftovers after we finish off the pumpkin cheesecake from last week. I have way too much dessert in this house. Not that it’s a problem for anything other than my waistline, really. And this year we’re not going on a cruise in the middle of December that I have to stay in super shape for, so I get to bust out stretchy pants and make the problem go away. Speaking of stretchy pants, I hope everyone has a fantastic Thanksgiving full of fried turkeys (the only way to eat turkey) and family. Don’t fry your family though…draw the line at cannibalism, always. Good old Kate Bakes Cakes will be taking a Kate Bakes Break until mid December due to traveling and the end of the semester (so. much. grading.), so I will see you all back then with some delicious Christmas treats when the timing is finally appropriate for Christmas-themed posts. Because unlike everyone else in the world, I remembered that after Halloween there was another holiday before Christmas...looking at you, Hobby Lobby. ‘Til next time, my fellow eaters!

I bid you a-dip. -
Boozy Cheesecake? Don't Mind If I Do.
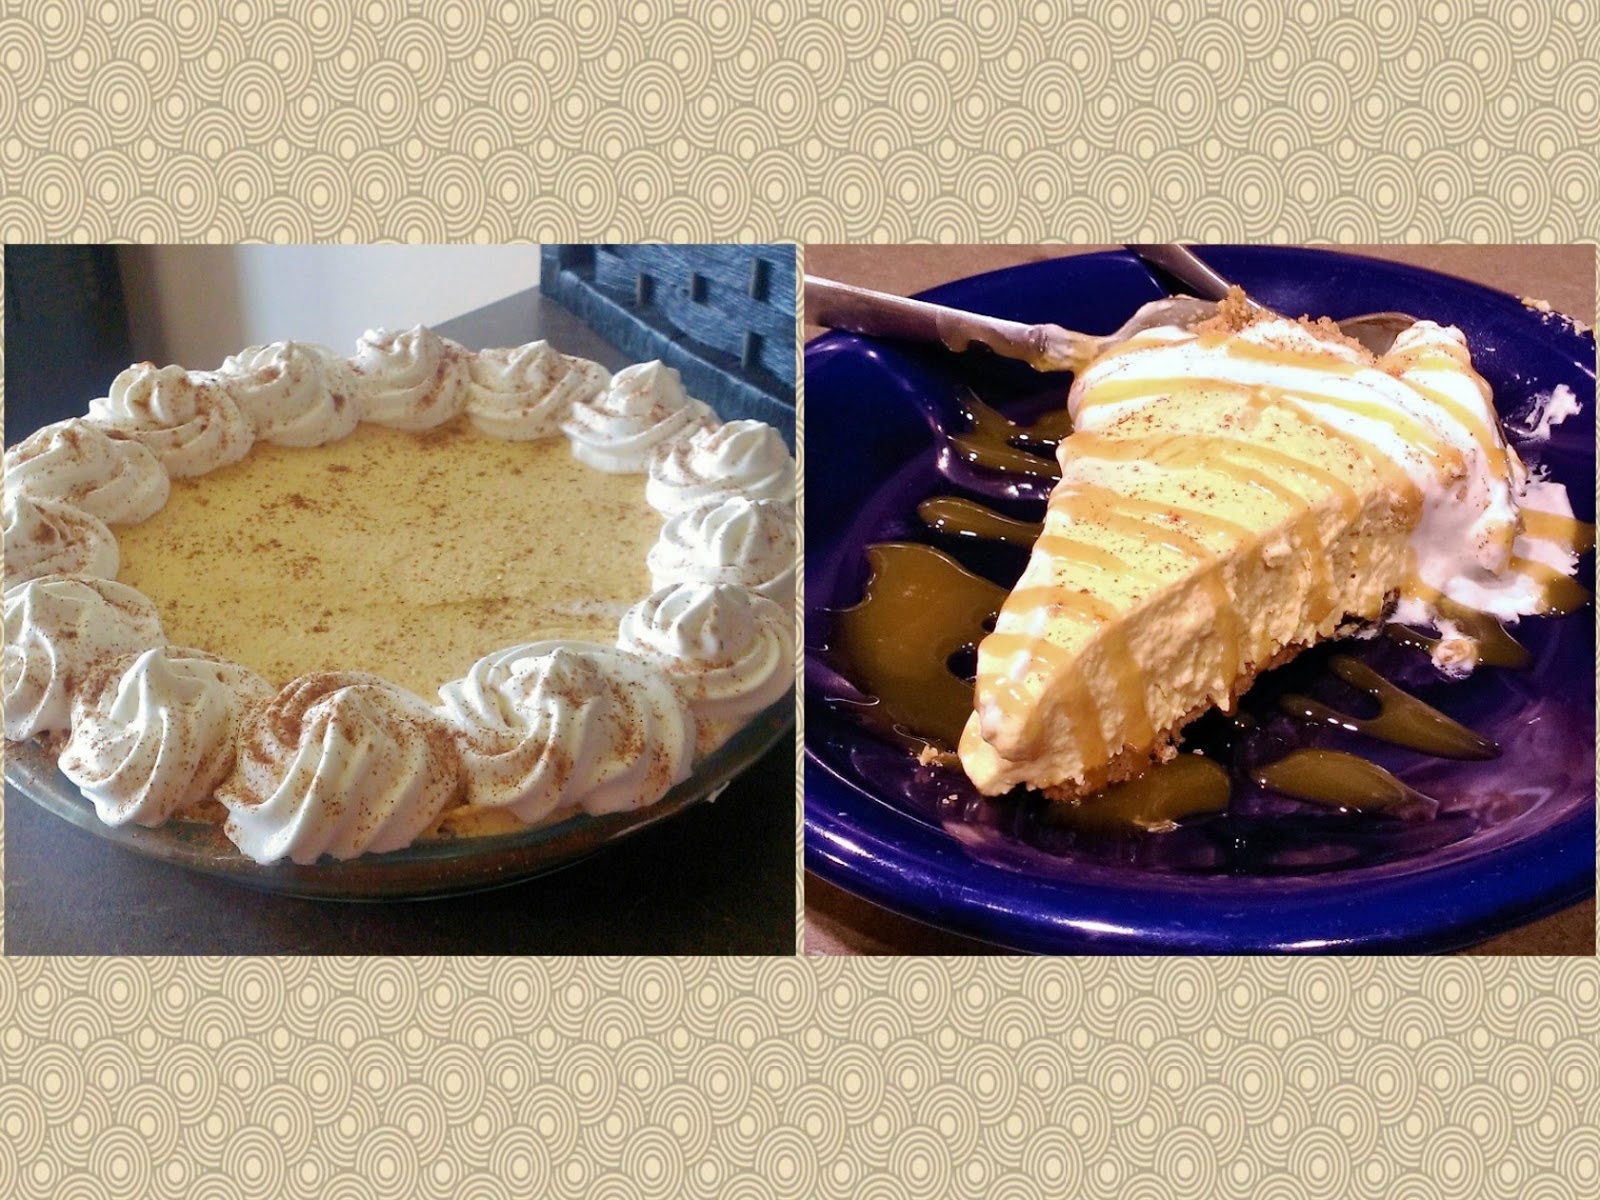
I have been a really bad basic white girl this fall. Until Friday, I had yet to add pumpkin spice to a single thing, and we’re just blowing through November! I finally rectified the situation, so if I had Uggs and wore leggings as pants, I could be back in the basic club in no time. Let me preface this week’s creation by divulging a secret: I hate pumpkin pie. The texture is…soupy, and the flavor is lacking in the required level of pie sweetness (this is a real thing). I’m told it is made more palatable with the addition of Cool Whip. However, I’ve seen my mom and sister put so much Cool Whip on top of their pumpkin pie every Thanksgiving that I’m not entirely certain they aren’t just eating a plate full of whipped cream…so can the pie really be that good? I don’t think so. And you know what else is missing from pumpkin pie? Booze. No one can be in a house full of extended family without a little buzz in their back pocket in case of awkward family emergencies. I desperately wanted to fix this, so I thought about what was pie adjacent but still tasted good with pumpkin flavor. The answer: pumpkin cheesecake. Where does the alcohol come in, you ask? Into my mouth, mostly. But in all seriousness, it is super easy to make whipped cream from scratch and add rum or any other preferred spirits into it. So when someone asks you if you have a little Captain in you, your answer can be an emphatic and slightly slurred, “Yarr.”

Getting drunk off pie, what will she think of next? What’s actually pretty criminal is the fact that this cheesecake requires no baking and like five ingredients to put together, but it tastes like something you slaved away on for days. And unlike a soupy, bland pumpkin pie, this is light and airy with full flavor and decadence. And rum. Did I mention the rum? I swear I haven’t had any today, I’m just really enthusiastic over the fact that I found a way to make whipped cream taste even better. It was a Holy Grail baking situation, so I’m going to go on about it for days because my ego is as inflated as the balloons at Macy’s Thanksgiving Day Parade. Move over Snoopy, the Kateface balloon is taking center stage this year.

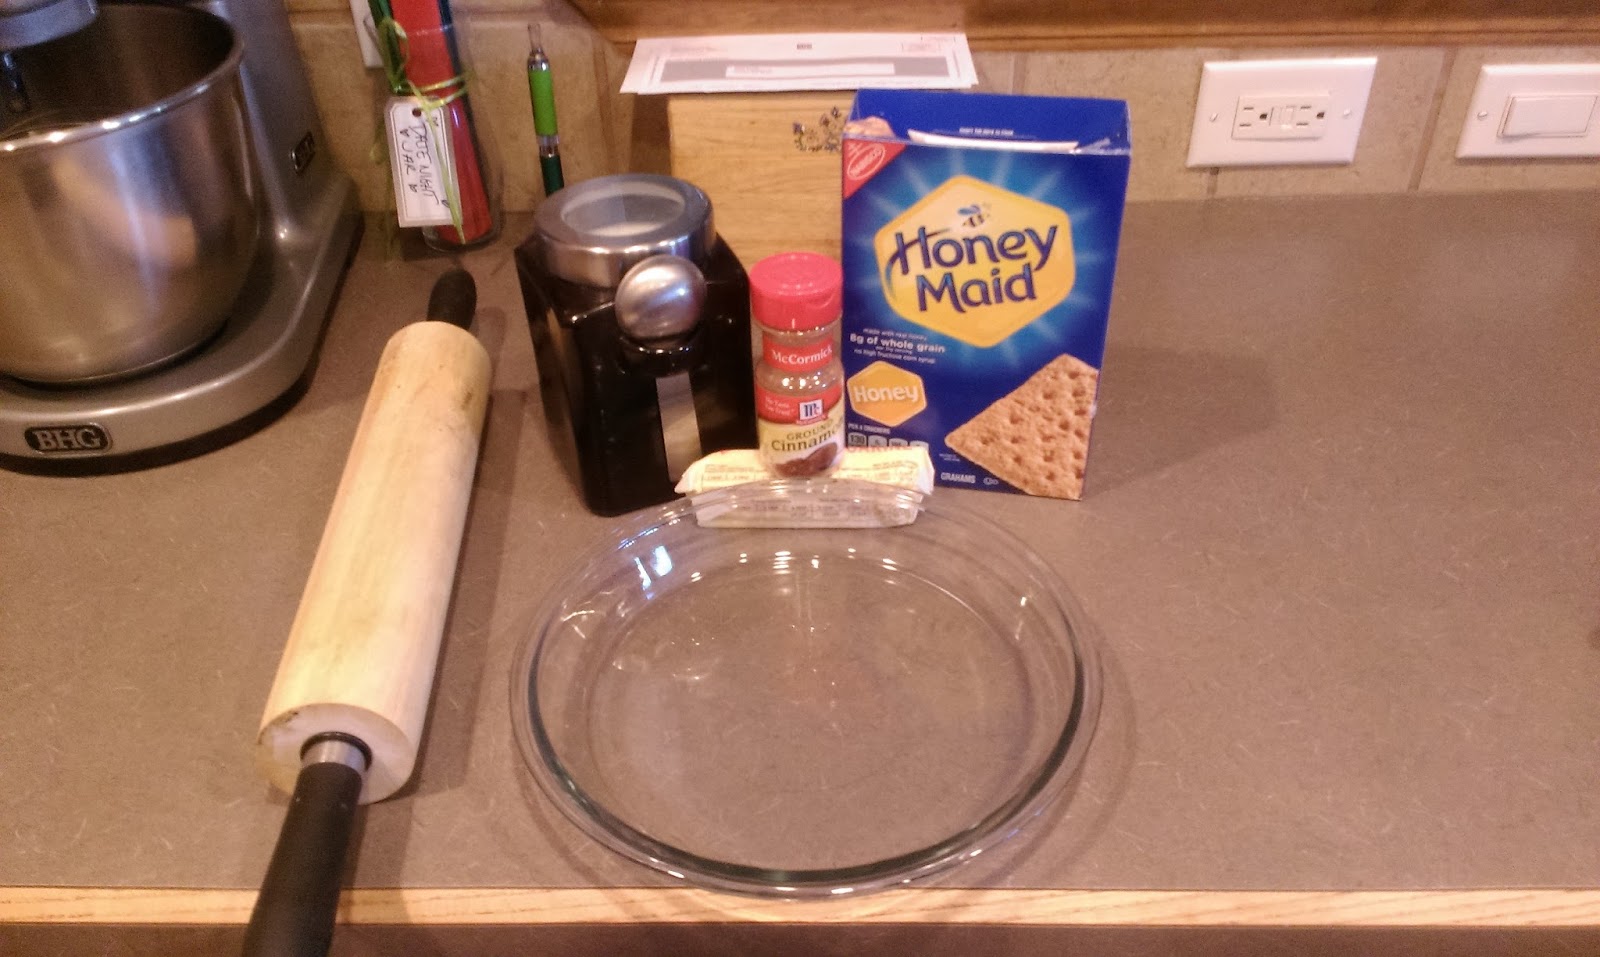
Crust from scratch is stress relief time. You could make things even easier by using a premade crust, but I did some tweaking and came up with a crust that is absolutely basic white girl approved. You need:
- 12 whole graham crackers
- 6 TBS of melted butter
- 1 TBS sugar
- 1/2 tsp cinnamon
- Optional: dash of pumpkin spice, chopped nuts, gingersnaps in place of graham crackers
This pie crust recipe can be pretty flexible depending on your needs, just be sure the cinnamon and sugar blend are present because they take things from boring to Autumn-in-your-mouth. Since fall is the undisputed champion of seasons, you just need to give in and let this crust happen.

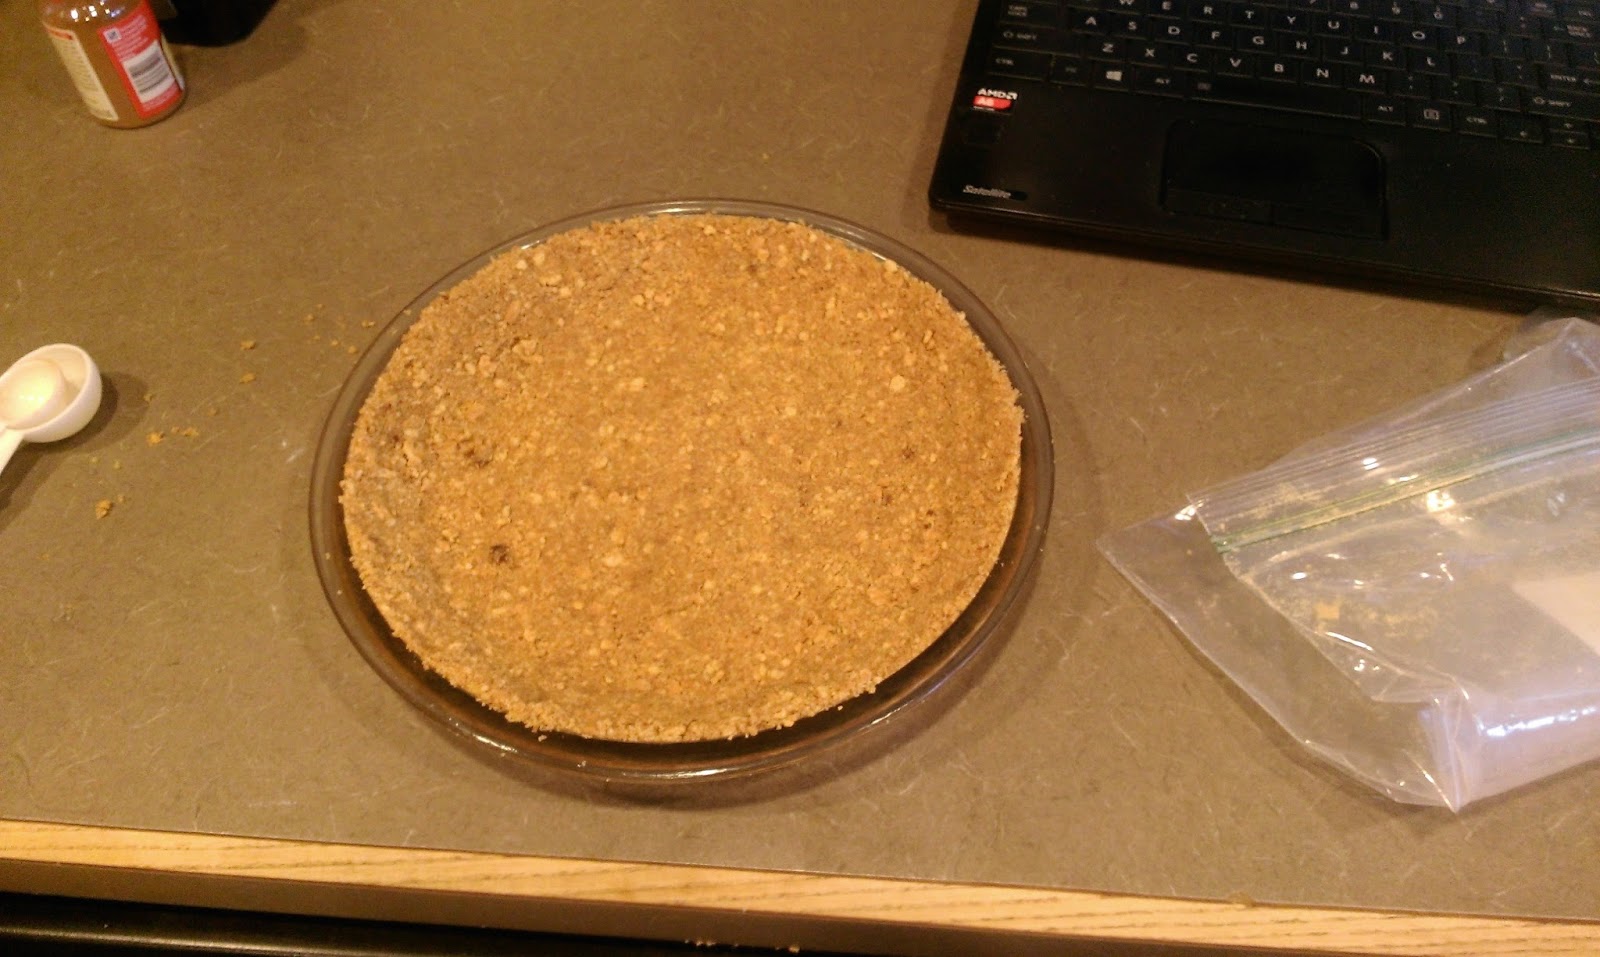
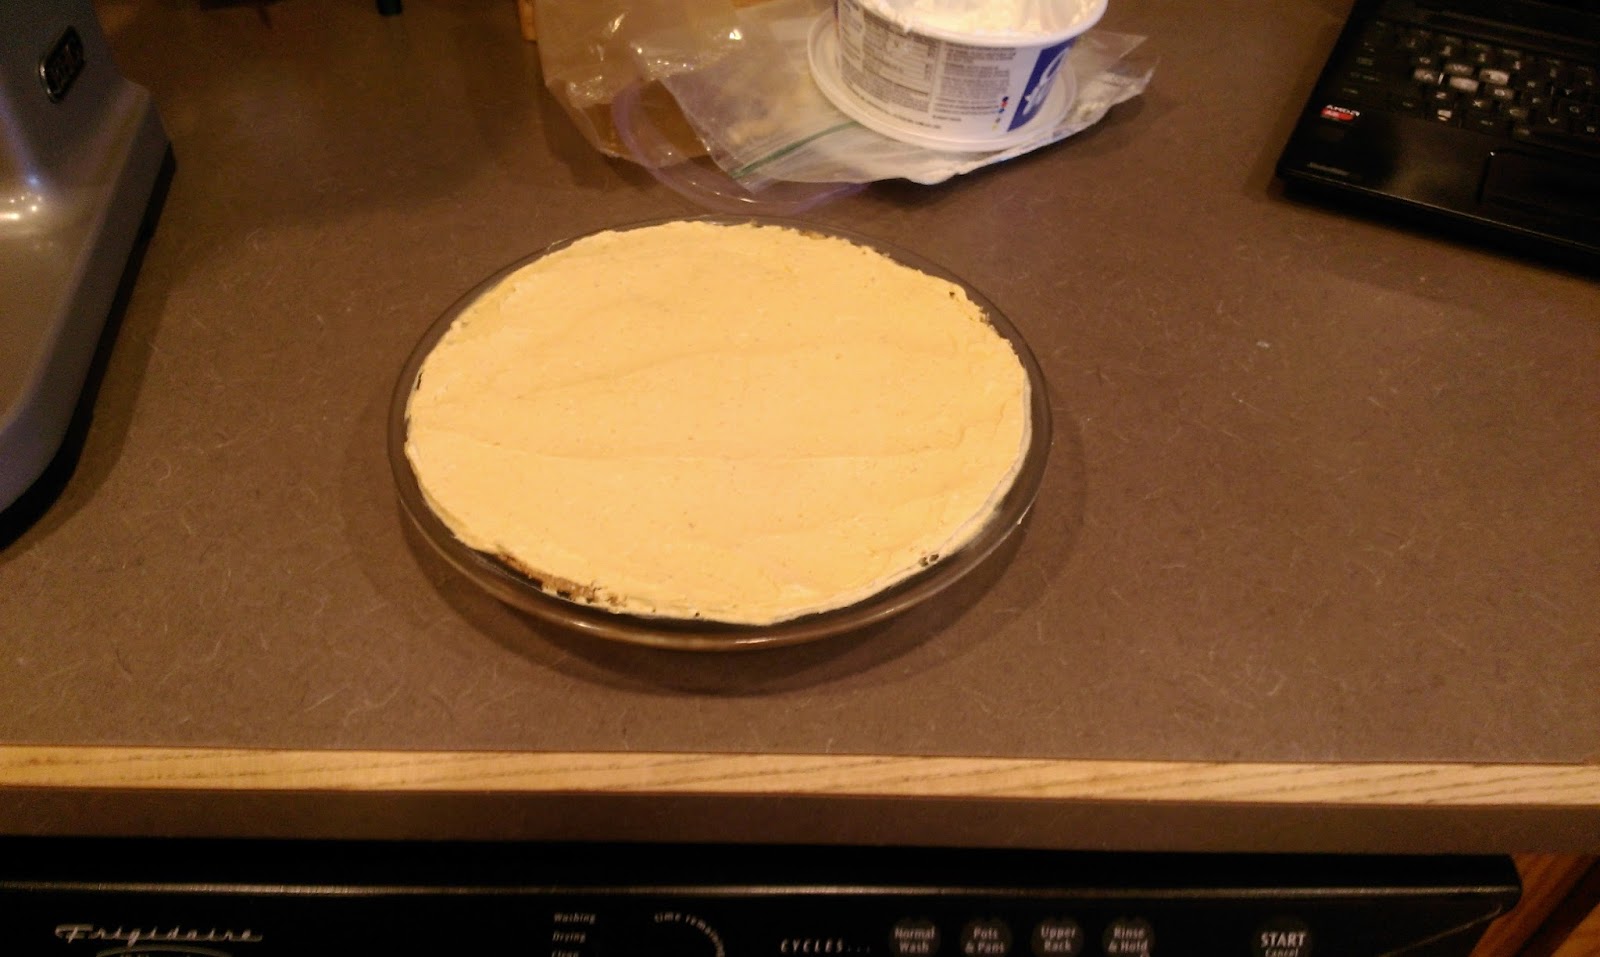
I want to frame this picture and reference it when my OCD tendencies flare up because hot damn is that a perfect crust. Start by crushing the graham crackers in a baggy with a rolling pin. Or if you like wasting 30 bucks, buy and use a food processor. But nothing beats (literally) smashing away with the pin while you vent a day or two’s worth of frustration out on some innocent graham crackers. Once the crackers are nice and fine, dump into a bowl with the butter, sugar, and cinnamon. Blend well and press into a 9-inch pie pan. Place your crust into the freezer while you make your filling so it can firm up.

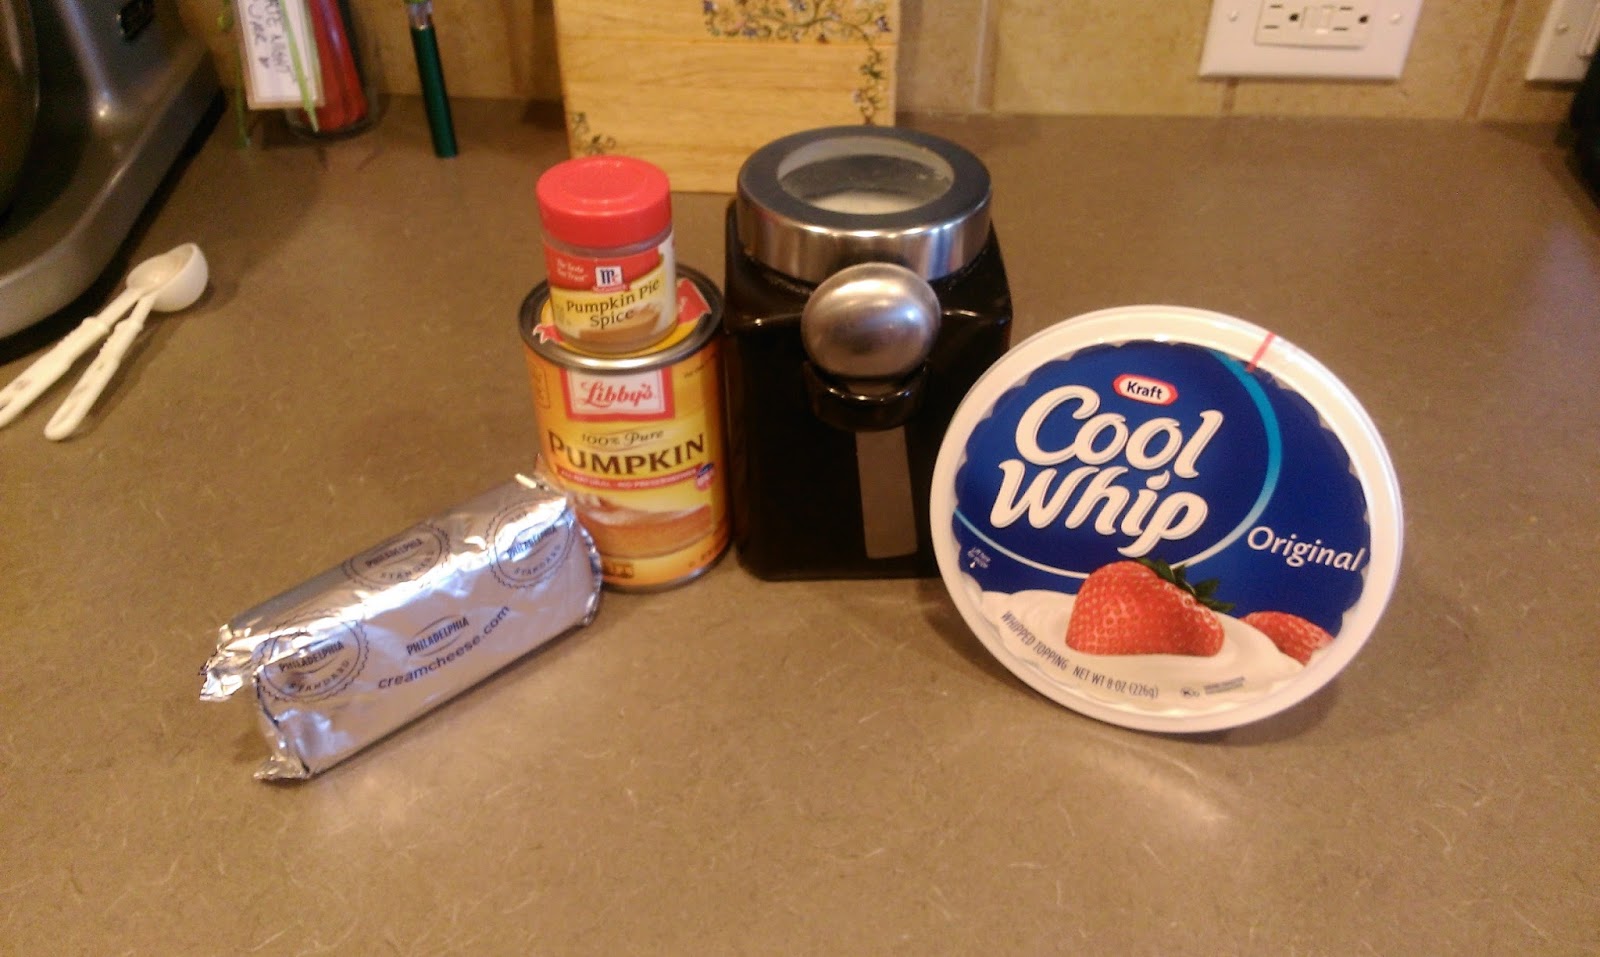
I’m not sure if you can handle how complicated things are about to get… Like I said, five ingredients to greatness!
- 8 oz. of softened cream cheese
- 1 cup of pumpkin
- 1/2 cup of sugar
- 1/2 tsp pumpkin pie spice
- 8 oz. room temp Cool Whip
You could honestly take the booze level up a notch and make your own rum-laced whipped cream for the cheesecake filling. I thought about it, but since I was already making a few tweaks from a Kraft recipe, I opted for regular Cool Whip to ensure I wasn’t ruining my dessert (the shame spiral that would’ve occurred after that would’ve been depressing). Next time I will most certainly make rum whipped cream for this though.

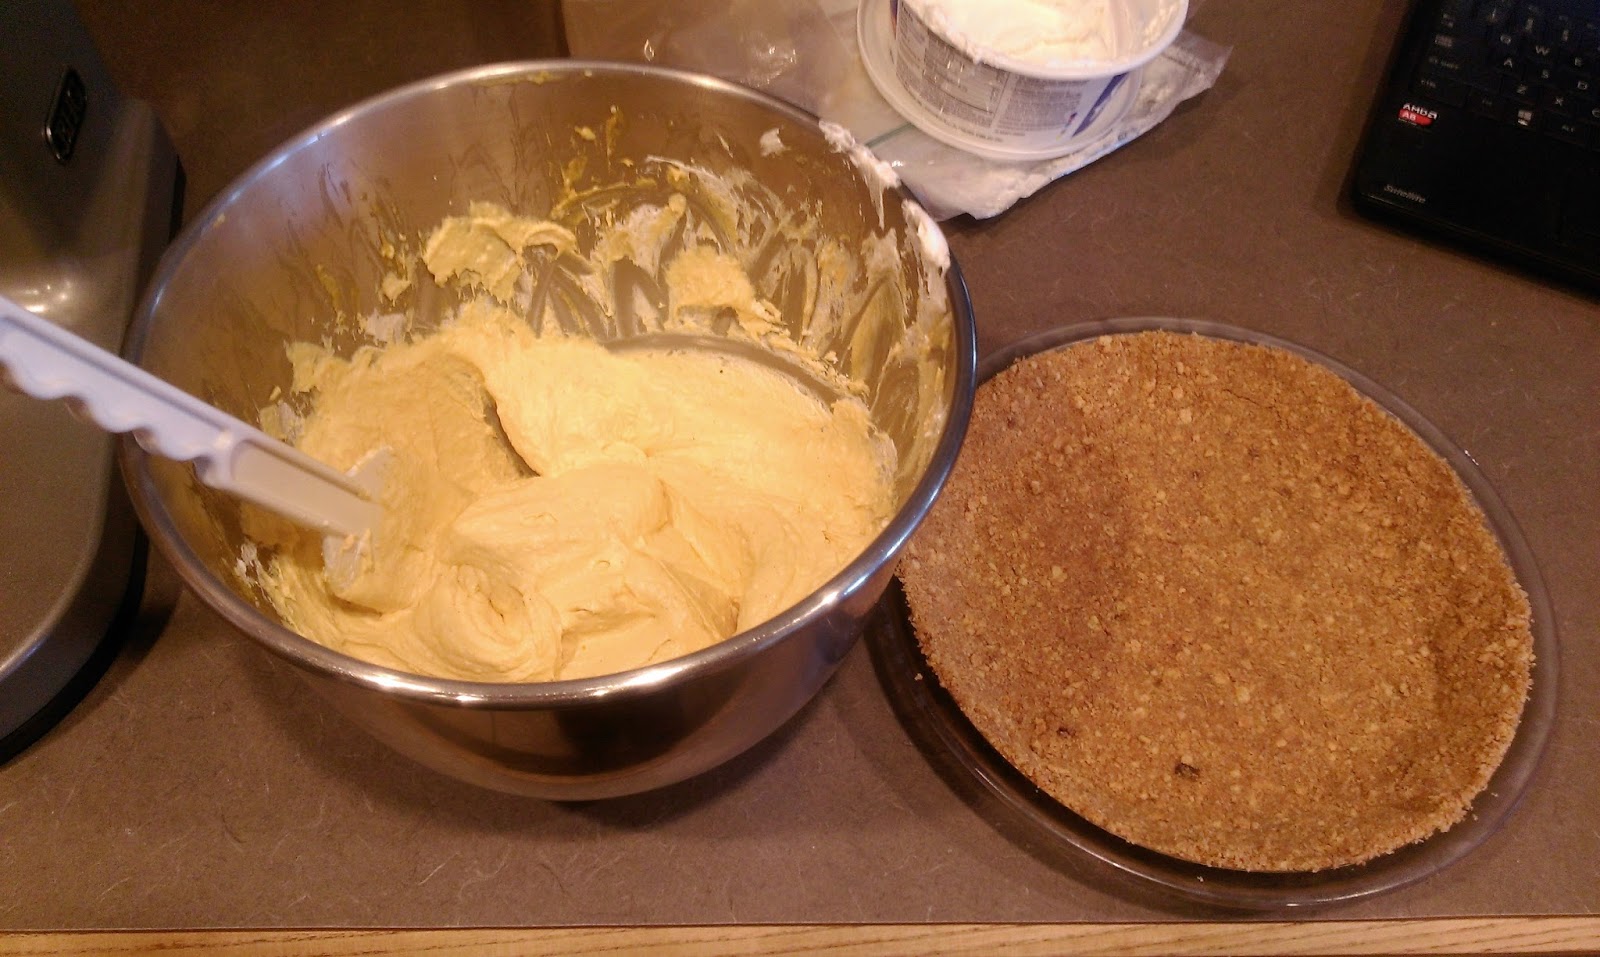
I enjoyed licking the spatula clean. Are you sure you’re ready for this? I don’t want you to get lost in the complexity of this recipe. I mean, you have to dump all five ingredients into a mixing bowl and blend for about three minutes. Then you have to turn your filling out into your pie crust. That’s hard work, y’all…

I could’ve died. Whew. I’ll allow you a moment to catch your breath after all that hard work. Place your cheesecake into the fridge for 4 hours to set, or if you’re impatient and want to try out whipped cream booze recipes, the freezer for 1 1/2 hours. Guess which route I took? Freezer for life, people.

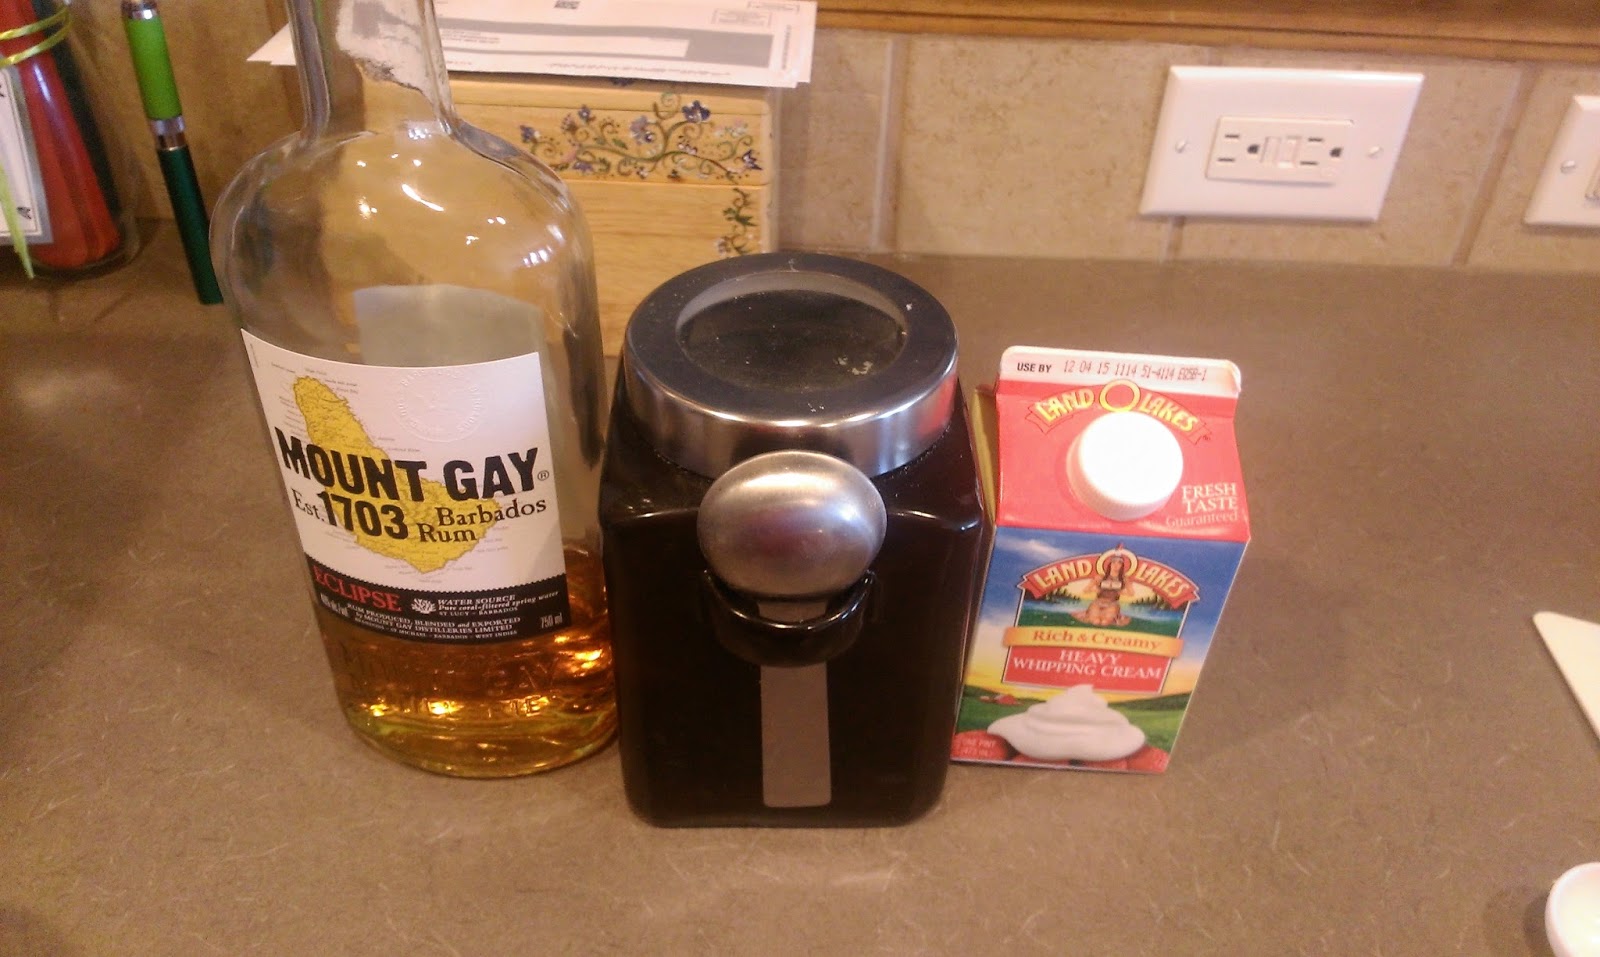
If you’re not getting your rum from Barbados, you’re doing it wrong. To make your own whipped cream, place a stainless steel mixing bowl into the freezer for about 20 minutes. You want things COLD. Cold like my heart kind of cold. Pour one cup of heavy whipping cream, 1 TBS of sugar, and 1/2 tsp of rum into the mixing bowl. Blend on HIGH. High like my mixer might break kind of high. Do this for one minute, and you have whipped cream! I ended up doubling this recipe so I could pipe decorations on my cheesecake and have rum whipped cream leftover to eat with some fruit (I know, I’m brilliant, AND I take the food pyramid seriously).

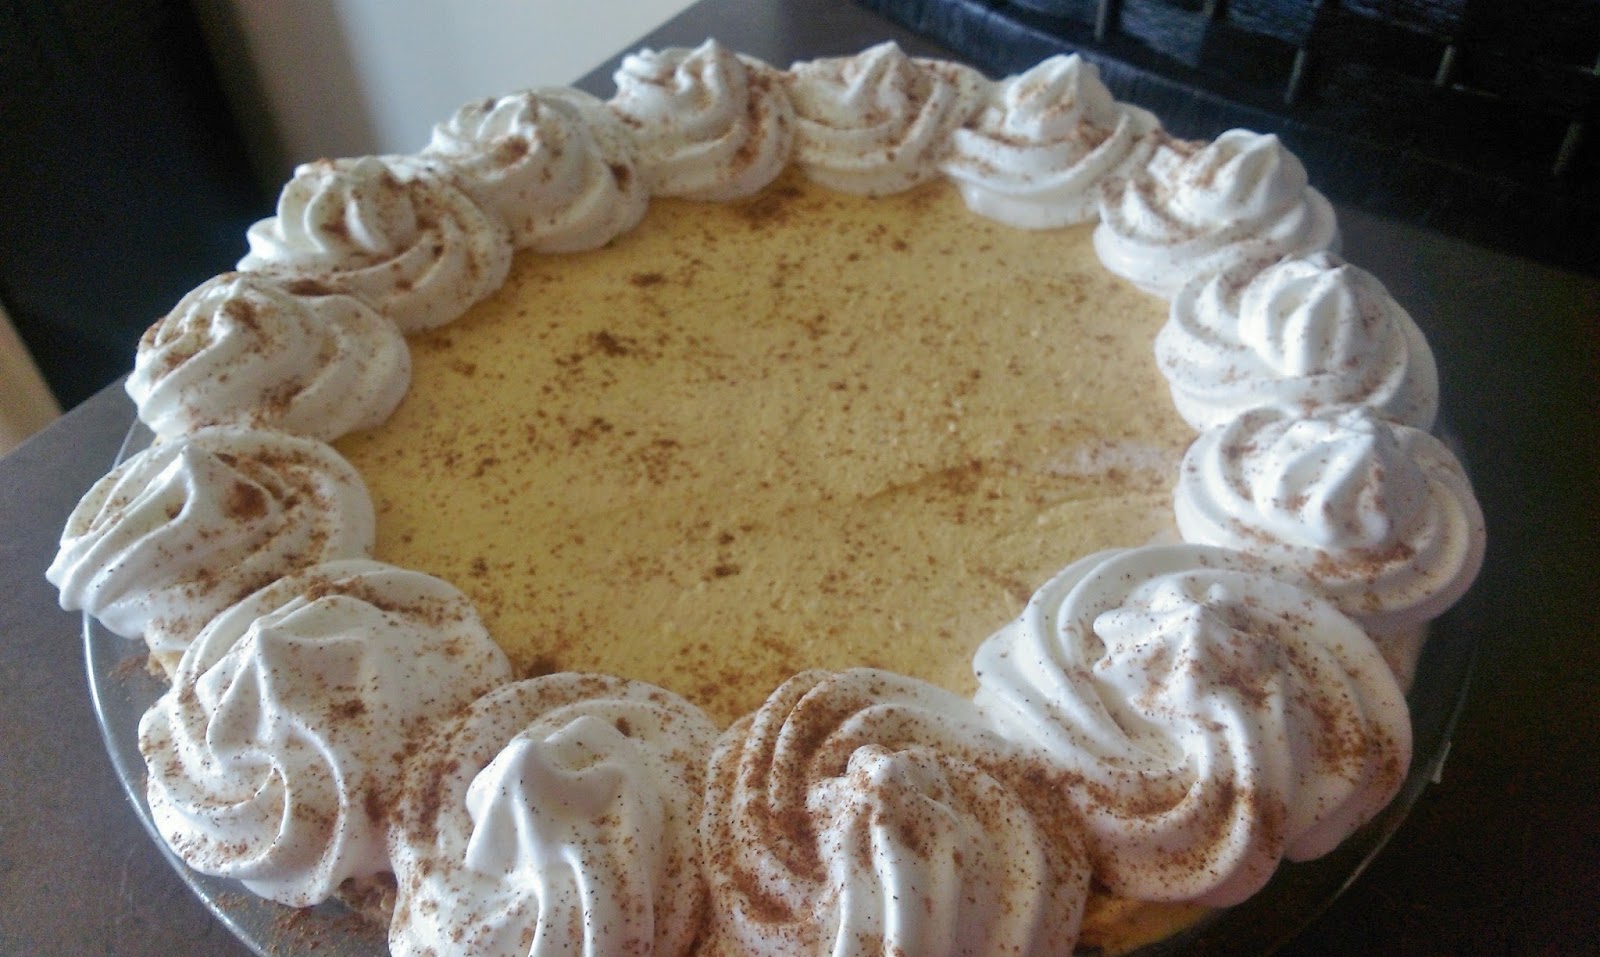
Your drooling is a perfectly acceptable reaction to this photo. This, my dear readers, is food porn. You can top your cheesecake with the rum whipped cream any way you like. I used a 1M tip on a piping bag and just did little circular mounds. I finished up by dusting the cheesecake with pumpkin pie spice. This was a decision that was met with uproarious applause by my taste buds. The hardest part about making this cheesecake was not eating it all while waiting for my husband to come home from work. When we served up a slice that evening, I topped it with caramel sauce.

Again, my taste buds were quite satisfied with my culinary actions. This cheesecake will change your Thanksgiving dessert menu. There is simply no time for pumpkin pie when pumpkin cheesecake is a thing that exists and wants you to experience pumpkin in the way it was meant to be experienced: topped with plenty of rum and caramel. Let’s face it, pumpkin is like the nerdy little glasses-wearing girl that when dolled up with the proper accessories, turns into Laney Boggs from She’s All That. Now that I’ve managed to compare a cheesecake to a cheesy late 90s film, I feel like my work here is done. Make the cheesecake. Embrace the cheesecake. Let the cheesecake take your Thanksgiving dessert table from sad and soupy to flavorful and rum-y. Because when Aunt Sally starts prying into your private life, you can shove a spoonful of pumpkin cheesecake into your mouth to prevent your ability to talk (table manners, y’all) while also getting a good buzz from the rum whipped cream to numb the annoyance. I just saved Thanksgiving!!! ‘Til next time, my fellow eaters!
-
Facing My Fears…with Cake.
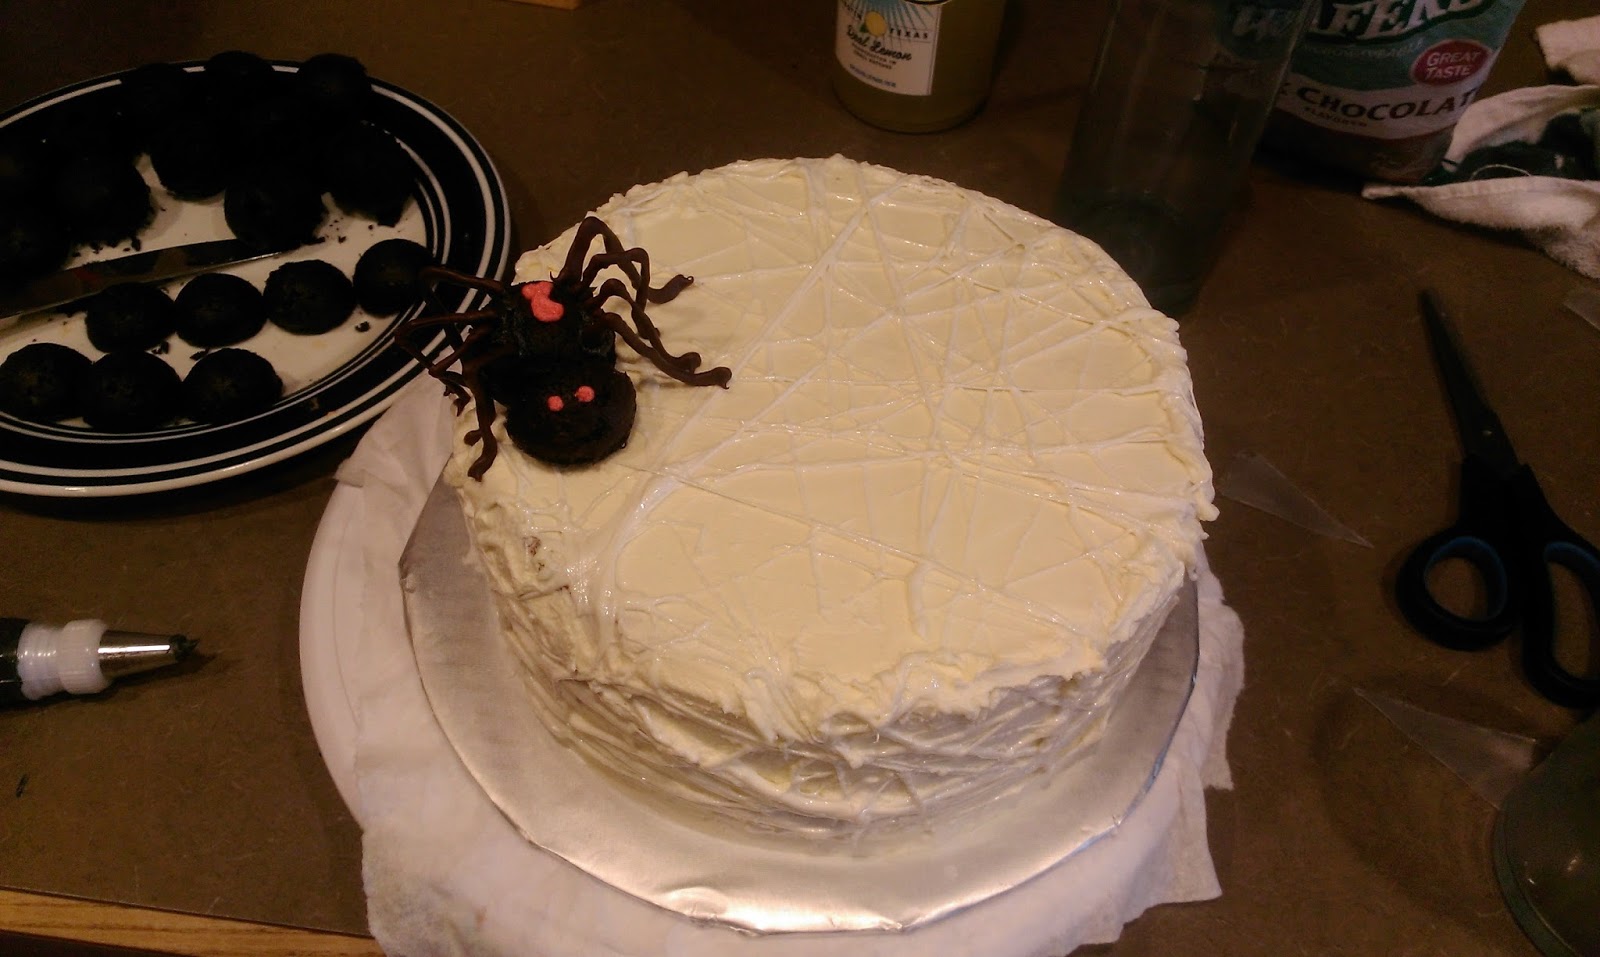
Guys, I’m in rough shape. When gently knocking on the door of 30, it’s probably not the best idea to stay up until 2 a.m. eating cake and candy. I’m suffering from massive post traumatic dessert disorder today. Seven-year-old me would be so utterly disappointed in my lost ability to shovel cake and candy into my mouth with nary a care or a tummy ache. I’ve spent most of the morning and afternoon curled into a tiny ball of suffering and regret. I had no idea a sugar hangover was worse than an actual adult hangover. Time has surely betrayed me (how Shakespearean)! As I pontificate on whether or not it was worth it, I’m reminded of how good the cake tasted and that no matter how old you get, a Kit Kat bar most definitely can solve most, if not all, your problems. Did I need to eat approximately ten mini Kit Kat bars? No. Did I anyway? Yes. Because chocolate pairs extremely well with beer. I was also celebrating due to the fact that I spent six hours working on said cake that somehow later turned into rocks in my gut. Although the cake took forever to bake and decorate, it was fueled by my childlike glee over Halloween and desire to celebrate the hell out of it. At least seven-year-old me would still be really proud of that. I had a blast making bloody brain cupcakes and a graveyard cake, but I wanted to get even creepier with my piece de resistance. I had to reach deep within the depths of my soul to decide what scares the absolute crap out of me the most…and surprisingly, running out of cake or wine was not at the top of the list. Spiders were. Spiders always win the creepy, make you want to shower seventy times lottery.

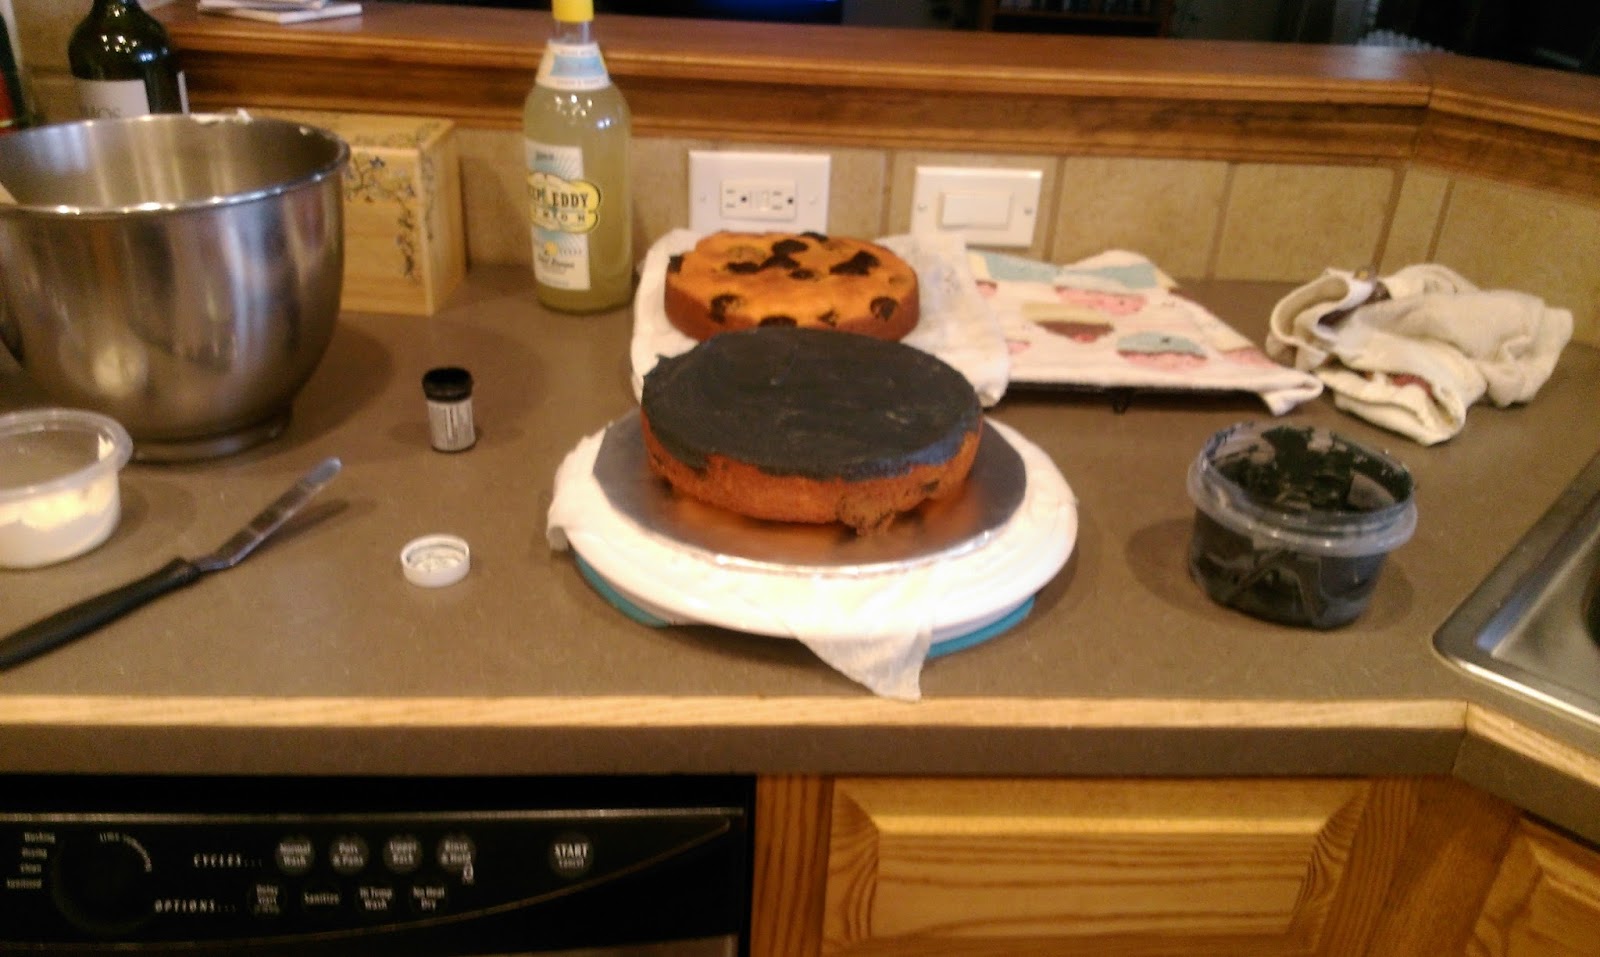
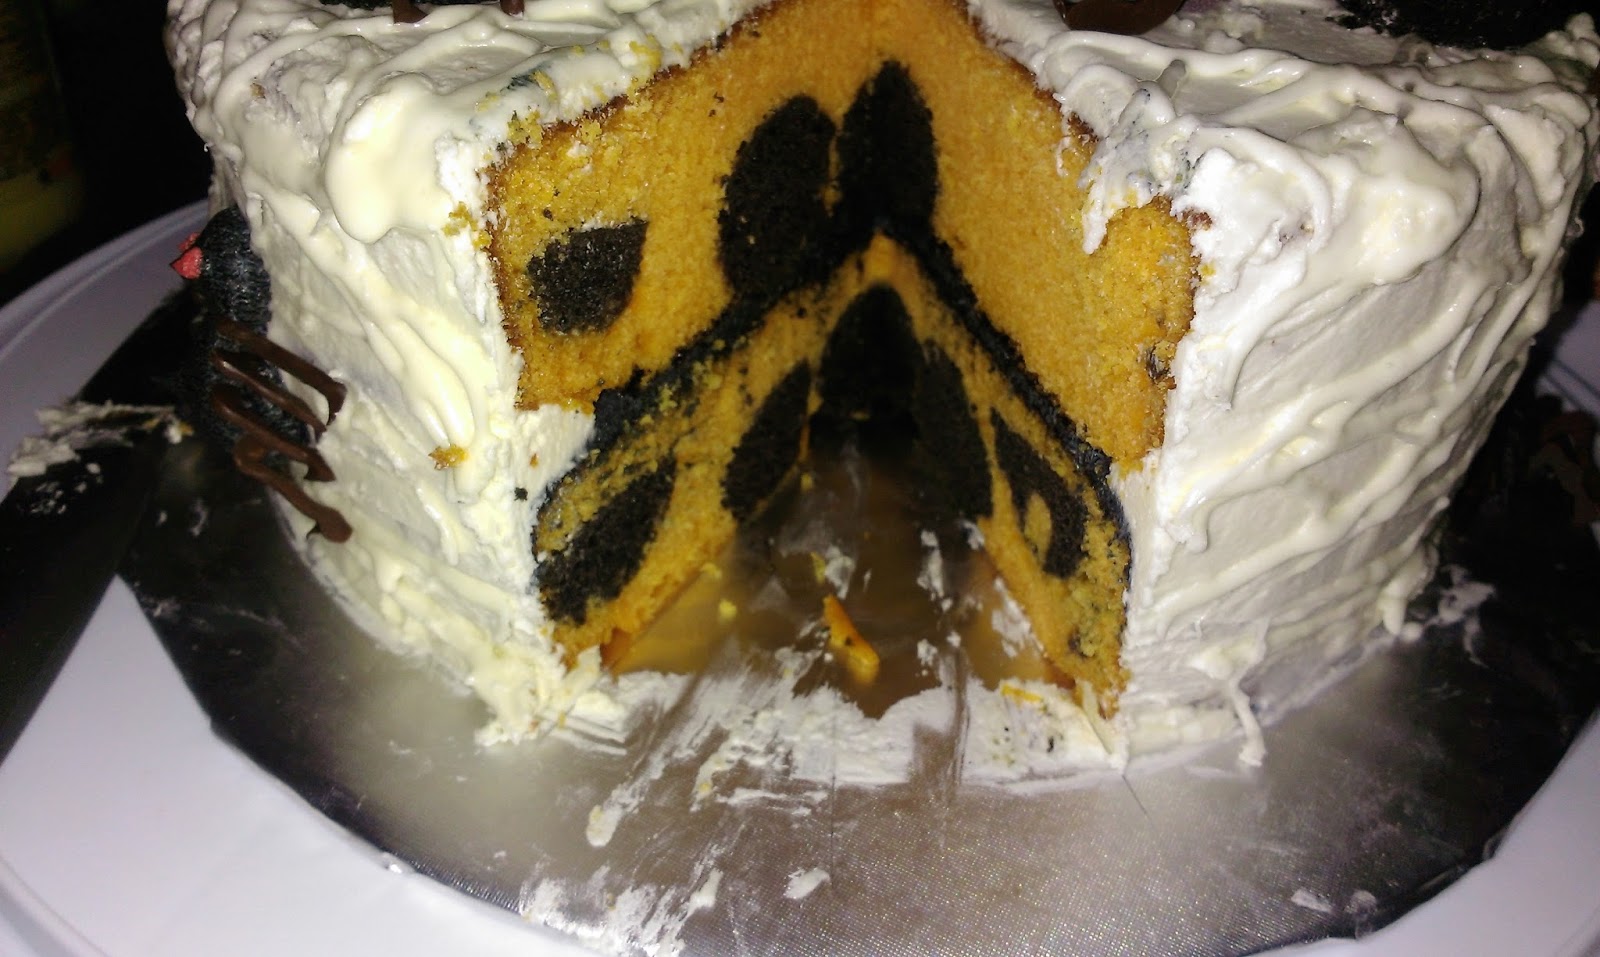
I’m not sure whether to run away screaming or eat you. My work here is done. A couple weeks ago during another one of our usual 40-50 m.p.h. “windy” days, a bunch of spiders were blown into town. How do I know this? Because they left thick, sticky strands of spiderwebs on EVERYTHING. Street lights, signs, trees, mailboxes, EVERYTHING. In what was a horror movie concept turned reality, I was left covered in web every time I wanted to walk my dogs. Doesn’t that make you want to visit the Land of Enchantment? To burn it down? Yes. Yes it does. Hell, I even wanted to light myself on fire a few times. Needless to say, I wanted to turn this terrifying experience into art to process my feelings on the matter like any good artist/weirdo. This is where the cake comes in. Why is it polka dotted you ask? Because I like polka dots. Polka dots are in no way terrifying or make me want to set things ablaze. I was balancing my fears with my loves, and it turned out so prettily! Step into my office and I will show you how to make your very own polka dot cake!

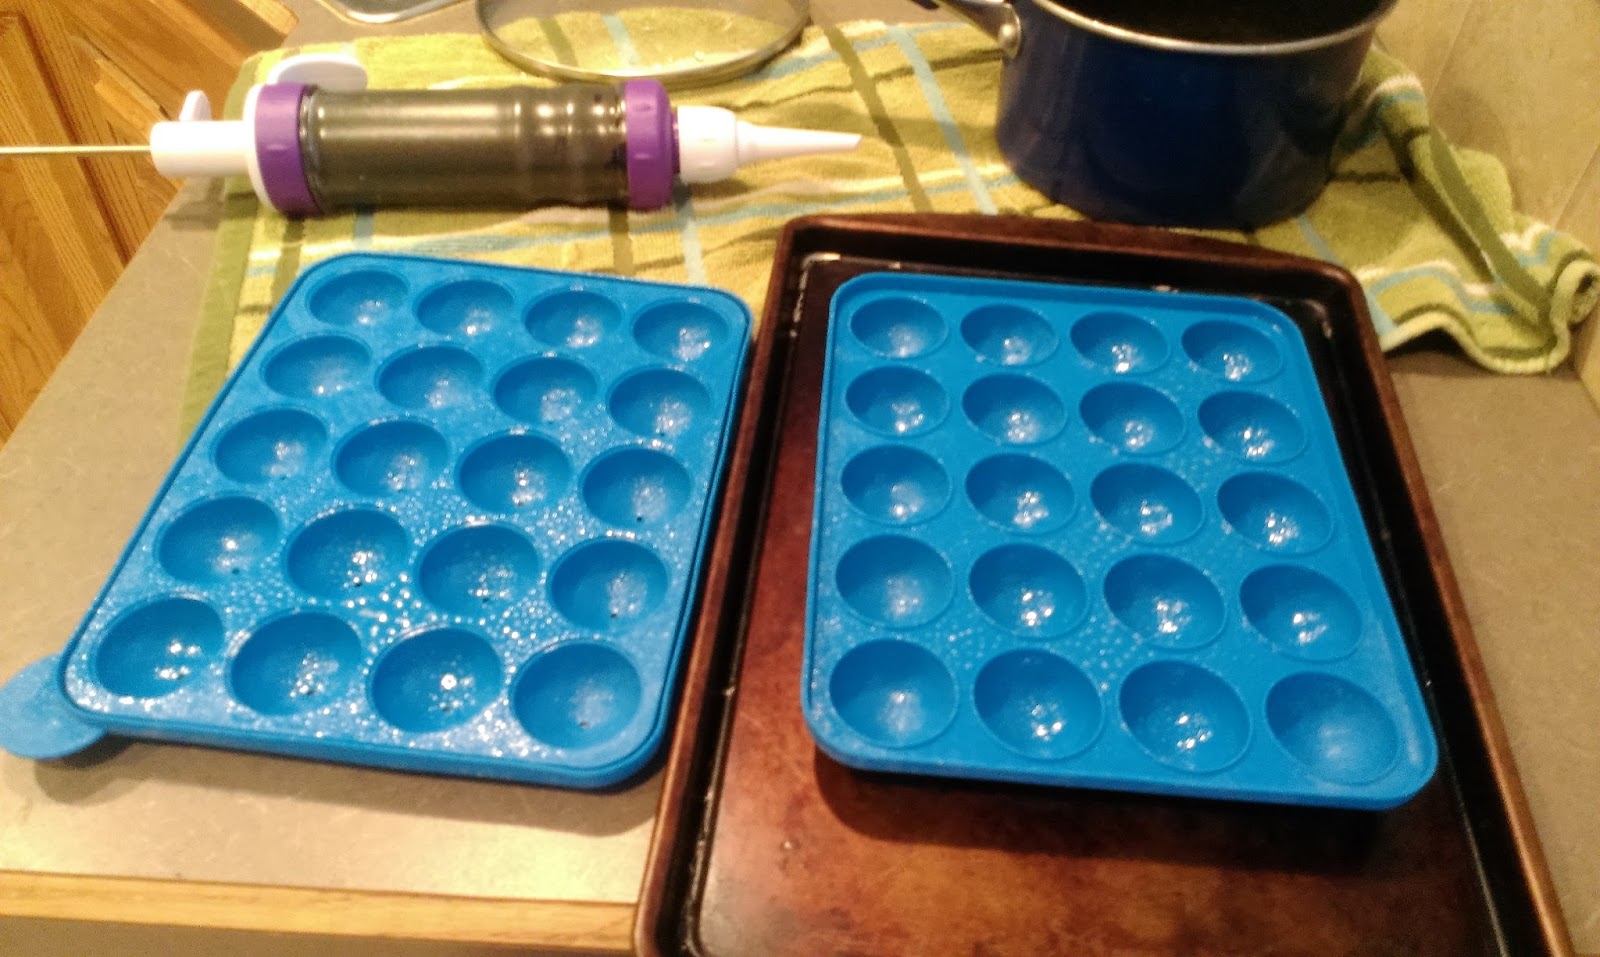
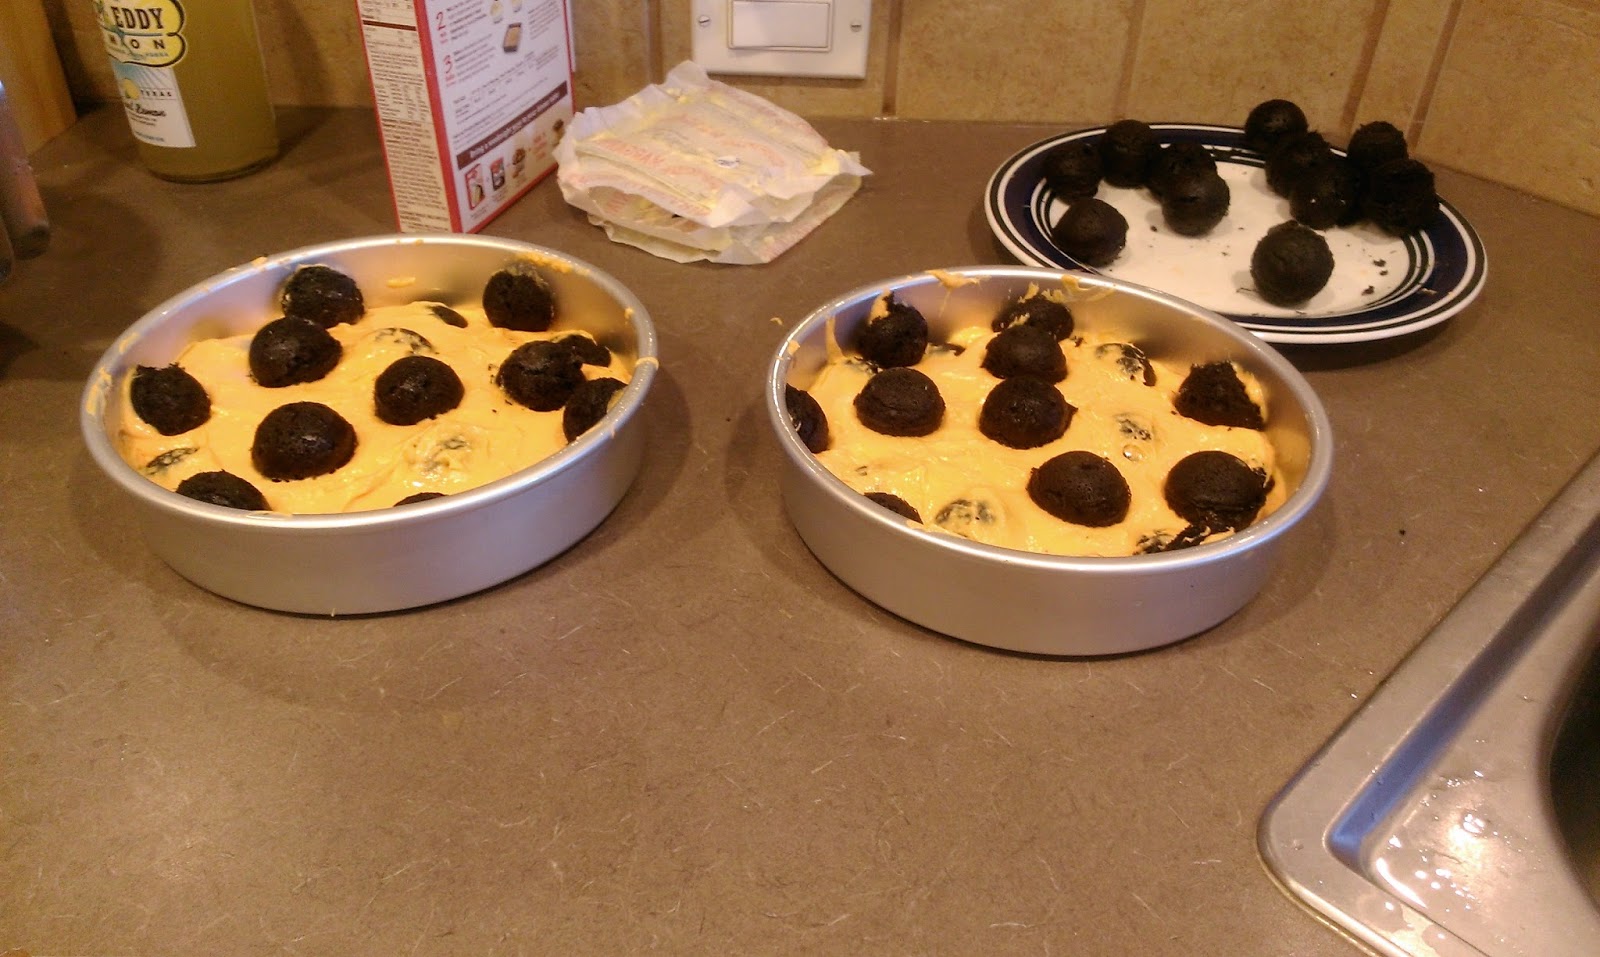
Dear Lord I’m cheating for the third week in a row. I’d fire me if I was actually paid for any of this. Yeah, we’re doing the cake jacking thing again. You need two cakes for a polka dot cake to work out, obvs. You’re also going to need a cake pop mold. Start by mixing the cake flavor/color you want for your polka dots. I used Devil’s Food cake dyed black.

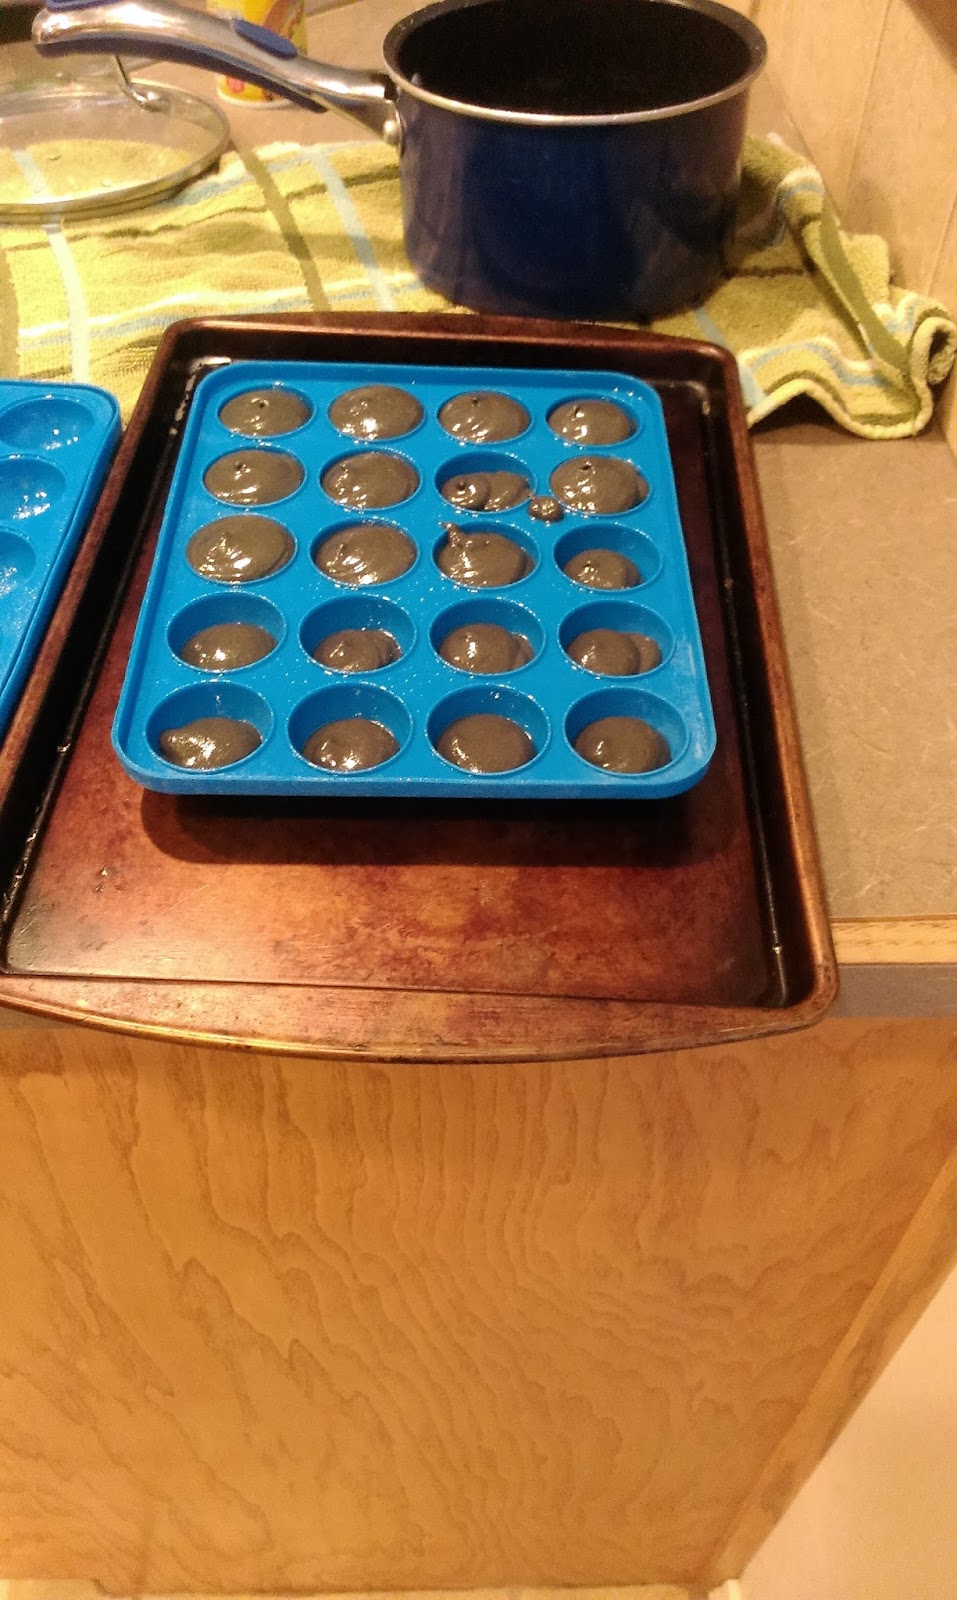
The Purple People Eater makes a rare appearance! Once your cake batter is made, you’re going to want to load it into a piping bag or a frosting gun to make your life easier. Spray a ton of Pam into both sides of the cake pop mold and then fill with batter.

This in no way looks edible. You want to fill some of the molds all the way up, some halfway, and some barely at all. This way you have dots of varying sizes. Place into the oven at 350 for about 10-15 minutes. Take out of the oven and leave the top on for 5 minutes. Remove the top and let cool on a cooling rack for another 5 minutes before removing the pops. I repeated this process 2 more times to give me 60 pops. You won’t use all of them in the cake; some of them you will need to create bodies for the spiders later on, and some of them you will eat because you need to “test” the quality of your cake pops.

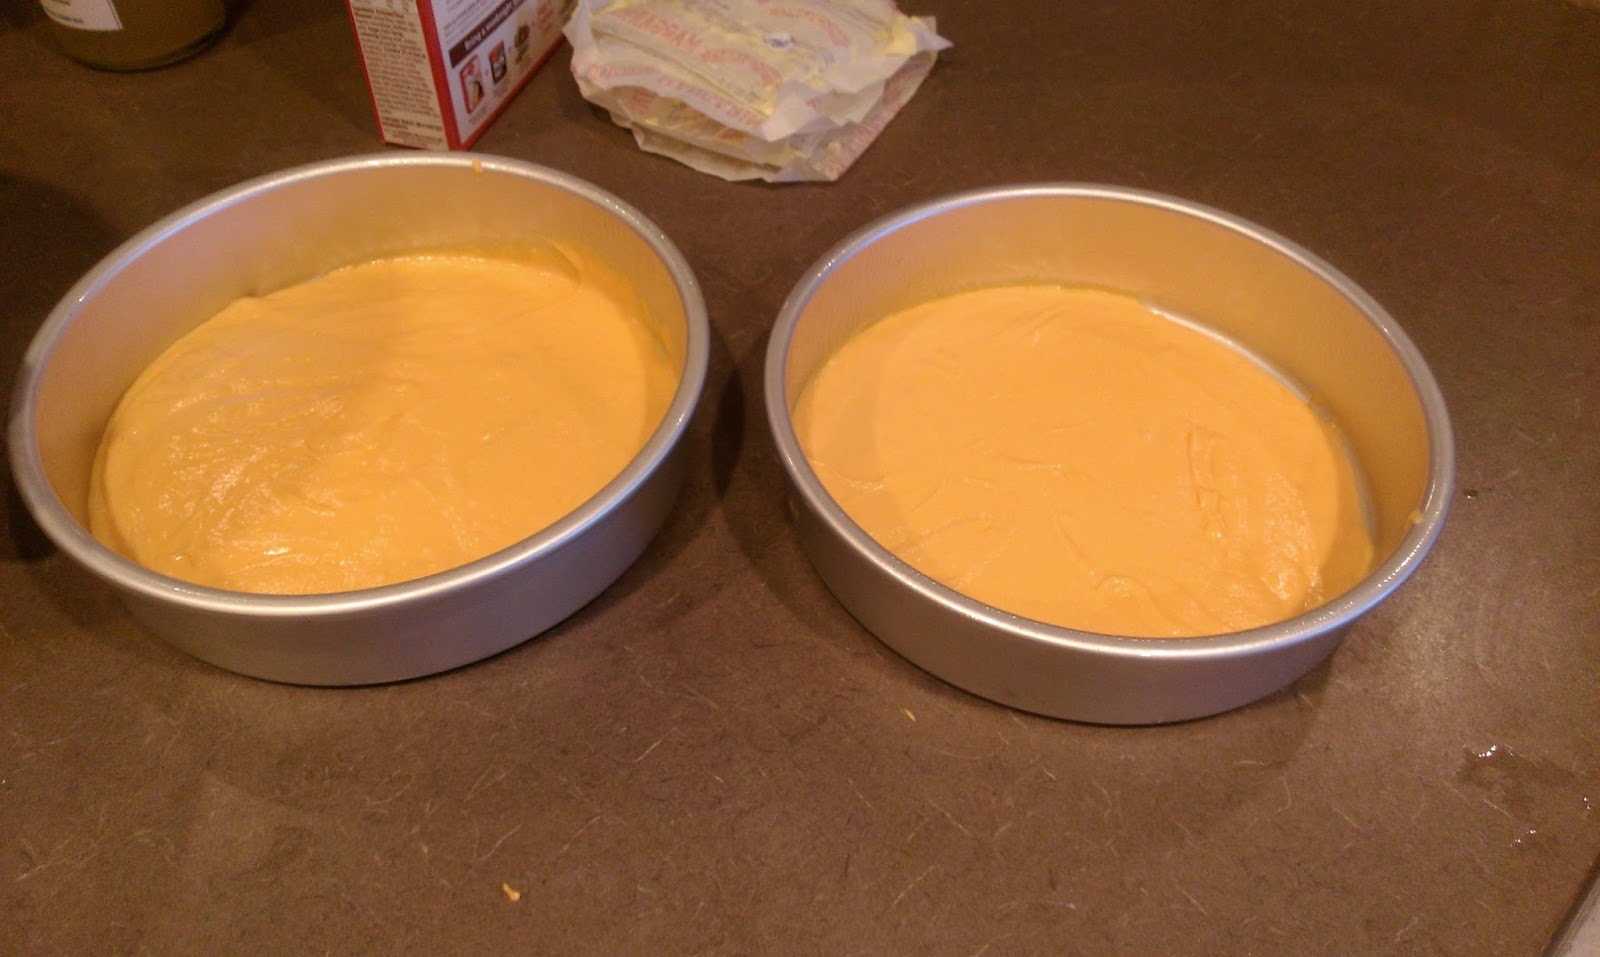
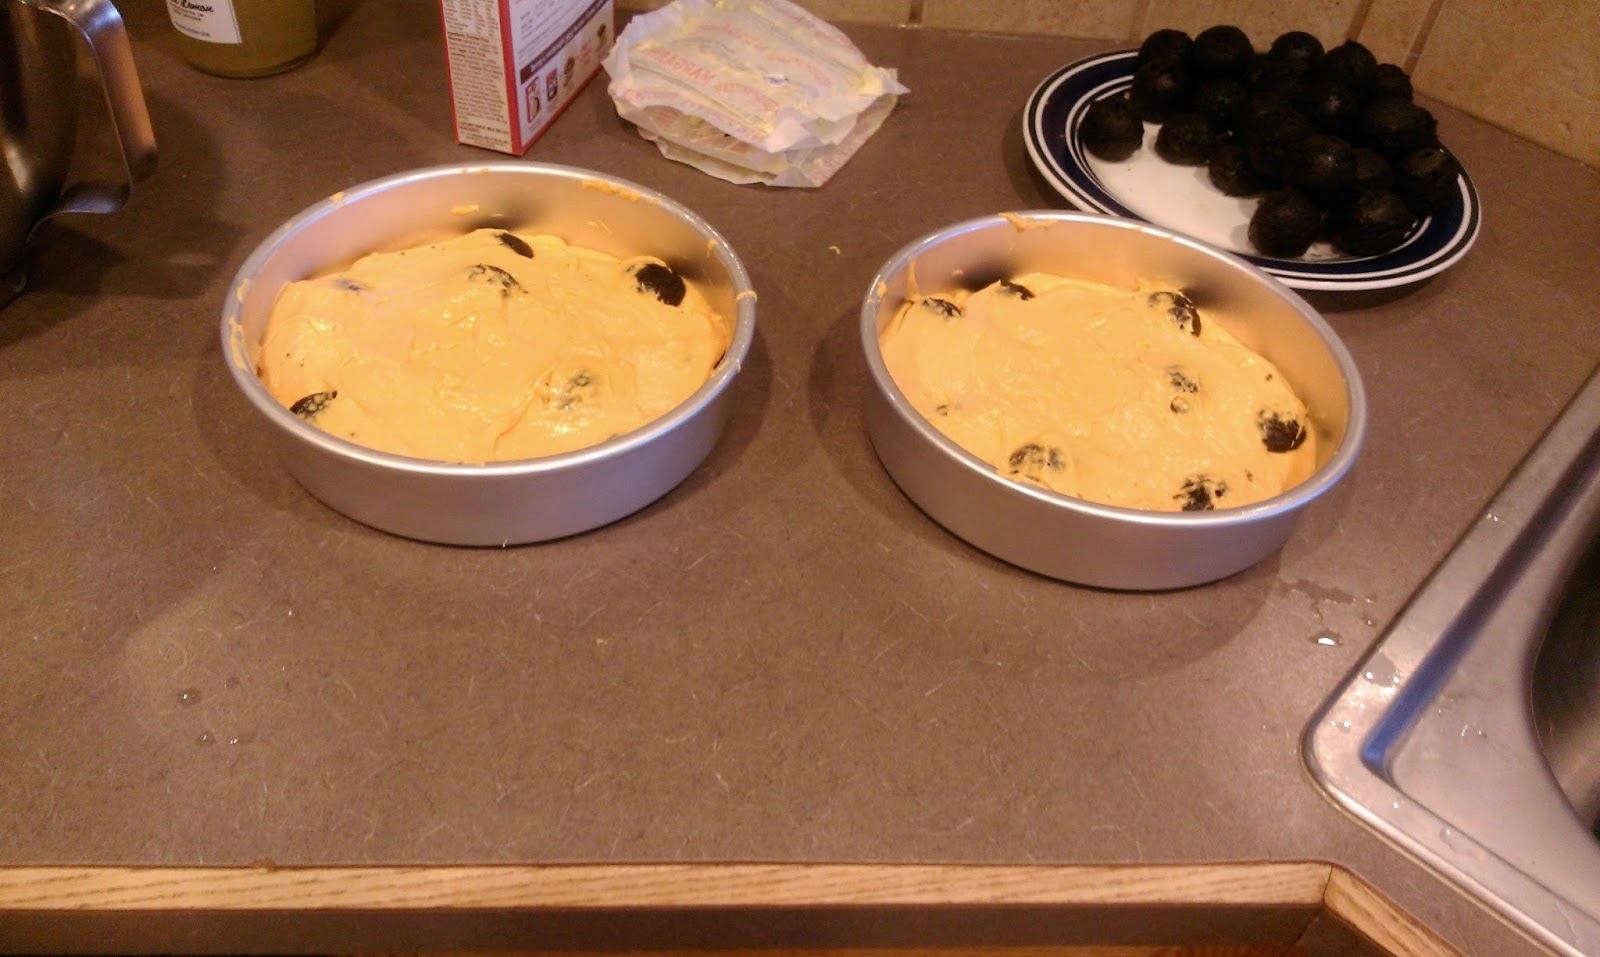
Suddenly craving an orange creamsicle. Once you’ve made all the cake pops, make the second cake batter. I used yellow cake and added in orange dye for this. Take a small amount of batter and plop into two greased cake pans. Then take varying sizes of cake pops and place into the orange batter:

End results are worth all these steps, I promise. Top these pops with the rest of the orange batter:

Like so. Then add another layer of random dots. I stuck a few to the sides of the pan as well by just dabbing a little batter on them and smooshing them into the side.

Which was both fun and messy. Bake at 350 for about 35 minutes or until the toothpick test works in your favor. It will take a bit longer than package directions because of the added density of the cake pops. The batter will puff up and around the pops, so they don’t dry out either. Winning!

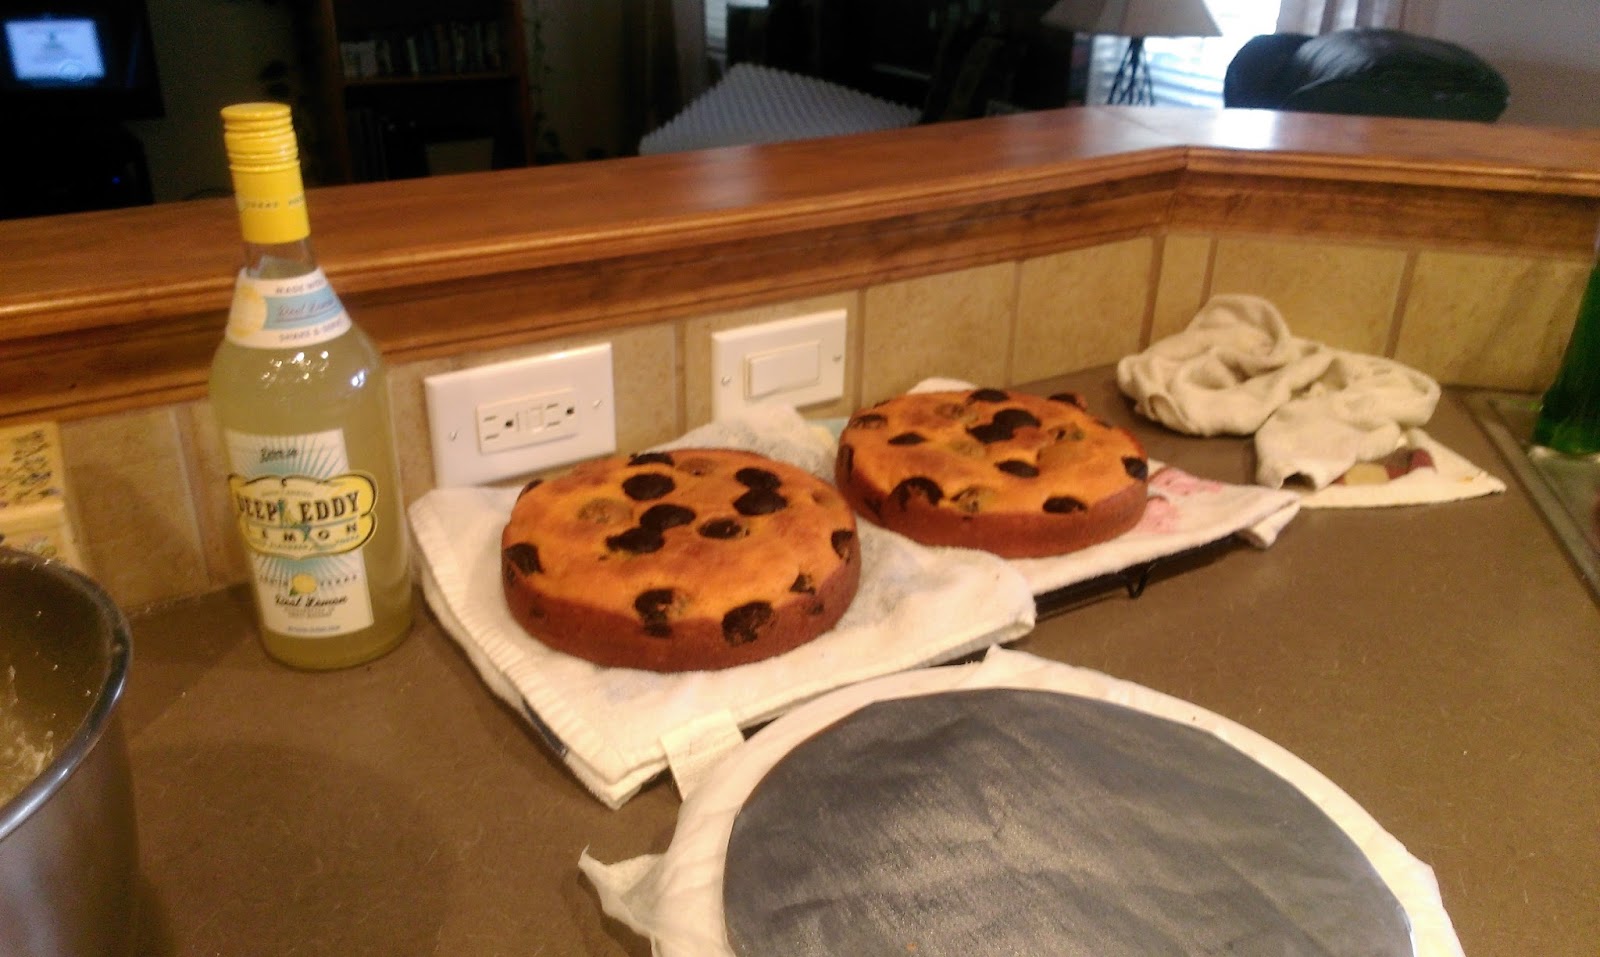
Yes, there’s always some kind of vodka on my kitchen counter. It’s like playing Where’s Waldo with these photos but significantly easier. Let cool on a cooling rack in the pans for 10 minutes before removing and letting chill in the fridge or freezer depending on how impatient you are.

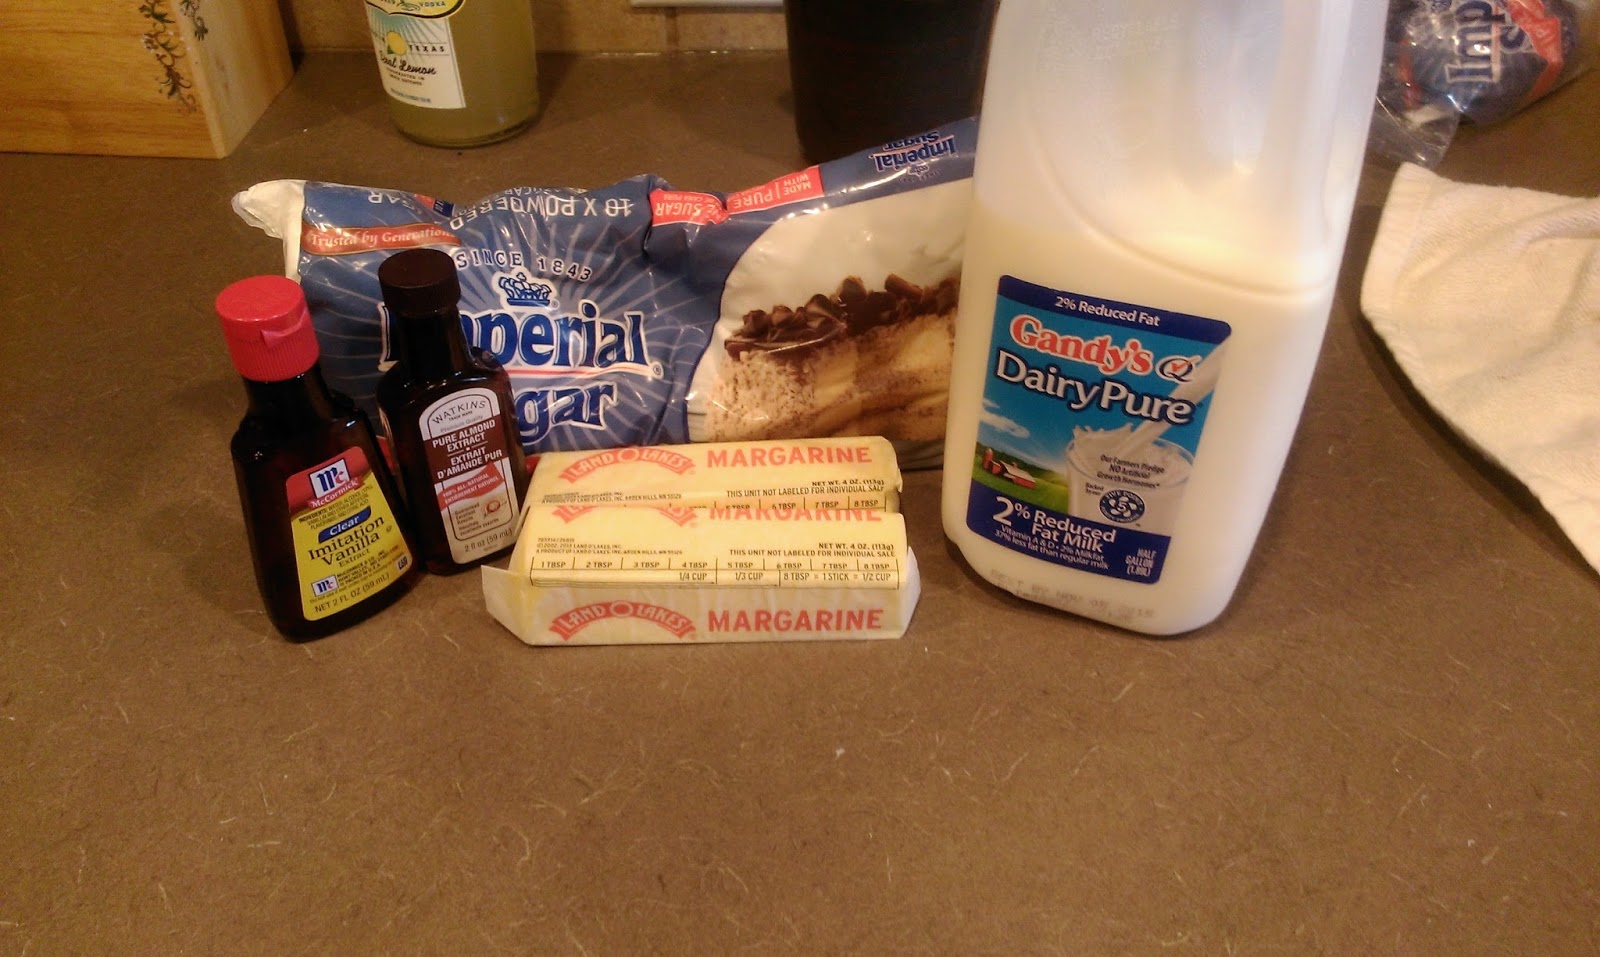
It’s buttercream time!! I used my favorite full buttercream recipe for this cake since I didn’t need the frosting to be totally smoothed out and perfect. Gather up:
- 2 softened sticks of butter (1 cup)
- 4 cups of powdered sugar
- 1 1/2 tsps of vanilla
- 1/2 tsp of almond extract
- 4 TBS of milk
Cream the butter for a few minutes before adding in the vanilla, almond, and 2 cups of powdered sugar. Blend and then scrape down the bowl. Add in 2 TBS of milk and mix. Add in the remaining sugar and blend and scrape. Finish up by adding in the last 2 TBS of milk.

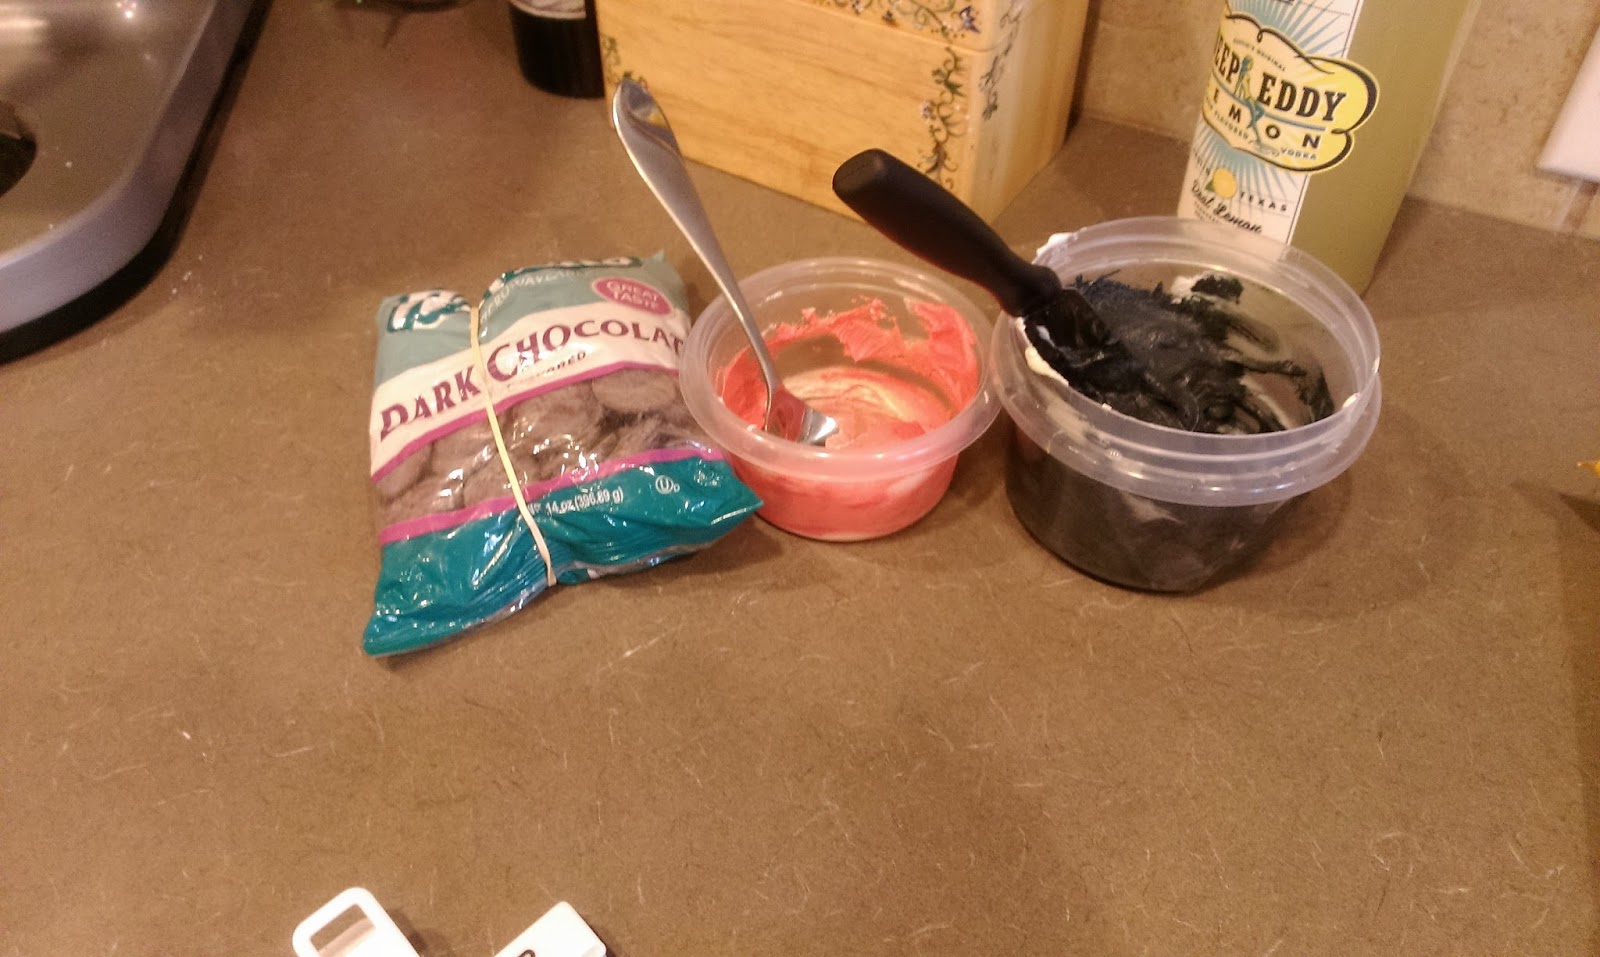
Set aside a tiny bit of frosting and dye it red; set aside a larger portion of frosting and dye it black. We need this for the spiders and the middle layer of frosting. You’ll also need some chocolate melts for the spiders, too. More on that later. 
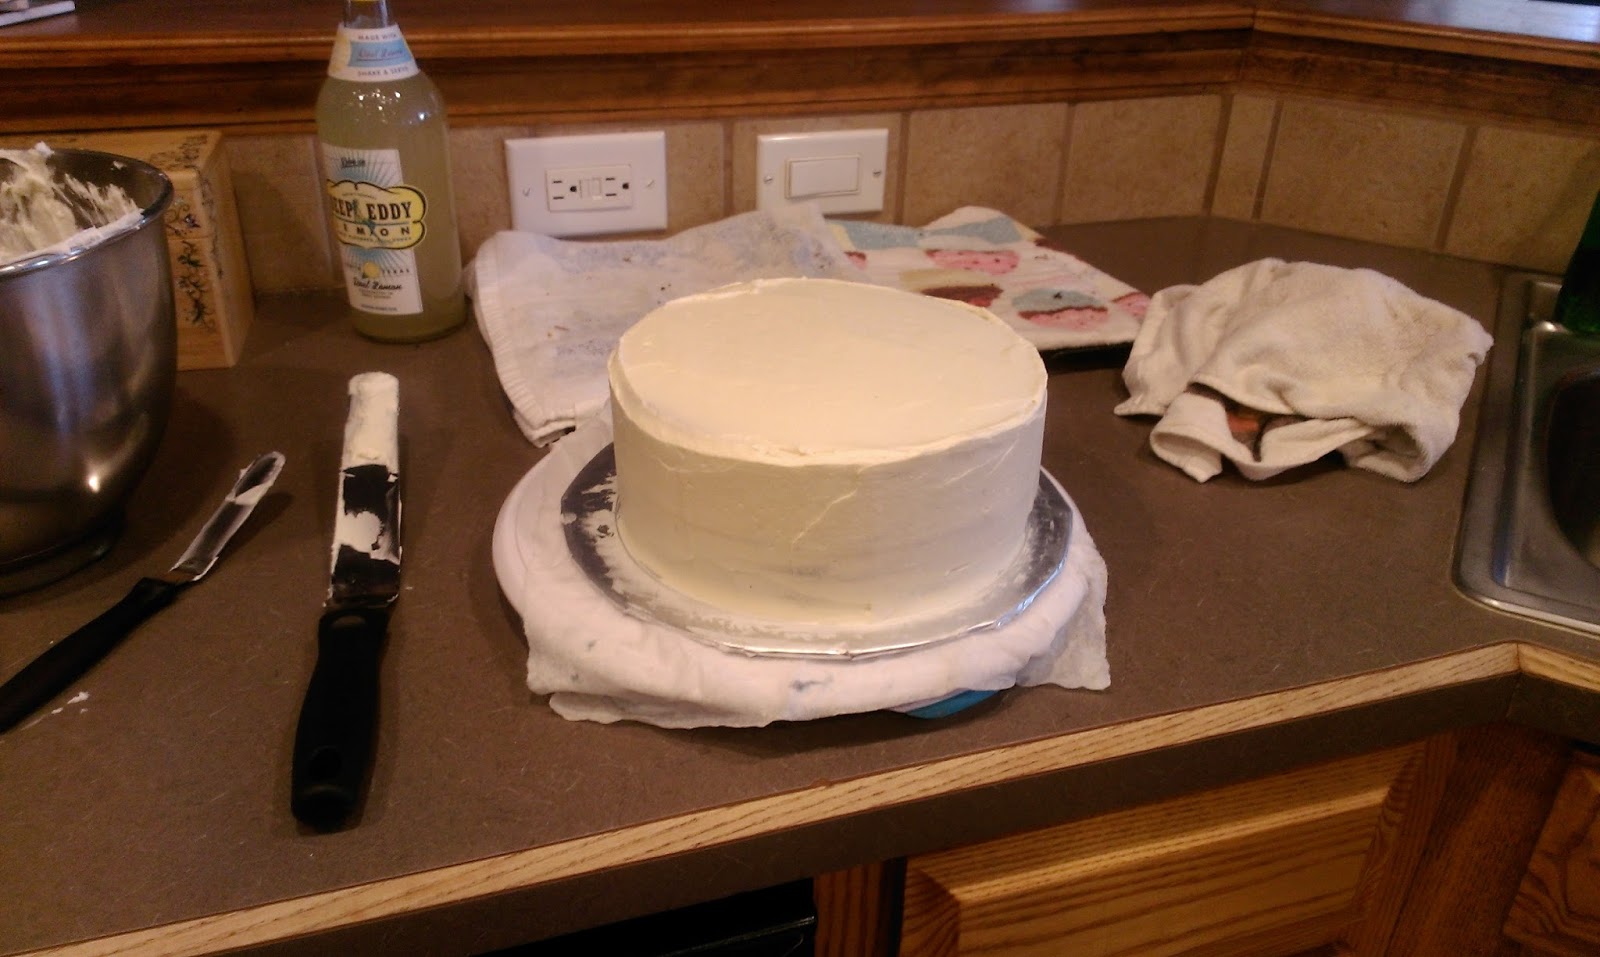
Add a nice thick layer of the black frosting on top of the bottom cake. Place the second tier on top and frost with the plain white frosting. I knew I was going to cover the cake in “web,” so I didn’t crumb coat. 
This is what rebellion looks like. Once the cake is frosted, place into the freezer for about 30 minutes. You want to freeze the buttercream so that you have a solid work space for the webbing. To make the web, melt a bowl of marshmallows in the microwave for 30 seconds. Stir like hell for about another 30 seconds, and then prepare to get stupid messy.
All in the name of art. Take the spatula or spoon you’ve been stirring with, and plop it in the middle of the bowl of melted ‘mallows. Pull up and away slowly to create a really long, thin strand of marshmallow creme. Use your hands now and take the strand and drape it randomly over the cake. You want to make a messy web, so use varying thickness of webbing placed randomly on the cake. This was SO STICKY but surprisingly a ton of fun. My husband watched me do this part, and I swear he was thisclose to jumping in and trying to do some himself. Marshmallows: fun for the whole family.

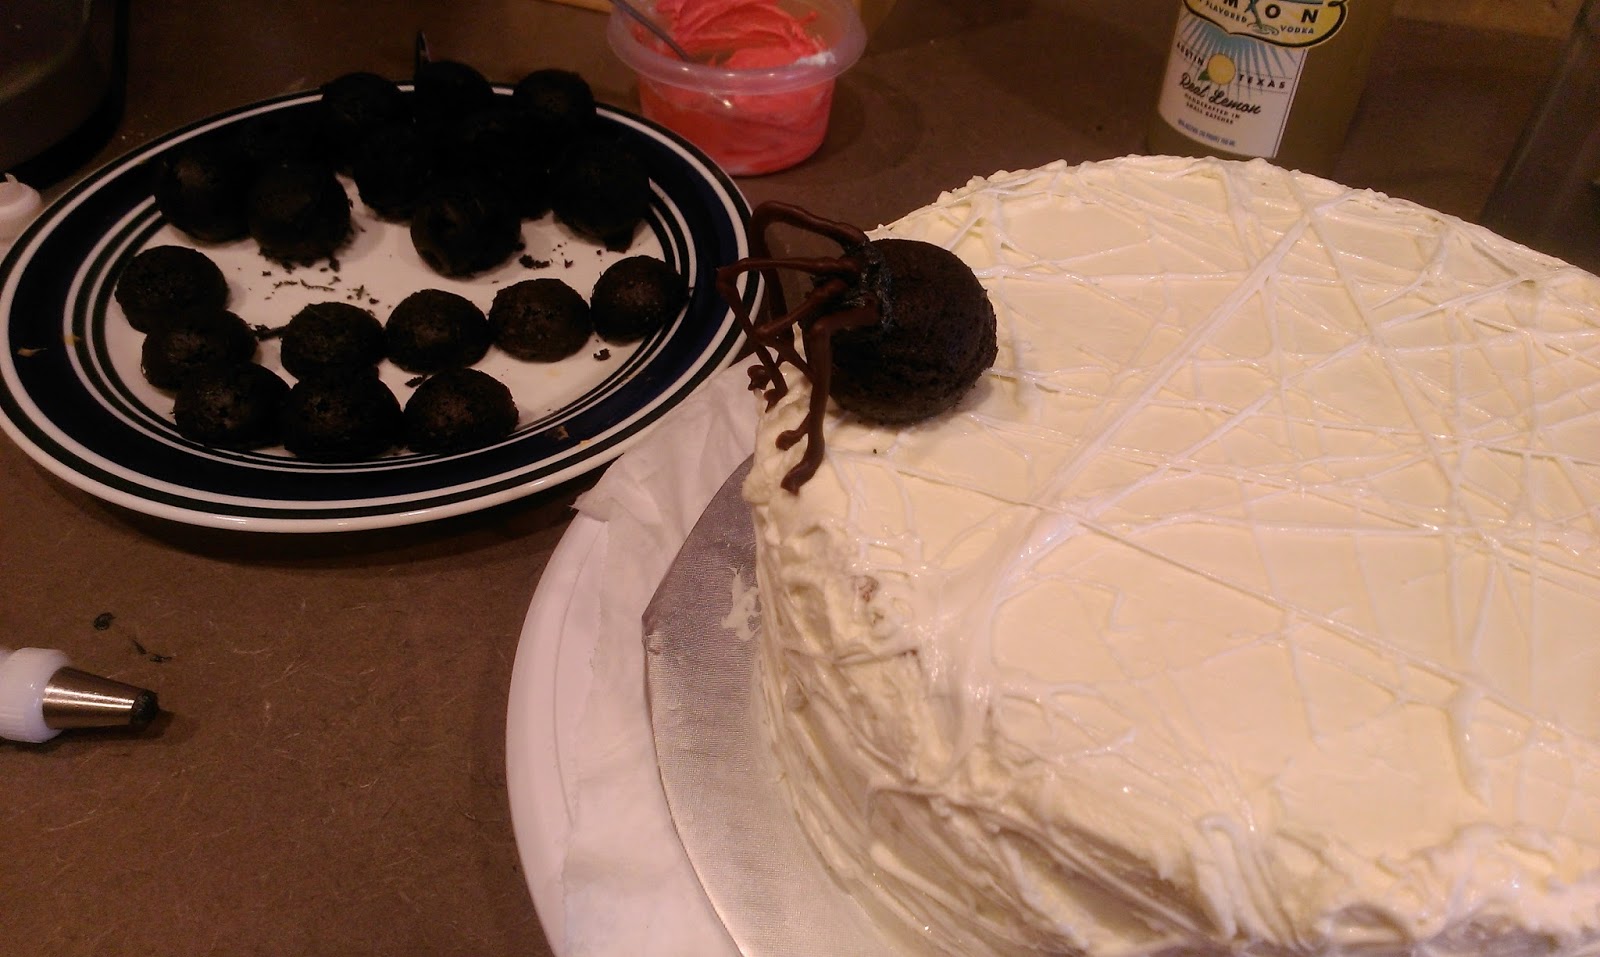
This is what my finished webbing looked like. Honestly, I thought about calling it a day there. This looked really cool and creepy. I loved it. But I still needed to face my hairy, eight-legged fears, so it was spider making time.

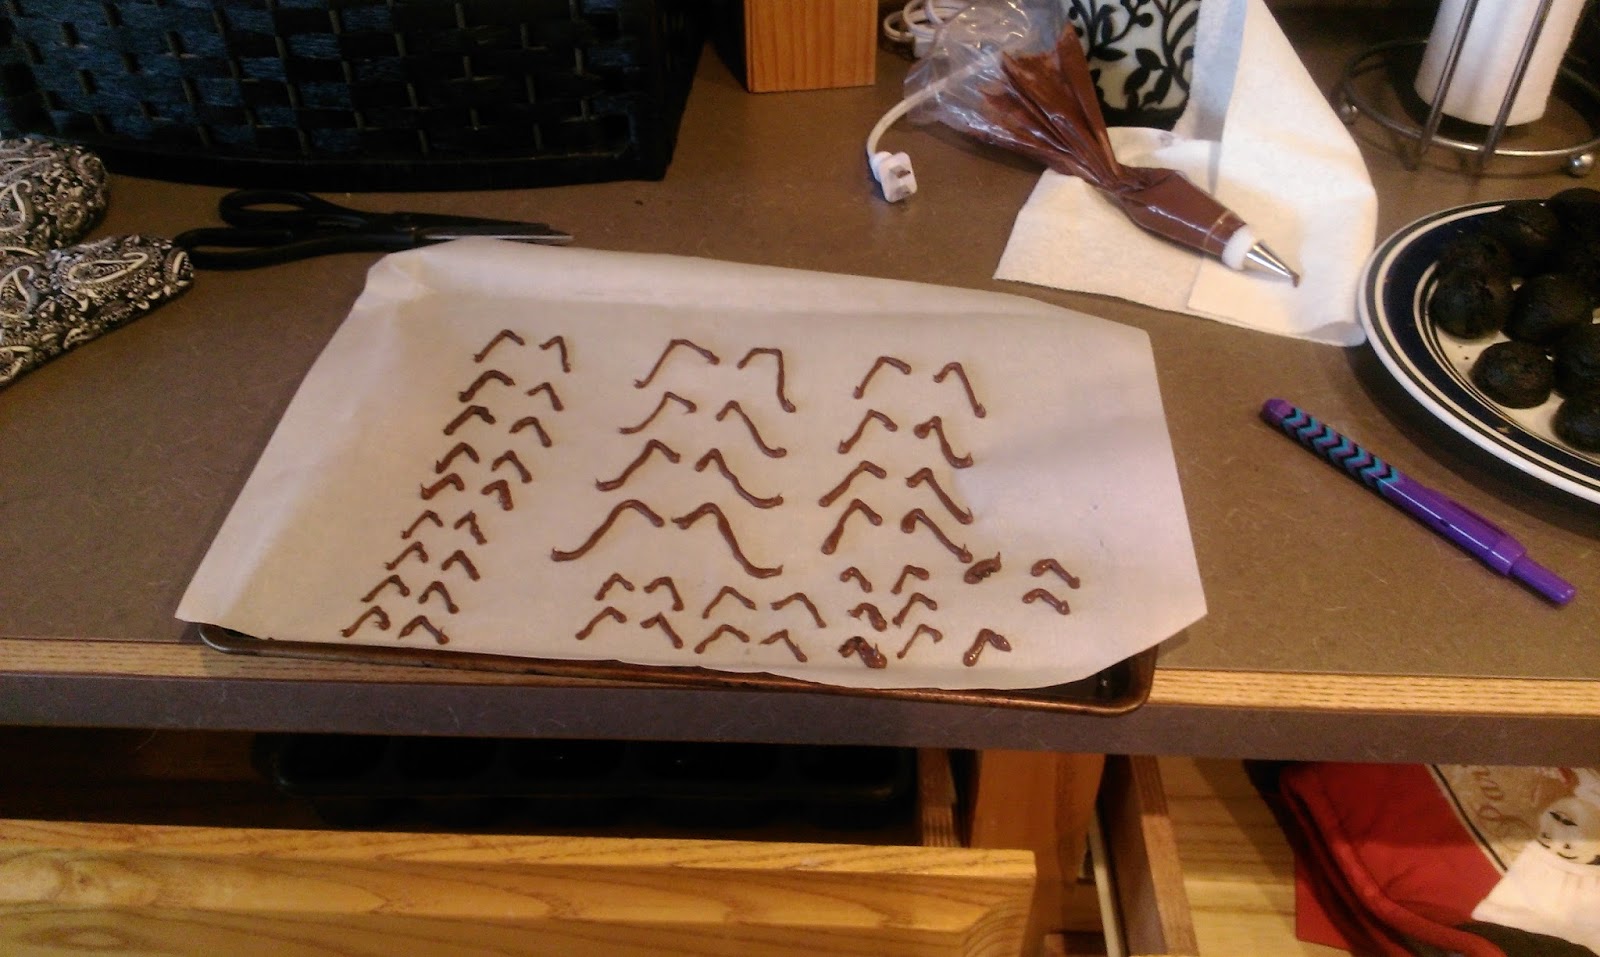
Melt a little bit of chocolate and place it into a piping bag fitted with a small #2 or #3 tip. Draw spider legs of various sizes by simply piping backwards sevens all over the place on a sheet of Parchment paper with a baking sheet under it. Put this tray into the fridge to harden. 
Remember those leftover cake pops you’ve been snacking on? Take a HUGE one and place it on the cake. Spread a little black frosting on top of it to create a glue for the spider legs. Place the hardened chocolate gently onto the frosting and into the spider webbing. 
Finish the giant-ass terror that haunts your life and dreams by taking a smaller cake pop and cutting it in half. Place this up against the body, and you’ve got a head! You can leave the spider plain, or you can take the red frosting and pipe little dots for eyes and an hour glass on the body to make it a Black Widow. I used a #2 tip to do this. 
Add as many spiders as you like in various sizes. I made a medium-sized spider by using a smaller cake pop for the body and piped a head on to it with the leftover black frosting in a piping bag with a #12 tip. 
For the smaller spiders, I simply piped little mounds of black frosting for the heads and bodies. And you’re done! I was dying to see how the inside of this cake turned out. I had no idea that I could somehow increase my anticipation of Halloween night, but I achieved this feat the second I made this cake. The six hours of nonstop standing really paid off:

Spooky insides, too? I’ve really outdone myself here. Cute, polka dotted, and covered in spiders. This cake was a crowd pleaser for sure. I knew it was good because a room full of drunk people didn’t even make a single peep while they were eating it. Moments like this remind me why I like baking so much. I just want to feed the masses and make people have the warm fuzzies on the inside because of my cake. Honestly, for being an evil genius, it’s a pretty noble cause to have. Perhaps I’m not as dark and twisty as I make myself out to be. Well, my stomach is definitely still dark and twisty today; even coming with a foot of sugar sends it into stabby convulsions. I’m realizing now why people say you can’t have your cake and eat it, too. Or in my case, have your cake, 17 Kit Kats, a handful of potato chips, some Red Bull and eat it, too. Now if you’ll excuse me, I’m going to go eat some celery and reminisce upon the days when I could eat like a human garbage can and go run around for miles with literally no negative consequences. ‘Til next time, my fellow eaters!

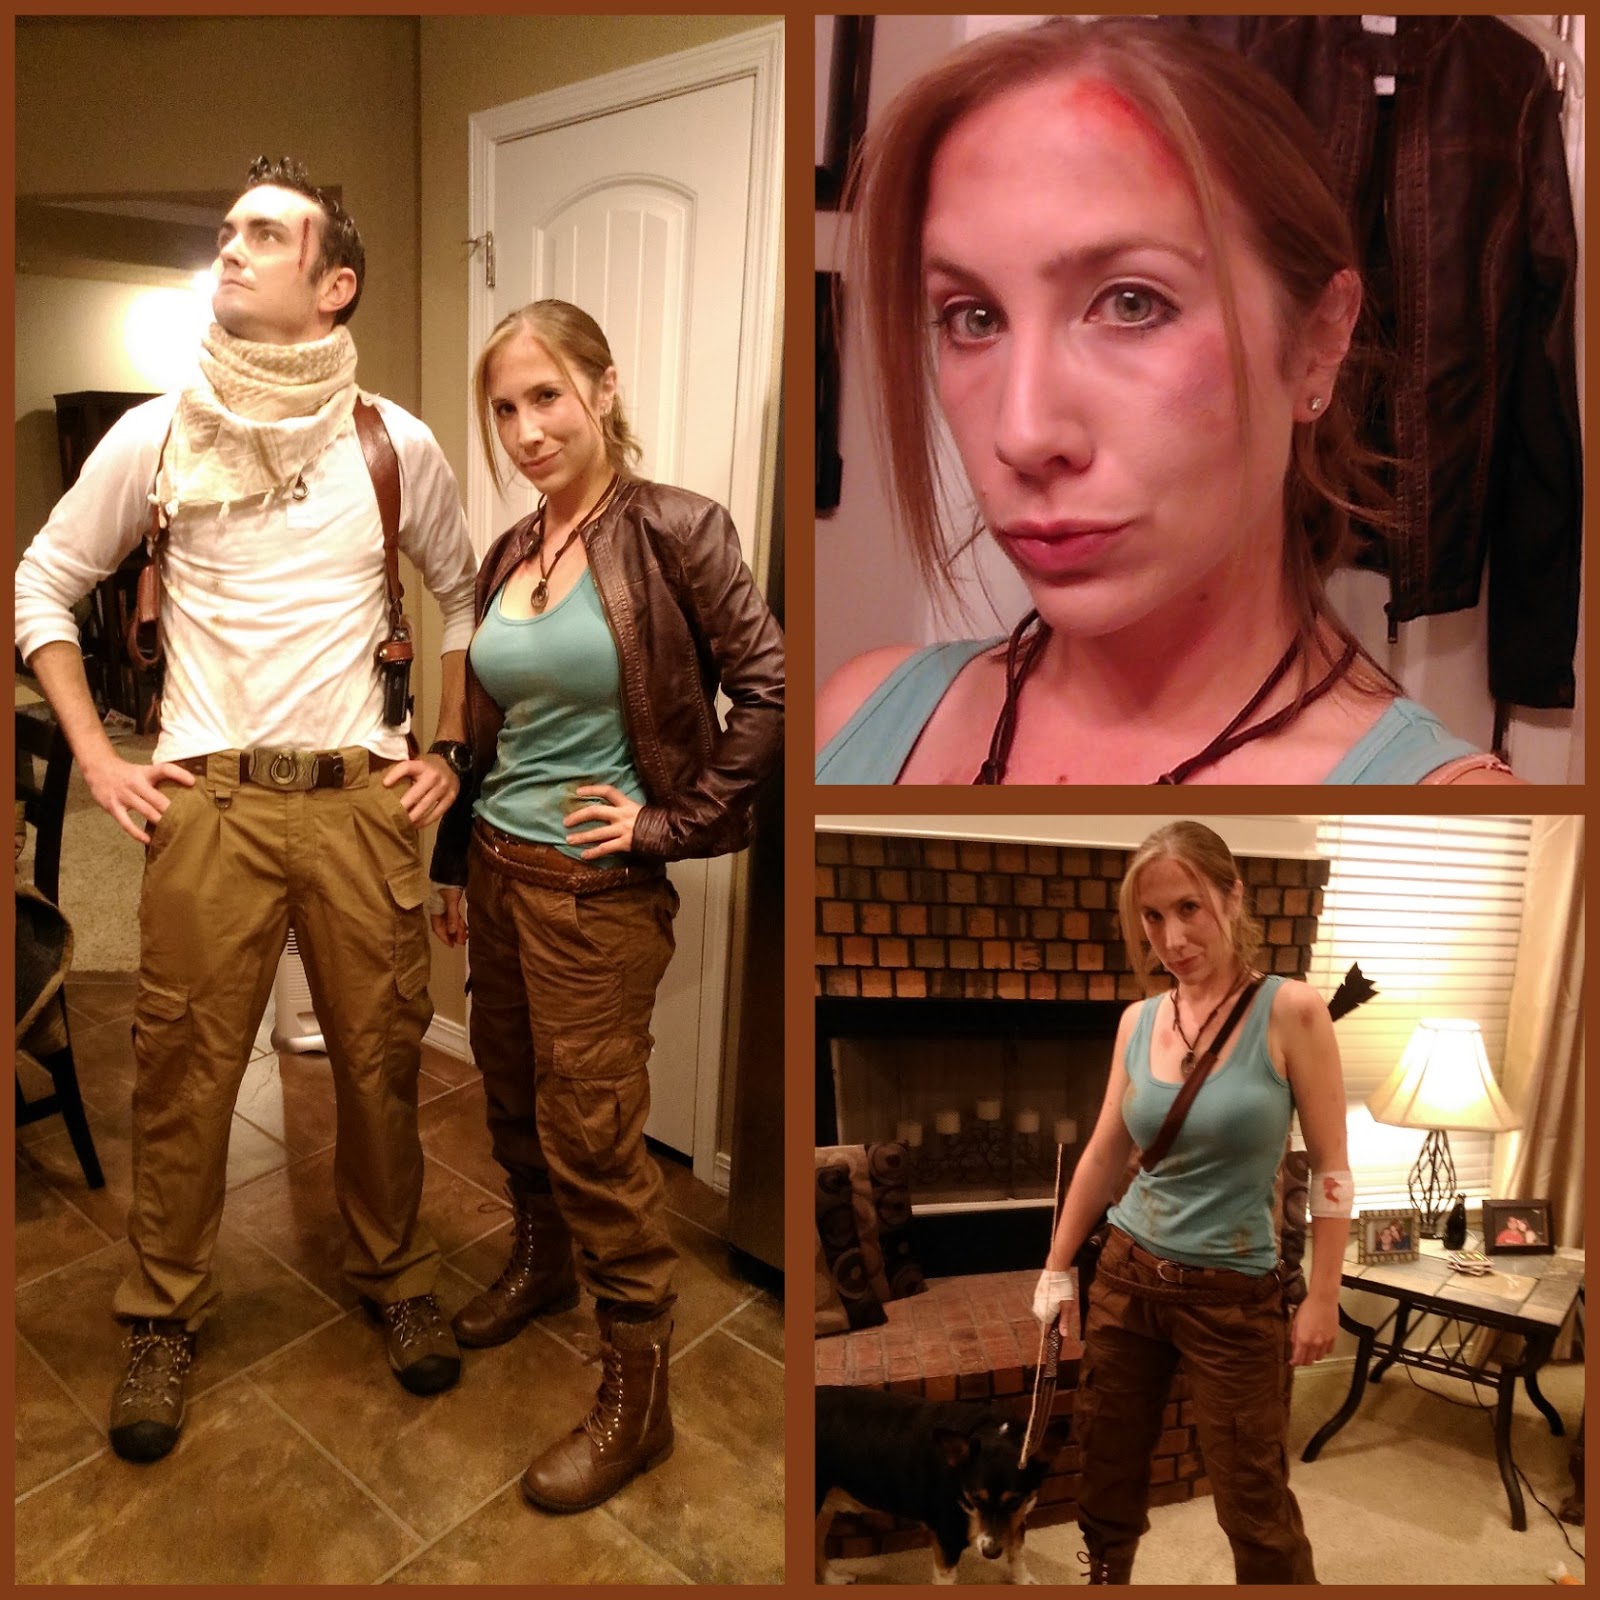
Always look for an adventure! Lara Croft Tomb Raider and Nathan Drake of Uncharted hope you all had a fun, safe, and sugary Halloween and a wonderful day of remembrance this Dia de los Muertos. -
Prepare to Be Terrified by Cuteness!
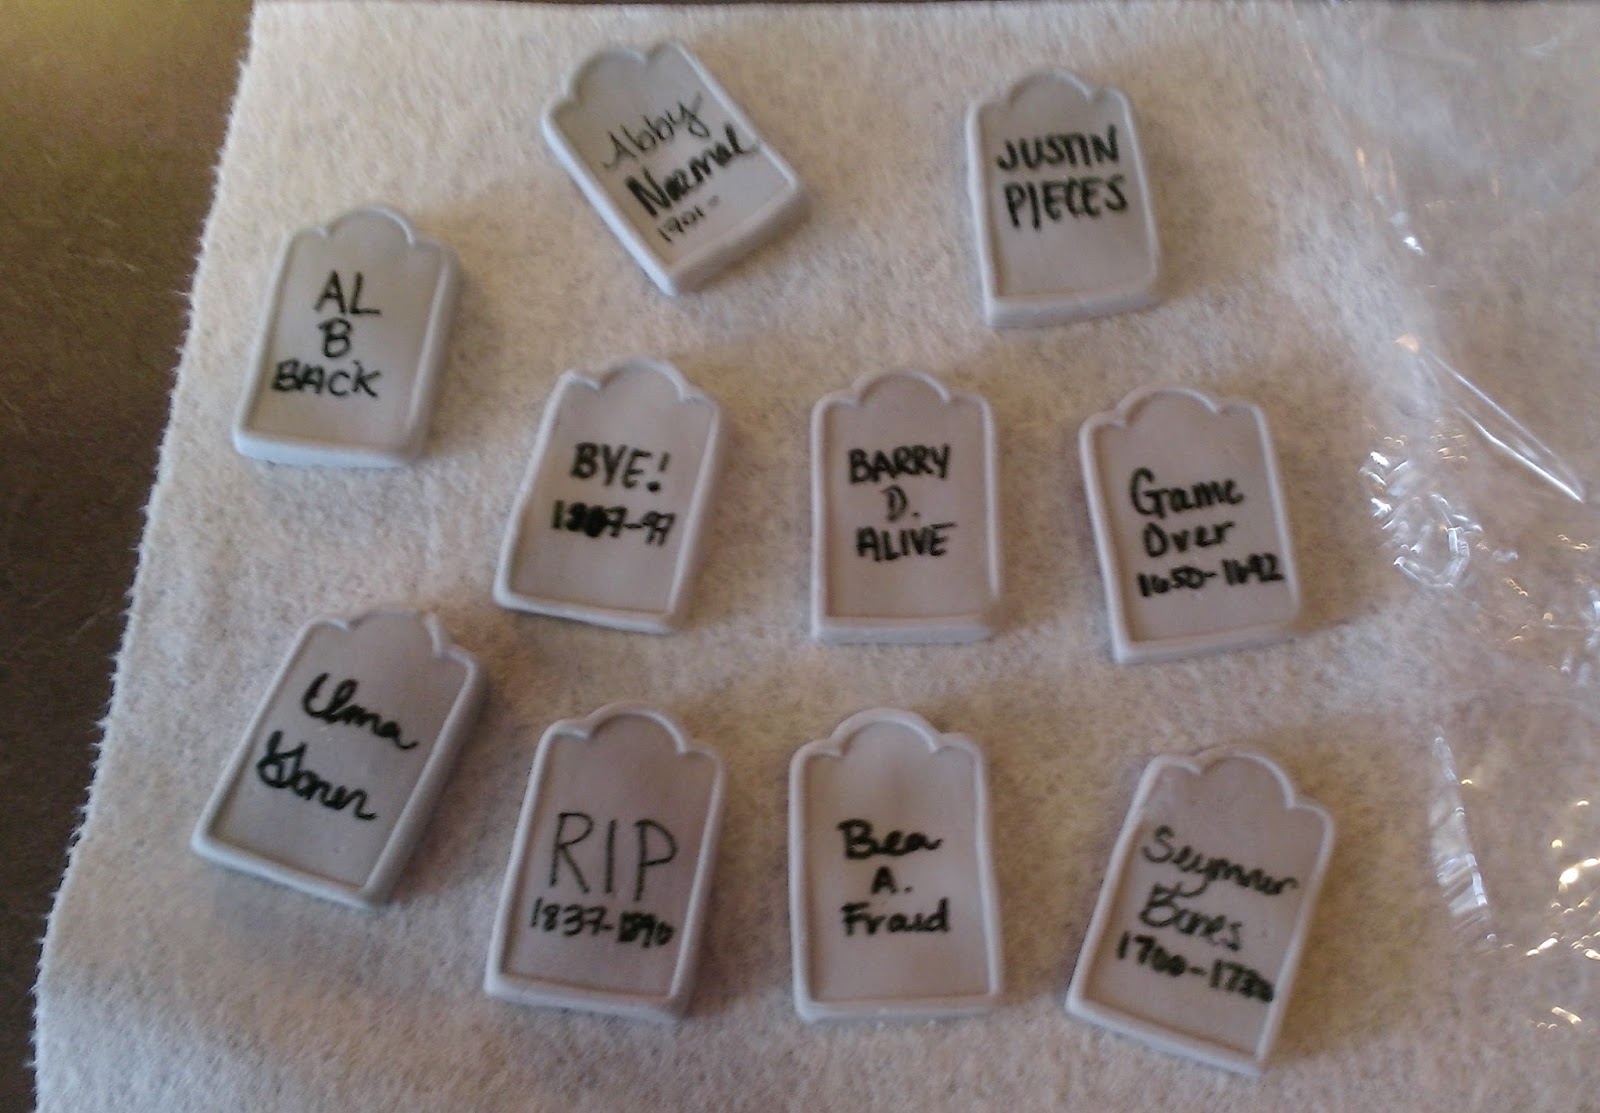
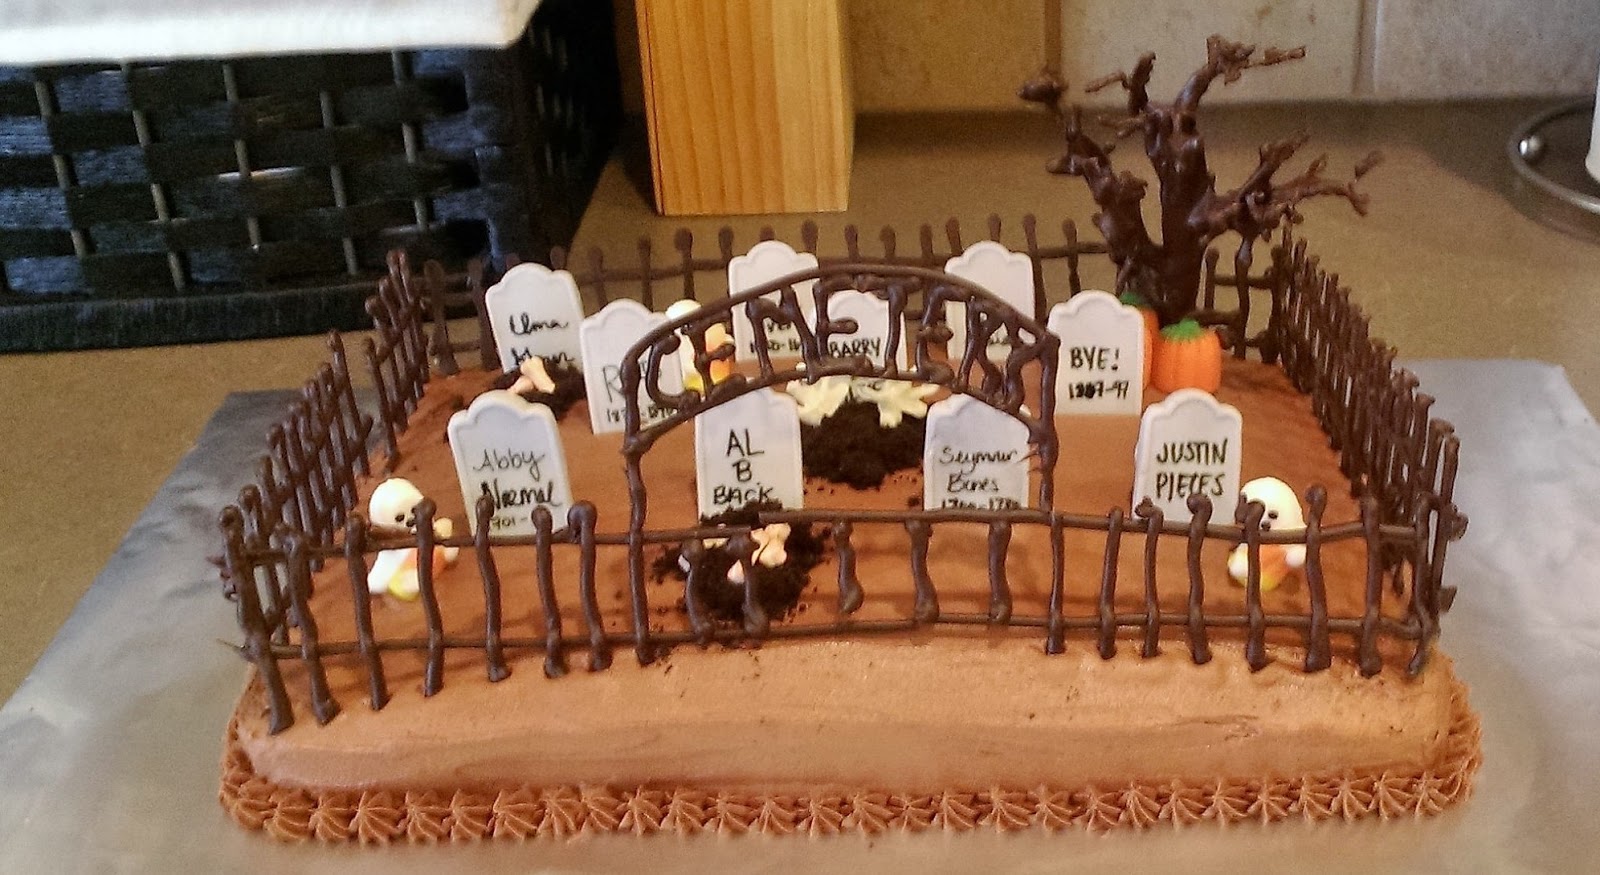
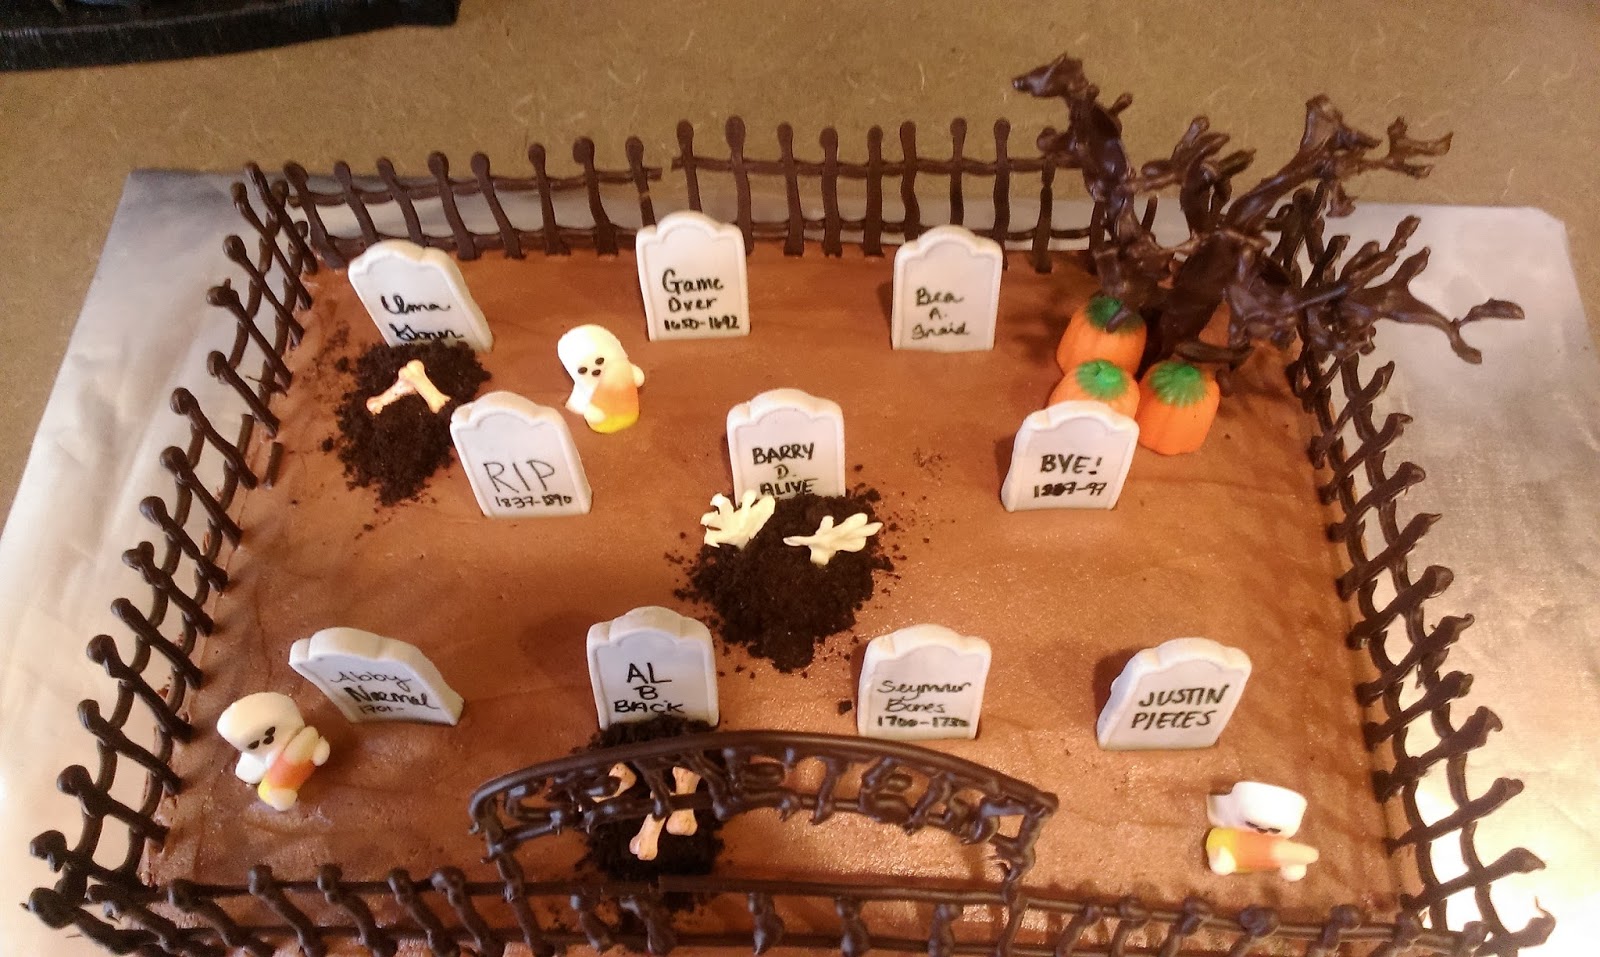
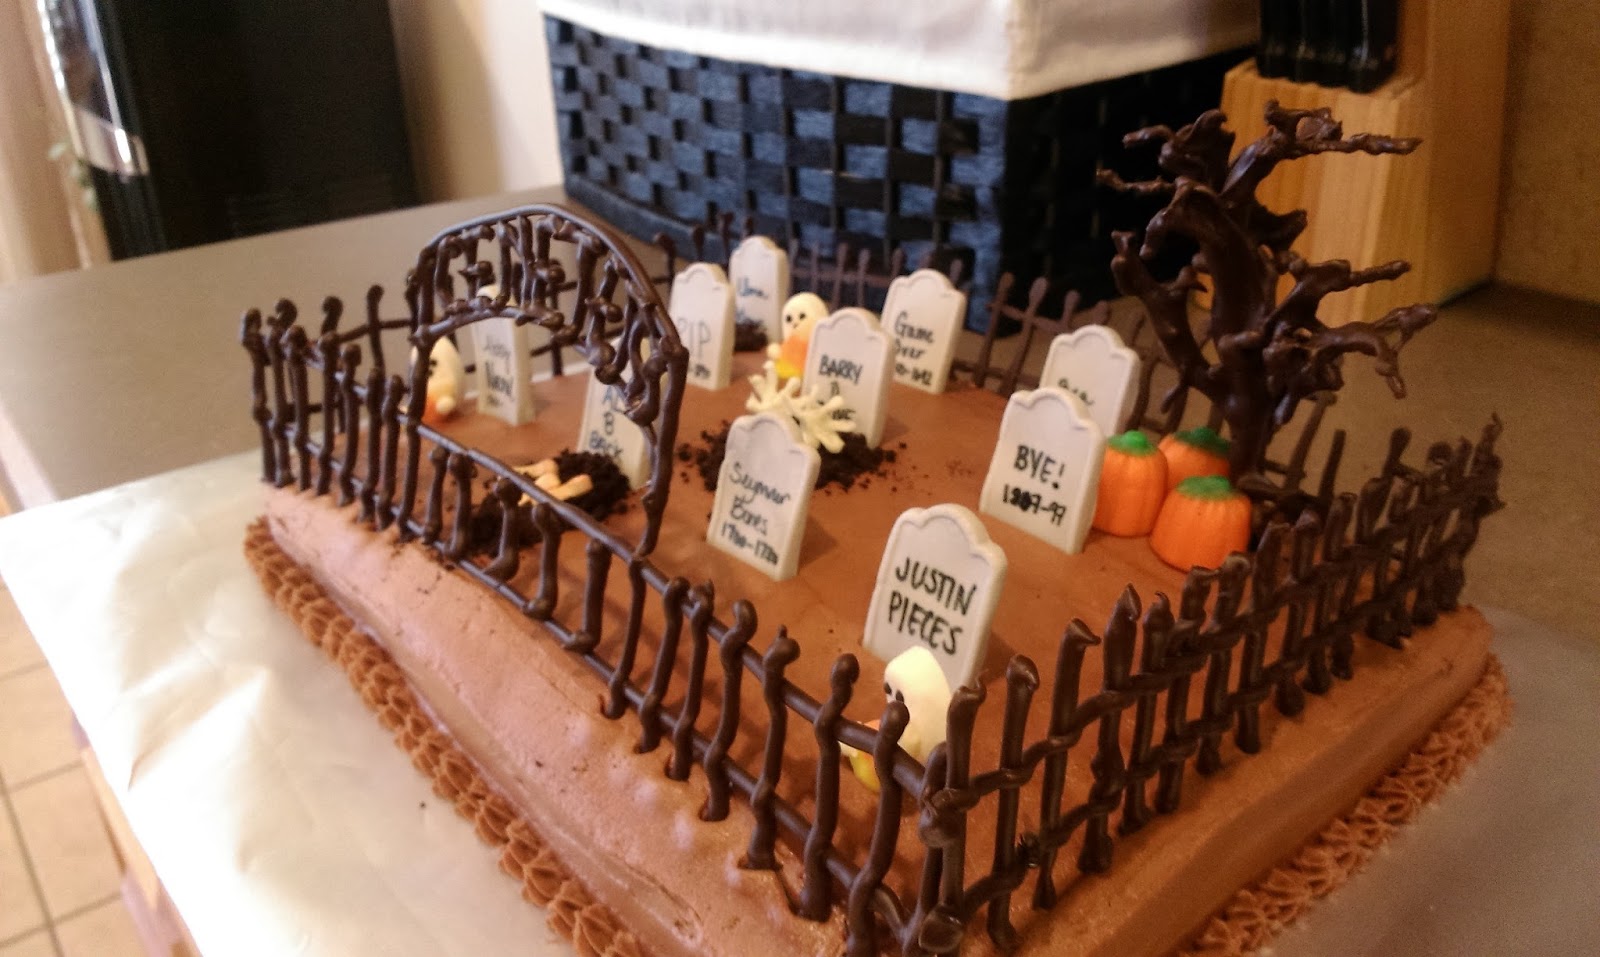
My only problem with Halloween is that there simply isn’t enough time, enough space in my fridge, or stretchy enough pants for me to make all the spooktacular desserts that I want to stuff my face and the face of others with. I want to be able to make desserts so gross that people may or may not be afraid, very afraid. After all the fun I had with the bloody brain cupcakes last week, I considered myself on a Halloween high hover…I suppose you could say I hopped on my broomstick to conjure up a few new spells. You really can’t be too surprised at this point that I’m going to be making multiple blog posts about multiple Halloween desserts…this is coming from the woman that gave you a bajillion dessert ideas for Saint Patrick’s Day after all. When I love a holiday, there is no half-assing it. I am only a whole-asser. Alternatively, remove the -er and flip those around to find another accurate description of me. I decided back in August (seriously, I’m only a little crazy) that I wanted to make a graveyard cake for Derek and I to have at the house. From that idea spawned a dessert so terrifyingly cute that you won’t even care if it haunts you for the rest of your days:

Aww, how morbid and adorable. I know, not nearly as gross and ghastly as bloody brain cupcakes, but I had a darn good time coming up with silly tombstone ideas after marathoning The Addams Family, Addams Family Values, and Hocus Pocus the day prior. See, Halloween even has the best movies…I’m not sure why I still have to sell this so hard to you. Cheesy chick flicks for Valentine’s Day? Sappy feel-good films for Christmas? Who needs them when you’ve got the all-time love story of Gomez and Morticia and the family solidarity of the Sanderson Sisters (added bonus: everything Bette Midler does). Sure there’s a lot of darkness and brooding, but cake has been scientifically proven to cheer people up. I’m basing this science off of how happy I feel when I’m eating cake, but that’s still proof somehow.

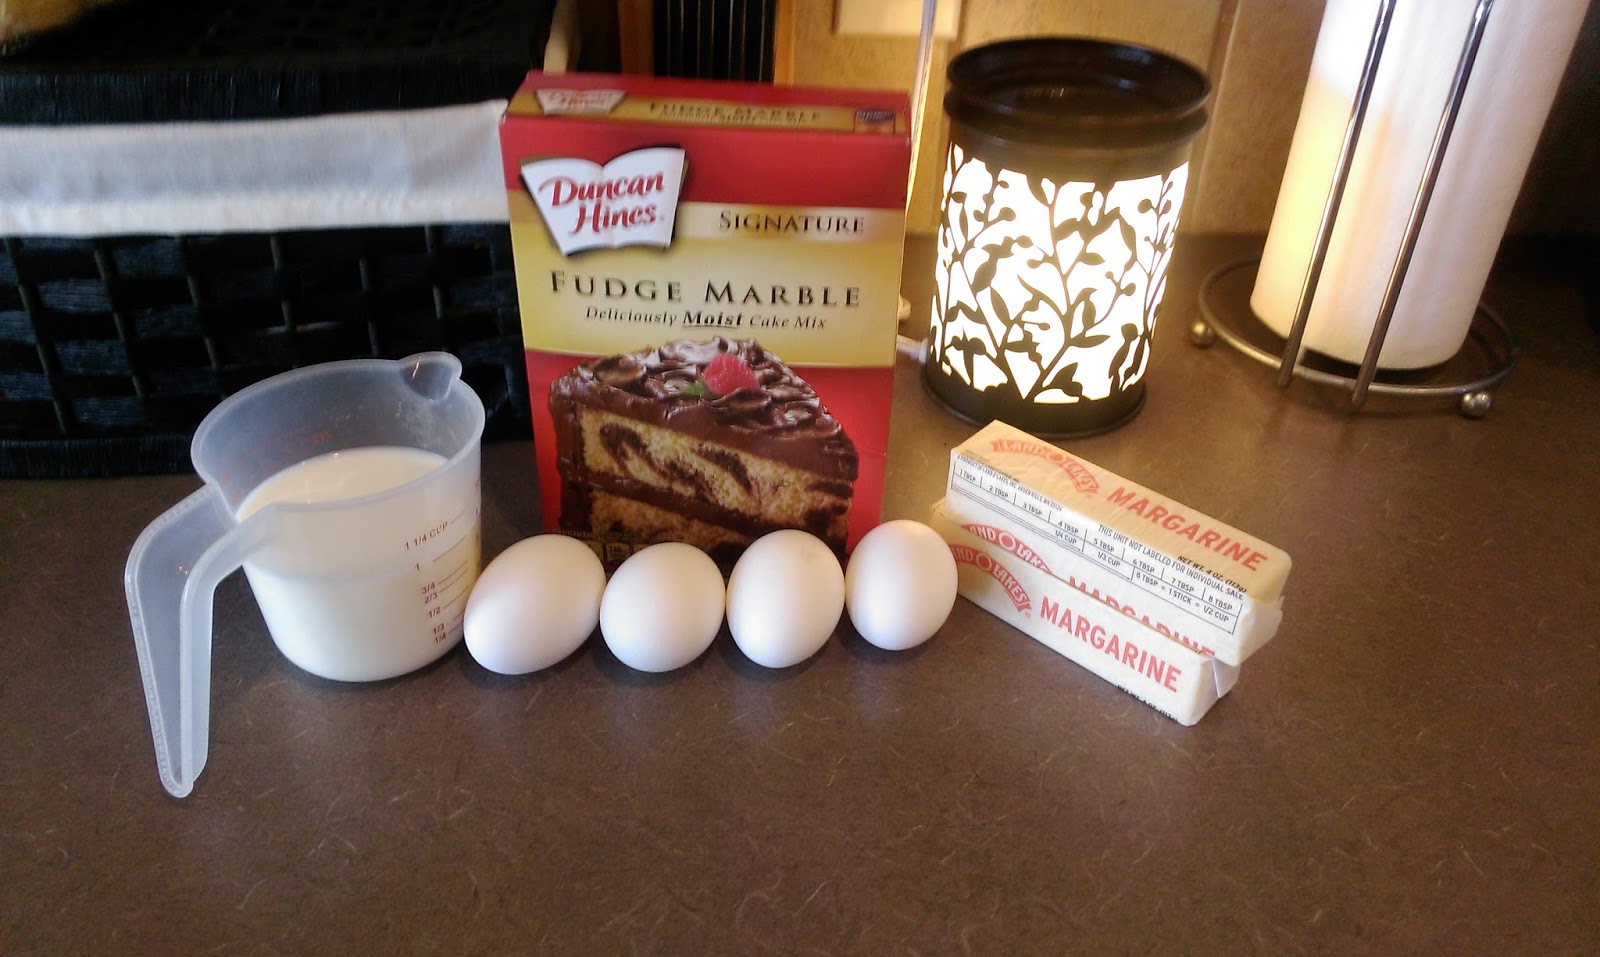
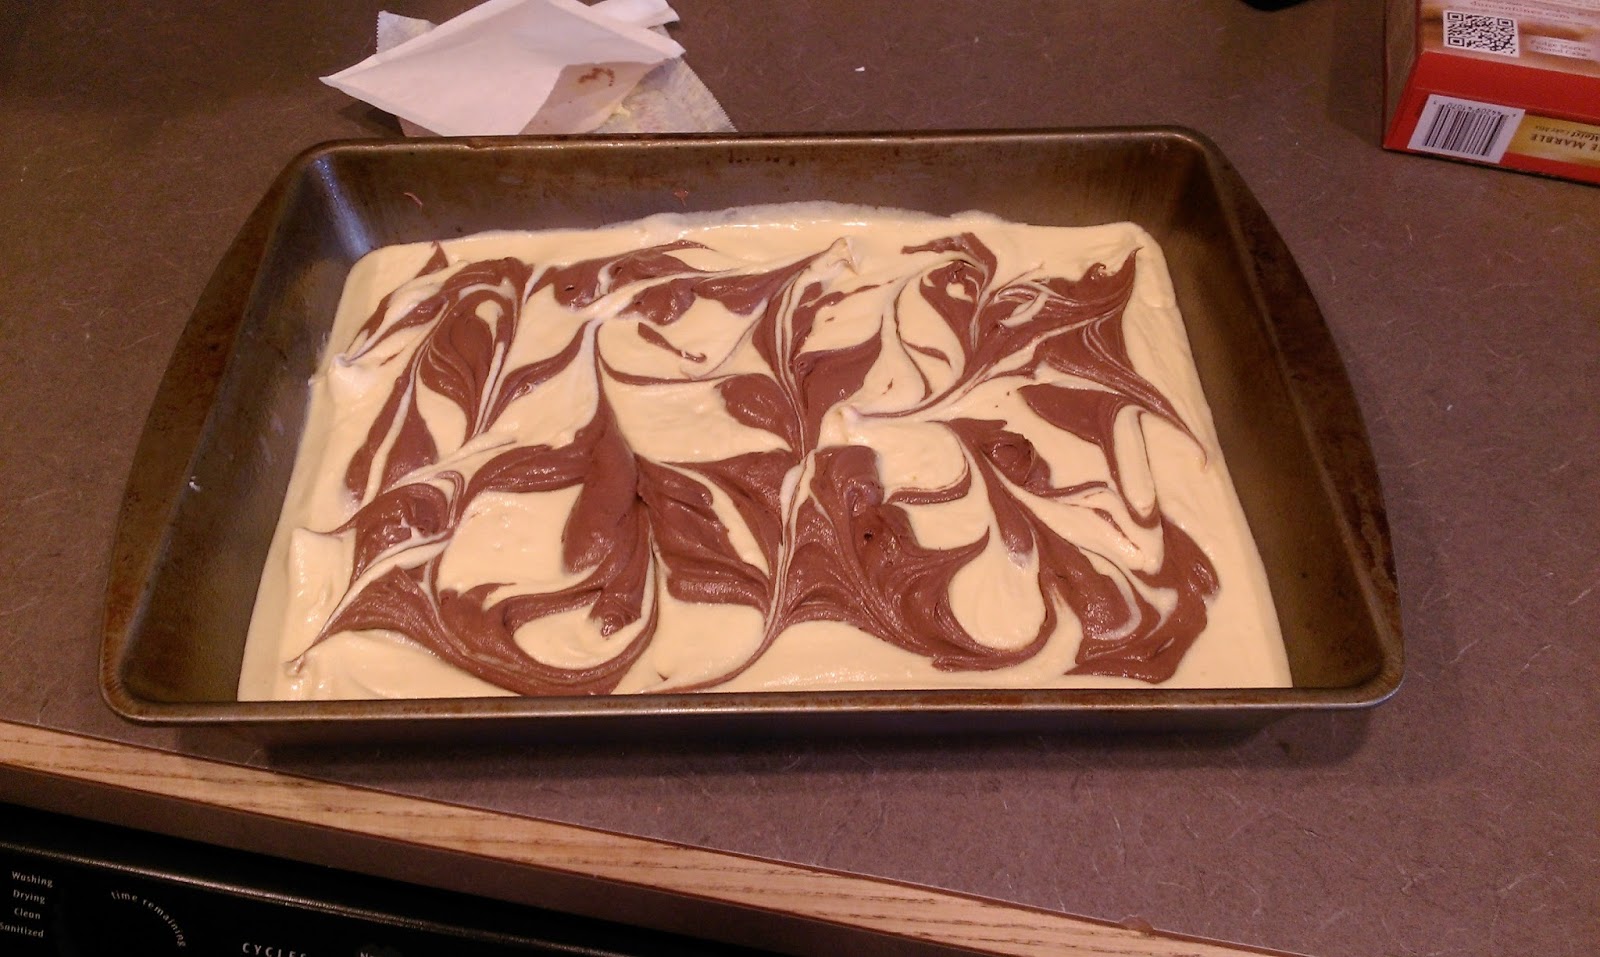
Again with the cheating! What am I? A coach for the New England Patriots? I have actual other-people-proof that my method of cake jacking a box cake mix will trick everyone you know into believing you made your cake completely from scratch. When I cheated with the braincakes last week, people at the party did not believe I made them from a box and simply jazzed them up a bit following the formula you see above (and I have told you about numerous times). So seriously, it works! If you’re feeling lazy, things don’t have to taste lazy, and that’s a win in my book. I followed cooking instructions on the box and made my languid marble cake (completely the opposite of my from-scratch-for-paying-customers marble cake). It felt right to go lazy with a graveyard cake…there’s not much activity happening amongst tombstones after all, and I didn’t want to kill myself by working to hard and end up in an actual graveyard. Death by caking…such a shame.

My favorite part of making a marble cake is the plopping, 
followed by the swirling. From ew to ah. 
It’s like a cake Rorschach Test. I’m seeing waves. Of cake. Once done baking, I allowed my cake to cool in the fridge while I proceeded to get marker all over my left hand. Not only do I get to die seven years prematurely to right-handed people, but I also get to smear marker on my hand until the day that happens.
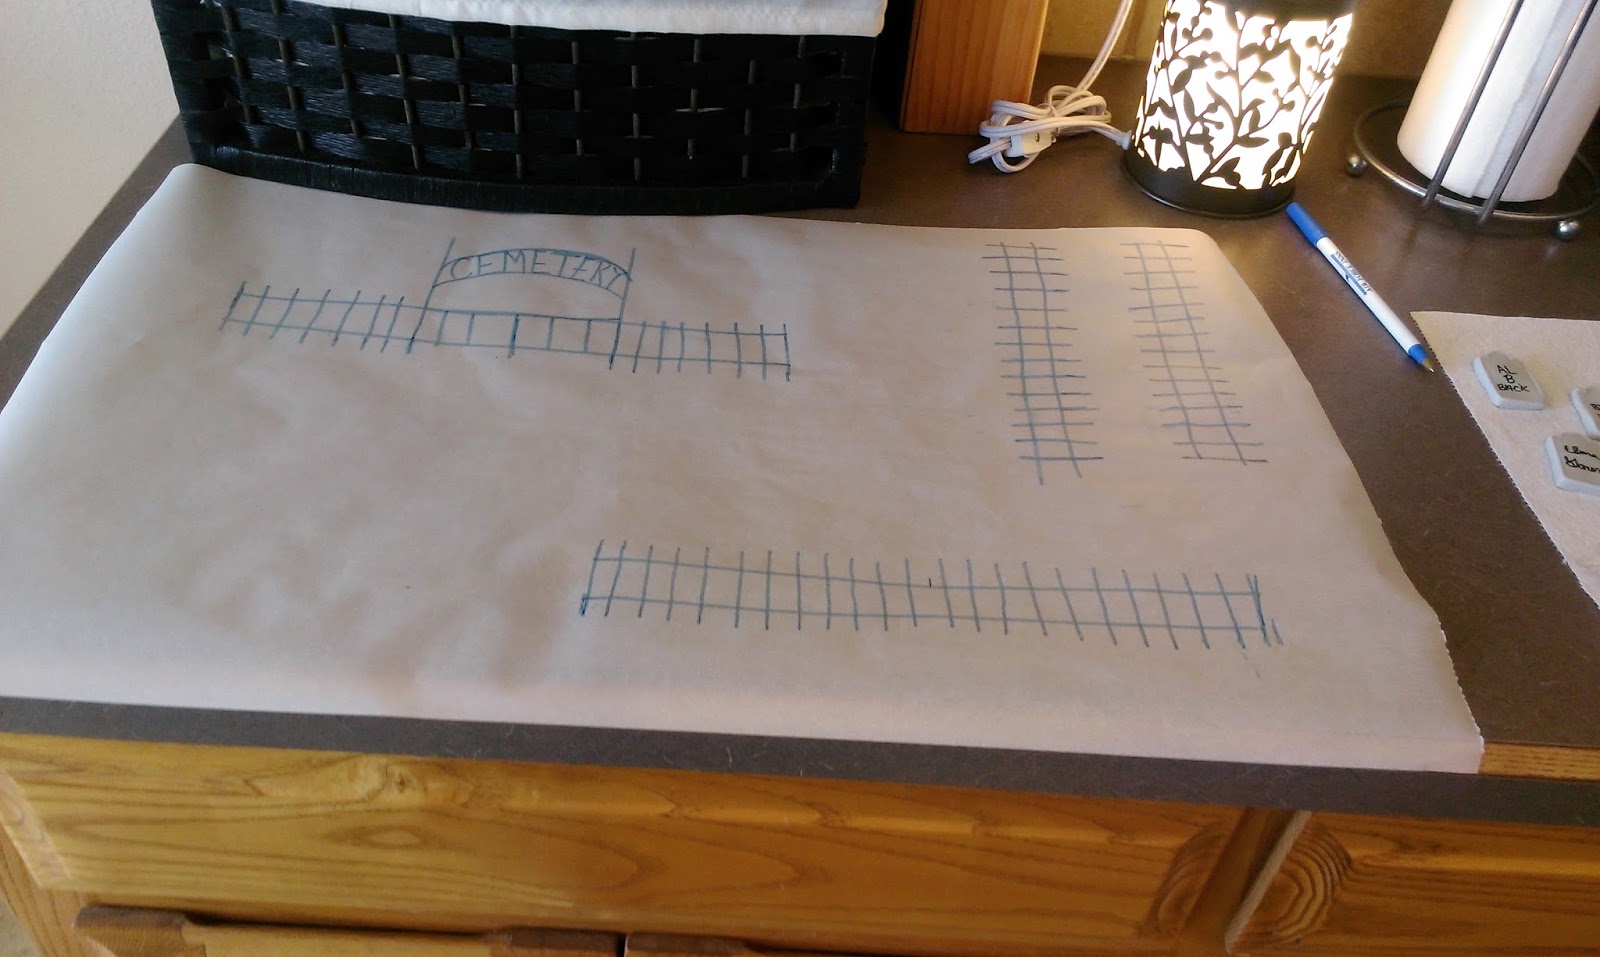
I measured out my cake and then drew out how I wanted my fences to look based on those measurements. I used a non-toxic marker since I knew I wanted to pipe chocolate on top of my stenciling without killing myself. I’m sure I could’ve attempted to draw out my cemetery sign backwards and flipped the paper over, but simply remembering how to spell cemetery correctly in the first place was hard enough. While the marker dried, I gathered my remaining fun ingredients:

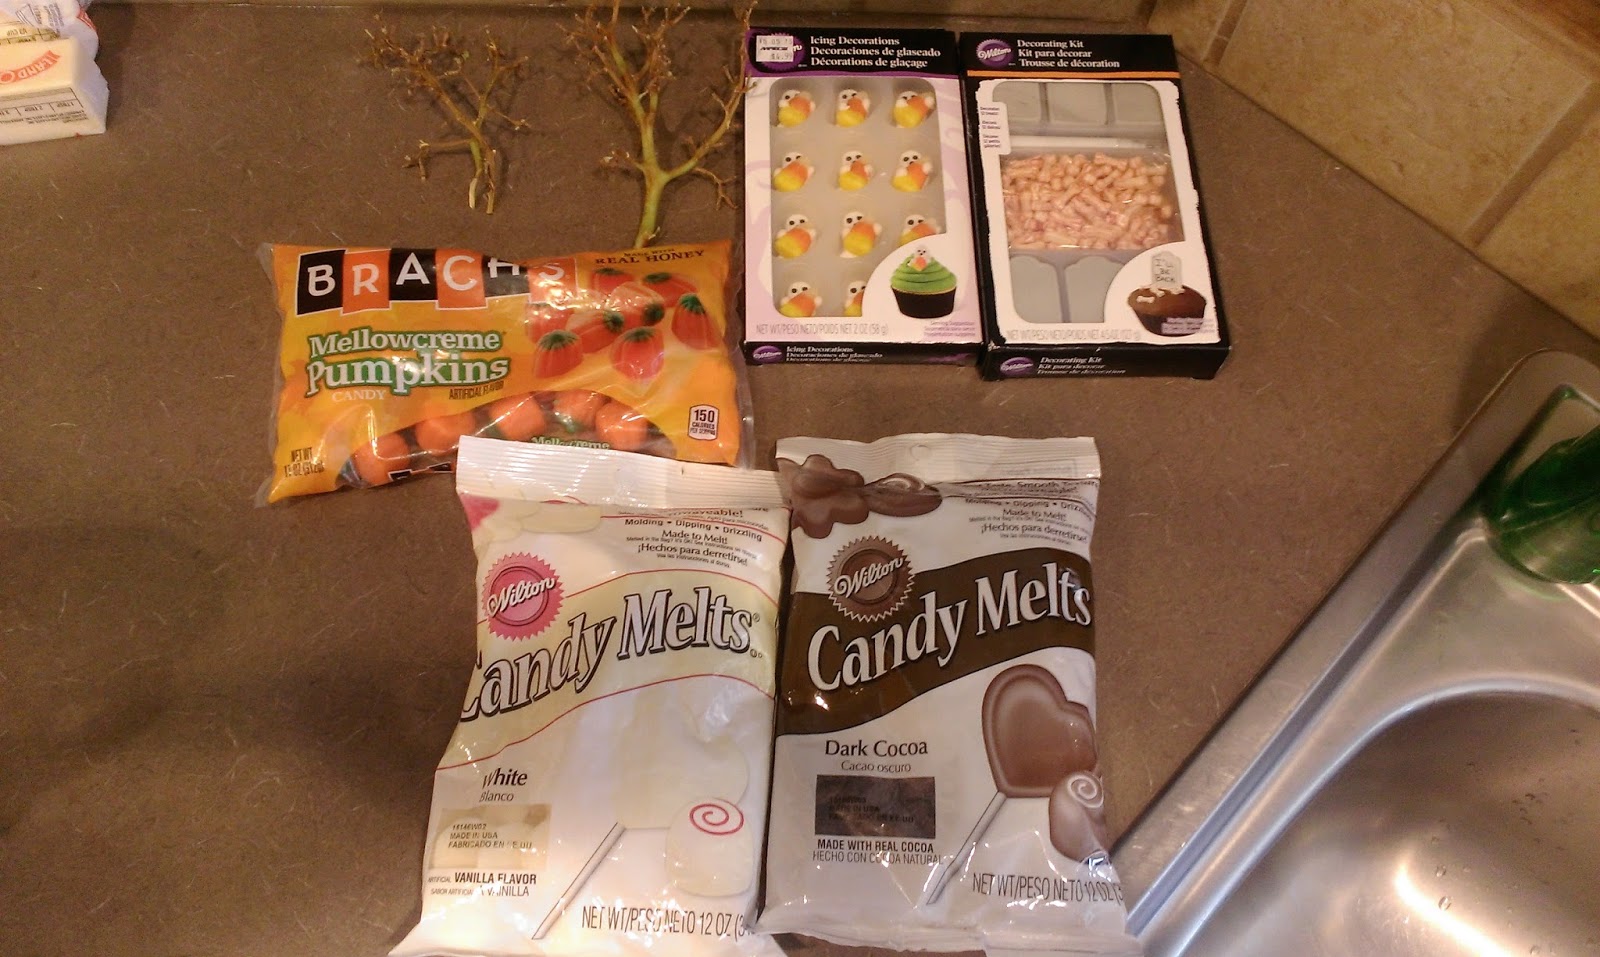
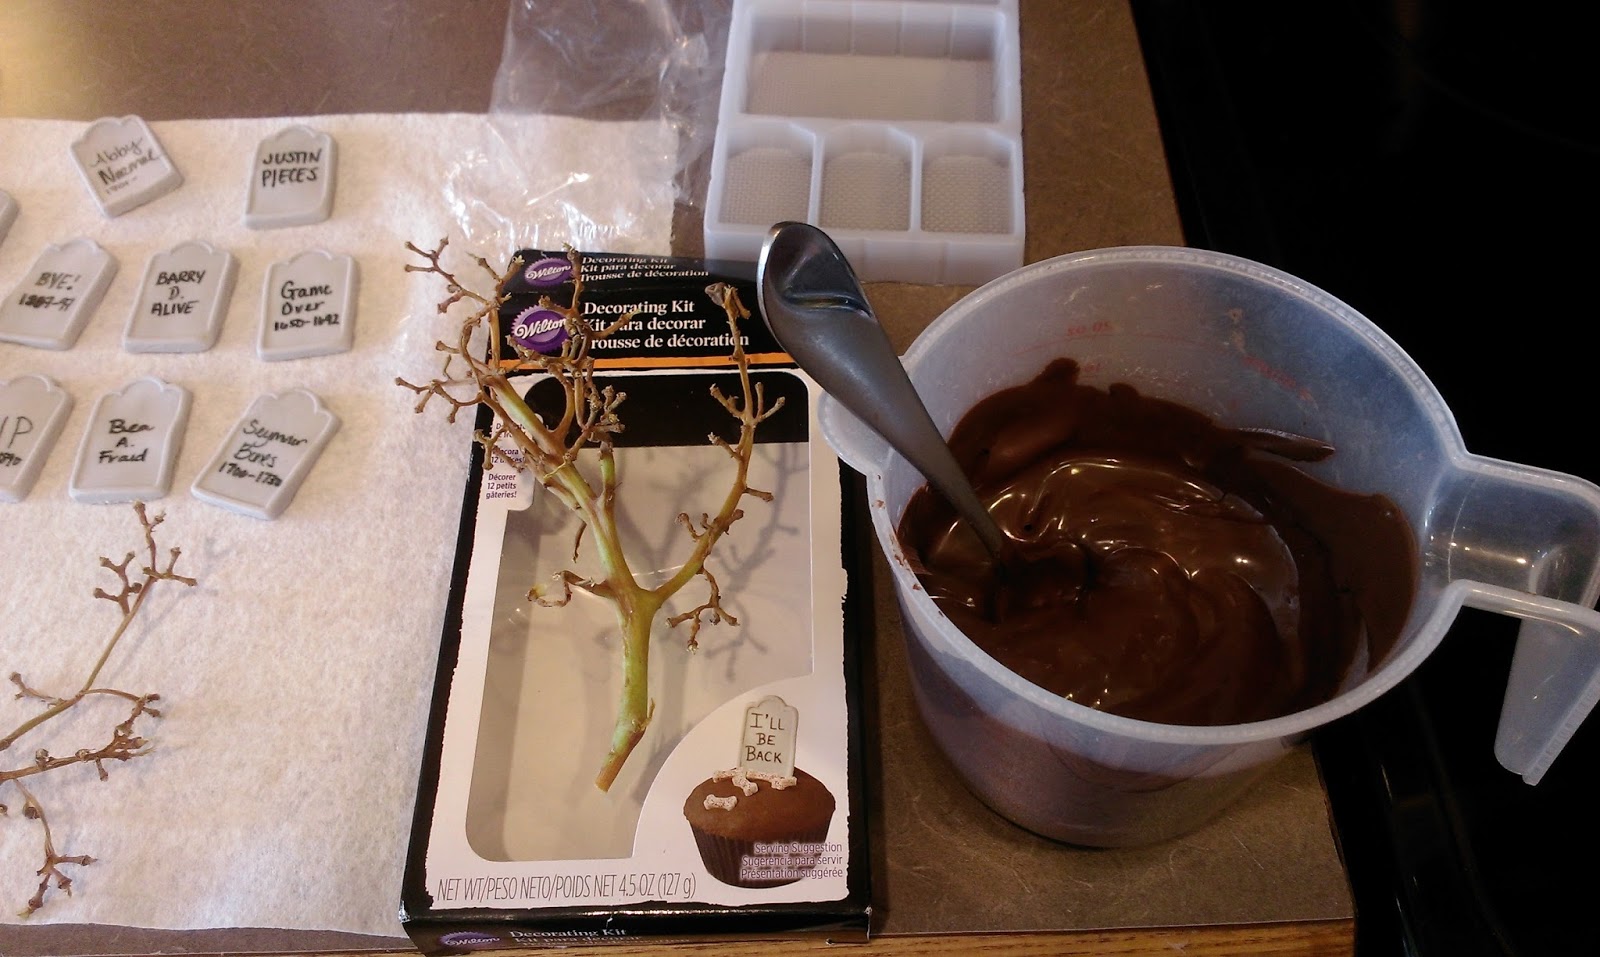
This included white and chocolate melts, tiny ghost cupcake toppers, tombstones, the best Halloween candy in the world (suck it, candy corn- candy pumpkins for the win), and grape stems. You read that correctly. Not pictured: crushed up Oreo’s to use as dirt. Bonus: you get to eat the filling before crushing! While my cake continued to cool, I decided to get a little silly and come up with some tombstones. My husband gets to take credit for the great tombstone tribute to Young Frankenstein (if you can’t pick it out, we can’t be friends).

I almost wrote out a Jon Snow tombstone and then thought, ‘Too soon.’ 
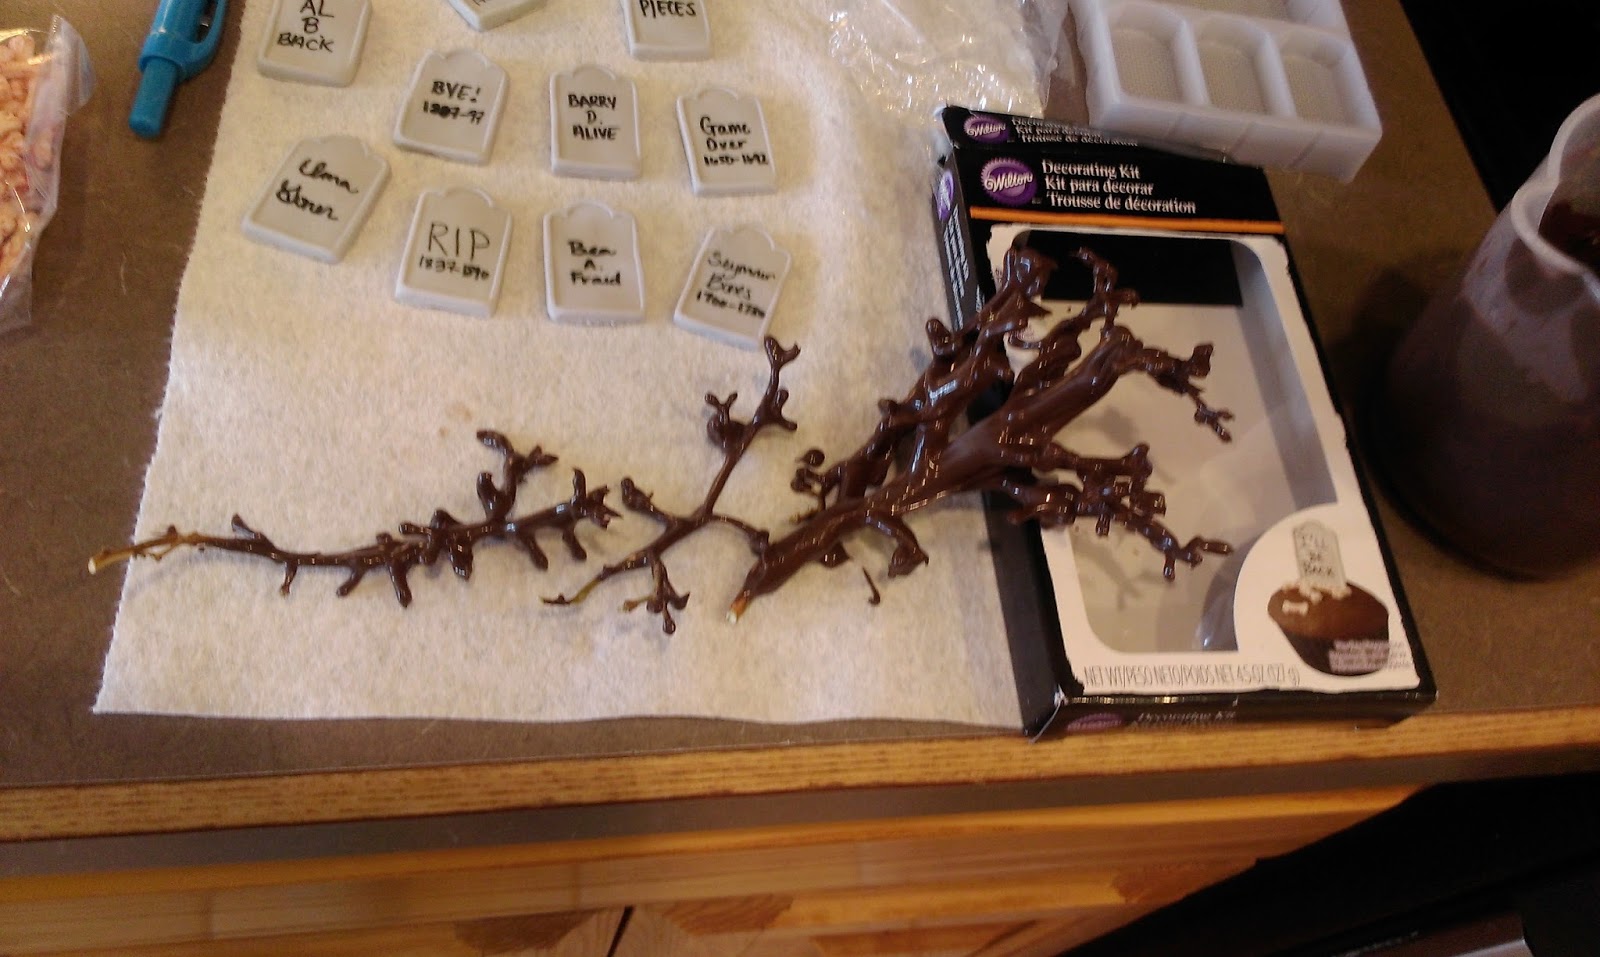
You may have been wondering about the grape stems. Well, my brilliant little head decided a grape stem coated in chocolate would make an excellent dead tree. 
And my brilliant little head was right. I melted chocolate according to package directions and simply dipped the stem and set out to dry on a paper towel. I then poured the rest of the melted chocolate into a piping bag fitted with a #3 tip. I piped over my fence drawing very carefully and let it rest for a bit. While it was resting, I melted a little bit of white chocolate in a piping bag. I snipped the tip off and piped out little hands on my Parchment sheet. Once I could CAREFULLY move the sheet of Parchment paper with a cookie tray underneath, I placed it in to the fridge to harden. Things will be hard enough to handle when you can slide a small spatula underneath to lift the chocolate off the Parchment. Now that all the little touches were complete, it was time to make my chocolate buttercream frosting.
I do order Crisco in Costco size! Thanks for noticing. You need:
- 1/2 cup of softened butter
- 1 cup of Crisco
- 2 tsp of vanilla
- 3/4 cup of cocoa*
- 6 cups of powdered sugar
- 6 tablespoons of milk or heavy cream
*You could use 1/4 cup of Hershey’s Special Dark cocoa and 1/2 cup of regular for a dark chocolate frosting.
Blend the butter and Crisco for three minutes until fluffy. Add in the extract and cocoa and blend slowly. Then add in two cups of sugar and two tablespoons of milk. Blend, scrape down the bowl, and repeat this part two more times. Crumb coat the cake and place in the freezer for 15 minutes. Place the final frosting coat on and freeze again for 15-30 minutes. This frosting WILL work with the paper towel trick. But I was going for a graveyard and not a chocolate masterpiece, so I skipped the paper towel smoothing for an uneven terrain look.

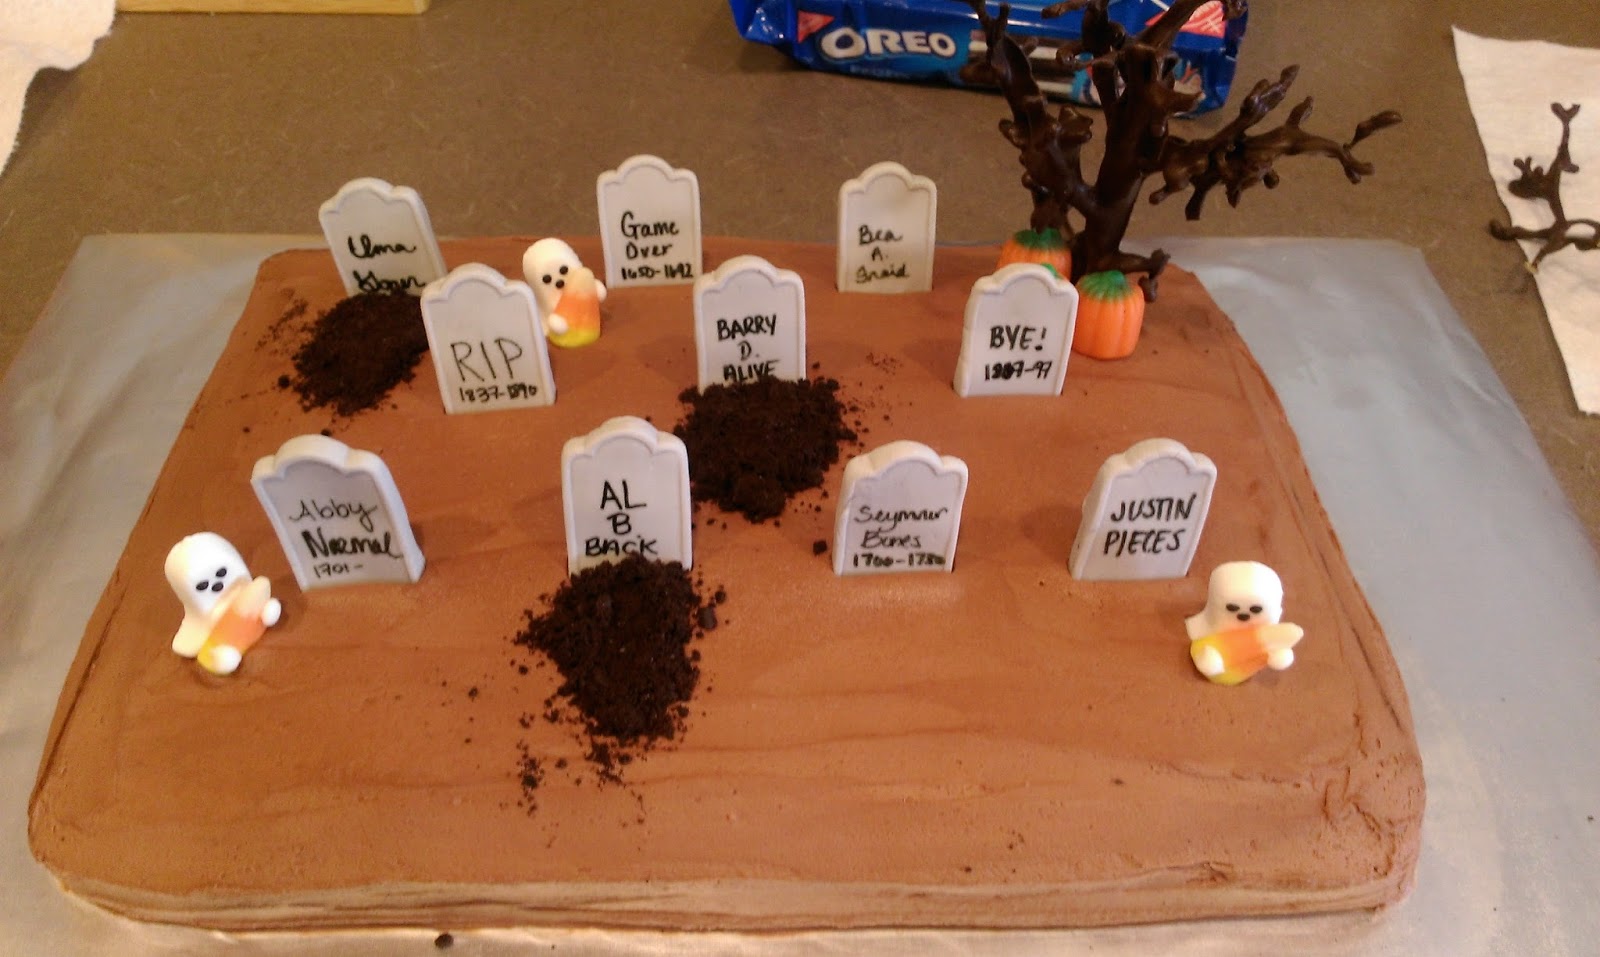
To decorate, I started by firmly, yet somehow also gently, placing my tombstones and tree into the thick frosting layers. 
I placed three pumpkin candies in front of the tree to give it some support. Then I hid my restless spirits and sprinkled Oreo dirt on a few graves. Barry D. Alive seemed like a glaringly obvious choice for fresh dirt…and my set of skeleton hands! I sprinkled a few bones on the fresh dirt piles for Al B. Back and Ima Goner. 
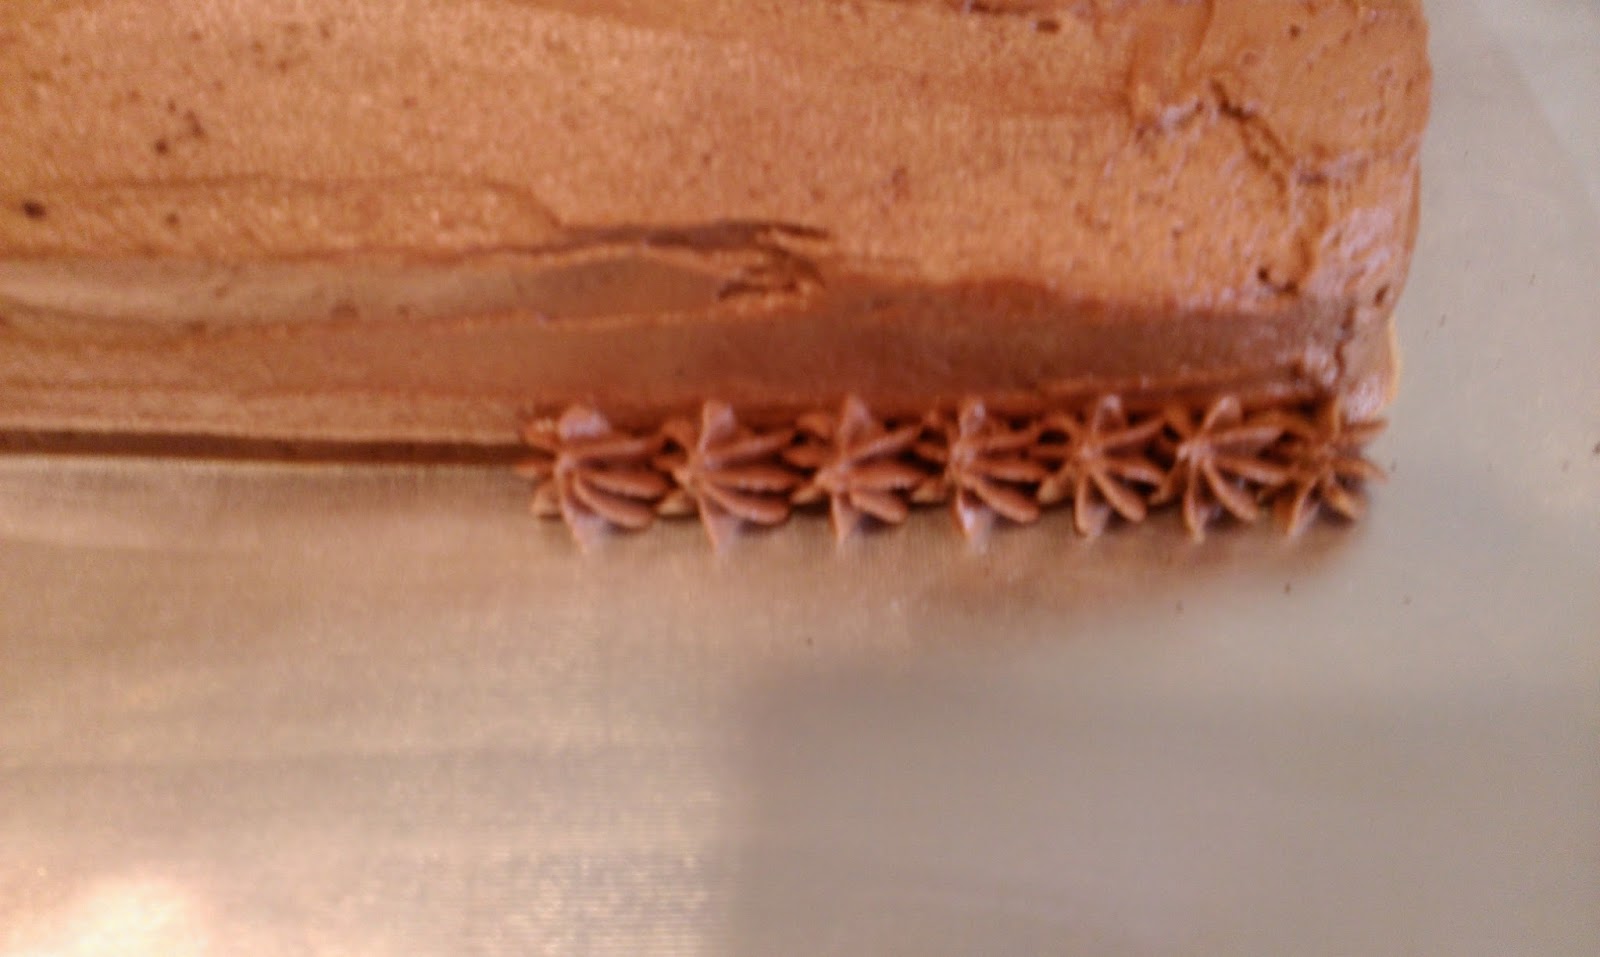
I’m into Halloween, but I’m not a heathen, so my cake needed a nice border or I wouldn’t be able to rest. I filled a piping bag with my leftover frosting fitted with a #21 tip to make small stars. 
A-like-so. 
Then I SO FREAKING CAREFULLY IT HURT ME INSIDE placed each little section of fence into the frosting. I’ve never even held a baby as gently as I held these pieces of chocolate fence. Mostly because chocolate is more important to me than babies, but whatever. Not gonna lie, a couple of my fence pieces still broke even with my tender loving care. But in an accidentally on purpose moment that I’m still going to take credit for, the broken fence pieces just added to the overall decor of a rundown graveyard. It works.

Excuse me while I marvel at my creativity. I’m in love with this cake. I haven’t even cut in to it TWO DAYS later because I just enjoy looking at it in the fridge so much. It fills my tiny little black heart with glee. I’m going to have to get my husband to cut into it, or we’ll still be looking at it in it’s whole glory until Christmas. I’m sure it will taste as delightfully sinful as it looks, thus making this another crowning achievement in my book (my book is small, okay?). I don’t have children (much like Mary Sanderson, I can SMELL them, but I don’t want them), but this would be a really fun cake to make with children, should you both smell them and yet still have them. Make it a family affair so your spouse can come up with creatively awful and hilarious tombstone ideas. See? Halloween is so about love and family…in it’s own twisted way, of course. Al B. Back on November 1 with my final Halloween masterpiece. Have a Halloween so magnificently macabre that it haunts your dreams! ‘Til next time my fellow eaters!

Every time I see the Justin Pieces tombstone, my brain reads it as Justin Bieber. Wishful thinking, I suppose. -
There's a Little Zombie in All of Us
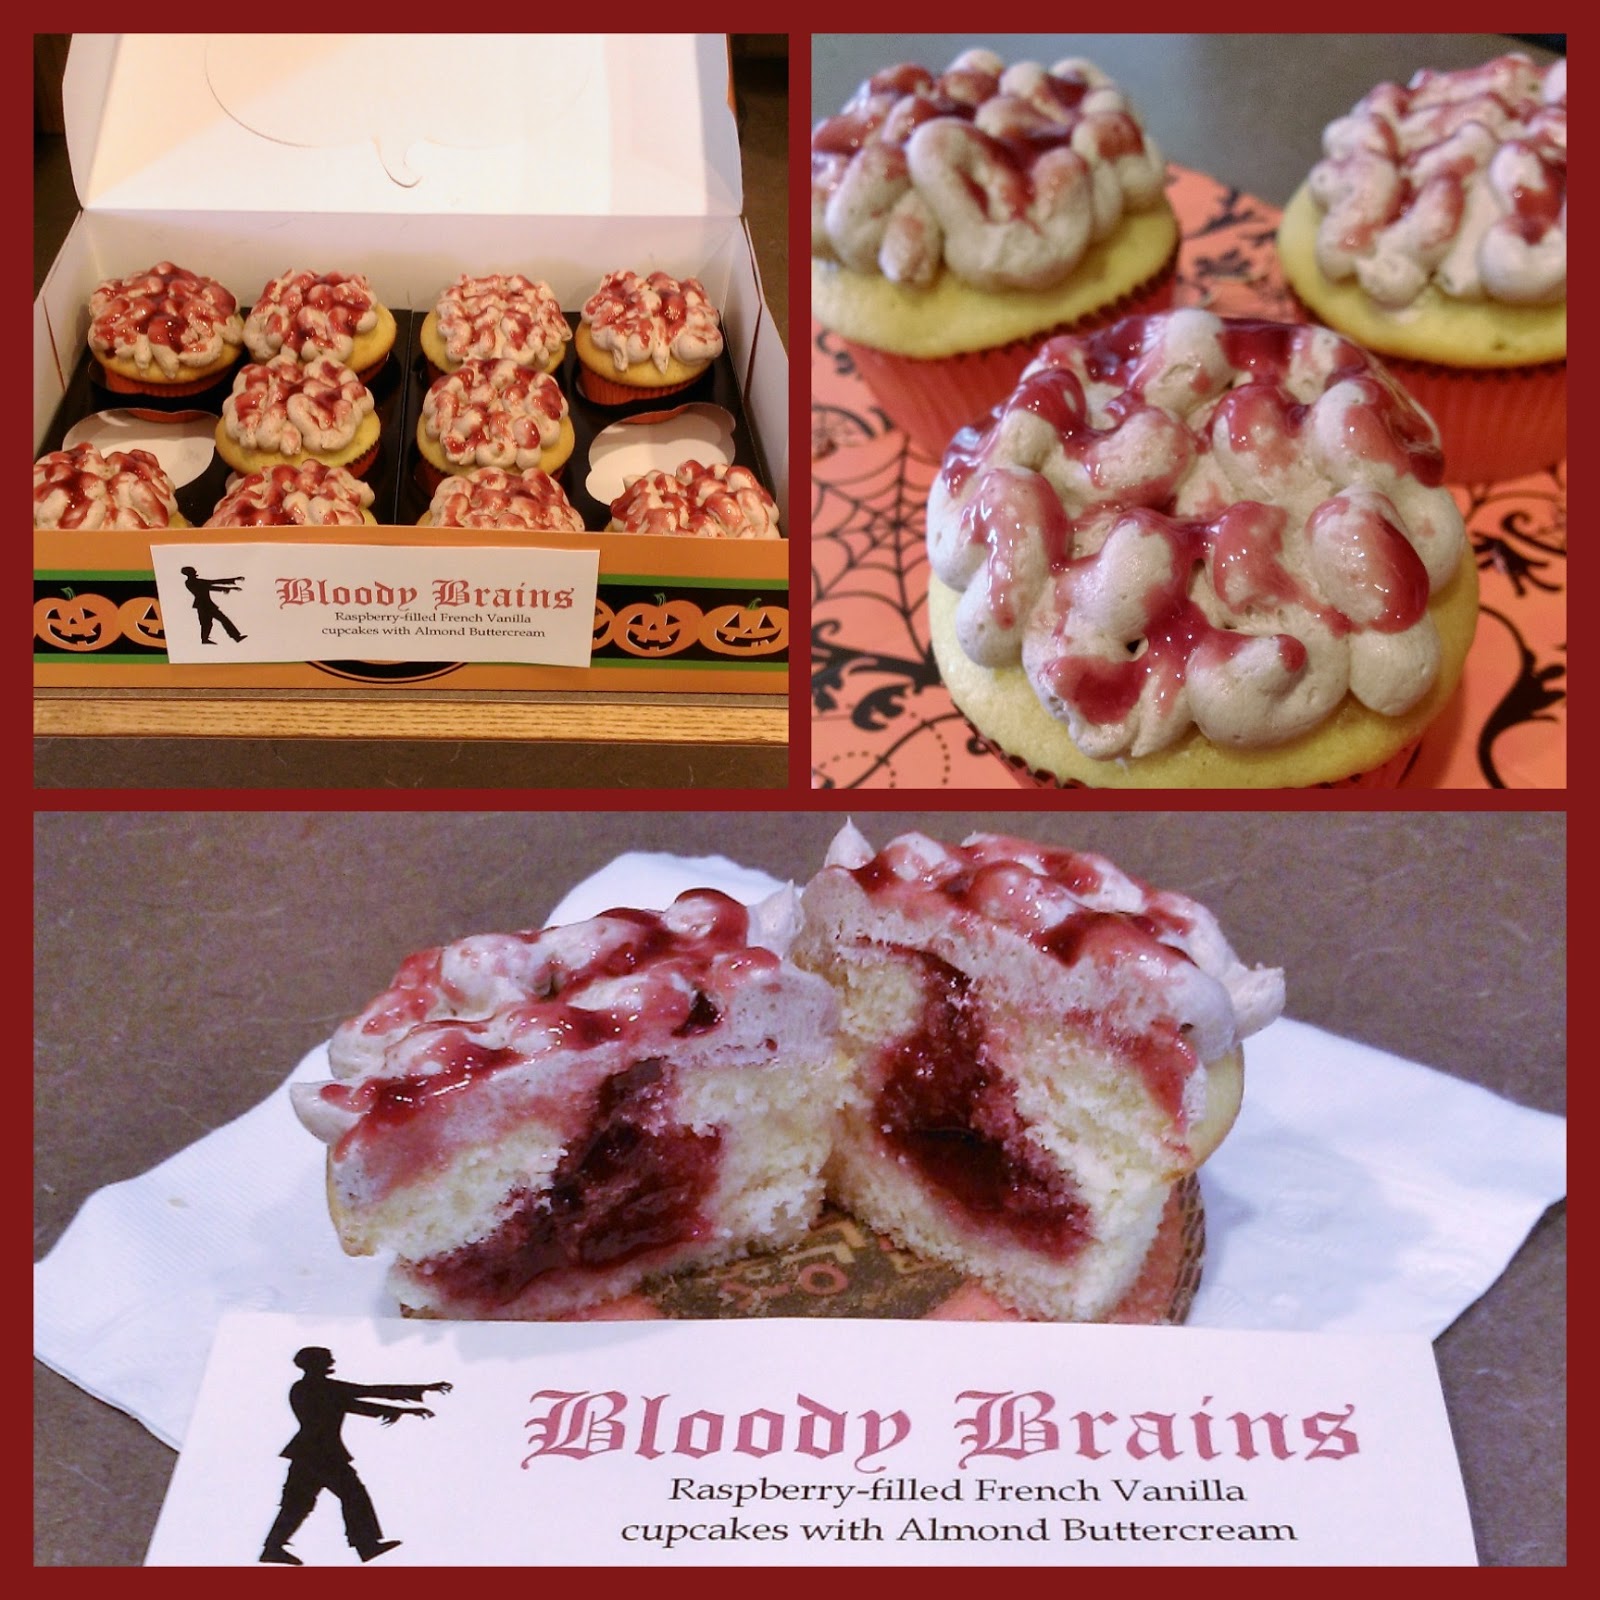
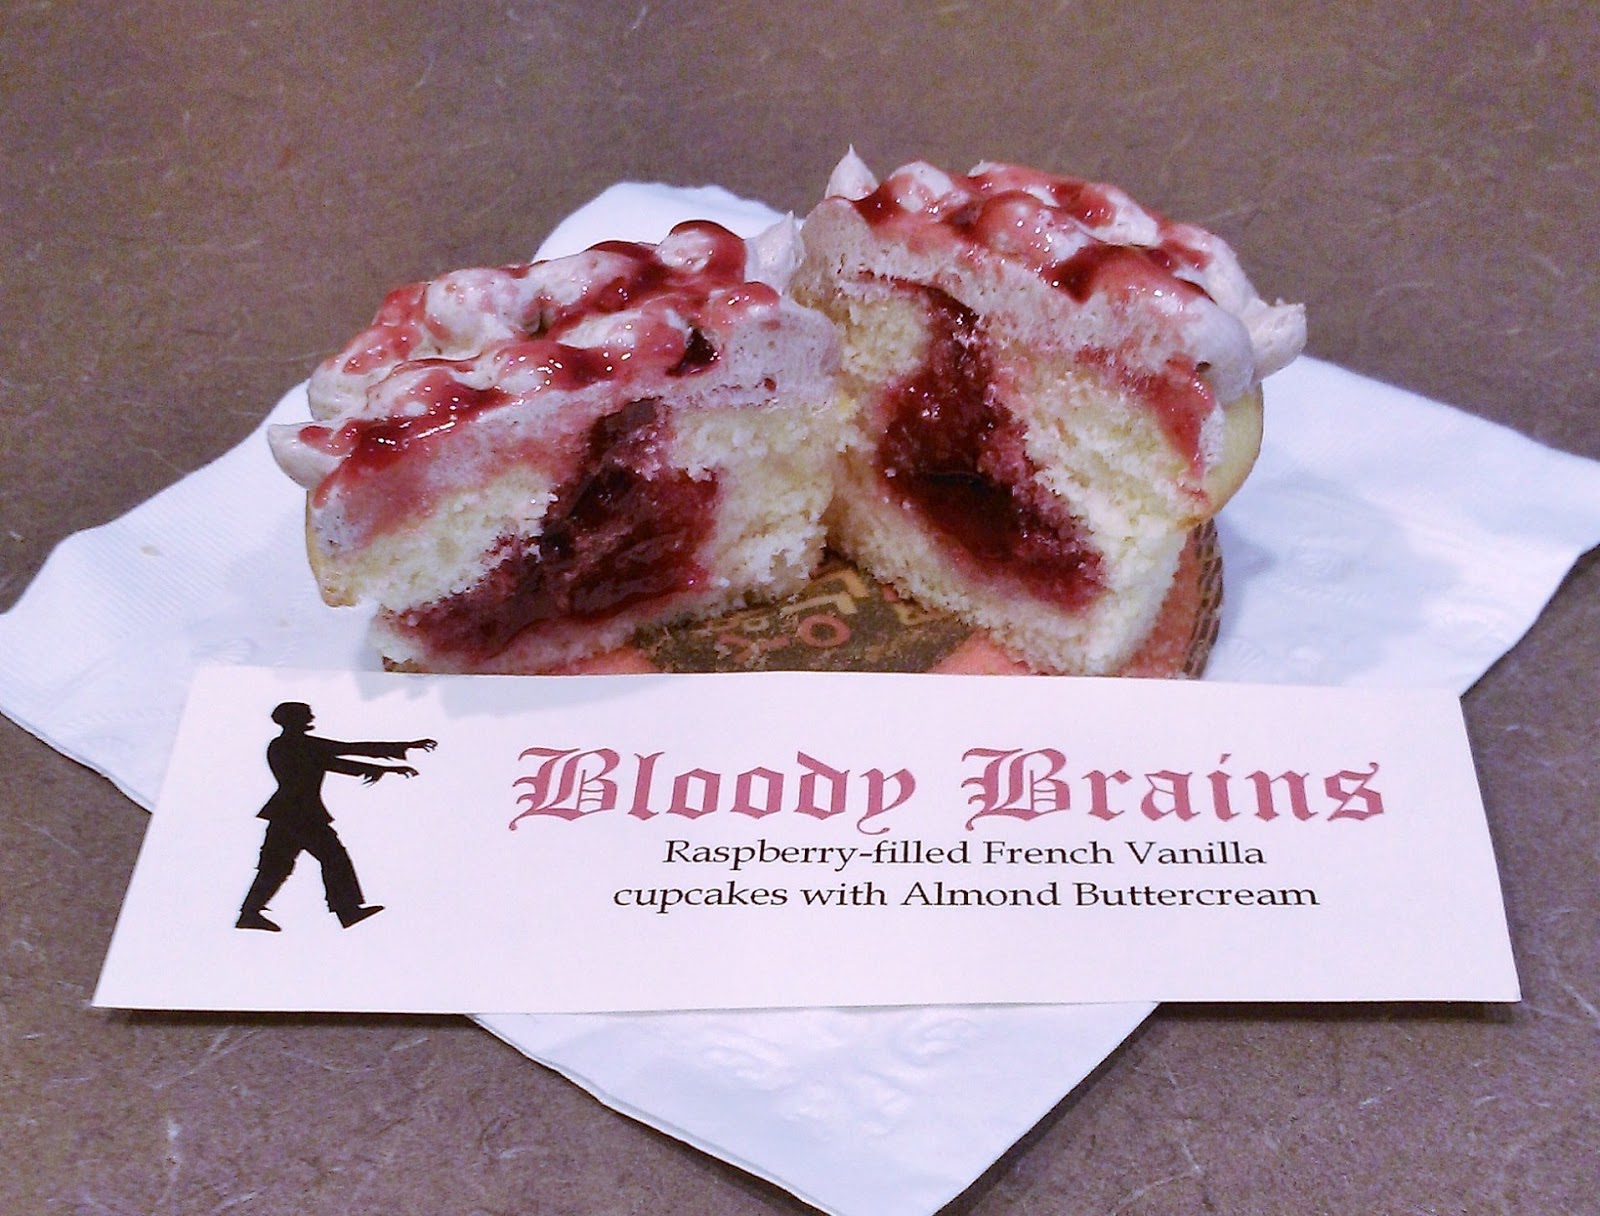
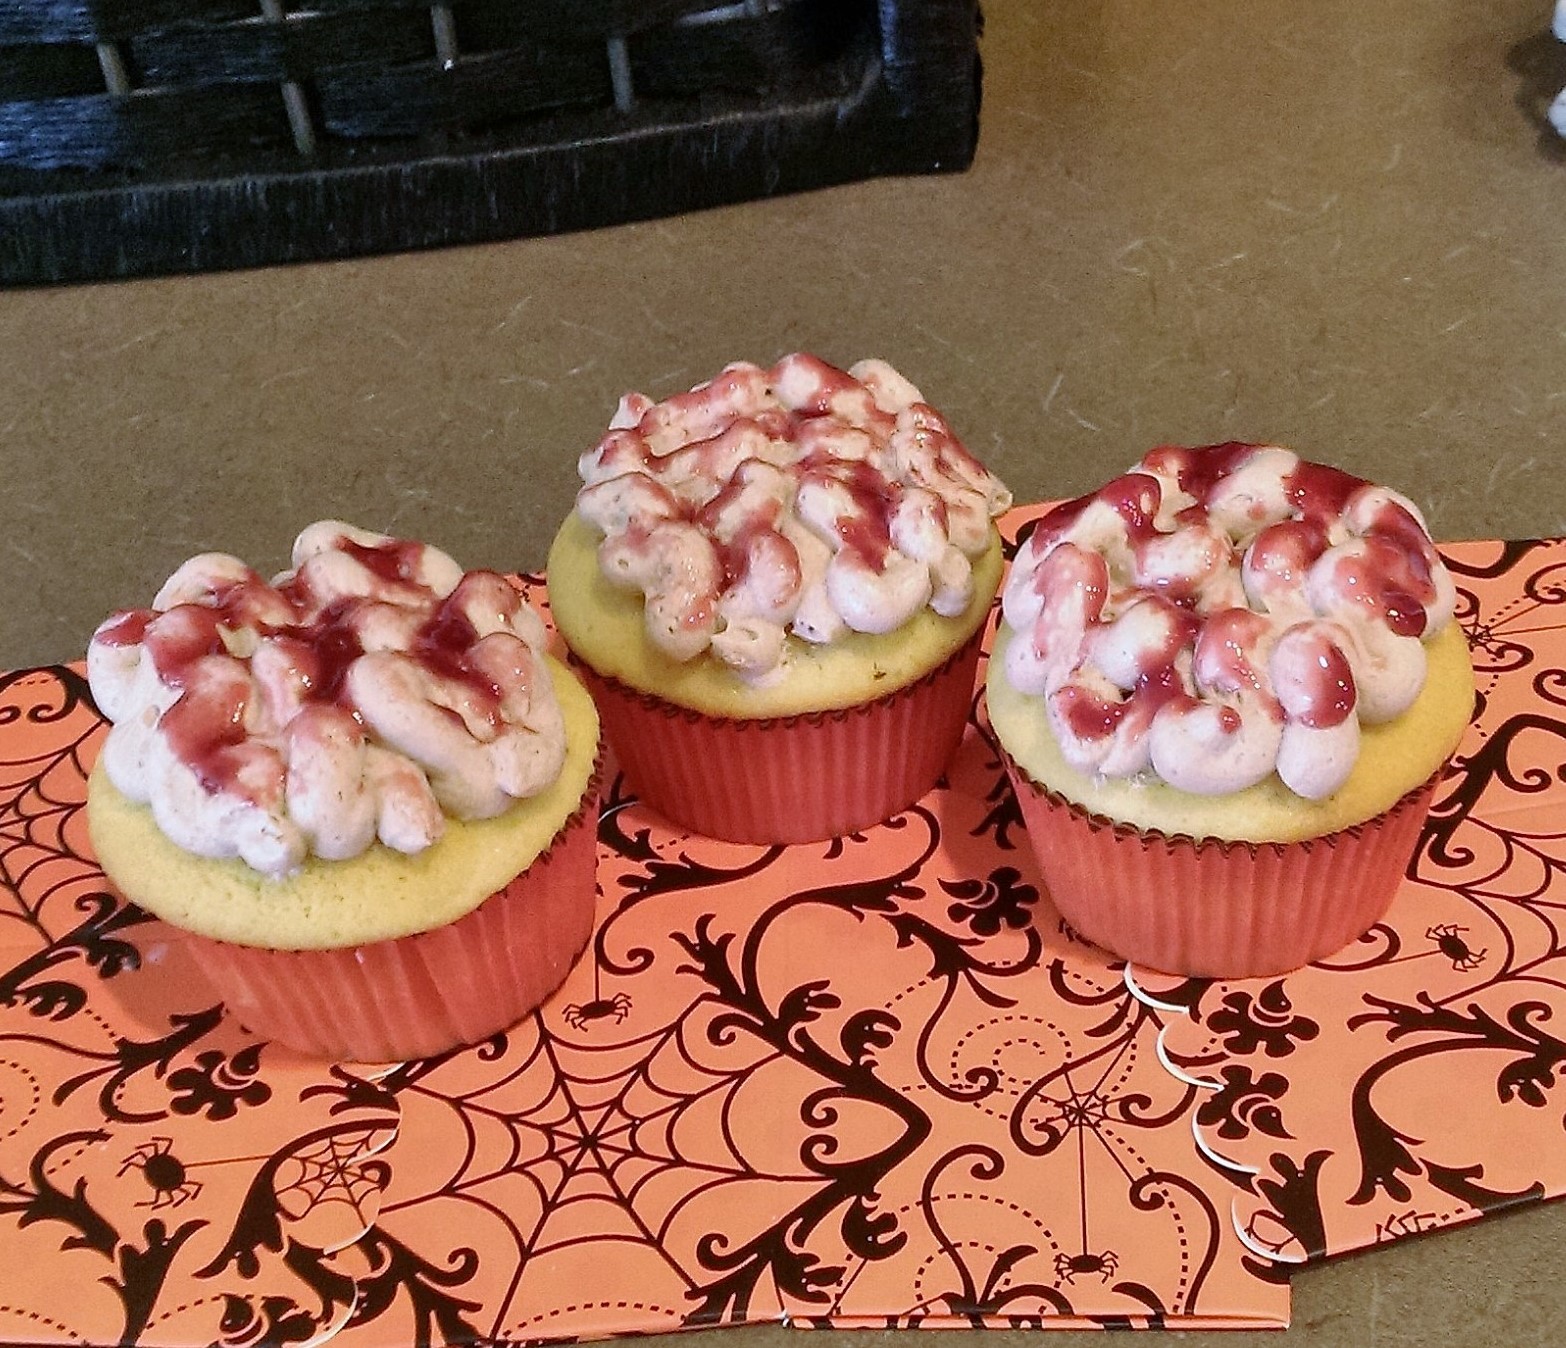
When most people think of holiday baking, it’s all fruitcakes, fudges, and gingerbread houses. When I think of holiday baking, it’s all ghost cakepops, sugar skull cakes, and Nightmare Before Christmas birthday cakes. Clearly when I don a festive holiday hat, it has horns on it. When I sing holiday tunes, it’s usually the theme from the Addams Family. And when I decorate my home for the holidays, children run screaming in the opposite direction. Halloween is my lifeblood, and each year I try to outdo myself on all things spooky and wicked (the latter comes relatively easy for obvious reasons…spend five minutes in the Clovis Walmart and new forms of torture just come springing to life in your imagination). So this year I asked myself one very important question when I was coming up with baking ideas: on a scale of 1-10, how gross can I make something look while still getting people to eat it? I was delighted to settle on a solid 8.5 and went for broke. And thus, the bloody brain cupcake was born:

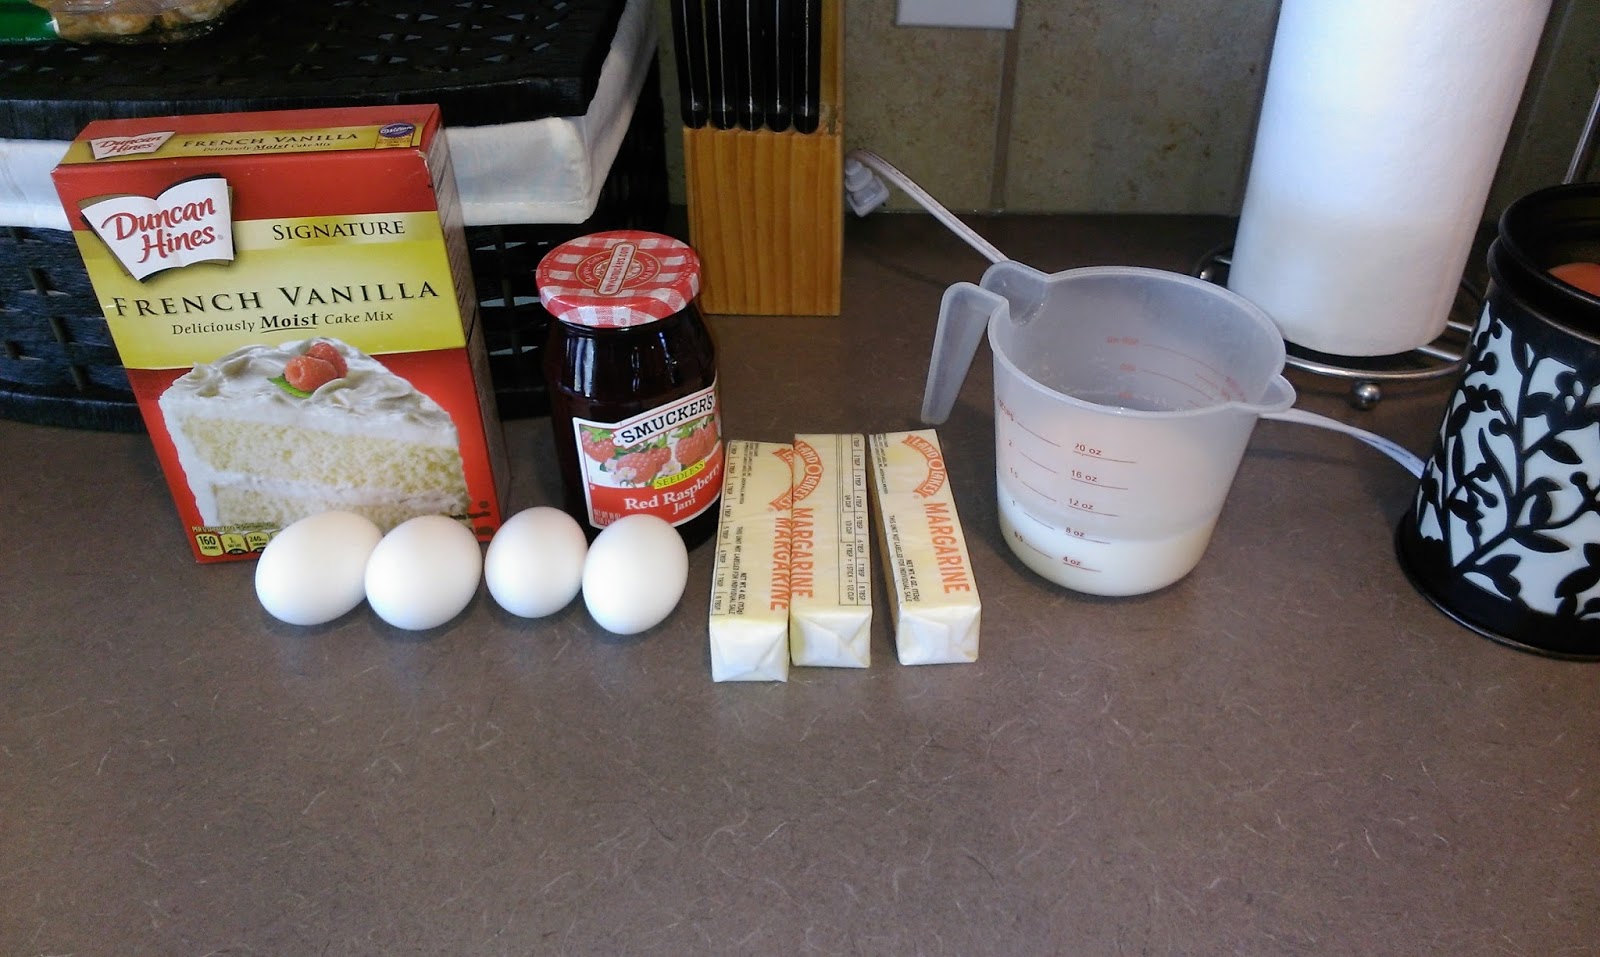
Did you just gag a little? Then my work here is done. There were points during the decorating of these cupcakes where I was cackling with witchy glee and then just full on evil laughing once finished. Strangely enough, my evil laugh and my regular laugh are strikingly similar. It shouldn’t be too hard to transition into my evil laugh full-time after I’ve completed world domination, so that’s a plus. I am still taking applications for minions and underlings, however. I did cheat some (what evil genius doesn’t?) and just made these cupcakes from a box mix using the cake-jacking method of adding in an extra egg, using butter instead of oil and doubling the amount, and using milk in place of water. I was more focused on the creation of repulsive decoration and less on taste. Can you blame me? Duncan Hines has had my back too many times to turn away now. Never forget where you came from!
But I suppose I can’t be that evil if I’m sharing my trade secrets. 
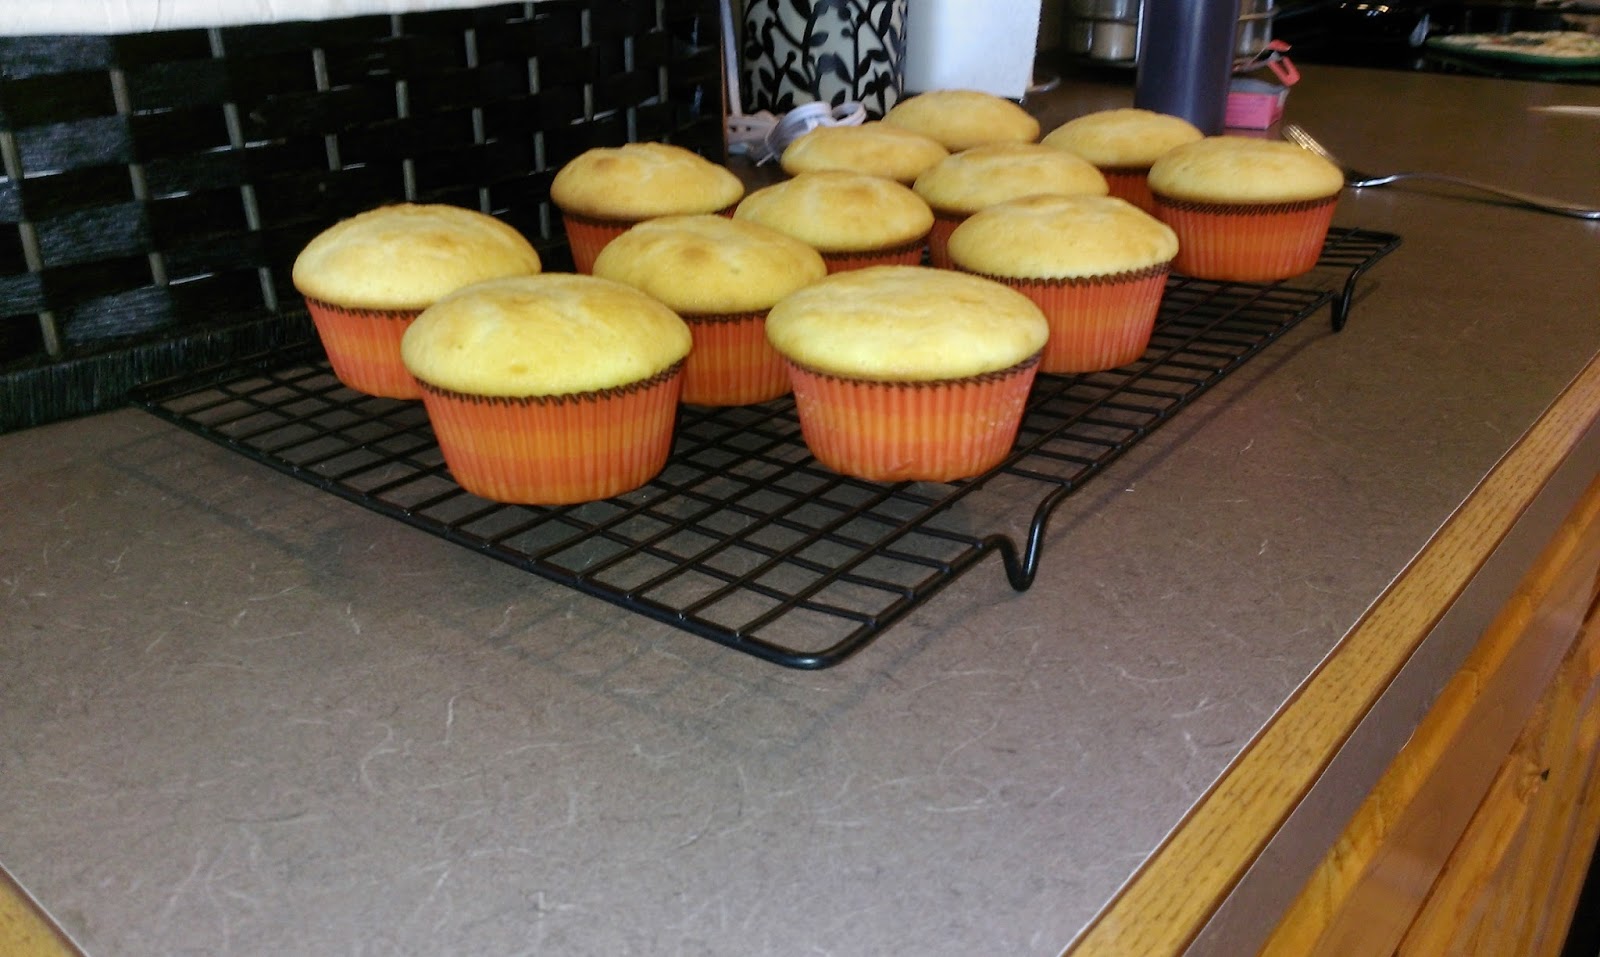
Naturally I had Halloween cupcake papers on hand. I couldn’t call myself a Halloween enthusiast if I didn’t. Once baking my cupcakes according to package directions, I let them cool off on a cooling rack in the fridge because I was extremely impatient…but not before ogling how perfectly domed and sized they all were. I am super horrible at getting my cupcakes to all be the same size and not extremely large or way too tiny. Goldilocks would hate me. Somehow this recipe that was supposed to make 24 cupcakes only made 21. I guess I had to sacrifice three cupcakes in order to get 21 perfect ones. Worth it!
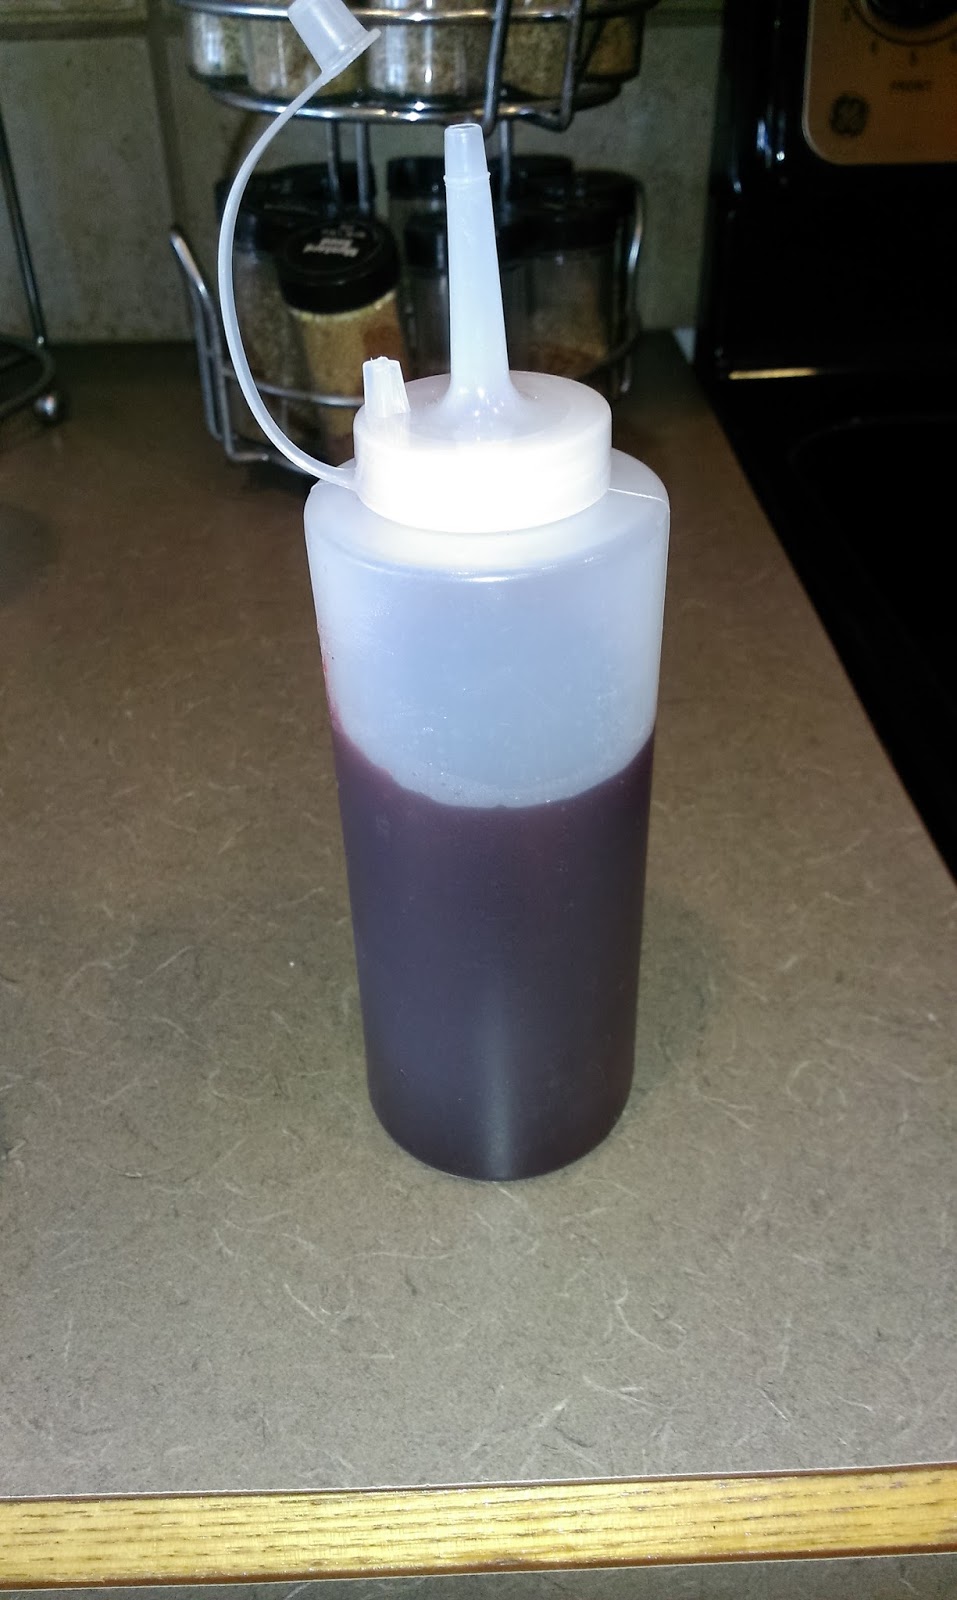
You know what really sucks? Trying to fill a squeeze bottle with jelly. My kitchen is permanently coated in raspberry jelly now. No bloody brain cupcake would be complete without blood. Obviously. Sometimes I really need to turn overly-spelling-it-out teacher mode off, but I don’t know how. My blood was simply seedless raspberry jelly mixed in a bowl until smooth. You need a COMPLETELY cool cupcake before filling though.

Filling is a sinch! Sink the tip of the squeeze bottle into the cupcake and fill to your heart’s content. 
I applied moderate pressure to the squeeze bottle and once the filling was noticeably spilling out the top, stopped. About 3/4’s of a jar of raspberry jam will fill 21 cupcakes. Save the remaining jelly for later. Phase two of reaching evil baking genius has been completed. Now, on to phase three and making of the frosting!
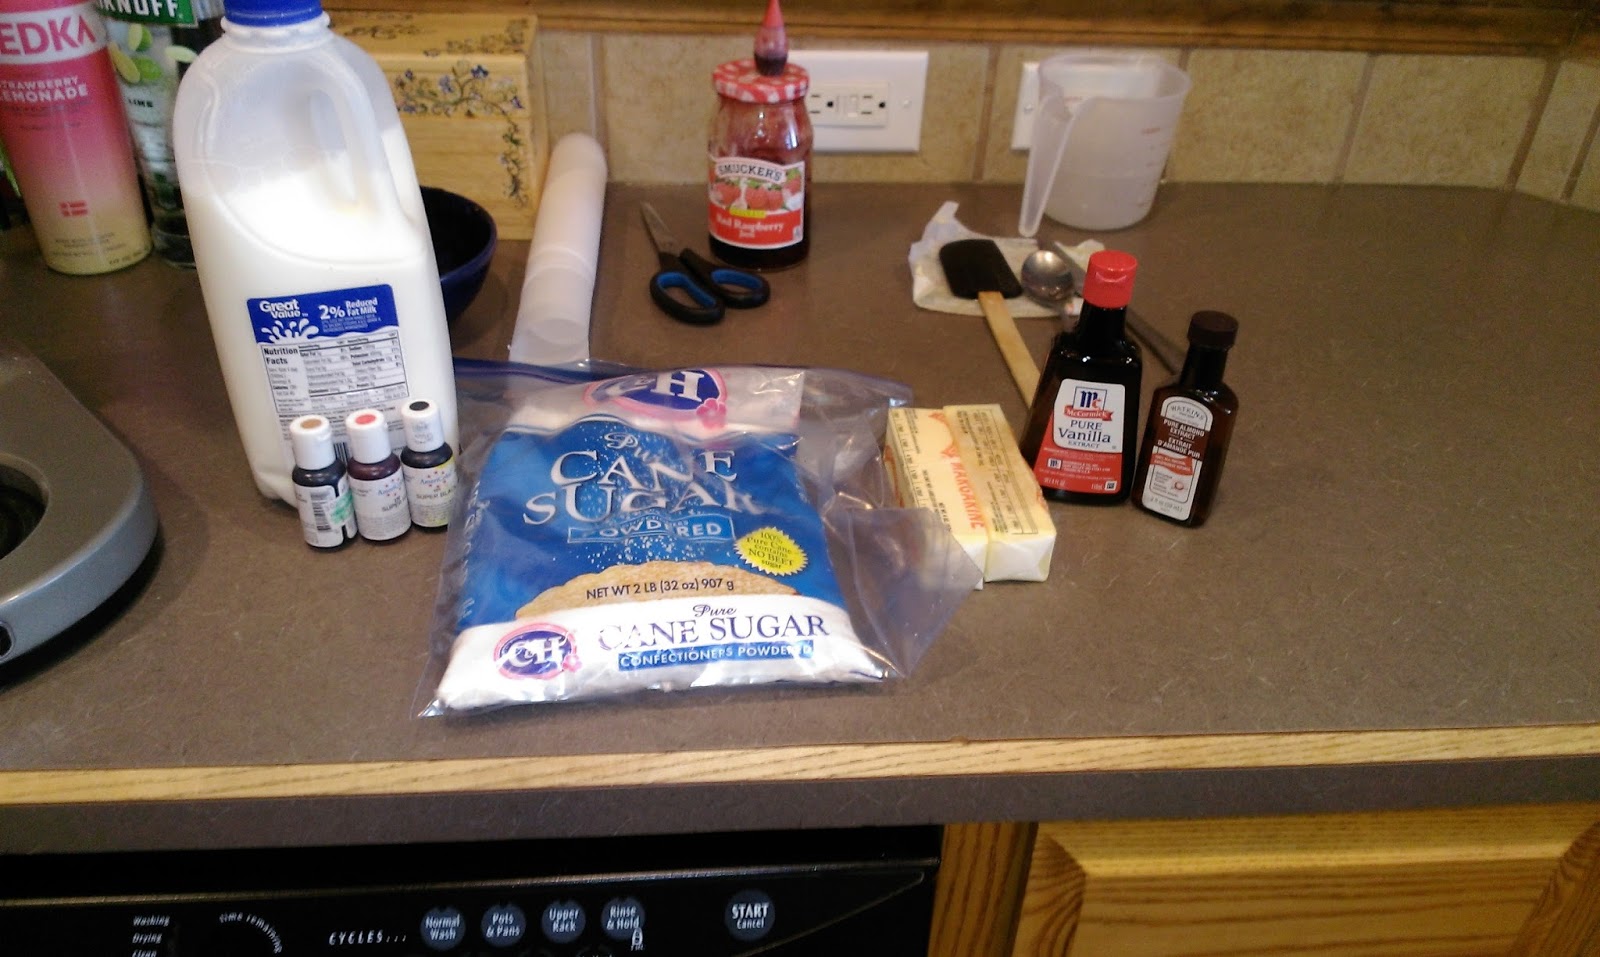
You noticed the vodka in the background, didn’t you, you sly little minx? You’re also not surprised at all, are you? I made my standard almond buttercream for the brain base. You need:
- Two sticks (1 cup) of softened butter
- Six cups of powdered sugar
- One tablespoon of vanilla
- One teaspoon of almond extract
- Three-four tablespoons of milk or heavy cream
- Brown, red, and black gel dye
Mix together the butter and two cups of sugar until you’ve got a nice lumpy base. Add in the extracts and one tablespoon of milk and mix. Scrape down the bowl then add in two more cups of sugar and one more tablespoon of milk. Add in the remaining two cups of sugar after scraping the bowl and the remaining milk (I used all four tablespoons for easier piping). Once the frosting is mixed, add in one drop of red dye, one drop of black dye, and three drops of brown dye. This magically calculated formula (also known as “winging it”) yielded a perfect brain matter color. Now it’s time to create brains. Delicious, tasty braaaaaiiiins. I made it halfway through this blog without a zombie reference. I’m feeling pretty good about myself.

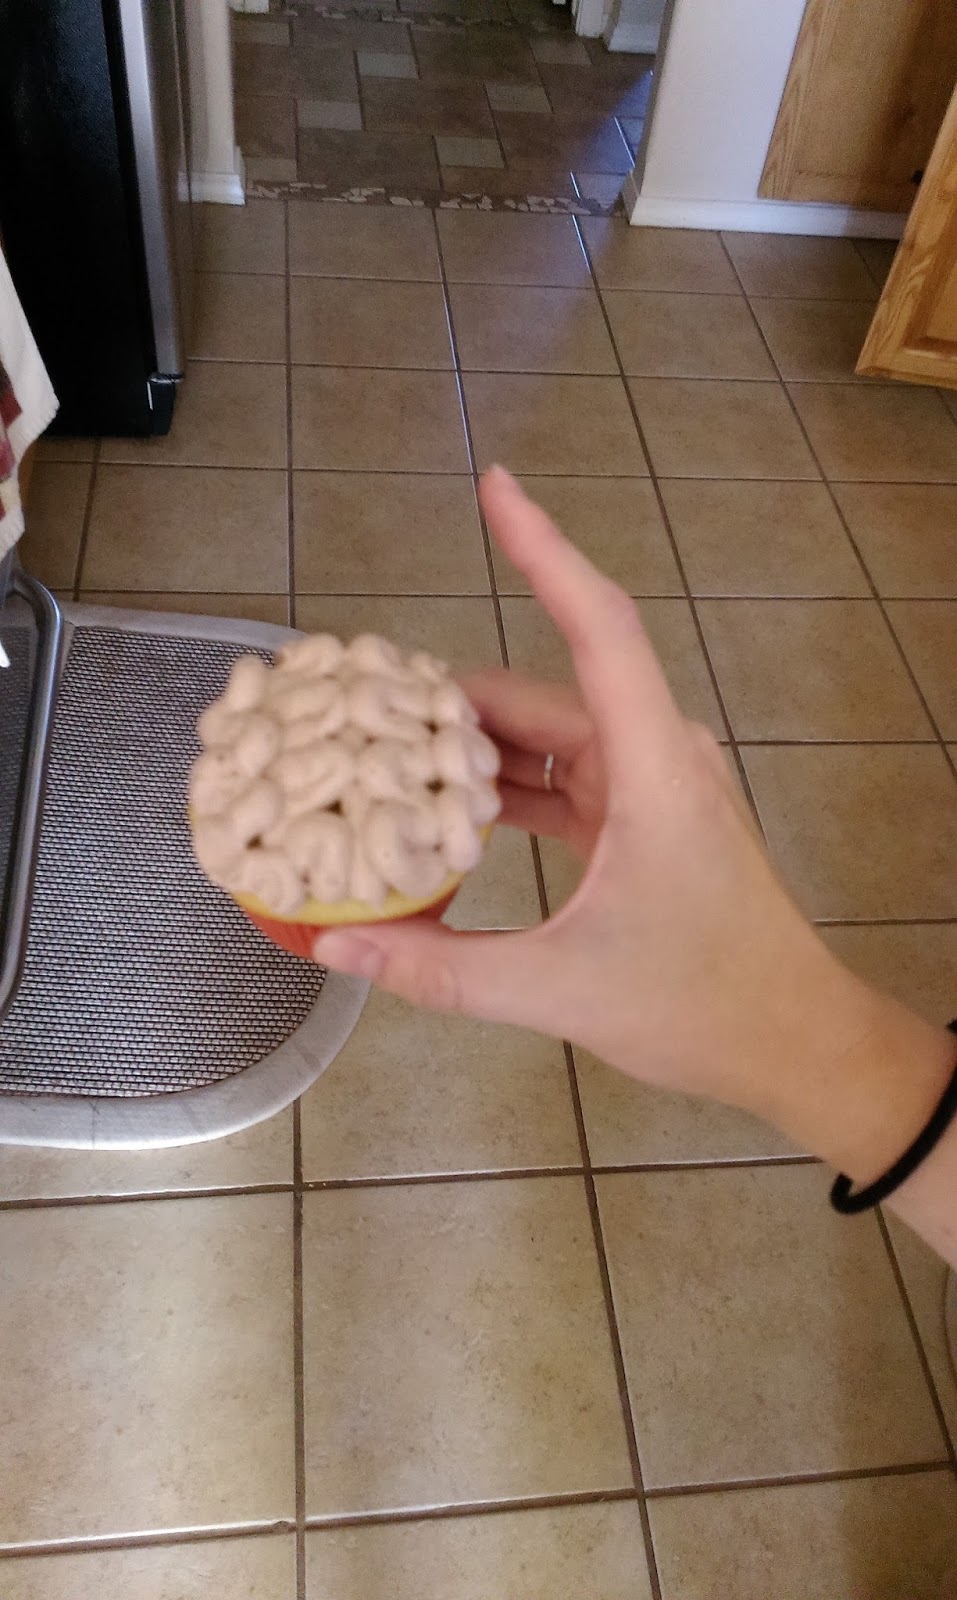
Once you’ve placed half of your frosting into a piping bag fitted with a round open tip (I used a #12), start by piping a single line down the center of the cupcake to separate your brain’s hemispheres. I can get scientific, thanks for noticing. Then simply pipe a wavy line partially on top of the middle line to boost up your frosting and give your brain a dome shape. 
You can continue to pipe that same line further over on the cupcake, all the while continuing to just zigzag and make wind-y lines. Some of them I continuously piped, others I stopped and used a completely separate second line. I liked the continuous line look better. Simply repeat the process on the other side of the cupcake. 
And you, too, can feel like your very own Dr. Frankenstein. POWER!!! 
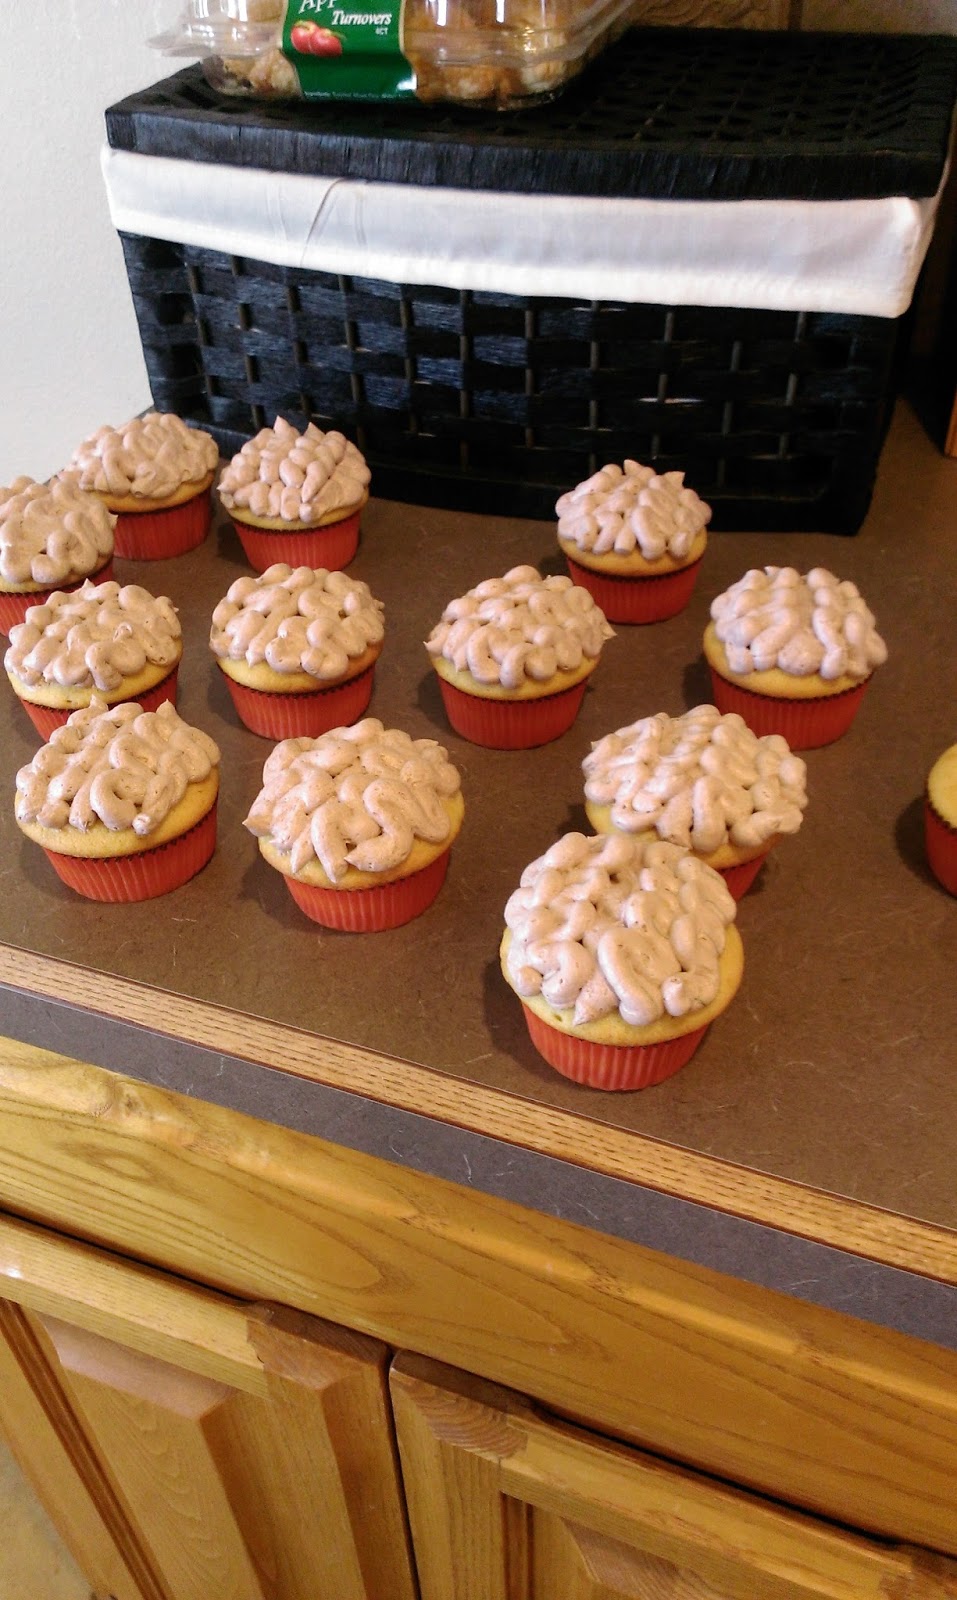
A field of brains. Knowledge is power (and yummy), after all. You could call it a day here and have boring gray brains for dessert, but I felt as though the grossness factor was a mere four without making stuff even bloodier. I was also testing out my skills as a creator here, you know, so if the zombie apocalypse ever happens, I’m able to trick the undead into eating my cupcake brains instead of my actual brains because they just look that good. Plus a zombie full of cupcakes is going to be a lot easier to run away from. These are the things I pontificate about (had I been born with less of an active imagination, I may be solving global warming or the bacon shortage or something important. Eh.).
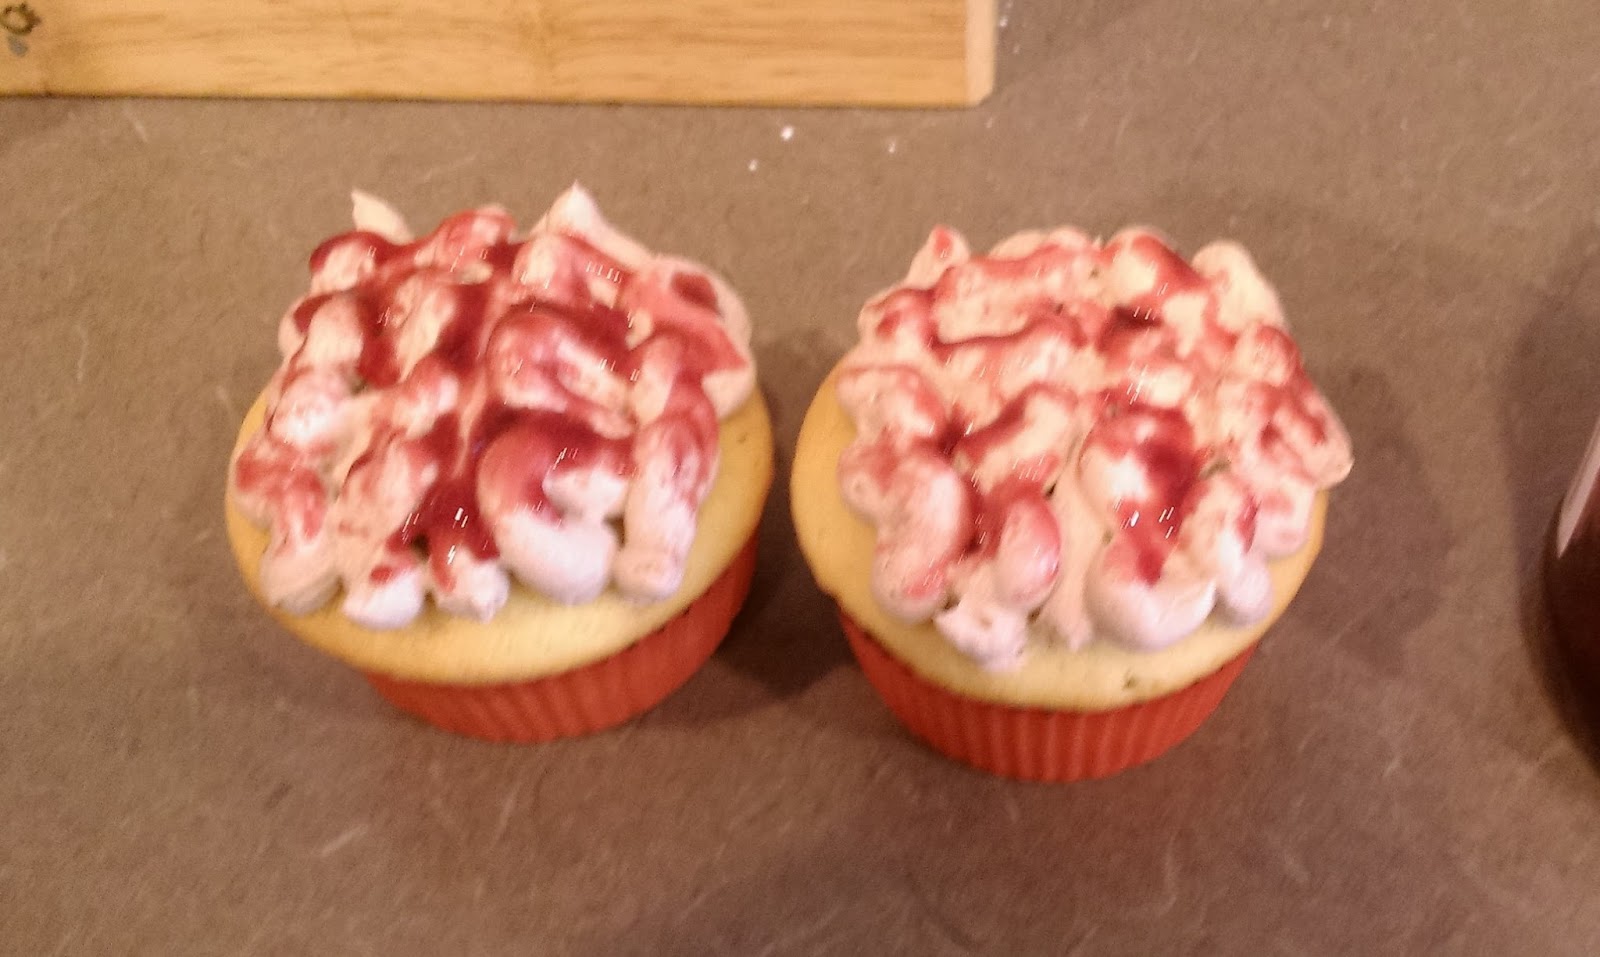
Yes, now we’ve achieved 8.5 on the grossness scale. To splatter blood on your brains, first stick all your frosted cupcakes into the freezer for 30 minutes. Once the frosting is solidified and can be touched without causing any damage, you’re ready to get messy. Take a small bowl of the raspberry jelly and dilute it with a few drops of water. Mix in some red food coloring for maximum gore and find a small paintbrush. Get creative and fill in whatever nooks and crannies you want to by brushing the jelly onto the frosting. You don’t need to put a lot on if you don’t want to. You also don’t need to use much pressure when brushing so the brains don’t get flattened. No one wants to eat a brain that looks like its been met by a Mack Truck. And there you have it…a cupcake that looks so gross you won’t want to eat it. But you will anyway because it’s still a cupcake, and no one can resist a good cupcake.

Even when it’s oozing blood. I’m hoping people will be brave enough to eat these at the costume party we’re attending tonight. If not, my husband and I will be consuming mass quantities of brain matter and loving it. We sampled the cupcake I cut in half for blogging purposes (the things I do for you people), and I am happy to report that I will henceforth be covering everything in seedless raspberry jam (except steak; we’ve been over this before). It is tart, sweet, and perfectly blended with the French Vanilla cake and utterly complementary of the almond buttercream…I’m starting to think those zombies have the right idea because brains are delicious. ‘Til next time, my fellow eaters!

Brains in surplus…I could’ve become one rich lady if the Wizard of Oz Scarecrow was real. -
Still Trying to Survive the Blue Bell Shortage…
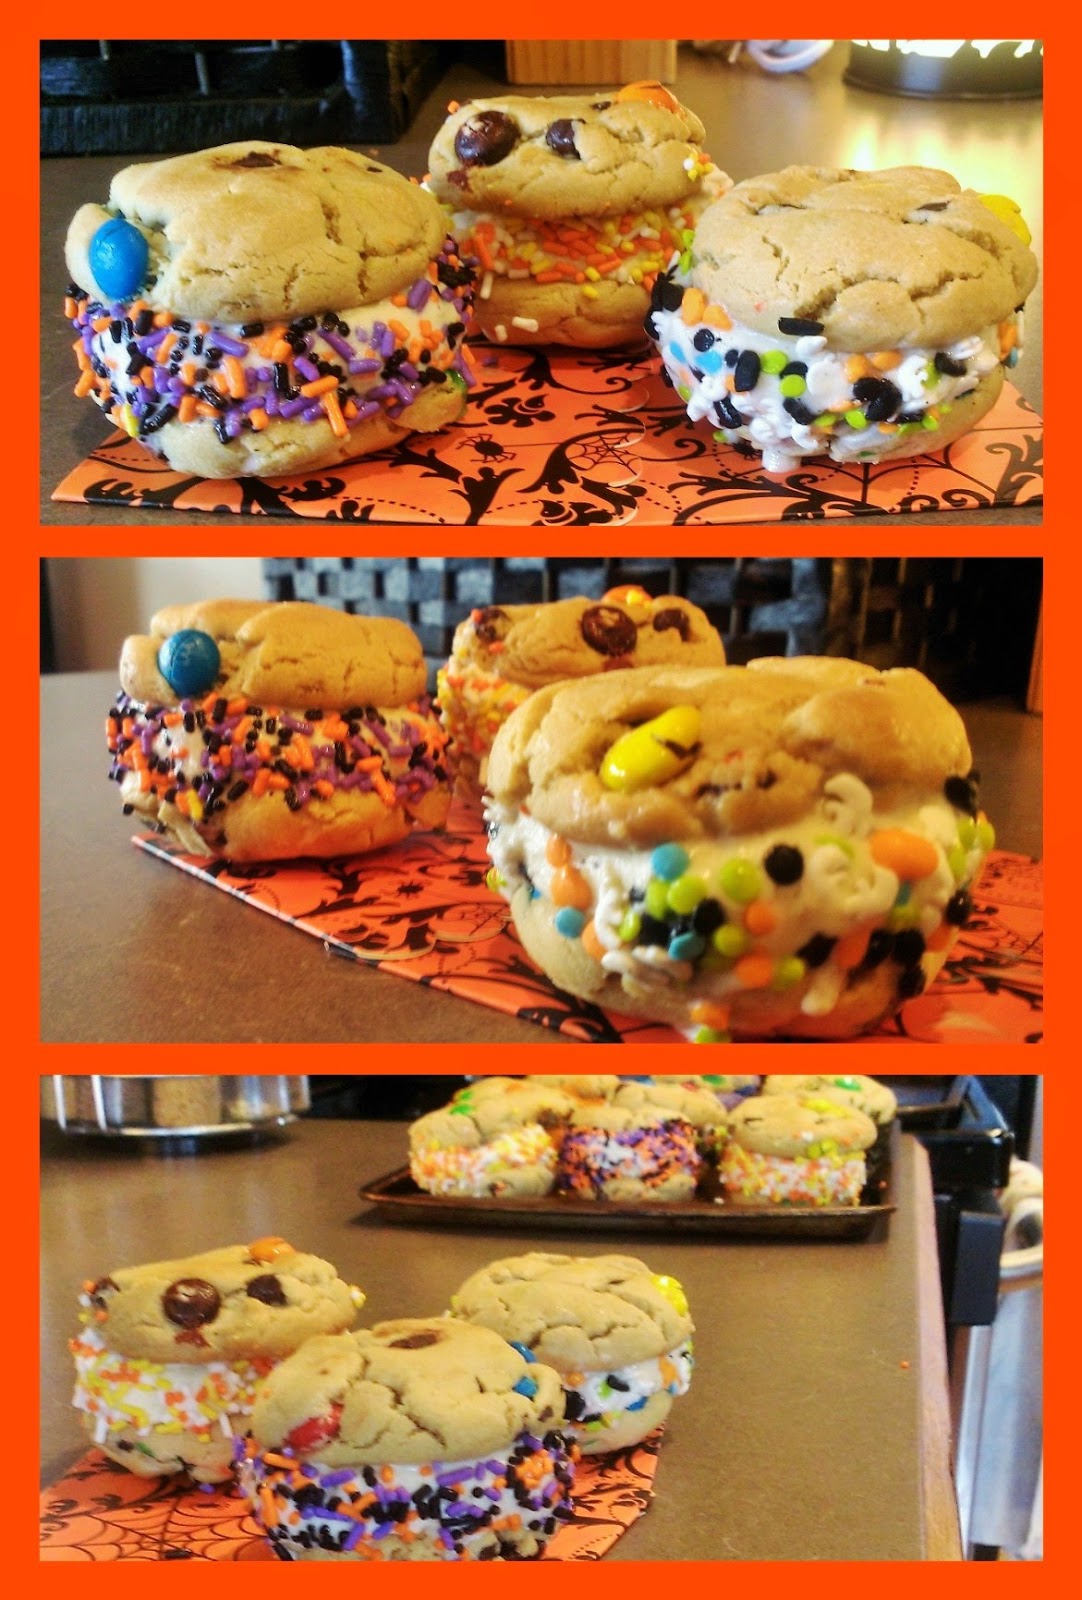
My husband and I will be celebrating our fourth nananiversary tomorrow, so naturally I asked him what type of dessert he wanted me to bake to celebrate (you know, so I can keep my status as ‘solid choice’ wife material on lock). He immediately decided upon ice cream sandwiches. I was at first very excited and then extremely sad because we STILL HAVE NO BLUE BELL IN NEW MEXICO. I am barely scraping by at this point. So much so that when we head out to Dallas next week, we will be loading up a cooler full of half gallons to bring home with us. I am nothing if not devoted to my preferred brands. I mean, I may single-handedly be keeping the Banana Boat sunblock industry in play right now, no joke. So the thought of having to make ice cream sandwiches with anything but Blue Bell hurt me, but love sometimes causes us a little bit of pain, so I powered through and made some delectable ice cream sandwiches with my favorite M&M cookie recipe and Breyer’s French Vanilla ice cream (shudder).

The perfect ratio of cookie to ice cream has been achieved! I know, last week I was all, “Oh we’re saying goodbye to summer with spiked root beer float cupcakes” and this week I am all, “Oh hey, ice cream is good, right?” Here’s the thing about me and ice cream: it is real, and it is deep. It could be 12 degrees outside and snowing like crazy and I would still think it was the perfect time to go pick up some Dairy Queen…they are named Blizzards for a reason, aren’t they? There is never a bad time for ice cream. Just man up and eat it while wrapped in your favorite blanky if it’s too chilly outside. Besides, two cookies sandwich the ice cream in this case, so you have a warm, edible handle to hold on to. I think I’ve done a fantastic job of demonstrating why ice cream sandwiches are an appropriate choice for October, so let’s get to the good part, shall we?

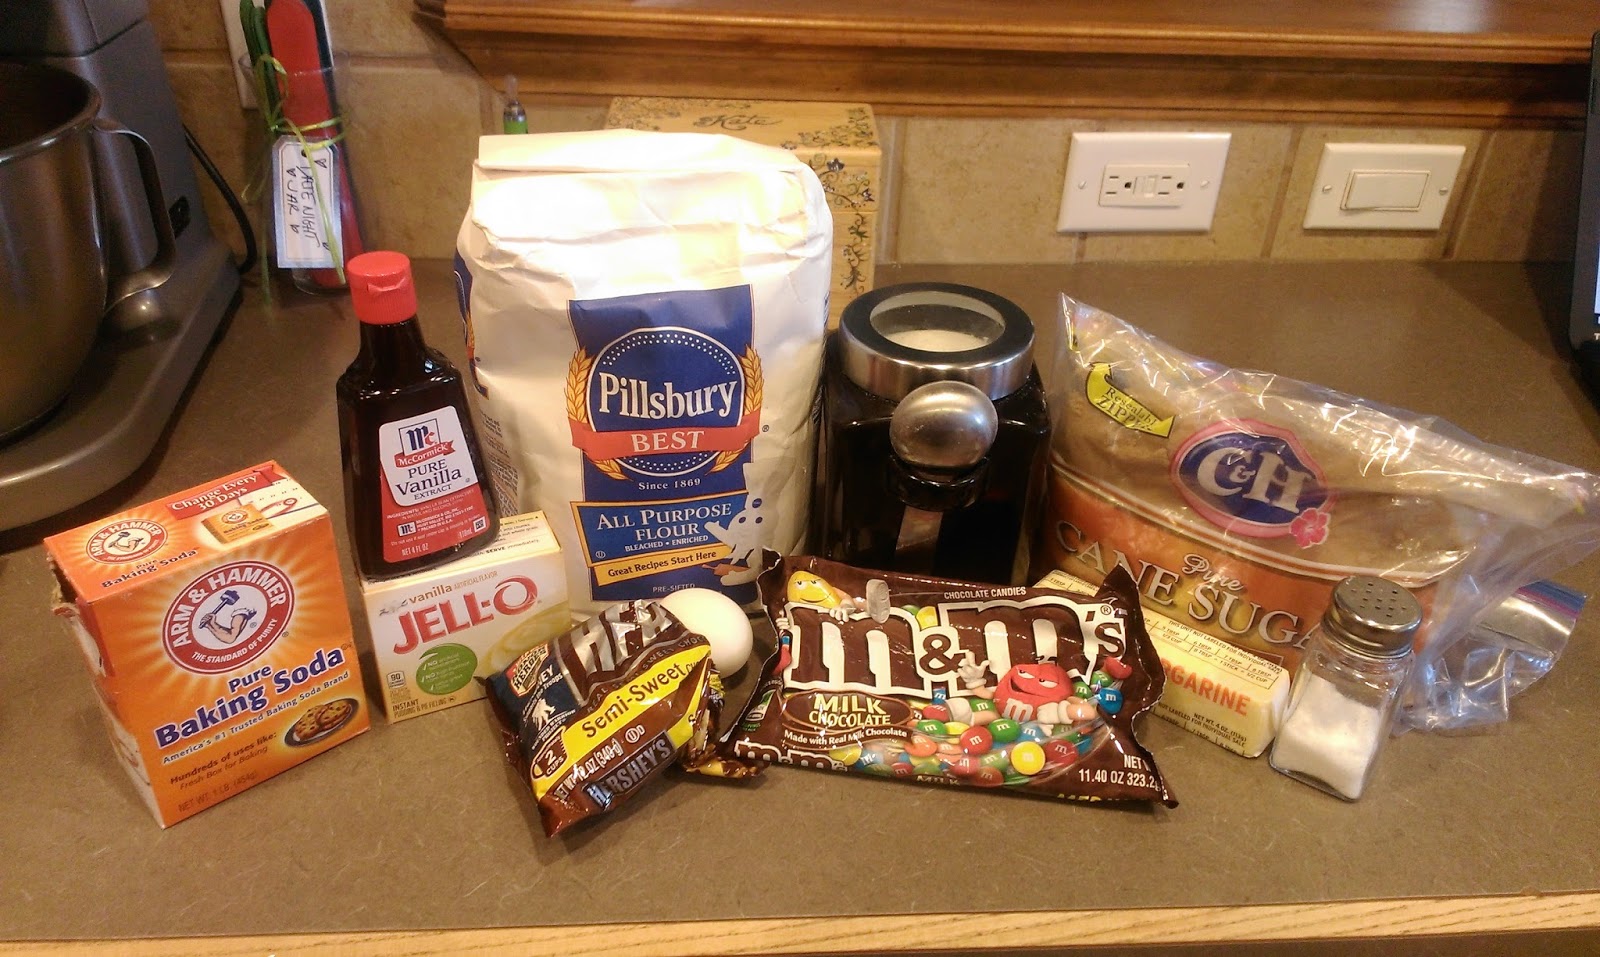
I bought way too many M&M’s, but then I realized this wasn’t actually a problem. I have a tried-and-true cookie recipe that I have been using for a few years now. These cookies stay soft and moist for weeks because of one simple little ingredient: Jello pudding; thus proving that Jello can, in fact, be good for more than just adding booze to (although still a solid usage in my opinion). I send these cookies to Derek when he is deployed, to family members for various holidays, etc. They hold up fantastically, so I figured they would make an amazing base for ice cream sandwiches and stay soft after freezing. Move over thin, boring chocolate sandwich cookies (not you, Oreo’s, you’re cool), I’m about to make the magic happen. Here’s what you need:
- 3/4 cup butter at room temp
- 3/4 cup packed brown sugar
- 1/4 cup sugar
- 1 teaspoon of vanilla
- 1 room temp egg
- 2 cups of flour
- Half a 3.4 ounce packet of Jello vanilla instant pudding (this is 2 heaping TBS)
- 1 teaspoon baking soda
- Dash of salt
- 1/4 cup of chocolate chips
- 3/4 cup of M&M’s (I used plain, but any other kind would work depending on your preference)
Start by mixing together the butter, sugars, vanilla, and egg until nice and fluffy. This usually takes about 3 minutes on medium/high. Add in a cup of the flour, mix well, and then add in the final cup. Mix together before adding in the pudding, baking soda, and salt. Finish up by mixing in the chocolate chips and M&M’s. This recipe makes 24 cookies total.

Okay, it actually made 25. But one did not last long in this world before being eaten. Use a cookie scoop to scoop heaping mounds onto Parchment-lined trays. Shape into rounds and place extra M&M’s on top if you’d like them to be pretty. I go the extra mile there because eating pretty desserts actually does taste better. Science! Or extreme narcissism, but whatever. Cover up the trays with plastic wrap and place into the freezer for at least an hour or two. This will help the cookies not spread out and get too thin when baking. We want those ice cream sandwiches to be thick and tasty…and not at all reminiscent of a thin Communion wafer.

I’d probably go to church more if they just gave me cookies instead. Once frozen, preheat your oven to 350 and remove the dough mounds and Parchment paper. Spray the pans with cooking spray and cook eight cookies on one cookie sheet for 11-12 minutes. Things won’t spread out any since the cookies are frozen, so just look for golden edges to check for doneness. I flattened my cookies out a bit by gently pressing down on them after I took them out of the oven to give them a better shape for sandwiching. Let the tray cool down a bit before placing back into the freezer and bake the two remaining rounds of cookies on two more greased trays. You want the cookies to be solid when making the ice cream sandwich so you can apply pressure and squish down the ice cream, hence the freezing for about a half an hour because a warm cookie would just fall apart. Now, let me continue to blow your minds with a handy trick for making ice cream sandwiches!

The trick isn’t actually cup stacking. 
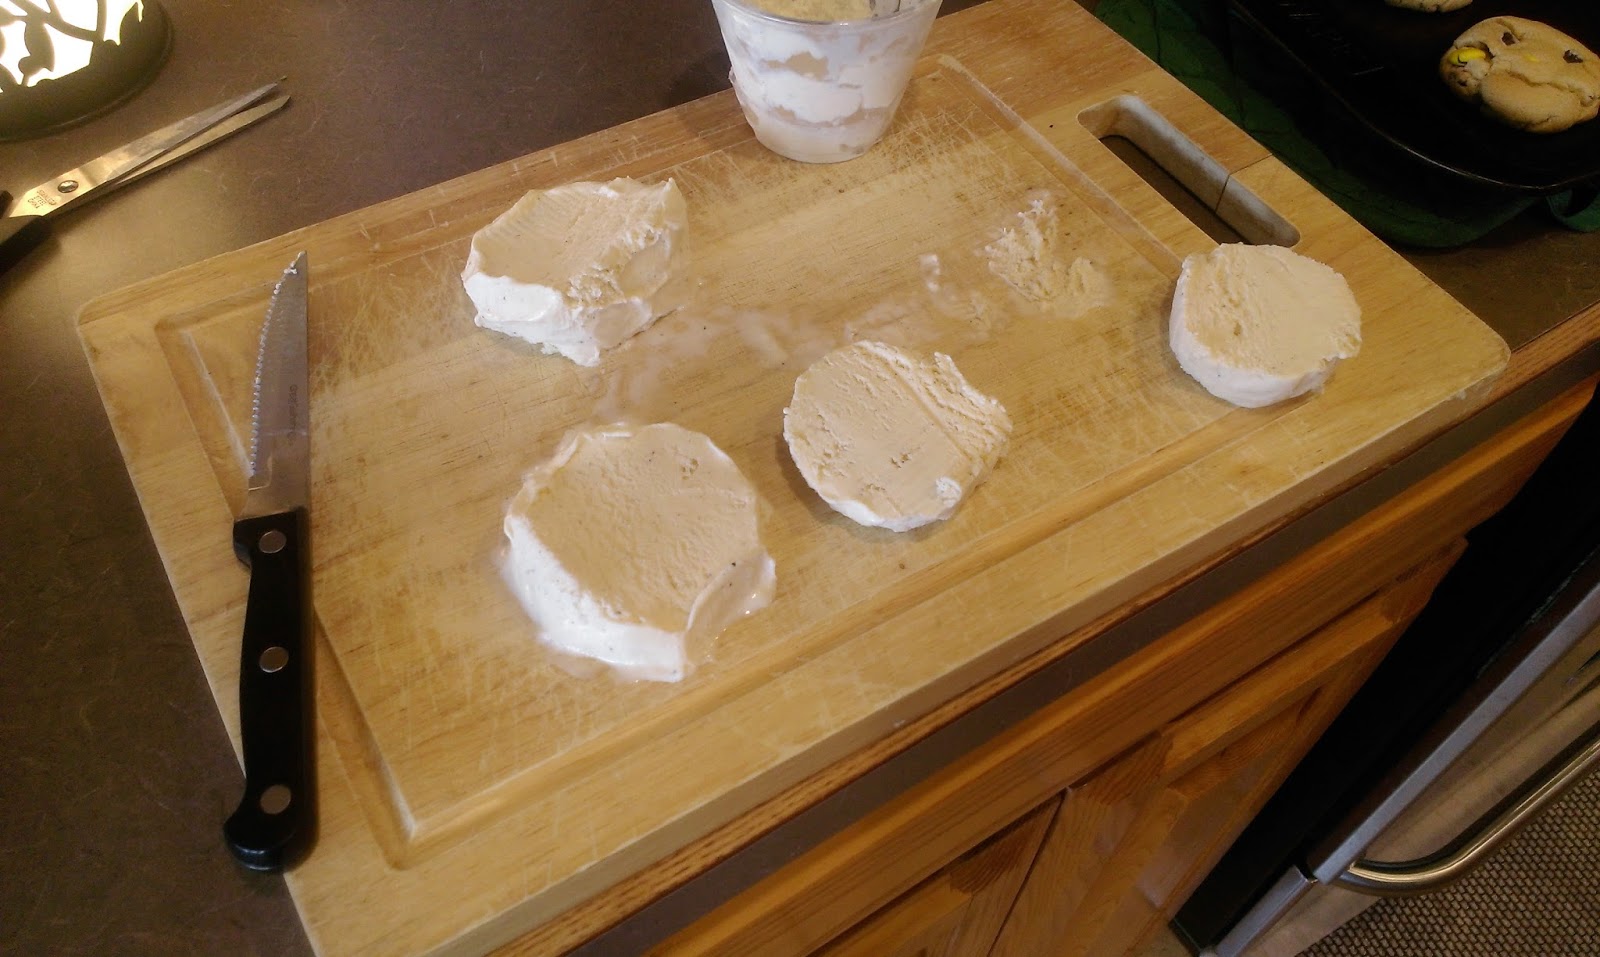
It’s cup filling. If you place your ice cream into a plastic or paper cup, you give it the desired round shape needed for an ice cream sandwich. I only had plastic wine cups (because, hi, have you met me?), but small plastic cups would work best. All you need to do is pack it down into the cup and place back into the freezer to harden. I did this while my cookies were baking.

I have Popsicle sticks, so these almost went a whole different route. 
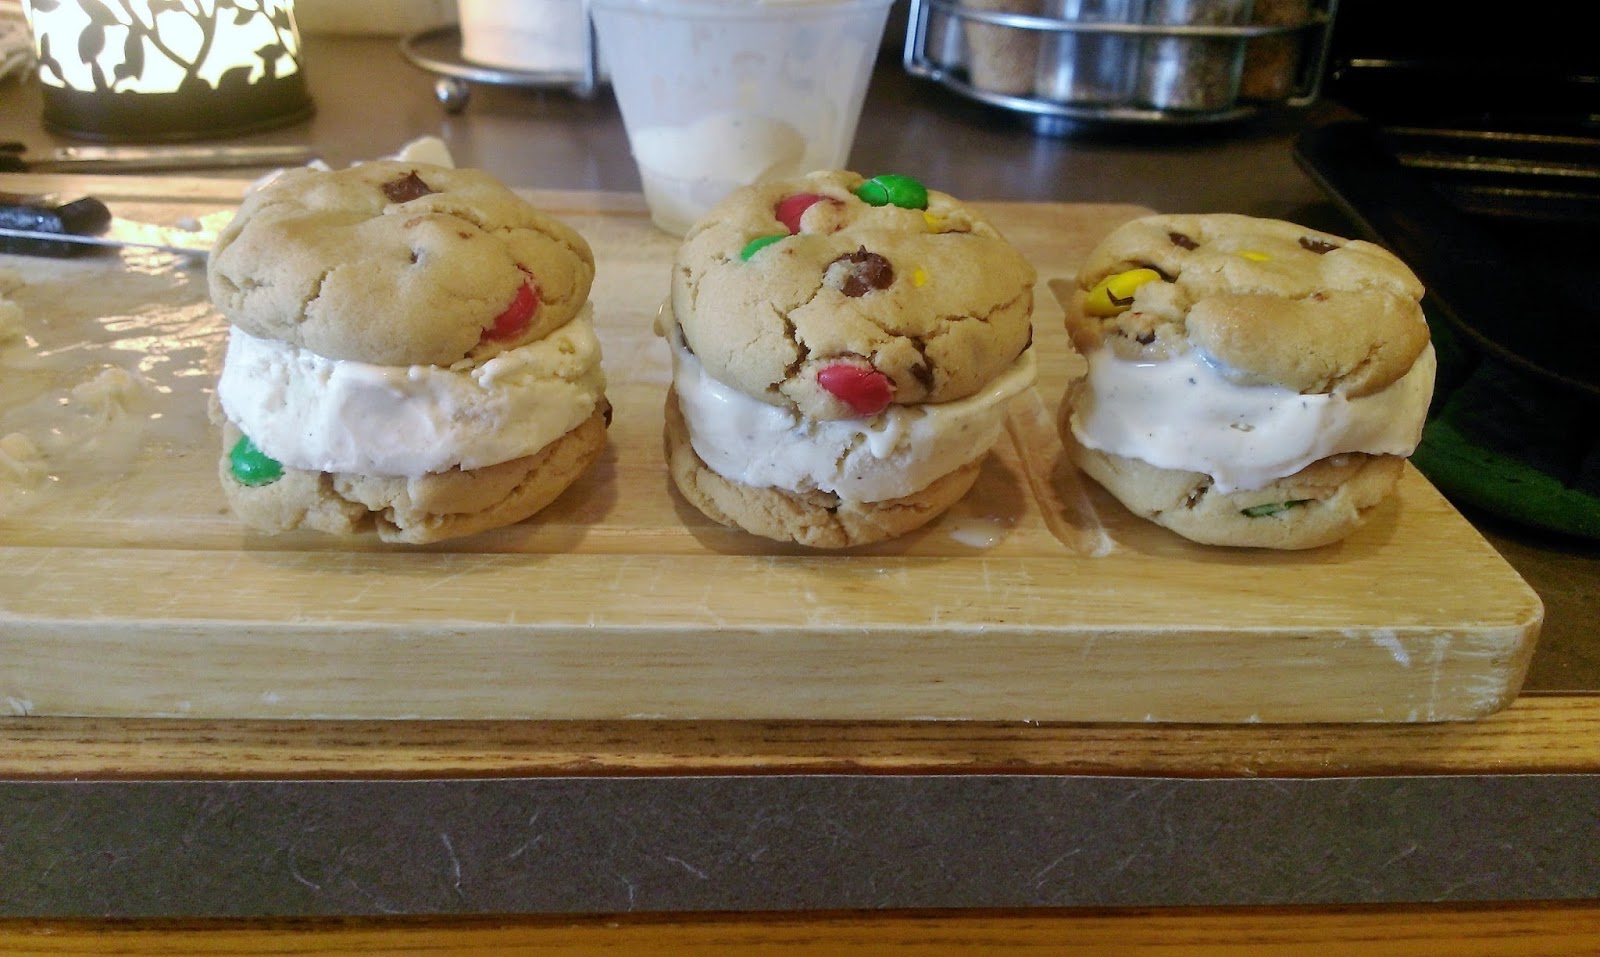
I decided to stay true to the course and hacked away instead. Once my cookies were done and frozen, I took each plastic cup out and cut it open with scissors and placed it on a cutting board. Then I cut the logs into 1/2 inch thick pieces to place in between two cookies, and an ice cream sandwich was born! I’m not drunk with power…just tipsy.

Can you blame me? They just look tasty. 
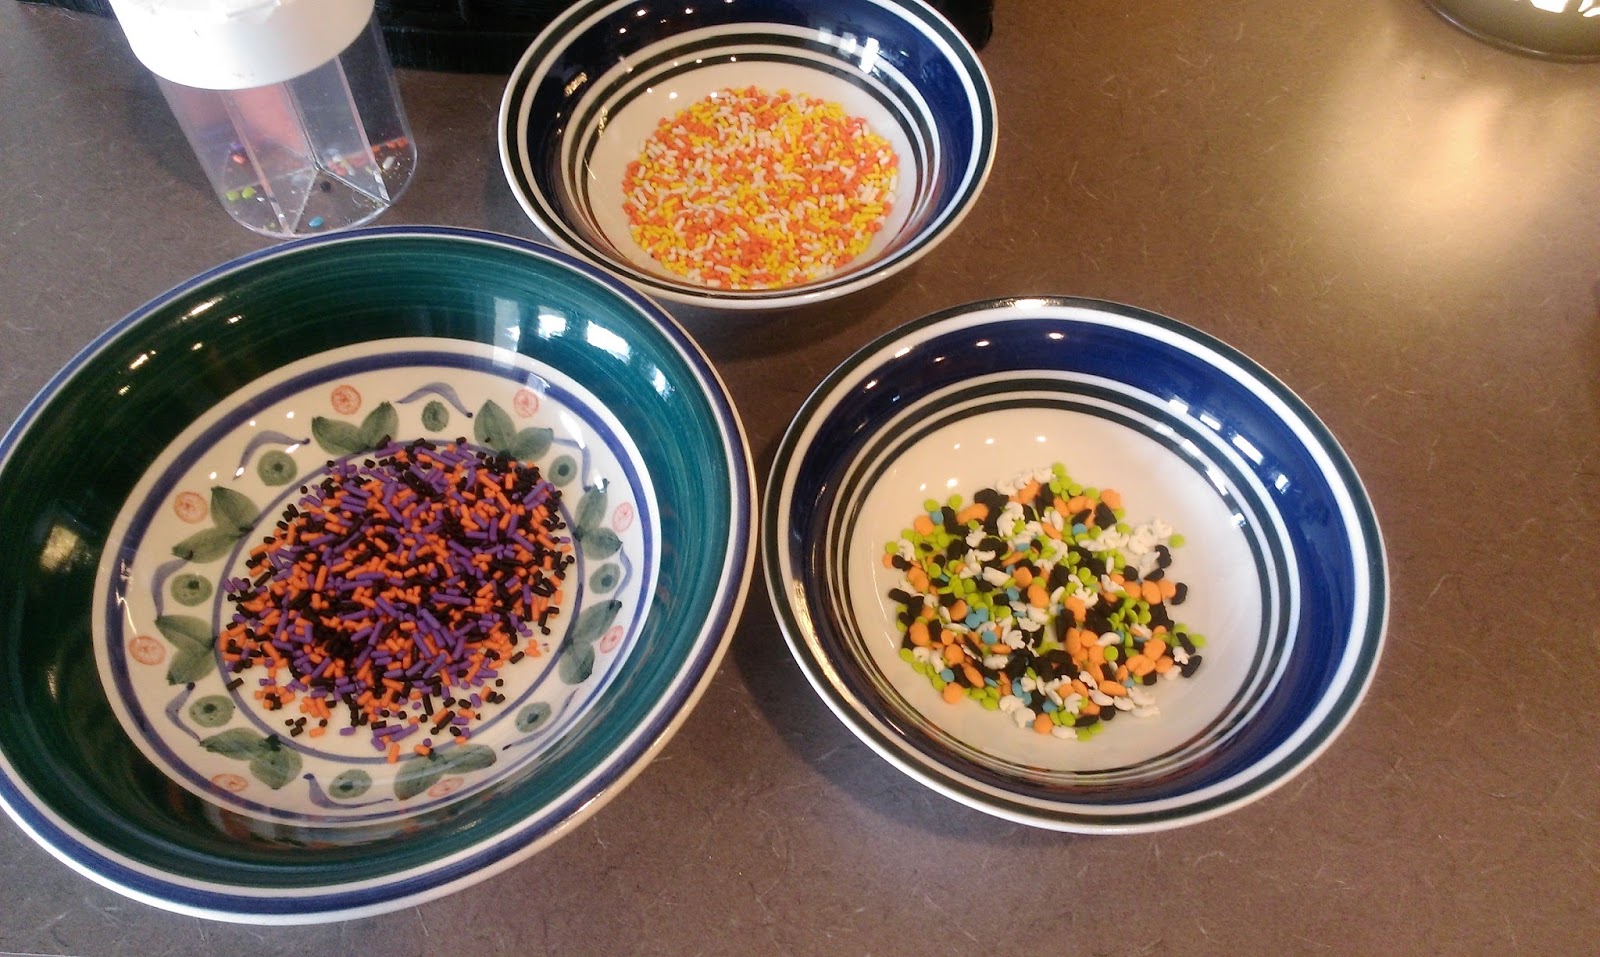
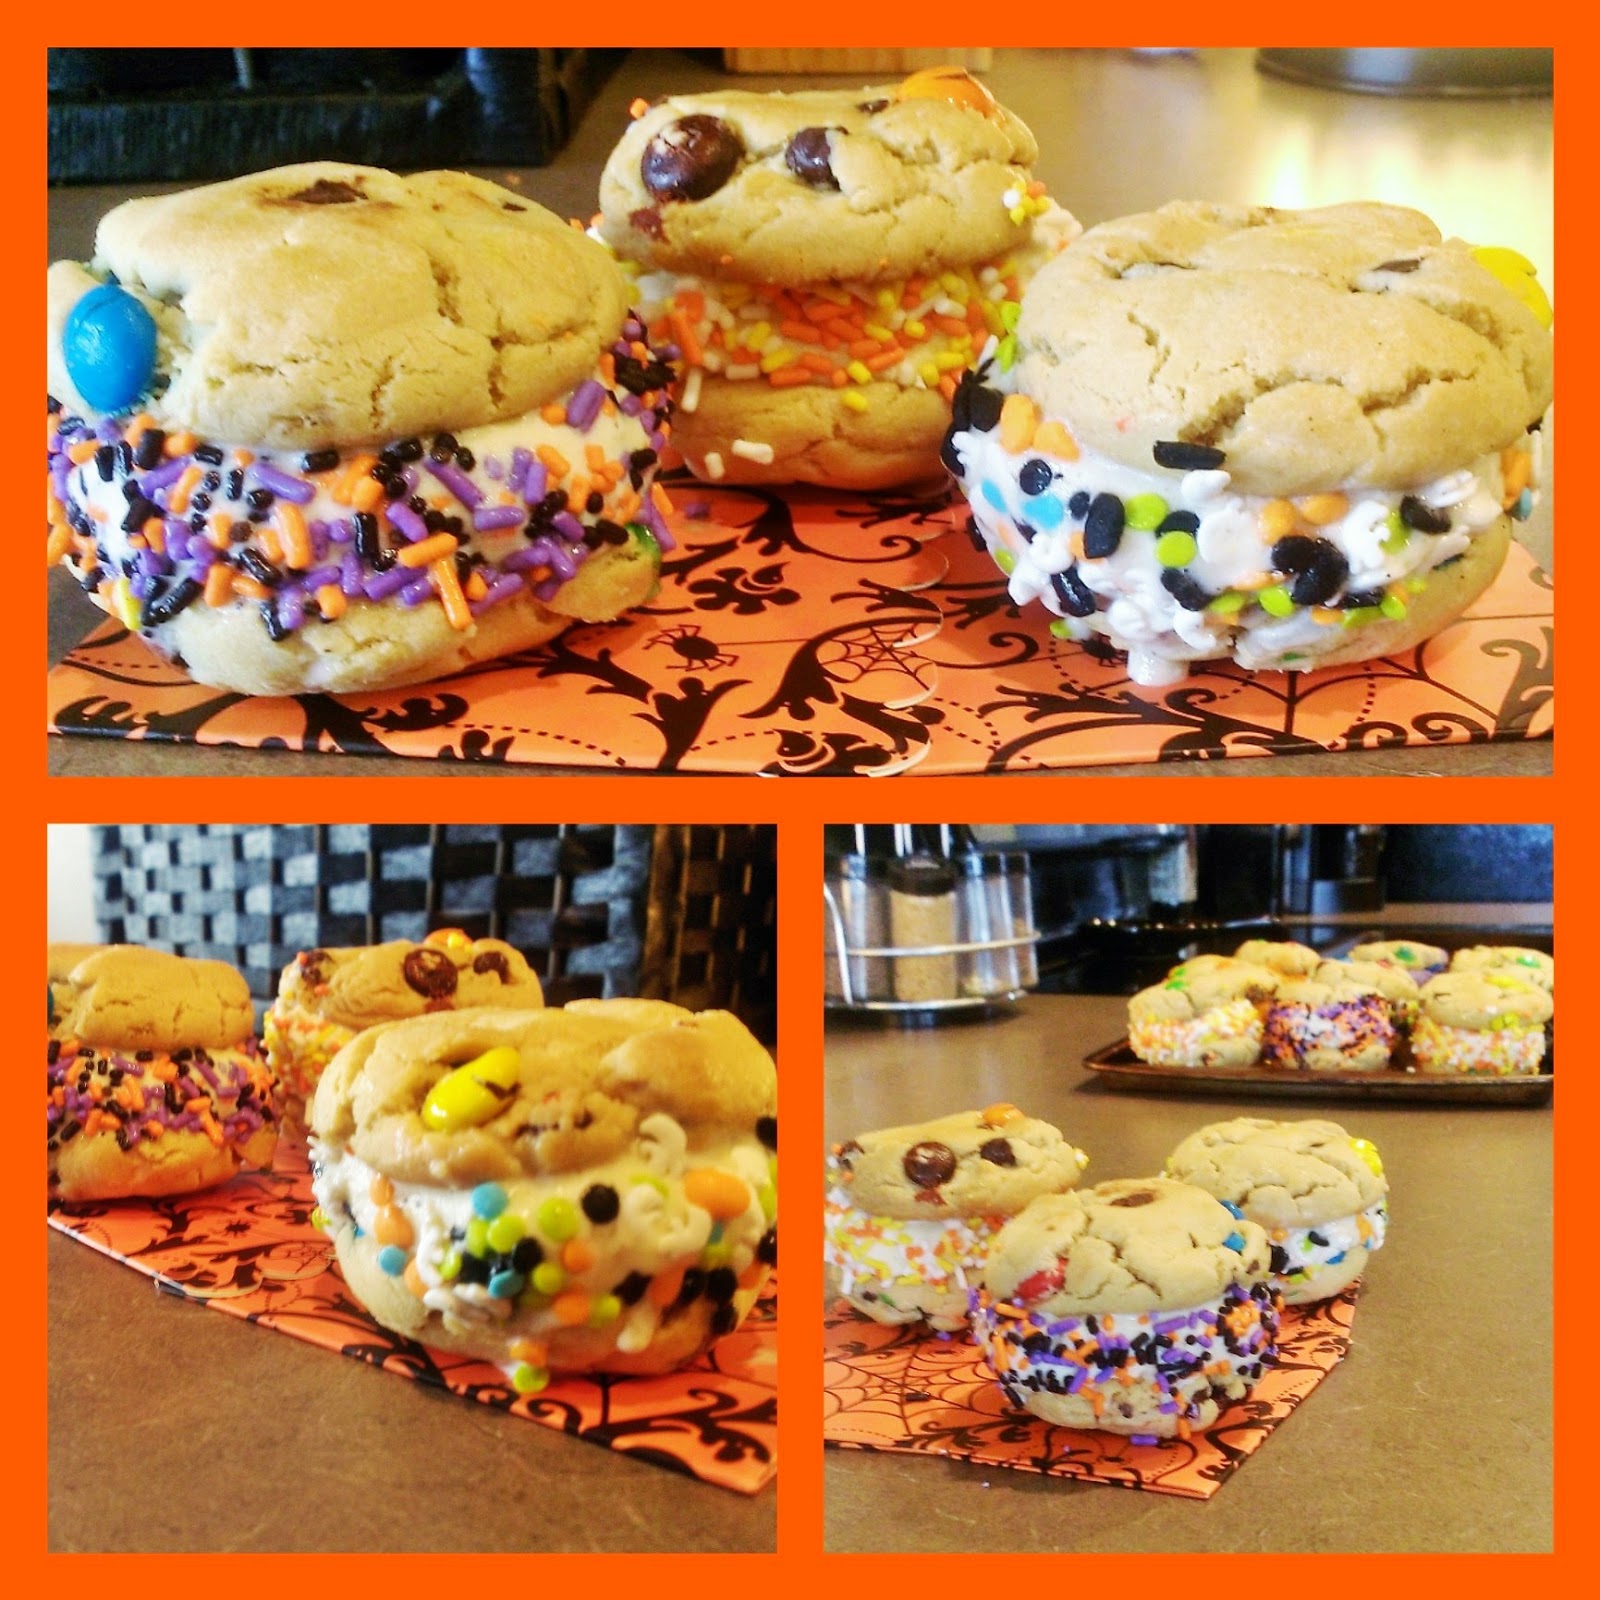
But not nearly festive enough for October…enter the spooky sprinkles. Since Halloween is undisputedly my favorite holiday, everything in my home has been on full creepy tilt since October 1st. Needless to say, I couldn’t just let these ice cream sandwiches sit there looking all Fourth of July Americana. I had to make them spooky, and this is where the sprinkles came in. I realize you might be thinking that sprinkles are the least terrifying thing in the world unless you drop a jar full of them in your kitchen because you’ll be cleaning up the aftermath for decades, but my sprinkles even had GHOSTS in them, so they were scary without the threat of a sprinkle grenade situation. Once my sandwiches were assembled, I simply rolled them in a bowl of sprinkles and placed back on a covered tray in my freezer.

I know, I have a serious Halloween problem. Y’all…my husband is my idea man for a reason. These things are amazing even though they were made with nary a trace of Blue Bell. I might have died of pure bliss if they had been made with it, so perhaps I should thank the cruel fates for keeping my ice cream out of reach. These sandwiches are so easy to assemble, and yet they taste like something concocted at a Cold Stone Creamery. You get the Cold Stone experience at home without all the weird singing employees and the actually having to be in public-ness of it all. If that isn’t a win for you, you’re probably reading this off stolen WiFi in a coffee shop because you just can’t get enough of having strangers around you. I’m gonna back away now and go cuddle with my dogs like a proper introvert. ‘Til next time, my fellow eaters!
-
So Long, Summer!
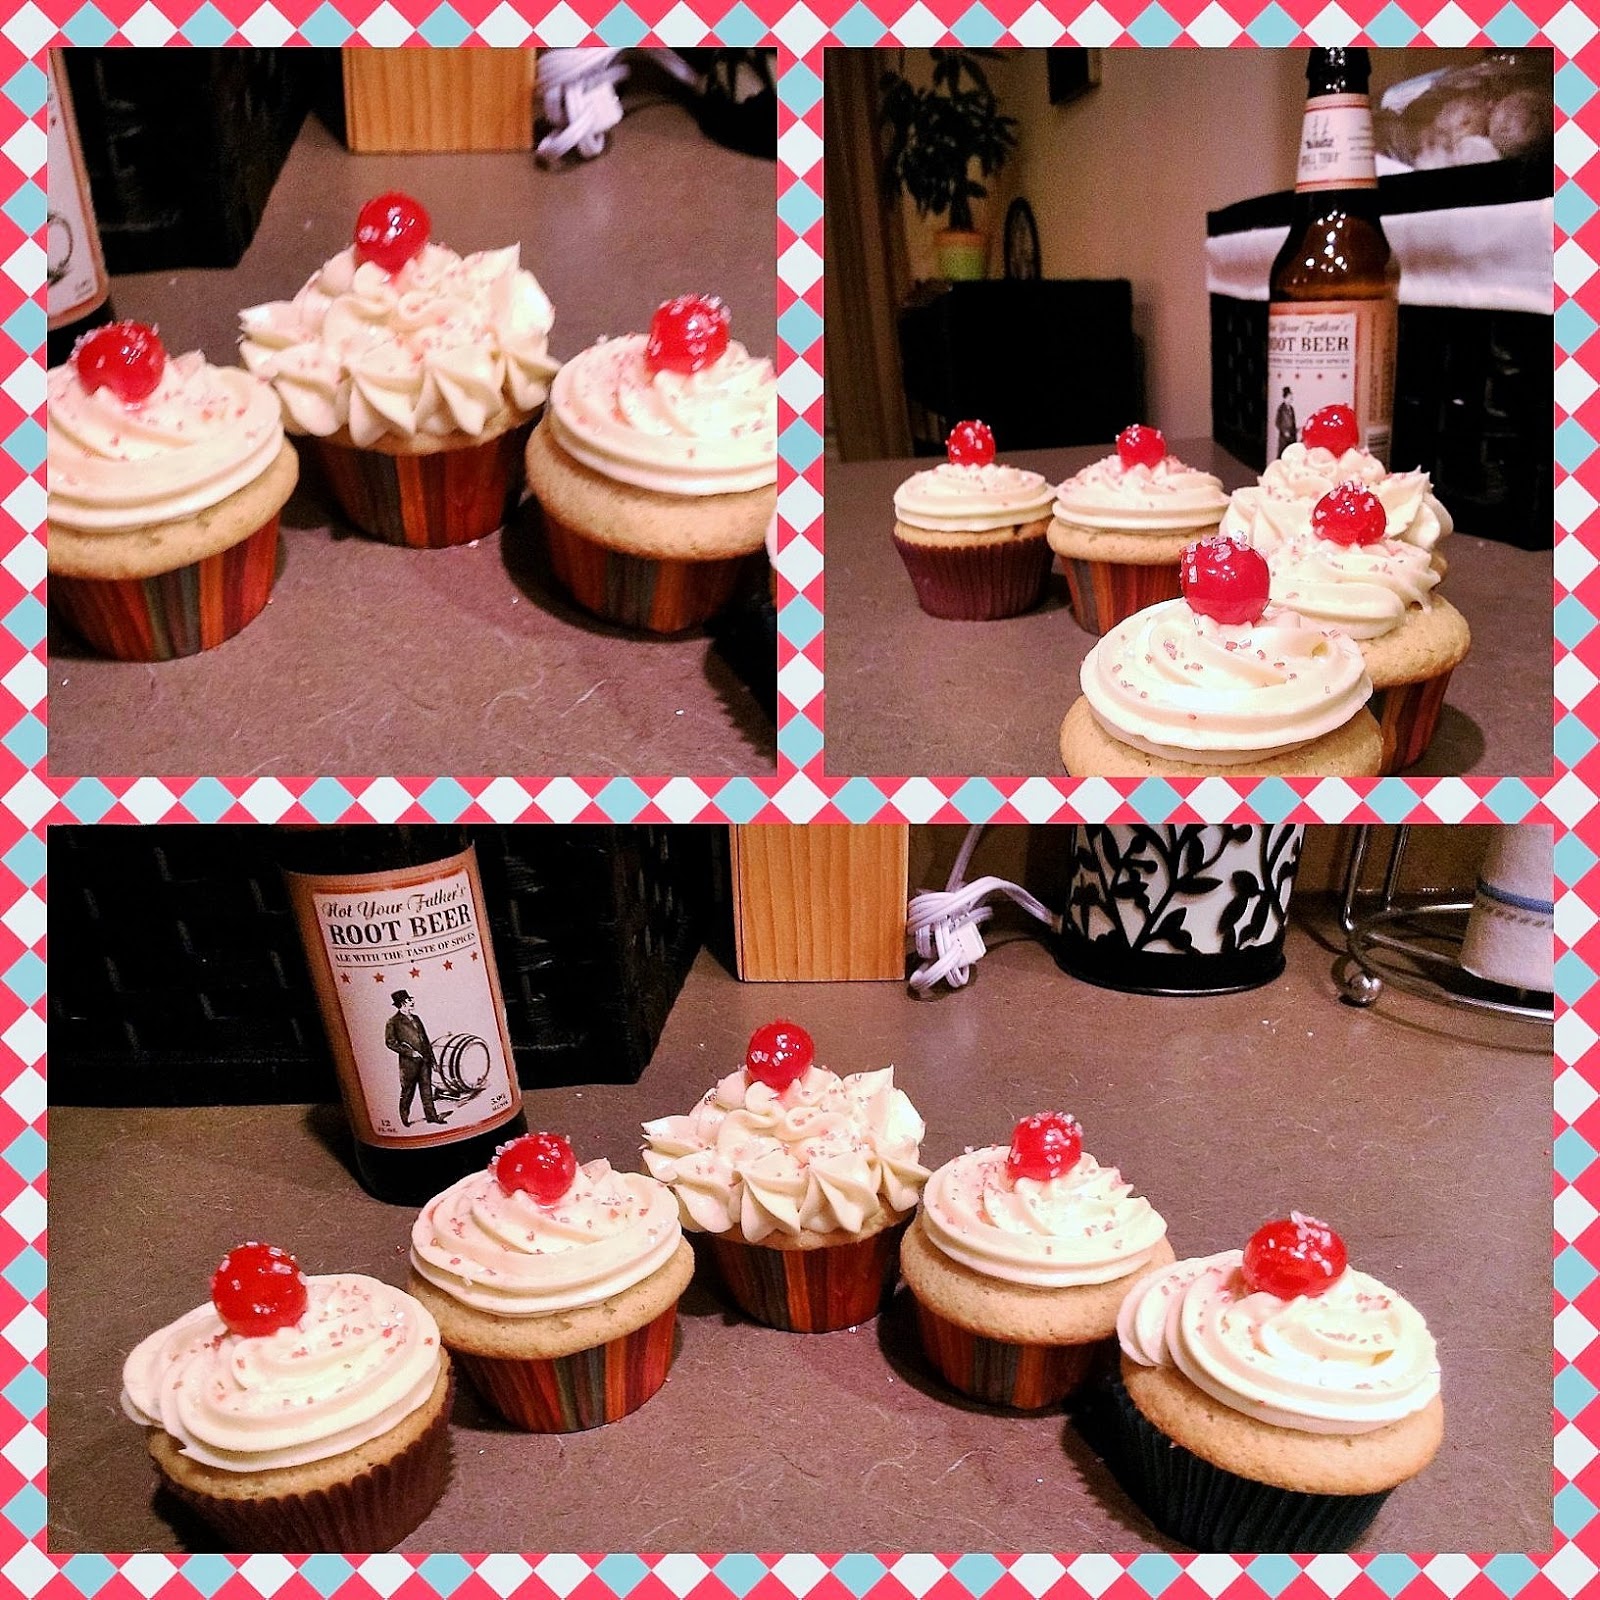
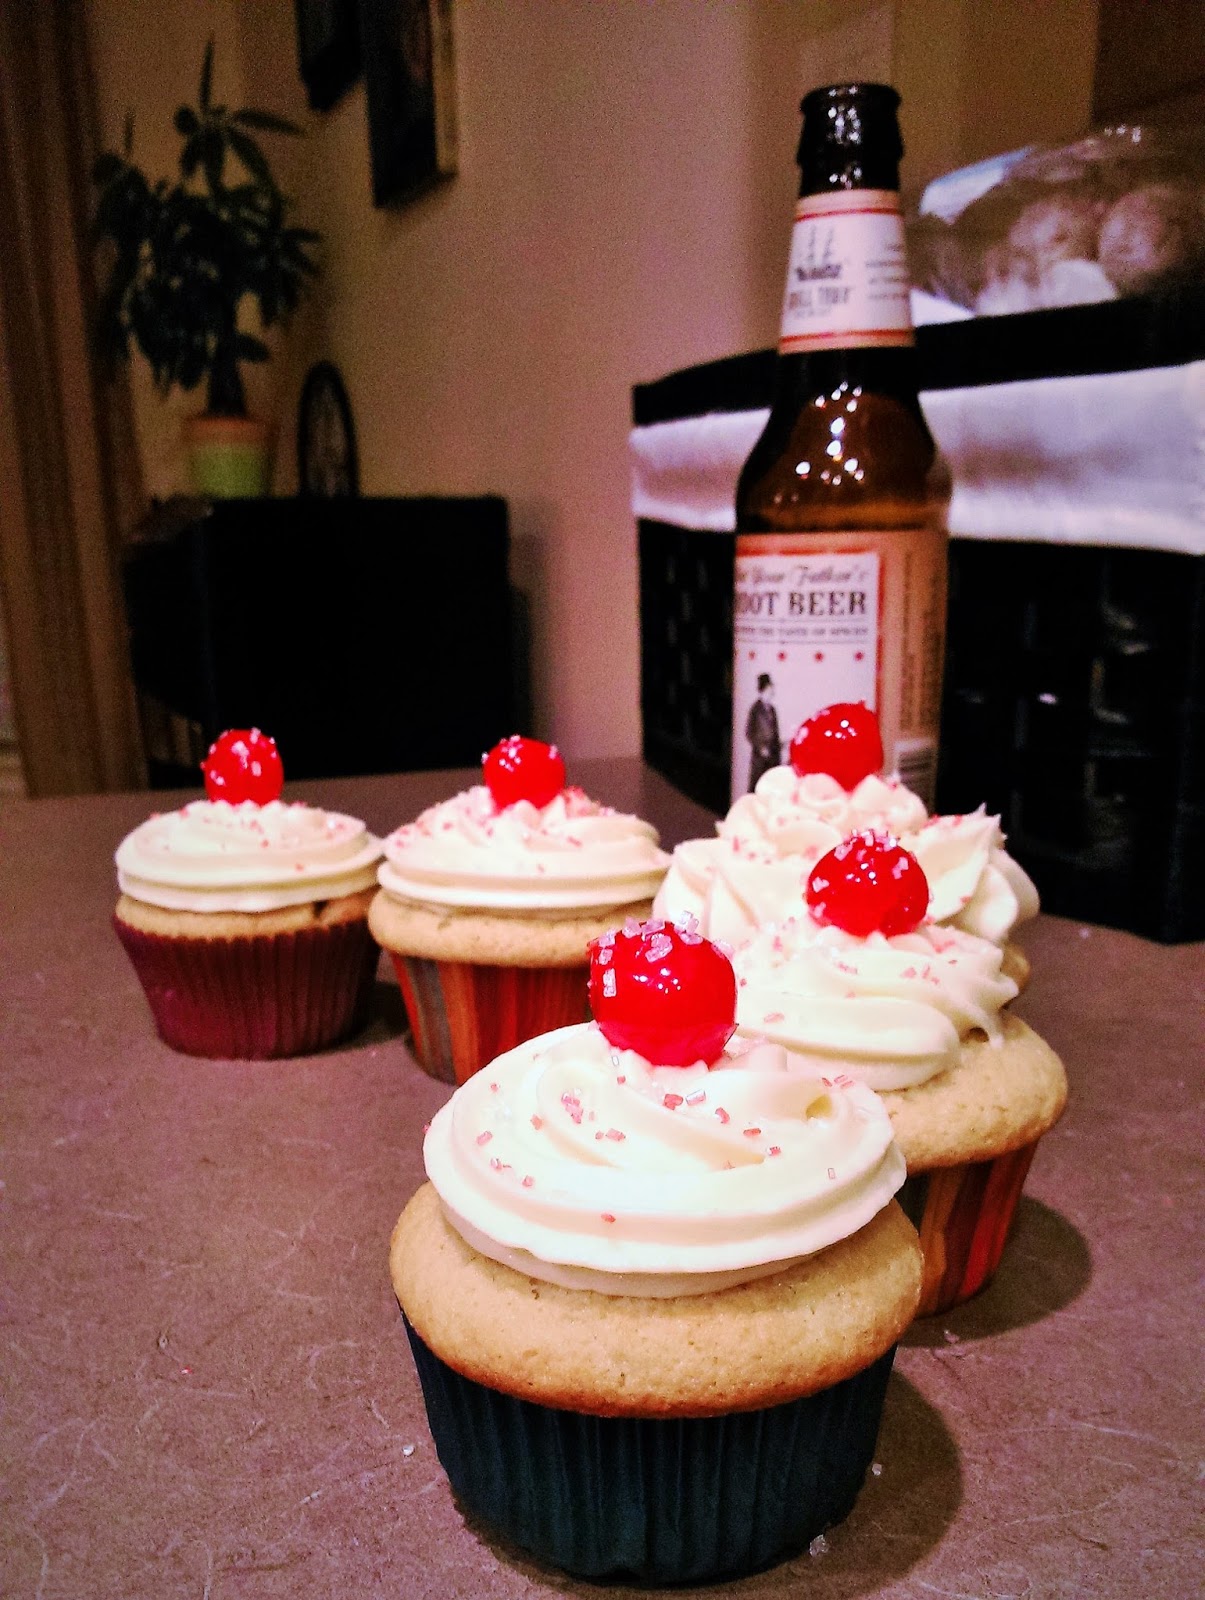
Welcome to another riveting round of “Can She Find a Way to Put Booze in That?” …the short answer is always yes. I mean, I’m still not good enough to turn water into wine, but I have found a way to add Baileys, Guinness, tequila, and hard cider to a lot of cakes and baked goods. I love a good 2-in-1 deal (except when it comes to my shampoo and conditioner- there are reasons these things need to be kept separately). Summer has been hanging on tighter than a clingy girlfriend with three cats, but thankfully with the fall equinox things have started to cool down around here. I’m hopefully mere weeks away from adding to pumpkin spice to everything I eat except steak because even I can’t find a way to make that work, and in my family, beef is sacred and to be eaten only with a tiny amount of ketchup or A-1 (wearing stretchy pants while eating steak is optional but highly encouraged). I decided that in order to truly send off summer, I needed to come up with a farewell dessert. As it is plain to see, I will come up with just about the flimsiest of excuses to make dessert happen in this house. Vikings won the game? We need brownies to celebrate. I didn’t trip over myself for a full 24 hours? Better bake some cookies. So I found a recipe for root beer float cupcakes and had a moment of pure genius. A few weeks ago I was having a really rough day (either grading papers or a bad hair day were involved), and I decided I was going to make myself a root beer float with Not Your Father’s brand root beer. These delightfully wonderful people came up with a root beer that actually tastes like root beer and is also packed full of alcohol. What I do for baked goods, these people did for a classic beverage. Sadly, I am not being paid to promote this boozy root beer, but if anyone wants to send a few cases my way, I am not going to object. Meet the spiked root beer float cupcake:

Seriously, they’re not paying me to promote this product. I just love it that much. It fills me with glee (that could also just be the alcohol). I’m sure everyone is aware that the best part of the root beer float is the creamy mix of root beer and ice cream that forms at the bottom of the glass. These cupcakes taste just like that with the added bonus of frosting that will give you a bit of a buzz. They are insanely easy to make…like even if you had half a sixer of this root beer I’d still have faith that you could bake these without burning your house down. Just don’t forget the oven mitts when removing from your oven. Can’t say I didn’t warn you.

I know, I had no idea root beer extract was a thing either, but now I want to put it in everything. Root beer extract is the new pumpkin spice in my book. I’m trying to break the basic white girl barrier… I found to original recipe for these cupcakes here, so if you’re weird and want booze-free cupcakes, have at it. I mean, I guess if you have kids you shouldn’t make boozy cupcakes and then flaunt it to their tiny little faces that they can’t have any. That would be mean and totally something I would do, which is another sterling example of why no one should ever leave their children with me. So here’s what you need for the spiked cupcakes:
- 3/4 cup room temp butter
- 1 1/2 cups sugar
- 2 1/2 cups flour (loosely packed, not hard packed)
- 2 1/2 tsp baking powder
- 1/2 tsp salt
- 3 room temp eggs
- 1 tbsp root beer extract/concentrate
- 1/2 tsp vanilla extract
- 1 cup of Not Your Father’s or Coney Island hard root beer
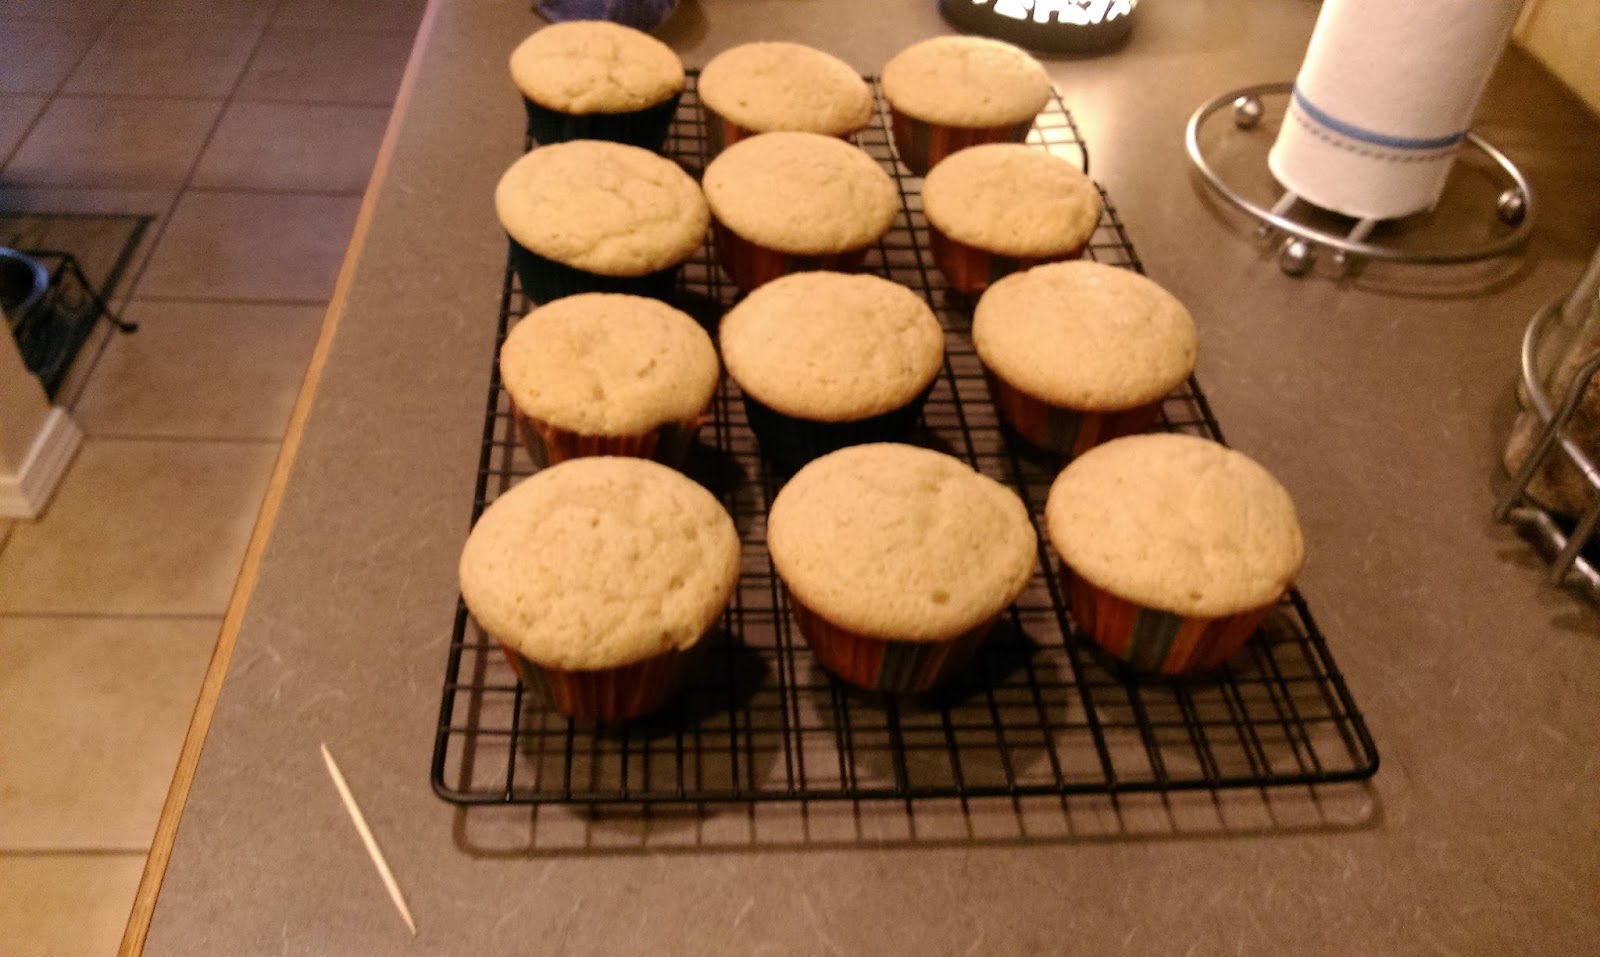
Start by preheating your oven to 350 and lining your muffin tin with cupcake liners. This recipe yields 18 cupcakes, so if you have two muffin tins, throw in some more liners. Cream together the butter and sugar for 3-4 minutes or until fluffy. While that is mixing, in a medium bowl throw together the flour, baking powder, and salt and set aside. Once the sugar butter is done, throw in each egg, one at a time, and mix well. Add in the root beer concentrate and vanilla and blend. Throw in a third of the flour mix and a third of the hard root beer and mix until just incorporated. Repeat this until you’ve used all of the flour mix and all of the root beer. Pour your batter into the cupcake liners until they’re 2/3 full and bake for 18-20 minutes or until a toothpick comes out clean.

My house smelled like the inside of an IBC root beer bottle, and it was fantastic. Let the cupcakes rest in the muffin pan for 5 minutes before removing to a cooling rack. Once my second batch was out of the oven, I started making the frosting. Normally I take a picture of the ingredients I use to make frosting, but this time I was super excited and somehow also tired at the same time because it was like 10 p.m., so I forgot. Don’t judge me, I bake when the will strikes me. The Dark Knight Rises was on TV, and I just can’t quit Christian Bale, OK?

And I mean, technically, the ingredients are pictured here…technically. But enough of my sass and sexy Batman reasoning, here’s what you need:
- 1 cup room temp butter
- 3-4 cups powdered sugar
- 1 tsp root beer extract
- 1 tsp vanilla
- 3 tbsp hard root beer
- Optional: maraschino cherries and sprinkles
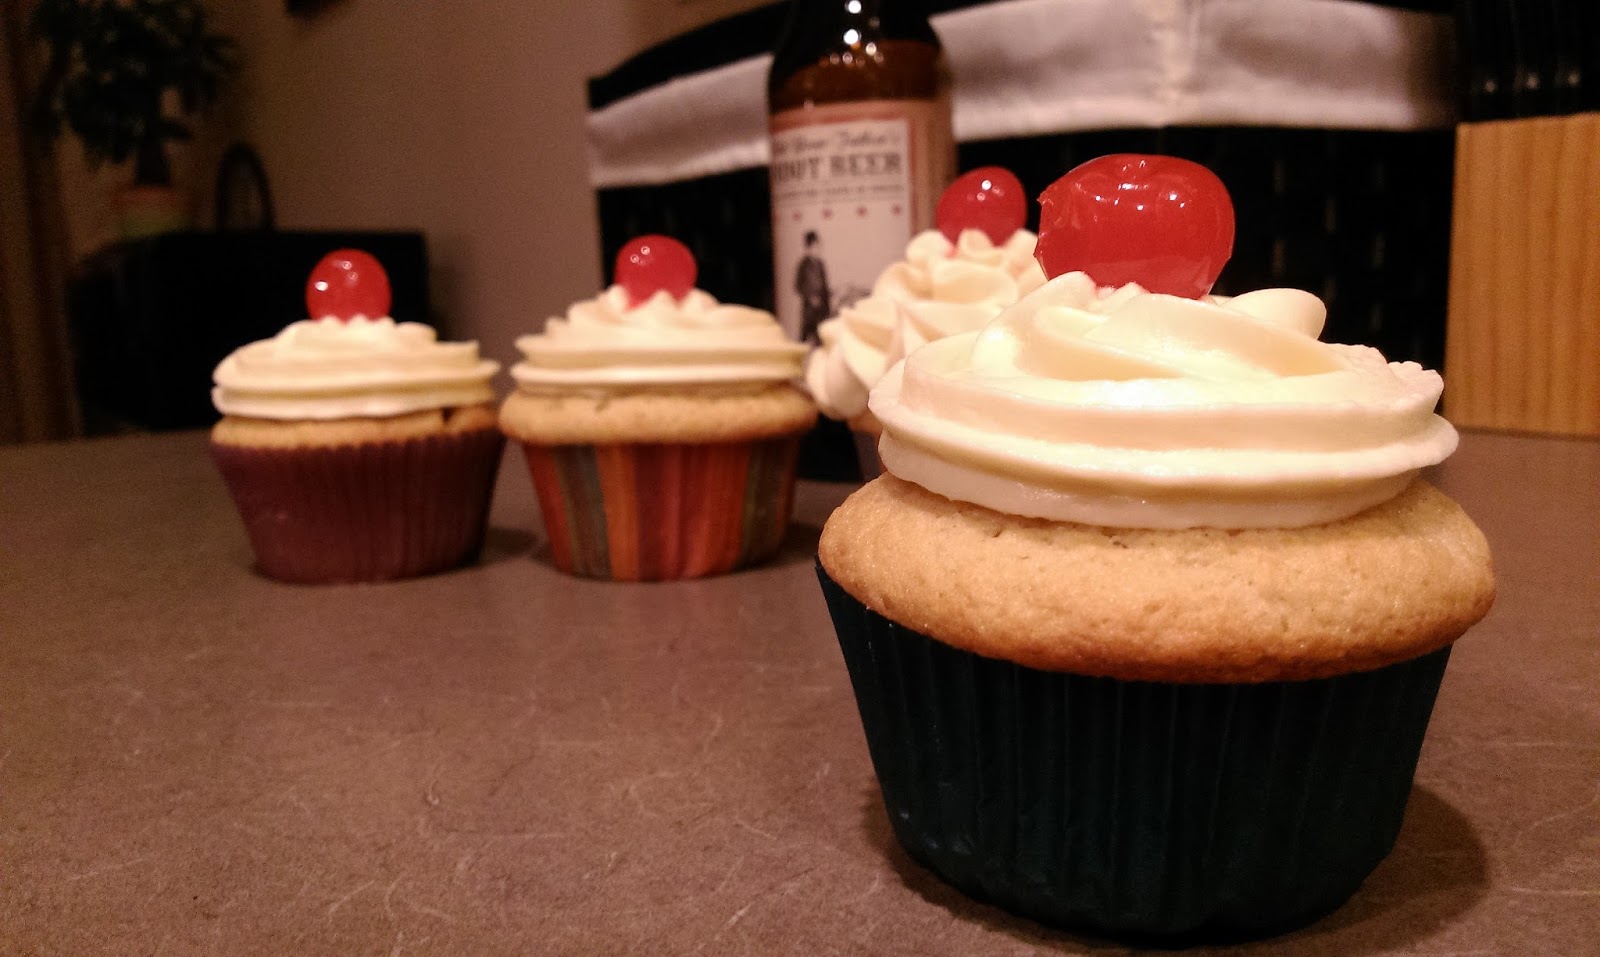
Depending on how thick of a frosting you want, use more or less powdered sugar. I used 4 cups of powdered sugar because I wanted a frosting thick enough to hold its shape for piping. Mix together the butter and a cup of sugar for a minute, then add in the root beer extract, vanilla extract, and a tablespoon of hard root beer. Mix well before adding in another cup of sugar and another tablespoon of hard root beer. Repeat the process one last time with the remaining cup or two of sugar and the last tablespoon of extract. I loaded a piping bag fitted with a 1M tip for decorating.

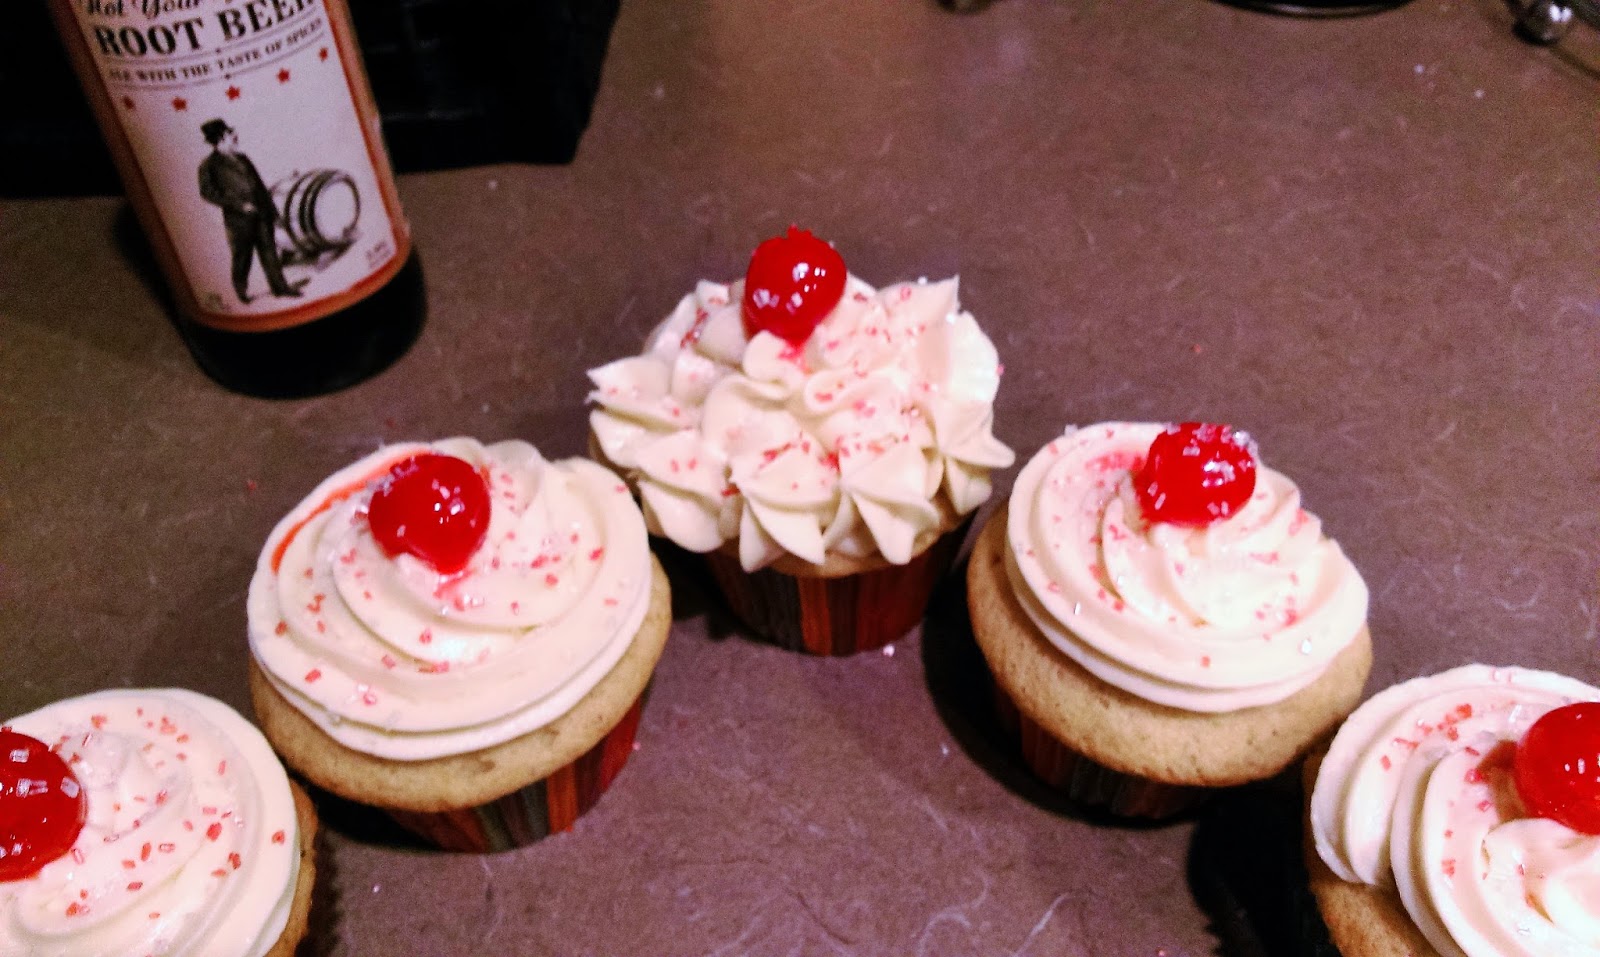
So swirly! I did a typical frosting job here and just started on the outside edge of each cupcake and swirled my frosting in a circle and piped a larger mound in the center of the cupcake to put my cherries into. I had some extra frosting by the end, so I only frosted one cupcake differently:

One of these things is not like the other, one of these things has 50 added calories because of all the frosting… For the cupcake in the center, which honestly I liked the best, so go figure that it was the last one I decorated, I made a large mound of frosting in the center of my cupcake and then surrounded it by piping little stars one at a time around the edge. I finished off by literally adding a cherry on top and, of course, sprinkles of the red and white variety to complete the look.

Everything is just that much better with sprinkles. There are very few adjectives that could properly sum up how amazing these cupcakes taste, but the ones that come to mind are delicious, soft, and a mouth-watering punch of root beer for your taste buds. Plus there’s the added bonus of the fact that these cupcakes also come with alcohol content! I could eat these for breakfast, lunch, and dinner. I won’t lie, I did eat one with my breakfast this morning in place of a donut. Life is all about choices, people. Choose the boozecakes, they’re probably better for you than powdered donuts anyway. But between the Baileys cream cheese brownies from two weeks ago and now these spiked root beer float cupcakes, we’re sitting pretty (and slightly leaning to the left) in this household. Time to go celebrate that Vikings victory with a cupcake. ‘Til next time, my fellow eaters!
-
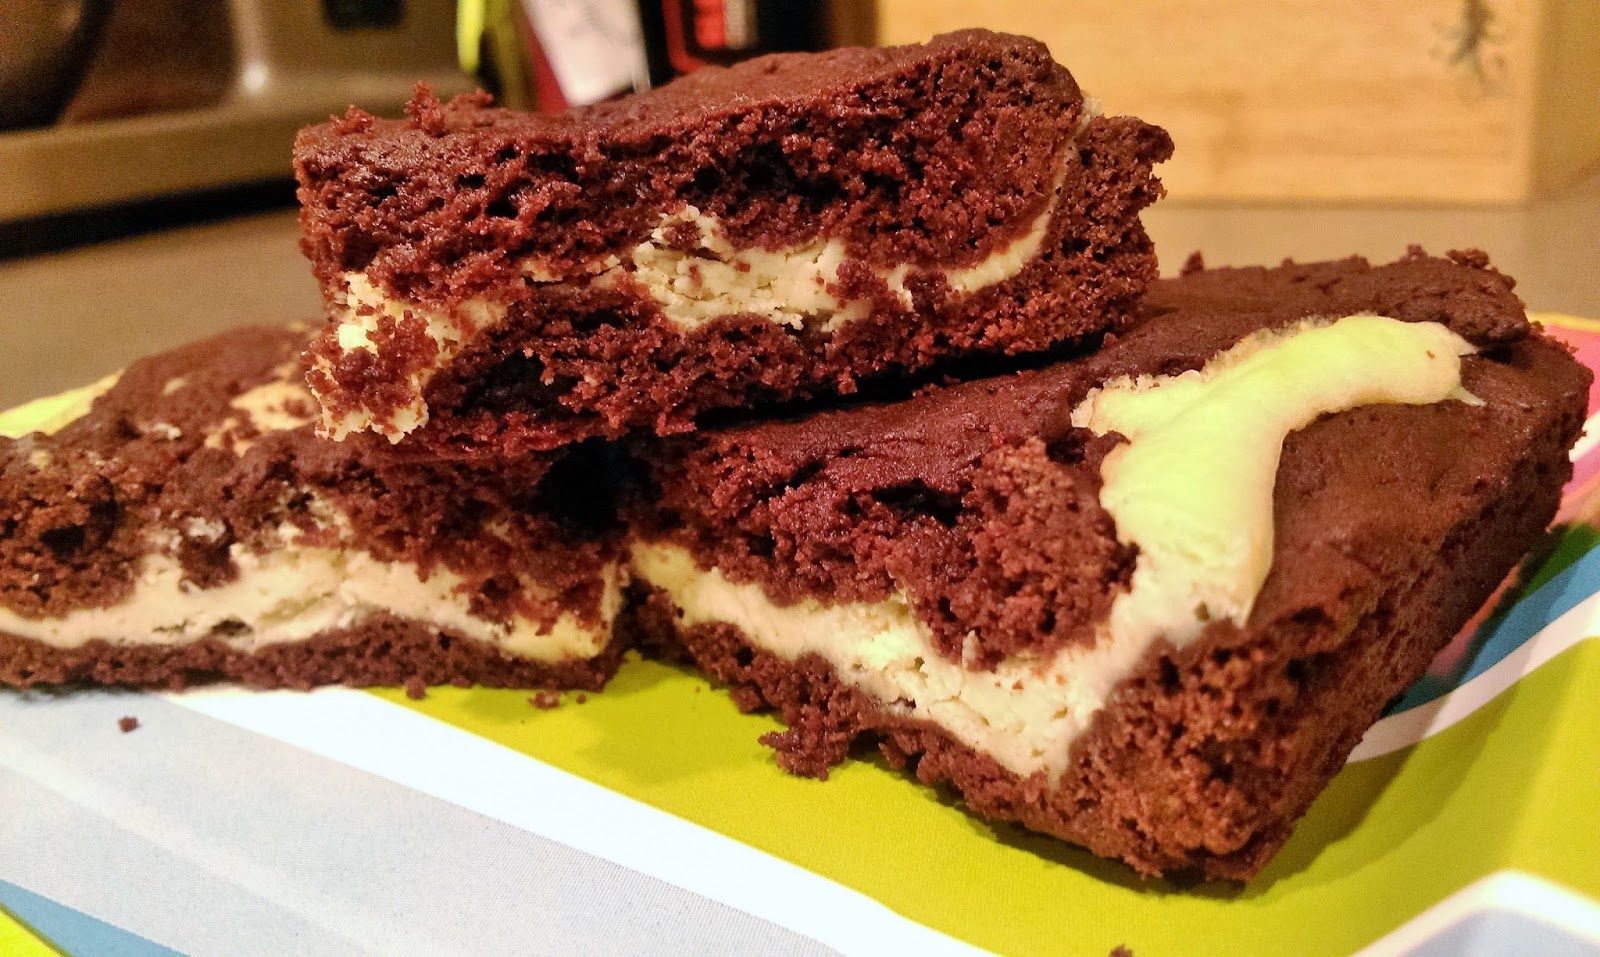
When Drinking Baileys Just Isn't Enough…
It’s that glorious time of the year when the temps are falling and white girls everywhere are Instagramming their pumpkin spice lattes. While I will pumpkin spice all the things eventually, I’m too caught up in yelling at my TV because sitting at the precipice of Autumn means one wonderfully American thing: NFL football is back on TV, baby. My dogs are going to have to readjust to my fanatical screeching, as to my knowledge, doggy ear plugs have not been invented (if I just gave you your million dollar idea, I expect to be cut in for a substantial profit). I get extremely worked up over most sporting events (hockey, tennis, NASCAR, professional bowling…), but football will always take the cake for me. Well, in this case, it will always take the brownies for me. To celebrate the arrival of what SHOULD be fall weather (New Mexico has other ideas) and the return of football, I made a batch of brownies. But these aren’t just any brownies, my dear readers. The brownies are filled with a layer of Baileys cream cheese.

Because sometimes, just drinking Baileys isn’t enough. I am almost entirely certain God put me on this Earth to try to find or create as many dessert + booze combinations possible and spread my creations on to mankind. A sort of dessert prophet, if you will. As of the posting of this blog, I have not been struck down by lightning nor has it started raining fire and brimstone, so I think I’ve made my point. Anyway, I know you’re familiar with my Guinness chocolate cake with Baileys frosting, so you know that I keep a hearty stock of Irish cream in my home. I’m a firm believer that Baileys can fix just about any problem a person might have. Not a morning person? Some Baileys in that coffee will perk ya right up. Teenagers driving you crazy? A good Baileys buzz can make even the grumpiest of children tolerable. In a place where drinking Baileys isn’t socially acceptable (shudder)? Eat it, instead!

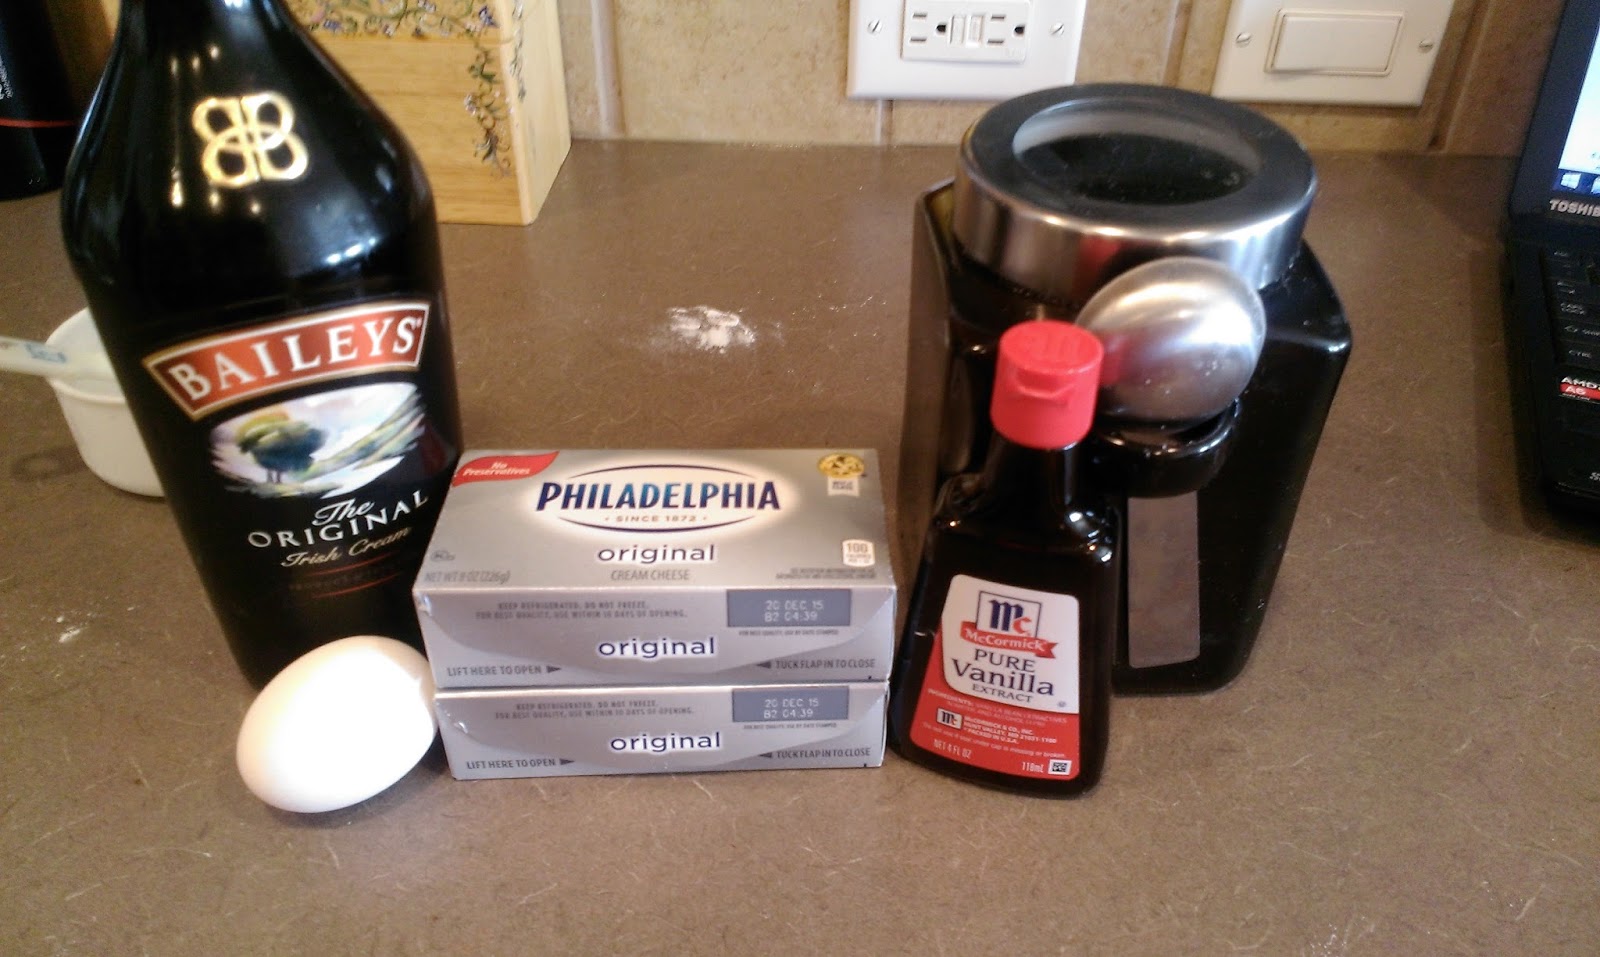
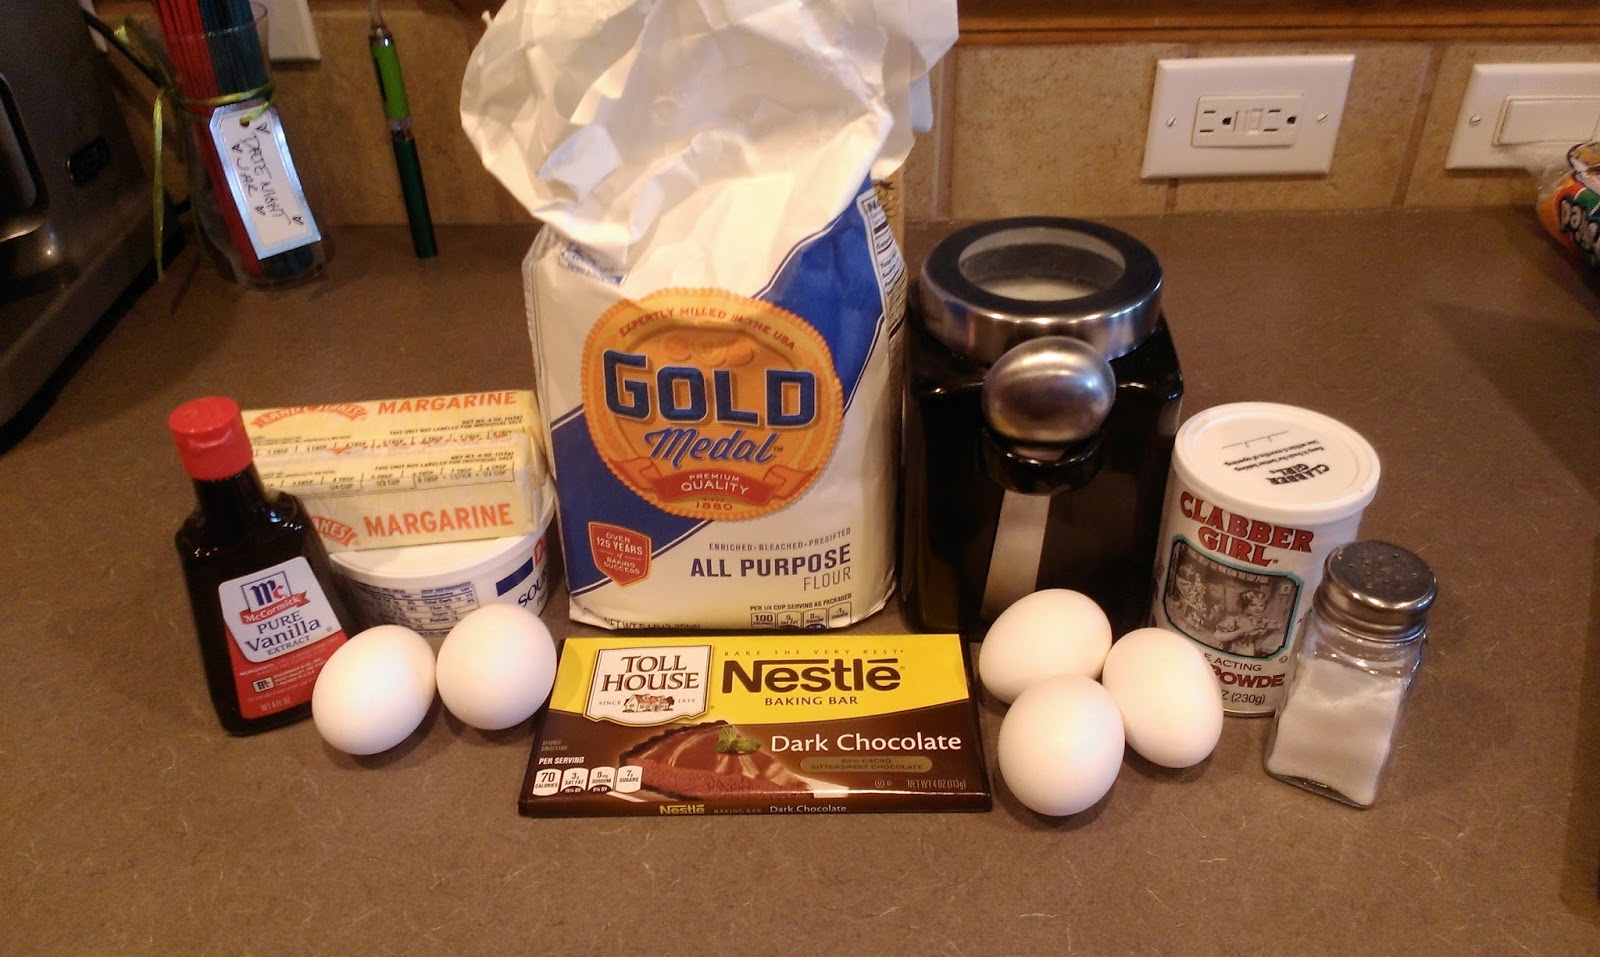
Always keep spare chocolate on hand for emergency booze brownies. I know, it looks like a lot of ingredients, but these are quite simple to put together. I found and made some changes to this recipe. You need:
- 1 1/2 C flour
- 1/2 teaspoon baking soda
- 1/2 teaspoon salt
- 12 tablespoons of butter (you’re gonna melt it, so no worries about coming to room temp)
- 1 C sugar
- 1/4 C water
- 1 C semisweet chocolate chips
- 8 ounces unsweetened baking chocolate
- 2 teaspoons vanilla extract
- 1 teaspoon espresso powder (I could only find giant jars of espresso powder, and I hate coffee, so the leftovers will exist until the end of time.)
- 4 eggs
Preheat the oven to 350 and grease a 9×13 jelly roll pan or baking pan with cooking spray. If you want thinner brownies, go for the jelly roll pan. If you like thicker, jaw-stretching and/or possibly jaw dislocating brownies, use a 9×9 pan (and increase baking time). Start by breaking up the baking chocolate into small squares and nuke following package directions until softened (but not fully melted). Get a large pot and bring the sugar, butter, and water to a gentle boil. Remove from heat and immediately add in chocolate chips, baking chocolate, vanilla, and espresso powder. Stir until the chocolate has melted. Let this cool off for about 10-15 minutes so you don’t scramble your eggs. I’d eat scrambled chocolate eggs, but this isn’t that kind of fusion recipe, so mix the flour, baking soda, and salt together in a medium bowl and then make your cream cheese filling to pass the time.
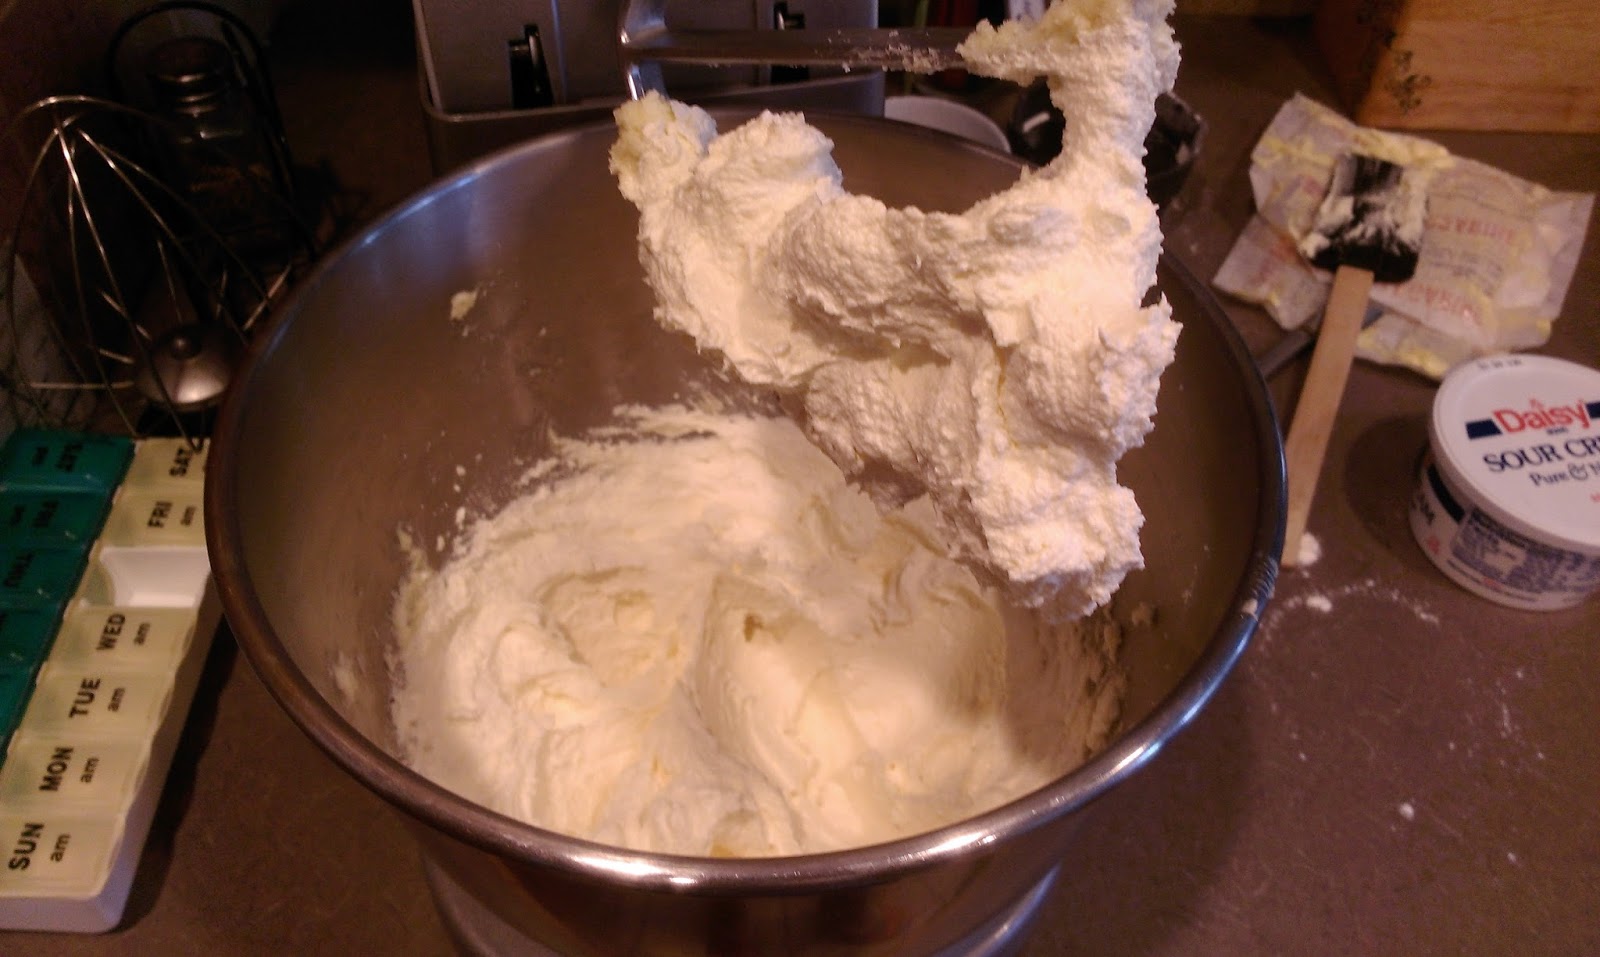
Cream cheese and Baileys…I could’ve just eaten this with a spoon. To make the filling you’ll need:- 2 8-ounce blocks of cream cheese at room temp
- 1 egg
- 1 teaspoon of vanilla
- 1/3 C of sugar (or more if you like sweeter filling)
- 1/4 C of Baileys (or more if you’re not busy drinking while baking…kidding. But if you use more sugar, throw some more Baileys in there, too, so the flavor is still there.)
Ready for this? Throw everything in the mixer on medium/high for 3 minutes. That’s it. It needs to be that simple in the event you have been sampling the sauce while putting together everything else. So easy, a drunk baker can do it! Now, once the chocolate mixture has cooled a bit, beat in each egg one at a time, and then slowly whisk in the dry flour mixture little by little until everything is incorporated. Take half of this chocolate batter and pour into your pan. Smooth out evenly like so:

Sadly, not enough batter to have any extra to lick. *Le sigh* 
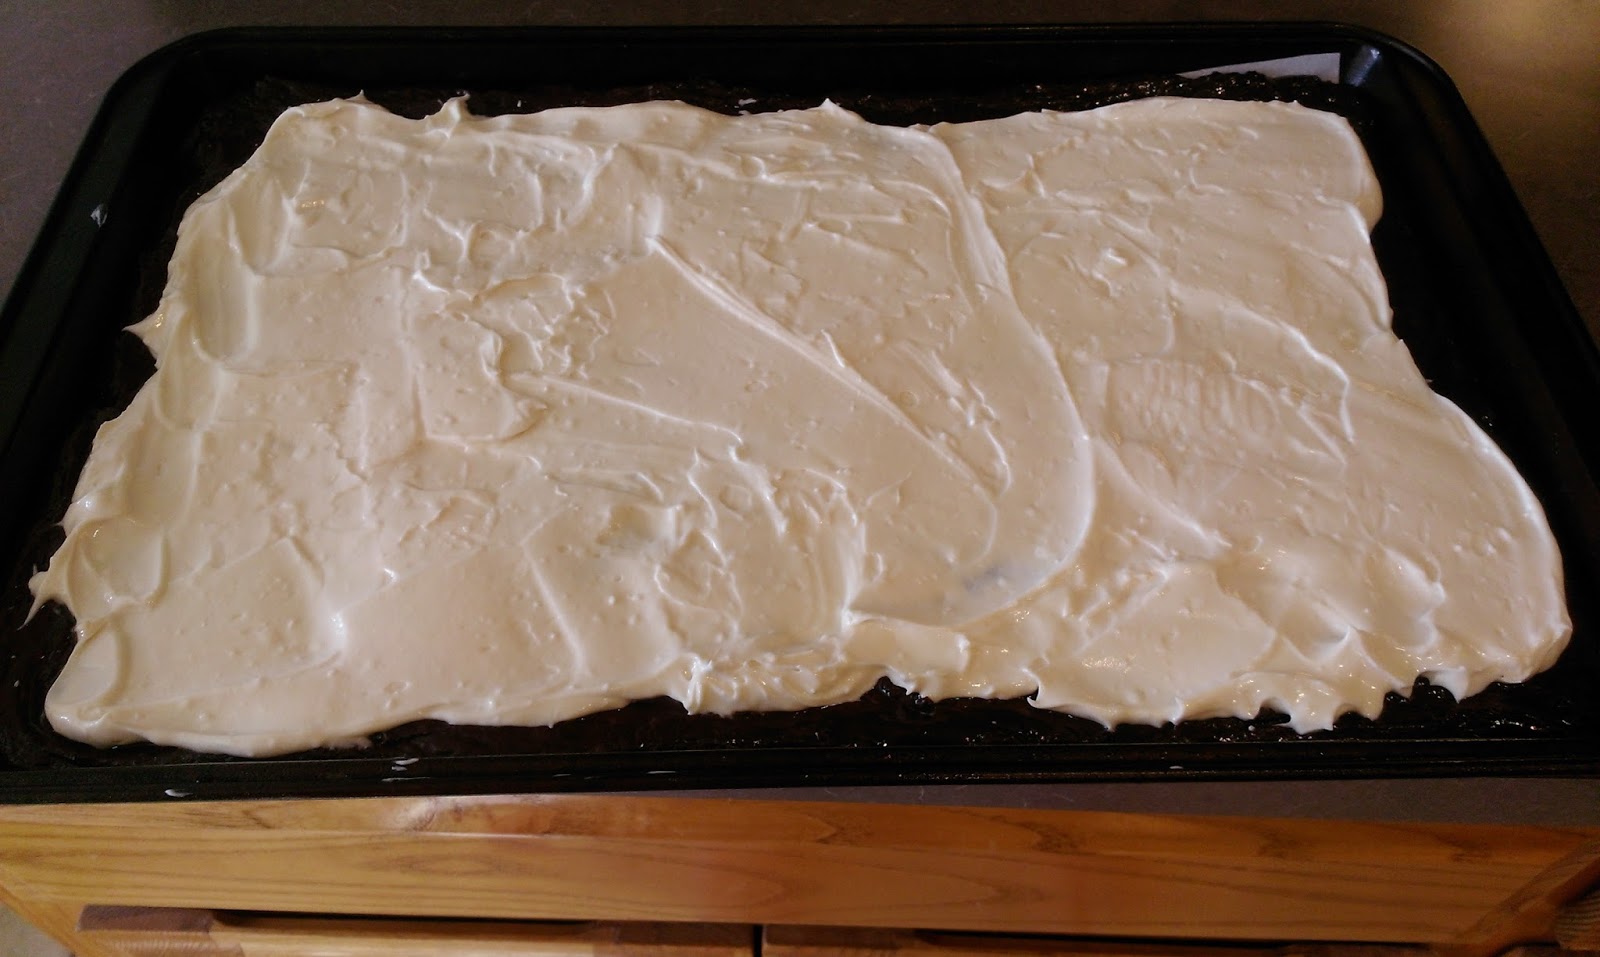
Then take the cream cheese filling and drop dollops of it over the bottom brownie layer. 
Smooth out relatively evenly with a small spatula. 
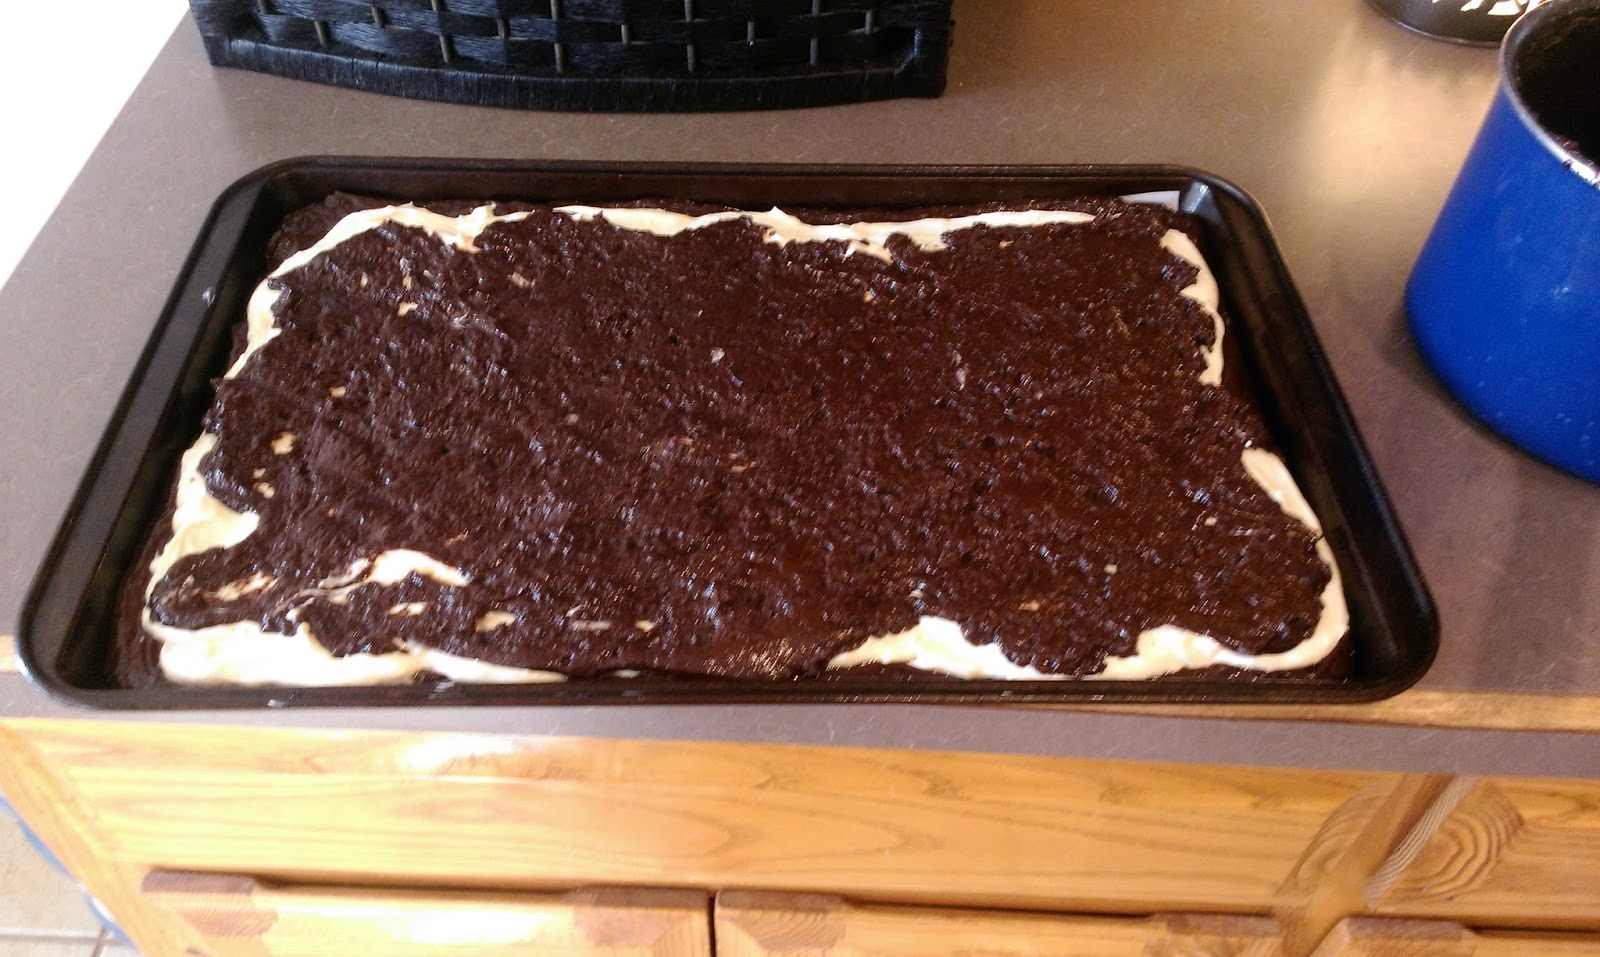
Finish up by spreading (gently, oh so gently) the rest of the brownie batter on top of the cream cheese filling. Place into the oven and bake for 20-25 minutes at 350. Start checking at about 20 minutes to see if the filling has set and the bottom layer has cooked using the toothpick test. If you’re baking in a deeper pan like an 8×8 or 9×13, you’d probably need to cook for double the time. I mean, I’d be more worried about what might happen to your jaw if these brownies were baked in an 8×8 pan, but live your life the way you want…just don’t burn the damn brownies. Once cooked, cool on a wire rack completely and then slice away.

Pictured: my life goals in one photo. Oh my GOD, these are the richest chocolate brownies I have EVER had in my LIFE. So rich it necessitated all the caps lock moments happening in the previous sentence. The filling is so delightfully sweet to offset the denseness of the chocolate brownies, and together these ingredients form a moment so blissful even angels would weep over their pure deliciousness. I’d like to think so anyway; after all, I am the dessert prophet, so I’m acutely aware of how heavenly these Baileys brownies are. I’d better go say a Hail Mary or two before pushing the envelope any further. ‘Til next time, my fellow eaters!
-
You Can't Take Me Camping, but You Can Take Me Baking.
I don’t do camping. It’s bad enough that there’s no indoor plumbing and humidity is my hair’s natural enemy, but the idea of being simultaneously eaten alive by mosquitoes and possibly bears just doesn’t sit well with me. I’m what you call an indoor housewife. My husband knows taking me camping will involve lots of bargaining, a possible diamond exchange, and at the bare minimum, a fifth wheel camper. Simply put, my idea of roughing it is staying at a hotel that doesn’t serve free breakfast. While camping is not for me, I realize other people are normal, not nearly as vain, and generally enjoying experiencing life outside of an air-conditioned room. Good for you, well-adjusted outdoorspeople. One of the only ways you’ll catch me entering a tent willingly is if there’s a cake inside of it. So when I was commissioned to make a campfire cake for a first birthday party, after the initial cold shiver at the thought of roughing it passed through my body, I decided camping wouldn’t be so bad if the outside world was less terrifying and more adorably sugar-filled.

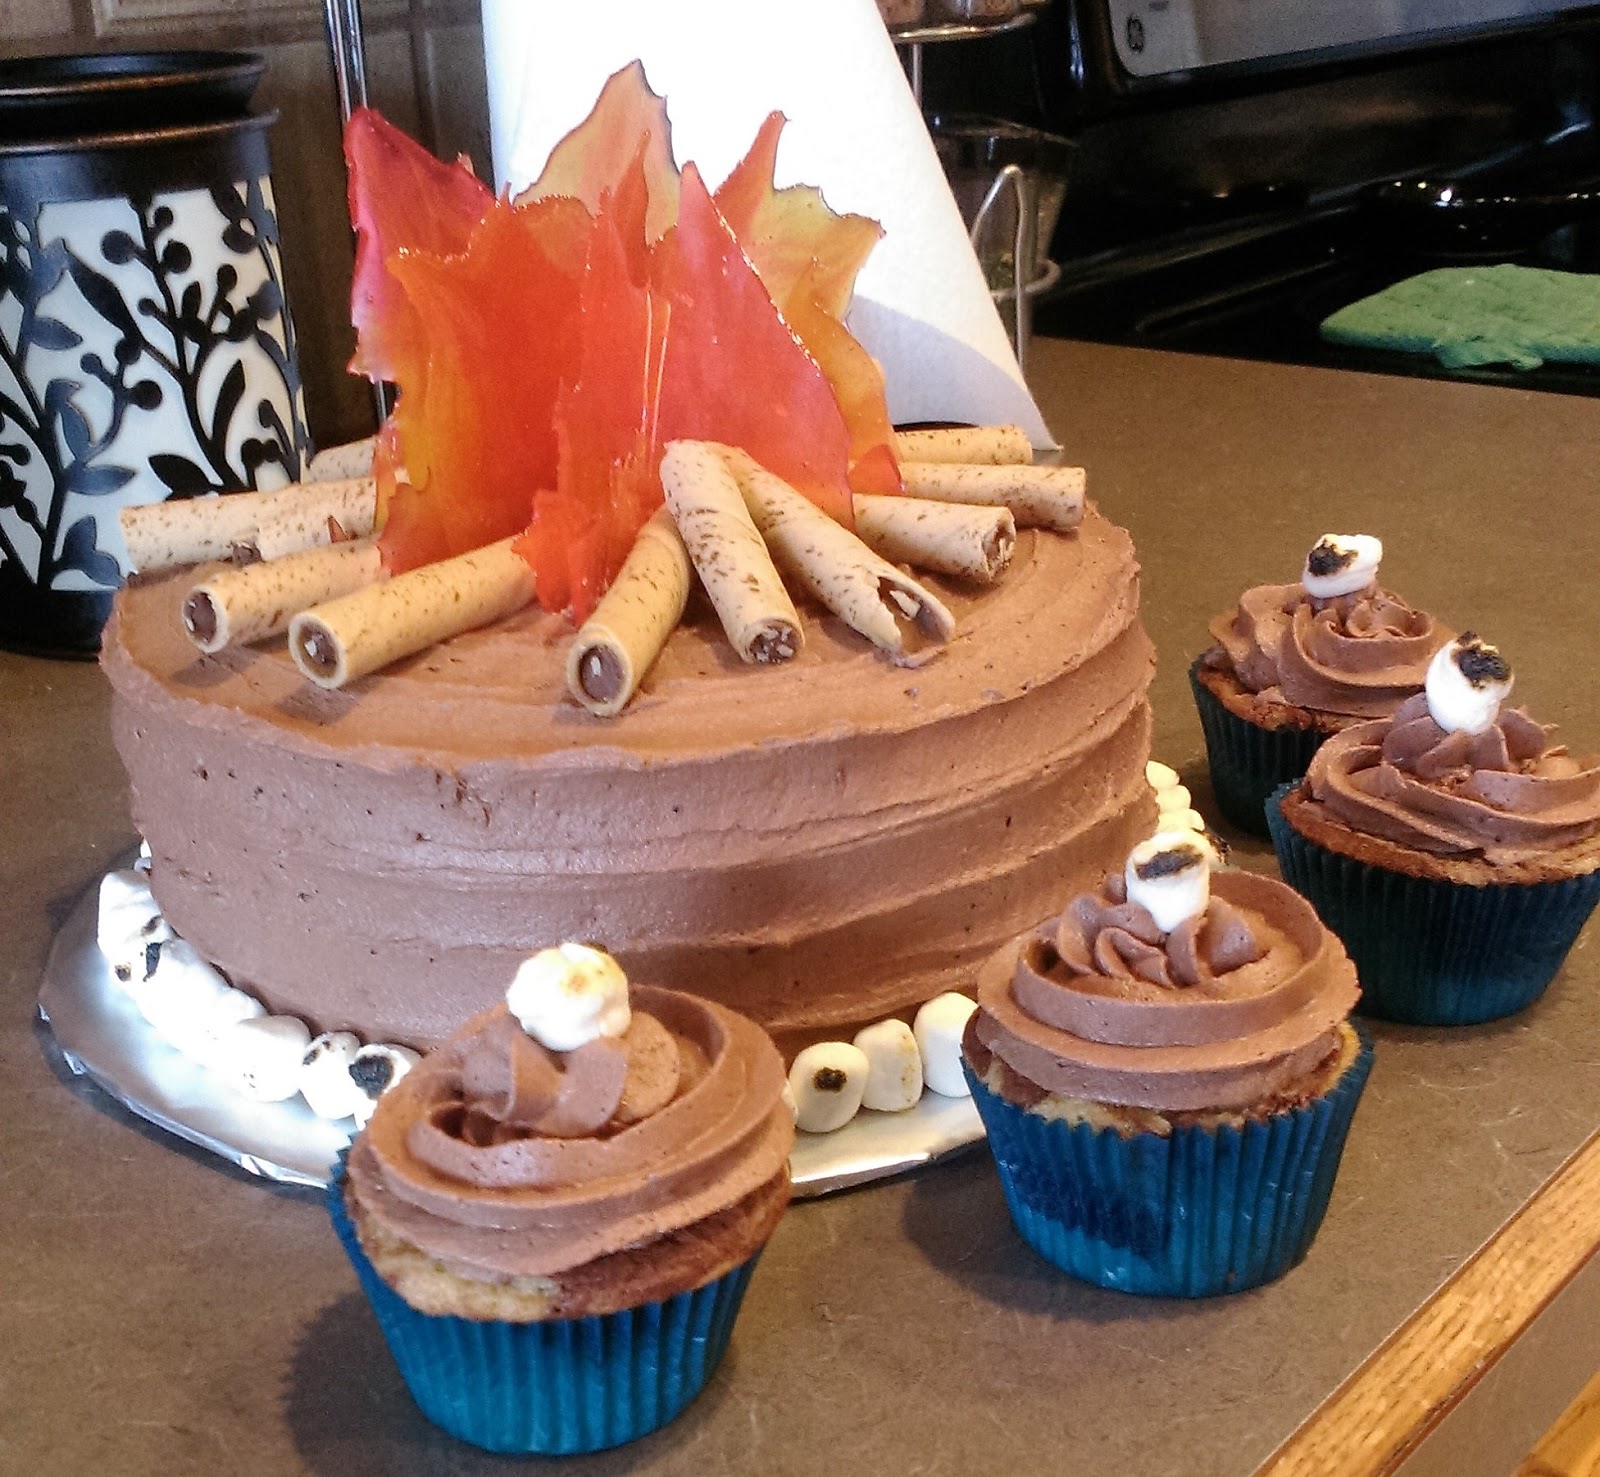
Like so. I will go to any function or location you ask me to if you promise me dessert (this is how my mother got me to go to church in my formative years without throwing fits…smart woman). The cake itself was a marble cake, as were the cupcakes, and I made a chocolate whipped buttercream to adorn them all. I sat down with a spoon and ate some of the leftover frosting. I don’t have a problem (I think); the frosting really was just that good. So let me teach you how to build the world’s tastiest campfire.

As with most cakes, butter is always a good starting ingredient. I found and adapted this recipe from A Taste of Home, and the extra cupcake I made told me that was a really delicious choice. Here’s what you need:
- 4 ounces of chopped bittersweet chocolate
- 3 TBS of melted butter
- 1 1/4 cup of butter at room temp
- 2 cups of sugar
- 5 eggs at room temp
- 3 tsp of vanilla
- 1/2 cup of sour cream
- 2 1/4 cups of flour
- 2 tsp of baking soda
- 1/2 tsp of salt
Start by preheating your oven to 350 and greasing 8-inch round pans. This recipe will make enough batter to fill 3 pans, or 2 pans and 5 cupcakes…dealer’s choice. Nuke the chocolate and 3 TBS of butter together until melted and smooth (follow the heating directions on the package). Set this aside to cool off.

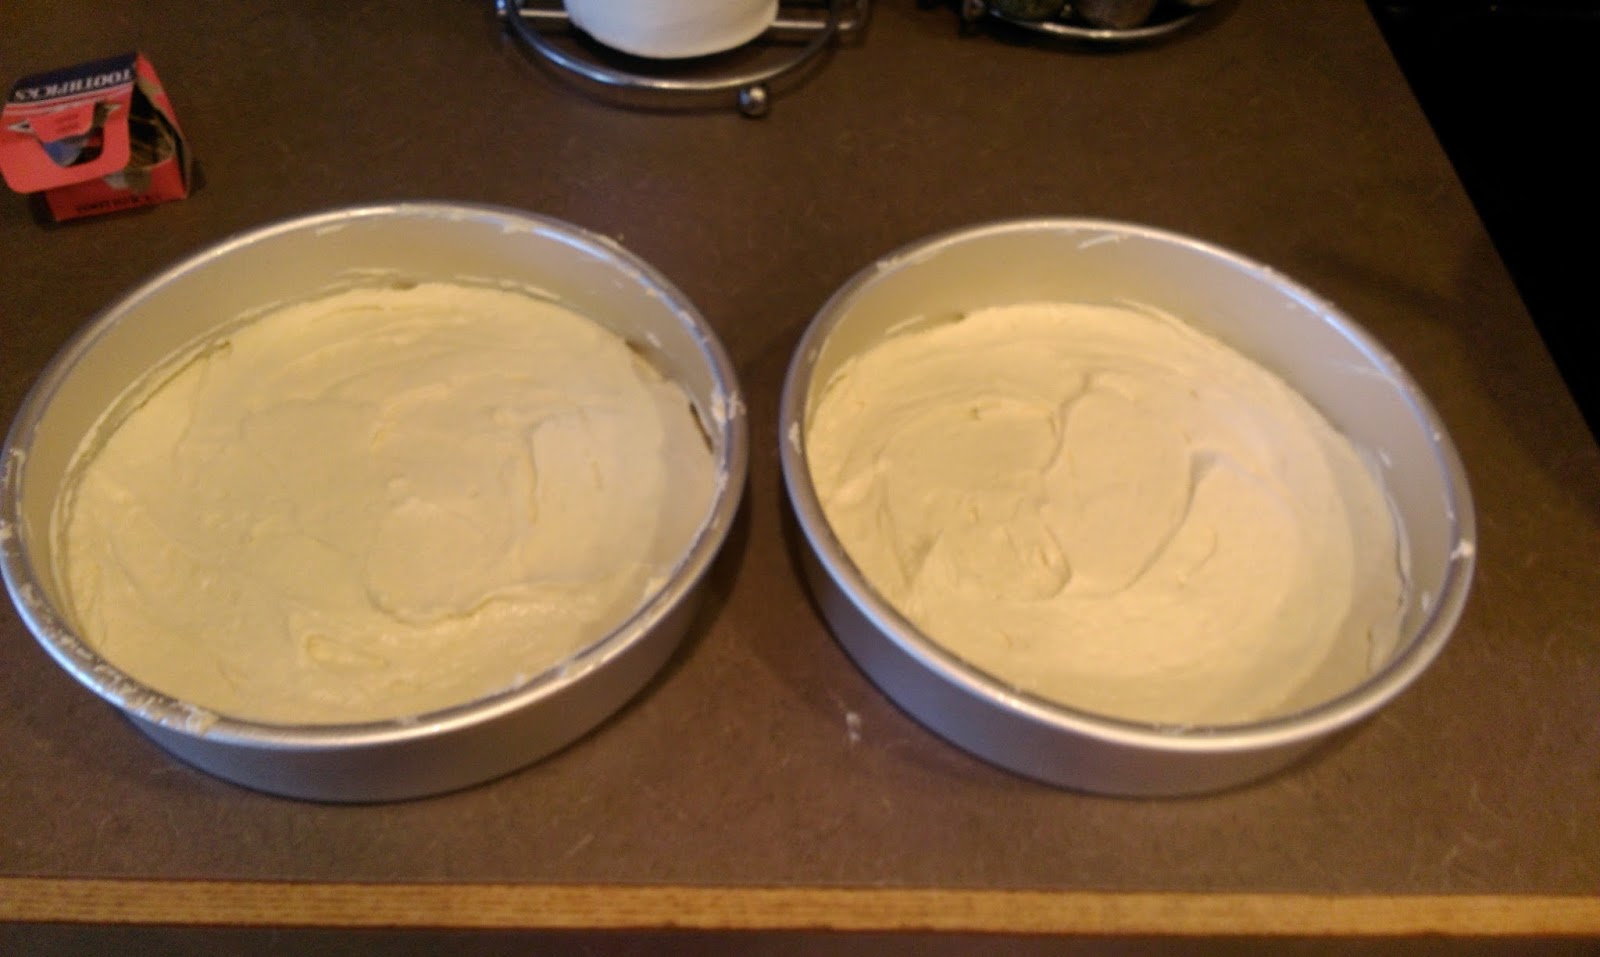
It’s so fluffy, I’m gonna die! Cream together the remaining butter and sugar until it looks like a big puffy, scrumptious cloud. Approximate mixing time to achieve optimum puff is 4-5 minutes. Add in each egg one at a time until well mixed and plop in the vanilla. While you are letting the cloud form, mix together the flour, baking soda, and salt in a medium bowl. Then take and add half of this dry mix into the wet mix and blend on low. Add in half of the sour cream and mix well. Repeat these two steps again until you have a gorgeous pound-cake consistency batter (read: thick and artery clogging). Now, take two cups of batter and combine it with the melted chocolate in a bowl. Now you’ve got the two batters! Way easier than making them separately.

You’re gonna be gorgeous, kid. To make the cupcakes, simply plop a spoonful of the vanilla batter in a paper liner and then plop a spoonful of the chocolate batter in next to that.

Trippy. To marble, take a toothpick and draw S shapes in the batter. Bake these for 20 minutes or until a toothpick comes out clean. Set aside to cool before frosting, as per the usual. 98% of the cake wrecks I’ve seen in my day are because people frost with reckless abandon before stuff is cooled off. Don’t be that guy.

Now, to make the cakes, fill each pan with the vanilla batter. 
Then plop in random spoonfuls of chocolate batter until it is used up. 
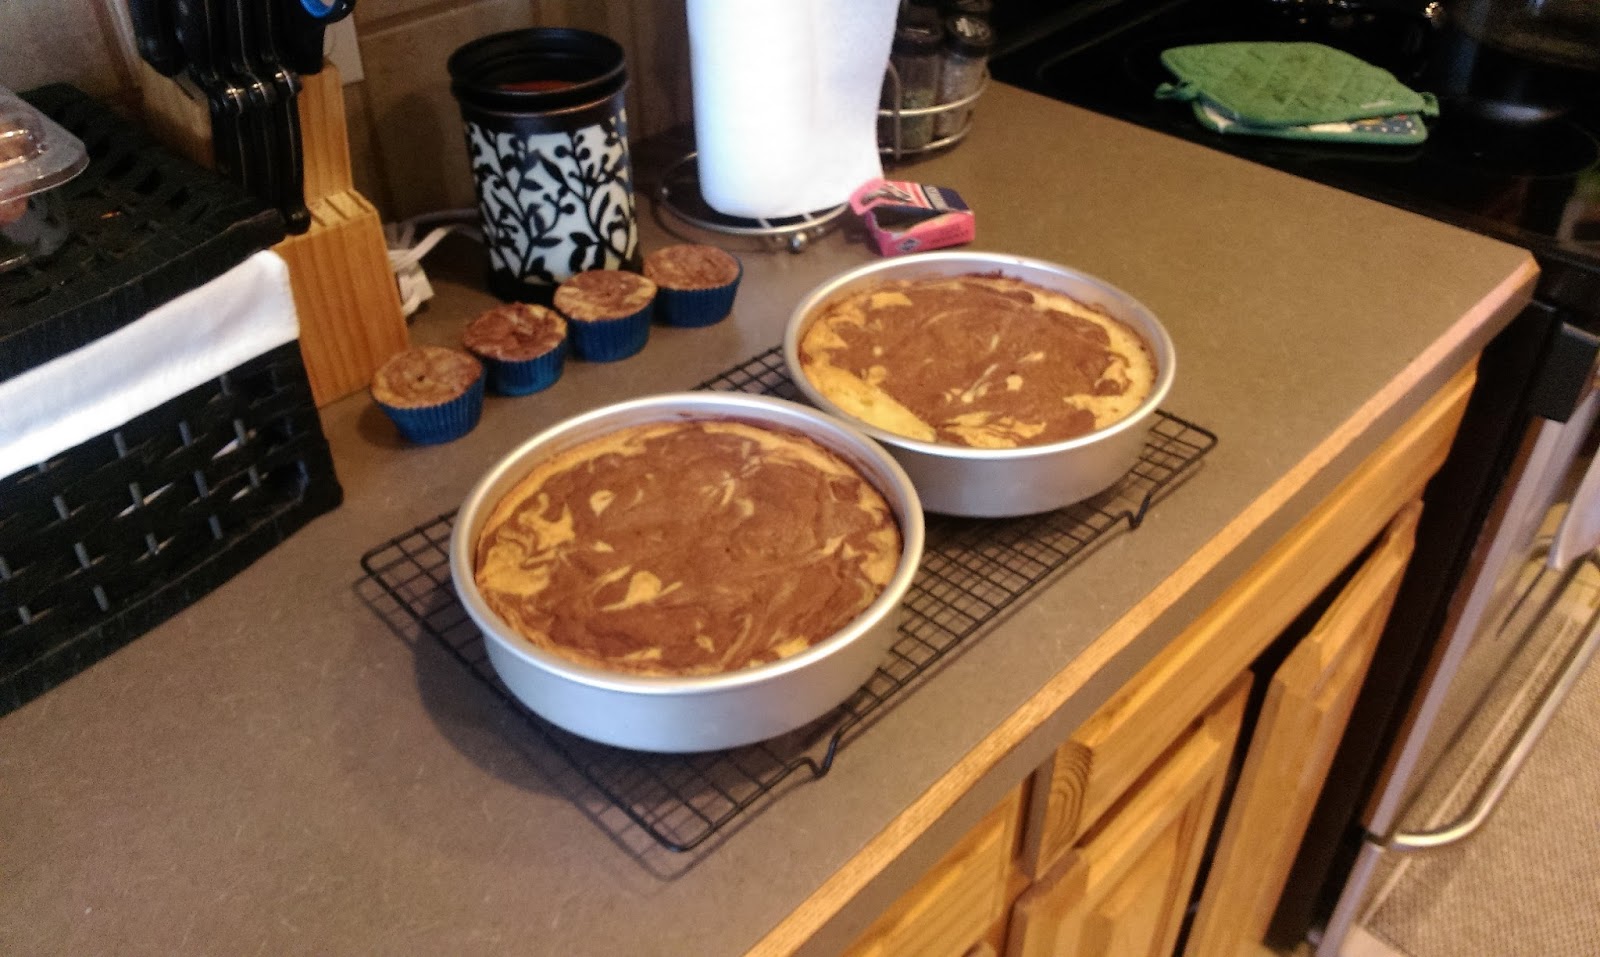
Take a knife and swirl away! Bake the cakes in the center rack of your oven for 25 minutes. Let cool on a rack in the pans for 10 minutes, then remove from the pans and finish cooling on the rack. It will take time to make the frosting and the flames, so I left things out and didn’t freeze them, and this ended up giving the cake plenty of time to cool off.
So you can just oogle the cakes for awhile. Now, I had pictures of the frosting process, but my phone decided not to import them to my computer for some reason. I think the computer switching to Windows 10, immediately regretting the decision, and switching back to Windows 8.1 has caused my phone to no longer really trust my laptop’s ability to make sound life choices. Clearly I’m blame shifting here, but gather this stuff for the best chocolate frosting you’ve ever had in your life:
- 1 1/2 cups room temp butter
- 4 cups powdered sugar
- 3/4 cup cocoa powder
- 2 teaspoon vanilla extract
- pinch table salt
- 4 TBS heavy cream
Mix together the butter and powdered sugar until you have another puffy cloud situation (4-5 minutes). Add in the cocoa powder, salt, and vanilla extract and blend well, scraping the bowl. Finish off by adding the heavy cream in, one TBS at a time. Immediately realize you haven’t truly lived life until you tasted this frosting. Cover bowl of chocolatey heaven with a damp paper towel and set aside…it’s time to melt things.

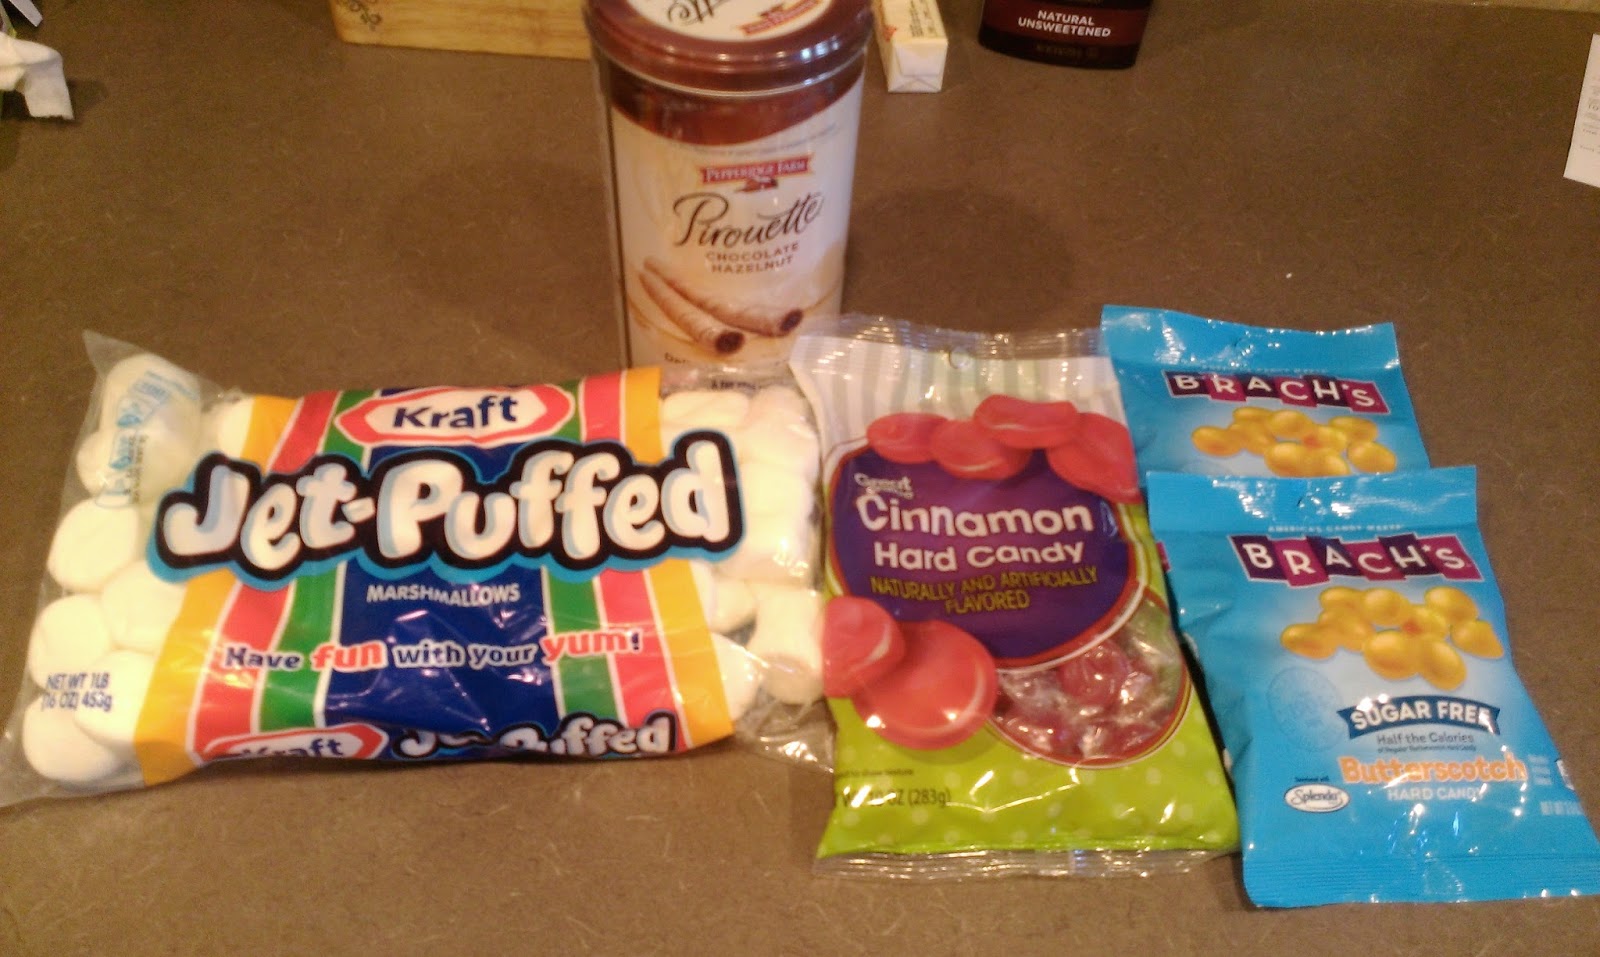
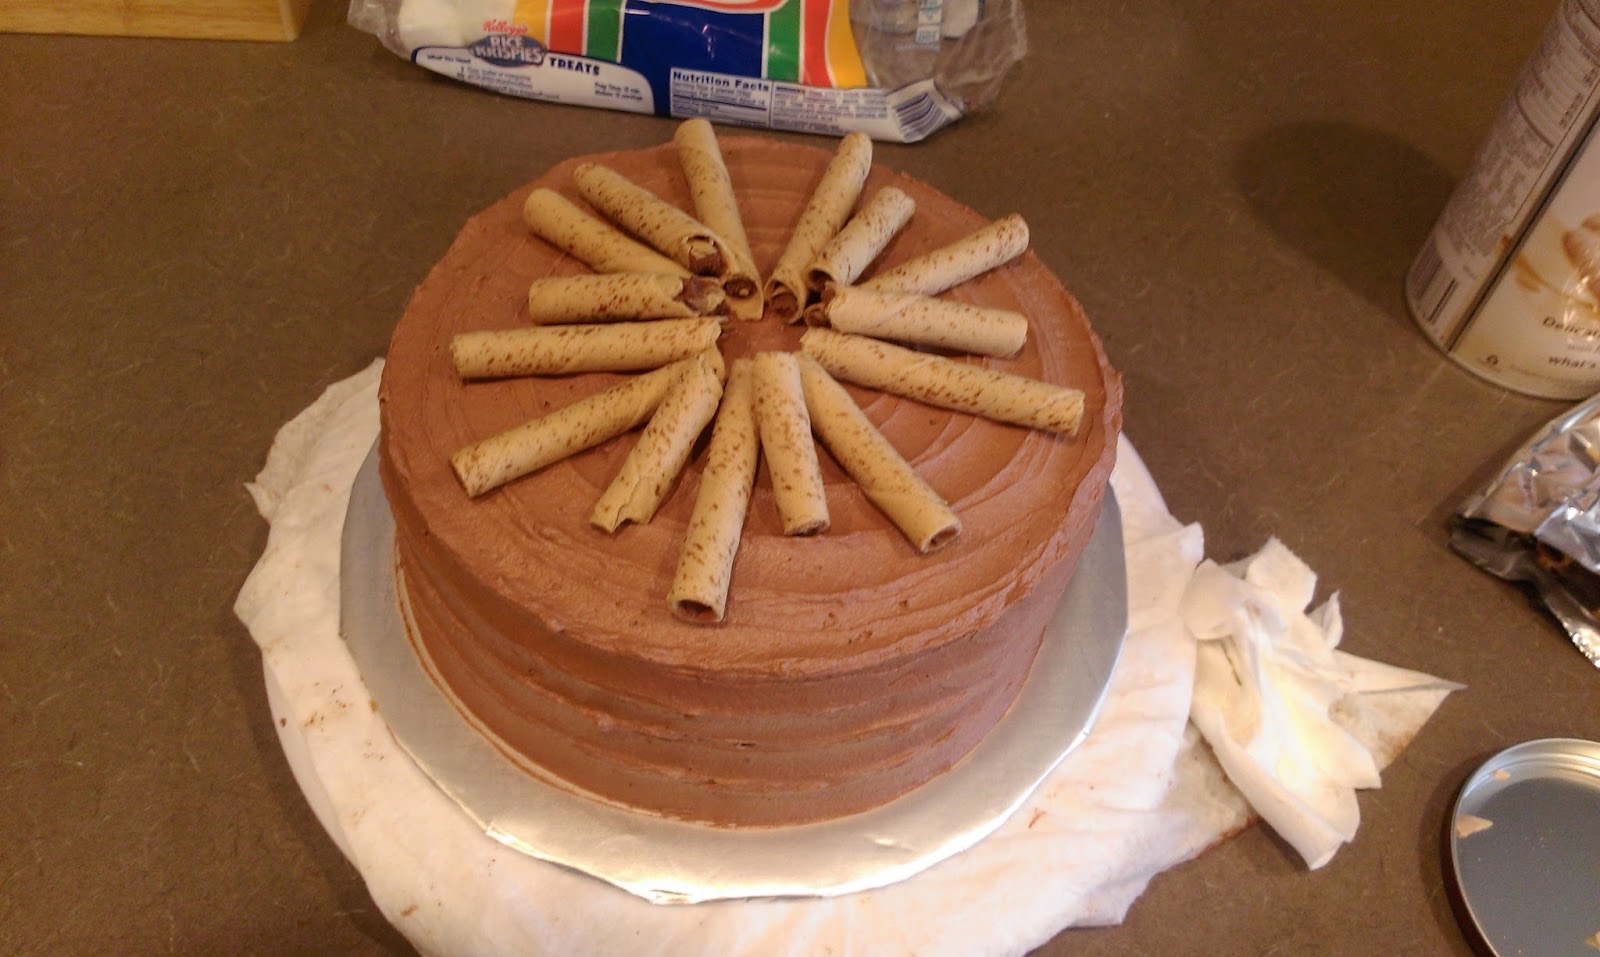
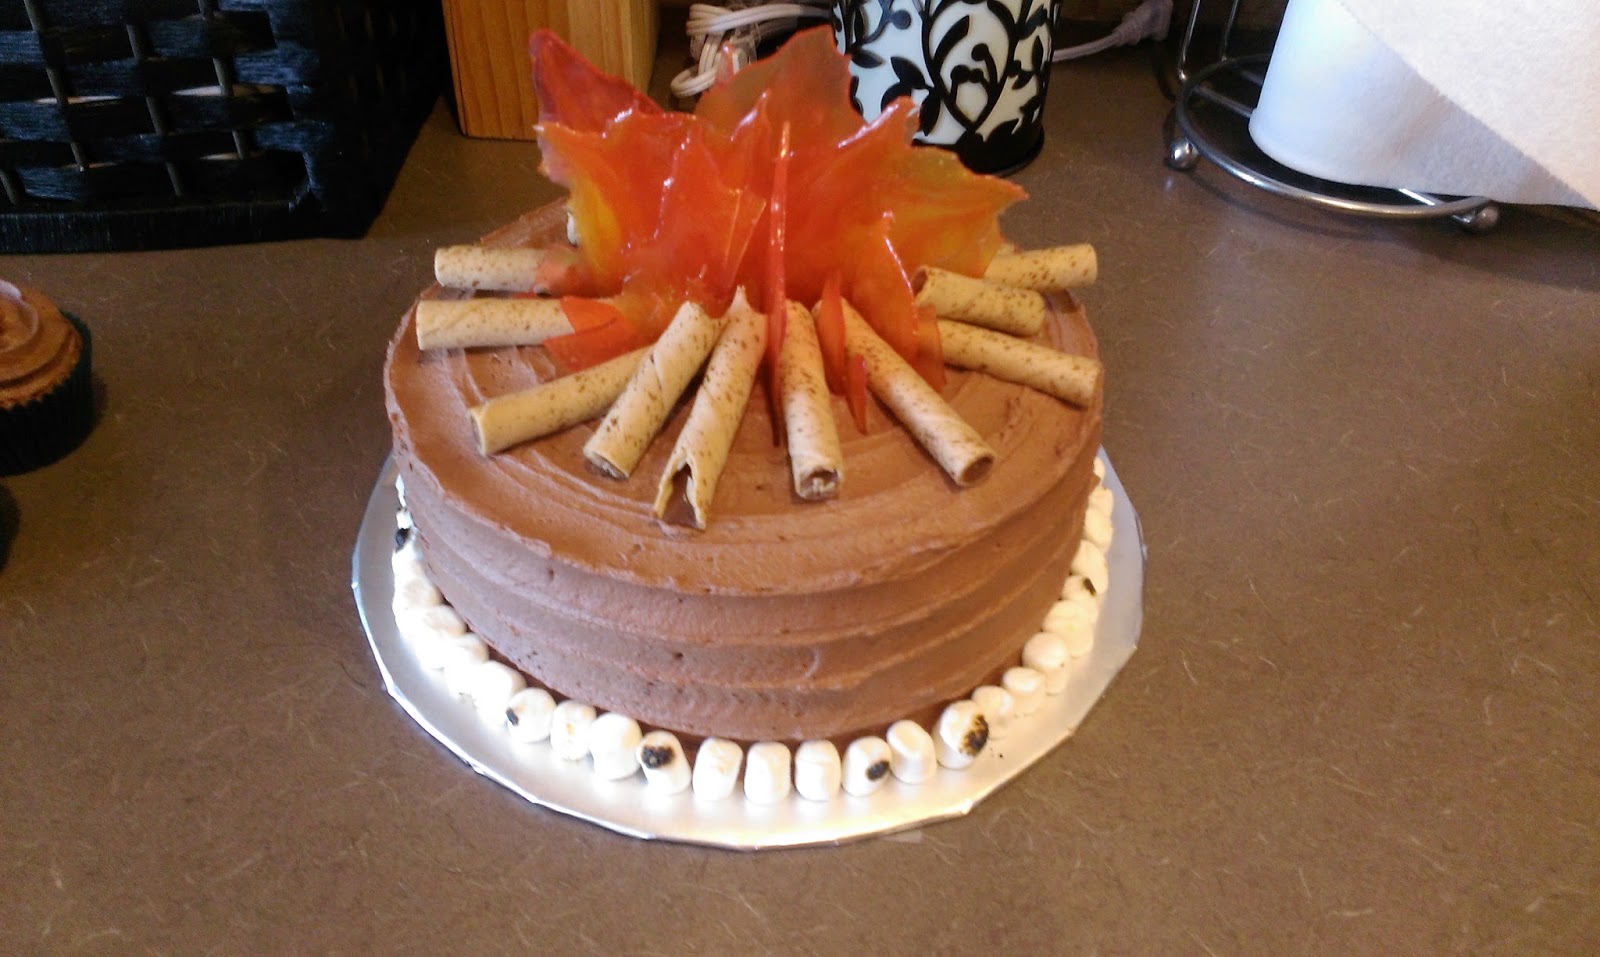
You need some camping supplies. Crush up 14-18 cinnamon hard candies in one plastic bag and 14-18 butterscotch candies in another bag. My weapon of choice for this was a hammer, and yes, things did get messy. You’ll also need a can of Pirouette cookies and some marshmallows. I ended up using smaller ones because my cake plate wasn’t big enough to hold the S’mores-sized marshmallows. Marshmallows, as tasty as they are ridiculous to spell.

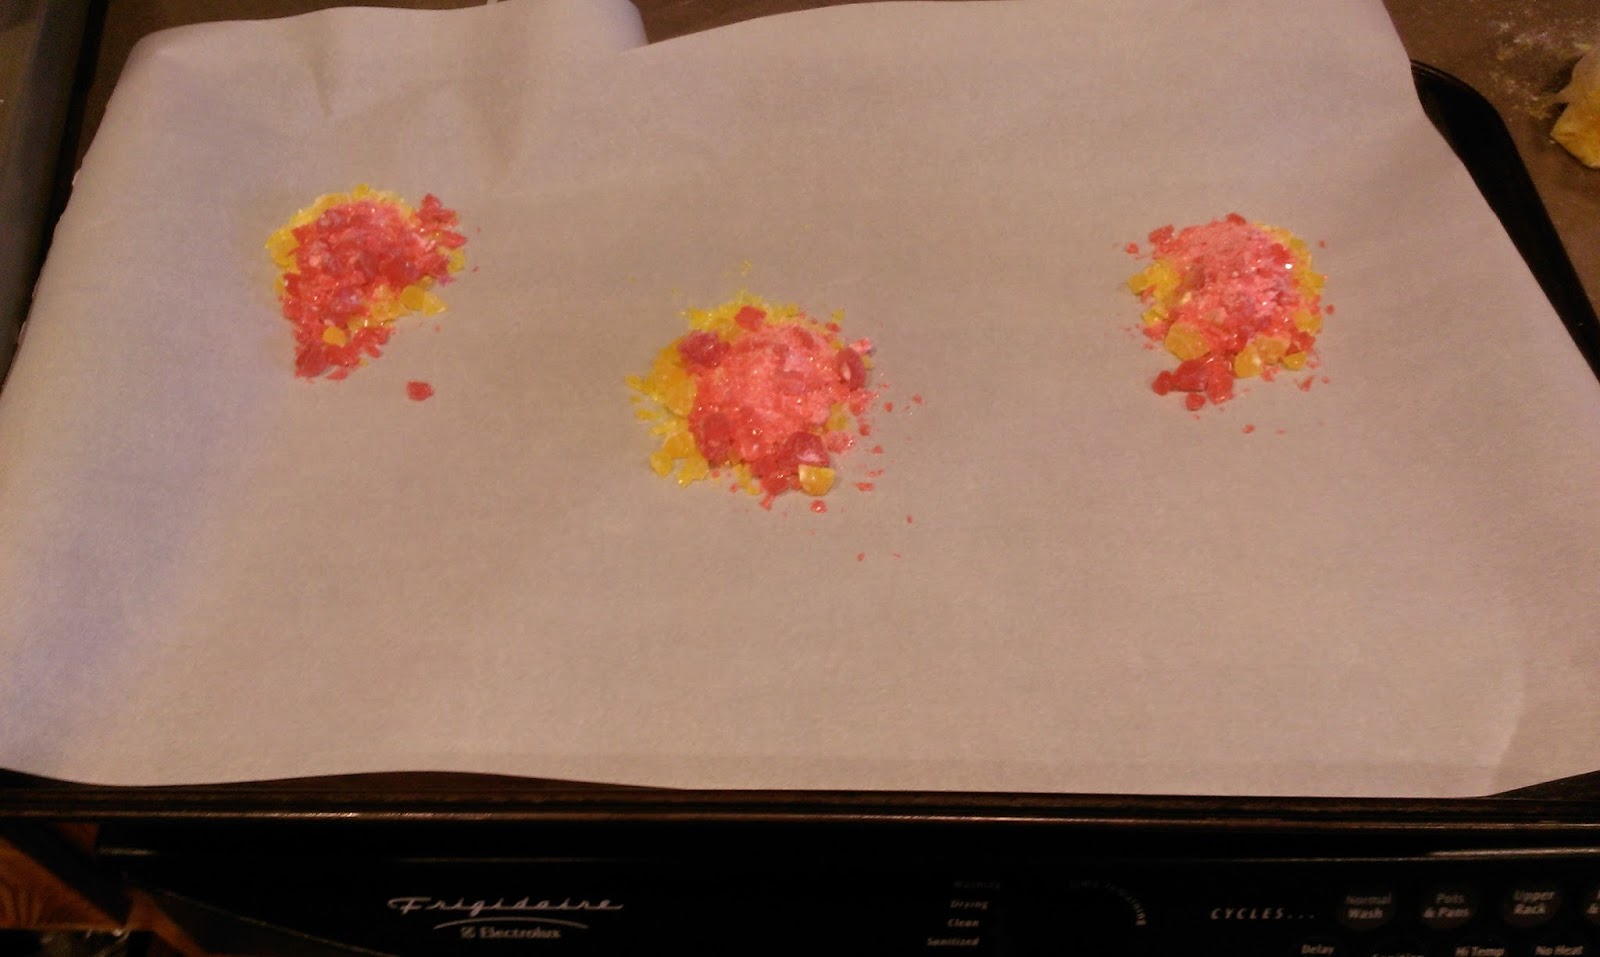
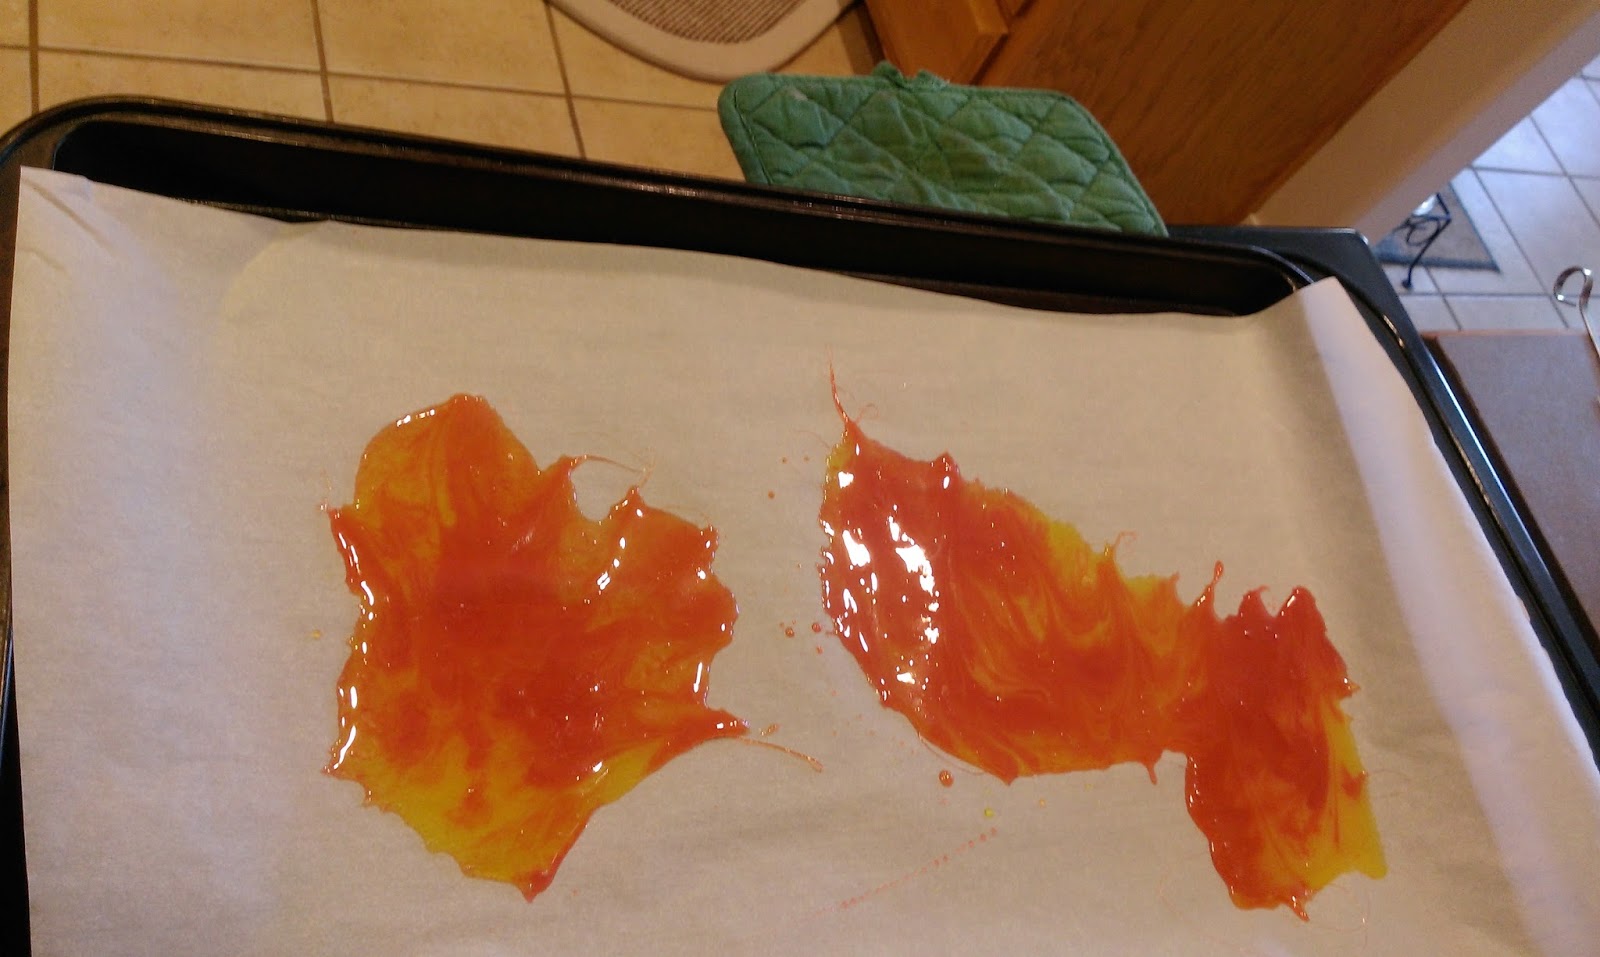
You’re about to be en fuego. Preheat your oven to 375 and line a baking tray with Parchment paper. Take a spoonful of the crushed butterscotch and pile it onto the tray. Top this pile with a spoonful of crushed cinnamon candy. I opted for three piles on one tray and baked for 6 minutes. When you pull it out of the oven, take a metal skewer or knife and pull up from the bottom of each pile to mix the colors and create flame shapes.

This looks like a ketchup and mustard mishap. ..but you get the idea. Repeat this process 3 or 4 more times until you’ve used up your crushed candies. These harden really fast, so if you need to pop stuff back in the oven to melt again and finish shaping, do so for a minute or two. You can handle these after about 5 minutes of cooling without any issues. I ended up breaking these apart with my hands to create smaller flames and varying shapes. By now, you should be able to frost the cupcakes and the cake.

I filled a piping bag fitted with a 1M tip and simply started on the outside edge of each cupcake and circled in. I ended my circle by piping a mound in the middle of each cupcake, releasing pressure, and pulling up and away quickly to form a star. 
Because I like stars, that’s why. 
I then put some foil down on the counter, grabbed four small marshmallows, and “roasted” them with my stick lighter. I have coincidentally never felt more ridiculous in my life, but these looked really cute. 
This frosting is so thick and…voluminous? that you actually don’t need a crumb coat for once. I felt like such a rebel just frosting one layer and calling it good. But it was a relief to be able to skip a few steps after working for hours on the rest of the cake. So slather on a hearty layer of frosting and either smooth out or swirl or whatever the hell you want to do to finish the frosting look. Whatever the hell I wanted to do was give this cake a more rustic texture to go along with the outdoorsy theme. I took my small angled spatula and set it on the outside edge of the top of the cake. I constantly turned my cake turntable around while slowly moving my spatula in a circular spiral pattern. For the sides, I took my spatula and constantly turned my turntable (appropriately named) around the whole cake. Then a I took my spatula and placed it directly below the line I had just made and turned it all the way around again. I repeated this 3 more times. 
Then I broke up the cookies and gently placed them on top of the cake to form my logs. 
I took the candy flames and placed them in varying spots inside of the logs. Press gently into the cake to insert these so you don’t break them. The flames DO NOT refrigerate well (they get..floppy), so keep this cake boxed up and stored out. You will eat it so fast it won’t even matter, promise. I finished things off by ridiculously roasting more marshmallows with my stick lighter, and then eating a couple extras for good measure. Gotta show those babies who’s boss. I was supremely happy with how cute this cake turned out to be, and I sincerely hope it was enjoyed at the birthday party! There really is no such thing as a bad cake (much like pizza, even when it’s gross, it’s still really good), and kids love sugar in any form. I am going to reuse this frosting and marble cake/cupcake recipe for the rest of my days because it is simply mouthwatering. Unlike camping and experiencing the actual outdoors, this cake allows me to remain in my comfort zone by simply simulating the tingly embrace of a campfire (since cake always gives me the warm fuzzies). ‘Til next time, my fellow eaters!
And unlike bears or mosquitoes, cake is perfectly happy being at the bottom of the food chain. When presented with the choice to have cake or go camping, always choose the option that ends with you being the eater and not the eaten.

Healthy-ish cake, cupcakes, pie, and cheesecake recipes and decorating tips