-
At Least Cake Doesn't Make You Sweaty.
As most of you are aware, I hate summer. I hate it with a fiery passion that burns hotter than Texas in August, which is to say it is an incredibly intense abhorrence…especially after spending the week before last in cool, breezy, dreamy Vancouver and coming back into the nearly literal hellfire that is the Eastern New Mexico desert. I spent the majority of the past seven days relearning how to breathe and exercise at altitude. I spent the majority of the past seven nights whispering sweet nothings to my humidifier for saving my lungs and nostrils from spilling out of my nose and running back to the Pacific Northwest. I wouldn’t have blamed them for trying. Clearly, this was a problem that only cake could help placate. Or is it placake?

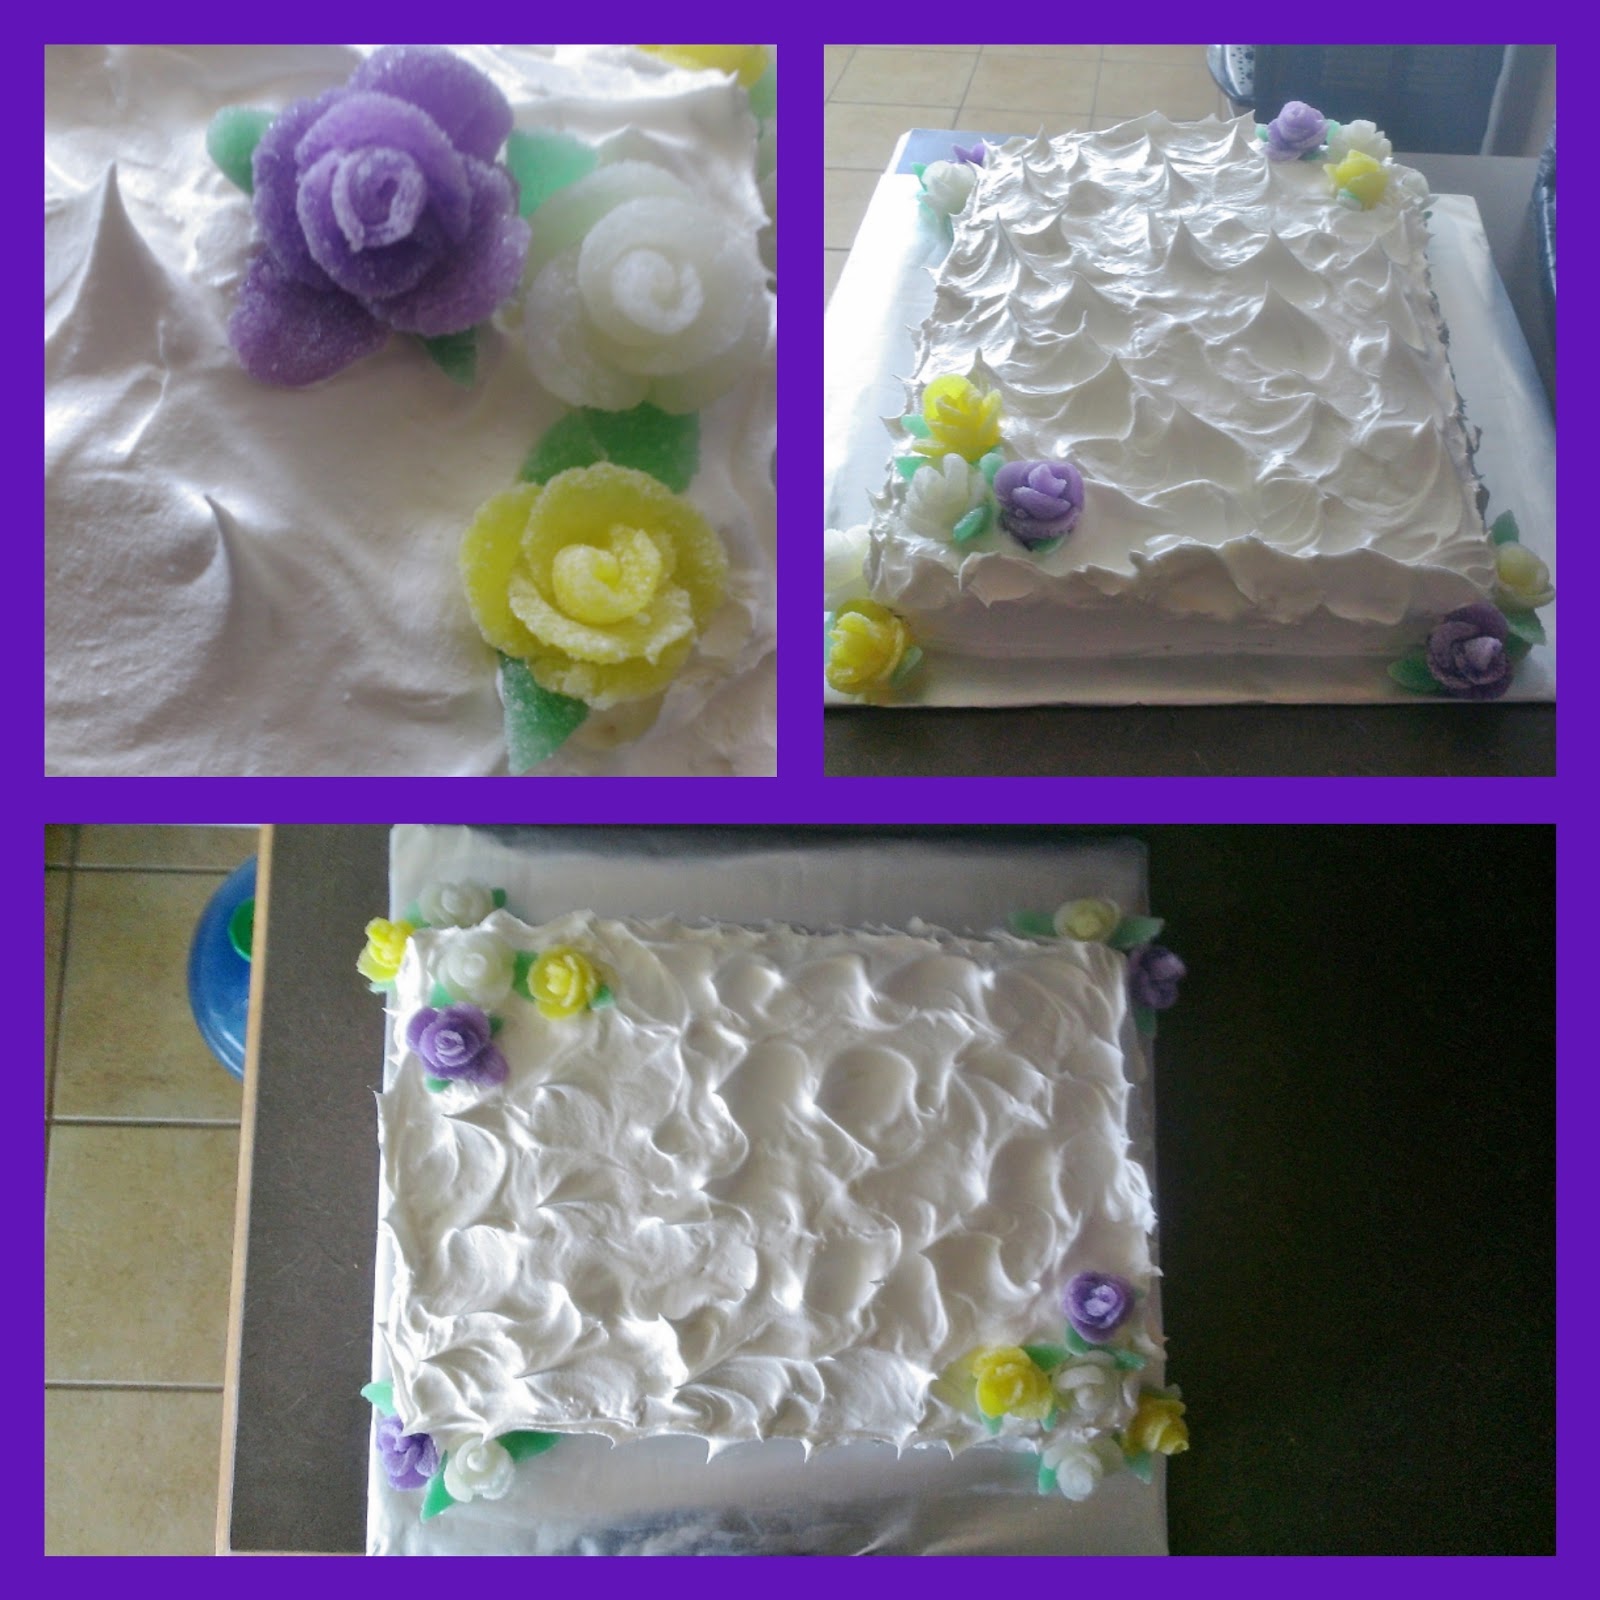
Definitely placakeable. Yes, under those giant Cool Whip peaks and delectable gumdrop flowers is indeed a cake ripe for the taking. But not just any cake…a cake perfect for summer: a white cake with lemon filling. Sweet, sour, and light, the taste combinations are enough to make even the biggest curmudgeon (Hi, my name is Kate, tolerable to meet you) forget how gross and sticky it is outside. Best of all, this cake takes me back to simpler times (and summers that involved lots of swimming and boating to tolerate the heat) because it is something my mom would make with frequency while I was growing up. It could be argued that I am, in fact, still growing up…or out, depending on how much cake I eat.

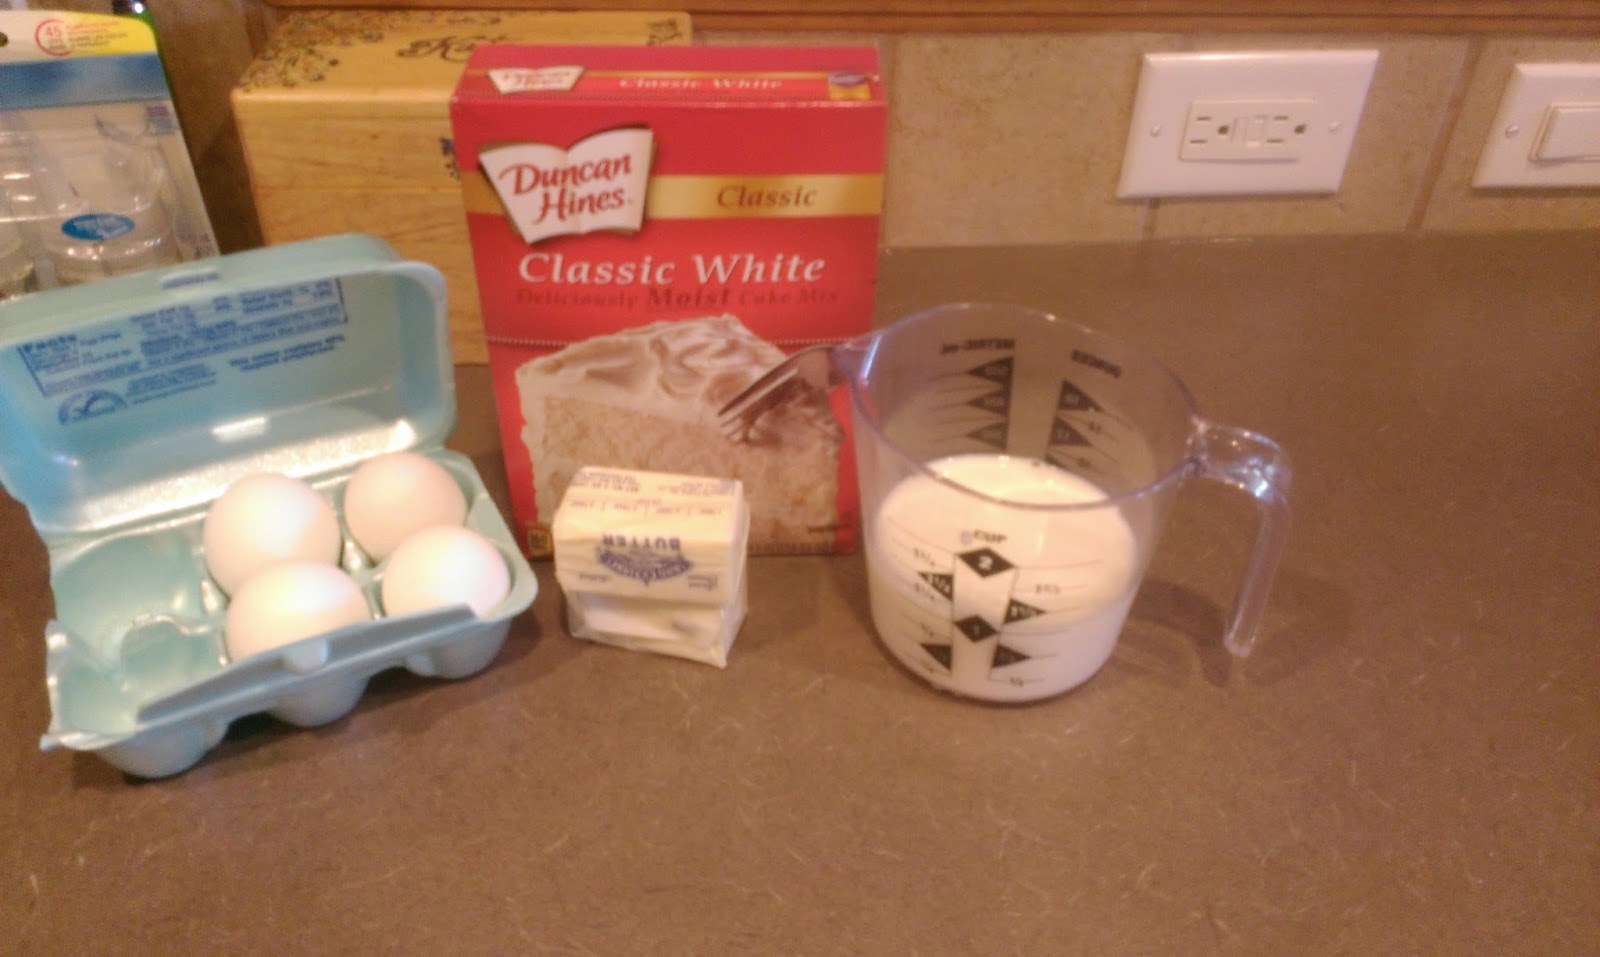
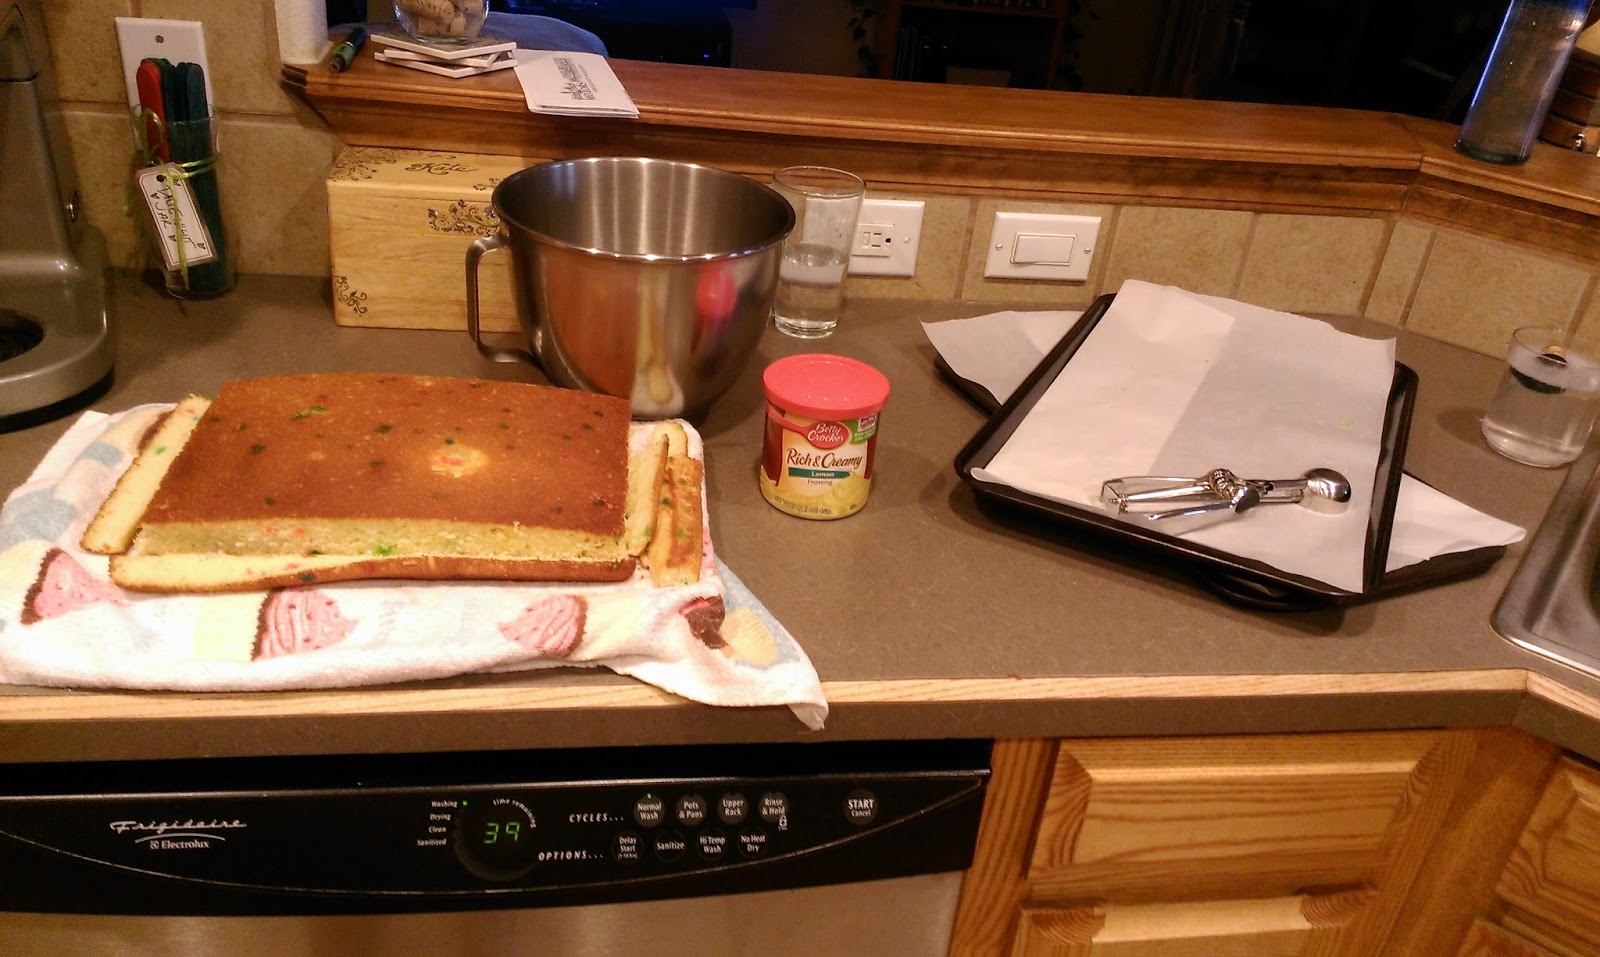
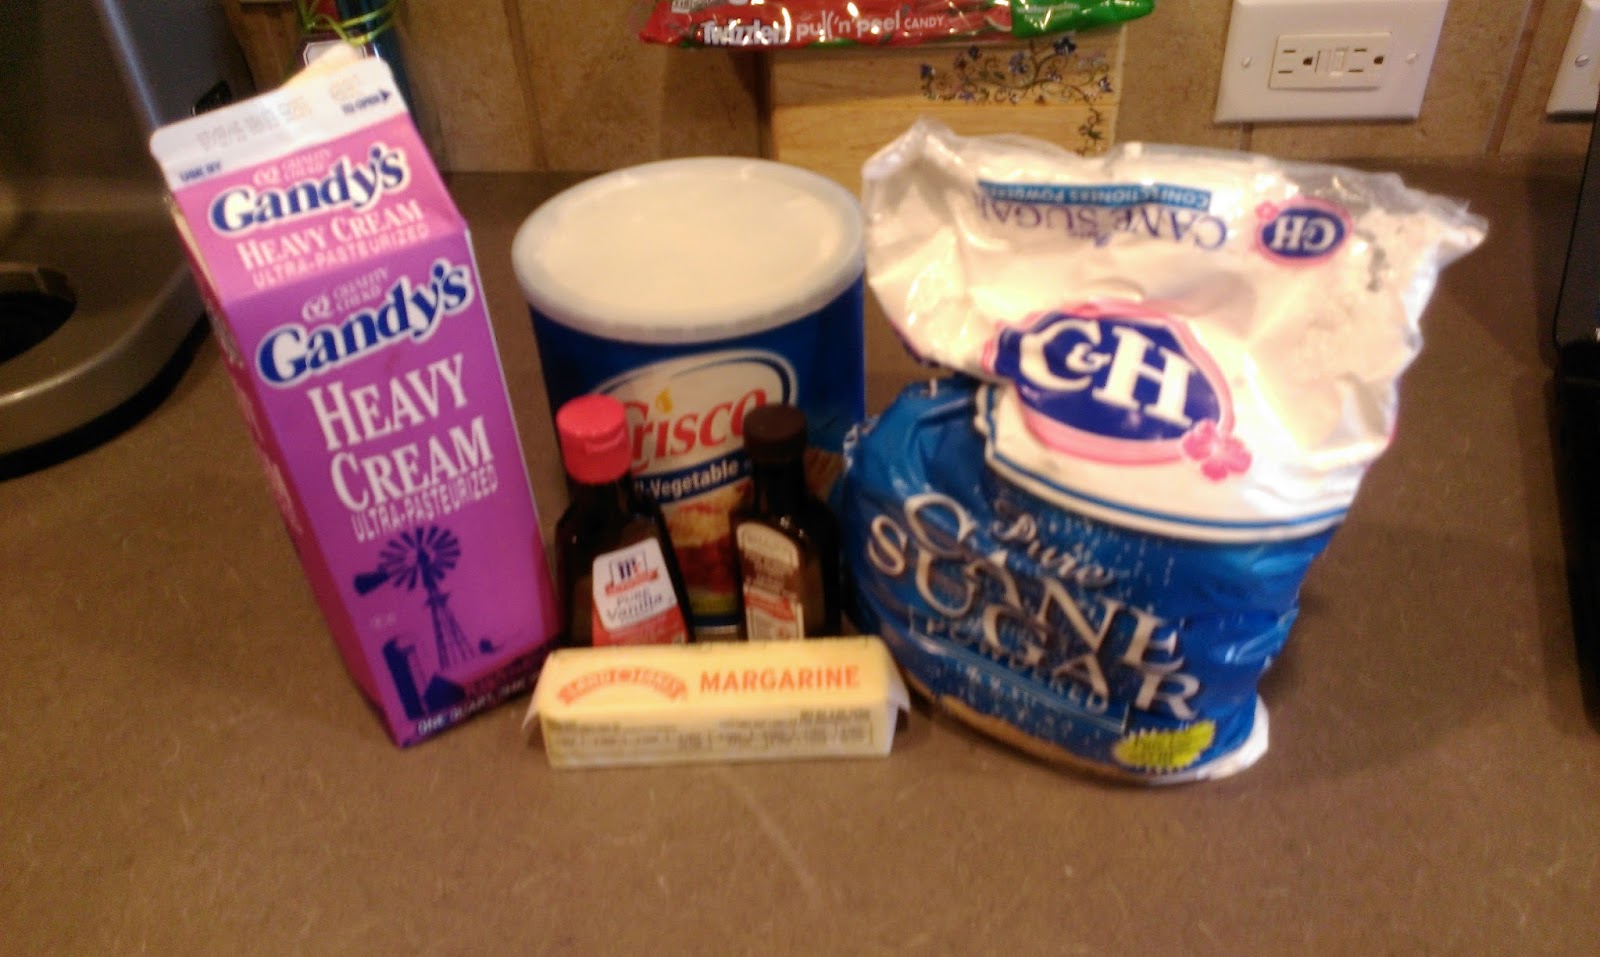
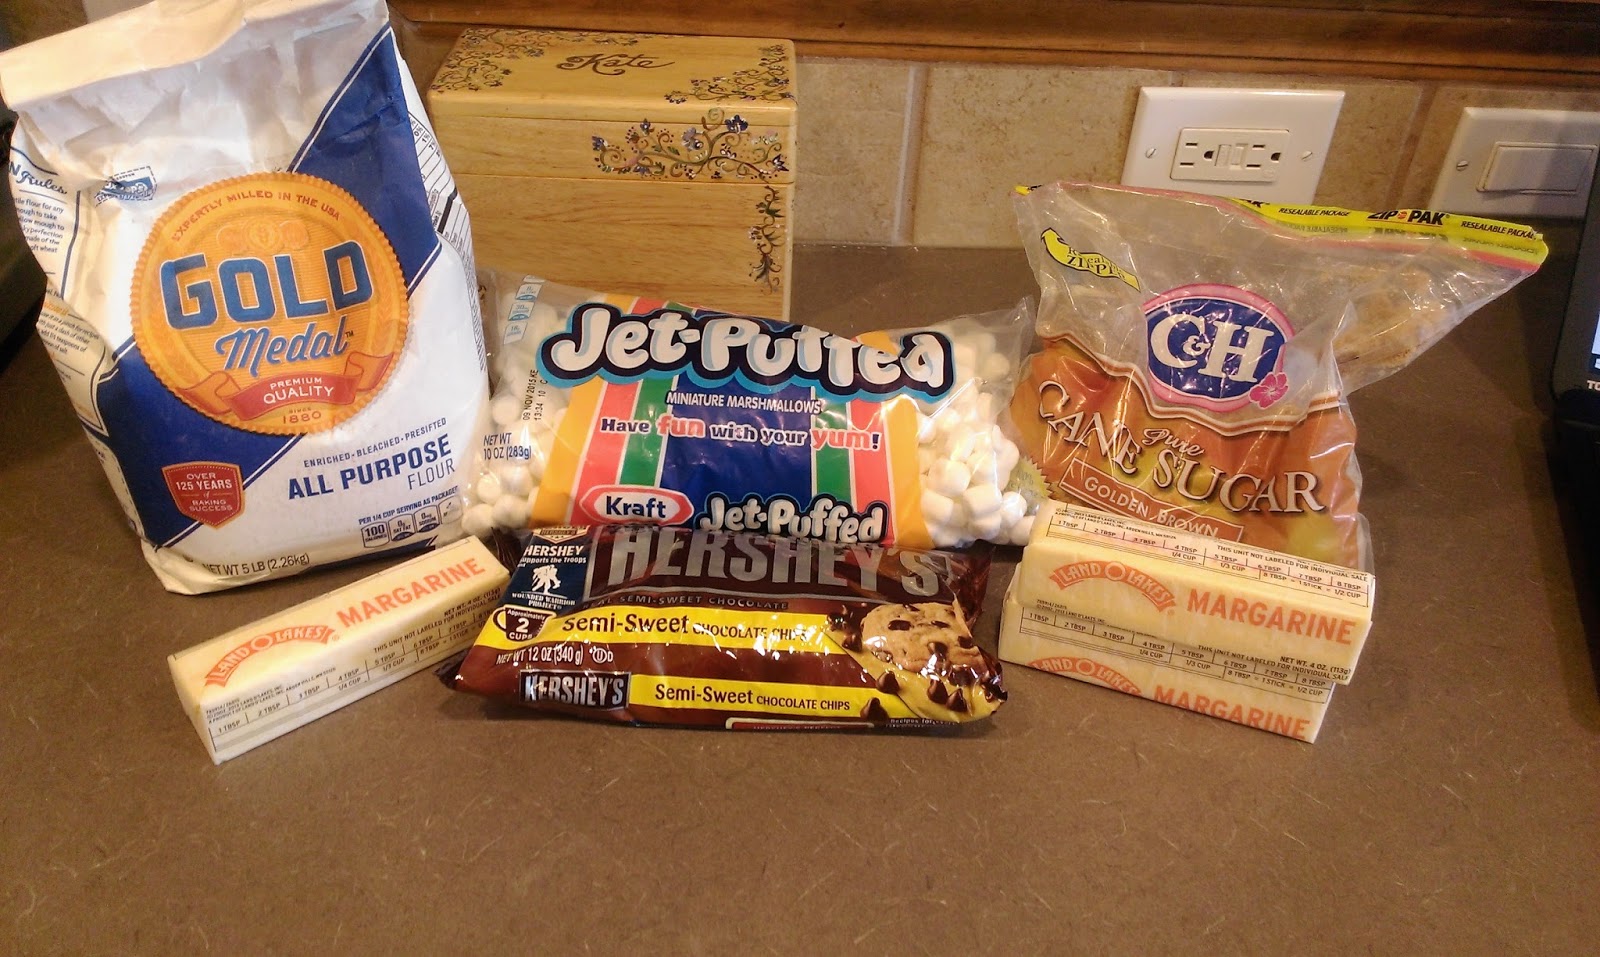
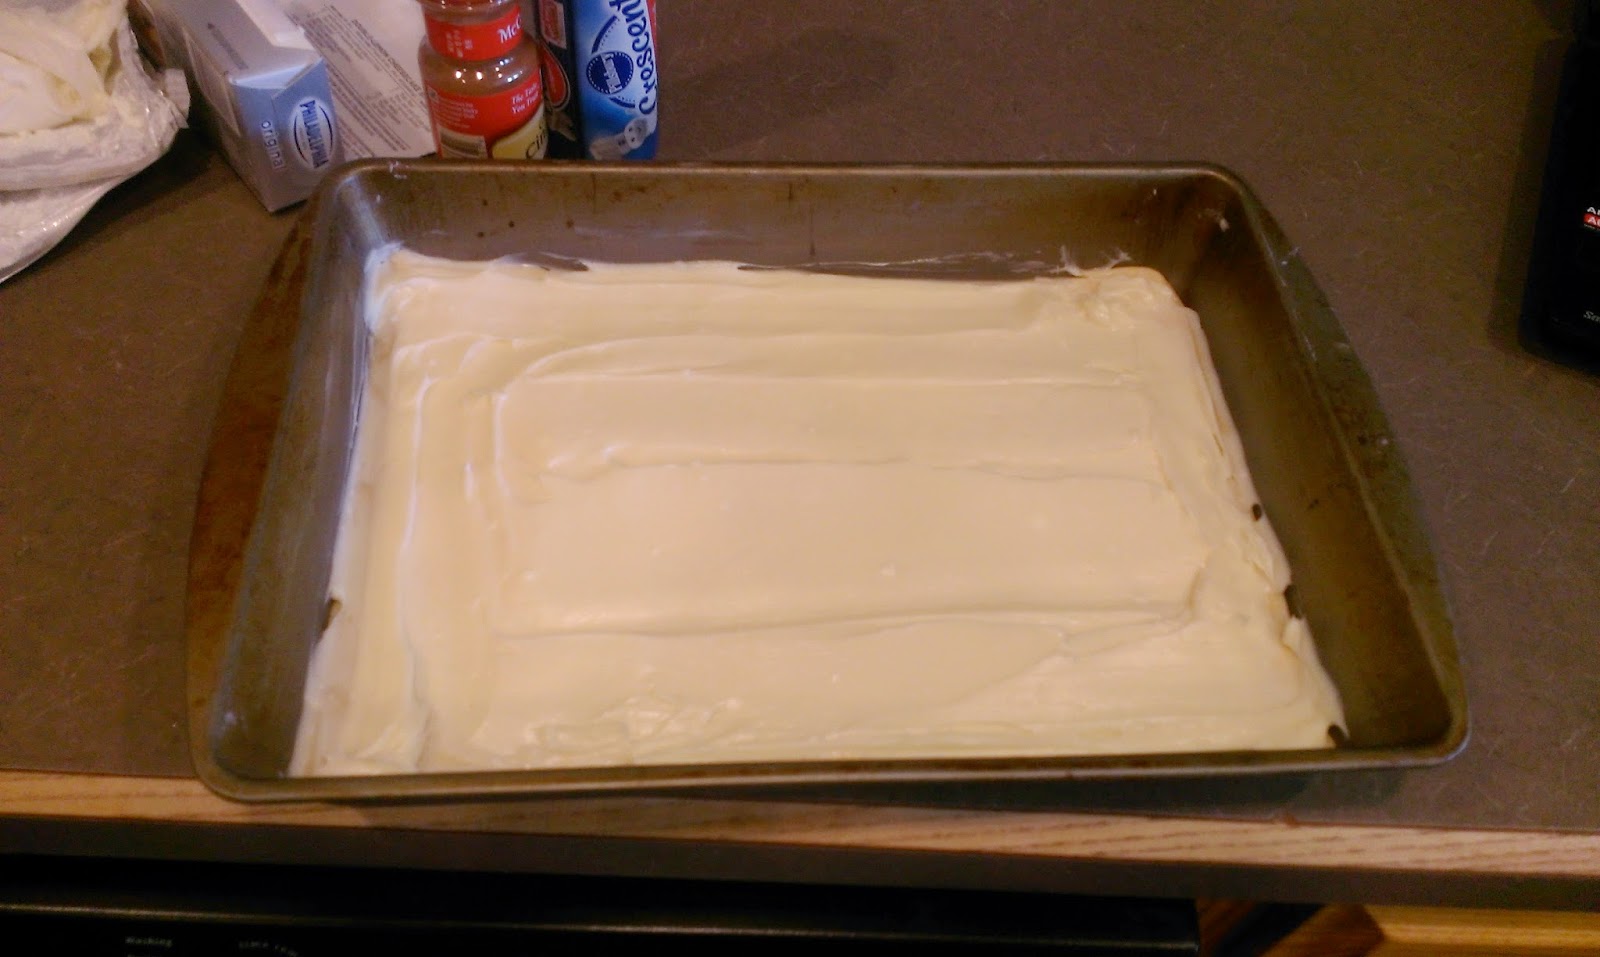
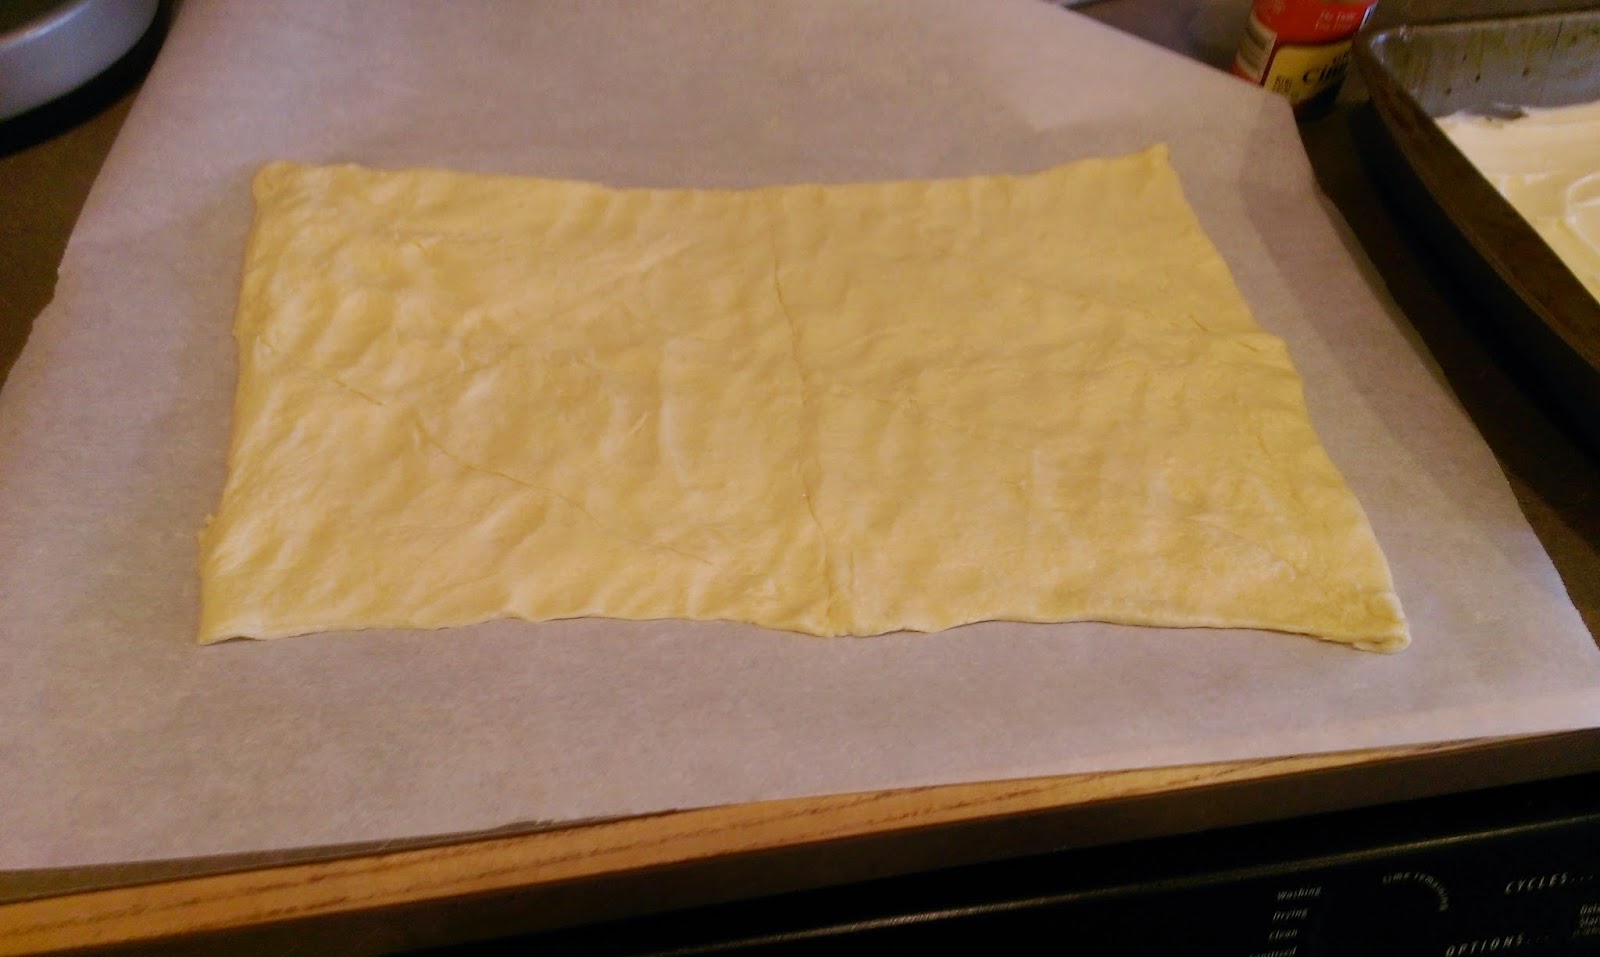
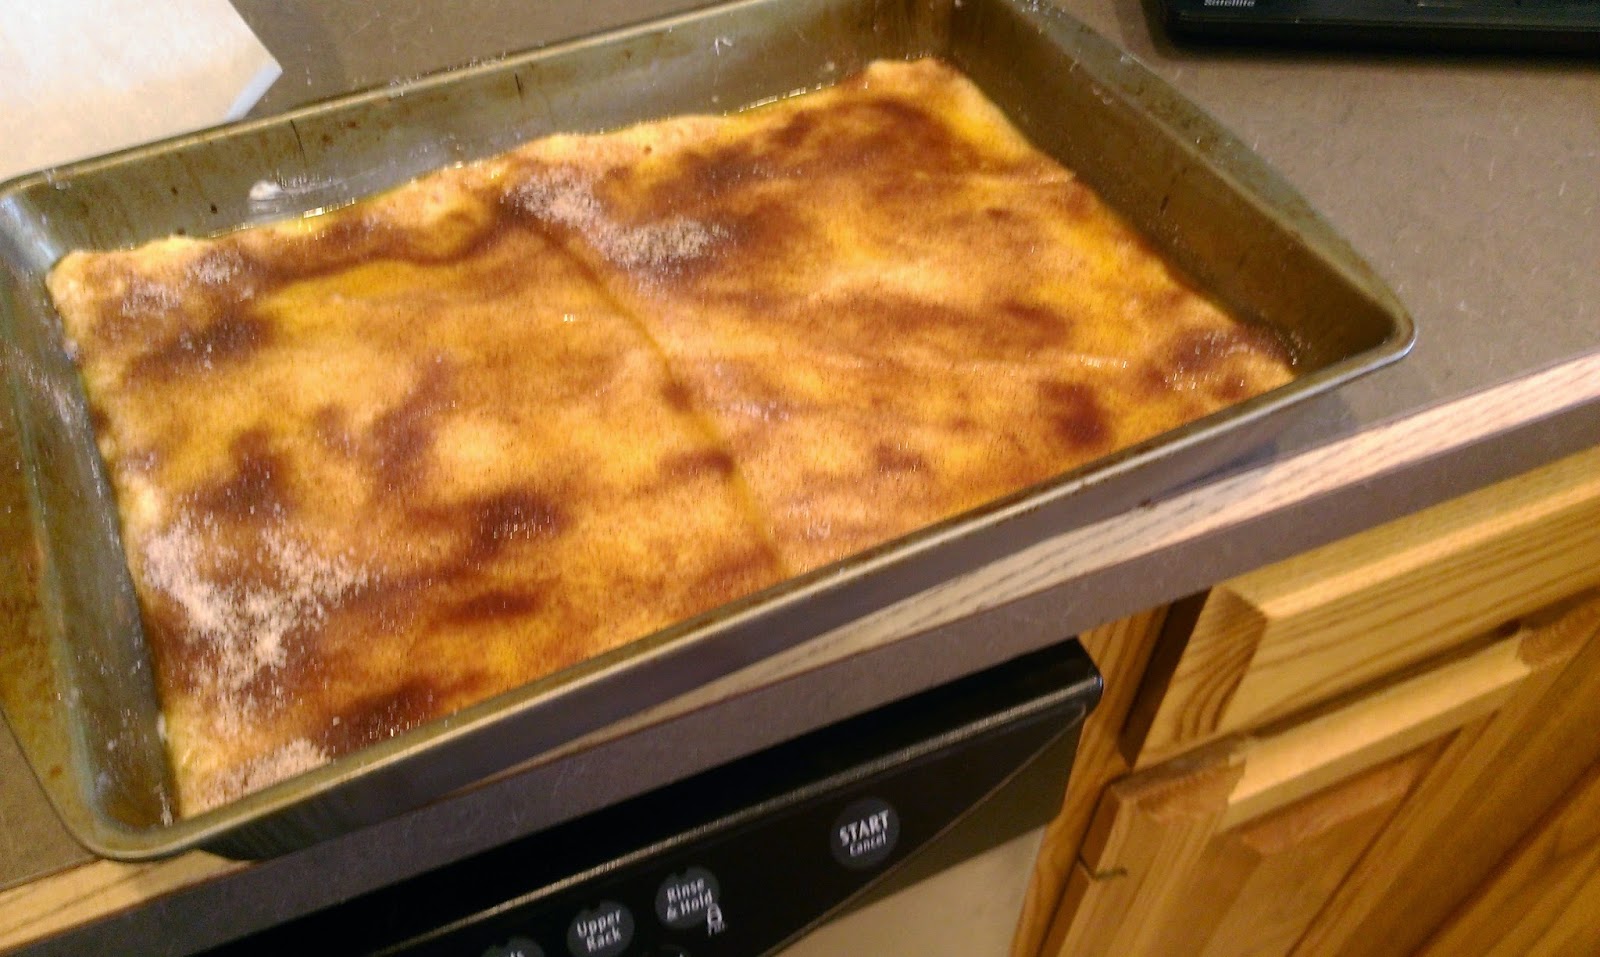
Did I mention this was quick AND easy? I know, I love it, too. I realize I very rarely use box cake mix anymore when I bake. But guess what? I have found that even the fanciest of from-scratch recipes still end up tasting almost the same as taking a box cake and adding an extra egg, opting for butter over oil with the amount doubled, and subbing milk for the water. This is a tried and true way of making something so simple taste like you slaved over it all damn day. So for this cake, start with a box of your regular cake mix and follow directions, adding in the substitutions I mentioned above for a bakery-type richness in your cake. In this case, only use egg whites in your cake. Otherwise you’re pretty much gonna end up with a yellow cake, which is also really tasty, so I guess you do you, but I prefer the lemon filling with white cake. I also really enjoy separating egg yolk and egg whites because I’m a complete weirdo with a slightly major case of OCD. I baked this cake in a well-greased 9×13 pan at 350 for 22 minutes. Arbitrary time, but that’s what worked for me.

Things are about to get…stabby. 
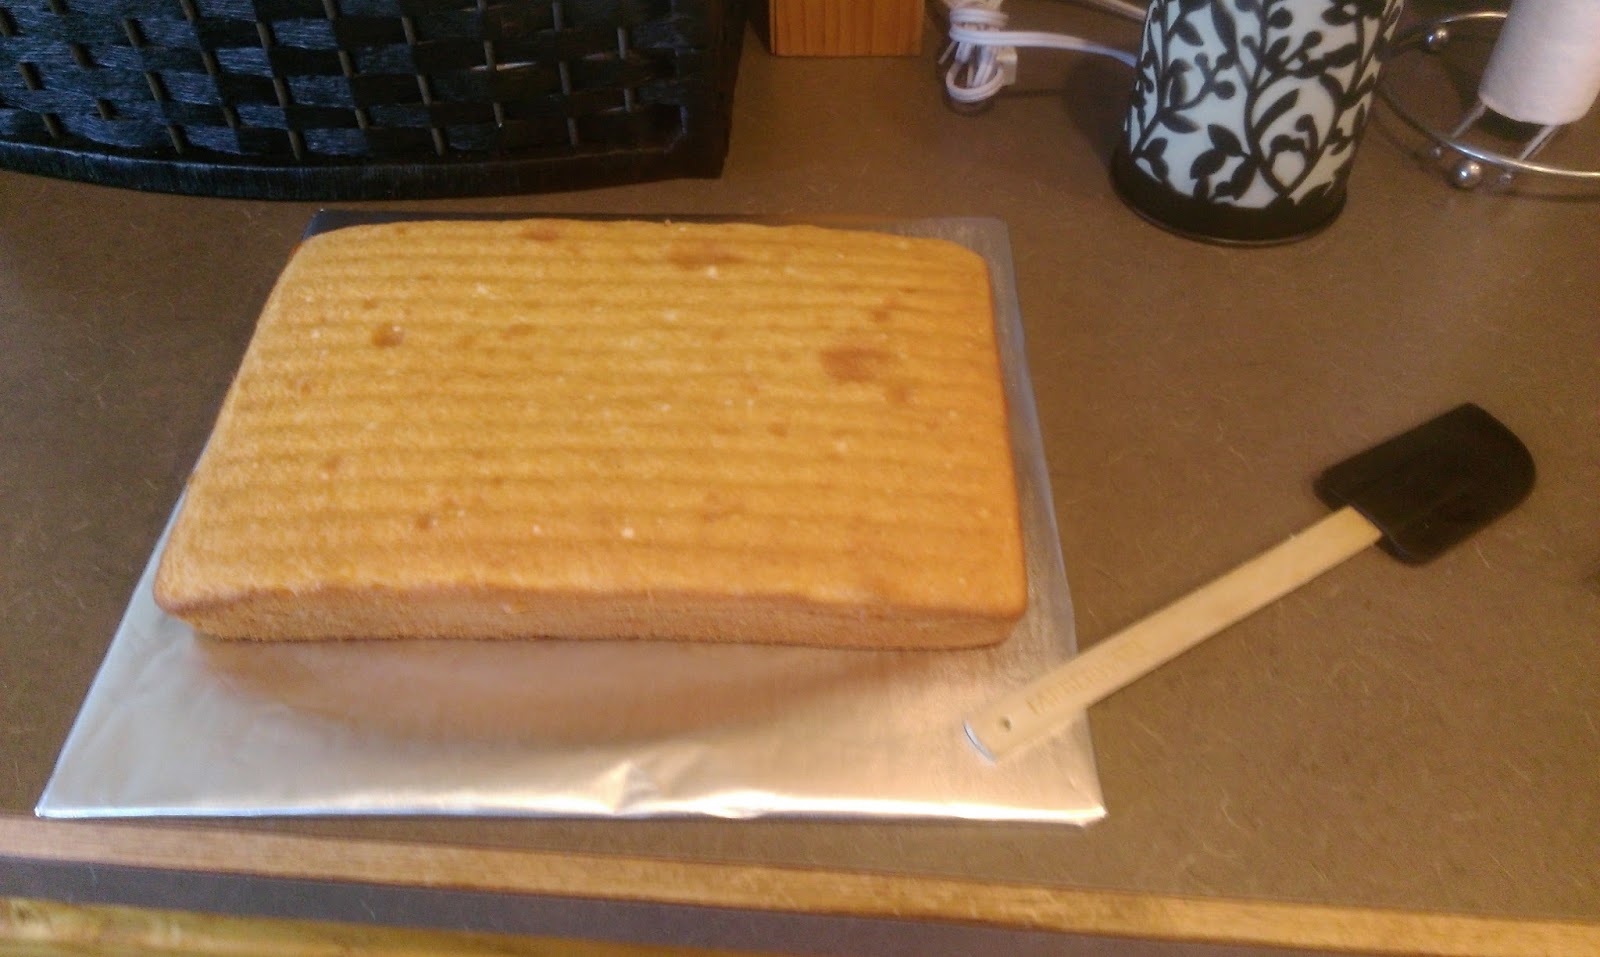
I still cringe whenever I have to massacre a cake. After 10 minutes of cooling after pulling out of the oven, turn the cake out of the pan. Let the cake cool on a cooling rack until room temp. Once at room temp, take the wooden end of a spatula/scraper and stab rows of holes into the cake so the filling has a place to go. Speaking of filling, I guess you kinda need to know how to make that stuff, too. You guys are so needy…but much like my love for my dogs, I appreciate your clingy-ness as well.
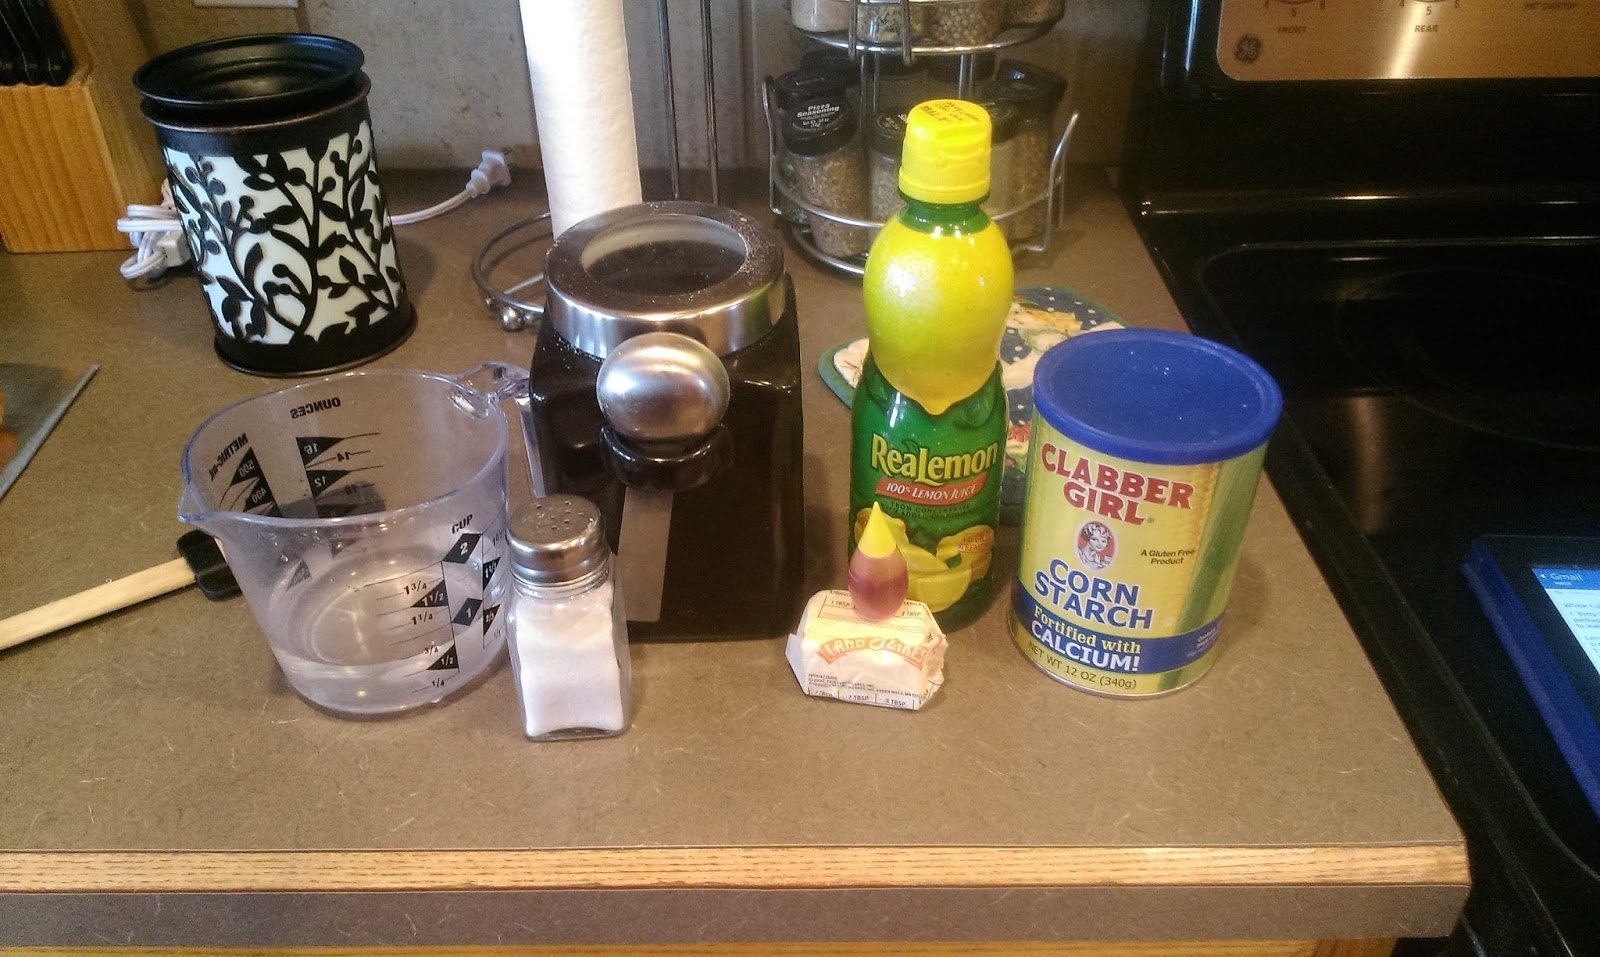
Still keeping it simple! You’ll want a medium saucepan for this because things will get bubbly. Gather up:
- 3/4 cup sugar
- 3 tablespoons cornstarch
- 1/4 teaspoon salt
- 2/3 cup water
- 1 tablespoon margarine or butter
- 1/3 cup lemon juice
- 3-4 drops yellow food coloring
Mix together the sugar, cornstarch, and salt in the saucepan. Slowly add and stir in the water, and then bring to a boil. You will want to keep stirring until the mixture is boiling, then set a timer for 5 minutes. Turn the temp down a bit so it is just at a boil and stir like hell the full 5 minutes. If you missed arm day at the gym, this should have you covered. Once the 5 minutes are up and the mixture is thickened, remove from heat and stir in the butter. Finish up by adding in the food coloring and lemon juice.

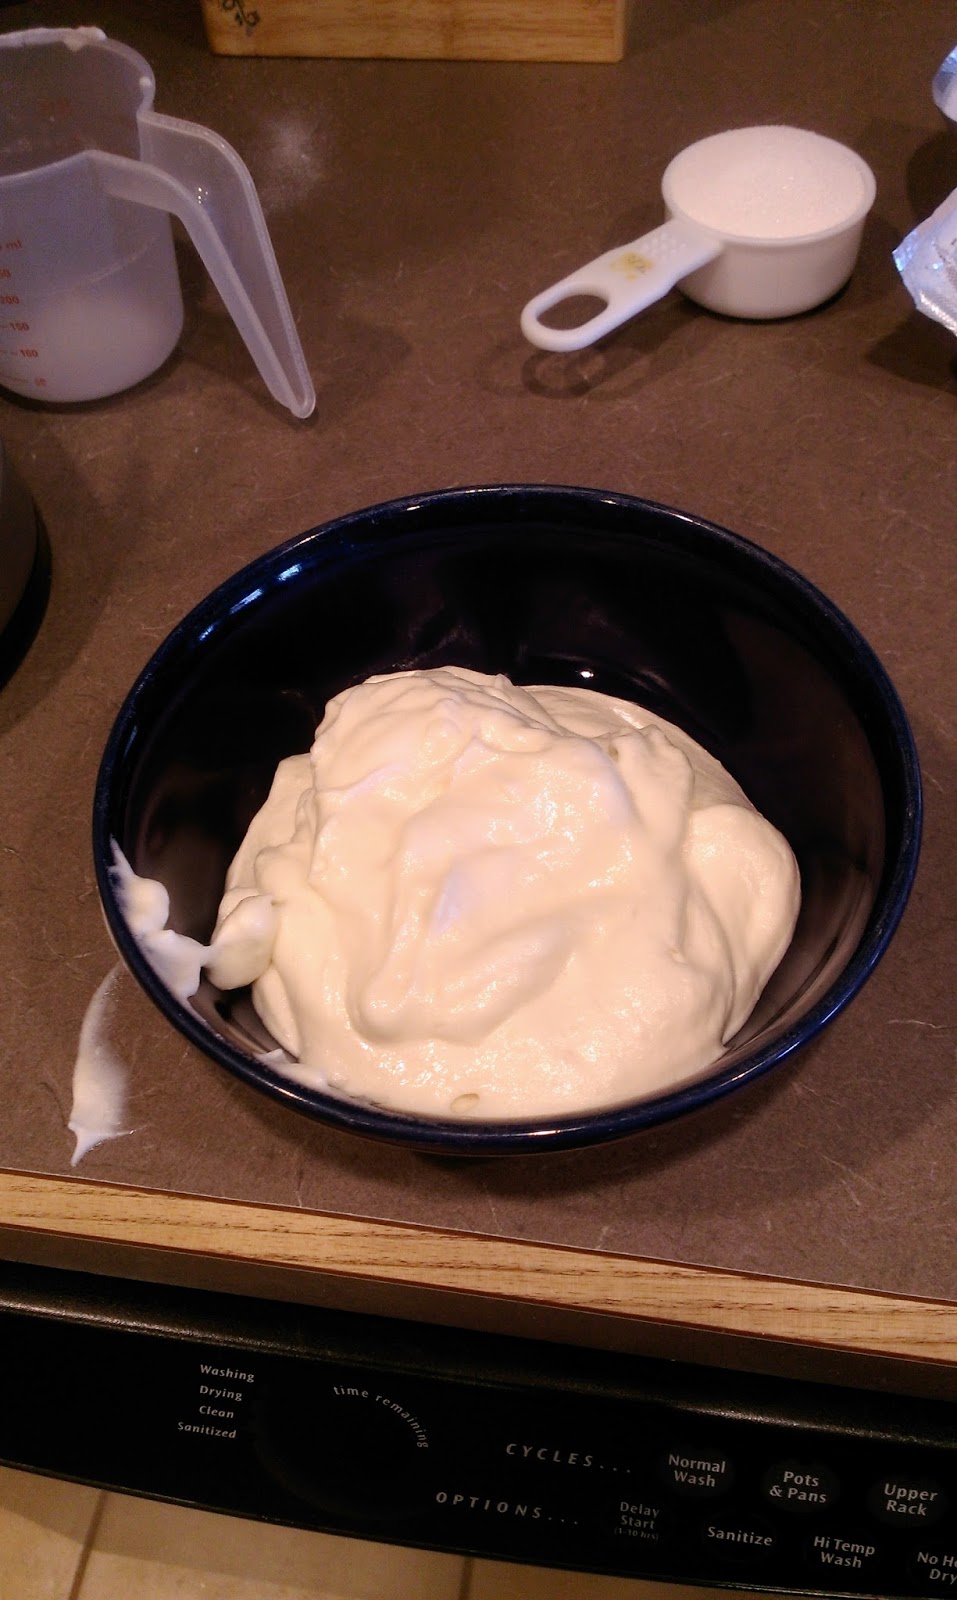
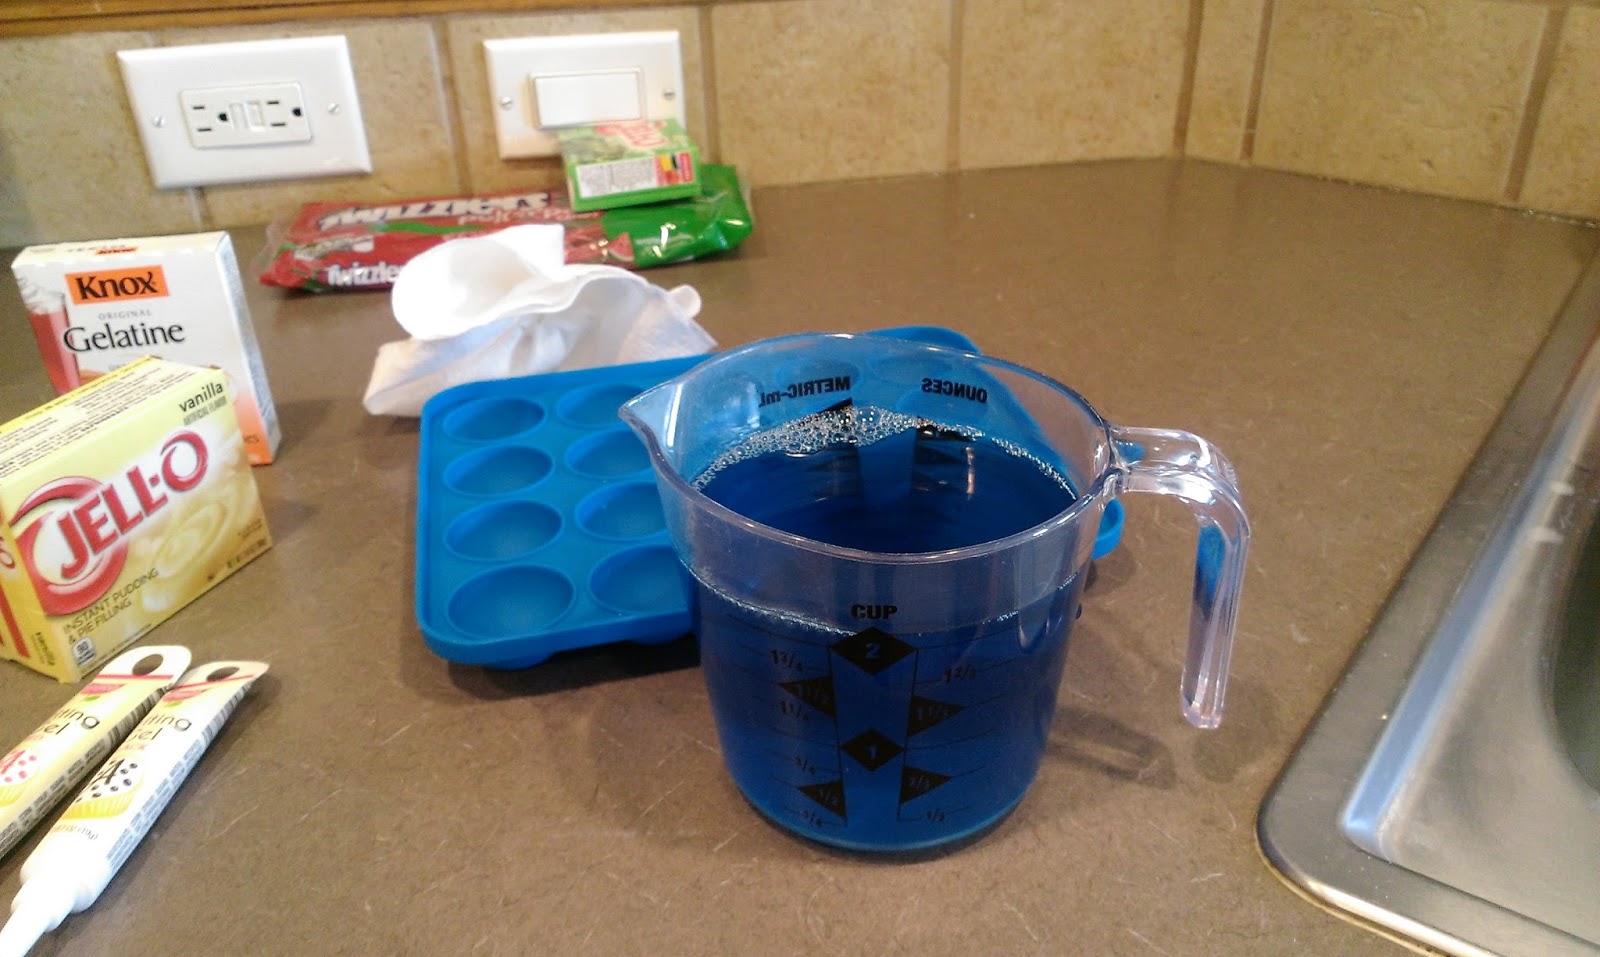
I realize this just looks like a giant pan of those egg yolks I discarded earlier, but it’s not, I swear. I added an accidental fifth drop of dye, and sweet baby Jesus things were YELLOW. I’d go with 3 drops to keep things less…glow in the dark-y. Now, pour this into a liquid measuring cup and set in the fridge for an hour to settle, cool, and thicken. If you prefer to speed things up, go for the freezer for 30 minutes.

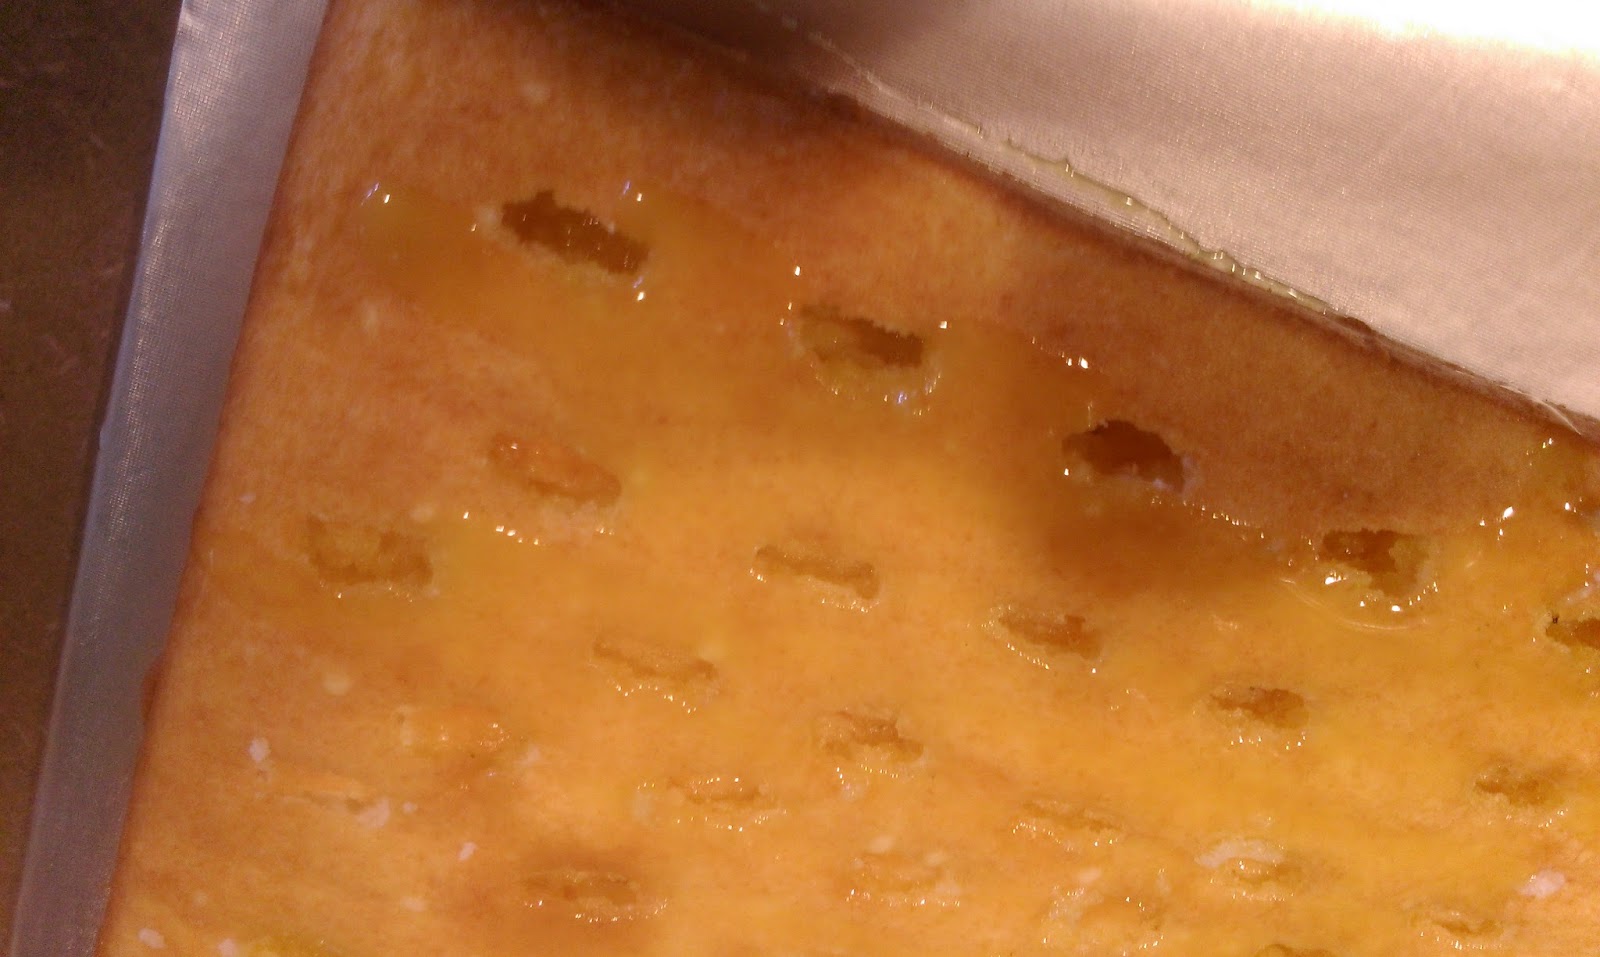
Mmm…lemony goodness. Once cooled and thickened, very slowly pour into the holes you earlier stabbed into your poor defenseless cake. If any runs off, just wipe up with a damp paper towel…or your finger. Place into the freezer for 15 minutes to firm up. But back before when I was cooling the filling in the fridge, I made my gumdrop roses:

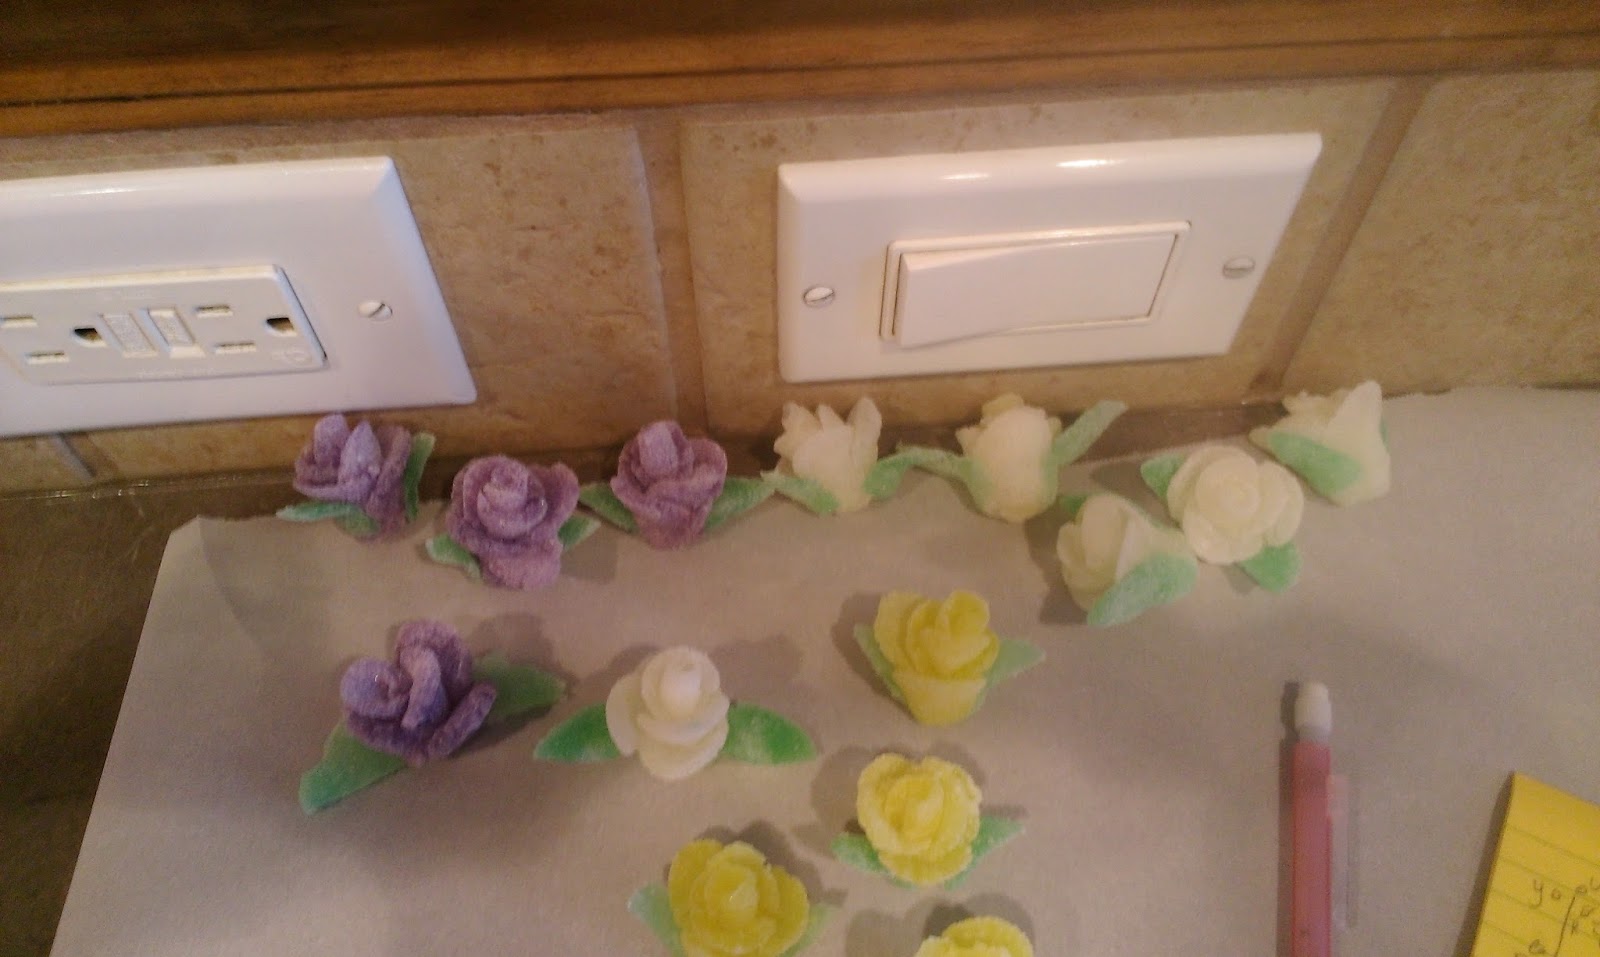
You beautiful, time-consuming roses, you. I previously made gumdrop roses to put on top of an angel food cake I made, so if you’d like the detailed tutorial, it can be found here. I ended up making 14 gumdrop roses for this cake, but you don’t need to be nearly as ridiculous as I am. Honestly, it would’ve looked pretty with just 6, but when I go the extra mile, I end up actually going an extra 3 or 4 miles instead. At least my crazy is the productive kind?

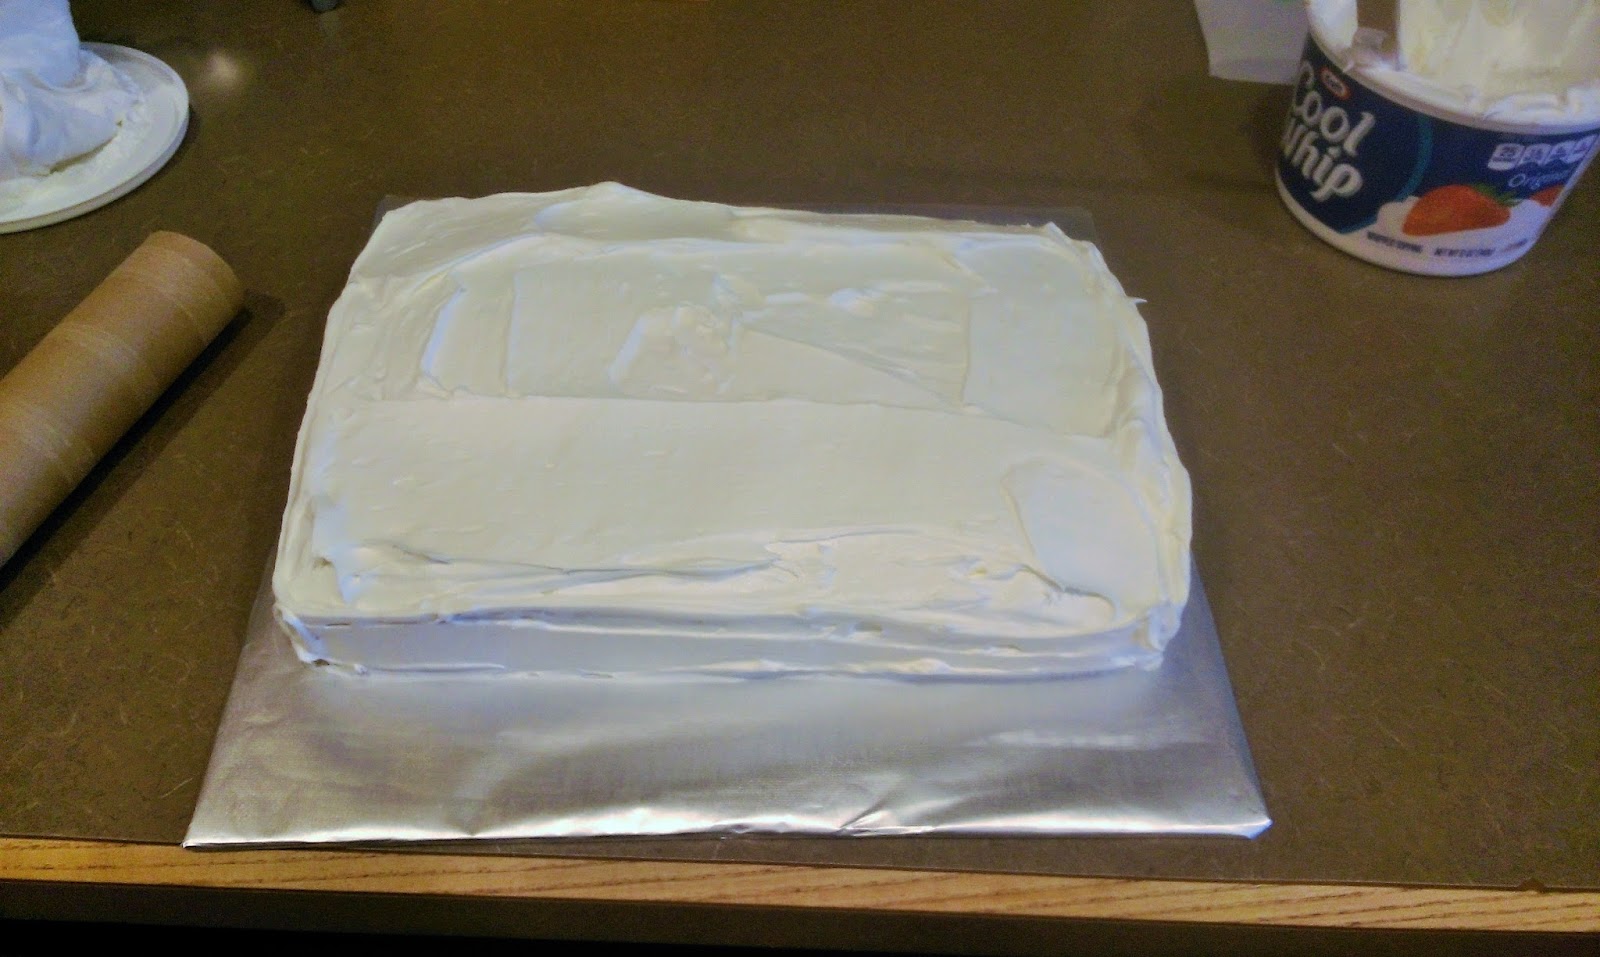
Don’t worry, we’re gonna make it look pretty. Once the filling was set, I took a large tub of Cool Whip and spread it on my cake with my spatula. Use as much or as little as you desire. Fun Kate Fact- I hated Cool Whip with a passion until about a year or two ago. My sweet tooth has calmed down a bit in my old age, and I realize not every cake needs to be topped with five inches of chocolate frosting…although I don’t object when they are.

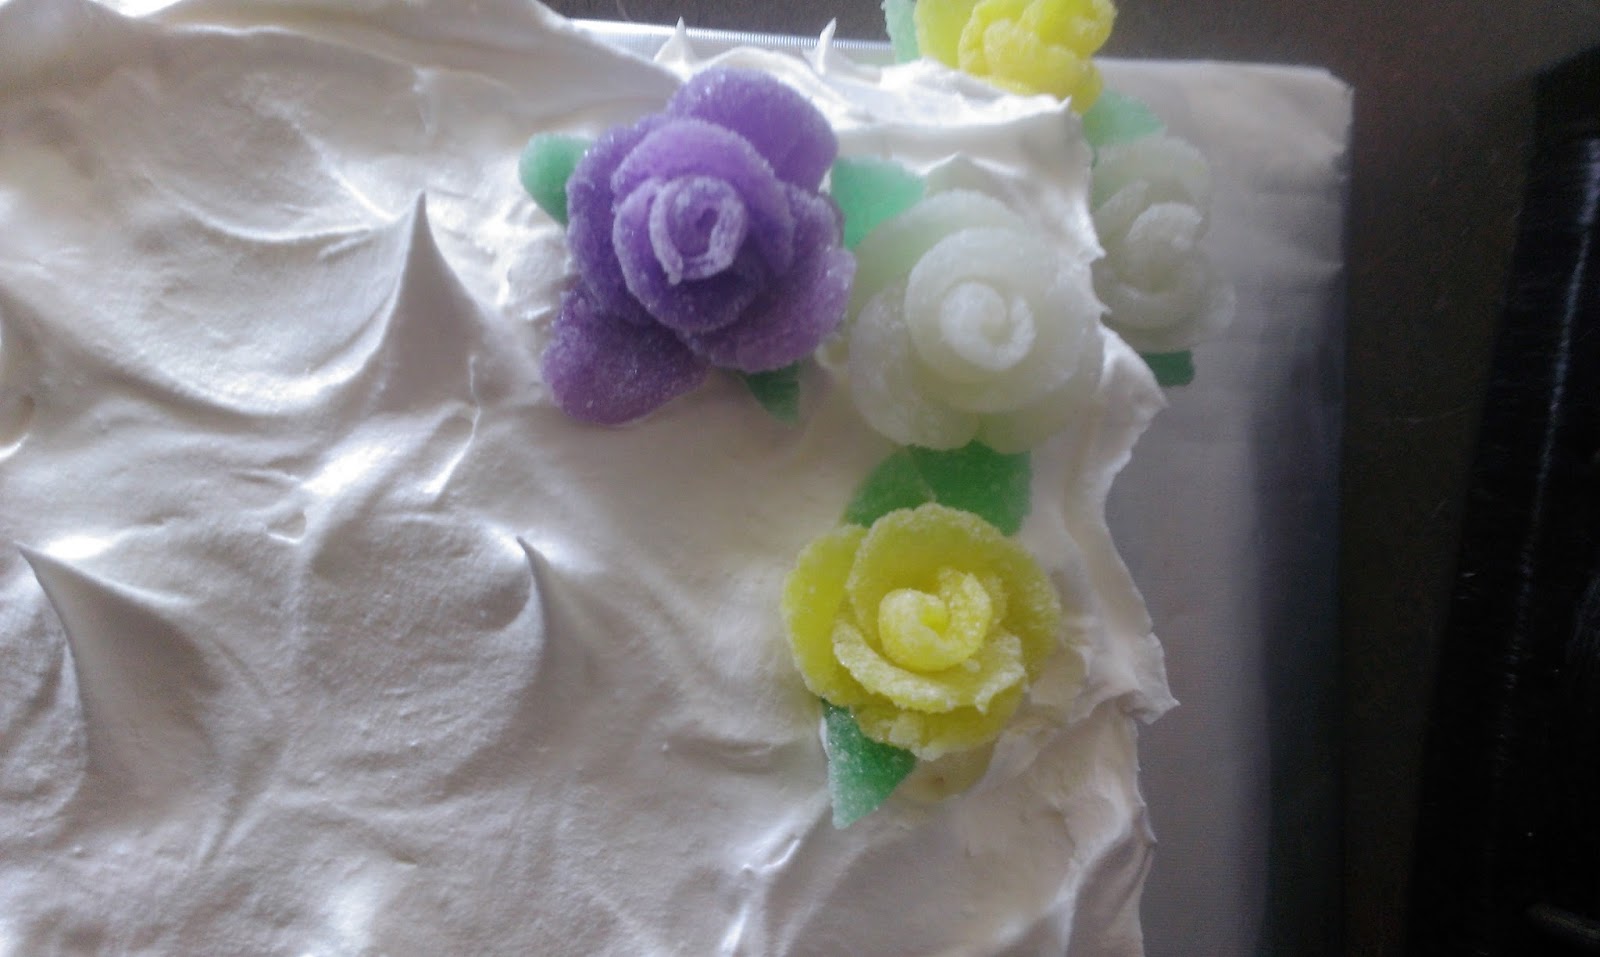
Now that’s better. To make “waves,” simply take a small spoon and press into the Cool Whip. Swirl in a circular motion and pull the spoon up and away quickly. Do this motion over the top and sides of the cake. This will create the wavy look you see here. 
It’s so easy and fast, yet still quite pretty. The “going the extra foot” of frosting decorations, really. 
Then I simply pressed my gumdrops into the Cool Whip so they would stay put. And that’s it. You’re done. Sometimes it really only takes 2 hours to make a delicious AND pretty cake. I lied…by sometimes, I really mean quite rarely. Like, you probably have a better chance of finding 100 bucks on the ground in a parking lot or meeting the man of your dreams than finding a decoration style this easy. So bask in the glory and enjoy this precious moment. Almost as precious as the first day of Autumn…which cannot get here fast enough. Until then, crank up the A/C and grab a large slice of lemon-filled white cake with Cool Whip topping. It just may be the one thing that keeps you sane and sweat-free (but definitely not sweets-free) for the remainder of the summer. ‘Til next time, my fellow eaters!

Thank you for letting me stab and eat you in order to not die from sweating this summer, lemony cake. You’re the real MVP here. -
Hank Turns Four…ish!
I am an animal lover, but more specifically, I am a dog person. You have a dog that hates everyone? It will love me. On a 1-10 scale of being obsessed with my dogs, I’m Paris Hilton. If my house was burning down and I could only grab two things, well, I’d go up in flames because my dogs hide under the bed when the smoke detector goes off. I even refuse to work full-time because I don’t want to only be able to be a part-time dog mom.. need plenty of time for those 3.5 mile walks after I teach class in the morning…between cuddle fetch sessions, of course. My dogs are both rescues, and here’s the thing about that–rescue dogs know you saved their lives, and the amount of loyalty and love they give to you is simply unparalleled. Hank and Freyja were dealt really crappy hands for the first year of their lives, and it is my job to make sure they get treated like the extremely valuable pack members that they are and want for nothing for the rest of their adorable, short-legged, furry days. Needless to say, very important doggies get very important doggy birthday cakes. Unfortunately, we do not know either pooches actual birthday, so we have designated birthdays for them, and Hank is now approaching his fourth year(ish). Hank, much like his mother, loves cake. I mean, he loves just about anything if it comes on a plate (also like his mother), so pleasing him in the dessert department is pretty easy.

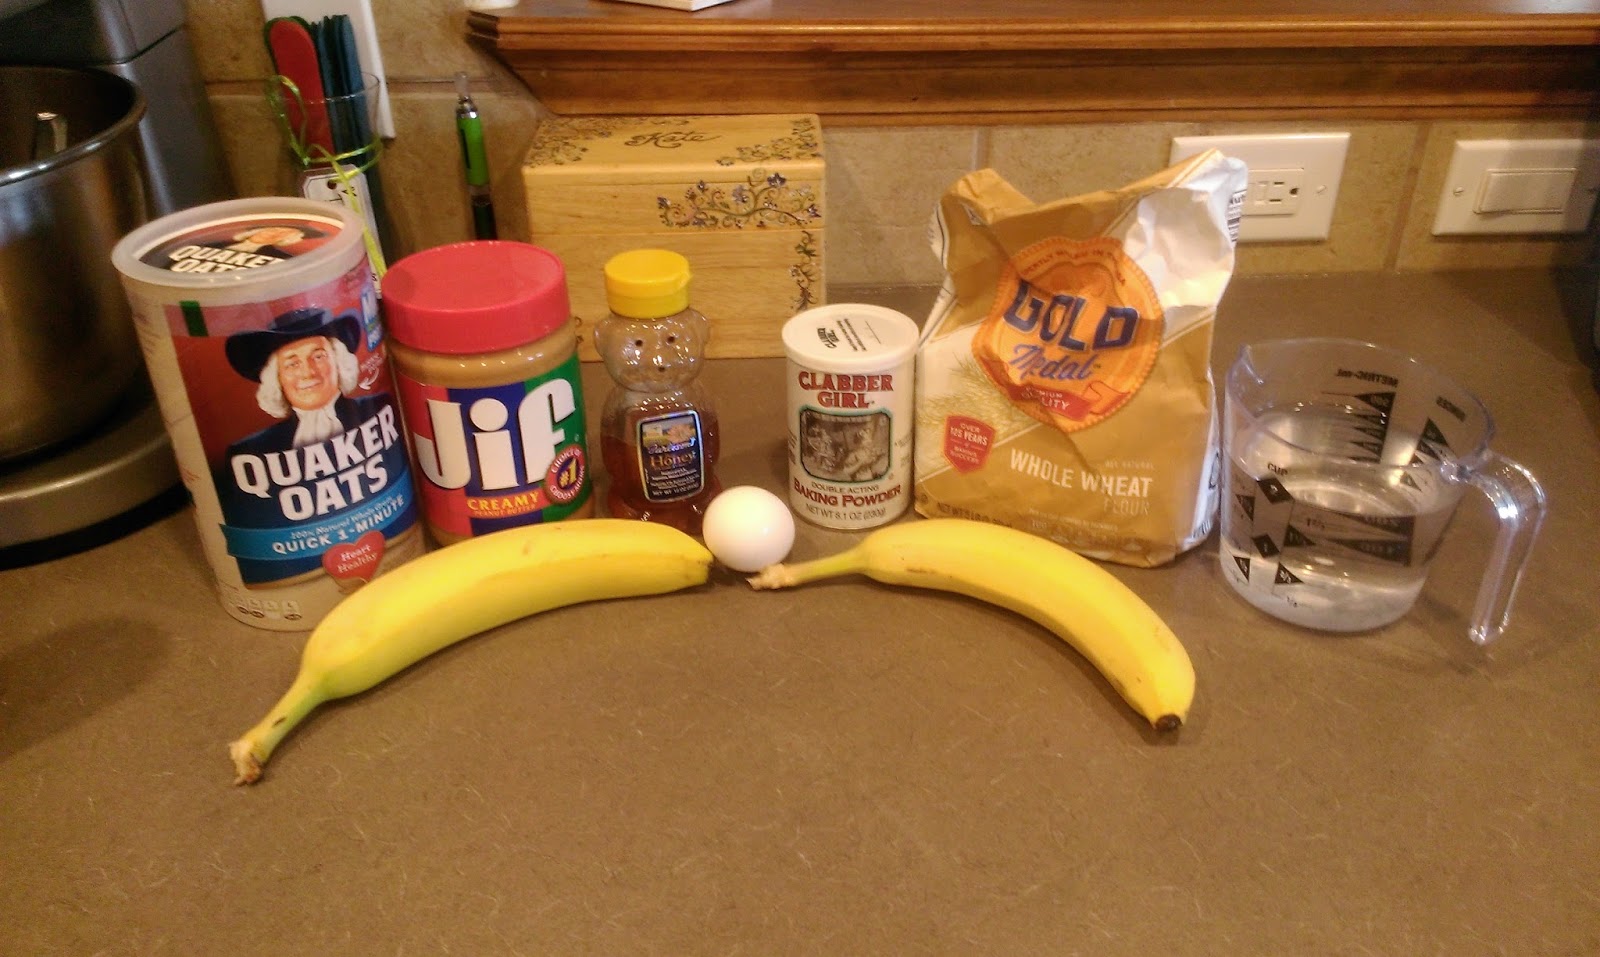
“Dear God, Mother, hurry up and give me a piece.” -Hank Spartacus Fox I could do nothing but bake doggy birthday cakes, pupcakes, and dog treats for the rest of my days and be the happiest person on the face of the planet. I’ll have to hope our next duty station has a dog bakery somewhere because I take the term “crazy dog lady” to a whole new level. I’ve made a variety of pupcakes for Hank and other dogs, but I have never made a full-on cake safe for doggy consumption. I did a lot of research, and found a recipe for a peanut butter banana cake here and made some slight changes. The whole process from start to finishing decoration took all of two hours, and if you love your dogs half as much as I love mine (congratulations, you’re normal!), you should definitely make your canine companions a sweet birthday treat like this.

You will have a captive audience in the kitchen, too. The ingredients are super simple, and you probably have most of these things already sitting around:
- 2 ripe bananas
- 4 TBS honey
- 1 egg
- 2 cups of water
- 3 cups of wheat flour
- 1/2 TBS baking powder
- 1 cup of uncooked oatmeal (mine is the quick cook stuff)
- 1 cup of JIF…because if you really care about your dogs, and your real children, too, I suppose, you won’t feed them Skippy.
Start by preheating the oven to 350 and greasing a pan. I used an 8×11 pan, but you could get away with an 8″ round if you want a plain cake. I had other ideas. Smash the two bananas and place into a stand mixer and mix with 3 TBS of honey, the egg, and the water. Mix on low as this is pretty slushtacular. Simply add in the flour, baking power, and oatmeal to this wet mix and blend well. Pour into your greased pan.If baking in an 8×11 pan, bake for 45 minutes. A smaller pan will require longer time, as this is a super dense cake.

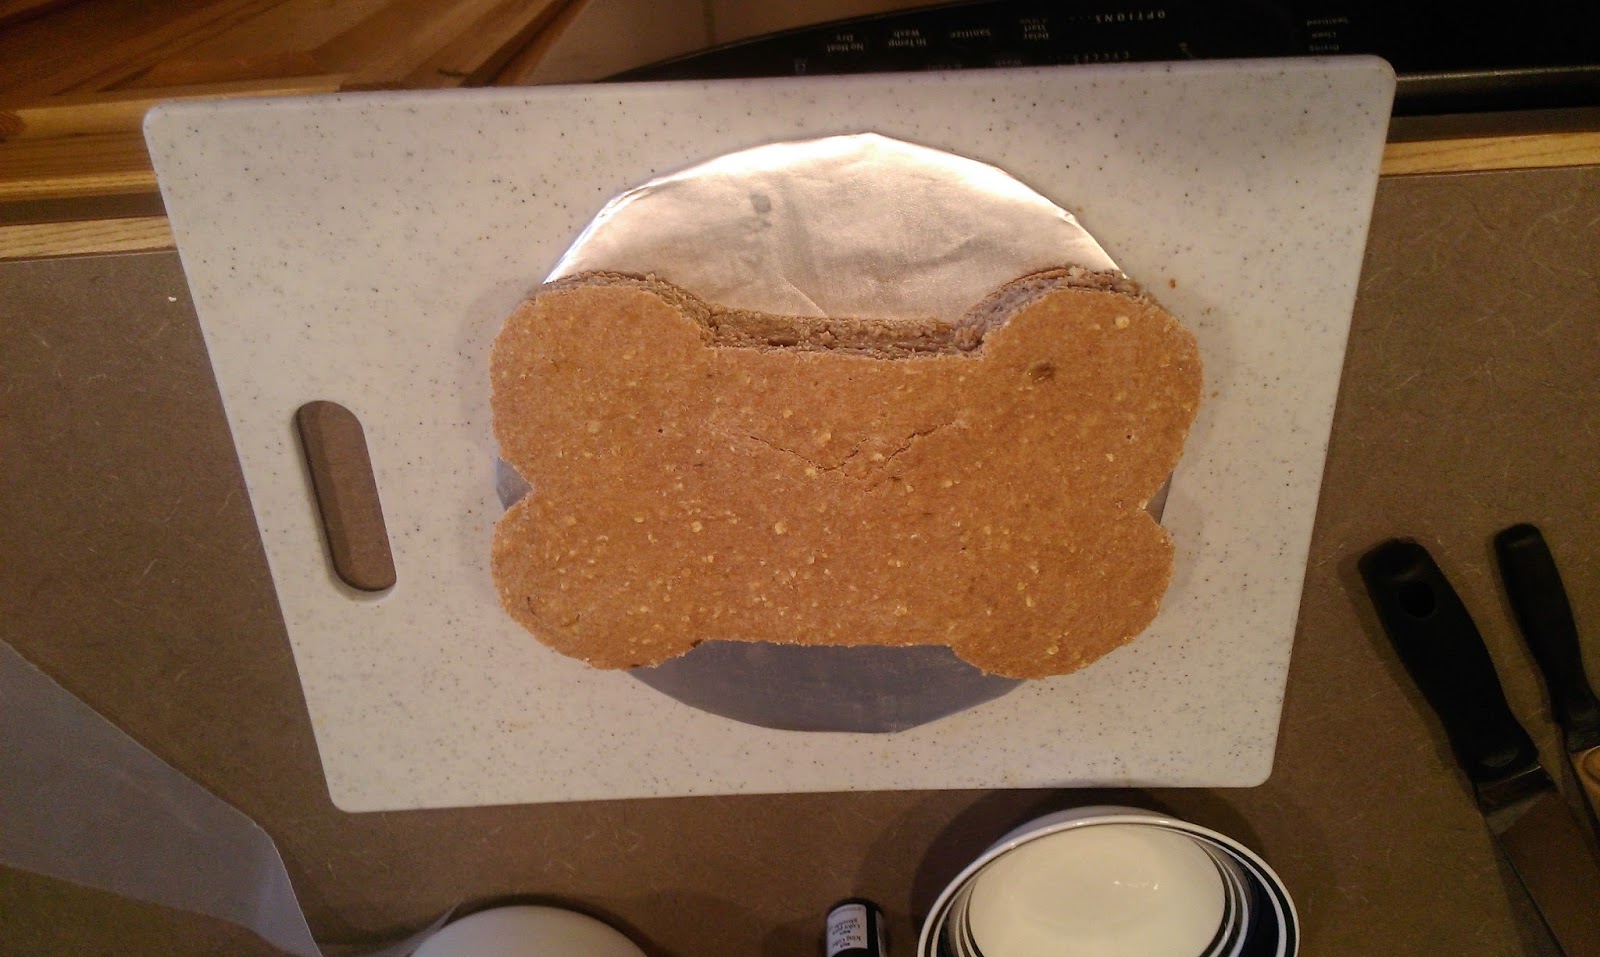
This…doesn’t look that bad actually. I’d eat it. OK, I ate it. Not gonna lie, I tried a little of the batter before it went in to the oven because I live dangerously and don’t care about salmonella or admitting to the public I ate dog treats. It was like a bland oat or granola bar, really. I’d add sugar if it was for me, but it wasn’t, so I suppose I will stay focused on this blog’s true star, Hank’s birthday cake. Once the cake is done, let it set in the pan on top of a cooling rack for a half an hour before turning out to cool on the rack completely (only takes 15 minutes in the freezer).

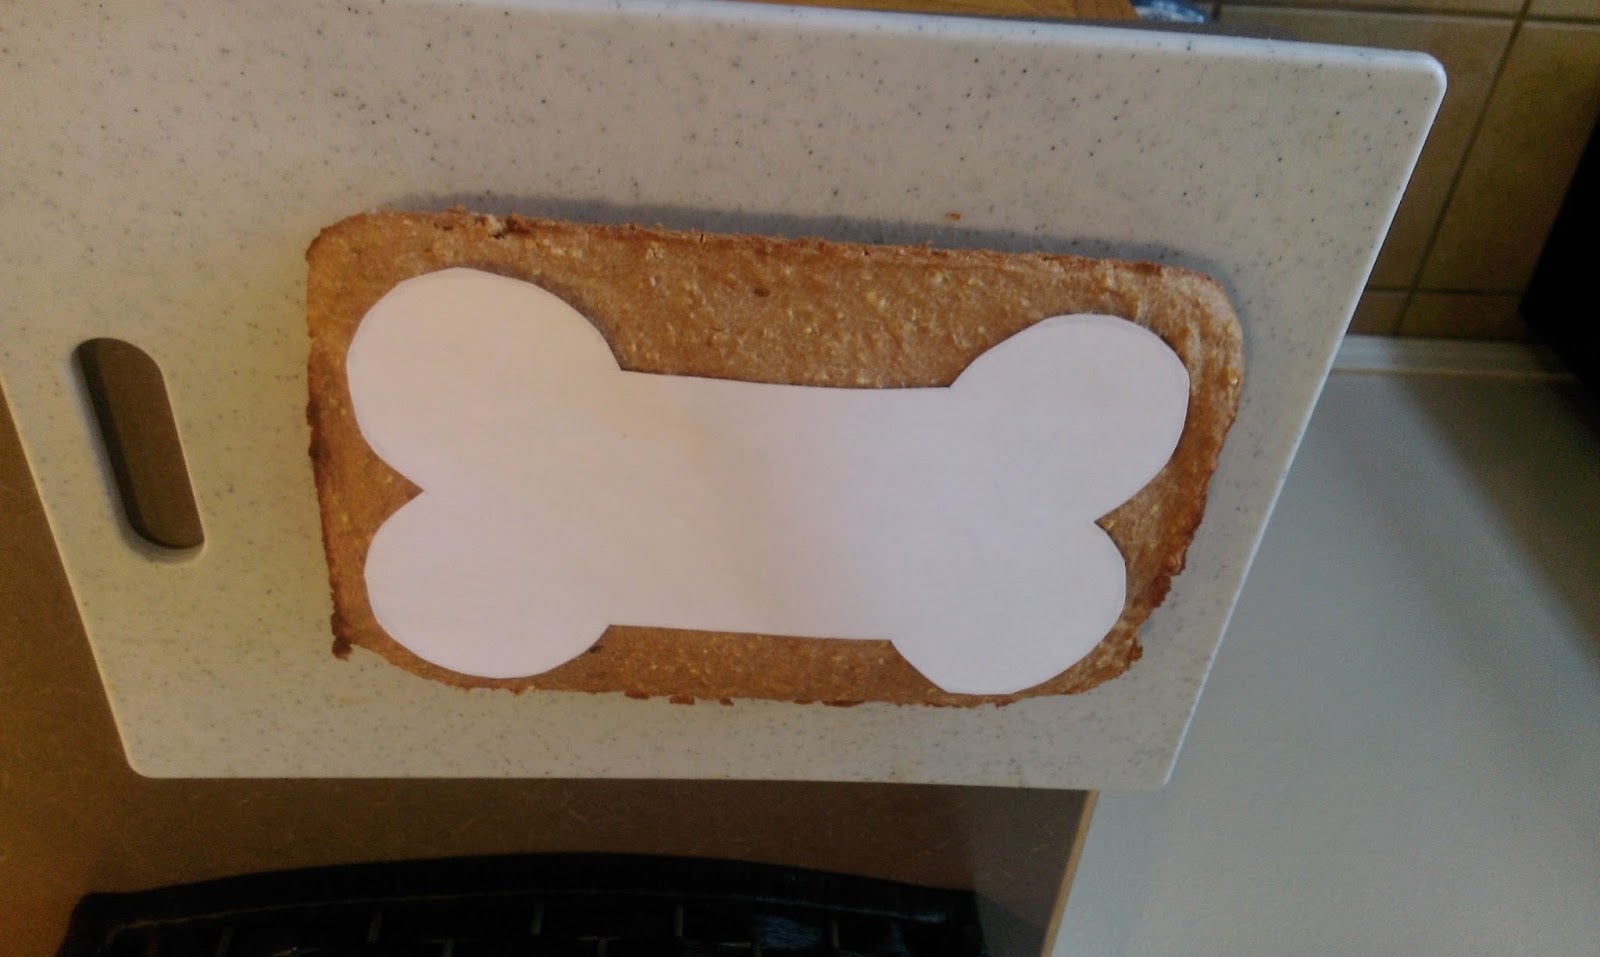
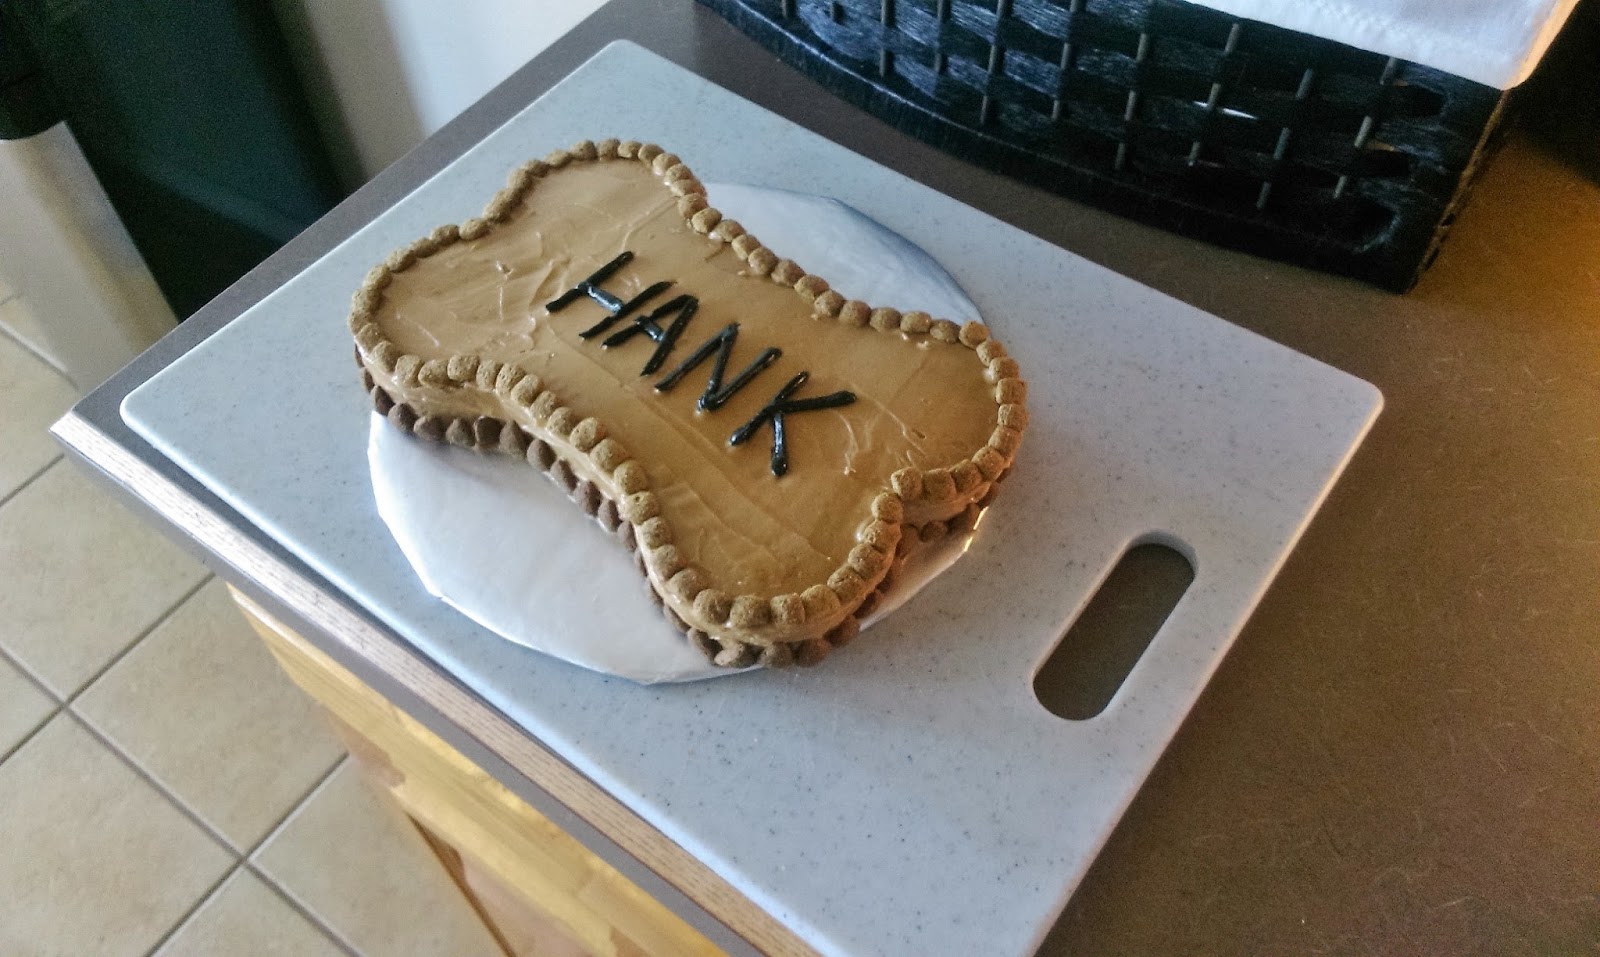
I was dead set on making this cake look like a giant milk bone, so I cut out a milk bone shape on a piece of paper and cut around my cooled cake. 
I placed it on a cake round and marveled at my creativity. As talented as he is, Hank can’t actually pat me on the back for this, so I did it for myself. 
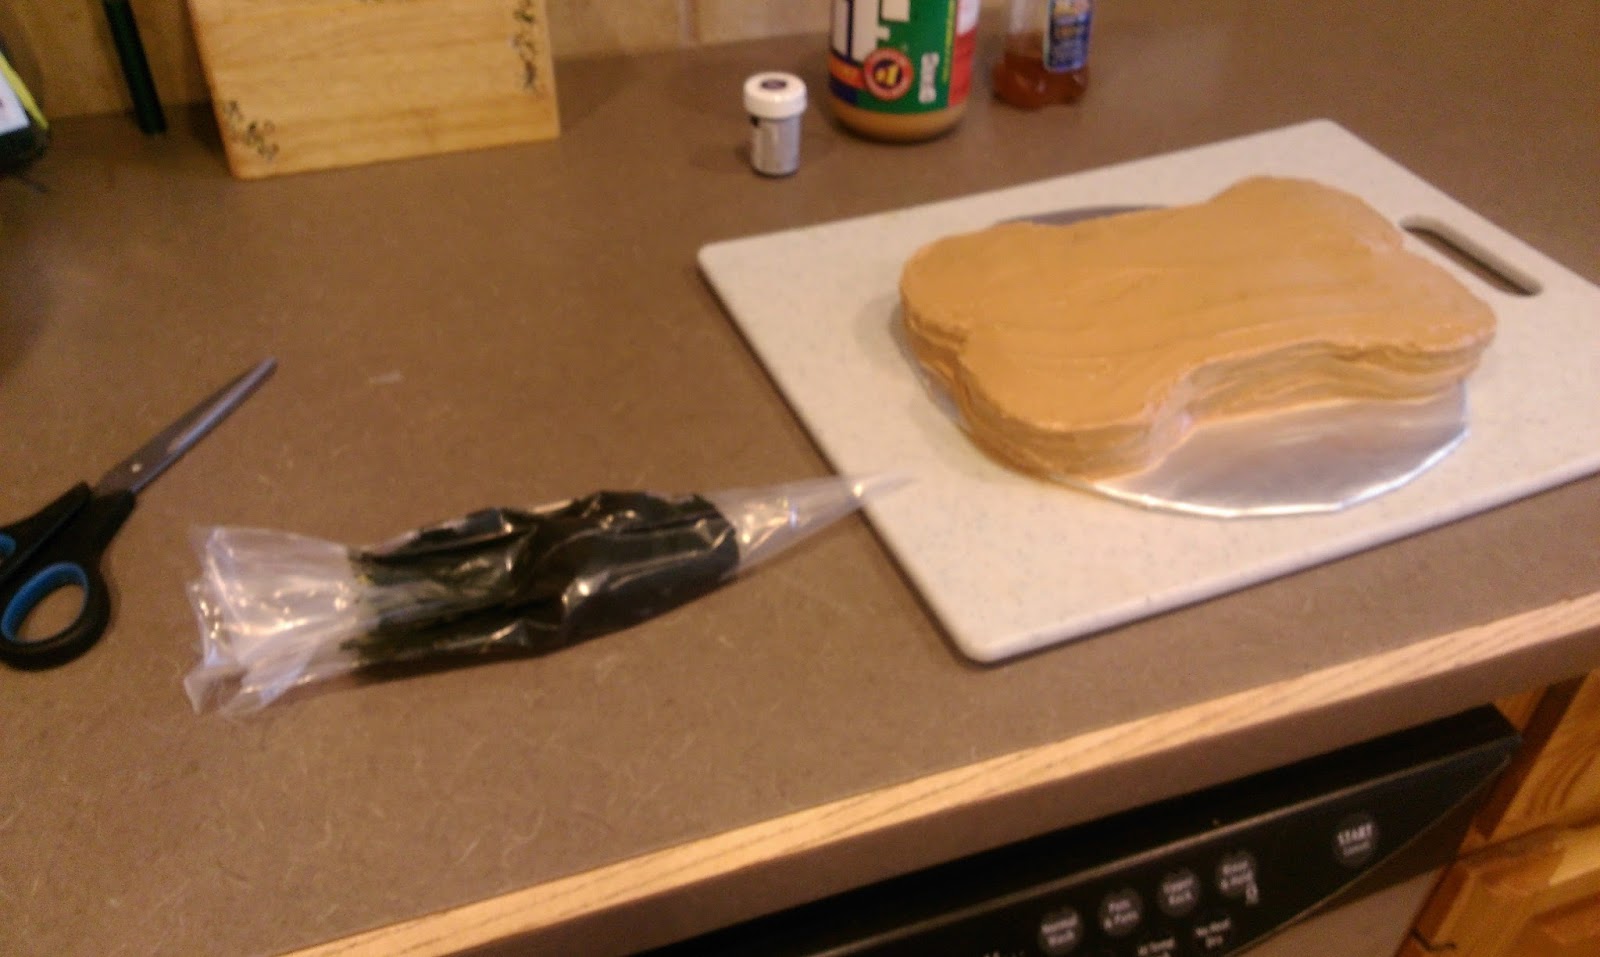
Everything’s better with JIF! Making the frosting for the cake is extremely easy. Mix the cup of peanut butter with the remaining tablespoon of honey, and use a small angled spatula to frost the cake. I smoothed things out with my larger spatula before realizing Hank wouldn’t care if the frosting wasn’t perfect (but I would). I took the remaining frosting and mixed with some black gel icing. I placed this into a piping bag and snipped off the tip before writing Hank’s name in the middle of the cake with it:

I finished things off by adding a kibble border around the side and top of the cake. I suppose you’re wondering if the dogs liked the cake…Is the sun hot? Is fall the undisputed champion of seasons? Of course. I mean, the second I get out the jar of JIF and the dogs see the bottle with the red cap, they go crazy. I thought they might stage a coup while I was taking my time frosting the cake, or at least find someway to just so happen to end up on the counter top right next to it. Hank has managed to do this before to eat a bowl of pumpkin candies, so I put nothing past what his love of food can drive him to do.

As witnessed here where he is licking the bowl clean after cake. Yes, his eyes are closed as he is the one dog in the world that has figured out this will help him savor his meal. I may have accidentally taught him this, but it’s adorable either way. There is nothing in this world I wouldn’t do for my dogs, including sleeping in less than one cubic foot of space so they can cuddle with me every night and waking at the crack of dawn to walk them before it gets too hot out. You might think I am crazy and that I love my dogs too much, and I’d say you’re right on both accounts. But dogs are not items to be thrown in the backyard and forgotten. Dogs are family members. Dogs are best friends. Dogs are furry little children. You’re the one in charge of the pack, and if you guide and love your dogs just right, they’ll have your back no matter what. You’ll know if you’ve mastered this balance the moment your dogs start standing watch by you while you’re just trying to go pee in peace in your own bathroom. They can’t leave their Alpha alone with their pants around their ankles, after all…literally. ‘Til next time, my fellow eaters!

Happy Birthday to my soulmutt, Hank. After all these years together, I’m quite certain you’re really the one who rescued me. -
What a Lovely Day.
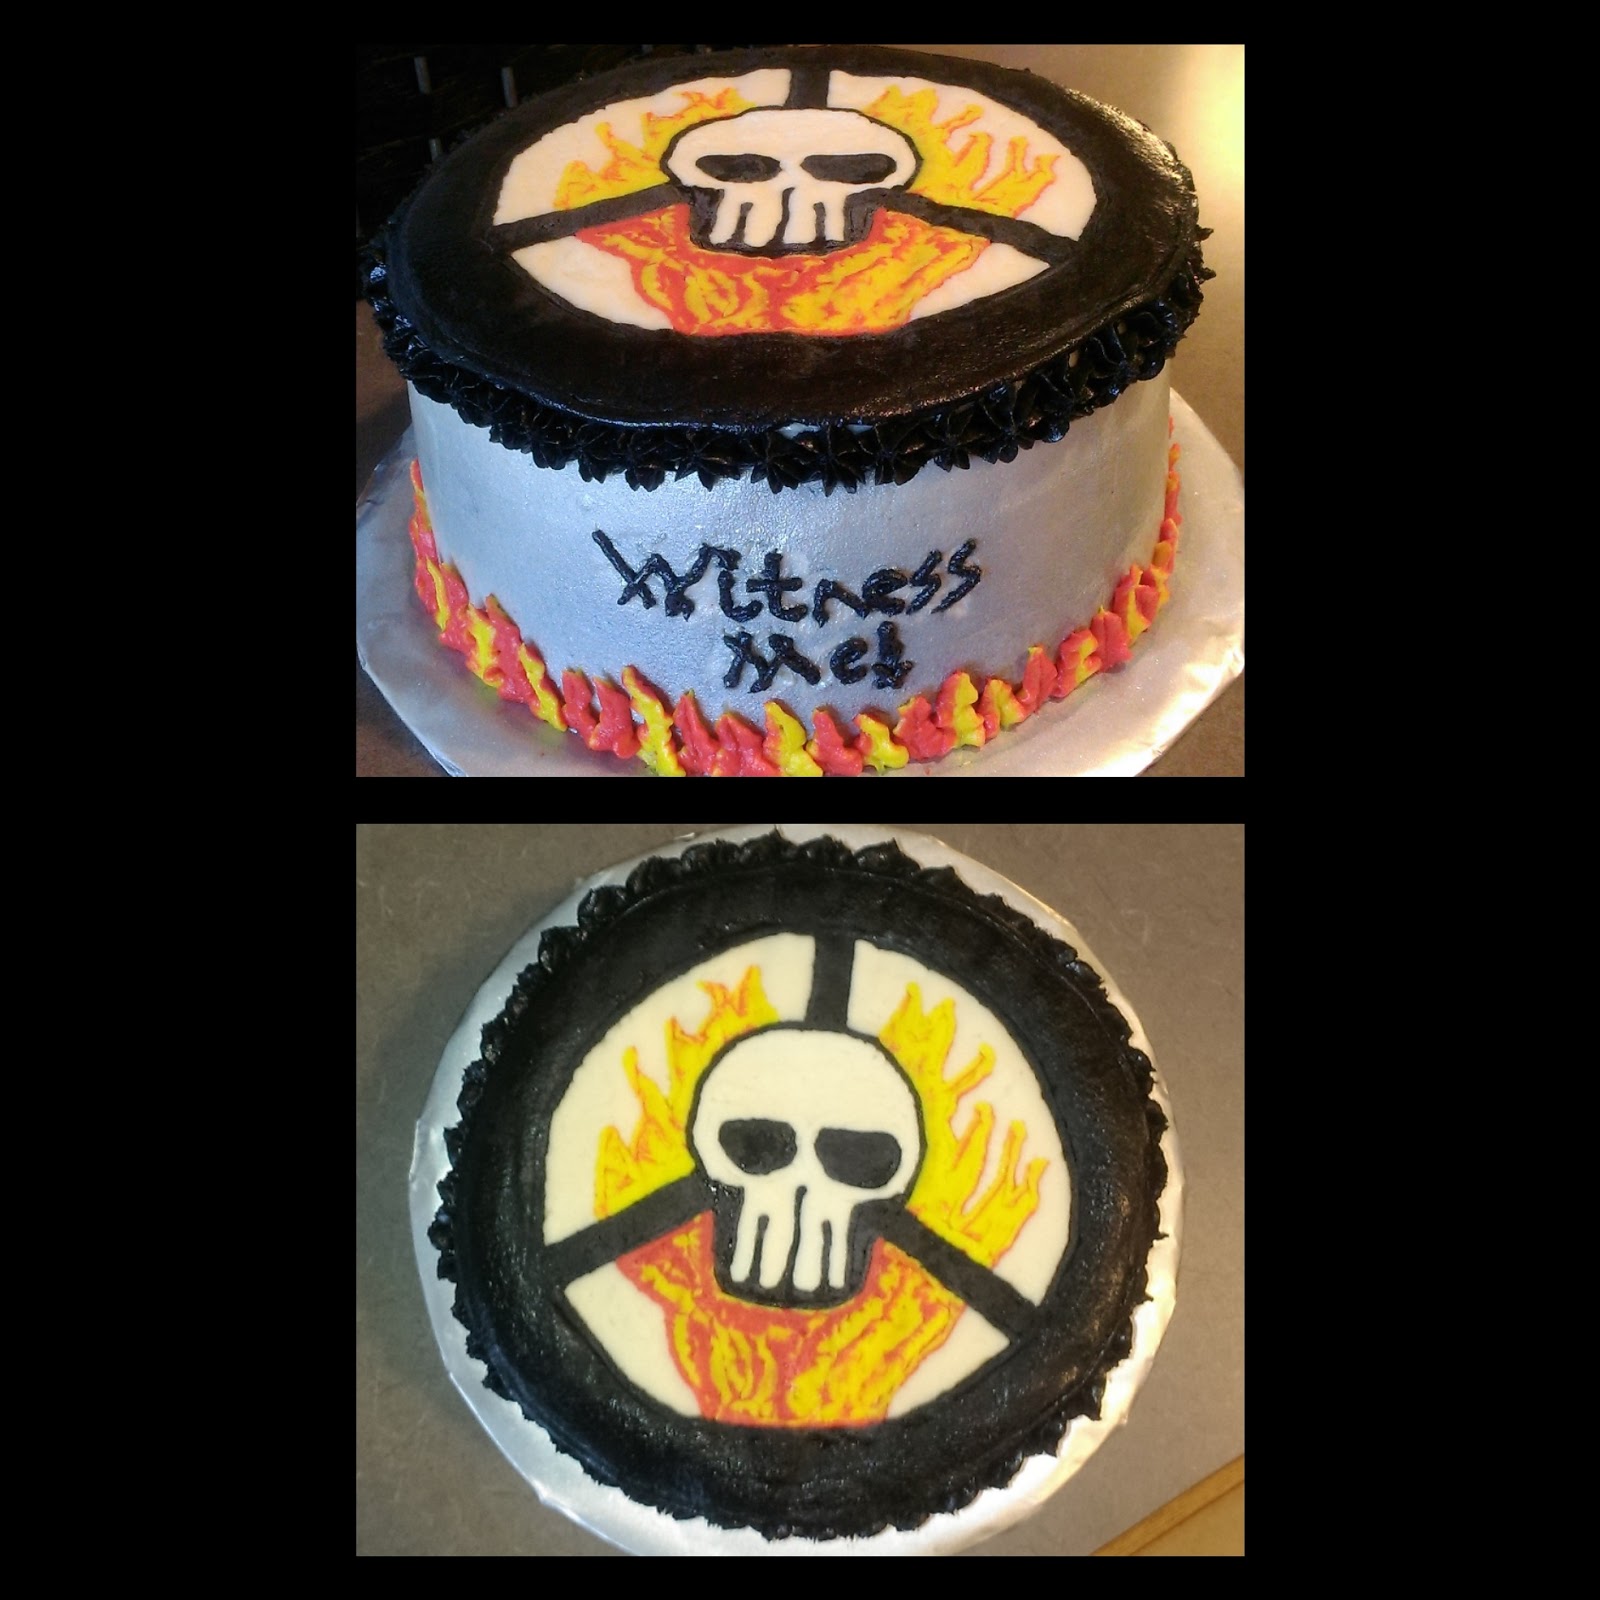
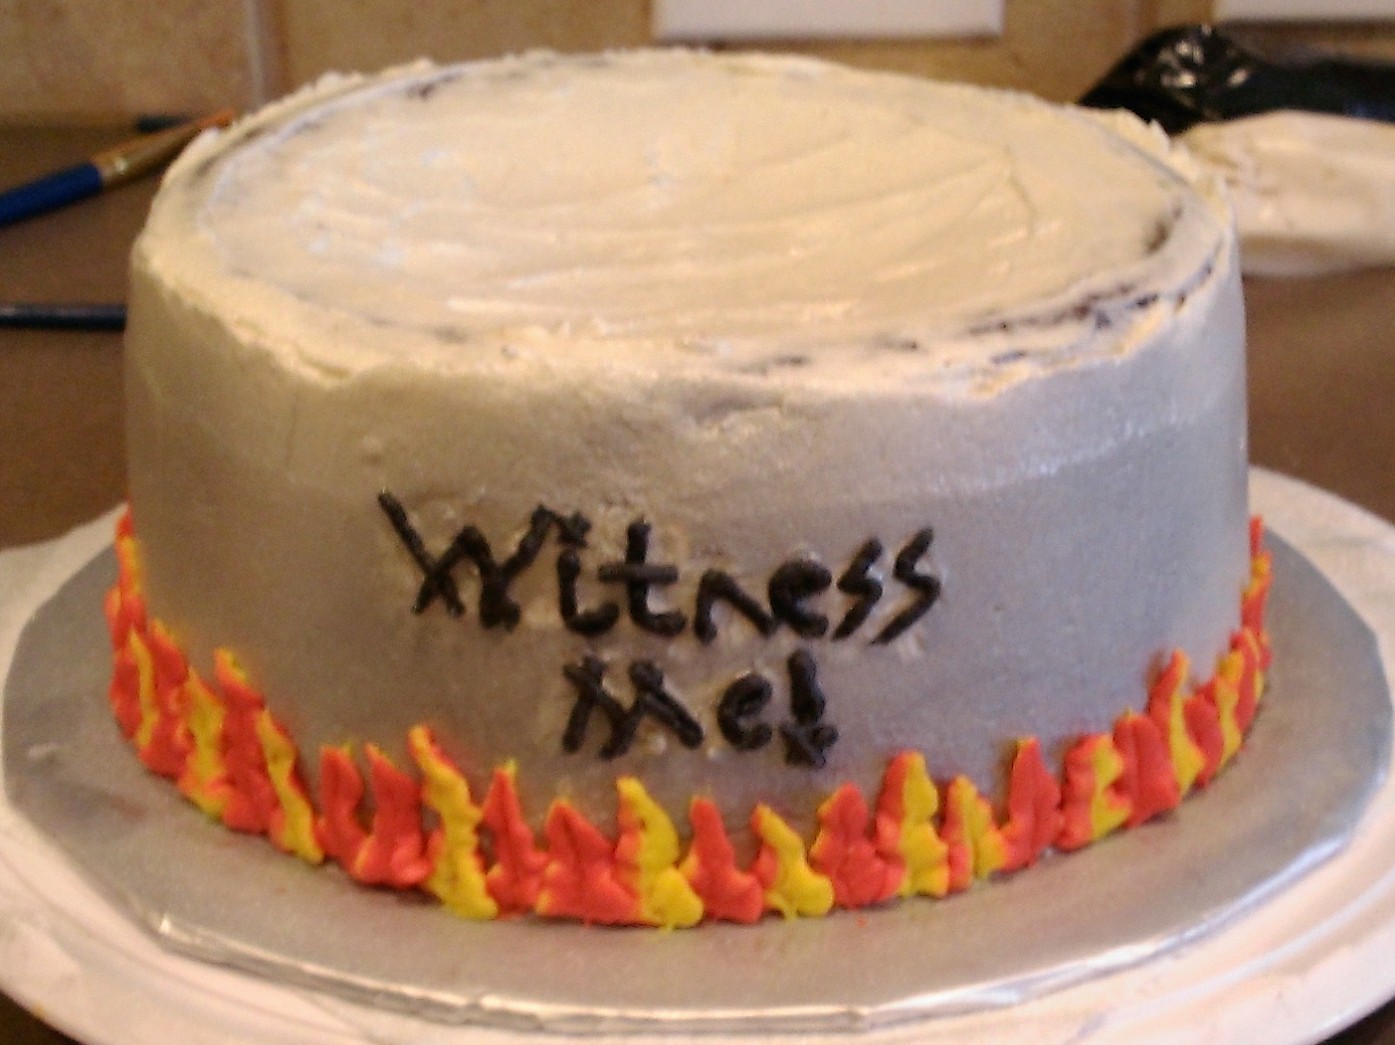
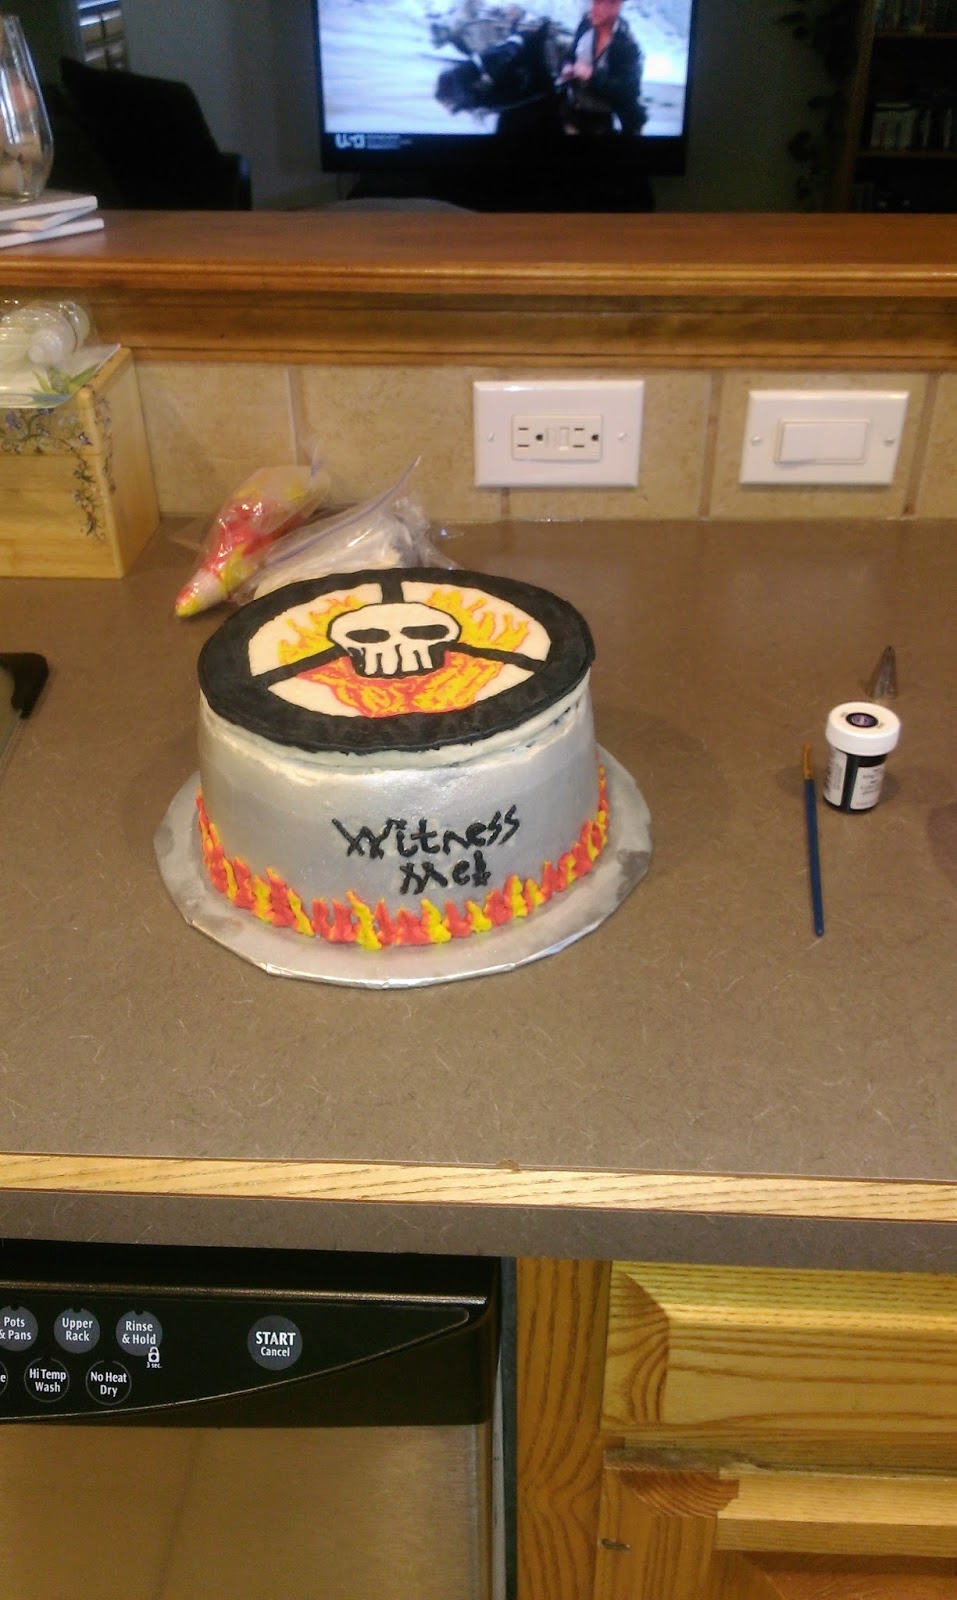
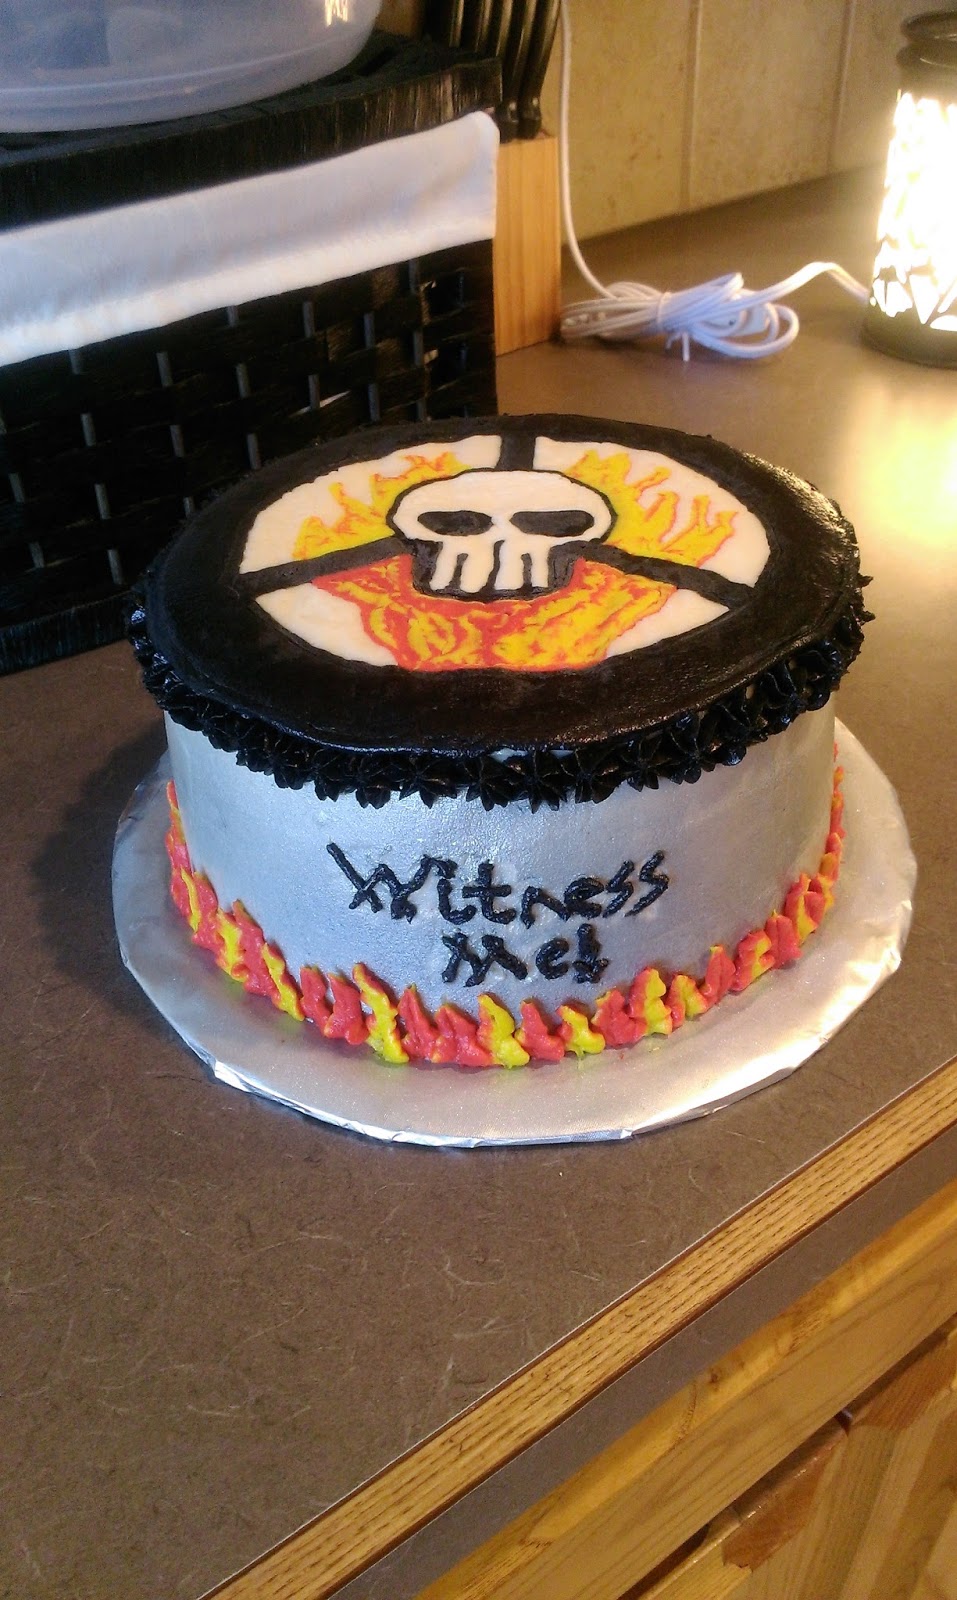
Nothing says “party” quite like leather, assorted weaponry, and cake. I feel like that may be the most Texan thing I’ve ever said, so I better preface this with some content. Recently, my husband’s husband (yeah, your husband has a best friend he can’t function without, too) and his wonderful girlfriend moved into the neighborhood. They decided they wanted to host a housewarming party this past weekend…but not the kind of housewarming party where the wine and cheese spread was the main focus. No, this ended up being the kind of house party where come midnight, a group of grown men had gathered in the kitchen while waiting for me to give them fake metallic tramp stamps (#squadgoals). You see, our friends decided to let the neighborhood know the War Rig had arrived by hosting a Mad Max party….which makes the shiny and chrome fake tatts a little more understandable. There were War Boys, Imperators, a gyrocopter pilot, and our very own apocalyptic banjo player complete with “flame shooting” banjo. Even the charcuterie stayed in character in the form of assorted meats, fruits, and vegetables from Immortan Joe’s Garden, and the Mother’s Milk (piña coladas) was cold and filling. Hence my opening statement: I’ve never seen more airsoft guns and leather all in one place, and it was glorious. And of course the cake had to fit in with the theme, so I was commissioned to make a steering wheel cake and did so in honor of Nux, the charming halfwit he was…

I’m gonna witness you going straight into mah belly. There was lots of talk about becoming shiny and chrome in Mad Max: Fury Road, so naturally most people were carrying around cans of silver color mist to spray in their mouths so they, too, could be witnessed on the adventure to Valhalla, or in this case, the adventure to their impending hangovers the following morning. By the end of the night, most people looked like they had just finished making out with half of a three-ring circus, so the photo ops were pretty epic….I even made sure the cake was sprayed in a shiny chrome finish and bared the “Witness Me” War Boy cry. Have I mentioned how much I enjoy a good costume party? Although in Clovis, the Mad Max world seems one Walmart closing away from actually happening.

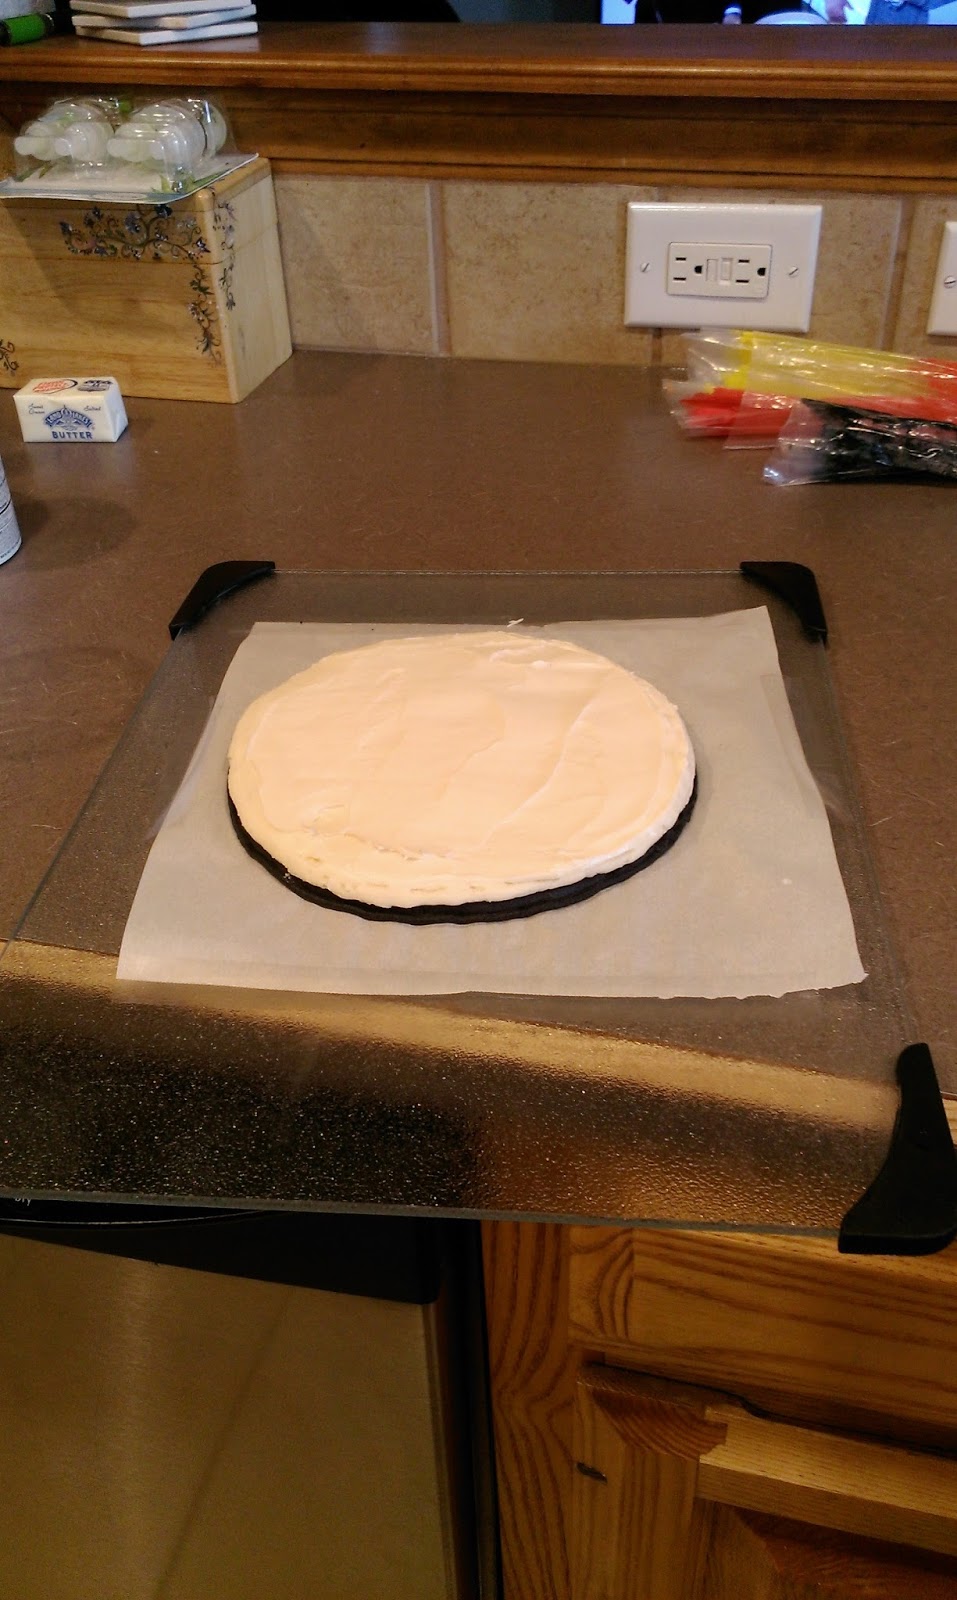
I love it when friends leave us a love note. Since this was a rager for the ages, I made my Guinness chocolate cake (recipe doubled for 2 8-inch rounds) with crusting Baileys buttercream frosting for both the sides of the cake and the buttercream transfer on top (frosting recipe and amount there). This was only the second transfer I’ve made, and my first 8-inch transfer. It involved more detail than the Ace of Spades transfer, but it was a lot easier to handle and place on the cake than the 9×13 transfer that required both me, my husband, and a lot of praying to put on top of that cake.

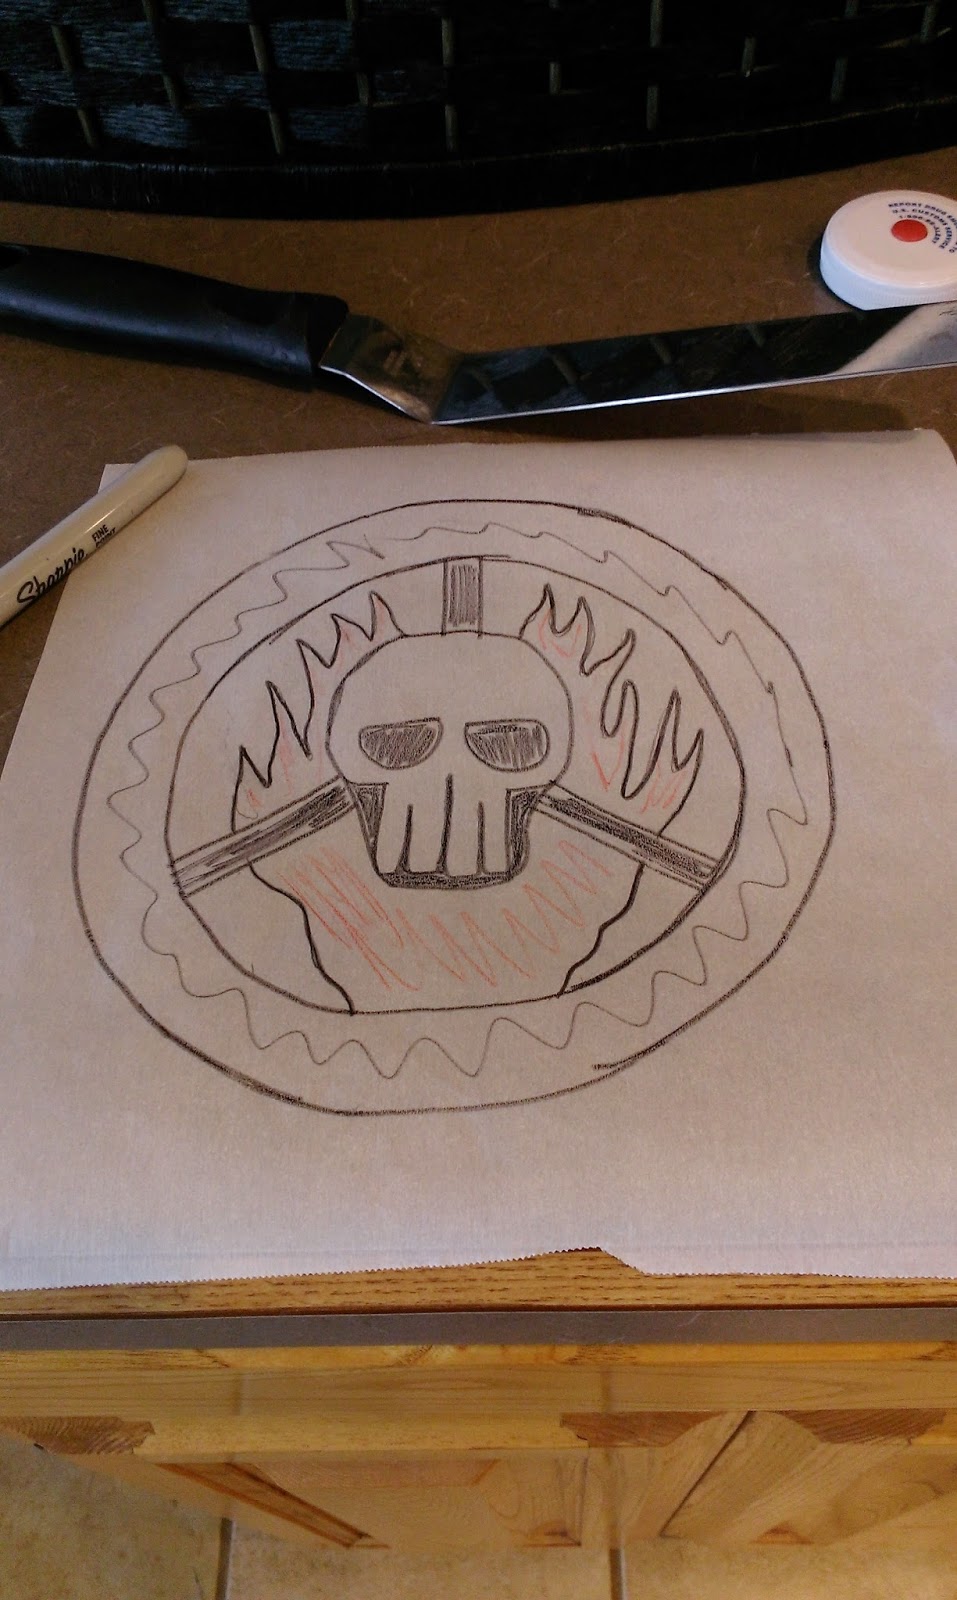
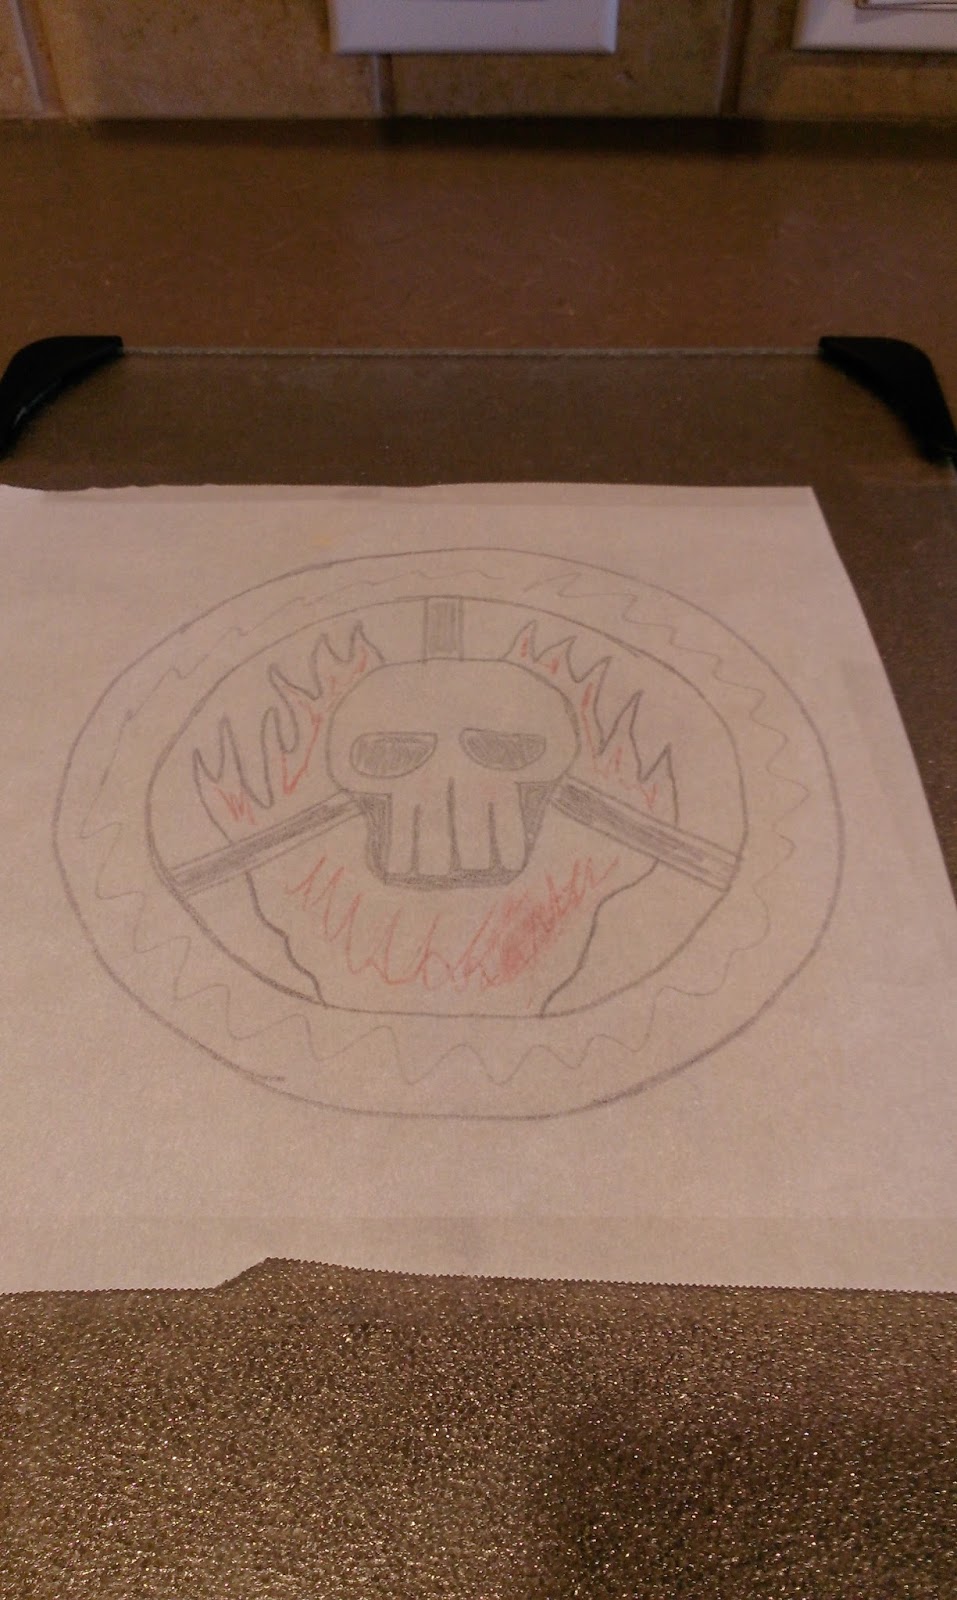
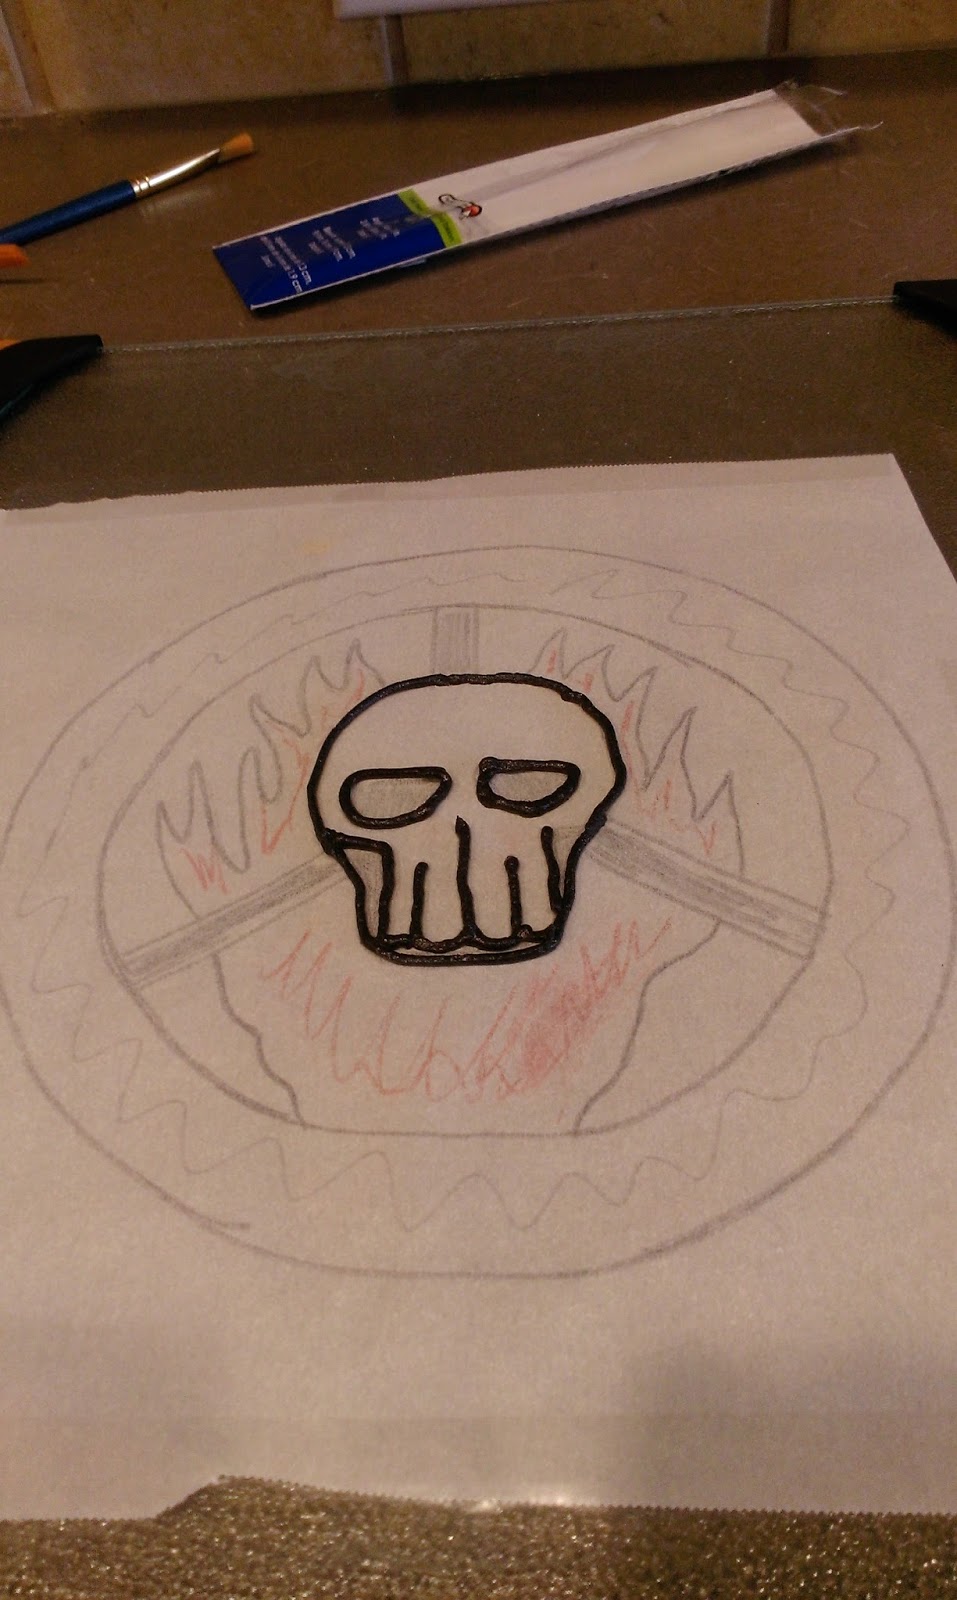
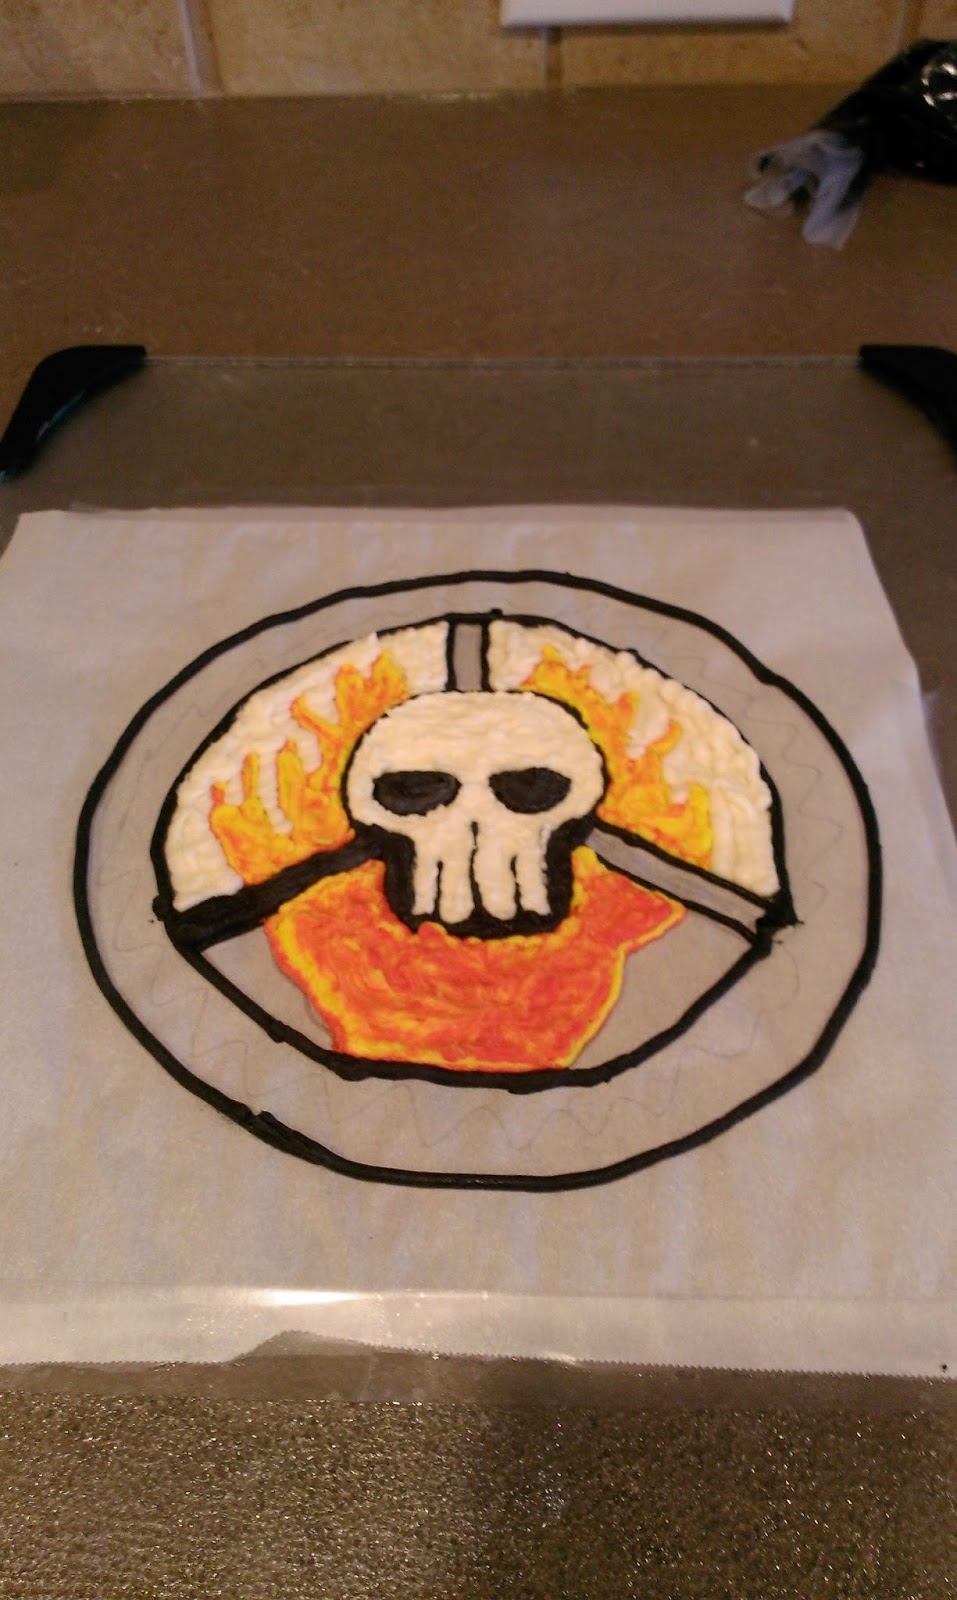
Like that? Didn’t even warn you it was crappy photo montage time. There’s no rules in the apocalypse, people. For this transfer, I drew out a steering wheel with a skull in the middle on Parchment paper using black and red Sharpies. I am so not talented enough to draw Nux’s actual steering wheel, so this was as close as it was gonna get. It still looks like fire and brimstone, so it works. 
Then I flipped it over and taped it to a clear cutting board. 
Always start a transfer by outlining each color on your transfer. Check your work from the underside of the glass cutting board or plexiglass. If you see light poking through or if your outlining looks uneven or crooked, use a paintbrush to reshape your lines or pat down any areas where light is poking through. This sounds simple, but it is very time consuming. As with most things that require painstaking effort, the end results will totally kick ass and make you the preferred cake decorator for the apocalypse. 
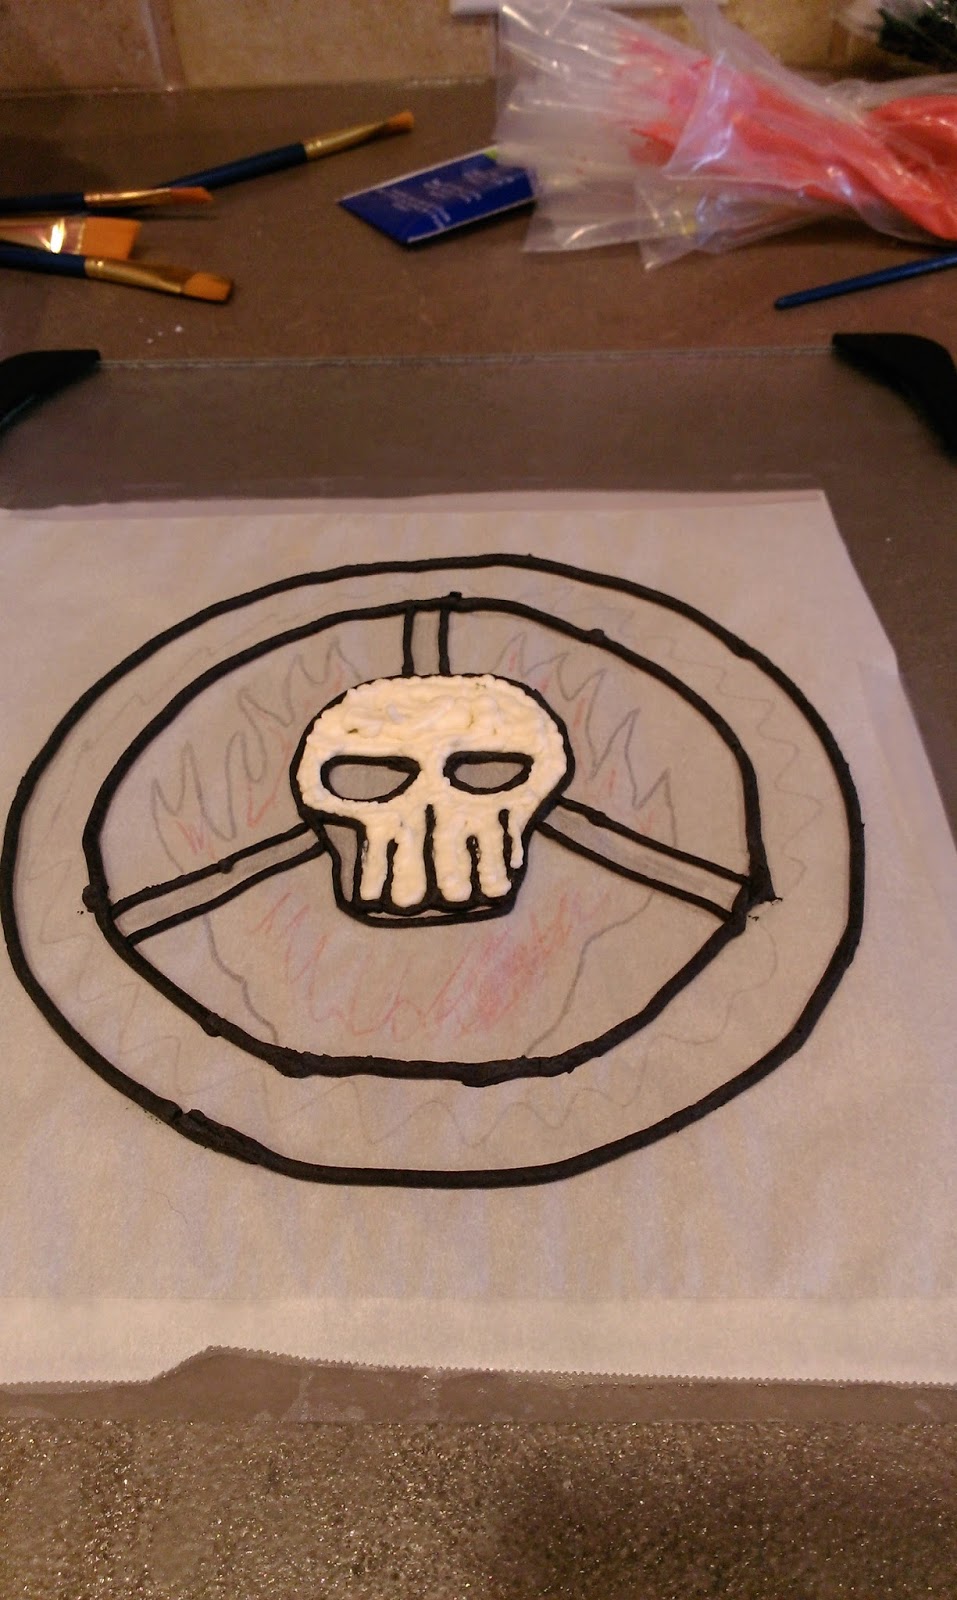
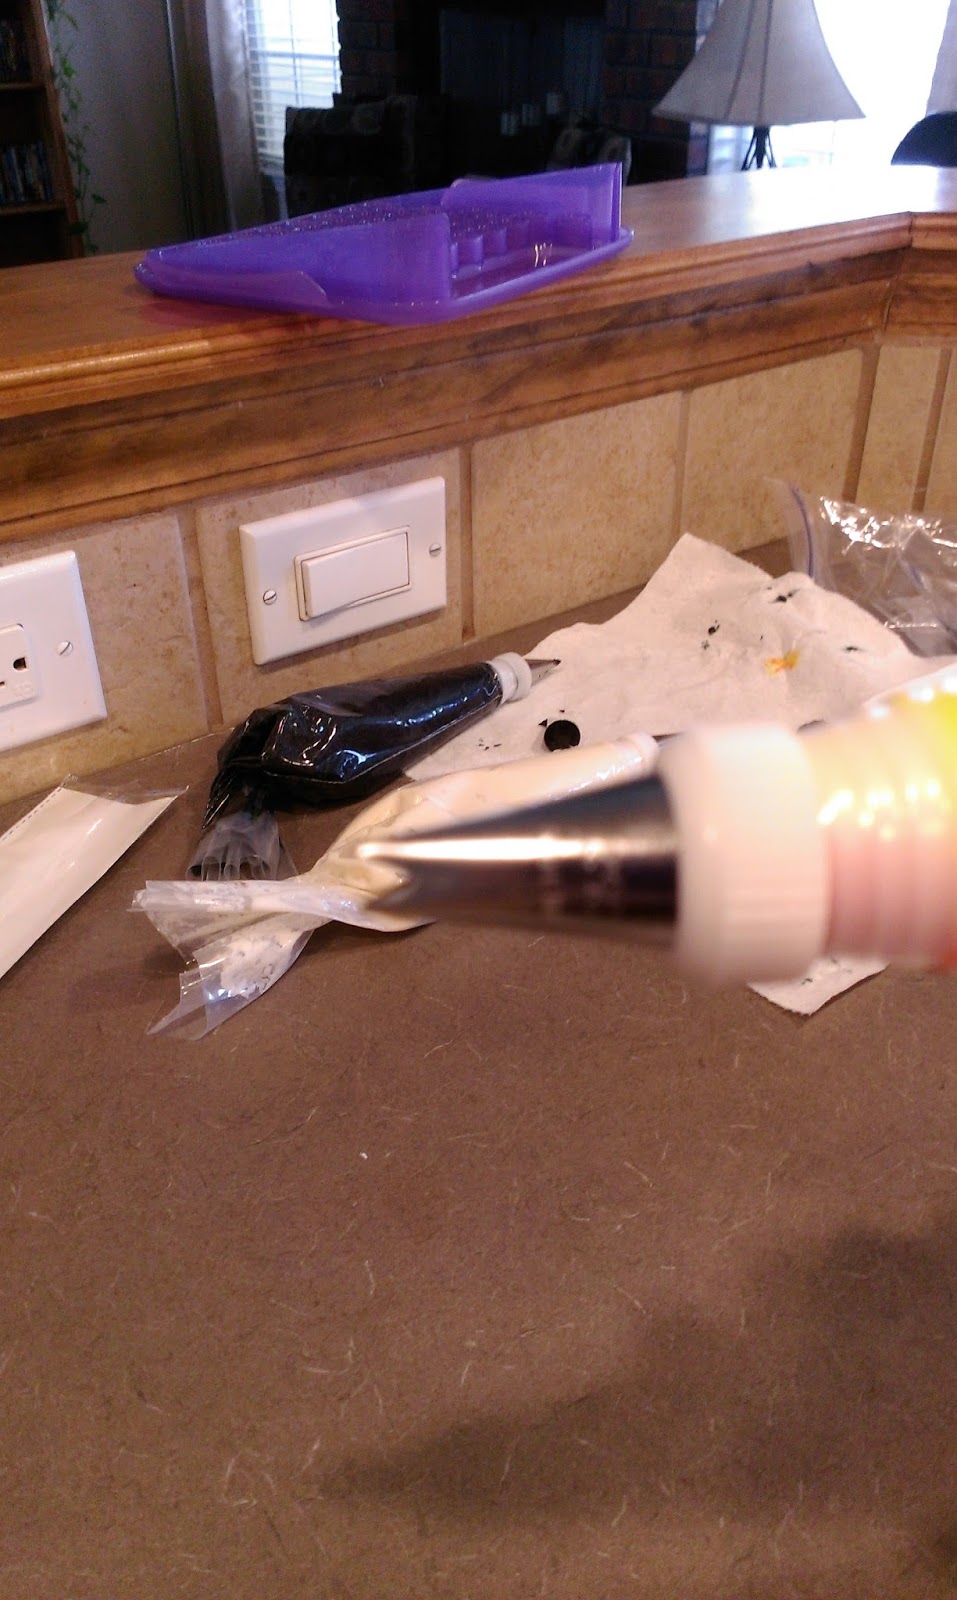
At the end of May when I made the Ace of Spades cake, I had the wherewithal and astounding willpower to not eat the leftover black Baileys buttercream I had used, but instead carefully package and freeze it for future use. I wanted to go back in time and hug myself for this because it was a huge help just to place #2, #3, and #5 tips on the frozen bags and let them thaw out for use on this cake. Speaking of this cake…once I had outlined everything that was going to be black, I placed my transfer in the freezer for 30 minutes to set. 
Then I came back in and filled in the skull with a piping bag fitted with a Wilton #3 tip before setting back in the fridge for another half an hour. Luckily my husband was home to keep me sane during the massive amounts of waiting time in between icing layers. 
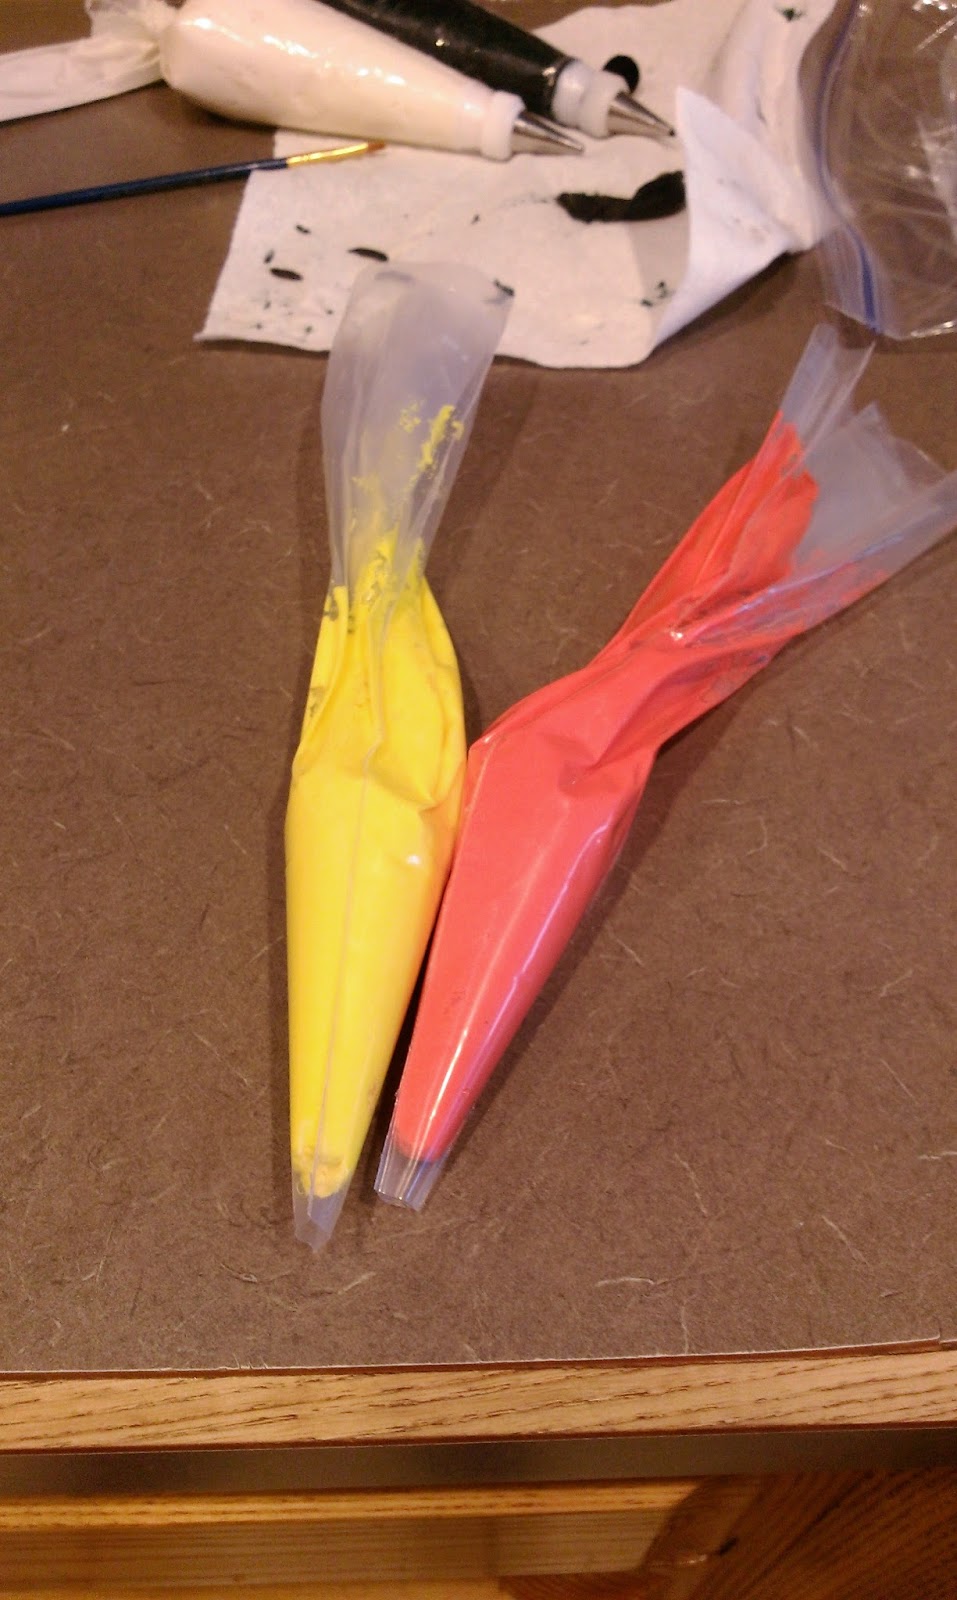
For my flame section and flames on the side of the cake, I made one small bag of frosting dyed yellow and one small bag of frosting dyed red. I snipped a small amount of tip off of each bag… 
And slid them into an empty bag fitted with a #3 tip. I piped out a bit of frosting until both colors were coming out at the same time, creating a red, yellow, and orange effect for the fire. 
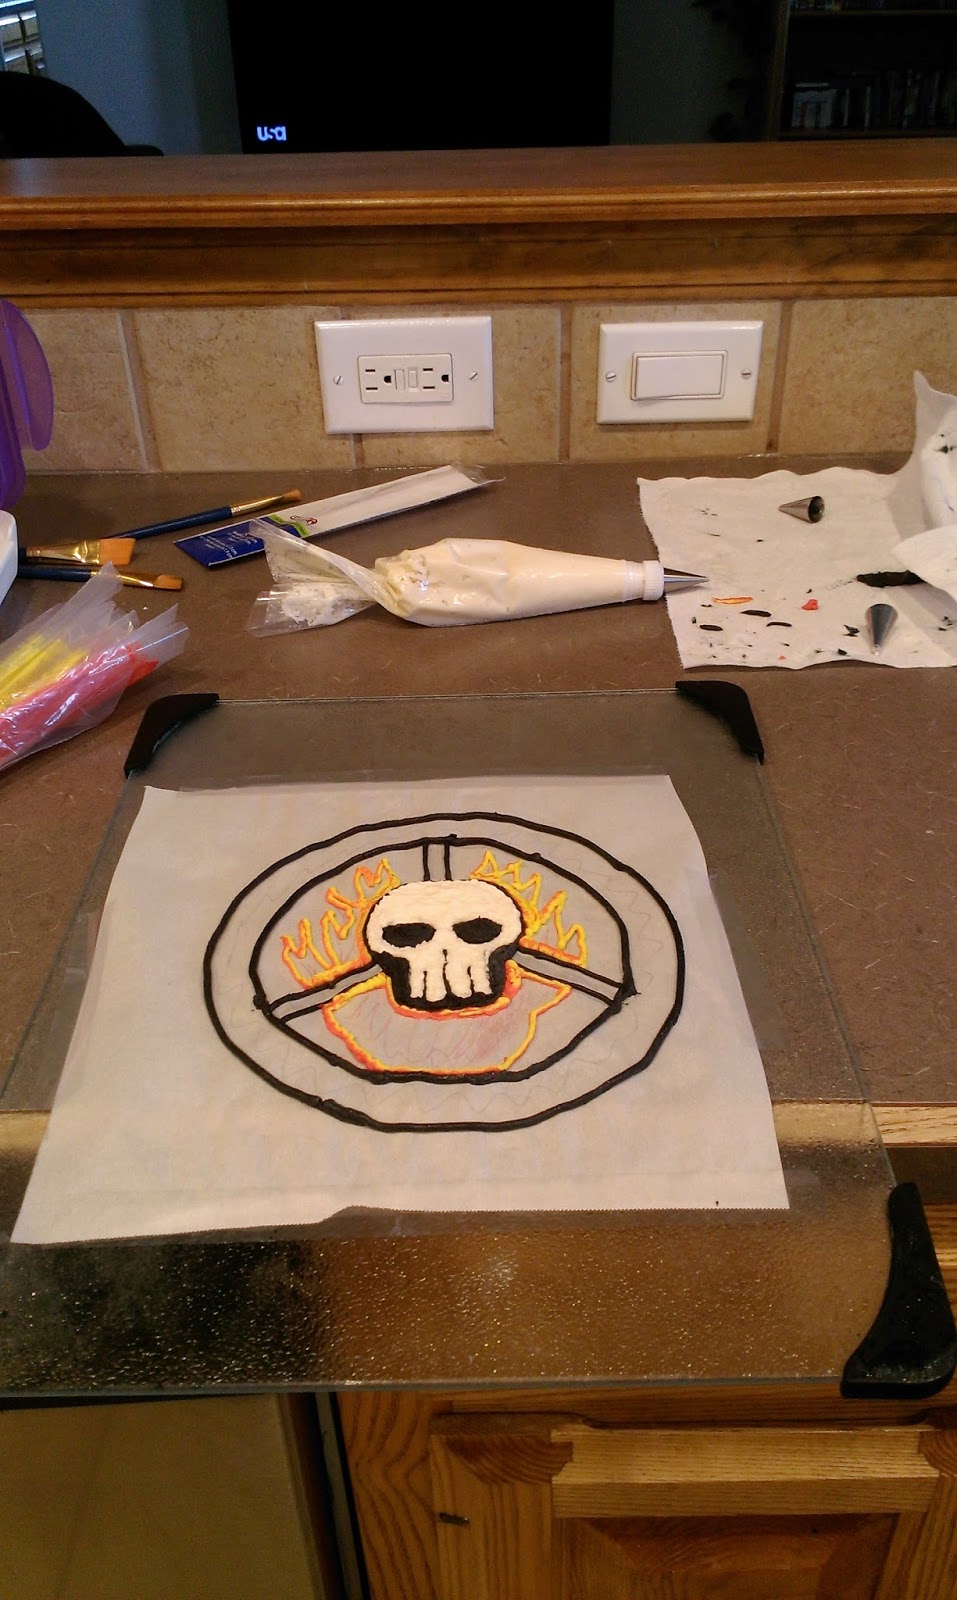
As “witnessed” here. Once done outlining the fire and filling in the black areas on the skull, back to the freezer for another grueling 30 minutes. 
Then I filled in the flames completely…loved how this turned out. Guess where it then went for a half hour? If you guessed Reno, you’re wrong. 
Then I filled in the white section behind the flames with painstaking calculations, piping, and paint brushing before freezing for the 800th time. The end of the world is a lot of work, y’all. 
The light at the end of the proverbial tunnel was finally coming around though when I finished filling in the black sections of the steering wheel. This time around I froze for a full hour to let things really set. 
I really want an Oreo… To finish up, I placed a #12 tip on a final bag of white frosting and gave my transfer a level back. After piping over everything completely, I used a small angled spatula to smooth things over. This then went into the freezer overnight. 
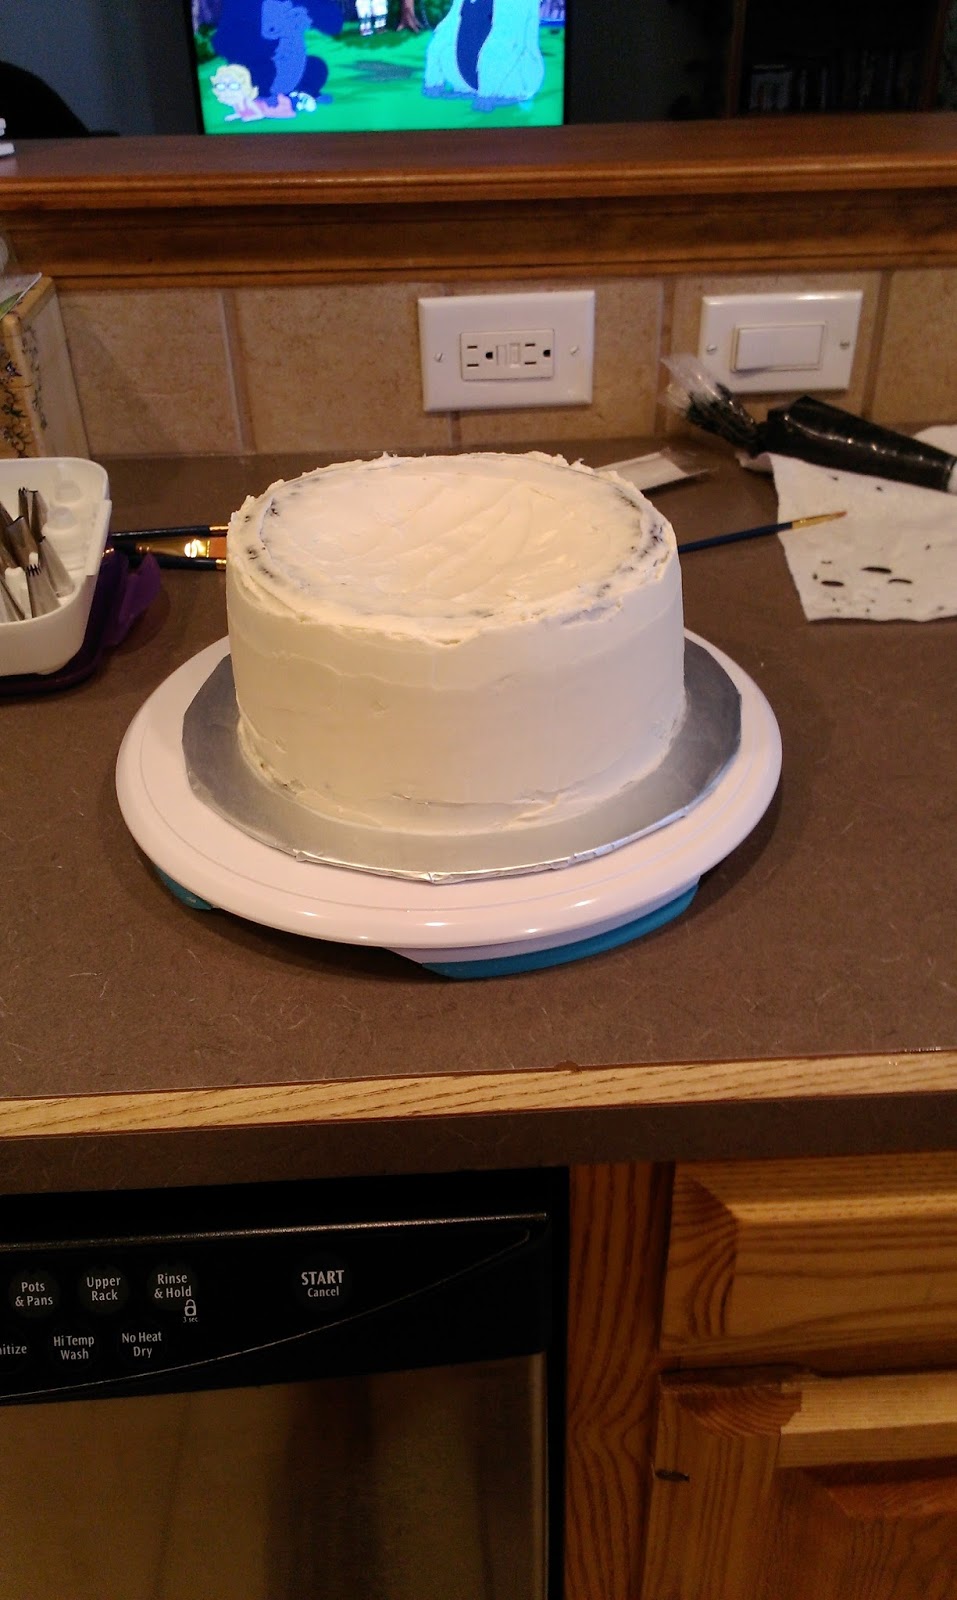
I left my cake (crumb coat, final coat, and smoothed on the sides) in the fridge overnight as well. I didn’t place a final layer of frosting on top since the transfer would take care of that for me. 
I sprayed the entire cake with silver color mist because it had to be shiny and chrome. No way around it. Any areas that were runny I soaked up with the edge of a paper towel. Luckily, it was not humid this time around and everything actually dried. Whew. 
I took a toothpick and scrawled in the War Boy mantra before piping over it with a #3 tip in black frosting. 
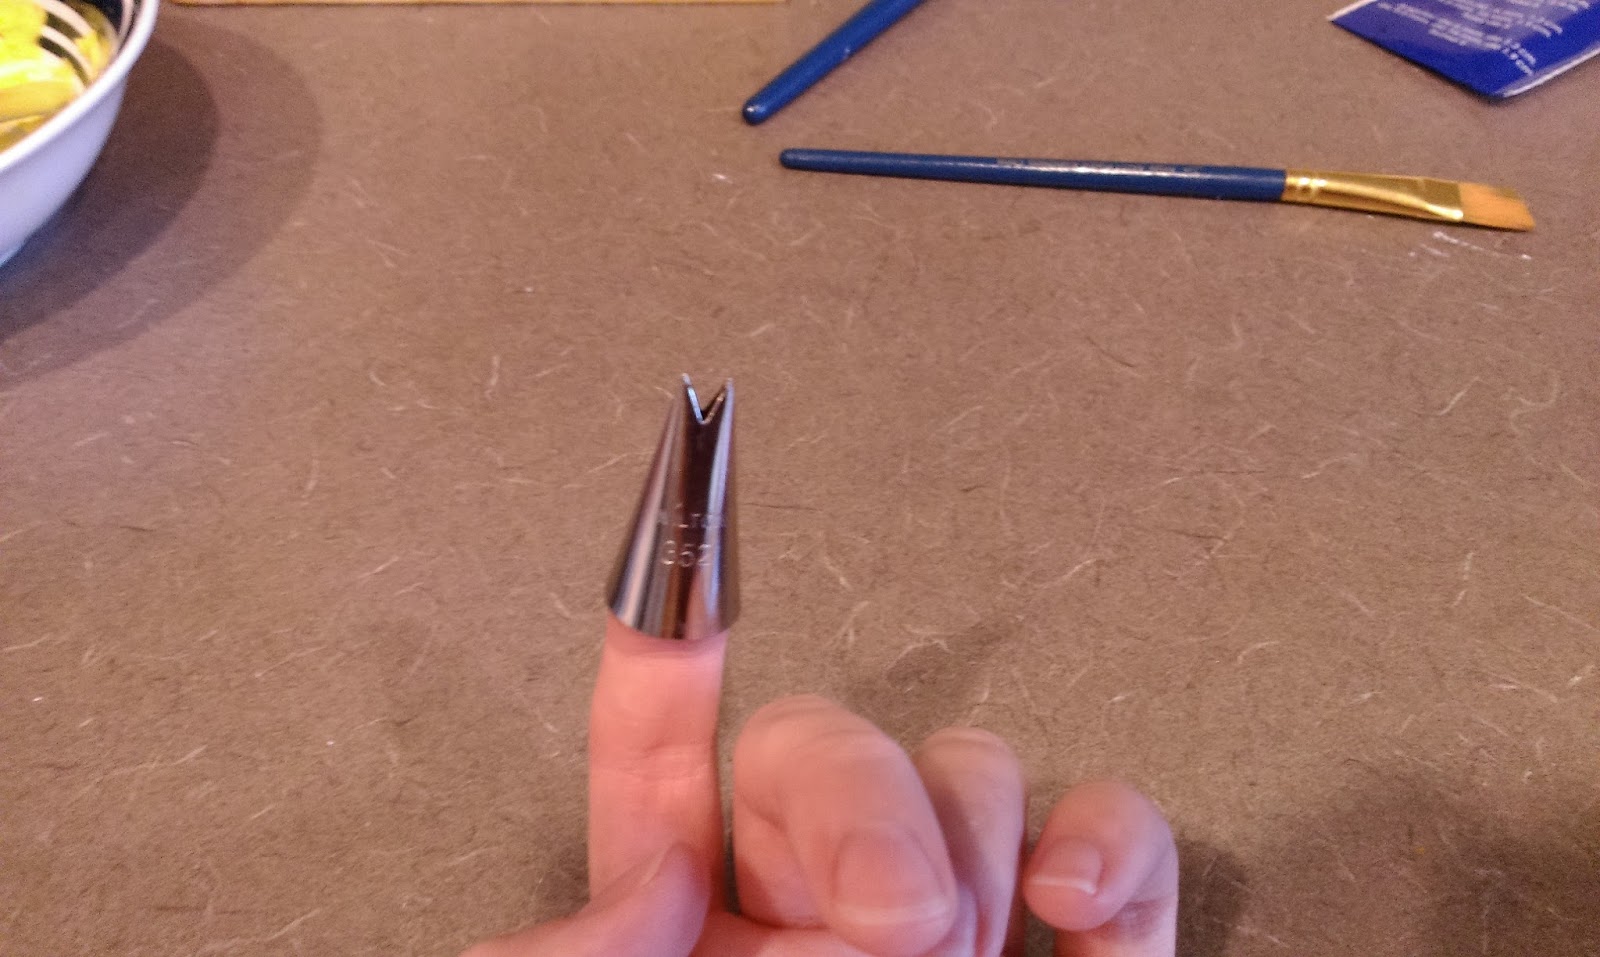
This is a tip I was totally unfamiliar with and not at all sure why I already owned. Say hello to the Wilton #352 tip…more commonly known as the leaf tip. But I used it to make beautiful fire! POWER! Sorry..that’s a Top Gear thing (why does everything I love leave me?), but it seemed appropriate here. 
To make flames (or leaves, you damn hippie), you want the tip pointed sideways, as pictured above. 
I held my bag with the tip like the photo above and piped a large base and quickly pulled up and then released pressure and pulled away. I turned the bag completely around and did this again to let the opposing side of color be shown. I did this back and forth around the entire cake, varying the size of my flames. 
And it was bitchin’. 
After letting my spray dry, I came back in and placed my frozen transfer on top and gently peeled away the Parchment paper. Things will need to be smoothed, so let it sit out and thaw for about 15 minutes before smoothing any lines out with the paper towel trick. 
This cake would definitely get a pass into Valhalla. So shiny. So chrome. So witnessed. So tasty. I finished off by adding a “spiky” border around the transfer to hide the edges. I took the black frosting bag and fitted it with a #21 tip and made small spikes around the entire edge of the transfer. I am quite content with how this cake turned out, and thrilled with our friends for hosting such an awesome night. I’m also happy with how committed to the theme everyone at the party was…all the “Witnessing,” fake bruises, cake, and costumes a girl could need to enjoy the fictional end of the world in head to toe black (so slimming so all the chips and cake can be eaten!), surrounded by a bunch of crazy leather-clad friends. What a lovely day. ‘Til next time, my fellow eaters!
-
I Have an Affinity for Green Desserts
Ahh, the lime. Some of my favorite things come accompanied by them- gin and tonics, vodka sodas, and Coronas. But I’m not here to talk to you about booze or the lime’s curative powers for scurvy, if that’s still a thing. I’m here to talk to you about cheesecakes and pie- I just didn’t have a very good segue from one point to the next. We can’t always be winners, I suppose. Aside from my hands-down favorite pie in the world, my mom’s cherry pie recipe, key lime pie is a close second. But seeing as how I am both lazy AND accident prone, zesting and juicing 20 tiny key limes to make a pie would be downright dangerous for both my knuckles and my fervor for baking. This is why I have never made a single key lime pie in my entire life. But it is so hot outside I thought I might die if I didn’t make something at least somewhat comparable, and then Pinterest directed me to a recipe for a lime cheesecake–thus bringing together the holy trifecta of my favorite foods: cheese + cake + lime. If only all desserts could afford my taste buds such an enlightening experience. Although let’s be real, as long as it hasn’t fallen on the floor for longer than five seconds, I will eat any dessert you hand to me. I just happen to prefer desserts that are green.

Because they are as tasty as they are aesthetically pleasing. Isn’t that just melt-on-your-tongue refreshing to look at? Because it is melt-on-your-tongue refreshing to eat. This is kind of a combination of a cheesecake and a meringue pie, seeing as it has the richness but not the density of the former, and it is a winner in my book for sure. S’mores are wonderful and all, but this cheesecake can make even the most sweltering of summer days seem somewhat tolerable. The power of lime! The process itself is insanely easy as well, so let’s get to it, shall we?

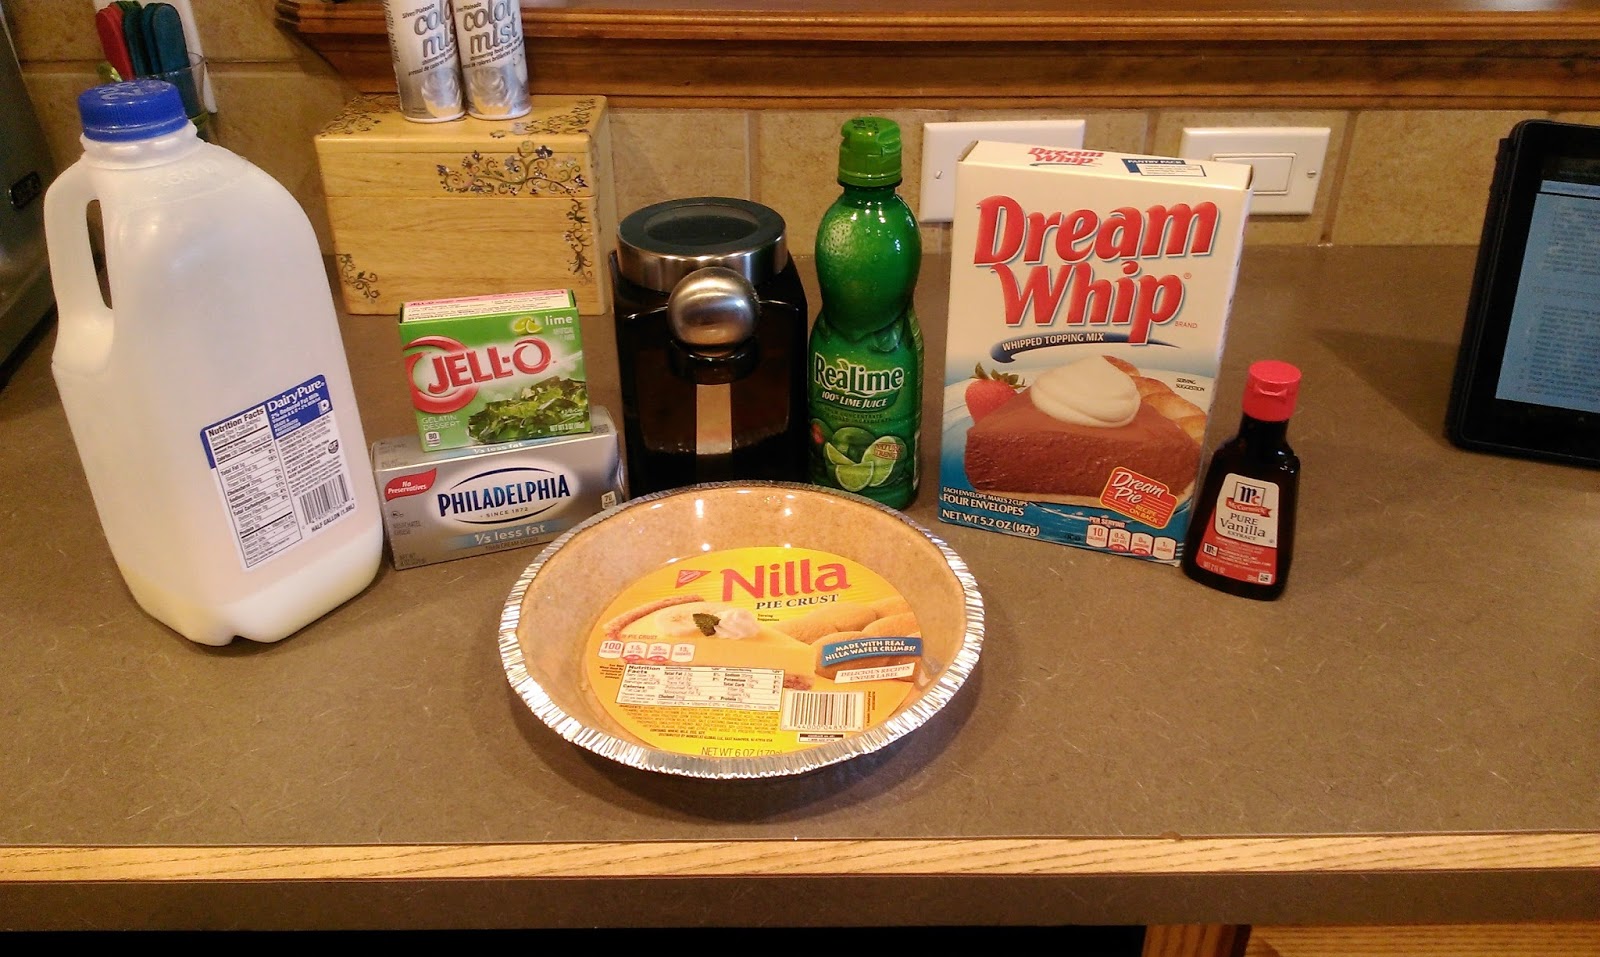
Yeah, I didn’t even make my own crust…that’s how hot it is outside. I’ve gone listless. I found and adapted this lime pie/cheesecake recipe from here, and here’s what I used:
- One premade pie crust. Graham cracker would work, but Nilla Wafer was a winner in my book.
- One packet of lime Jello
- One cup of boiling water
- Three TBS of lime juice
- One 8-oz brick of cream cheese. I went light this time, as I am always afraid I’ll have to wear a swimsuit on vacation, and we’ve got one of those coming up soon.
- Half a cup of sugar
- One packet of Dream Whip. This requires a half a cup of cold milk and half a tsp of vanilla to make. It yields two cups, so you could try subbing Cool Whip instead, as it is a similar consistency. Dream whip can be found by the Jello and pudding in a grocery store.
- Optional:
- Crushed graham crackers or Trader Joe’s waffle butter cookies
- Lime garnish
- Cool Whip for topping or frosting decorations
- One crappy photo montage (I really need a phone with a better camera):

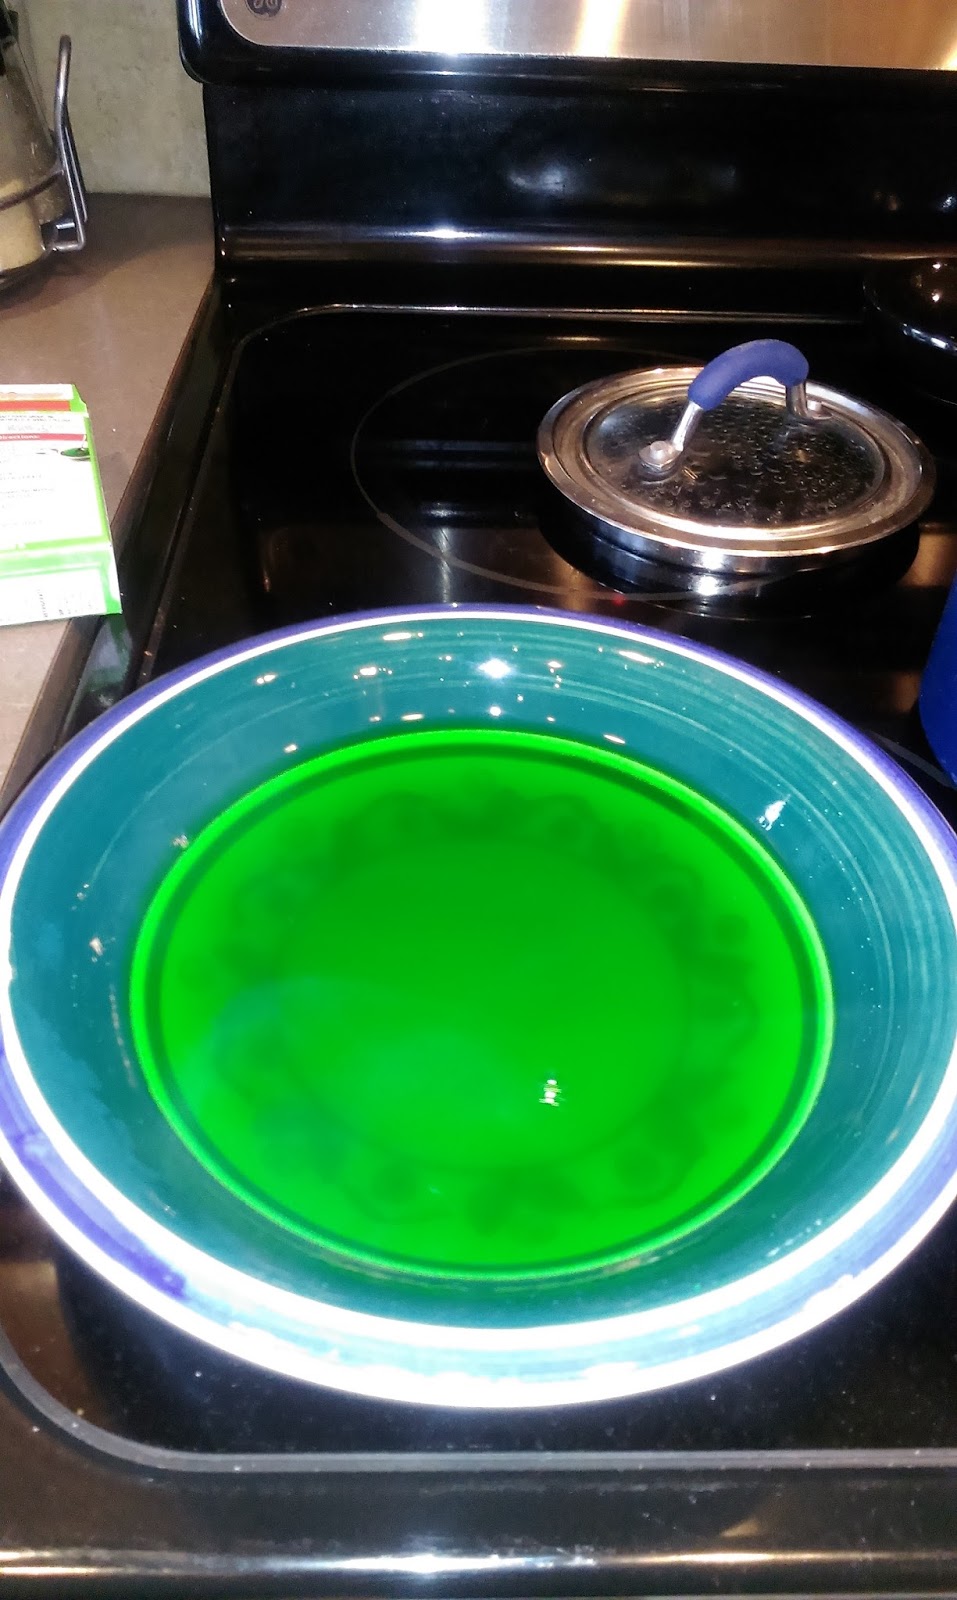
Start by mixing the boiling water, lime juice, and Jello packet together in a medium bowl. Refrigerate after this step for about 45 minutes. You want it slightly set, but not enough to create a skin. 
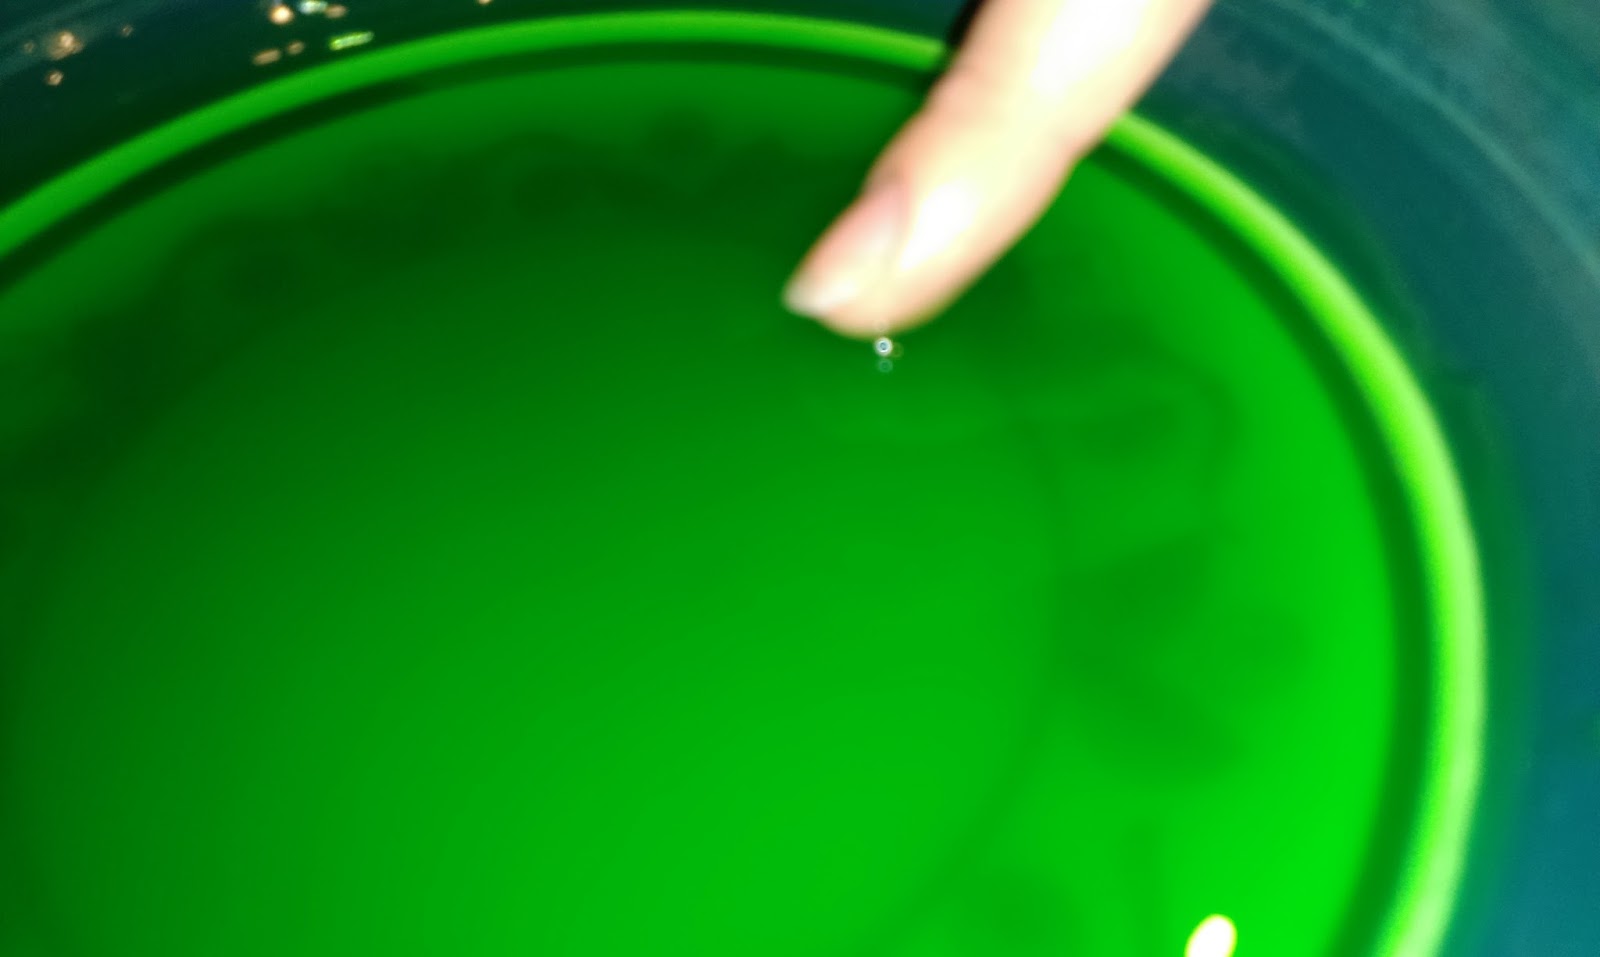
If I had a better camera, you’d be able to see the thickness of the Jello dropping off my finger. When the droplets slightly stick to your finger, the Jello is ready. 
While your Jello is setting, mix the packet of Dream Whip with 1/2 C cold 2%/Skim milk and 1/2 tsp of vanilla extract. This takes four minutes, and when done, should look like a thicker version of Cool Whip (see above). Cover and put in the fridge until your Jello is ready. At this point, I crushed one waffle butter cookie in a small plastic baggy and loaded up a piping bag with a 1M Wilton tip for my Cool Whip. Then I mixed together the cream cheese and sugar for a few minutes until fully incorporated and let it rest in the mixing bowl covered by a dish towel. After that I think I ate lunch or something while cursing Jello for taking so long to become so wonderful.

When the glorious moment finally came, I poured my partially-set Jello into the mixing bowl with the cream cheese/sugar mix. Mix for a few minutes, and if you have any larger clumps of Jello that set quicker than the rest of your bowl, scoop them out. Perhaps eat them, your choice. 
Remove the Dream Whip from the fridge and mix in. 
And now it is time to pour your mixture into the pie crust. Shove into the fridge (covered) for about four to six hours to set. 
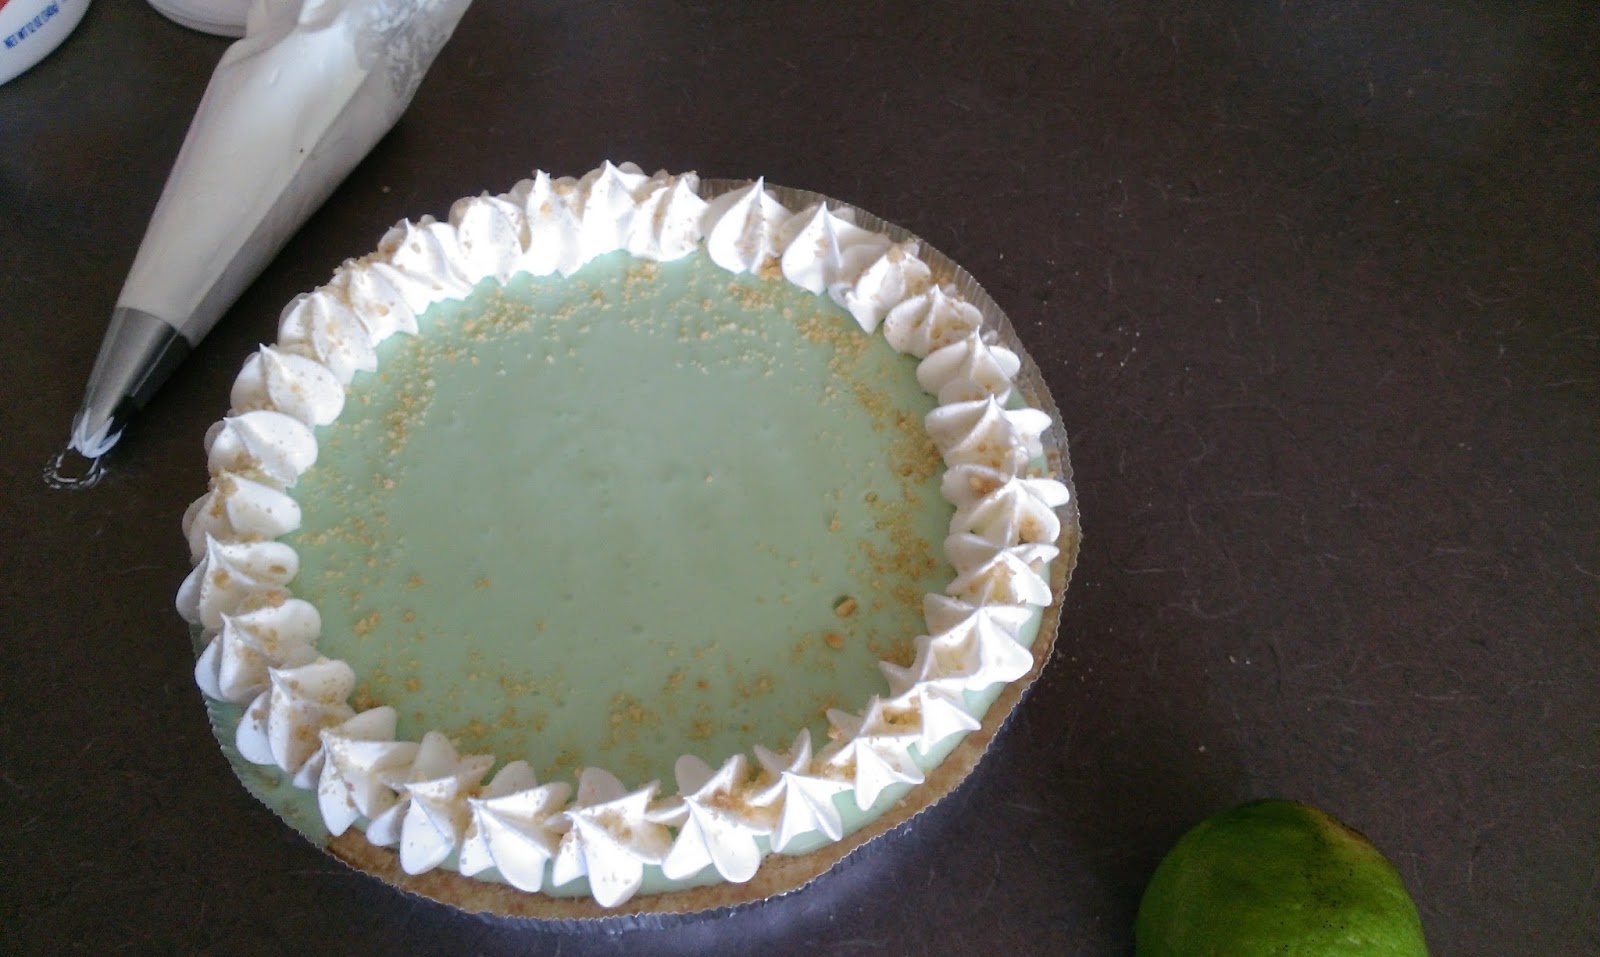
You could stop once the cheesecake has set, but since when do I not look for an excuse to add frosting designs on things? I stirred my tub of Cool Whip with a spatula to get out any air bubbles and then loaded up my piping bag and piped little stars all around my cheesecake. Just hold the tip and bag straight up and down and gently squeeze until you get a star the size you like. Pull the tip away quickly and gently. Repeat around the whole cheesecake. 
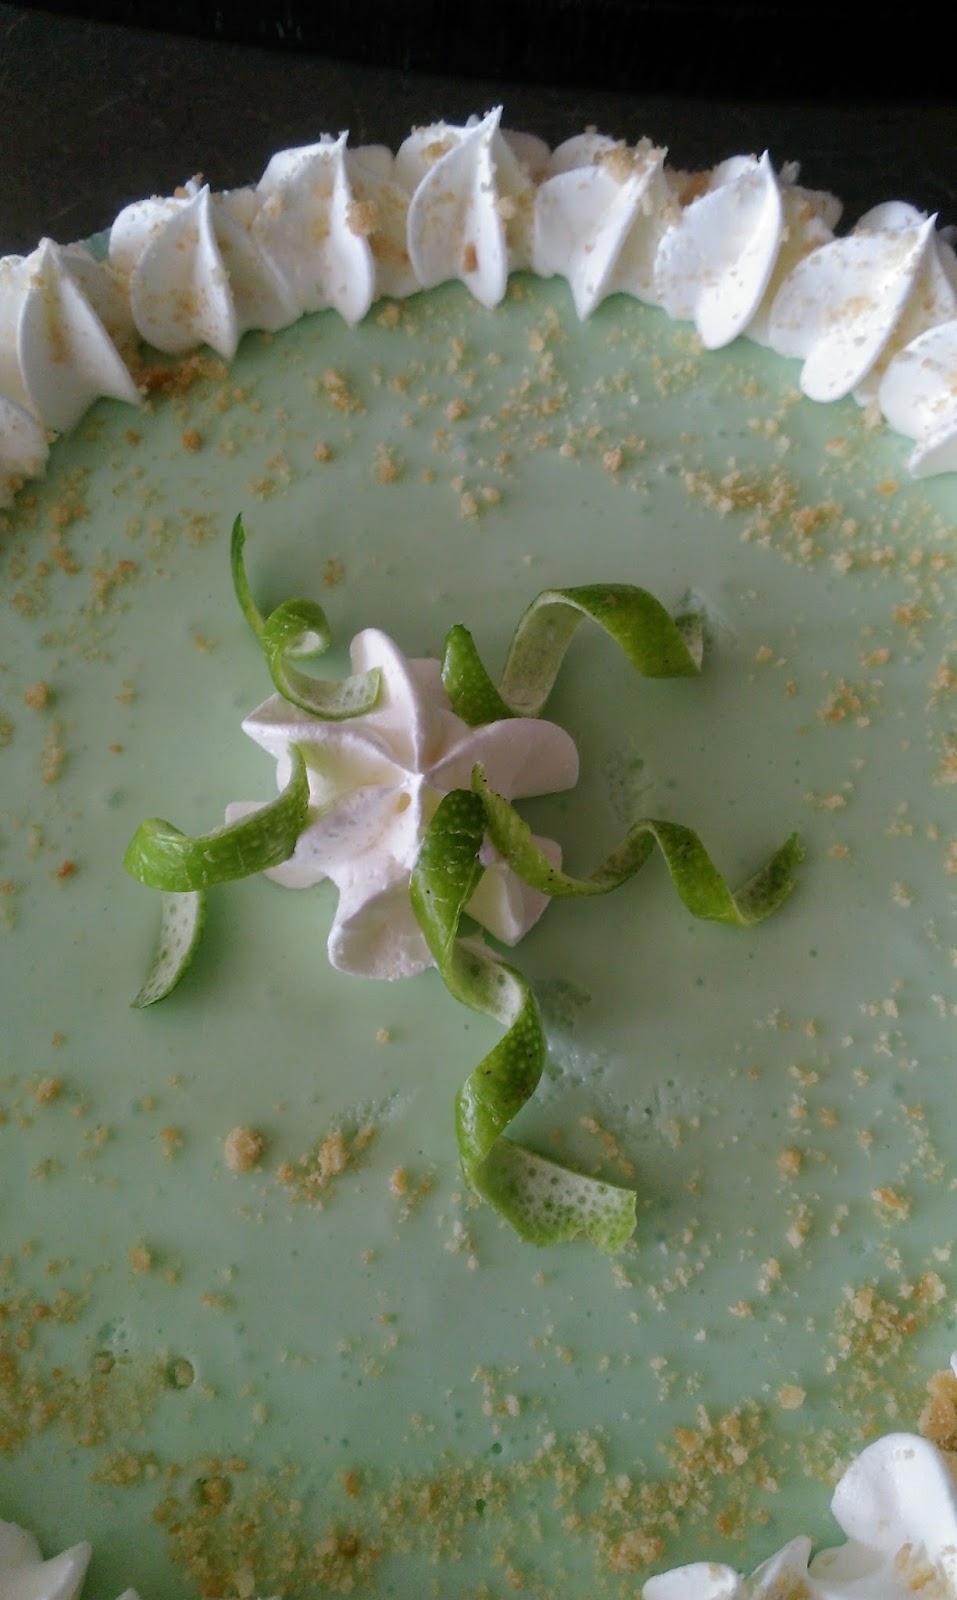
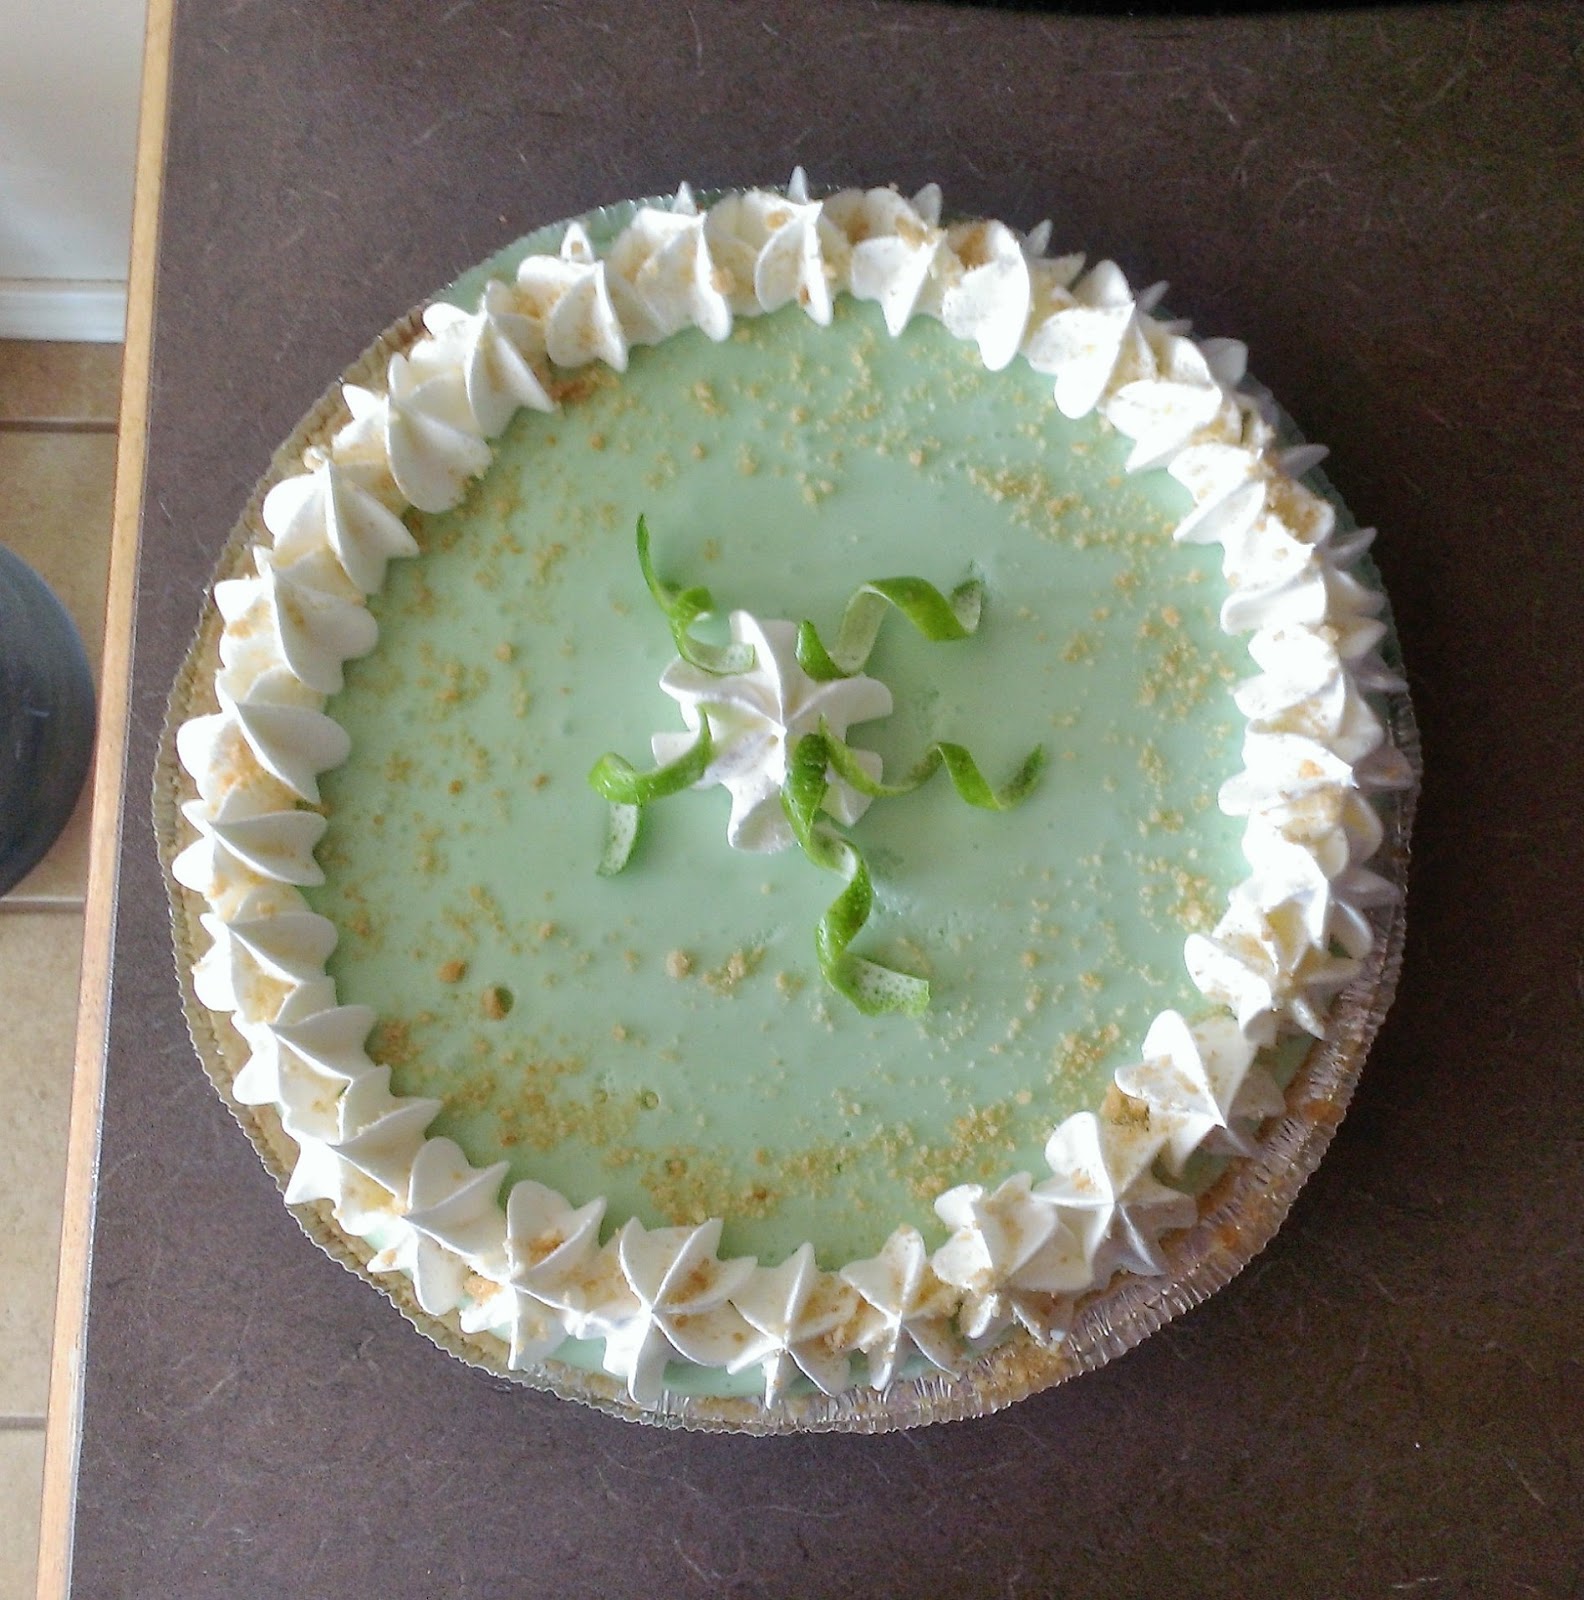
Then I took my crushed cookie crumbs and sprinkled them all around the side of my cheesecake and on top of my piped stars. I thought I was finished, but then I realized I wanted to add a garnish to the center of my pie because I am fancy as hell, and nothing screams class quite like garnishes you’re not allowed to eat adorning your foods. Since summer has only two real benefits to me, 24/7 flipflop wearability and the fact that it’s gin and tonic season, I always have limes on hand in the fridge. Lime garnish on top of a lime cheesecake? My OCD is tingling.
To create lime spirals, take a potato peeler and peel off a large and long chunk of lime. Take this chunk and slice it into smaller strips. Wrap each strip, one at a time, around your pinky finger. This will create a nice circle. You could stop here and it would still be pretty, but to create a spiral, unfurl the circle and take each end and twist in the opposite direction. This will create a nice spiral:

Not pictured is the pinky finger now missing a large chunk of skin thanks to the potato peeler. Just when I thought I might be capable of making an actual Key Lime Pie… I bled for this cheesecake…for not in or on; I feel like the specificity of my preposition use here makes a really big and less health inspection-y difference. But this lime cheesecake is light, airy, and packs a wallop of tart lime flavor while the cream cheese keeps things from getting too acerbic. No one wants bitter
beercheesecake face. The cool thing about this recipe is that you could easily replace the lime Jello with any other flavor of Jello to create loads of different cheesecakes- orange, raspberry, whatever you like, you adventurous little monkey. So not only is this dessert gorgeous and tasty, it is also extremely versatile in direction. Like the Jennifer Lawrence of cheesecakes, if you will. What, taking it too far? I’m simply proud of the fact that I resisted typing any lyrics to “Put the Lime in the Coconut” during the entirety of this blog post. You’re welcome. ‘Til next time, my fellow eaters!
Enjoy the view! -
Red, White, and Sparkly.
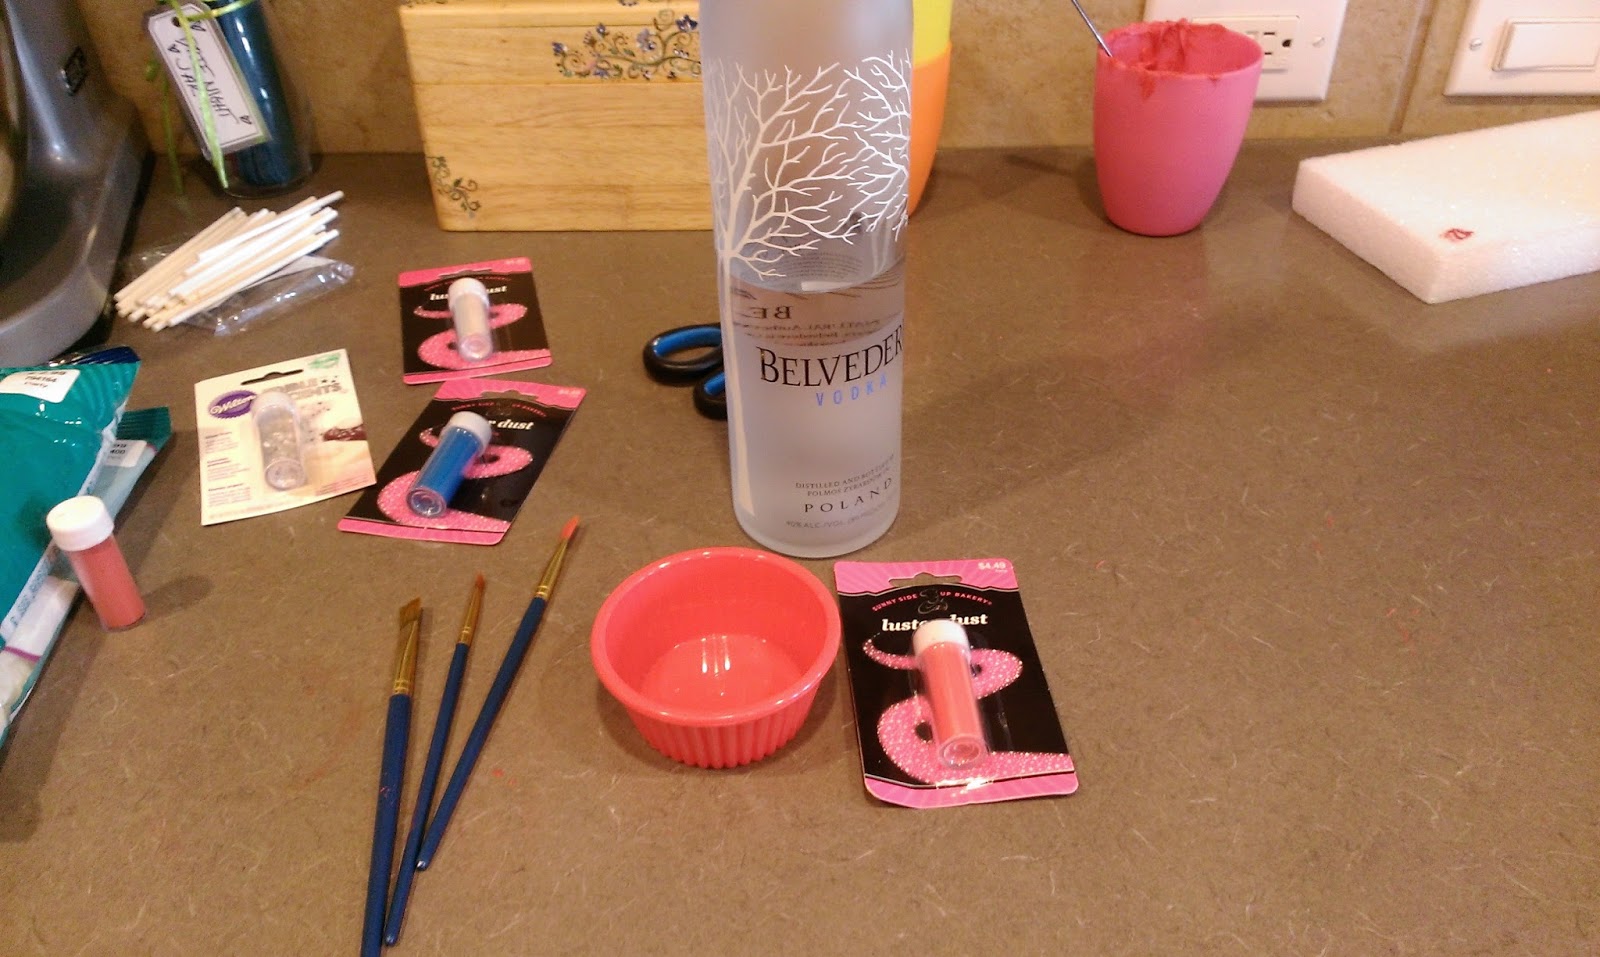
I trust everyone is having a fantastic Fourth of July. I love celebrating freedom, America, and my God-given right to shove whatever I want in my mouth today with reckless abandon because America’s birthday is everyone’s cheat day. Truth…just ask the KFC buckets in our trashcan. Am I full of regret? Yes. But does that regret taste like the extra crispy recipe? You better believe it. We’re gearing up for a couple of BBQs later, so naturally I spent all day yesterday coming up with a dessert that just screams “‘Merica!!!” without actually having to say a word. After last year’s American flag cake, I realize I shot myself in the foot and nothing I ever bake for July 4th will be able to top that. So going in with low expectations (how American of me), I decided to make a flag out of cake pops instead. But since this is a day all about panache and flare, I realized that my cake pop flag needed to be as blindingly bright as the sparklers and Roman Candles I’ll probably be burning myself and others with later. I apologize in advance to anyone who loses an eyebrow at my hands this evening…I’ll bake you a free cake. So to help make my pops…pop…I decided to try out luster dust for the first time, and I was NOT disappointed (and not just due to the fact that you get to use vodka to mix it for painting and perhaps sipping. I’m sure my insides are quite sparkly now)…

“And I’m proud to be an American, where the flags are so tasty. And I won’t forget the eggs that died, and gave that cake to me.” …yep, it’s official, I’m going to hell for that. Every once in a while, you just see something so American it brings a tear to your eye. This is one of those moments, people. I still hate making cake pops, but getting to coat them in a shiny layer of edible glitter was pretty damn awesome. Cake pops are time consuming, and as I mentioned earlier, I spent about 6 hours working on these yesterday from start to finish. Still not as time consuming as most cakes, and considering I owe my cake-baking freedom to some pretty baller forefathers, the work was most definitely worth it in order to show my patriotism in a less explodey, more nourishy kind of way. Lord only knows what weird British dessert I would have made if it weren’t for old G.Wash and Tommy Jeffs. What? I can’t be the only person who gave the Founding Fathers awesome nicknames.

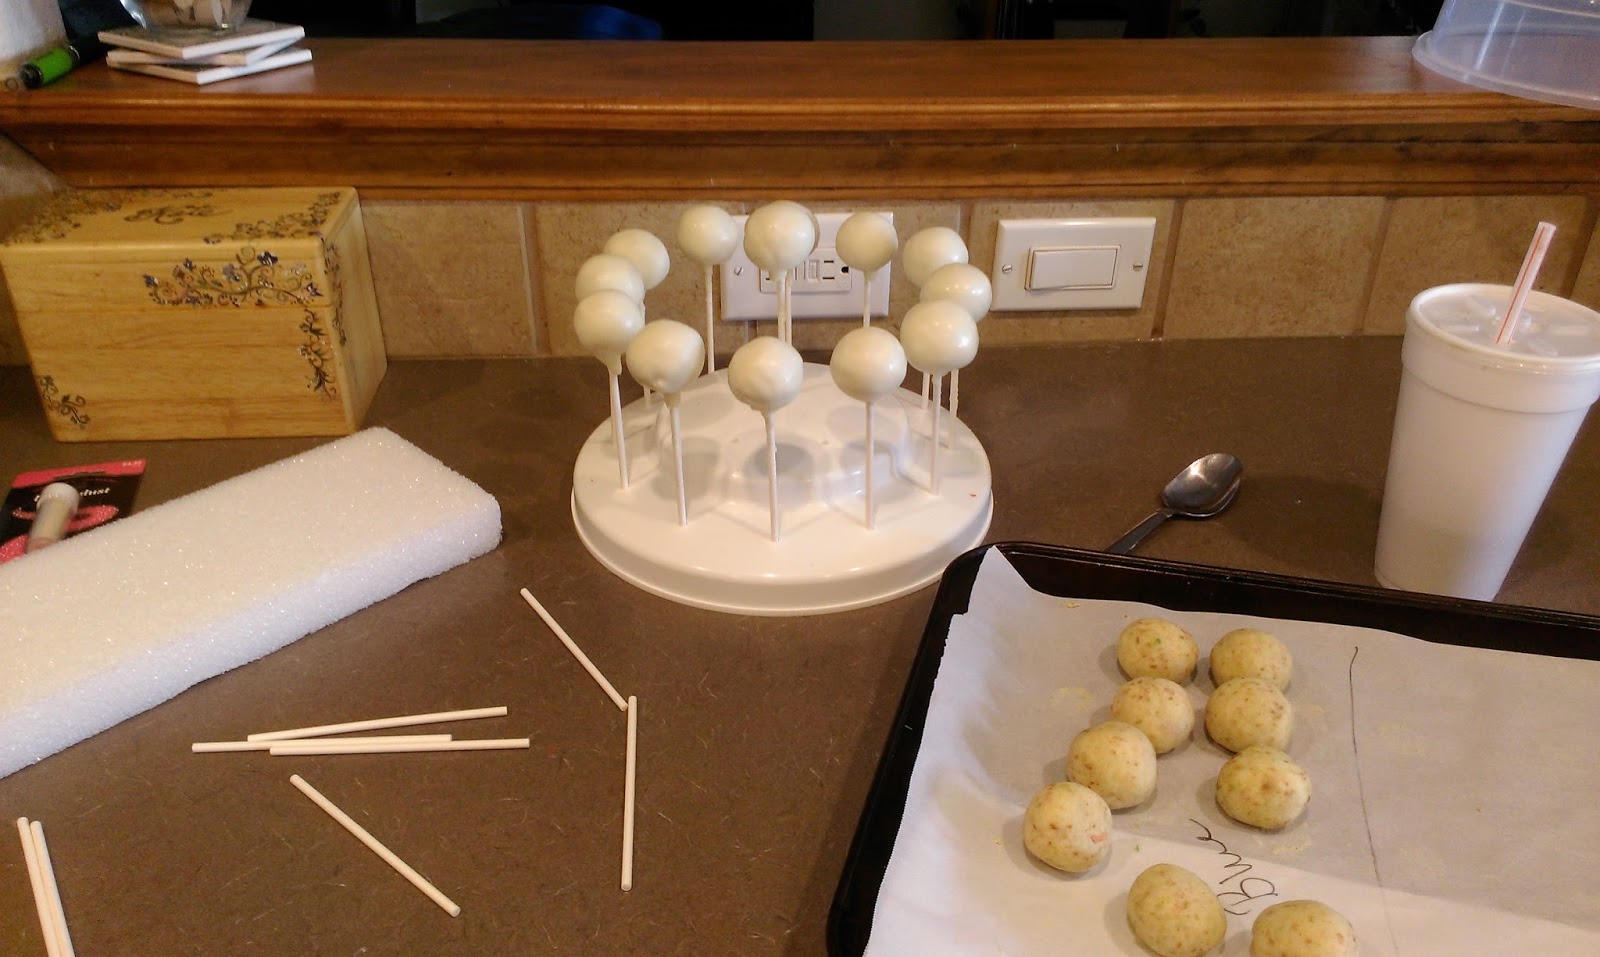
Yeah, it was a box cake. I celebrate my right to be lazy and entitled, okay? I’ll give you a few pointers on cake pops that helped me streamline the process:
- Make your cake a day ahead of time, crumble into a large bowl when cooled, and mix with 2/3 of a can of frosting. I wanted lots of color, so I went with funfetti cake with lemon frosting.
- I use a cookie scoop to scoop and form each pop.
- I also recommend freezing for a half hour and then rerolling your pops to get a great form. Something about rolling 40 cake pops, by the end of it, things are looking a little wonky thanks to your claw-like phalanges. So give them and the pops a rest before one final reroll, and you’ll thank me later.

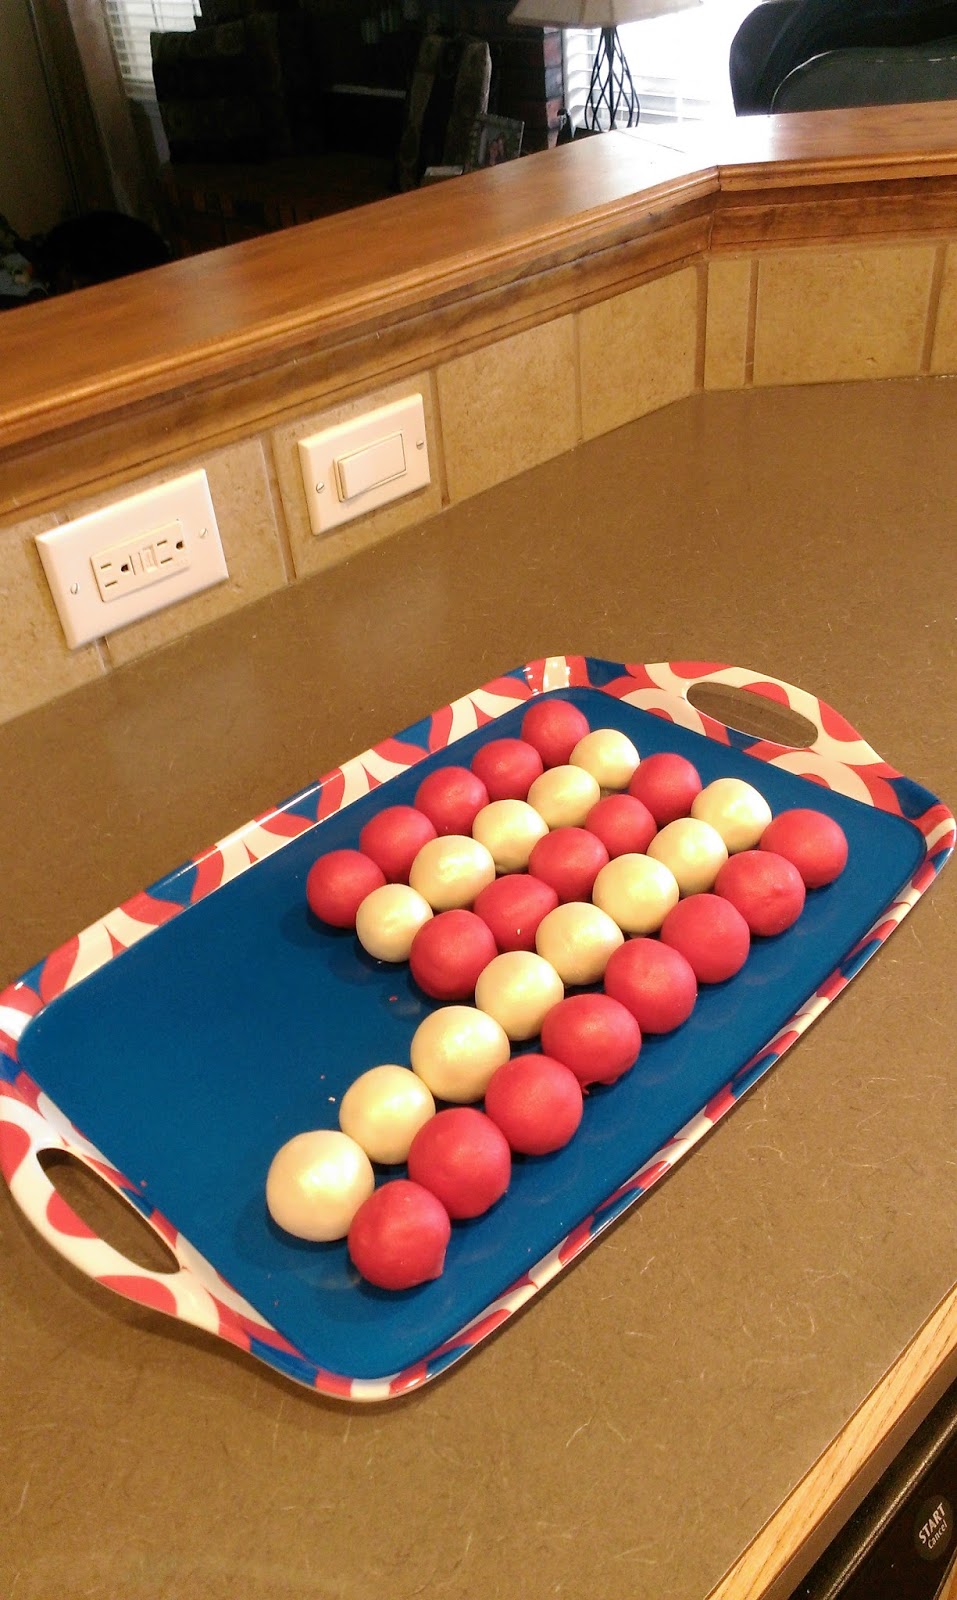
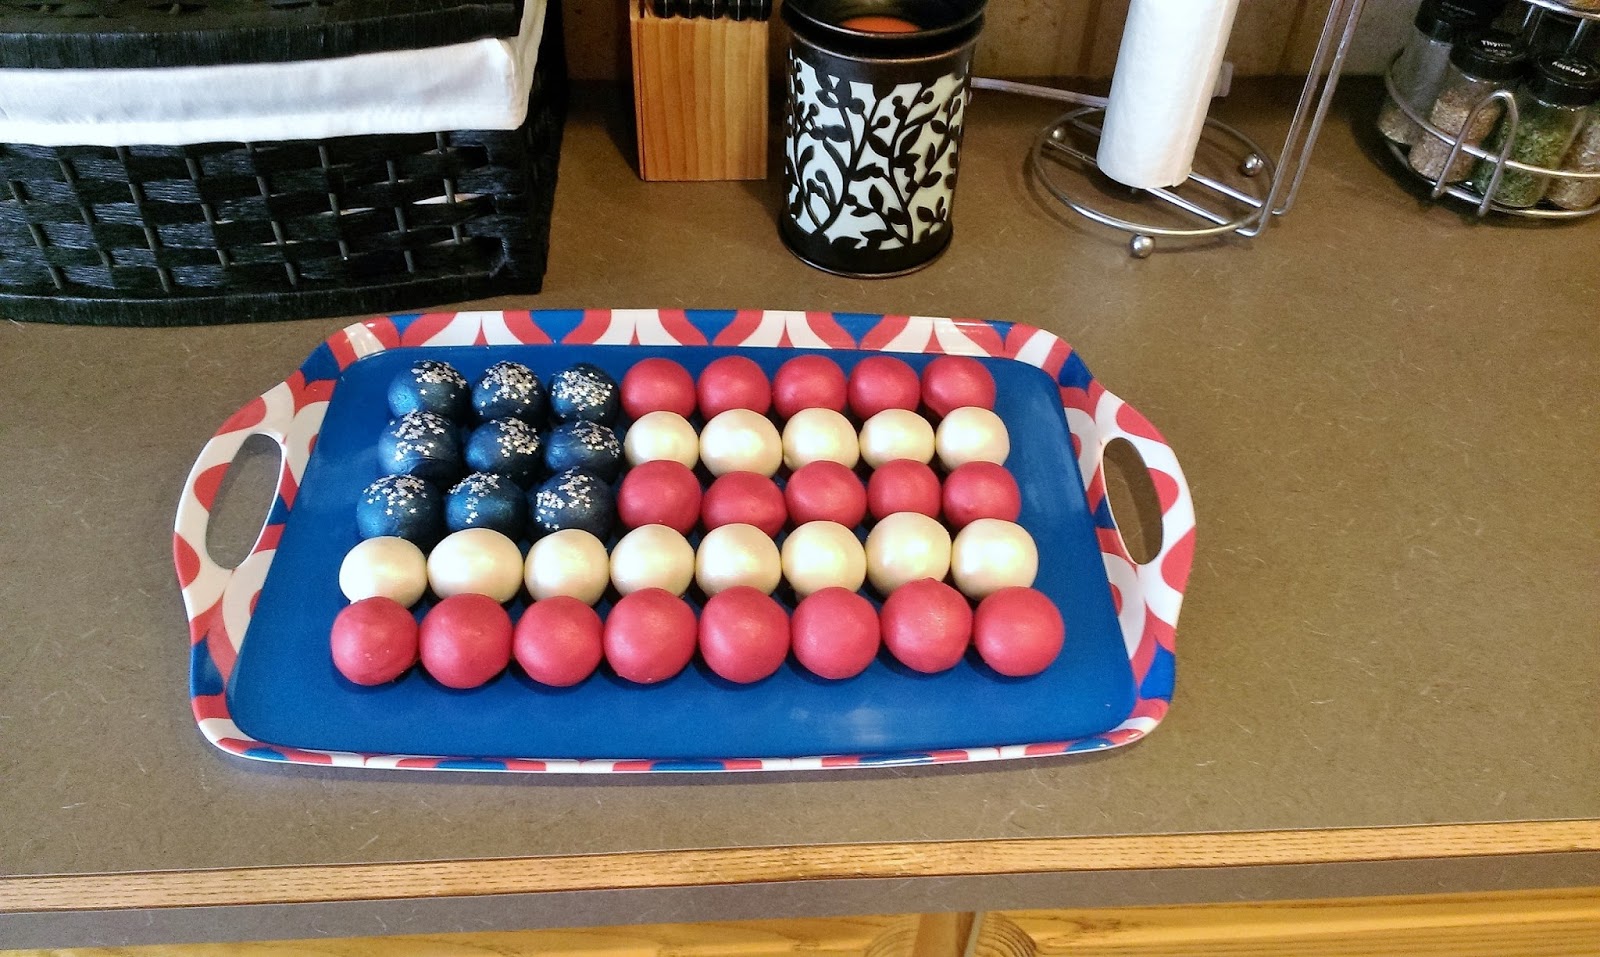
Now, on to some geometry. I had 40 pops and a tray from Hobby Lobby to place them on. You need more red than any other color. I had 18 red pops, 13 white pops, and 9 blue pops. By the end of all the chocolate coating, I had red, white, and blue myself (long live Arrested Development).

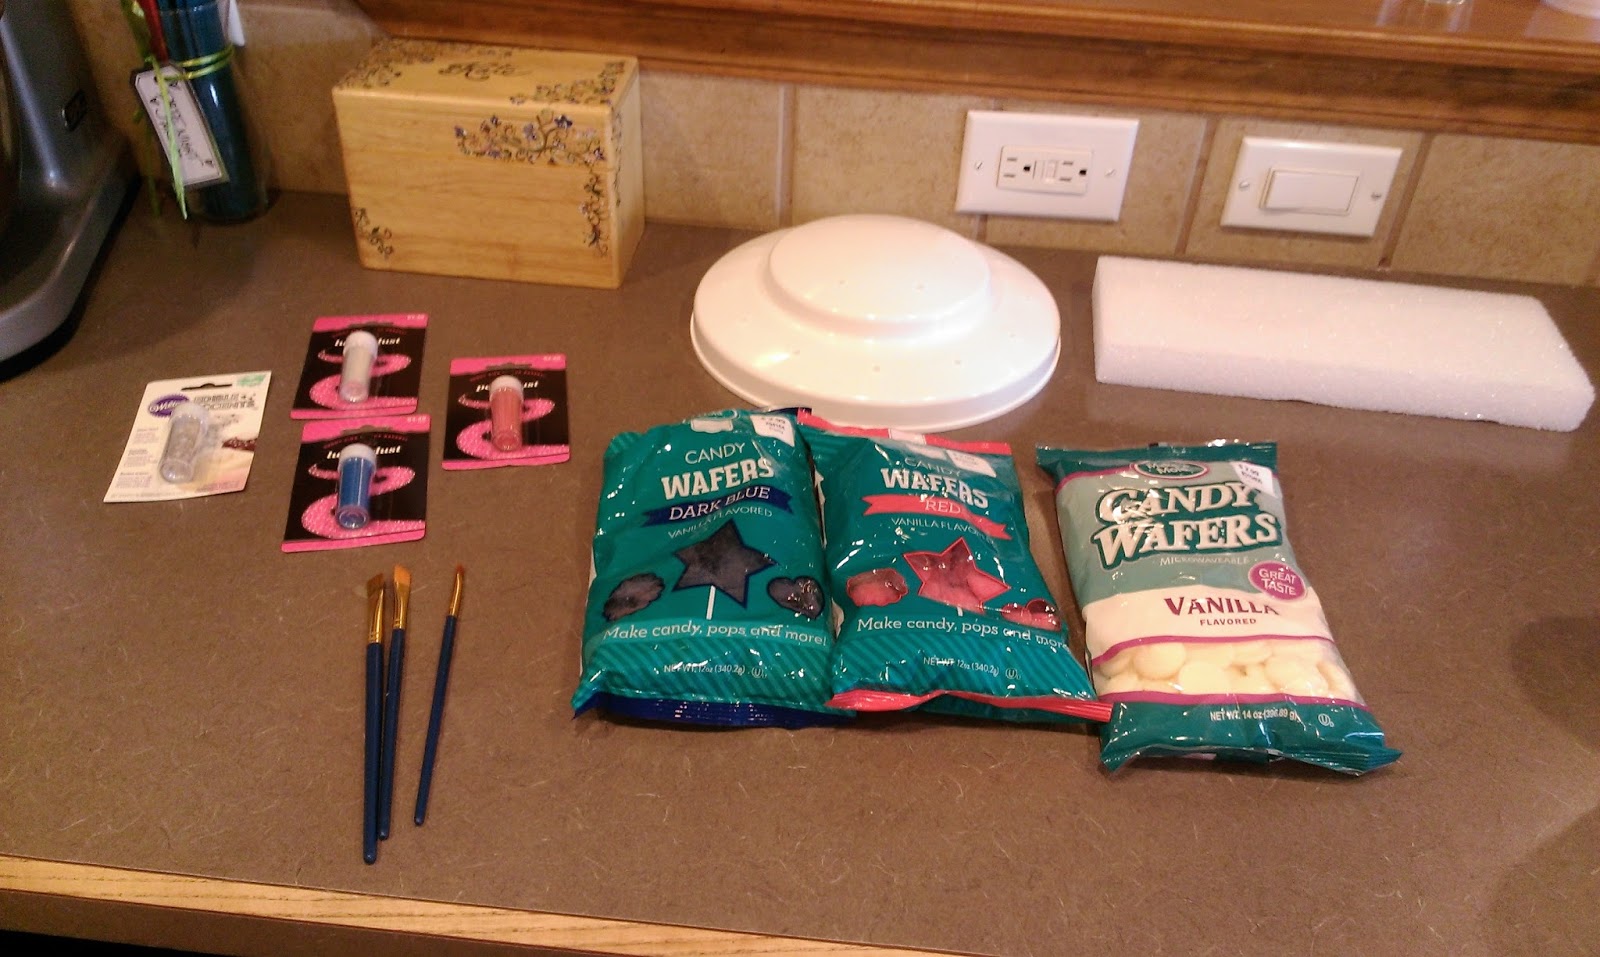
I am really getting my money’s worth out of those $4 paint brushes. Once you’ve rolled everything nicely, gather up the rest of the ingredients. I used:
- One bag of red, white, and blue candy melts
- Paint brushes
- Red, white, and blue luster dust
- Cake pop stand and styrofoam block
- Small jar of star sprinkles
- Cake pop sticks (you need these to make painting and dipping easier, but they will be removed in the end)
- Vodka. It is good for the soul AND the luster dusting process
No one bought me a new camera after my plea last week, so let’s get ready for a crappy photo montage that only a Window’s phone could bring you. I’ll never understand how I can create a PowerPoint presentation on my phone, but taking a decent picture is next to impossible.

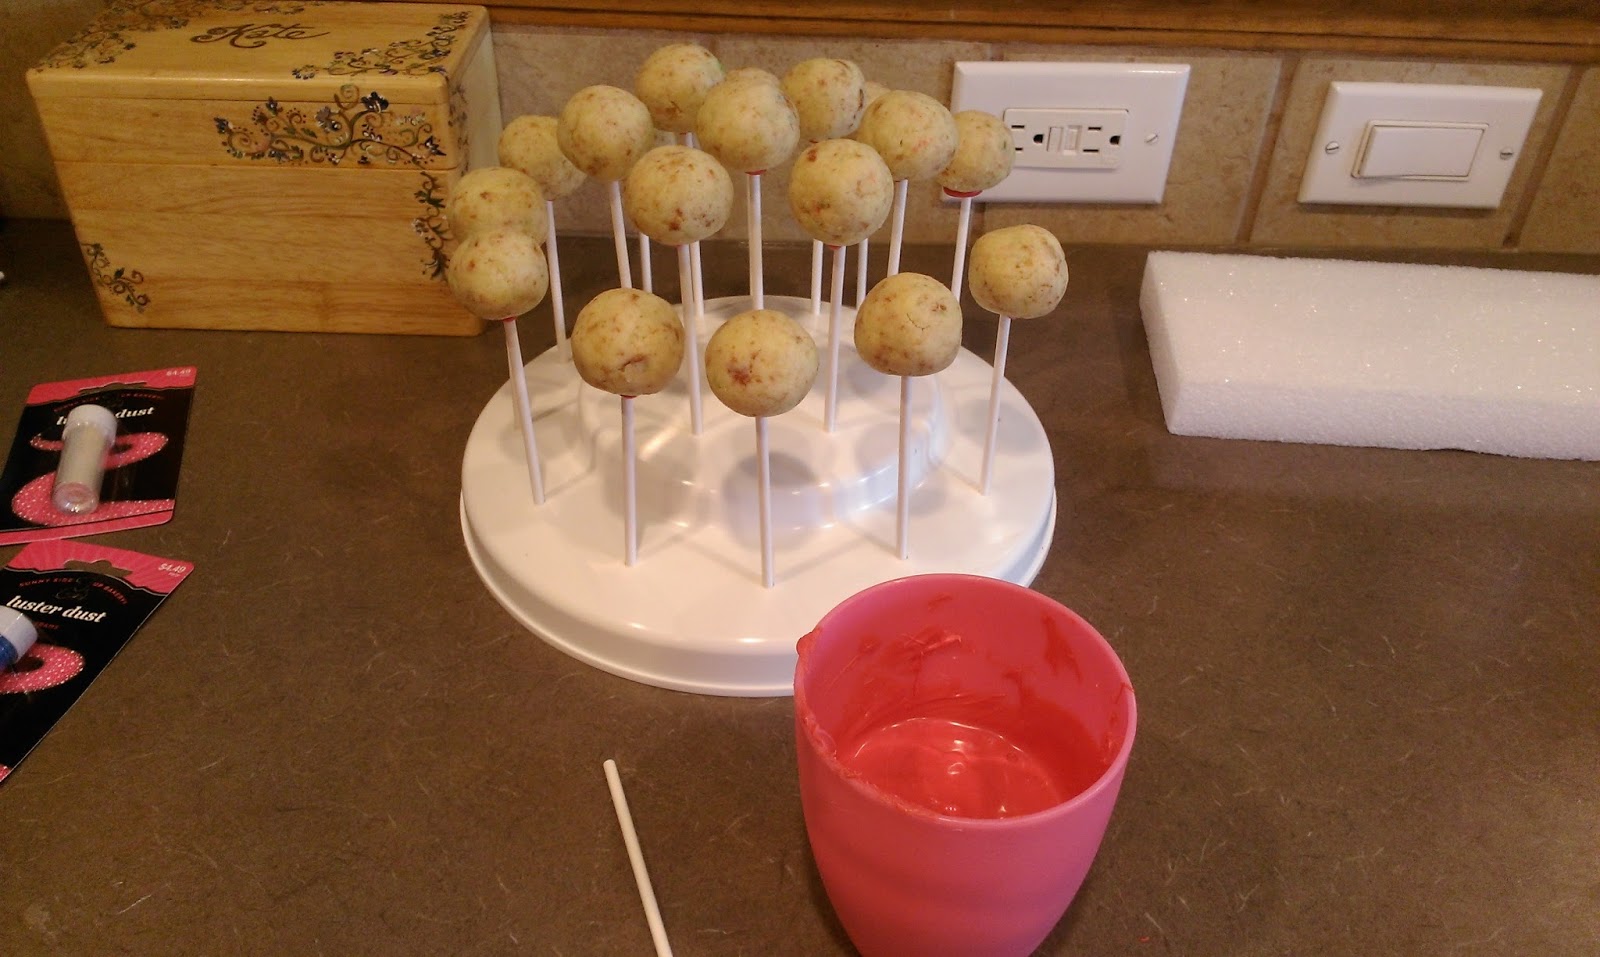
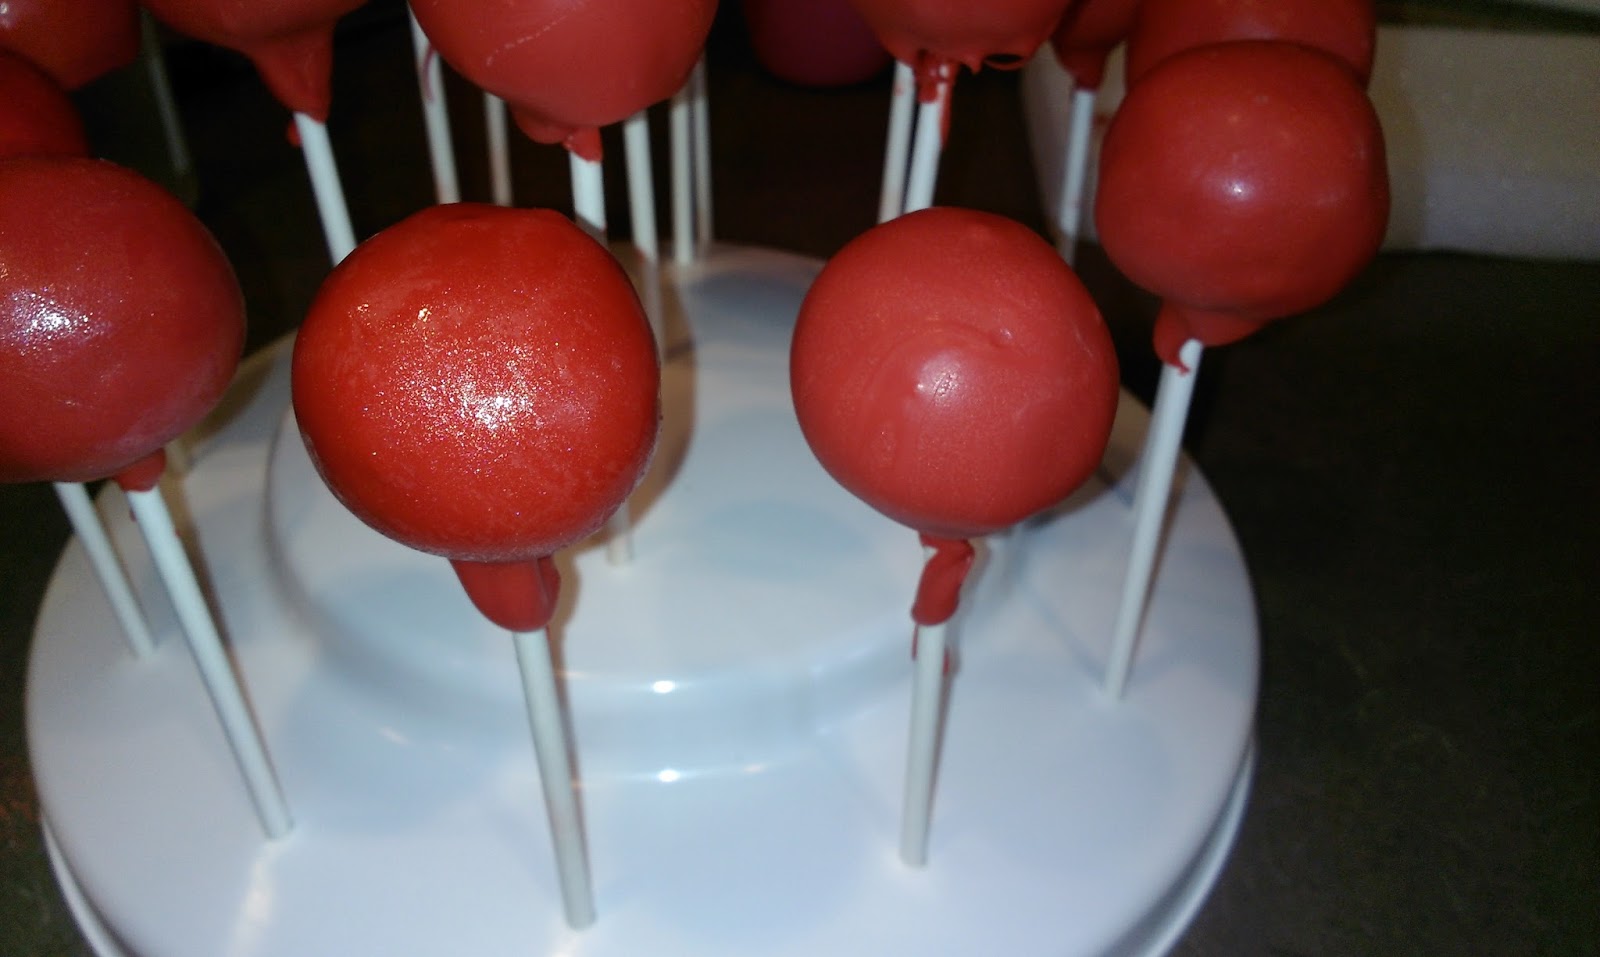
Start by melting your chocolate into a deep cup or Tupperware. Follow package instructions so you don’t scorch the chocolate and render it useless. Take a pop stick, dip it into the chocolate, and stab into a cake pop. Repeat until you’ve done this for all 18 red pops. Place into the fridge for 10 minutes to harden. 
I just had the strong, overwhelming urge to go to Target sweep over me. Nuke your chocolate on LOW power for 10 seconds. Take each pop individually and dip into your cup/bowl/whatever. Pull out of the chocolate slowly, and then hold the pop over your cup at a 45 degree angle. Tap your wrist holding the pop with your opposite hand over the cup while slowly spinning the pop in one direction. When you come full-circle, spin back around in the opposite direction all the while tapping your wrist. Tapping your wrist will smoothly rid excess chocolate and prevents the pop from shaking too hard and falling off the stick, so don’t just hit the pop on the cup because that is what will happen. Trust me, I’ve failed for you here in the past. Place into the fridge for 20-30 minutes to dry. 
Belvedere has saved me two weeks in a row now. Is there anything a potato can‘t do? 
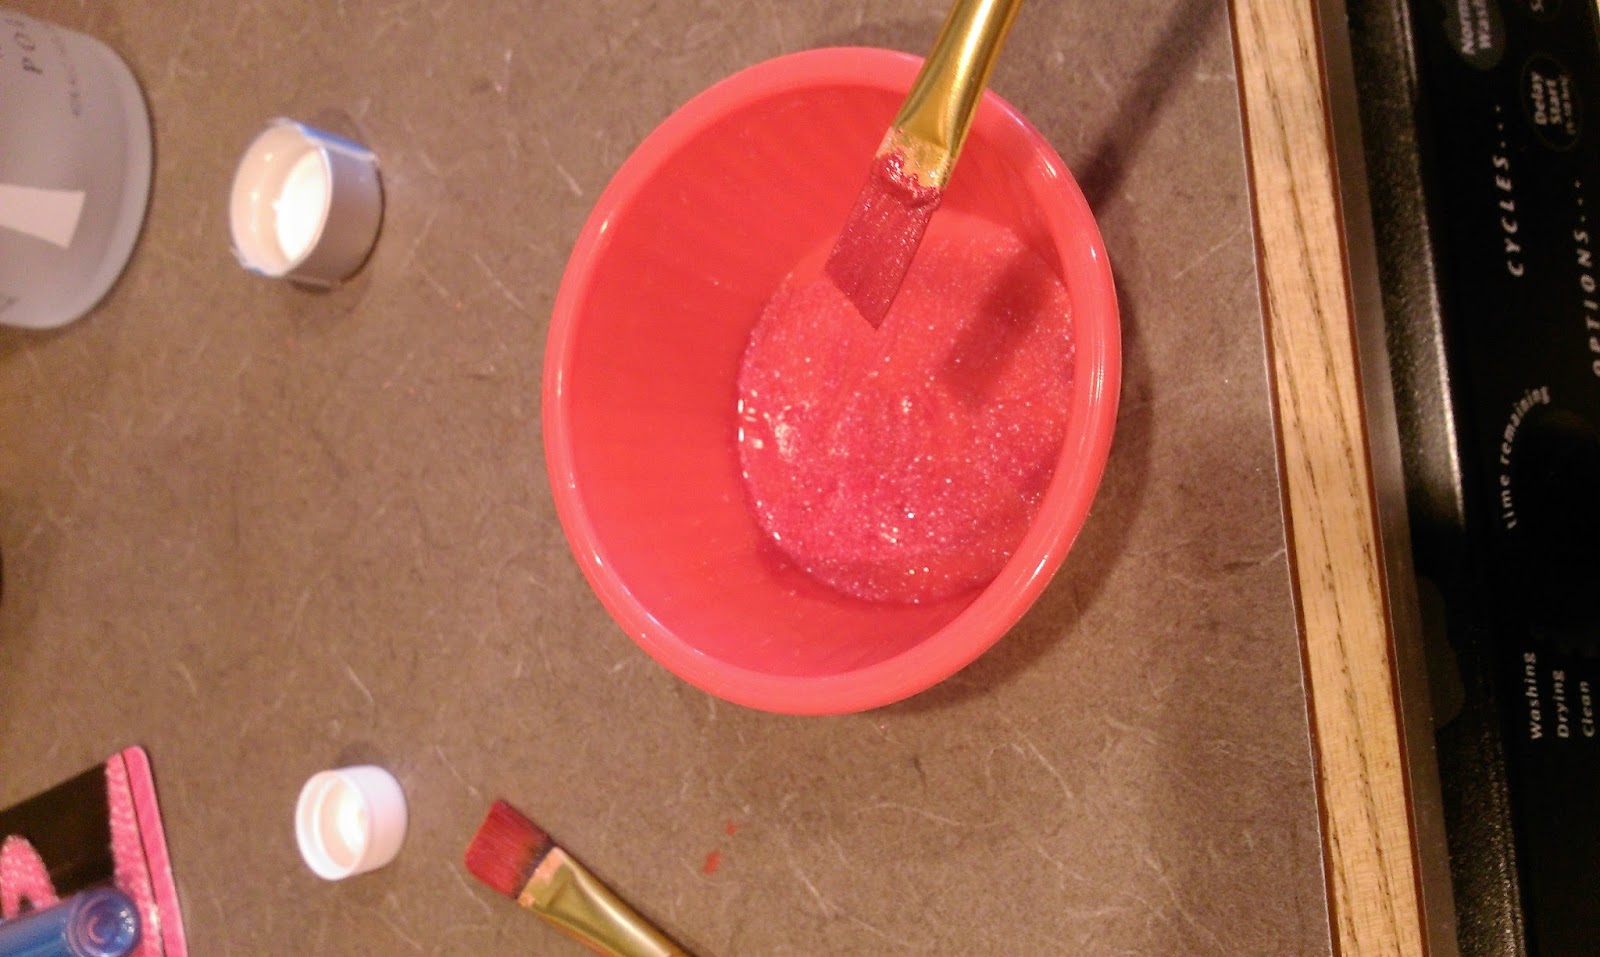
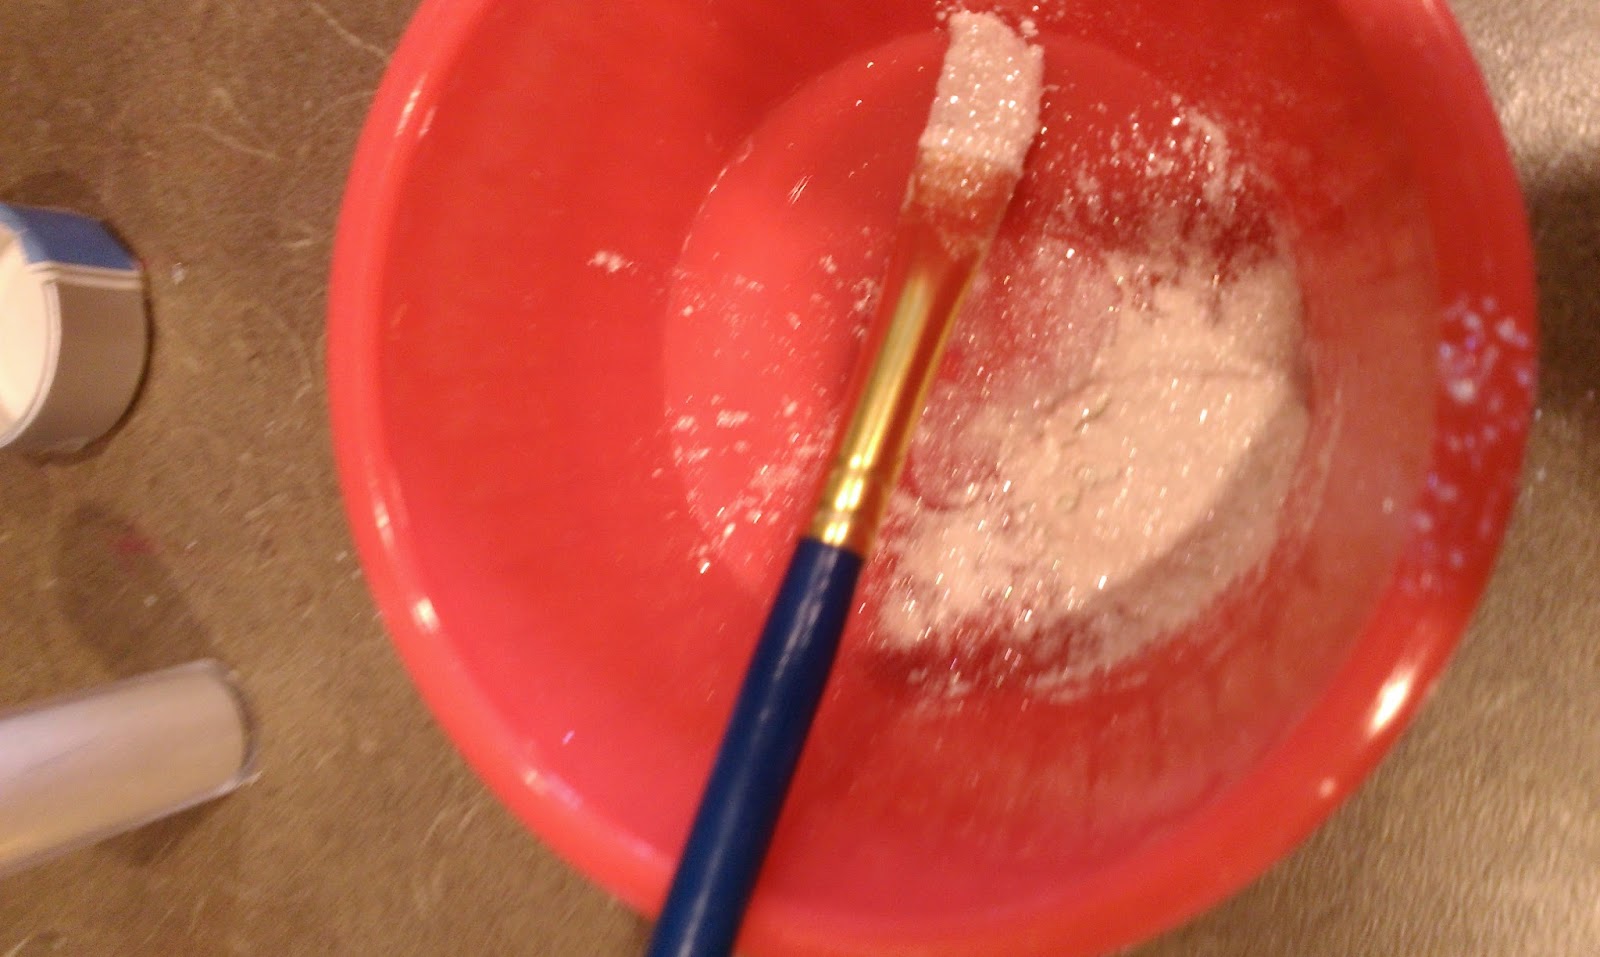
Take a large paintbrush full of luster dust and place into a tiny ramekin. Add a few drops of vodka or another clear liquor with high alcohol content to this and mix. The vodka helps you paint on the luster and will then evaporate as it dries, so your pop will take just fine and not at all like vodka (sadly). 
I simply painted on the dust. I got through about 6 pops before creating another mix of vodka and luster. 
You can really see the difference here…luster on the left, plain pop on the right. Once you’ve painted all the red pops, place aside on the counter to finish drying–this process will take about an hour. So while those are drying, you can get started on the white pops!
Here’s a better look at how much luster dust I used. This amount covered all 13 white pops with none to spare. 
And mixed with vodka! I know it’s Russian, but I have to hand it to them…vodka is a very versatile liquor. From assisting in improving baked goods to lowering your standards, it has an everyday use for sure. 
Repeat the melting chocolate, stabbing pops, fridge for 10, dipping, and fridge for 30, luster dust process again for the 13 white pops. These white pops were actually quite pretty on their own, but as is the case in life, most things look better with a coat of paint on them. 
I never want anyone to eat these. They are all that is right and beautiful in this world. You could tie ribbons on these and make them wedding cake pops quite easily. I die. By the time you’ve luster dusted the white pops, you can remove the sticks from the red pops by gently wiggling the stick until they come loose. Since the pops, now cake balls, need to sit flat, take a small paring knife and trim away any uneven bottoms. I hate uneven bottoms on cakes, chairs, and people. And surprisingly enough, a little knife action can fix the problem for all three. Once you’ve…unstuck? the red pops, melt the blue chocolate and skewer the 9 remaining pops before chilling in the fridge. Come back and dip the last of the pops in the blue chocolate and let set for another half an hour in the fridge. This is where time adds up…with the waiting. Could you guess patience is not a virtue I possess? If you’re more than 5 minutes late to something, I think less of you as a person. Not that it matters. I think less of me as a person after what I did to that bucket of KFC earlier.
I was reminded by these pops how much I hate the Dallas Cowboys. Once the blue pops are dry, paint with the blue luster duster. While the dust is STILL WET, sprinkle with stars or little white sprinkles. Set aside to dry, but continue to look at these condescendingly out of the corner of your eye while muttering derogatory comments about Tony Romo.

You know exactly what I mean. 
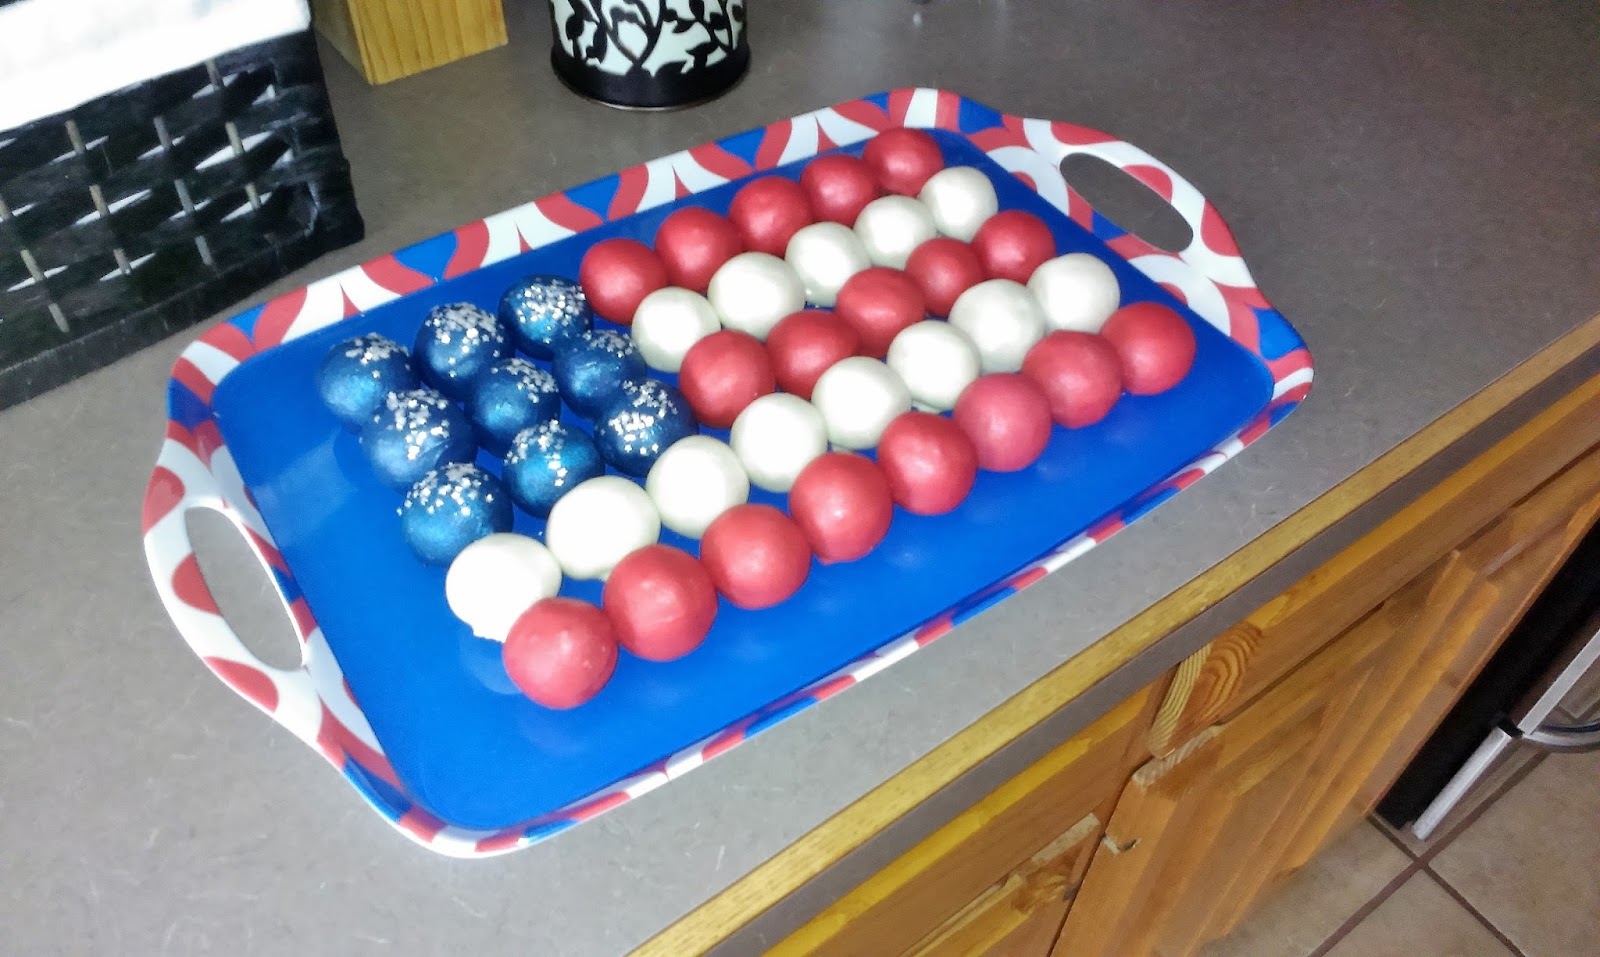
There is a sparkly light at the end of the tunnel. Once done with the blue pops, remove the sticks from the white pops. Now you can begin to assemble the flag. The top three rows have 5 pops of alternating color while the bottom two rows have 8. And my Hobby Lobby tray has infinite rows of patriotism.

Once the blue pops are dry, add all nine in the remaining square. I’m quite OCD (no, really?), so I shuffled things around and made sure no rough edges or unevenness were occurring with my flag. Then I took a step back on the feet that had lost feeling around hour four and admired how gorgeous this cake pop flag turned out to be. Was it hard? Did I end up having to run to Hobby Lobby during the middle of the process? Did I experience grotesque hunger anger when I plowed through snack time? Yes. But all things considered, it was totally worth it (much like the fried chicken). I will be happy to sink my teeth into one of these pops later…even if it does feel a little un-American to eat Old Glory. On a serious note, I of course am a very proud Texan and military wife. But I am an even prouder American. We have come a long way even just in recent weeks, but I hope our country continues to adapt and learn how to embrace our differences instead of fighting over them. Think of how far we have come since 1776, but we still have room for opportunity and growth. And that’s part of what makes being an American so great; we all have different experiences to share and bring to the table in the feast that is life. So continue to take another helping of freedom and love and brotherhood (and cake pops) this Fourth. ‘Til next time, my fellow eaters.

G.Wash would’ve loved these…wooden teeth and all. -
Must…Eat…Caaaake
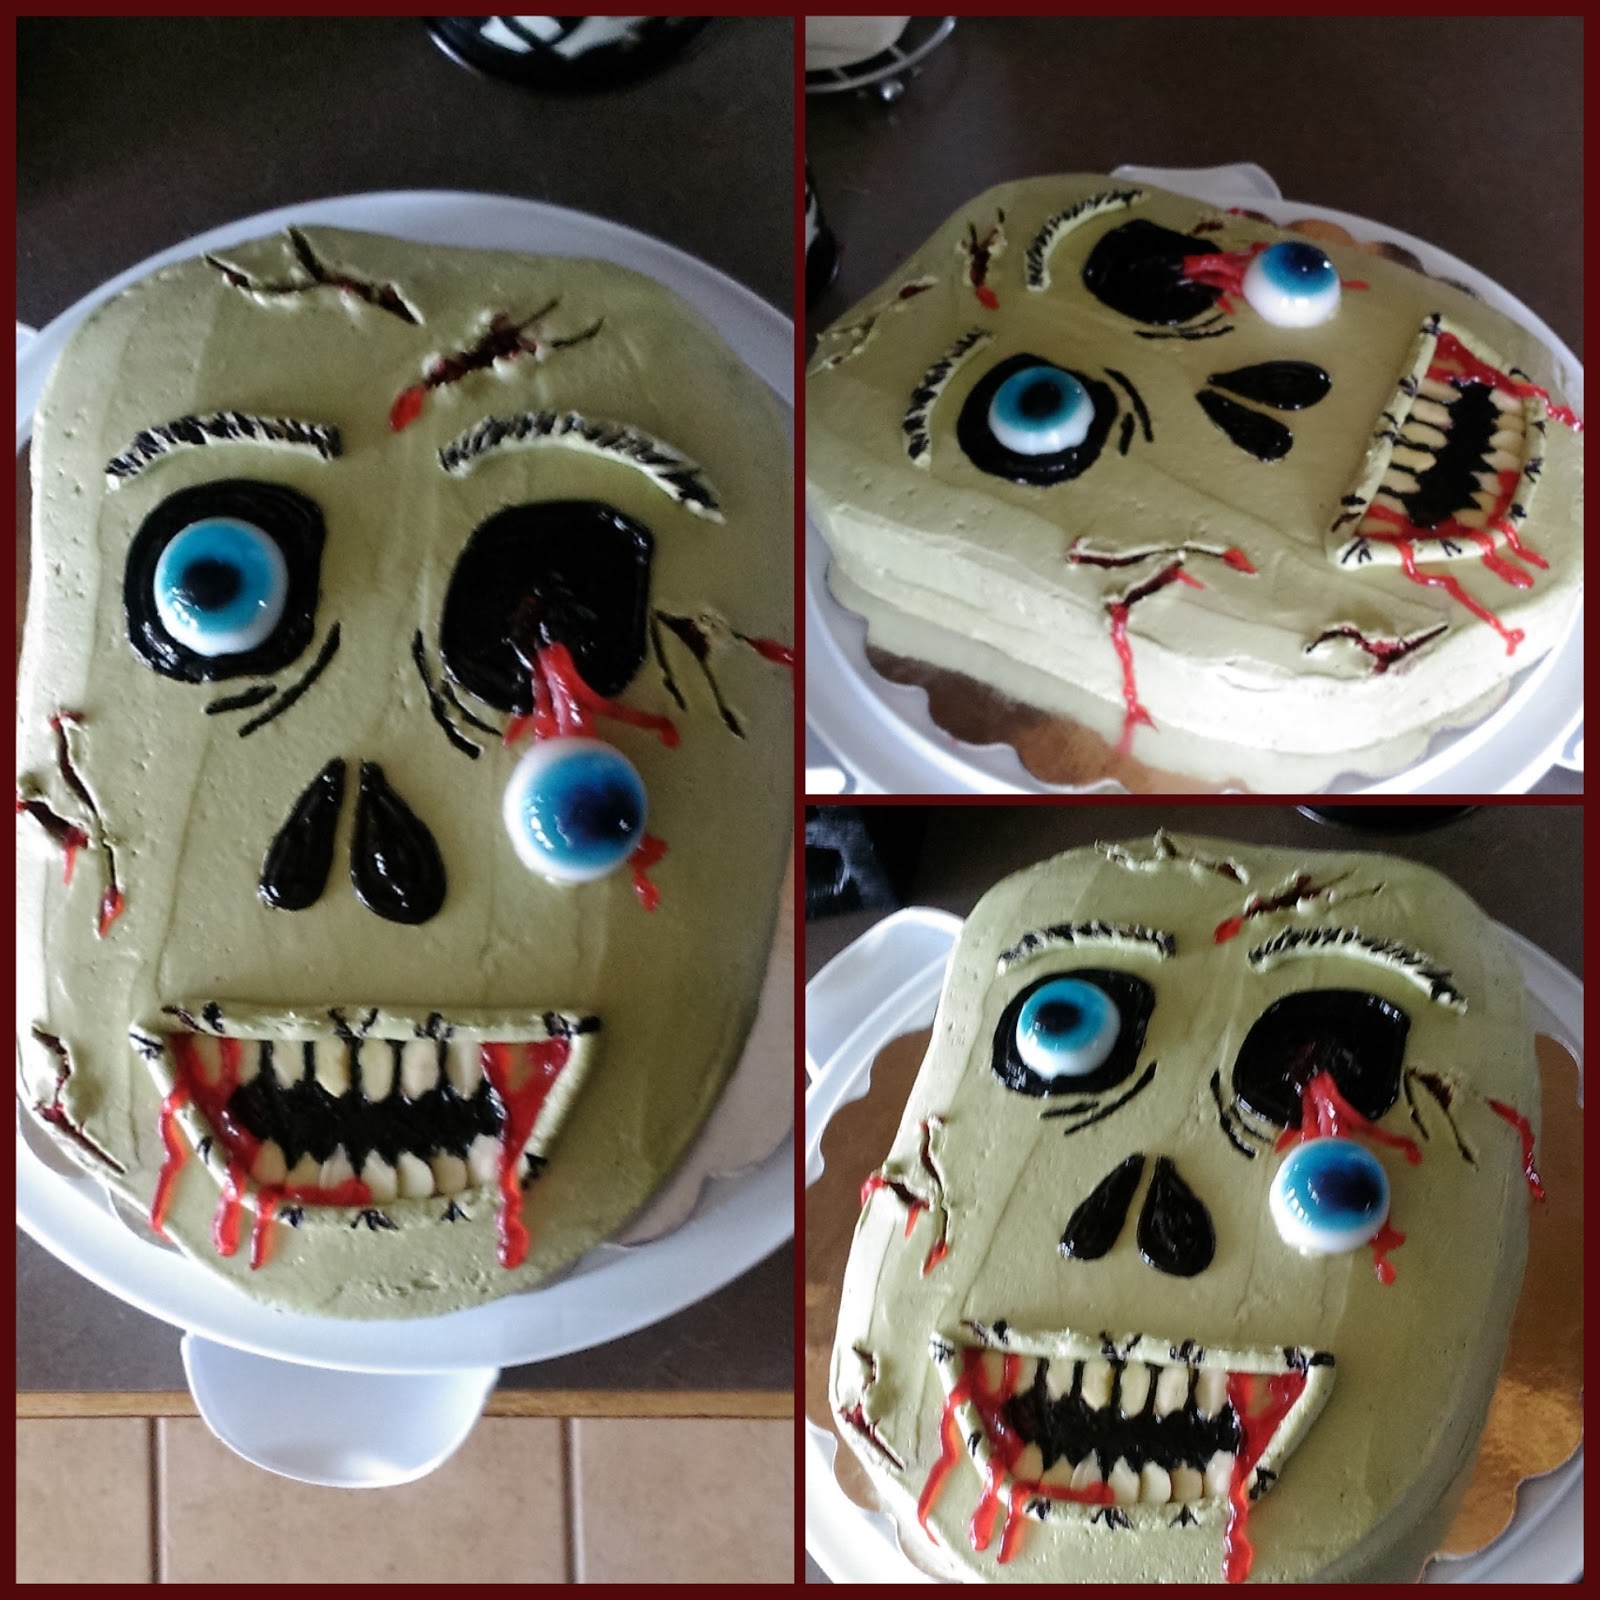
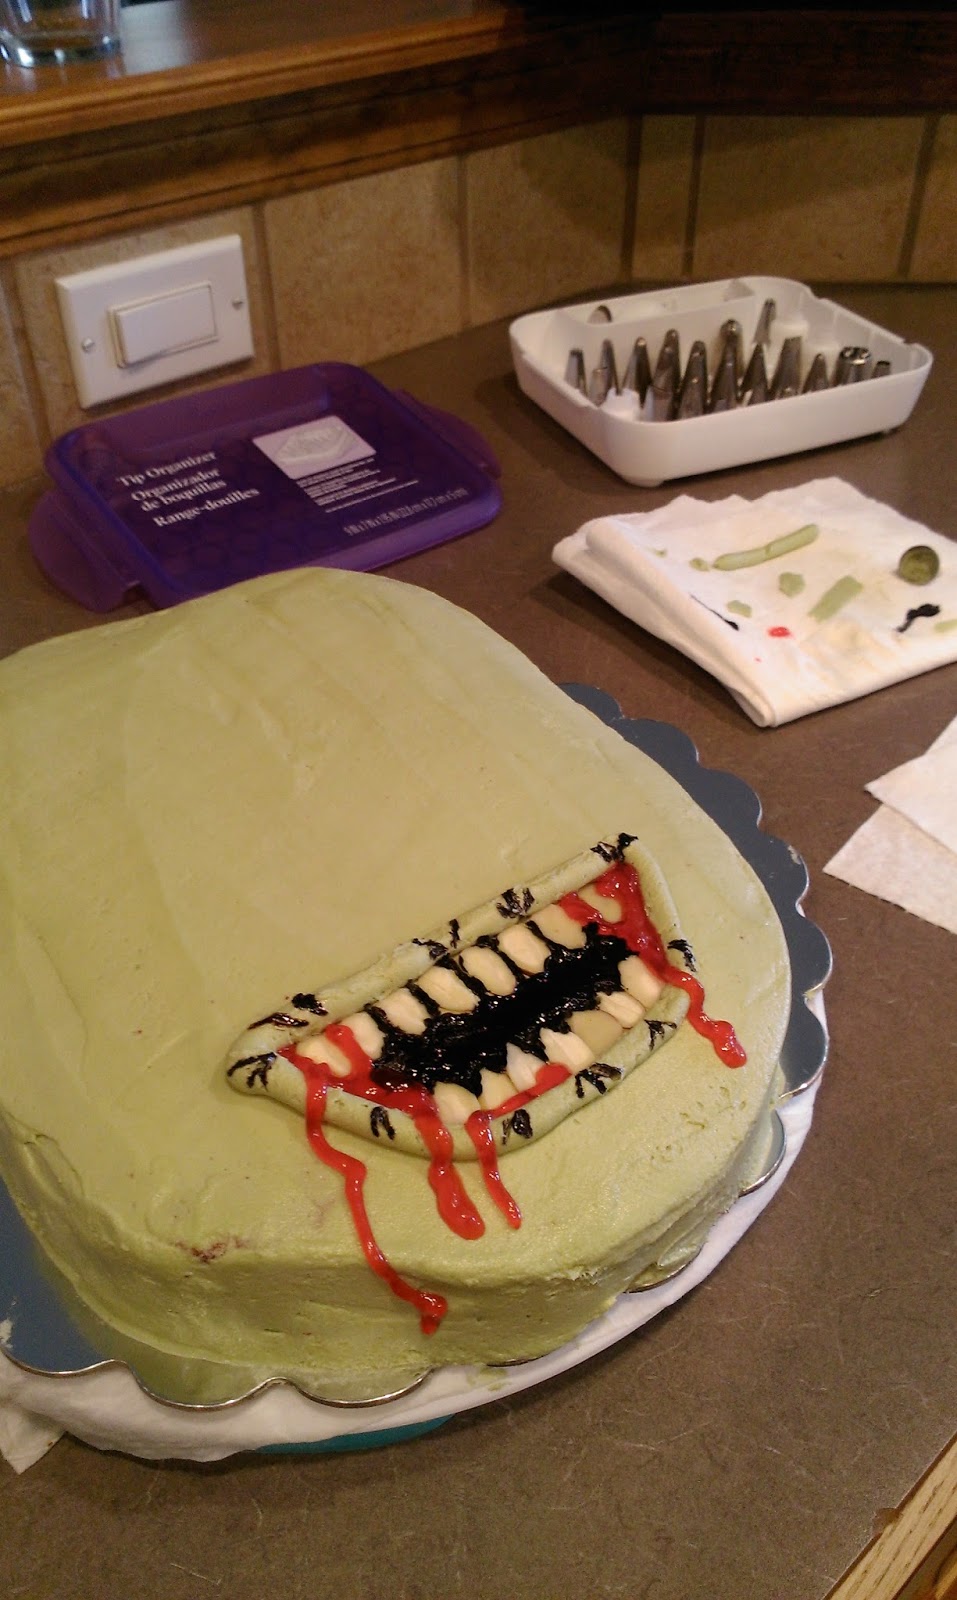
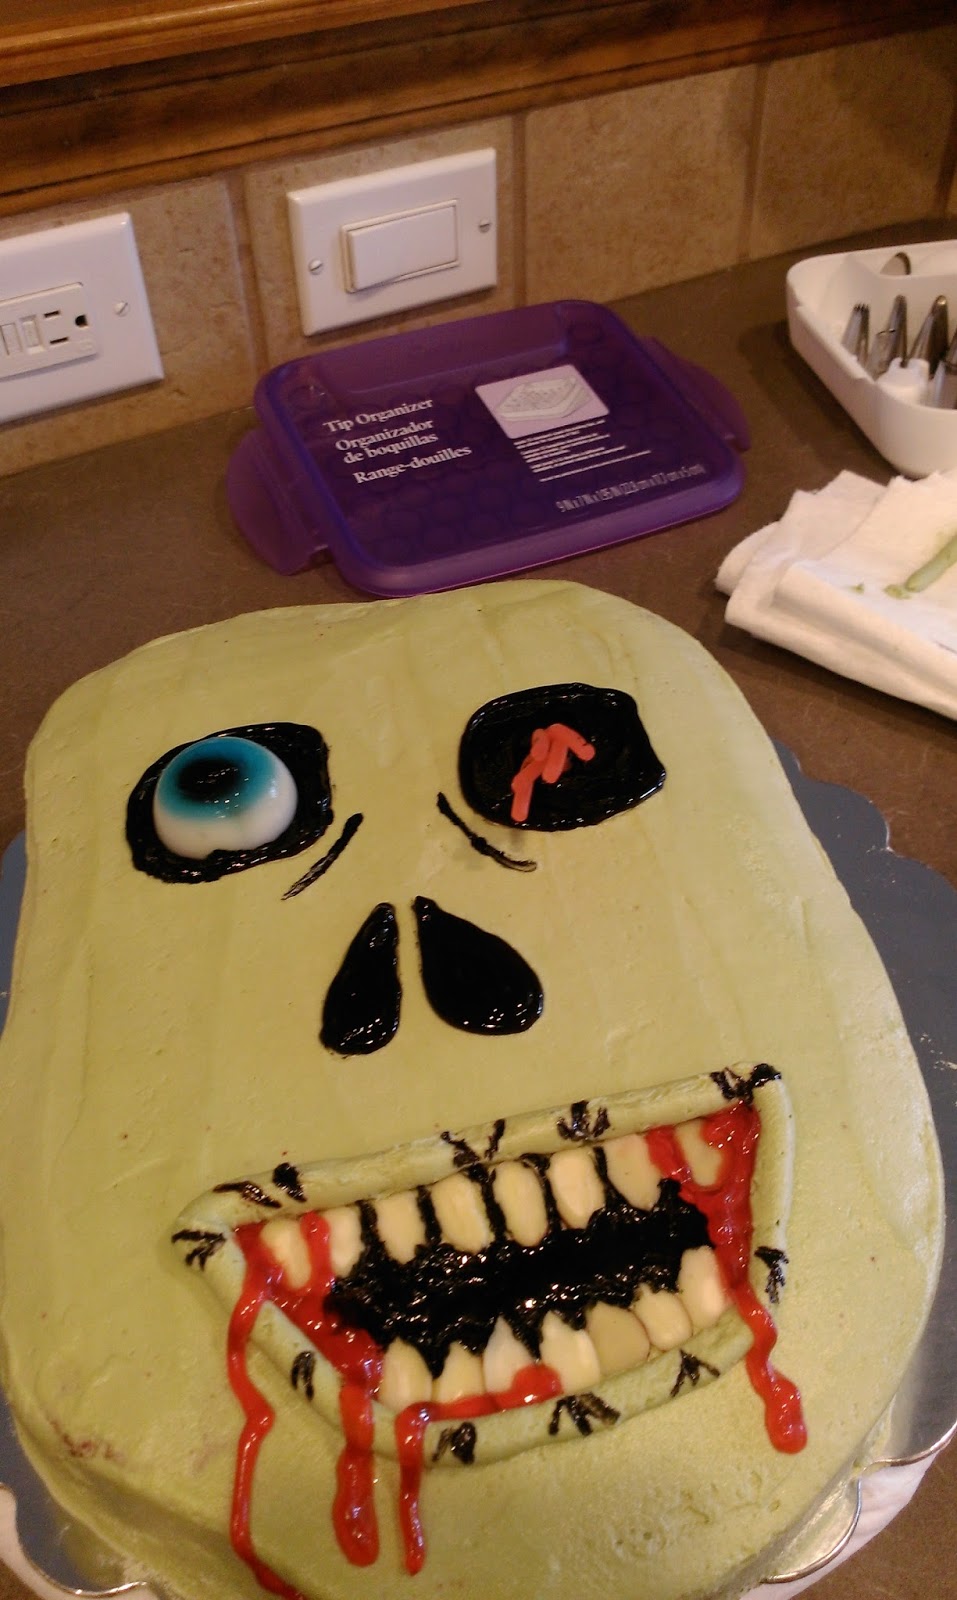
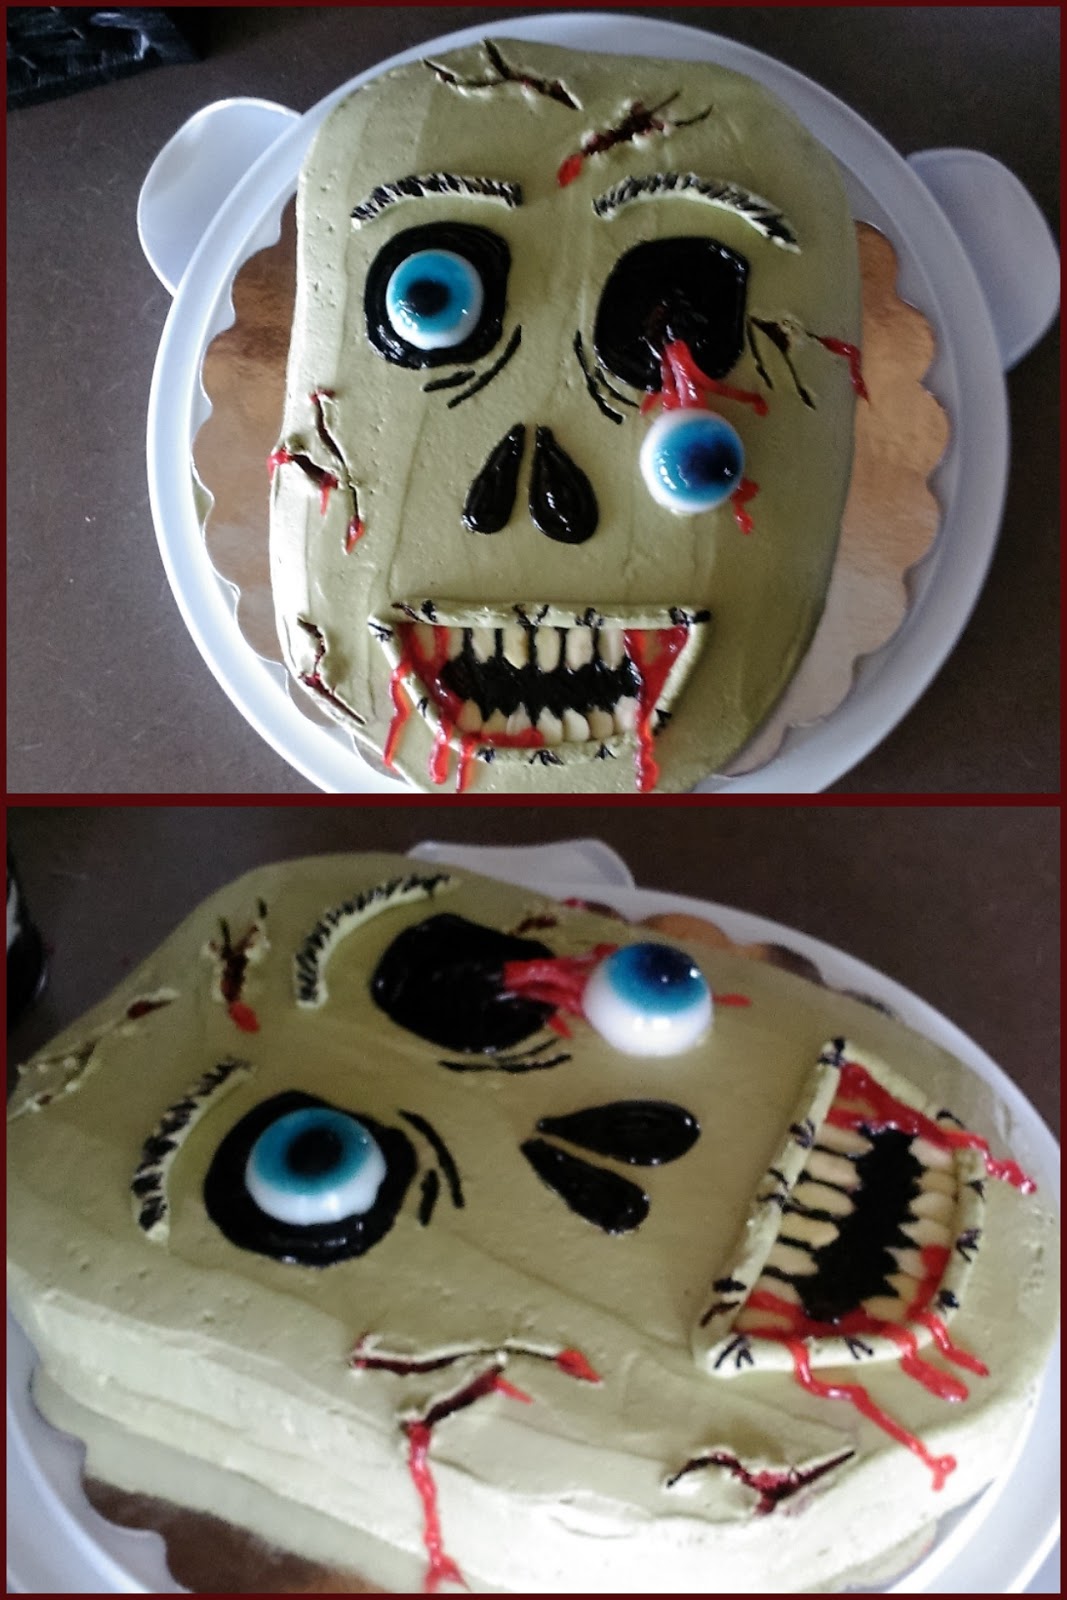
The last time I had a party for my birthday was when I turned 25. I figured it’s pretty much all down hill from there, especially since no one has found the Fountain of Youth or created that awesome anit-aging potion from Death Becomes Her. So I have been beaten into a quiet submission whereby I hope, like with most problems, that if I ignore my birthday hard enough it will simply go away. My husband is the exact opposite of me. He still loves to throw a good shindig (and caution to the wind) to see if he can still party like he did when he was 22. Recovery time not withstanding, he really knows how to have a birthday…take for instance the early party we had for him last year before he deployed complete with Cookie Monster cake and slip and slide. This year we decided to throw a backyard fire pit party with a ton of appetizers and beer…and the cake, you ask? Well, my husband simply said to me, “This year I want a red velvet zombie cake,” and I took it from there. Derek gets what Derek wants! I was also thrilled with the idea of making a cake that was supposed to have flaws and look icky. It was a glorious cake decorator’s rebellion. I was so happy to make it, it almost made me forget I’ll be turning 29 in six months. The power of cake, y’all.

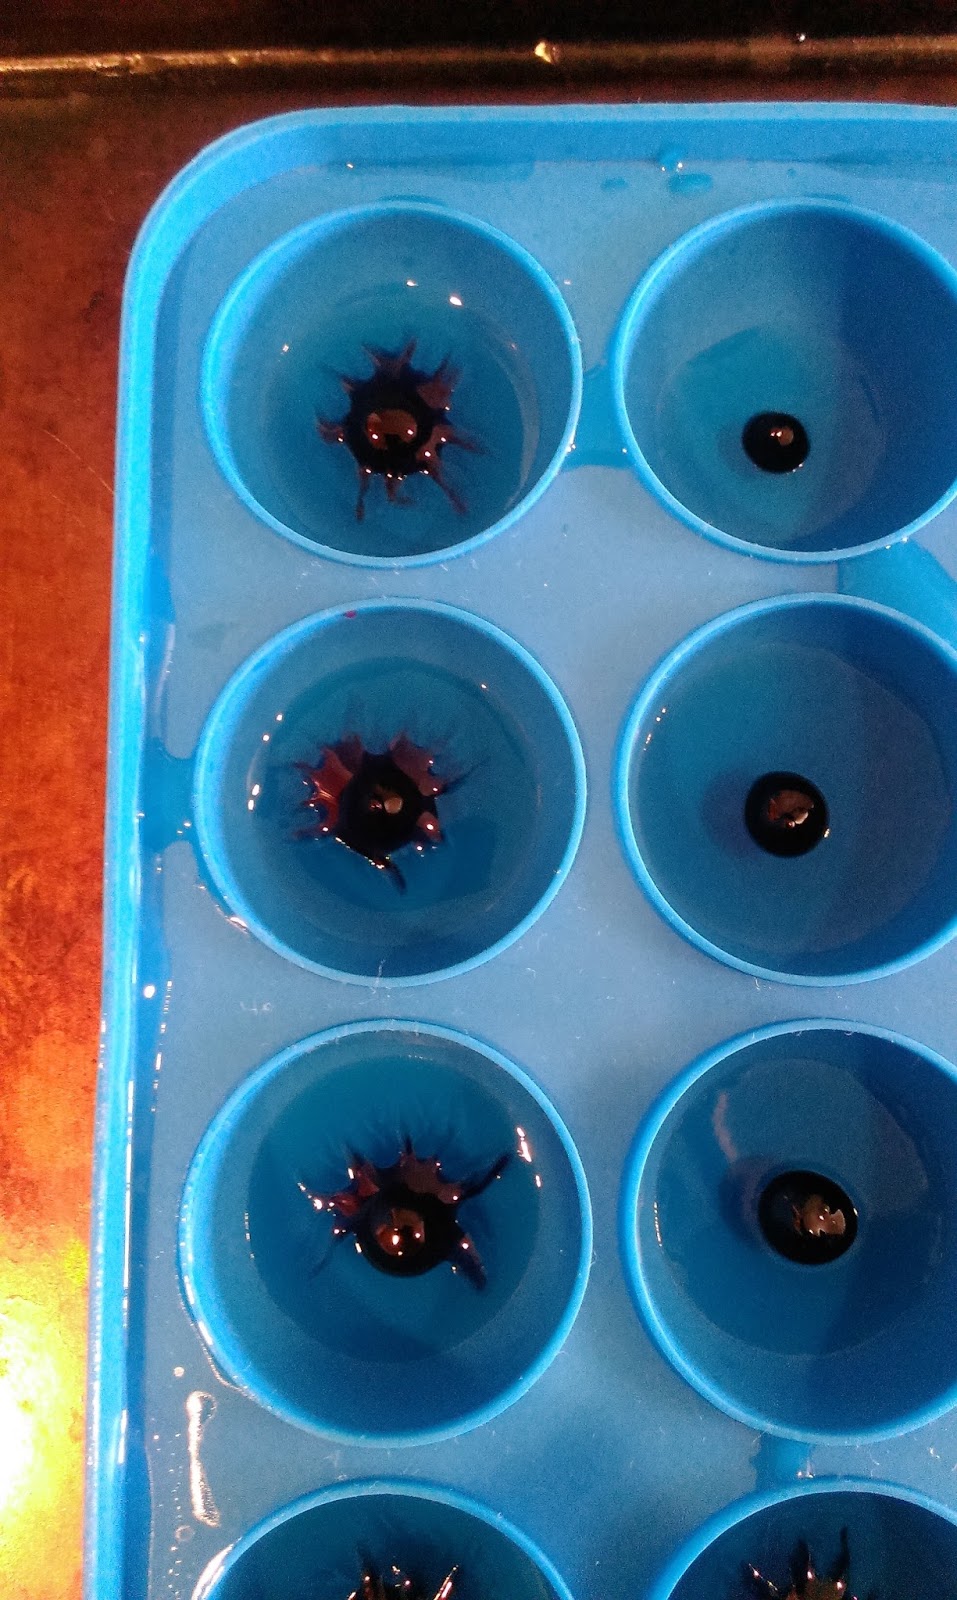
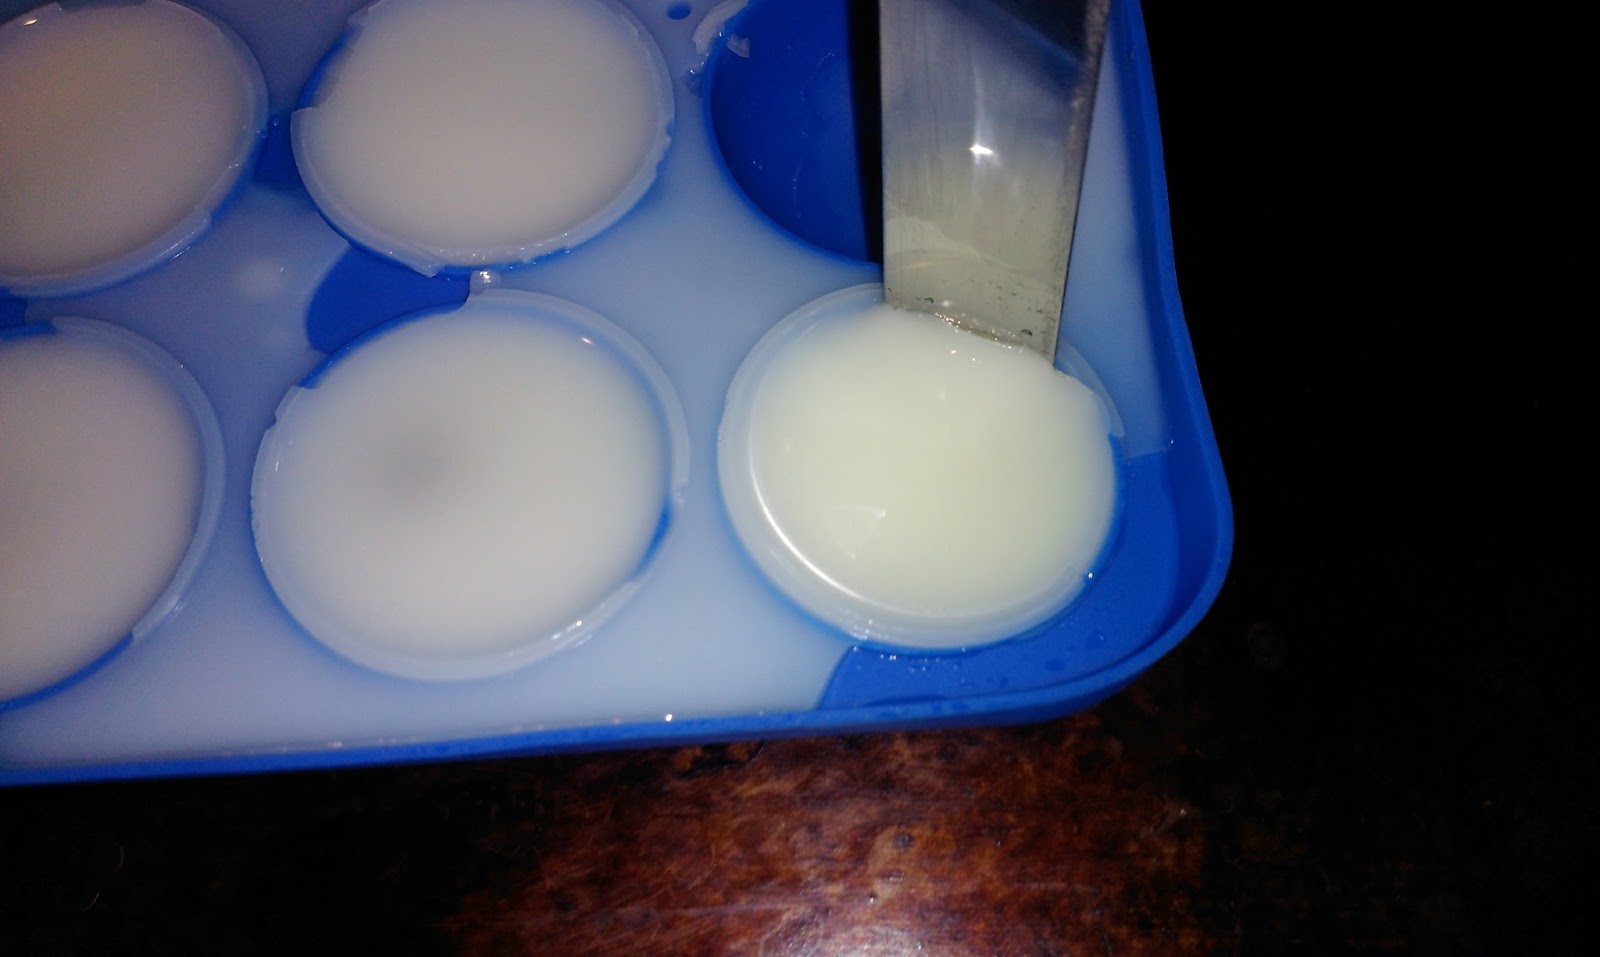
In a surprising twist, I will be the one eating your brains, sir. I know, isn’t it spectacularly gross and awful in all the right ways? The most time consuming aspect of making this cake was making the Jello eyeballs…but this resulted in me being able to eat a very large bowl of very blue Jello for dinner one night without any sort of hospitalization required. Aspire to be me, people. If you want to make creepy eyeballs, definitely do this a day ahead of time, as it does take awhile to set. Since I have a ton of my usual crappy photo montages to show you, let’s get down to business. If anyone wants these to end, it will require you purchasing me a better camera.

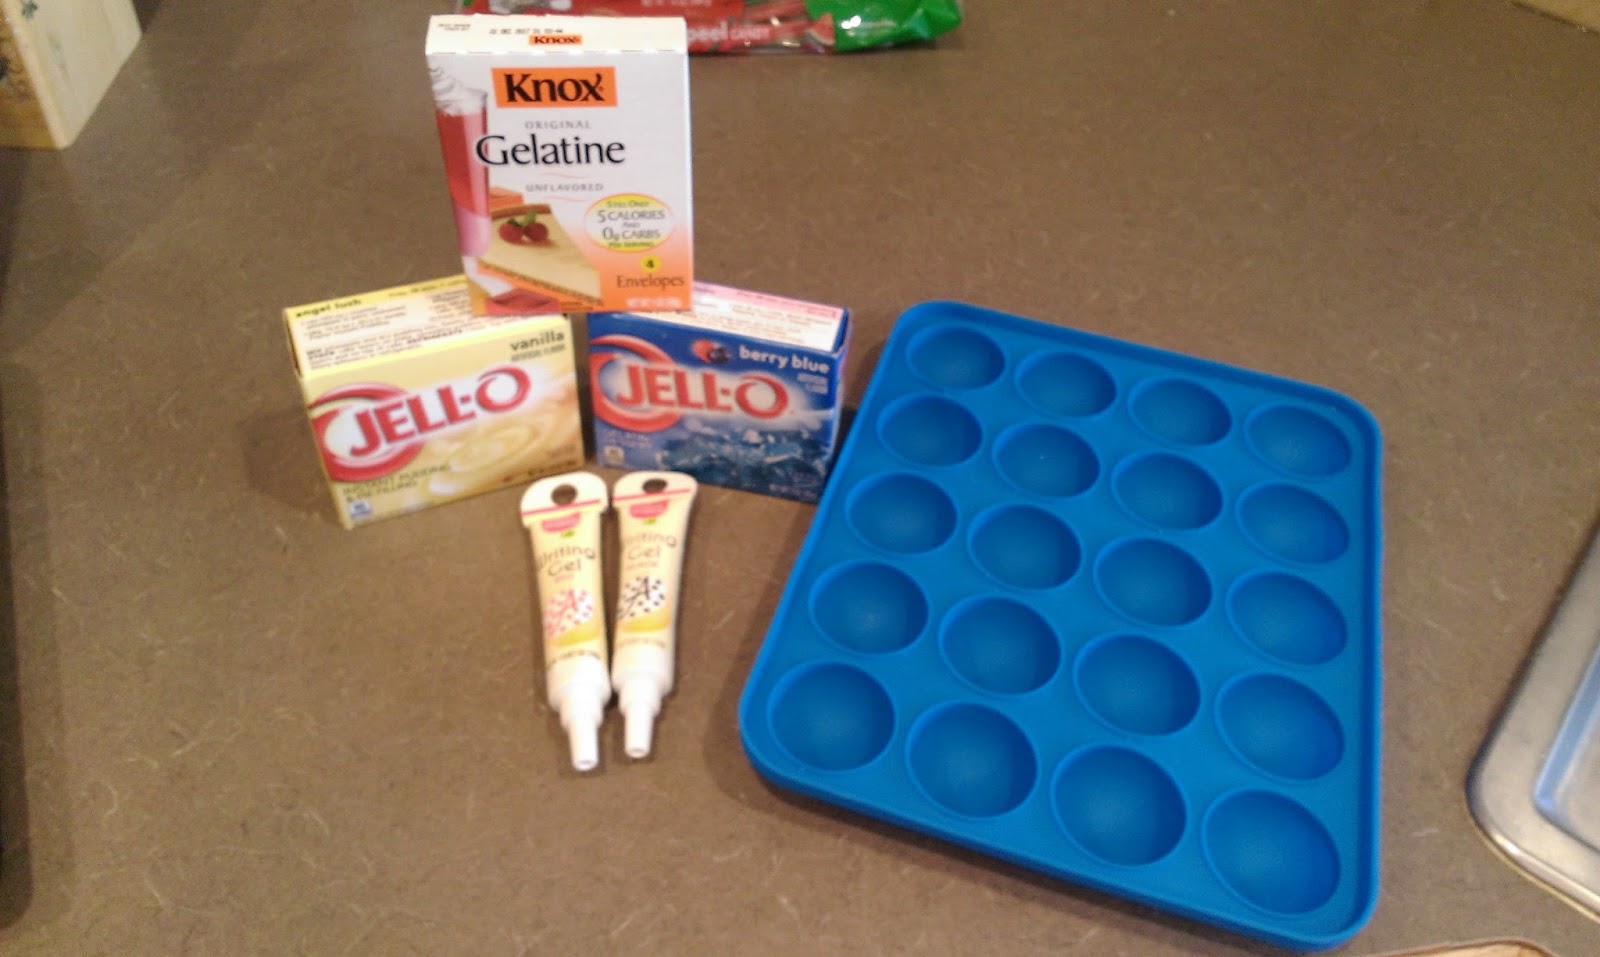
You will need a box of whatever color Jello you want to use for the irises, a box of vanilla instant pudding, Gelatine, and writer icing in black for the pupils and red if you want a bloodshot look. I used this cake pop tray for assembly. No word on whether or not it actually works for cake pops…yet. 
Prepare the Jello for your irises as directed on the box, adding in a tablespoon of the Gelatine for better firmness. In what is an essential step, pour it into something with a spout. You’re still gonna make a huge mess, but this is why people have dogs, yes? 
Slightly to the left of my feet in this picture is said doggy cleaning device. During the pouring process, I accidentally got some Jello on Freyja’s head. She was sticky for a day or so, but big brother Hank really enjoyed cleaning her up. Don’t pour a ton of Jello into the mold, just about 1/3 of the way full. You can always use a paper towel to soak up any excess. Now place into the fridge to set for 2-3 hours. 
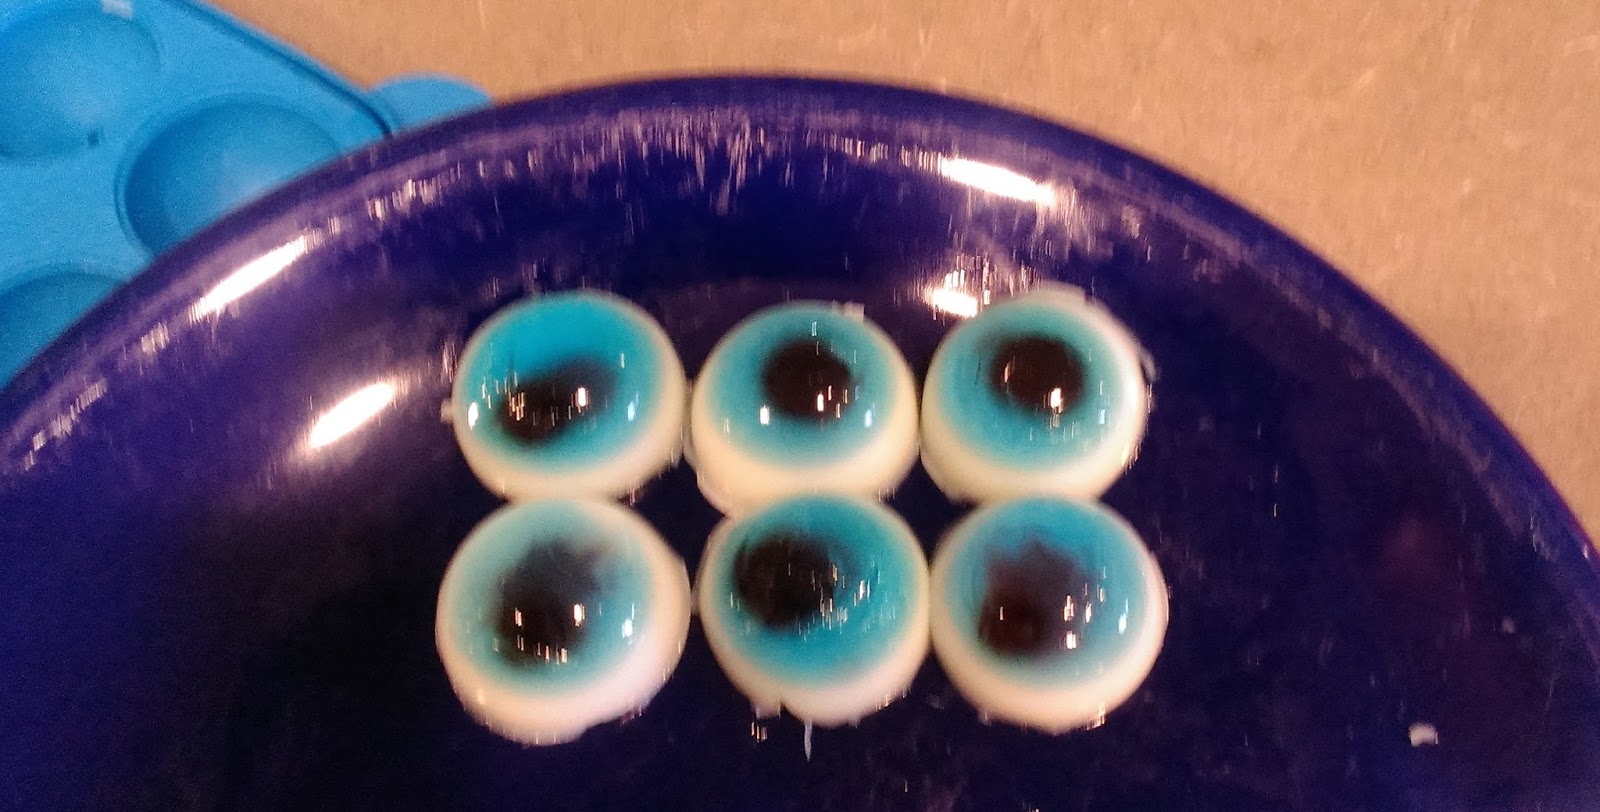
Once the iris is set, come back in and place a dot of black into the center for the pupil. Use a toothpick if needed to dab it down or reshape. If you want a creepy, cloudy, dead-eye look, drop a large glob of red writer icing on top of the black, and use a toothpick to draw lines of red out from the pupil. Set back into the fridge for 2-3 hours. 
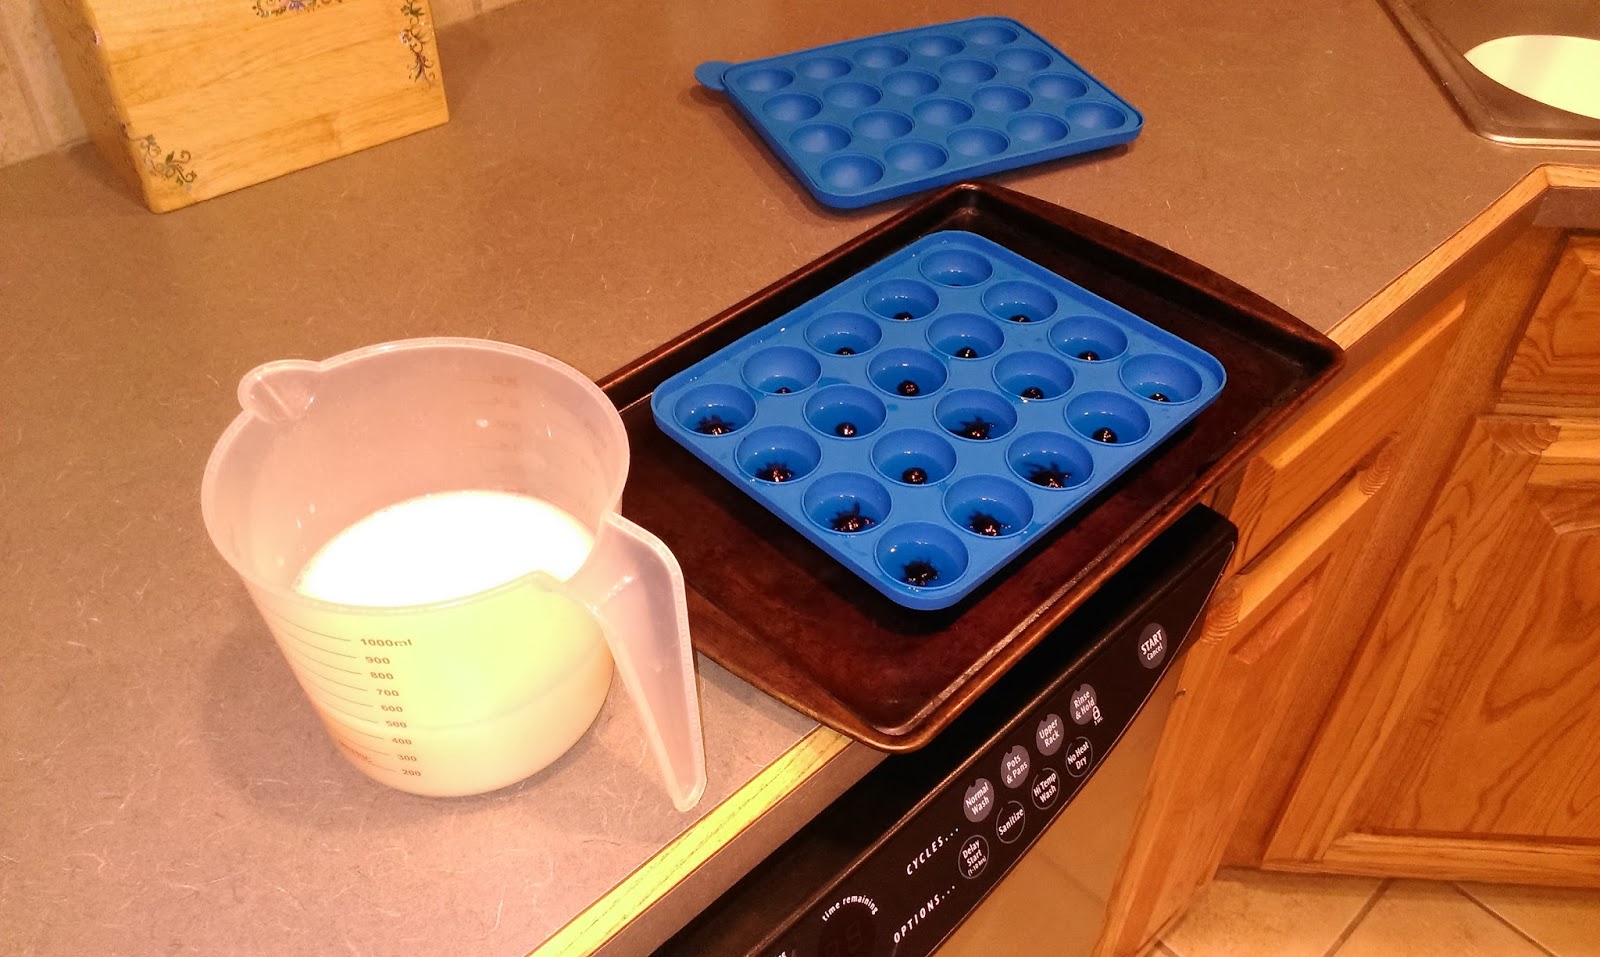
Now, mix the pudding in with 1 1/2 tablespoons of Gelatine, 1 tablespoon of sugar, and 1 cup of hot but not boiling water (steaming hot, if you will). Blend this together very well, and then add in 1/2 cup of cold water, 1/2 cup of cold milk, and 1 teaspoon of vanilla extract. Let this cool down to room temperature, and then pour into something with a spout. Very gently, pour on top of your pupils and irises. Gently is a must, or you run the risk of moving the pupils. 
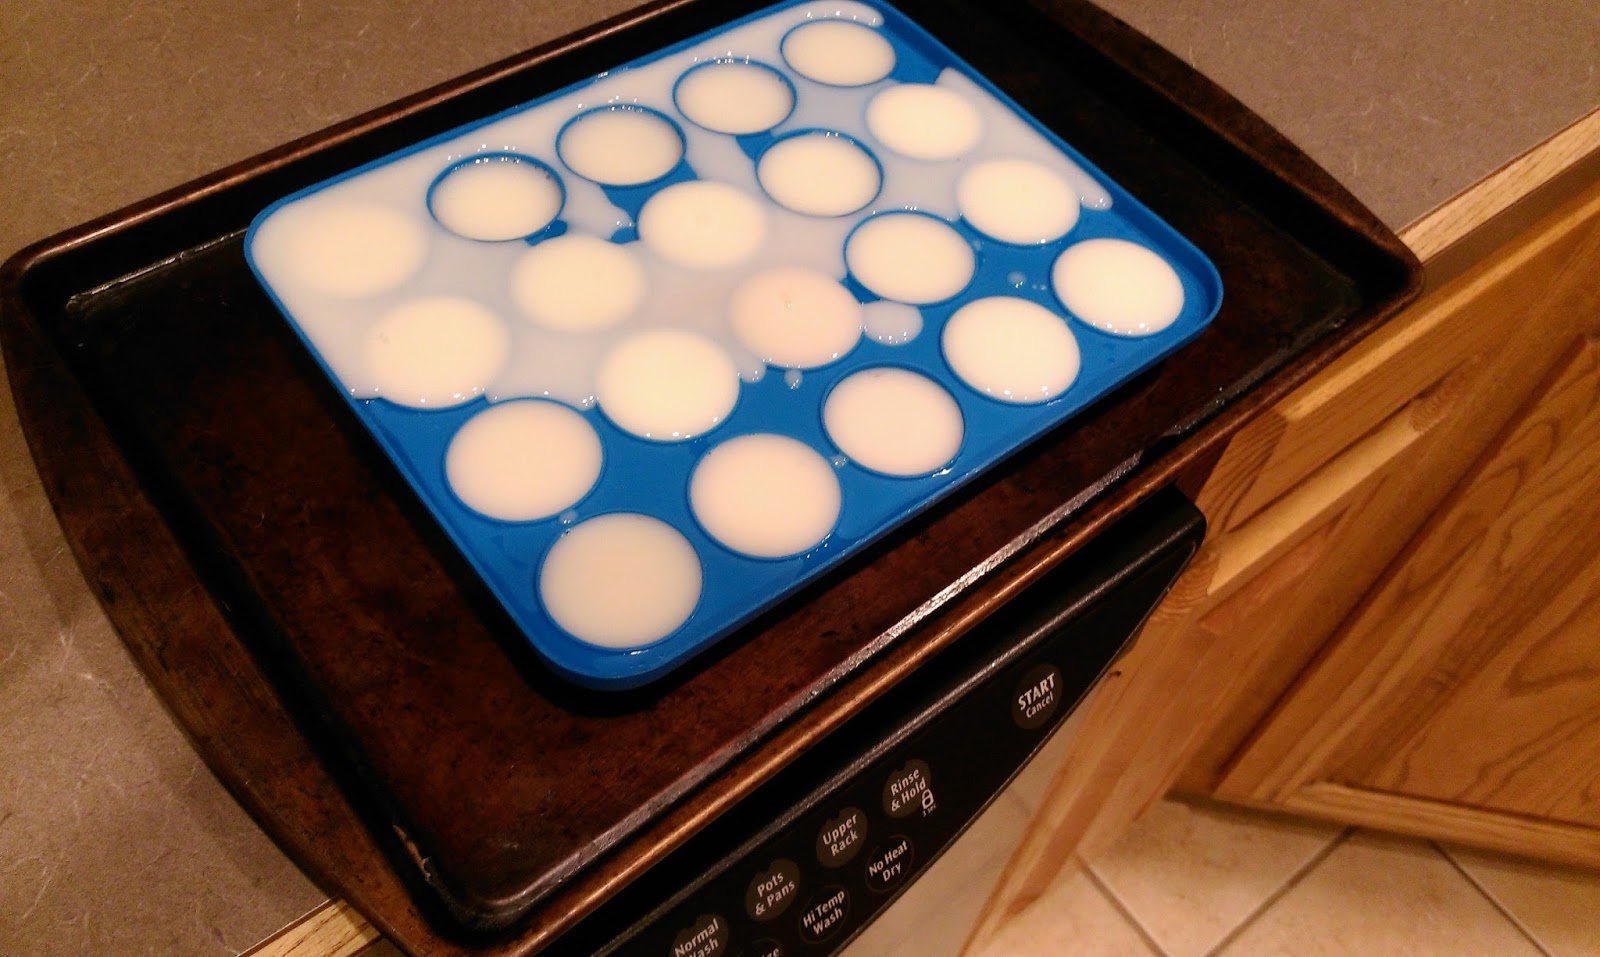
Fill them all the way to the top this time. Overflow is ok. Place the top on your cake pop mold and leave in the fridge for 2-3 hours or until set- I left them alone overnight to set to be safe. 
I then took a small angled spatula and loosened the eyes up from the sides and bottom of the pop mold. Slow and steady wins the race here for sure. I sped through a couple and was left with eyes sans irises, so they looked like tiny little implants for a small woodland fairy or something instead. 
I love the dead-eyed look from the eyeballs I put red icing into, but I did love the normal eyes as well. Creepy either way, and you very well could add booze into either recipe and make these even cooler, because that’s what booze does to things (in moderation, anyway…don’t eat so many boozy eyeballs you end up dancing like Elaine Benes). I usually cop out and make red velvet cakes from the box, but my mom has a recipe that is simply to die for…and since I had that giant bowl of leftover blue Jello for dinner, I was riding a pretty large high and decided to go for it and make my cake from scratch–was definitely not disappointed with the results. I share this recipe with you, my dear devoted readers, because my mother is an excellent baker, and this cake will make your life infinitely better.
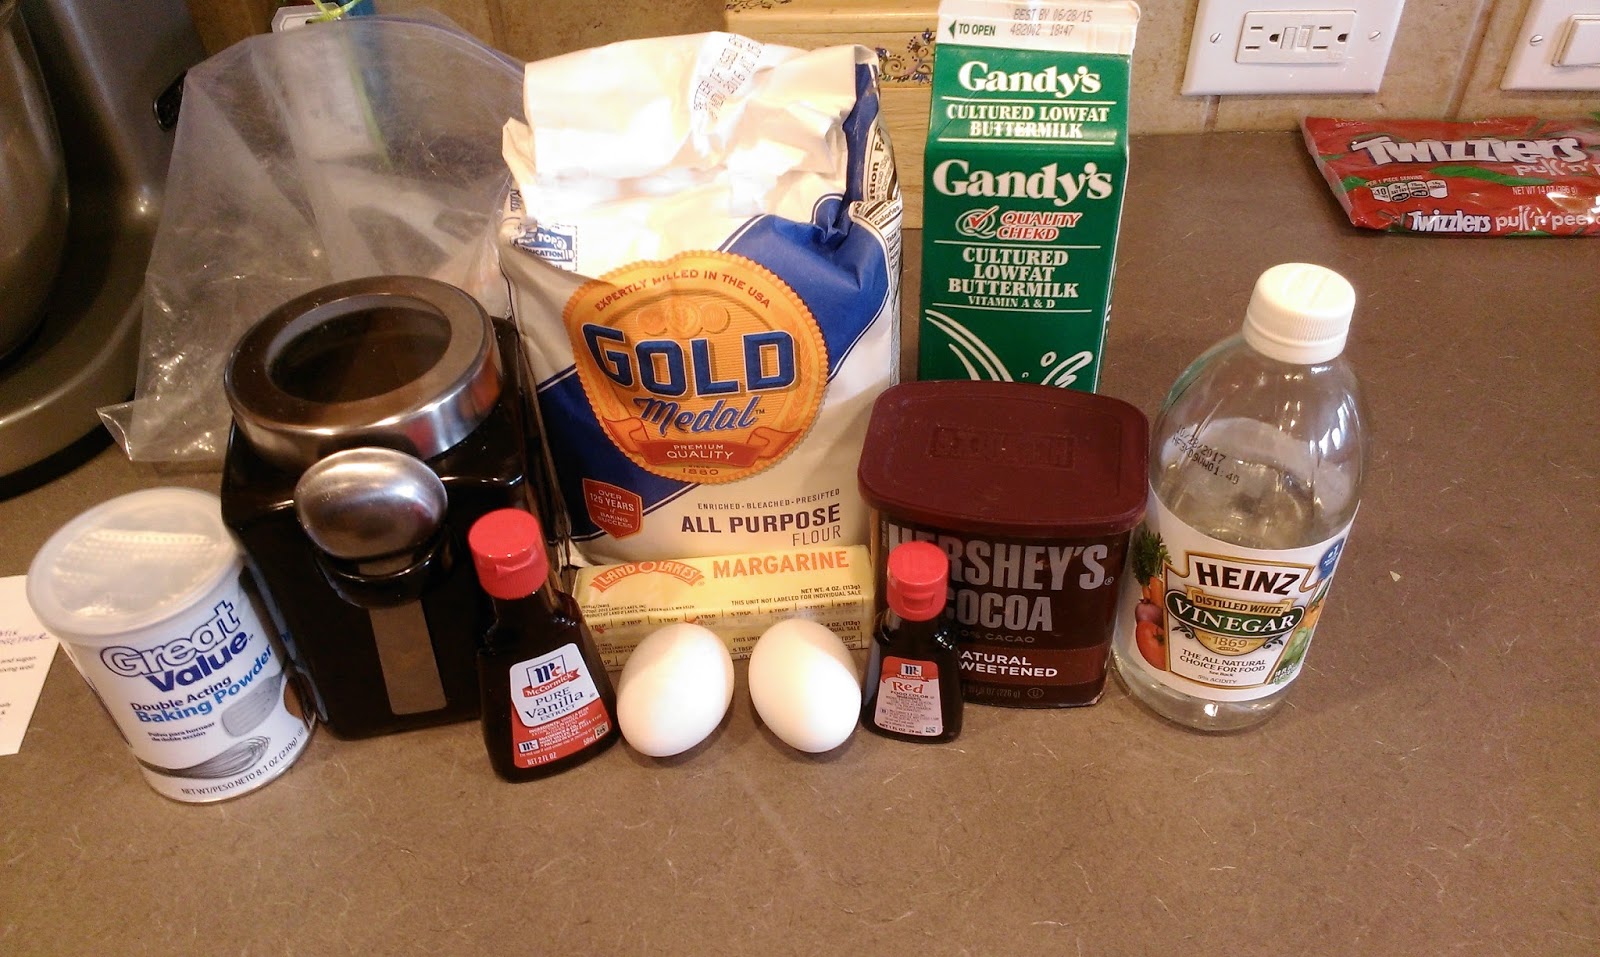
I mean, I already had everything I needed on hand, it was kismet. Preheat your oven to 350 and grease a 9×13 pan (or two 8-inch rounds depending on your cake design preferences). Then gather:- 1/2 cup of butter at room temp
- 1 1/2 cups of sugar
- 2 eggs
- 1 full bottle of red food coloring (1 oz)
- 2 heaping tablespoons of cocoa powder
- 1 cup buttermilk
- 2 1/4 cups flour
- 1 teaspoon vanilla
- 1 tablespoon vinegar (I know this sounds scary, but just go with me here)
- 1 teaspoon of baking soda (yeah, baking powder is pictured, but thankfully I reread my recipe card after the Jello jitters started to calm down)
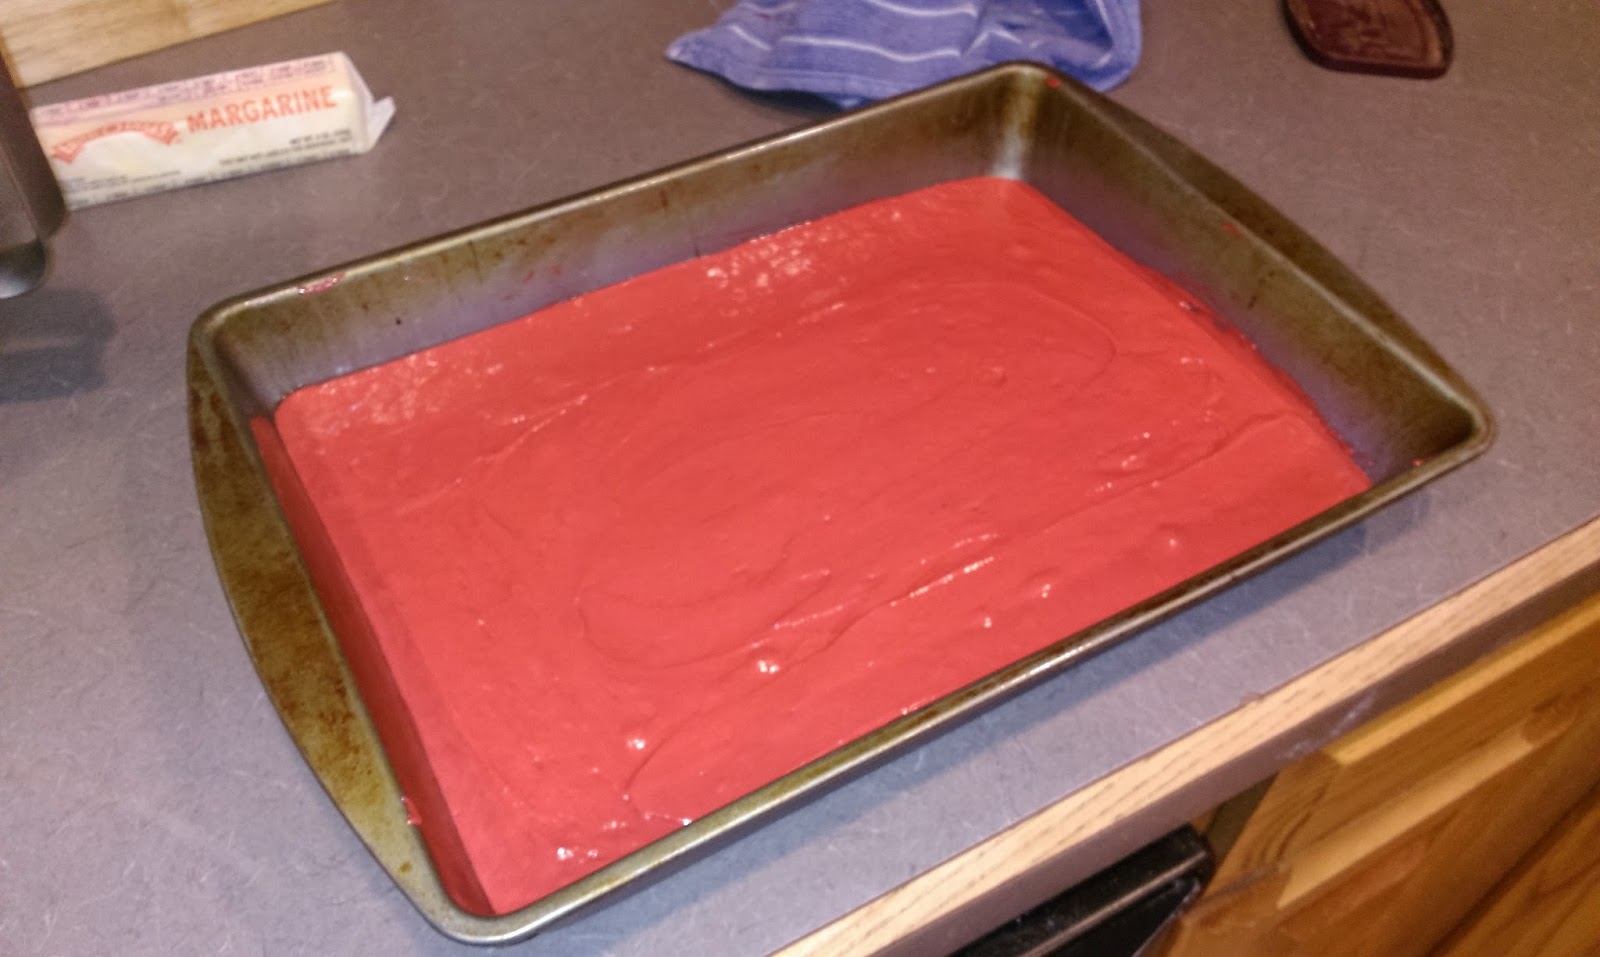
Cream together the butter and sugar for 2-3 minutes. While this is going on, mix together the food coloring and cocoa powder to make a paste. Once the butter and sugar is nice and fluffy, add in each egg, mixing well after each addition. Then add in the cocoa paste mixture. Add in a third of the buttermilk, mix, a third of the flour, mix, and continue until it is all nicely mixed in. Add your vanilla. In a small dish or measuring cup, mix together the vinegar and baking soda to relive your sixth grade science fair when you made that exploding volcano. Once well mixed, add in to your cake batter and blend.

Pour into the pan and bake for 25 minutes or until a toothpick comes out clean. 
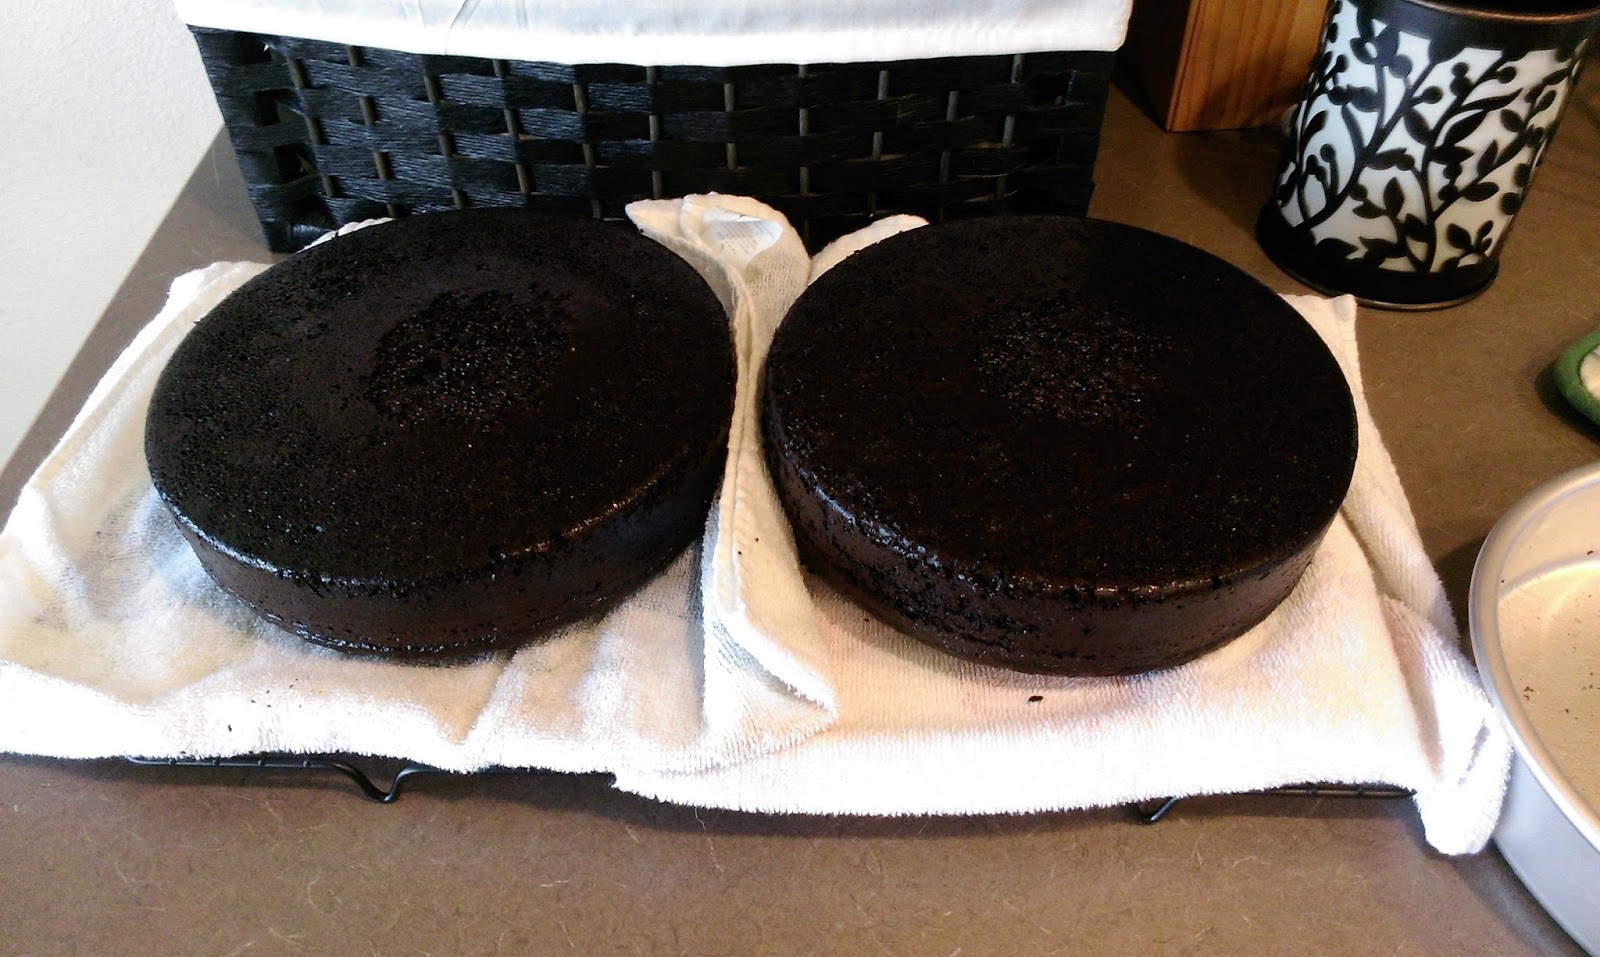
So red. So pretty. So delicious. Now, as I will always tell you, let the cake rest on a cooling rack in the pan for 10 minutes, then place a towel on top of the cooling rack and empty out the pan. Let cake rest in the freezer for an hour or two so shaping the zombie’s head is easier.
To shape the head, I rounded the top of the cake and cut in diagonally on the bottom to make a chin. Place back into the freezer while you make the icing so the crumbage isn’t too insane. 
At this point, I should just invest in powdered sugar. 
I used brown and green dye mixed together to create some ghoulish skin. I used mostly green with four or five drops of brown added in. I made my almond buttercream frosting to so grossly adorn the zombie’s face. I used:
- 1 cup of Crisco
- 1/2 a stick of butter
- 1 teaspoon of vanilla
- 1 teaspoon of almond extract
- 4 cups of powdered sugar
- 4 tablespoons of heavy cream or milk
- Optional: gel icing dye
Blend together Crisco and butter for a few minutes. Add in the extracts and one cup of sugar. Mix well and scrape the bowl. Add in one tablespoon of milk or heavy cream. Repeat the sugar/cream process until you’ve used all 4 cups and tablespoons. Add in dye if using.

Now crumb coat that man eater! I love how sickly the color turned out. I was okay with a cheesy zombie…if I had make a Walking Dead-esque zombie, I would’ve been too afraid to eat it. Truth. Set in the freezer for 30 minutes after coating. 
Bring out and add the final coat of frosting. Stick back into the freezer for 30 minutes, and then take out and use the paper towel trick to smooth things out. Since it is an ugly zombie cake, I didn’t expend too much effort into the smoothing. The rougher the better. Precisely why making zombie cakes are fun. I wonder if there’s a niche market for this… 
I swear to God the Belvedere isn’t for drinking… While the decorating is easy, you will want a few odds and ends for your zombie:
- Red and black decorator icing
- Black and brown gel icing dye mixed with a small splash of vodka to thin it out without making it watery. Shots optional? I was about to hit the Jello withdrawal wall, and the vodka would’ve been useful, but I soldiered on anyway. I save myself for pinot grigio, what can I say.
- The leftover frosting fitted into a piping bag with a large round tip
- Paint brushes of varying sizes
- Thinly sliced almonds
- Pull and peel Twizzlers

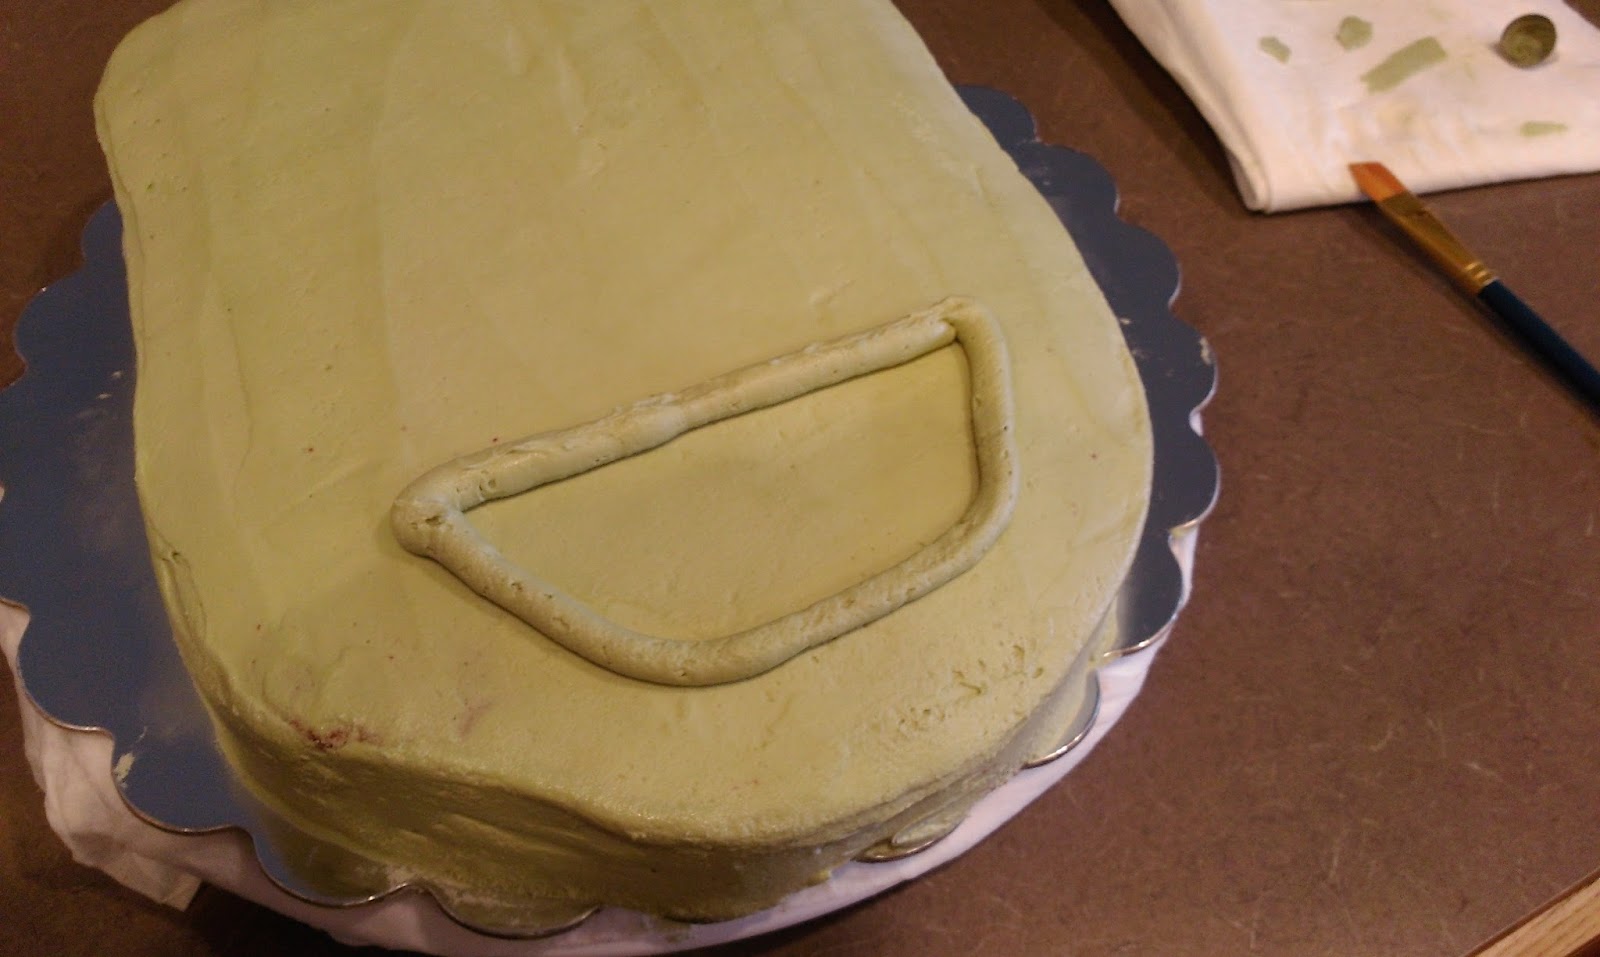
Start by piping out a mouth shape for the…mouth. At this point my cake looks more like the toad from Flushed Away: Which gave me a great idea for my next birthday cake. 
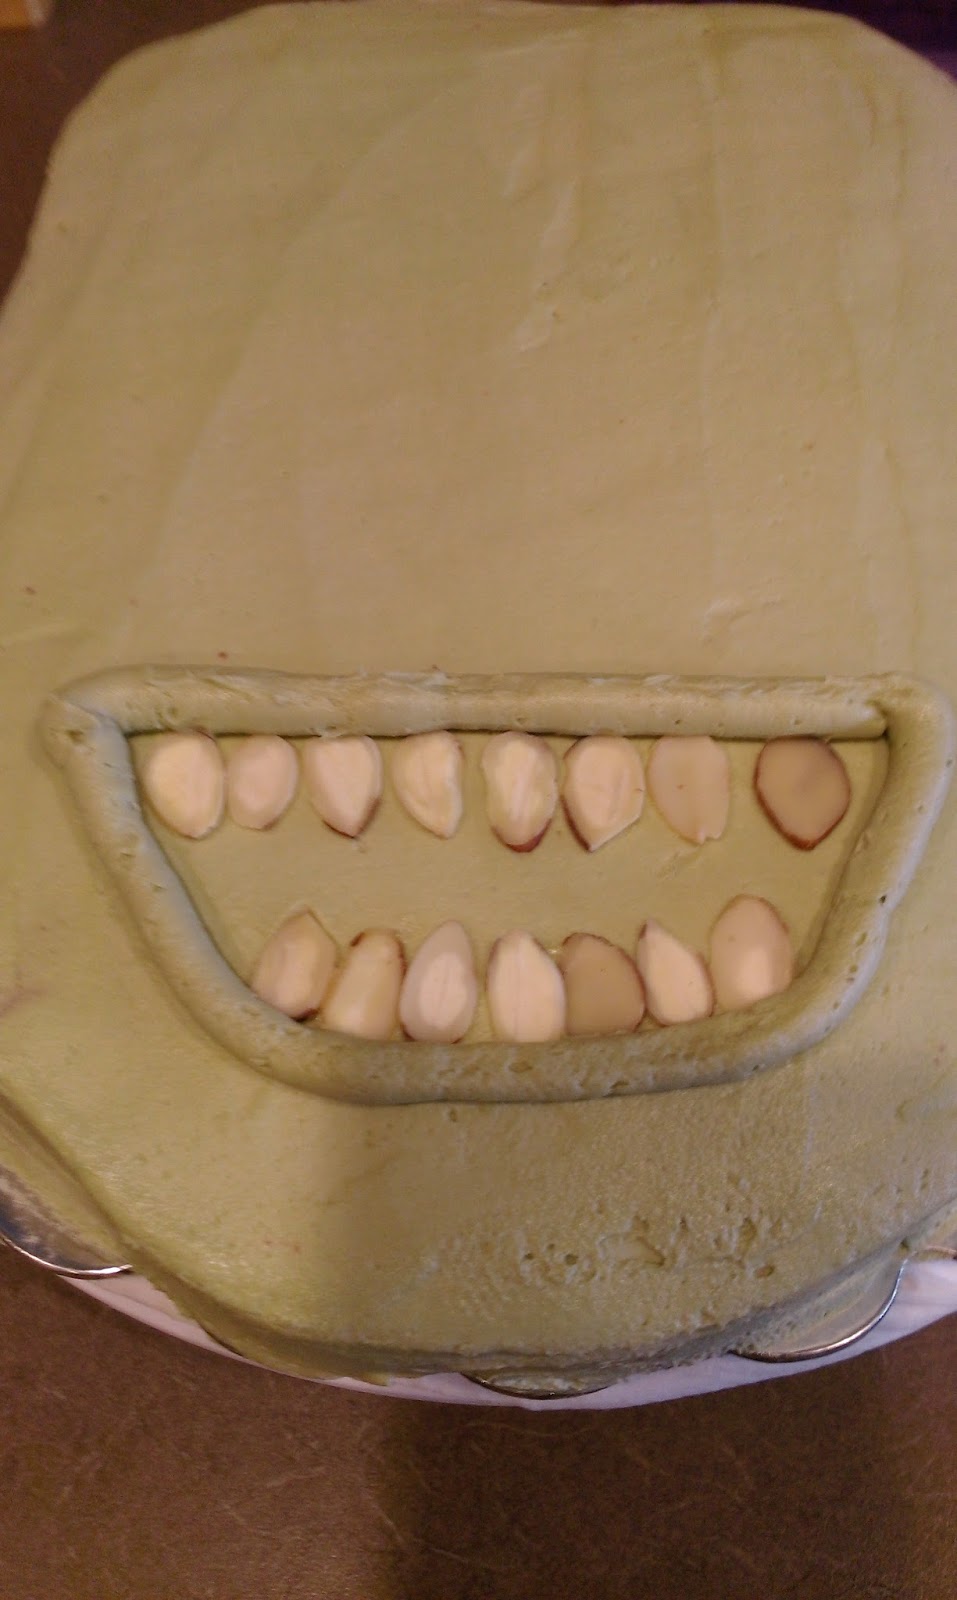
Then add the almond slices in to get teeth. Still looking toadish to me, so let’s add some gore. 
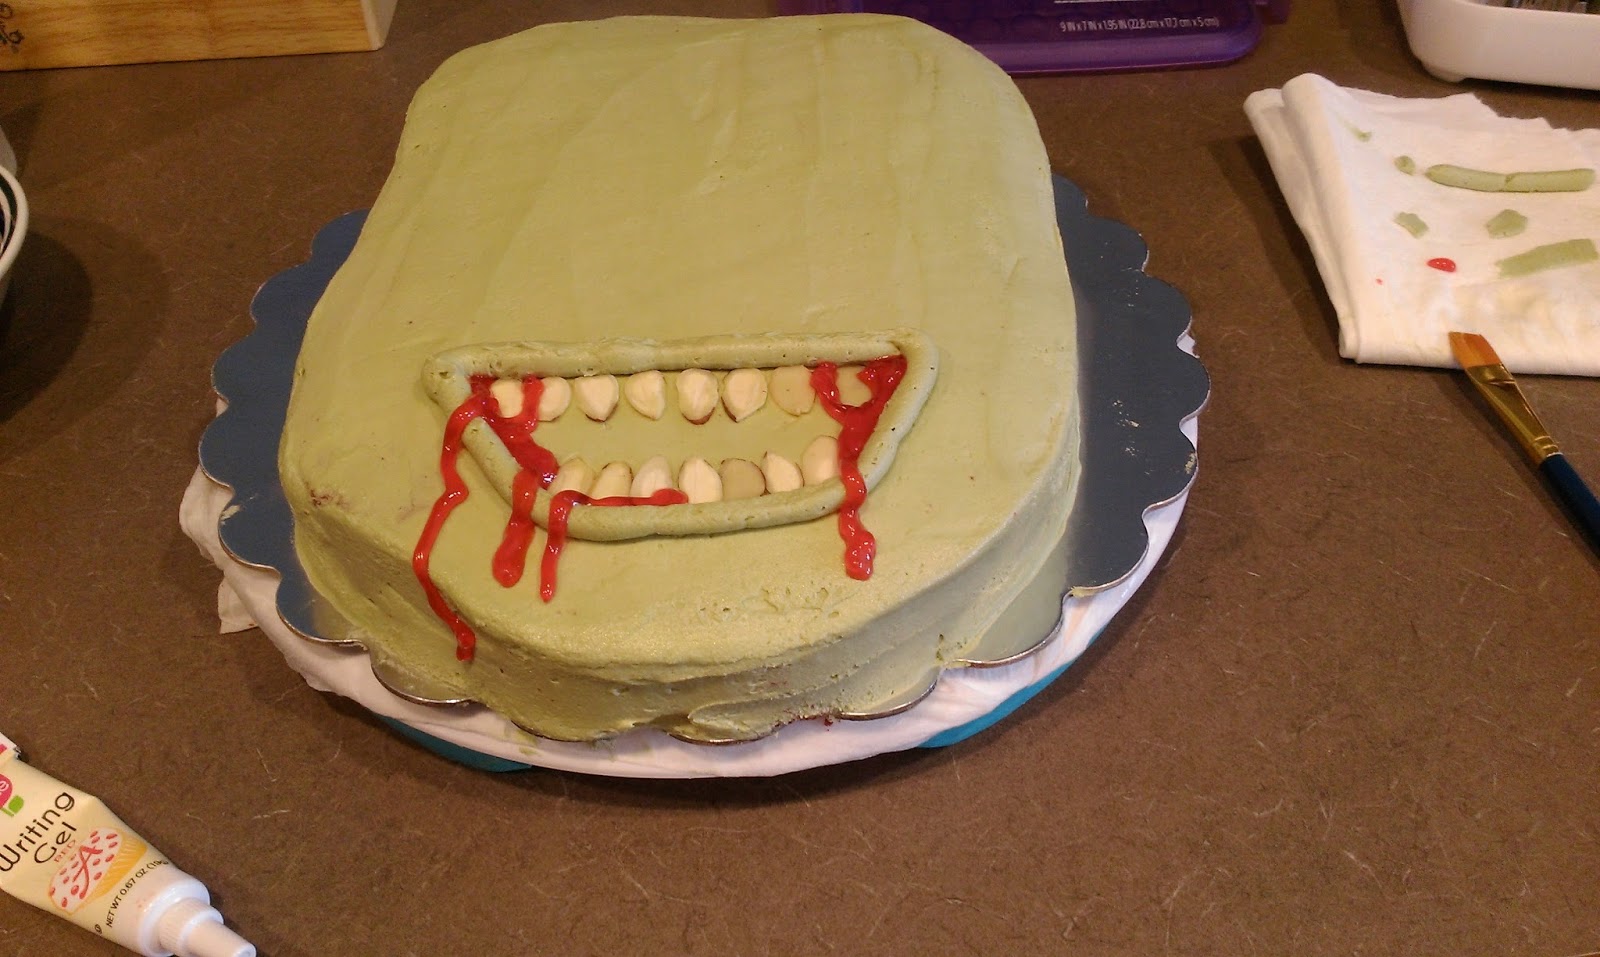
Toad…I think you may be ill… I took the red writer icing and drizzled blood throughout the mouth. 
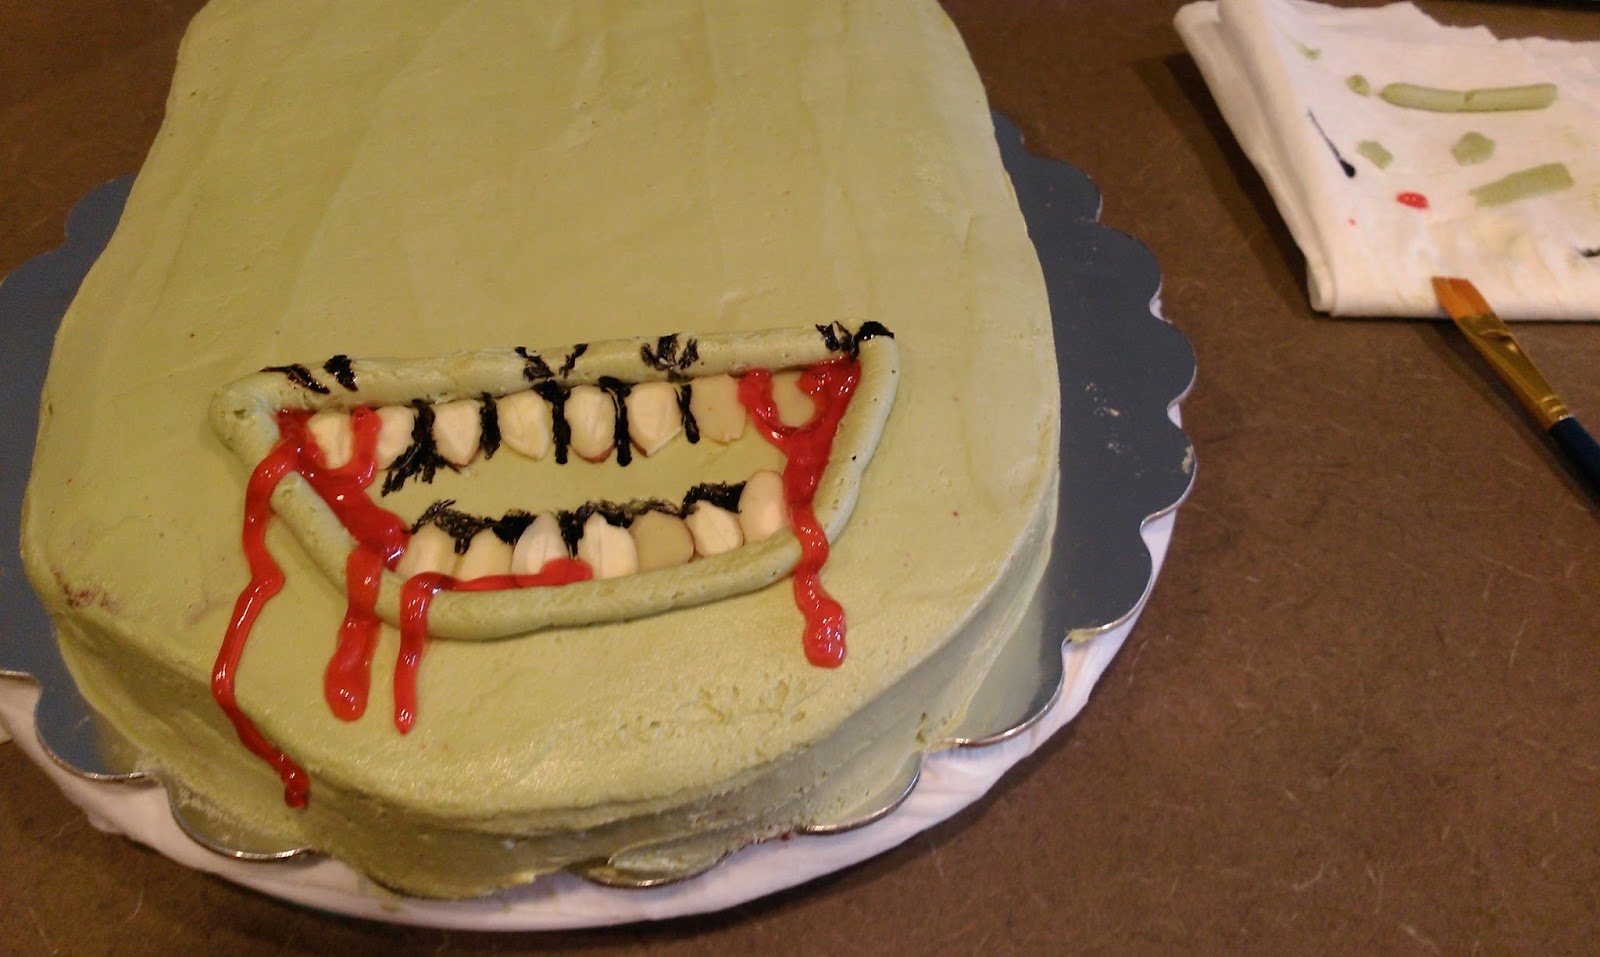
Then I took my smallest paintbrush and outlined the teeth with the black, brown, and vodka dye mix. I also came in and drew lines on the mouth to make it look rougher and cracked. 
Then I took a larger brush and filled in the rest of the mouth. It’s either the start of a zombie, or Toad really does need to seek veterinary help ASAP. 
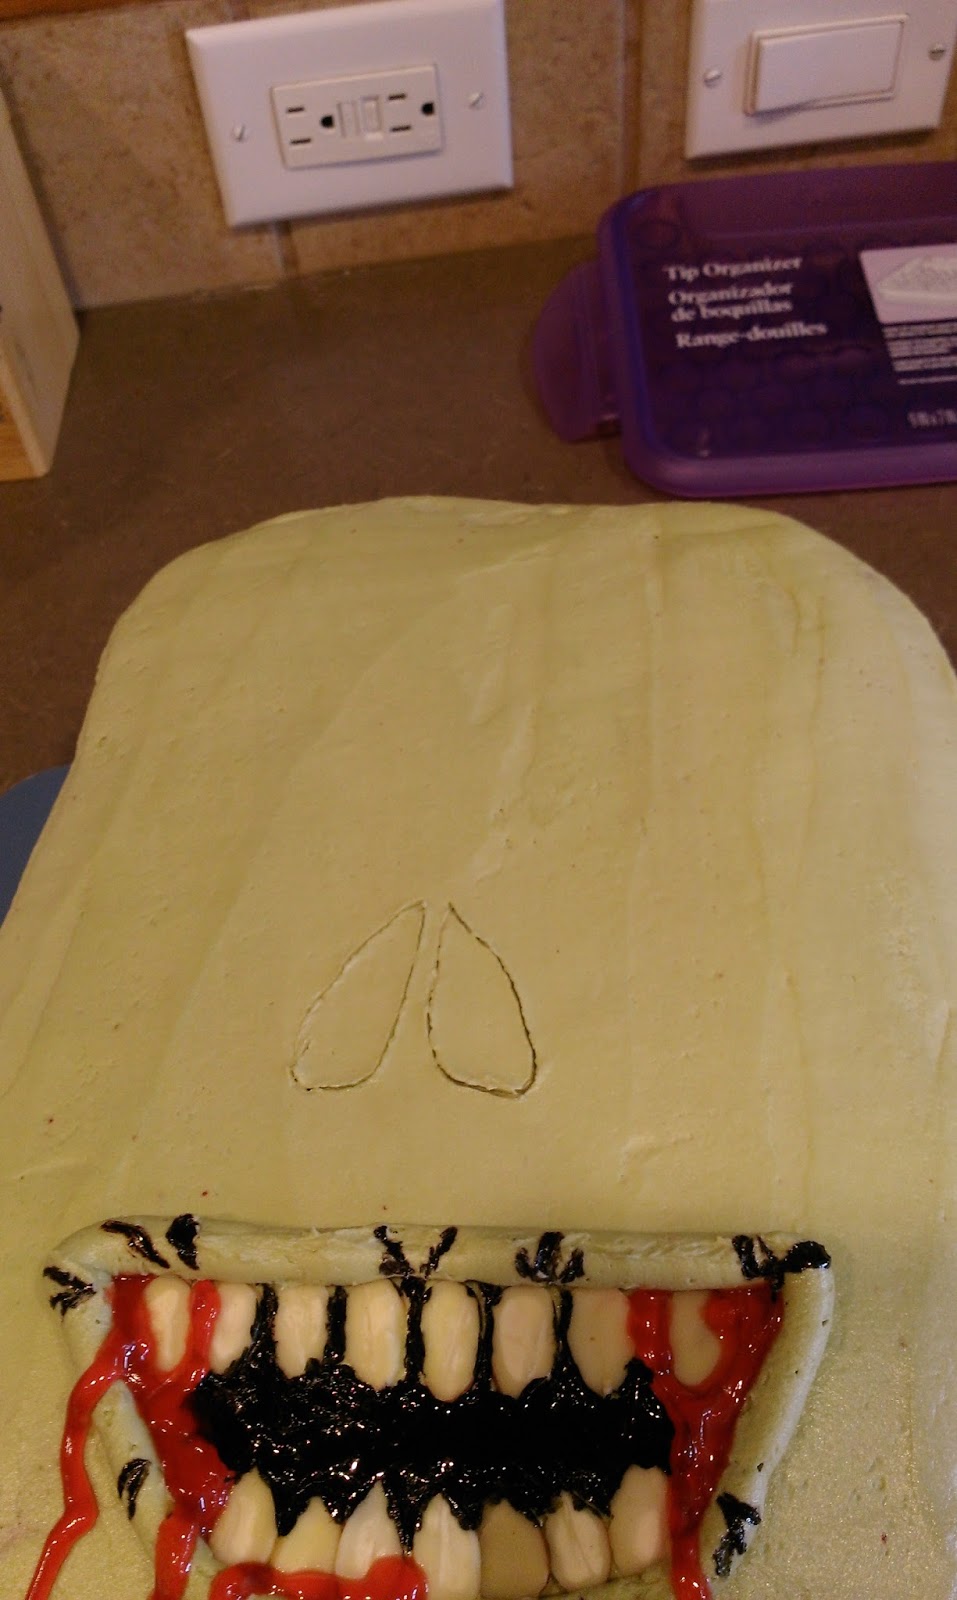
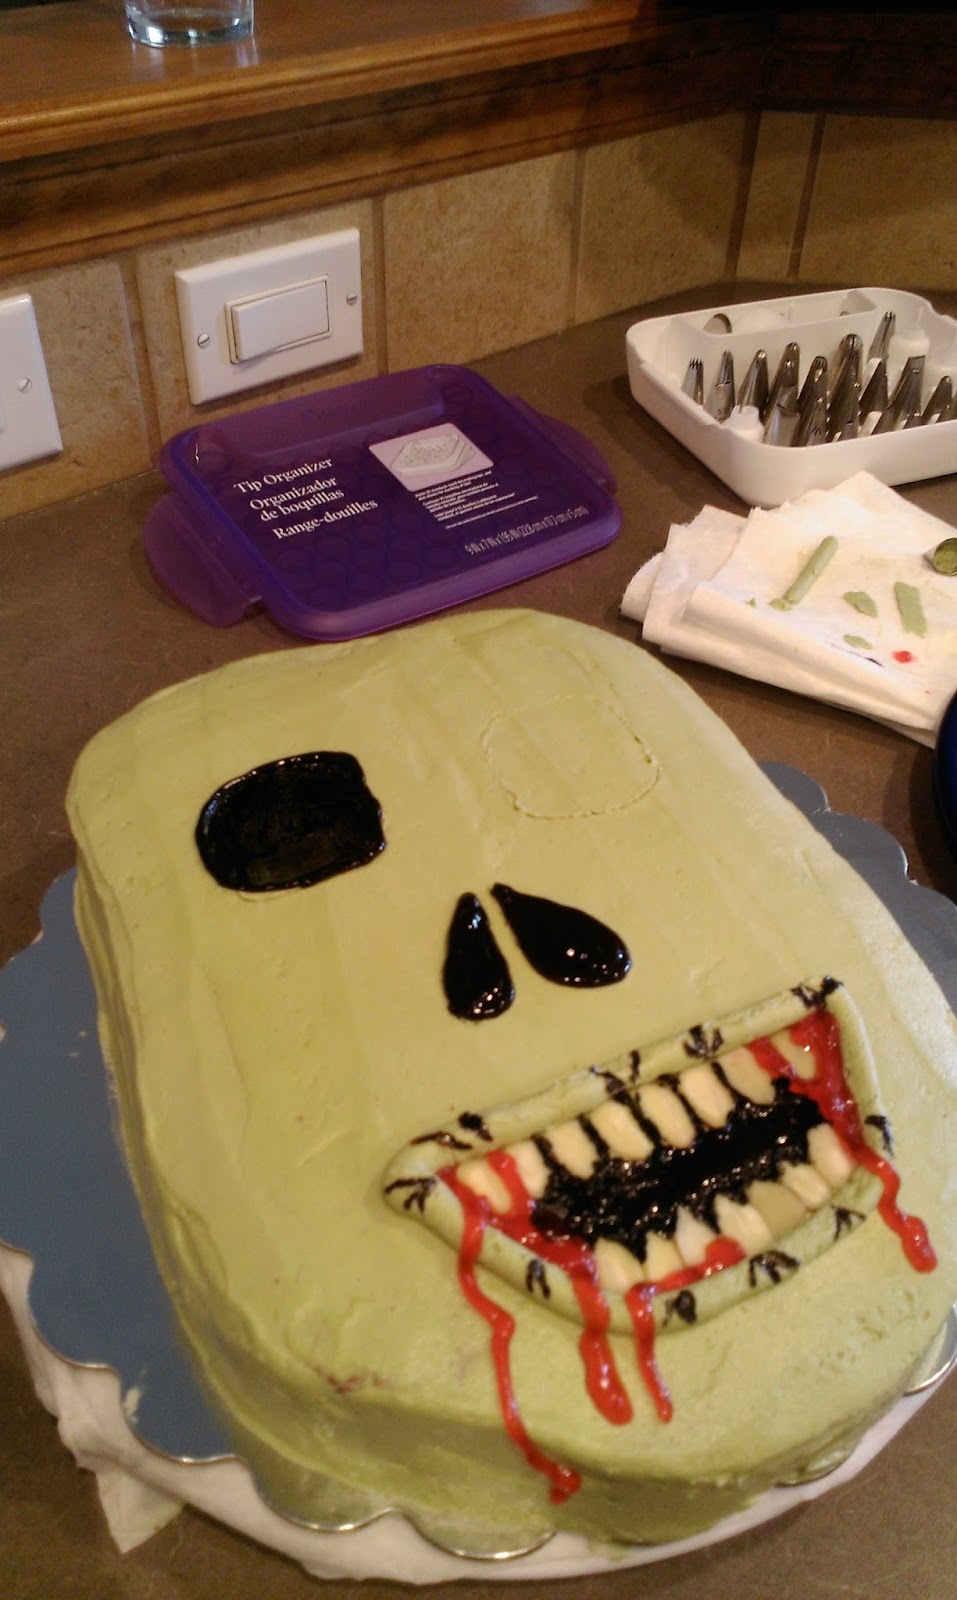
I used a toothpick to draw in the outline of the zombie’s nostrils. 
I filled this in with the black writer icing. 
I did the same thing for the eye sockets, but I only used the writer icing to outline the socket and painted in the rest with dye mix. 
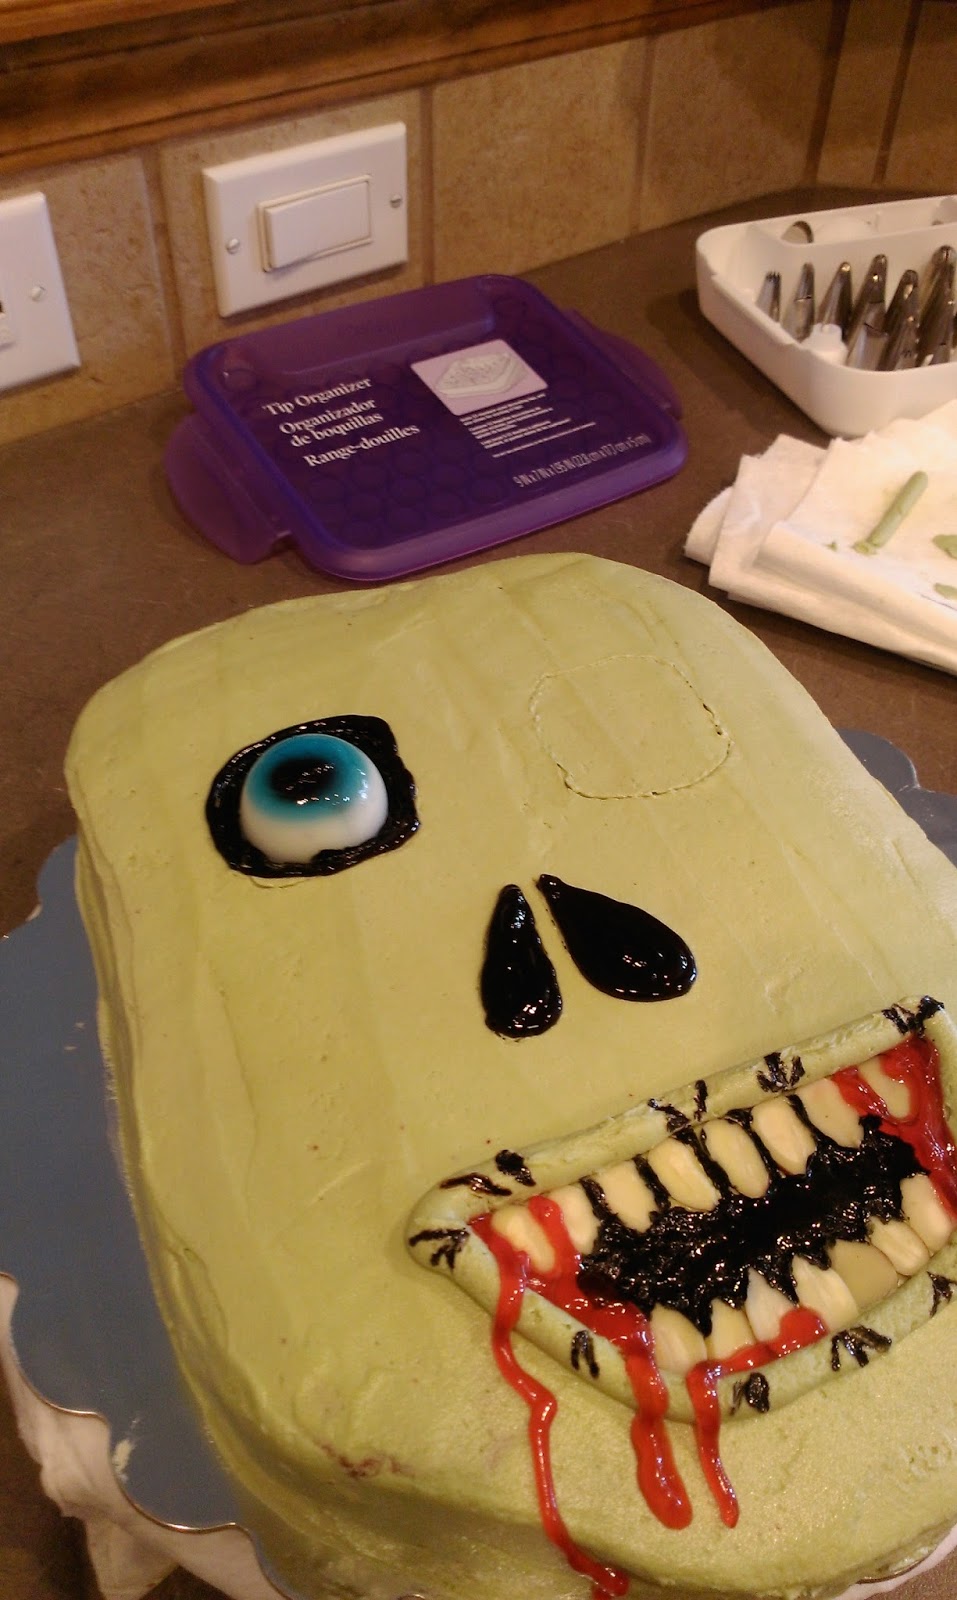
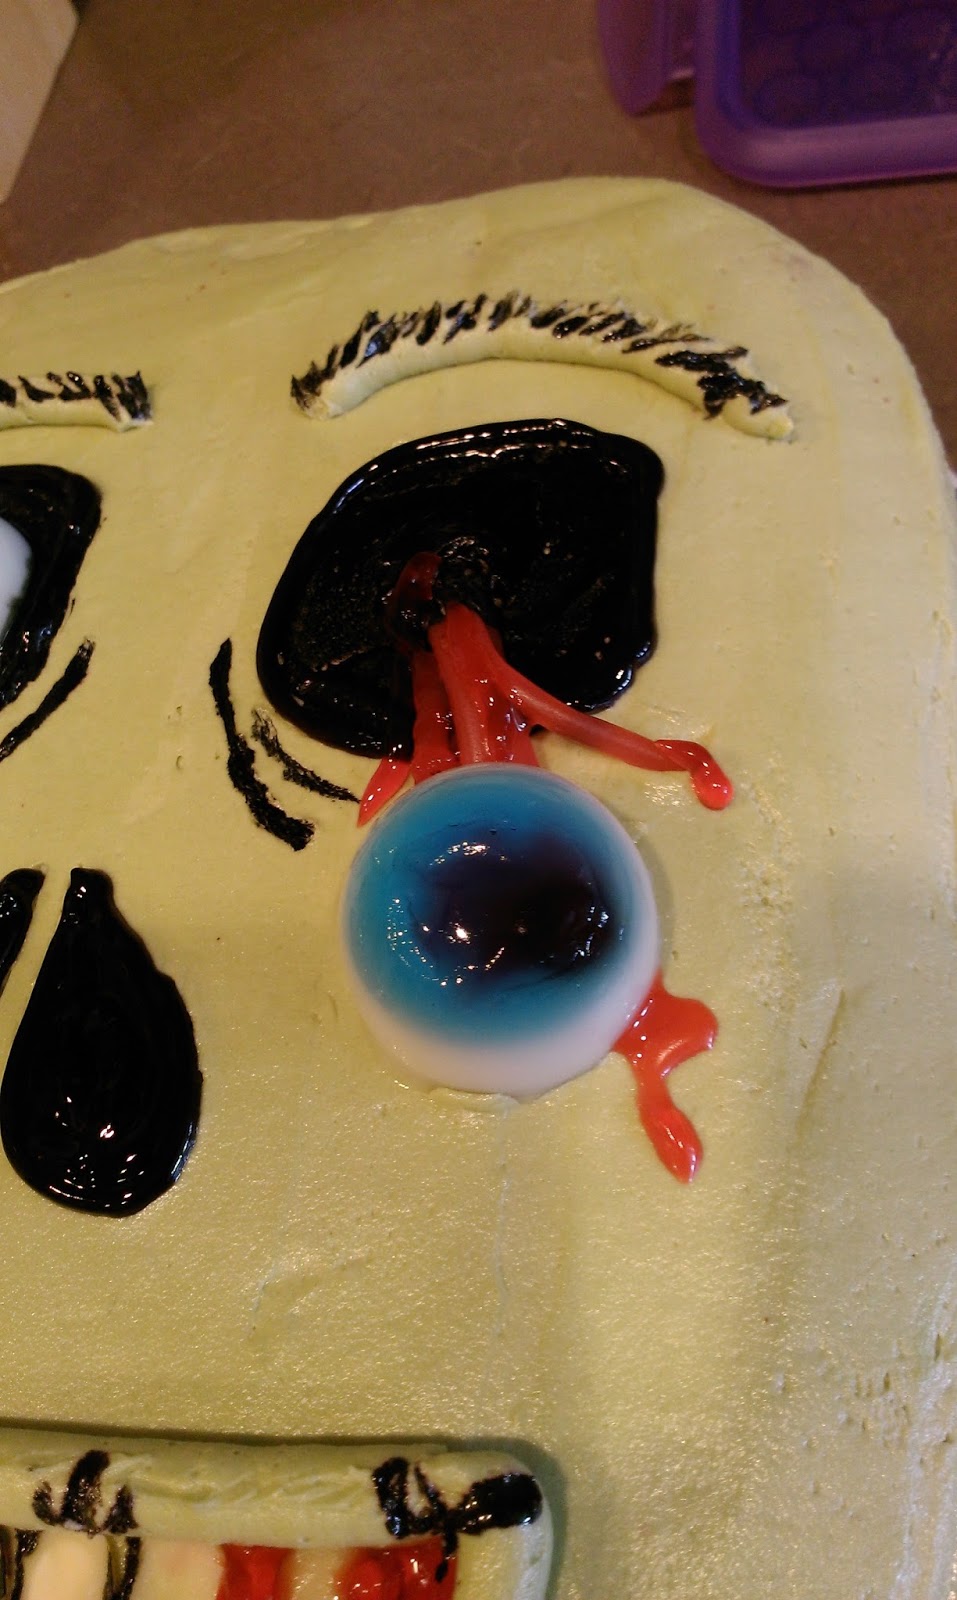
Funny thing about Jello…it jiggles (and will leave you with massive hunger anger when it wears off). My eyeball wanted to slide around quite a bit, so I frosted a small barrier of writer icing around it to keep it put. I only wanted one eyeball falling out of this zombie’s head. Even I have standards, as crappy as they may be. 
When I finished outlining and painting in the other eye socket, I took a small section of Twizzler and pulled it apart to look like the muscle holding the eye in place was falling out. I apologize if I haven’t used the correct terminology for what holds our eyes in our heads. I get woozy when I stub a toe, so clearly I do not delve into human anatomy for fear of puking. I shoved, seriously, not gentle at all, the Twizzler into the middle of the socket. I flattened it out so the eye would have a place to rest, and I painted in any area that was disturbed by the Twizzler. 
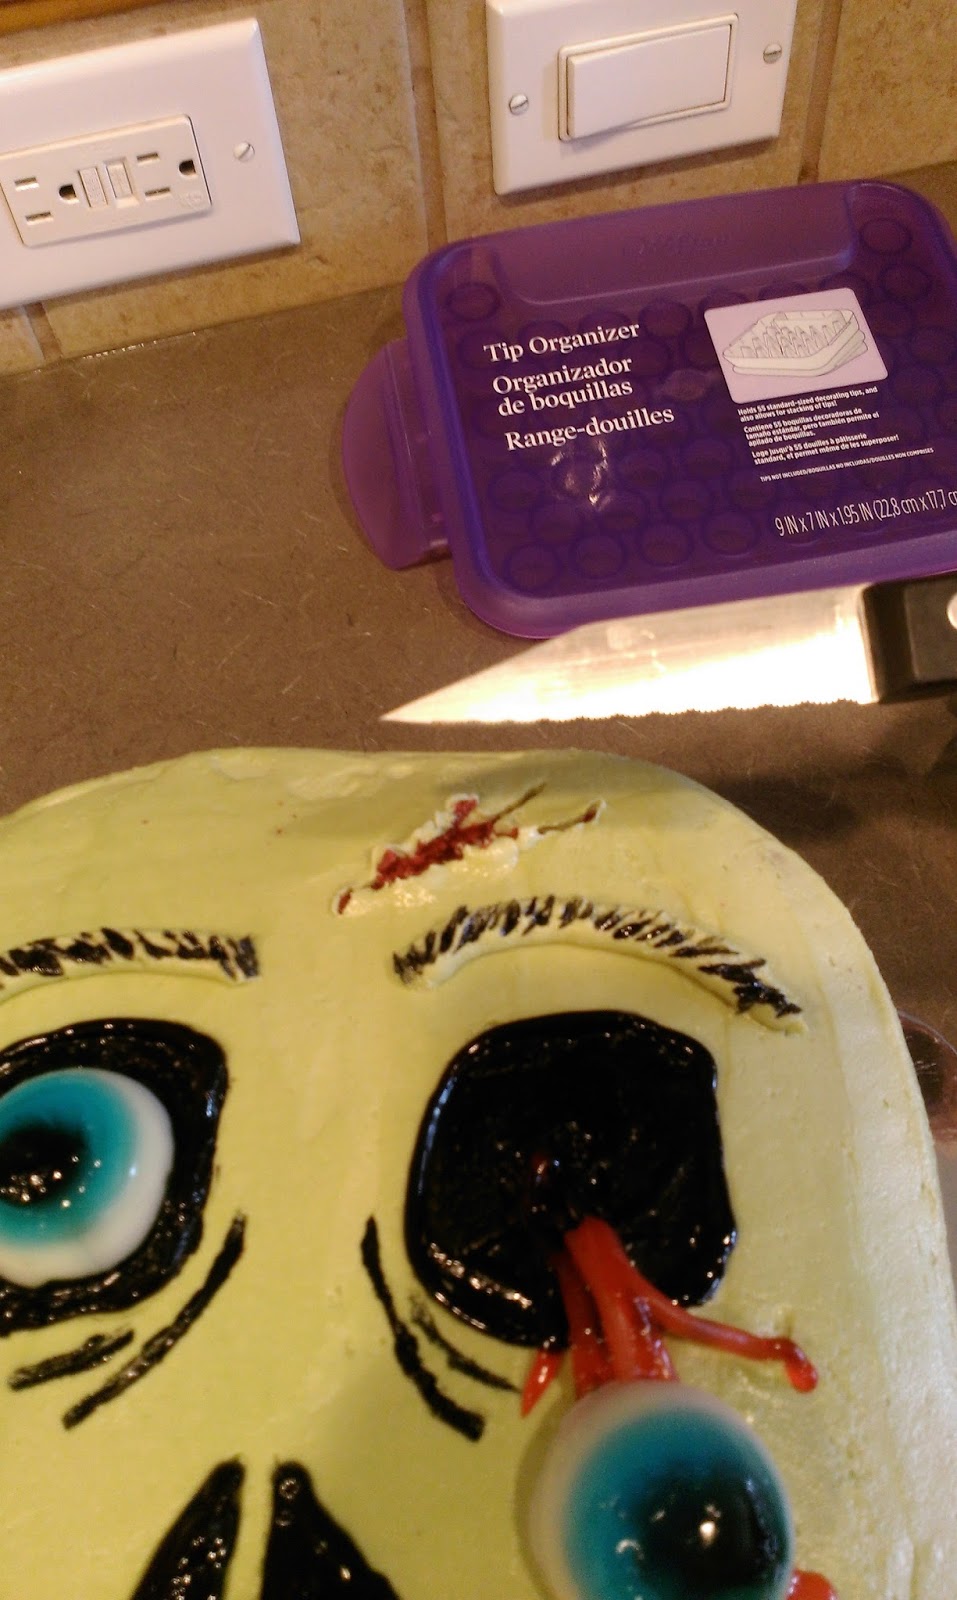
I added in extra “blood” with the red writer icing. I also piped on eyebrows with my piping bag and decorated sparse eyebrow hairs on with my dye and small paintbrush. I also came back in and added bags under the eyes with this as well. 
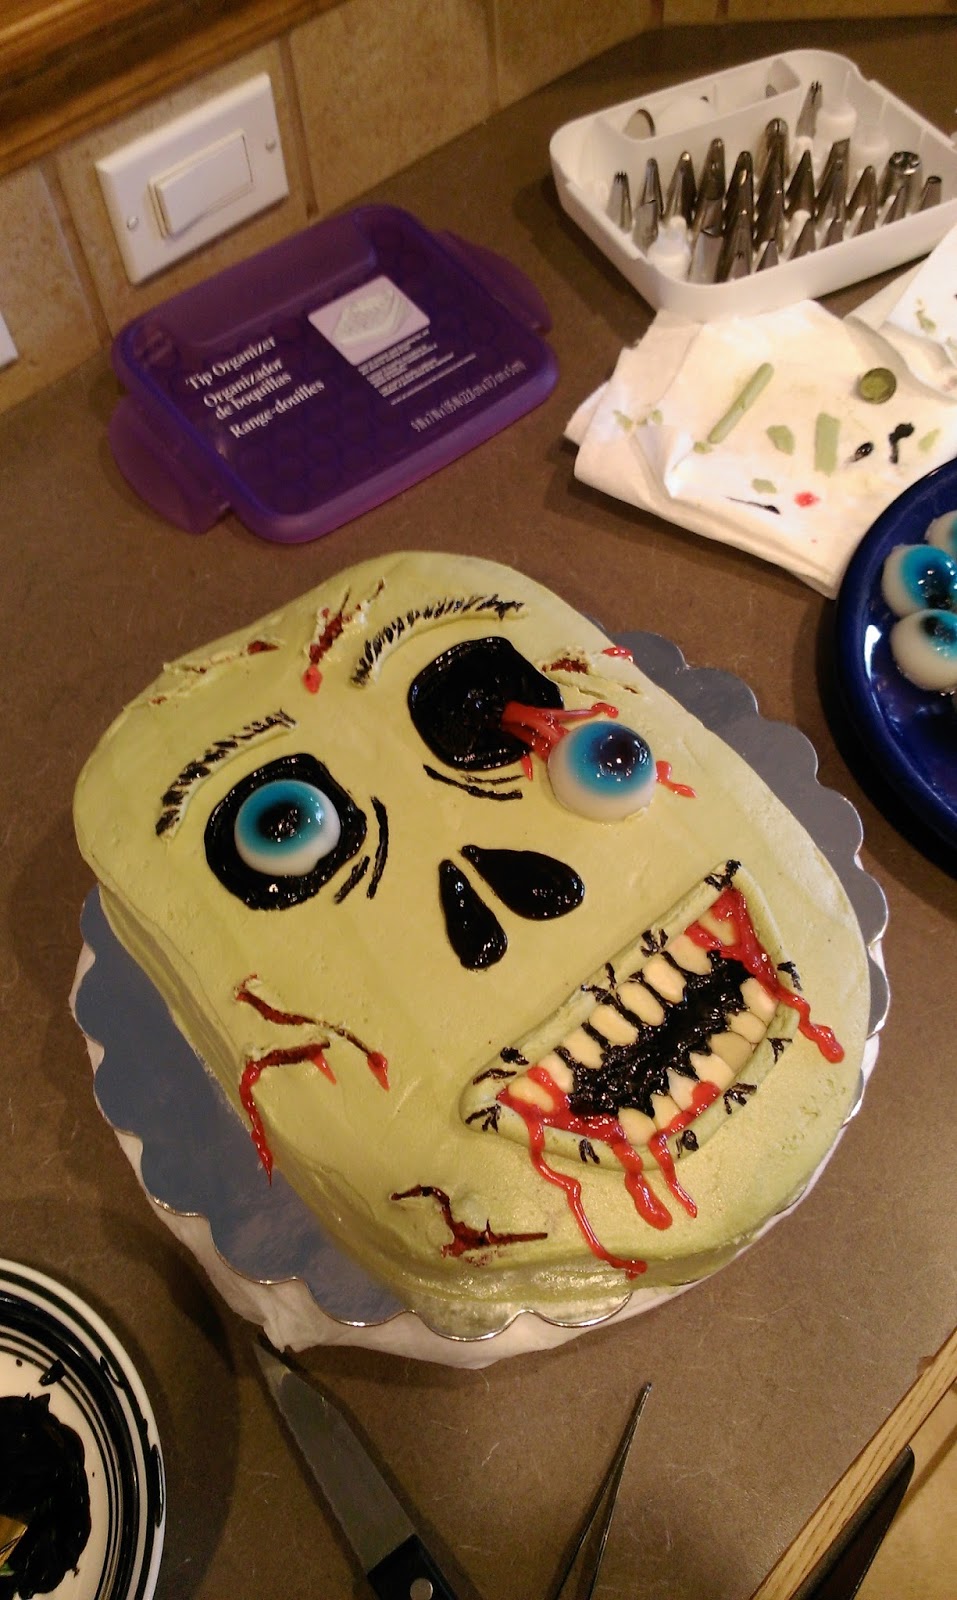
But my zombie still wasn’t looking rough enough, so I decided to carve his face up a bit. It was a little nauseating but ultimately freeing to carve into a cake before even serving it. I used a small sharp knife and created various cuts in the cake. I pulled the knife out to bring chunks of cake to the surface–thank you, red velvet, for making this possible. 
I finished off the cuts by adding more blood coming out them. And there you have it: one zombie with a striking resemblance to a CGI toad. I doubt toads taste this good though. I am proud to say the cake was an absolute hit, and I even had blog fans in the house (literally) that had anticipated what kind of cake Derek would be having. This, of course, made it very difficult for my swollen head to fit through doors for the rest of the night, but worth it. Always nice to know my self-deprecating witticism and semi-talented cake decorating skills don’t fall on deaf ears…or blind eyes in this case I suppose. Derek’s party was a success. People feasted and drank like kings. Or like adults in our late twenties absolutely dreading the severity of our hangovers the next day. Nothing like a little cautious alcoholism, I suppose. I believe my only regret (I remembered to take Advil before bed, thankyouverymuch), is that I never named the zombie. But the second you name something, you know I’m not allowing anyone to eat it. ‘Til next time, my fellow eaters!

“Here’s looking at you, kid. With my one good eye. You lookin’ might tasty today.”
-Unnamed and now beheaded zombie cake -
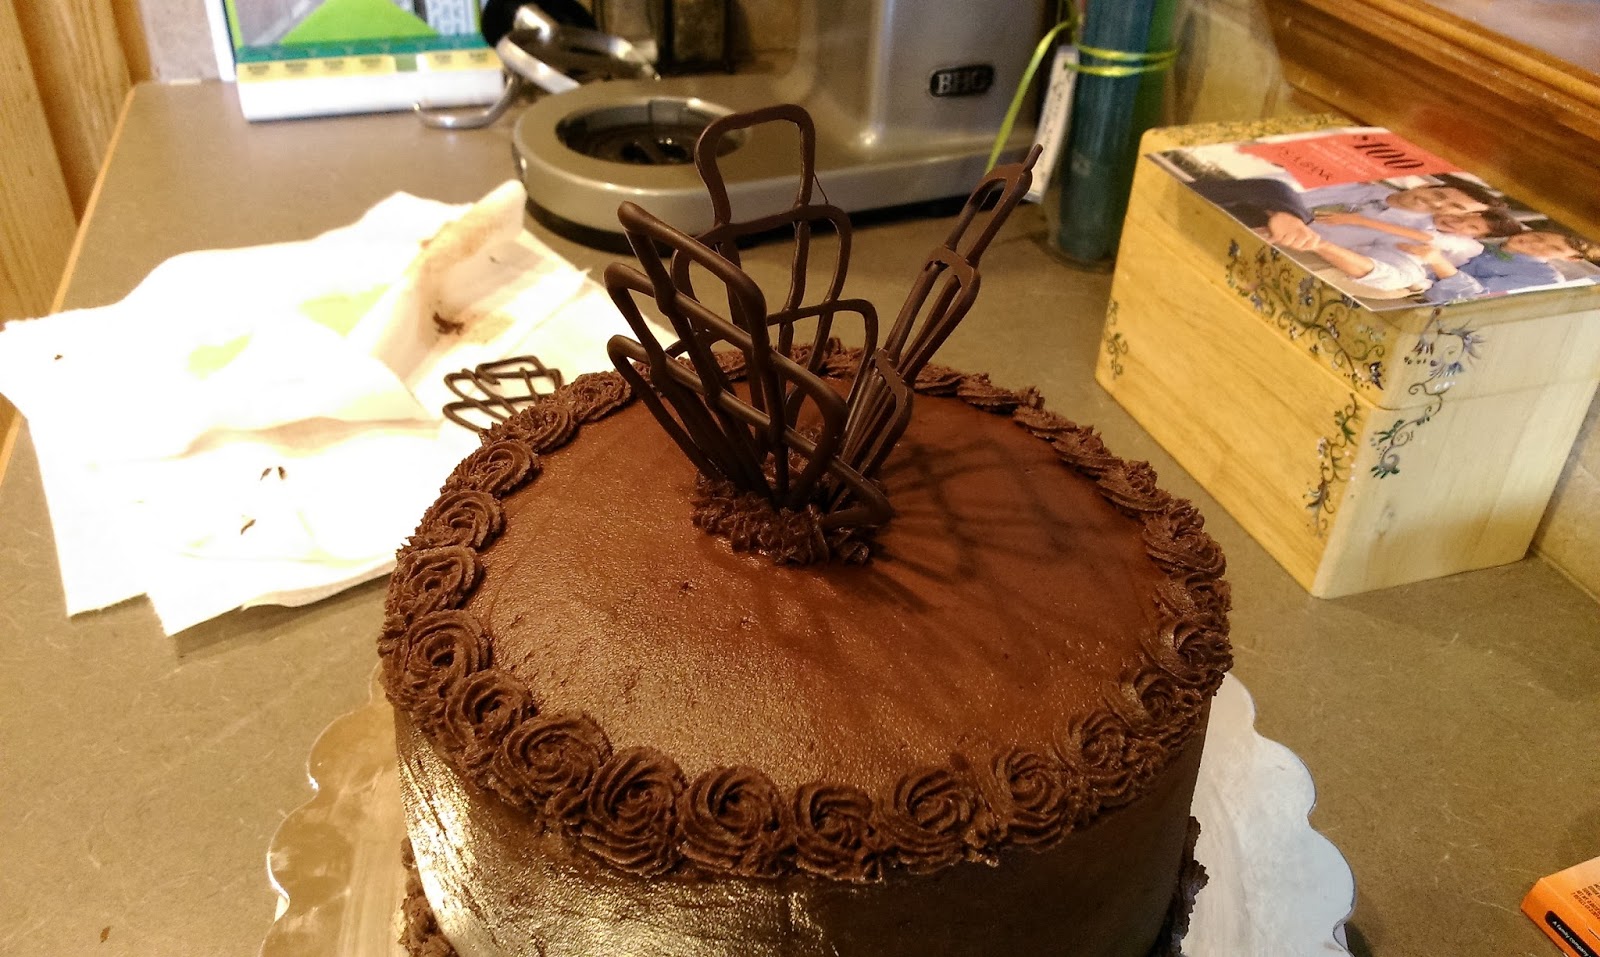
It Was a Dark and Chocolatey Cake…
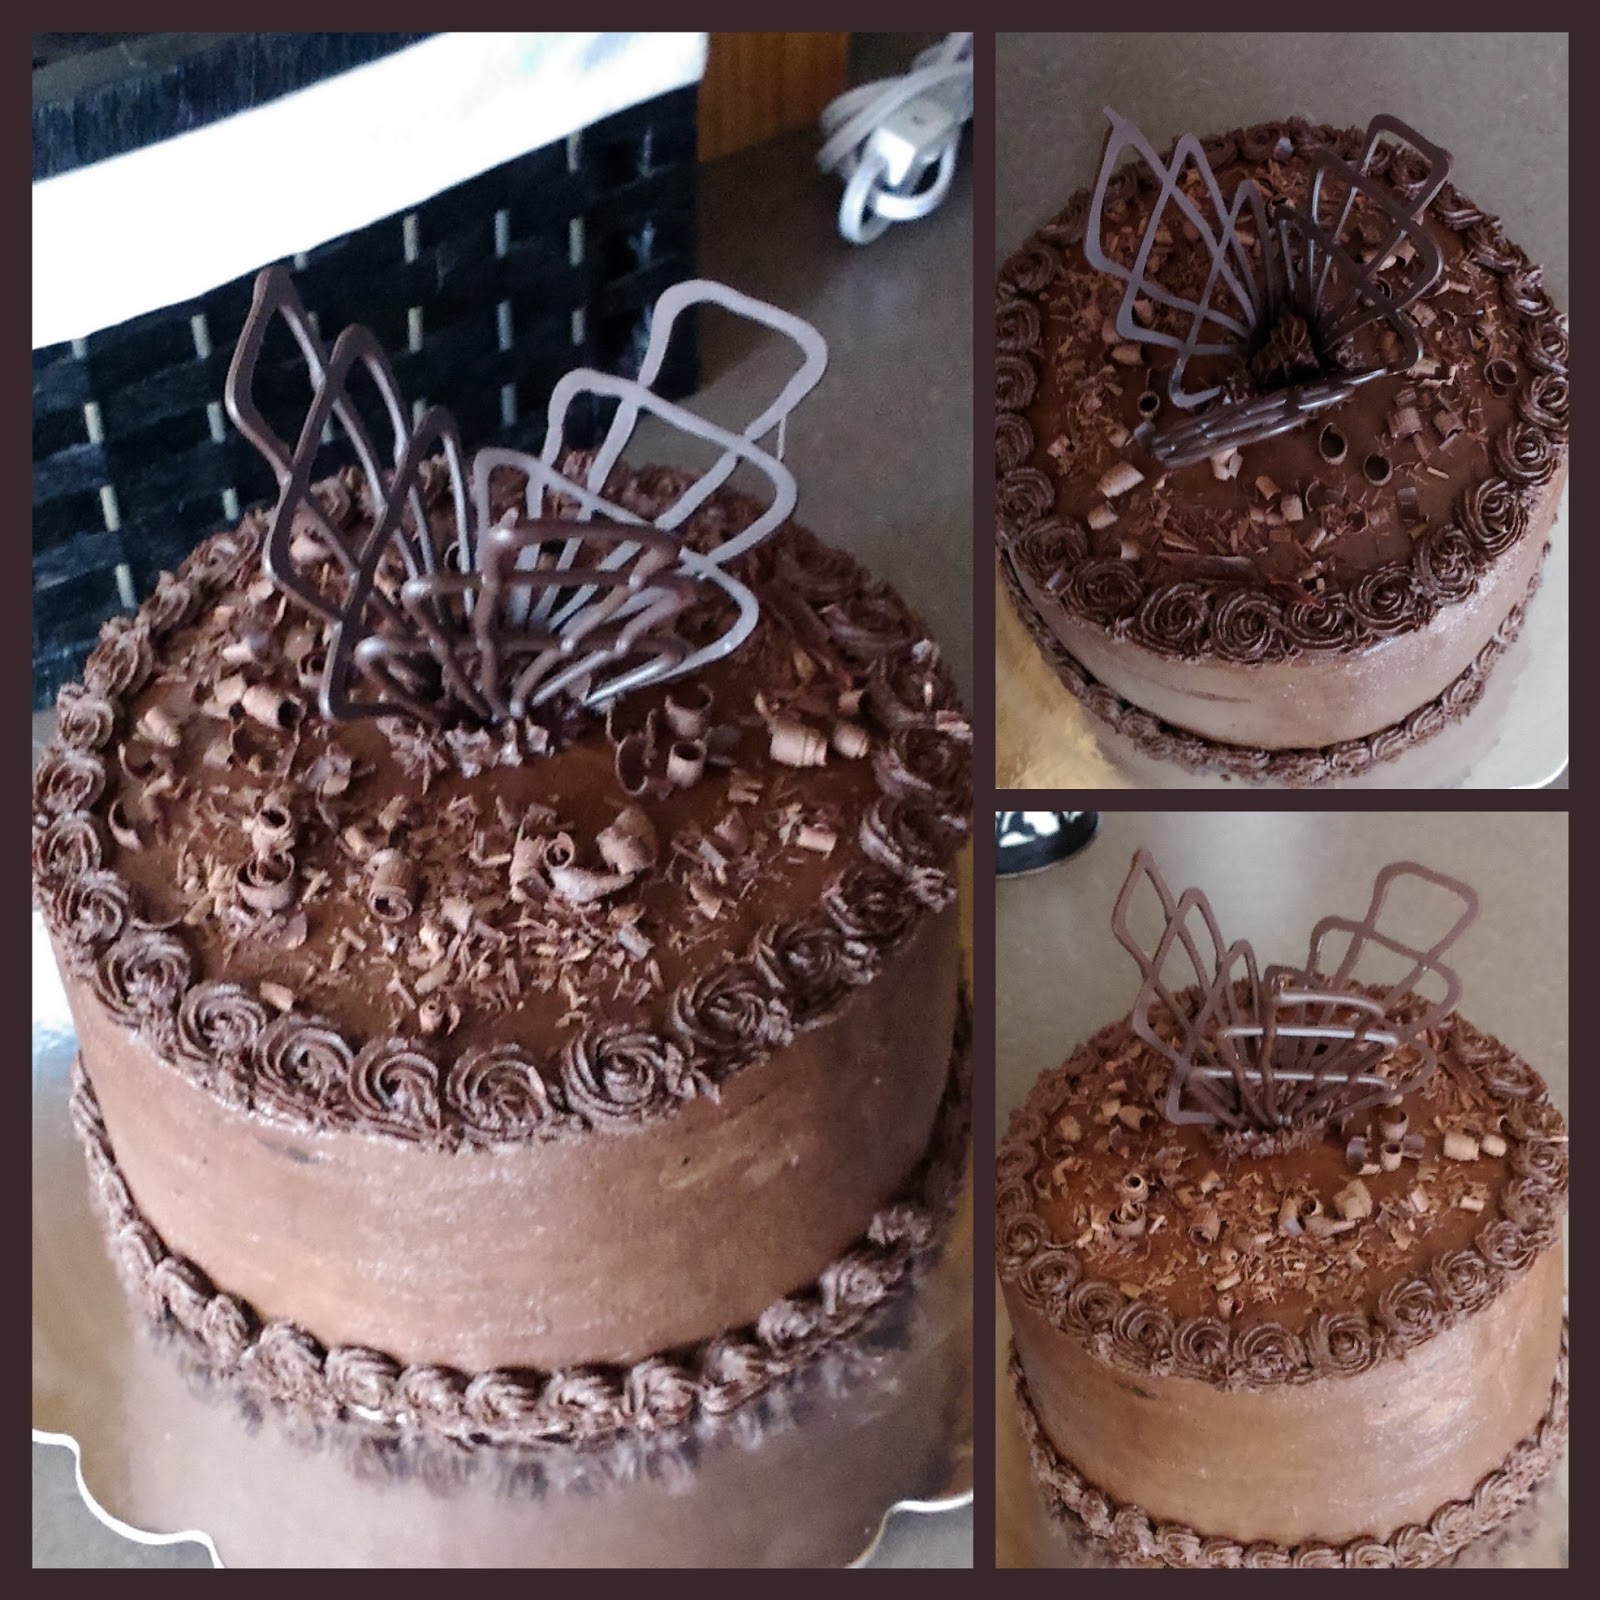
…and isn’t that how the good ones always start out? This past weekend my sister, brother-in-law, and niece came out for a visit. Since it was halfway between my sister’s and her husband’s birthday, I decided to make a chocolate cake of epic proportions to celebrate them both. I also hope that if anyone pities us enough to come visit and make the long, flat, arduous drive to Clovis, they’ll only remember how great my cakes taste and forget about the fact that our two main attractions are a small zoo and a Chili’s. I wanted to make a dark chocolate fudge cake because when I see chocolate I always ask myself, “How much darker could this be? And the answer is none” (Bonus points for understanding the Spinal Tap reference). Most everyone I know is a huge fan of chocolate, but my husband is not. While he has a million qualities I adore (hello sense of humor, swimmer’s build, and charming smile that gets him just about anything), I am slightly perturbed that when he sees a chocolate cake his first instinct isn’t to grab a shovel or just dive headfirst into it, but instead to inquire on the status of other dessert selections. I decided I didn’t want to be left with half a cake all to myself when my family went back to civilization, so instead of going full dark chocolate fudge from top to bottom, I made the frosting a simple chocolate buttercream so it wouldn’t be too chocolatey for Derek to eat. I mean, I did just get a new elliptical, but I had a horrible mental image of me eating half a cake while using it, which totally defeats the purpose…

Heeeelllooooo, gorgeous. I’m really glad I made the alteration because the dark chocolate is complimented so well by the lighter buttercream…what a happy accident that turned out to be that I will still take credit for, a-thank-you. I know what you’re thinking…’Is that a chocolate cake with chocolate frosting with chocolate curls and chocolate filigree? Is she insane?’ Short answer: Yes. Yes I am. And it is this kind of crazy that just so happens to translate into evil chocolatey genius territory. If you like chocolate even remotely, this will turn you into a full-fledged chocoholic. Out of all of the -oholics, this is probably the least destructive, so just hop on that elliptical while someone dangles a piece of cake in front of you. Let me break down the cake recipe, frosting recipe, how to create simple chocolate filigree, and chocolate curls. Onward to tastiness!

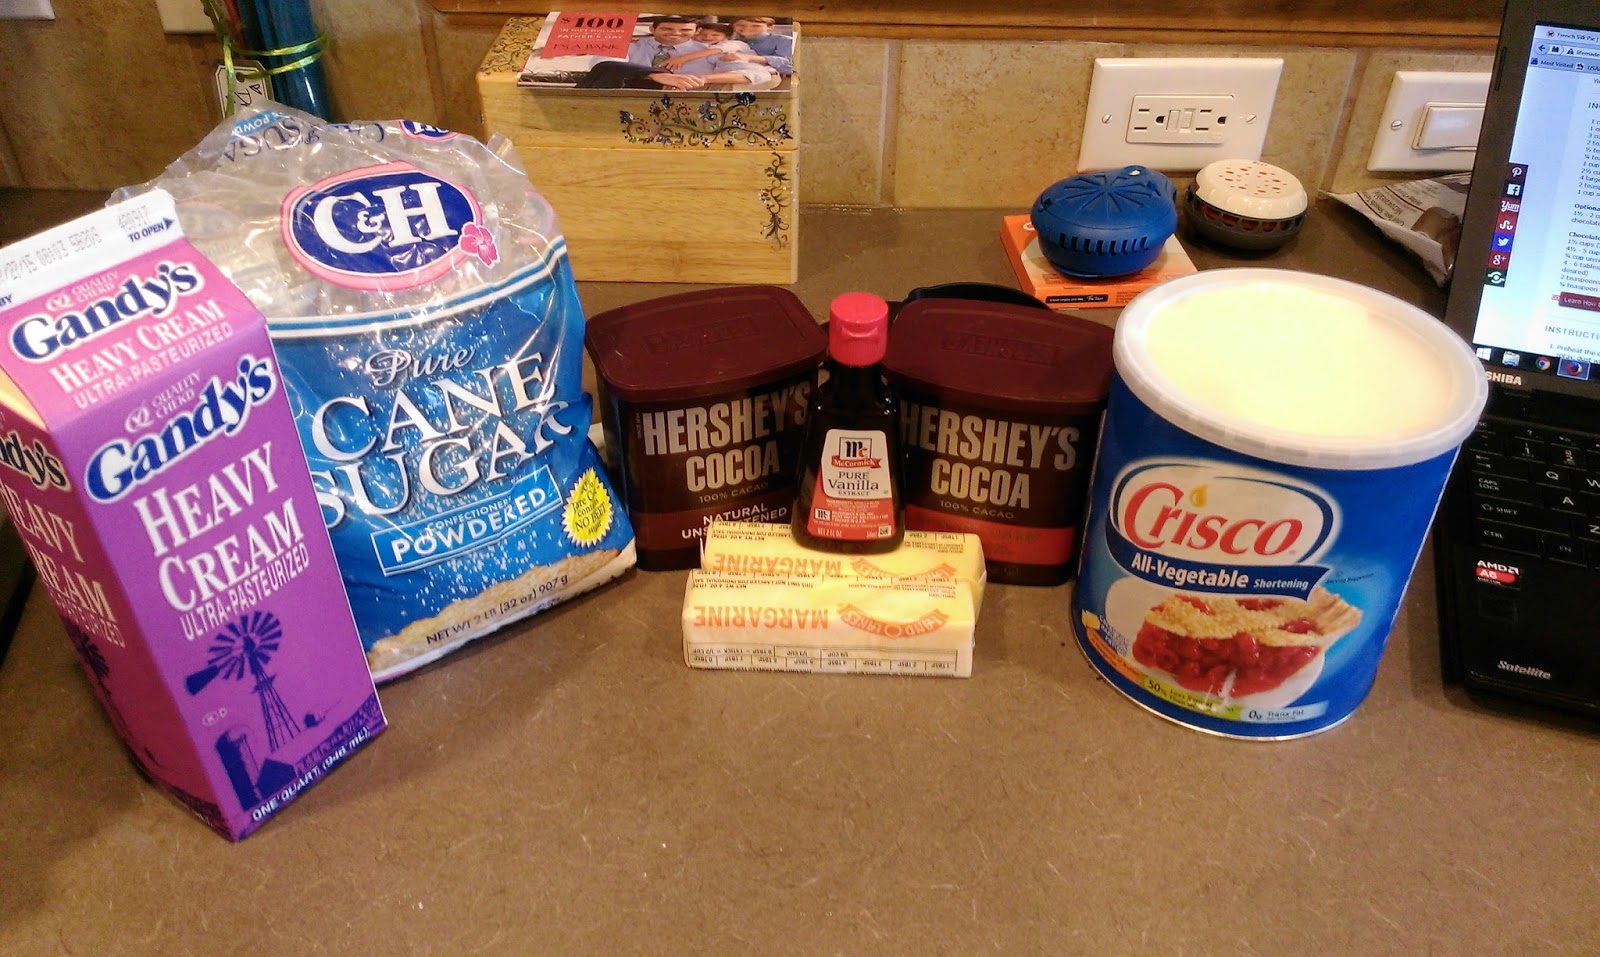
Sour cream…I don’t know how you do it, but you make the best cakes possible. I came across about a thousand different fudge cake recipes and kind of created an amalgamation of loads of them. The ingredients aren’t too taxing, and throwing the cake together in your stand mixer is a complete breeze. You need:
- 3 cups of cake flour
- 1 cup of Hershey’s Special Dark Cocoa
- 2 1/2 cups of sugar
- 1 HEAPING tablespoon of baking soda (or one TBS and one TSP)
- 1 1/3 cup of veggie oil
- 1 cup of heavy cream or buttermilk depending on your taste preference. The heavy cream will yield an intensely rich taste, but I opt for buttermilk to compliment the sour cream
- 1 cup of boiling water
- 1 cup of sour cream
- 4 eggs
- 2 tsp of vanilla extract
Start by preheating the oven to 350 and greasing two 8-inch or 9-inch rounds. I used 8-inch rounds to yield a very tall cake. I was going for a chocolate tower effect, if you will. My favorite part about this cake is you kind of do things backwards, but this means less dishes! Dump the flour, cocoa, sugar, and baking soda into a stand mixer bowl and mix together with a spatula until fully blended. Then add in the buttermilk/heavy cream and blend slowly. Scrape the bowl then add in the vegetable oil and blend for a minute on medium speed. While you are mixing in the liquids to your dry mix, set up a small pot and boil the water. Once boiling and your other liquids are incorporated to your dry mix, very, very slowly add a little of the water to your bowl. Mix slowly or you’re gonna be slinging hot water around at about boob height in your kitchen which could lead to a disaster and a really not fun story to tell the ER doctor (thankfully not speaking from experience). Once all the hot water has been added, let the cake mix rest for just a moment so it isn’t super hot (I waited 5 minutes). This way you won’t curdle your sour cream and scramble your eggs because the mix is too hot. Add in the sour cream and extract and mix well. Finish off by adding one egg at a time to the mix and blending well. Pour into your greased pans and bake for 30 minutes or until a toothpick comes out of the cake mostly clean.

Don’t forget to smack the pans on the counter. This is a very bubbly cake mix, so you want to knock out as many bubbles as you can to keep air out of the cake. 
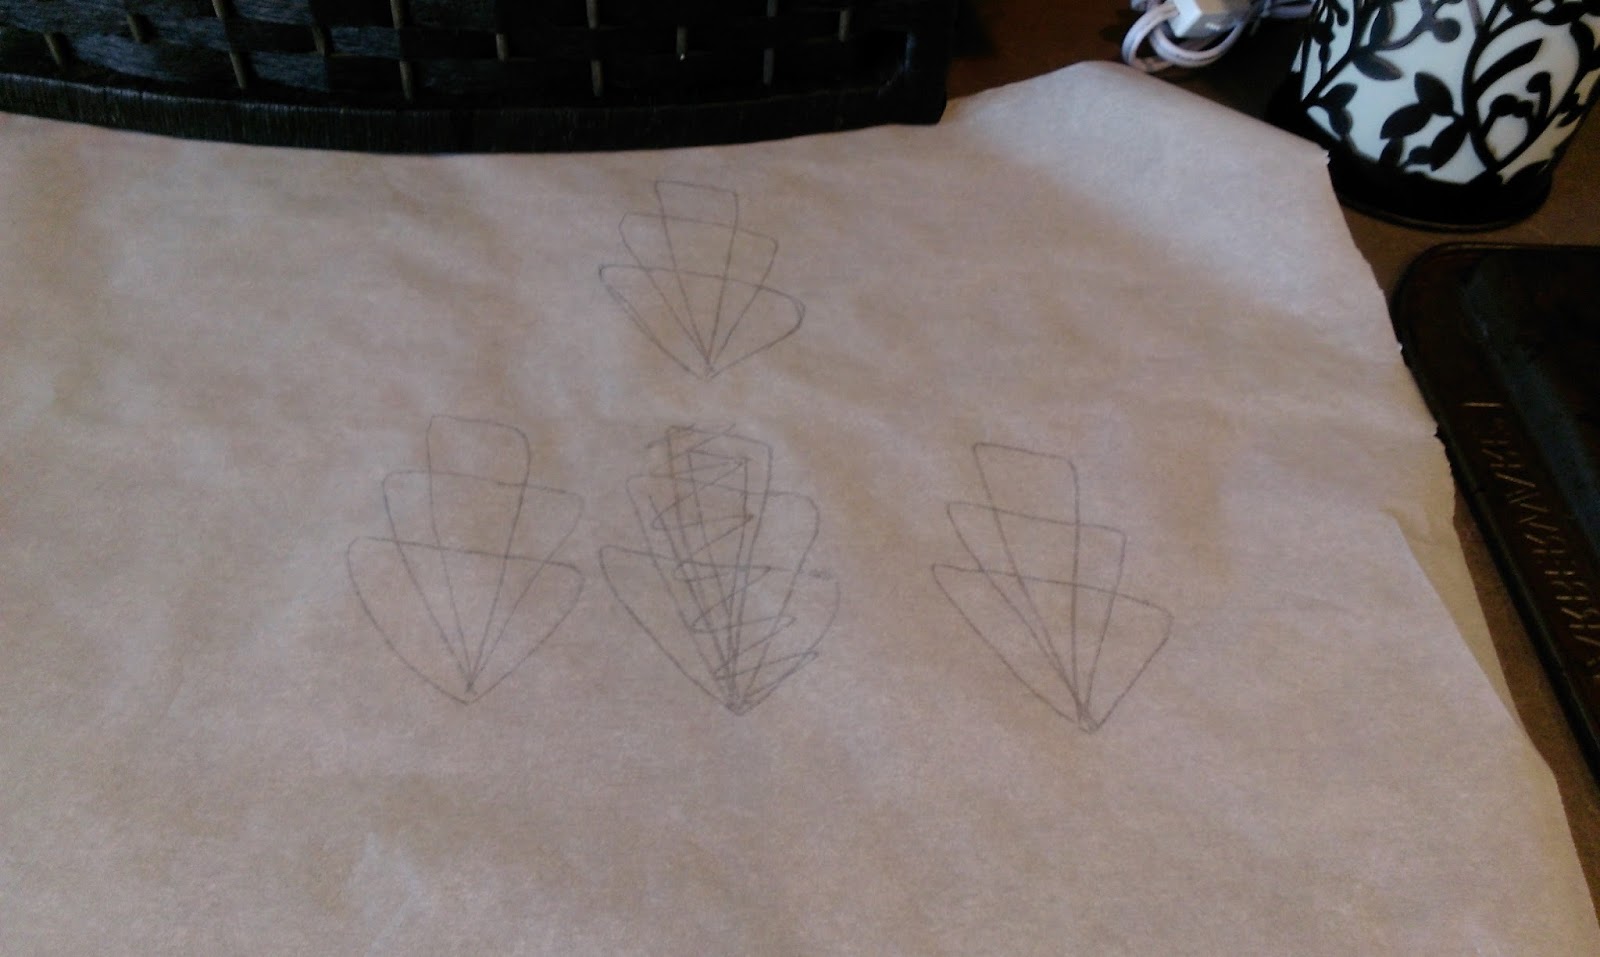
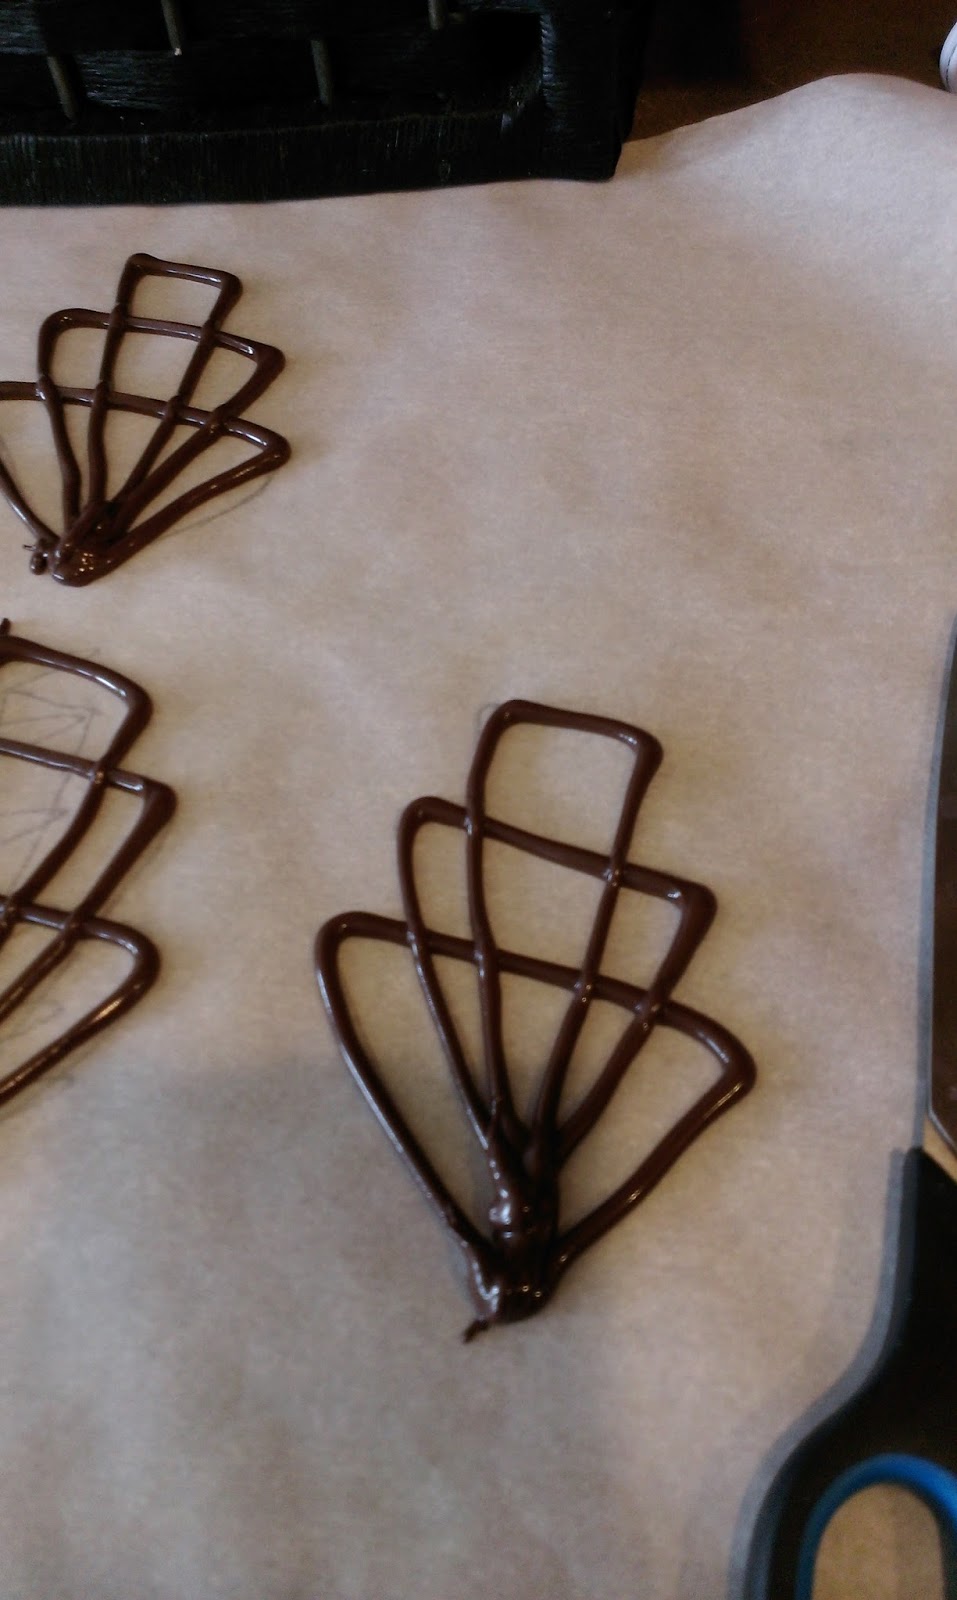
Heaven must look similar. Let your cakes cool on a cooling rack on top of some kitchen towels until room temp. You can always place into the fridge or freezer to speed this process up, but I used the time to come up with a filigree design and place my plan into action. To make a chocolate filigree, you only need a few simple ingredients:- Parchment/wax paper with your design drawn on it
- Chocolate melts or chocolate chips melted down (I used half a bag of melts)
- A plastic baggy with a small bit of the corner trimmed or a piping bag fitted with a round tip (I used a #5 tip)
Remember, when working with melted chocolate, there is a golden window of opportunity when the melted chocolate has firmed up enough that you can have great control over it before it gets to hard to pipe with. I melt my chocolate down and load up my piping bag then let it rest for 5 minutes before piping.

I drew a simple design on my paper then flipped it over. 
Then all I needed to do was trace over the design with my piping bag full of chocolate. Make as many or as few filigrees as you like. I made 8 with the intention of using 3 and the knowledge of knowing my clumsy hands would break at least 2 while assembling onto my cake and the hope of having an few extras for snacking. Leave the filigrees alone after piping for about 15 minutes. Then use a spatula to place on a plate or tray and put into the fridge to keep cool until you’re ready to use. 
Chocolate curls are cute and fun, like me after a glass of wine. To make you just need a chocolate bar, baking bar, whatever…chocolate in some bar form and a vegetable peeler. I made short and long curls by peeling the short and long edges of the baking bar respectively. Put more pressure onto the bar to make curls that have more loops. I then placed these into the fridge to chill until I was ready to use them. 
The makings of greatness. Buttercream + chocolate = a marriage of tasty convenience. When your cake is almost cool, begin making your frosting. Gather up:- 1 cup of Crisco/shortnening
- 1/2 cup of softened butter (1 stick)
- 1/2 cup of Hershey’s Cocoa Powder
- 1/4 cup of Hershey’s Special Dark Cocoa Powder (if you want an even lighter chocolate flavor, omit this and use 3/4 cup of the regular powder instead)
- 2 tsp vanilla extract
- 6-7 cups of powdered sugar
- 6-8 tablespoons of milk or heavy cream (heavy cream yields a richer frosting with more flavor)
Start by creaming together the Crisco and butter for 3 minutes until fluffy. Add in the cocoa powders and vanilla extract and slowly blend together. Add in two cups of powdered sugar, blend on low and then add in two tablespoons of heavy cream/milk. Repeat this until you’ve mixed in all 6 cups of sugar and all 6 tablespoons of milk/cream. If you want a stiff consistency of frosting, stop here. If you want something you can also decorate/pipe with later, add in the extra cup of sugar and 2 more tablespoons of milk/cream.

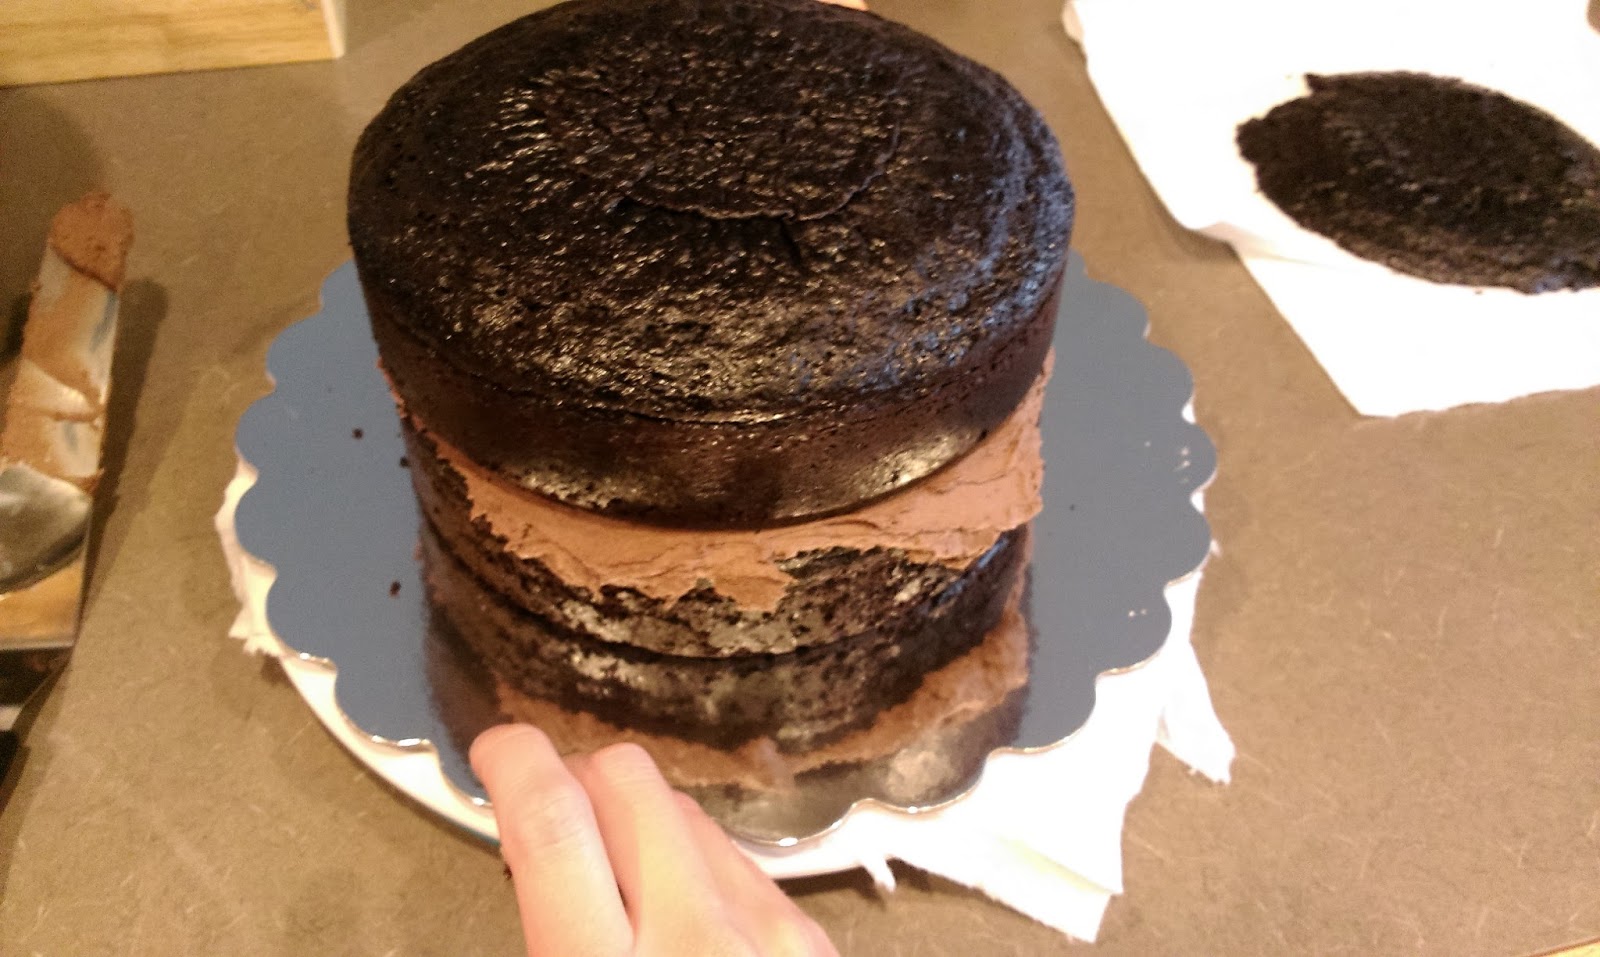
What a tall drink of water. Or cake. Assemble the cake by slathering a nice layer of frosting on the bottom layer and affixing the top layer to that. Go ahead and crumb coat so that the dark chocolate cake is mostly hidden:

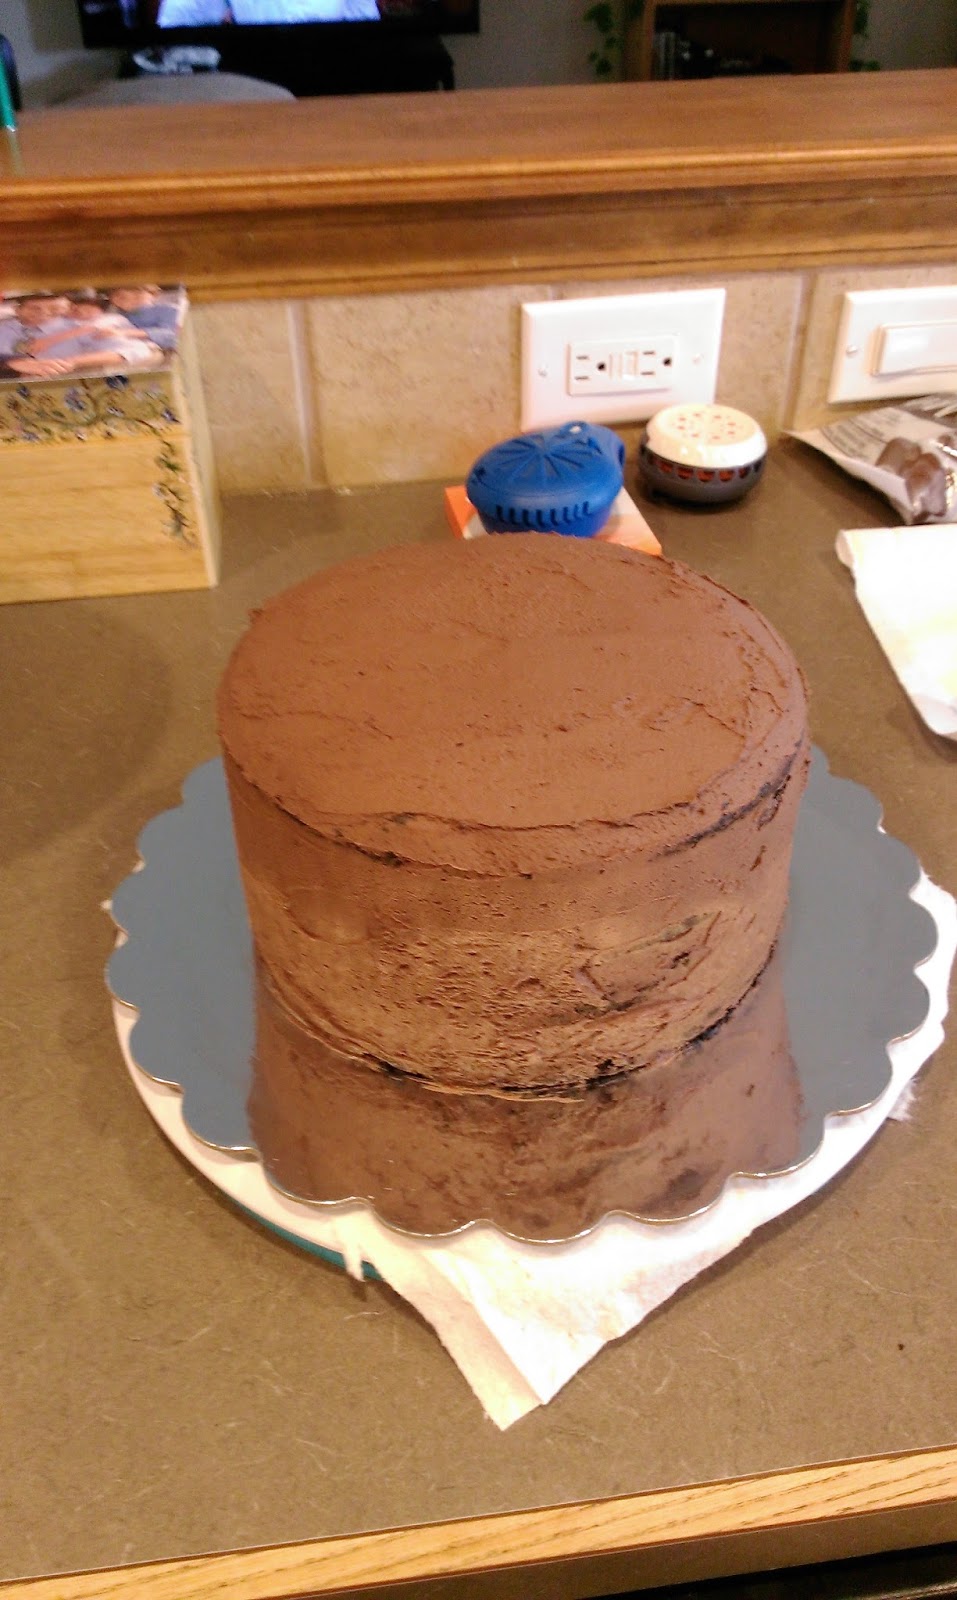
Like so. Stick in the freezer for 30 minutes to set, then come back in and put a final layer of frosting on top of your crumb coat. Try to get it as smooth as possible, but know you can smooth things out later with a Viva paper towel. Place back in to the freezer for another half an hour and then smooth out any unevenness with the paper towel trick.

I wanted a rosette border on top and bottom of the cake, so I used a #18 tip on a bag of the chocolate buttercream and started my border. I simply piped a bit of frosting out in the center of my rosette and swirled around to the left until I had come all the way back around to my starting point and stopped piping and pulled the tip away slowly. 
And repeated until the bottom was bordered. 
I did the rosettes on the top of the cake a bit larger, and at the ending point, I left enough space to pipe a small star and jazz things up a bit. Gorgeous! You could stop there, but then you’d have a lot of filigree for nothing. 
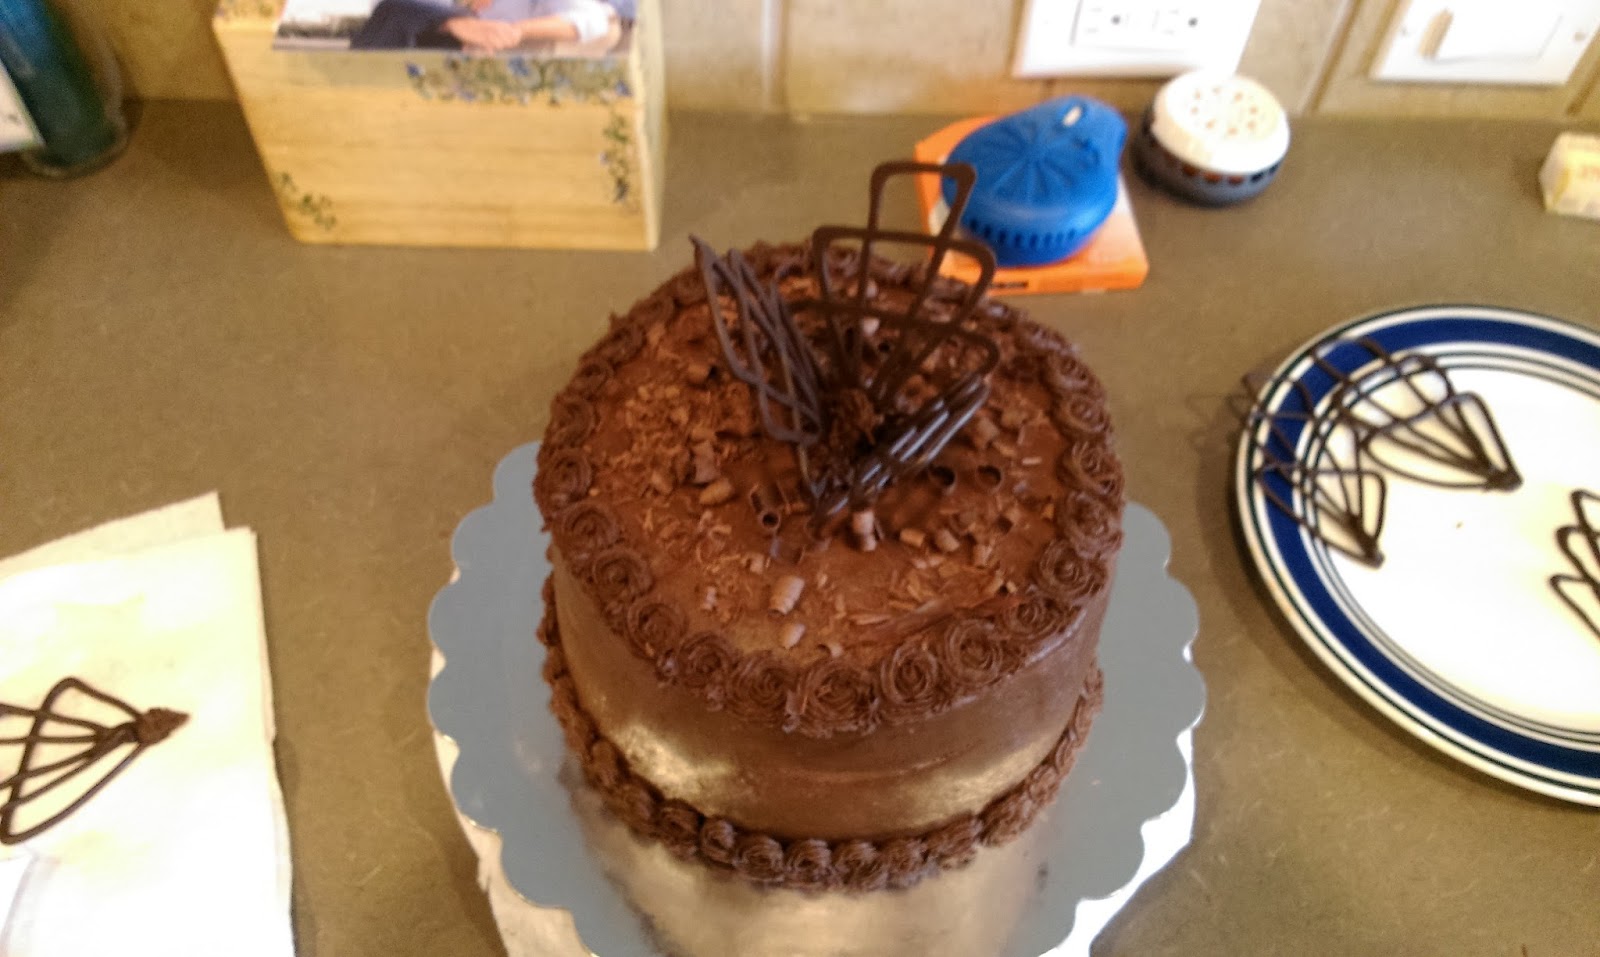
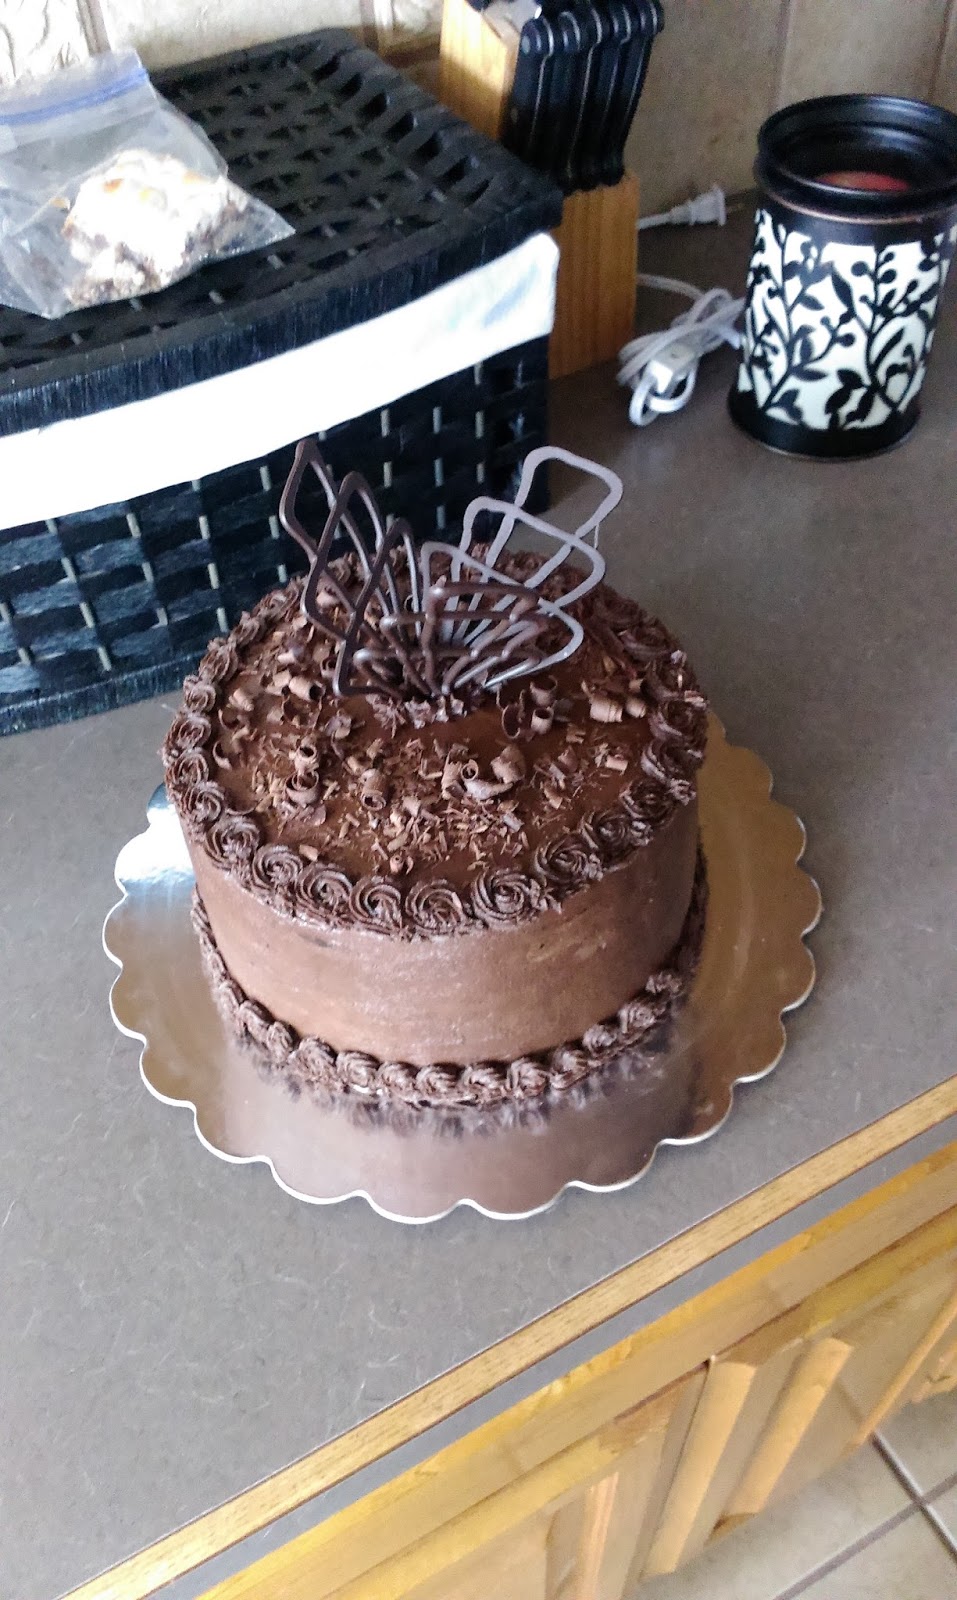
Still edible, but prettier on the cake than in the fridge. I needed a platform to place the filigree into, so I piped a large mound of frosting on the middle of the cake. Then I inserted three of the filigrees into the mound, only breaking one! A miracle! But then I had four leftover filigrees, which even by my standards was a few too many. To finish off, I took my piping bag (still with the #18 tip) and piped small stars around the filigree’s base.
Like a filigree graveyard. I finished off the cake by sprinkling the chocolate curls on the top and around the filigree. This is a seriously awesome-looking cake that does take a small amount of work to bake, but the decorating is so unbelievably easy while it looks unbelievably intricate and hard. So we’ll keep that between us because you can totally handle this and make it your own. If my clumsy left-handed self can do it, anyone can. I’m the poster child of enlightening self-deprecation.

You get a filigree! And you get a filigree! Everyone gets a filigree! Mmm..words cannot really express how this combo of dark chocolate fudge cake and light, airy chocolate buttercream just tastes so right. But, yeah, this cake was extremely tall on its own and adding the filigree on top made it so tall I couldn’t use a cover on my cake safe. It was like the supermodel of cake that had legs (or in this case, filigree) for days. Due to this I kept it in the beer fridge until my family arrived and could help me eat this giant, gorgeous tower of cake. Know what goes really well with dark chocolate fudge cake? Beer. So it was almost fortuitous that the cake ended up in the garage beer fridge anyway. As for how my non-chocoholic husband felt about it? Well, we watched the Game of Thrones finale last night, and Derek was either eating his feelings or just that interested in seeing what this cake tasted like, so we each had a piece to stifle the pain of being a fan of this show. Valar morghulis, I suppose. That means “always eat the cake” if you’re not a GOT viewer…’Til next time, my fellow eaters!

You make Jon Snow’s death a little less painful, chocolate cake tower. -
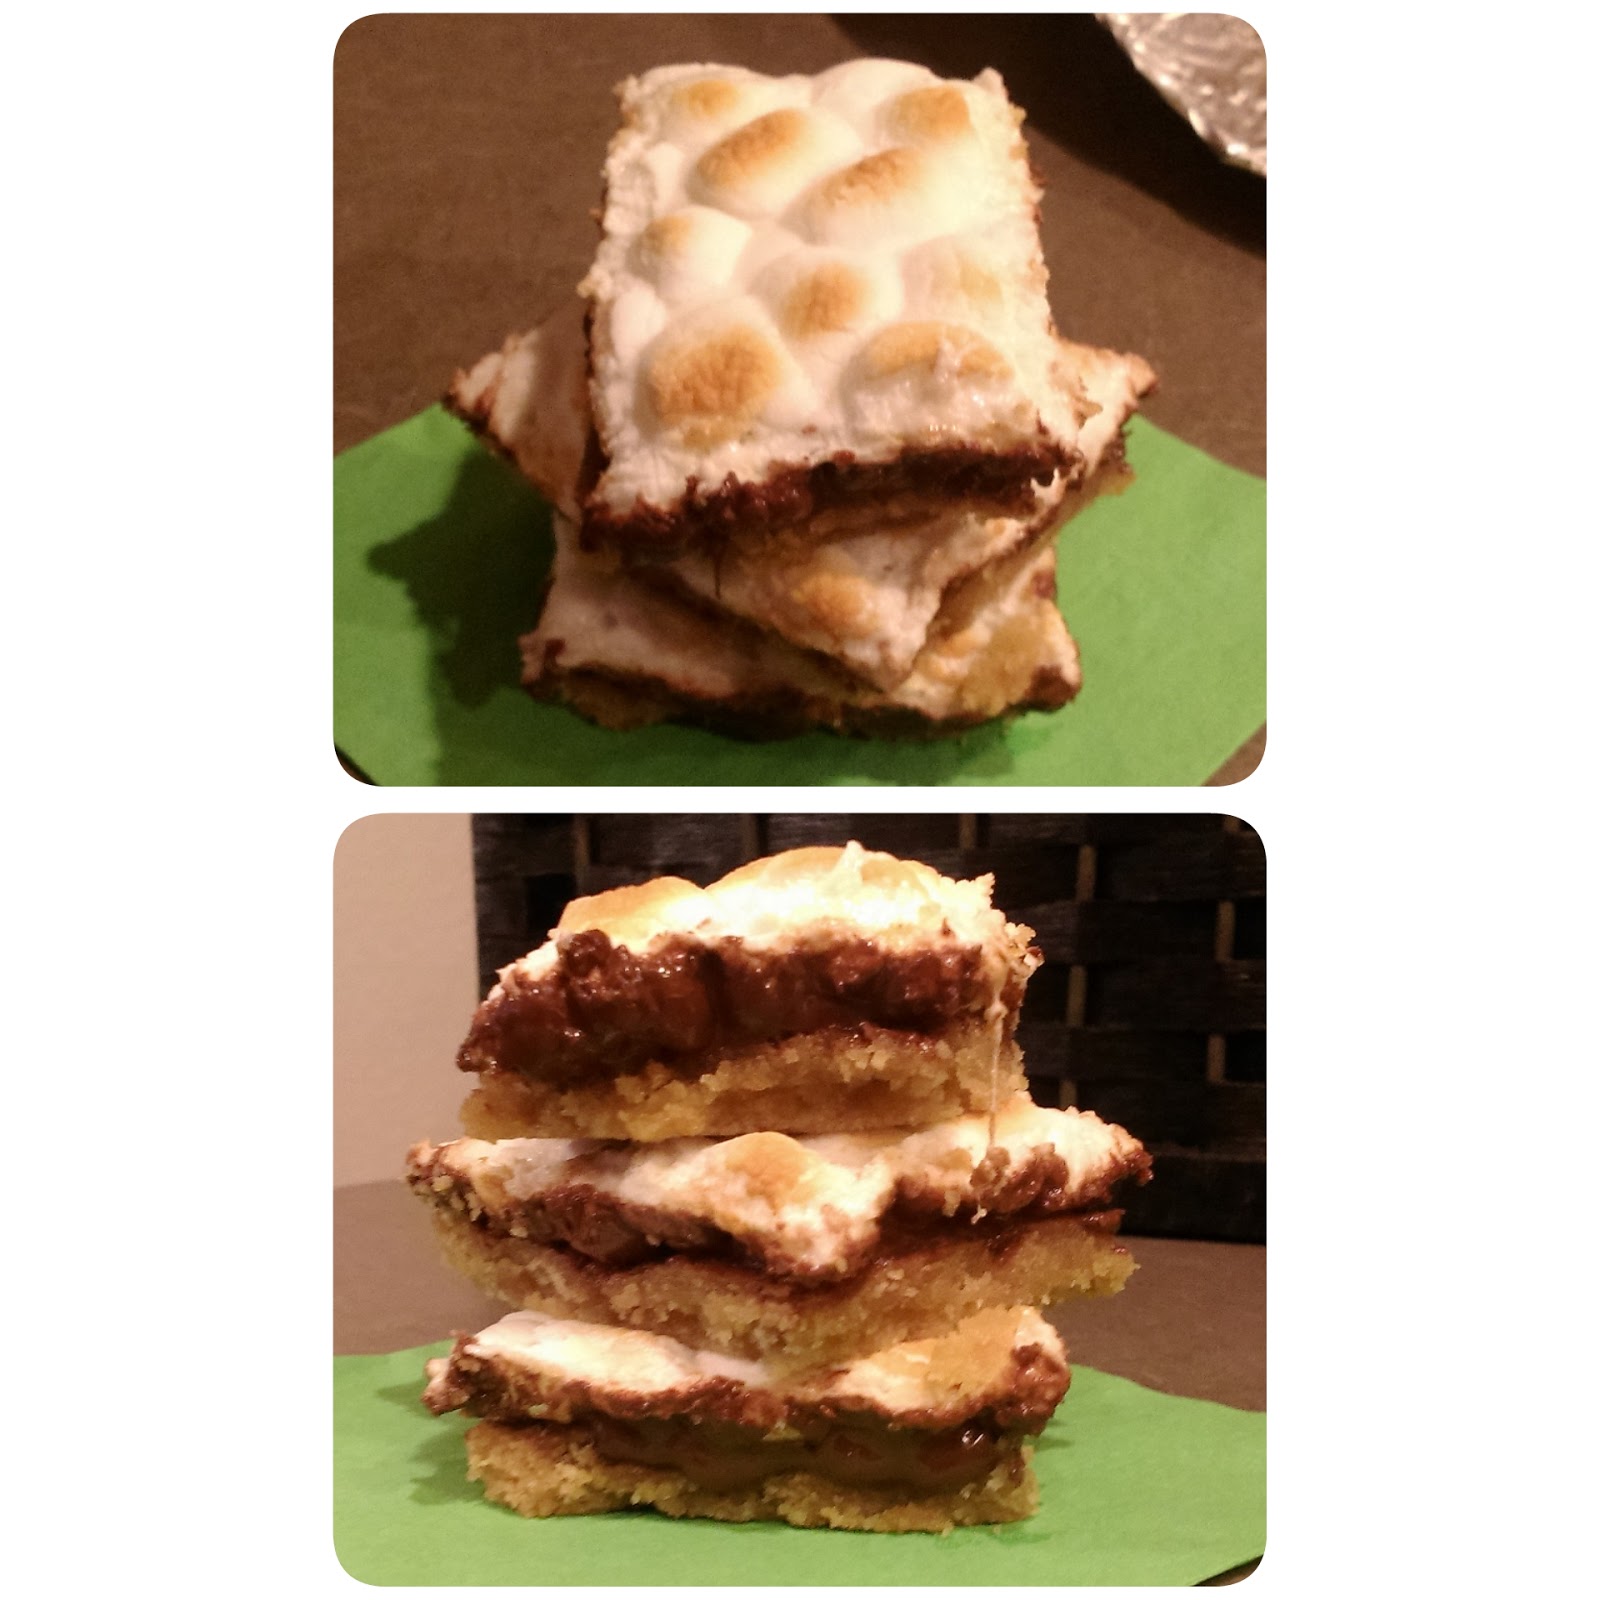
Toffee S'mores Bars: Because You Don't Have to Be the Only Thing Roasting This Summer
So June 1 came, and the second it did, Mother Nature hit preheat on her oven. Seriously, we spent all day Sunday sitting on our back porch enjoying a cool breeze, cooler adult beverages, and a couple good books. Come Monday morning, I was sweating like a hooker in church when I walked the dogs at 8 in the morning. Summer is here. My least favorite of the seasons, especially since the closest body of water we had decided it didn’t want to pay rent for the month of June and totally dried up in a day thanks to the heat. Farewell, Predator Pond. It’s also never really made sense to me that summer is a big season for campfires and bonfires in the later evening. I guess when you spend all day roasting in the heat yourself, you just really need to set something else on fire so you can spread the pain. I guess the one potentially good thing that could come from a backyard fire pit extravaganza is that you accidentally set your yard on fire, in which case, firetruck! Those babies have a hose on them that could turn your entire backyard into one glorious slip-n-slide. I can get behind the backyard fire pit for one reason: S’mores. I’ve already regaled you with how to make cupcake S’mores, but I needed some roasted marshmallows to help me deal with this sweltering grossness, so I came up with an idea for some deluxe Toffee S’mores bars so I could take the sweetness with me anywhere I wanted without making a mess and bringing ants along with me.

“Hello..is it me your looking S’mores?” Ooey. Gooey. Sweet. Salty. In short: Amazing. These are the best part of camping without actually having to be outside…in nature. She’s a cruel beast, but these S’mores toffee bars can take the sting out of just about anything. The added bonus is that they are unbelievably easy to make. Seriously…the hardest part about all of this was waiting for them to cool so I could cut them into bars. So if you’d like the summertime taste without the summertime heat, these are for you. If you’re a crazy person who loves the summertime heat, I suppose you can still eat these, too, just know I think you’re a sweaty weirdo.

I think these are even the simplest ingredients I’ve blogged about in ages as well. If you keep chocolate chips and marshmallows on hand during the months of June-August, you already have everything you need to make these bars waiting for you in your pantry. How nice of them.
For the bars:
- 2 cups of flour
- 1 cup of brown sugar
- 1/2 cup of butter
For the toffee:
- 2/3 cup of butter
- 1/3 cup of brown sugar
For the topping:
- 1-10 ounce bag of mini marshmallows
- 1-12 ounce bag of chocolate chips
Now be prepared for instructions so easy I’m fairly certain a well-trained dog could follow them. I wouldn’t let my dogs make these because Freyja is a rather charming idiot and Hank a rather charming glutton (plus, where would that leave me, the baker?!), but you may have more luck with your dogs.

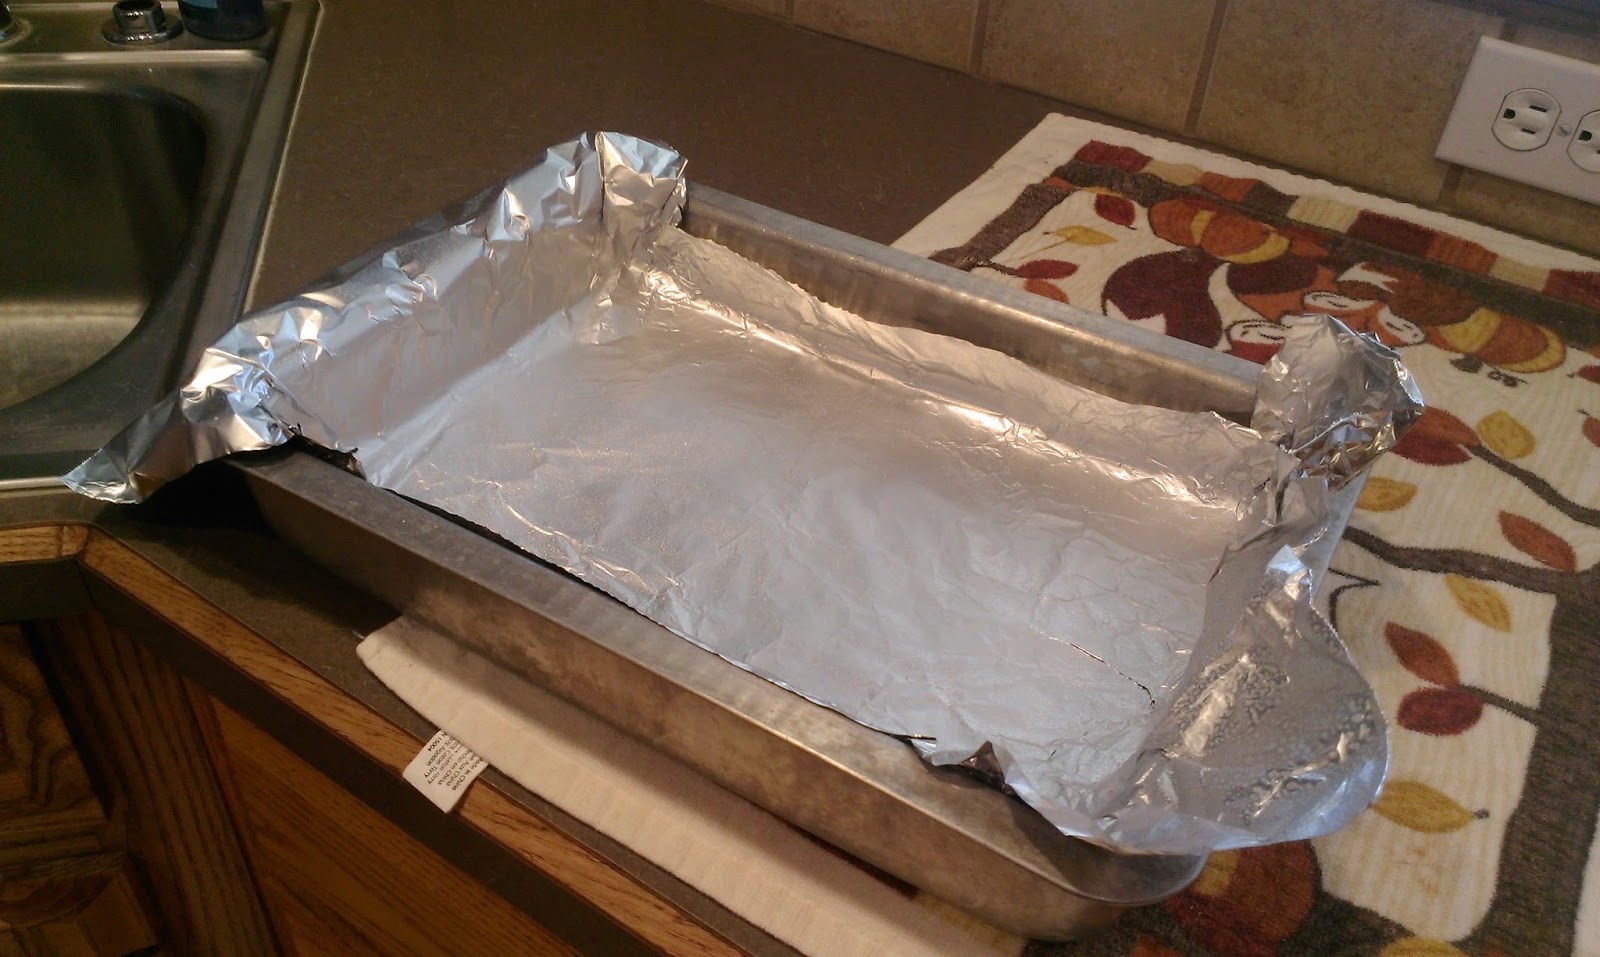
If you want thin bars, line a 9×13 pan with foil and spray the foil with non-stick spray. If you want really thick bars, place these in an 8×8 with foil and spray. Preheat the oven to 350. 
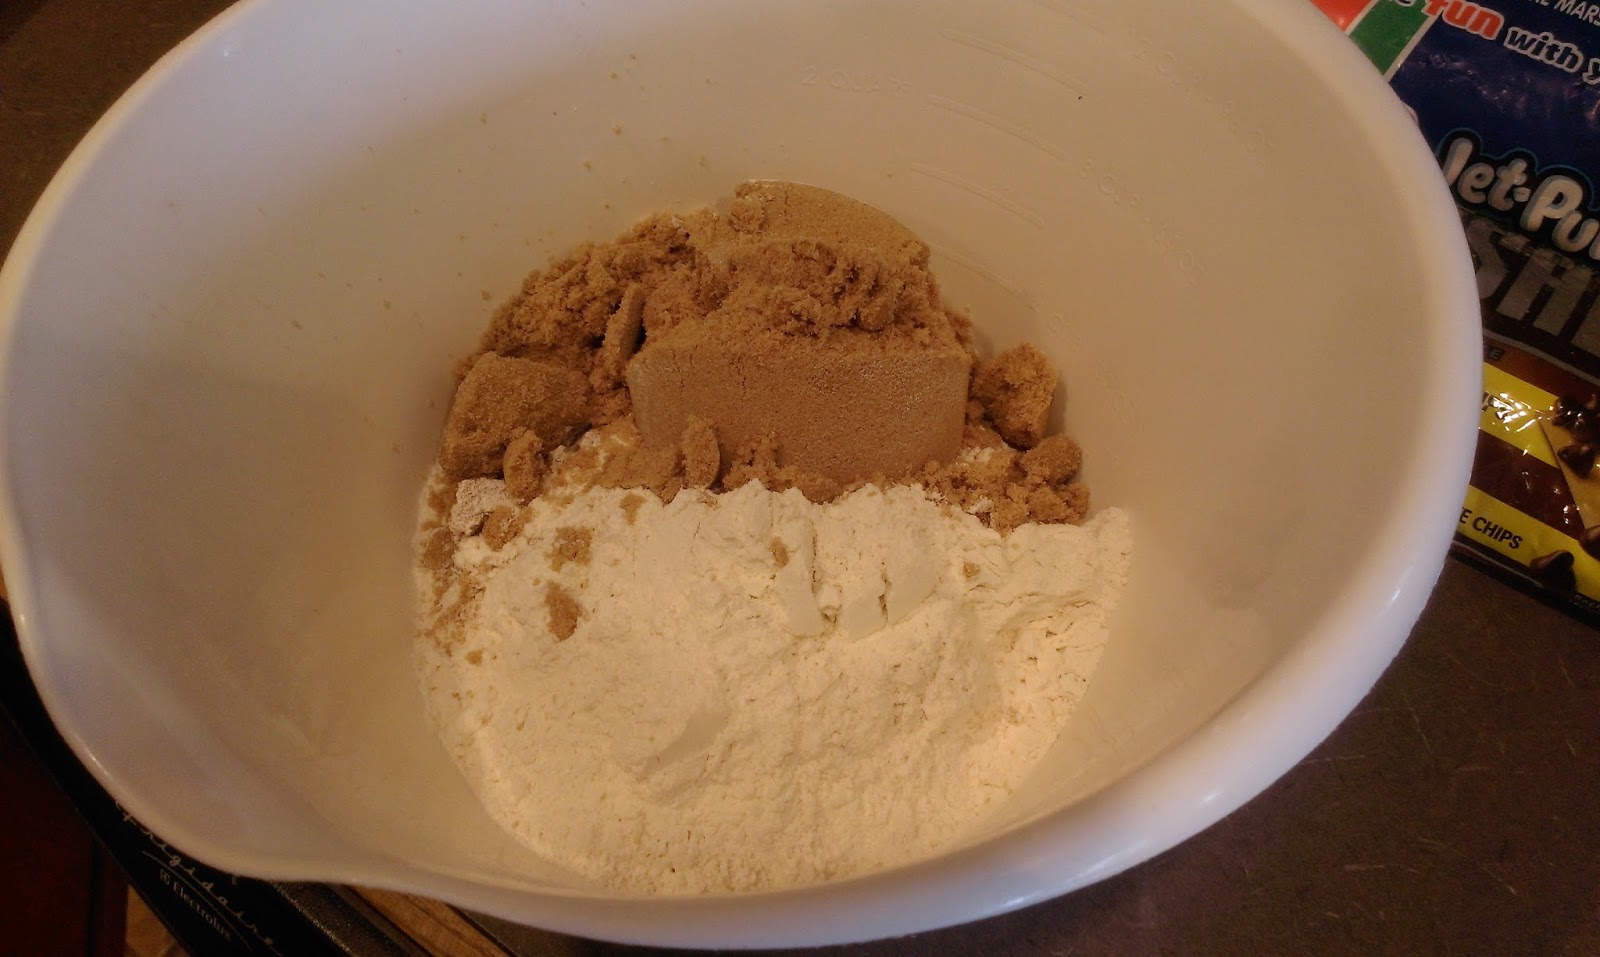
Nuke your butter in the microwave for 20 seconds. You want it goopy, but not melted. Mix it in with 2 cups of flour and 1 cup of packed brown sugar. Take two forks or a pastry cutter (I’ve yet to meet anyone that actually owns a pastry cutter) and blend all the ingredients together. This should form something with consistency similar to Gak. You’re welcome for the 90s reference. 
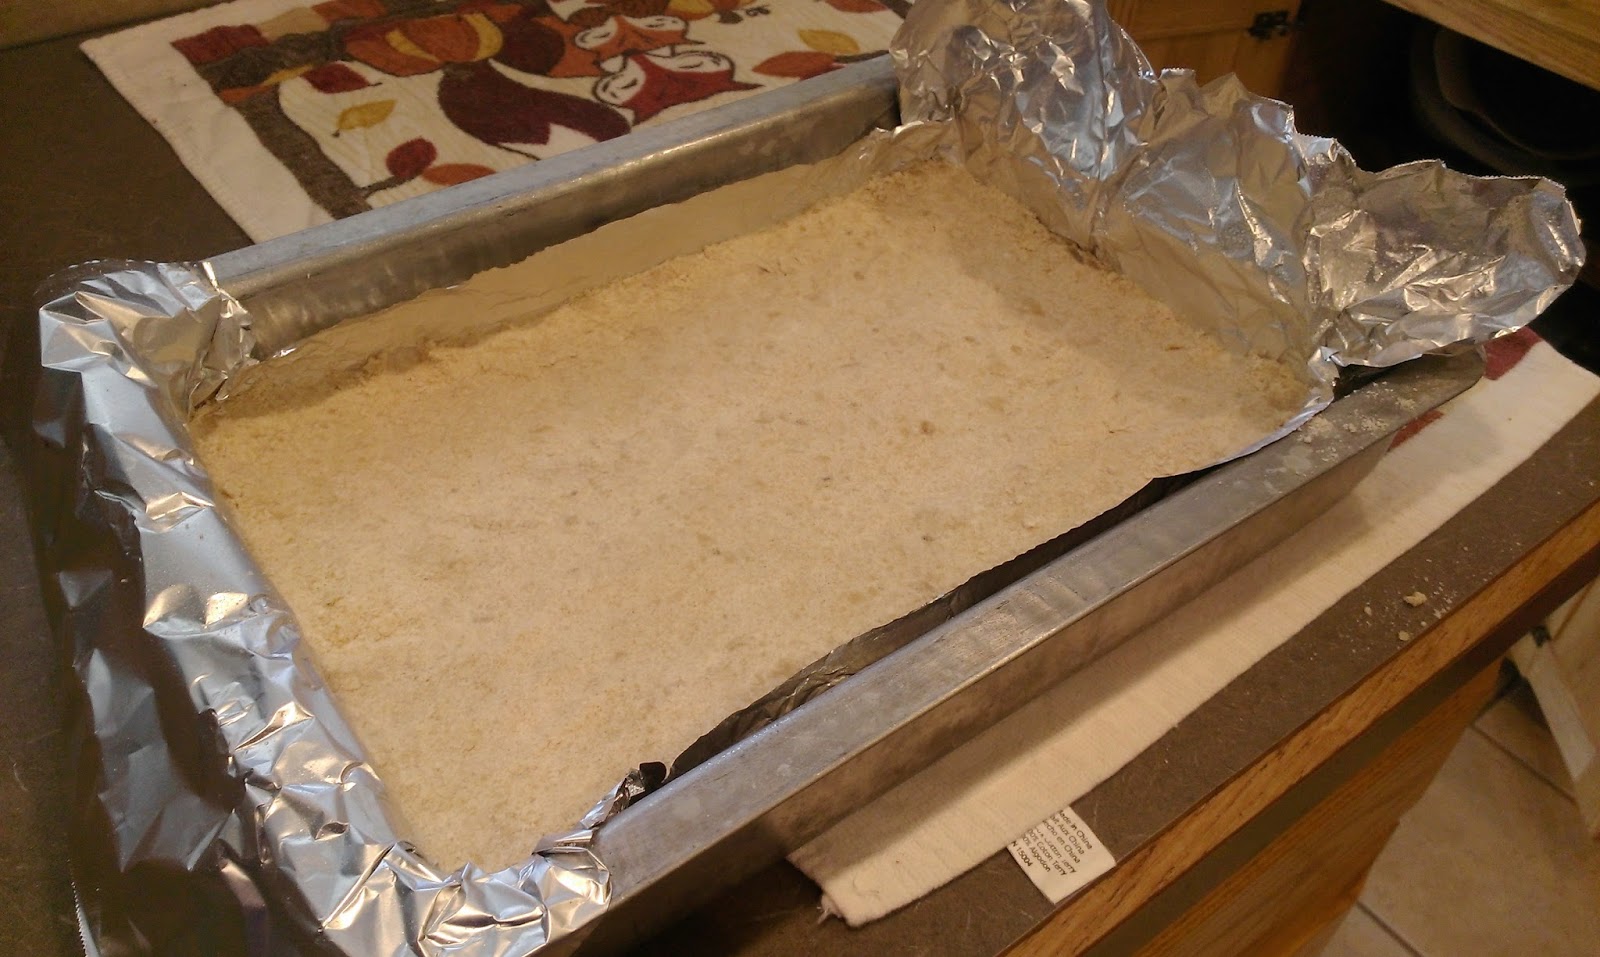
Take the edible Gak and press it into your pan. I took a handful at a time and pressed it firmly into my pan until the pan was full. Pay close attention to the edges- be sure to press these areas down firmly as well so your edge pieces don’t crumble like a dainty flower in a storm…or me in over 80 degree weather. 
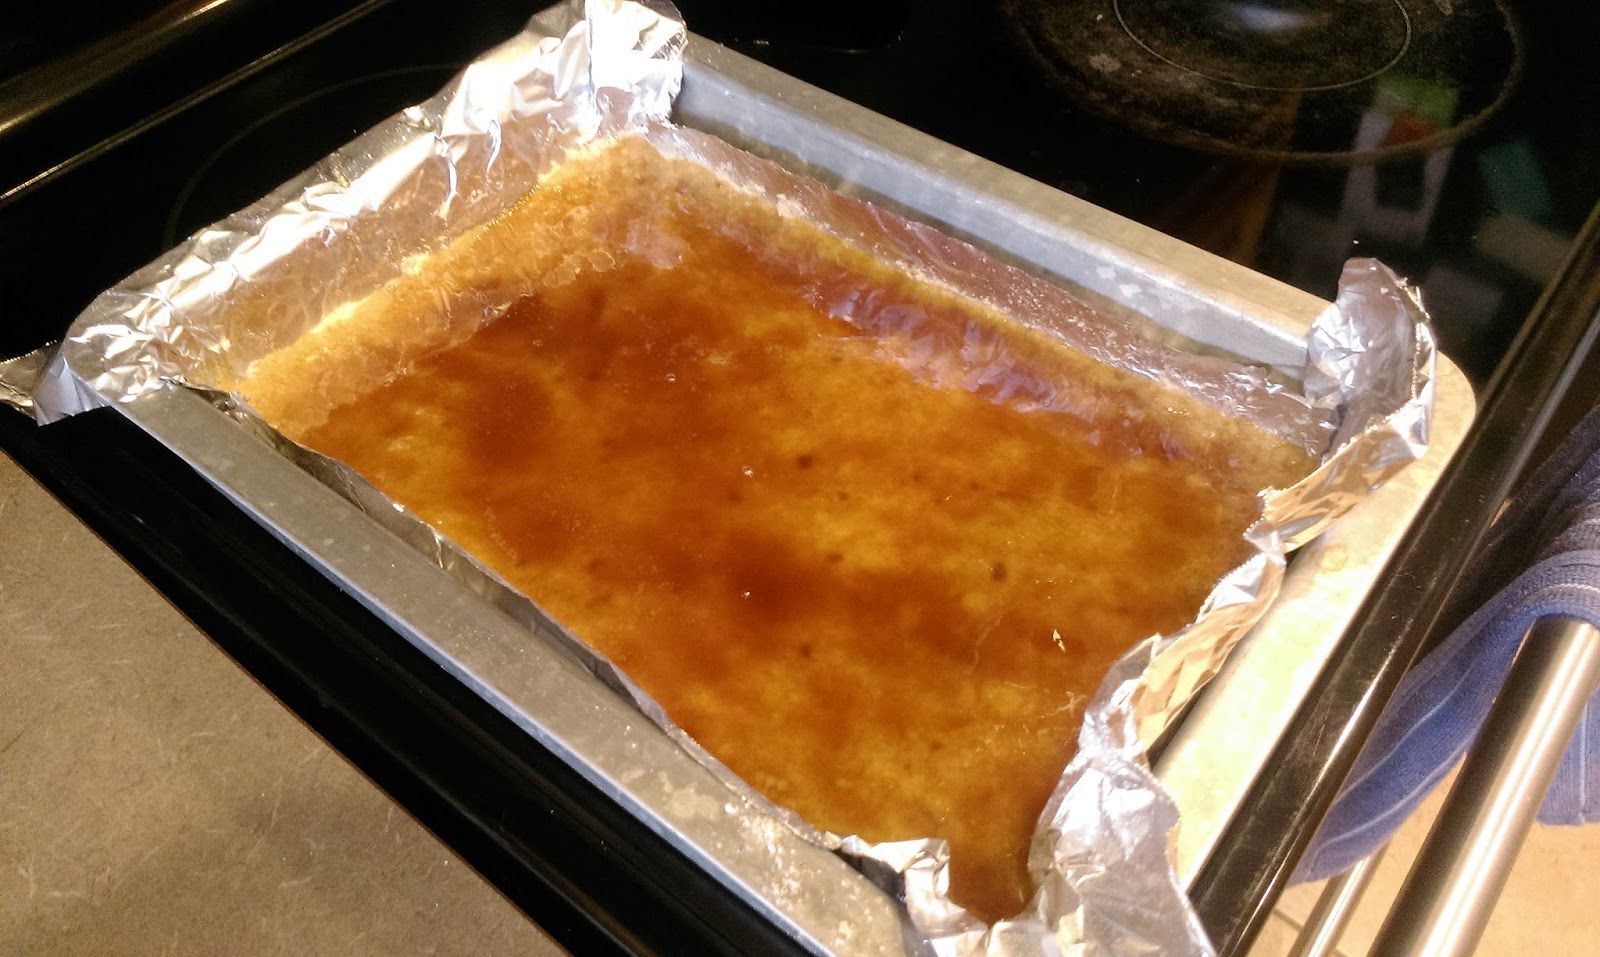
Now, let’s make some toffee. Once you realize how easy this is, you’re going to put toffee on EVERYTHING. I just wanted to eat it straight out of the saucepan. So, on medium-high heat, place 2/3 cup of butter (this is 10 1/2 tablespoons, let me save you the Google search) and 1/3 cup of packed brown sugar and melt together in a small saucepan. Keep mixing thoroughly until it begins to boil. Once boiling, stir like hell for one minute and then remove from heat. You need to use this stuff right away or it will be thicker than syrup and impossible to spread, albeit still delectable, so have your crust at the ready. 
Pour your toffee on top of your crust. I moved my pan back and forth to get an even coverage. Now place on the top oven rack and bake for 17 minutes. Not gonna lie, ate quite a few marshmallows while waiting for this crust to come out of the oven. Your entire house will smell how I imagine the inside of the Keebler Elf’s tree house must smell, and it will make you hungry. But once the 17 minutes has passed and your toffee is nice and bubbly, things get even better.
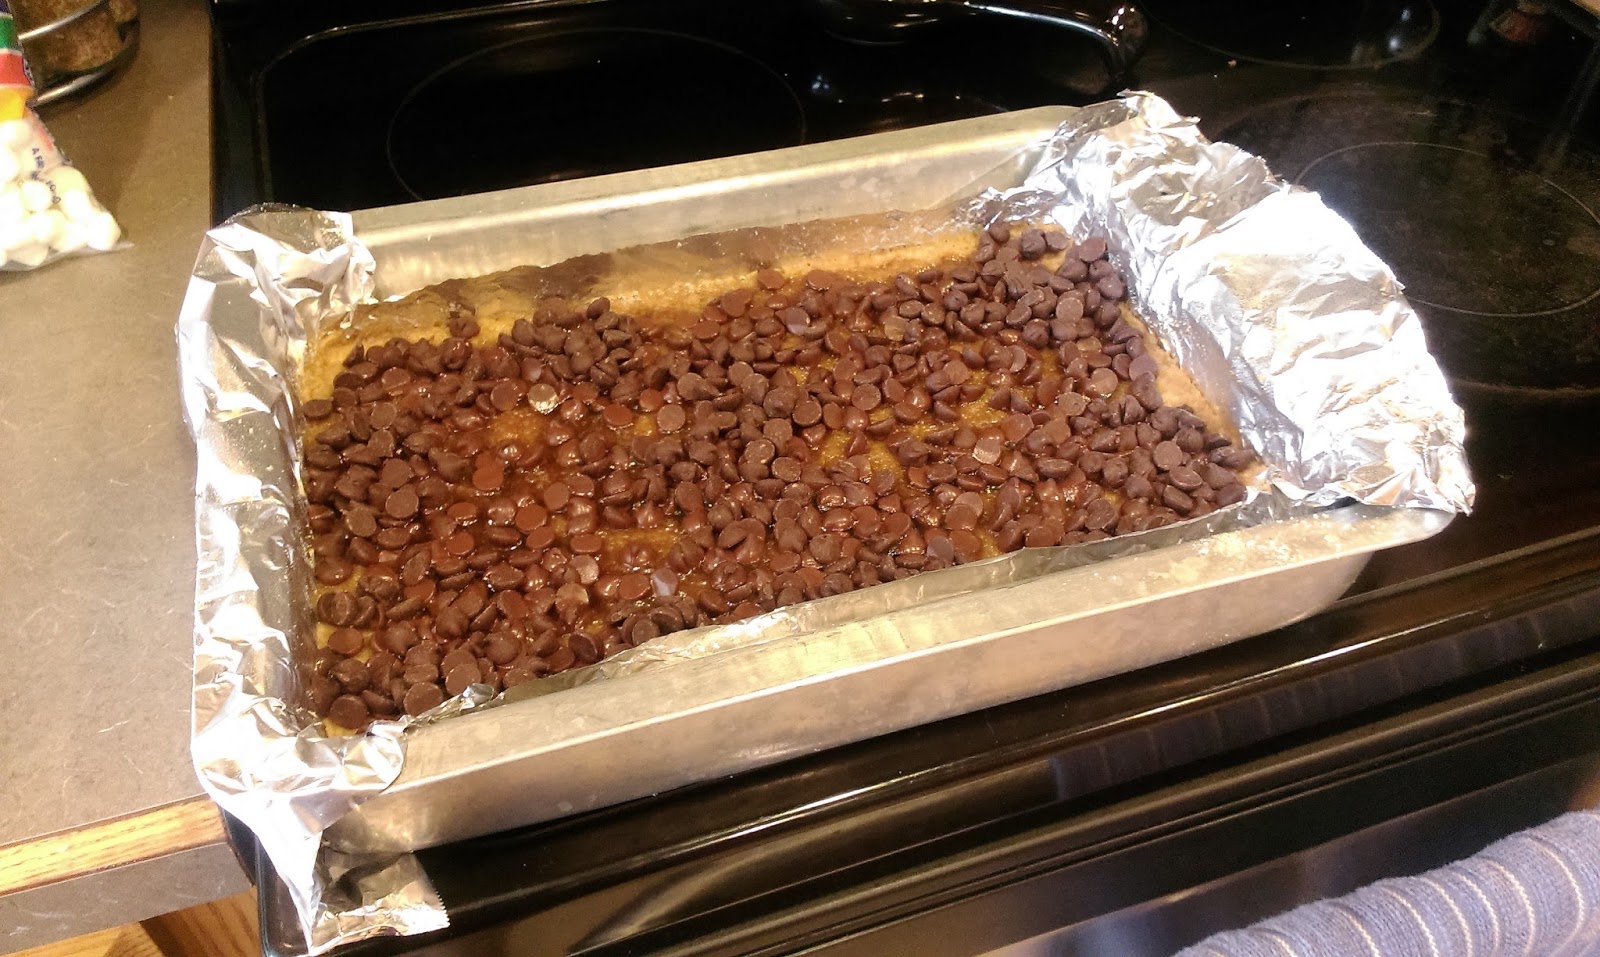
Spread your entire (what’s left of it after snacking anyway) bag of chocolate chips on top of your toffee crust. Place back into the oven at 350 for 3 minutes. 
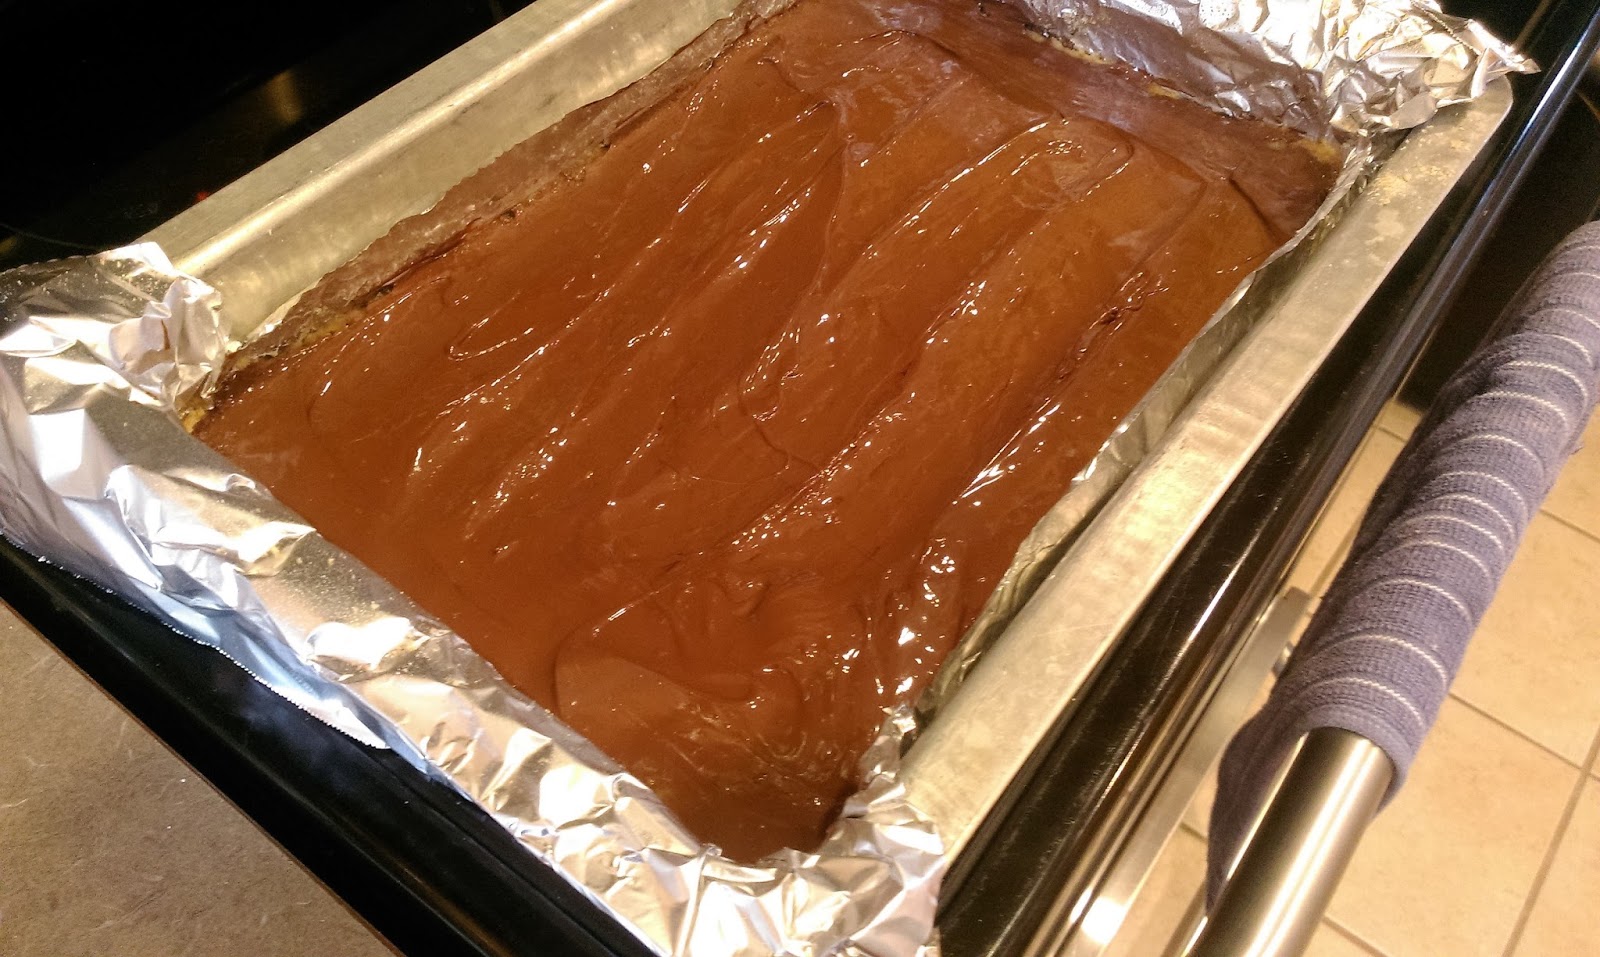
One your chocolate chips are melted, take a spatula and spread them evenly over the crust. If you don’t like marshmallows, you could always call it a day here or top with crushed walnuts and still have an amazing dessert. But when it’s so hot outside I could bake cookies on the dashboard of my car, I need roasted marshmallows on top of this chocolate to make my soul stop hurting. Sweating like a pig doesn’t seem so bad when S’mores are involved. 
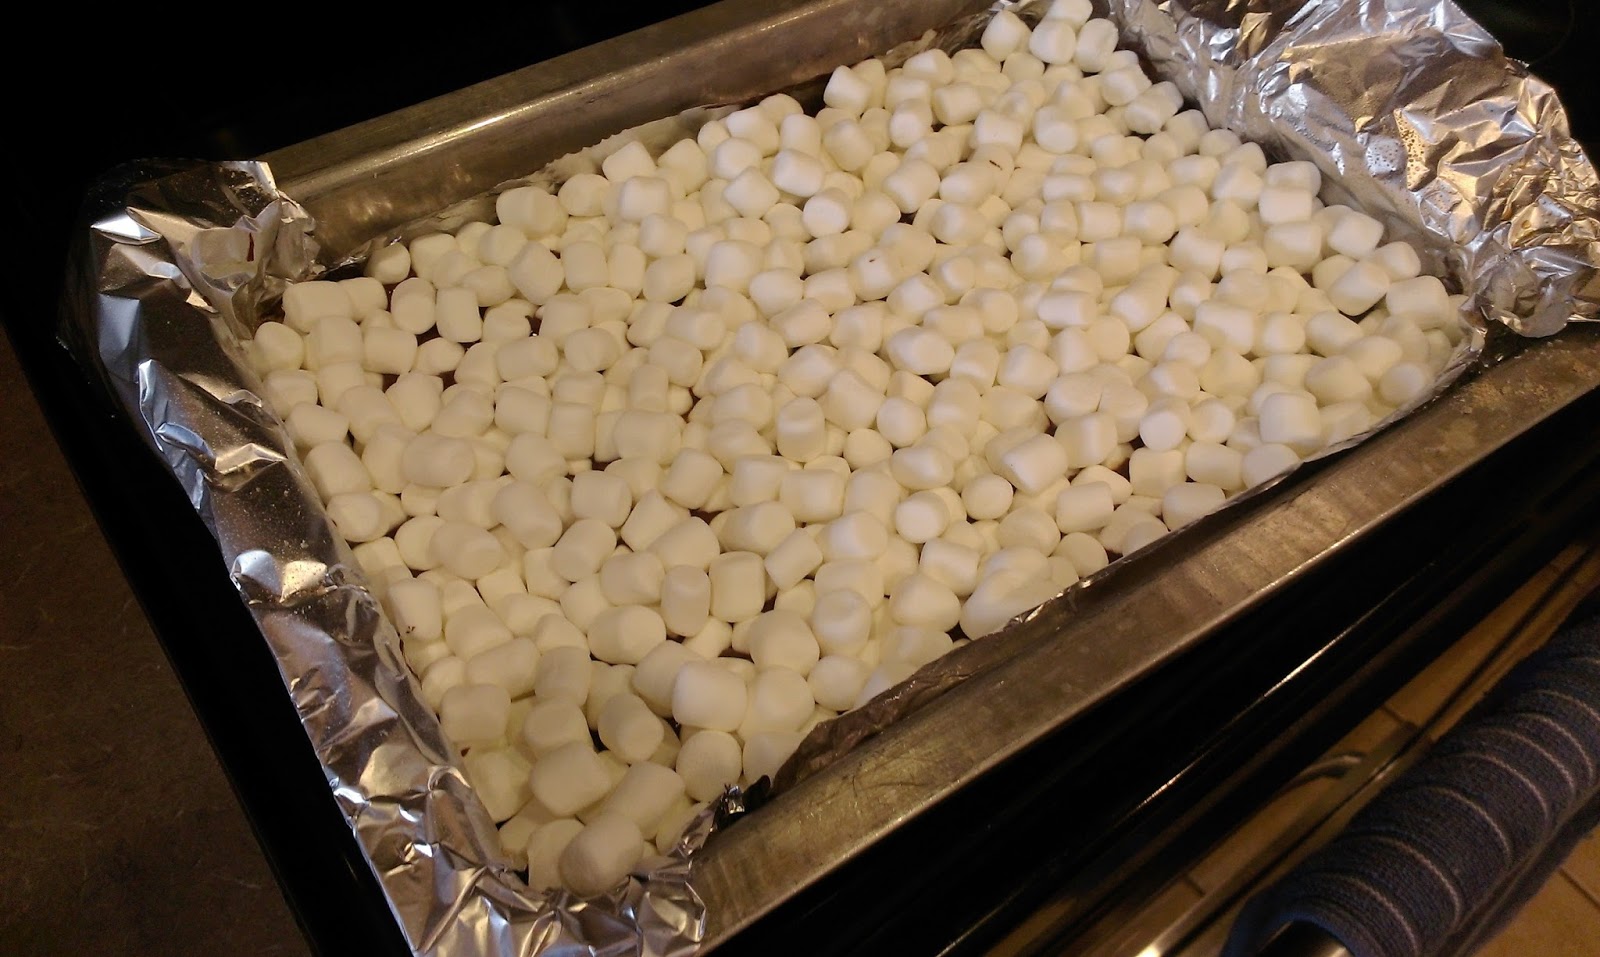
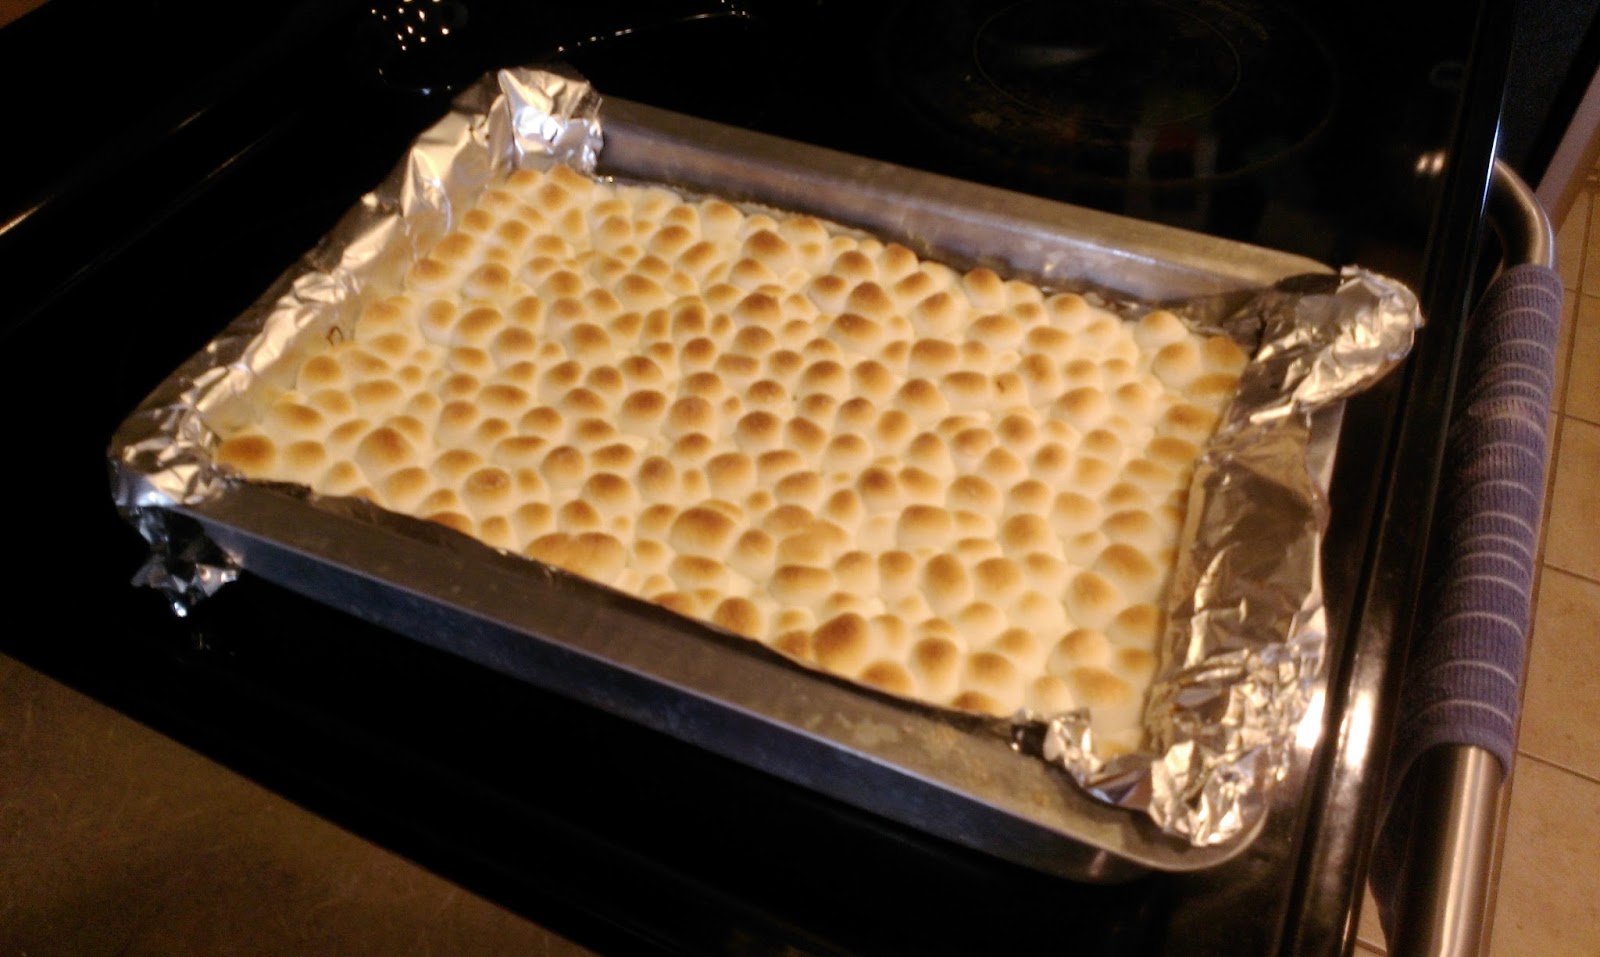
Top the chocolate layer with your marshmallows. Doesn’t have to be perfect because these will spread out and get puffy as they roast. Marshmallows, what can’t you do? Stick this under your broiler for 2-3 minutes depending on your roasted marshmallow preference. 
This was a full two minutes under the broiler, and it was perfect. Mouth watering yet? If it isn’t, it’s probably just because it’s so damn hot outside your body refuses to use any more moisture than necessary. 
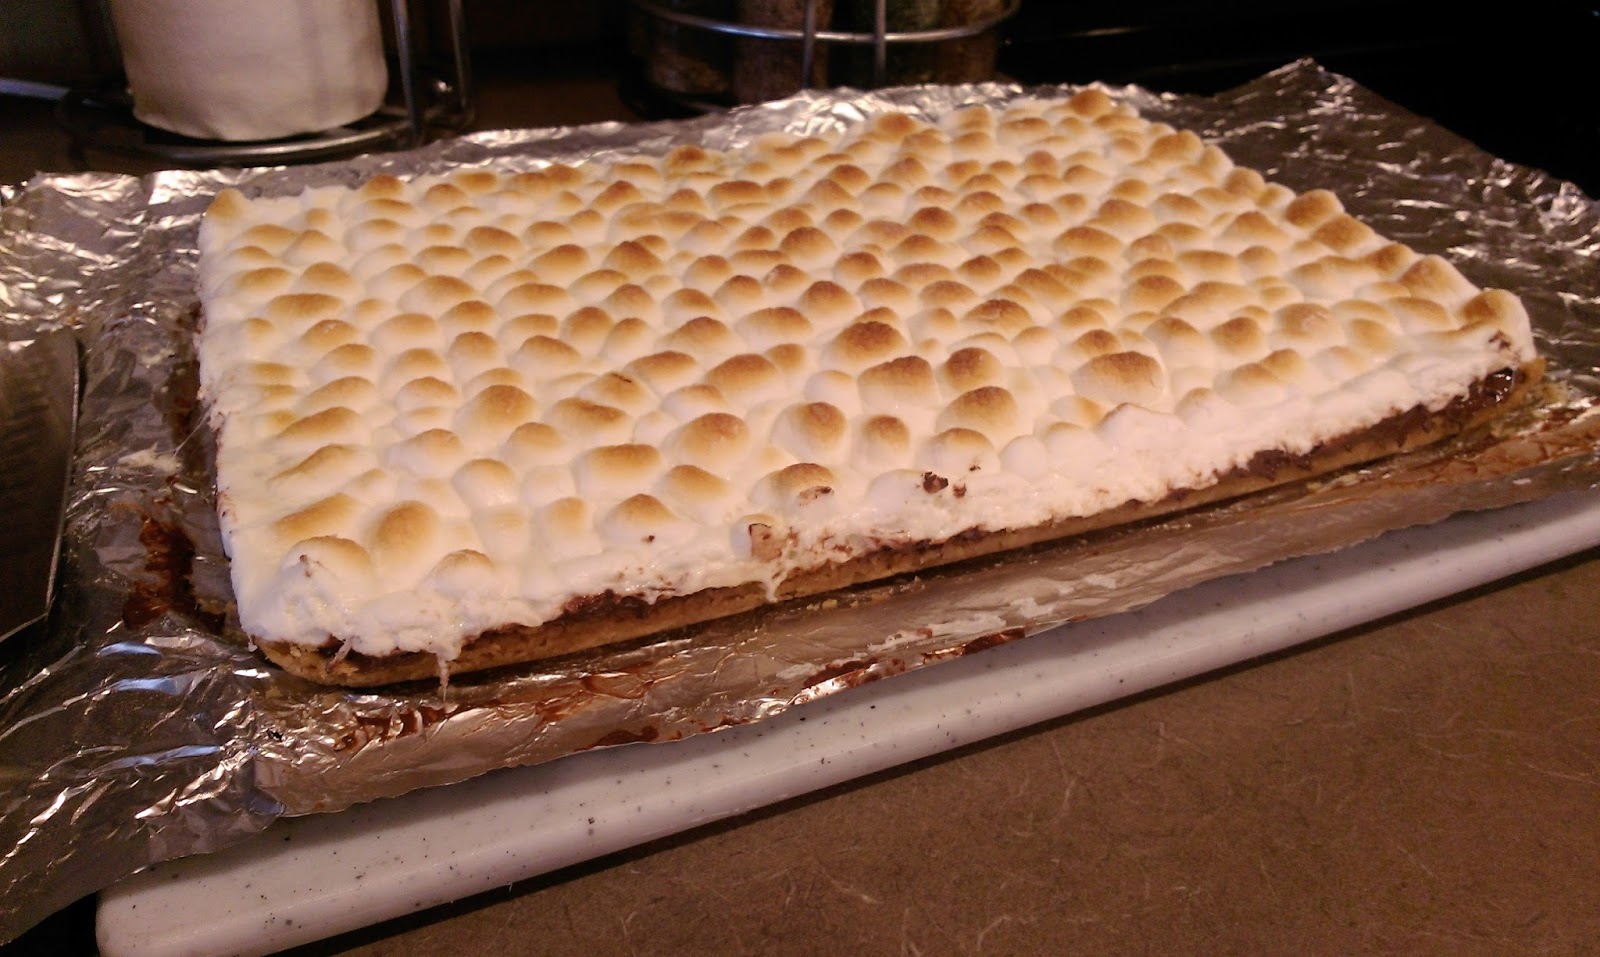
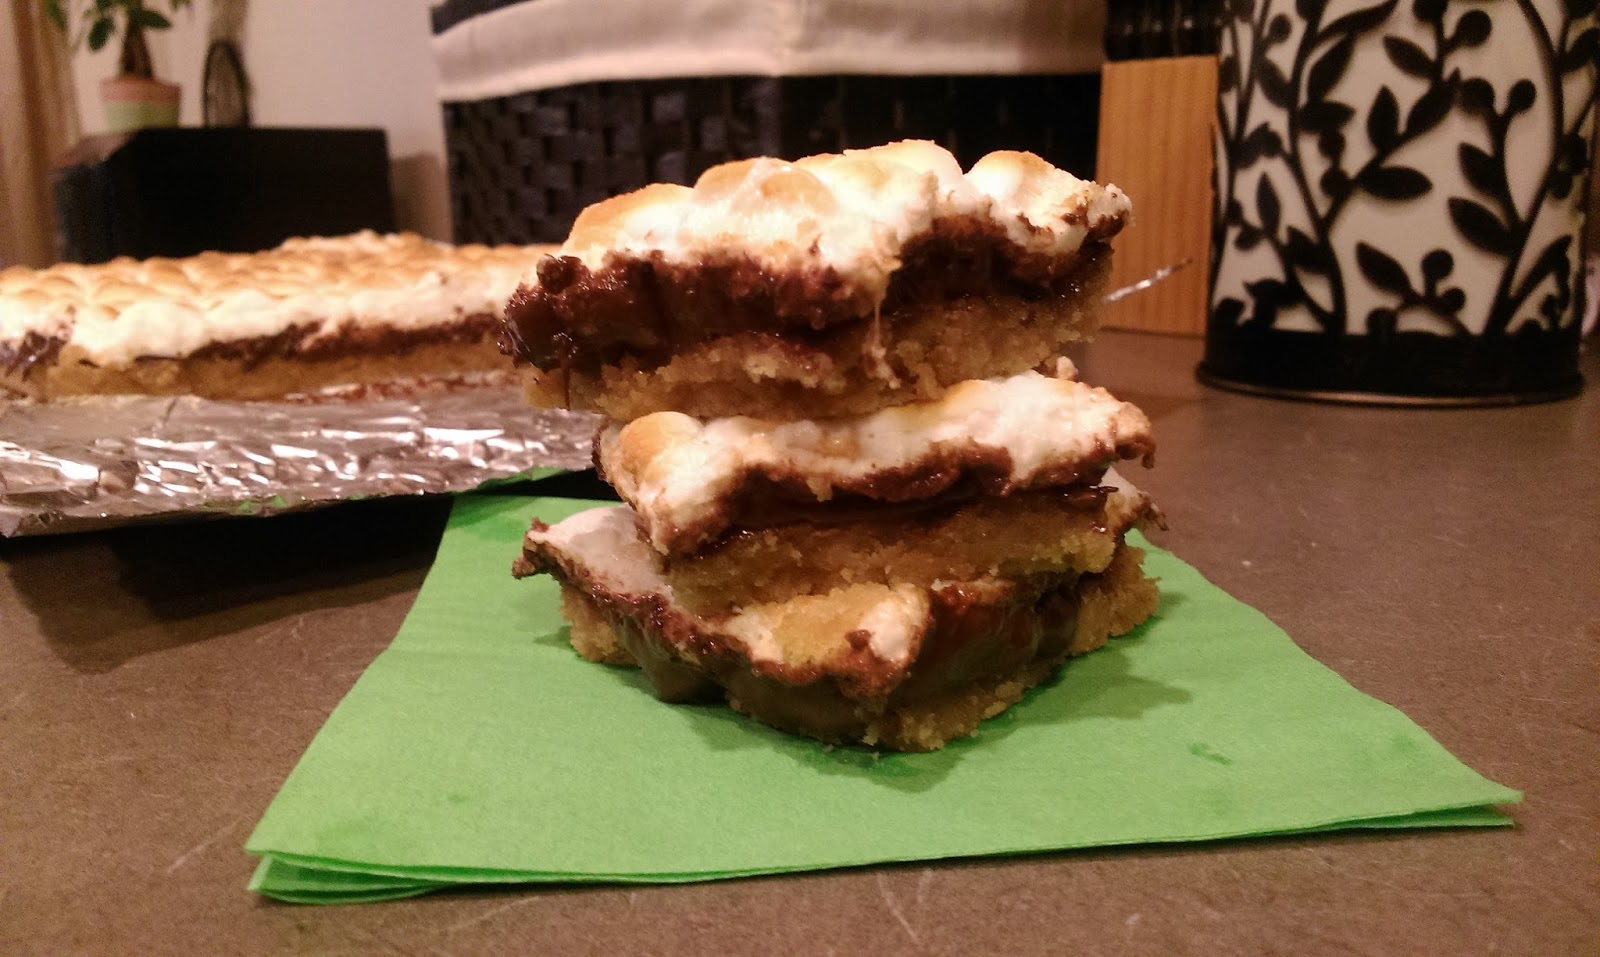
Let cool in your pan until room temp. I placed in the fridge for 1 hour before removing from the pan, and then I waited another hour before removing the foil from the sides and cutting into bars. Once slicing, enjoy a bar or two. I mean, I’d say you (or your dog) earned it after making them, but they’re just so damn easy to put together that this isn’t one of those moments resulting in hard work earning a reward. Instead it’s a chance to eat something so delicious it makes you forget you may or may not be sweating to death. I suppose that’s the magic of the S’mores bar–making summer tolerable since some Girl Scout decided she was tired of eating twigs and berries on a camp out and went with it. God Bless her…and whoever came up with toffee, but I’m too lazy to look that up because I’m hungry and I hear my pan of bars calling my name. Maybe the heat is making me delirious, y’all…’Til next time, my fellow eaters!

I can and will have S’more. I promise I’m done with my terrible puns now. -
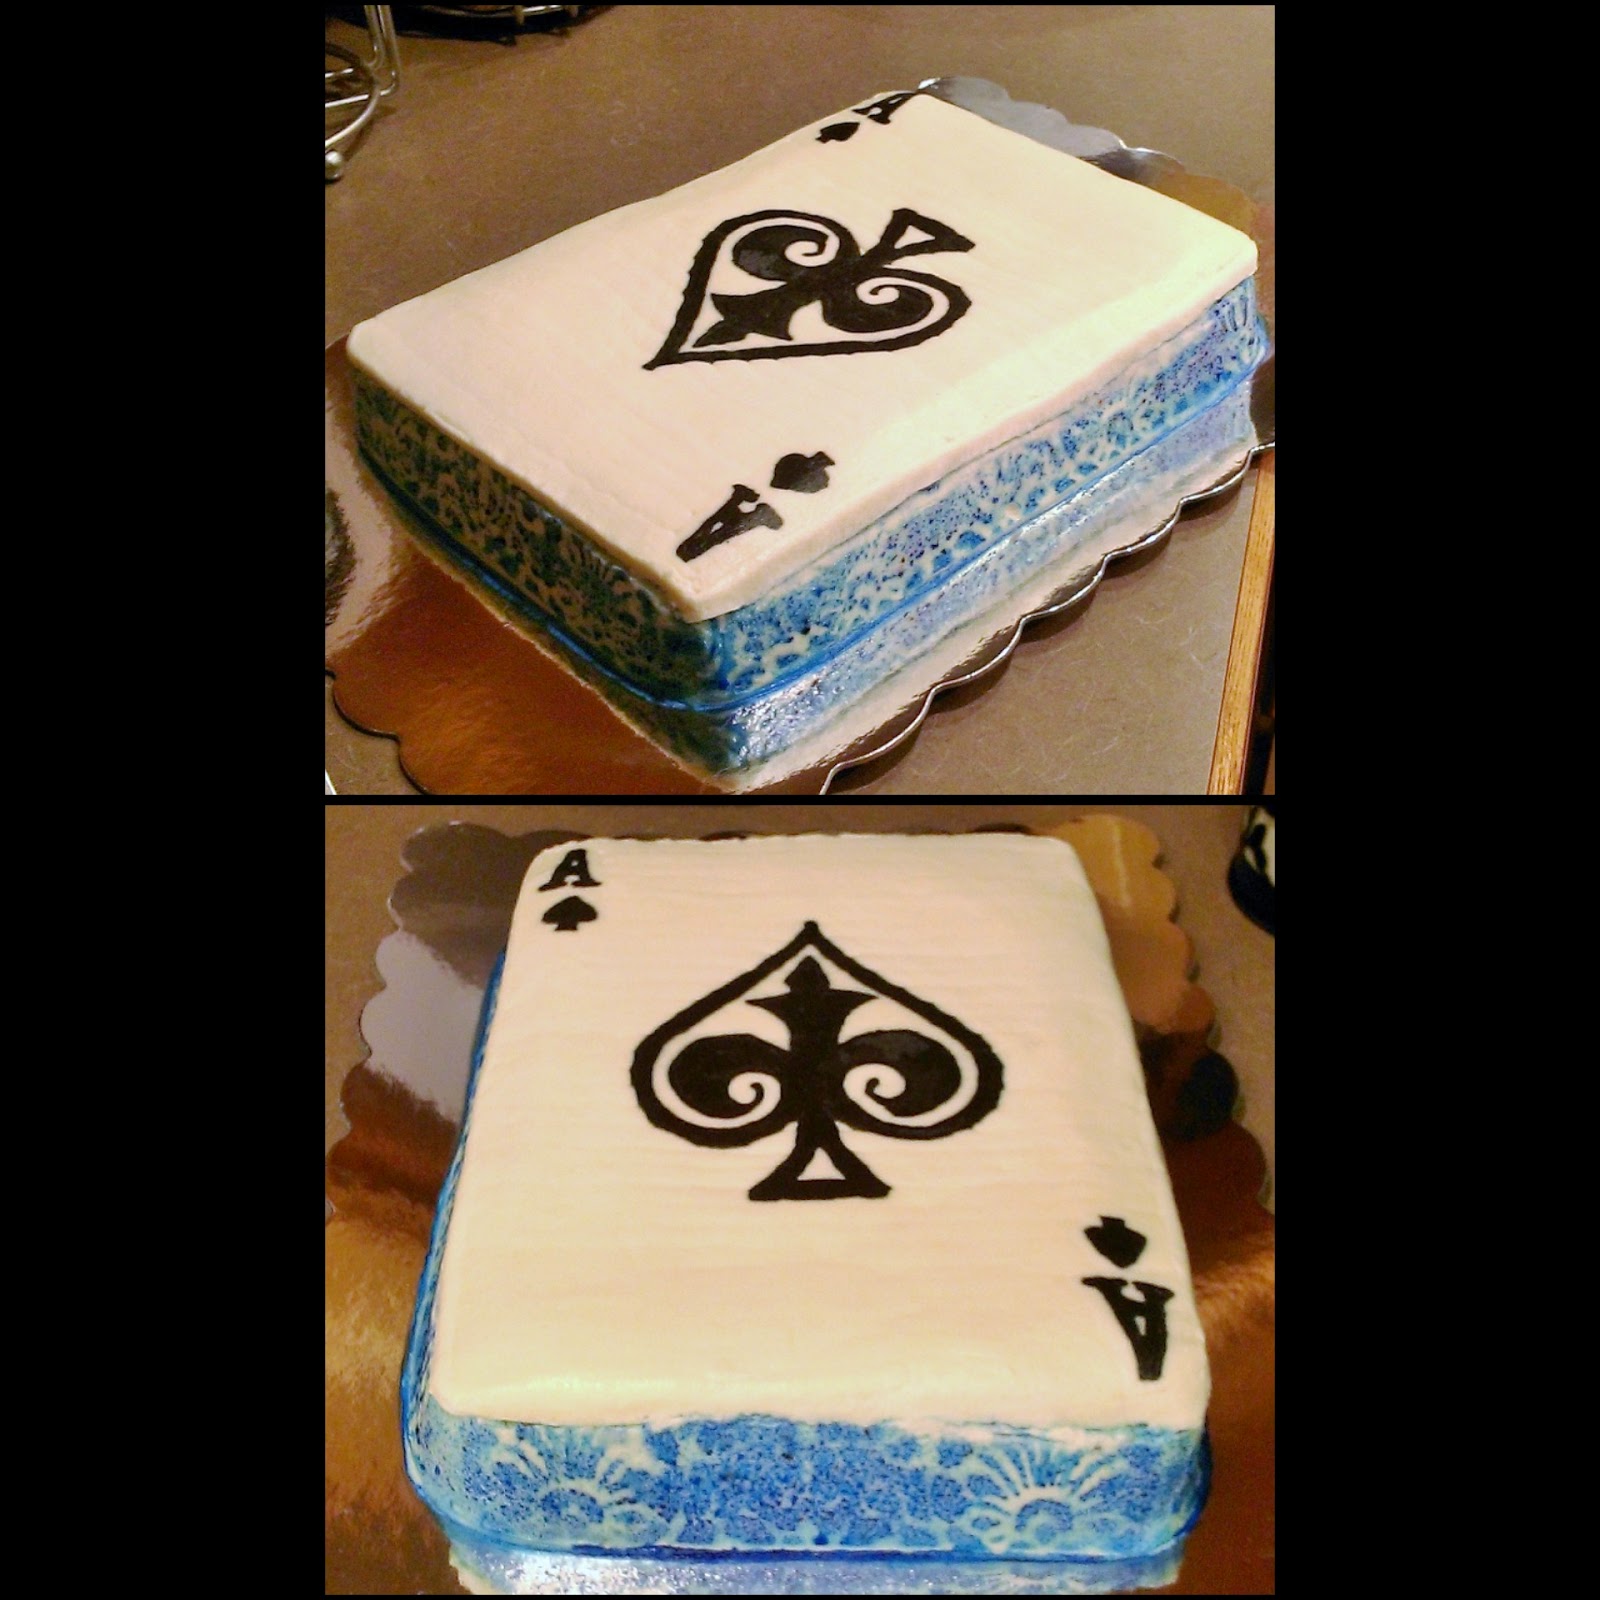
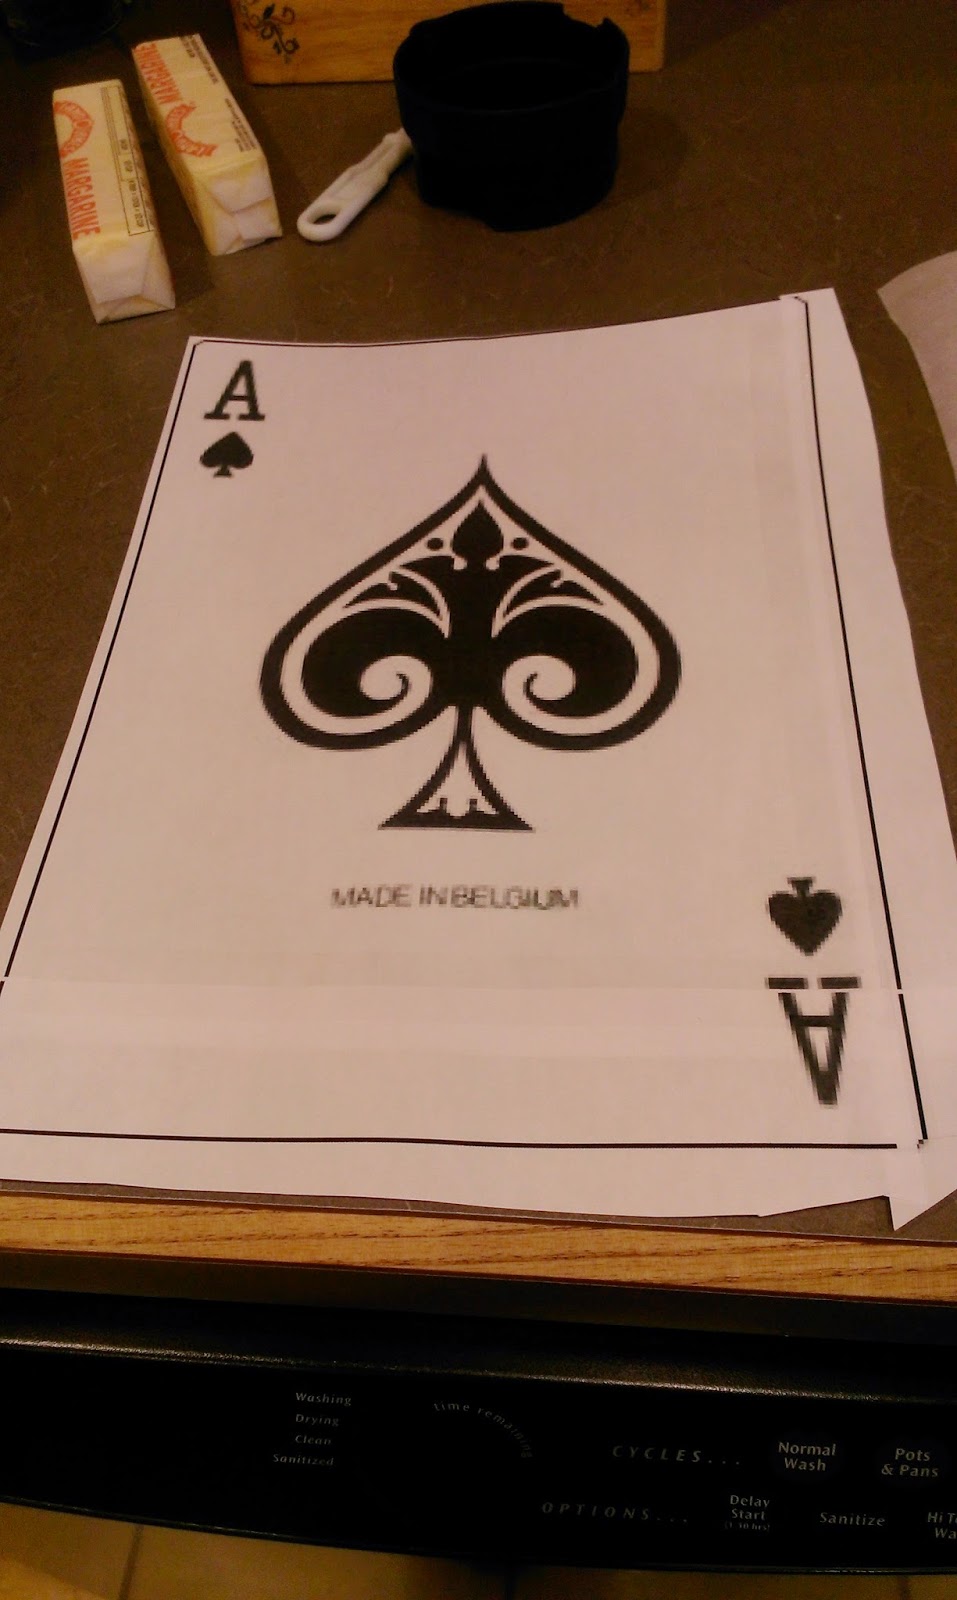
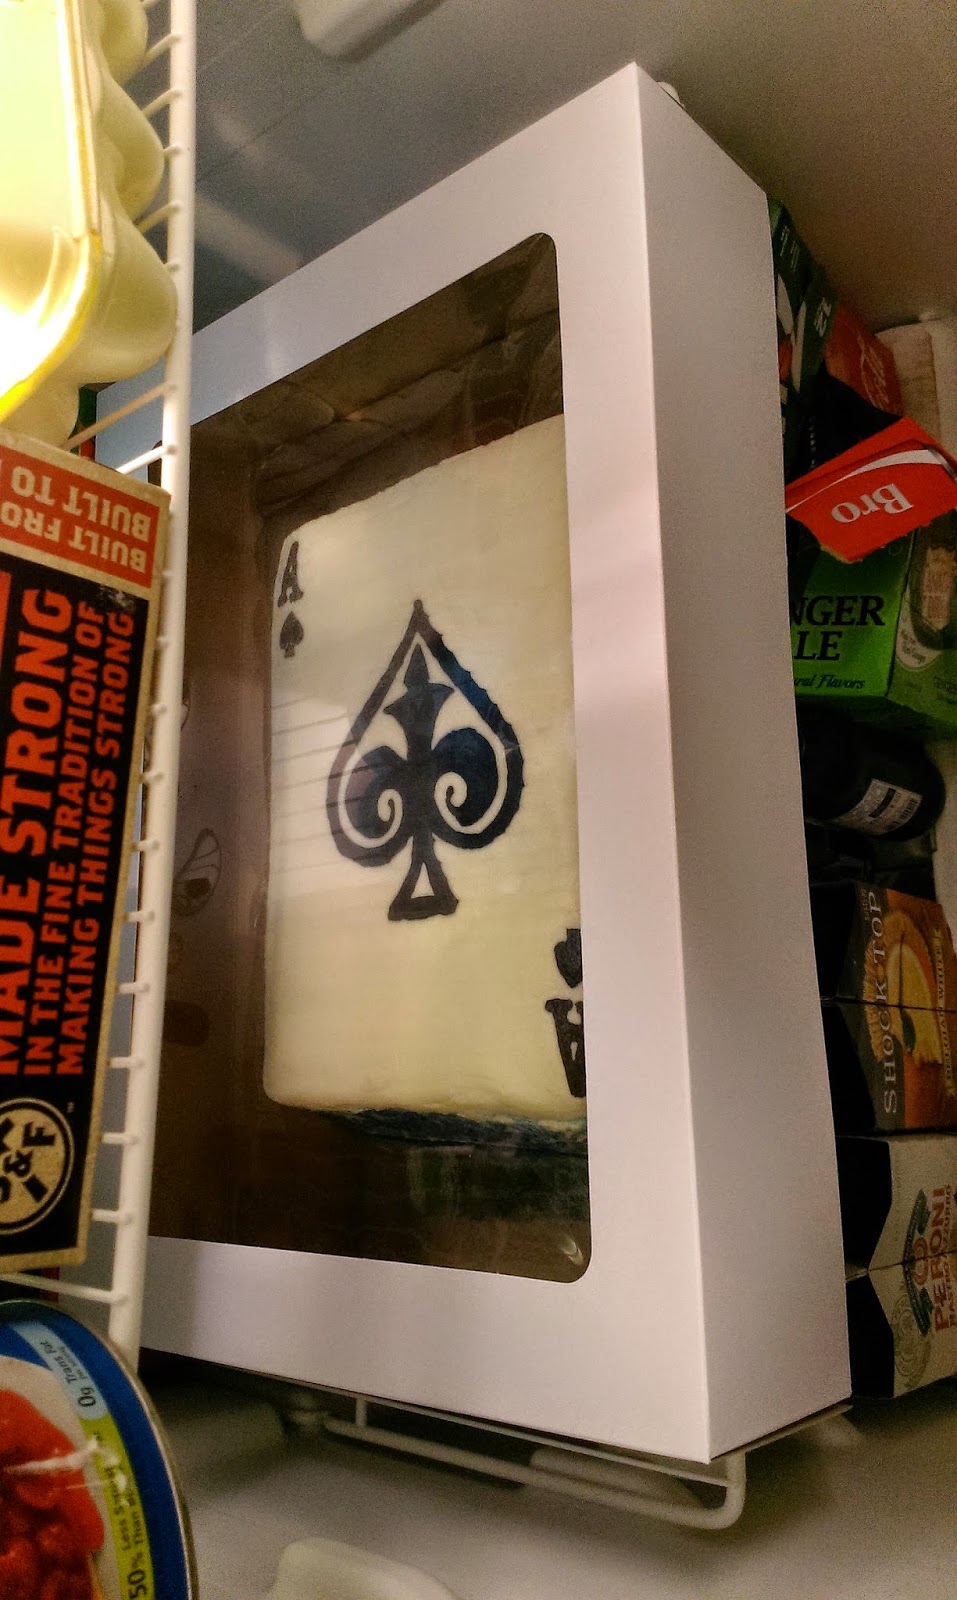
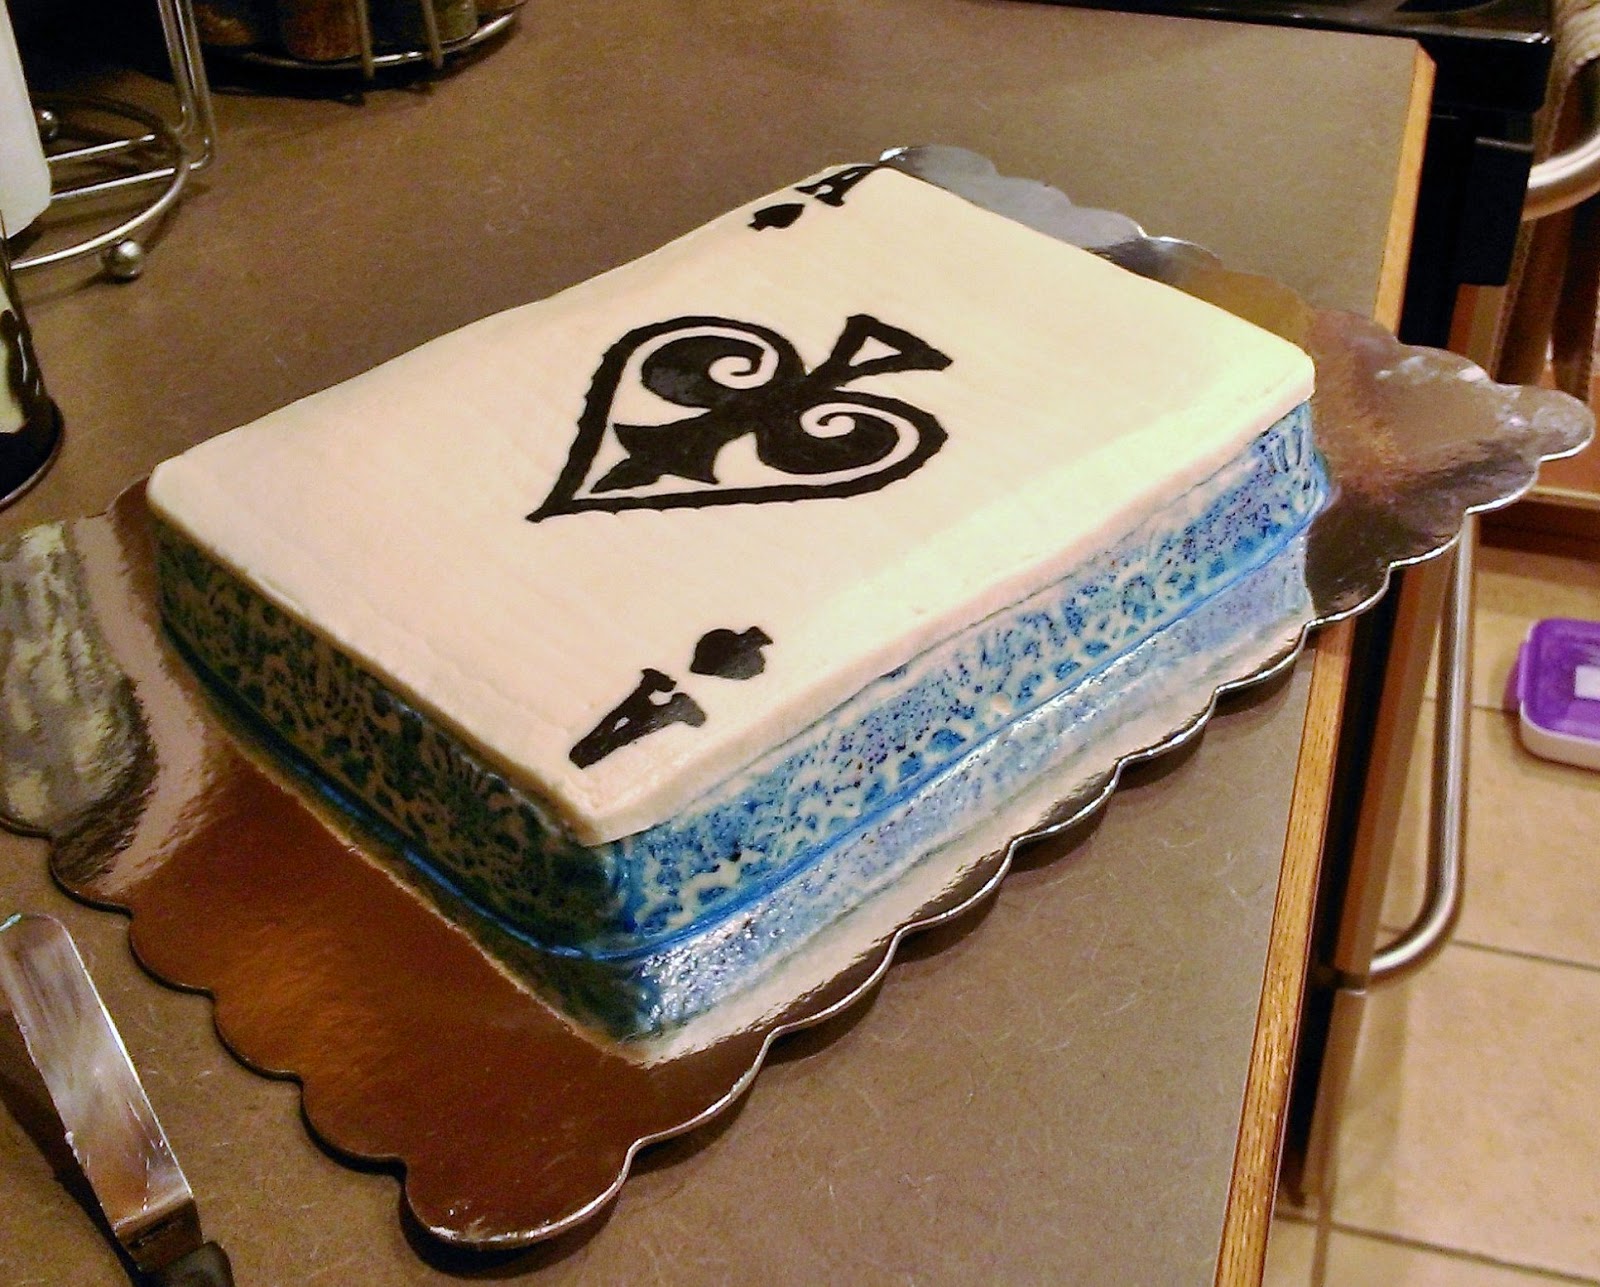
Ace of Cakes…Seriously.
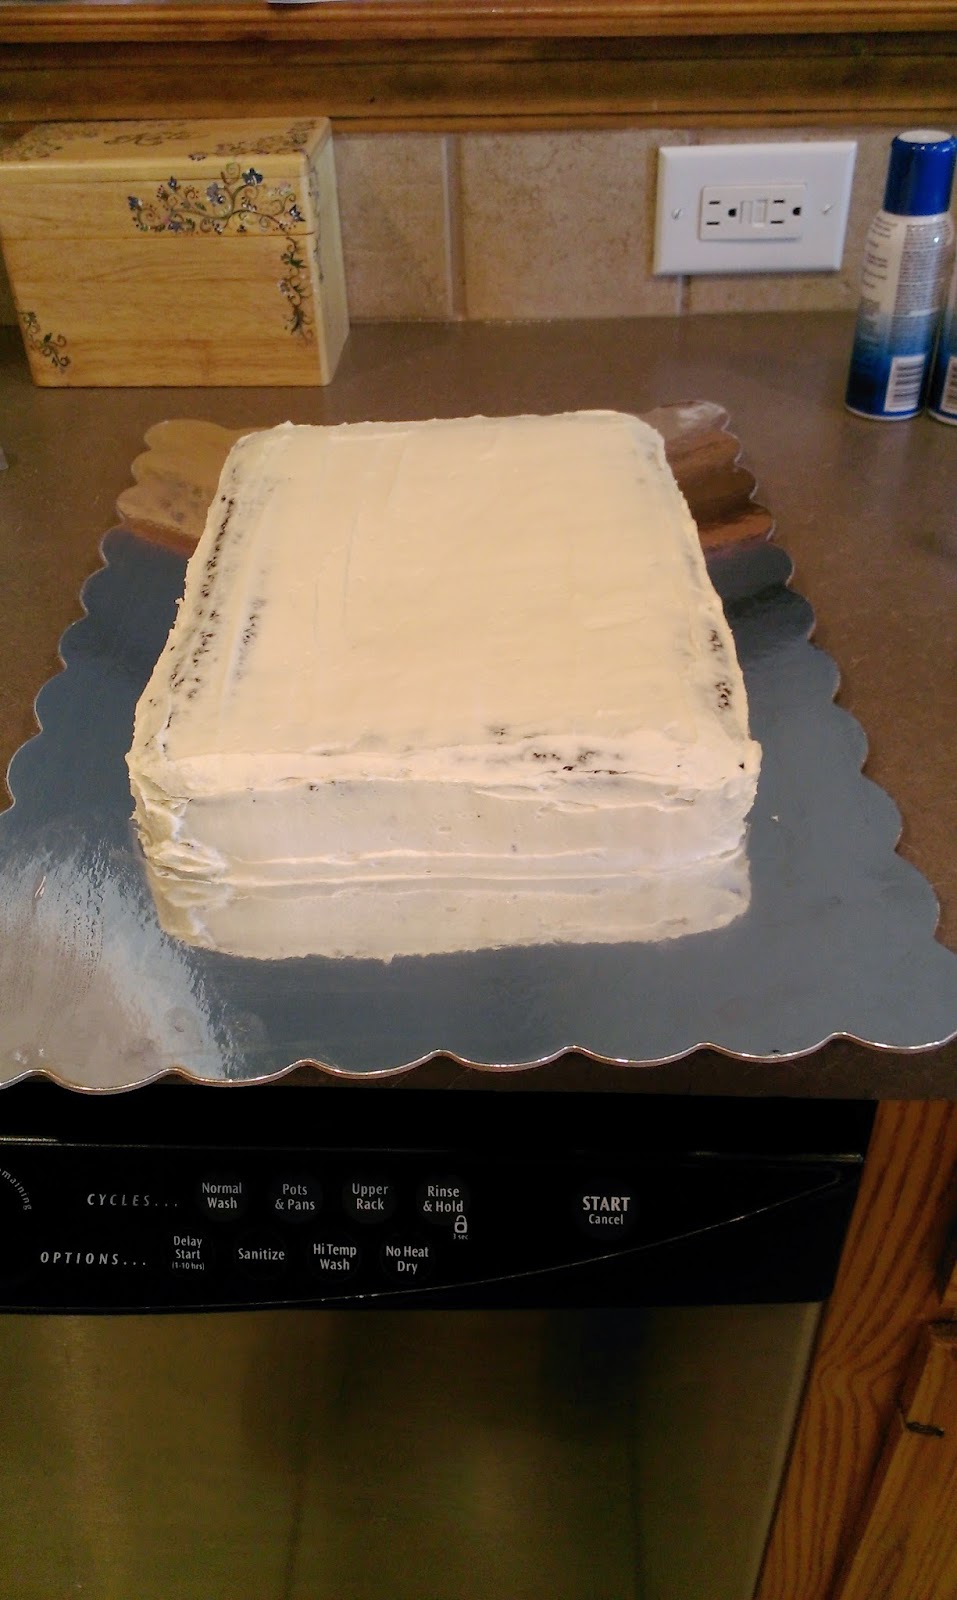
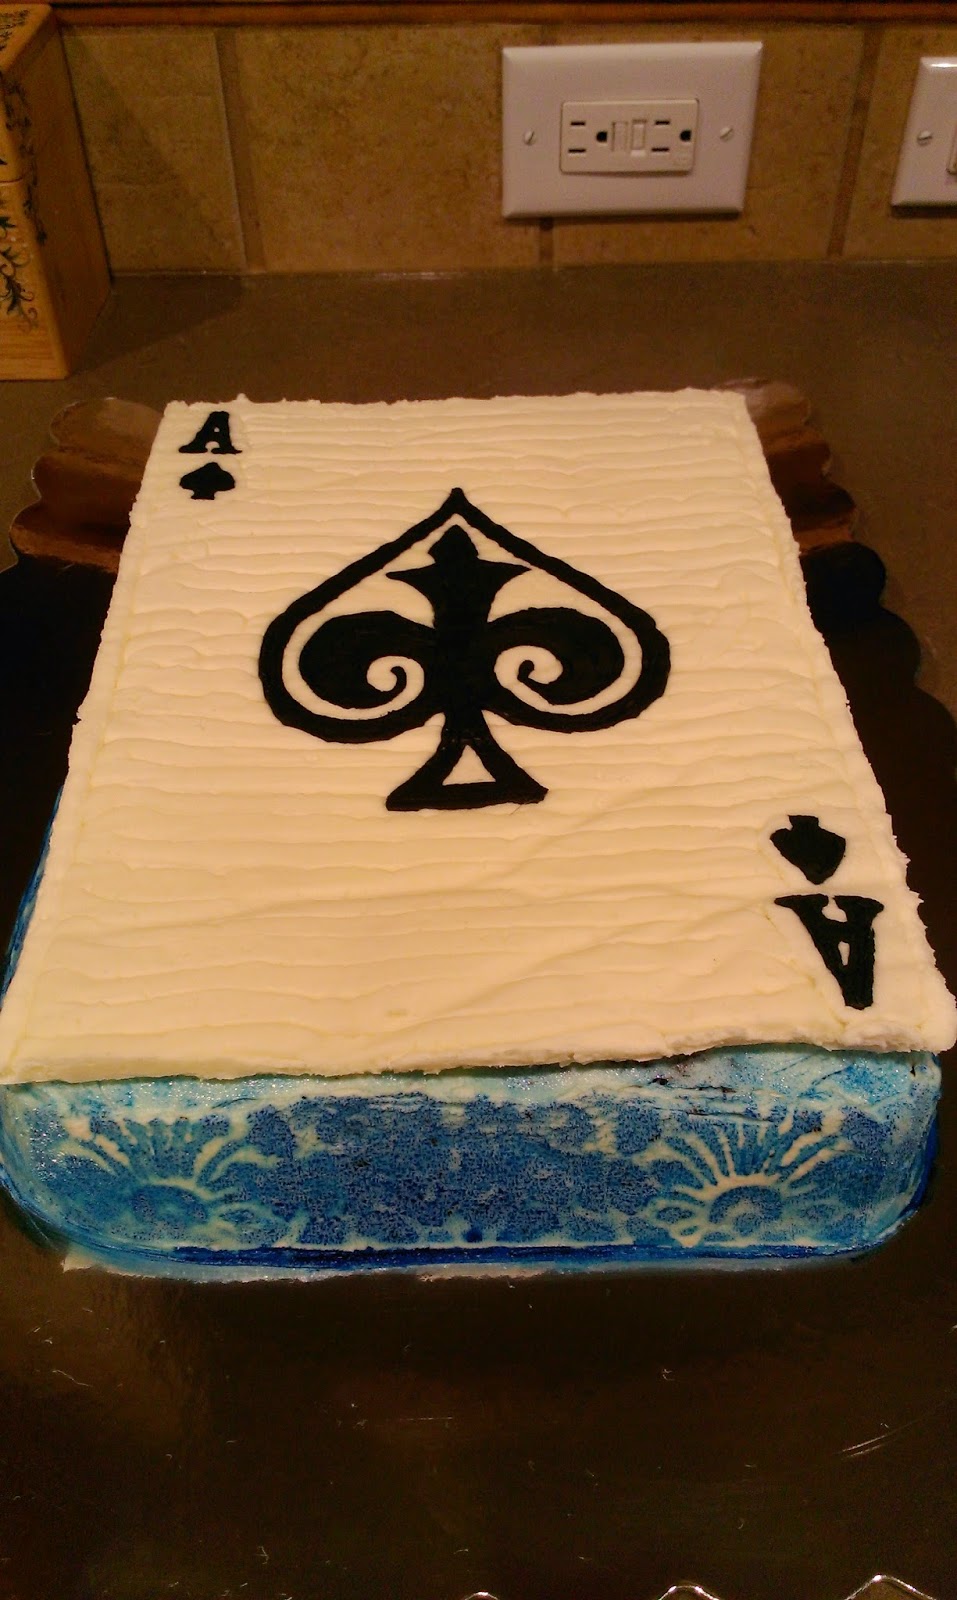
I hate humidity. I hate it more than slow walkers, asking people for favors, and not being able to eat Blue Bell ice cream with the cobbler I made a few days ago. I talk my fair share of trash about Clovis, but usually our humidity levels are so low we all shed our skin like snakes every season to deal. Lately, however, we have gotten more rain than this city has seen in years. Almost 8 inches since the beginning of May! I mean, things are green, my predator pond is back in full swing and has triple the water of last year, but the mosquitoes and humidity are now rampant. I don’t like stepping out of a shower only to sweat through my towel and need another one before I even finish drying my hair. Granted, I probably have some sort of sweat gland cancer considering I sweat like a football team in sauna, but somehow it doesn’t bother me so much when summertime isn’t humid. Aside from my hair looking like a wilted dandelion and my excessive sweating issues, humidity is hard on way more than my petty vanity and other people’s sense of smell–humidity is hard on baking. I was commissioned to make an ace of spades birthday cake for a friend’s party last weekend, and the 95 percent humidity nearly killed my frosting dreams. I realize if we ever move somewhere with regularly high humidity that I may not be able to frost without the use of fondant, and that makes me incredibly sad. I mean, I’m not so good with the emotions, but that realization definitely didn’t give me the warm fuzzies inside.

But this cake certainly did. I used a few new techniques in creating this cake: buttercream transfer and stenciling, but I used the Guinness chocolate cake with Baileys frosting recipe just doubled to make a 9×13 cake. I wanted to make the whole thing look like an actual (albeit edible) playing card, complete with that Bicycle Playing Card back look on the sides. The humidity almost beat my dreams, but after a few meltdowns and tantrums and threats of never making another cake, I managed to pull myself together and soldier on. And it only took one glass of wine! I mean, really, like I’d never make another cake…if I had a piece of actual cake for every time I’ve said that I’d have like five cakes all made by me anyway. So let’s talk about this buttercream transfer business because it will totally change the cake game for you, especially if you feel like fondant is the only way you can do cool cake toppers. Be prepared, as I am about to take you through a crappy photo montage to the max.

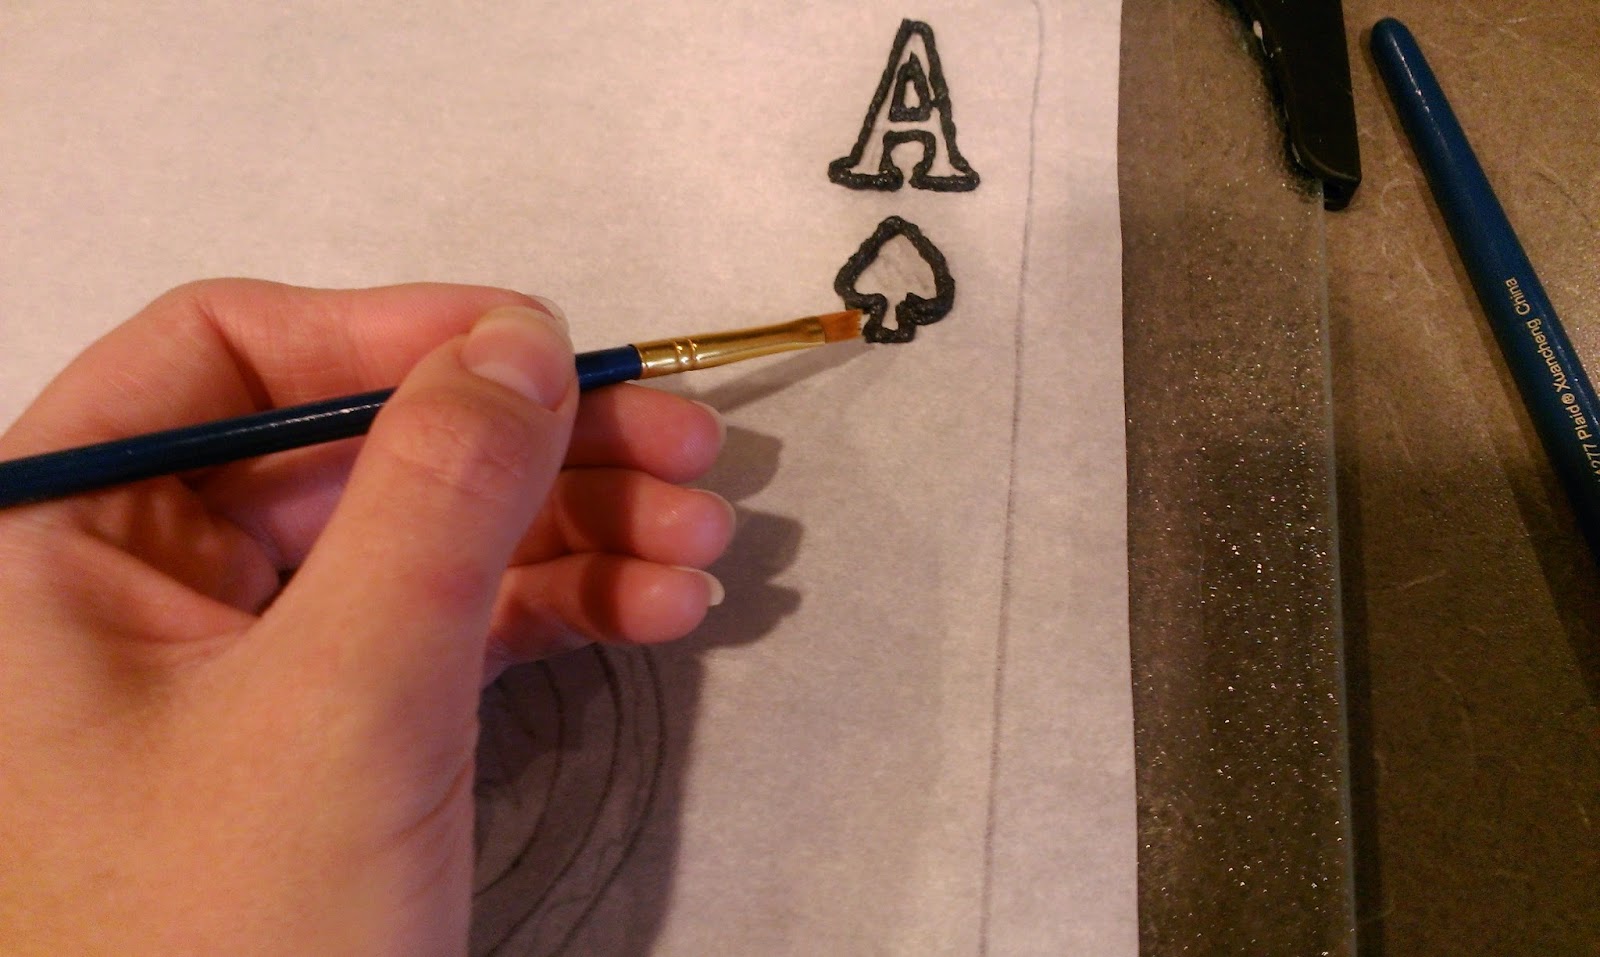
Start by printing out whatever image you want to appear on the top of your cake. I adjusted the printing size to 8 1/2 by 12 1/2 inches because I initially planned on having a small border around the cake top. But apparently my 9×13 pan is actually only an 8×12, so I had to scrap that idea entirely. No idea how the hell that happened since the pan itself really does measure 9×13. 
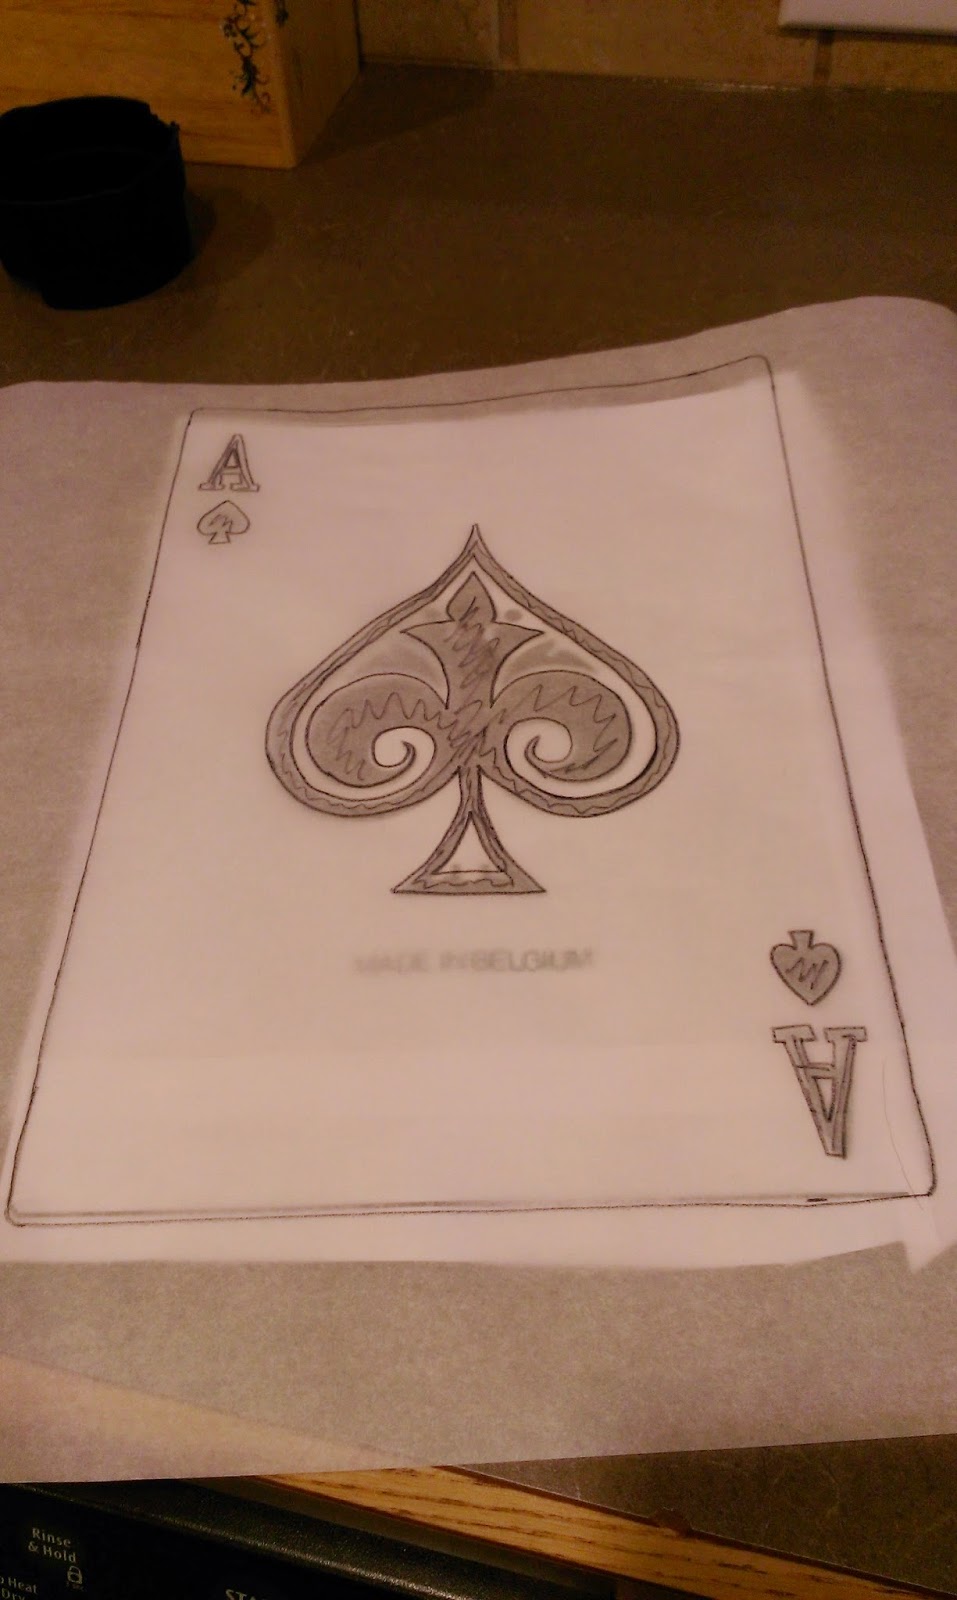
Then take some Parchment paper and place it on top of your printed image Trace the image with a Sharpie. 
So much Sharpie on my left hand after this. 
Take your tracing and place it face down on a clear cutting board or plexiglass. Be sure to tape all the edges down. 
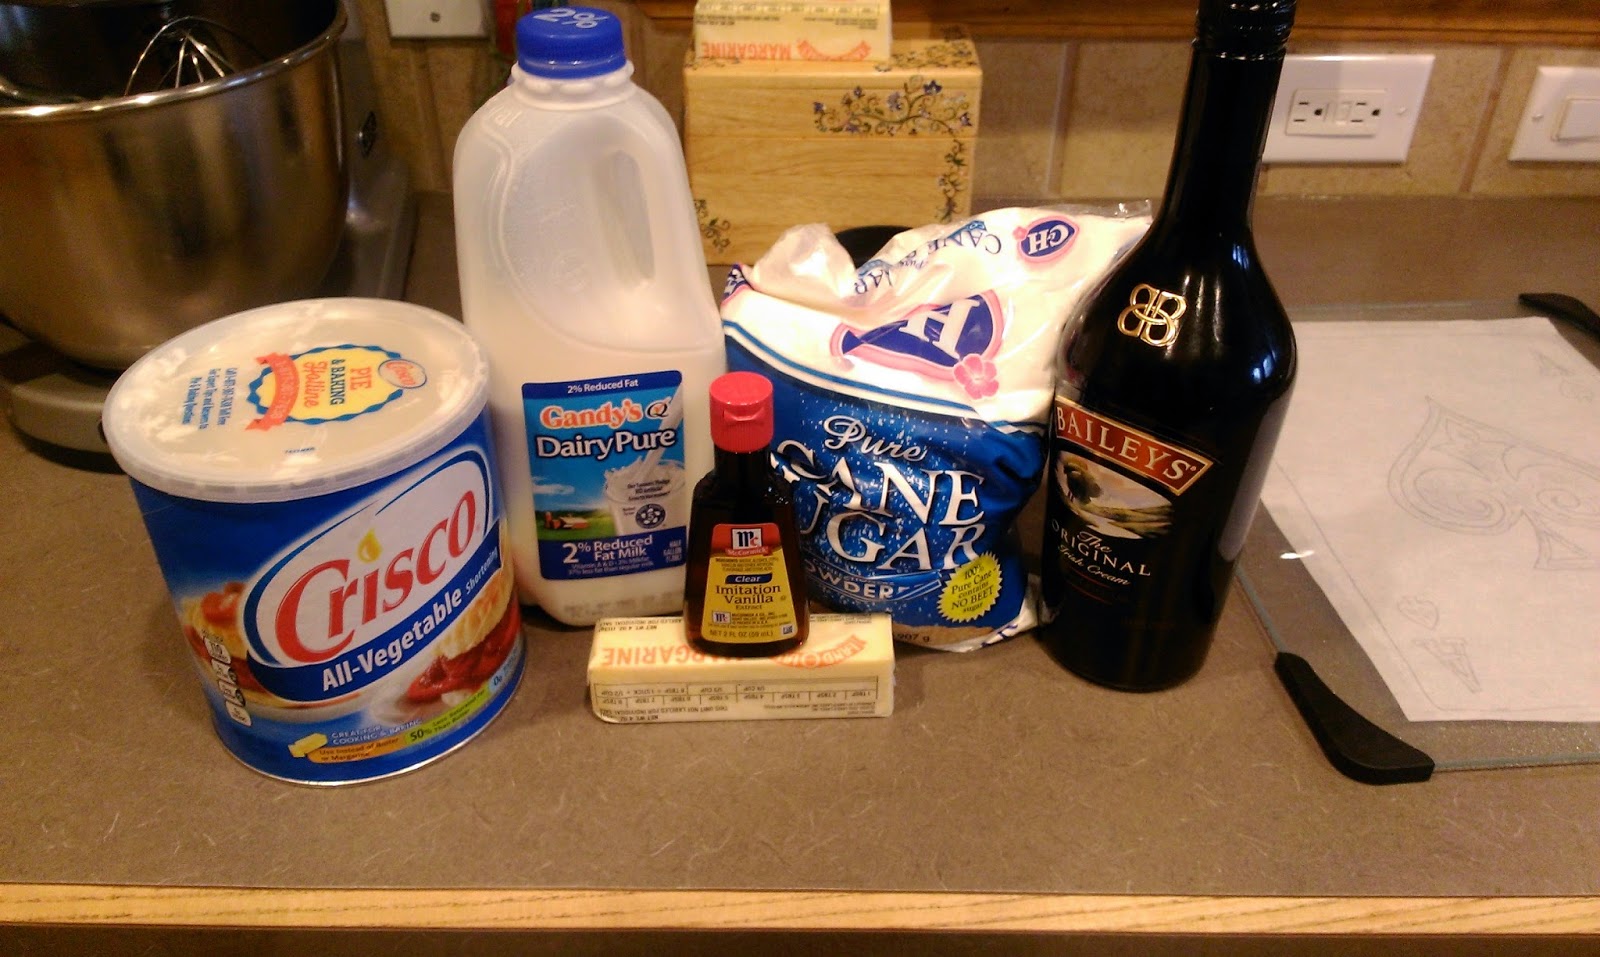
Drink Baileys as needed. I made some alterations to my Baileys buttercream so that I could make it as white as possible for the playing card top. It was still deeeelissshhh:- 1 stick of room temp butter
- 1 1/2 cups of Crisco
- 6 cups of powdered sugar
- 1 tablespoon of CLEAR vanilla extract
- 3-4 tablespoons of Baileys
This does make quite a bit of frosting, but I used it all to make my buttercream transfer PLUS another batch to crumb coat and frost the sides of my cake. Combine the Crisco and butter for 3 minutes in a stand mixer, then add in the extract and 1 tbs of Bailey’s. Add in three cups of powdered sugar and mix on low, scraping the bowl as needed. Add in 2-3 more tbs of Baileys depending on consistency preference and three more cups of sugar. It is easier (and boozier!) to add in 3 tbs at this point to make piping with the buttercream turn out better for your transfer.

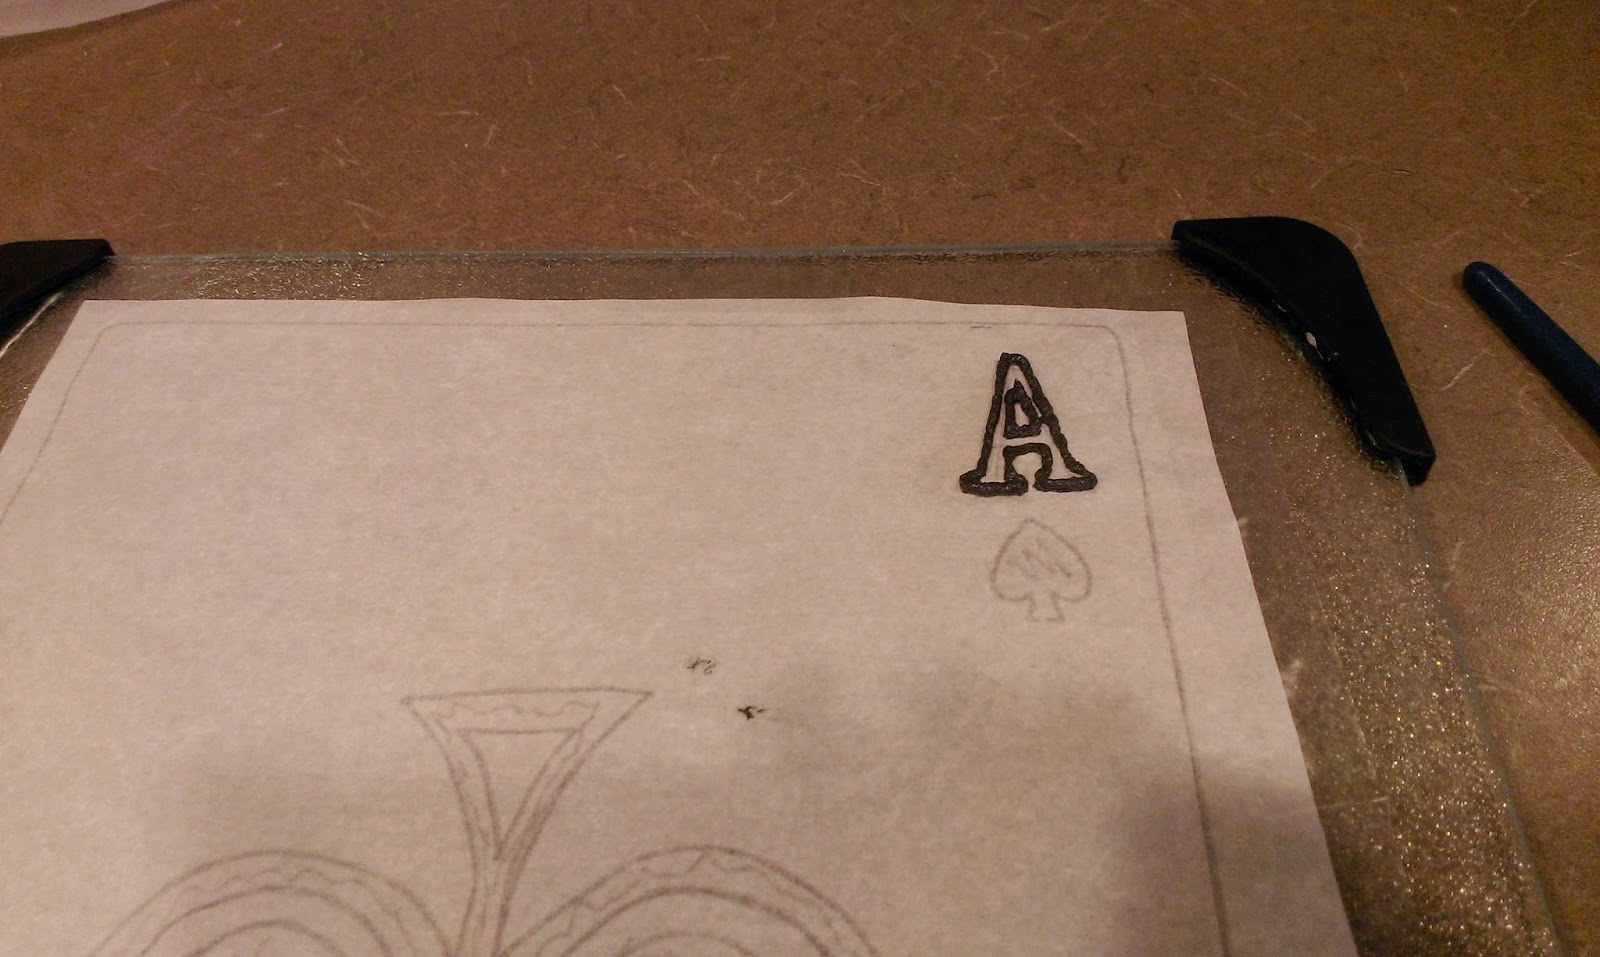
You will need varying sizes of round tips depending on what kind of image you are piping. I used a 3, 5, and 12 Wilton tip. If you need to dye your frosting different colors, simply take a few small bowls and dye away. I like using Wilton’s gel dye, as it really gives a rich color without a weird taste like Americolor dye can. Fit your tips to piping bags and load up with whatever color you plan on outlining your image with. 
I needed to outline the spade and smaller details in black, so I loaded a piping bag fitted with a 5 tip and outlined the A, small spade, and large spade. 
Buttercream is quite malleable, so if you look under your glass cutting board and see spaces or small holes in your outlines, take a paintbrush and lightly push your frosting in and down until the light or holes aren’t noticeable when you check from the underside of the cutting board. 
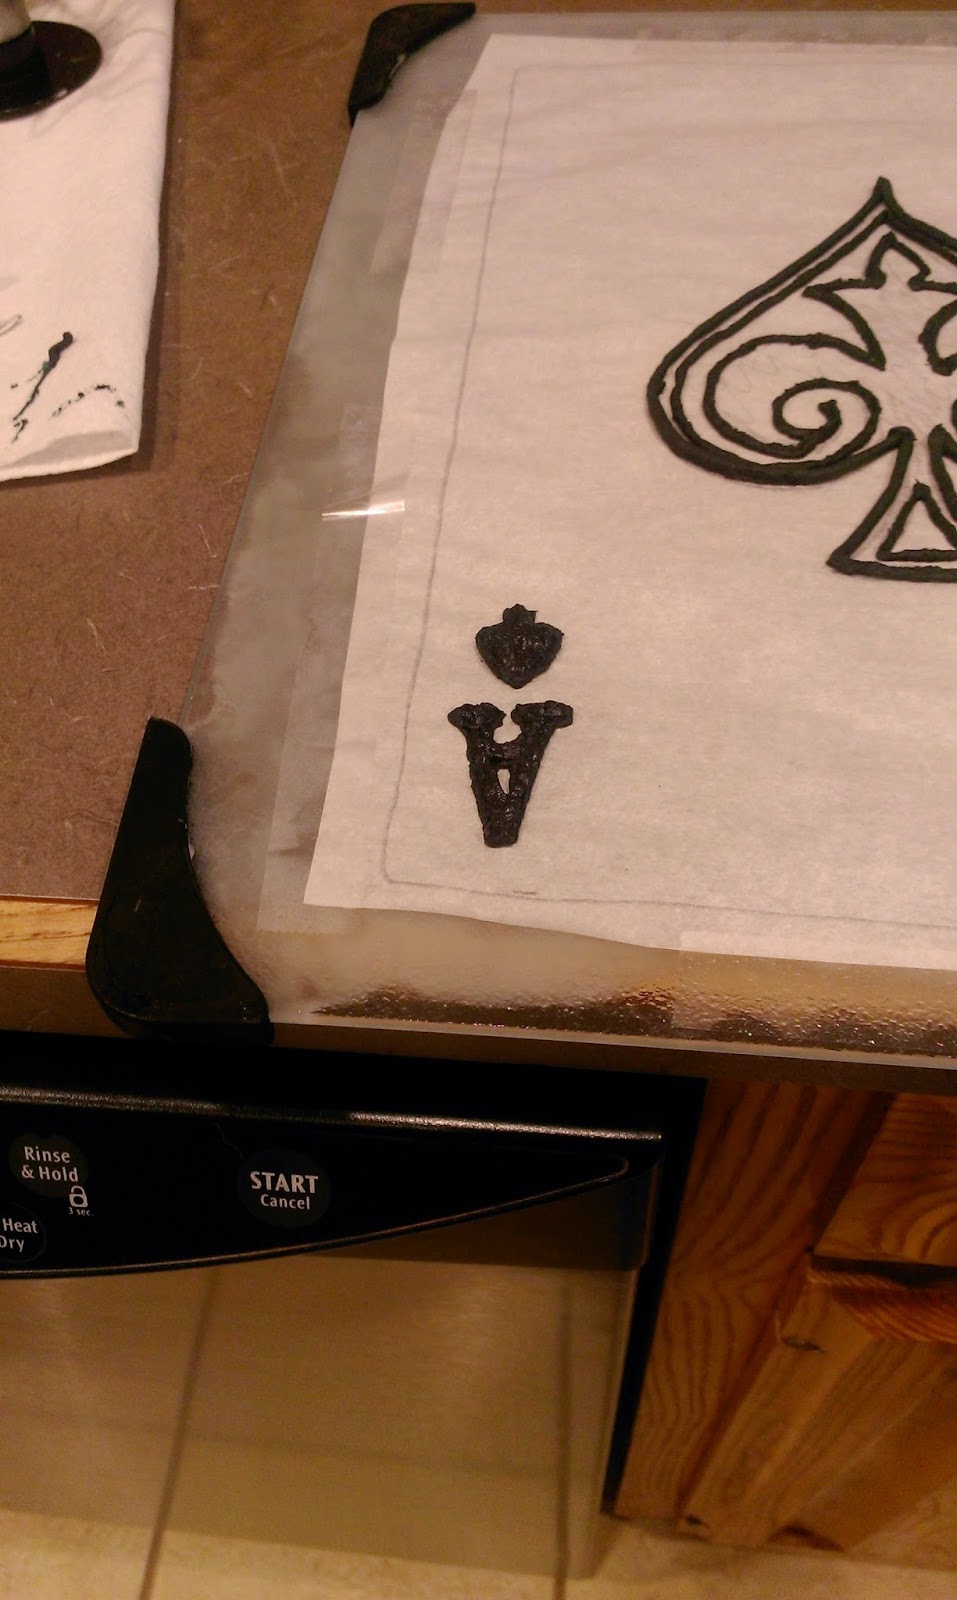
Once you’ve got all your outlining done, place the cutting board into the freezer for at least a half an hour to set. I waited a FULL hour because I did not want there to be a remote chance that my black frosting would melt down and stain the white frosting later. 
After my first deep freeze, I went back in and filled in the A, little spade, and larger spade. If you have multiple colors in your image, fill them in one at a time with a freeze between each color so nothing runs. Again, CHECK your work frequently from the other side of the cutting board. If you see light poking through, uneven lines, etc. fix it with a little paintbrush. I’m not going to lie to you, this is insanely time consuming, but I accept nothing less than perfection. If I had a ruler, I’d snap you on the wrist with it right now. Ice your wrist while your transfer is back in the freezer for another 30 minutes to an hour to let things set. 
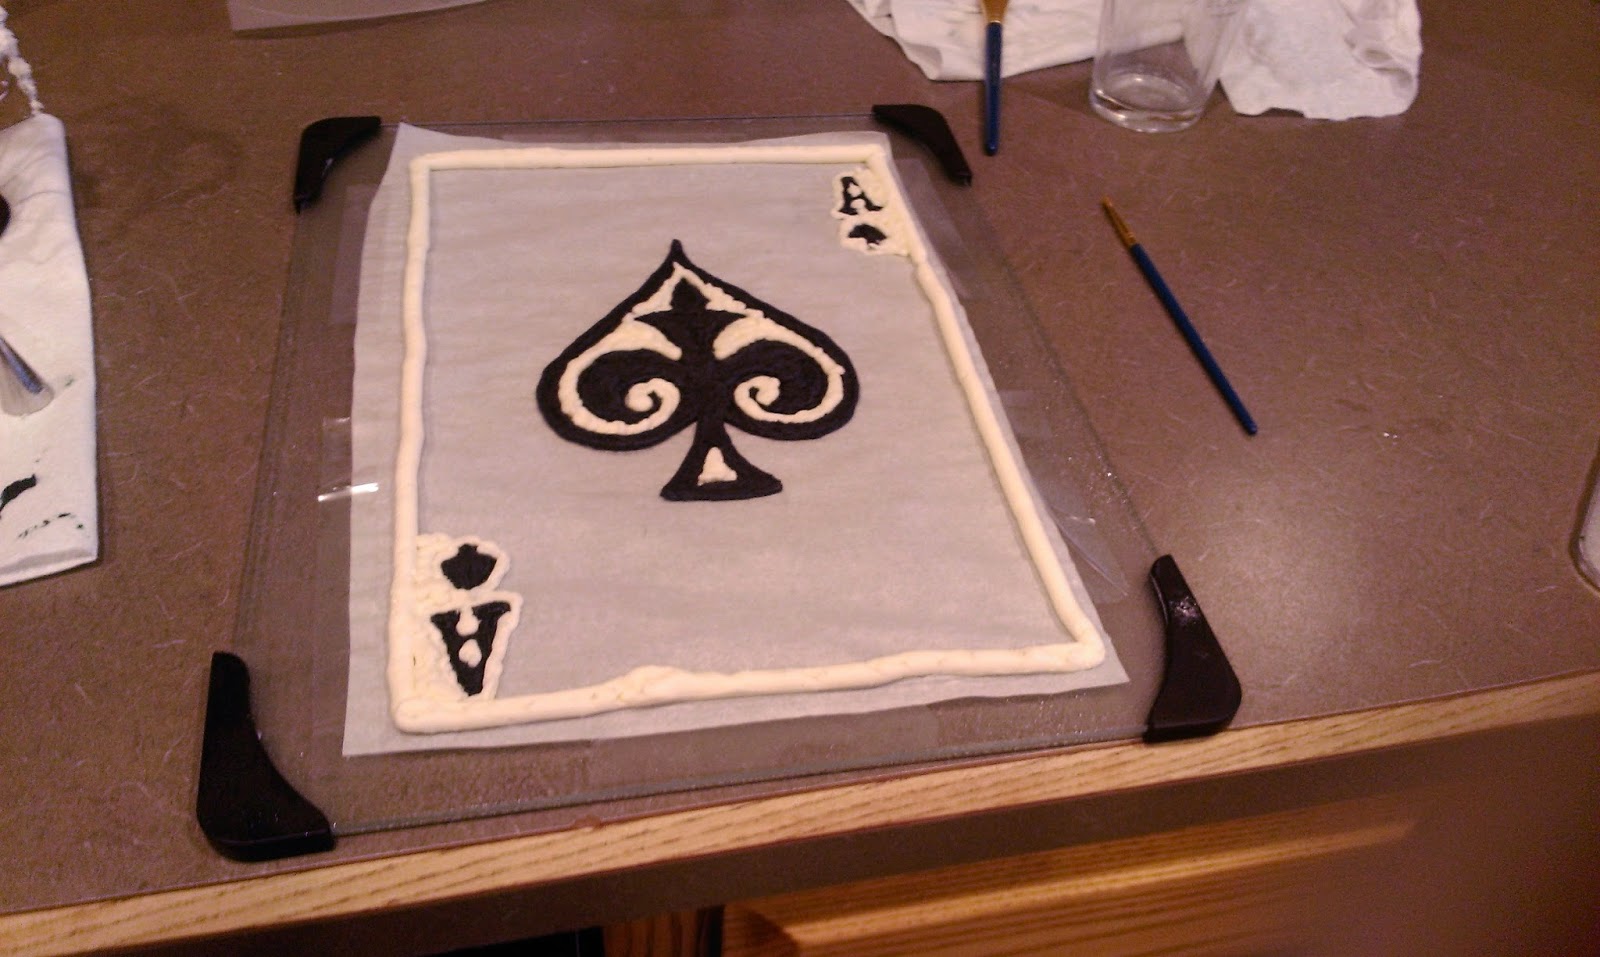
I fitted a 3 tip with plain white Baileys frosting and came back in and filled in the large spade, and with a 12 tip I outlined around the edge of the card before switching back to the 3 tip to fill in the A and little spade. Of course, things went back into the freezer after a quick quality check from underneath the cutting board and necessary adjustments with my paintbrush. 
Now, once you’ve filled in all your colors, you want to give your transfer a background. Fill it in with whatever color you want to match the rest of your frosted cake. Clearly I needed to use white to give my playing card a white background. I piped back and forth across the card and OVER the top of all my previous work using a 12 tip. I came back in with a larger paintbrush and pressed things flat. 
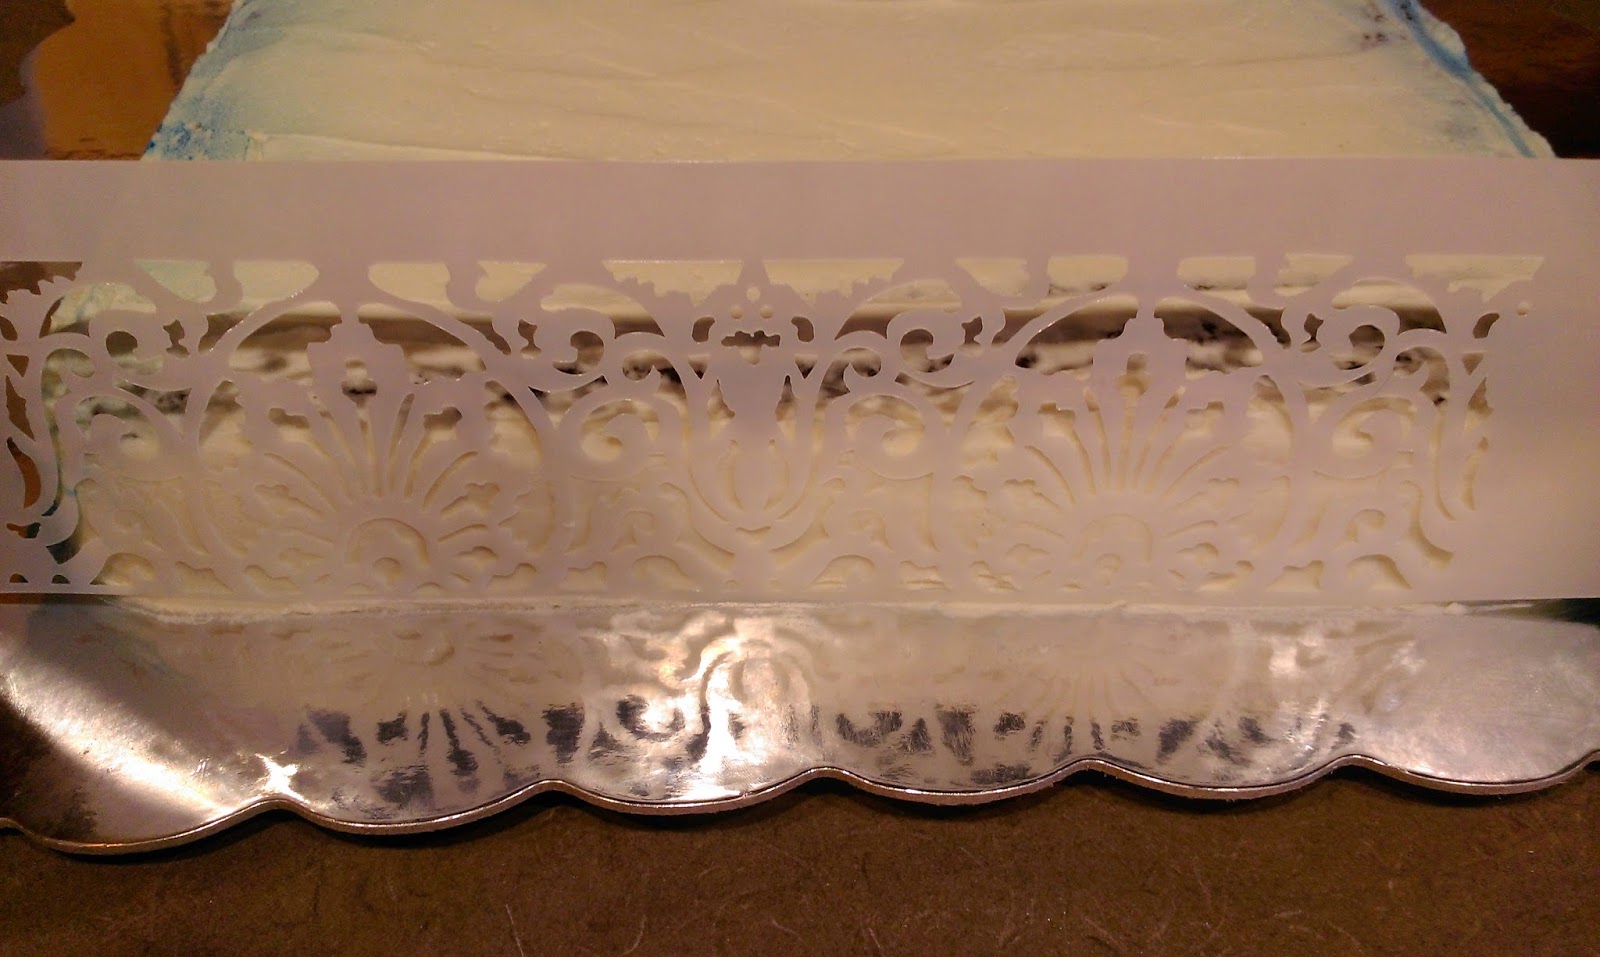
To finish up, smooth out your background with a small angled spatula. You want an even, flat back so it fits smoothly on top of your cake. Place in the freezer for AT LEAST two hours before transferring to your cake. I did my transfer a full day before I made my cake so that it could sit in the freezer overnight. I told you it wasn’t easy, but it is possible. Anything worth doing is worth doing well, or as I call it, whole-assed. Half-assing your transfer is going to make for one sad cake. Sad cake can still be eaten, but you will taste it’s tears and heartbreak which taints the experience. Or something. Definitely give yourself a day or two ahead of time to make your transfer. Now, on to the much simpler stenciling–especially if you live somewhere without soul crushing humidity!
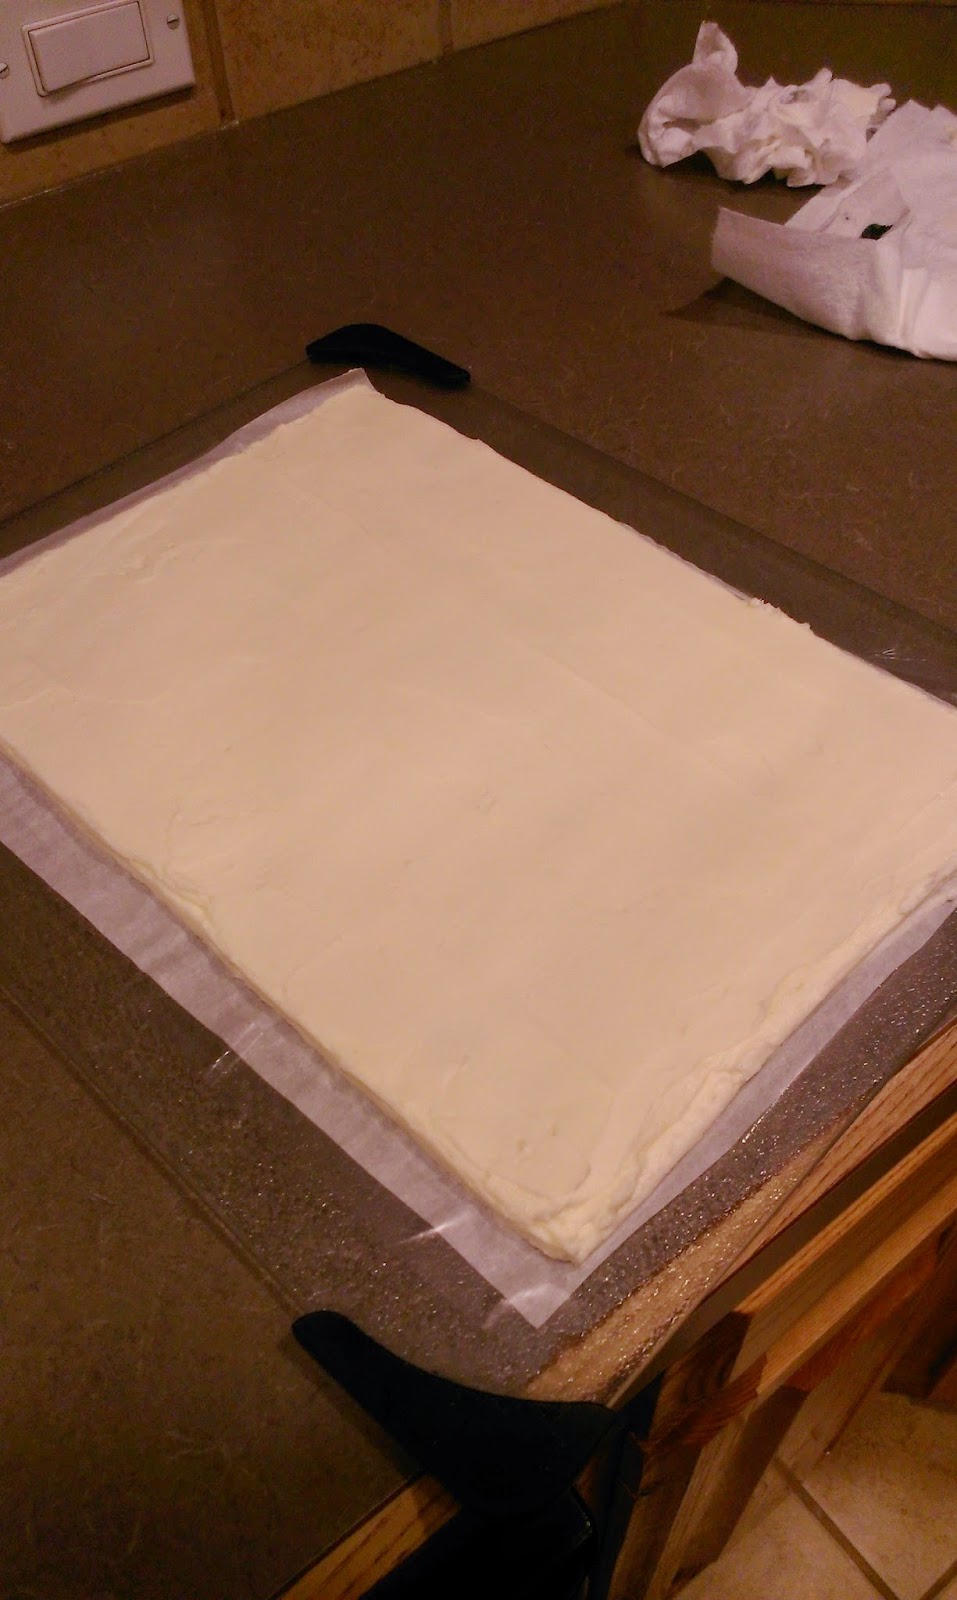
Before you stencil, make sure you’ve crumb coated your entire cake. Freeze the cake for 30 minutes, and then frost your top layer of frosting. The top of the cake doesn’t need a final layer of frosting because it is getting the transfer. Not pictured because I was hungry for lunch: Place back in the freezer to set for 30 minutes and smooth out the sides with the Viva paper towel technique. 
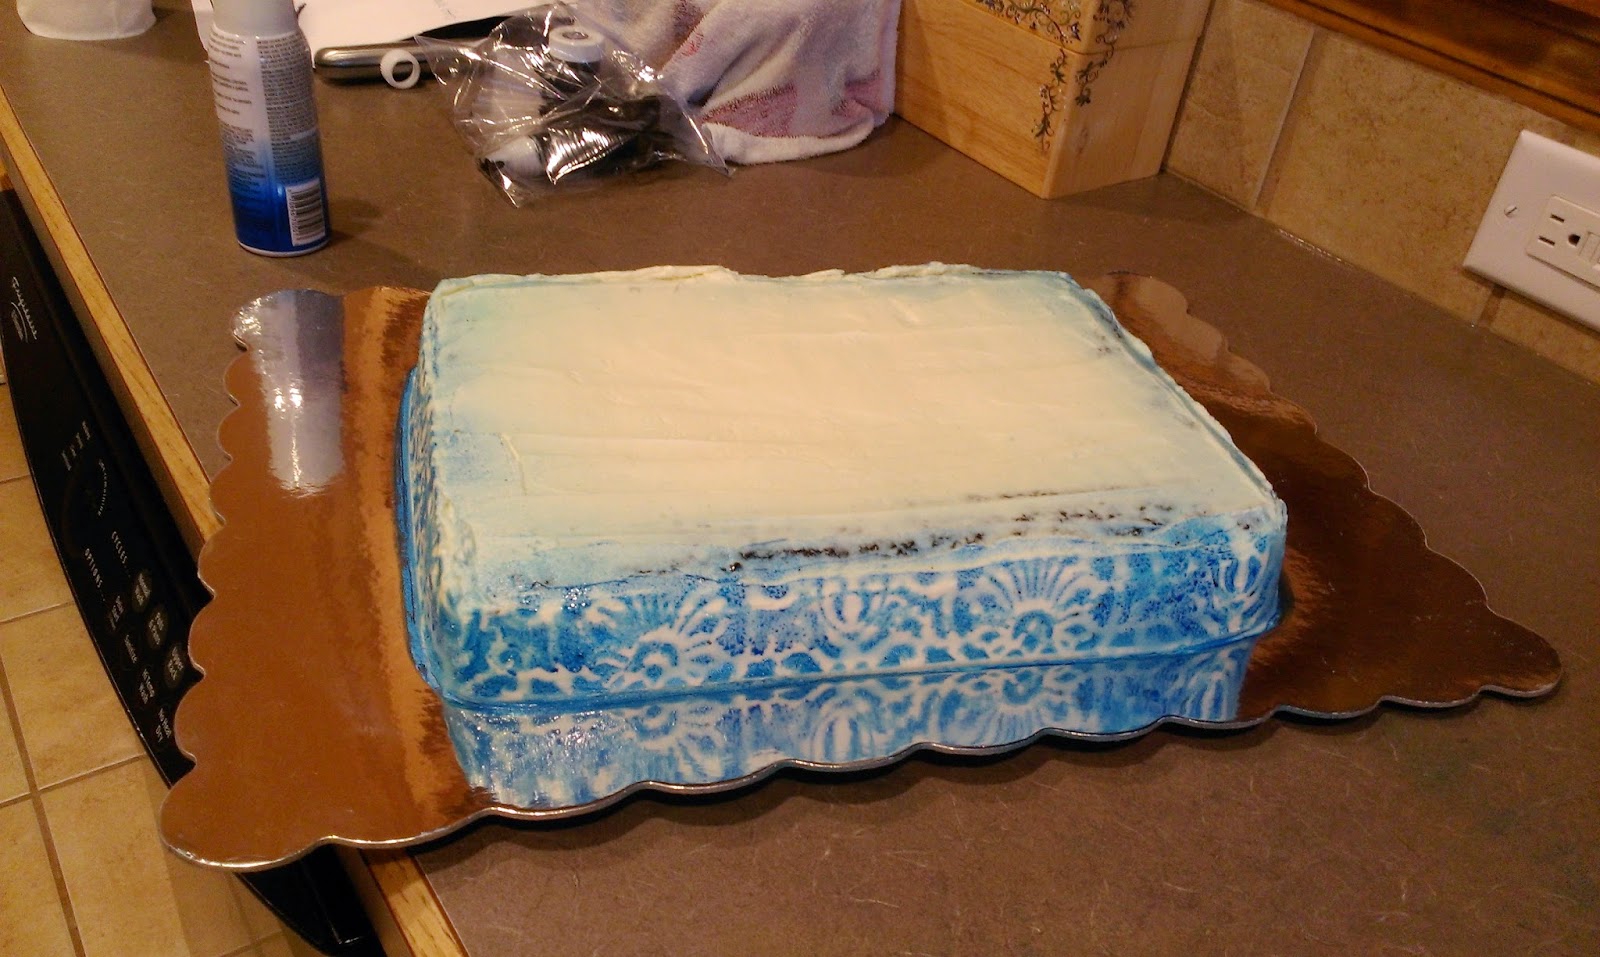
You can find a stencil for just about anything on Amazon, just search for “cake stencils.” Yes, supremely easy compared to what we just went through with the transfer, thank the cake gods. Whatever color you want your stenciling to turn out, head to Walmart, Michael’s (hate you if you have one!), HobLob, etc. and get a can of Wilton color mist. My husband picked up two for me just in case (but mostly to prevent another meltdown if I ran out. Thanks, hun.). 
Your buttercream should be very cold for this so the stencil doesn’t peel your frosting away. Simply place up against the side of your cake and press in gently so all the little nooks and crannies are sprayed evenly. 
Then spray! I covered myself and most of my kitchen in blue, but most importantly, I covered the sides of the cake! Hooray! Once done spraying, gently pull away the stencil and rinse it off with water. Color mist’s mortal enemy is water (and subsequently humidity), so it will come off of you, your kitchen, and your stencil quite easily. Be sure to thoroughly dry the stencil before repeating on all sides of your cake. Place your stenciled cake back in the freezer for an hour or two to firm up the color mist. This is where I lost my mind. It was so humid my cake started sweating if it was left out for more than five minutes and ended up looking like a crying teenage girl wearing blue eyeliner (unclear if she’s crying because she couldn’t find the right shade of eyeliner or Manic Panic hair dye). This meant I needed an extra set of hands and more wine- stat! To finish the cake in a quick manner. Carefully and oh so gently, we took the buttercream transfer from the freezer and removed it from the cutting board. Using all four of our arms (not a typo!), we flipped the transfer over and lowered it on to the cake before removing the Parchment paper.
I would’ve lit my house on fire if this had broken in it’s final stages. Upon peeling off the Parchment paper, you will have lines running across your cake giving it that Crow’s Feet look we all try to Botox away. Don’t worry- if you followed the frosting recipe above, you have a crusting buttercream on your hands and can use a Viva paper towel to smooth these lines and wrinkles away. Wish this worked on my face, too.
Ahh, Botox cake. I had to keep taking breaks to put the cake away so it would stop crying. I may have even been crying in there once or twice. But thankfully, humidity be damned, this cake turned out almost exactly as I had pictured it in my head….minus the border because my transfer flattened out significantly after the paper towel trick, so I had no room for one. I simply smoothed the sides of the buttercream transfer for a finished edge.

I believe this cake is aces… Y’all, this cake was a HIT. Worth the existential crises, back-aching work, and everything. The birthday party had a poker theme, and this confection literally took the cake…as did everyone else. I’ve never had people take SECONDS of my cake, but they did, and they did with frequency. I was told by several guests that this was the best chocolate cake they’d ever had in their life (and naturally I agreed- I just didn’t realize how big of gold mine I’ve been sitting on since St. Patrick’s Day). Basically, what I’m saying is, make the damn chocolate cake and change your life already. If you live in sweltering humidity, forgo the pretty frosting and just eat this by the fistful. ‘Til next time, my fellow eaters!

I don’t have a poker face, but I do have a cake face. As in, my face was covered in it after I finished my piece. -
My Sopapilla Awakening
When I was a child, I was an extremely picky eater. When we went to places like the Olive Garden, a Japanese steakhouse, or even a sub-par fast food join in my eyes, my parents always had to bring in a McDonald’s Happy Meal for me. I would eat most things my mother made at home, except green beans. She would regularly tell me I wasn’t getting dessert until I finished them, so I would take ten minutes to eat two green beans while hiding the rest under my chair. By the time she had realized what happened, I had licked the plate clean and fled the dining room…if I had a dog as a young child, I probably could’ve gotten away with this more than twice. I was also a painfully shy child, and if I wasn’t related to you, I hid behind the nearest parent while they conversed with you. In all honesty, I acted much like a feral cat as a child where food and strangers were involved- when no one was looking, I might creep up, take a tiny bite, and run away until the strangers left or come back for more bites if I actually liked the food (I also became very good at hiding under tables due to this). When we would stay with my dad on weekends, he would go through his regular rotation of things I found acceptable to eat- fish sticks, hot dogs, sandwiches, and macaroni and cheese. But if it was a long weekend, my dad generally tried to avoid feeding my sister and me macaroni and cheese for breakfast, lunch, and dinner (4-year-old me and 28 year-old-me still think of this as the Holy Grail of menu planning), so we would go out to eat at one of the few places I found tolerable- Shakey’s Pizza or El Chico’s. I was always OK with pizza because I saw the merits of putting tons of cheese on top of bread and heating it up, and I liked El Chico’s because they had curly fries and Jello (Hindsight- what the hell kind of Mexican restaurant is this?). Since I was too shy to talk to servers, my sister always ordered me the same thing I wanted, but she and my dad always tried to get me to take a few bites of their food or dessert…Jello couldn’t sustain me forever, after all. On probably the fiftieth request, I finally caved in and tried a little bit of a sopapilla. The second it hit my tongue, I am positive my pupils dilated and my quest to eat everything sugary-sweet began. The sopapilla actually opened me up to trying other “Mexican” food like Taco Bell, and I consider it a gateway into not being afraid to embrace the better TexMex cuisine I have become so obsessed with. So when one of D’s friends hosted a belated Cinco de Mayo party (aptly titled Ocho de Mayo as it was hosted on May 8), I knew I had to bring my sopapilla cheesecake bars to try to enlighten as many people as possible.

Te amo. Te amo mucho. I adore these. Know who else adored these? The entire party. I made a whole sopapilla cheesecake and ended up cutting the bars to half the size above to make more bars for people. The whole tray was almost entirely demolished before dinner was even served. After dinner, well, I took an empty plate home two hours after I had arrived. To say these were a hit is like saying people like free stuff- it’s just a damn fact. But what’s best about these? It’s a Pillsbury recipe I tinkered around with, and it only takes like fifteen minutes to make. SO SIMPLE that you too can be the life of the fiesta, or just make your family love you that much more.

Make sure you get original crescent rolls and not garlic butter crescents…. You are a mere few ingredients and simple steps away from a sopapilla awakening, my dear friend. Here’s what you need:
- 2 rolls of original or reduced fat crescent rolls (you can also just get the crescent sheets, which would be way easier, but the commissary didn’t have any- whomp, whomp)
- 2 8 ounce blocks of cream cheese (you can use reduced fat cream cheese, but…real cream cheese is just where it’s at with cheesecake)
- 1 cup of sugar
- 1 teaspoon of vanilla
- 1/4 cup of melted butter
- Cinnamon and sugar mixed together for topping (I used 3 tablespoons sugar to 3/4 tablespoon of cinnamon)

Lightly grease a 9×13 pan and preheat the oven to 350. Take one tube of crescents and press them into the pan. Make sure you’ve pressed the seams together if you’re using the rolls and not just the crescent sheet. 
Mix together the cream cheese, sugar, and vanilla in a stand mixer. Spread it on top of the first layer of crescents until everything is covered evenly. Doesn’t have to be perfect, but somewhat level is a good goal to aim for. 
Roll out some Parchment paper or flour your counter top and open up the second tube of crescents. Even things out and pinch together the seams before transferring to the top of the cheesecake mix. 
Ahem, rotate your computer screen, and then use your hands to continue to pinch together the seams in any areas that came loose while transferring. 
Place the melted butter in one bowl and the cinnamon sugar in another. 
This right here- you will hear angels singing. Spread the melted butter as evenly as you can on top of the top crescent sheet, and then sprinkle the cinnamon sugar on top. I used a spoon and flung the mix on top of the butter. Certainly doesn’t have to be perfect because it is gonna look good no matter what after you bake it at 350 for 25 minutes. 
Told you so. Now let your cheesecake set in the fridge for a few hours or the freezer for one so you can cut them into bars. 
I think this initially made 12 pretty decently large bars, but I did end up cutting everything in half and some into quarters again to feed the masses. You can keep these chilling in the fridge for as long as they last, but when you have them out on a table for people to eat, they will be gone before the cheesecake can even get to room temp. I promise. My tribute to the greatness that is the sopapilla- 5 easy ingredients and 15 minutes of prep work. And there you have it- how one tiny little delicious piece of sugary-fried dessert took me from only being able to eat at McDonald’s to experiencing what places other than the Golden Arches had to offer. I’d like to think that thanks to the sopapilla, I learned I could be a much braver little girl and not a feral
kidcat. It took a few years, but I began eating most things or at least was not afraid to try them, and at the age of 9 or 10, I finally started speaking up and placing my own orders at restaurants instead of having my sister do it for me. I found my voice after that…and have not stopped talking since. ‘Til next time, my fellow eaters!
Thanks for the delicious cinnamon-sugar and sometimes honey-laden memories, sopapilla cheesecake bars.

Healthy-ish cake, cupcakes, pie, and cheesecake recipes and decorating tips