-
Love at First Bite 🧛♀️
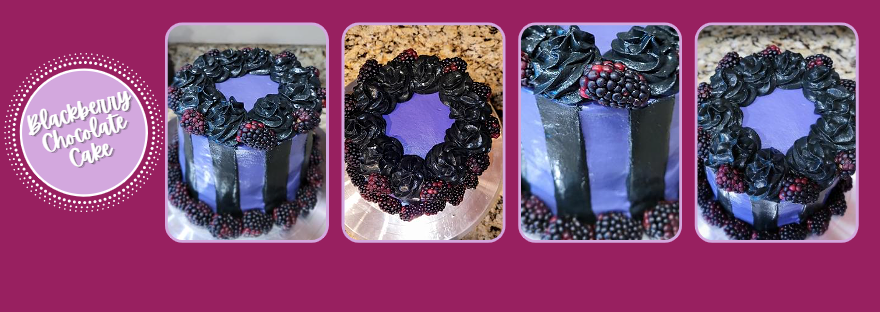
I always get a little sad when I finish my final Baketober recipe. I firmly believe October needs to be longer, or maybe we need to get a second Halloween in like, February or something because spooky bakes are just the best…after all, demons are a ghoul’s best friend. I have been dying to make a chocolate and blackberry cake, and I figured such a dark and scary recipe was the perfect way to cap off Halloween baking. I may not get a second Halloween, but with a little witchful thinking, I did manage to make a cake so delicious that it will haunt me until next year.
A scare is born. Fudgy chocolate cake with tart blackberry compote between every layer that’s covered in black cocoa cream cheese frosting–this is a cake that is so decadent even the devil himself couldn’t come up with something more enticing. You would think you might have to exorcise to earn a slice, but keep your demons at bay–each slice is only 300 calories (10 slices total). Definitely used some witchy magic to make that happen, but if the broom fits… This might be my new favorite flavor combo (watch out peanut butter and chocolate, you’ve got competition). Rich chocolate with a tart blackberry zing is just so perfect. It’s the kind of cake with a flavor so dreamy that it makes plain chocolate cake look like a total ghoul.
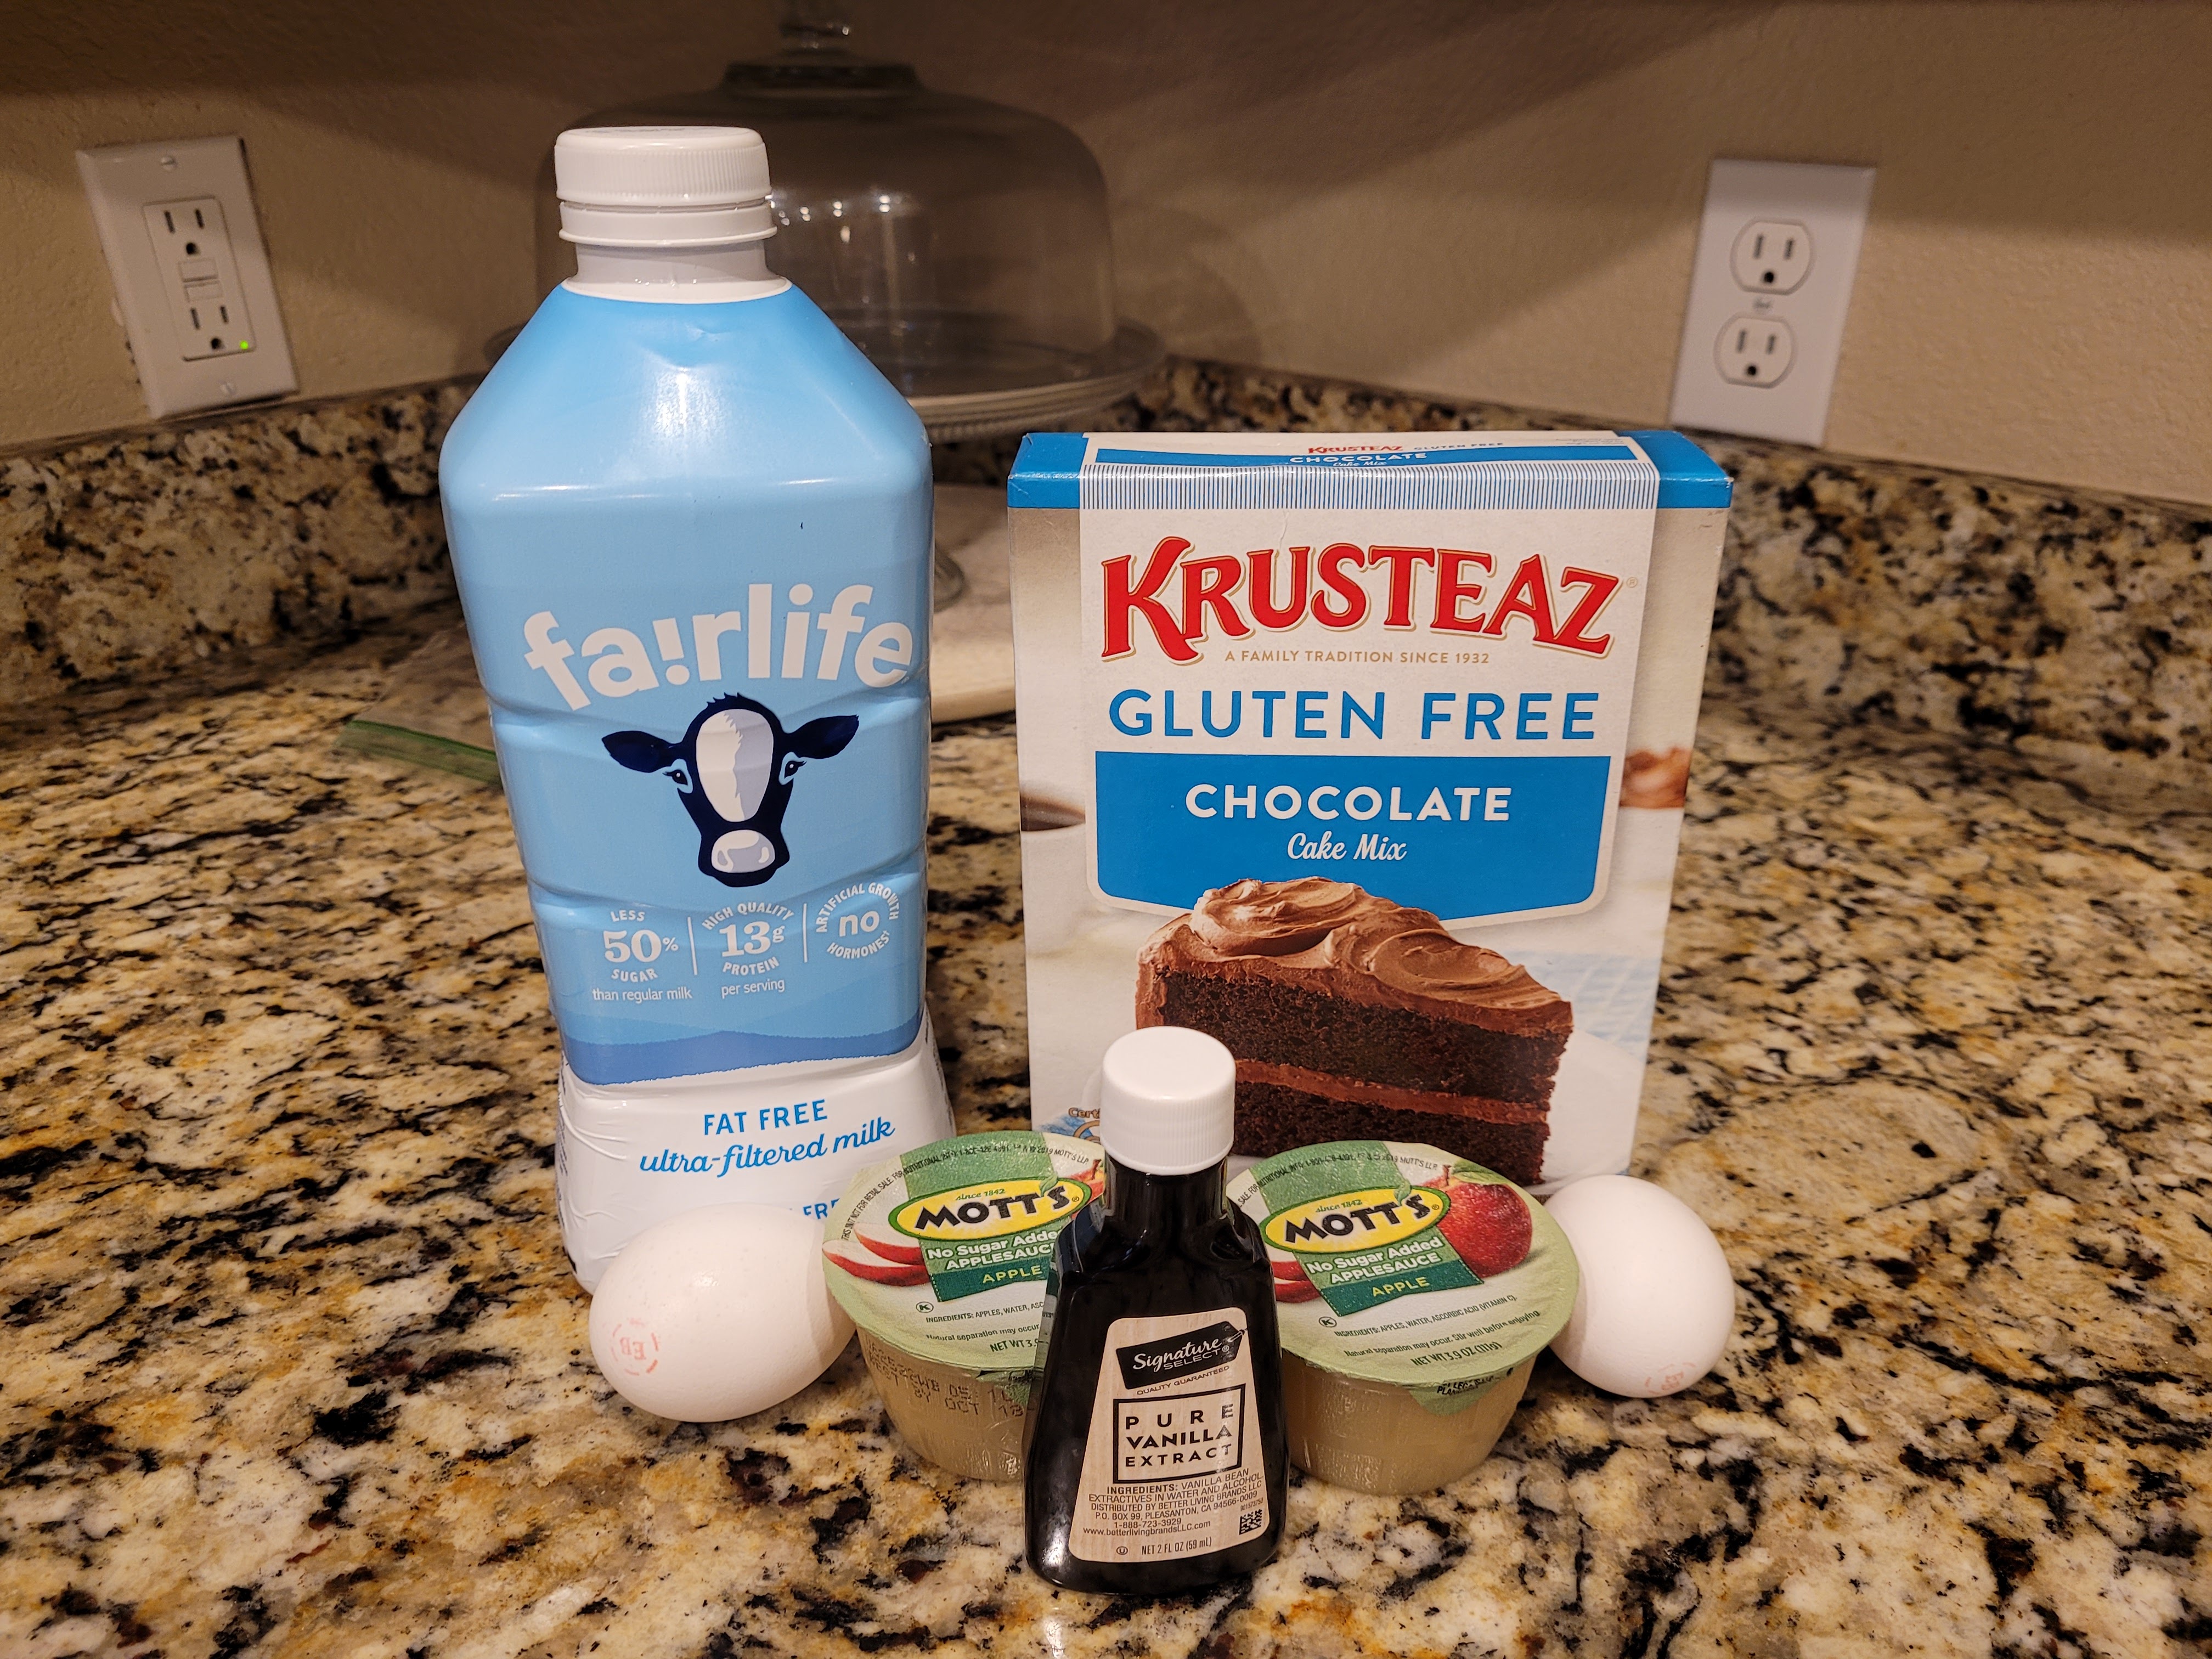
It’s a recipe that’ll put a spell on you, alright. After over a year of searching for a Whole Foods GF cake mix replacement, I finally found it. I should’ve known…Krusteaz makes the best waffle mix (prior to my need to be gluten free, this was the only waffle mix I let near my pantry; RIP youthful stomach), so it stands to reason they know what they’re doing with a cake mix, too. Definitely going to try their yellow GF cake mix ASAP. It bakes easily with the adaptations I want to lower sugar and fats in my baked goods, and it doesn’t get stale approximately 10 minutes after you pull it out of the oven like 90% of other GF cake mixes. To make, you’ll need:
- 1 box of Krusteaz gluten free chocolate cake mix
- 173 grams (3/4 c) unsweetened applesauce
- 2 eggs
- 1 1/2 c fat free or skim milk
- 1 tsp vanilla extract
Preheat your oven to 350 and prepare three 6-inch round cake pans with cooking spray and bake even strips. Mix all the ingredients together in a stand mixer on medium-high for two minutes. Evenly distribute batter between the three pans and bake for 30-35 minutes, until a toothpick comes out with a few crumbs from the center of the cakes. Let these rest in the pan for 10 minutes before placing on a cooling rack to completely cool before frosting.
Only the blackest of berries for a Halloween cake. While your cakes cool, you can make the blackberry compote. Dump 3 cups (360 g) of blackberries into a medium saucepan with 1/2 cup (100 g) of Lakanto classic monkfruit sweetener or regular sugar. Heat on medium-high and stir to help the berries release their juices. Once the juices are released, add a tablespoon of cornstarch and stir frequently for 10 minutes. Things will get nice and thick; I also used a potato masher to break up any larger pieces. Move your saucepan to the fridge to cool and allow the compote to thicken while you make your frosting.
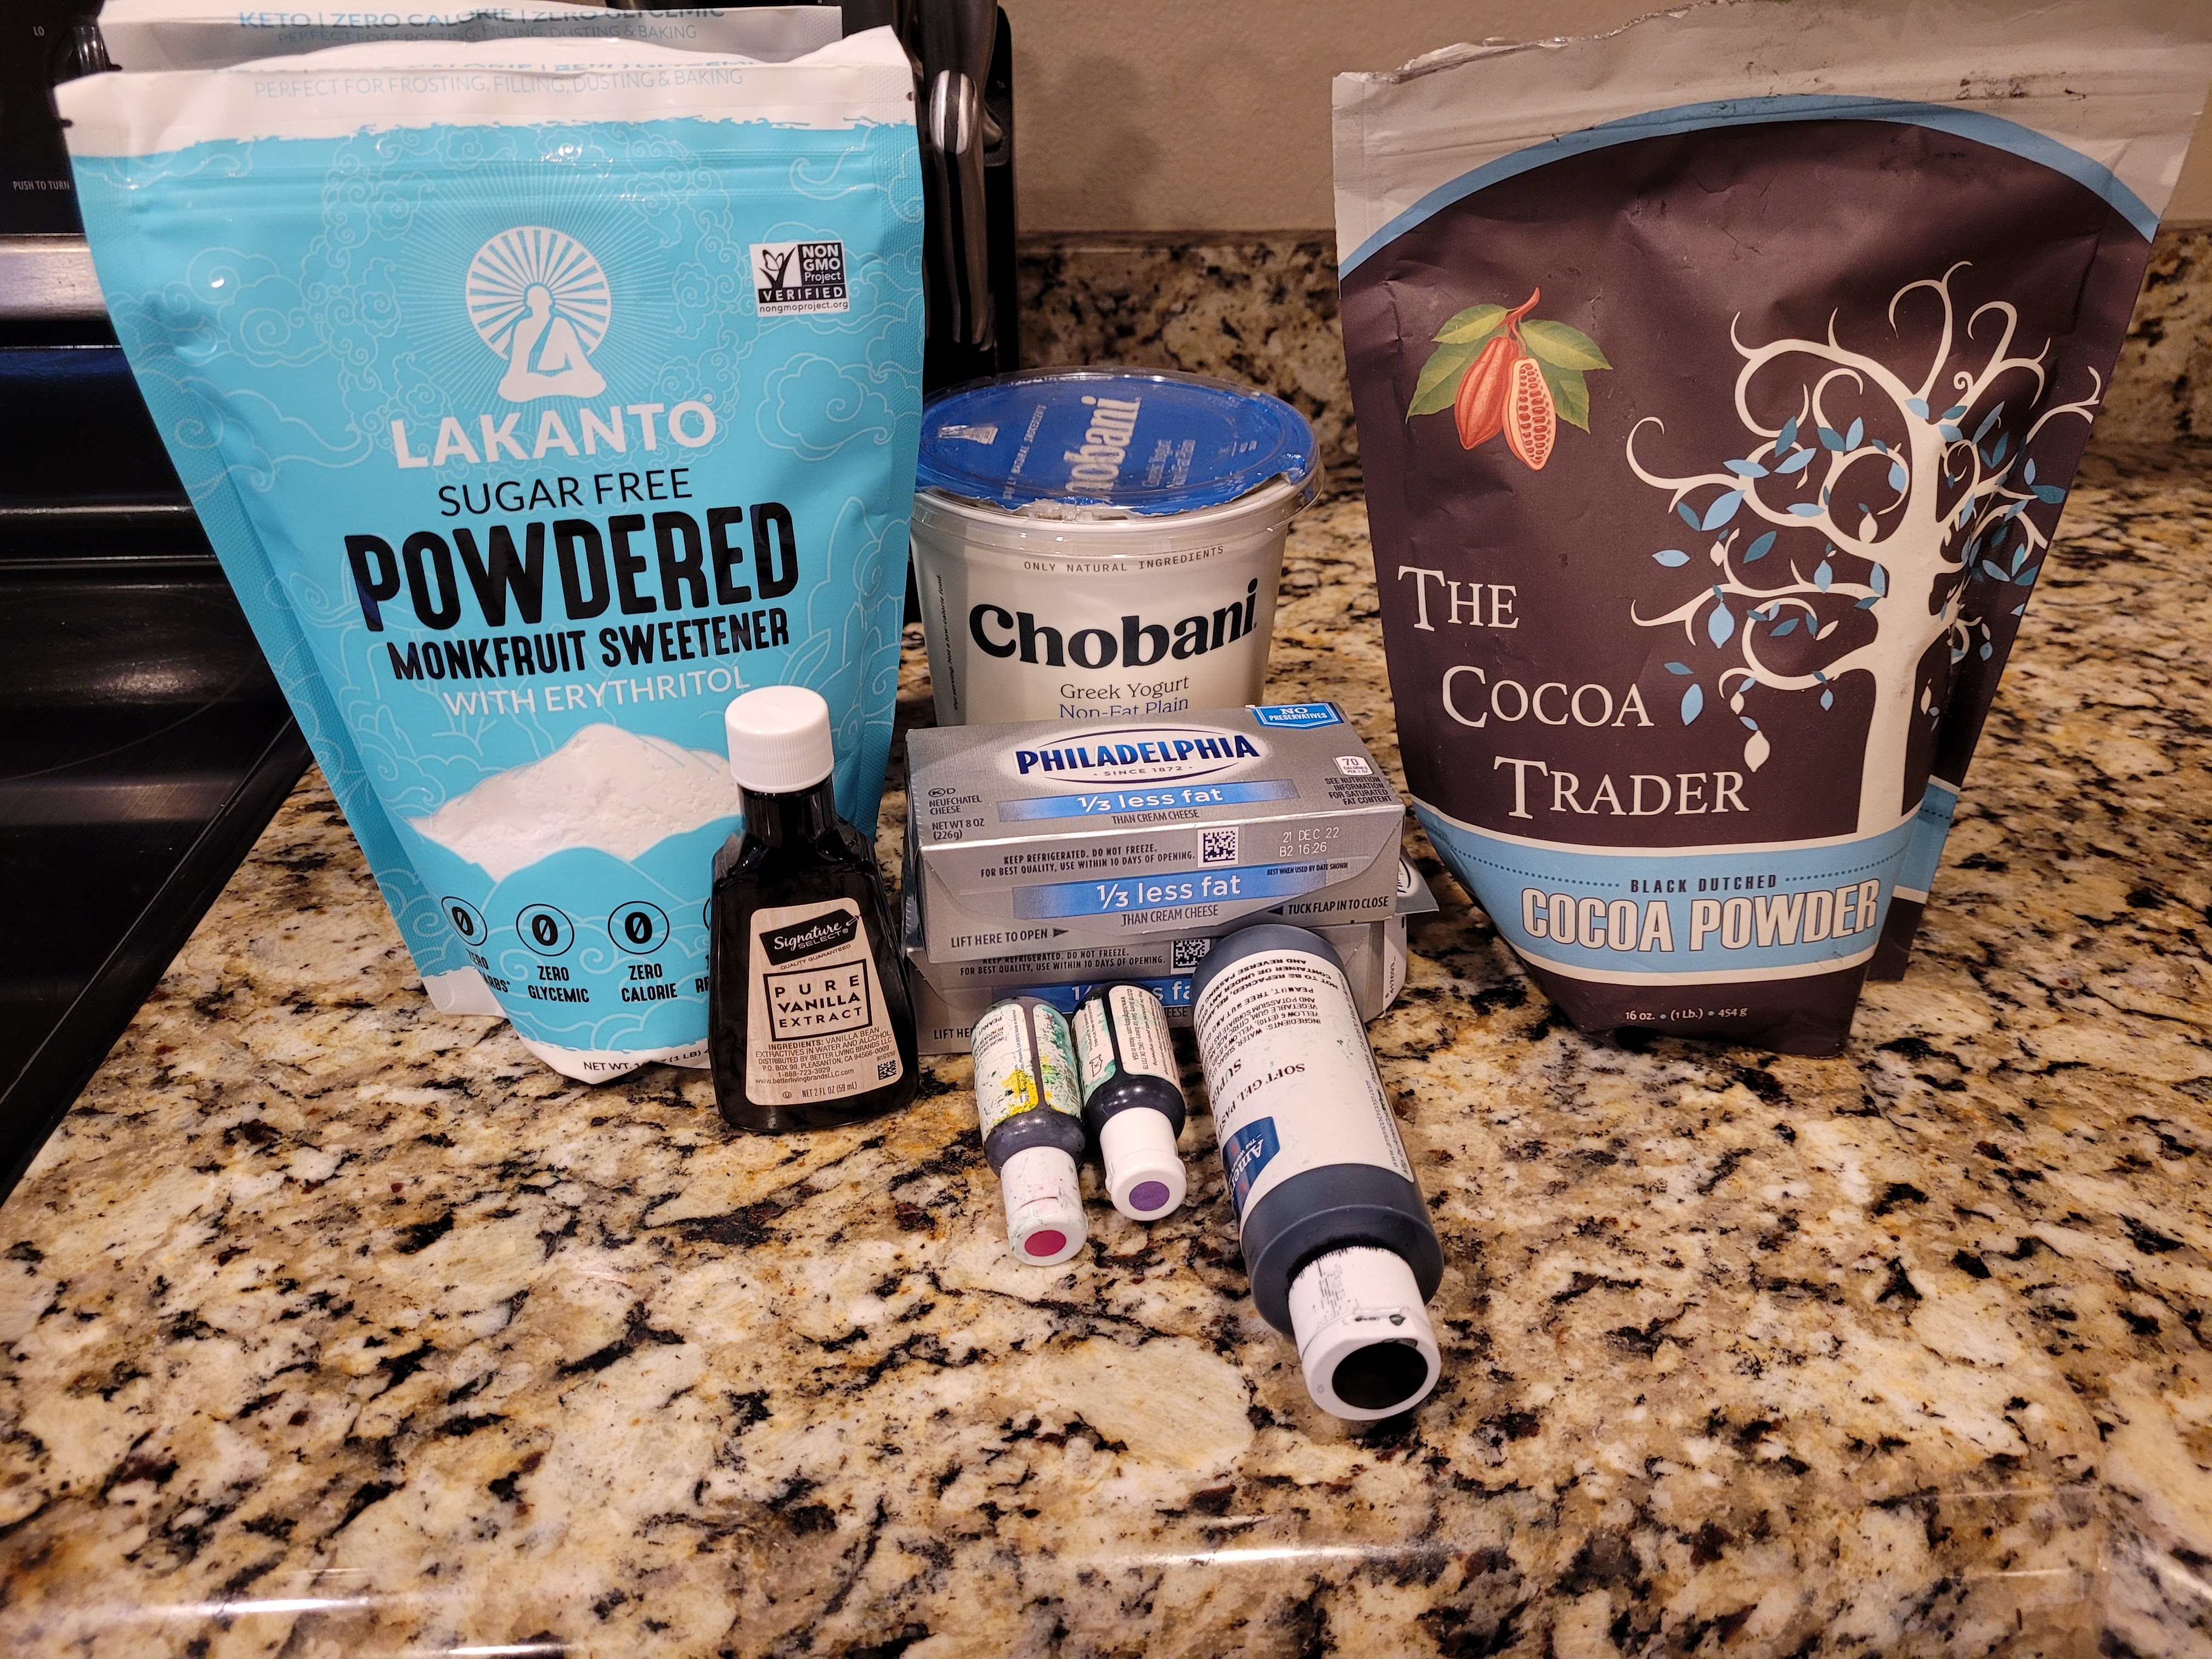
Black cocoa is the real MVP of every Halloween recipe. I made two batches of frosting, one in purple, and the other dyed black. I honestly didn’t use much black frosting, but I was completely out and love to have some leftover on hand in my freezer because it’s usually something I need sparingly for eyes, noses, small details, etc. on bakes, so it’s a pain to have to dye a tiny bit of frosting black. You could probably get away with one batch of frosting since the middle of the cake is filled with compote and little frosting, but here is what I used:
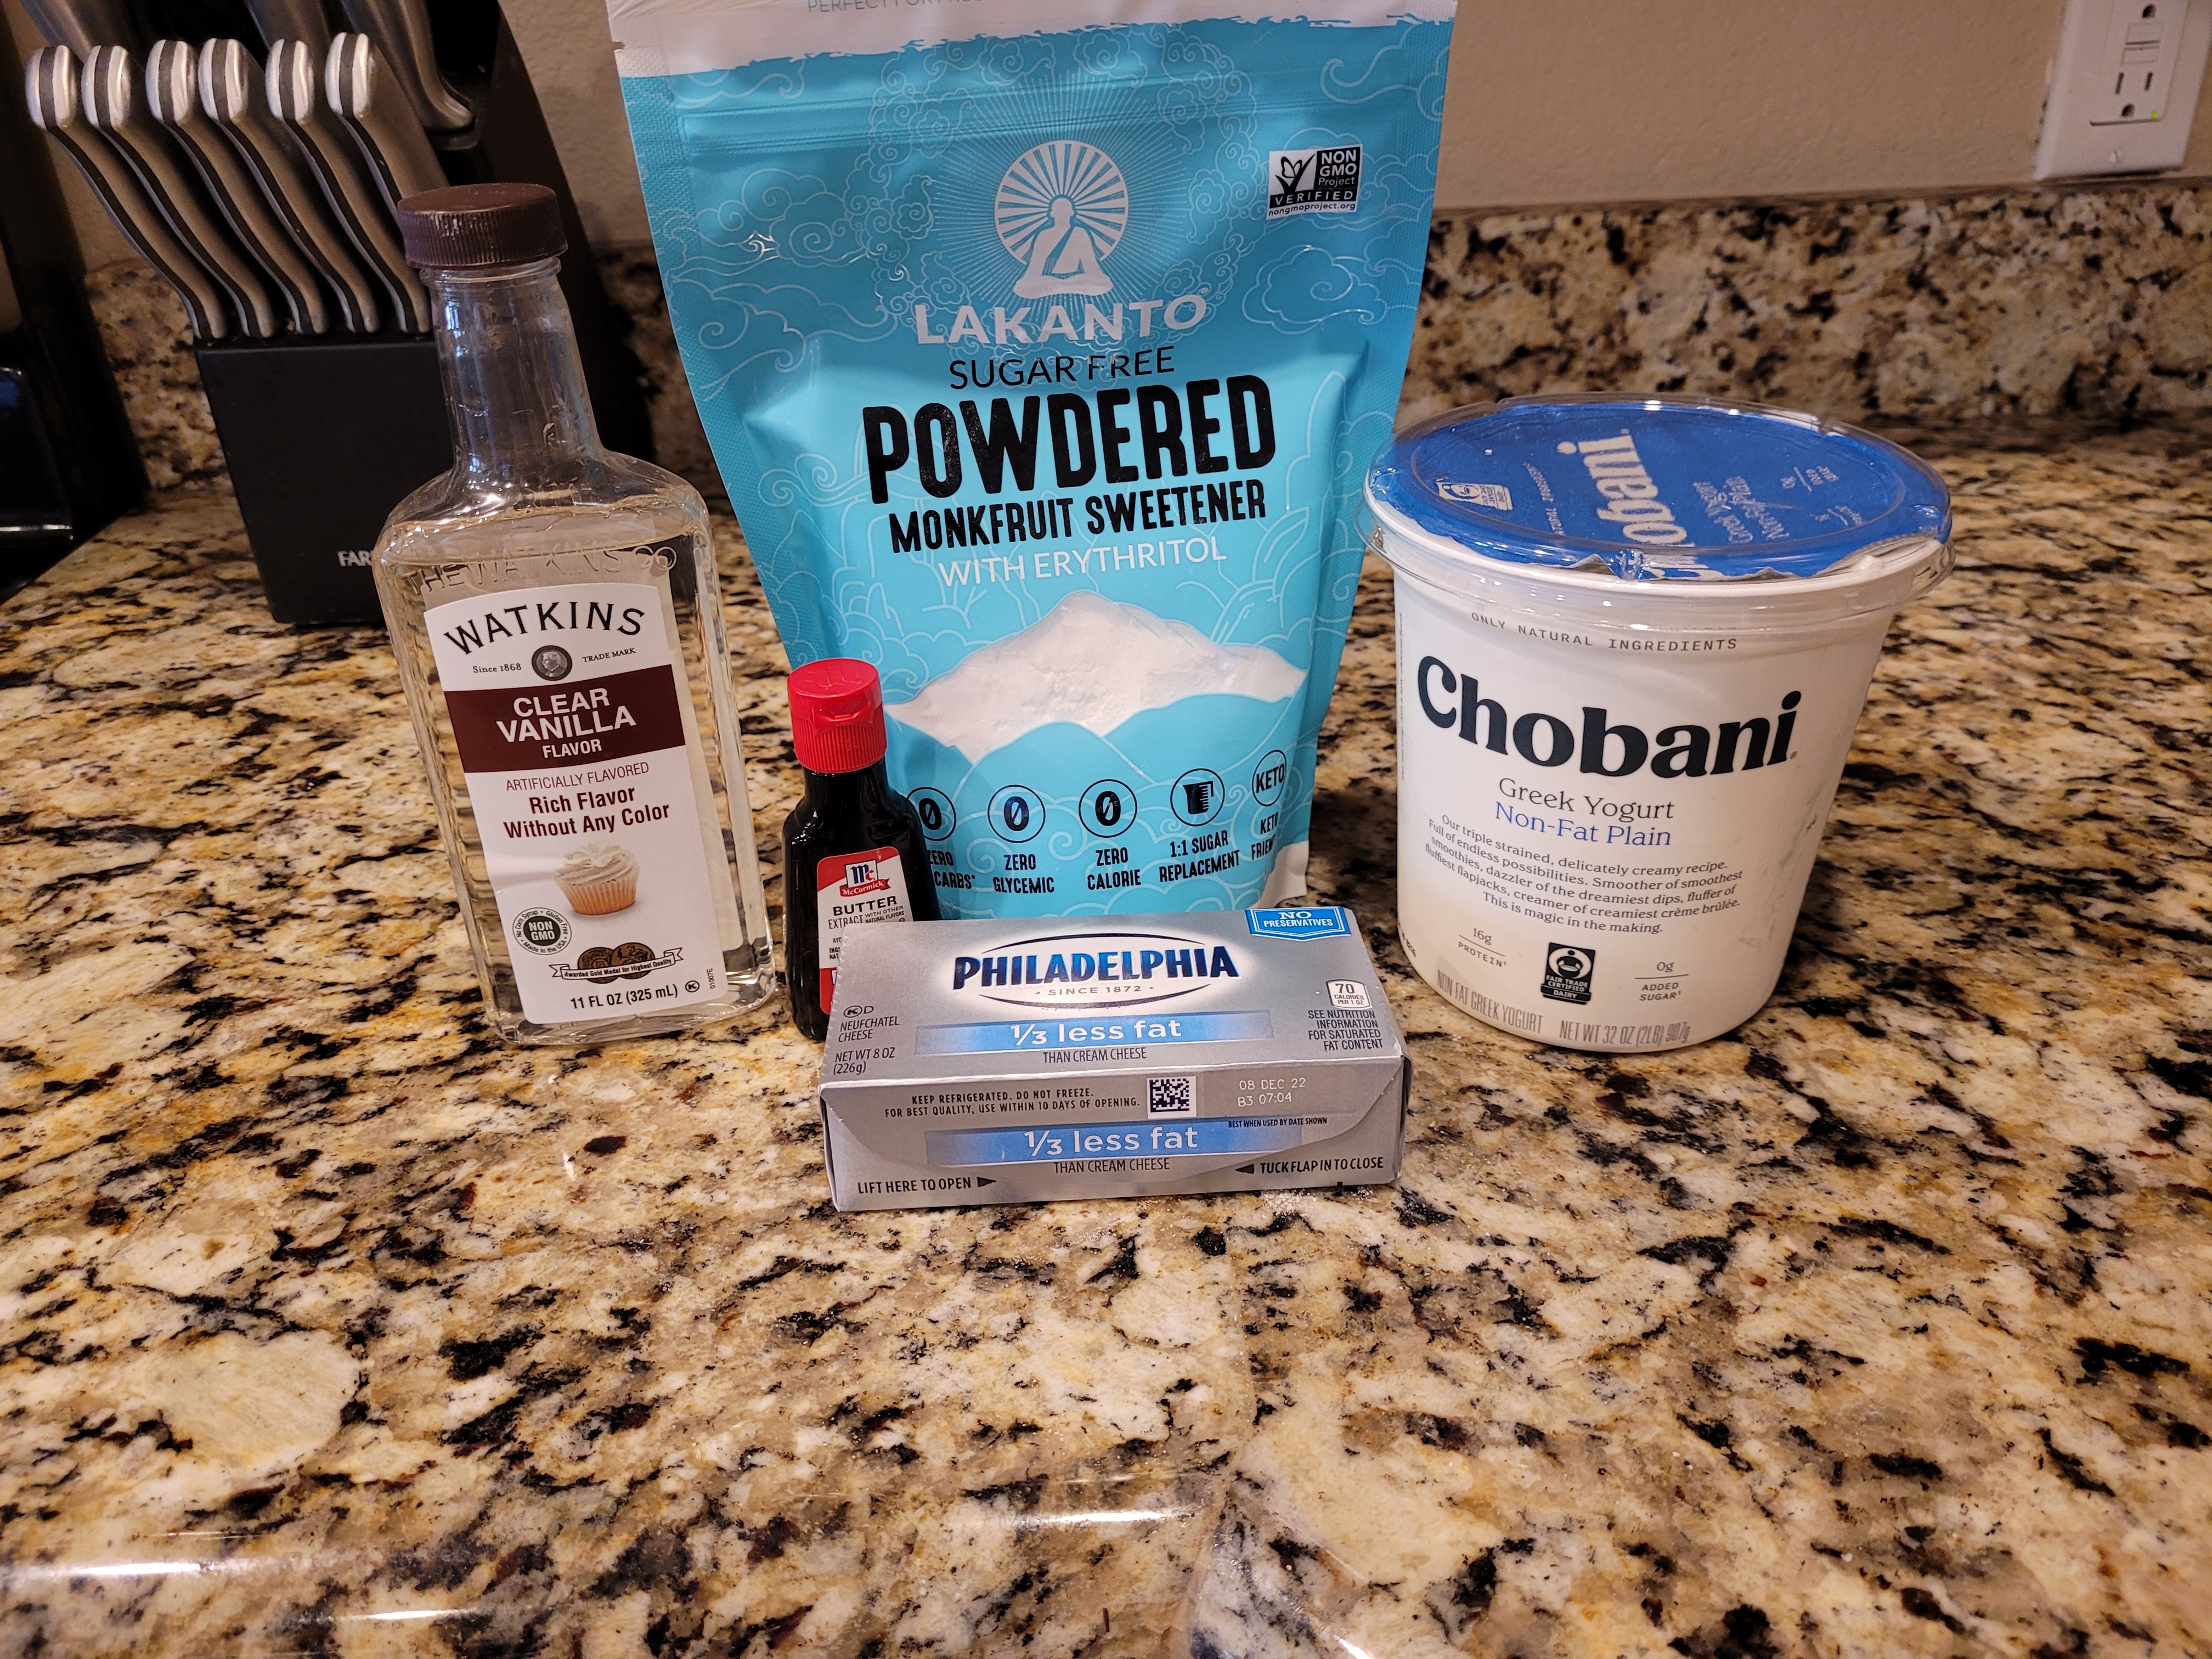
- 2 cups (452 g) of Greek yogurt, strained overnight; divided
- 16 ounces 1/3 the fat cream cheese at room temp, divided
- 7 cups of Lakanto powdered monkfruit, divided
- 2 TBS vanilla, divided
- 3 TBS fat free milk, divided
- 1 ounce of black cocoa
- Purple and black gel dyes
Mix half the yogurt and half the cream cheese on medium high for two minutes. Add in 3.5 cups of powdered Lakanto, 1 TBS vanilla, and 1 TBS of milk, blending on low until things come together, then turn to high. Scrape the bowl and add purple gel dye, mixing until you get your desired color. Dump all this frosting into a separate bowl, then mix remaining yogurt and cream cheese on medium high for two minutes. Add in the rest of the powdered monkfruit, vanilla, 2 TBS milk, and 2 TBS black cocoa. Mix well and add in a little black gel dye if needed. Now, you’re ready to assemble!
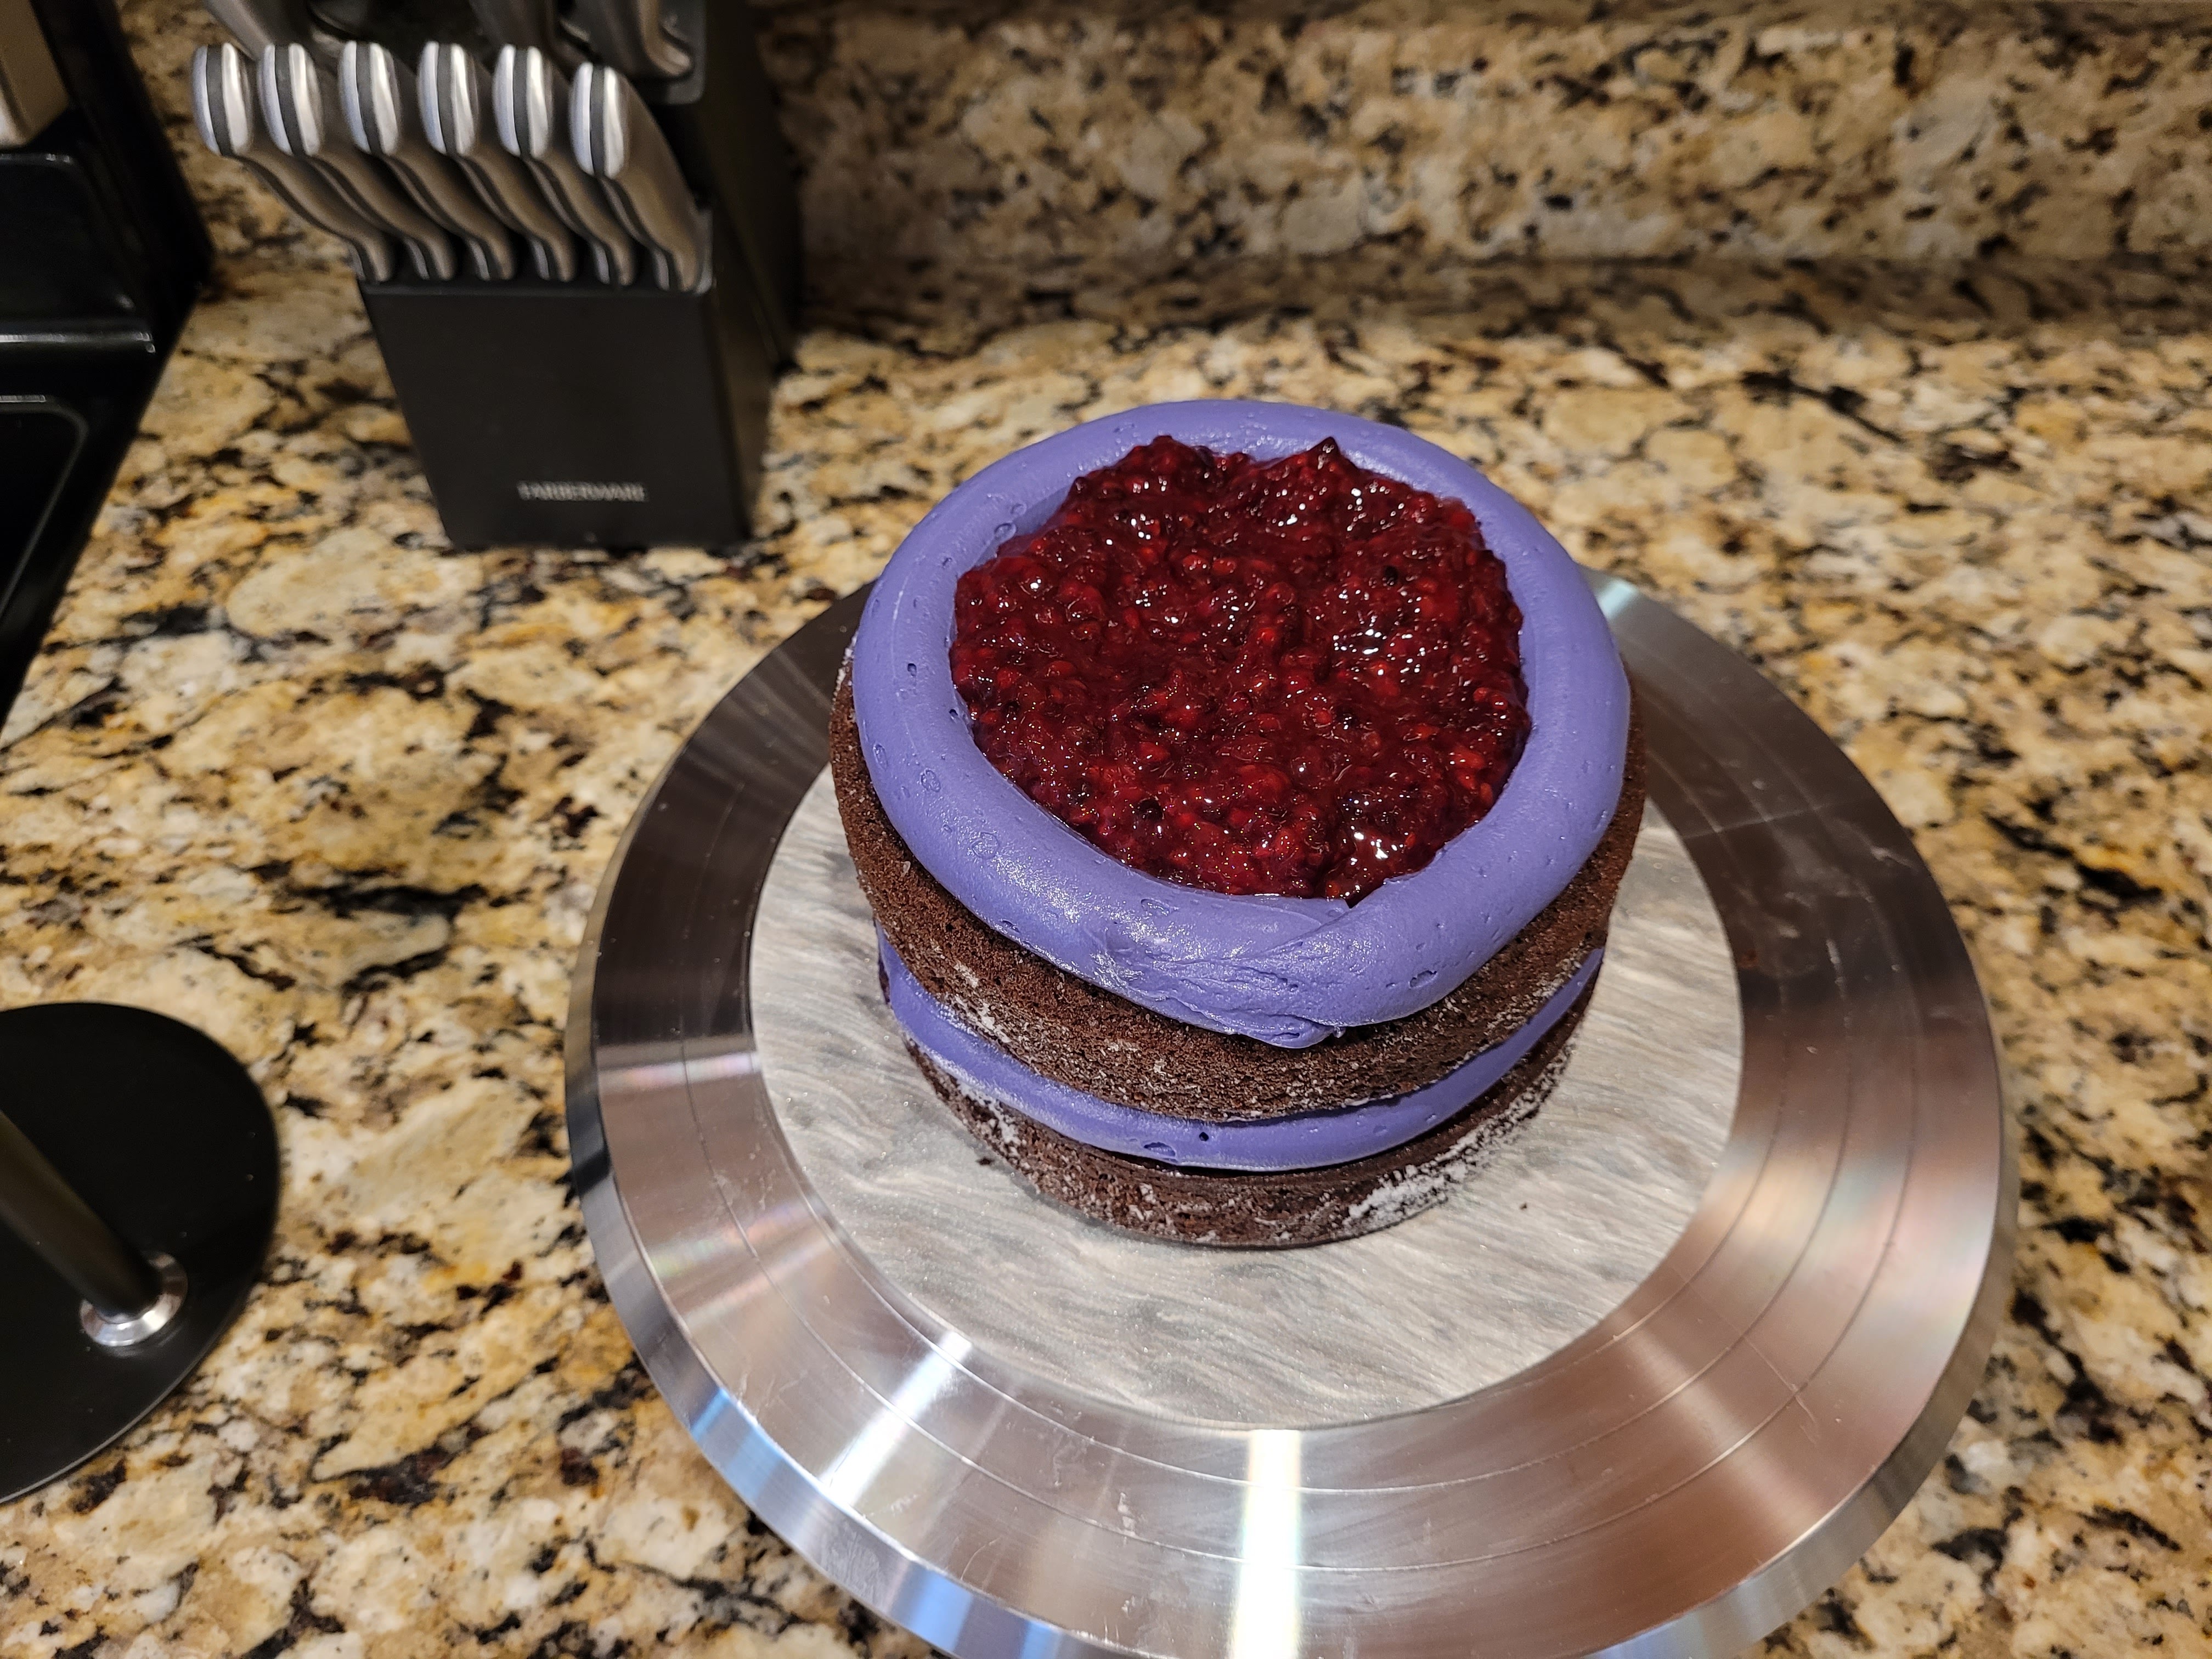
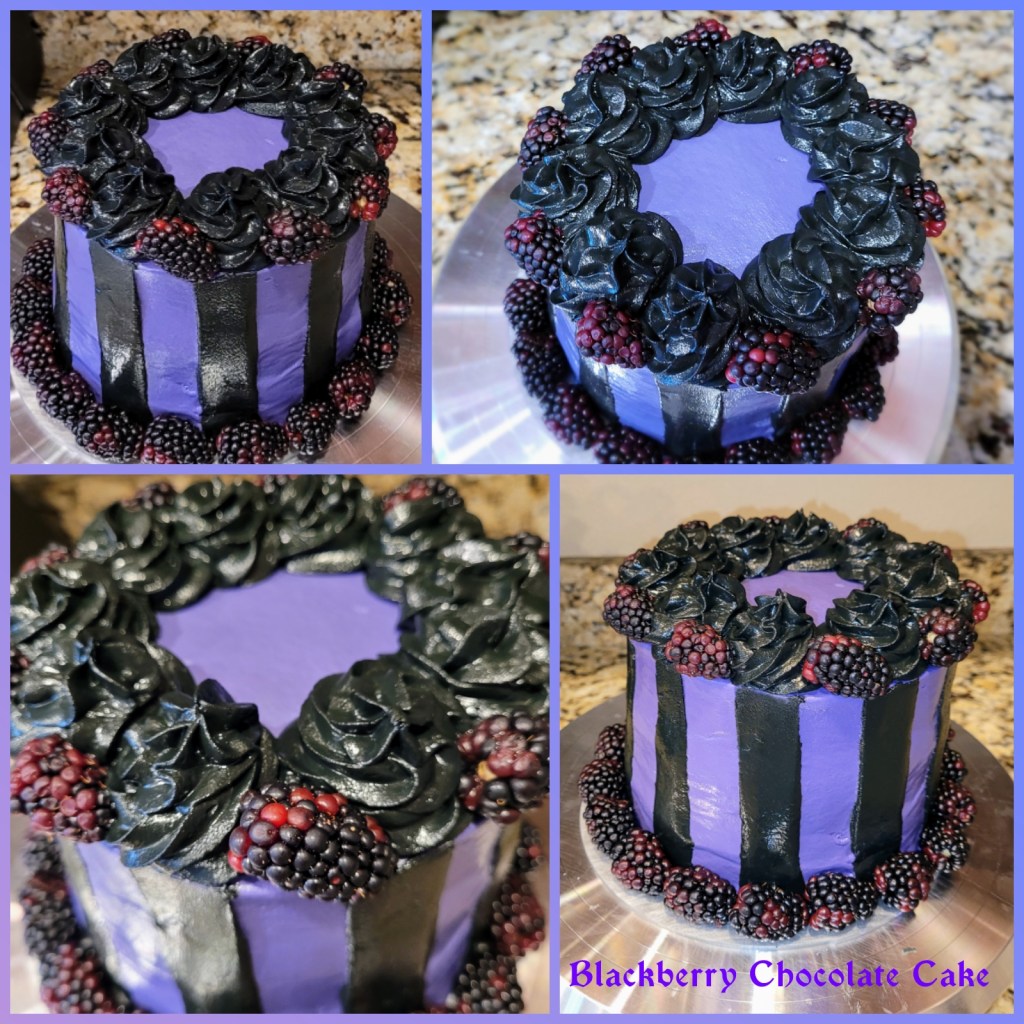
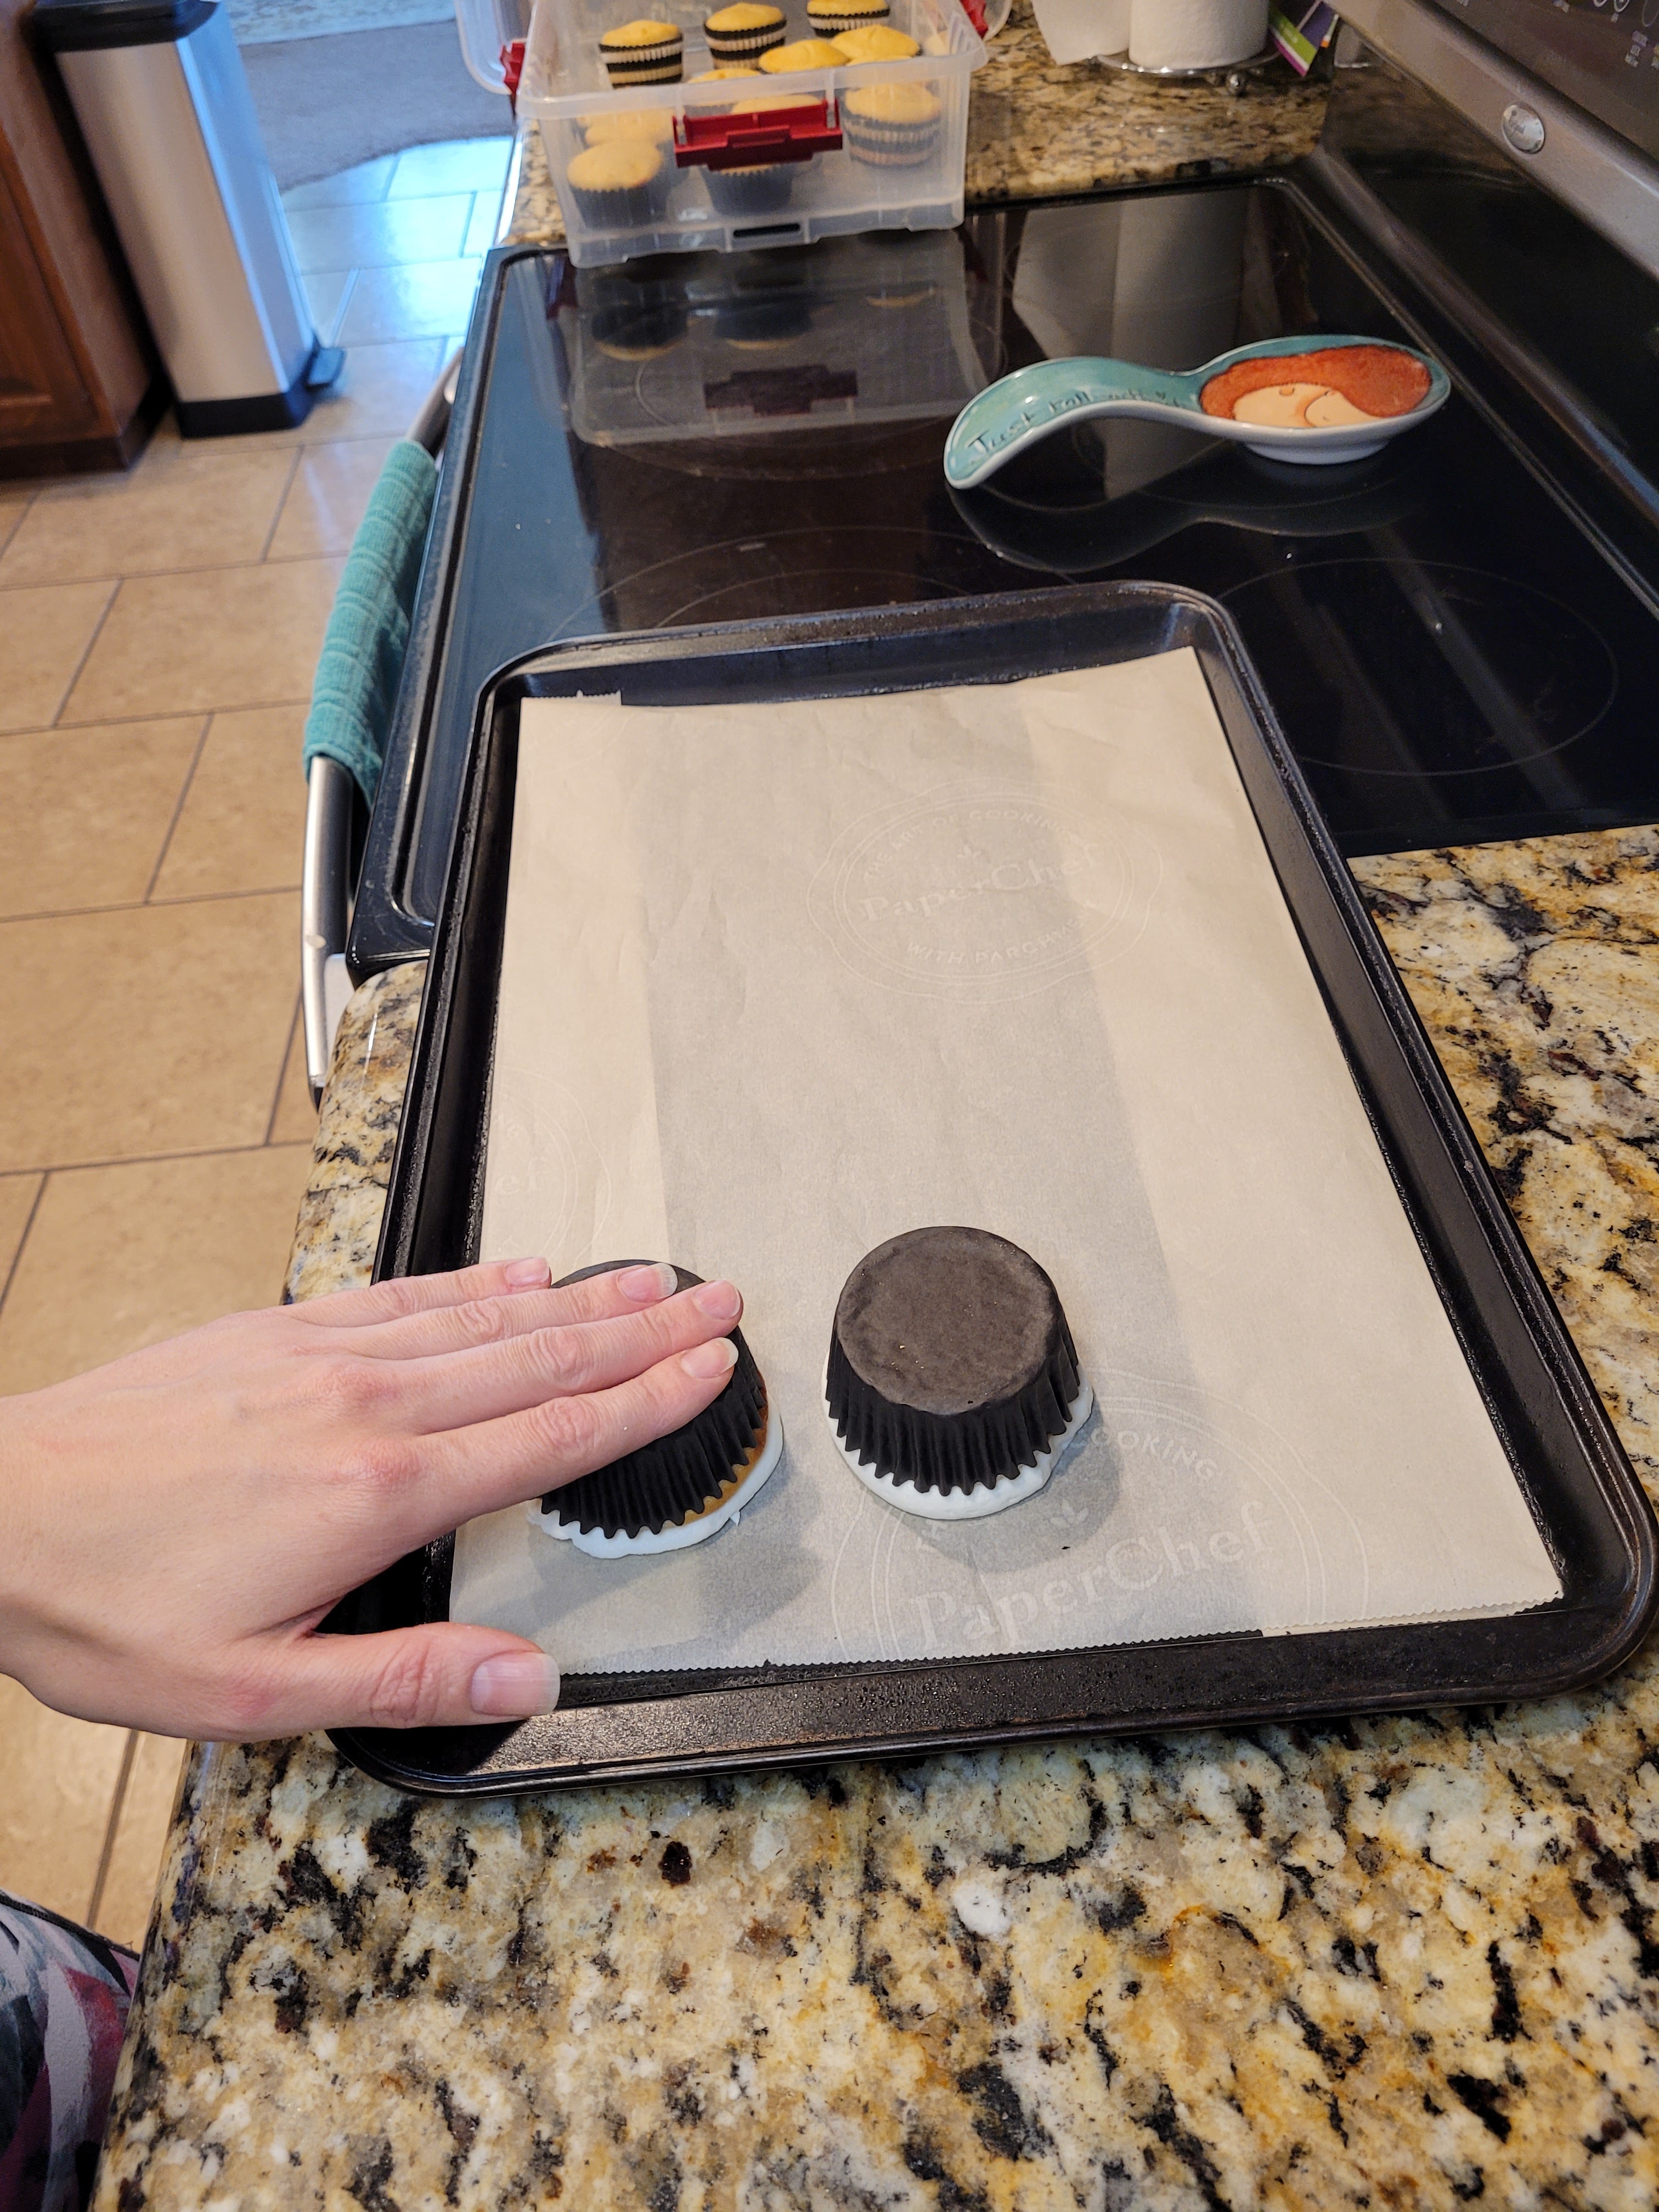
Filled with blood and guts, from the looks of it… Place some purple frosting into a piping bag and draw a circle around the edge of a cake round; this acts as a dam to keep your bloody compote in place. Spoon compote in the middle and top with another cake round. Repeat this process one more time; you probably will have about 1/2 of the compote leftover; use this to top toast, oats, waffles, or just eat it with a spoon straight out of the bowl because it is insanely yummy. I also recommend using a few dowels in the cake to keep things sturdy since the compote is heavy. I forgot to do this, and my cake toppled over on day 4 (sigh..still gonna eat it though.).
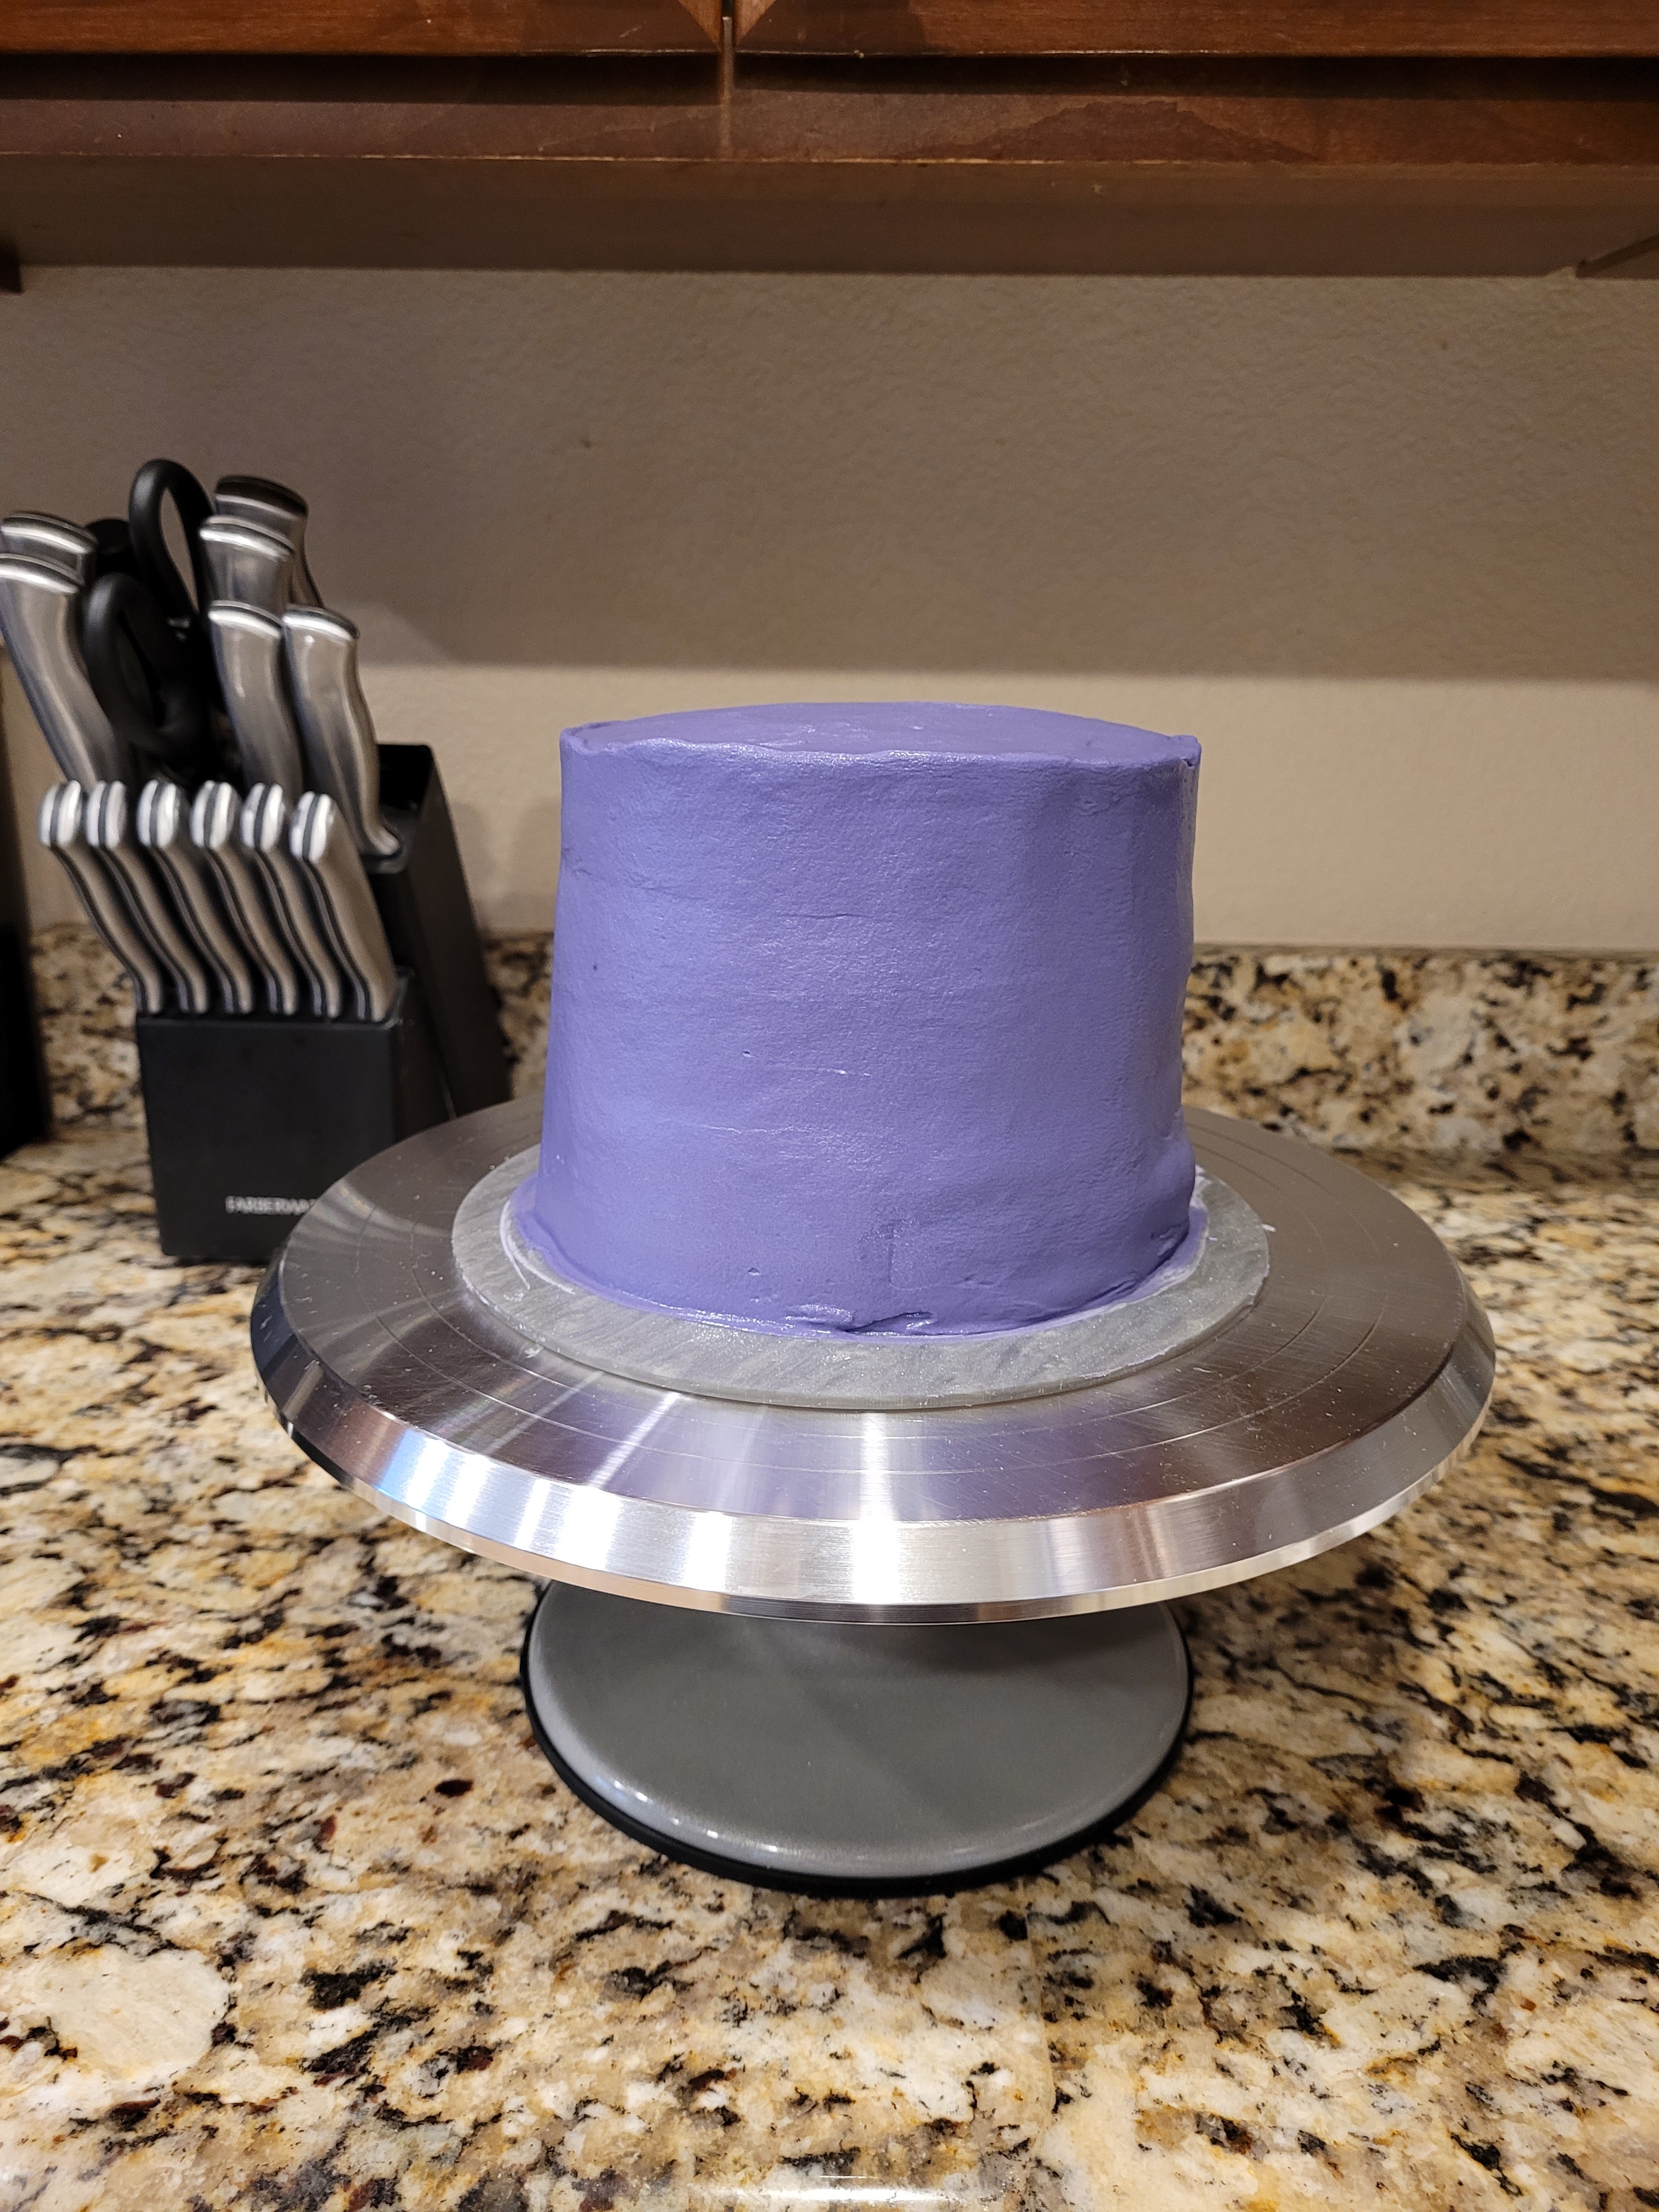
Purple people pleaser. Frost the entire cake in purple frosting, smoothing as best as you can. I placed my cake in the freezer for 30 minutes to firm, then removed and used my Viva paper towels to smooth out any bumps. Just gently apply the paper towel to the top and side of the cake and use your hand to smooth up and down, side to side, do the hokey pokey, turn yourself about. Works like a charm.
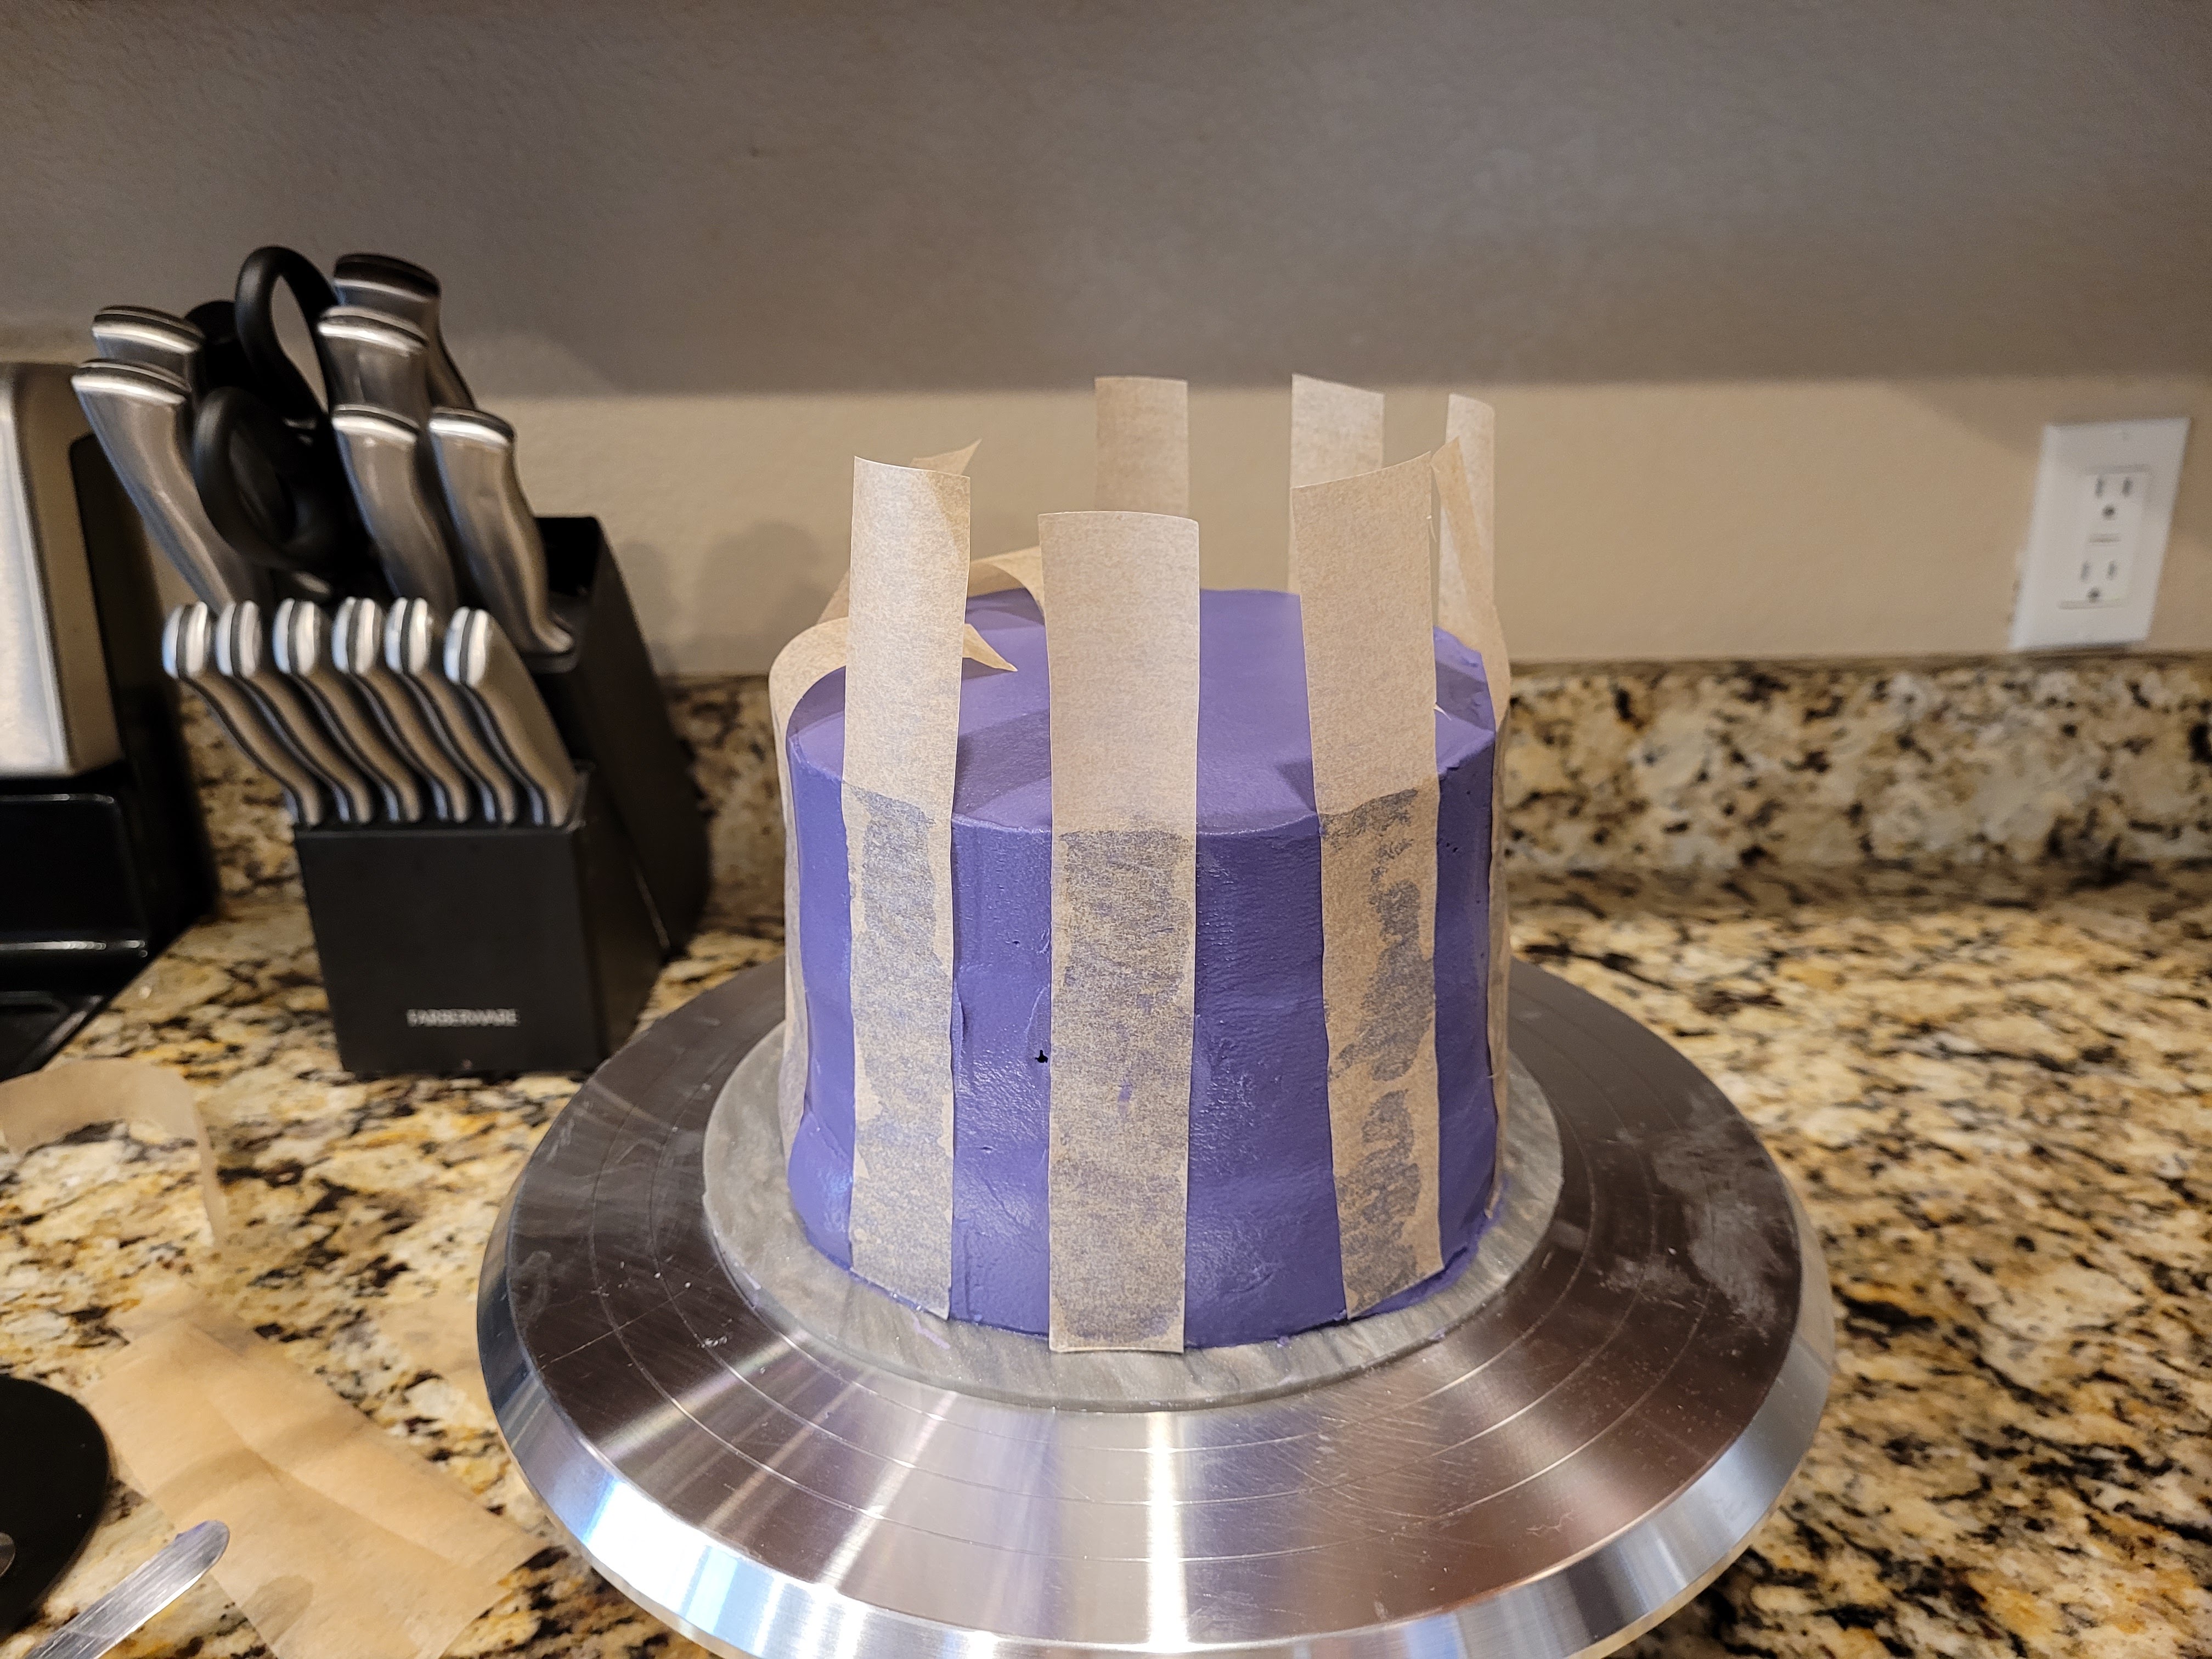
This could have been a horror story. You’ll need to cut several strips of Parchment paper for your vertical stripe guide. I cut eight strips, each one inch wide and about 8 inches long, so they would be easy to remove later. Evenly apply these strips around your cake, using a food-safe paintbrush to gently press the paper into the cake and prevent any black frosting from getting under it. Now, freeze your cake for 30 minutes. You need the purple to stay in place as well, so this will help.
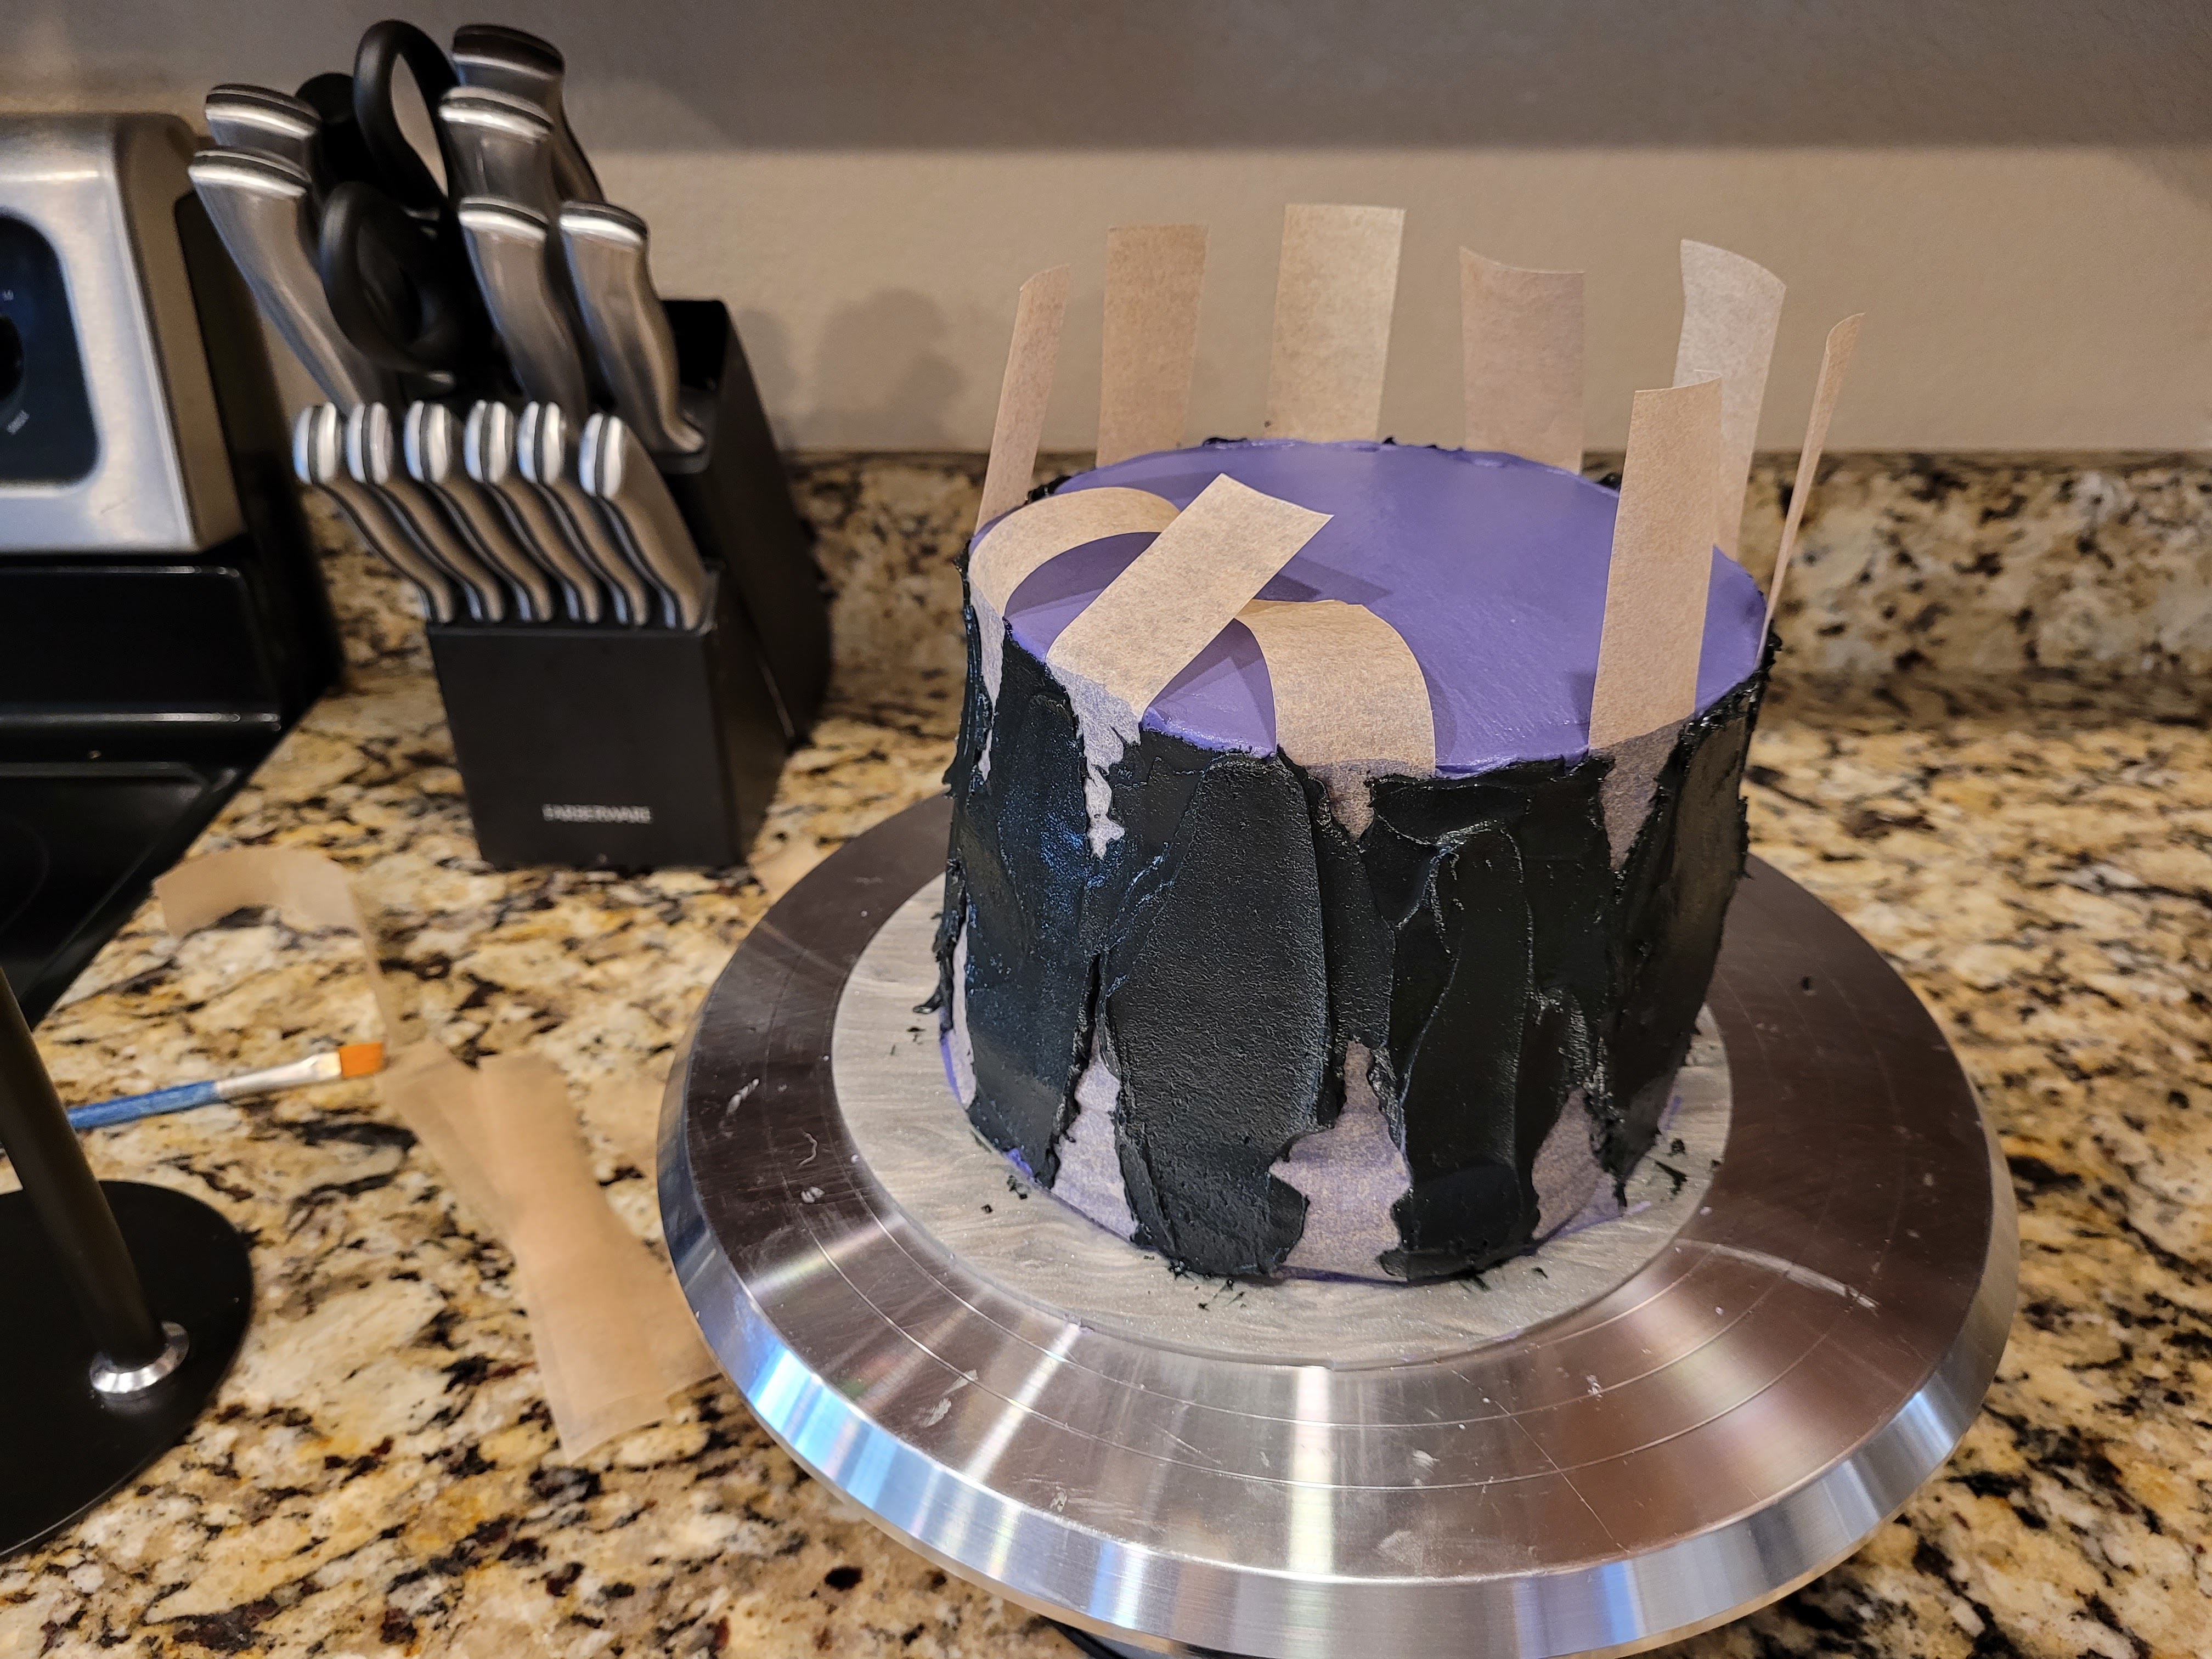
I was praying to the Halloween gods (Jack Skellington, Wednesday Addams, and Winifred Sanderson) this would turn out OK. With gentle pressure, I used an angled spatula to apply black frosting on all the non-Parchment surfaces on the side of my cake. Once covered, I used my bench scraper to make a few passes around the cake and smooth out the black frosting. I placed this back in the freezer to allow the black frosting to set before removing the Parchment strips.
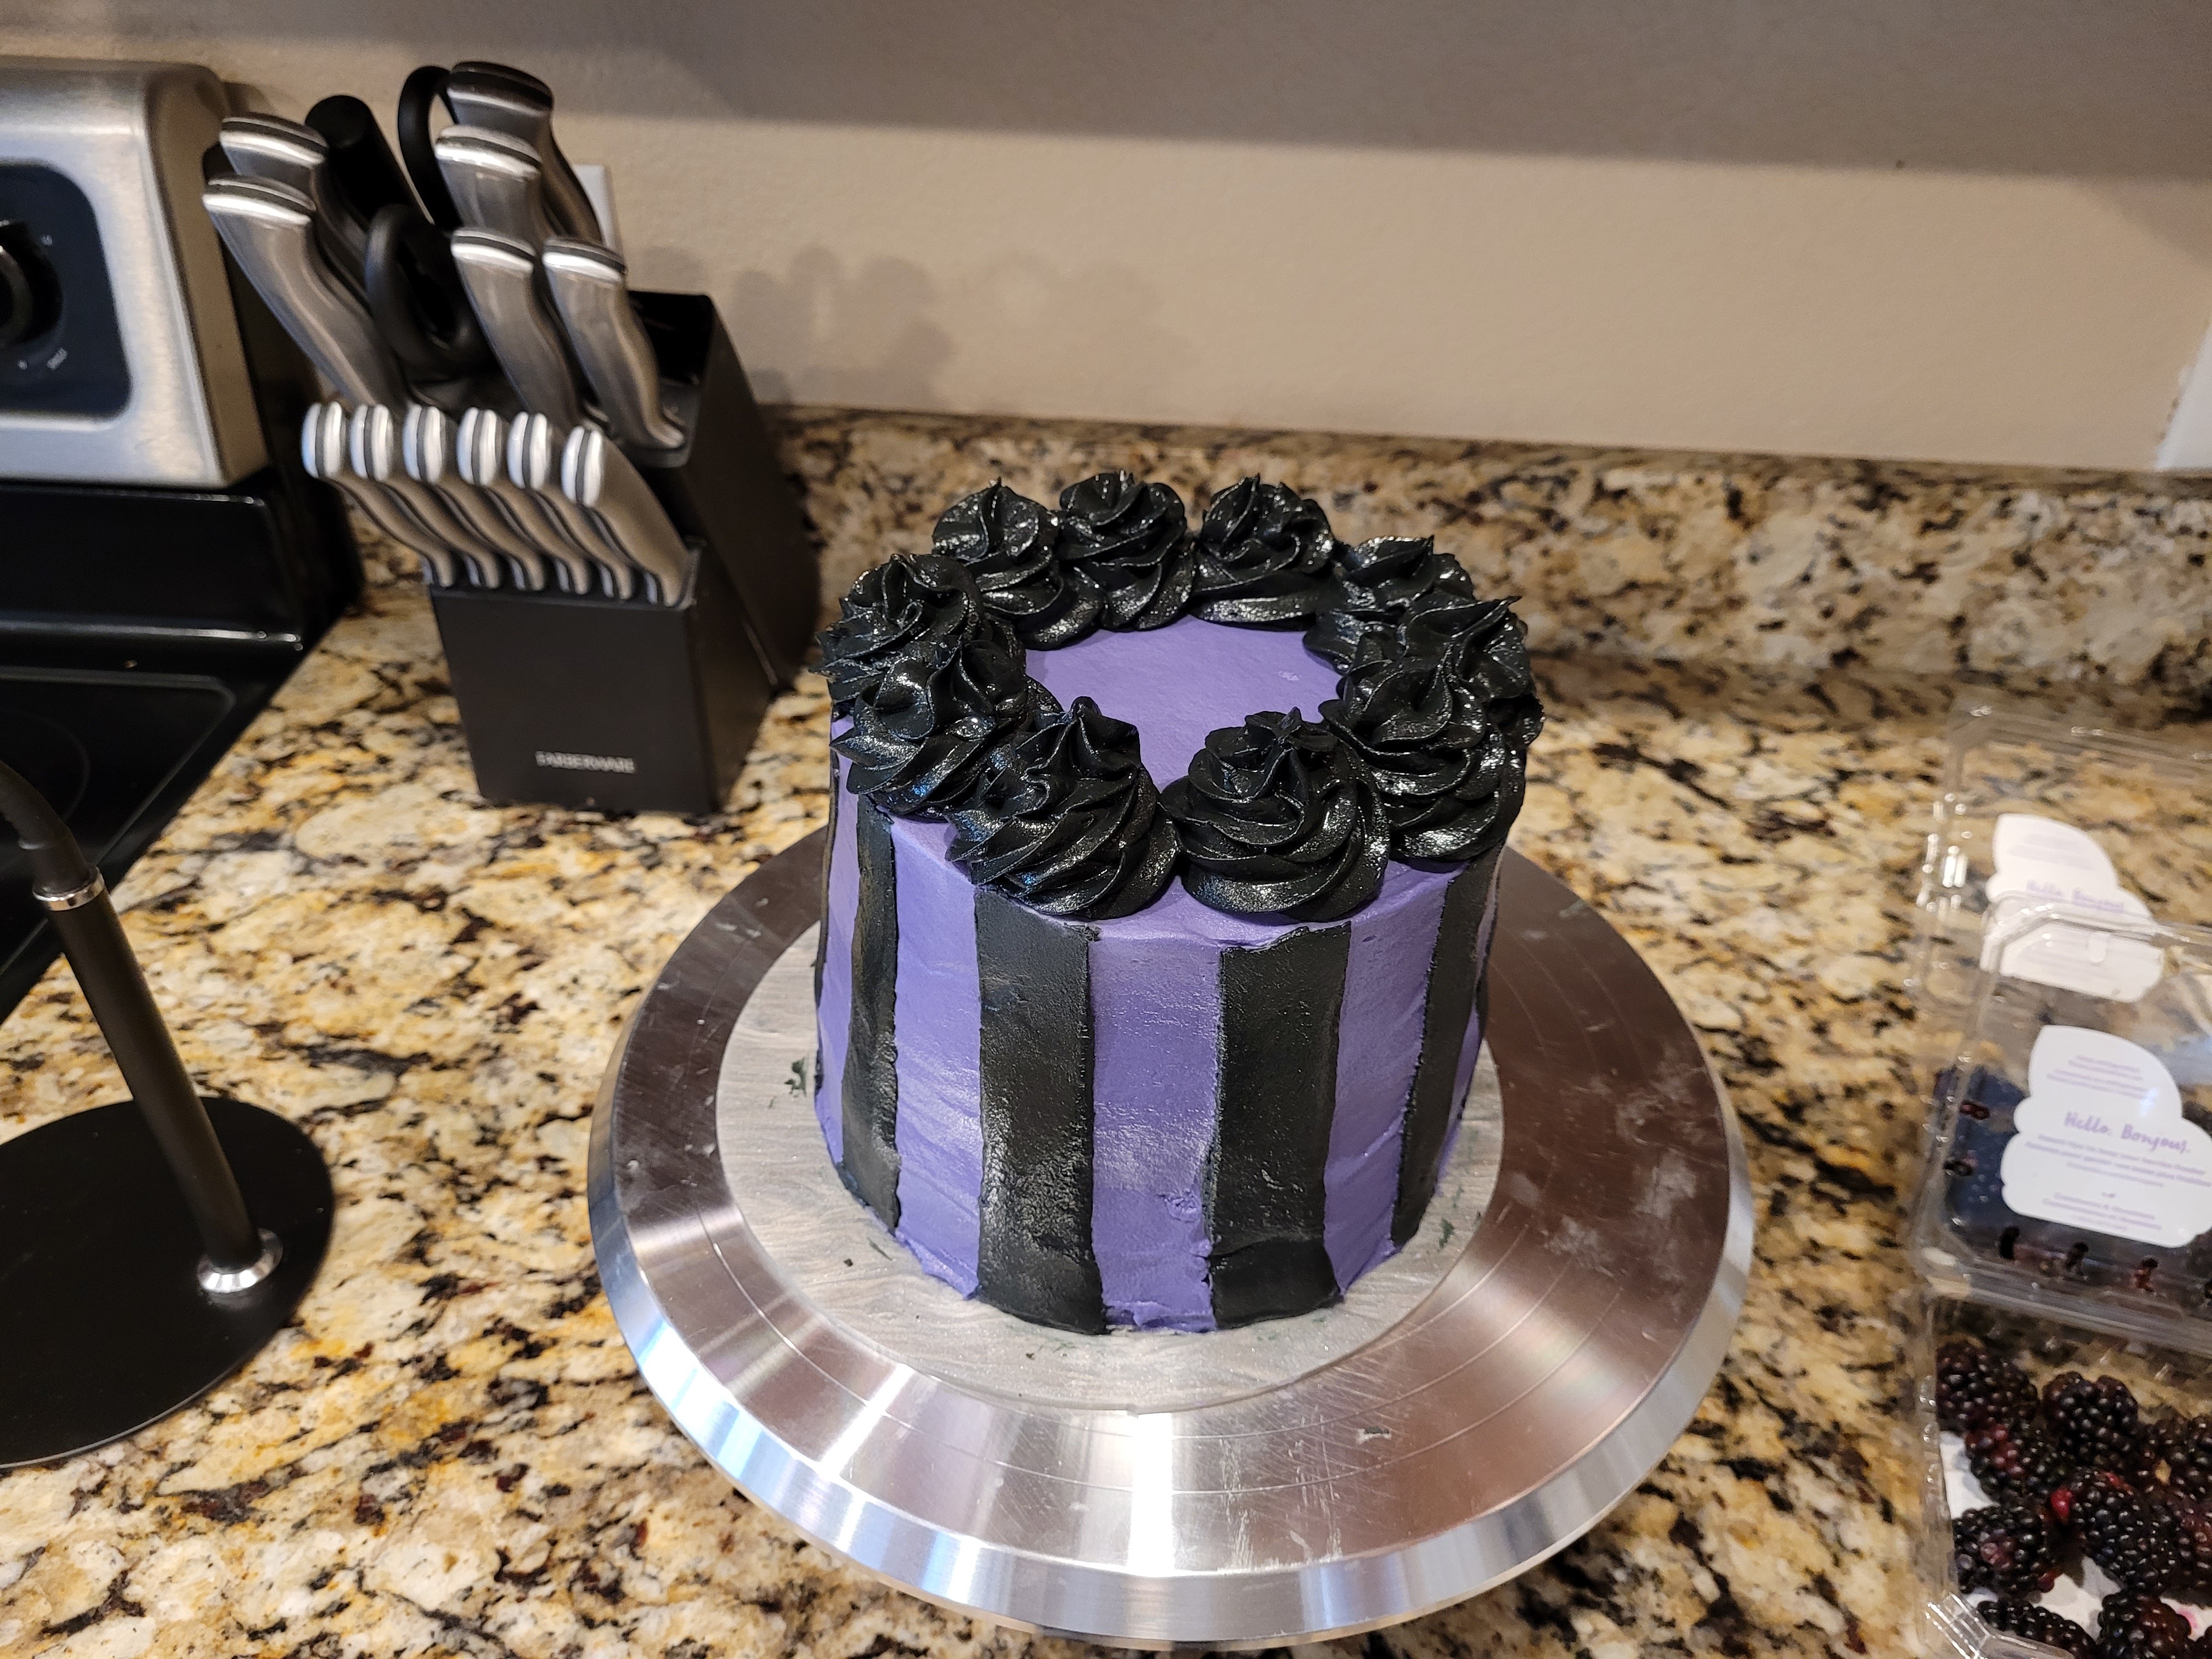
Howl you doin? You should very easily be able to peel away the Parchment paper strips after this to reveal a beautifully spooky-striped cake. Black and white would 100% give Beetlejuice vibes, so keeping that in mind for next year. I then took more black frosting, putting it into a piping bag with a 1M tip, and created swirls on the top of the cake.

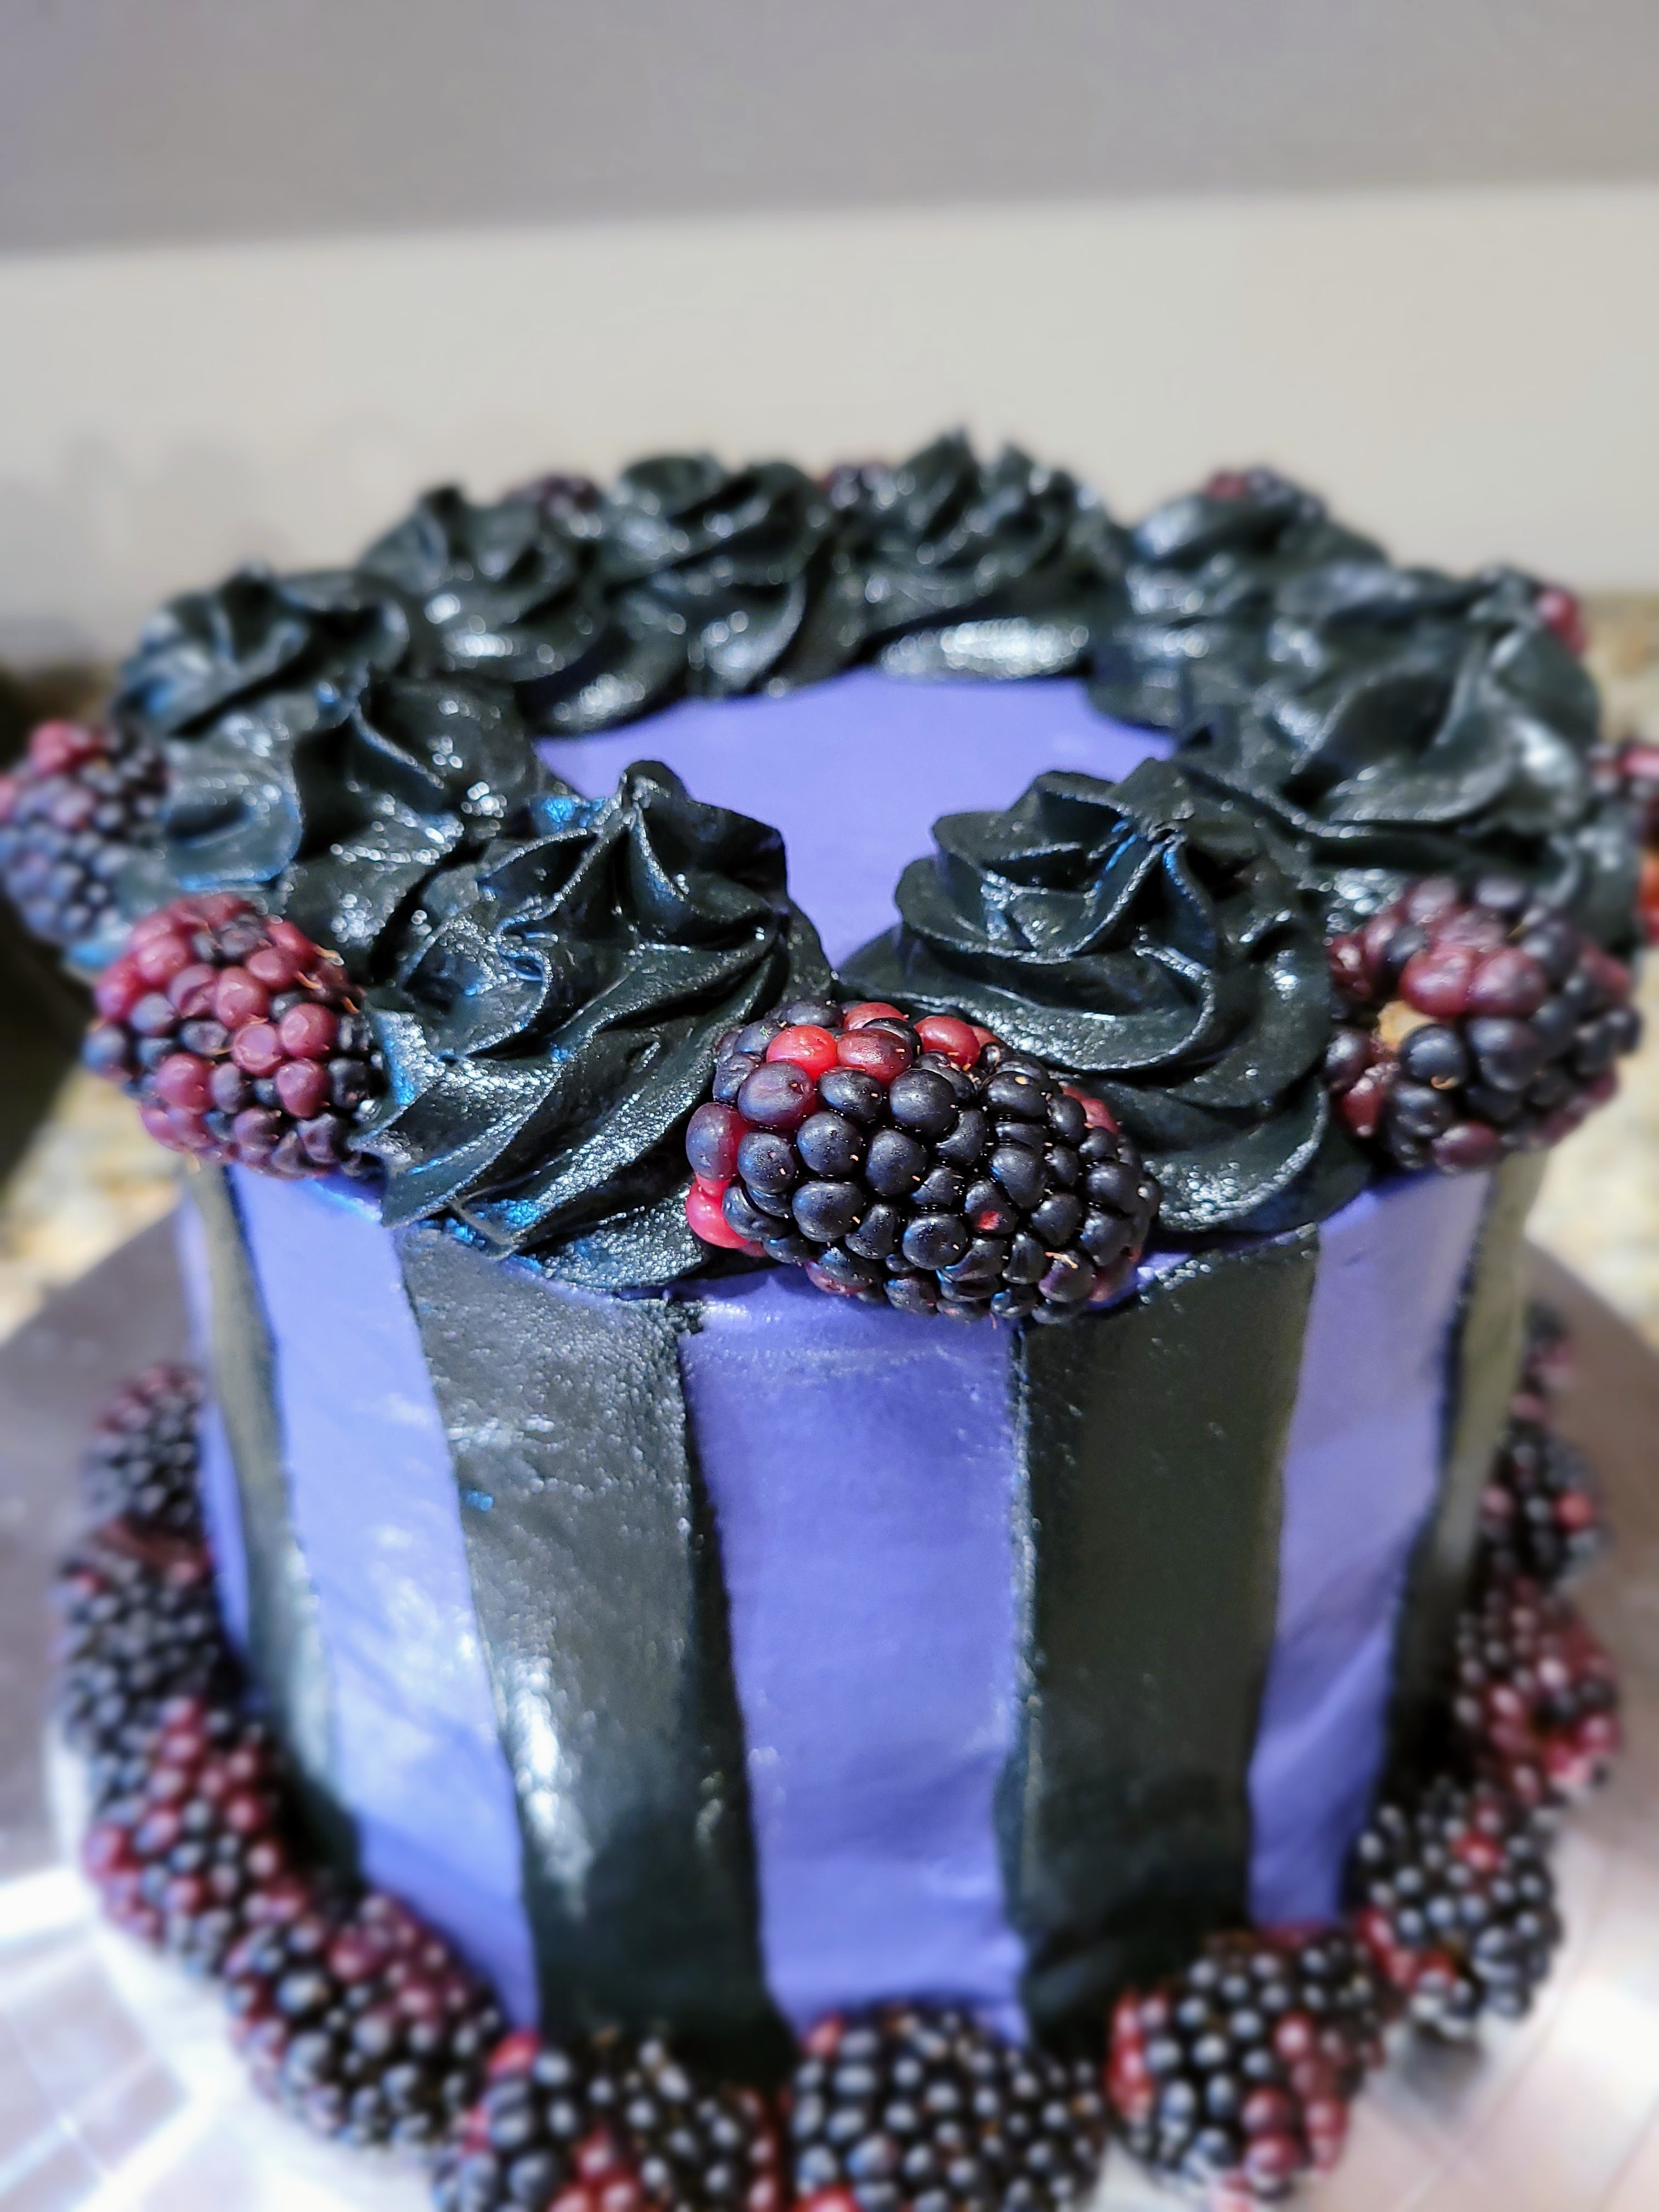
It’s a brew-tiful day for some cake. To finish, I added a blackberry border around the bottom of the cake, and then added blackberries at the top edge between every swirl.
Gorgeous and macabre? It’s perfect. I am really happy with how these vertical stripes turned out; it’s always nerve wracking trying something new, especially when it’s holiday-specific and can’t just be tried again the next weekend. I think I had Halloween luck on my side with this one! I am goblin up every bite of this cake because it is just so dang delish. Even if you don’t want to make a fancy, striped cake, just try the recipe. Blackberry and chocolate are absolutely divine together…a wicked good flavor for sure. Plus, the blackberry compote has an oozing guts look about it when you cut into a slice, so it’s spooky even without the vertical stripes (a.k.a, a perfect recipe). As Baketober draws to a close, I’d just like to say fangs for the memories. ‘Til next time, my fellow eaters!
Recipe and Instructions
Blackberry chocolate cake
Fudgy chocolate cake with blackberry compote filling and black cocoa cream cheese frosting
Feel free to use your preferred brand of chocolate cake mix and replace Lakanto will regular sugar in the compote recipe and powdered sugar in the frosting. I recommend only using half the compote and inserting dowels into your cake to keep it sturdy since the compote is heavy.
Ingredients
FOR THE CAKE
*1 box of Krusteaz gluten free chocolate cake mix
*173 grams (3/4 c) unsweetened applesauce
*2 eggs
*1 1/2 c fat free or skim milk
*1 tsp vanilla extract
FOR THE COMPOTE
*3 cups (360 g) blackberries
*1/2 cup (100 g) Lakanto classic
*1 TBS cornstarch
FOR THE FROSTING
*16 ounces (225 grams) 1/3 the fat cream cheese at room temp, divided
*2 cup (452 grams) fat free Greek yogurt, strained overnight to remove moisture, divided
*7 cups of Lakanto powdered monkfruit, divided
*2 TBS vanilla extract, divided
*3 TBS milk, divided
*1 ounce black cocoa
*Purple and black gel dye
Directions
- Mix all cake ingredients on medium for two minutes.
- While mixing, preheat oven to 350 and prepare three 6″ round cake pans with cooking spray and bake even strips.
- Evenly distrbUte batter between rounds.
- Bake for 30-35 minutes, until a toothpick comes out with a few crumbs from the center.
- Let rest on a cooling rack in the pan for 10 minutes before removing from the pan to cool completely before frosting.
- To make compote, mix berries and sugar together in medium sauce pan on medium-high heat; once berries start to release their juices, add the cornstarch and stir frequently for 10 minutes; allow this to cool before assembling your cake.
- To make frosting, whip half the cream cheese and half the yogurt together.
- Add in 3.5 cups of the monkfruit, 1 TBS vanilla, and 1 TBS milk blending well.
- Dye this batch purple and place into a new container.
- Use remaining frosting ingredients, adding in the black cocoa and black gel dye to make the black frosting batch.
- Frost and decorate cake (detailed instructions above), placing blackberry compote in between each layer of cake before coating the whole cake in purple frosting.
- To make vertical stripes, please seE instructions above and use black frosting to coat and add swirls on top of the cake.
- Keep cake in an airtight container in the fridge.
Nutrition
Macros
10 servings
300 cal/45 c/8 f/10.7 p per slice
Til next Baketober, this cake will haunt my taste buds in the best way. -
Quite the Pumpkin Batch
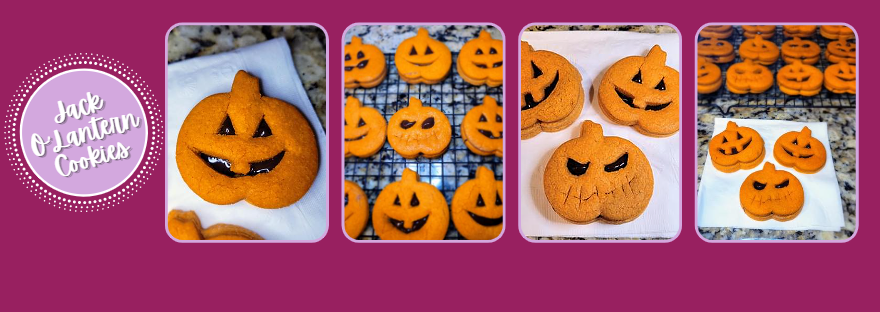
If you hear a cackling voice floating over the wind this weekend, it’s just me, eager with delight that Halloween is so, so very close. It’s been a few months since I’ve made a batch of cookies, so I approached this week’s bake with a “go big or gourd home” mentality. I knew I wanted to make boozy cookies stuffed with chocolate, so the most logical thing to do was make Jack O’Lantern cookies, naturally. I know, ideas like these, they take guts. Pumpkin guts.
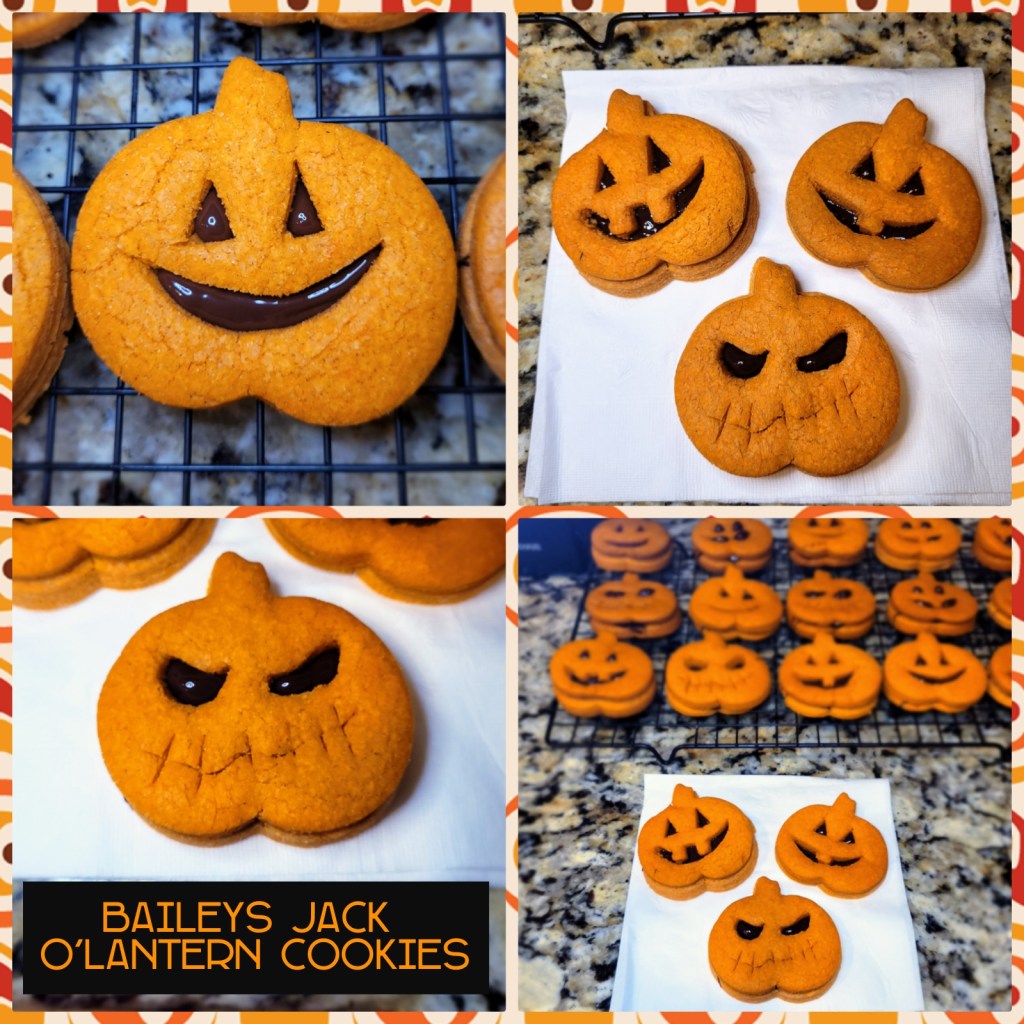
Good thing I like to *carve* out time for my baking every weekend then. I simply took my peanut butter whisky cookie recipe, swapping the whisky for Baileys because chocolate filling needs a boozy-flavored casing to cover it. Since I do a very detailed step-by-step on that blog post, head over there to get the nitty gritty if you need more help getting your dough put together; otherwise, head down the page for the simplified recipe and instructions. You can also view a quick tutorial on my Instagram about how I put these together. But oh my gourdness are these little cookies delightful to both look at and eat, so I am calling it a win in my big “boooooook!” of spooky baking recipes. The cookies are nice and soft with a hint of Baileys, and that semisweet chocolate filling takes them over the top when you heat them up for 10 seconds in the microwave to make it all melty again. It’s like a softer Orange Milano cookie with double the chocolate filling (and booze). It just doesn’t get any better than that…especially at only 152 calories a boozy, chocolate-stuffed cookie! They’re rather large, so one will definitely tide you over unless your stomach is feeling emptier than a pumpkin that’s been turned into a Jack O’Lantern.
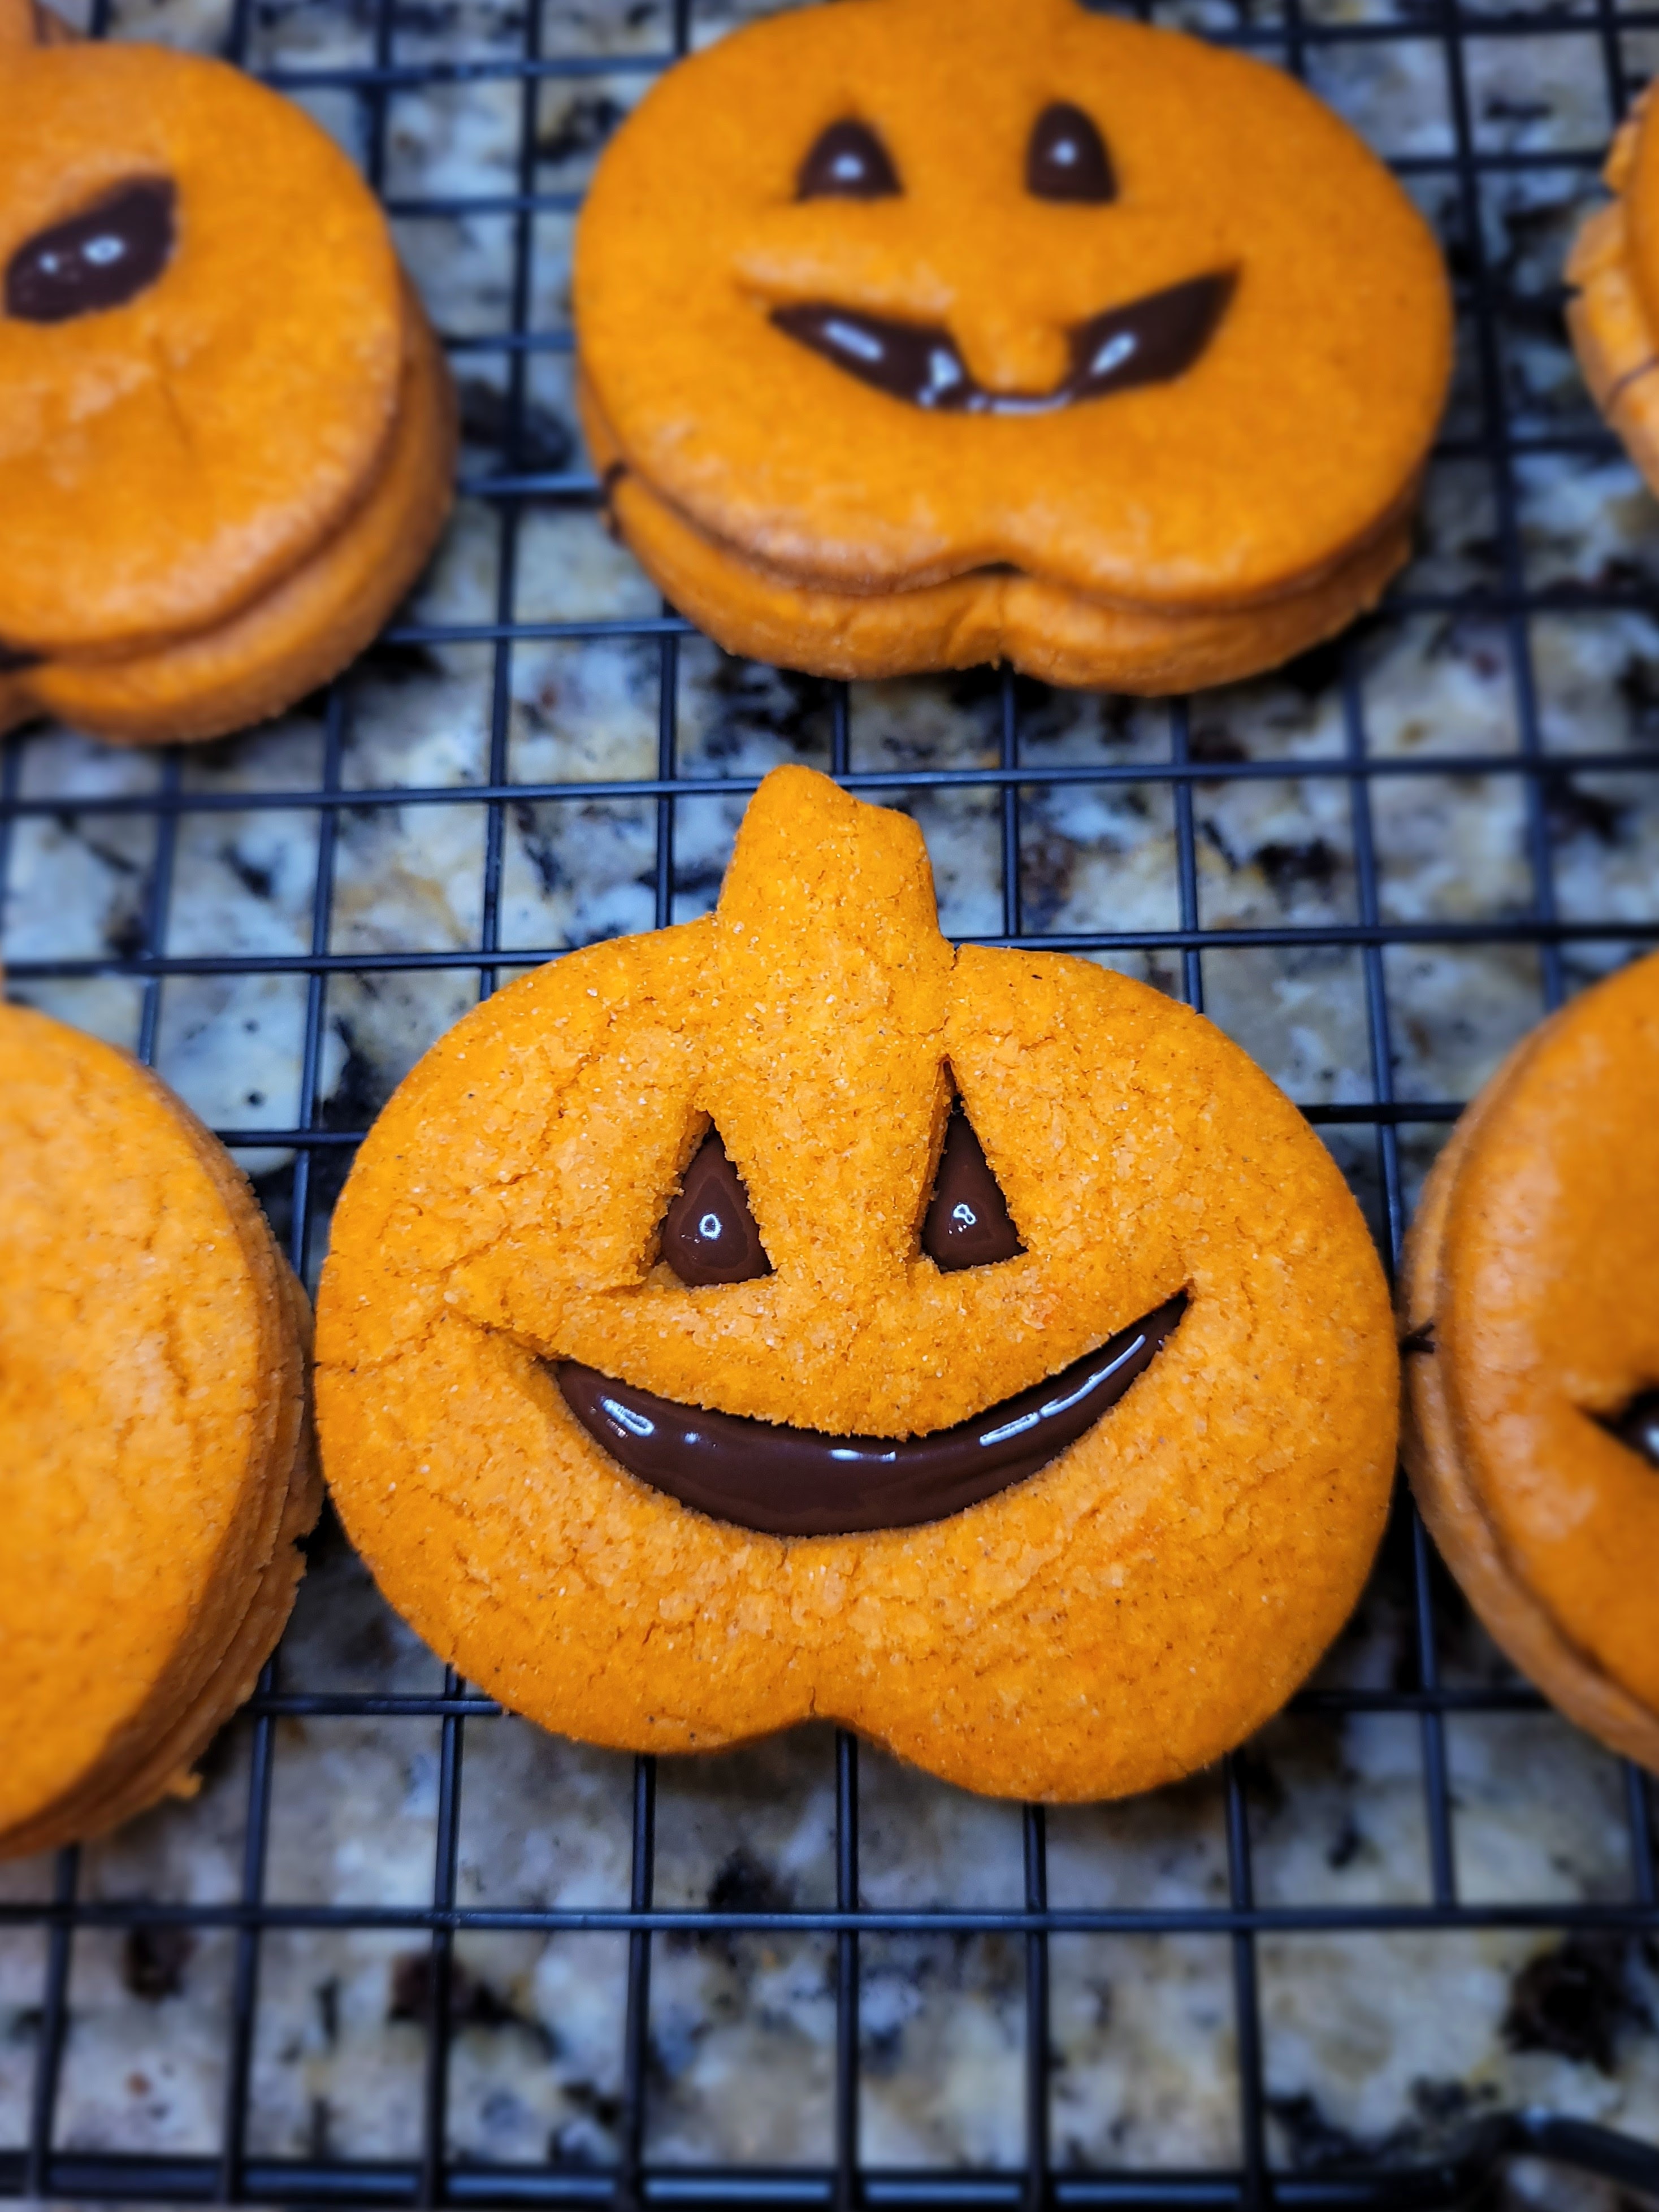
Look at his adorable, fat little face. He’s more a plumpkin than a pumpkin, but it works. 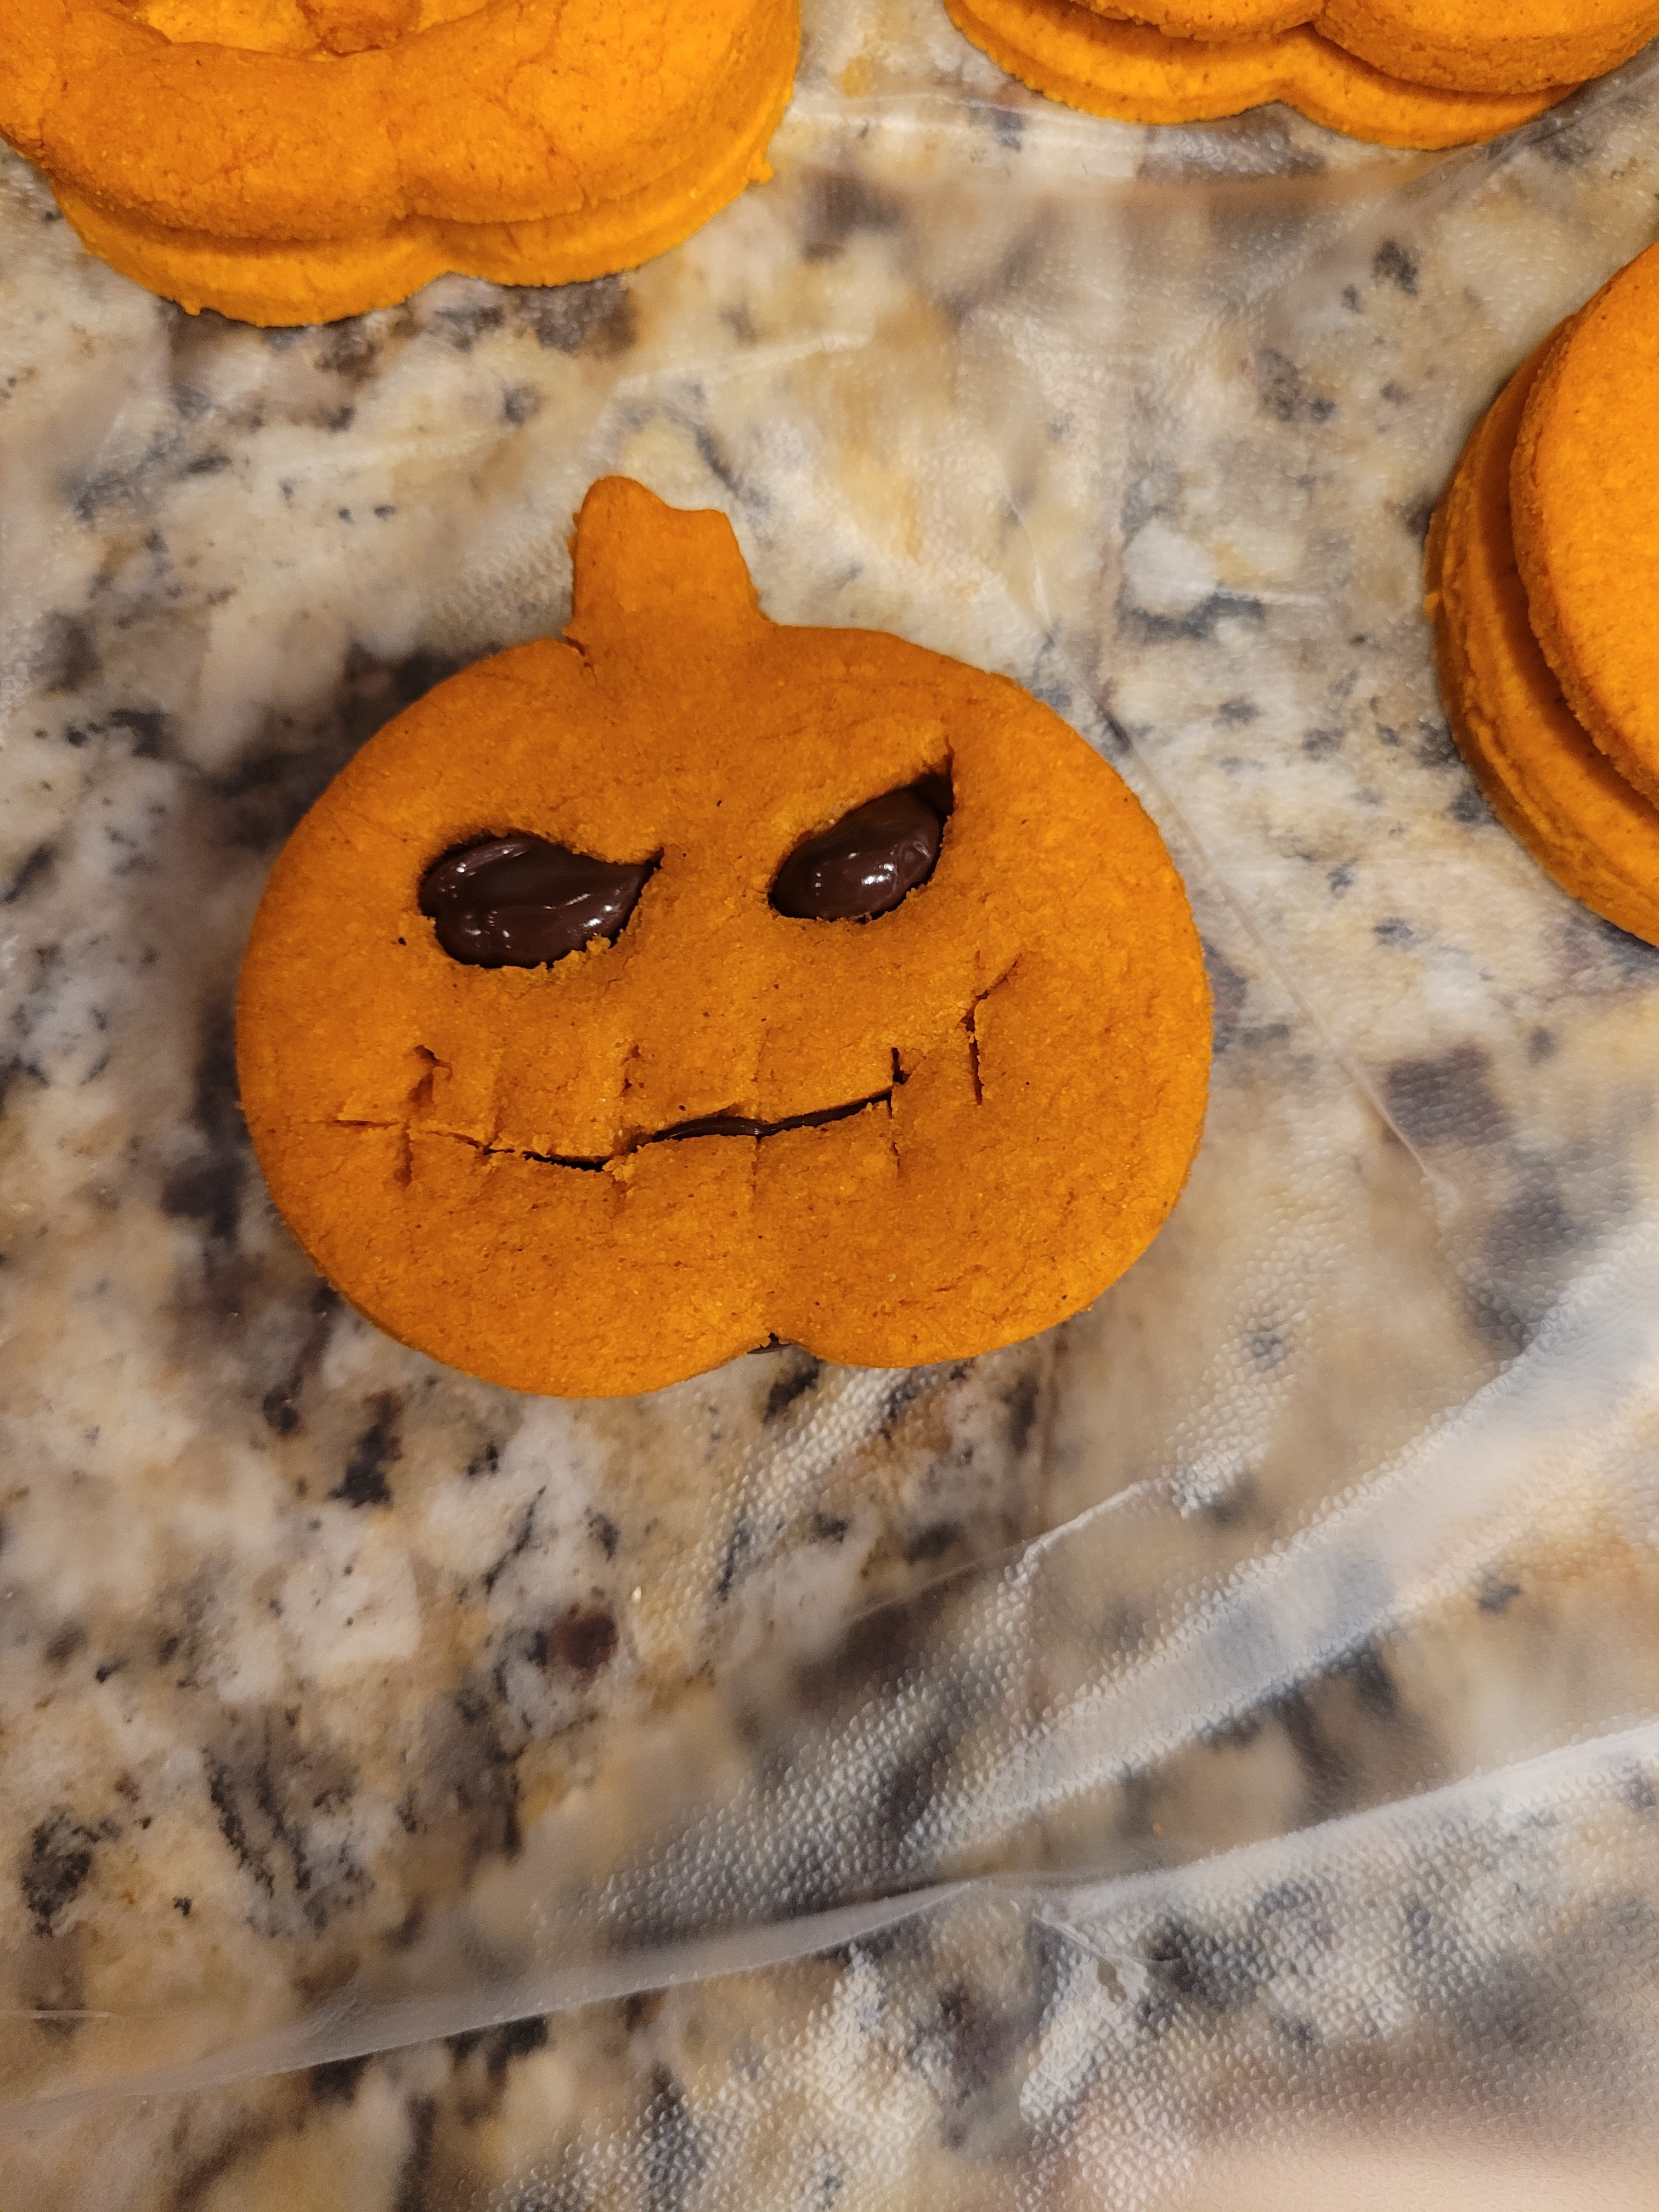
My face when someone tells me to smile more. Recipe and Instructions
Baileys Jack O'Lantern sugar cookies
Adult sugar cookies with a chocolate filling
You can definitely use all purpose flour if not gluten free. You can also substitute alcohol with the flavor of your choosing; to make kid-friendly, swap the booze for milk.
Ingredients
- FOR COOKIES
- 3/4 cup of butter at room temp
- 1 1/2 cups of Lakanto golden monkfruit sweetener (regular brown sugar also works just fine)
- 2 large eggs at room temp
- 3 TBS Baileys flavor of choice (I used their light flavor with 40% less sugar in it)
- 2 tsp vanilla extract
- 3 1/3 cups gluten free measure-for-measure flour
- 1 tsp baking powder
- 1/2 tsp baking soda
- Orange gel dye
- Pumpkin cookie cutter
- 1/2 bag (4-5 ounces) of Lily’s semisweet chocolate chips, melted (you can use whatever brand you’d like; I prefer these since they are sugar free)
FOR CHOCOLATE FILLING
Directions
- Mix butter and sugar until light and fluffy.
- Add eggs, extract, Baileys, and orange gel dye mixing well.
- Add baking soda, baking powder, and 1/3 of the flour, mixing well.
- Add remaining flour in 1/3s, mixing well (add more orange dye if you need to).
- Roll dough into a large ball, wrap with cling wrap, and place in fridge for 30 minutes.
- Once chilled, roll out half of the dough with a rolling pin dusted with flour, or cover the ball with more plastic wrap. Roll to about 1/4″ thickness.
- Cut out pumpkins with pumpkin cookie cutter; repeat with remaining dough.
- Take HALF of your pumpkins (this recipe made 48 cookies total for me, so I cut out faces on 24 cookies) and cut out desired Jack O’Lantern faces with a pairing knife or X-acto knife.
- Place Parchment paper or silicone mats on large baking trays. Put 12 cookies on each tray, placing in the freezer to firm for 10-15 minutes before baking.
- Preheat oven to 350 while dough chills.
- Bake one sheet of cookies at a time to desired doneness. For softer cookies, bake 8 minutes. For crunchier cookies, bake 10 minutes.
- Let cookies cool on the sheet for 5 minutes before removing to a cooling rack to cool completely.
- Once all cookies have cooled, melt chocolate chips in a microwave safe bowl. I used 50% power for 1 minute, stirred, and heated again for 30 seconds at 50% power to get things smooth and melty.
- Use a small spoon or teaspoon to drop a dollop of melted chocolate onto a plain pumpkin and spread evenly.
- Take a Jack O’Lantern face cookie and press it on top of the melted chocolate to adhere; repeat until all cookies have been sandwiched together.
- Let all cookies harden for 30 minutes before placing in airtight container to save.
- I recommend reheating for 15 seconds in the microwave to get chocolate filling melty again before eating.
Nutrition
Per Serving: 152 calories per cookie
7.5 fat/20 carbs/1.8 protein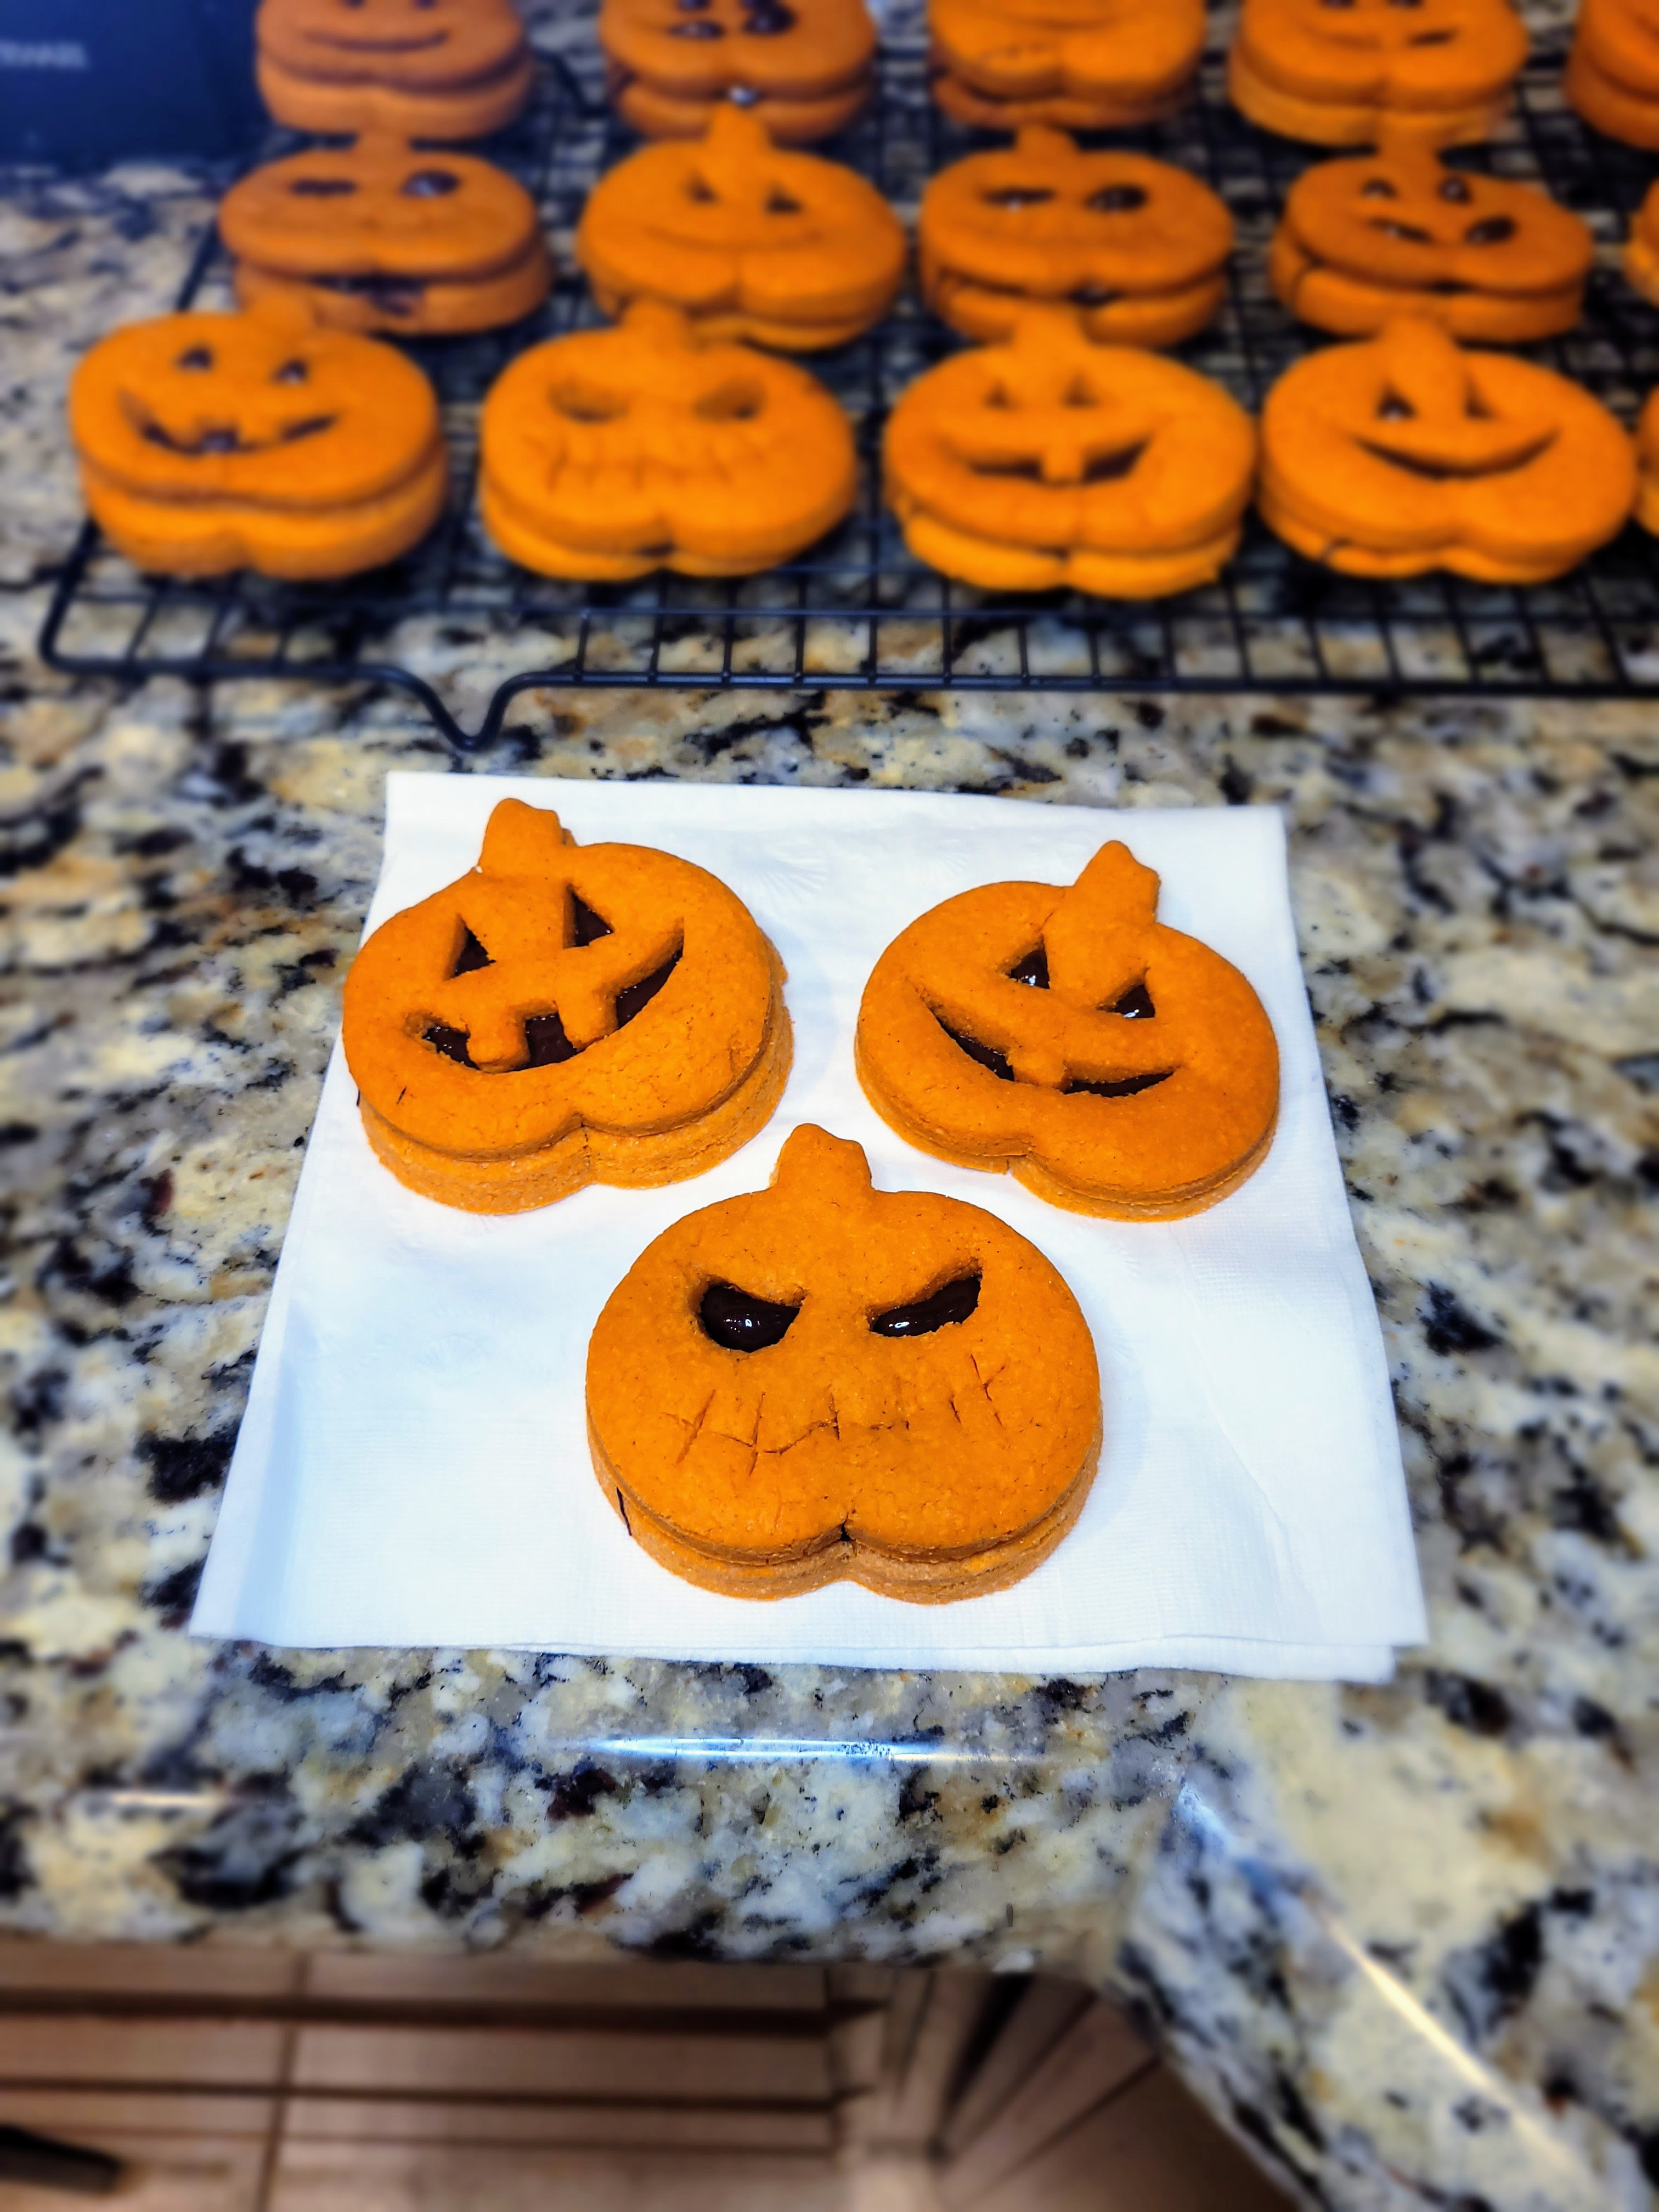
Orange you glad you have this easy recipe? Bake your spooky heart out! - 3/4 cup of butter at room temp
-
Squad Ghouls
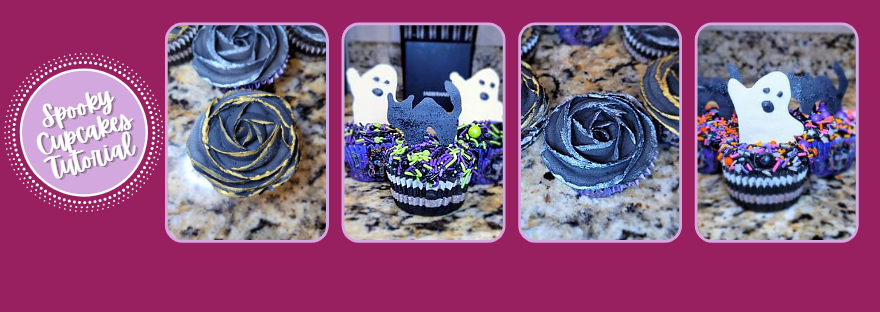
Alright, it’s mid-October, I’ve watched all my favorite silly Halloween movies six times, it’s 50 out, gray, and rainy, and I am pretty sure I’ve died and gone to spooky heaven. The only thing that could make the day any more perfect is a cupcake, so it’s good thing I’ve got a creepy dozen (not to be confused with a baker’s dozen) waiting for me in the fridge. If you’re not spending a Sunday on the couch with the Sanderson Sisters and a chocolate cupcake, you’re just not Octobering properly. Allow me to guide you to achieving peak eeriness with these chocolate cupcakes adorned with ghoulish fiends and dead roses.
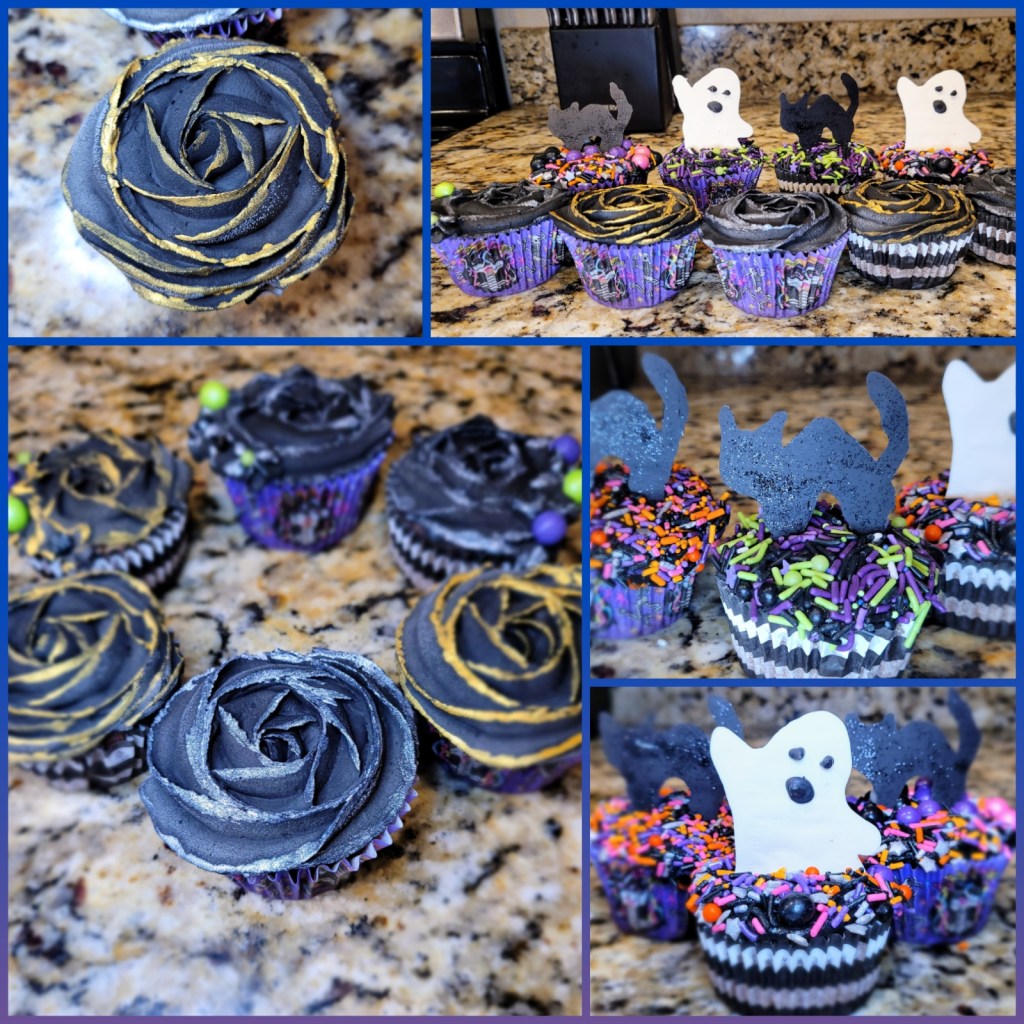
Now, that’s the spirit! These ghosts, cats, and roses are a chocolate cupcake base with my leftover caramel cream cheese frosting from my spiderweb cupcakes on top. While the frosting does give me deja boo, this chocolate cupcake mix is insanely good–it’s more a Devil’s Food cake flavor than a standard chocolate cake, which is both taste and holiday appropriate. A caramel frosting and a rich chocolate cupcake base makes for a match made in flavor heaven (or hell depending on how your diet’s going…because you’re not gonna be able to eat just one). Each cupcake is 225 calories, and the recipe makes 12 total. I mean, you can definitely share, but I’m more into treats (for myself) than tricks.
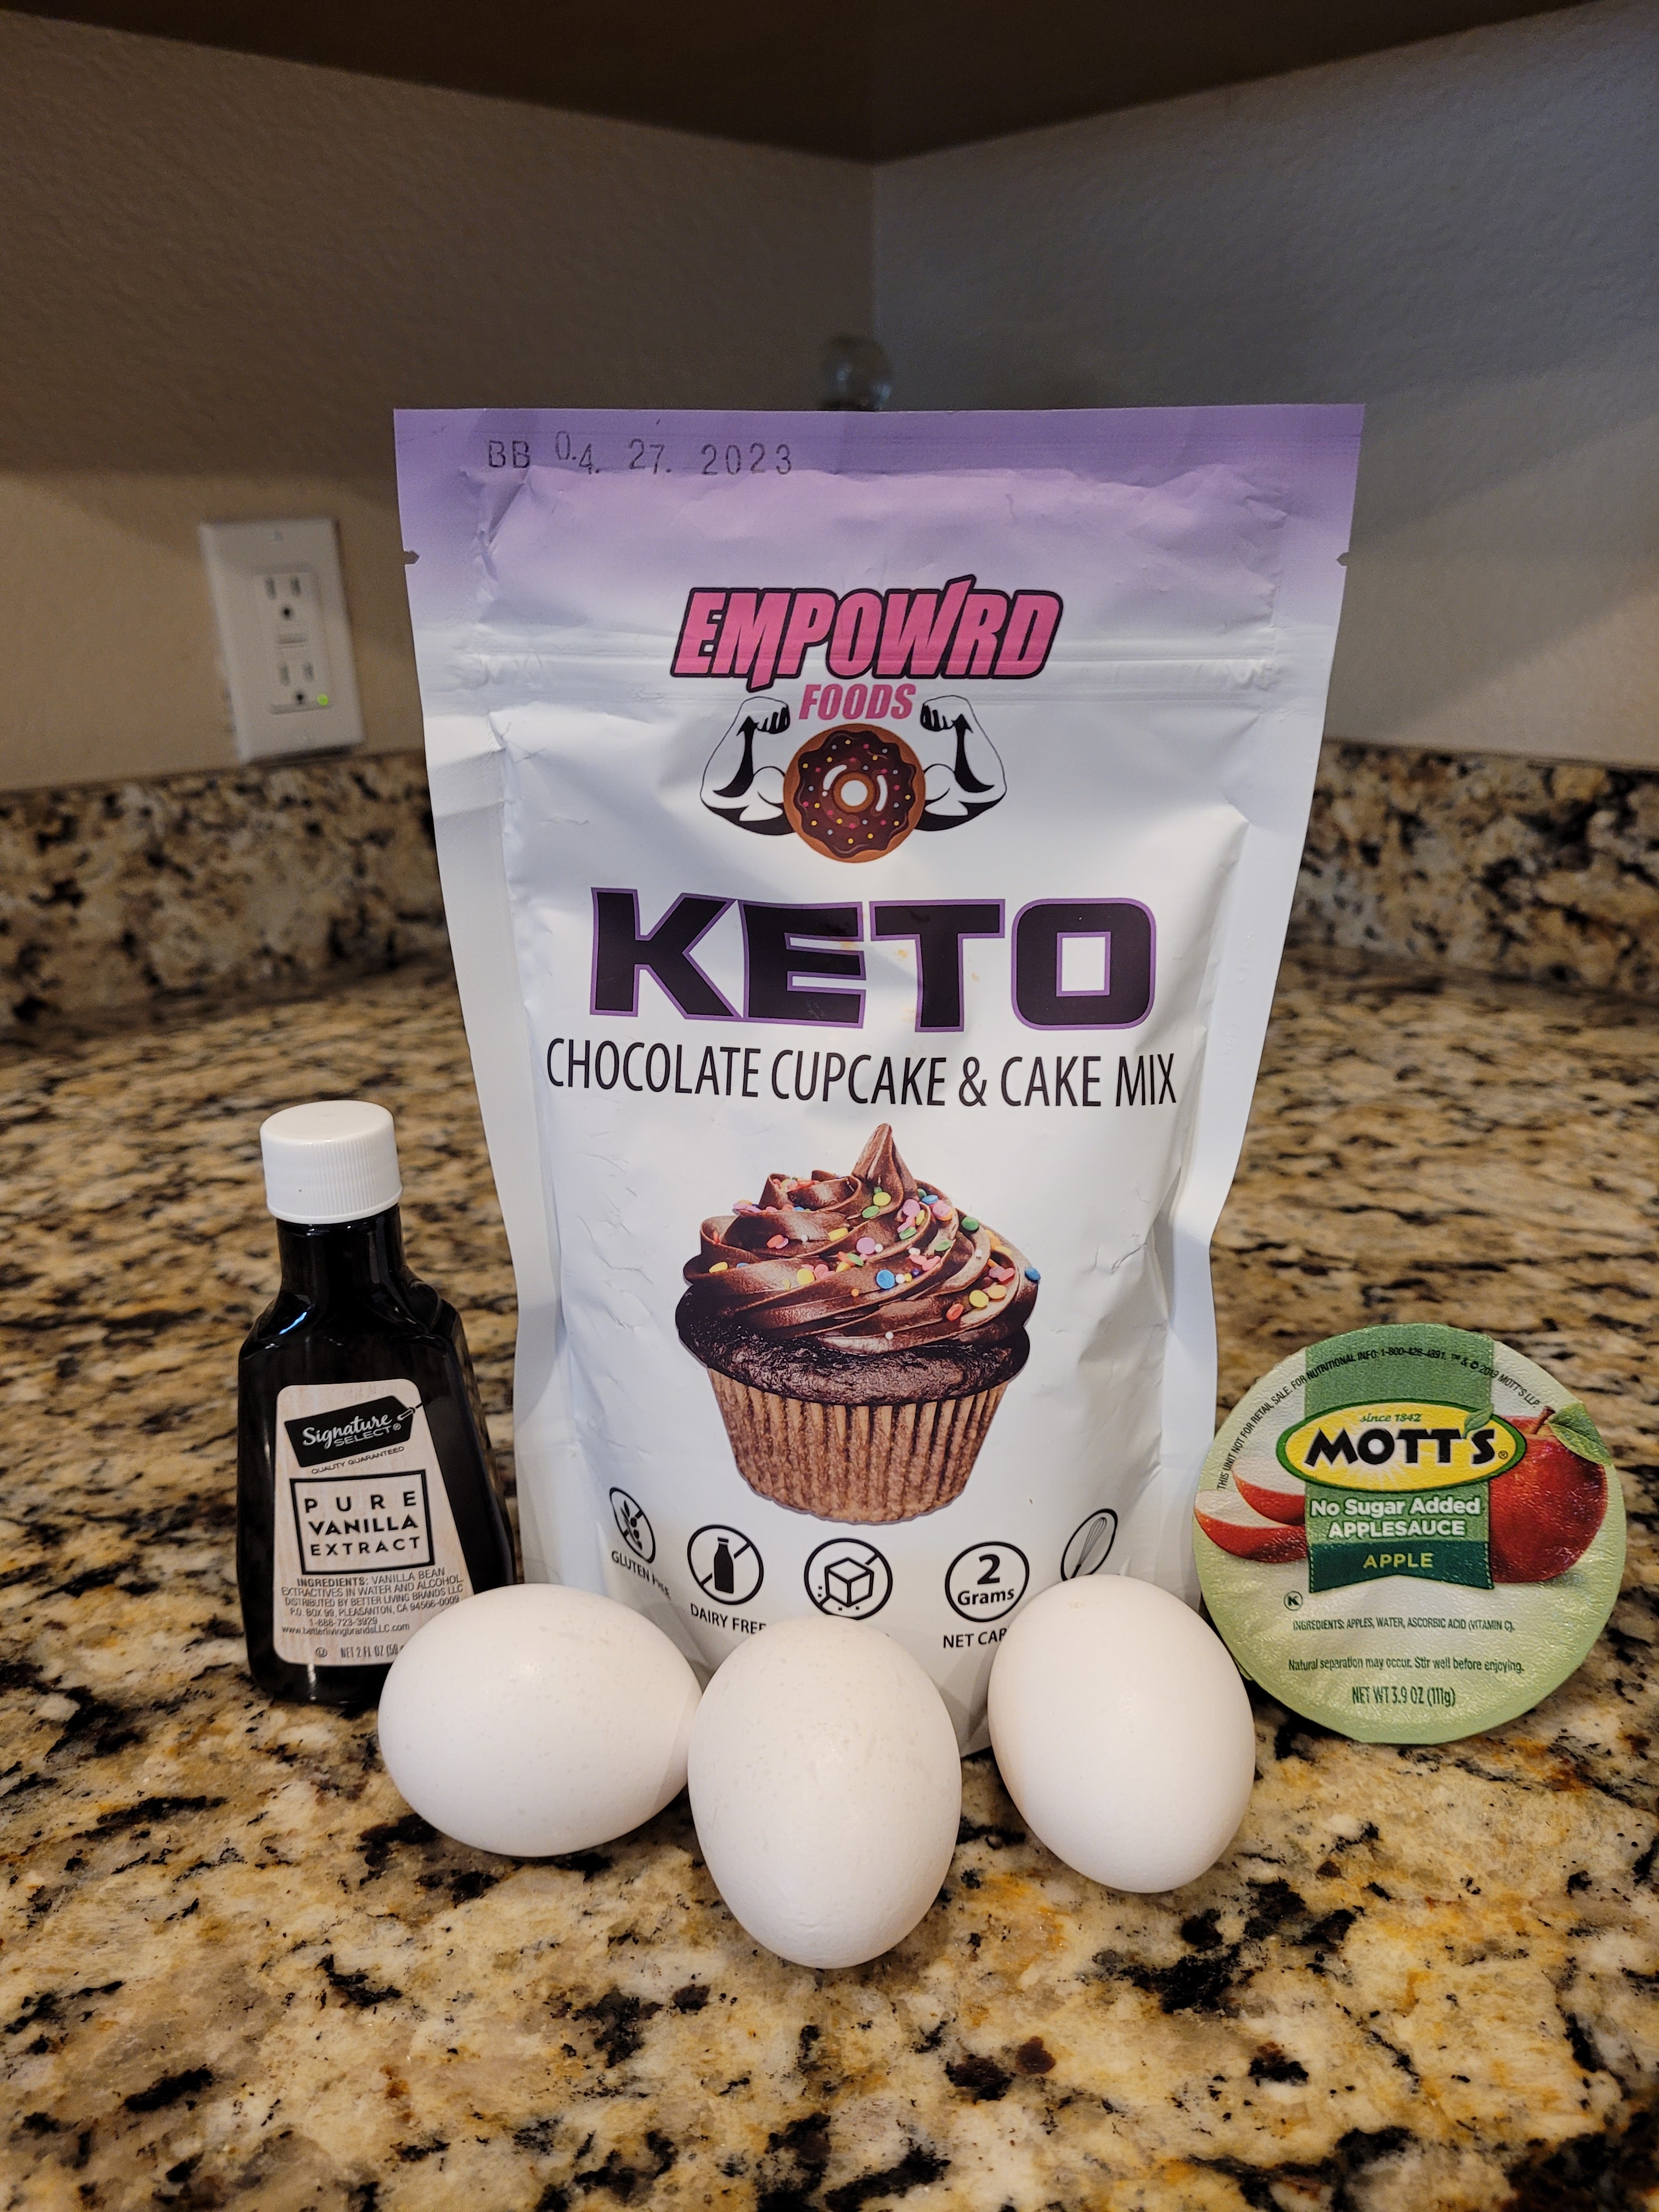
The trick is eating fewer than three at a time though. To make, you’ll need:
- 1 bag of Empowrd gluten free chocolate cupcake mix
- 115 grams (1/2 c) unsweetened applesauce
- 3 eggs
- 1 tsp vanilla extract
Preheat your oven to 350 and line a muffin tin with 12 cupcake wrappers. These do make smaller cupcakes, so realistically, I’d say it would make 8-10 normal-sized cupcakes if you want fuller cakes.
Mix all the ingredients together in a stand mixer on medium-high for two minutes. Use a small cookie scoop to evenly distribute batter into the prepared pan, and bake for 18-20 minutes, until a toothpick comes out of the center of a cupcake mostly clean. Let these rest in the pan for 10 minutes before placing on a cooling rack to completely cool before frosting.

They may be small, but they are mighty delish. While your cupcakes cool, you can make the ghosts and cats. You just need white and black candy melts (I get mine on Amazon, Wilton brand). I traced a cat and ghost template I made on Canva onto Parchment paper with a Sharpie, then flipped it over. If you have cookie cutters to trace or can draw a cat or ghost freehand with no issues, these are also other options. I can’t even draw a stick figure that looks human-adjacent, so I like to size a silhouette down in Canva and print it out.
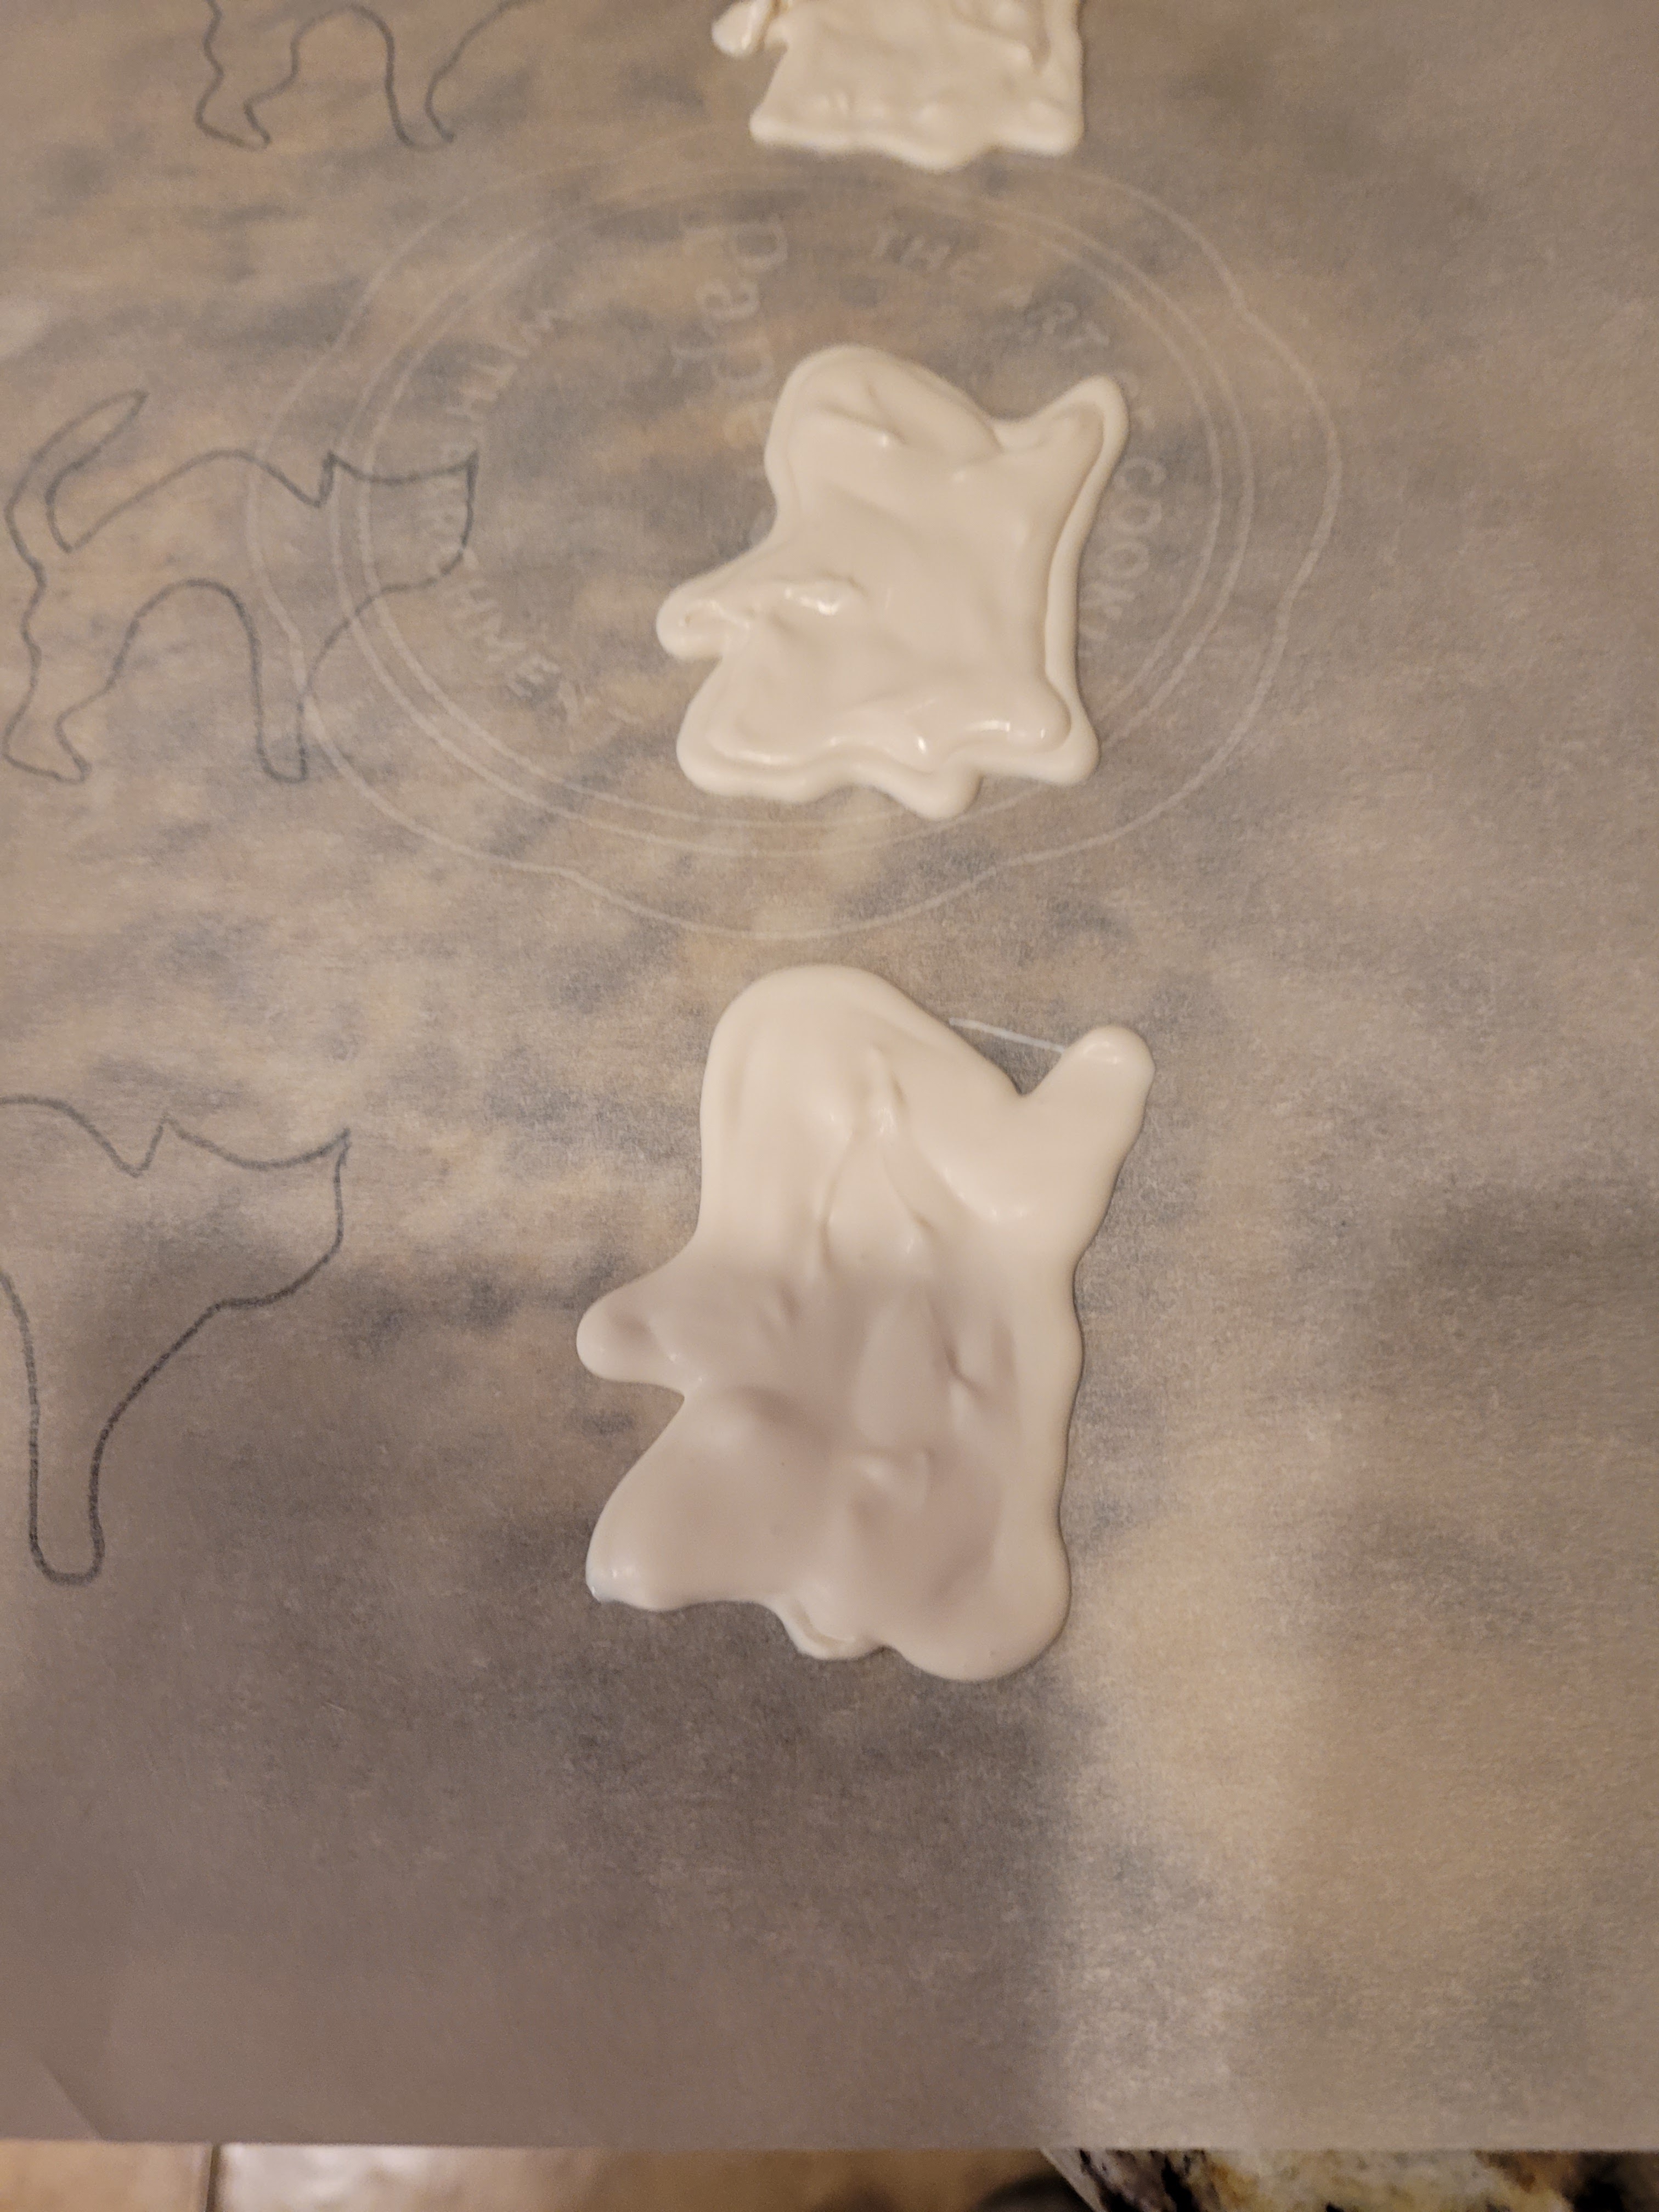
I guess it’s a good thing ghosts are also shapeless blobs, so freehanding them truly cannot end badly. I melted about 1/4 of a package of white candy melts following package directions and placed in a piping bag. I snipped the edge off the bag and outlined my ghost. Then I filled him in quickly and used a toothpick to swirl the chocolate around while it was still melty to smooth out. It doesn’t need to be perfect, you just don’t want any gaps. While these set, I melted 1/4 of a package of black candy melts following package directions and placed into another piping bag. Once you can touch the ghosts without feeling any tackiness (a.k.a. ethereal ooze), they are safe to gently flip over and add eyes and a mouth.

Ugh, he is totally ghoul and he knows it. Snip a very small corner off your bag, then draw a small circle for the mouth and two eyes using the black melts. Then you have a Casper-level of friendly ghost who’s ready to adorn the top of a cupcake even though he knows you’re going to eat him (like I said, he’s a really ghoul guy; he gets it. It’s a haunt or be haunted kind of world).
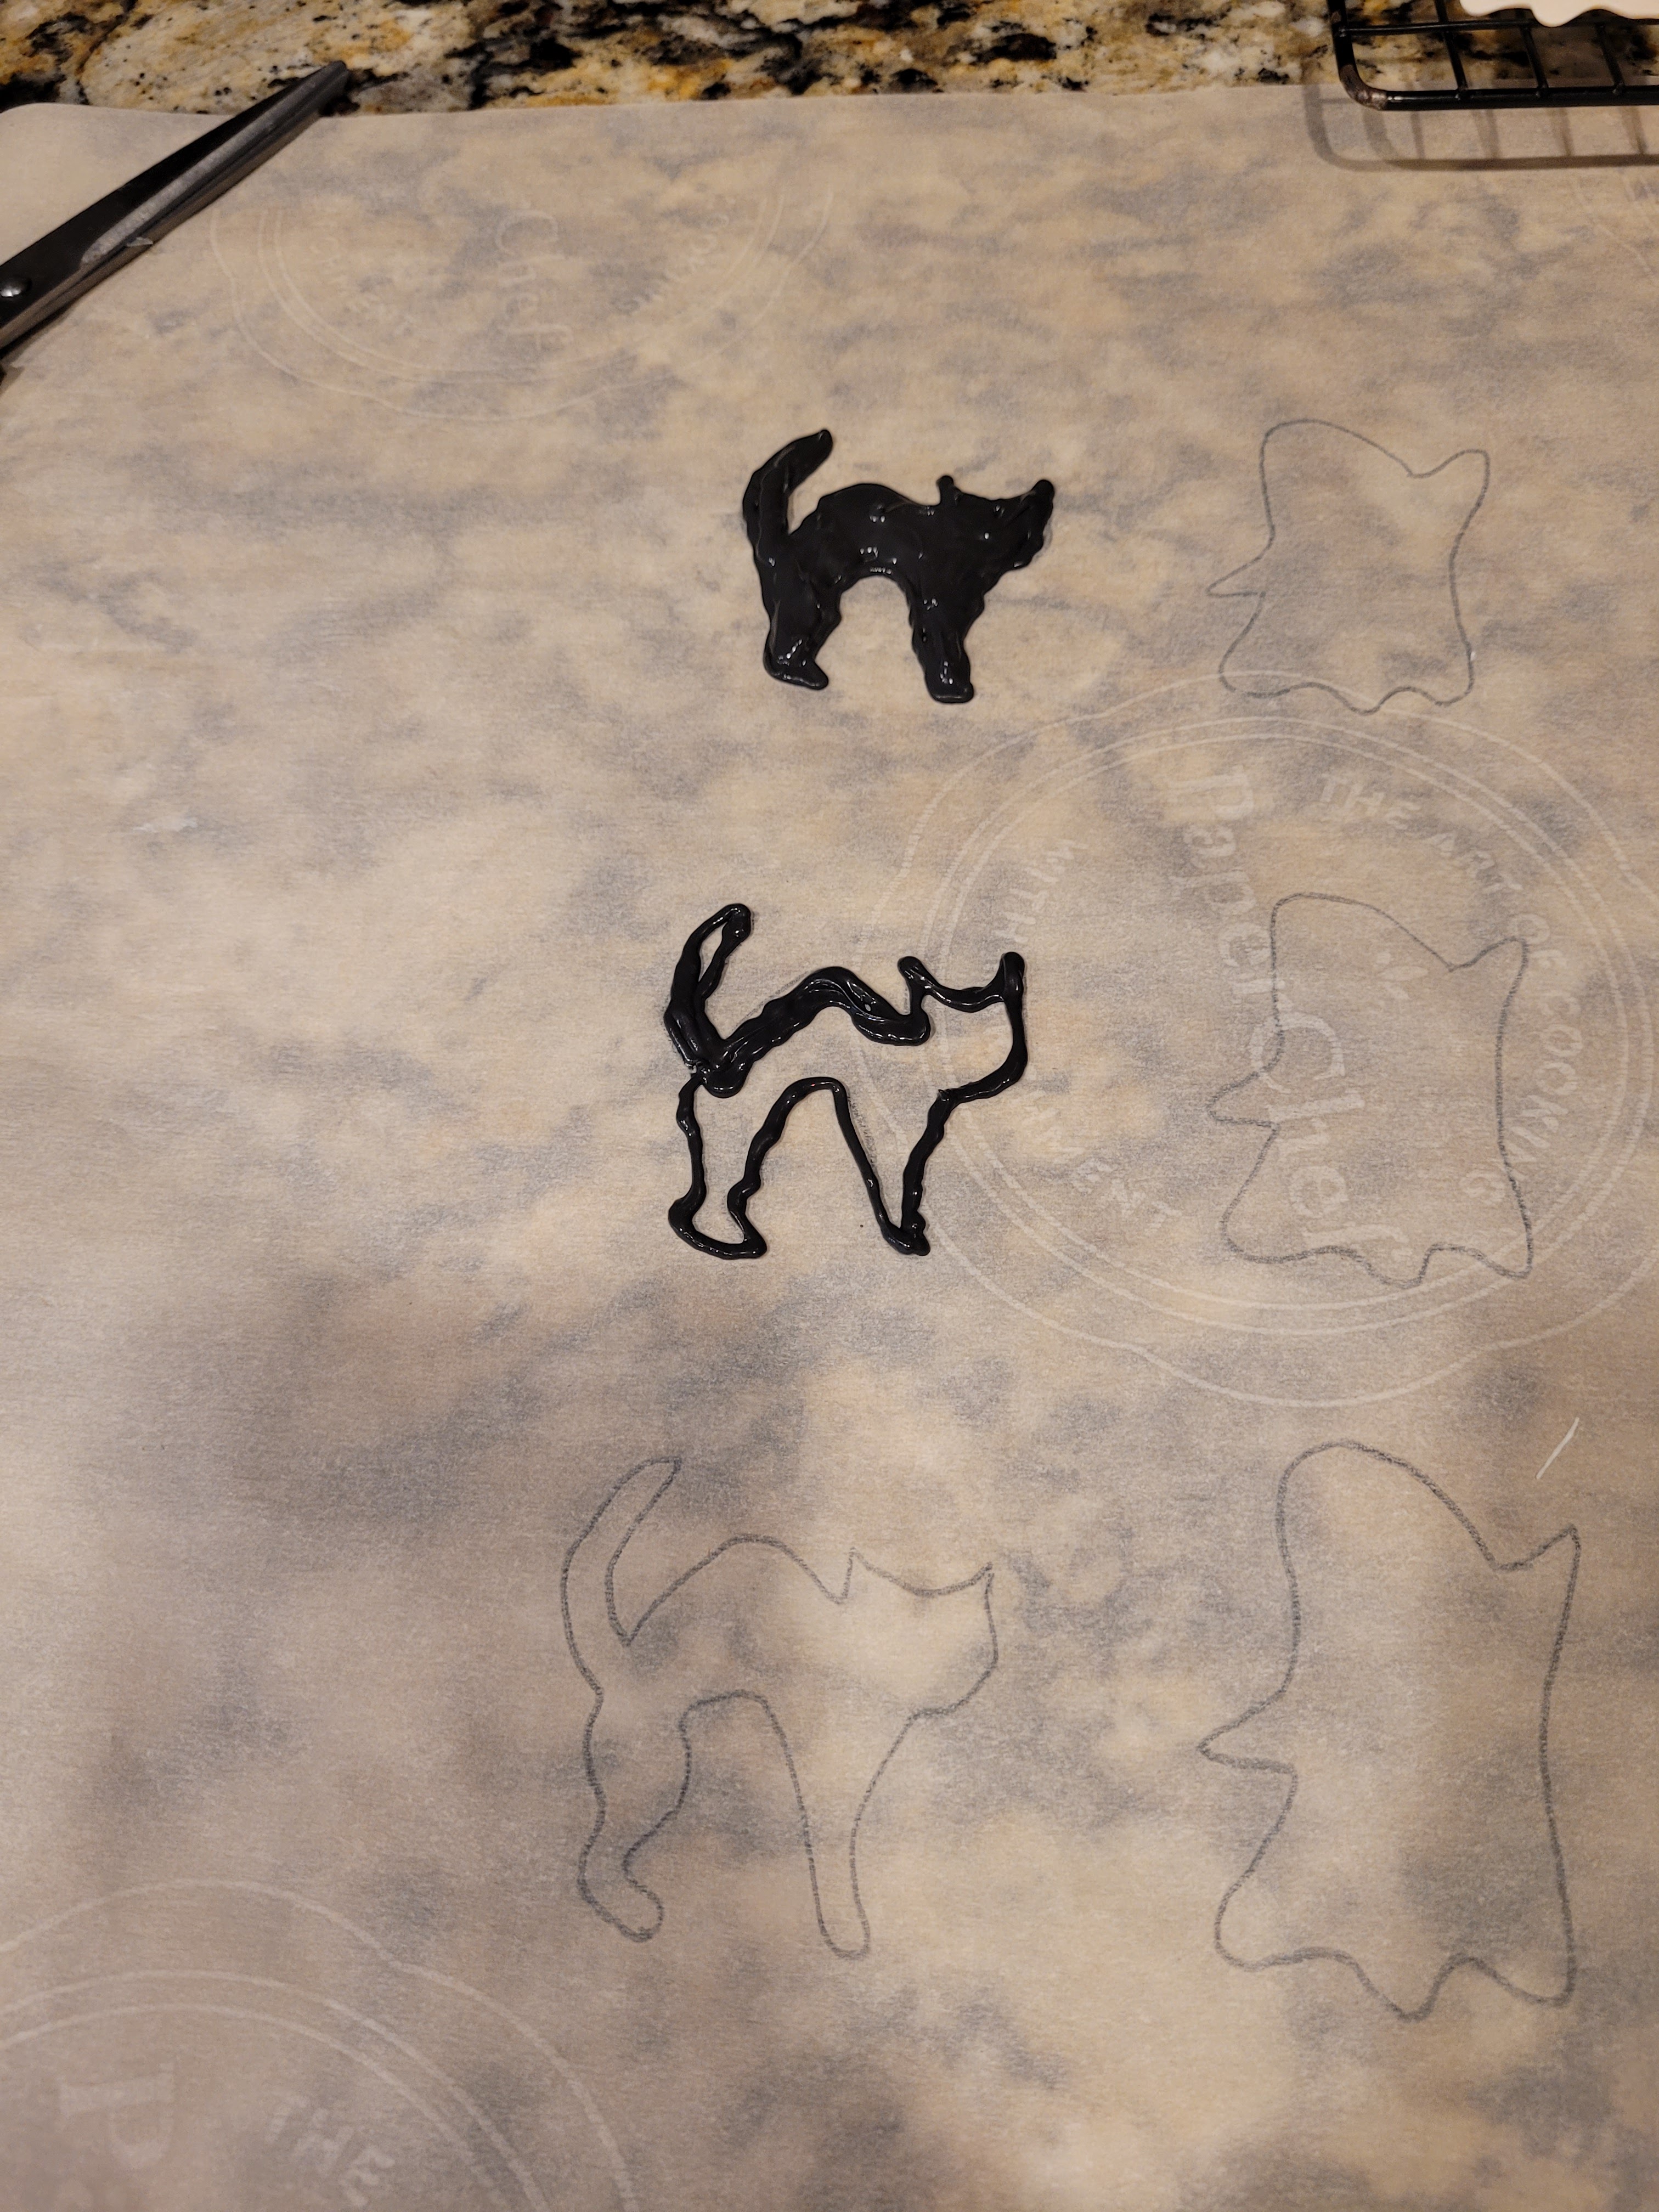
Now, let’s have a small cat-astrophe… You do want to work quickly, so don’t admire those boo-tiful ghosts for too long or your chocolate melts will, well, no longer be melted. Work quickly to pipe the outline of a cat, then fill in and use a toothpick to swirl out any gaps.
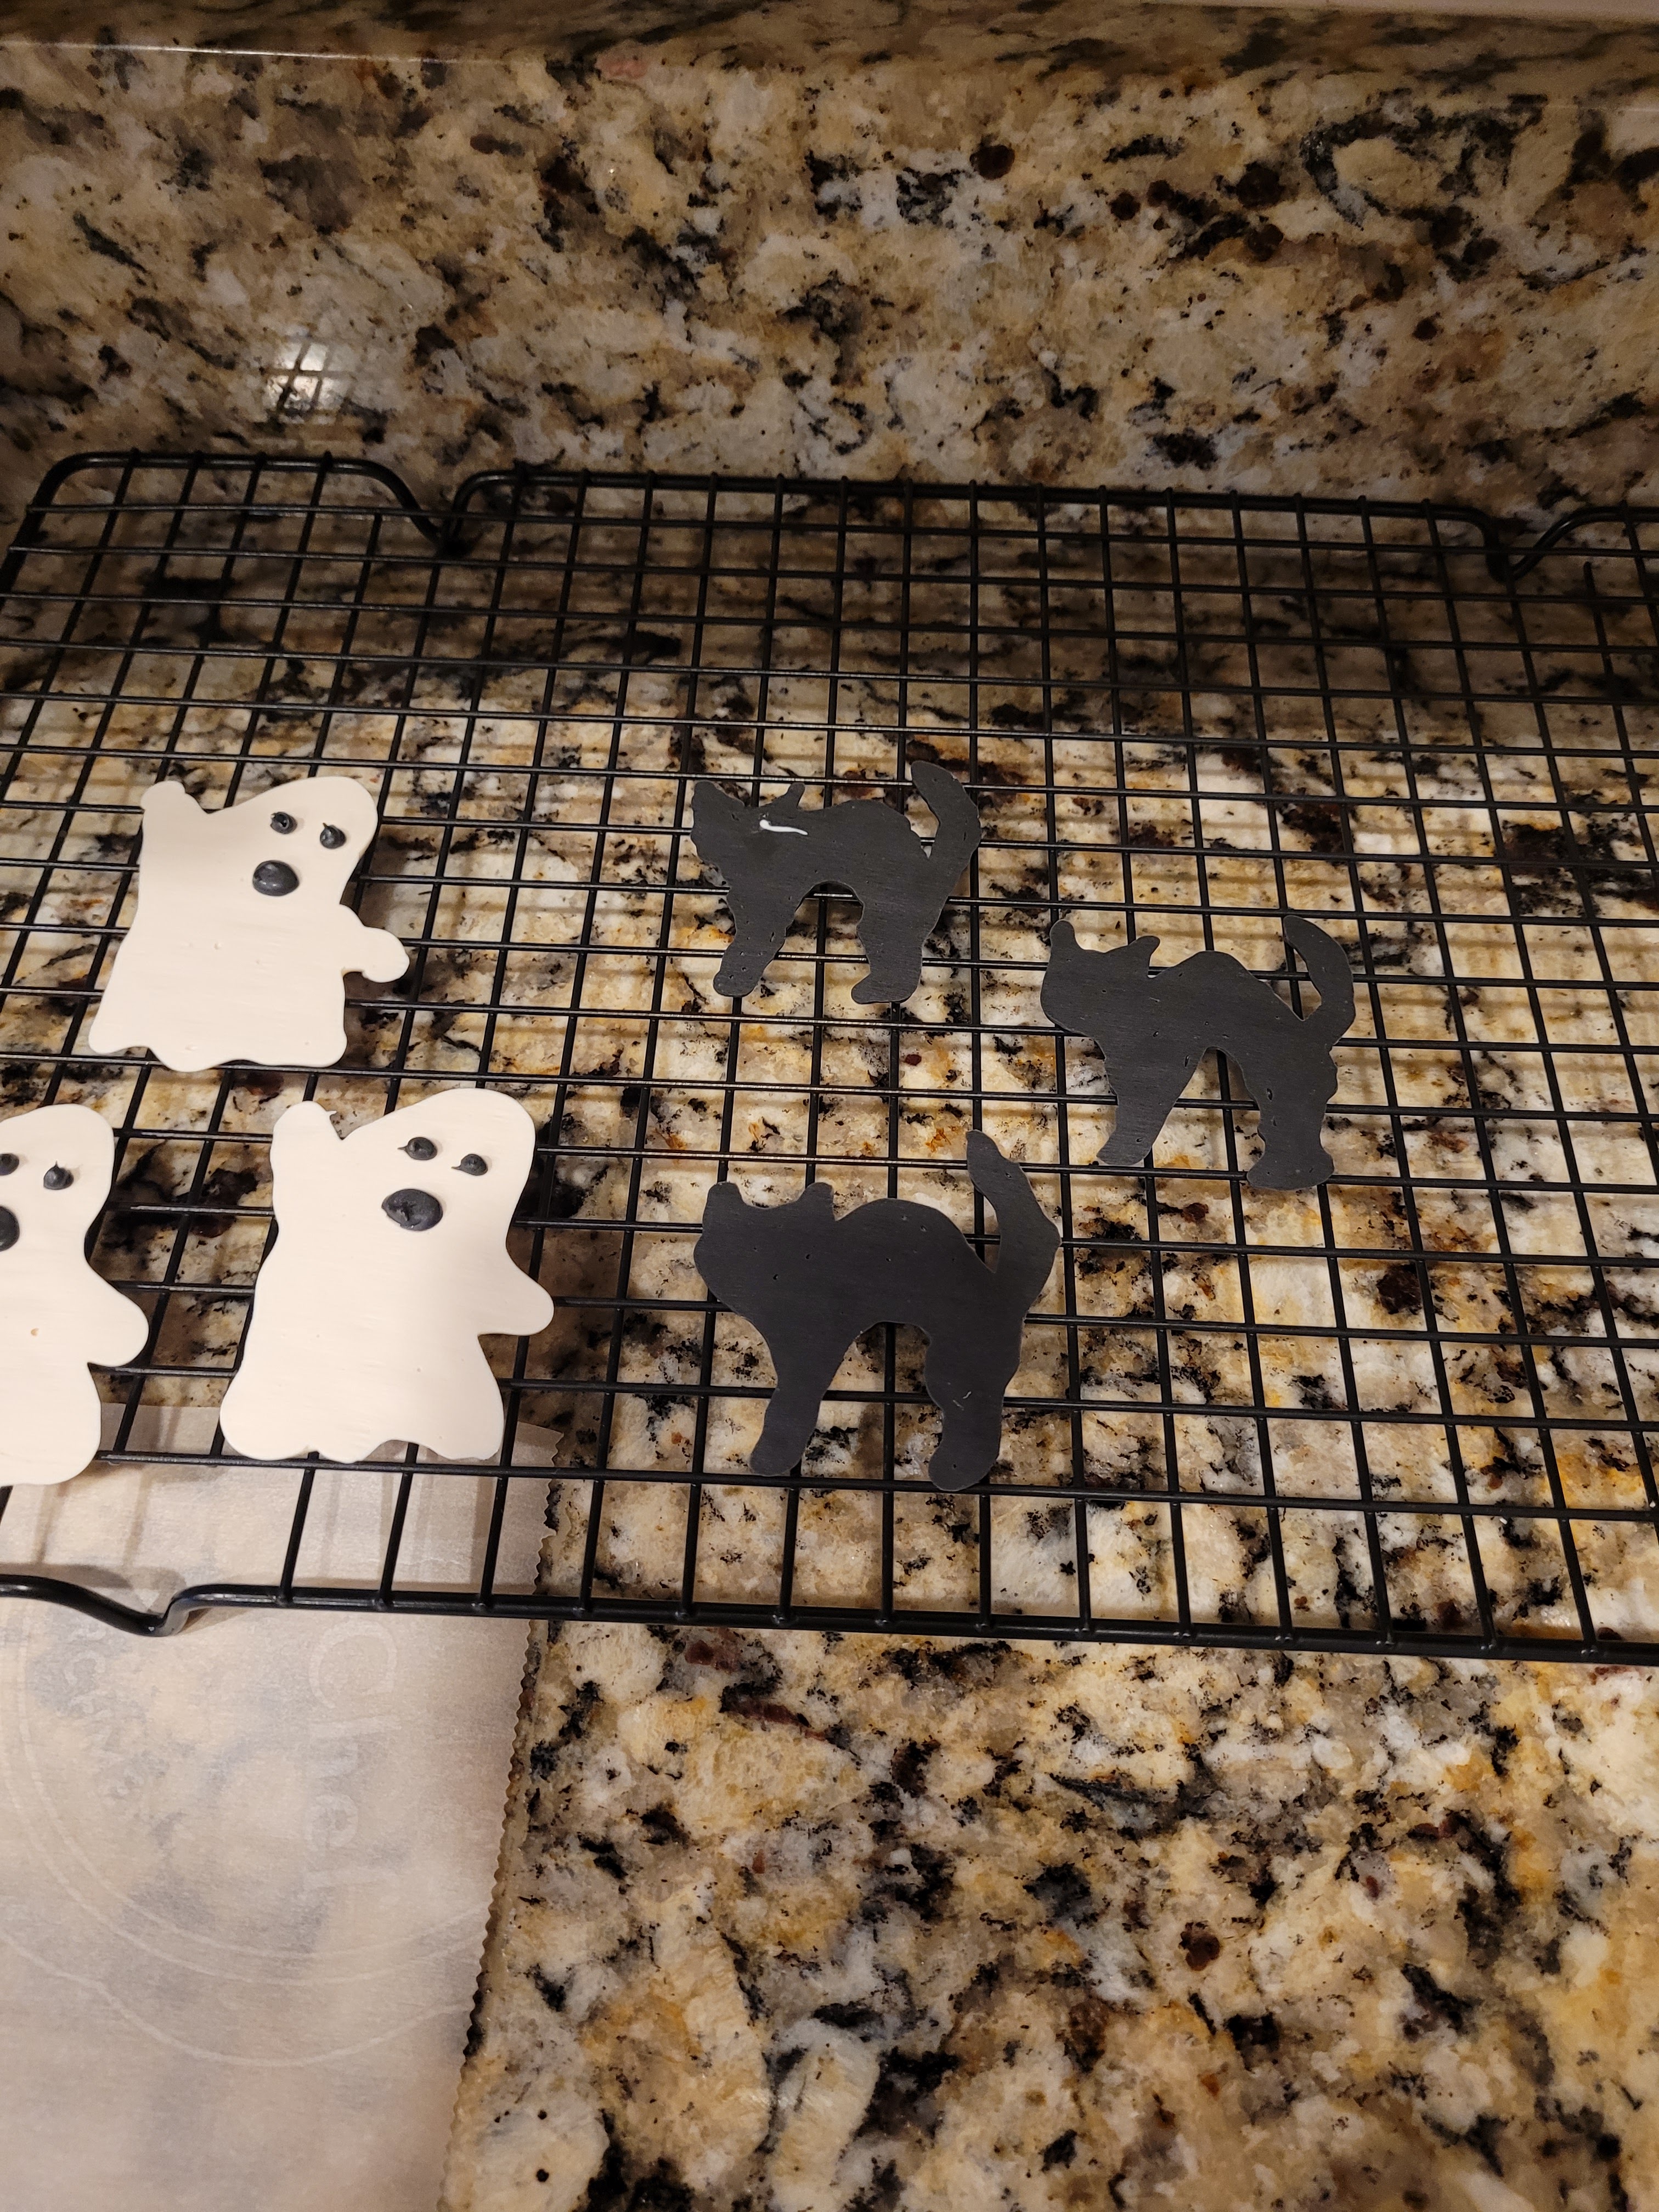
Yeah, one cat has a gray hair, which to me, a 35-year old, is a true horror story. I must have piped that poor kitty on top of a stray strand of white chocolate from my ghosts. He’s haunted, for sure. Now, let these set before adding black edible glitter to them with a food-safe paint brush. If you don’t have edible black glitter yet, you’re not really living Baketober in all its glory. Do I have a shelf reserved for edible glitter and Halloween sprinkles in my pantry? Does a ghost lurk in the woods? Do werewolves howl at the moon?

You know it, boo. I had a whole bunch of leftover frosting, so this is what I used to pipe all my cupcakes with. I also bought all my Spooky SprinklesTM and edible glitter from Amazon. I dumped a bunch of one sprinkle mix into a small bowl and a bunch of the other sprinkle mix into another bowl. Then I used a large round tip to pipe a mound of frosting on top of half of my cupcakes. Once done with this, I swirled the top of a cupcake face down in a bowl of sprinkles until it was completely coated, then gently slid a ghost on top. I repeated this process, varying which bowl of sprinkles I used. You can catch a video tutorial of this and how to paint the roses on my Instagram as well.
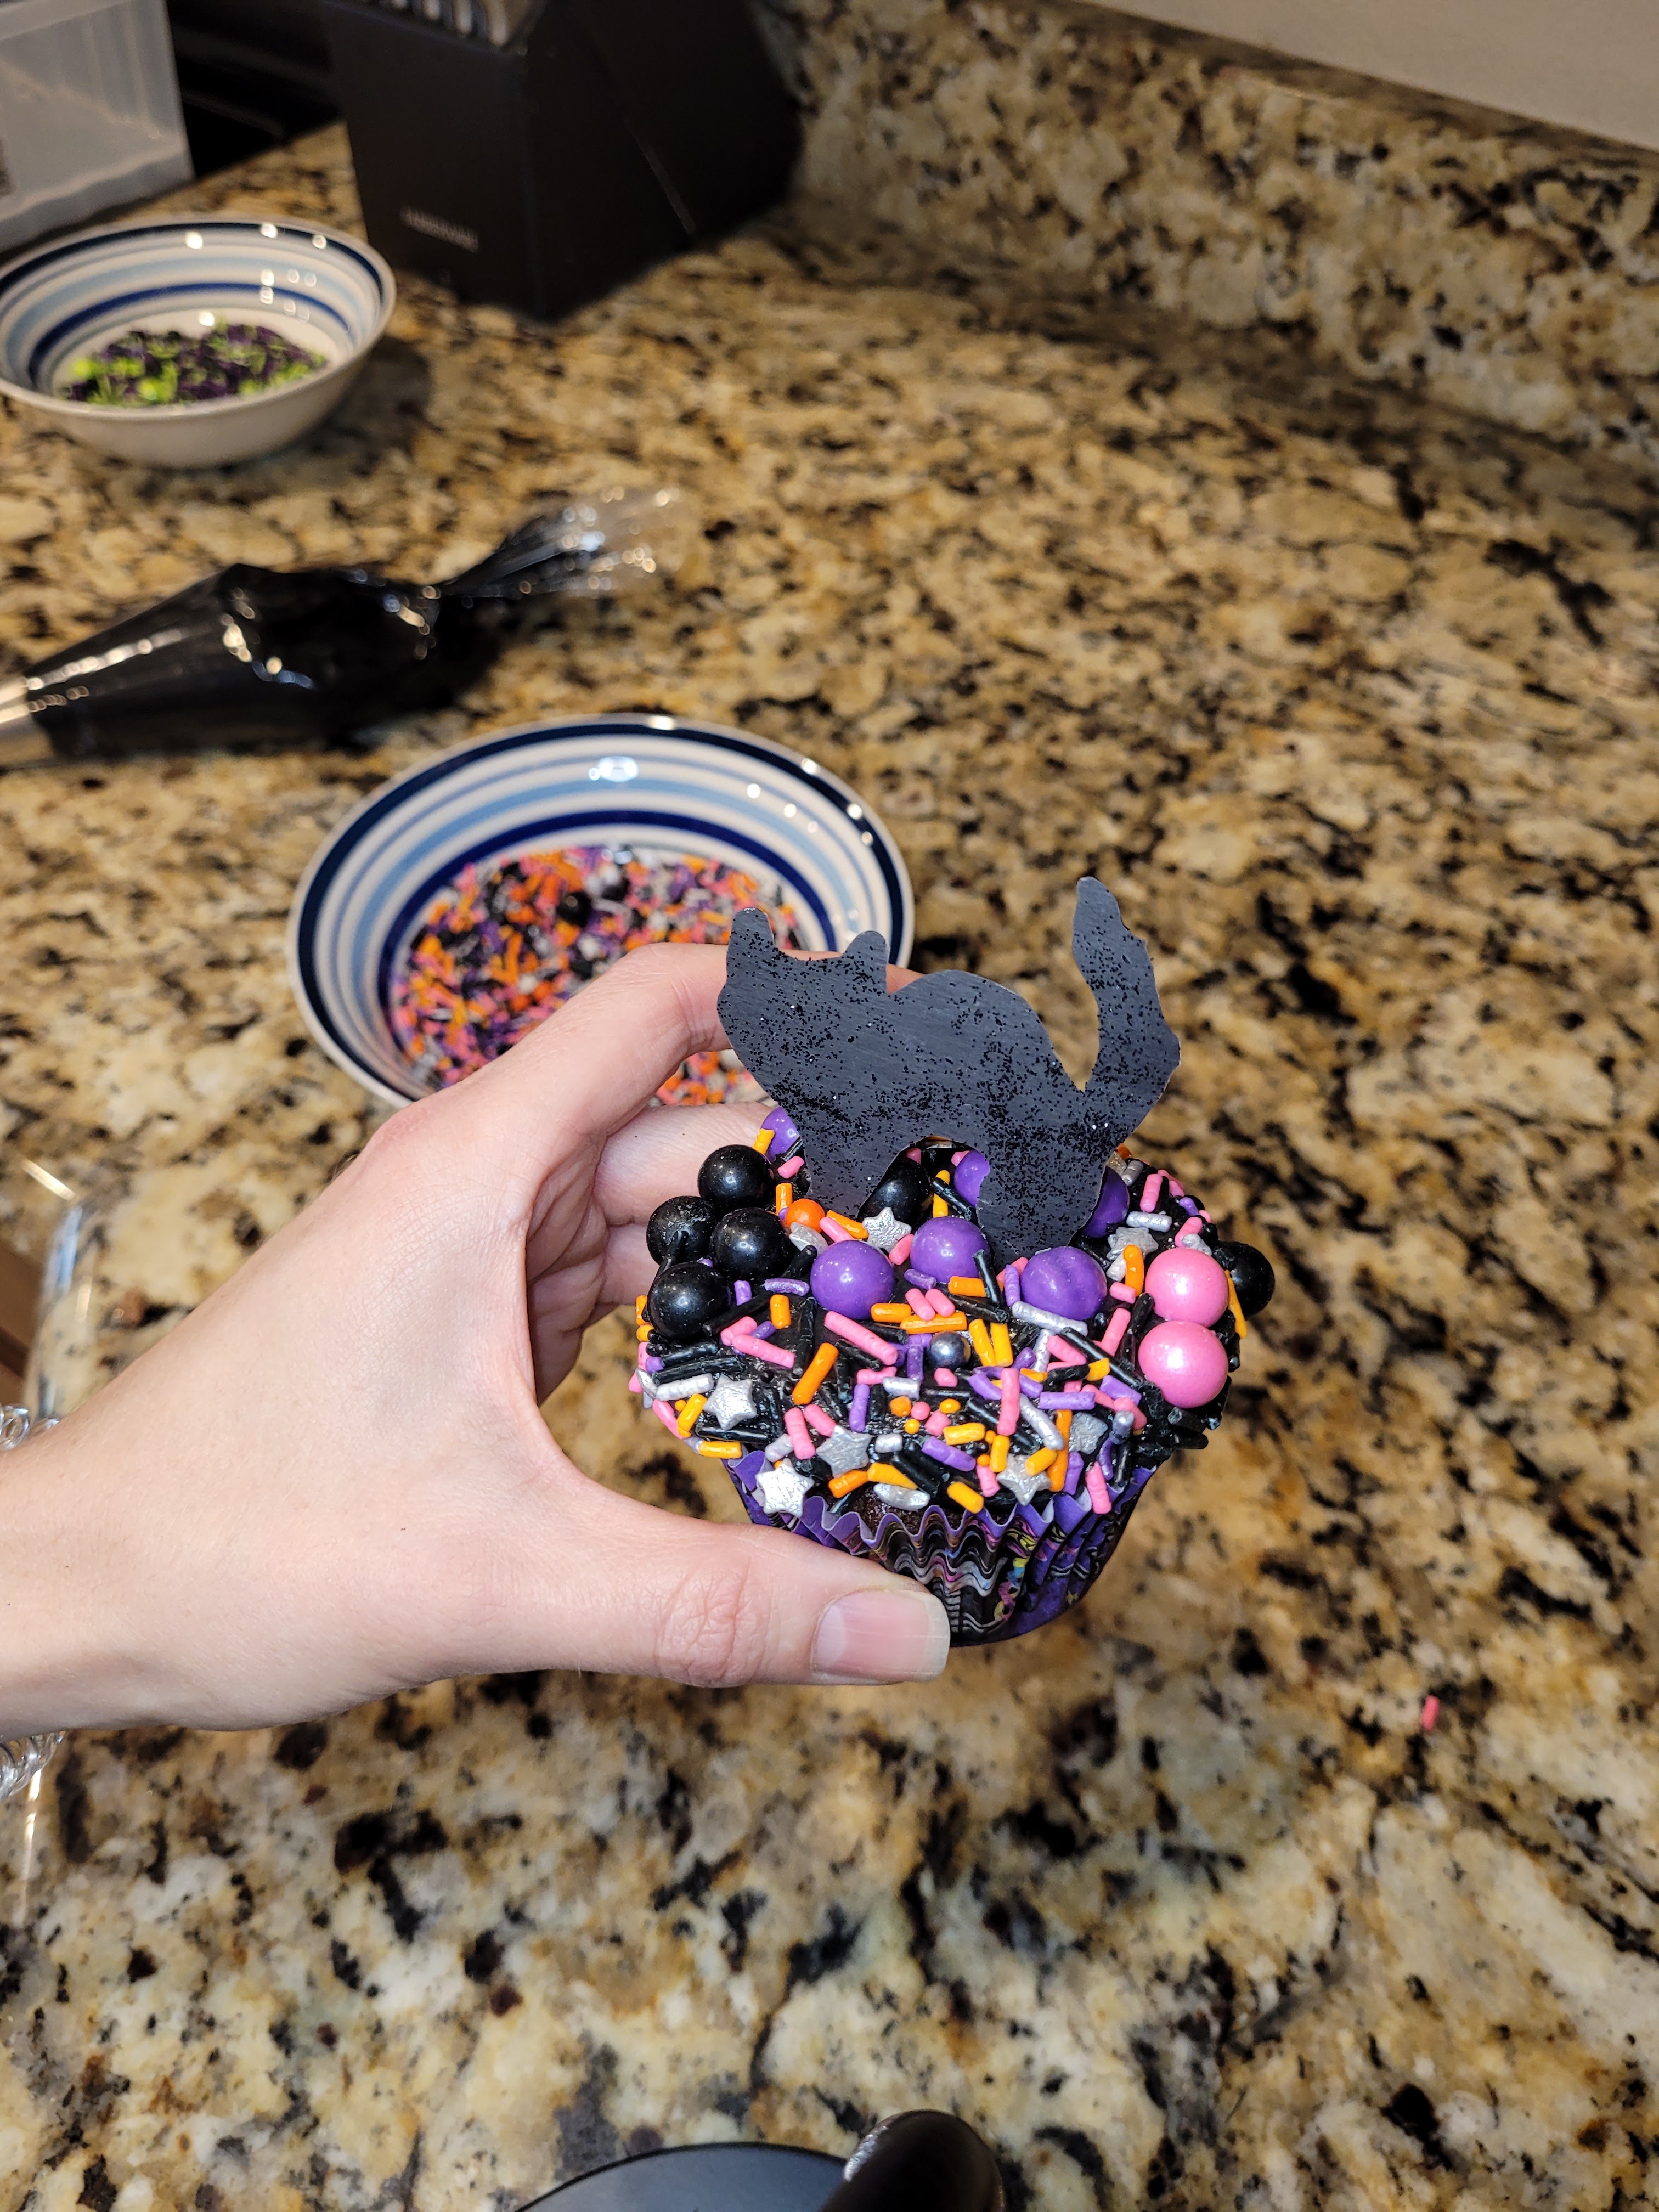
That’s some purranormal activity right there. 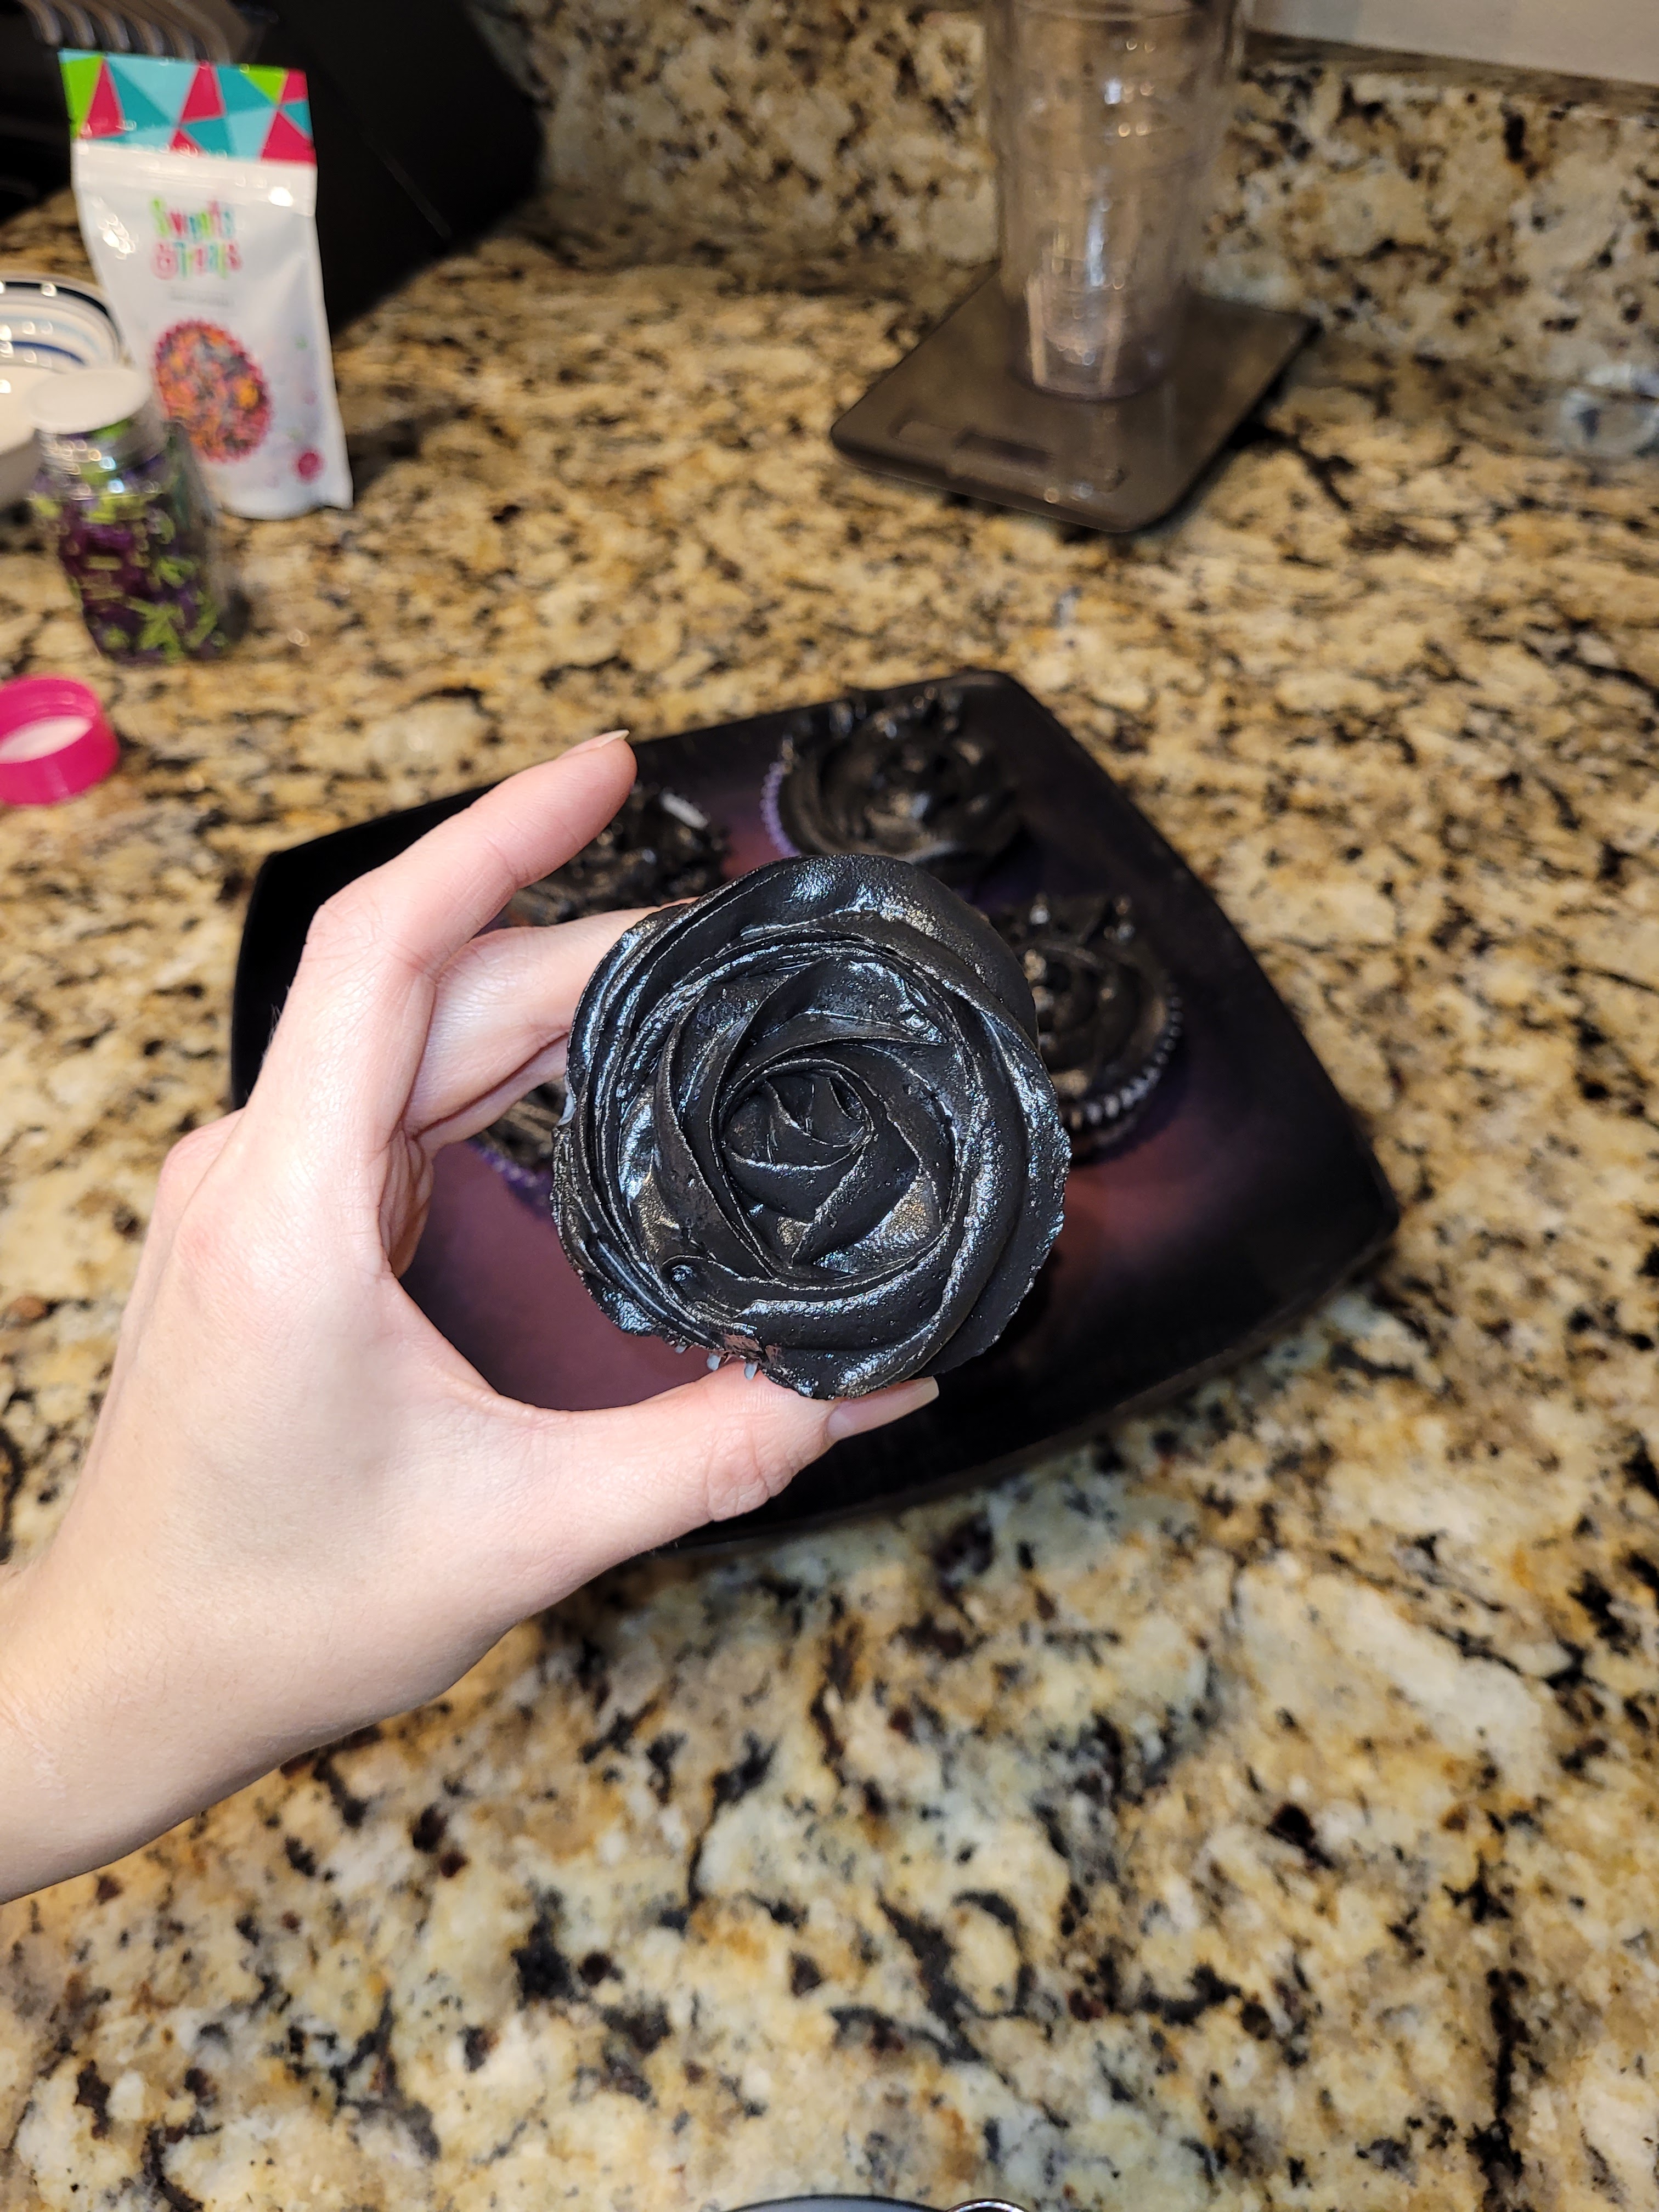
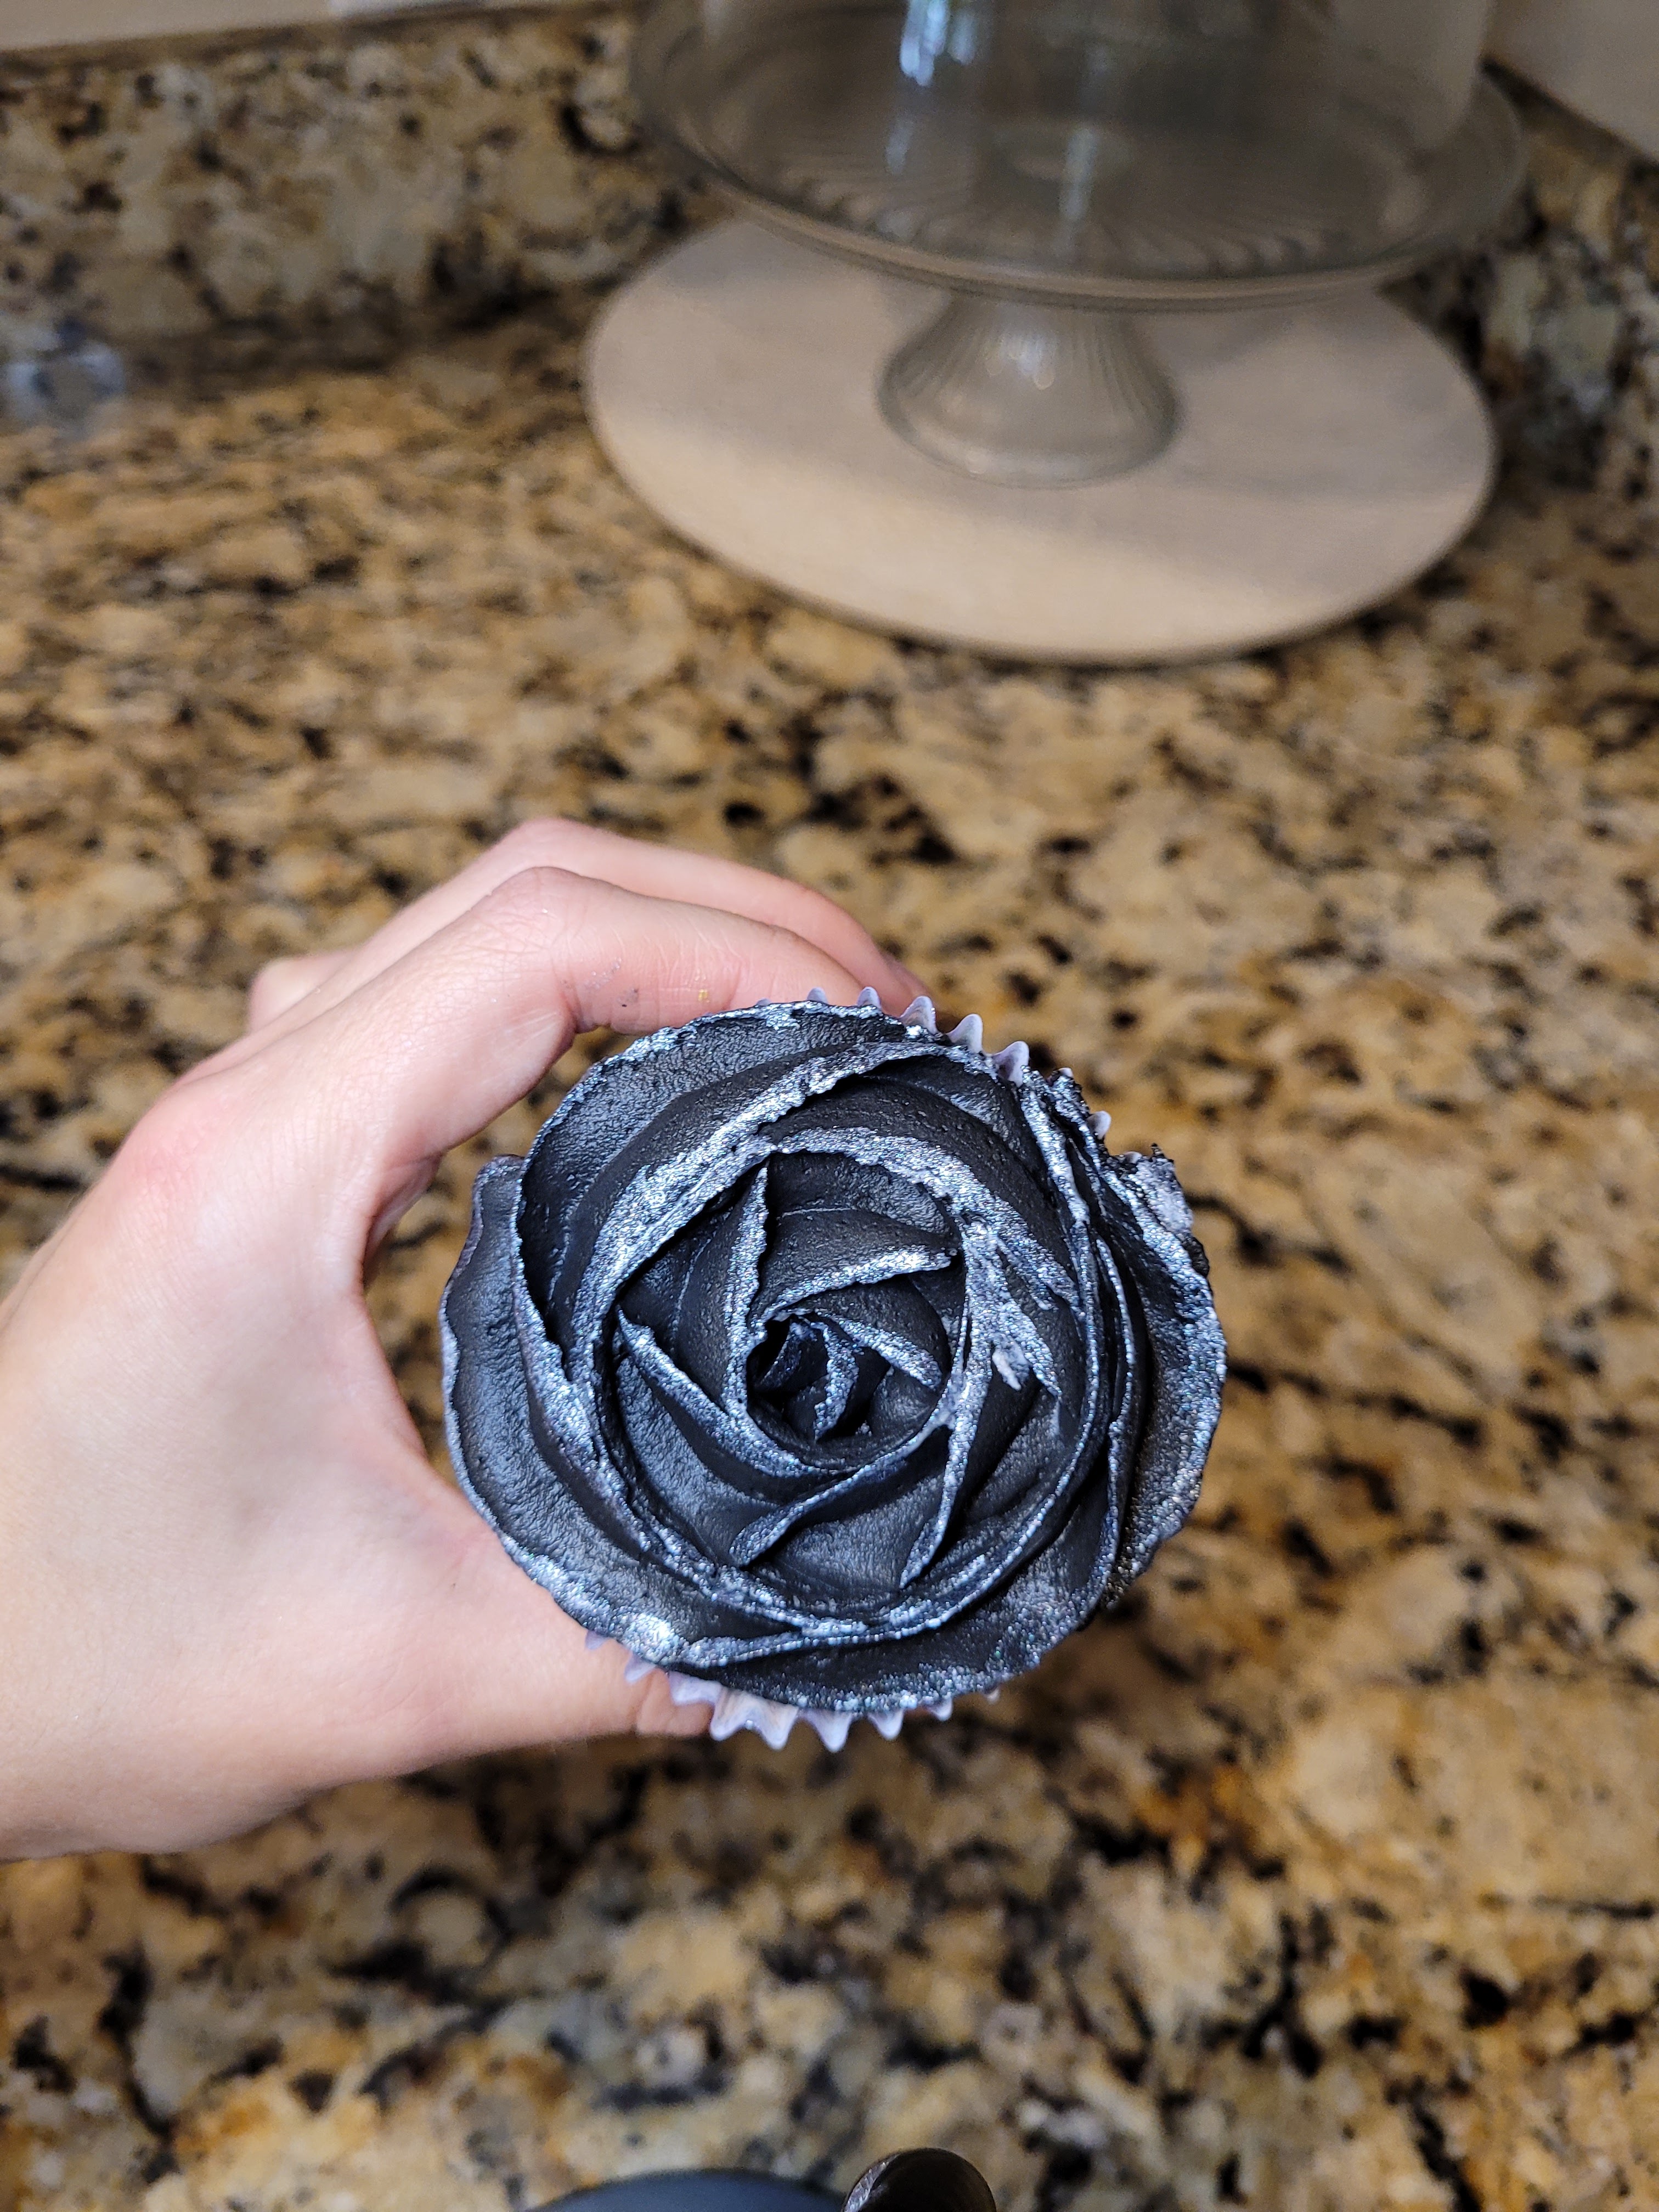
Always stop to smell the roses. Especially when they’re made of chocolate. To make the roses, fill another piping bag with frosting and a 2D or 1M tip. Start in the middle of the cupcake and pipe a small mound; now, draw a circle around this mound, continuing around the cupcake until you reach the edge. I’m a lefty, so I find it easiest to start in the middle and pipe around counterclockwise. Now, you will need to let these freeze for about 30 minutes so you can paint them, so pop them into the freezer while you mix your paint.
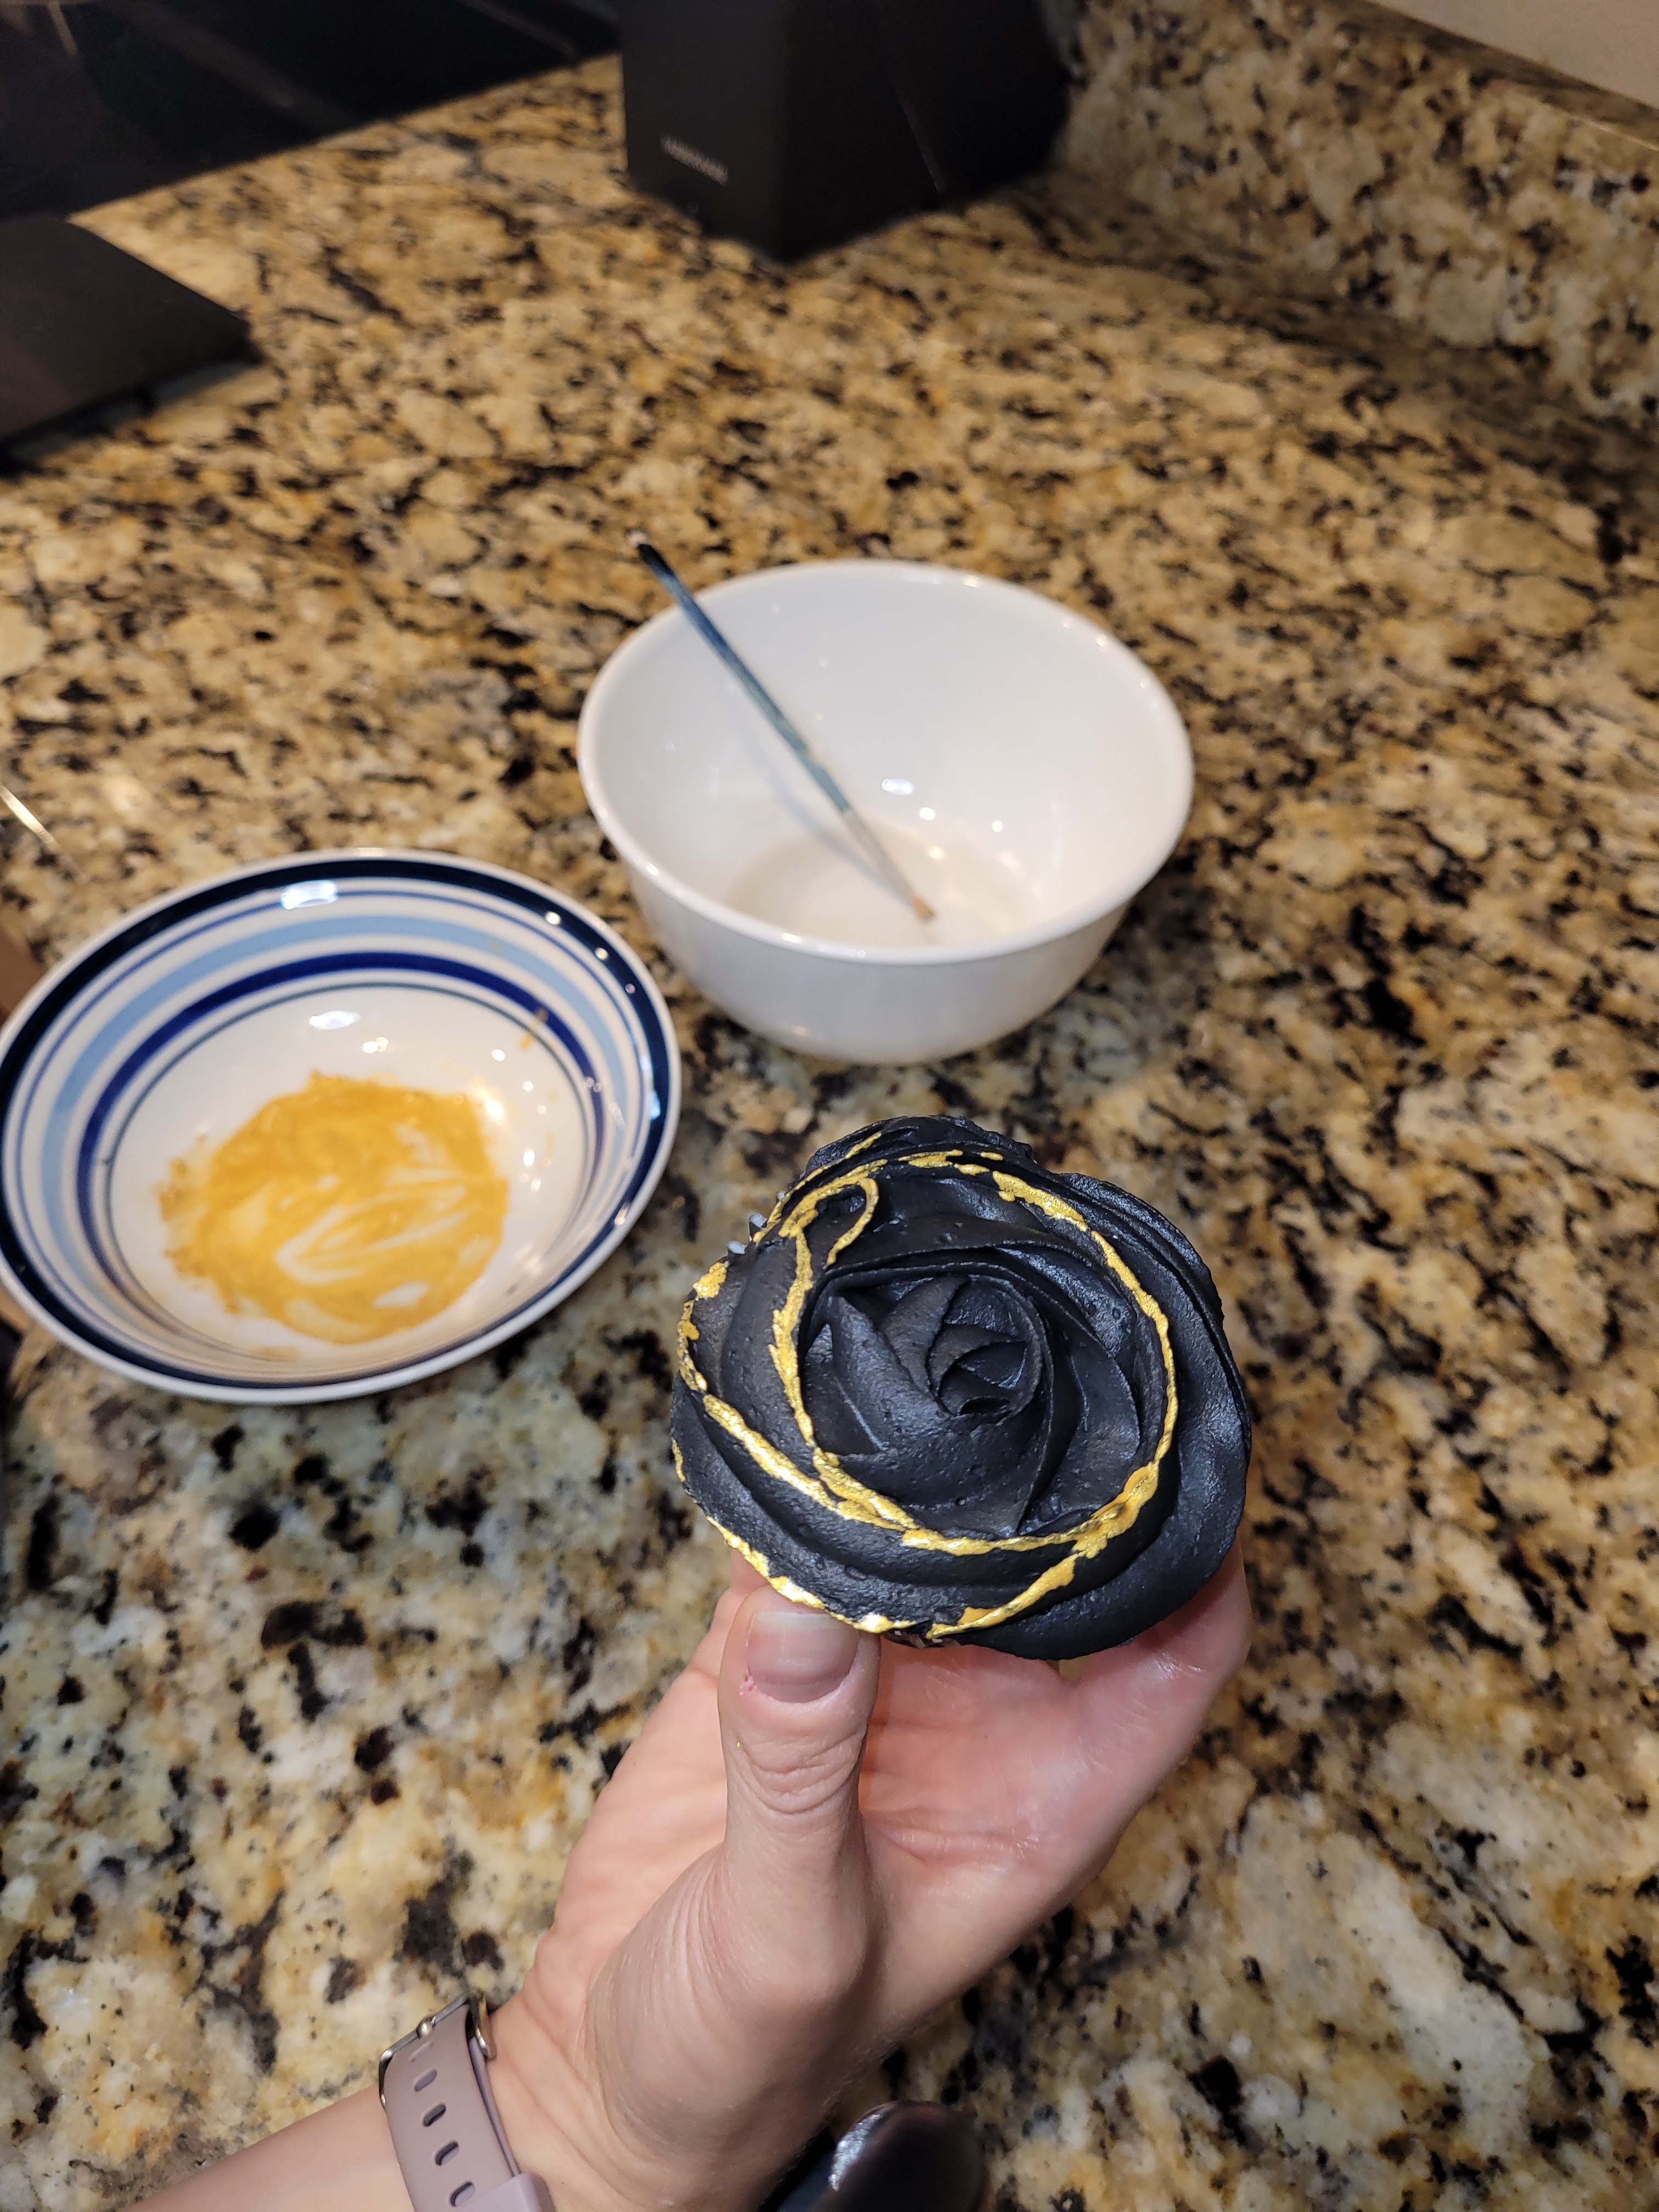
Bum, bum, bum…Painting the roses dead. We’re painting the roses dead. I used silver and gold luster dust, but you can use just about any color, and it will pop on the black roses. I took 1/4 tsp of clear vanilla extract and mixed a teaspoon of gold luster dust in a small bowl; I used the same ratio in another bowl for the silver. You can also use 1/4 tsp of vodka, but we somehow don’t have an ounce of vodka in our house. Probably because I don’t bake with it, and my husband is a whisky guy. The flavor of either the extract or the vodka will evaporate as the paint dries, so don’t worry about your roses tasty like a distillery.
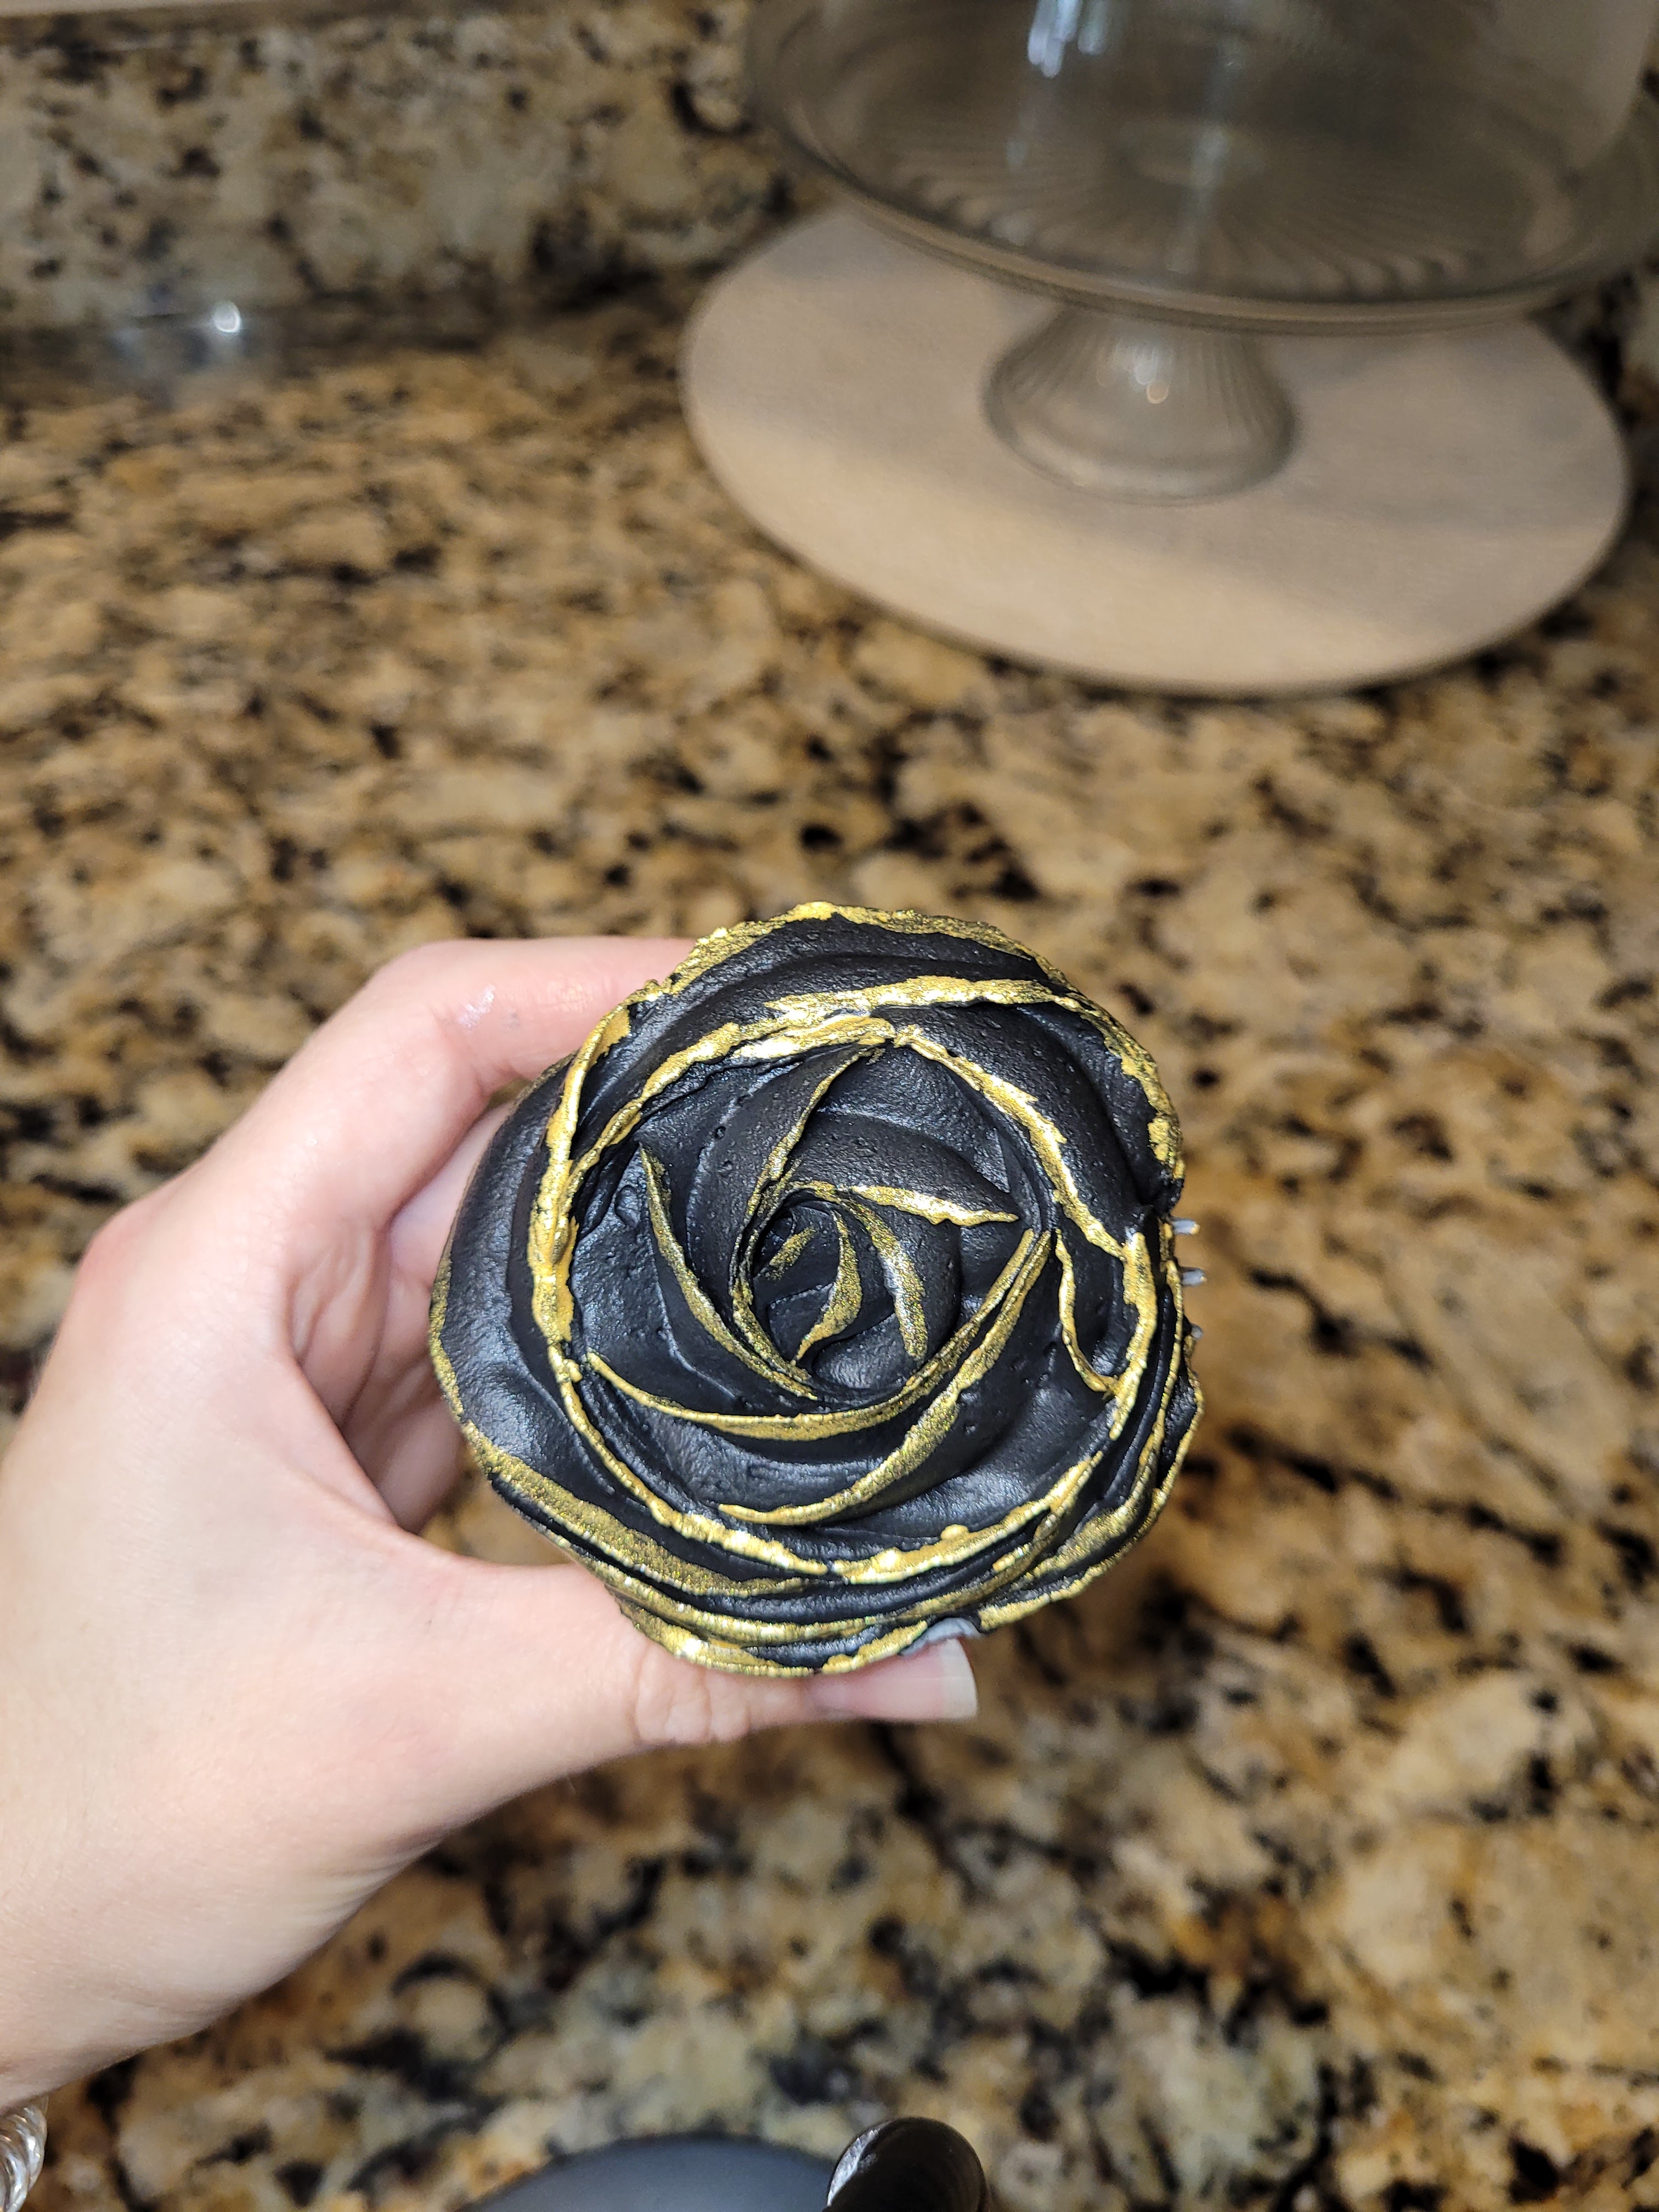
I think I just became an evil Disney queen making these? Take a chilled cupcake and a small food-safe paintbrush dipped into your paint. Take small, simple strokes around the edges of the petals to paint. It is a little time consuming, but it was fun to paint in all the little nooks and crannies. Once painted, place in the fridge to allow the paint to set.
These are so delightfully macabre. 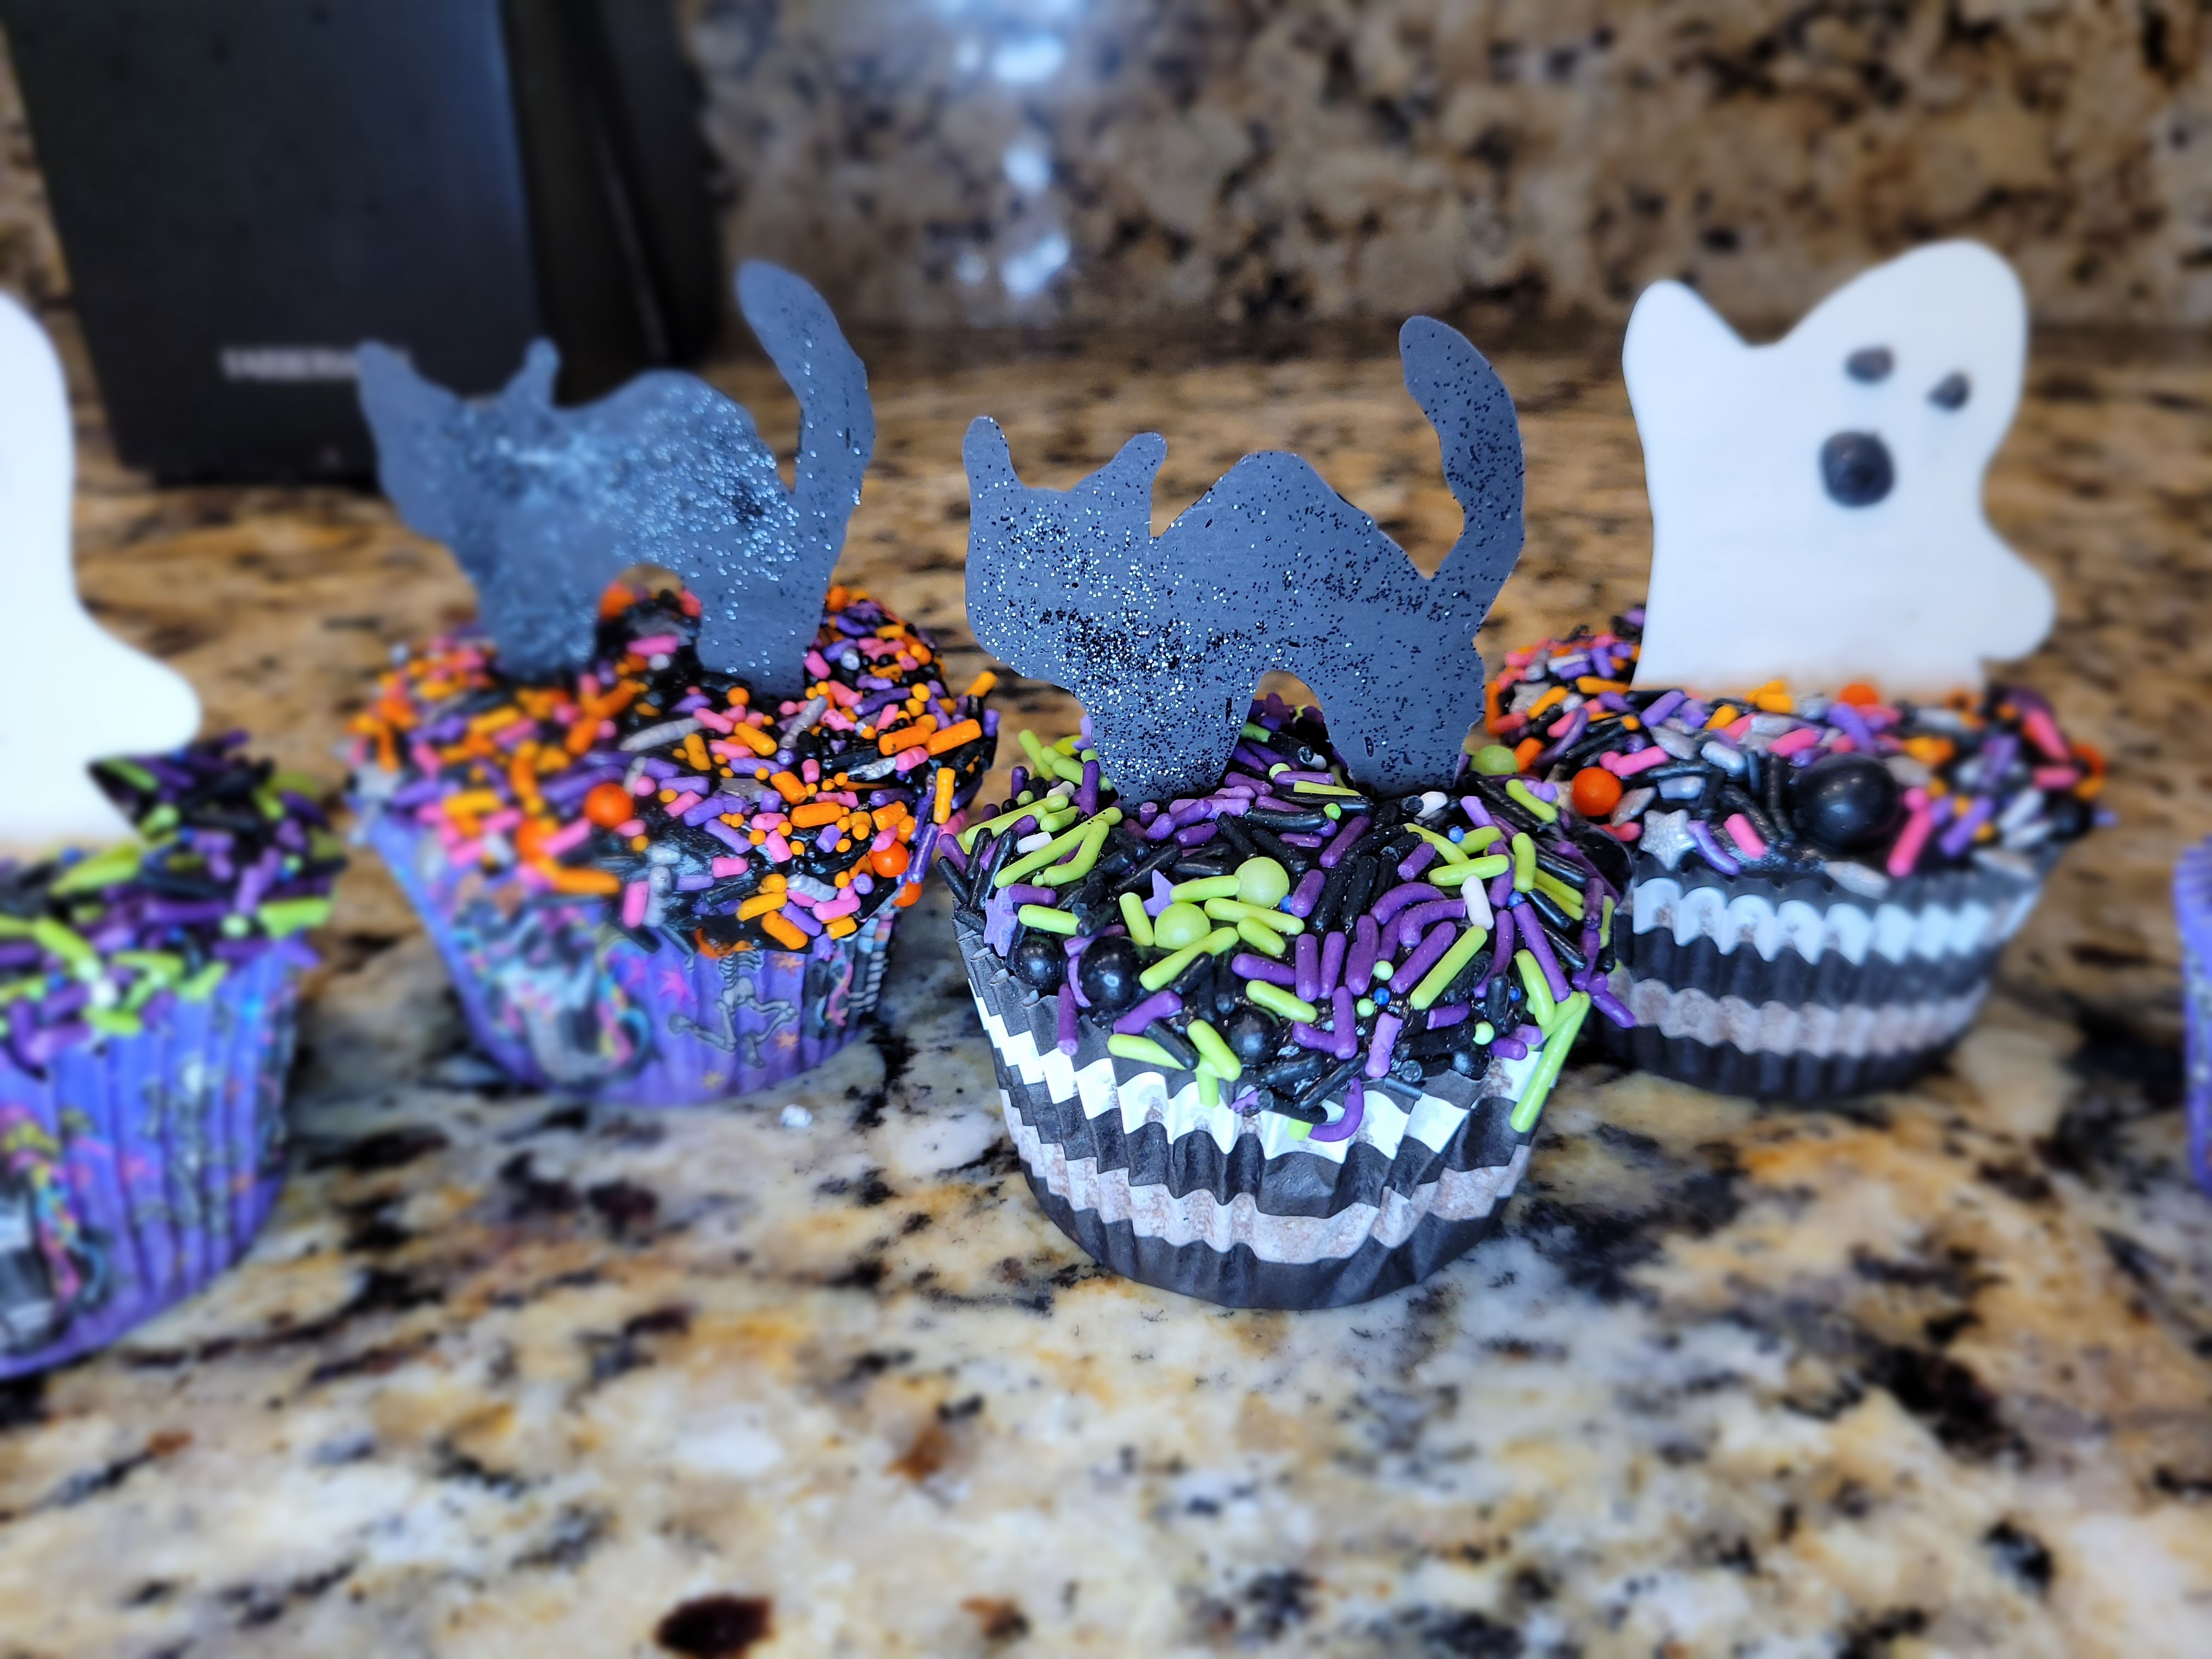
Twist the bones and bend the back
Itch-it-a-cop-it-a-Mel-a-ka-mys-ti-ca
Trim him of his baby fat
Itch-it-a-cop-it-a-Mel-a-ka-mys-ti-ca
Give him fur black as black, just
Like
This!
…although Binx probably wishes he was this sparkly.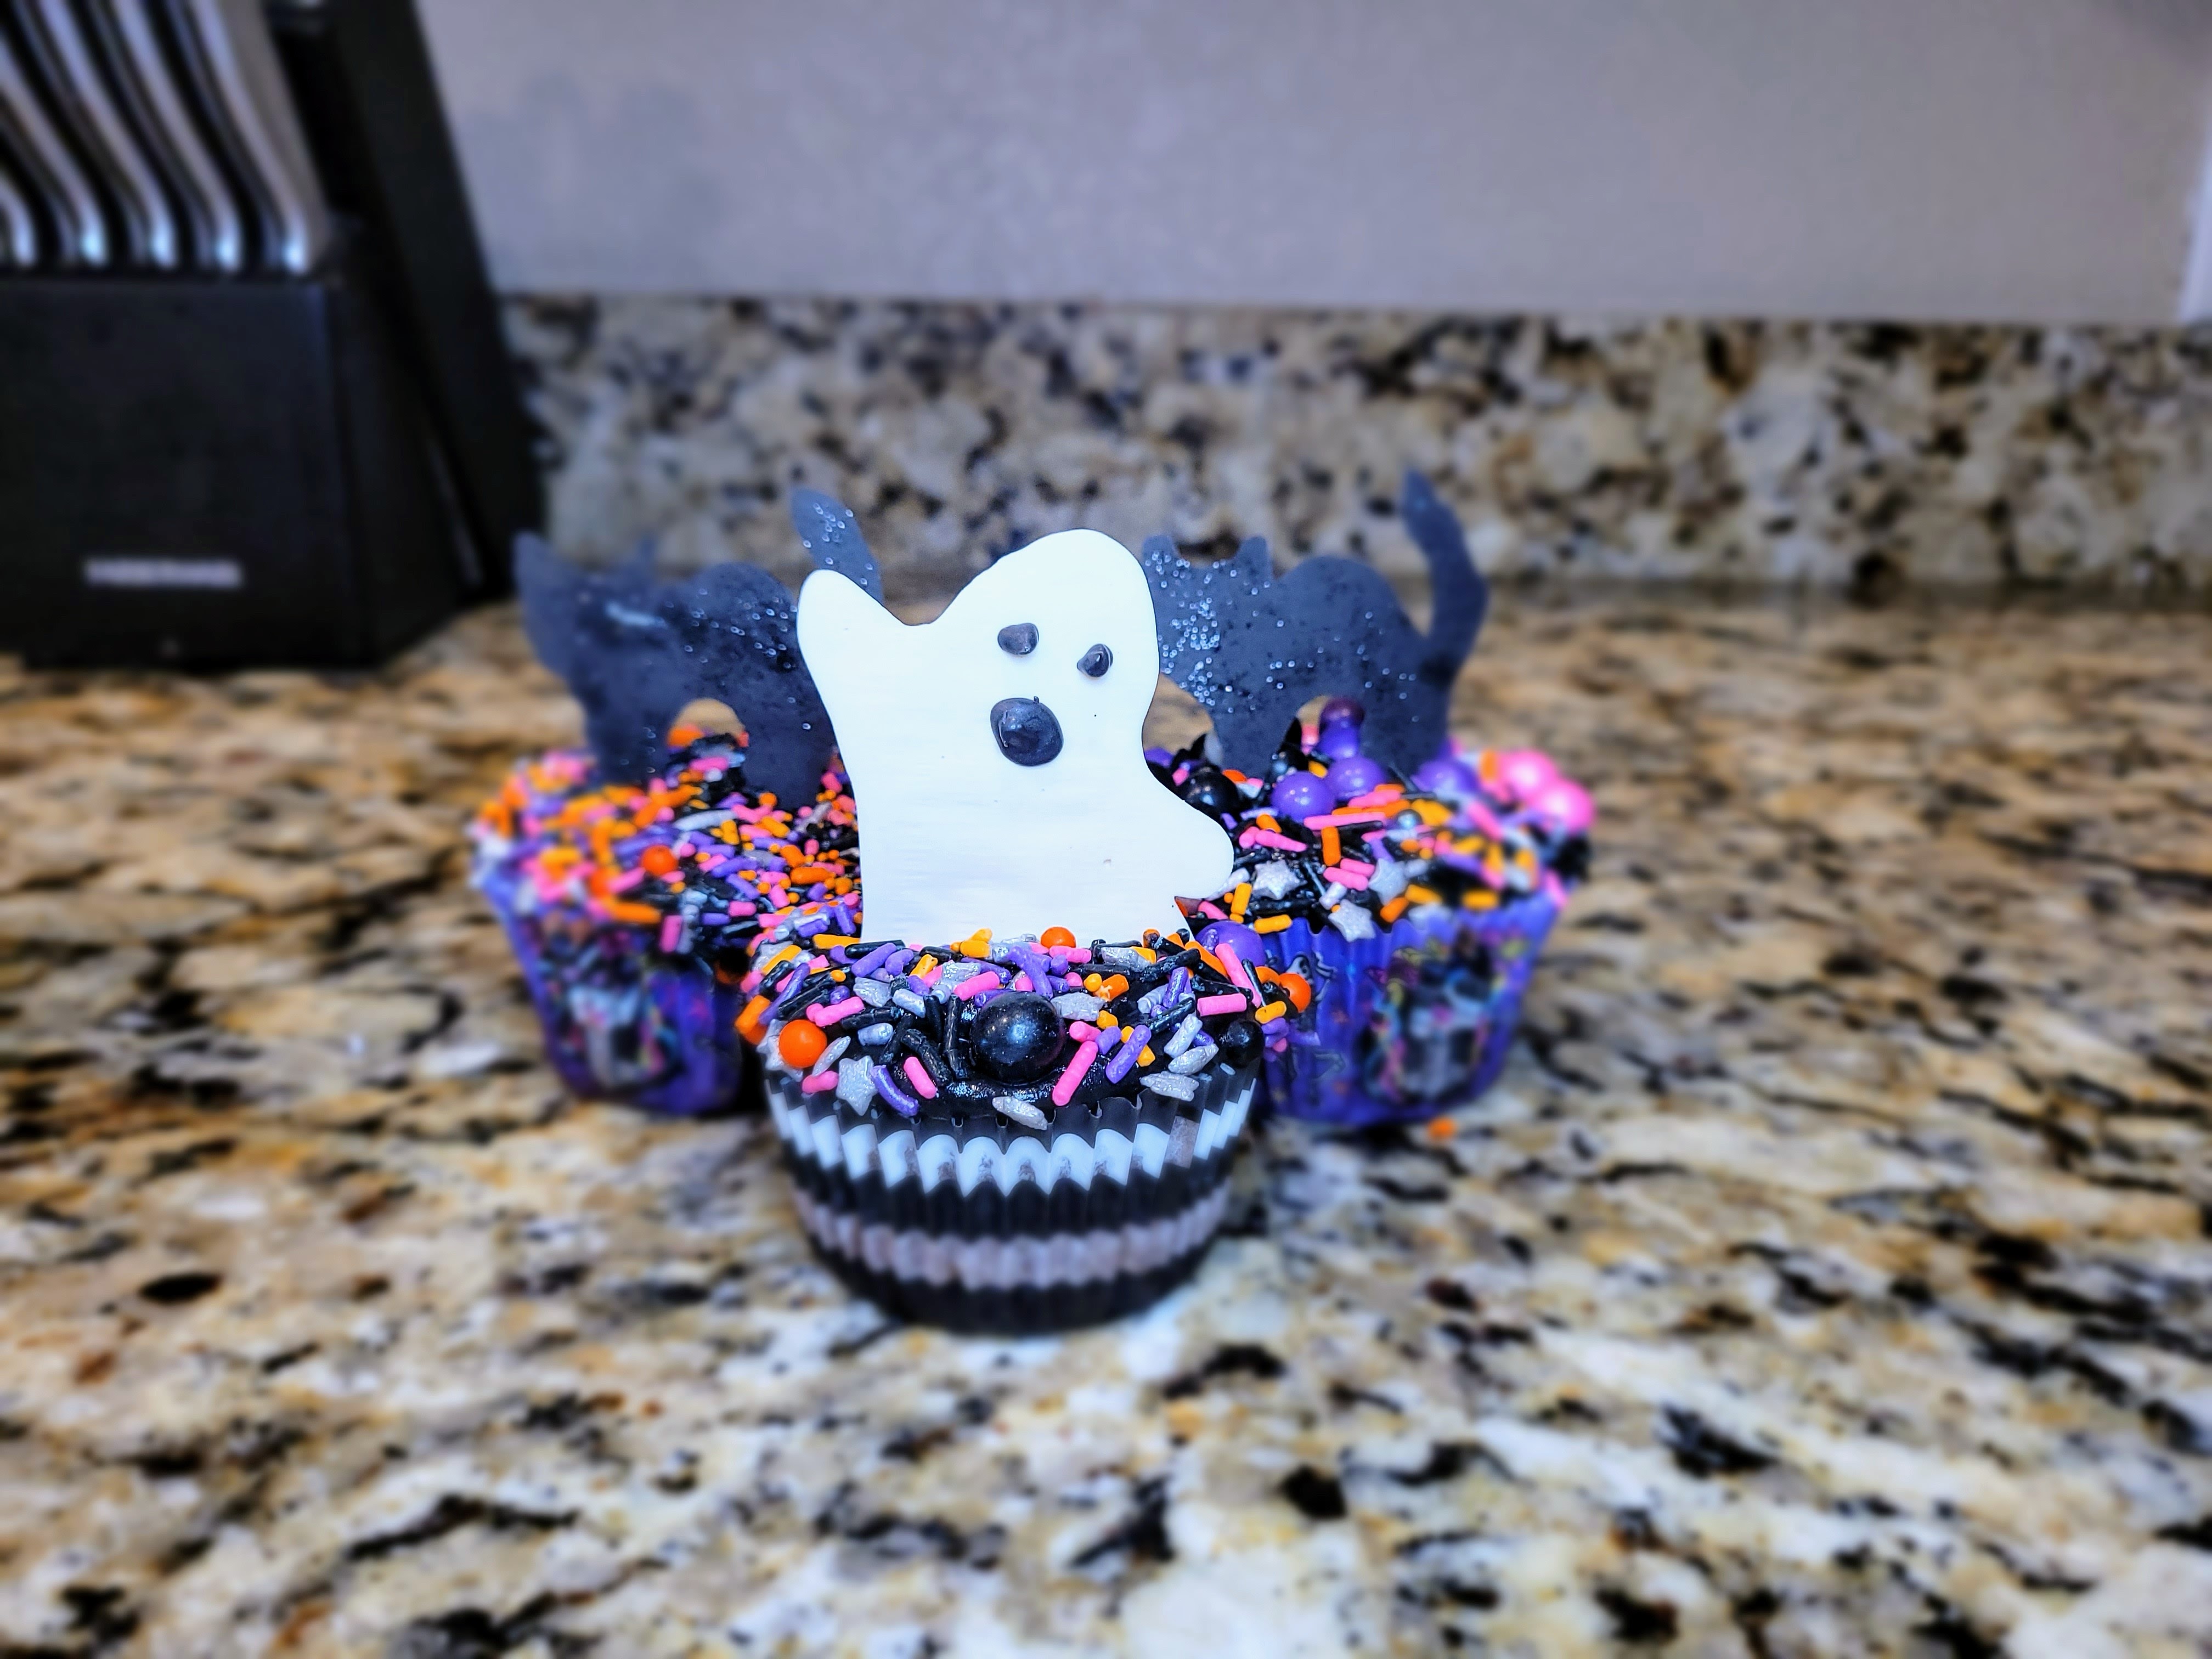
I don’t want to boost their e-ghost, but they really are the cutest pals I’ve ever seen. 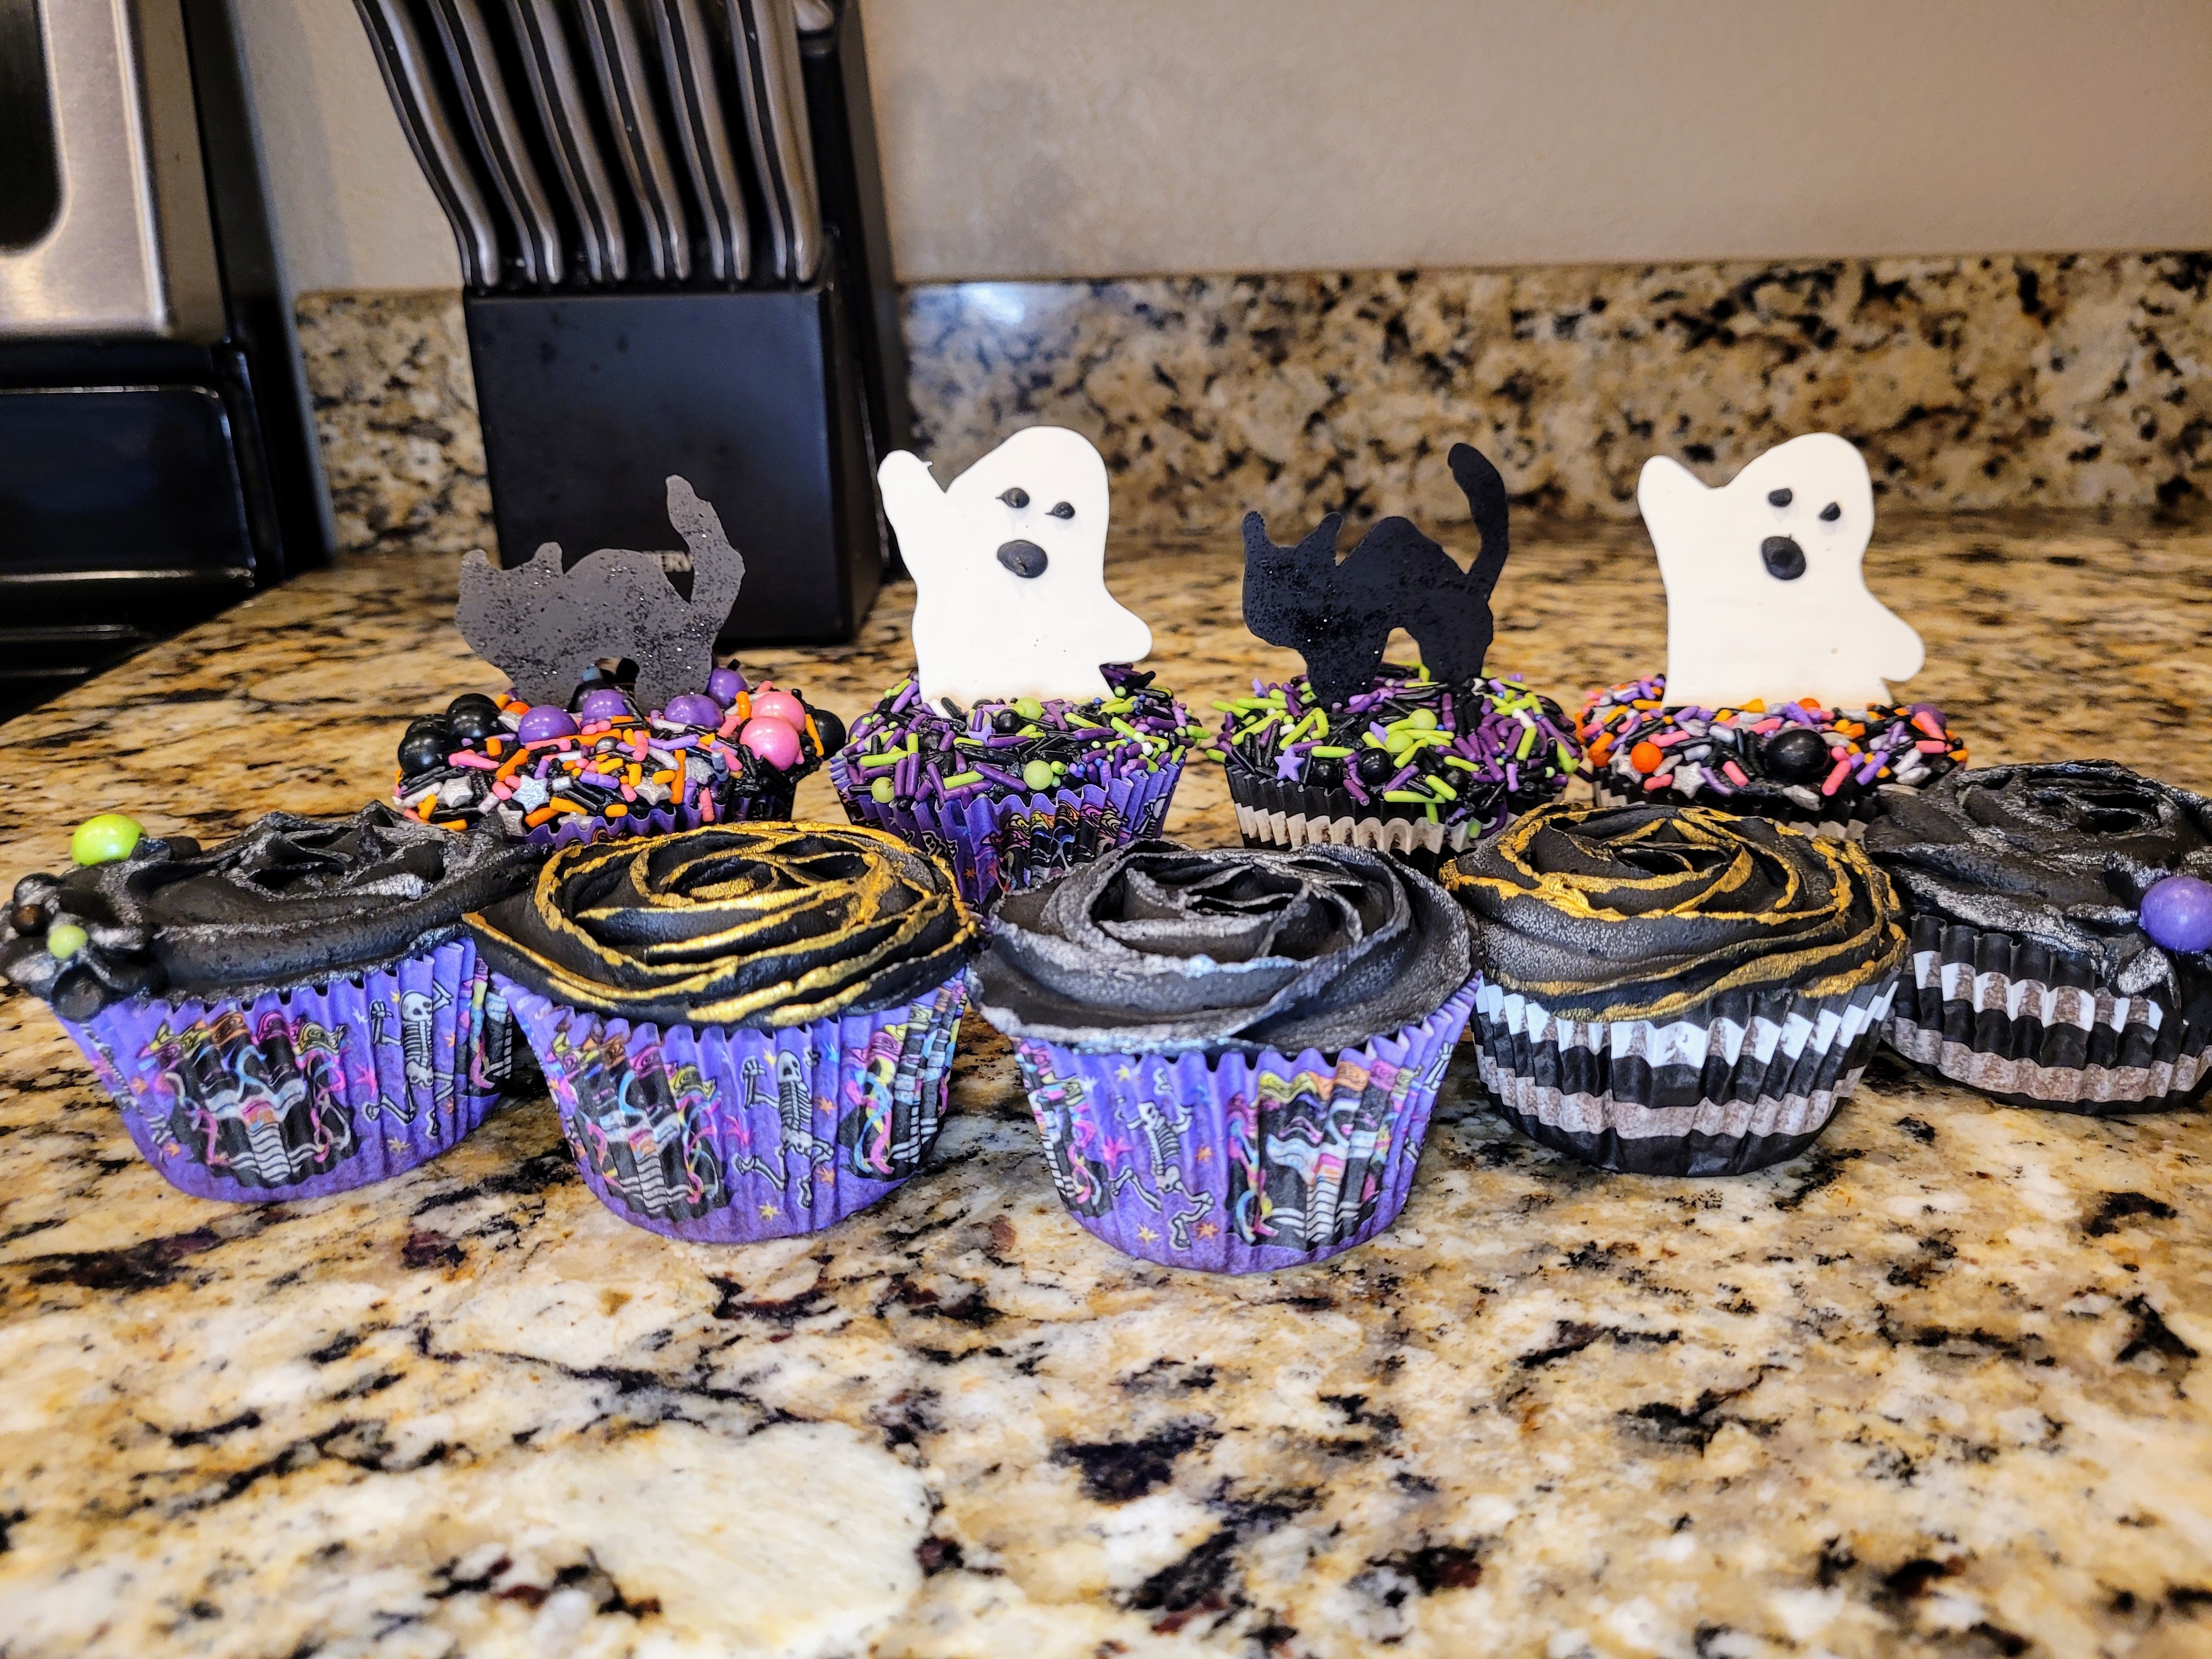
A field of screams I am 100% buying a smaller paint brush to try painting flowers again very soon. I still love how these turned out, but I wanted a thinner line. Altogether though, they’re creepy and they’re cooky, mysterious and spooky…they’re all together ooky, my cupcake family. The cats and ghosts are truly so simple to make, so definitely use these tips to make your own batch to inspire shock and eww at your next Halloween get together. I highly recommend trying that Empowerd cupcake mix because it so, SO chocolatey. It’s rich, the cocoa flavor is off the charts, and anything that holds together caramel cream cheese frosting with spooky accoutrements is a winner in my book. ‘Til next time, my fellow eaters!
Recipe and Instructions
Devil's Food Cupcakes
Soft, incredibly chocolatey cupcakes
I cannot guarantee the same results without using the ingredients listed below.
Ingredients
FOR THE CUPCAKES
*1 bag of Empowrd gluten free chocolate cupcake mix
*3 large eggs
*1/2 cup unsweetened applesauce
*1 tsp vanilla extract
FOR THE FROSING
*8 ounces (225 grams) 1/3 the fat cream cheese at room temp
*1 cup (226 grams) fat free Greek yogurt, strained overnight to remove moisture
*4 cups (1 bag 16 ounce) of Lakanto powdered monkfruit
*2 tsp caramel extract
*2 tsp clear vanilla extract
*1 ounce black cocoa
Directions
- Mix all cupcake ingredients on medium for two minutes.
- While mixing, preheat oven to 350 and line muffin tins with cupcake wrappers.
- Fill each wrapper 2/3 of the way full.
- Bake for 18-20 minutes, until a toothpick comes out with a few crumbs from the center.
- Let rest on a cooling rack in the pan for 10 minutes before removing from the pan to cool completely before frosting.
- To make frosting, whip cream cheese and yogurt together.
- Add in half the monkfruit and all the extracts, blending well.
- Add in remaining monkfruit and mix well; if too thick, add a tablespoon of milk.
- Pipe cooled cupcakes as desired; review tutorial above for detailed instructions.
- Keep cupcakes in an airtight container in the fridge.
Nutrition
Macros
12 servings
225 cal/24 c/9.8 f/9.6 p per donut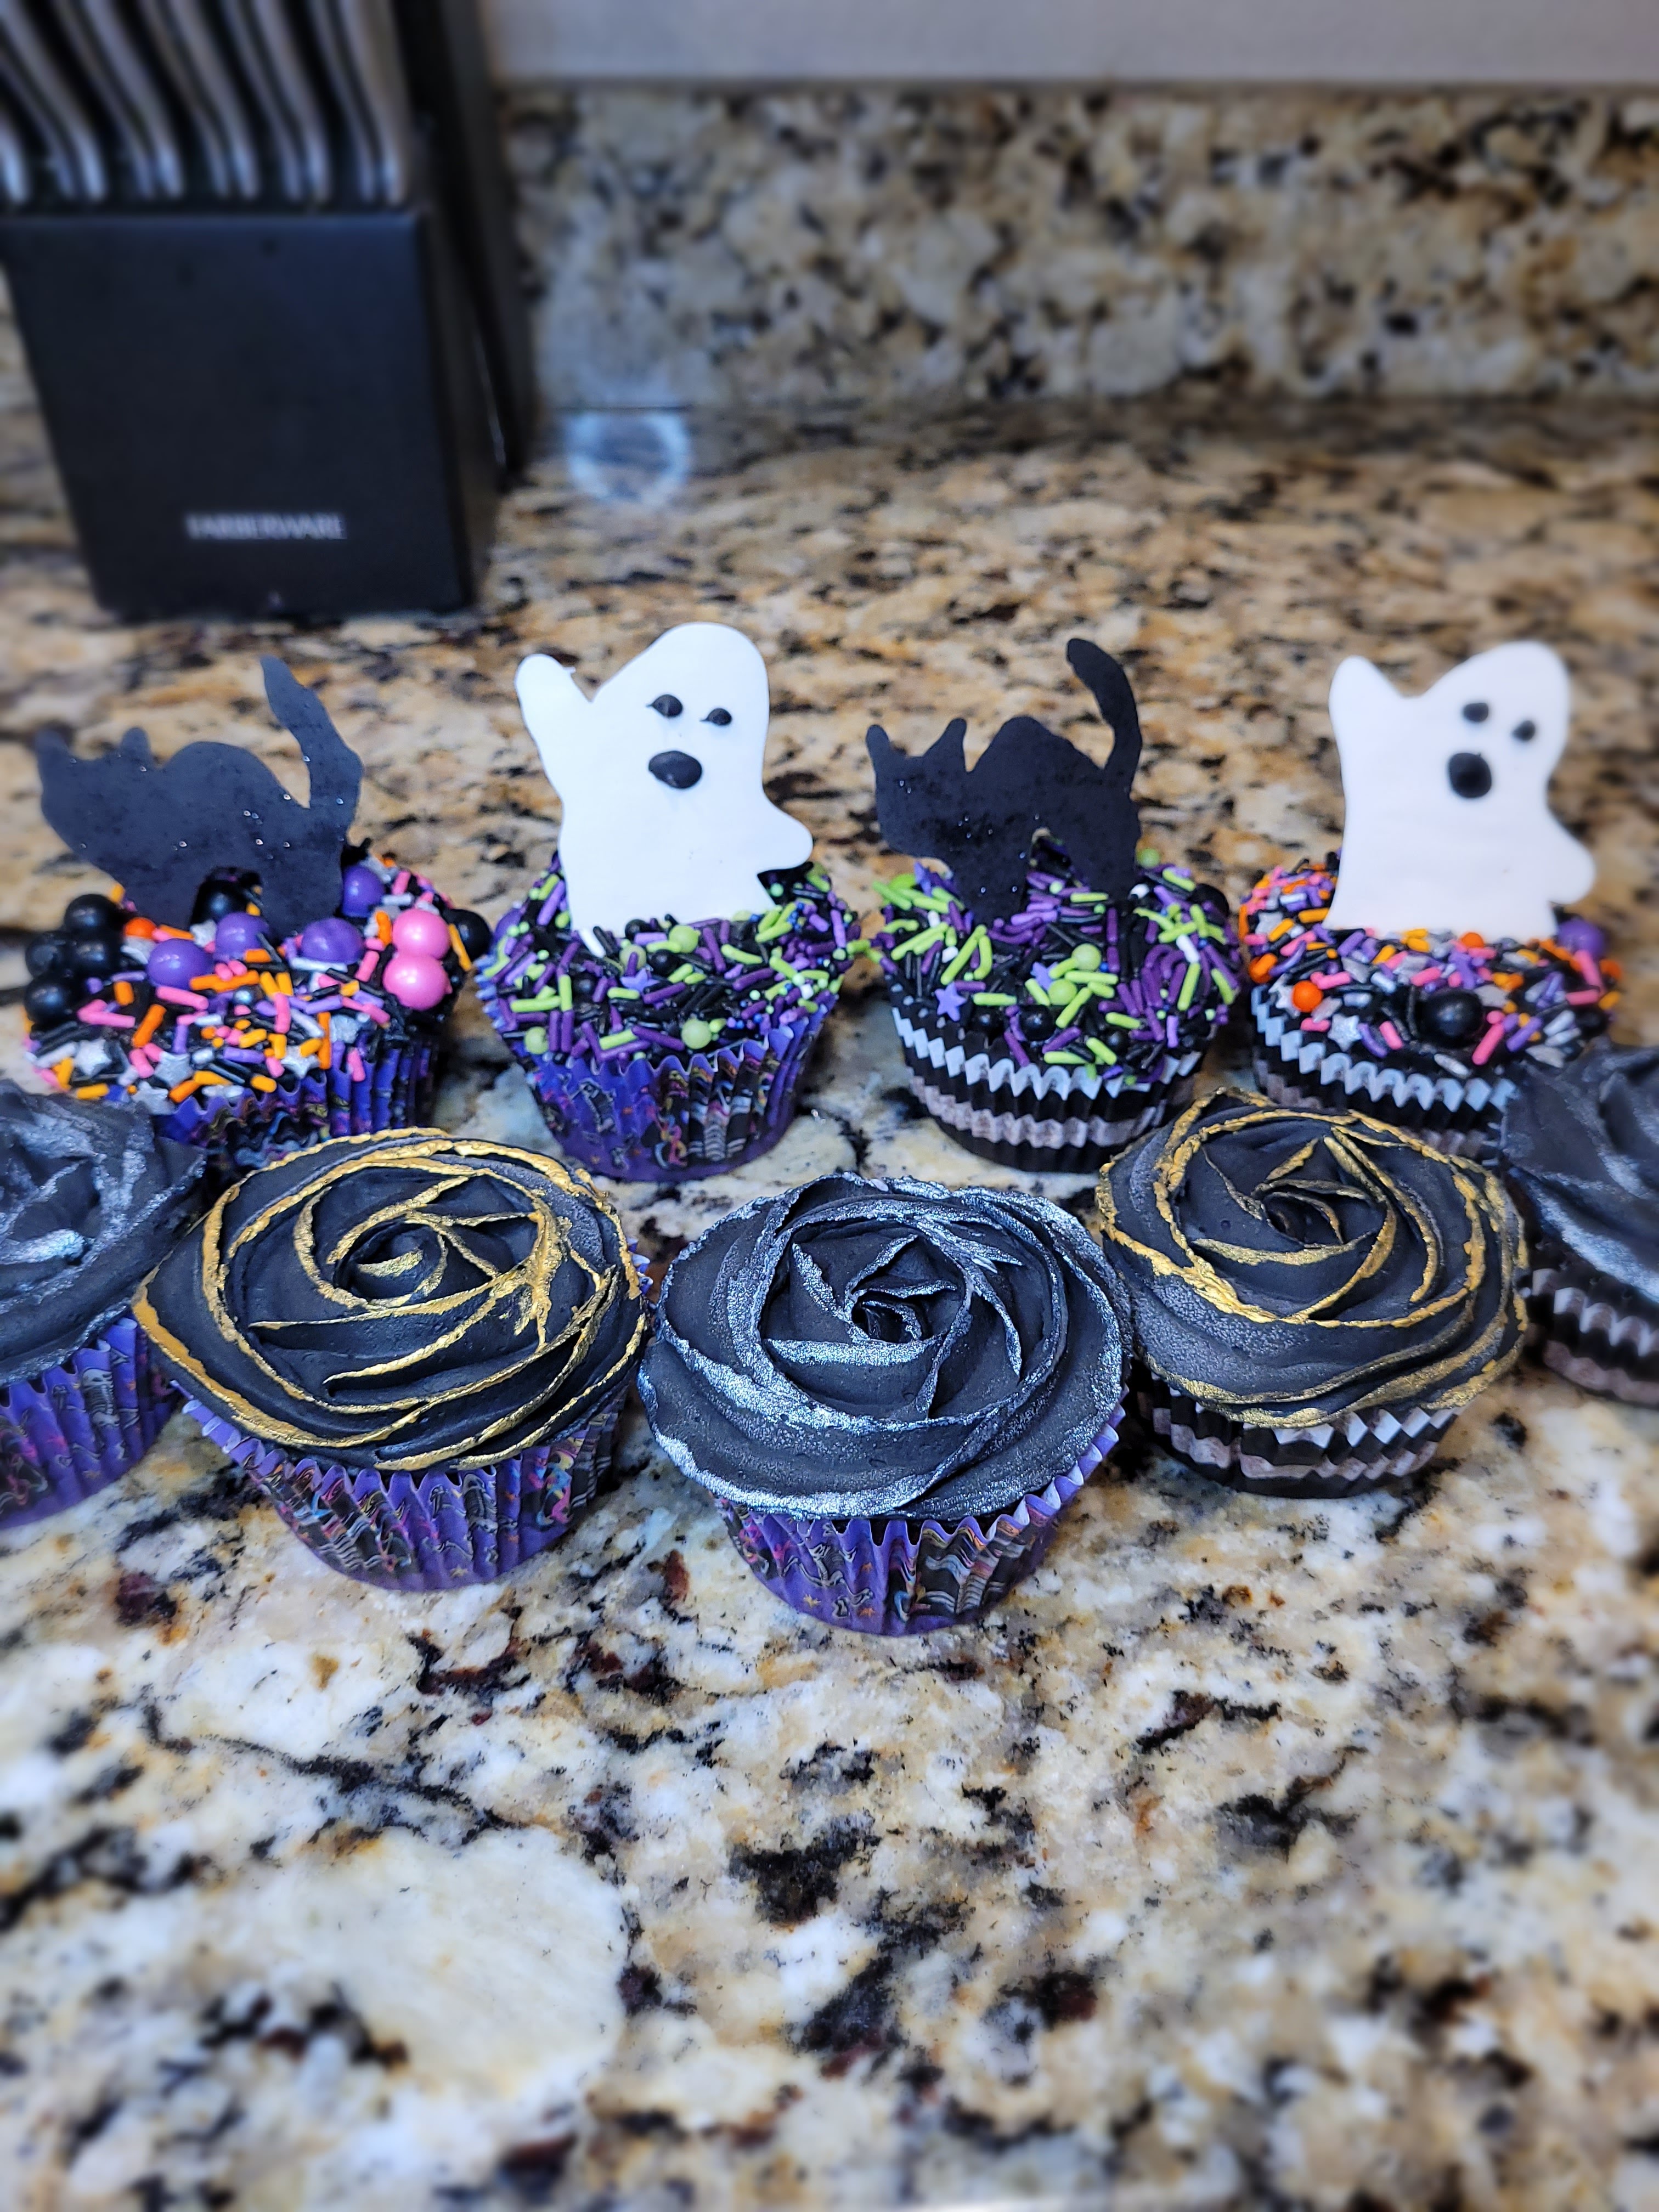
Creepy, a lil’ cute, and a lotta black? Now you’re Octobering properly. -
Black Velvet Donuts
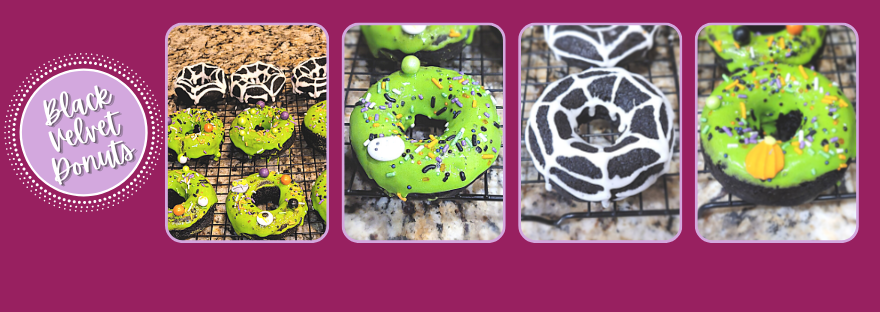
Dessert shouldn’t be the only thing getting the Baketober treatment. That’s right, it’s my mission to make breakfast spooky, too, and through donuts, all things are possible. This black velvet donut recipe is insanely easy to throw together, and even piping spiderwebs (more spiders, seriously?!) and glazing with ghost slime only adds mere minutes to the total time from start to donut-in-your-mouth finish. You could say this recipe is pretty a-glaze-ing, and you’d be right.
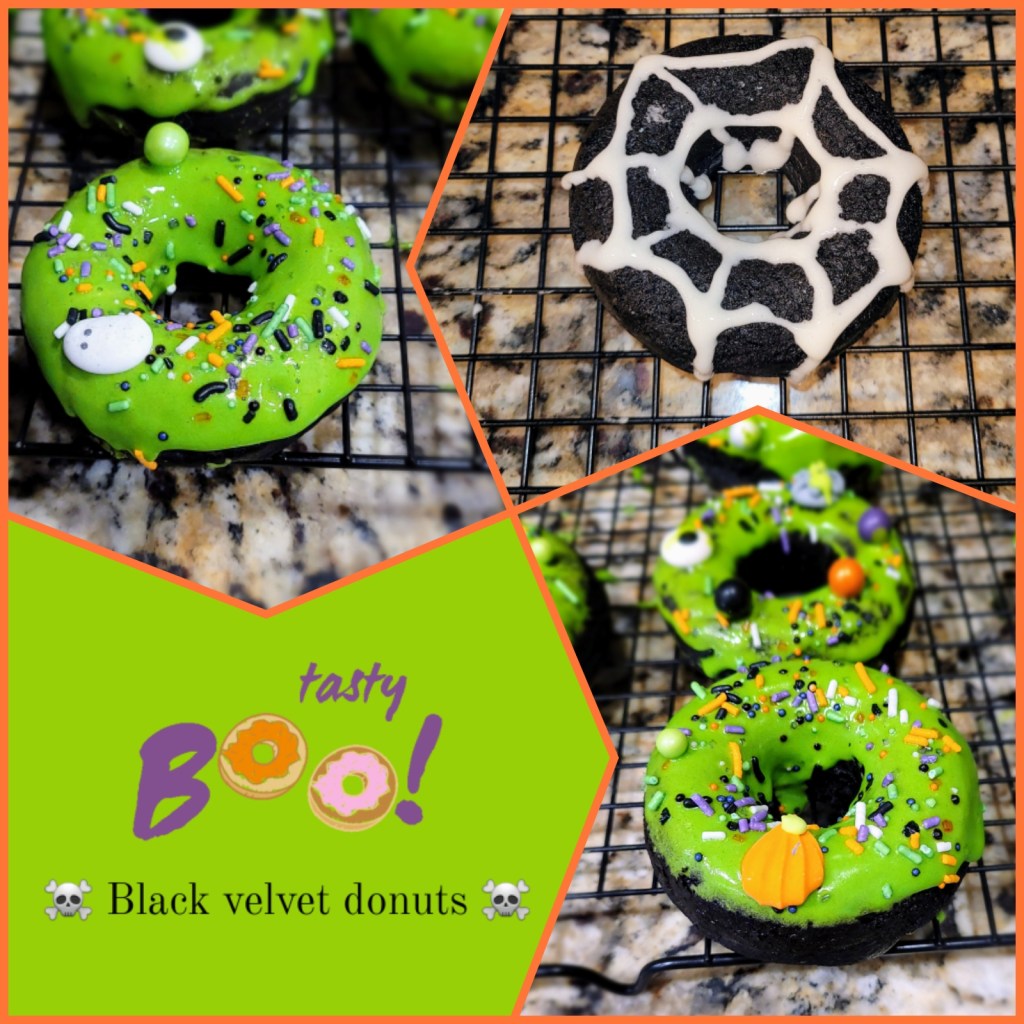
Donut stop me now. Donuts so good, they’ll haunt your dreams. But at only 110 calories a donut, they won’t also haunt your waistline, so that’s nice. This recipe makes 10 donuts that taste exactly like a giant Oreo thanks to the black cocoa and the vanilla glaze. I am a firm believer that donuts are for all ages, so share with your kids, friends, parents, that ghost that haunts your basement–anyone will love them.
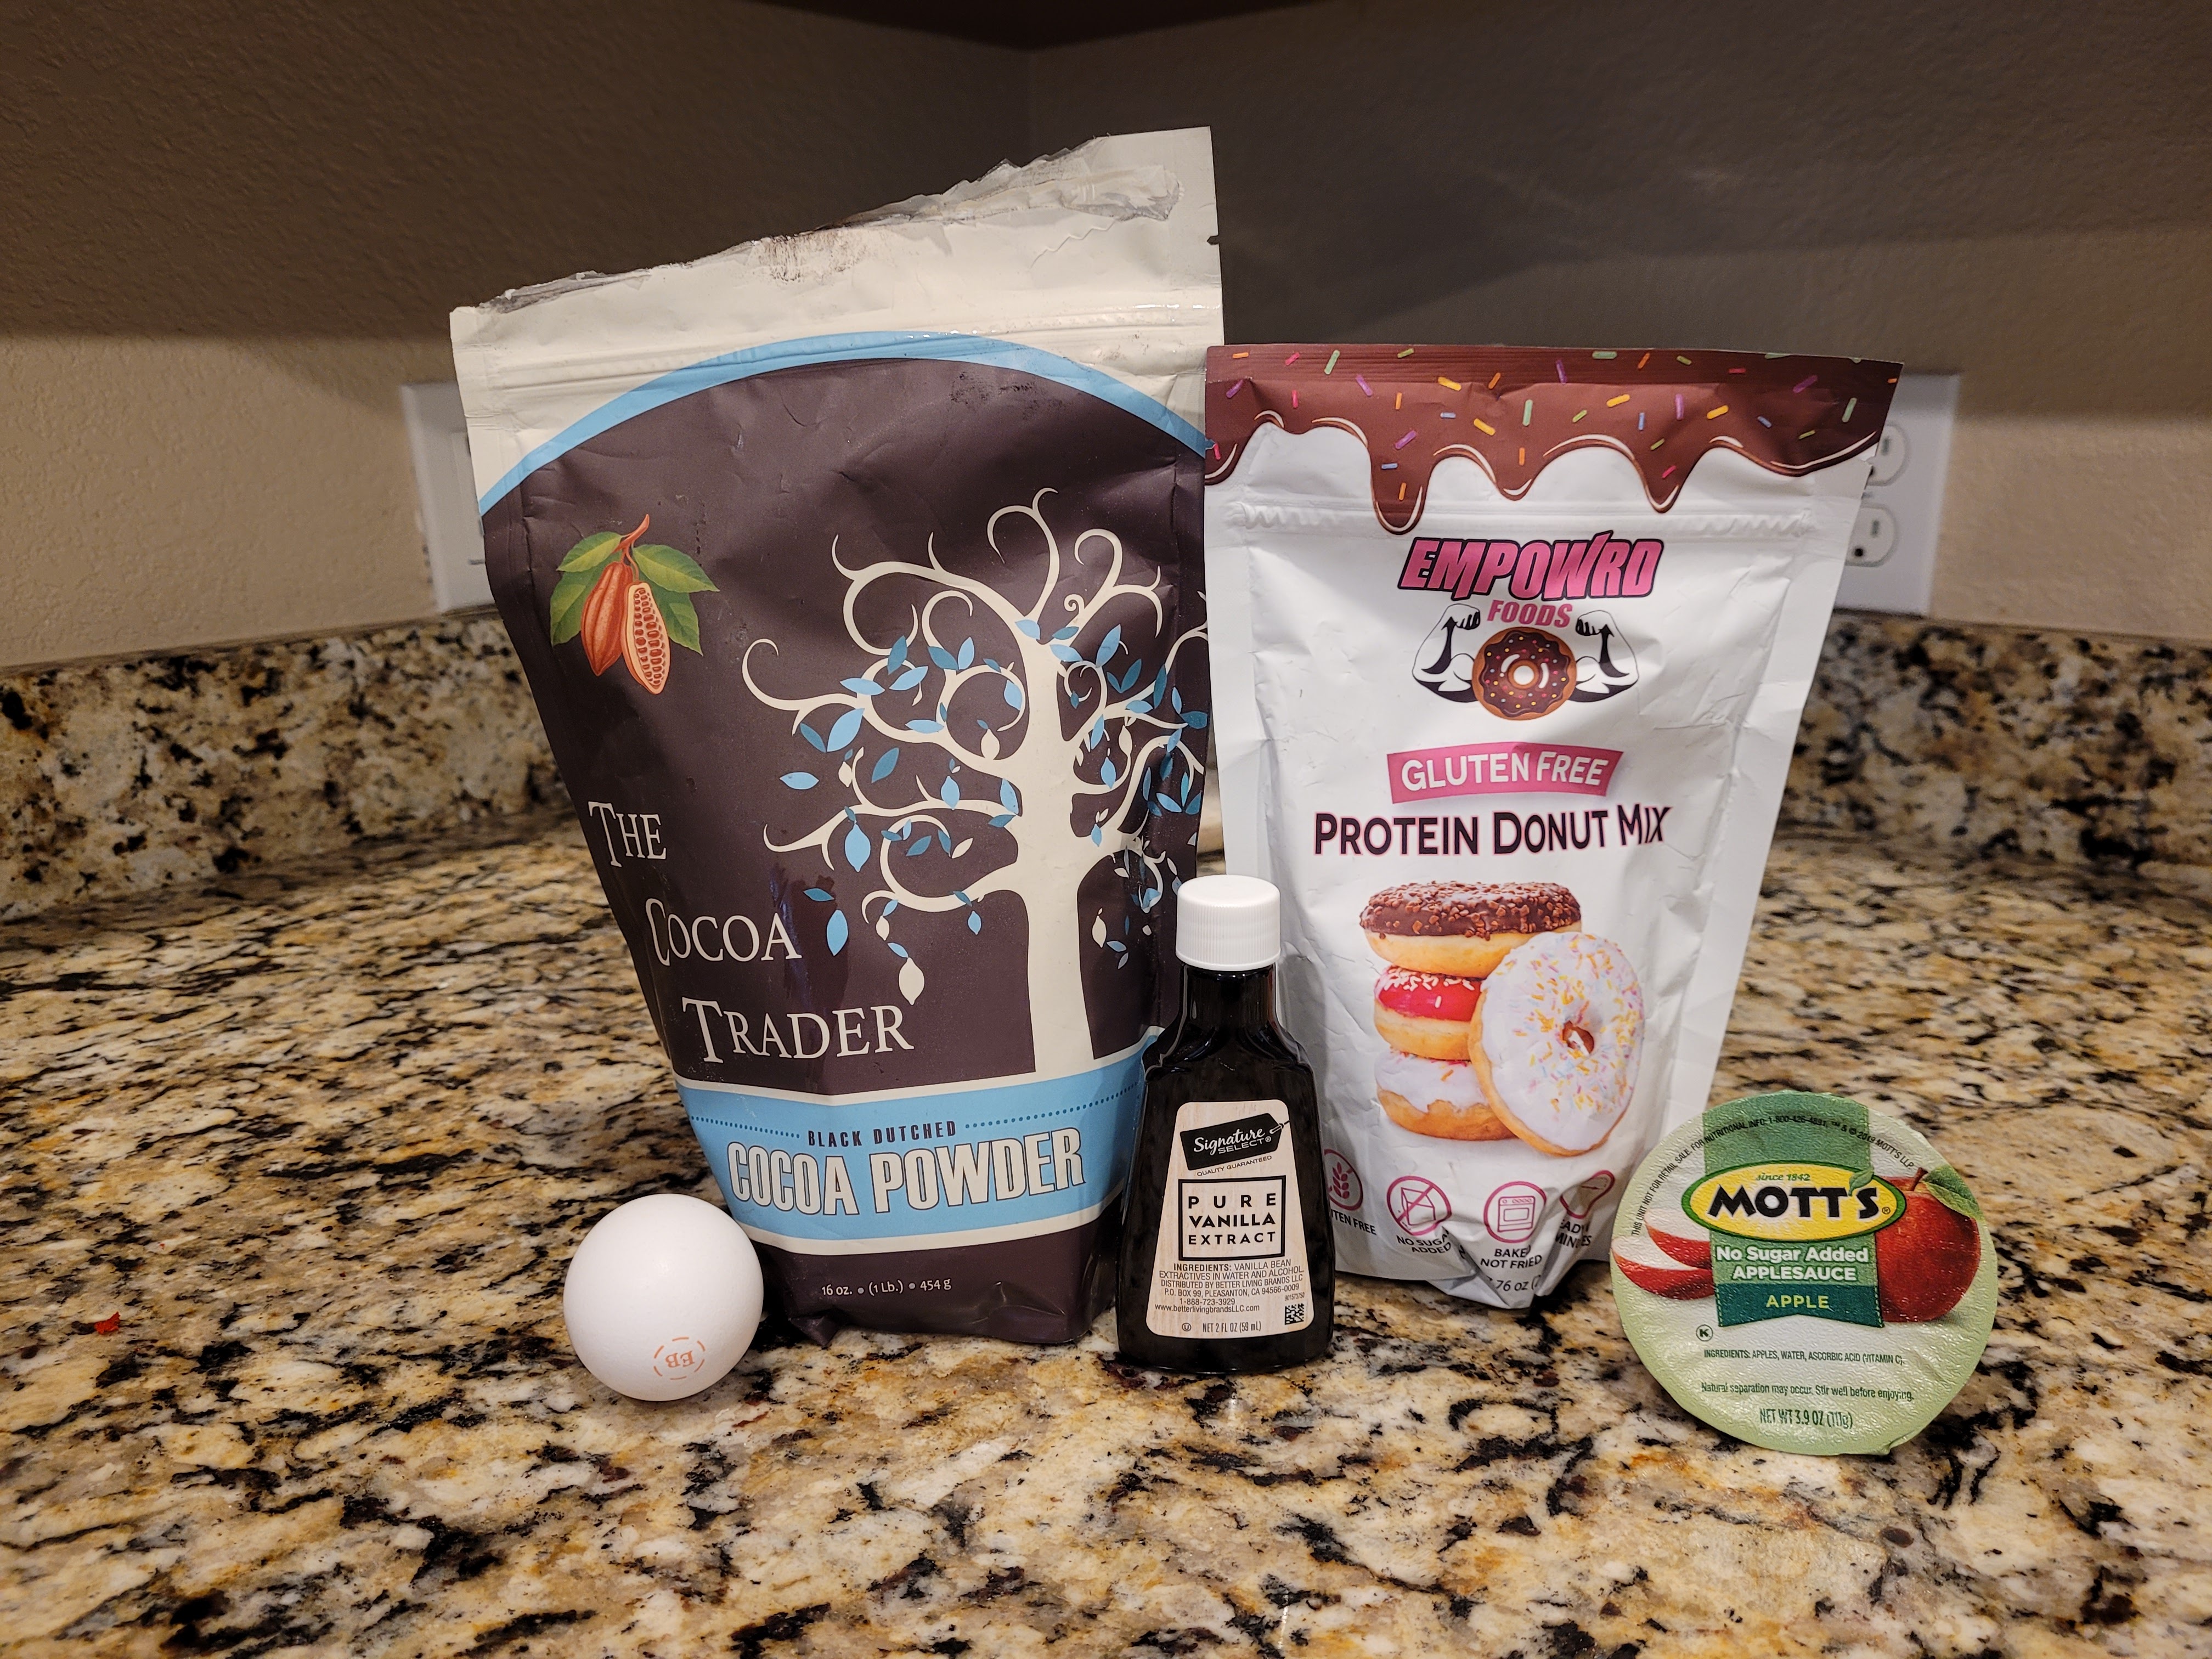
I mean, we should all be eating more hole foods anyway, right? To make, you’ll need:
- 1 bag of Empowrd gluten free protein donut mix
- 115 grams (1/2 c) unsweetened applesauce
- 1 egg
- 1 ounce of black cocoa powder
- 1 tsp vanilla extract
- 1/2 c + 2 TBS water
- Optional black gel dye to make darker
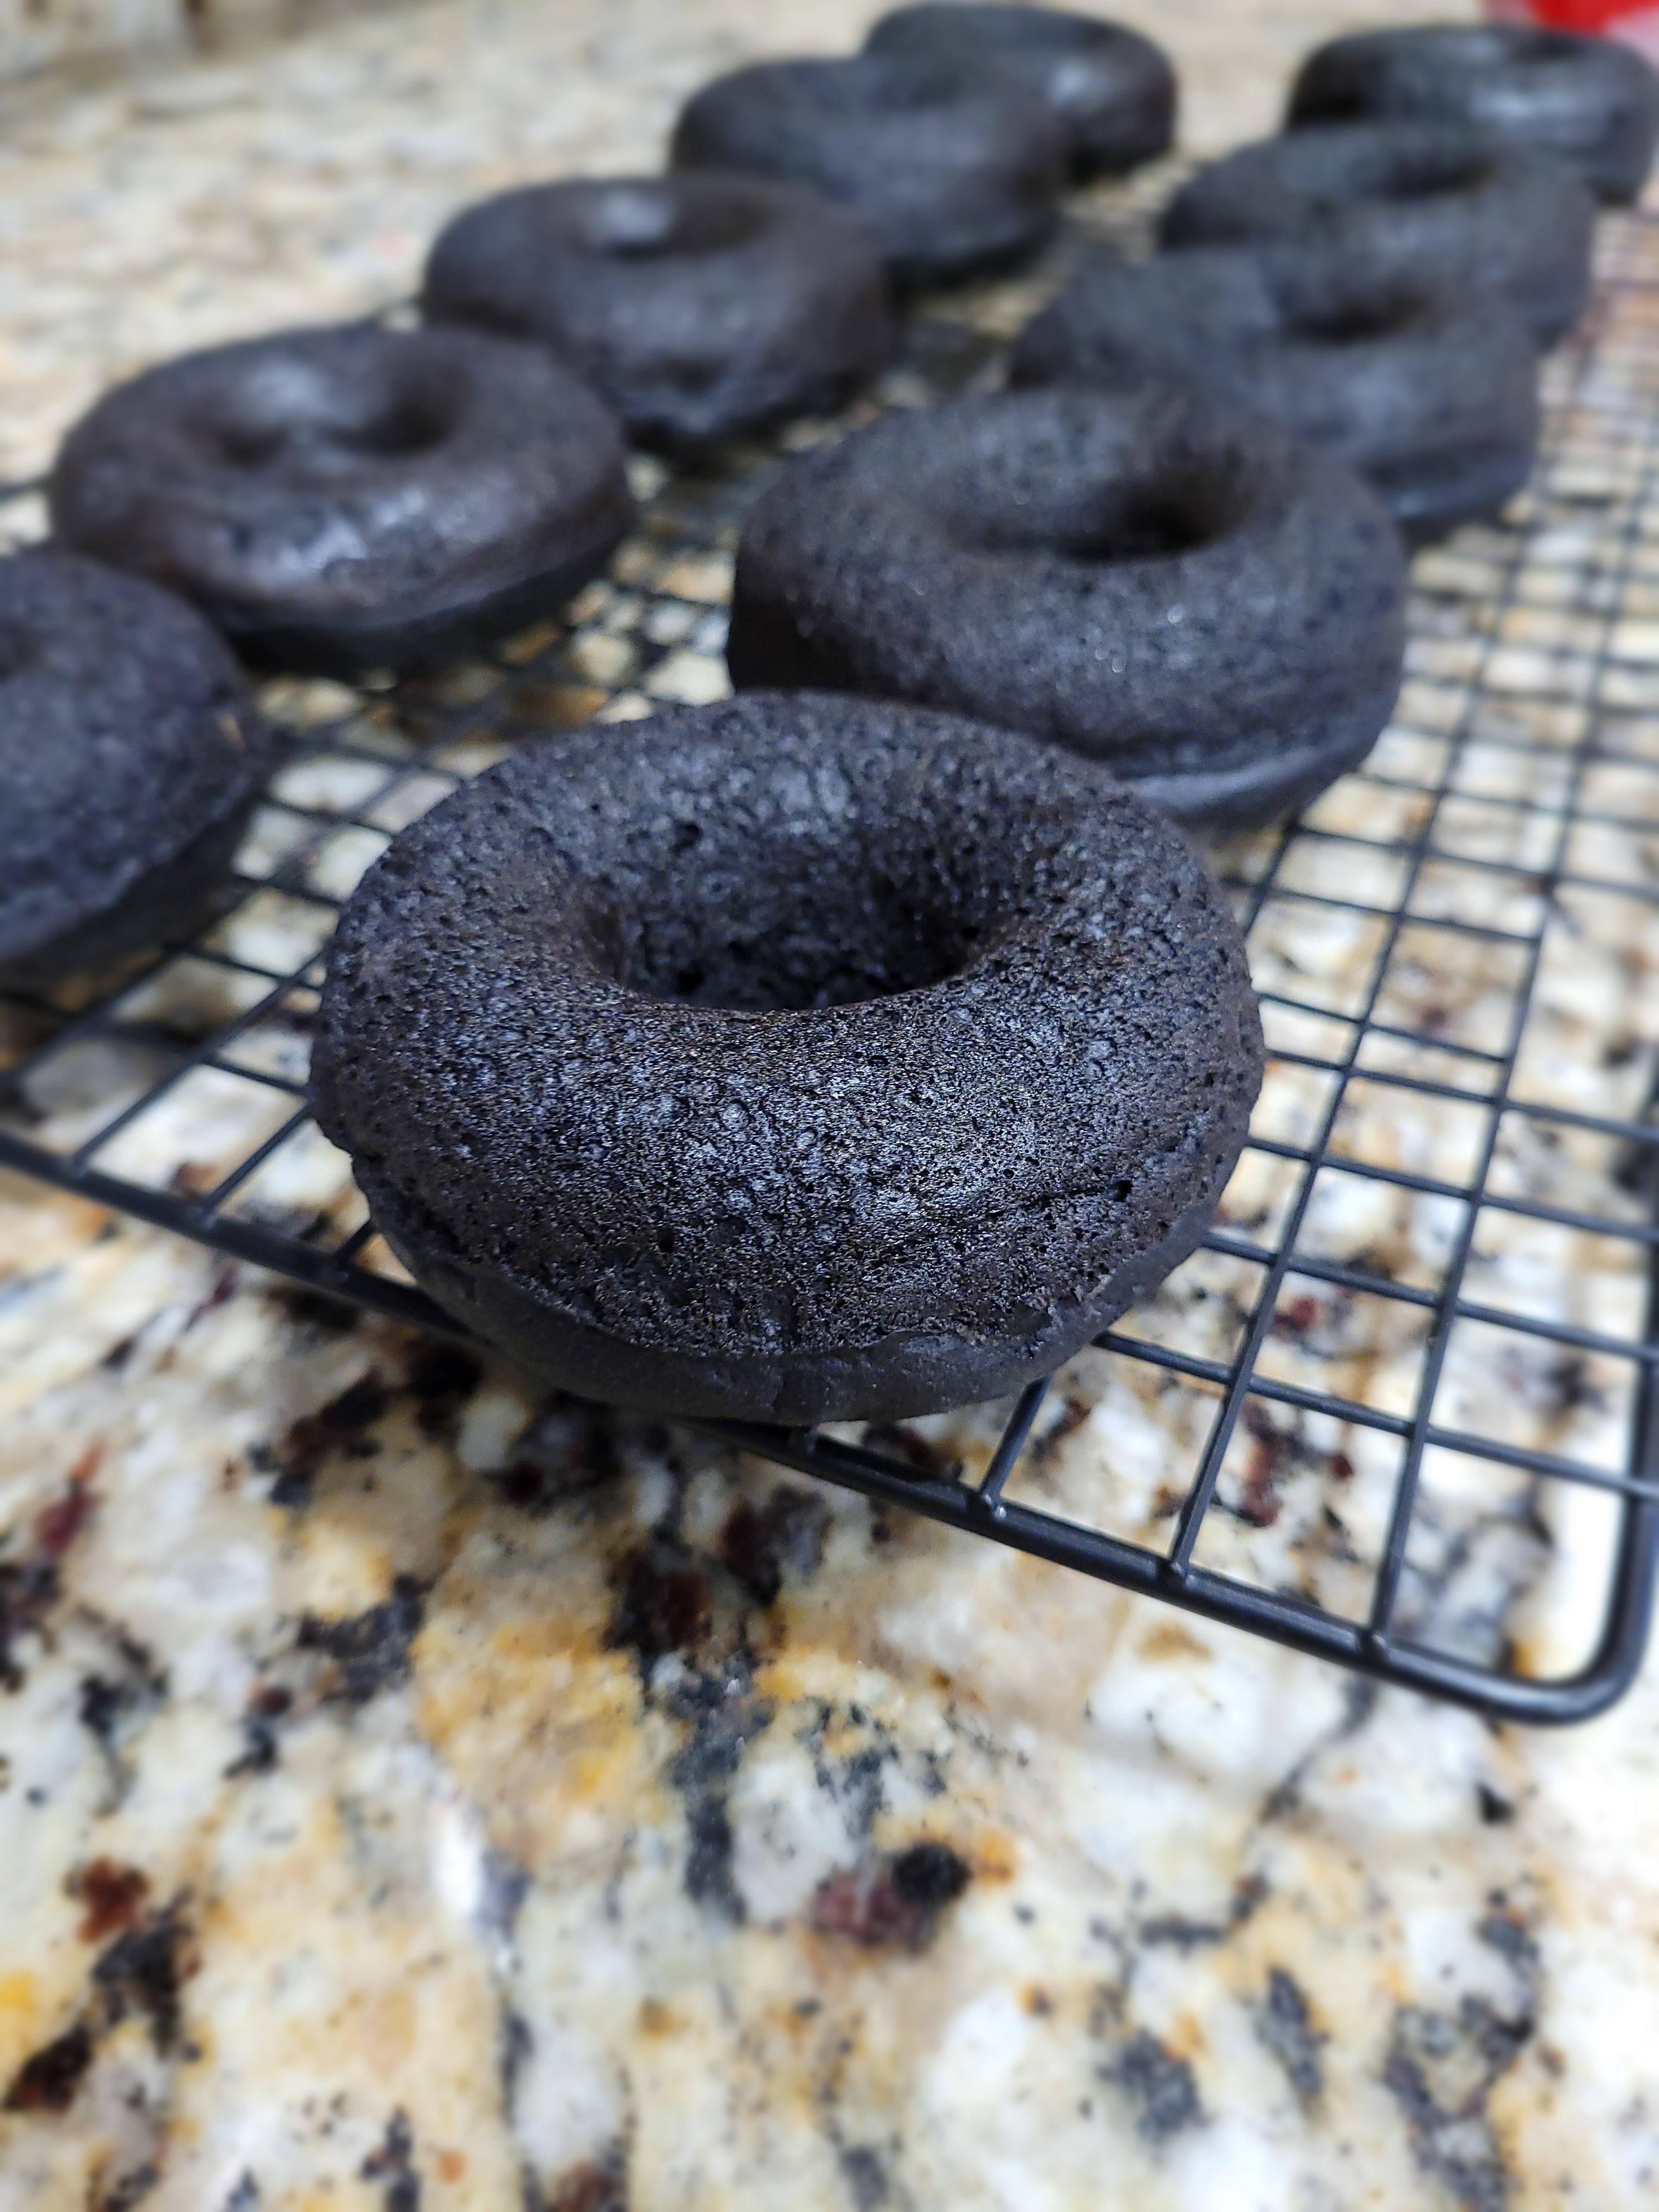
Preheat your oven to 350 and spray a donut pan with cooking spray; alternatively, you can make these into muffins if you don’t have a donut pan. Mix all ingredients together by hand with a whisk until smooth. I use a piping bag or plastic bag with the tip snipped to pipe my donut dough into each donut cavity; this makes 10 donuts. Bake at 350 for 10 minutes. Let cool in the pan for 5 minutes before removing to a cooling rack. Let cool for 15 minutes before glazing.
Time to get glazy The glaze is also very simple to make; you’ll need:
- 30 grams Quest vanilla milkshake protein powder
- 30 grams Lakanto powdered monkfruit
- Water to get a drizzly consistency (about 4 TBS)
- Lime green gel dye
- Spooky sprinkles
You can also just choose to use all powdered sugar/powdered monkfruit, but this will make the glaze a lot sweeter. Mix the protein powder, monkfruit, and water until you get a consistency that is thick enough to pipe with. Load a piping bag or plastic bag with half the glaze and gather half your donuts.
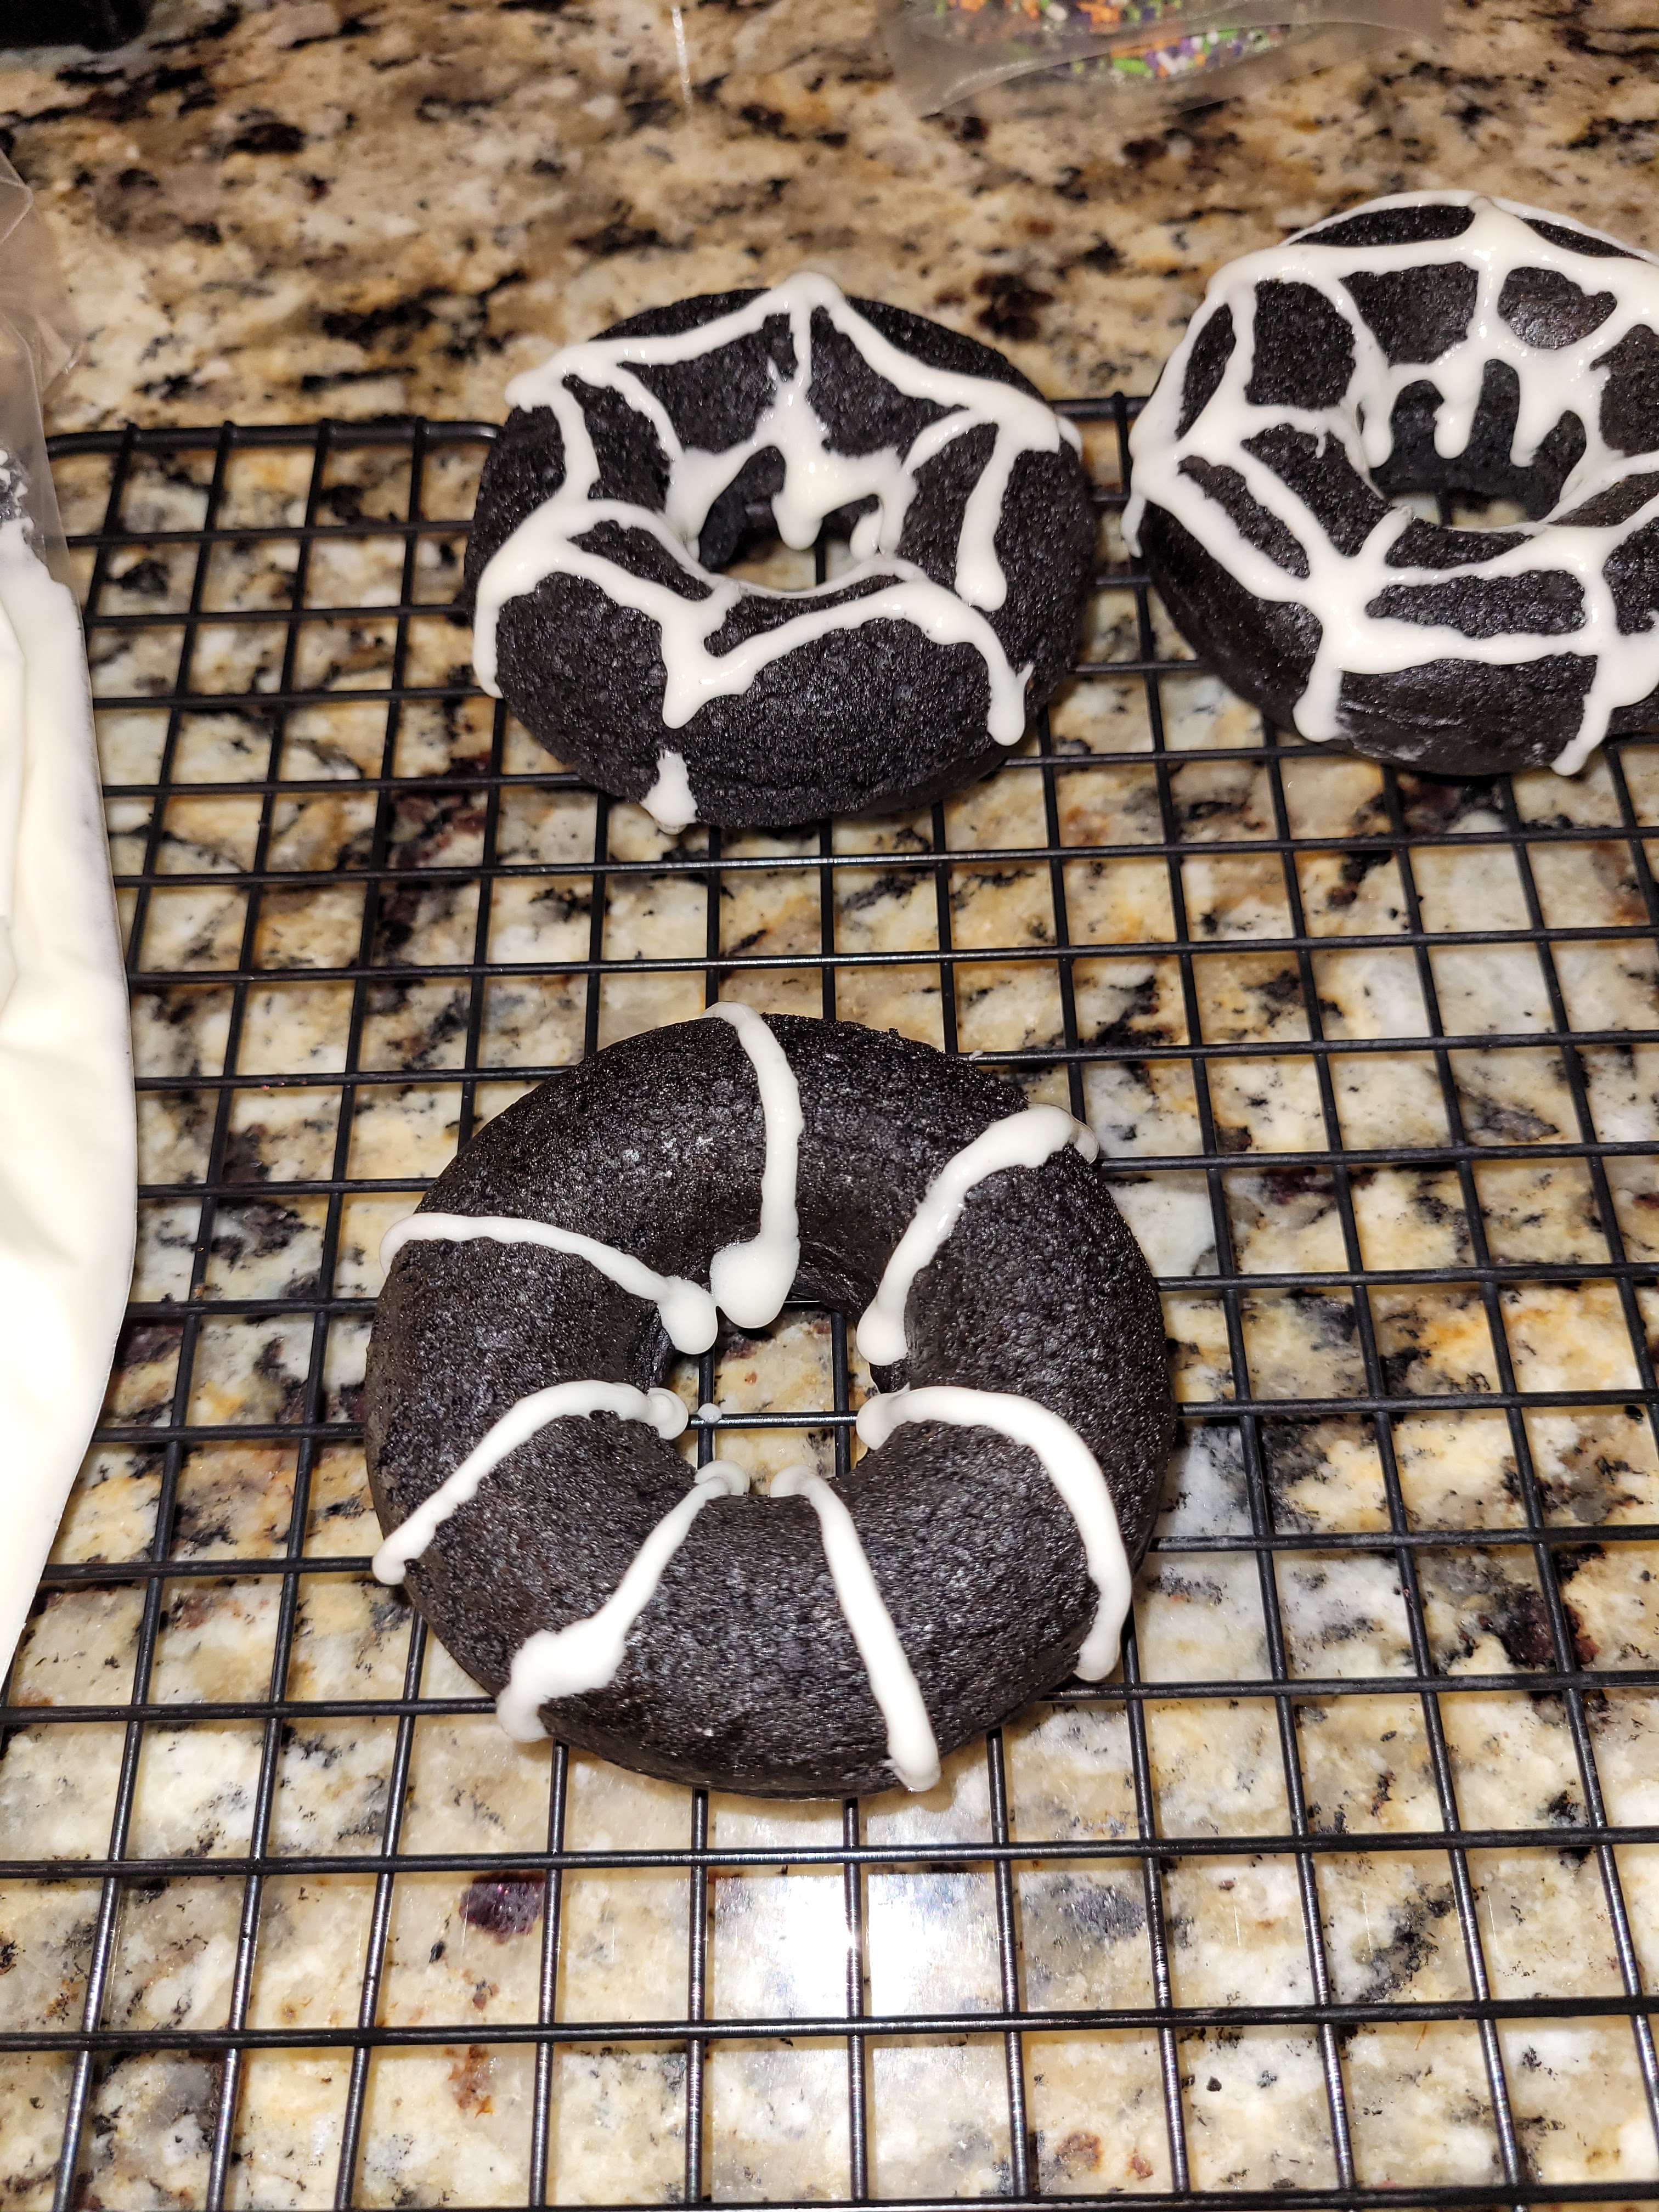
What a tangled web we weave Snip a very small corner off your bag, then draw 6 lines coming out of the center of the donut to start the spiderweb.
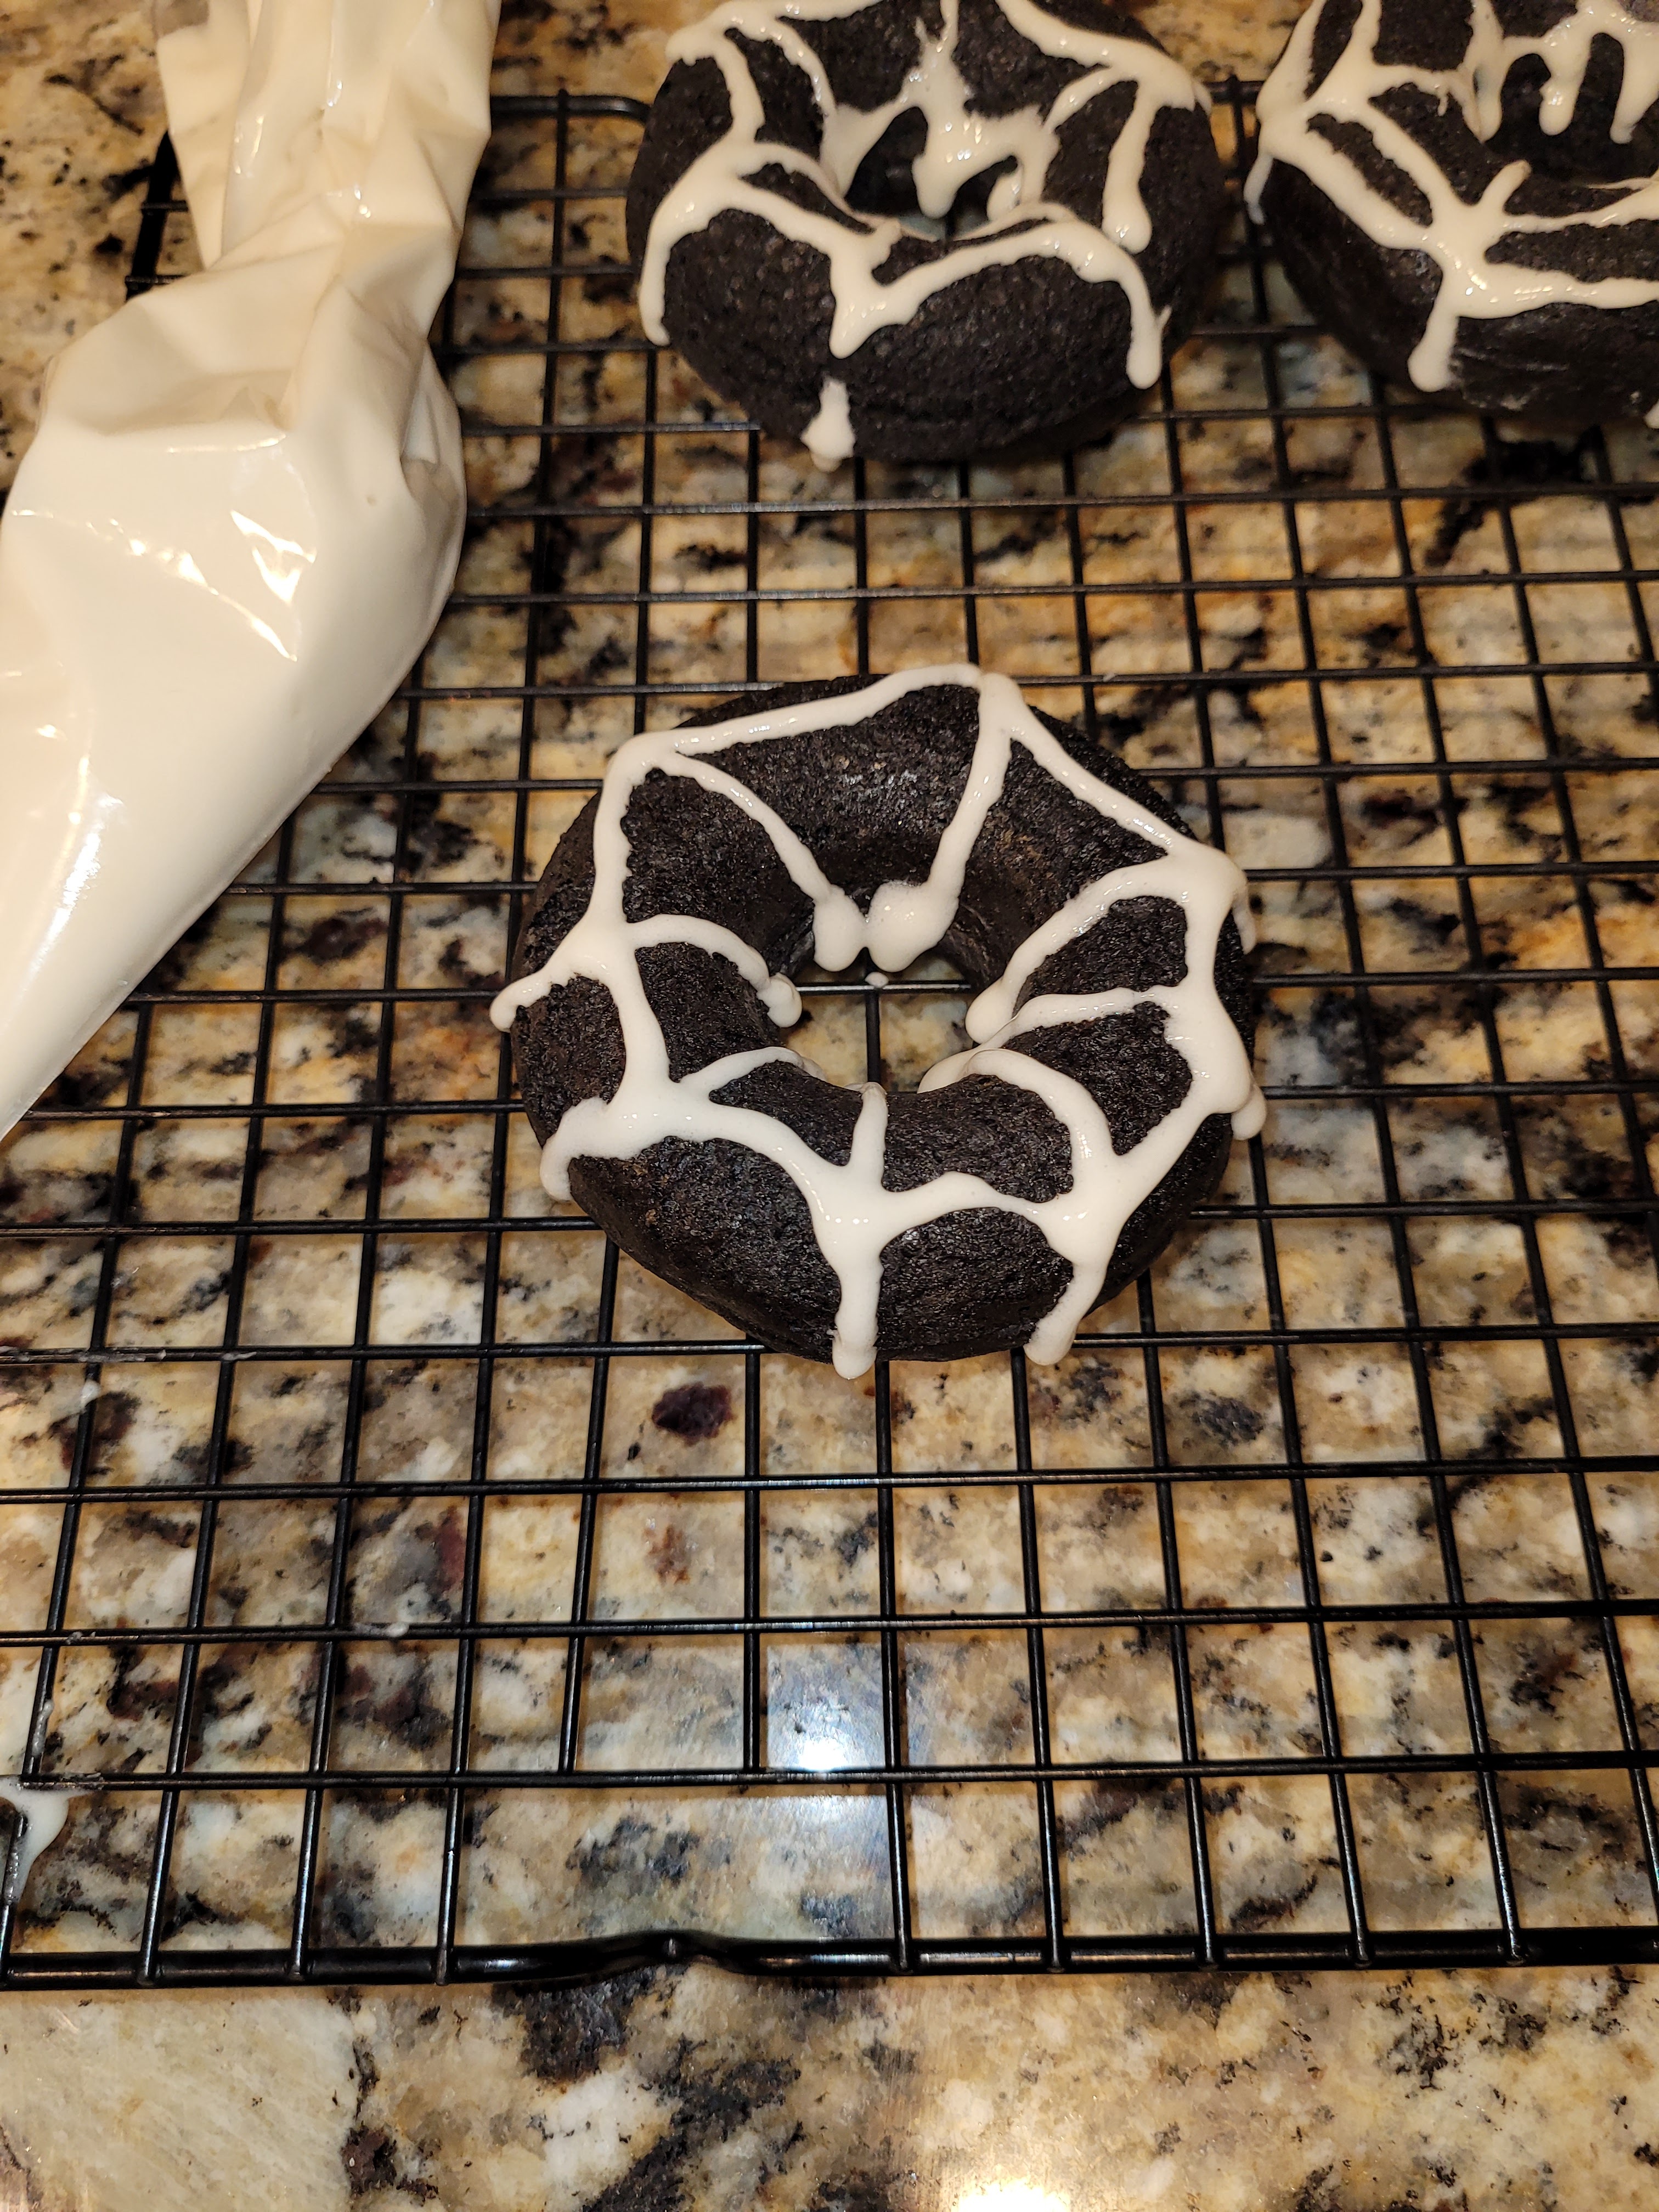
Still hate spiders, but nothing can keep me from a donut. Then draw a curve from one vertical line to the next to form the outside shape of the web.
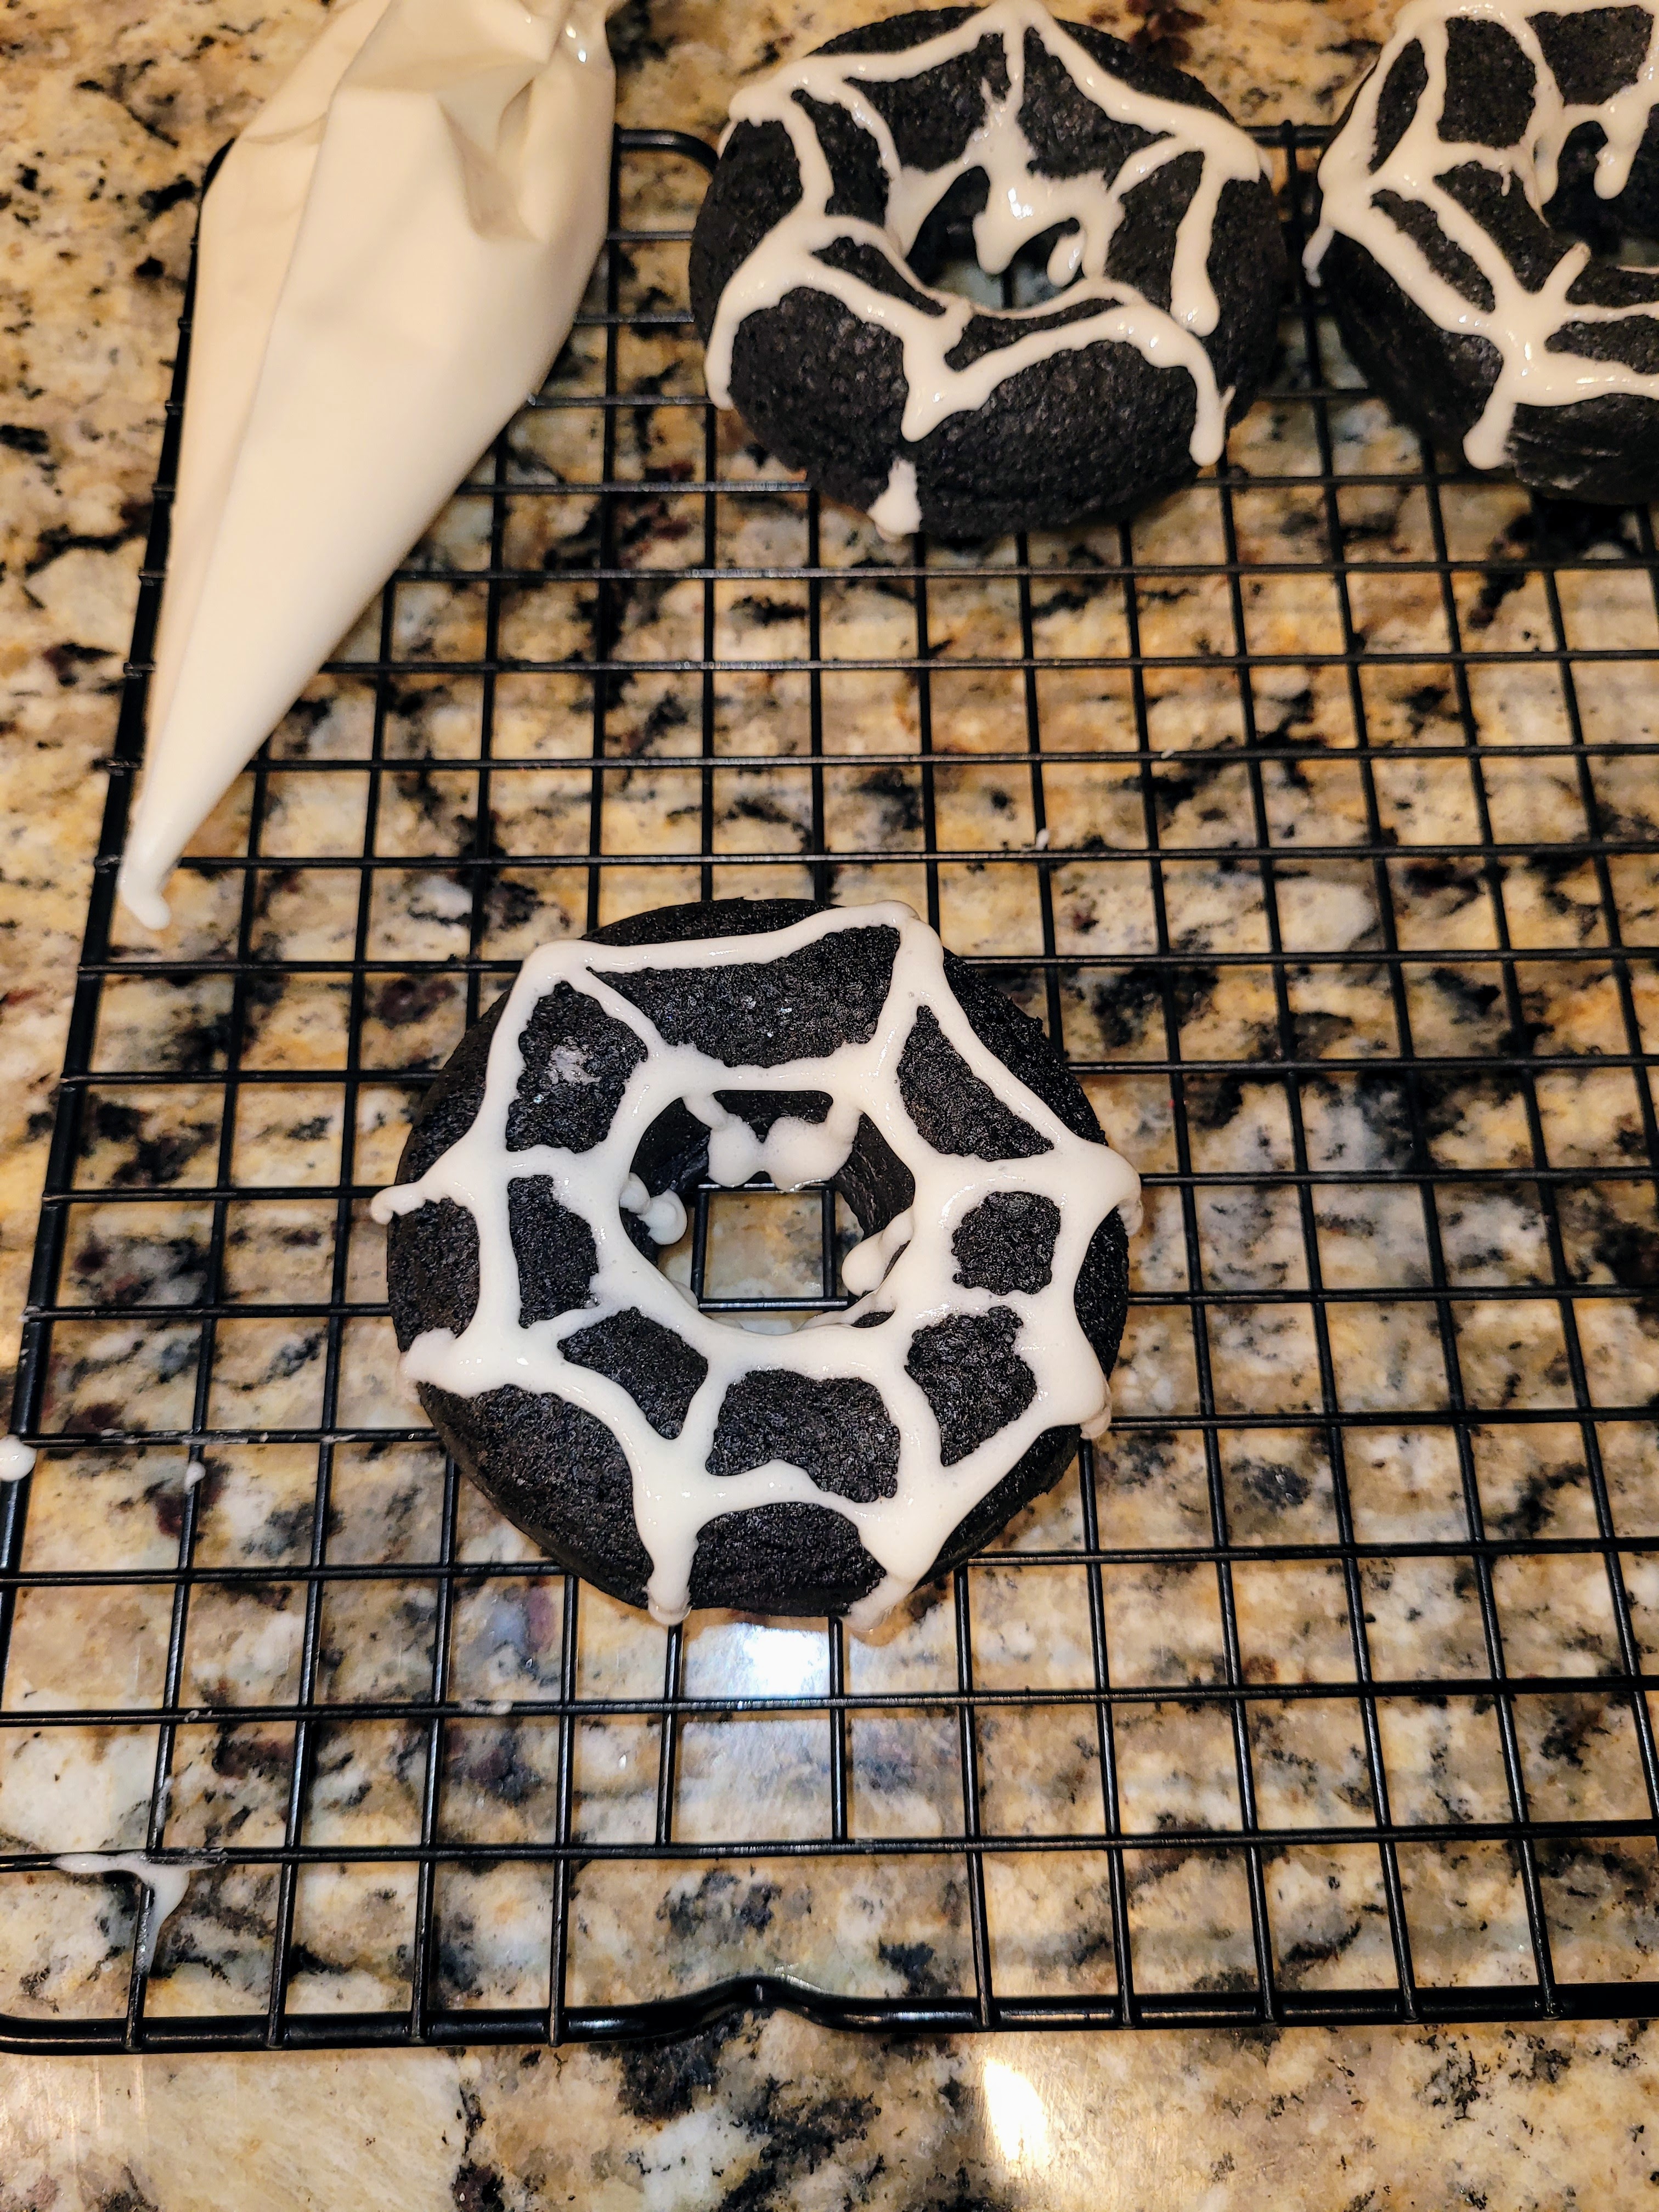
Spooky yet satisfying. To finish, draw another set of curved lines closer to the center of the donut, and you’ve got more edible spiderwebs than probably necessary, but hey, it’s Halloween.
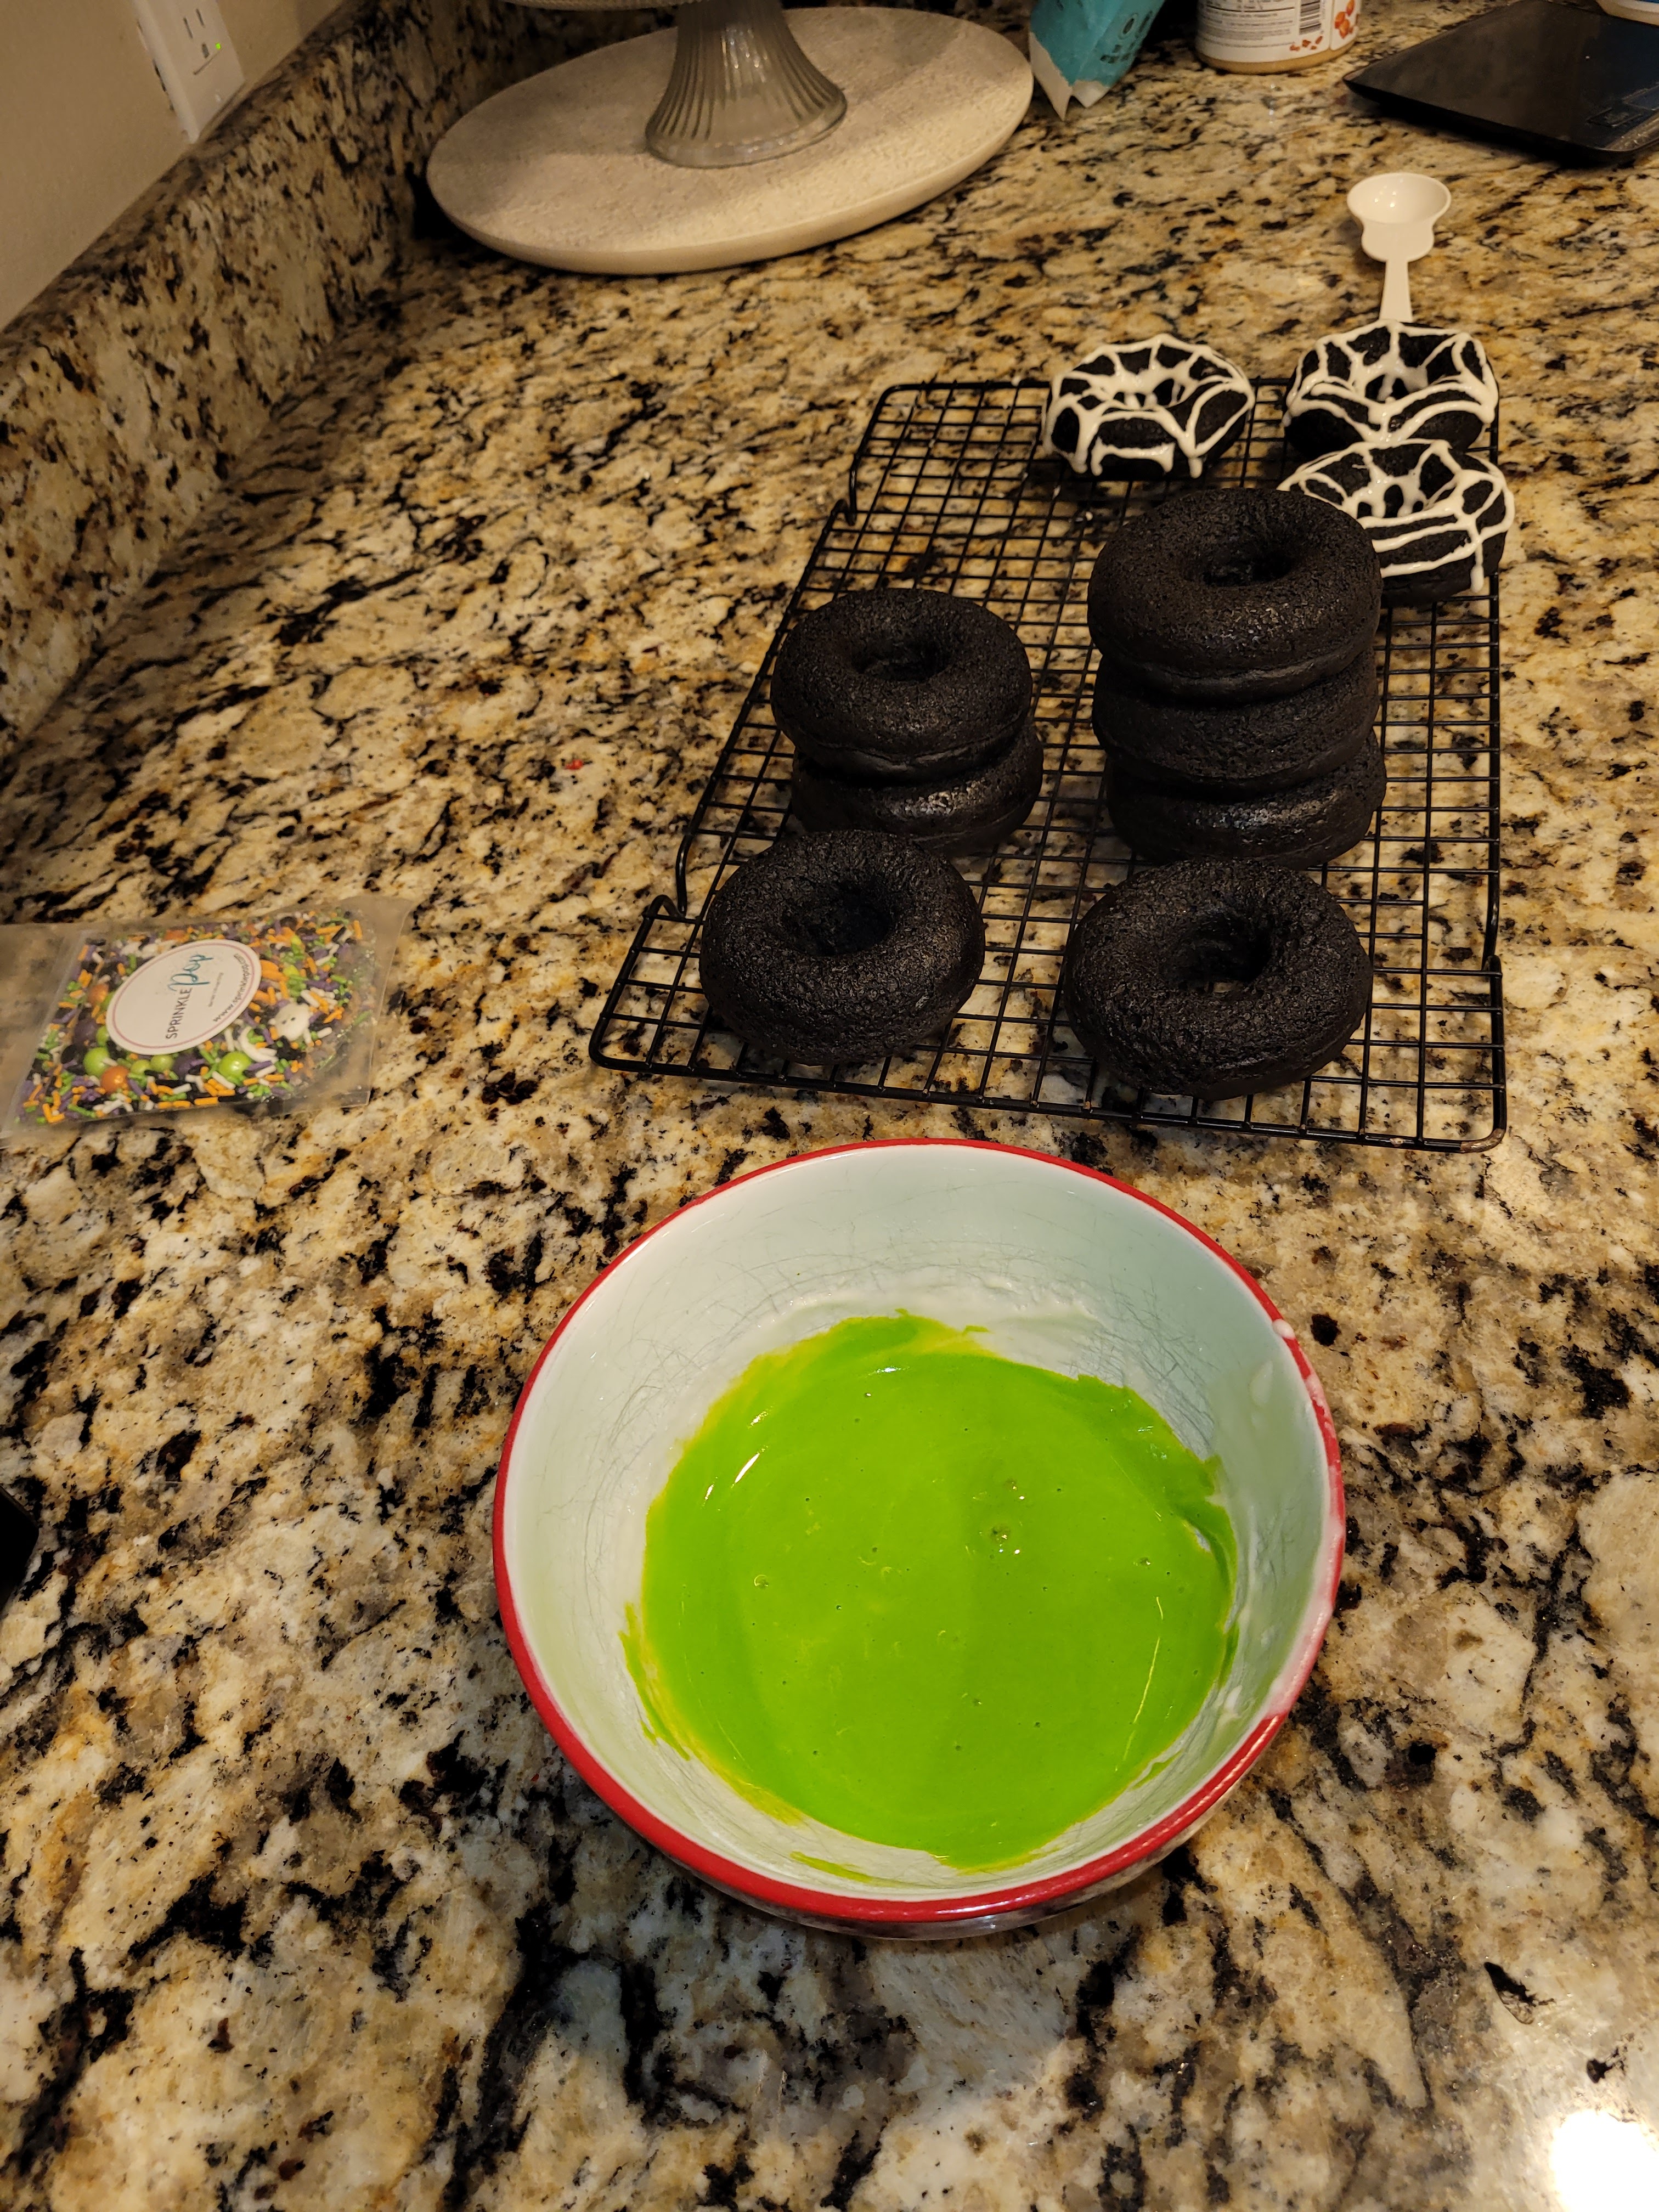
No Slimers were harmed in the making of this ooze. Now, have the slime of your life and take the remaining glaze and dye it lime green; add another tablespoon of water if needed to thin out a little bit. You want the consistency of this glaze to be a tiny bit more drippy than the spiderweb glaze. Dip a donut face-down into the glaze, give it a few twists, then flip upright and shake to get the glaze coated evenly over the donut (and, also, your entire hand; worth it). Repeat with remaining donuts. Slime is of the essence, so before the glaze sets, be sure to top with spooky sprinkles!
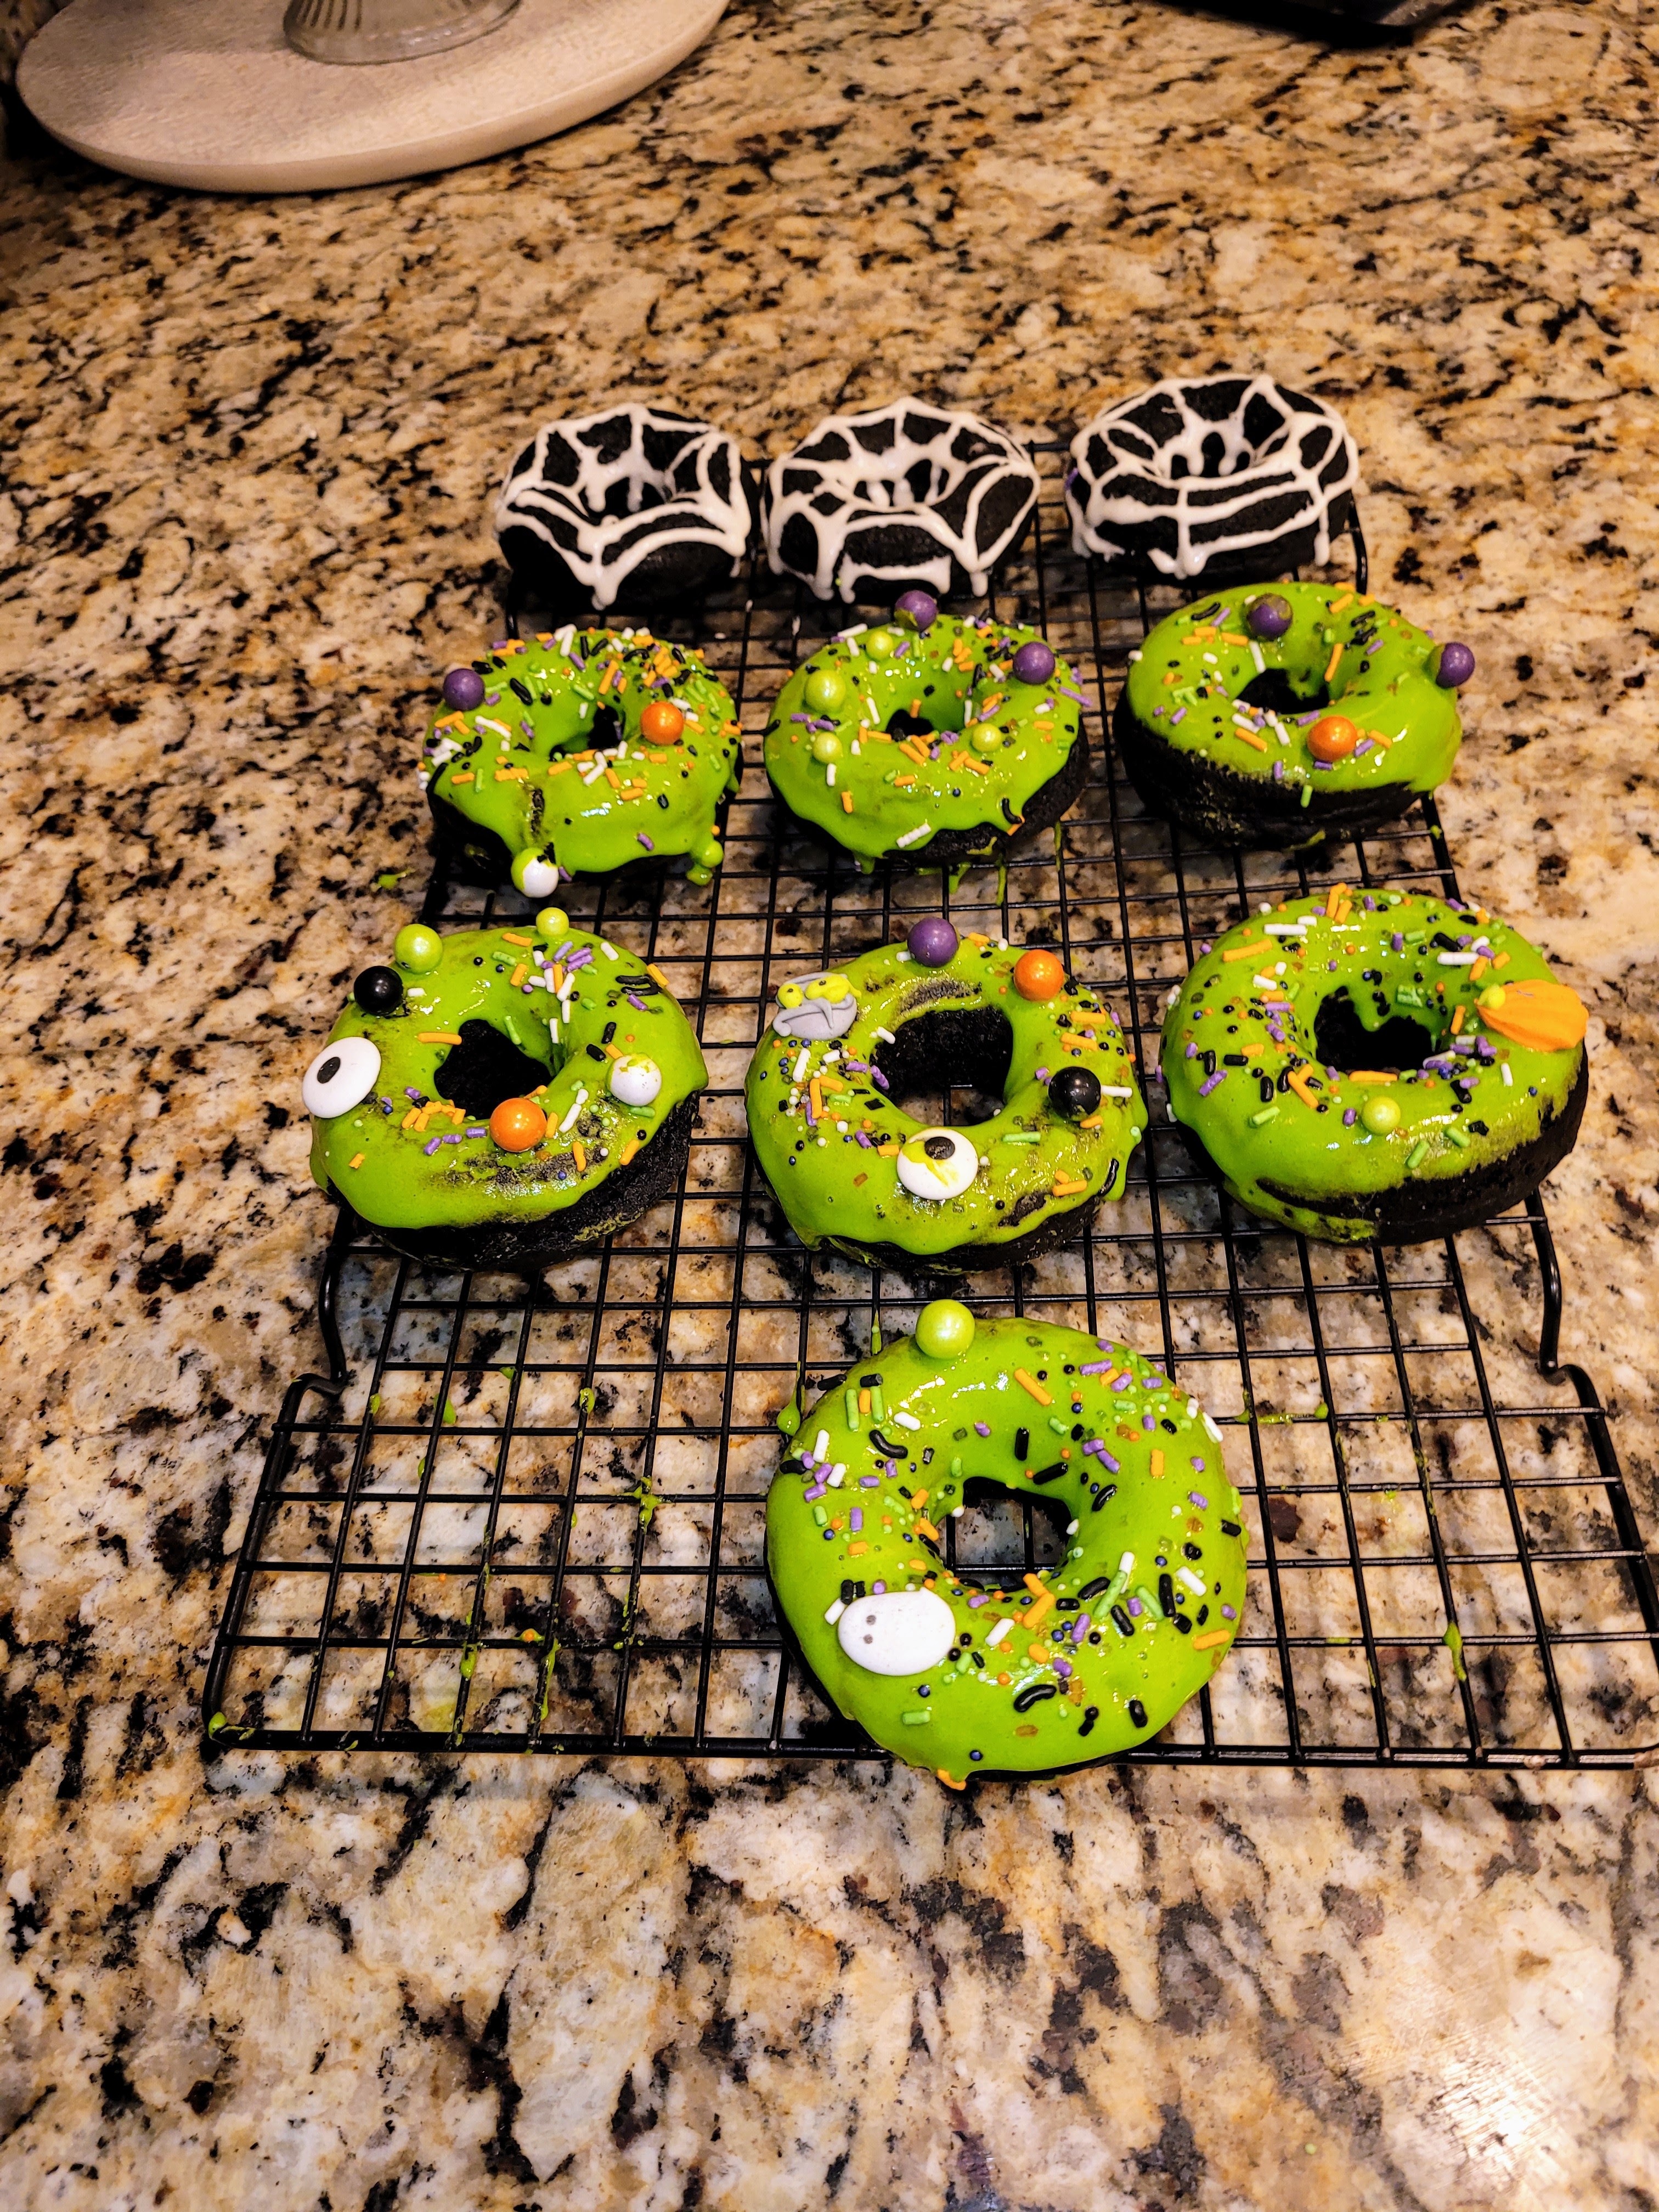
I donut know what I would do without Halloween. These donuts are best eaten right away, as are all donuts, but given eating nearly a dozen donuts at once is “frowned upon,” keep leftover donuts in an airtight container in the fridge. These reheat very well in the microwave for 10 seconds. I also typically freeze half and save for later; they thaw out great- a Halloween miracle! Anything that black or that slimy deserves to be celebrated; so eat, drink, and be scary for breakfast with these Oreo-adjacent spooky babies. ‘Til next time, my fellow eaters!
Recipe and Instructions
Glazed Black Velvet Protein Donuts
Soft, Oreo-flavored donuts with a high protein glaze
I have not tested this recipe with any other protein powders or mixes, so I cannot guarantee the same results without using the ingredients listed below.
Ingredients
FOR THE DONUTS
*1 bag of Empowrd gluten free protein donut mix
*1 large egg
*1 ounce black cocoa powder
*1/2 cup unsweetened applesauce
*1 tsp vanilla extract
*1/2 c + 2 TBS water
FOR THE GLAZE
*30 grams Quest vanilla milkshake protein powder
*30 grams Lakanto powdered monkfruit
*Water to get a drizzly consistency (about 4 TBS)
*Optional: sprinkles and green gel dye
Directions
- Preheat oven to 350 and grease a donut pan with cooking spray (can use a muffin tin if you don’t have a pan)
- Mix all donut ingredients well
- Carefully pour batter into the pan until each cavity is 3/4 full (I used a piping bag with the tip snipped to make this easier)
- Bake for 10-12 minutes, until springy
- Let donuts cool on a cooling rack for 15 minutes while you make the glaze
- Mix Quest vanilla milkshake protein powder with Lakanto monkfruit. Add water to get a drizzly consistency (about 4 TBS)
- Once donuts have cooled 15 minutes, dip into glaze and top with sprinkles (for spiderweb donuts, see instructions above)
Nutrition
Macros
10 servings
110 cal/14 c/1.8 f/9.5 p per donut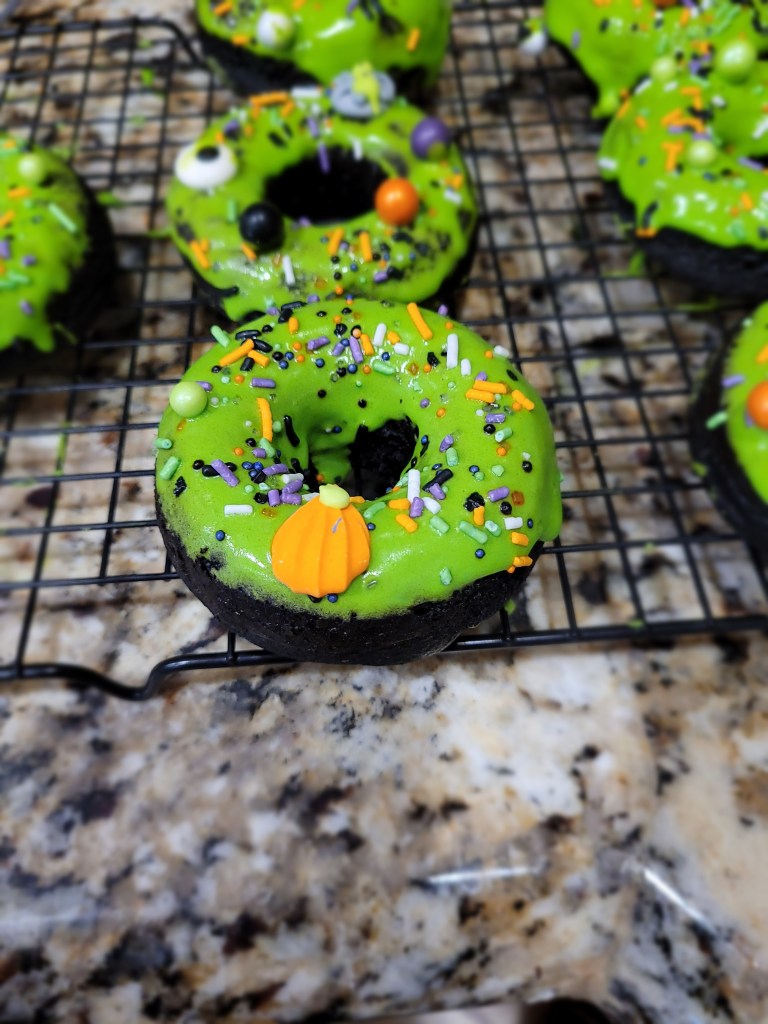
Donut hate me because I’m boo-tiful. -
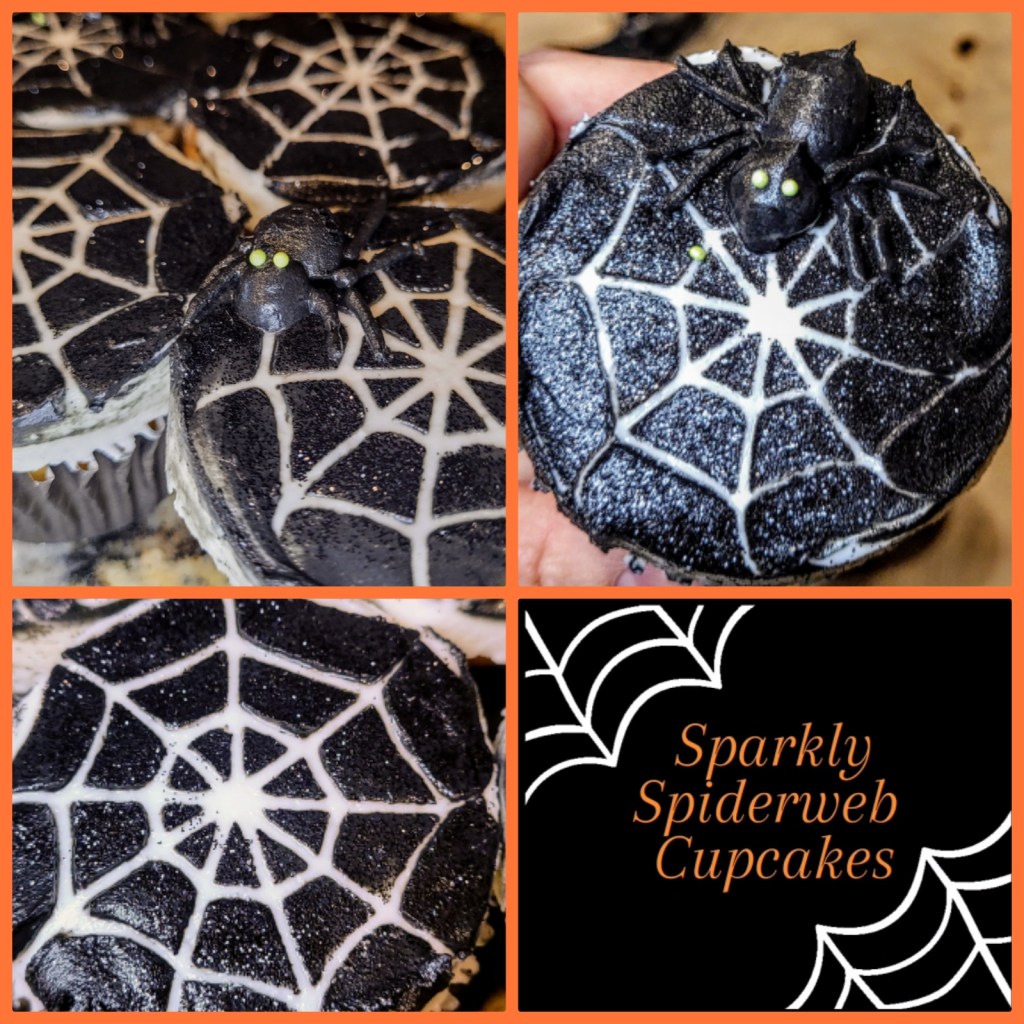
Snackin’ on the Spiderwebs

I know that summer is coming to close when two things happen: 1. I no longer have to get up before the sun to take my dogs for a walk without dying, and 2. I begin to have an uncontrollable yearning to put pumpkin spice or caramel in literally everything. Both of these things occurred over the weekend, so between that and 31 Nights of Halloween premiering on FreeForm, I’d say we’ve safely made it to my favorite season, as well as my favorite month, of all: BAKETOBER! I had initially planned to make my first Baketober event a Hocus Pocus cake, but since I am still feeling victimized by the Disney-fied second movie that dropped last week (it couldn’t hold a black flame candle to the original), I just wasn’t up to running amok, amok, amok, if you will. Instead I was feeling a little creepy, a little crawly, and a little like something sparkly might make things better. So, I made these sparkly spiderweb cupcakes instead, and I gotta tell you, as much as I hate spiders (the only thing with 8 legs that can be trusted is an octopus), these filled me with great, spooky glee.
Sorry I’m not home right now, I’m eating all the spiderwebs; leave a message, and I’ll call you back. Pictures simply do not do the sparkles justice; since I refuse to shell out money to WordPress so I can upload videos, head to my Instagram to get the full sparkle effect; truly, the only time spiderwebs have been mesmerizing and not terrifying. I tried a new gluten free cake mix to make these scrumptious caramel-flavored cupcakes with caramel cream cheese frosting. I’d rate it a 6 of 10 purely because there’s so much cornstarch in the mix that it tastes more like a caramel-flavored cornbread recipe than a cupcake. It’s not bad though, and the caramel cream cheese frosting brings it back into dessert and not side dish territory. I can’t really complain since they’re also only 154 calories for one cupcake, so I can eat two at a time and still fit into my Halloween costume later this month.
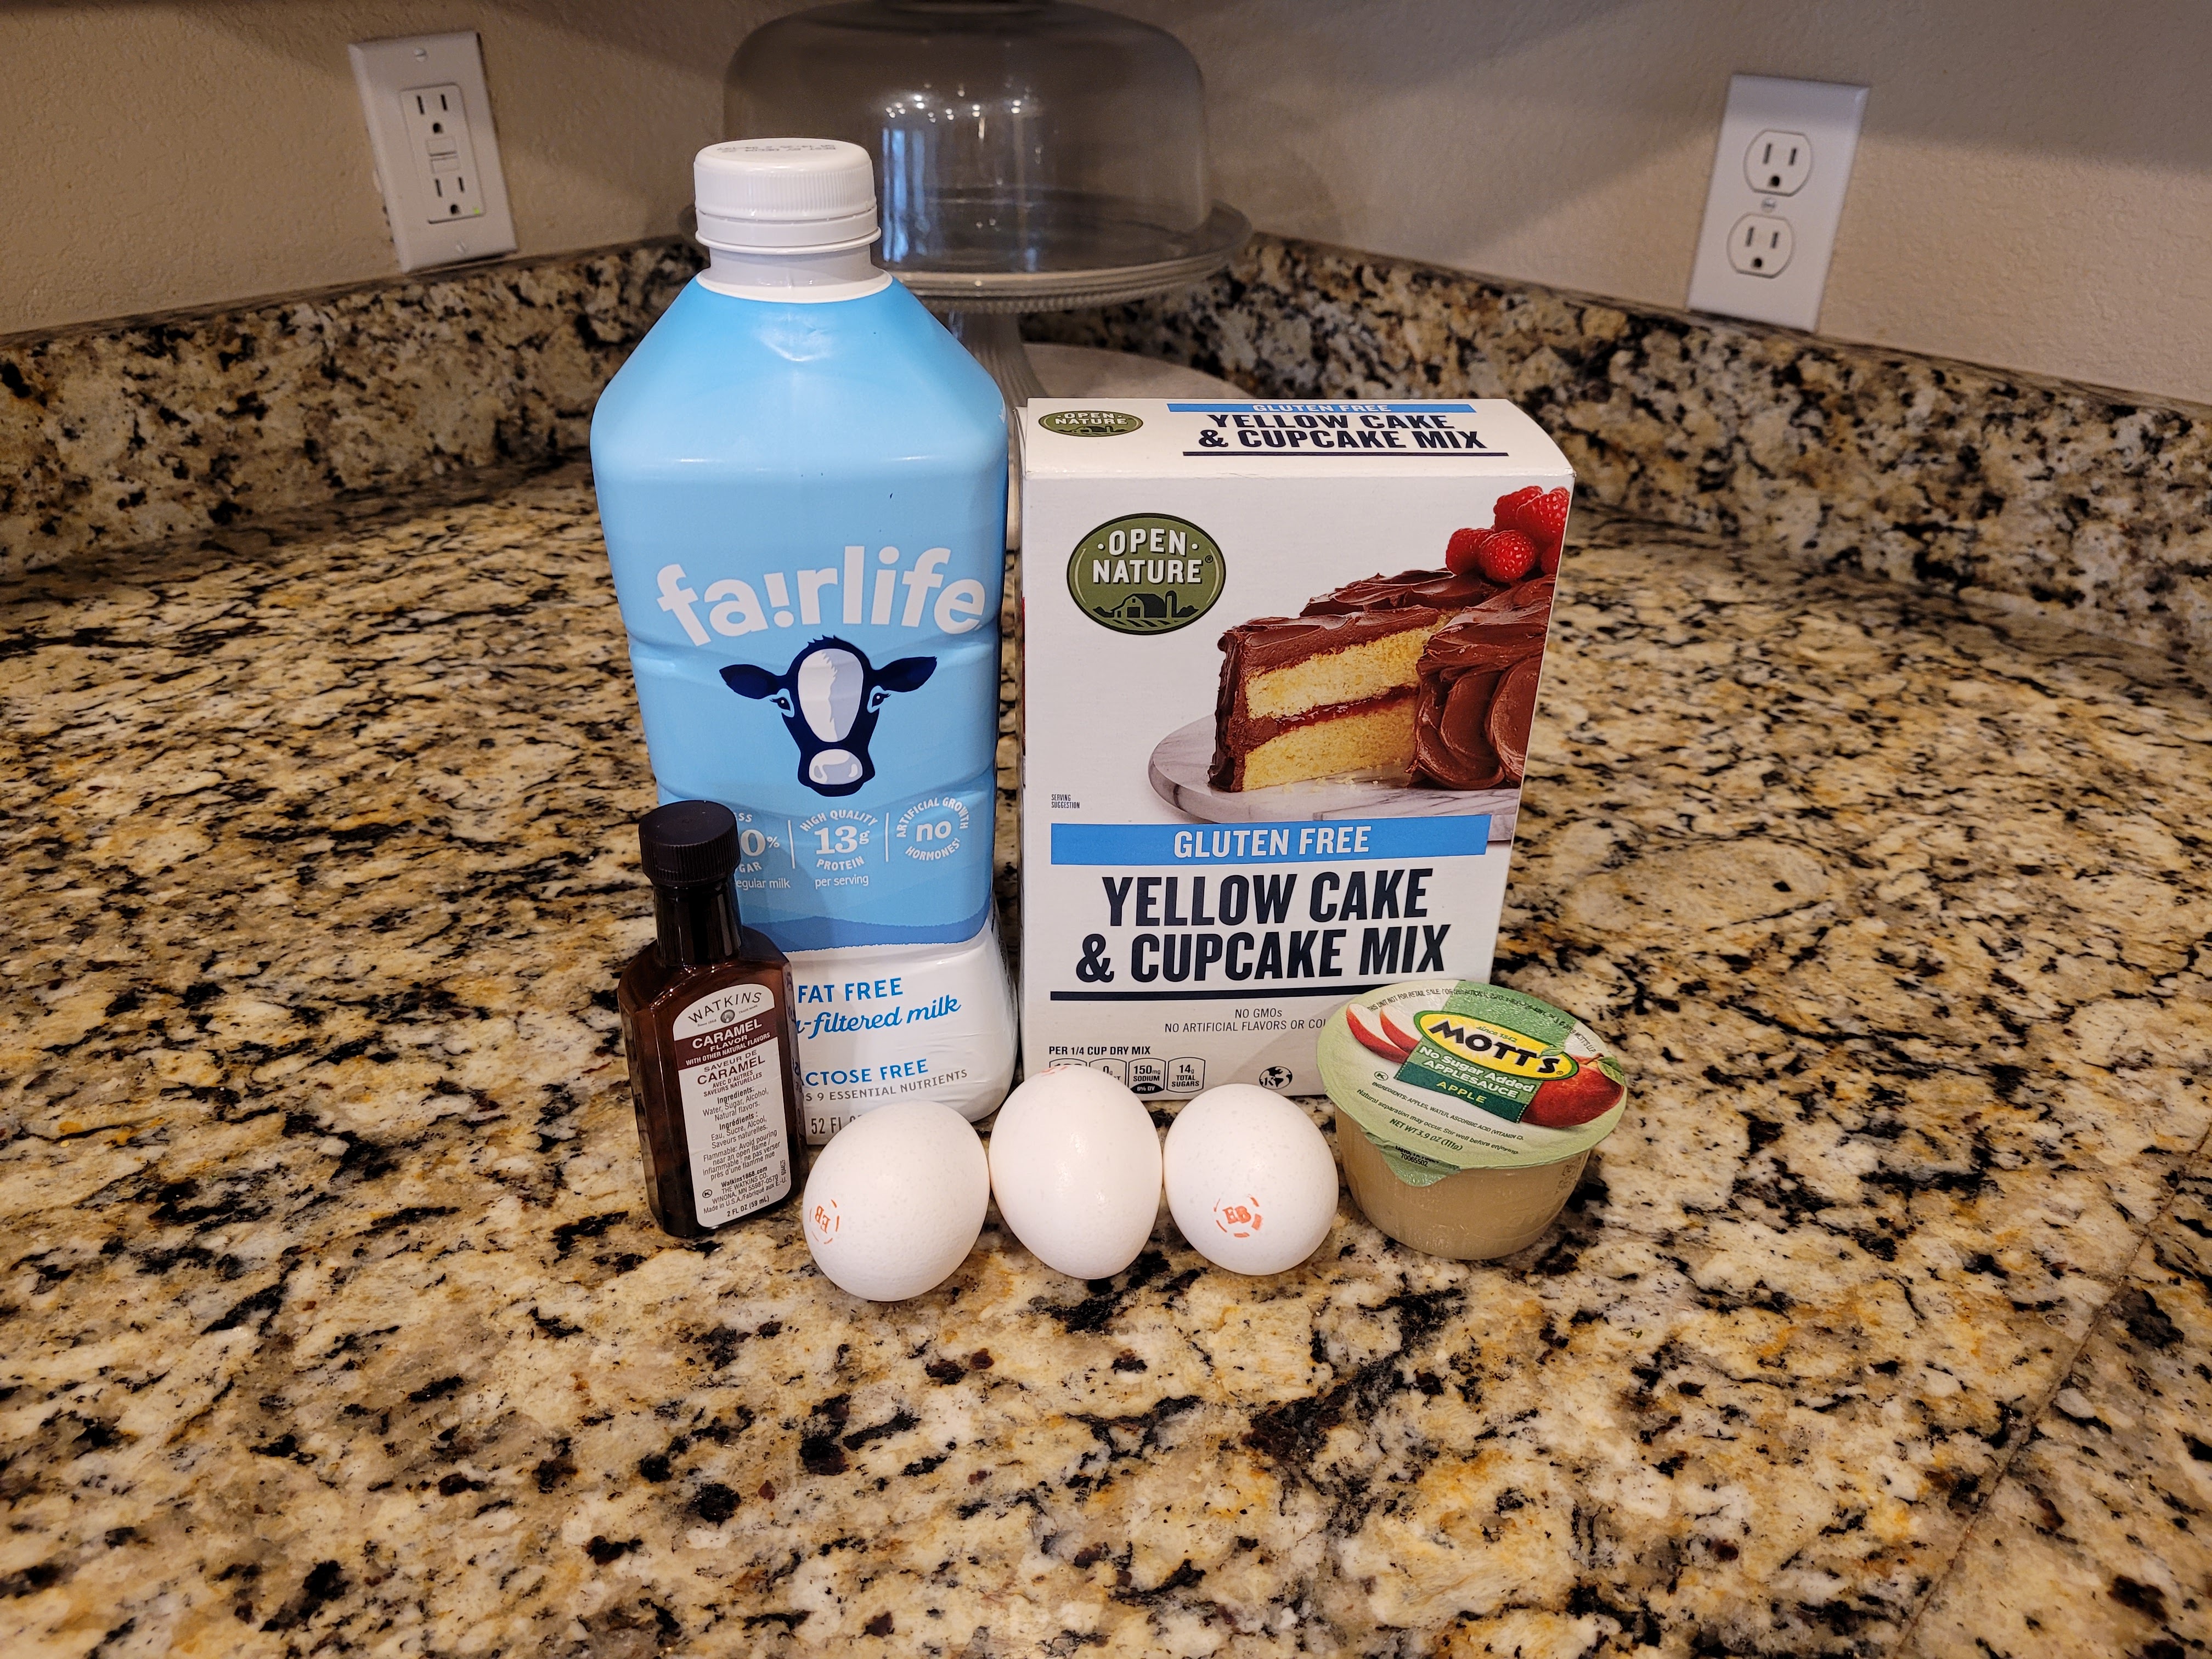
Yellow cornbread mix would be more appropriate, Open Nature people. For this recipe, I used:
- 1 box gluten free yellow cake mix
- 2/3 cup fat free milk
- 3 eggs
- 1/2 cup unsweetened applesauce
- 1 tsp caramel extract
Start by preheating the oven to 350 and lining two muffin tins with 12-15 cupcake liners (this made 15 cupcakes for me). Mix all ingredients on low in a stand mixer for 30 seconds before turning to medium-high speed for one and a half minutes. Divide batter evenly into the cupcake liners and bake for 22-25 minutes, until a toothpick comes out with some crumbs.
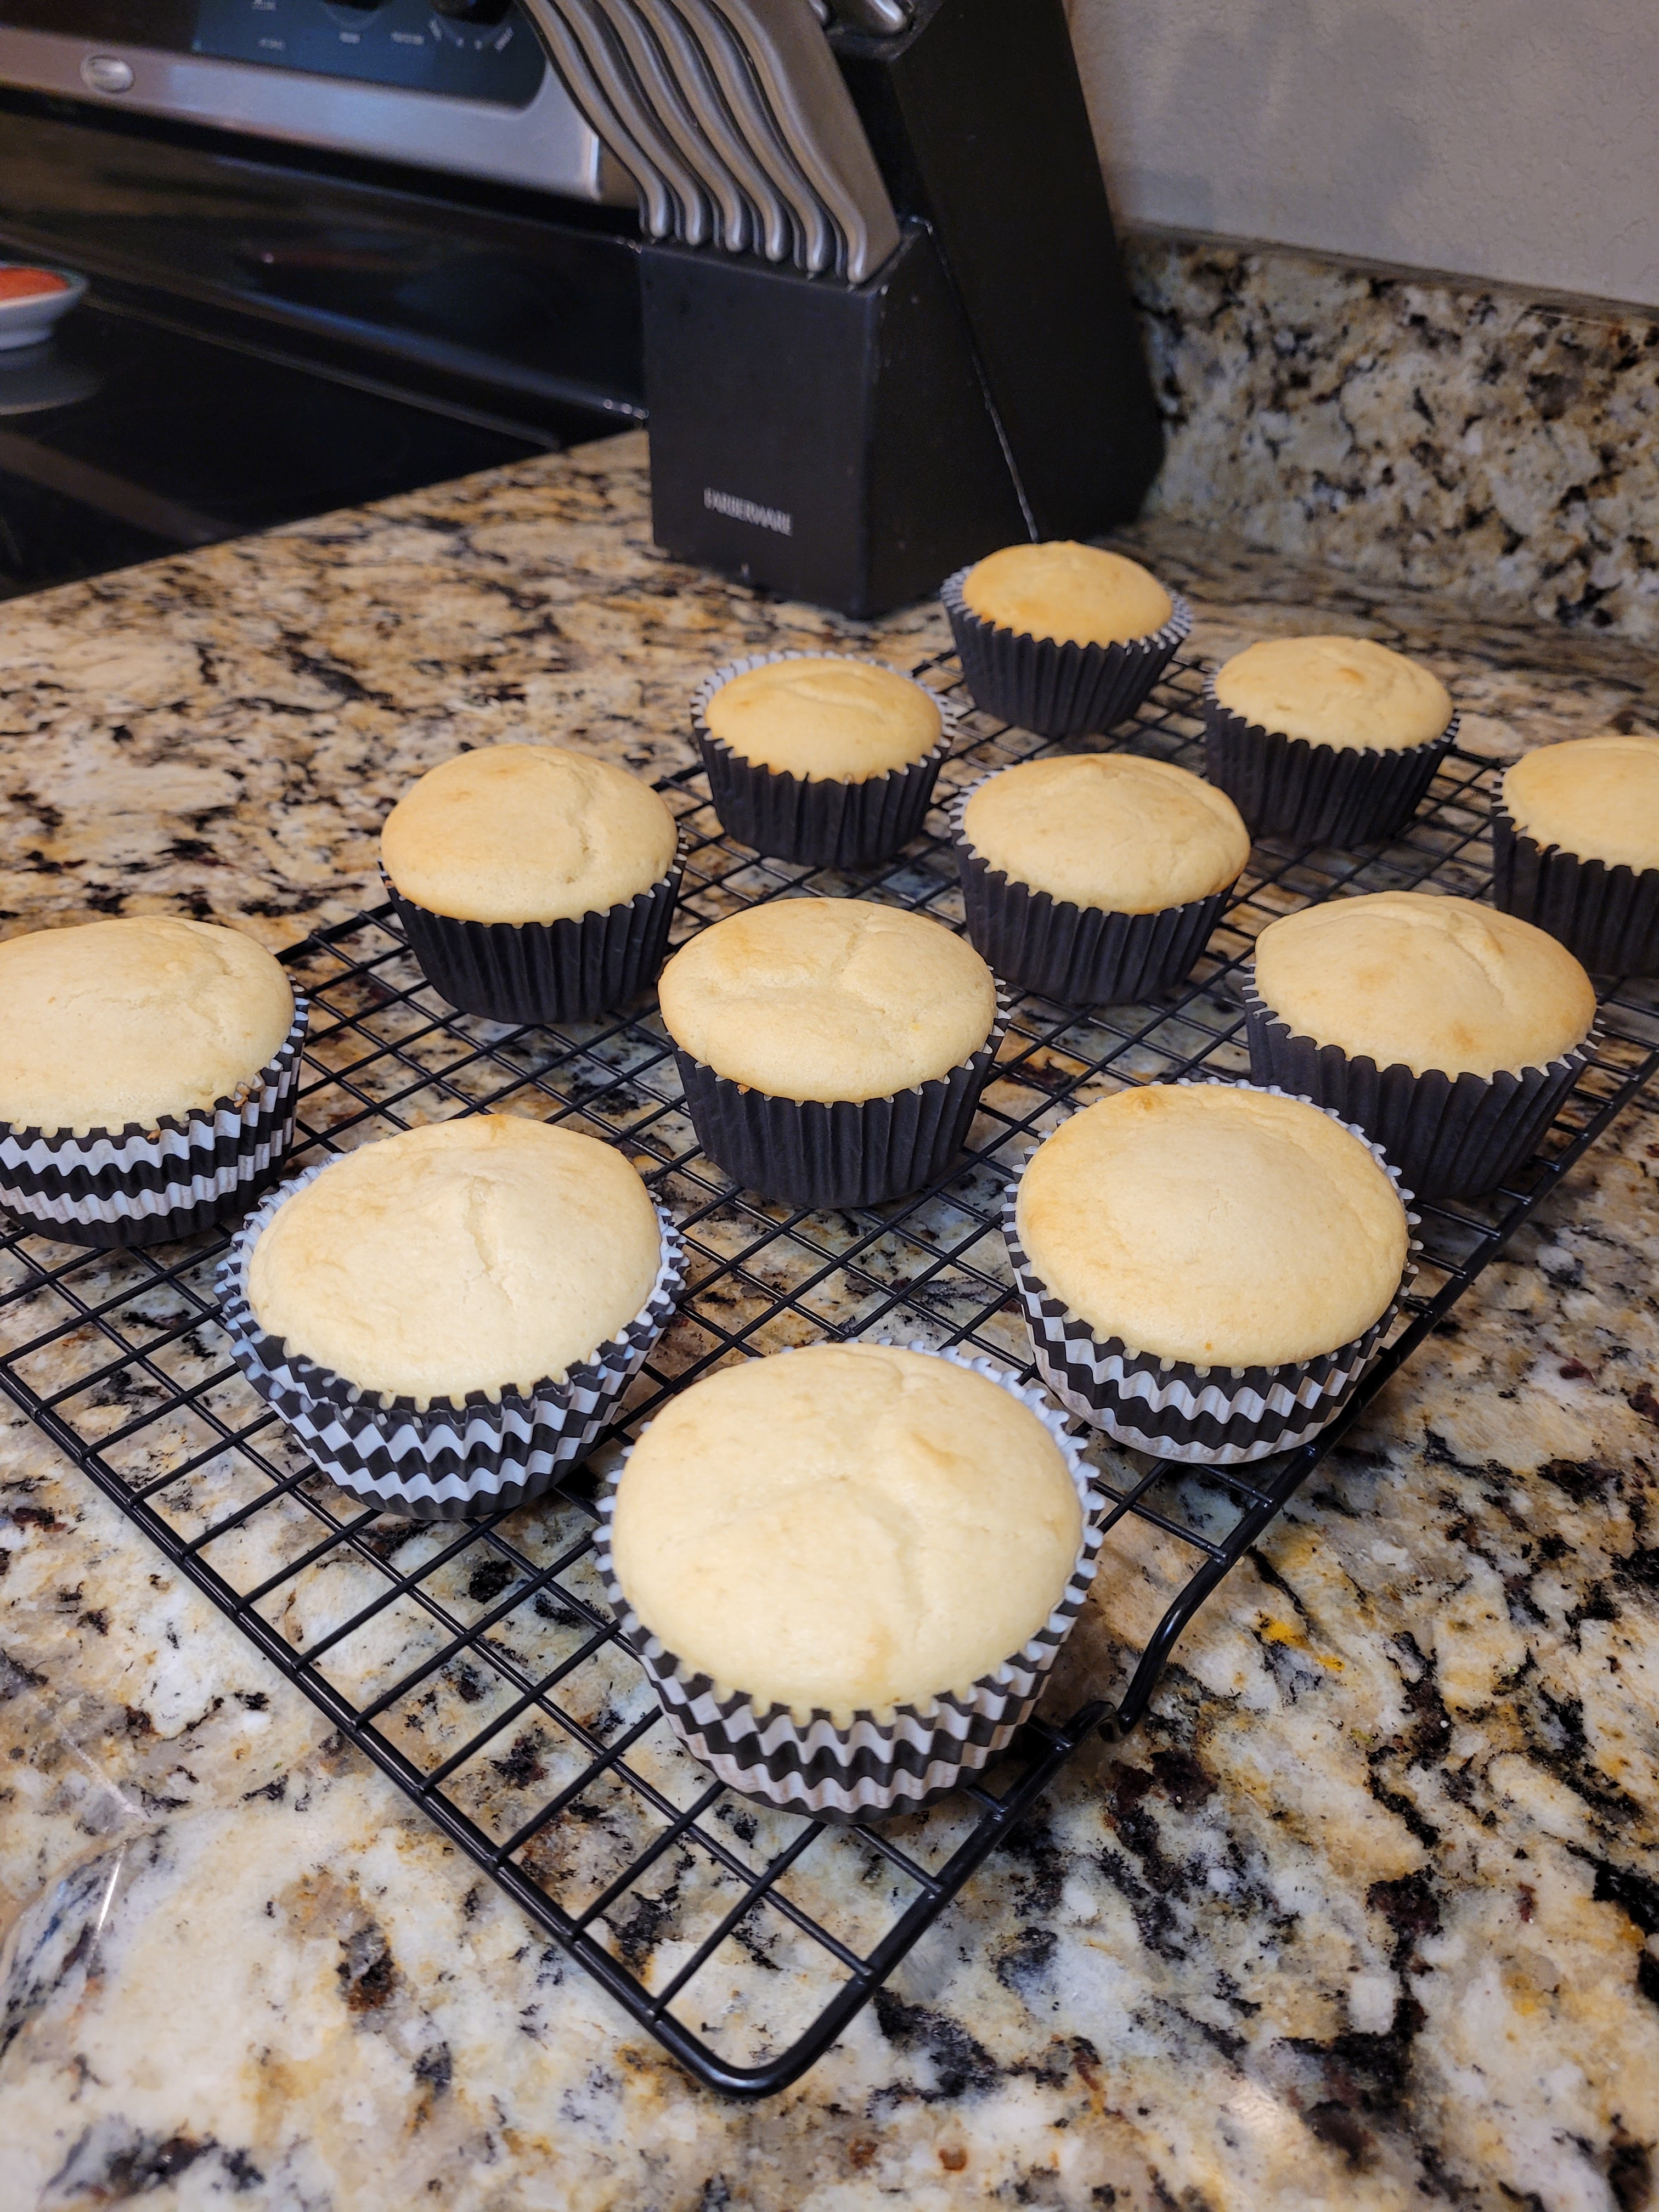
Yes, I do have festive cupcake wrappers for days. Let the cupcakes cool in the pan for 5-10 minutes before removing to cool completely on a cooling rack. You can put this in the fridge or freezer to speed up the process while you make frosting.
I will never be able to use this entire bottle of clear vanilla extract in my lifetime. The frosting is the clear winner in this recipe, but that’s usually the case when you have a sweet tooth or 32. To make this totes fall apropes caramel cream cheese, you’ll need:
- 8 ounces (225 g) of 1/3 the fat cream cheese at room temp
- 1 cup (226 g) plain, non-fat Greek yogurt, strained overnight
- 4 cups/1 bag of Lakanto powdered monkfruit or regular powdered sugar
- 2 tsp caramel extract
- 2 tsp clear vanilla extract
- To make black frosting later:
- 1 ounce (2 TBS) black cocoa
- Black gel dye
- 1 TBS fat free milk
Start by mixing the cream cheese and yogurt until smooth and fluffy, 2-3 minutes. Add in half the powdered monkfruit or sugar and half of the extracts. Mix on low until incorporated, then add remaining monkfruit and extracts. If the frosting seems too thick after mixing together, add 1 tsp of milk at a time until you get an easily spreadable consistency.
Flatten those cupcake tops like a spider trying to crawl through the house. Before you do anything else to the frosting, load some plain white frosting into a piping bag and snip a decent chunk off. Use this to pipe a circle of frosting on top of each of your cooled cupcakes. Then take a sheet of Parchment paper and place it on a large cookie sheet. Flip a cupcake upside down and gently press onto the surface of the Parchment paper. Repeat on all cupcakes, then place in the freezer to set for 30 minutes.
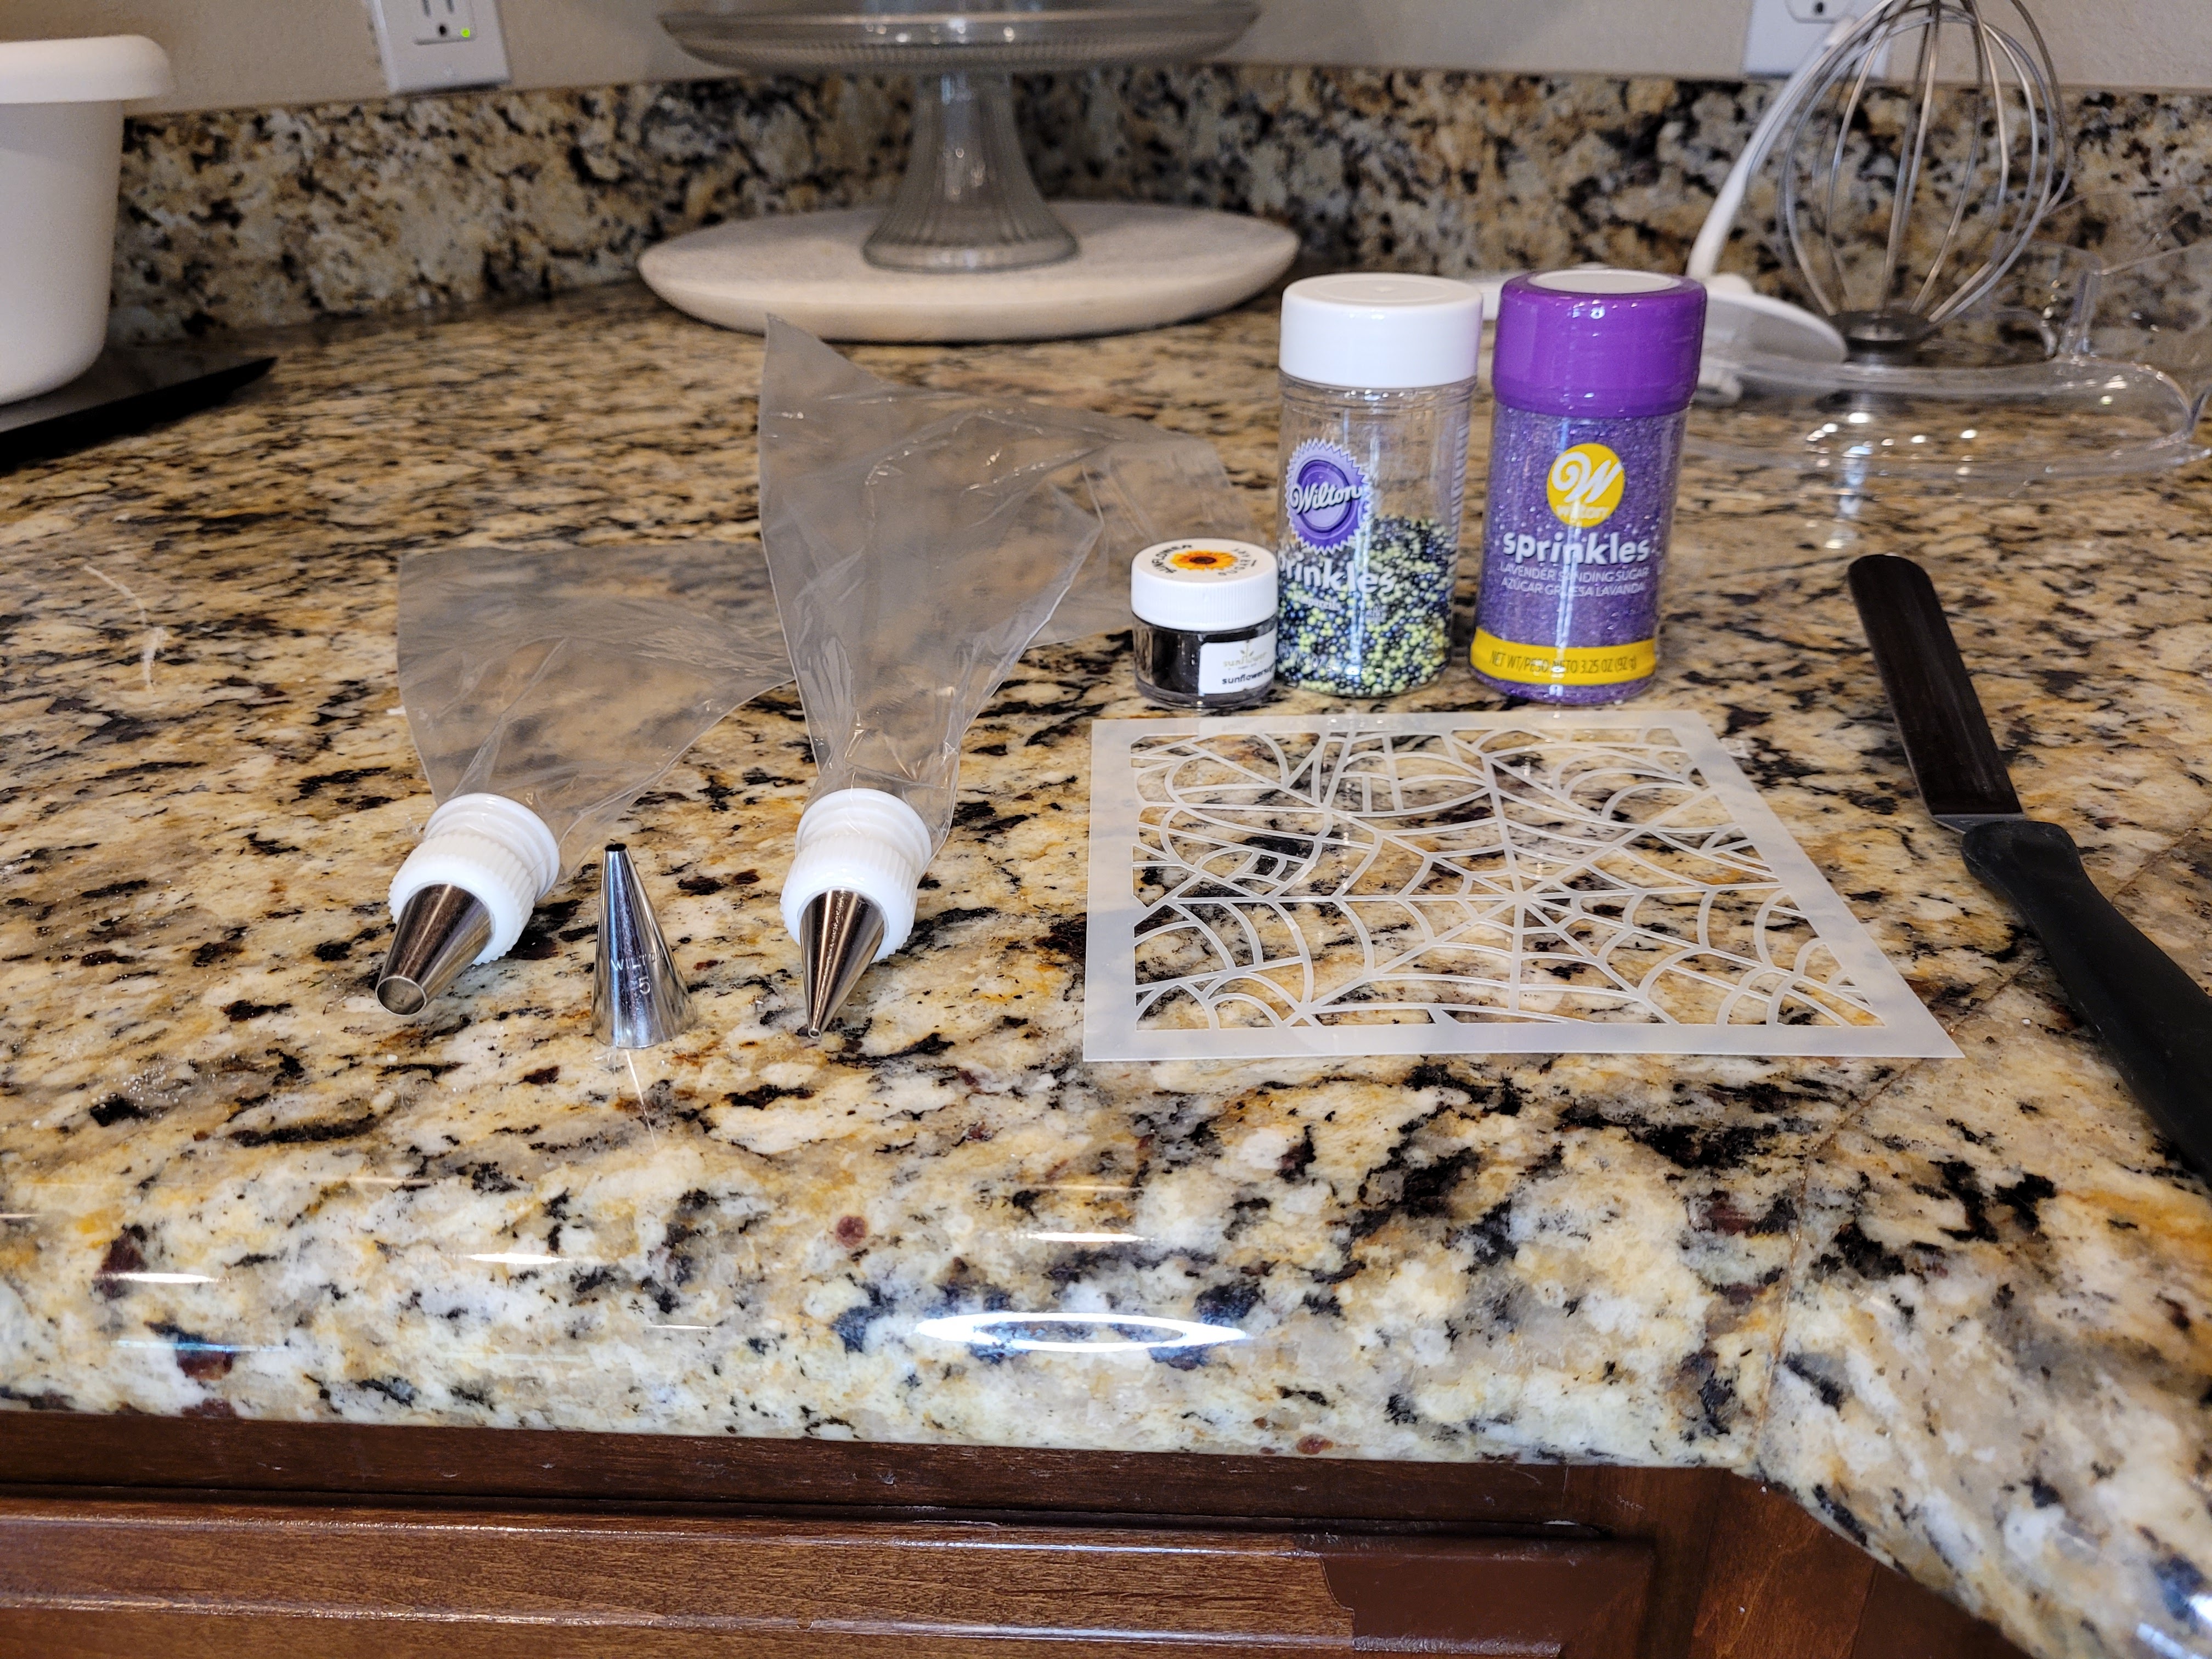
While those freeze, gather your spiderweb essentials. I found this template on the web (irony). The whole design process is actually very simple. You only need the template, some black edible glitter, and if you want to also pipe spiders, a #12 round tip and a #5 round tip, and some eerie sprinkles for eyes.
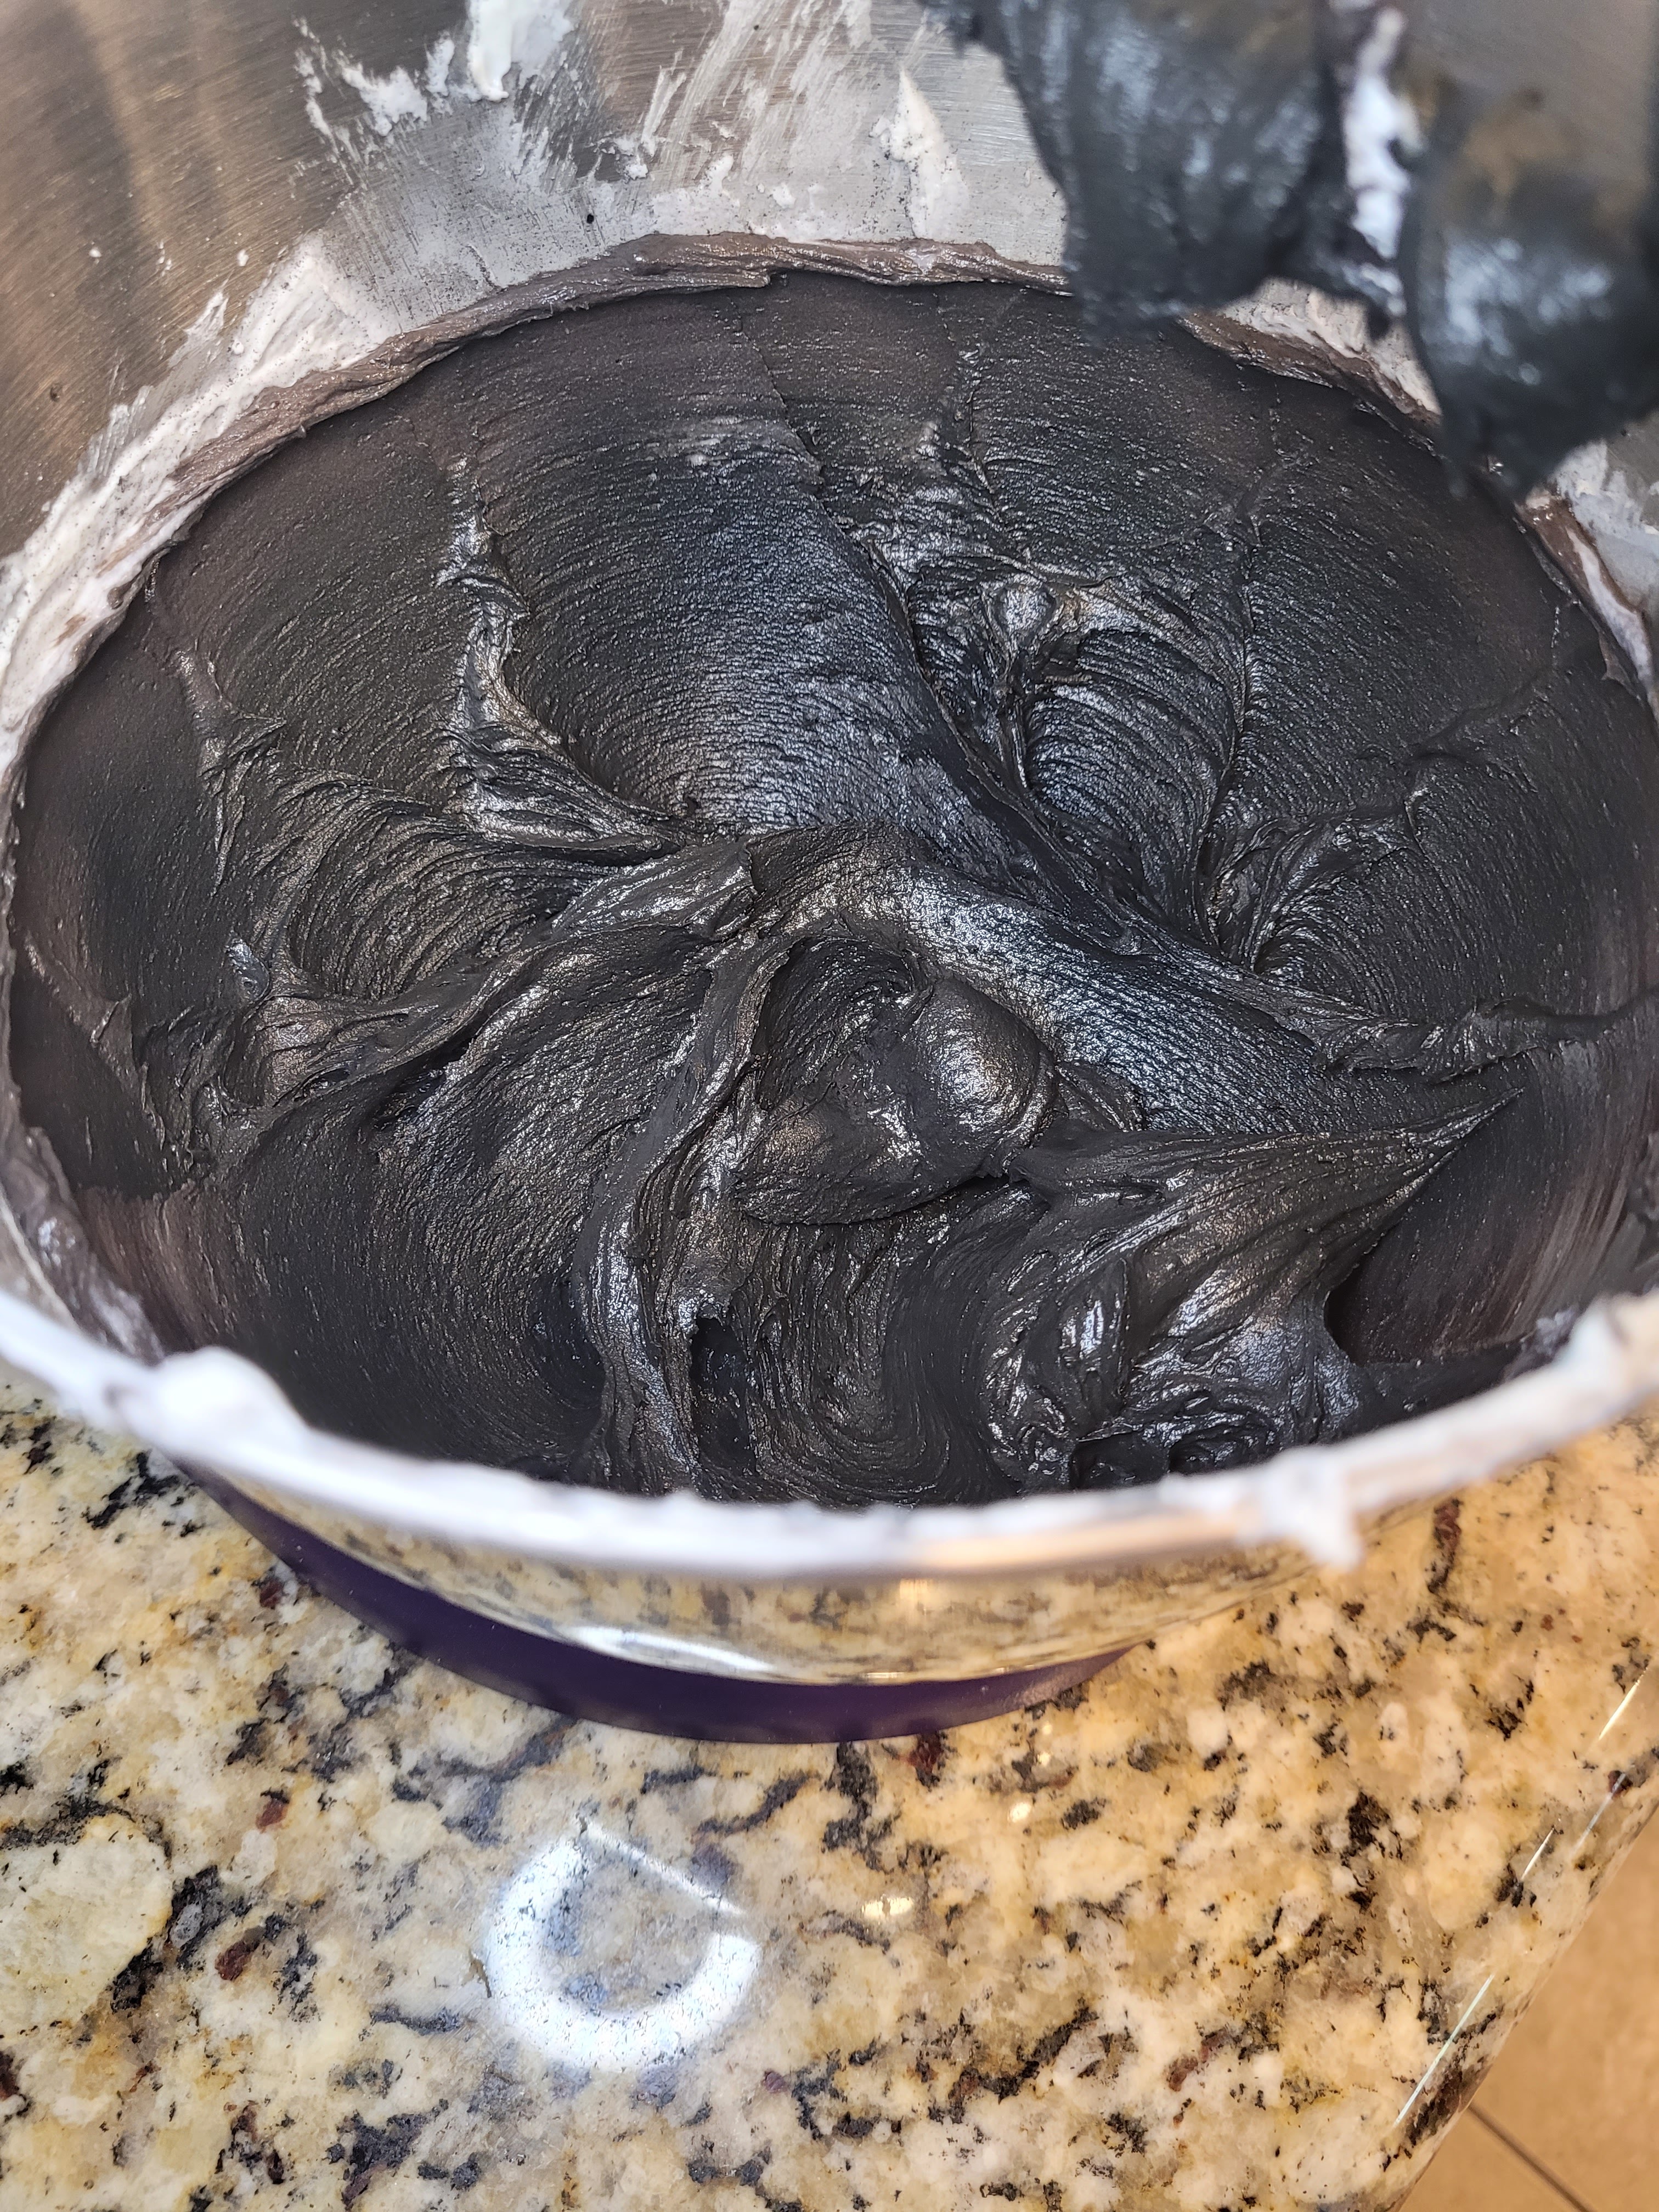
Oh, and frosting as black as my soul. Once you’ve got your cupcakes in the freezer, you can dye your remaining frosting black. Honestly, my spidey senses tingled a little, and I wish I had set aside plain white frosting to dye bright purple or lime green because my black spiders on sparkly black background got lost. So if you want to pipe spiders, save a little frosting to dye a brighter color. Then add 1 ounce of black cocoa and squeeze of black gel dye to the white frosting and mix. Things will probably get pretty thick, so a tablespoon of milk will thin things out.
Now get ready to make a mess. Take your cupcakes out of the freezer, and set your stencil on top of a cupcake. Press gently to secure the template to the cupcake.
Black glitter will be EVERYWHERE, but this fits my preferred aesthetic of “spooky but pretty,” so all good. Slather a thick layer of black frosting on top of the template, then use an angled spatula to smooth across the top of the cupcake to get into the grooves of the stencil before swiping away excess frosting, wiping the spatula off with each pass over the top of the stencil to remove more black frosting. Once you can start to see the white of the stencil again, stop swiping and dip a food-safe paintbrush into the edible black glitter and tap this on top of the cupcake. Repeat until the top of your cupcake sparkles like the darkest abyss.
I specialize in web design. Very carefully, peel the template off the top of the cupcake to reveal your spiderweb. It can be a little tricky, but use a slow, steady hand (and beweave in yourself) to remove the stencil completely.
This is a no-fly zone. To make a spider, load your purple/lime/orange/yellow/red whatever color you choose to dye a little frosting into a piping bag with a coupler and a #12 tip. Pipe a large blob for the body and a smaller blob for the head. Switch to a #5 tip to draw all eight ungodly gross legs, then finish with a few bright sprinkles for eyes.
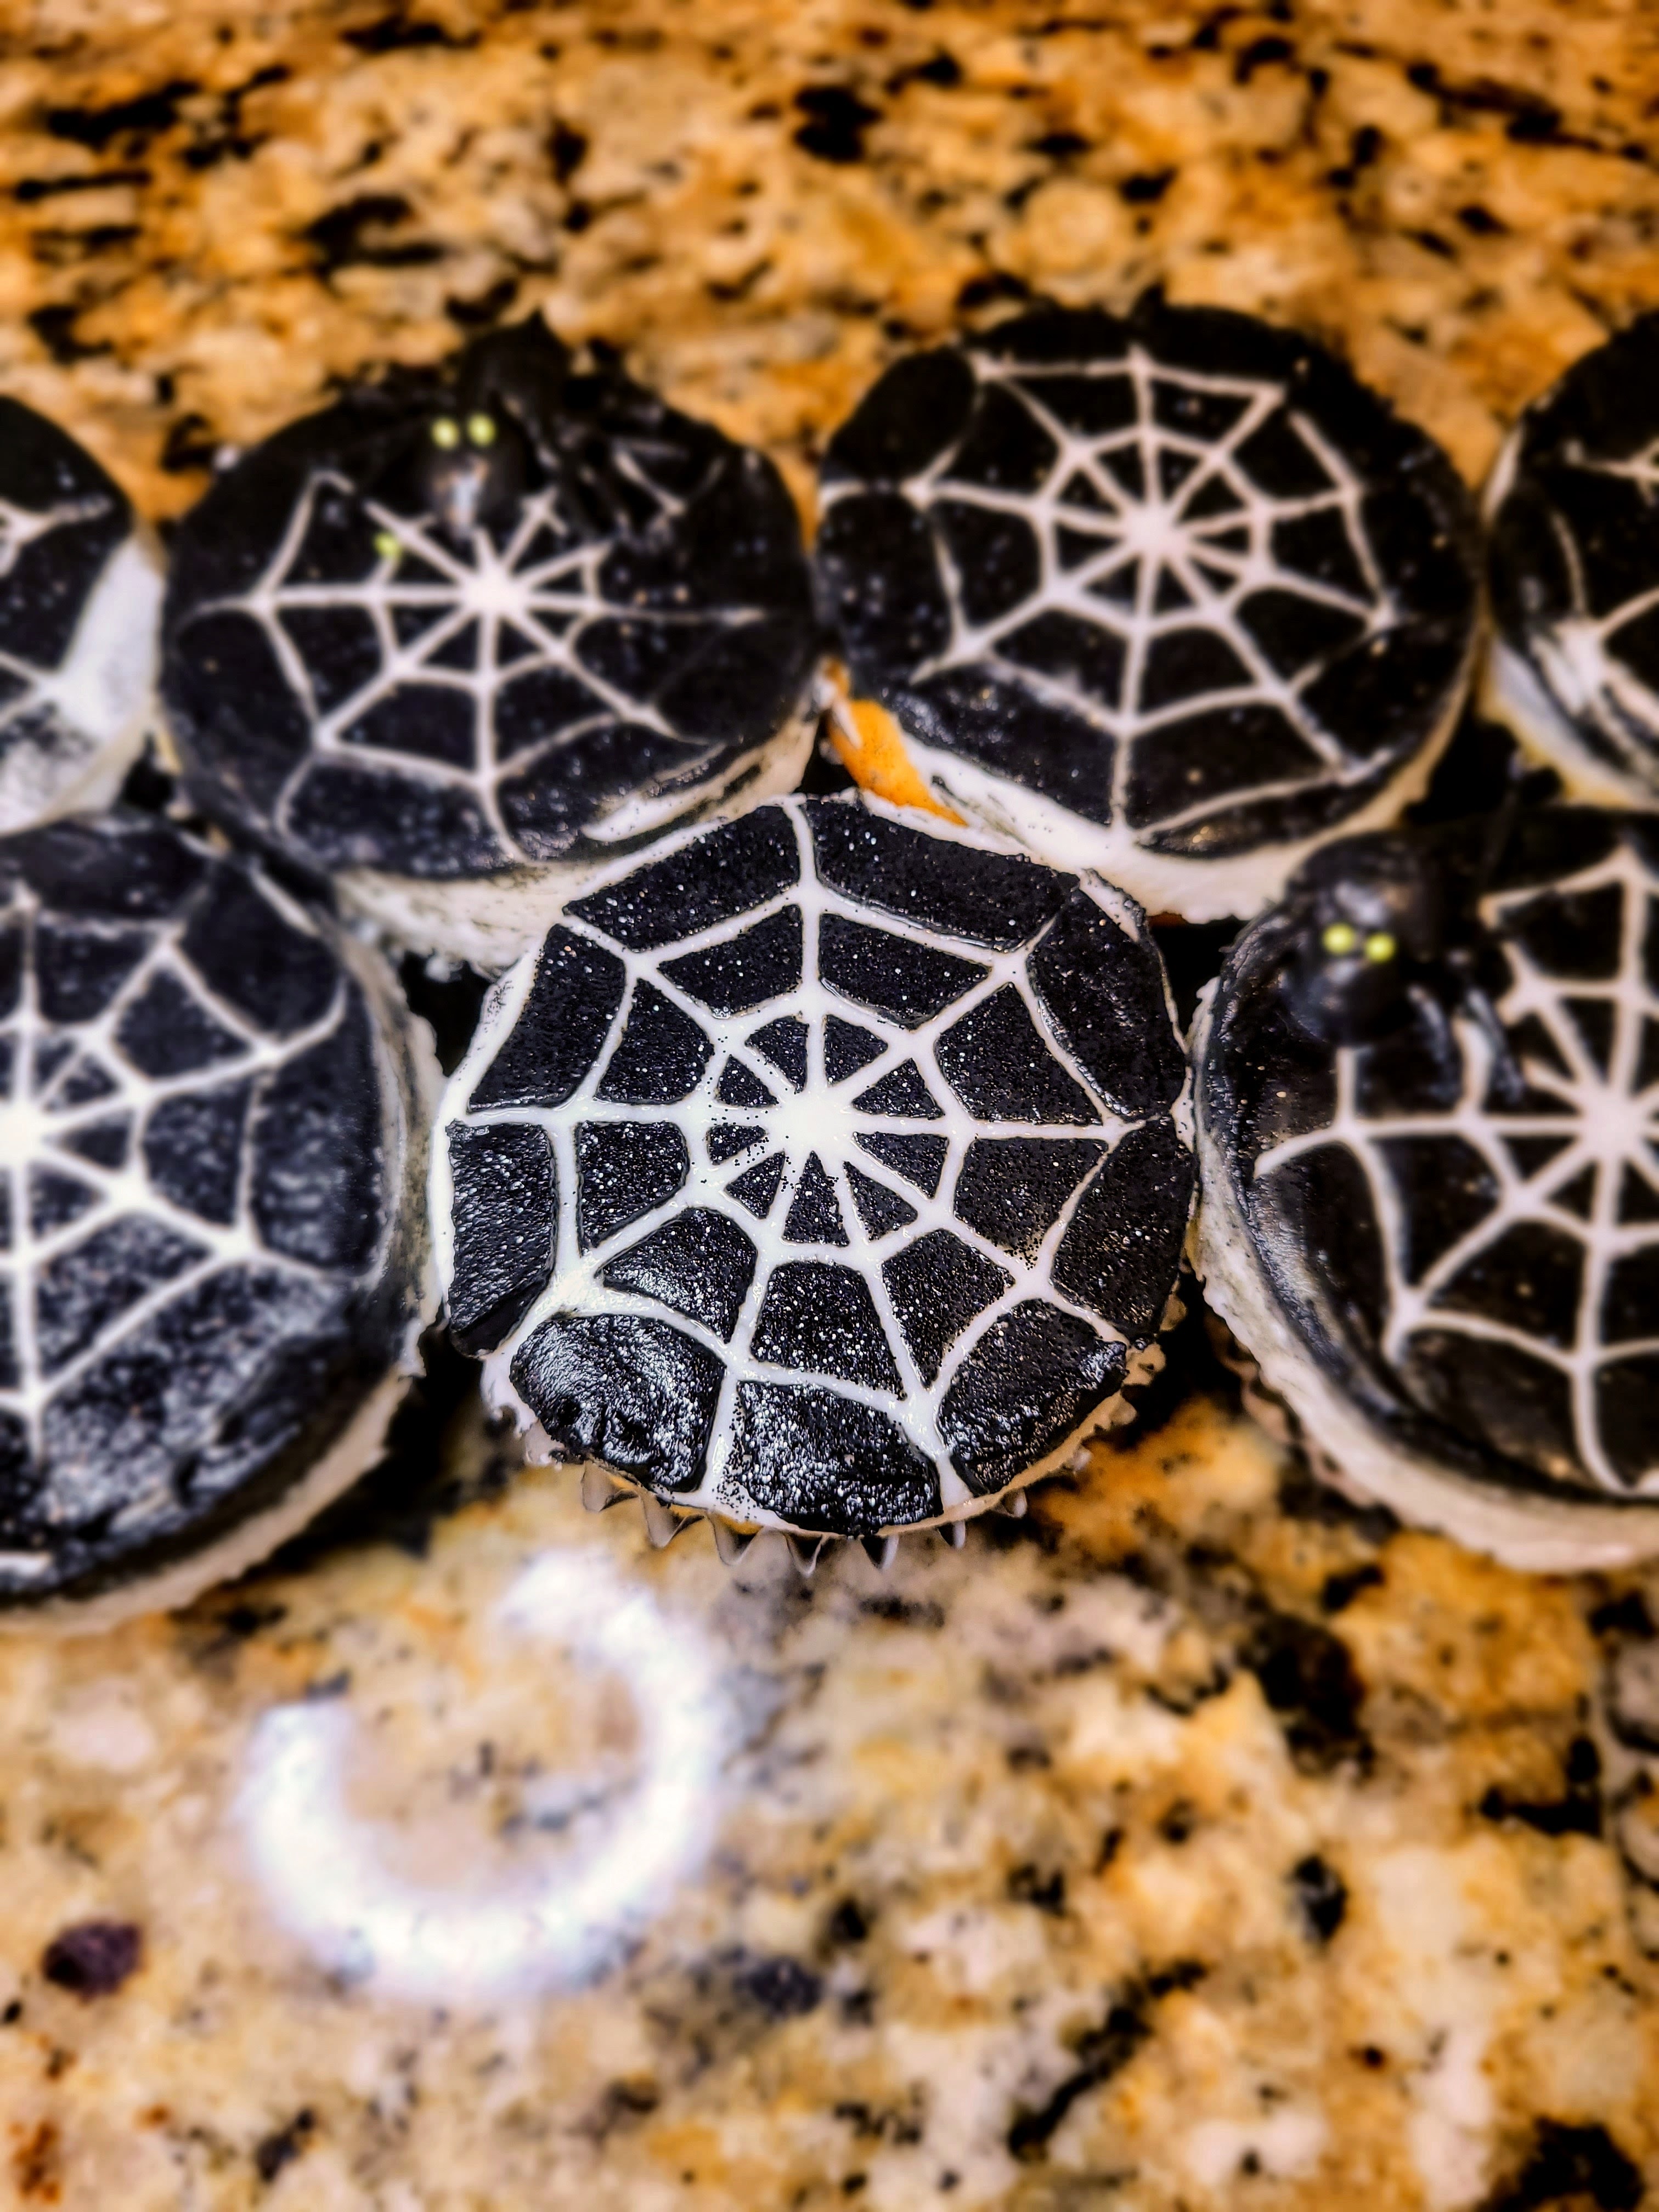
Shudder with horror every time you look at a cupcake with a spider on it, and you’re done! If you like cornbread with honey, then boy is this the box cake mix for you. If you like your cupcakes a little more dessert-y, skip Nature Made brand. We’re still gonna eat the whole bundle because 1. Spooky cupcakes, and 2. Caramel cream cheese frosting is absolutely divine. It’s like getting a caramel apple without risk of losing a tooth when you bite into it- smooth, creamy, caramely. Keep leftover cupcakes in the fridge for as long as they last (if you make it past three days without devouring every last one, congrats, you have more willpower than I do). I am SO HAPPY it’s finally October, and I’ll be back again next weekend with a spooky breakfast bake. Because dessert shouldn’t be the only meal (it’s a meal in this house) that gets to be frightfully delightful. ‘Til next time, my fellow eaters!

Do you want to squish each spider before you eat the cupcake? Or are you normal? So many heebie jeebies. Recipe and instructions
Caramel cupcakes with caramel cream cheese frosting
Fall flavor OG inside and out, caramel shines through this recipe
You can use a regular cake mix if not gluten free and powdered sugar in place of powdered monkfruit, but this will change the macros.
Ingredients
FOR CUPCAKES
*1 box of yellow cake mix
*3 eggs
*1/2 cup (111 grams) unsweetened applesauce
*1 tsp caramel extract (I find mine on Amazon)
*2/3 cup of fat free or skim milk
FOR FROSTING
*8 ounces (225 grams) 1/3 the fat cream cheese at room temp
*1 cup (226 grams) fat free Greek yogurt, strained overnight to remove moisture
*4 cups (1 bag 16 ounce) of Lakanto powdered monkfruit
*2 tsp caramel extract
*2 tsp clear vanilla extract
FOR DECORATING
*Gel dyes in black and whatever color you’d like your spiders to be
*#12 round tip and #5 round tip for spiders
*Spiderweb stencil of choice (found at craft stores, Amazon, etc.)
*Bright round sprinkles for spider eyes
Directions
- Mix all cake ingredients on low for 30 seconds.
- Blend on medium high for one and a half minutes.
- While mixing, preheat oven to 350 and line muffin tins with cupcake wrappers.
- Fill each wrapper 2/3 of the way full.
- Bake for 22-25 minutes, until a toothpick comes out with a few crumbs from the center.
- Let rest on a cooling rack in the pan for 10 minutes before removing from the pan to cool completely before frosting.
- To make frosting, whip cream cheese and yogurt together.
- Add in half the monkfruit and all the extracts, blending well.
- Add in remaining monkfruit and mix well; if too thick, add a tablespoon of milk.
- Pipe cooled cupcakes as desired; review detailed instructions above to use the stencil and pipe spider bodies
- Keep cupcakes in an airtight container in the fridge.
Nutrition
Per Serving: 154 calories per cupcake
2.8 fat/26.8 carbs/4.26 protein -
PB&J Gluten Free Poptarts

I may be a grown woman, but dang do I ever love Poptarts. I haven’t had a real one since before 2019 when I began to have a terrible gluten intolerance (thanks, aging!) and had to eliminate wheat from my diet. I’ve tried some gluten free Poptart-adjacent pastries from various brands, but most of them were cardboard flavored and didn’t have that sweet icing drizzle that just makes the Poptart. Needless to say, when I found a gluten free puff pastry at the grocery store, an idea popped into my head. Since I’m also obsessed with peanut butter and jelly sandwiches (I might be 35, but I have the taste palate of a 6 year old), I wanted to make the best Poptart flavor to never exist (seriously, this is such low hanging fruit, people of Kellogg’s). For a video tutorial, head to my Instagram!
Let’s talk about our fillings. Recipe and Instructions
PB&J Poptarts
Delicious peanut butter and jelly poptarts, great for ALL ages
If you’re not gluten free, use any brand of puff pastry. Schar gluten free puff pastry is kept in the freezer aisle near other puff pastry and pie shells for those looking for a GF recipe. I found mine at Albertson’s.
Ingredients
FOR THE POPTART & FILLING
*1 box of Schar puff pastry sheets, thawed to room temp
*8 TBS Smucker’s Simply Fruit strawberry jelly
*1 egg
FOR THE DRIZZLE
*30 g Quest vanilla protein powder
*16 g PBFit or preferred peanut butter powder
*6 TBS water
Directions
- Preheat your oven to 400 degrees and line two large baking trays with Parchment or Silpat liners
- Place some Parchment paper down on your counter, roll out one puff pastry sheet, then top with more Parchment paper
- Use a rolling pin to roll out to 12×16″ rectangle
- Cut into 8 equal-sized rectangles (you can 100% use a ruler to help, but they should each be about 3″ wide and 8″ high in size)
- Repeat steps 2-4 with the second sheet of puff pastry
- Place one tablespoon of jelly onto 8 of your puff pastry sheets and smooth out so you’ve got about 1/4″ of space around the egde of the puff pastry sheet
- Whisk an egg in a bowl, then use a basting brush to brush the egg wash on the border of the puff pastry sheet
- Place a plain puff pastry sheet on top of this and use your fingers to seal the edges first, then come back with the tines of a fork, pressing gently to ensure the puff pastry sheets are sealed together
- Repeat the egg wash and sealing for the remaining 7 Poptarts
- Use your fork to prick a few holes in the top of each Poptart so it doesn’t get too puffy
- Use the remaining egg wash to brush the tops of each Poptart to get that golden coloring
- Bake at 400 for 10-11 minutes until golden
- Cool your Poptarts on a cooling rack for 15 minutes
- Mix all glaze ingredients together, then place in a piping bag or plastic bag with the edge snipped
- Drizzle the glaze on top of each Poptart and let set for 30 minutes
- Poptarts should be kept in an airtight container in the fridge; reheat in your air fryer or oven at 300 degrees for 5 minutes to get the pastry crispy and filling melty again
Nutrition
Macros
8 servings
297 cal/31 c/18 f/4.7 p per Poptart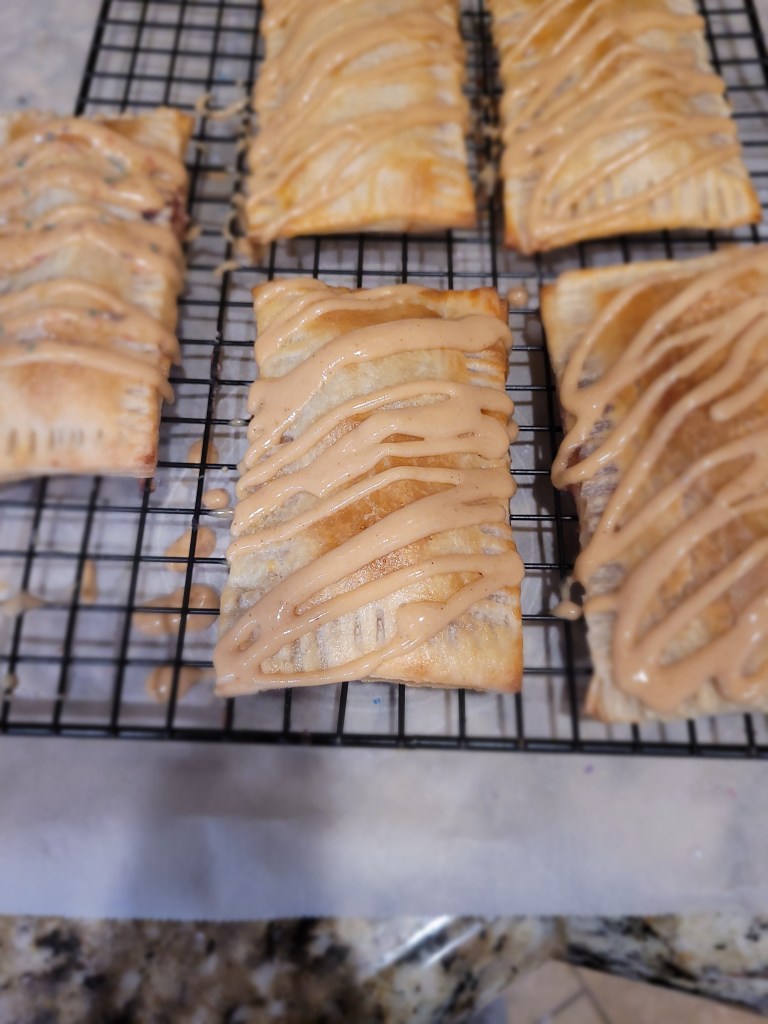
I love it with all my tart. - Preheat your oven to 400 degrees and line two large baking trays with Parchment or Silpat liners
-
Maple Cream Pie
As someone who loves fall and a rich history of French Canadian ancestry, you might find it surprising that I’ve never had maple cream pie. Syrup practically runs through my veins, so I knew this was one thing I had to try. I will say it is obviously a very sweet and not at all macro-friendly pie, but thankfully it’s fall (a.k.a. the start of bulking season), so my carb intake has greatly increased. But even if it is calorie dense, it’s absolutely worth it to have a slice- crust me. It’s light and creamy but also sweet and sticky. Like the softest stack of flapjacks topped with syrup to ever exist. Plus, it’s super easy to throw together!
I’m occu-pied by how mapley this tastes. Recipe and Instructions
Maple Cream Pie
Sweet maple cream pie with a premade crust
You can use any type of premade pie crust, just follow the instructions on the box to thaw and cook as needed. I used a gluten free graham cracker crust, but I do think this would be better with a little less sweet of a regular pie crust, my store was just out of them!
Ingredients
*1 premade pie crust
*240 mL (1 cup) of pure maple syrup (the real deal; sugar free will not work)
*6 ounces (2 cups) Half & Half
*32 g (1/4 cup) cornstarch
*48 g (1/4 cup) Lakanto golden monkfruit
*2 eggs
*1 tsp vanilla extract
*28 g (2 TBS) light butter, cold
Directions
- In a medium or large saucepan, add all ingredients except for vanilla and butter, whisking well
- Place saucepan on stove and use medium heat
- Whisk continuously for 18-20 minutes, until the pie batter gets extremely thick
- Remove from heat and whisk in the extract and butter until smooth
- Pour filling into prepared pie crust and add a sheet of plastic wrap on top of the pie to keep a film from forming
- Let set in the fridge on the cooling rack overnight
- For clean slices, freeze your pie for a few hours, then cut into 8 slices; if you’re not worried about clean slices for photos, just cut into 8 slices after setting overnight
- Top with some Cool Whip Free and enjoy
- Keep leftovers in the fridge
Nutrition
Macros
8 servings
345 cal/48 c/15 f/4.5 p per slice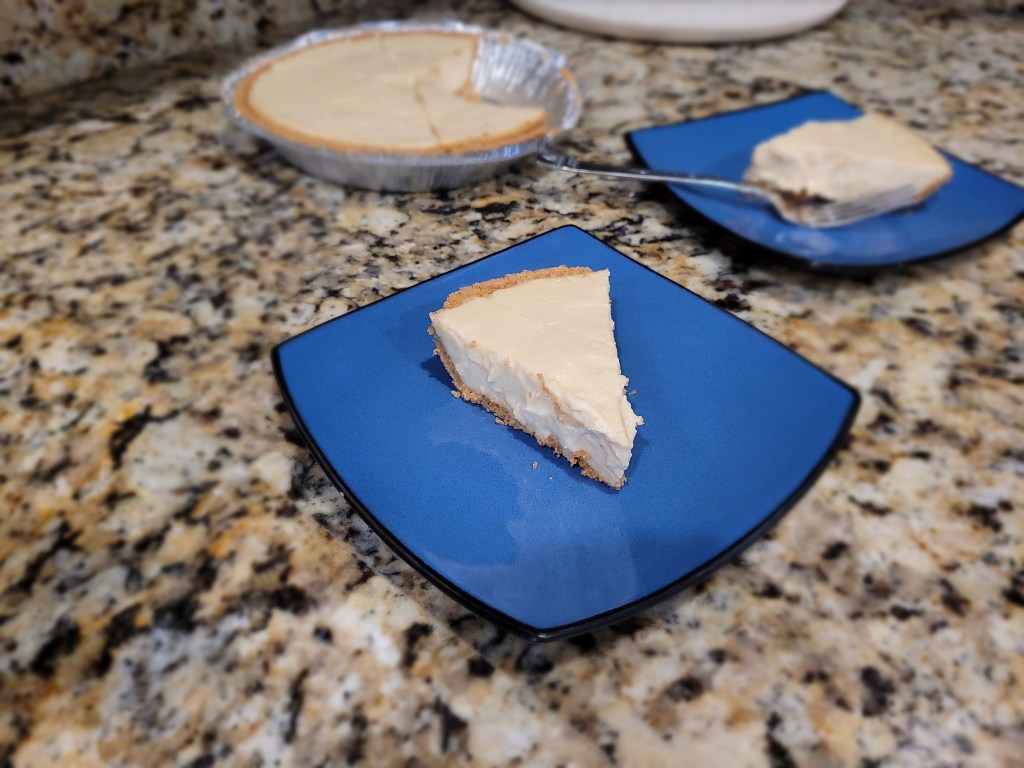
Keep your eyes on the pies. - In a medium or large saucepan, add all ingredients except for vanilla and butter, whisking well
-
Pumpkin Pie Blondies

Oh my gourd am I ever happy its pumpkin season again. After a lovely 2-week trip to Amsterdam and Norway, I am back home and baking gluten free goodies like crazy. These pumpkin pie blondies are satisfying my major basic white girl need to bust into fall by pumpkining all the things. And at only 113 calories a blondie, you can have like four of them and they’re still healthier than a pumpkin spice latte! Fall miracles. These are super moist, soft, and taste exactly like a slice of pumpkin pie, just with way more texture. Full disclosure: I hate pumpkin pie with a passion that consumes my soul; the flavors are all there–it tastes so great, but the texture is a shapeless mush that is absolutely disgusting and revolting on my tongue. Turning the pie into blondies gives a solid texture and not a gelatinous, well, ooze.
Did I mention these are topped with a pumpkin cheesecake cashew butter glaze? Because they’re topped with a pumpkin cheesecake cashew butter glaze. Recipe and Instructions
Pumpkin Pie Blondies
Moist blondies meet with pumpkin cheesecake cashew butter
You could definitely replace the cashew butter with peanut butter or almond butter depending on allergies and flavor preferences. Use a 1:1 replacement. You can also use regular flour if not gluten free or regular sugar. This will impact the macros, though.
Ingredients
FOR THE BLONDIE BASE
*45 grams (1/2 c) Quest vanilla milkshake protein powder
*50 g (1/3 c) King Arthur gluten free flour
*48 g (1/4 cup) Lakanto granular monkfruit
*1/2 tsp baking powder
*1 tsp pumpkin pie spice
*1/2 tsp vanilla extract
*1/3 c Fairlife fat free or skim milk
*225 g (1 c) fat free Greek yogurt
*28 g (2 TBS) American Dream Pumpkin Cheesecake Cashew Butter
FOR THE GLAZE
*56 g (4 TBS) American Dream Pumpkin Cheesecake Cashew Butter
*60 ML (4 TBS) sugar free syrup
Directions
- Preheat oven to 350 and grease an 8×8 pan with cooking spray
- Mix all dry ingredients (protein powder, flour, monkfruit, pumpkin spice, and baking powder) well in a large bowl
- In a medium bowl, whisk the yogurt, extract, cashew butter, and milk until smooth
- Dump liquids into large bowl with dry ingredients, mixing just until everything comes together. If the batter seems too thick, add 1-2 TBS of water or milk to thin out
- Pour batter into prepared pan
- Bake at 350 for 20-25 minutes (a toothpick should come out clean)
- Let cool in the pan on a cooling rack until room temp, then make glaze
- Mix the remaining cashew butter with syrup until smooth. Place in a piping bag or plastic bag and snip the tip
- Drizzle glaze on top of cooled blondies, then slice and serve
- Keep leftovers in the fridge!
Nutrition
Macros
9 servings
113 cal/11 c/3.5 f/9.3 p per slice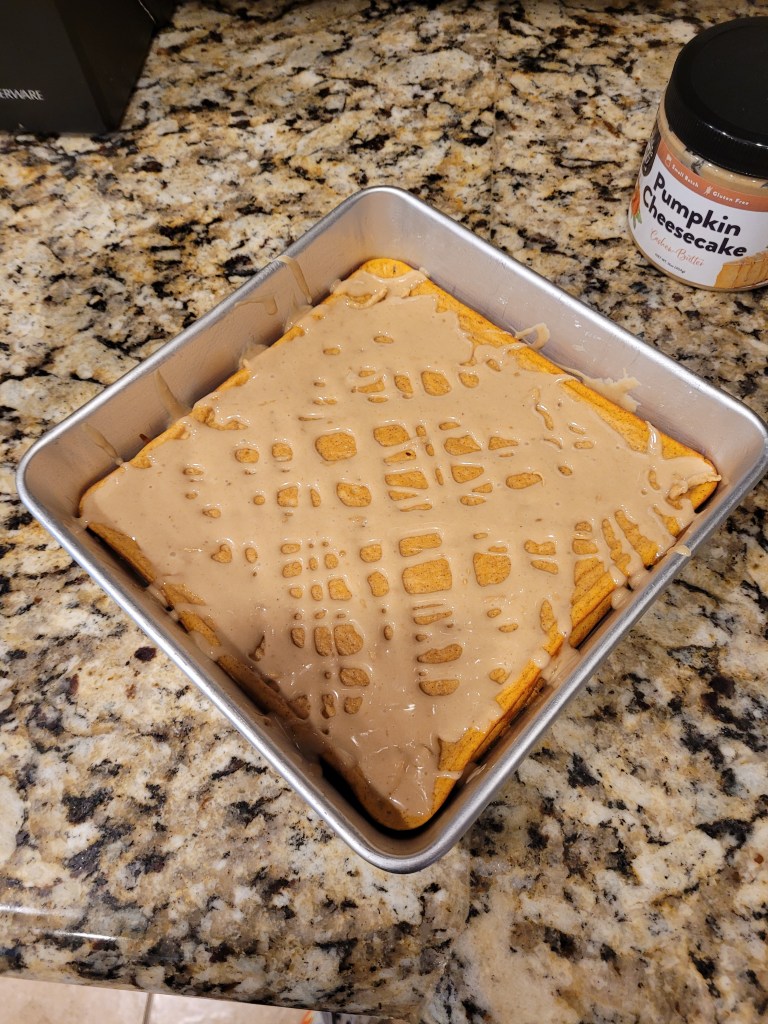
Do you eat it for breakfast, dessert, or a snack? Yes. - Preheat oven to 350 and grease an 8×8 pan with cooking spray
-
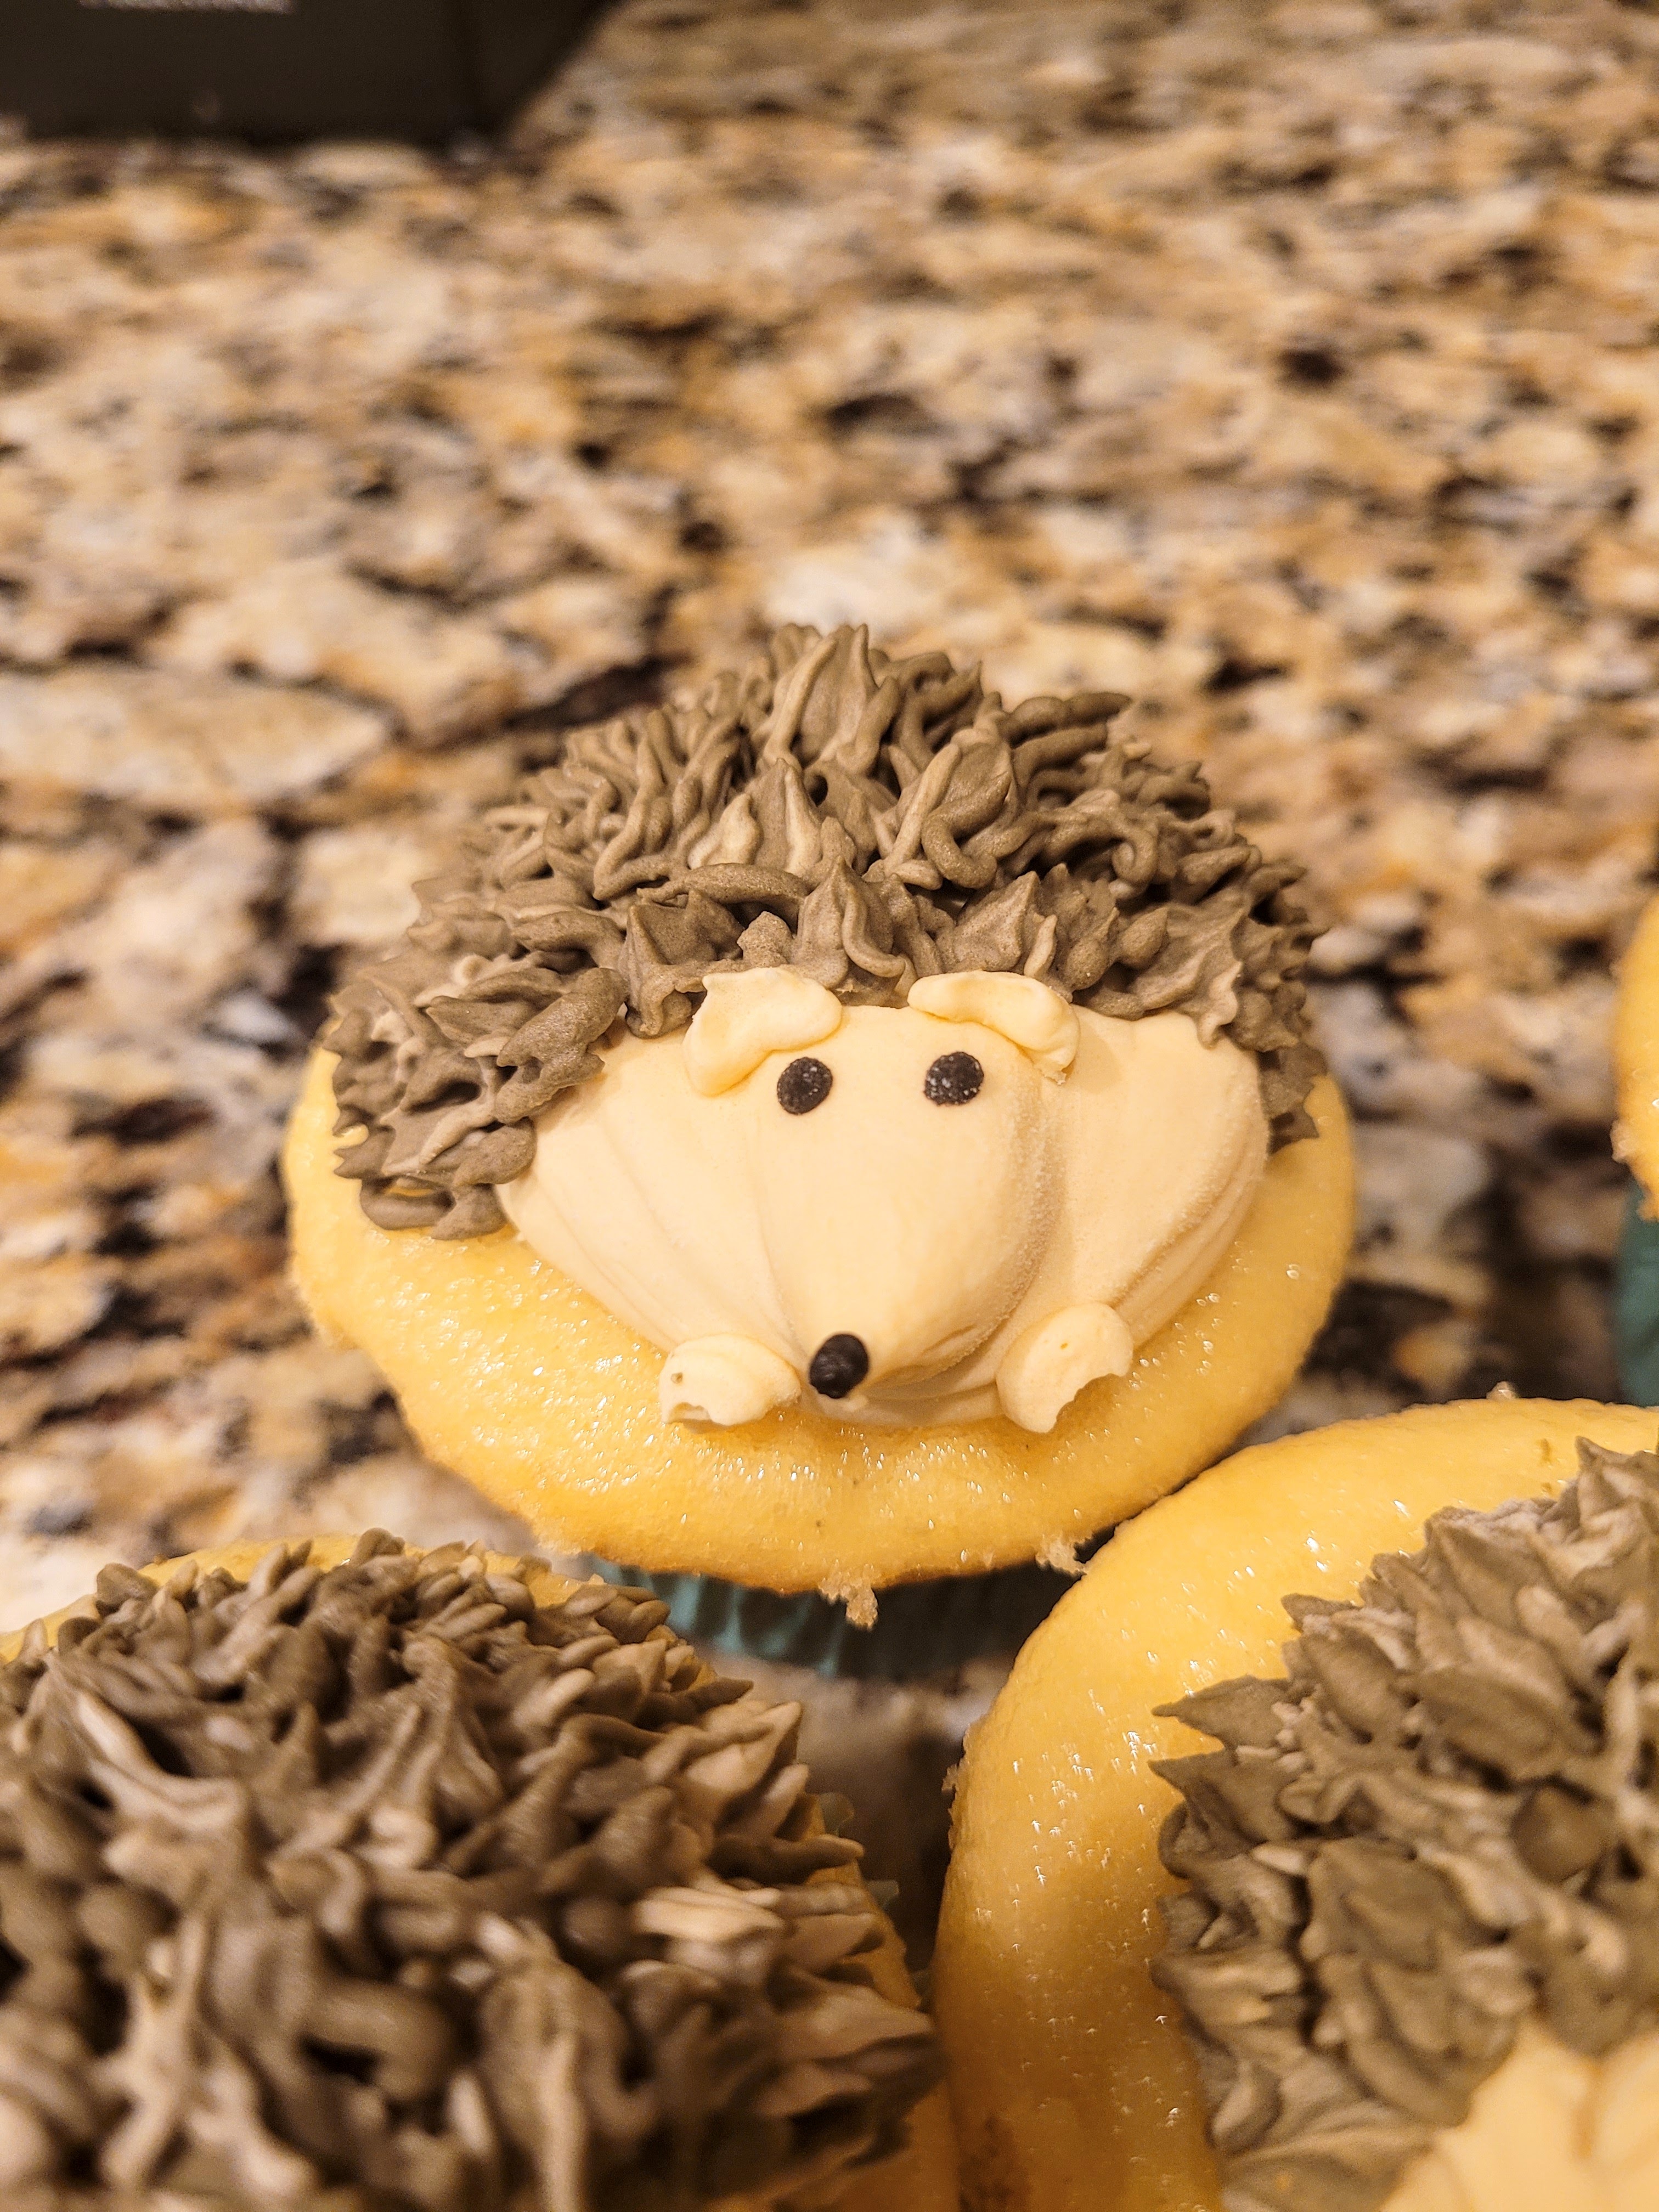
Livin’ on the Hedge
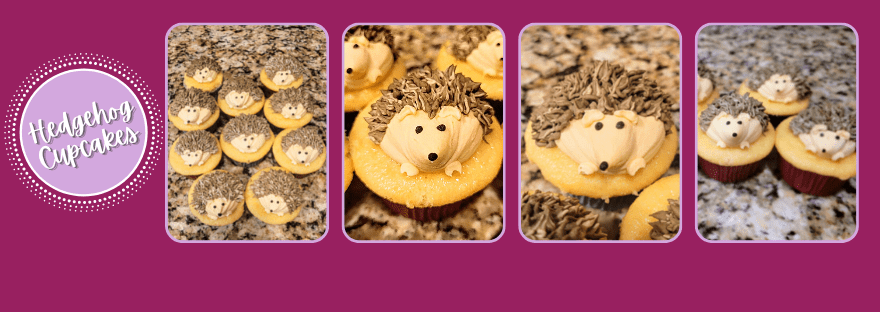
I had such a blast making my Shark Week cupcakes last month, I wanted to try out a new set of animal cupcakes featuring my second favorite animal of all time: the hedgehog. Much like how I can relate to the shark’s bottomless hunger and angry resting face, I feel similar kinship to the hedgehog. I am also small, prickly on the outside, and have terrible eyesight. I’ve also been know to roll up into a tiny ball to avoid awkward social situations.

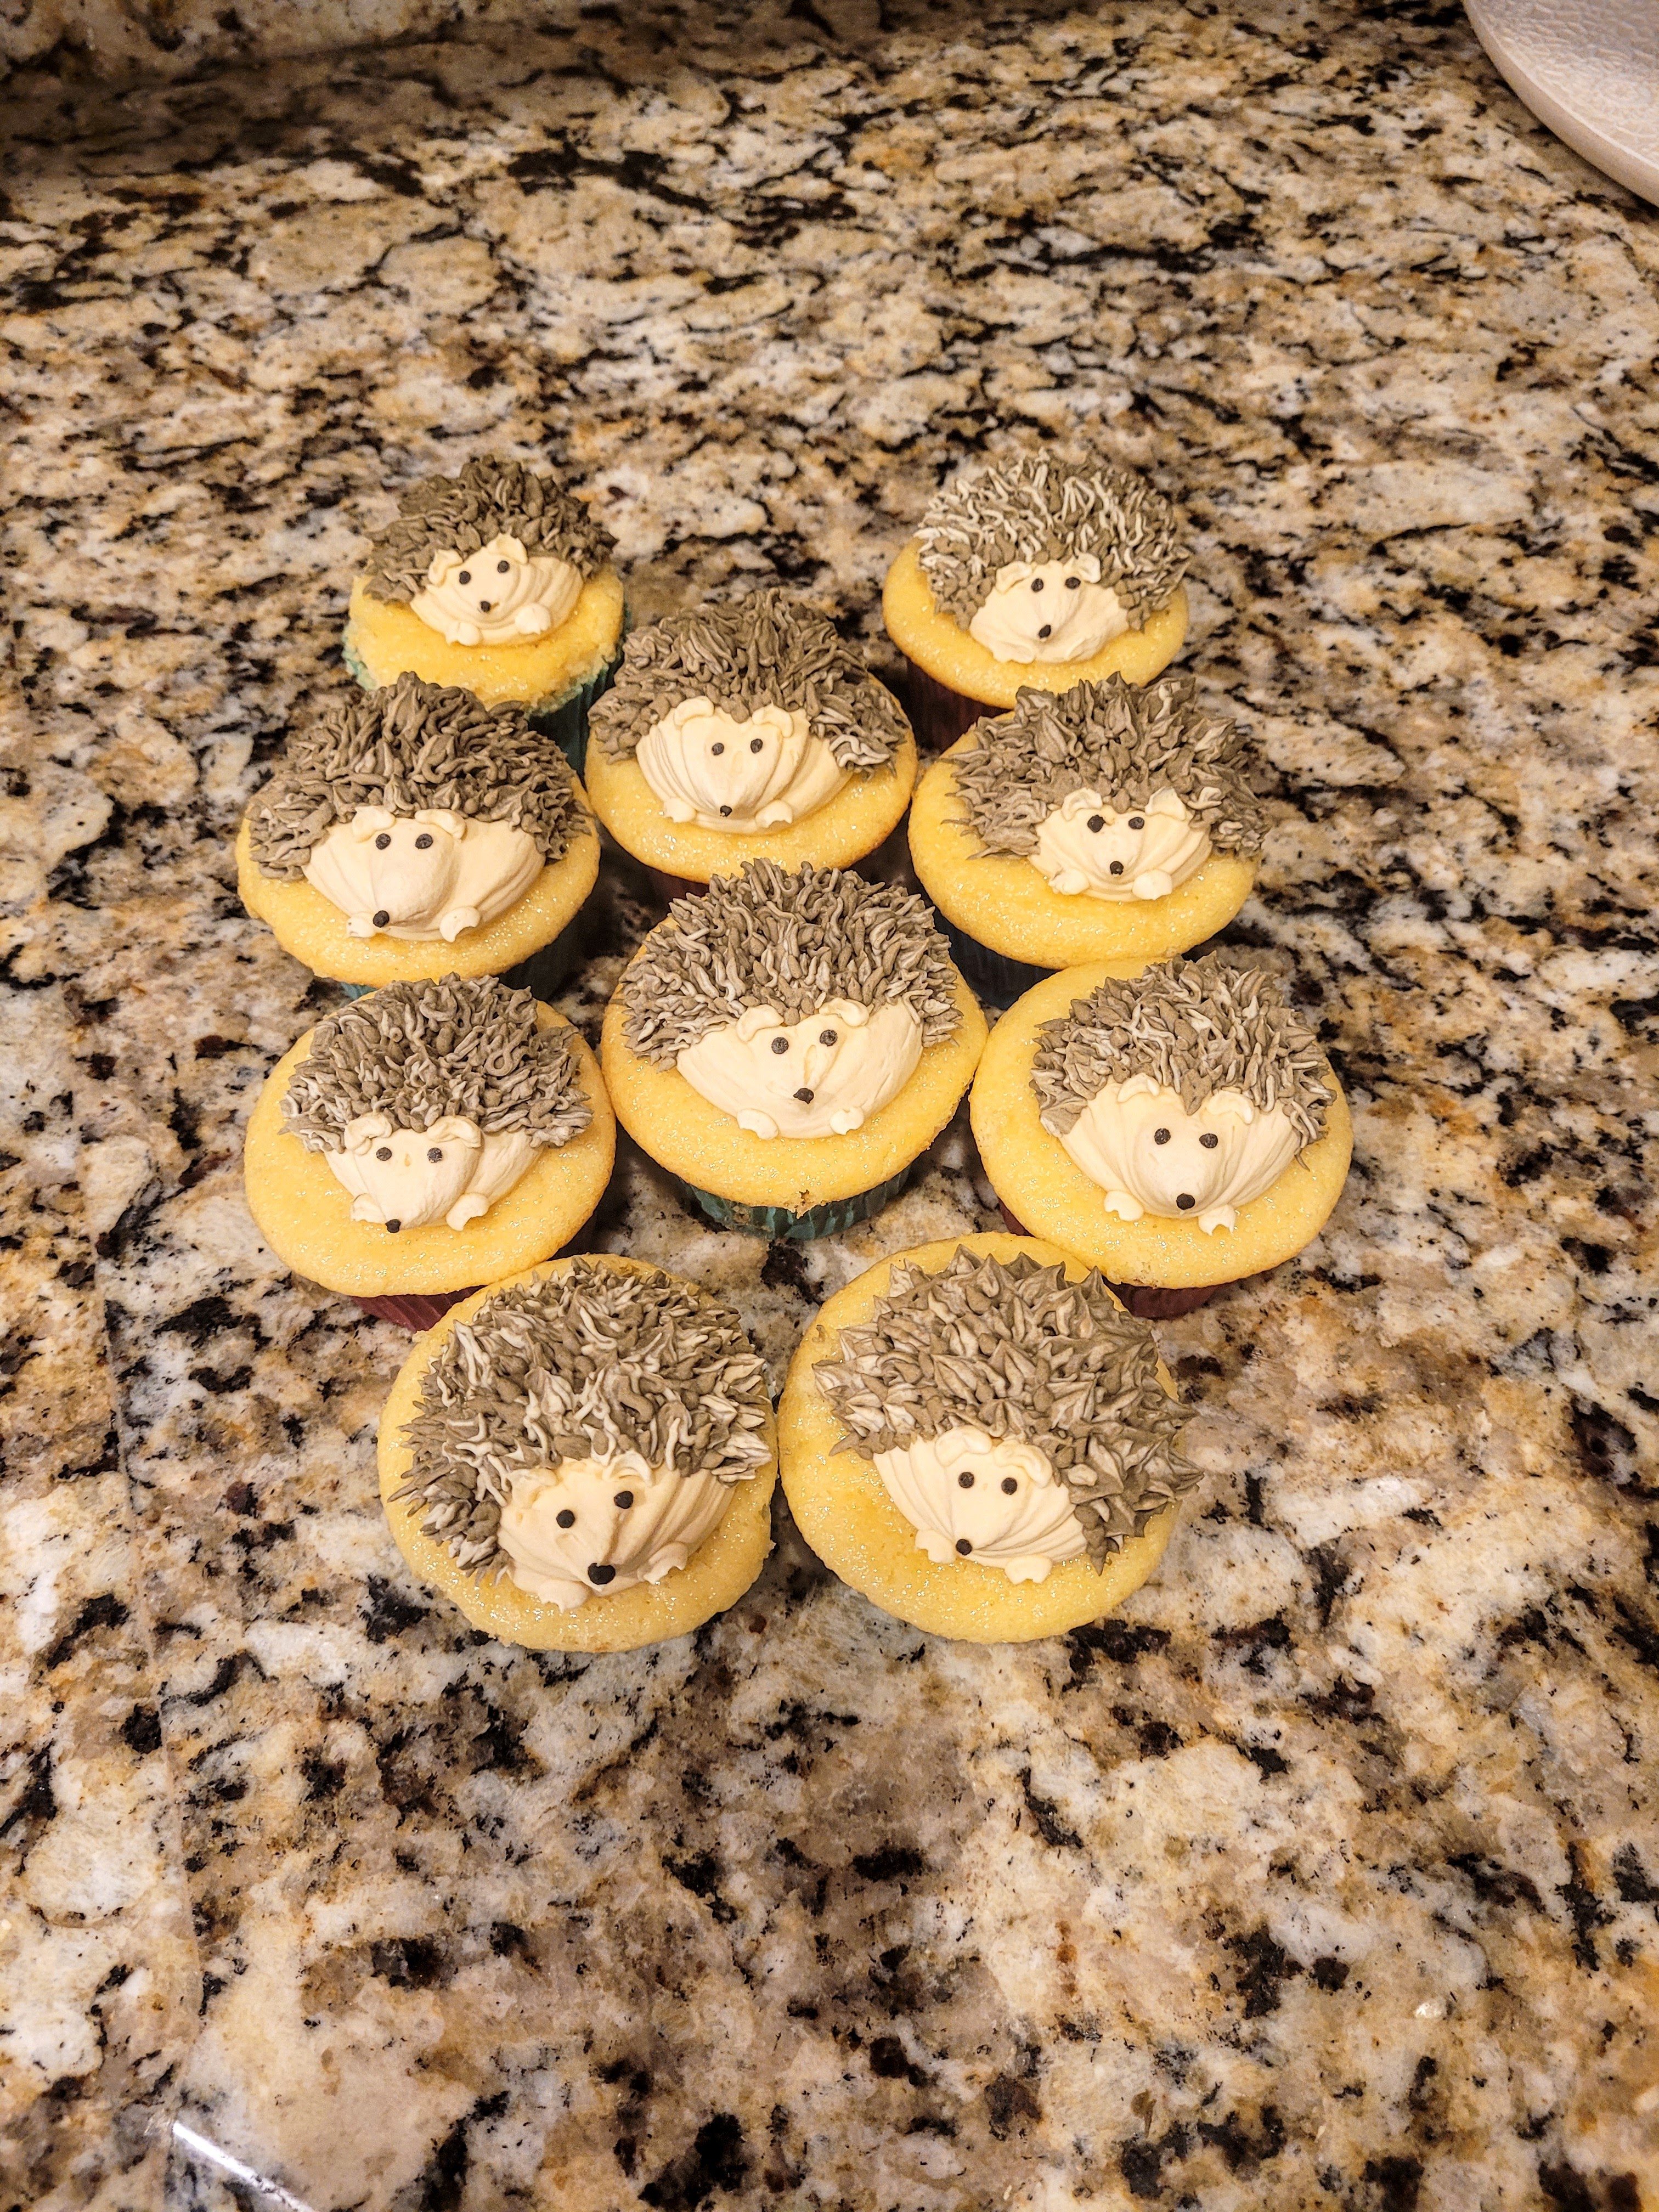
I also like to look sharp and hedgey. These doughy little spike balls were so much fun to make, and they’re so stinkin’ cute I almost don’t want to eat them…I have to close my eyes to take a bite or it seems like an act of animal cruelty. These rotund babies are cake batter yellow cupcakes with cake batter cream cheese frosting, and although an actual hedgehog wouldn’t go near one, that just leaves more for me. They won’t share the hedge, I won’t share the cupcakes. And at only 170 calories a cupcake (recipe makes 16 total), I’m definitely eating these faster than a hedgehog can scarf down some mealworms (Fun fact! Hedgehogs are primarily insectivores, and feeding them worms and crickets is both a unique and gross experience, and probably the only thing I don’t miss about having a hedgehog).

I do miss having a huffy, angry little ball of spikes around as mini animal likeness though. Have I tried Pamela’s gluten free cake mix on the blog yet? I’ve tried so many, it’s hard to remember. But considering how great Pamela is at making giant gluten free fig jammies, I was hoping her cake mix would be aces as well. Happy to report: very yummy, very soft, and very easy to adapt. For the yellow cake batter cupcakes, you need:
- 1 bag of Pamela’s vanilla cake mix
- 3 eggs
- 1/2 cup (111 grams) unsweetened applesauce
- 1 tsp cake batter extract (I find mine at Walmart)
- 2/3 cup of fat free or skim milk
Preheat your oven to 325 and line two muffin tins with 16-18 cupcake wrappers. Mix the eggs, applesauce, extract, and milk until smooth on low in a stand mixer. Add in the cake mix, and mix on low for two minutes until smooth. This batter will be very runny. Also, this cake mix REALLY puffs up (totes apropes since hedgehogs are super puffy, too), so definitely only fill your cupcake liners 2/3 of the way full. I definitely went for 3/4 of the way and all my cakes were overflowing. I easily could’ve make 18 cupcakes instead of 16. Bake for 20-22 minutes, until a toothpick comes out clean from the center of the cupcake.
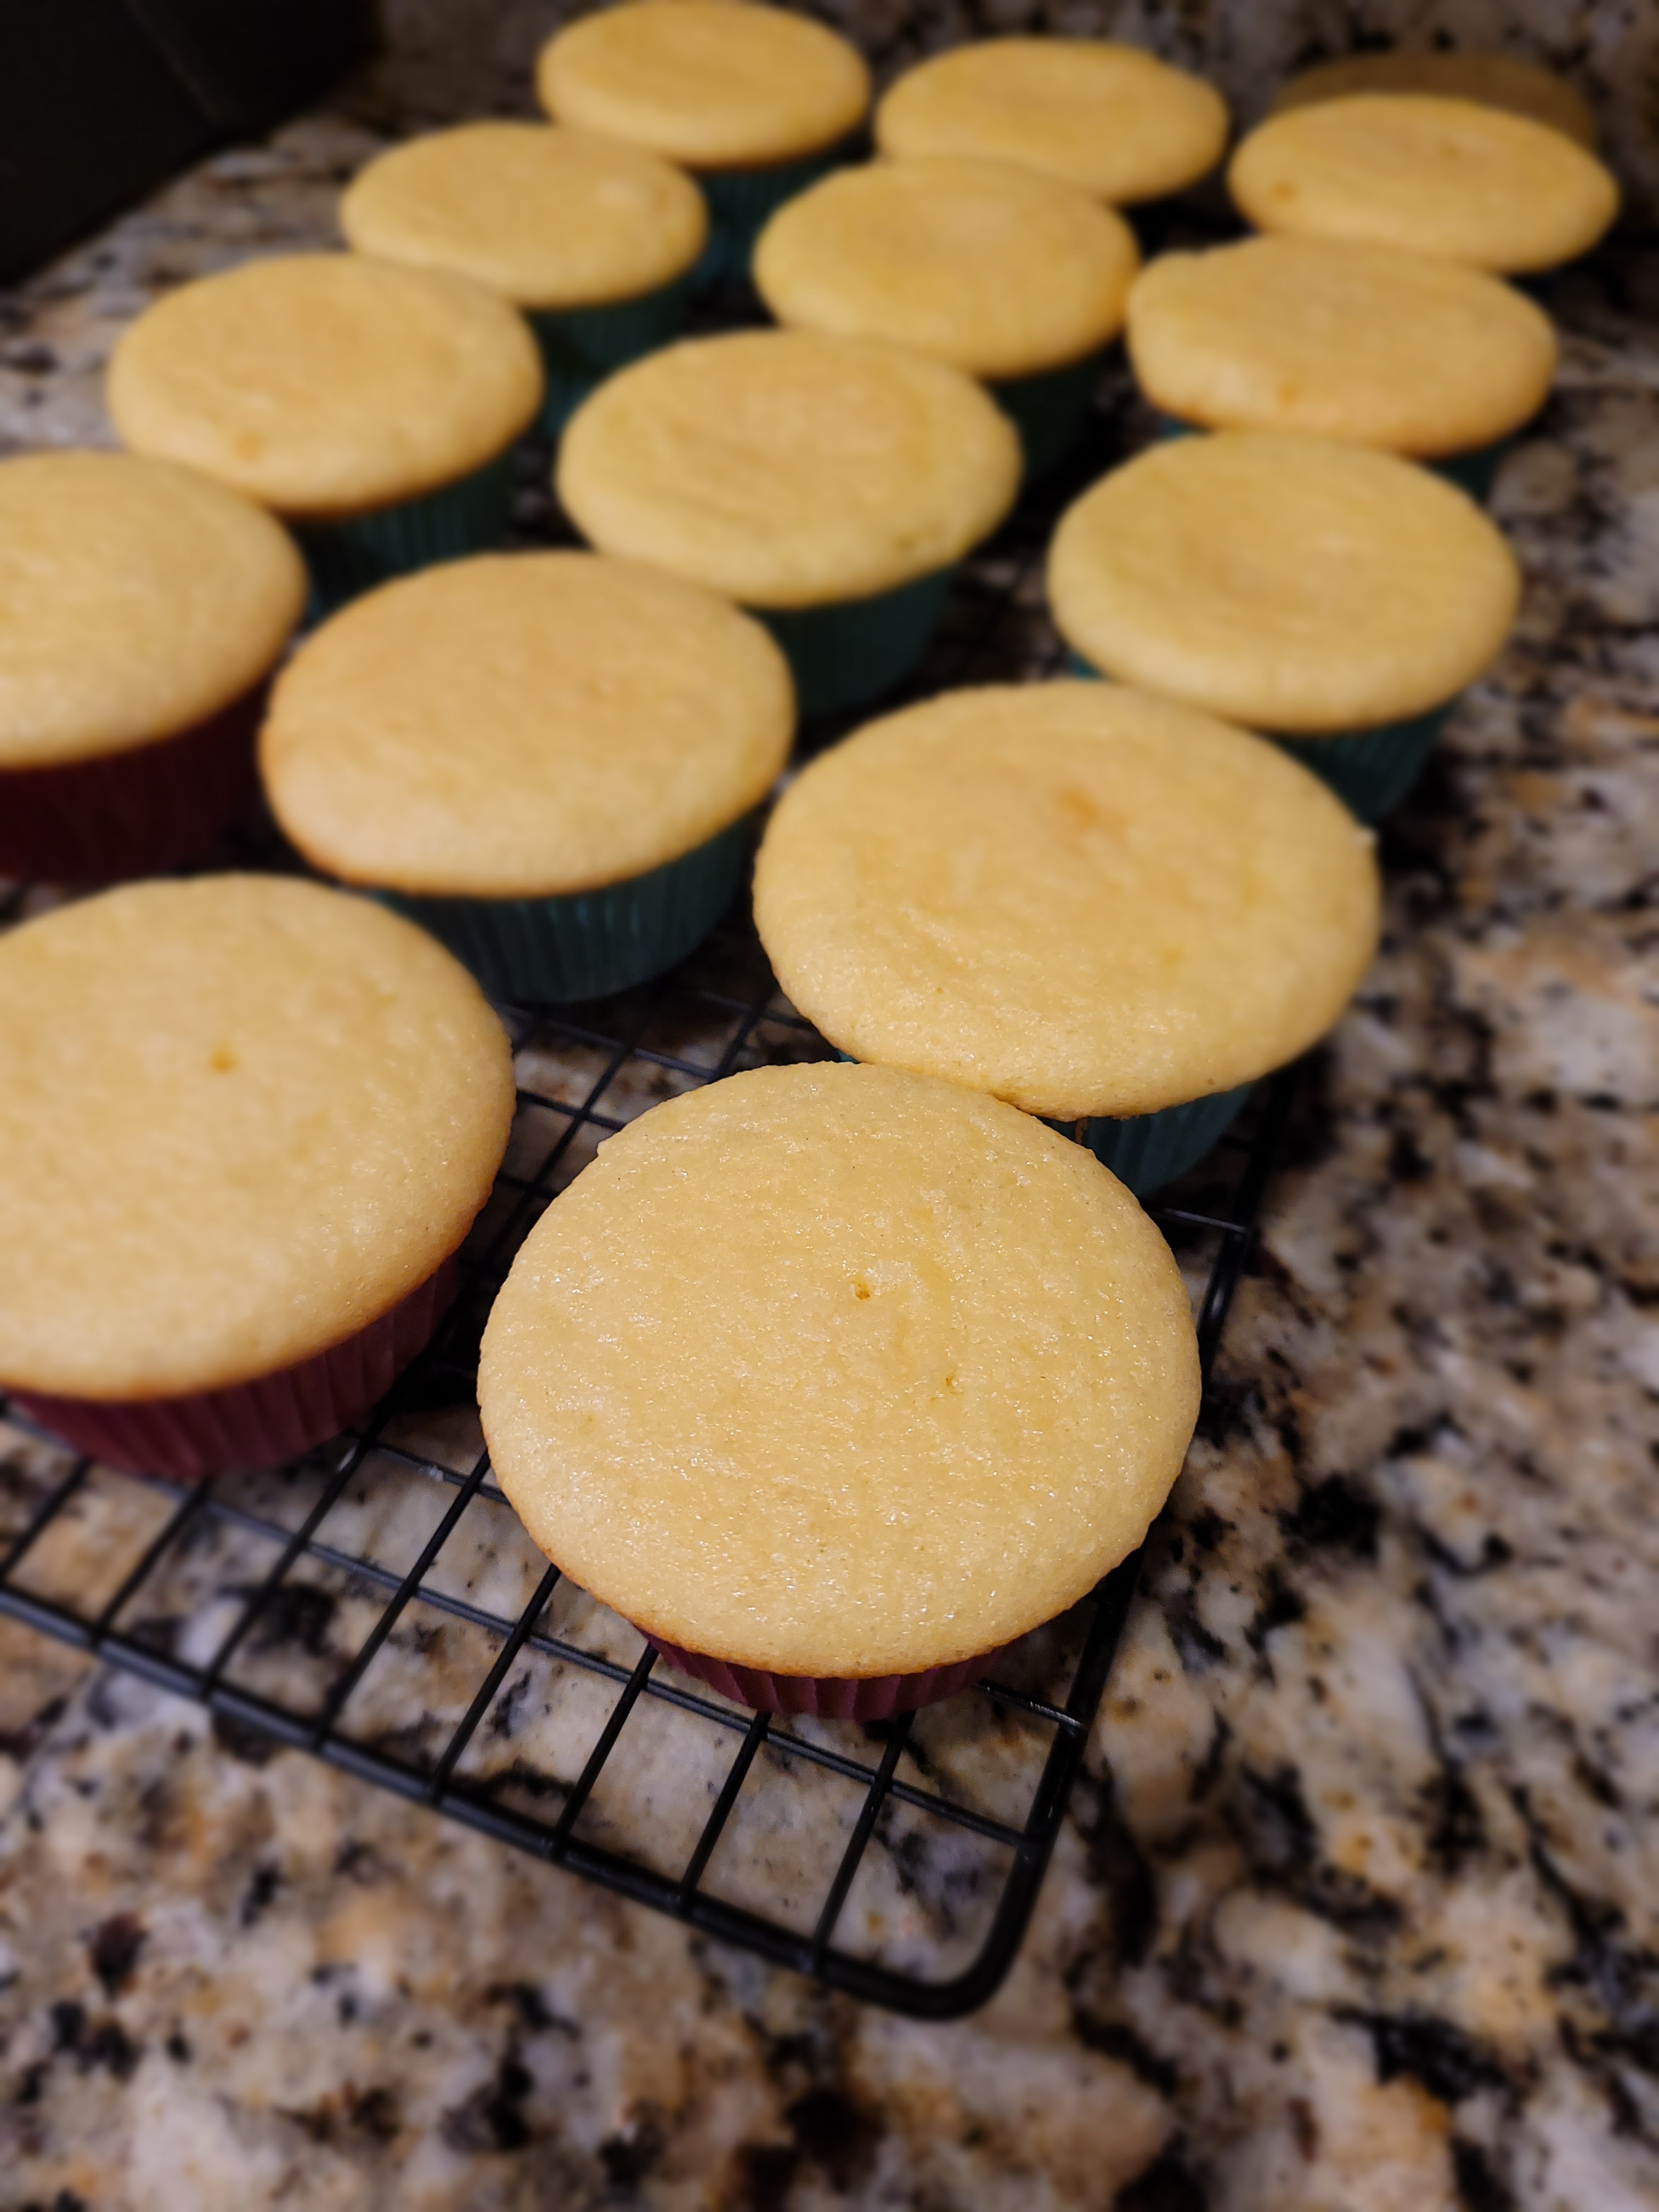
I don’t like to hedge my bets, but this might be my new favorite gluten free mix. Let the cupcakes cool in the pan for 10 minutes on a cooling rack before removing from the pan and cooling completely on said cooling rack again. You can put these in the fridge while you make your frosting.
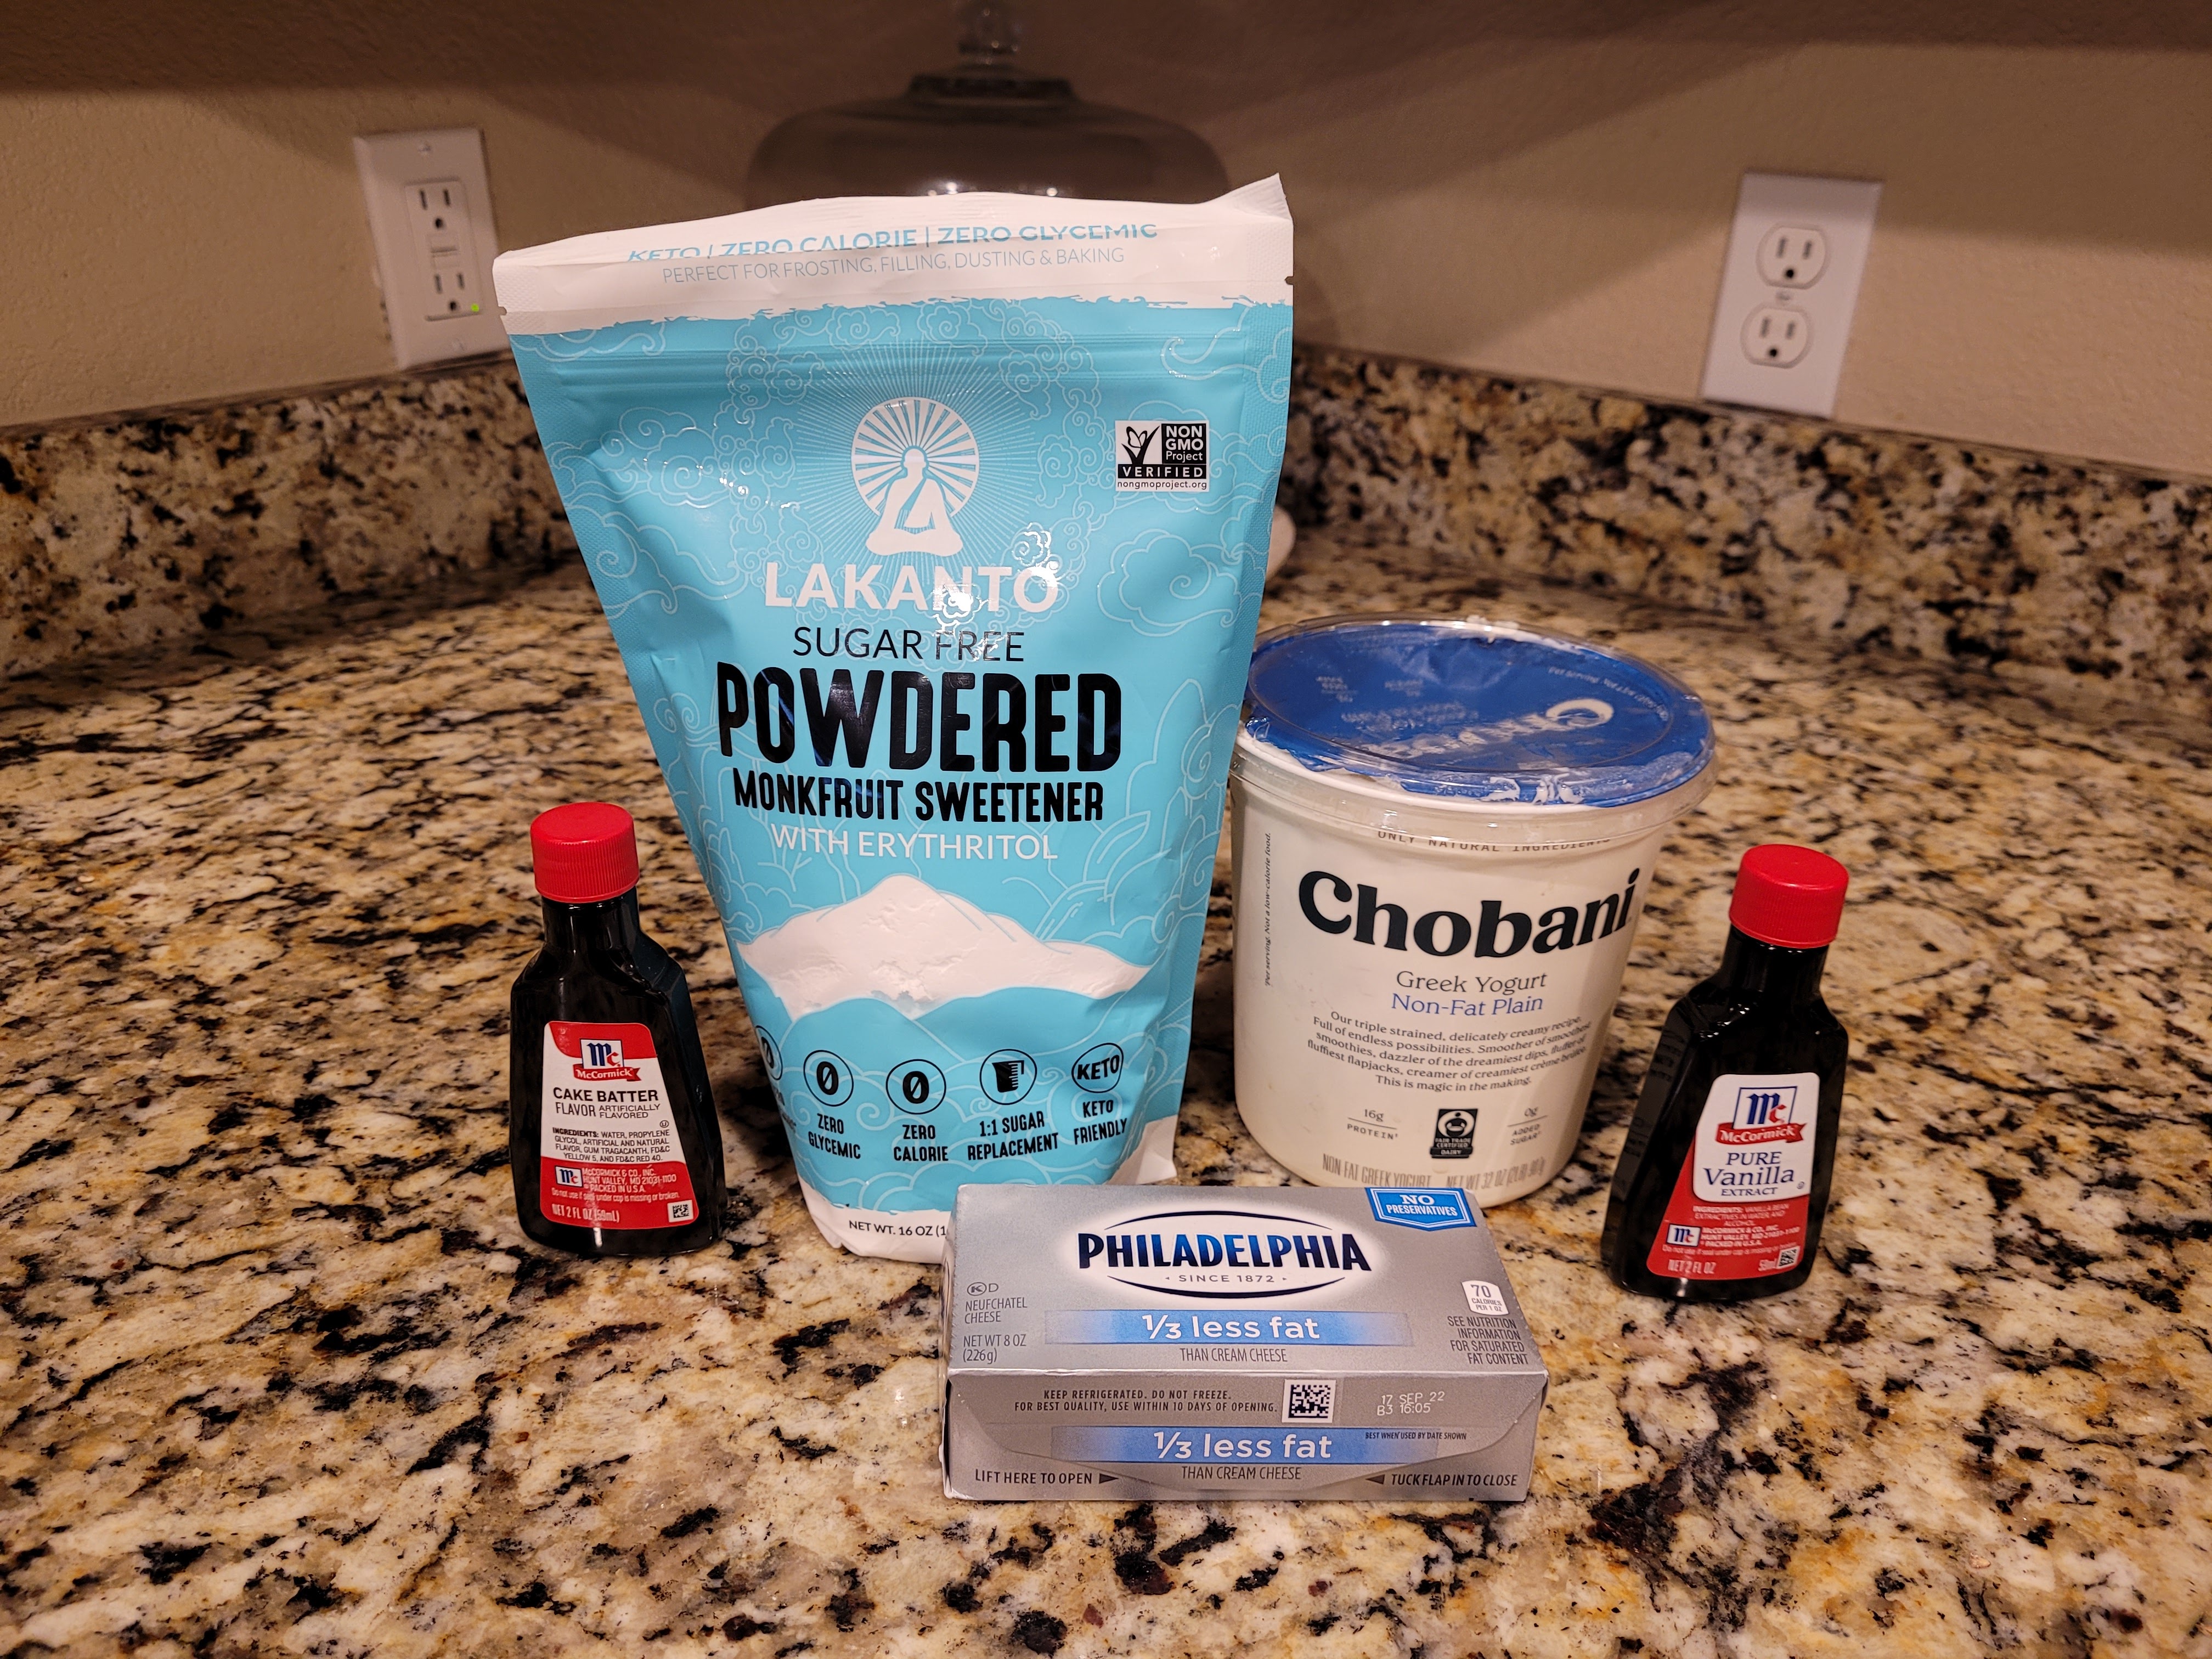
If you’ve never used cake batter extract, prepare to have your life CHANGED. This is me underselling cake batter extract: it is the single greatest extract I have or will ever use in a frosting recipe. This frosting tastes exactly like cake batter; we all know we’re not supposed to lick the spoon or the beaters, but we do. We risk salmonella because cake batter just tastes that good. It’s worth it. OK, now imagine this flavor, but in frosting form…and without risk of hospitalization due to a bacterial infection. It’s a miracle. Here’s everything you need for the frosting and the decorating:
- 8 ounces (225 grams) 1/3 the fat cream cheese at room temp
- 1 cup (226 grams) fat free Greek yogurt, strained overnight to remove moisture
- 4 cups (1 bag 16 ounce) of Lakanto powdered monkfruit
- 1.5 tsp cake batter extract
- 1 tsp vanilla extract
- Gel dyes in black, brown, and beige
- Tips 1A (or another large round tip like an 806 or 808), two #2 round tips, one #80 tip for ears and feetsies, one grass tip for spikes
Blend the cream cheese and yogurt until smooth; add in half of the monkfruit and both extracts. Mix well on medium speed. Add in the remaining monkfruit and blend well. If the frosting is too stiff, add in a tablespoon of milk. Dye half of the frosting beige for the hedgehog’s body, ears, and feet. Dye a tiny bit black for the eyes and nose, and dye the rest brown for the spikes.
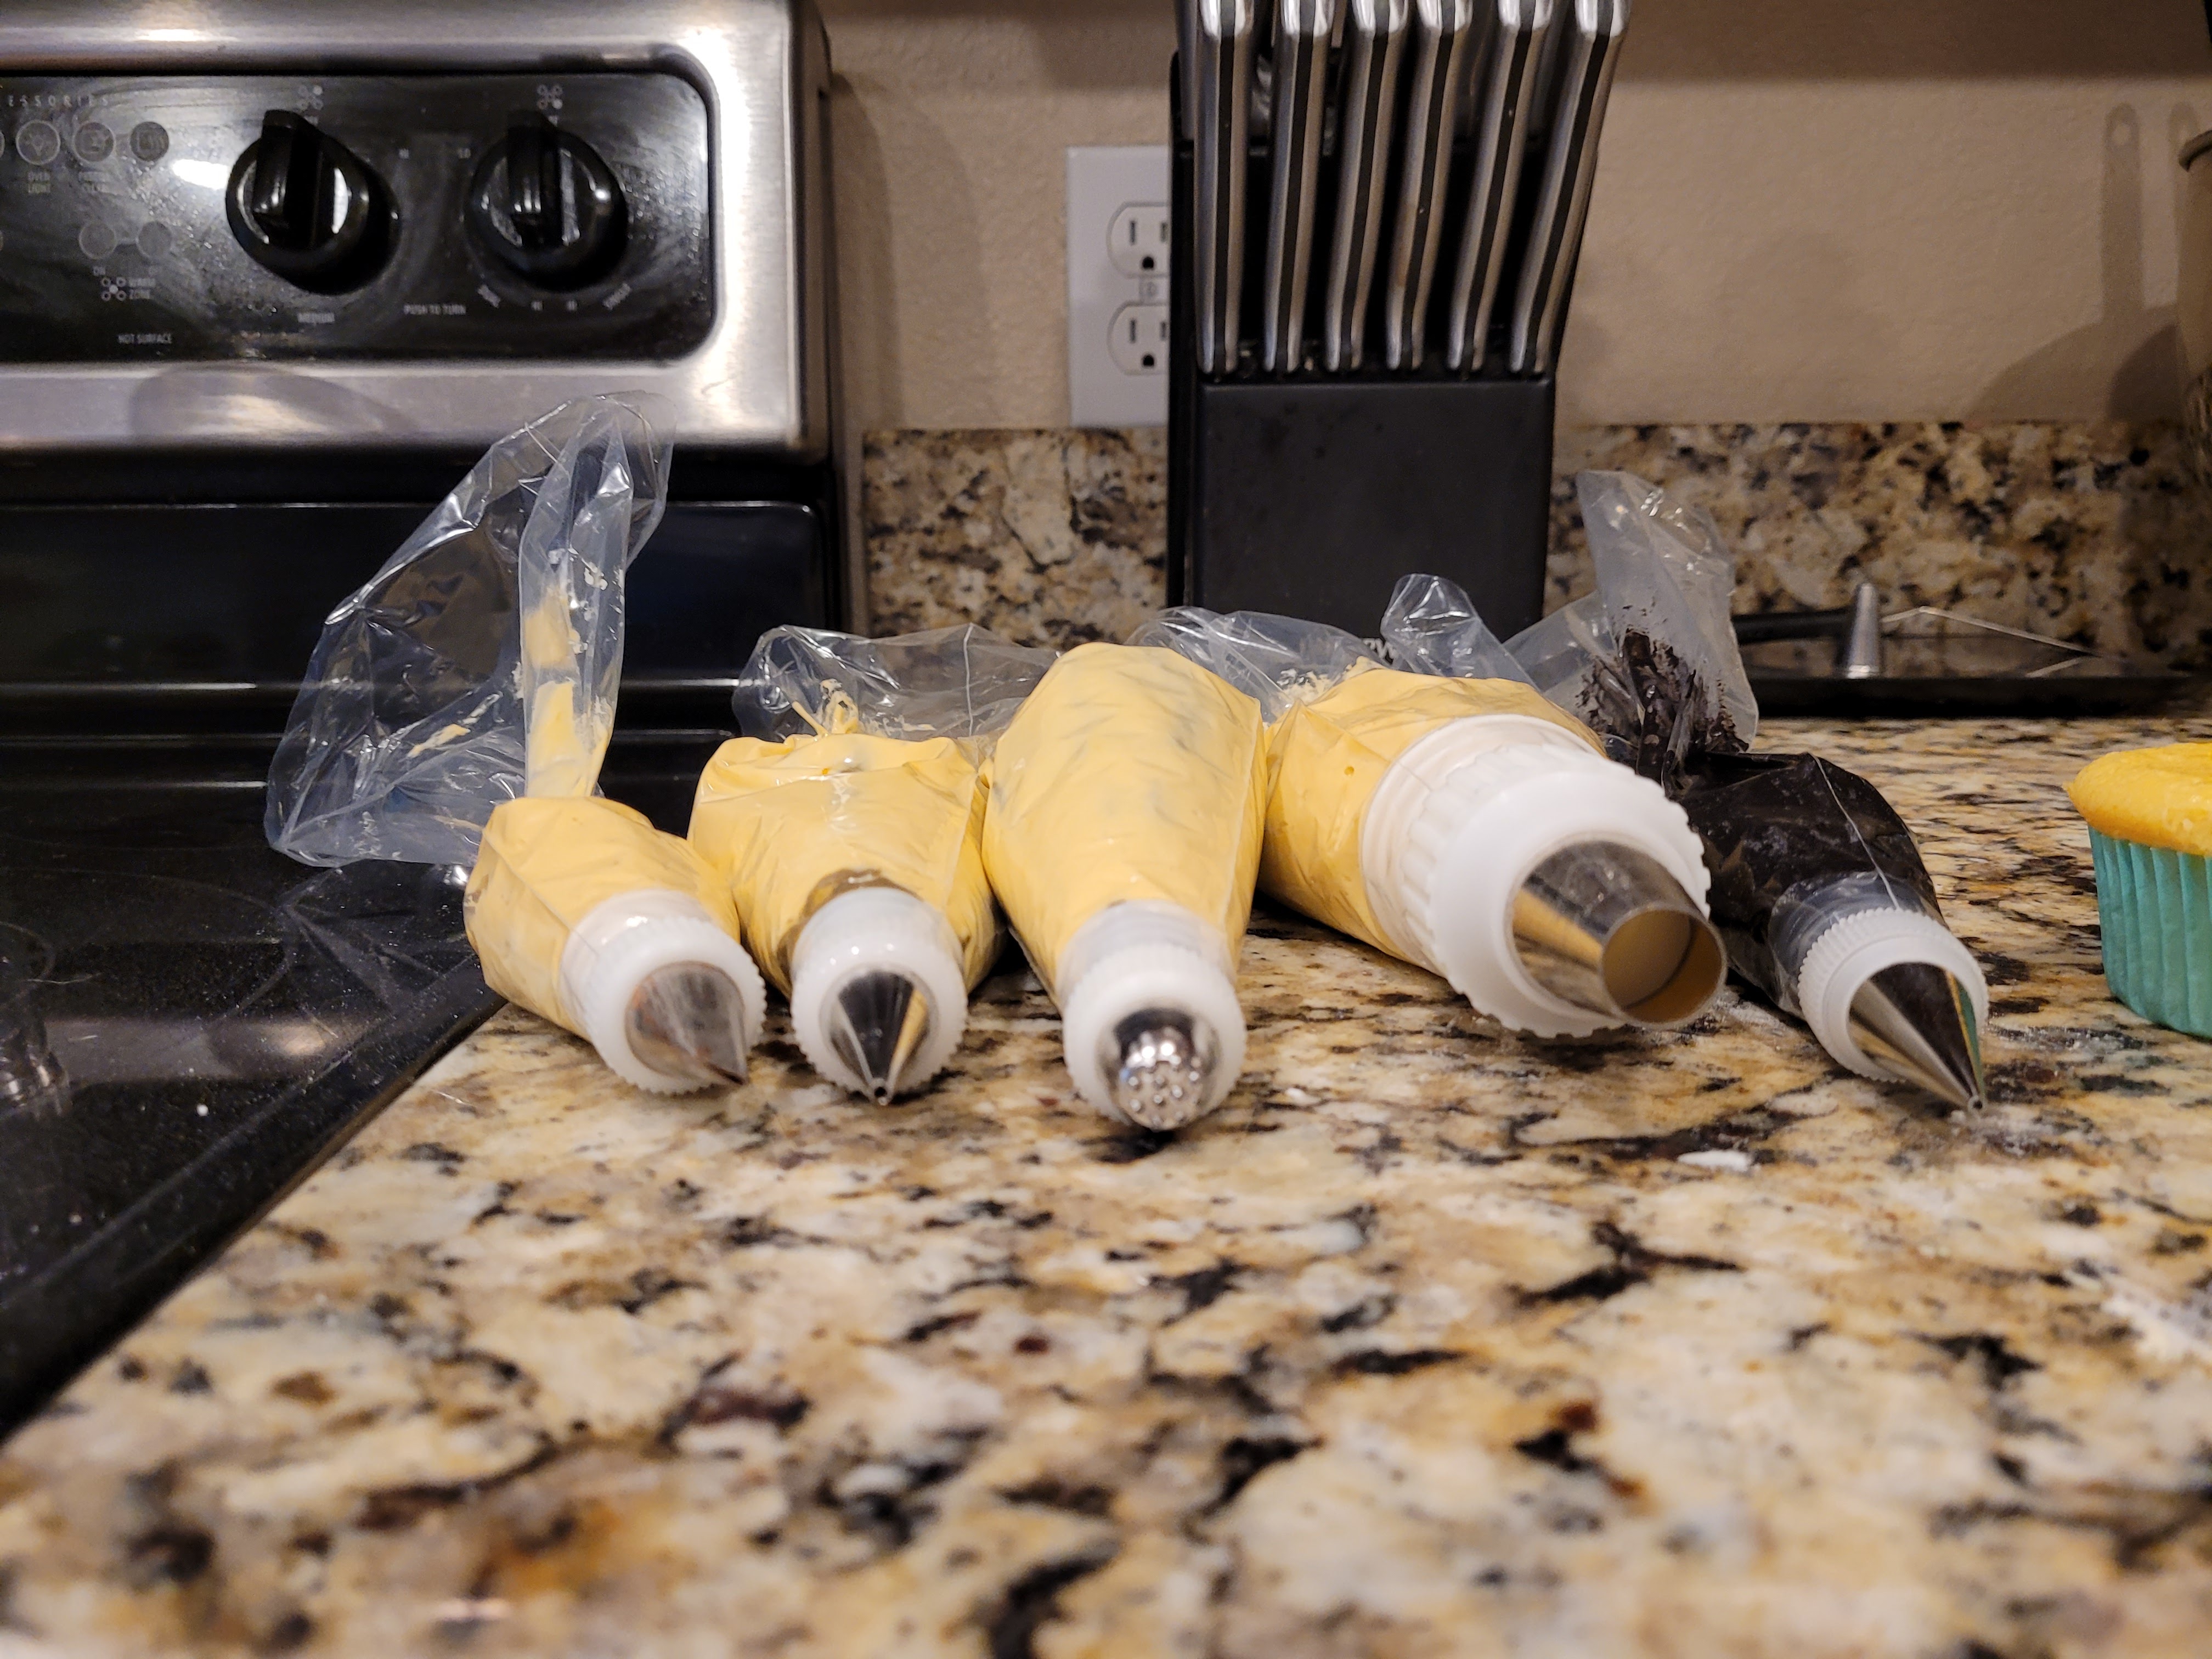
The lineup…I had never used a #80 specialty tip before, and now I’m going to use it on everything. I wanted to create a two-toned look to my hedgehog spikes, so I took two piping bags, one fitted with a grass tip and the other fitted with a #2 tip, and painted beige buttercream up the sides of each bag with an angled spatula. Then I placed my brown frosting into the center of each bag, piping out a little until the colors started to mix. I put my black frosting into a bag fitted with the other #2 tip, a small amount of beige into a bag fitted with he #80 tip, and the remaining beige into a bag with my 1A large round tip.
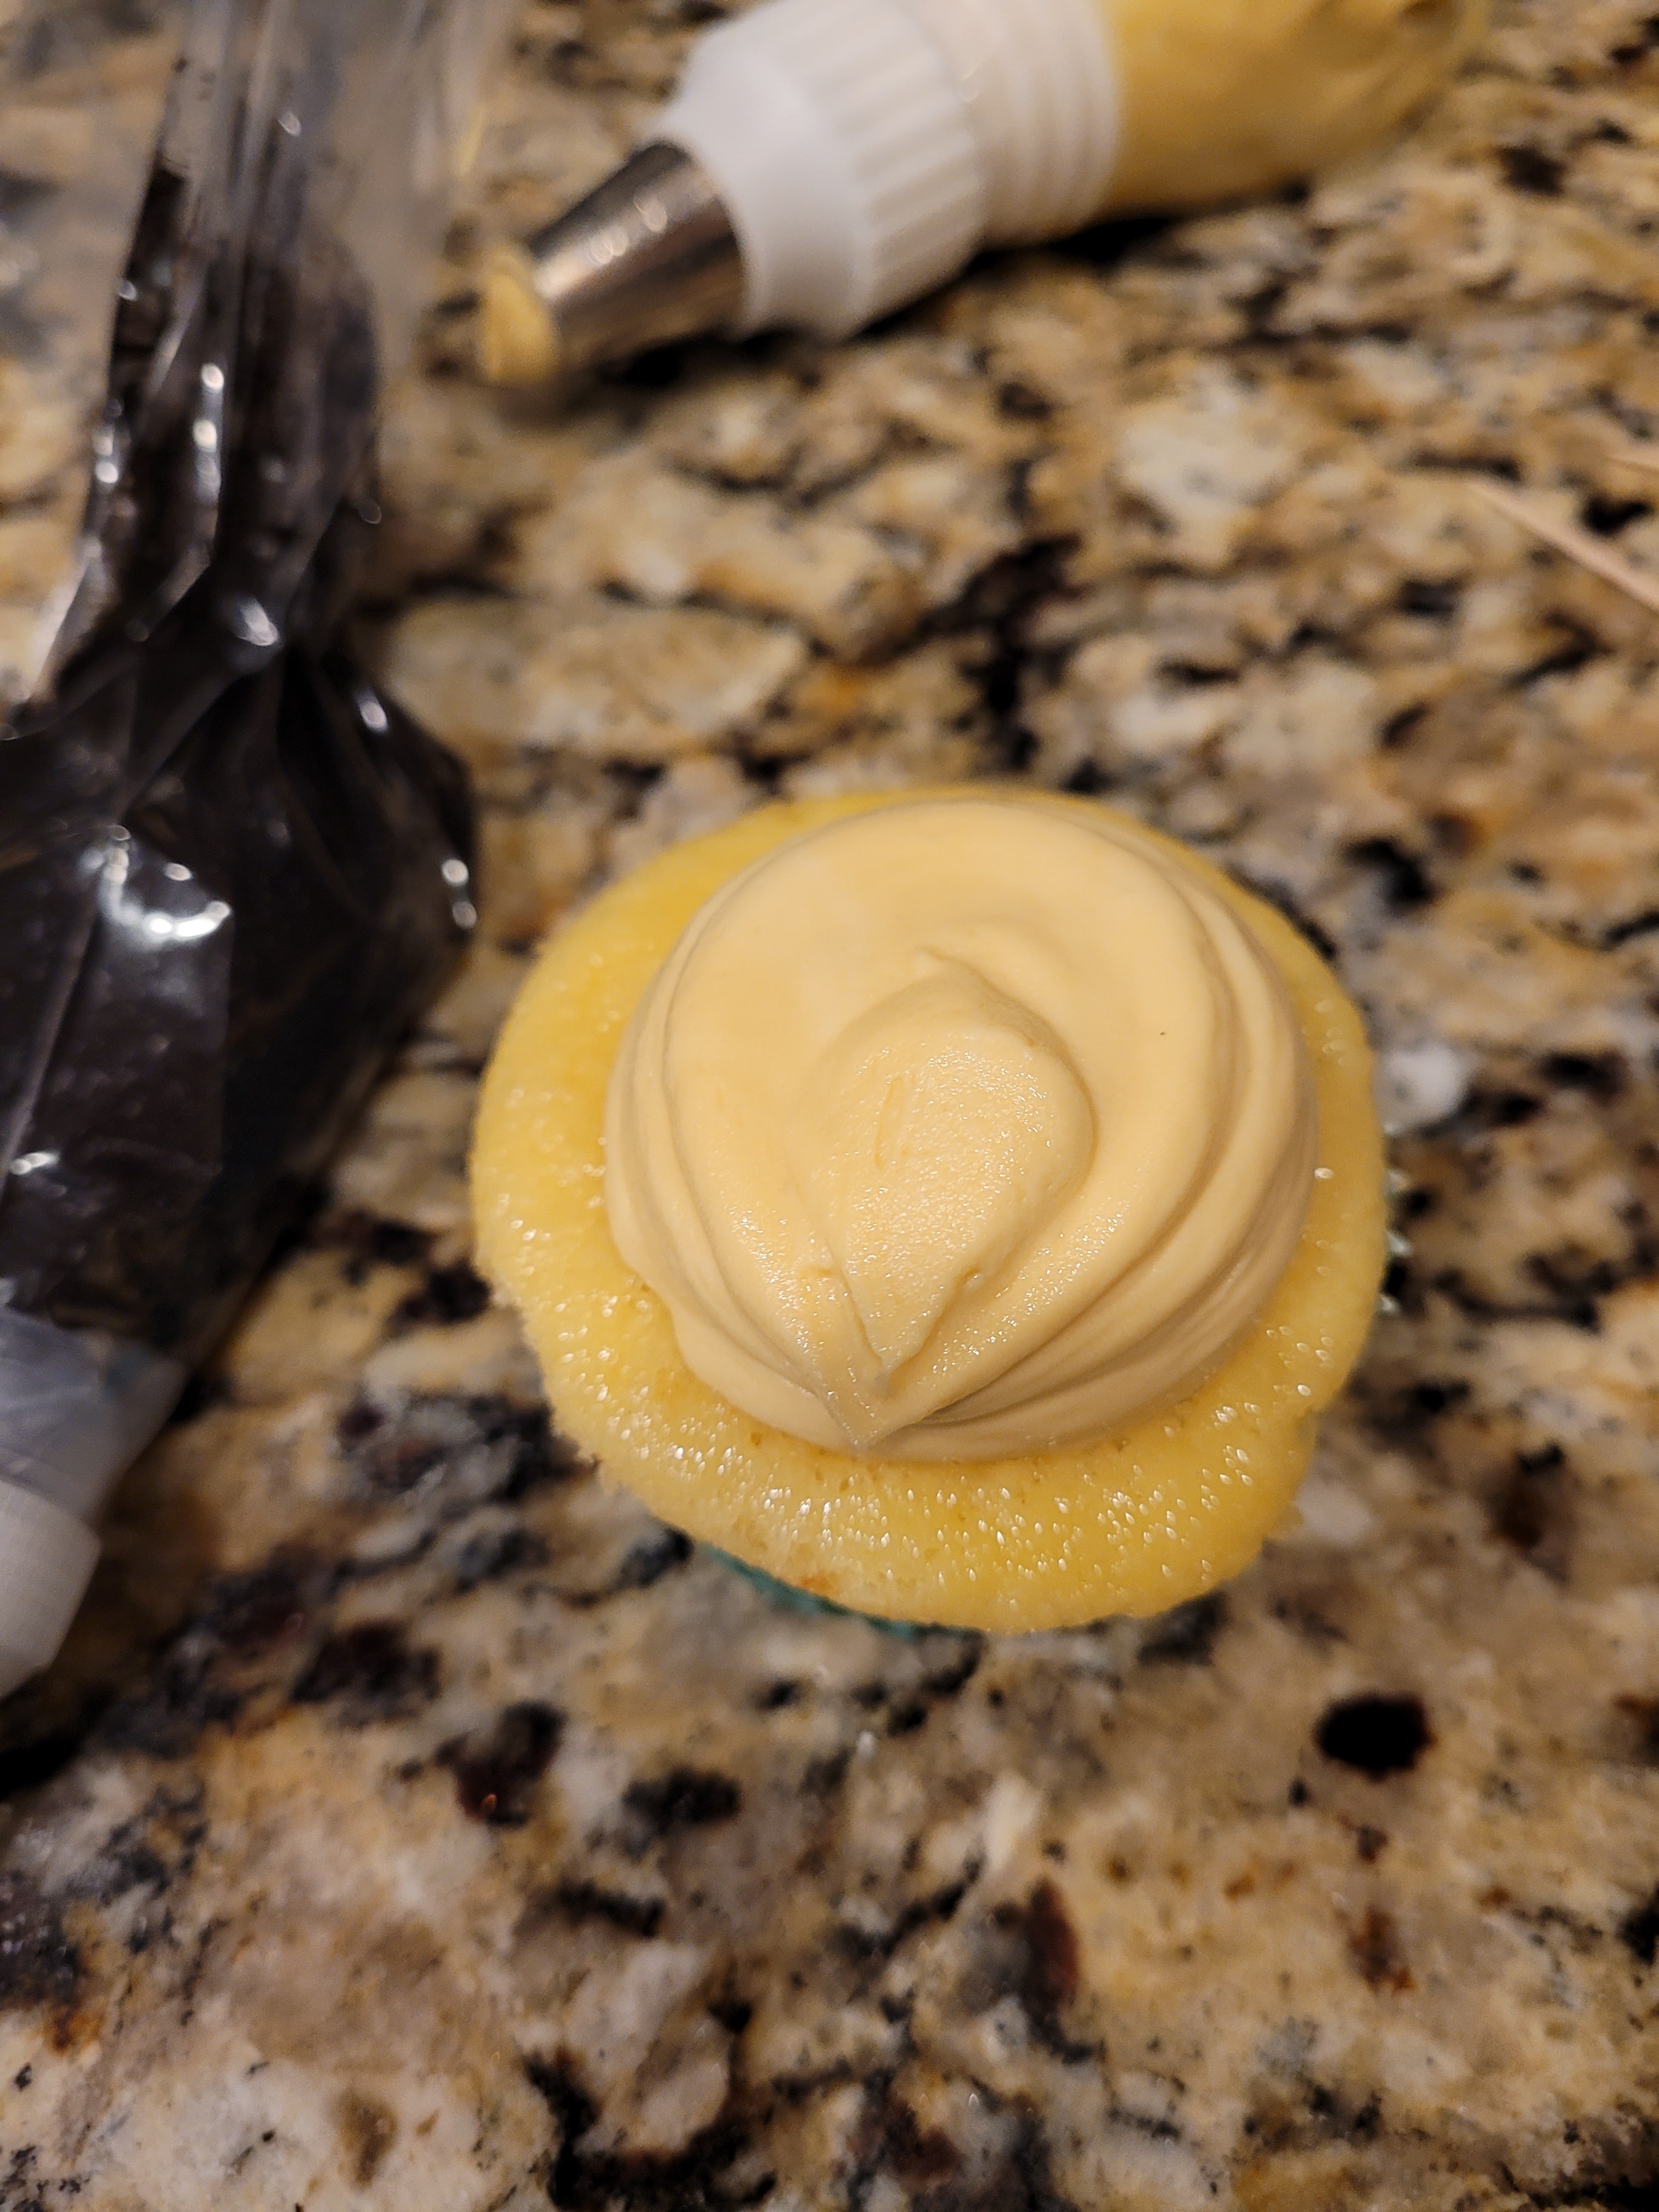
So many chins… I was a little bit on hedge when I first tried piping out the body with my 1A tip. I found the best way was to pipe with my tip straight down on the cupcake’s surface, making a flat, circular mound of frosting. Once I had a big enough mound, I stopped piping, with my tip still in the center, then slowly dragged my tip downward to create that little point at the very end to make the space for a face. It took me a couple hedgies to get this just right, so just know if you try this, everything quill be alright in the end. Some of your hedgie cakes may have double, triple, or even quadruple chins, but as someone who accidentally opens her front-facing camera on her phone while looking down at it frequently, same. We may have many chins, but we’re still adorable.
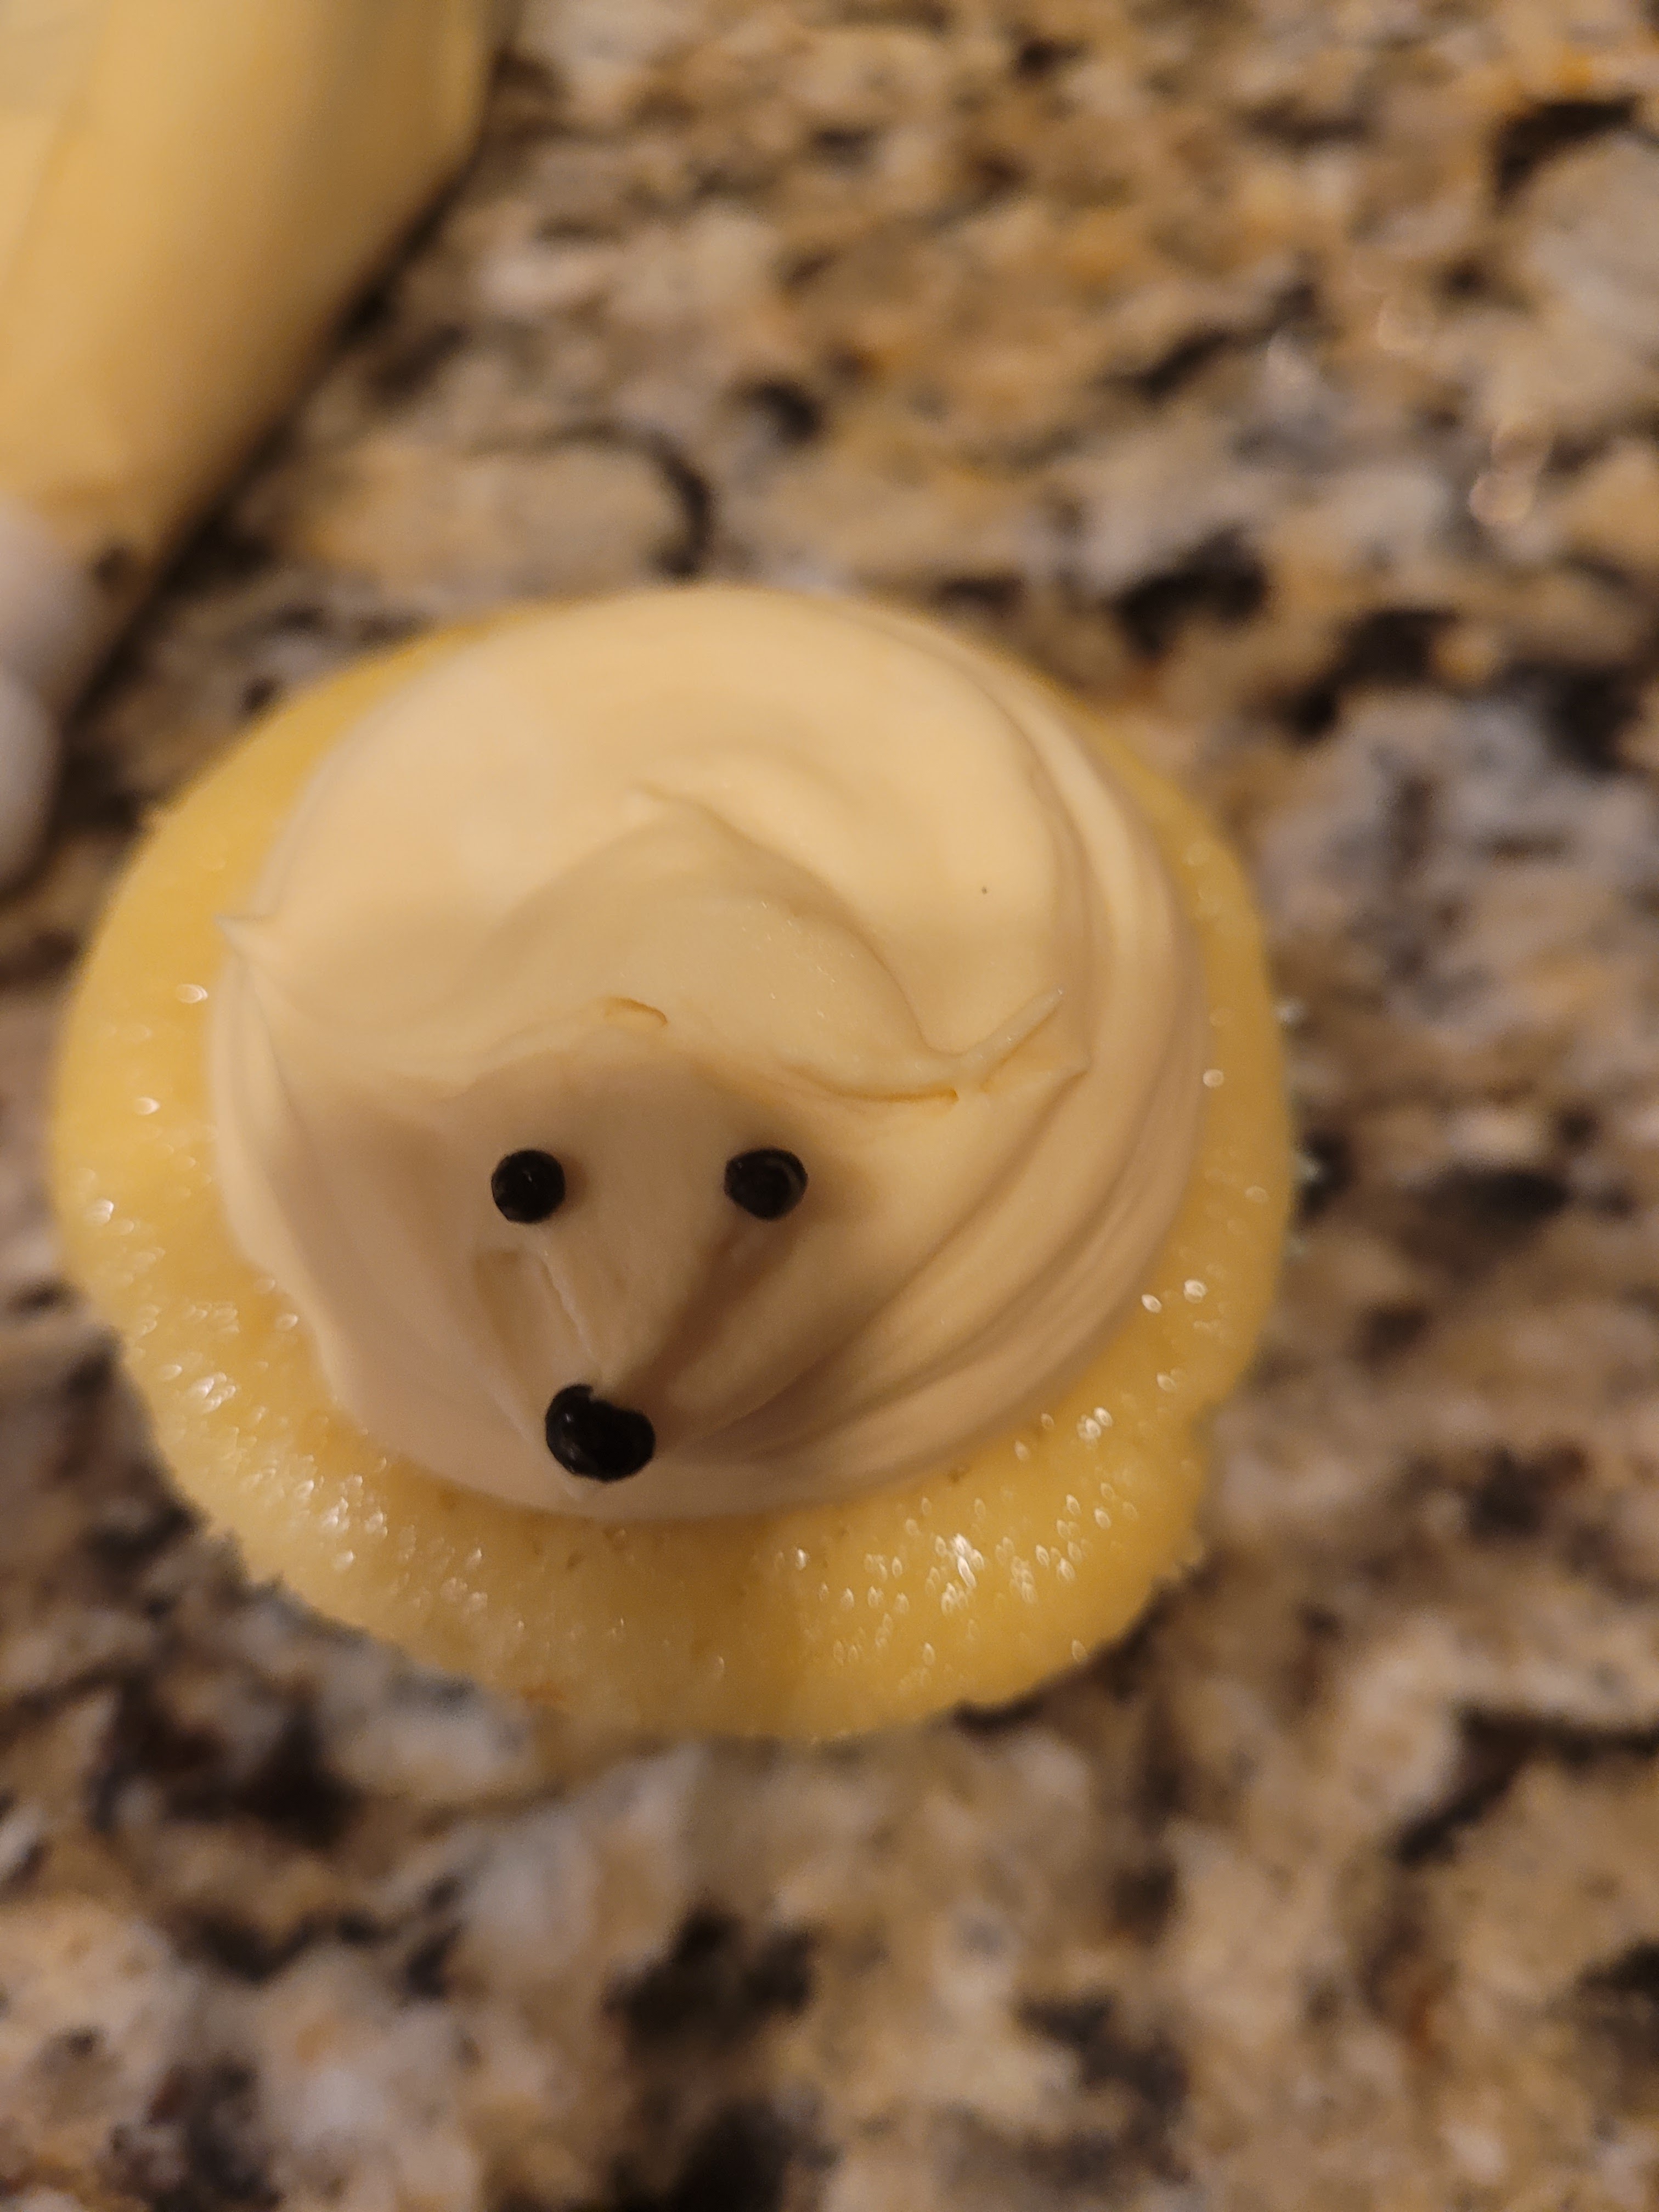
It’s looking straight into my heart with those beady little eyes, and it spikes joy. I took a toothpick and drew a little widow’s peak on each head/face area so I knew where to stop piping before dotting the eyes and nose onto each. You can really have fun with these because each face shape will inevitably end up a little different than the last, so they all have their own personality. Then I froze my cupcakes for 30 minutes so the body would be firm enough to pipe the spikes onto.
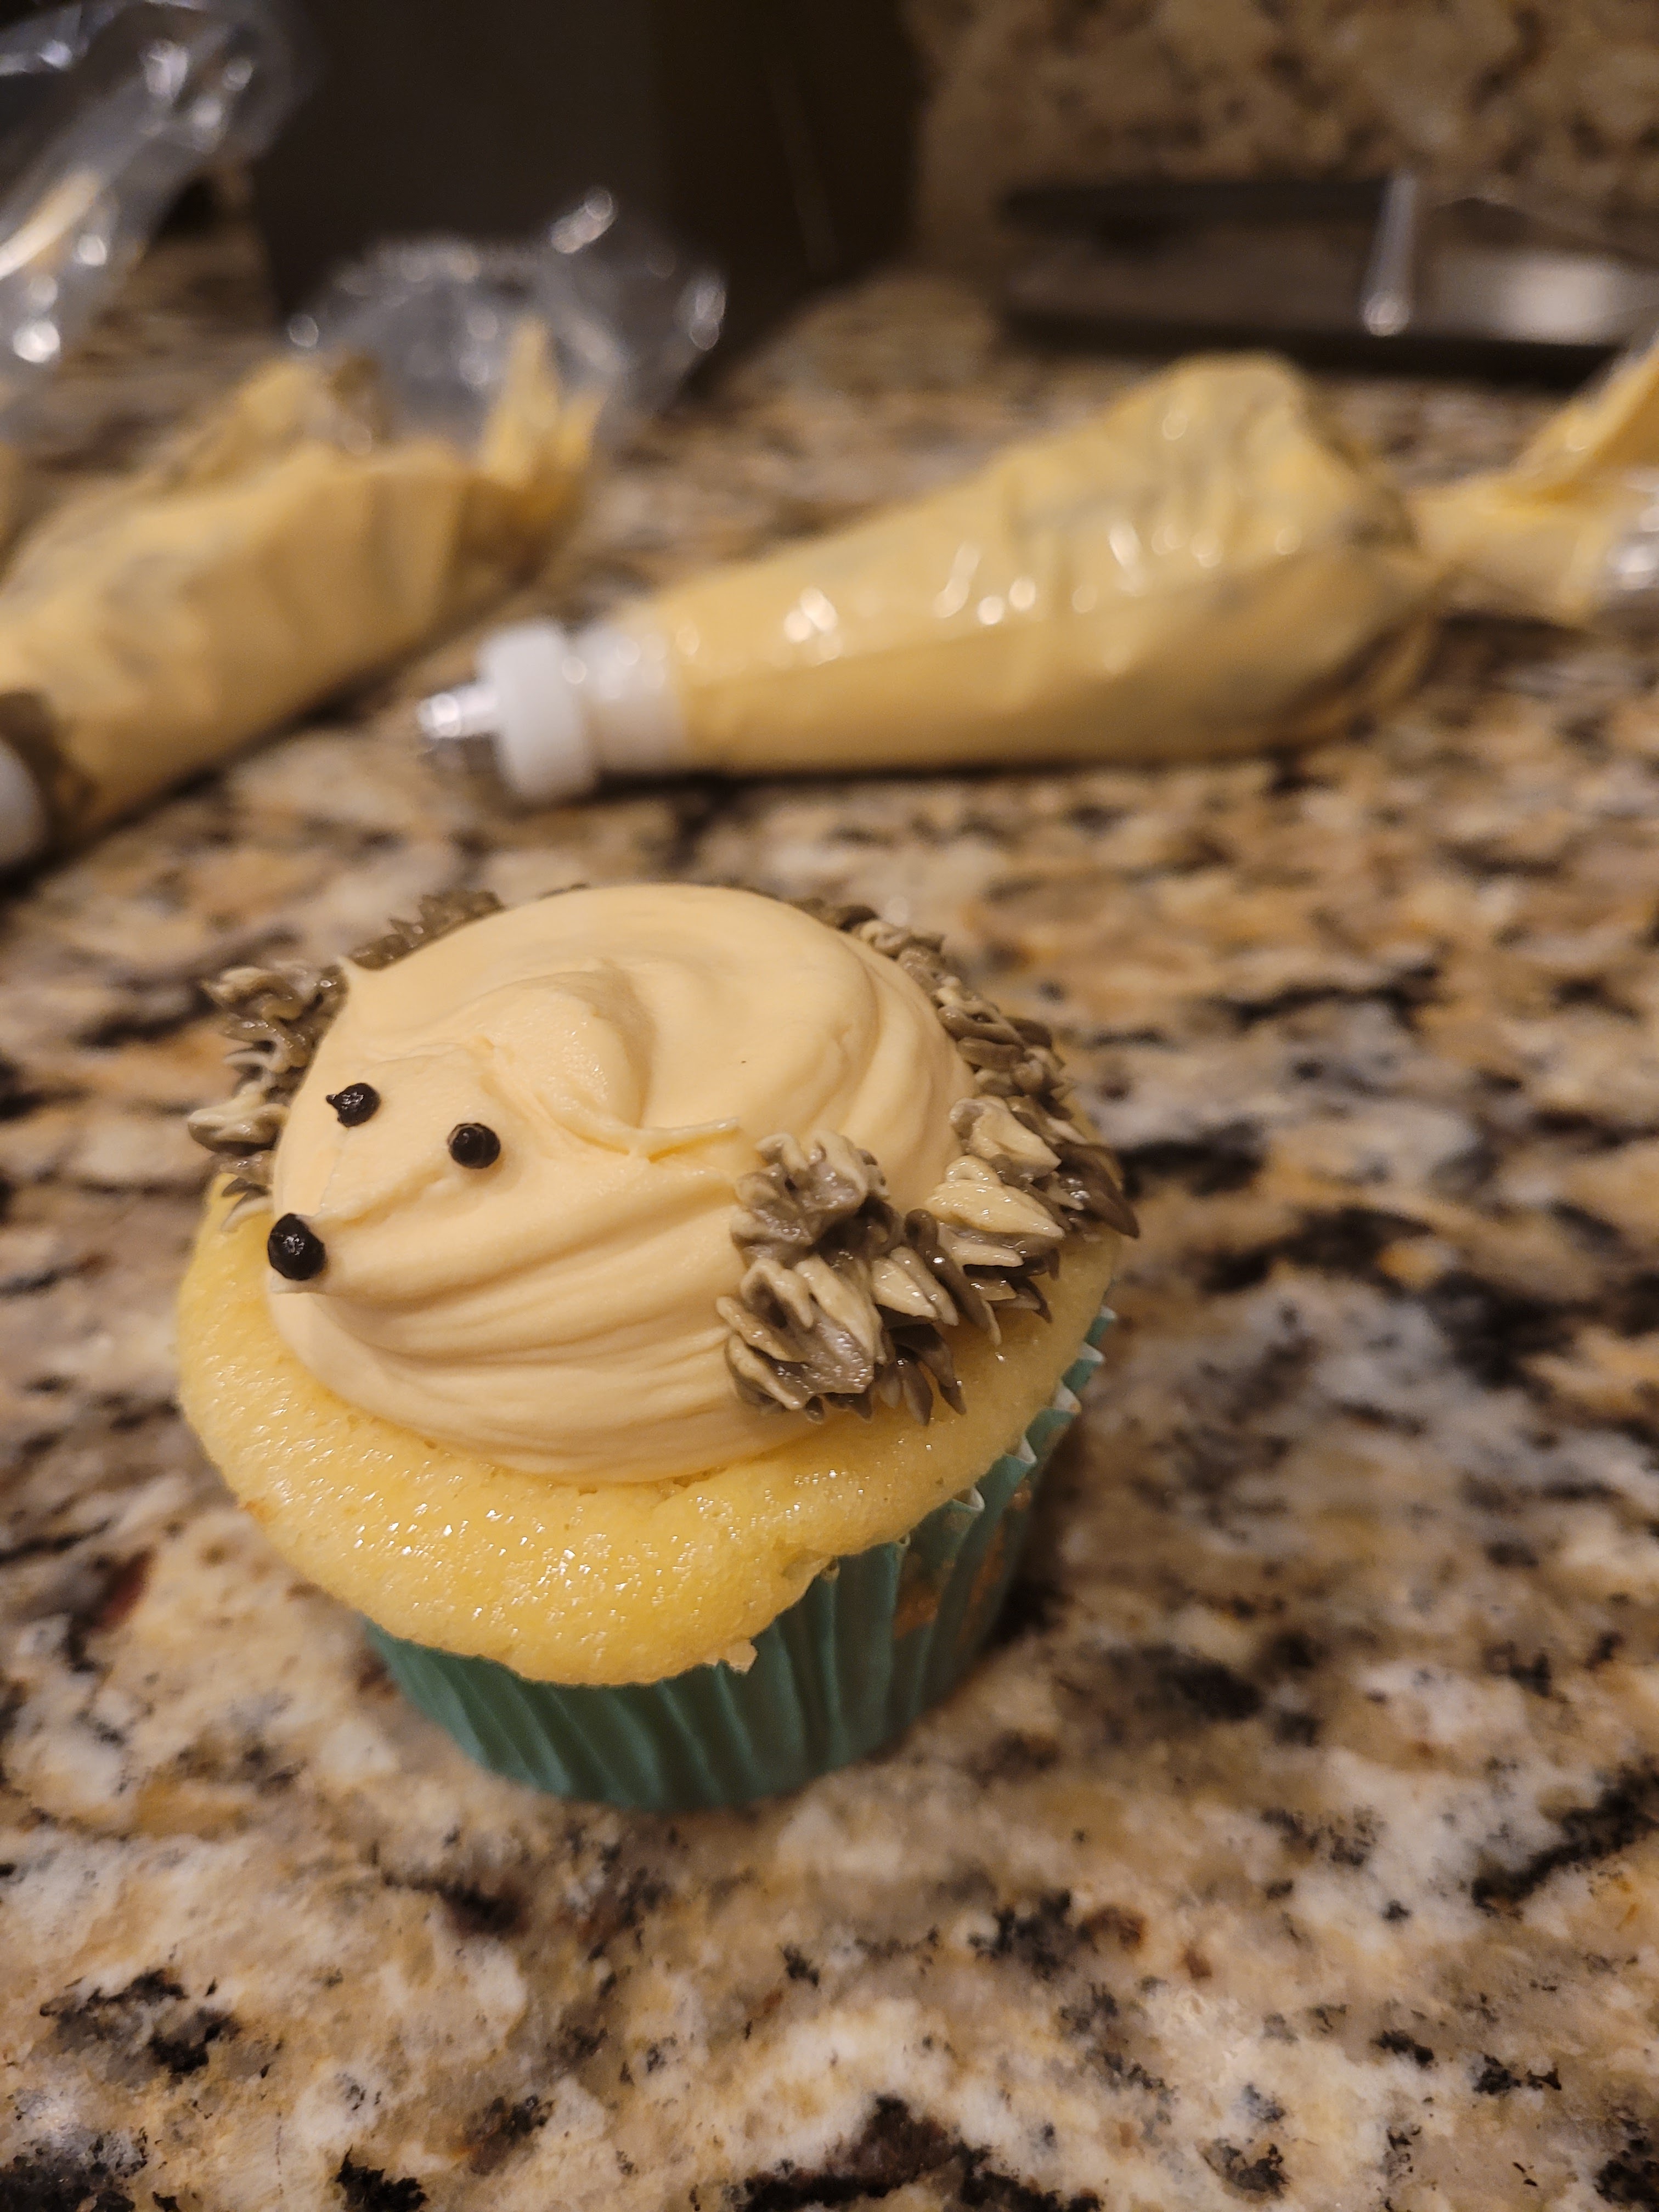
He wasn’t suffering from hedge pattern baldness for long. Once firmed up, you can use your grass tip to pipe on the body and pull away quickly to make spikes. I found it easiest to go around the outside and work my way toward the face. The biggest pain here is how quickly the grass tip gets clogged up. I used a toothpick about every third row of spikes to clean out the nozzles.
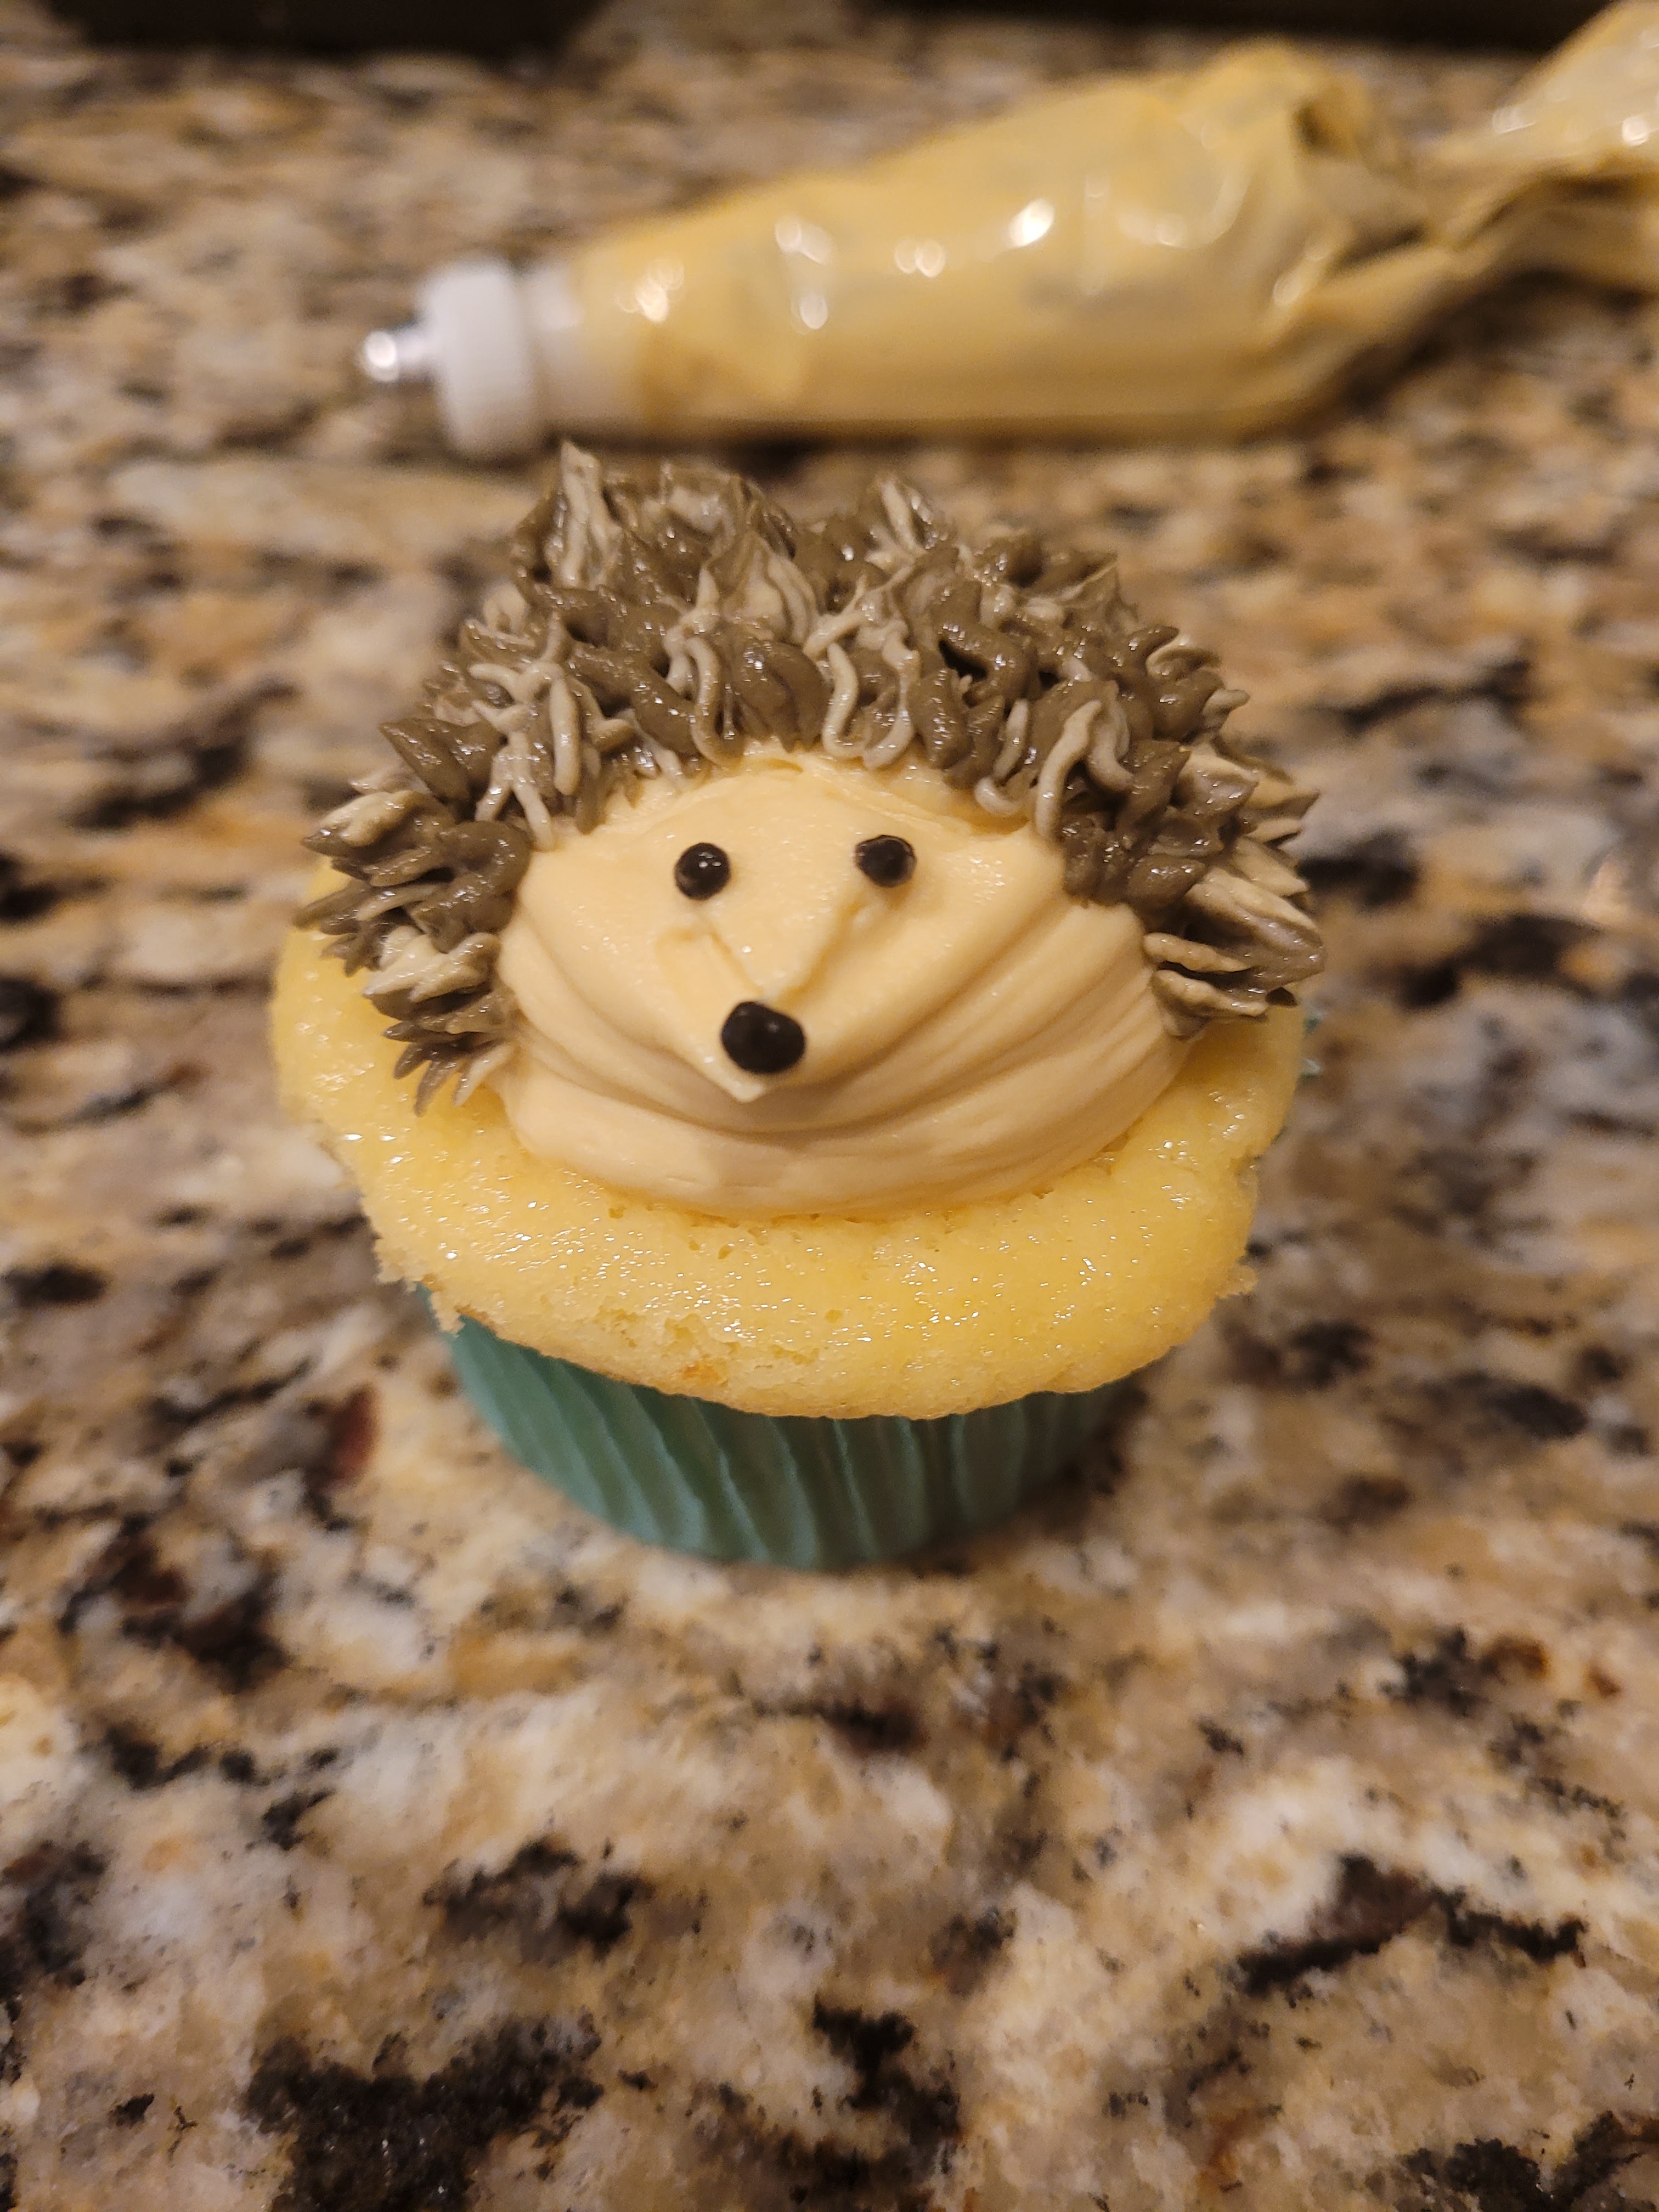
Oh my quill power is fading quickly. He is so cute, I can’t stand it. Once you get closer to the face, it is easier to switch to the other bag with the #2 tip and brown/beige frosting mix to fill in the smaller areas or any empty patches on the body.
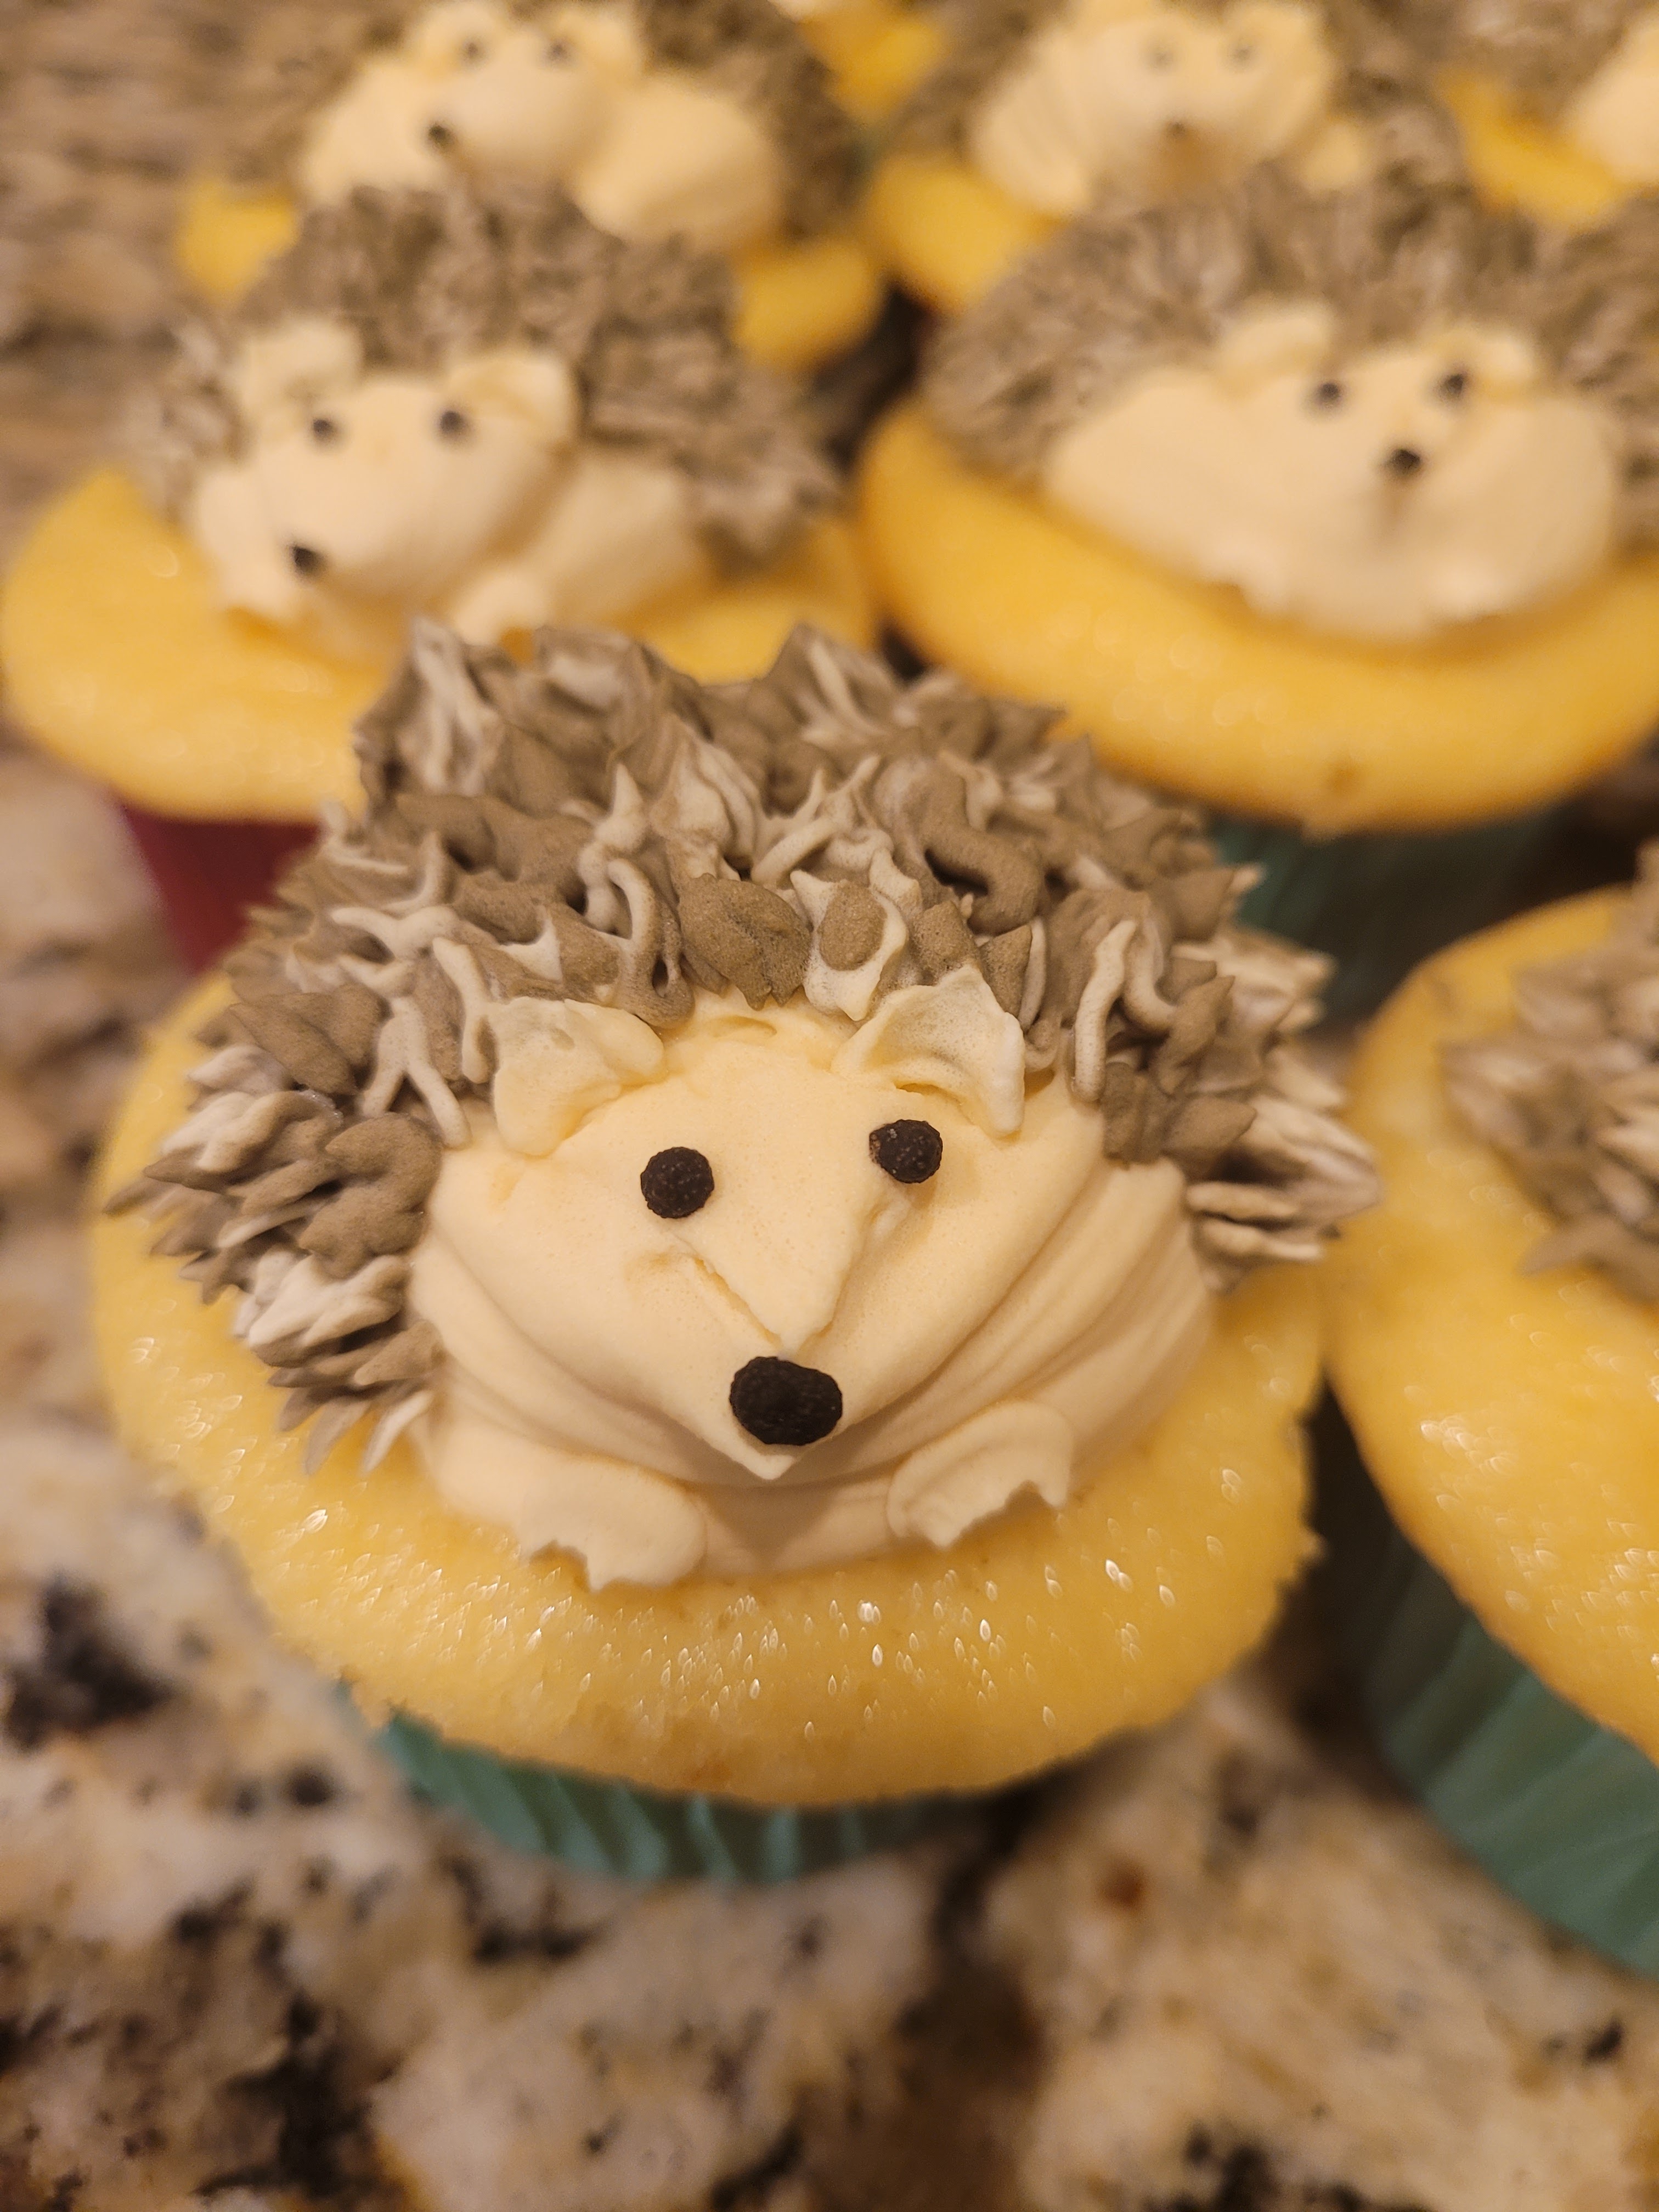
Those tiny eeeaaarrrsssss…I’m dead. I’ve died and gone to hedgehog-lovers heaven. To make the world’s cutest ears and teeny feetsies, I used the #80 tip, piping near the top of the head. I placed my bag straight up and piped a small amount, pushing down to squish the ears a little before pulling the piping bag away. I did the same technique to pipe the feet.
I just love these a whole hedge of a lot. 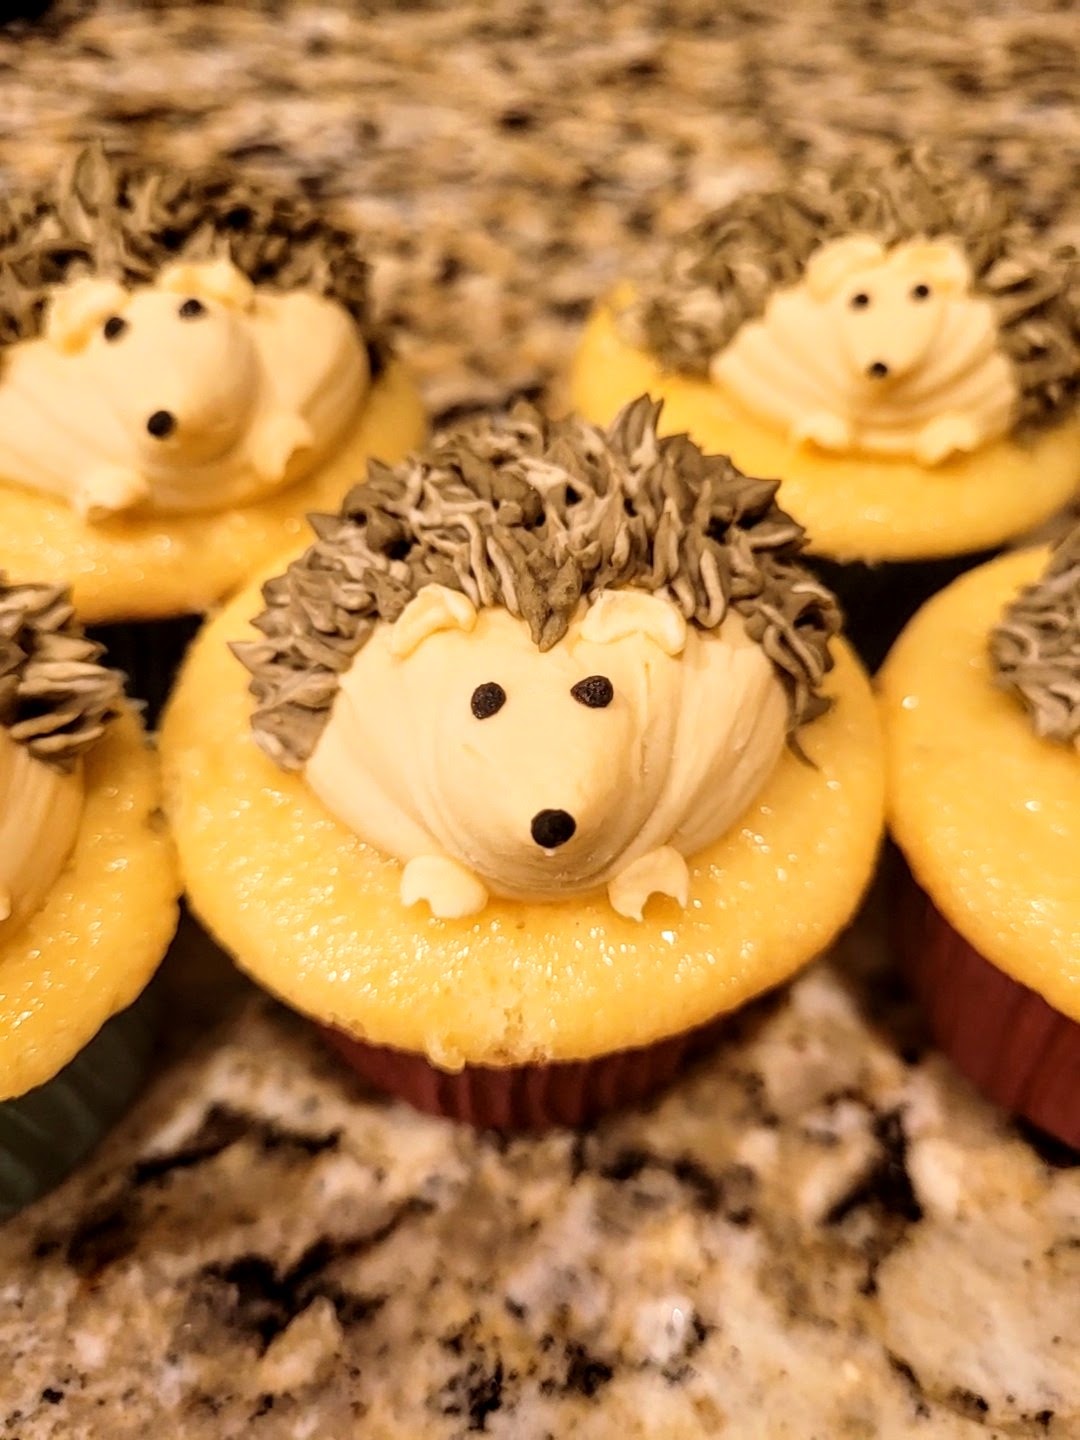
Decorating them really spiked my interest. Terrible puns? Just roll with it like a hedgehog would. I am just giddy that these turned out the way I was hoping. Each one is a little different, whether it’s the face, ears, quill patterns, or ridiculous number of chins. I did take breaks to let my frosting refirm in the freezer since this yogurt and cream cheese combo gets soft under the heat of your hands quickly, but the flavor is worth the few extra minutes. The cupcakes themselves are really light and airy with a great cake batter flavor, and the frosting is next level cake batter goodness. It’s decadent without being too heavy, which is almost dangerous because I want to eat several at a time. These cupcakes have fueled my want for both more cupcakes and another hedgehog (for keeping, not eating). I will make do with the cupcakes for now, and dream of the day I can have another cranky, huffy, tiny little adorable animal to run my life. ‘Til next time, my fellow eaters!
Because much like the hedgehog, I, too, get real huffy if you try to touch me. Spirit animal! Recipe and instructions
Cake batter cupcakes with cake batter cream cheese frosting
Buttery yellow cake with cake batter flavor and decadent cake batter frosting
You can use a regular cake mix if not gluten free and powdered sugar in place of powdered monkfruit, but this will change the macros.
Ingredients
- FOR CUPCAKES
- 1 bag of Pamela’s vanilla cake mix
*1/2 cup (111 grams) unsweetened applesauce
*1 tsp cake batter extract (I find mine at Walmart)
*2/3 cup of fat free or skim milk
FOR FROSTING
*8 ounces (225 grams) 1/3 the fat cream cheese at room temp
*1 cup (226 grams) fat free Greek yogurt, strained overnight to remove moisture
*4 cups (1 bag 16 ounce) of Lakanto powdered monkfruit
*1.5 tsp cake batter extract
*1 tsp vanilla extract
FOR DECORATING
*Gel dyes in black, brown, and beige
*Tips 1A (or another large round tip like an 806 or 808), two #2 round tips, one #80 tip for ears and feetsies, one grass tip for spikes
Directions
- Mix eggs, applesauce, and milk on low until blended.
- Add cake mix and blend on low for 2 minutes.
- While mixing, preheat oven to 325 and line muffin tins with cupcake wrappers.
- Fill each wrapper 2/3 of the way full.
- Bake for 20-22 minutes, until a toothpick comes out clean from the center.
- Let rest on a cooling rack in the pan for 10 minutes before removing from the pan to cool completely before frosting.
- To make frosting, whip cream cheese and yogurt together.
- Add in half the monkfruit and all the extracts, blending well.
- Add in remaining monkfruit and mix well; if too thick, add a tablespoon of milk.
- Pipe cooled cupcakes as desired; review detailed instructions above to make the hedgehogs
- Keep cupcakes in the fridge; remove 15-20 minutes to soften before eating.
Nutrition
Per Serving: 170 calories per cupcake
3.4 fat/29.6 carbs/3.4 protein -
Apple Strudel Cashew Butter Blondies
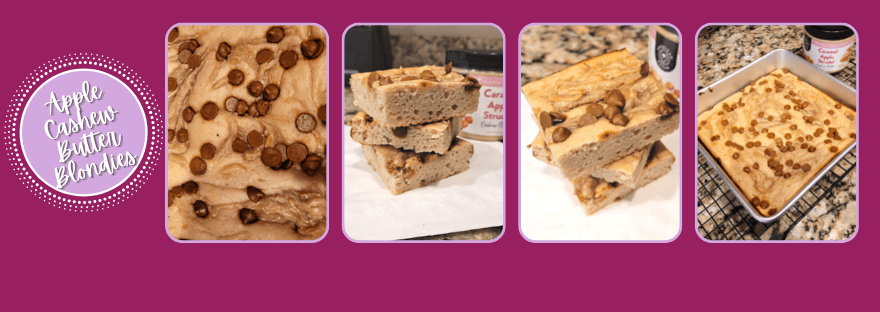
I know, that’s a mouthful to say, but thankfully it’s also a mouthful to eat. And BOY I have been sleeping on blondies. I 100% consider myself a brownie kinda gal…the only Blondie I was a fan of before this recipe sings “Call Me” and “Rapture.” But add a little American Dream cashew butter to a recipe, and I become a believer. Sorry, it’s hard to act cashewal when I’ve stumbled upon a new dessert favorite. But American Dream’s apple strudel cashew butter has crushed gluten-free shortbread cookies, caramel chips, and diced crunchy cinnamon apples just swimming around in each jar, so the flavor of these blondies are apple-solutely amazing. At only 134 calories a blondie, you can totally go nuts for these cashew butter blondies.
The terrible puns truly never end. But thank God they’re served with a side of dessert. Recipe and Instructions
Apple Strudel Cashew Butter Blondies
Soft, sweet blondies meet with apple strudel cashew butter
You could definitely replace the cashew butter with peanut butter or almond butter depending on allergies and flavor preferences. Use a 1:1 replacement. You can also use regular flour if not gluten free or regular sugar. This will impact the macros, though.
Ingredients
FOR THE BLONDIE BASE
*45 grams (1/2 c) Quest vanilla milkshake protein powder
*50 g (1/3 c) King Arthur gluten free flour
*48 g (1/4 cup) Lakanto granular monkfruit
*24 g (3 TBS) PbFit powder or powdered cashew/almond/peanut butter
*1/2 tsp baking powder
*1/2 tsp vanilla extract
*1/3 c Fairlife fat free or skim milk
*225 g (1 c) fat free Greek yogurt
*28 g (2 TBS) American Dream Apple Strudel Cashew Butter
FOR THE SWIRL
*58 g (4 TBS) American Dream Apple Strudel Cashew Butter
*15 ML (1 TBS) sugar free syrup
*30 g (@ TBS) Hershey’s cinnamon chips
Directions
- Preheat oven to 350 and grease aN 8×8 pan with cooking spray
- Mix all dry ingredients (protein powder, flour, monkfruit, PB powder, and baking powder) well in a large bowl
- In a medium bowl, whisk the yogurt, extract, cashew butter, and milk until smooth
- Dump liquids into large bowl with dry ingredients, mixing just until everything comes together (if batter is too stiff, add 1-2 tbs water or milk)
- Pour batter into prepared pan
- Mix the remaining cashew butter with sugar free syrup, then drop by the spoonful into the batter, using a knife to create swirls of cashew butter
- Top with cinnamon chips
- Bake at 350 for 20-25 minutes (a toothpick should come out with a few crumbs)
- Let cool in the pan on a cooling rack until room temp, then slice, and enjoy!
- Keep leftovers in the fridge (can reheat for 15 seconds to get chips nice and gooey again)
Nutrition
Macros
9 servings
134 cal/12 c/5.1 f/10 p per slice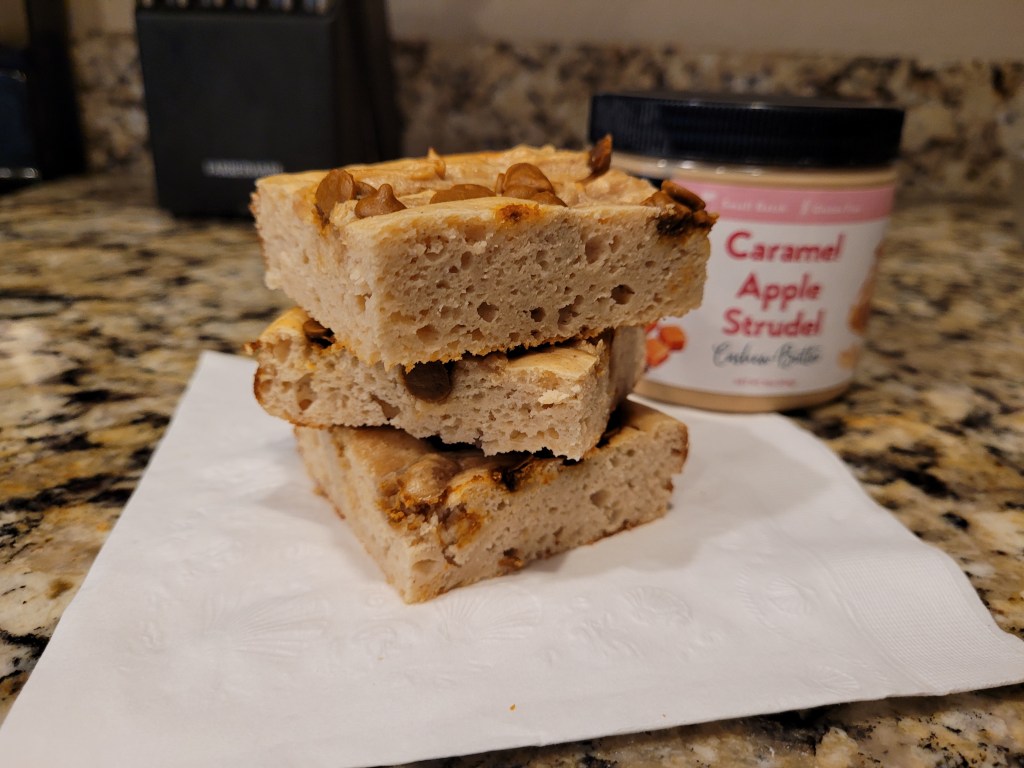
“Call me (call me) on the line…Call me, call me any, anytime” …and I will 100% be there if dessert is involved. - Preheat oven to 350 and grease aN 8×8 pan with cooking spray

Healthy-ish cake, cupcakes, pie, and cheesecake recipes and decorating tips
