-
Here Comes the Sun(flower)

I do not have a sunny disposition (it’s more gloom-adjacent), but it’s summer and I’m trying to perk up instead of wilting in the heat. In order to avoid a funk, I wanted to create a good connotation to go along with the sun. You know, trick myself mentally into liking it and whatnot. Naturally, this meant a Pavlovian-response was going to be necessary. You know, see sun: want sweets (and not, “see sun: burst into flames”). There are few things in the world that make me happier than a good dessert, so in the name of science, I forged ahead. After all, what is brighter and more cheerful than a field full of sunflowers and more determined than the bumblebee?
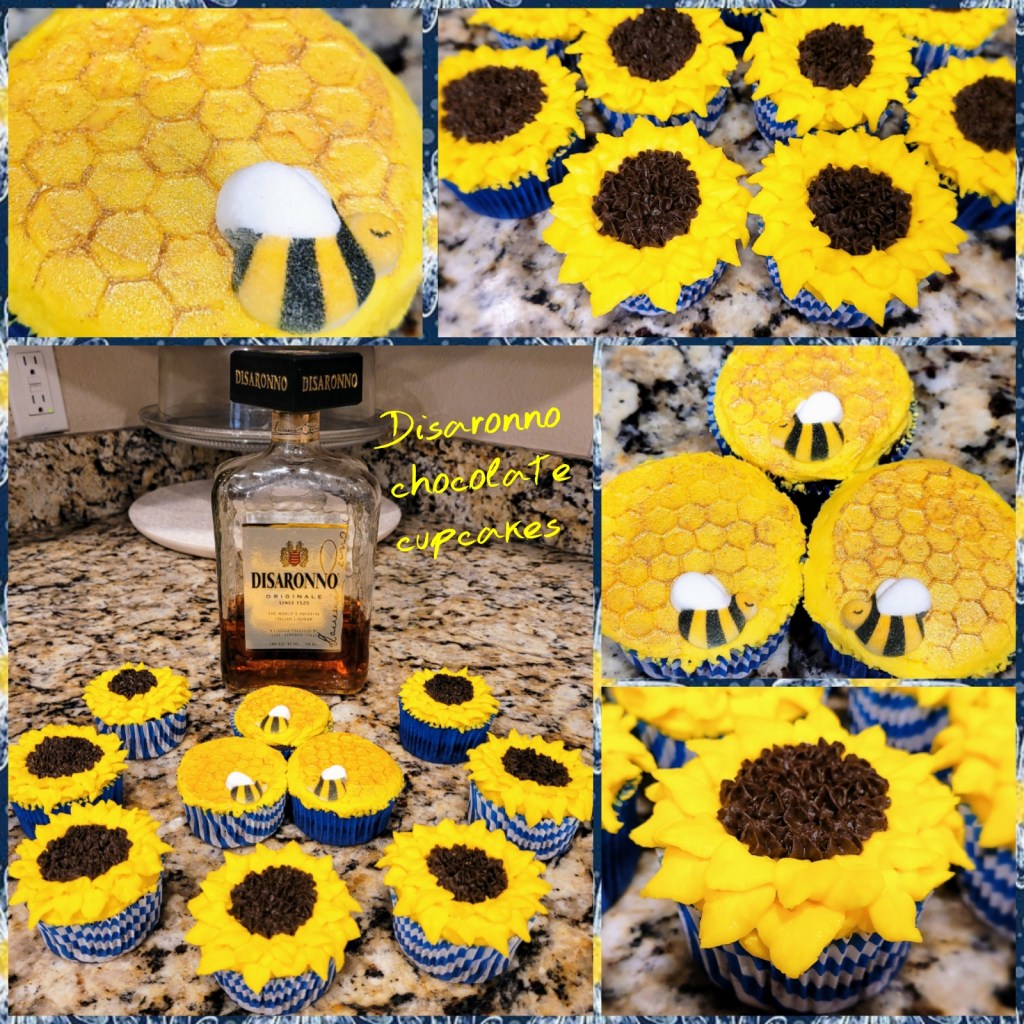
The answer is Disaronno. These un-bee-liavably cute cupcakes are chocolate Disaronno cupcakes with cream cheese Disaronno frosting; if I can’t trick myself into liking summer, I’ll at least be somewhat tipsy for it. I was actually going to make Baileys cupcakes, but I didn’t know I was out of baking Baileys (this is most assuredly a thing), so a quick compromise was made, and this chocolate amaretto deliciousness came to bloom. The Disaronno really brings out the chocolate flavor, and you’re left with that smooth amaretto aftertaste with each bite: so moist, so chocolately, so amazing. I thought about liquefying my leftover frosting to drink it–because that Disaronno cream cheese is HEAVENLY. The “sun most definitely shone down, angels sang, whole nine yards” kinda good. Also, because I’m either a witch or a very determined fit person, these are super macro friendly. You know, so you don’t have to worry about becoming chub-bee. They’re only 141 calories per cupcake, 18 cupcakes total.
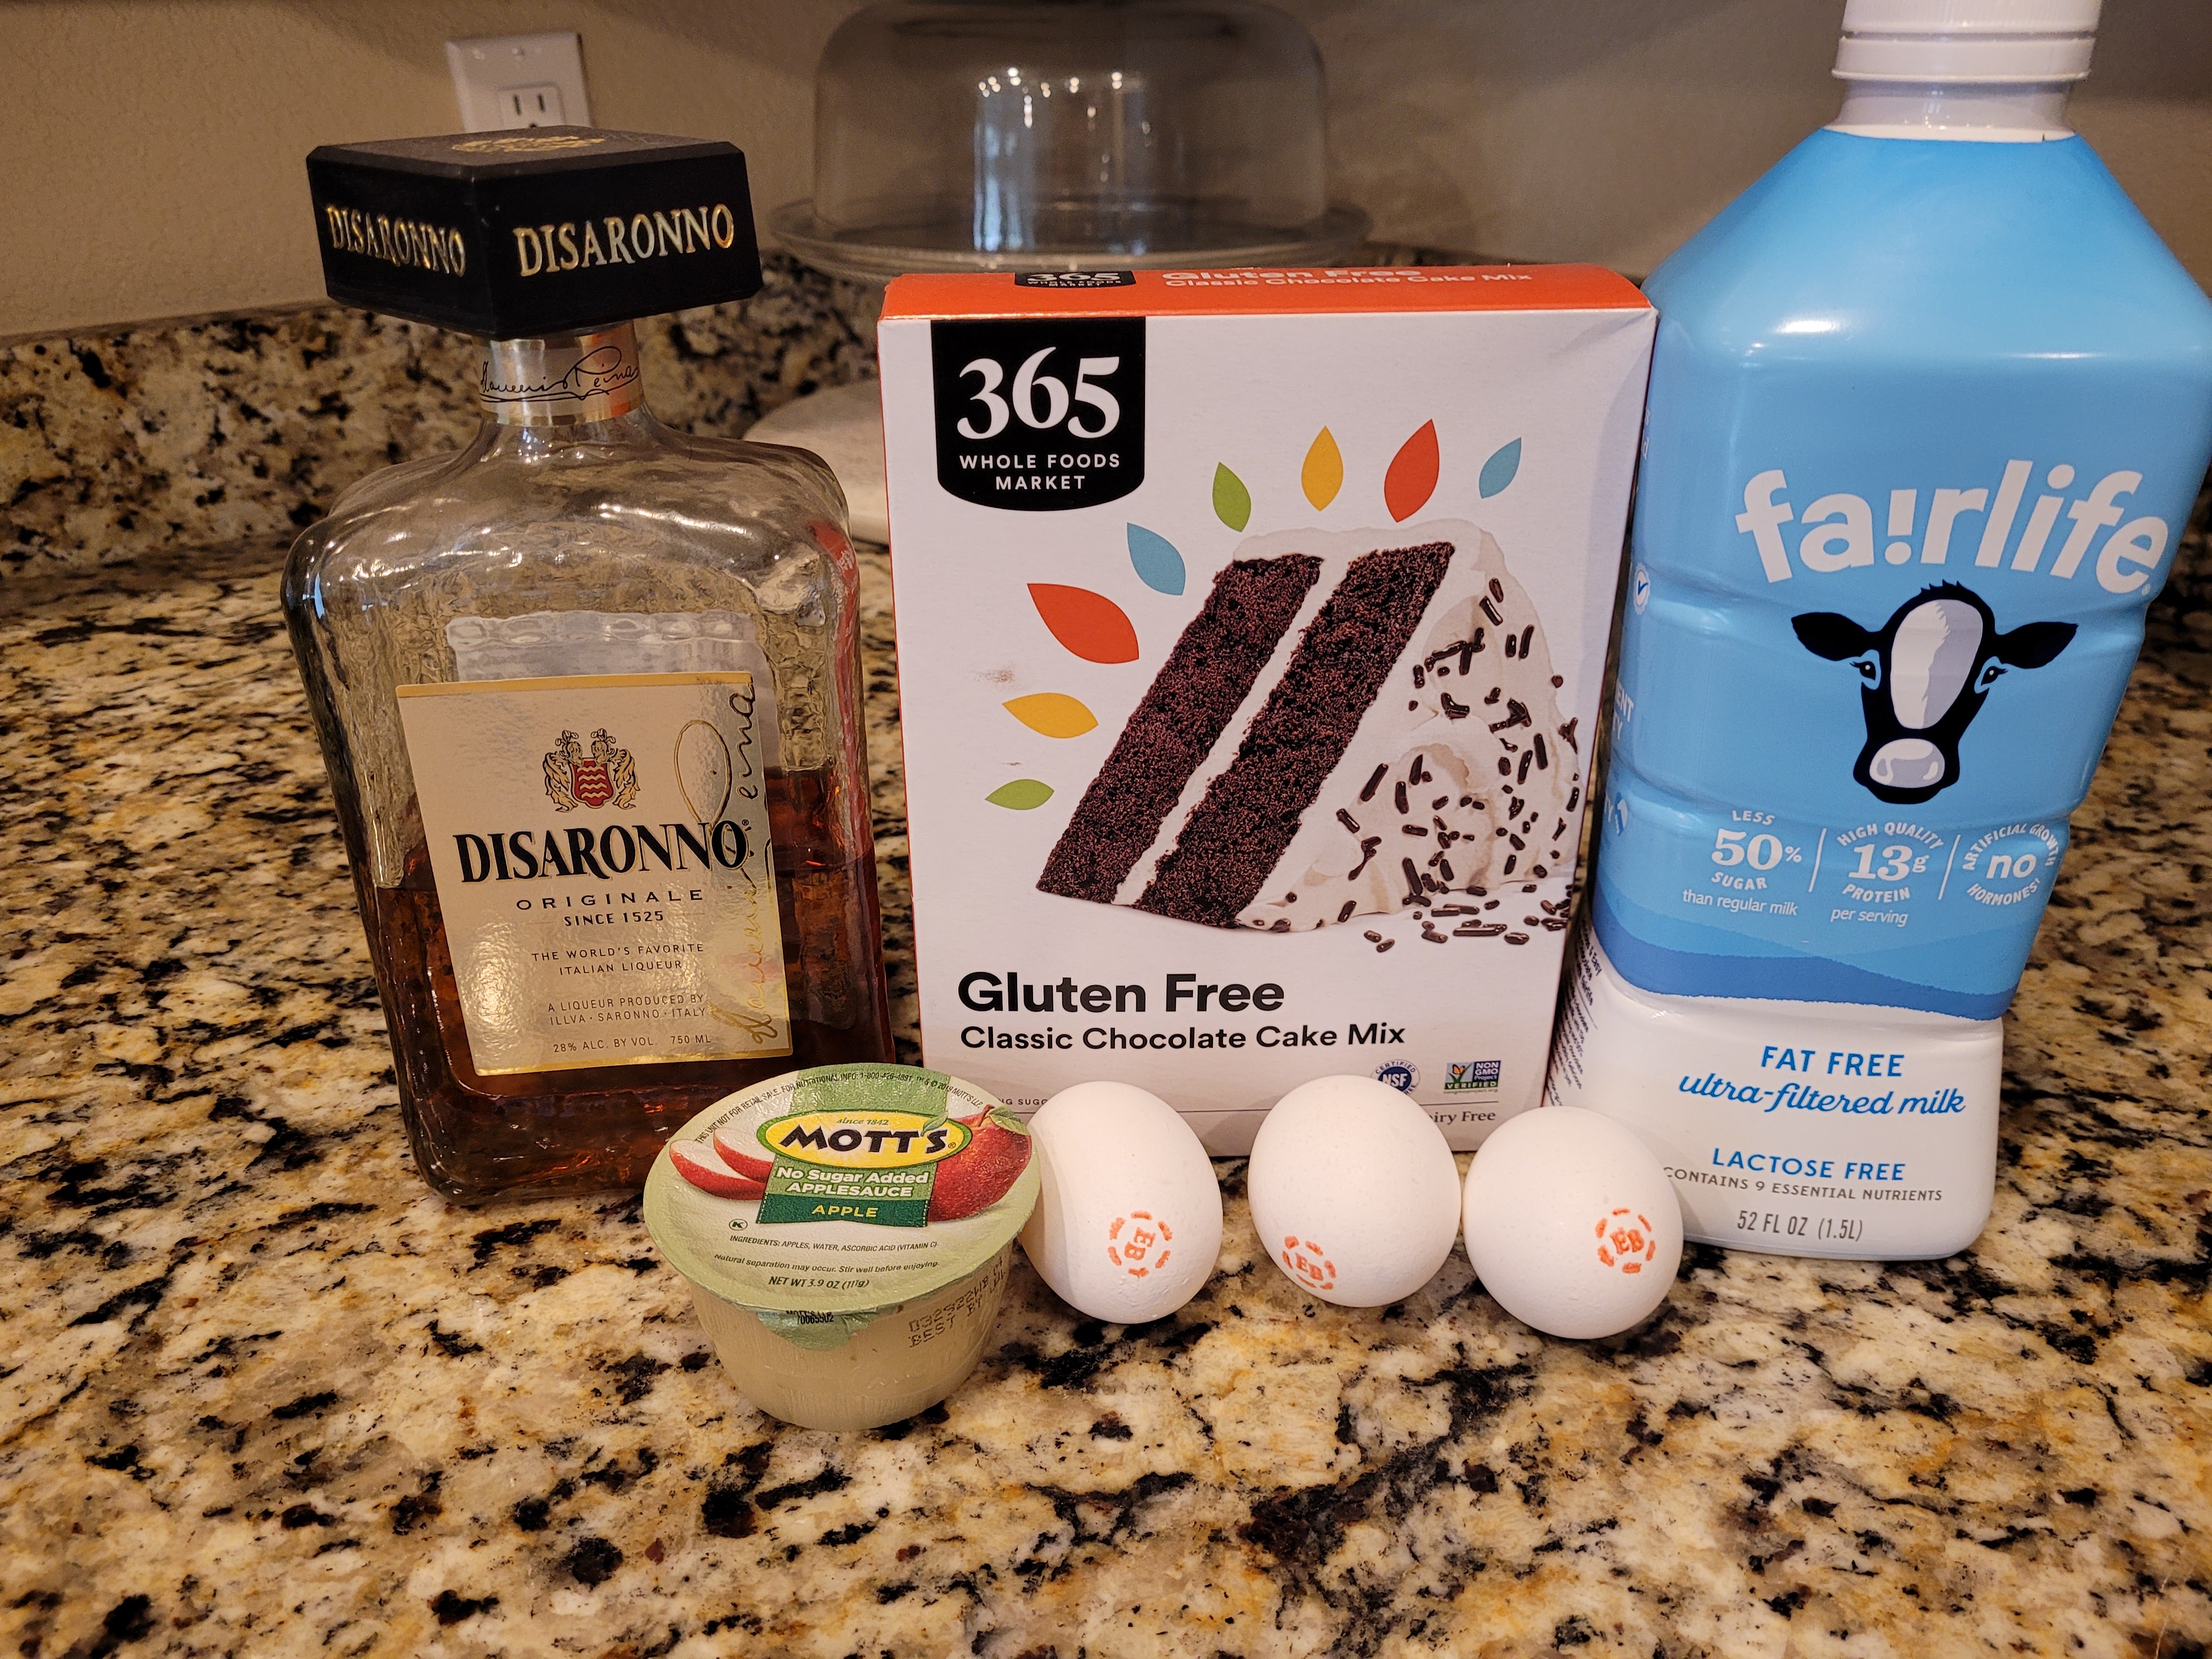
Alas, the final Whole Foods GF cake mix met its end. Poured one out for this. I was saving my last Whole Foods gluten free cake mix left from our move for something really, really good. I’ve tried about 95 different GF cake mixes, but this one will always reign supreme. So if you’re near a Whole Foods…hook a baker up. To make the cupcakes, you need:
- 1 box of gluten free chocolate cake mix, regular if you’re a fortunate soul that can eat gluten
- 3 egg whites (92 grams)
- 1/2 cup of unsweetened applesauce (111 grams)
- 1/2 cup of fat free or skim milk
- 1/4 cup plus 2 TBS Disaronno
You can also up the boozy ante and just use 3/4 cup of Disaronno, but since my Disaronno is drinking Disaronno and not baking Disaronno, I went with less. I need to be able to have an ounce over the rocks in a snifter from time to time to swirl around and feel like a James Bond villain. It’s a real mood booster.
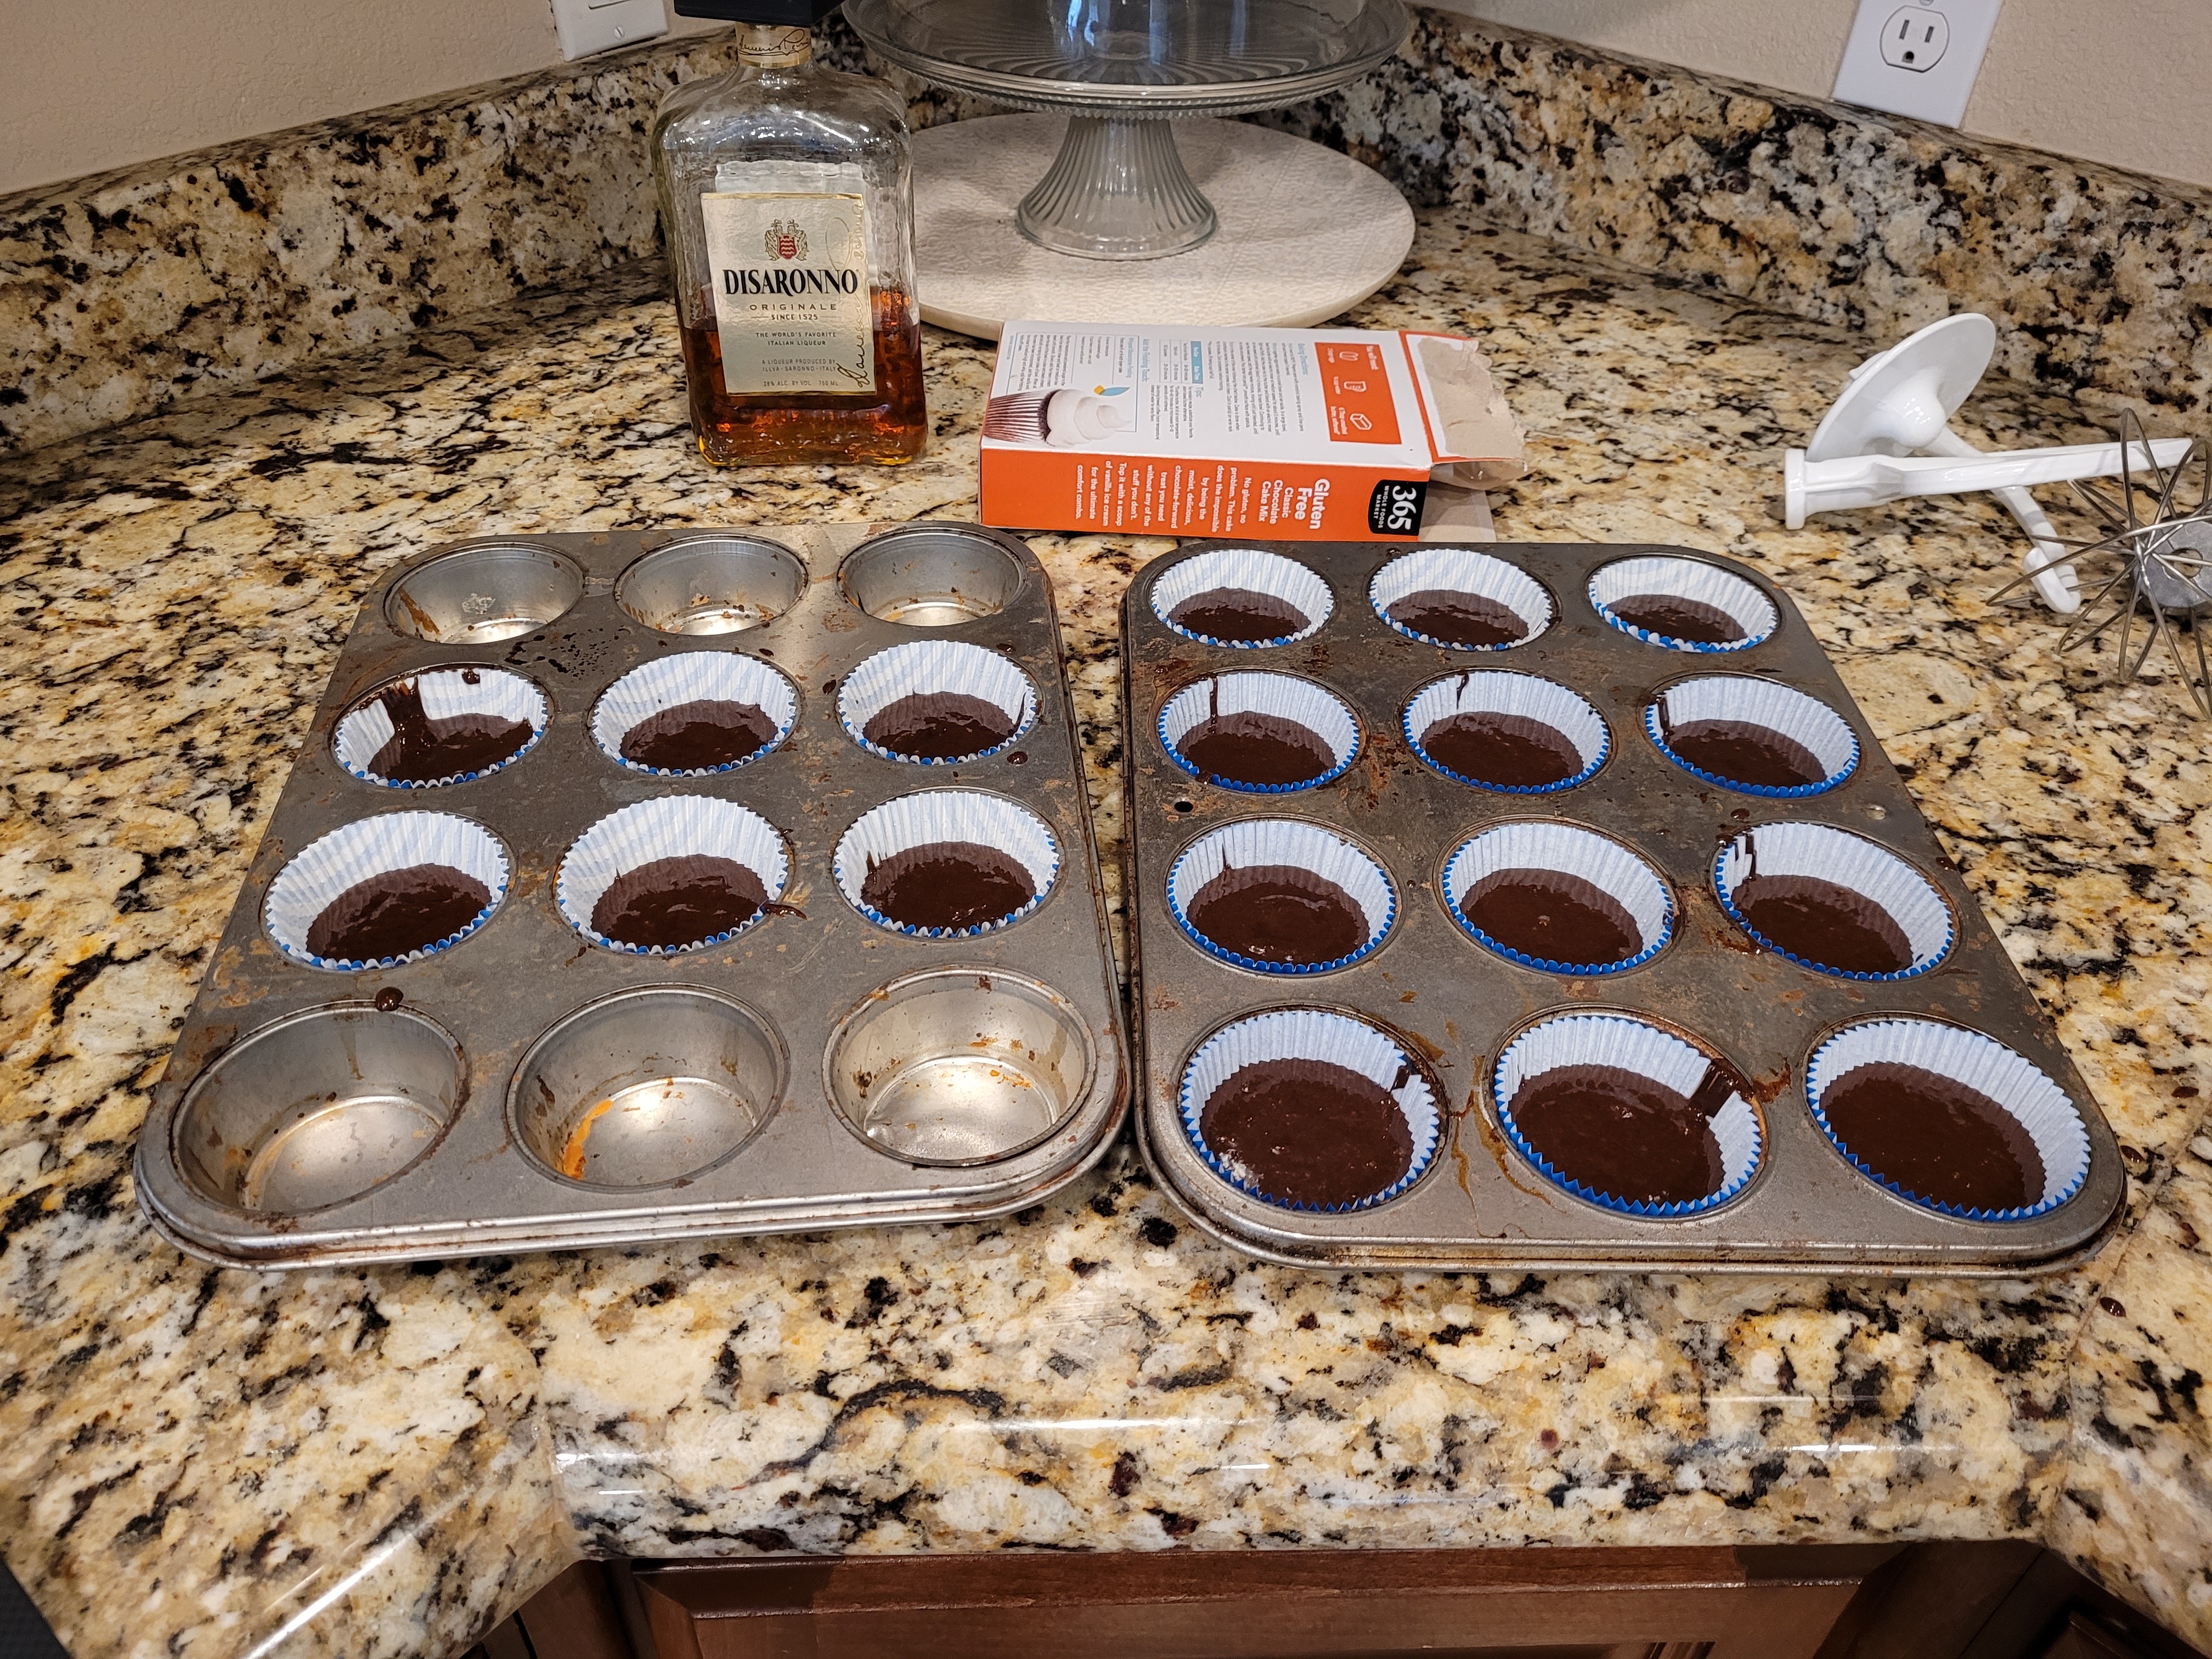
I mean, you could pretend to be James Bond instead, but where’s the fun without any plotting for world domination? Preheat your oven to 350 and line two trays with 18 cupcake liners. Dump all the ingredients into your stand mixer, mixing on low for 30 seconds before bumping to high for 30 more. Never overmix a gluten free recipe unless you enjoy chewing tire rubber. Use a cookie scoop to fill each liner at least halfway full. Bake at 350 for 20 minutes, or until a toothpick comes out of the center of a cupcake clean.
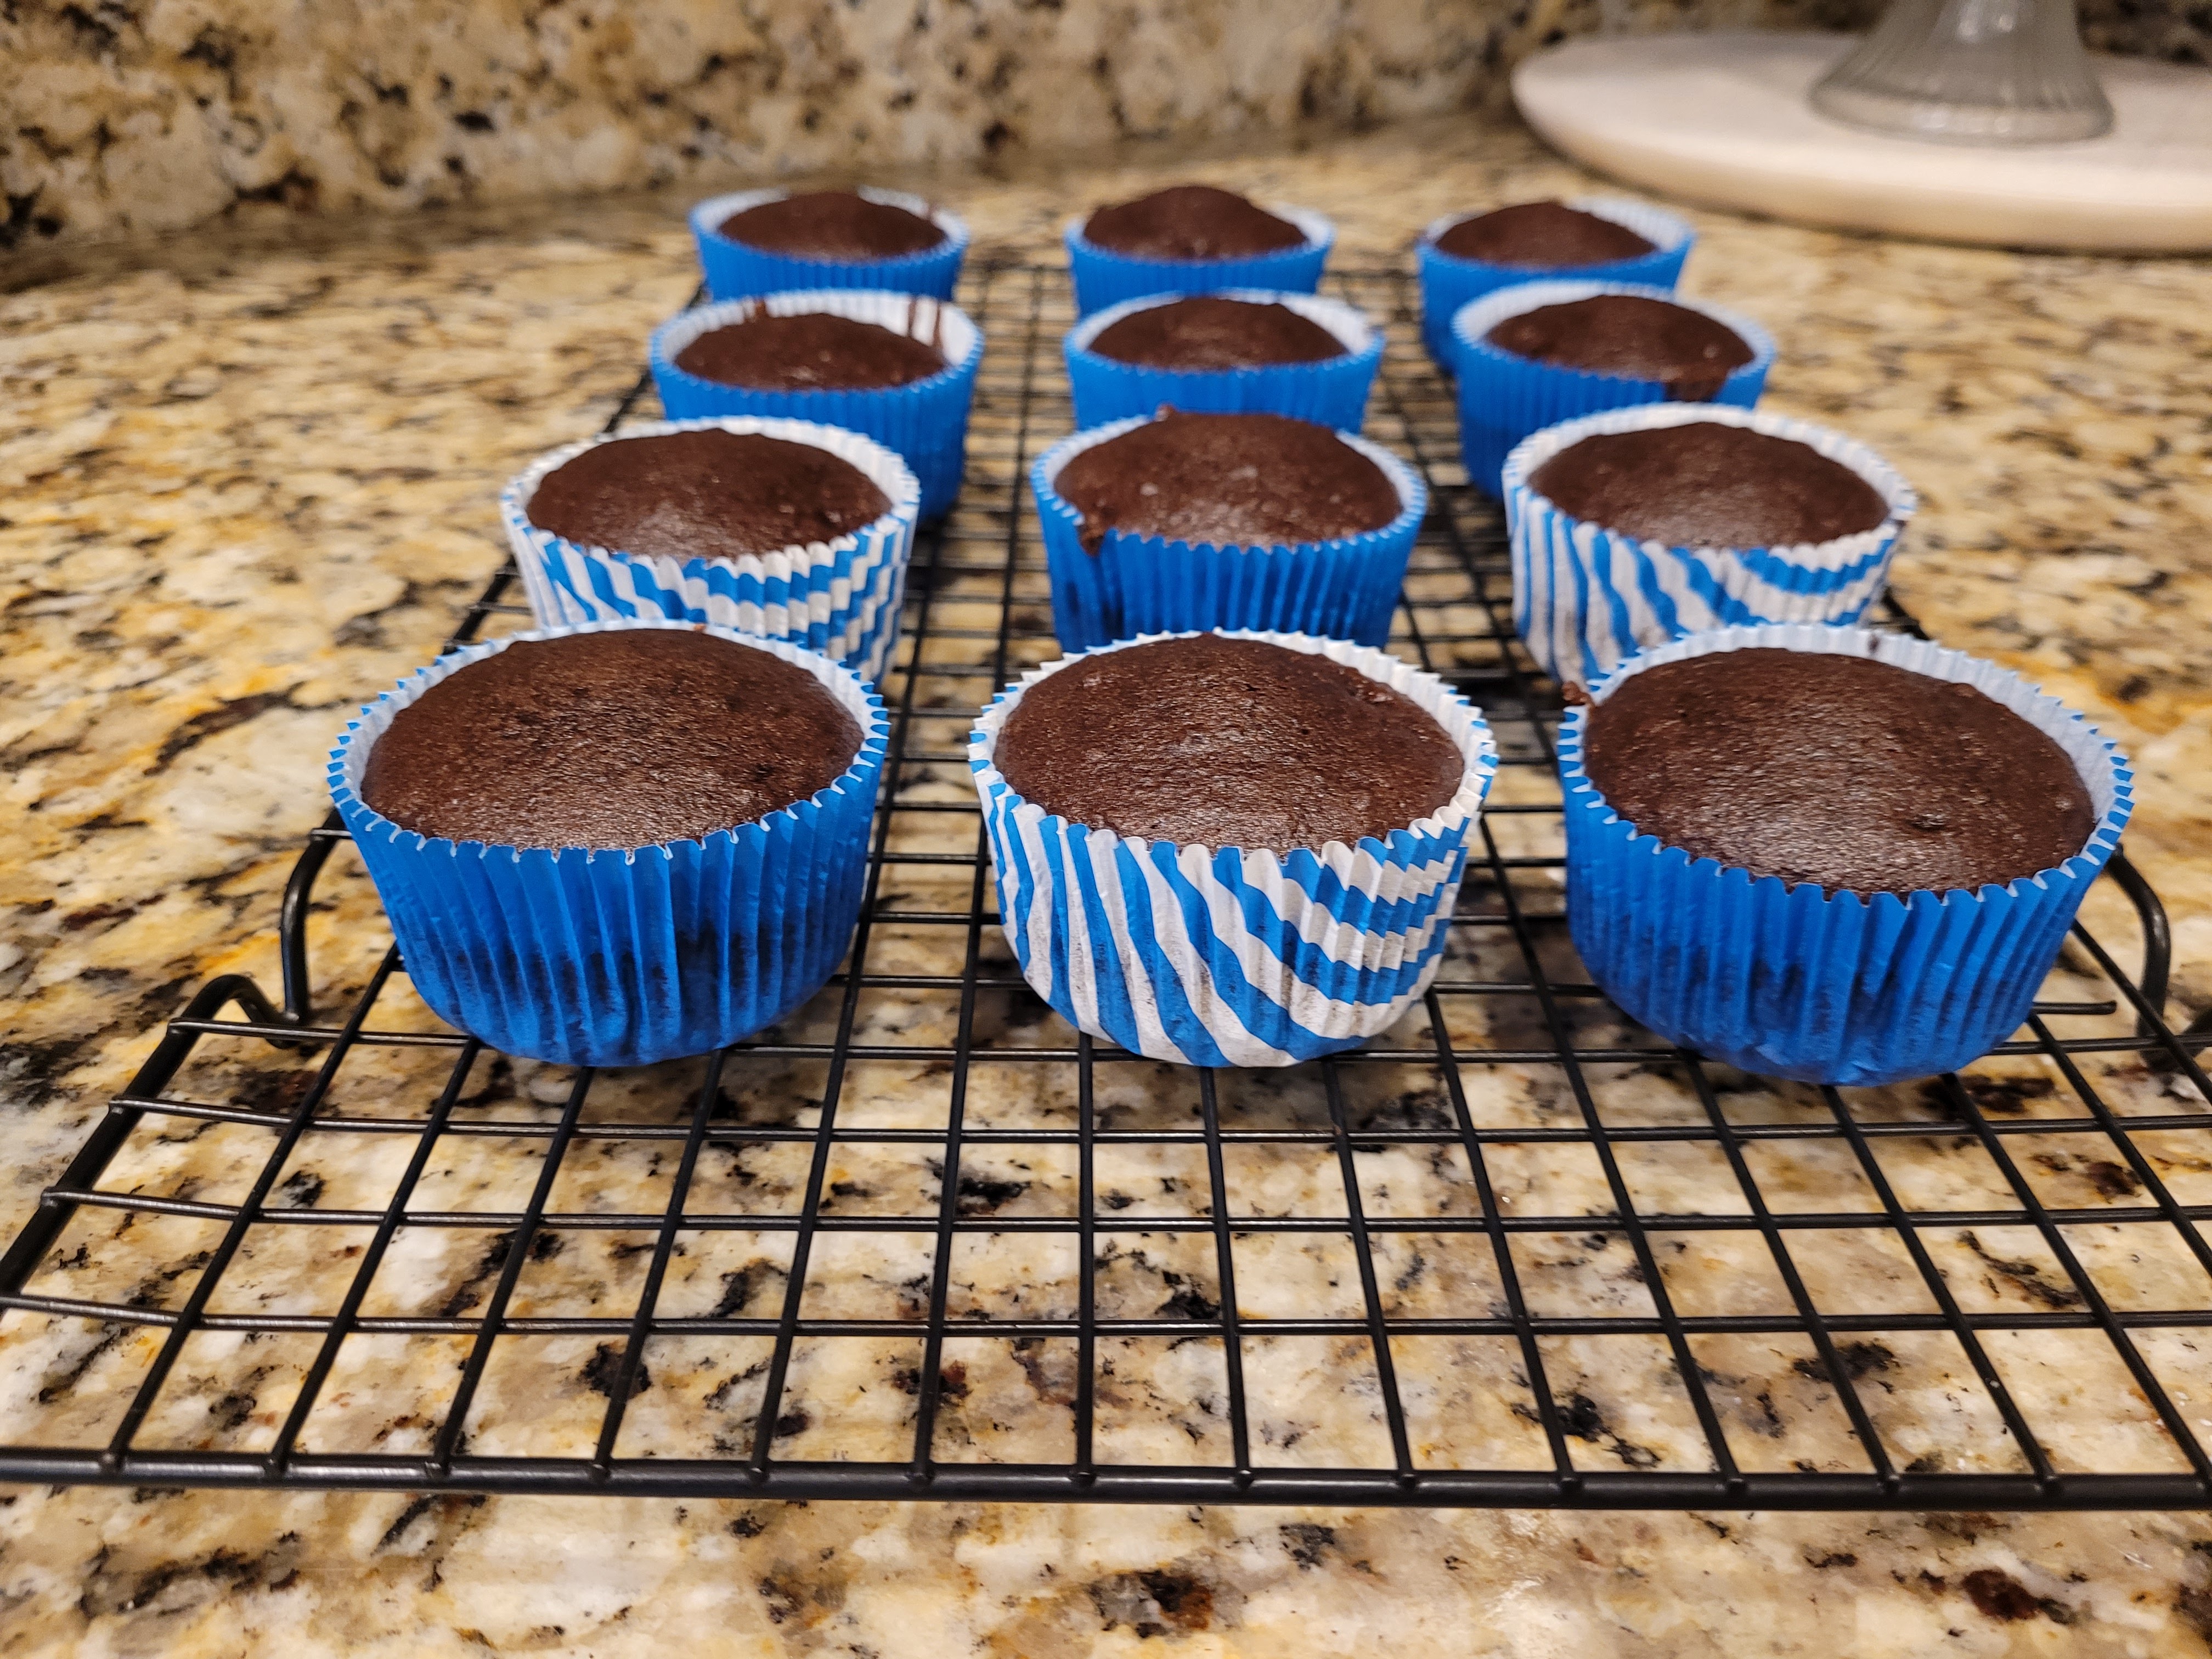
Your house is gonna smell like the inside of a Disaronno bottle…100% recommend. Now, let your cupcakes rest in the pan on top of a cooling rack for about 10 minutes before you remove them. Let them cool completely on the same rack before frosting. I always stick mine in the fridge while I make my frosting, and by then, they’re ready for piping.
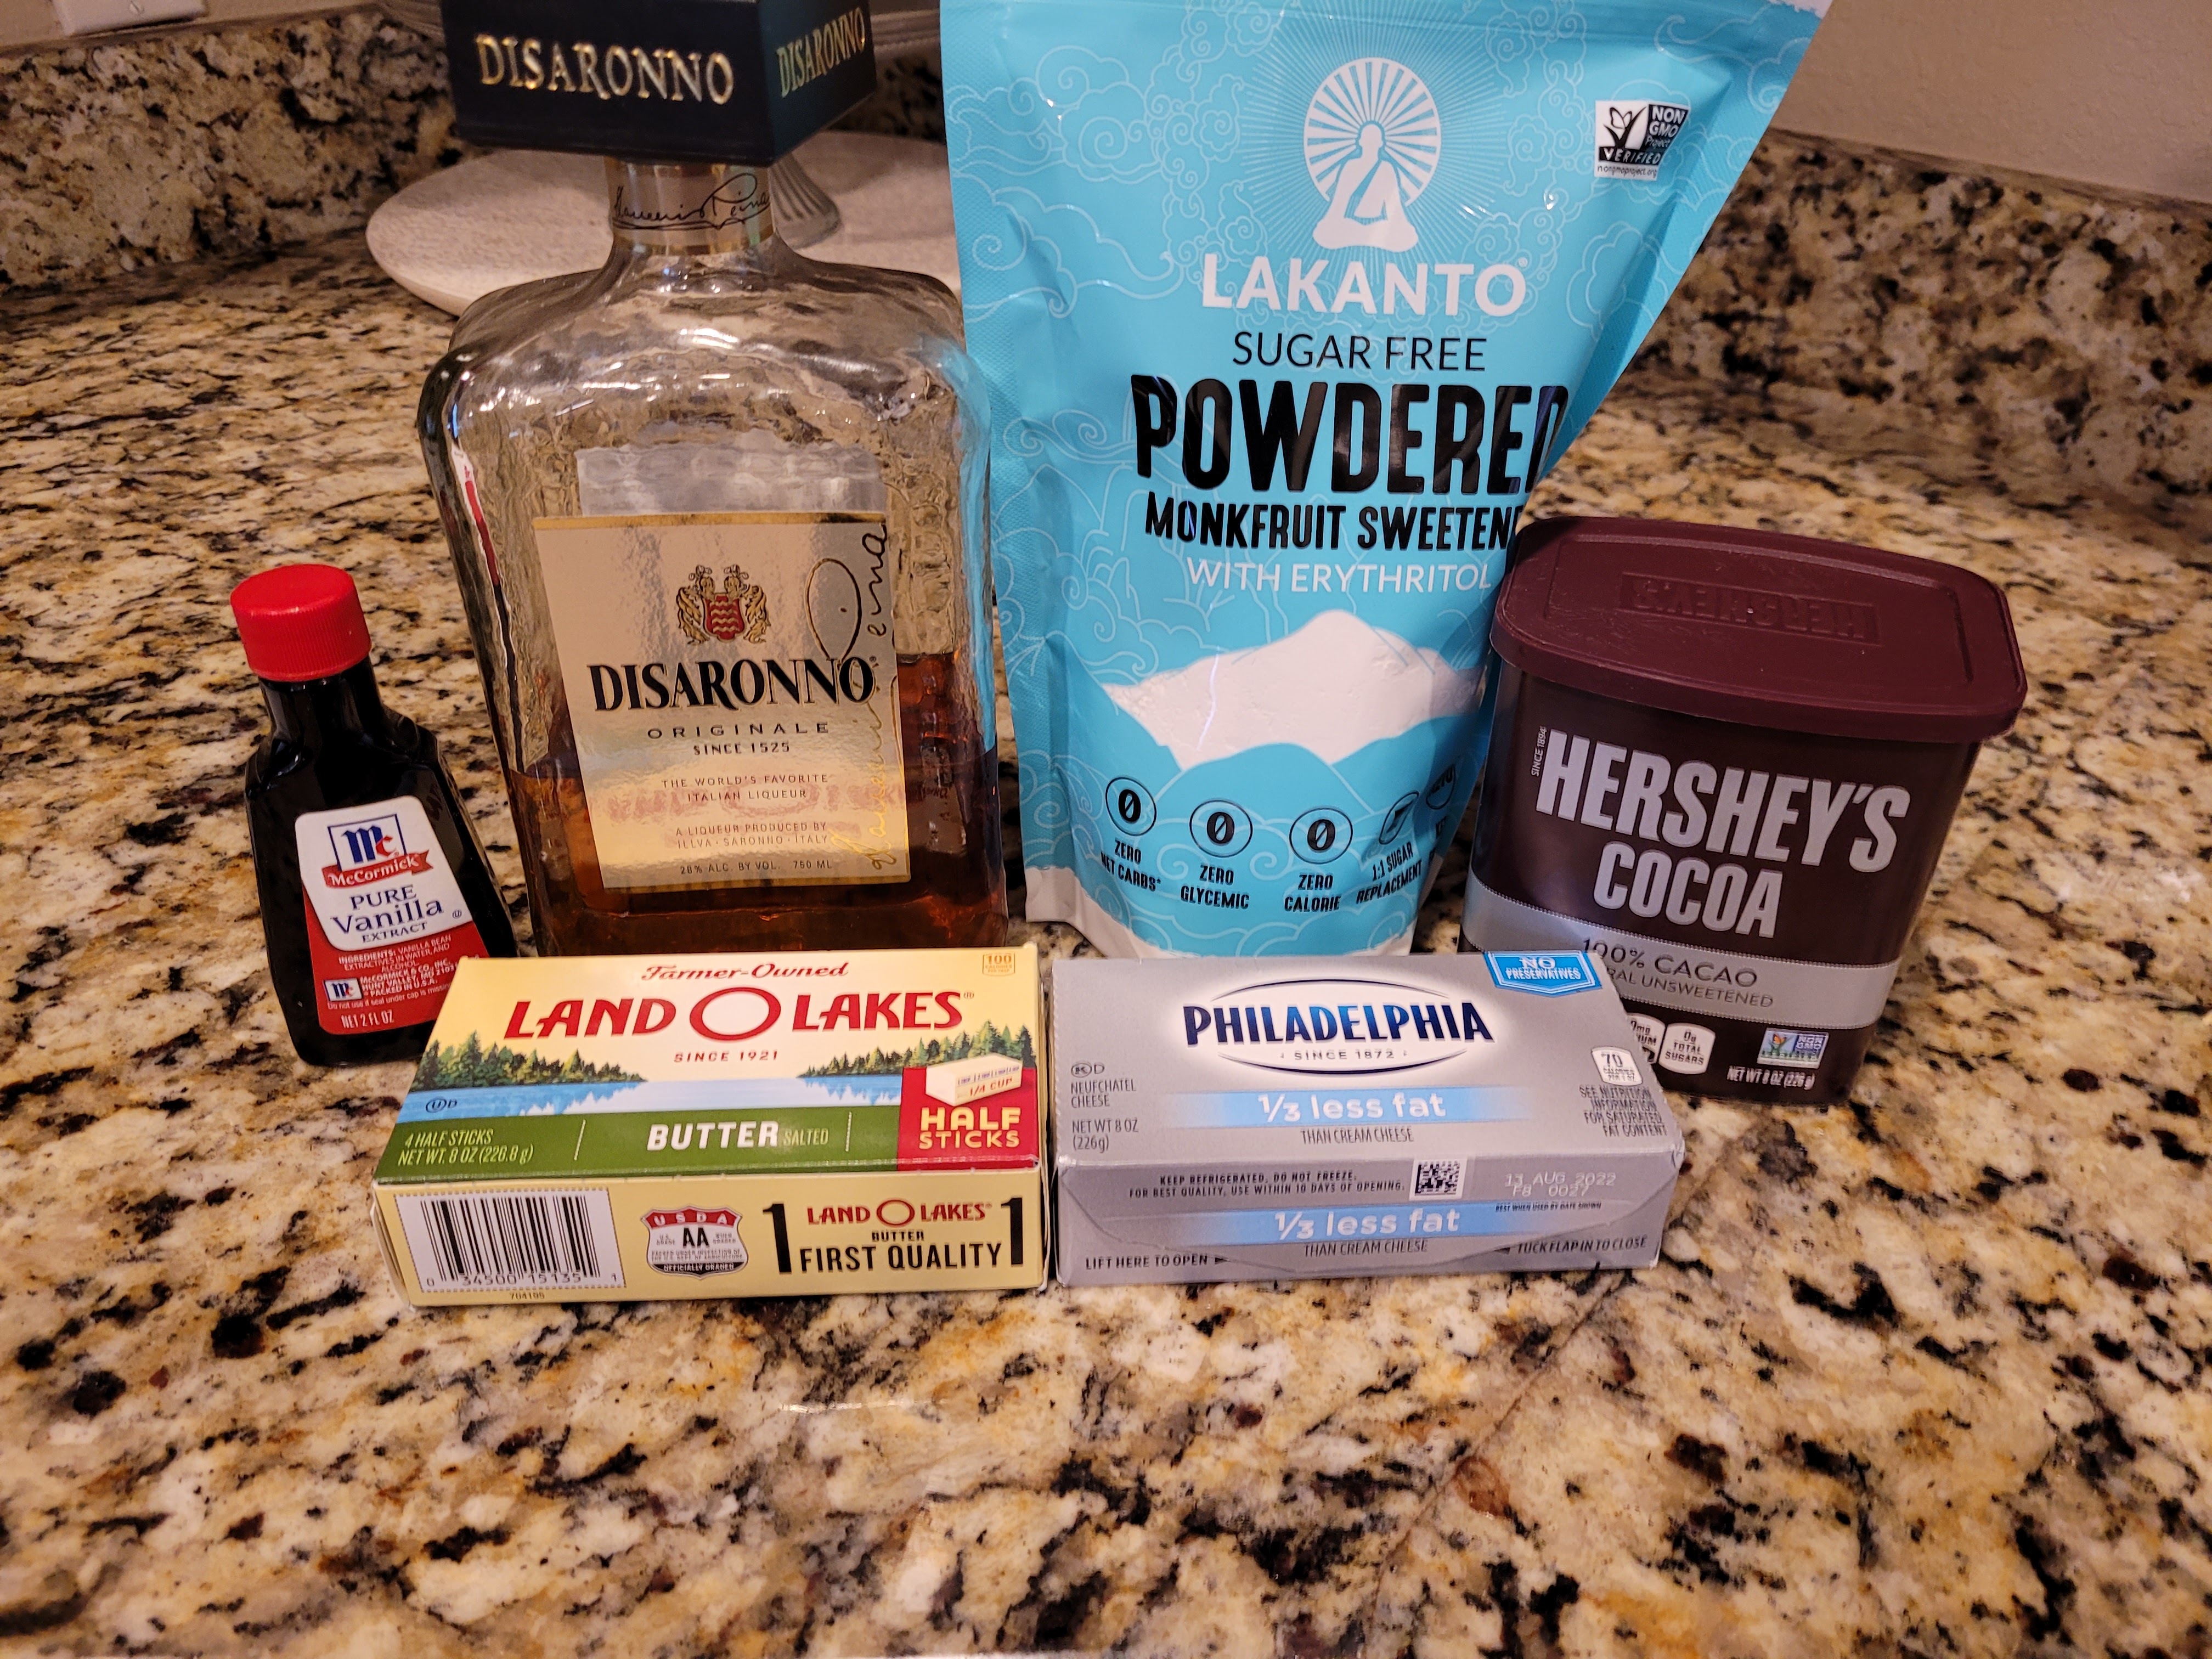
Mhm, real butter making an appearance again already. Totally forgot to strain yogurt overnight for this frosting, so here we are, using butter with all its delicious fat and calories.
- 1/2 cup of butter, softened to room temp (112 grams)
- 8 ounces of 1/3 the fat cream cheese, softened to room temp (225 grams)
- One 16 ounce bag of Lakanto powdered monkfruit or regular powdered sugar (456 grams)
- 1 tsp vanilla extract
- 1.5 ounces Disaronno (3 TBS)
- 1 TBS cocoa, reserved
- Gel dyes in brown and yellow
Mix the butter and cream cheese on medium high until fluffy and light in color, 3 minutes. Add in half of the powdered monkfruit, the vanlla, and 1 TBS of Disaronno. Mix well before adding the remaining monkfruit and 2 TBS of Disaronno. Set aside a small portion in a separate bowl. Add the cocoa powder to this and some brown gel dye. Dye the rest of the frosting in the mixer bowl yellow.
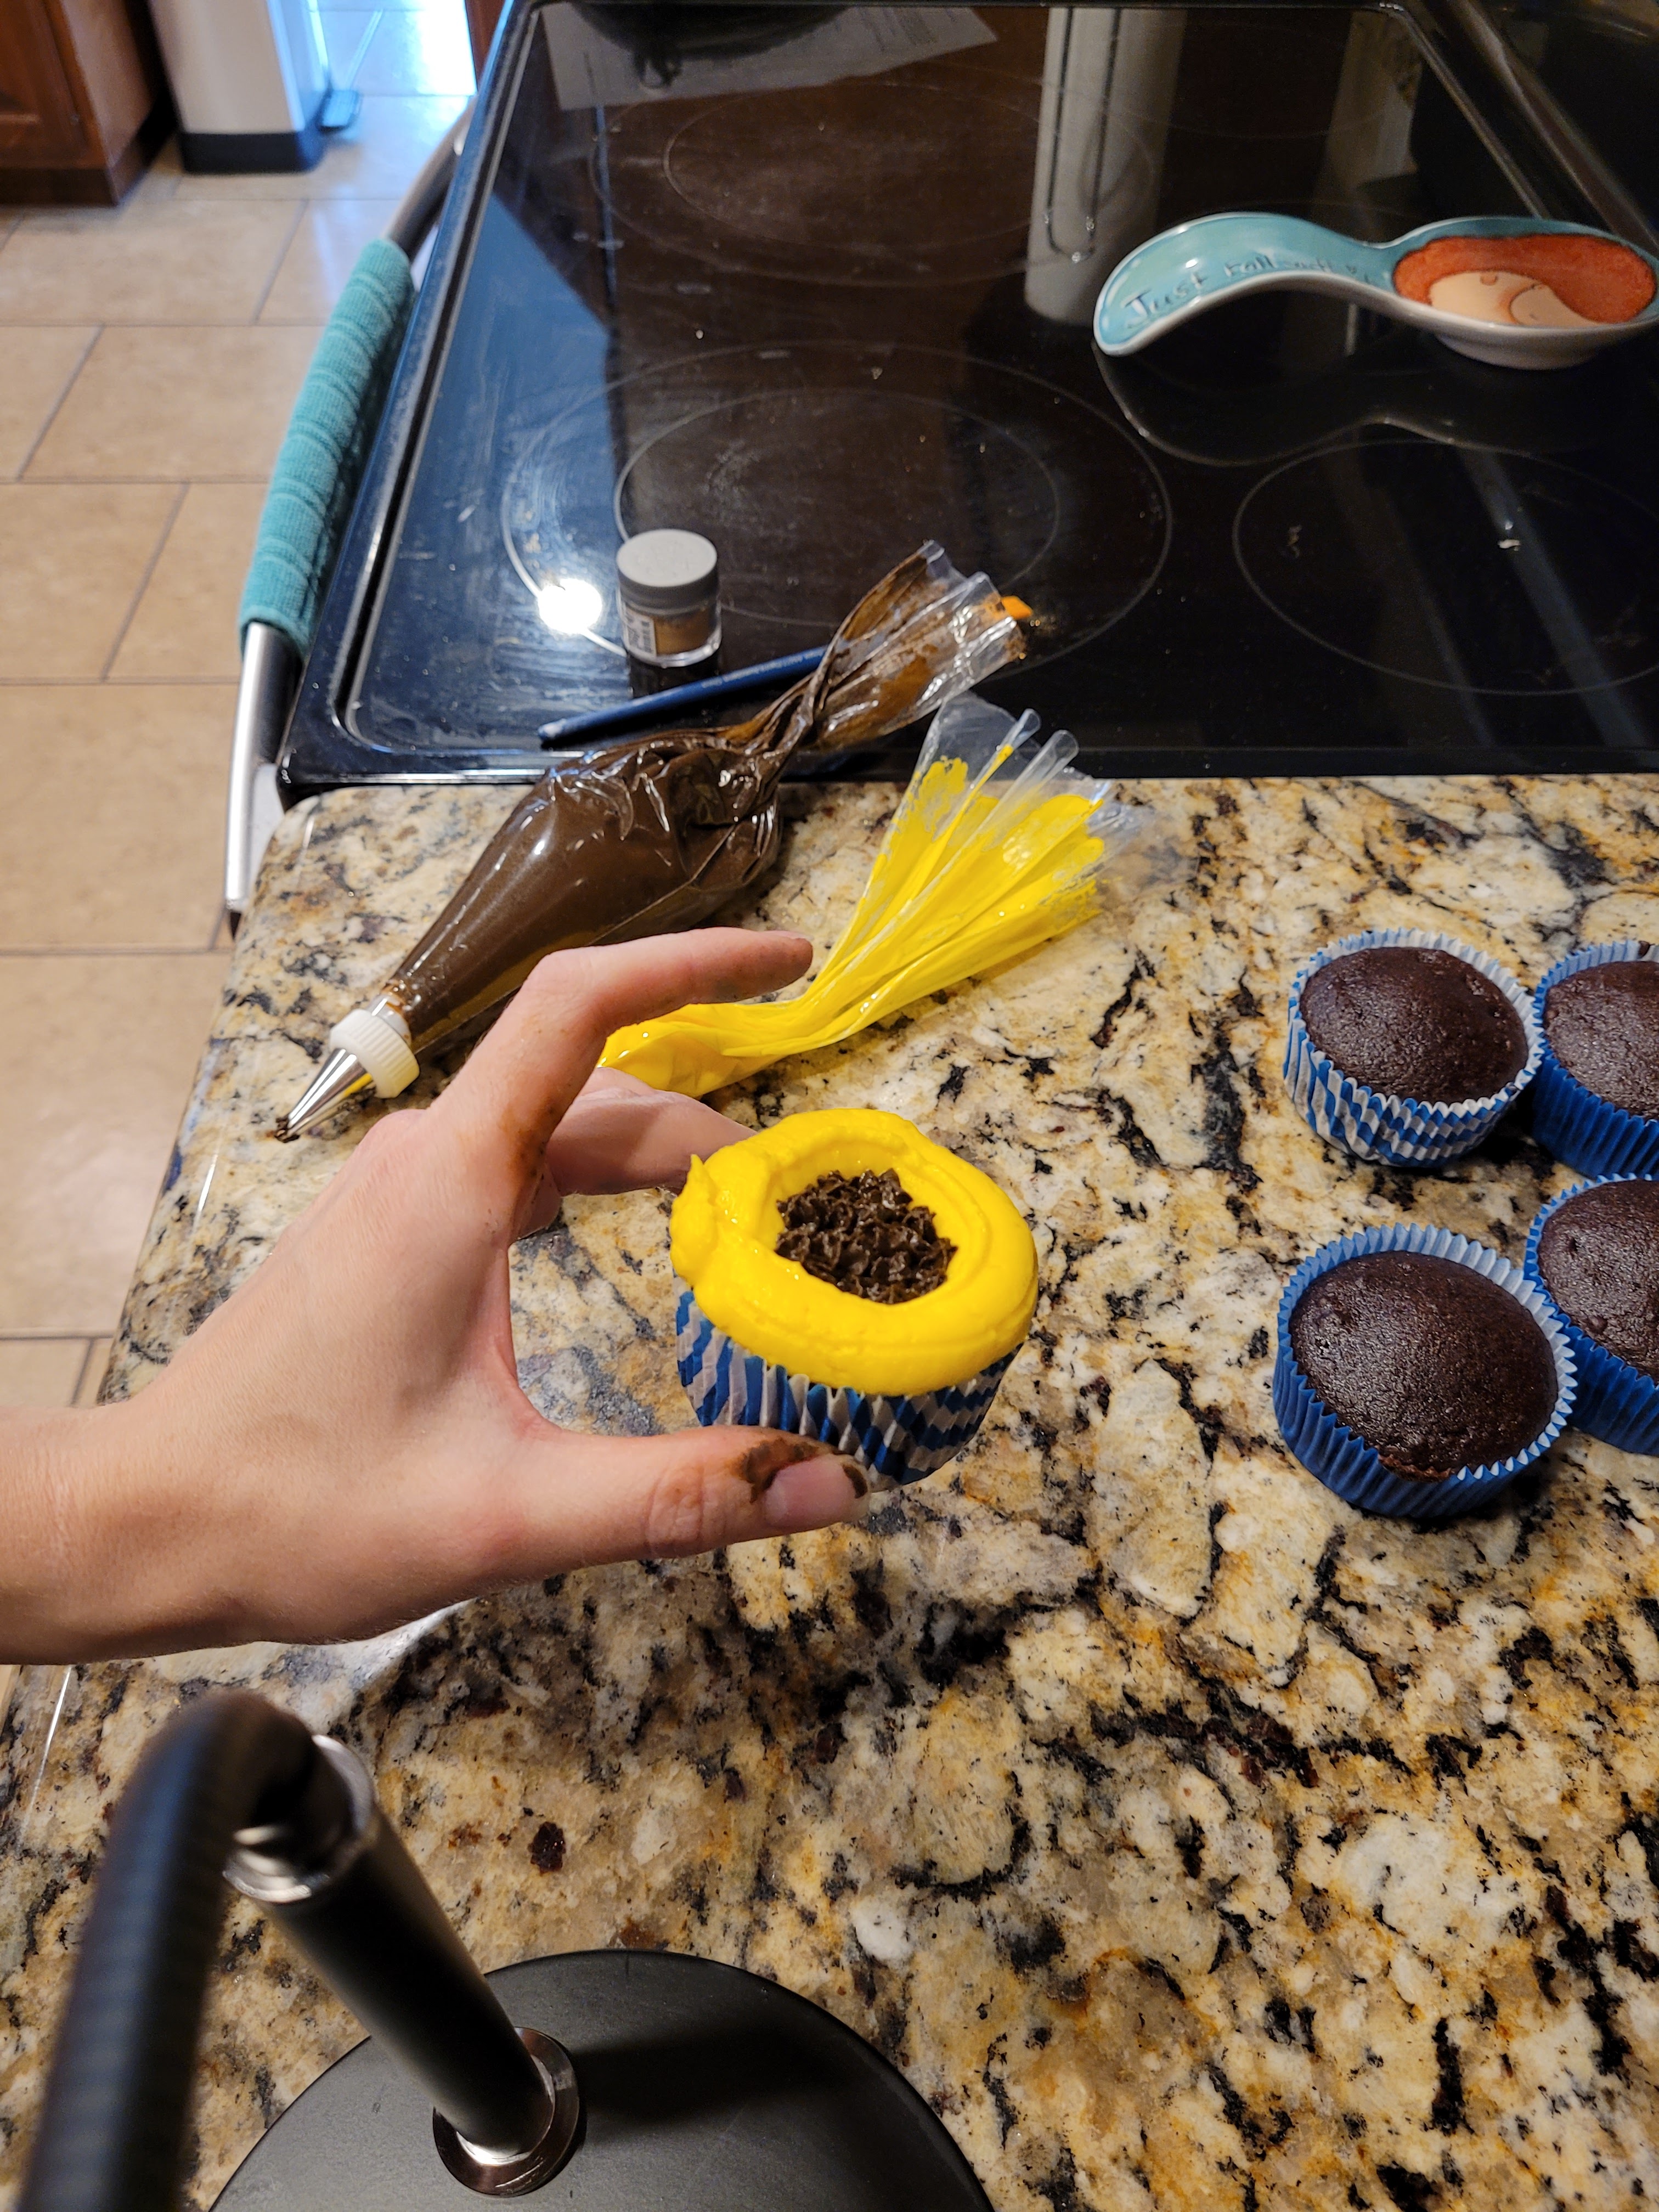
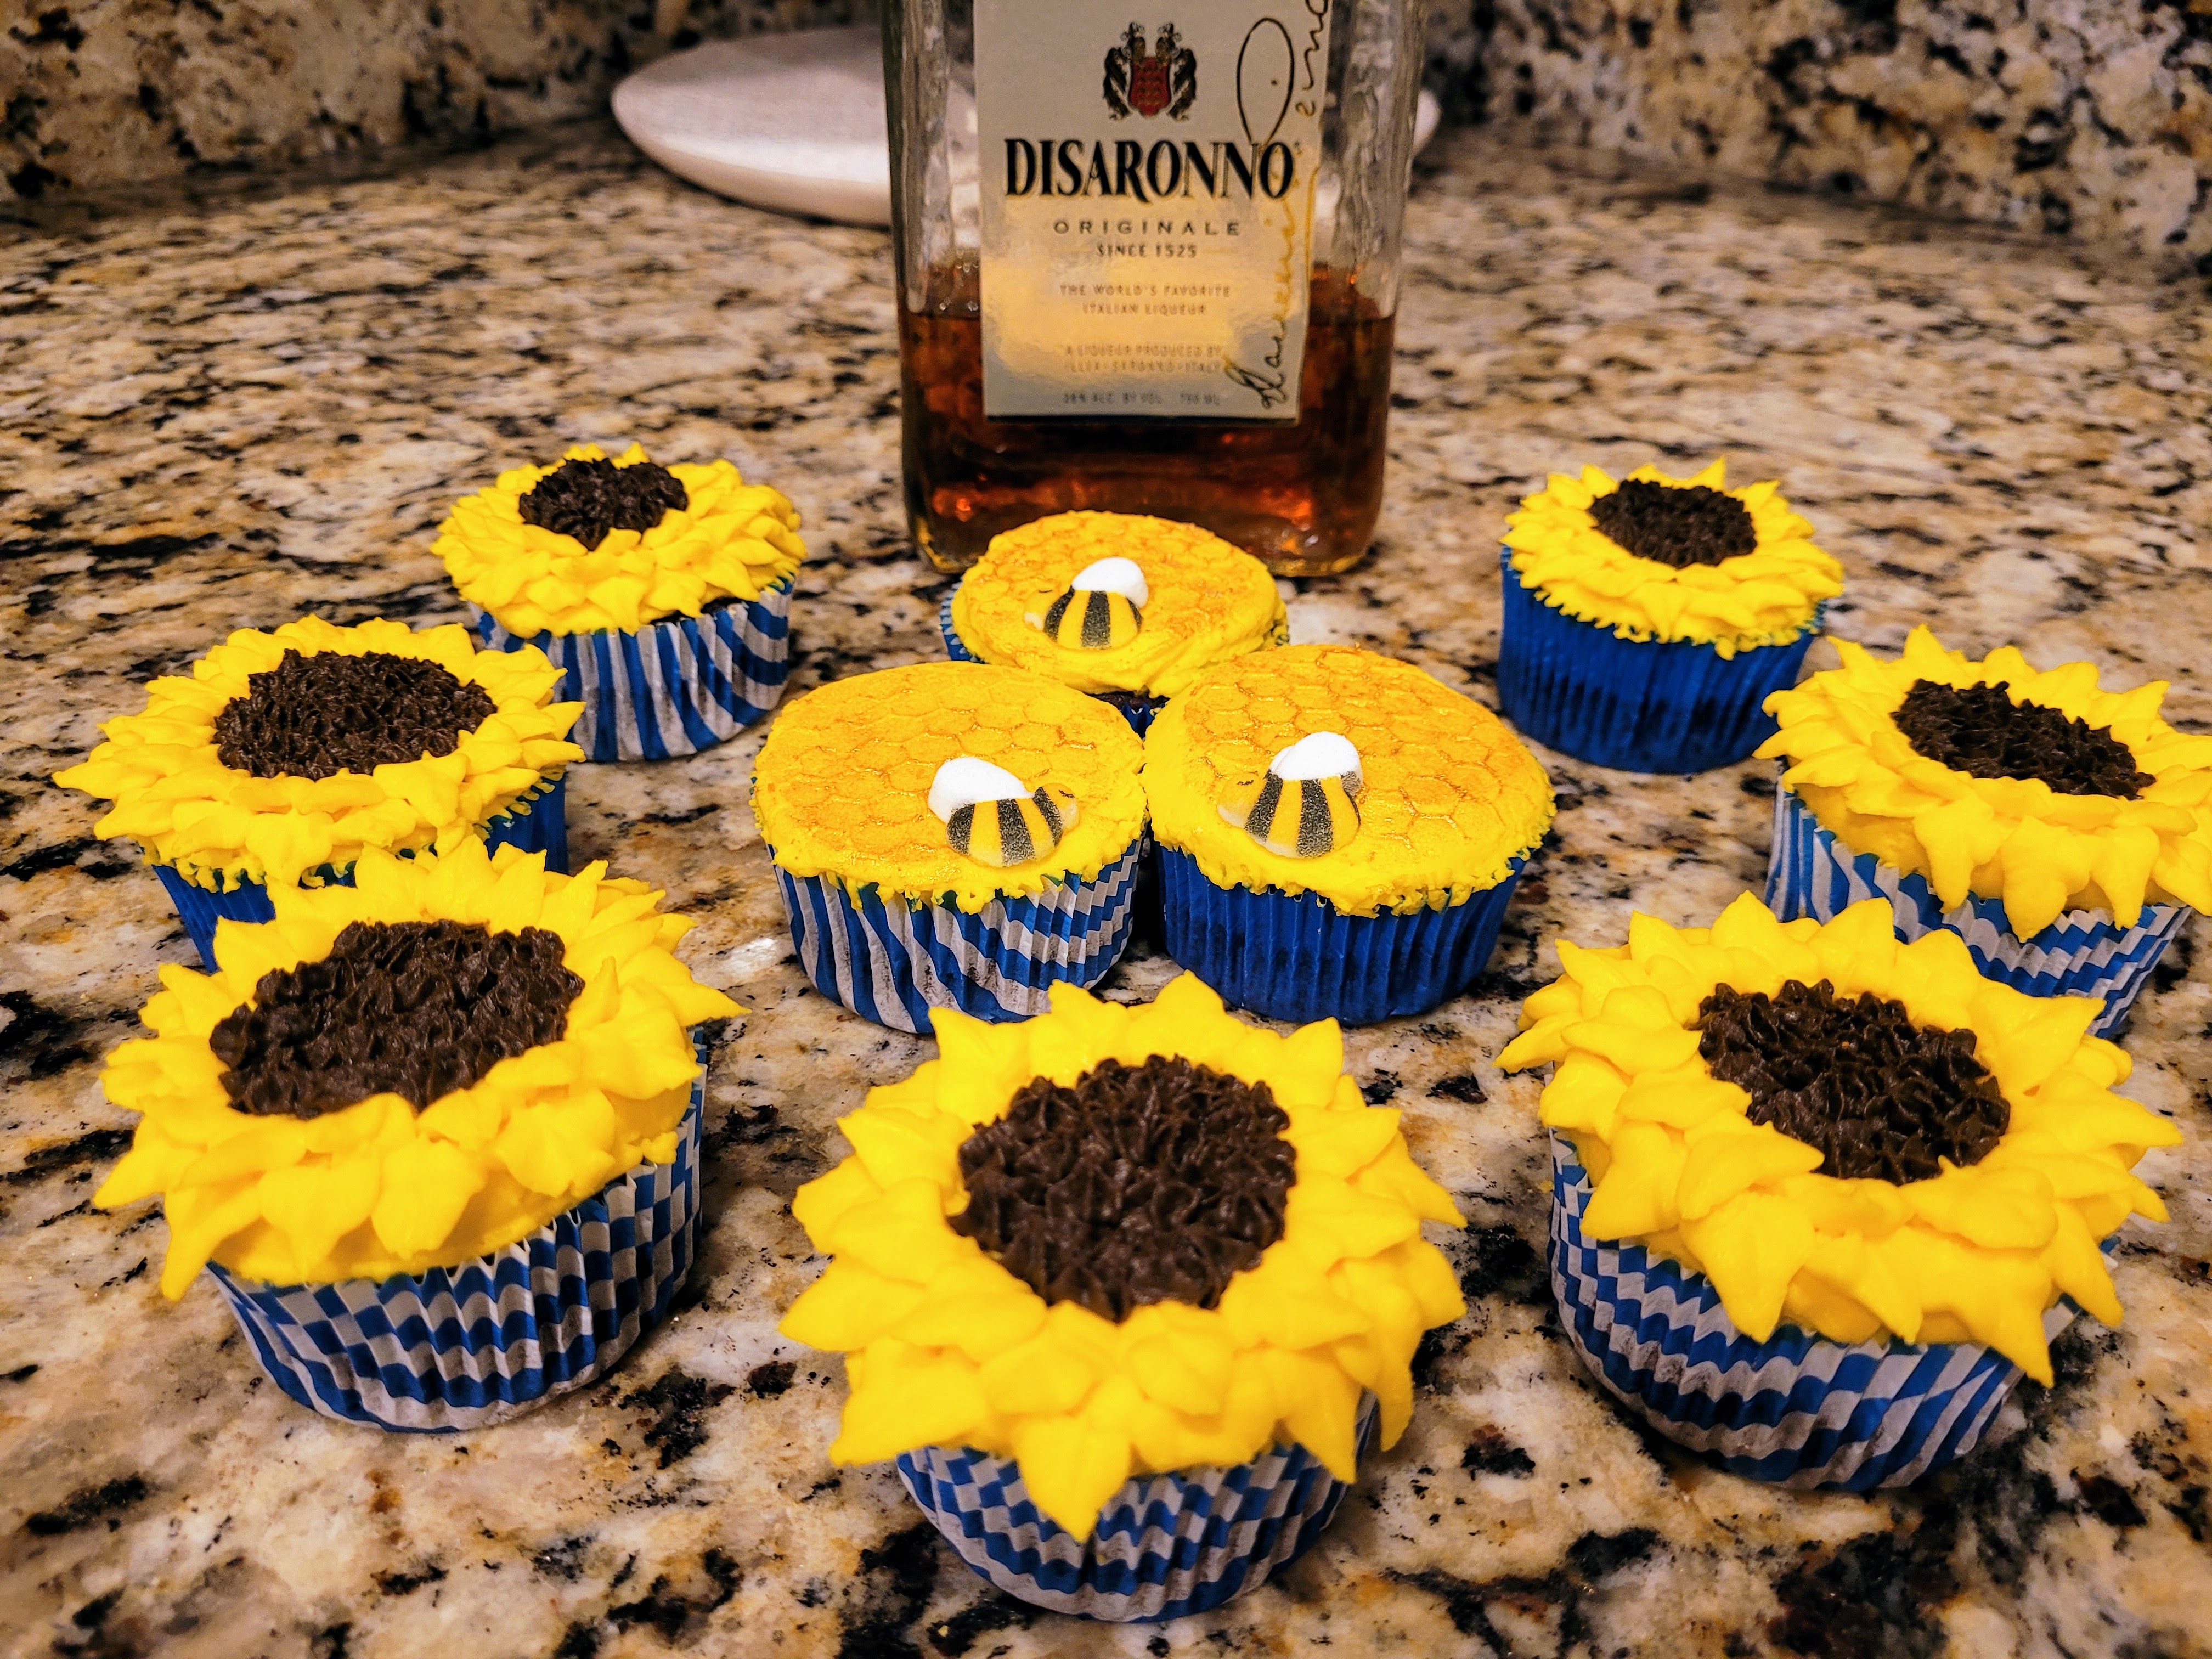
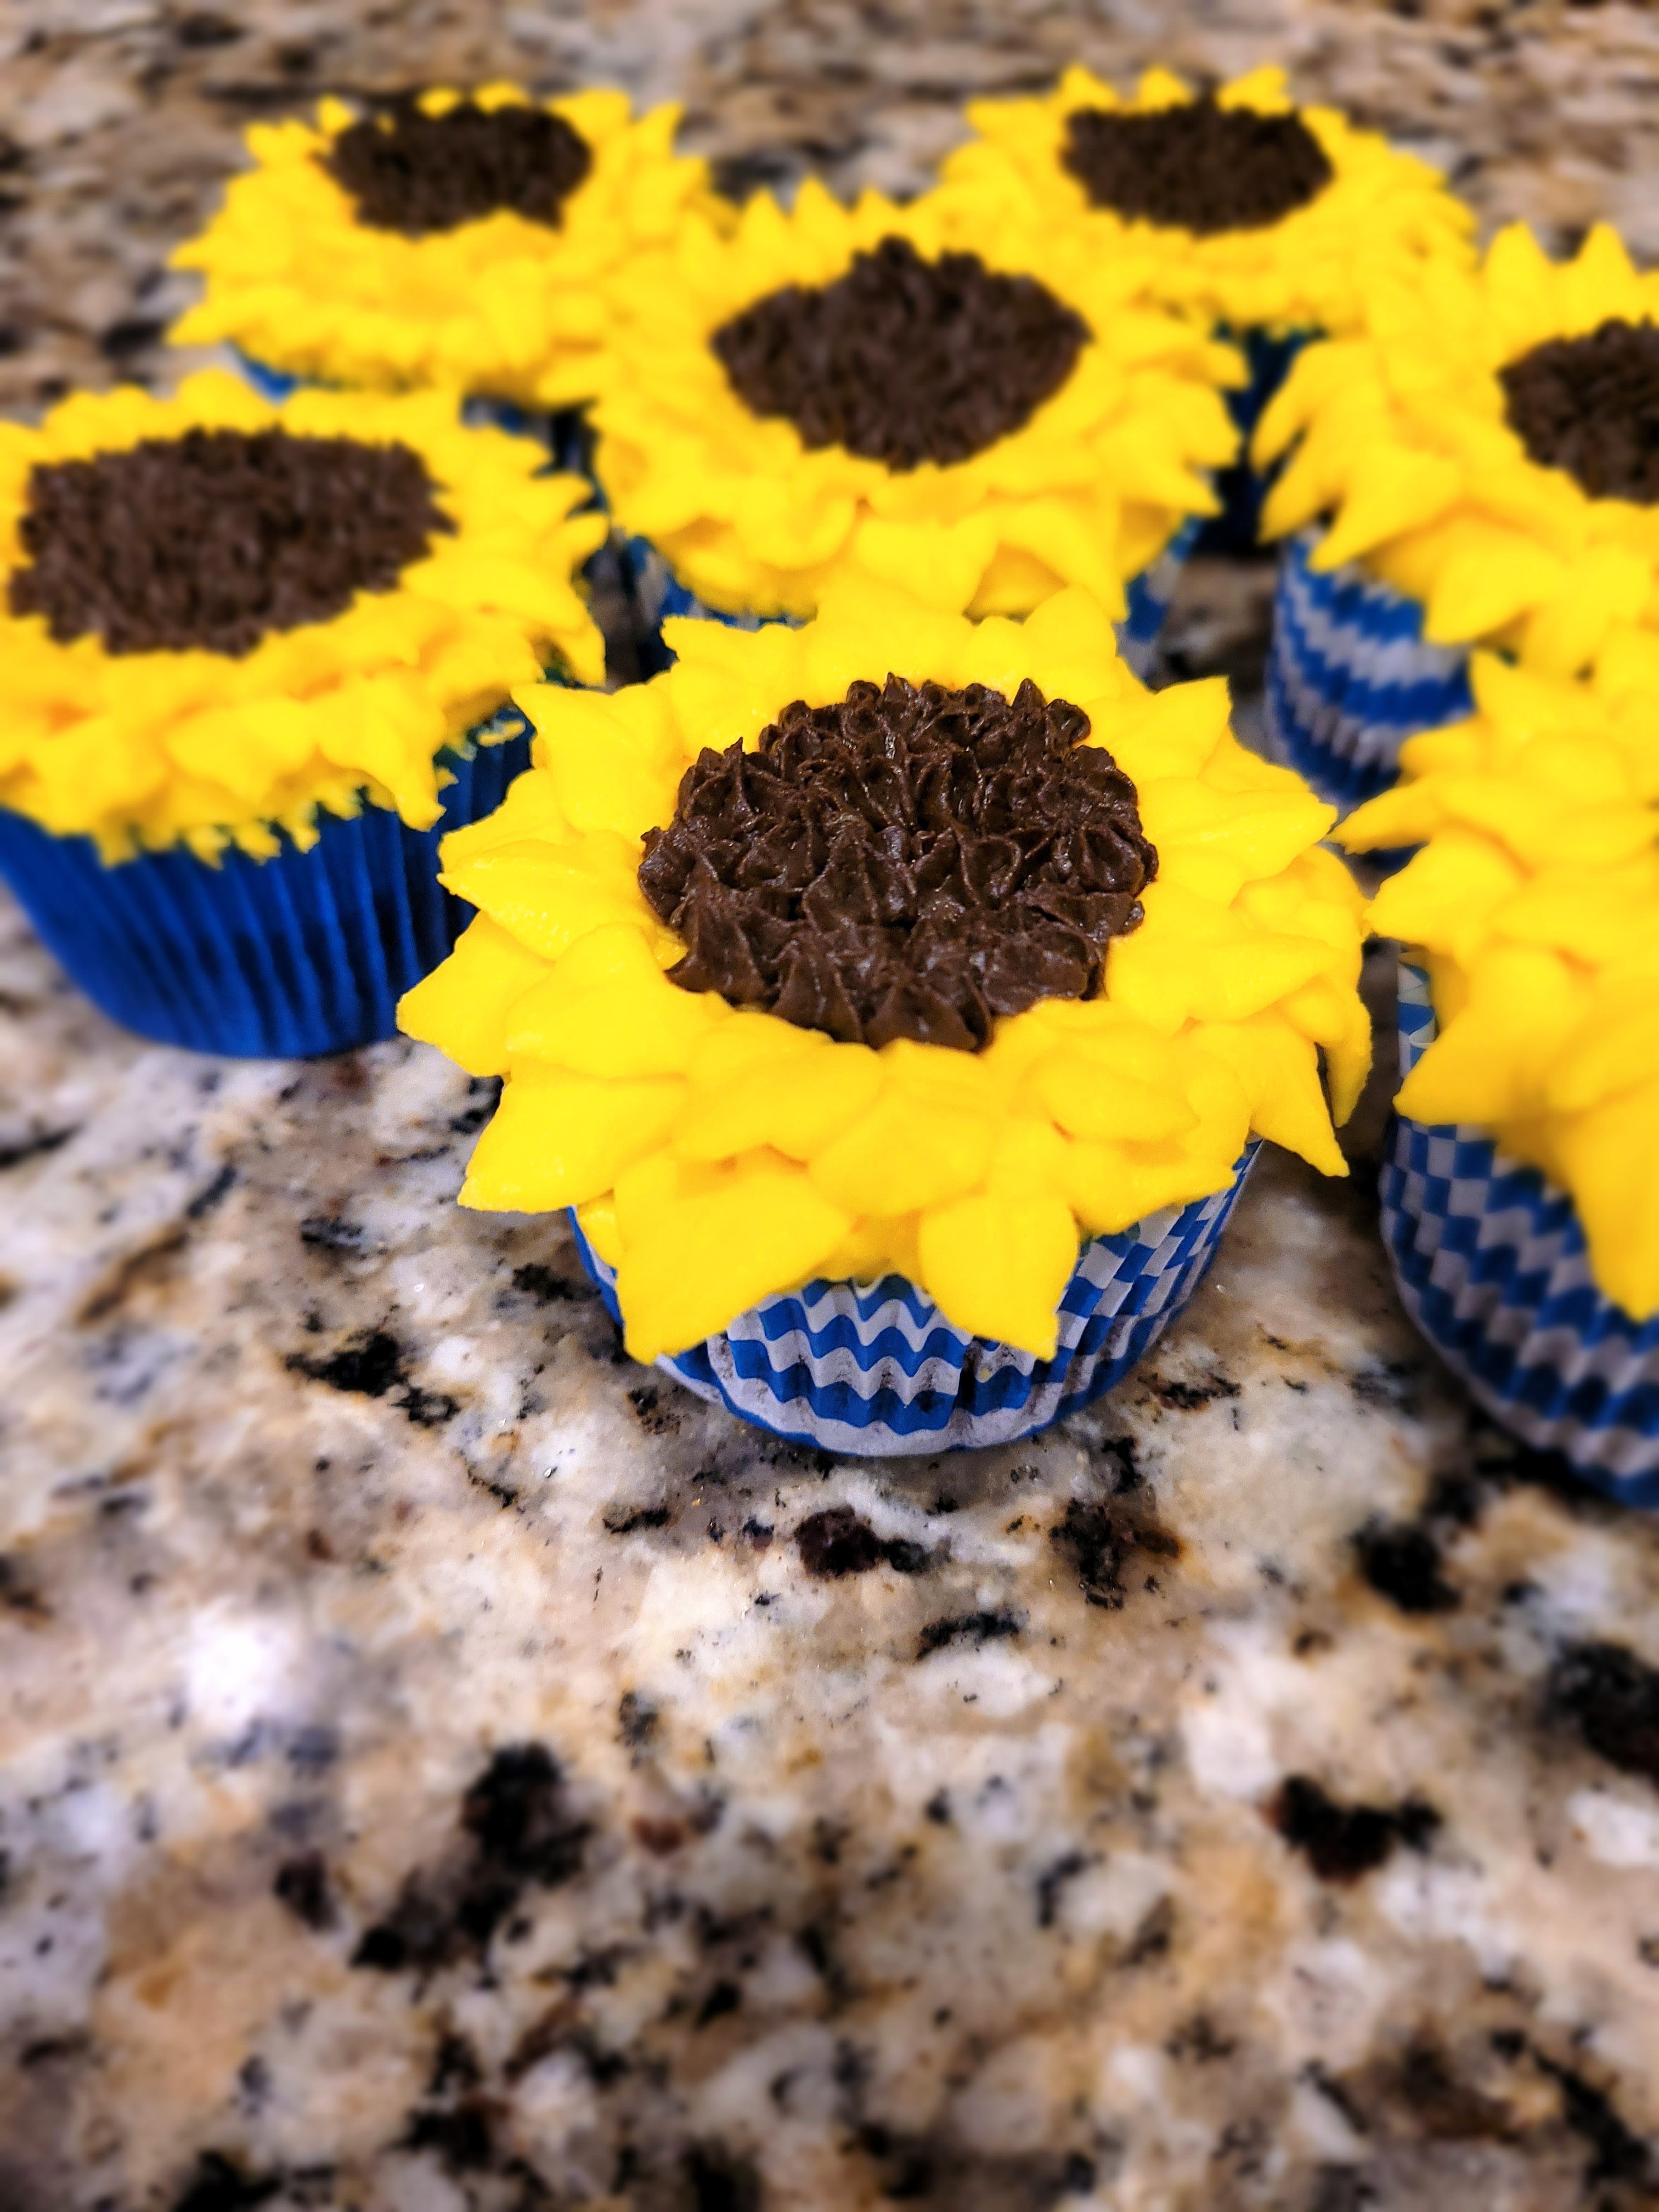
Yep, that’s me, covered in chocolate frosting. Let’s rewind so you can understand how I got to this point. To make the sunflowers, you’re going to need a leaf tip of some kind (I used a Wilton 352) and a small open star tip (I used a Wilton 16). Put a hefty amount of yellow frosting into a piping bag with a coupler. Grab a cooled cupcake, and before you add the leaf tip, just pipe a circle of frosting around the outside edge with the coupler. This way your leaves have something to stick to.
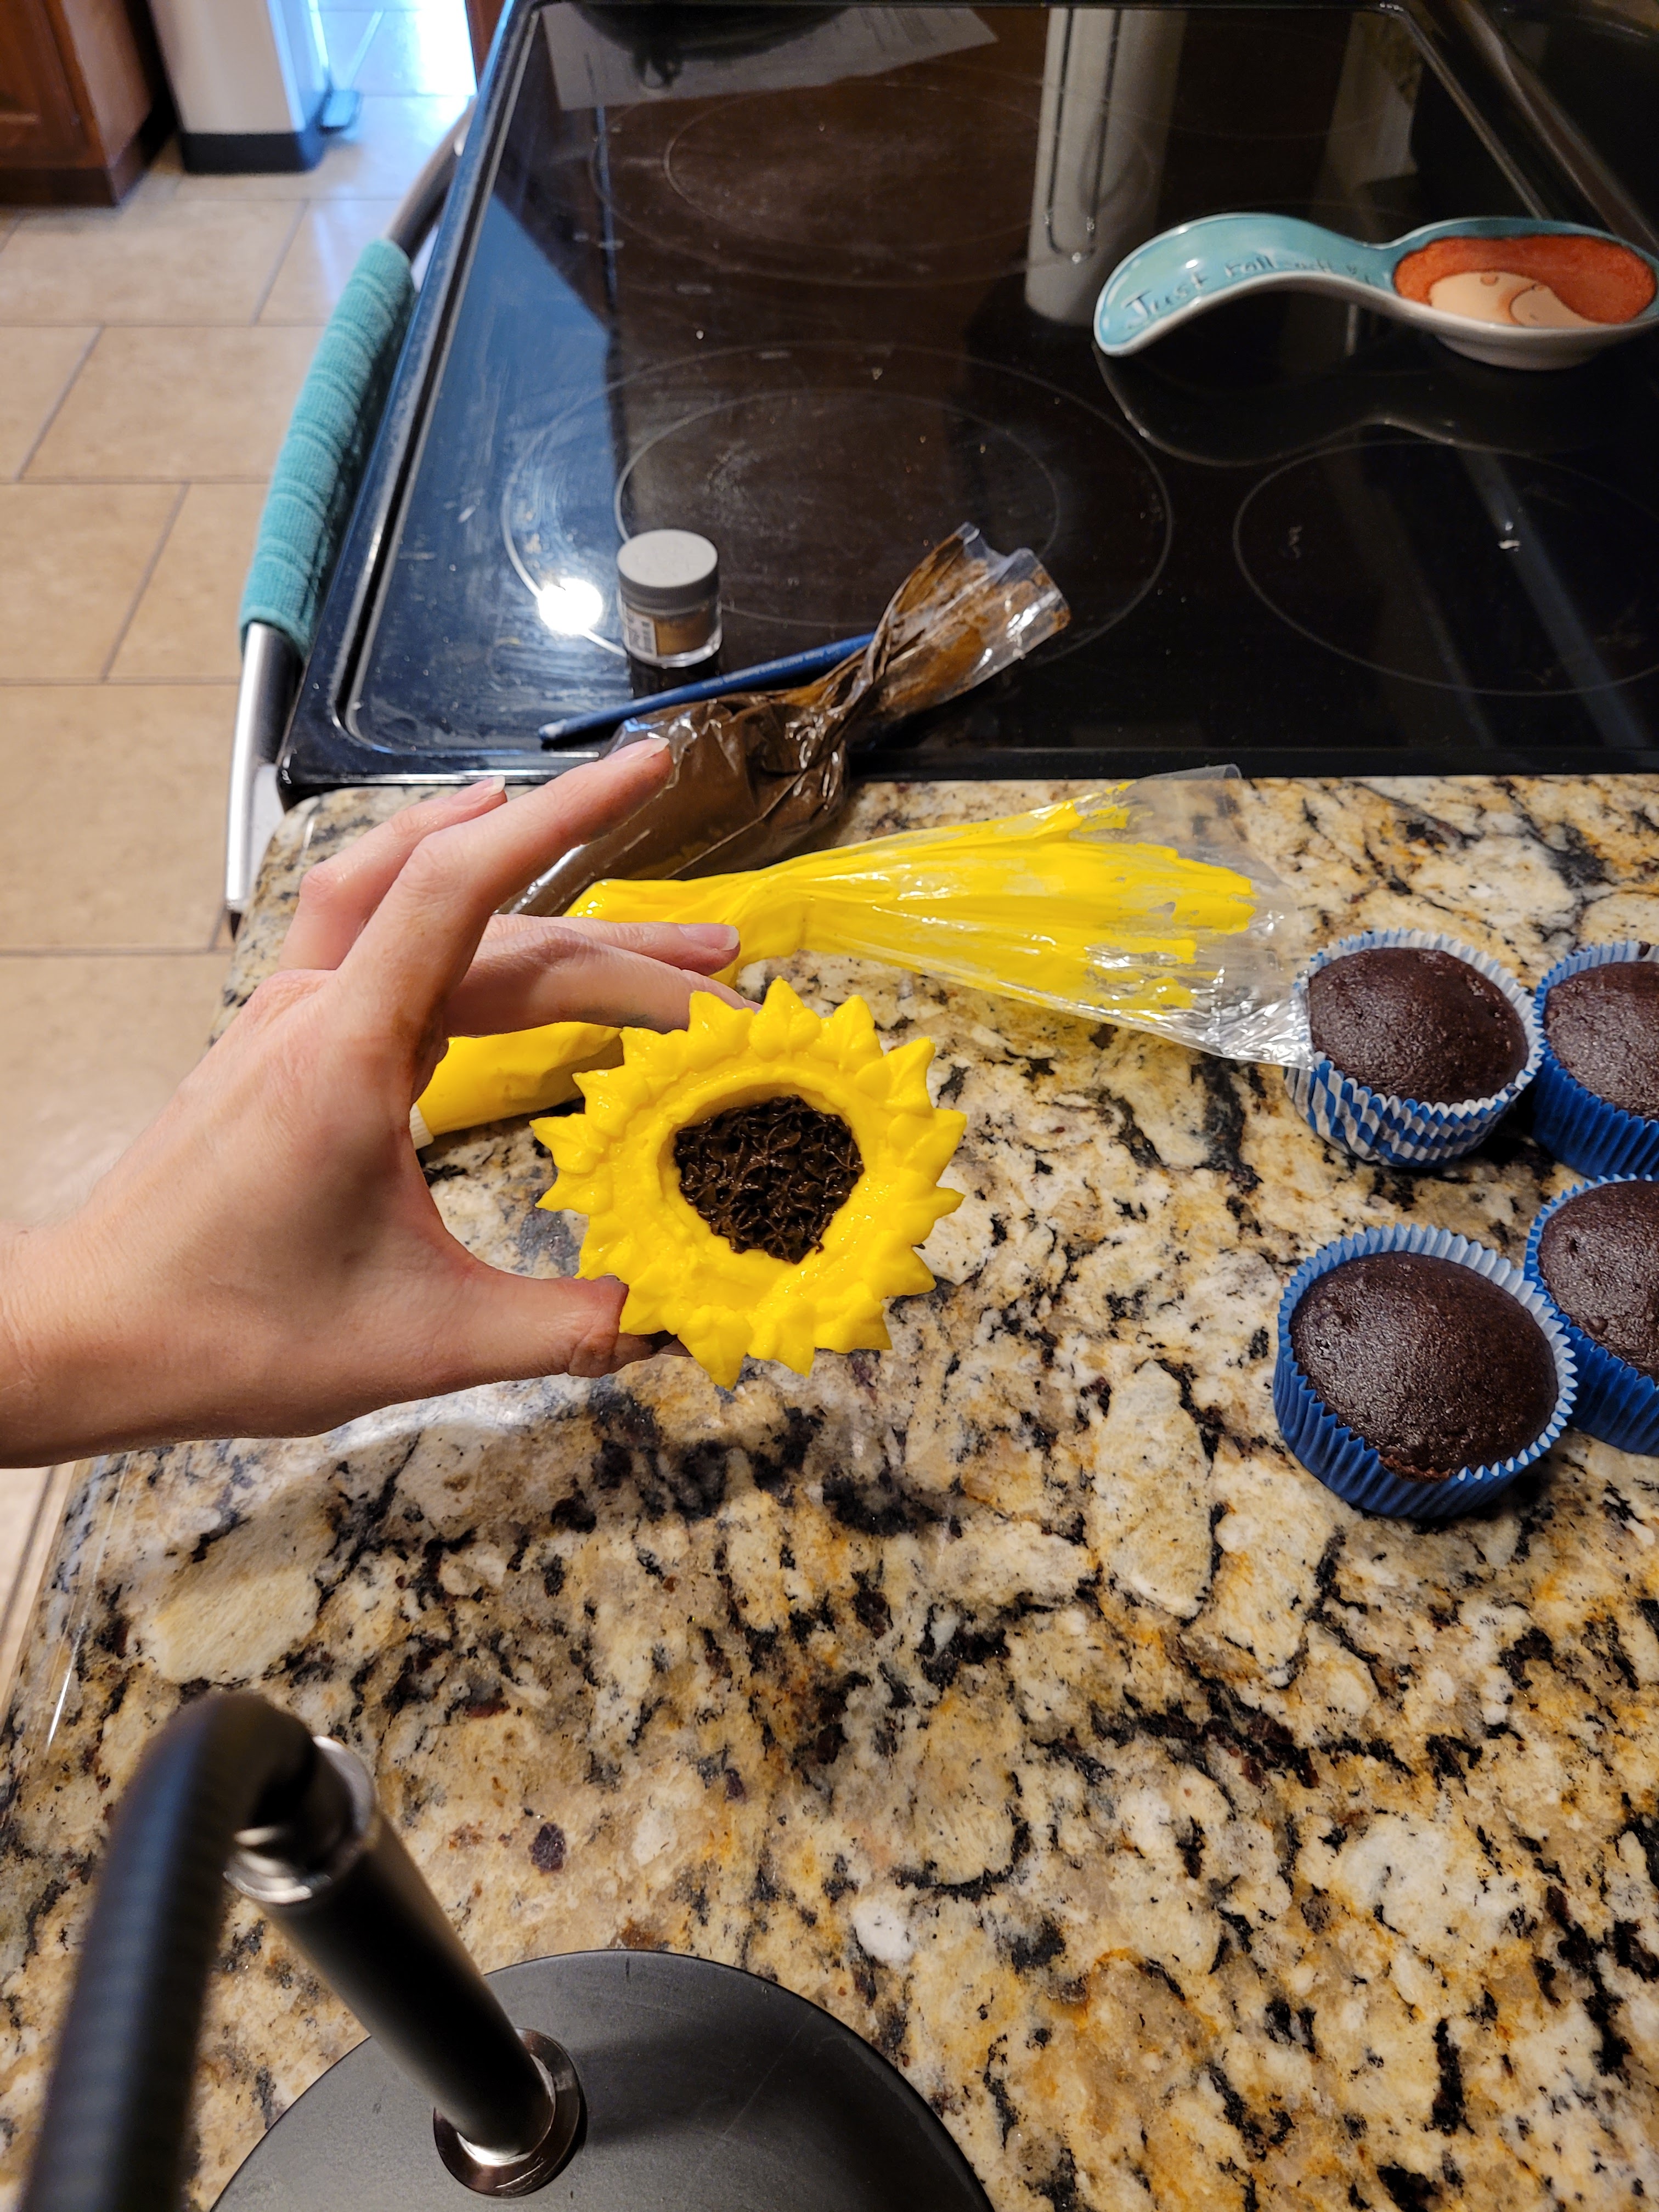
Seed between the lines: leaf tips are a real pain in the aster. Wrong flower, but you get the point. I avoid leaf tips because they are very finicky. You need a moderate amount of pressure to pipe, and perfect timing to pull out and away when needed. Every single sunflower looked different because of this. I started with an outside layer of petals, pictured above.
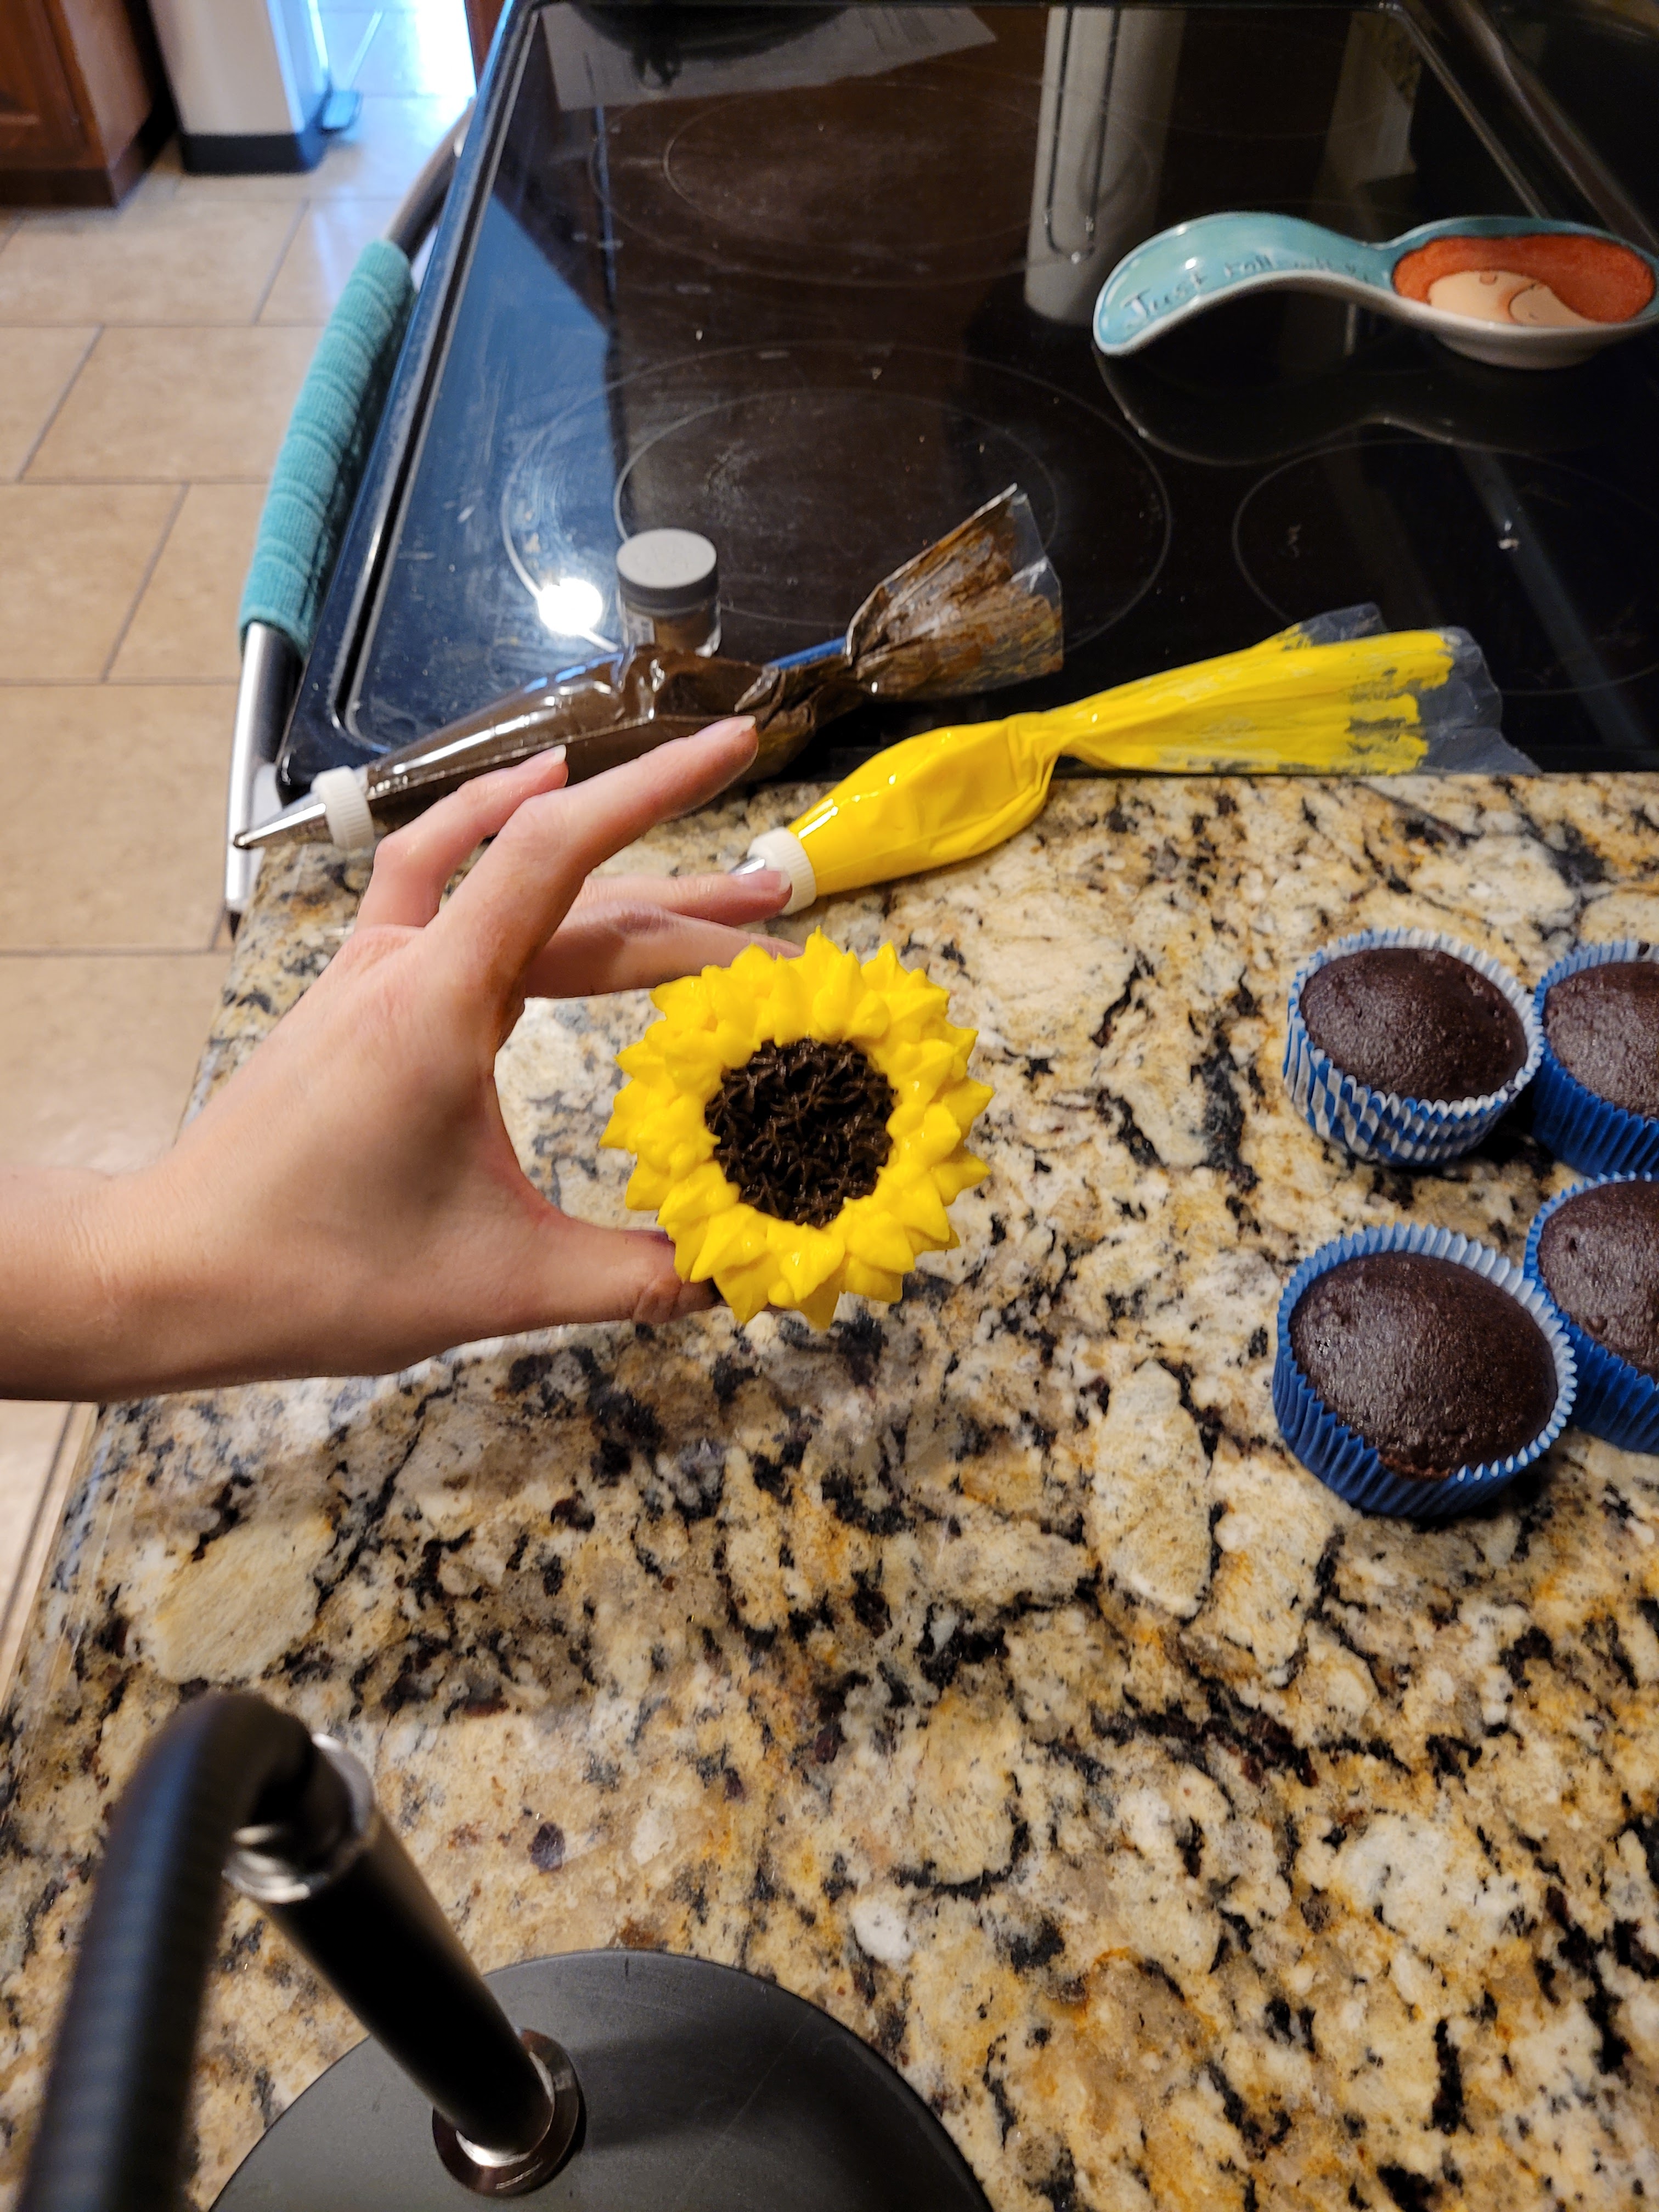
Don’t keep it plant up, let it grow! I was frustrated but also was not going to let the leaf tip best me, a hobby baker of almost 10 years. This tiny tip would not be my downfall. I added a second layer of petals on the inside of the ring I created earlier, trying to alternate so my petals didn’t overlap the first layer. To finish, I grabbed my chocolate frosting, placed into a piping bag fitted with a #16 open star tip, and piped a few layers of stars in the center of the circle for the sunflower seeds.
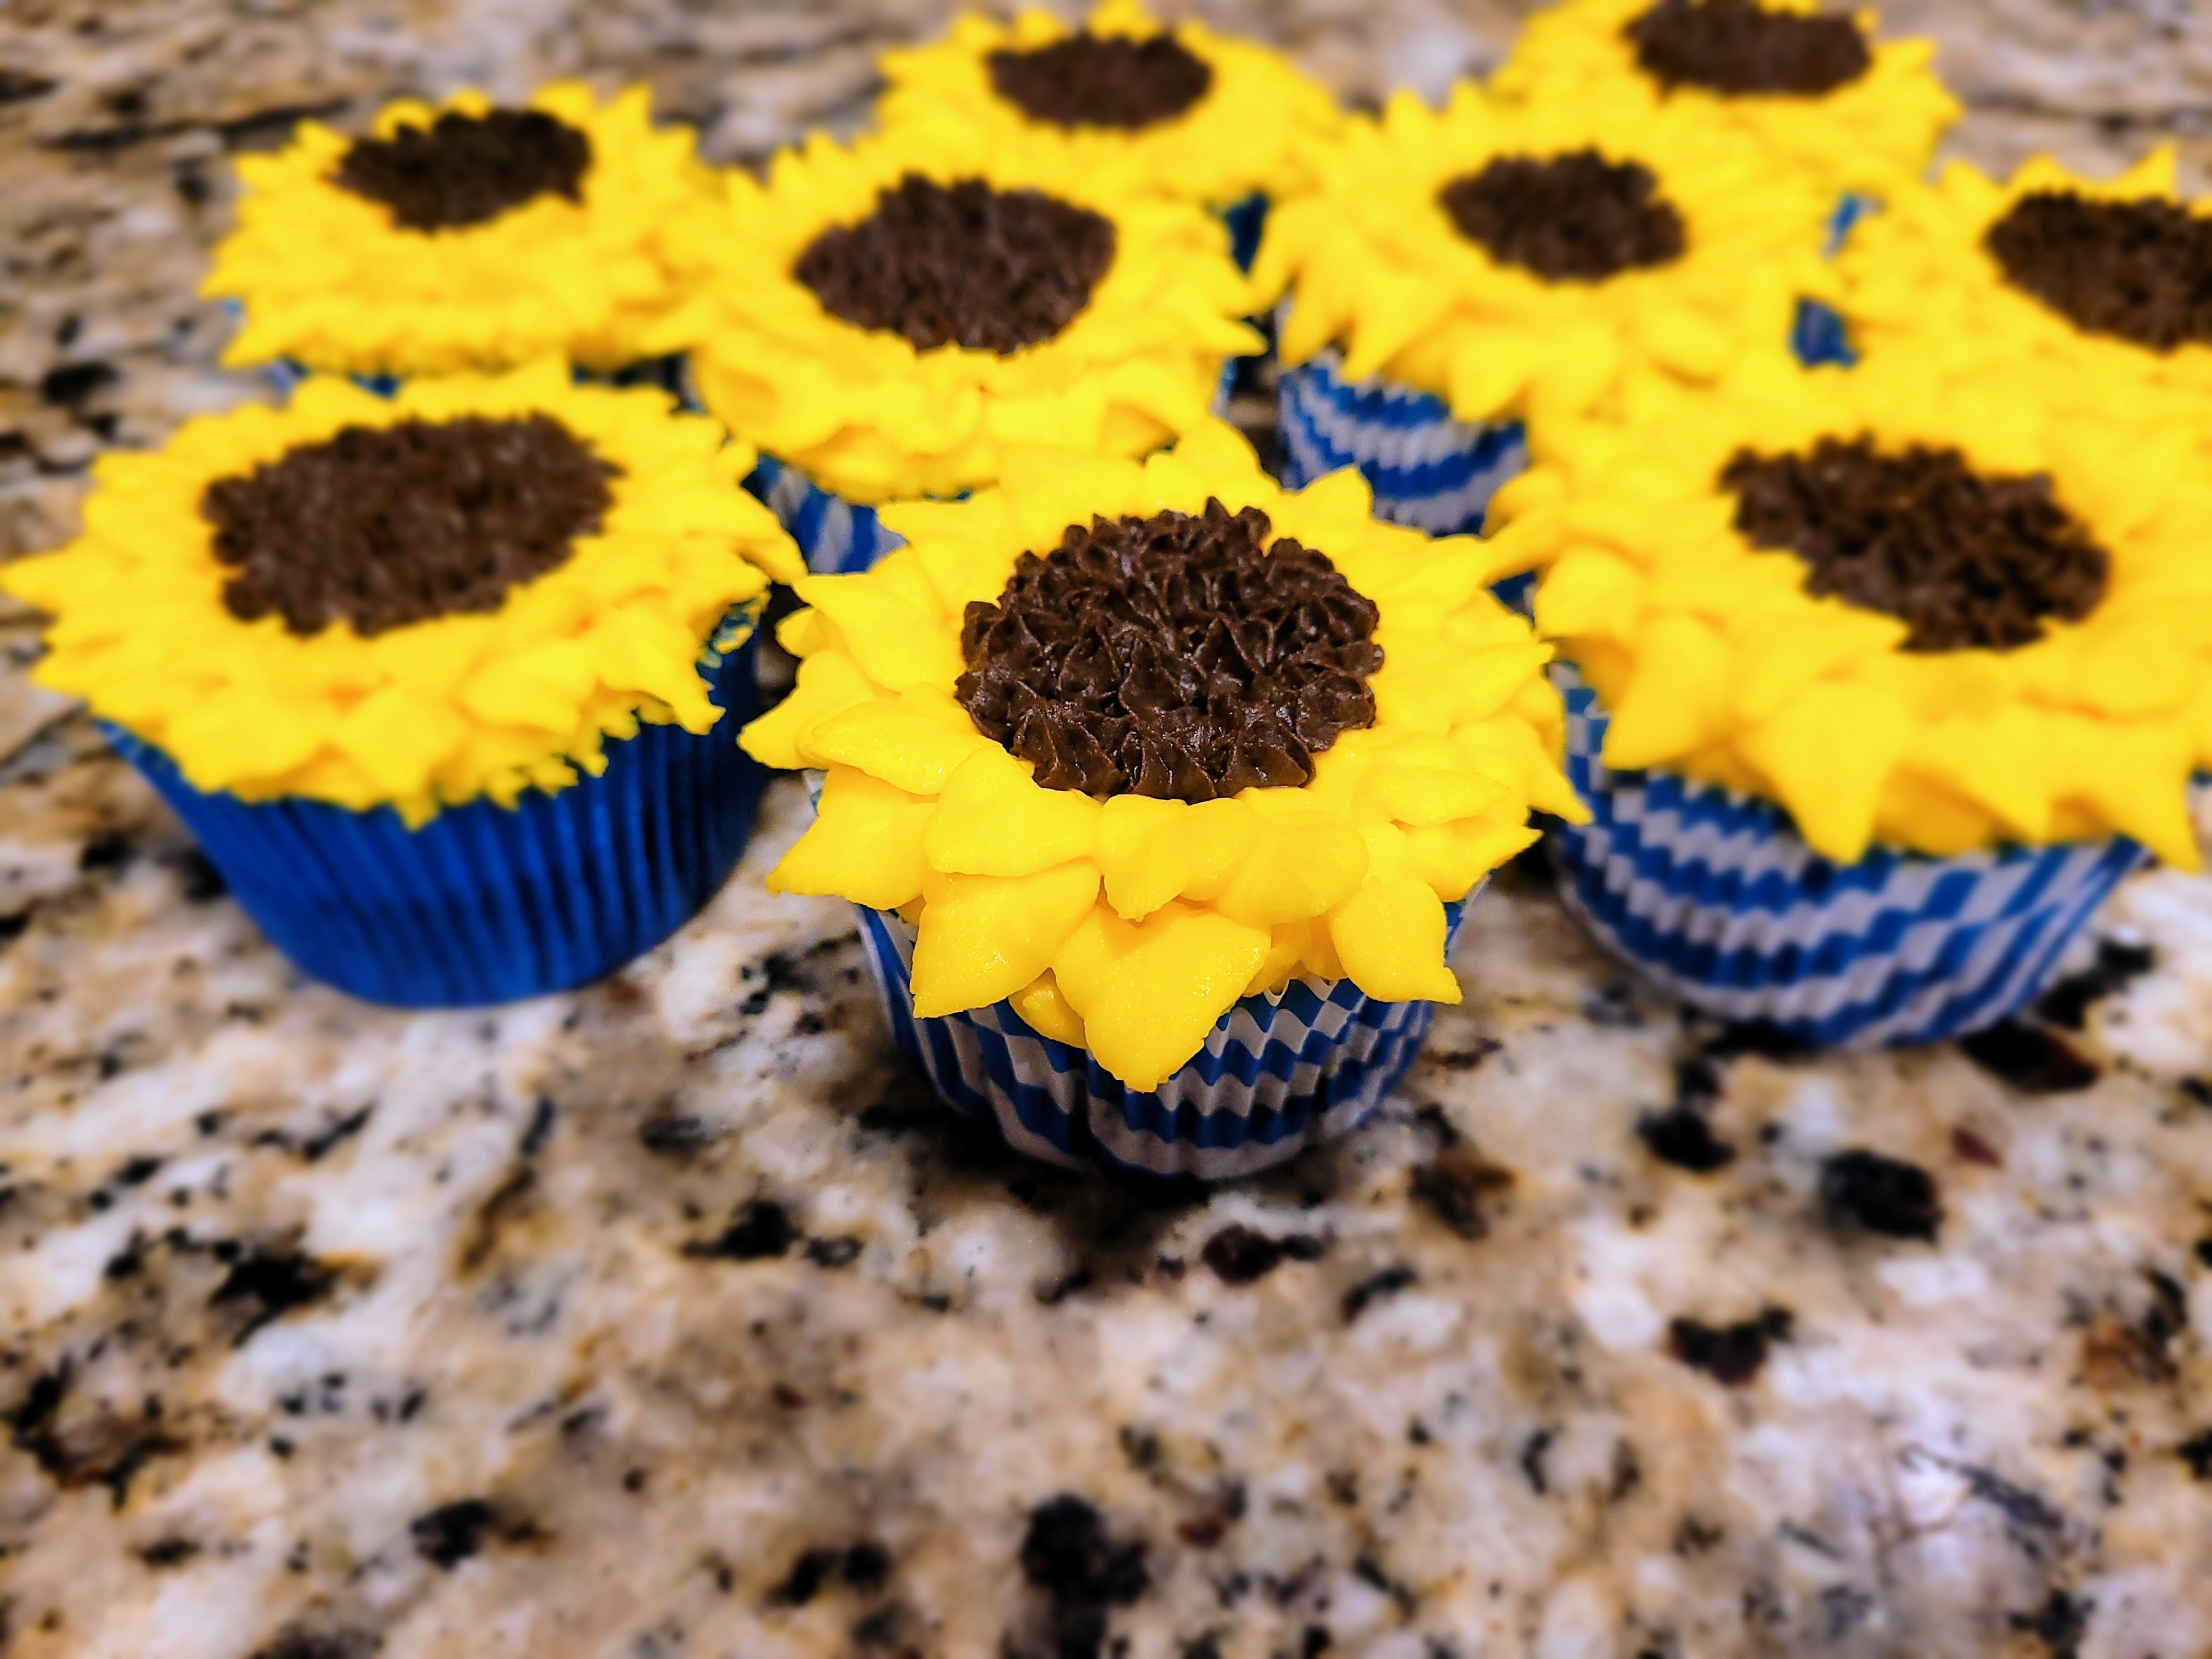
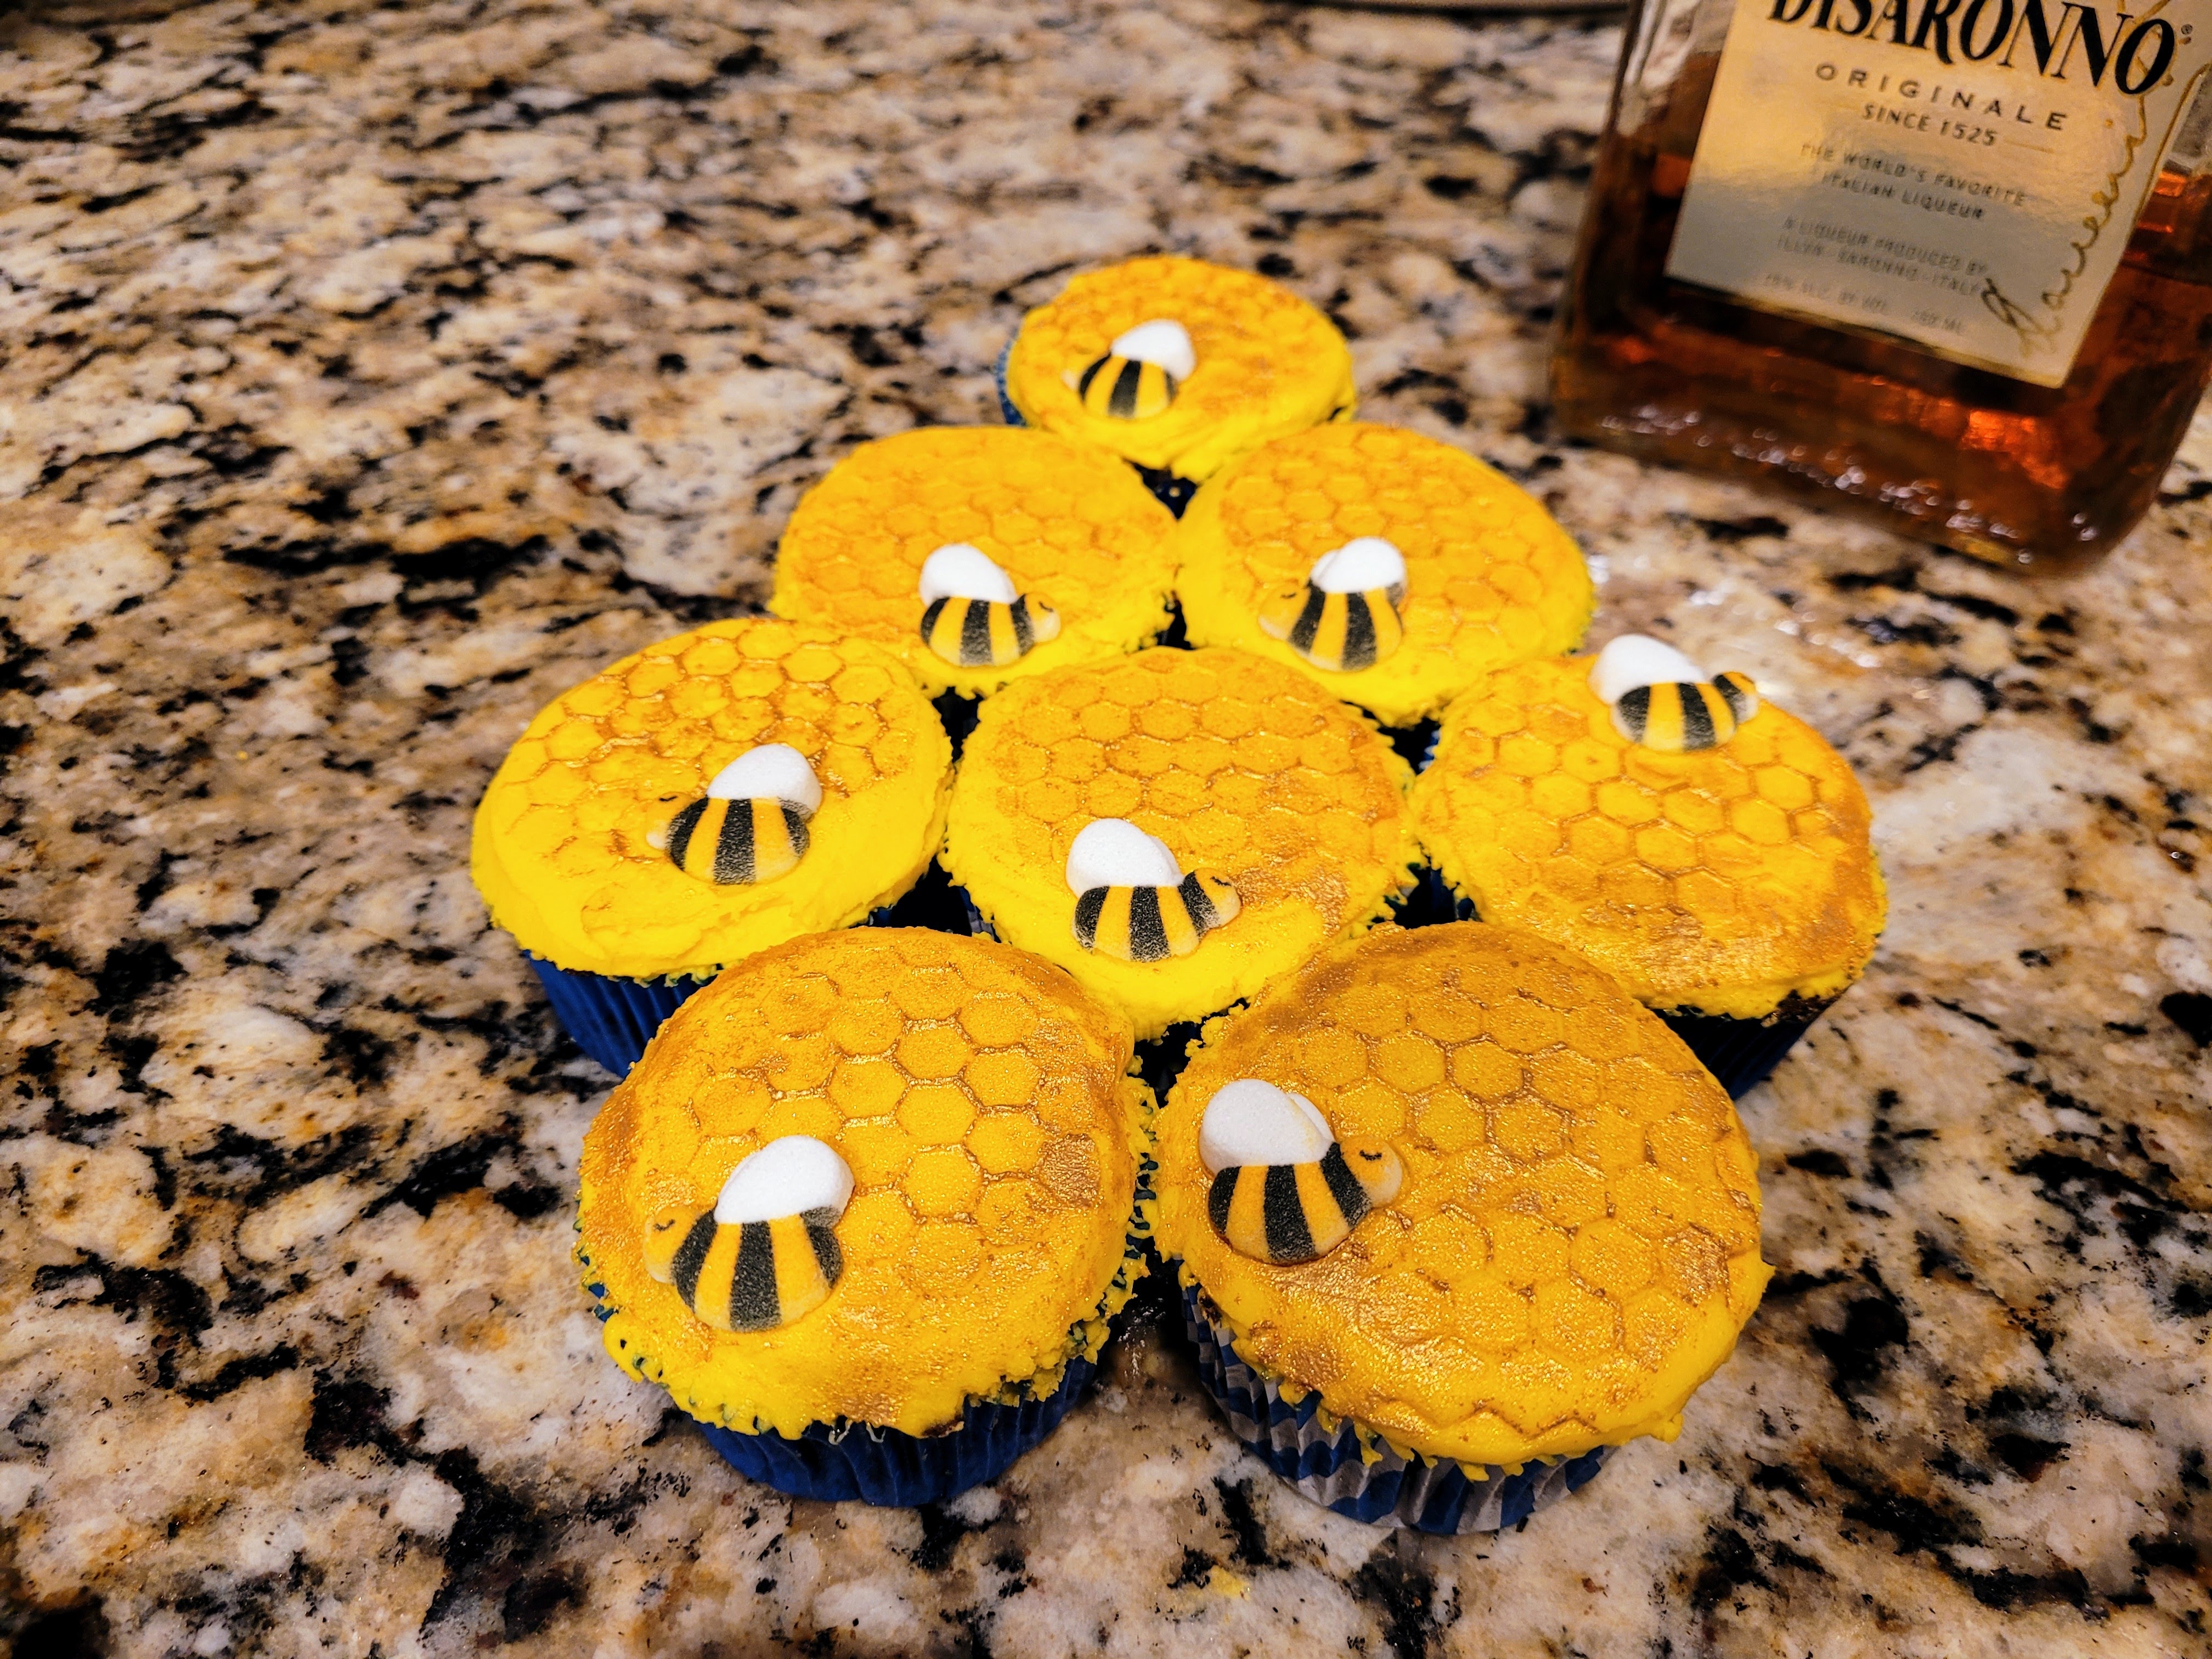
Advice from a sunflower: be outstanding in your field. I repeated on half of my cupcakes. Some ended up looking more like sadflowers, but here we are, still able to eat them even if they aren’t pretty. In your face, leaf tip. Happy to report the bee cupcakes are 900 times easier to decorate. At this point, I was determined–a force to bee reckoned with.
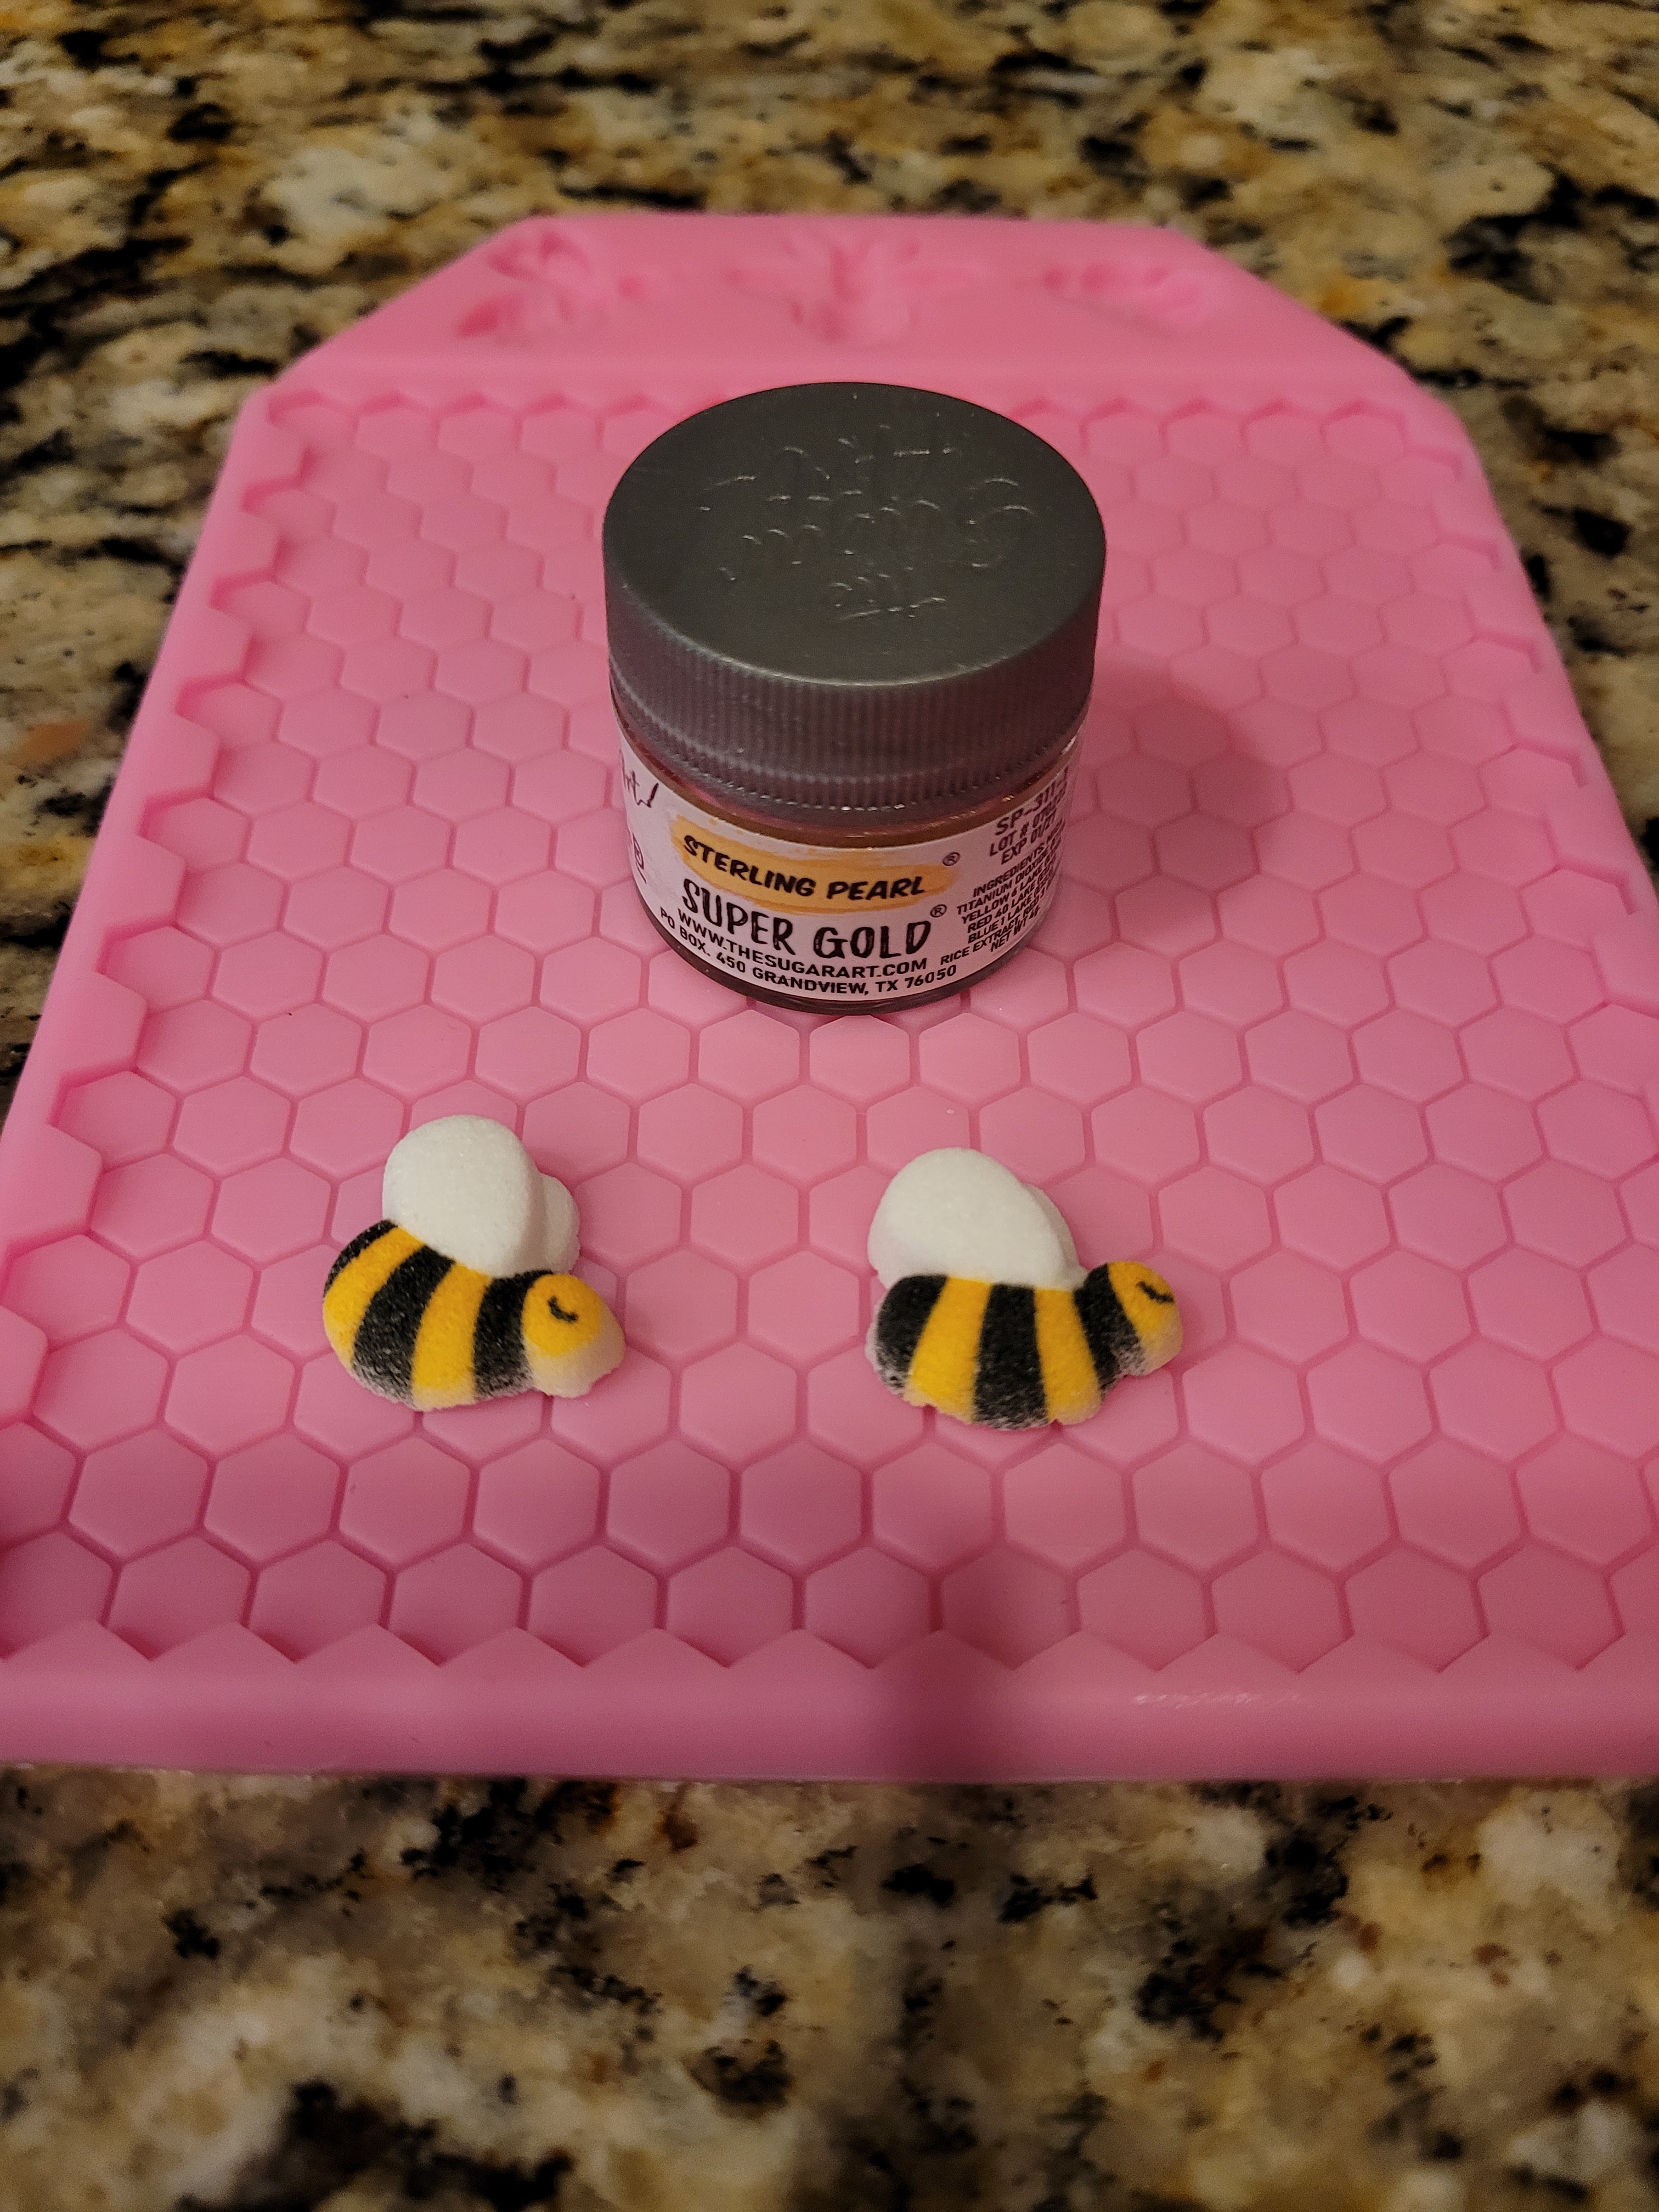
After all, it’s called a bumblebee and not a humblebee for a reason. A few cheap tools from Amazon made the bee cupcakes possible:
- This silicone honeycomb mat
- These sugar bees
- Edible gold dust (yells, “I love goooolllllddddd,” a la Goldmember).
- You’ll also need some food-safe paint brushes
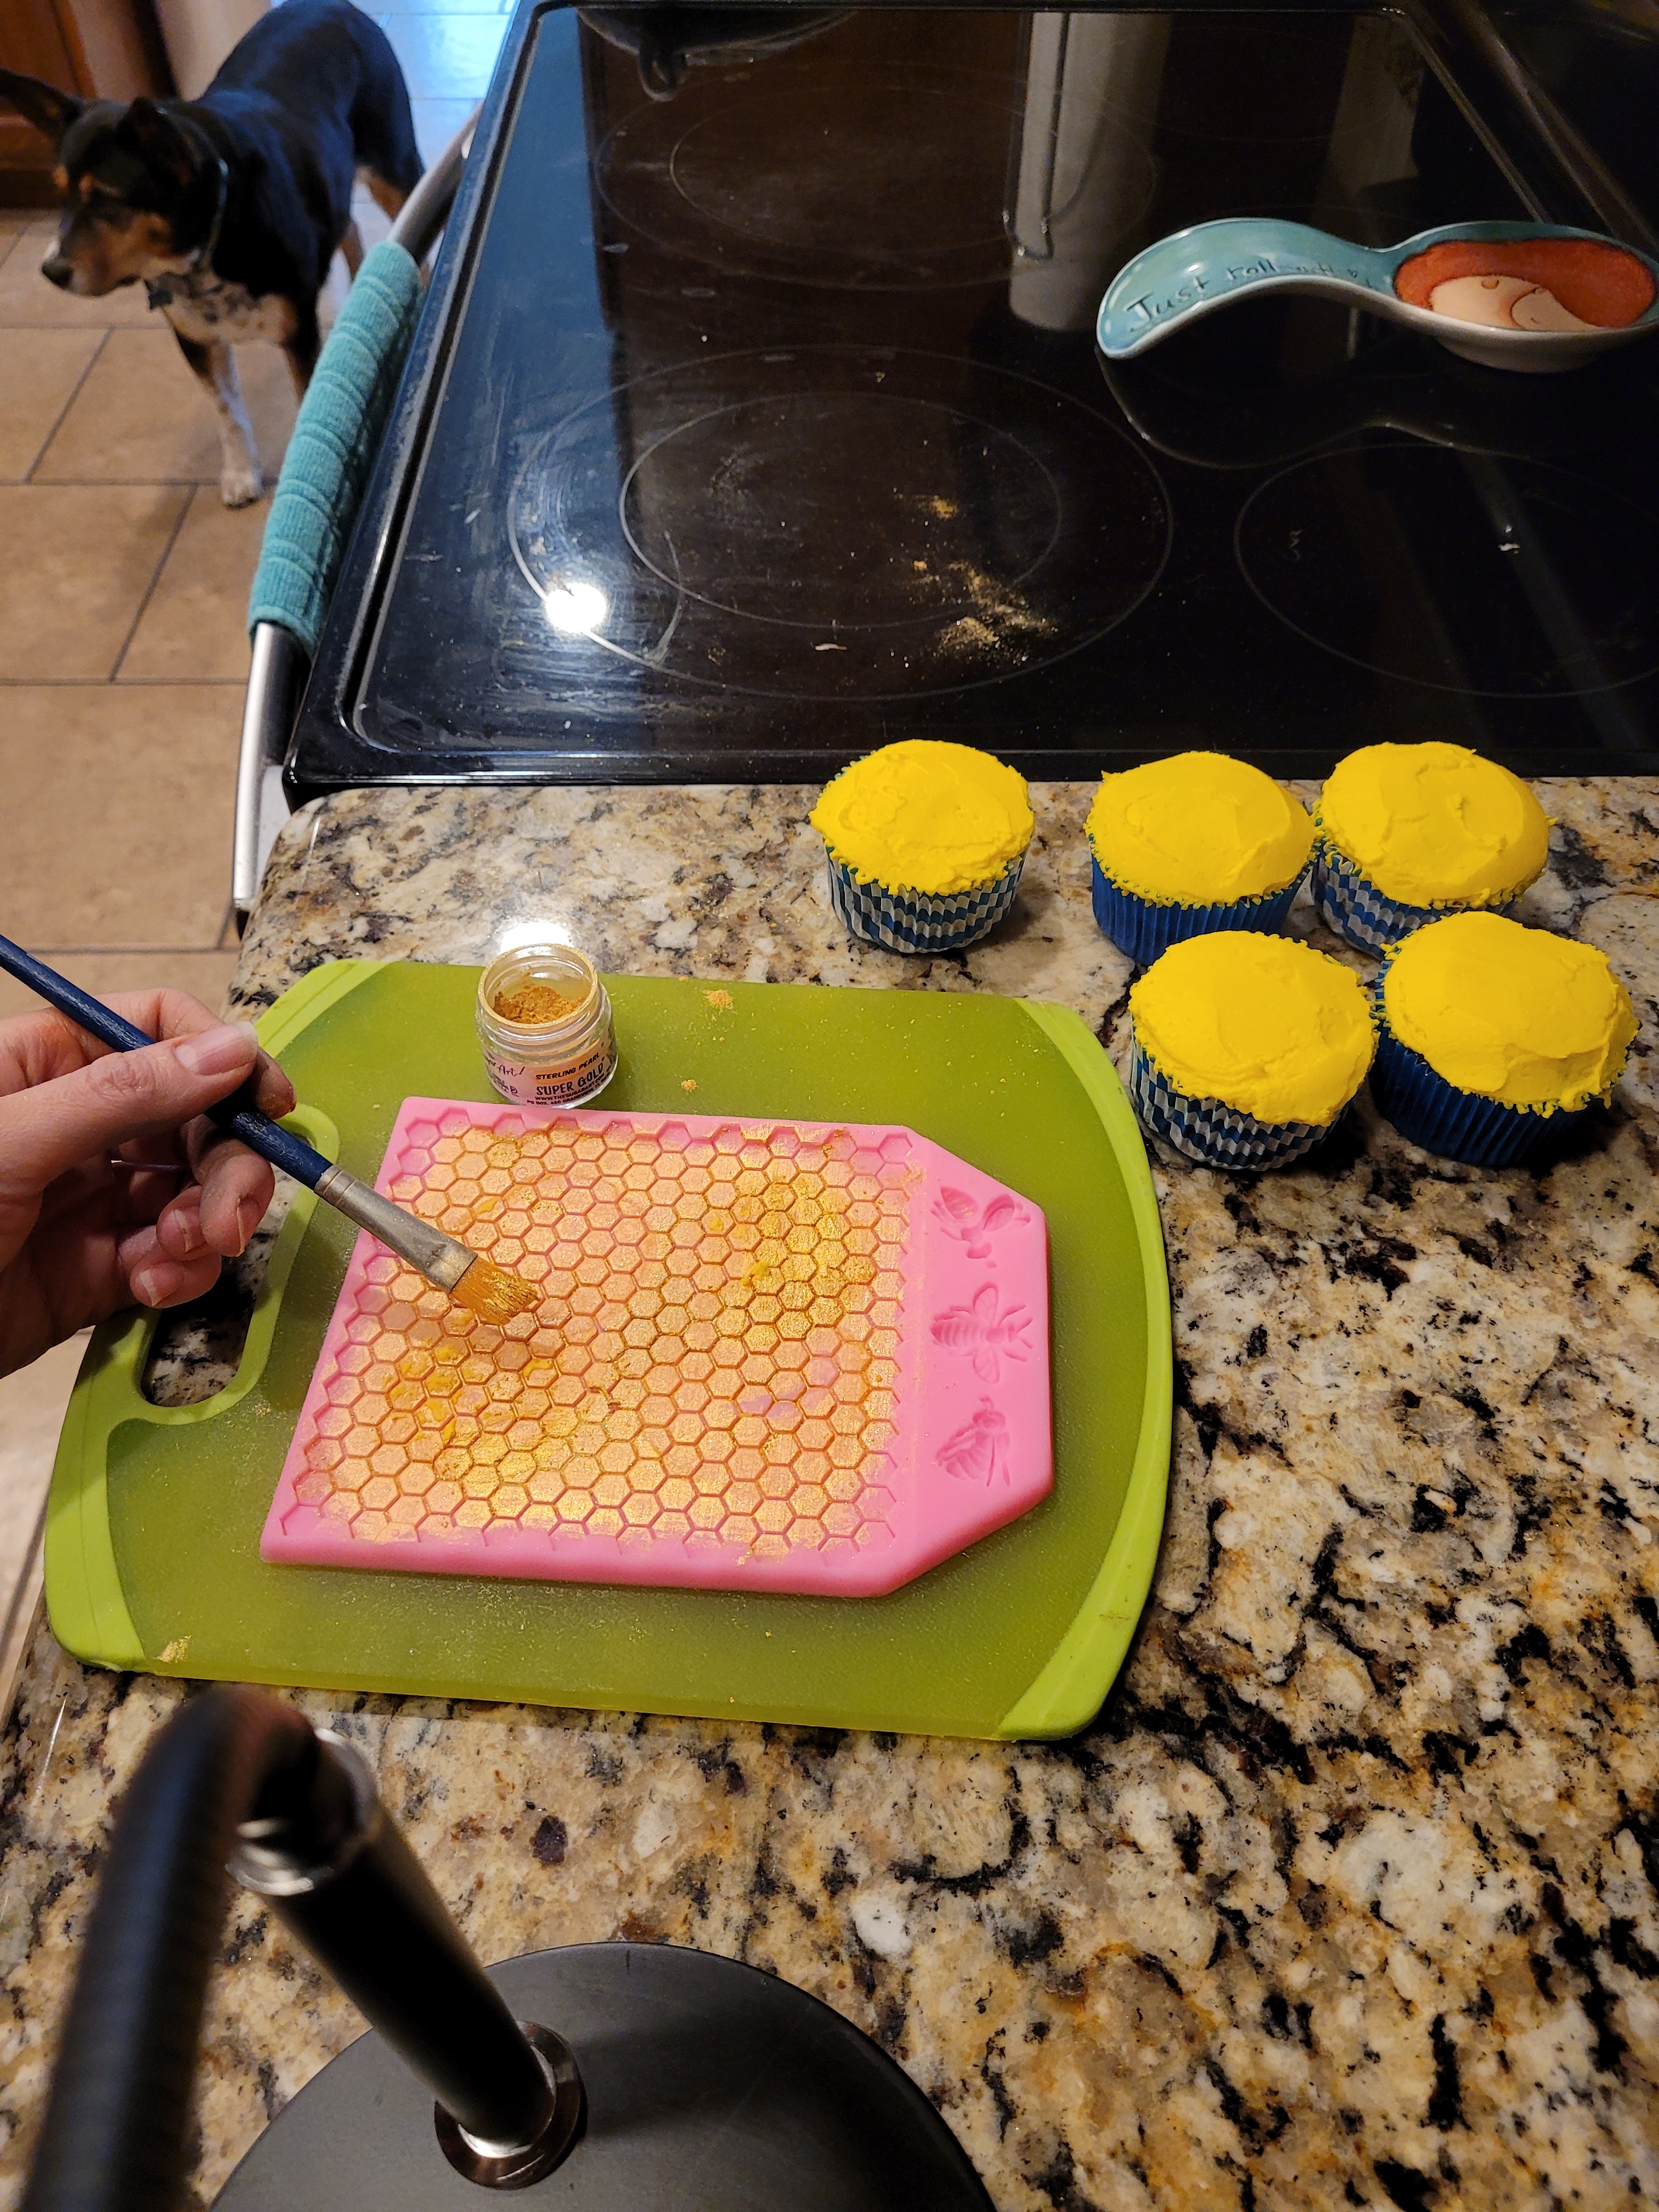
If you look closely, you can see my dog that likes to try to eat bees, or spicy sky raisins, hoping I drop a cupcake. Place the silicone mat on a small cutting board or sturdy surface so it’s easy to move later. Take a paint brush, and paint the entire surface with the edible gold dust. Use the remaining yellow frosting to top each cupcake. I used a nice, thick amount, spread flat (seen above).
This was terrifying. So the buzz on Instagram lately is something called the flip and freeze method to get perfectly flat cupcake tops. The problem is, no one ever actually explains how they do it. Are the cupcakes chilled first? How long are they frozen for? Why won’t you tell me your trade secrets??! I need more than 5 second reel with trending music to show me how to do this!
I followed my instincts, and as luck would hive it, nailed this method on the first try. Since I’m not trying to make money off my reels (shameless plug, follow katebakescakes87 on Instagram), let me give you the deets.
- Take a room temperature, frosted cupcake, and flip it frosting-side down on the honeycomb mat. I twisted mine down gently to imprint.
- You should have room to fit 3 cupcakes face-down.
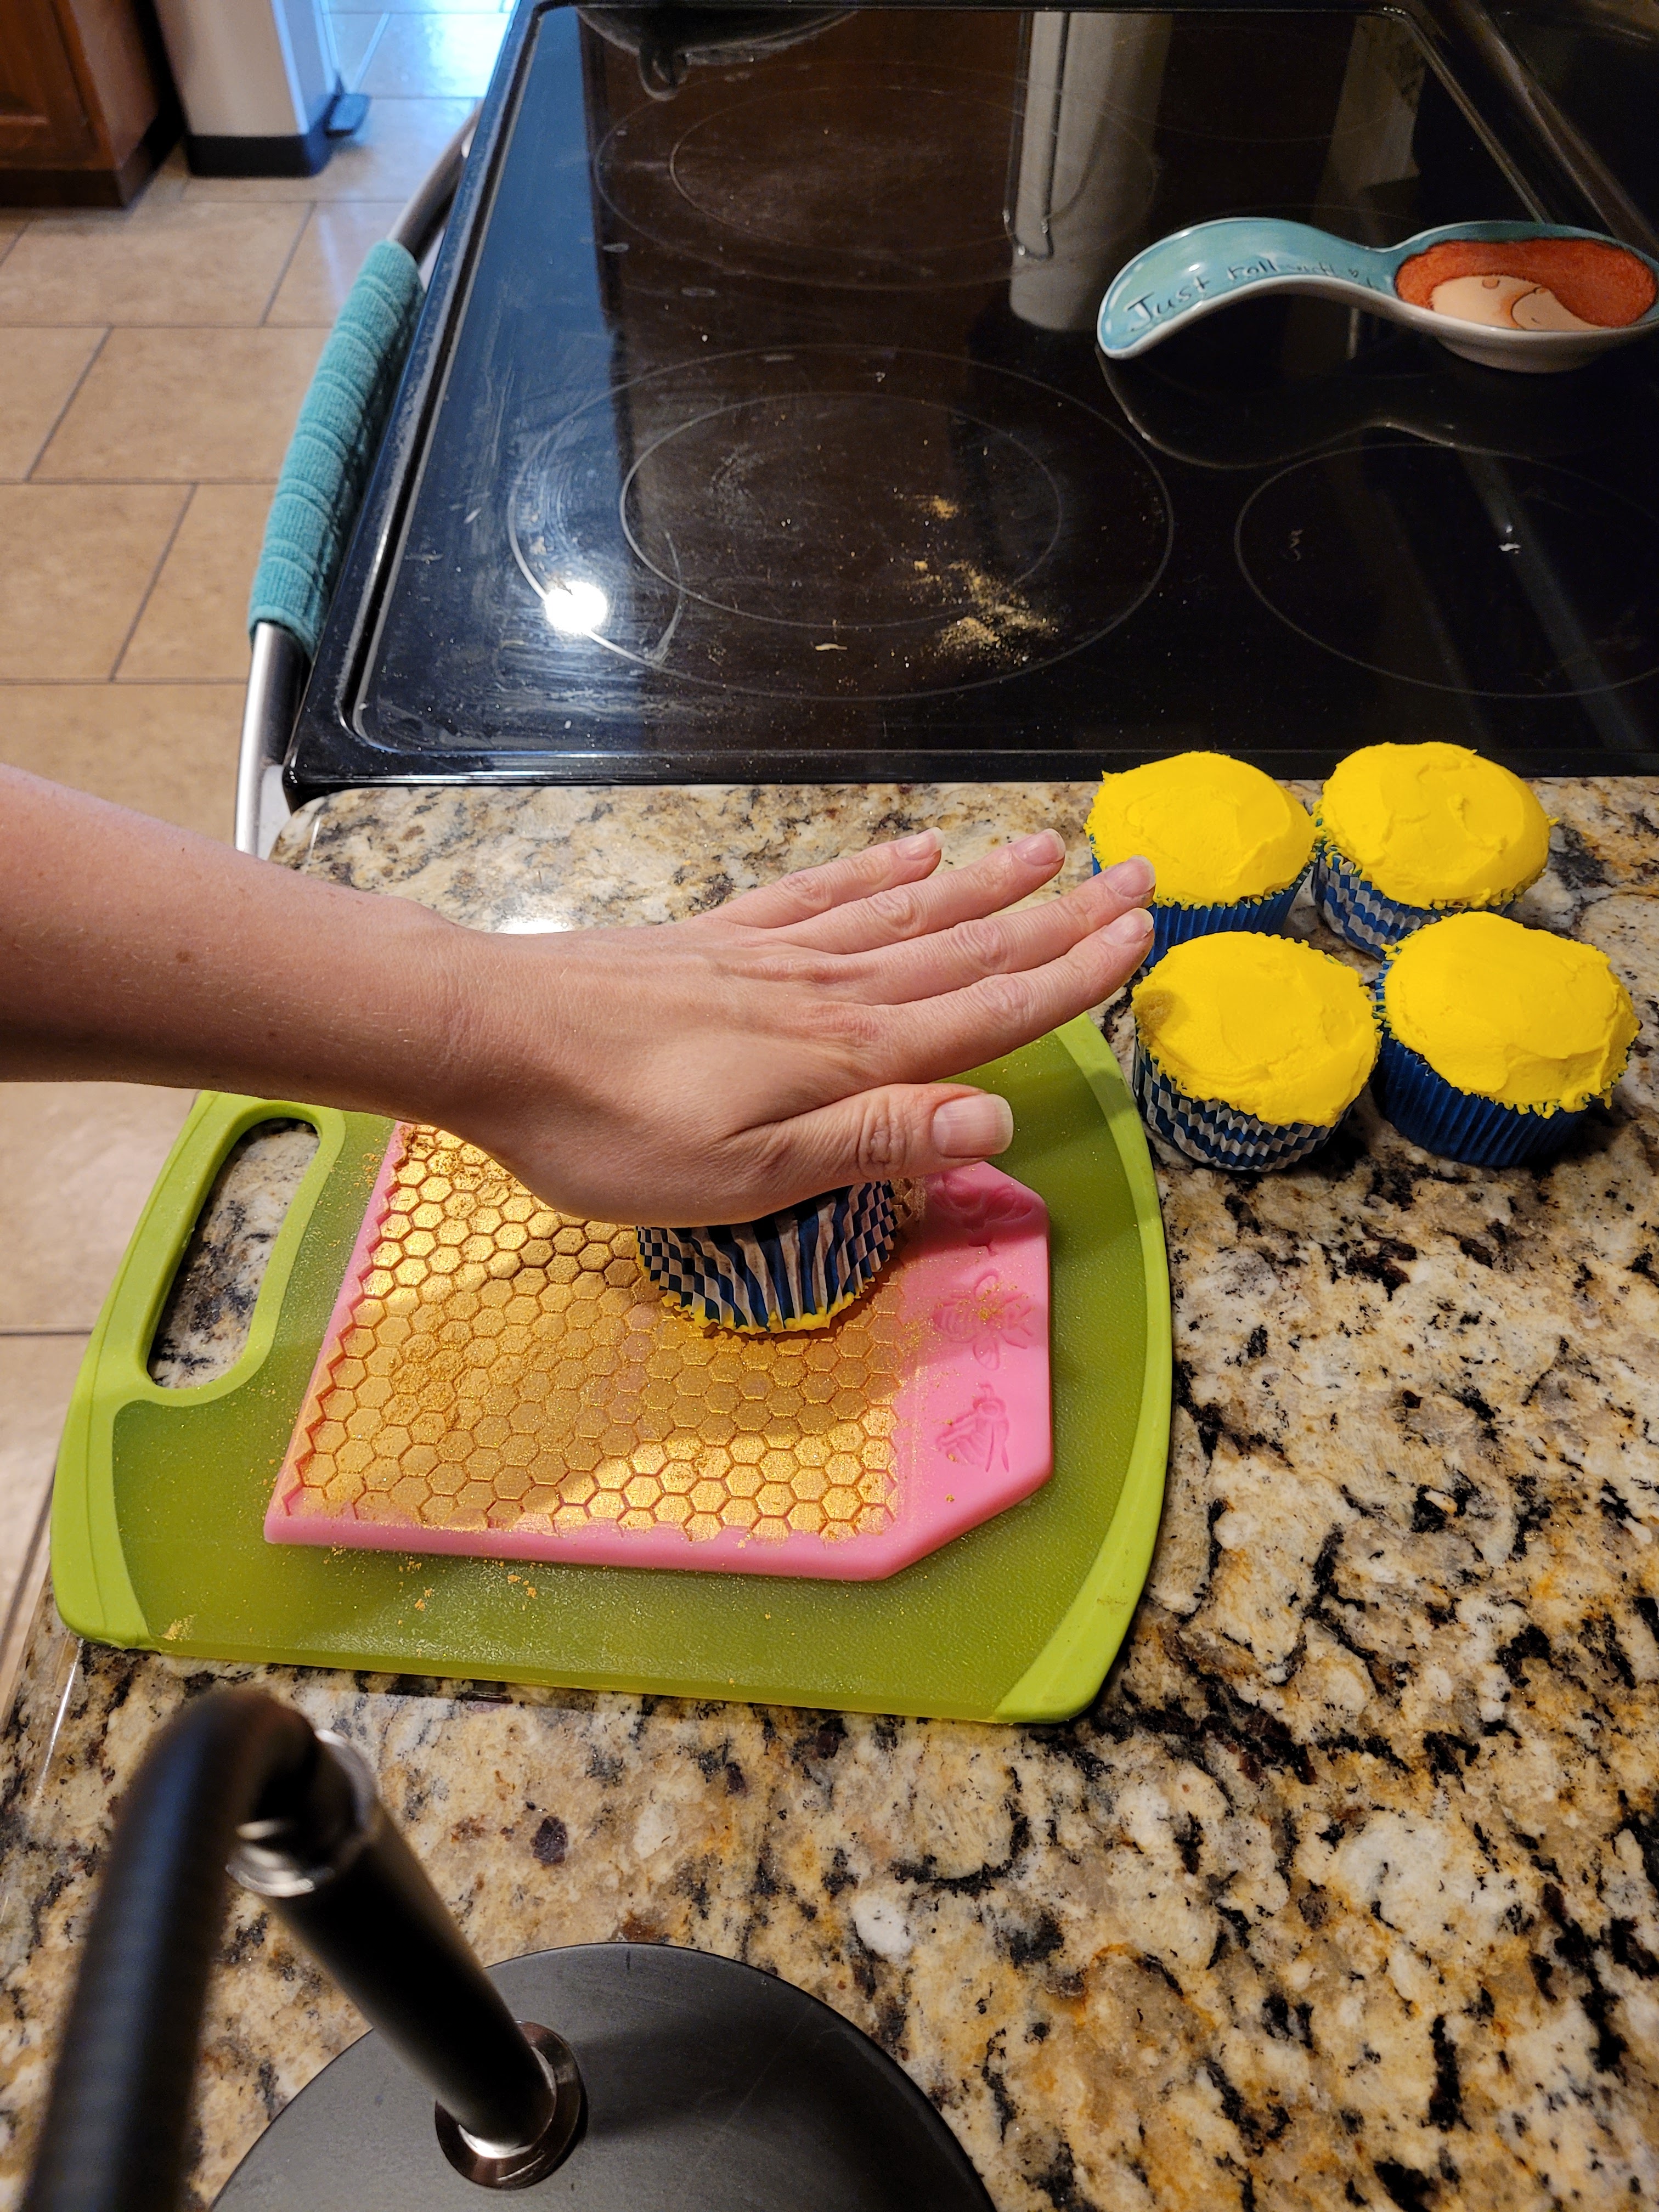
- Now, take the cutting board with your mat and cupcakes on it, and put it into the freezer for 15 minutes.
- Remove from the freezer and gently peel each cupcake off the mat. The tops should have the comb imprint in gold. If you see any areas where there aren’t any gold dust, come in with a small paintbrush and brush on more gold dust while the cupcake is still frozen.
- Once they’ve softened a few minutes, add a bee on top!
Not too shab-bee Honestly, these turned out so much better than I had hoped. I am so ready to try this again with other mats, patterns, and just plain cupcakes.
OK, kinda feelin’ like summer might not be the worst thing in the world now. The sunflower represents longevity…however, these are definitely not gonna last long in the fridge, and my hopes for summer are also the same. I might not have been able to trick myself into liking summer so much as I did remind myself why I love chocolate and booze combos together so much. If you’re on the fence, don’t be a wallflower–just try the recipe. You’ll see what I mean. Baileys, Kahlua, Disaronno, whiskey, rum: it doesn’t matter, the actual alcohol will bake out, but it leaves behind this rich flavor that enhances the chocolate and makes a super moist bake; these are rich but not at all dense, quite the opposite. I still can’t get over that amaretto cream cheese frosting: it’s slightly tangy, sweet, and finishes with a cherry aftertaste. You could say these cupcakes are the bees knees (not sorry, and I will not beehive). Consider me the Queen Bee of terrible puns and delicious boozy cupcakes. ‘Til next time, my fellow eaters!
You are my sunshine, my boozy sunshine…you make me happy, because days are hooottttt… Recipe and Instructions
Disaronno Cupcakes
Amaretto-flavored cupcakes with amaretto cream cheese frosting; rich, decadent, and moist but still light and low calorie.
I used Whole Foods gluten free cake mix for this recipe. Using other box mixes may yield different results.
Ingredients
FOR CUPCAKES
* 1 box of Whole Food’s gluten free chocolate cake mix
* 3 egg whites (92 grams)
* 1/2 cup of unsweetened applesauce (111 grams)
* 1/2 cup fat free or skim milk
* 1/4 cup plus 2 TBS Disaronno
FOR FROSTING
* 1/2 cup (112 grams) of butter at room temp
* 8 ounces (225 grams) of 1/3 the fat cream cheese at room temperature
* 4 cups of powered sugar or Lakanto powdered monkfruit
* 1.5 ounces (3 TBS) Disaronno
* 1 tsp vanilla extract
* 1 TBS cocoa powder, reserved
* Yellow and brown gel dyes
* Optional: petal tip, open star tip, honeycomb mat, edible gold glitter, sugar bees
Directions
- Preheat your oven to 350 and prepare muffin tin with 18 cupcake liners.
3. Pour batter into prepared liners and bake for 20 minutes, or until a toothpick comes out cleanly from each round.
7. Once cooked, let rest in pan on a cooling rack for 10 minutes.
8. Turn cupcakes out of pan and onto cooling rack to cool completely before frosting.
9. To make frosting, beat butter and cream cheese in stand mixer on high for 3 minutes.
10. Add half the sugar and liquids, mixing well, scraping the bowl.
11. Add remaining sugar and liquids, mixing well.
12. Frost cake as desired; for styles pictured above, please read main body of the blog for directions.Nutrition
Per Serving: 141 calories per slice
5.6 fat/20 carbs/2.6 protein -
Easy Protein Cake with Cream Cheese Frosting
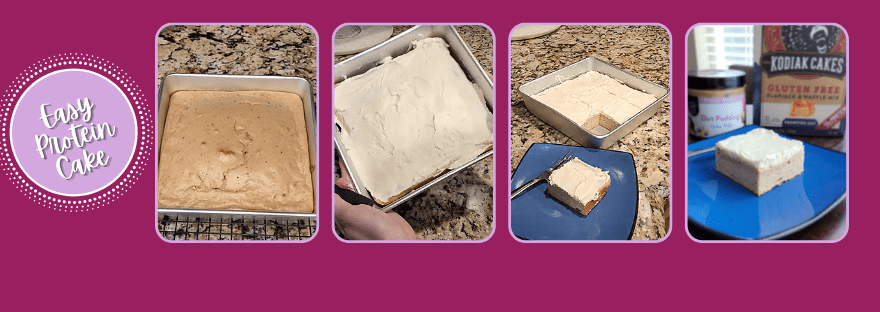
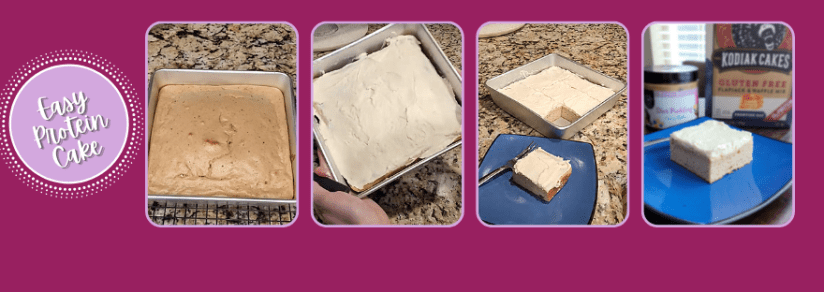
What she lacks in appearance, she more than makes up for in taste, truly. Cakes don’t always have to take two and half days to make and decorate. The phrase “Never judge a book by its cover,” comes to mind for one of my all-time favorite cake recipes: a protein cake suitable for breakfast or dessert. Or both. Both is good. It might not be fancy-looking compared to most of my cakes, but it is divine. I make this recipe every other week, and I never get tired of it.
Kodiak Cakes Protein Cake with Cream Cheese Frosting
Macro-friendly and gluten free protein cake topped with delicious cream cheese frosting
Baking with protein powder is finicky. If you use a different protein powder, results cannot be guaranteed.
Ingredients
Dry ingredients:
-1/2 cup (53g) Kodiak Cakes gluten free pancake mix
-2 scoops (60g) Quest vanilla milkshake protein powder
-1 tsp (8g) Jell-O sugar free cheesecake pudding mix
-1 tsp baking powder
Wet ingredients:
-1/3 cup (84g) American Dream cashew butter (any flavor will do! I mix it up and use a different flavor every time.)
-3 liquid egg whites (92g)
-1/4 cup (56g) unsweetened apple sauce
-1/4 cup (56g) nonfat plain Greek yogurt
-3/4 cup (180mL) fat free or skim milk
-1 tsp vanilla extract
Frosting:
-6 tbsp (90g) ⅓ the fat cream cheese (softened to room temperature)
-1/3 cup (80g) nonfat Greek yogurt
-1 tsp (8g) Jell-O sugar free cheesecake pudding mix
-1 tsp vanilla
-1/4 cup Lakanto powdered monkfruit sweetener
Directions
-Preheat oven to 350F.
-Combine all wet ingredients into a large mixing bowl, and all dry ingredients in another.
-Spray 8″ pan with non-stick spray.
-Mix dry into wet batter until no clumps remain.
-Bake for 15-20 minutes, until a toothpick comes out of cake clean.
-While baking, combine all frosting ingredients into a bowl.
-Once cake is completely cool after baking, top with frosting.
Nutrition
154 cal/slice
11 carb/6.4 fat/13 grams protein per slice -
Easy Protein Brownies
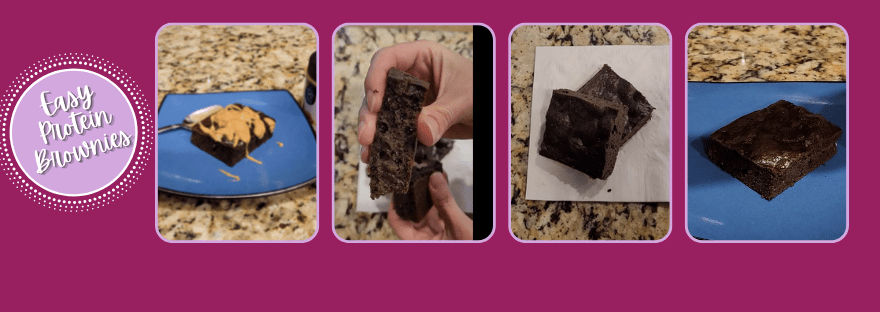
Dark chocolate macro heaven Sometimes you need a hug in the form of chocolate, and these brownies definitely do the trick. They don’t contain a ton of fat, so because of this, they are more cakey than fudgy. If you want a super fudgy brownie (not low calorie, sorry, I only can work so many miracles), go check out my Baileys brownie recipe. I highly recommend topping these protein brownies with some macro-friendly almond, cashew, or peanut butter for ultimate guilt-free decadence.
Dark Chocolate Peanut Butter Protein Brownies
Macro-friendly protein brownies, light, cakey, and delicous
Baking with protein powder is finicky. If you use a different protein powder, results cannot be guaranteed.
Ingredients
Dry ingredients:
-⅓ cup Lakanto golden monkfruit or regular brown sugar
-36 grams Quest chocolate milkshake protein powder
-¼ cup dark cocoa powder
-1 tsp baking powder
Wet ingredients:
-¾ cup runny peanut butter (I use American Dream peanut butter)
-½ cup plain Greek yogurt
-2 large eggs
-1 tsp vanilla
-2 to 3 tbsp fat free or skim milk
Directions
-Preheat oven to 325 and spray 8×8 pan with cooking spray
-In medium bowl, whisk dry ingredients together
-In a large bowl, whisk together wet ingredients
-Dump dry ingredients into wet, whisk just until everything comes together. If the batter is too stiff, add additional tablespoon of milk.
-Don’t over mix or brownies will turn out tough.
-Bake for 20 minutes or until a toothpick comes out clean.
-Cool, cut, and enjoy! Top with Cool Whip, chocolate or caramel sauce, or more peanut butter
Nutrition
Macros for 9 servings: 6.9 carbs/9.1 fat/12 protein (158 calories) -
Just in Lime for Summer
Jump to recipe
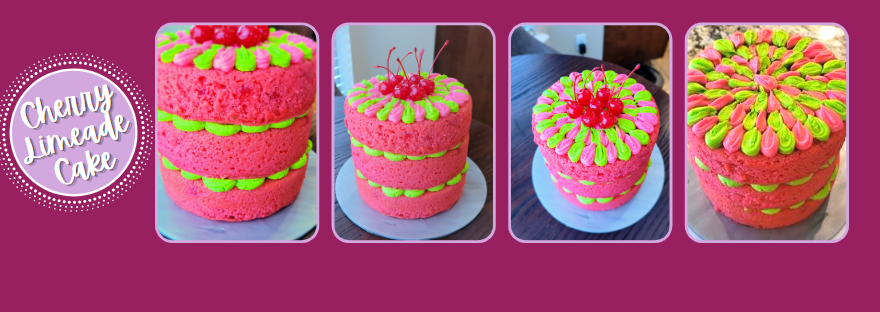
I’d like to point out I’ve managed to make it all the way to the middle of May before I started complaining about summer heat this year. If we still lived in Florida, these tantrums would’ve began in February, so thank you, New Mexico: the land of enchantment and lower A/C bills. Plus it’s a dry heat, so if you place me in the shade with a cold beverage, I can make it approximately 90 minutes without a single complaint. It’s a personal best. But one thing summer always makes me want is a Cherry Limeade from Sonic. Because I draw the lime at suffering through the heat without some form of thirst-quenching goodness. I had one a few weeks ago, and it inspired me to try turning it into a cake. I mean, that’s why we’re all here, right? As great as I am with a turn of phrase, we’re here for dessert.
My charming wit is the cherry on top of my personality, though. You shouldn’t look directly into the sun or probably at this cake without risk of retinal scarring. I apologize. It’s like a 90s Lisa Frank fever dream, but you can eat it! Now I’m feeling both nostalgic and a little dizzy, but that could either be from the heat or my eyes are about to pop out of my head due to how bright this cake is. I will say its flavor is sub-lime…it tastes cherry delicious. I’ve turned a lot of drinks into cake flavors, but this is hands-down the closest interpretation to the real thing. Sweet cherry flavor with a sour lime bite–it’s completely refreshing which also makes it very dangerous. I can down a Route 44 diet Cherry Limeade in approximately two minutes, and I’m pretty sure I could eat half this cake in the same amount of time. Good thing it’s only 264 calories a slice for 12 slices, or we’d have a swimsuit season snafu on our hands.

Wondering if you have a cut on any of your fingers? Discover every open wound with the help of citrus! Curing scurvy and causing debilitating hang-nail burning since the dawn of time. I juiced so many limes for this cake and found so, so many cuts on my hands whose existence prior to that point were completely unknown. It was a real hoot. For the cake you need:
- 1 box of yellow or white cake mix (I tried Cup4Cup gluten free yellow cake mix)
- 1 packet of sugar free cherry Jell-o
- 1 cup of milk
- 3/4 cup unsweetened applesauce
- 1/4 cup of fresh squeezed lime juice*
- 1 tsp lime zest
- 4 egg whites
- 1 tsp almond extract
- Chopped maraschino cherries to your preference (I used 56 grams)
- Hot pink gel dye
*You could also use bottled lime juice. Kind of against baking rules, but using it is more of a white collar lime, so light punishment only if you’re caught.
Preheat your oven to 325 and grease three 6-inch round or two 8-inch round cake pans with cooking spray. With a whisk attachment, whip the milk, applesauce, lime juice, lime zest, extract, and egg whites until slightly fluffy. Add in the cake mix and Jell-o, whisking just until everything comes together. Fold in the chopped cherries by hand. Evenly distribute batter into your pans and bake for 35 minutes or until a toothpick comes out clean. Start checking around 30 minutes if using the 8-inch pans.

These layers deserve a turn in the limelight. Once done baking, leave your cakes in the pan for 10 minutes while on a cooling rack. Turn these out on the rack to completely cool before frosting. You can plop your cooling rack into the fridge or freezer to speed this up.

Oh look, more limes. I would love to know how many limes Sonic uses in a day. I’m sure its more than six, but does the same person have to cut and juice them all day? My hangnails just recoiled in horror. I have not made a traditional buttercream in about two years because I find it way too sweet and calorie dense. I made it for this cake because I needed very stiff frosting to pipe a particular pattern on top of the cake. Spoiler alert: the pattern didn’t work, so I scraped it off and started over with something completely different.
I made this a naked cake for a few reasons: less buttercream/lower calories, I wanted the cake layer colors to show through, and my husband is currently away, so I wanted to be able to take the top layer off to freeze it for him to have when he gets home. I know, I’m shocked I share cake, too.
To make the buttercream, you need:
- 1 cup of butter at room temp
- 4 cups of powered sugar or Lakanto powdered monkfruit
- 1/4 cup plus 1 tsp lime juice
- 1 tsp almond extract
- Hot pink and lime green gel dyes
- Large round tip and two 125 petal tips or another large round tip
Whip the butter until fluffy in a stand mixer, about 3 minutes. Add in half the powdered monkfruit, the almond extract, and half the lime juice, mixing well then scraping the bowl. Add in the rest of the powdered monkfruit and lime juice, blending fully. Remove a third of the frosting to another bowl and dye hot pink. Dye the frosting in the main mixing bowl lime green.

Once upon a lime, when I still had hope this cake would turn out how I wanted. Place a cooled cake layer face down, then take split your frostings: fill a piping bag with large round tip with half the green frosting, another with the 125 petal tip and the rest of the green frosting, and the final bag with another 125 petal tip and hot pink frosting.

Is…is it alien poo? With the large round tip, pipe circle blobs around the edge of your cake layer. Now grab an angled spatula.

Whew, looks more like a flower now. That’s relaxing and not at all gross. Take your angled spatula, and in the middle of one blob, push down and swipe away, pulling your frosting toward the middle of the cake. Repeat on all blobs. You will need to add a little dollop of frosting in the middle and just smooth this out; nothing fancy needed here since no one will see it. Unless knowing it isn’t piped exactly the same bothers you, then by all means, let your OCD take the wheel.

Pretty sure this looks like a giant Lady Gaga Oreo. Add your next layer, and repeat with the blobbing.

This cake is very psychedelic. I do not recommend making this cake if you’re on any form of drugs. Even Benadryl. I’m afraid of what could happen. 
Exsqueeze me, you are not what I was going for… I added my final layer, tried to pipe a herringbone pattern, and it just was not working. I didn’t use a coupler, so I was stuck with two giant bags of frosting with large petal tips. You could make waves with this, but I wanted a pattern that would match the middle layers of frosting, so I piped alternating colors with the large end of the frosting tip facing me. I would’ve preferred to use the large circle tips to pipe alternating blobs of color, and dragged those to the center of the cake like the middle layers, but it is what it is (and what it is is still edible cake).

I repeated a few more circles while cursing my lack of foresight. I ALWAYS use couplers. The one time I don’t… 
It’s incredibly colorful, but not what I was going for, so I’m sad. Which means I need cake, so boy does this ever work out in the end. 
Now, for the actual cherries on top. Best part of the Cherry Limeade is the cherry waiting for you in the bottom of your cup. You know you’re gonna get to chew on that amazing Sonic ice to get to it, and this is your final reward for making an excellent beverage choice from start to absolute finish. Moral of the story: don’t forget to add more cherries to the top of your cake to tie everything together.

Brighter than 1,000 suns, this one. You will have a LOT of leftover frosting (I used half). This can be frozen and used again at a later date or shame-eaten because your design didn’t turn out the way you wanted. 100% up to you…

Just looking at it makes me both thirsty and hungry at the same time. For the full experience, go grab a Cherry Limeade from Sonic, then eat a slice of this cake. It will BLOW YOUR MIND. You could say this cake is my main squeeze right now. It really and truly tastes exactly like the drink which makes me extremely happy and way less of a sourpuss dealing with the summer heat and the sun’s infernal rage. The cherry and lime are meant to be together, and the burst of cherry chunks in the cake mixed with the citrus from the lime are bliss. I don’t even mind the traditional buttercream frosting either; the lime juice balances everything out just right so it isn’t sickeningly sweet. I may start wearing sunglasses while I eat it though because looking directly at this cake is like stepping outside from a dark movie theater into the sun. Worth it. ‘Til next time, my fellow eaters!

Made it just in lime for summer! Recipe & Instructions
Cherry Limeade Cake
Cherry Limeade-flavored cake with cherry chunks, lime zest, and lime buttercream frosting
I used Cup4Cup’s gluten free yellow cake mix for this recipe. Using other box mixes may yield different results.
Ingredients
FOR CAKE
* 1 box of yellow or white cake mix (I tried Cup4Cup gluten free yellow cake mix)
* 1 packet of sugar free cherry Jell-o
* 1 cup of milk
* 3/4 cup unsweetened applesauce
* 1/4 cup of fresh squeezed lime juice
* 1 tsp lime zest
* 4 egg whites
* 1 tsp almond extract
* Chopped maraschino cherries to your preference (I used 56 grams)
* Hot pink gel dye to your liking
FOR FROSTING
* 1 cup of butter at room temp
* 4 cups of powered sugar or Lakanto powdered monkfruit
* 1/4 cup plus 1 tsp lime juice
* 1 tsp almond extract
* Optional: Hot pink and lime green gel dyes
* Optional: Large round tip and two 125 petal tips or another large round tip
Directions
- Preheat your oven to 325 and prepare three 6″ rounds with cooking spray and bake even strips.
3. In a separate bowl, whisk the cake mix and Jell-o together.
4. Add the cake/Jell-o mix to the stand mixing bowl and mix on low until everything comes together.
5. Fold in the chopped cherries by hand.
6. Pour batter into prepared pans and bake for 30-35 minutes, or until a toothpick comes out cleanly from each round.
7. Once cooked, let rest in pan on a cooling rack for 10 minutes.
8. Turn cakes out of pan and onto cooling rack to cool completely before frosting.
9. To make frosting, beat butter in stand mixer on high for 3 minutes.
10. Add half the sugar and liquids, mixing well, scraping the bowl.
11. Add remaining sugar and liquids, mixing well.
12. Frost cake as desired; for styles pictured above, please read main body of the blog for directions.Nutrition
Per Serving: 264 calories per slice -
Every Bunny Loves Carrot Cake
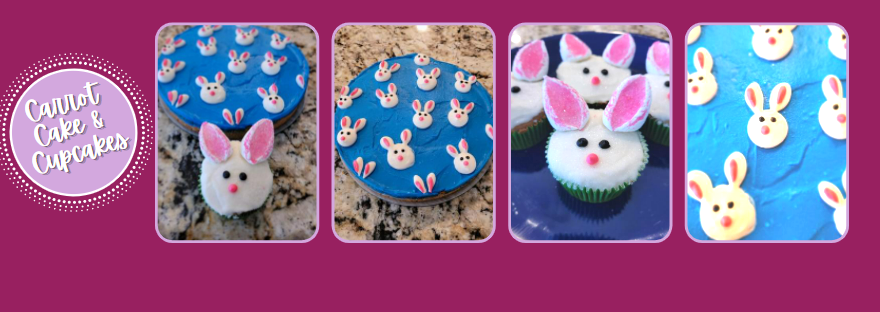
I’m a fan of Easter simply because it’s the Spring Edition of “There Are No Rules: We Begin Eating Chocolate at Sunrise,” much like how Christmas is the Winter Edition of “There Are REALLY No Rules: Cake Pairs Well with Spiked Hot Chocolate at Dawn.” I knew I wanted to do a bunch of baking for the holiday weekend, but I turned into a bit of an Easter basket case Thursday when our fridge stopped working (despite my best efforts to repair it). I was down to a tiny beer fridge in my husband’s office and a small fridge out in the garage…I wasn’t sure I’d have room for a single cupcake after moving everything out of our broken kitchen fridge and freezer. Needless to say, after throwing out a ton of spoiled meats and fancy ice creams, some bunny needed cake (it was me. I’m some bunny).

They are simply ear-resistible. Where there’s a will to bake, there’s a way to make those baked goods fit into a tiny fridge. I’d like to thank Tetris for preparing me for this exact life moment because these carrot cake and cupcakes are 14-carrot gold in the flavor department. Filled with pineapple, carrots, Craisins, and the most delicious cream cheese frosting, each bite is eggs-travagantly delicious. I’m not a huge carrot cake person (really, vegetables in a cake?), but since carrots are a sweeter veg, I’d say hoppiness can sometimes be as simple as a really good carrot cake. However, the moment anyone tells me to put riced cauliflower or spinach in a dessert recipe is the day I quit baking. These appropriately-vegetabled cupcakes and cakes are only 173 a slice/cupcake (20 servings total). I’d say it’s an Easter miracle, but well, I don’t want to walk outside and get struck by lightning or anything smite-adjacent.

I may be a cake eggs-pert, but this box mix threw me for a loop. I tried a Natural Grocer’s find as the base for this cake. I don’t like to throw too many of my own adaptations into a brand/mix I’ve never worked with before, so I mainly followed the directions on the cake box for the carrot cake recipe. I had a gut feeling the batter needed more liquid in it, but I went ahead as it told me to. Unfortunately, my gut was right (it’s a seasoned pro at cake eating, after all), and the cake ended up being very tough. It wasn’t over baked or over mixed, so I attribute a lack of moisture to be the culprit. Don’t get me wrong, the flavor is still AMAZING, but I like each bite to taste like a fluffy cloud of cakey goodness, not a cement brick of cakey goodness. I’ll add my suggestion below; I’ll definitely use this mix again because the flavor is SO GOOD, just with added liquid to keep things softer and lighter and less like (weighs an actual) pound cake.
- 1 box of Namaste GF spice cake mix
- 3 egg whites (92 grams)
- 1/2 cup unsweetened applesauce (111 grams)
- 1 1/2 cups grated carrots; I processed into a fine pulp in my food processor (75 grams)
- 1/2 cup of less sugar Craisins or regular raisins (80 grams)
- 8 ounces crushed pineapple with juices (226 grams)
- I would add 1/4 cup of milk to this next time

Because the batter was thicker than a solid chocolate Easter bunny. Preheat your oven to 350 and prepare a muffin tin with 12 cupcake liners and spray an 8-inch round pan with cooking spray. Alternatively, you could make 24 cupcakes or two 8-inch rounds. Blend the cake mix, egg whites, applesauce, and pineapple on medium-high in a stand mixer for 30 seconds. Add in the Craisins and carrots until everything has come together. Pour into your prepared pans and bake the cupcakes for 20 minutes and the cake round for 25. A toothpick should come out of each with just a small amount of crumb on it.

This made my house smell good for THREE WHOLE DAYS (avoid joke about Easter miracle). Let everything cool in the pan for 10 minutes before turning out to cool completely on a cooling rack. Or, you know, in a fridge if you have one that works.

What, you don’t buy your vanilla extract in the same size as a handle of booze? The cream cheese frosting is super simple to put together but an absolute must with carrot cake. Without cream cheese frosting, it’s just a mix of fruits and vegetables in bread pretending to be cake.
- 8 ounces of 1/3 the fat cream cheese at room temp (225 grams)
- 1 cup of plain Greek yogurt, strained overnight (226 grams)
- 3 cups of Lakanto powdered monkfruit or powdered sugar (360 grams)
- 2 tsp CLEAR vanilla extract (we’re making Easter bunny, not dust bunny cupcakes, no brown extract)
- If your frosting is too thick, add 1 TBS milk
Whip the cream cheese until fluffy, about 3 minutes. Then add in the yogurt, blending well, then half the monkfruit, and the 2 teaspoons of extract. Mix, scrape the bowl well, and add the remaining sugar.
Now, to make bunny cupcakes you will need a few more items:
- Hot pink gel dye
- Black gel dye
- Hot pink sanding sugar
- White sanding sugar
- #2 round tip (2 of them)
- Large marshmallows
To make the bunny cake you will need:
- Blue gel dye
- Hot pink gel dye
- Black gel dye
- Tips 125, 104, 1A, and 2 (having two here also helps)
You can take a tiny bit of frosting to dye black since you only need it for eyes on either cake or cupcakes, and you don’t need much more dyed pink for the noses and ears. You need more plain white frosting than anything else, and a decent amount of blue to frost the top of the cake. I had a bunch of leftover frosting, so you don’t have to skimp. Once prepared, decorating is an absolute breeze.

Cut a large marshmallow in half diagonally. 
The cut sides will be nice and sticky, so roll those face down in some pink sanding sugar. 
Add a layer of white frosting to the top of every cupcake, then gently roll in the white sanding sugar. 
Gently press the backs of the ears into the frosting. 
Then use your black frosting with a #2 round tip to pipe little eyes. 
And do the same with the pink frosting to make little noses. You could easily pipe a heart for the nose, but I was going ‘minimalist bun’ to match my cake. 
Which I slathered a layer of blue frosting on first, then let chill in the tiny amount of free space left in our garage fridge. 
I also had my prepared frosting chilling in the fridge for 10 minutes. For reference, the 1A large round tip and 125 petal tip are for the bunny ears and face. You’ll need to alternate between the 2 tip and the 104 petal tip with the pink frosting for the nose and ears; the other 2 tip can be used with the black frosting for the eyes.
I am literally all ears. I just randomly piped ears first with the #125 tip; the round side of the tip should be pointed up to make the top of the ears. You just need to apply gentle pressure to pipe each ear and gently pull away. A full video can be found at my inspiration for this cake here.
At this point, we’ve got a sky full of bunny clouds. Add the heads with the 1A round tip, and use an angled spatula to smooth out if needed.

Giving me real Wallace and Gromit: Curse of the Were-Rabbit vibes. How hare-raising. Use the round tips to give your bunnies eyes and noses unless you want some weird dystopian Easter thing going on. Use the 104 tip, also round side pointed up, to gently place pink onto the whites of the ears. I found it easiest to pipe and gently pull down, then away for this.

Don’t worry. Be hoppy. I have to add in that my calorie calculation for these cupcakes does NOT include the marshmallow ears because marshmallows are only edible when melted and sandwiched between chocolate and a graham cracker. Don’t even get me started on Peeps. They are an abomination and must be stopped. Whoever decided to take a marshmallow and make it even less edible than usual, but dye it hot pink!, is clearly evil.

These little bunnies though? Pure innocence. 
But this cake is absolutely my favorite. 
Oh look, it’s a bunny getting a photo taken of itself while also getting more bunny ears. This was accidental, but perfect positioning nonetheless. 
The one on the bottom left just looks like it doesn’t carrot. It’s a punny rabbit. Well not exactly Easter hot cross buns, but insanely cute buns abound instead with either the cake or cupcakes, so you can’t go wrong. Add in a little extra liquid with this recipe, and I know it would be absolutely the perfect balance of dense carrot cake with a spring in each bite. I love the spices that come together in carrot cake, and anything that has pineapple in it I will eat with reckless abandon (especially pizza–where it belongs–and I will fight you on this). The cream cheese frosting is extra tangy with the use of the Greek yogurt, so it’s a perfect addition to the spices and the sweetness of the pineapple and Craisins. Basically, this is the recipe that will make you a carrot cake lover and not just a carrot cake tolerator. I am hoping for a hoppy ending with the fridge saga, but at least I carved out enough space to keep these beautiful bunnies refrigerated. I hope you eat your body weight in ham, chocolate eggs, and carrot cake today–as is Easter tradition.’Til next time, my fellow eaters!

These bunnies won’t judge you. -
Simply the Zest

I love gloomy weather. Is it grey and cloudy? Good. It is raining? Better. Is it snowing? Best. Needless to say, after five very long, very winter-less years in Florida, I was stoked to be back in New Mexico where it gets cloudy, rainy, and snowy sometimes all in the same day during the winter months. Sadly, we went from mid 40s to low 80s this week, so I think we’ve skipped straight from winter to summer. I generally need a spring-buffer to prepare my frail, heat-hating body for the sun’s rage in the summer (it has literally zero chill). Since I knew I needed some lemon-aid to get through this hot weather, I turned to my favorite coping mechanism: the cheesecake. I wanted spring vibes happening inside my house if they weren’t going to take place outside of it, so I made the cheesecake lemon flavored and accidentally turned it into a giant daisy during the decorating process.

Daisy me rollin’, they hatin’…. March went by in a blur, and I try to blog once a month, so I had to squeeze one in before April and all it’s foolery. I haven’t made cheesecake since November (which apparently means my mental health has been optimal this winter since feelings-eating hasn’t been a thing), so I knew it was time to bust out the springform pan for springtime eatings. I know lemon typically has a summer-flavor connotation with it, but I felt this was the right call for my cheesecake flavor because like me, lemons are also small, thick-skinned, and slightly bitter. THIS. CHEESECAKE. It is positively divine. It is tart but creamy, sweet but sour, and probably the best thing I’ve eaten all month (and the only thing I want to eat for the rest of it). It is light and refreshing but also truly satisfies my gigantic sweet tooth, like a lemon bar married a cheesecake and had really tasty children. Thankfully, each slice is fewer than 300 calories (282 to be exact) for 8 slices total. I am sharing with my husband, lover of all things sour, so there may be some battling toward the end of this beauty.

One of us is bound to squeeze the day and take that final lemony slice. I am not a fan of cheesecake crusts that go all the way up the side of the cheesecake. I like a small, thin layer of crust because I want less filler and more filling. If you need more graham cracker crust than there is actual cheesecake, just save yourself some time and go make s’mores. For my lighter crust, I use:
- 1 cup (120 grams) Kinnikinnick gluten free graham crumbs
- 2 TBS (24 grams) Lakanto granular monkfruit sweetener
- 2 TBS (28 grams) light butter
To make, I preheat my oven to 375 and line an 8-inch springform pan with Parchment paper and spray with Pam. I mix all 3 ingredients in my food processor until the crumbs look wet. I spray my hands with Pam and press the crust into the prepared pan. Bake time will vary from 10-15 minutes by oven. This was my first regular cheesecake in our new kitchen, and my oven definitely over-bakes quickly, which I unfortunately learned the hard way with this crust (it was a real whoopsy daisy, if you will). Baked at 12 minutes, it is very, very tanned. Ten minutes next time, for sure.

This was pre-sunburning. I placed my crust into the freezer to cool down while I made my filling. I also turned my oven off to cool down a bit since bake temp for the cheesecake is lower.

Lemons the size of my whole friggin’ hand brought to you by Albertsons. This filling is super easy to make, and given that cheesecakes are known prima donnas in the dessert world, that’s saying something. All you need is:
- 8 ounces (225 grams) 1/3 the fat cream cheese at room temp
- 1/2 cup (96 grams) Lakanto classic monkfruit sweetener
- 14 ounces (398 grams) fat free plain Greek yogurt, strained overnight
- 1 tsp vanilla
- 1/4 cup (58 grams) lemon juice (I only used 1 of the ridiculously large lemons for this)
- 1 TBS lemon zest (still only 1 lemon needed since these were terrifyingly large lemons)
- 3 eggs at room temp
- OPTIONAL: if you don’t have lemons or don’t want to zest and juice, try using 2 tsp of lemon extract to taste; you may need more depending on how tart you want your cheesecake
- To be used for topping:
- 5 ounces (142 grams) lemon curd
- 85 grams Cool Whip Free
Turn the oven to 350 degrees, then mix the cream cheese and sugar in a stand mixer with paddle attachment for 3 minutes on medium-high. Add in the strained yogurt and mix well before adding in the zest, juice, and vanilla extract on medium-high. I scrape the bowl at this point, then add in the eggs on low speed, one at a time.

Then prepare for a weird-looking ritual. Before I pour my filling onto my cooled crust, I always line the pan with several overlapping sheets of foil and two crockpot liners to keep water out of the crust during the water bath. My middle name should be “Safety” because there is no step I won’t take to ensure the well-being of my baked goods. I then pour my filling on top of my crust and place this into a large roasting pan before filling the pan with 4-5 cups of very hot water. I baked at 350 for 1 hour and 5 minutes, until the edges of the cheesecake were getting golden and set but the center was still jiggly. Then I turned off my oven, cracked the door open, and let the cheesecake finish baking for 1 hour. It may seem like a lot of weird hoop-jumping, but this process has never steered me wrong in yielding a cheesecake without any cracks on the top.

If a lemon curd, it would. At this point, I moved my frozen Cool Whip Free from the freezer to the fridge to thaw out overnight, and I moved my cheesecake from the oven to a cooling rack so I could use a sharp knife to run around the edge of the pan. Then I placed the cheesecake + rack into my fridge for 30 minutes to cool.

Now it’s time for the icing on the (cheese)cake. I filled a piping bag with 5 ounces of lemon curd, snipped the tip, and piped the curd around the center of the cooled cheesecake before smoothing out with an angled spatula, leaving about a 1-inch edge without curd:

This picture makes me want a fried egg. Now, since cheesecakes like to do nothing more than be, well, lazy daisies, cover with plastic wrap and let this set overnight in the fridge.

They’re always worth the wait, though. The next day, like a kid on Christmas morning (or someone obsessed with dessert), I ran to the fridge to remove the springform pan and finish my cheesecake.

Circle the part you want to eat… I used 85 grams of Cool Whip Free plopped into a piping bag with a 1M tip to make a large circle for my inadvertent flower petals to sit on top of…I was really just going for a cool swirly pattern but it ended up looking like a daisy in a twist of good fate.

Spring has sprung. Right onto my fork. Straight into my belly. I piped a zigzag back and forth on top of the circle base, and I looks pretty nifty. At this point, you could cut and serve, but it was only 9 a.m., so I very sadly placed my cheesecake back into the fridge and shuffled away, longingly gazing at my fridge and willing the clock to spring further forward to dessert time.

It just looks so happy, so bright, so ready to be cut into reasonably-sized pieces. 
Alexa, play “Here Comes the Sun.” I’m more of Stones girl myself, but I’ll give the Beatles their just desserts (ha!) for writing that bop because it’s been on a loop in my head since the first bite of this cheesecake. Creamy cheesecake flavor meets tangy lemon curd and sweet Cool Whip topping? This is perhaps the first time I’ve been excited about spring’s arrival since I was still young enough to hunt for Easter eggs.

It’s almost as pretty as an Easter egg, too. I might have had whatever the opposite of the winter blues is called (cold weather contentment?), for the last four-plus months, so it’s probably a good thing it’s getting hot out or I might never have been sad enough to make this delicious cheesecake. Just thinking about how decadent yet light, sweet yet sour, and accidentally floral this cheesecake is brings me a joy not even the sun can outshine. And the zest, as they say, is history. ‘Til next time, my fellow eaters!

Have a nice daisy! I plan on having several (slices). -
A Heart Full of Cake
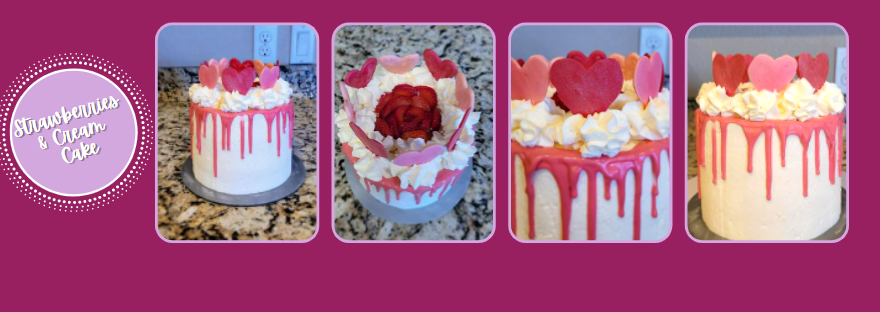
Let me preface this blog by plainly stating, I do not celebrate Valentine’s Day. Adjectives to describe me have never included “lovey dovey,” “romantic,” or “cuddly.” I required six feet of personal space even before COVID, and I would rather get my eye poked than meet someone for the first time who says they’re a hugger. OK, now that I’ve laid all this out for you, I will say I do look for any and all opportunities to make very bougie, very delicious cakes. It just so happens that Valentine’s Day is a perfect chance to make such an over-the-top creation considering everything else about the holiday is very in-your-face. Who really wants a 6-foot tall, 80-pound stuffed teddy bear? No woman, that’s who. We want cake. A lot of it. And preferably guilt-free. We’d also like real pockets on all our pants, but that’s a whole other thing.
I can’t cake my eyes off of you. I assume normal, romantic people, that strawberries and whipped cream are definitely still a thing included on the list of “Valentine’s Day Items to Woo With?” In the exaggerated spirit of the holiday, I’ve taken this duo to the next level and turned simple strawberries and whipped cream into what I consider a cake so cute it almost hurts my eyes. It’s so pink, so whimsical, so full of…love. It melts my tiny, icy little heart, this one. It doesn’t hurt that it’s also SO DELICIOUS I don’t actually want to share it with my husband, but in the spirit of Valentine’s Day, I will. Vanilla cake layers topped with sugared strawberries, ensconced in cheesecake-flavored whipped cream frosting….if you could eat a cloud, I imagine that is what it would taste like. Light, fluffy, the perfect amount of sweetness, and so very satisfying to my sweet tooth (the only part of my body and personality that is so). It’s not the lowest in calories, but for 371 calories for 12 slices total, it’s still well within the realm of “feelings eating” without breaking the bank.
Yep, that’s a koala in a chef’s hat on a cake box. I have literally no idea why. Still searching and trying GF box mixes, and up next: Natural Grocers brand gluten free vanilla cake mix. I will say without doctoring it in the way I did, this would be absolutely flavorless, but it yielded gorgeous, tall layers, so I’m torn. To make the vanilla cake you need:
- 1 box of white or yellow cake mix, gluten free if needed
- 6 ounces of fat free plain Greek yogurt (170 grams)
- 2 tablespoons of unsweetened applesauce (40 grams)
- 1 cup of fat free or skim milk
- 1/2 cup of egg whites (112 grams)
- 1 TBS vanilla extract
- 1 tsp almond extract –you can swap this out for either more vanilla or another flavor (lemon, butter, etc.) to give this specific brand of cake mix more flavor
Preheat your oven to 350 degrees and prepare three six-inch round cake pans or two eight-inch round cake pans with cooking spray and bake even strips. Combine the cake mix and yogurt in a stand mixer on low until crumbles form, then add in the remaining ingredients, mixing on medium-high for 2 minutes. Pour into the prepared cake pans and bake for 30 minutes at 350, or until a toothpick comes out cleanly from each round. Place pans on a cooling rack for 10 minutes, then turn the cakes out to cool to room temperature before adding frosting or filling. I made this cake in two days, so I chilled my rounds in the fridge overnight, and then leveled them the next day (they domed up a bit even with the bake even strips).
Honestly, a terrible color combo in my opinion, but here we are, being bougie anyway. While my cakes cooled, I made my sparkly hearts. All you need are pink and red chocolate melts and pink and red luster dust. All things easily found at a local craft store, or the world’s craft store, Amazon.
Yes, I really suck at drawing hearts. I didn’t doodle hearts in notebooks as a young girl because I was usually too busy trying to understand why I would ever need algebra as an adult or deeply fascinated by trying to perfect that damn “S” drawing. If you were born before 1995, you know the one.
Anyway, I used a marker on Parchment paper to trace out 12 hearts (only used 8), and then flipped it over. For my pink hearts, I melted 1 cup (160 grams) of melts following package instructions, then I poured them into a piping bag and let them sit for 5 minutes before snipping the very end of the tip. I piped and filled a whole bunch of pink hearts, using a toothpick to help even things out. I had an over abundance of melted chocolate left over, so I probably only needed 80 grams. I did the exact same thing with the red melts.
I mean, I made it to my mid 30s before not being able to freehand hearts became an issue, so… I left these to harden for 30 minutes before coming back in with little food-safe paint brushes, and I just took little bits of luster dust and dry brushed them onto the back of each heart.
Now you’re speaking my language: sparkly. The pink was much more subtle, which is a shame, because the luster dust looked so pretty. As a side note, I did NOT figure these hearts into the overall calorie count of the cake because I hate eating white chocolate. White chocolate is cocoa butter lying about being chocolate, and it has absolutely no place in my mouth.
Strawbs, on the other hand, most definitely do. While your cakes and faux chocolate hearts (great idea for an emo band name) cool, you can get after the sugared berries. I chopped a 16 ounce container of strawberries into thin half-moons, and then I dumped these into a bowl with two teaspoons of Lankanto monkfruit sweetener (regular sugar also works). You want to let this sit and mix together as the berries release their juices for about a half an hour at minimum. The longer you can let these two combine, the tastier the berries will be. I did not need all of the berries; I used 2/3 and saved the leftovers for pancake or waffle toppings. Have no fear, they will be eaten.
Even if you’re a diehard buttercream fan, you will love this frosting. Whipped frosting gets a bad wrap. Unlike the whole white chocolate masquerading as something it’s not, it is still frosting; it just doesn’t contain a metric ton of powdered sugar, which I’m totally okay with. It’s still very calorie dense, but just trust me on this one…when you mix a box of sugar free Jell-o pudding with a quart of heavy whipping cream, that’s how dreams are made.
- CHILLED mixing bowl needed
- 1 ounce box of sugar free cheesecake pudding mix (or vanilla, or strawberry if you want a pink frosting)
- 1 quart of cold heavy whipping cream
- 1/3 cup of Lakanto powdered monkfruit or powdered sugar
The colder your mixing bowl, the quicker this will come together. Dump the cream and pudding mix into a stand mixer with a whisk attachment. Whip on medium-high for 3 minutes, or until stiff peaks are forming and frosting sticks to the whisk when the mixer is raised:
Like so. Finally, add in the powdered monkfruit and blend for 30 seconds. Now you’re ready to assemble this monolithic cake (nothing says, “I love you,” like a cake that’s almost as big as those stupid giant bears).
You’ll have leftover frosting and strawberries, so you know, make super sexy pancakes or something. Find a cake plate, and place your first layer of cake face down on said plate, then plop a decent amount of frosting down, smooth it out, and top with berries. Press them gently into the frosting, and it they’re all not sitting evenly, just add a smaller layer of frosting on top so the next cake layer has an even surface to sit on.
Lather, rinse, repeat. Sort of. Add the next layer, face down, slathering with frosting, berries, more frosting if needed, then add the top layer face down.
Did I use a ridiculous amount of whipped frosting? Yes. But once you taste it, you’ll know exactly why. Now you can slather a hearty amount of this absolutely addictive frosting on the entire cake:
Like buttah. It is very easy to smooth whipped frosting, and a few passes with the bench scraper had things looking perfect. Now, VERY IMPORTANT, before you add any hot ganache topping, you need to chill your cake in the freezer for a half an hour or things will get very melty and awful…you know, like a sobbing girl who just got dumped on Valentine’s Day that’s wearing a LOT of mascara that isn’t waterproof…so, so runny.
And we never want cake to equal sadness. I love the way drip cakes look, so I’m happy to report they’re also relatively easy to make. I used two tablespoons (30 grams) of heavy whipping cream and 1/2 cup (90 grams) of pink melts, dumped together in a bowl, and microwaved at half power for one minute. I mixed until smooth, then added in a teaspoon of pink luster dust. I wanted more sparkles, but I didn’t want to add so much that the drip wouldn’t set. I pour this into a squirt bottle to actually make my drips on the top of a very chilled cake.
I only dripped on the edges since the middle is going to be covered with berries. …and again, the taste of white chocolate causes my soul to leave my body, so I didn’t want it all over the top of the cake. Once I was done gently squirting little drips all over the top edge of the cake, I placed it into the fridge to set for 30 minutes. I loaded up a piping bag with a 2D tip with frosting and gathered my sparkly hearts.
I just pipped large mounds of frosting on top. Pipe with the bag facing straight down, pushing out frosting into mounds. When done, push down a little, then pull up and away quickly. I kinda liked the minimalist look here, but since I had inadvertently painted my hands sparkly pink and red, we were using those hearts, dammit. If my hands had to look like a Lisa Frank painting, it needed to be for good cause.
WHAT a heartthrob. To finish, I gently placed hearts of alternating colors into each frosting mound. Then I made a “rose” in the middle by overlapping strawbs on their sides.
Honestly? That’s probably my favorite part of the whole “look,” and it was the easiest to do. But we all know how much I love a good sprinkle sparkle topping. This cake holds the key to my heart. Yes, it’s a heart full of cake. From the bottom of my heart (you know, the pointy part), I hope if you do celebrate Valentine’s Day that it’s a good one. If you spend two days making and assembling a cake so pretty you may not want to eat it (you will) for your loved one, you’ve done a good job of expressing your heart’s feelings without the need to say a single, ooey-gooey word. Is cake a love language? I feel like cake should be a love language. I’m telling you, we are firing on all flavor cylinders here with this cake. It is so light and refreshing, and those sugared berries combined with the cheesecake-flavored frosting that practically melts on your tongue…if ever I believed at love in first
sightbite, it was with this cake. I may try to pen a Hallmark movie about girl who meets a cake and gets swept away. Too much? Yeah…now you know how the rest of us feel, you schmoozy Valentine’s Day lovers. Go write a sonnet or something. I’ll be busy hiding this cake from my husband so I don’t have to share it. Hey, we all express our love differently… ‘Til next time, my fellow eaters!I’ll never let anyone hurt you. Except for this fork. -
Space: The Most Delicious Frontier
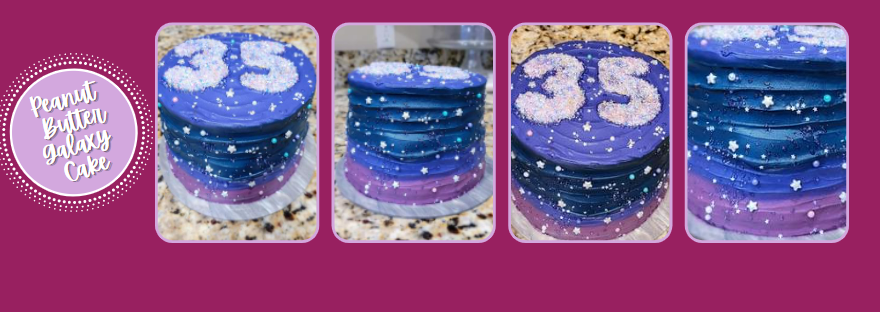
I know it seems weird to most people that I make my own birthday cake, but baking is my hobby, not my husband’s. I’m sure if I relinquished control (ha!) and let him bake my birthday cake, it would turn out absolutely fine (but oh would there be hovering). Alas, then what would I have to blog about? Trust me, you guys don’t want a blog about my thoughts regarding anything other than baked goods because it could get real weird, real fast…and there would be even more terrible puns than usual. I started thinking about what I wanted my birthday cake to be a few weeks ago. Usually I go for dark humor (see: tombstone cake for my 30th birthday) or something silly (like Kevin the minion or Kowalski from the Penguins of Madagascar). Since I was turning 35 and feeling older than dirt (why does everything crack or pop when standing?!), I thought it would be totes apropes to make a birthday cake in homage to something else that’s older than dirt: space.
It’s also very sparkly, and you all know how I feel about sprinkles…they’re out of this world. A yes, the night sky: now featuring my age in the form of a constellation! Like fireworks but brighter. Look, if I had to get another year older, I wanted to do it with a big splash. I am now solidly in my mid 30s and feeling, well, okayish about it, but I knew I’d feel better if there was peanut butter involved, so I decided to make this a funfetti peanut butter birthday cake. I am never depressed when eating cake OR peanut butter, so I figured combining the two would Sa-turn my frown upside down. I think my 2nd goal of 2022 (wearing more plaid than most Canadians do is still solidly planted in the top spot) is finding a way to incorporate peanut butter in a baked good at least once a month. THIS. CAKE. Full stop–it is a baking super nova of deliciousness. The frosting is a peanut butter cream cheese frosting to boot, so peanut butter + more peanut butter = a flavor brighter than the dang Milky Way (galaxy or candy bar). I somehow managed to make this possible for only 278 calories a slice, 12 slices total.
Ju-pit-er believe it. I’m still testing out gluten free box mixes easily found in Clovis, and while I’ve found a great cupcake replacement, I needed a mix large enough to make three 6-inch rounds, so I tried Pillsbury’s GF funfetti mix this time around. Fun fact time! I did a food sensitivity test…turns out, my body can handle gluten just fine. But wheat, barley, rye, brewer’s yeast, and baker’s yeast…not so much. Find me a cake mix or bread without any of those things, and you know what they are? Yup. Gluten free. Sorry, that was more of a sad fact than a fun one. Anywho, to make this peanut butter decadence, you need:
- 1 box of funfetti, white, or yellow cake mix (GF or regular)
- 1/2 cup of unsweetened applesauce
- 1/2 cup of egg whites
- 1 1/4 cup of fat free or skim milk
- 1/2 cup of peanut butter–I used American Dream Nut Butter Breanne’s Blend because it is a gift from the macro gods. High protein, low fat PB? Sorcery, for sure, but delicious sorcery.
Preheat the oven to 350, dump all these ingredients into a stand mixer and blend on low 1 minute before turning to medium-high for 2 minutes. Prepare three 6-inch pans or two 8-inch round pans with cooking spray and bake even strips. Evenly distribute the batter between pans and bake for 25 minutes or until a toothpick comes out clean. Leave in the pan and place on a cooling rack for 10 minutes before turning out of the pan and letting cool completely on a cooling rack. Your house will smell like the inside of a peanut shell (this is a good thing, unless you’re allergic to peanuts, I assume).
Look at that volume. Bigger than…Don’t make a joke about Uranus. Don’t make a joke about Uranus. The cakes are very large and dense, that’s all I’m saying. You can move these to the fridge or to the freezer to cool completely while you make your frosting. Definitely make sure they are COMPLETELY cool before frosting. It’s all sun and games until you frost a still warm cake, then things are gonna get sloppy, sad, and depressing, like Pluto after it lost its planetary status. Don’t worry, Pluto, I still believe in you.
As a child of the 80s, there will always be nine planets in my heart. I gotta admit, I was a little worried about how this frosting would turn out. We had a ton of leftover plain Greek yogurt from a soup recipe, so I decided to use it in place of vanilla Greek yogurt, but now I’m a convert. This let the peanut butter flavor shine without any interruptions. So, to make, I used:
- 8 ounces of 1/3 the fat cream cheese, softened to room temp
- 1 cup of plain Greek yogurt, strained overnight
- 1/4 cup of PB Fit or PB2 peanut butter powder (I used chocolate PB Fit, but plain would work even better, I think)
- 3 cups of Lakanto powdered monkfruit sweetener or regular powdered sugar
- 1 tsp vanilla extract
- 1 tsp butter extract (this helps bring out the PB flavor even more, but if you don’t have any, use another tsp of vanilla)
- 1 TBS skim or fat free milk
Start by whipping the yogurt and cream cheese until fluffy, about 3 minutes. Then add in the powdered peanut butter, the extracts, and half the monkfruit sweetener. Mix on low until blended, then add in the other half of the monkfruit sweetener and the milk, mixing well. You want a stiff frosting, but I found it was too stiff without the TBS of milk…that made things just right. Now, split your frosting into three bowls. One bowl should have a bit more than the other two since it will go on the side and top of the cake as the purple/violet layer. More on that in a second! Let’s get to the rest of the tools you’ll need for a space cake so pretty, you’ll forget the sadness and existential despair of turning another year older.
Haven’t used these cookie cutters since my sister turned 30… I might have gone a little crazy at Hobby Lobby when I was picking out sprinkles for this cake. I mean, you see seven different types of sprinkles here…four of which were purchased solely for this cake (and because, purple sprinkles). For my space background, I used varying star sprinkles, pearls, and plain purple sprinkles. All of these can be found at your local craft store like Hobby Lobby, Michael’s, etc. I used electric purple, violet, and navy blue gel dyes.
As I mentioned above, divide your frosting into three bowls. In one bowl, I used several drops of electric purple plus two drops of violet to make the color on the far left. I used a ton of violet for the bowl in the middle, and the final bowl is mostly navy blue dye with a couple drops of violet. I placed all three into their own piping bags to make life easier. No tips needed! Just snip the edge of the bag.
This color palette is life. LOOK at these acrylic cake plates my in-laws gifted me for Christmas! You can “ooh” and “aah,” I did. Honestly, these new cake plates were a huge inspiration because the swirls reminded me of space. I am trying to bake greener this year, so that includes reusable cake plates, silicone cupcake wrappers, etc. These are so, so gorgeous.
Time to assemble that space cake! Take a cooled layer, place it face down on the cake plate, and use a little purple and a little electric purple to swirl a layer of frosting. Smooth out with a spatula before adding another cake layer, also face down, on top. Repeat the frosting layer with a little navy and a little purple before adding the final layer (you guessed it, face down).
You will have a giant cake monolith before you. IDK what it is about that Pillsbury cake mix, but it yielded TALL layers, and I am here for it as a short person dying for more tallness…I will take it where I can get it. Heels, hair, cake layers, whatever.
Obviously, this is just a starting point. My husband chose the moment pictured above to enter the kitchen and see what I was up to…naturally. I swore things would look edible eventually. To make your night sky layer, start with the electric purple, and pipe two-three lines on the bottom cake layer. Then take the purple, and pipe two-three lines around the middle cake layer. Use the navy to pipe two-three lines of frosting around the top layer of cake. Switch back over to the purple, and pipe your remaining purple frosting on the top. I had NO purple frosting left, and enough navy and electric purple leftover to eat exactly two spoonfuls of frosting to 1. Taste test, and 2. Eat my feelings.
Why couldn’t my spouse have walked in during this part?! Now, take a bench scraper, and make one pass around the sides of the cake. Swipe off any excess frosting collected on the scraper into your empty mixing bowl. I went around my cake three times to get an even, blended spread. I used an angled spatula to smooth my top layer.
Space needs texture? I decided to swirl my angled spatula, flat against the cake, while turning my cake table with my free hand to create lines and blend the color layers a bit more. This is totally optional, but I love the way it turned out.
Now, shamelessly show your age! I gently placed my cookie cutters into the top of the cake, pressing in carefully but firmly.
Whilst holding my breath, I then added in my sprinkles of choice. I pressed the sprinkles down into the frosting layer while the cookie cutters were still in place. I took my time doing this and was very, very gentle. Once firmly applied, I carefully took the cookie cutters off by lifting straight up slowly to reveal my age-stellation:
Do I wish that was a two instead of a three? Maybe. I made a three-layer cake because I’m three decades into this life. If I was only in my 20s, I only would’ve earned a two-layer cake. If this is the logic I’m using to mentally justify my age, boy, I am SO looking forward to my 40s!
Now comes the absolutely fun part. I then took small stars, big stars, and beads in white, purple, teal, and pink, to make constellations and such all over my cake. Absolutely random in pattern, but totally fun to do. To finish off, in what I refer to as a a sneaky moon-euver, I took a small handful of plain purple sprinkles and literally threw them at the cake:
But it worked. Sometimes you have a “now or nova,” moment, and this was definitely that.
Space: the most delicious frontier. In Neptune with these vibes. I may be another year older, and this may be the first year of my life without Betty White in it (we’re still not over that, nor will we ever be), but damned if I didn’t knock it out of the park with the flavor of this cake. This box mix definitely passes my picky “Whole Foods GF cake mix or bust,” mentality. It’s a very tall cake, but it is still very light, springy, and moist…it is a dense as a brick without somehow tasting like one, which is no small feat. I am so in love with the peanut butter flavor here inside and out. The addition of powdered peanut butter into the frosting helped keep the macros and calories in control without losing any flavor. This means I get to eat all the slices without guilt or a gut bomb (thanks, 30s). Getting older may not be easy, but it can be delicious. Here’s to another trip around the sun. Thank you all for your birthday well wishes! It has been a magical week (and not just because of the cake, although that certainly didn’t hurt). ‘Til next time, my fellow eaters!
This recipe was a stroke of pure Venus. -
He's a Green One, Alright.
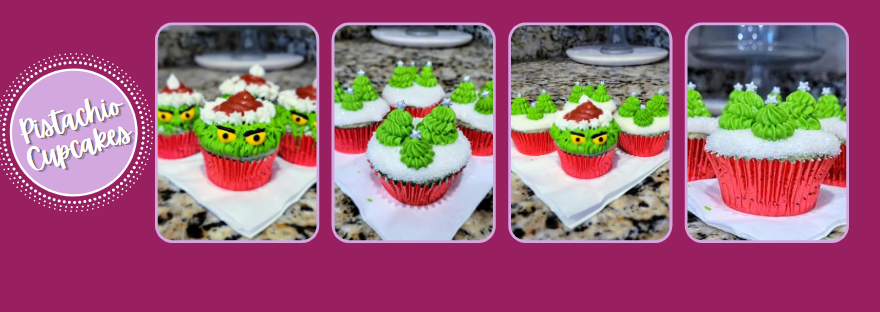
Well, we’ve finally made it into the last round of Holiday Eating 2021. I’m not huge into Christmas…the music is deplorable, most of the movies are too mushy (except for Die Hard, the best Christmas movie), and well, minus a strange man coming down the chimney at night to leave gifts, there is literally nothing spooky about it. As a lover of all things Halloween, you can see why I think Christmas has its shortcomings–save for the desserts. For some reason, during the month of December, it is appropriate to eat dessert at every single meal of the day, and I am so here for it. So yeah, I’m a little crabby and flabby during Christmas, much like my single favorite Christmas icon, the Grinch. I figured making a Grinch-based Christmas dessert was the closest I was gonna get to creepy Halloween-adjacent bake, so I went for it.
He may be a mean one, but he is definitely a green one. Yep, they’re terrifying and so, so very angry, and to me, this is perfect. To be fair, the Grinch didn’t really hate Christmas, he hated people, and after nearly two years in a pandemic, I’m thinking he made some valid points. I must say though, he makes an absolutely delicious dessert. These pistachio cupcakes are so moist, light, and fluffy thanks to the secret ingredient, and the cream cheese frosting is the right amount of sweet (think a happy medium between Cindy Lou Who and the Grinch). I love a good green dessert, and to boot, these cupcakes are only 188 calories a piece. Sleigh what??
Still trying to find a decent GF Whole Foods cake mix replacement… I’m gr-inching along over here, trying my best to make a cupcake that won’t kill me, still tastes edible, and lacks all forms of gluten, and I think I may have found a suitable replacement for my Whole Foods GF cake mix. It’s perfect because it only makes a dozen cupcakes, and truly, with the alarming rate I inhale dessert, I don’t need more than 12 cupcakes waiting to meet their demise via my sweet tooth. As the Grinch aptly said himself, “Am I just eating because I’m bored?” To make these phenomenal pistachio cupcakes, you need:
- 1 bag of Birch Benders GF yellow cupcake mix or half a box of yellow cake mix if not gluten free
- 1 box of sugar free Jell-o pistachio pudding mix (this is the probably not-so-secret ingredient)
- 1/2 cup of unsweetened applesauce
- 3/4 cup of milk
- 1/2 cup of egg whites or 3 large eggs
- 1/2 tsp almond extract
With the addition of the pistachio pudding, this recipe needed more liquid than what the Birch Benders recipe called for, just FYI! So don’t follow along with the recipe on the back of the bag. Preheat your oven to 350, line a muffin tin with seasonally-appropriate cupcake wrappers, and dump all your ingredients in a stand mixer. Mix on low for 30 seconds before turning to medium-high and mixing another 90 seconds.
Just wait, they get greener. I used a cookie scoop to place one and a half spoonfuls of batter into each liner. I gently swirled each cup with the back of the spoon to even out. The batter is quite thick with the pudding mix in it, so tapping the counter to even out doesn’t really work here. I baked for 24 minutes at 350, until a toothpick came out mostly clean and my tops were starting to get just a tiny bit golden.
I didn’t want to burn them, but they need a couple extra minutes to firm up. Now, I recommend leaving the cupcakes in the tin for 10 minutes to cool once you’re done baking. This way you don’t burn your fingerprints off, unless you’re looking to commit a little light holiday larceny like our pal the Grinch. Once cooled a bit, remove from the tray, place the cupcakes on a cooling rack, and shove this in the freezer to cool completely while you make the frosting.
Why is it so hard to find plain M&M’s?? I went through it trying to find plain M&M’s…everything was holiday themed green and red or not a plain M&M, whose size I needed for Grinch eyes. I was also trying to find Reese’s Pieces instead since I just needed small yellow circles for eyes, but I could not find anything smaller than a 5 lb. bag, and I can’t be trusted around a 5 lb. bag of chocolate peanut butter candy (that is a level of self control I’m very aware I don’t have). I skipped that and went to the checkout in hopes of finding a plain bag of M&M’s…behold, a Christmas miracle! Granted the only color I needed was the least populated in the bag, I was definitely feeling Grinchy after this. I will say the hardest part of making the frosting is simply finding plain M&Ms in a reasonably-sized bag (share size it says, as if I would)… For the cream cheese frosting you need:
- 8 ounces of 1/3 the fat cream cheese, softened
- 1 cup (226 g) fat free vanilla Greek yogurt, strained overnight
- 2.5 cups of Lakanto powdered monkfruit
- 1 tsp almond extract
- 2 tsp vanilla extract
- 12 yellow M&M’s
- Gel dyes in red, lime, and black
- Star sprinkles and white sanding sugar for Whoville Christmas trees
- Piping tips: #12 round, #21 open star, #2 round, #32 open star, and #233 grass tips
Mix the cream cheese and yogurt until fluffy, about 3 minutes. Add the monkfruit and extracts, mixing on low first, the whipping on medium-high until everything has come together. Take a tiny amount of frosting (less than what I have pictured below), set in a bowl, and dye black; place this in a piping bag with a #2 tip. Load a piping bag with a #21 open star tip with plain white frosting, and then divide up your remaining frosting so that you have A LOT in one bowl to dye green, and a smaller amount to dye red. I dyed too much of my frosting red and didn’t have enough green, so I could only make 6 Grinch cupcakes. I would’ve made all dozen Grinches, but my fallback plan was Whoville Christmas trees since I had plenty of white and a smidge of green. Try as I might, I can never get the frosting amounts right when I bake.
My least favorite part of baking is dying frosting.”Hate, hate, hate, hate, hate, double hate, loathe entirely.” The Grinch and I have a lot in common it seems… Put your green frosting into a bag with a #12 round tip, and have the grass tip handy to switch over to. The red frosting also needs a #12 round tip. Take your completely cooled cupcakes, and make a large, tall mound of frosting with the green bag. Doesn’t need to look pretty, it’ll get covered with hair.
Not actual hair, mind you. Unless you have dogs. Then, good luck. Once I had a little mountain of green frosting, I switched to my grass tip and drew hair all over by simply piping a line of frosting at the top, then working my way down in two more layers, and repeating all over. It definitely doesn’t need to look perfect or pretty. The Grinch was not known for his dashing good looks and perfectly coiffed hair.
Yep, this looks exactly like ketchup. Now, grab the red frosting and draw small loops to build up a Santa hat on top of his head.
Now we’ve added mayonnaise. Then take your white bag of frosting and give the Santa hat a little star trim and one on top.
He is somehow staring into my soul with nary a pupil. Then take a yellow M&M, cutting in half gently with a sharp knife. Place this on the front of his face, and give him very angry eyebrows and tiny, soulless pupils with the black frosting.
You might regret it once you’ve done this though. It kinda feels like you’ve got a kitchen full of tiny serial killers looking at you…or at the very least, the world’s most judgemental cupcakes. On the upside, these are so angry that they’re a perfect likeness of the Grinch. And if you only do half of your dozen this way, you can make some very cute little snowy Whoville trees to try to temper all that tiny green rage.
Because you always, always need something with sprinkles. I piped a large blob of white frosting on my other 6 cupcakes, smoothing out with an angled spatula. Then I dumped plain sanding sugar in a bowl, and one at a time, gently placed the cupcakes face down in the sprinkles, swirling around the bowl.
So sparkly! Then I swapped to my #32 piping tip on the remainder of my green frosting. The trees are very easy to make. Just pipe one larger mound, pushing down before pulling away, then pipe a smaller mound on top of that, pushing down before pulling away, and then one tiny little mound on top, where you simply pipe then pull away to make a point. Then add whatever whimsy you fancy to finish your Whoville Christmas trees. Could be funky glitter, little stars, round sprinkles for ornaments, you name it, it’ll work, because those Whovilles were wild with style.
These are so cute I can’t stand it. “Help me…I’m feeling.” Starting to feel like How the Grinch Stole Christmas was maybe also meant to be my autobiography?
Because my heart (and waistline) grow three sizes every time I look at these adorable cupcakes. This kinda brings a whole new meaning to the “He sees you when you’re sleeping, and knows when you’re awake” bit. I swear, his eyes follow you around the room. So these “definitely before he reformed” pistachio Grinch cupcakes are a tad bit terrifying and yet somehow seasonally appropriate because red + green = CHRISTMAS! I can’t stress enough how amazing these are…I’m definitely sad there’s only a dozen of them because that pistachio flavor is so, so right. The cupcakes are so fluffy and light that you definitely could eat them by the dozen, and the cream cheese frosting is 110% the icing on the (cup)cake to make these sheer holiday perfection. I know, it’s not gingerbread or peppermint, but it’s green, so I count pistachio as a Christmas flavor. Trust me, yule be sorry if you don’t make a batch to eat, enjoy, and terrorize your children with. I hope everyone has a wonderful holiday season. Merry Christmas to all, and to all a good fight over that last cupcake. ‘Til next time, my fellow eaters!
Do you eat the Grinch cupcakes, or do the Grinch cupcakes eat you? It’s a thinker. -
The Belle of the Butterball
Day 4 of the Thanksgiving holiday: the sight of turkey on my plate for the 65th time, the stretchiest of pants don my waistline, and I’m simply proud of myself for showering today. I gotta say, I probably wouldn’t need to take Zzz-quil every night if I ate a turkey leg an hour before bedtime. But post-fried-turkey coma, the thing I absolutely enjoy the most about Thanksgiving is the dessert spread. Like oh, you just ate your body weight in stuffing and mashed potatoes? Here’s a platter of five different kinds of pies. We threw in some cobbler, too, just because we’ve officially lost our mind. It’s absolute madness, and I cannot stress enough how much I love it. Dessert with a side of more dessert? This is my Shangri-La. If you’ve ever wondered whether a petite woman can eat an entire pie in less than a day, let me assure you, the answer is yes, and don’t forget the Cool Whip. Considering my propensity to eat everything in sight during Thanksgiving, I decided to go small for the dessert table this year…in my defense, my husband was frying a turkey, and this is literally the only time I put the main course before dessert. Enter mini pumpkin cheesecakes with gluten free Oreo crusts!
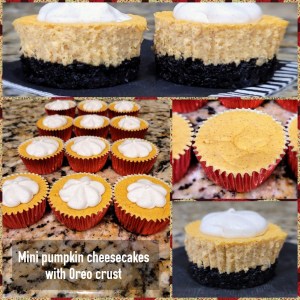
I mean, I can’t quit dessert cold turkey… GUYS…I know I say this literally every single time I make a cheesecake, but this is the BEST RECIPE EVER. Unless you hate pumpkin, then I am sorry for you and your empty soul. But if you love it, this is the creamiest cheesecake with the right amount of pumpkin flavor, an extra little boost of sweetness and pumpkin spice in the whipped topping, and those buttery Oreo crusts are drool-worthy. Since I knew I’d be eating about 6,500 calories in main and sides on Thanksgiving, I made sure these were ultra low cal. This recipe makes 14 cheesecakes at 173 calories a piece (yes, less than a single dinner roll). Definitely keep this recipe in your back pocket for next year, or later this week because it is still November, and pumpkin is still a seasonally-appropriate flavor. Peppermint and gingerbread can stand in line and wait a few more days.

I refuse to Christmas bake before December 1. There are actually 2 ways to go about the crust. I figured my cheesecake filling would make 12 total cheesecakes, but I had leftovers, so two of my cheesecakes simply had a single Oreo on the bottom as a crust, and honestly, I liked these better because they were easier to handle and retained a good bit of crunch after baking. But if you like a buttery crust, you need to crush 14 Oreos in a blender or food processor until a fine crumb, then pour in 3 TBS of melted light butter, and pulse until everything is wet. Line 2 muffin tins with 14 cupcake liners.
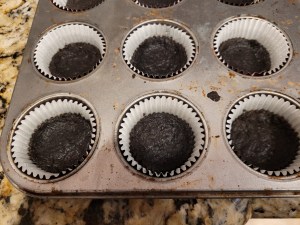
Like a bottomless pit of flavor. Place one tablespoon of the crust into 14 cupcake liners, using a shot glass or the bottom of the tablespoon to smooth the bottoms out and slightly up the sides of the liners. Bake at 325 degrees for 10 minutes, then remove from the oven and place in the fridge to chill while you make your filling.

There’s a little bit of a hustle and work here since these are cheesecakes, but baking is my cardio, so all good. The actual cheesecake filling is made of:
- 16 ounces of 1/3 the fat cream cheese, softened at room temp
- 1/2 cup of Lakanto monkfruit sweetener (classic)
- 1 teaspoon of vanilla
- 1 teaspoon of pumpkin spice
- 1/2 cup of pure pumpkin
- 2 eggs at room temp
Once your crusts are done baking, lower the oven temp to 300. Start by whipping the cream cheese and sugar together until light, fluffy, and smooth, about 3 minutes. Then add the vanilla, pumpkin spice, and pumpkin, mixing well on medium. Switch the mixer speed to low, and add the eggs, one at a time, until fully blended.
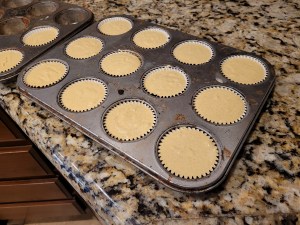
I just want to bake the world a better place. One cheesecake at a time. Grab the cooled crusts from the fridge, and fill each liner almost all the way to the top with batter. Gently tap on the counter to release any bubbles, then bake for 15 minutes at 300 degrees. Once those 15 minutes are up, turn off the oven, but leave the cheesecakes inside with the oven door shut for 30 minutes. Then crack the door for 1 hour to finish cooling…cheesecakes are fickle divas, but since they are so good, we let them pretend they’re Mariah Carey.

I pecan’t even…they are just so delicious. Once cooled to room temp, you can remove them from the muffin tin and place in the fridge before topping with even more pumpkin spice.

Consider the whipped topping the sprinkle version of cheesecakes…it isn’t done until it’s got sprinkles. 
Hi, sprinkles. I took 124 grams of Cool Whip free (less than half the container) and mixed it with 1/2 a teaspoon of pumpkin spice. Truly, you don’t need much here. A little pumpkin spice goes a long way…it isn’t like garlic, where you can dump 10 cloves into a recipe and everything’s fine. Ingestion of too much pumpkin spice puts you at risk of turning into a basic white girl.

I was going for pumpkins on top of pumpkins, but this is fine because I am wholly aware that I am a basic white girl. I used a piping bag fitted with a 2D tip to place little pumpkin-y dollops of whipped topping onto each cooled cheesecake. I had a little topping leftover, so to prepare for Thanksgiving, I just piped the leftovers straight into my mouth. Shame? What is that?
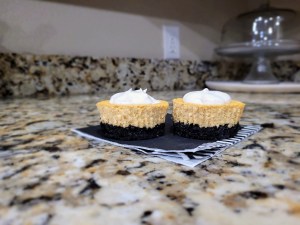
There’s no time for shame when cheesecake is involved. Keep your mini cheesecakes in the fridge until ready to serve and devour by multiple handfuls. My in-laws were with us on Thanksgiving, and these were a big hit. My husband isn’t huge into pumpkin (because there’s a 2-month window where I put it in EVERYTHING), but he even liked these, so it strikes a good balance with pumpkin lovers and people who are indifferent to pumpkin flavor. I mean, it’s a cheesecake, so it’s absolutely decadent, sweet, and heavenly. It also certainly does not hurt that there’s a chocolate Oreo crust…don’t sleep on this flavor combo. Pumpkin and chocolate are meant to be together…like most other things and chocolate. Because if there’s one thing in this world I am always thankful for, it’s reliable, old chocolate. I hope everyone had a wonderful holiday celebrating with family, friends, and loved ones. I know we did, and we are so grateful for the time we got to spend with our family (and not just because of the smorgasbord of fried turkey and these cluckin’ awesome cheesecakes). Never take those moments (or desserts) for granted. ‘Til next time, my fellow eaters!
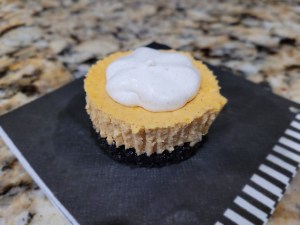
Until next fall, pumpkin, my love…

Healthy-ish cake, cupcakes, pie, and cheesecake recipes and decorating tips


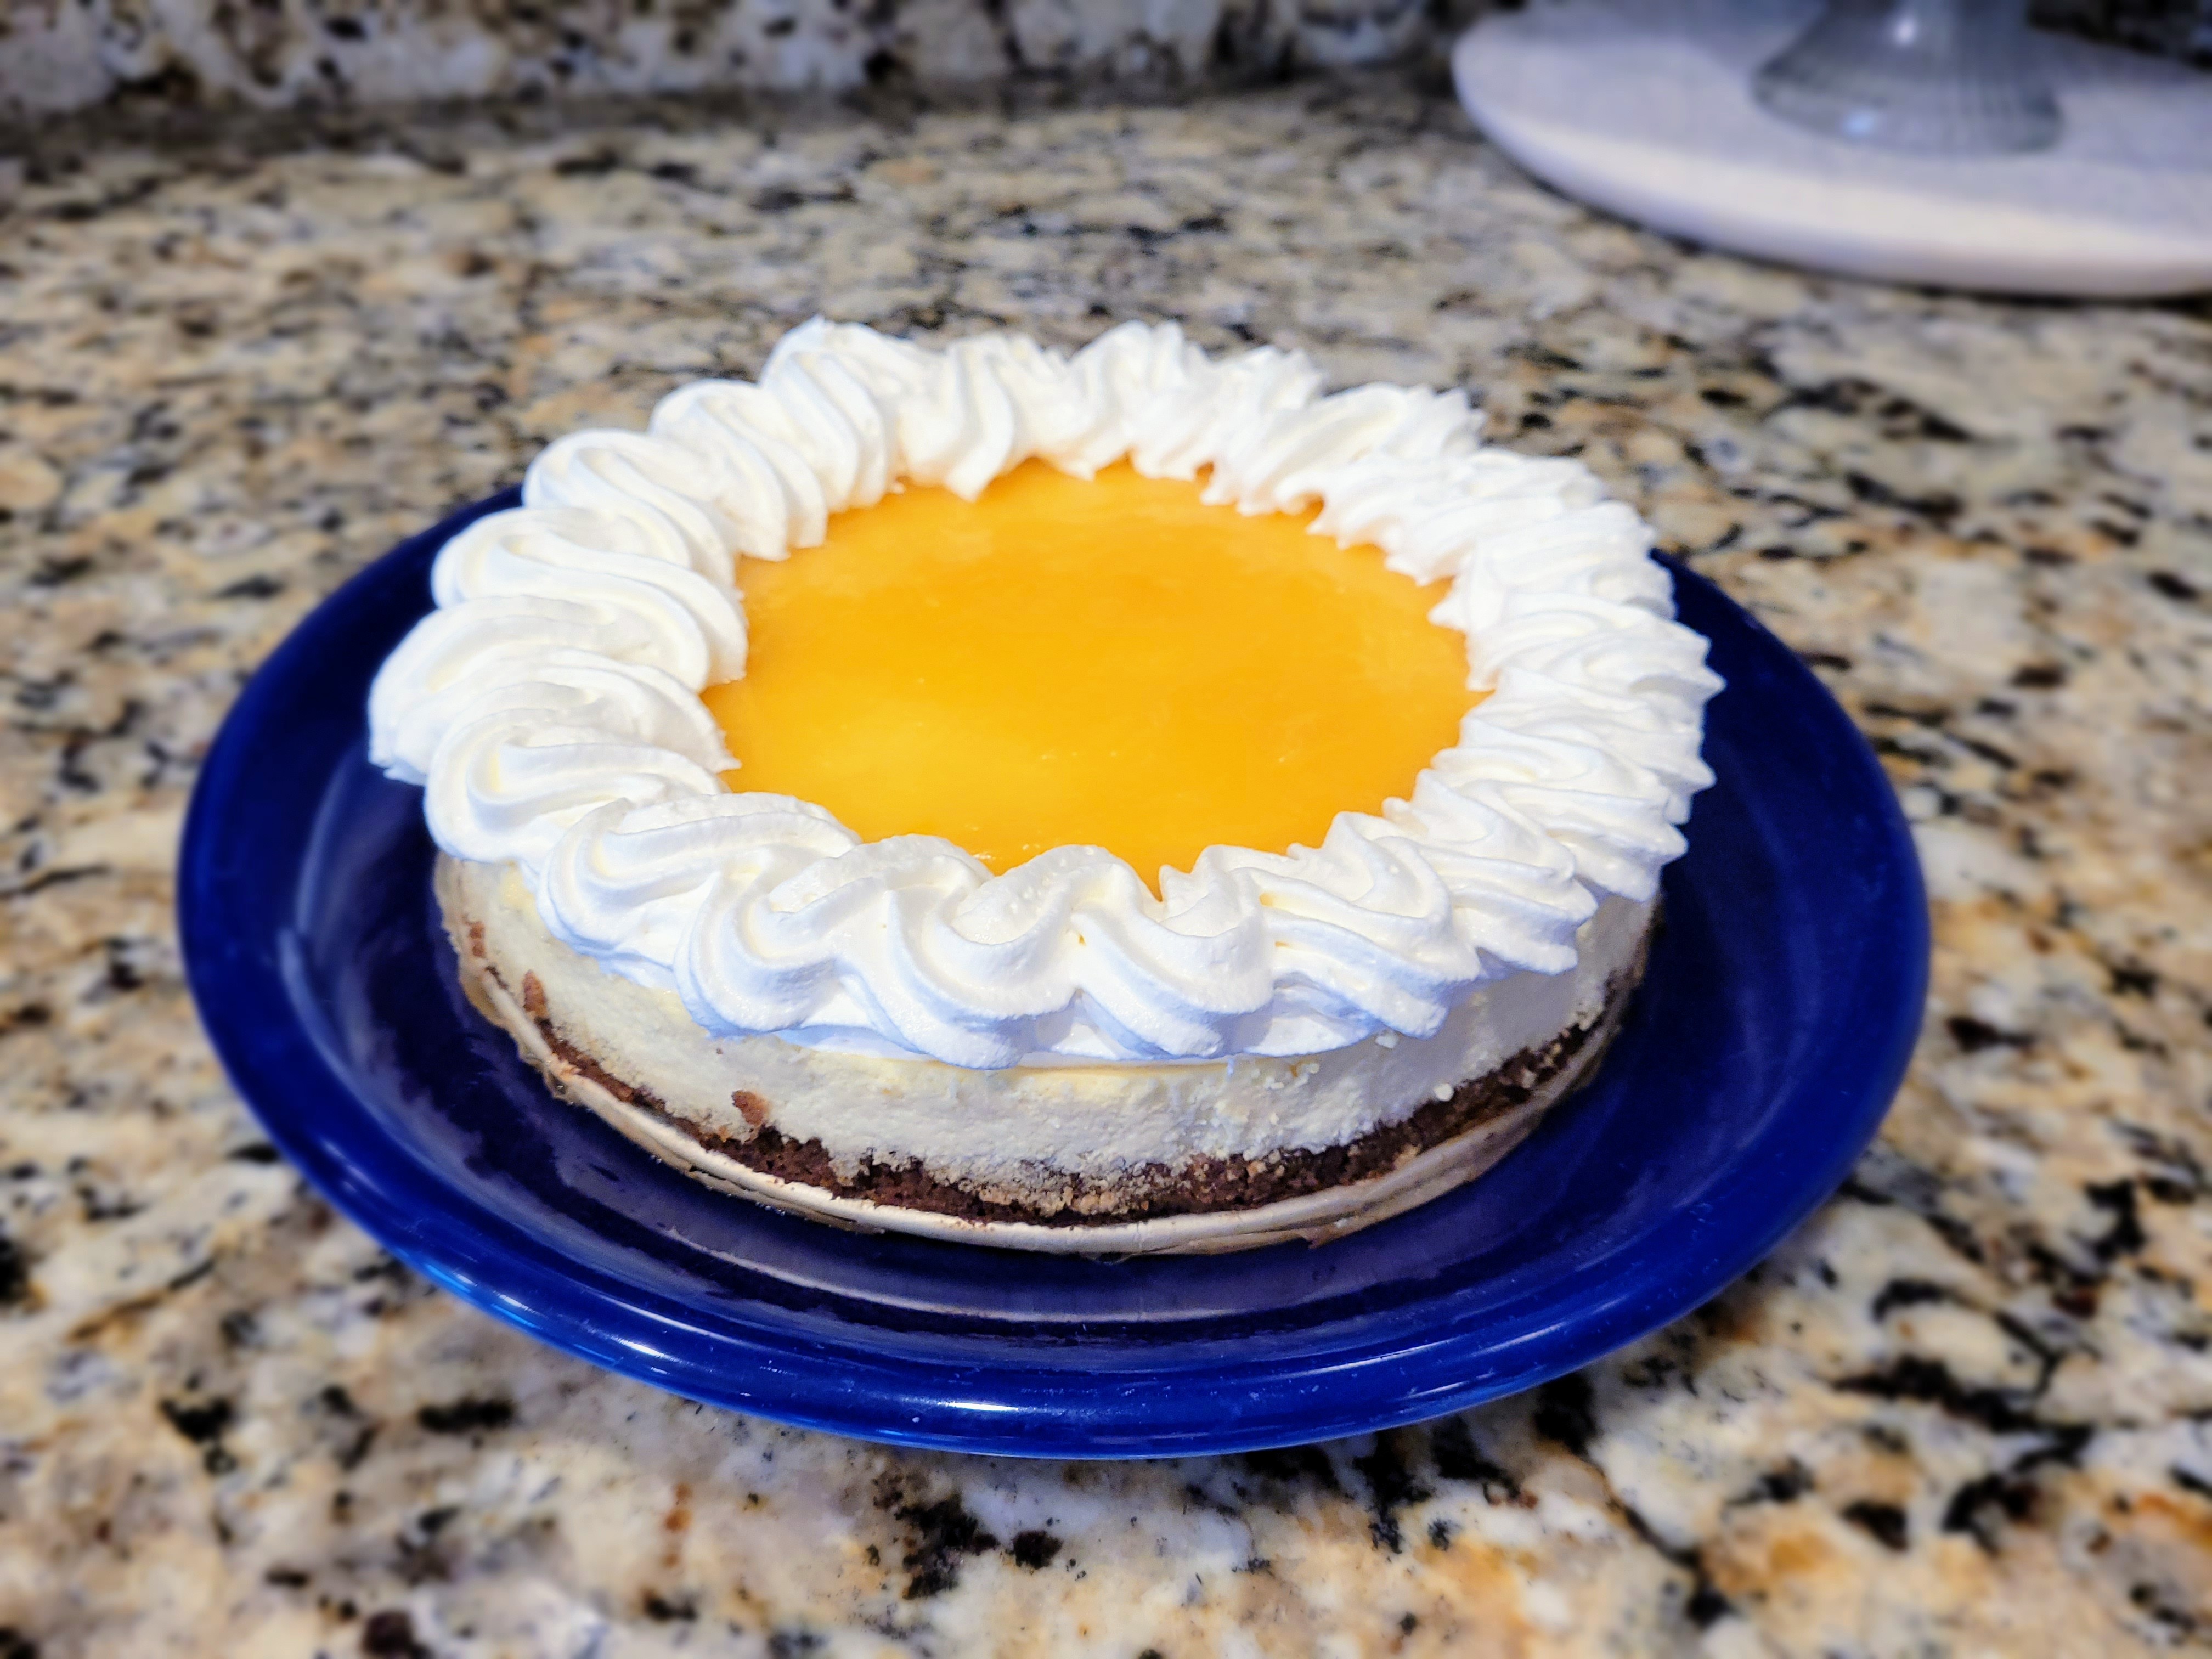


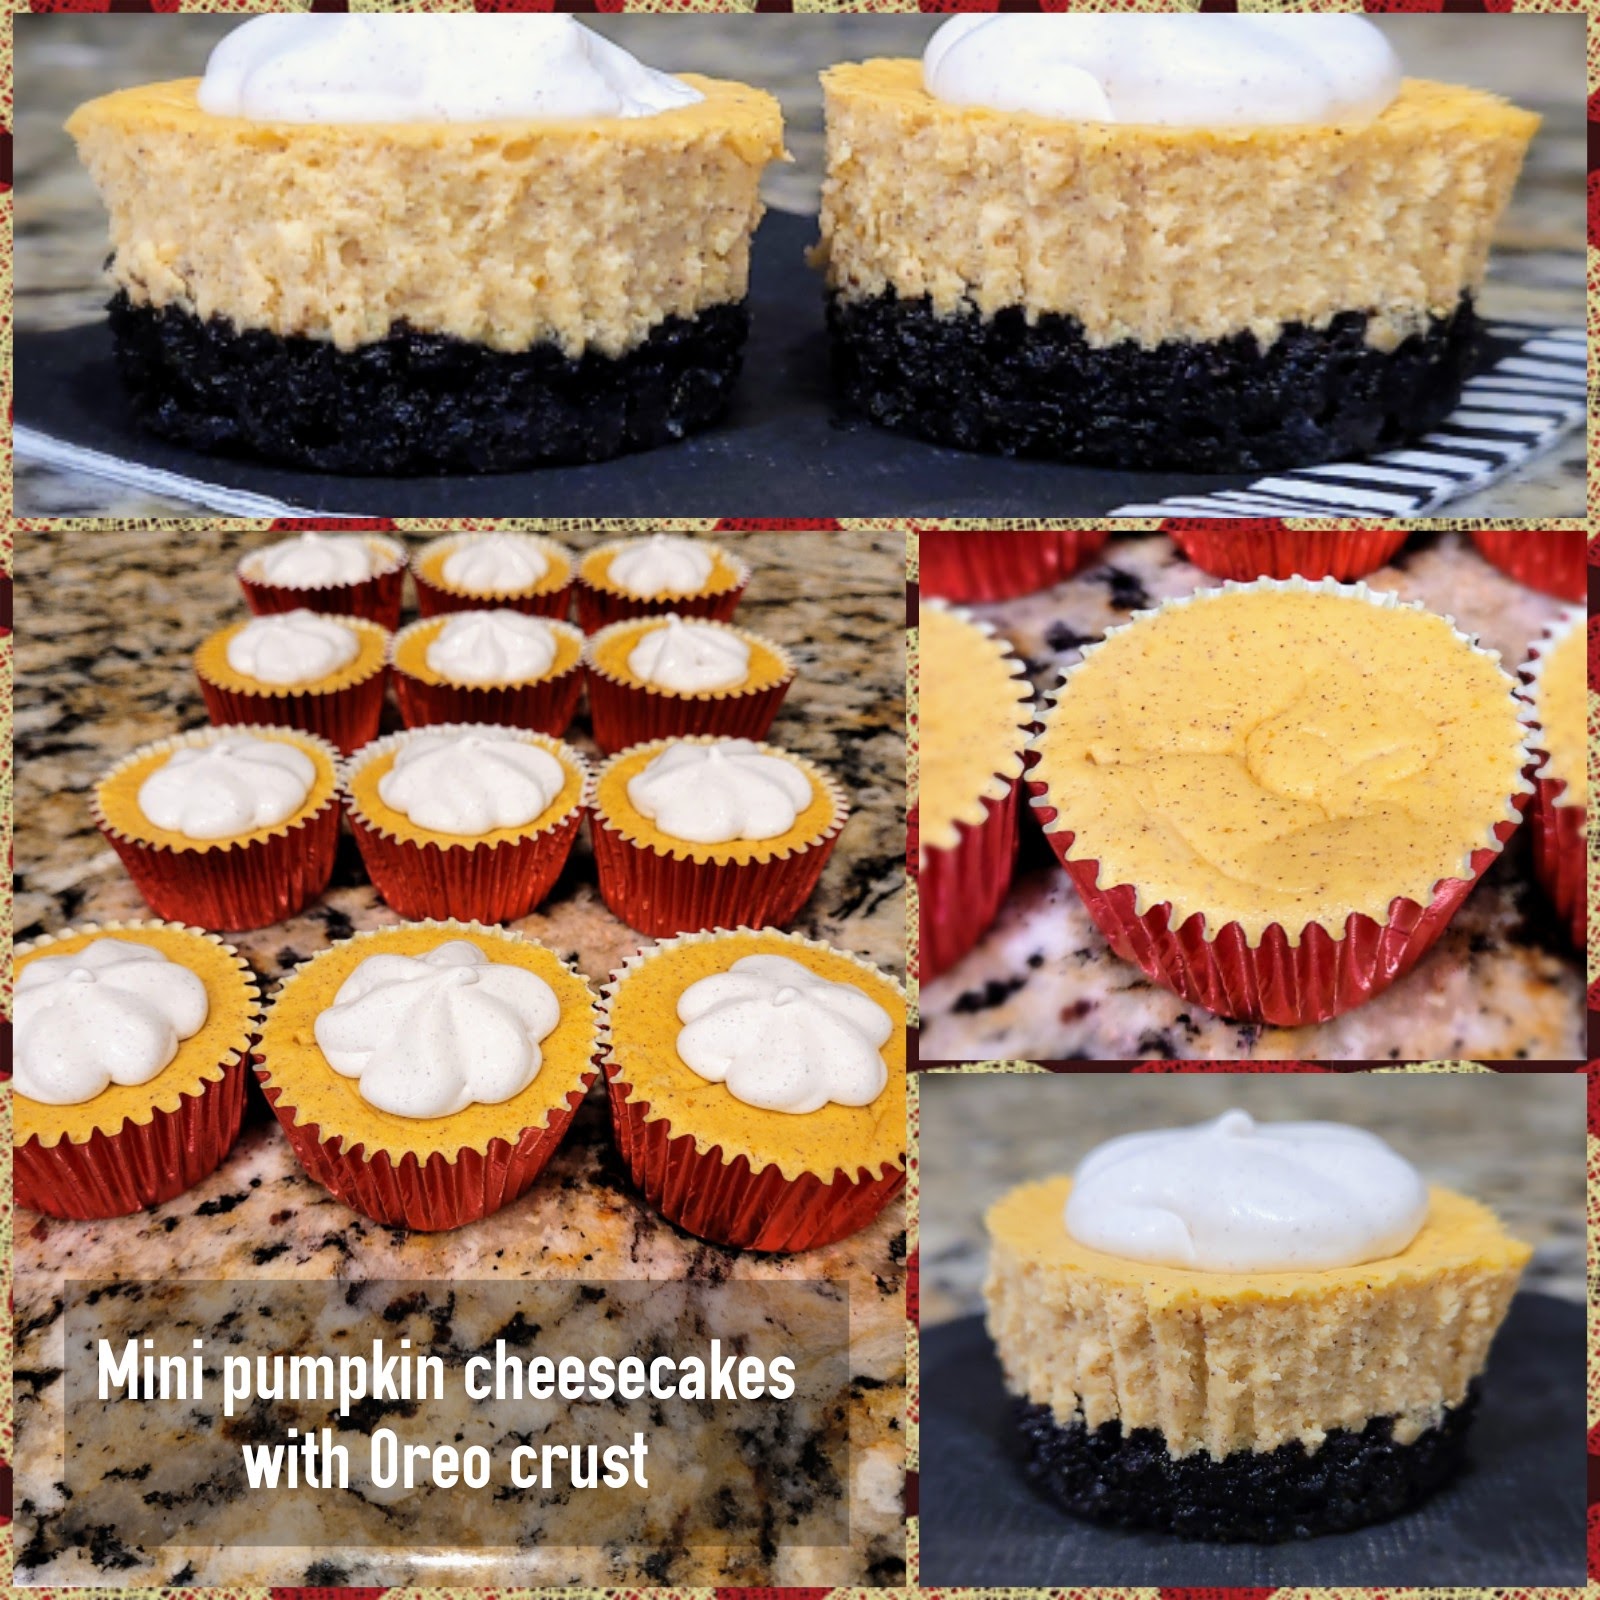
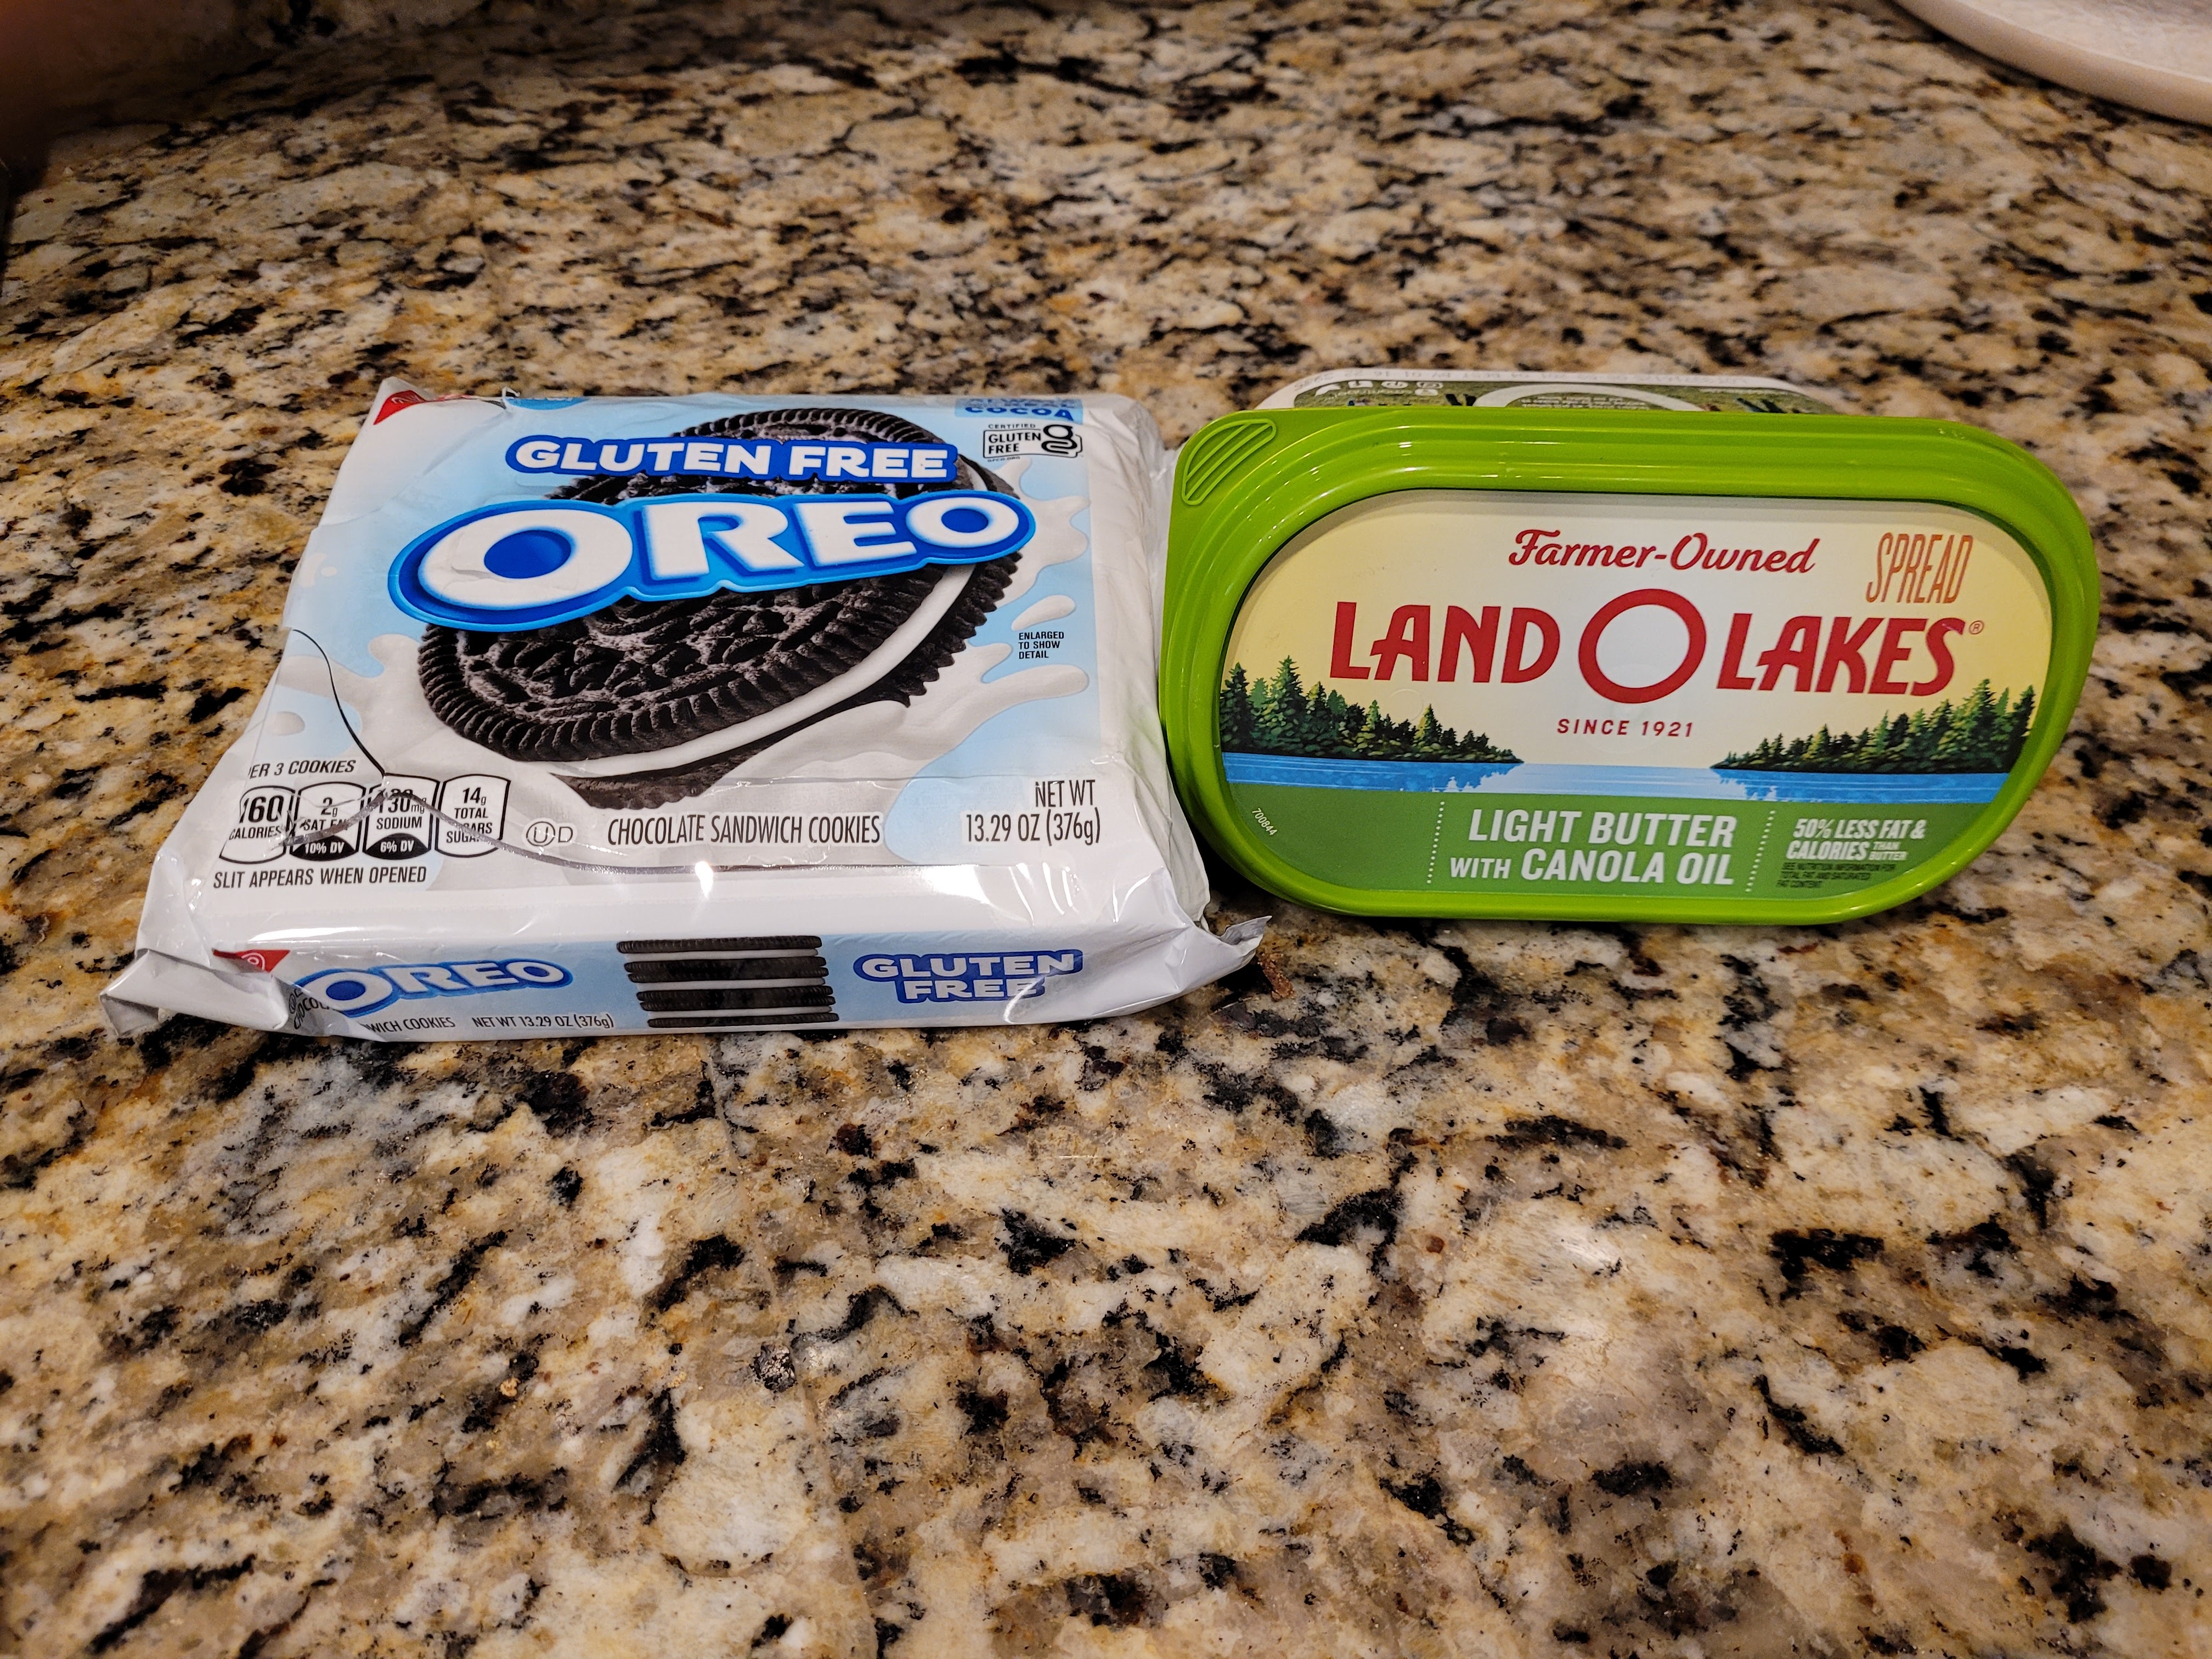

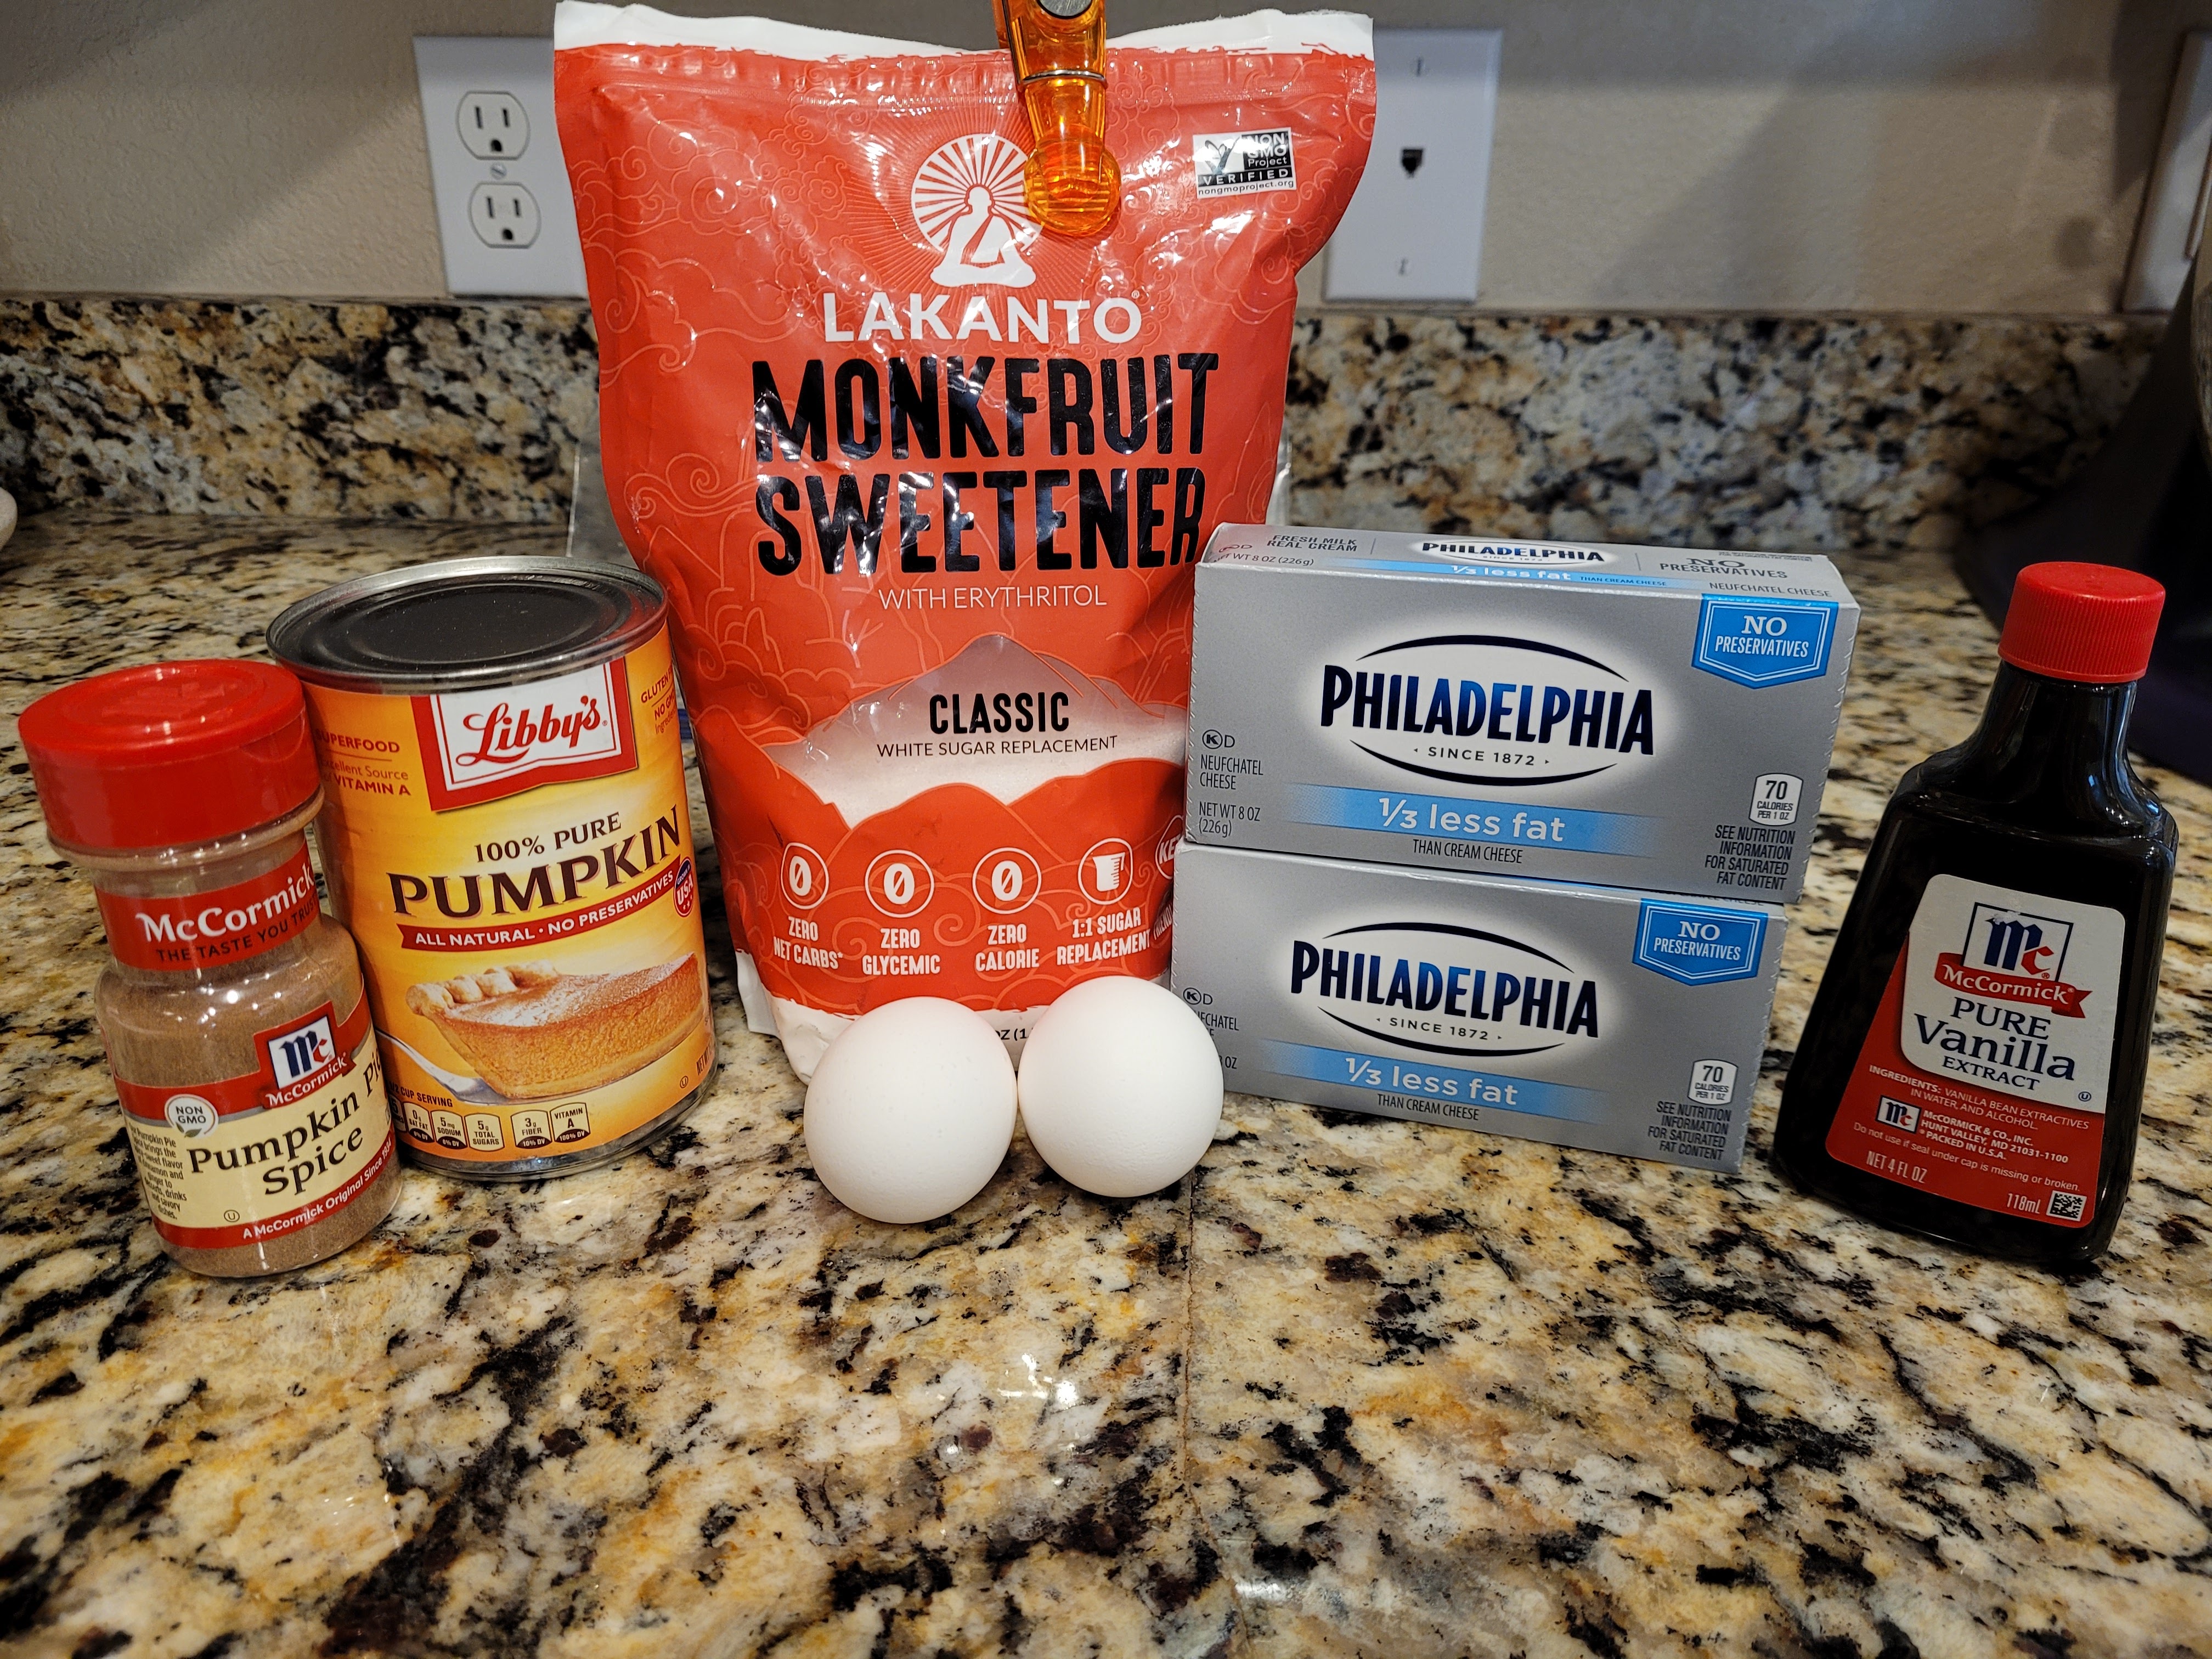


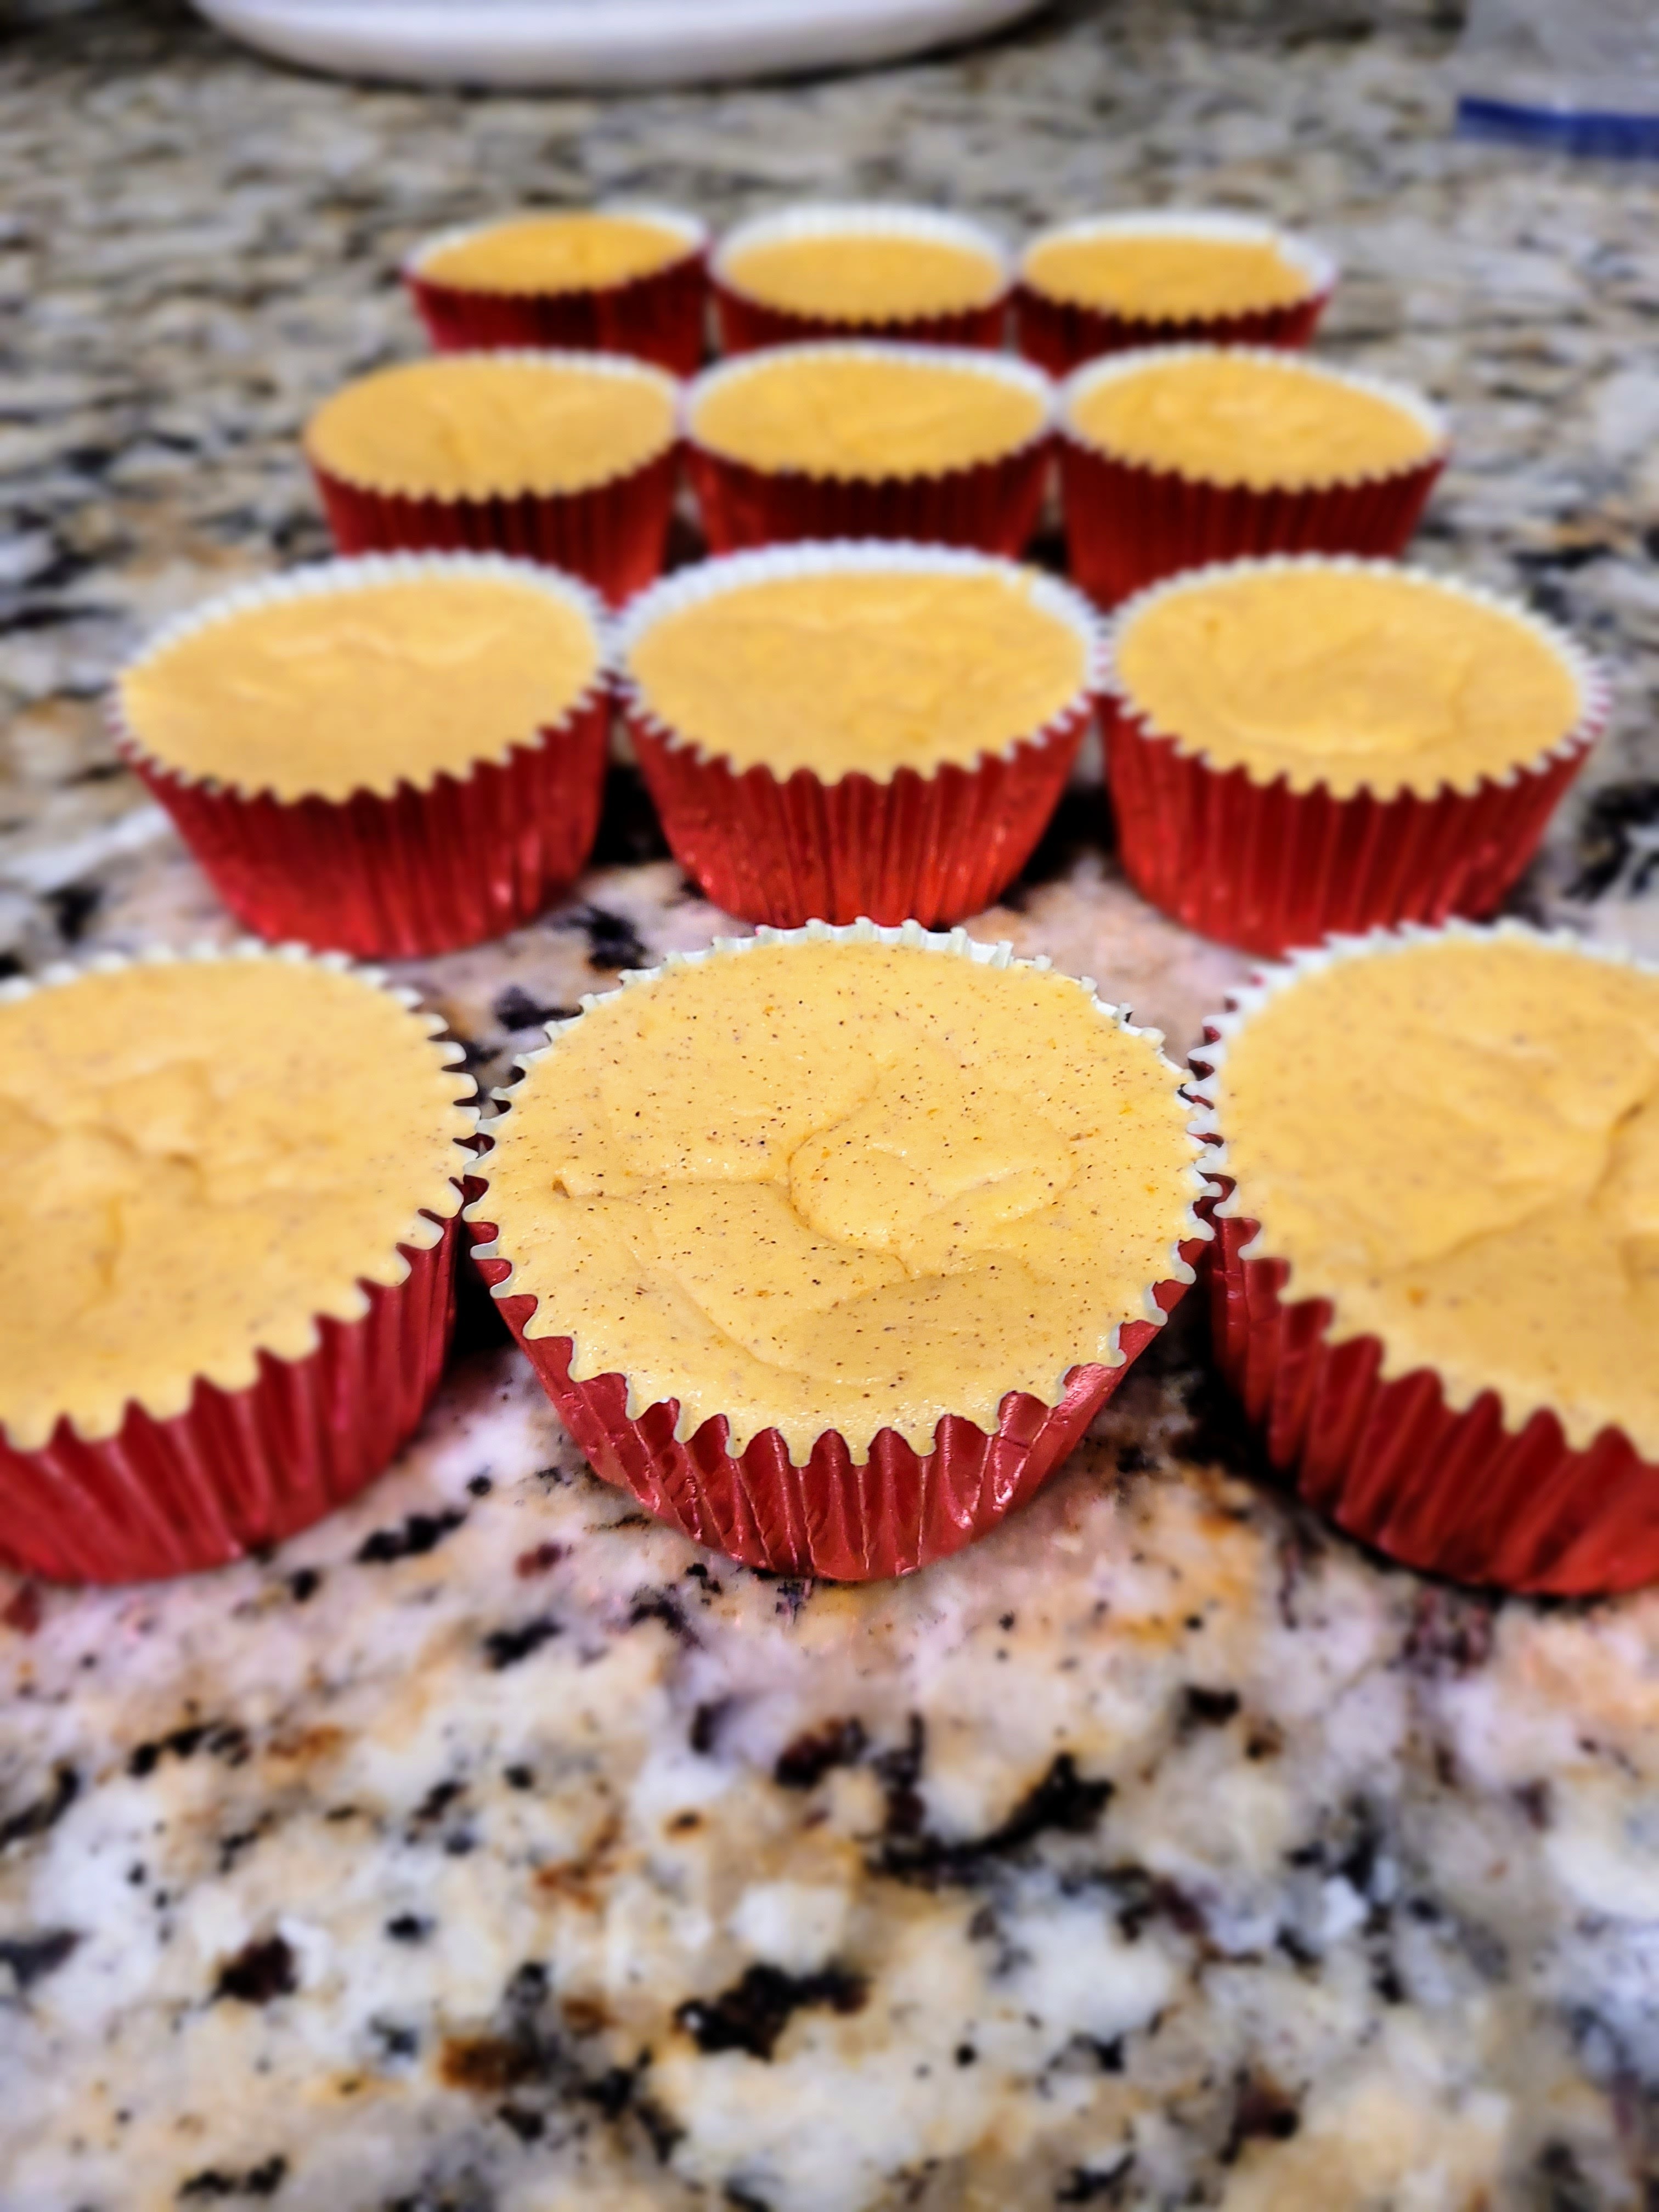
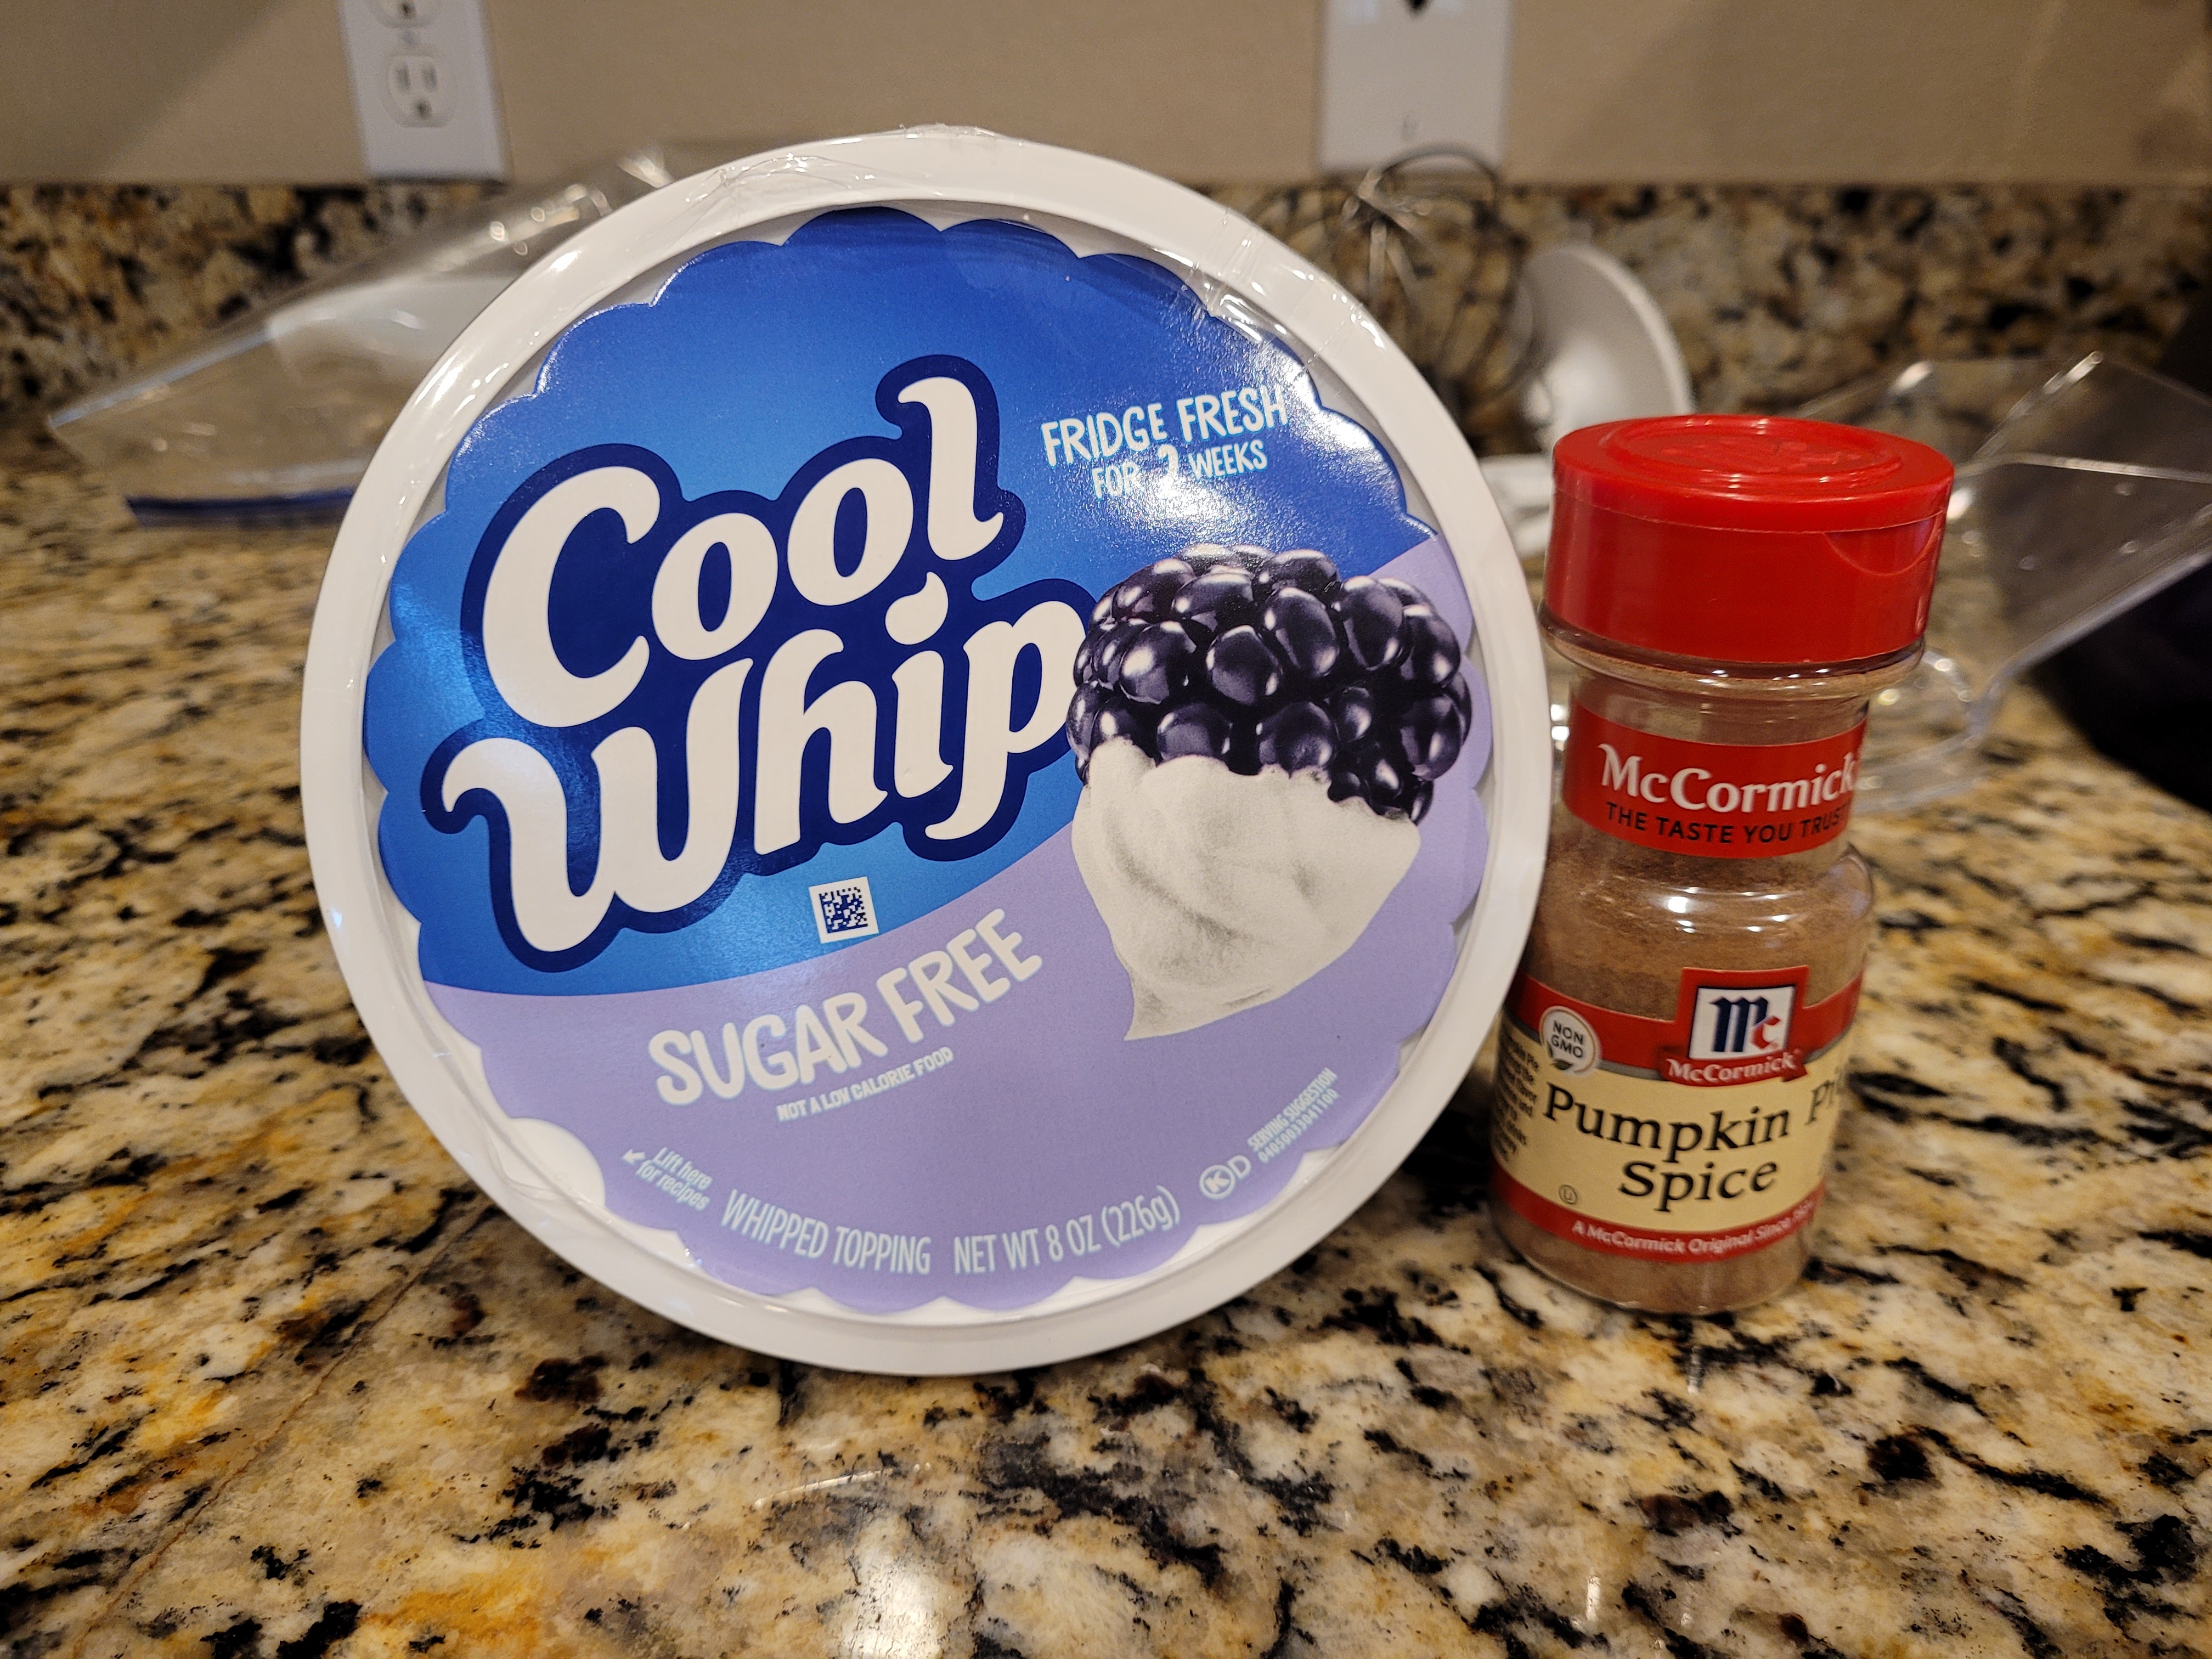
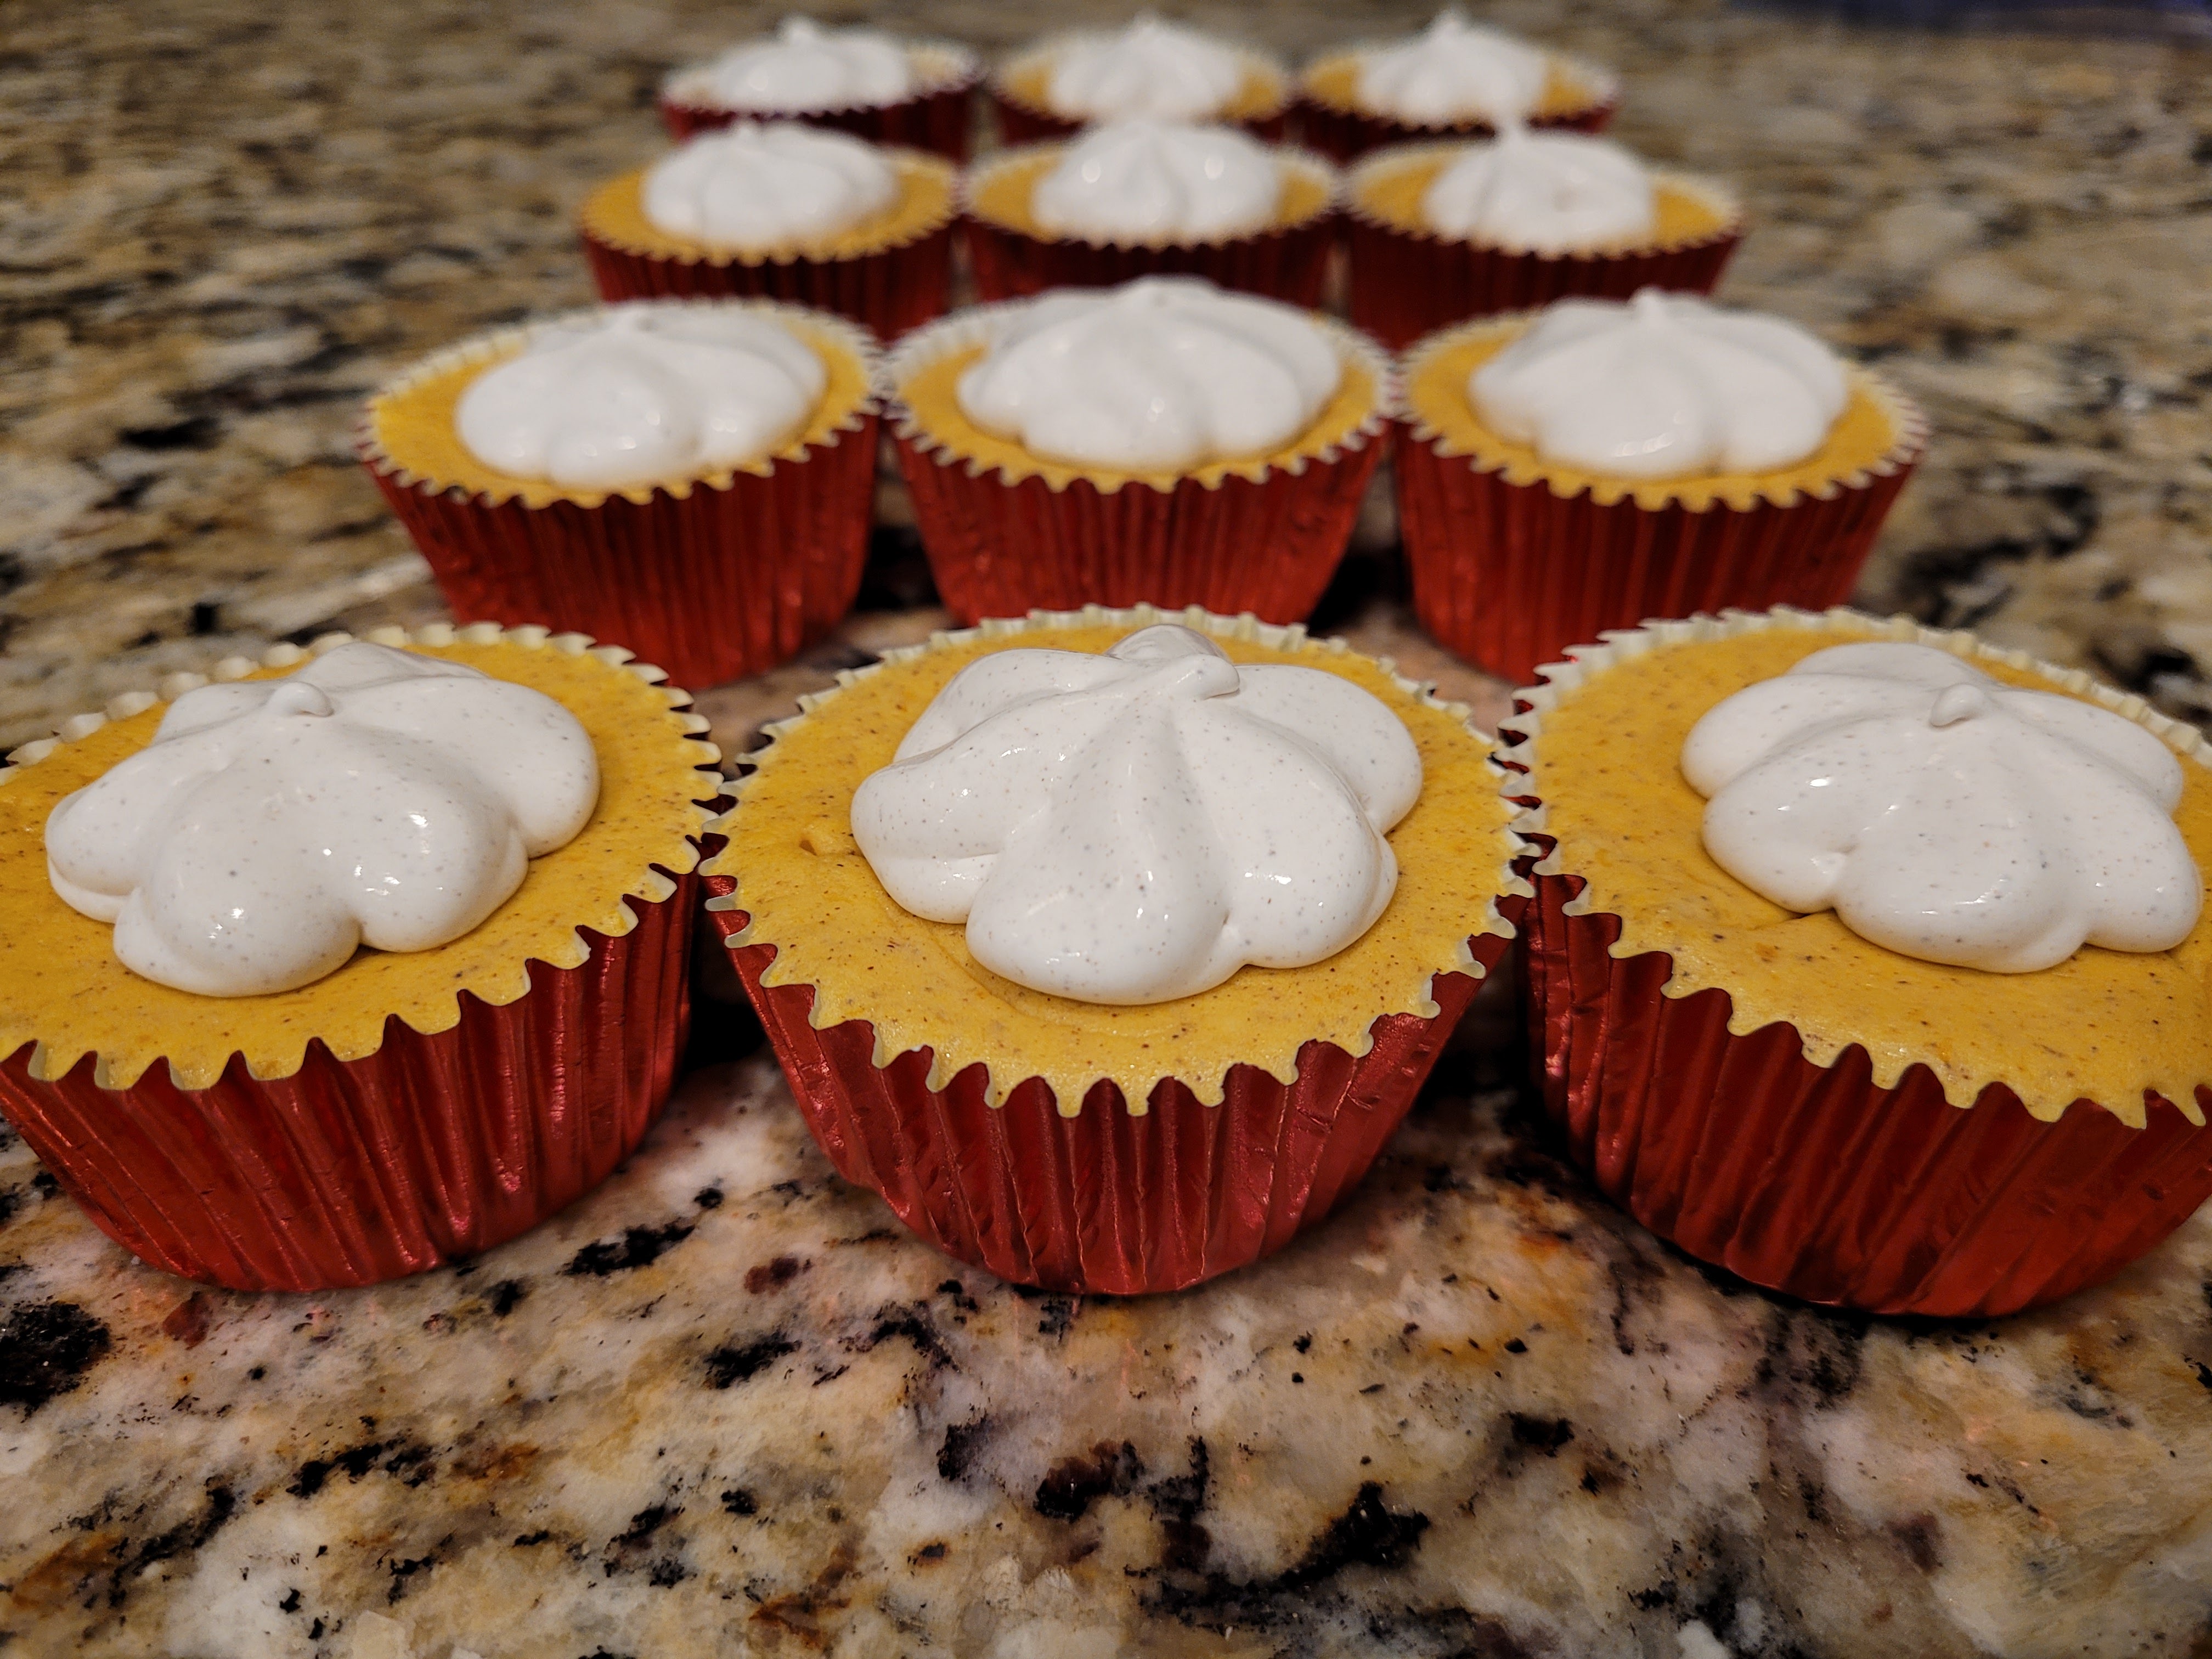

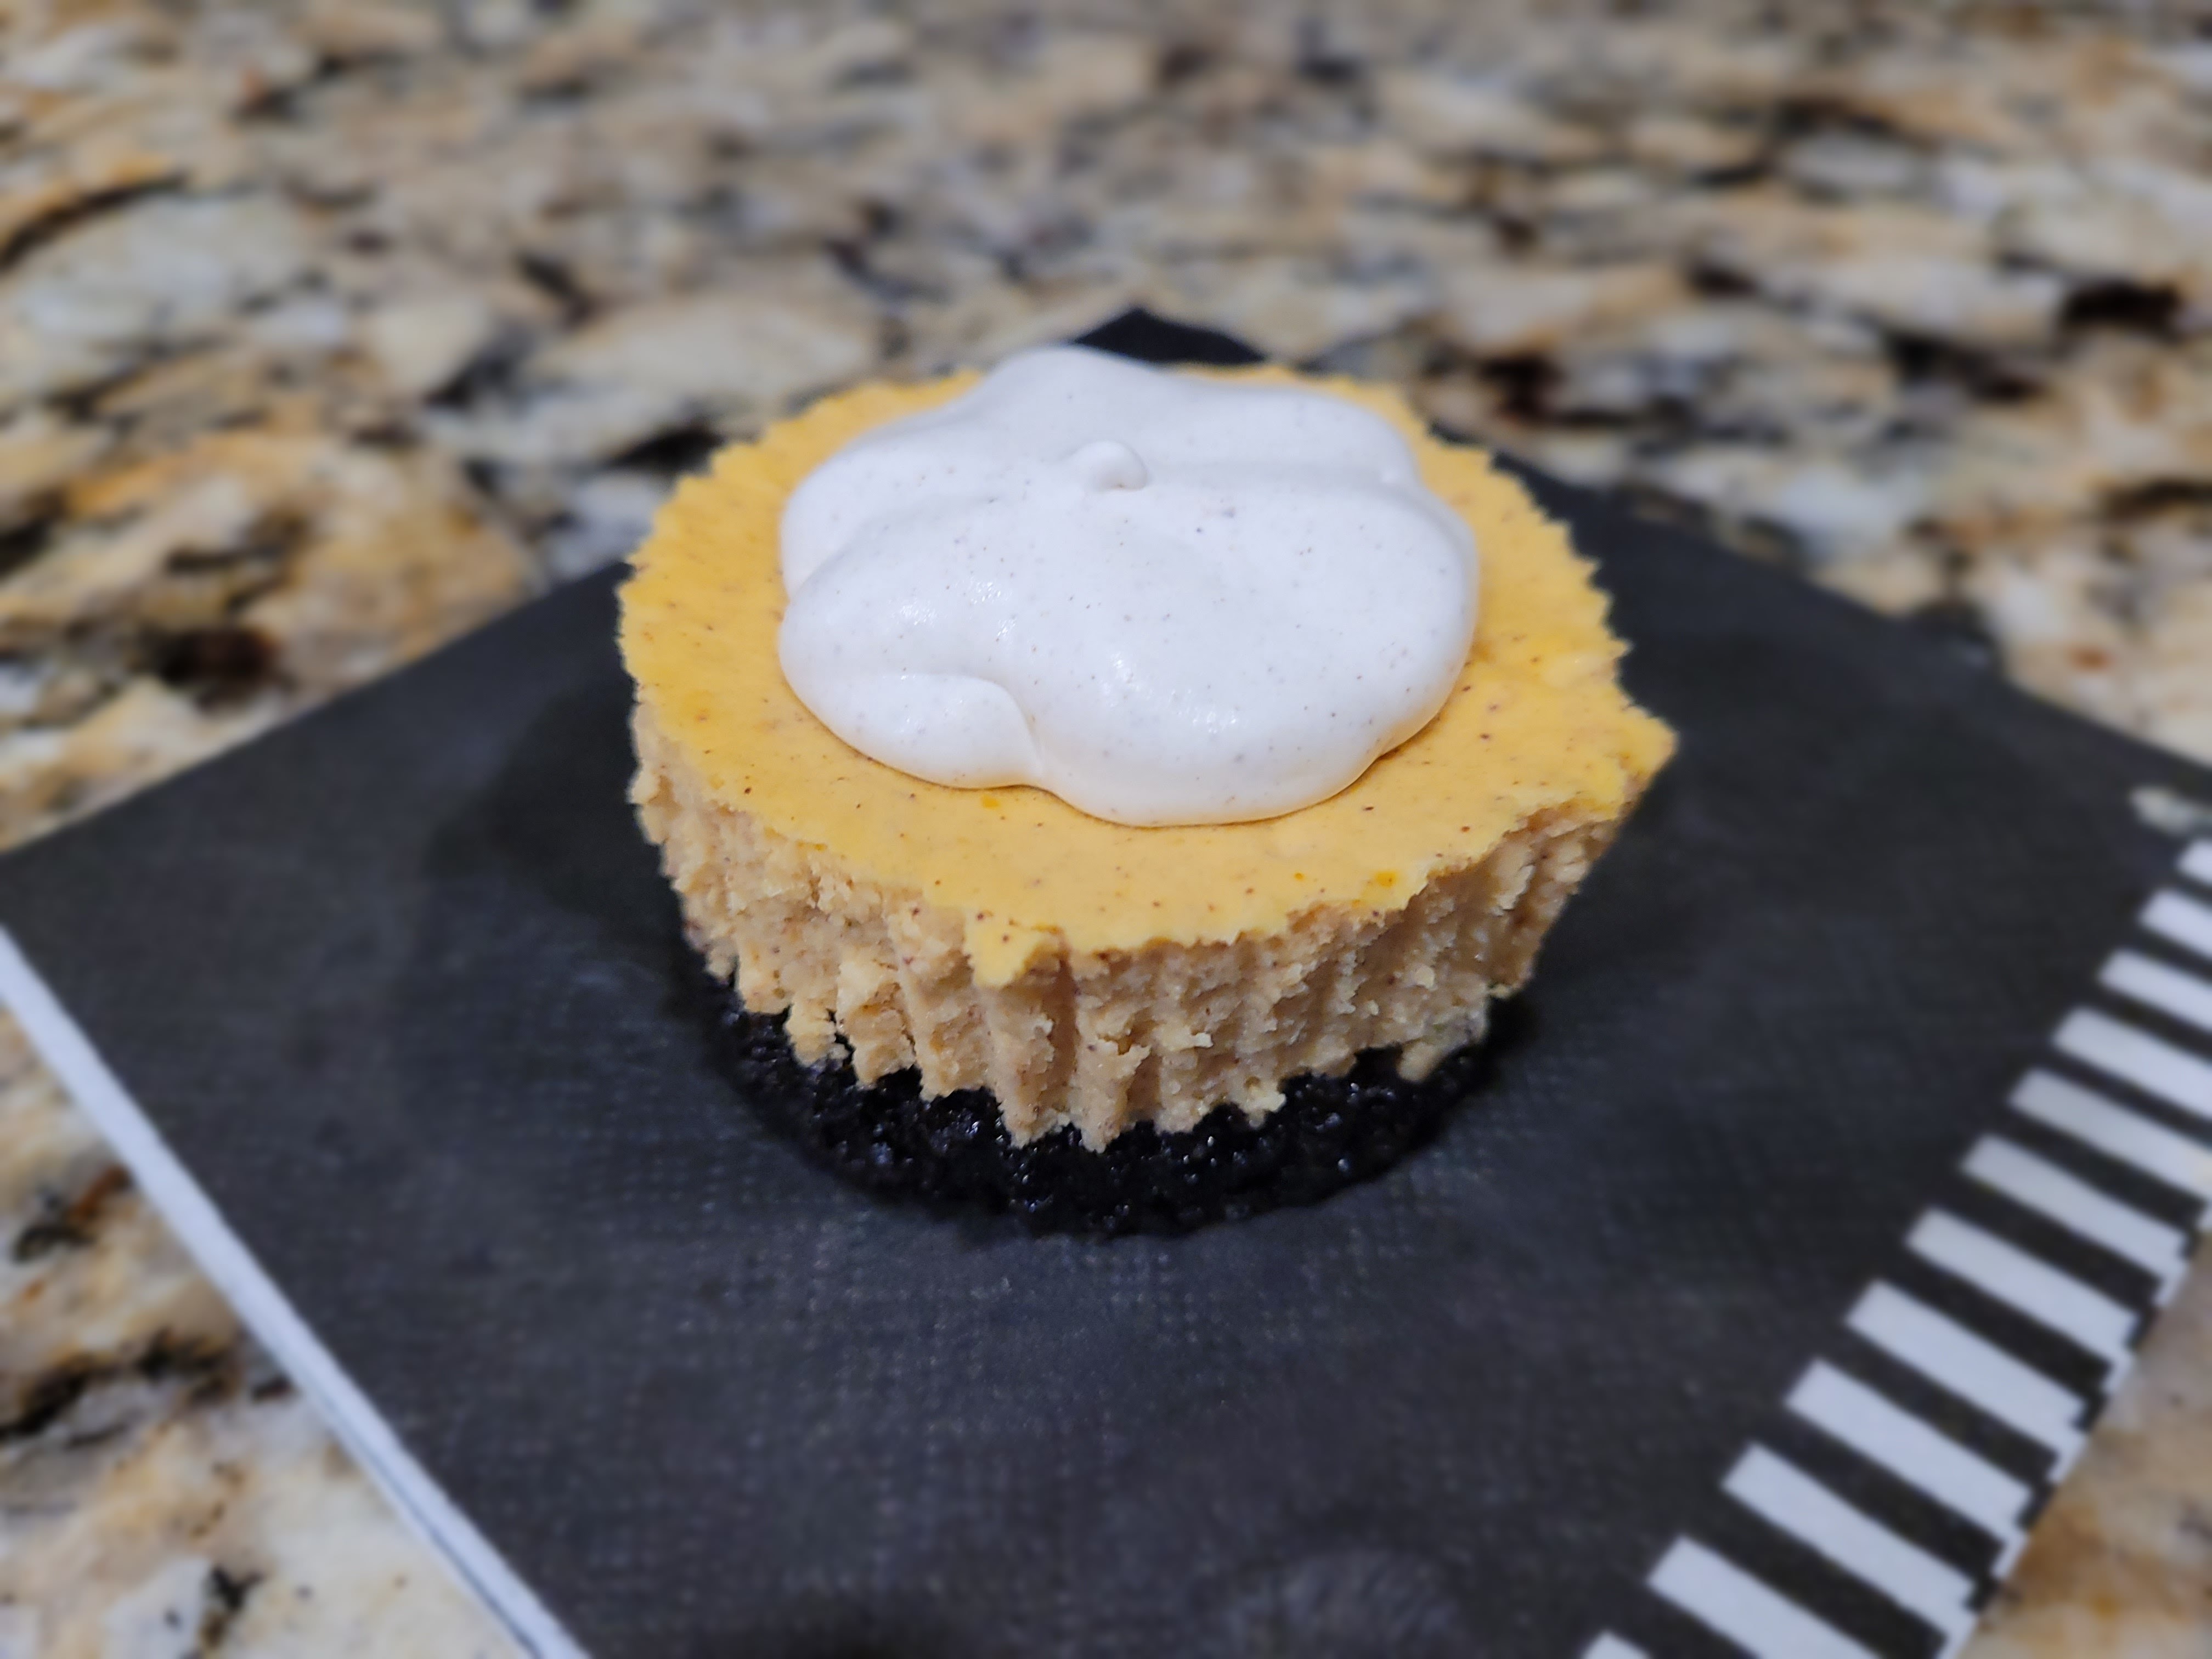
