-
Bone-a Fide Celebrations
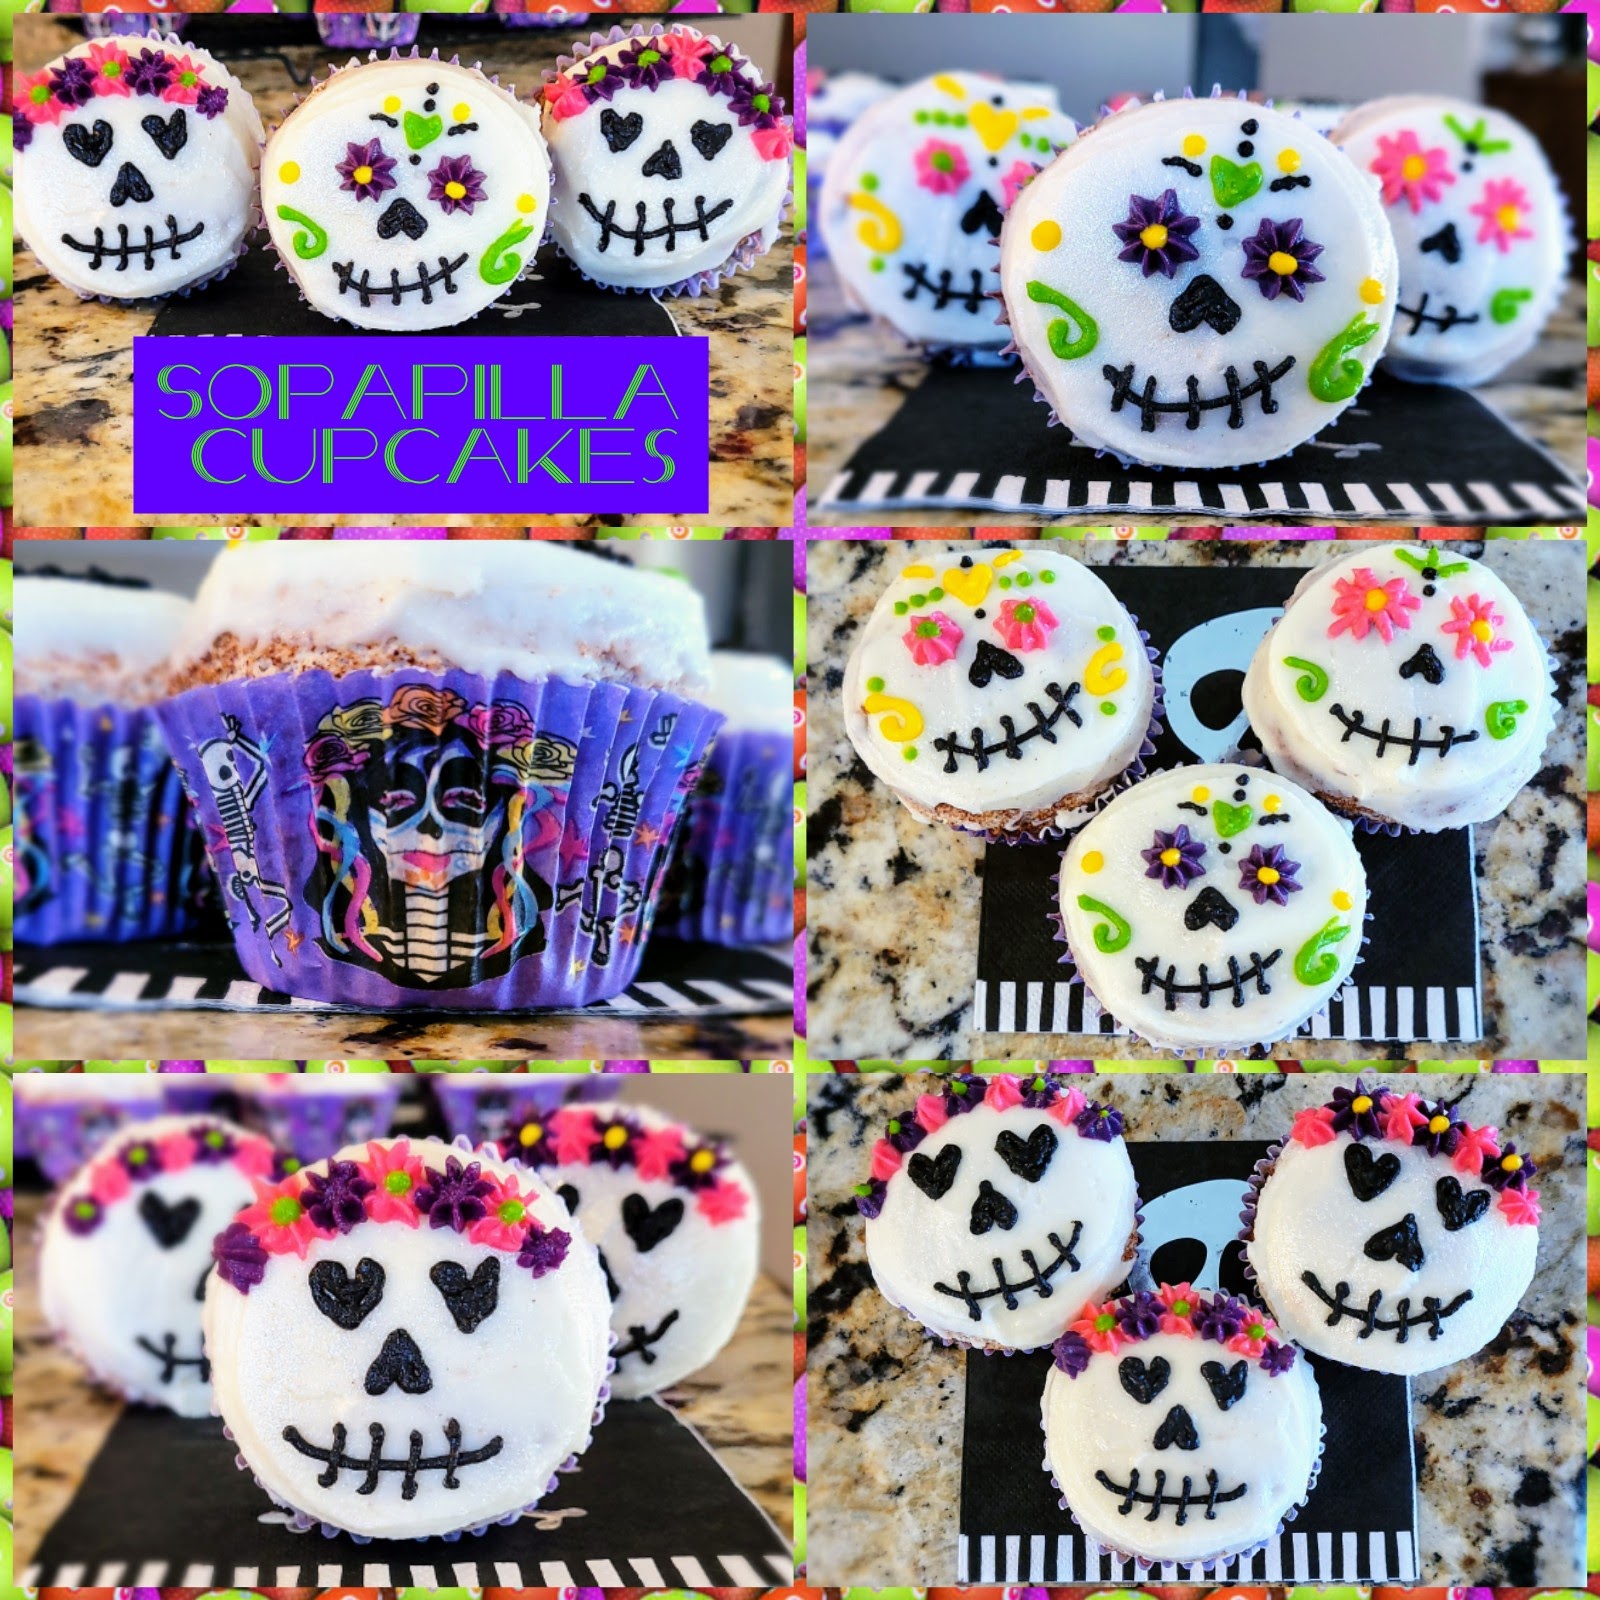
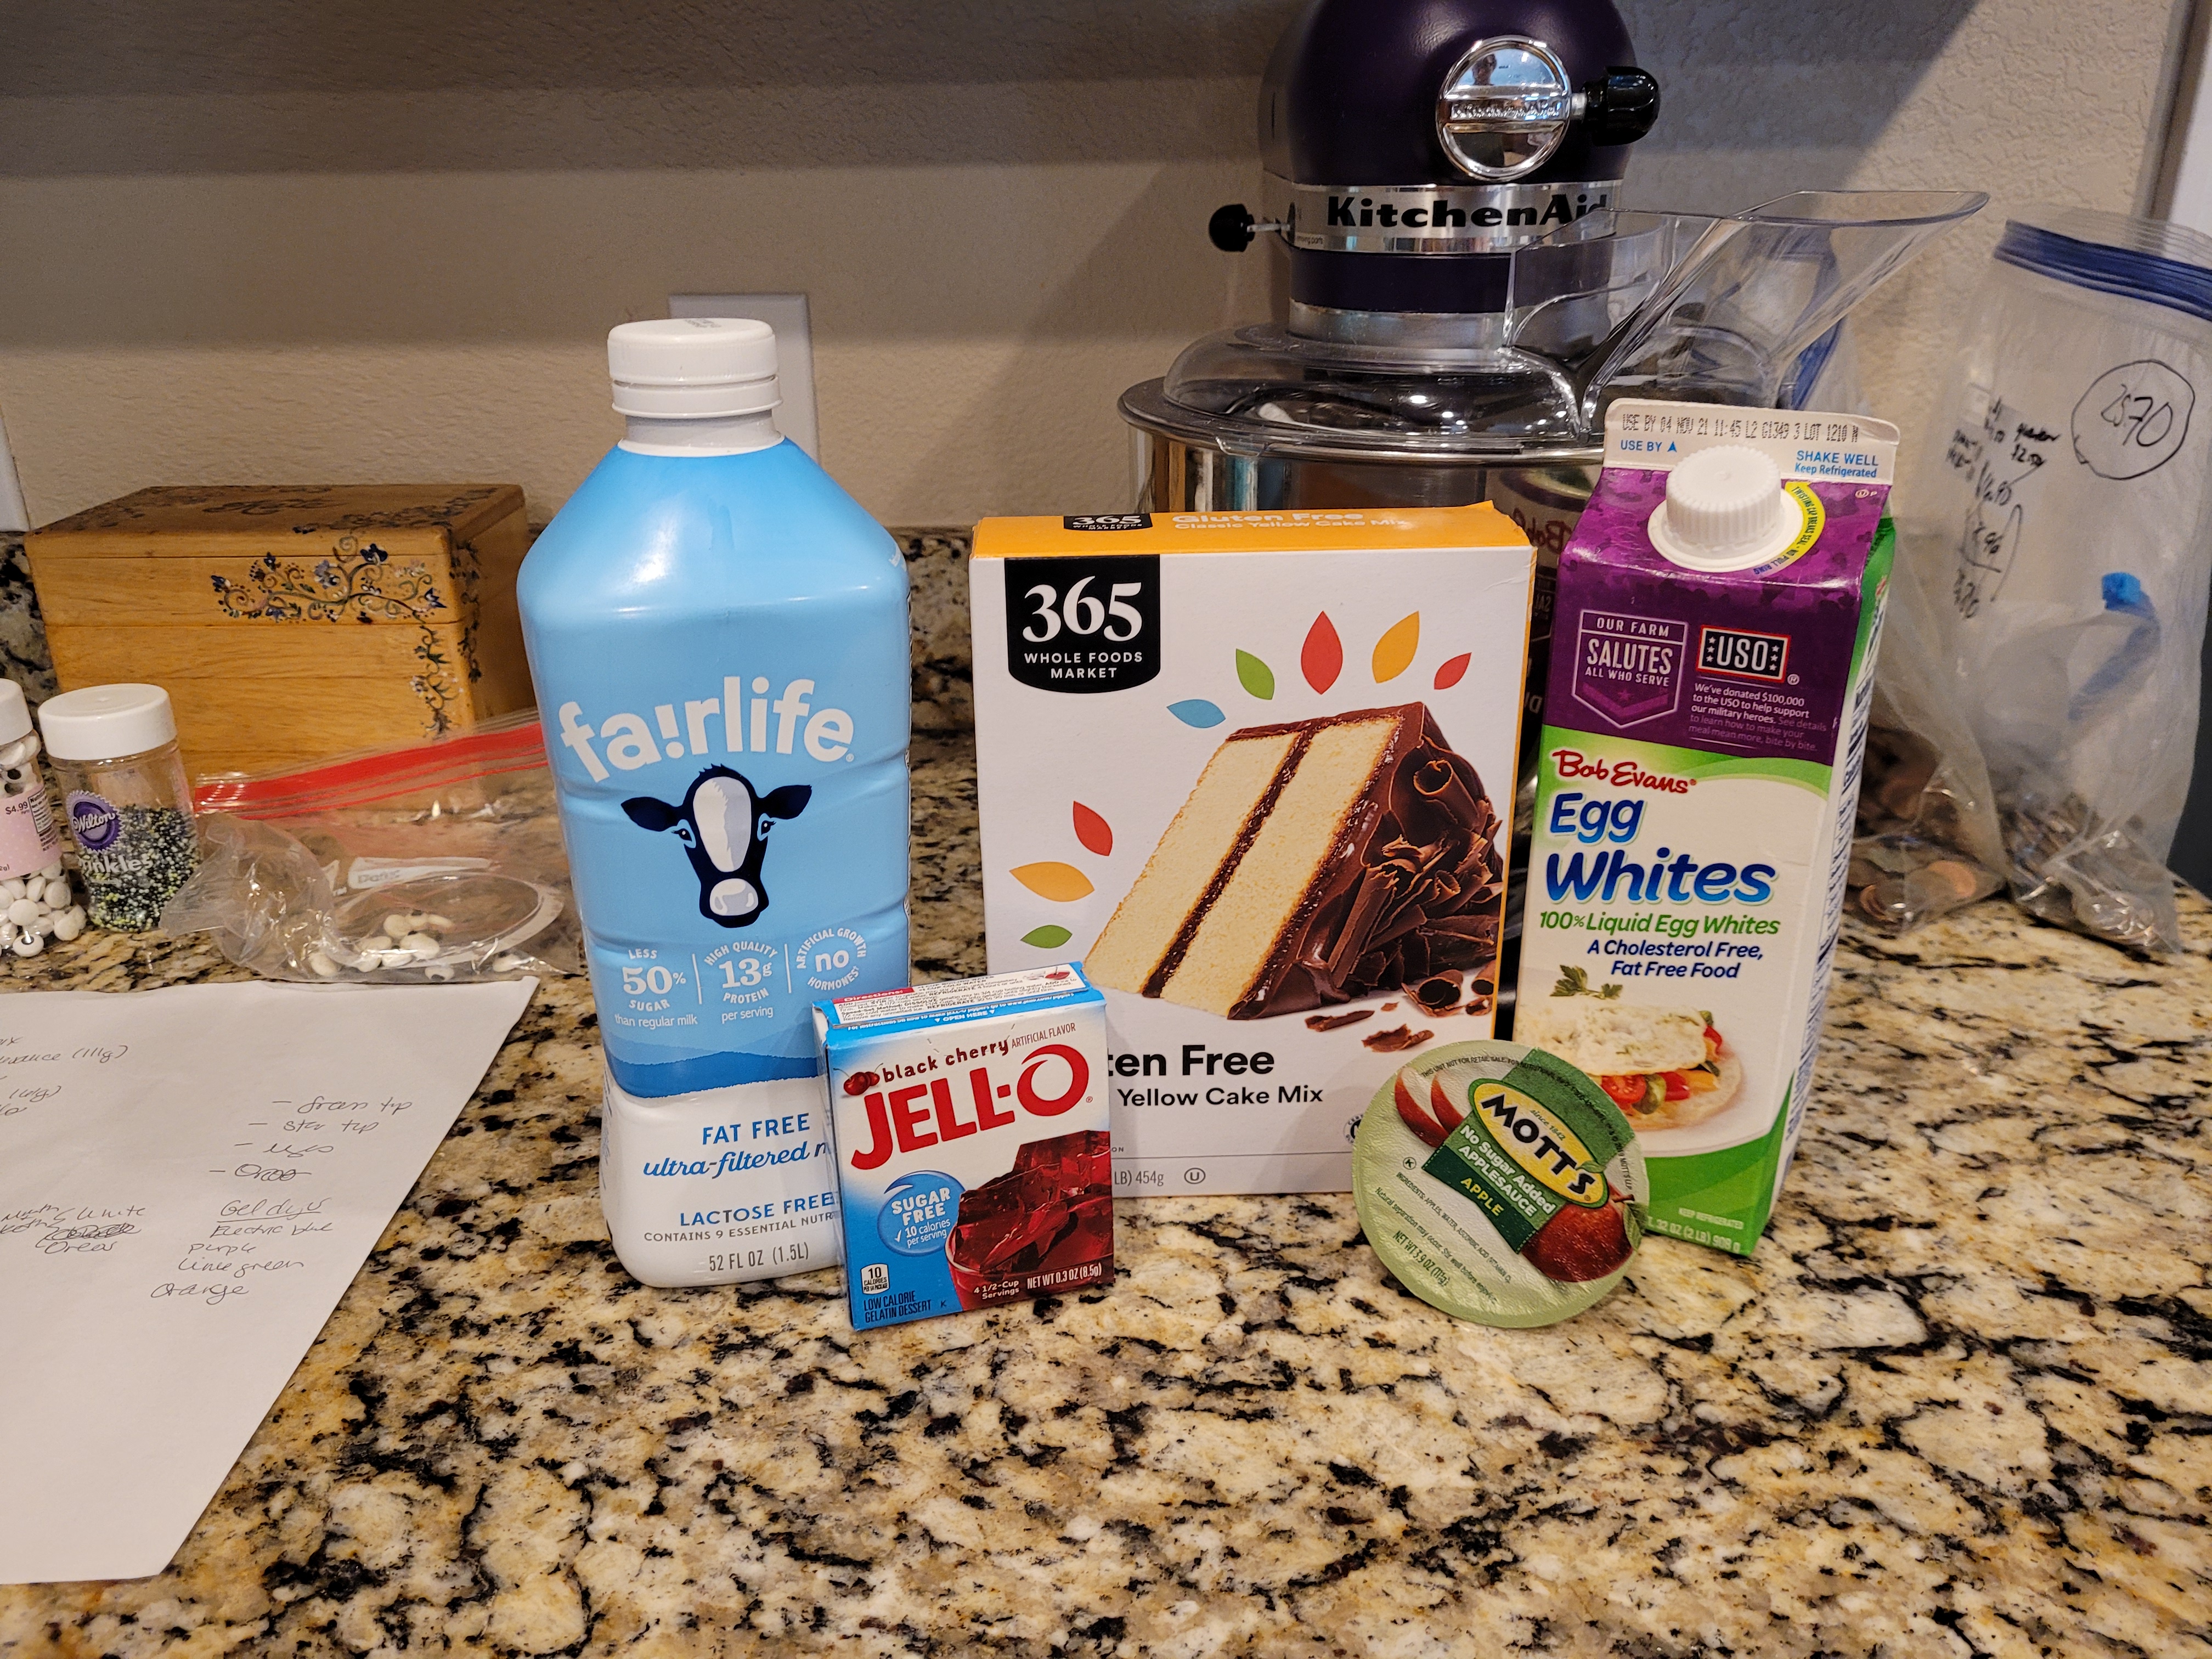
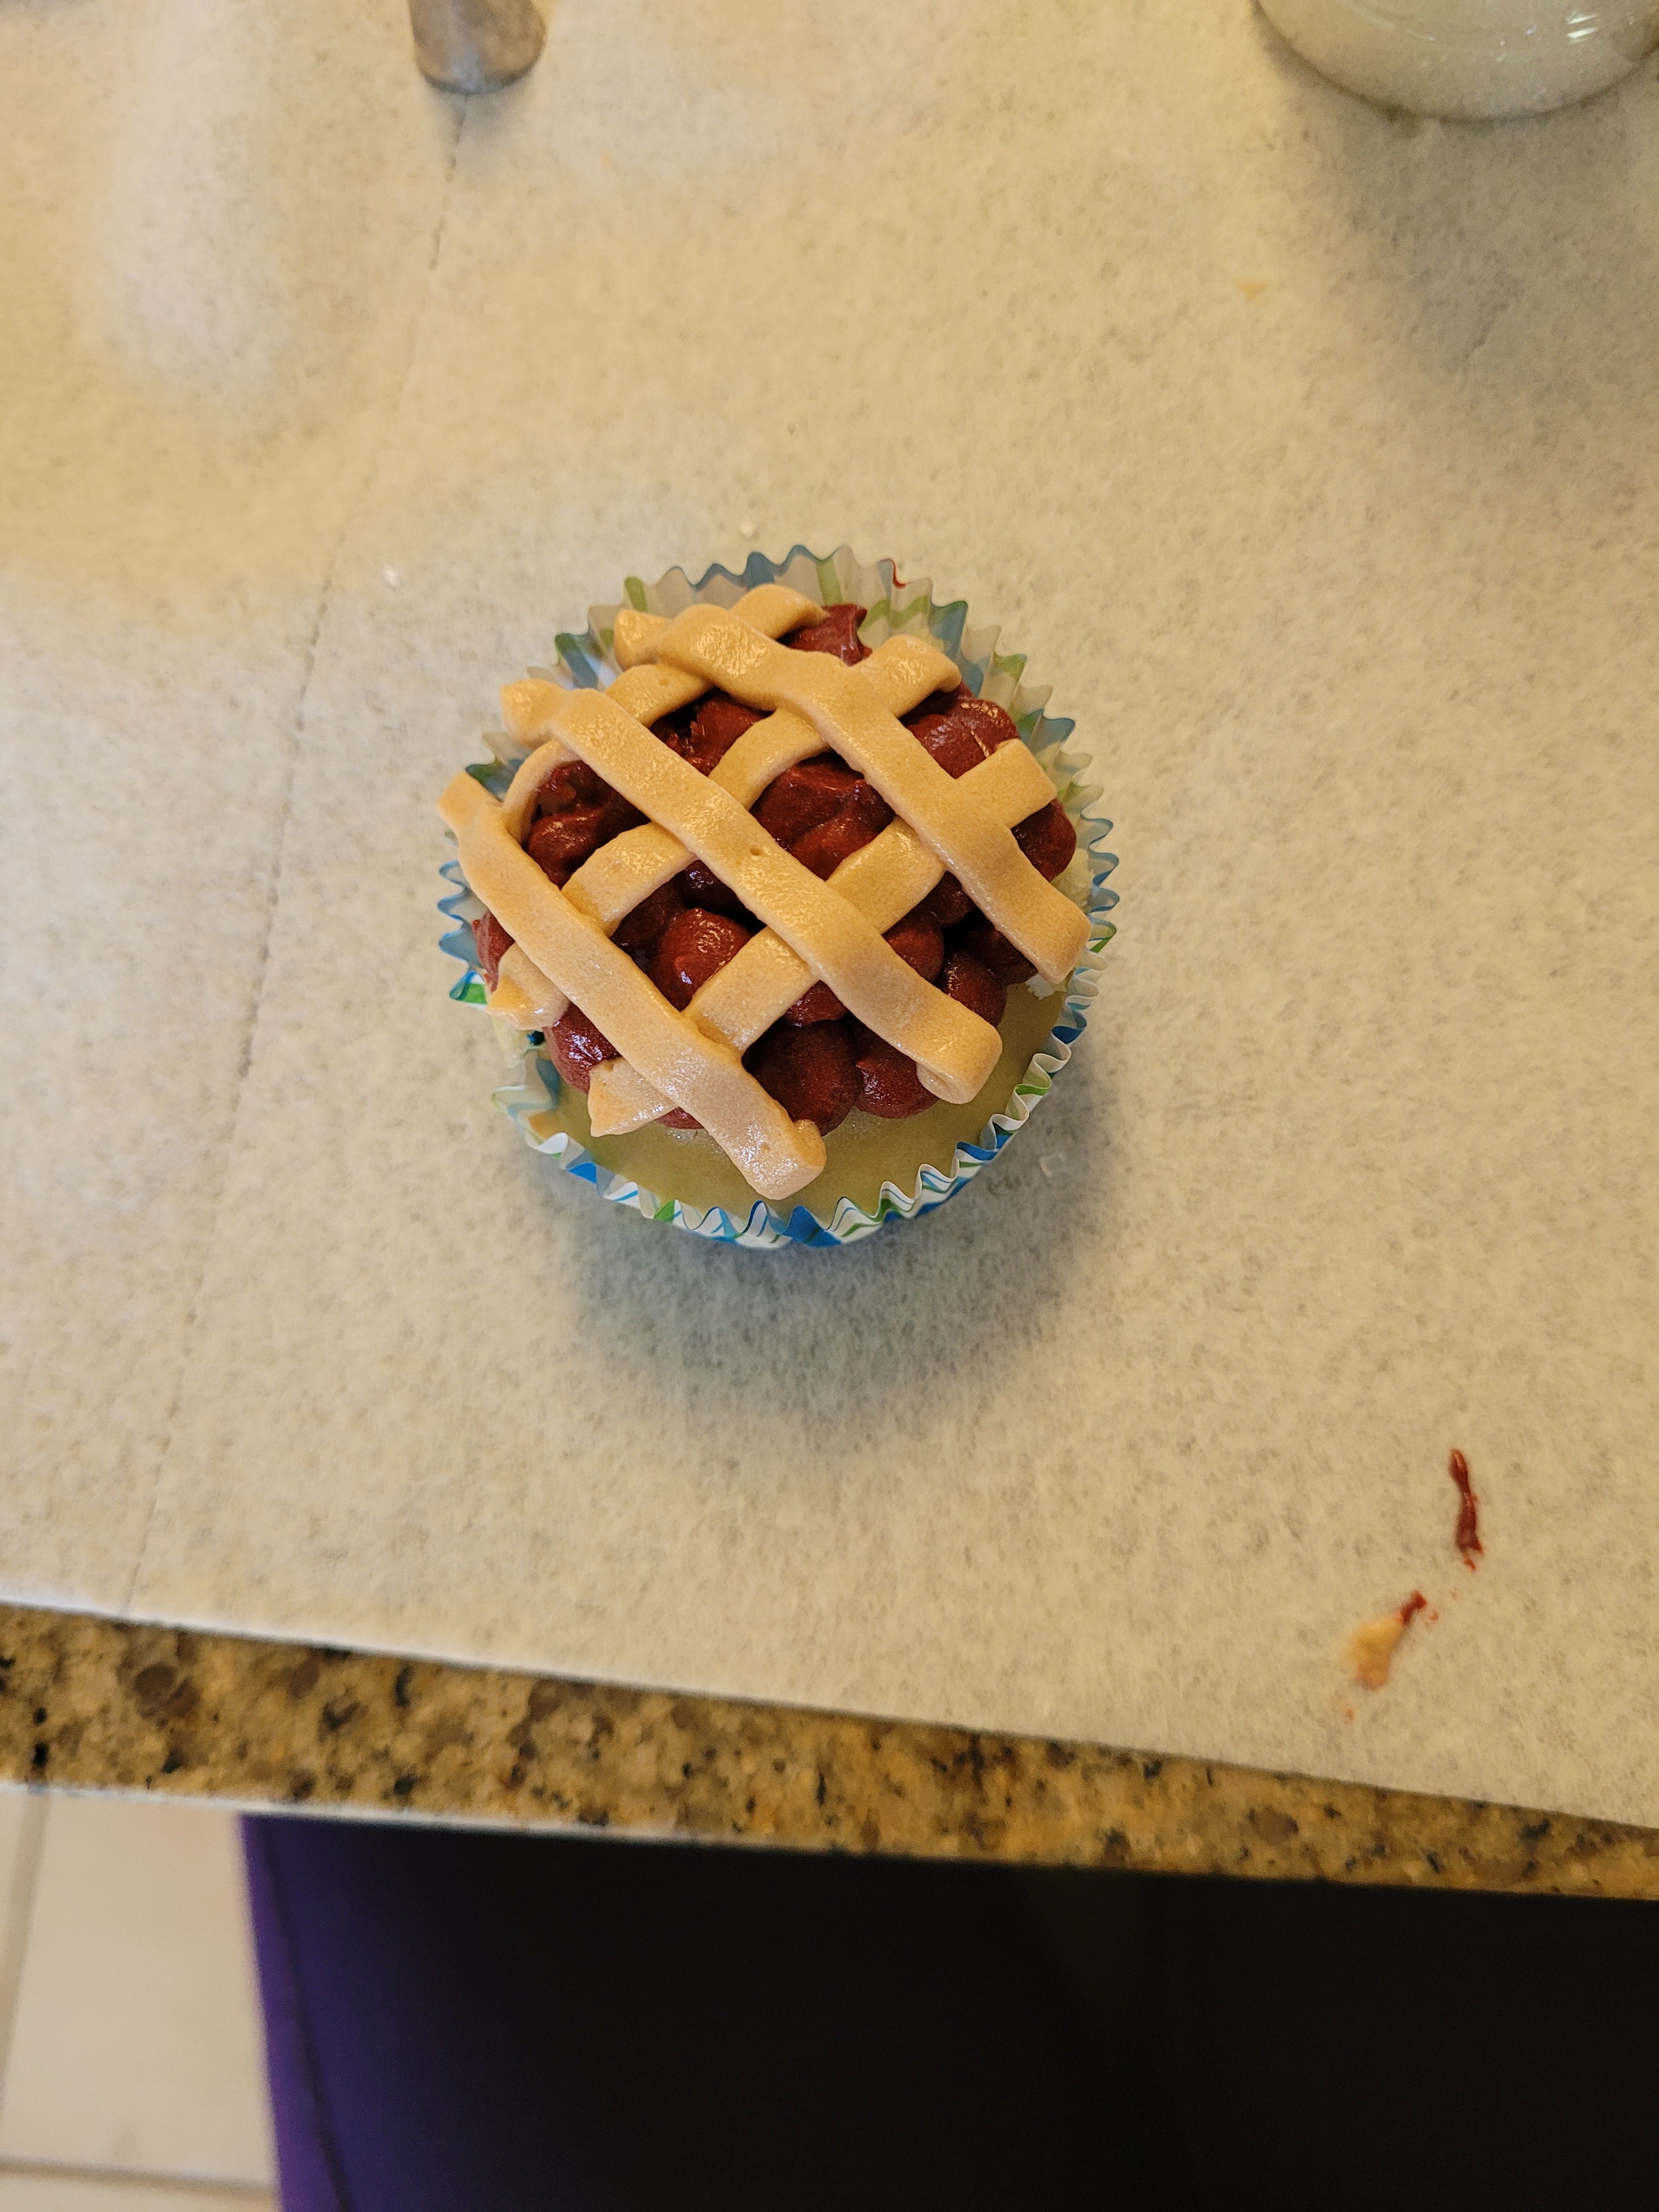
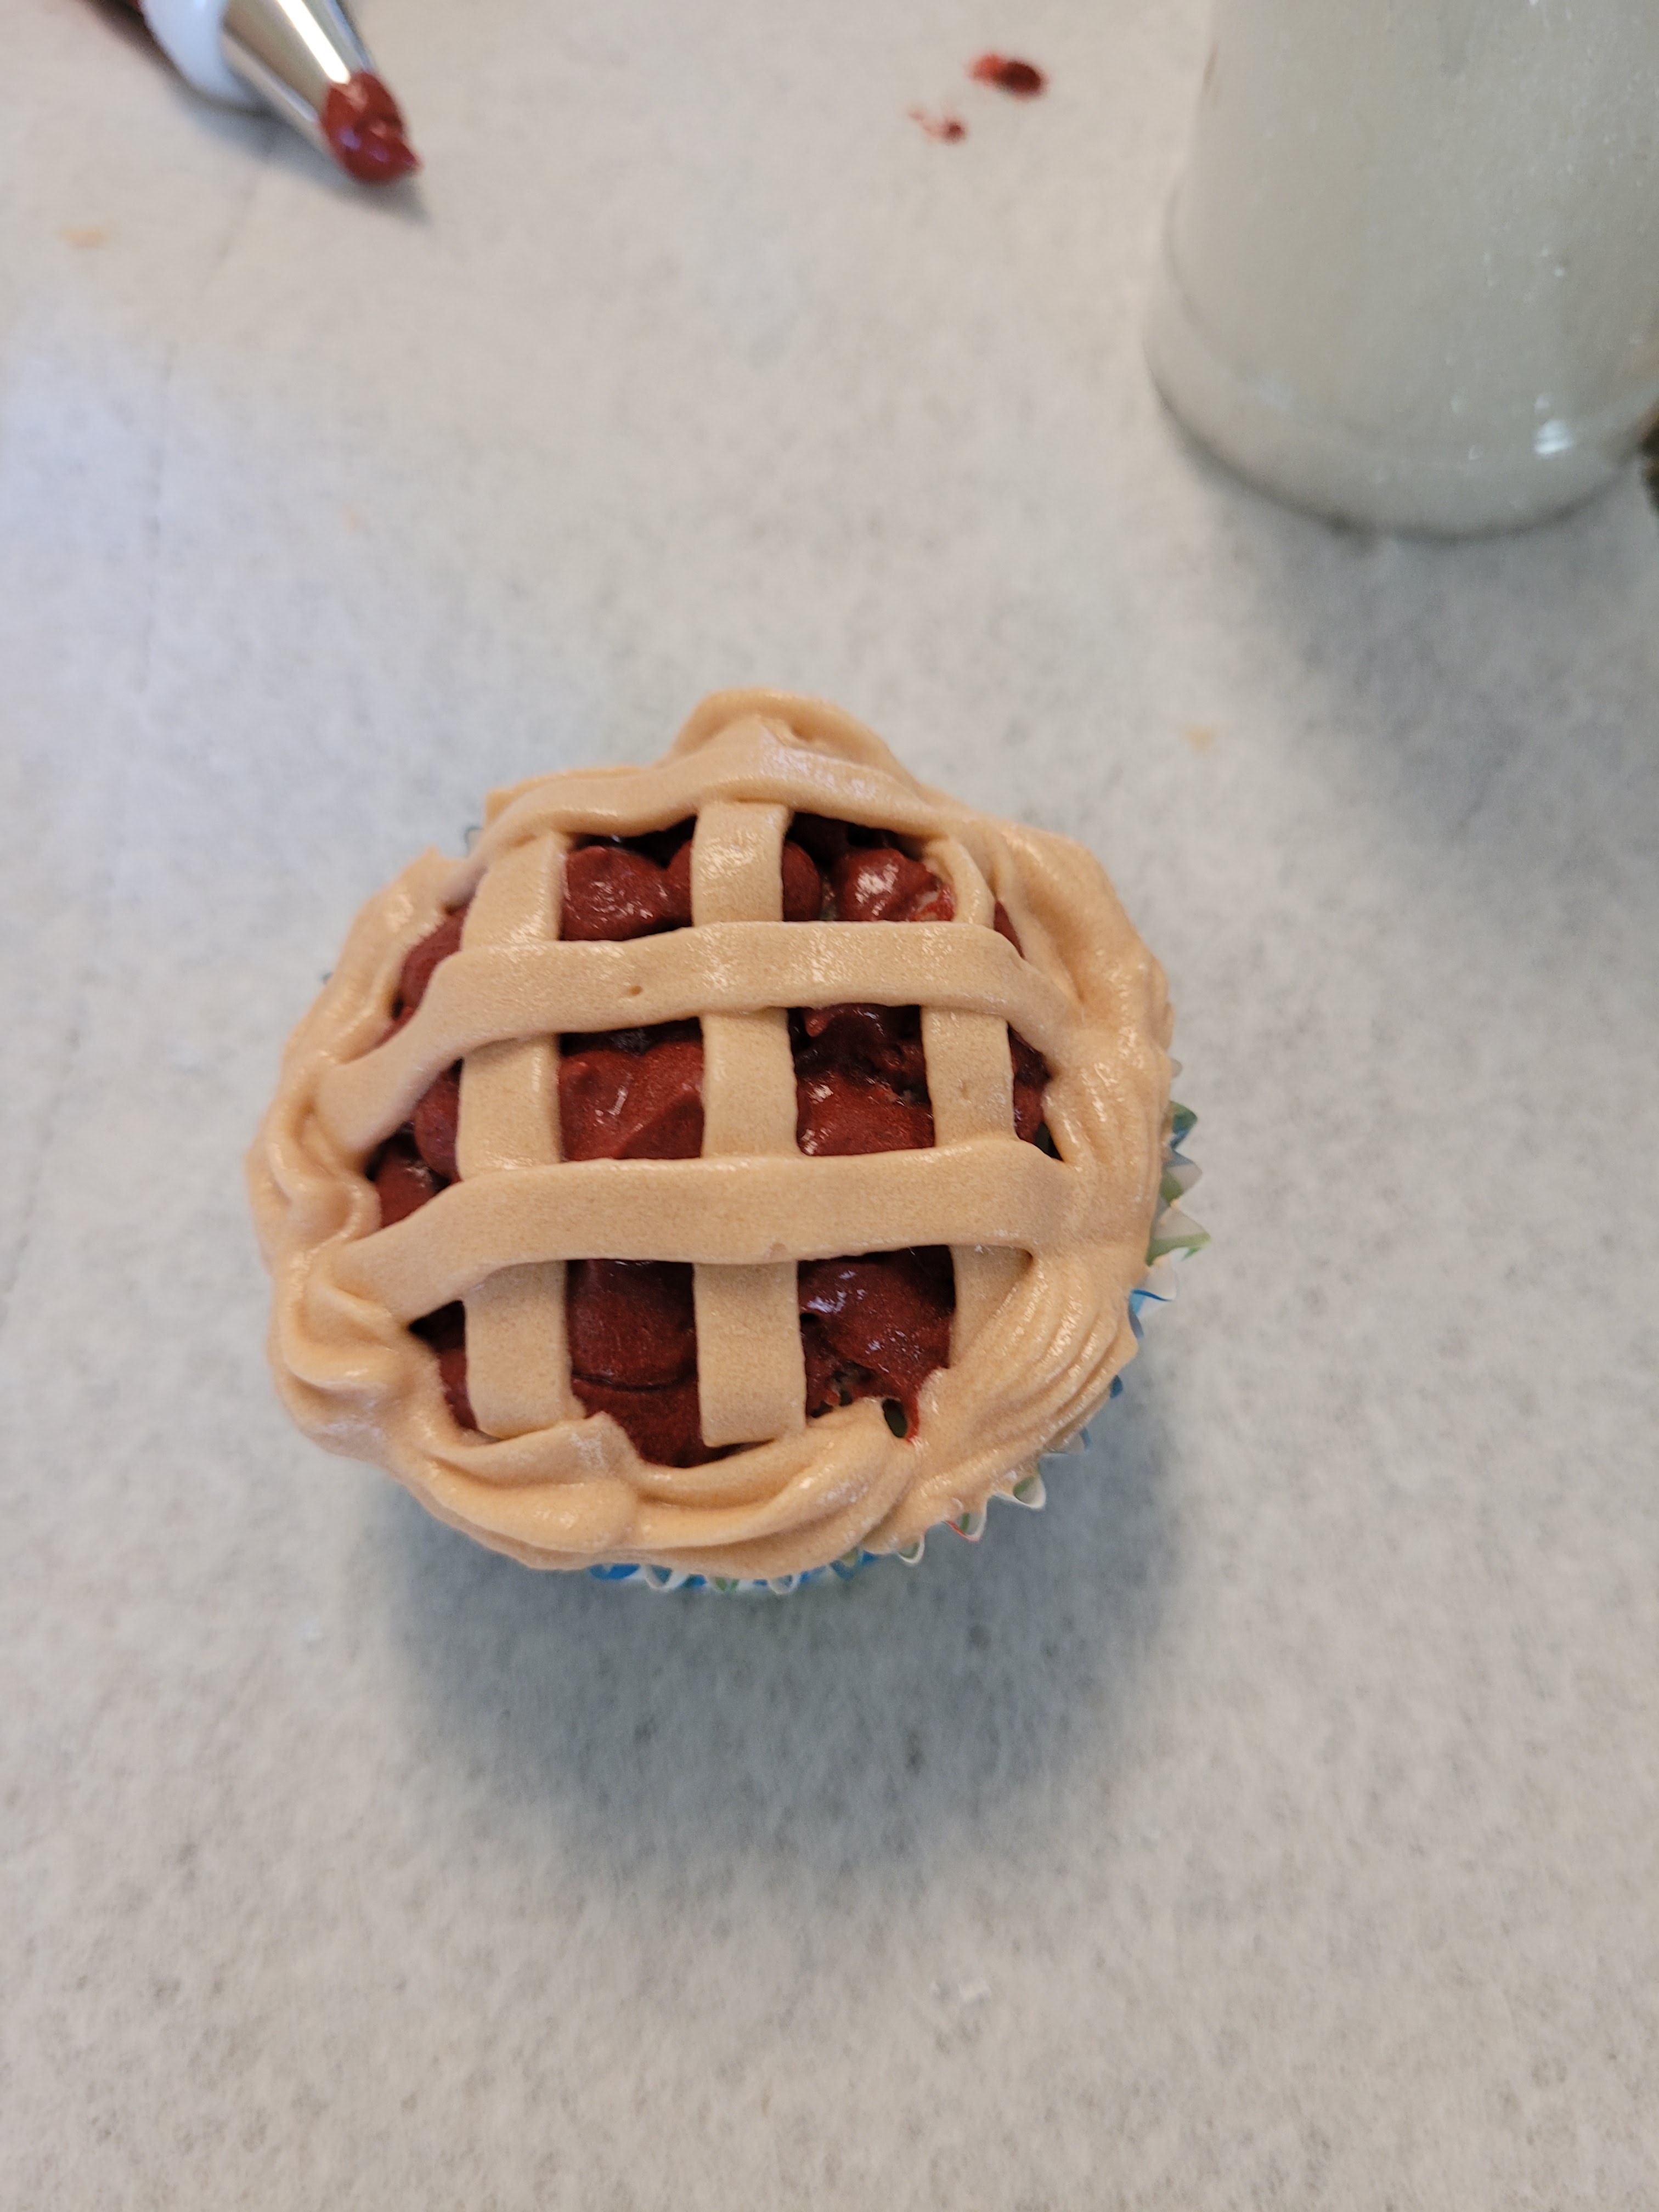
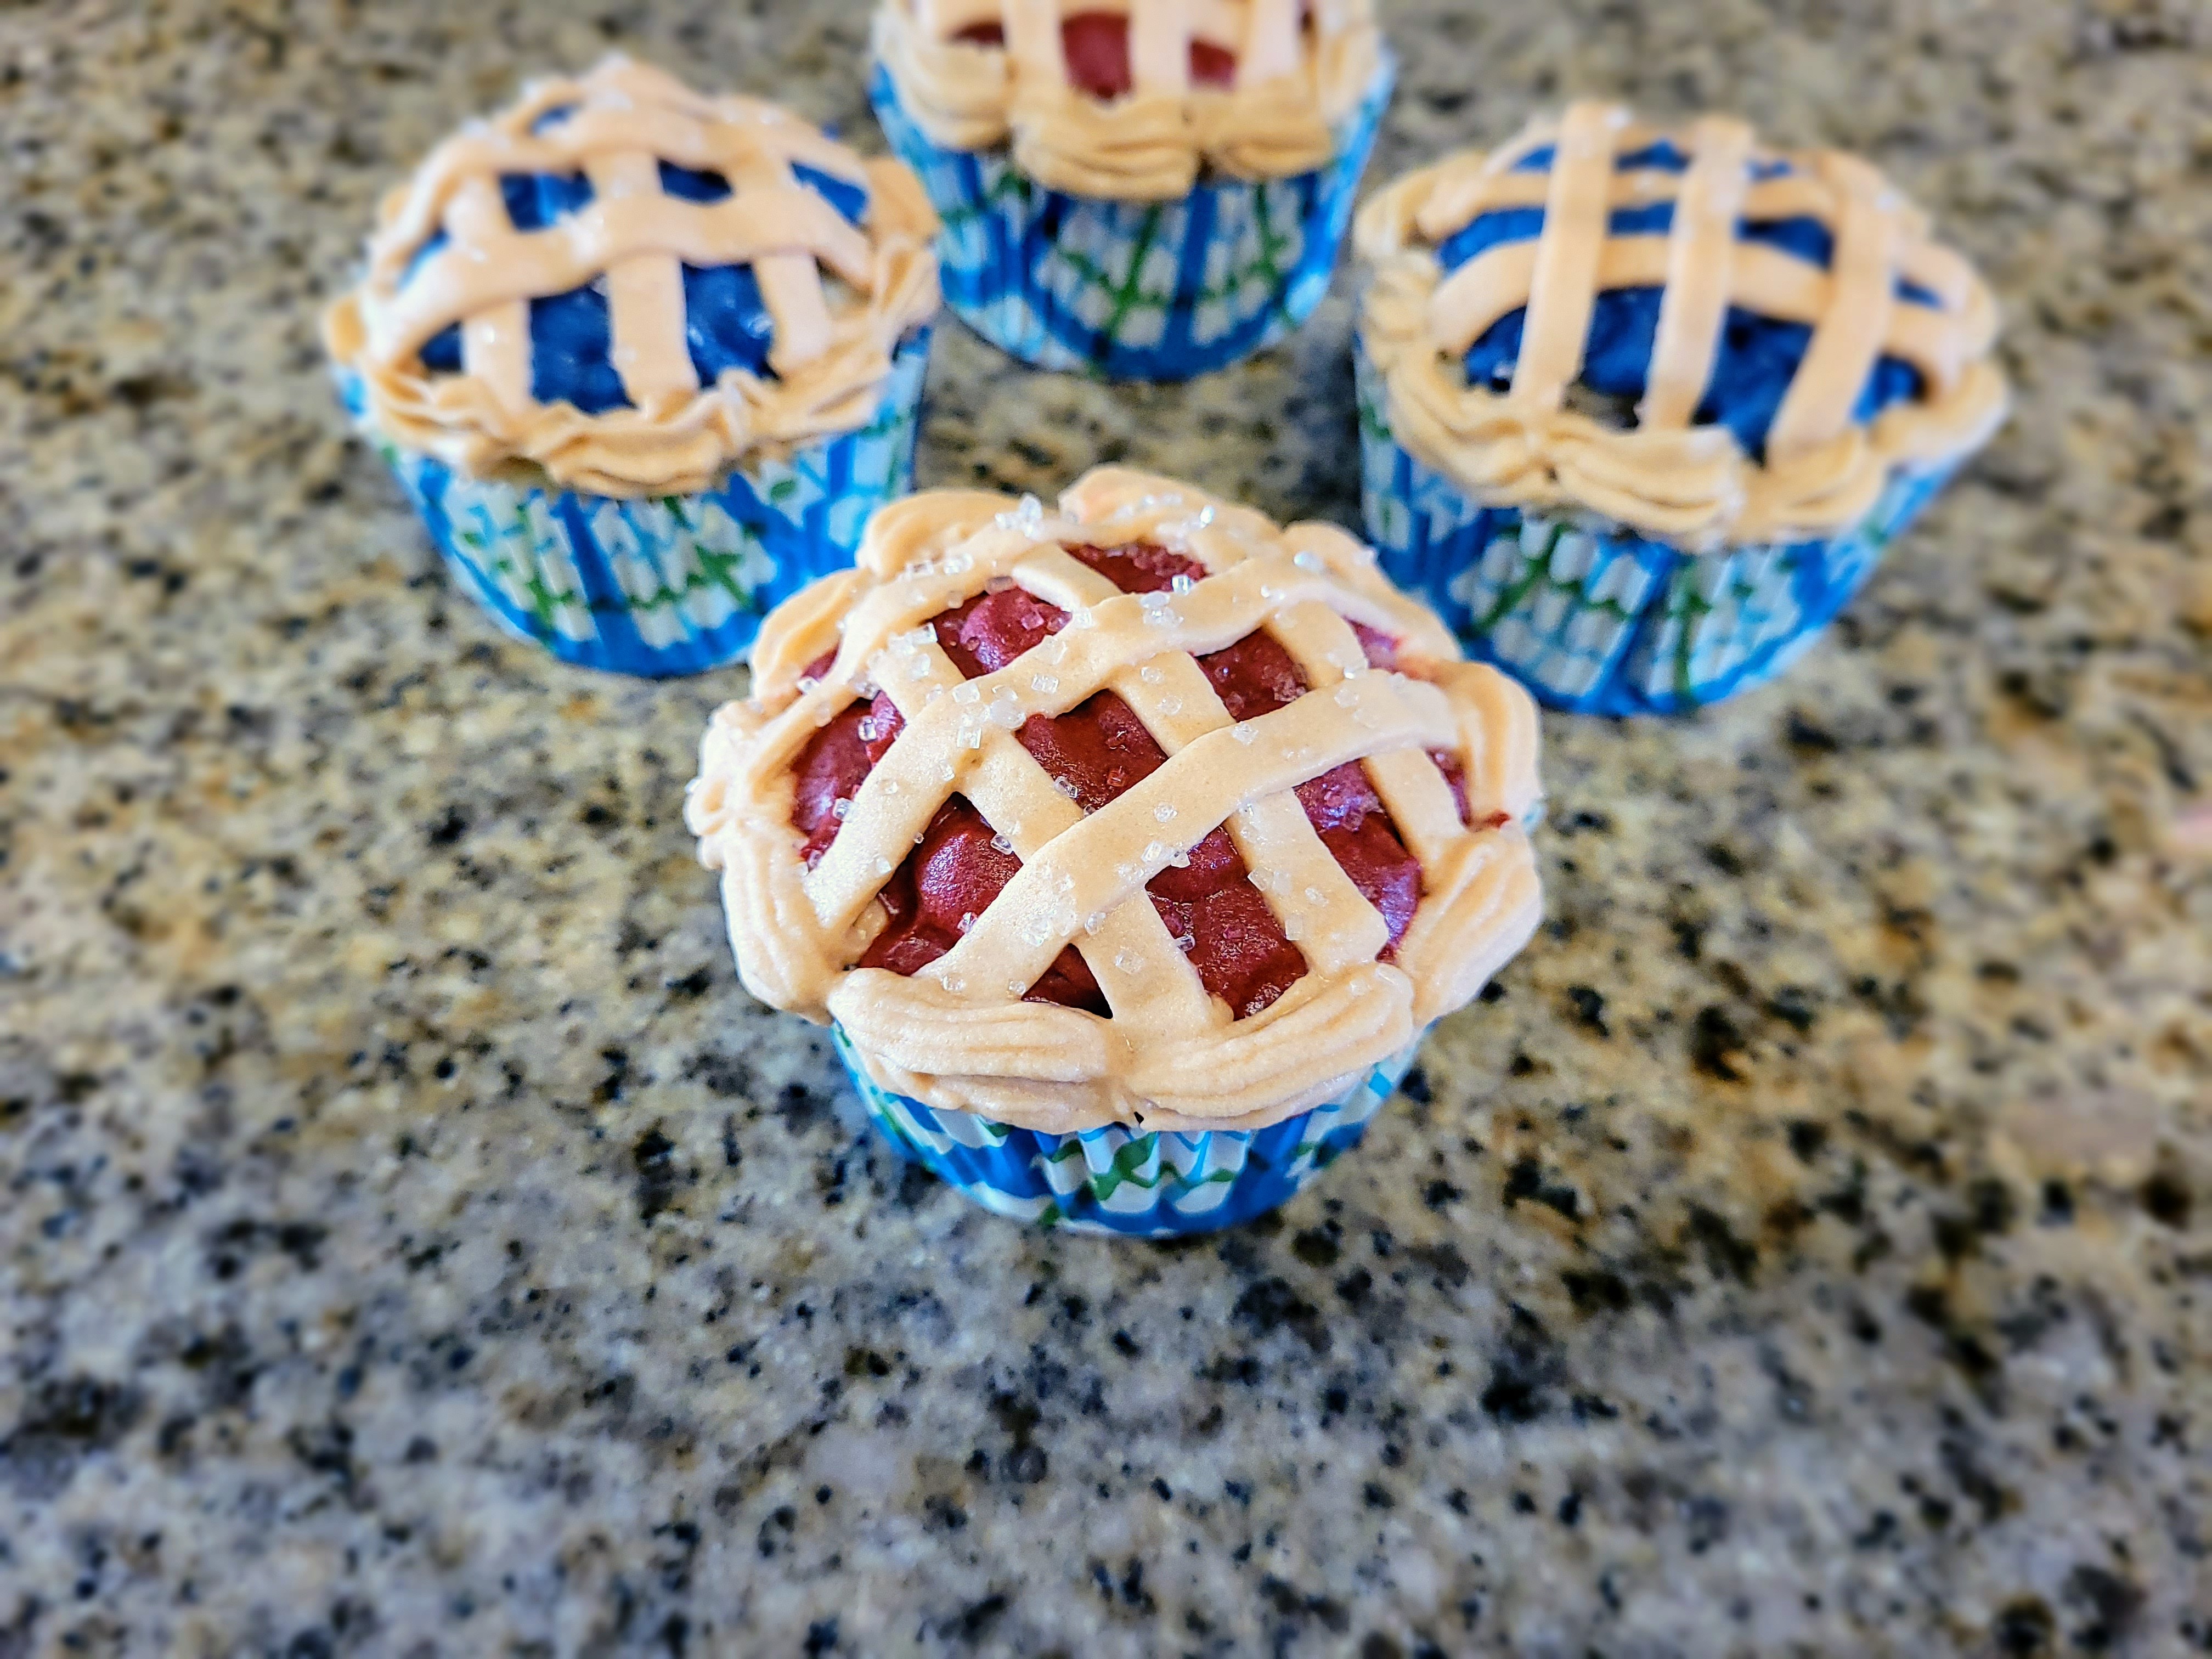
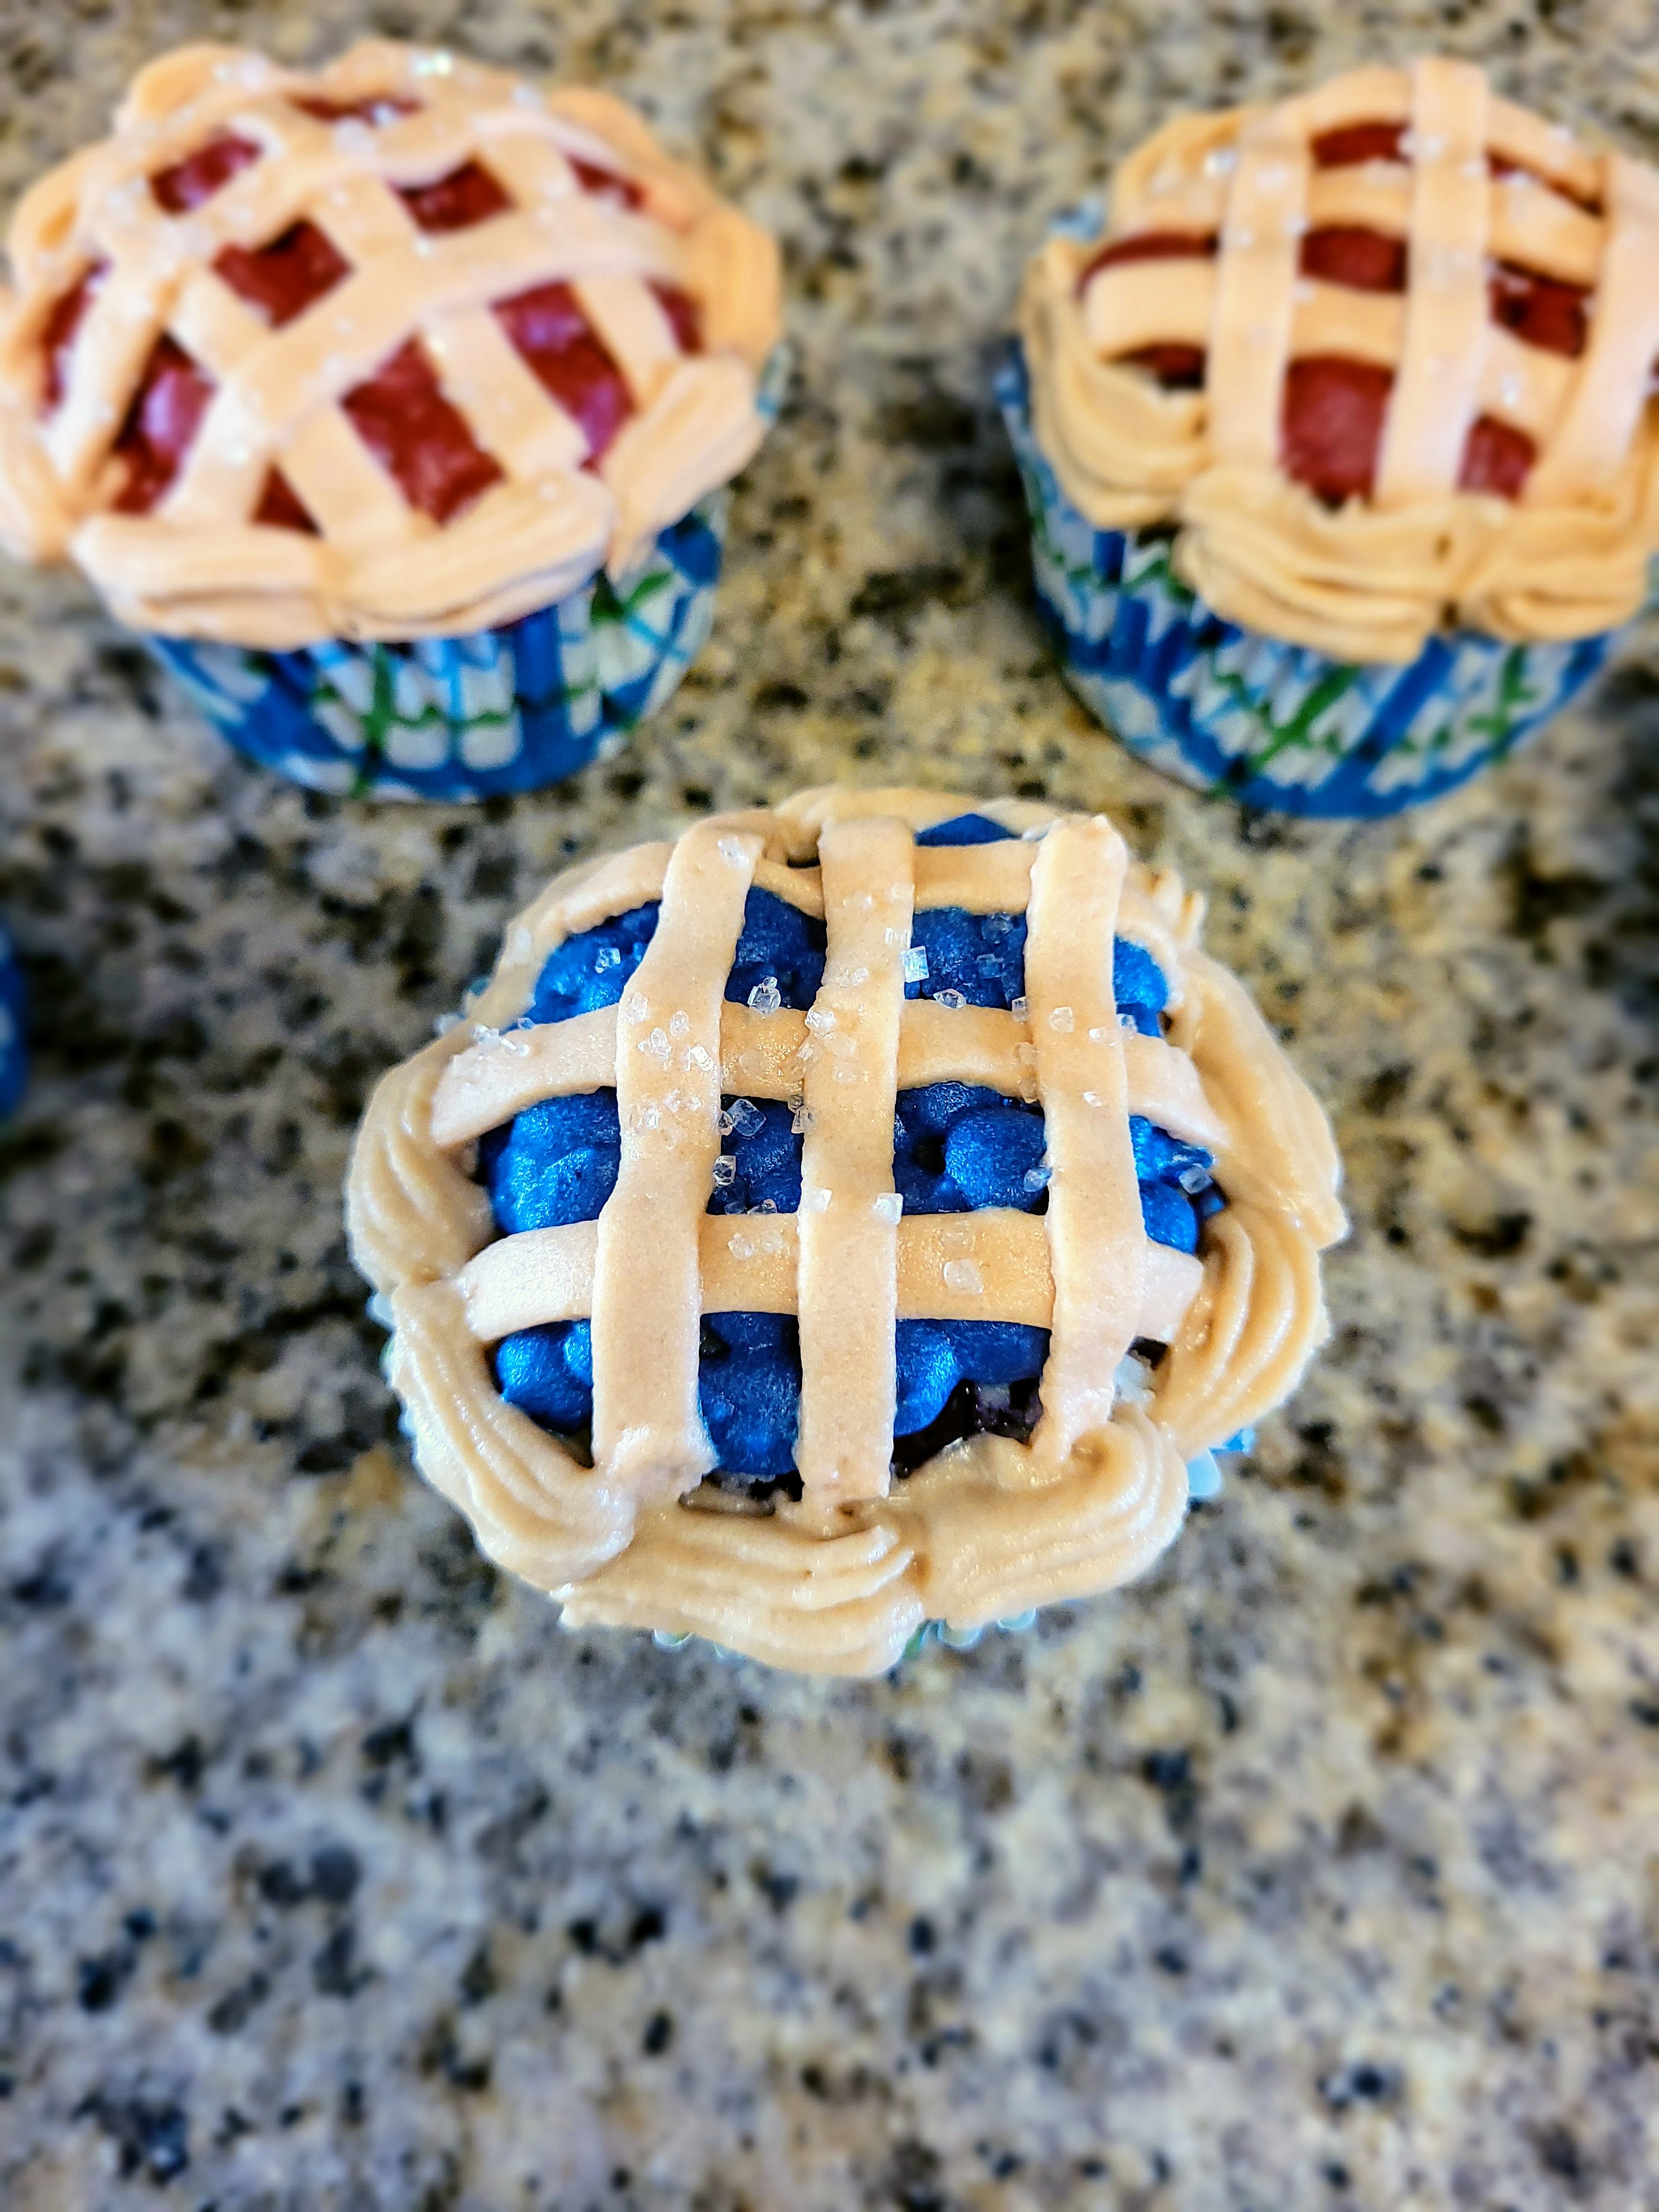
We had a bone chilling Halloween thanks to New Mexico taking it upon itself to have a chilly, windy, spooky day that was just the perfect amount of seasonally appropriate. It gave me great comfort to sit in the dark and hide from my greatest fear (children) while watching Hocus Pocus for the 6,575th time this month…the weather really set the tone for Halloween ambiance, and I could not be anymore thrilled with spending a Halloween at a temperature below 85 (looking at you, Florida). I actually made my final dessert of Baketober on Saturday, but I wanted to wait to post about it since it is not a Halloween dessert, but a tribute to Dia de los Muertos. Although Novembooer doesn’t have as much of a ring to it as Spooktober, I am happy to close out my favorite season of baking with none other than sugar skull-decorated sopapilla cupcakes with honey buttercream frosting.

These were skele-fun to make. You know a good pun always tickles my funny bone, but in all seriousness, I have always been so interested in the Day of the Dead, especially growing up in and then spending a good part of my adult life in regions that celebrate it. Thanks to movies like The Book of Life and Coco, I feel like Dia de los Muertos has become a holiday more people are familiar with, which I love. It’s an excellent tradition to honor and celebrate the lives of those who have passed. The vibrancy, dedication, and love put into each ofrenda is amazing…to celebrate what was had instead of mourn what was lost is something beautiful. I wanted to bake something for us to celebrate in our own way, and I positively love the festiveness and spirit of a calavera. I will admit I have absolutely no idea how to make a proper pan de muerto, but this basic white witch sure knows her way around a cupcake. And who doesn’t love a good, pillow-softy, honey-soaked sopapilla? This was a mashup made for the holiday.

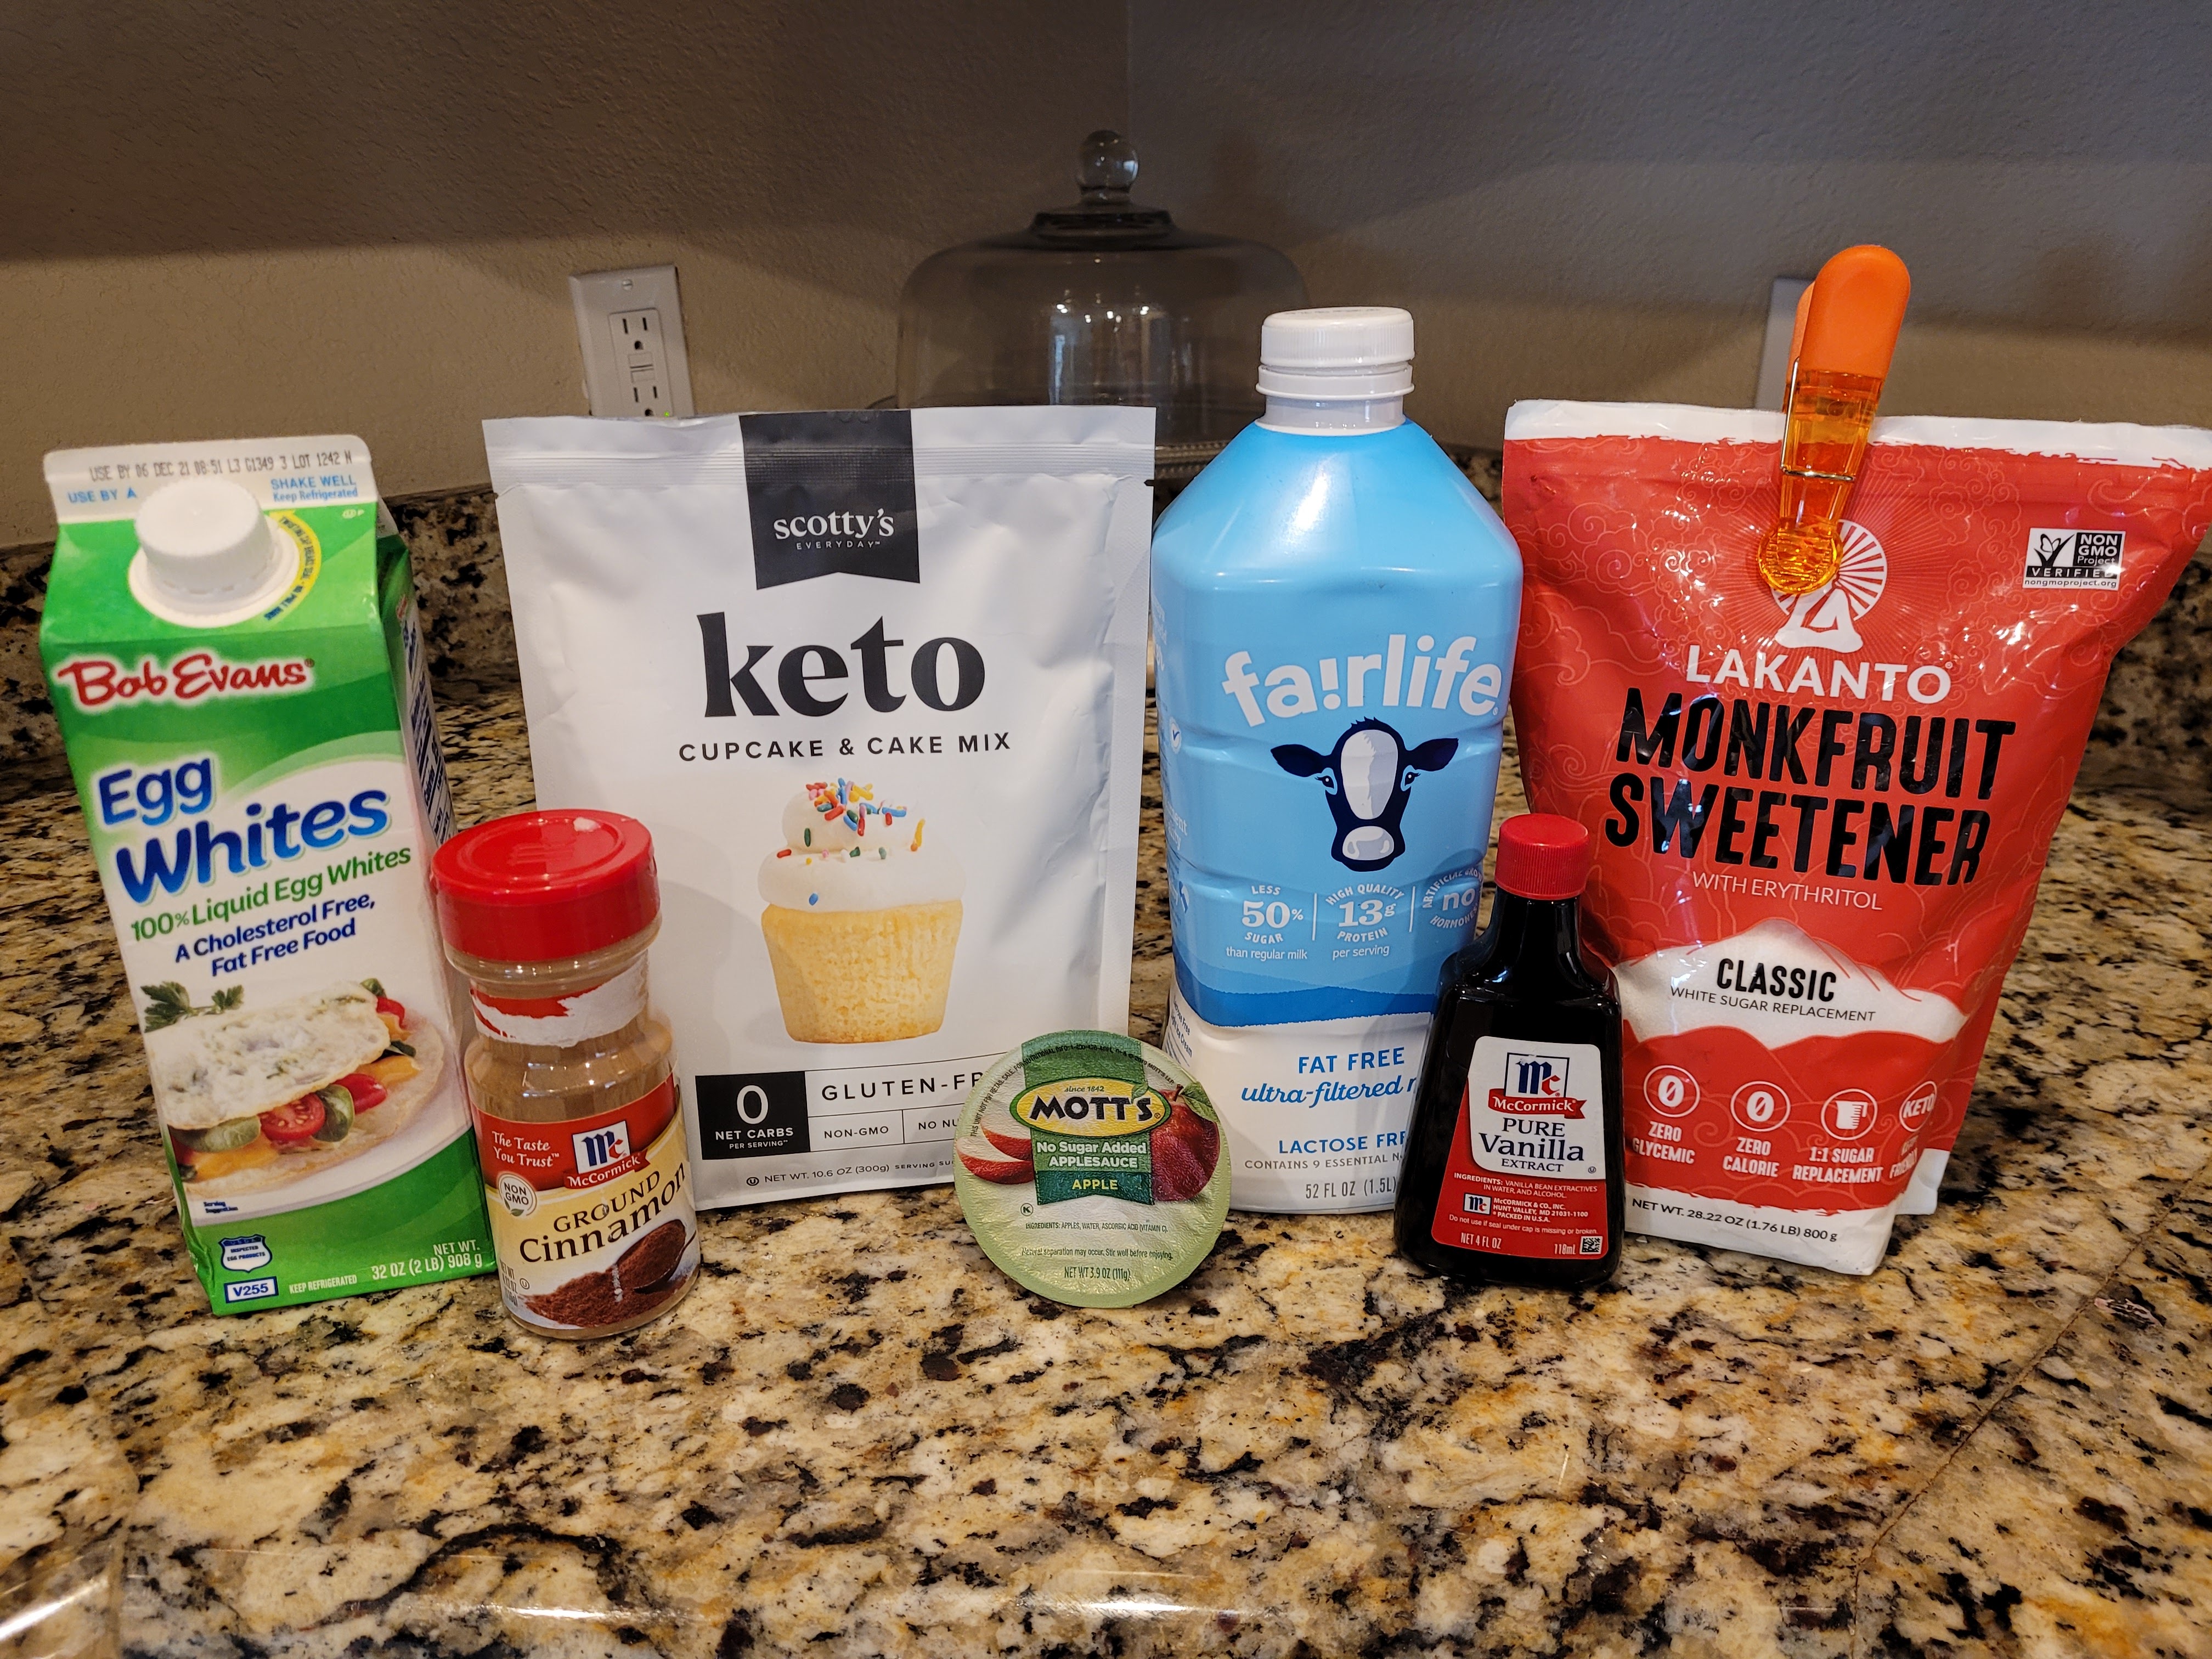
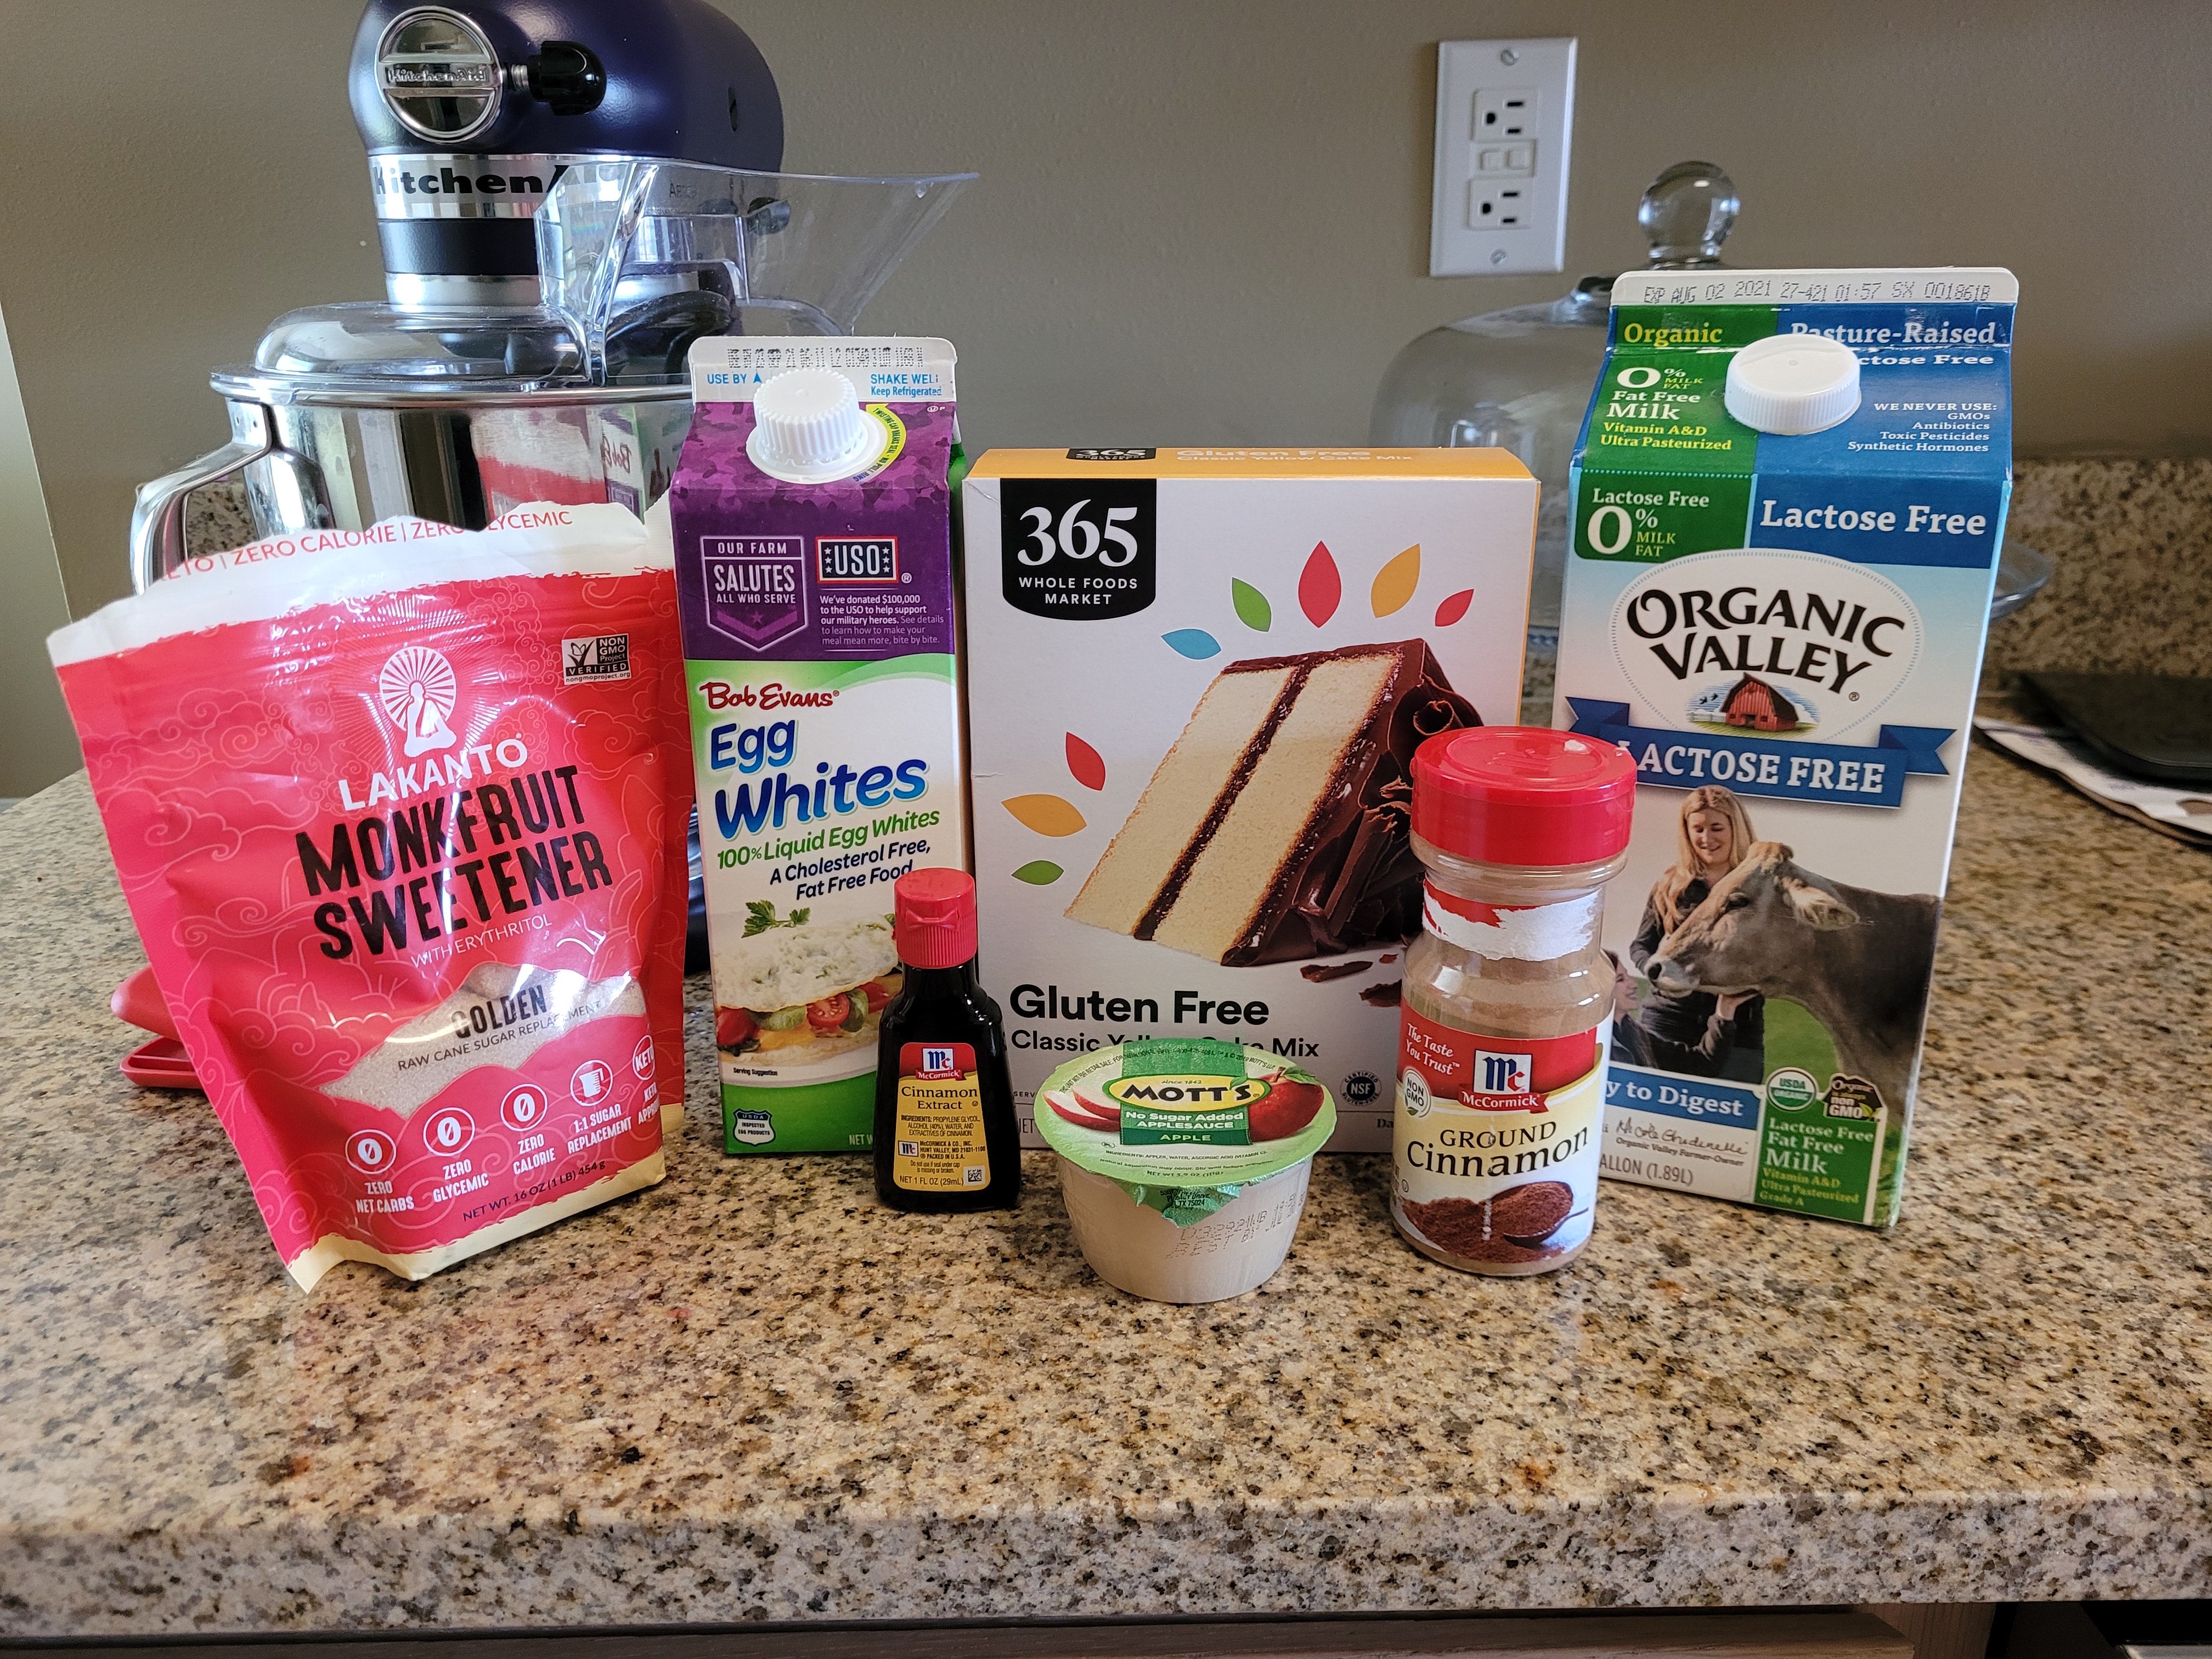
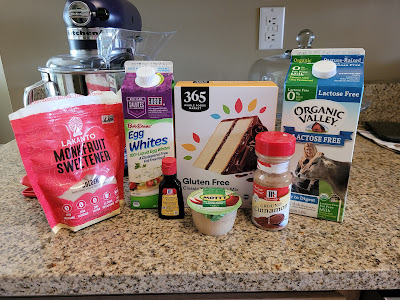
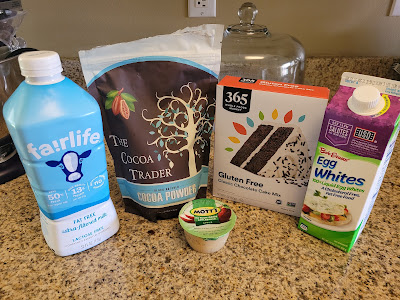
The only horror here is that I ran out of Whole Foods GF cake mixes. Halloween is a scary time of year, but nothing is scarier to me than running out of a tried and true baked good mix with zero way to re-up my supply. I bought so many boxes of gluten free Whole Foods brand cake mixes before we left because they are hands-down the best gluten free mixes in the world. Sadly, I ran out (cue the horror music), so it was time to try some new mixes. For my very low calorie (157 calories a cupcake) sopapilla cupcake recipe, I used:
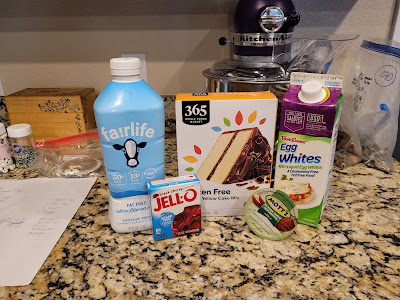
- 1 bag of Scotty’s keto cupcake and cake mix (gluten free and found on Amazon)
- 1/2 cup of unsweetened applesauce
- 1/2 cup of egg whites
- 1/3 cup of fat free or skim milk
- 1 TBS vanilla extract
- 1 TBS cinnamon, divided
- 2 TBS granular Lakanto monkfruit sweetener (or regular sugar)
- Also, the world’s most amazing cupcake wrappers thank to my mom, the family Queen of Halloween:
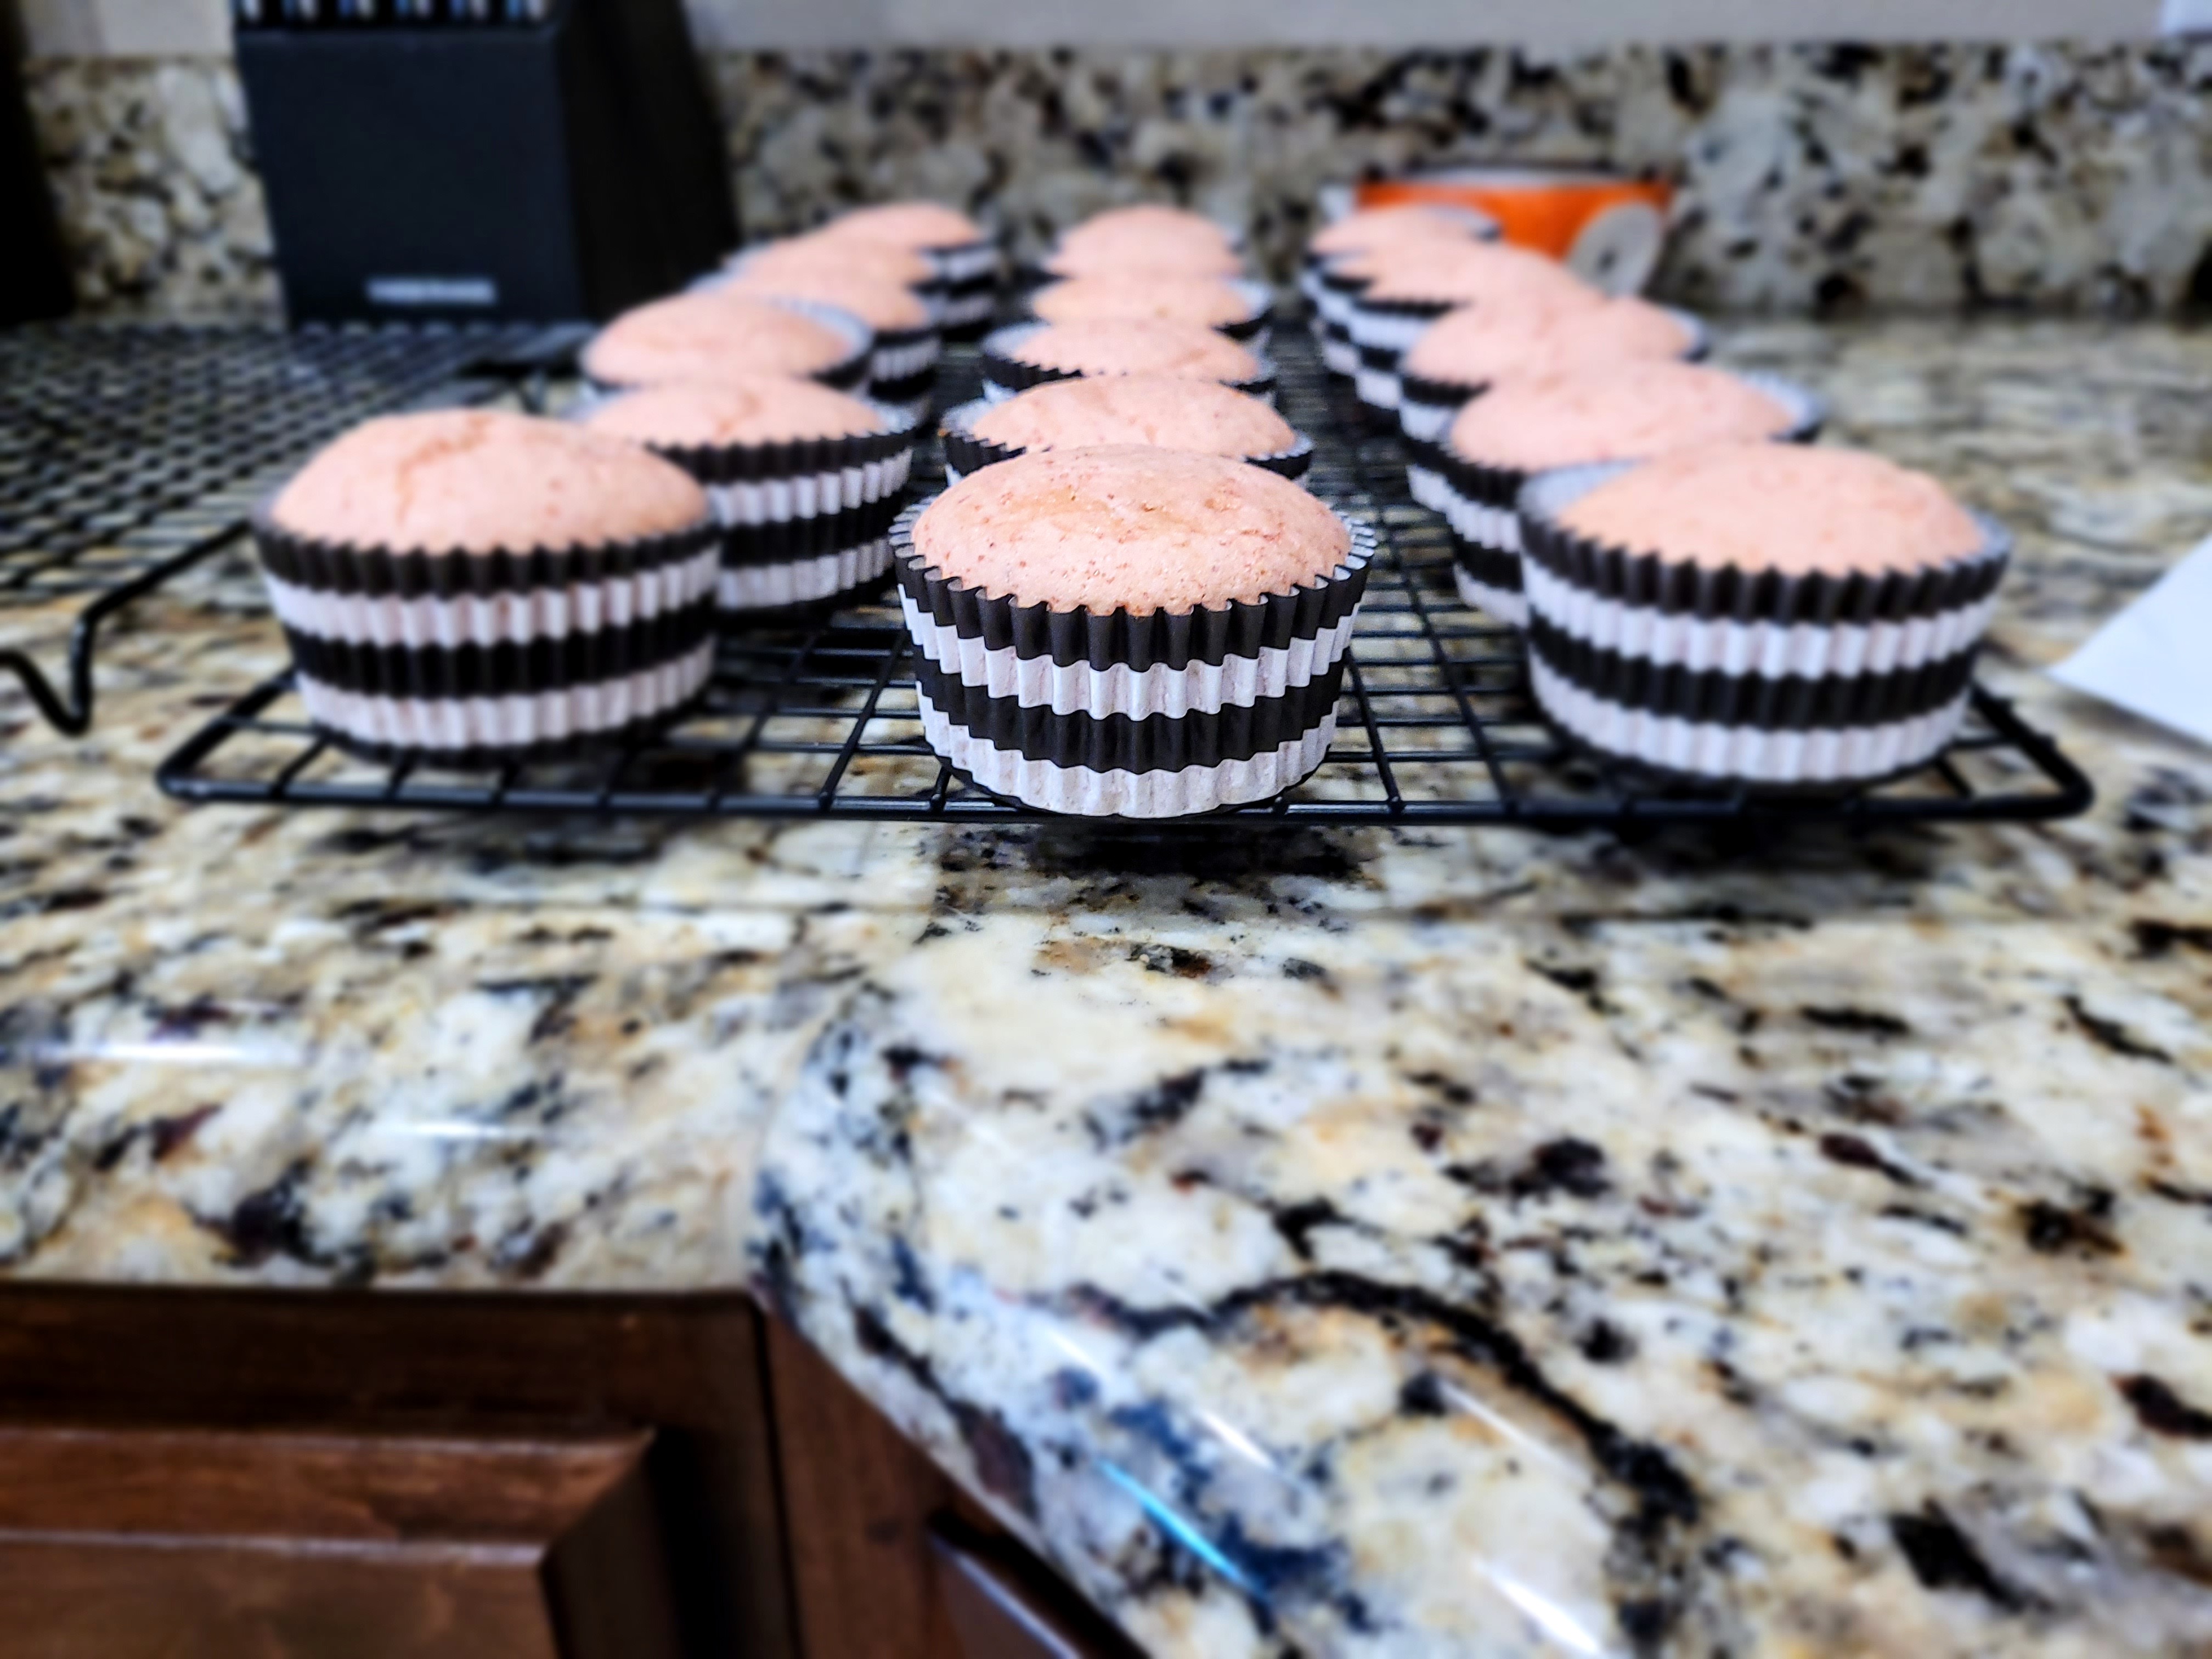
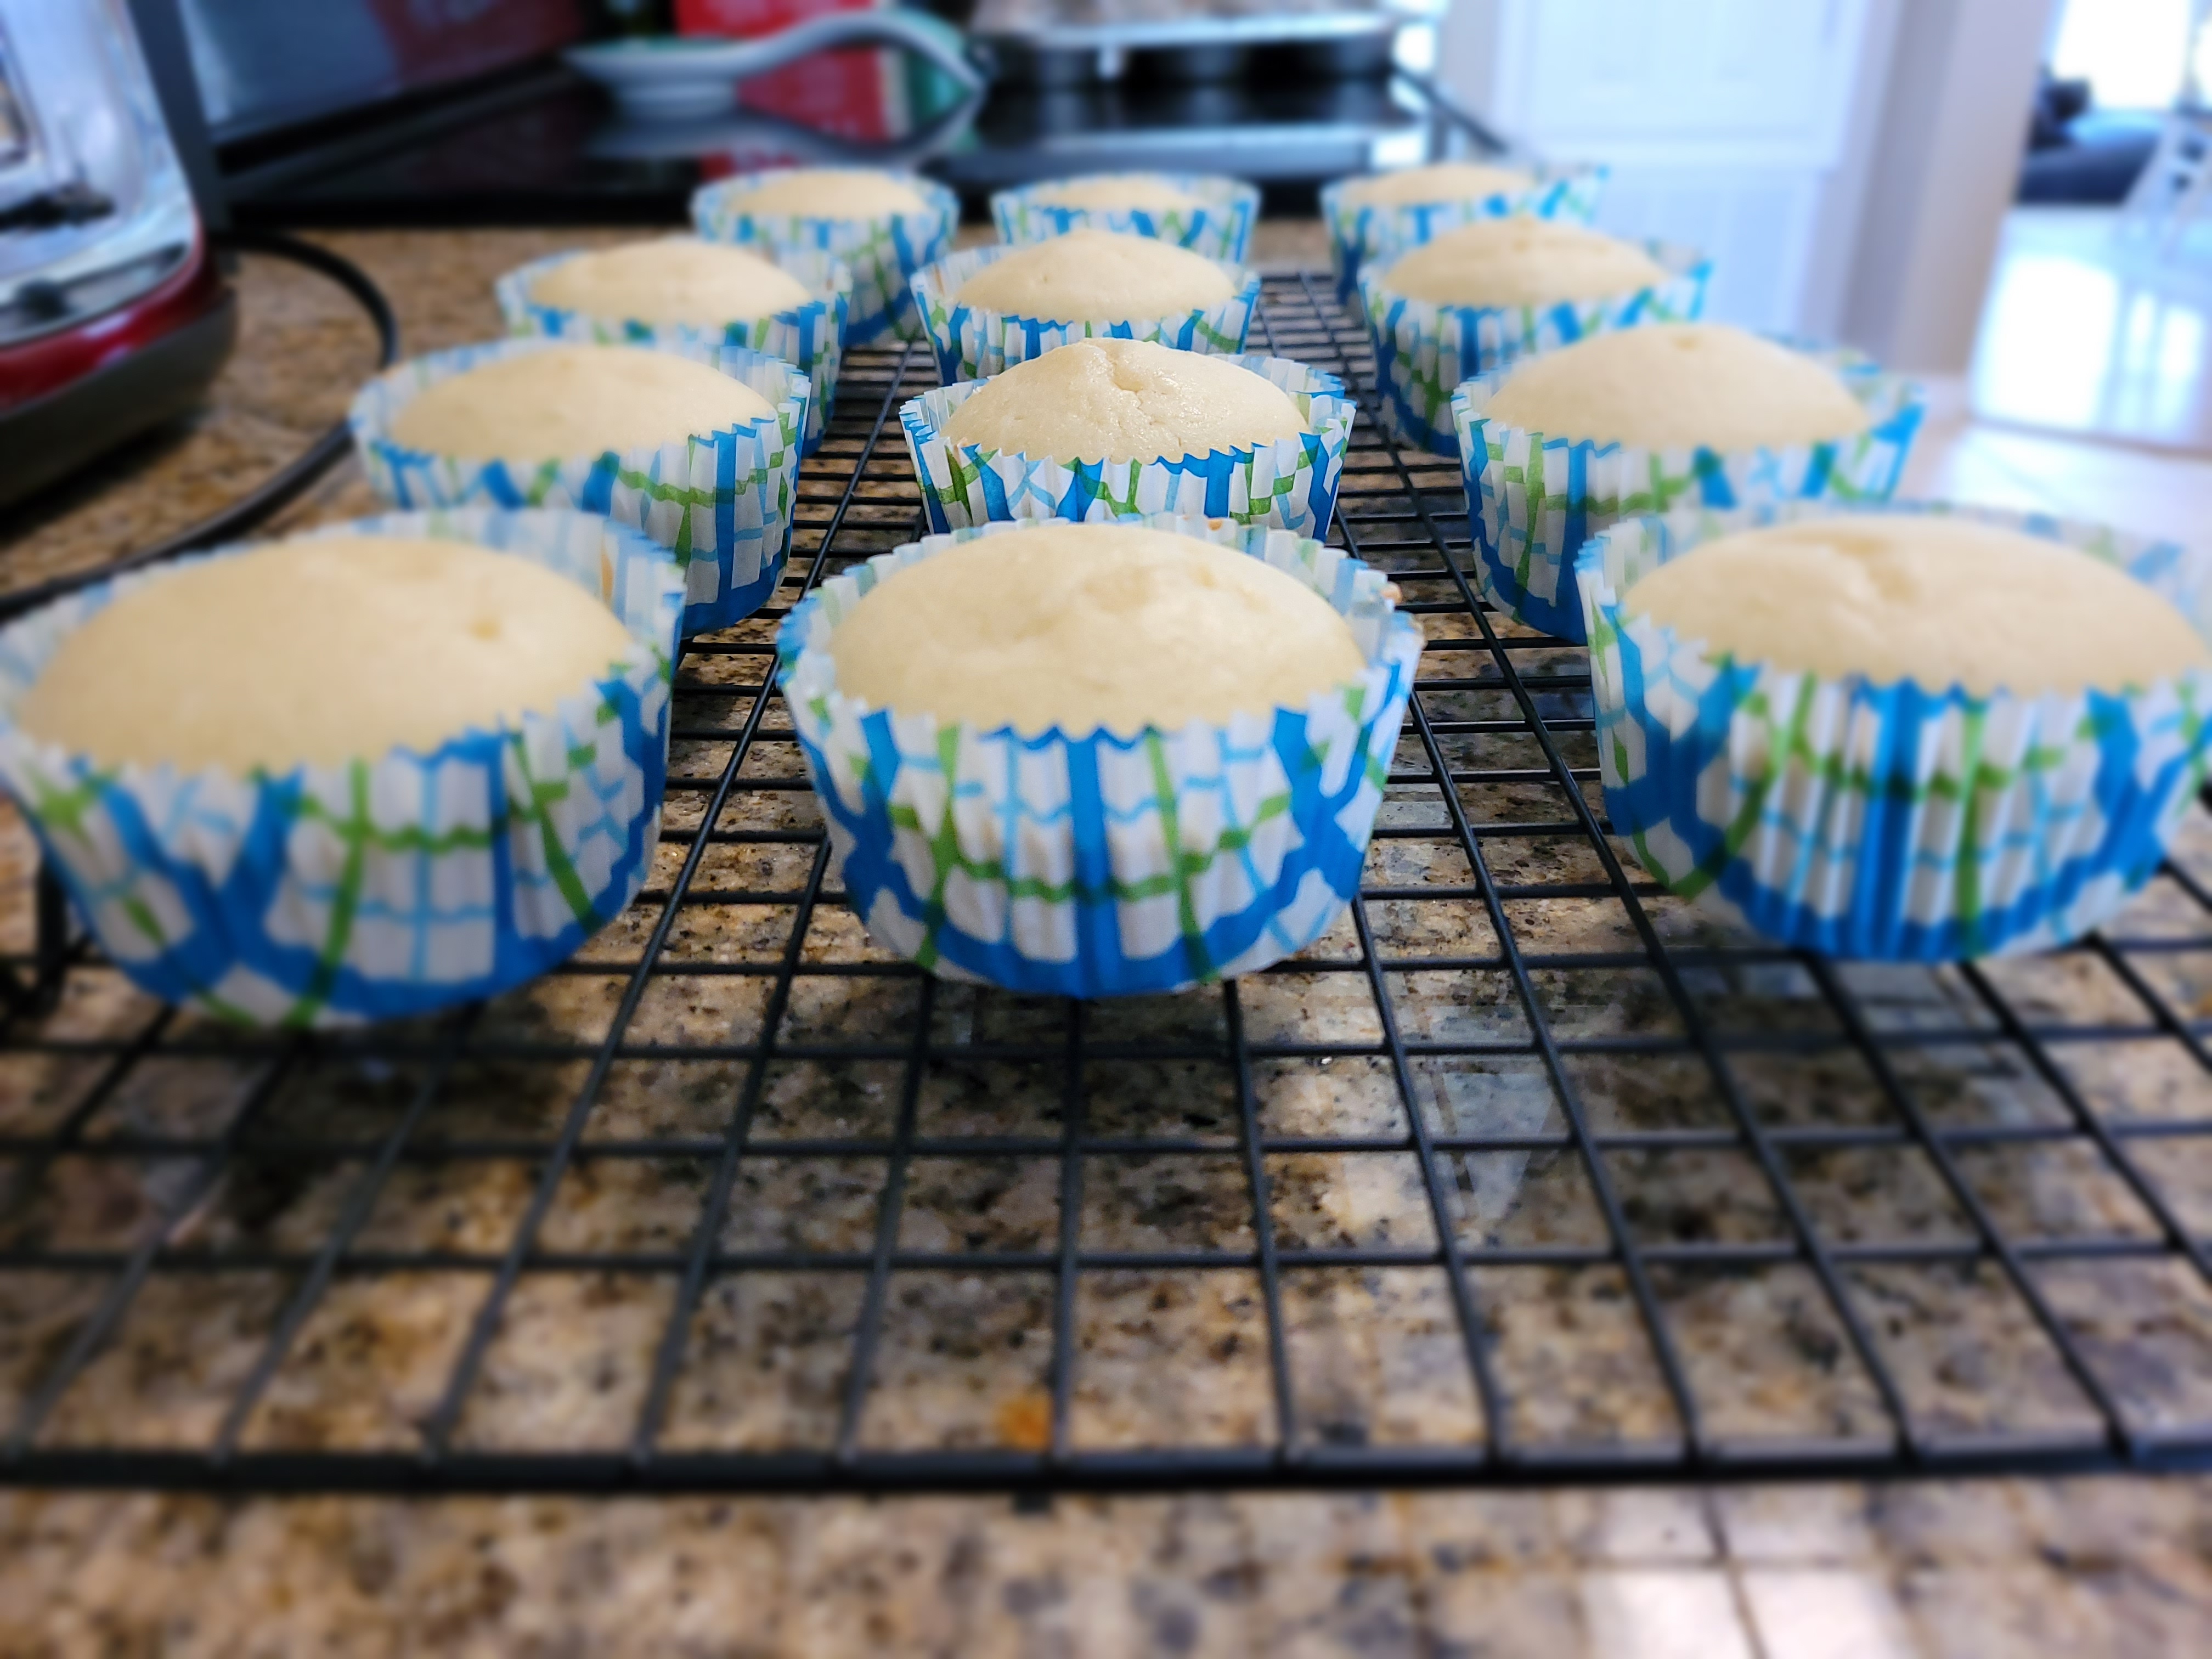
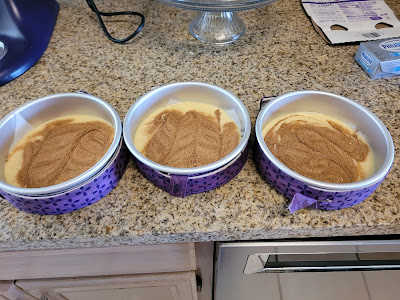
I have waited a whole year to use these, so pardon my excitement. To bake, start by preheating the oven to 350 and lining a muffin tin with 12 cupcake wrappers. Carefully pour the cake mix into a stand mixer (seriously, this mix was SO powder-fine, everything looked like it was covered in snow after I haphazardly dumped the bag in the mixer…including my face…spooky ghost makeup!). Add in the applesauce, egg whites, vanilla, and 1/2 TBS of cinnamon. Mix by hand for a second, then turn mixer to LOW speed..my Kitchenaid’s idea of low made it look like a cloud of volcanic ash was settling in my kitchen…so definitely take a second to mix by hand. Then blend on low for about a minute. While this is mixing, put the sugar and remaining cinnamon in a small bowl, mixing together. Reserve for later.

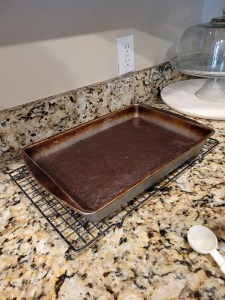
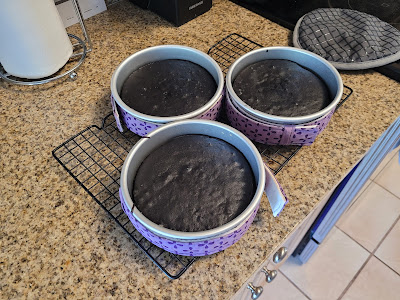
All that cinnamon sugar goodness. Using a cookie scoop or tablespoon, plop a scoop and a half of batter into each liner. Then take the cinnamon sugar mix and sprinkle it on top. Bake at 350 for 20 minutes.

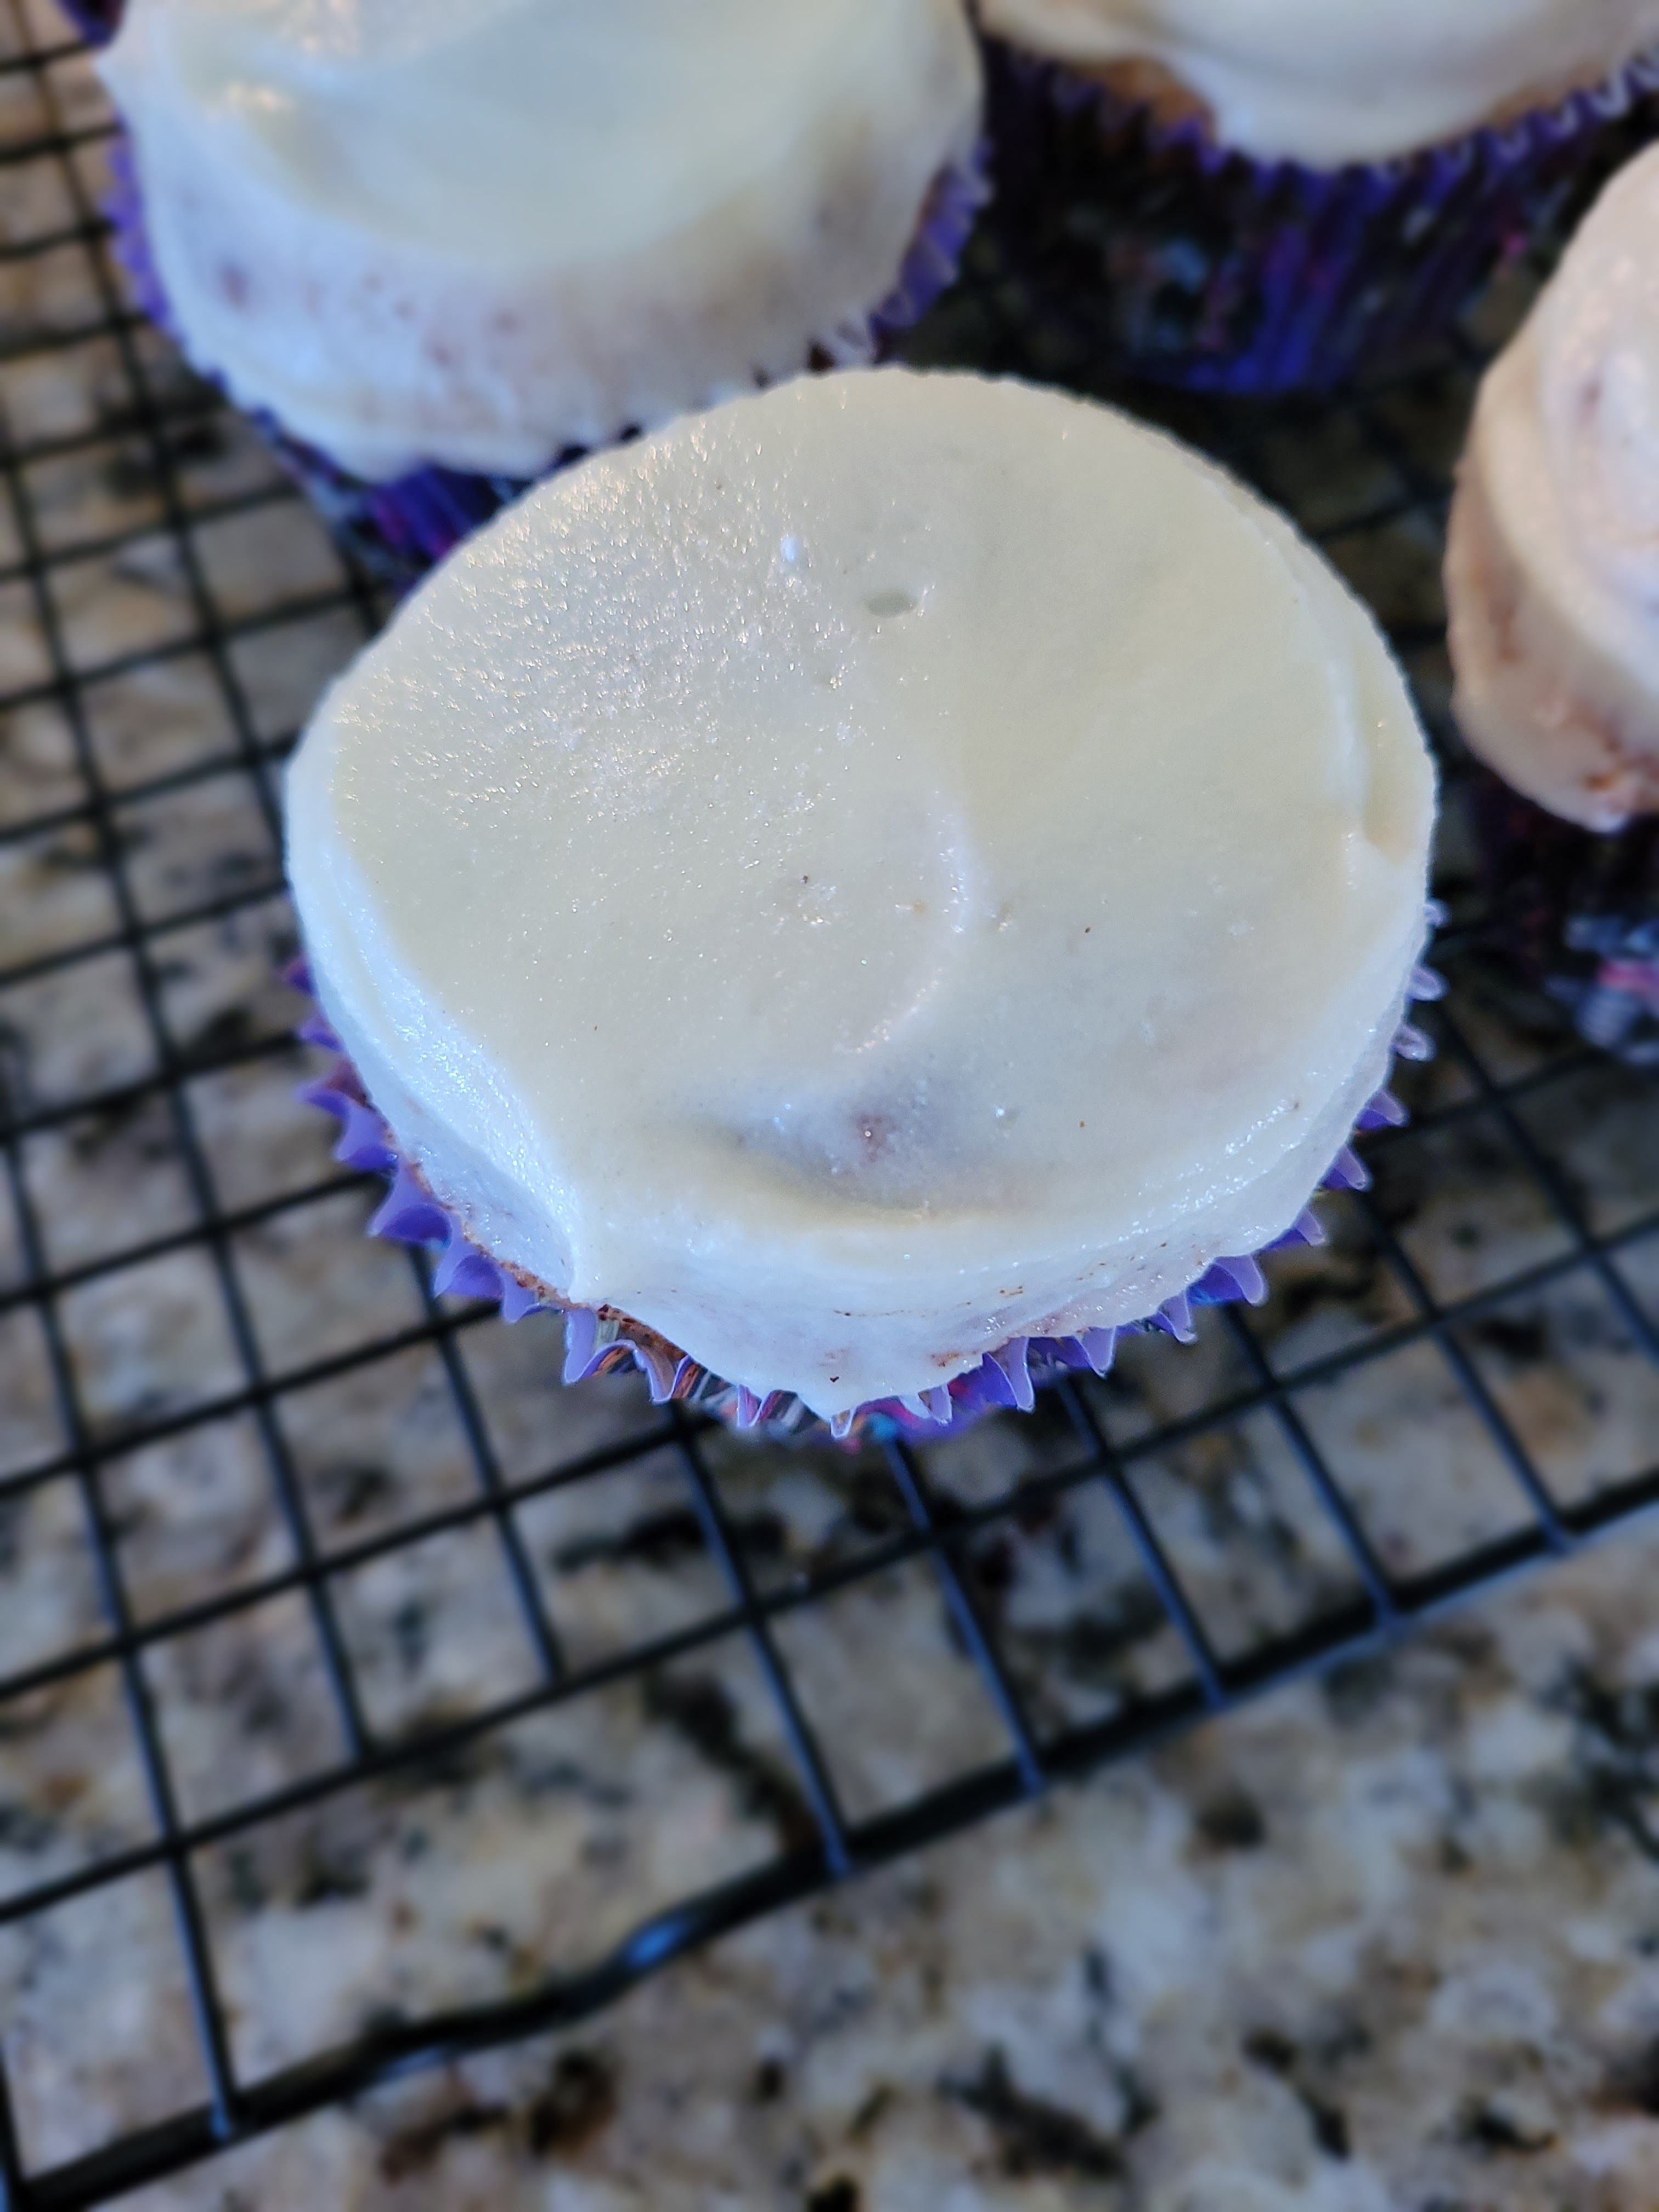
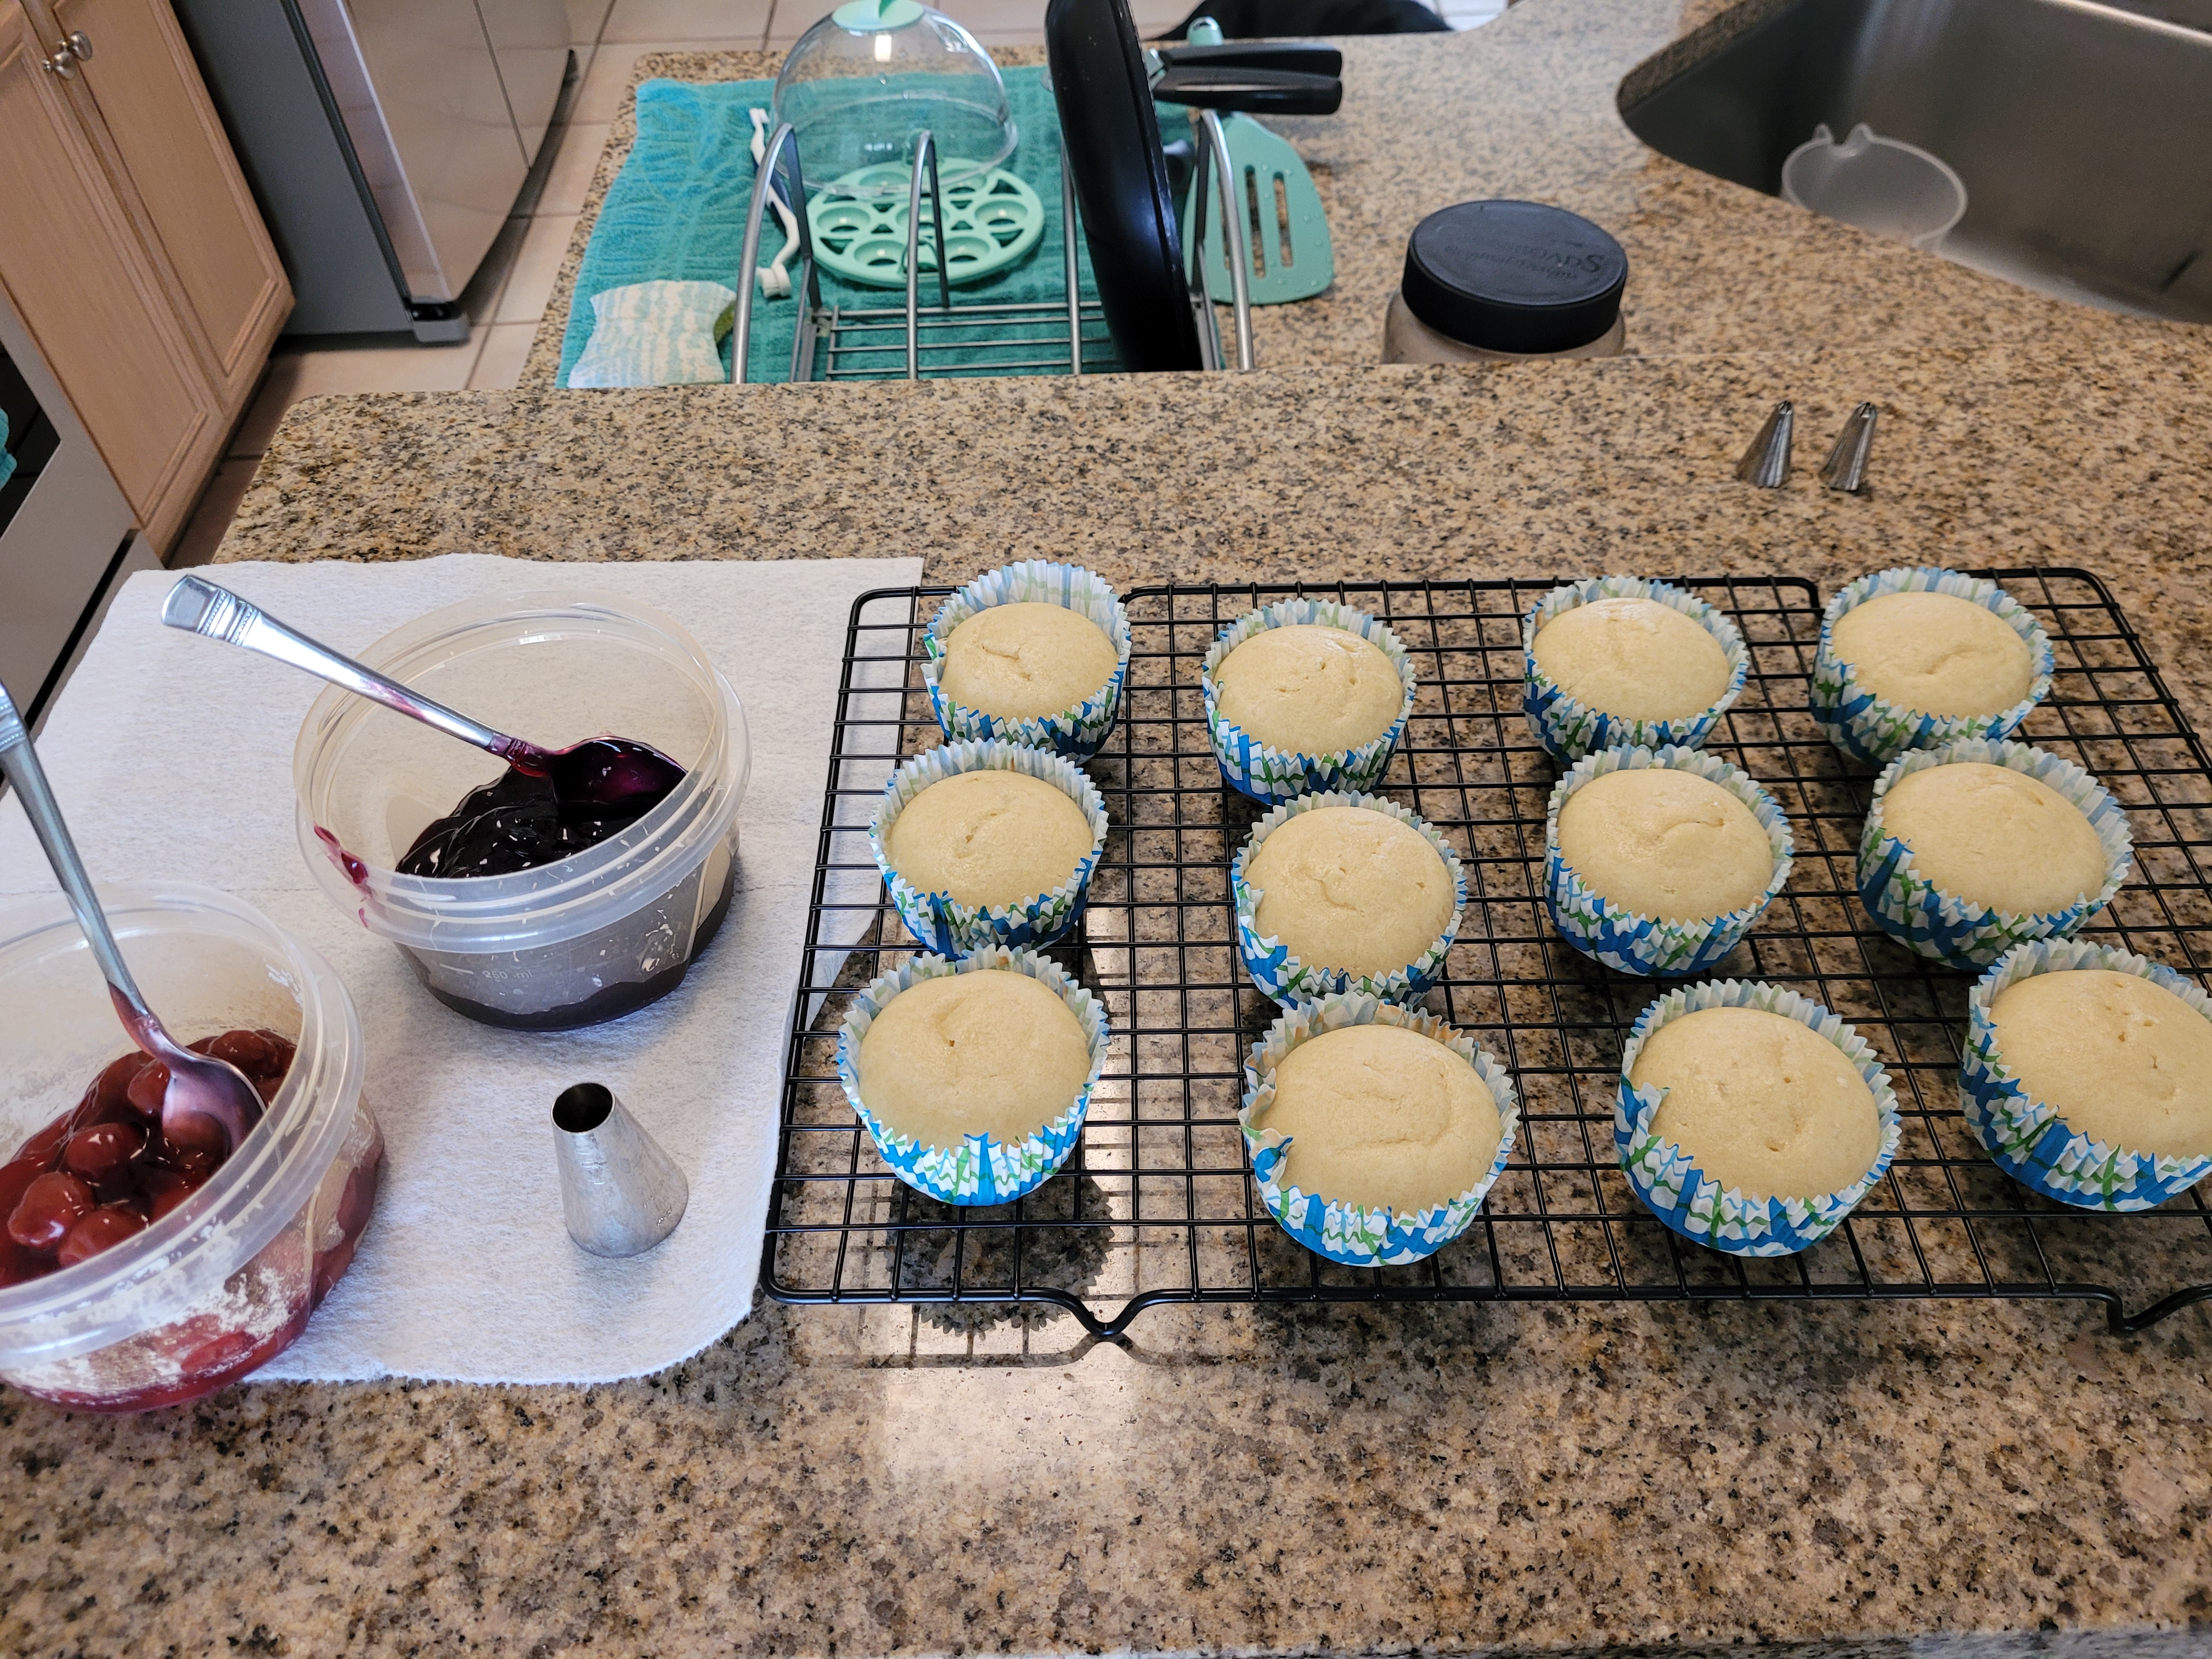
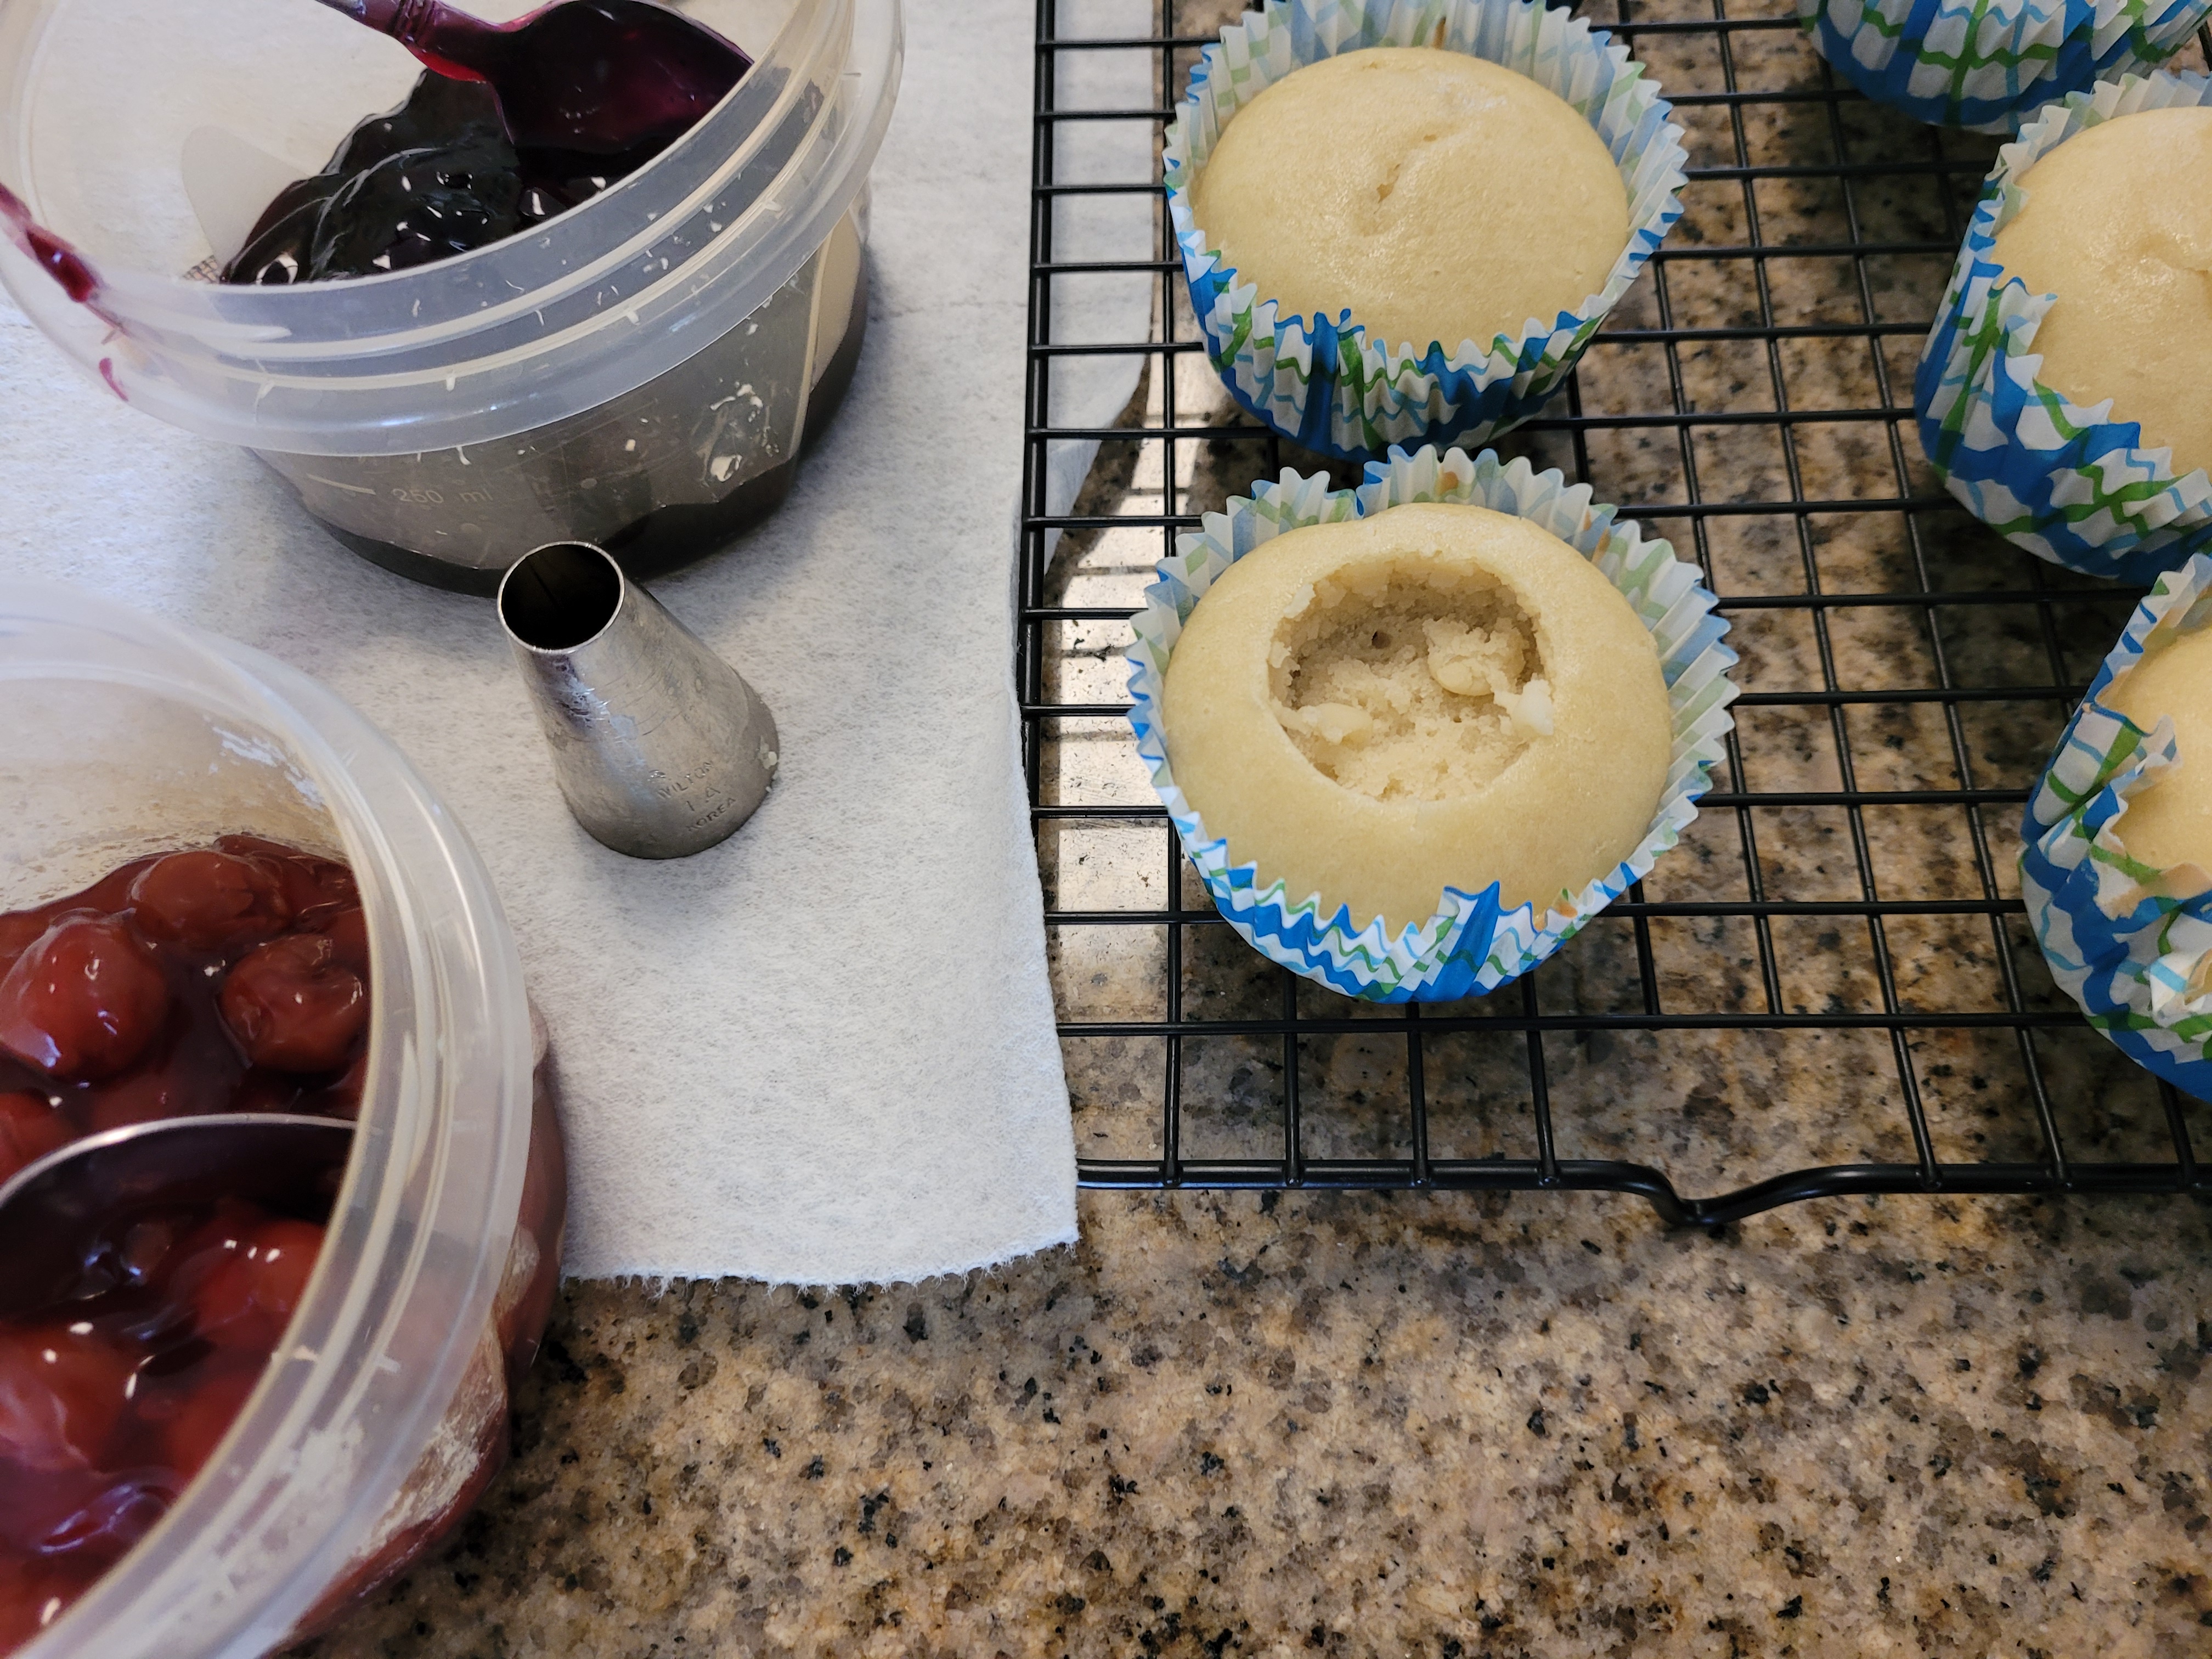
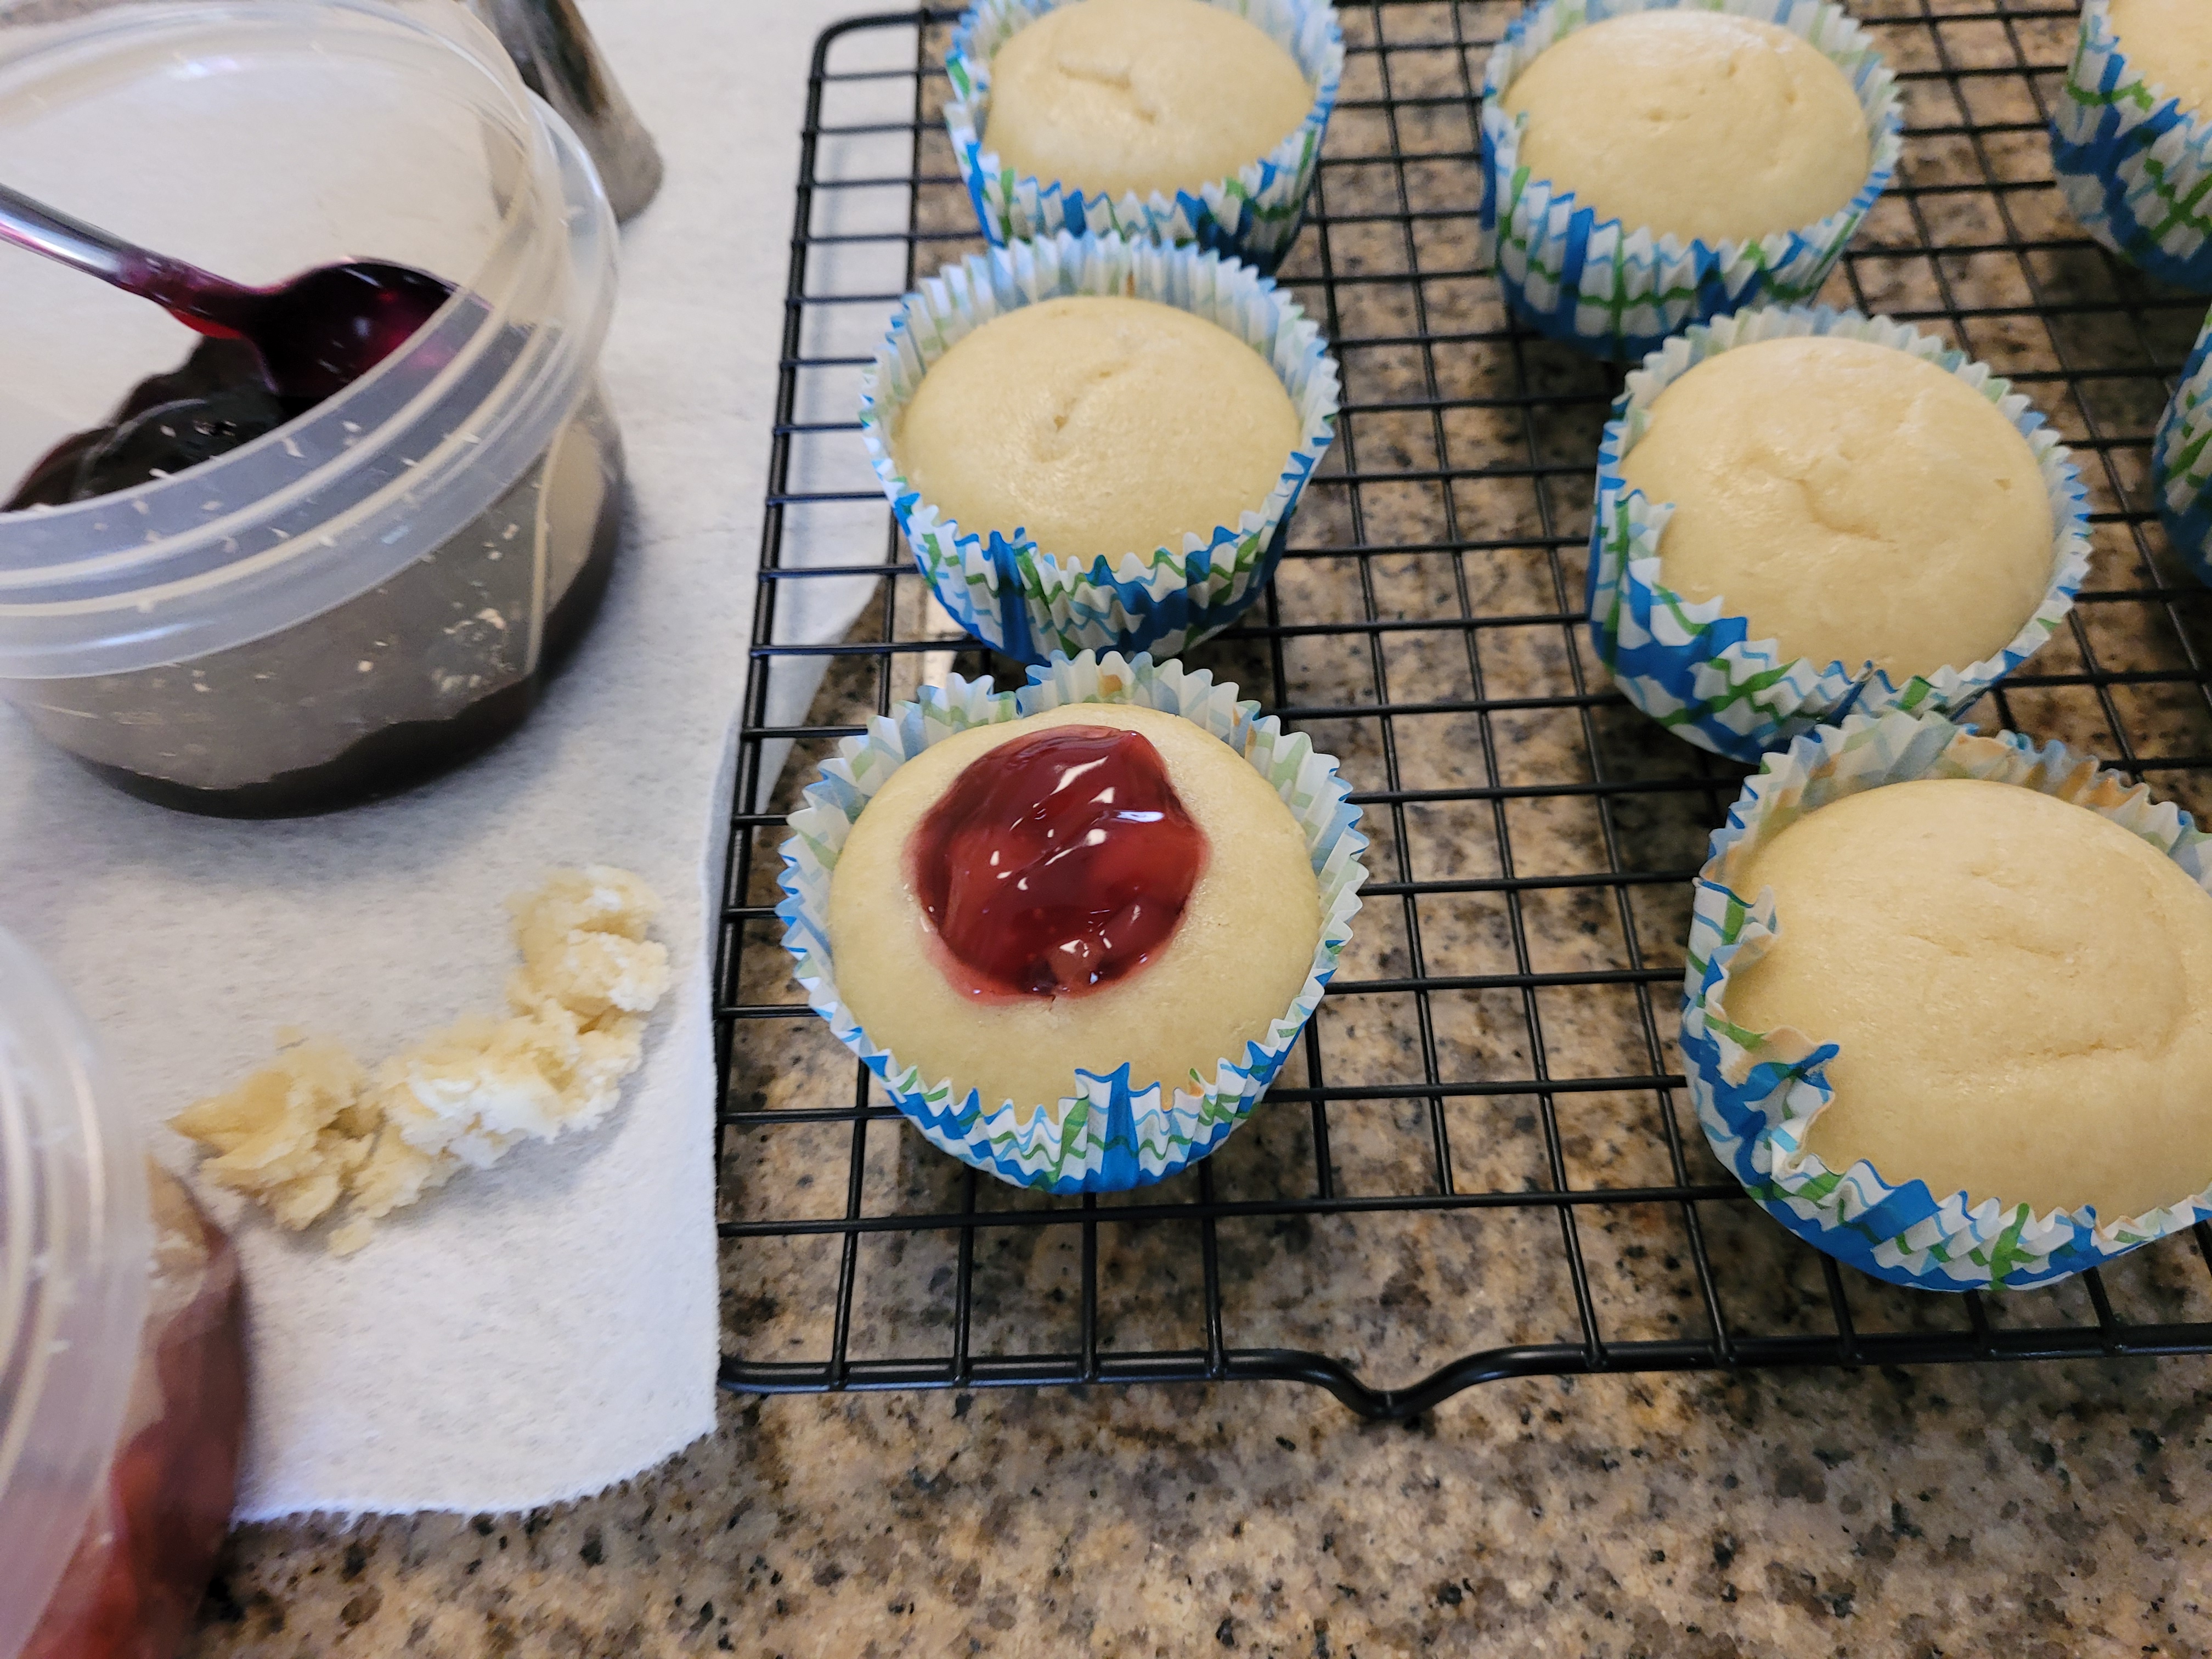
End result gives off major concha vibes, not sopapilla ones, but still. Once done, remove from the oven but leave in the pan for 10 minutes to cool. After they’ve cooled a bit, they’ll be safe to remove from the pan and placed on a cooling rack. I put this in the fridge to chill completely while I made frosting. I have the same amount of patience as a skeleton has guts (read: zero).
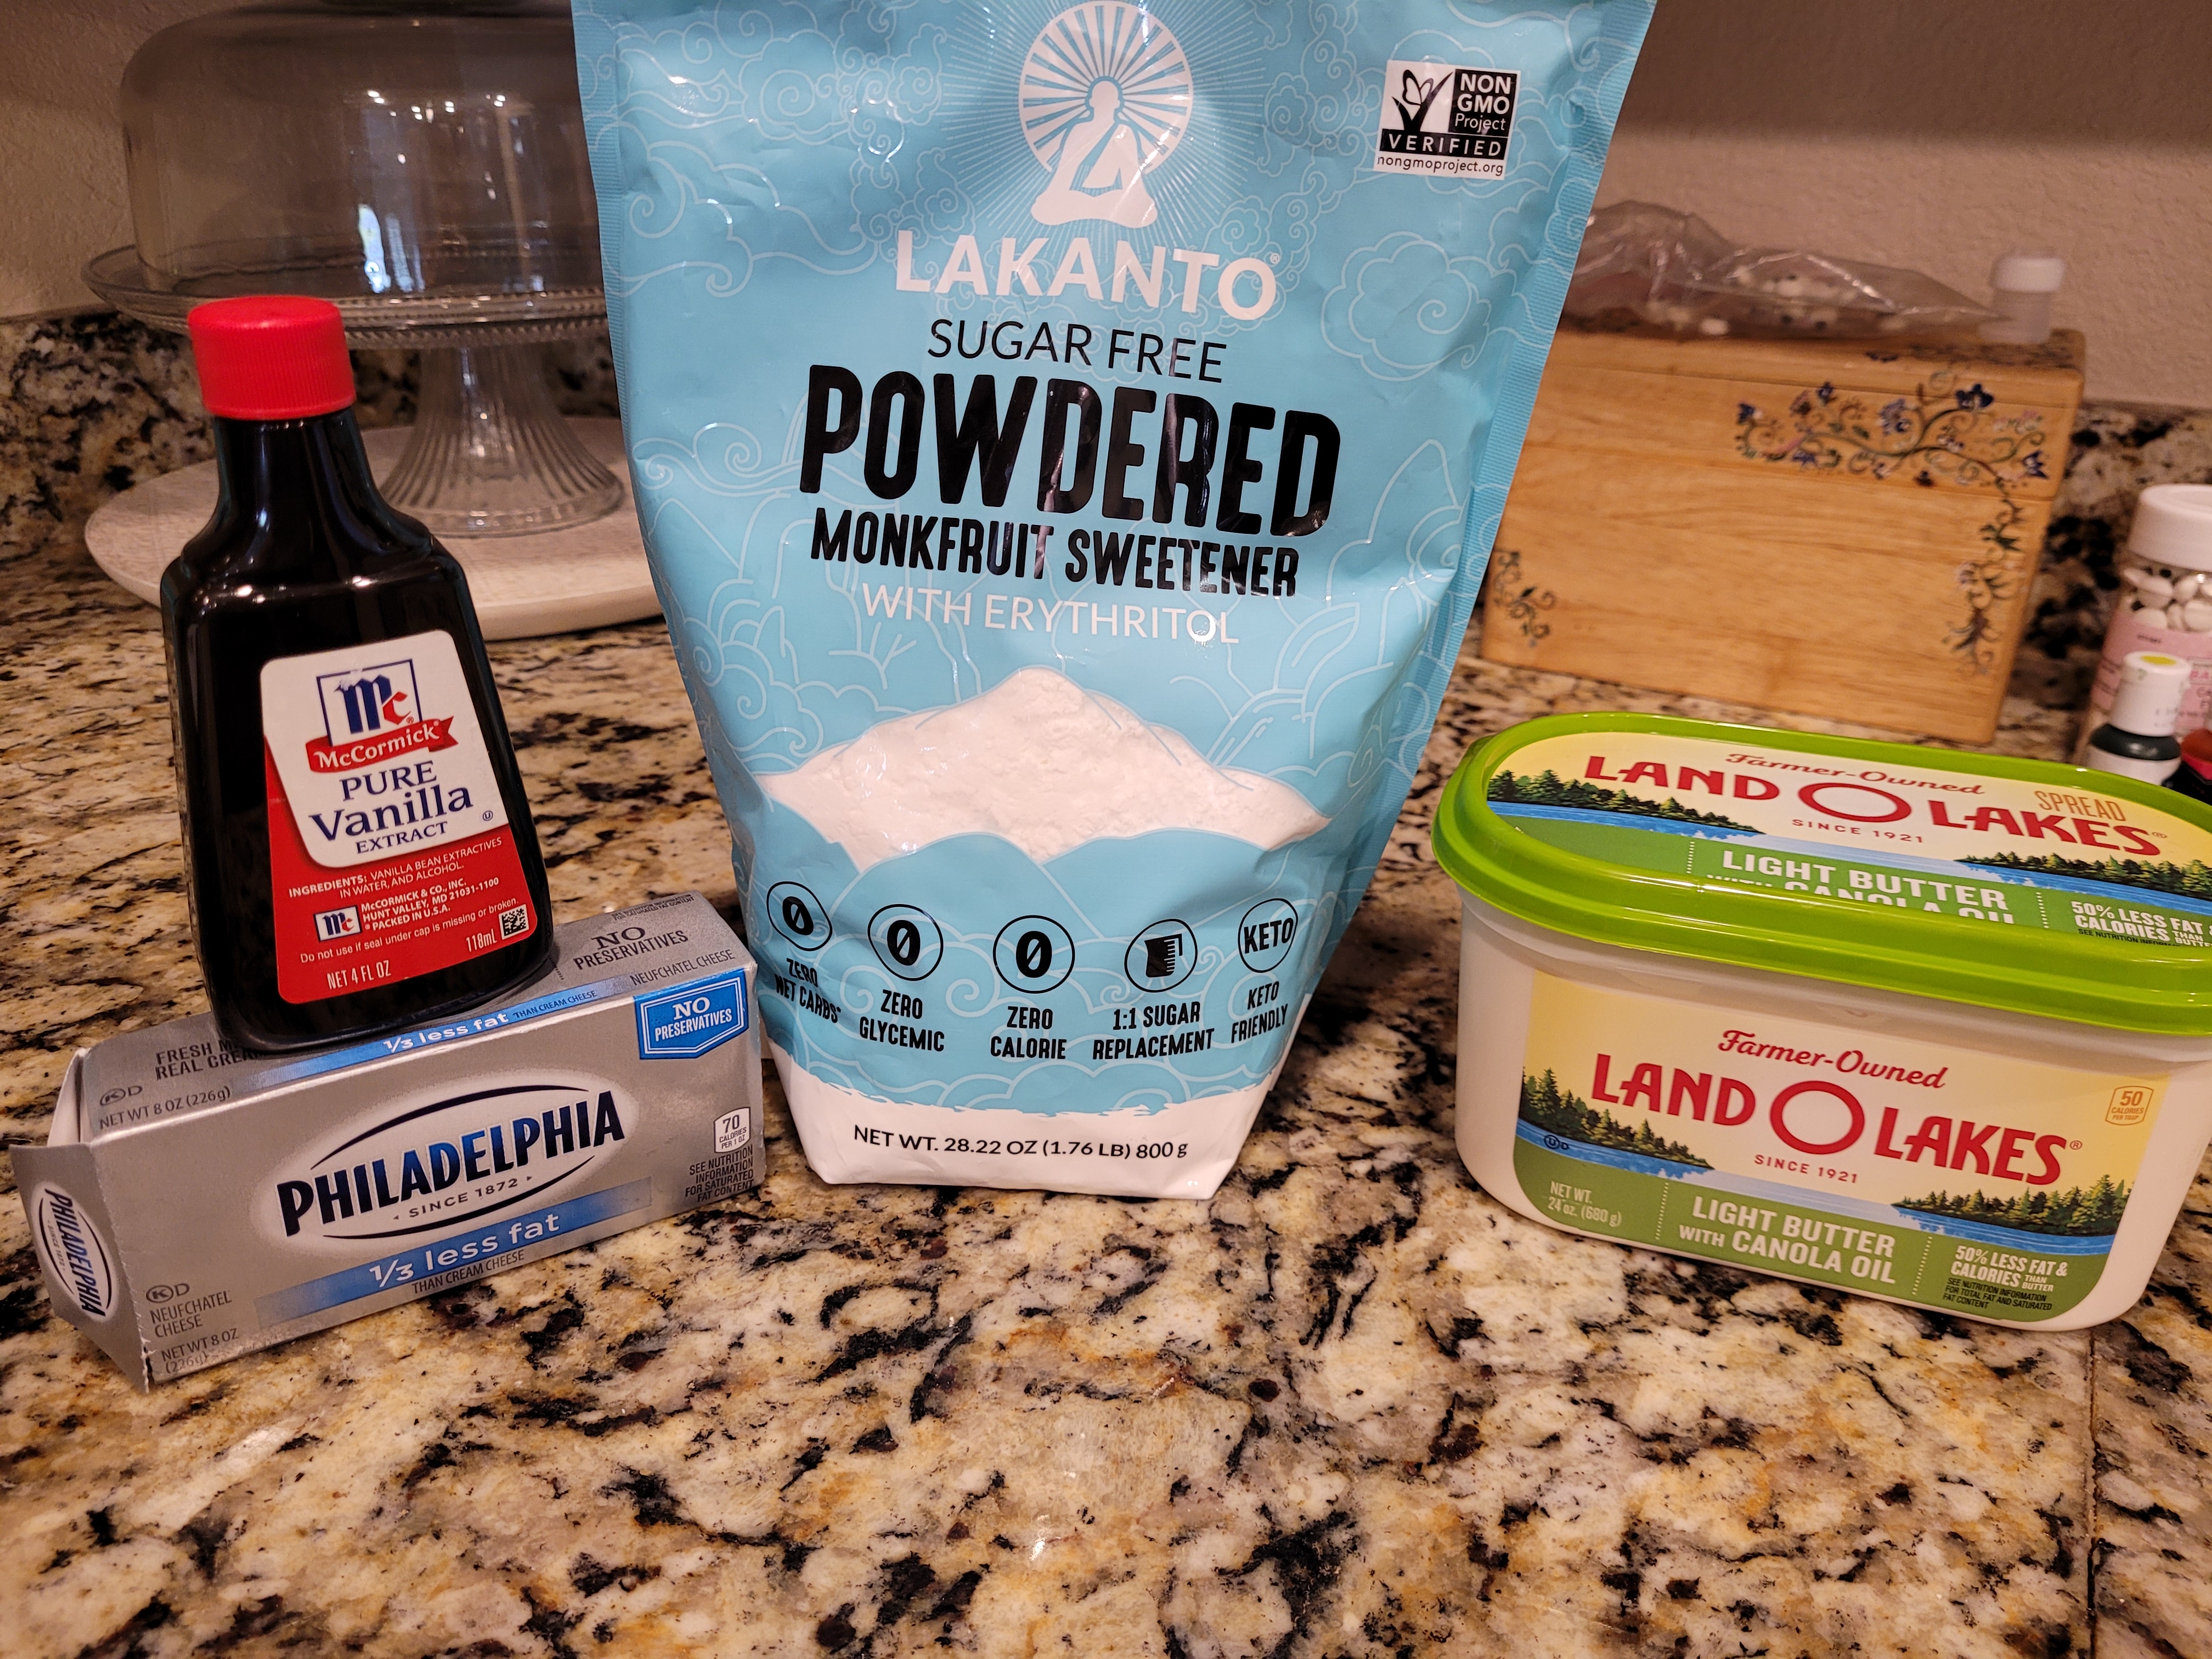
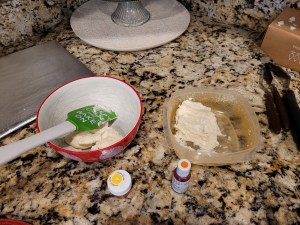
Yeah, forgot a photo. I was so excited at HOW GOOD MY HOUSE SMELLED after the bake that I completely forgot to take a photo of my frosting ingredients. It was all I had in me not to eat the entire dozen cupcakes before they were even frosted…you know, still in muffin format (really, what’s the difference?). For my honey buttercream frosting, I used:
- 1/2 cup reduced fat butter, still chilled
- 1 cup of vanilla Greek yogurt, strained overnight, still chilled
- 2 TBS honey
- 3 cups Lakanto powdered monkfruit sweetener
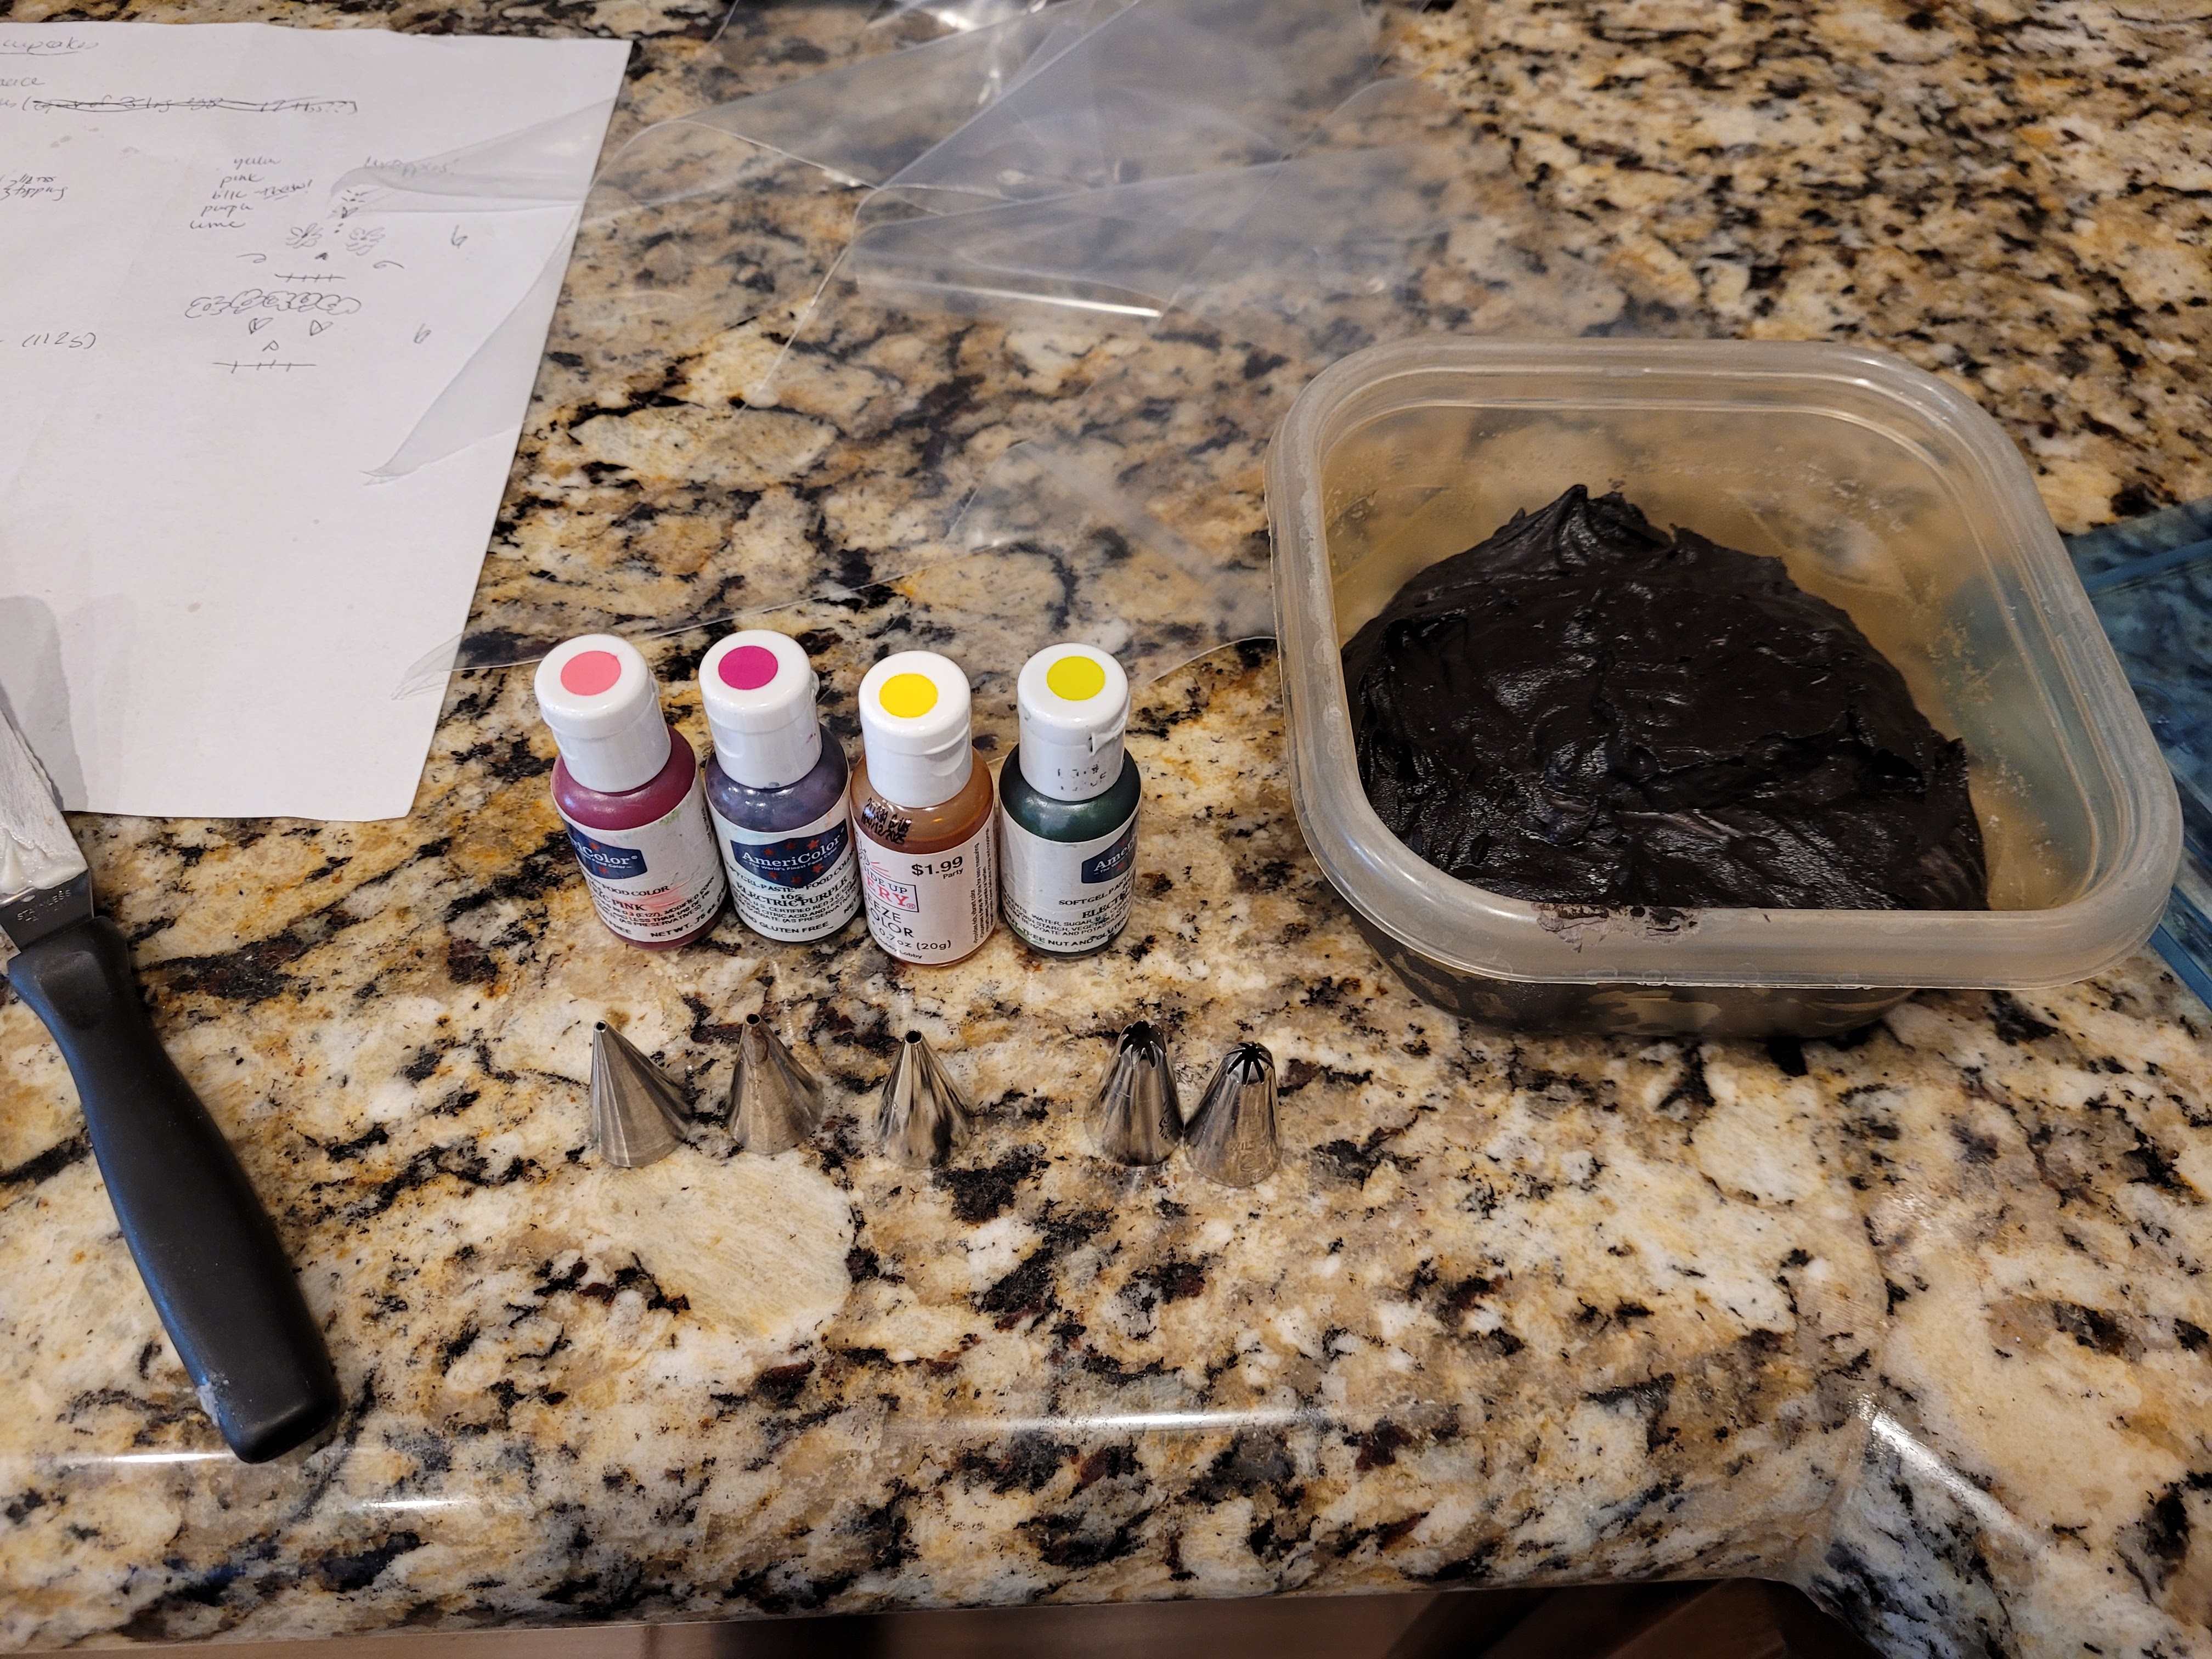
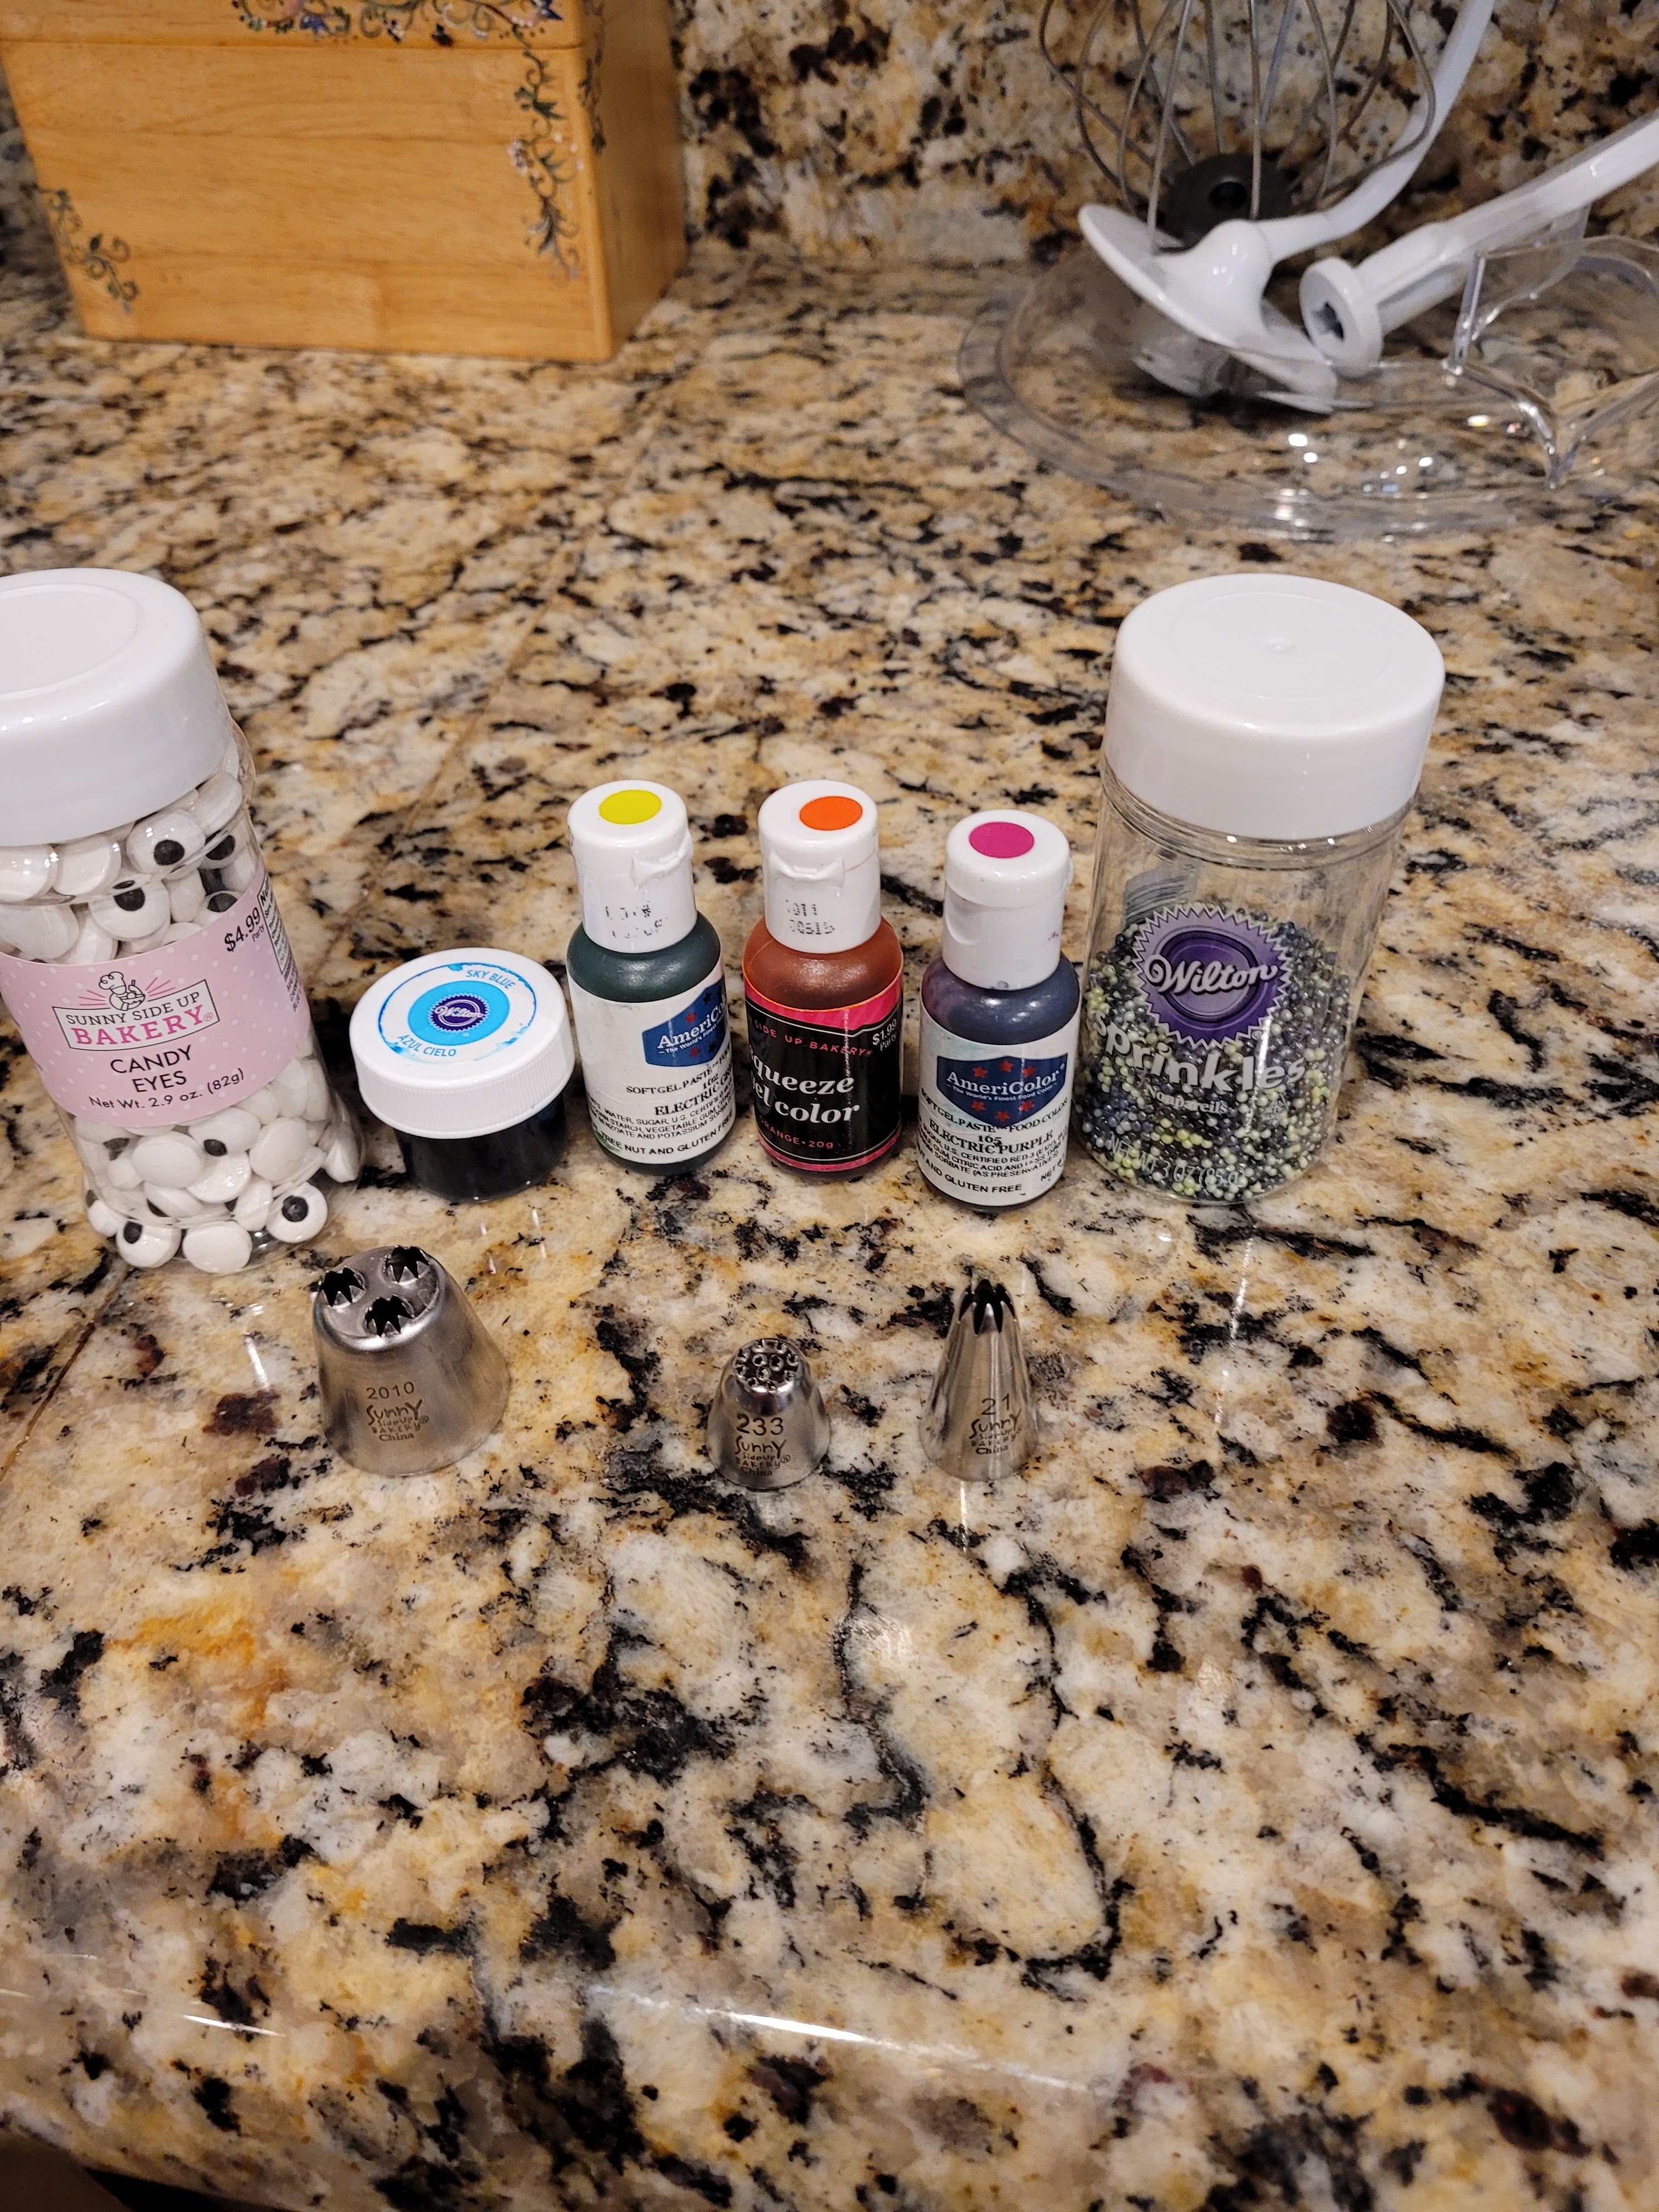
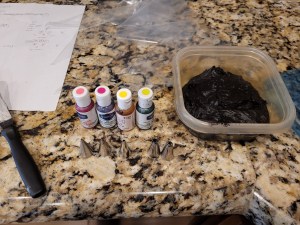
- Gel dyes in neon colors (I used pink, purple, yellow, and lime)
- Small round tips (#1, #2, #3) and a few open star tips (#18 and #21)
- I also had leftover black frosting, which I moved from the freezer to fridge overnight to thaw out. This recipe will make enough to cover all 12 cupcakes even without the extra helping of black frosting. You will just need a pinch of black cocoa powder or black gel dye.
- Optional: edbile silver luster dust
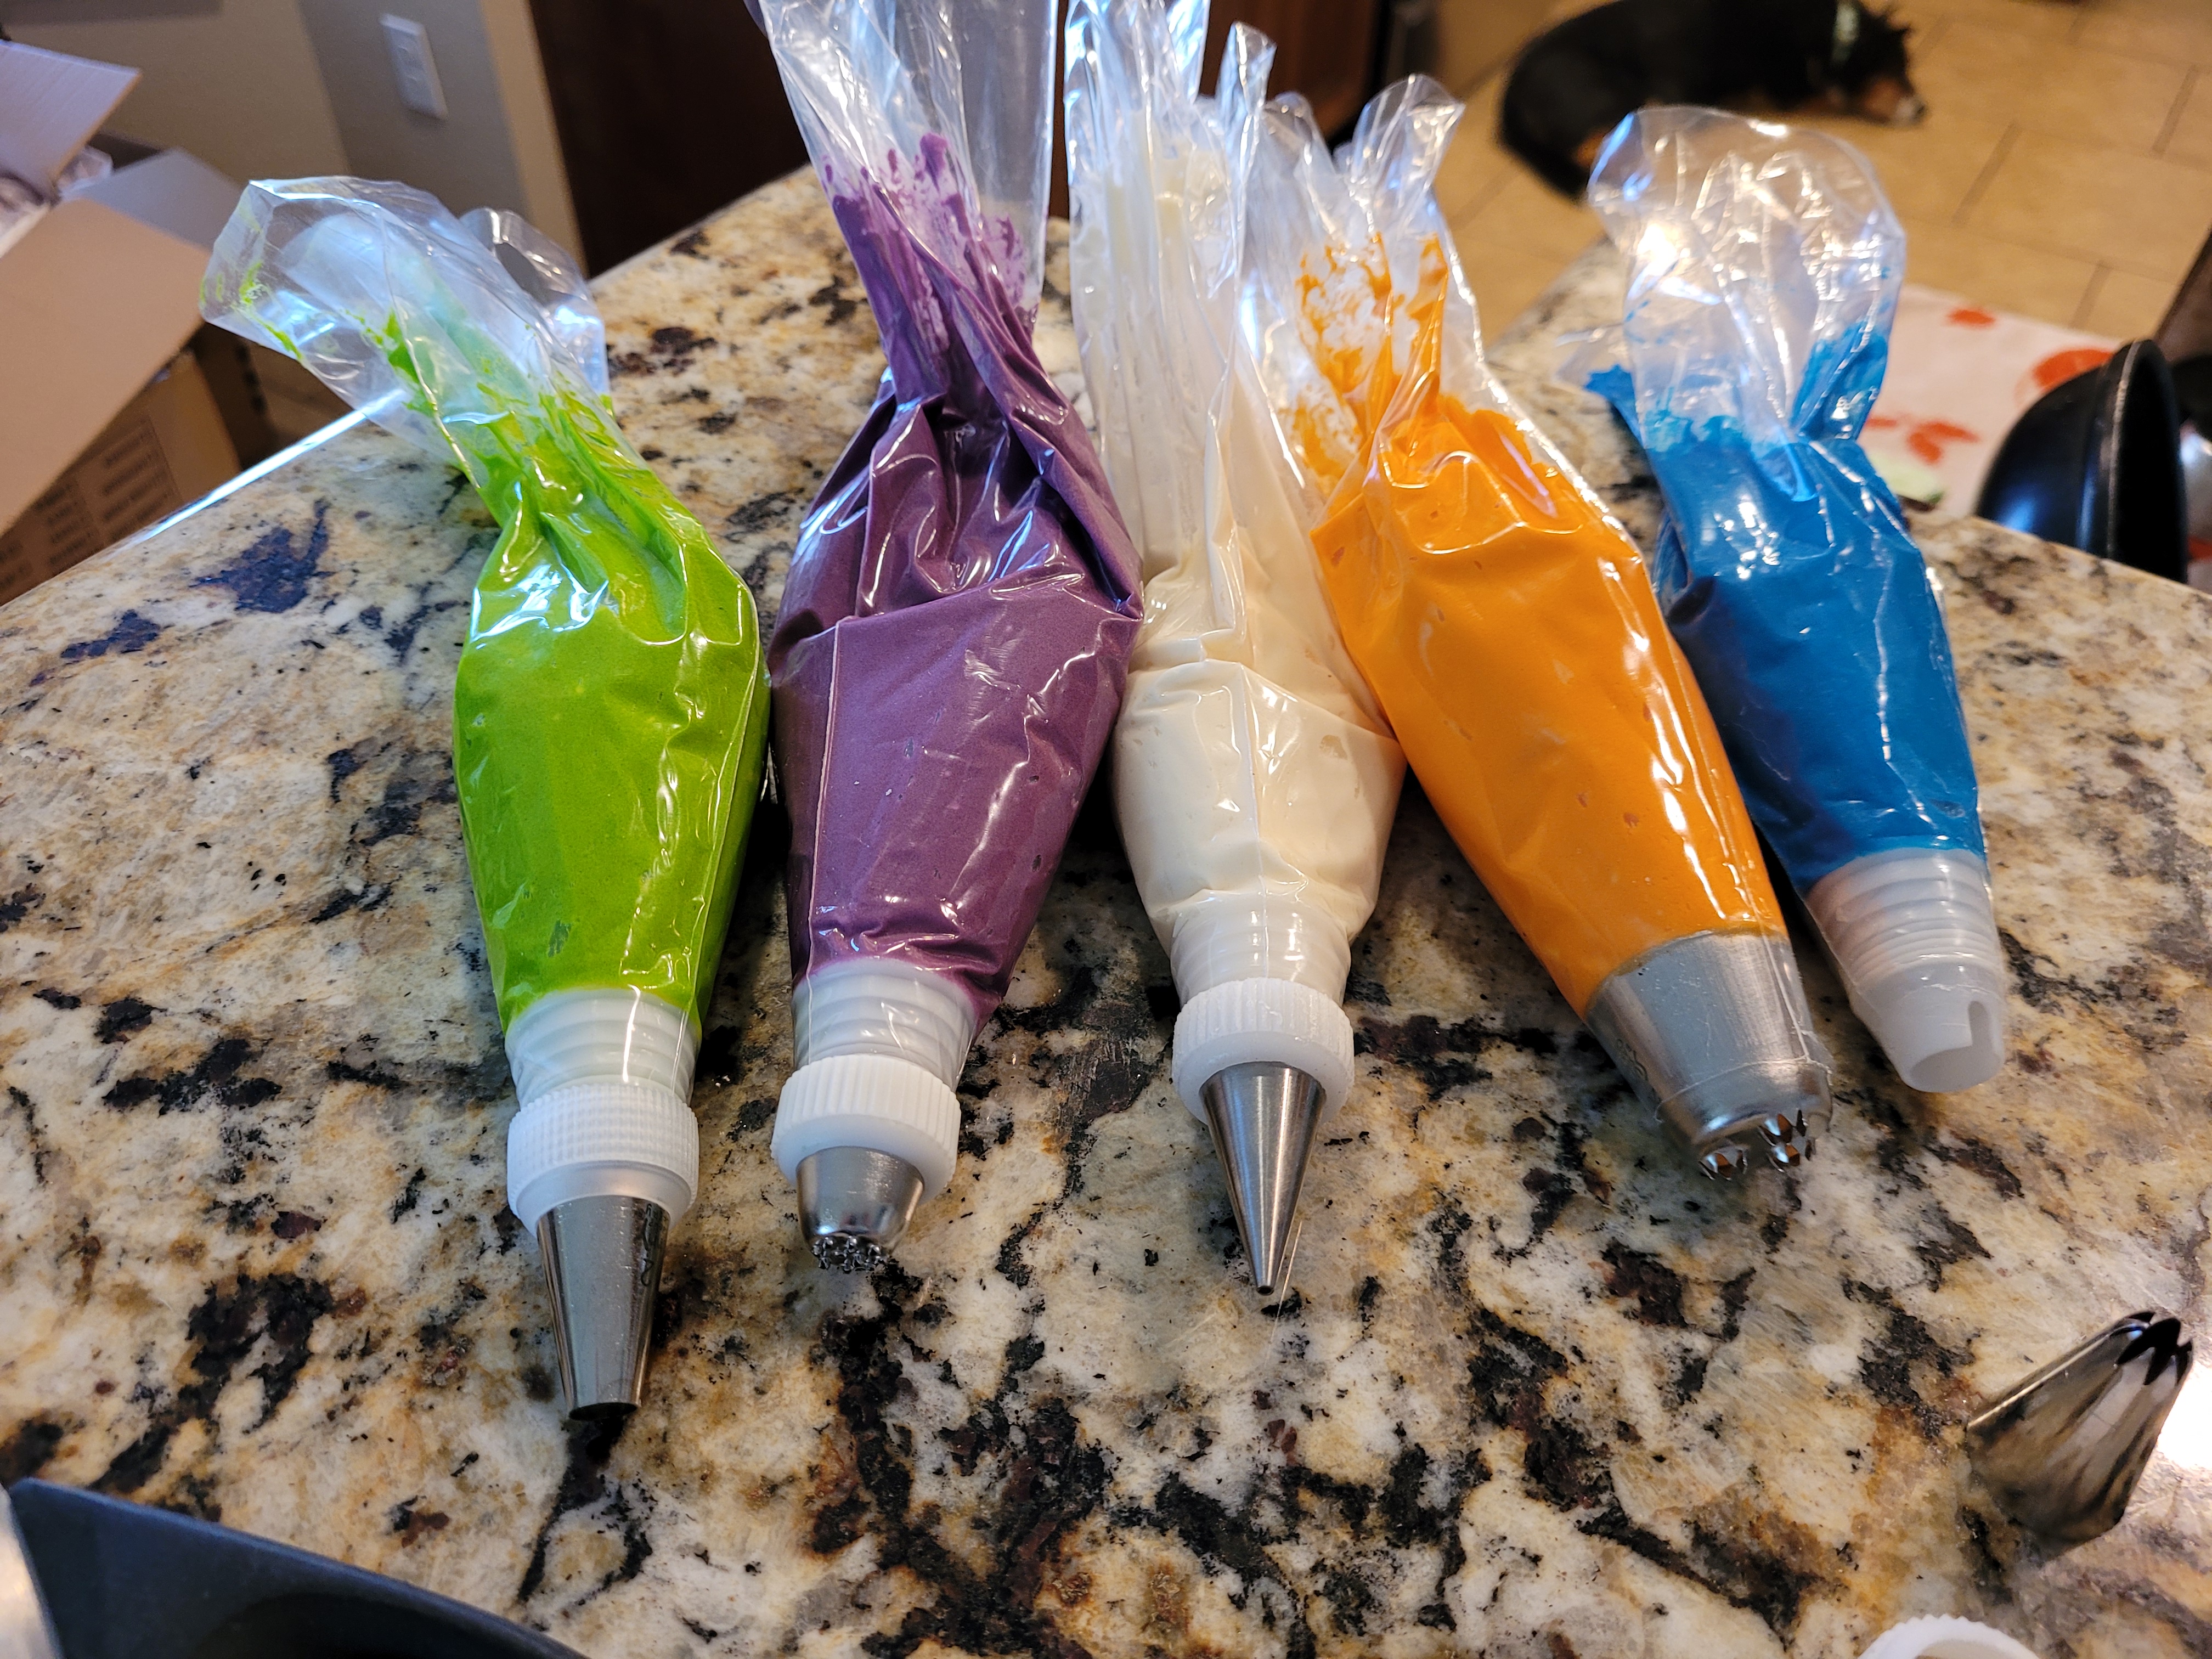
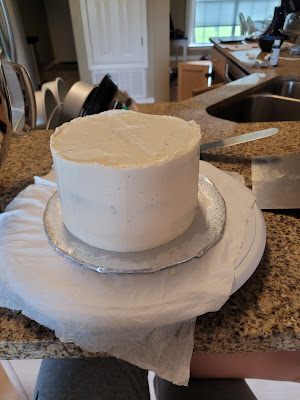
Simply whip the cold butter and yogurt together until smooth, then add in the honey and powdered sugar. Mix well, then grab your fully chilled cupcakes. Wait to dye your frosting until after you’ve made the skull’s base.
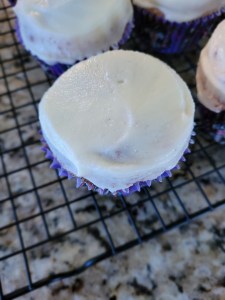
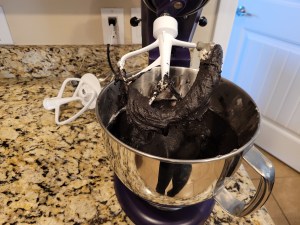
I love a good sparkle. I slathered on a hearty amount of plain white frosting onto each cupcake, then I used an angled spatula to smooth out. I put the cupcake on the counter, kept my spatula flat, and then used my free hand to spin the cupcake around…this let the frosting flatten out, then I repeated on the sides of the cupcake to give a solid base. I then took a paintbrush dipped in silver luster dust and gently tapped it on top of the cupcake to give it sparkle. Even skeletons should sparkle. It makes them look skella rad. I placed these in the freezer to set while dying my frosting. I was absolutely still so jazzed that I forgot to take even more photos, but split your remaining frosting up evenly and dye each a fun color, make sure to dye some black if you’re not like me and don’t have a special freezer section devoted to leftover frosting…if there’s a Bakeaholics Anonymous, I probably need a meeting.

At least this guy wasn’t judging me. I used the following frosting tips for each color:
- Hot pink frosting with #18 tip
- Purple frosting with #21 tip
- Black frosting with #2 tip
- Yellow and lime frostings with #3 tips
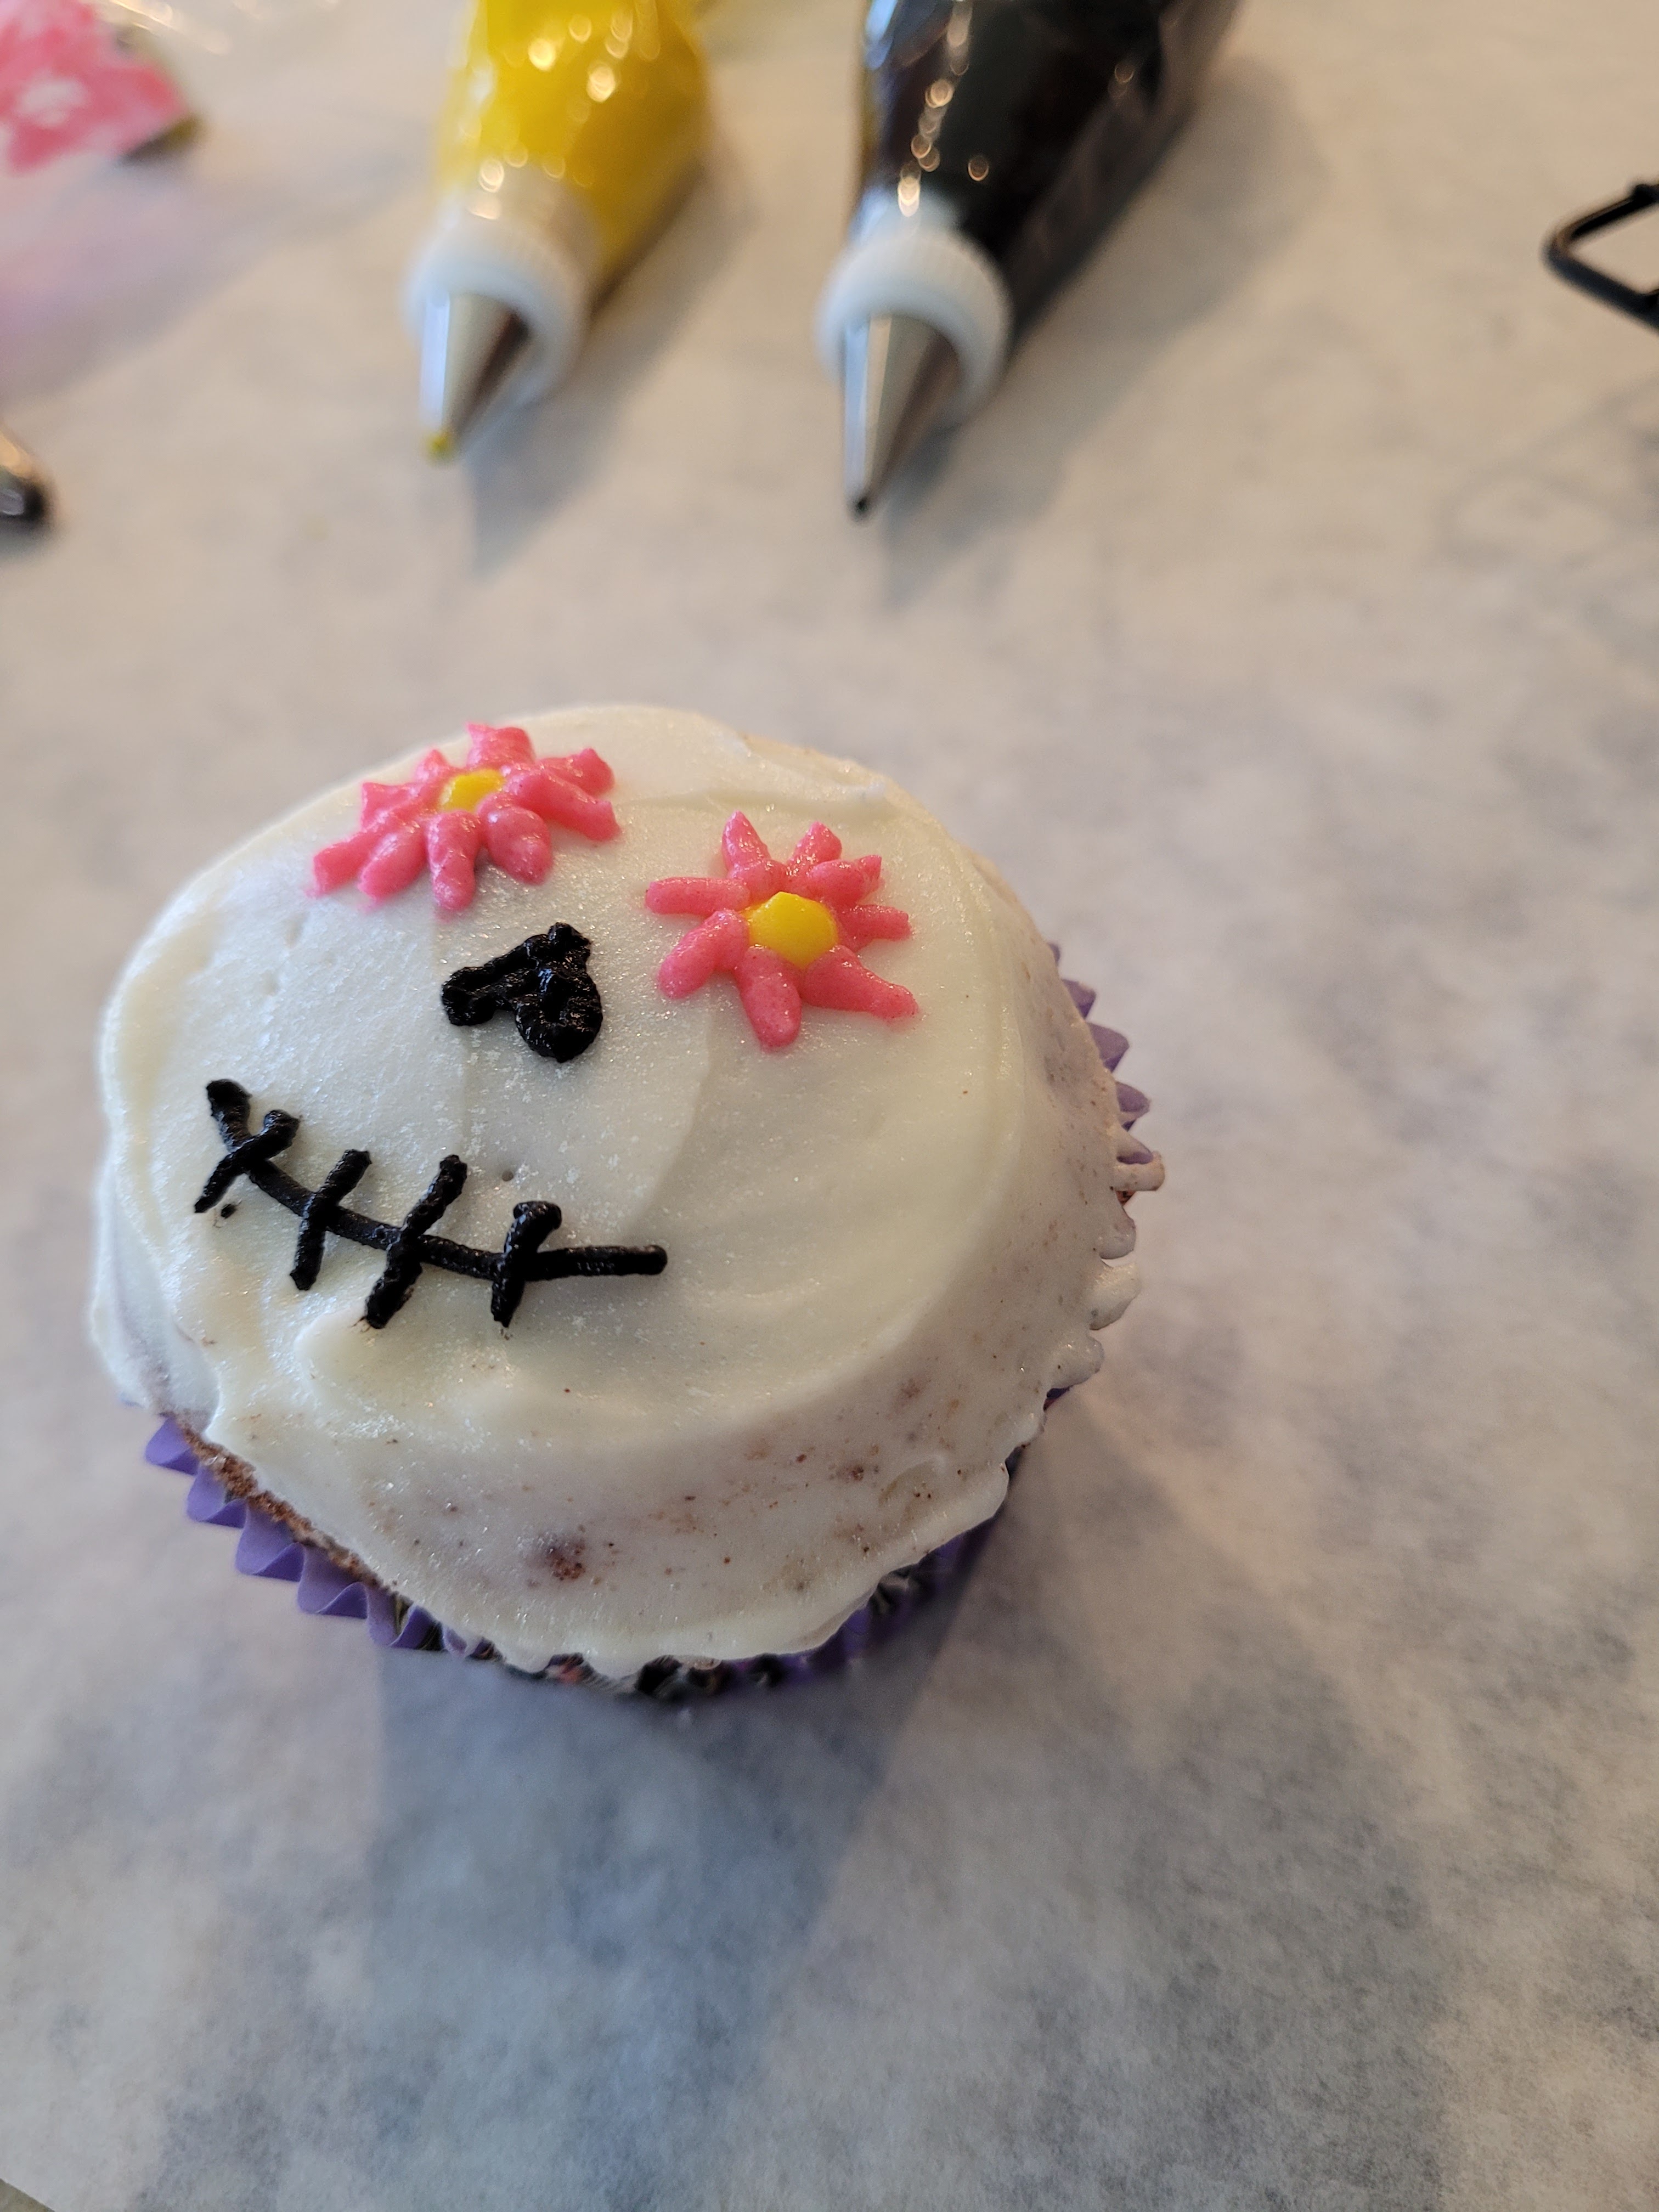
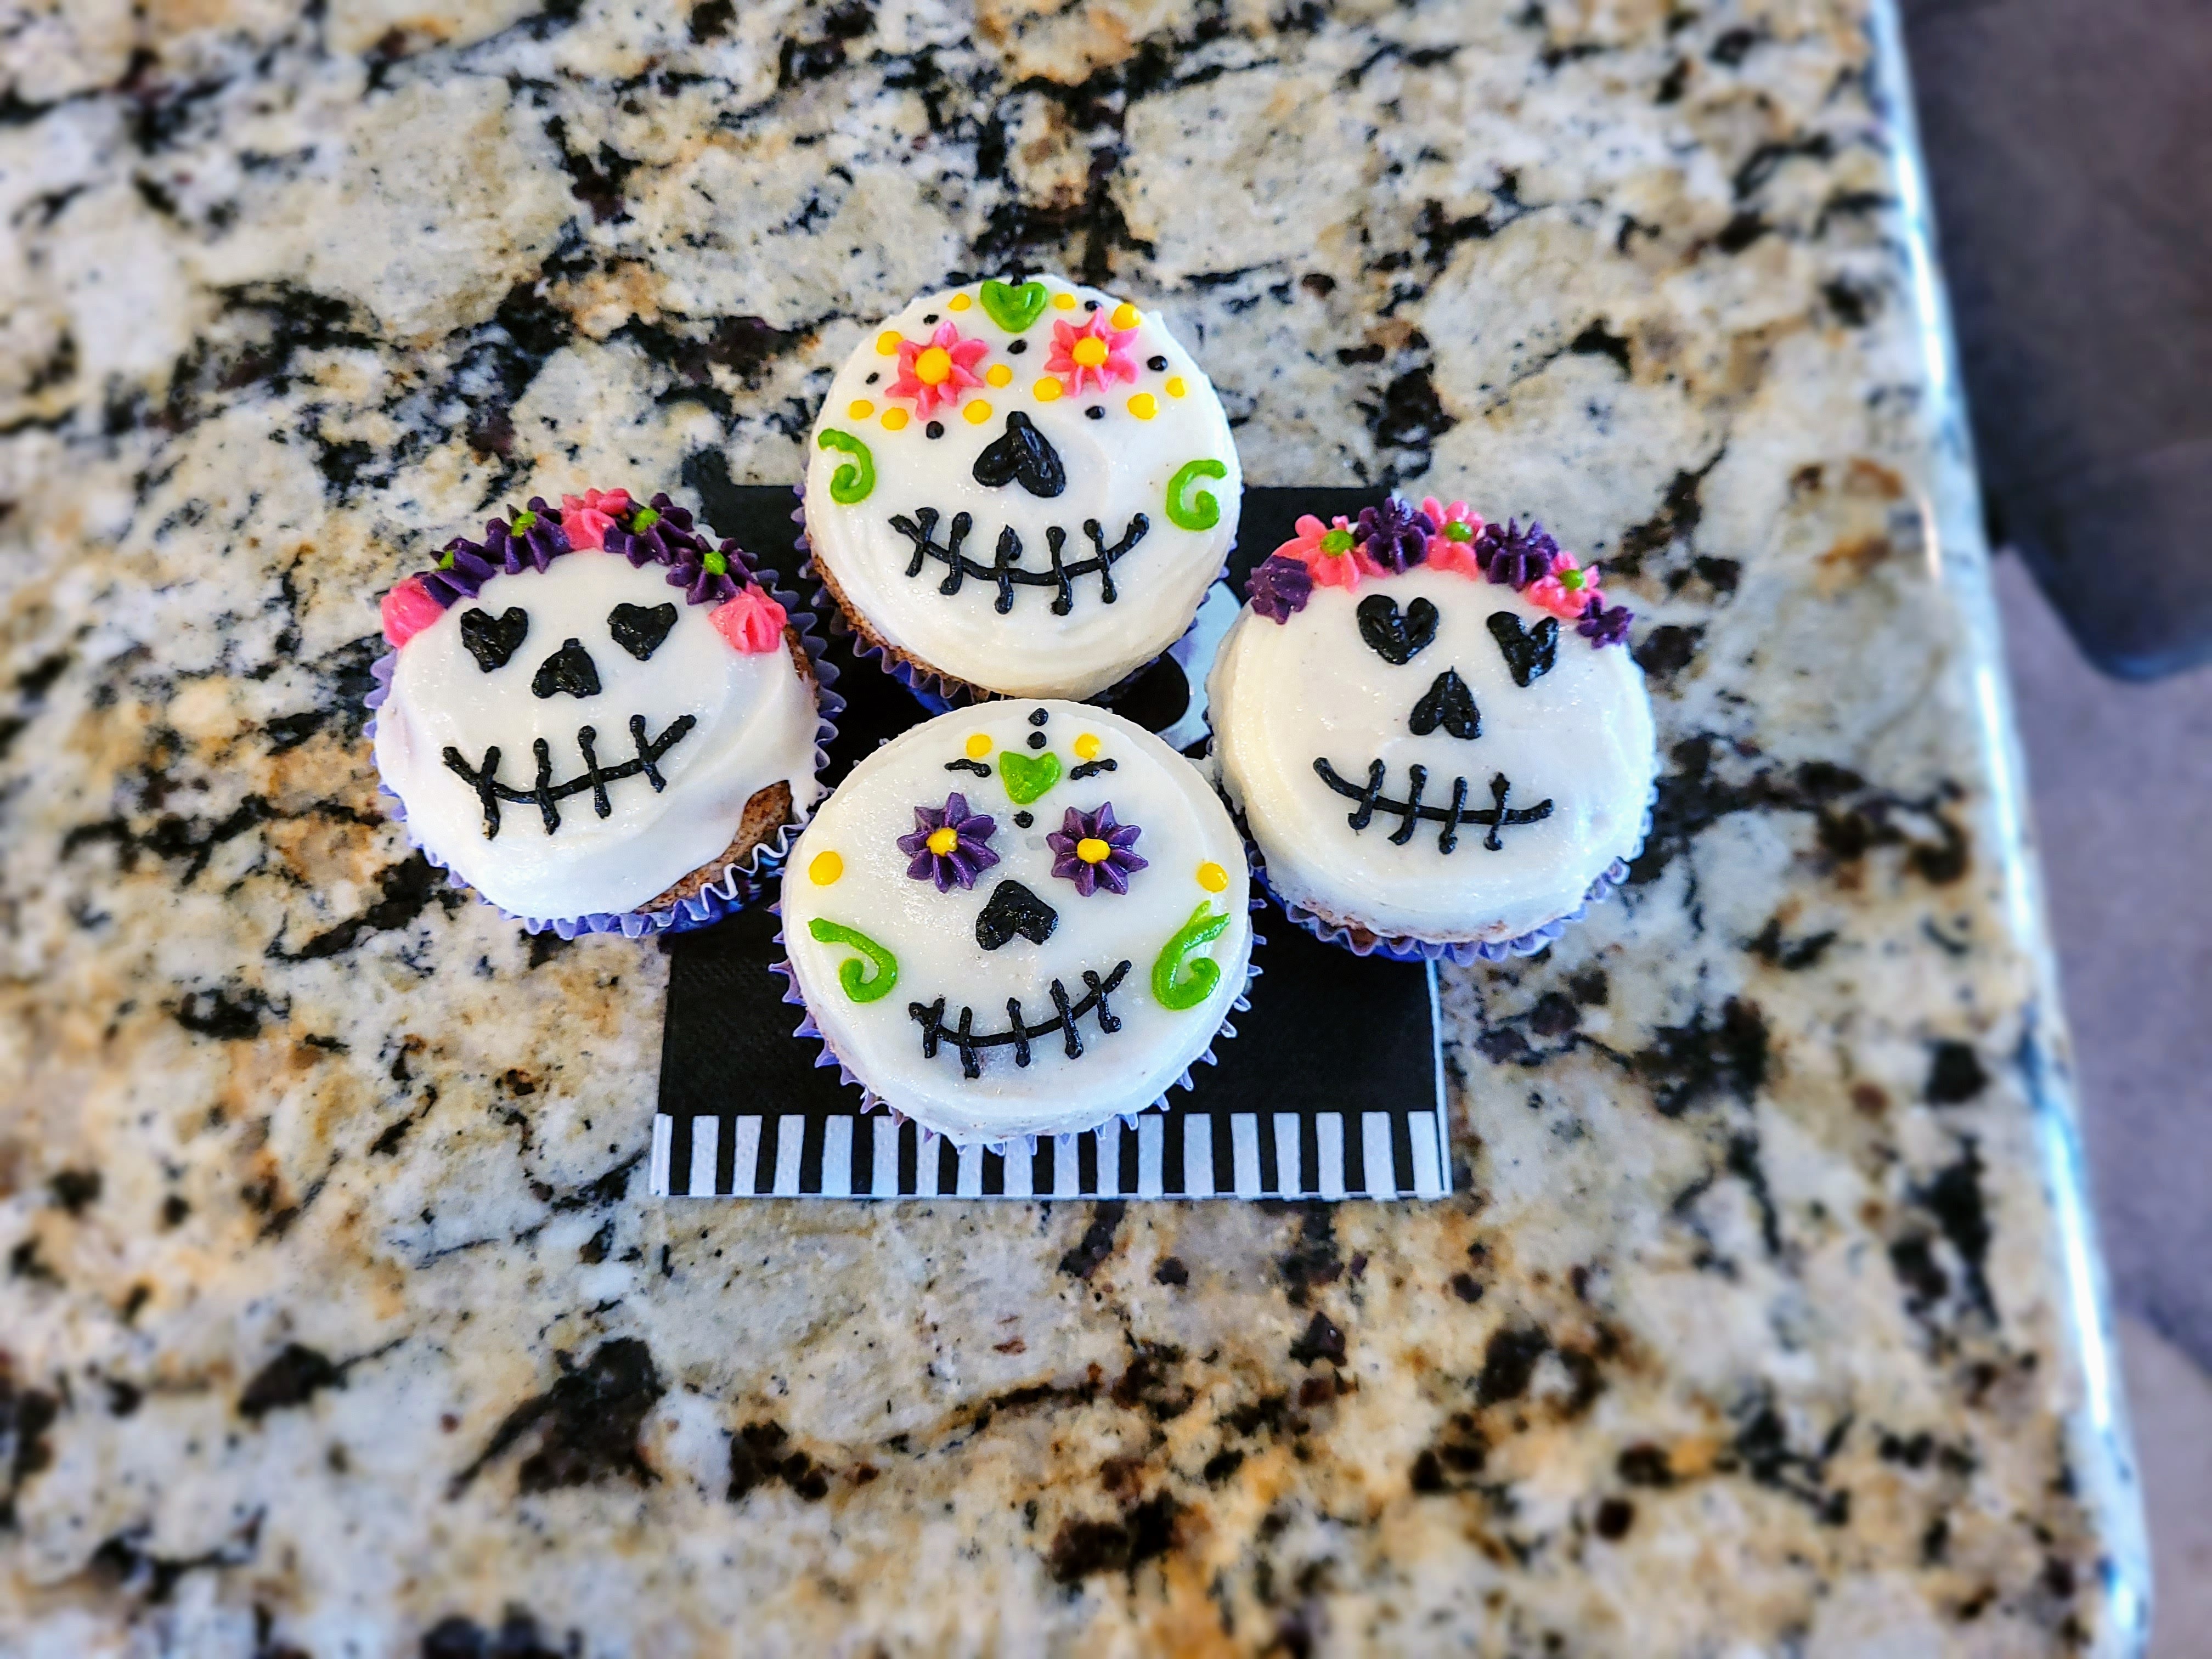
Basically, your imagination is the limit here. Use the black to draw on the mouth and nose. The easiest way to pipe the nose is to turn the cupcake upside down and draw a heart, and this will be nose when you turn him right side up!

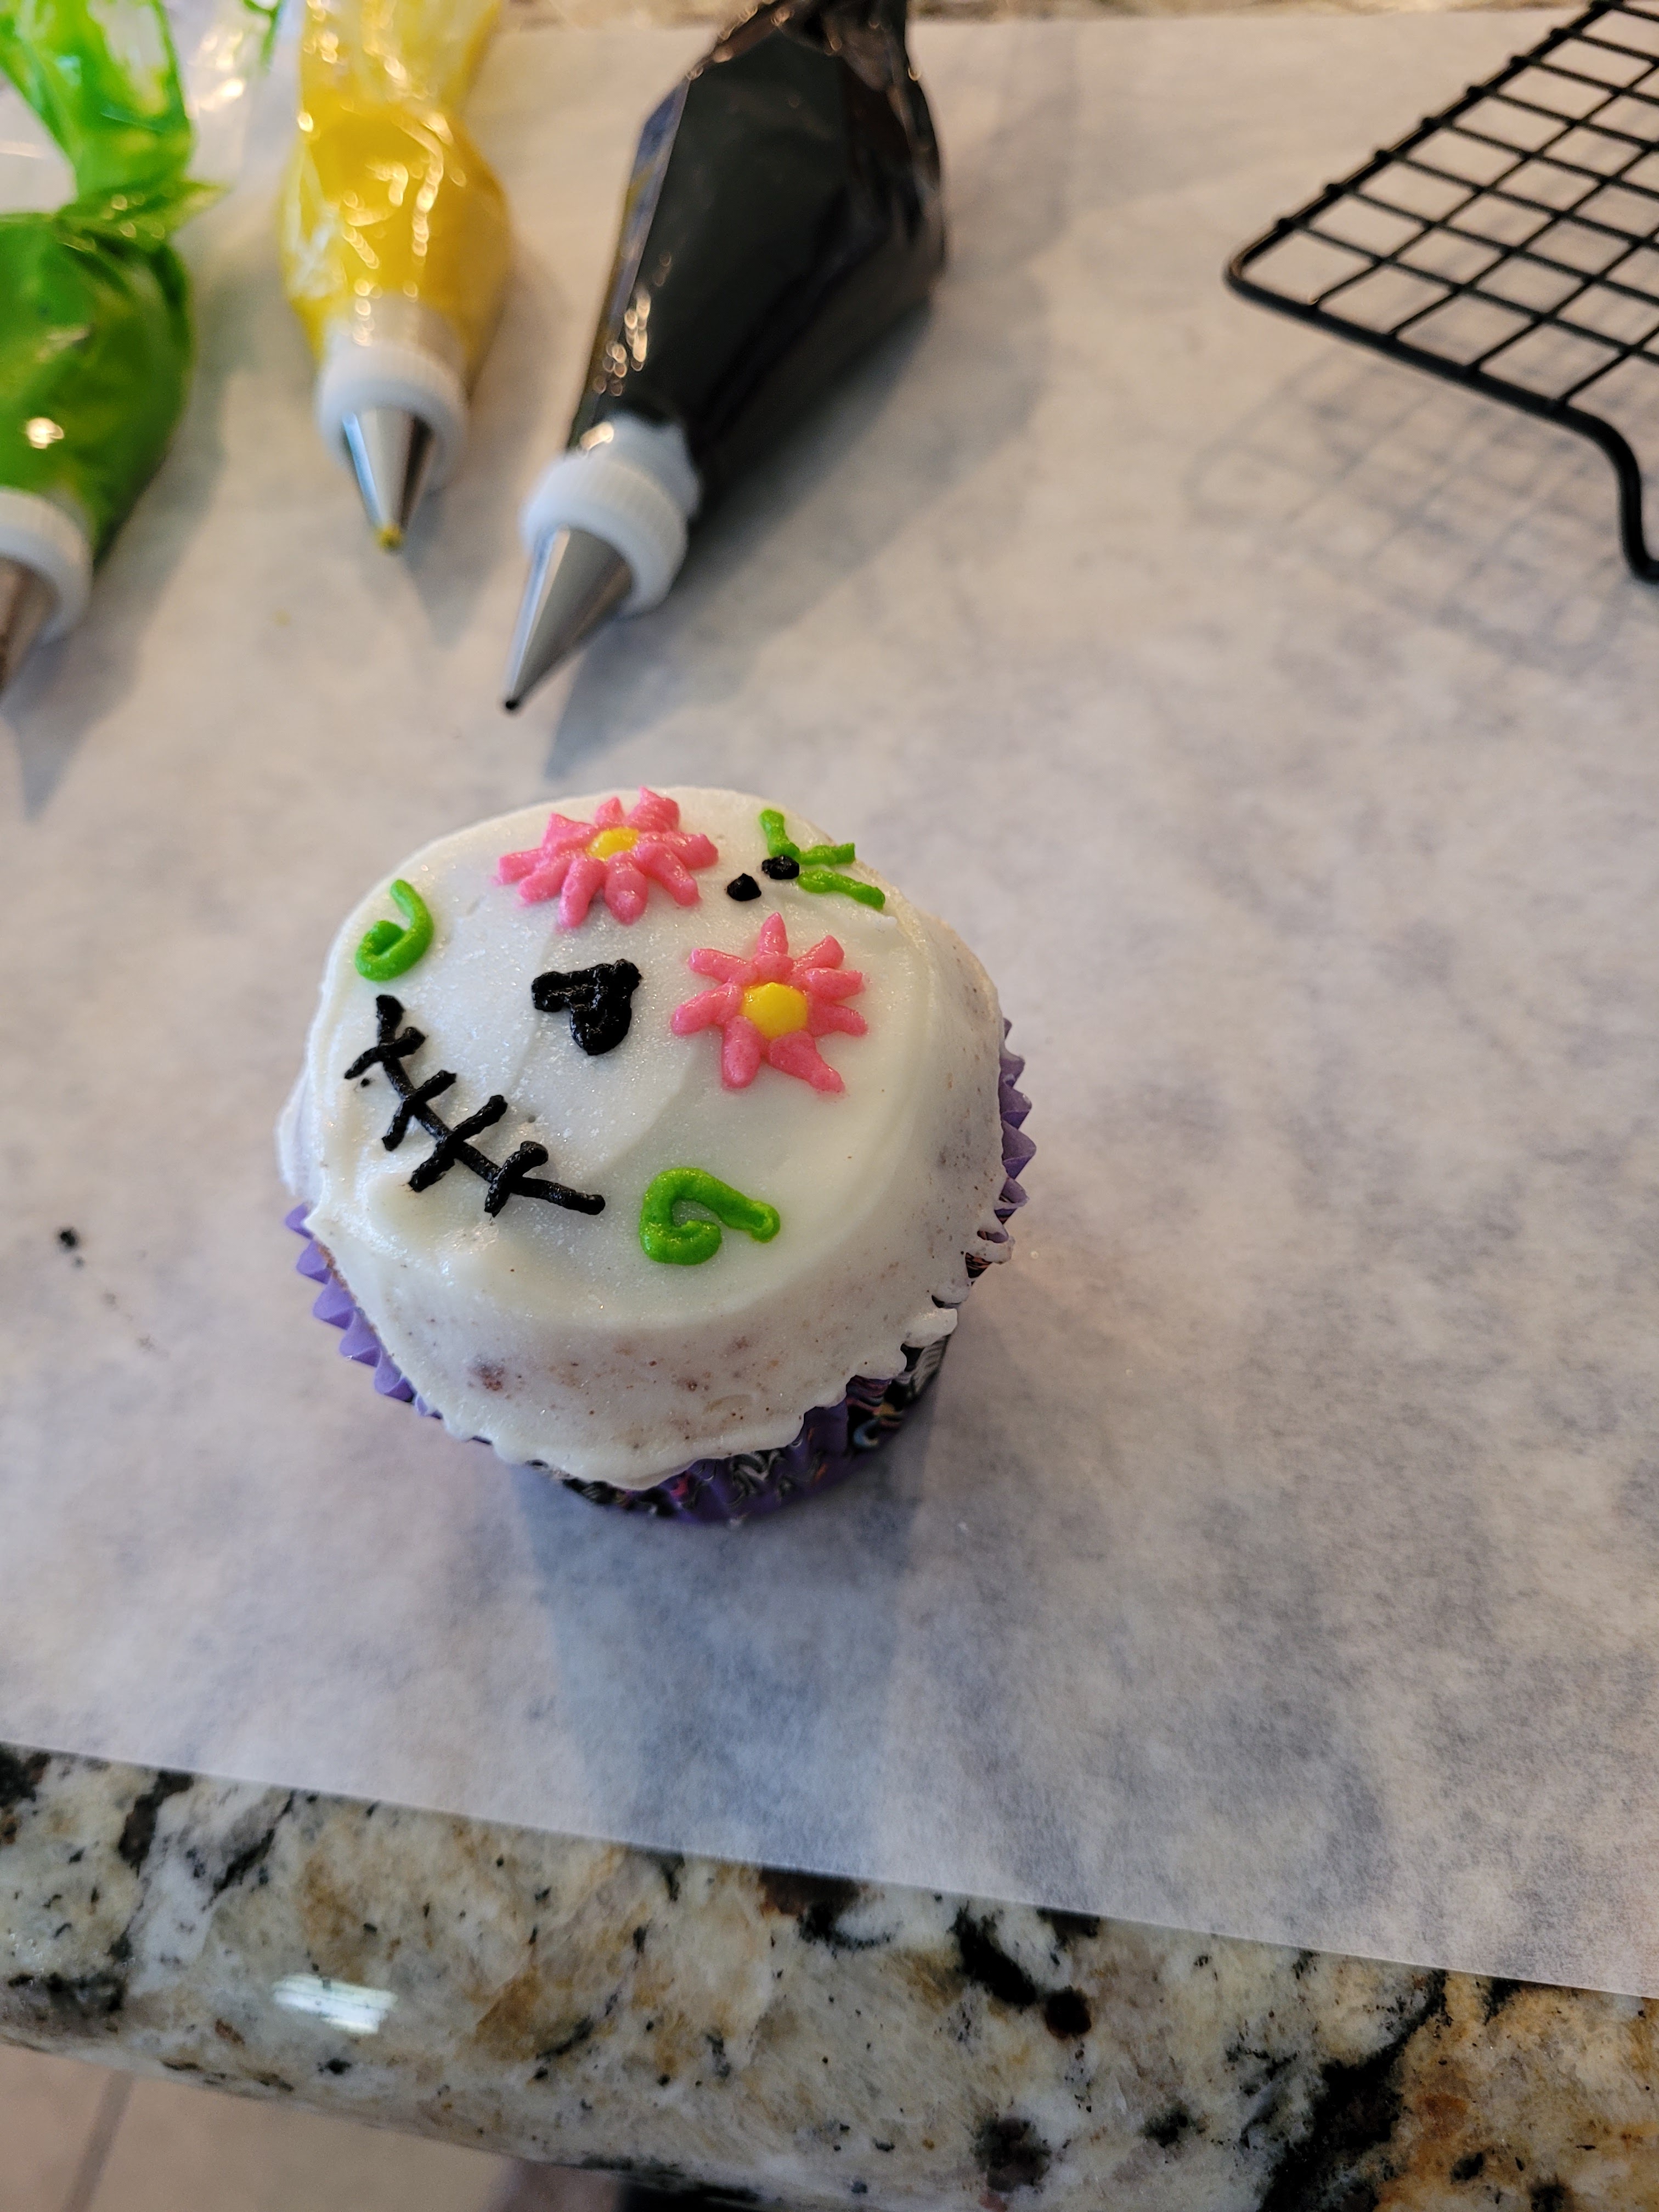
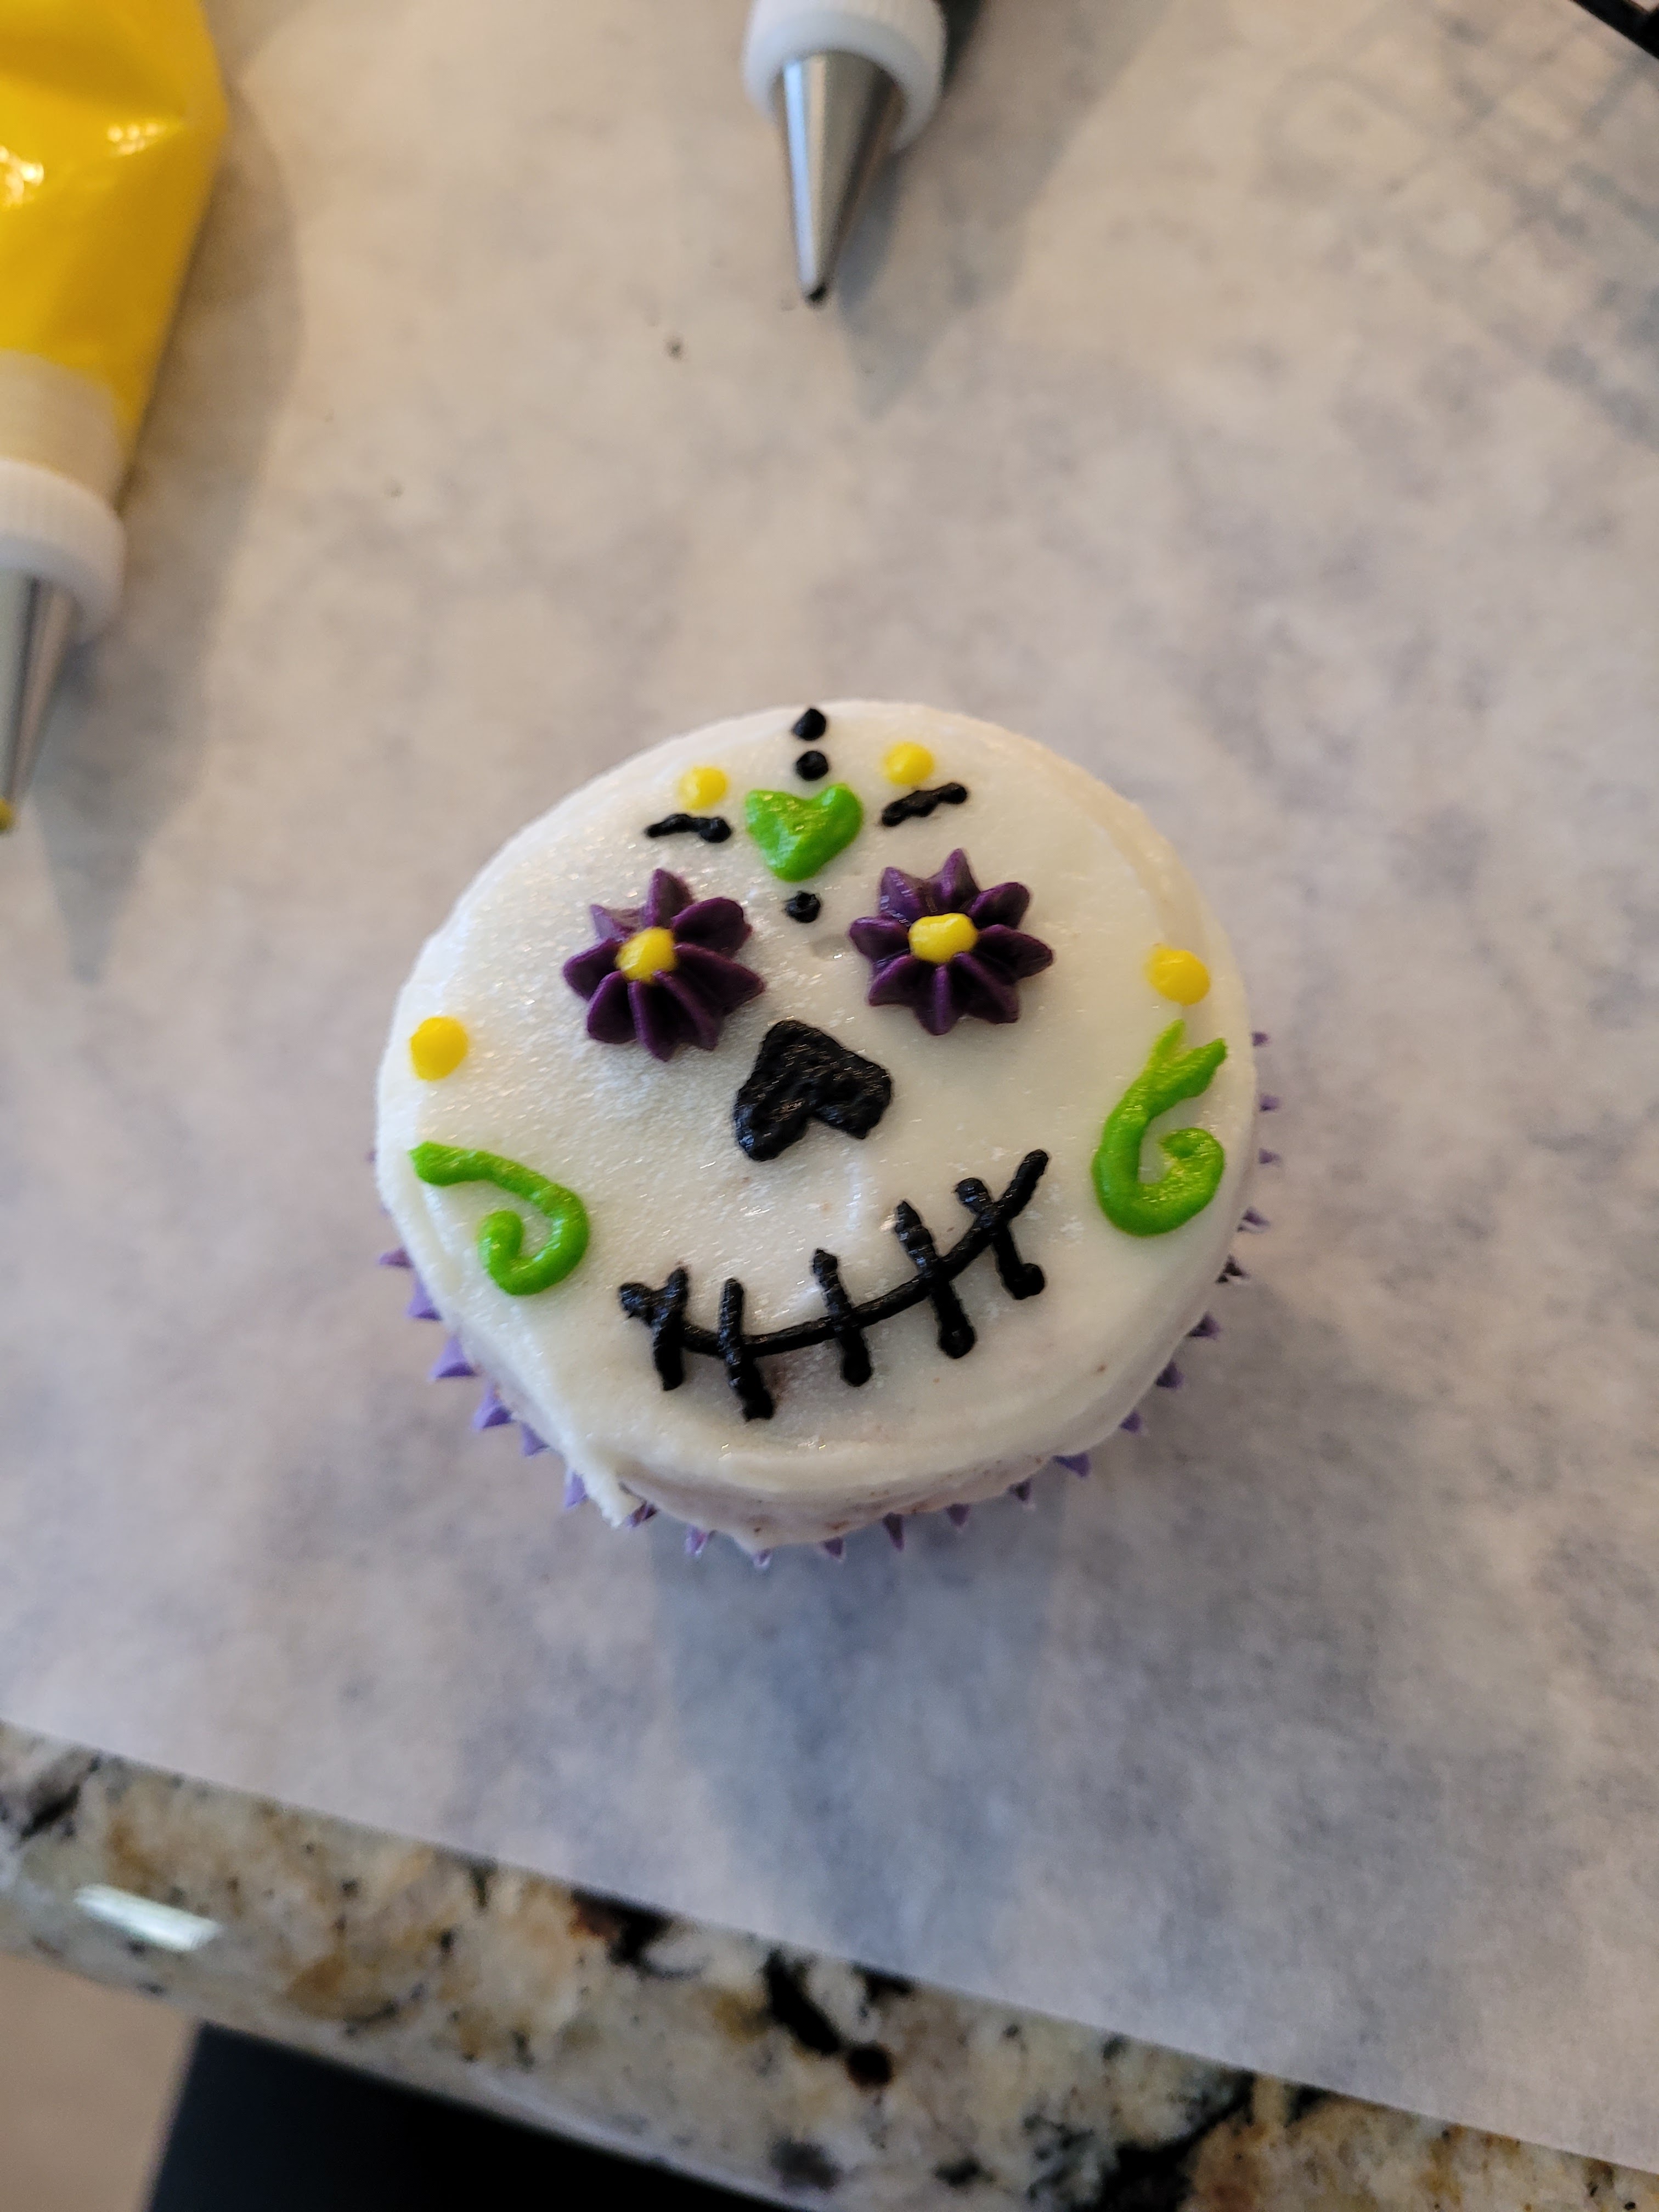
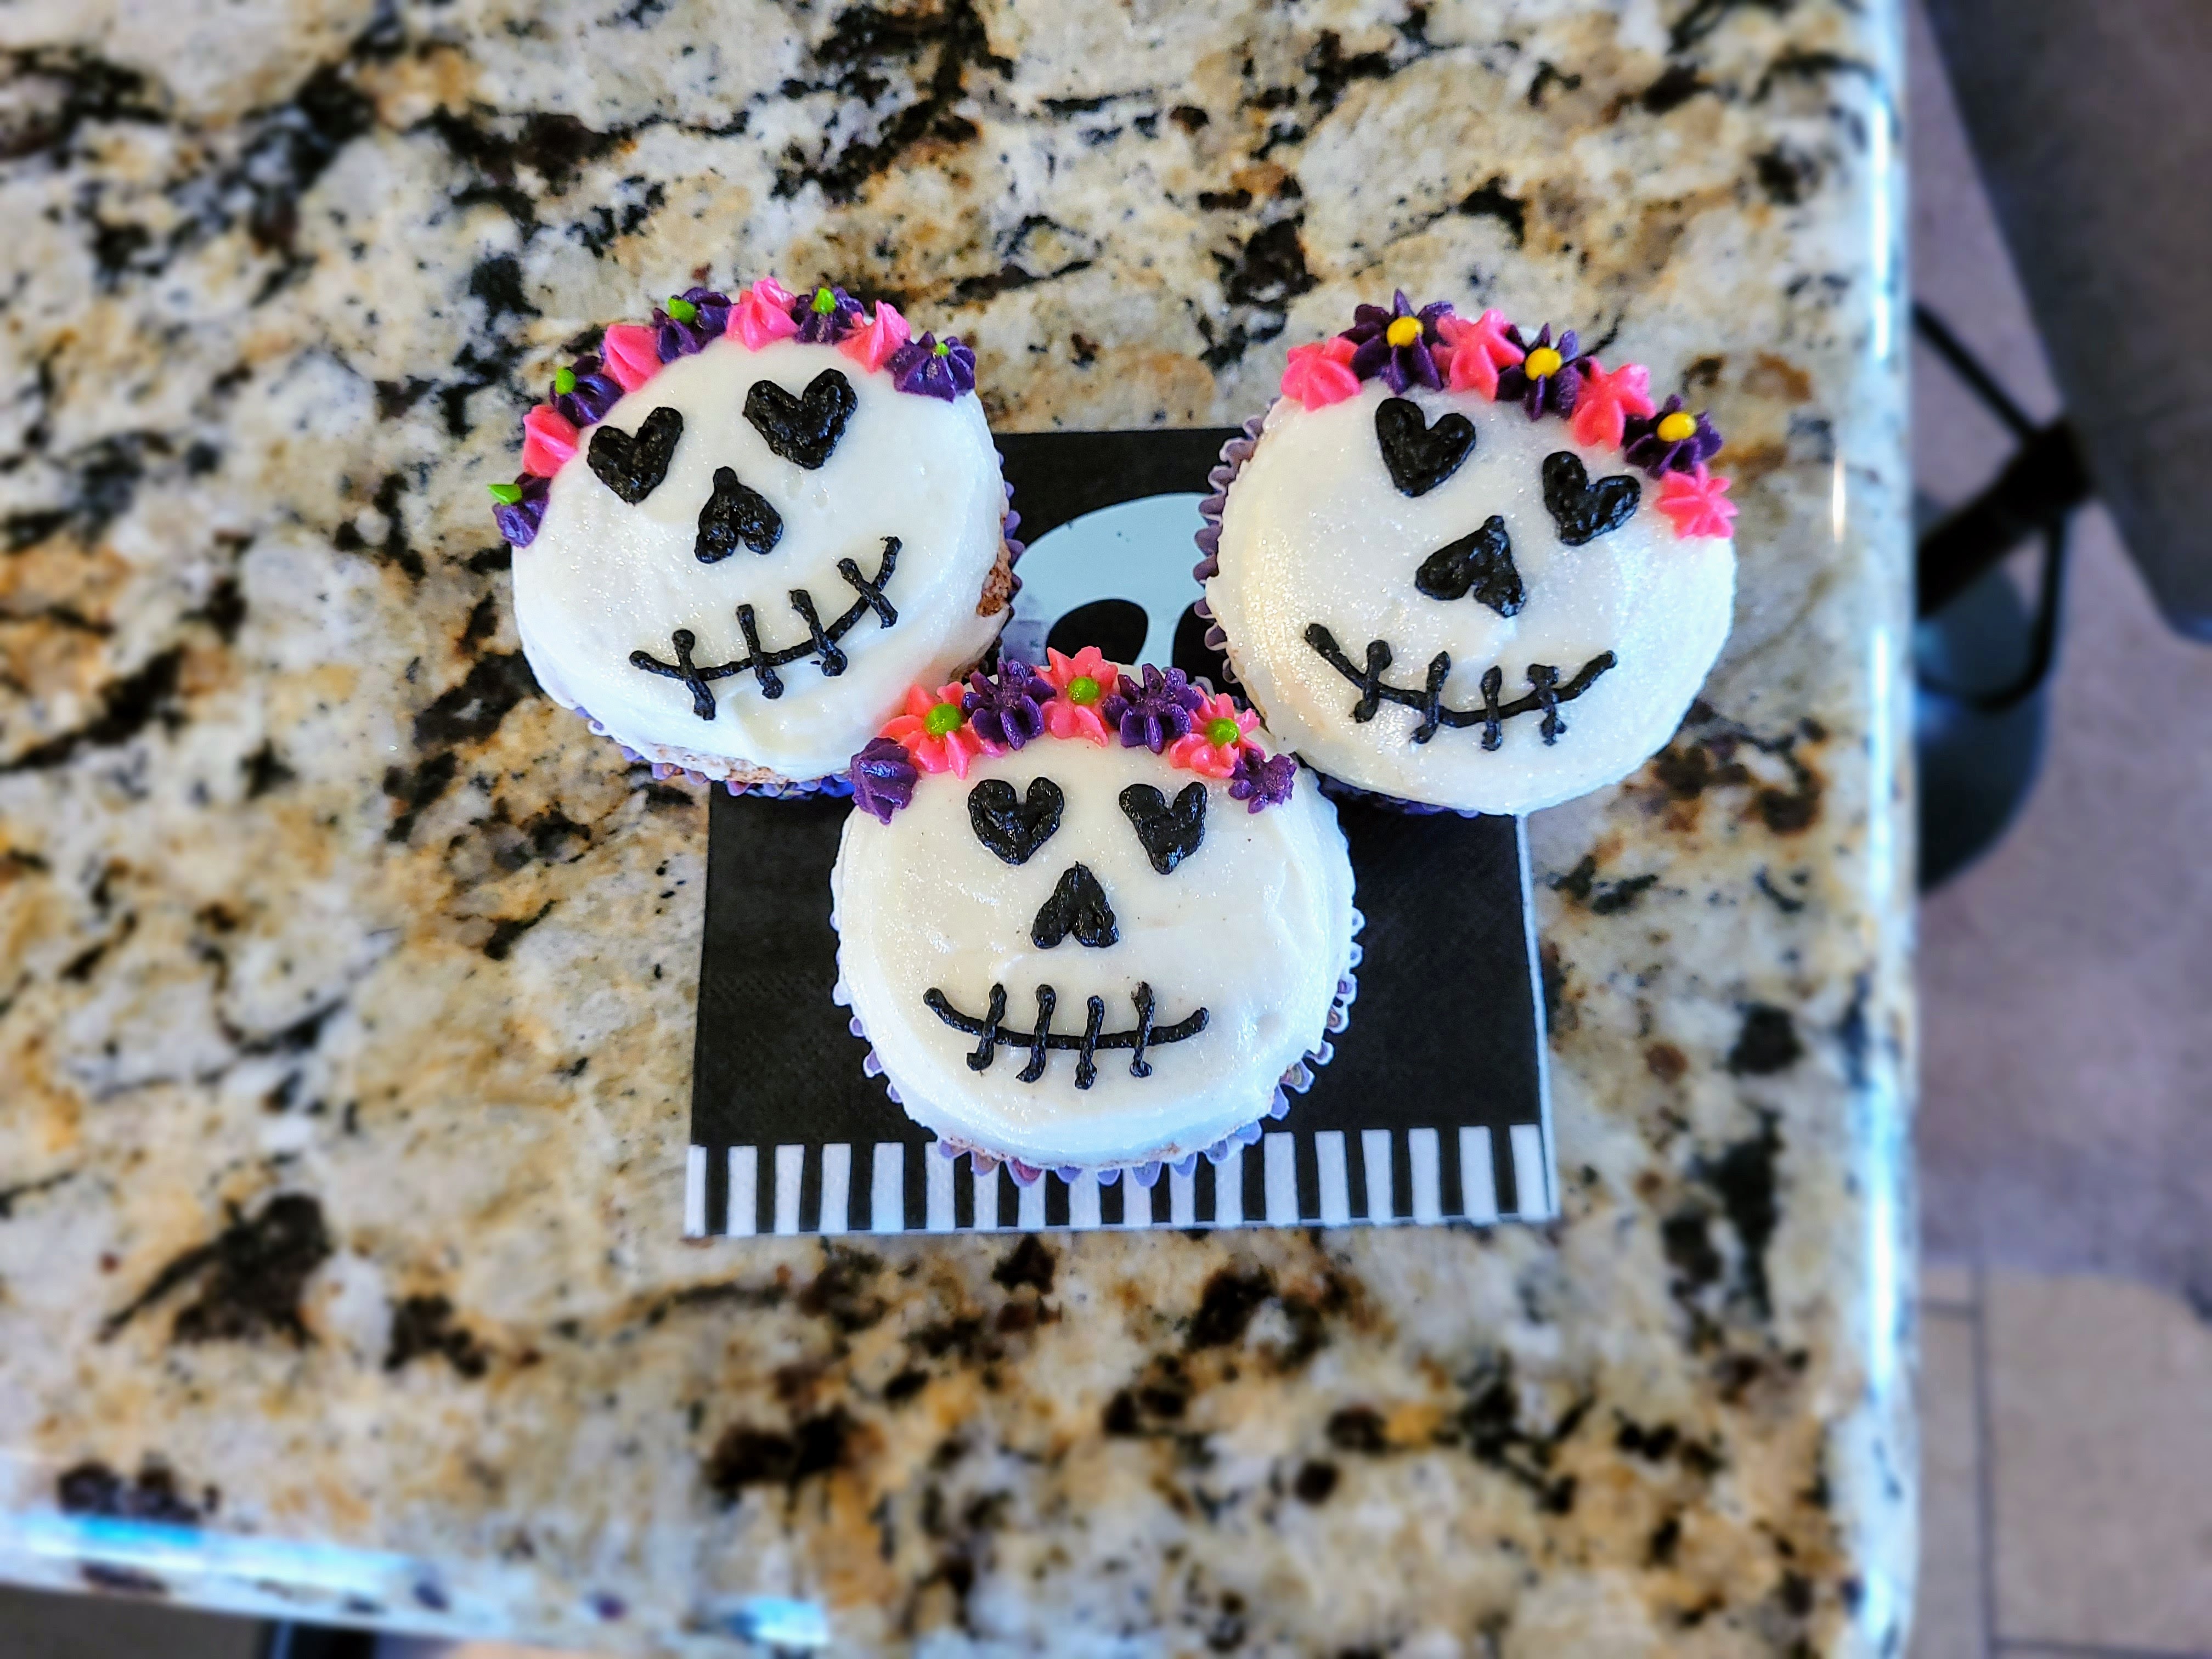
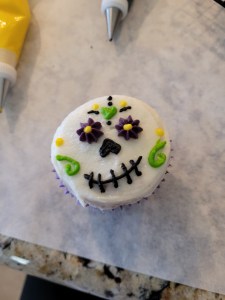
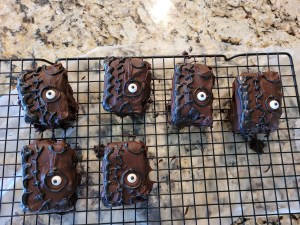
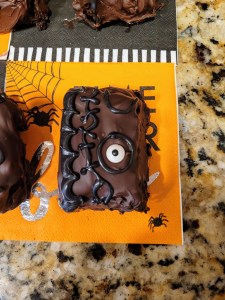
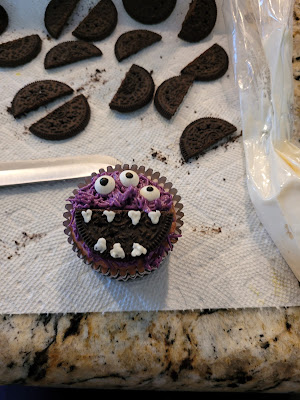
They may be dead, but they’d still like the option of looking decent. For eyes, I used the star tips to pipe flowers, then came in with a round tip to give them pupils. I then used various colors in the round tips to draw lines, dots, and fun patterns on each calavera.
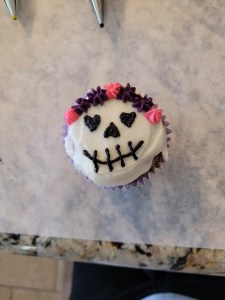
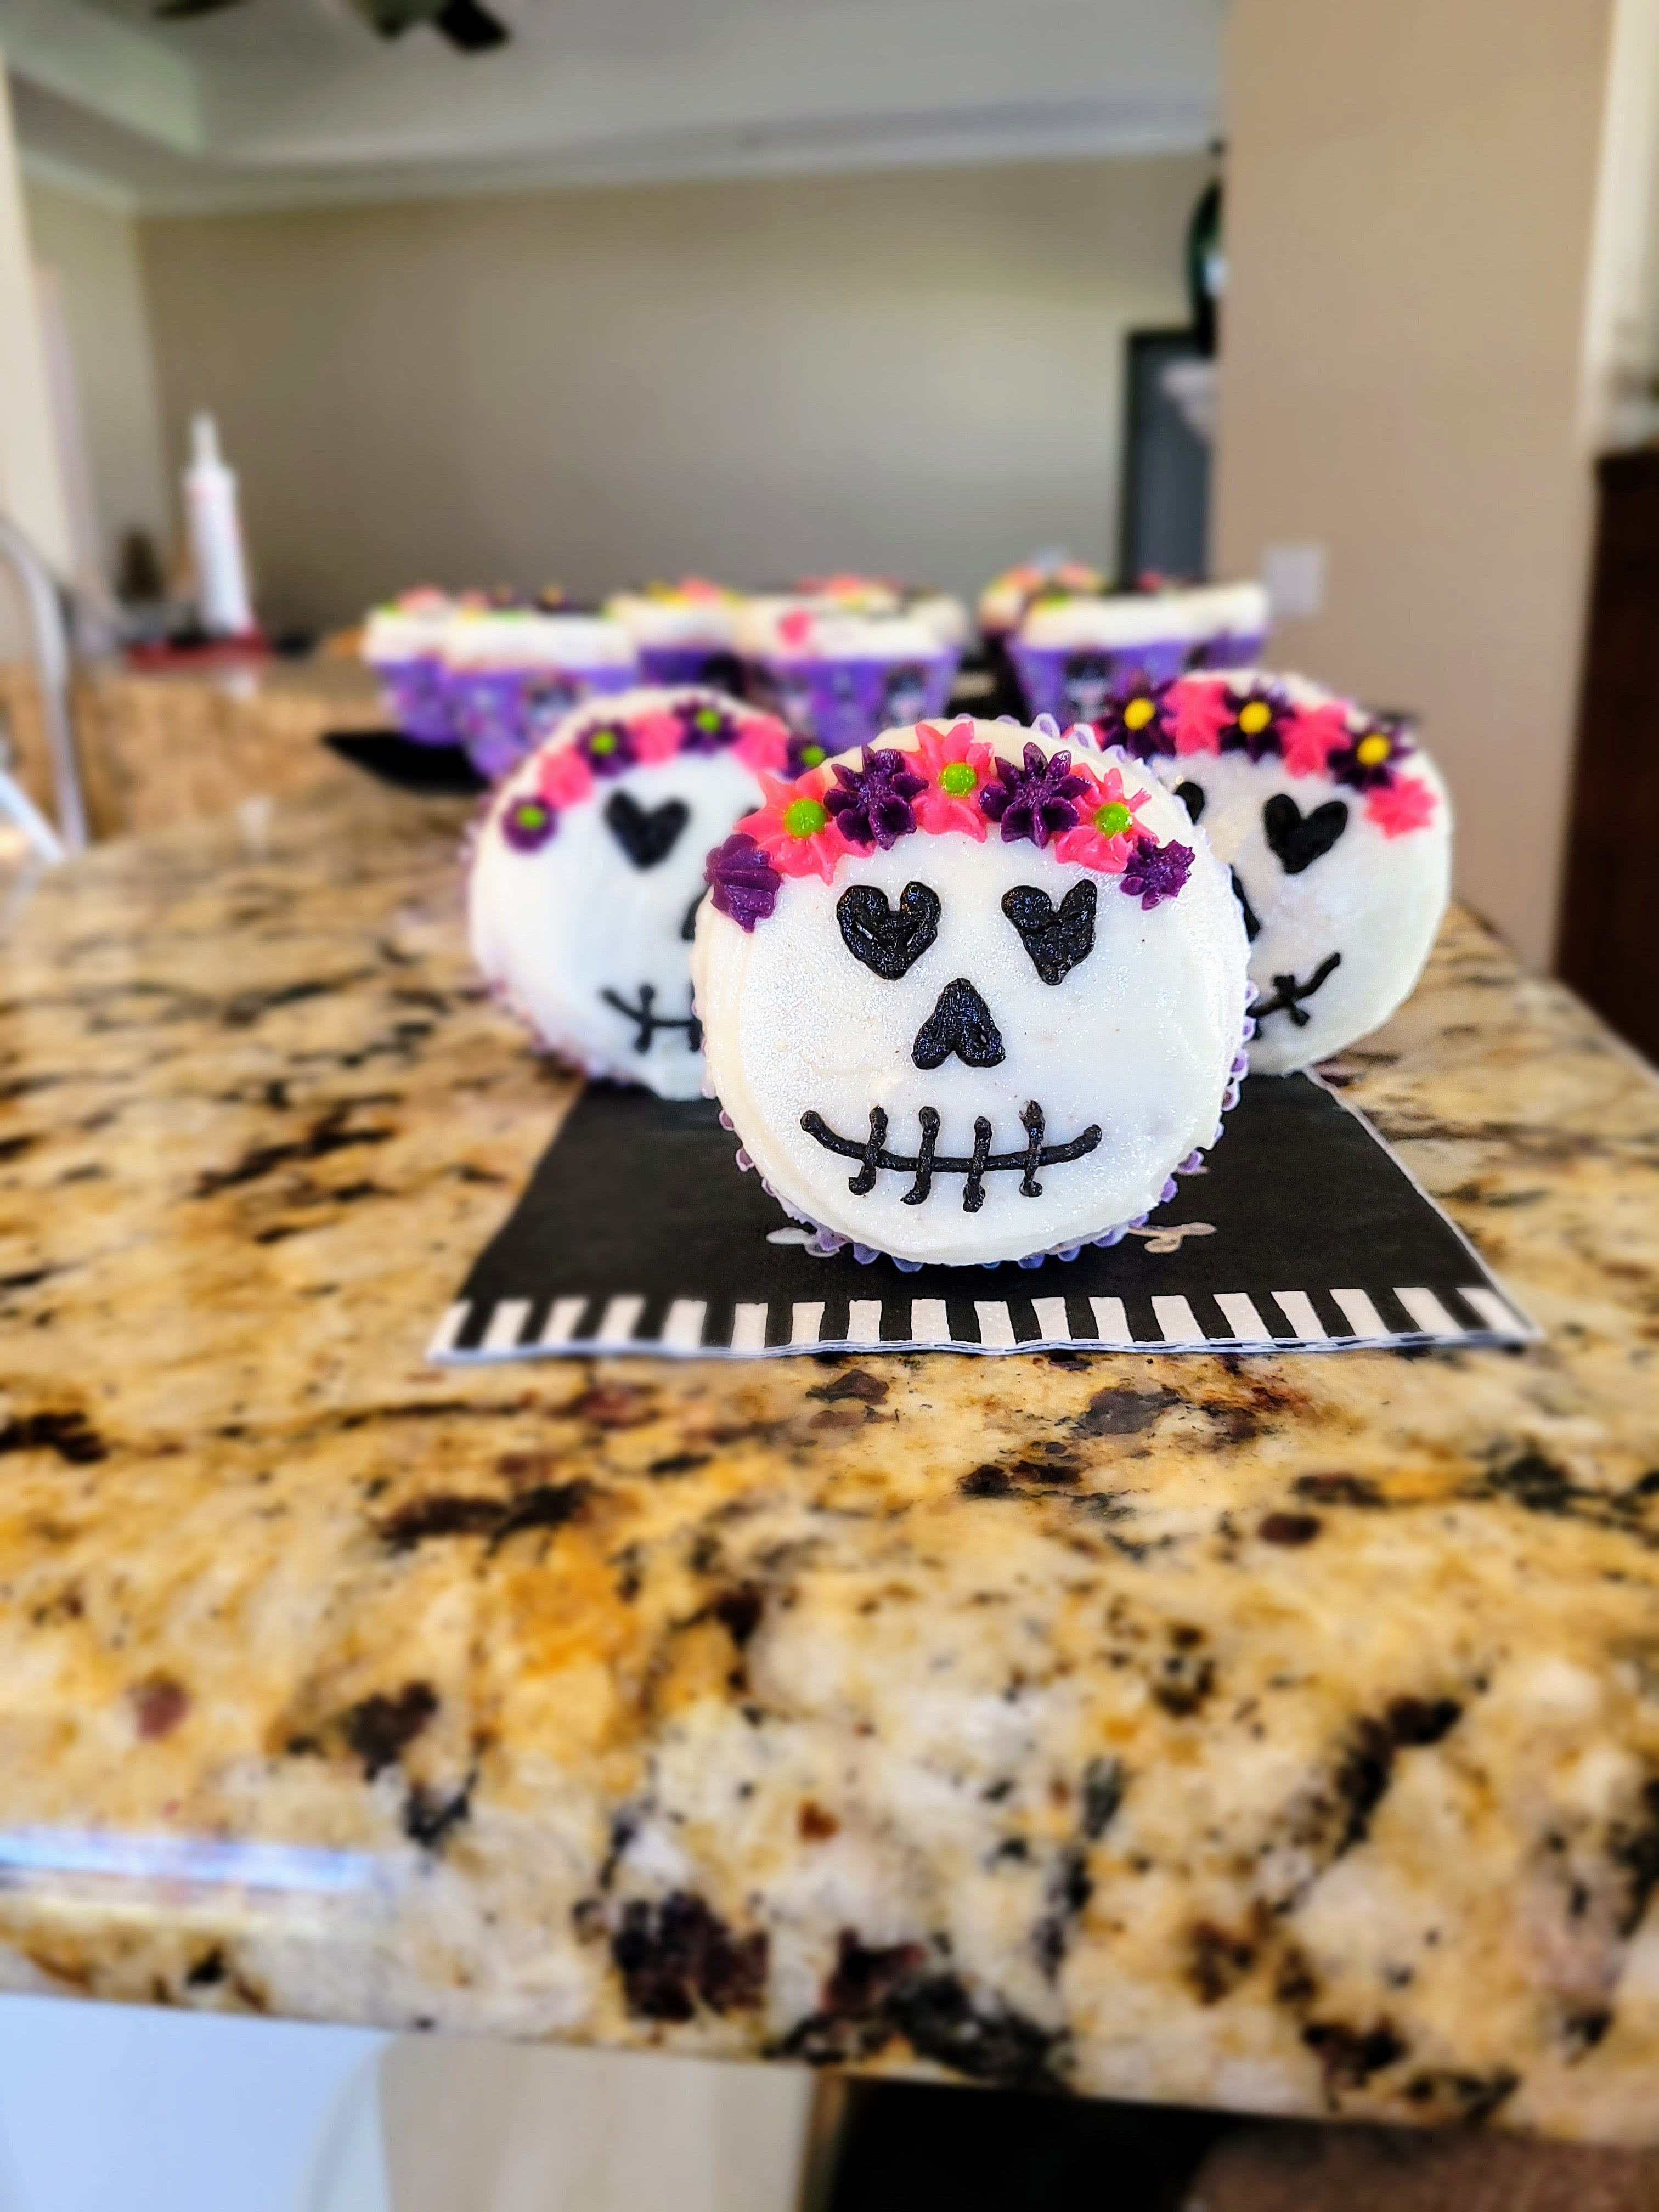
Looking fierce, might take a skelfie later. I also used my round tip to draw hearts for eyes on several calaveras and then used the flower tips to give them a proper flower crown. You can come in with the round tips to give each flower little dots in the middle as well.
This dude is by far my favorite of the bunch. His slightly crooked smile just makes it. He doesn’t care that his smile isn’t straight. He’s a skeleton. Absolutely nothing can get under his skin. Ya know, on account of the fact that he doesn’t have any.

They obviously get it…look at those smirks. 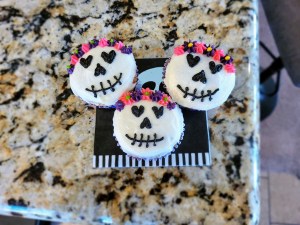
These ladies make me so happy. 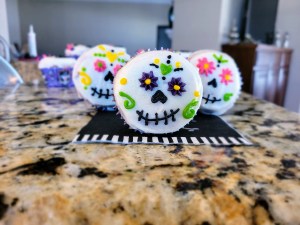
Hey again, handsome. 
I like to imagine this was a really fun double date…you could say it’s a humerus prospect. Yep. more skele-puns. Seriously, whatever colors or patterns you use, there is simply no wrong way to make a super cute sugar skull. As long as it looks happy, vibrant, and fun, you’ve done an excellent job of making a great Dia de los Muertos celebratory dessert.

Having some totally bomb cupcake wrappers also helps (thanks, Mom!). OK, I could upload literally hundreds of photos of these cupcakes because they are probably my favorite bake of Baketober 2021…make no bones about it. As far as flavor is concerned, that honey buttercream frosting is absolutely fibula-ous. It’s creamy, just the right amount of sweet, and if you drizzle a little extra honey on top, you definitely get the full sopapilla experience. As for that new cake mix, I will say it gave a nice, light, springy sponge, but if I hadn’t added cinnamon, there would’ve been zero flavor. So, that’s a major bummer since it did yield a really nice texture, but it was more like a bread flavor with cinnamon added in. I mean, maybe I just found the very basic pan de muerto recipe I’ve been looking for, so small Dia de los Muertos miracles? I will definitely make this sopapilla cupcake recipe again when I either find the right new GF box mix or convince someone with a Whole Foods nearby to mail me 65 boxes of their mix. I guess I better retire my resting witch face and ask politely. It’s been a wonderful month of spooky bakes, and I can’t wait until next October! ‘Til next time, my fellow eaters!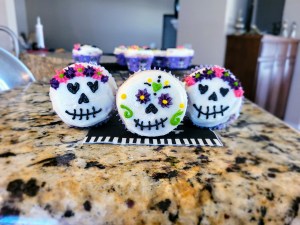
Better get to work on my social skulls, you could say. -
Bone to be Wild
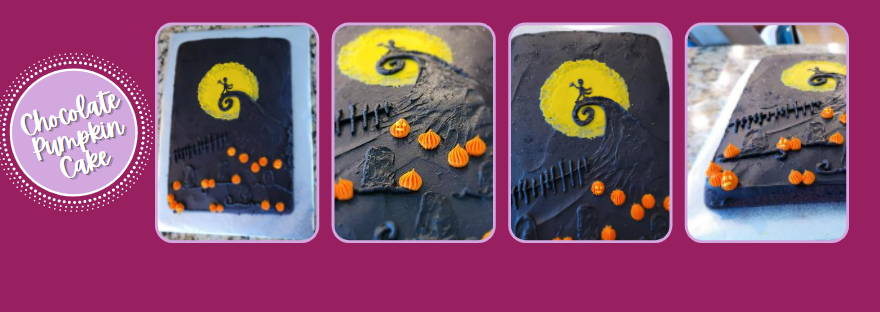
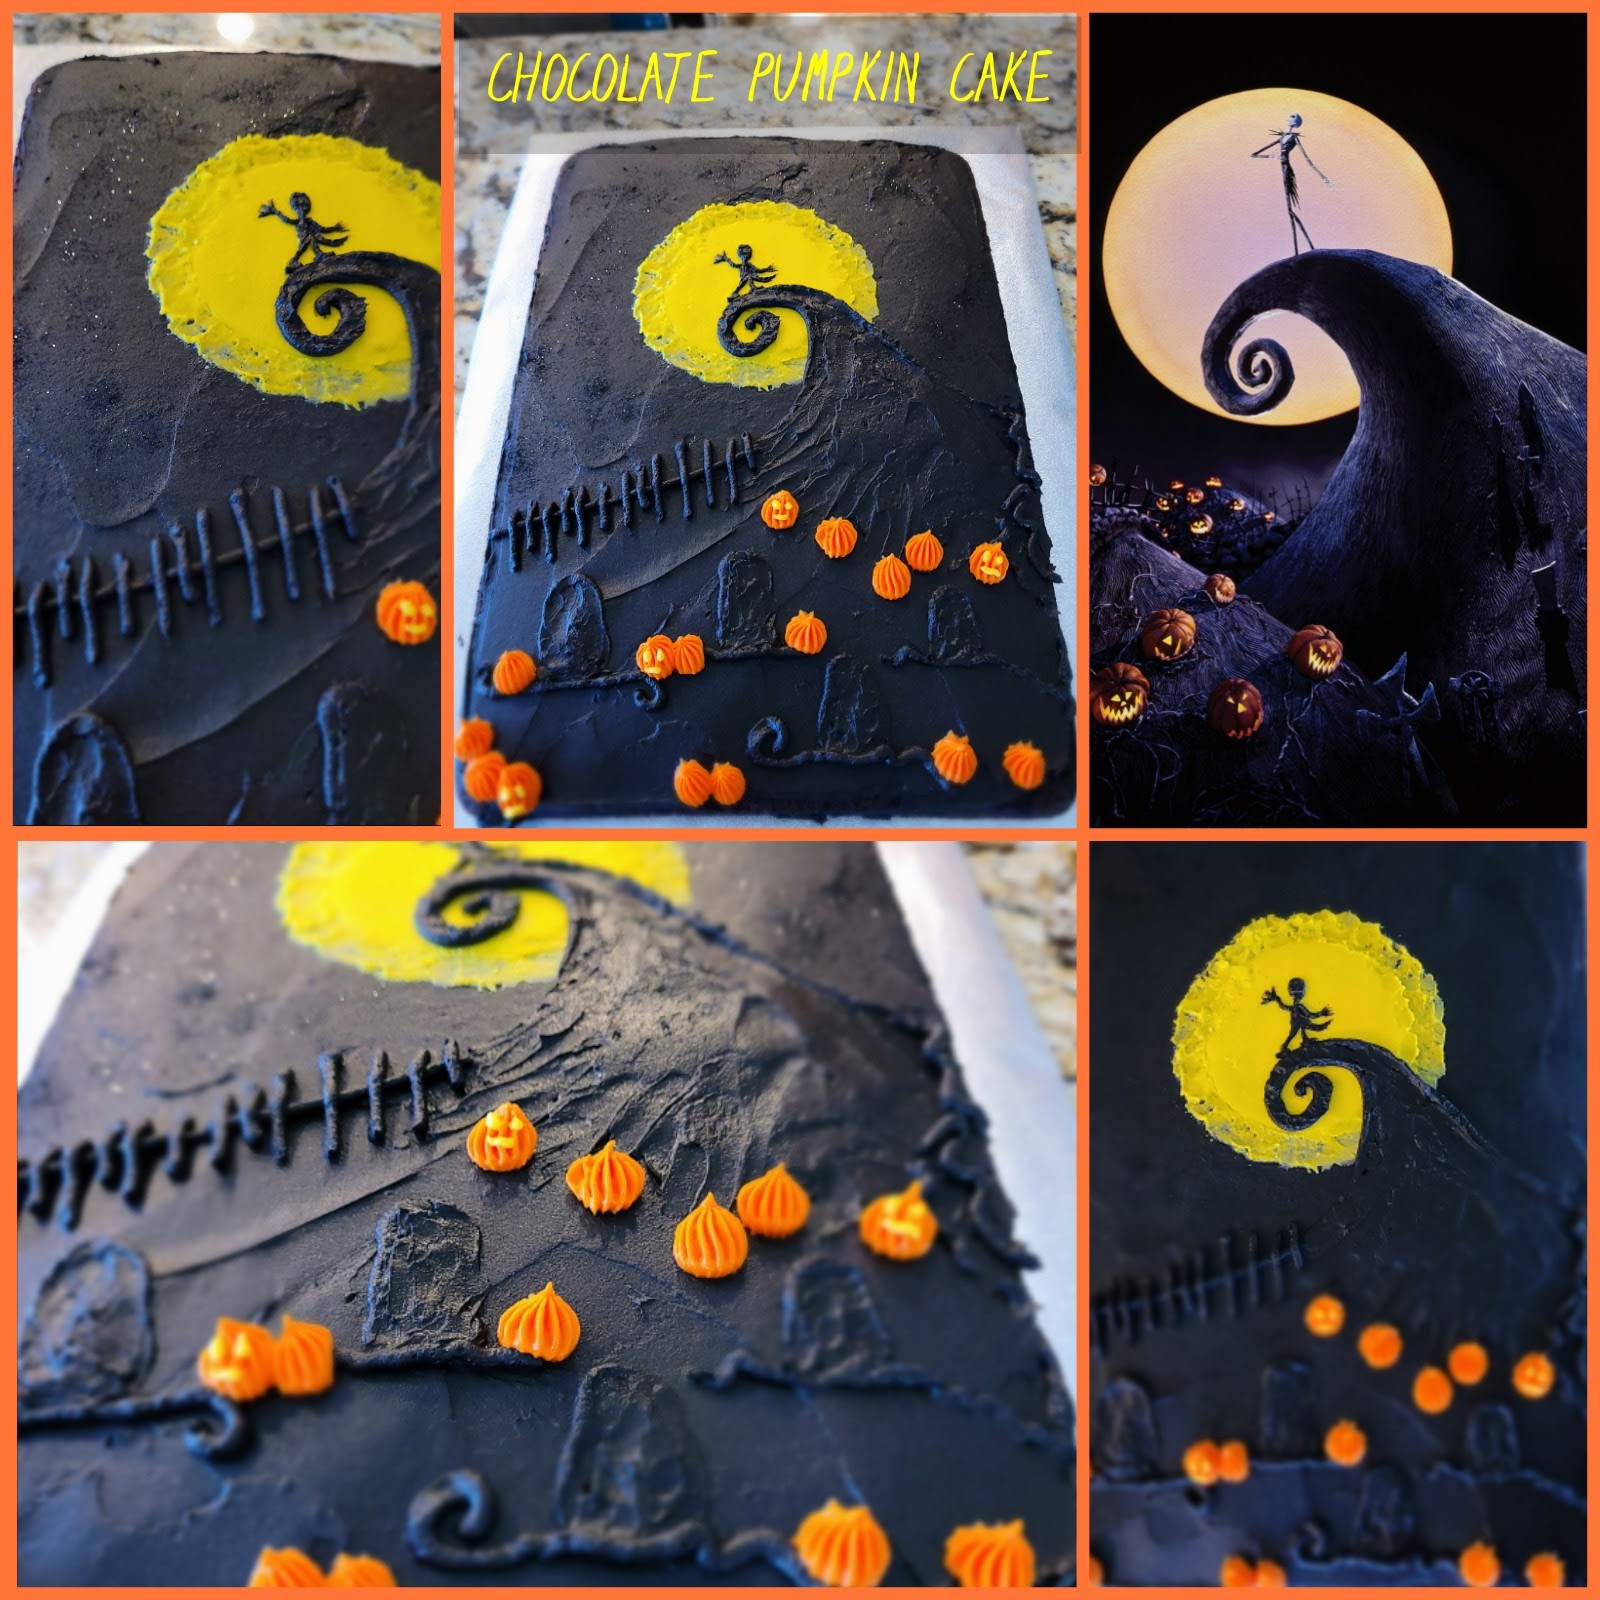
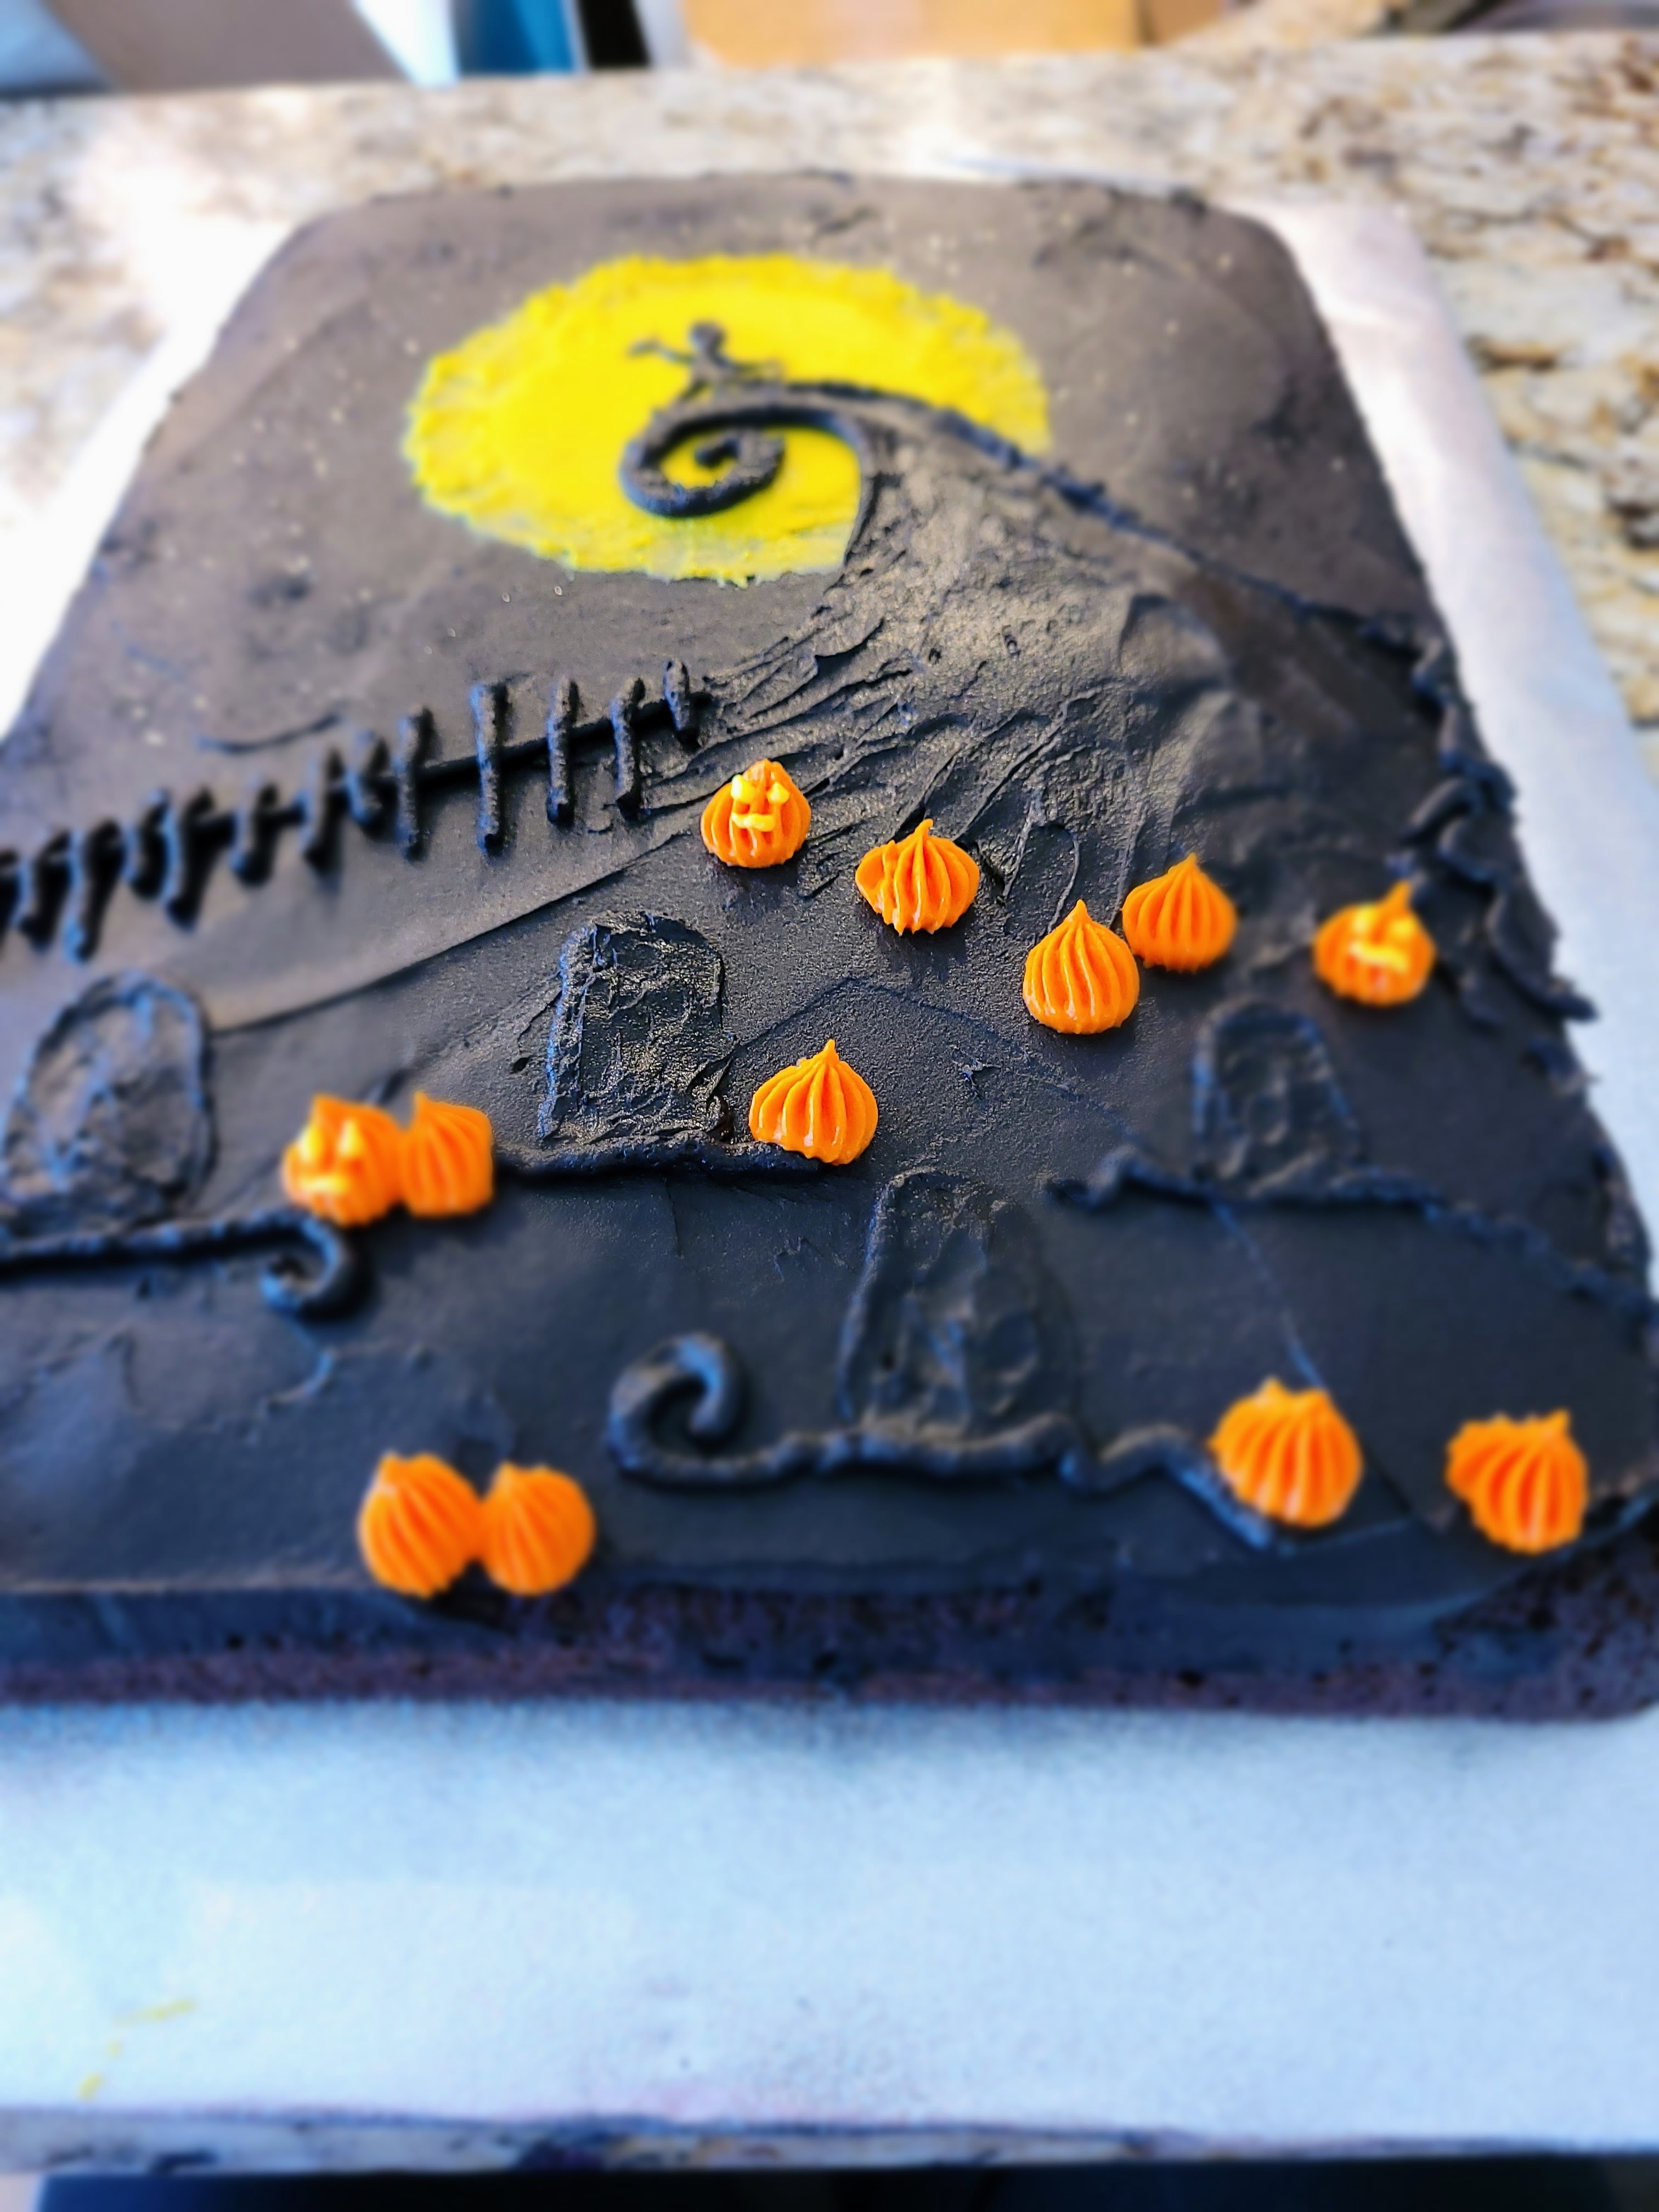
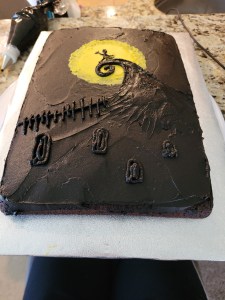
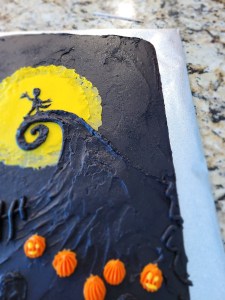
It’s mid-October, and I am dying over the fall weather in New Mexico. Chilly walks in the morning get an A+ for spookiness because there’s usually several flocks of black birds and Chihuahuan Ravens cawing from the rooftops as the sun rises, and boy, does it ever make me feel right in my creepy element, and I LOVE IT! This inspired me to create a scene of one of my other favorite spooky places: Spiral Hill in Nightmare Before Christmas. Everyone needs a good hill to sing their heart out on, but when you add tombstones and deranged, demented pumpkins, it’s just perfect. After all, demons are a girl’s best friend.

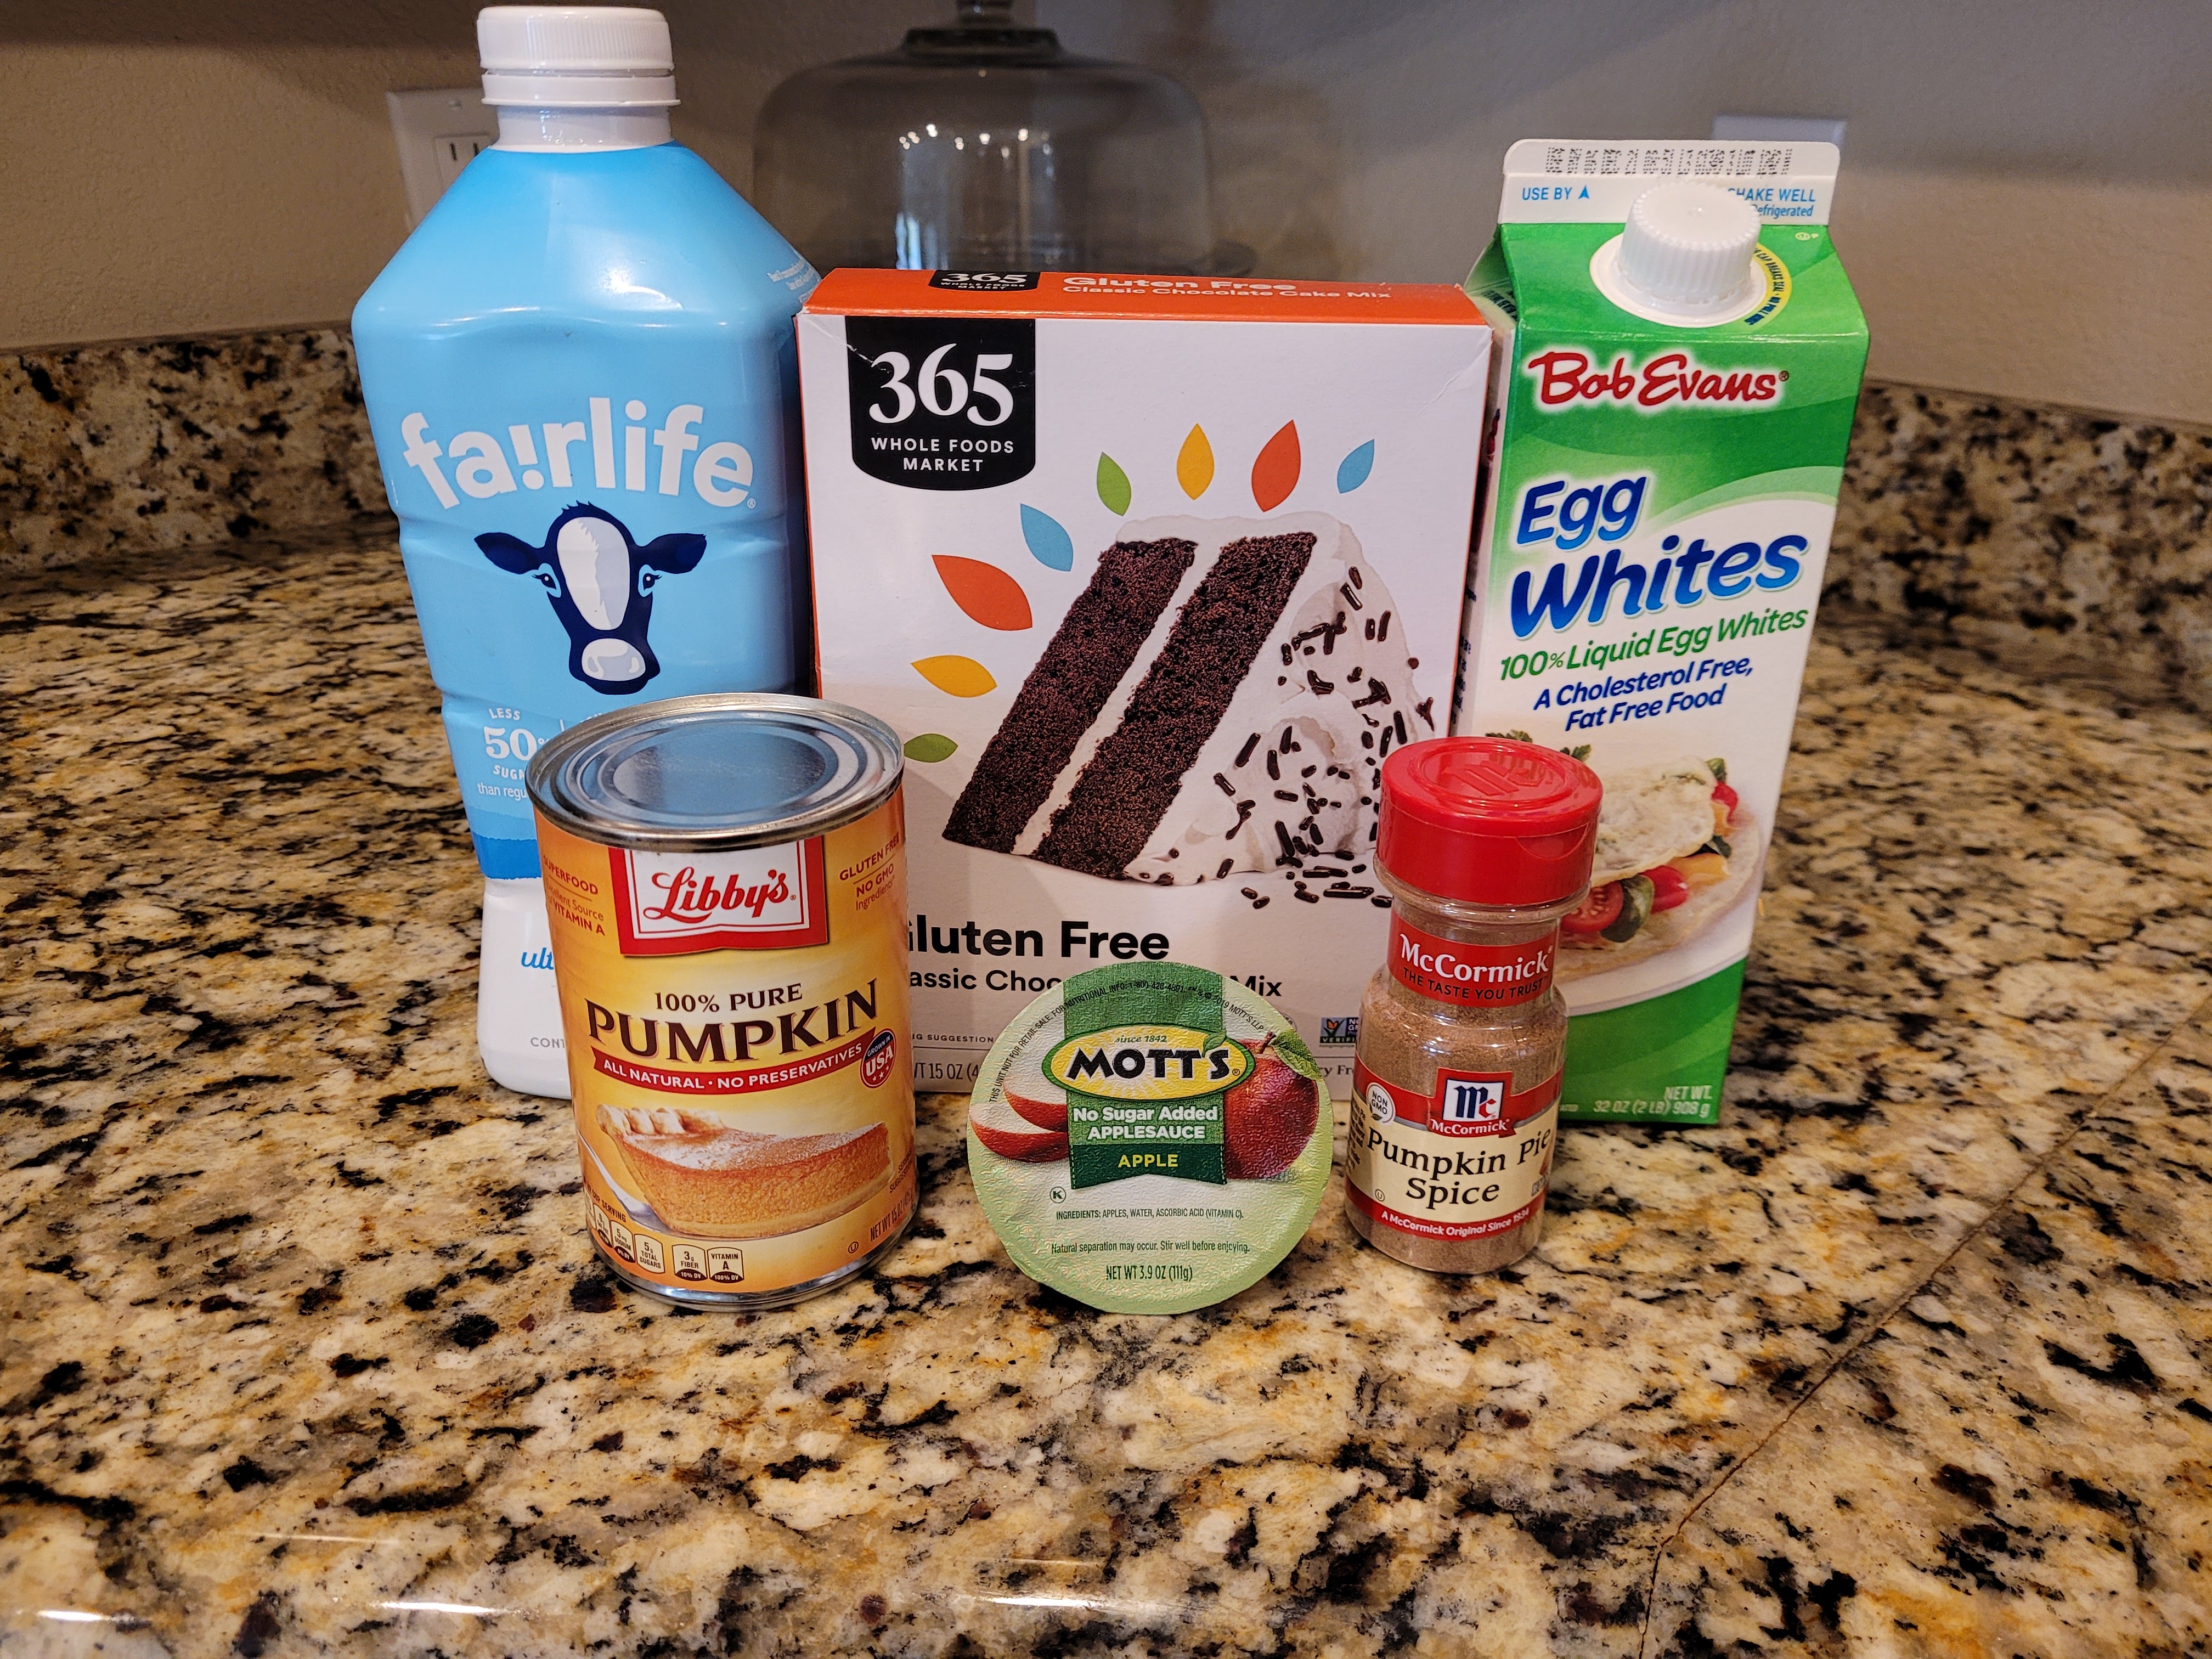
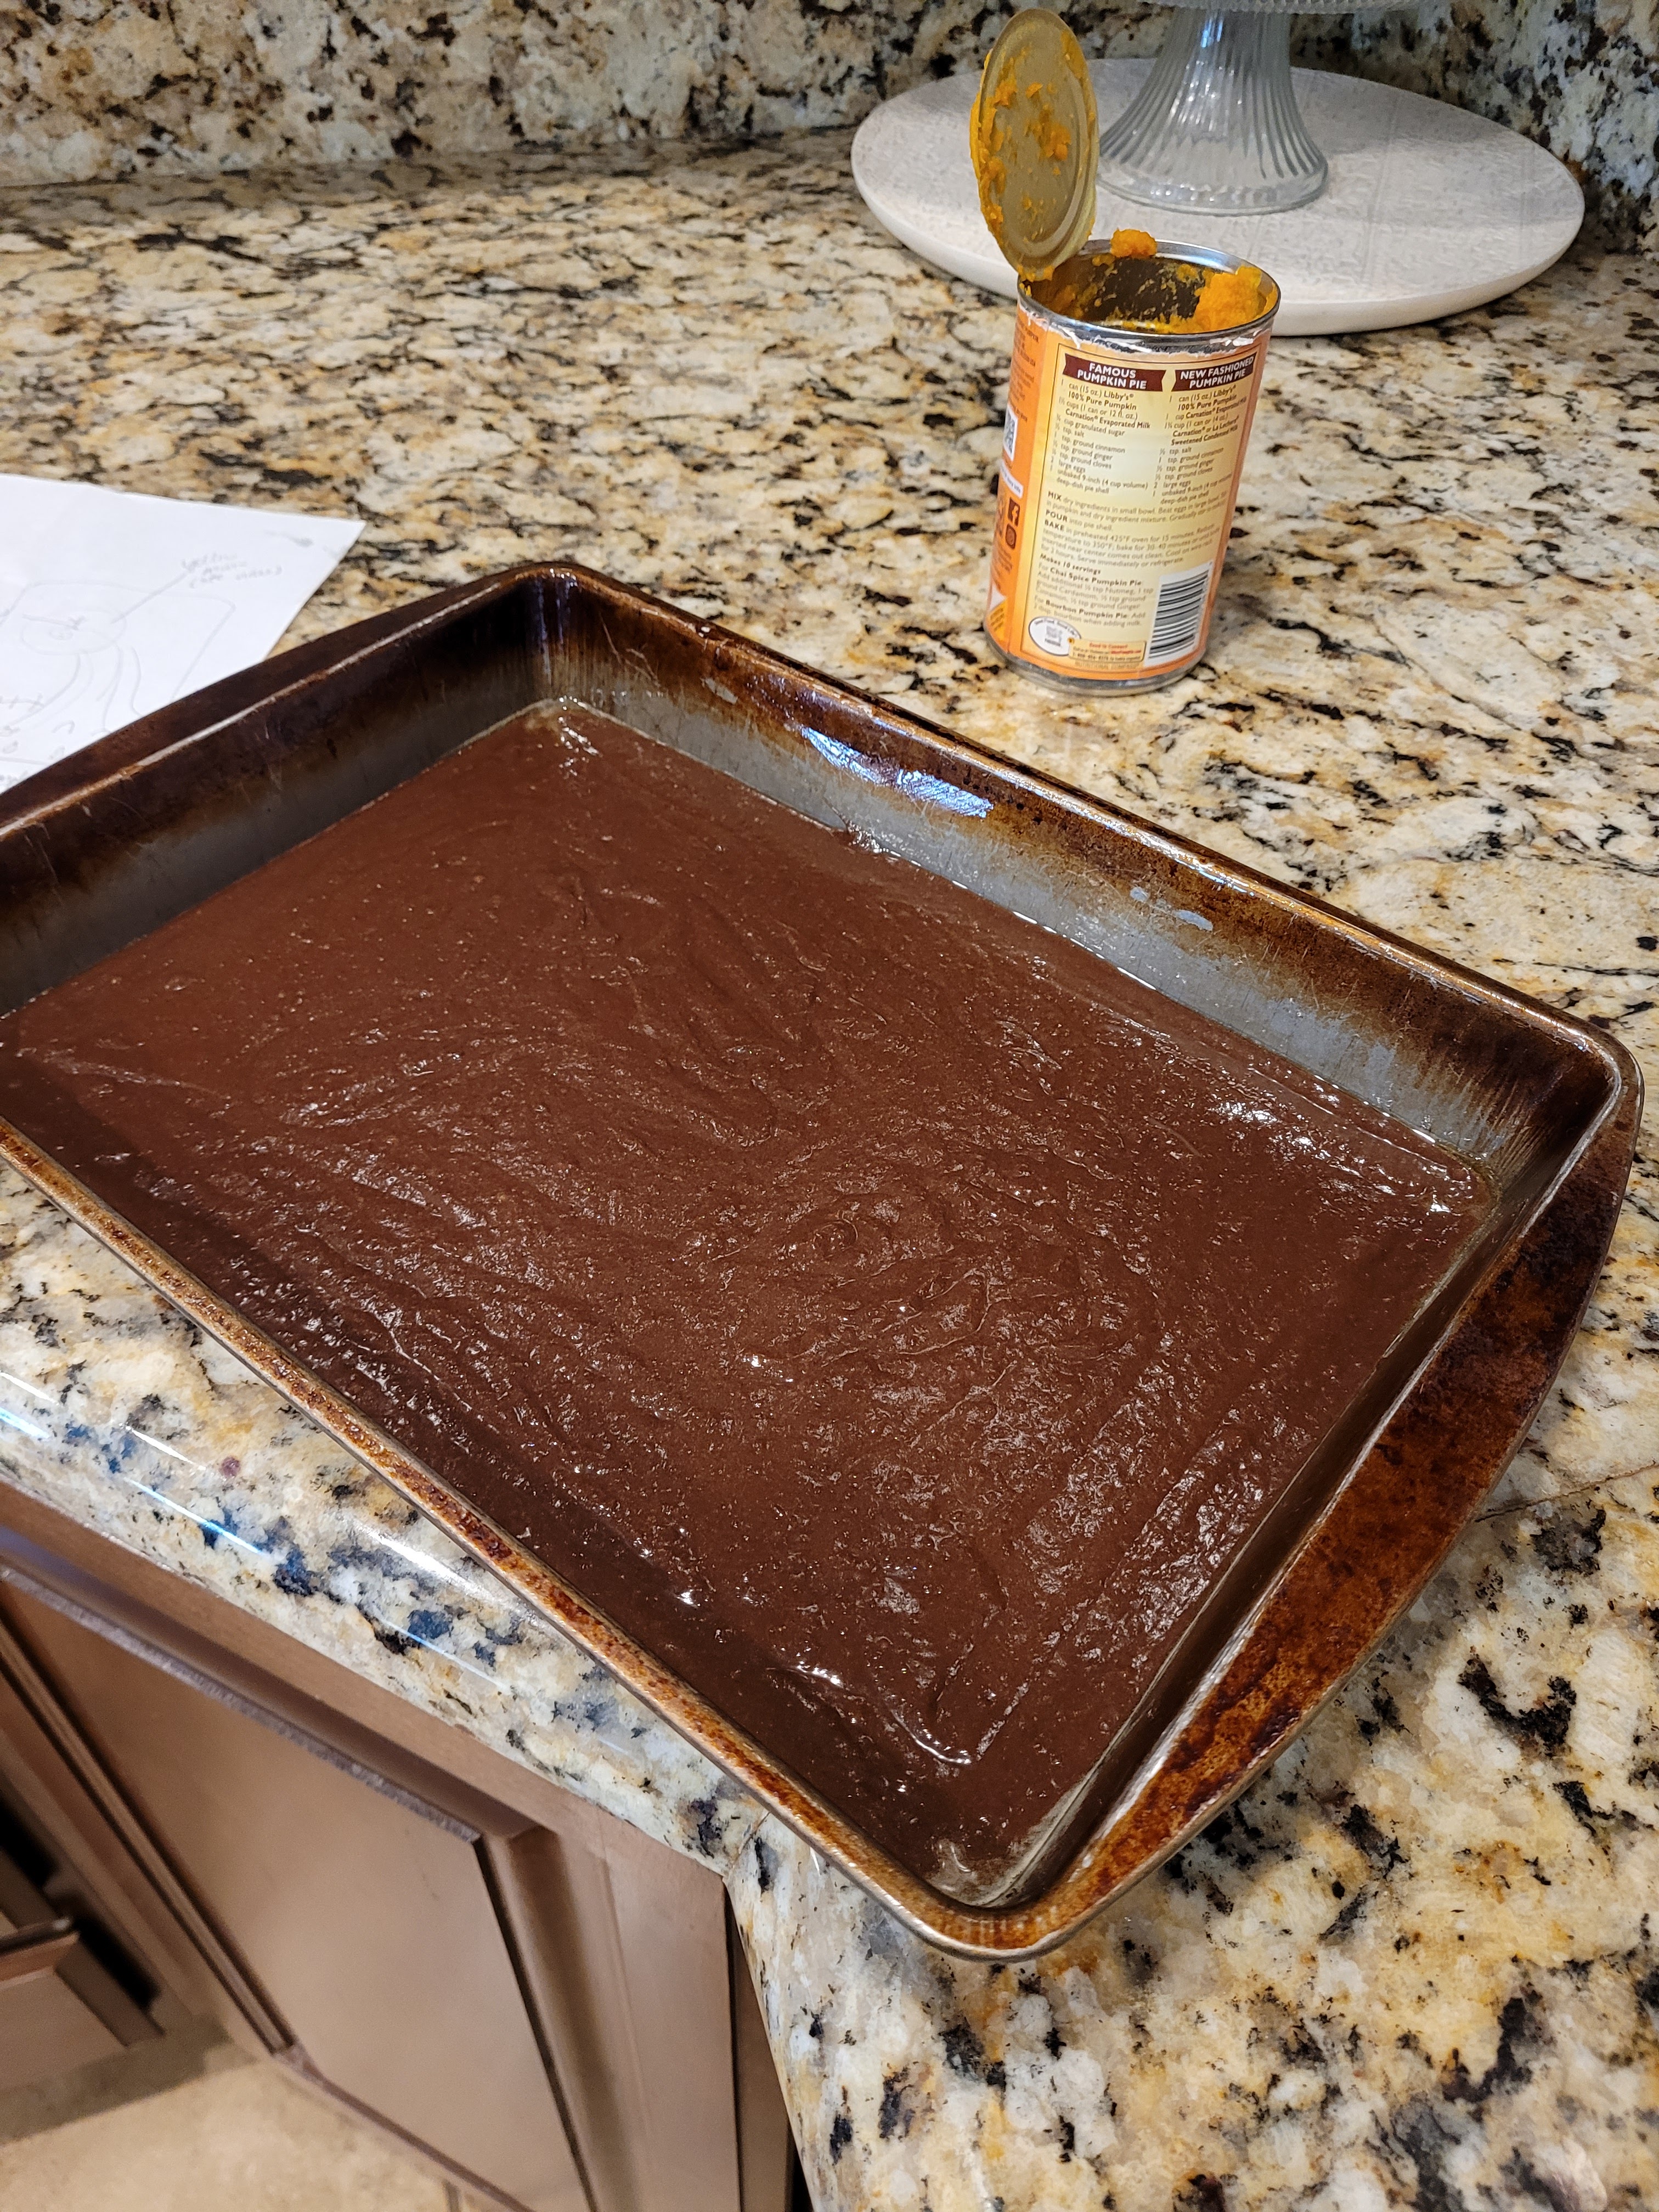
Let’s give ’em pumpkin to talk about. Oh, I may be all about the terrors of the night, but we also know I am all about the sprinkle sparkle–so I had to make the night sky shine with some luster dust that really only picks up on video. It’s a constant war in my head between “make it sparkly, but somehow also make it spooky,” because inside, I am the Wicked Witch of the West just wrapped into a Glinda the Good Witch exterior, but I say, if the broom fits, fly it.Yeah, Jack looks more like a crash test dummy, so he definitely is a good example of why you should always use stencil templates instead of free-handing, especially when you’re distinctly aware of the fact that you cannot draw a stick figure, but I am very pleased with how the rest of this cake turned out. The absolute best part is this is my first pumpkin dessert of the season, which means fall has truly arrived! It is a chocolate pumpkin cake because these are two flavors that just go so right together but no one ever thinks to combine them. But the nutmeg, cloves, and cinnamon in pumpkin spice and the smooth richness of chocolate are a match made in heaven, even though this is an evil Halloween blog. It’s all treats and no tricks, too, because it’s only 226 calories a slice for 9 slices total (I like to eat my cake with a side of cake, so you could easily make this 12 servings for 170 calories).
Pumpkin spice and everything nice, indeed. Even if you only sorta like pumpkin, you’ve gotta try it with chocolate…it’s next level. This cake is SUPER easy to make, you just need:- 1 box of chocolate cake mix
- 1/2 cup (111 grams) unsweetened applesauce
- 1/4 cup (41 grams) egg whites
- 1 cup (244 grams) pumpkin puree
- 3/4 cup of milk
- 1 tsp of pumpkin pie spice (a little goes a very long way…)

Did I eat a spoonful of plain pumpkin? Or is there another reason it’s still on the counter? …IYKYK. Start by preheating your oven to 350 and mixing all ingredients in a stand mixer for 2 minutes on medium high. Pour your batter into a 9×13 baking sheet that has been thoroughly sprayed with Pam or cooking spray beforehand. Bake this for 25 minutes or until a toothpick comes out of the cake clean,
I just love a good sheet cake. Sheet dreams are made of this! Let the cake cool in the pan on top of a cooling rack for 10 minutes before you turn it out onto the cooling rack…I use a tea towel on top of the cake so when I flip the pan over, it’s got somewhere soft to land on the rack. Put this in the fridge to cool off while you make delicious black cocoa cream cheese frosting.

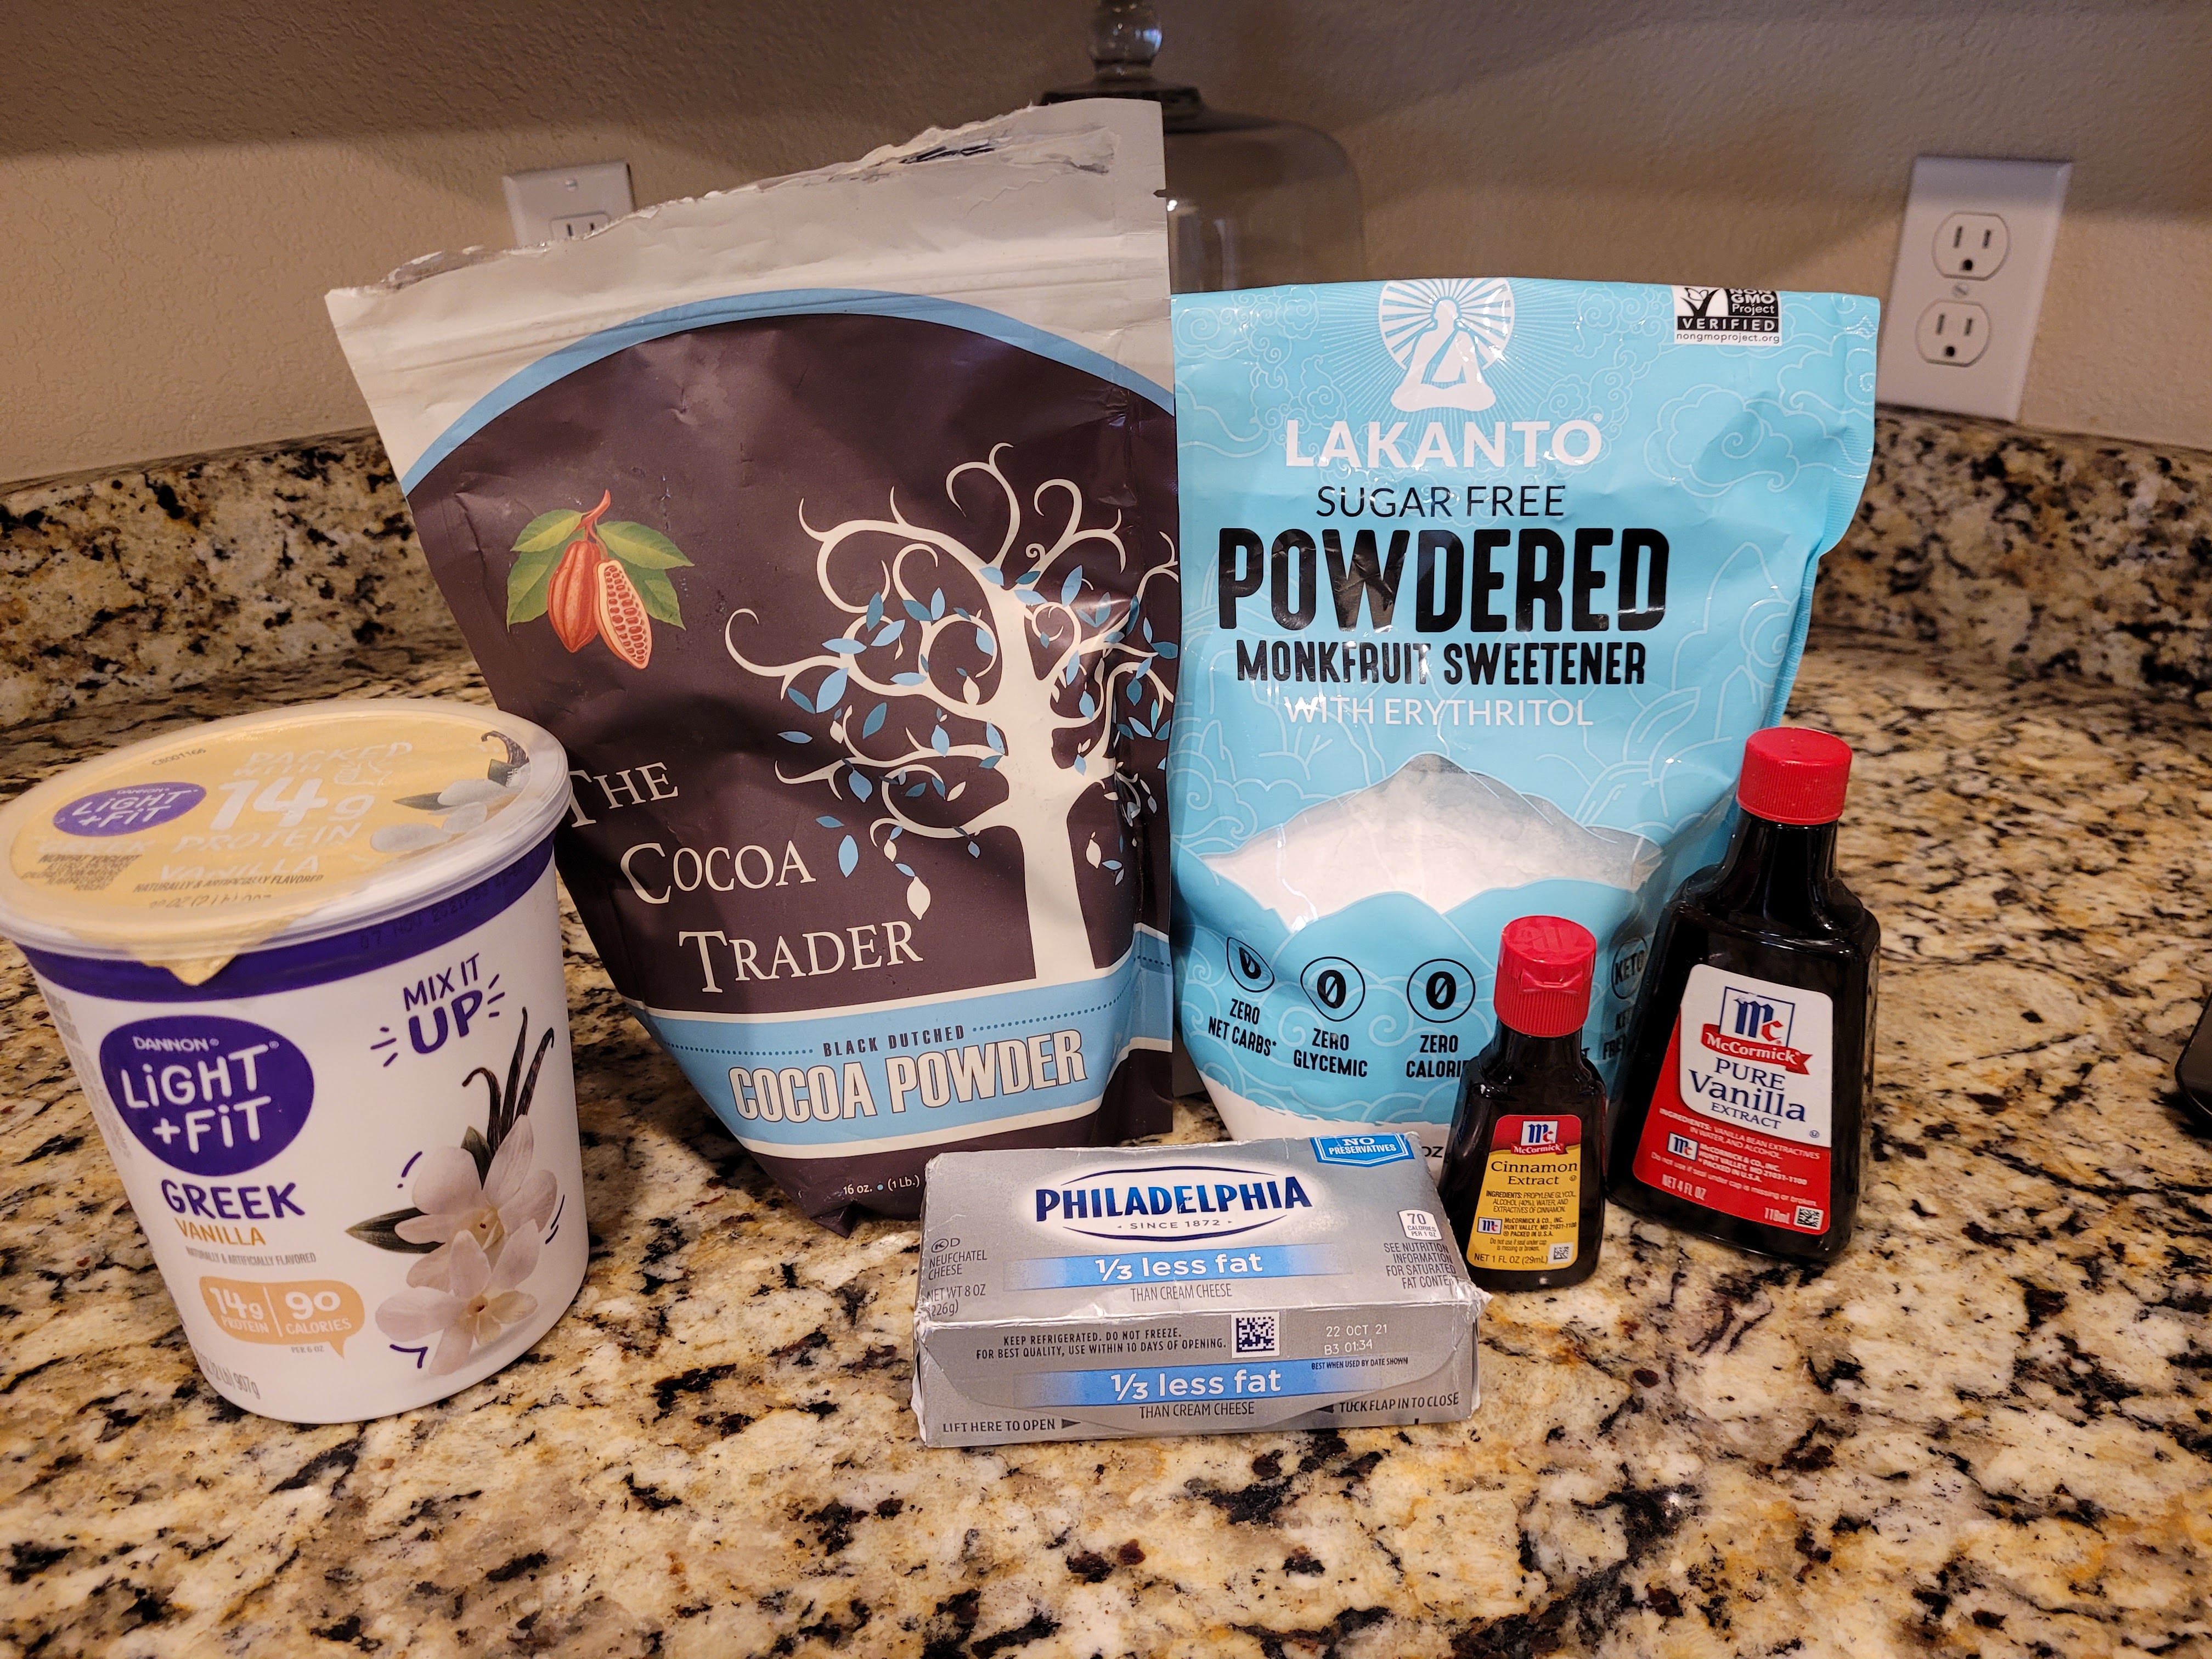
Black cocoa is the MVP of black frosting recipes This is a yogurt and cream cheese frosting, so be sure to strain your yogurt overnight in a sieve. I put a bunch of Viva paper towels (a cheesecloth would also work) in the strainer, then measure out the yogurt I need, put this on the paper towels, cover, and let sit in the fridge overnight to strain. Don’t skip this step if you want to have a stiff, pipe-able frosting. You need:
- 8 ounces of 1/3 the fat cream cheese at room temp
- 1 cup (226 grams) yogurt, chilled and strained –I used vanilla, but if you can find pumpkin flavor…
- 1 1/2 cups Lakanto monkfruit or powdered sugar
- 1 tsp vanilla extract
- 2 tsp cinnamon extract (alternatively, just use 1 TBS vanilla and omit this if you don’t have cinnamon extract)
- 1/4 cup of black cocoa (I find mine on Amazon)
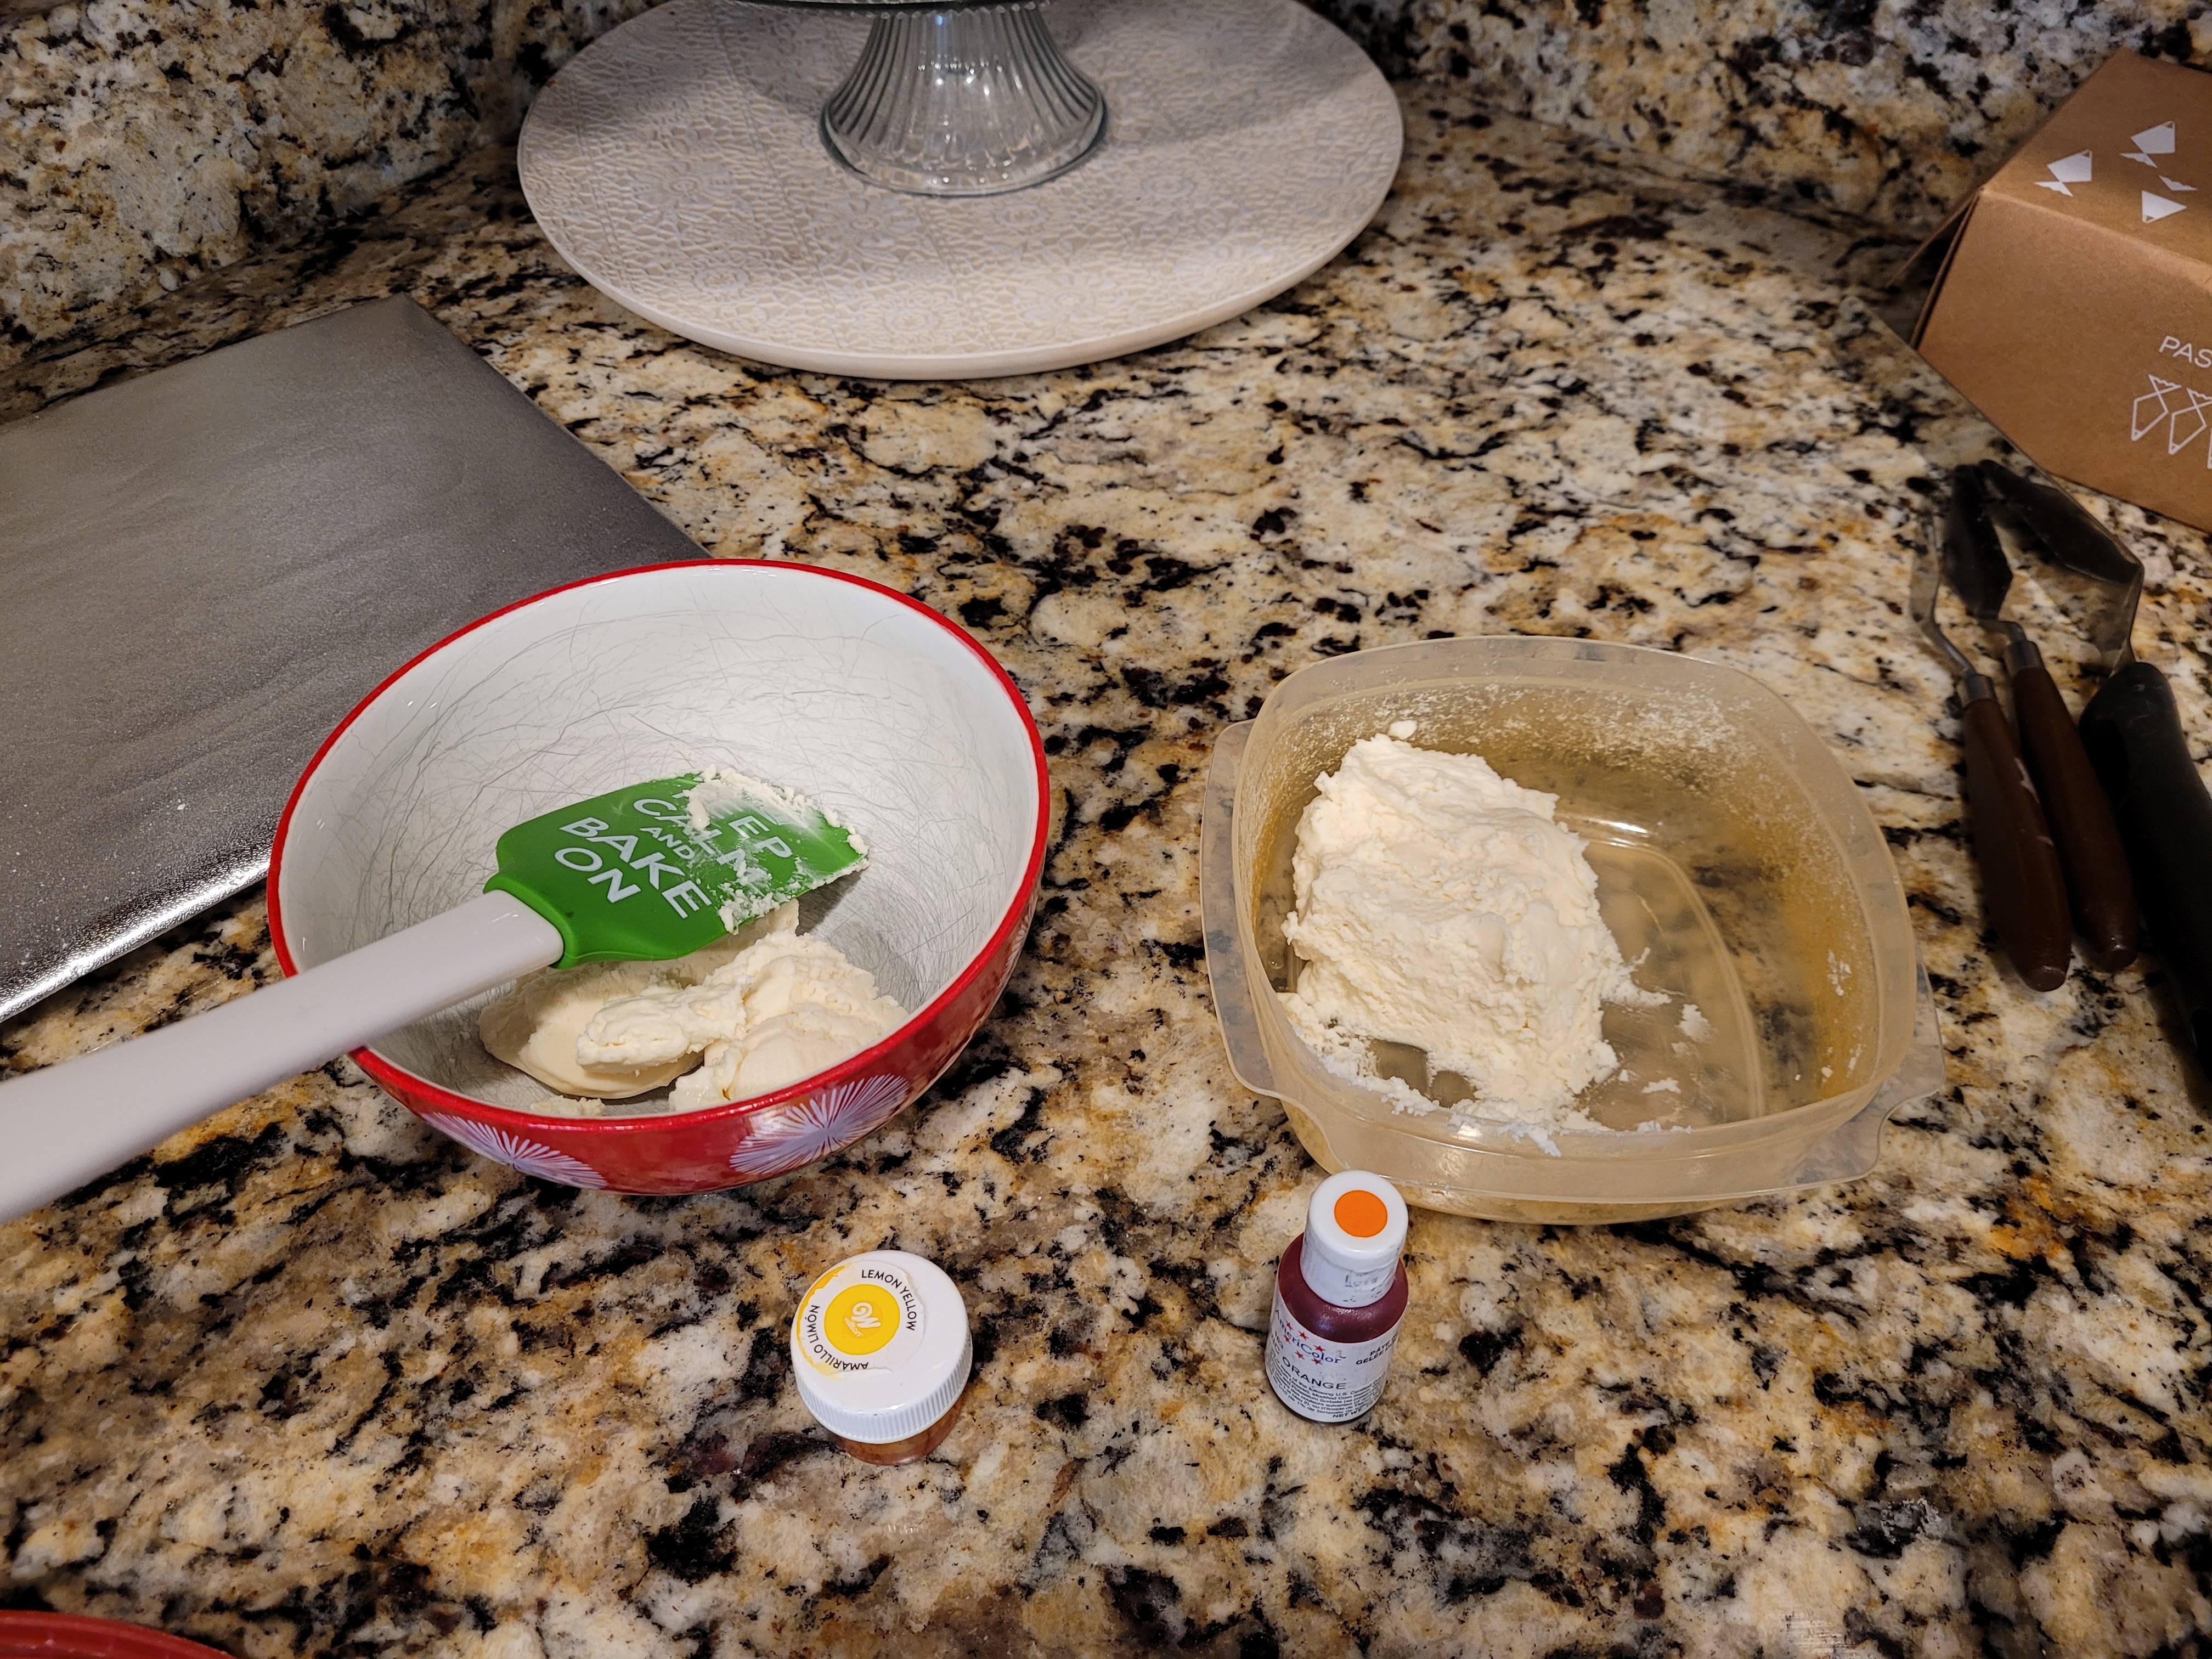
Whip the yogurt and cream cheese together for 2 minutes on medium high before adding the sugar and extracts. Mix well, then remove a portion of plain white frosting to save for the yellow moon and orange pumpkins later. This makes a lot of frosting–I only used about 1/3 since I didn’t frost the sides of my sheet cake. You can freeze the rest for later because having black frosting on hand is handy even during Christmas (too soon).
You don’t need a lot! Now, turn your attention back to the mixing bowl and add the 1/4 cup of black cocoa. Mix well, until you have a frosting so black, you’re worried it might consume your soul.
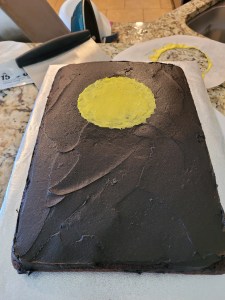
Given the opportunity, it most definitely would. Now, take your fully cooled cake and slather a layer of that gorgeous, soul-sucking black frosting on top. It doesn’t need to be perfectly smooth; I used a sweeping motion with my angled spatula to give the background some texture. Then place it in the freezer to set for 15 minutes while you make your moon stencils.

It’s like staring into the world’s most delicious abyss. 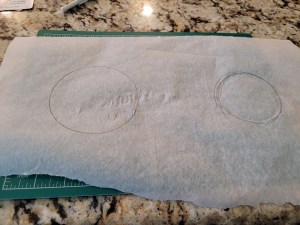
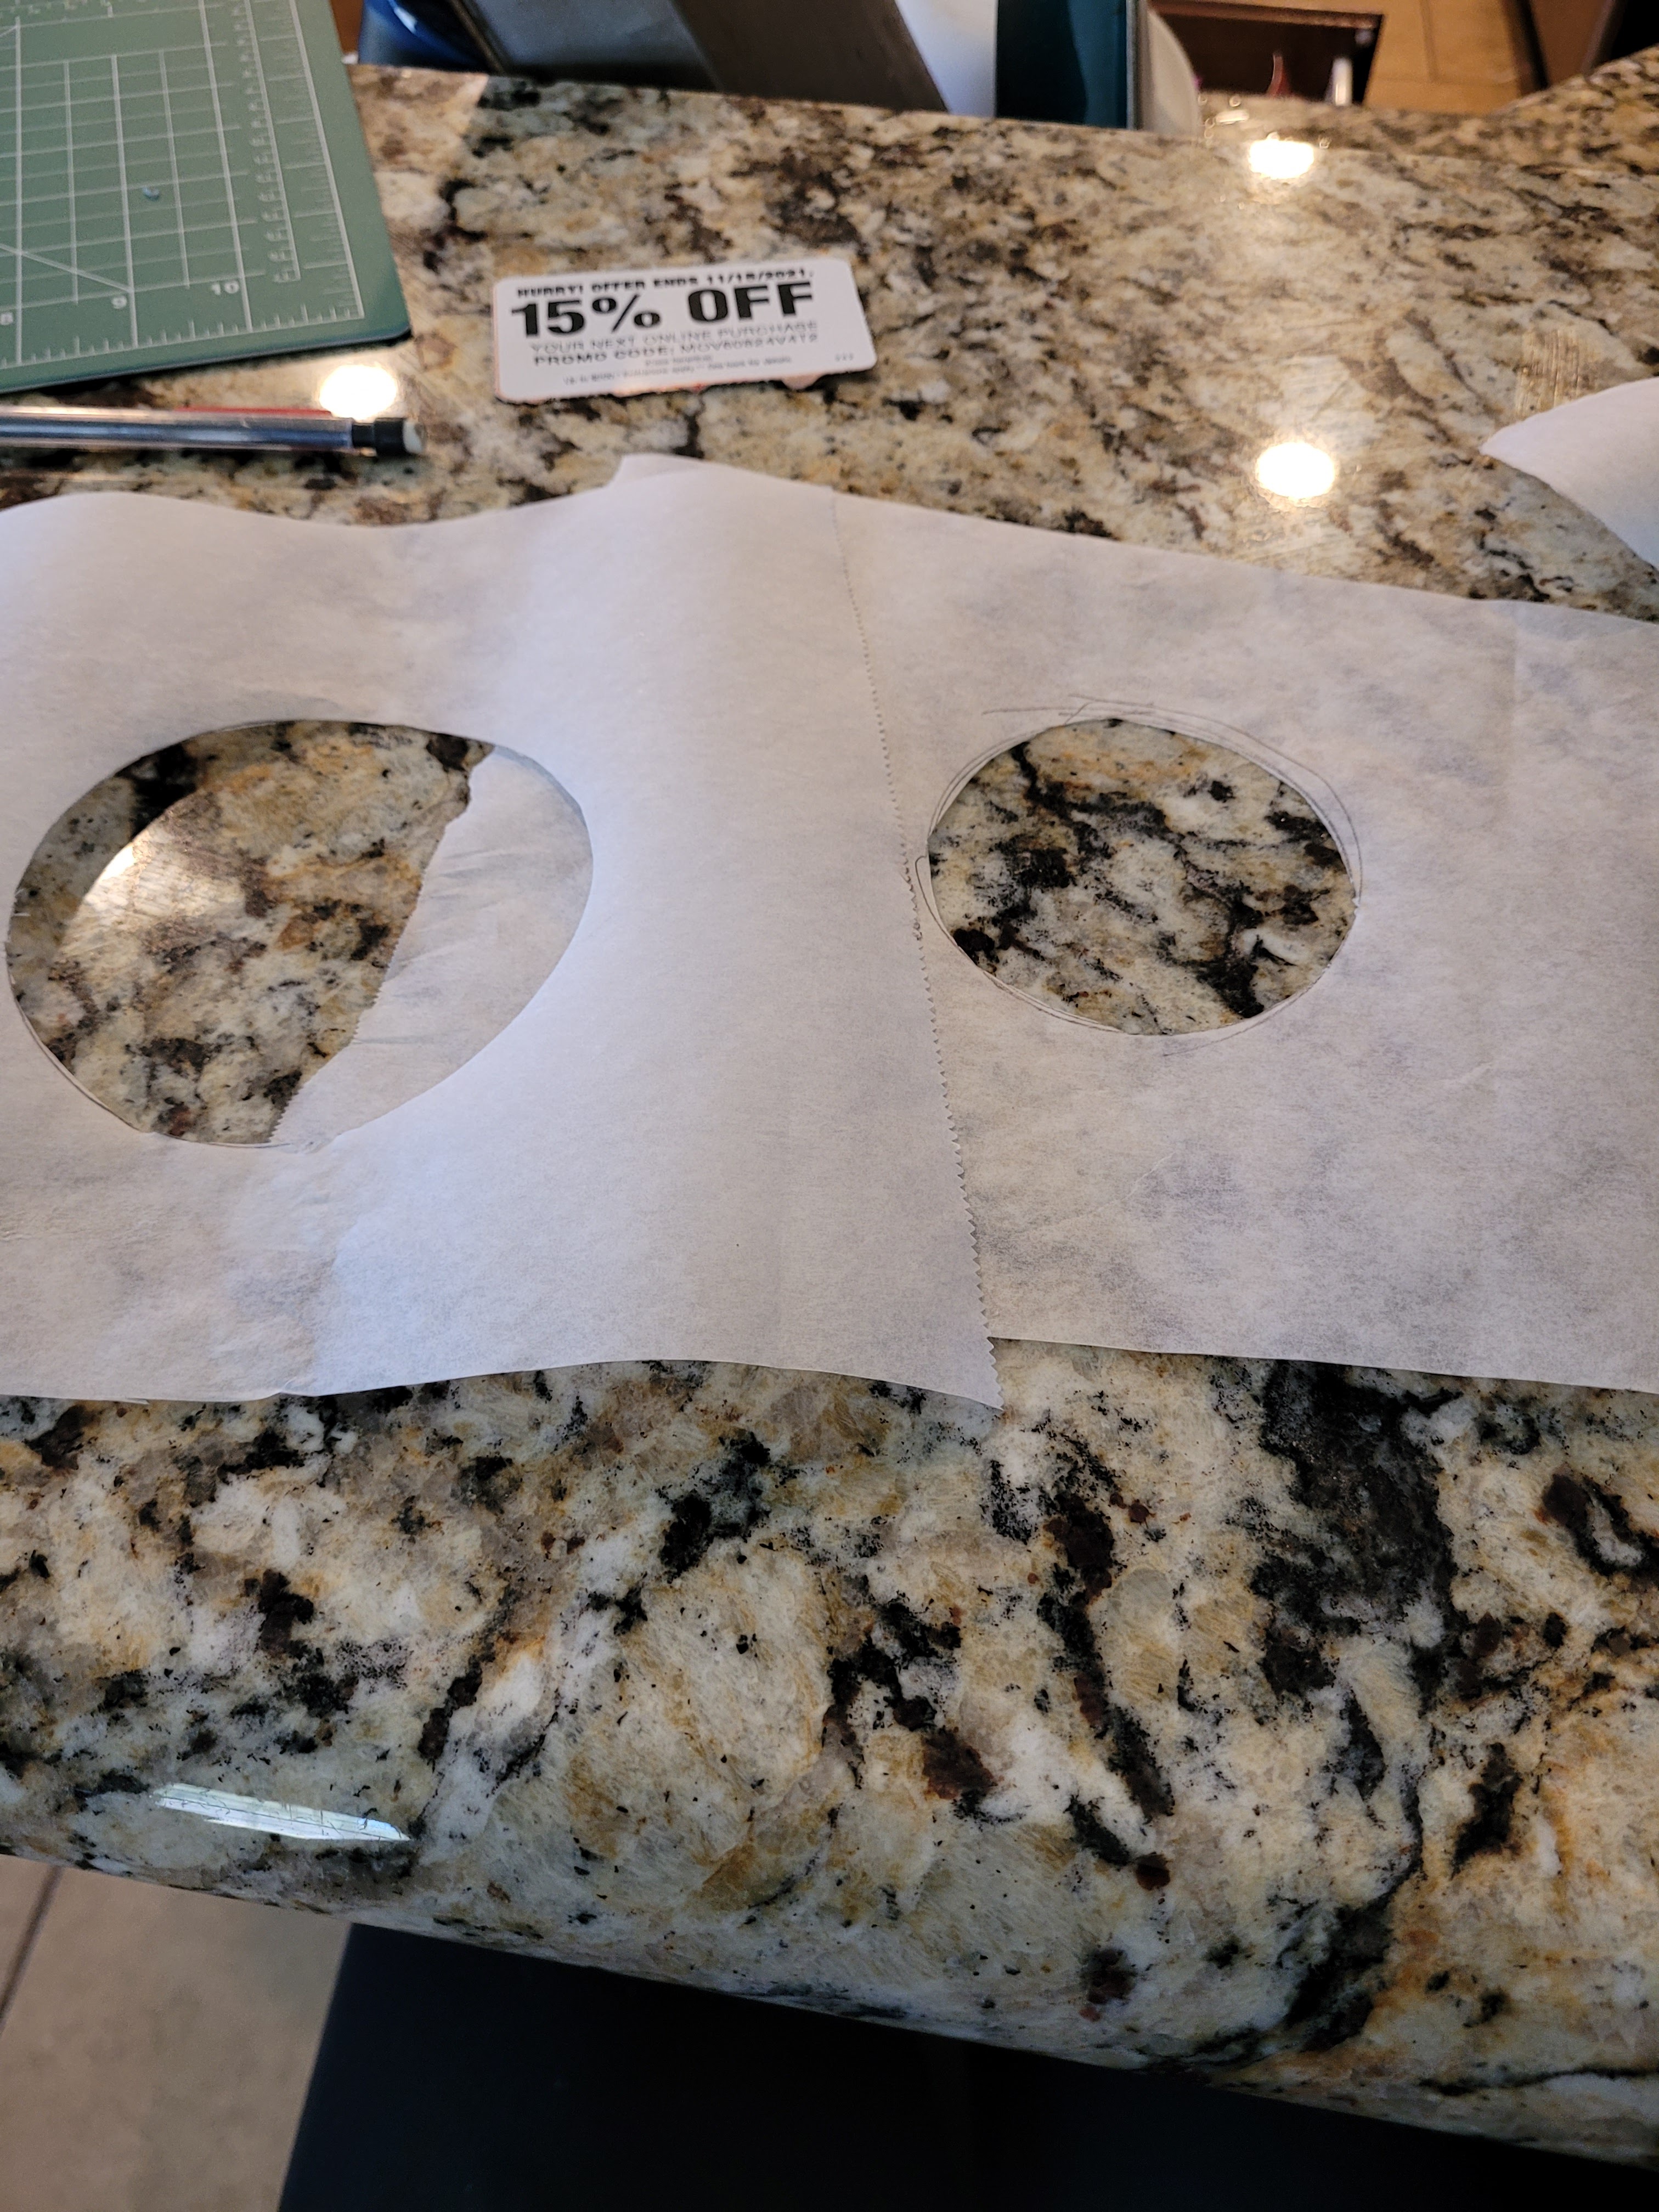
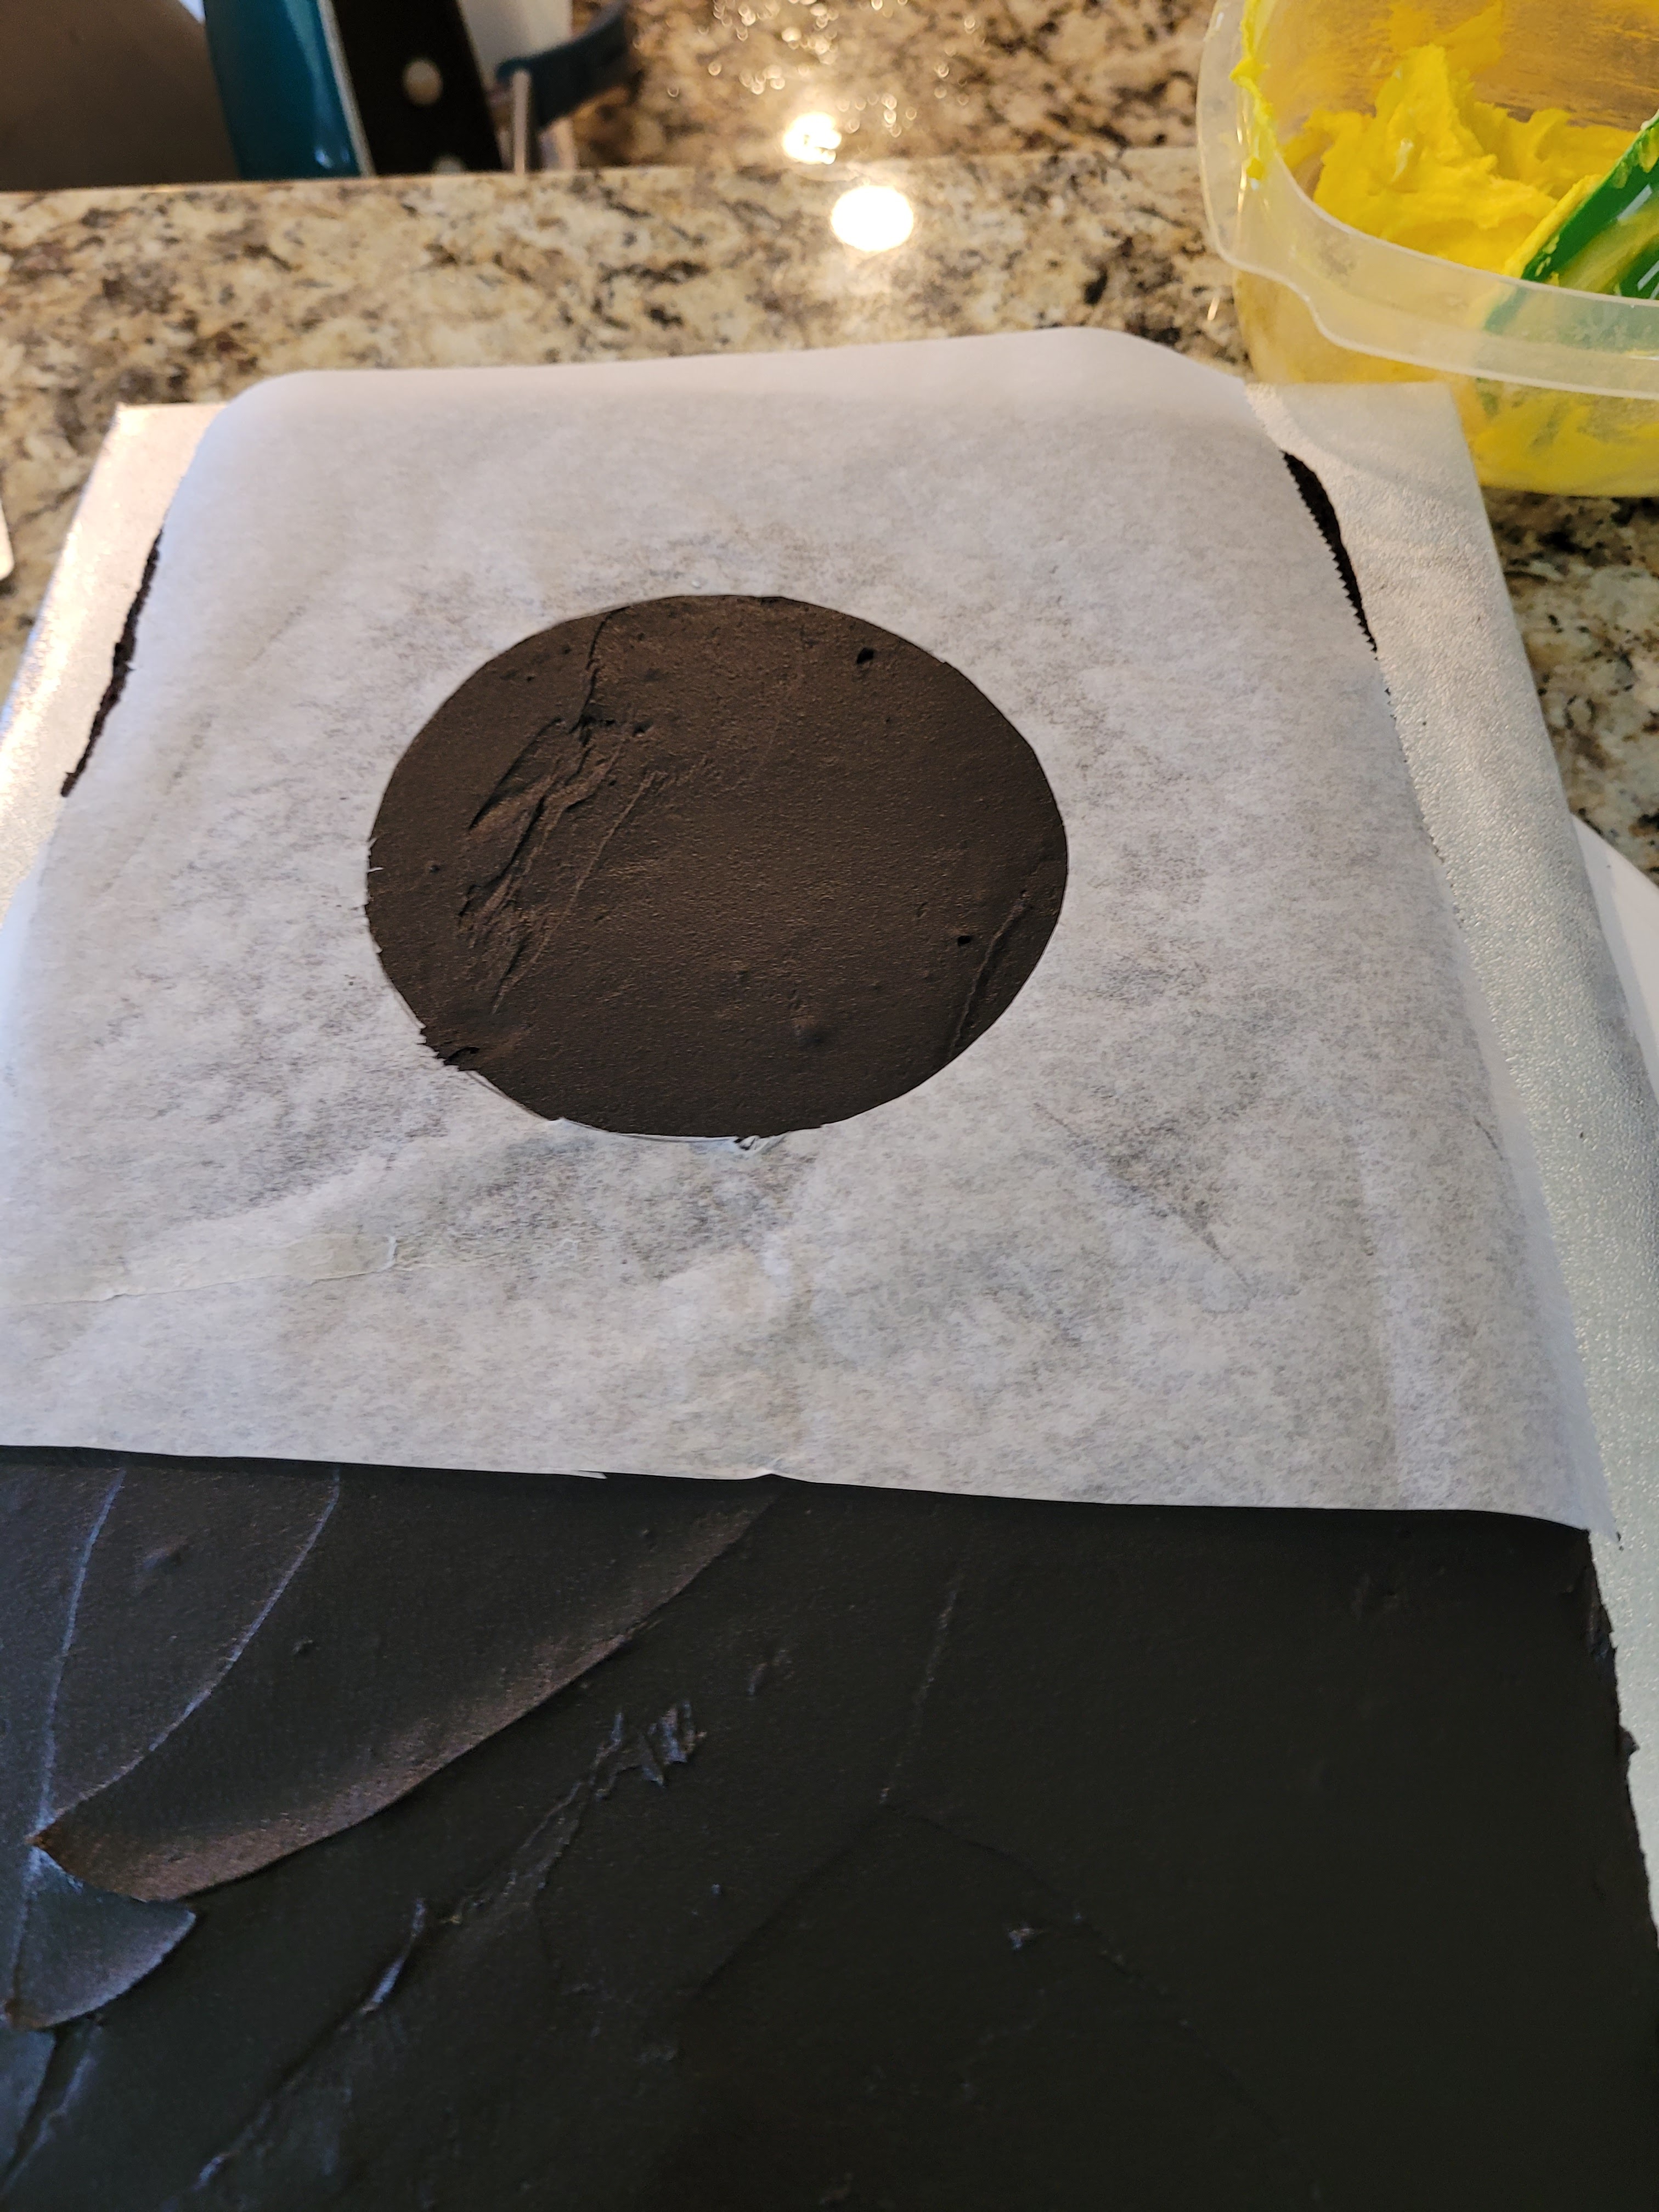
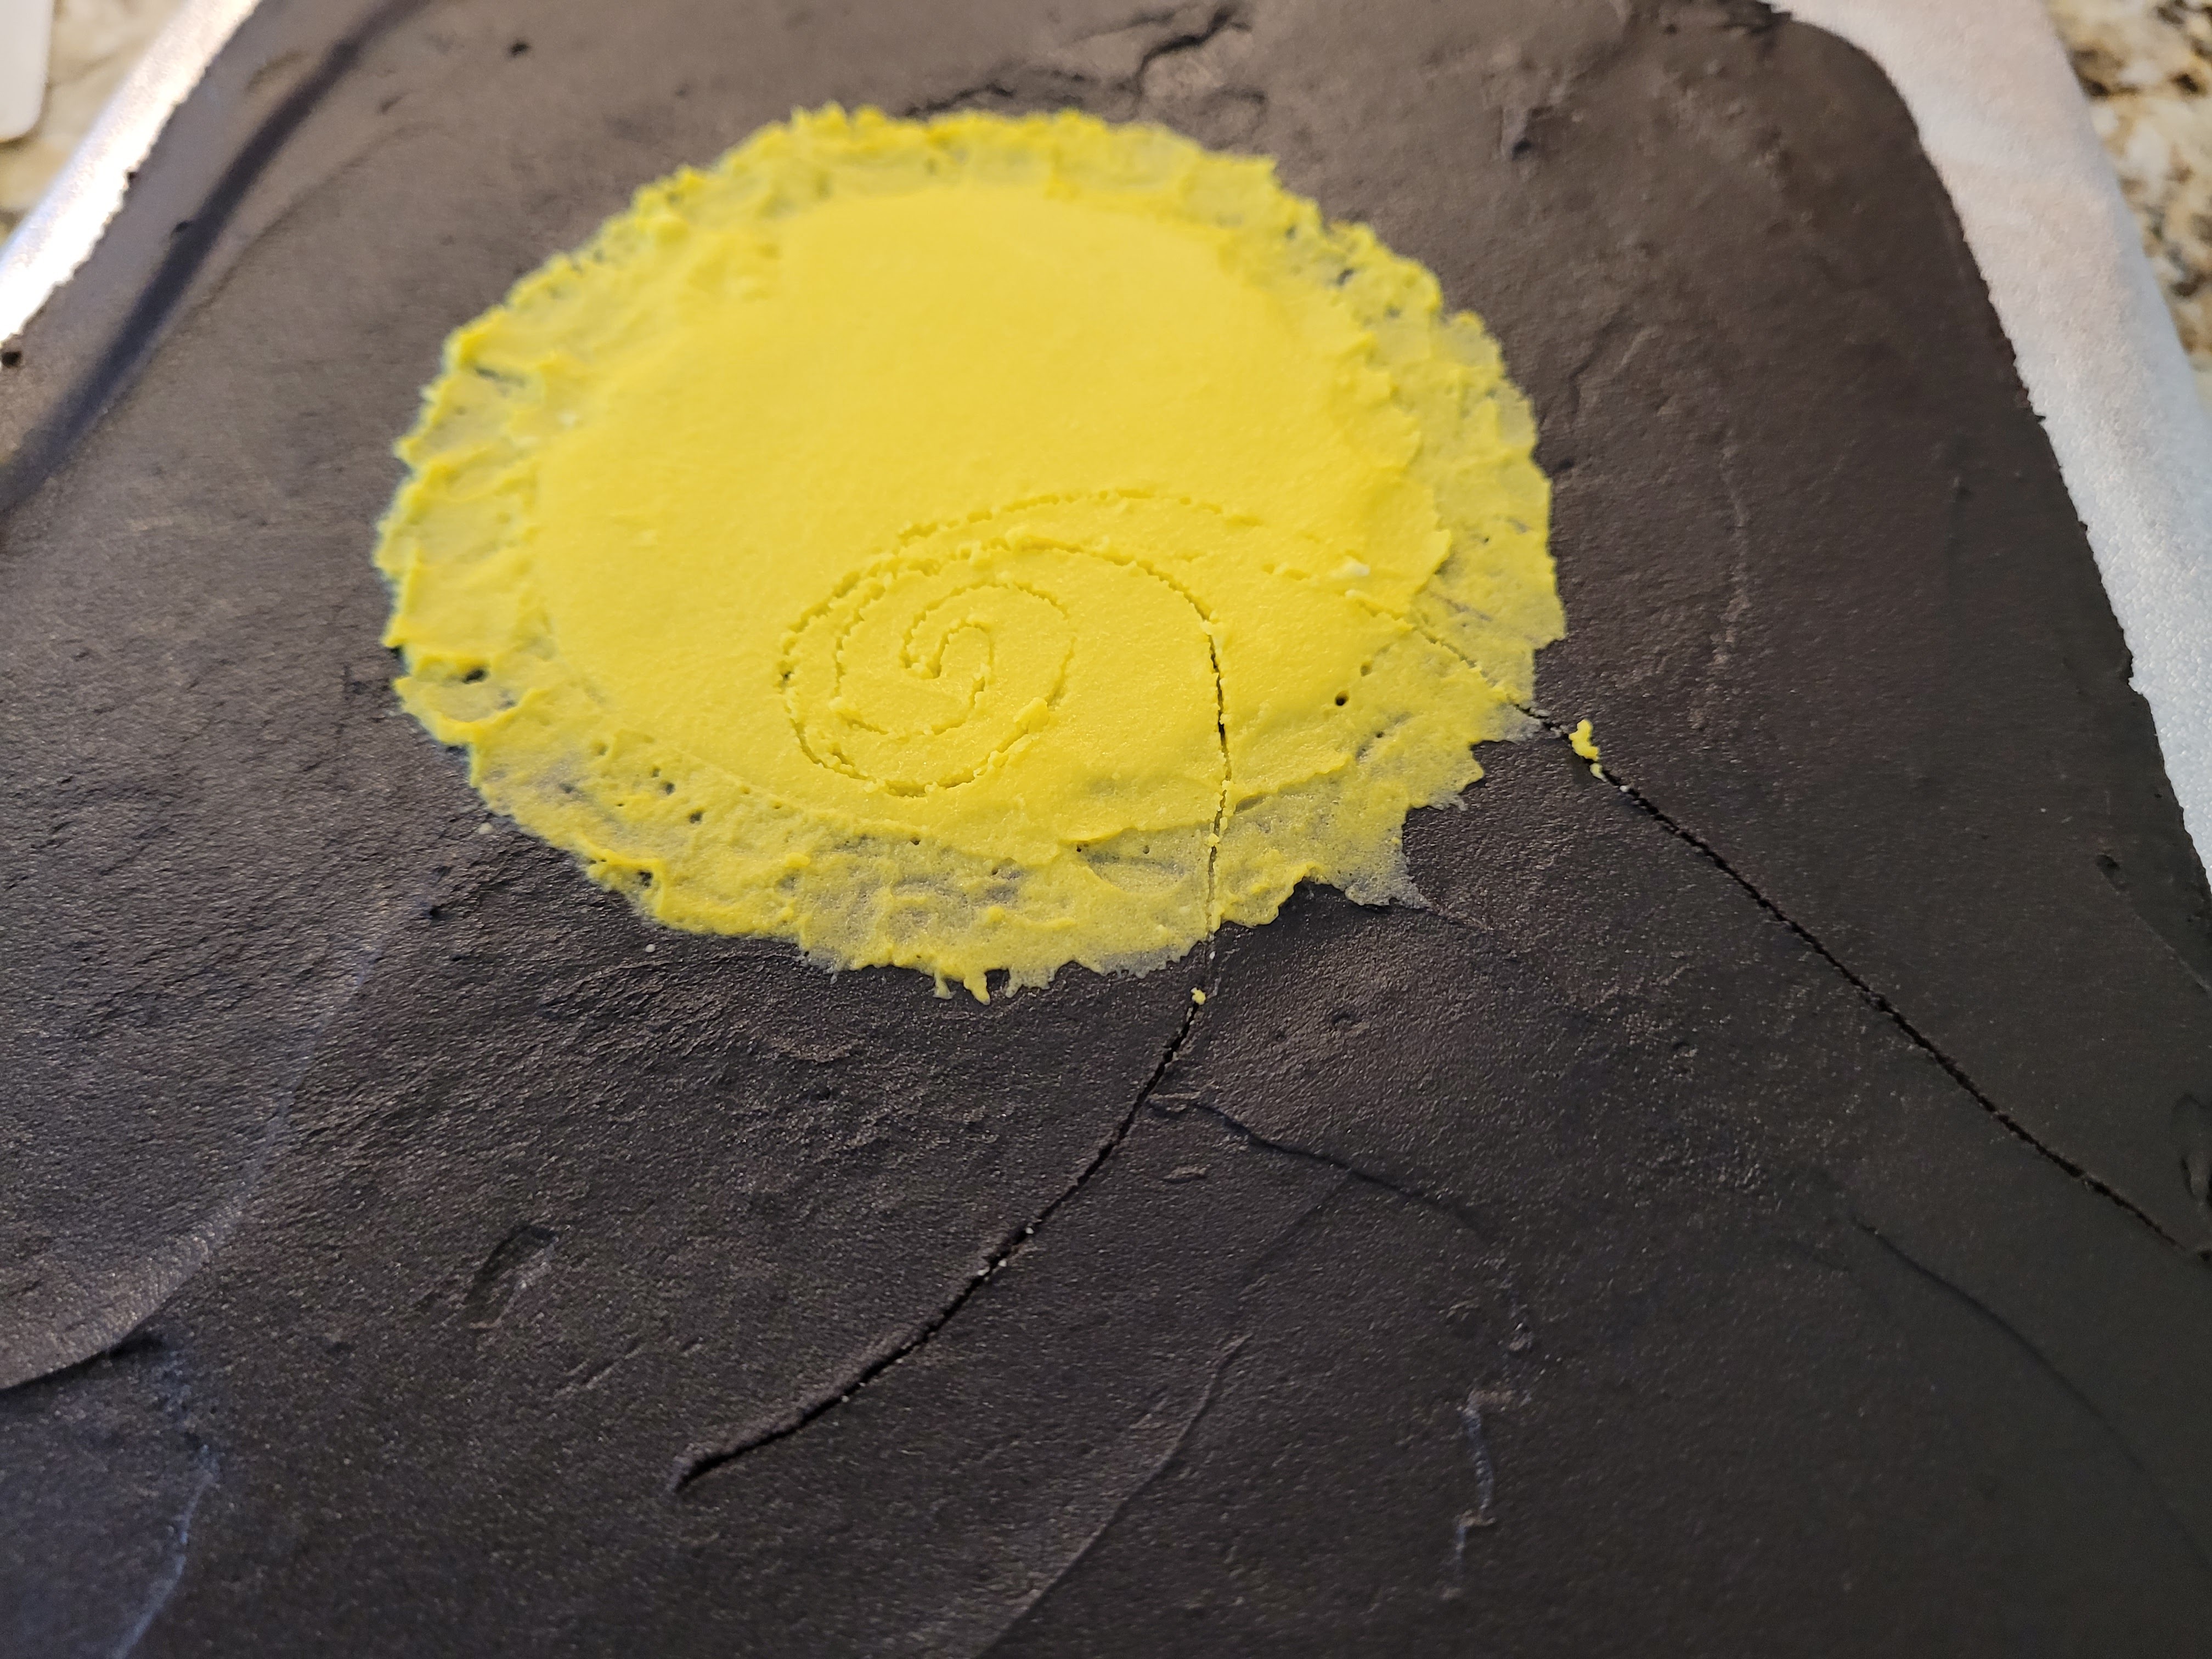
Don’t worry, you don’t need an actual compass. So I took Parchment paper, a pencil, and a drinking glass to trace the cup upside down for a larger circle, and then right side up for a smaller circle/the base of the glass. Then I used my X-acto knife to cut out the inside of the circles.

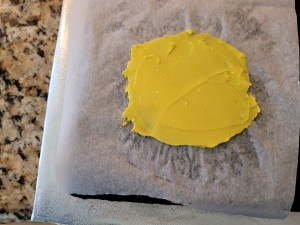
Could be the start of a spooky ghost mask. I cut these into two sheets, as pictured above. You’ll need the larger hole to start with. So take some of your reserved frosting, and dye it yellow. You’ll also need an angled spatula or a paint brush.

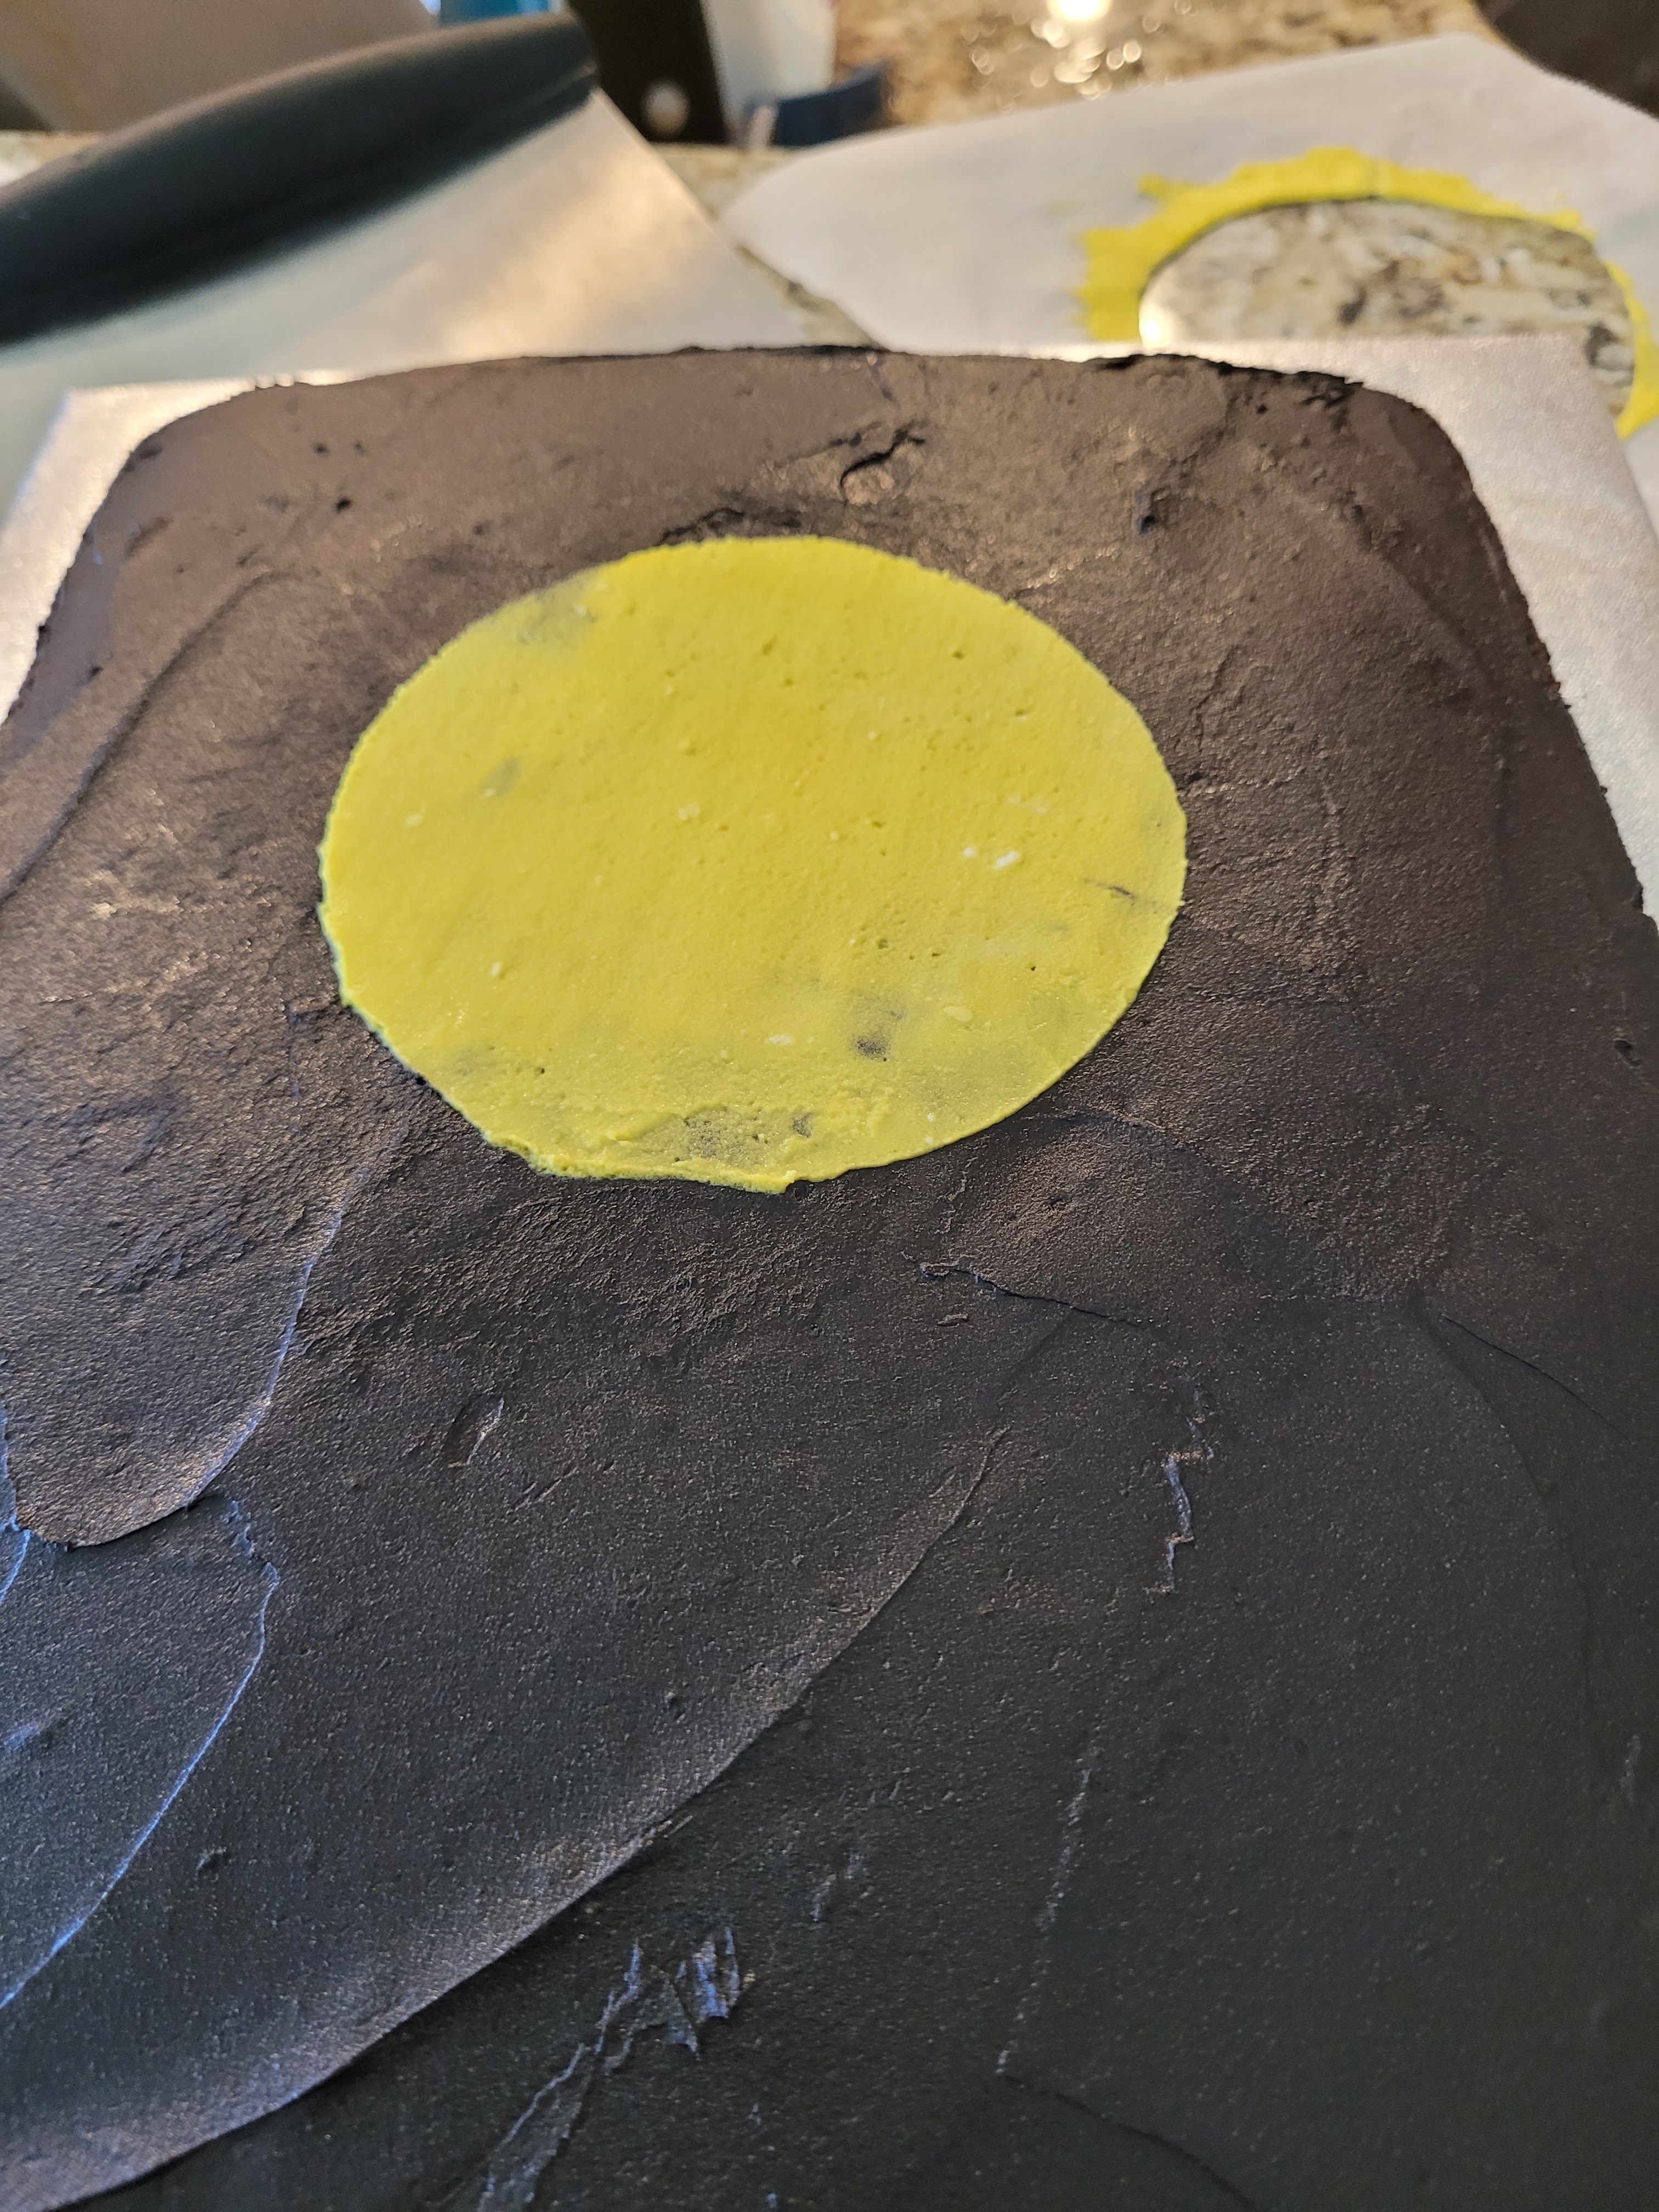
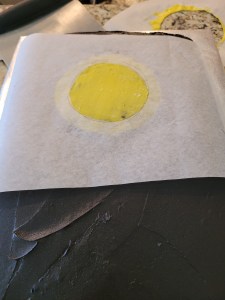
The dark side of the moon. Place your larger template on top of your chilled frosting. Use your fingers or a paintbrush to gently push the edges down into the frosting so the yellow doesn’t bleed everywhere.
Heap some yellow frosting into the center of the circle and spread it out evenly. Then use your angled spatula to smooth out and sweep off excess frosting. This is going to be the outer glow of the moon, so you only need a very thin layer of frosting. Some black peeping through is fine:

I see the light! You can remove your template now and use your paintbrush or angled spatula to make small sweeping motions from the outside edges of the moon out to the black on the cake to create that halo.
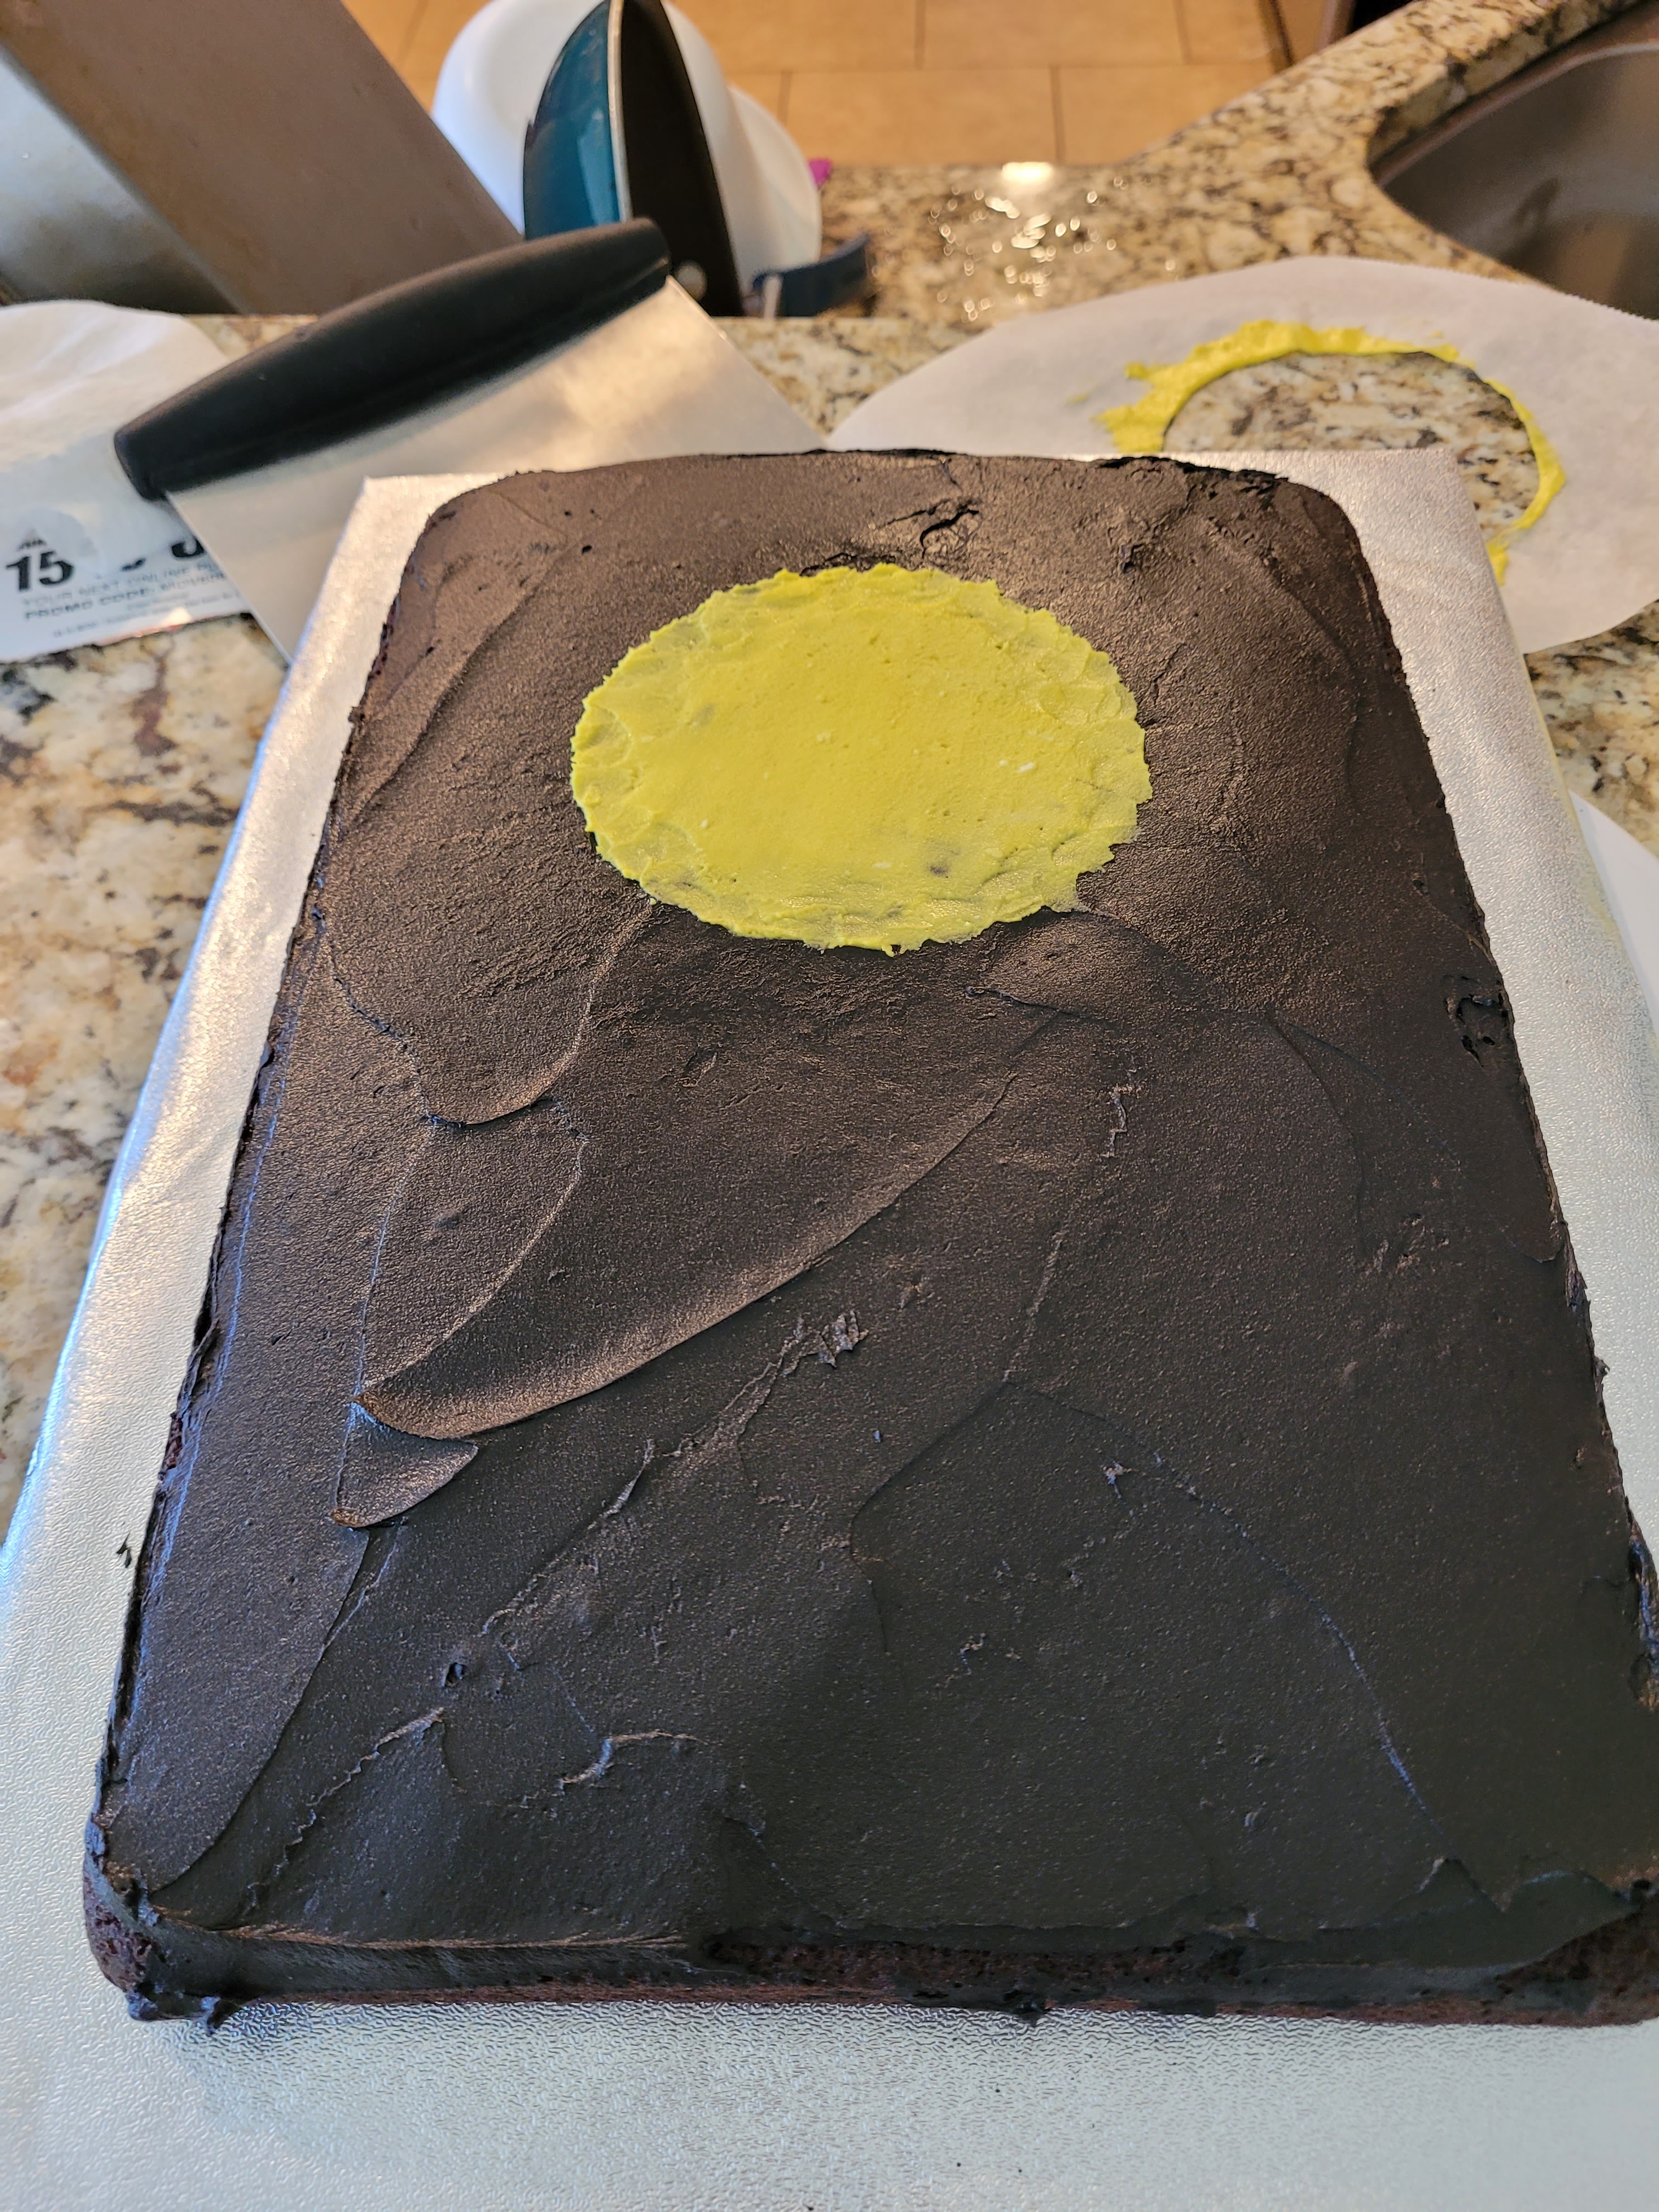
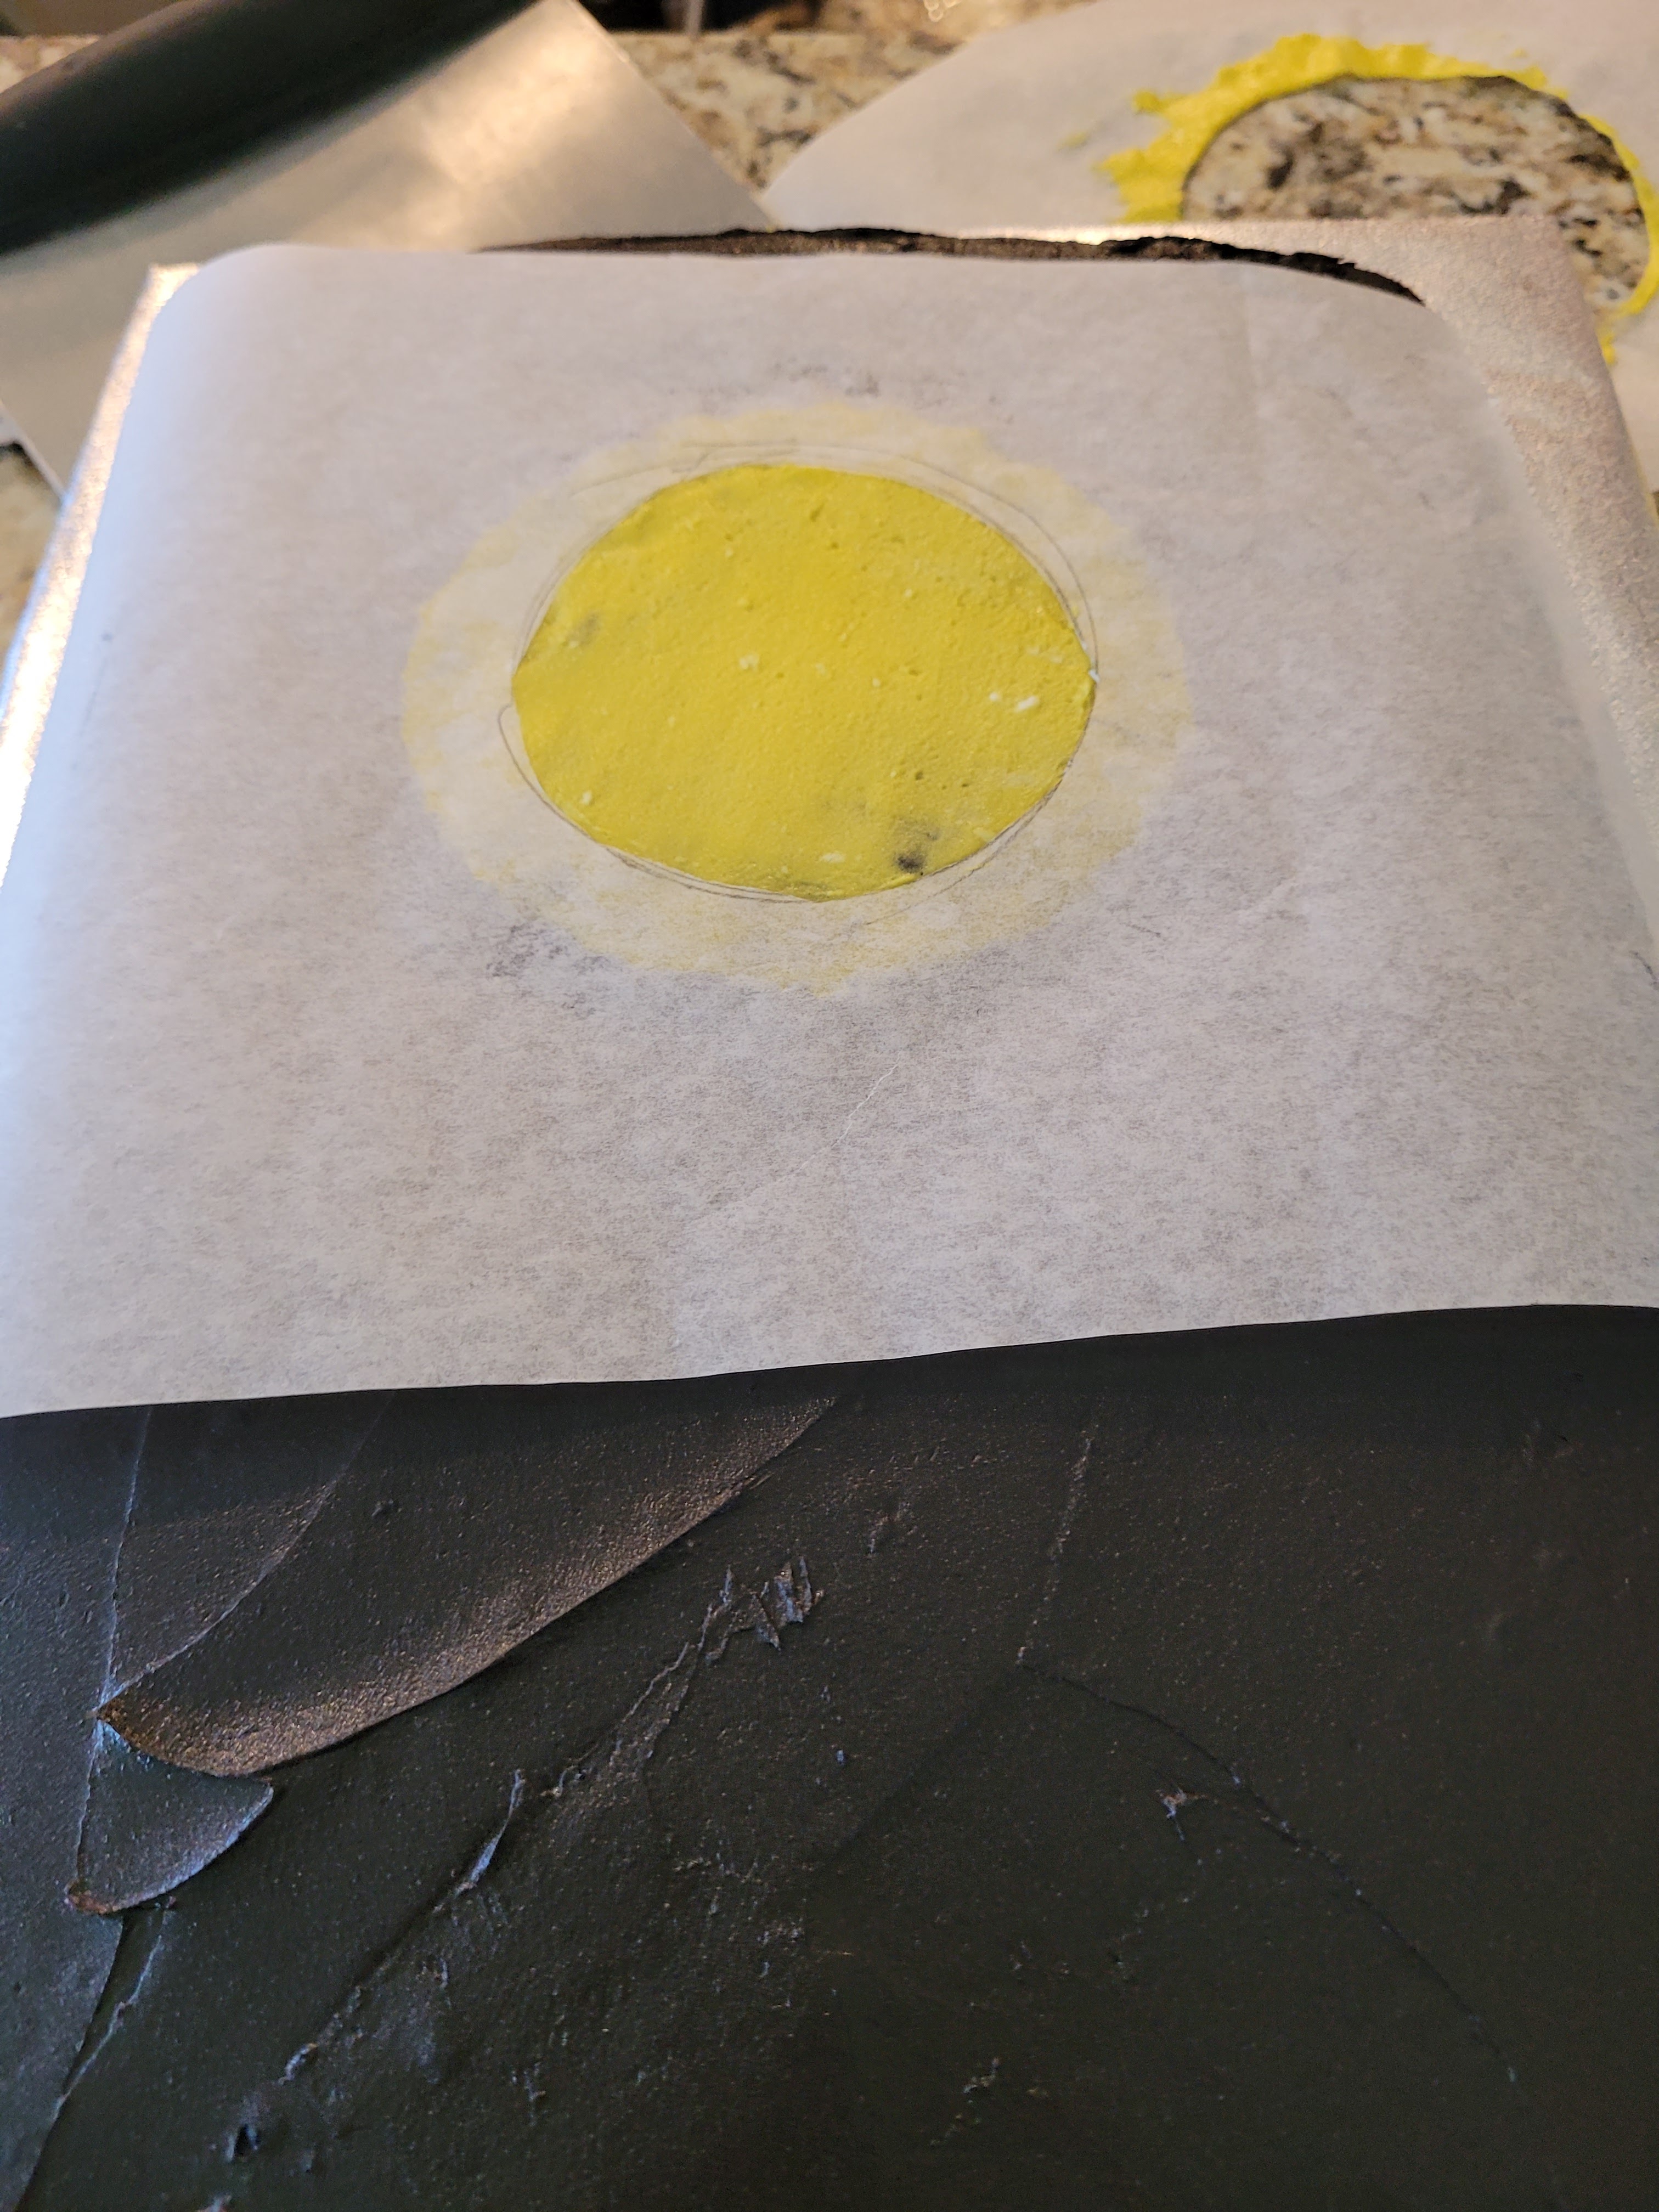
Hide your werewolves. Now, throw back in the freezer for 15 minutes to let this layer set. Then you’ll repeat with the smaller circle to make the main moon.
1. Smaller Stencil. 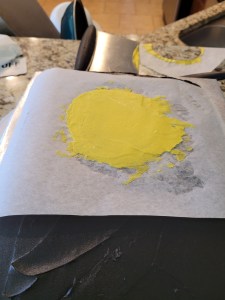
2. Even more yellow frosting & smoothing out with angled spatula. 
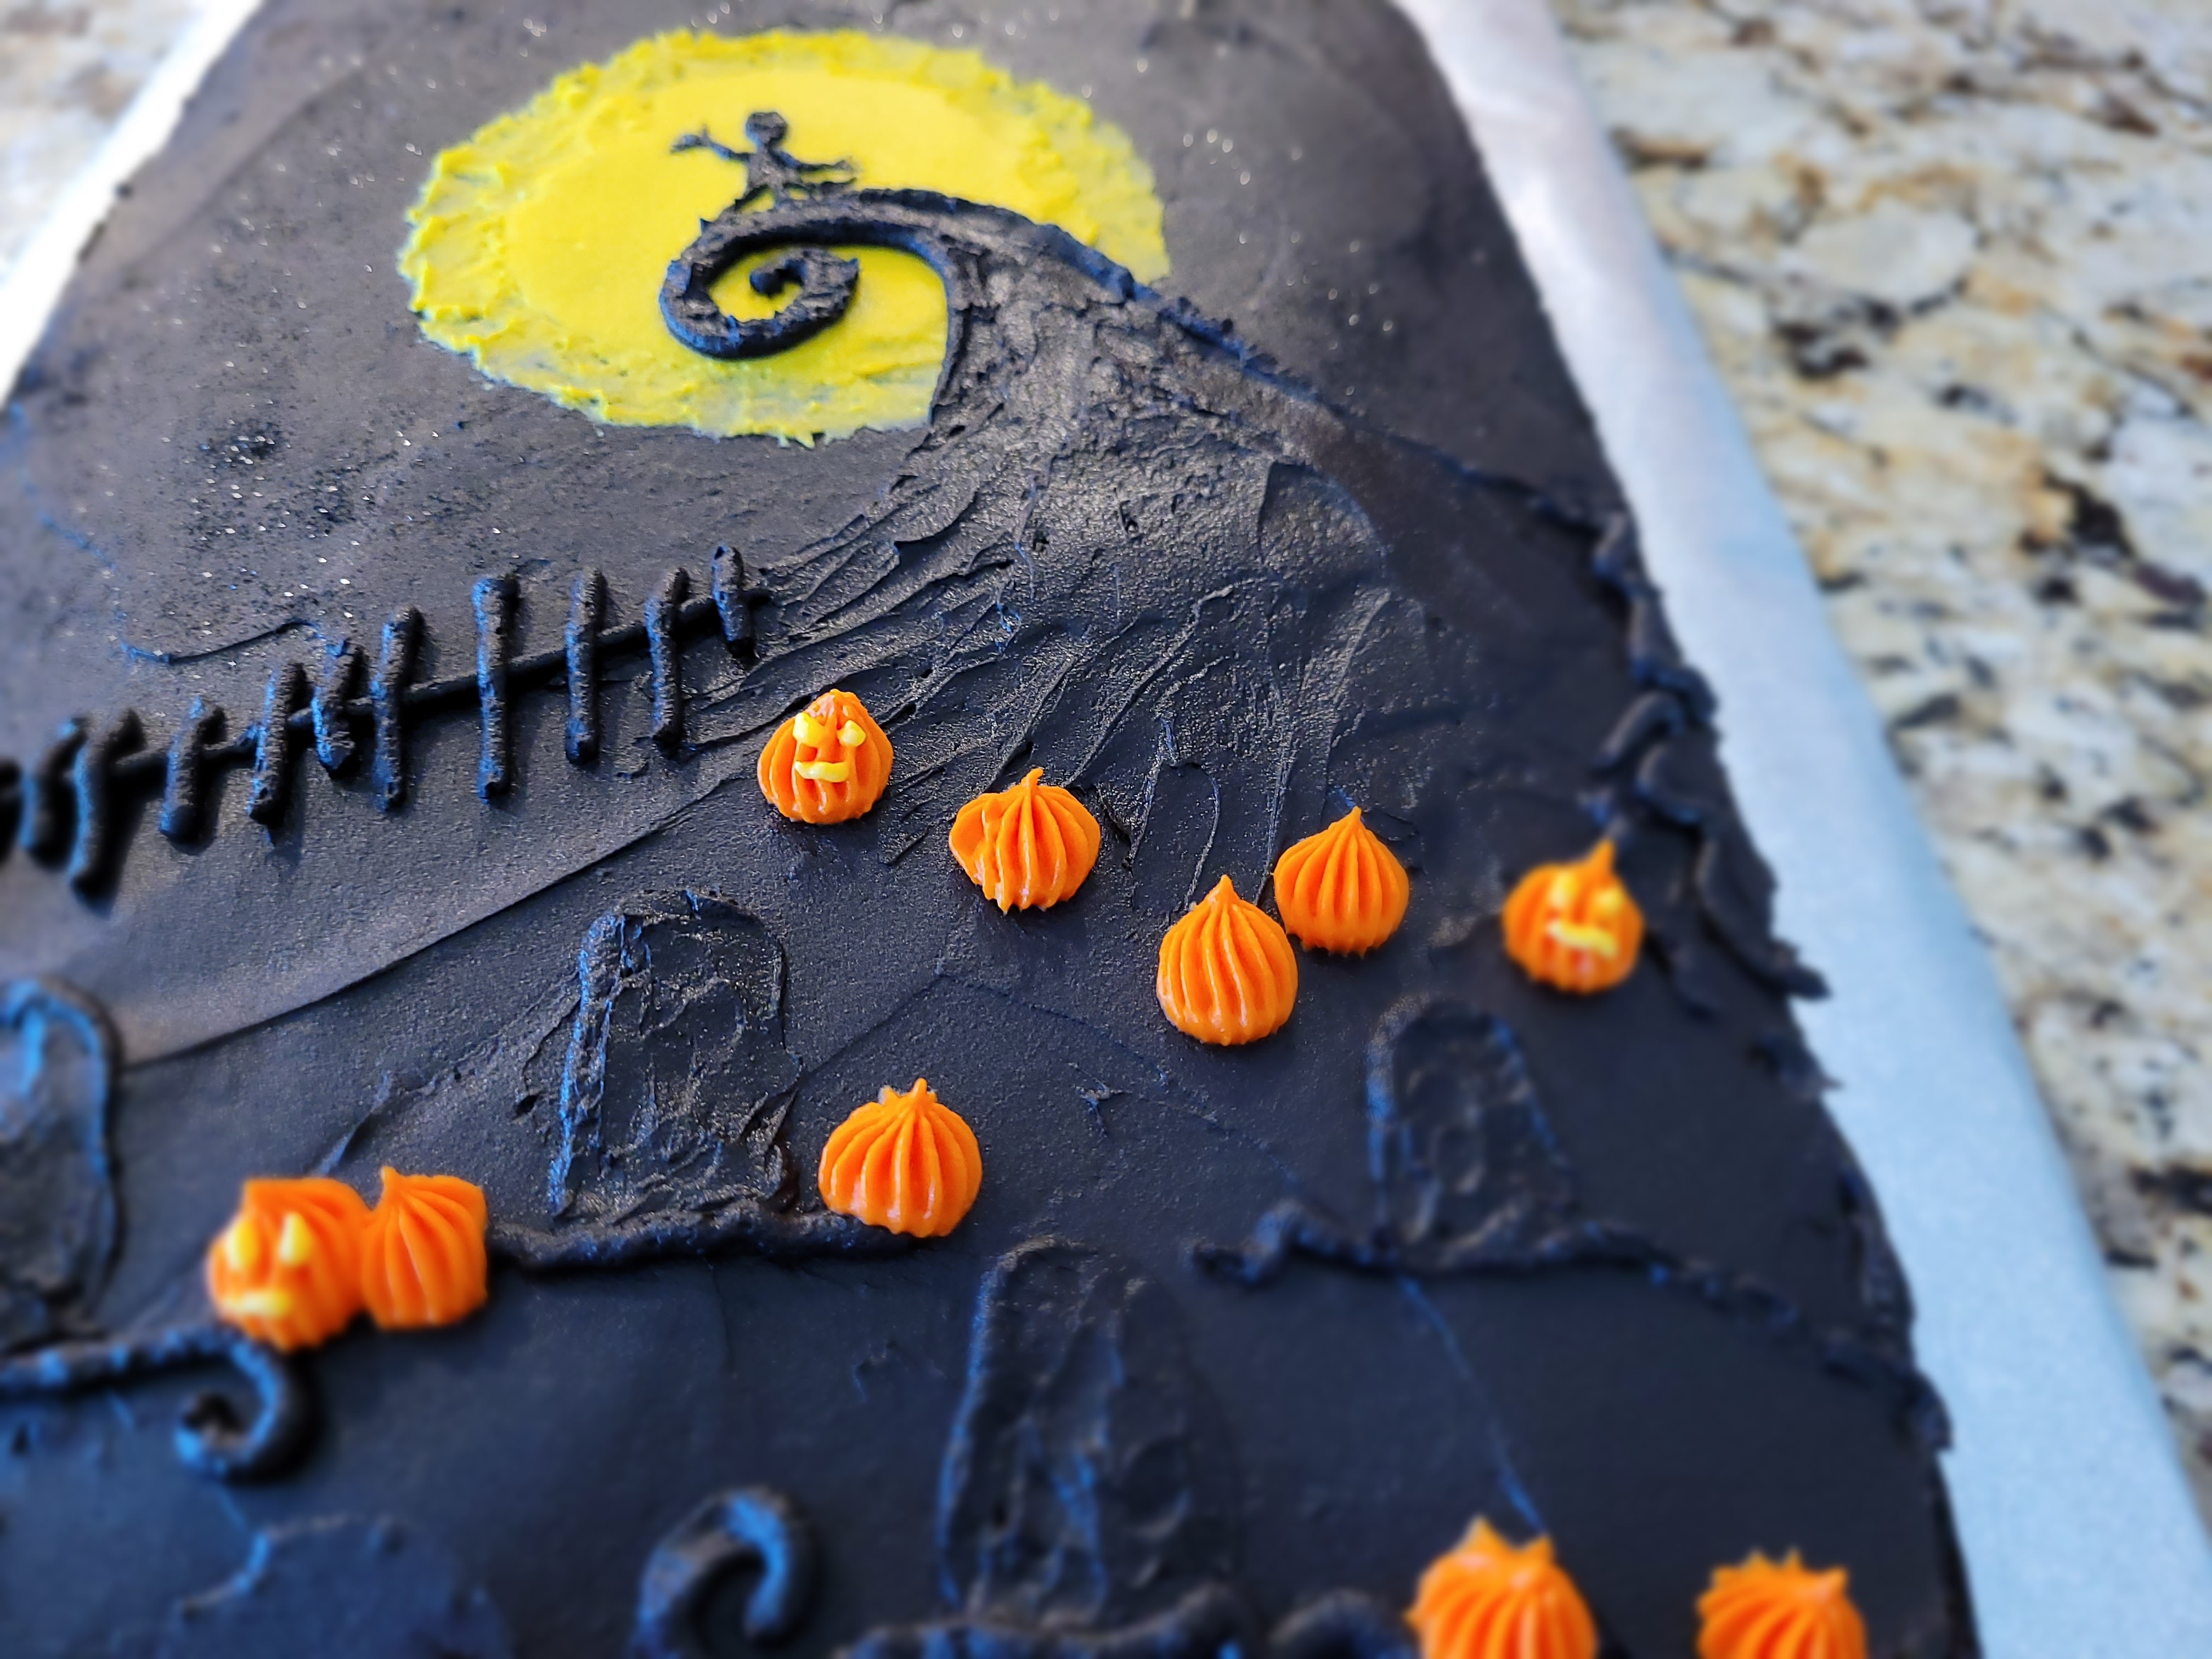
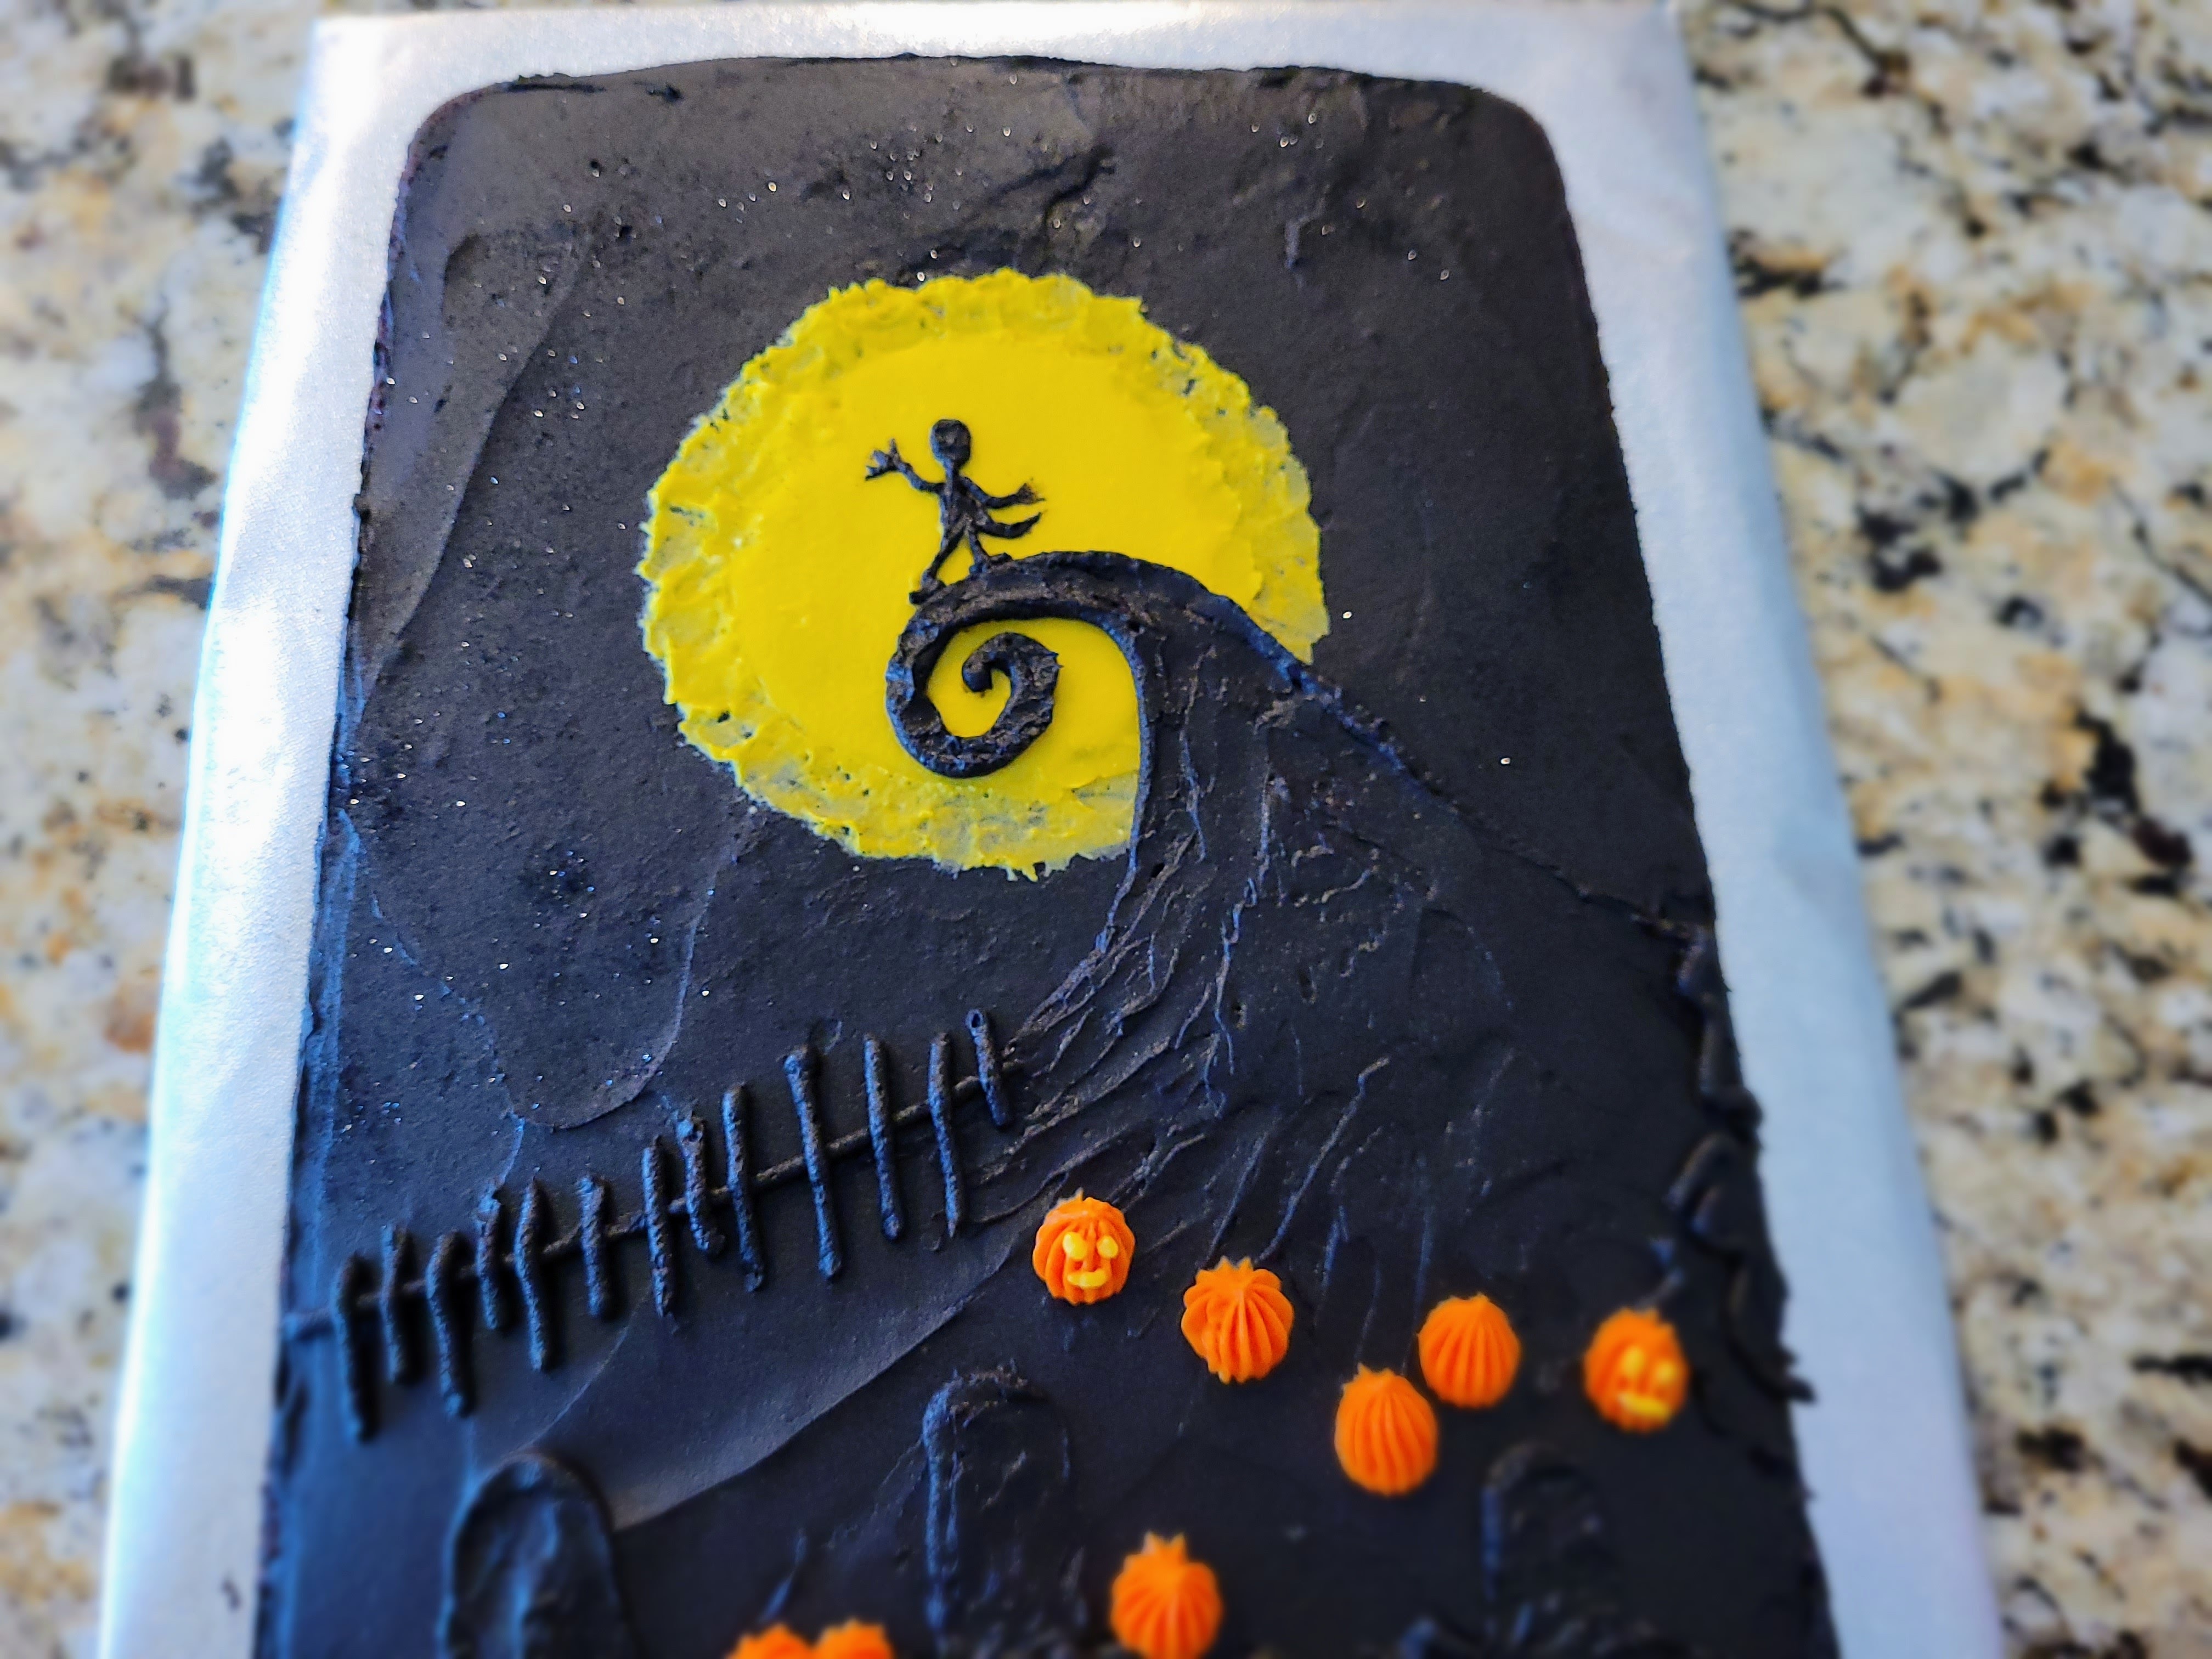
3. Howl at the moon. Now, grab a toothpick and carefully draw out spiral hill on top of the moon and rest of the cake. I should have moved this down a bit to make my hill bigger. By the time I got to Jack, he had a wee little space to fit in, which also adds to his unfortunate appearance. The Pumpkin King deserved better from me, the Pun-kin Queen of Halloween.

Cake decorating is hard work. You don’t know Jack-o-lantern if you think it’s a piece of cake. Well, eating it literally is anyway. I took my bowl full of black frosting and loaded a bunch of it into a piping bag fitted with a coupler and a #5 round tip. I then traced the outline of the hill, and filled it in with more frosting. I used a palette knife, but an angled spatula would also work, to give the hill some texture.
Oh no, this is giving me Florida flashbacks. No waves! No beach! I used my piping bag to draw a pretty rudimentary fence to meet up along side the hill, then drew out a few tombstones, using my palette knife to smooth them out. I also used a toothpick to draw Jack before butchering his appearance…I piped him out with a #2 round tip, but I HIGHLY suggest cutting out a template like I did with the moon and frosting him on top of the moon that way. And also, make him and the hill bigger. He is a larger than life character, after all.
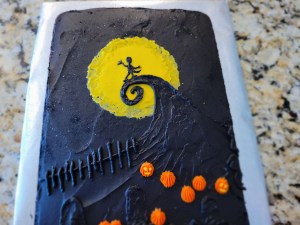
He was bone to be wild, and I made him look mild. Sadness. I also drew in some vines in black around each tombstone and along the sides of the cake. Then I took my last little bit of white frosting, dyed it orange, and put it into a piping bag with a #18 star tip. I piped a little field of cute pumpkins all over the graveyard. Simply pipe up and away quickly to create the pumpkin shape.

This is simply not creepy enough. So, to remedy, I put the rest of my yellow frosting into a piping bag with a #2 round tip and piped tiny Jack-o-lantern faces on some of the pumpkins.

Are they smiling or screaming? Now, NOTHING IS DONE IF THERE AREN’T SPRINKLES. Or in this case, edible glitter dust.
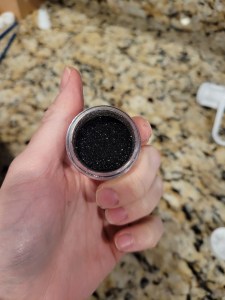
Always wondered if this would work as an eye shadow, not gonna lie. This is my black disco dust, or edible food glitter. I ordered it from Amazon sixty-seven years ago, an Id have only ever remembered to use it twice. This being one of those times. I used a paintbrush dipped into the jar and then gently tapped the dust around the top half/sky portion of my cake, avoiding the moon.
Pictures don’t do it justice. This took the cake from being okay to being, OH, KAY! A little sparkle is always needed, even during Halloween.
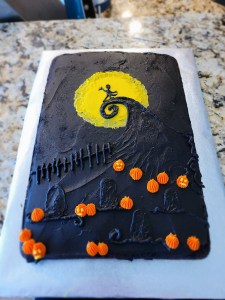
I mean, it’s a cake dedicated to a skeleton that wore a tuxedo. We need flare. My poor Jack may look jacked up, but I love my creepy pumpkins, the texture and way my Spiral Hill turned out, and my spooky halo moon. I definitely think this is a cake I’ll remake in a few years…with a template for Jack. He needs to shine! Like my night sky.

And maybe some different styles of tombstones. Not every cake can be perfect, and sometimes the flaws make it a little more fun. That’s probably why I enjoy Halloween baking so much. Things are supposed to look a little creepy and rough around the edges this time of year!
Turning that baking fail into a baking lesson! I mean, poor Jack aside (he even looked better than this when he tried to be Santa), it’s a still a cake. And oh my, what a yummy cake it is. I know pumpkin flavor has turned into the flavor of the basic white girl thanks to Starbucks (the one thing Seattle didn’t get right), but pumpkin is still a solid flavor choice for October and November. And I’m telling you, even if you’re on the fence or only kinda tolerate pumpkin flavor, just do me a favor and try it paired with chocolate. I promise it will make you a believer and part-time basic white girl. It is just so good with chocolate, and add in that black cocoa frosting (think Oreo cookie) along with the chocolate in the cake, and pumpkin is not the star player here, but part of a bigger cast of flavor. You know, consider these tastes the Lock, Shock, and Barrel of Halloween Town. Always working together to create havoc and mischief for your waistline. Worth it. I’ll be back once more before Halloween with my final bake of Baketober (sad Mayor of Halloween Town face). ‘Til next time, my fellow eaters!

“For it is plain as anyone can see. We’re simply meant to be.” —Jack and Sally, or me, to a slice of this cake. -
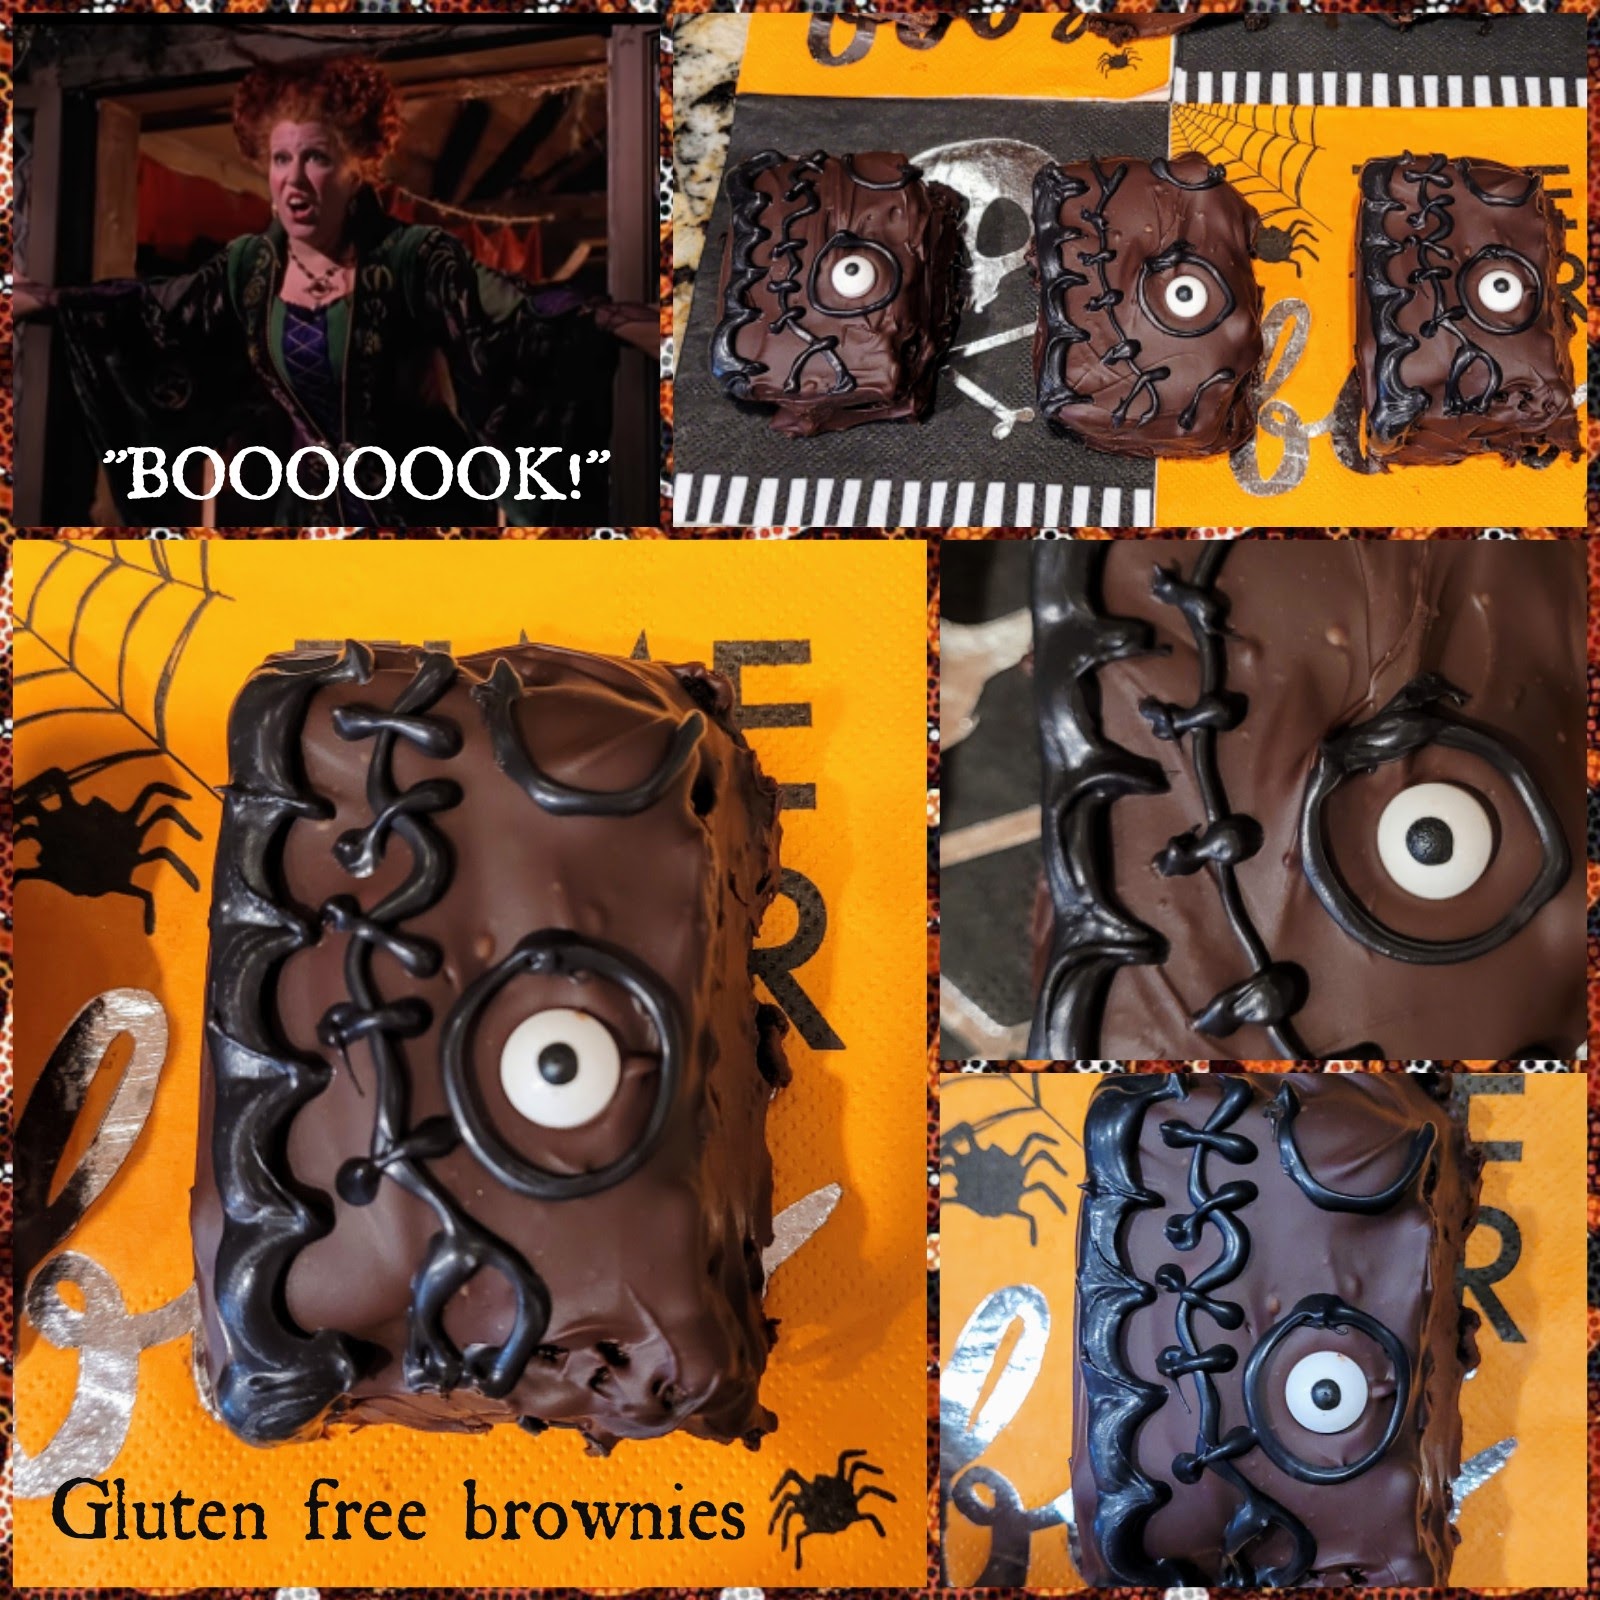
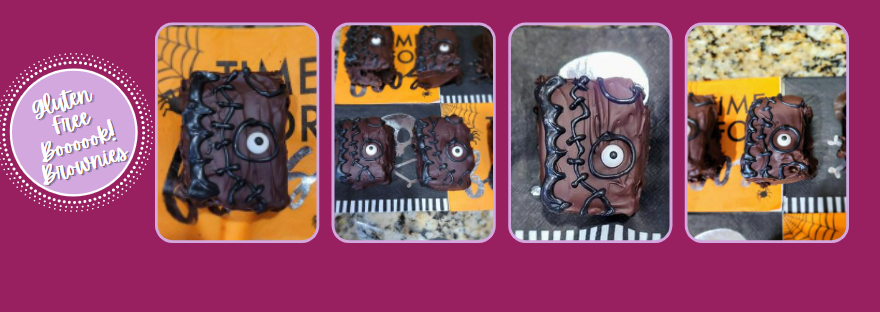
Booooooook!
Considering it’s October, I’m still up to my old tricks and treats. You know, baking spooky things, watching Hocus Pocus at least once a day, and enjoying a seasonally appropriate gloomy, gray day (thank you, New Mexico!). If I had to pick, Hocus Pocus is my all-time favorite Halloween movie and has been since childhood. While most little girls wanted to be Sarah because she’s blonde and pretty, I always loved Winifred best, even as a kid. I mean, she loves a good book, she doesn’t suffer fools, and she looks fabulous in green…she’s basic witch goals. That whole turning enemies into cats thing would also come in pretty handy. Since we’re still getting the house set up, I didn’t have a ton of free time to bake this weekend, so I opted for a quick, easy tribute to my favorite of all witches…

“Hello. I want my book. Bonjour. Je veux mon livre.” My biggest hope is the sequel sees Winifred reuniting with her book, mostly so she can slap Max Dennison upside the head with it. Kid was a real tool, that’s all I’m saying. But I had nary a scare in the world as I made and decorated these Booooook! brownies. They were so much fun, and truly, done in under an hour. If you’re looking for a dessert that appears to have taken all day, but takes a solid 30 minutes of work total, these book brownies fit (and hit) the spot. I wish I could say they’re super low cal, but anything coated in layers of chocolate is gonna hit the macros a little hard. The recipe I used makes 12 brownies at 329 calories a piece. If you opt to leave the chocolate coating off, they’re 229 calories, but they won’t be as delicious…just creepin’ it real. You gotta indulge every once in a while, and feasting & sweatpants season has begun anyway.
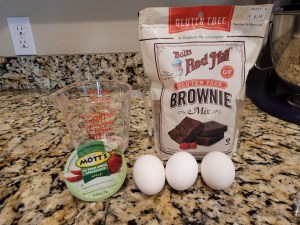
If I was actually a witch, the only spell I’d ever cast is making all desserts zero calories. I’m still feeling out the grocery stores here to see what they offer in the way of gluten free baking mixes which has been turning into, well, a real witch hunt. BUT I was happy find Bob’s Red Mill gluten free brownie mix at our health food store to test out (you know, for science). I am now absolutely hooked on this mix because it makes the fudgiest brownies. If you like cakey brownies, 1. Just no. & 2. Why not just make…a cake? Give me bricks of chocolatey fudge or give me, well, I’d still eat the cake brownies, but I wouldn’t be completely happy about it. To make these, all you need is:
- 1 bag of Bob’s Red Mill gluten free brownie mix (or your favorite box brownie mix)
- 1/4 cup of water
- 1/2 cup of unsweetened applesauce
- 3 eggs
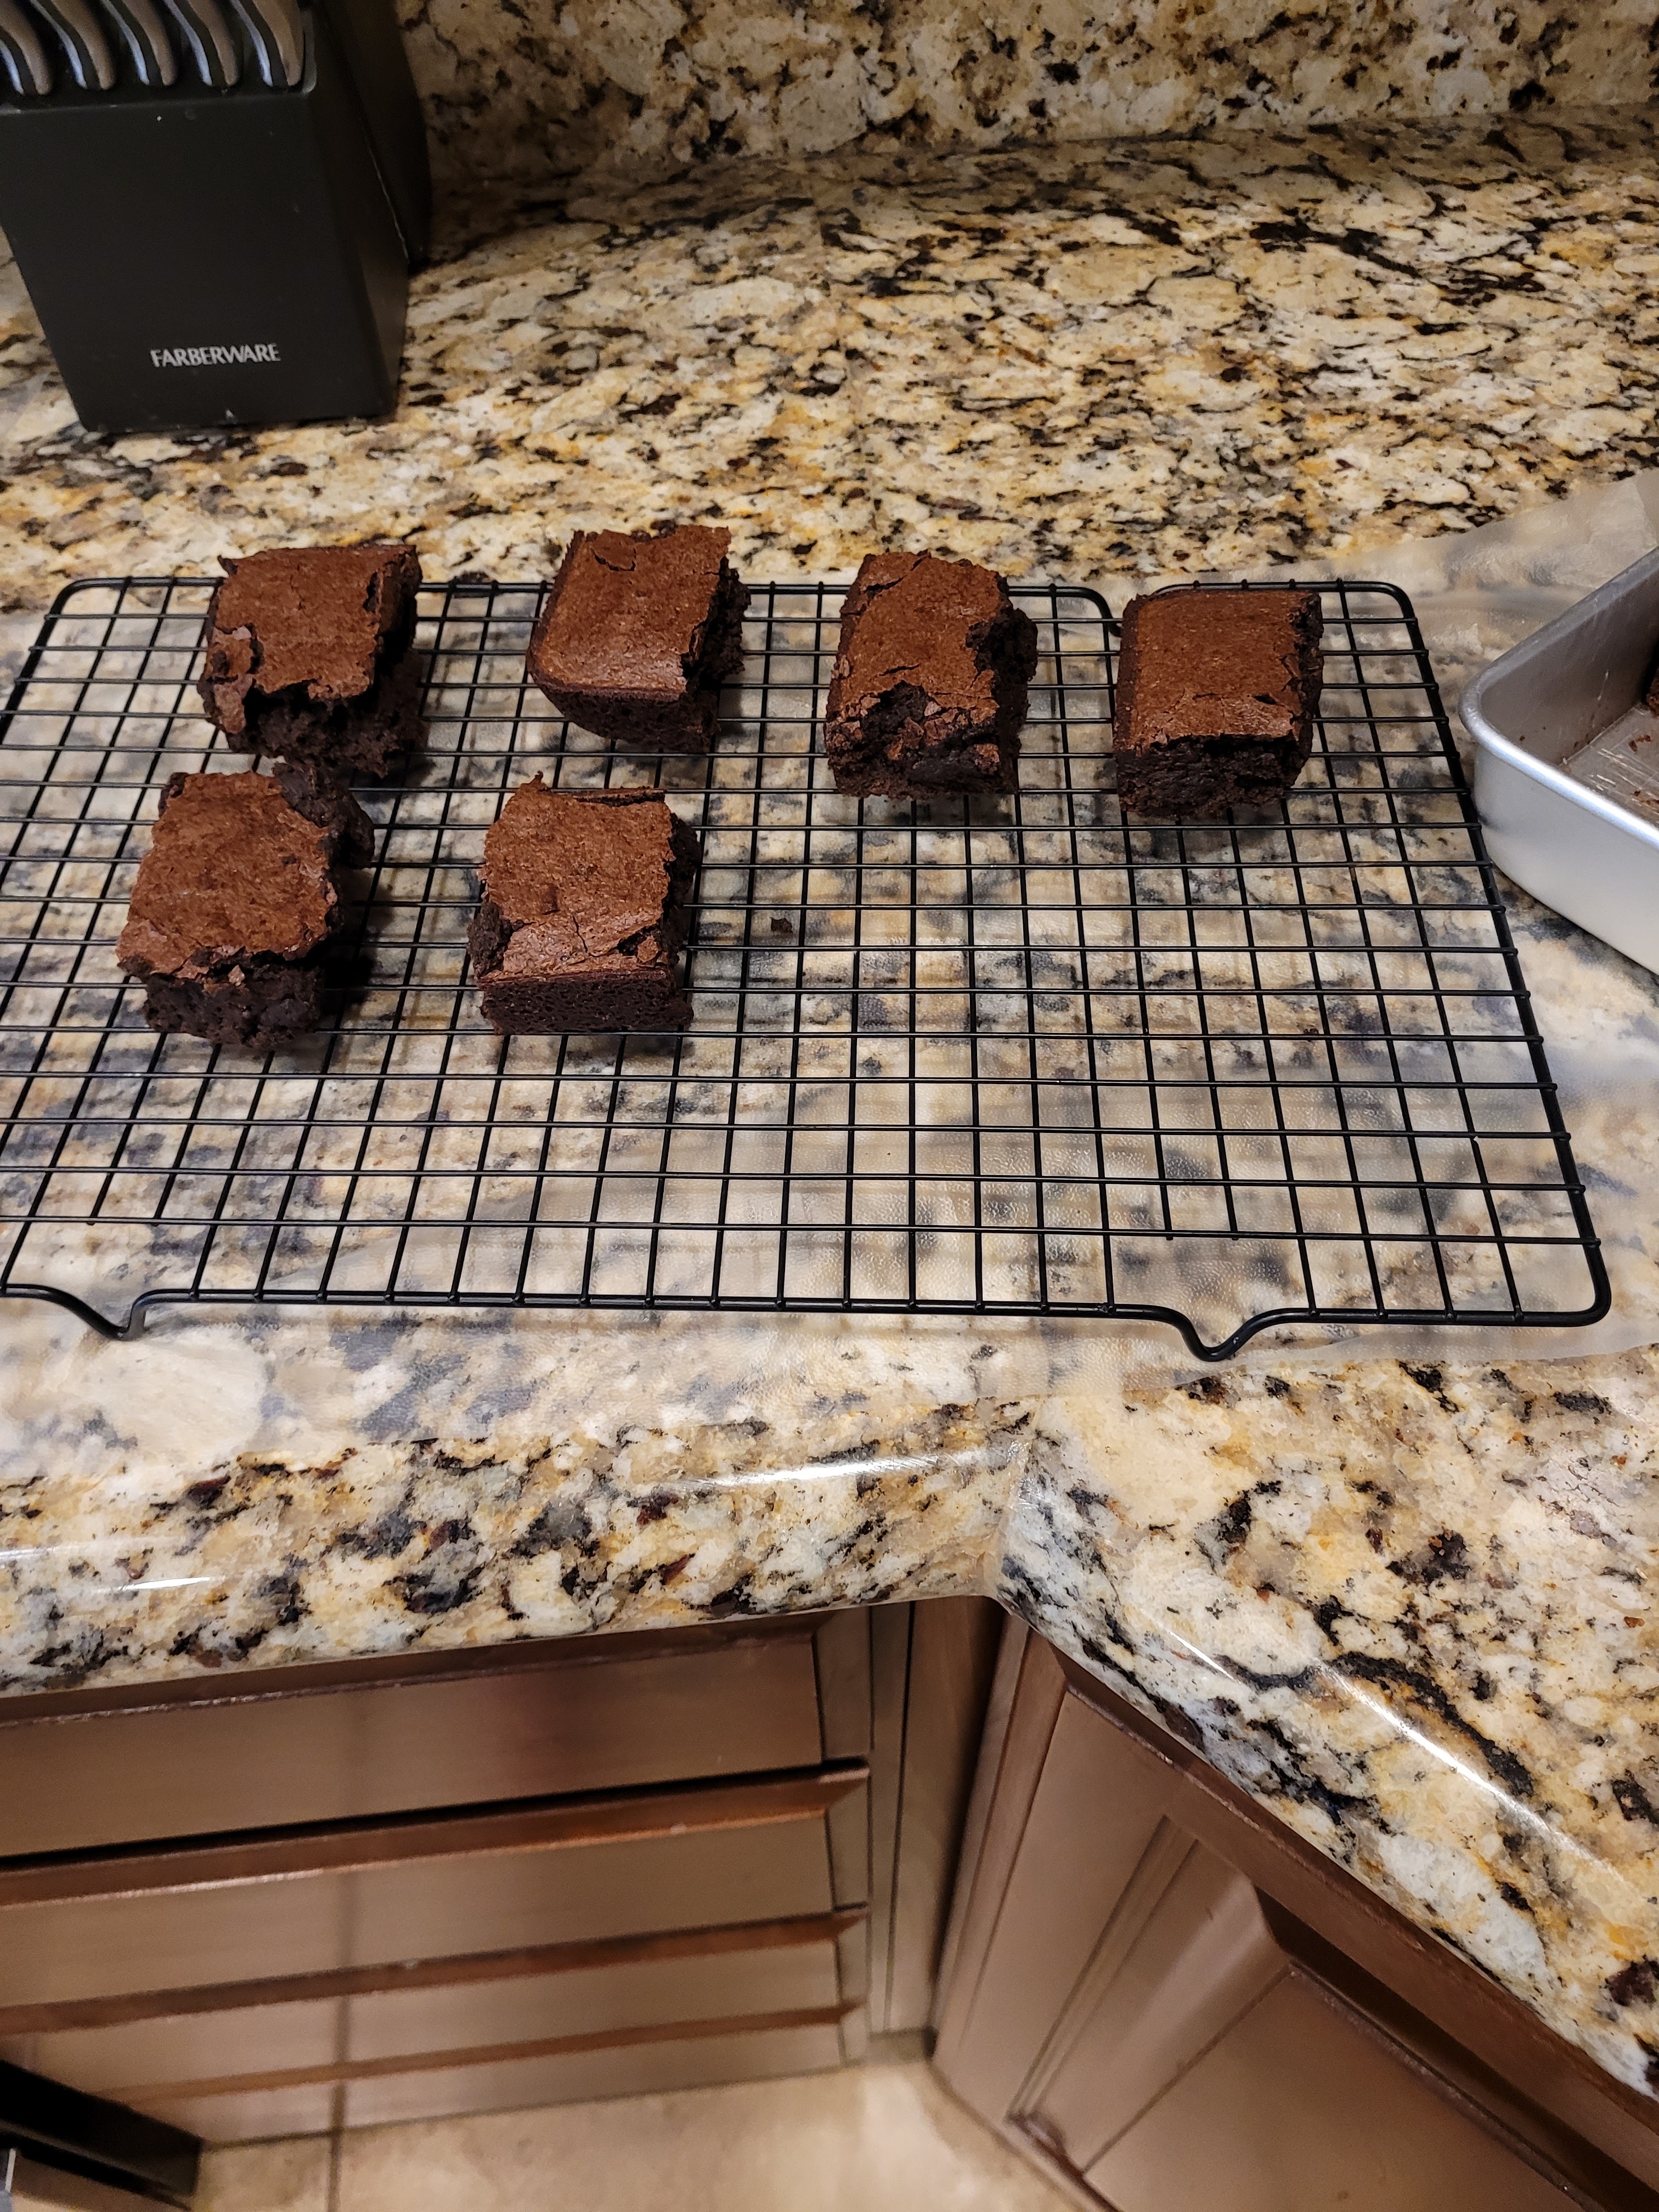
Whisk all ingredients together by hand until smooth. Grease an 8×8 or 9×9 pan and preheat your oven to 325. Pour your batter into your prepared pan and bake until a toothpick comes out mostly clean…a few crumbs are fine, you just don’t want liquid batter dripping off the toothpick. I baked in an 8×8 pan for 35 minutes.
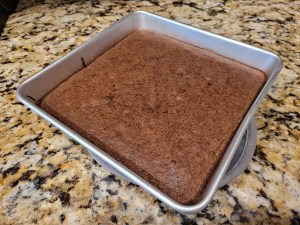
These brownies put me in a trance, alright. Once baked, I put these in the fridge to fully chill so they’d be easier to cut. Unlike last week’s insight into serial killers, I did not enjoy cutting these the way I did sawing through Oreo’s, so I was definitely meant to be a precise, strategic psycho murderer and not just your average slasher. In either case, I definitely butchered these brownies while cutting them, so maybe freeze them instead or try using a plastic knife.
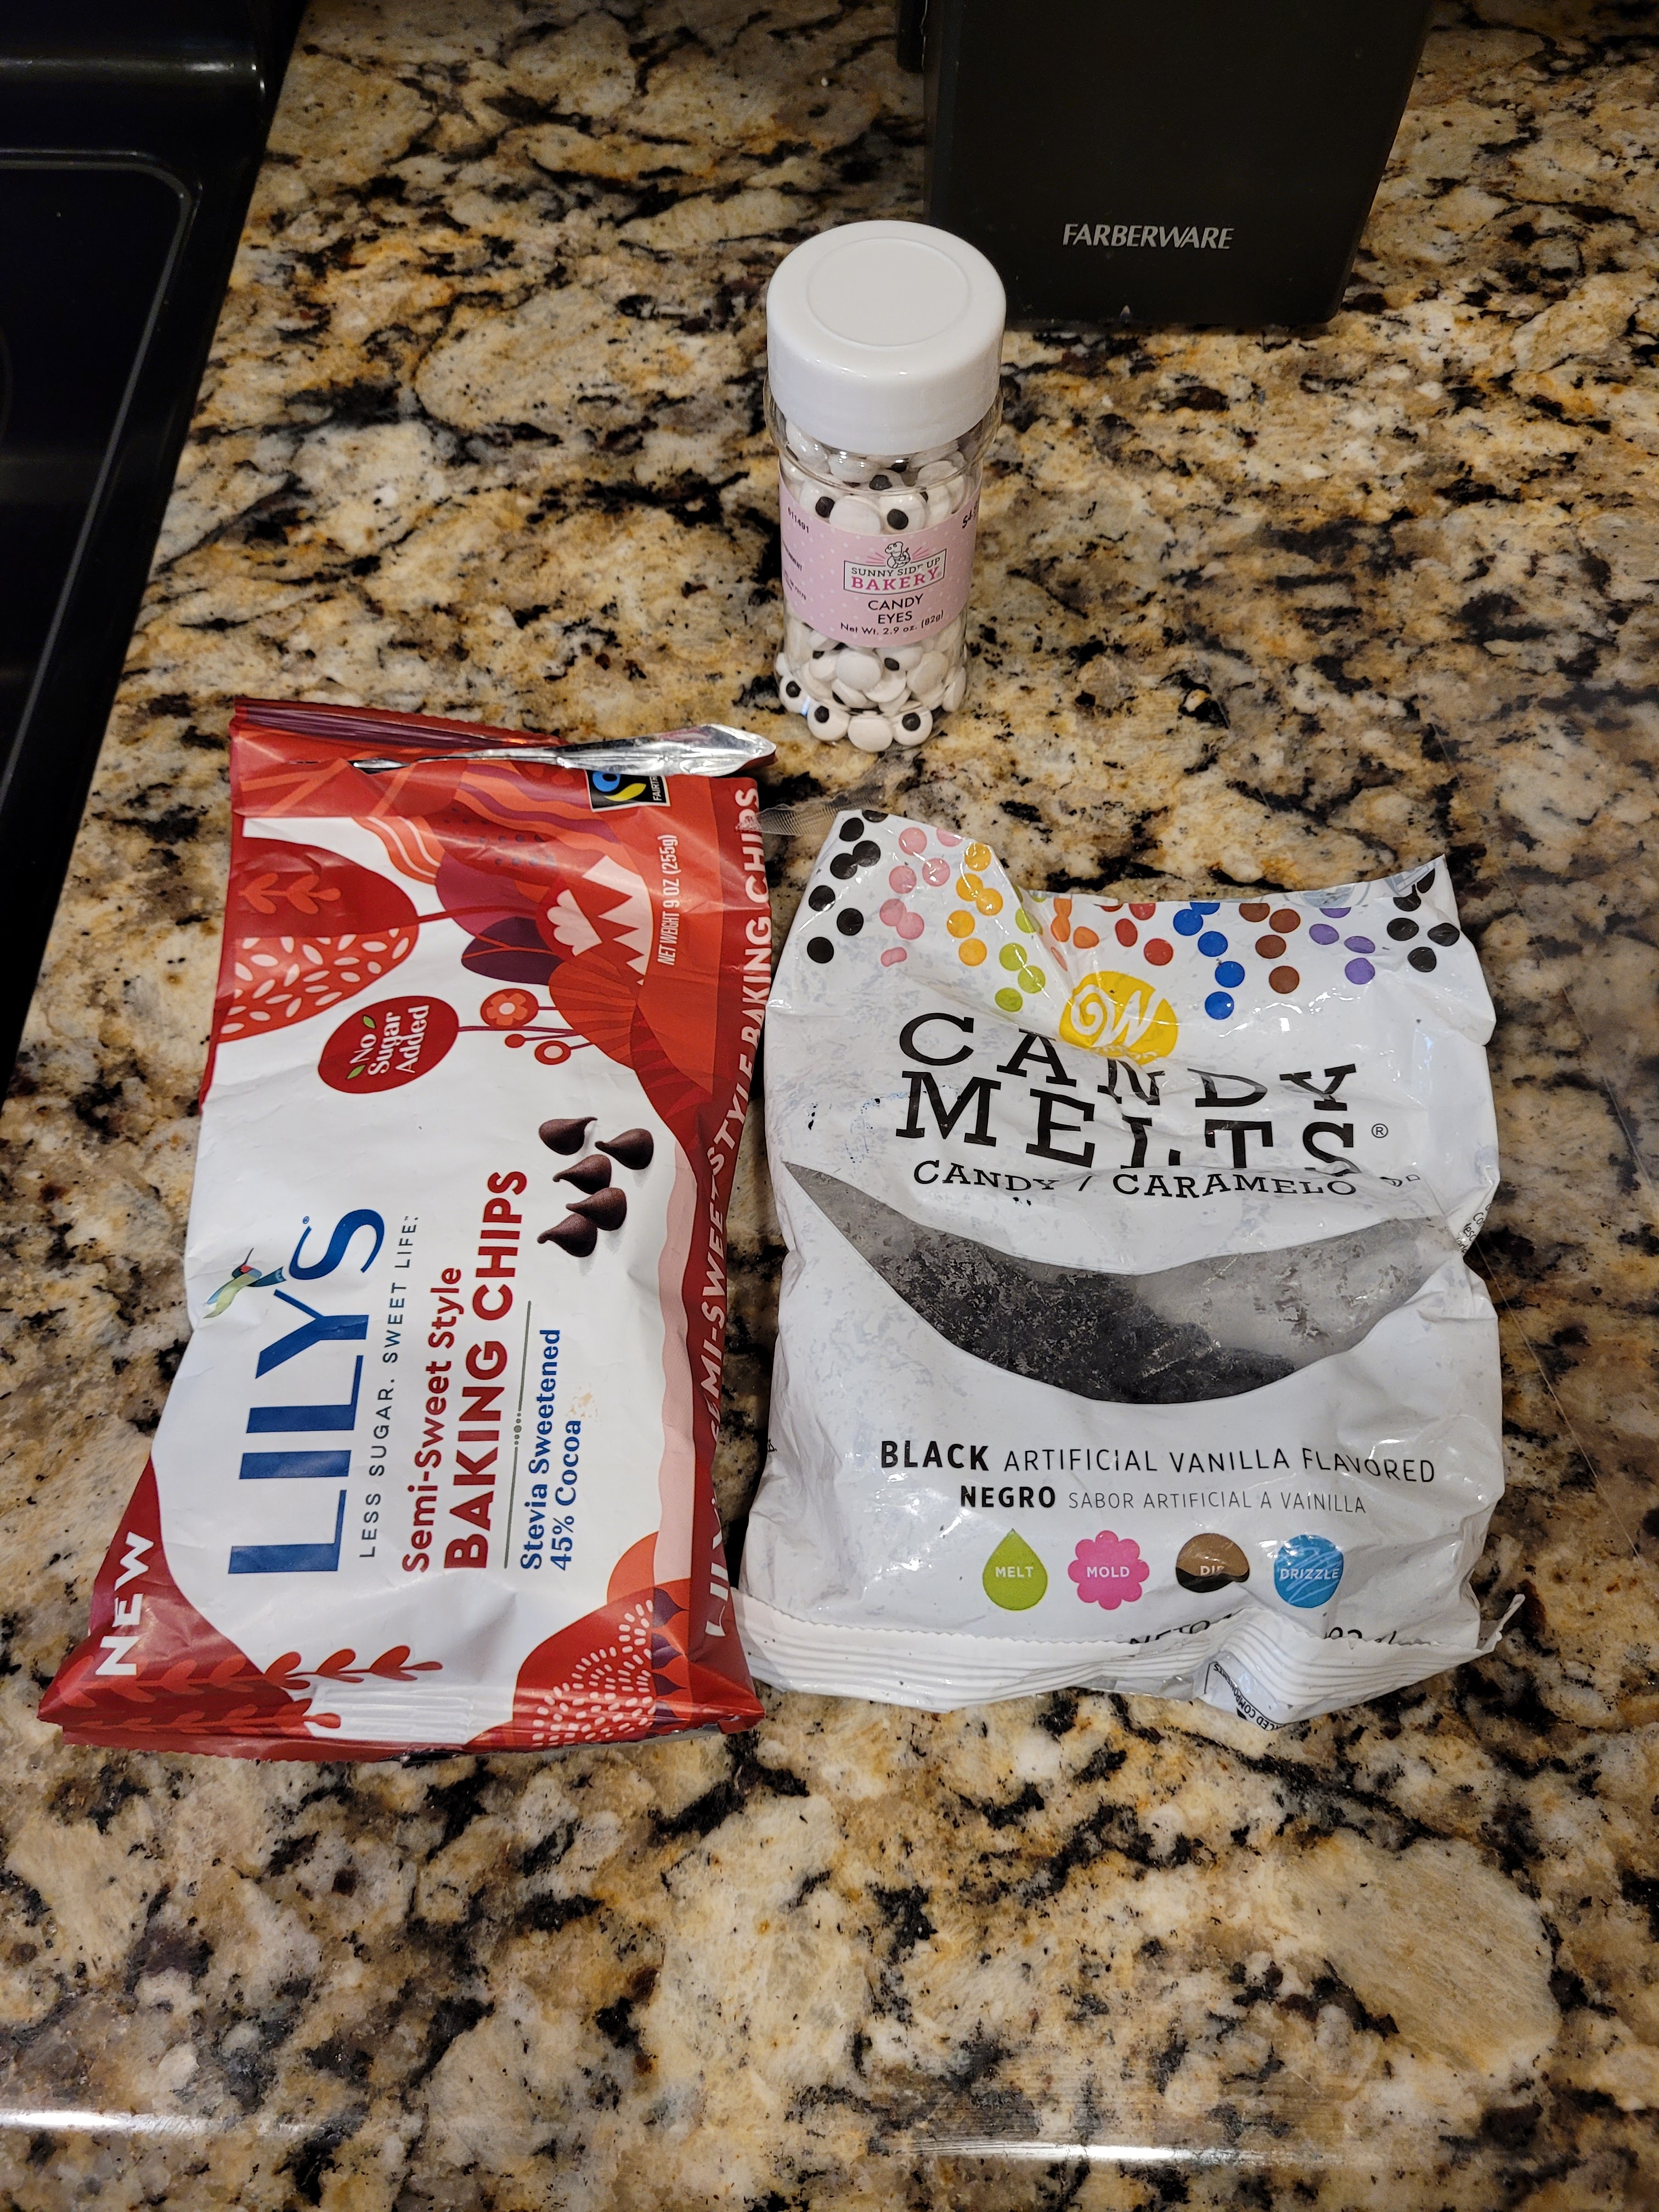
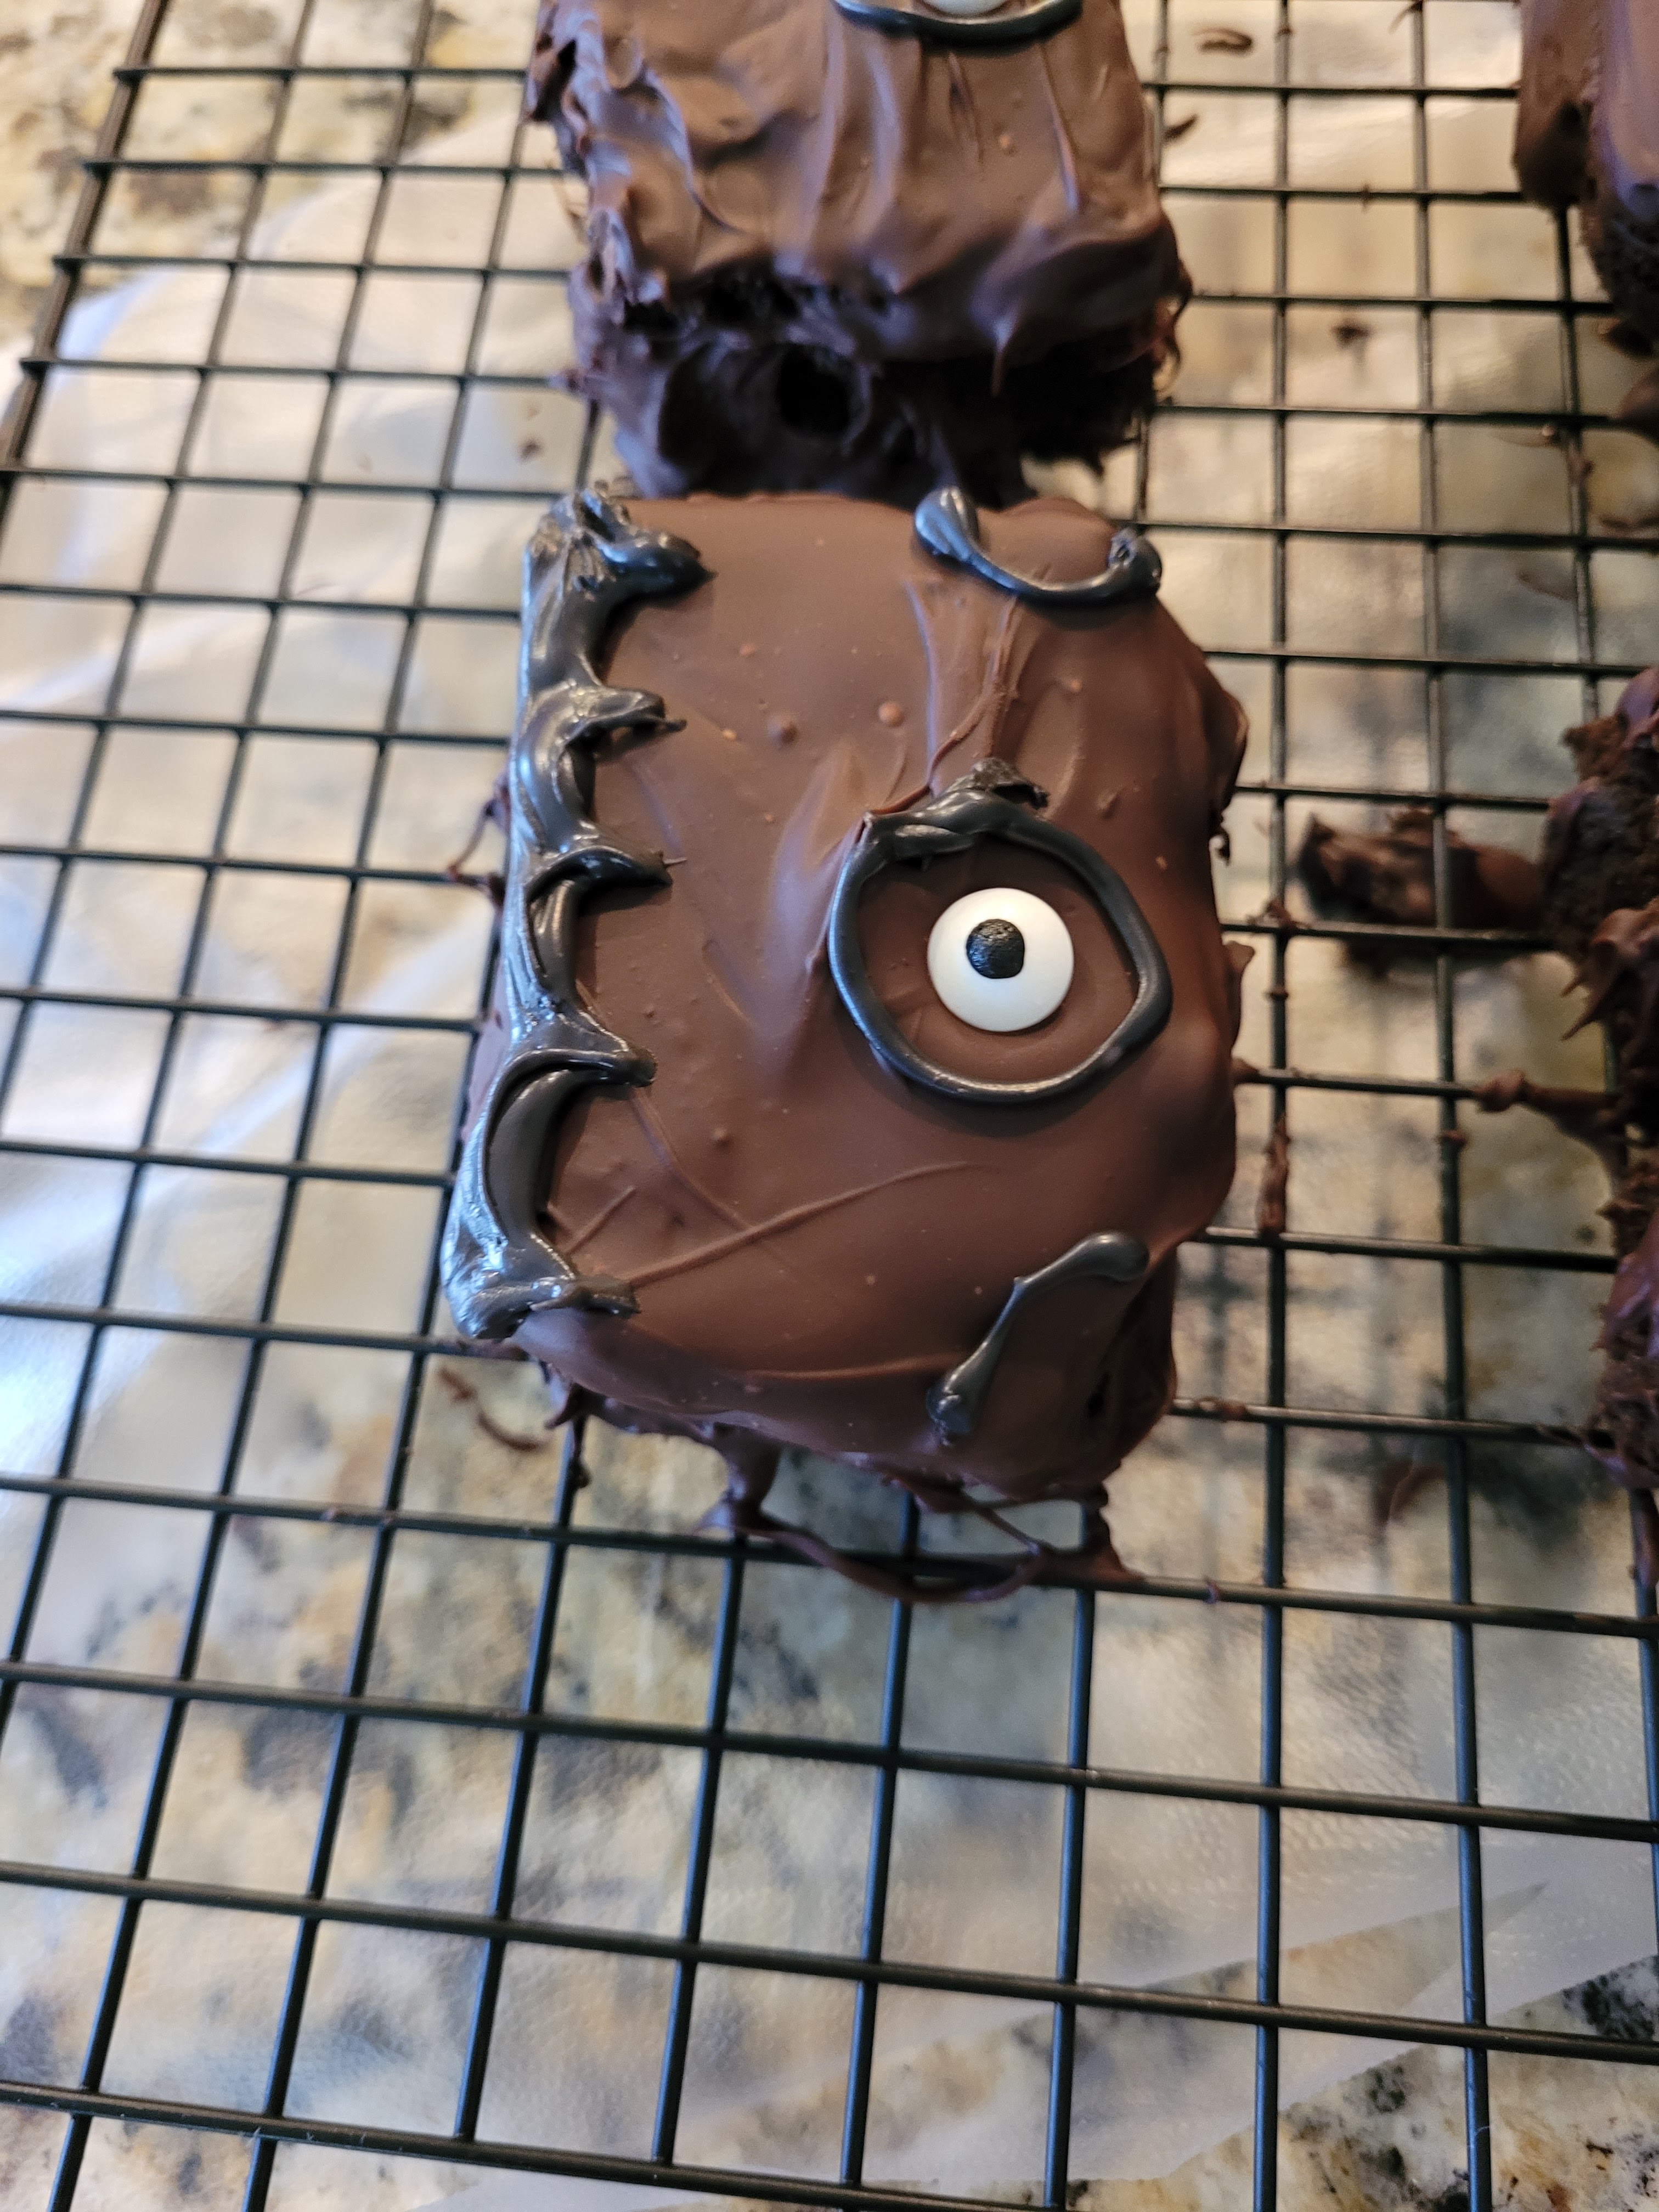
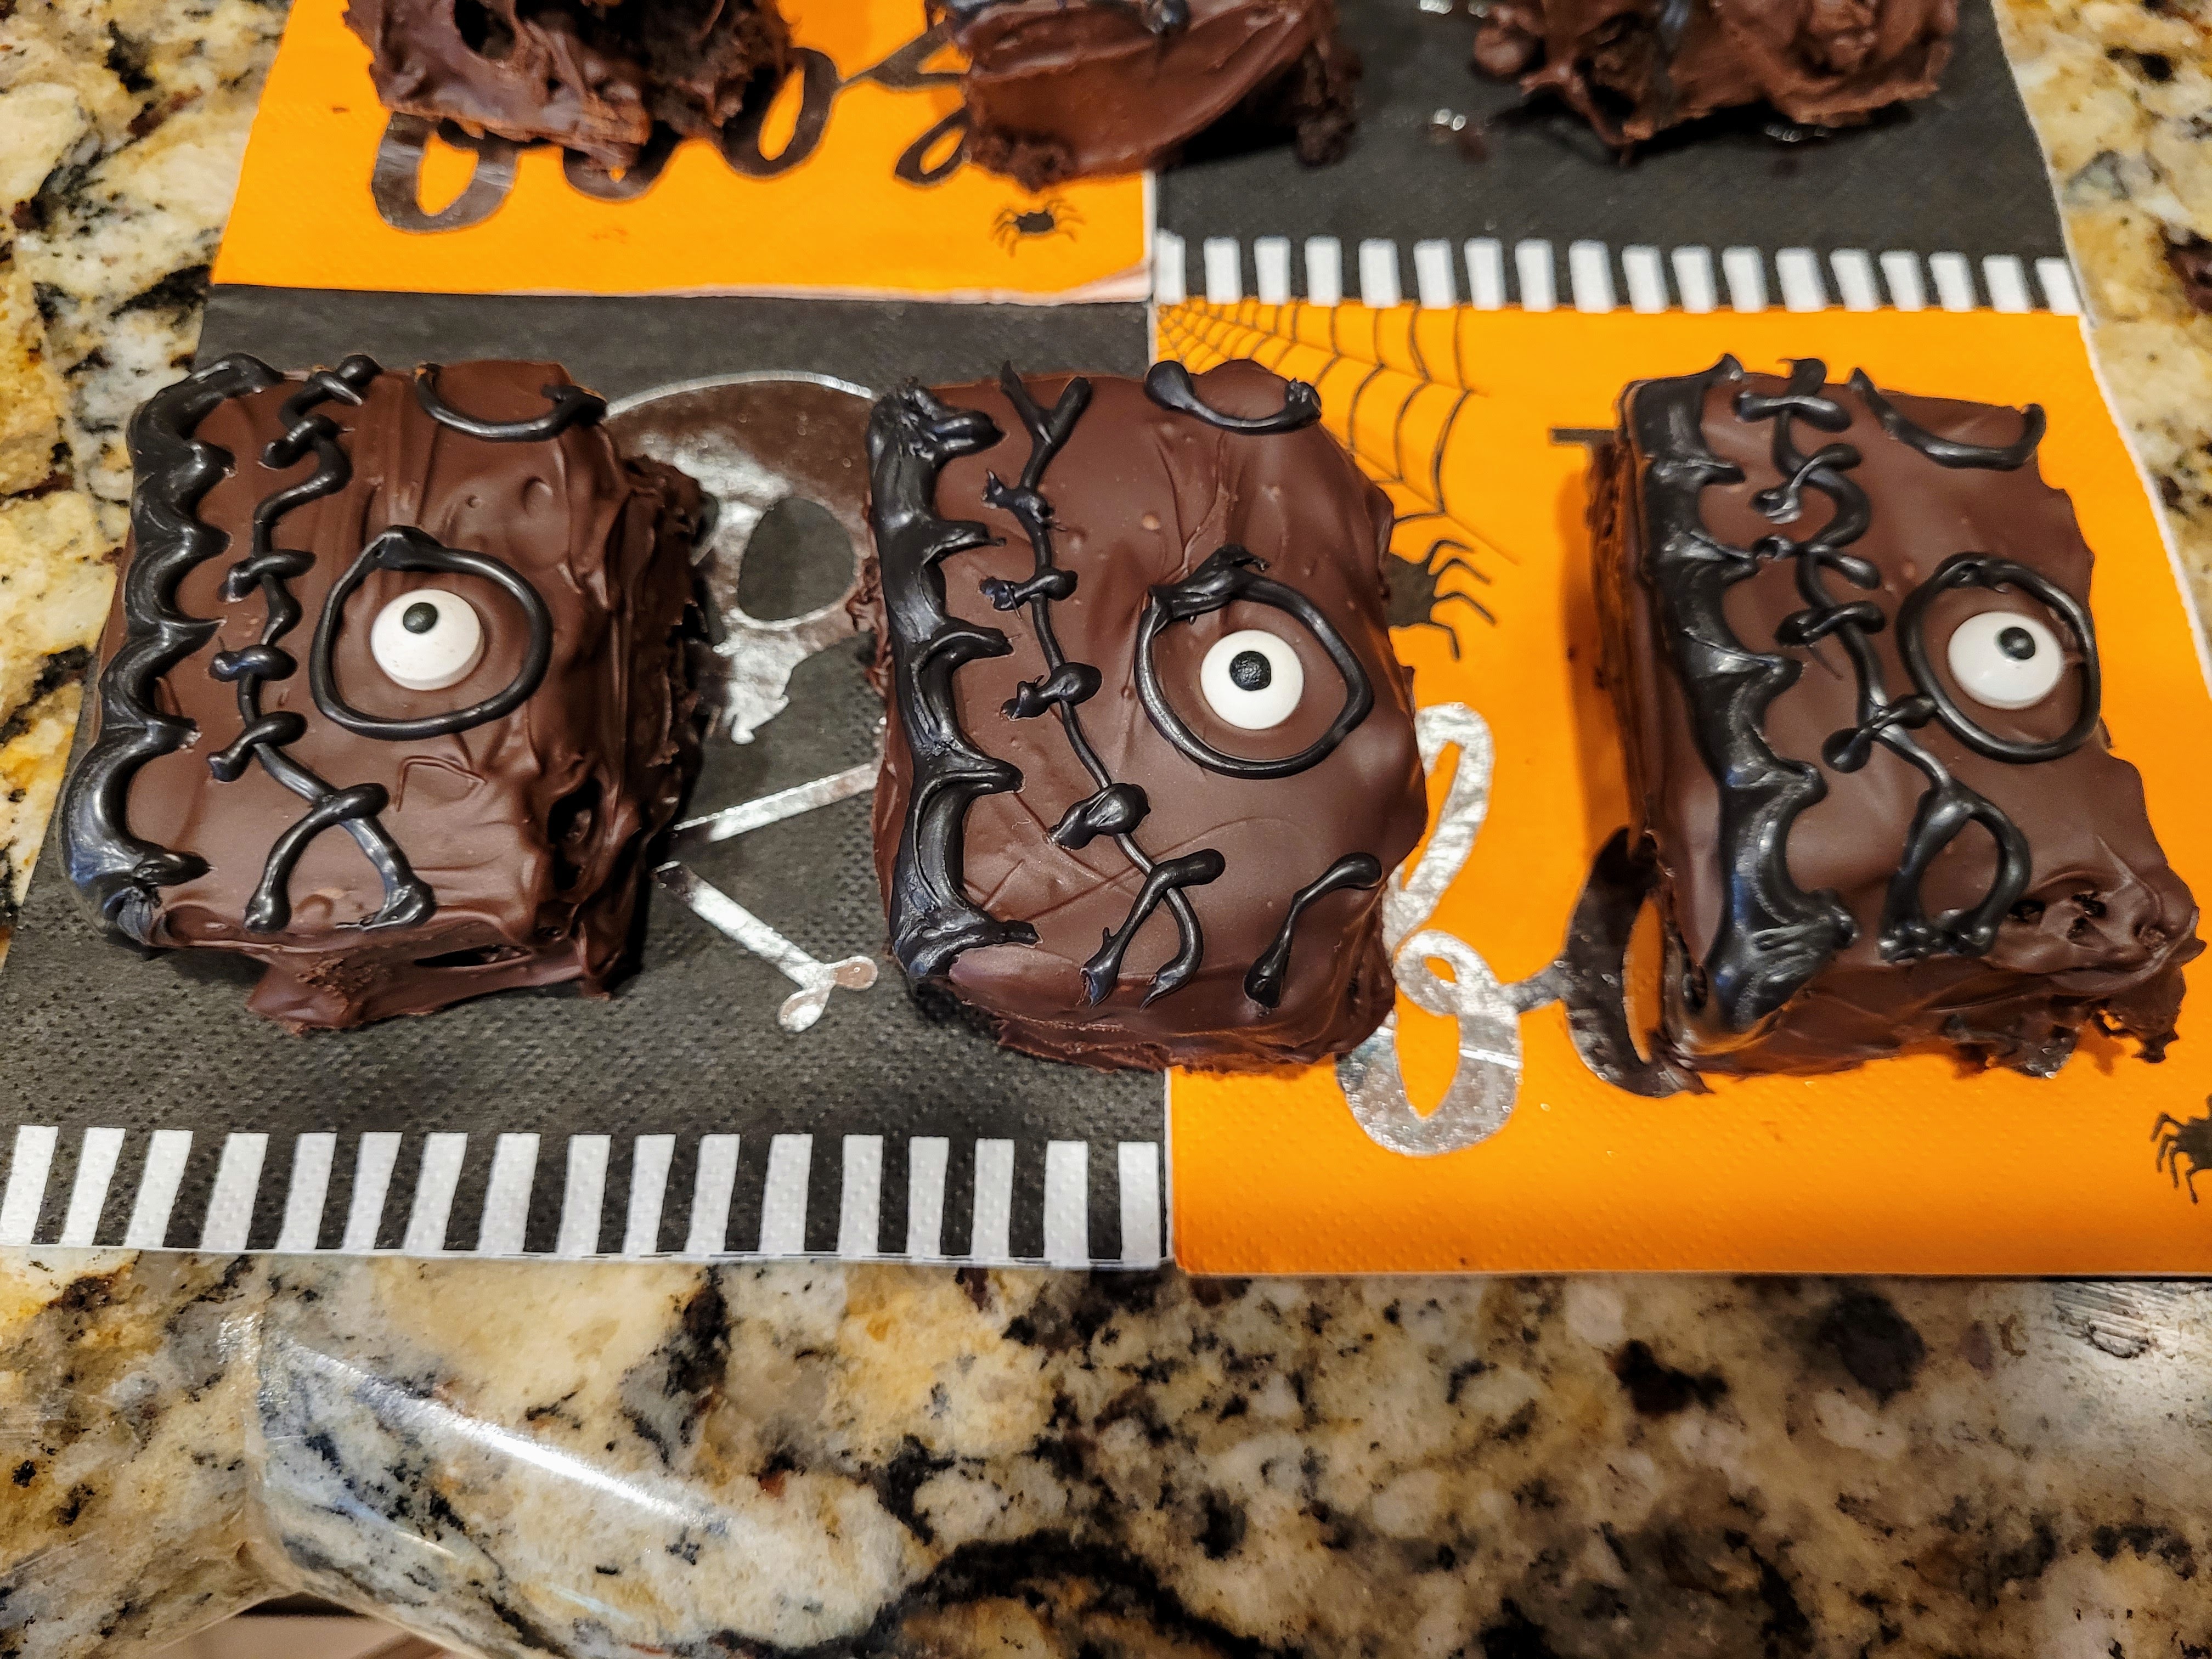
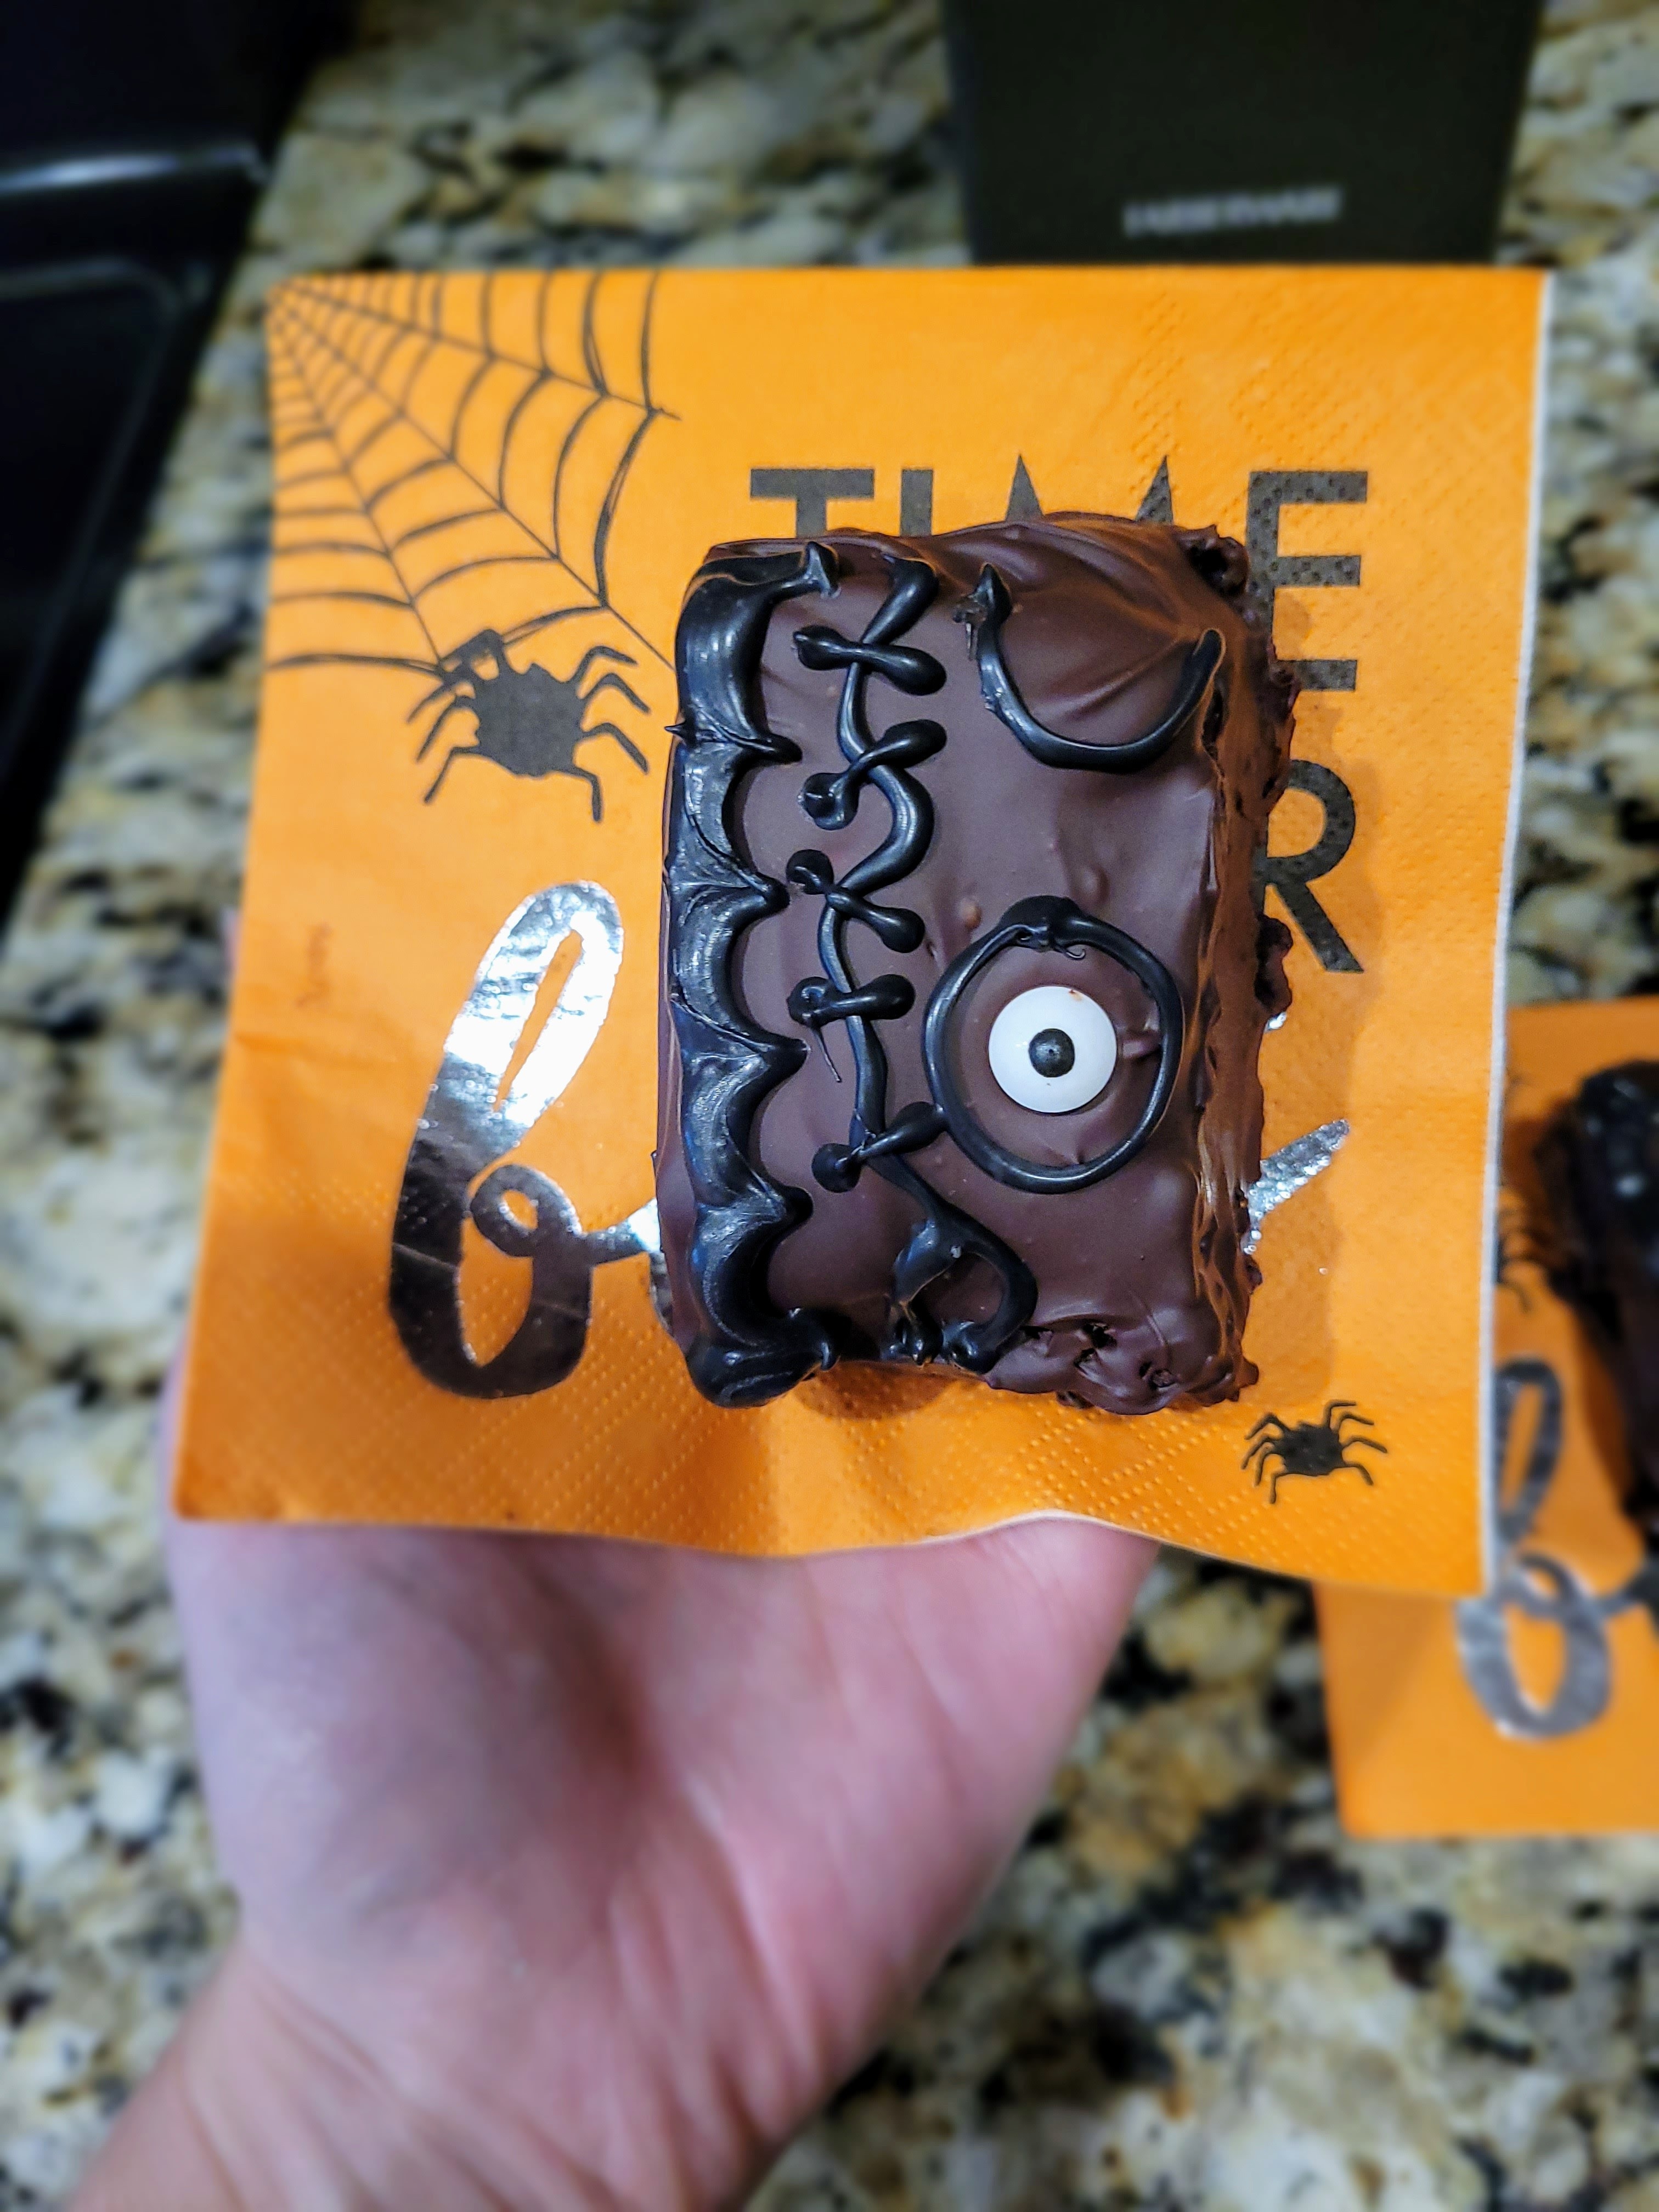
Am I trying to use eyeball sprinkles on every bake this month? Eye’d like to say yes, but this is purely coincidental. To finish the Boooook! brownies, you’ll also need some yummy chocolate chips, black candy melts, candy eye sprinkles, and a piping bag with or without small round tips. Once my brownies were chilled completely, I hacked away into 12 pieces. Hacking is actually putting it nicely. I have watched horror movies where the killer was kinder in death than I was to these brownies.
Absolutely annihilated them. Luckily, they were both cold and fudgy (Count Chocula’s working biography title), so I was able to reshape them after all this happened. I only coated 6 brownies in chocolate and left the other 6 plain for my husband because he’s not really into chocolate (maybe he’s the serial killer, because that’s truly an anomaly). I used 175 grams of Lily’s sugar free semisweet chocolate chips to coat all 6 of what we’re now referring to as “my brownies.” …but, really, aren’t they all?

Eye put a spell on you, and now you’re mine… I mean, just throw on Bette Midler’s version of “I Put a Spell on You,” and I will get so pumped up you could convince me to rob a bank. I definitely hummed that song while I melted my chocolate and prepared to slather chocolate on more chocolate (which is also a good way to pump me up. You want to add chocolate to MORE chocolate? I’m in.).
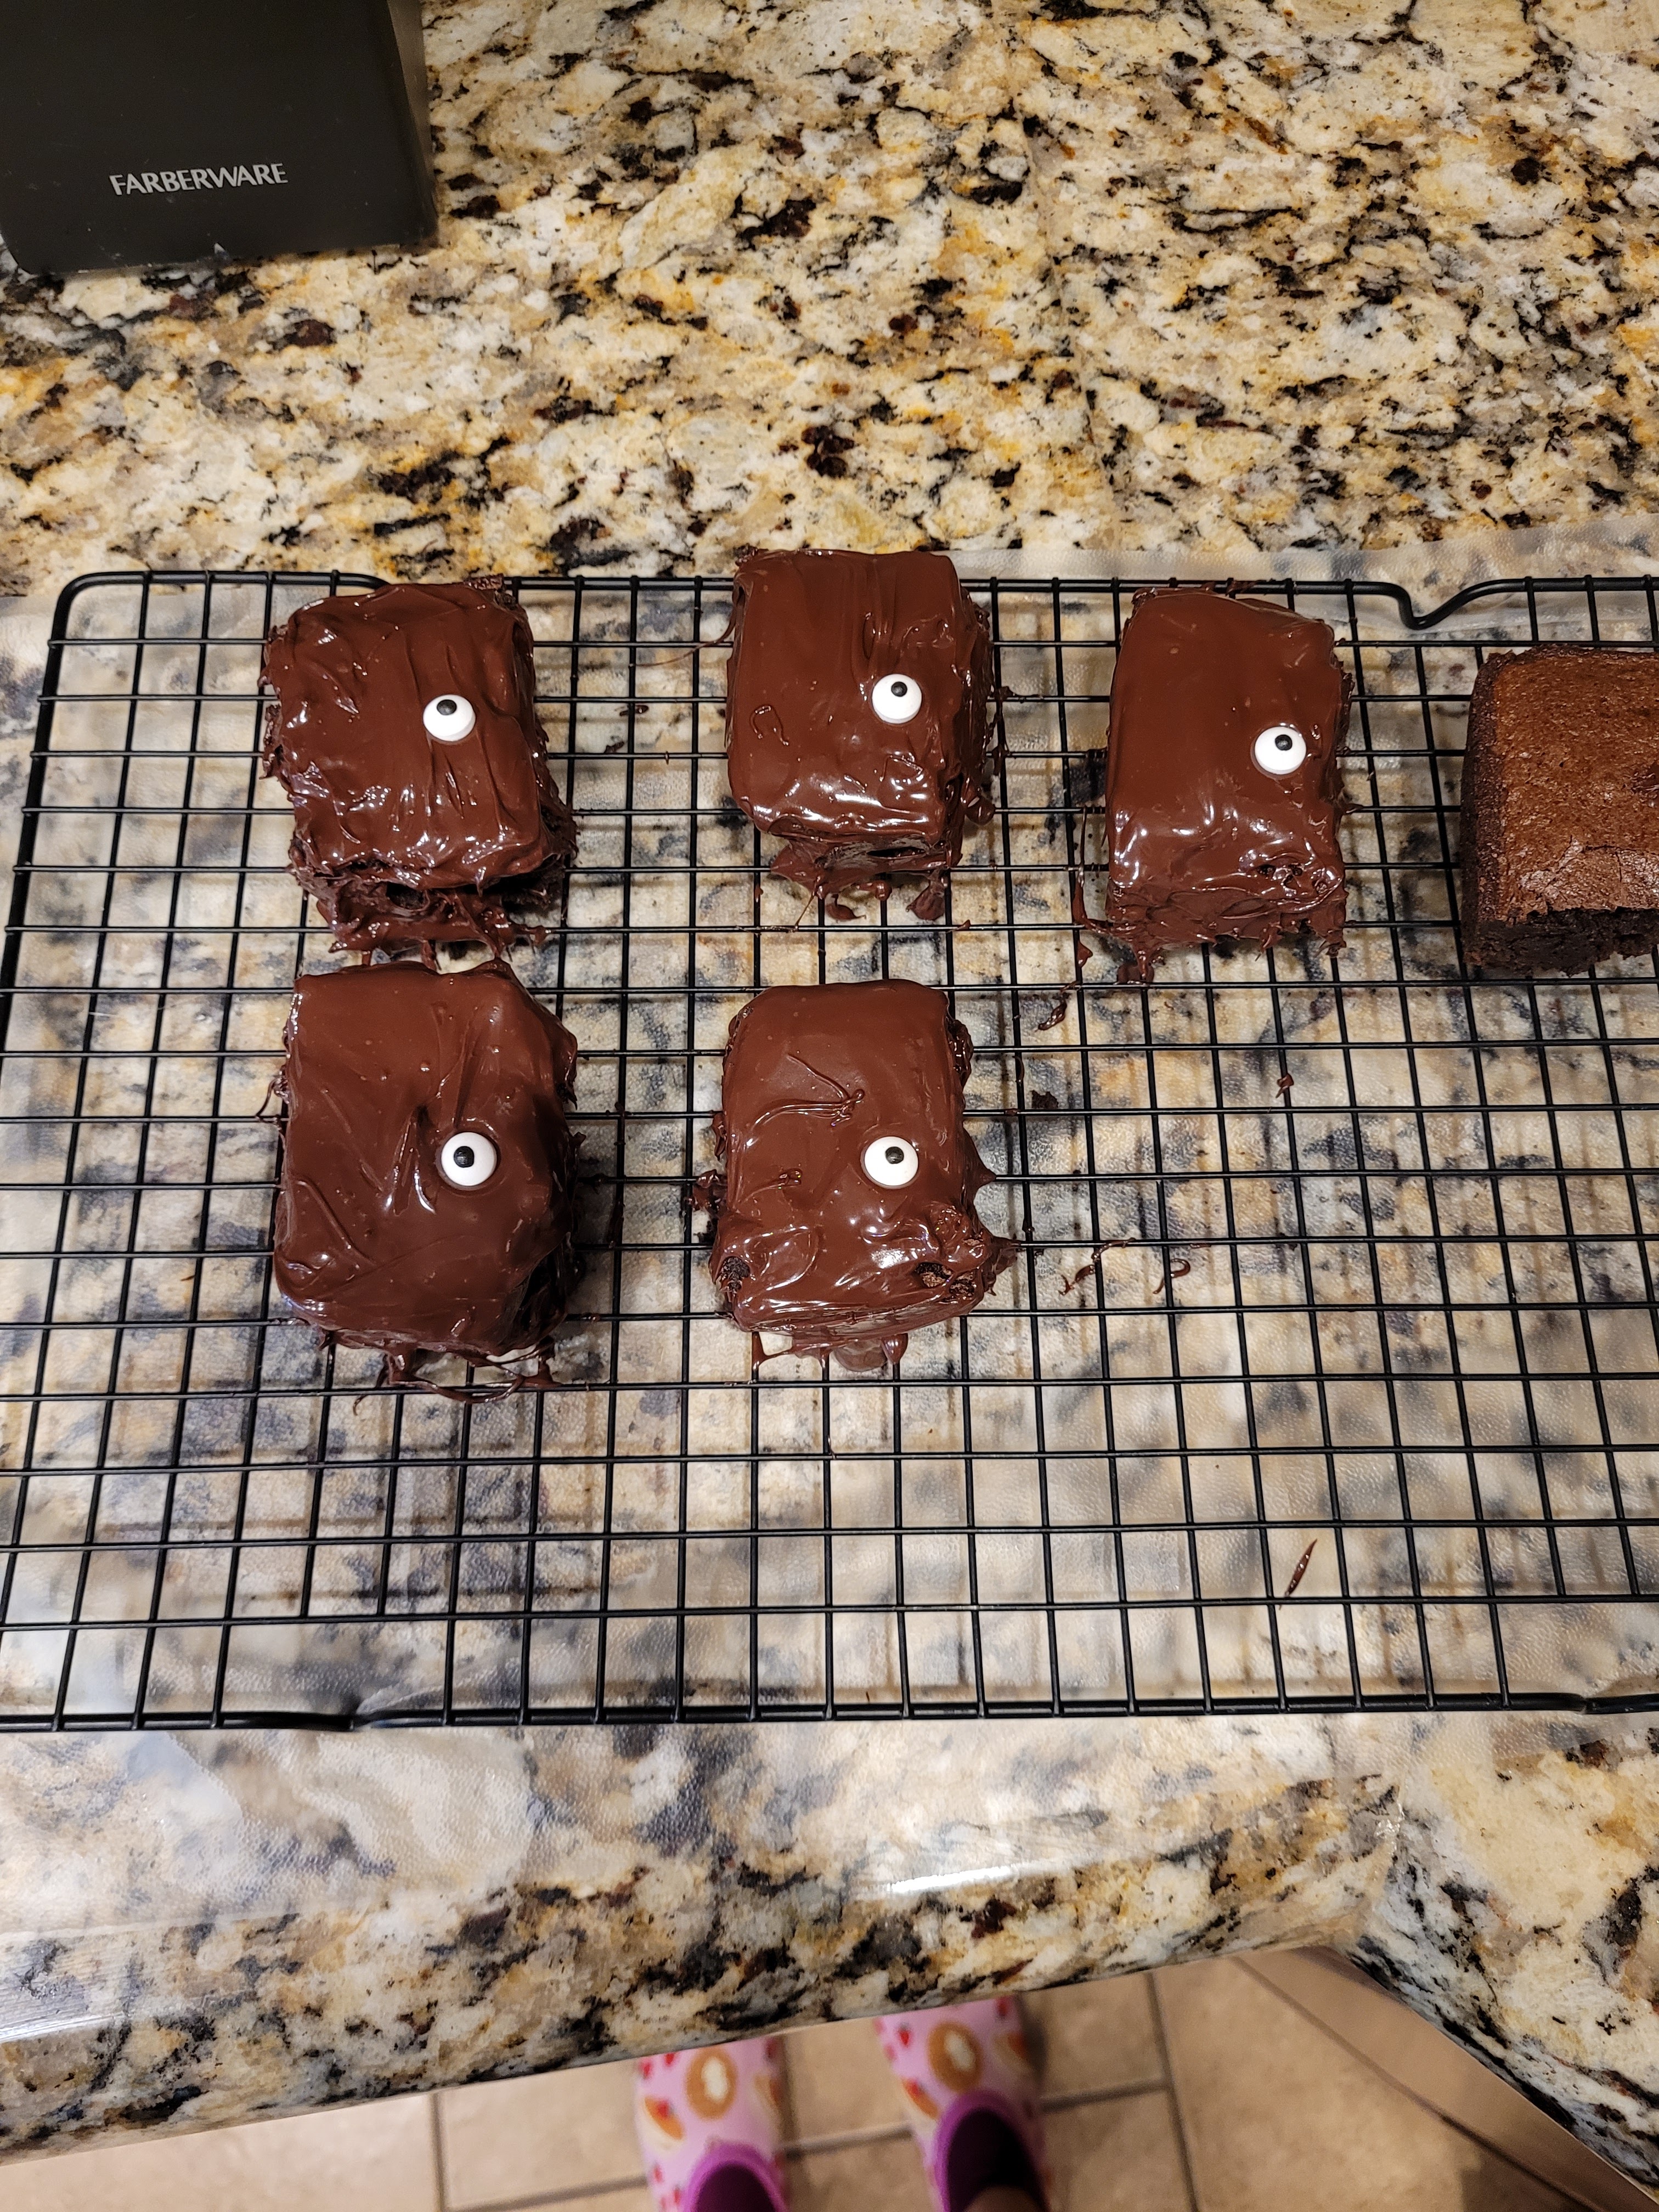
I melted the chips for 1 minute at 50% power, then stirred until all my chips were melted and smooth. I put down cling film on the counter since I’m out of Parchment and put my cooling rack with brownies on top of this. Then I used a large spoon to heap melted chocolate on top of each brownie, using the back of the spoon to smooth out the top and let the chocolate drip down the sides of the brownies. While the chocolate was still wet, I placed one eye on eye brownie. I put them back in the fridge to set while I melted my black candy melts (I had about 1/4 of an open bag left, and I had tons leftover after decorating my booooooks). These also melted at 1 minute/50% power, but I added 1 tsp of vegetable oil to smooth things out since they weren’t brand new. Then I placed this in a piping bag with a #3 round tip. You could also just place in a piping bag or plastic baggy and make a small snip at the end with some scissors.

And then I gave them all a black eye. I really put these brownies through the ringer. I drew a small circle around each book’s eye. Then I drew two small semicircles at the right-hand corners. I took my coupler off my piping bag to draw a thick line to work as the spine for each book.
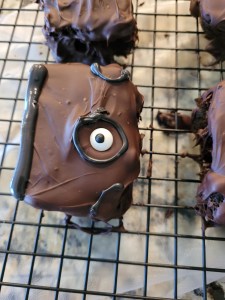
I feel like it’s trying to tell me something… Then I grabbed a toothpick and “pulled” the melted chocolate out to the right to give the spine s some texture:
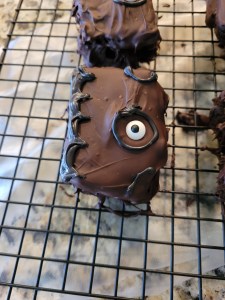
But maybe he’s just staring at me like that because he knows I’m going to eat him. After this, I put my coupler back on and drew a zigzag pattern in the blank space.
You know, to make it look like human skin sewn together, because that’s what book was really made of, and I value authenticity. I drew thin, tiny lines across these zigzags to make it look like a stitched pattern. Then, I let these set in the fridge for 15 minutes.
Would Winifred eat them, or would she love them too much to do so? These are the real questions. Once set, I used a knife to gently pry them off the cooling rack (what is it with me and knives this month?!). These live in the fridge to keep the chocolate from getting melty. I take them out about 15 minutes before we’re ready to eat them so the chocolate is easy to bite through but isn’t melty enough to make me look like Augustus Gloop (wrong movie for this blog).

Knowledge truly can be delicious. I had an absolute blast in this edition of arts and witchcrafts. These were so easy to make, and they fill me with so much delight. I’ve never done a Hocus Pocus-inspired bake for Spooktober before, so it’s about time. As a Winifred-in-training, it’s essential that I, too, have my wonderful book of spells. I am hoping that when the chaos of painting and decorating the house subsides, I’ll be able to take on a full day’s worth of baking to make a cake that is either absolutely ghastly and grotesque, or absolutely terrifying and delightful. Until that happens, I have the world’s fudgiest, chocolate book brownies to keep my taste buds company. They are definitely rich, but I like to devour an entire book in one sitting anyway, so this definitely works for me. I am 100% into the Halloween groove now, and I’m gonna thank hitting the books for that. ‘Til next time, my fellow eaters!

Let’s just hope we don’t have to wait another 300 years for those Sanderson Sisters to return. -
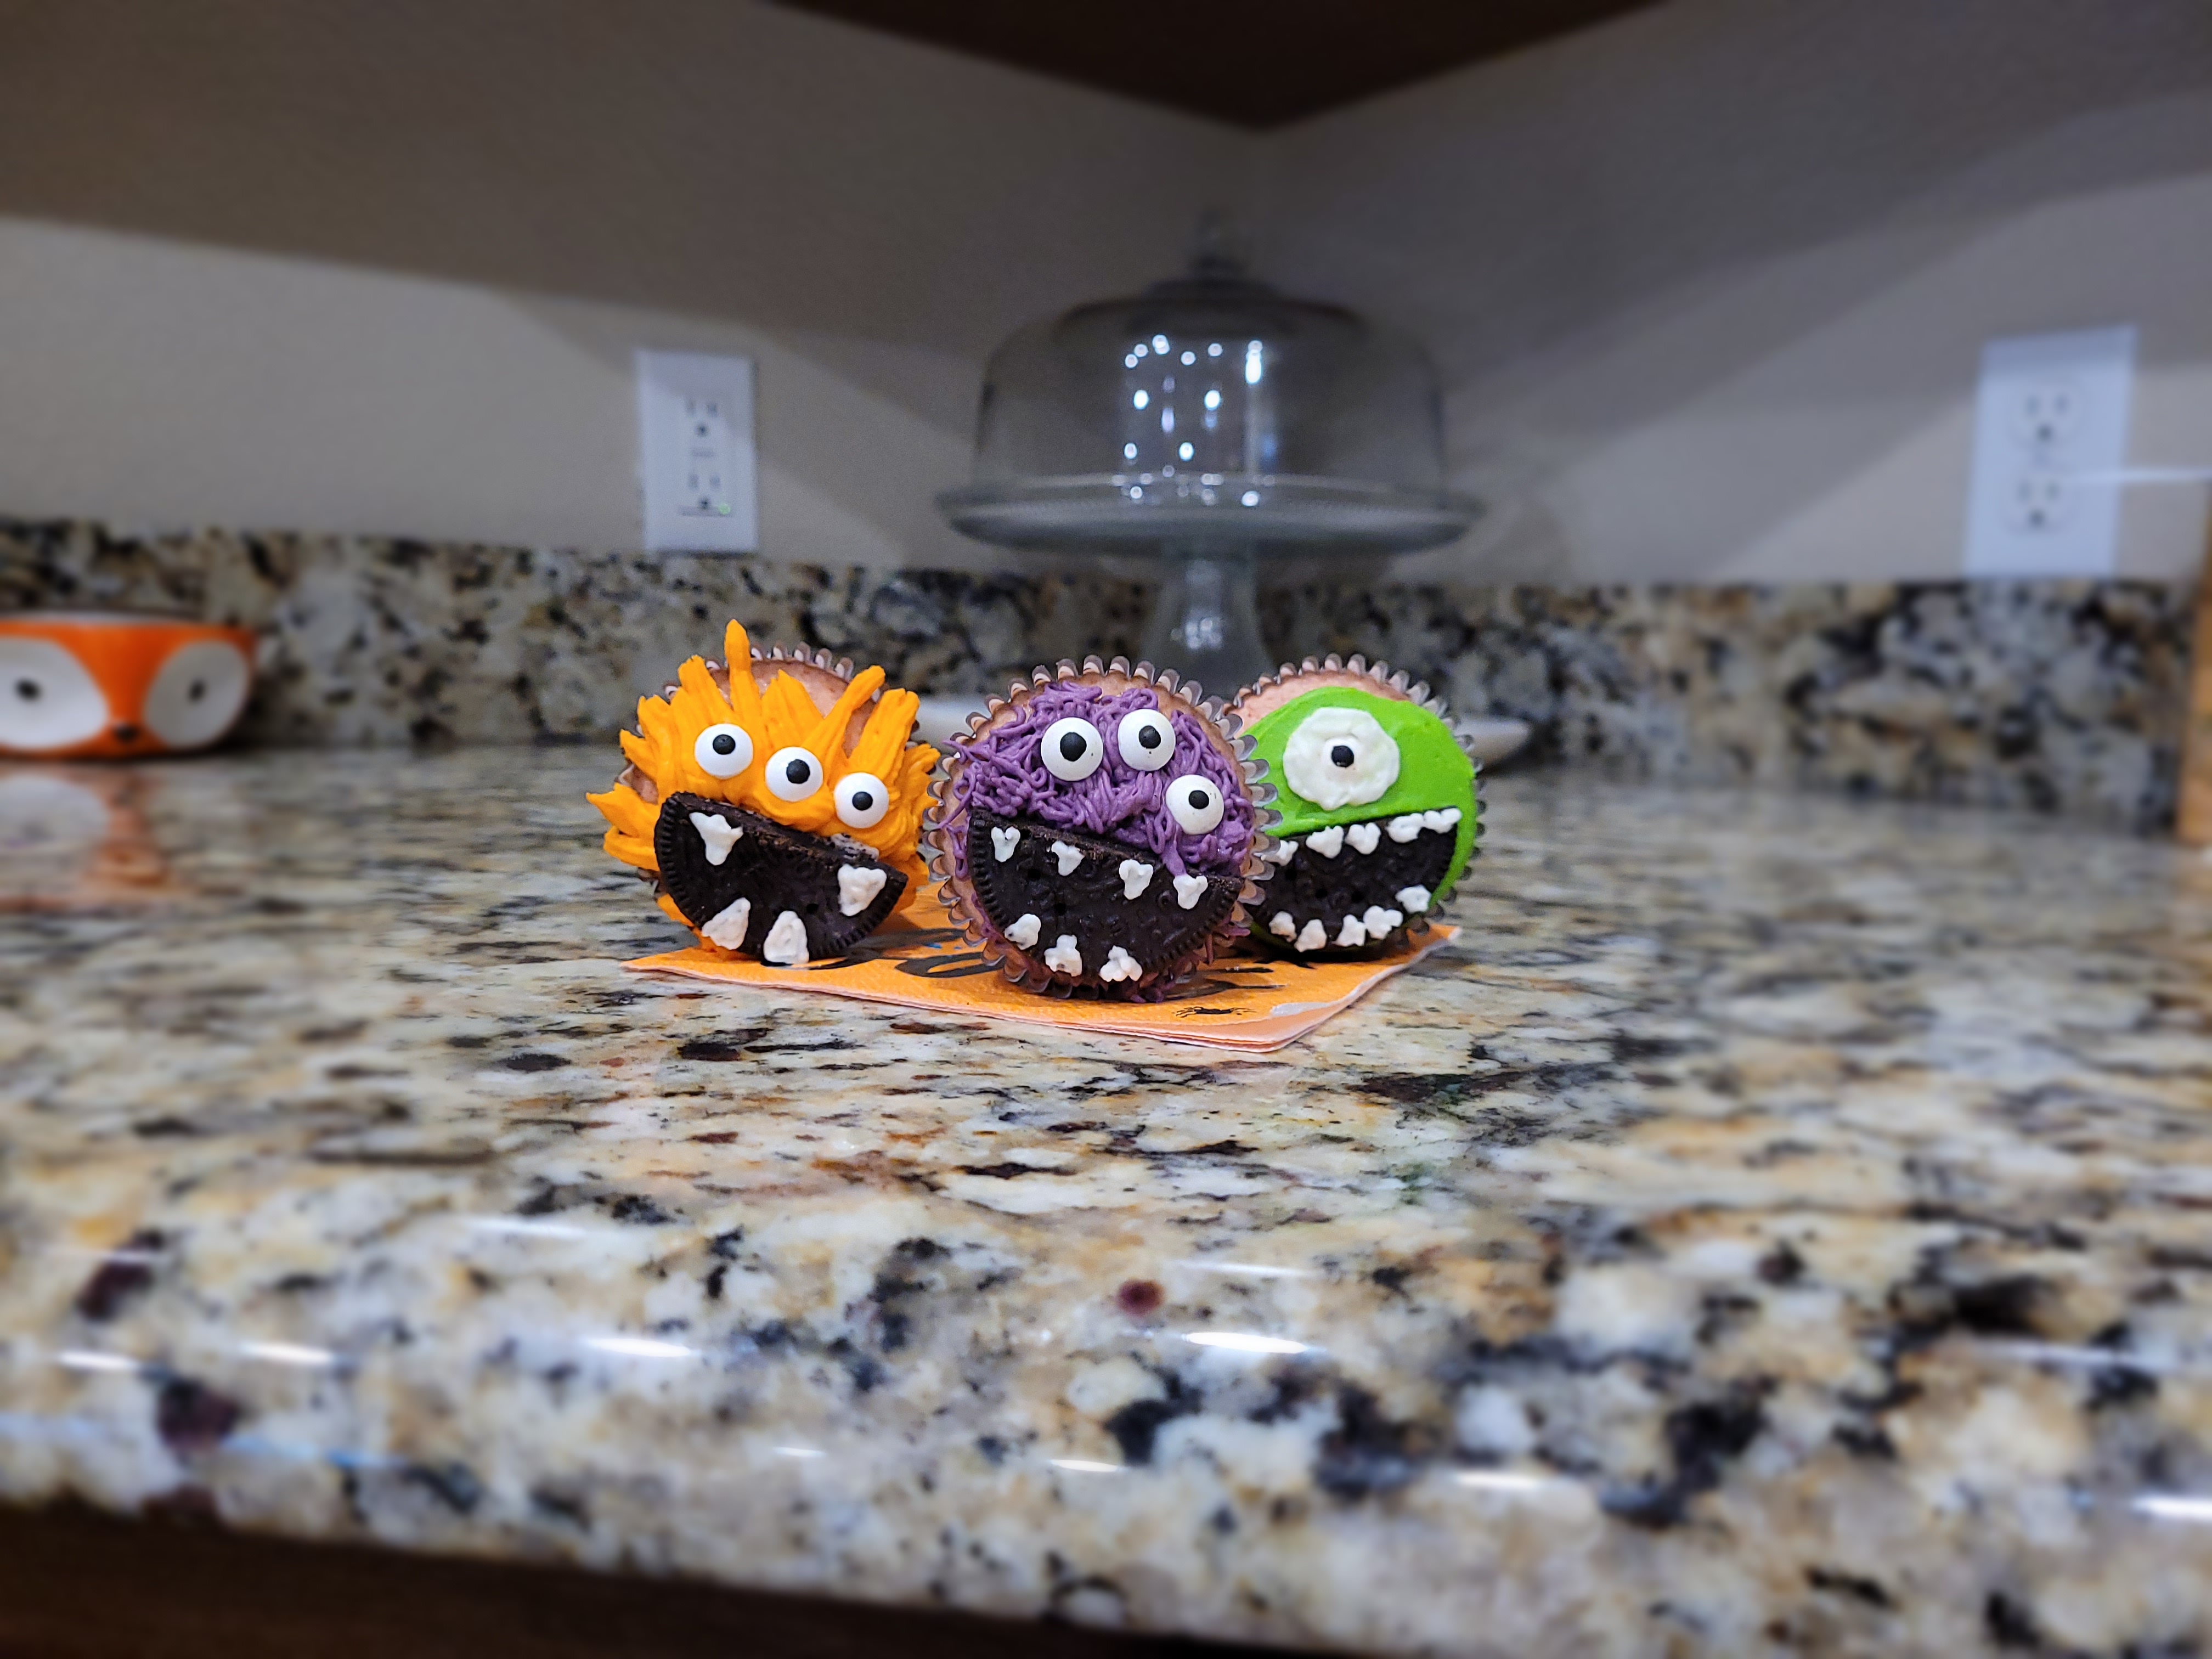
Aaahh!!! Real (Tasty) Monsters
The witch is back! Oh boy, it’s been a real adventure since my last blog in August. We moved back out to New Mexico, driving cross country from Florida with two spazzy dogs (and sometimes two spazzy humans). After waiting almost 20 days without 98% of our belongings, our home goods finally got delivered which means BAKETOBER HAS COMMENCED! I was getting downright twitchy not being able to bake (and more over, not being able to eat said baked goods). But I am happy to say that I’m not going to miss a single week of baking in October. I’m coming out frighting.

It’s technically eye candy. I know, they’re absolutely awful, but that’s kind of the point. I mean, I am a little rusty since it’s been a couple months, so give a ghoul a break. But they are each delightful (or frightful) in their own weird little monstery way. And they are absolutely delish–it’s a black cherry flavored cupcake with cream cheese frosting, and they are so yummy I have to eat them two at a time. I’m just glad they can’t actually scream while I’m scarfing them down. And boo-lieve it or not, these terrifying little babies are only 142 calories a monstercake (recipe makes 18 total). They are so easy and so much fun to make, and they have me feeling all sorts of spooky and happy.
I may be blonde, but otherwise, I am Wednesday Addams. The recipe itself is incredibly simple. I’ve done black velvet, Black Forest, most of the creepy flavors you can come up with for Halloween, but these just might be my new favorite. All you need is:
- 1 box of yellow or white cake mix (I used Whole Foods gluten free yellow cake mix)
- 1/2 cup (111 grams) of unsweetened applesauce
- 3/4 cup of skim or fat free milk
- 1/4 cup (79 grams) of egg whites or 2 whole eggs
- I box of sugar free black cherry Jell-o mix (10 grams of Jell-o powder)
Preheat your oven to 350 and line a couple muffin tins with cupcake wrappers (obviously, they need to be spooky to be seasonally appropriate). Mix together everything else on medium-high in a stand mixer for two minutes. I used a cookie scoop to plop one and a half scoops of batter into each cupcake wrapper.

New kitchen counters and cabinets are giving this ghastly girl life. I baked for 20 minutes…which, still learning my new oven here, was probably 2 minutes too long. Start checking for doneness with a toothpick around 18 minutes. Once a toothpick comes out clean, place your tins on top of cooling racks.

These wrappers are giving off Pugsley Addams vibes. Here for it. After 10 minutes, remove the cupcakes from the tins and let cool completely before frosting. Things will be very grotesque, and not in a good way, if you don’t let these cool first.

Don’t waste cream cheese frosting…that’s a cardinal baking sin. To make the cream cheese frosting, all you need is:
- 8 ounces of 1/3 the fat cream cheese at room temp
- 1/2 cup (112 grams) reduced fat butter or spread (leave cold)
- 2-3 cups of Lakanto powdered monkfruit sweetener or regular powdered sugar
- 2 tsp vanilla extract
I had SO MUCH leftover frosting, and I used 3 cups of Lakanto. I’d recommend only 2 cups since 18 cupcakes don’t need a ton of frosting. I froze half to use later for scary confections, so I’ll probably thank myself for this next weekend.
Start by whipping the cream cheese and butter together on medium-high in a stand mixer until fluffy, about 2 minutes. Add in your sugar/monkfruit and vanilla, blending on low until things start to come together, then switch to medium-high until well blended.

SPOOKY SPRINKLES™ RETURN! So, I triple checked all my gel dyes before packing them up…and yet, the black still somehow managed to explode all over the bag it was in (Florida is nearly below sea level…give it time, but now we’re up at 4,200 ft elevation, so things got very balloon-y). After cleaning all my bottles and dying my hands various shades of the rainbow, I managed to salvage all my dyes in what I’m referring to as a Halloween Miracle.

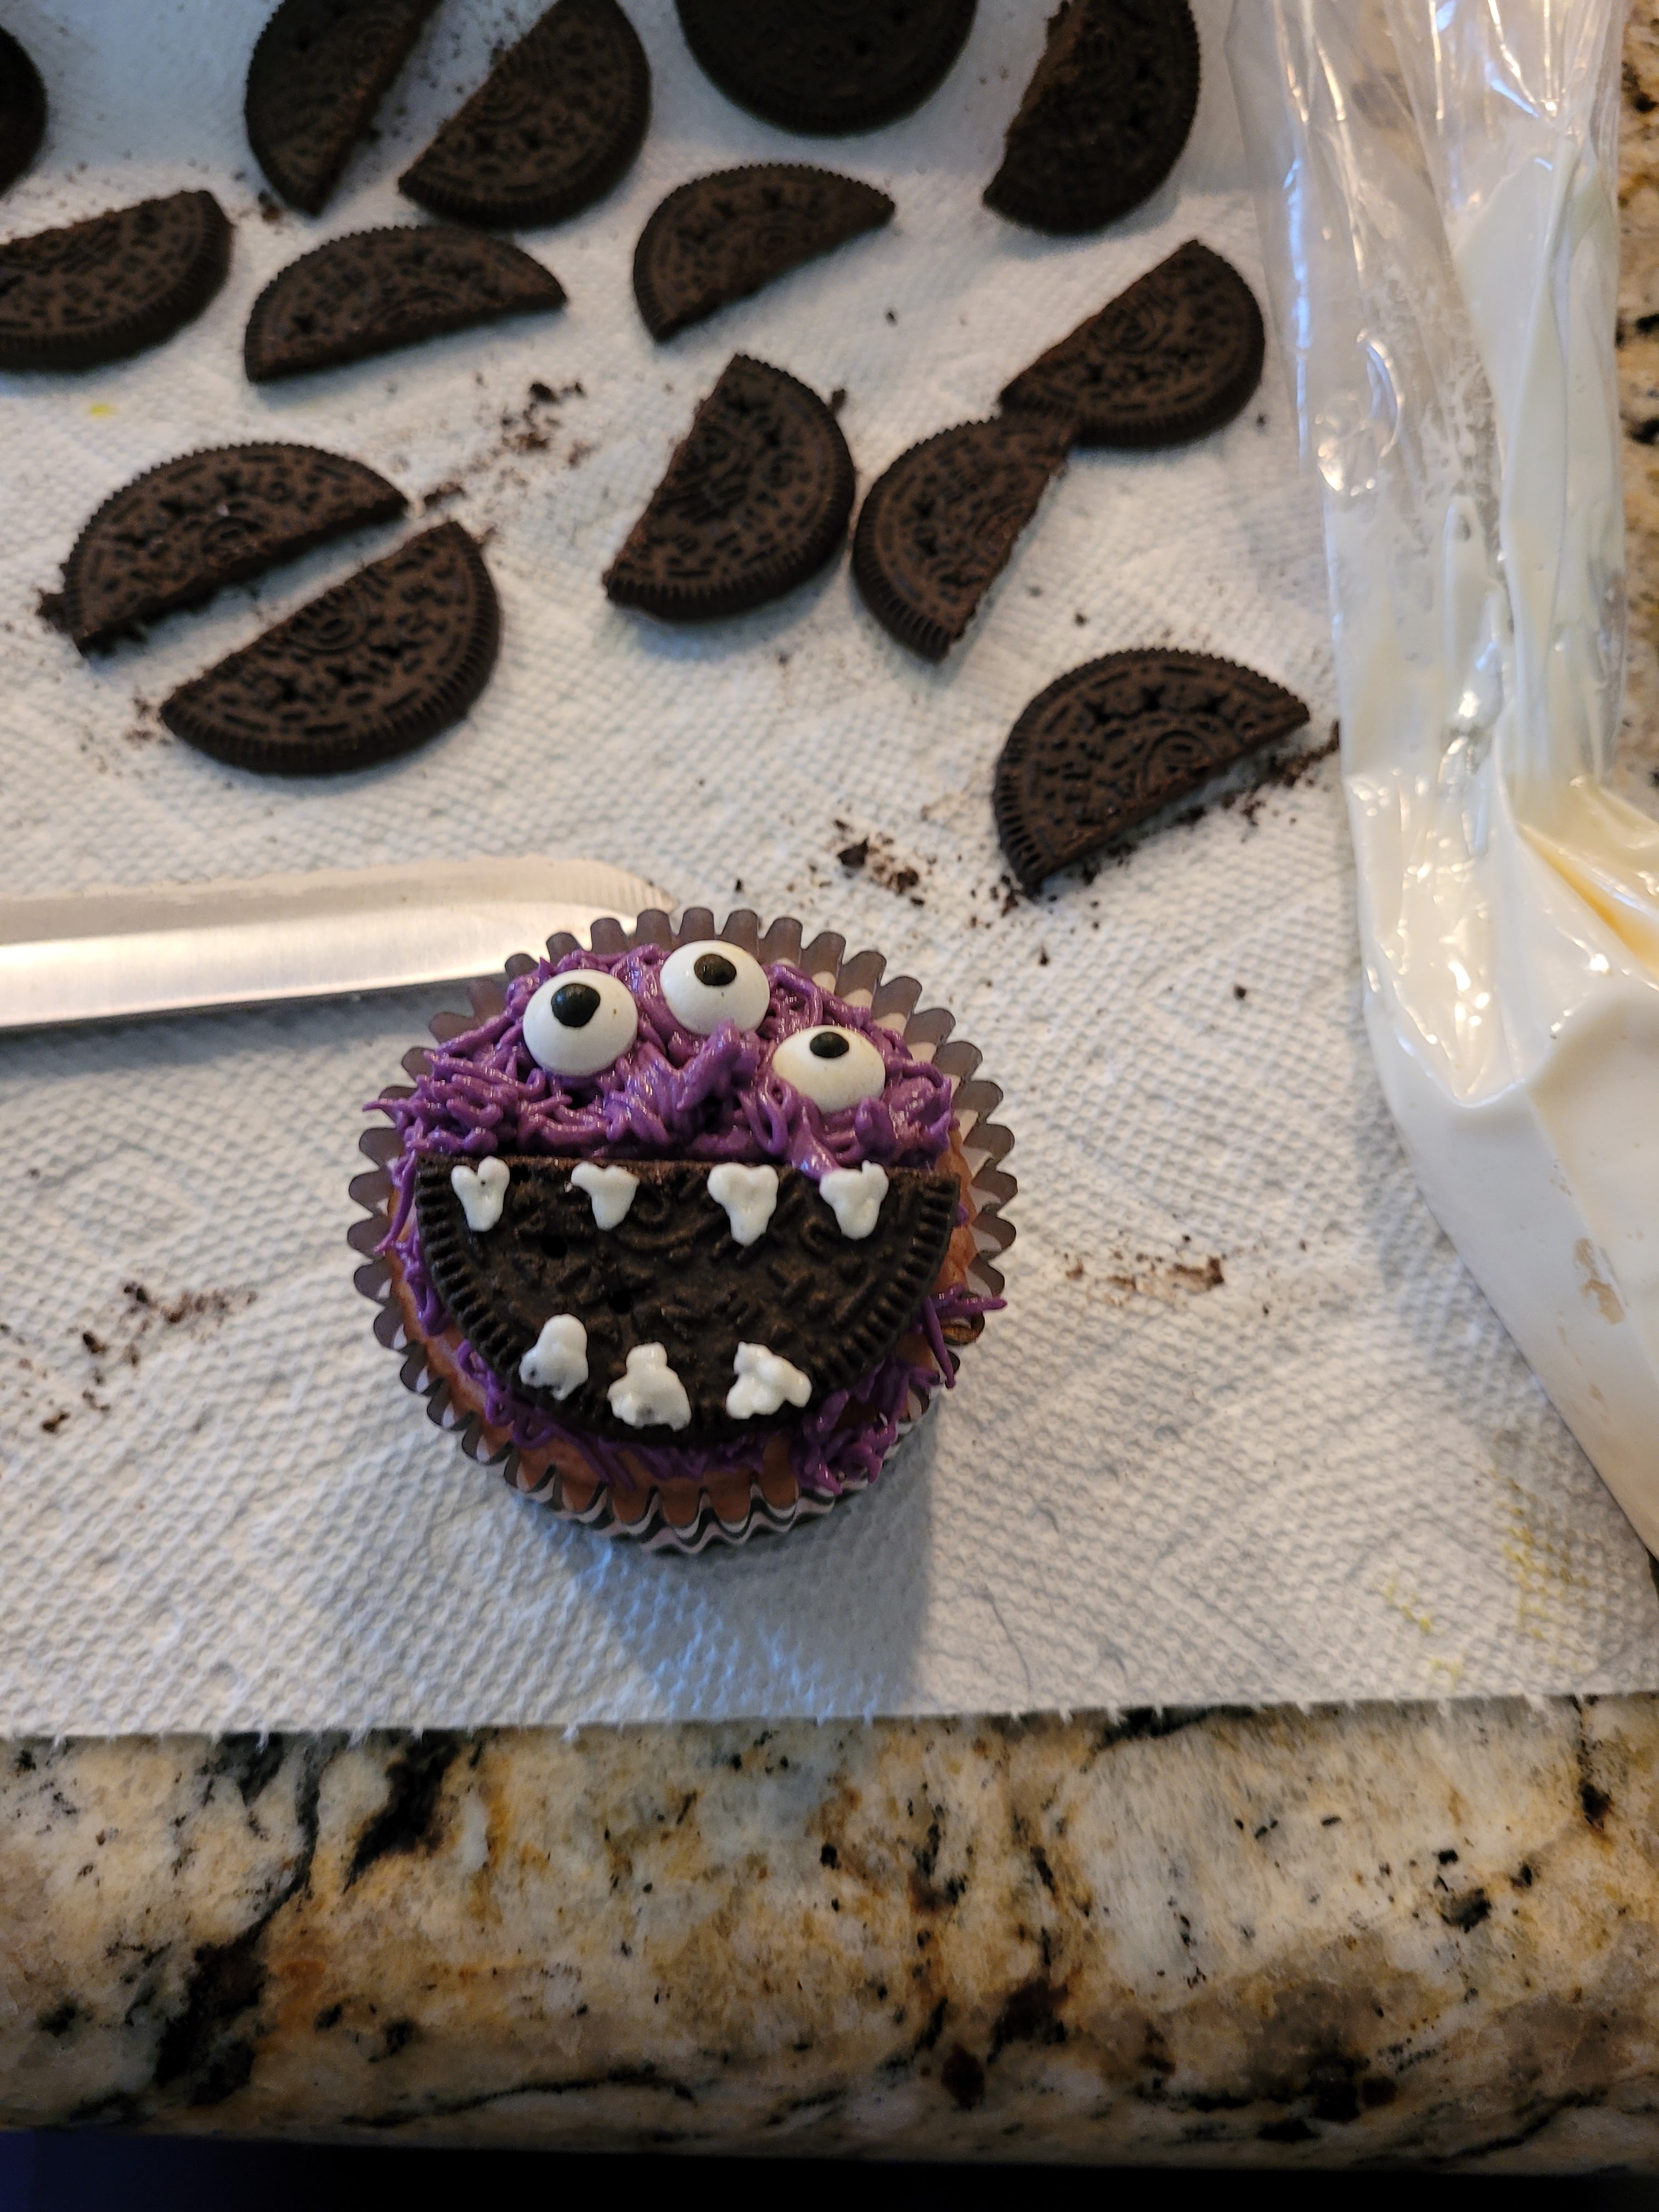
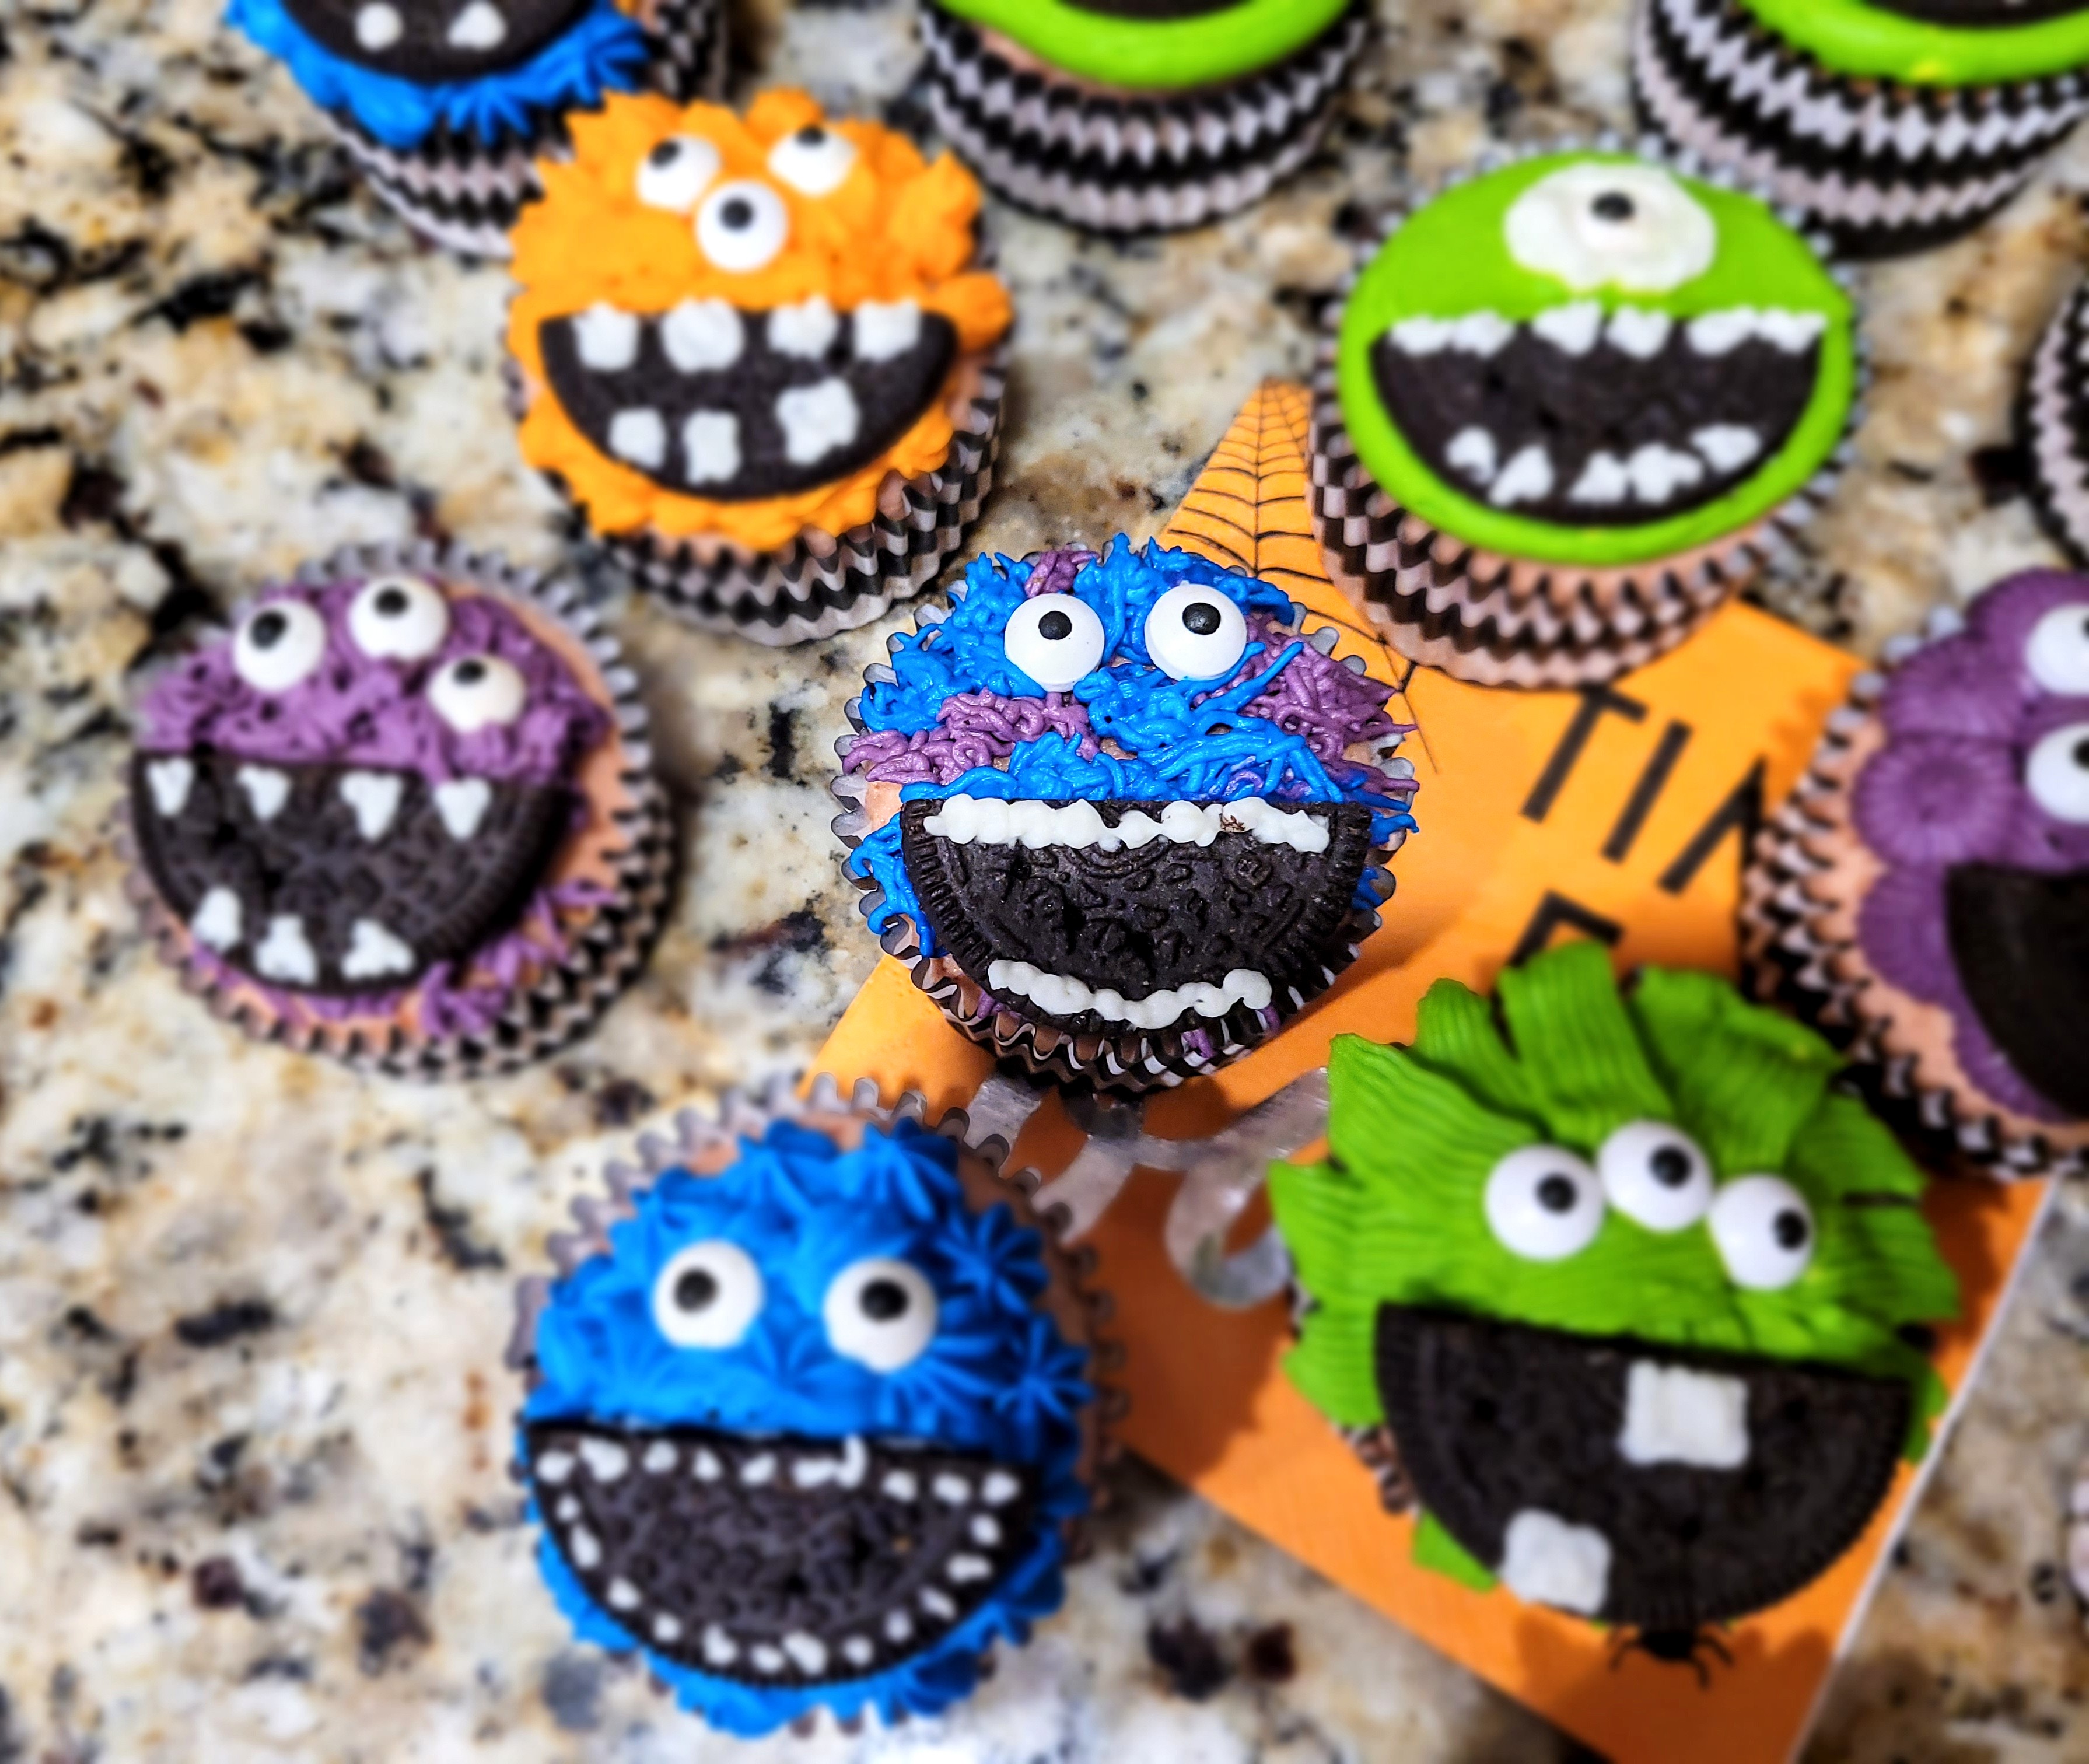
Is there a Patron Saint of Halloween Baking? If so, they’re my new favorite. I used orange, bright blue, bright purple, and lime green dyes for my monsters. I also kept a portion of frosting plain white for monster fangs. Other things you’ll need include Oreo’s for mouths, eyeball sprinkles (what do you mean you don’t have these on hand already? What are you? Normal?!), various piping tips (open star, three star, basket weave, grass tip for hair, etc.). I pretty much used every tip I have to make random monsters. Remember, they’re monsters, not models, we don’t expect perfection, we expect scarefection.

It would not be a Halloween post without a knife. Ghostface and Jason Voorhees would be proud. The absolute best way to cut an Oreo in half, surprisingly, is not with one’s own mouth. Did I test this theory? Yes. About 6 six times. Was I sad it didn’t work? No, because you can’t be sad when you’re full of gluten free Oreo’s. Instead, I split an Oreo in half, picked out a serrated knife, and very, very slowly, with the meticulous persistence of a psycho murderer, sawed through until two clean, even pieces remained. And that, my friends, are how monster mouths are made, and how a serial killer may or may not have been born.

I mean, at least the monster looks happy about it. I used a #2 round tip to pipe various fangs, buck teeth, and tiny teefs onto each Oreo half for my monster mouths. Your imagination allows for endless possibilities here. I then used a grass tip to pipe hair on several monsters, pictured above. On others I used open star tips to pipe stars or blobs, on others I used basket weave tips to create long tentacles. Truly, this is all up to how creative you feel like getting.
This is Peter. According to his Monster Match profile, he likes long walks on the beach, eating small children, and prefers robust red wines. I did about 4 monsters of each color, tried piping some colors together, and pretty much just had a ball with it. I hadn’t baked in well over a month, so I got busy having fun and totally did not take photos of each different version until I was done…

It’s a field of screams. 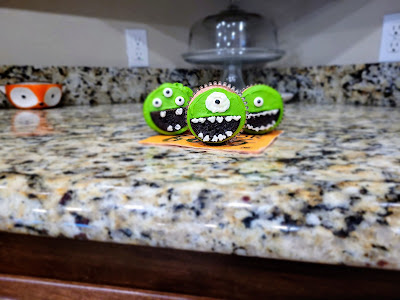
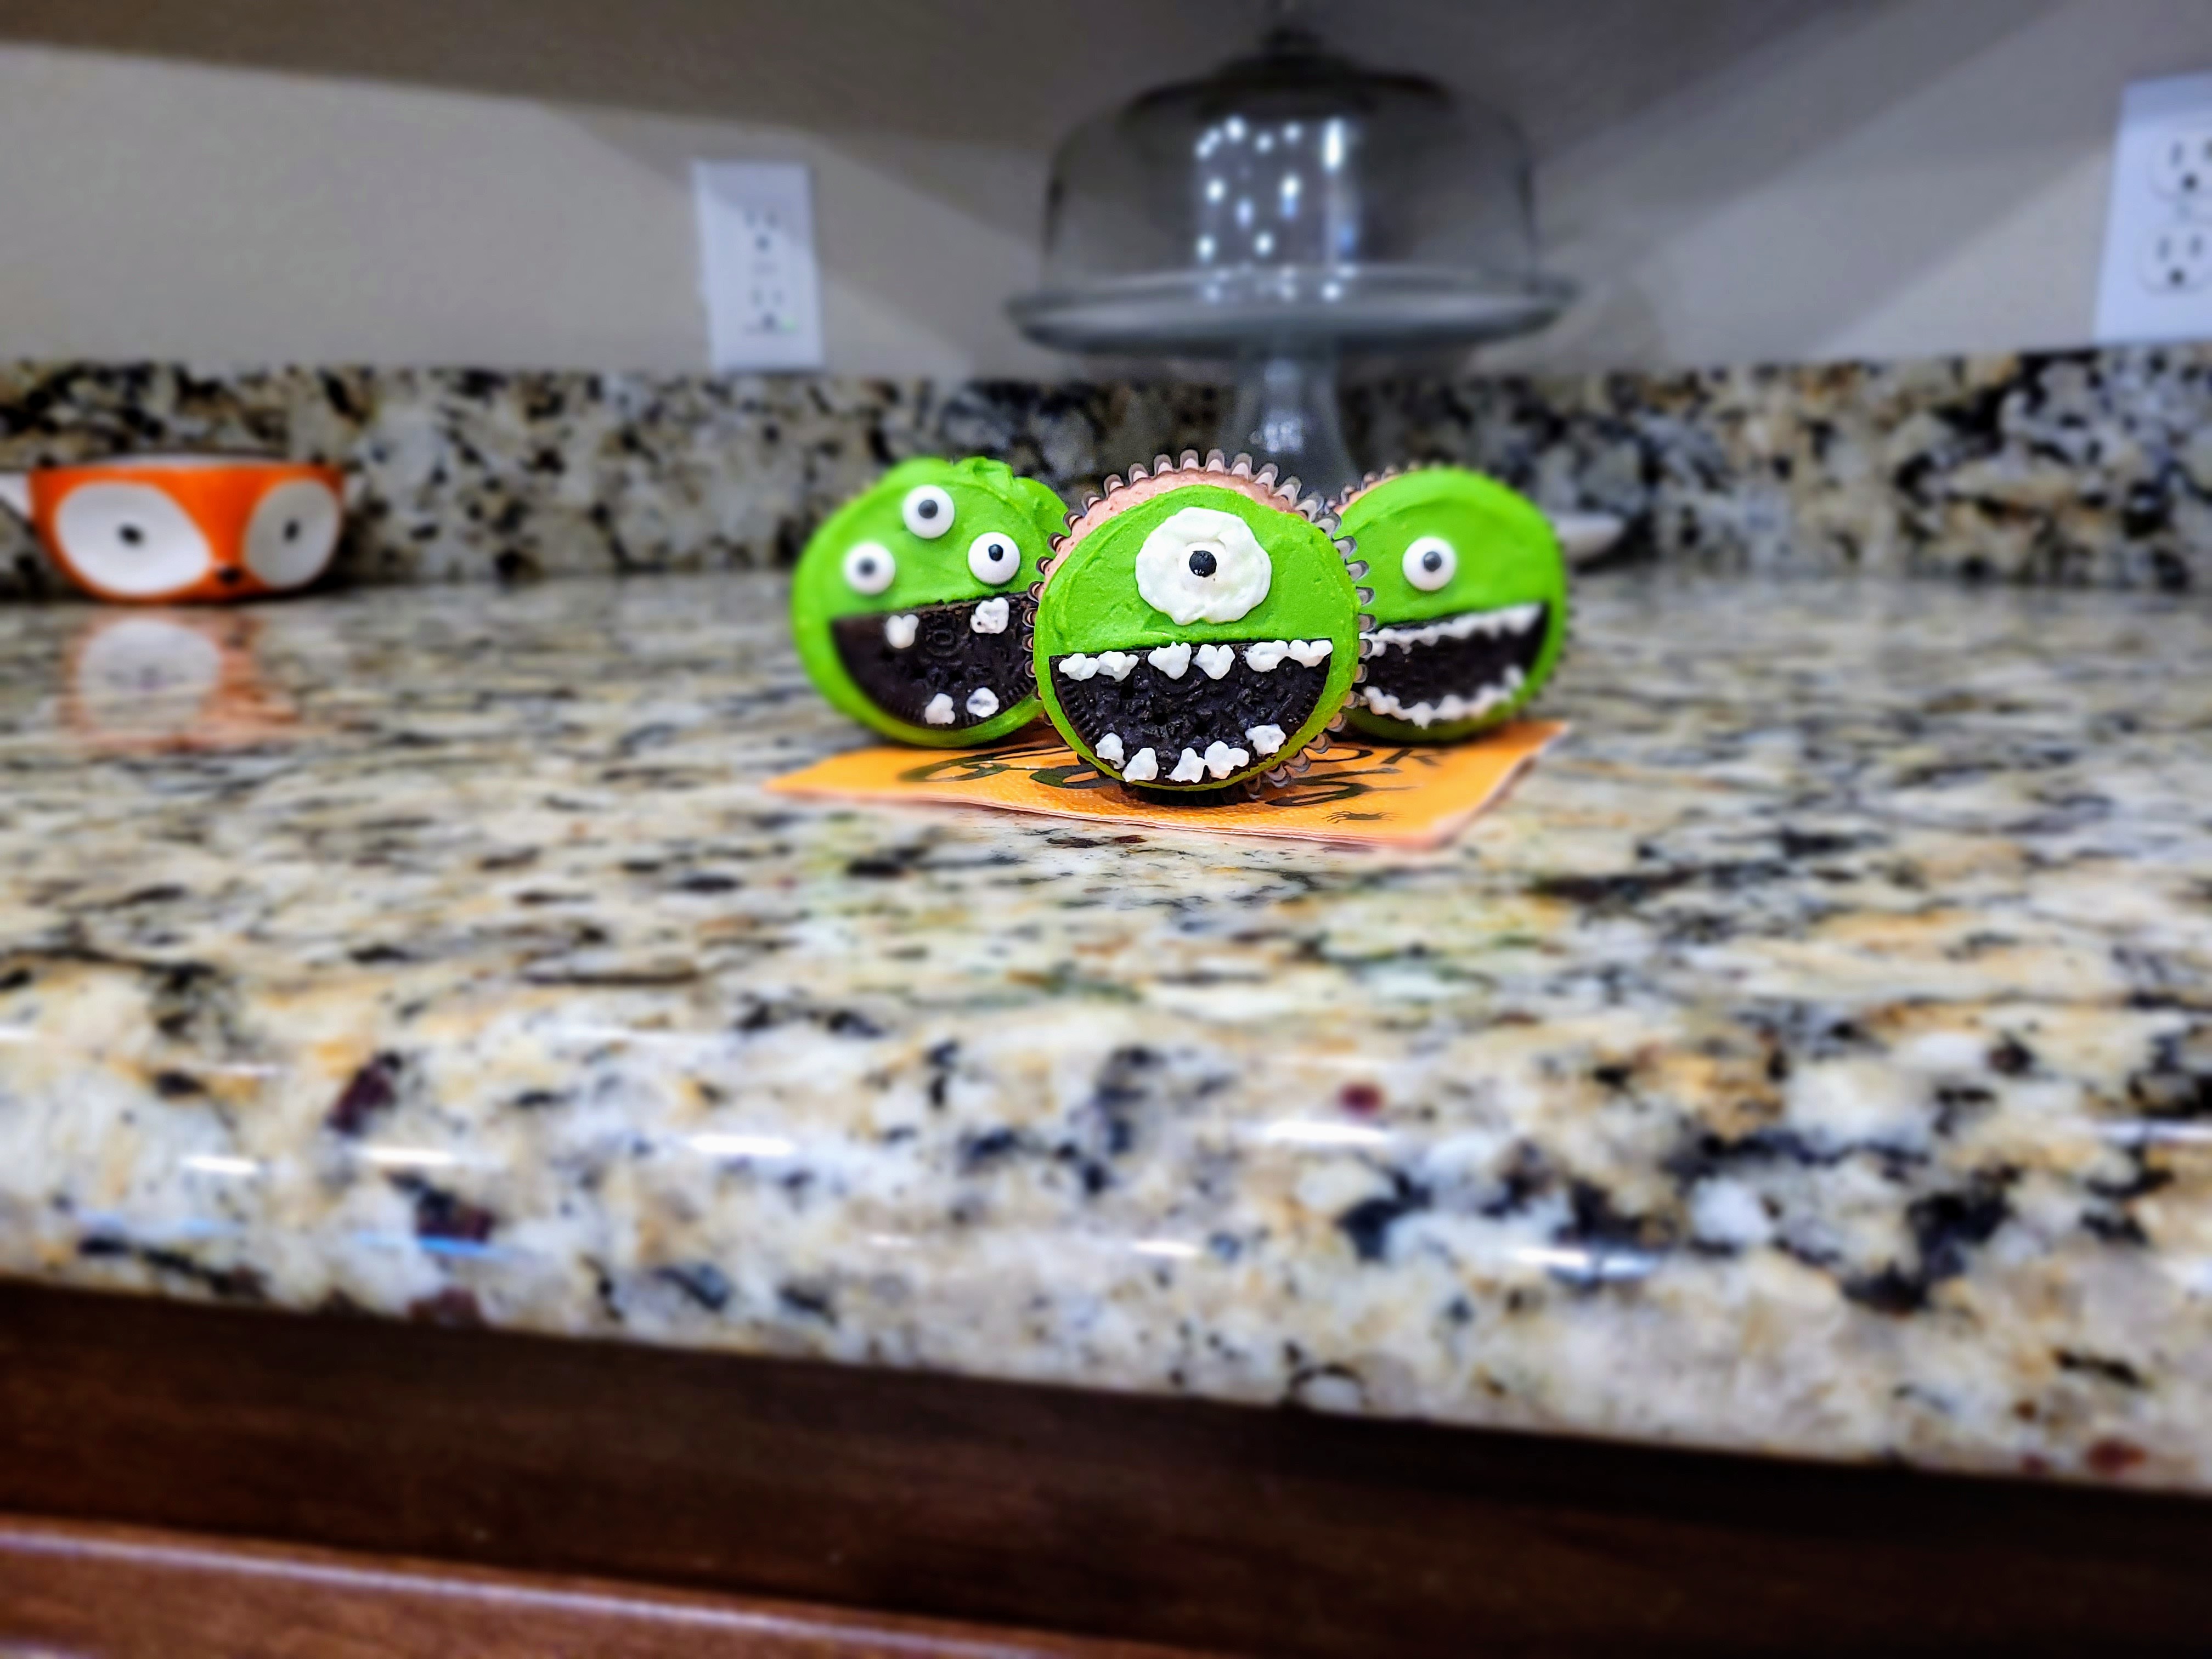
Put that thing back where it came from, or so help me. I very much so had to make a Mike Wazowski monstercake because he is my all-time favorite monster. I also made his apparently inbred three-eyed cousin and tiny pupil-ed sibling.

Don’t worry, Sully was kinda there. I used a grass tip with purple and later blue to make a tiny, hairy rendition of Sully, because Mike needs his friend, obviously. Is she serious? Will we ever know? I’m just saying, for a proper Scare Floor, you need both characters.
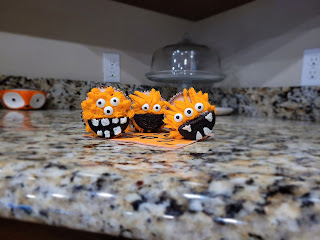
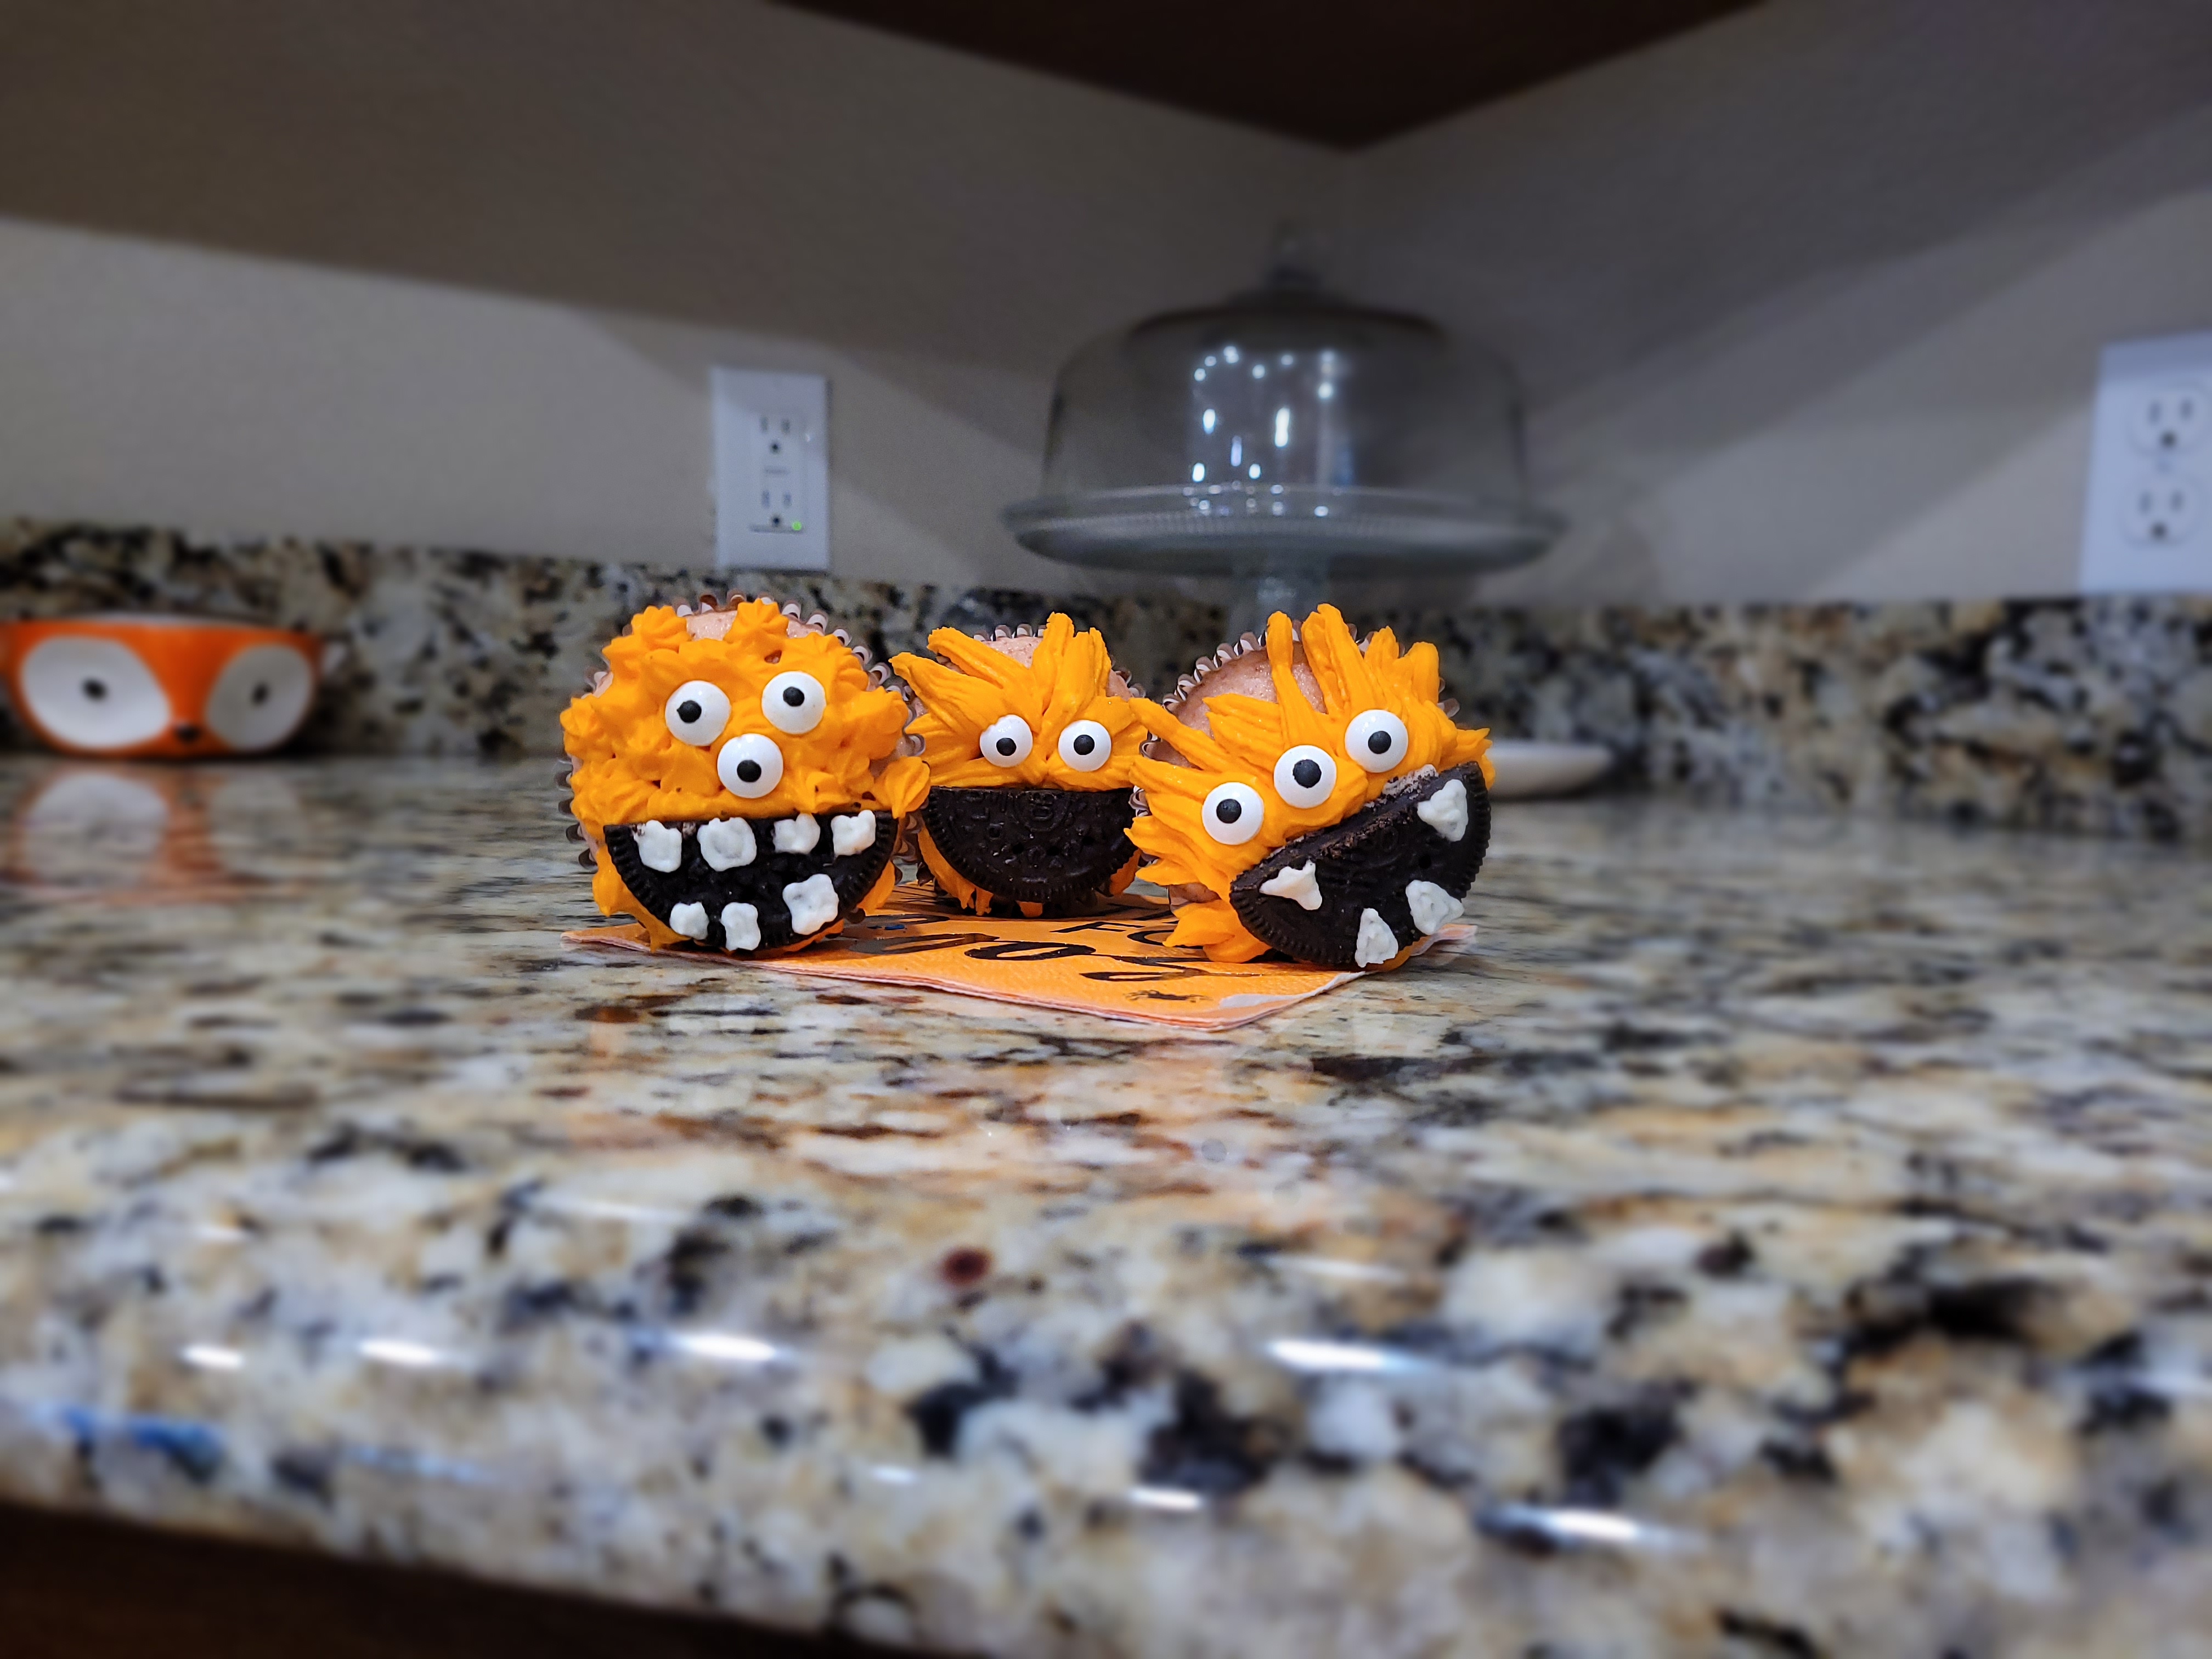
Oh hey there, my slightly unhinged orange friends. These all gave me Animal from Sesame Street vibes…especially the dude in the back. I bet he can really play the heck out of a drum set.

Gotta love those Purple People Eaters. Are they creepy in a fun way? You bet. So, my mission was accomplished on that front. But the FLAVOR…oh man, something as simple as adding a packet of Jell-o to this recipe took it to the next level. You get that amazing black cherry flavor, and it is so good with that slight tang of cream cheese frosting. If you wanted to make them even spookier, you could add a few drops of red and a drop of black food coloring to the mix to make the cupcakes look like monster blood or guts when you bite into them. You’re welcome. That’s what I’m here for, to deliver gross ways to eat baked goods in October.

I scream, you scream, we all scream, everyone’s screaming… For more cupcakes. I am not kidding, these are so good, even my husband that doesn’t really like dessert has been eating them two at a time as well. This definitely makes me feel like less of a glutton then when I’m double-fisting cupcakes by myself…but I do realize this means we’re gonna run out of monstercakes really fast, so I’ll be back at it again this weekend, baking up a terrifying storm of Halloween horrors. Now that this basic witch has her baking tools back, Spooktober dessert possibilities are endless. ‘Til next time, my fellow eaters!

A scarytale ending, indeed. -
You Desert the Best…
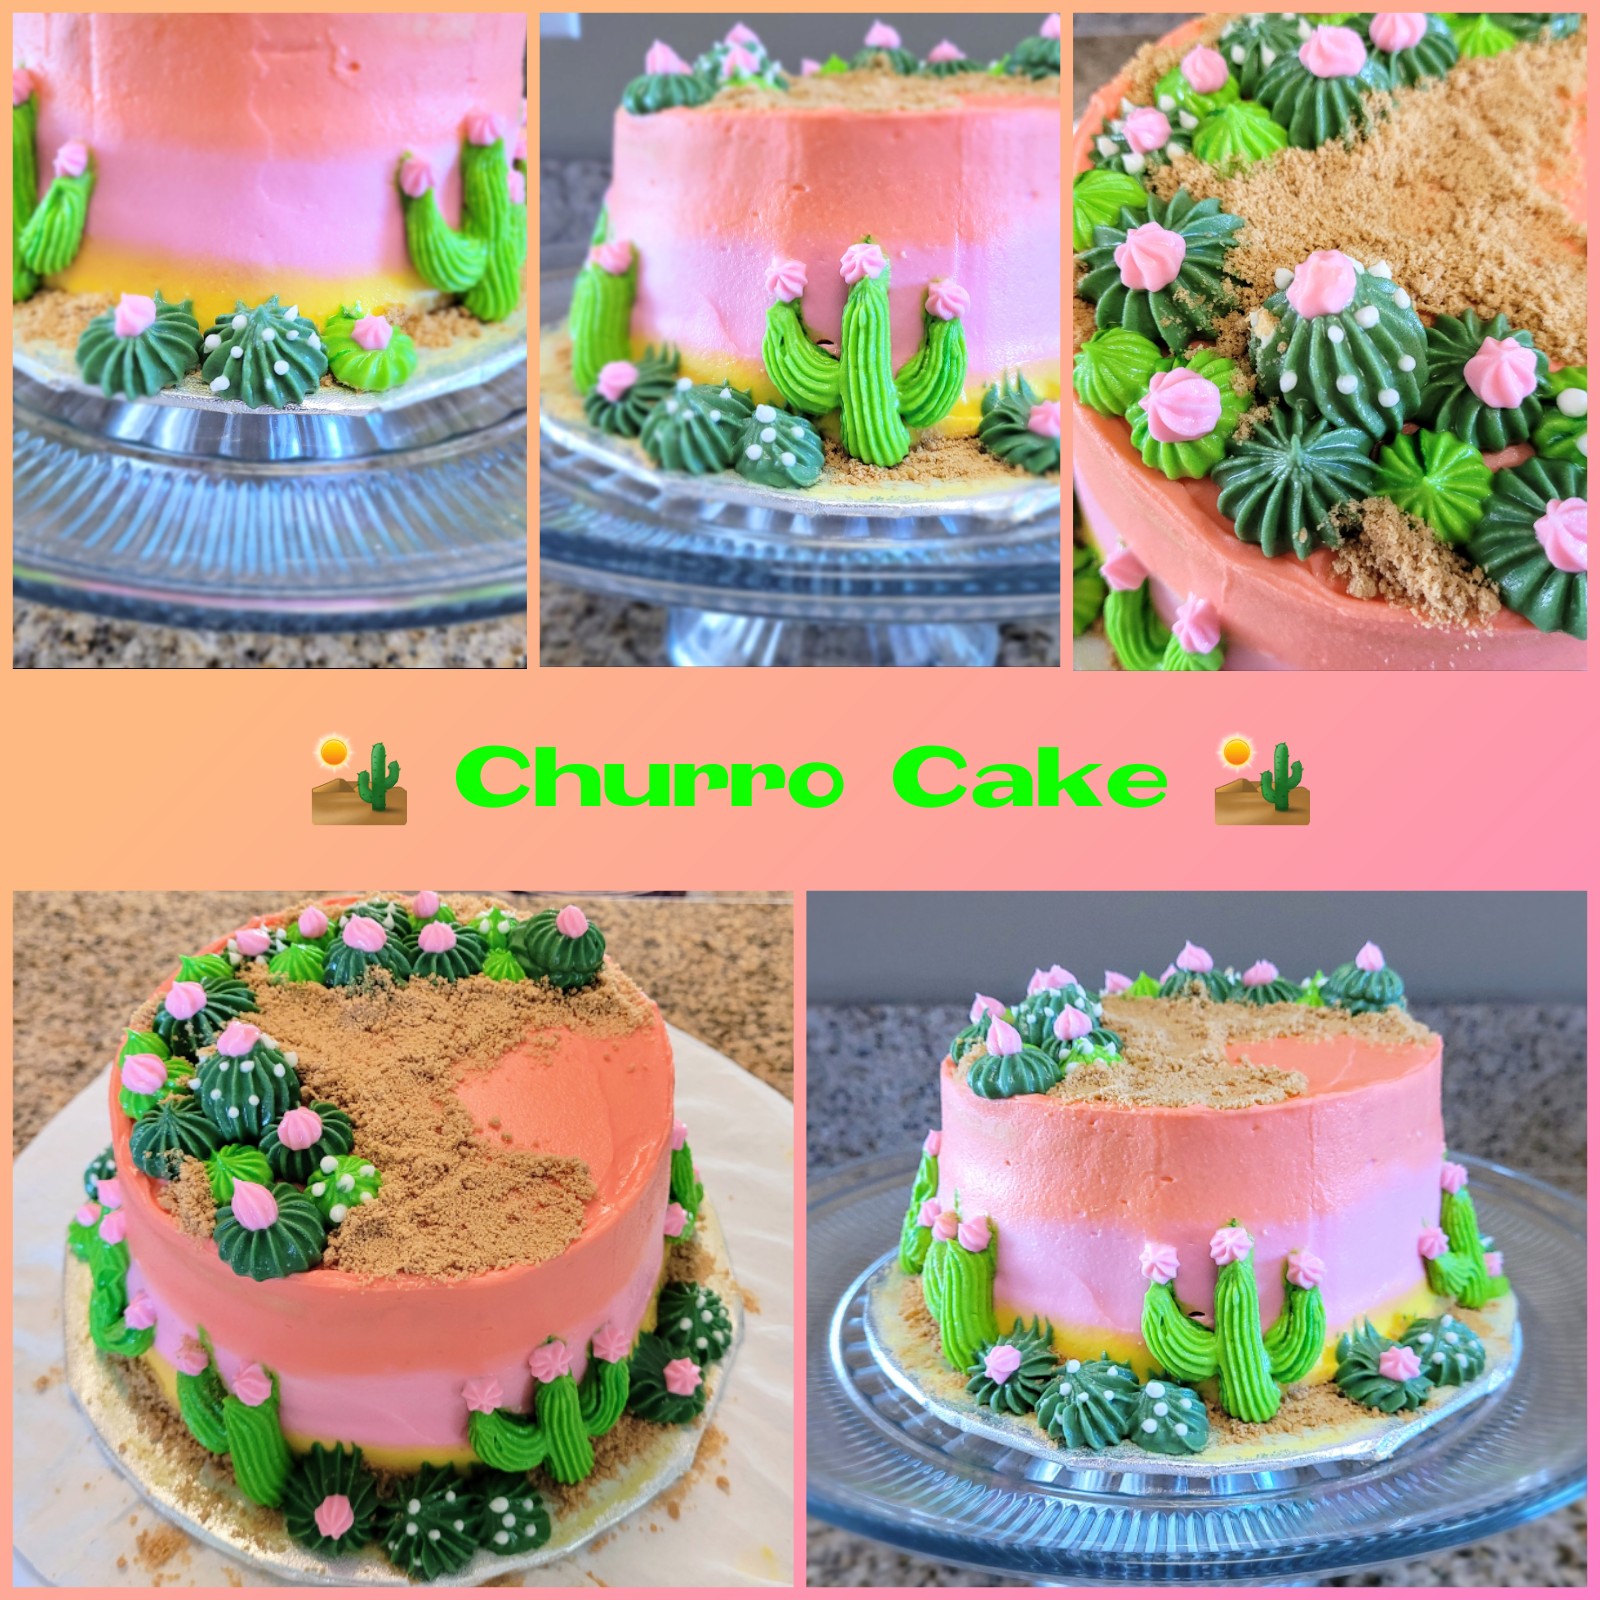
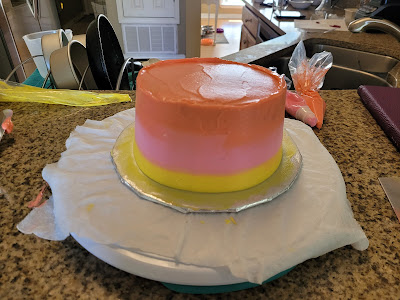
Derek and I are gearing up for our move back to New Mexico next month. Most people hear we’re headed back to Clovis from Florida and think we’re insane since we’re so happy to get back. What’s not to like? The climate is dry, like my humor. The plants are prickly, like my personality. The desert is flat, like my…wait. I guess I’m excited to go back because I am the desert… While there are definitely a few things I’m going to miss (lookin’ at you, Whole Foods home delivery), Florida never really felt like home to me. While I can see why people love to vacation here, Florida simply was not all it’s cactus to be. Give me those wide expanses, perfect sunsets, and Tex-Mex!!! And cake. Because this is a cake blog. And I made a cake inspired by New Mexico, so naturally, it’s a churro cake with a desert scene.

It’s pretty spiketacular. I’ve actually made this churro cake recipe before but never blogged about it. Happy to report it is just as delicious as it was the first time around, so you could say cactus makes perfect (stop rolling your eyes, you know this is who I am, unstoppable baker and pun master). The cake itself has a heavenly cinnamon and brown sugar swirl baked in to each layer, and the cream cheese frosting is also cinnamon flavored. Since I can’t have gluten, this is probably the closest I’ll ever get to being able to scarf down an actual churro, so I’ll take it! I’m not saying the amount of churros I ate in my youth directly contributed to the gluten intolerance that hit me in my 30s, but it probably didn’t help. In any instance, I’m just happy to be eating something churro-adjacent, and for only 309 calories a slice for 8 slices (a mere 247 calories for 10 slices).
You know, getting my just deserts. It is a super simple cake recipe, and even the cacti decorating is fun and fast. To make the churro cake, you need:
- 1 box yellow cake mix
- 1/2 cup unsweetened applesauce (111 grams)
- 3/4 cup of fat free or skim milk
- 1/4 cup of egg whites (61 grams)
- 1 tsp cinnamon extract
- For the swirl you need 2 tsp of cinnamon and 2 TBS of Lakanto golden monkfruit sweetener or regular brown sugar
Preheat your oven to 350 and line three six-inch round cake pans with Parchment paper, cooking spray, and bake even strips. Combine everything except the cinnamon and brown sugar in your stand mixer, beating on medium-high for two minutes. Evenly distribute the batter in all three pans. Now, take a small bowl and mix together the cinnamon and sugar.
Then get swirly. I just dumped a few spoonfuls on top of each cake round, then used a knife to gently swirl around and evenly distribute the mix into the batter. I mixed it in more the first time I made this cake so the swirl was inside the middle of the batter, but this time I wanted to get a good glaze or creme brulee effect on the top of each layer for a crisp bite, so I didn’t mix in the cinnamon sugar into the batter completely. I baked my cakes at 350 for 26 minutes.
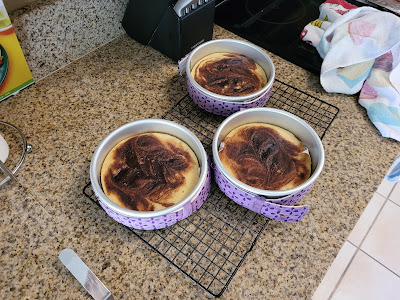
Churro brulee. Oh yes, things got super nice and caramelized. You get that amazing churro crunch this way that simply can’t be beat. Let the cakes rest on a cooling rack while still in the pans for 10 minutes, then turn out on the cooling rack to cool completely while you make your frosting. I put my cakes in the freezer because I am nothing if not impatient. Who has time to cool cakes when all you want to do is eat them?!

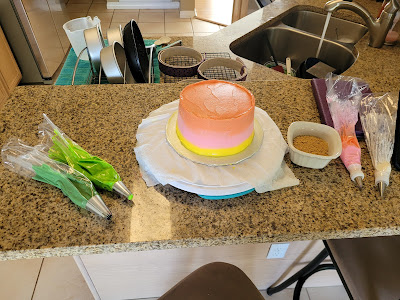
Back to that yogurt cream cheese frosting. I’m addicted. I got to buy new piping tips to make this cake. I haven’t had to buy piping tips in like, two years…some still exist out there that I don’t already own, which was a surprise to both me and my husband, who has accepted that half of the kitchen storage belongs solely to my baking accoutrements. We don’t need cups, we need cake pans!! To make the cinnamon cream cheese frosting, you’ll need:
- 8 ounces (220 g) of 1/3 the fat cream cheese at room temp
- 1 cup (226 g) of Dannon Light + Fit vanilla Greek yogurt, strained overnight to remove excess moisture
- 3 cups (360 g) of Lakanto powdered monkfruit or regular powdered sugar
- 1 tsp clear vanilla extract
- 2 tsp cinnamon extract
- Gel dyes in Kelly green, leaf green, lime, brown, pink, yellow, and peach (not pictured)
- Wilton 6B, 4B, 2, and 18 piping tips
- 1/4 cup of Kinnickinick gluten free (or regular) crushed graham cracker crumbs for sand
Beat the cream cheese in your stand mixer until fluffy, about 2 minutes. Then add in the yogurt, half the powdered sugar, and all the extracts. Mix well, then add in the remaining powdered sugar. Now, go grab those cooled cakes before you tint any frosting.
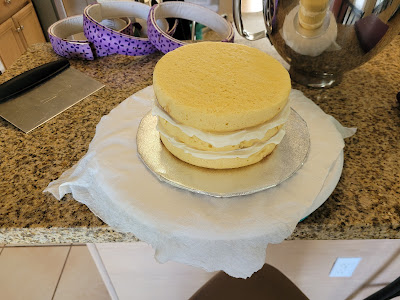
I hated having to hide that churro brulee topping, but a level cake is a must. Use a bit of white frosting to layer in between each cake round. I always place my cake rounds face-down as it typically allows for a more level cake. Now, once you’ve filled your layers, take a small amount of white frosting, and load it into a piping bag with the #2 round tip. This will be for the cactus spines. Take the remaining frosting and divide it into 5 bowls:
- One dyed yellow
- One dyed pink
- One dyed peach
- One dyed light green, using half leaf green and half lime gel dyes
- One dyed dark green, using half Kelly green or leaf green and half brown gel dyes
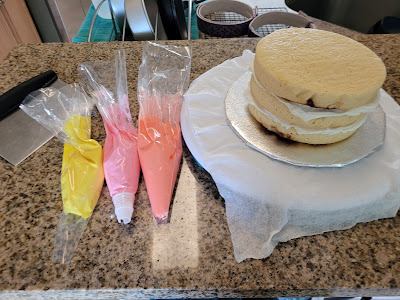
About to get that sunset on. I put my yellow, pink, and peach into piping bags to make my sunset background super simple to create. I didn’t use any piping tips for this, just snipped the ends of the bags. My pink bag has a coupler on it for later.
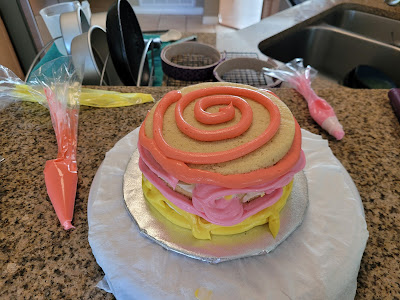
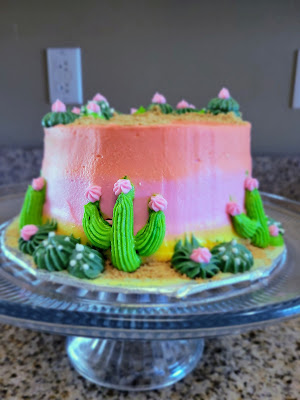
Abstract cake art. Now, as you can see above, this does not take any form of precision or accuracy to make happen, or I wouldn’t be able to decorate a single cake. Simply pipe yellow around the bottom cake round, pink on the middle cake round, and peach around the top layer. You will need to save some pink for the cactus flowers. I ended up combining my leftover pink and peach together for this.
See? Not a catastrophe! Now, take a bench scraper and make several passes around the cake and smooth out the top layer. You want the colors to start to bleed together to give off that sunset vibe.
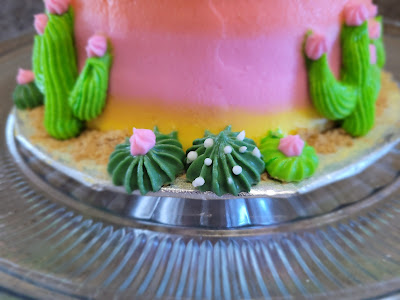
I truly can’t wait to see these again in person, but I’ll take a New Mexico sunset on a cake because that means I have cake. Now, load up the green frostings–one with the 4B tip (these will be the taller, skinnier cacti), and the other with the 6B tip (these will be the round, squatty cacti…look, we can’t all be tall, skinny cacti). Put the #18 star tip on the pink frosting bag.
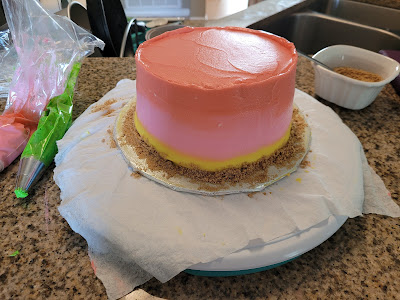
Now, sans cacti, this is a Florida sunrise cake. It just needs a little drink umbrella on top, and then you can call it a day. I then used a spoon to dust graham cracker sand around the edge of the cake. Now comes the fun part!
Cacti either look like they’re in a stick up or about to give you the world’s most painful bear hug. If you have only ever seen a cactus once in your life, you can pipe them. You just take the piping bag and pipe straight up to create the middle/trunk, then pipe another line in a half U shape on one side, and repeat on the other. I did this all over the cake in varying heights with the 4B tip.
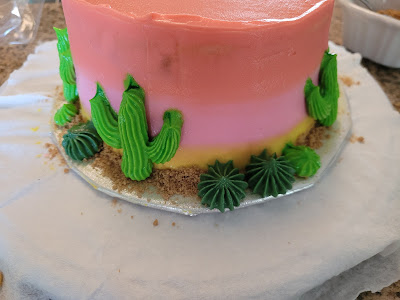
Those little squatty ones are cute though. The I took the frosting with the 6B tip and just piped little mounds around the sides of the cake.
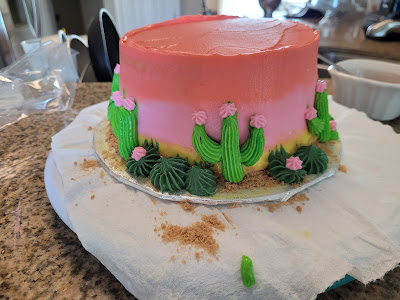
The cactus flower is this cake’s equivalent to sprinkles. It’s simply a must. Using the #18 star tip, I piped dots of little flowers on some of the cacti. Then I used my white frosting with the #2 round tip to pipe teeny little dots on the edges of some of the cacti to make spikes.
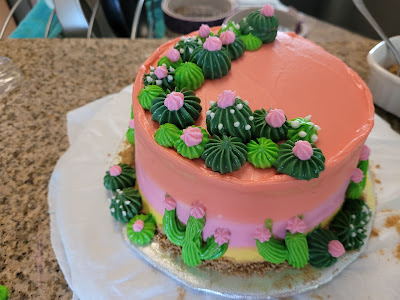
Don’t forget the top! Then I came in with my remaining frosting to pipe a little field of cacti on top of the cake. If you apply pressure to the piping bag while pulling straight up, you can make some pretty tall mounds with the 6B tip. I added flowers and spikes before grabbing more sand.
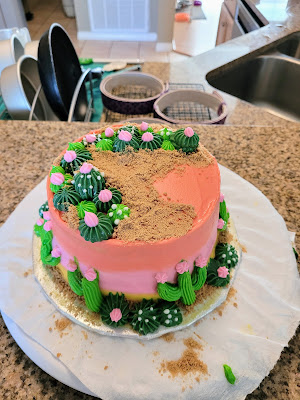
The desert, the beach, there’s always sand in everything I own… I used my spoon to smooth out the graham cracker crumbs and carefully place it anywhere there was a gap between a cactus or two. That’s it! It took me about 10 minutes to frost and decorate the whole cake. It takes longer to dye all the frosting than it does to use it, so truly, this is a really fun, quick, easy way to decorate a cake.
I mean, these little guys are so cute I could just eat them right up (and did). 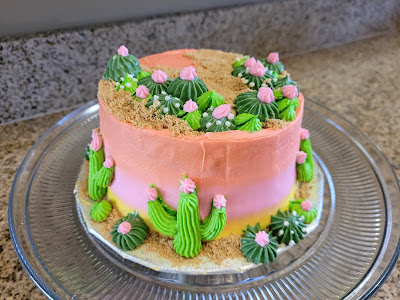
As far as the cacti can see, this is a nice homage to New Mexico. 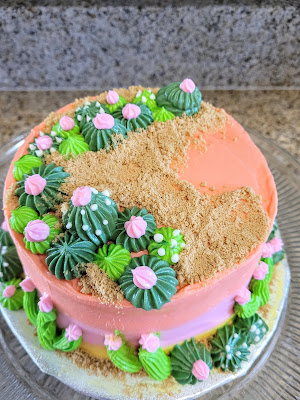
Should it have been a prickly pear flavored cake? Probably. But you can pry my churros out of my cold, dead hands. I have to say it because it’s both true and a pun: this cake has the most succulent flavor. It is moist, it is cinnamony, it has that churro brulee crunch, and that cinnamon cream cheese frosting is the right amount of sweet to compliment it all. I wish I could eat this cake every day for the rest of my life (like how I used to be able to eat actual churros. Thanks, body.). I had so much fun making it, and even more fun eating it, as it should be. I’m not sure I’ll have time to blog again before the move next month, so this is quite possibly the last time Kate ever bakes cakes in Florida. Never fear, Kate most definitely knows how to bake cakes at high altitude in New Mexico. It’ll take us a minute to get used to high elevation and that smell (Eau de Cow) again in Clovis, but I’m looking forward to our adventure back to the Southwest..away from insane humidity and the evil sun from Mario 3 that follows you around and tries to kill you (he retired in Florida, naturally). ‘Til next time, my fellow eaters!
I’ll be far less sweaty and upsetty the next time we meet here. It’s hard to be unhappy when you’re full of salsa and enchiladas like God intended. Now, how to make gluten free sopapillas… -
Shark Cake, Ooh Ha Ha!
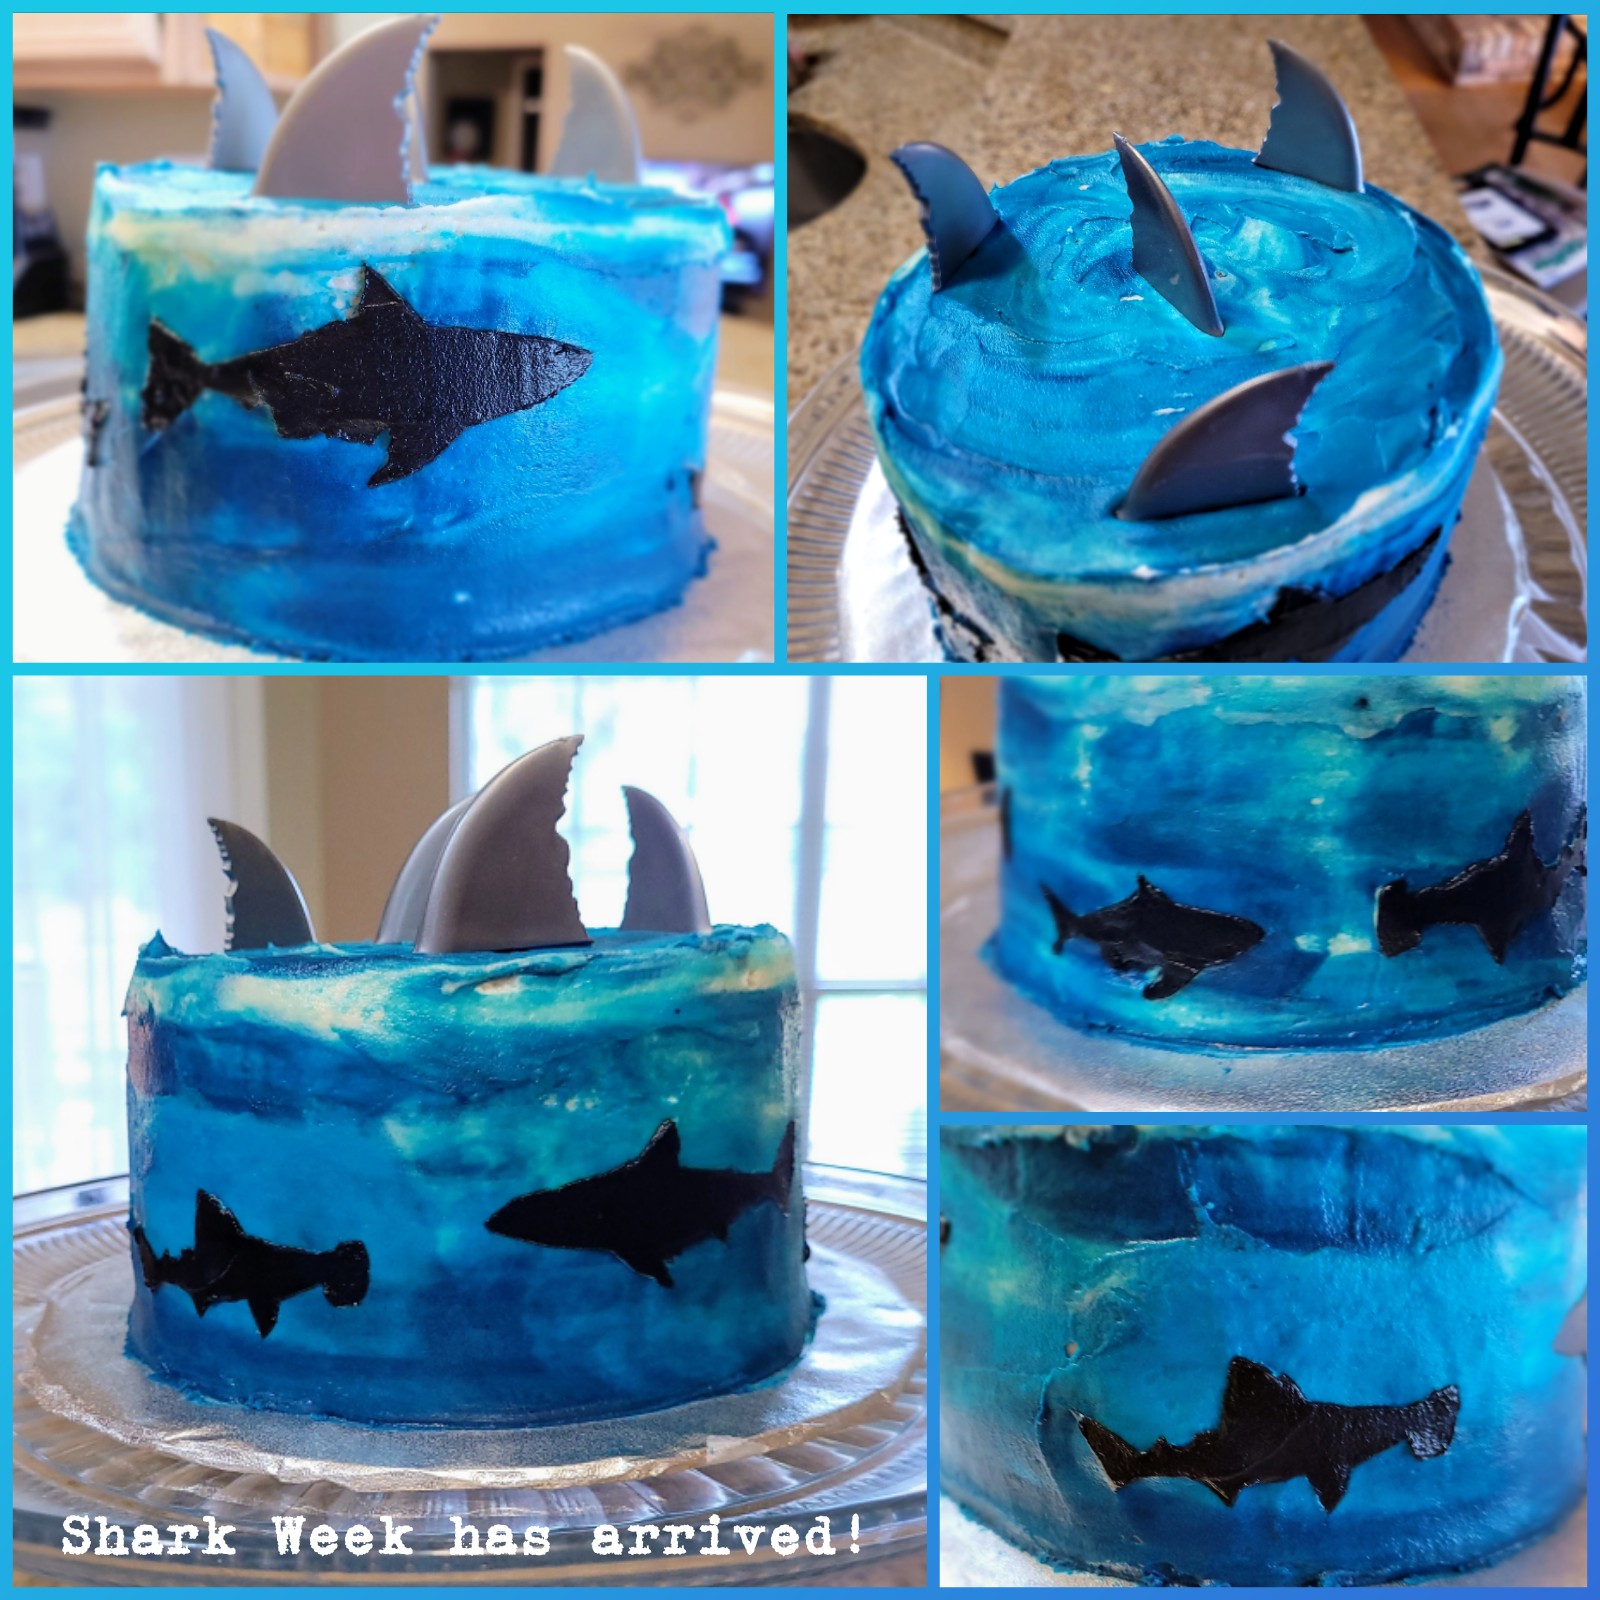
Did you know you’re more likely to be killed by a cow than a shark? Not in a “When Burgers Bite Back” situation, but these are still good facts to know. And if you’re somehow unaware, SHARK WEEK STARTS TONIGHT! I am obsessed with sharks, so next to Halloween, this is the absolute best time to be me (or maybe a shark). But sharks definitely get a bad rap; they can’t help the permanent resting shark face or the fact that they’re the perfect eating machines…parallels I can definitely relate to…but it’s important to learn about sharks and respect their habitat since they were there before we were. And definitely before those killer cows, too. I wanted to mako something great to kick off the start of my favorite week of the year, so enter, Shark Cake, Ooh Ha Ha!

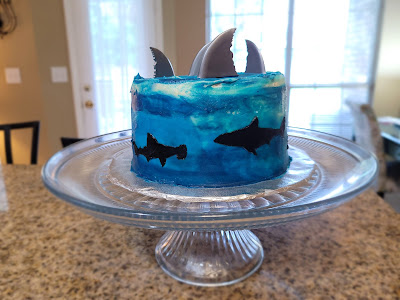
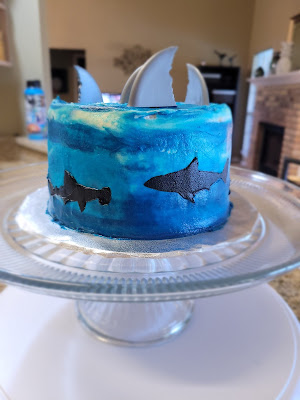
You could say its Jawsdropping. Look, I’ve been covered in a severe poison ivy rash for two weeks straight. Is it testing the limits of my sanity? Do I look like a plague-addled nightmare? Yes and yes, but there was no way I was going to shark my baking responsibilities. I figured a day in the kitchen keeping my hands from itching temptation would be just the ticket, and it was. This gorgeous Oreo-flavored chocolate cake with cream cheese frosting is something I’ve been kicking around in the ole’ noggin for a couple years, and I finally wanted to execute my shark-scape. I couldn’t be happier with how the ocean depth painting turned out, but let’s be reel here, this is definitely a cake worthy of whipping people up into a feeding frenzy. At only 284 calories a slice for 8 slices (or 227 calories for 10 slices), you can pound like 12 burgers, some fries, a license plate or two, and still get this to fit in your macros for the day (might leave out the license plates if you’re not an actual shark though).
Watch out for that cow. The cake and frosting are super simple to make. All you need for the Oreo cake is:
- 1 box of chocolate cake mix (I use Whole Food’s gluten free mix)
- 1/4 cup + 2 TBS (64 grams) egg whites or 3 whole eggs
- 1/2 cup (111 grams) unsweetened applesauce
- 3/4 cup fat free or skim milk
- 1 ounce of black cocoa (this is what makes it taste like an Oreo, don’t skip it!)
Preheat your oven to 350 and prepare three 6-inch round pans with Parchment and cooking spray. Two 8-inch rounds would also work, but your cook time will vary. Dump all your ingredients in the bowl of a stand mixer and give it a whirl on medium for 1-2 minutes until things have come together. Pour out the batter evenly into each pan and bake for 24 minutes. A toothpick should come out mostly clean.
Don’t forget bake even strips if you’ve got ’em! Once cooked, remove your pans from the oven and place on top of a cooling rack. Give it 10 minutes before you turn your cakes out of the pan and onto the cooling rack to come to room temp. I speed this process up by shoving the cooling rack into the fridge for 30-45 minutes. While that’s cooling, you can make your shark templates.

Excuse my dungeon lighting…it was storming and this house is like a cave without natural light. To make my sharks, I used pencil to draw some shark outlines on Parchment paper in varying sizes and types; Great White and Hammerhead to be precise. I didn’t think a Goblin shark would translate well…

Hammerheads were difficult enough, but that would’ve been hilarious. Once drawn, I grabbed my X-acto knife and carefully cut out the outlines. I have yet to seriously injure myself with my X-acto knife, but those blades are probably as sharp as a shark’s tooth, so, give it time because I am a disaster.

I mean, you can definitely tell it’s a shark, and I didn’t lose a finger to make it happen. 
Small, sharky miracles. Now, you want to keep the full sheets, not the pieces you cut out. These will work as your templates. Once I had my cakes frosted and knew how much overlap I needed, I cut each into smaller squares so I could move them around the cake easily.

That black cocoa came in clutch with this whole cake, TBH. This is just a basic cream cheese frosting, so feel free to play with different extracts to flavor your frosting. Coconut extract, caramel extract, or even root beer extract would probably taste awesome with the Oreo cake flavor. This makes a lot of frosting (I only used half and froze the rest). You need:
- 8 ounces 1/3 the fat cream cheese at room temp
- 1/2 cup (112 grams) light butter (leave cold)
- 4 cups (a whole bag) of Lakanto powdered monkfruit (or regular powdered sugar)
- 1 TBS (36 grams) vanilla extract
- 1 tsp black cocoa powder
- Gel dyes in black, light blue, blue, and navy
- Absolutely fintastic shark cupcake toppers (Amazon!)
Start by whipping the cold butter and cream cheese together until fluffy, 2 minutes. Add in half the powdered sugar and all the vanilla extract. Mix well, then add the rest of the powdered sugar. Hold off on the black cocoa for right now. You’ll use this later once the cake is fully covered for the sharks.
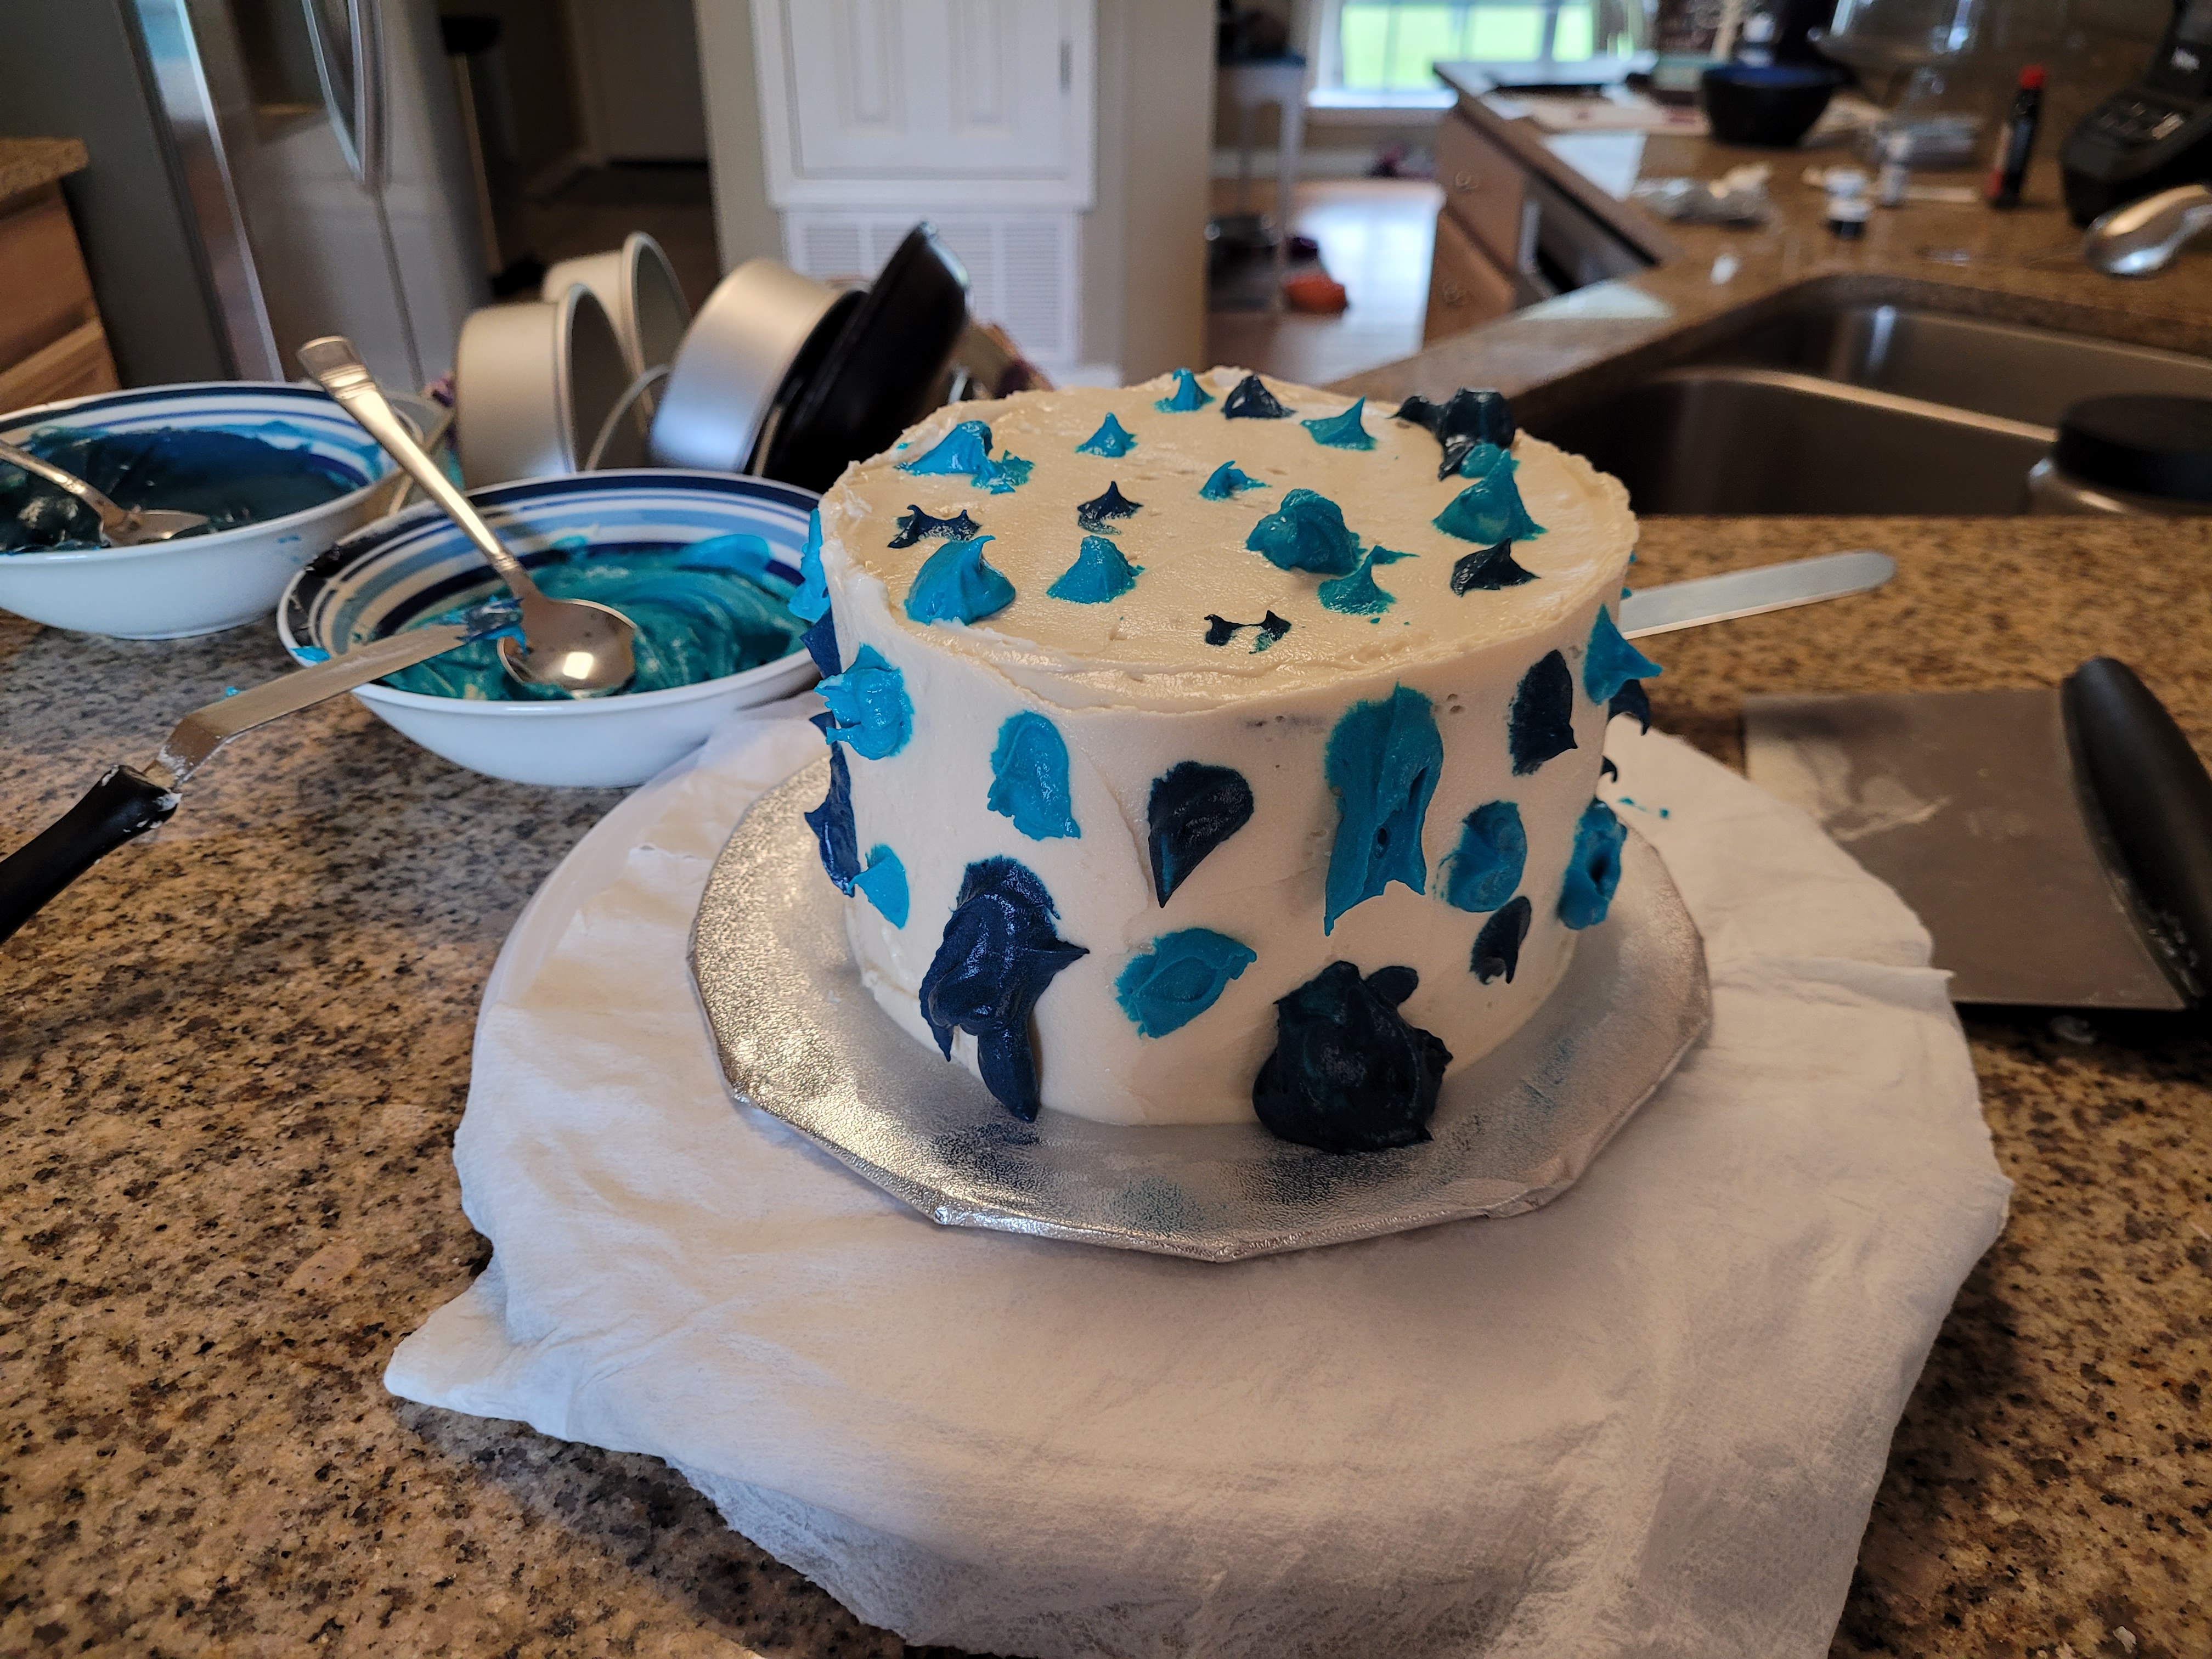
But first, you must frost. Stack, fill, and cover your entire cake in plain white frosting first. Set this in the fridge while you dye your frosting to make the ocean background.

I’m blue, da ba dee da ba daa… In two bowls, place a heaping amount of plain white frosting. Dye one light blue, and then in the other, mix blue and navy blue gel dyes to achieve a rich, dark blue hue. Now, grab your cake!

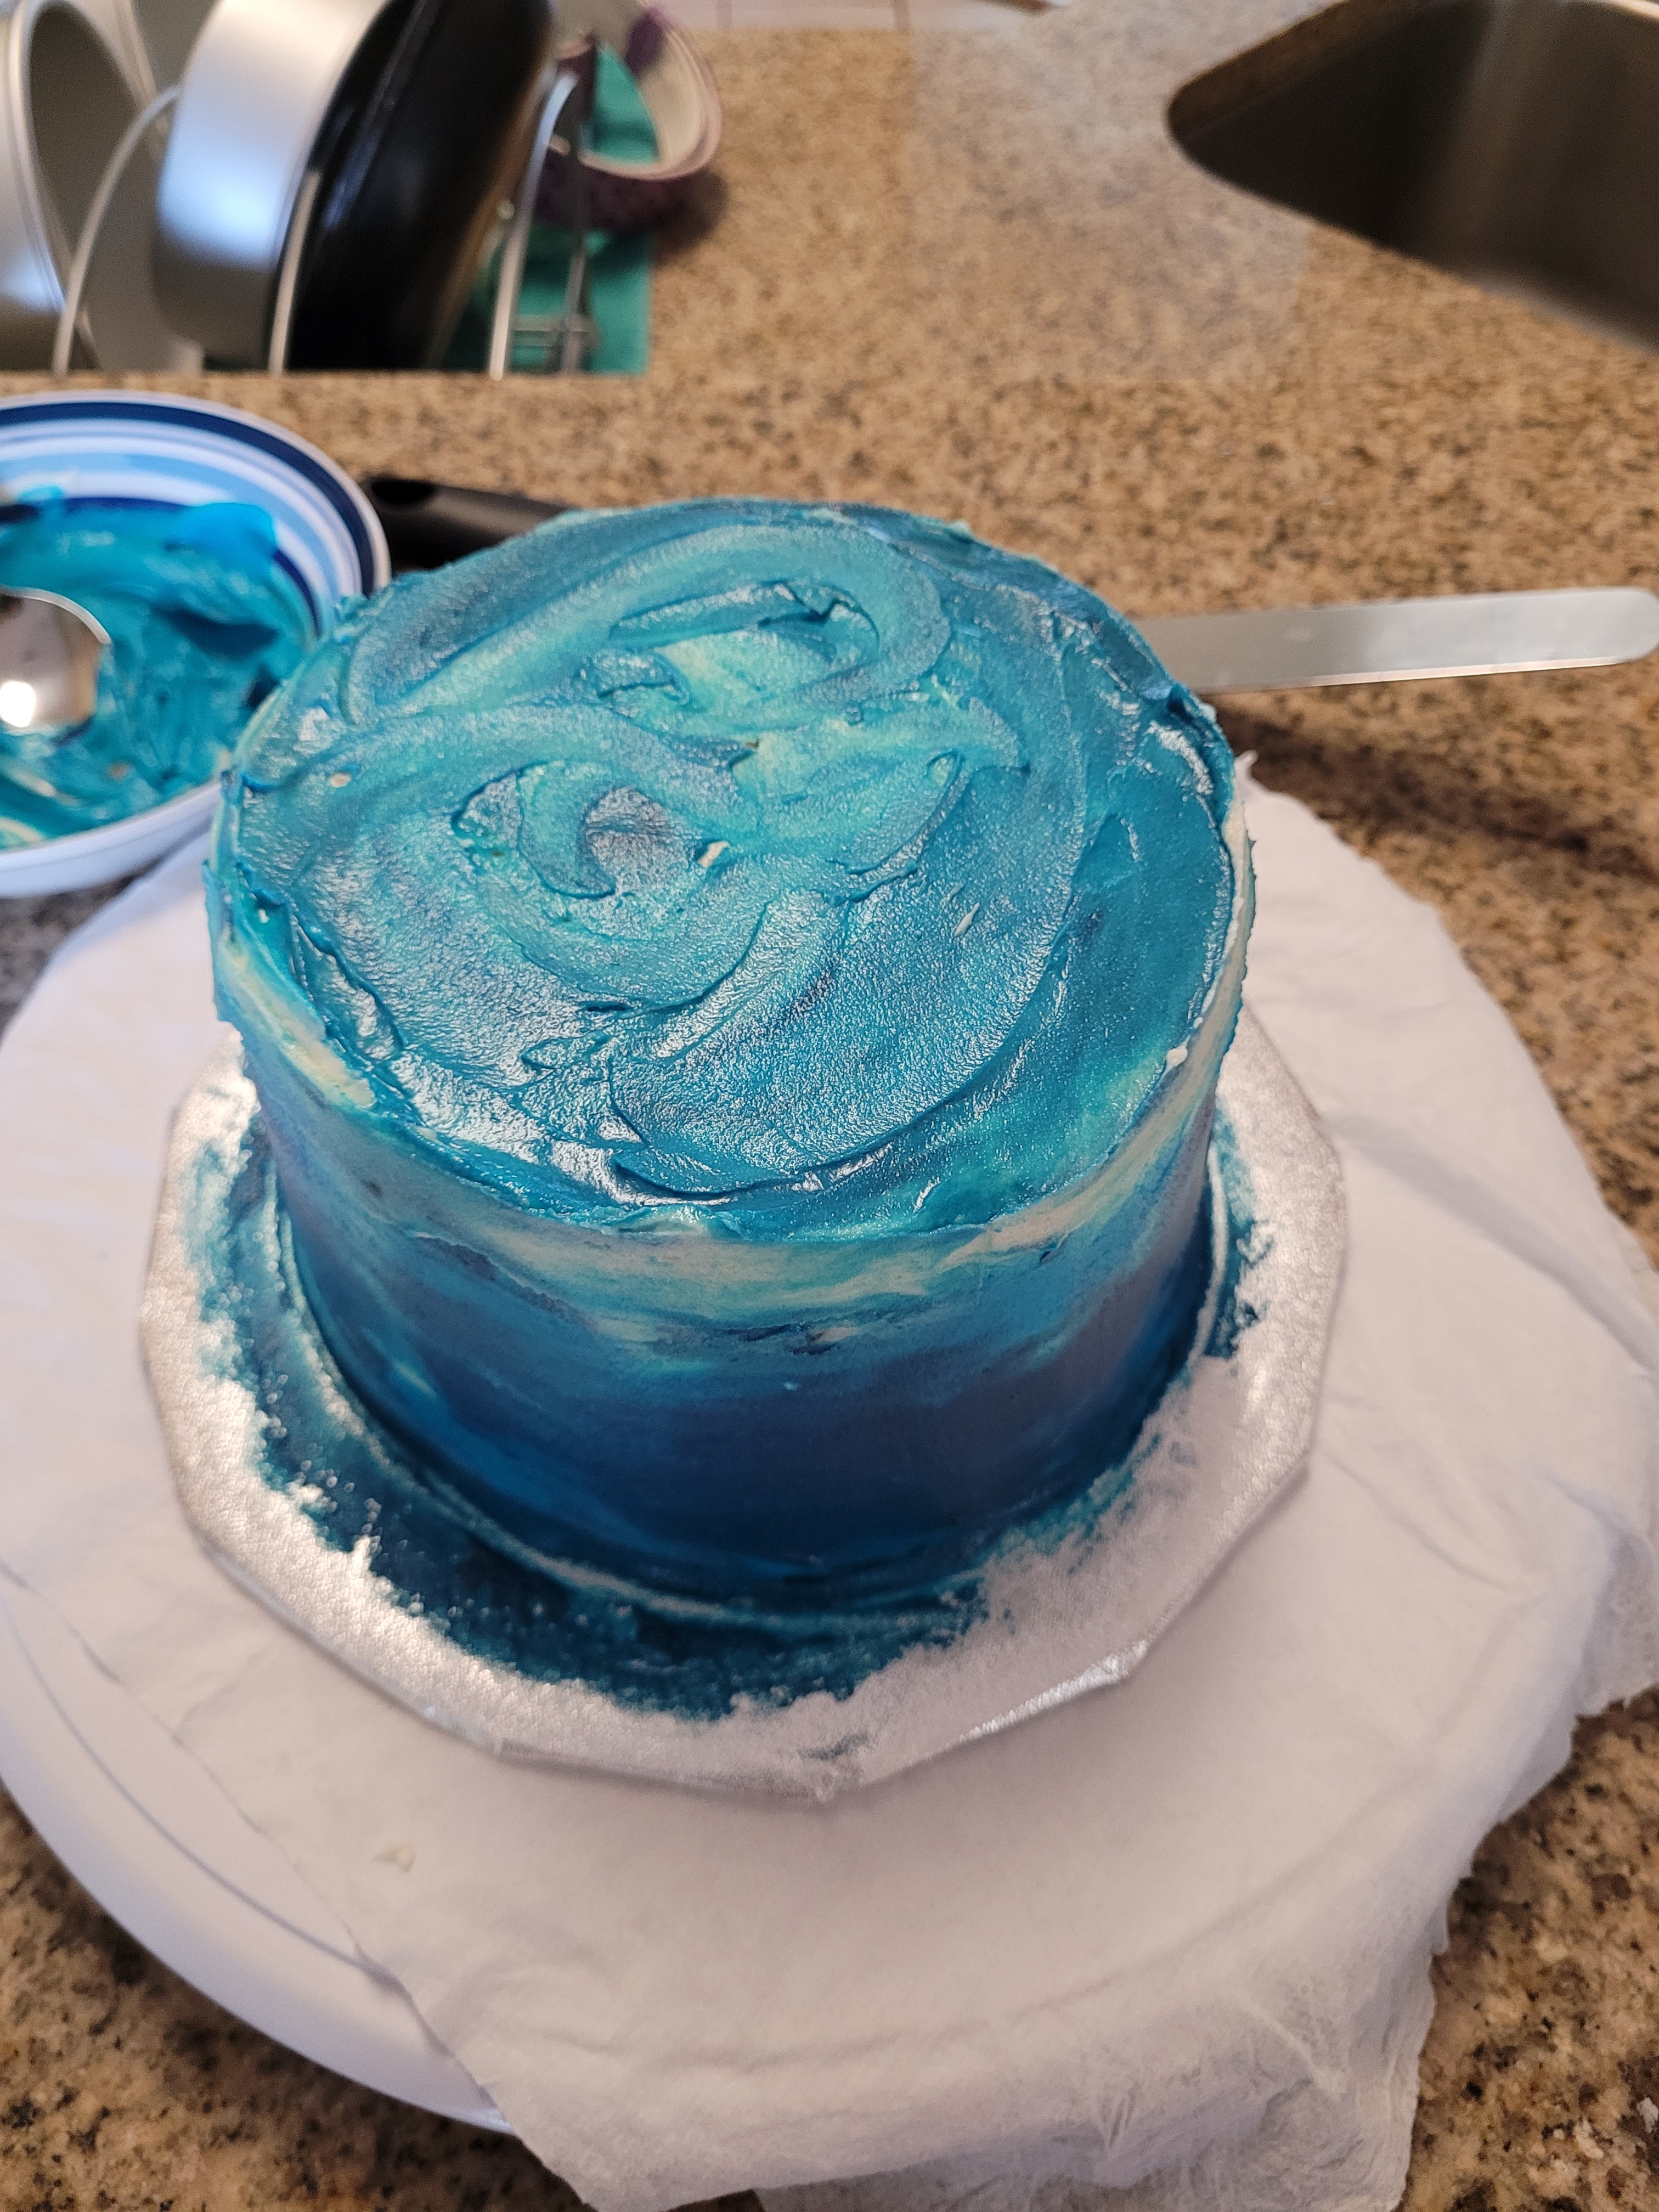
Oh look, it’s my poison ivy rash in cake form. SPOTS EVERYWHERE. Itching intensifies. Okay, okay, with a small angled spatula, just plop drops of light blue and dark blue frosting all over the place. There’s absolutely no rhyme or reason here, you just want a sort of even balance. Once you’ve done that, you just need to come back in with an angled spatula or scraper, and gently scrape the sides of the cake until your colors are blending together. I would make a pass around the whole cake, clean off my scraper, and make another pass. I did this 3 times and followed the same suit on top.
The ocean is calling… 
But you might want to test the waters first. I used an angled spatula to make swirls all around the top and top side of the cake to give it a wave texture. Now, chill this cake for 30 minutes in the fridge or 15 in the freezer so your black frosting doesn’t bleed into it. To make the black frosting, take your leftover blues, dump them together, add that teaspoon of black cocoa and some black gel dye, and you’re ready to get sharky.

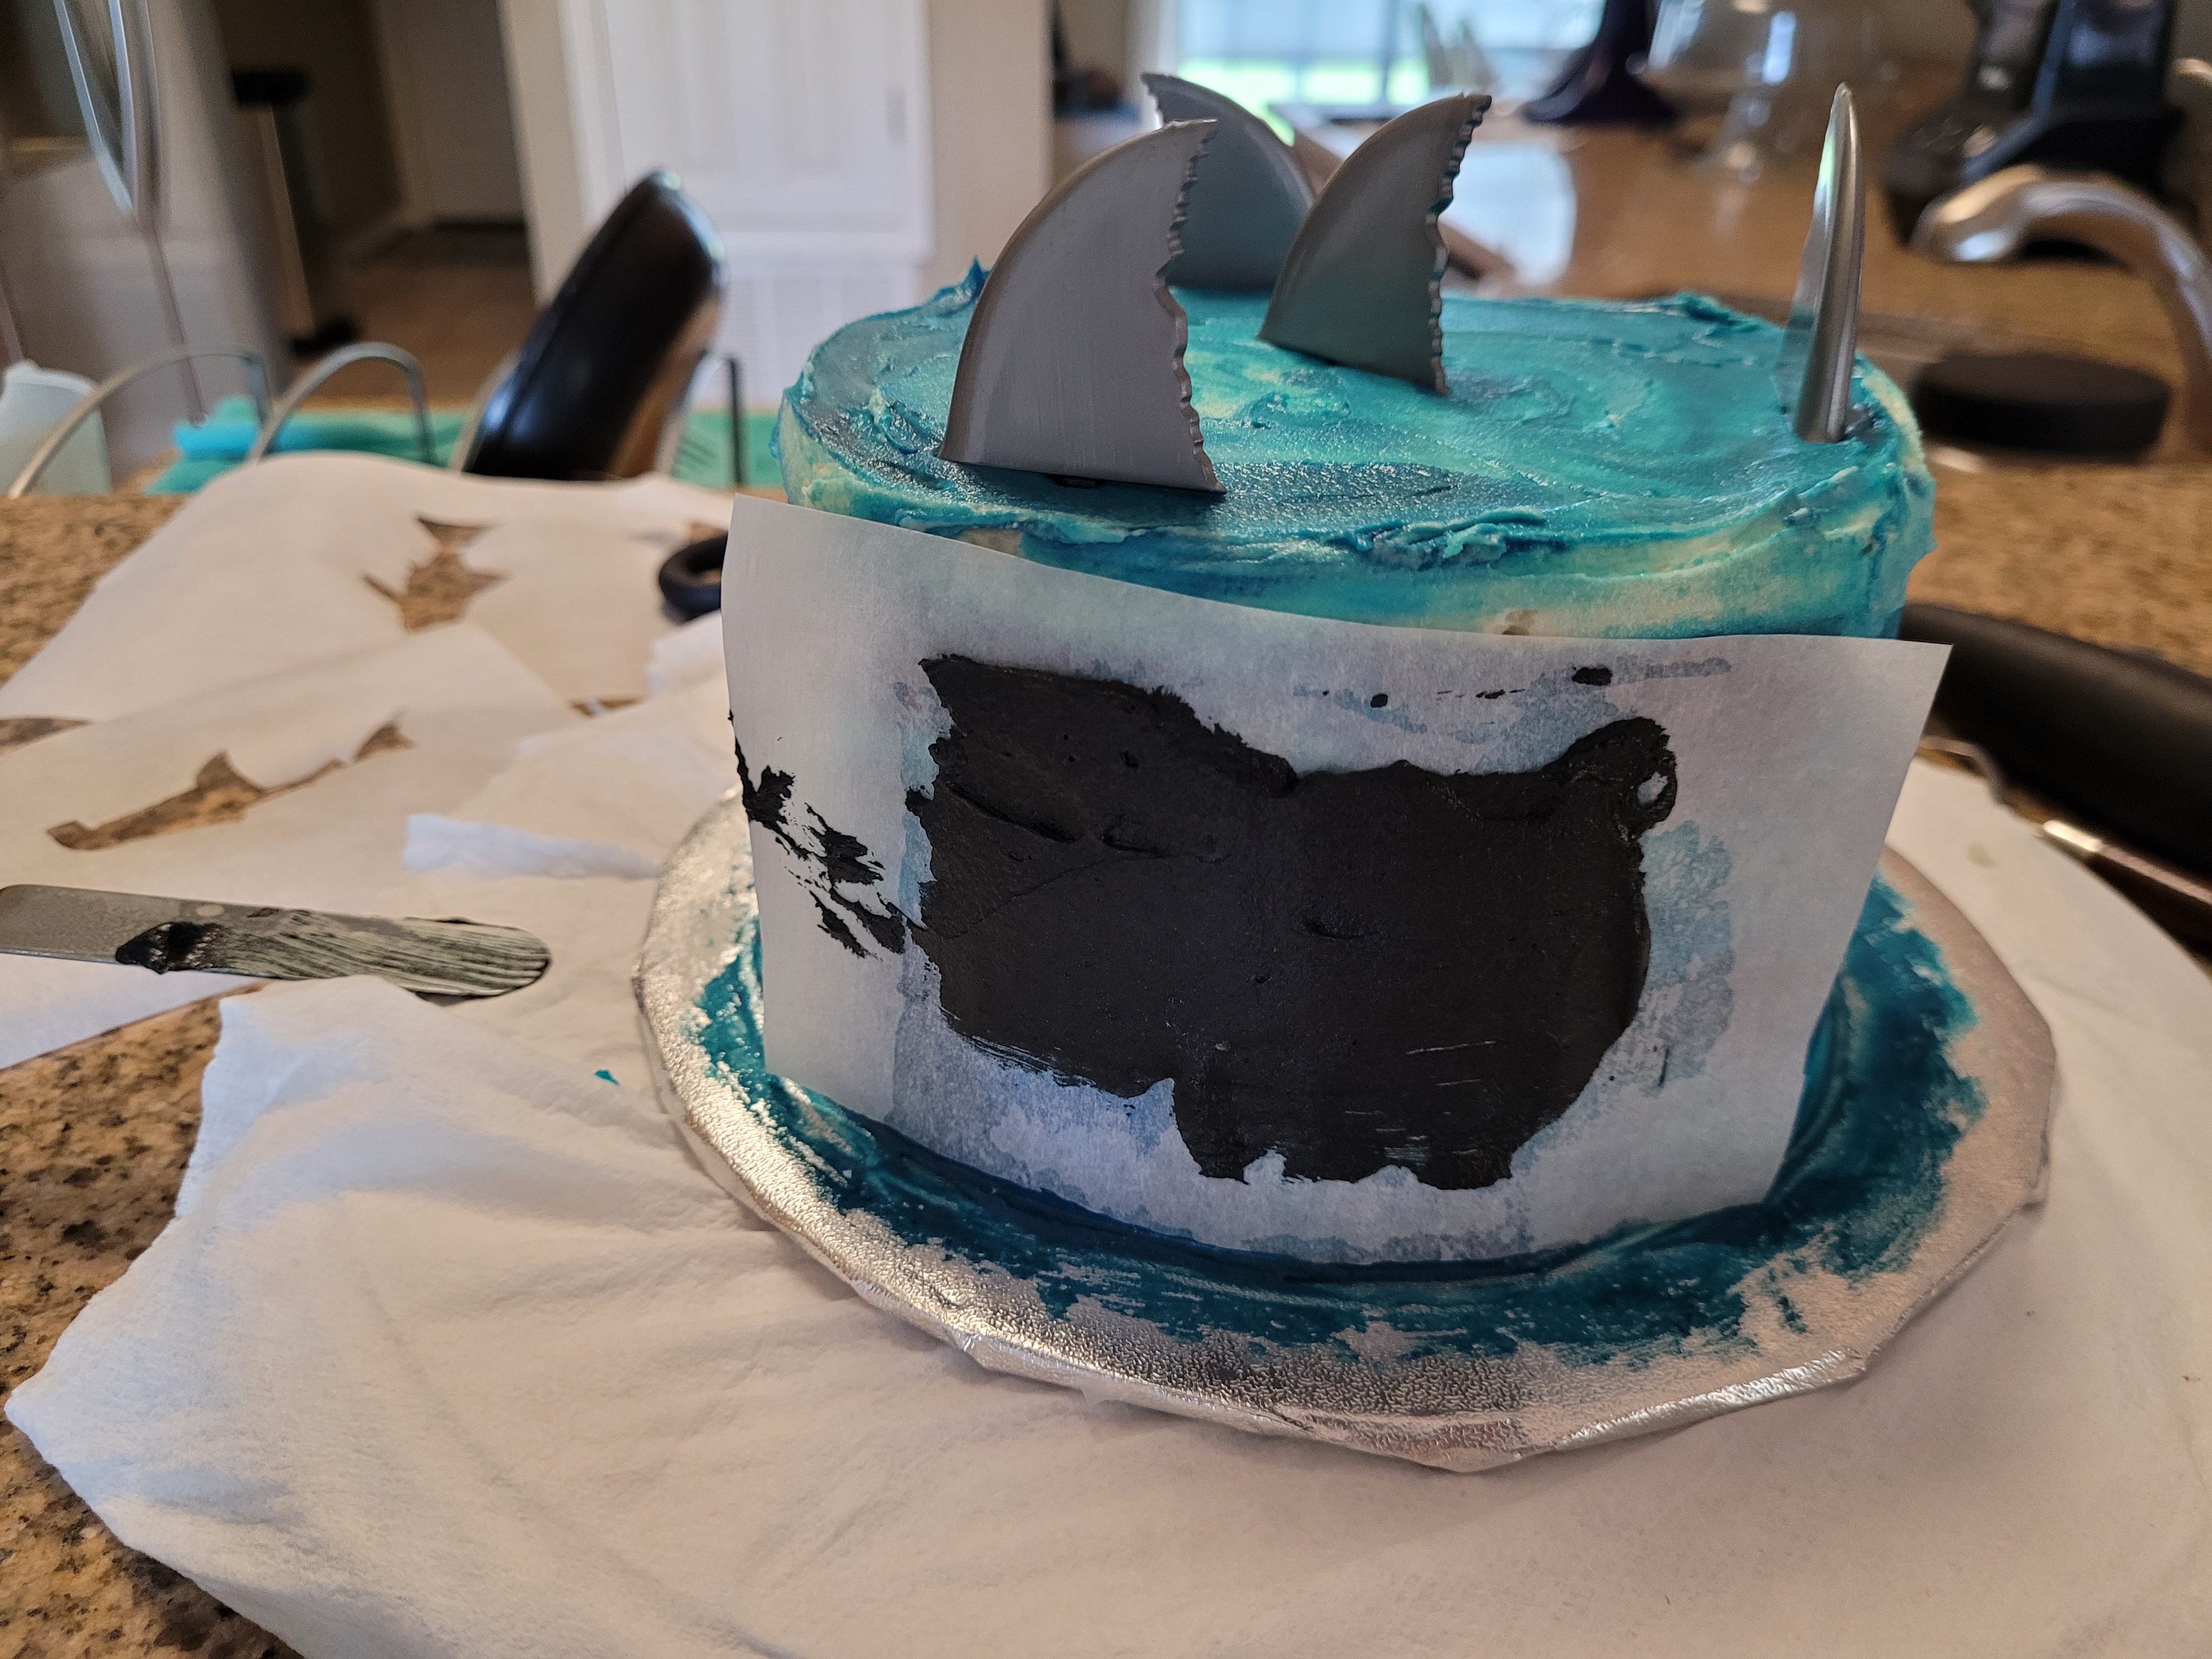
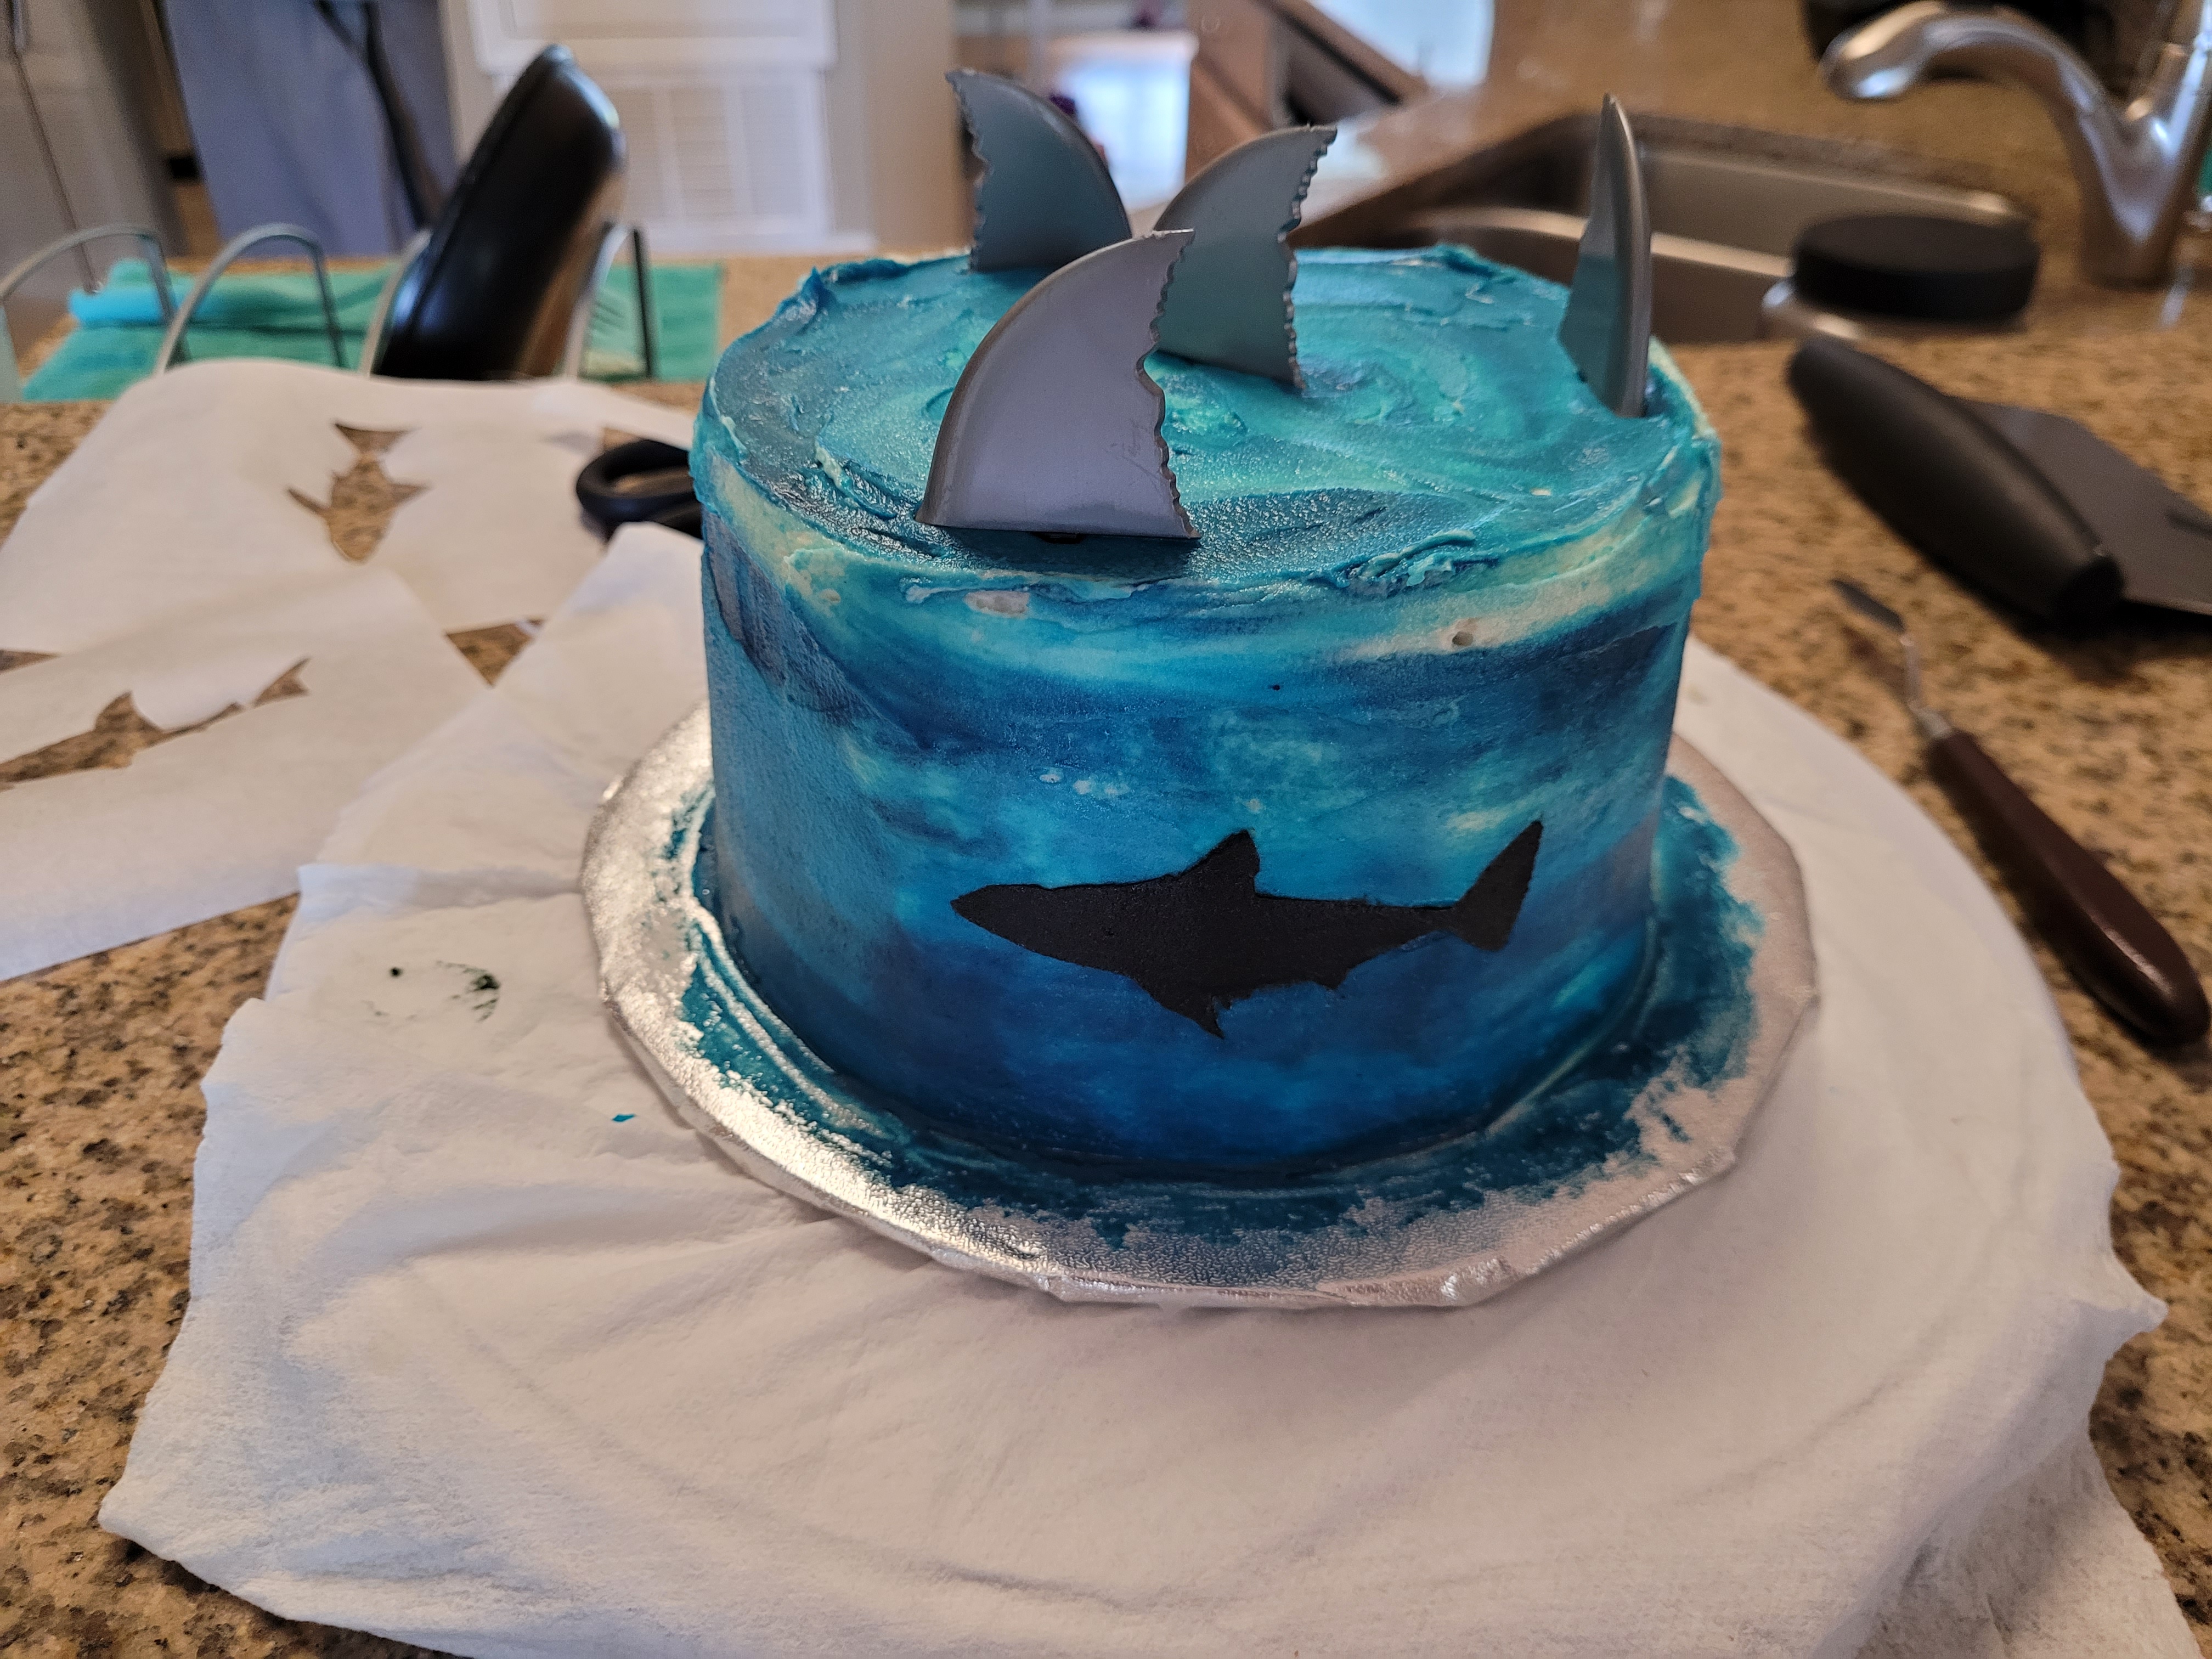
Cue the Jaws theme! To start, I obviously couldn’t wait to use the cupcake toppers, so I stuck a circle of them around the edge and one in the middle of the cake. Was I giddy with shark-loving delight while I did so? Yes. I believe I also used my hand as a makeshift shark fin on top of my head and chased my dogs around for a second (there were no casualties). You could also use chocolate melts to make smaller dorsal fins, but I’m itchier than a thousand mosquito bites, so give me a small break (and scratch) for corner-cutting.
Take your stencil, you can see I trimmed the edges down so that I could easily place it on the side of my cake, and very gently press into the surface. I used a paintbrush to push the small edges down into the frosting layer.

This part is truly terrifying. Like, scarier than the idiot mayor from Jaws. I was afraid I’d miss a spot and the whole stencil was gonna look more like a blob fish than a shark. But, I took a decent amount of black frosting and spread it evenly over my stencil. I used my scraper to make one pass over the whole stencil, then, whilst holding my breath, very gently peeled the stencil off the side of the cake.

Oh you big beautiful fish. I repeated this process around the cake, making some sharks swim toward one another, others away, on varying heights. Just be careful you’re not overlapping too much because pushing the template down in one area could mess up another design.
I’ve reached peak Shark Week. 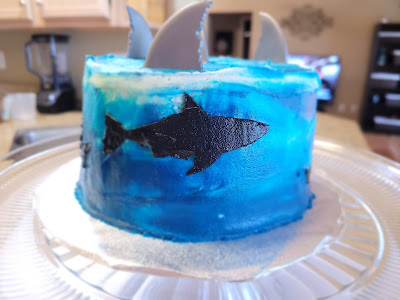
This is Bruce. Fish are friends, not food. 
But this guy is shifty and will eat literally anyone. 
Like my derpy little Hammerheads. 
Just dying to sink my teeth into this cake. I am so happy with how this turned out. It’s a little rough in places, but so are sharks, so just go with me on this one. You know, there’s somefin for everyone. Sharks are absolutely fascinating powerhouses and sadly very misunderstood. Something actually called a Killer Whale gets to play at SeaWorld, while sharks get the short end of the stick. I mean, they can’t help it that by default sharks kinda have to hug using their mouth. But I digress…I am glad I finally executed this cake. It was a lot of fun to use the templates, and depending on your design and color palette, you could really go into a design frenzy with this one for sure. Oh, let’s not forget that Oreo cake. I’d definitely bite your arm off to get another slice, so fear me more than the shark (I have land capabilities). It is a rich, chocolatey goodness that’s still nice and moist without being too heavy. And in my book, there’s no better frosting than cream cheese, so together, these two really do make an Oreo cookie in cake form,so we’ll be chowing down on this cake all week while we enjoy new episodes of SHARK WEEK! ‘Til next time, my fellow eaters.
Stay jawesome! -
'Merican as cheesecake.
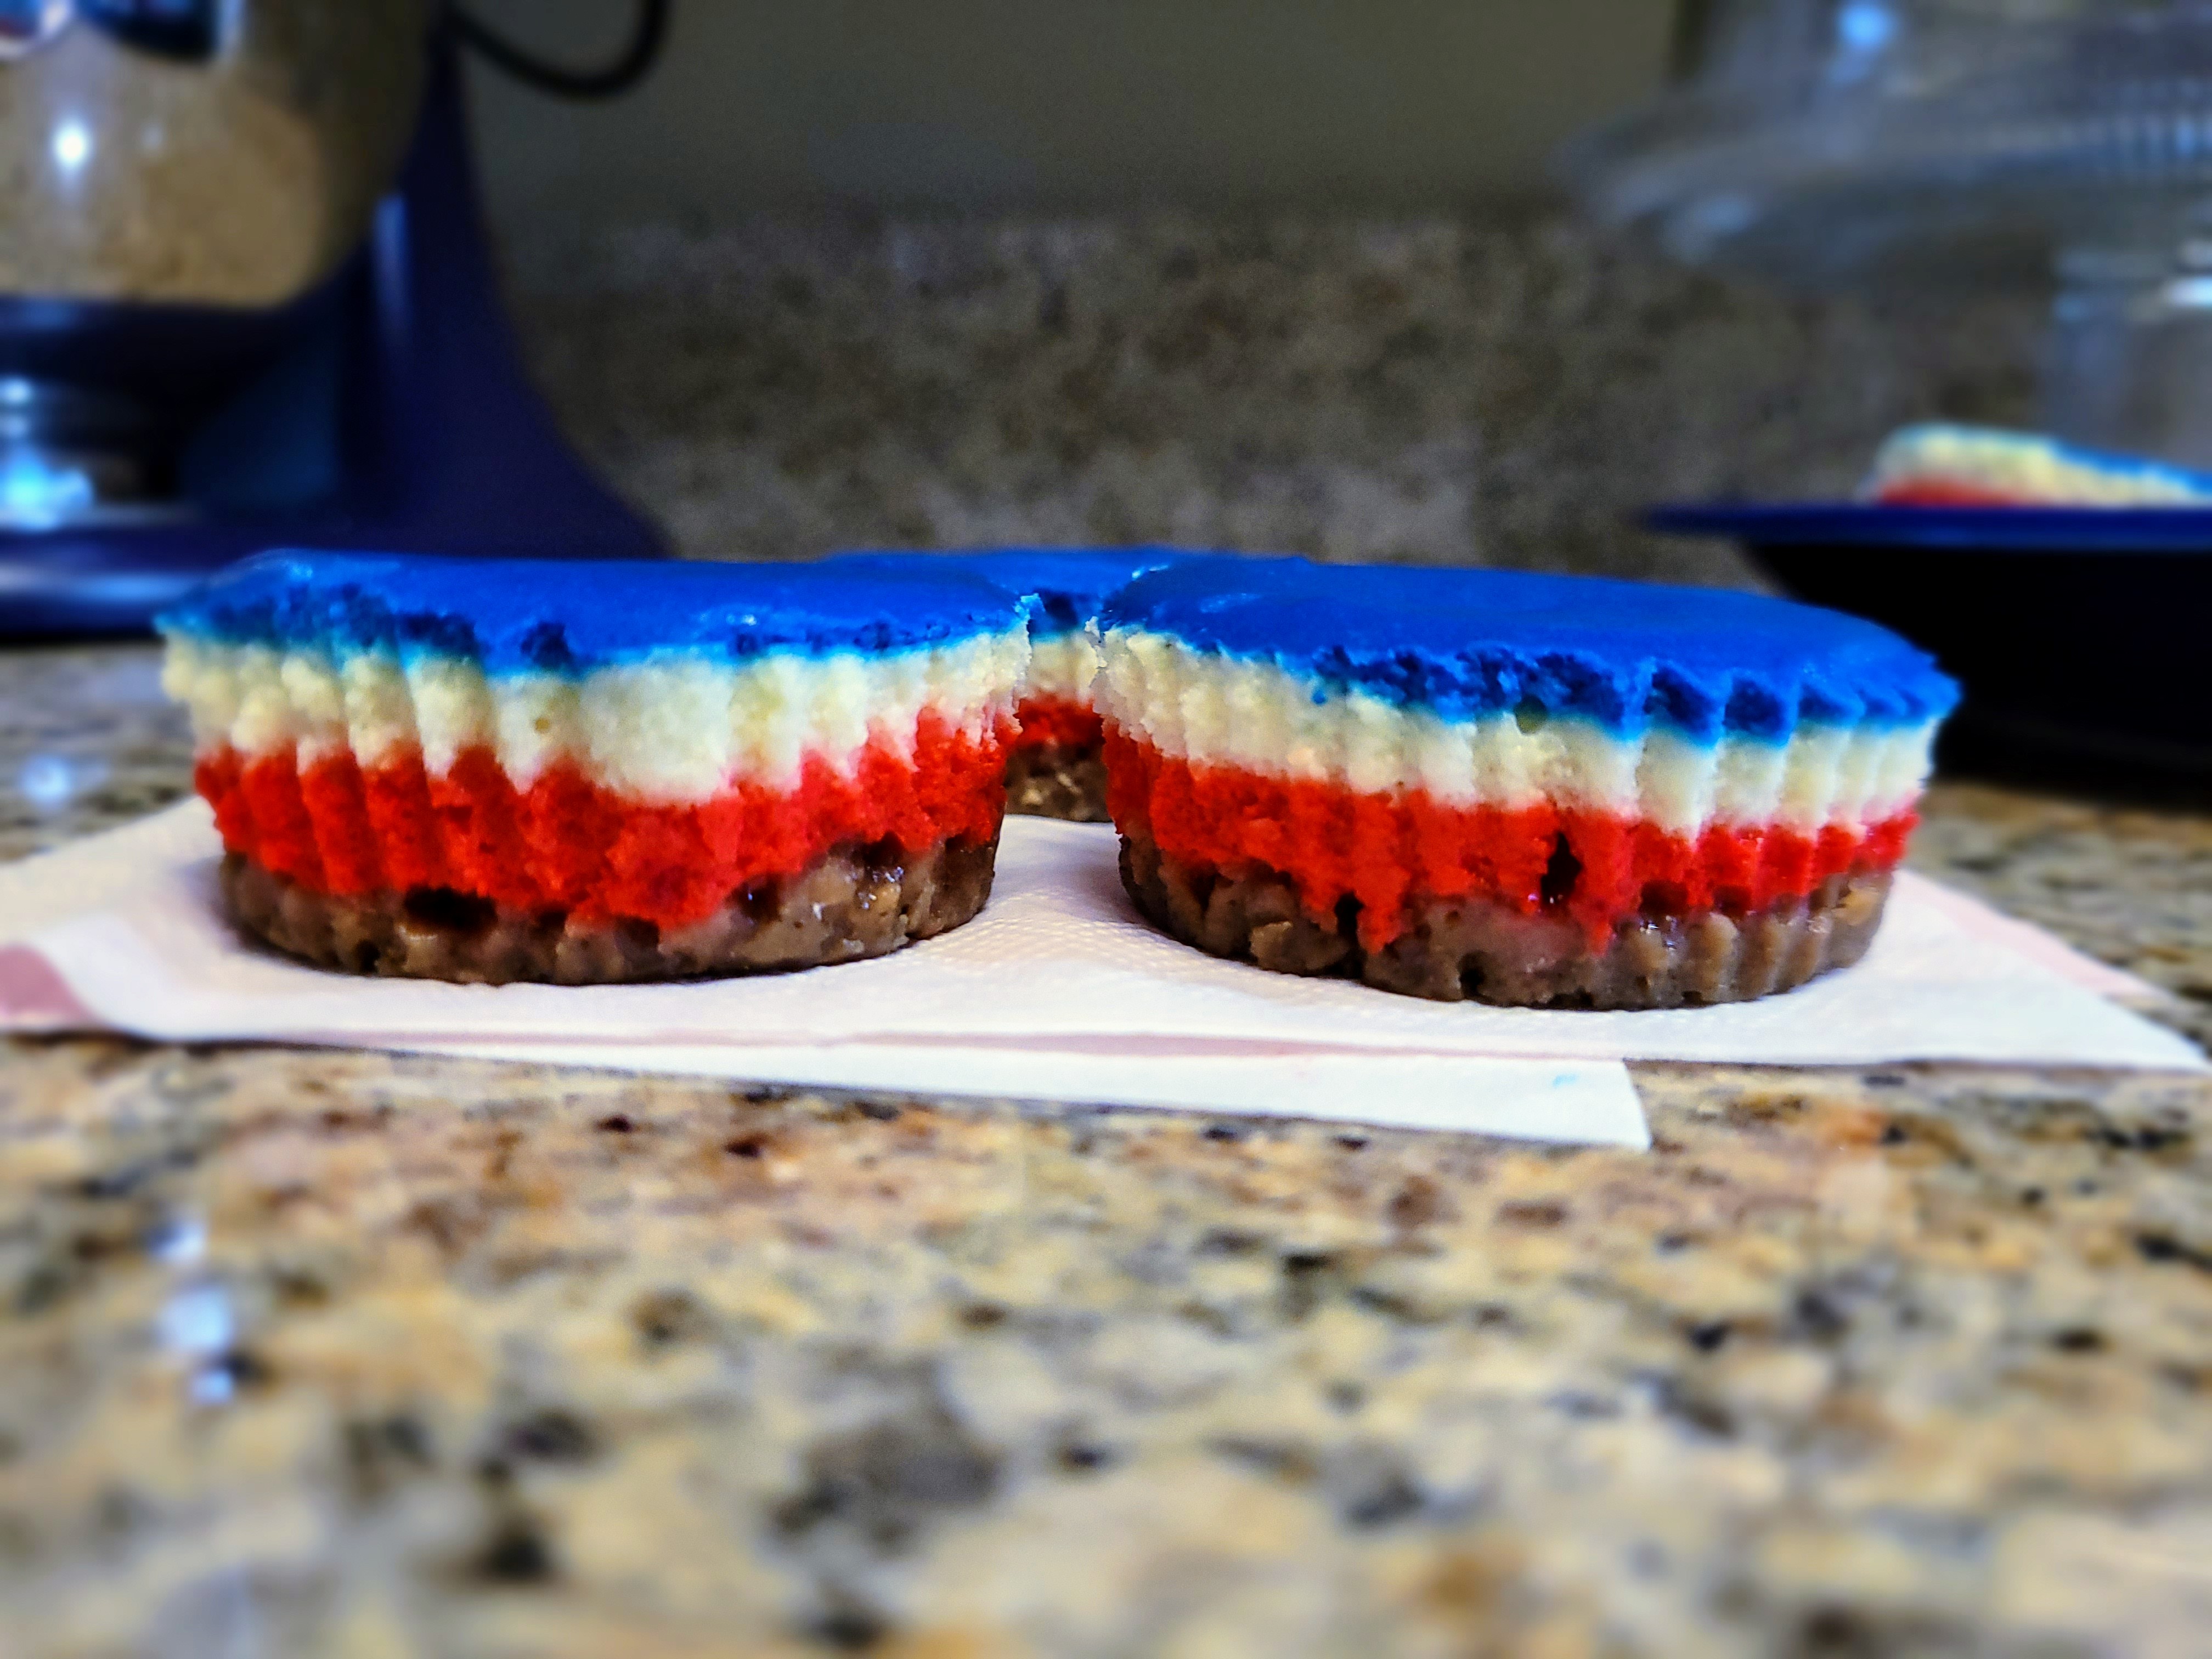
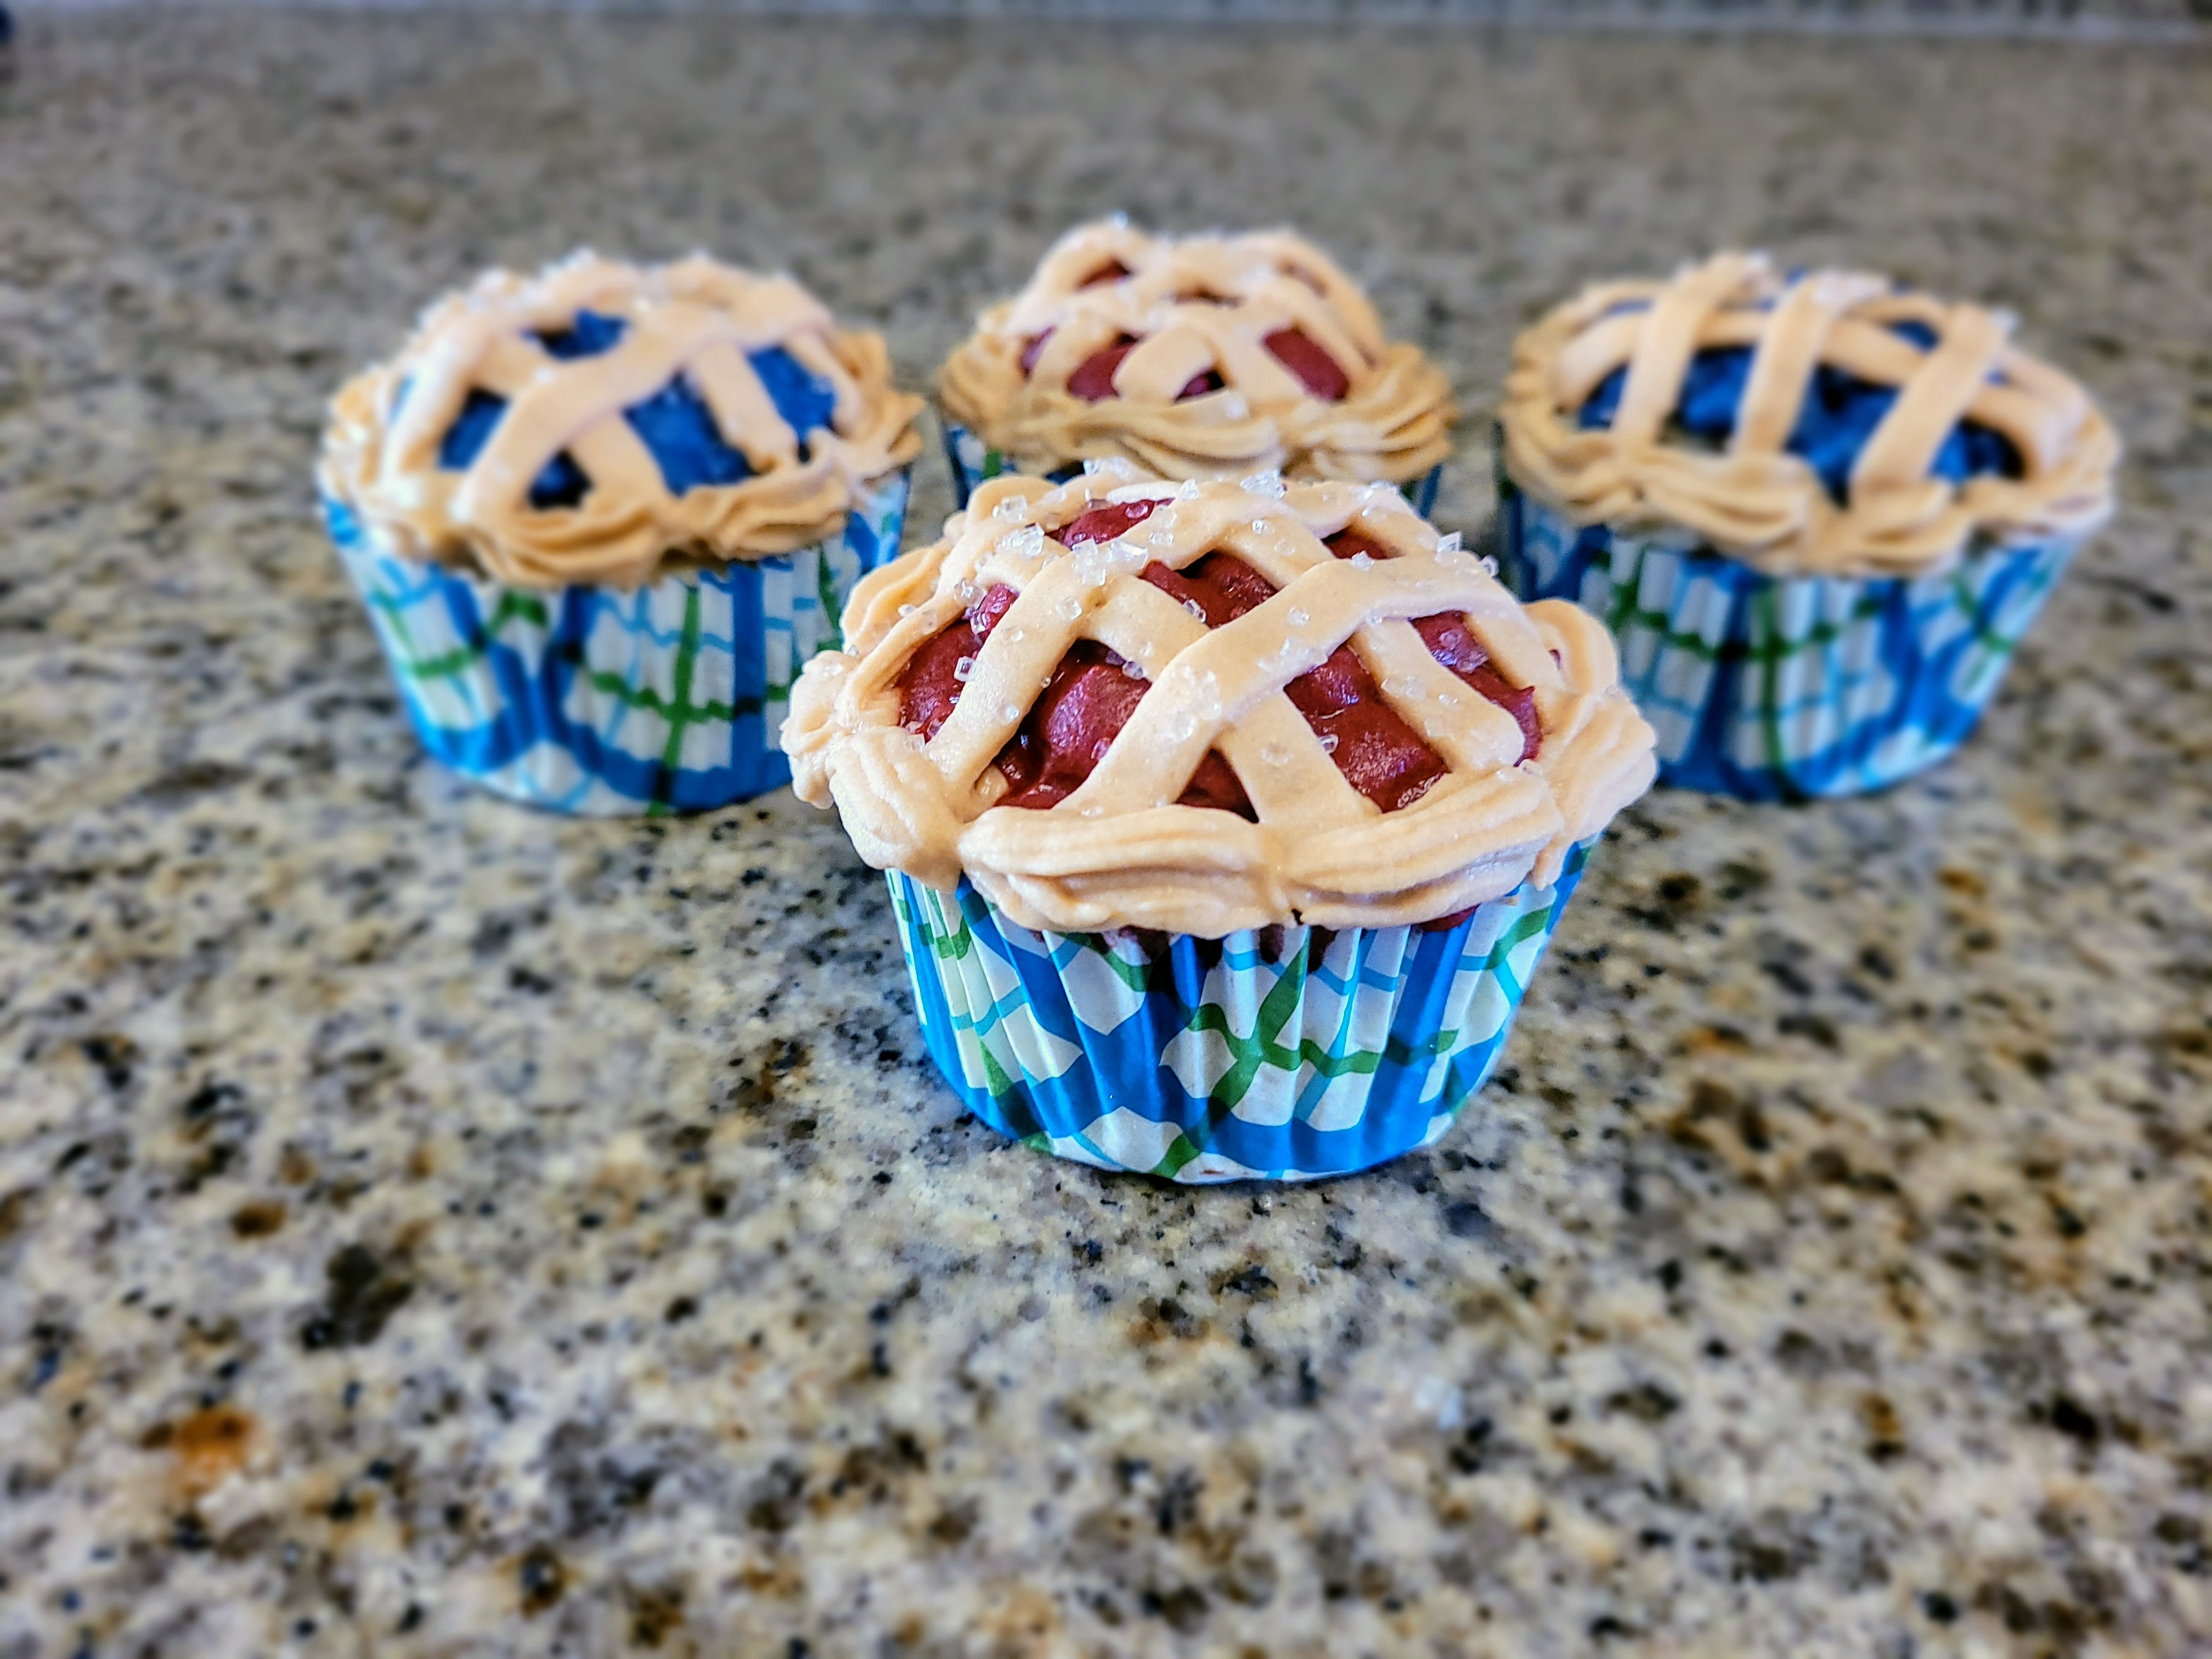
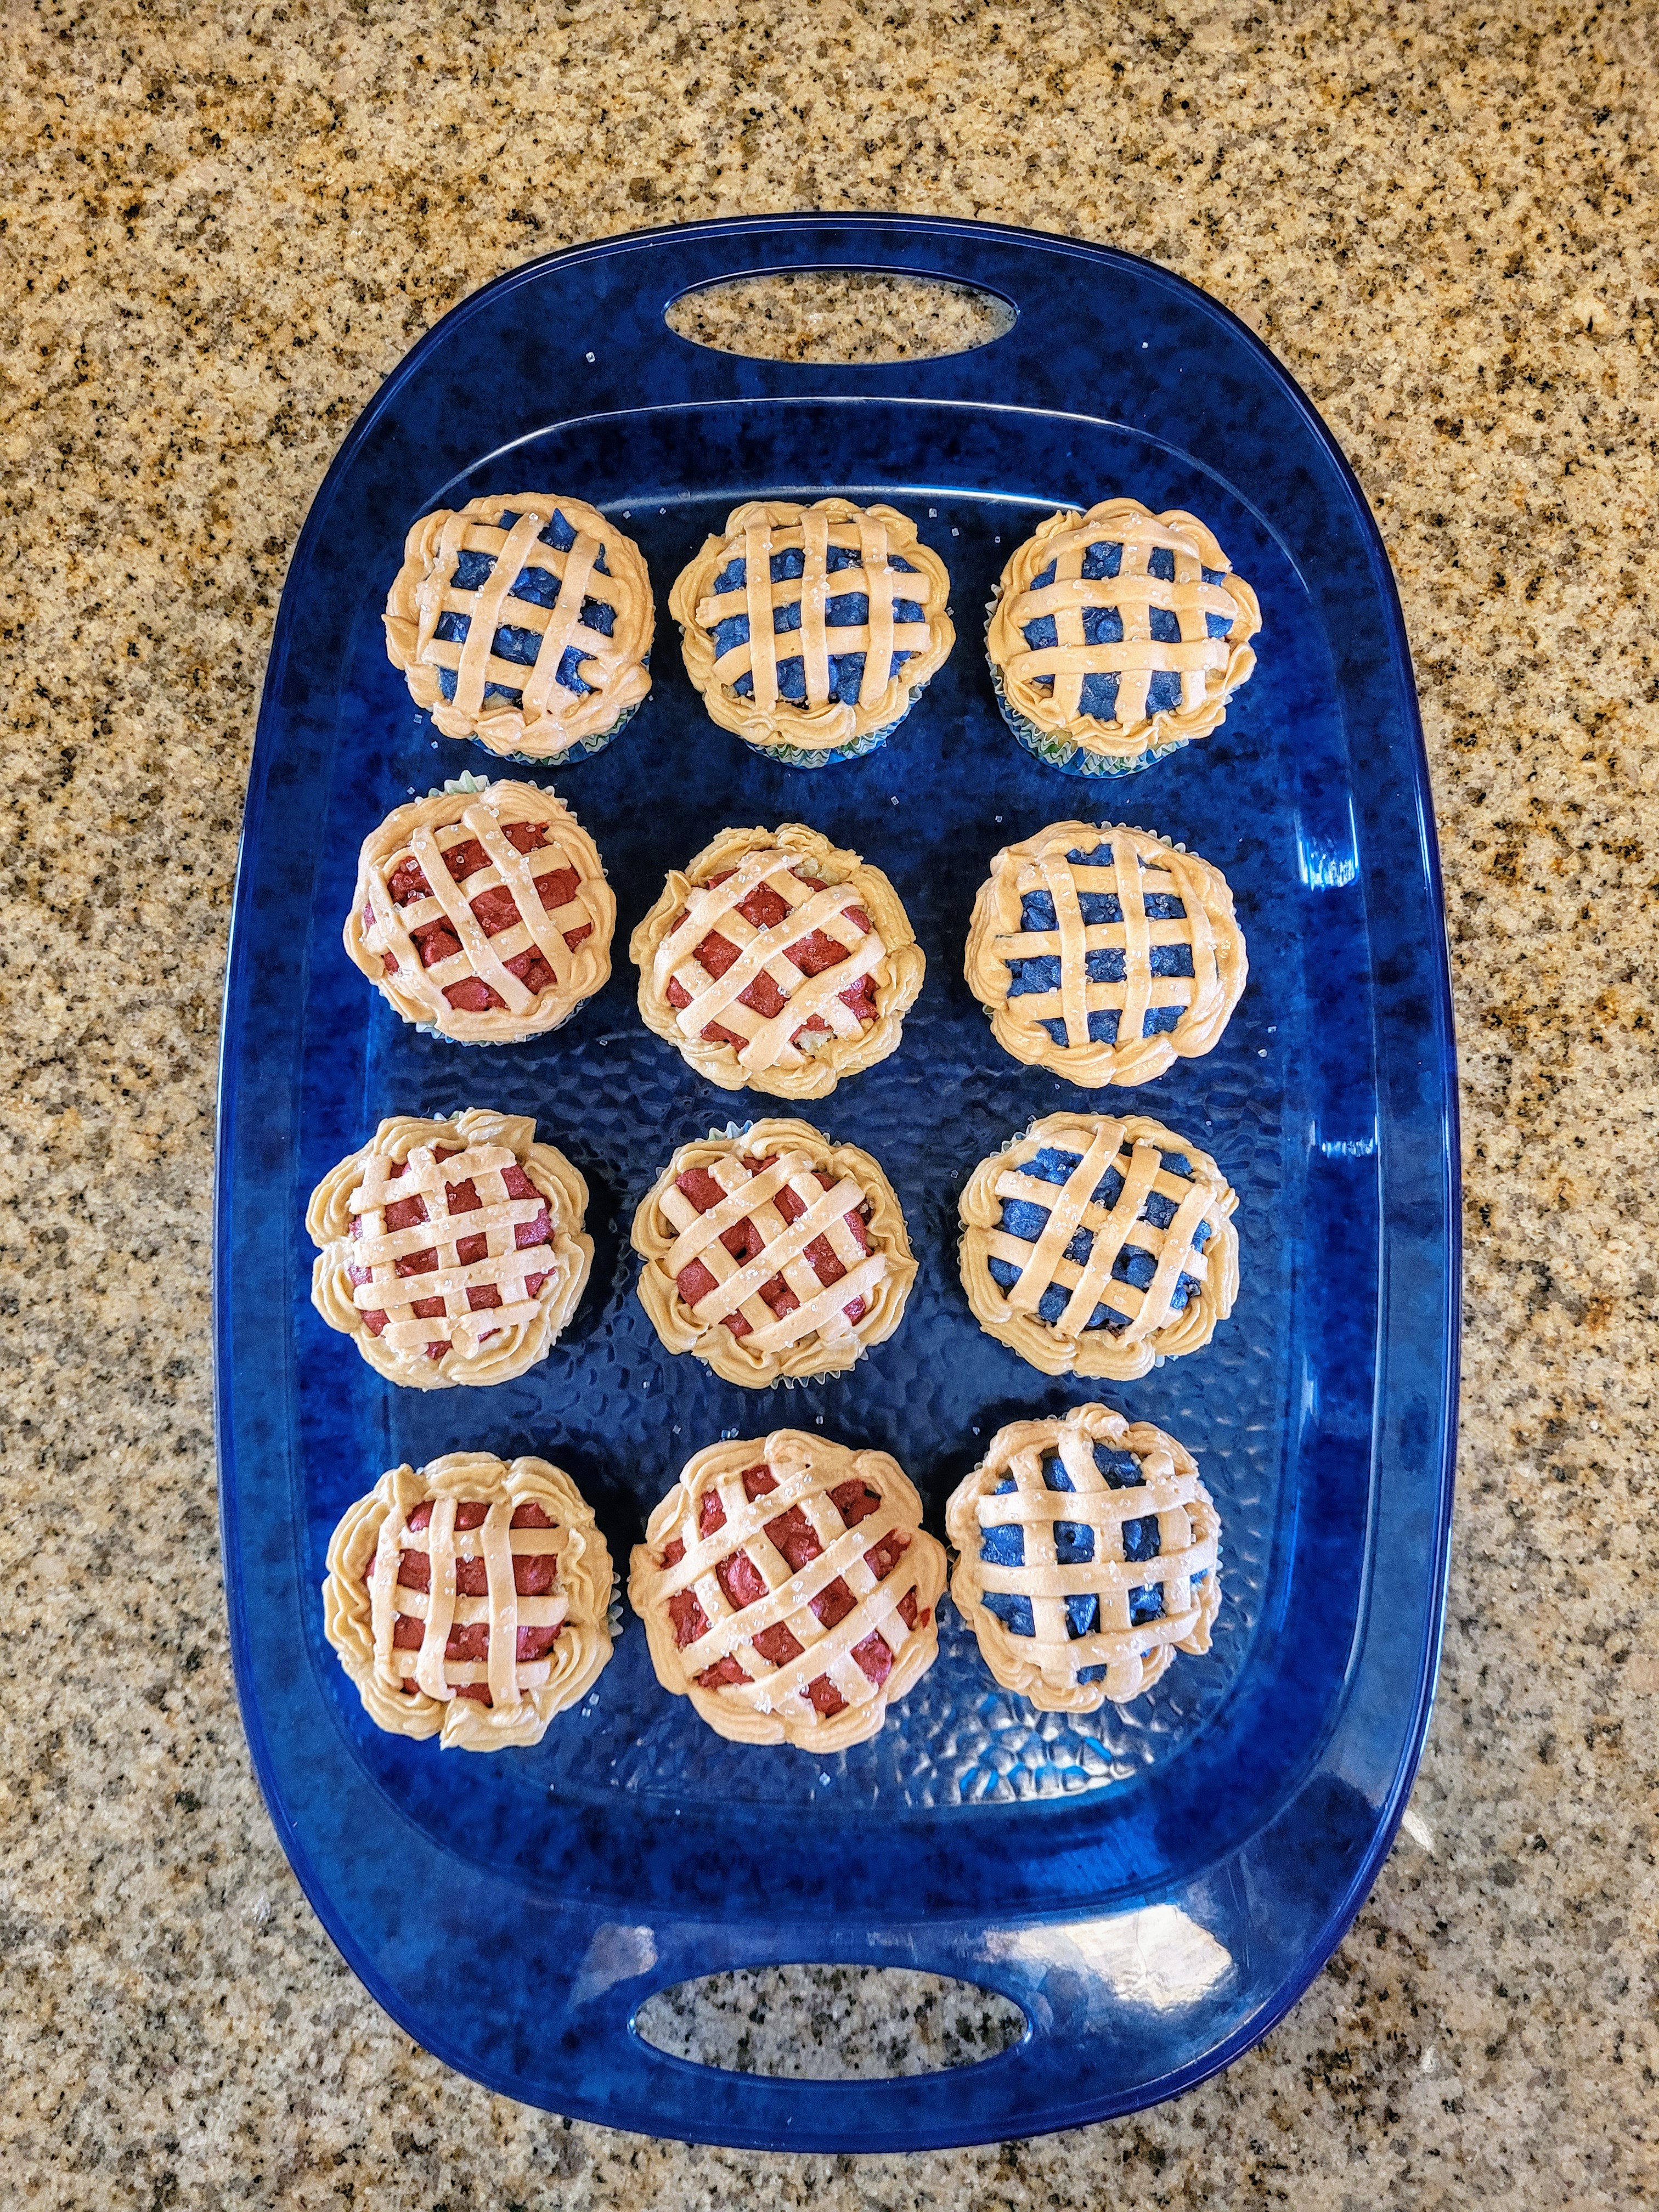
Ah 4th of July–let us celebrate our independence from those stuffy tea drinkers whilst blowing things up and pigging out. I loved Independence Day until we adopted a dog terrified of loud noises; my holiday now consists less of sparklers and more of sedatives (for the dog, not me, although…). While fireworks may not be in the cards for me any longer, the food still stands. It’s been several years since I made a 4th of July dessert since we’re typically still picking away at my husband’s birthday cake. While I’m totally fine with the idea having multiple cakes laying about the house for me to eat, Derek’s not big into dessert, so I would take it as a personal challenge to eat everything before it went stale. By the time July 4th rolled around, I would be red, white, and barfy. Luckily, I’ve concocted a dessert that while small, still packs a big bang of flavor, and well, freedom.
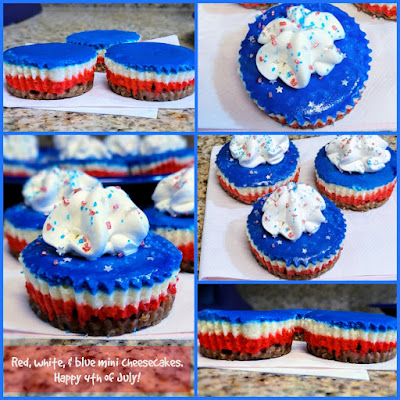
Red, white, and beautiful! I may have out-Americaned myself here with these red, white, and blue mini cheesecakes. Each layer is bold and bright, and they taste like little cups of freedom…okay, so maybe freedom doesn’t really have a taste. Some would say it’d be American as apple pie, but I’ve yet to see anyone make a red, white, and blue apple pie, so just go with me here. These are cute little vanilla cheesecakes with buttery crusts, and they are absolutely guilt-free at only 145 calories per cup (recipe makes a dozen mini cheesecakes). I’m pretty sure you burn more than 145 calories when you twirl around with sparklers for a hot minute, or during your mad-dash sprint away from the cadre of fireworks you just set off. And people say Americans are lazy.

We’re just fans of working smarter, not harder. This recipe comes together super fast, so if you’ve got 2 hours before your backyard BBQ, you’ve got time to whip up a dessert that will make the Karen next door bow down to your baking dominance. All you need for the crust is:
- 1 cup (120 g) of gluten free Graham cracker crumbs (regular works if you’re not GF)
- 2 TBS (28 g) light butter, melted
- 2 TBS (24 g) Lakanto monkfruit sweetener or regular sugar
Mix ingredients together in a medium bowl until everything is wet. Then line a muffin tin with cupcake wrappers and preheat your oven to 325. Dump a heaping tablespoon of crust into each liner, then use the back of the tablespoon to smooth out and smush down. Bake for 5 minutes, then remove to a cooling rack. Turn your oven temp down to 300.

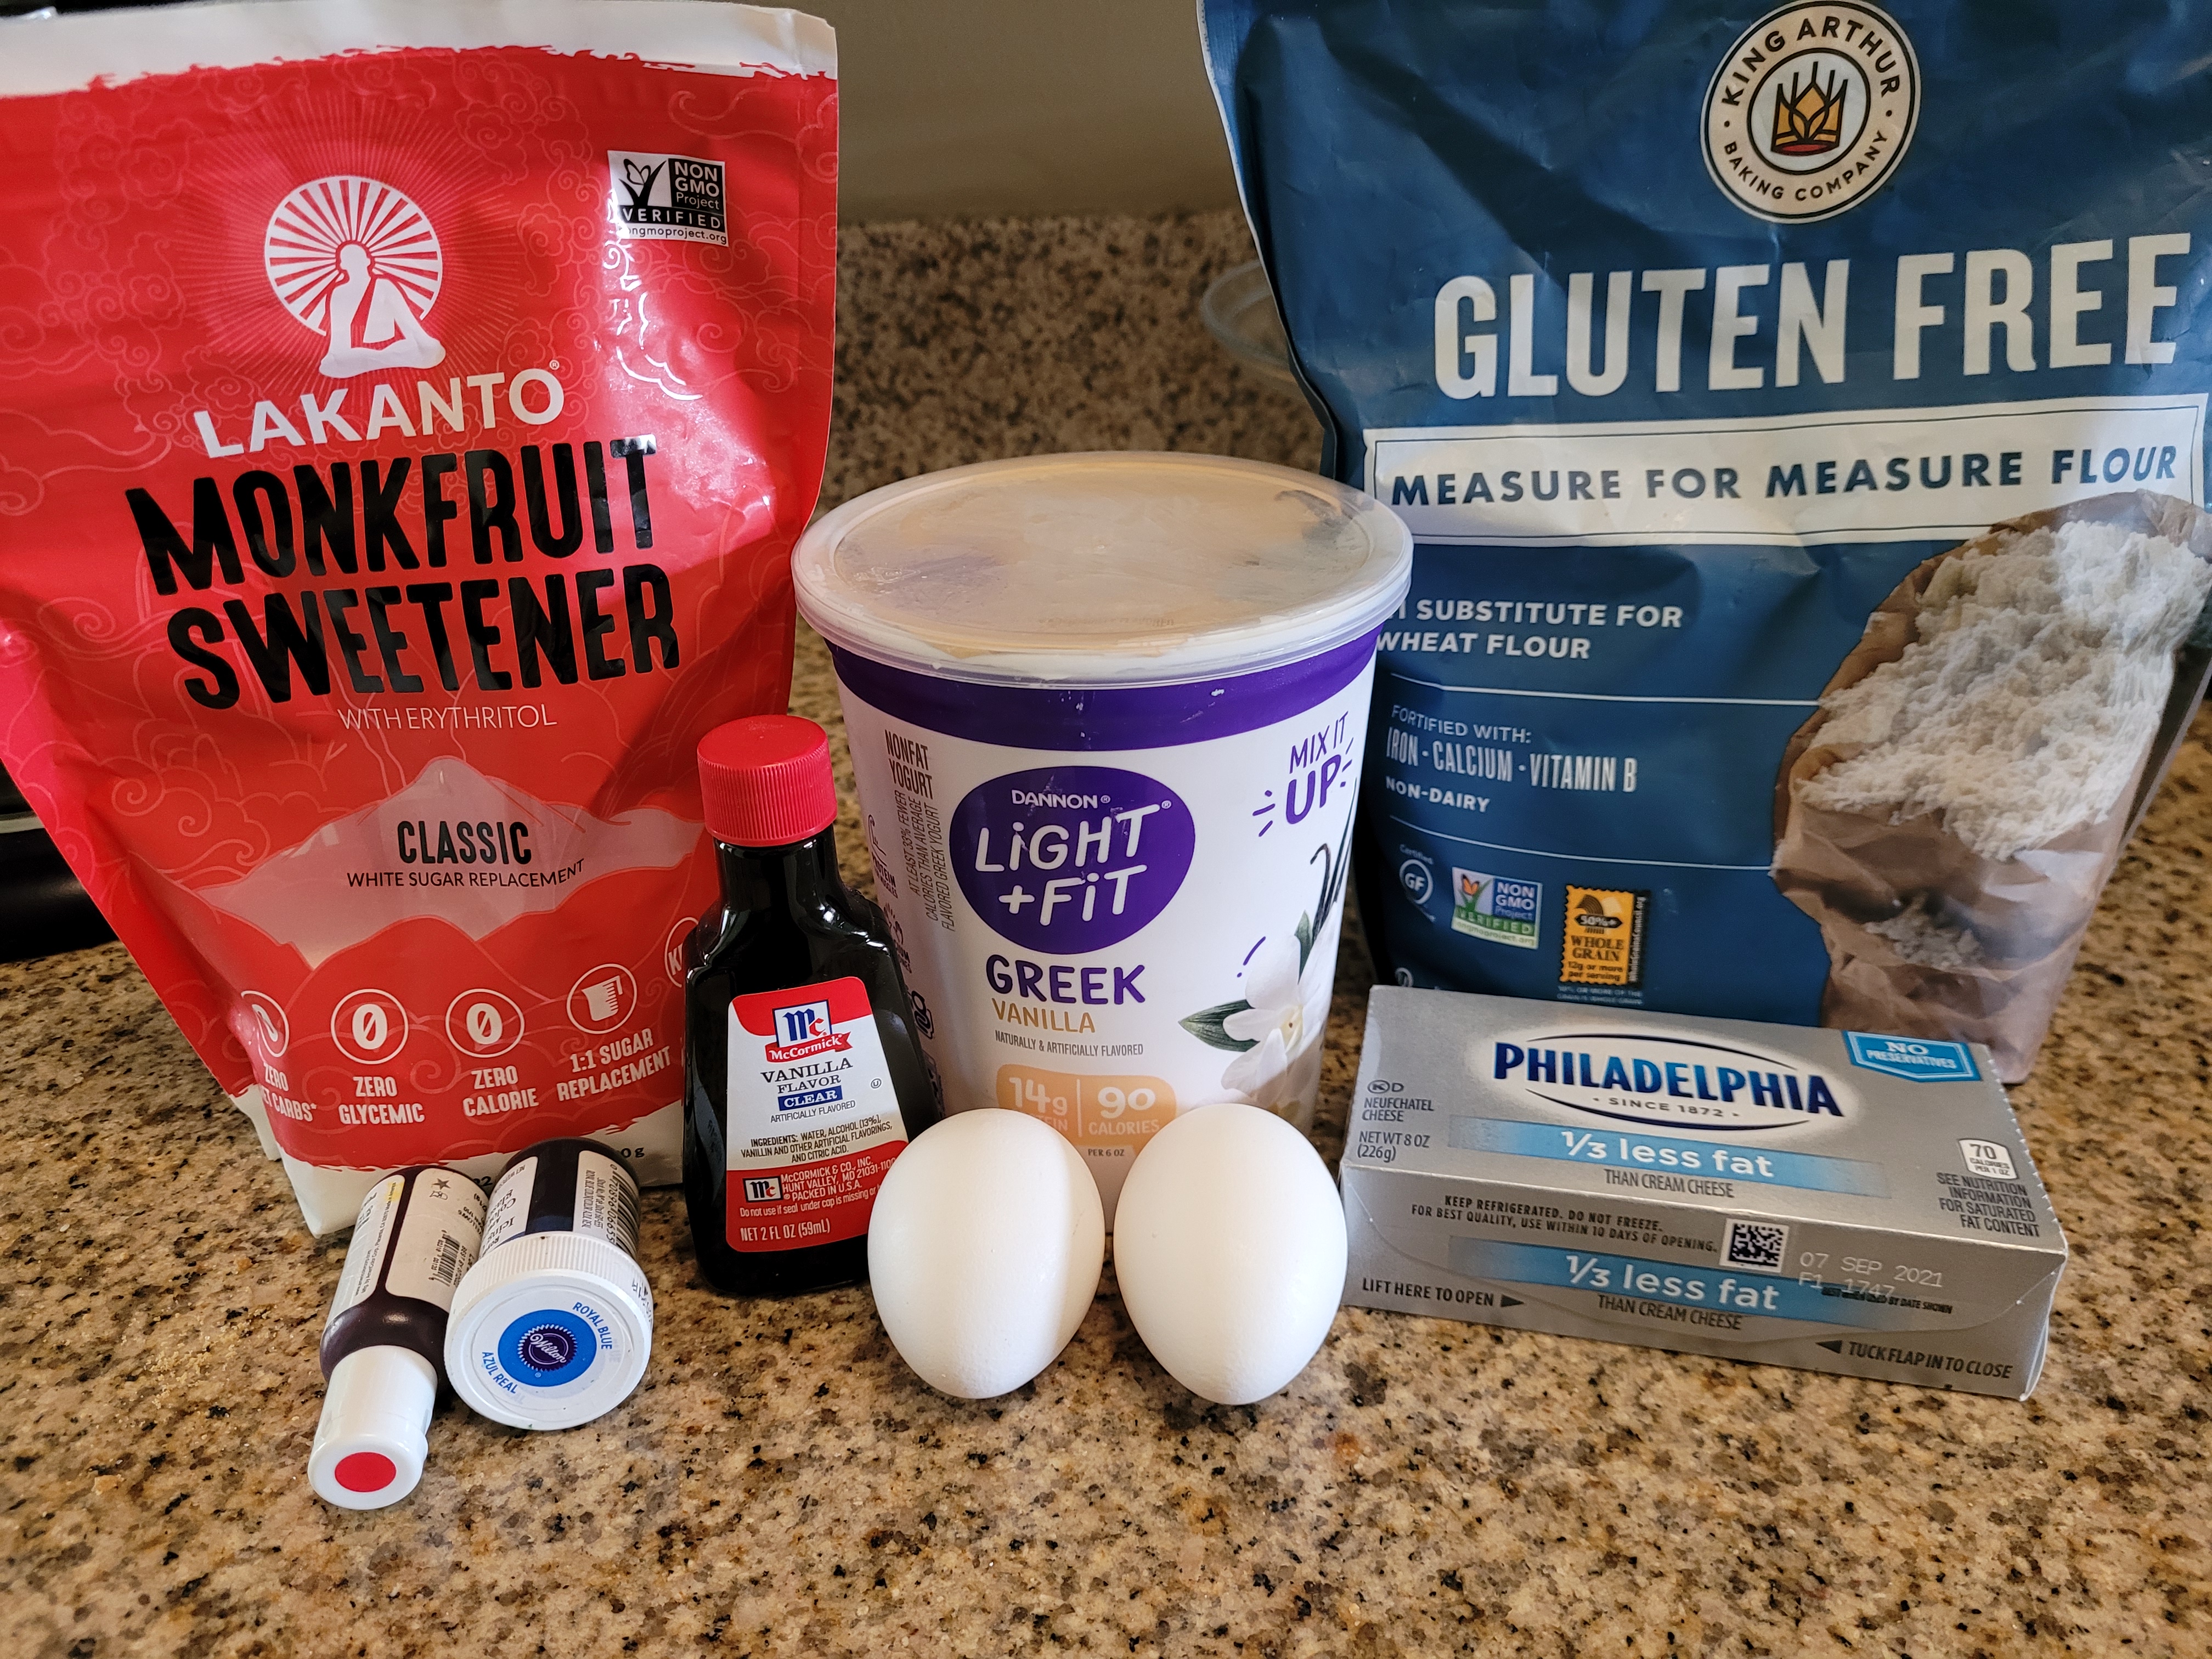
Man, even my ingredient packaging was red, white, and blue. This is so American it almost hurts. This is a really simple vanilla cheesecake recipe, but you could always up the ante and make it super American by adding some Jack Daniels or other boozy goodness to the base recipe. I used:
- 8 ounces of 1/3 the fat cream cheese at room temp
- 1/2 cup (96 g) Lakanto monkfruit sweetener or sugar
- 3 TBS of King Arthur gluten free measure for measure flour (regular all purpose works if you aren’t GF)
- 8 ounces (226 g) Dannon light + fit vanilla Greek yogurt, strained overnight
- 1.5 tsp vanilla extract
- 2 eggs at room temp
- Red and blue gel dye
- Toppings: Cool Whip (I used sugar free), red, white, and blue sprinkles or stars
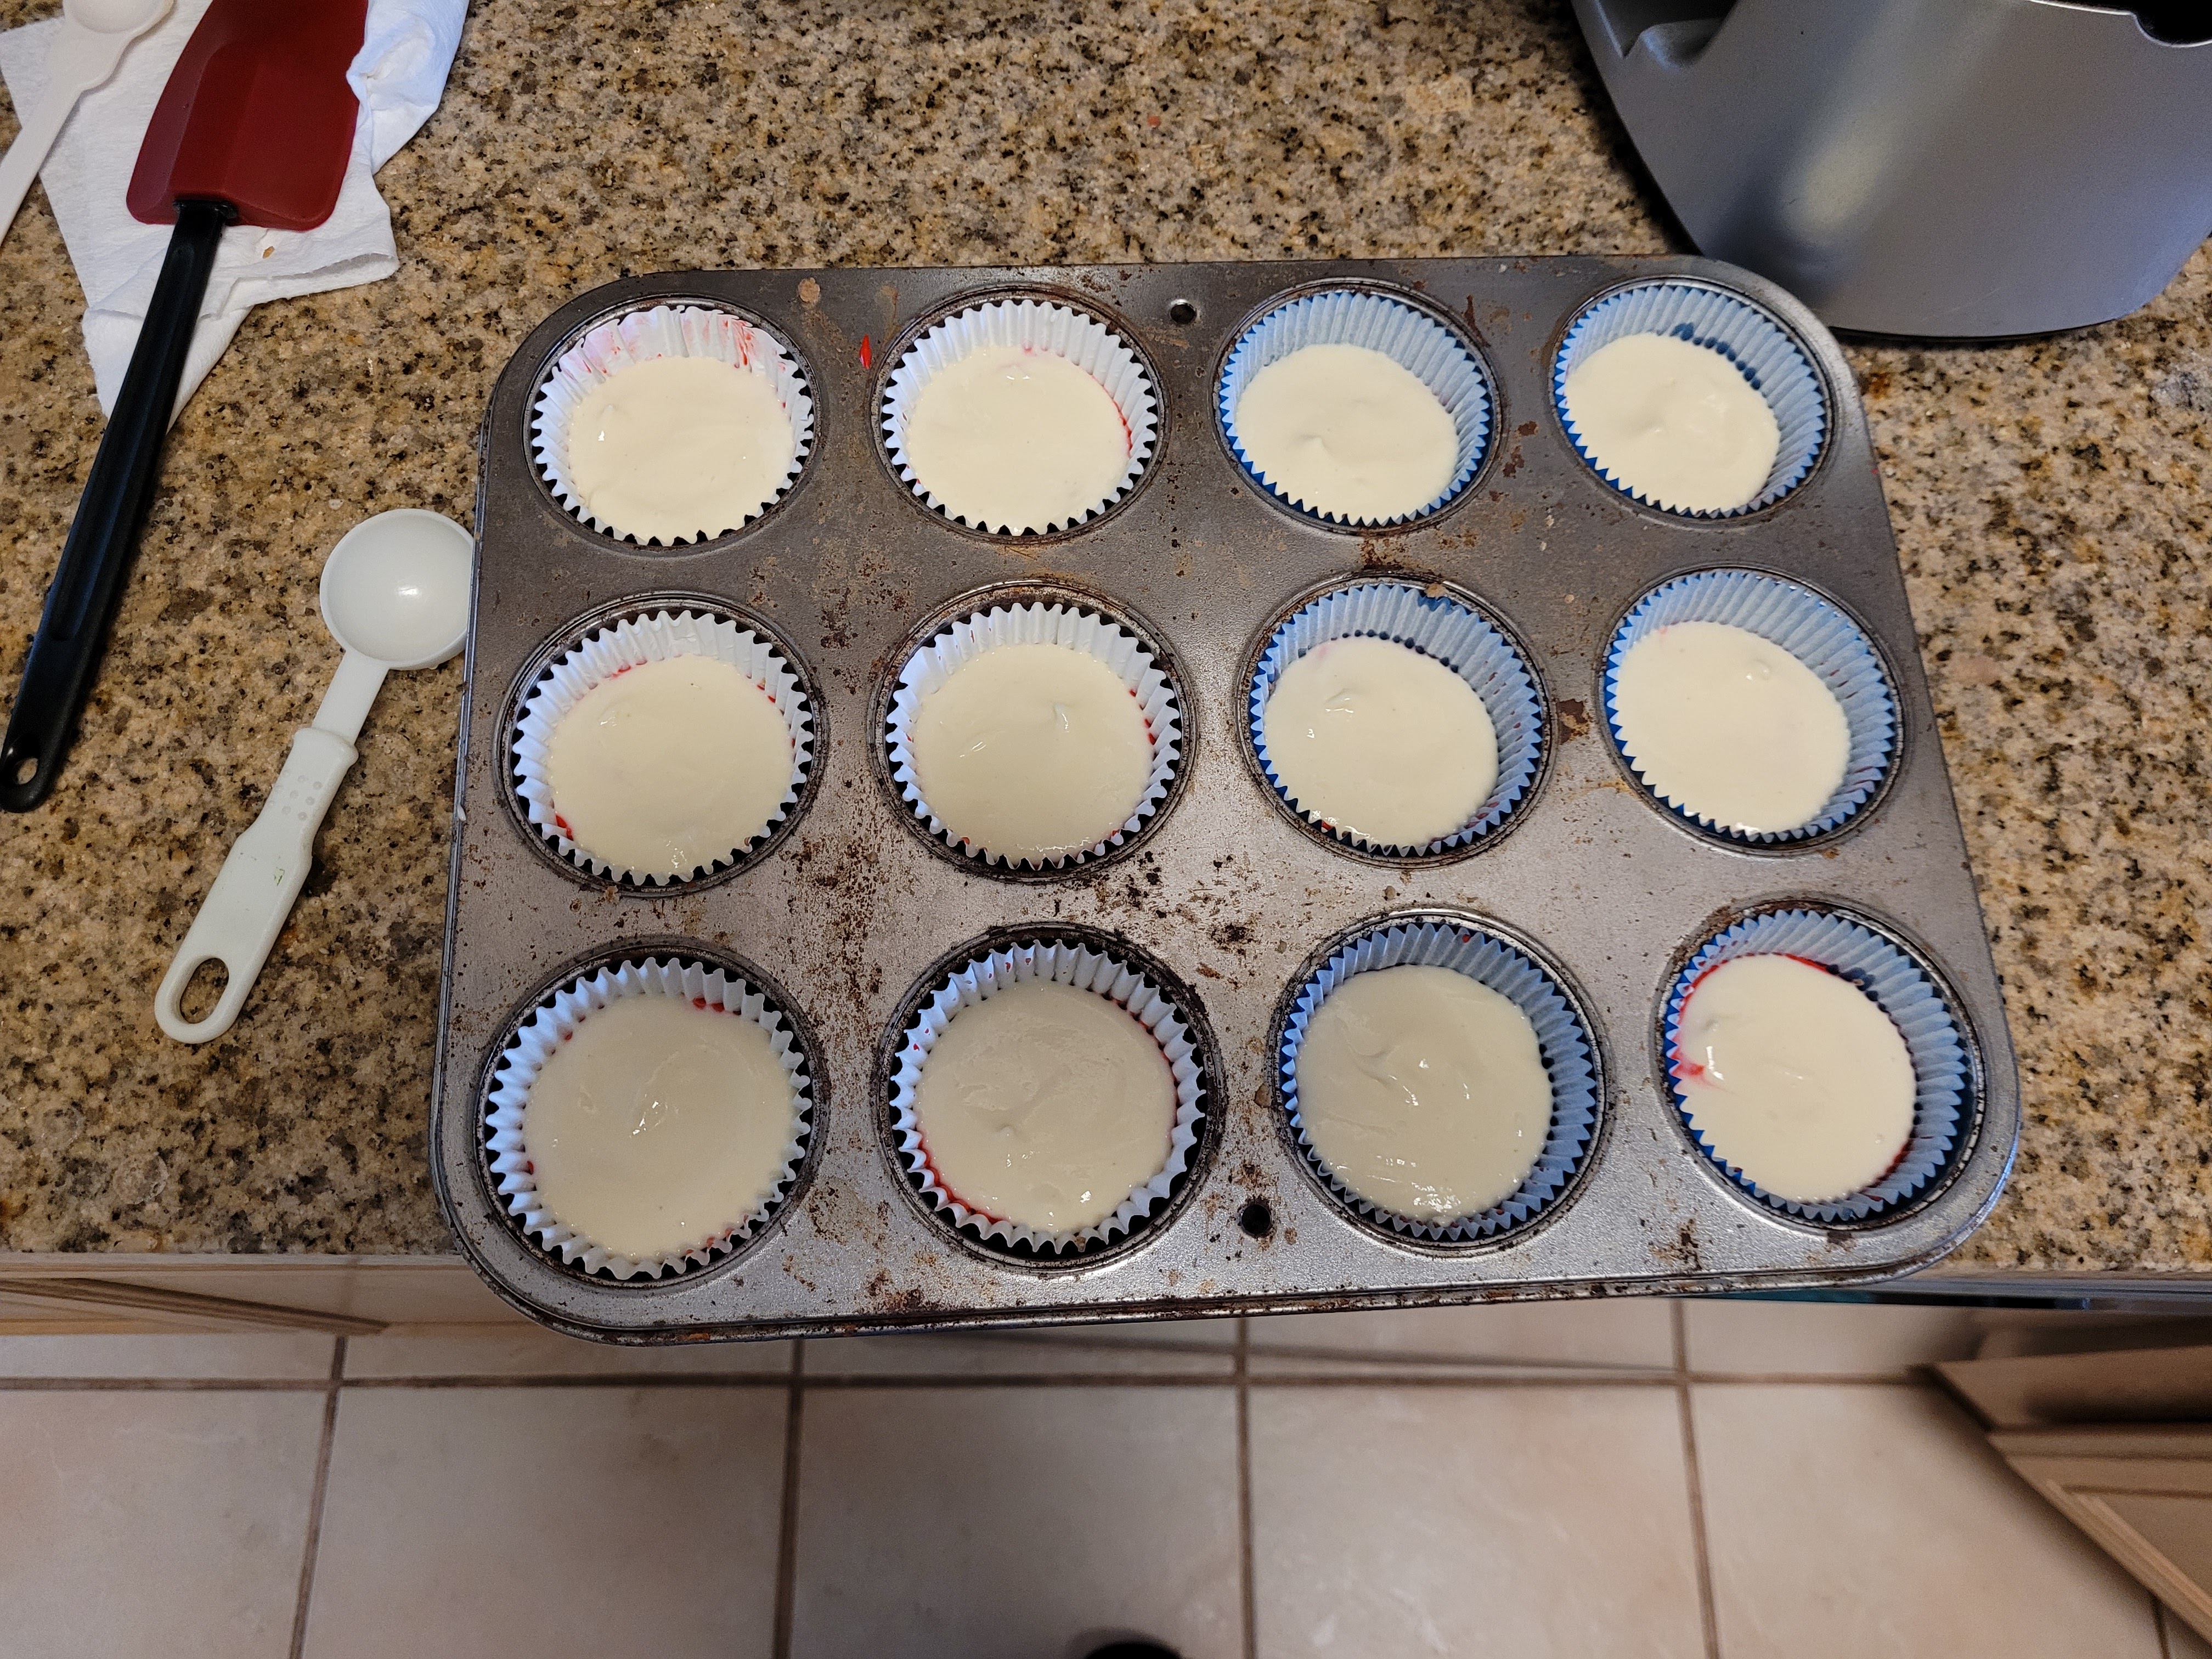
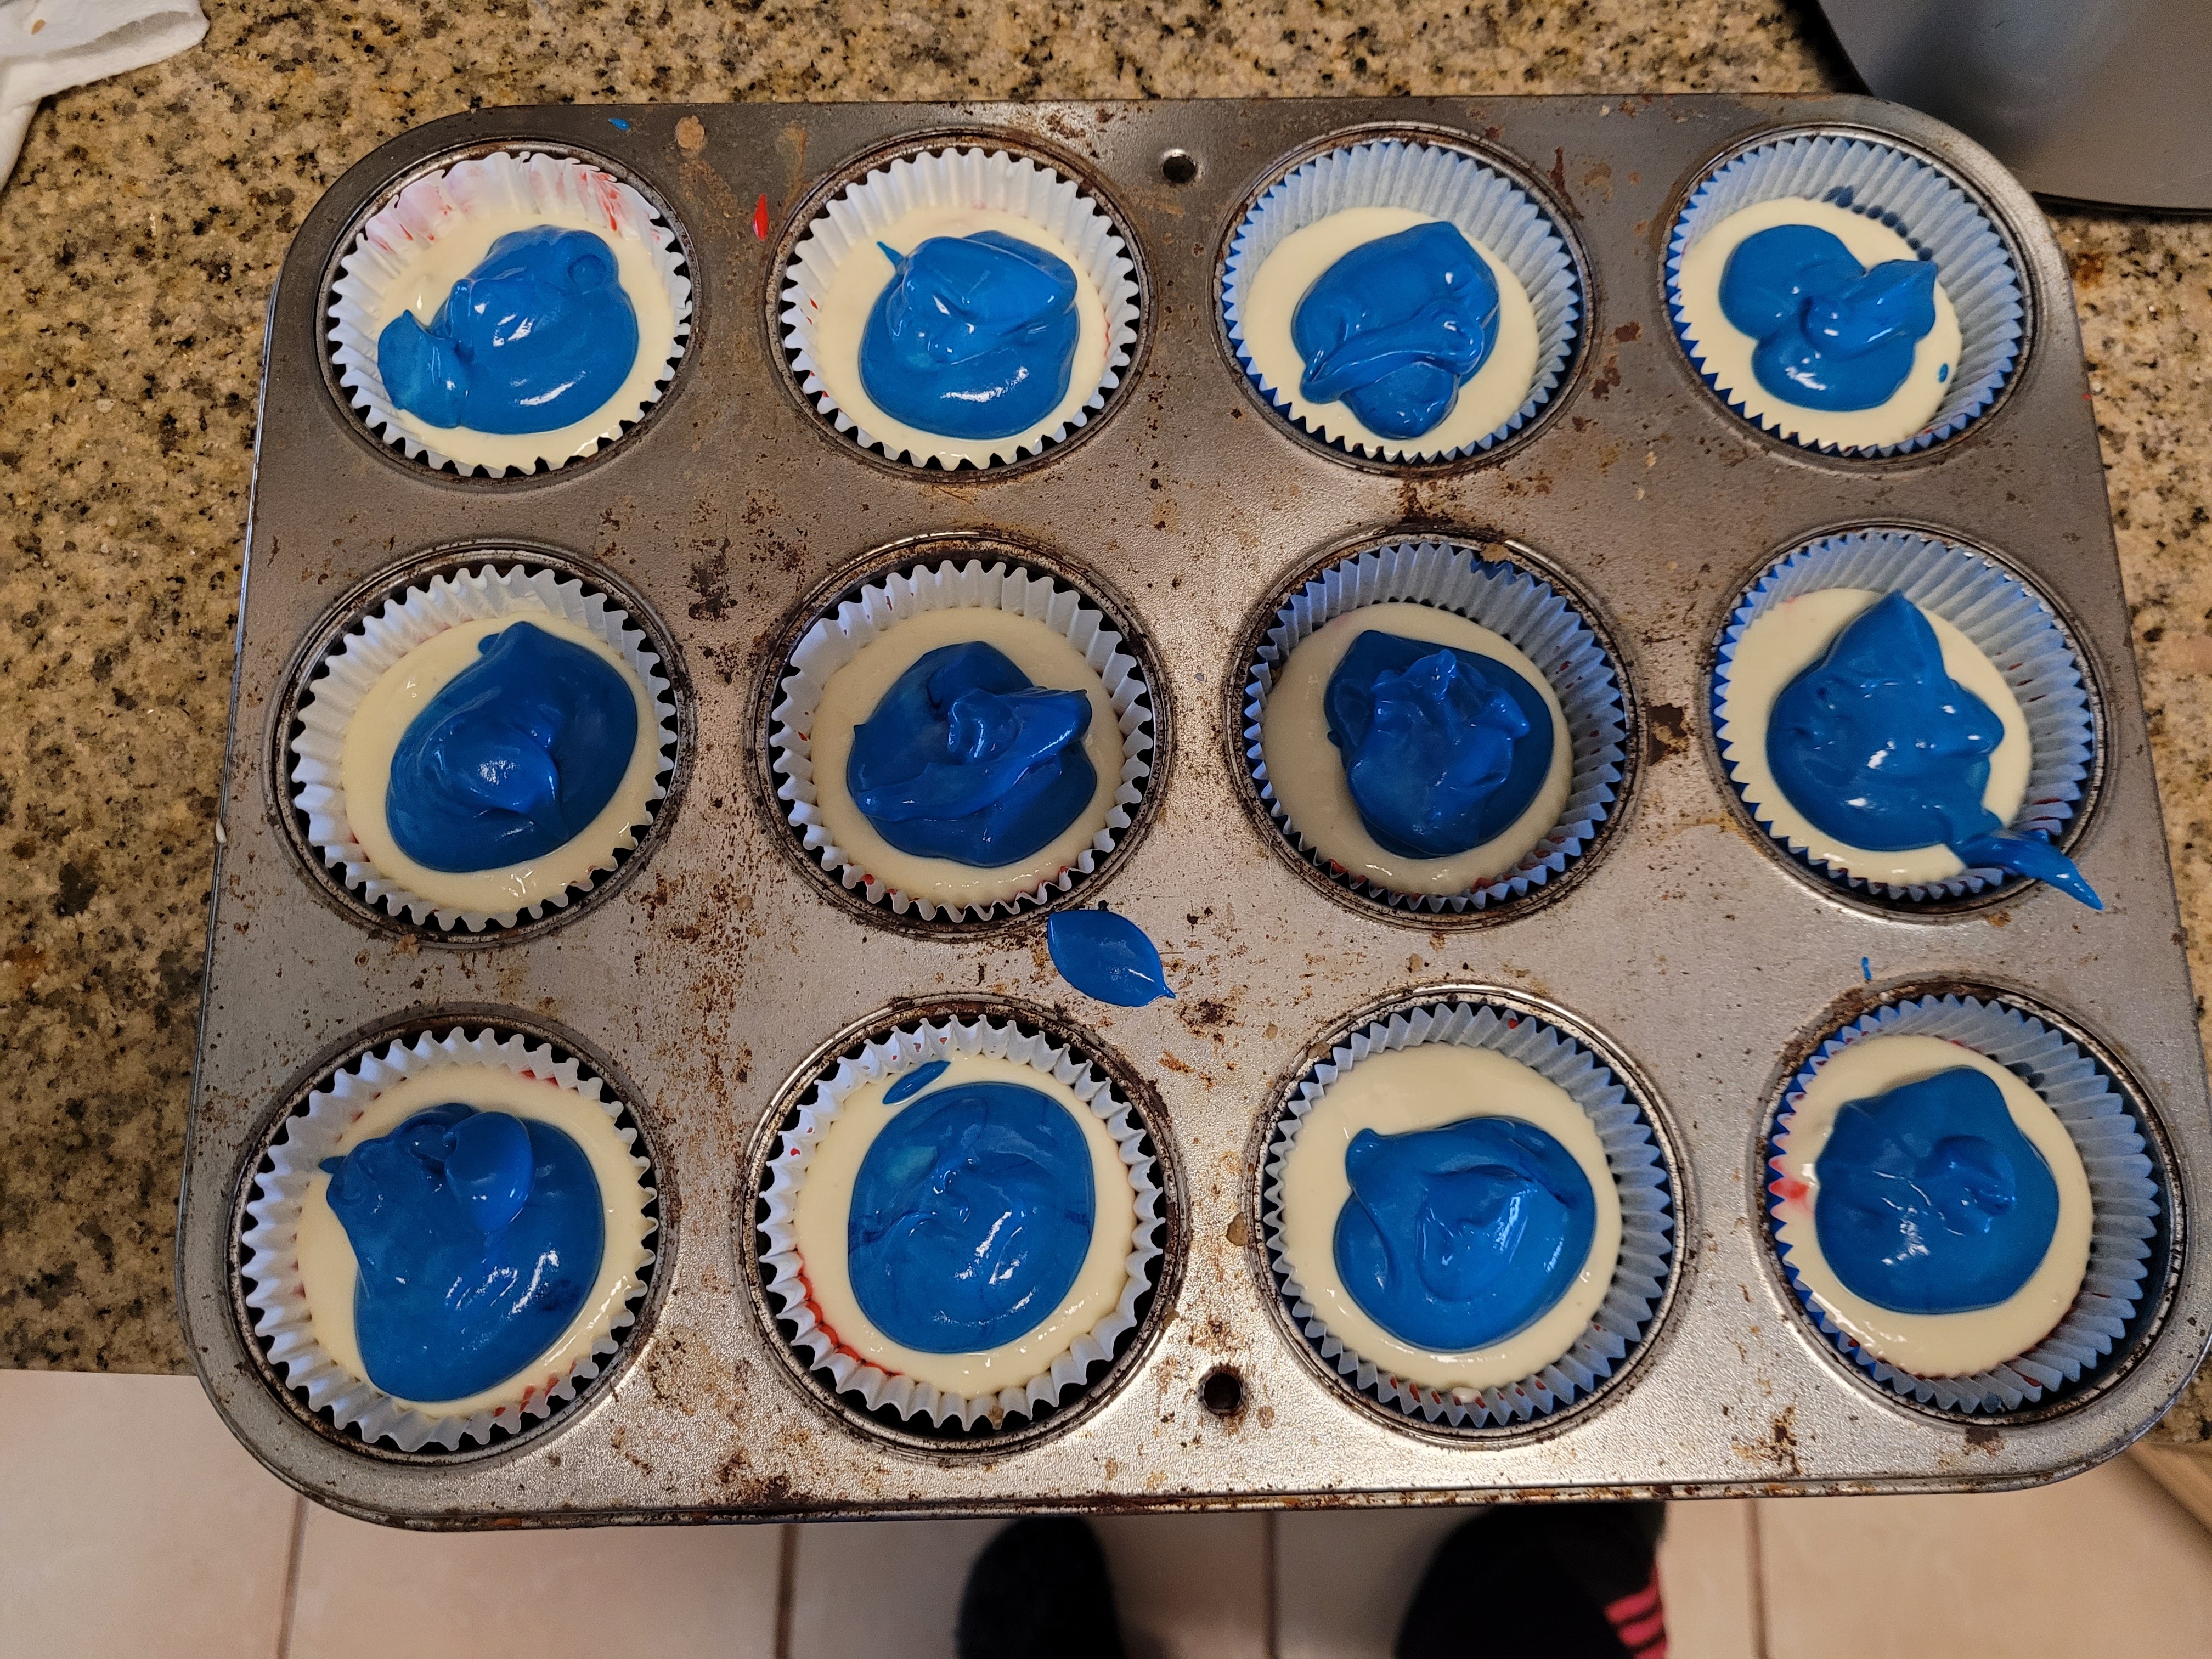
Start by mixing the cream cheese, sugar, and flour together on medium for 2 minutes in your stand mixer. Then add in the yogurt and vanilla extract, mixing on medium for another minute. Turn the speed to low, and add the eggs, one at a time, scraping the bowl after each addition. Now, divide the batter into three separate bowls. I placed 212 grams of batter into each bowl. I left one alone, dyed one red, and dyed the last blue.

Now grab those crusts! Get your tablespoon, and plop a little under a tablespoon of the red-dyed batter on top of the crusts. I used the back of a teaspoon to smooth things out so the red batter was completely covering the crust.

Like so. Kinda want to go to Target after looking at this photo. You can also gently tap the pan on the counter in order to even out your batter at this point.

I was sure things would start going wrong at precisely this moment. Now, clean that tablespoon and dry it off before plopping a little less than a tablespoon of the white batter on top of the red batter.

My teaspoon became the real MVP. Like the George Washington of baking accessories–the Founding Father of making this cheesecake possible. I VERY GENTLY, like I was pressing on an eggshell while trying not to break it, used the back of the teaspoon in circular motions to smooth out the batter without causing it to blend into the red layer. This was 98% successful…looking at you, bottom right cheesecake.

Thank God our flag only has 3 colors in it. I was getting pretty stressed that since my red and white layers worked out, I would surely get too cocky and move too quickly with the blue layer and mess everything up. I used a level of patience and slooowwwwwness I didn’t even know I possessed to finish the last layer with the help of George the teaspoon.

Red, white, and *whew.* Now, bake at 300 for 20 minutes. Then, because all cheesecakes, even the small ones, are demanding divas (how properly American of them), turn off the oven, leave the door shut, and set a timer for 10 minutes to let these needy little beauties finish cooking. After this time has passed, crack the oven door and wait another 10 minutes before removing the pan from the oven and putting it straight in the fridge. These will cool off extremely quickly this way, so you can be ready to stuff your face once the deviled egg tray runs dry and there’s nary a hot dog left in sight.

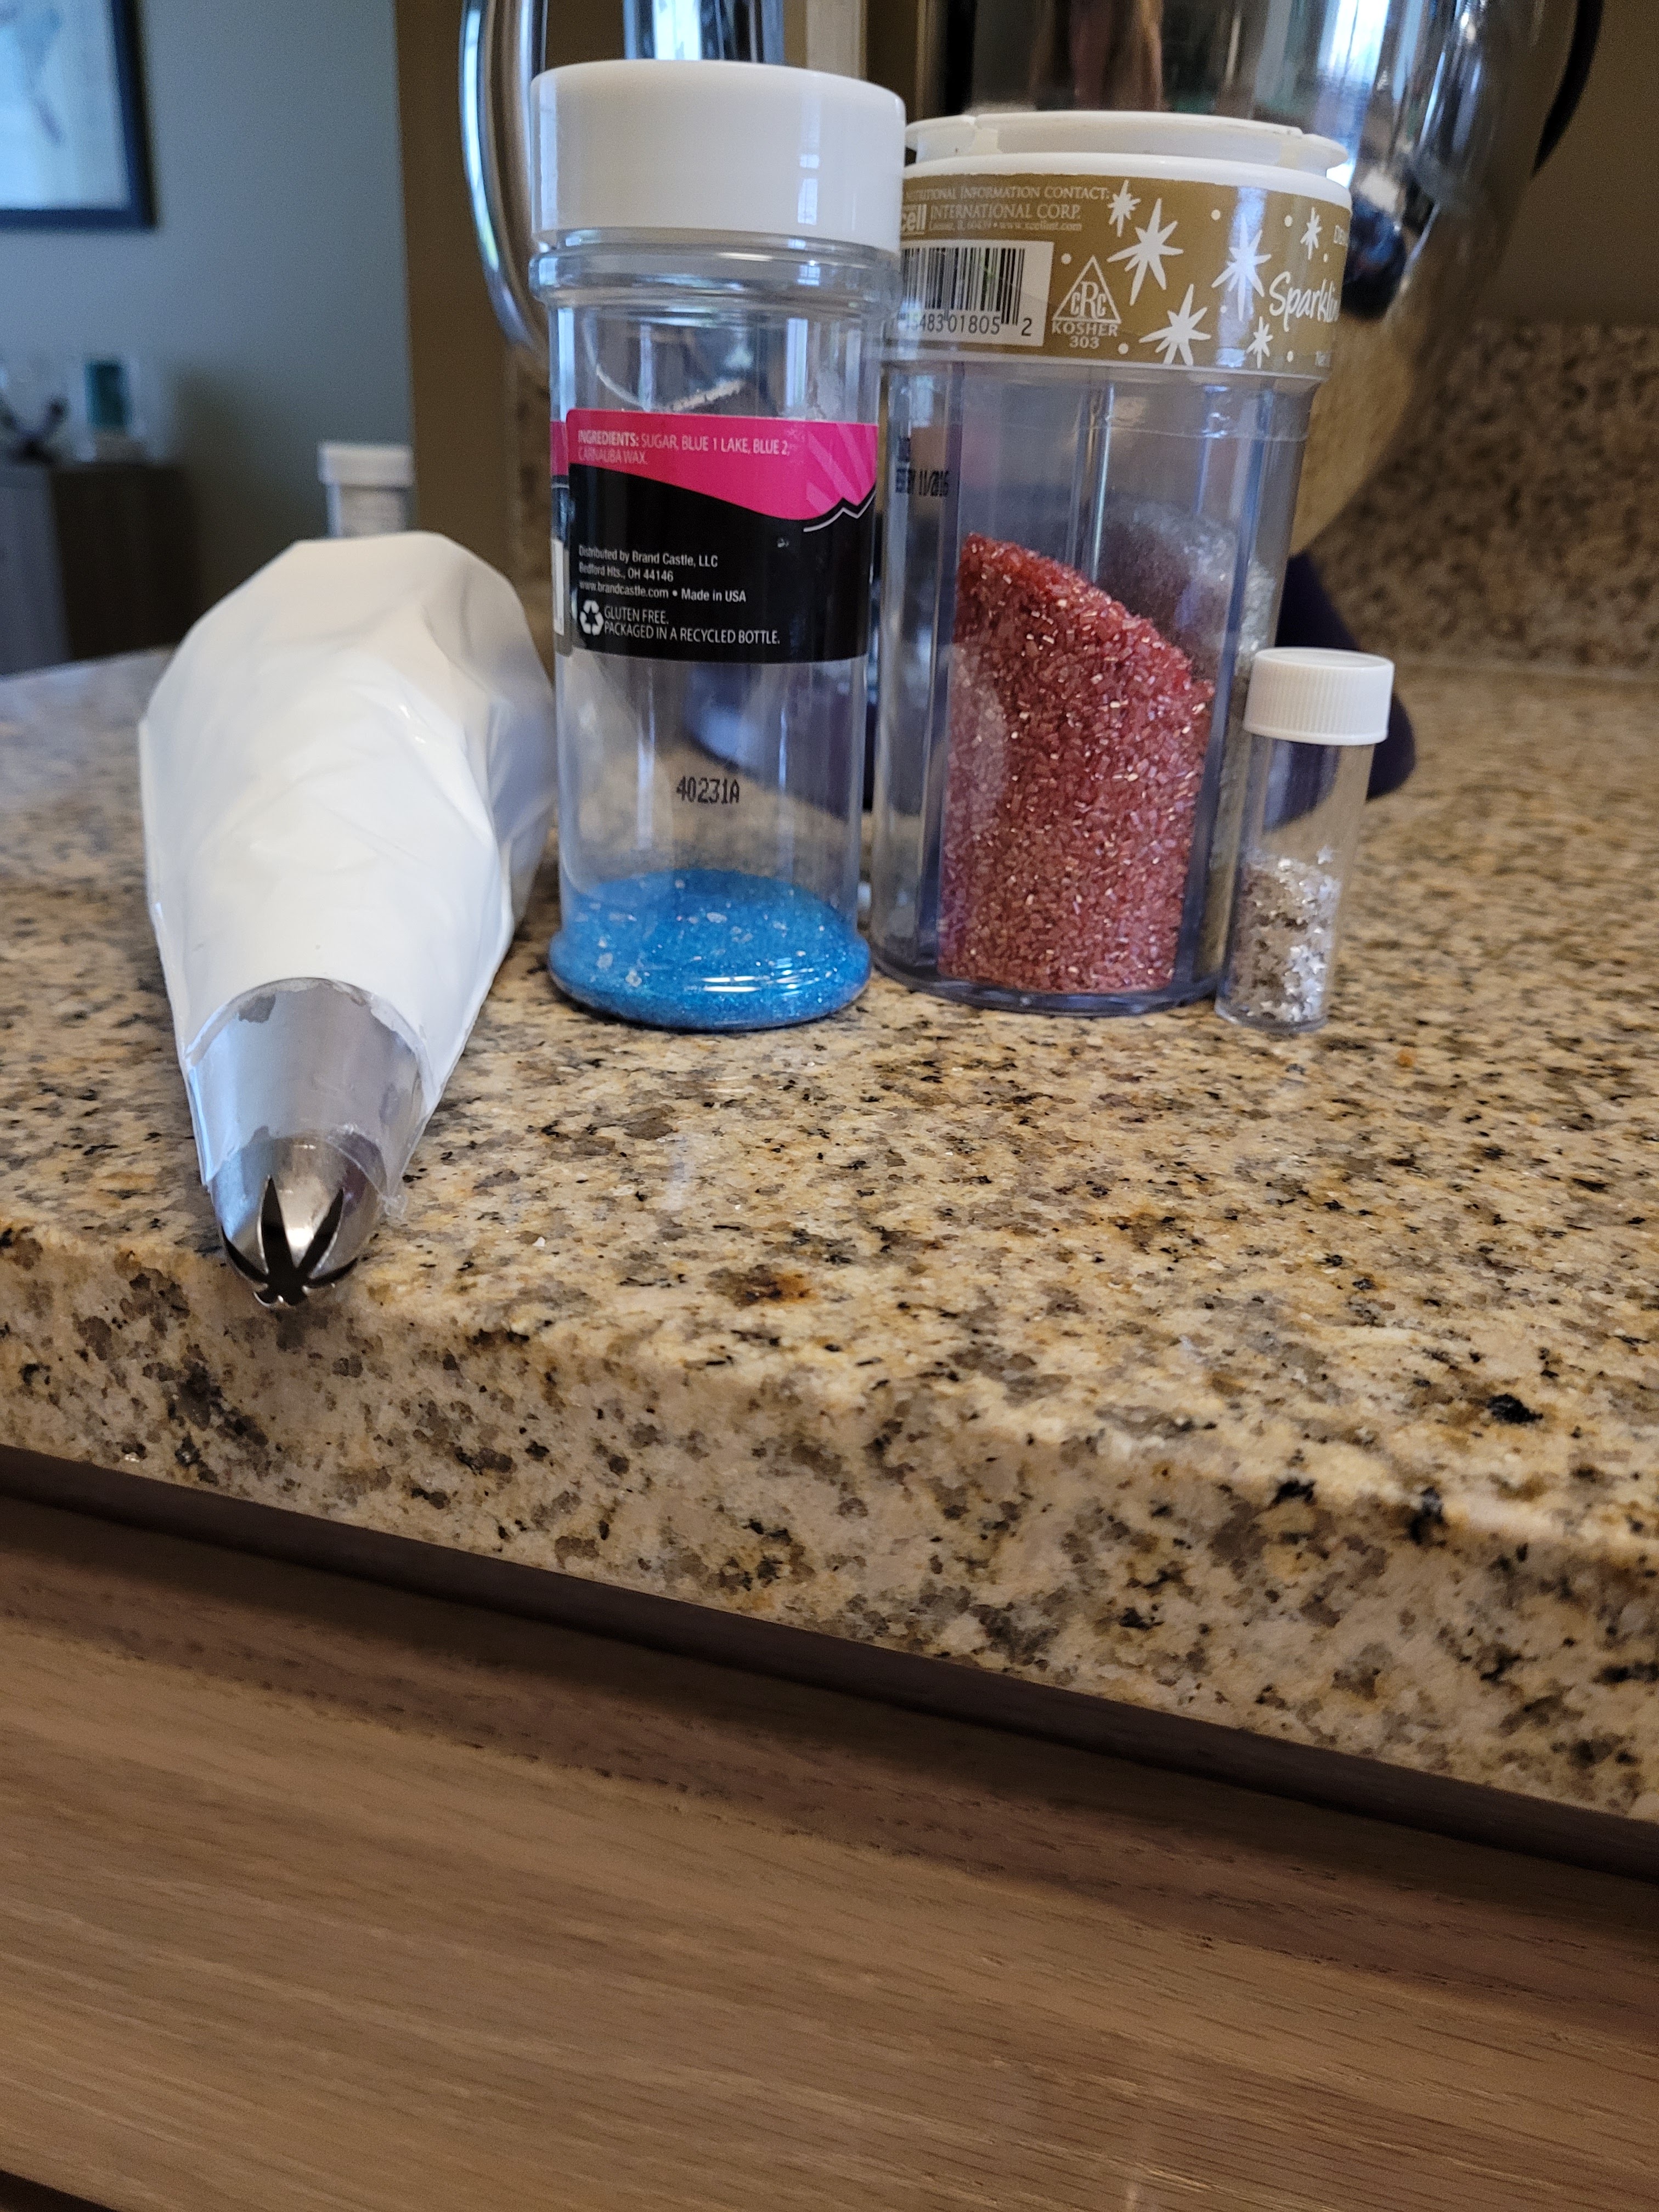
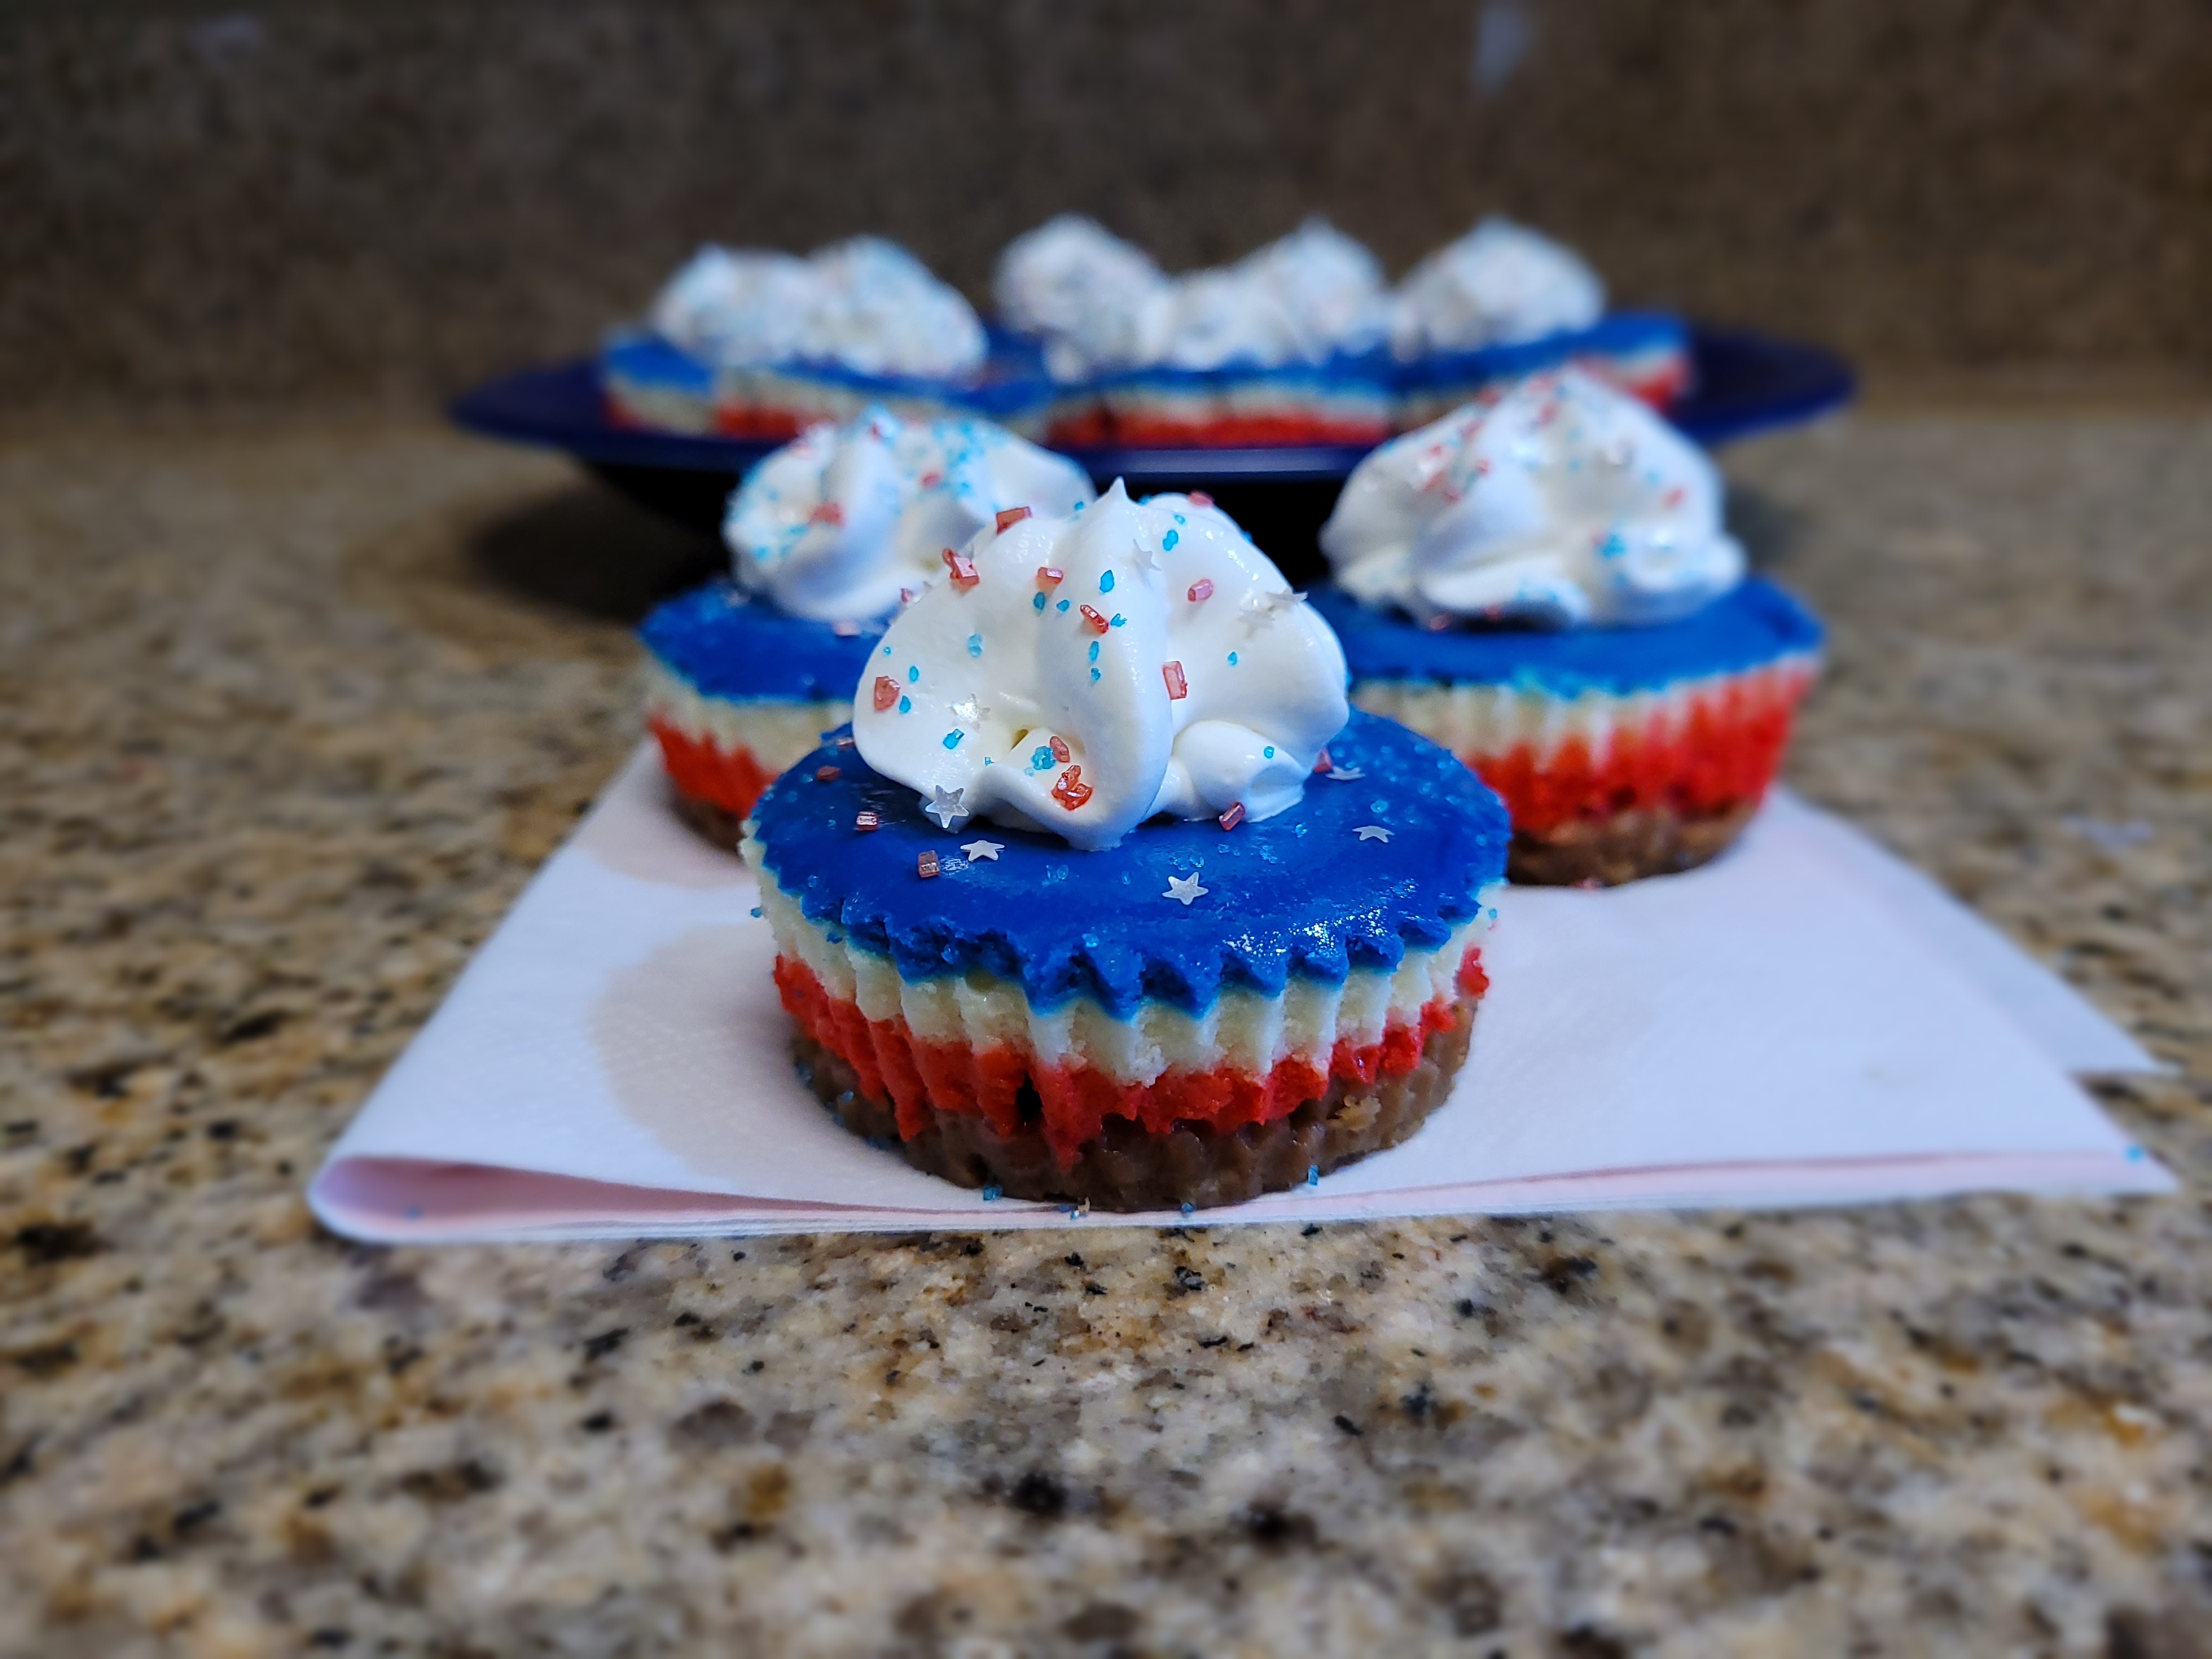
Oh look, sprinkles! If you’ve only ever read one of my blog posts, you know sprinkles are not optional in my book. Once my cheesecakes were cool to the touch, I unwrapped them (c’mon, gotta show off those layers), and I used a total of 50 grams of Cool Whip free to pipe little mounds on top of each cheesecake using a 2D tip.

Peep that layer action. ‘Merica. 
The mounds kinda look like little stars, and I’m here for that. 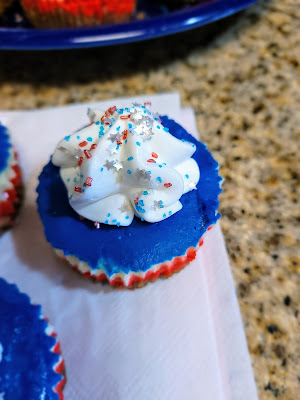
Then, I added red and blue sprinkles and silver stars to finish things off. I don’t even care if you’re Canadian–you have to appreciate how straight up American these little cheesecakes look. Sure, America is kind of a hot mess, but where else is it socially acceptable to eat meat in tube form all day, crack open countless watery beers, take in a NASCAR race, and still have time to blow stuff up at night? While these may not have been the things the Founding Fathers were concerned with, I think cheesecake existed back then, so they probably would’ve enjoyed the heck out of these little patriotic treats.

Next to exploding things, this is about as American as it gets. While these look absolutely adorable, they taste 1,000 times better. A plain vanilla cheesecake is a reminder that sometimes simple is best, and this is a prime example of a classic outshining whatever the new flavor trends are, which, again, is pretty darn American. I also feel being able to eat them two at a time also meets American food expectations, so I’m just gonna out-freedom myself and go eat like six of them. I hope everyone has an amazing 4th of July. May your sparklers be bright and may you still have all 10 fingers tomorrow. ‘Til next time, my fellow eaters!

Cue the sparklerssprinkles! -
Trouble in Paradise
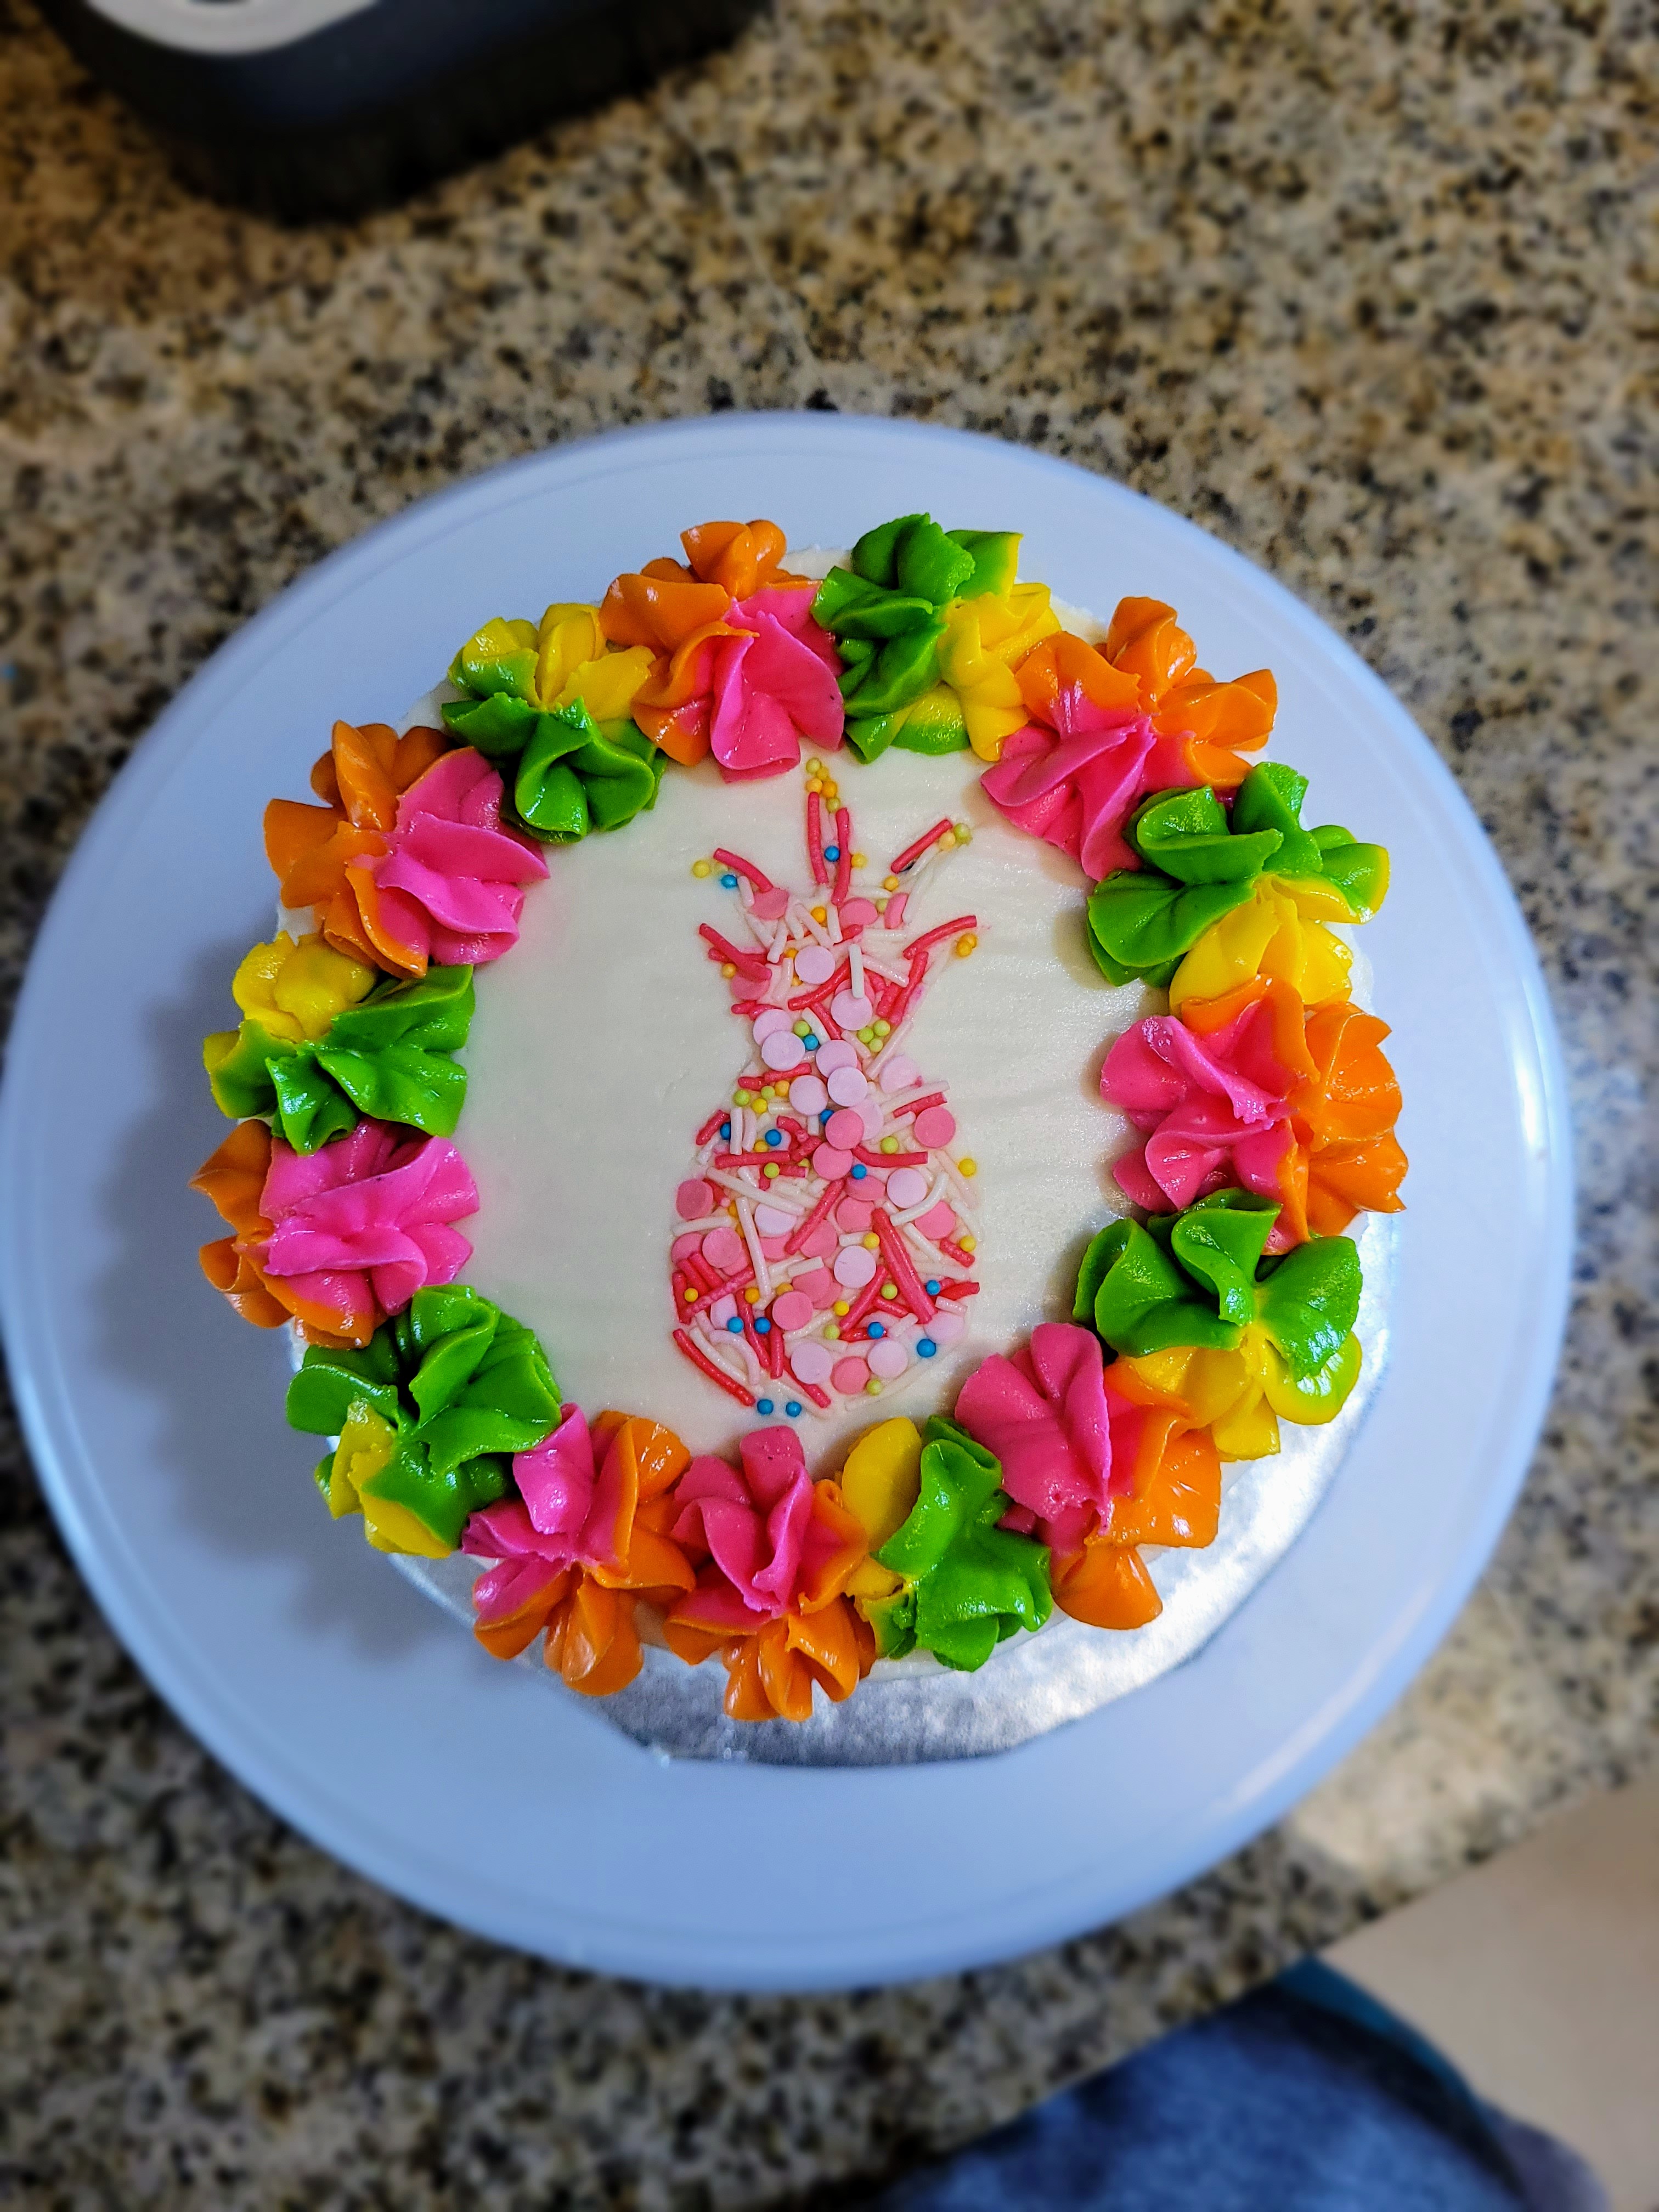
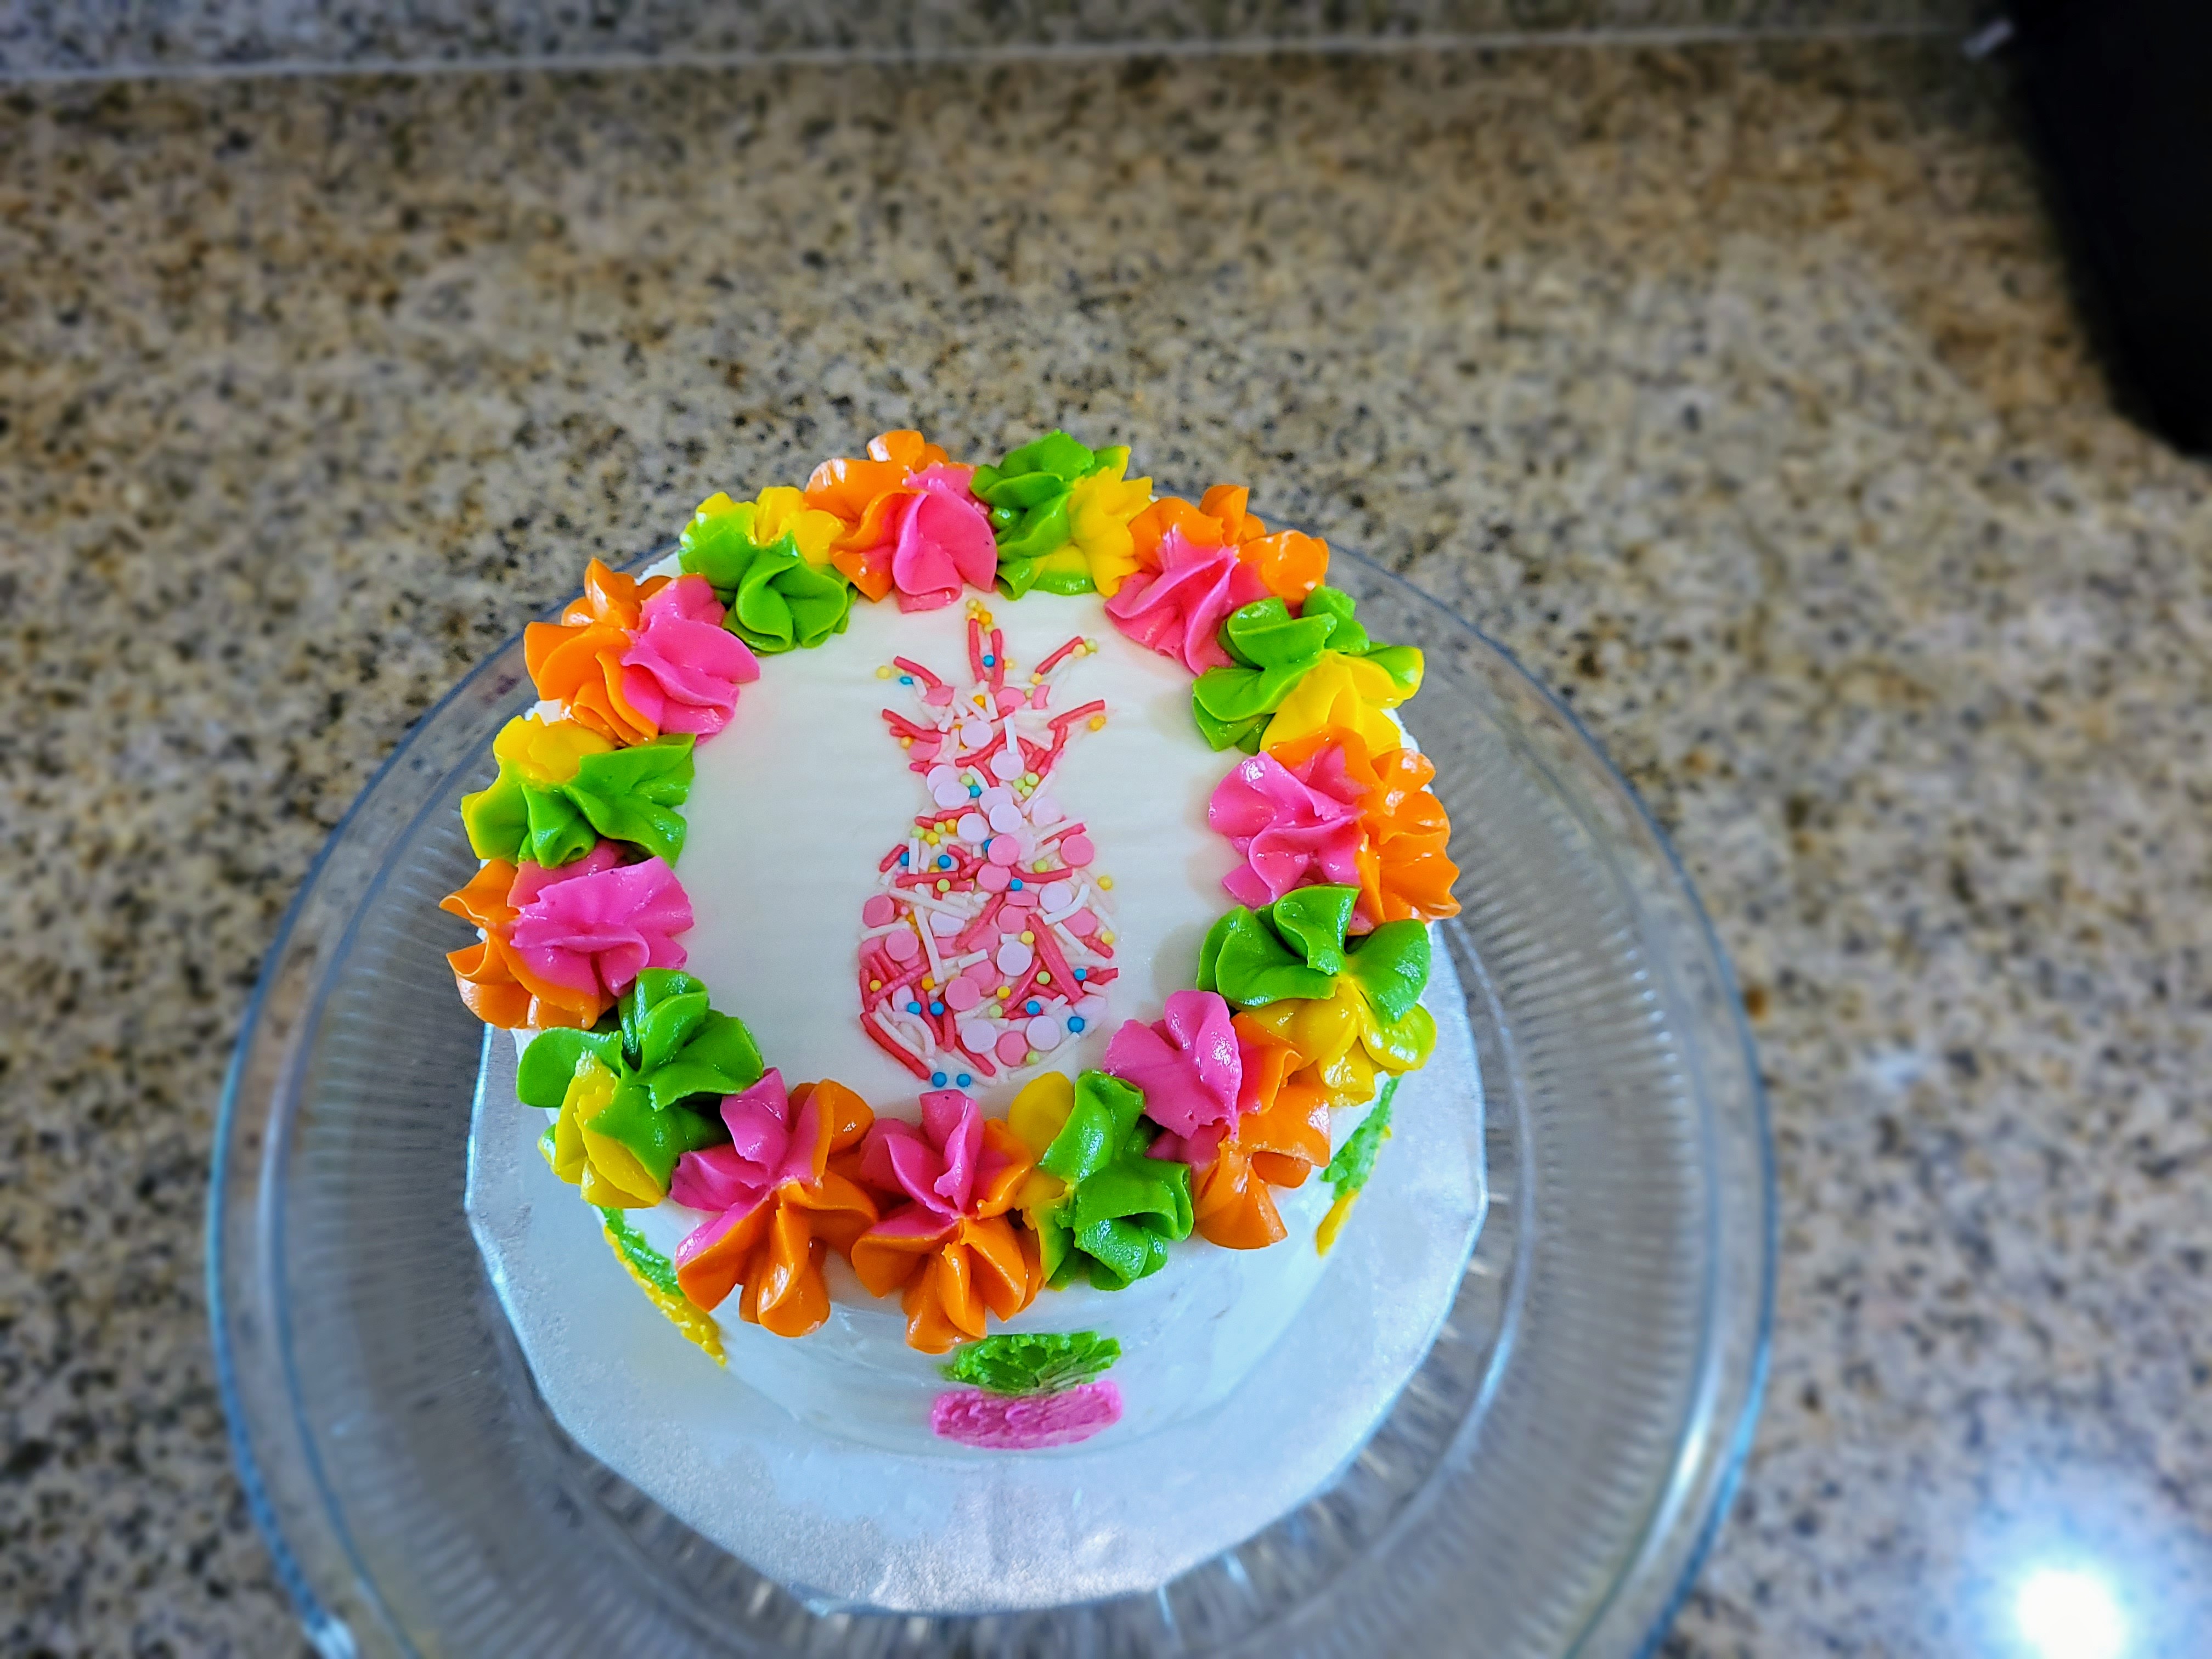
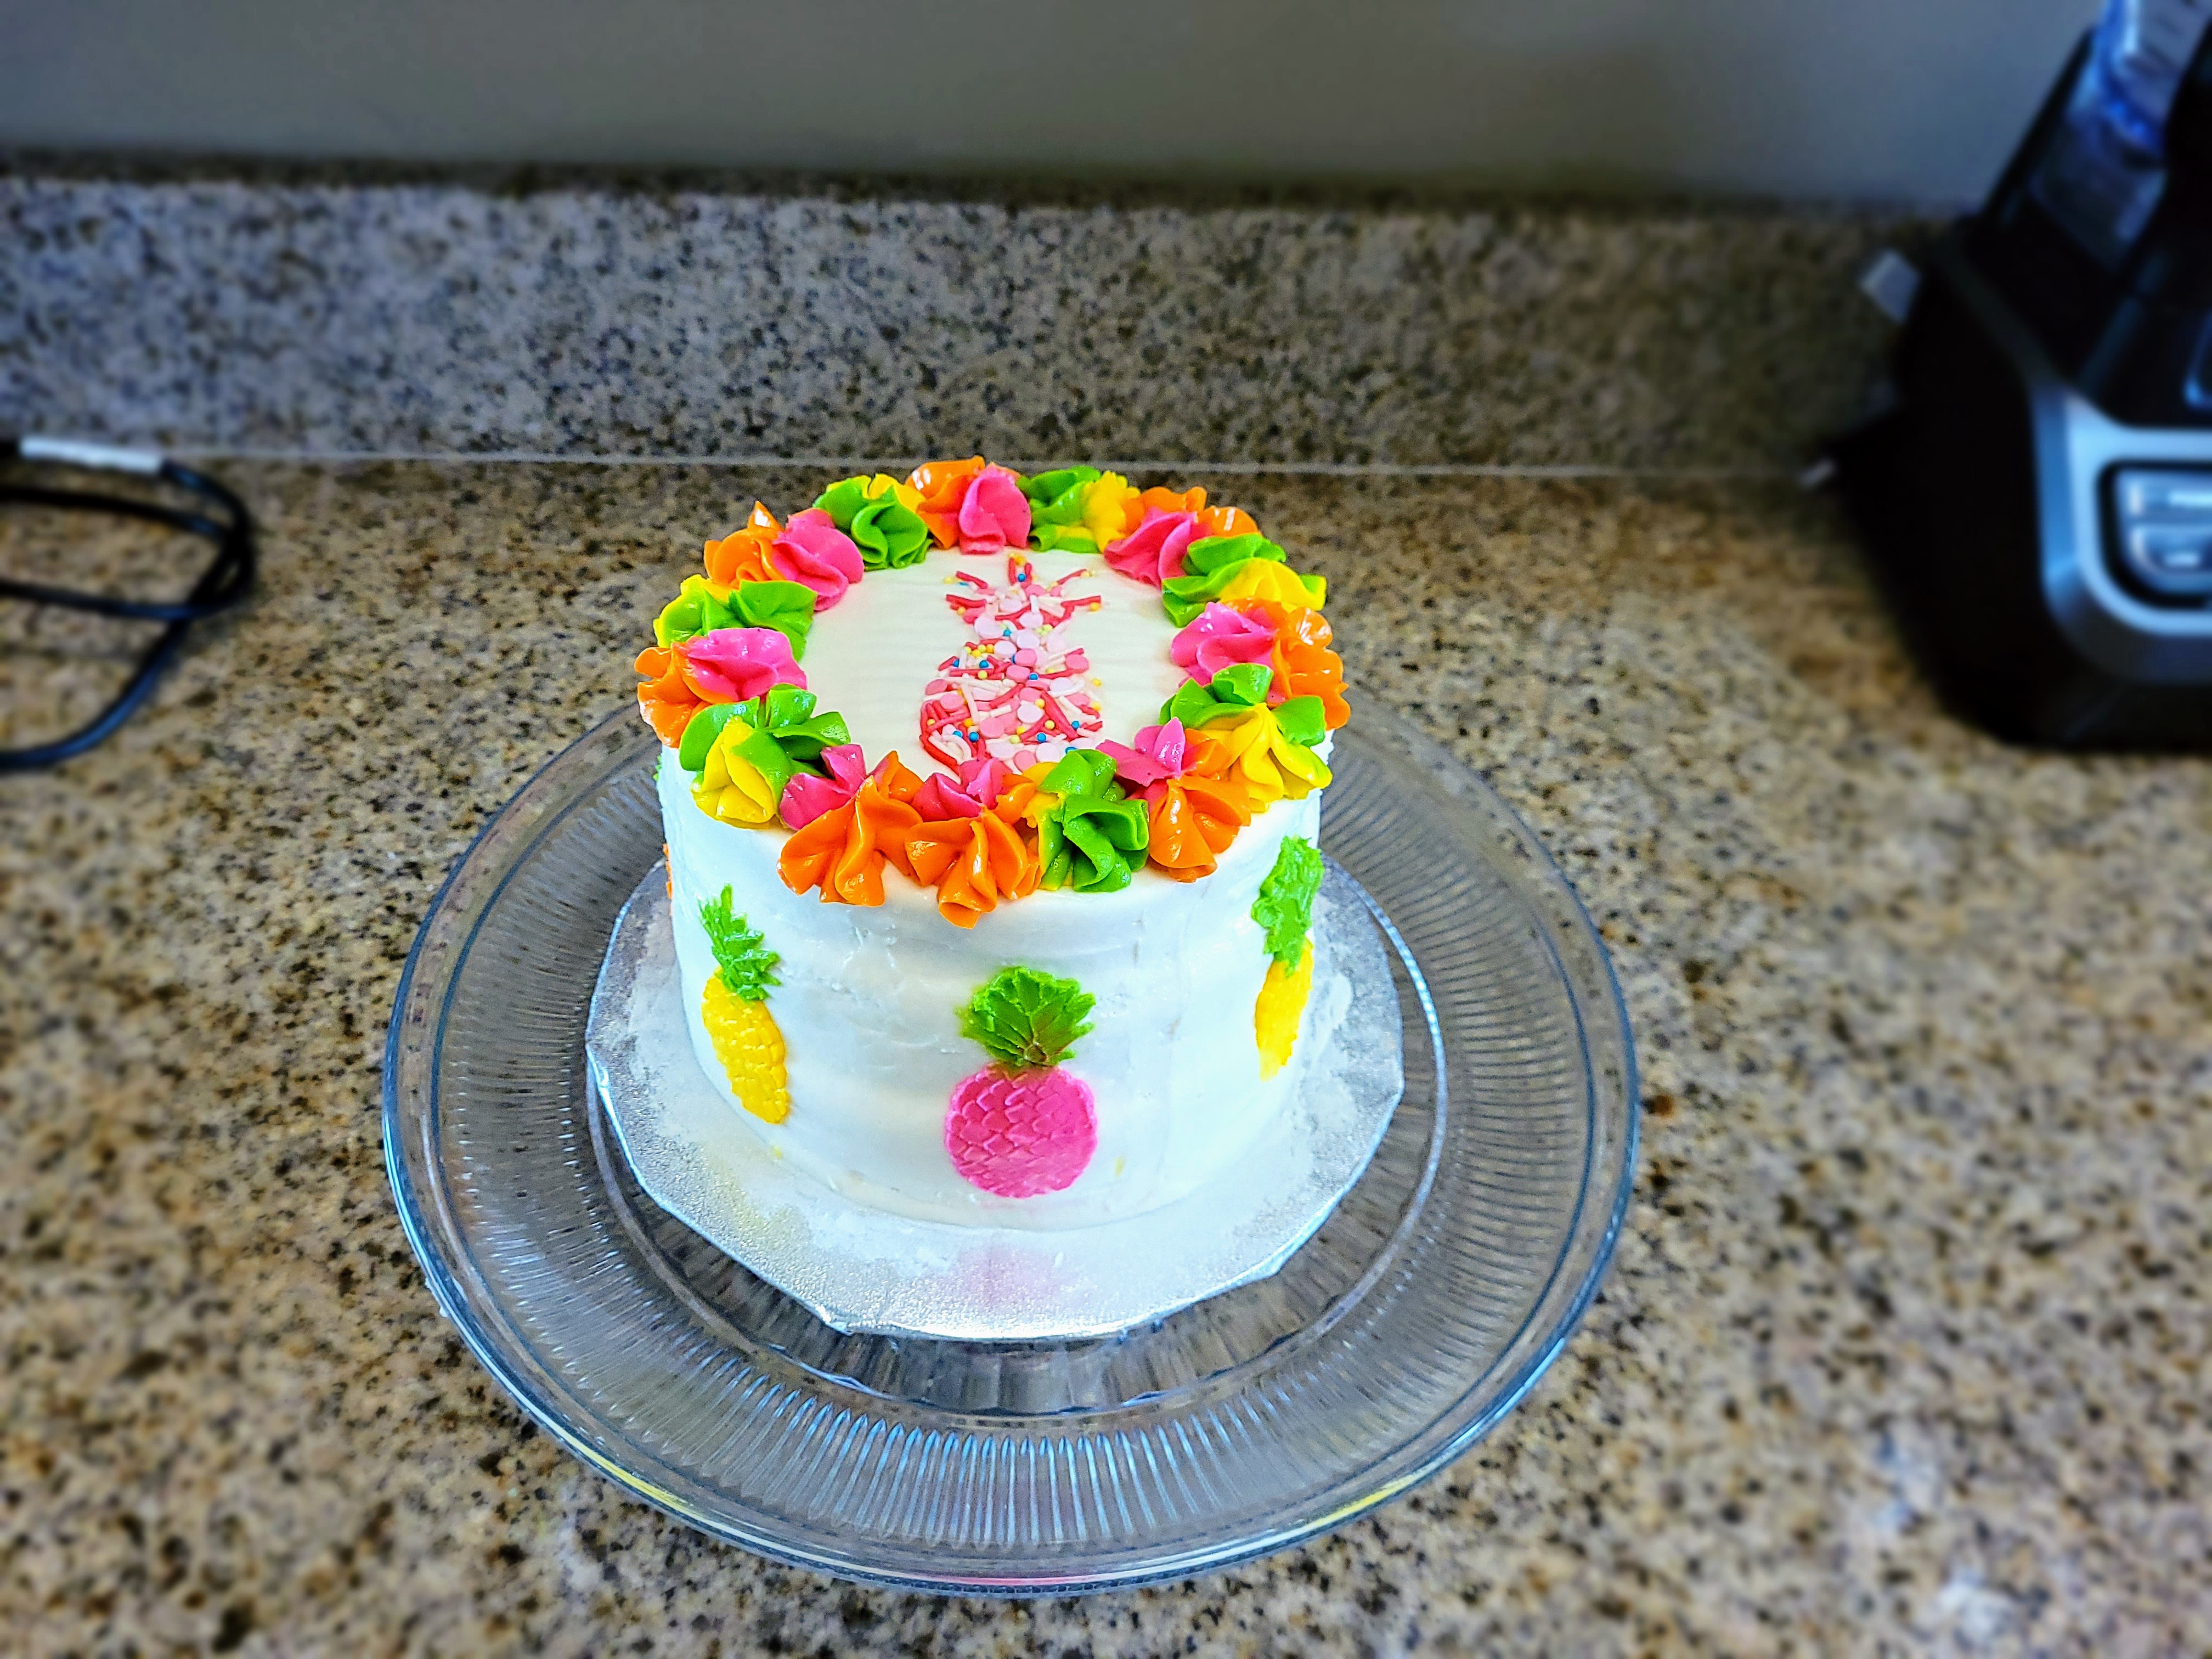
Ah yes, nothing like a tropical storm to remind me that it’s probably cooler in hell right now than it is in Florida. Between the wildlife, weather, and drivers, a more accurate state motto would be, “Florida- just try to live here.” We may have been stuck inside all weekend, but that meant there was plenty of time to bake! I wanted to make Derek’s birthday cake a week early since we will be celebrating his birthday in Nashville next week. I took the opportunity to make him a super bright and fun cake because he’s my super bright and fun husband. I chose a pineapple cake with coconut cheesecake filling and coconut cream cheese frosting to mark his big day. In hindsight, I realize I made an extremely big tropical cake during an extremely big tropical storm, so the irony isn’t lost on me. You win again, Florida…
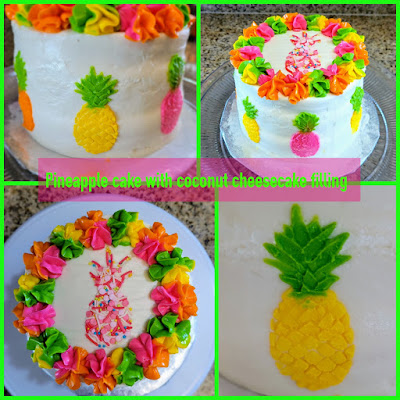
It’s the pineapple of my eye. My color palette for cakes this year is apparently, “Can it be brighter?” And I’ve taken it as a personal challenge that yes, yes it always can. This neon beauty screams summer (I also scream in the summer, but for very different reasons), and oh my it tastes exactly like summer should, too. Surprisingly, there is zero rum in this cake, but it is bursting with pineapple flavor in every bite. To me, the real star of the show is something you can’t even see–the coconut cheesecake filling. Sure cake is great, but you know how to take it to a level you might call coco-nuts? Slap cheesecake between each layer. This is probably the best idea I’ll have all year, so I’m hanging my hat on this. The coconut cream cheese frosting is also to die for, but c’mon, cheesecake layer. Inside a cake. And somehow, only 345 calories a slice for 8 slices total, or you could bump it down further to 276 calories a slice for 10 slices. Either way, this is a pre-birthday birthday cake, so the calories don’t count in this house.
I mean, you could definitely add rum though. The cake itself is extremely quick and easy to throw together. All you need is:
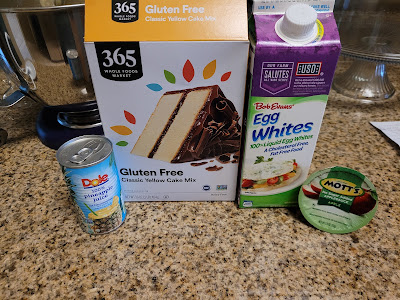
- 1 box of yellow cake mix (I used Whole Food’s gluten free version)
- 1 can of pineapple juice (177 ml) (you could also use half a can plus half a cup of really good rum)
- 1/2 cup of unsweetened applesauce (111 grams)
- 1/4 cup of liquid egg whites or 3 egg whites (61 grams)
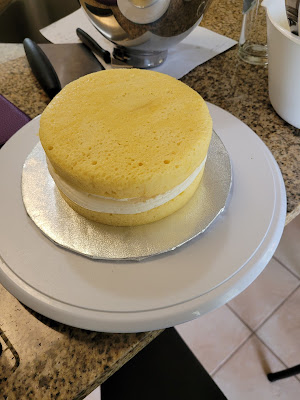
Preheat your oven to 350 and line 3 six-inch round cake pans with Parchment paper and cooking spray (you can also use 2 eight-inch rounds). Dump all cake ingredients into a stand mixer and blend on low for 30 seconds, the medium for 1-2 minutes, until everything is fully incorporated. Pour batter into prepared pans and bake for 24-26 minutes or until a toothpick comes cleanly out the center of each round.

At this point, my house smelled like a Caribbean vacation. Not gonna lie, wasn’t mad about it. Let your cakes cool in the pan on a cooling rack for 10 minutes before turning out onto the cooling rack to come to room temp before frosting. I put my rounds in the fridge while I worked on making the filling and frosting.

Jello cheesecake pudding is revolutionary. Add it to anything- your cakes, your yogurt, your heart and soul…it goes well with everything. The filling is super simple to make, you just need:
- 1/2 a box of Jello instant cheesecake pudding mix (14 grams)
- 3/4 cup of skim or fat free milk
- 1 tsp of coconut extract
- 1 cup of Cool Whip sugar free (72 grams)
Whisk the mix, milk, and extract for 2 minutes by hand (admire your biceps; you will feel them). Place this in the fridge to firm up for 5 minutes, then whisk in the Cool Whip. Leave this in the fridge to set up while you make the frosting.

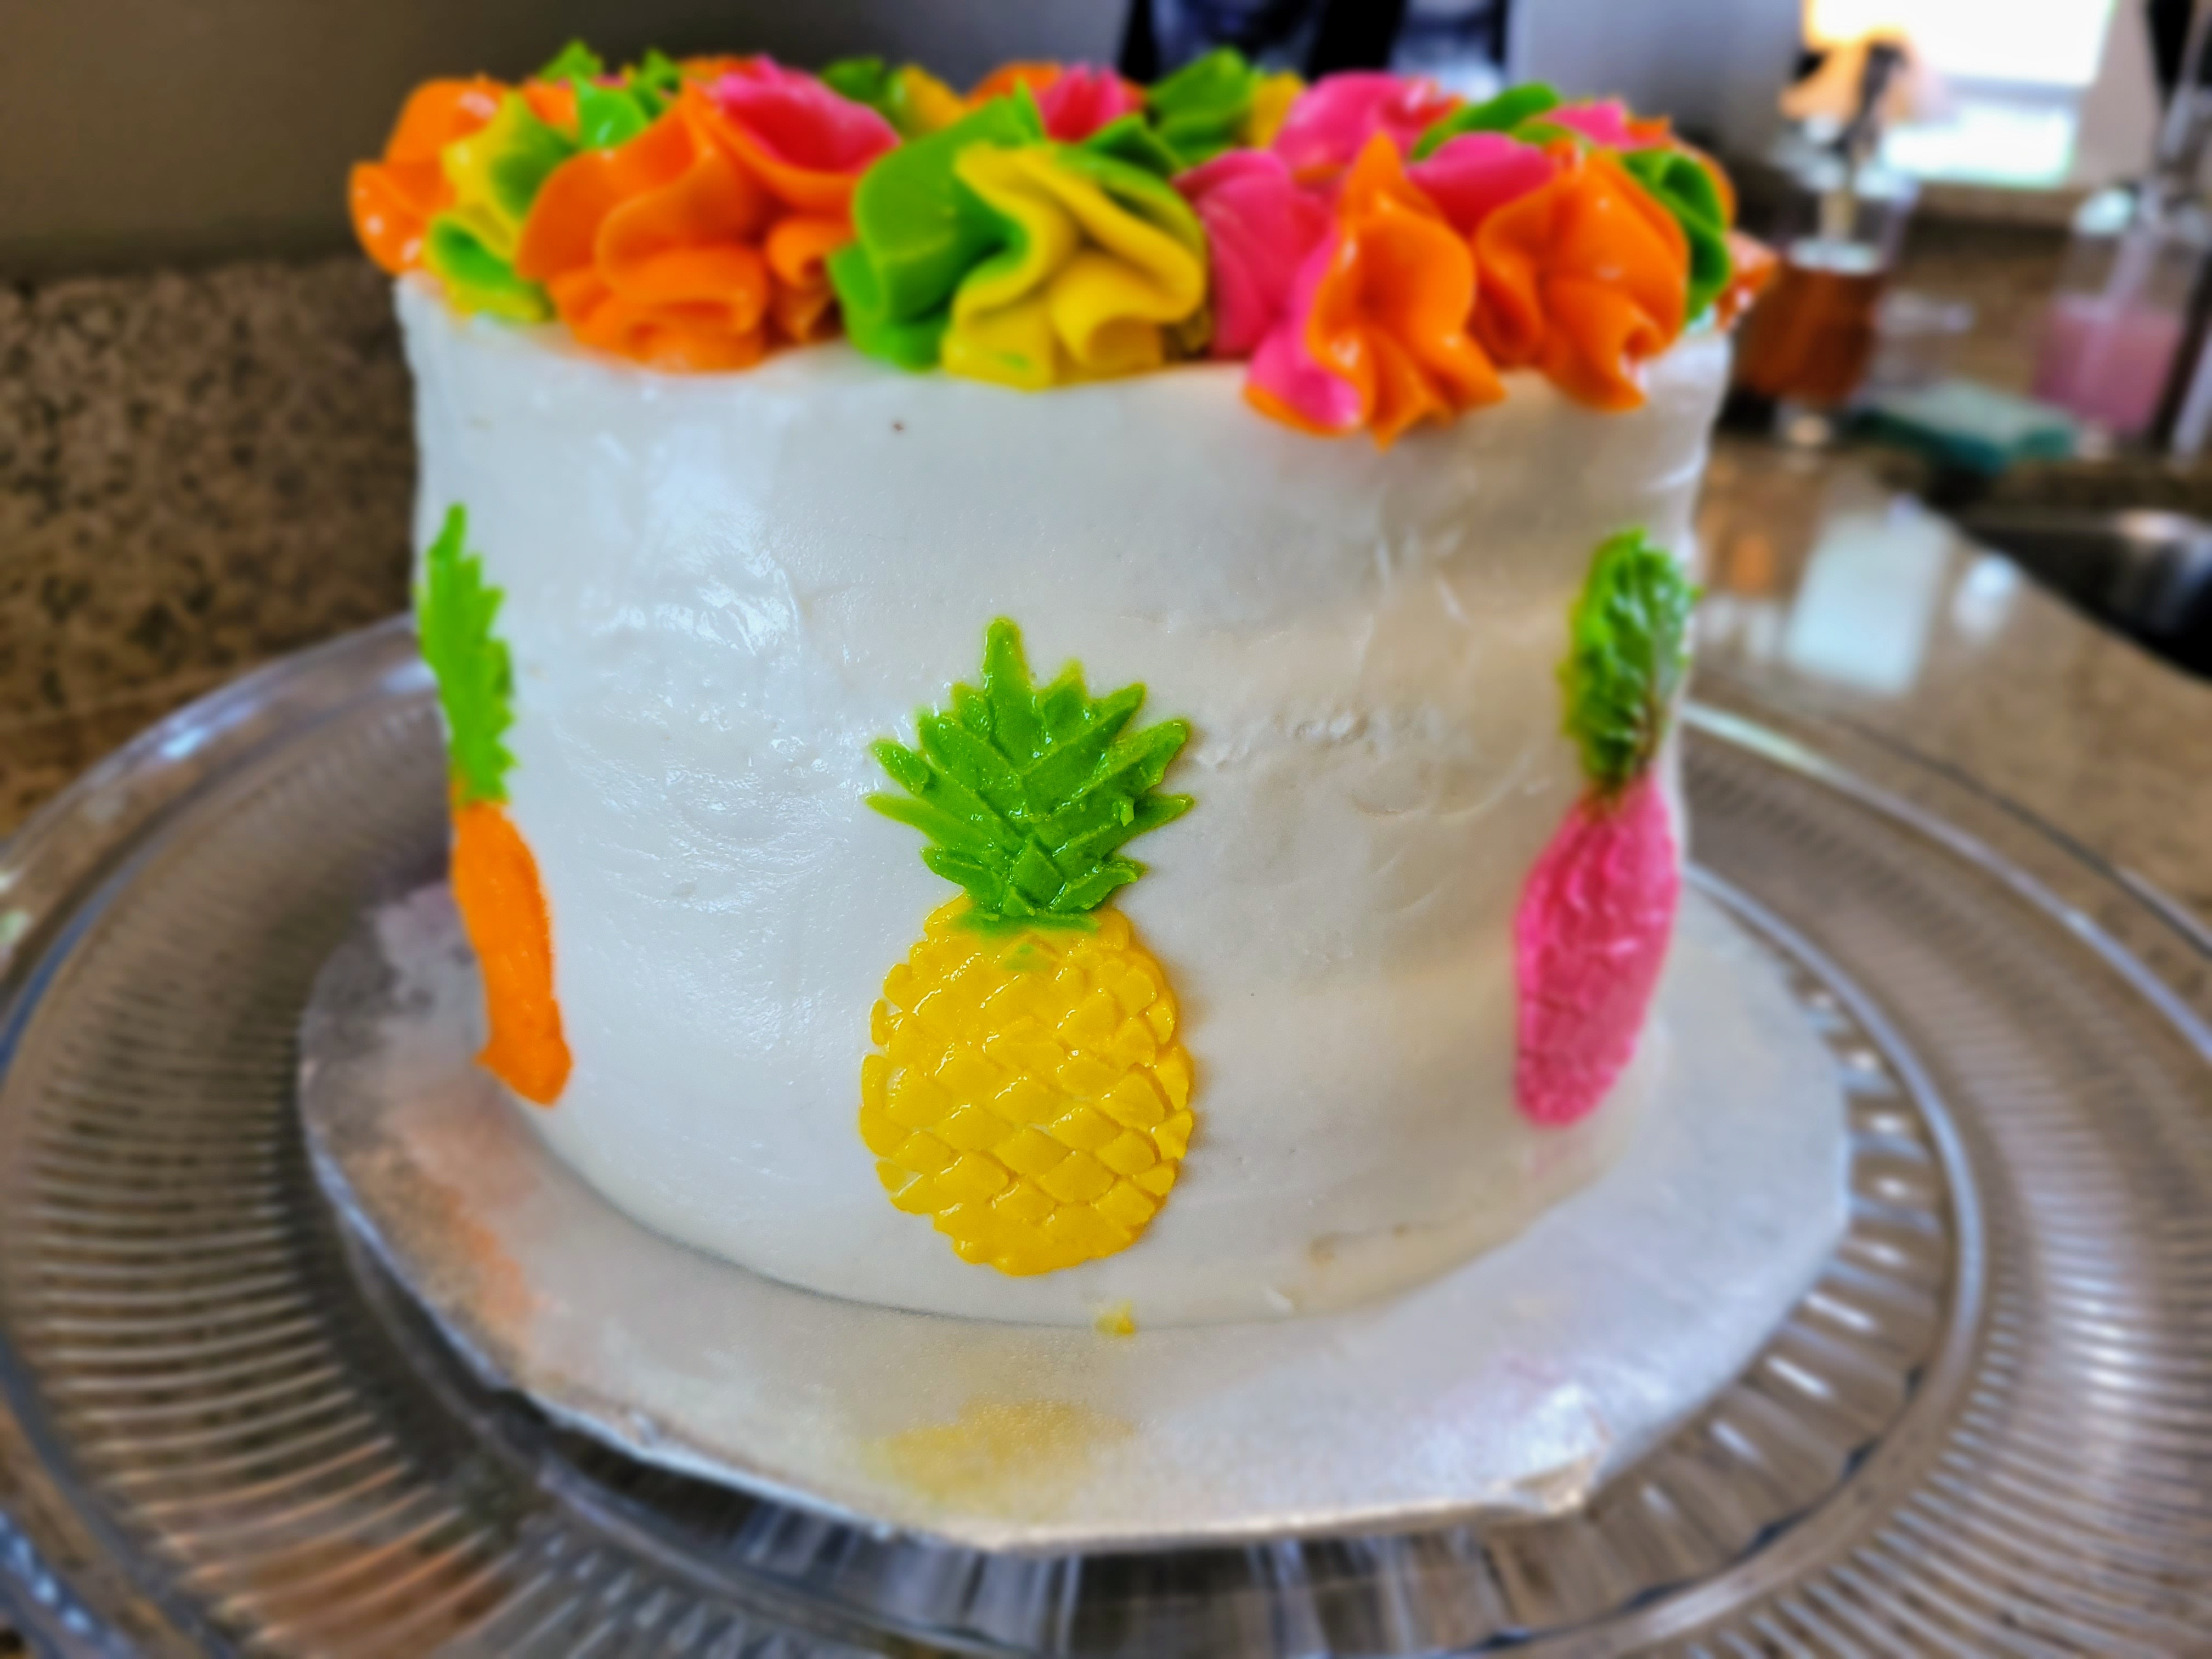
Yes, I have a set of sprinkles for literally every occasion and holiday. I may not sparkle, but damned if my baked goods don’t! I needed a crusting buttercream to make my pineapple stencil work on the sides of the cake, and even then, there was still trouble in tropical paradise. Next time, I would make my life easier by just using a cutout like I did for the top of the cake, but more on that later. To make the coconut cream cheese frosting, grab:
- 8 ounces of 1/3 the fat cream cheese at room temp (224 grams)
- 1/2 cup of light butter; I left this chilled since it is a thinner consistency (112 grams)
- 3 cups of Lakanto powdered monkfruit sweetener or powdered sugar (576 grams)
- 1.5 tsp of clear vanilla extract
- 1.5 tsp of coconut extract
- Gel dyes in lime, orange, hot pink, and yellow
- 2D piping tips
- Some annoyingly bright and chipper summertime sprinkles (I found mine at Michael’s)
- This pineapple stencil template
Mix the cream cheese and butter until light and fluffy, 2-3 minutes. Add in the powdered sugar and extracts, mixing on low until things come together, then bump up to medium high until everything is well mixed. This makes a LOT of frosting. I used about 60% of it, and then had 40% leftover to maybe eat with a spoon while crying about the humidity.

In my life, there will never be enough kitchen counters for the volume of mess I make and space I take up while baking. Now, take your cooled cakes, grab your filling, and put a little bit of frosting into a piping bag, snipping the tip (no actual piping nozzle needed). Place your first layer face down on a cake board.

Circle of life. Now, pipe a circle of frosting around the edge of the cake, then load up the center with the cheesecake filling.

Yes, I was wearing some of the filling at this point. Smooth this out a bit before adding your next layer and repeating the process.
Resisting the urge to start eating. 
Literally sitting back to admire my handy work and/or willpower to not dive head-first into this cake. Now, place a nice thick layer of frosting all over your cake, smoothing out as needed. Chill this for 30 minutes in the fridge, then come back and use a Viva paper towel to gently smooth out any uneven areas of frosting.
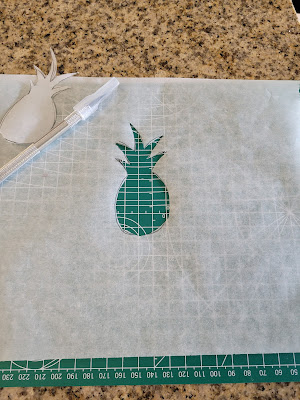
The Exact-o knife has become a critical kitchen tool. While your frosting is chilling, go ahead and make the pineapple outline for the top of the cake. I used Parchment paper, drew a pineapple on it, and cut out the inside with my trusty Exact-o knife.

Soon, you will have sprinkles. Gently secure this to the top of the cake, pressing in at the little grooves so the paper is flush with the top of the cake.
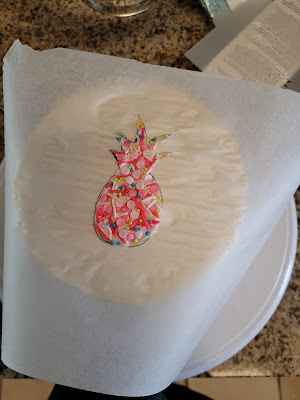
It was clearly pine-ing for sprinkles. Now gently press a handful of sprinkles into the top of the cake. I took my time with this, putting in different sizes of sprinkles where it would best define the pineapple shape. Now, go put this in the FREEZER for 15 minutes while you dye your frosting. You need a very chilled cake to stencil on, or things will get sticky and hard to manage, like me after several tropical adult beverages.

…It’s an honest assessment. I was quite sticky after dying all my frosting, but there wasn’t any rum involved. I just like to mix with extra gusto which means I end up wearing quite a bit of frosting…ya know, saving it for later. I divided up my remaining frosting into 4 bowls: lime green, orange, yellow, and hot pink. For the stencil, you’ll also want a metric ton of paper towels, an angled spatula, a steady hand, and the patience of a saint (I only possessed 2 out of 4 of these things). You can also gently remove the Parchment paper on top of the cake before you stencil.

Hi, please don’t pay attention to that pink hot mess. It was my trial pineapple. I was trying to figure out:
- Do I need a LOT of frosting or a little?
- Does swiping up or sideways work better?
- When on vacation, should you drink a tropical beverage out of a coconut or a pineapple?
Sadly, I never really figured out the answer to any of these questions. My first pink pineapple looked more like a Rorschach test of something trying to be a pineapple. Too much frosting, only swiped left (if this were Tinder, that pineapple would get used to the swipe-left rejection). Second orange pineapple, little frosting, swiping up….somewhat better but its…pineapplyness….was still questionable. My third yellow pineapple? The only one of the bunch that turned out right. What did I do? I’m still not sure. I placed my template flush with the cake, spreading a dollop of yellow in all directions with an angled spatula, wiping the spatula clean, then coming in with green and hoping for the best before carefully peeling away the template. Definitely wipe off the template between each use as well.

I don’t think I’ve ever held my breath longer. 
But it worked, sorta! Maybe the pineapples were angry because, ‘No, Kate, we’re not pink or orange in nature, so we simply can’t do this.’ I had two of each color pineapple around the cake, and only the yellow ones turned out properly, so nature bests me again.

Giving me yet another reason to hate nature. To finish, I first thanked myself for not totally ruining this pre-birthday birthday cake because at least the top pineapple was adorable, and then, I loaded my frosting into separate piping bags. I put the orange and pink bags into a large piping bag fitted with a 2D tip, and I put my yellow and green bags into another large piping bag fitted with a 2D tip. I piped out enough frosting out of both bags until the colors were coming out at the same time. Then I just piped little mounds of alternating color around the top of the cake. If I could’ve gotten away with only showing the top of this cake, I would have. I am so happy with how cute this turned out. The sides of the cake, however, fill me with rage. My poor husband has a hot mess of a pre-birthday birthday cake, to go along with his hot mess of a wife.

I relate to the pineapple, as I, too, am spiky on the outside but sweet on the inside. But thankfully the tropical storms have subsided, and we can now enjoy the actual fruits of my panic-y labor. I enjoy making my husband’s birthday treats each year almost as much as I enjoy Halloween baking, and that’s saying something (I must be truly fond of him). He’s not a huge dessert fan, but I’ve yet to have to hold him down to get him to eat a slice, so I think it passes his pre-birthday seal of approval.
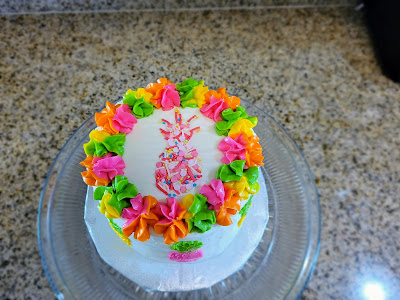
You a fineapple, cake topper. I’m sorry if these photos hurt your eyes because NEON! This is so bright and festive it almost makes me forget that outside is so gross, sweaty, humid, and hot that I’m 110% positive I will spontaneously combust if I spend more than 3 minutes in direct sunlight.

I am also 110% positive I would want a slice of this cake as my last meal. I truly believe a good dessert makes most things more bearable, including living in a state that tries to kill me most days, and I am wild about the flavor combos going on here. I absolutely hate the texture of coconut, but the flavor is amazing, and this cake has plenty of it. You could definitely add coconut shavings in with the cheesecake filling if you like the feeling of eating while simultaneously brushing your teeth with fur. My personal preference is to avoid that experience if at all possible. Plus, I dig this bake exactly the way it is. Completely melt-in-your-mouth buttery pineapple cake meets coconutty, thick cheesecake filling, all finished off with a nice, slightly tart cream cheese frosting. The sweet meets tangy and tropical flavors are pretty much the cake version of a Bahama Momma. I think eating a slice while drinking one would transport you to your very own private Caribbean island. I’m gonna have to try that… ‘Til next time, my fellow eaters!

It’s so good it almost makes me like summer. Or the idea of summer, anyway. Thank God there’s no ERCOT in Florida, cause we are running the A/C like it’s a track meet. -
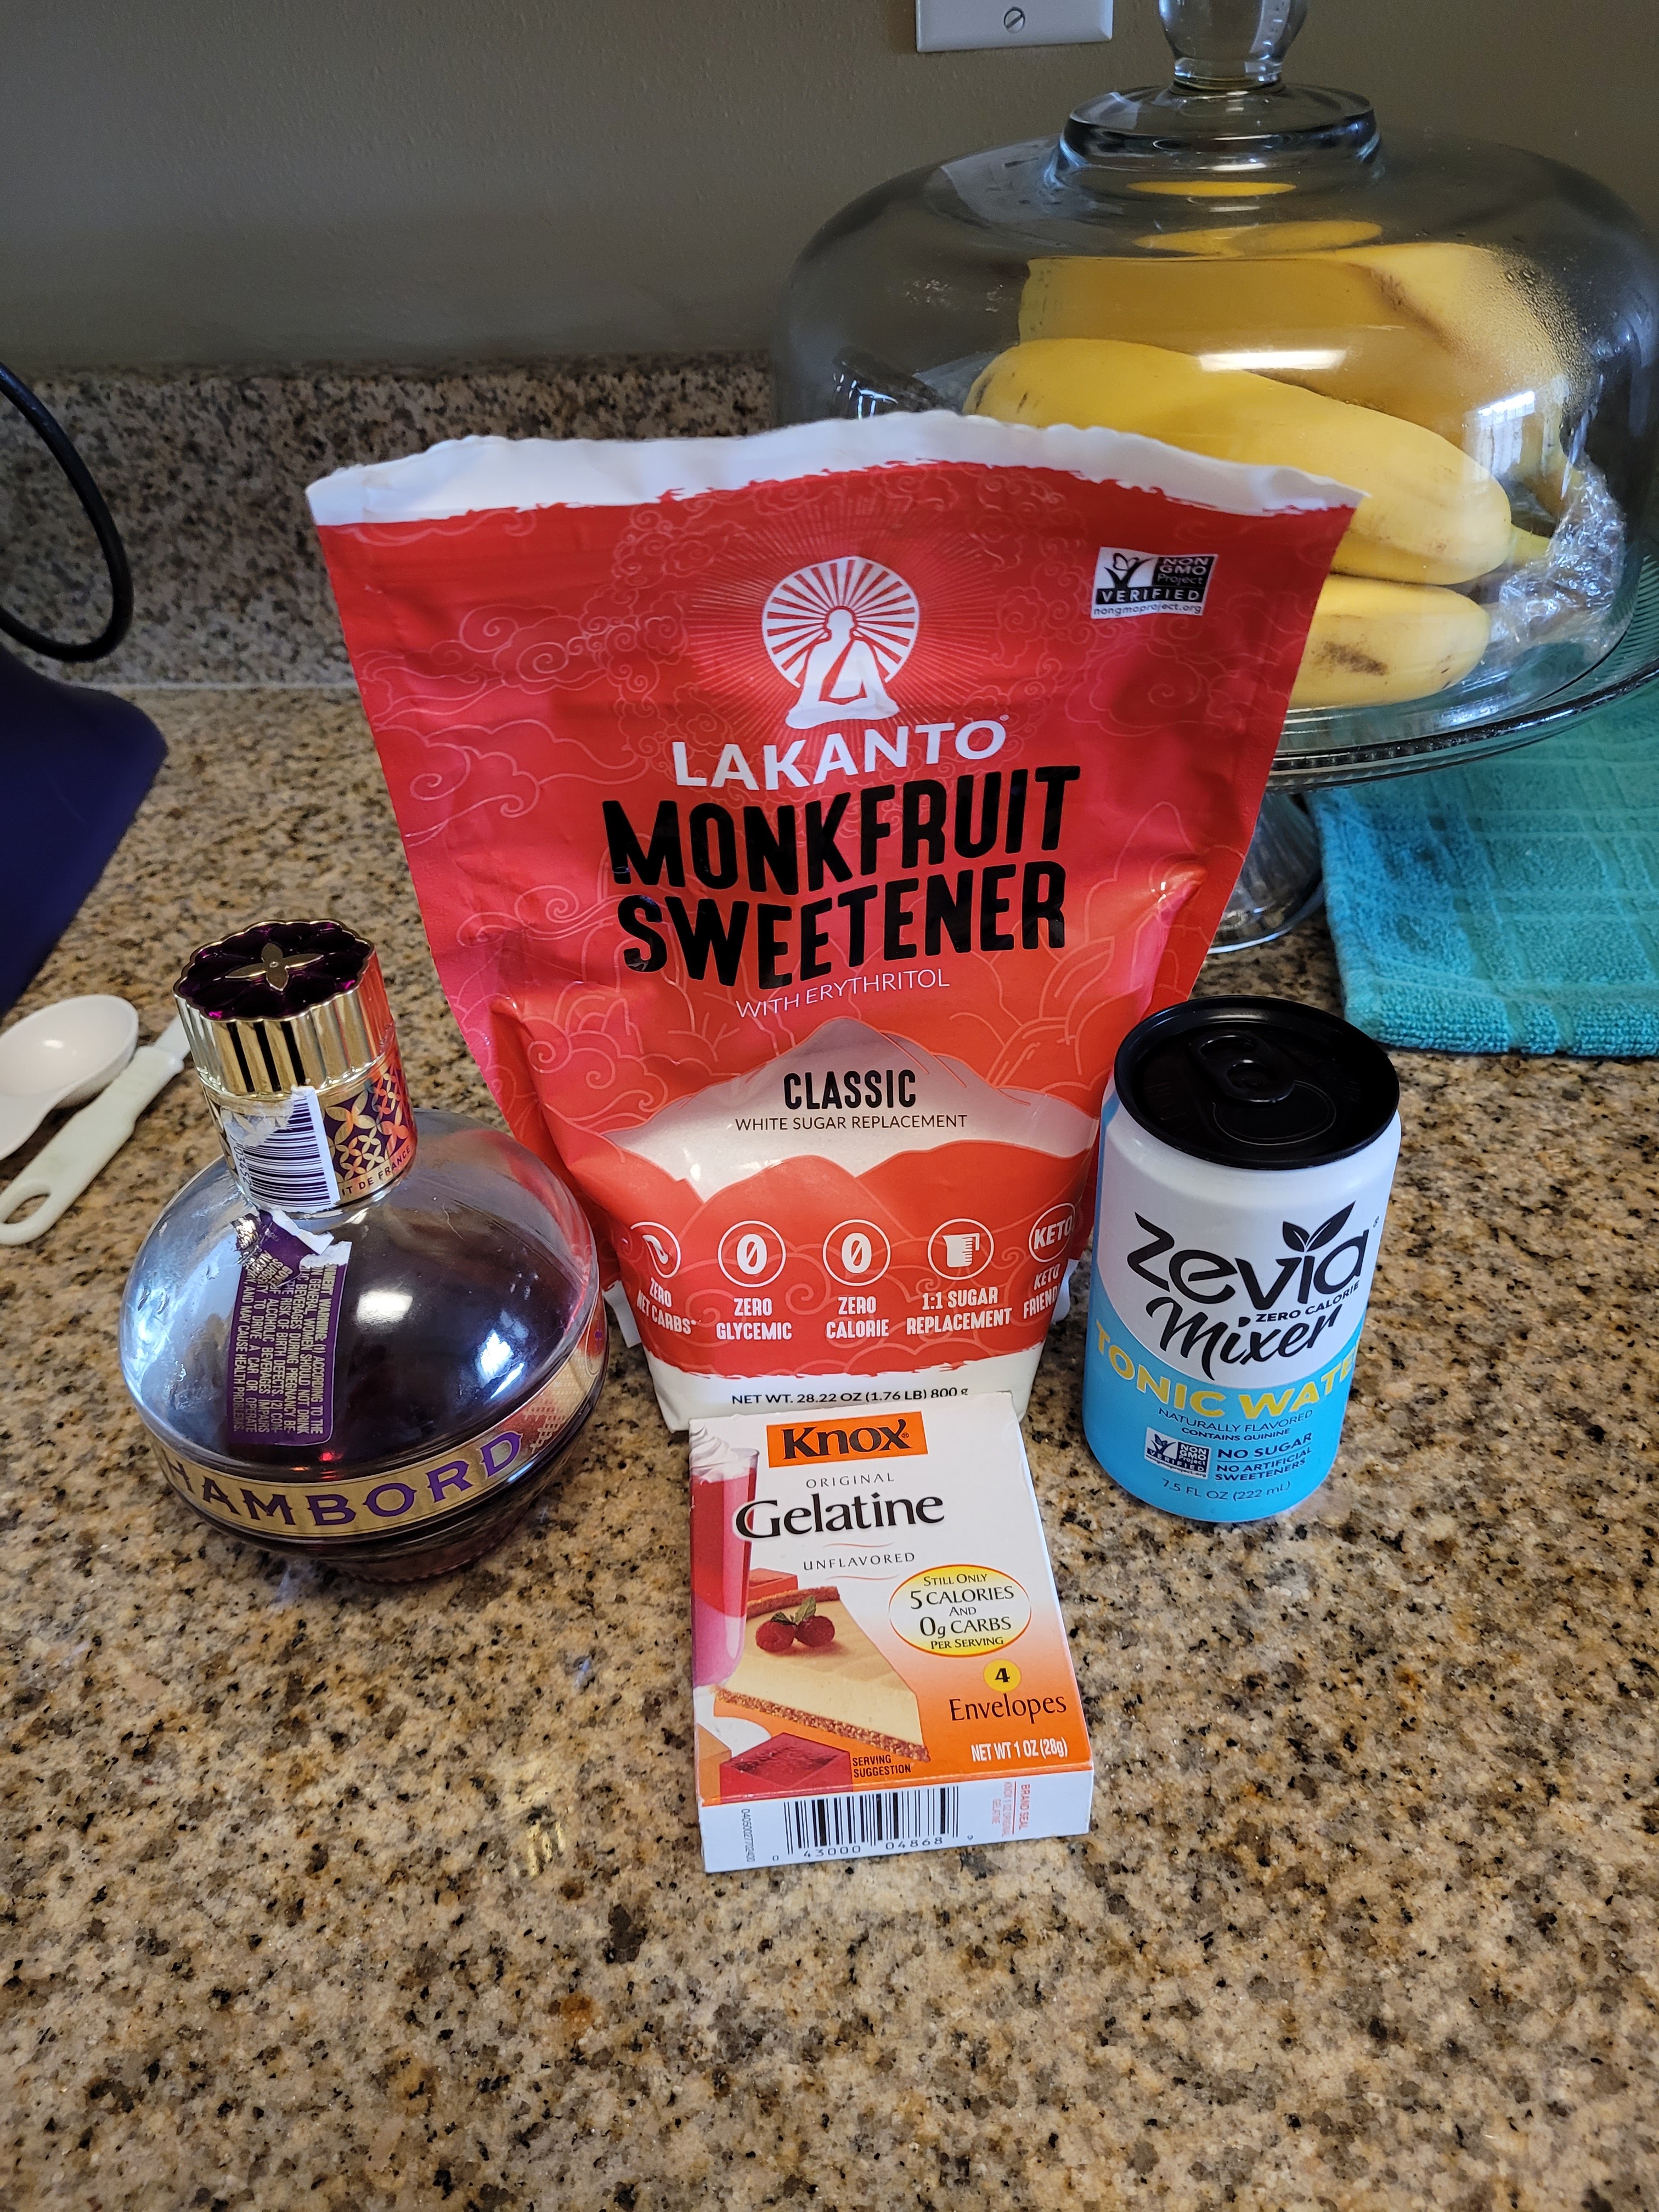
Only the Finest of French Liqueurs!
Some of the best things in life are French–baguettes, laughing at other people’s pain, charcuterie, I could go on for days. I also feel like some of the more classy things in life are French, the language, the wines, the cuisine…I realize this is coming from someone with a largely French heritage, but please keep in mind I watch NASCAR every Sunday, positively love McDonald’s, and see no shame in eating peanut butter straight out of the jar, so I’m not exactly what you’d call “upper-crust.” The only thing I consider myself to be high class in regard to is when it comes to my choice of fancy liqueurs. In particular, fancy French liqueurs. I knew my stomach and I wanted to make a cheesecake since it had been awhile, and I wanted to try another with a gelatin topper. It also had to be a boozy cheesecake topped with fruit ensconced in boozy gelatin…you know, Jello shots, but make it classy.

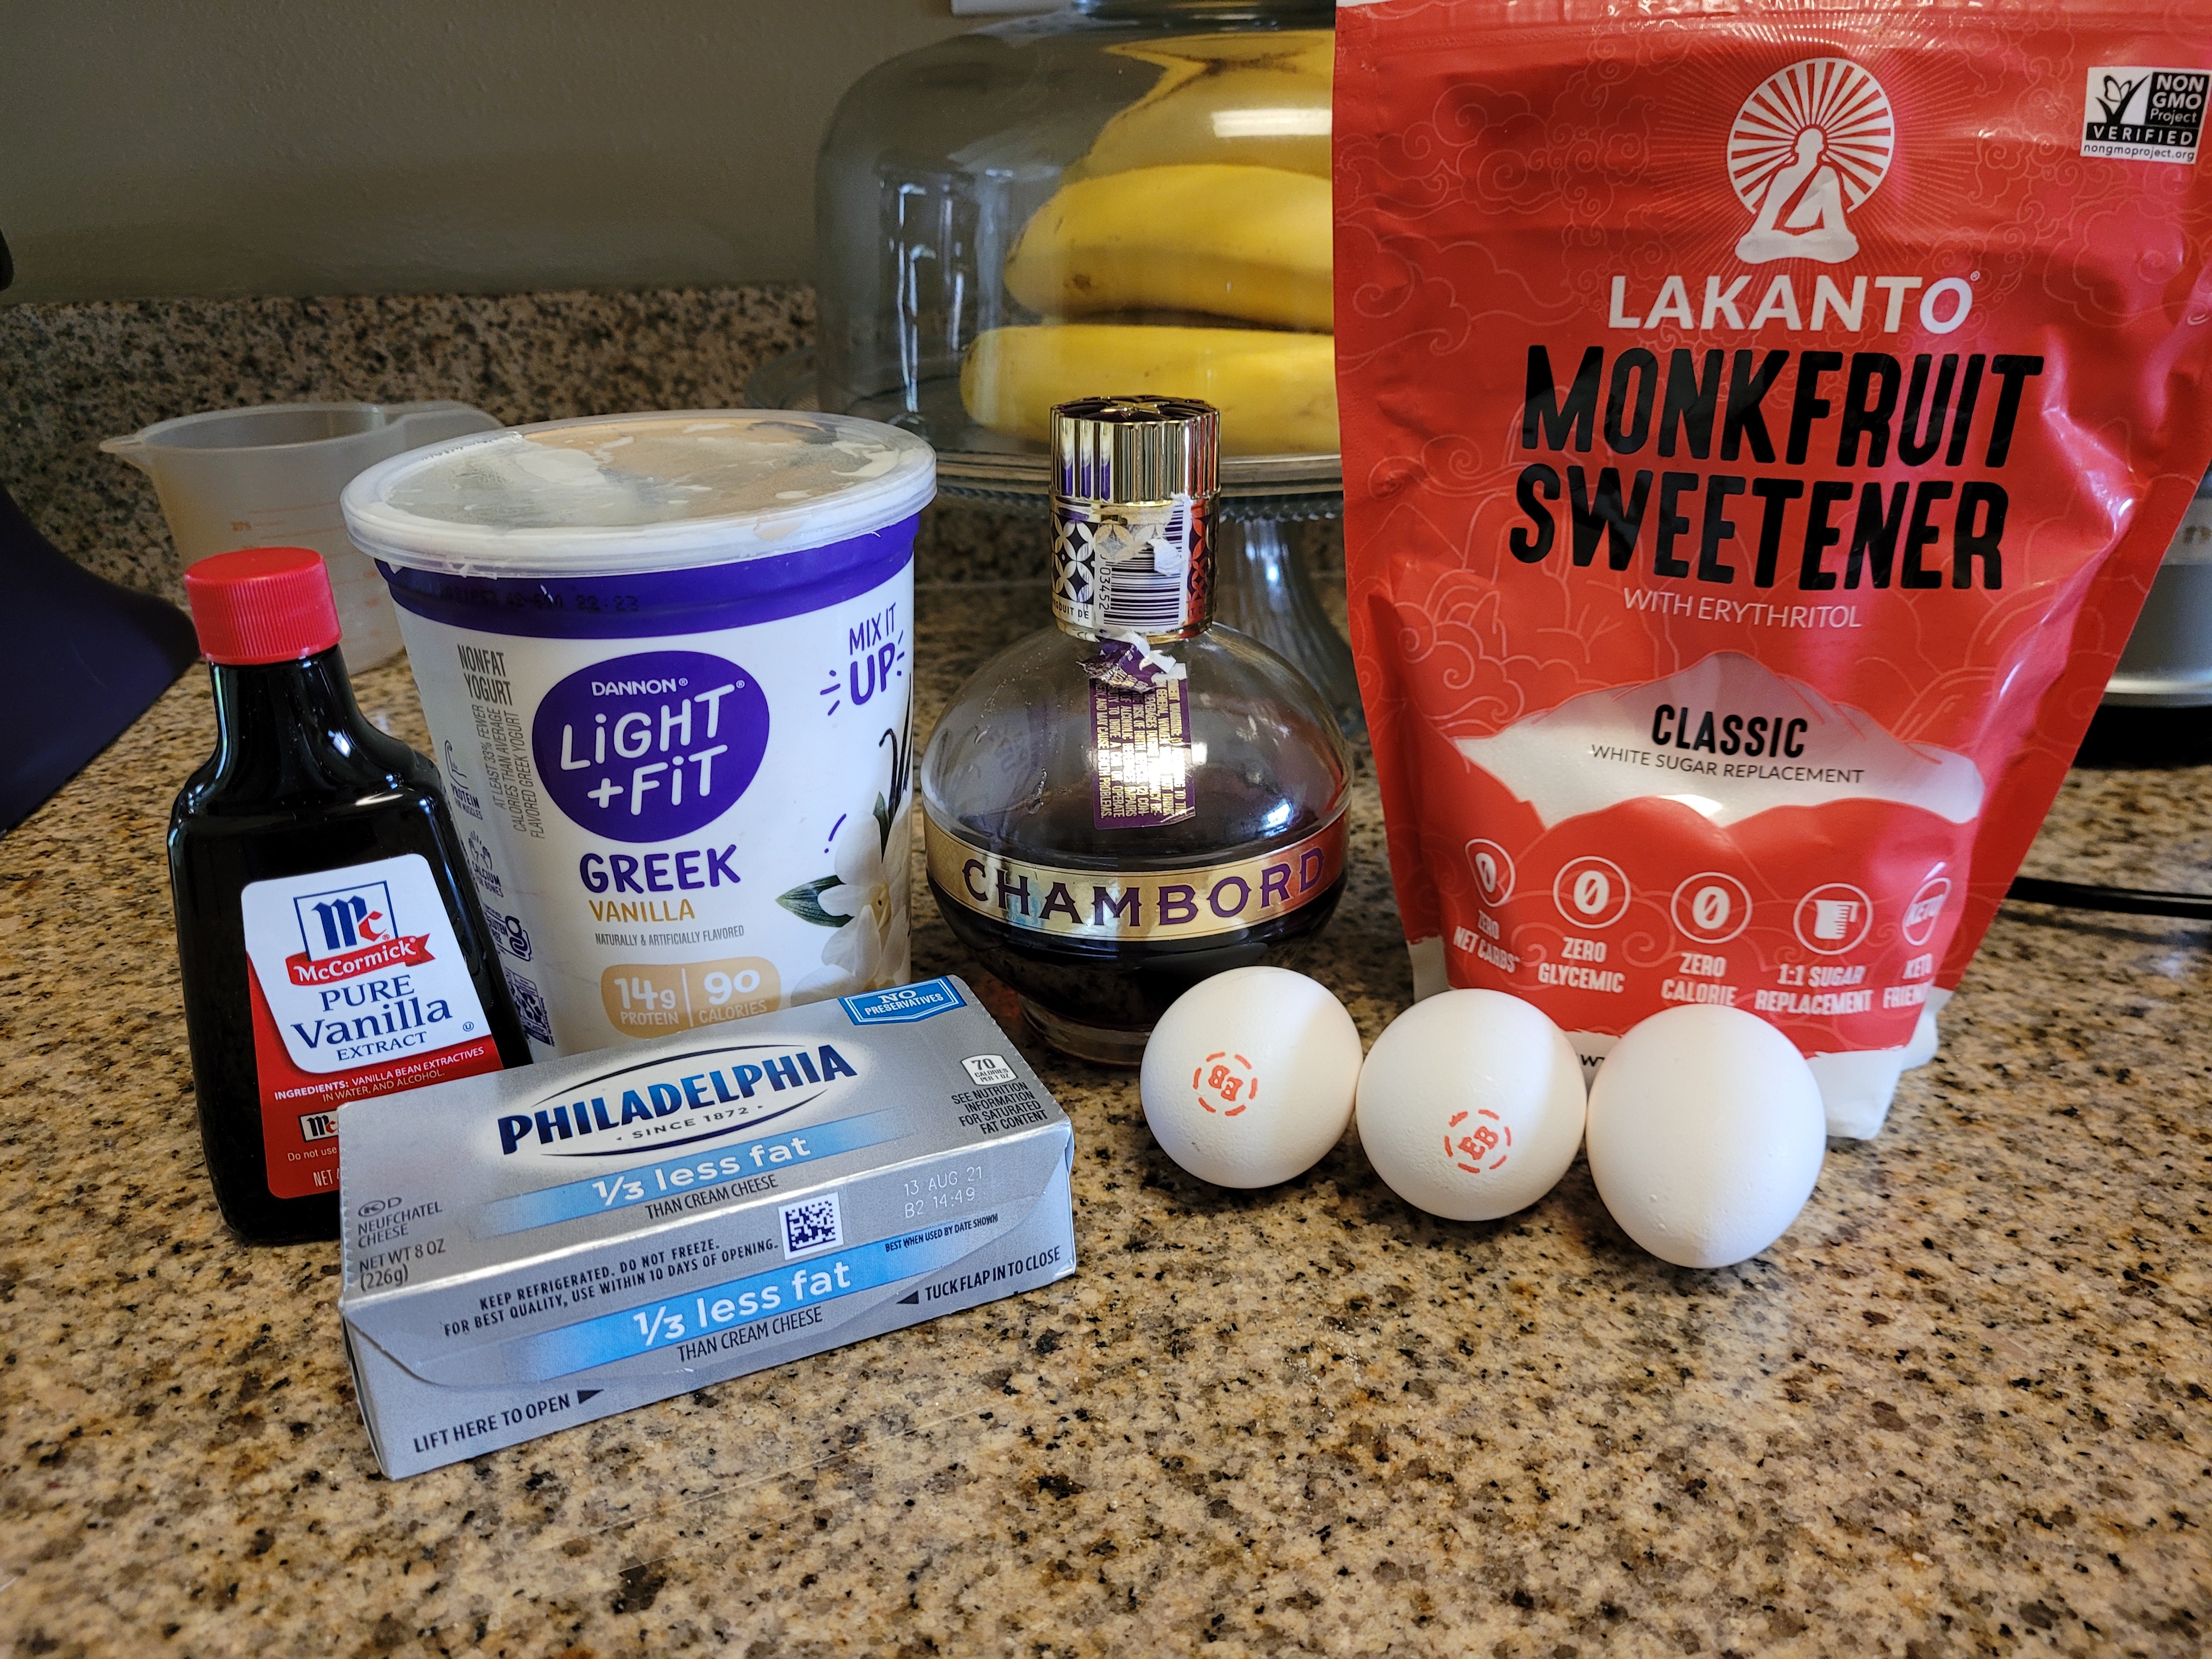
Even that font is pretentiously French. Okay, I realize I say this a lot, but this is the best cheesecake I’ve ever made and/or eaten. For those not familiar, Chambord is a raspberry liqueur, so this cheesecake is essentially a boozy raspberry cheesecake. It is rich, but not too rich (if it were part of France’s caste system, it would definitely be a cheesecake with some form of nobility), and that Chambord finish is absolute perfection. It’s nice and creamy with a zing of raspberry, and the gelatin topper is pretty nifty, too. That layer also has Chambord in it, so every bite will bring forth the maximum raspberry flavor potential. To boot, the gelatin layer gives it a cute little wiggle like it’s waving hello every time you take a forkful…I like a cheesecake that’s polite and delicious. It’s also LOW CAL! Yep, only 250 calories a slice for 8 slices total. I’m probably breaking some ancient French law by creating a decadent dessert with less than 80 pounds of cheese and fewer than 6,000 calories, but c’est la vie.
Sacrebleu, she’s even using light butter. I realize that some people are just here to enjoy my witty repartee, but for the three of you actually here because you regularly like to bake my recipes, 1. Truly, you’re fabulous, and I appreciate you, and 2. I know not everyone has to be gluten free or sugar free, so I’m going to offer substitutions in my ingredients lists below. To make the crust, you’ll need:- 2 TBS (28 grams) light butter or regular butter (increase to 3 TBS if using regular Graham crackers and add 1TBS water…or dare I suggest, Chambord…)
- 2 TBS (24 grams) Lakanto classic monkfruit sweetener or regular sugar
- 1 cup (120 grams) of Kinnikinnick gluten free Graham crumbs or crushed Graham crackers
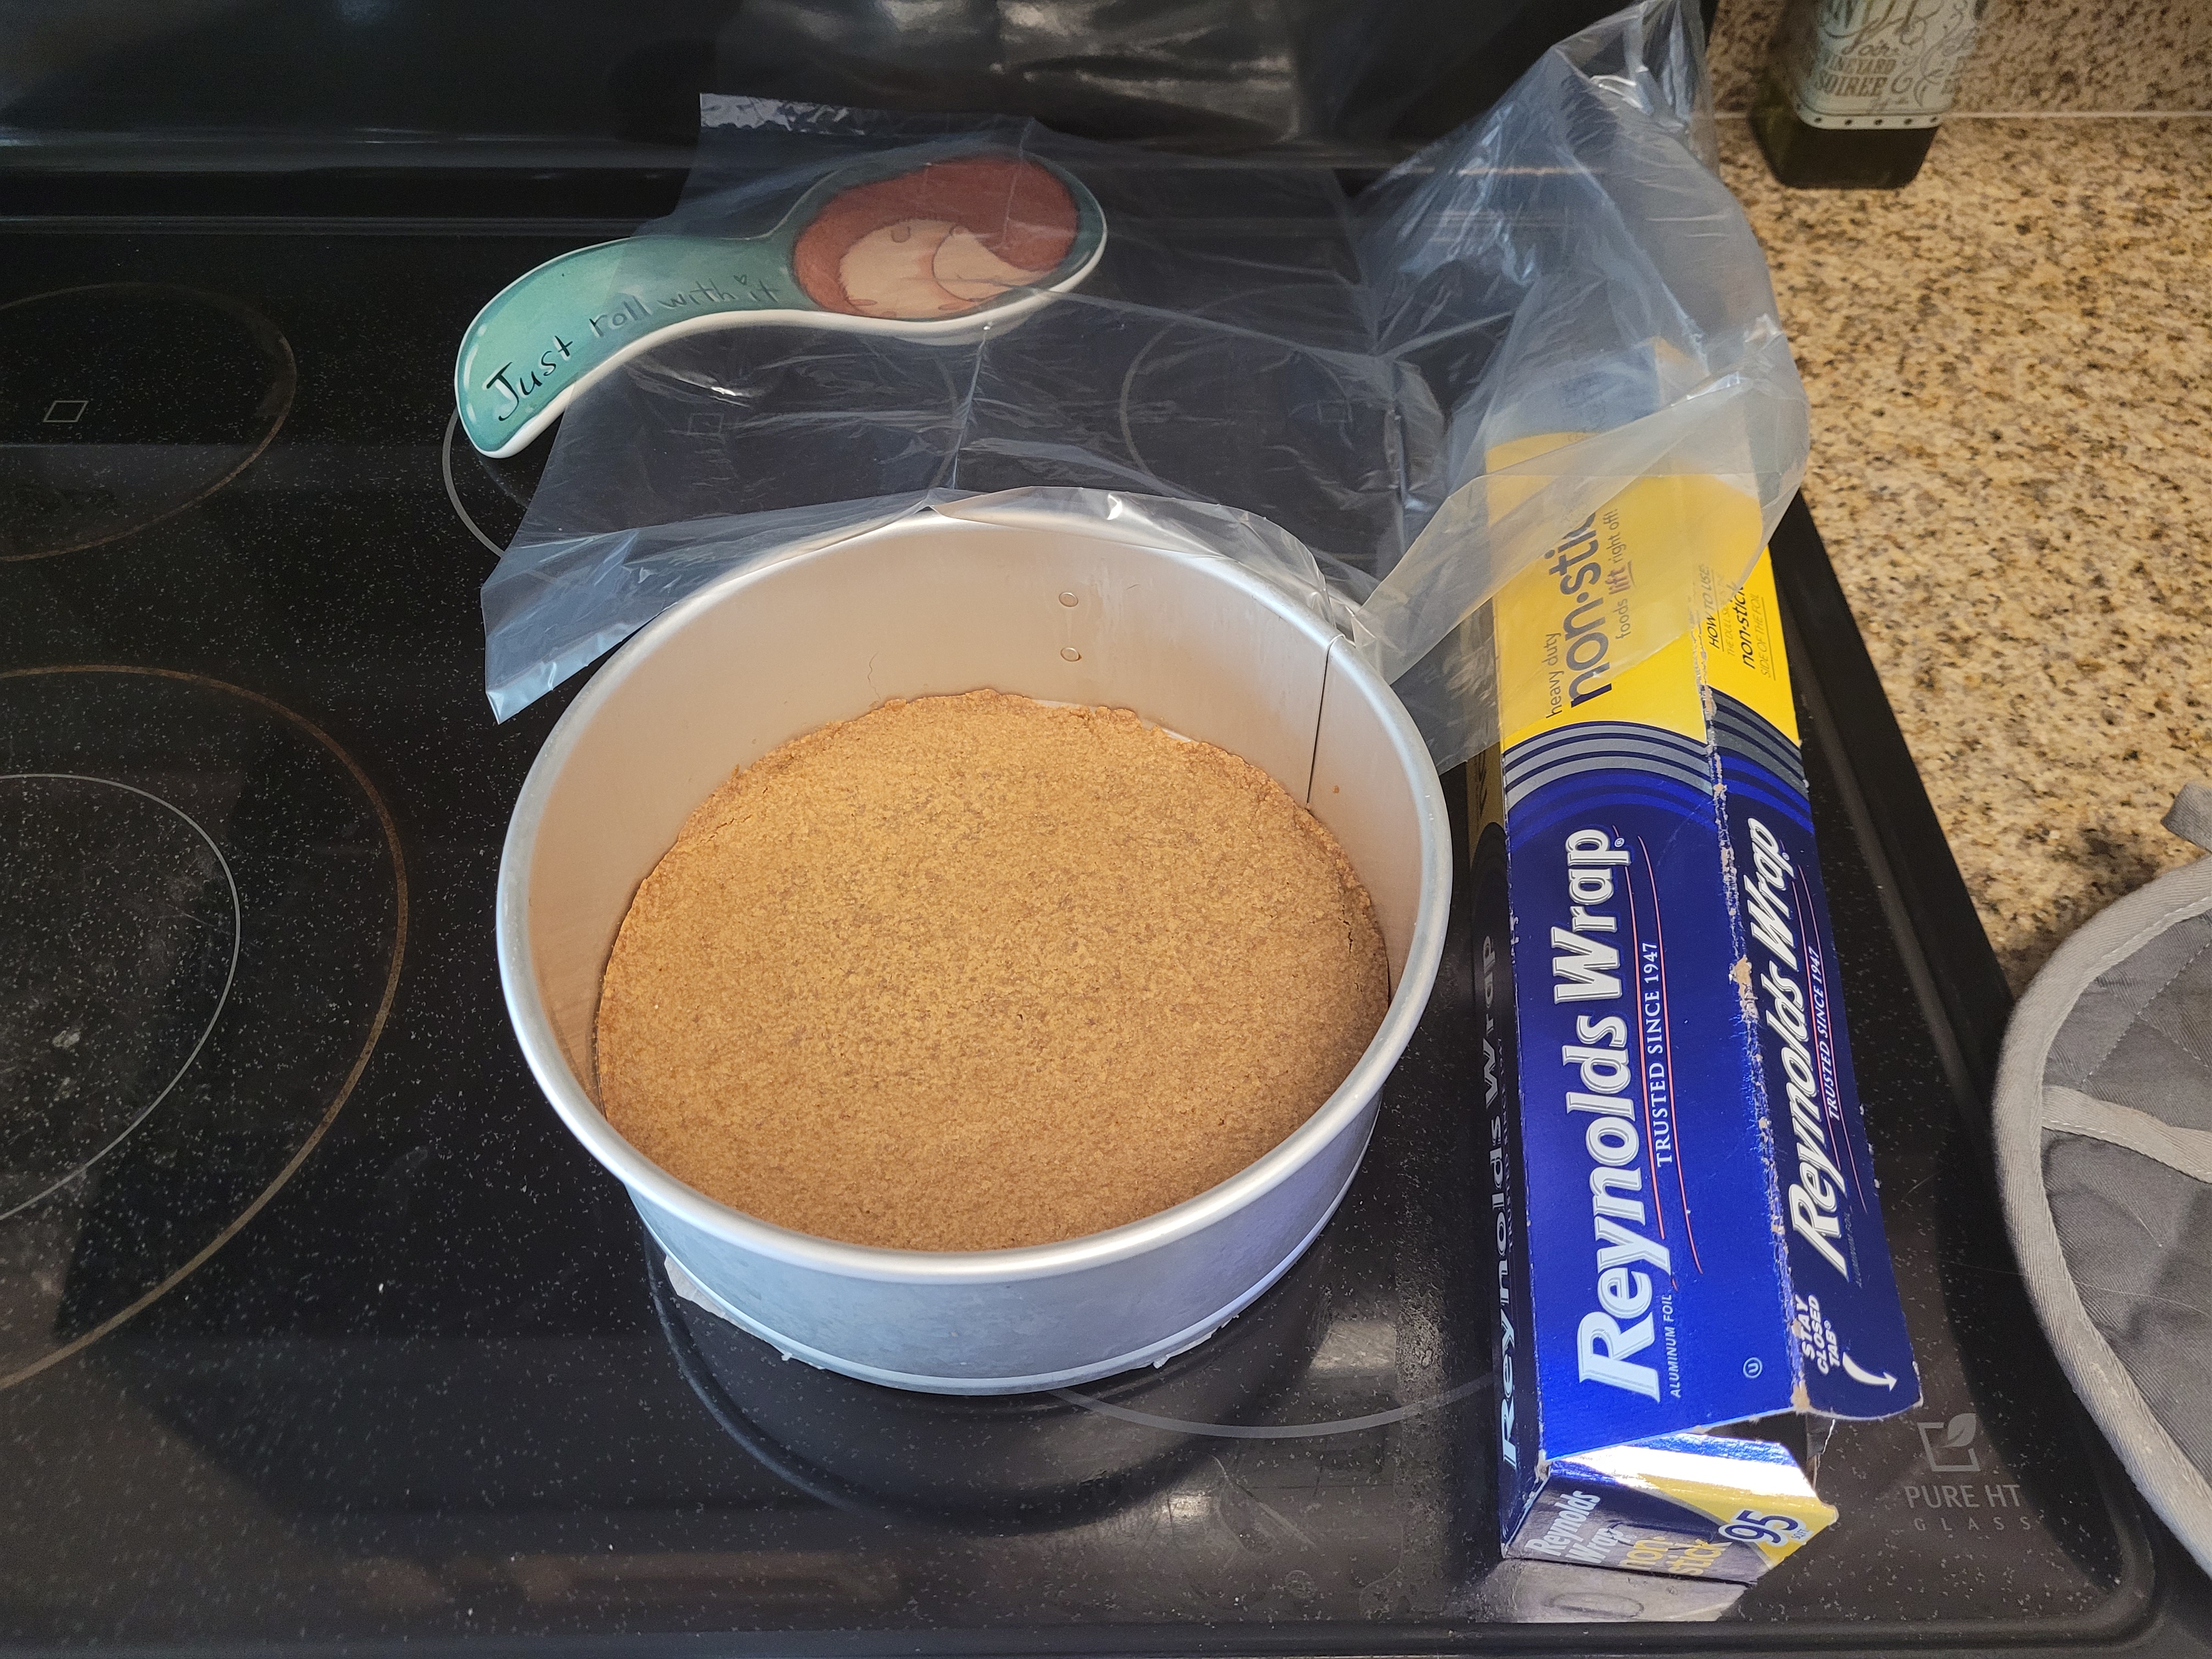
In a food processor, mix all these items together just until it forms a nice and crumbly paste. Preheat your oven to 375, then line an 8-inch Springform pan with Parchment paper and spray with cooking spray. Gently press your crumbs into the bottom of the pan. I don’t like a huge crust up the sides of my cheesecake, so if you do, double the recipe above. I like to grease the bottom of a measuring cup and gently press it into the crumbs to make an even crust layer. Bake this for 10-15 minutes, until nice and golden (mine is usually ready around 12 minutes, but all ovens differ). Lower your oven temp to 350 and let the crust cool completely while you make your cheesecake filling.
That Chambord bottle is so out of place with these commoners. I’ve tweaked my base cheesecake recipe again because I felt like using cottage cheese as a replacement for cream cheese yielded cakes that would only stay good enough to eat for the first day or two because they would get soggy. Maybe I wasn’t straining my cheese for long enough, but I knew I wanted a cheesecake that wouldn’t have to get thrown away (tabernac!), so I went with a new ratio of cream cheese to strained yogurt. We are several days in, and the cheesecake isn’t remotely soggy, so this is how we do things now. You need:
- 8 ounces of 1/3 the fat cream cheese at room temp
- 1/2 cup (96 grams) Lakanto classic monkfruit or regular sugar
- 14 ounces (398 grams) of fat free Greek yogurt, strained* overnight. You can use any flavor you’d like–raspberry would be an EXCELLENT choice. I used Dannon Light + Fit vanilla.
- 2 ounces (1/4 cup) Chambord (if you don’t want to use alcohol, try a raspberry juice concentrate)
- 1 tsp (12 grams) vanilla extract
- 3 eggs at room temperature
*Strain your yogurt overnight by placing cheesecloth or super absorbent paper towels (I use Viva) in a medium sieve. Place this over a bowl, and plop your yogurt on top of the paper towels. Cover and place in the fridge to strain.
Double check that you’ve lowered your oven temp to 350. Whip the cream cheese and sugar in a stand mixer until fluffy, about 3 minutes. Add in the yogurt, mixing on medium-high until incorporated. Add in the Chambord and extract, giving a good mix. Now, add each egg, one at a time, while mixing on low speed to prevent air bubbles from forming that can crack your cheesecake during baking. Once all eggs have been added, set your batter aside and prepare your pan for a water bath.

This prevents the dreaded soggy bottom during bathing. I take three large sheets of foil, overlapping, and fold it over the sides of my pan. Then I take TWO crockpot liners and double bag this…I used to only use one bag, but these liners just aren’t as sturdy as they used to be. It never fails water will get in the first bag, but not the second.
I will do anything to keep my cheesecake safe. Now, pour your batter in the pan. Place your Springform pan into a large roasting pan, and fill this up with 4-6 cups of STEAMING HOT water. The bath also helps prevent cracks in the cheesecake and allows for more even cooking. Bake your cheesecake at 350 for 1 hour and 20 minutes. There should still be some jiggle at the center of the cheesecake, but the sides should be set. Turn the oven off at this point, crack the door, and let the cheesecake finish baking for 1 additional hour.

Big old fat BONJOUR! to the most beautiful cheesecake I’ve ever pulled out of the oven. After, let your cheesecake rest on a cooling rack until it comes to room temp. I like to run a sharp knife around the edges of the pan at this point, then I cover with plastic wrap and place in the fridge to set overnight. I would give it at least 4 hours before you put your gelatin layer on top.
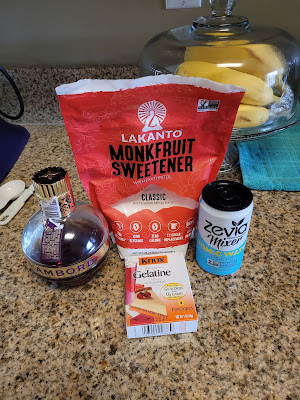
More Chambord! Lord! The gelatin layer isn’t difficult to make, it’s the timing part that becomes a real pain in the derrière. More on that later. You need:
- 3/4 cup of soda water, tonic water, regular water, sparkling wine, sparkling fruit juice, your choice. I used Zevia calorie-free tonic water.
- 1/4 cup of Chambord
- 0.25 oz of gelatin (one packet)
- 1 cup of water
- 2 TBS (24 grams) Lakanto classic monkfruit or sugar
You can play around with the liquids here. Next time I’d use more booze, maybe 50:50 tonic to liqueur. It does “bake out” some when you boil it, so the flavor is more mellow. Start by placing 1/2 cup of the tonic in a large bowl and sprinkle a packet of gelatin on top. Let this rest for 5 minutes while you bring your remaining 1/4 cup tonic, 1/4 cup Chambord, and 1 cup of water to a boil in a medium saucepan. Once boiling, add the sugar and whisk until dissolved. Now, carefully pour this on top of the bowl with the gelatin. Whisk until no lumps remain, then pour into an 8×8 pan and place in the fridge to start to set. Give this a stir every 10 minutes or so. Once it starts to thicken, it’ll be ready to pour on top of your cheesecake. It took 35-40 minutes for me. I pulled out of the fridge at 40, and it was starting to get clumpy and a little difficult to work with. I wish I had pulled it out at 35 minutes, so keep a close eye on it while you layer your cheesecake with fruit.

This started with so much promise. I just used blackberries and raspberries to make little concentric circles. I pressed my fruit in the top of my cheesecake firmly, but my raspberries were not heavy enough to keep from floating away when I added the gelatin on top. My blackberries were HUGE, so the gelatin layer didn’t cover them completely either. Should have cut them in half. I was SUPER frustrated to watch the actual fruits of my labor go floating away during the final step of this cheesecake. But, when in Paris, do as the Parisienne’s do, complain about it and then take a nap.
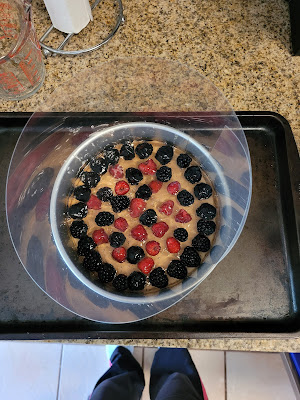
Pardon my French, but damn this got messy! I used an acetate collar to keep the gelatin from making its way down the sides of my cheesecake. I always like to place this on a baking sheet in case things go really, really wrong, and then my whole counter isn’t covered in boozy, sticky Jello. I placed my gelatin into a liquid measuring cup to slowly pour it on top of the cheesecake, but it was so viscous that it turned into a flood situation for my poor little fruit circles…away they floated, leaving me with what you see above. Again, if I had pulled it out of the fridge when it was more like a hot syrup consistency and not cold syrup consistency, my fruit would’ve stood a better chance of, well, standing in place. Once you’ve topped your cheesecake with the gelatin, return to the fridge to set for 3-4 hours. Then you can run a knife around the edge of the acetate sheet, gently remove, and take the cheesecake out of the Springform pan for final plating.
I mean, it still looks bougie enough to eat. 
And a slice on its own is a real showstopper, merci beaucoup! 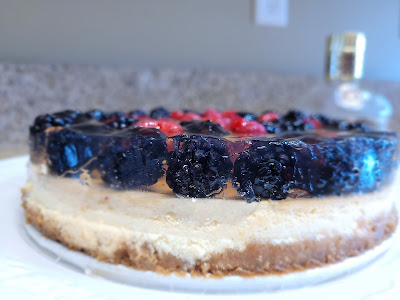
Considering the taste, I have no regrets! I mean, super French Frenchy Napoleon Bonaparte did once say, “Victory belongs to the most persevering,” and I feel like the gelatin layer took me to battle, but I soldiered on. Did Chambord exist during Napoleon’s days? I feel like he would’ve drank that stuff out of a gold chalice while mocking, well, everyone else for not being as French as him. Anyway, I am here to reassure you that janky fruit layer aside, this is a cheesecake that will change your life. It is the right mix of tart raspberry, creamy vanilla, and a lovely buttery crust. The fresh fruit on top mixed in that boozy gelatin is so, so dreamy, and it was worth every minute of work to make this beauty. I’m not even finished with this cheesecake yet, and I’m already planning on putting it back into the rotation for dessert again next month. I might even try adding in a raspberry puree plus Chambord swirl…big ideas for big desserts. Consider me the Marie Antoinette of baking because I just wanna let everyone eat (cheese)cake. ‘Til next time, my fellow eaters!
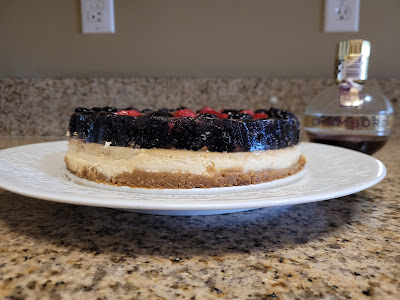
This cheesecake is definitely a dessert revolution, Marie. -
Feast Your Pies on This
Sorry, the blog was getting a little dusty and vacant. Not for my lack of baking, though. I actually made several cakes between my last blog in March and now, but because I am 1,000% picky and 7,000% critical of myself, I didn’t like how they turned out visually, so I didn’t blog about them. While the recipes themselves were super yummy (and will be used again in future posts), my decorating was rather “blah.” Well, my whole mood from 2020-2021 has been rather “blah,” so I guess these cakes were just following suit. I was having feelings that would go really well with pie, so I knew what pick-me-up was in order to get me out of my baking rut. In pies we crust.
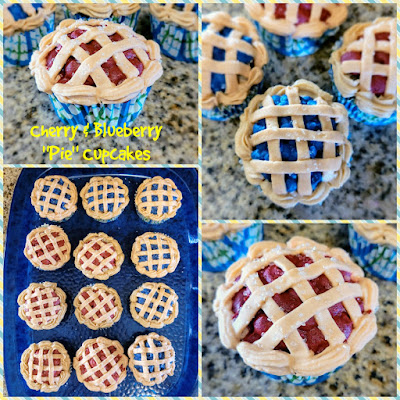
I only have pies for you. Okay, these aren’t actual pies, but hear me out…Pies are baked goods that are filled with fruit and have a crust. My pie cupcakes are also baked goods that are filled with fruit and have a crust (sure it’s a piped decoration crust, but it still counts). Other added benefits of pie cupcakes over actual pies are that shoveling them in your mouth using only your hands is not frowned upon, you get 12 servings instead of only 8, and for the life of me, I cannot get a gluten-free scratch pie crust recipe to work, but cupcakes? Oh yes, I can make the heck out of some cupcakes. If you’re pie-ning for a dessert that is a cute, festive addition to any summer BBQ (now that we can do those again, yay, science!), these more than fit the bill. Half a dozen cupcakes are heaped with blueberry pie filling and the other half have cherry pie filling inside. You could easily double the recipe for 24 cupcakes, but my husband and I don’t need 24 cupcakes for just the two of us (read: I take that as a personal challenge to eat them three at a time). Thankfully, this recipe is only 195 calories per piecake…which means you could also top them with the world’s tiniest scoop of ice cream and have guilt-free pie a la mode!

I mean, it’s the little things in life, right? I am always on the lookout for gluten free cake mixes that don’t taste like gritty sandpaper after they’re baked or dry out within 5 minutes of removing from the oven. Basically, good gluten free cake mixes are about as rare as unicorns (and also as expensive as I’d imagine a unicorn would be). My go-to is Whole Food’s brand, but truly, I didn’t want to make 600 cupcakes, just 12, so when I found Betty Crocker’s gluten free yellow cake mix that makes one 9-inch round cake or, as luck would have it, a dozen cupcakes, I thought I’d try it out with very minimal changes to the ingredients the box called for and see what happened. To make my pie cupcakes, I used:
- Box of yellow cake mix (any will do if you’re not gluten free, but only use half the mix to make 12 cupcakes)
- 2 eggs at room temp
- 1/2 cup of unsweetened applesauce at room temp
- 1 1/2 tsp vanilla extract
- 1/2 tsp almond extract
- 3/4 cup water (or milk, but Betty called for water, so I listened)
- Your preferred brand of canned blueberry and cherry pie fillings. For less sugar, I like using Duncan Hines Simply Pie Filling
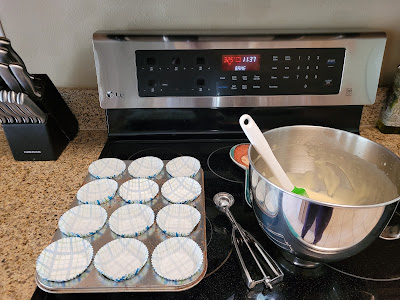
You’ll also need summer-appropriate cupcake liners. Not optional. I preheated the oven to 325 (my oven cooks HOT and things get dried out easily; the box instructions called for 350, so follow your instructions if your oven isn’t tethered to the sun), lined my muffin tin, and then dumped everything EXCEPT the pie fillings into my stand mixer, mixing on low for 30 seconds, then bumping to medium-high for two minutes. I used a cookie scoop to place one and a half scoops of batter into each liner, and I baked these for 21 minutes at 325. A toothpick came out mostly clean, and I didn’t want to risk over-baking and drying out the cakes, so I removed them from the oven and let them rest while still in the pan on top of a cooling rack for 10 minutes before removing from the pan and allowing to cool completely to room temp.

Which was hard because they smelled like I needed to eat one right away. You don’t want to core and fill your cupcakes with the pie filling until they are cool to the touch. I placed mine into the fridge while I made and dyed my frosting, and this gave them (and me) enough time to chill out.

Sadly, my yogurt cream cheese frosting didn’t make the cut. So my cakes that were DELICIOUS BEYOND ALL REASON but didn’t look pretty? Yogurt cream cheese frosting was to blame. While it works for some bigger decorating, things like stenciling and small piping (you know, the things I wanted to do) just don’t work well since it isn’t a stiff enough frosting. So, back to regular cream cheese frosting for anything piping-centric. Or in this case, pie-ping centric. Not sorry. For the frosting:
- 8 ounces 1/3 less fat cream cheese at room temp
- 1/2 cup light butter at room temp
- 3 cups Lakanto monkfruit sweetener or powdered sugar
- 1 tsp vanilla extract
- 1/2 tsp almond extract
- Navy, purple, maroon, red, brown, and beige gel dyes (if you only have blue/red/beige, this will work fine)
Whip the butter and cream cheese until fluffy, 2-3 minutes. Add in the 3 cups of sweetener and the extracts, blending on low speed until things start coming together; then turn to medium-high and let everything fully incorporate. Full disclosure: for only 12 cupcakes, you will have a TON of leftover frosting. Freeze it for later! Or you know, eat most of it with a spoon. Whatever makes you happy.
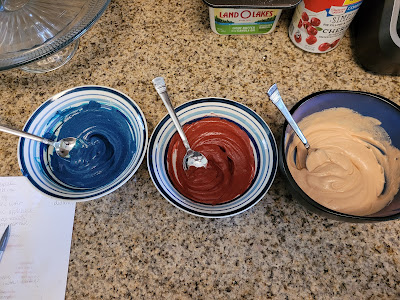
This is why I always have a spoon handy. I placed large heaps of frosting into three bowls. For my blueberry pie, I used a mix of navy blue and purple gel dyes. For my cherry pie, I used maroon and bright red. Finally, for my crust, I used a tiny bit of brown mixed with beige. I loaded each into a piping bag. For the blueberries, I used a #5 round tip; for my cherries, I used a #12 round tip, but this ended up being a little too big for my liking. If you have two #5 tips, just use these. I used two different tips for my crust. For the “lattice,” I used a basketweave tip (Wilton #46), and for my crust border, I used a #21 star tip. Now, put your piping bags and the leftover bowl of frosting into the fridge to firm up while you fill your cupcakes with PIE!

Dessert mashups are highly underrated. Remember, COOL YOUR CAKES! This is my life’s mantra. When they’re cool enough to core, use the end of a large piping tip or a cupcake corer if you have one. I always just grab my 1A tip and use the base. You’re only going to need about a tablespoon of pie filling in each cupcake, and since I count my macros, even for dessert, I pre-measured my pie fillings. I ended up with enough leftover pie filling to make actual pies, so I put these in airtight containers and froze for later (and maybe ate some with a spoon…measured of course, cause ya know, macro tracking is addictive).

Take another little piece of my heart now, baby. Simply wiggle the base of the frosting tip into the center of the cupcake until it’s about halfway into the cake. Remove, and grab some pie filling.

Pie truly does fill the empty void. I filled half my cakes with cherry and half with blueberry pie filling. You could do all one flavor if you wanted, but you know, eating them two a time, you get more variety this way (nods knowingly). I took the hollowed out pieces and crumbled them on top of the pie filling. You could skip this, but I refuse to waste or throw away cake (into my mouth. I would’ve eaten all 12 toppers).
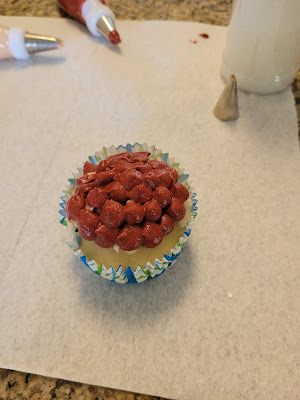
She’s my cherry pie! To start decorating your pies, simply pipe little round blobs of cherries or blueberries on top of your filling with a small round tip. I did all my cherry pies first, then put these into the fridge so the frosting would firm up while I piped all my blueberries. I shifted back and forth between having one set in the fridge to firm up the frosting while the other set were out being decorated since I live in Florida where it is hot and humid and things as delicate as cream cheese frosting stand no chance at room temp.
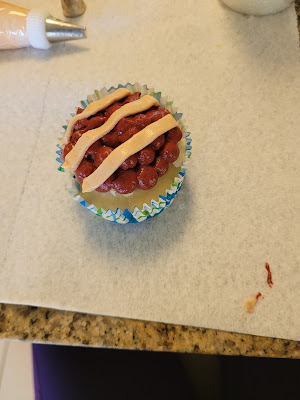
Everything is sweaty. Everything. Once my cherries had firmed up and it was safe to pipe on top of them without worrying about the frostings bleeding together or clumping, I put the basketweave tip on my beige frosting. I simply piped three stripes down one side of my cupcake.

You’re already adorable and you’re not even finished yet. Then I turned my cupcake the opposite direction and piped three more lines to finish my lattice pattern, then back into the fridge with all six cherry cupcakes, and out with all six blueberry cupcakes to do the same thing. My sweaty hands (why is everything so hot, Florida?!) were an issue a few times, so I also placed my piping bag (tip removed) in the freezer for 5 minutes or so to let my frosting firm back up. If you find your frosting is getting hard to control, try freezing it for just a bit. This will make a huge difference in how crisp your lines look.

I am occu-pied by how perfect this looks. To finish, swap your beige frosting tip over to a #21, then pipe shells, sideways, around the edge of the cupcake. If you’re feeling extra (when am I not?), you can add some large sanding sugar crystals on top to make it look even more like an actual pie.
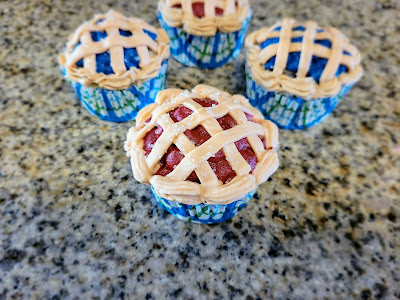
When in doubt, always add sprinkles. 
They’re cutie pies, alright. 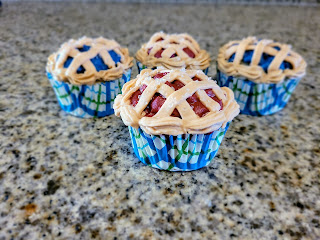
You wanna piece of me??! Nothing says summer quite like pie and that irrepressible Florida humidity, so these pie-inspired cupcakes are at least bringing me some much needed relief from sweaty madness. I was a little skeptical of using a new box mix, but Betty Crocker’s gluten free mix turned out to be pretty tasty. I would add another tablespoon or two of liquid next time though; while the flavor is AWESOME (thank you, almond extract, the unsung hero of all baked goods), even with under-baking these a little, they’re a little too dry for my liking. I prefer a super moist (sorry) cupcake, and these had a texture that was more dense than moist (but thankfully not grainy or cardboard-adjacent at all). HOWEVER, since they’re all filled with yummy, syrup-y pie filling, this really helps lessen how dense the cakes are, and most people with novice palettes or taste buds probably won’t even notice (read: drunk uncles and children at your family BBQ will still be eating these two at a time). Plus, add that cream cheese frosting on top, and it’s stellar flavor from start to finish. It’s been a hot minute since I’ve made a regular cream cheese frosting, and classics are classics for a reason. Add all that together and it equals one tasty piecake you’re probably not gonna want to share (so maybe do make 24). I’m having a hard time deciding if I like the blueberry or cherry piecakes better, so I suppose I’m just going to have to keep eating them until I find out. ‘Til next time, my fellow eaters!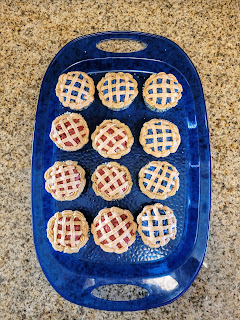
You could say I have fillings for these beauties.

Healthy-ish cake, cupcakes, pie, and cheesecake recipes and decorating tips