-
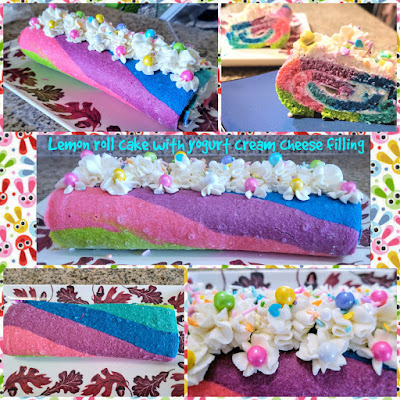
A Different Kind of Spring Roll
The definition of insanity is doing the same thing over and over again and expecting different results. My name is Kate, and I am insane. For years (I’m not even kidding–at least five years), I have tried to master the art of making a roll cake. I would come up with an awesome idea, pattern, flavor, etc., and without fail, 98% of the time, they would completely fall apart when I tried to roll them up in a towel or unroll to frost them no matter how many different approaches, tips, and techniques I tried. The other 2%? Cake roll turns out visually PERFECT but tasted like I’d imagine a running shoe would taste like: all rubbery and absolutely disgusting. But since I refuse to be bested by a baked good, I tried for the 1,947th time to make a roll cake. I cried actual tears when I finally managed to make a roll cake that, well, rolled, wasn’t split into 16 different pieces, and also actually tastes like a cake and not a pair of Nikes.
 It’s a spring roll…get it?
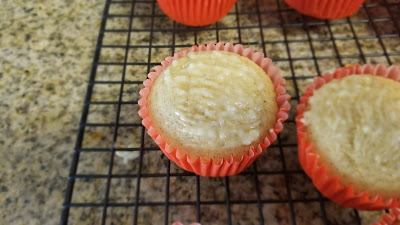
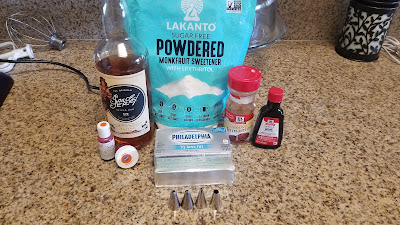
This cake is positively blooming with lemon flavor. Something about springtime brings up lemon flavor associations in my mind…these thoughts then take a roundabout path that end up with me wanting a giant lemonade from Chick-fil-a only to realize, of course, it’s Sunday, the only day of the week you ever want Chick-fil-a because you can’t have it. At least I have this lemon cake that is bursting with enough spring-color-palette bliss that it reminds me of Peeps. But unlike those marshmallow? (questionable) creations, this is actually edible. Since it’s a cake roll, it is a pretty springy (seriously, no pun intended I SWEAR), light, airy cake filled with lemon flavor, but my absolute favorite part (that I finally get to share with you since this recipe didn’t turn into a flaming pile of my broken hopes and dreams) is the filling. It’s my new take on cream cheese frosting with a secret ingredient that cuts down on fat and calories in a major way: Greek yogurt. But it doesn’t taste like sour cream gone bad (get it together, plain Greek yogurt); it is blended in with ingredients that make this a yummy, creamy filling that also holds stiffly enough that you can pipe decorations with it. Added bonus? Each slice of this heavenly Easter-eqsue lemon cake roll is only 209 calories (8 slices total). You will need to make your frosting ahead of time, so scroll down after the cake recipe to learn why and how.

You’ll have 95 cups of buttermilk leftover, though. Grease that waffle iron or pancake griddle… I don’t usually do from scratch recipes because I am lazy and follow the “work smarter not harder” approach to life. But with the increasingly high number of cake fails I’ve experienced with cake rolls (I still taste shoe rubber when I think of the last one), I decided to find a base recipe and experiment with extracts only. Happy to report the following recipe worked expertly and tastes phenomenal, so, ya know, roll with it:
- 1 cup of flour (I used King Arthur’s gluten free flour)
- 1 tsp baking powder
- 4 eggs at room temp
- 3/4 cup of Lakanto granular monkfruit sweetener or regular sugar
- 2 TBS vegetable oil
- 2 TBS buttermilk
- 1 tsp apple cider vinegar
- 1 tsp vanilla extract
- 1 tsp lemon extract
- Gel dyes: I used Americolor electric green, teal, electric blue, electric purple, and electric pink. All together, a shockingly good spring/Easter color palette.
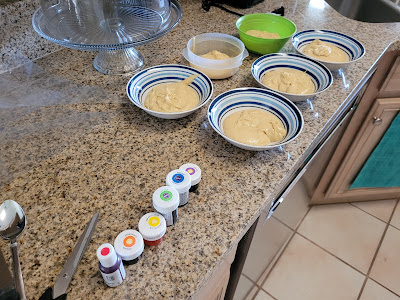
Egg-scuse me, that was a terrible pun. So was that, but I apologize for nothing. You want the recipe? You gotta deal with my bad dad jokes. Preheat your oven to 350 and prepare a 10×15 jelly roll pan with Parchment paper sprayed with cooking spray.In a bowl, mix the flour and baking powder together; set aside. In a stand mixer with paddle attachment, whip the eggs on medium-high for 4 minutes until fluffy and pale yellow. Turn the mixer speed to low, add the sugar slowly, and let it fully incorporate. Add in the oil, buttermilk, vinegar, and extracts, followed finally by the dry flour mix a little at a time. You don’t want to over mix since you need to color the batter later, so just mix on low until everything comes together.Divide batter into 5 small bowls (I used 1/2 cup of batter in each bowl). Dye each your springtime colors of choice (if it isn’t neon, really pink, or annoyingly yellow, is it actually a spring cake?). Much like my rainbow bundt cake, you’ll use every bowl and spoon in your kitchen, so thank God for dishwashers.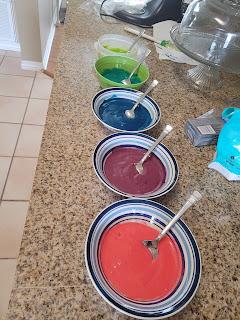
I know it might sound odd, but neon pink is such an obnoxious color that I absolutely love it. Now, once you’ve dyed all your batter, add each color to its own piping bag or a plastic bag.

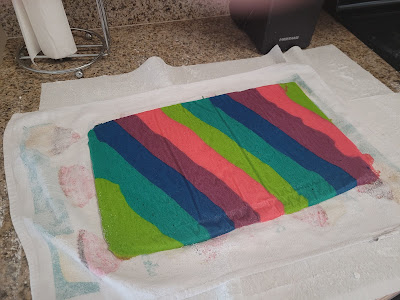
And prepare to turn everything in your kitchen into a neon disaster of Meow Wolf proportions. You might want to put some paper towels down so you don’t dye your kitchen counters to match those Easter eggs you were working on with your kids (I assume this is still a thing people do, ponders Lady No-Kids). Grab that prepared pan, and snip the tips off the piping or plastic bags. I alternated diagonal stripes of lime, teal, blue, purple, pink:

While giddily giggling at how blindingly bright this cake was going to be. I really wanted it to scream SPRING IS HERE, and I think you could probably see these colors from space, so, mission achieved. I used an angled spatula to gently smooth each color after I piped it so that there were no gaps between colors and the batter was spread evenly for baking. Be sure to wipe the spatula clean between each color.
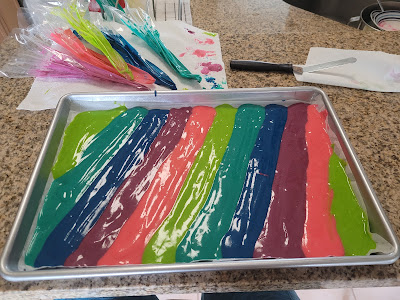
I get a strange yearning to find all my old Lisa Frank memorabilia looking at this. Next time, I would make my stripes thinner so more of them show once the cake is rolled up. Alternatively, you could do horizontal stripes as well. Once you’ve filled the pan, gently tap it on the counter a few times to release air bubbles. Bake at 350 for exactly 12 minutes. I added an extra minute because it still felt a little too spongy, and I had cracking issues in some places. I definitely attribute this to the bake time because the thinner areas where I didn’t do as good of a job evenly distributing batter were the areas that cracked. So be careful to really evenly spread the batter and not to over bake by even 1 minute…this is the Mariah Carey of cakes–total diva. Had I pulled the roll out at 12 minutes, it definitely would’ve been spongy enough to be malleable all over for rolling.
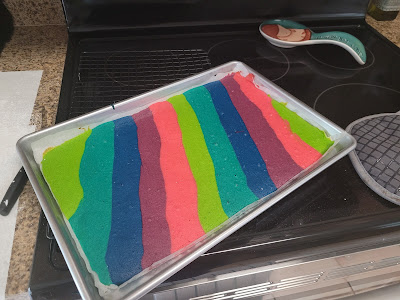
Seriously, this is so neon it hurts to look at for more than 10 seconds at a time. *It’s perfect.* Rewind a bit, and while your cake is still baking in the oven, throw down a tea towel and dust the ever-loving-heck out of it with powdered sugar on both sides. This will keep the cake from sticking to the towel. There will be powdered sugar covering everything in your kitchen no matter how many paper towels or how much wax paper you put down, so prepare for it to look like a drug deal went very wrong. White powder EVERYWHERE. Now, the SECOND that cake comes out of the oven after 12, not 13 minutes, put the tea towel on top of it, then put a cooling rack on top of that, face down. With the aid of some pot holders, flip all this over together.
It’s like a very hot, potentially burn-y circus act to get this out of the pan. Remove the pan, which is now on top of everything, very carefully so you don’t burn yourself, or worse, hurt the cake. It may be a very demanding cake, but it is otherwise perfectly innocent. Carefully, slowly, gingerly, incredibly nimbly, roll the cake up in the towel starting from the short side (left to right, not top to bottom, based on the position of my cake above).
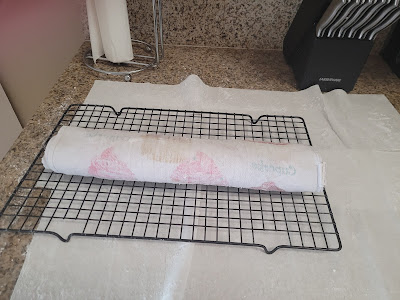
Don’t forget to breathe in there somewhere, too. Congratulations, you’ve made it 75% of the way. I assume performing surgery is easier than making a cake roll, but I might be off base. Let the cake cool completely to the touch while in the towel on top of cooling rack. Don’t move it to the fridge or freezer; you don’t want it to dry out at all. If you blast it with cold air, it will, and then when you try to unroll it, it will crumble. Trust me, I’ve done this about 2,700 times, and every time I put my roll in the fridge to chill, it absolutely crumbled apart.

Yes, you need specialty spring sprinkles. It’s simply a required aesthetic aspect to compliment how unbeliveably neon this cake is. Guys, put your feelings about Greek yogurt aside. I absolutely refuse to eat plain Greek yogurt, but the flavored stuff is aces. I prefer Two Good or Dannon Light+Fit flavors, but your favorite brand will work. You want to get started on this the day before you bake because you need to strain your yogurt overnight. To make:
- 8 ounces/226 grams strained vanilla or lemon Greek yogurt (I used vanilla)
- 8 ounces of 1/3 less fat cream cheese at room temp
- 2 TBS powdered monkfruit or powdered sugar
- 2 tsp vanilla
- Optional: 1 tsp lemon extract (I didn’t, but really wish I had added this because I love lemon flavor)
- Not even remotely optional: these adorable Easter sprinkles
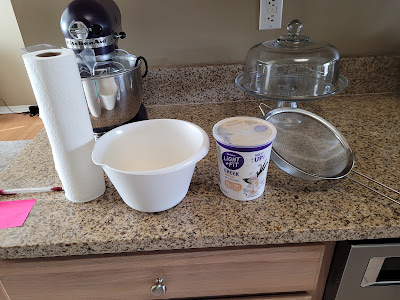
Yogurt Straining 101 Yogurt straining is super simple, it just takes awhile. In order to make a pipe-able, stiff frosting, you’ll need to do this. Put a sieve over a bowl, and put either cheesecloth, a coffee filter, or a thin layer of really durable paper towels (I used two sheets of Viva folded in half) in the sieve. Then plop your yogurt in this, cover with plastic wrap, and let drain overnight in the fridge.
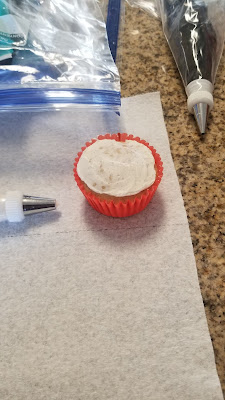
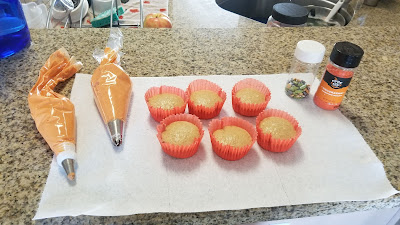
The next day, beat the softened cream cheese in a stand mixer until light and fluffy, around 3 minutes. Add the yogurt, blending on medium high until everything comes together. Add the powdered monkfruit and the extracts, and finish mixing. Now, pray to whatever deity you believe in because it’s time to unroll your cake.Once the cake is cool to the touch, very slowly unroll it from the kitchen towel. Use 2/3 of the frosting to slather on the top of the cake. Once you have a nice thick layer of frosting, this helps to hold things together in the event of any cracking (There will be cracking. There will always be cracking). Slowly roll the cake back up, using the towel to help guide you along the way. I would roll a small section, carefully ply the towel away from the cake, roll again, and repeat until my cake was in a solid roll with minimal cracks (i.e., it was in 1 piece and not 7).
An Easter miracle! Wait… Hindsight here is my only cake roll plate is fall-themed. Fall is the best season, so it stands to reason I’ll have to use this recipe again in a few months. Until then, let’s think of this as a “Gathering of the Seasons.”

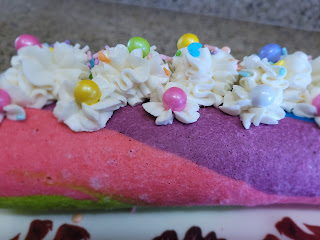
Fall leaves and neon spring hues definitely do not go together. Now that you’ve survived the hardest part of making a cake roll, have some fun and decorate that electric beauty. I used a 2D tip and the rest of my frosting to pipe large mounds down the middle of the cake, then came back in to pipe small flowers beside each mound. Naturally, I finished with sprinkles, as is always the case.

Because they’re freakin’ delightful, people. 
Cake plate aside, I am so happy with how this looks. 
The inside is absolutely adorable to boot. 
Few times in my life have I felt more relief than when a cake roll finally turned out right after a million failed attempts. It was a large baking victory, and I stand by it! You can definitely trim the ends to give it a cleaner look for presentation, but after the anxiety and breath holding, you’ll probably be ready to take a nap or drink a stiff beverage once you’re done piping and sprinkling. Plus, trimmed ends = wasted cake, and we just can’t have that. I wish I had used a bit more filling so the color layers were separated better, but there’s always next time. I assume my next cake roll will end up being an utter nightmare, so I’m just basking in the glow of this cake…which is completely possible thanks to those electric neon hues it’s giving off. I am eagerly awaiting my next slice.
These are also the best tasting sprinkles I have ever had, and that’s saying something because I have an entire pantry shelf devoted to sprinkles. After a few heavier cake bakes, this roll and the lemon flavor are so refreshing. It’s nice to eat a slice of cake and feel somehow lighter? But that could also just be the years of cake roll fails falling off my soul. Either way, this recipe is delicious, and that yogurt cream cheese frosting is an absolute game changer. Whatever cake flavor- strawberry, chocolate, vanilla, caramel, blueberry, you get the point, there’s a Greek yogurt in the same flavor that you can make your cream cheese frosting with. I’m already plotting out how to use it in my next bake. Until then, this colorful springtime beauty is all I need. I hope everyone has a wonderful Easter next Sunday! If you bring this cake roll to your family gathering, you will make the Easter Bunny look like an absolute chump. ‘Til next time, my fellow eaters!
-
Taste the (Boozy) Rainbow
A year ago, I was gearing up for St. Patrick’s Day with this gorgeous striped shamrock cake when the world more or less ended (probably should’ve made that clover cake topper a 4-leafer). I had never comfort eaten cake like that before, but it became a pretty regular occurrence thereafter in 2020. Here we are, March 2021, and I decided this year’s festive holiday bake needed to be bolder, brighter, and, well, boozier. Because after the past 12 months, I needed a solid reminder that good still exists, and in this case, it’s in the form of a Baileys salted caramel bundt cake the colors of the rainbow.

Also appropriate because much like the rainbow, I am over it. I know, for someone whose wardrobe is black with a dash of more black, this is a really vibrant, colorful choice. I kinda felt like a rainbow might be a mood lifter, and if that didn’t do the trick, the copious amount of Baileys in this recipe definitely would. I am happy to report that I was correct on both counts! This cake is swimming in delicious salted caramel flavor thanks to the Baileys both in the cake and in the glaze on top. It also delights me greatly every time I open the fridge and see this little cakey rainbow waiting for me to eat it (note: I don’t have a slice every time I open the fridge. But I want to, because YUM). Somewhere over the rainbow, Florida swimsuit season is a mere 10 days away, and this will only run me 247 calories a slice for 12 slices total…a Saint Patrick’s Day miracle!

This recipe is definitely my lucky charm. I will admit this is a very dense cake…it’s more like a Bailey’s sweet bread with glaze on top. If you prefer a lighter forkful, follow my recipe recommendations below to give your cake more spring. To make, you’ll need:
- 1 box of yellow cake mix (I use Whole Foods gluten free yellow cake mix)
- 1 box of sugar free instant vanilla pudding*
- 2 eggs at room temp
- 3/4 cup + 2 TBS of either regular or salted caramel Baileys
- 1/4 cup skim milk
- 1 tsp vanilla extract
- 1/2 cup of unsweetened applesauce
- 1/4 cup of butter at room temp*
- Gel dyes in red, orange, yellow, green, blue, and purple
*I wanted to see if these two additions would make a moister cake since gluten free mixes can get a little dry. I would omit both of these next time to make a cake with a lighter, more traditional texture. Don’t get me wrong, the flavor these bring to the cake overall are awesome, but I prefer a lighter texture for my desserts. With the current density, I do feel pretty comfortable eating this cake as a sweet breakfast bread though, so there’s that. Do rainbows have silver linings? Because this one does.
Start by preheating your oven to 350 and grease a bundt cake pan very well. In a bowl, whisk the eggs, vanilla, milk, and Baileys, and set aside. In your stand mixer, blend the applesauce and butter together (skip this step if not adding butter, just dump the applesauce in your mixer bowl). Add the pudding mix and 1/3 of the cake mix to the stand mixer, blending on low until it begins to combine with the applesauce/butter. You can scrape the bowl as you go, and add in 1/3 of the liquid mix. Blend, add 1/3 more dry mix, scrape the bowl, add 1/3 more liquid, etc. until everything is in the bowl, mixed together on low speed. Try not to over mix since you have to dye your batter and mix it around more later.
Get ready to Roy G. Biv it. You’ll need every bowl you have in your house and potentially even your neighbor’s, but, worth it, I promise. A technicolor dreamcoat of a cake requires a little extra effort. Split your batter evenly into 6 bowls. With my gluten free cake mix (which is a little less than a typical cake mix), I was able to scoop 2/3 cup into each bowl.

Let’s take a moment to appreciate my new phone’s camera. It’s fabulous. Dye each bowl a different color, obviously, so be careful cleaning spoons, or be lazy like me and use 6. Work smarter, not harder.

Maybe this cake should’ve been Skittles flavored. Does anyone make Skittles vodka? Now, take either piping bags or plastic bags, and fill your batter one color in each bag. You’ll want to snip your piping bag or plastic bag so there’s a medium-sized opening. Grab that prepared pan and small spatula.

Seriously, this is an unedited photo. LOOK AT THAT COLOR. Gah, I really was taking photos with a potato of a phone before this. Start with your red, and pipe circles into the bundt pan. Smooth these out with your spatula.

Truly, I hate the color orange. It makes me angry, and I’m not sure why. Was I accidentally hit on the head with multiple oranges as small child? Now, carefully pipe the orange on top of the red. Using gentle pressure with the spatula, smooth this batter out so that it is completely covering the red. You don’t want them to mix together, so use a light hand.

Also not a big fan of yellow, so maybe a whole fruit basket fell on my head? Above is before I’ve smoothed out my batter, so you have a better idea of what to “go for…” A.k.a., a concentric hot mess.

Thank god that spatula smooths things over. Repeat with the green, blue, and finish with the purple. Give your pan a few gentle taps on the counter to get rid of any bubbles, but not so hard your layers start to mix together. Bake this at 350 degrees for 30-35 minutes. A toothpick should come out cleanly when it’s done.
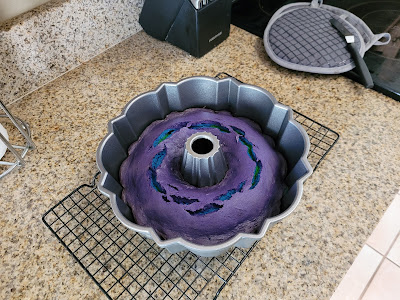
Honestly, should’ve layered this backwards because it is a true tragedy the purple is hidden on bottom. Leave your cake in the pan on top of a cooling rack for 10 minutes. Then run an angled spatula around the edges and the center of the bundt pan. I place the cooling rack on top of the pan and then flip everything over at the same time to release my cake.
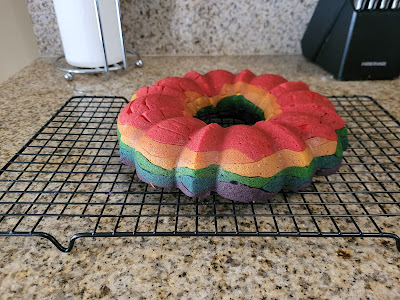
“Rainbow Brite, see the shining light…” If you’re over 30, appreciate that moment of childhood zen. Guys, it’s so colorful I kinda want to a die a little. And this is only the OUTSIDE. The inside is truly something Rainbow Brite herself would be envious of because it is fabulous. Now, I placed my cake inside the fridge to chill for 30 minutes before I made my glaze and eyed my baking Baileys.

What? Half the booze in our house is for drinking, the other half is for baking. This glaze is super duper simple, which, after spending an hour becoming a color mixing master, is something you’ll truly appreciate. You need:
- 1 cup of powdered monkfruit or sugar
- 1/2 TBS skim milk
- Oh look, more Baileys! I used 2 TBS, you could definitely do 2 1/2 and skip the milk, but I am lightweight
- Super rad St. Paddy’s Day sprinkles (I found mine on Amazon)
Dump the sugar, Baileys, and milk together and whisk until completely smooth. If you think things are too thick, try adding a tsp of milk or Baileys at a time. I put my glaze into a liquid measuring cup once my consistency was thick enough to coat the back of a spoon.

It also helps to have everything close by. Glaze sets quickly, so work fast to add sprinkles. Clearly, sprinkles are NOT optional in my book, so once I poured my glaze all over the top of the cake, I quickly added sprinkles on top:

Gotta let the leprechaun represent in there somewhere! Cute little shamrockin’ sprinkles will do the trick. 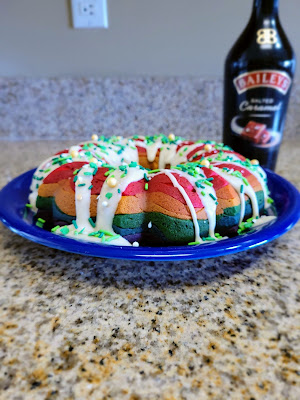 Irish I had more cake…
Now, let everything set up in the fridge for a couple hours before slicing. Keep it in the fridge until it is all devoured since there’s dairy in the glaze.

So magically delicious. If you ever wanted to eat a piece of cake whose pure existence just radiates joy and flair, this is definitely the cake for that. I realize most rainbows lead to a pot of gold, and in 2021, I hope that pot also contains a COVID vaccine so we can get back to regularly scheduled St. Patrick’s Day shenanigans by 2022. At least I have this cake to help me cope with being a shut-in for a while longer! Anything that tastes of salted caramel Baileys in each bite is a blissful escape from reality. That glaze is nice and sweet but finishes smooth and rich thanks to the Baileys, and it’s a nice little kick of flavor paired with the cake itself. It may be a dense bake, but that makes it no less delicious! I’m definitely making this again because Baileys makes everything better. I hope however you’re celebrating Saint Patrick’s Day, you’re safe, happy, and full of Baileys cake. ‘Til next time, my fellow eaters!

I’m not sharing though, so you’re gonna have to bake your own… -
Mint to Be
There are some people in this world that hate chocolate and mint together. They’re wrong. Mint and chocolate together, to me, are only rivaled by peanut butter and chocolate together, and that’s just because I have a borderline unhealthy obsession with both. I absolutely love when March comes around since St. Patrick’s Day is the perfect opportunity to add mint and chocolate together. Sometimes with Baileys. Sometimes with Guinness. Sometimes even just with more mint and more chocolate. Such is the case with my first St. Patrick’s Day dessert this year, it was simply mint to be.
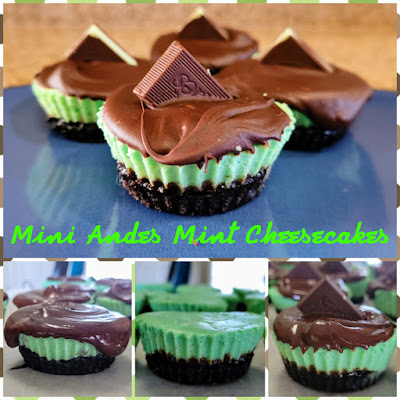
Also, it’s aesthetically pleasing to join green and brown together in a food without it looking like a pile of weird, potentially moldy goop. These mini Andes mint cheesecakes are a handful (literally) in terms of flavor. A buttery Oreo crust is topped with a mint cheesecake hiding little bits of Andes pieces and adorned with a nice thick layer of chocolate ganache. Every layer is its own form of taste bud heaven, and that rich chocolate flavor from the top and bottom somehow still lets the mint cheesecake flavor take center stage. It’s decadent and refreshing all at the same time, and they’re only 205 calories per cheesecake. This recipe makes 15 mini cheesecakes total, so you can share if you’re nice; or you can hoard them like a leprechaun and his pot of gold. It’ll be holiday-appropriate selfishness, so you do you.

Everyone around you will be green with envy, naturally. I was adapting a recipe, excited because I was getting mint chocolate, and totally forgot to pay attention to how I always prefer to blind bake cheesecake crusts, and I paid for it, y’all. So don’t be me. Remember to always blind bake your cheesecake or pie crusts before filling them so they’ll be nice and crisp and not soggy…consider this my encourage-mint to you to be a better baker! For the crusts, you’ll need:
- 15 Oreos (I would prefer the mint Oreos, but they do not have them available gluten free, so I went with regular)
- 2 TBS Lakanto classic monkfruit sweetener
- 4 TBS low fat butter, melted
Combine all ingredients in a large food processor or blender…I used my Ninja blender, chopping on high until everything was a fine mix.

That shot glass has come in so handy. For baking. Seriously. Using a cookie scoop, I dropped a large dollop into each silicone cupcake liner. These liners are awesome, not just because they’re also rainbow colored and therefore St. Patrick’s Day approved, but because you don’t have to spray your pan or use throw away liners; they are so easy to remove ANYTHING from, even sticky foods, so just go get yourself a set. I used the bottom of a shot glass sprayed with Pam to evenly spread the crust out in the liners. A tablespoon would also work! Here’s where I tell you to blind bake these crusts for 5-7 minutes at 325 degrees, then let them cool fully while making your filling. I skipped this step, and the crusts were super soft and messy. Granted, they’re just Oreos and butter, so under baking them poses no health risk, and we’re still eating them by the fistful anyway while my in-laws are here for a visit (also appropriate since they’re the ones who gifted me the silicone cupcake liners).

Andes mints should be eaten after all meals, not just Olive Garden ones. For the cheesecake filling, you’ll need:
- 16 ounces 1/3 fat cream cheese, at room temp
- 1/2 cup Lakanto classic monkfruit sweetener
- 1 egg at room temp
- 1/2 tsp vanilla extract
- 1 tsp mint extract
- 40 grams (1 serving) crushed Andes baking chips (sorry, not pictured!)
- Green gel dye
- 6.5 ounces of Lily’s semisweet baking chips
- 8 Andes mints, cut in half diagonally
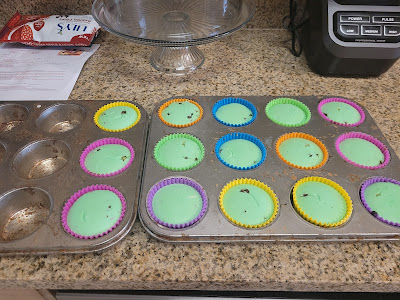
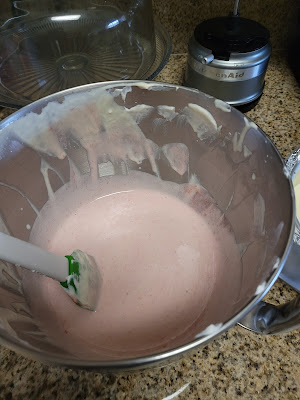
Check out those little Andes bits though..drool. Start by mixing the sweetener and cream cheese together on medium-high in a stand mixer. Give this about 3 minutes to come together and get nice and fluffy. Then add in the extracts, green gel dye, and the egg, mixing on medium-low speed for a minute or two until things are fully incorporated. Mixing on low keeps too much air from entering the batter; this can cause your cheesecakes to crack. It’s not the end of the world if these do since they’ll be topped with ganache. Finish by mixing in the Andes baking chips on low speed. Pour the batter on top of the cooled crusts, filling each liner almost to the top. Bake for 20 minutes at 325 degrees, then turn off the oven, crack the door open, and leave them to finish baking for another 10 minutes.

Something about this photo soothes my soul. Once those 10 minutes are up, go ahead and place the tins in the fridge to cool. If you’re using the silicone liners, you can take these out of the pan after about 30 minutes in the fridge since they’re so sturdy; you won’t have to worry about the cheesecakes collapsing before they’re fully cooled (wait at least an hour with regular cupcake liners). Just place them on a plate (liners STILL ON), and cover with plastic wrap. Put them back in the fridge to set overnight or for at least 4 hours.

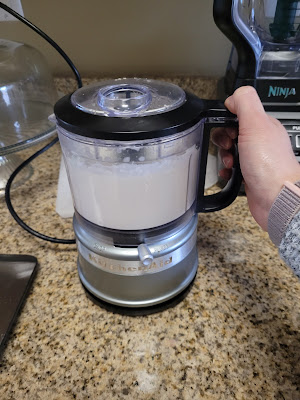
Cheesecakes are one of the few things in life worth waiting for… The next day, I removed all my cheesecakes from the silicone liners. Honestly, they were SO PRETTY like this I thought about calling it a day/recipe. But you know how I feel about adding accents to the top of everything (it is nonnegotiable), so I melted 6.5 ounces of Lily’s baking chips on 50% power in the microwave for 1 minute, stirred, and zapped again for another 30 seconds. These ended up acting like Magic Shell and are pretty thick, so if you want a softer ganache, add a 2-3 tablespoons of heavy cream or milk to the melted chocolate, mixing well.

And then I prepared to make a mess. While your chocolate is melting, throw down some wax paper and place your cheesecakes on top. Unwrap 8 Andes mints, cutting them in half diagonally. There will be one half leftover, so pop this in your mouth for all the hard work you’ve accomplished so far and treat yo-self.

This photo is is everything. Take a spoonful of melted chocolate, and drizzle it on top of each cheesecake. I used the back of the spoon to smooth the tops and push some of the chocolate over the edges.

Oh the enjoy-mint. Finish things off by placing half an Andes mint into the top of the ganache. Let these set up without moving them for 10-15 minutes, then put them on a plate and move them to the fridge to let the ganache finish setting up for a few hours.

These absolutely sham-rock. We’ve been eating these by flipping them upside down so we can hold the Andes mint topper and chow down since the crusts are a little too soft to handle. The ganache is nice and firm, so it acts as a better base, to be honest. Each bite has a little bit of Andes mint magic hiding in it, and I’m hard pressed to decide what my actual favorite part of this dessert is, so it’s a good thing it is all bundled together. Definitely heed my warning and blind bake those crusts, though! Even without the perfect crust, these are still beyond delicious, so I can only image how wonder-inducing they’d be if I wasn’t such an excited spazz when it comes to making mint chocolate desserts as fast as possible so I can devour them with the zeal and fervor shared by that leprechaun as he hides his Lucky Charms from children. Because seriously, who wants to share something so magically delicious? ‘Til next time, my fellow eaters!

We only have four left, so I’m planning my next mint endeavor… -
A Berry Big Deal
I don’t celebrate Valentine’s Day, but I do look for literally any reason to make a tasty dessert. I really celebrate the day after Valentine’s Day when I can procure 15-30 pounds of chocolate for like three bucks. But since I’m still waiting for that glorious day to come, I knew I needed to get on the ball and make a dessert to help me pass the time. Strawberries and Valentine’s seem to go hand in hand…here’s a piece of fruit that’s sweet as and shaped like your heart! Now eat it! And well, I love cheesecake berry much, so it just seemed like if I’m gonna sorta celebrate the day after Valentine’s Day, I could celebrate the few days before Valentine’s Day with a strawberry cheesecake. At what point do I just admit this is me celebrating Valentine’s Day, you ask? After 2020, do we really want hell freezing over? Because that’s what it would take…

That would literally be the last straw(berry). I have several secrets to indulge you with where this cheesecake is concerned. 1. It’s got cottage cheese in it. 2. This makes it extremely low in fat and calories. Because 3. I have to have dessert every single night, or I might either die or have terrible nightmares I live in a world where sweets don’t exist. Seriously, if you ever hear me say, “No, I don’t want dessert,” that’s code for, “I’m being kidnapped, please help me.” And since I load up on sweets but don’t want to load up on pants size, I wanted to try using cottage cheese as a replacement for cream cheese. Even if you HATE the stuff (it’s a very polarizing food..you either love it, or you hate it with the burning ire of a thousand suns), I can promise you after it is all mixed together, you would have literally zero clue that it’s there. Thank the strawberries and sugar for making that possible. But thank the cottage cheese for making this layered strawberry cheesecake only 173 calories a slice for 8 slices total.

Yet somehow, there’s even butter in it. I have a tried and true gluten free graham cracker crust that makes a nice base for either 8-inch pies or cheesecakes. I don’t like a crust going halfway up the side of my cheesecake, so this is enough to make a base only. Double this recipe if you like your cheesecake to be mostly crust, you weirdo.
- 3 TBS cold low fat butter, cubed
- 2 TBS monkfruit sweetener
- 1 cup of Kinnikinnick gluten free graham crumbs
- If using regular crushed graham crackers and not GF, add a tablespoon of water
Throw all these ingredients in a food processor (I have a mini food processor, and it’s the perfect size for this recipe), and puree until things get clumpy.

You’re gonna need Pam. Spray and line an 8-inch springform pan with Pam and Parchment paper. Dump your crust in, and spray your hands liberally with cooking spray because this recipe is STICKY. Press into an even layer and bake at 375 degrees for 12 minutes, then remove and place in the fridge to cool.

And get ready to fall in love with cottage cheese. I promise. For the strawberry cheesecake layer, you need:
- 16 ounces of small curd, low fat or fat free cottage cheese, strained, at room temp
- 1/2 cup of monkfruit sweetener
- 1/2 cup of light sour cream at room temp (you could also use Greek yogurt, but strain this, too)
- 3 eggs at room temp
- TBSP vanilla
- TBSP lemon juice
To strain the cottage cheese, place it in a sieve over a bowl and let it drain for at least 3 hours while it comes to room temp. Discard the liquid, then dump your cottage cheese into a food processor and puree it until absolutely zero lumps remain.
Butter wishes it was this smooth, even. I was multitasking while making my filling. You’ll also need to make a strawberry puree. To do this, I used 2 cups of strawberries, tops removed and then berries chopped in half, mixed with 1/4 cup of monkfruit sweetener in a medium sauce pan. I stirred every few minutes, cooking on medium high, for 10 minutes. By then, the strawberries had broken down, so I used a potato masher to complete the job.

My sieves saw a lot of action this day. Take your puree and pour it over a seive into a bowl. Use a spoon to gently stir and allow the liquid to drip through, leaving any large chunks of berry behind.

Could be liquid-hot magma. Put the drained puree into the freezer while you work on the rest of your filling. It needs to be completely cooled before using or it will curdle your filling. Nothing says, “Happy Valentine’s Day, I love you so much I could just die,” like a curdled rotten cheesecake, right? I digress. Now, place your blended cottage cheese in the bowl of a stand mixer with a paddle attachment and blend for 2 minutes with the monkfruit sweetener. Then add in the sour cream, lemon juice, and vanilla extract. Blend until incorporated. Add the eggs, one a time, mixing on low so you don’t add in too much air (that can cause a cheesecake to crack while baking). Once all your eggs have been added, let it rest for a moment while you preheat the oven to 350 and line your totally cooled springform pan with foil and a crockpot liner to keep it dry during it’s spa day in the oven.

This way said spa day doesn’t give it a soggy bottom. No one wants a soggy bottom. This is Valentine’s Day, after all. Giving your loved one a pile of mush won’t go over well. You’d need diamonds to rectify that situation… Pour half of your cheesecake batter into the prepared pan. Once your puree is fully cooled, add it to the remaining filling in your mixing bowl.
Before my hopes had been dashed. I mixed well, added a little pink food coloring, and hoped dearly that this would layer on top of my batter so I would have white-pink-red layering, but even gingerly pouring one spoonful at a time, it sunk like a stone, so only the middle of the cheesecake is pink. Truly, you would have to go no-bake in order for that layering to work, but I figured it was worth a shot, and even if it didn’t pan out, I would still have cheesecake. So you could feel free to dump the puree in with ALL of the cheesecake batter and add a little pink dye and have an entirely pink cheesecake with a red layer on top. It would look totes apropes for V-day. Sorry, my Millennial is showing.
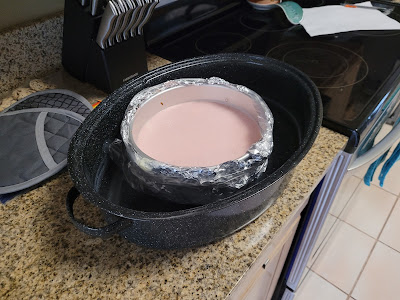
We just love the slang so much. Now, place your cheesecake into a large roasting pan and add 4-6 cups of VERY STEAMY (also totes apropes for V-day) water into the pan. The water bath allows for even cooking and no cracking. There should be no breaking of anyone’s anything on Valentine’s Day, especially not the top of their cheesecake! Bake this for 1 hour and 40 minutes at 350 degrees. The center should be wiggly like Jell-o, but the sides should be completely set. Once this is done, turn off the oven and crack the door. Leave the cheesecake in the oven for an additional hour to finish baking.

Remember, nothing says, “I love you,” like toiling away on a dessert for 48 hours. Once that hour is up, run a sharp knife around the edge of the pan and then top with plastic wrap. Place in the fridge for at least 4 hours if not overnight to finish setting. I kinda wish I had made the whole cheesecake that shade of pink…they do call it Millennial Pink after all. Someone help me.
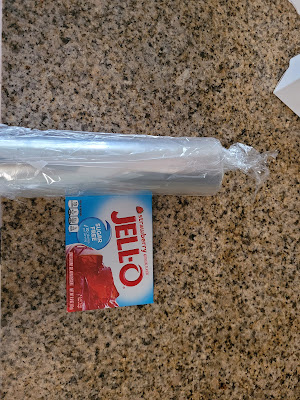
Say Jell-o to my little friend. For the final layer, the next day I boiled 2 cups of water and added one 0.6 oz packet of sugar free strawberry Jell-o, mixing for two minutes before removing from heat and letting cool to room temp. You do NOT add the cold water called for on the box. It will set without it, and it would be WAY too much Jell-o with the added cold water. You want a thin layer, not several feet of Jell-o to “tunnel of love” your way through to the cheesecake layers.
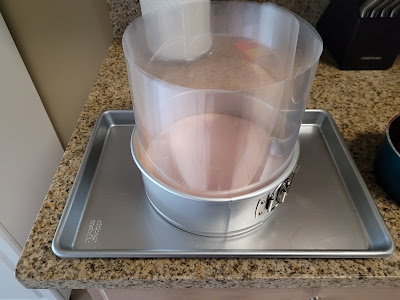
My cheesecake is wearing a cone of shame. I took acetate and cut two layers that completely ensconced the cheesecake. Very gently wiggle these or some wax paper into the sides of your pan to keep the Jell-o from overflowing out the side of your springform pan. I still placed my springform on top of a cooking sheet in case it did. This cheesecake was not going to best me a second time, oh no. I’m a “plan to fail” kind of person, apparently. I must be delightful at parties. Never invite me over to anything but a wake.
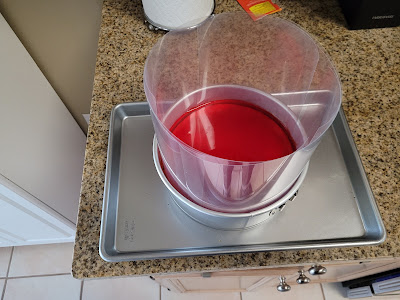
Suck it, cheesecake! Once the Jell-o is cool to the touch, put it into a measuring cup so it is easier to handle. Carefully pour this on top of the cheesecake, then move slowly and very carefully to the fridge. I had several curious dogs to contend with on my path to the fridge, but I’m happy to report we made it without turning my kitchen into a Jell-o covered bloodbath.

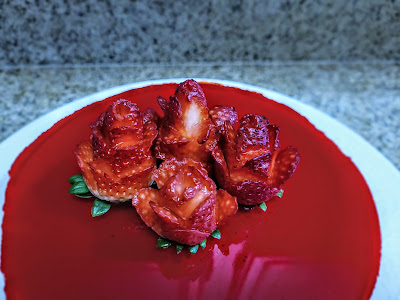
Alexa- cue Seal’s “Kiss from a Rose.” So, clearly, I put either glitter or some sort of accoutrement best described as “extra,” on top of 99% of all my bakes. Here we have no exception. I created strawberry roses with a few leftover strawberries and a small paring knife.
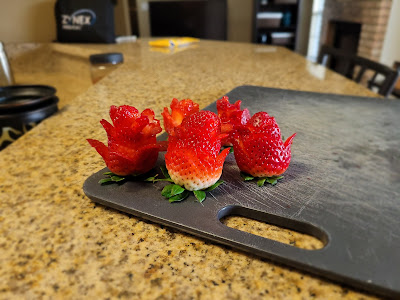
And I knew I had done well when my husband casually strolled through the kitchen with nary an idea what I was doing and said, “Oooohh, nice roses.” I could try to explain how I cut these and somehow didn’t lose a finger, but I am instead going to instruct you to view this how-to a much more talented person than I created. Just please come back to me when you’re done. I have abandonment issues also fitting of a Millennial. FOMO is still a thing, right?

Some seepage, but not terrible. I let my Jell-o layer set for about 4 hours before removing the collar of my pan and gently running my paring knife around the edge of the acetate collars to release the cheesecake. A bit of Jell-o made its way down the sides, but there’s still at least two distinct layers here, so I’m gonna call it a win.

Plus, those strawberry roses are a show-stopper. 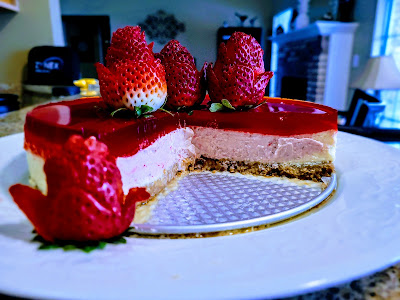
Sung to the tune of Prince’s “Raspberry Beret…”
“She wanted strawberry cheesecake, the kind you find in a grocery store.”Well, the inside is a lovely shade of pink, but I didn’t get my 3 layers like I had hoped. HOWEVER, I will report that the taste of this cheesecake is OFF THE CHARTS. Taking the time to puree those fresh strawberries was worth it. Jelly or Jell-o alone would not have resulted in such a perfectly sweet balance of the berries with the creaminess of the overall cheesecake. I honestly think using the cottage cheese made this way creamier than cheesecake usually is with cream cheese. There’s still a nice bit of tartness with cottage cheese, so you’re not missing that without cream cheese either, and the sour cream does add to that as well. It’s actually a really fun dessert to eat because you get so many flavors coming together with each bite. The fun wiggle of the Jell-o pairs with the softness of the cheesecake layer, and that graham crust is nice and buttery. Much like any good relationship, these flavors work well together and form an amazing team. My taste buds are now seriously in love, even though they know it will end in heartache when the last slice is finished. Good thing there will be plenty of on-sale chocolates in the pantry by then to nurse its wounds. Rebound chocolate! ‘Til next time, my fellow eaters.
You could say it was love at first bite. -
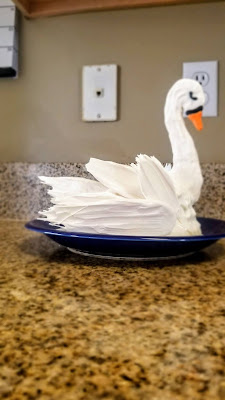
I Just Swanna Eat Cake
Well, as I take an introspective look back at my 33rd year on this planet, I guess I’d have to say I am thankful for those three or four times I was able to leave my house in 2020. In all seriousness, it was a rough year for everyone, but as an introvert, 2020 had its perks. I was able to spend most of it in sweatpants hanging out with my dogs, and I didn’t even have to open the door when food was delivered to my house. These small miracles kept me going. That and a huge serving of dessert every evening. I’ve decided to remain cautiously optimistic as we enter 2021 for VERY OBVIOUS REASONS, but there’s nothing like having a January birthday that somehow manages to sneak up behind Christmas and punch you in the face when you’re not expecting it (getting old is fun). As much fun as the “Ode to My Youth” tombstone cake was, I realized I hadn’t made a big fuss over making my own birthday cake since turning 30. I’m pretty important to, well, me, so this year I knew I needed to make a cake that was a swan song to my early 30’s because we’re rolling straight into the mid’s now. Naturally it needed to be heavy-laden with booze to cope.

You’re the swan that I want. This beautiful Swan
LakeCake is a super moist gluten free chocolate made with Skrewball peanut butter whiskey, and by made, I mean positively swimming in it, as swans are wont to do with large bodies of liquid. It’s also covered in an exceptionally amazing vanilla Greek yogurt cream cheese frosting, a recipe I am going to be using again and again because sometimes my need to reduce sugar and calories births ideas so crazy they actually work. Enough tooting my own horn (I’m not a goose, after all), this three-tiered cake comes in at only 281 calories a slice (10 slices total); so that’s like having a peanut butter Old Fashioned after dinner but more or less in cake form. Oh, and if you hate whiskey? Don’t worry. I find whiskey to be the most repulsive beverage in the world and believe drinking straight kerosene would burn less. But there’s something about taking whiskey and making it peanut butter flavored that completely changes the game. I absolutely am not a whiskey drinker; but oh sweet Jif-peanut-butter-gods, this stuff is amazing. Give it a shot (or take a few). It lends a rich flavor to the chocolate cake, almost like you’re eating a dark chocolate Reese’s.
Pro tip: mix an ounce of Skrewball with an ounce of Chambord for a liquid peanut butter and jelly sandwich. My birthday gift to you. I have become a Whole Foods junkie. I took my husband with last time I went, more or less to keep me from trying to buy the entire store but also to show him the Whole Foods World- shining, shimmering, splendid. He enjoyed fresh pressed juice, I bought 25 boxes of gluten free cake mix. Their cake mix is the only one I have used that allows me to play with the ingredients, so I cannot guarantee this recipe will work with other gluten free mixes. To make, you need:
- Gluten free chocolate cake mix, Whole Foods brand
- 2 egg whites
- 1/2 cup of unsweetened applesauce
- 3/4 cup Skrewball peanut butter whiskey (if you want to use less whiskey, use 1/2 cup and add 1/4 cup of skim milk; I said Skrew it, and used 3/4 cup of whiskey)
Start by preheating your oven to 350 and greasing three 6-inch round pans, lining with Parchment and bake even strips. Mix all ingredients on low in a stand mixer for 30 seconds before turning to medium-high for another 30 seconds, just until everything comes together. Pour batter into the prepared pans and bake for 24-26 minutes, or until a toothpick comes out of the cake clean.
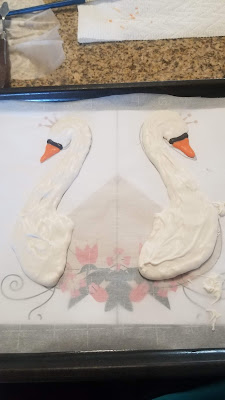
Leave your cakes in the pan for 10 minutes to cool before removing from the pan and placing on a cooling rack to completely chill before frosting. I recommend putting in the fridge or freezer to keep crumbs to a minimum when frosting. Now, time to work on that Ugly Duckling! Don’t worry, it has a happy ending (I mean, if you don’t eat it, anyway).

See, you’re beautiful, little swan! I found an image I liked on Canva, sized it to make sure it wasn’t going to be too tiny or huge for my cake, and printed it in mirror images so my swan had two sides to her head. I figured she’d appreciate that. Then I put my design down on a baking sheet and covered with Parchment.

Ahh, playing with chocolate. My happy place. You will need white, black, and orange Wilton chocolate melts (I find these work the best over other brands). Start by heating your white melts up according to package directions; I used half a bag for the head and feathers. If you have trouble with it seizing up, add a tsp of vegetable oil and it should thin things out again. I put this into a piping bag fitted with a medium-sized round tip (I alternated between a #12 and a #5). I used the larger #12 to flood the neck and most of the head before switching to the #5 to fill in the smaller end of the head close to the beak.
You’ll want to use a food safe paint brush, an angled spatula, or a palette knife to smooth the chocolate out and give a little bit of feather-like texture (just make little swirl motions). Place this in the freezer to set for 15-20 minutes.

Now, time to get artsy fartsy. Put the #12 tip back on your piping bag and lay out like, a lot of Parchment. Gather an angled spatula, large paint brush, and then pipe a really large mound of white chocolate. I used a BIG angled spatula to create my largest feathers by pressing down in the center of the white chocolate mound and pulling in one direction. I pulled this one section out a few times to create a long feather, and I used a paintbrush to give it texture by lightly stroking over the top of the feather. I did this twice for two large feathers, but for the smaller feathers, I used a rounded palette knife:

And took an upside down photo, sorry. This would also work with a small angled spatula. I used up all of my chocolate creating feathers of various sizes from large to medium to small. I think I had three leftover. You could eat those, but I find chocolate melts to taste even grosser than every whiskey in the world minus Skrewball, so I did NOT include the feathers in the calorie content for this cake. You’d need to add like several bajillion calories to this if you eat the chocolate melt feathers; I’d also recommend a COVID test because if you eat these and don’t find them repulsive, I assume you’ve lost the ability to taste. Whomp, whomp.

Back in black! Now, let your feathers set up for 30 minutes (I did not bother moving these to the freezer since they were so thin). Grab the swan from the freezer, melt a teeny tiny bit of black chocolate melts, and place in a piping bag with a #2 or #3 round tip. Pipe the top of the beak, then gently use a paintbrush or angled spatula to smooth and make sure the black band is touching the white completely. Let this set for 5-10 minutes; it’s a small piece and will dry very quickly.
Plus, the black band keeps it from looking like the worst, most ravenous, violent animal to ever exist: the goose. You can also draw on eyes with the black melts at this point, but I got distracted by melting a teeny tiny bit of orange chocolate melts and forgot to do this until later. I also put my orange melts into a piping bag with a #2 tip. I carefully filled in the orange part of the beak, using a paintbrush to ensure it was smoothed out and touching the black band.

Stop looking at me, swan! Now, let your pretty, graceful swan (in your face, man-eating goose) set up completely before handling. While this and the feathers are drying, you can make a REVOLUTIONARY frosting. Seriously, it’s probably going to be the best thing I do all year, and we’re only 10 days into 2021 (though it feels more like 100).

Apparently I don’t have high hopes for this year. Go figure. I found a delicious vanilla Chai Greek yogurt by Wallaby Organic at, you guessed it, Whole Foods. I wanted to try making a cream cheese frosting that wasn’t filled with butter and powdered sweetener, and this truly fits the bill. To make:
- 8 ounces reduced fat cream cheese at room temp
- 1 cup (about 1 1/2 of these 5.3 ounce Wallaby brand containers) of vanilla or plain Greek yogurt, no sugar added (important) and kept cold; I went with a low-fat variety, but a full-fat variety would be even thicker
- 1 TBS Skrewball
- 1 tsp CLEAR vanilla (it’s a pristine white swan, not a dirty, evil goose, so go with clear)
- 1-1 1/2 cups of Lakanto powdered monkfruit
Trial and error time! I only used one container of yogurt, and this frosting was very loose. I did NOT need to pipe with it, but if I did, next time I would use two containers. I would also strain them overnight (place yogurt in a strainer, on top of bowl, and keep in the fridge overnight to rid it of excess liquid). You can add in more powdered sweetener if things are still too thin.

But I found 1 1/2 cups of Lakanto was still firm enough to hold on to my beaters, so this was all I needed. Start by whipping the cream cheese until fluffy, 3-4 minutes. Then add in the yogurt, Skrewball, vanilla, and one cup of powdered sweetener. Mix well, and if things are too loose, add in another 1/2 cup of powdered sweetener to thicken things up. It should be able to hold on to your beaters, or it’ll slide right off your cake.

A peanut butter whiskey Oreo..I need this to be a thing. Work fast with this frosting since it needs to stay cold. Place a cake round face down on a cake board and slather a layer of frosting down before placing the second cake round face down on top of this.

A Double Stuf peanut butter whiskey Oreo *drooling* Slather frosting on top of this before adding the final cake round on top. Then go wild and cover the entire cake with frosting–be sure to save a little bit to stick your swan heads together and to adhere the feathers to the sides of the cake.

And get swirly. I used a rounded palette knife (this thing saw a lot of action for this bake), and I gently swirled little S’s all over the top and sides of the cake to give it texture. Swan feathers have texture, so just go with it.

Now comes the fun, yet slightly terrifying part. So, pretend you’re handling a baby hummingbird, Monarch butterfly, or something else that’s way more delicate than it should be (like my feelings), and gently, ever so gently, peel your dried feathers off the Parchment. Place the largest feathers on the bottom of each side of the cake. I used a little dollop of frosting to really help things stick.

Is it a cake or an exploding marshmallow? Things will look strange and very abstract before you add the head. But basically, stick feathers from largest on the bottom to smallest on the top only on the sides of the cake. Now, you will need to carve a shallow hole out on the very front of the cake in order to have somewhere to put the swan head.
Again, pretend you’re trying not to hurt my feelings. Be gentle. Very gingerly slide the head into that little carved out space. I found it helpful to “glue” my swan heads together with the last of my frosting, then I held the neck since it was the thickest/most heavy duty section and carefully pushed this end into the cake–I held the cake board with one hand and the base of the swan’s neck with the other to do this.

IT’S SWANDERFUL! I have no doubt this will be the cutest cake I make all year. It’s on point with my flamboyance of drunken flamingos I made last summer.

However, the swan is much classier and clearly can hold her booze better than those flamingos. Definitely keep this cake in the fridge until you’re ready to serve it, and for however long it lasts (it won’t be long). Since the frosting is like 87% dairy, you don’t want it to curdle and give everyone that eats it the 2021 version of the plague.

I know she looks unassuming, but she could go goose-dark at any moment if you leave her out too long. Seriously, I HATE whiskey (and geese, apparently). Truly. I would rather go to the dentist than be forced to take of shot of any whiskey in the world except for Skrewball. It’s great over ice, mixed into an Old Fashioned, but best enjoyed, in my humble opinion, in cake. And since it’s MY birthday dessert, you’re going to have to appease me and agree. Because I just swanna eat this delicious cake. It is so chocolately, and that vanilla cream cheese is the perfect amount of sweet and tangy thanks to the Greek yogurt. A forkful of each is enough to give me 5 seconds of uninterrupted pure happiness. My actual birthday was a little rough since my sweet baby Frey was having a mast cell tumor removed from her back leg, so the well wishes and cake definitely helped me cope. I am hoping she makes a full, speedy recovery and is back to begging me to drop pieces of cake and other baked goods on the floor again soon. I’m definitely not sharing crummies since its 1. A chocolate cake, and 2. Too good to share anyway. This cake is the swan for me. Did I turn 34 or into a dad? God these swan puns are terrible. I’m swanstoppable. ‘Til next time, my fellow eaters!

She’s too polite to tell me to stop making awful jokes. -
Let It Snow or Let It Go?
Picture it: a glorious 48-hour window in Florida where the humidity was below 50 percent, and the temperature was low enough I could finally turn the air conditioner off. Winter was so beautiful while it lasted, but as it snow happens, the A/C is back on, and I’ve returned to a general existence best described as “sweaty and wondering if there’s space to live in the freezer.” While winter may have literally only lasted two days here, it was long enough to inspire me to bake a cake in honor of one of my all-time favorite winter adult beverages, the Moscow Mule. There are some people who think this is a summer drink, but they’re wrong. Anything served in a hammered copper mug screams, “I want to make your hand as cold as the outside temperature,” therefore making it a winter beverage (told you snow). While this cake won’t freeze your fingers, it will make your insides all warm and fuzzy, and we can thank the vodka for that.

I inadvertently made a Frozen cake. Please don’t let Disney sue me. I’ll eat the evidence. I kinda wanted to go for “ugly Christmas sweater meets winter wonderland” with my design, and it accidentally turned into Elsa’s birthday cake…after texting my sister this picture, I am assured by her that this cake passed the Frozen test from my niece, so I guess if you’re looking for a Frozen-themed cake that you can throw together in a day that also allows you to drink copious amounts of vodka while you bake it and listen to your children scream-sing “Let It Go” at the top of their lungs for the 56th time in a day, this is the cake for you! Although, you might want to leave the vodka for adult beverages unless you’re trying to get a group of 7 year olds accidentally drunk off cake (it could either make the singalong better or much, much worse). In either instance, this is a DELICIOUS cake that truly tastes like the solid form of a Moscow Mule…plenty of ginger flavor, hints of crisp vodka, and sweet yellow cake undertones. And at only 267 calories a slice (10 slices total), you can rest assured this will not be the holiday dessert that does your diet in. Save that for eggnog.
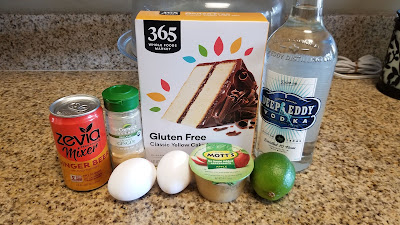
If you don’t buy your vodka from Texas, I assume you also purchase tortillas made in Ohio. Shame on you. The base recipe for this cake is super simple for some extremely tasty results. You need:
- 1 box of yellow cake mix (I used Whole Foods gluten free yellow cake mix)
- 2 egg whites
- 1/2 cup of unsweetened applesauce
- 1 tsp ground ginger
- 1 TBS lime zest
- 1/2 cup of ginger beer (I use Zevia Mixer 0 calorie ginger beer)
- 1/4 cup of goooood vodka (not Smirnoff; something classy like Deep Eddy or Grey Goose)
- 2 TBS fresh squeezed lime juice
Preheat your oven to 350 and line three 6-inch round pans with Parchment paper, cooking spray, and throw on bake even strips. Place all your ingredients into a stand mixer, blending on low for 30 seconds and then turning to medium high just until everything comes together–the gluten free cake mix said to stop the second that happens, and since I’ve had trouble ground testing just about every gluten free cake mix under the sun even when following directions, I listened. It took Whole Foods to make a gluten free cake mix that actually bakes and tastes like regular cake, and for that, we are thankful as we cringe slightly during checkout ($$$).
Evenly spread cake batter in the three pans, and bake for 24-26 minutes at 350 until a toothpick comes out cleanly from the center of each round.

Blonde and full of vodka! There’s a parallel here to me in my 20s… Let the cakes cool in the pan for 10 minutes before removing to cool completely on a cooling rack. Now, let’s gather up the tools you need in order to make a buttercream transfer onto the SIDE of a cake. I like to overachieve…buttercream transfers on top of a cake are so 2017. Since quarantine and COVID have clearly made me lose my mind, my cake baking and decorating plans are getting pretty wild.

Ha, THREE KINDS OF SPRINKLES. Yep, I’m a mad woman. You’re going to want acetate cake collars in order to do a side transfer, as well as a bench scrape or fondant smoother, angled spatula, small paintbrushes, and some Parchment paper. I’ll get into detail about piping tips and gel dyes here in a bit.

But first, more vodka. Did I mention the buttercream frosting is also its own Moscow Mule? Because it is. I told you, warm and fuzzy. Real warm. And real fuzzy. To make, you need:
- 1 cup of light butter at room temp
- 4 1/2 cups of Lakanto powdered monkfruit
- 1 tsp clear vanilla
- 1 TBS vodka
- 2 TBS ginger beer
- 1 TBS lime juice
- Navy gel dye
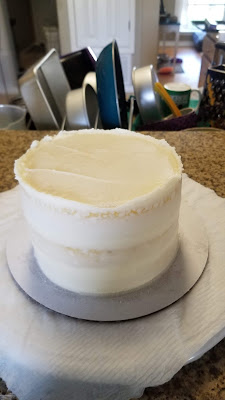
Whip the butter until soft, then add in half of the powdered monkfruit, the vanilla, and the vodka. Blend until well mixed, then add in the remaining powdered monkfruit, ginger beer, and lime juice. Now, grab those cooled cakes!

And prepare for something I never do.. Yeah, you definitely have to crumb coat this cake so the transfer has something to hold on to. I NEVER crumb coat since I usually frost on frozen cake rounds, so I used absolutely every iota of frosting made on this cake. Which meant I had none leftover to eat alone with a spoon, and that makes me sad.

Because the whole point of eating cake is for the frosting. I digress…place your first cake layer face down on a cake board, then slather a large helping of frosting on top, evening out before you add the second cake layer, also face down, on top. Add more frosting to this.

I just wanted to pick it up and eat it like a burger at this point. Place the final cake layer face down on the top, and then grab a measuring tape. You need to know how tall and how big around your cake is to make your transfer later. Write these measurements down, then slather a thin layer of buttercream over the entire cake.
I mean, this is pretty, too. I’d serve this. I do love a good naked cake, but in this instance, smooth out the top as best as you can and make sure there’s a nice thin layer all over the sides of the cake. Now, it’s time for sprinkles!
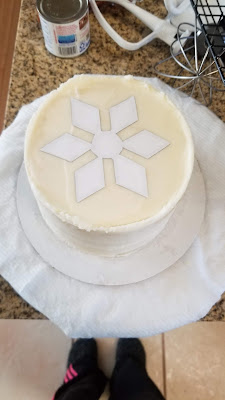
And that’s when you know I mean business. For the cake topper, I cut out a very simple snowflake design and placed it on the center of my cake, pushing down to ensure none of the edges weren’t essentially “glued” to the top.
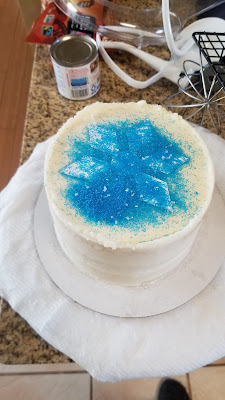
Then, I got wild with TWO different kinds of sprinkles. Spreading them all over the top of the cake. 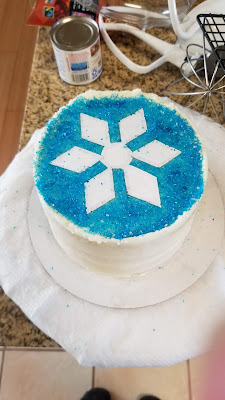
Do this until there’s a nice layer of sprinkles on top and no white frosting is showing. Gently press the sprinkles into the top of the cake and wipe excess off of the snowflake template so it’s easier to remove later. Now, I left my template on top of the cake so the sprinkles could settle while my frosting set in the fridge for an hour while I worked on my buttercream transfer. You do want your cake to be totally chilled before applying the transfer, so make sure your buttercream has time to crust up for at least 30 minutes in the fridge.
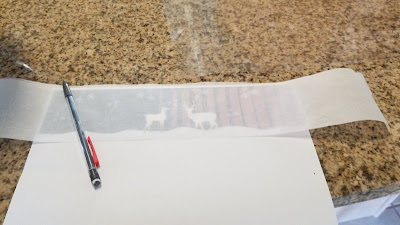
Now, time to trace! I used Canva to make my own winter scene, knowing my cake was a little over 3 inches tall and about 18 inches around. You can Google “simple winter scene,” “winter template,” etc., to find a good design without Canva. I cut the acetate to about 20 inches to give some overhang for handling, and then I cut Parchment paper the same size and 3 inches high. I copied my template onto the Parchment paper.
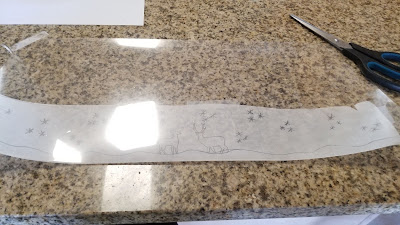
Blinded by the shine. Then I taped my Parchment paper behind my acetate. I loaded up a piping bag with a #3 round tip, and piped my deer and snowflakes. I used a small paintbrush to press the piping into a smooth and even layer so there were no gaps in the flakes or deer outlines.
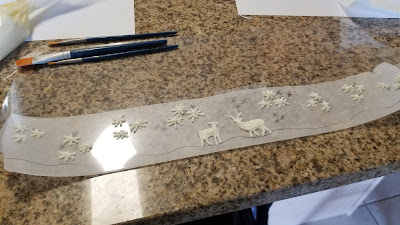
Sadly, the snowflakes would melt on me, just like my hopes for a real winter in Florida. As cute as they were, the snowflakes were too small and would not stay stuck to the acetate when I added the final layer of frosting. The ended up getting lost in my background layer and kind of melting in. I’d recommend using large details only for side transfers. A cool pattern of colors or bigger figures like the deer work well. I piped the snowy bottom of the scene using a #12 round tip, and then I placed this on a huge cookie sheet, taped the edges down to keep them from curling, and put it into the freezer for 1 hour to set up. While this was chilling, I dyed my remaining frosting a navy blue shade. I put it into another piping bag fitted with a #12 tip.

Then held my breath. It’s been ages since I’d done a buttercream transfer, but covering up the “picture” is always a hope for the best situation.

A sea of panic… Once I had covered the entire collar with my navy blue background, I first used a large paintbrush to gently spread the frosting and ensure no gaps/white space remained.

Smooth like buttah. Then I used an angled spatula to very gently smooth out the frosting. I probably should have used a little more pressure since I had some issues with air pockets/holes in the final design, but live and learn.

You’re gonna need extra hands. Take your chilled cake out of the fridge, and with the help of someone else, take the transfer you just finished smoothing (not chilled after), and gently lift and place the acetate collar on the cake. It helps to start in the middle and each person presses their end of the collar around the cake firmly.

Pretty sure I had been holding my breath for a solid 5 minutes at this point. Then, take the Parchment off and use a bench scraper or fondant smoother and run it around the cake collar several times to ensure everything is adhering to the cake. Now, place this in the freezer for at least 15 minutes. I went with 30. Then you can remove the acetate collar carefully once the frosting is set.
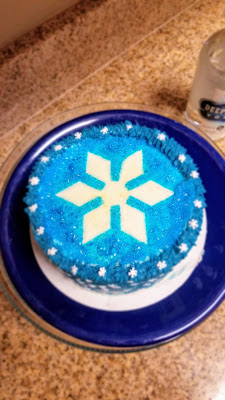
Ahh, love at frost sight. Time to finish the top! Once you’ve removed the acetate collar, you can use a sharp knife to trim down the edges at the top. I used my remaining frosting in a piping bag with a #21 star tip to create a star border on top of these edges, and added in some snowflake sprinkles. Then I carefully removed the snowflake template to reveal a pristine snowflake (you could very easily reverse the template and have the opposite effect, too, with the snowflake cutout and the glitter inside of it).
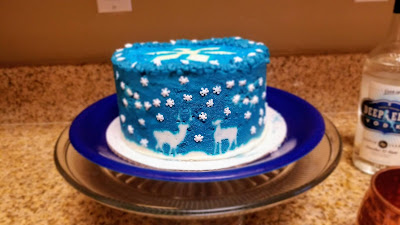
Oh, deer. It’s snowing out. Since my snowflakes more or less melted on me, I added regular snowflake sprinkles to my design to give those deer something to look at.

Obsessed with the top of this cake…maybe Elsa was onto something… 
I’m dreaming of a white Christmas (not a white sandy beach…Florida.). Well, it may be too warm for flannel or ugly Christmas sweaters outside, but at least my dessert tastes and looks seasonally appropriate. This is probably the only snow I’m going to see this winter to boot, but I’m not even that sad because I am in LOVE with the flavors of this cake…sweet buttercream frosting with a zip of ginger in each bite, a hint of vodka, and tons of delicious, soft yellow cake swimming underneath. A good cake heals most winter-related depression (or absence-of-winter-related depression in my case). We had a slice last night with a side of actual Moscow Mule to drink, and it was an amazing experience…where the cake ended and the drink began was absolutely seamless, and that’s how dang good it is. You could say it’s snow laughing matter how yummy this cake is. While it’s been *a year,* I have enjoyed baking every month, and can’t wait to try out new techniques in 2021. Here’s to sleighin’ it all season. ‘Til next time, my fellow eaters!

This cake wins Best in Snow 2020. -
For Fox Sake
Anytime we have company visit, obviously, I roll out the red carpet by serving a dessert fit for royalty. I mean, how much of a let down would it be if you came to the house of someone with a blog named “Kate Bakes Cakes,” only to be served stale Oreo’s or a week-old, store-bought Walmart cake (that blog would probably be named “Kate Provides Disappointment”)? Since my in-laws, the Foxes, drove out from Texas this weekend to spend some time with us, it provided me with the perfect opportunity to try out both a cupcake recipe and cupcake decorating technique I had been dying to use for a fall-themed dessert. So, for Foxes sake, these buttered rum cupcakes came to be:

A group of foxes is called a skulk, but there is absolutely NO skulking involved when you eat one of these. So, the Foxes are here, and I have foxes for the Foxes. It’s a foxton of foxiness. Aside from being absolutely adorable, these cupcakes are so delicious I can barely stand it (but that’s probably a side effect of the gluten and not the flavors themselves). I have never had buttered rum before, let alone created it myself, and now I’m completely obsessed. I was thinking outside the fox with this recipe, and I am so glad I did. The cupcake has wonderful cinnamon and nutmeg flavors swirled with spiced rum, and they’re even topped with more rum in the buttered rum glaze and the cinnamon rum cream cheese frosting. It’s the perfect dessert for in-laws or pirates, really. And at only 111 calories a cupcake (24 cupcakes total), you can eat them like three at a time to cop a pretty decent buzz thanks to all that Sailor Jerry’s.
The real MVP. This is such a simple recipe that tastes anything but, and all you need to make these buttered rum cupcakes are:
- 1 box yellow sugar free cake mix
- 3 egg whites at room temp
- 1/2 cup unsweetened applesauce at room temp
- 1/2-3/4 cup of spiced rum (think Kraken, Sailor Jerry, or Captain Morgan. Pretty much, it should be named for or about pirates and the pirate life)*
- 1/2-3/4 cup of skim milk at room temp*
- 1 1/2 tsp cinnamon
- 1/2 tsp nutmeg
*The total amount of liquid you want to use is 1 1/4 cups. If you like being punched in the mouth by a pirate, use more rum; if you don’t, opt for more skim milk. I only used 1 cup total of liquid, and I barely had enough batter for 24 cupcakes without that additional 1/4 cup. Lesson learned!

A few cupcakes ended up being very sad and small, but I’ll eat them anyway. Start by preheating the oven to 325 and lining two muffin tins with cupcake liners. Then dump all the ingredients into the bowl of stand mixer, blending on low for 30 seconds before bumping up the speed to medium high and mixing for two more minutes. Use a cookie scoop to help evenly distribute batter into your cupcake liners, and then bake the cupcakes for 18-21 minutes, or until a toothpick comes out of the center of a cupcake completely clean.

Your house is gonna smell like hot buttered rum, and it make cause you to turn into a swashbuckling pirate. Worth it. Let your cupcakes cool in the pan for 10 minutes before removing to a cooling rack to cool completely. While they’re cooling, you can make the buttered rum. Or butter yourself up with rum. Or both. Both is good.

You’re gonna hate how easy this is. Only because once you’ve learned how easy it is to make buttered rum, you’re gonna make it weekly. Here’s all you need: two tablespoons of butter, two tablespoons of rum, and 1.5 tsp of cornstarch. In a small saucepan, melt the butter on medium heat. Stir in the rum, and let things heat up for about 1 minute before adding in the cornstarch. Use a whisk to constantly stir until the mixture thickens up to a maple syrup type of consistency….side note, use buttered rum with maple syrup on your next stack of pancakes…will. change. your. life. Now, pour this into a bowl and let it cool for about 15 minutes.
Mmm, buttery rum goodness. Use either a basting brush or the back of a spoon, and spread a layer of rum butter on top of each FULLY COOLED cupcake (if your cupcakes are warm, remember, butter is know for its meltability). Sadly, you will use every ounce of the rum butter for your cupcakes, so there won’t be any left to lick out of the bowl. That just means you have to make more…
Good thing we’ve got a whole bottle of rum! As exceptional as the rum butter is, it is made infinitely better with the addition of a cinnamon rum cream cheese frosting. To make:
- 1/2 cup of butter at room temp
- 8 ounces of 1/3 less fat cream cheese at room temp
- 1 TBS spiced rum
- 1/2 tsp vanilla
- 1/2 tsp cinnamon
- 3 cups of Lakanto powered monkfruit sweetener
- Orange, maroon, and black gel dye
- Oreos, cut into tiny triangles for ears
Start by whipping together the cream cheese and butter until fluffy, 2-3 minutes. Then add in the rum, vanilla, cinnamon, and powdered monkfruit. Blend on low for a few seconds, then switch to medium high and blend until everything is incorporated. Now, I had leftover black frosting (thanks, Halloween baking, reminding me once again why I live for you), but you will want to divvy up your frosting so you have a tiny bowl dyed black for the fox noses and eyes, and then divide the remaining frosting so 1/3 is left plain, and 2/3 is dyed orange with a drop or two of maroon to give your foxes a fur coat that is made for photo ops. I ended up having about 1/4 of my orange frosting left, so if you use all your frosting, this will figure into a bit higher calorie count.
Now, let’s get foxy! I used a piping bag fitted with a #12 round tip to place a ring of white frosting on top of each cupcake. Then I used an angled spatula to smooth out.

Sorry, there’s some math here. Now, fit a piping bag with a #21 open star tip and your orange frosting. Start by pretty much creating a plus sign on the top of your white frosting. Then, fill in only the top half of the plus sign:

And don’t forget the ears! I took an Oreo, scraped the cream off (maybe ate that cream), and cut each side of 1 Oreo into eighths. I think I needed to do this a few times since the Oreo tops refused to cooperate with me and crumbled into uneven pieces against my unyielding knife skills.

You are one handsome fox. To finish, place your black frosting into a piping bag fitted with a small round tip (I used a #3). Dot the orange star on the bottom of the cupcake with a small mound of black frosting, and then come in and add small dots for eyes. And voila! You’ve created a cupcake that is almost too cute to eat but thankfully smells like a cinnamon-rum heaven to remind you it’s worth devouring.
But wait, there’s more! Or less, in this case. Like I said earlier, I ran reaaallly tight on batter toward the end without the extra liquid. I had 6 cupcakes that were little half cupcakes, so to find a way to make them look less sad and tiny (working title of my autobiography), I knew this was a job for sprinkles. I fit another piping bag with a 2D tip and more of my orange frosting.

I swirled each with one large rose and topped with orange sanding sugar. 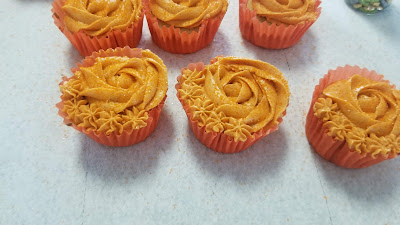
Then used my other bag of orange frosting with the #21 tip to pipe little stars around the edge. 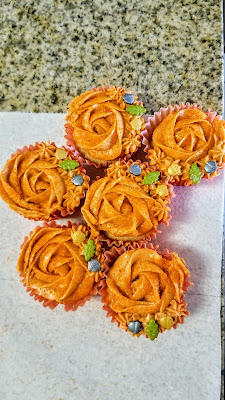
And because nothing is done without flair…I added some fall foliage sprinkles I had leftover from previous bakes. Honestly, they may be only half full, but they’re completely filled in my heart thanks to those sprinkles. As sly and cutesy those foxes are, these roses are absolutely gorgeous.

Looks like fall decided to finally show up in Florida. On a plate. I have to reiterate- BUTTERED RUM IS FANTASTIC. Guys, I know I try to sell you on everything I bake because dessert should be savored by all and in as many flavors as possible, but buttered rum cupcakes might just be peak fall flavor. Sorry pumpkin, you’ve been replaced. I am renouncing my basic white girl status. I am now solely interested in buttered rum flavor for fall.
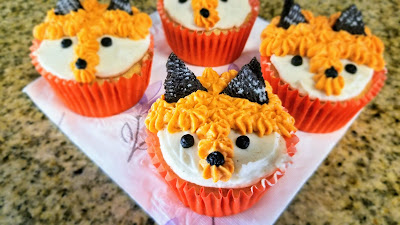
Clearly, this fox approves. Since these have both butter and a cream cheese frosting, be sure to keep your cupcakes in the fridge until you’re ready to devour the whole skulk of them. I actually made these a week ahead and froze them, frosting and all, and I take a few out of the freezer at a time and let them thaw out in the fridge (only takes an hour or two) before we enjoy them after dinner. Happy to report that the Foxes are enjoying the foxes, and I am still completely pleased with both the amount of fox puns in this blog and the divine flavor combos of rum, cinnamon, and spiced cream cheese frosting with every bite. If you bring these to your Thanksgiving feast, you’re gonna make whatever aunt or cousin you can’t stand look real lame for bringing just a pumpkin pie. Have your cupcakes and savor that small, petty victory (zero fox given). ‘Til next time, my fellow eaters!

You could also stay home, while being safe, and socially distancing from everything except these cupcakes. -
One Last Nightmare Before Christmas
As Baketober draws to a close, I knew I needed to create one last Nightmare Before Christmas, so to speak.You could argue literally everything about this year has been one big fat nightmare before Christmas, so my final spooky bake is firing on all cylinders, really…if you’ve got it, haunt it, I say. Many years ago when I first got into baking, I was commissioned to make a Jack Skellington birthday cake for a friend. To this day, it remains my most popular Pinterest creation, and every October, the repins go off the charts. I have come a long, long way since I made that cake in 2014, so I wanted to give old Jack an even more handsome cake countenance…

He is a witch’s fondest dream, after all. Quick-witted, legs-for-days, tune-carrying Jack Skellington with that wicked crooked smile always has been one of my favorite leading men, what can I say. My newest tribute to the Pumpkin King comes in the form of an orange creamsicle cake, and it is to die for…you could say I’m gonna be goblin up this cake with reckless abandon. Compared to Oogie Boogie’s rich black velvet cake tribute, this cake is extremely light and almost summery…Jack would allow it since it means exploring other holidays like 4th of July World (pretty sure that wasn’t a door in the movie, but you get my point). It has extremely refreshing bursts of orange flavor in an airy sponge cake with a tangy and sweet cream cheese frosting. It most definitely tastes exactly like an orange creamsicle in cake form, so mission accomplished, and at only 229 calories a slice (10 slices total), bone appetit, everyone, it’s completely guilt free.

Orange you glad to see such easy ingredients? Seriously, this is a very quick and easy cake recipe, I promise. All you need to make the cake layers are:
- 1 box sugar free yellow cake mix
- 3 egg whites
- 3/4 cup fresh-squeezed orange juice (I needed 2 large oranges)
- 1/2 cup of fat free or 2% skim milk (I use Fairlife fat free)
- 1/2 cup of unsweetened applesauce
- 1 tsp vanilla extract
- 1-2 teaspoons orange extract (I used 2, and I love that there’s no mistaking this is an orange-flavored cake)
- 1 box of sugar free orange Jell-o (they come in tiny boxes, but you really only need 1)
Preheat your oven to 325 and grease 3 6-inch round pans with cooking spray and bake even strips. Dump all your ingredients into a stand mixing bowl, blending on low for 30 seconds, then bump the speed up to medium-high for 2 minutes. Thanks to the orange Jell-o, you don’t need to add any food coloring to make this cake pop with orange coloring.

Now, evenly pour your batter between all 3 pans. Bake at 325 for 25-28 minutes, until a toothpick comes out of each cake round clean. Leave your cakes in the pan on top of a cooling rack for 10 minutes so they’re easier to handle. Then, with the help of some tea towels, flip each round out of the pan and leave on the cooling racks to finish cooling completely. I placed mine into the fridge to speed this process up. If you don’t have bake even strips, you will probably need to level your cakes once they’re fully cooled.
Orange like a Pumpkin King should be! Now, there are a few things to accomplish while those cakes cool:
- Make chocolate skulls.
- Cut out Jack Skellington’s face.
- Mix and try not to eat all the orange cream cheese frosting.

I will use these skull molds for any and all reasons I can come up with. I have a detailed account of how to make these skulls in this blog post from last Halloween. Head there to get the specifics!
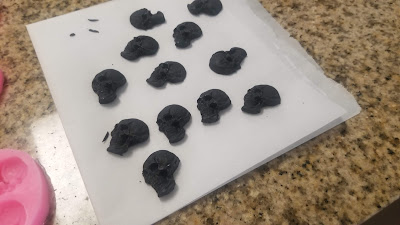
And say hello to my little friends. I believe I made 20 of these skulls for Jack’s “crown,” and only used 14. I made these last week and kept them in a single layer in a Tupperware at room temp. I actually hate the way chocolate melts taste, so I don’t ever eat these (they also add 13 calories a pop to the calorie count above), but damned if I don’t love how absolutely creepy they look.

Once again, I did not cut off a finger, X-acto knife win! Much like Oogie, I used an X-acto knife and a template on Parchment paper to create Jack’s face. I found this pumpkin carving template online, resized it to fit my cake (I used Canva to resize it, but you could copy and paste into Word or Paint and scale the size up or down as needed), and with the help of my X-acto knife and a cutting mat, I cut out what was needed:

I can’t say no to a devilish smile. I actually did this twice, because Jack’s face is on two sides of my cake, so no matter what angle he’s sitting at in my fridge, he’s smiling at me every time I open it. I’m almost as love-struck as Sally.
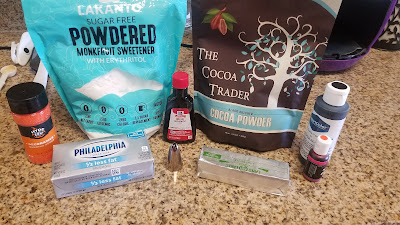
Ah black cocoa, we meet again. No, this isn’t a black cocoa cream cheese frosting for the third blog in a row. Sort of…part of the frosting that needed to be black is, but the vast majority of the frosting is a plain orange cream cheese icing. To make, you need:
- 1/2 cup low fat butter
- 8 ounces reduced fat cream cheese
- 1 tsp orange extract
- 1 tsp vanilla extract (optional: omit this and use 2 tsp orange extract if you want more orange flavor)
- 4 cups of Lakanto powdered monkfruit sweetener
- 3 tsp of skim milk, divided
- 1 TBS black cocoa
- Orange and black gel dyes
- Orange Spooky Sprinkles
- 3 piping bags
- 1M or 2D piping tip
Start by mixing the butter and cream cheese on medium high for 2-3 minutes, until light and fluffy. Add in 2 cups of Lakanto, orange and vanilla extracts, and blend on low until fully mixed. Then add in the remaining 2 cups of Lakanto and 2 tsp of milk. Blend fully, and then take a heaping amount of frosting (I used 10 ounces), and set it aside in a medium bowl. Once this is done, add several dollops of orange gel dye to the frosting left in the stand mixer bowl. Mix well, and turn your attention back to the reserved frosting. Add the black cocoa, final teaspoon of milk, and some black gel dye to this, mixing by hand. Now, we’re ready to assemble!

It smelled like a citrus factory at this point. Put your first layer of cake face down on a cake board. Add a decent layer of frosting to the top of it smooth out, and repeat with the next layer. Add the final layer on top, then cover the cake completely in orange cream cheese frosting. Be sure to reserve some orange frosting for the swirls on top. I ended up with a bunch of leftover frosting (both orange and black), and I have it in Ziplocks in the freezer for the next time I just need to eat frosting and nothing else (I refuse to believe I’m the only person who does this).
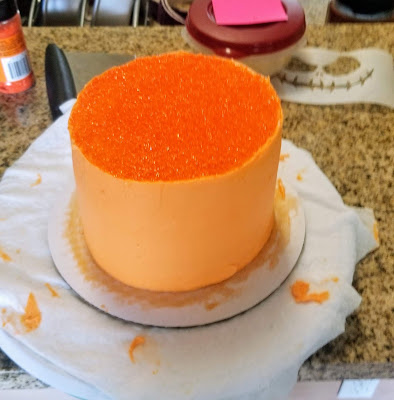
EVERYTHING. GETS. SPRINKLES. Once you’ve smoothed out the sides and top of the cake, very carefully pour the orange sprinkles on top, using light pressure with your fingers to get it to stick in place. This is a crusting frosting, so you can use the paper towl trick to smooth out imperfections once you’ve chilled your cake for 30 minutes.

I’m ahead of the carve here… …you will need to chill it for 30 minutes anyway to help your black frosting layer from mushing into the orange completely. Once my 30 minutes was up, I smoothed out a few areas and then placed my templates on each side of the cake. I used a paintbrush and some small palette knives to make sure no edges of the template were sticking up. This will keep frosting from leaking through to the rest of the cake, so do not skip this step. I got sidetracked at some point (it was by food), so I put my cake back in the fridge for 15 minutes and came back to it to do my painting:

I am a messy artiste. With the cake chilled, now you can use a small angled spatula or small palette knives to brush the black frosting over the template. You will want to use a bench scraper or the side of the angled spatula to smooth out this layer of frosting so it is evenly distributed and the layering isn’t wonky.

A scare is born… Once you’ve evened out the black frosting, carefully peel away your template, revealing the one and only Jack Skellington. You could call it a day, but I’m extra, so I wanted to give him a skull crown, too.
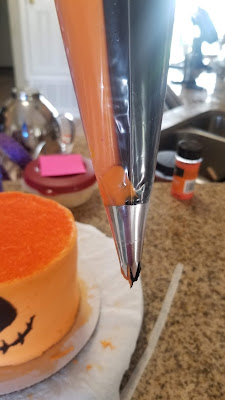
This is Halloween, everybody make a scene! I placed my remaining orange frosting in one piping bag and the black in another. Then in a larger piping bag fitted with a 1M tip, in both of these bags went. I piped out a few dollops on a paper towel until the colors were both coming out evenly.
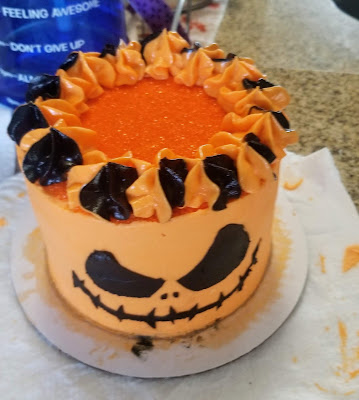
Spooookkkkyyyyy! I simply piped stars around the top of the cake, but honestly, there’s enough frosting to do larger swirls if you’d like.

Don’t forget about my little friends. Then I gently placed a skull into the top of each star.

And all was frightful. 
And more sprinkles. Because it’s me. …and also because I forgot to clean off my cake board after frosting, so I wanted to hide some blotchy orange and black stains, and sprinkles are a great way to do this. While the outside of the cake is ORANGE (it might even glow in the dark?), the inside is a bit more subdued:

A nice, mellow orange. Sorry for the flashback, my photo takes potato-quality photos in evening light. I’m giddy with delight at how cool this cake looks. It’s a huge departure in style from the cake a novice baker tried her hand at 6 years ago. I enjoy baking in October so much because I can let my inner Wednesday Addams shine and come up with creepy cool cakes I’d love to bake every month, but I realize it wouldn’t be as fun or unique if I did this ALL THE TIME. And in a year as useless as Halloween Town’s mayor, it’s been a ton of fun to have something to actually look forward to…especially when the end result is a delicious citrusy-orange cake with a heavenly smooth cream cheese frosting that I’m sad I have to share, but my husband definitely deserves cake after making it through shoulder surgery earlier this week *and* being married to my spooky self (he’s gotta deal with all this spookiness 365 days a year). I’m already churning out new ideas for next October because I truly can’t help myself. ‘Til next time, my fellow eaters!
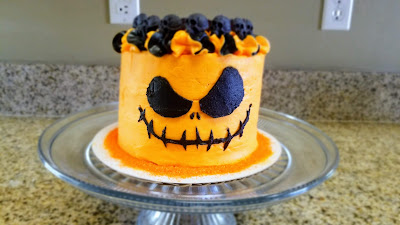
“And I just can’t wait until next Halloween ’cause I’ve got some new ideas that will really make them scream…” -
"Well, Well, Well, What Have We Here?"
I think we’re all painfully aware at this point that 2020 is pretty much a sack filled with horrors (all things considered, I’m extremely glad murder hornets didn’t become a bigger problem). I also happen to be a huge fan of another stitched up sack of gross curiosities- Oogie Boogie from Nightmare Before Christmas. I found myself singing “Oogie Boogie’s Song” last week and realized that it’s probably THE theme song for this year…for a multitude of reasons. Anyway, when a giant sack filled with worms and spiders tells you to watch out, you should definitely take heed. And while Jack Skellington will always own my heart (no, it’s not weird that I have a lifelong crush on a cartoon skeleton- he’s suave, creative, and smartly dressed), I feel like if any year deserves to be the year of the Boogie Man, it’s this one.
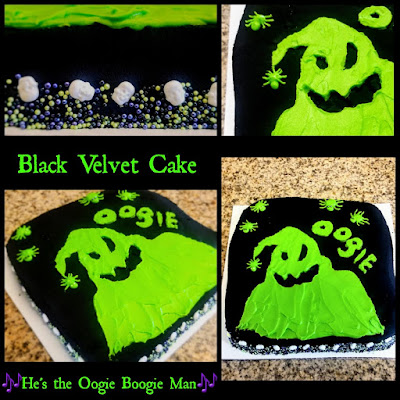
This is not filled with spiders–just topped with them. Big difference. Guys, it could realistically be none more black than this…and that’s thanks to the magic ingredient: black cocoa powder. I can finally give you a visual reference to the color of my heart and soul, and it’s thanks to chocolate. This is both the definition of irony and totally appropriate. This black velvet cake and tribute to the Oogie Boogie Man is filled with black cocoa powder both in the cake and in the chocolate cream cheese frosting (I am addicted to it). It tastes EXACTLY LIKE A GIANT OREO. I am convinced the folks at Nabisco have been harboring this as a secret, but black cocoa gives a richness that truly tastes exactly like everyone’s favorite sandwich cookie–except mine is in cake form (and gluten free), making it at least 75% better than an Oreo. It’s also only 280 calories a slice (9 slices total), or the equivalent of a meager 4 Oreo cookies. Black velvet cake is now a staple recipe in this house.
The hardest part of baking this cake is finding black cocoa powder. It’s awesome that this is so easy to throw together because I’m going to need to make one of these a month until I die. You need:
- 1 1/4 cups Lakanto monkfruit or Swerve Granular
- 1/2 cup unsweetened applesauce
- 2 eggs at room temp
- 1 tsp vanilla extract
- A dash of salt
- 3/4 tsp baking powder
- 1/2 tsp baking soda
- 1/2 cup + 2 TBS buttermilk (omit the 2 TBS if you’re using regular flour; the gluten free flour needs a little more moisture)
- 1/2 cup of hot water (I used my Keurig to brew hot water, but a sauce pan or microwave will work)
- 1/2 cup of black cocoa (link above to purchase on Amazon)
- 1 1/2 cups of Bob’s Red Mill 1:1 Gluten Free Flour Blend (or All Purpose if you’re fortunate enough to not have a stomach that revolts near bread)
Start by preheating your oven to 350 and greasing two 8-inch round or square pans and lining with Parchment paper…I tried making this in only one 8-inch square pan, and it took forever to cook and my edges got dry and crumbly, so definitely split this into two pans. Blend the applesauce and sugar on medium-high in a stand mixer for 2-3 minutes, until the mixture looks a little fluffy. Add the eggs, one at a time, blending til fully incorporated. Then add in the extract, salt, baking soda, and baking powder.
While things are mixing together, in a separate bowl, whisk together the hot water and buttermilk. Then whisk in the black cocoa powder until absolutely no lumps remain. Measure out your flour in another bowl.
Now, add 1/3 of the flour to your stand mixer bowl, blending until fully mixed in. Scrape the sides of the bowl, then add 1/2 of the cocoa mix, blending on low so you don’t make a huge mess. Scrape the sides of the bowl, then add another 1/3 of flour, blend, then the remaining 1/2 of the cocoa mix, blend, and finish with the last of the flour. Mix until things have come together nicely on medium-high. Pour into your 2 prepared pans.

See, same color as an Oreo. Bake at 350 for 30 minutes, testing with a toothpick. If you only have a few crumbs, remove from the oven. If the toothpick is still very wet with batter, continue baking another 3-5 minutes. Keeping the cakes in the pans, place onto a cooling rack for 10 minutes before running an angled spatula or dull knife around the edges of the pan before turning out on the cooling racks to cool completely. I placed my cake in the freeze for 15 minutes before leveling since it domed up on me (again, too much batter for one single pan, don’t make the same mistake).
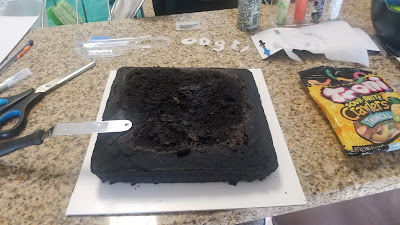
It looks a little sad with half of its head cut off, but look at that black cocoa magic! Now, set this aside to finish cooling completely while you make what is, quite literally, the best chocolate frosting that ever existed.
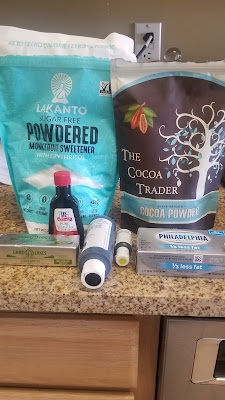
Seriously, my only regret is it took 33 years to find out about black cocoa powder. For the blackest of black, so-dark-it-could-be-an-endless-void cream cheese frosting, you need:
- 8 ounces reduced fat cream cheese at room temp
- 1/2 cup of light butter at room temp (I used Land O Lakes)
- 4 cups of Lakanto powdered monkfruit (or regular powdered sugar if you aren’t watching your intake)
- 1/2 cup of black cocoa powder
- 1 TBS of vanilla
- 2-3 TBS skim milk
- Black and lime green gel dyes
You’re going to be splitting this frosting up to dye two different colors, so keep that in mind. Begin by mixing the cream cheese and butter together until fluffy, for about 3 minutes. Add in 2 cups of powdered monkfruit, mixing on low at first to avoid an explosion, then switch to medium-high until blended. Add in the vanilla extract and remaining powdered monkfruit, blending well. Now, take about 1/3 of the frosting and put it aside in a bowl, this will need to get several drops of lime green gel dye mixed into it for Ooogie Boogie. Cover with a paper towel until ready to use. Now, turn your attention back to the rest of the frosting. Add in the black cocoa powder and at least 2 TBS of skim milk to thin this out so it is a spreadable consistency. Mix well, and if you see it’s still incredibly thick (hard to stir with a spatula by hand), add another TBS of skim milk. Then add in a few drops of black gel dye to make this frosting so black you could lose an entire coven of witches in it. Now, on to the knives!

It’s a Boogie Man cake, of course we’re going to play with knives to create it. 
A face only Lock, Shock, and Barrel could love. For my Oogie Boogie, I sketched him out on Parchment paper with the help of an Oogie Boogie pumpkin carving template sized down to fit the top of my cake. You’re also going to need an X-acto knife, scissors, fun Halloween sprinkles (Spooky Sprinkles!), and either a few palette knives or angled spatulas to make Oogie, boogie, to life. I really wanted to use some gummy worms with this cake, but I could only find Trolli’s, and they look absolutely NOTHING like real worms, so consider me very disappointed. Sorry, Oogie.

He’s no Jack Skellington, but he’s a handsome devil in his own right. Put your template down on a cutting mat or board, and use the X-acto knife to cut out his mouth, eyes, and the inside of the O’S and the G. Save these pieces!! You need them later. You also need to cut out the rest of the letters, but you don’t need to keep these. Also cut out his silhouette (I used scissors because I considered it extremely fortunate I hadn’t lost the tip of a finger to the X-acto at this point). You should pretty much have a reverse image:
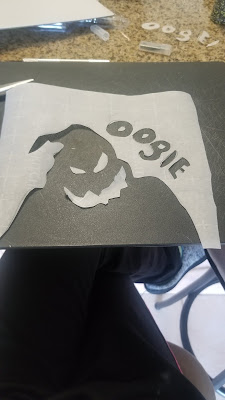
“You’re jokin’, you’re jokin’
I can’t believe my eyes!”You can set this aside while you frost the completely cooled cake with the blacker-than-a-black-hole portion of frosting. Since you’ll have two layers, place one layer down on a cake board before spread a decent amount of frosting on the top of it, then add the second layer, and completely cover the entire cake in the black frosting. You’ll probably use all of the black frosting (and will lick the bowl for the rest). This does crust, so if you want to smooth it out with the paper towel trick, you totally can. I kept things a little messy because this is a cake tribute to a creature that vomits worms, so neatness was not my concern.

Time to get sprinkly! Now, place your cake on a large baking tray so you don’t get sprinkles EVERYWHERE. I cleaned my house the day after I made this, and not gonna lie, I found sprinkles in a 100-foot radius of my kitchen, but I sprinkle with gusto.
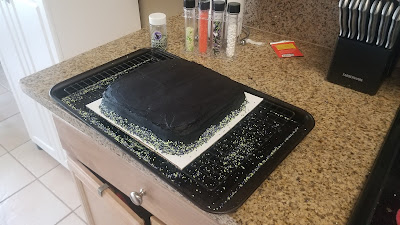
I needed a bigger tray, apparently. I used a Halloween mix of sprinkles, all by Wilton and found at a craft store. I used a mix of black, purple, and green sprinkles, pouring a handful into my palm before gently pressing on the sides of the cake. Once I was done with that, I came back in and gently placed skull sprinkles at the top of the border:

I mean, look at that frosting. Black velvet, indeed. Once you’re done making a mess your dogs will be so happy to help you clean up, place your template on top of the cake.

I was giddy with delight at this point. I used toothpicks to help nail down my template, and to help me keep track of where the smaller pieces like the eyes, mouth, and insides of the letters were placed on my cake. I also used a paintbrush and an angled spatula to push my template down into the frosting a bit. You just want to make sure there are ZERO gaps (ah Zero, easily the best character of Nightmare Before Christmas). I put my cake in the fridge for 30 minutes to allow my black frosting to crust up so it wouldn’t bleed too much into the green.

I think I also found the Nickelodeon slime recipe? Using a very skinny palette knife, I slathered a thick layer of green frosting over OOGIE, only marginally spreading to even it out. Again, a sack of horrors cake does not require smoothed perfection, but if you’re feeling twitchy about that, use an angled spatula to swipe everything perfectly even…I will always make an exception for OCD.

Definitely slime. The jig is up, Nick. Come back in with more green frosting and gently spread over the rest of Oogie’s body, eyes, and mouth. You want to apply minimal pressure while you’re spreading out the green frosting so you don’t disrupt the template. Now comes the terrifyingly fun part!
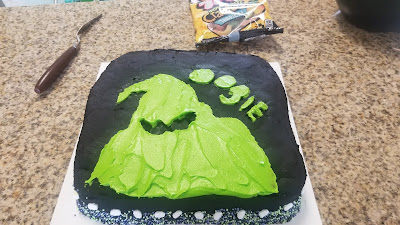
Oh we’re getting spooky, alright. Using the toothpicks, gently wiggle the templates straight up and away so as not to disturb the green frosting. I also used a very pointy palette knife to help with larger pieces. Repeat until you unmask the Boogie Man in all his grotesque glory:

Oh heeeyyyy, nightmare fuel. I ended up not using the Trolli’s since they looked more like pencils than worms, but if you can find real gummy worms, you could stick one coming out of Oogie’s mouth, and then spread some around the top of the cake. I ended up using the leftover green frosting to outfit Oogie in his second favorite critter, spiders.

He needs them to bake a special batch of his snake and spider stew. I put a coupler on a piping bag, filled it with my green frosting, and alternated between a round 12, 5, and 2 tip to make my spiders. Starting with the #12 tip, I piped little circular blobs around the cake.
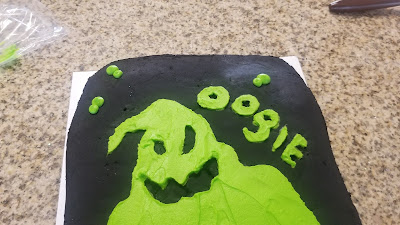
Only in the month of October do I condone “spidering” your baked goods. Switch over to the #5 tip, then add little blobs in front of the body to make the spider’s head.

But wait, there’s goremore!To finish, switch to the #2 tip and pipe 8 little legs on each spider in straight-ish lines.

He’s…cute? To make them less terrifying (I have to eat this cake after all, and I HATE SPIDERS), I used little individual sprinkles to give my spiders TWO, ONLY TWO eyes. They’re far less shiver-inducing with only two ojos and not eight. Although I do admire the symmetry of having eight legs and eight eyes, this is where my respect for spiders ends.

Oh, good sir, you are delightfully awful. I am SO happy with a multitude of things about this cake: it is so black it could use a nightlight, Oogie is so creepy he could spring off the cake to gamble with you (or your life), and it tastes like the world’s greatest Oreo. *Insert any color* velvet cakes are always so dense, and this is definitely no exception. I don’t make velvet cakes often since I do prefer a lighter sponge, but since this cake tastes exactly like an Oreo, it pairs excellently with a glass of milk to wash it down. I went on and on in the last blog about a regular chocolate cream cheese frosting, but black cocoa powder makes that batch the poor man’s chocolate cream cheese frosting for sure. This is silky, creamy, and deeply chocolately. It isn’t like a light cocoa vs dark cocoa flavor; black cocoa frosting is not at all bitter like a bar of dark chocolate. It gives a real richness that pretty much makes the frosting and cake party on your taste buds. Since trick-or-treating is probably out this year (the true horror here is 2020, not my terrible puns), you could just make this cake instead and reluctantly share it with your children. Definitely keep your cake in the fridge for as long as it lasts to keep the cream cheese frosting firm.
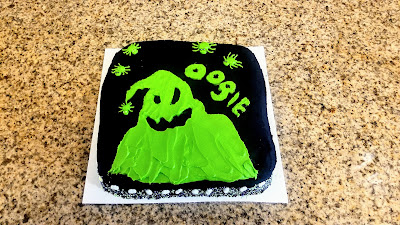
I, on the other hand, refuse to share. I had to put a few slices in the freezer while my husband is out of town this week…there’s no way it would still exist anywhere else but in my stomach if I didn’t, and I want him to have the giant Oreo cake experience because although I am evil, I’m not mean…there is a difference. It’s the thinnest of lines, but even villains have their moments of kindness. You know, like when Oogie didn’t actually kill Santa Claus. He just sang about how he wanted to instead; see, thin line. ‘Til next time my fellow eaters!

If I eat another slice, “I might just split a seam…” -
Owl About Cupcakes
It’s October, which means I can be as creepy and weird as I want and it’s just considered festive, unlike the rest of the year when my dark sense of humor and love of the color black are totally lost on most. After suffering through 2020, it’s possible to be dead inside but still really excited about something, and for me, nothing brings greater joy than Halloween baking. Ghouls just wanna have fun, after all. I decided I wanted to make some cupcakes that were fun Halloween-y and not flat out creepy. You know, starting by gingerly getting my feet wet (or webbed?), but don’t worry, your Hallow-queen has some tricks up her sleeve later this month. For now, take a look at these adorable black forest cupcakes with chocolate cream cheese frosting!
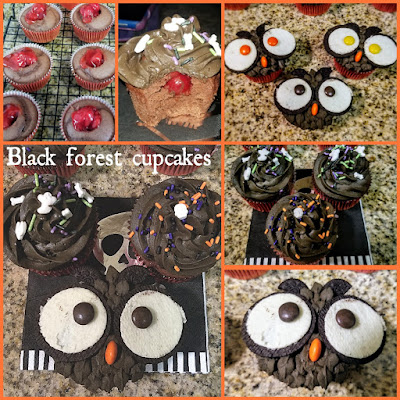
You could say I’m owl about how cute these are. Aren’t these an absolute hoot? I am trying so. hard. to reel in the terrible puns, but these just bring me so much happiness. They are cute but also slightly spooky, and a dozen owls make up my parliament. The other dozen cupcakes were supposed to be bats, but Oreo’s prove to be extremely hard to separate while retaining pretty cream-side canvases, so before I was driven, well, completely batty by trying and failing at getting Oreos to play nice, I busted into my spooky sprinkle collection (it is large) and did simple swirls topped with ghosts and skulls. I love how they all turned out, and I assume these would be easy to make as a family with the kids for a fun treat. I mean, I have the same willpower around Reese’s and Oreo’s as a six year old, and I only ate a third of my body weight in candy while making these. Good thing they’re VERY low cal (the owls are 191 calories each; the swirls are only 118 calories each). I swear, all treats, no tricks, with this recipe…these are a rich devil’s food cake filled with sweet cherries and finished with a tart chocolate cream cheese frosting. They are to die for *cue evil laughter.*
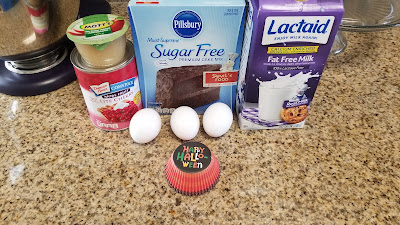
But unlike most evil villains, I have no long, convoluted plan. These are SO easy to make. For the black forest cupcakes, you’ll need:
- 1 box of sugar free devil’s food cake mix
- 3 egg whites
- 1/2 cup of unsweetened applesauce
- 1 1/4 cup of fat free milk
- 1 1/4 cup of lite cherry pie filling (about half a can)
Preheat your oven to 325 and line two muffin tins with festive Halloween cupcake liners (not optional). Dump the cake mix, whites, applesauce, and milk in a stand mixer, and blend on medium-high for 2 minutes. Once well mixed, use a large cookie scoop to plop one and a half spoonfuls into each cupcake liner. Bake for 20 minutes, or until a toothpick comes out of the center clean, then still in the tin, place on the counter for 5 minutes before removing to completely cool on a cooling rack.
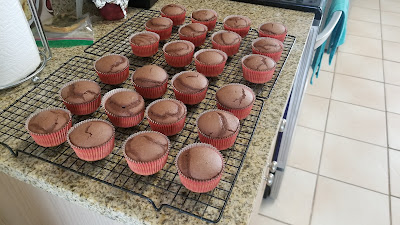
Your house will smell sinfully delicious. You want to let these get pretty cool before coring and adding the cherries, so plop into the fridge for a half hour to speed things up. A speedy spooky timeline is a real must for busy witches like me.

Now, get ready to core! Take a large frosting tip (I used a 1M), and gently press into the center of each cupcake, twisting until you get about 75% of the tip into the center of the cupcake. Remove, and you should have a decent hole
for burying the bodiesfor the cherry filling.
They do look a little sinister and murdery this way. 10/10 would haunt. I used a 1/2 TBS to scoop cherries and plop into the center of each cupcake. They should hold about 3-4 cherries each. Once done, you can try to put the cupcake cores back in, save for cakepops, or eat by the handful (you’ll never guess which one I chose…). Place your cupcakes into the fridge so the filling can firm up while you make your frosting.

This recipe is a game changer. Chocolate cream cheese frosting might not be the traditional black forest cake topper, but this just works on so many levels. Super easy to throw together (more time for eating cupcake core remnants), all you need is:
- 1/2 cup of reduced fat butter at room temp
- 8 ounces of reduced fat cream cheese at room temp
- 4 cups of Lakanto powdered monkfruit sweeteneer
- 1/2 cup of cocoa (dark cocoa would probably also be fang-tastic)
- 1 TBS of vanilla extract
- If needed, 1 TBS of skim milk to thin out for decorating
- Brown gel dye (optional)
Whip the butter and cream cheese together for 3 minutes until fluffy. Add in half of the monkfruit sweetener and the vanilla, blending well. Add in the cocoa, the rest of the sweetener, and milk if you’re piping and not just slathering these on top of the cupcakes. I also added several drops of brown gel dye to get the owls a little closer in color to the Oreo’s. Mix well, but be careful not to over mix or it will thin out the cream cheese frosting. If this happens, just pop it into the fridge for 30 minutes to firm back up before frosting.
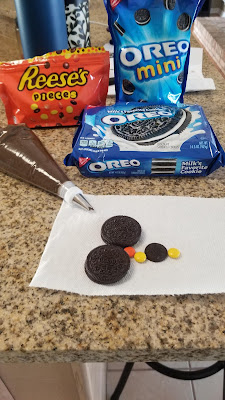
Thanks to this recipe, I now have enough candy to build a house in the woods with to lure children to their impending doom. To make the owls, you will need Reese’s pieces or M&M’s, Oreo mini, and regular Oreo’s.

Each owl will need the cream side of 2 Oreo’s, two Reese’s of the same color for eyes, one orange Reese’s for a nose, and 1 side of a mini Oreo for eyebrows? Eyebrow feathers? You know what I mean. 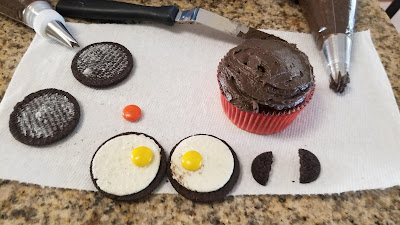
Those eyes look as confused as I am right now. Put the Reese’s gently on the cream side of each Oreo, then snap a mini Oreo in half, and grab those cupcakes from the fridge. I just slathered on a layer of chocolate frosting on top of each cupcake, then placed the eyes about in the middle of the cupcake:

It is the angriest bird. Poor thing has resting owl face. Drop the orange Reese’s a little below the eyes for a beak, and position the mini Oreo’s above the eyes to form what we’re now calling eyebrow feathers. Let’s just say how you position these can make the owl look like “Awww” or “Oh God, it wants to kill me.” You could call it here, but I loaded up a piping bag with a #352 leaf tip and piped little feathers. To do this, you want to hold the bag so the piping tip is sideways, and then gently press a little frosting out of the bag while lifting back toward you to form feathers:

Yep, this bird is trying to steal my soul with its rage. Repeat for as many cupcakes as you’d like, and then store them in the fridge to firm up for an hour before eating. The frosting will crust up a bit, so your owl’s feathers will look more defined.
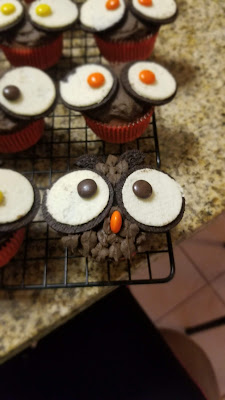
Let’s take a look at a finished owl with eyes that say, “I would gladly tell you how many licks it takes to get to the center of a Tootsie Pop,” and not “I will haunt your every dream.” Look at his ADORABLE LITTLE OWL FACE. For the remaining dozen cupcakes, I used a piping bag fitted with a 1M tip to create a traditional cupcake swirl before topping with Spooky Sprinkles (TM).

Ghosts & Bones (sounds like the next Mumford and Son’s album title) for everyone! I had so much skele-fun putting these last dozen together. Were there sprinkles everywhere? Yes. Any regrets? No. This is why I have dogs to clean my floors.
This owl is also giving me puppy dog eyes. 
Try as I might, most of my owls ended up being completely evil. 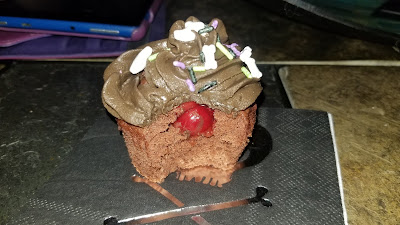
But at least there’s a cherry on topish. Delicious chocolate cupcake paired with cherry filling? There’s a reason chocolate-covered cherries are a thing, and black forest cupcakes remind you exactly why. These aren’t too rich or too sweet thanks to the chocolate cream cheese frosting offering a little tang to take the edge off the cherries. Everything is firing on all cylinders in this recipe, so I feel like an evil genius for concocting my first of many Spooktober bakes! It’s always nice to get to share my bakes with family and friends, and these are being eaten with much fervor while my parents are visiting this weekend…I froze half to send on my parent’s journey up to my brother’s house for my niece and nephew, but I can hear those owls screeching my name from the other room, so I better learn to practice some willpower lest I become “the witchy aunt who literally takes candy from children.” Never fear, I am just getting started…this blog will be my regular haunt all month long. ‘Til next time, my fellow eaters!

I can feel it in my bones–gonna be a great month for baking.

Healthy-ish cake, cupcakes, pie, and cheesecake recipes and decorating tips


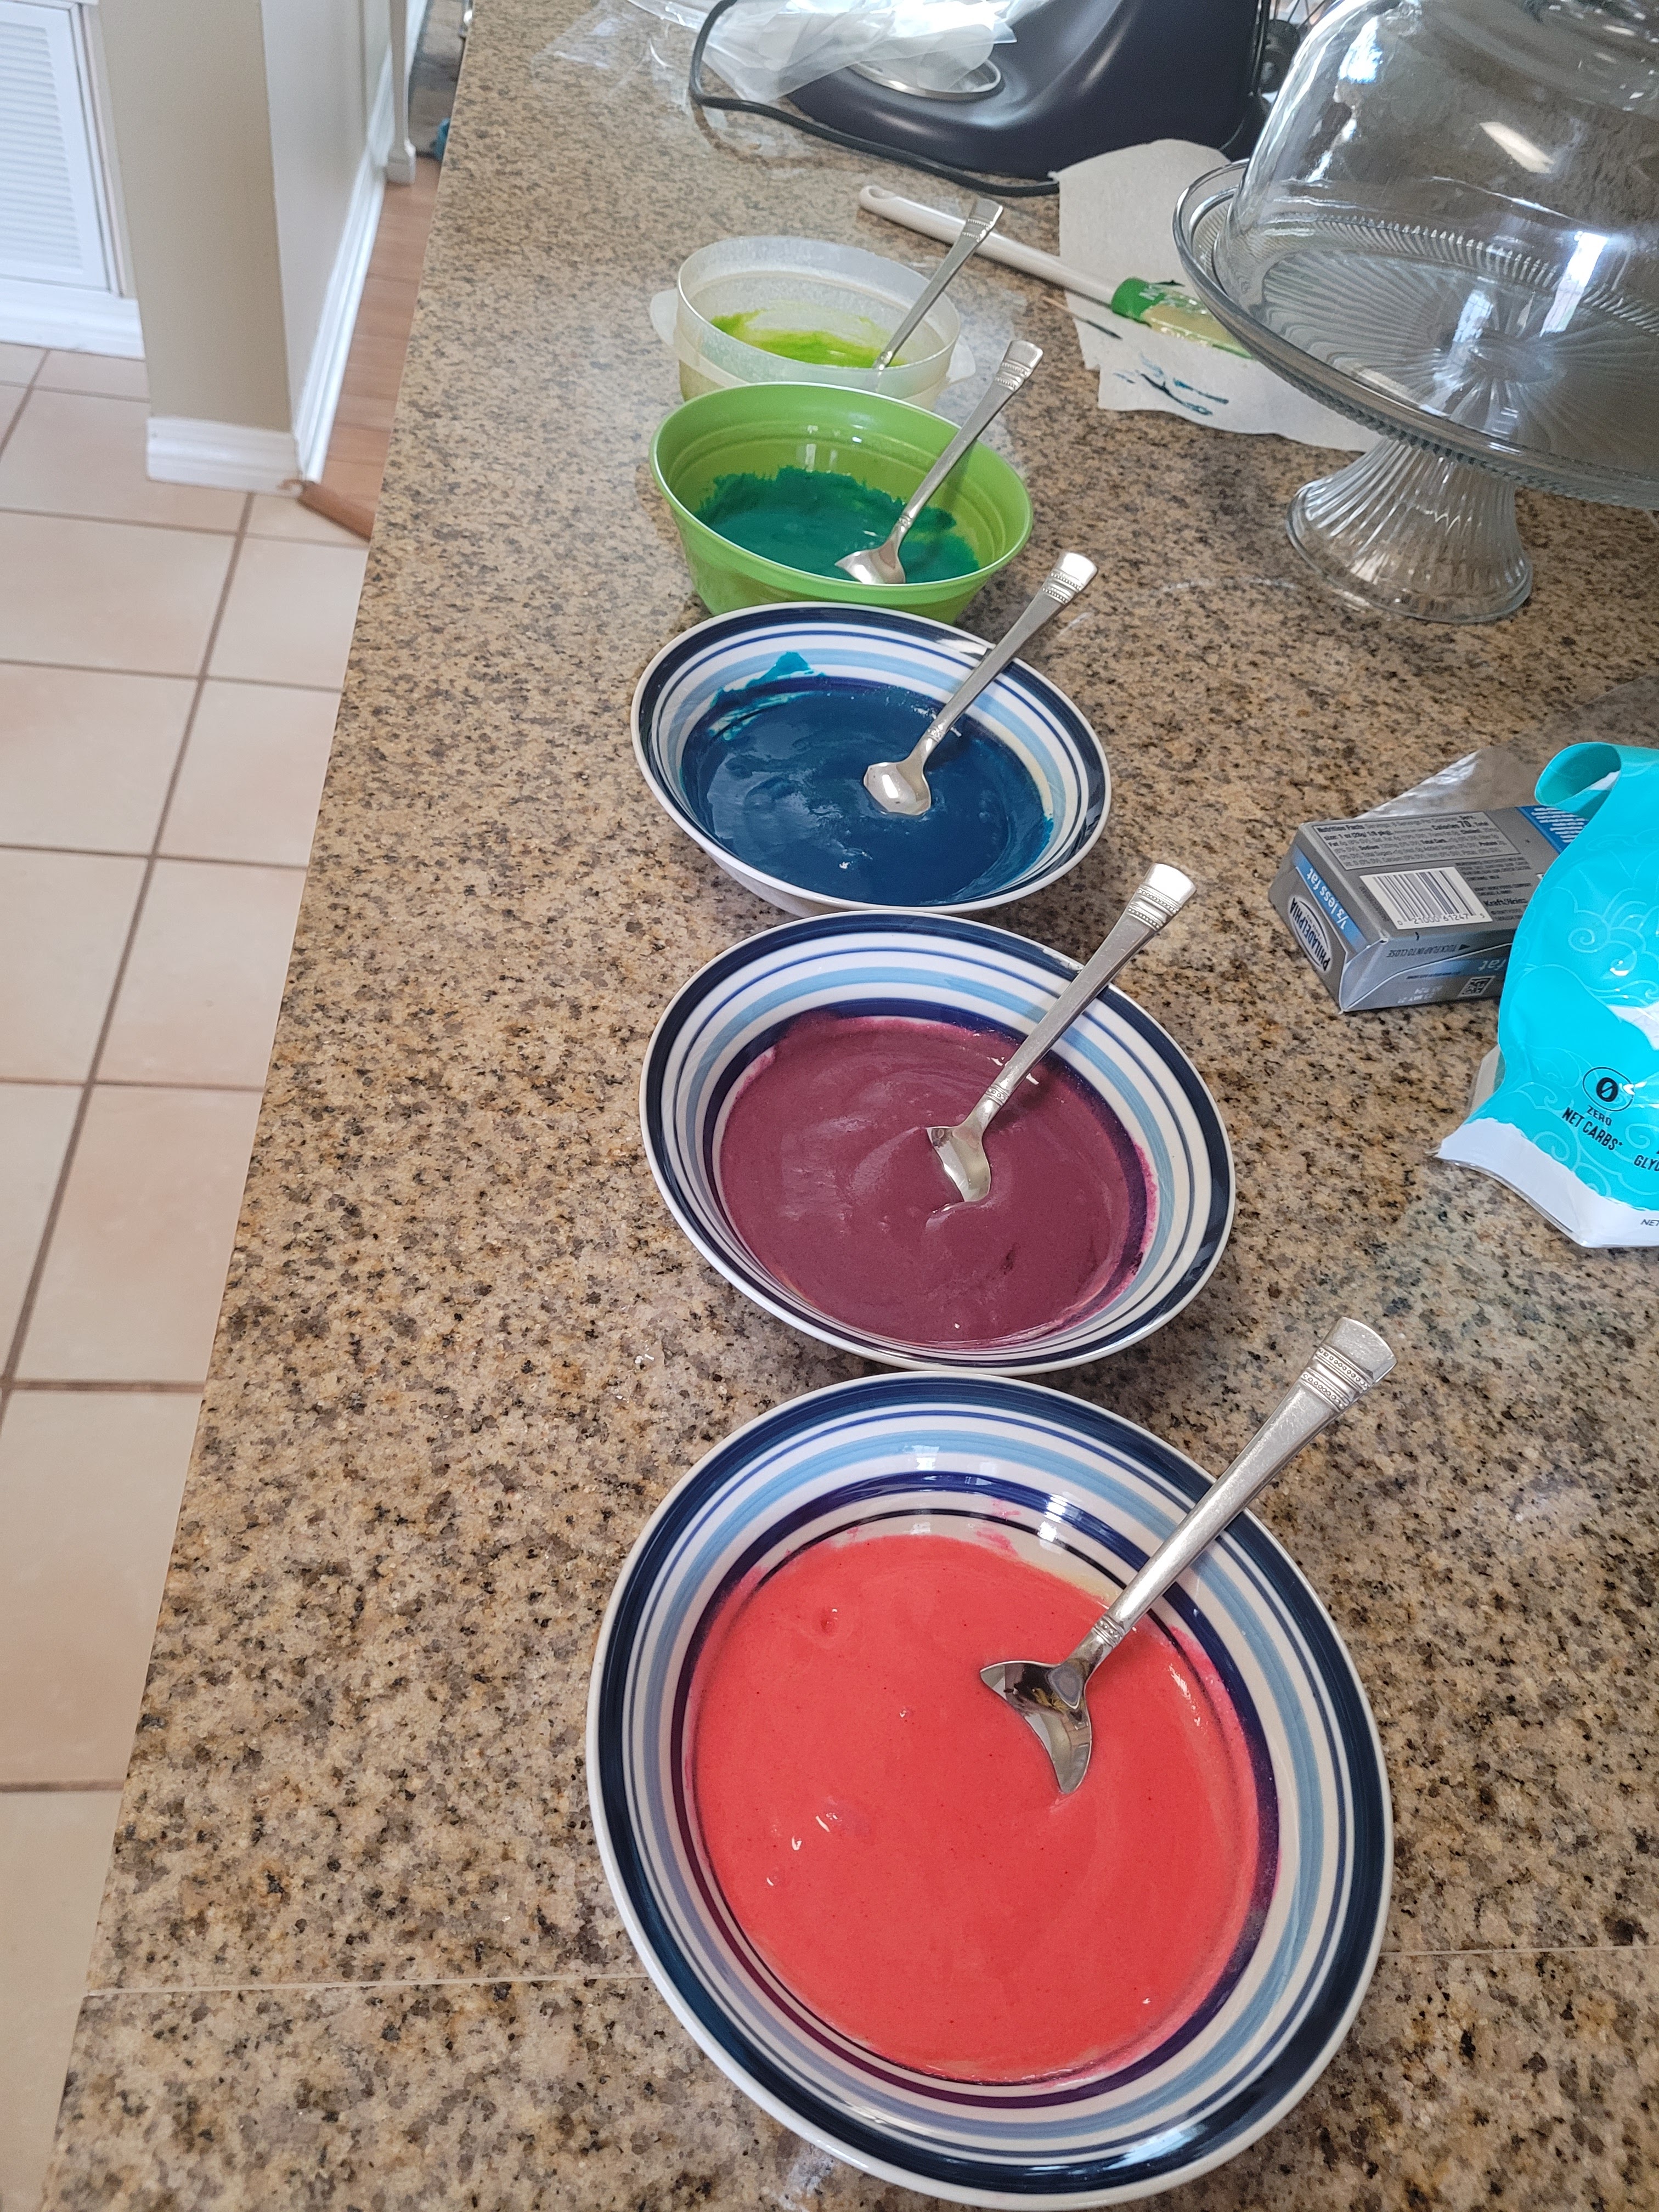
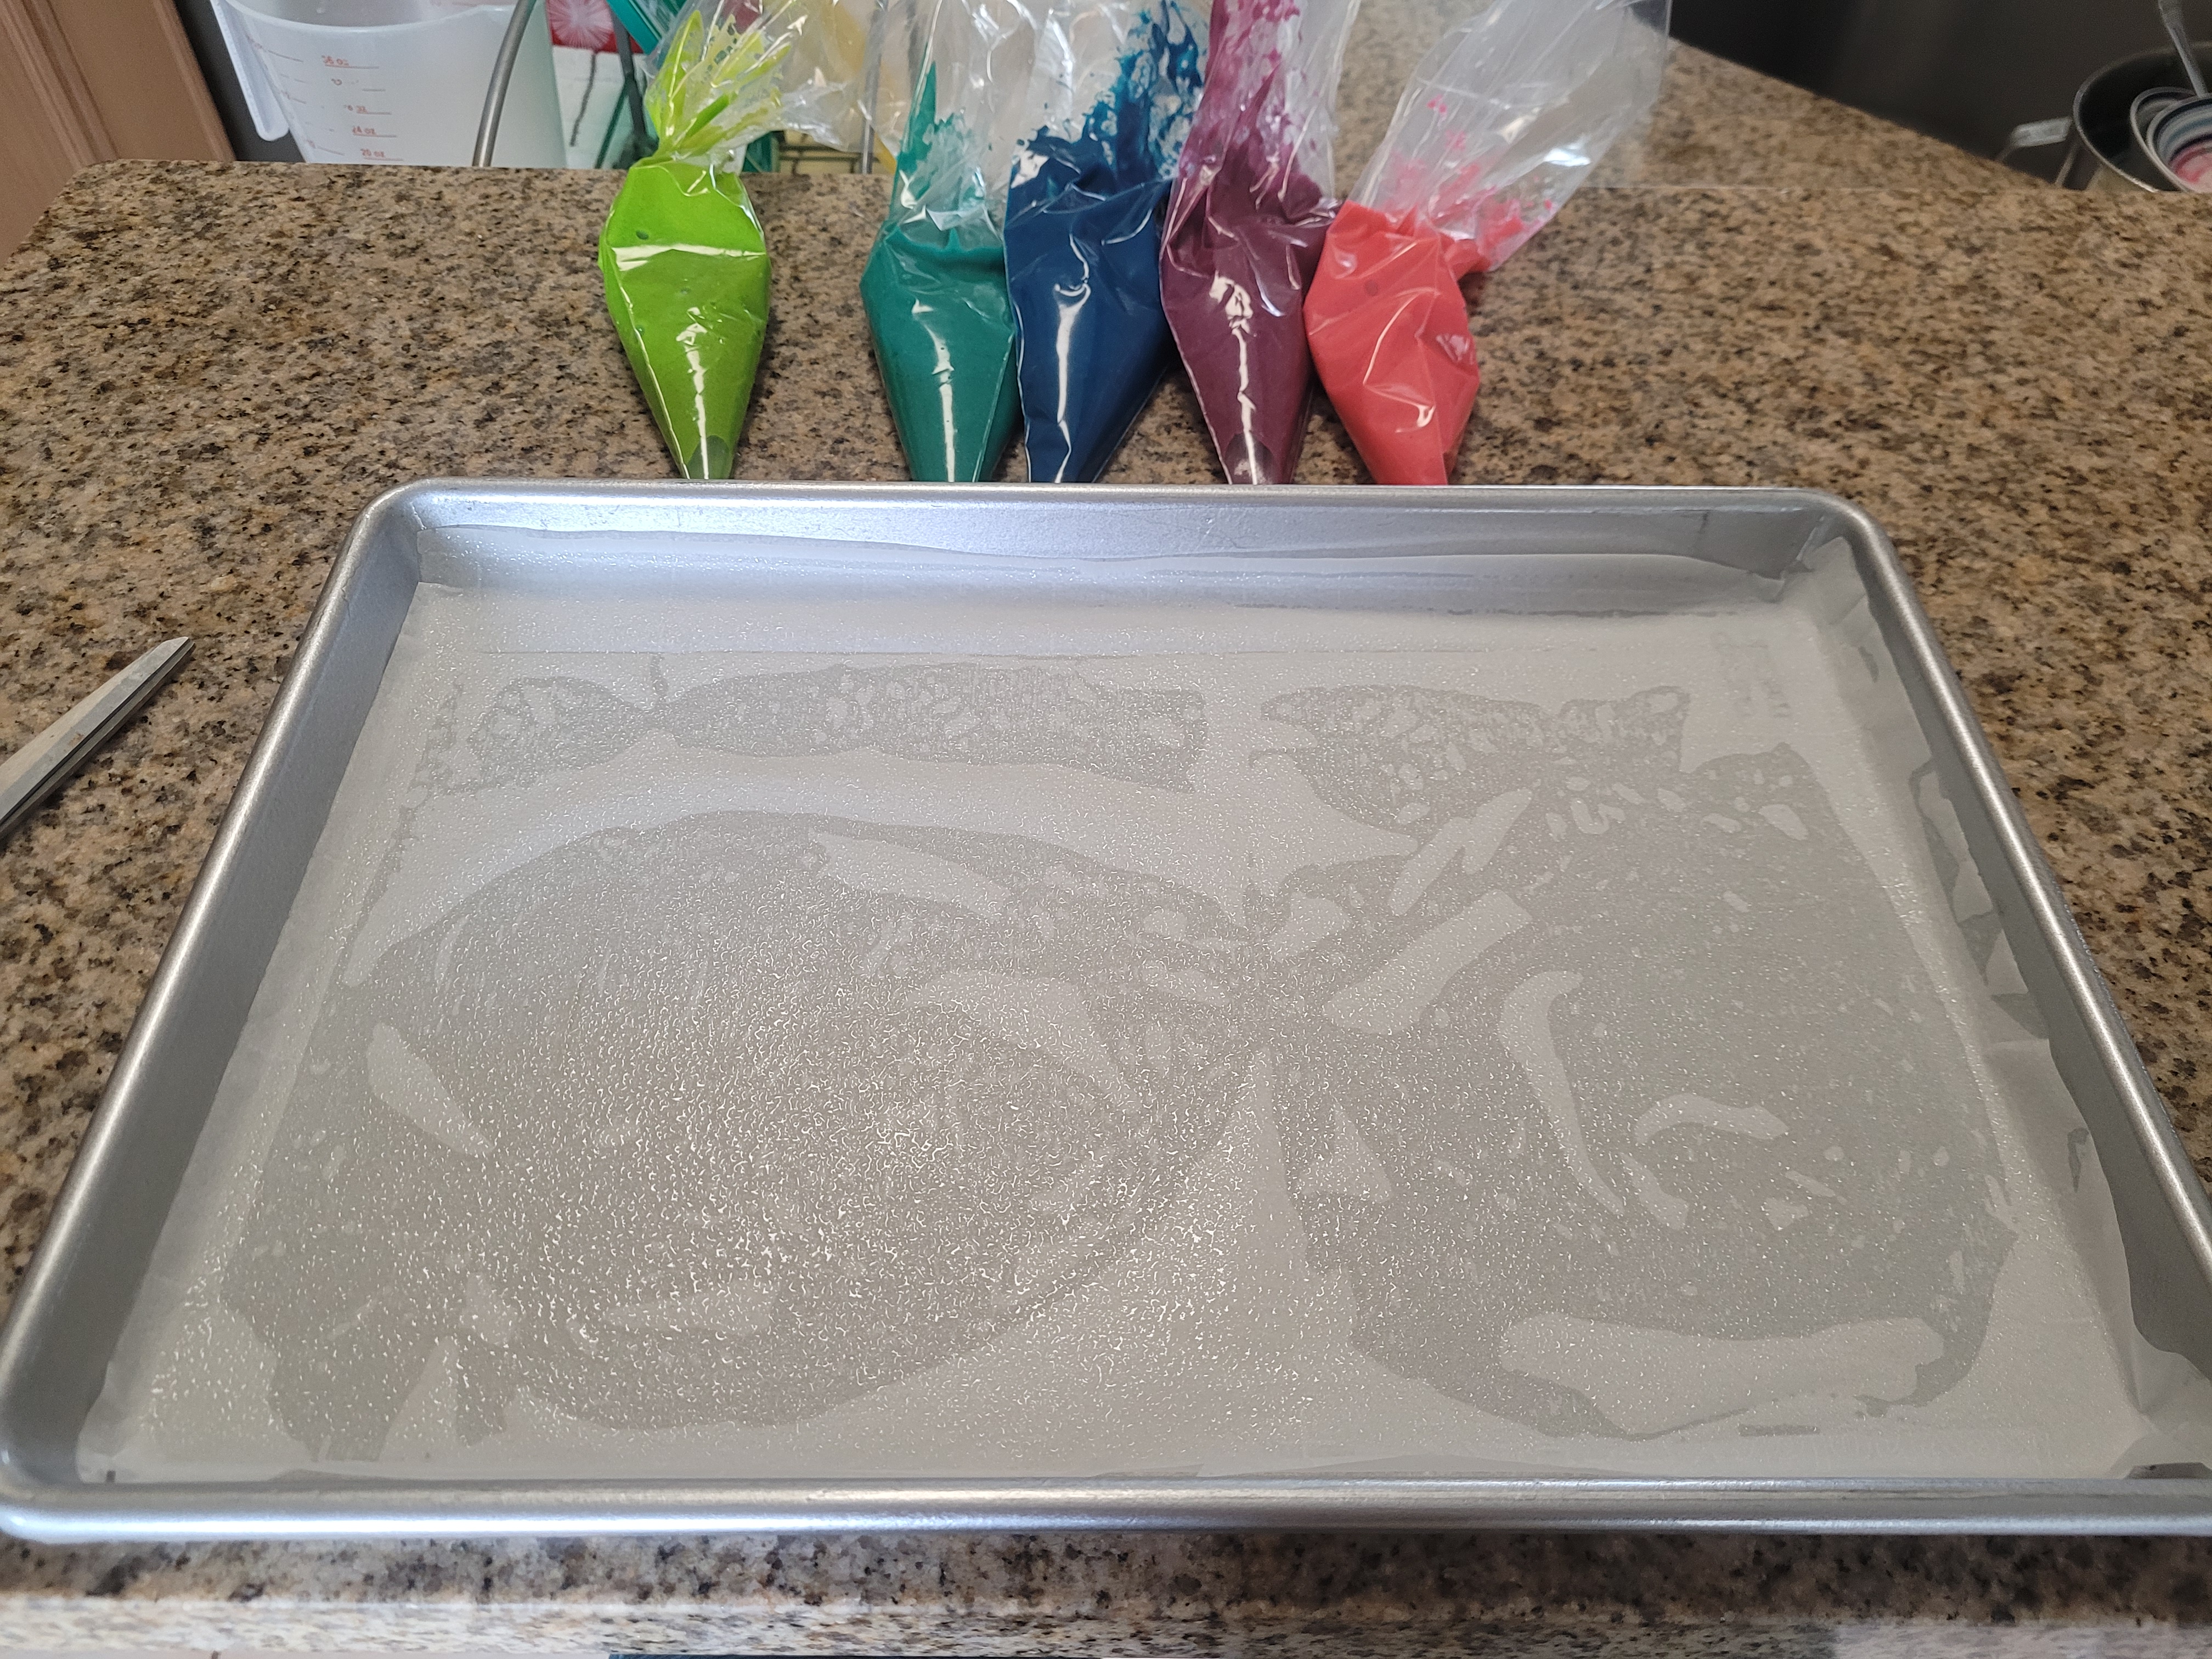


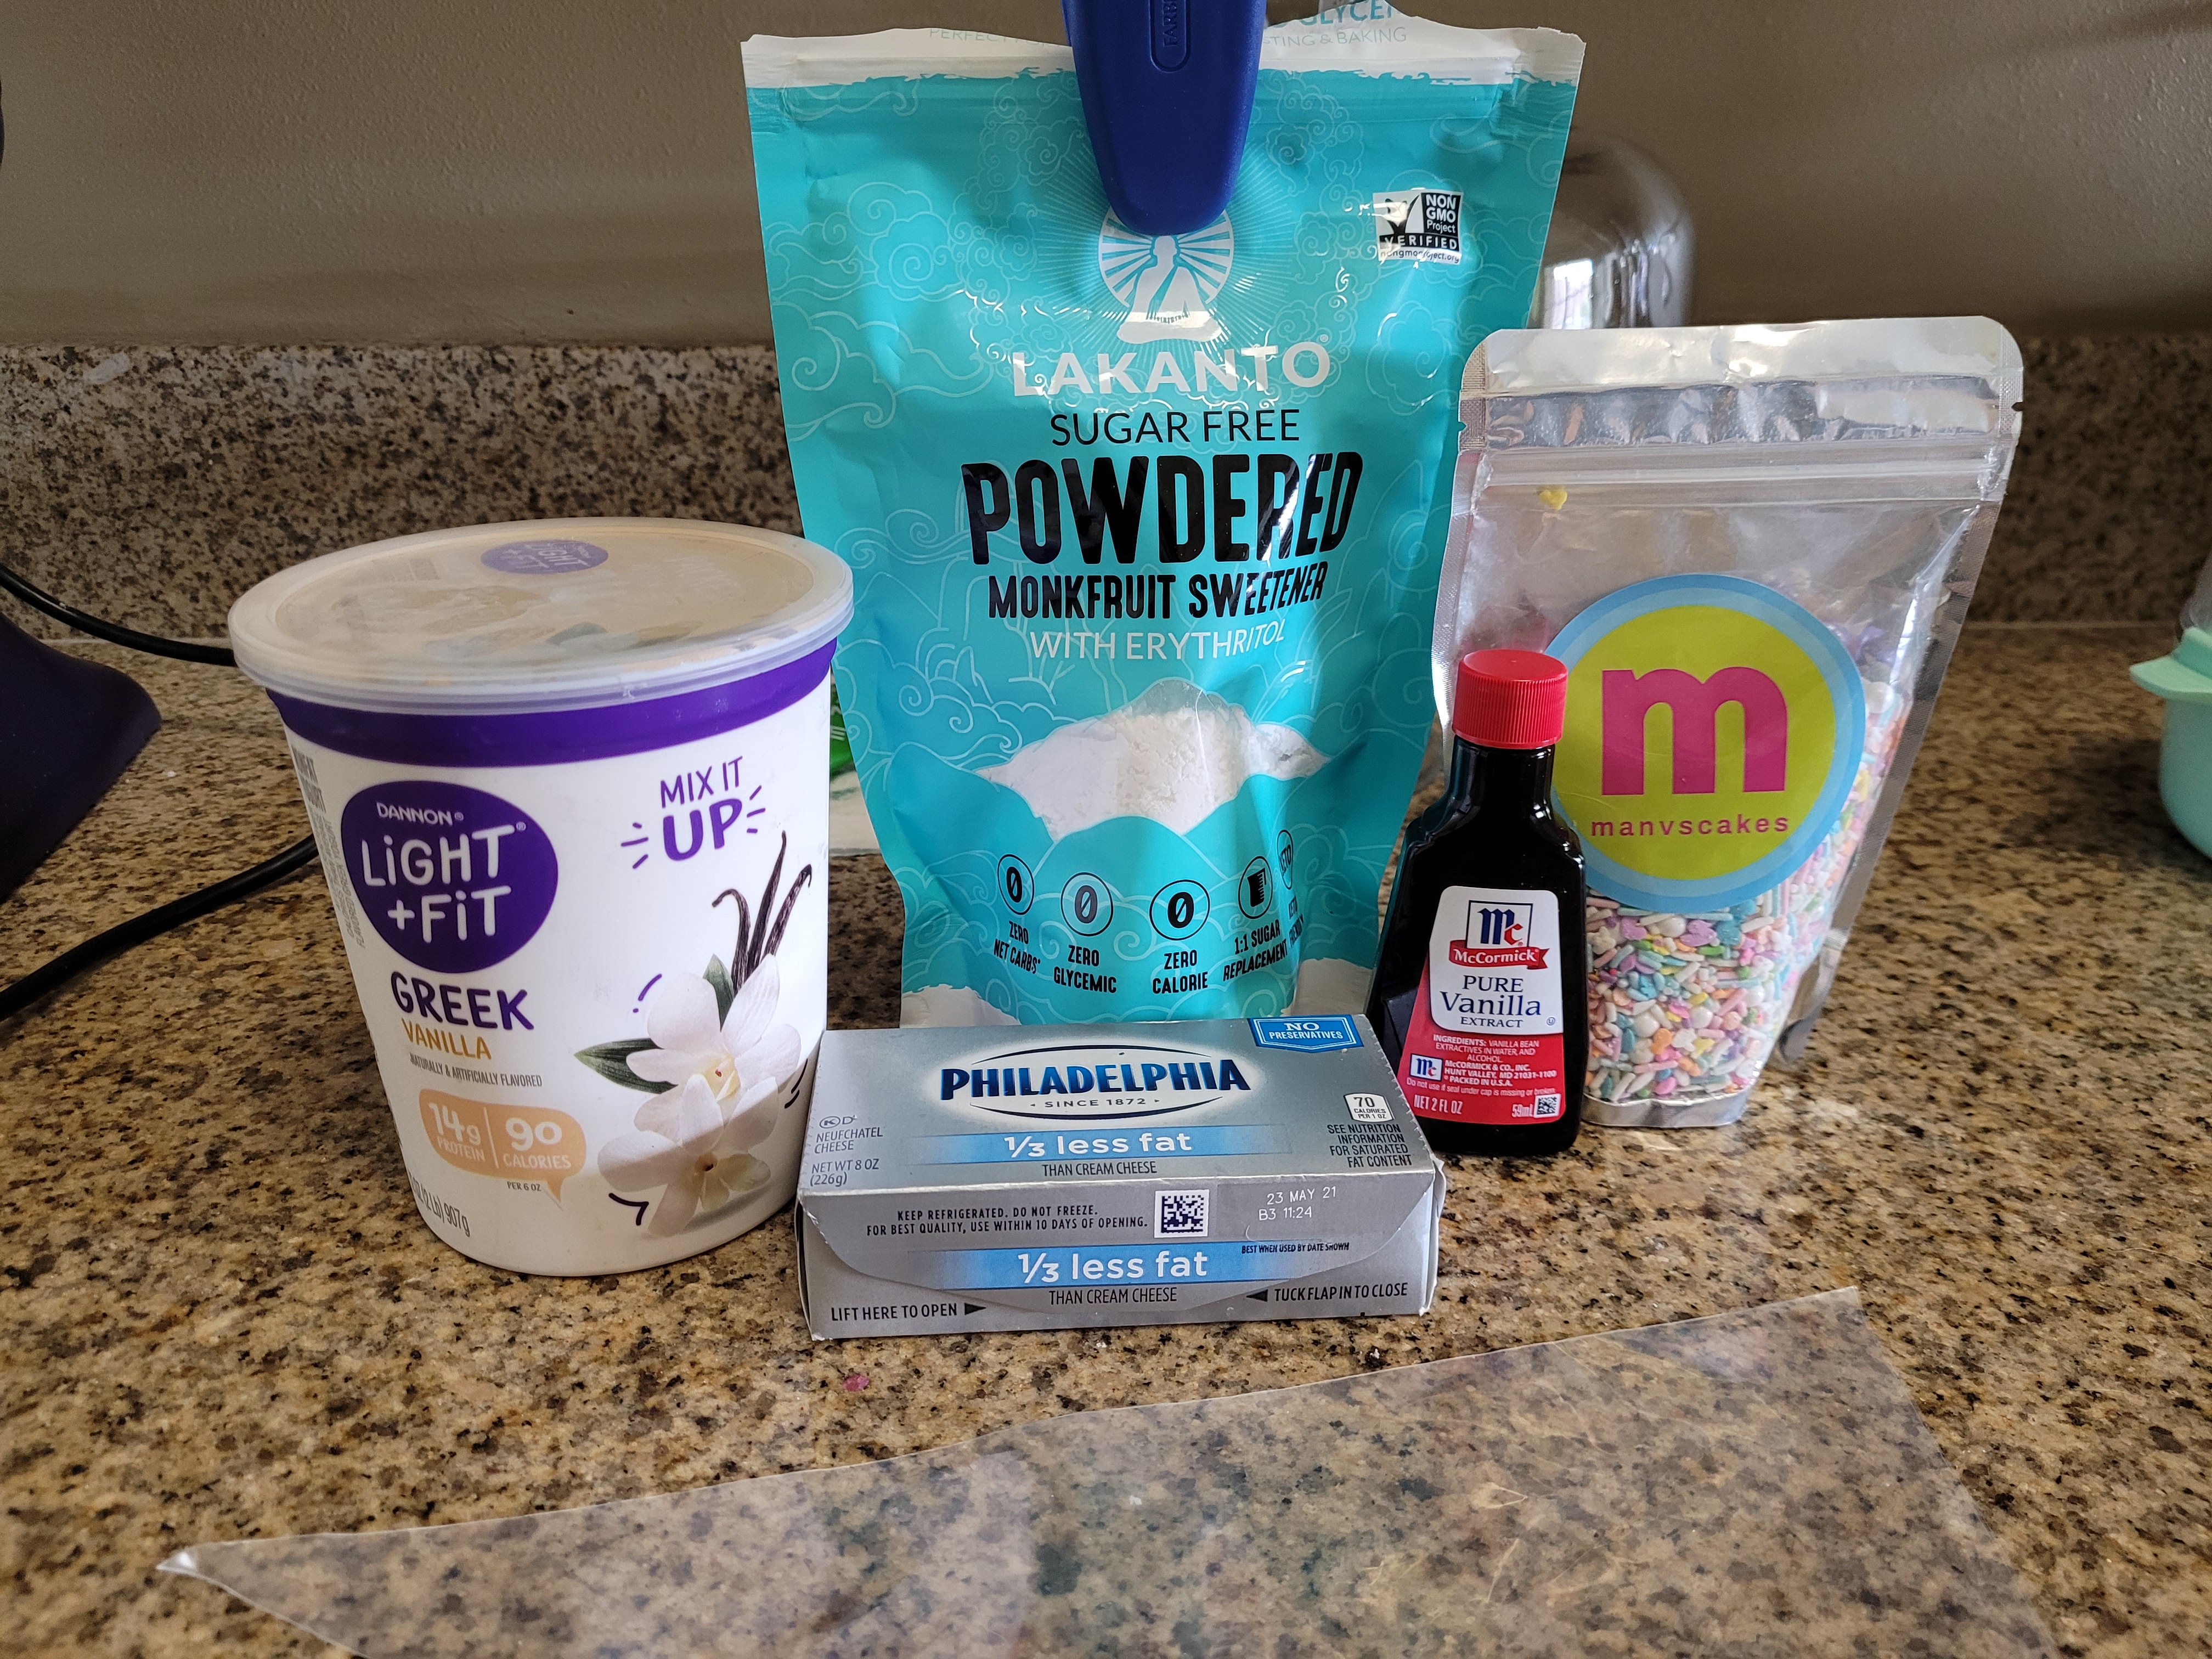


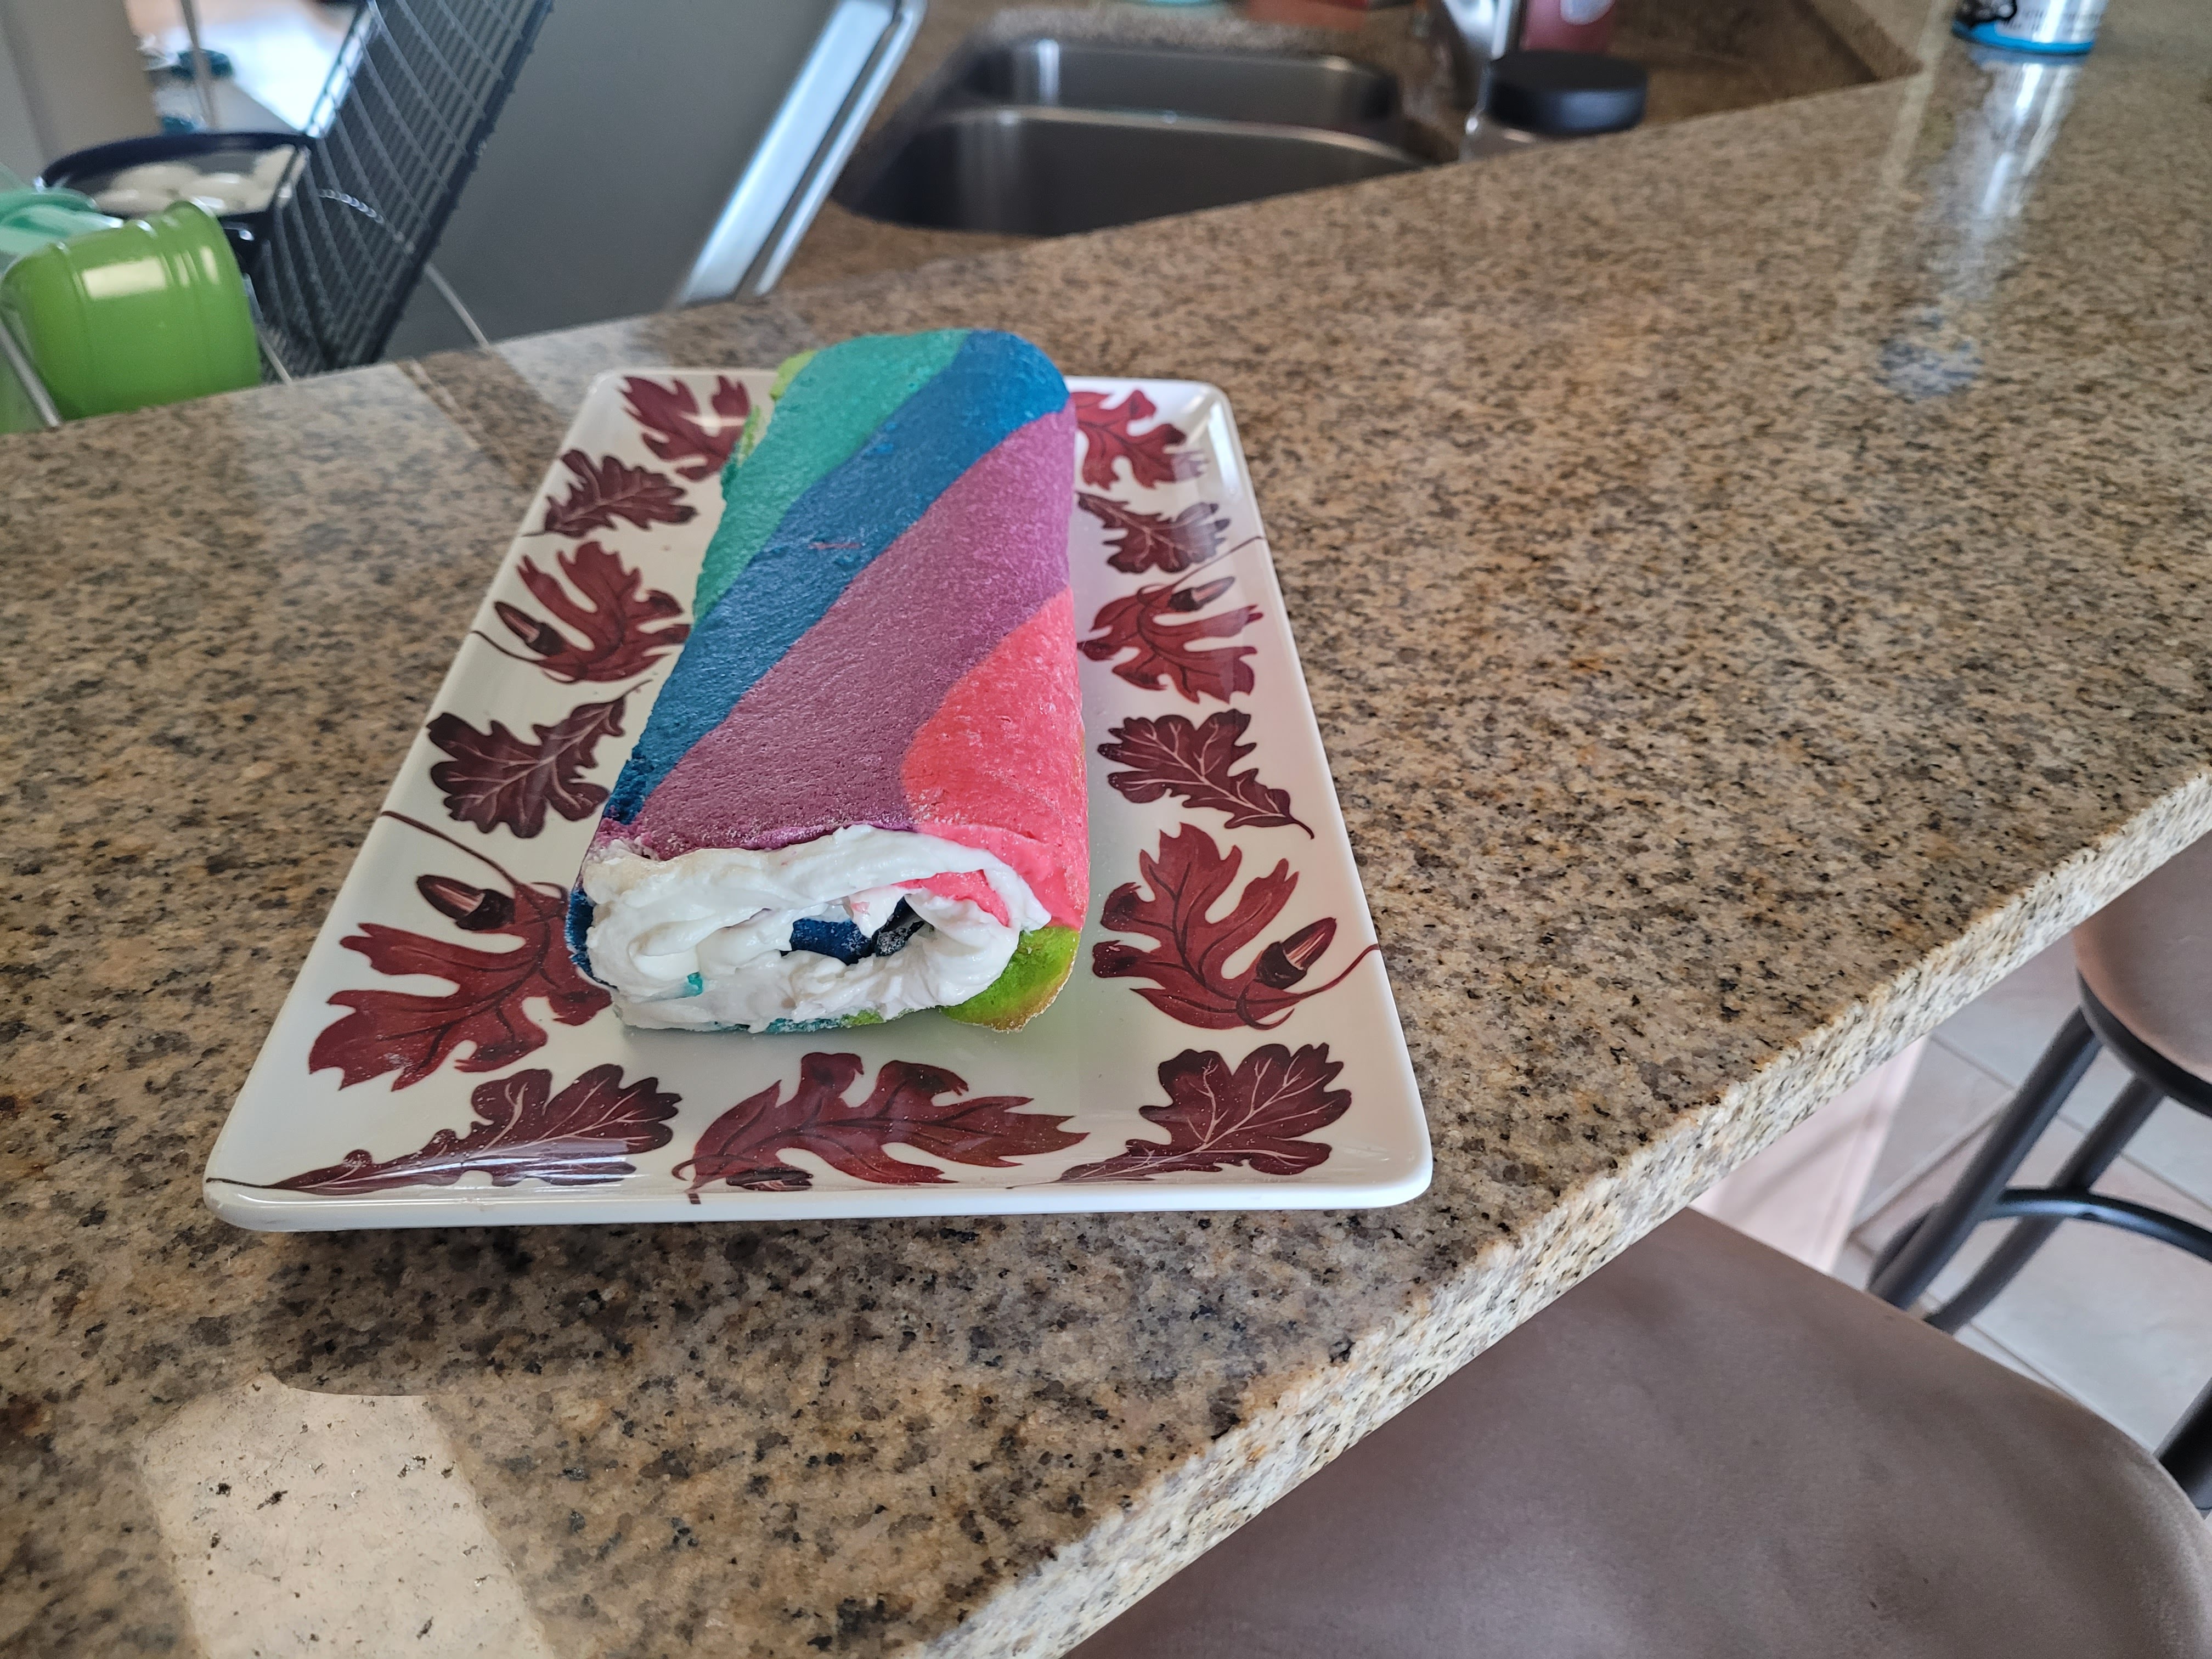
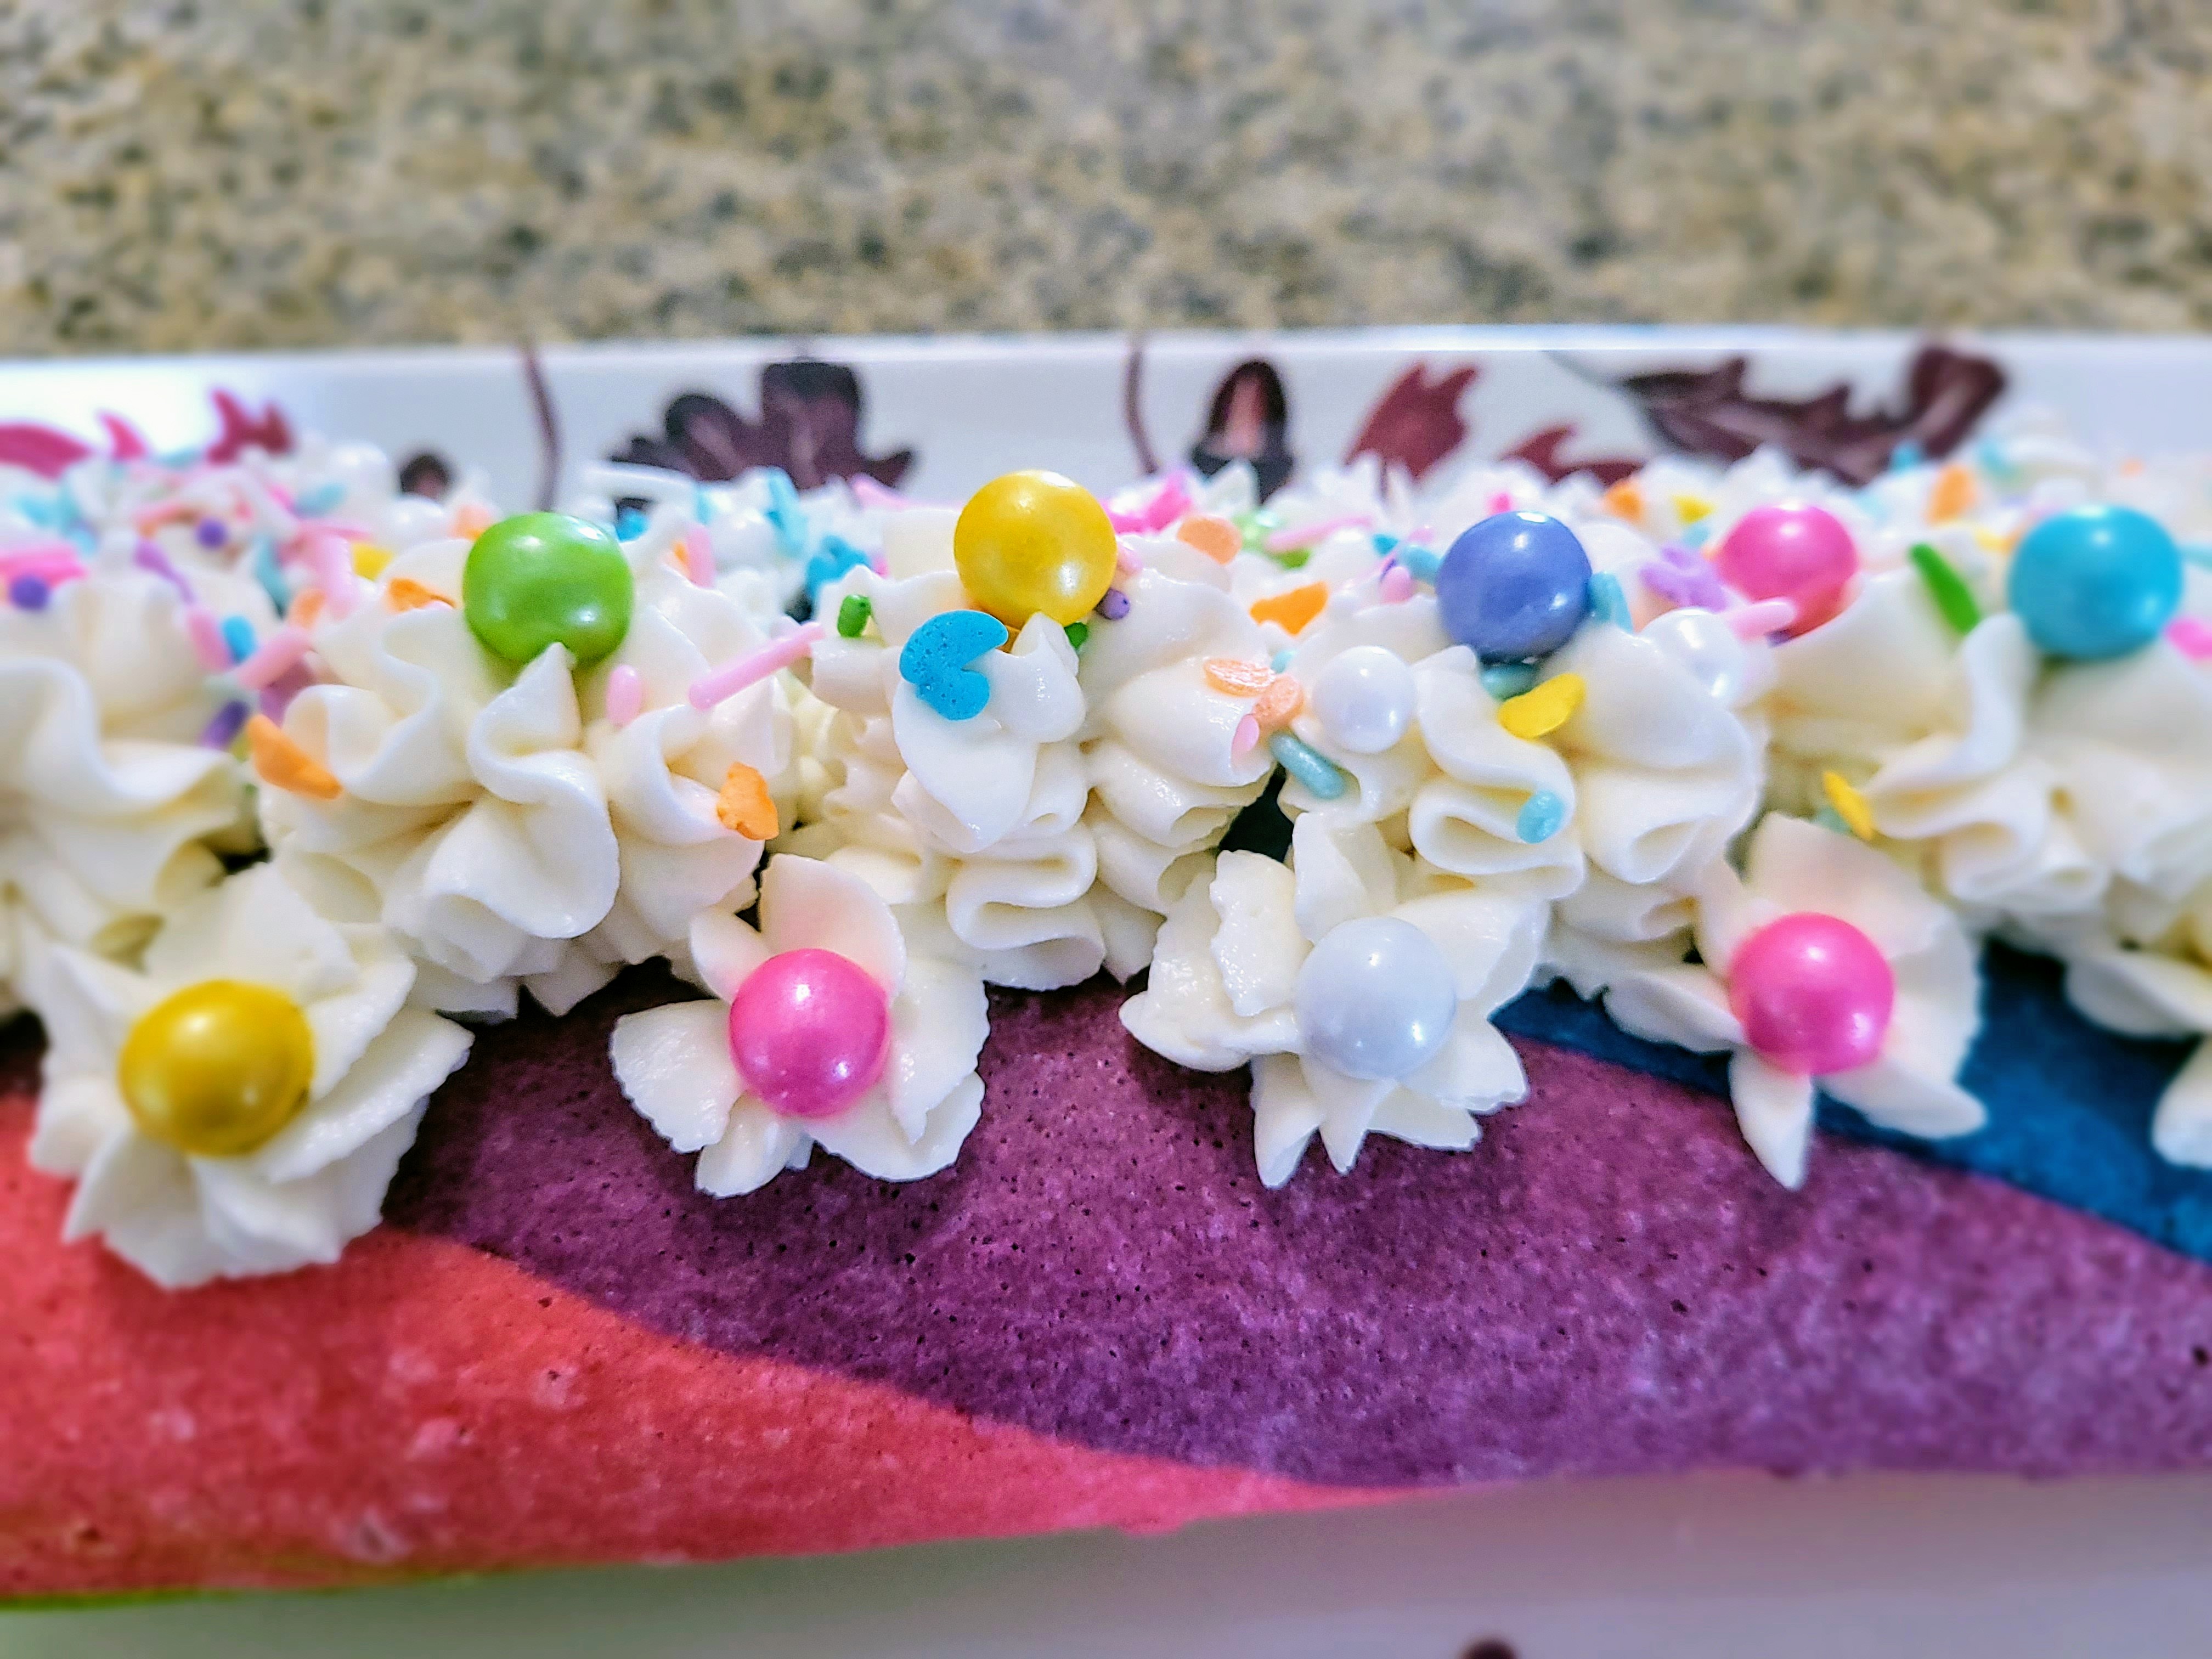


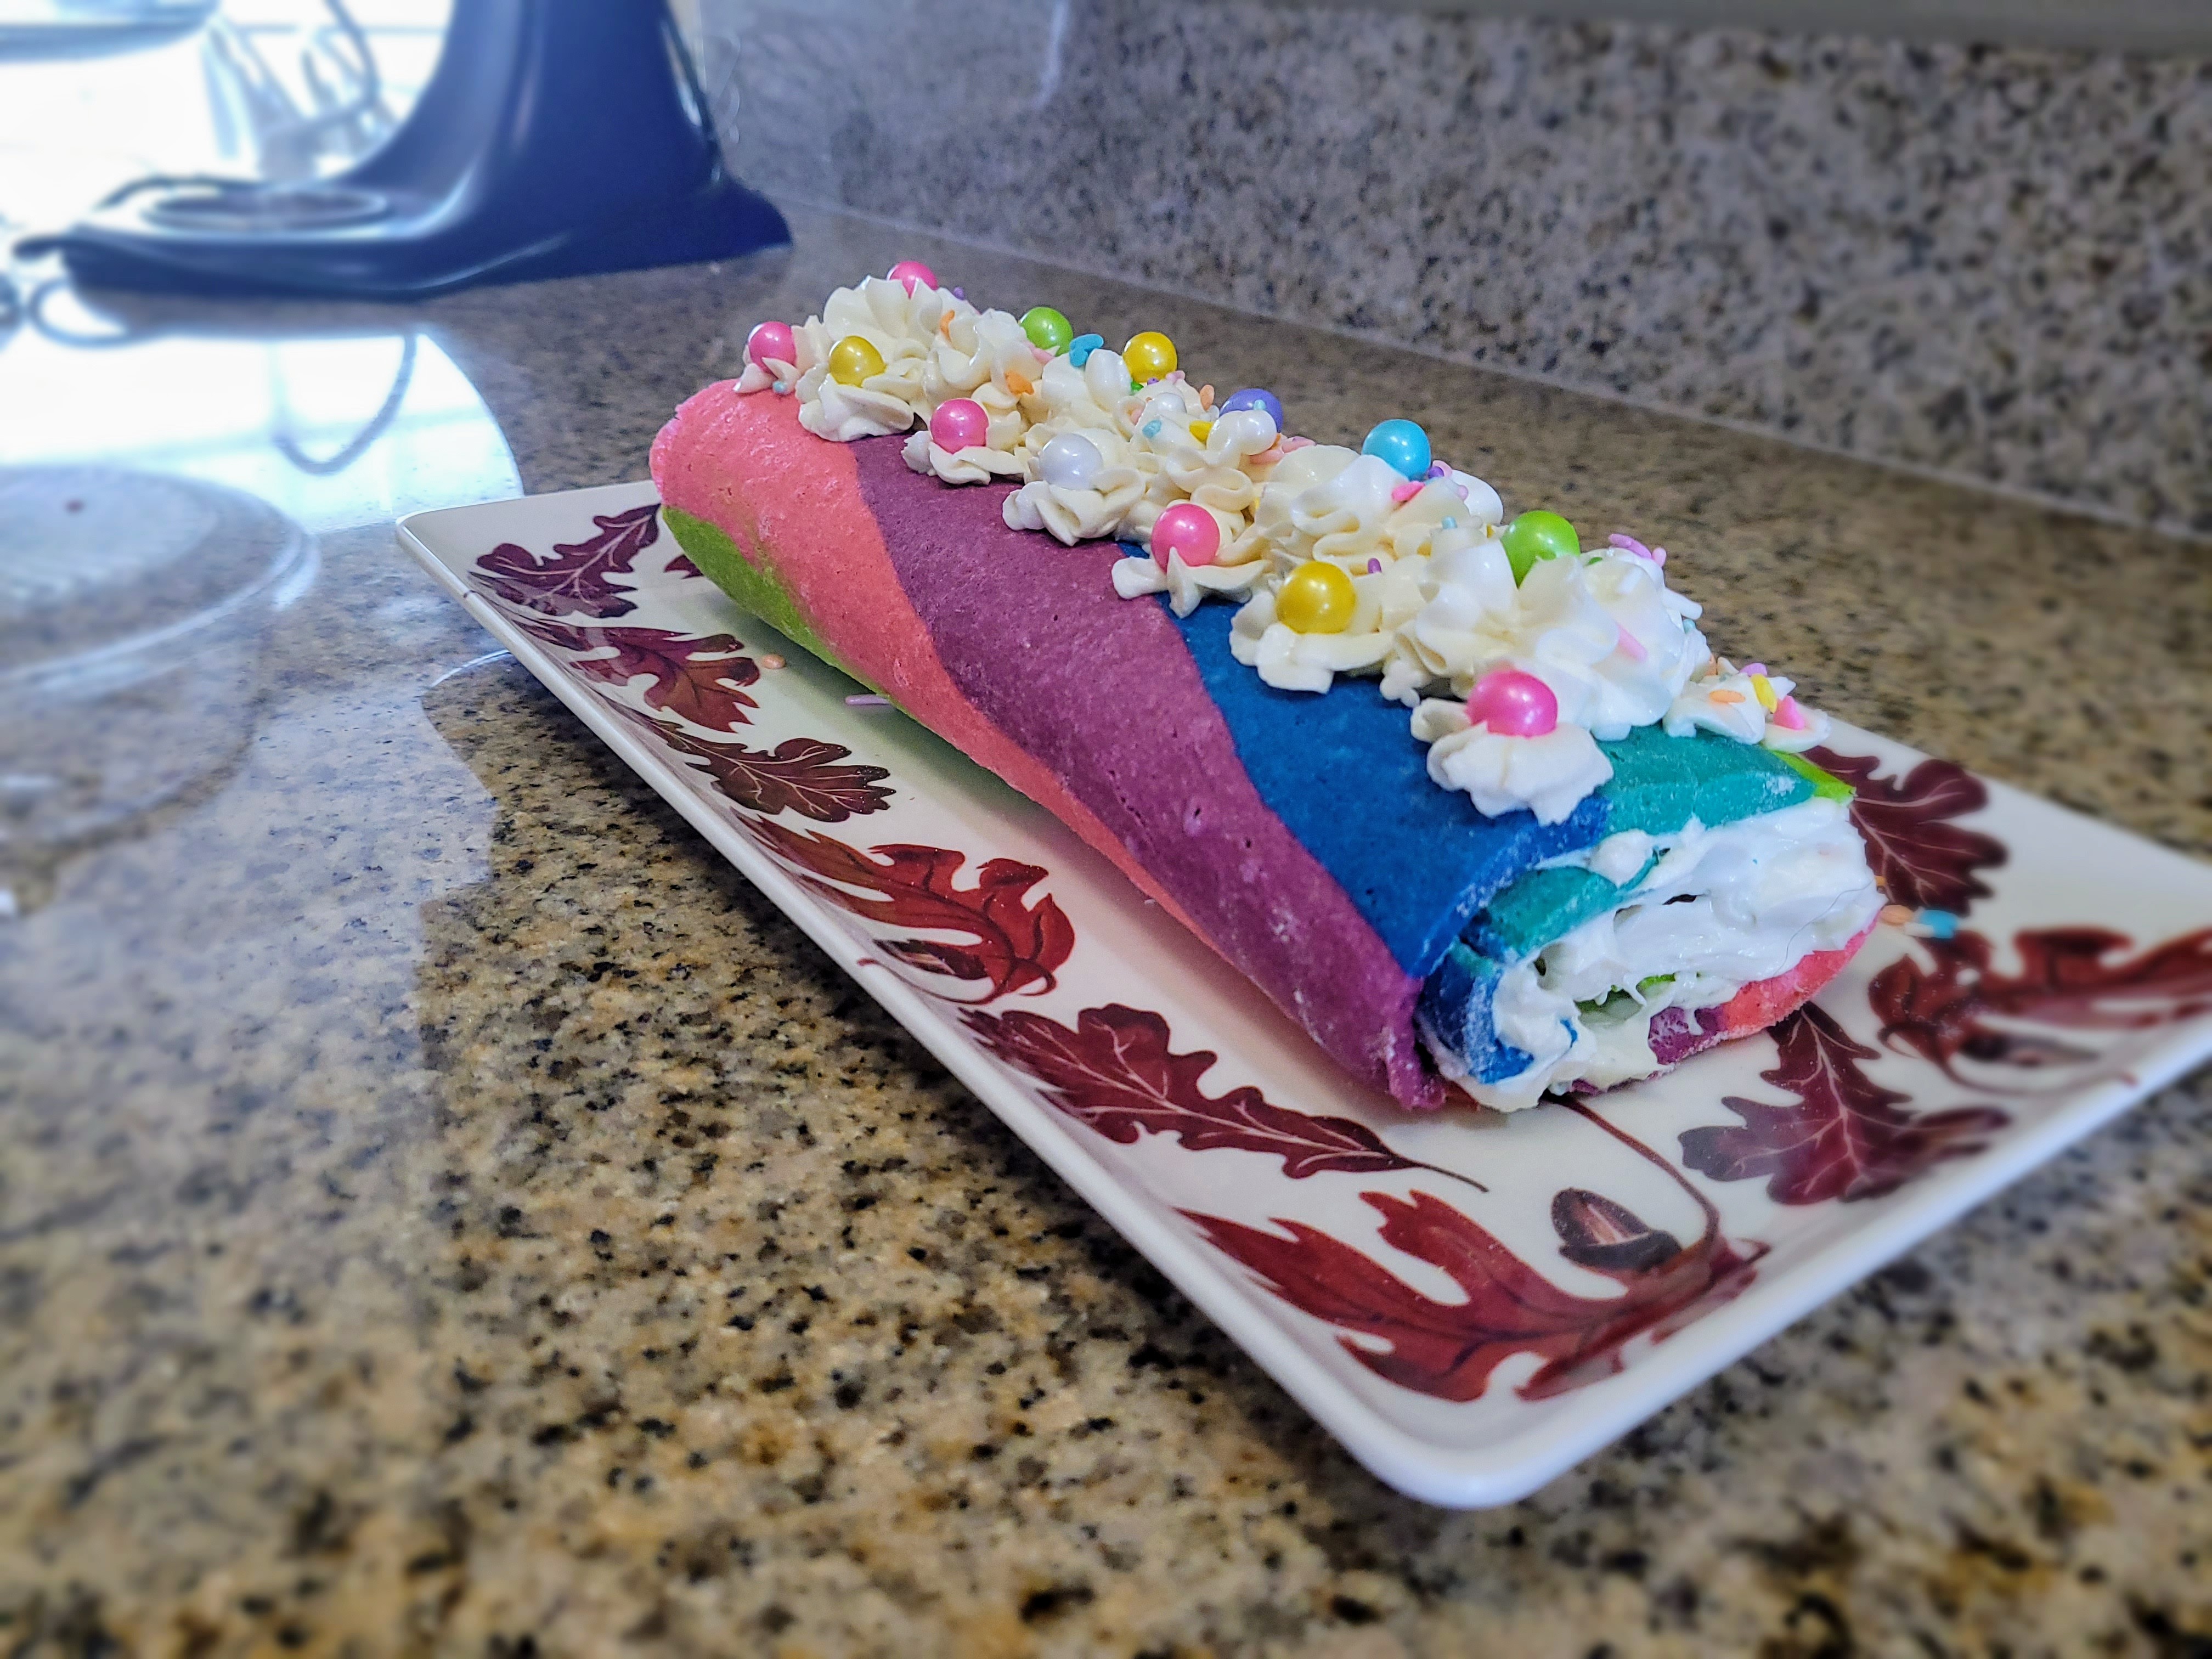

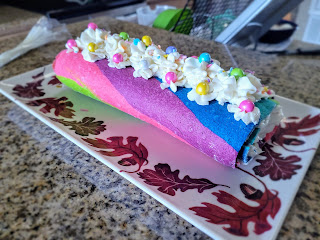


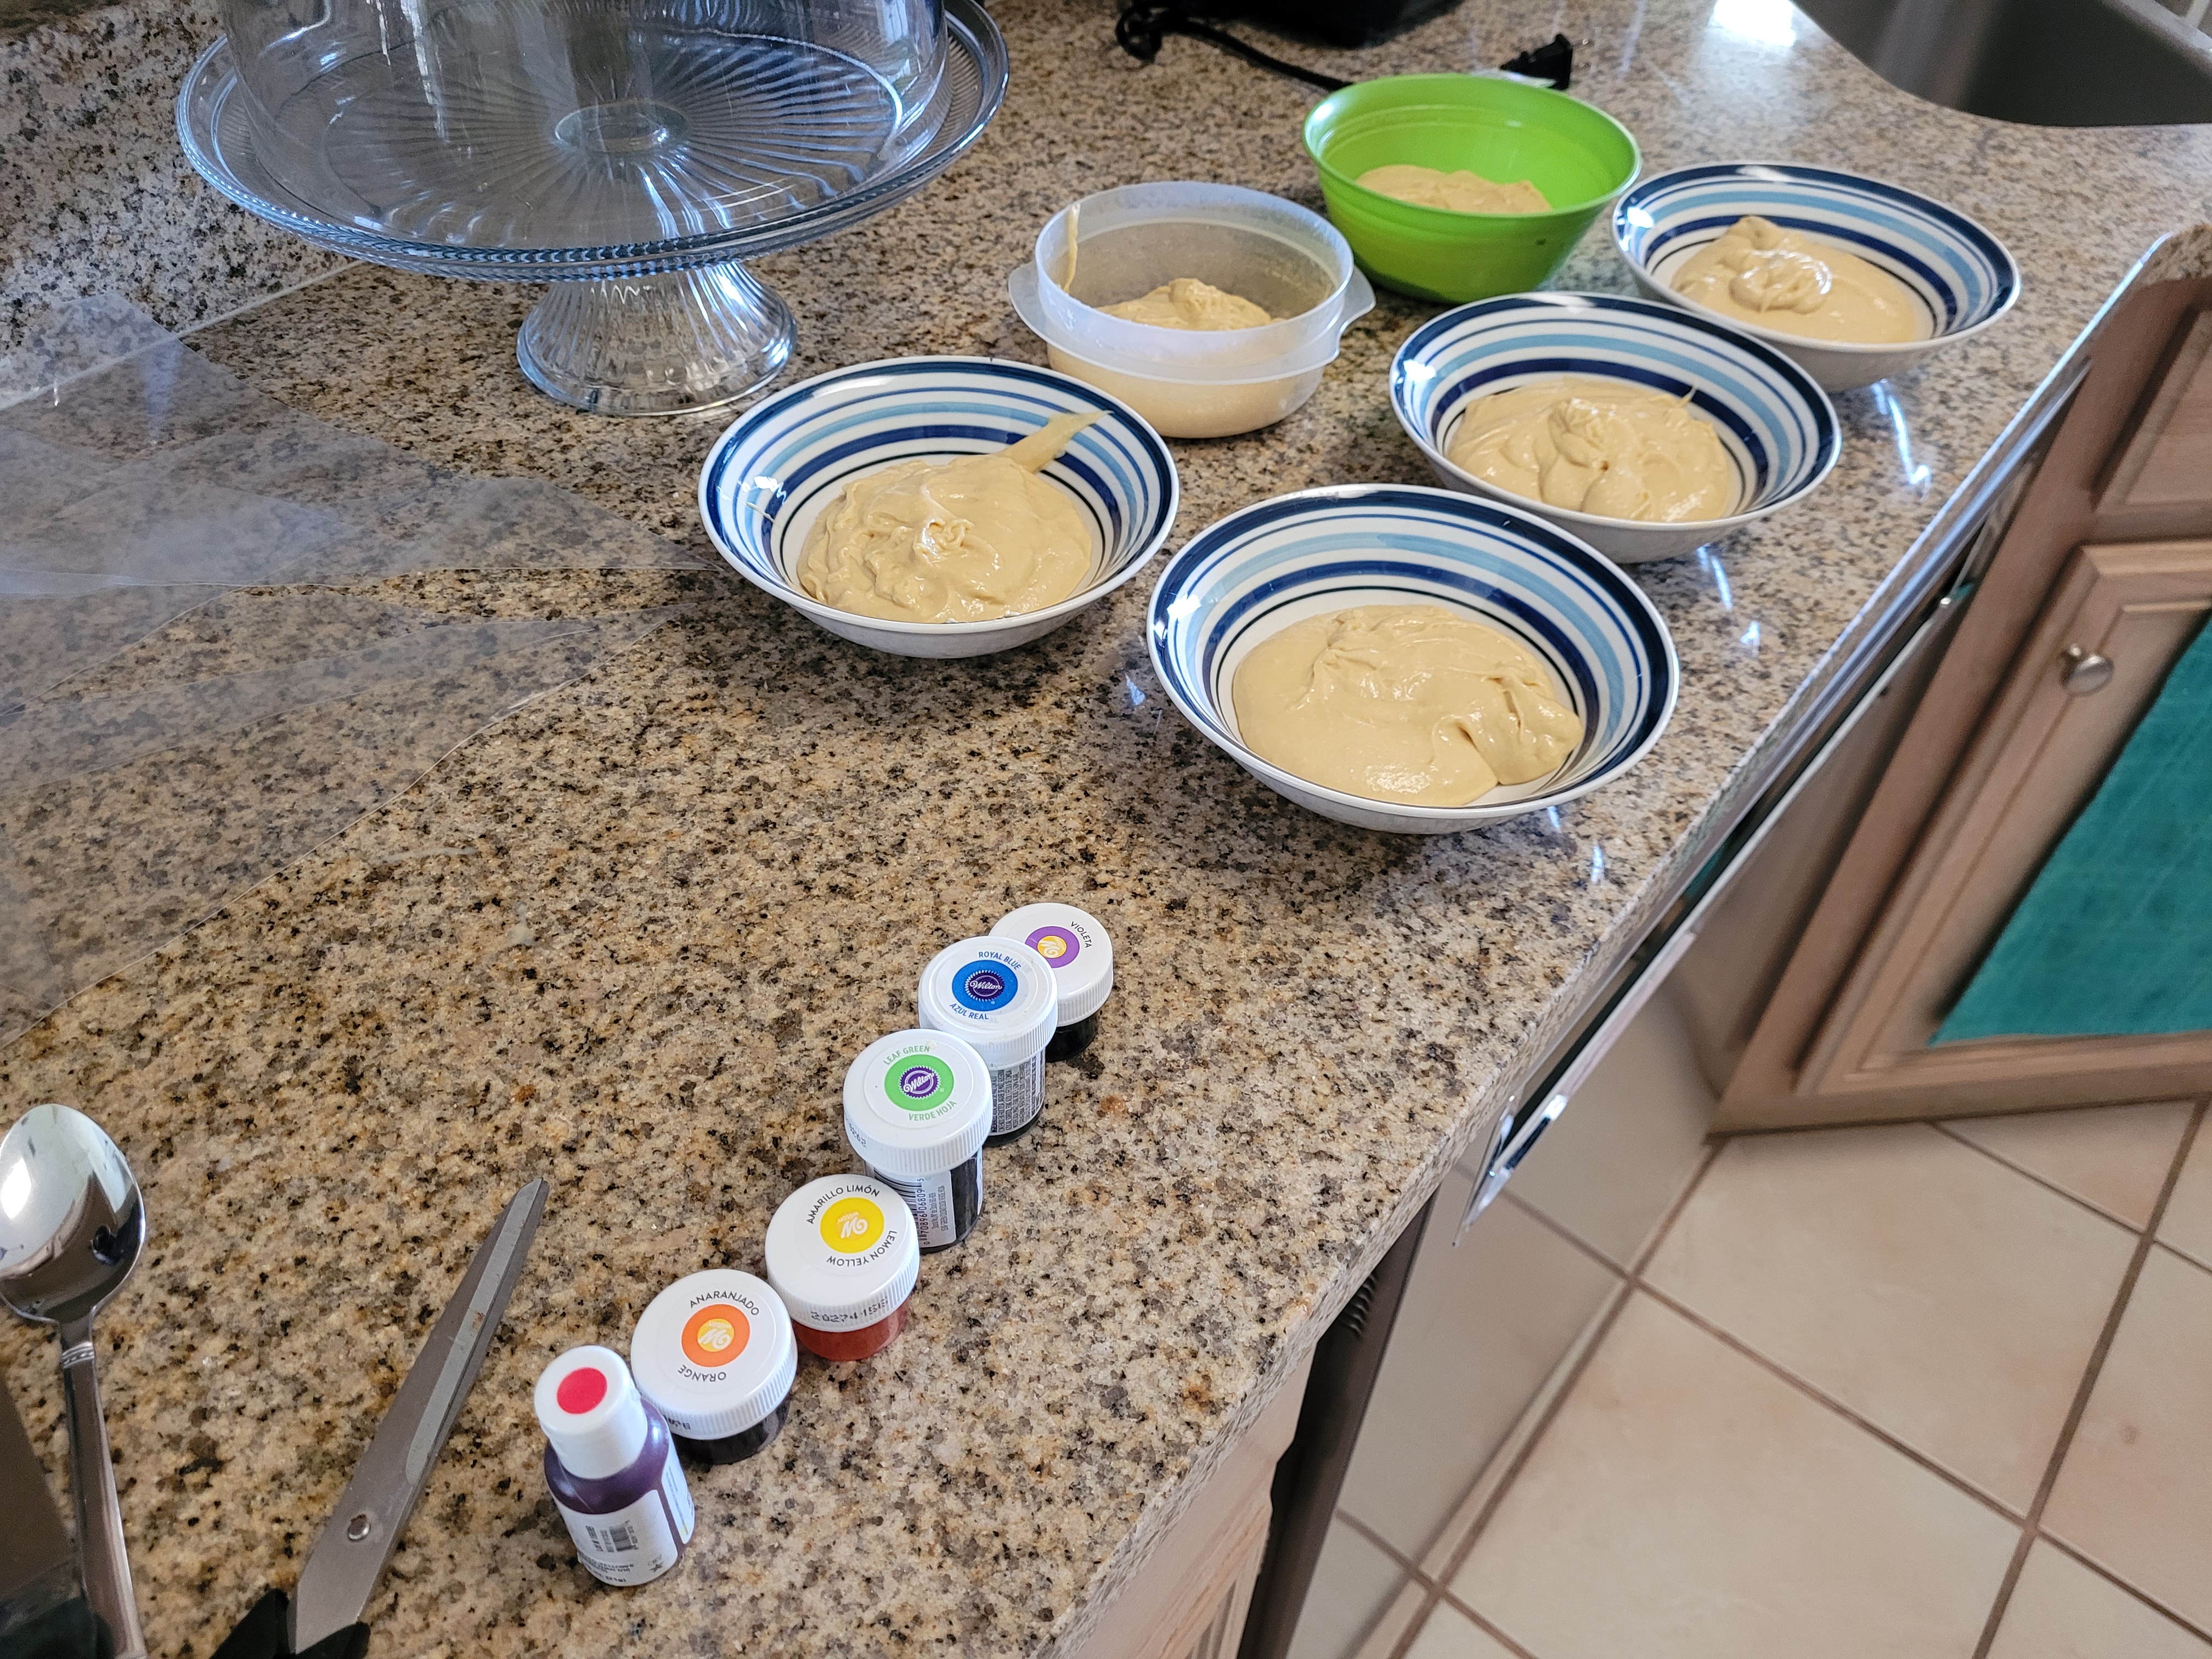

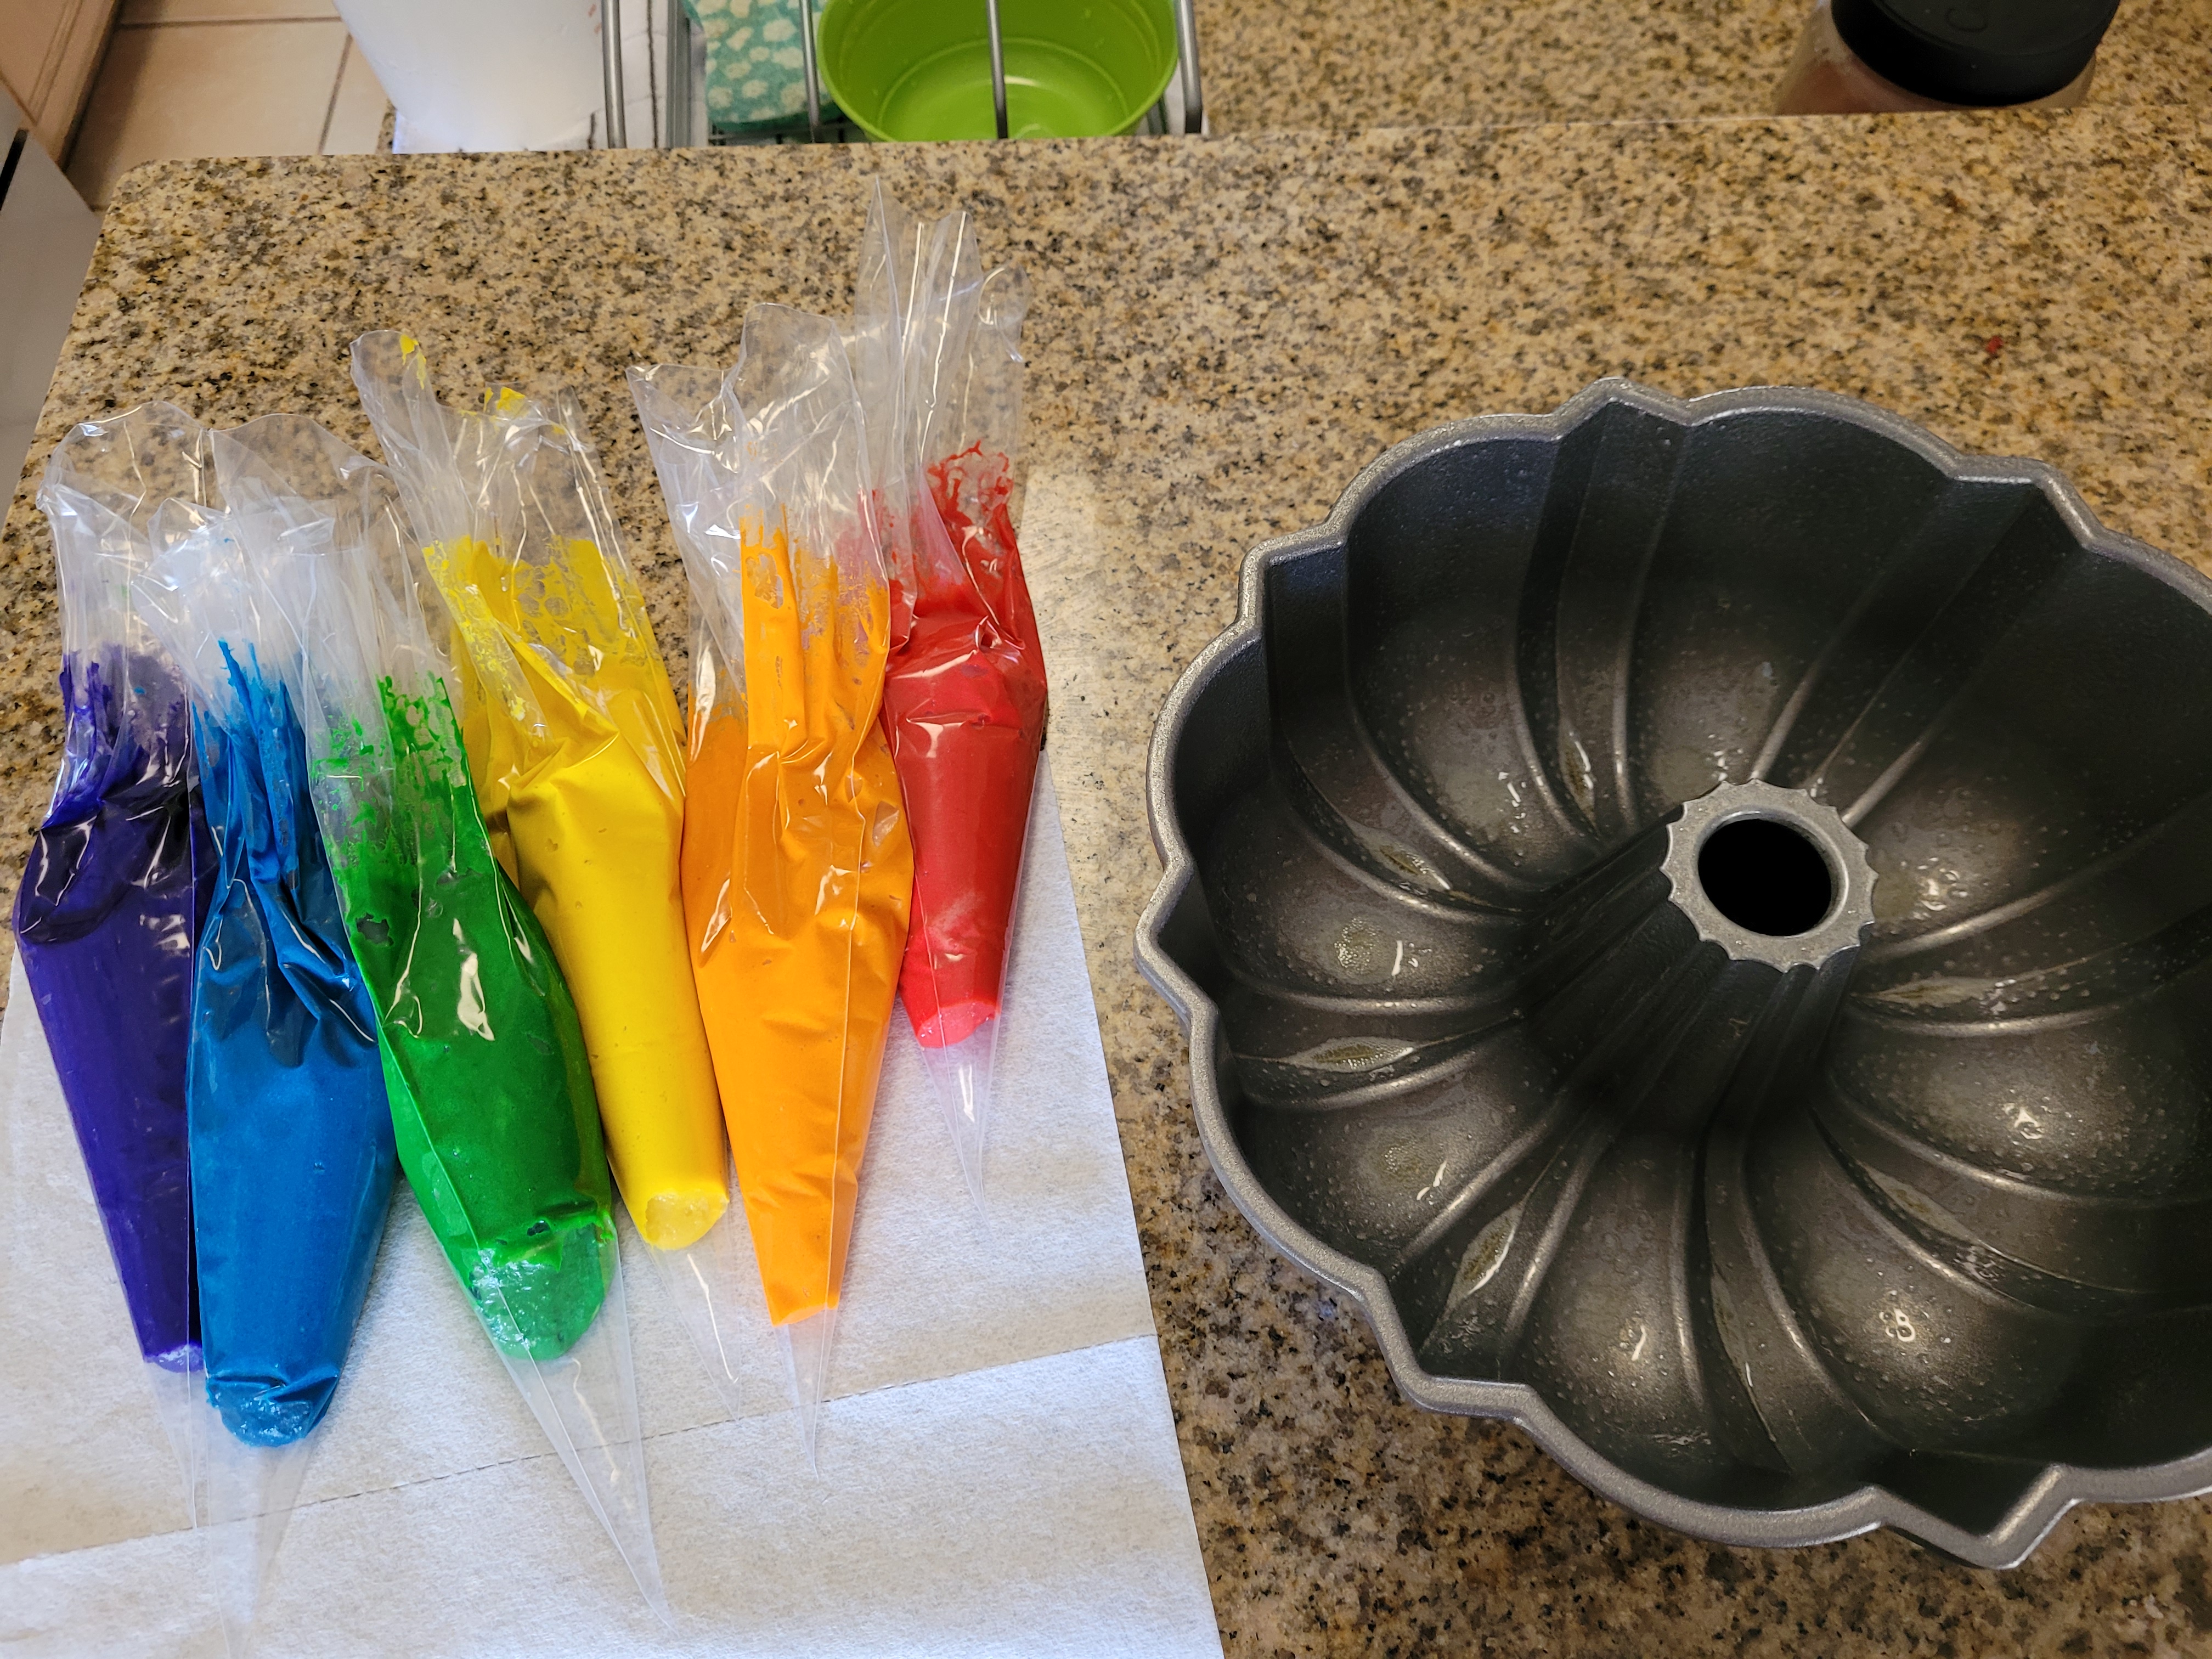
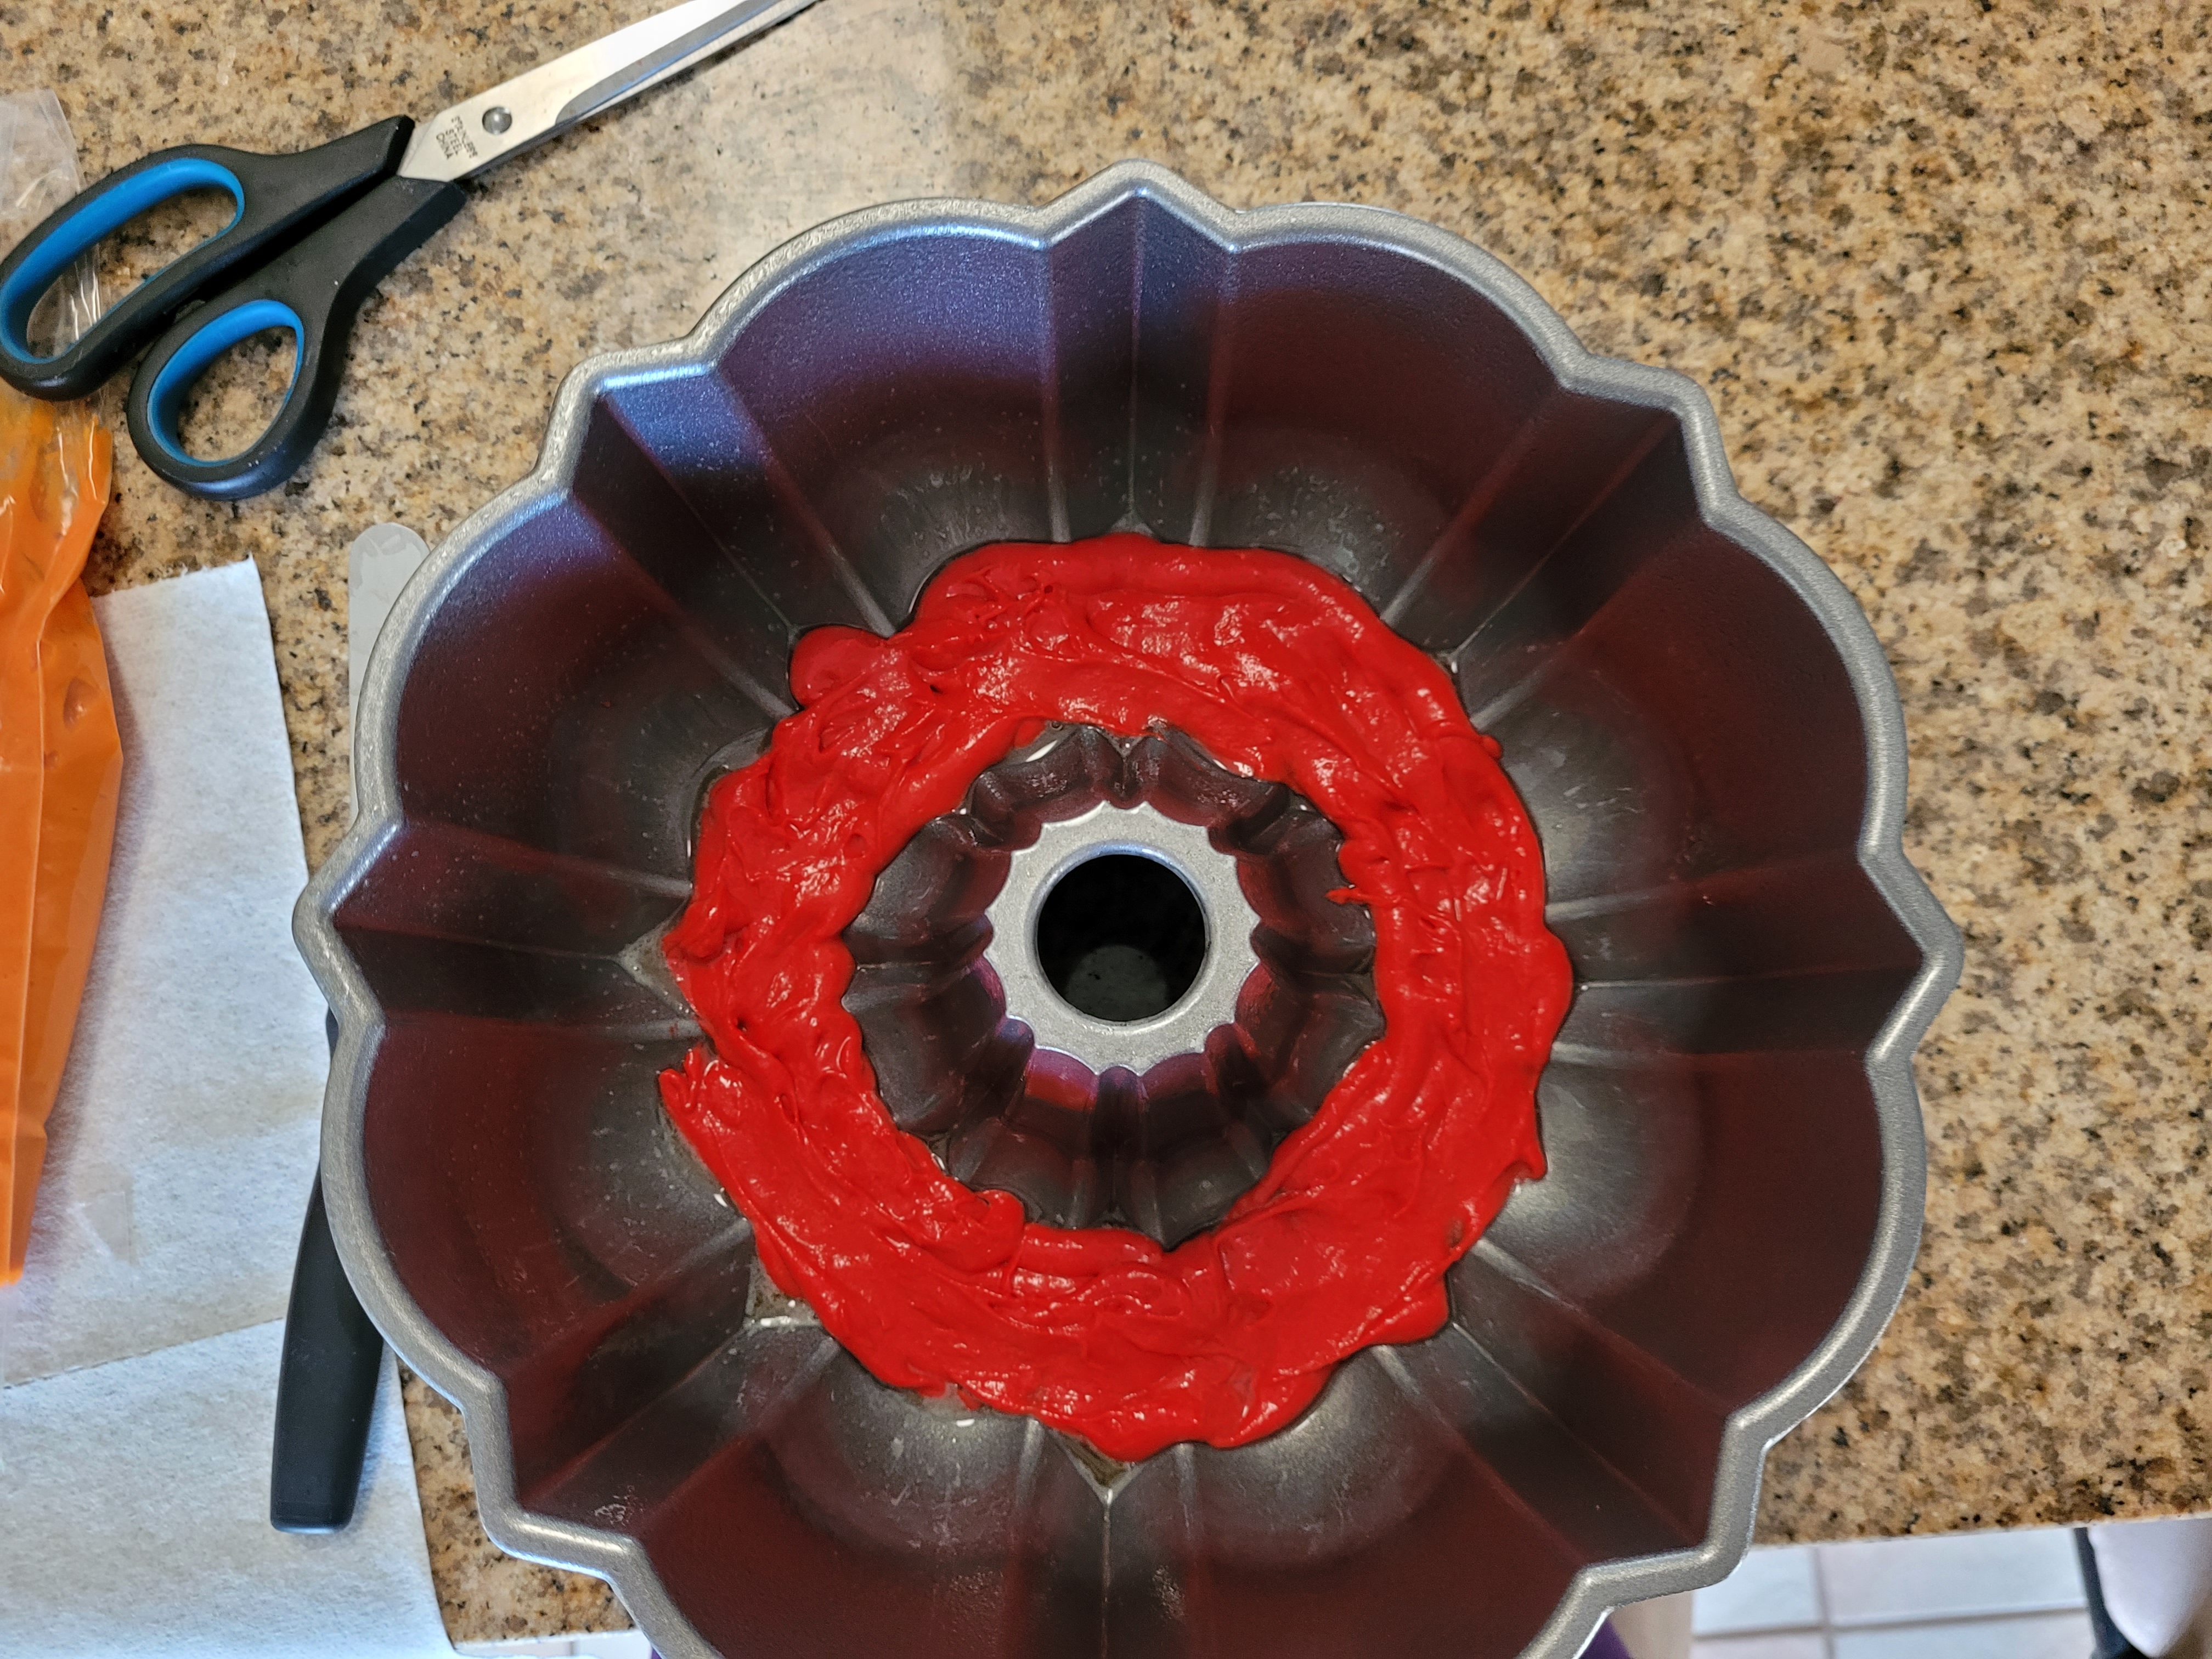
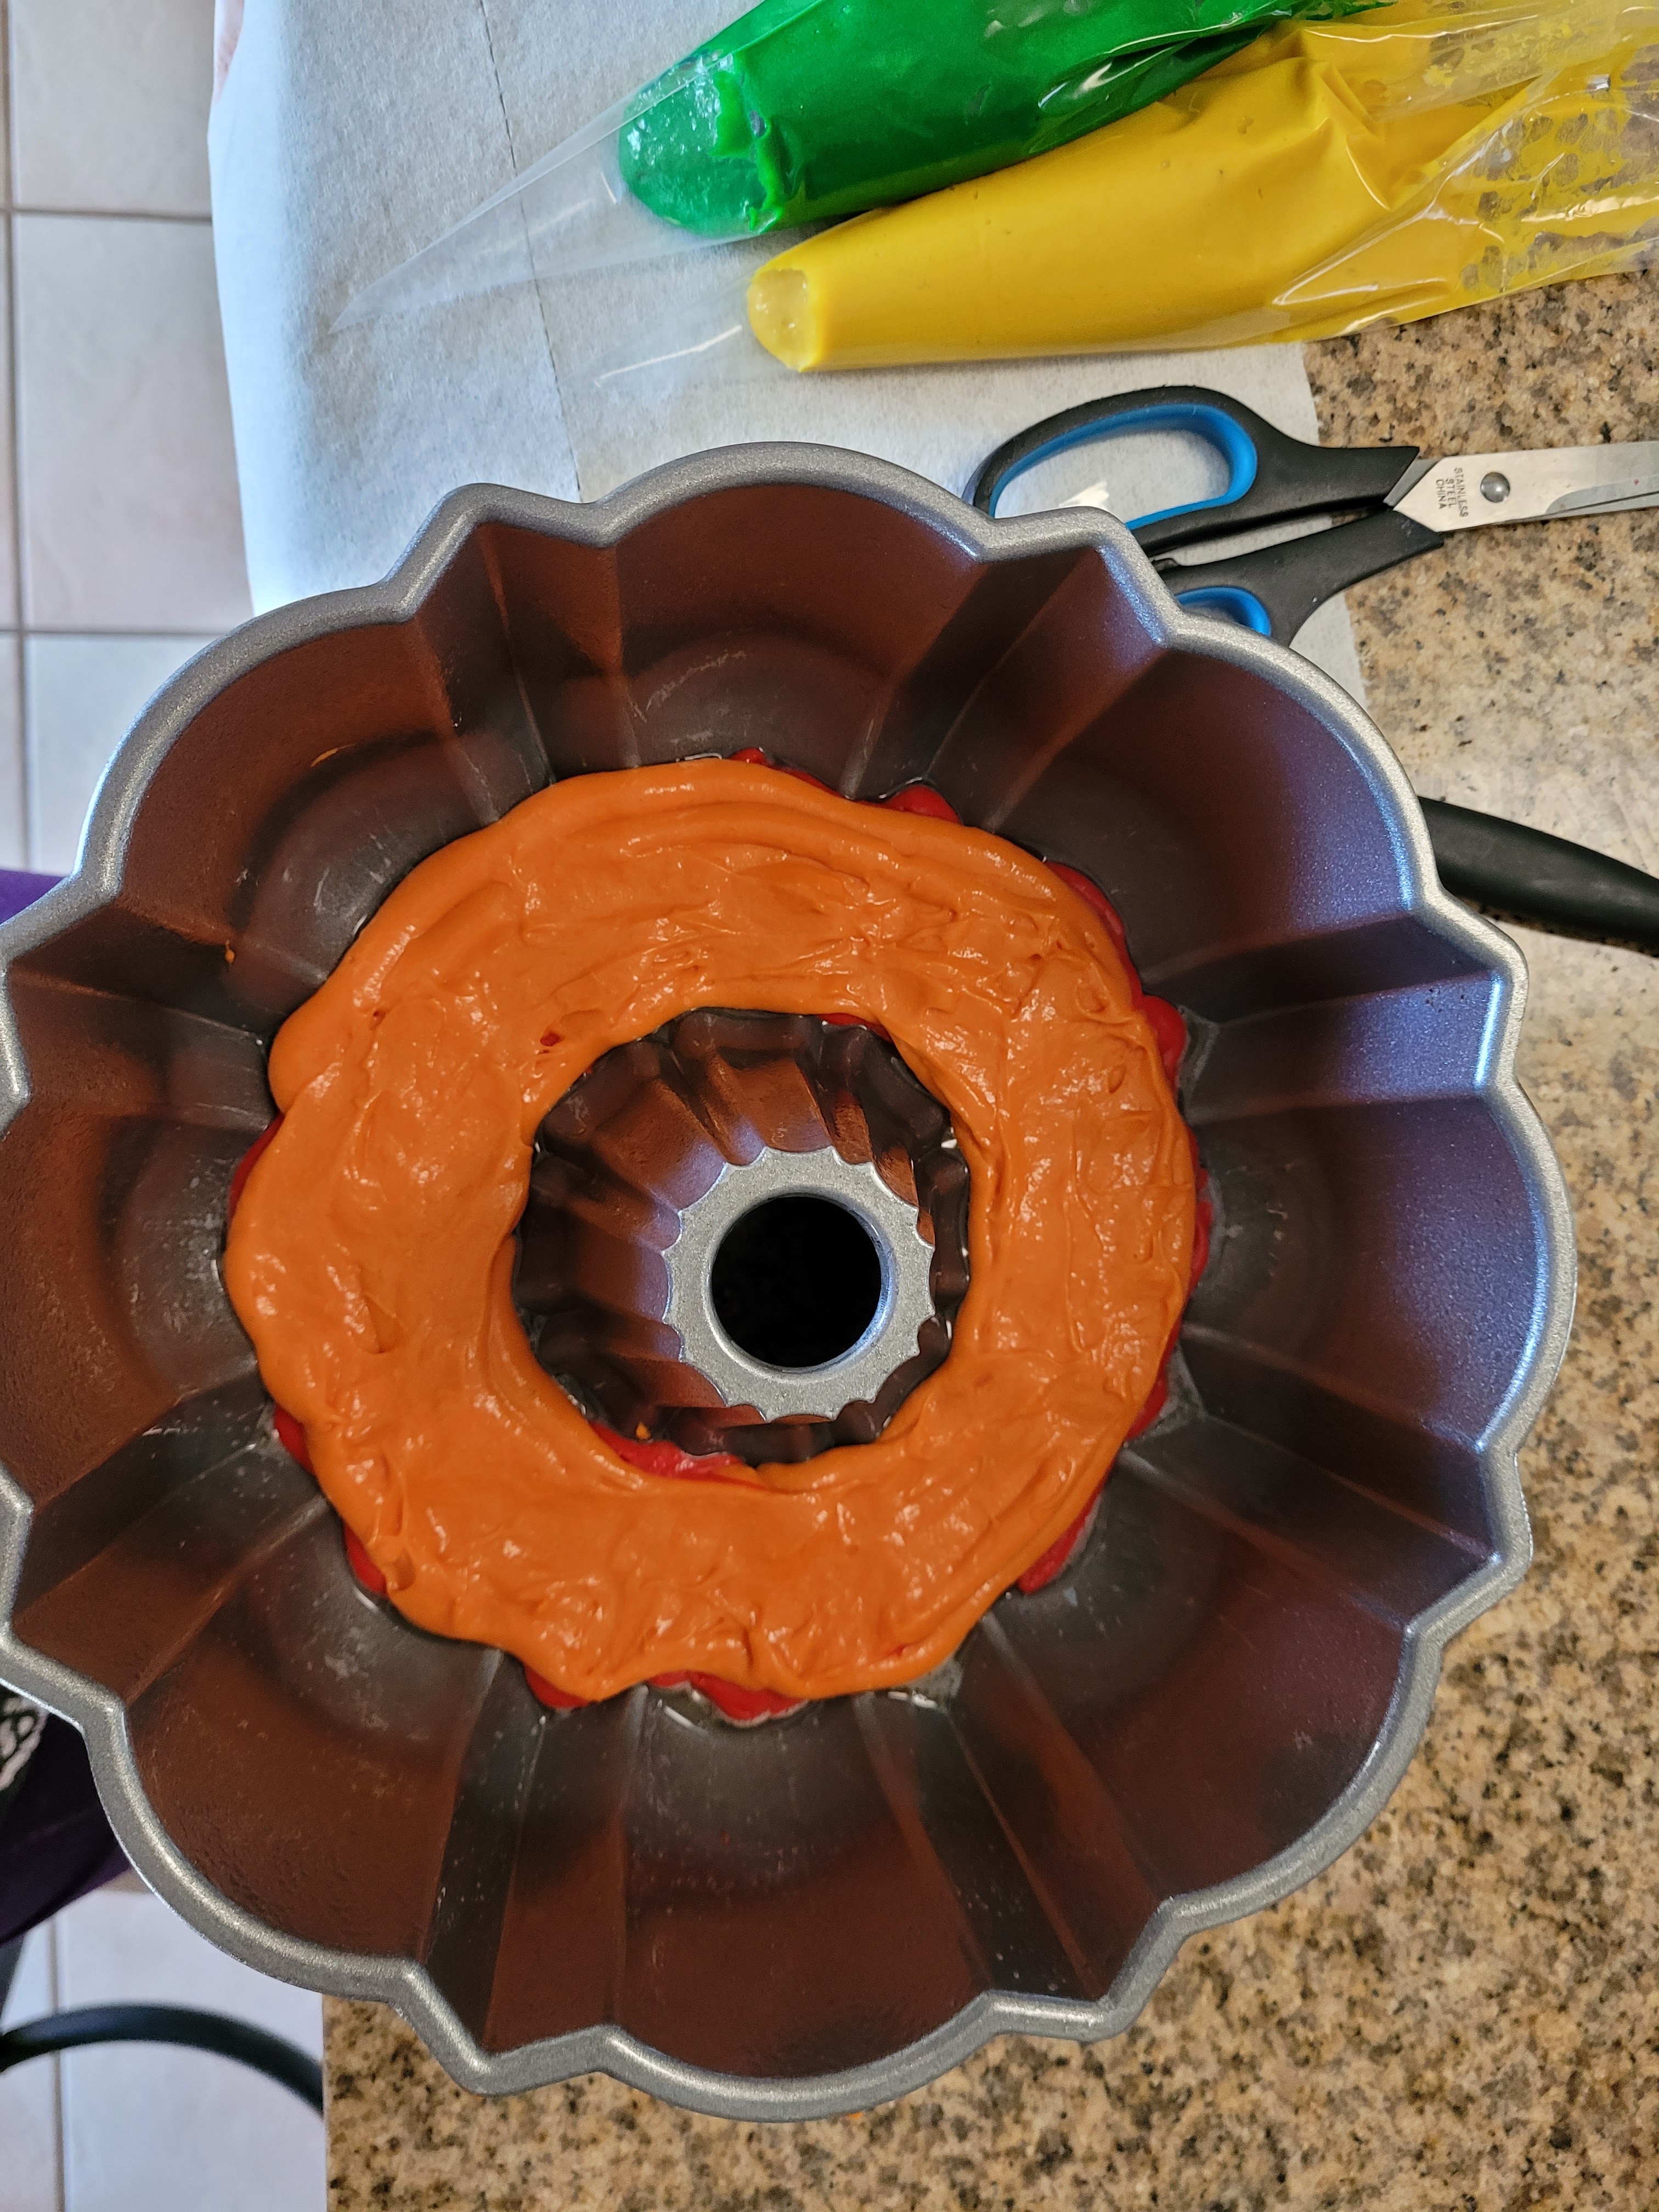
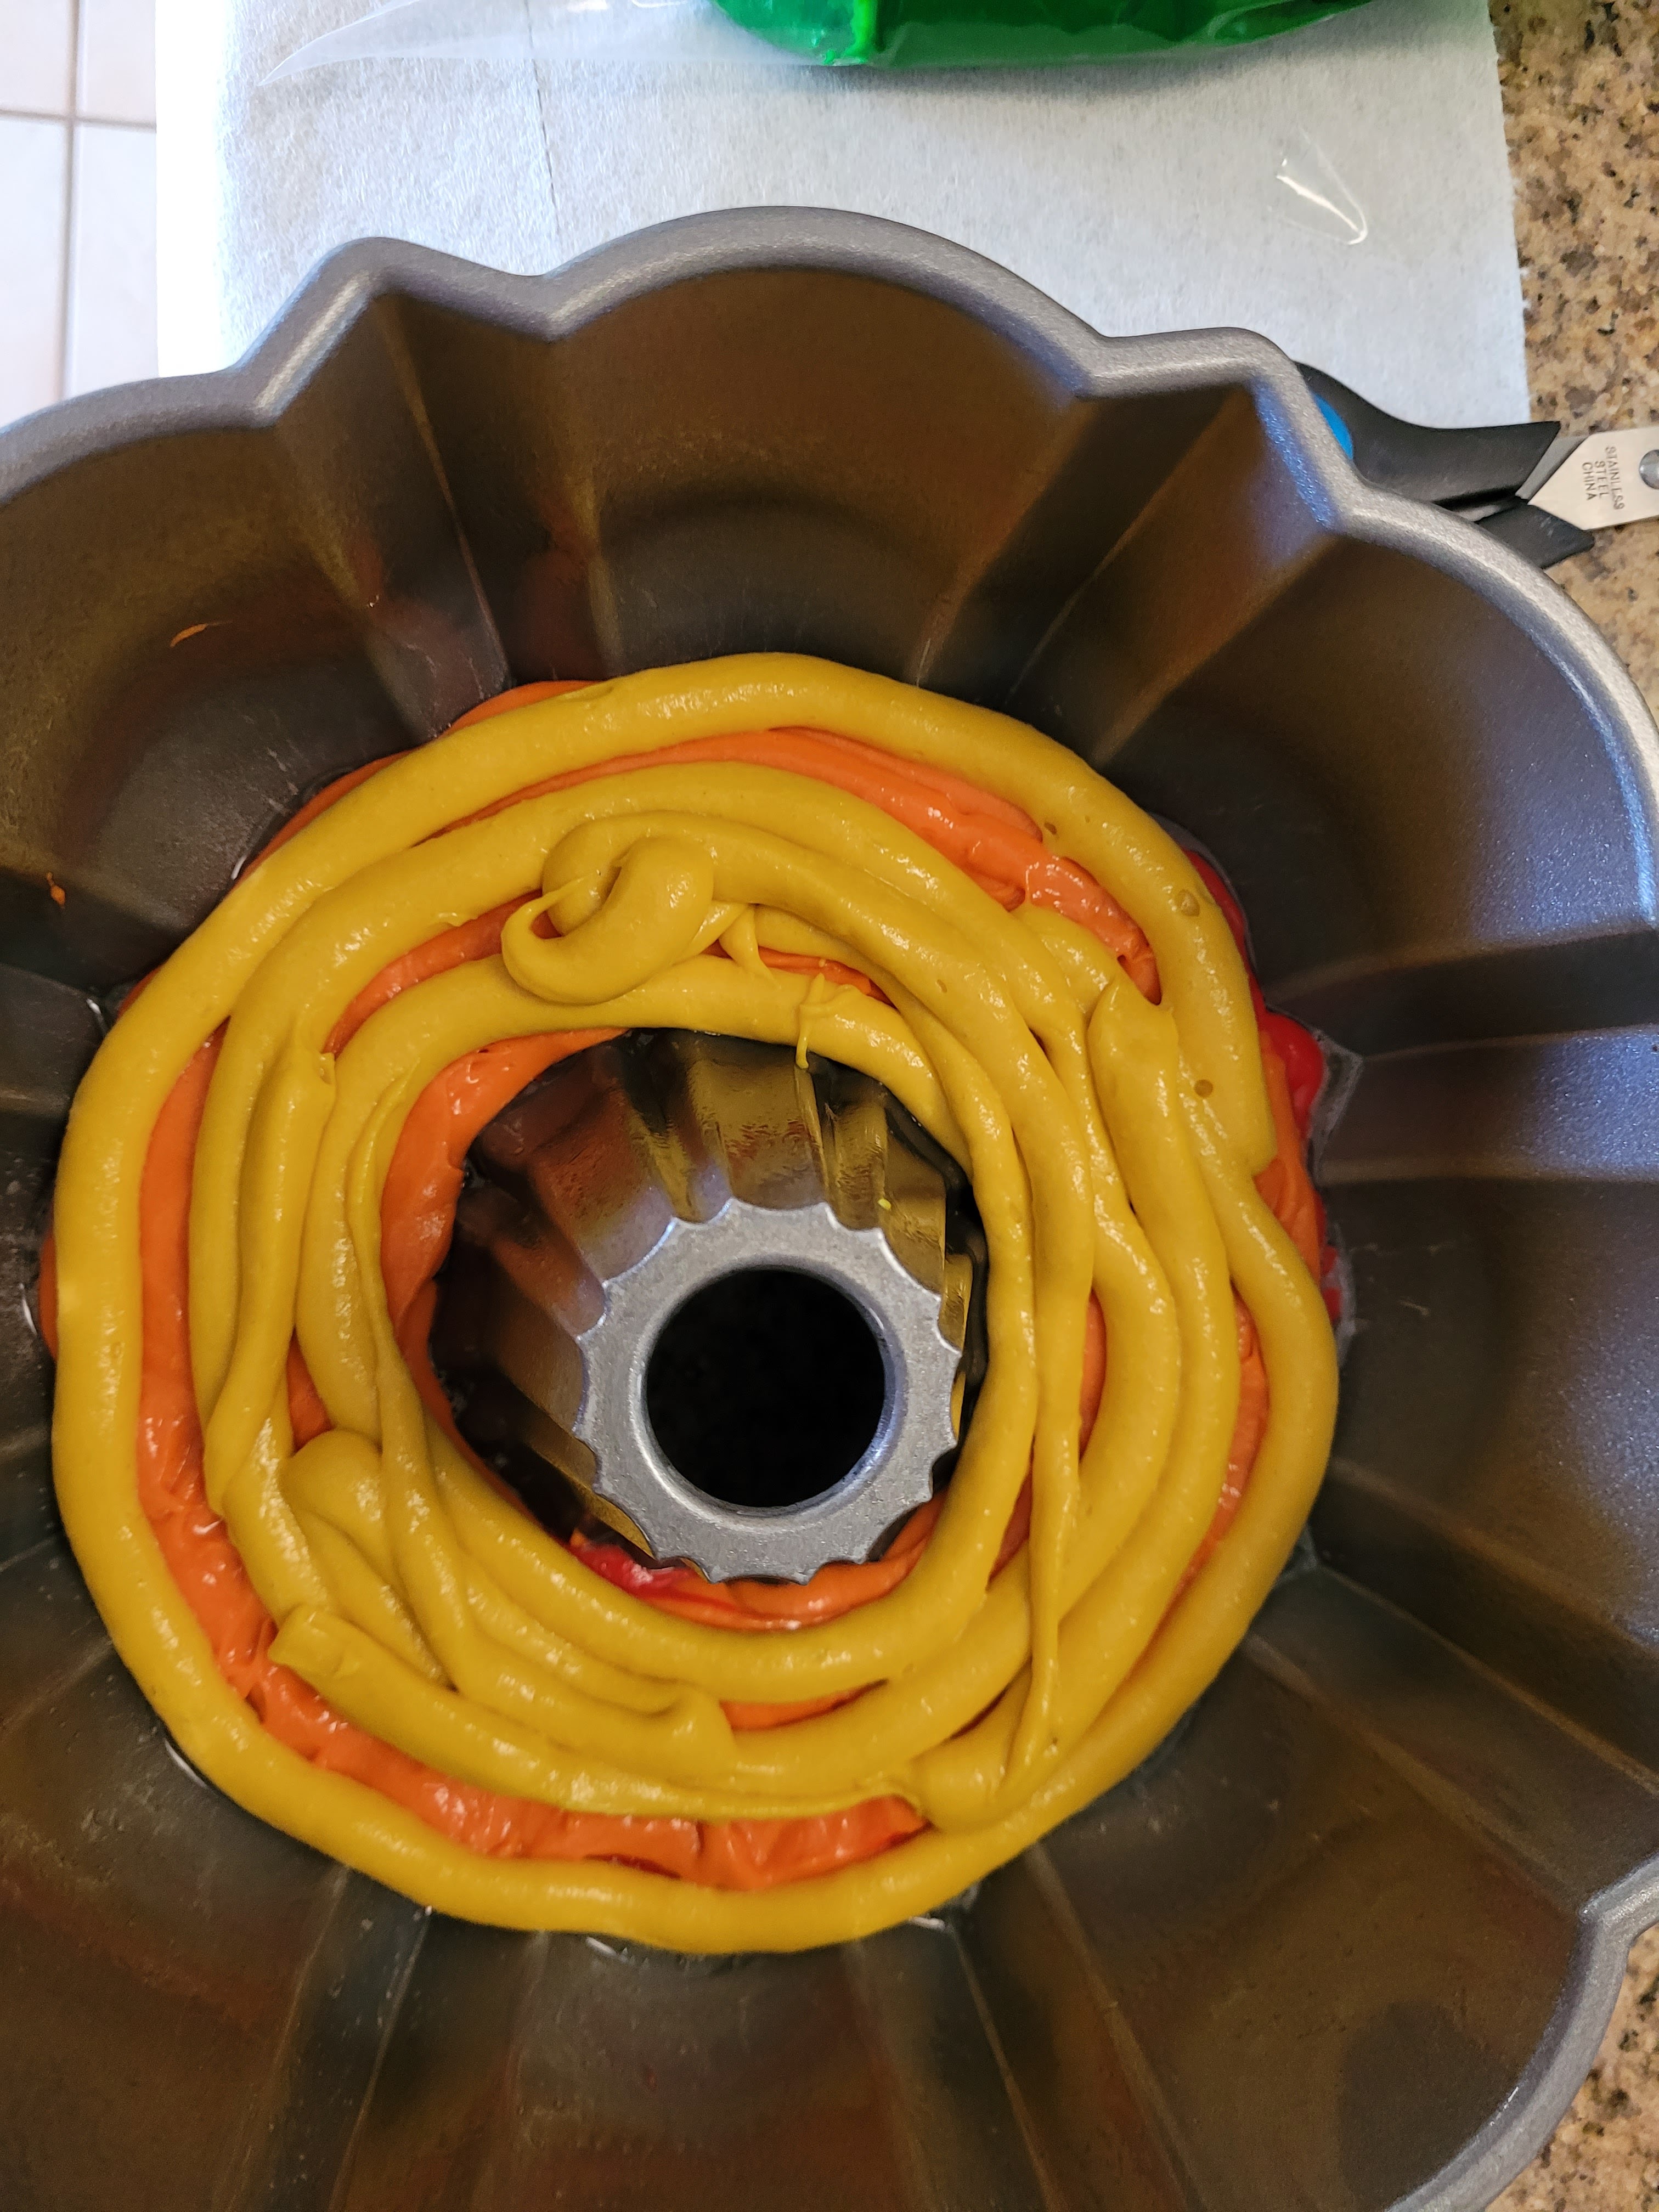
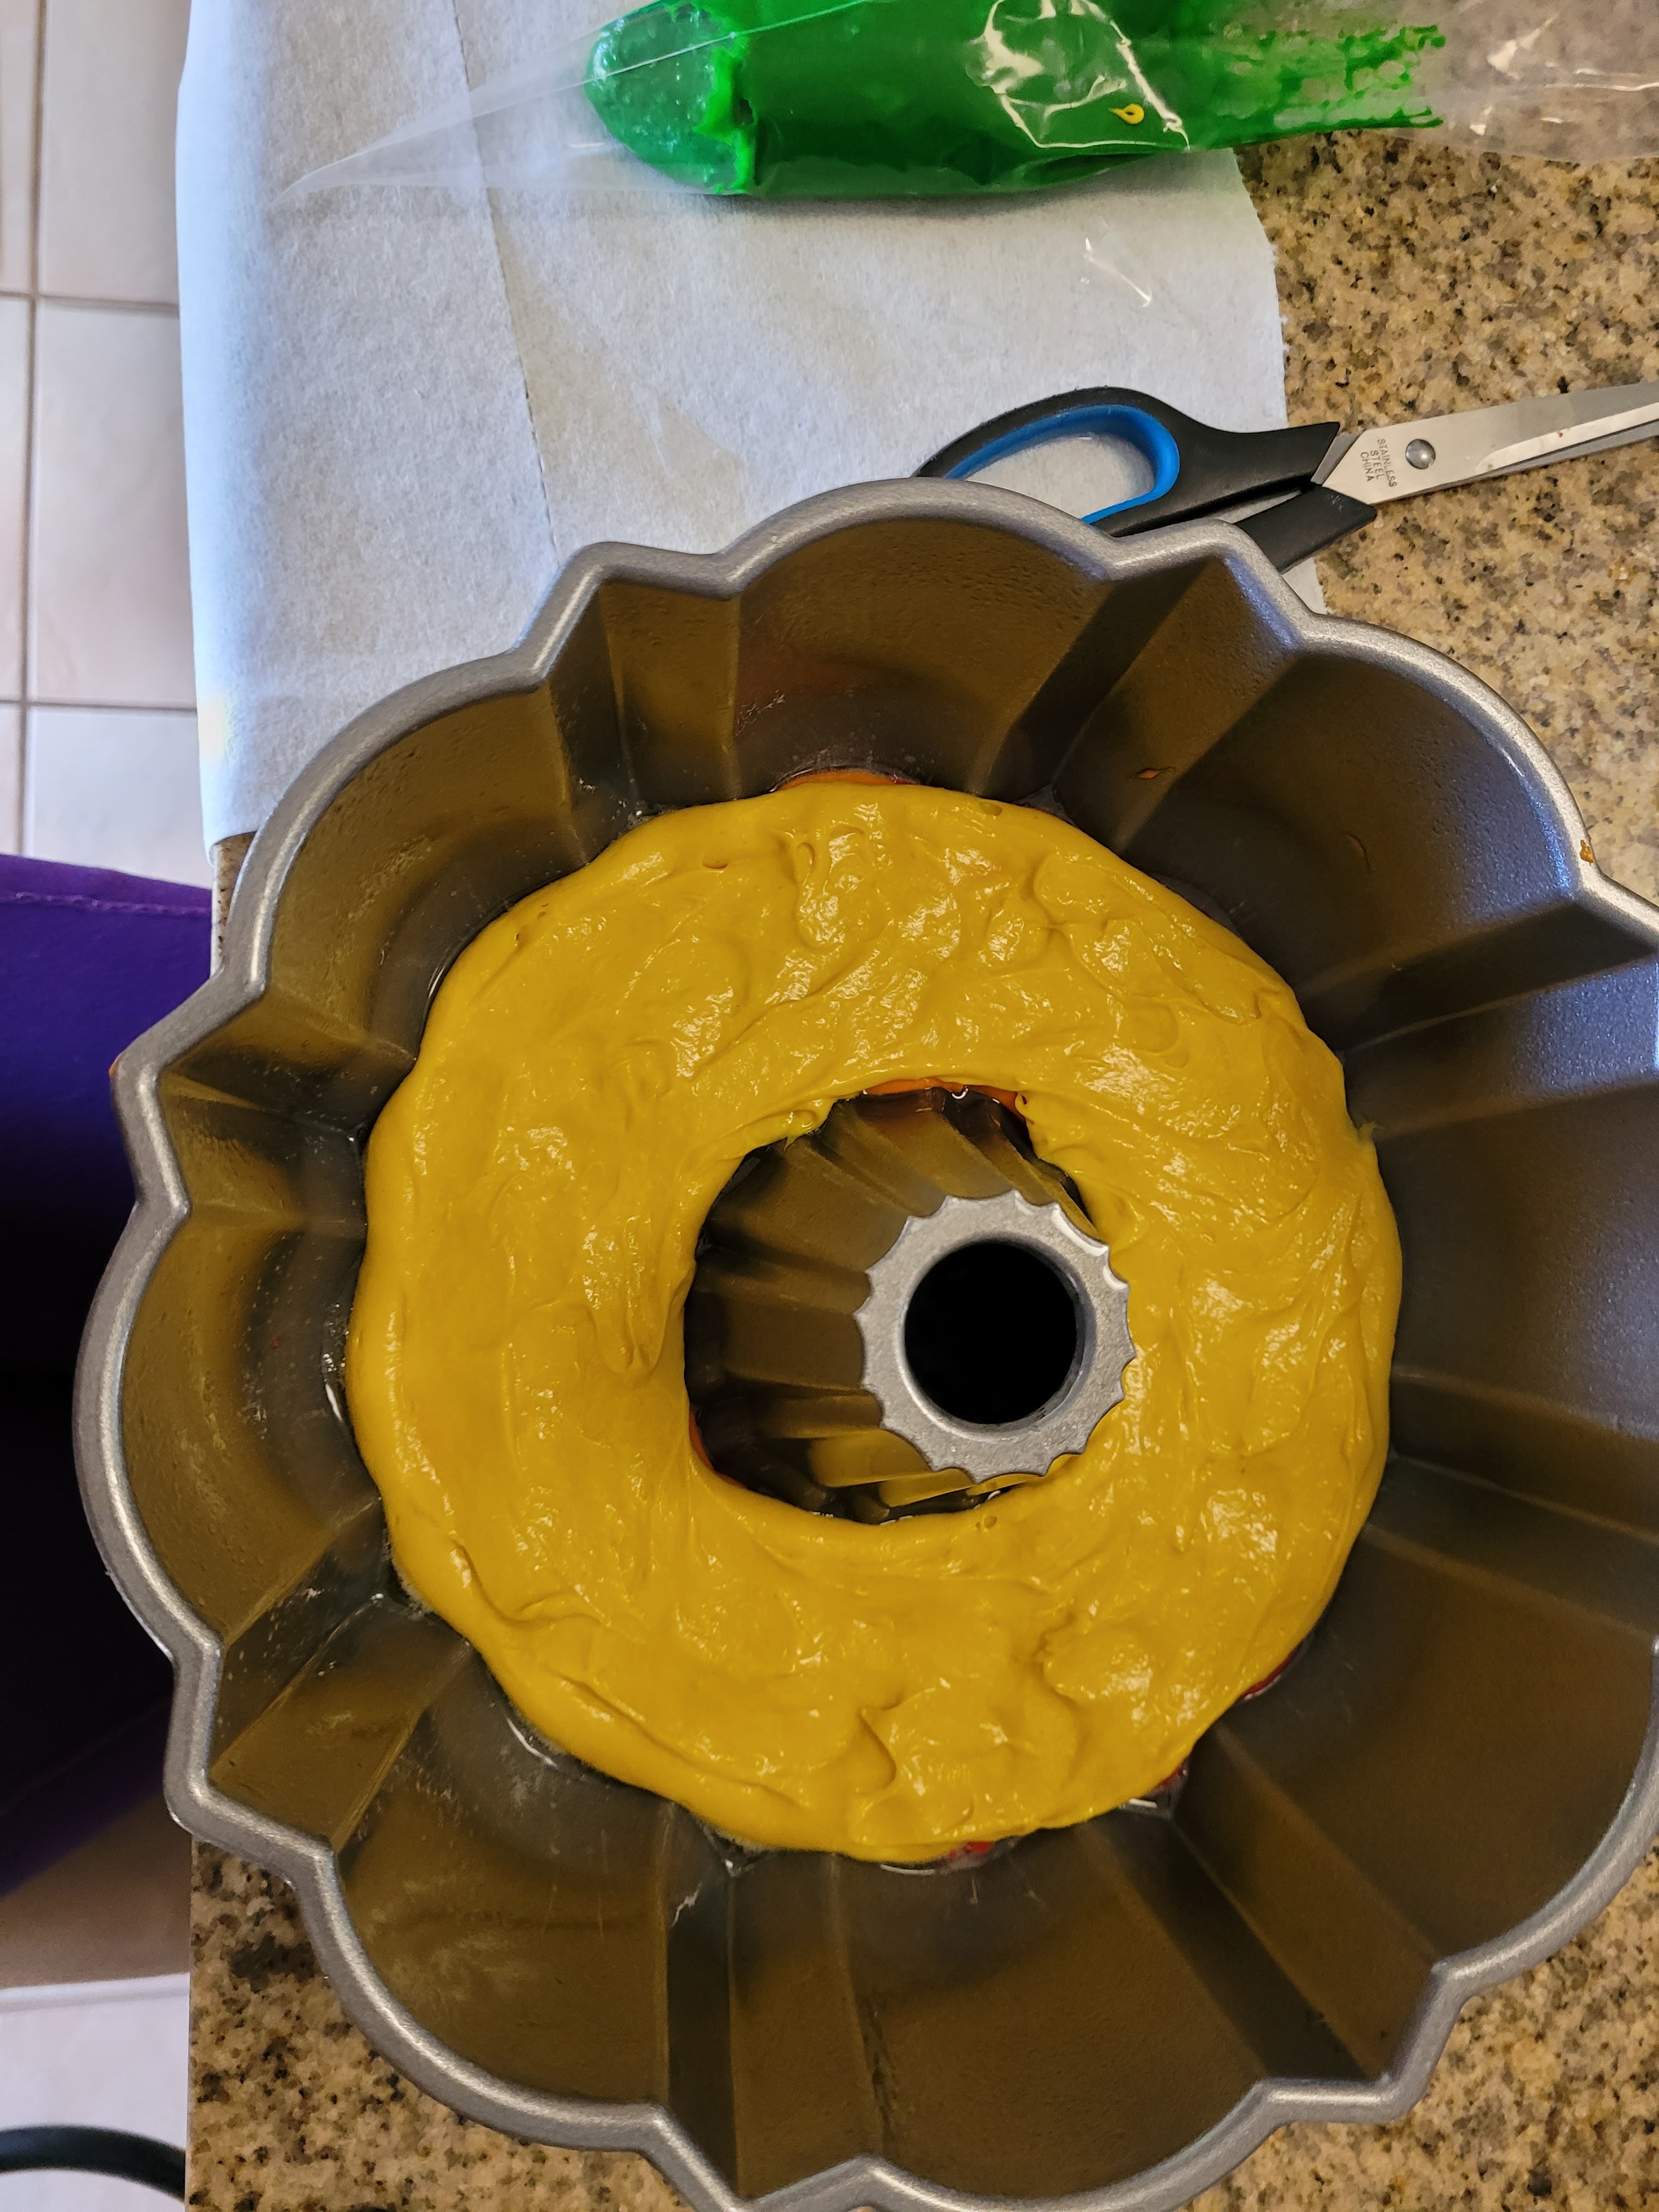
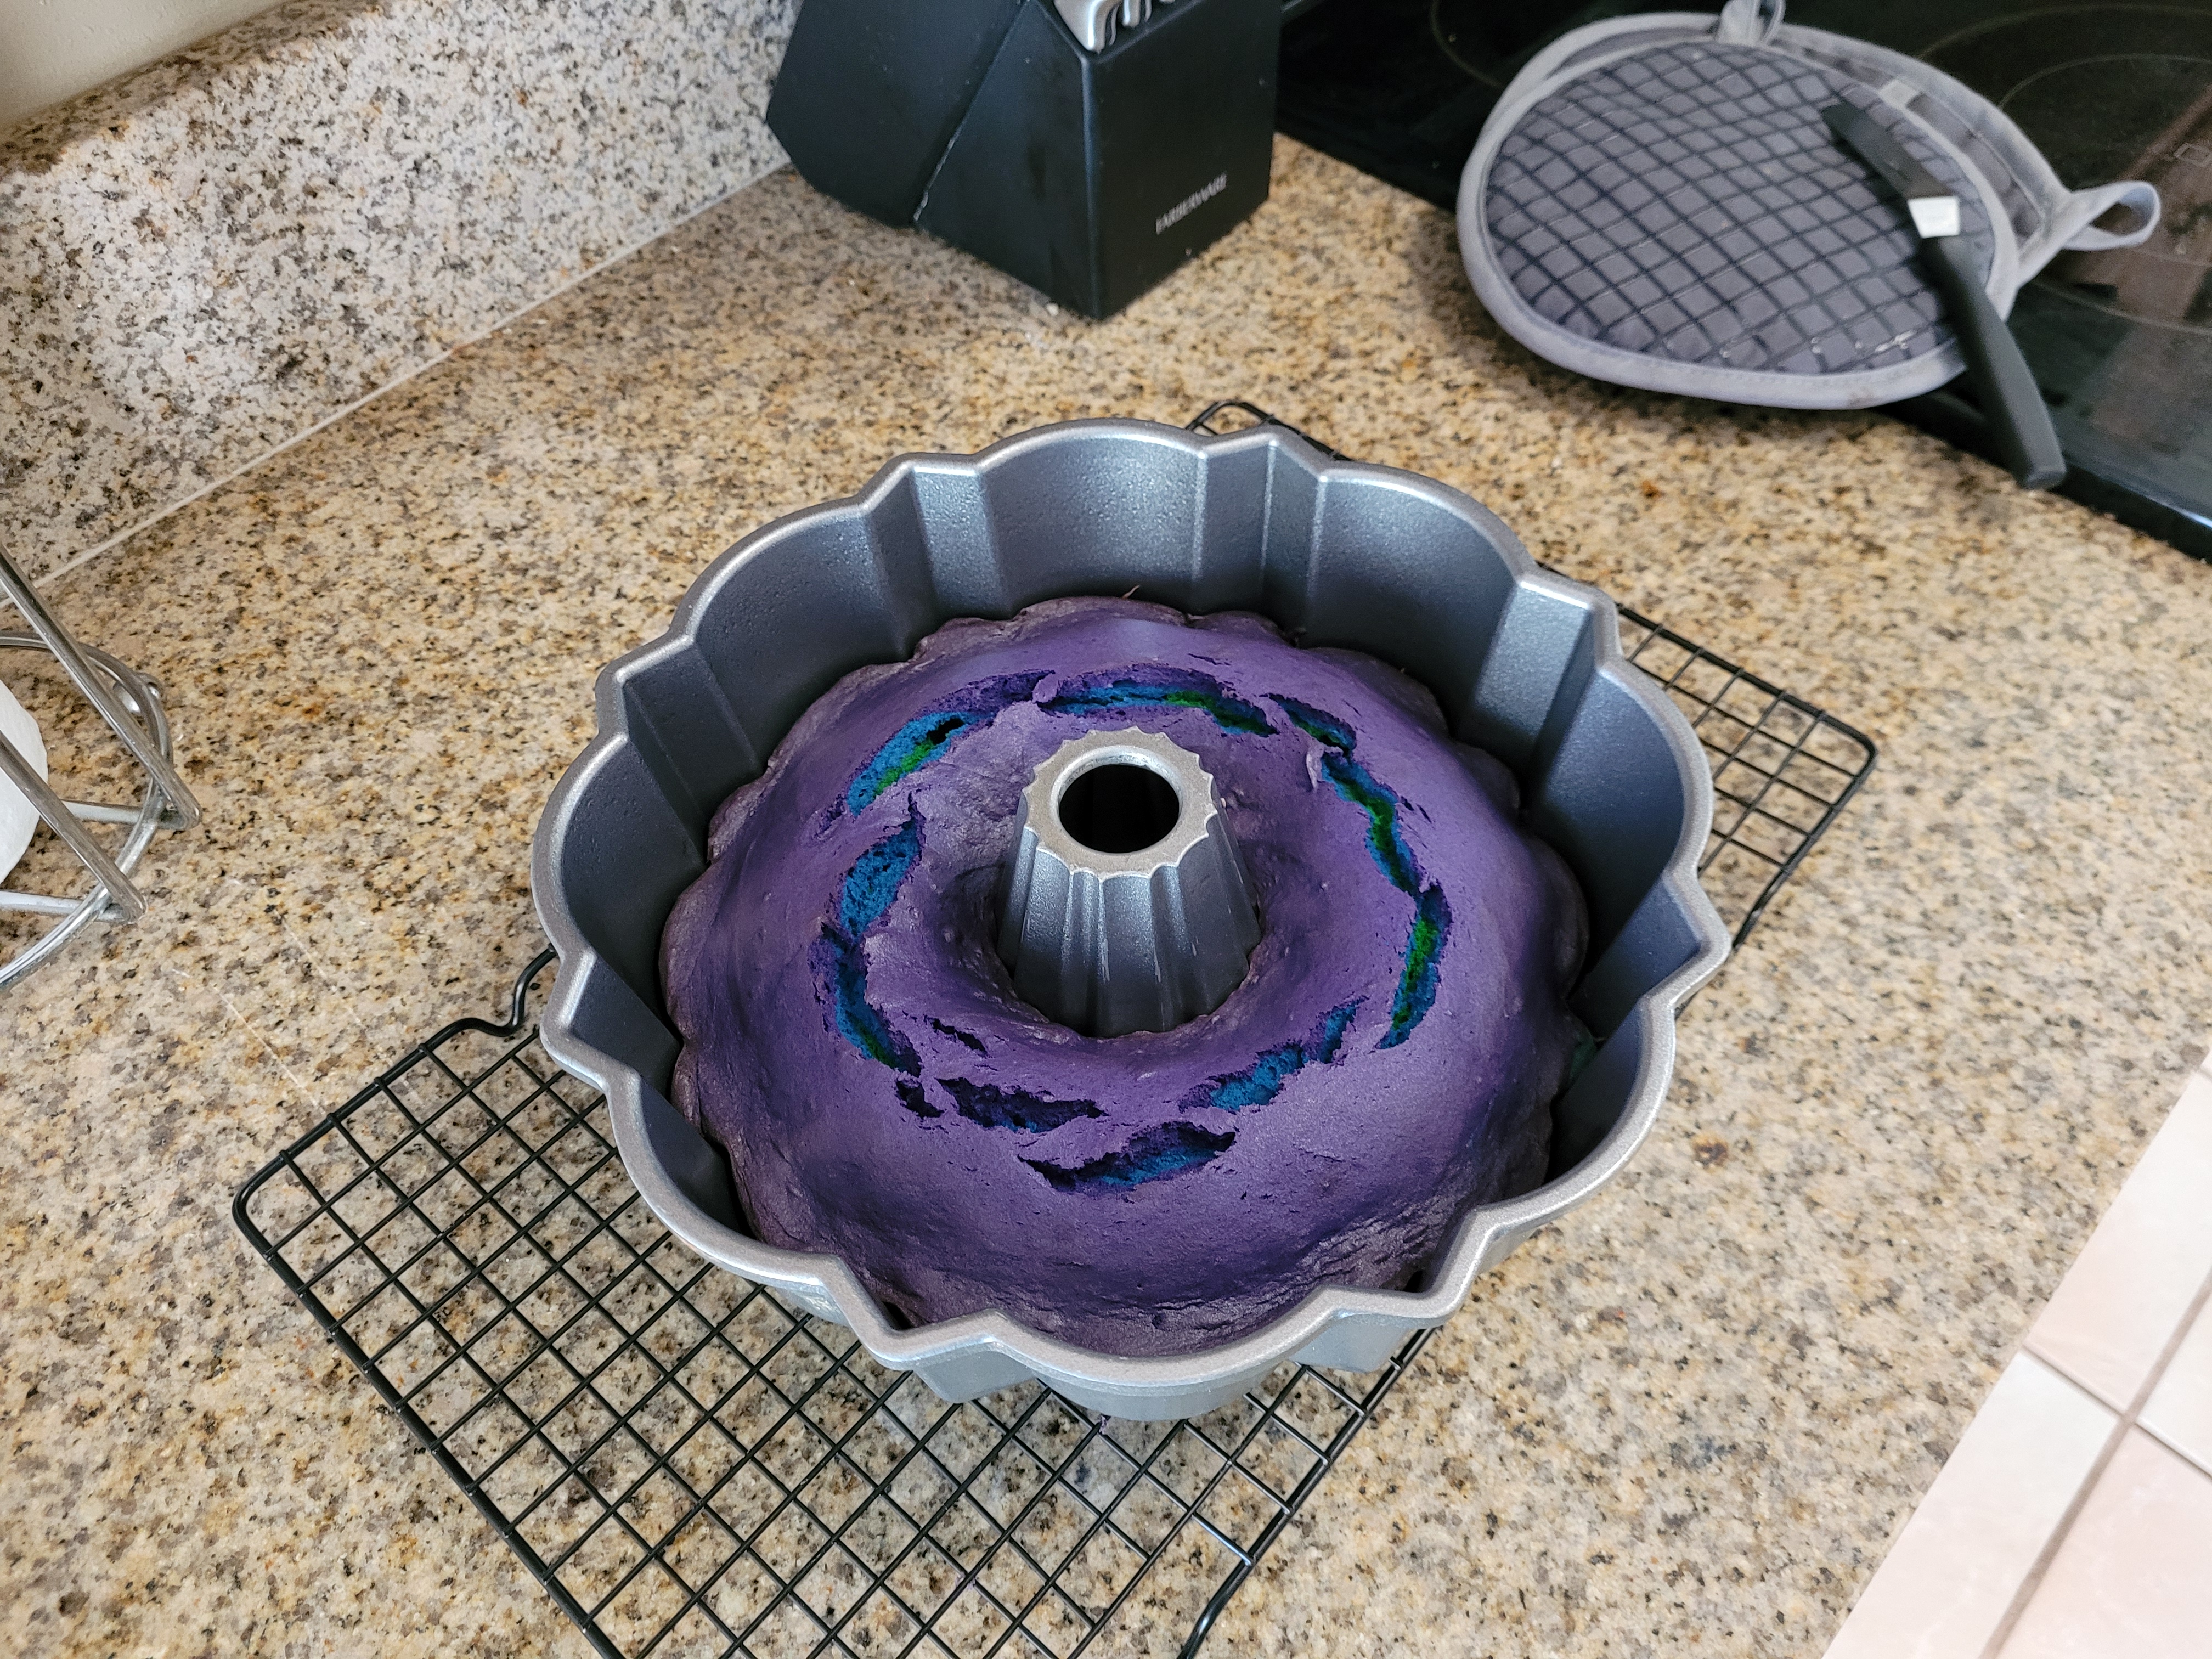


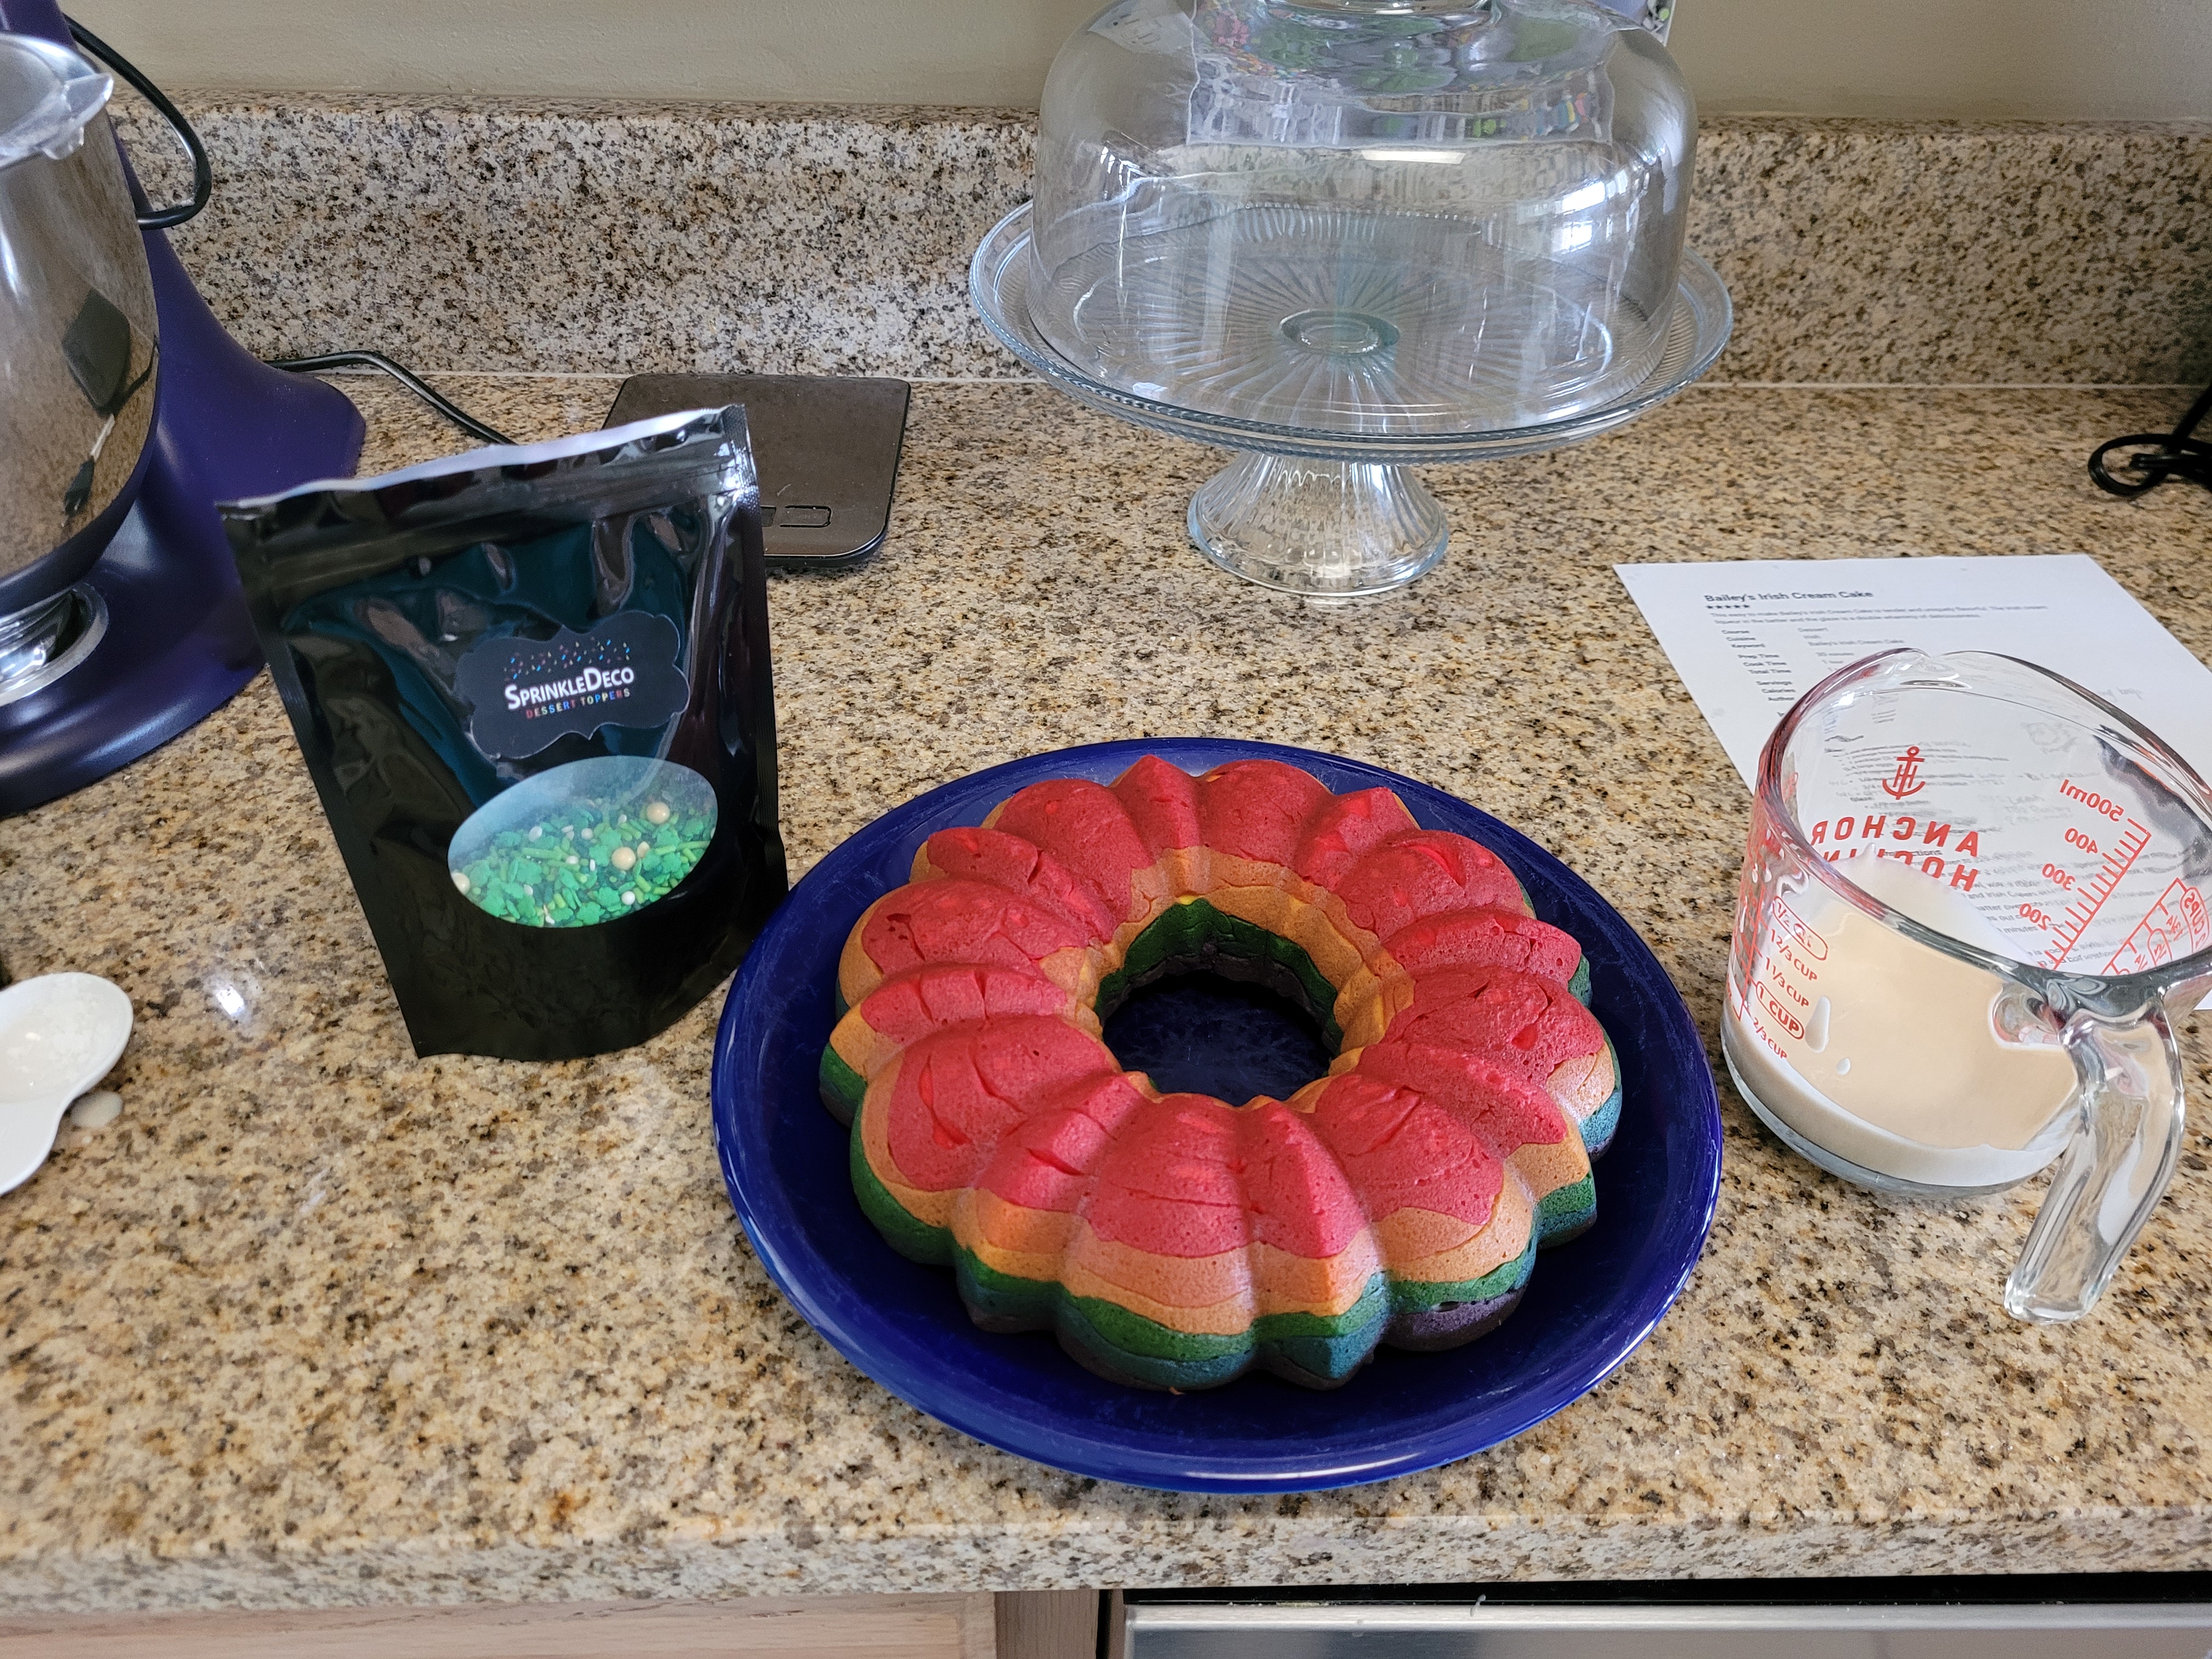
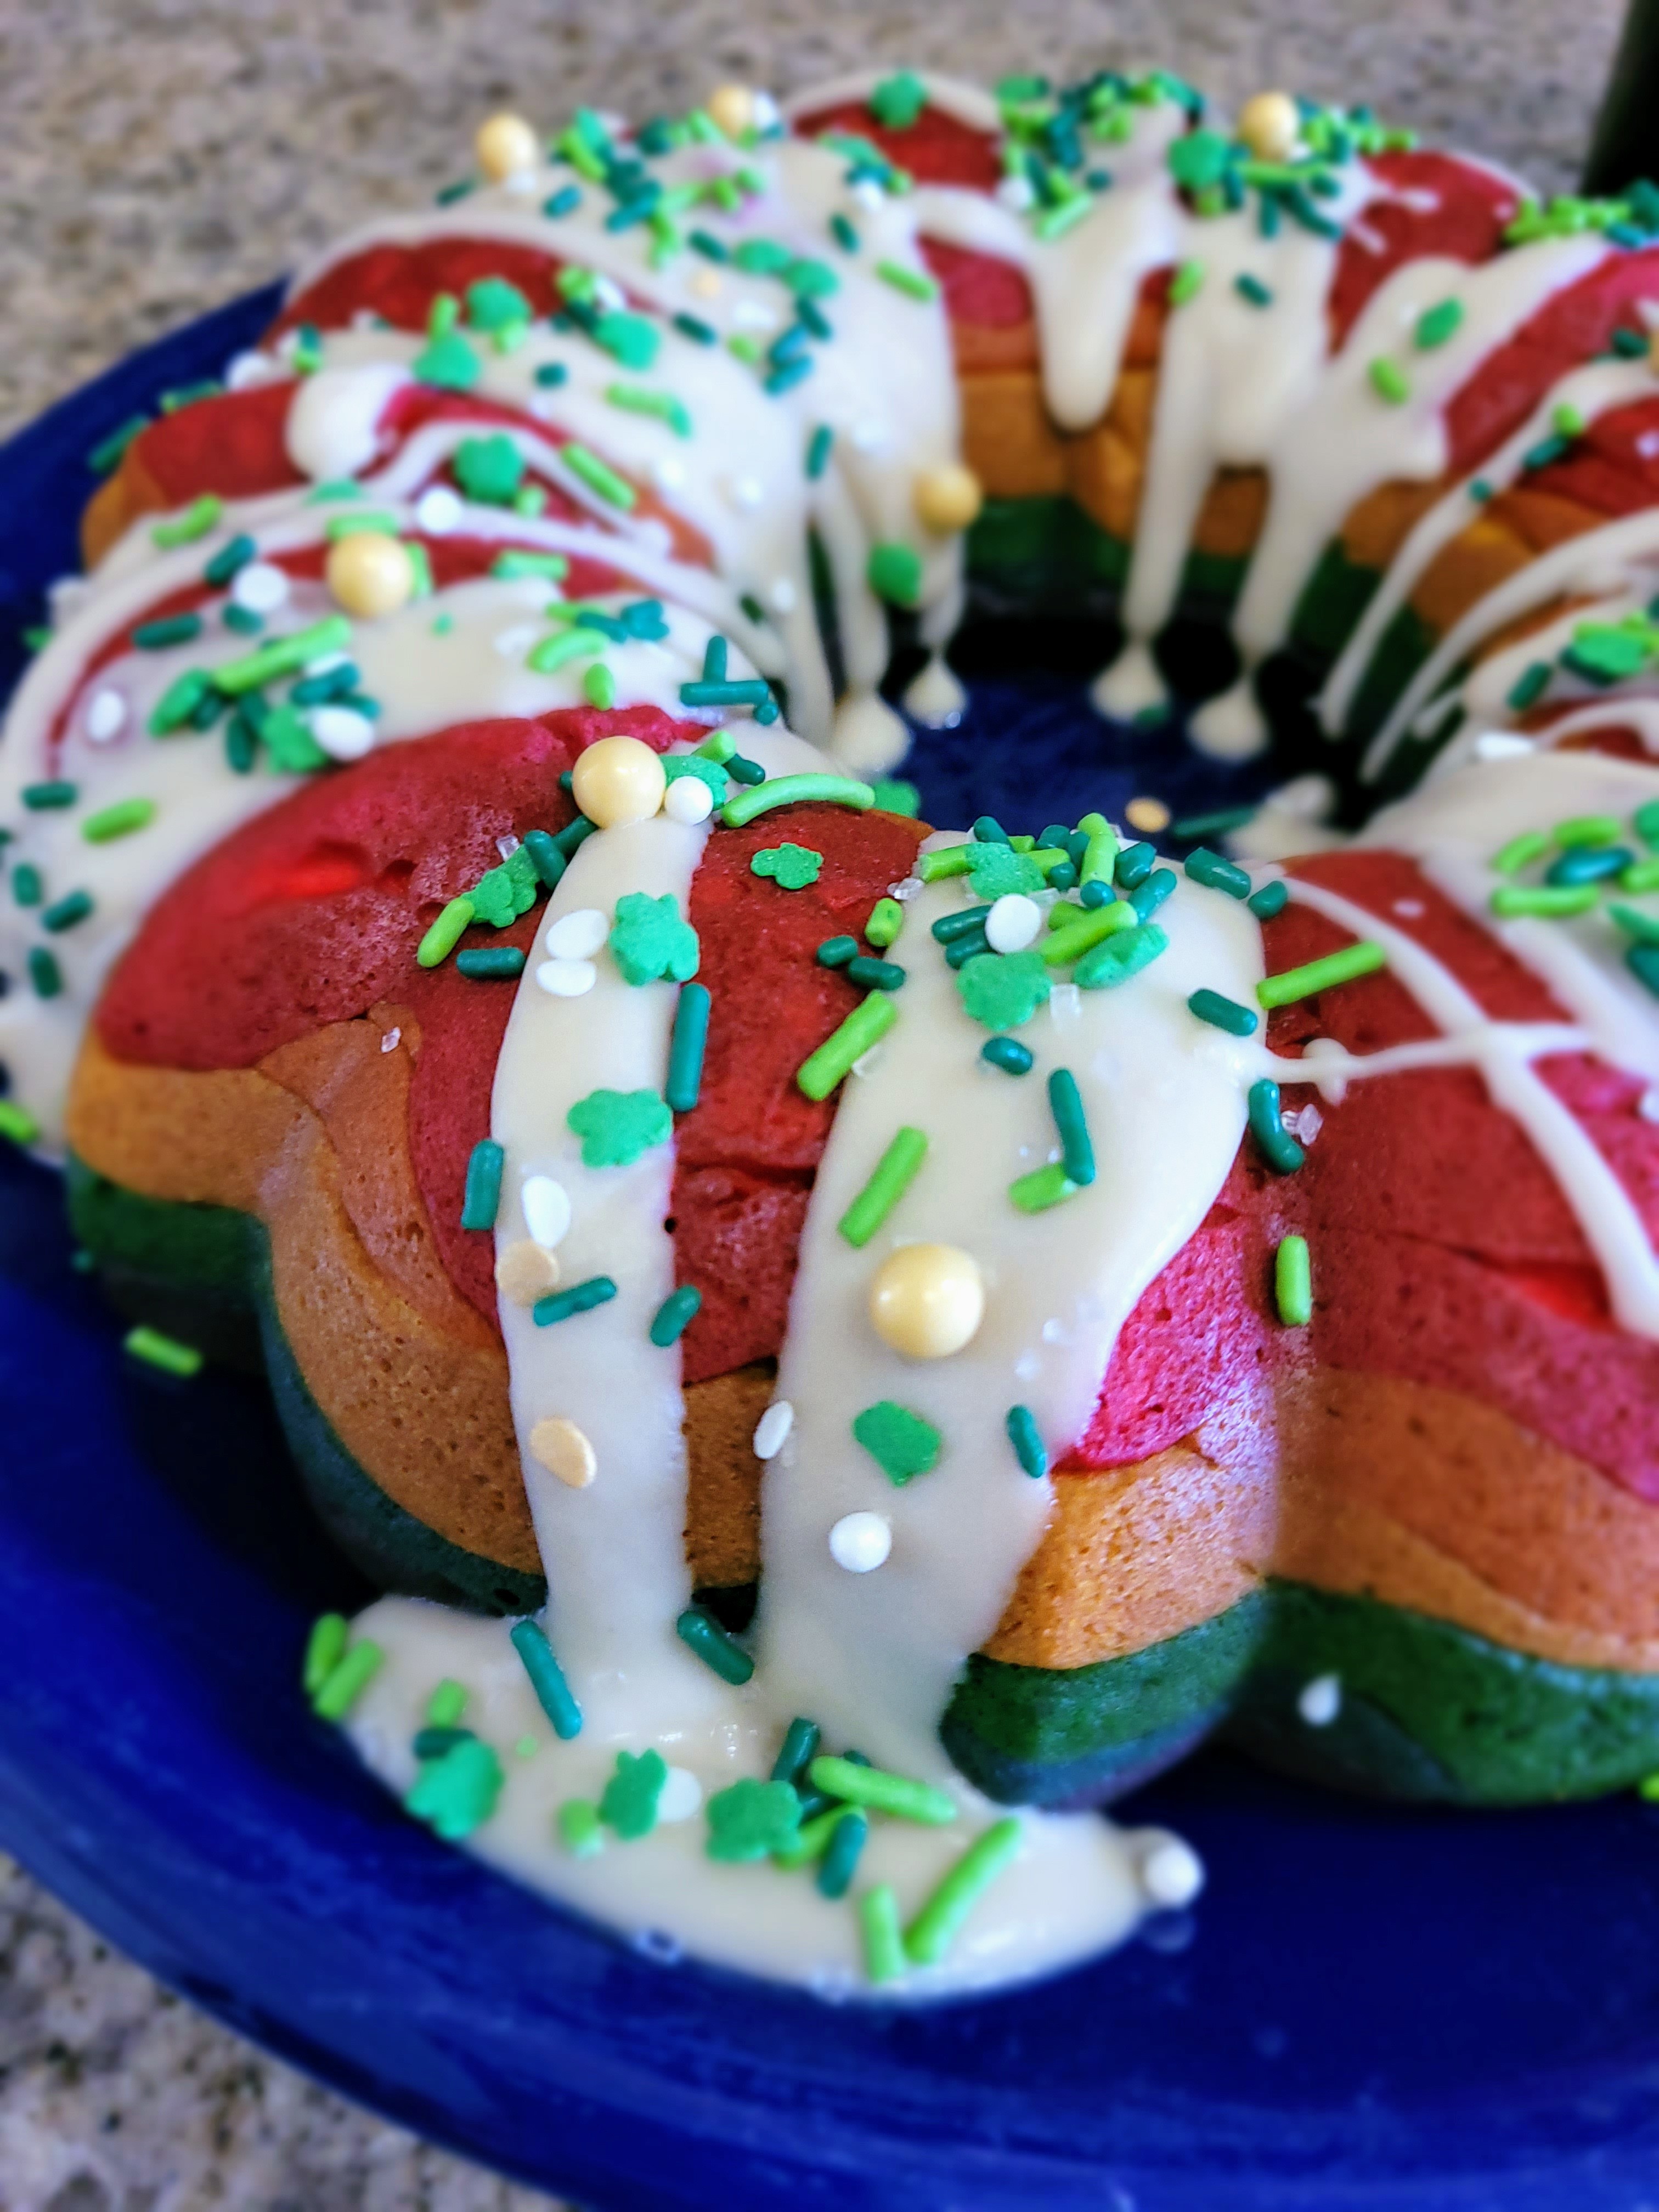
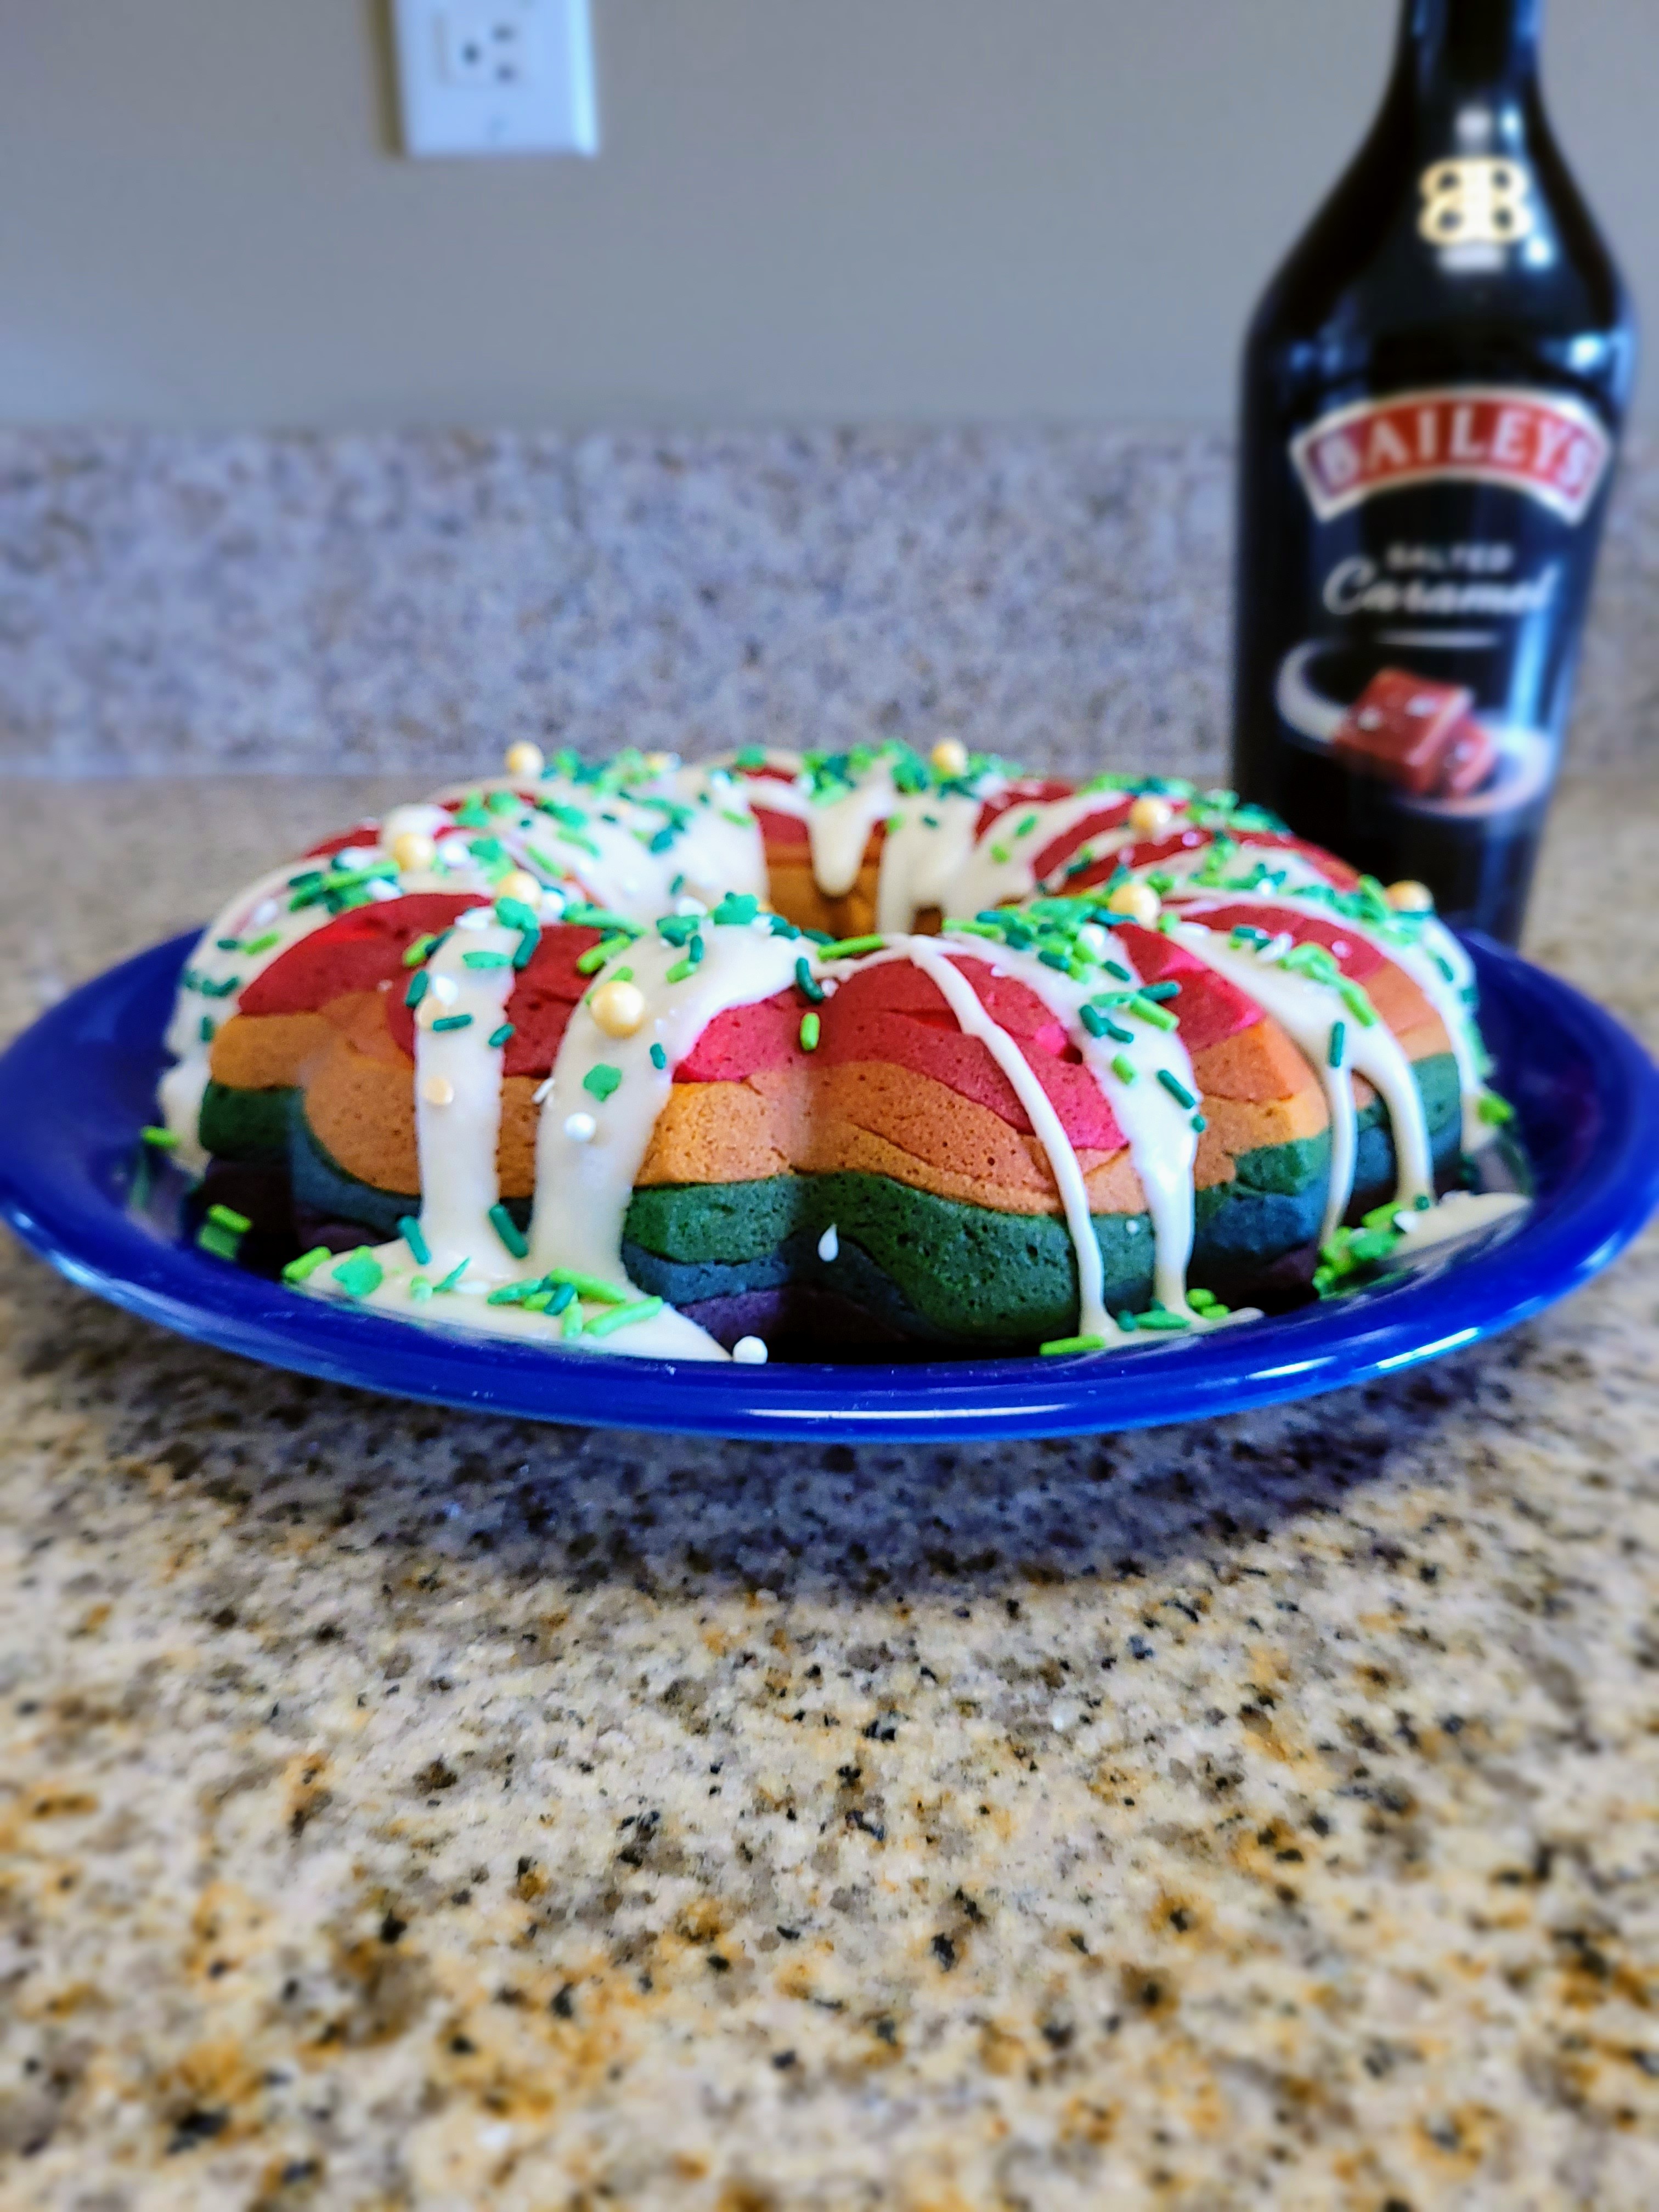
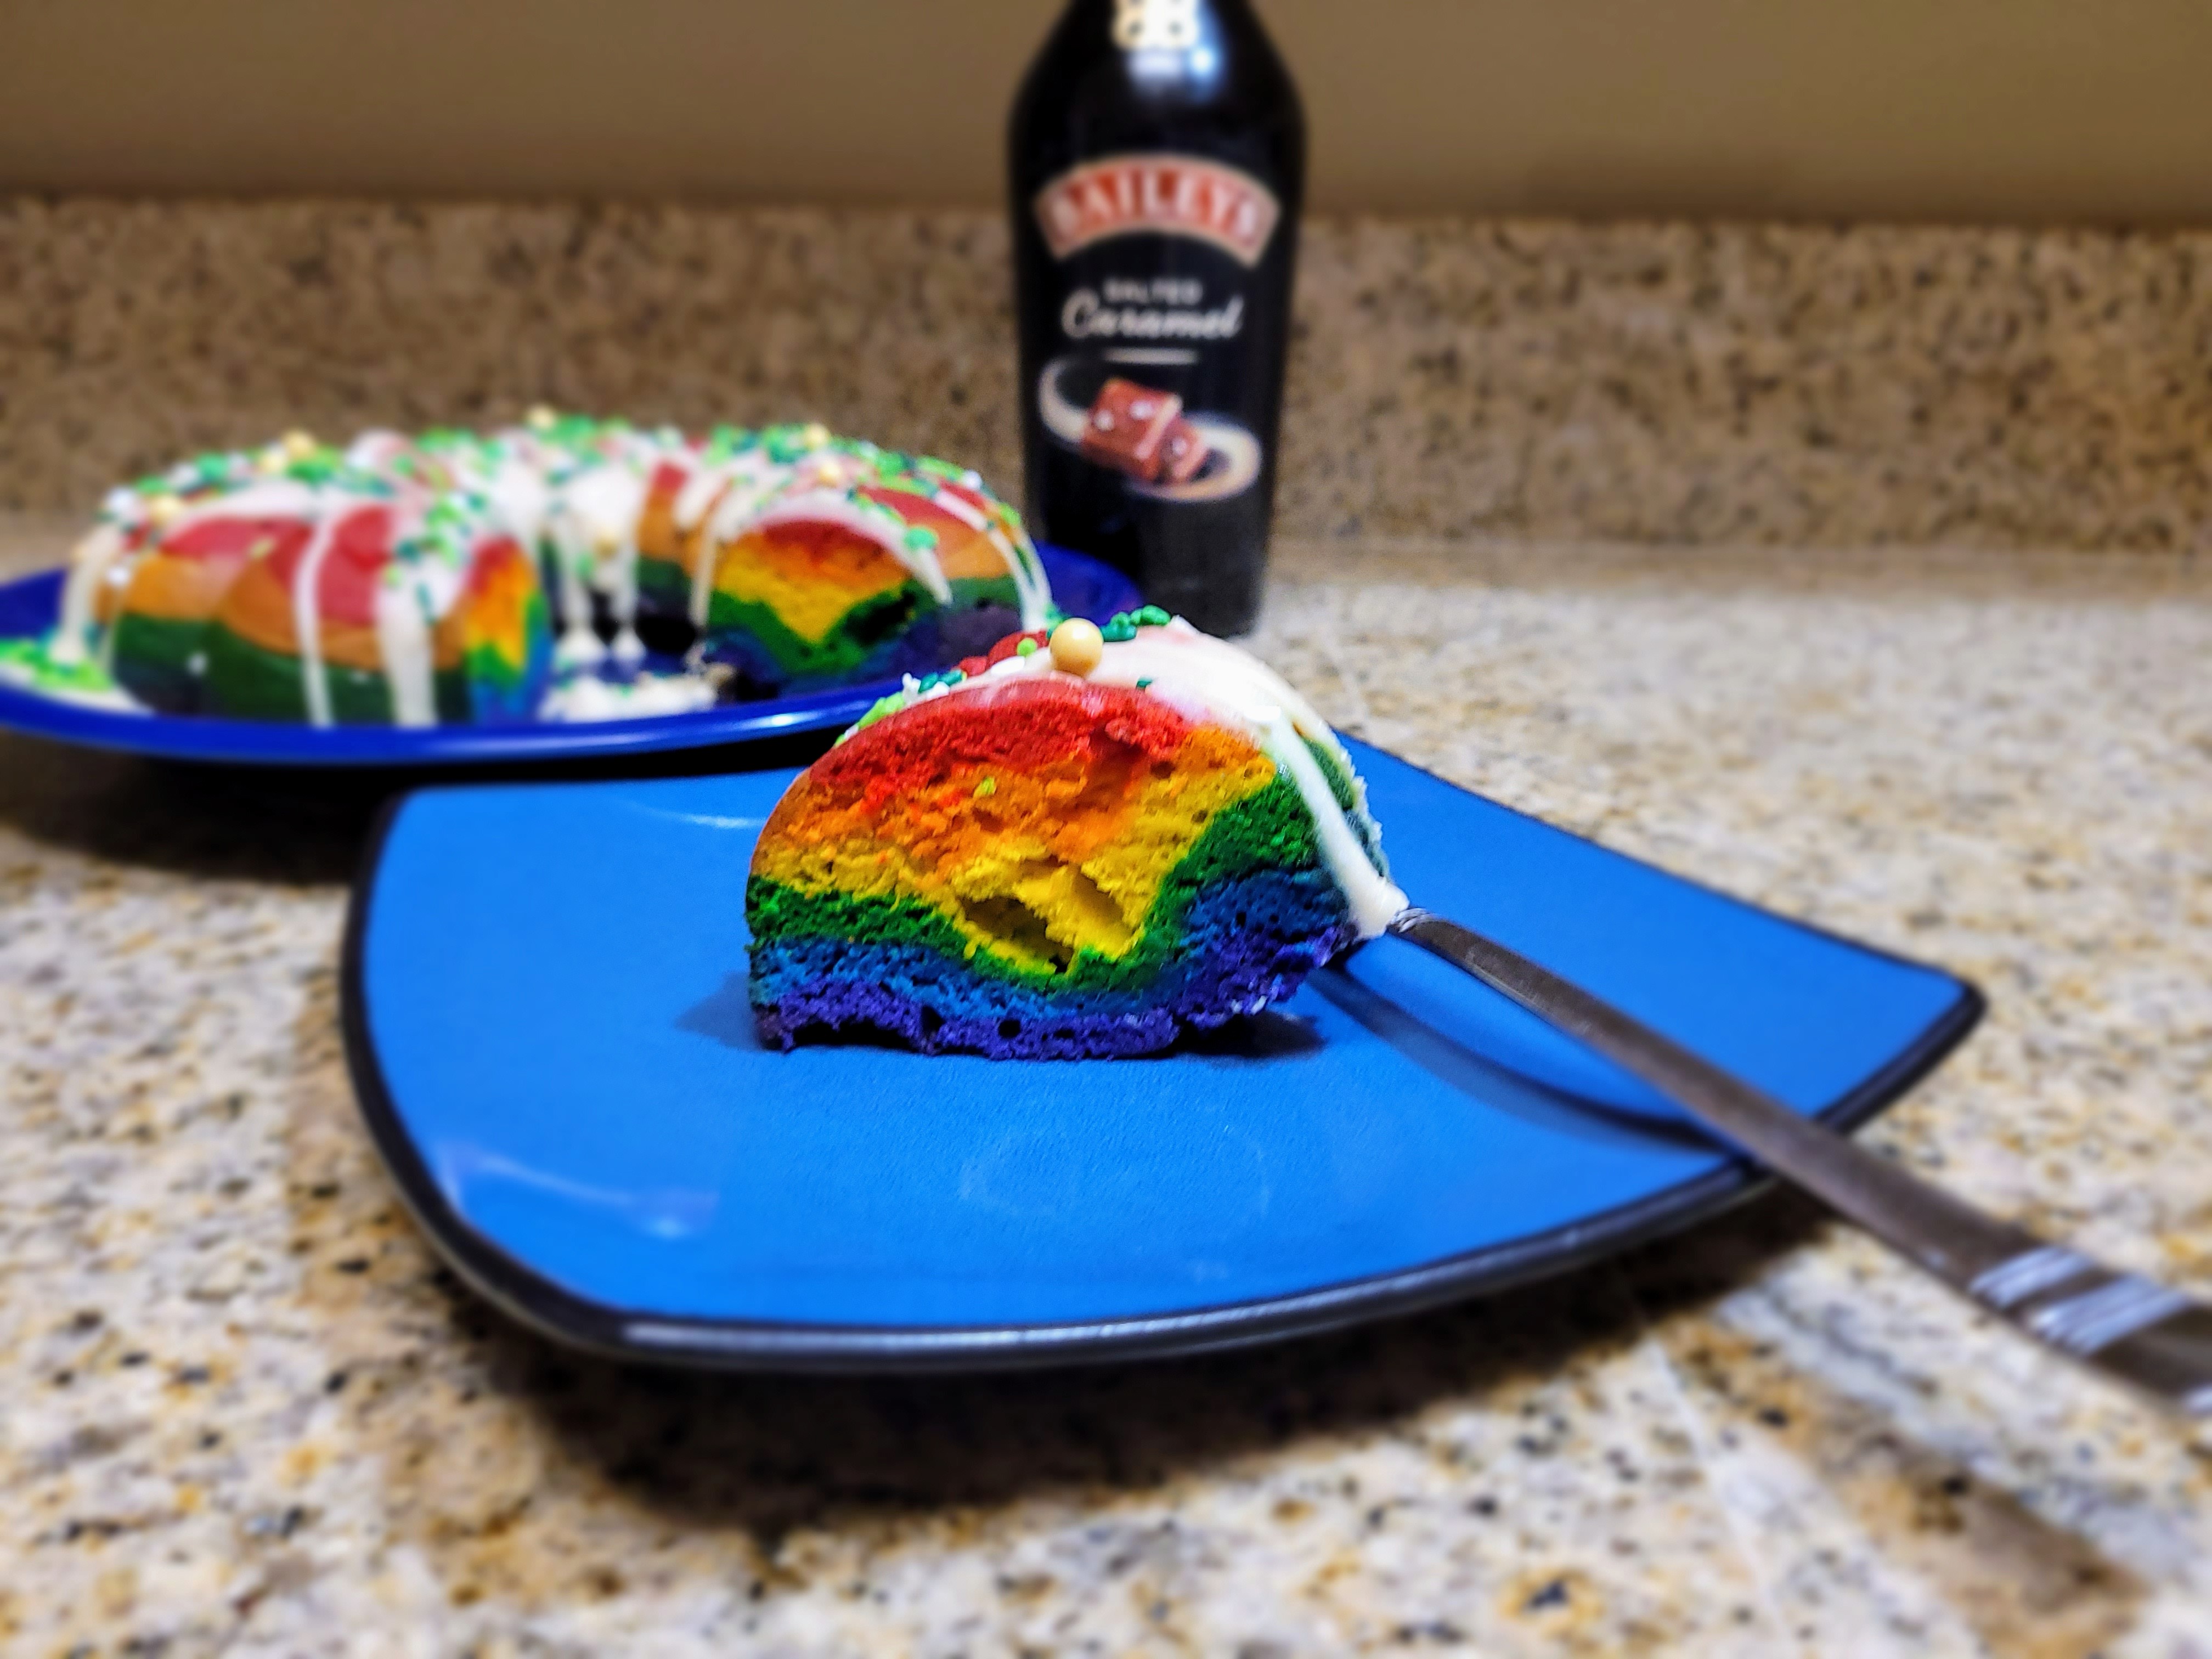


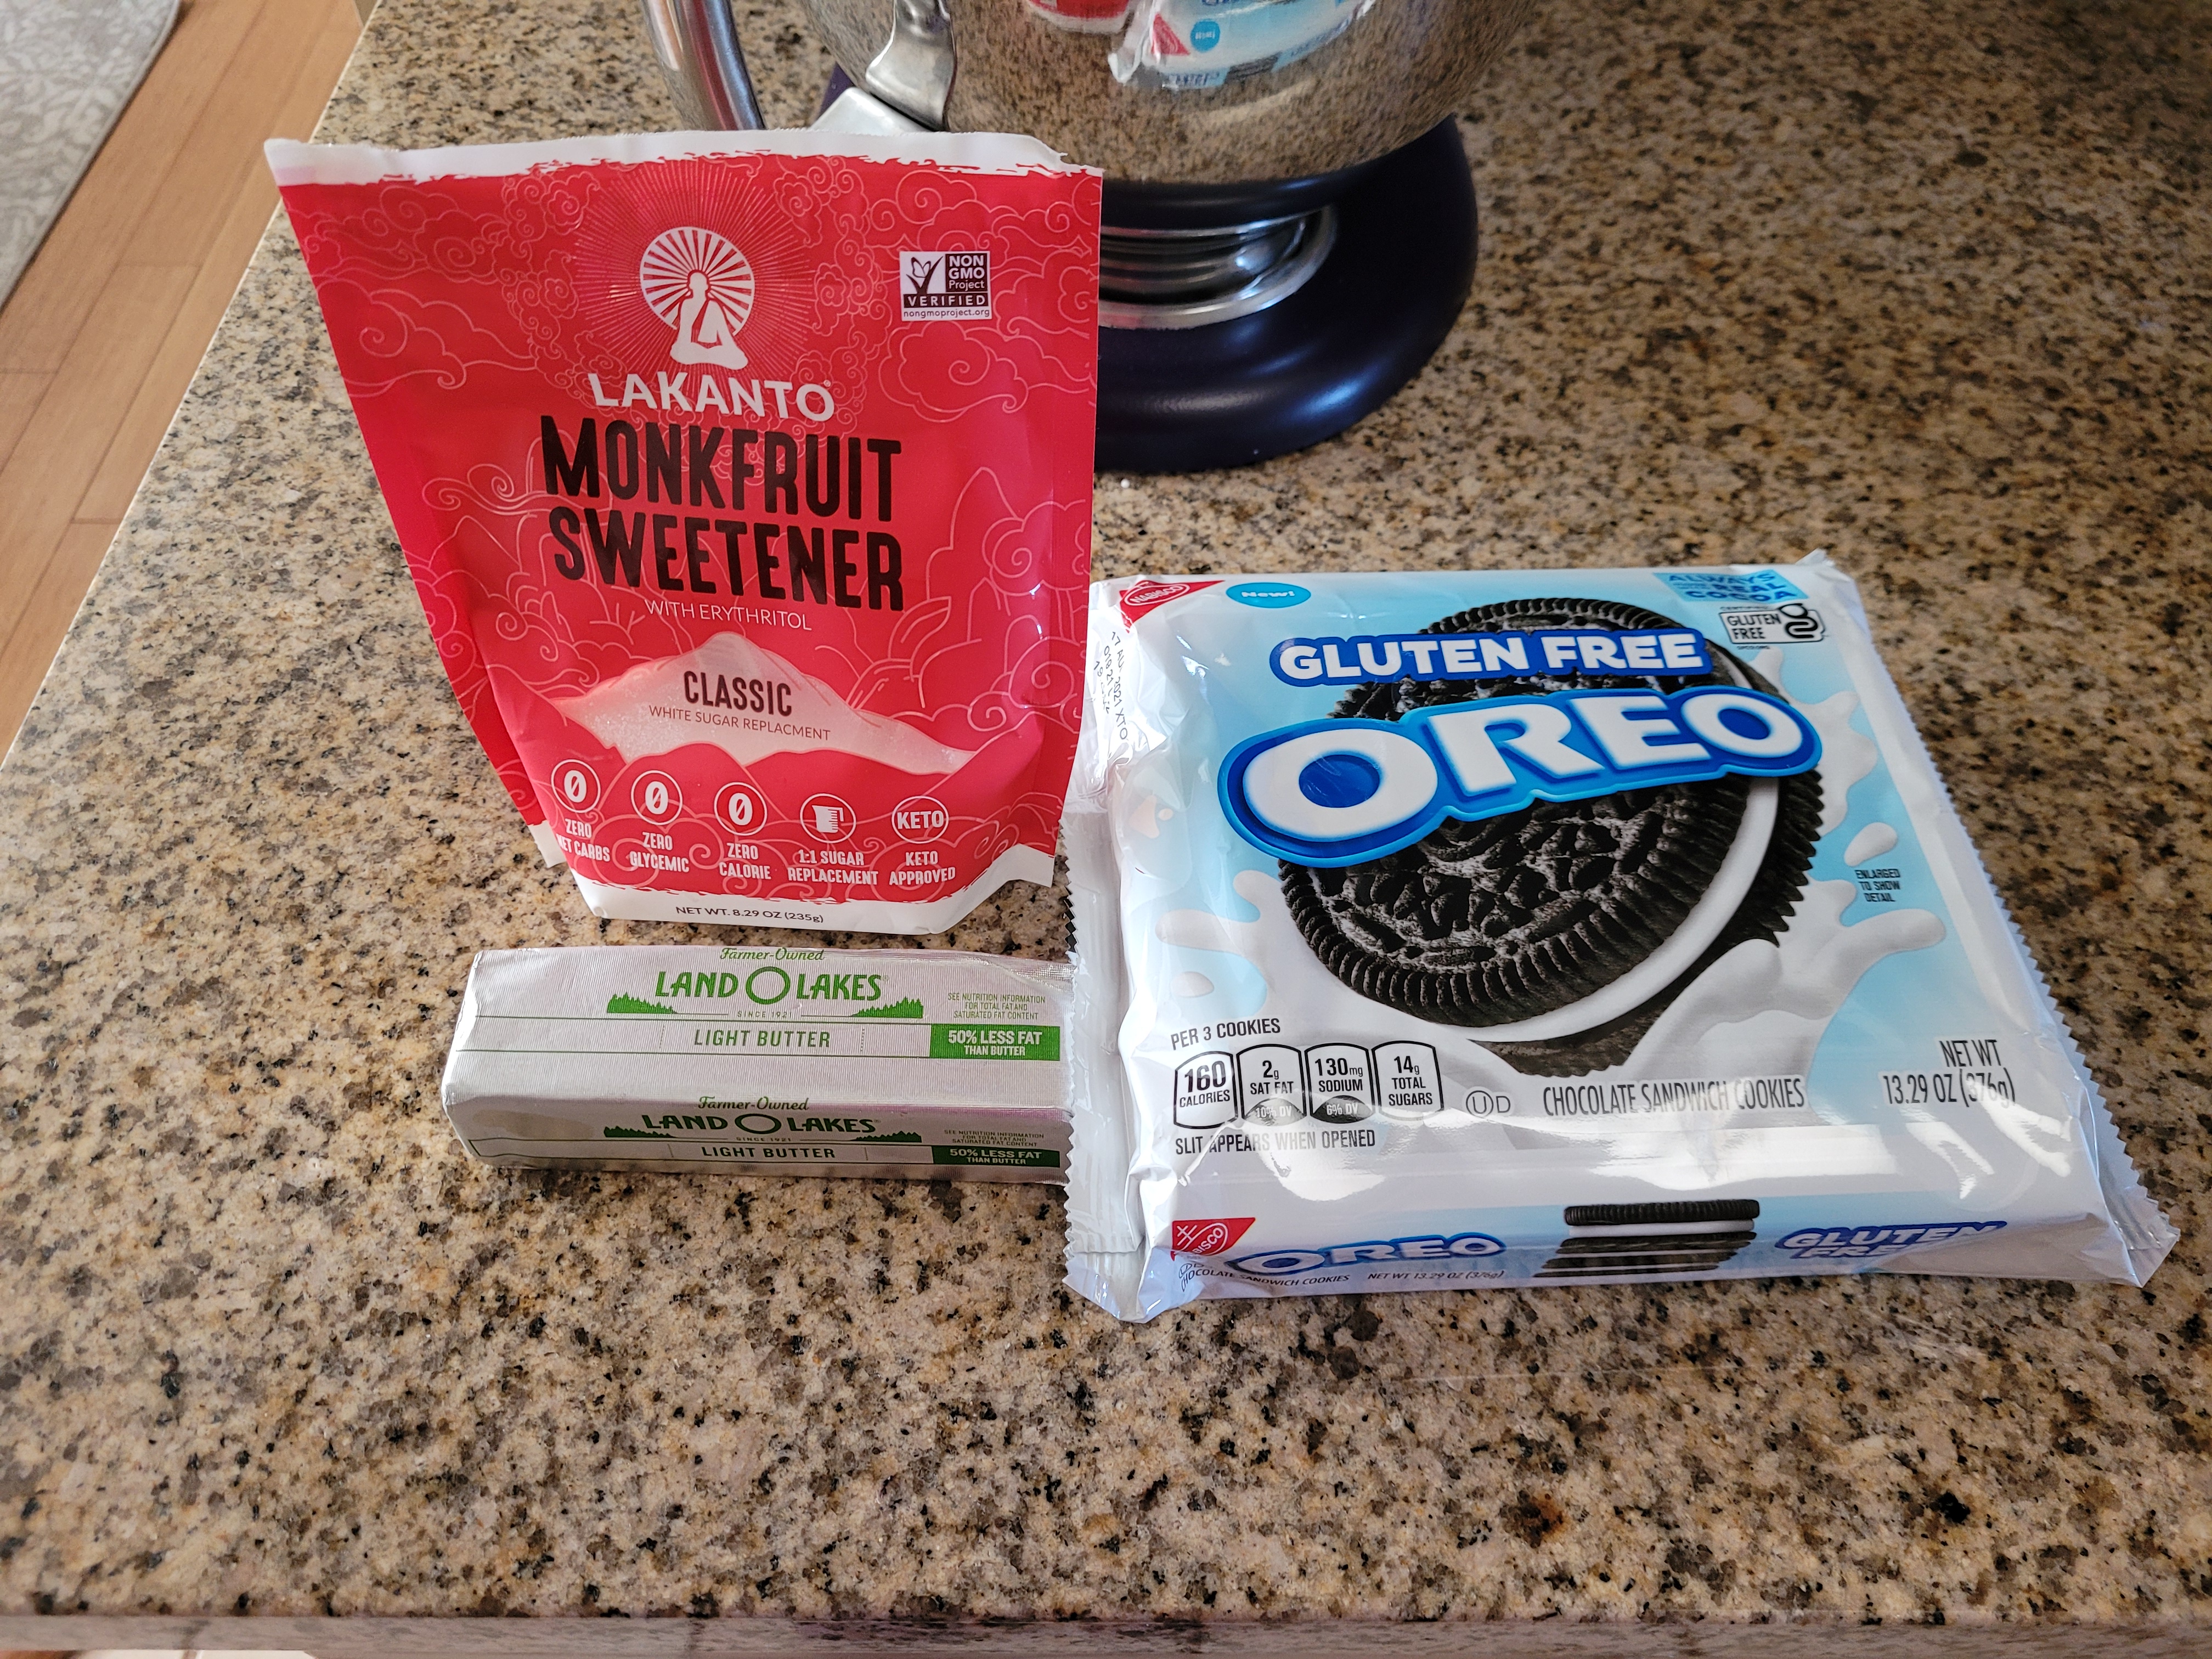


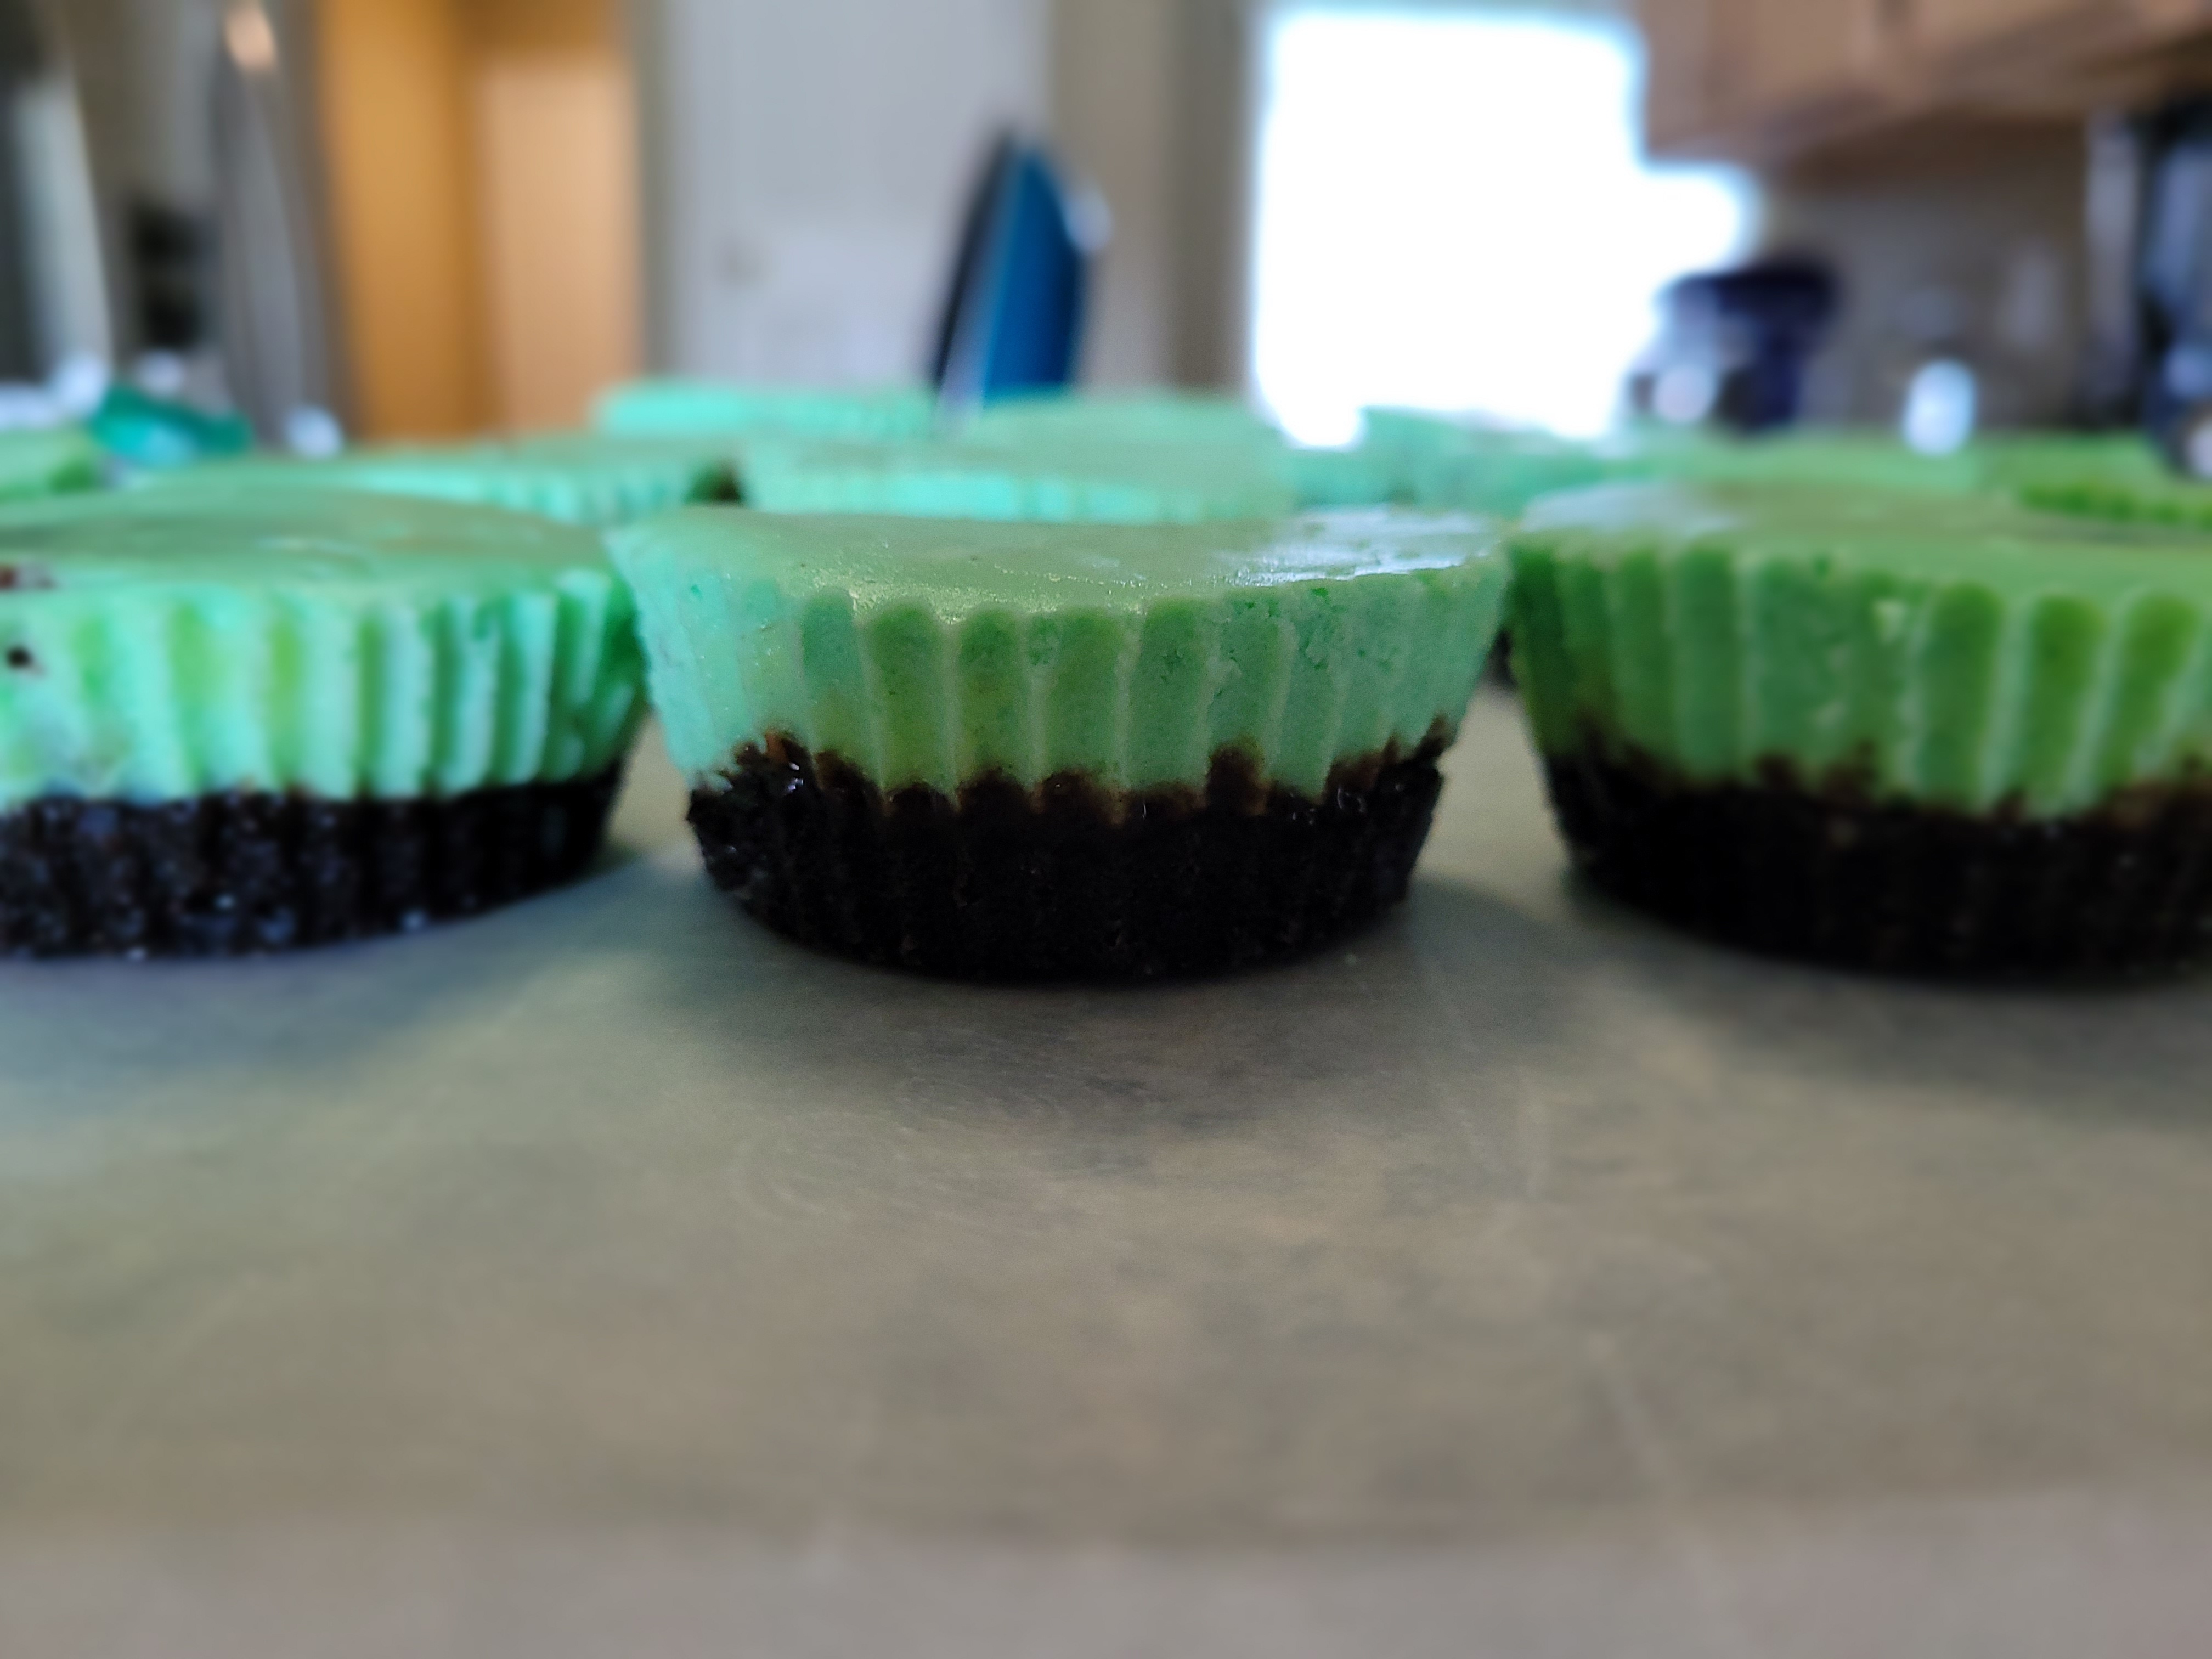
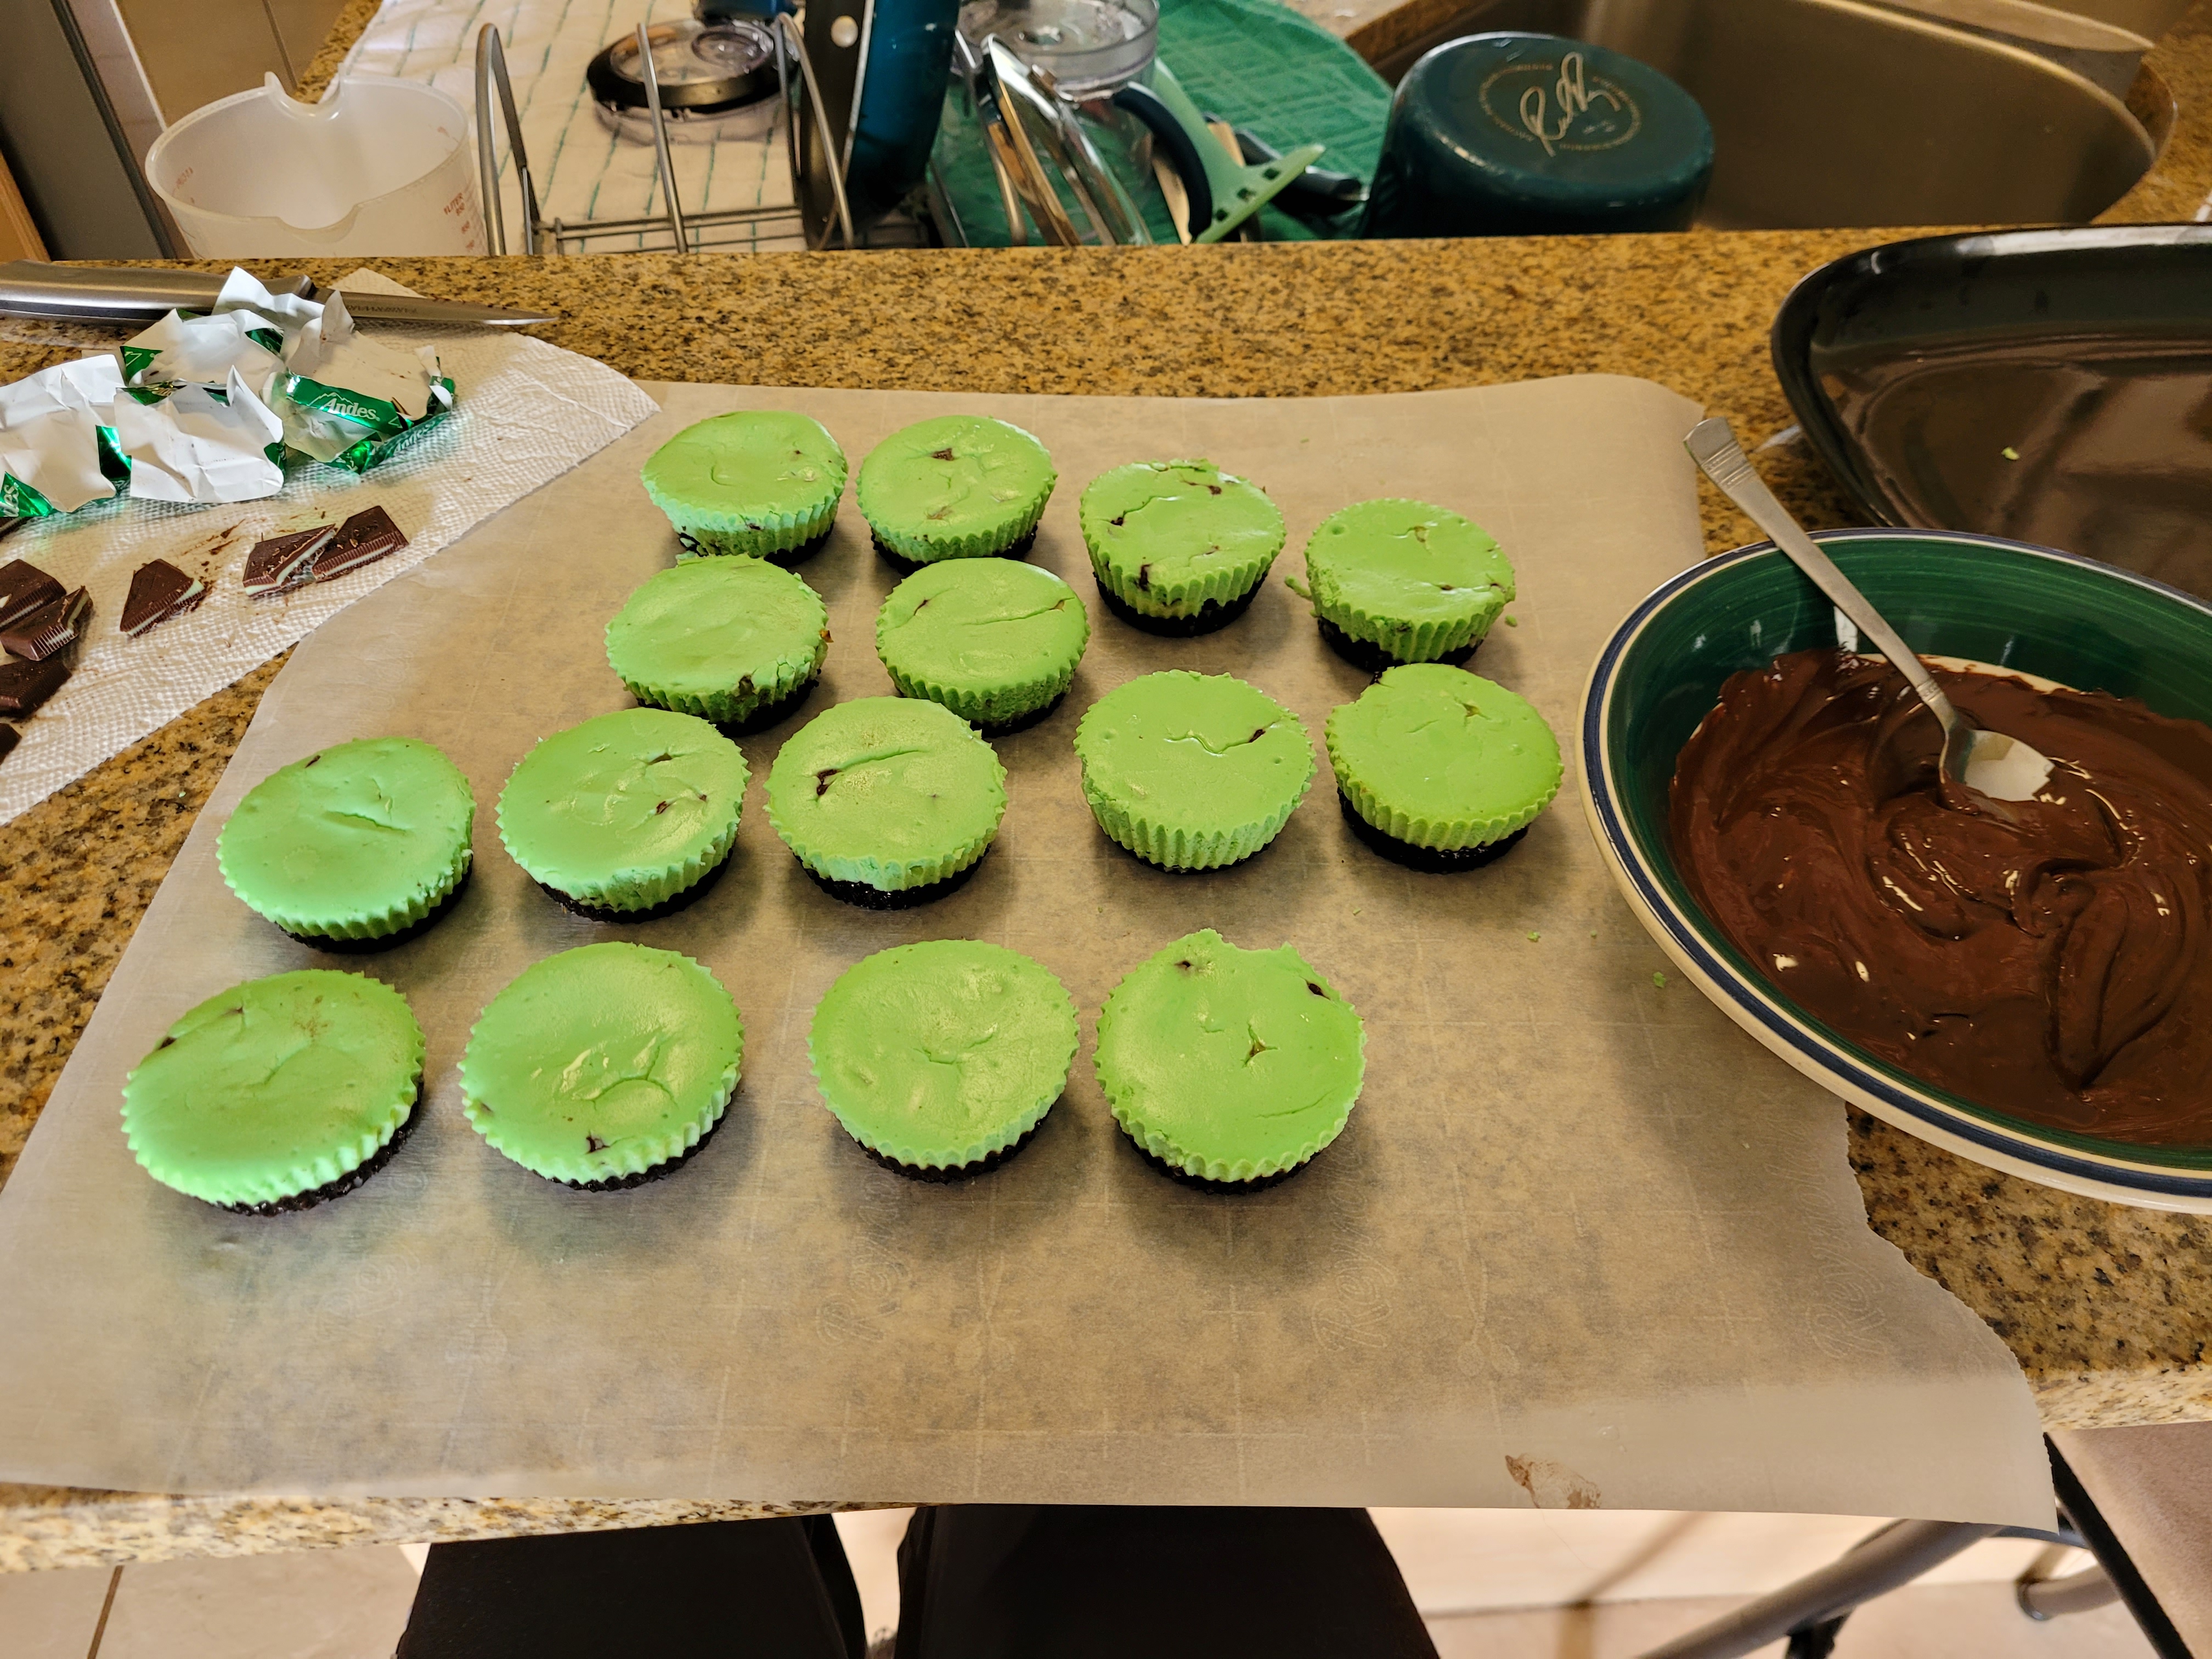


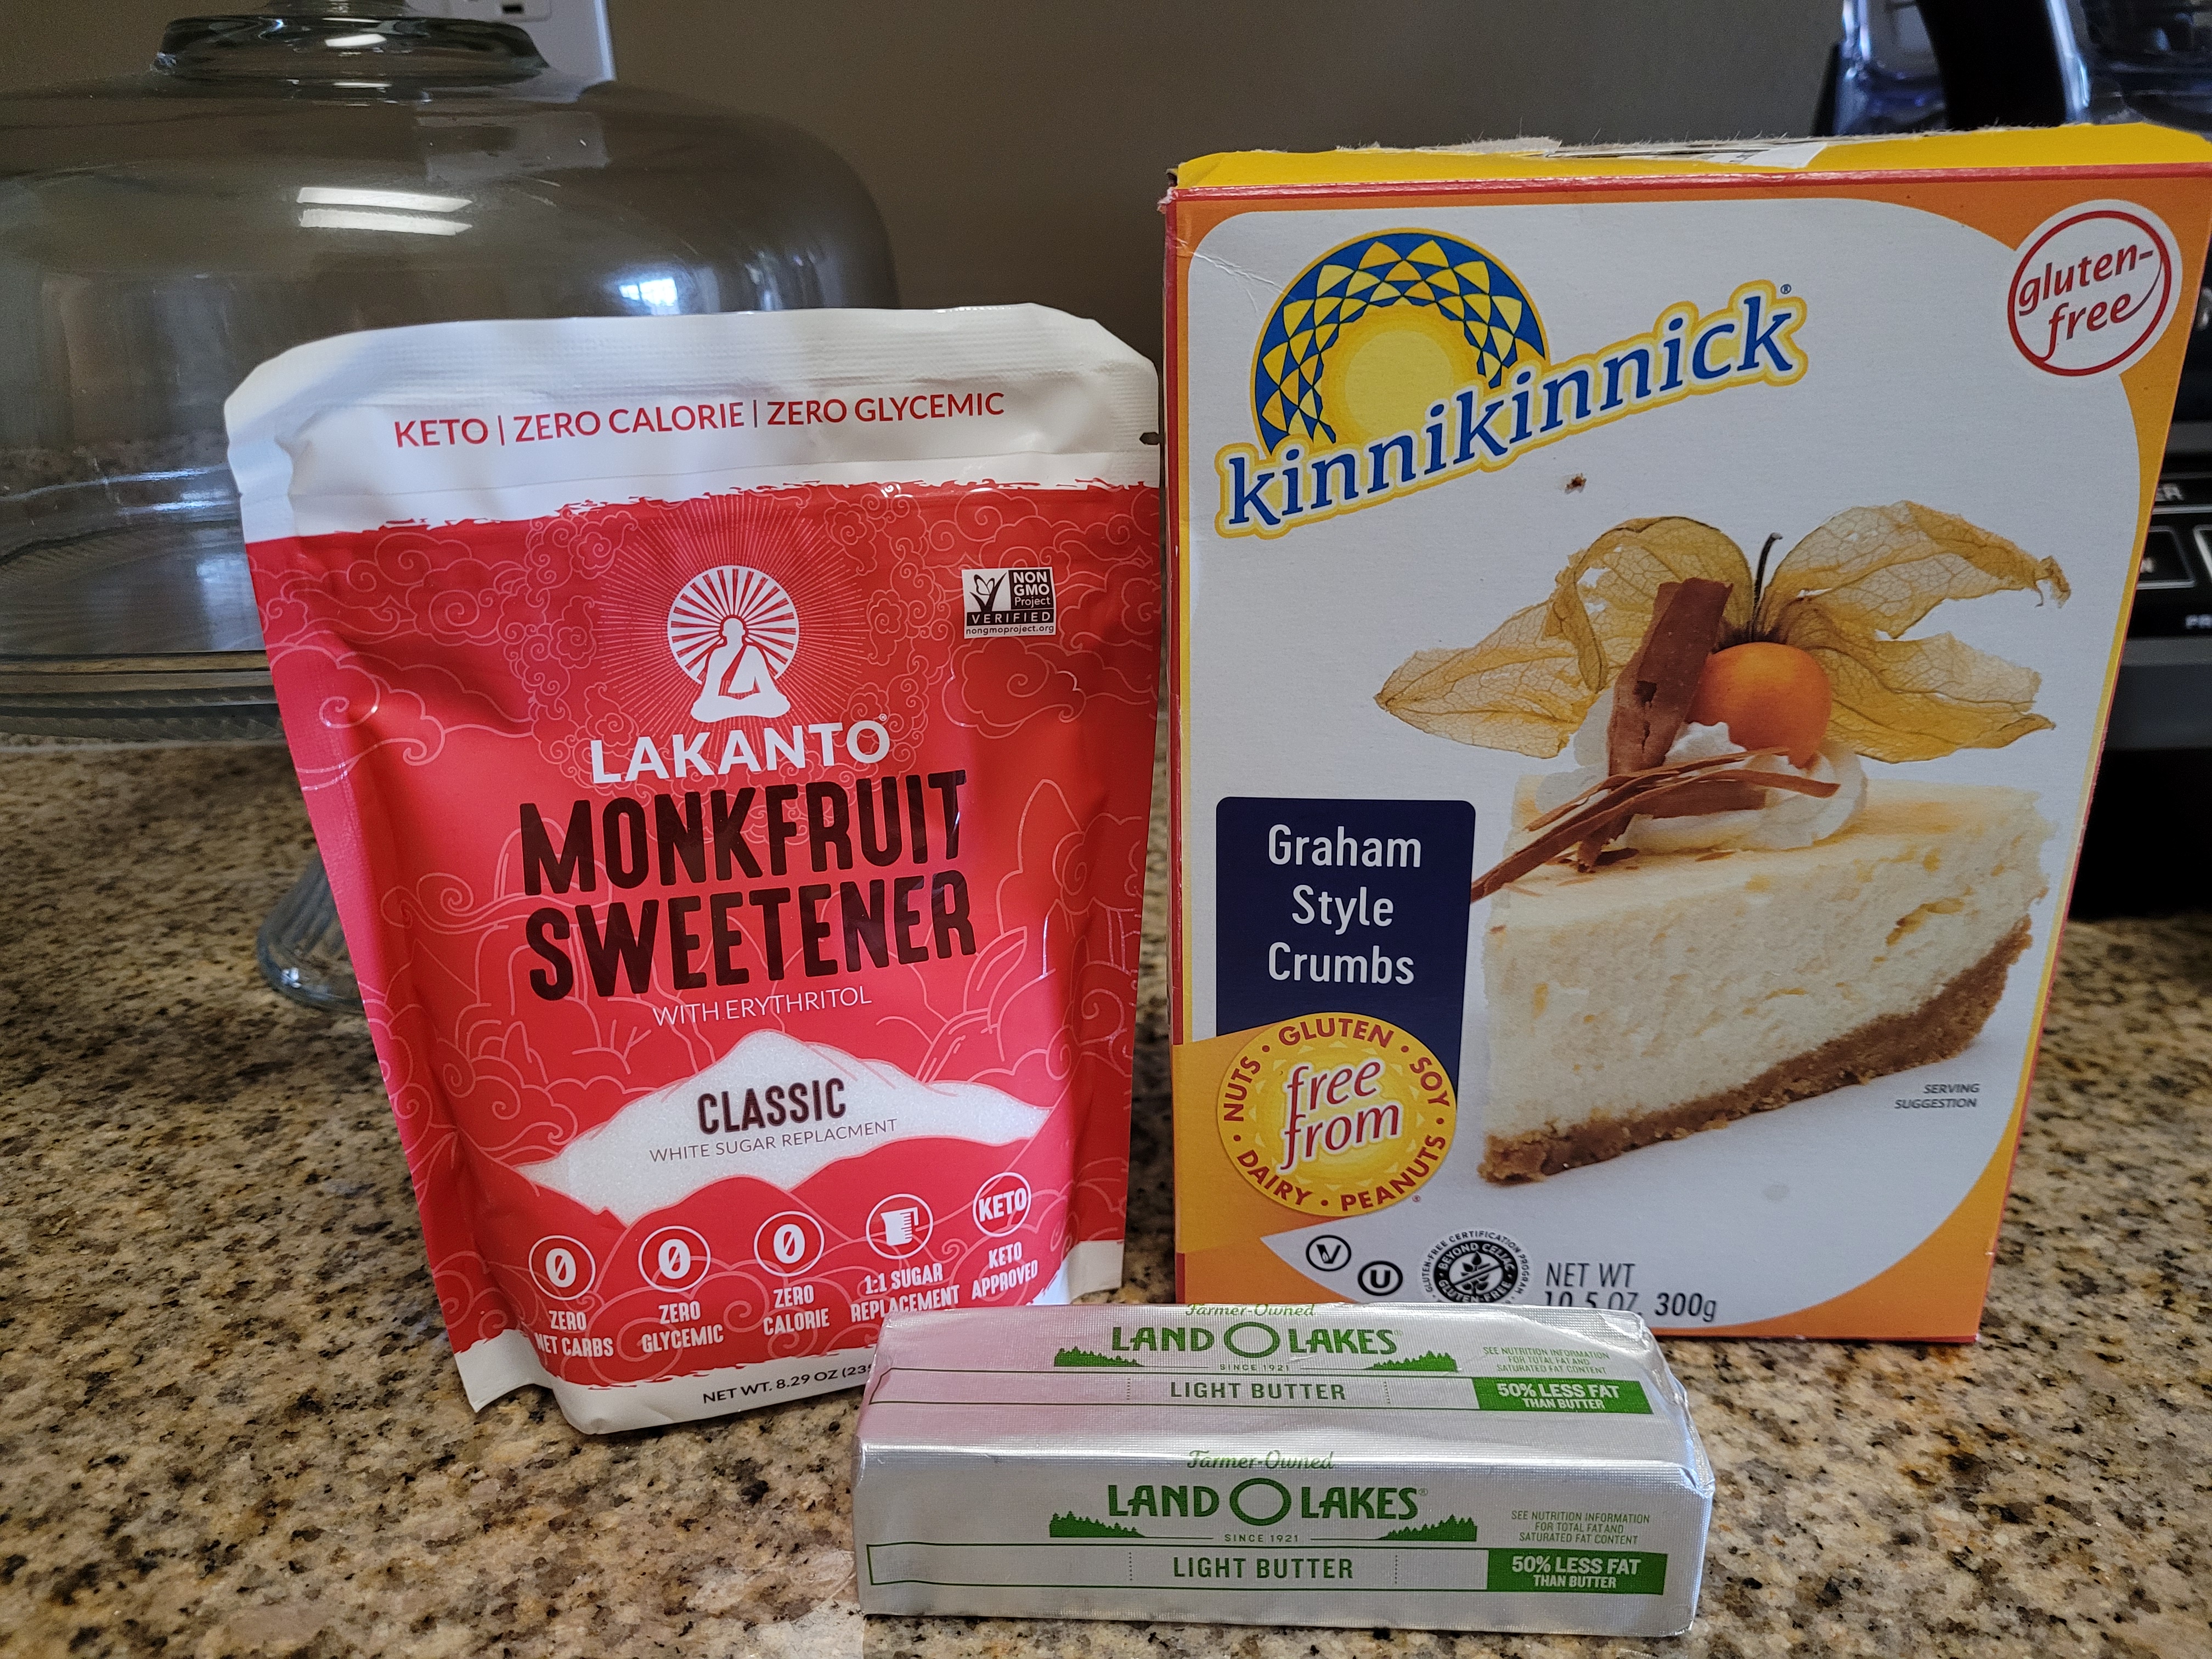
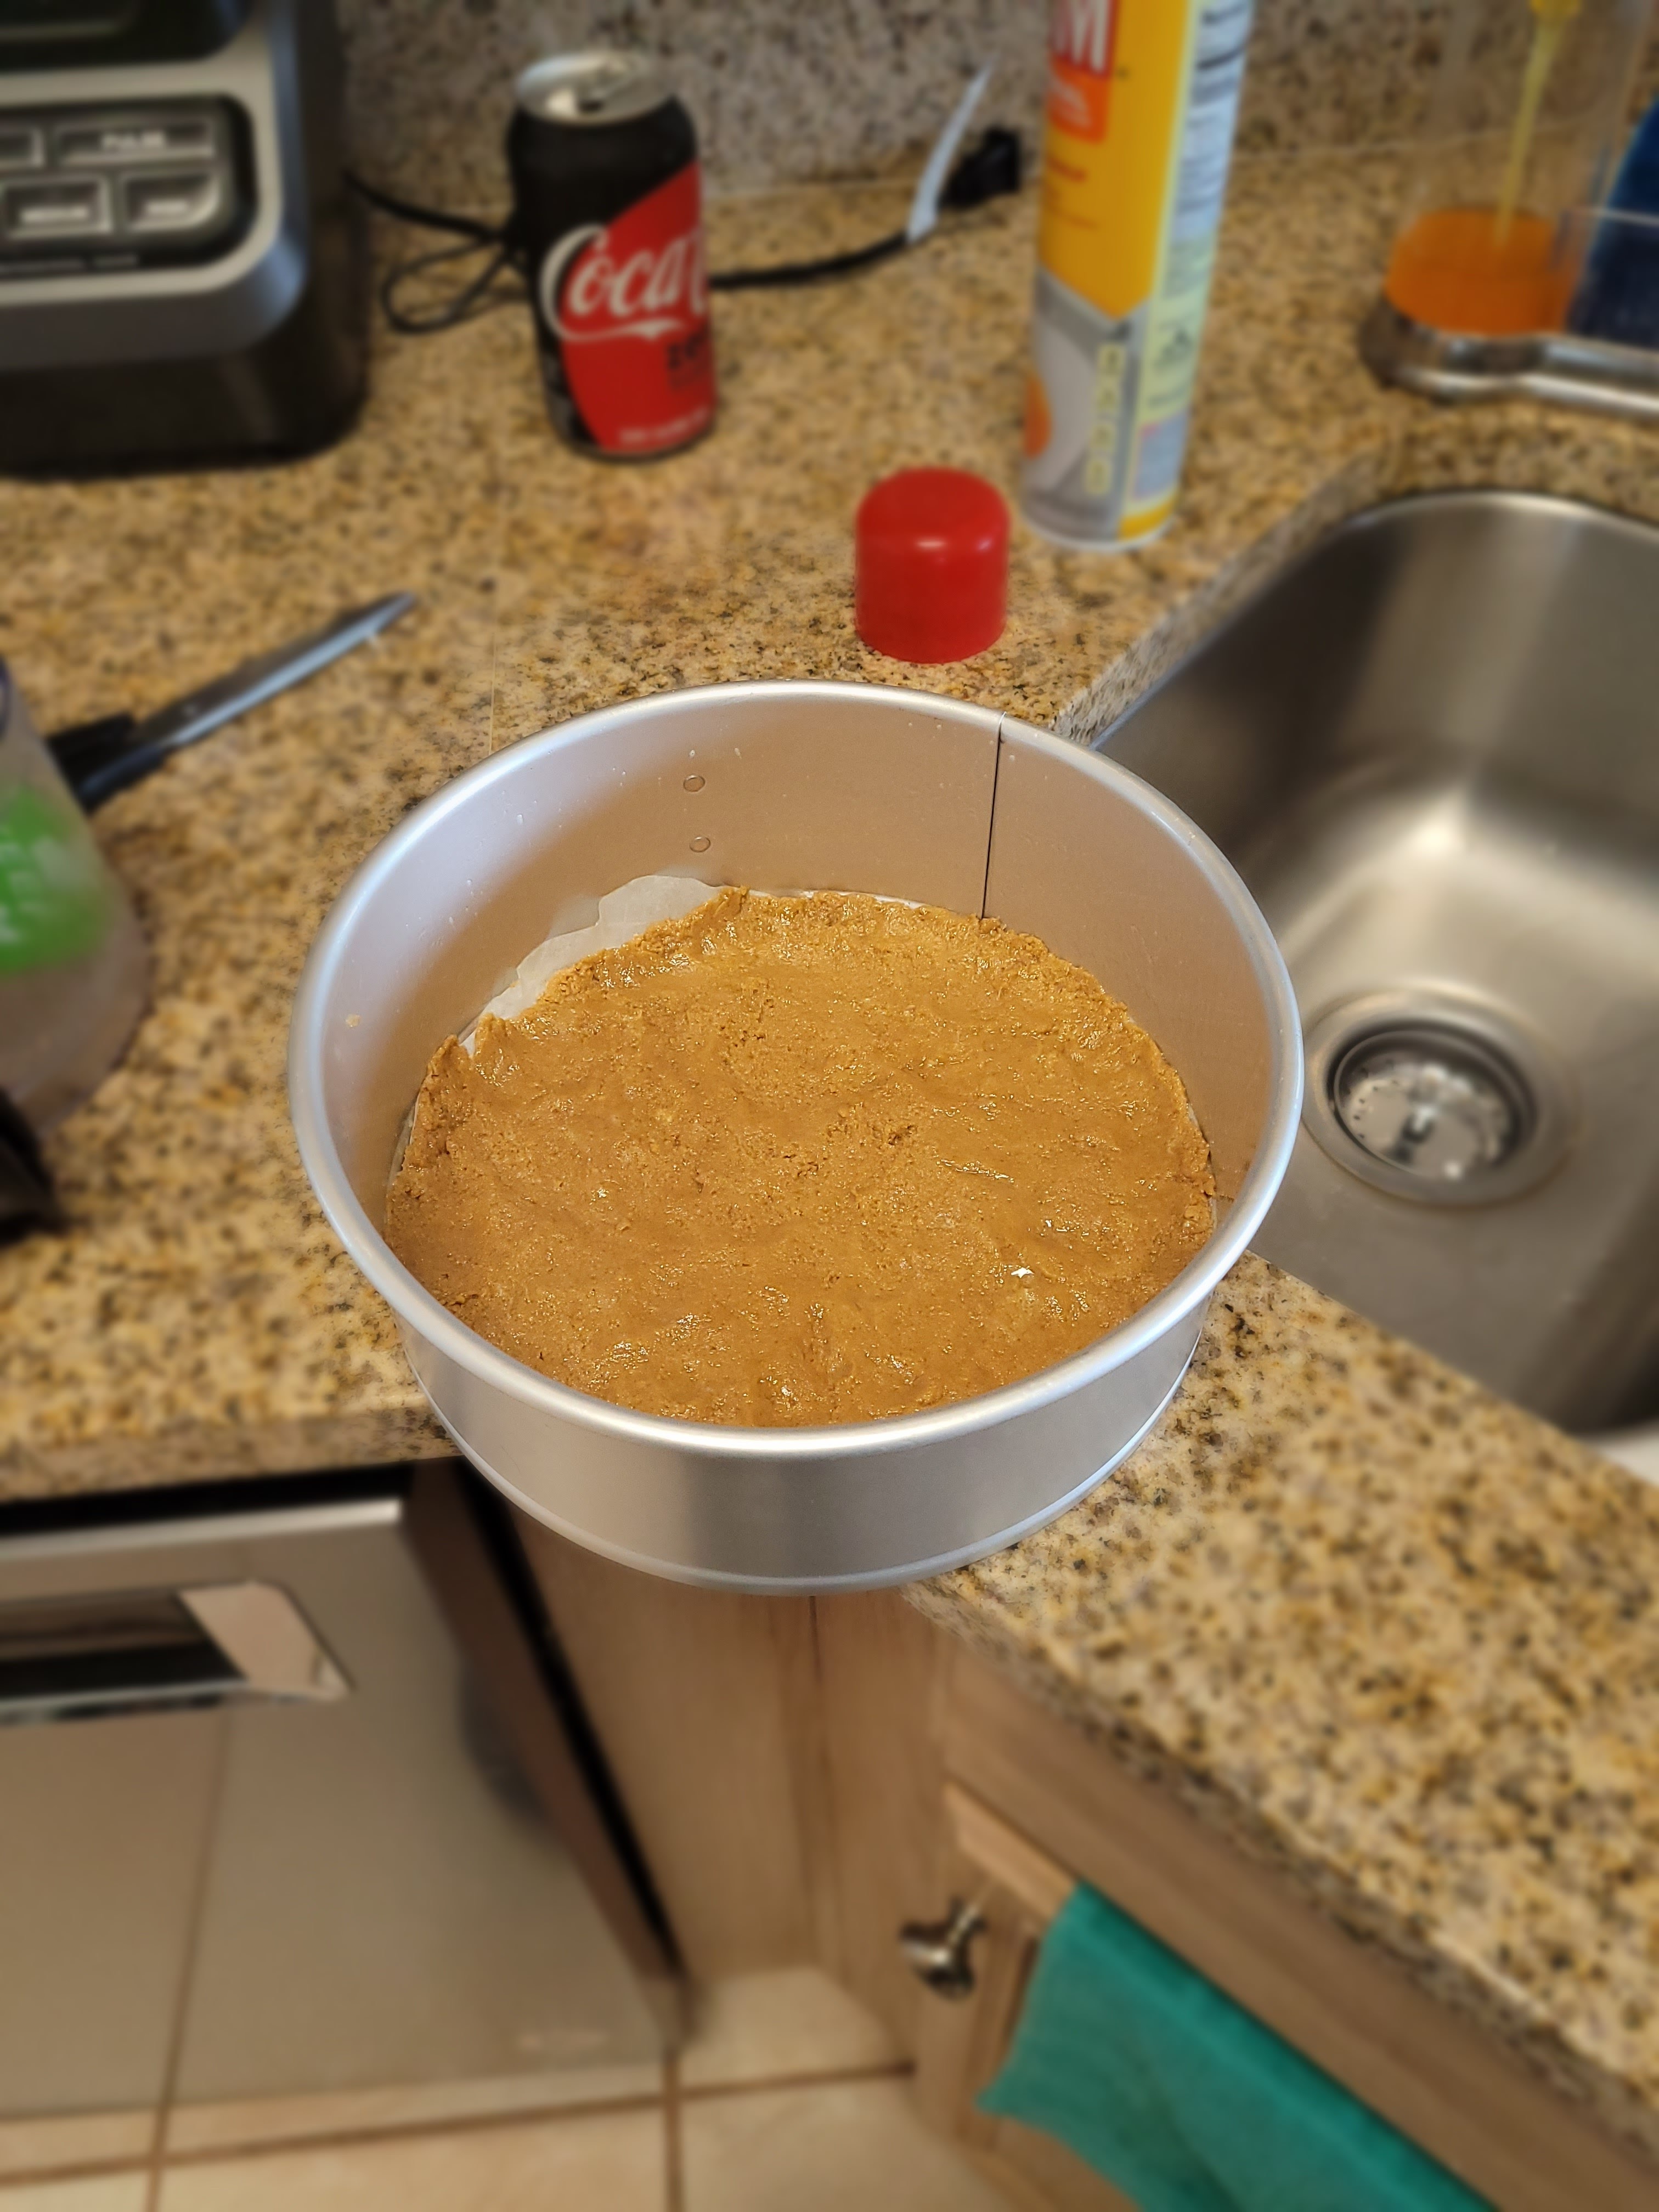
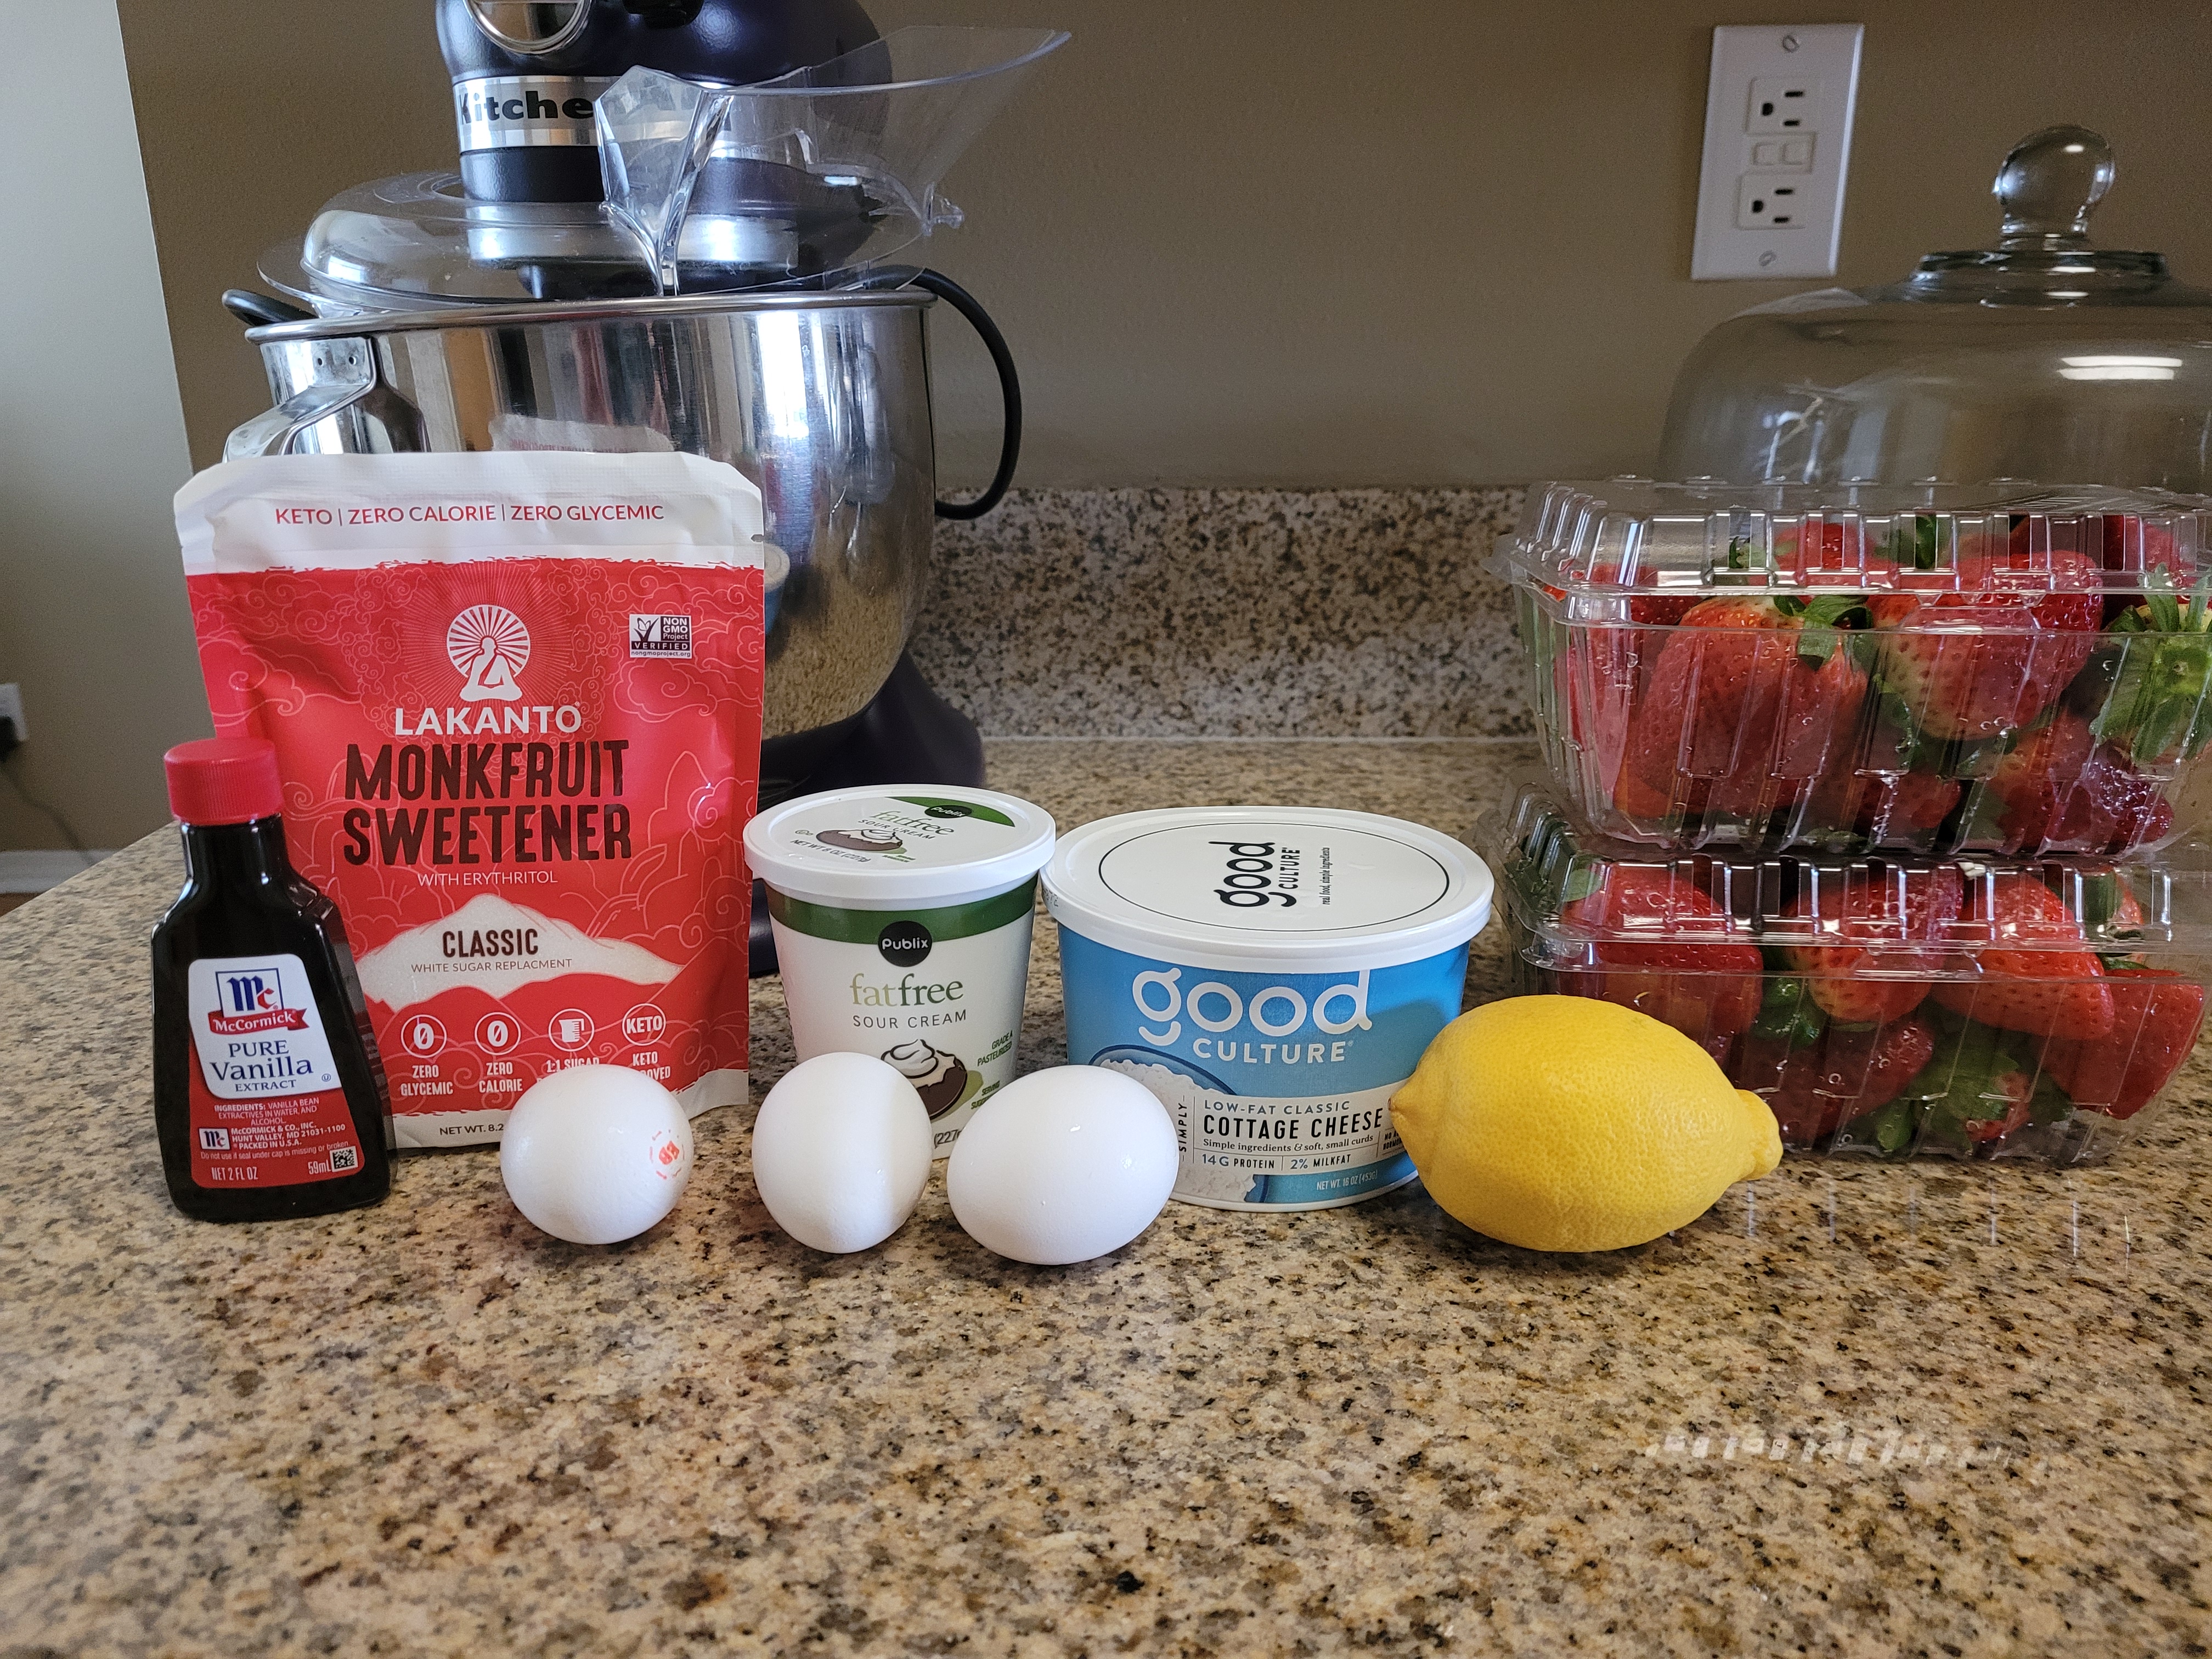


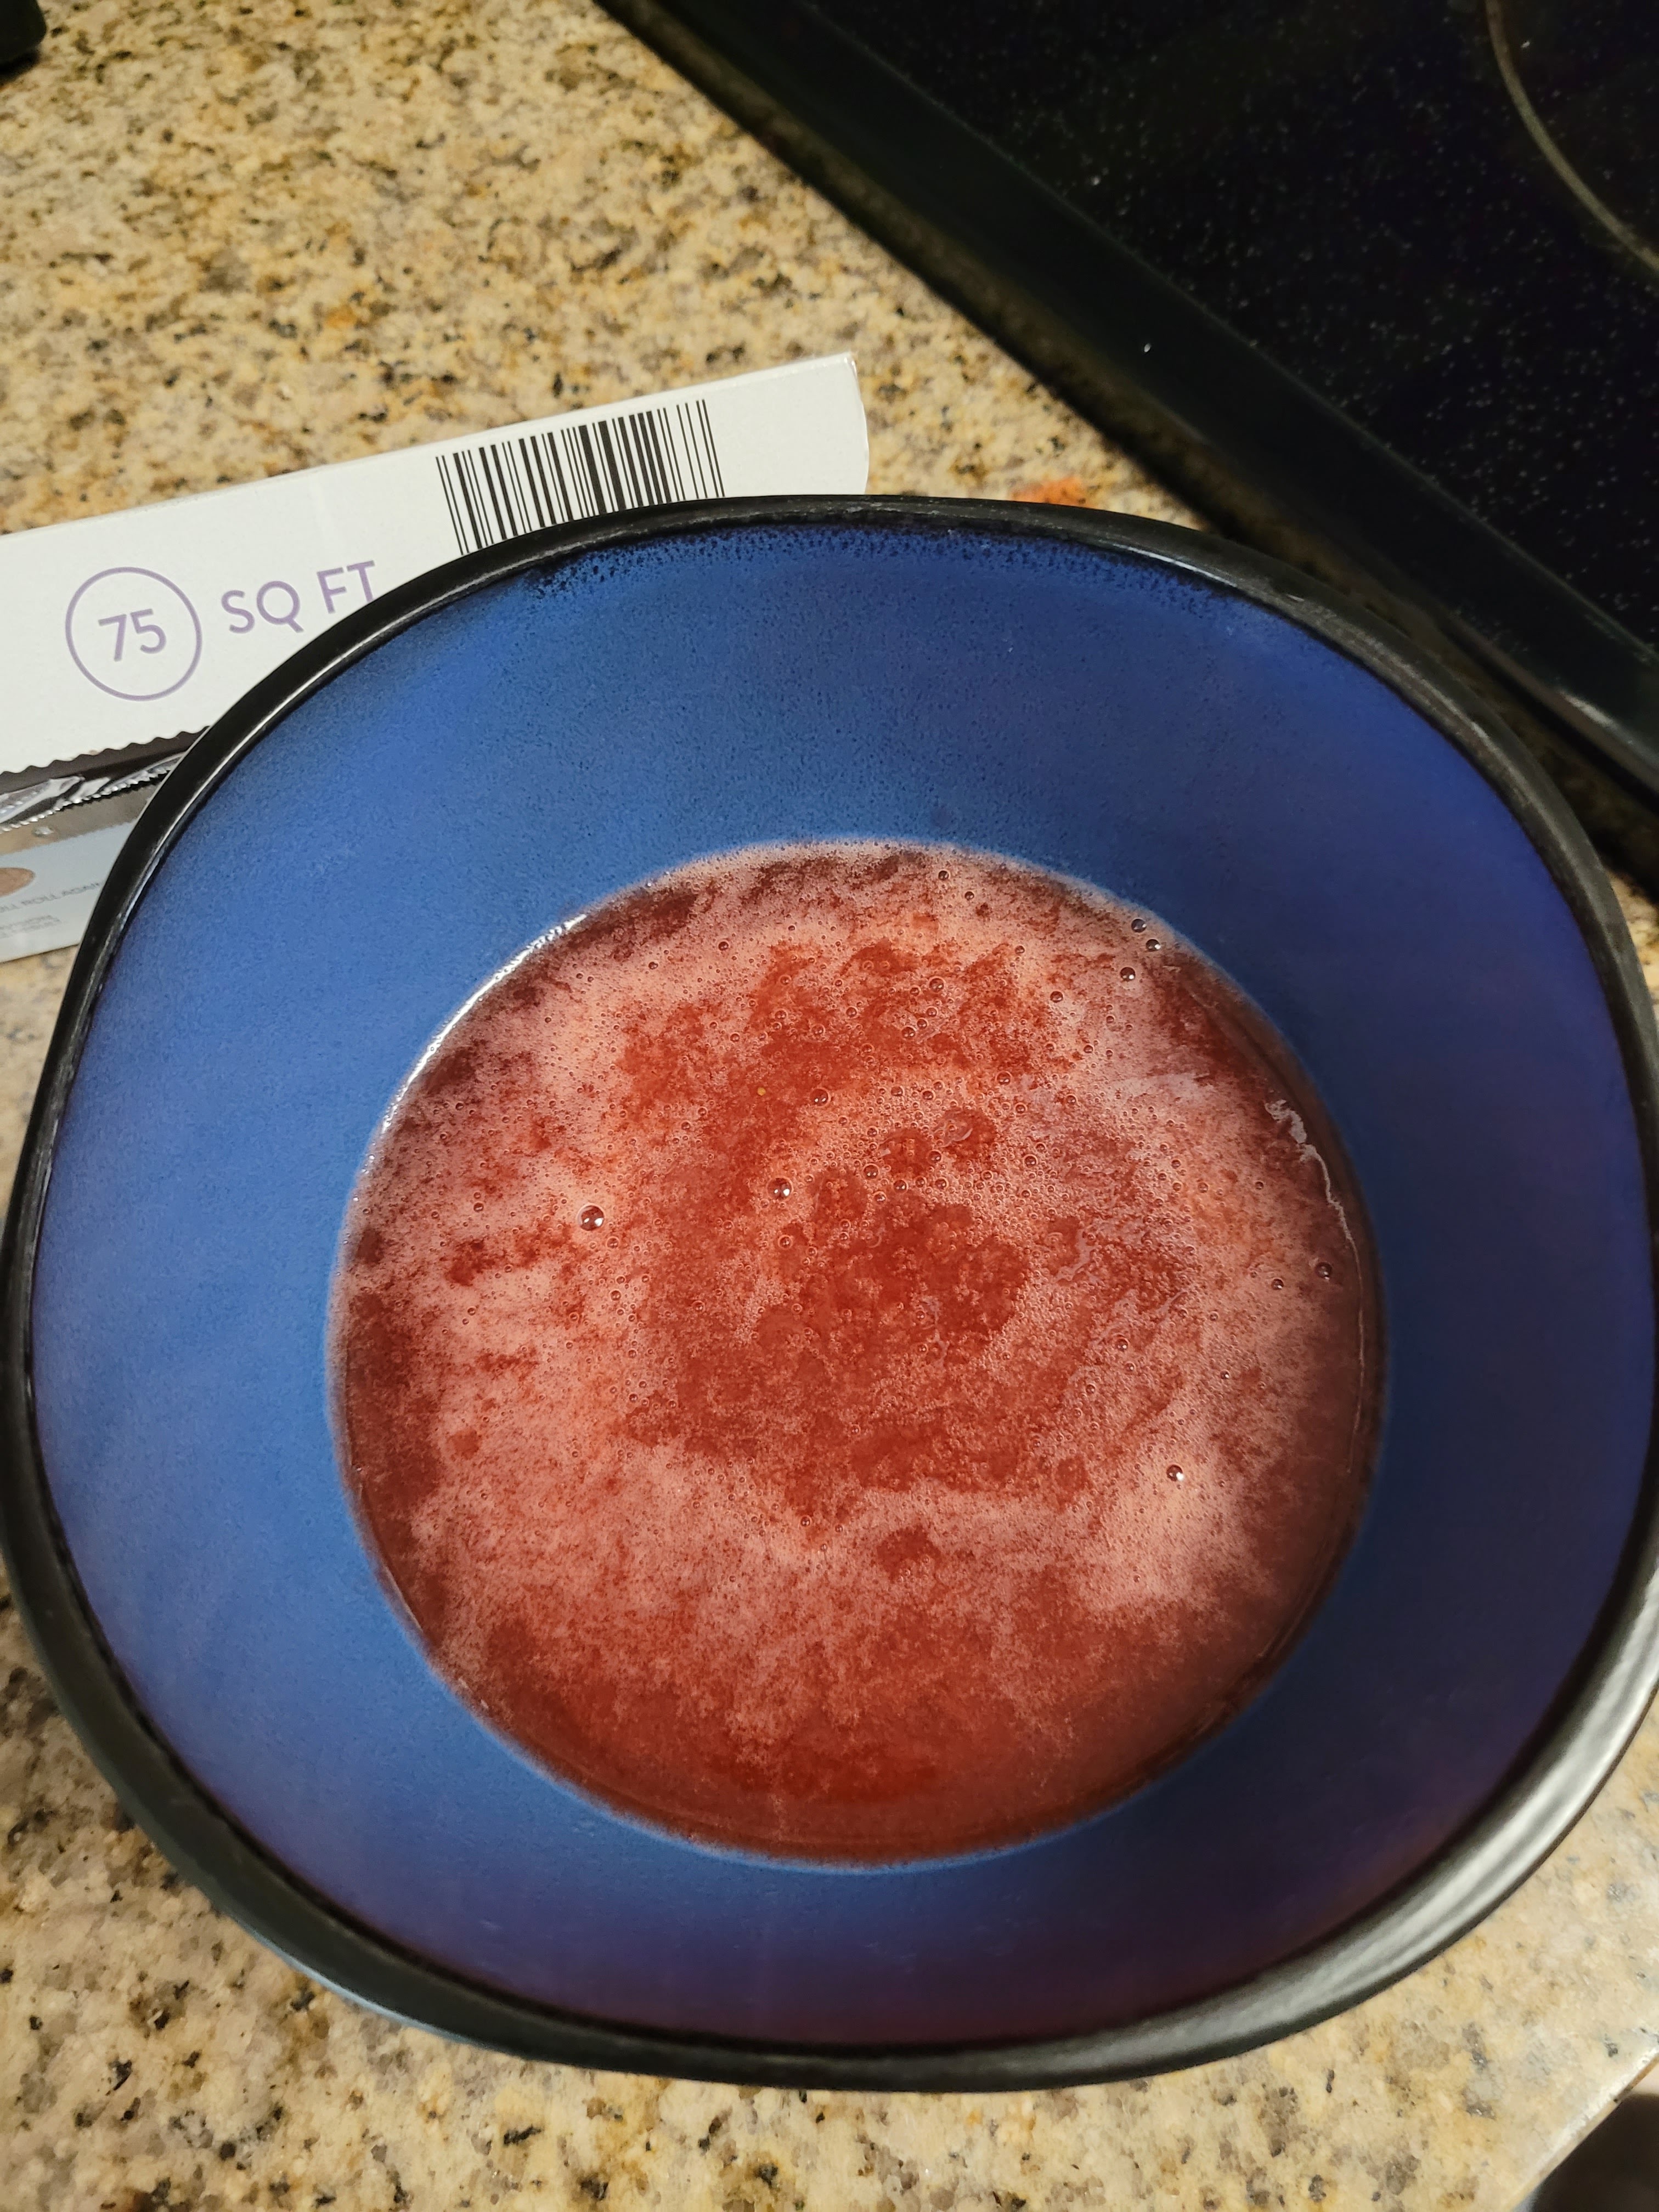
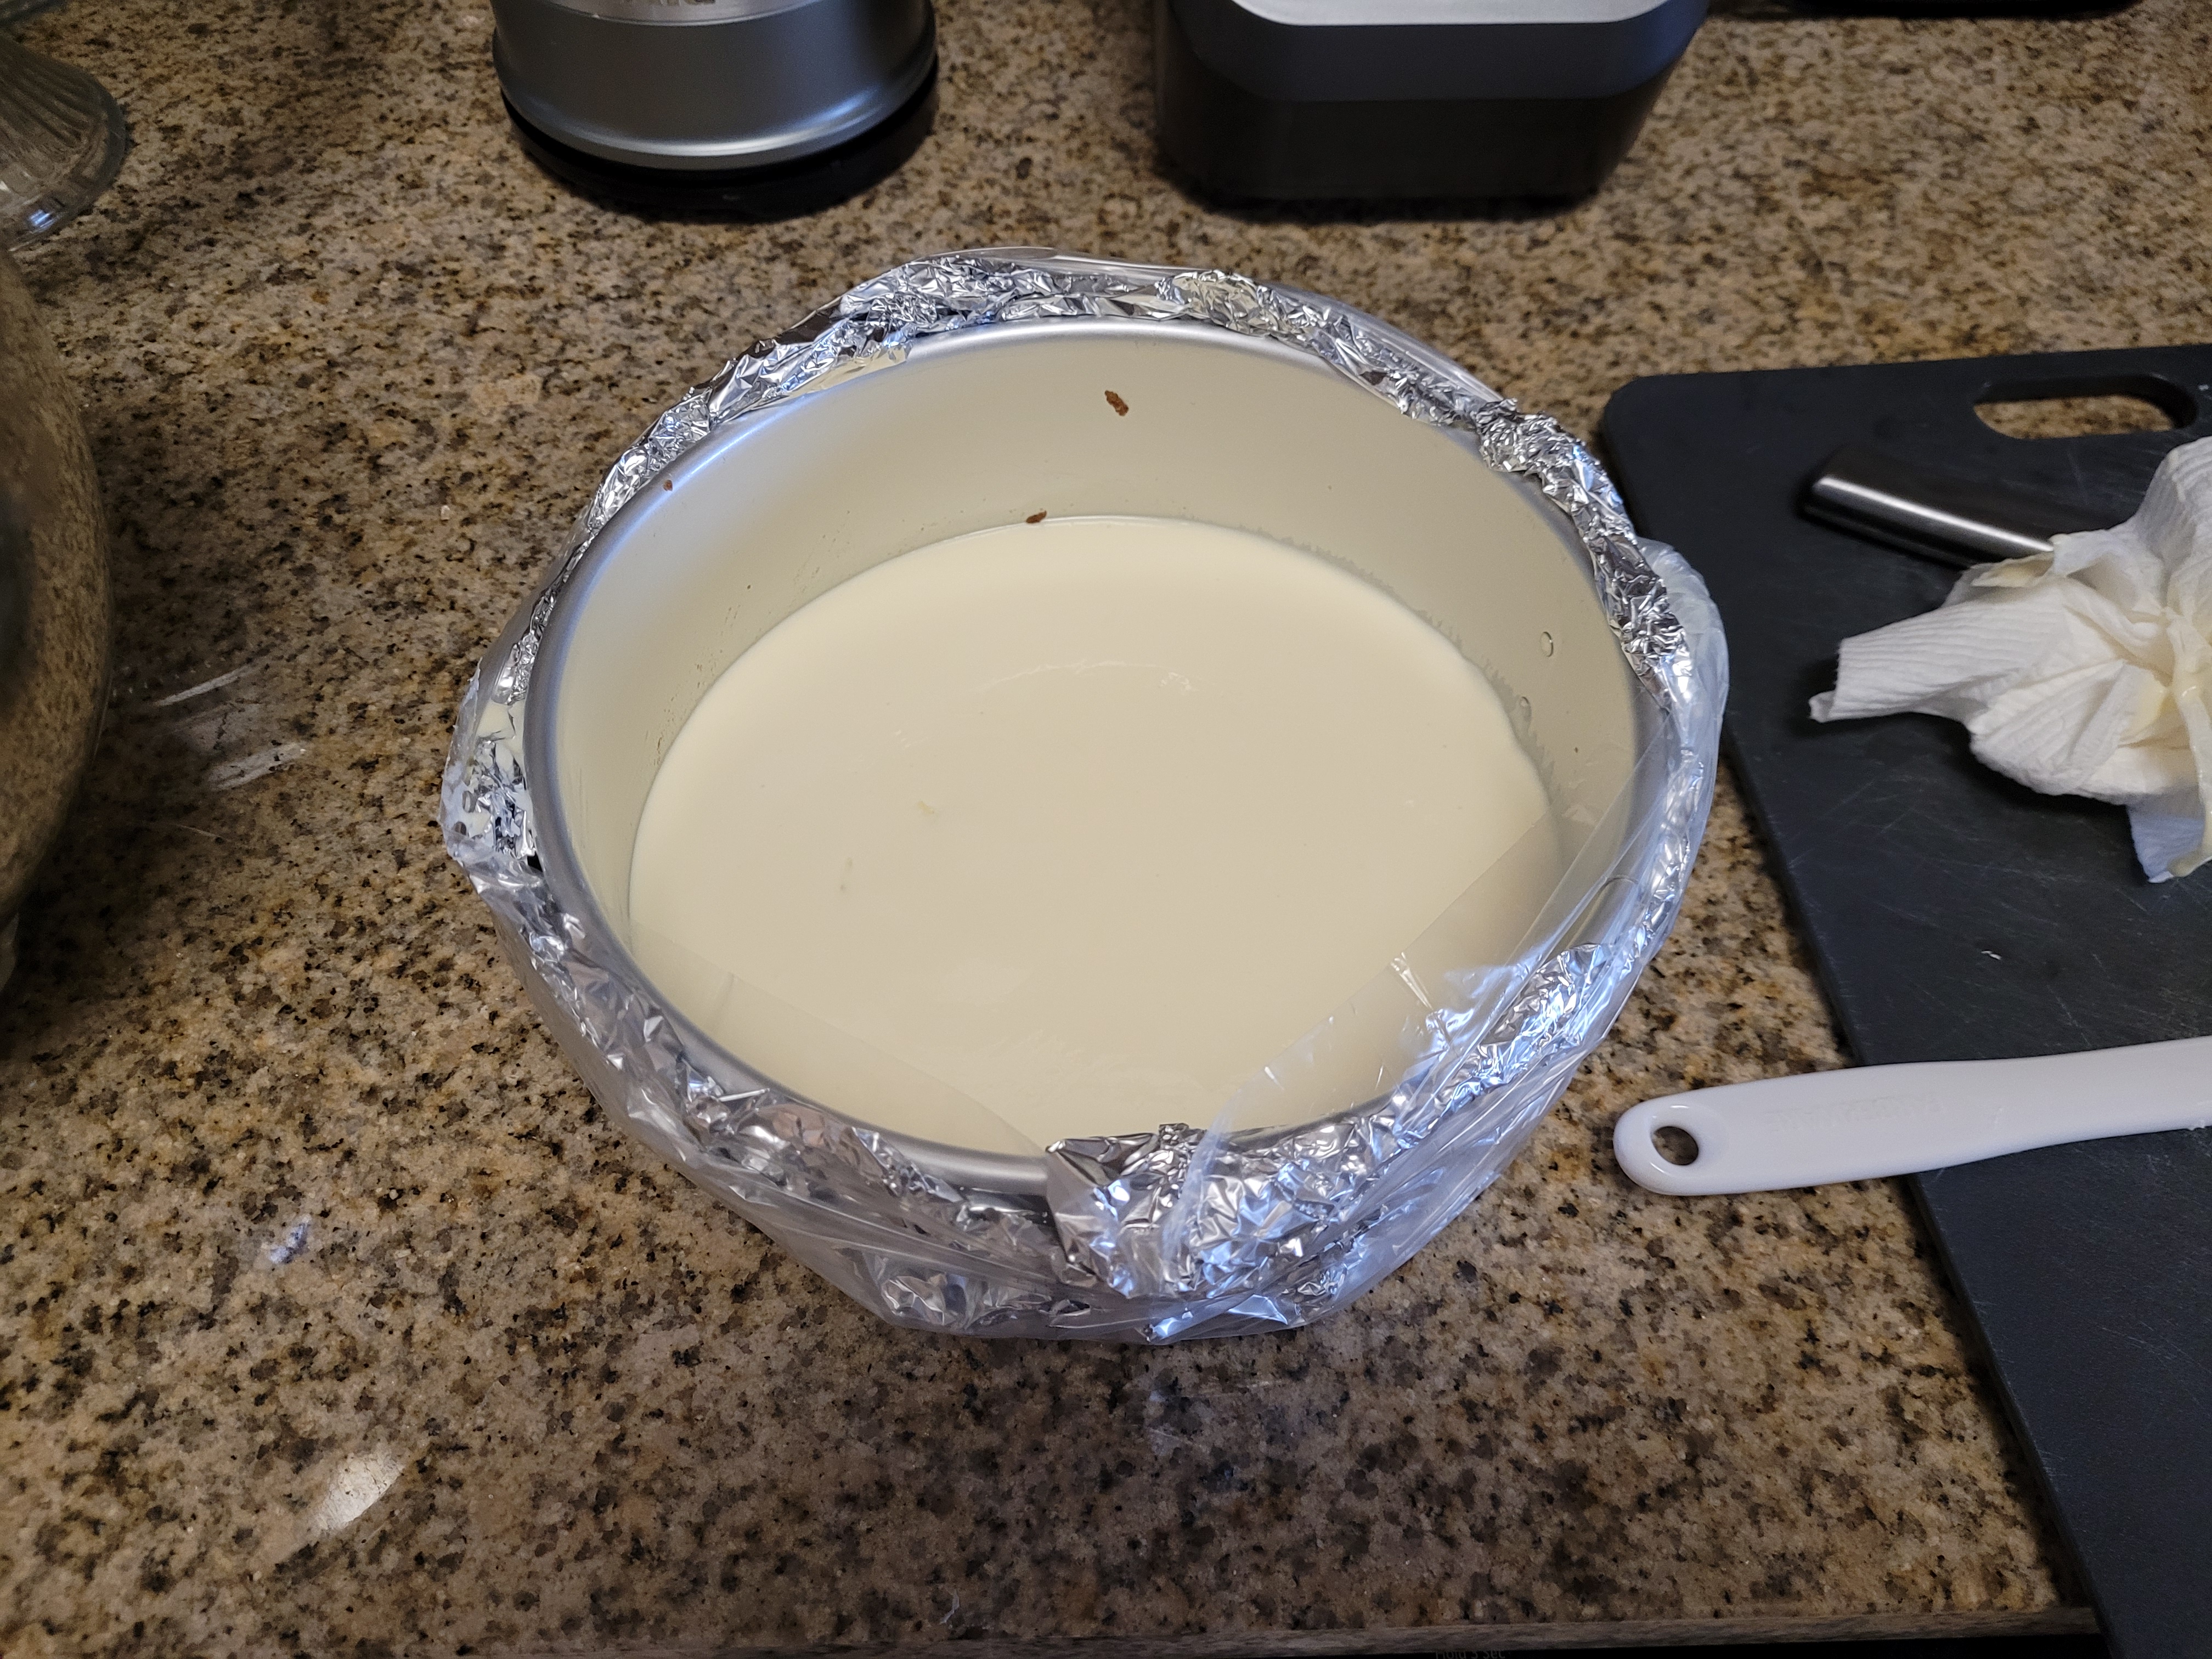
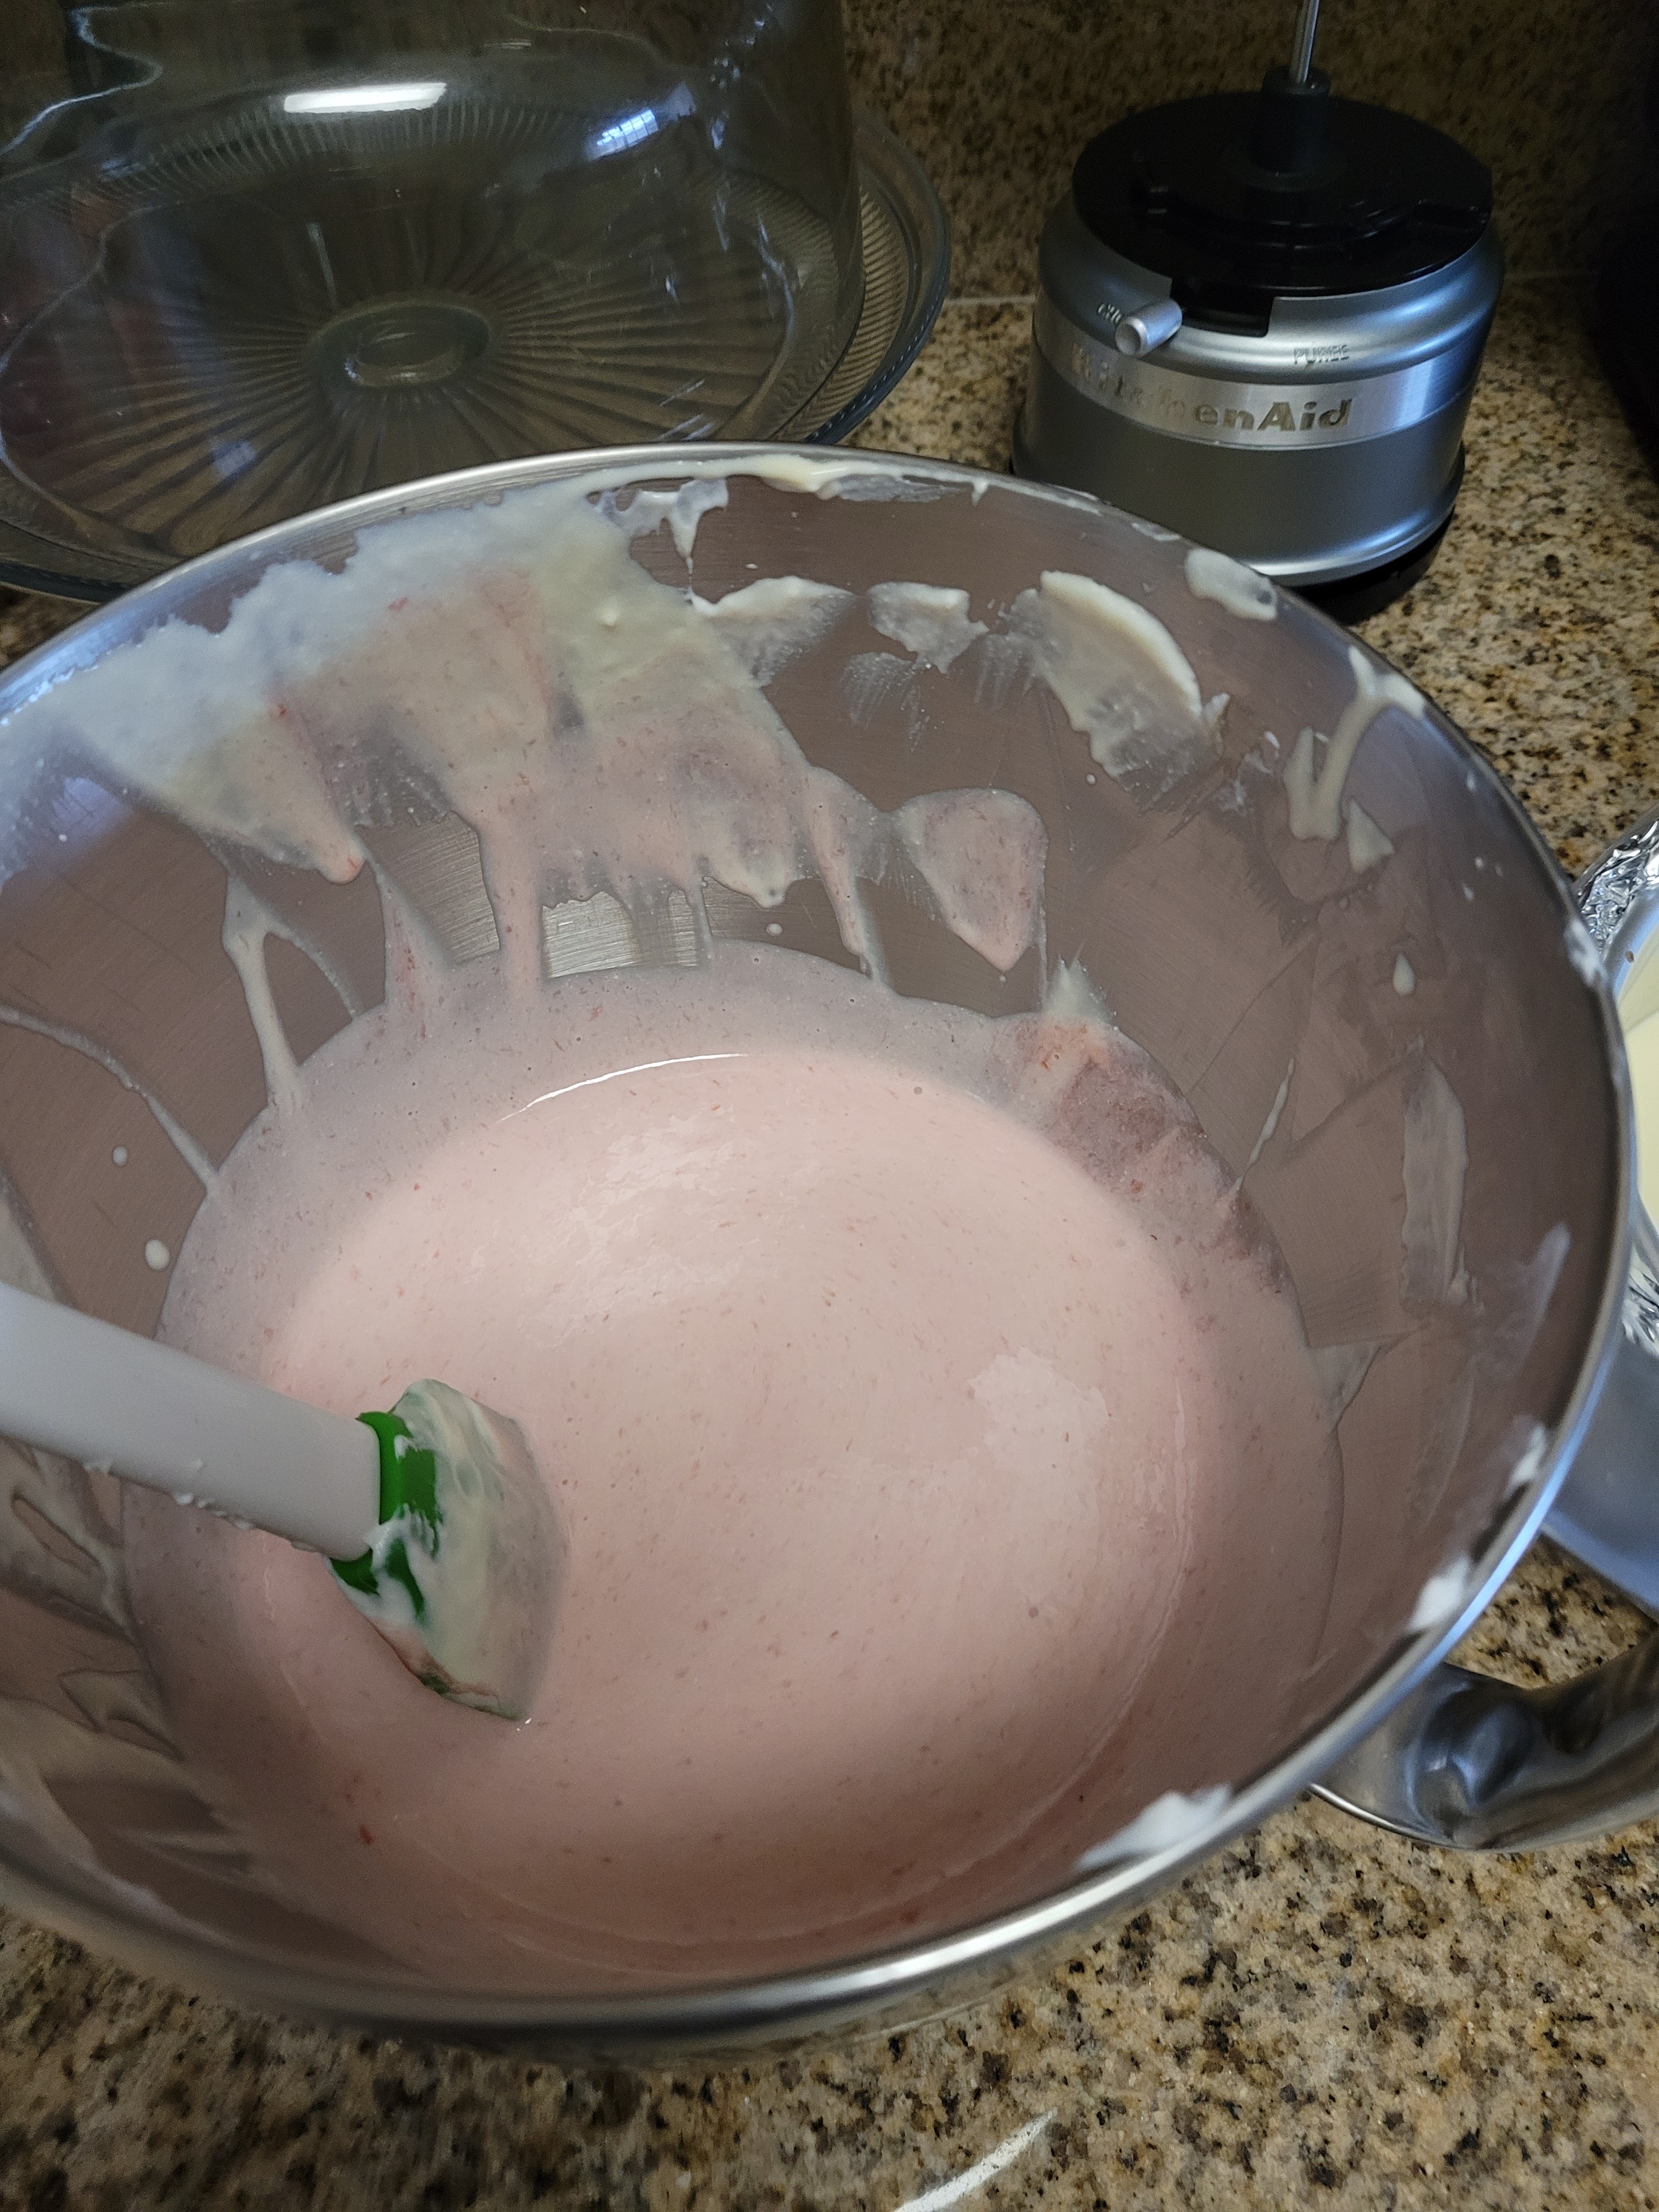


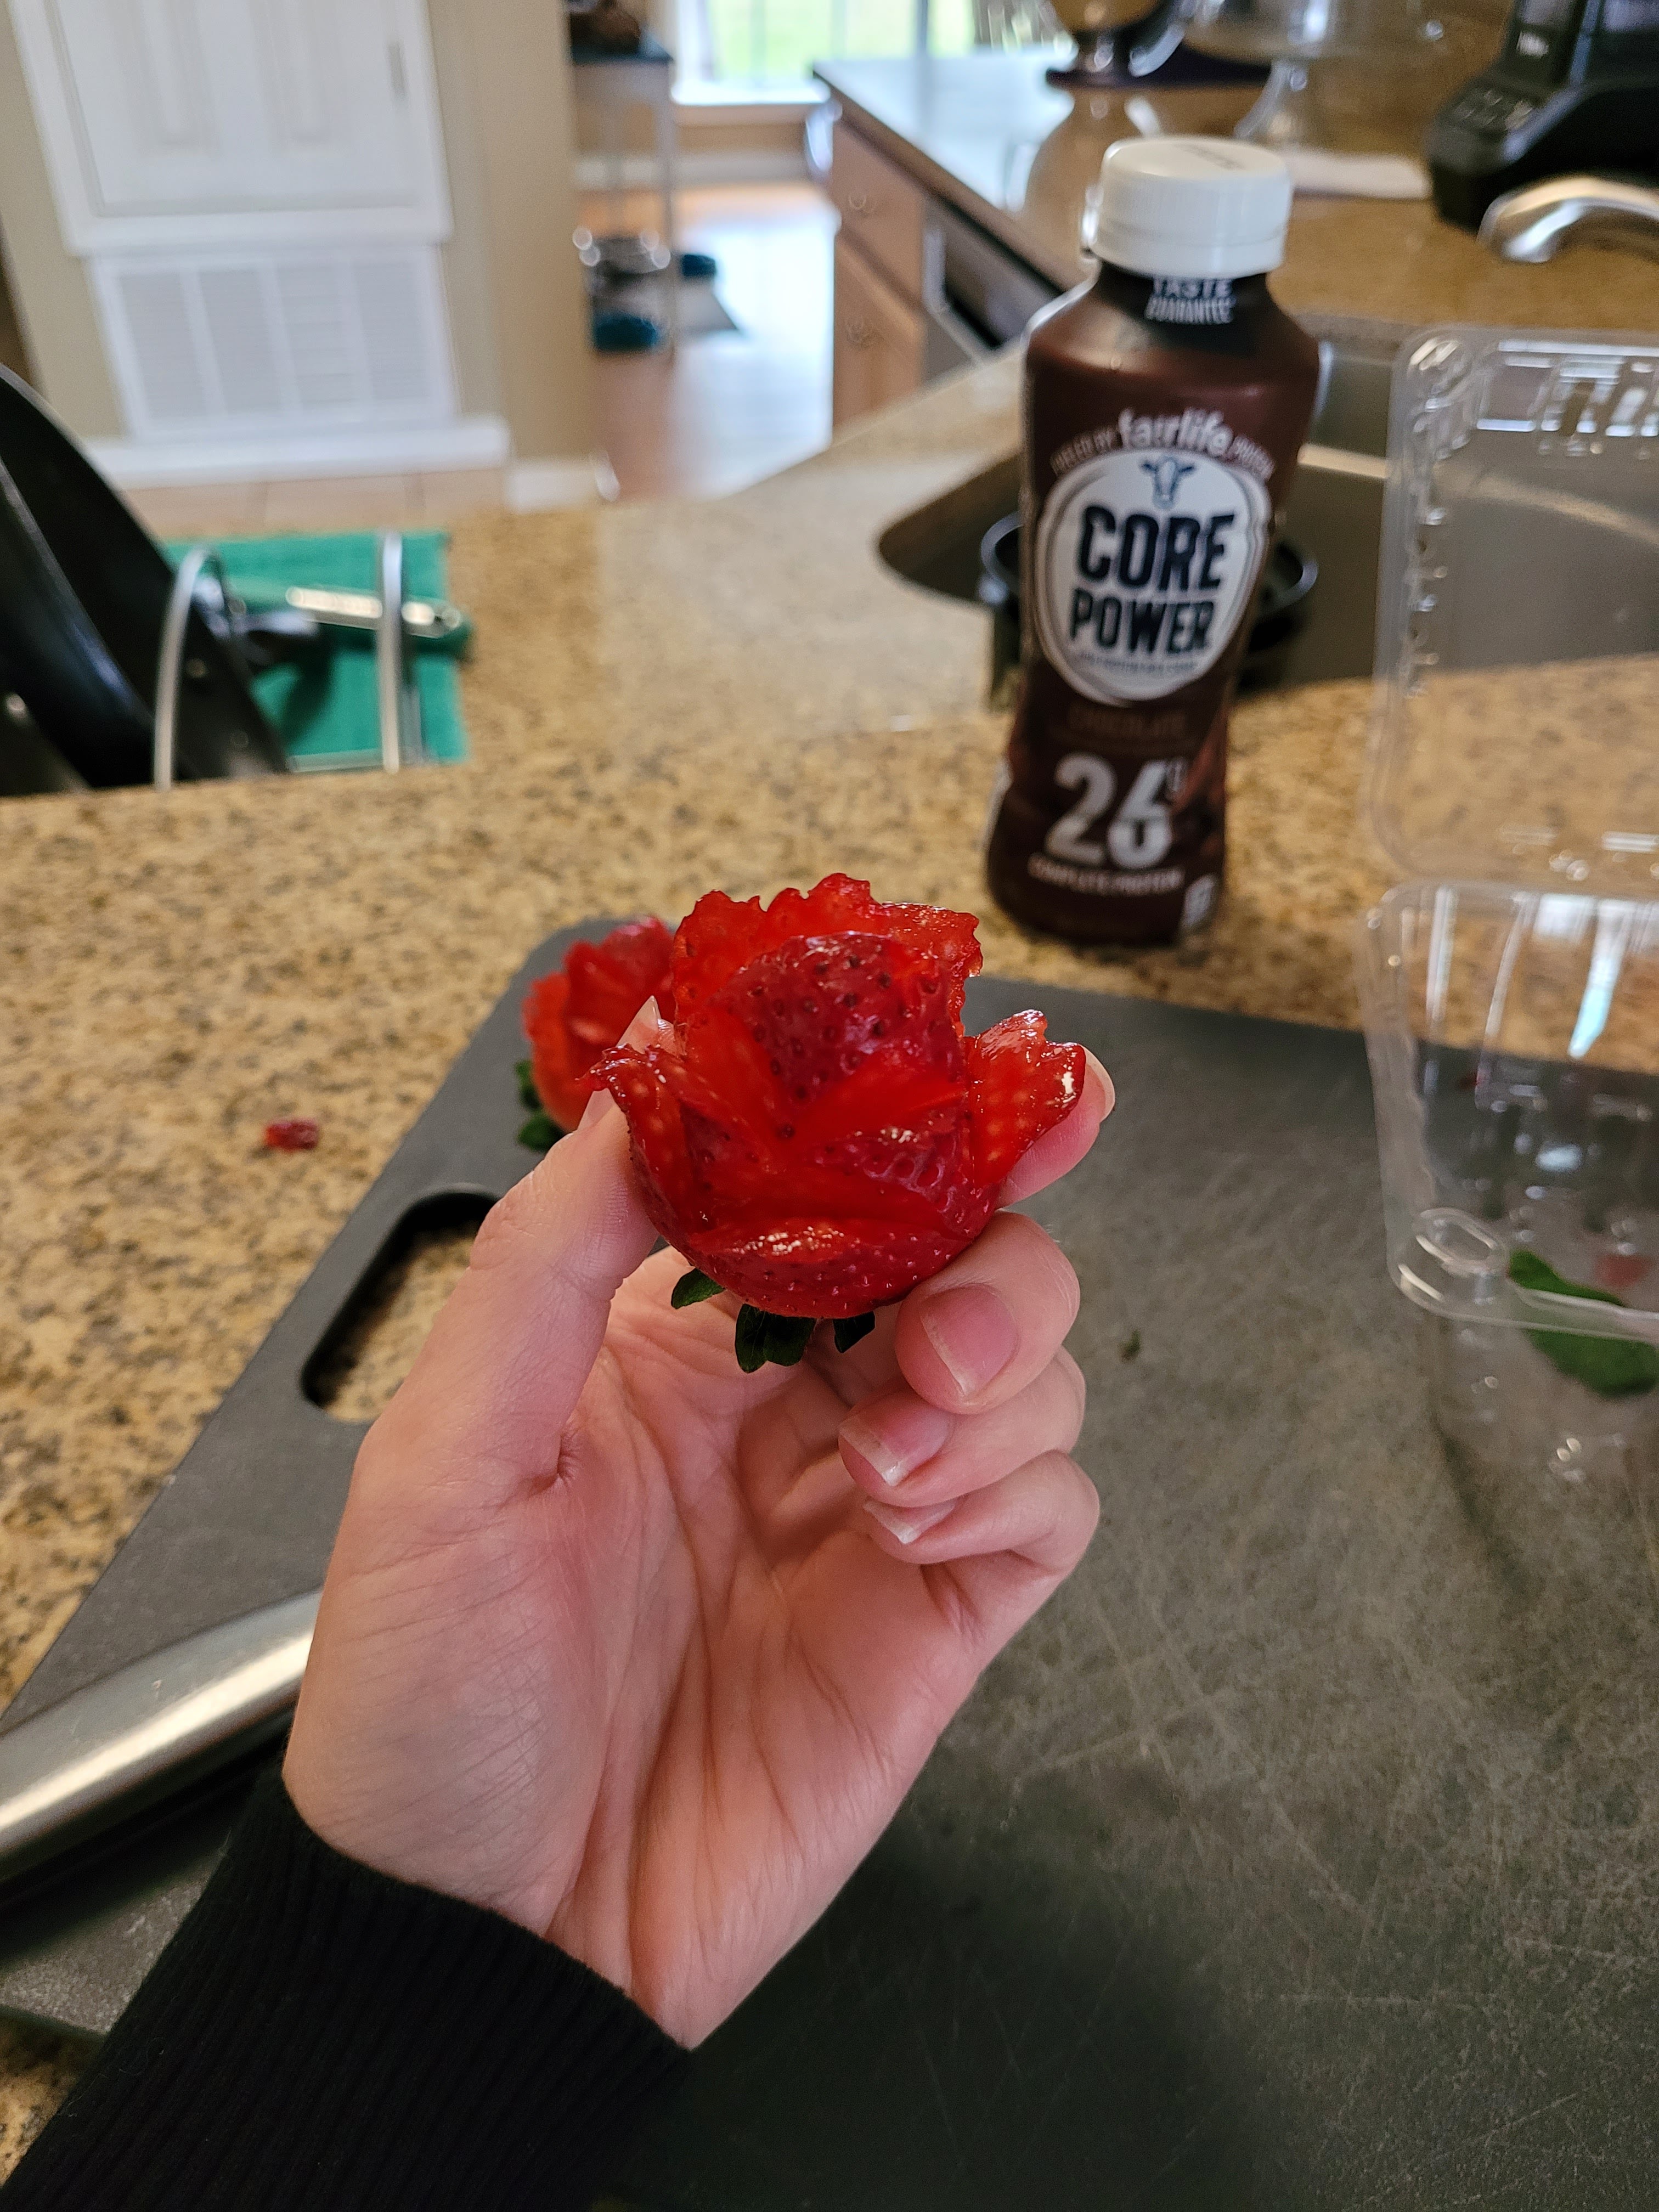
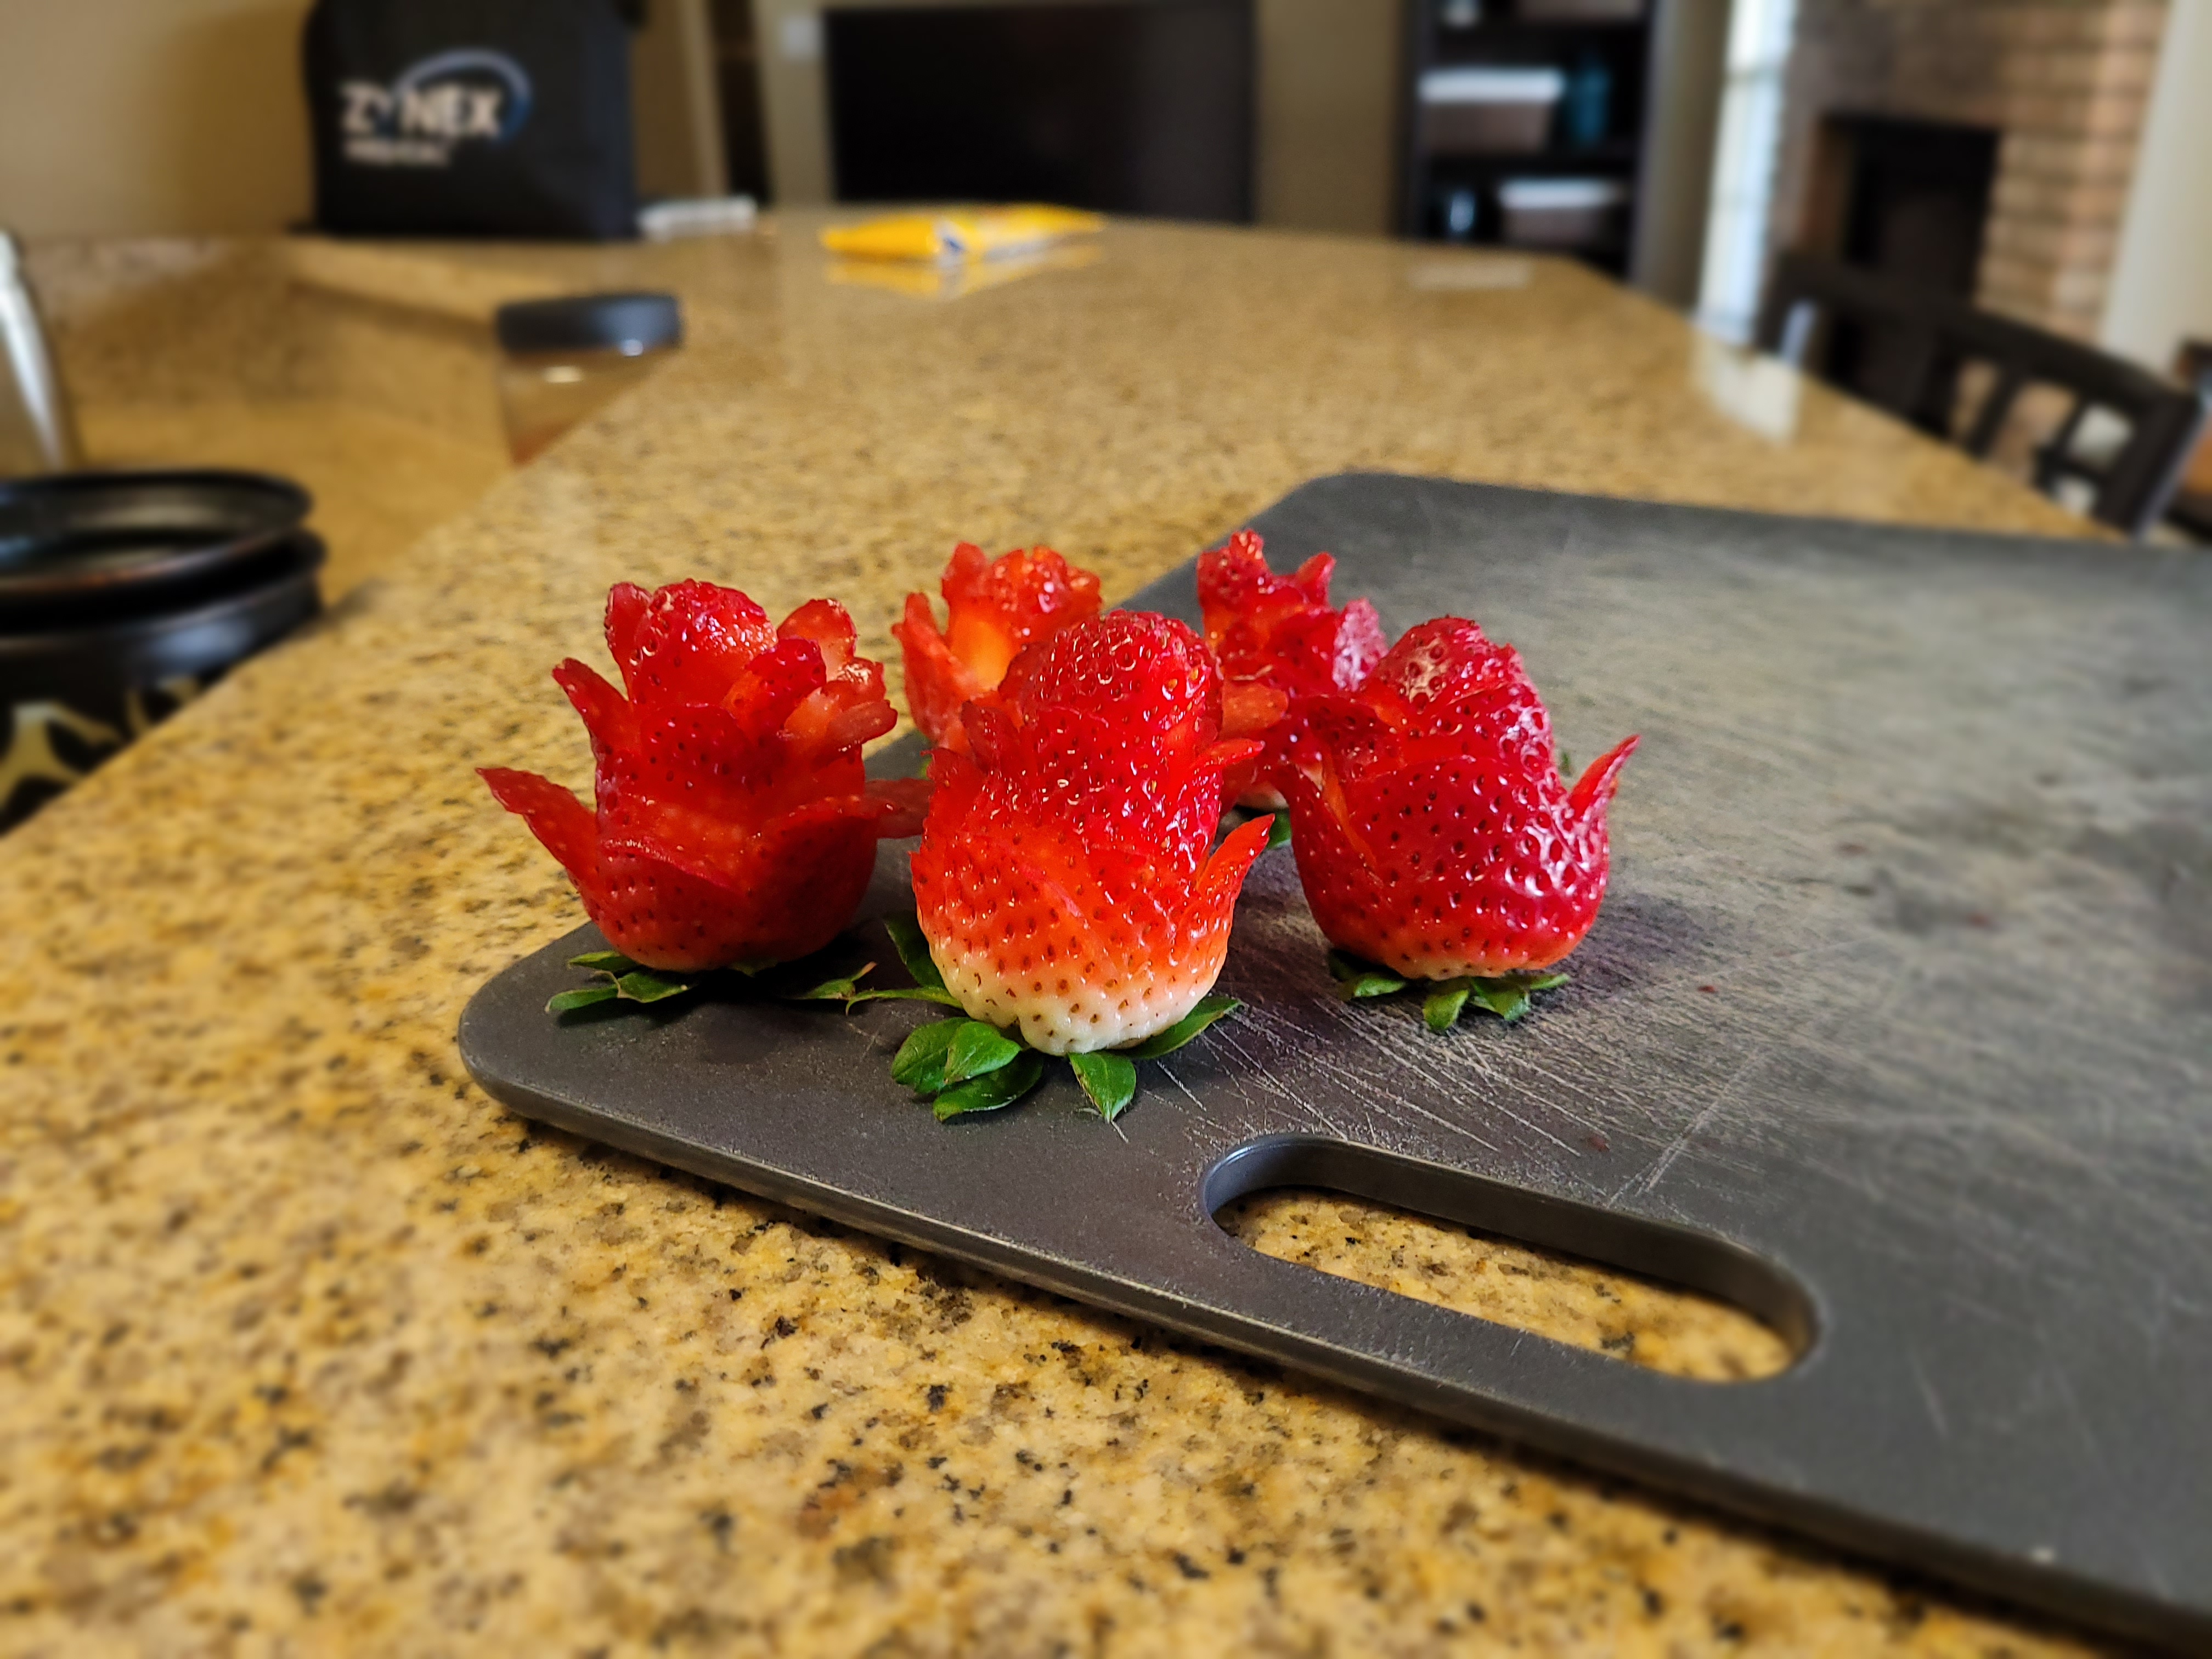


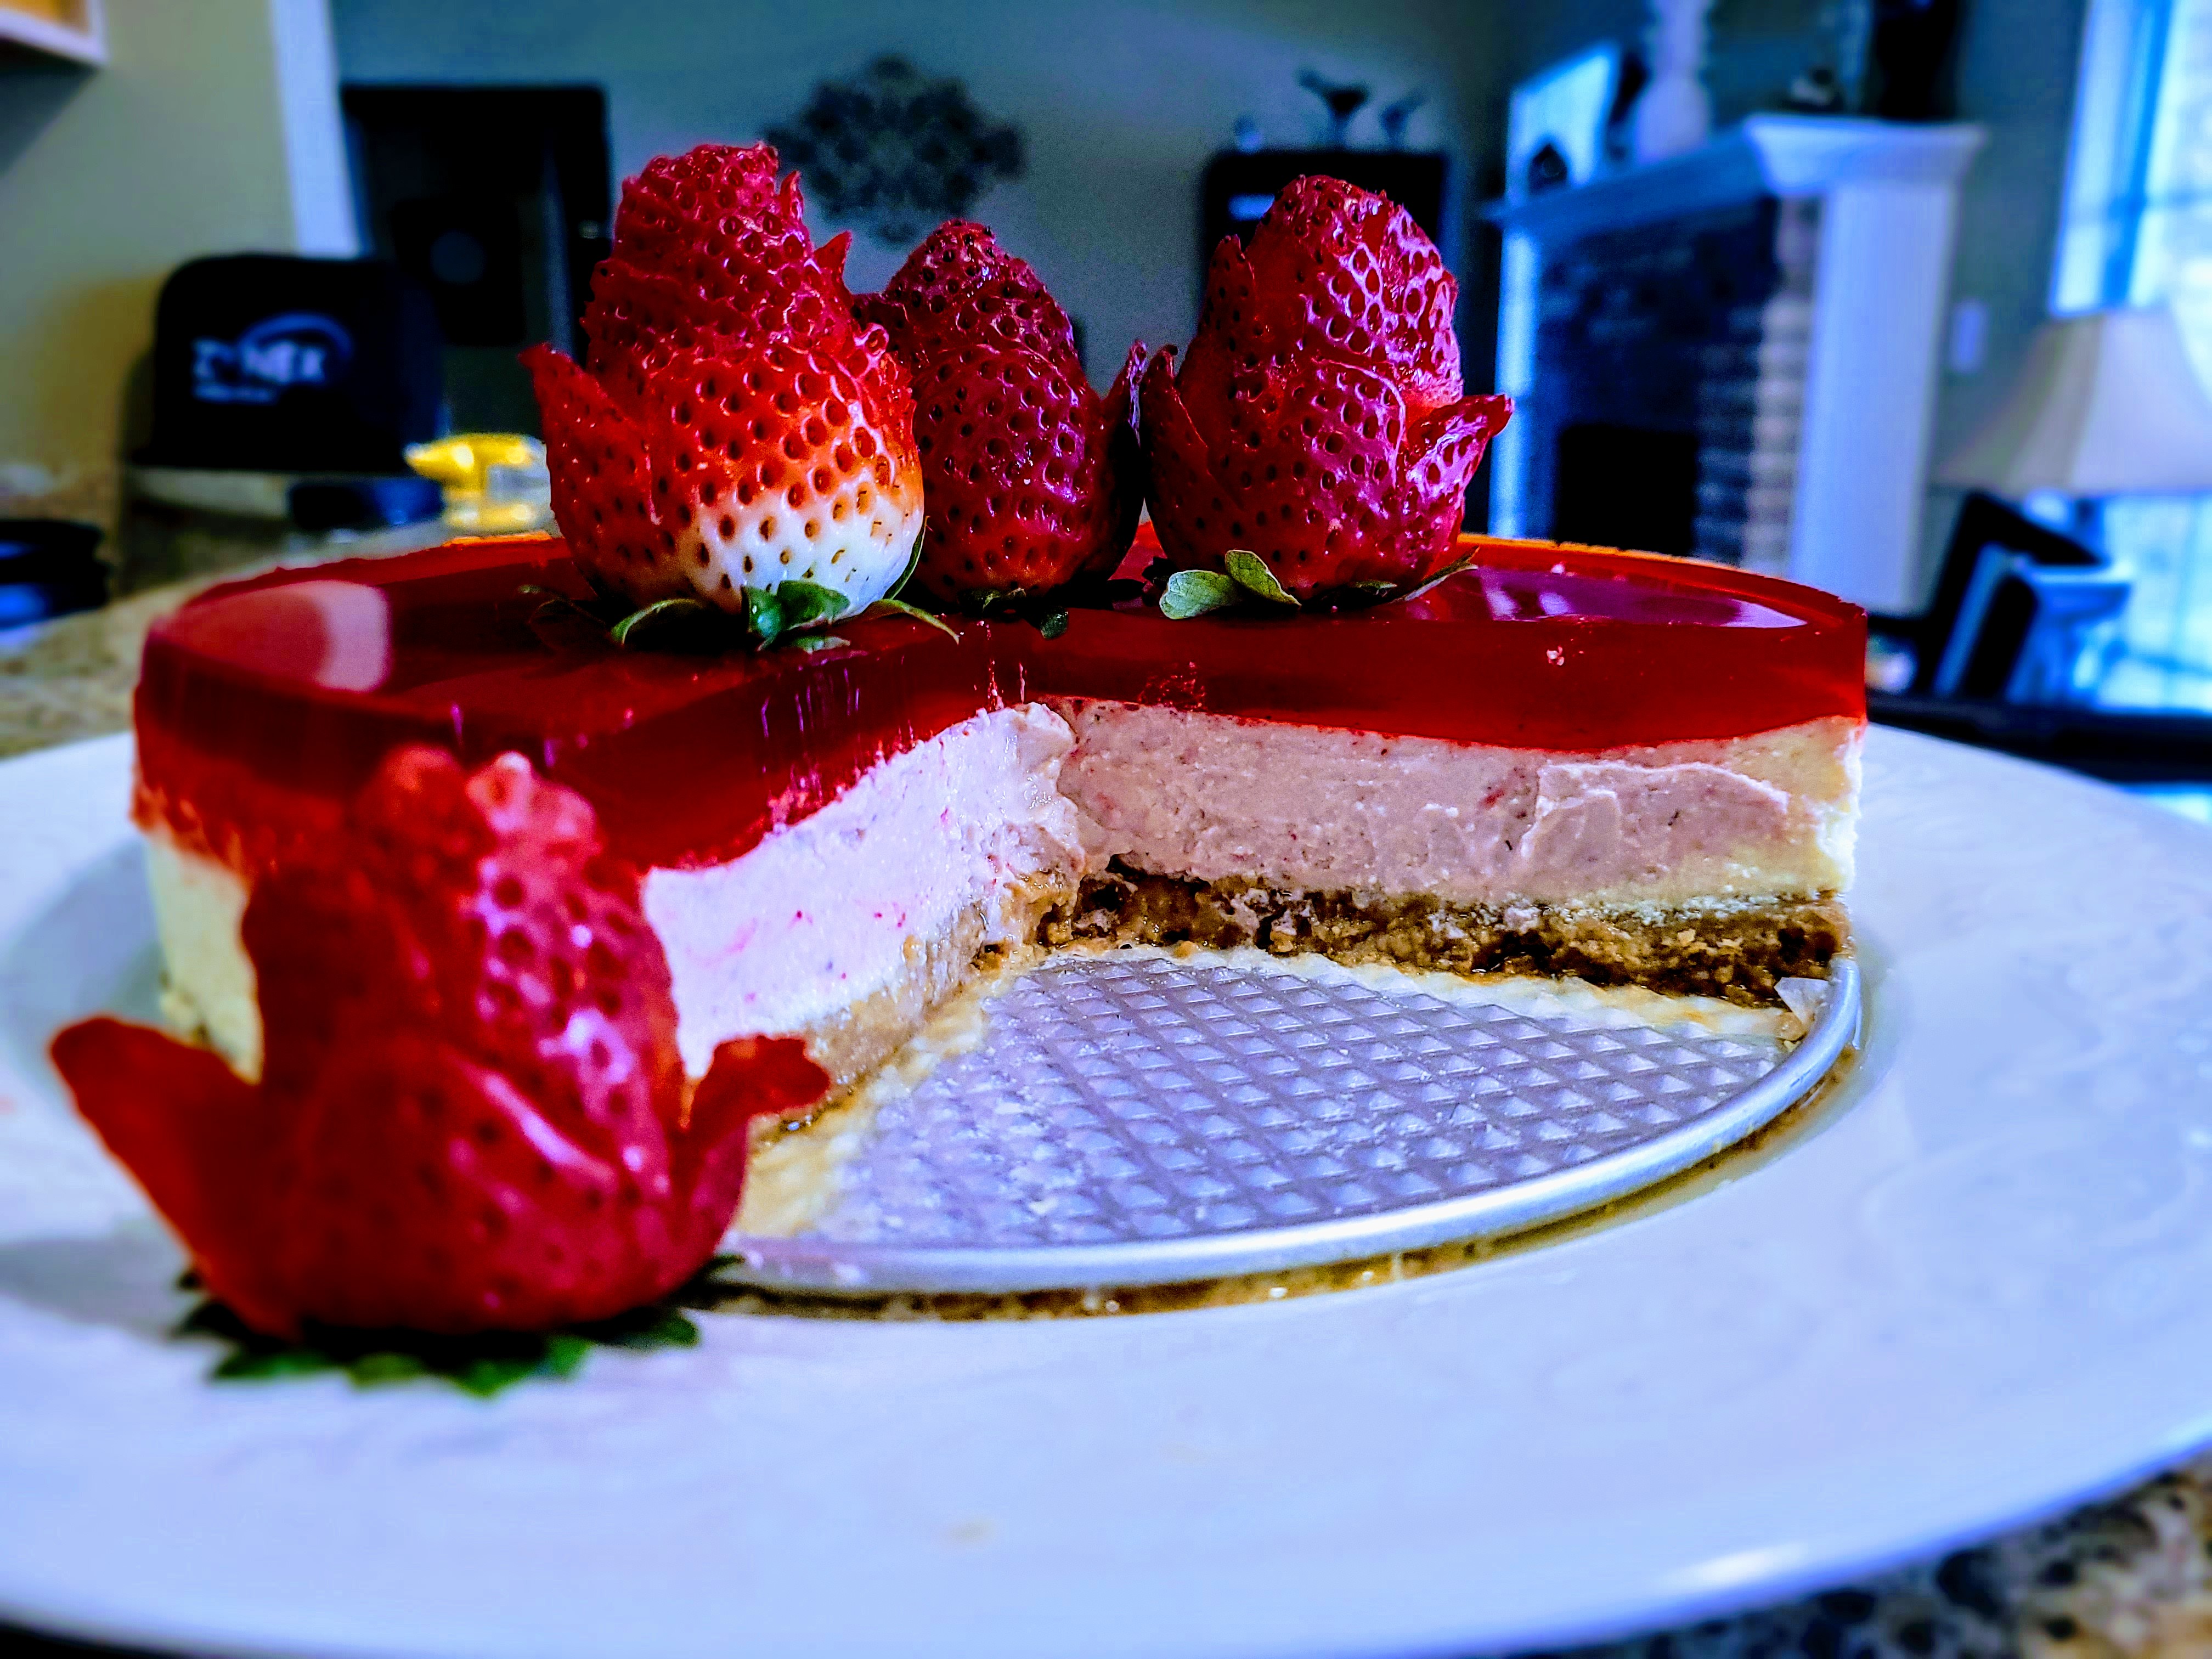
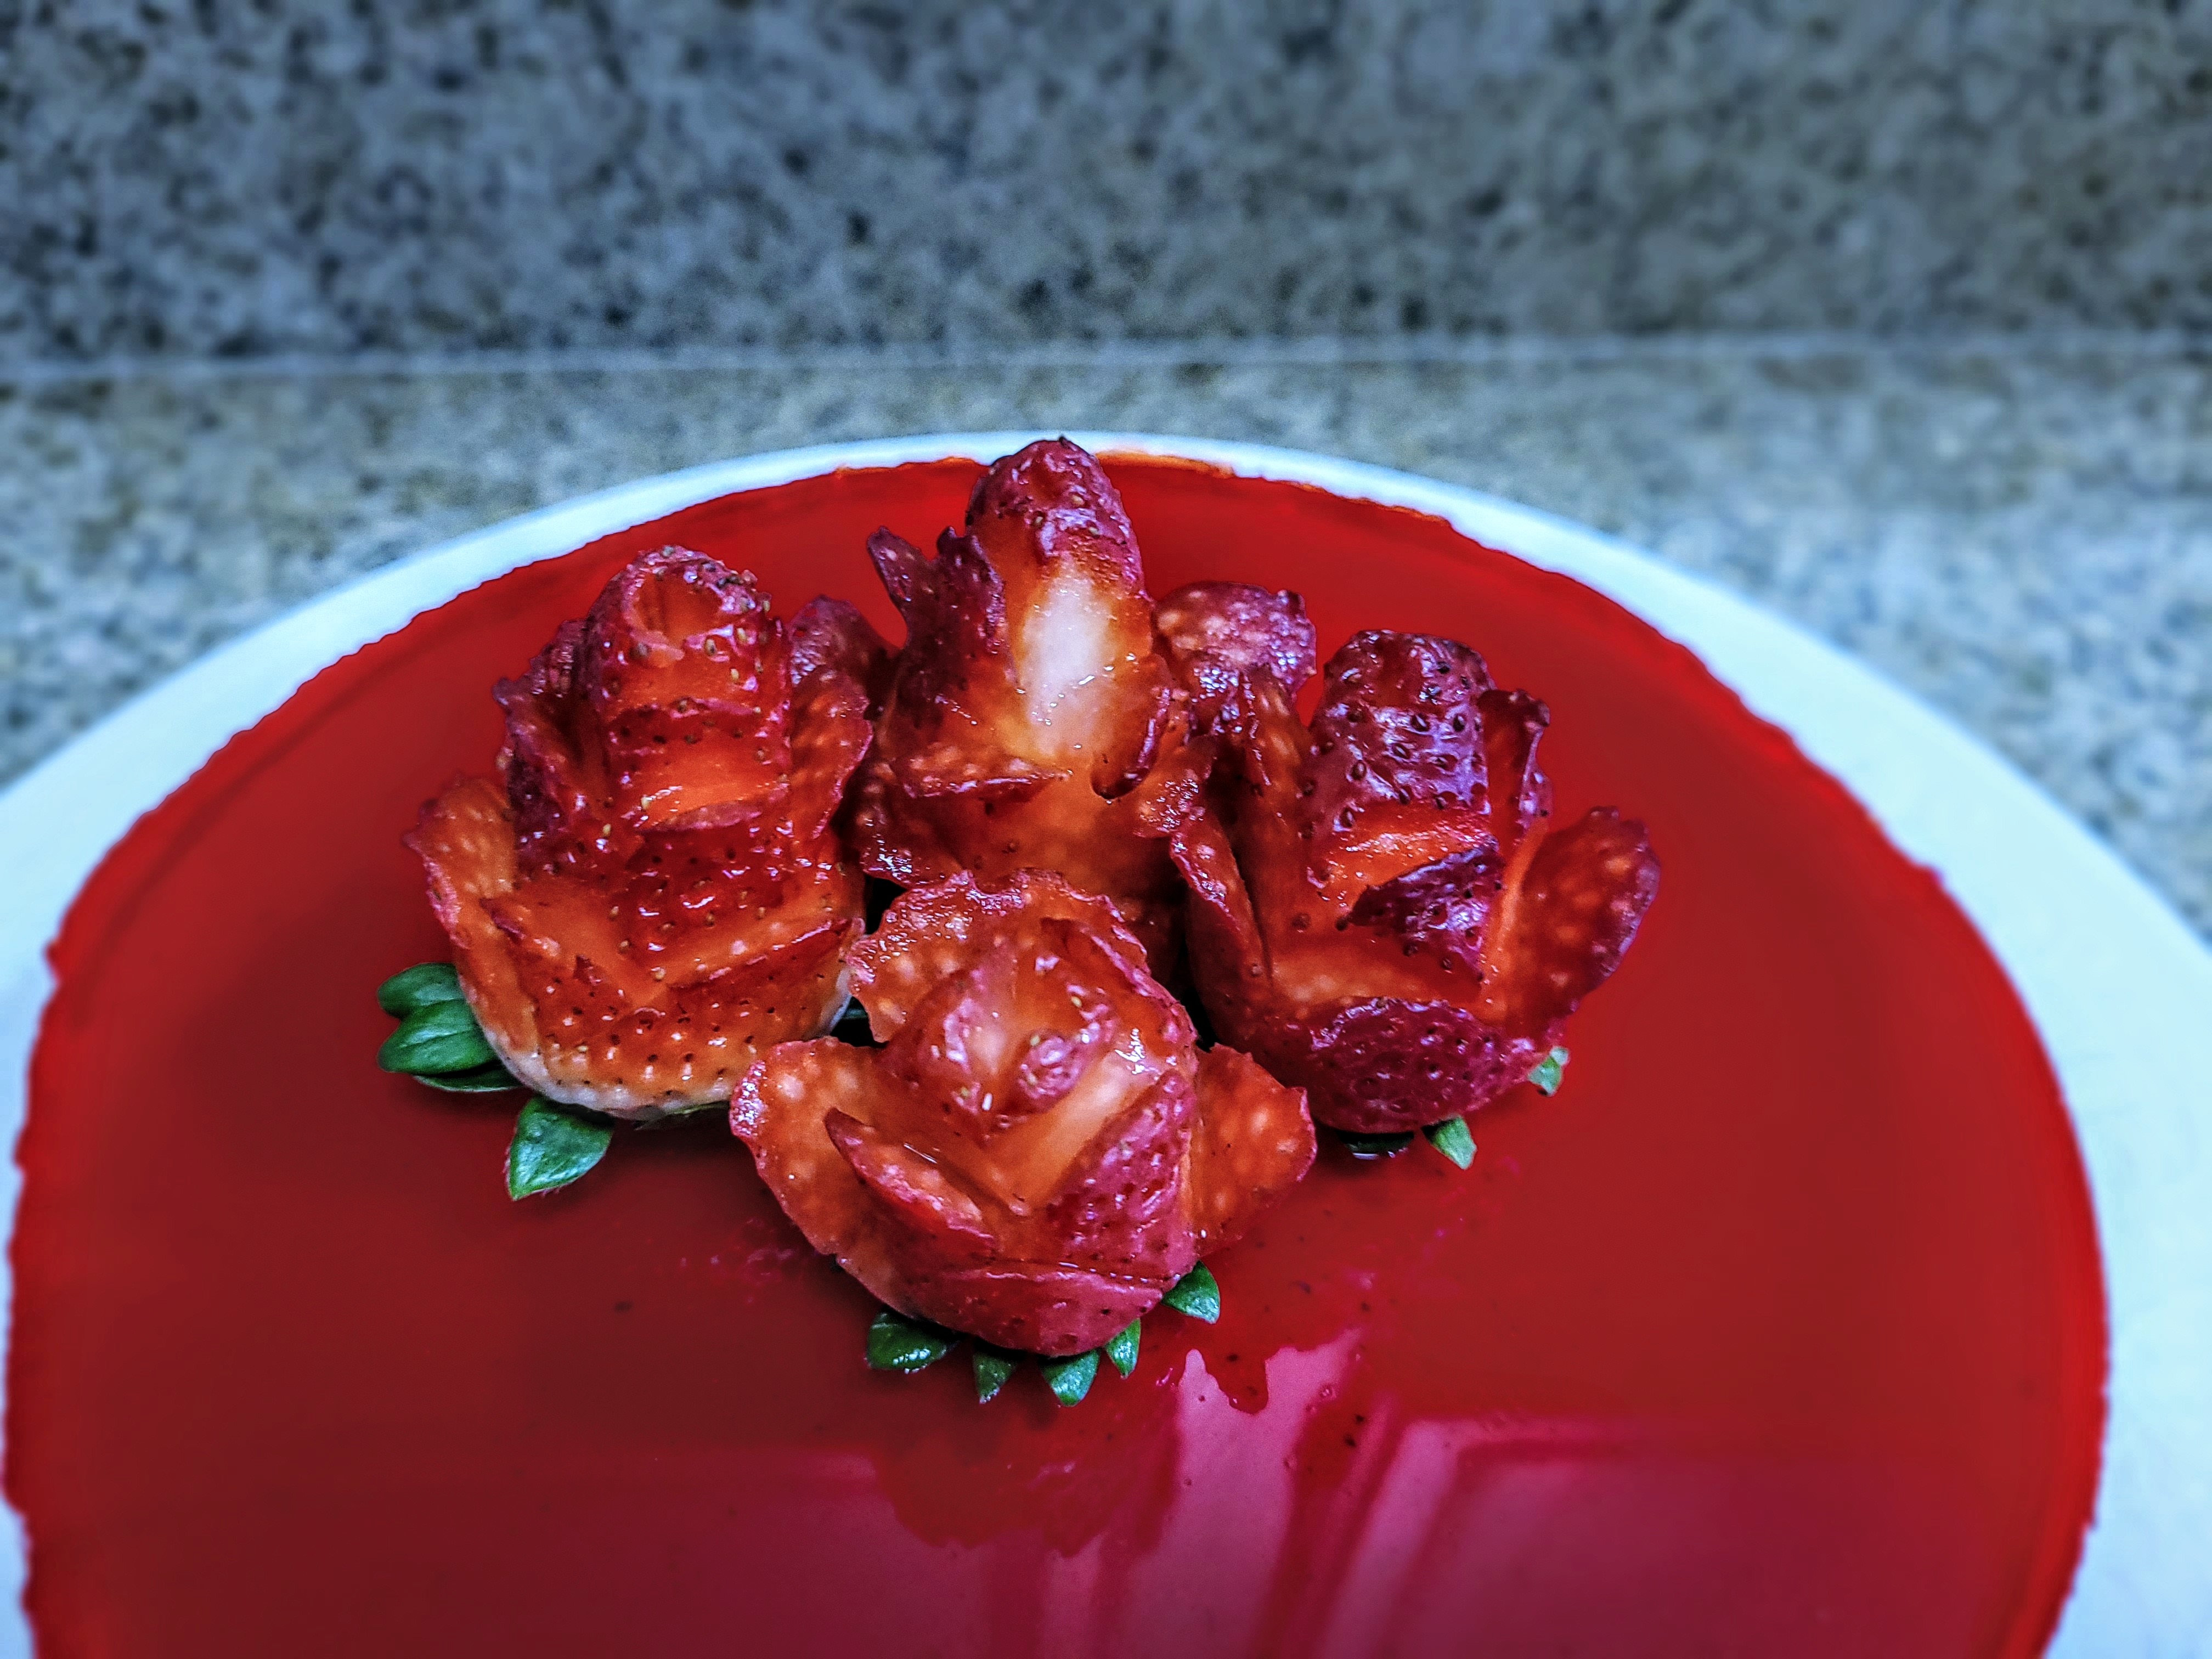
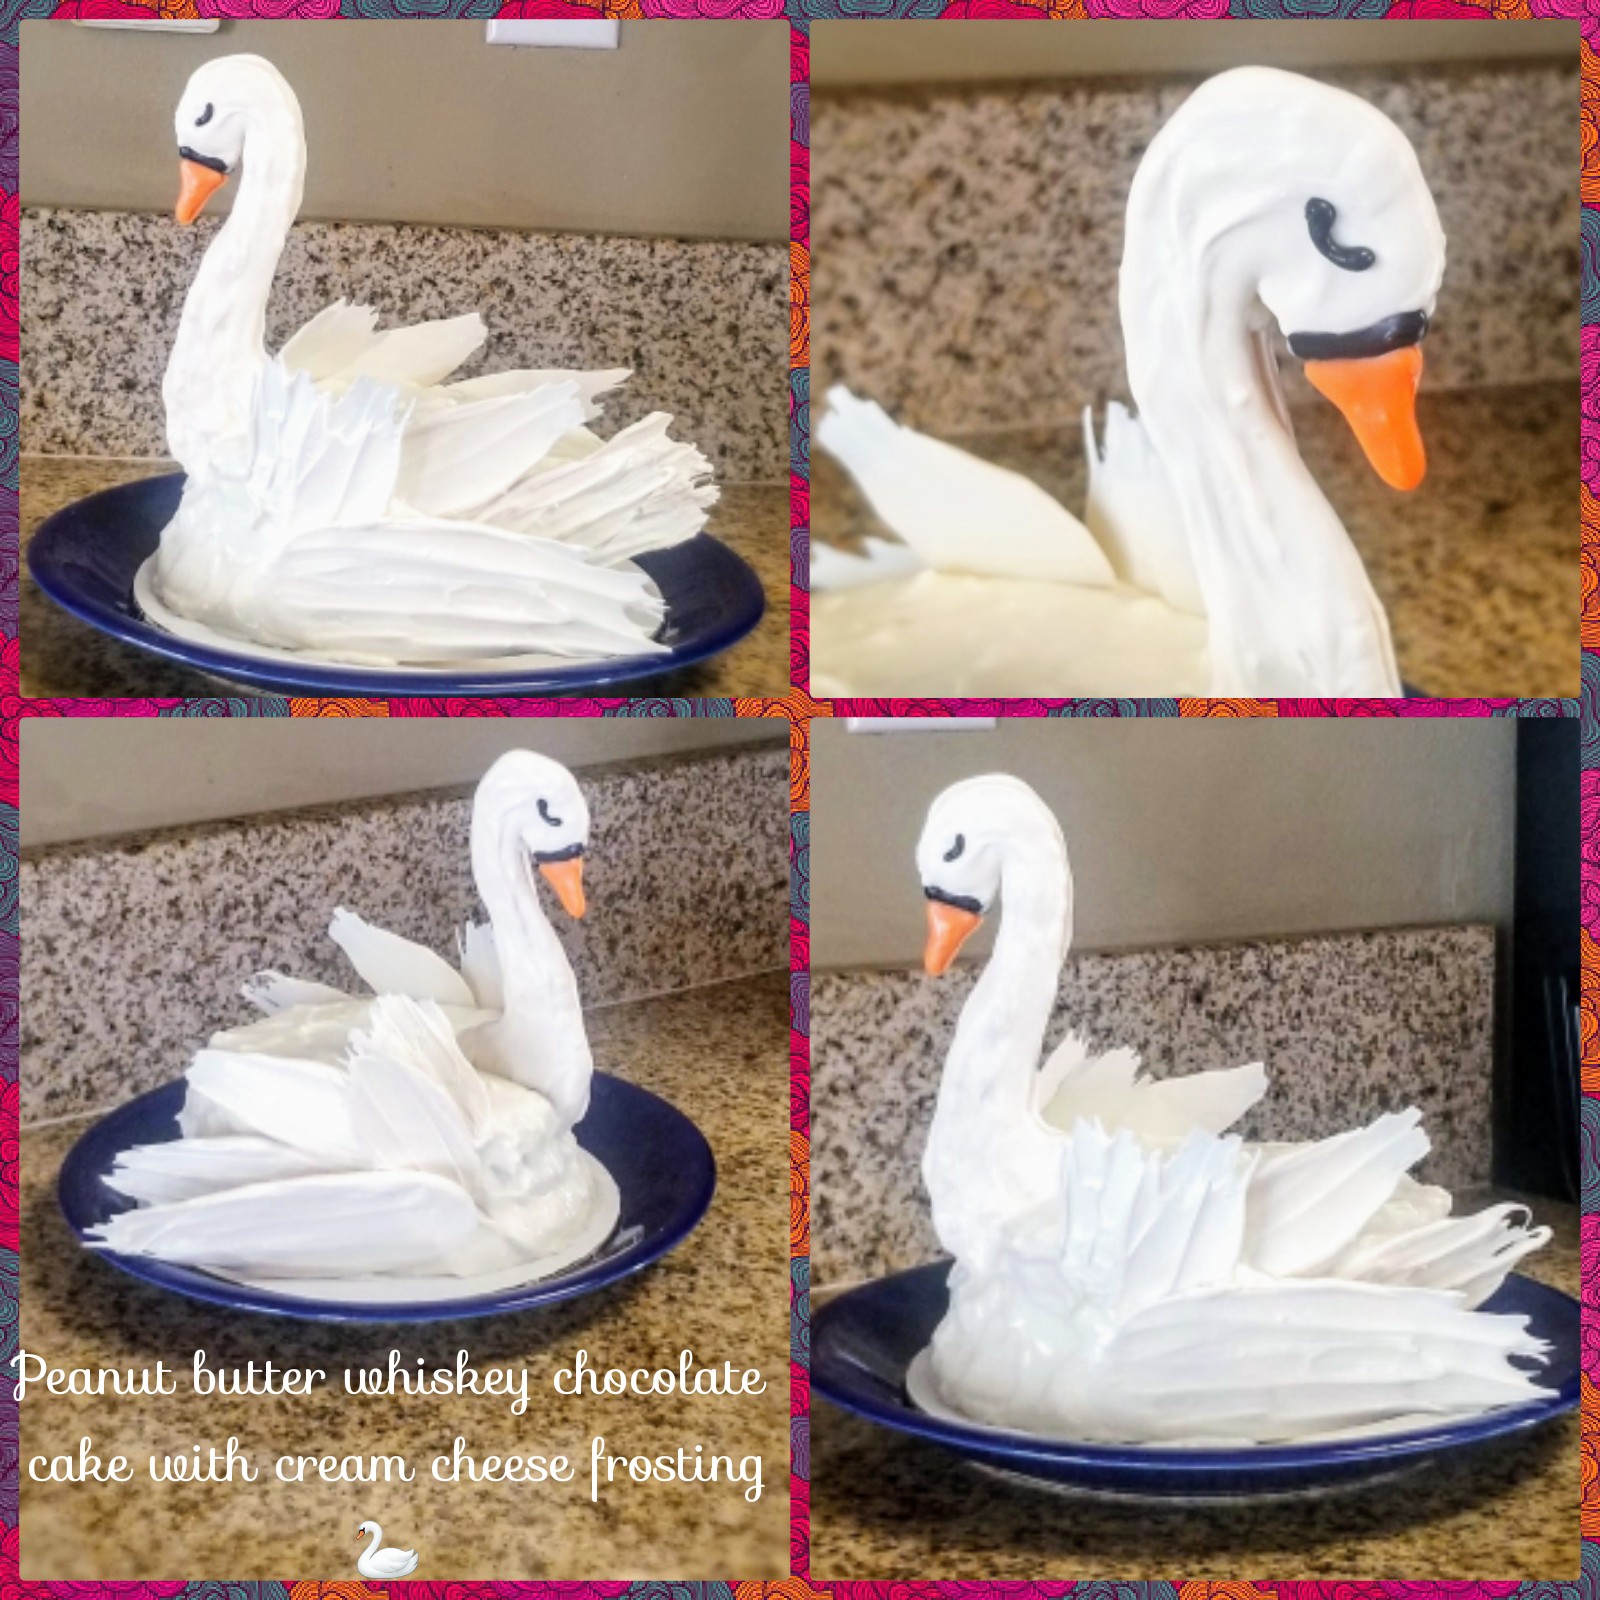

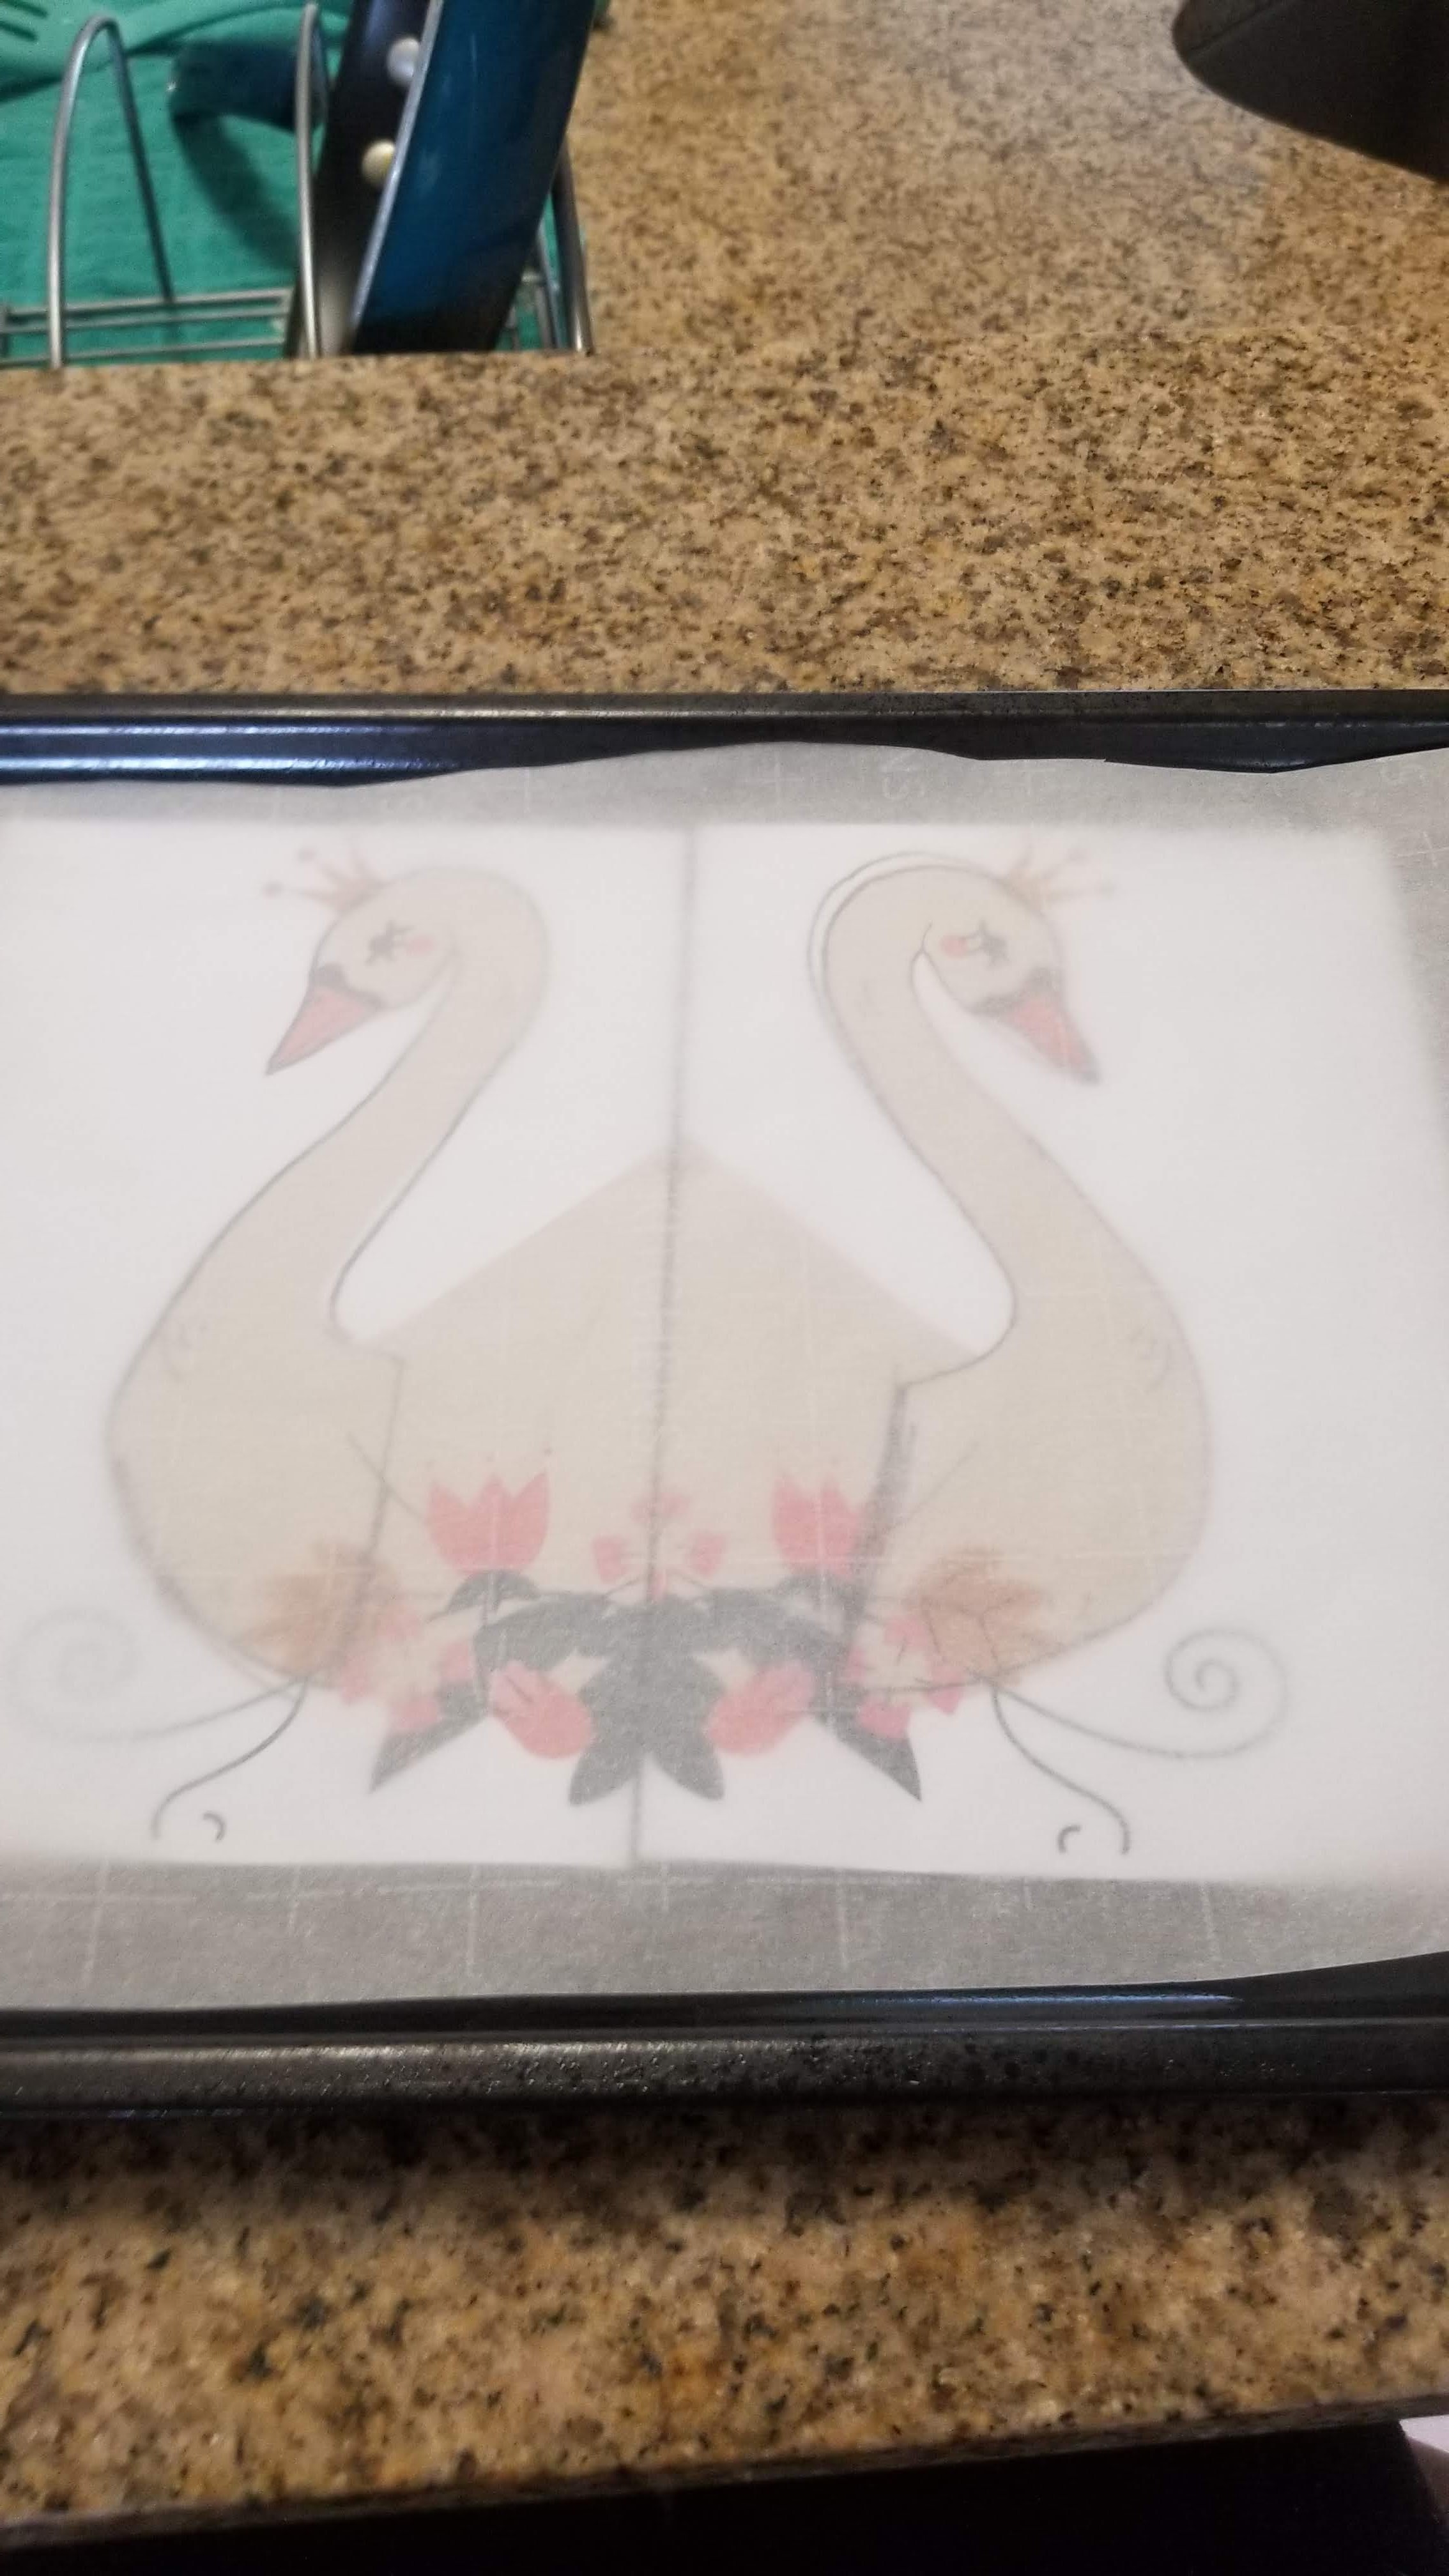


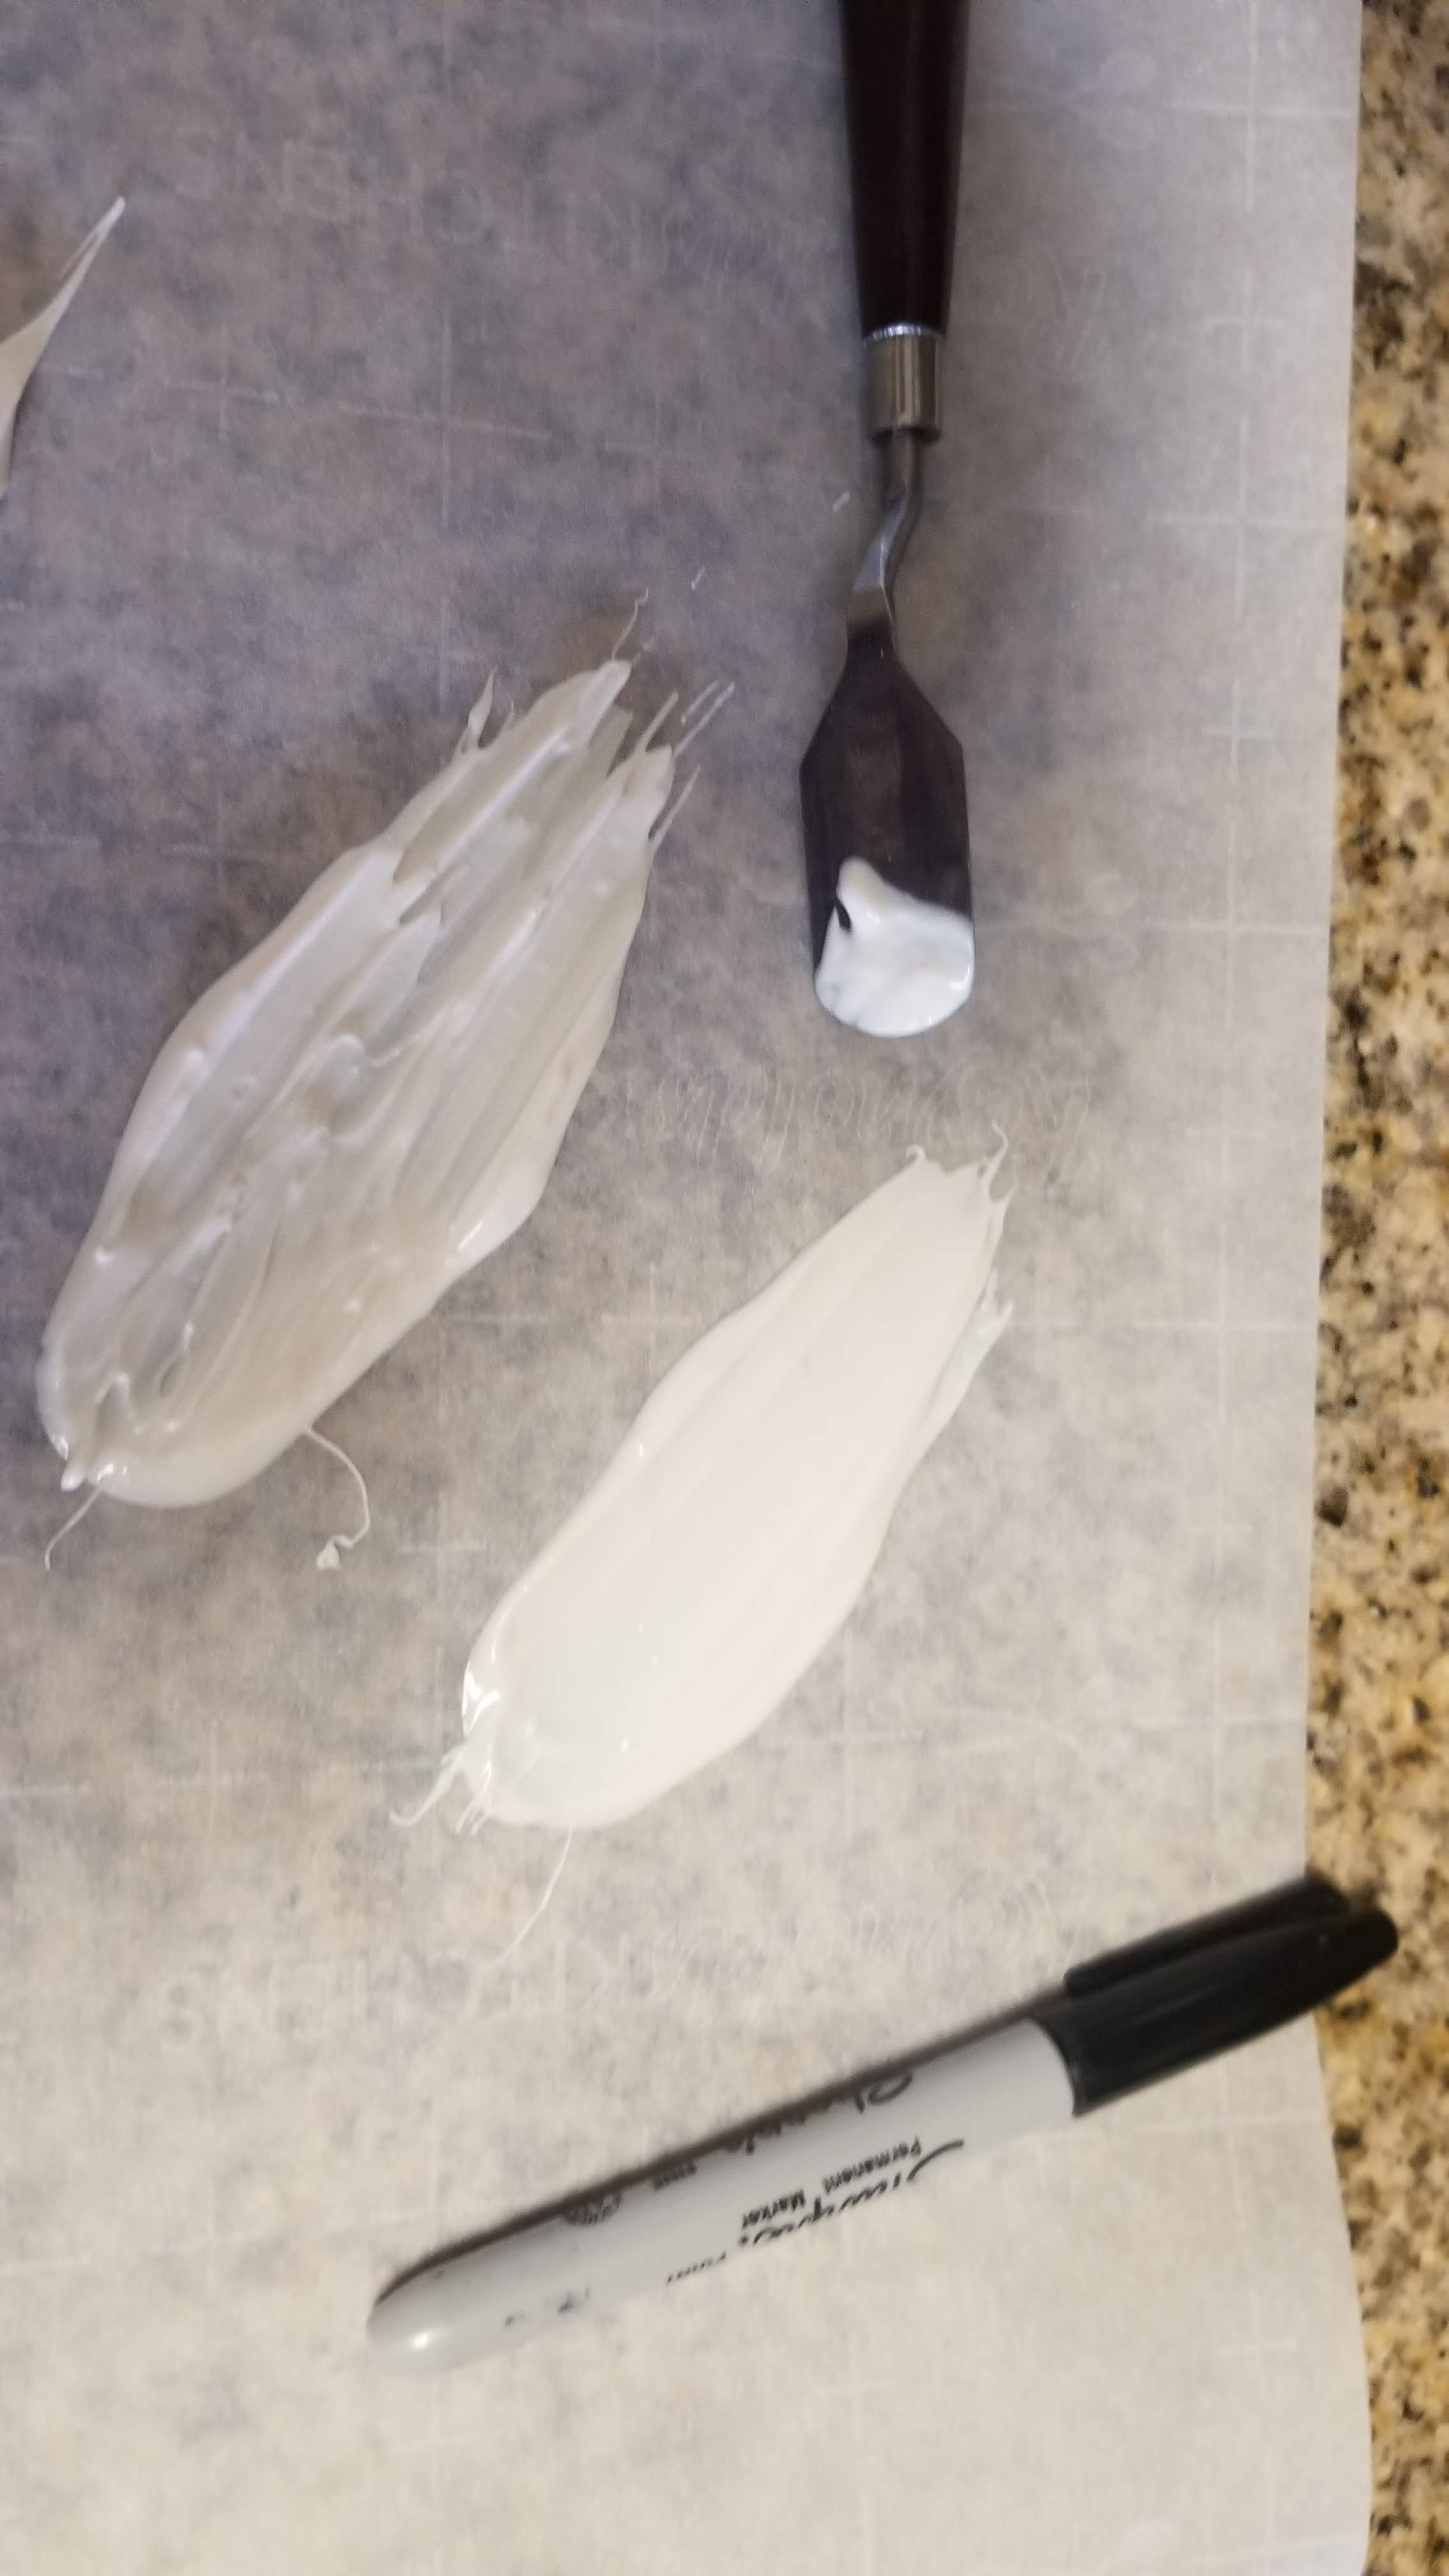


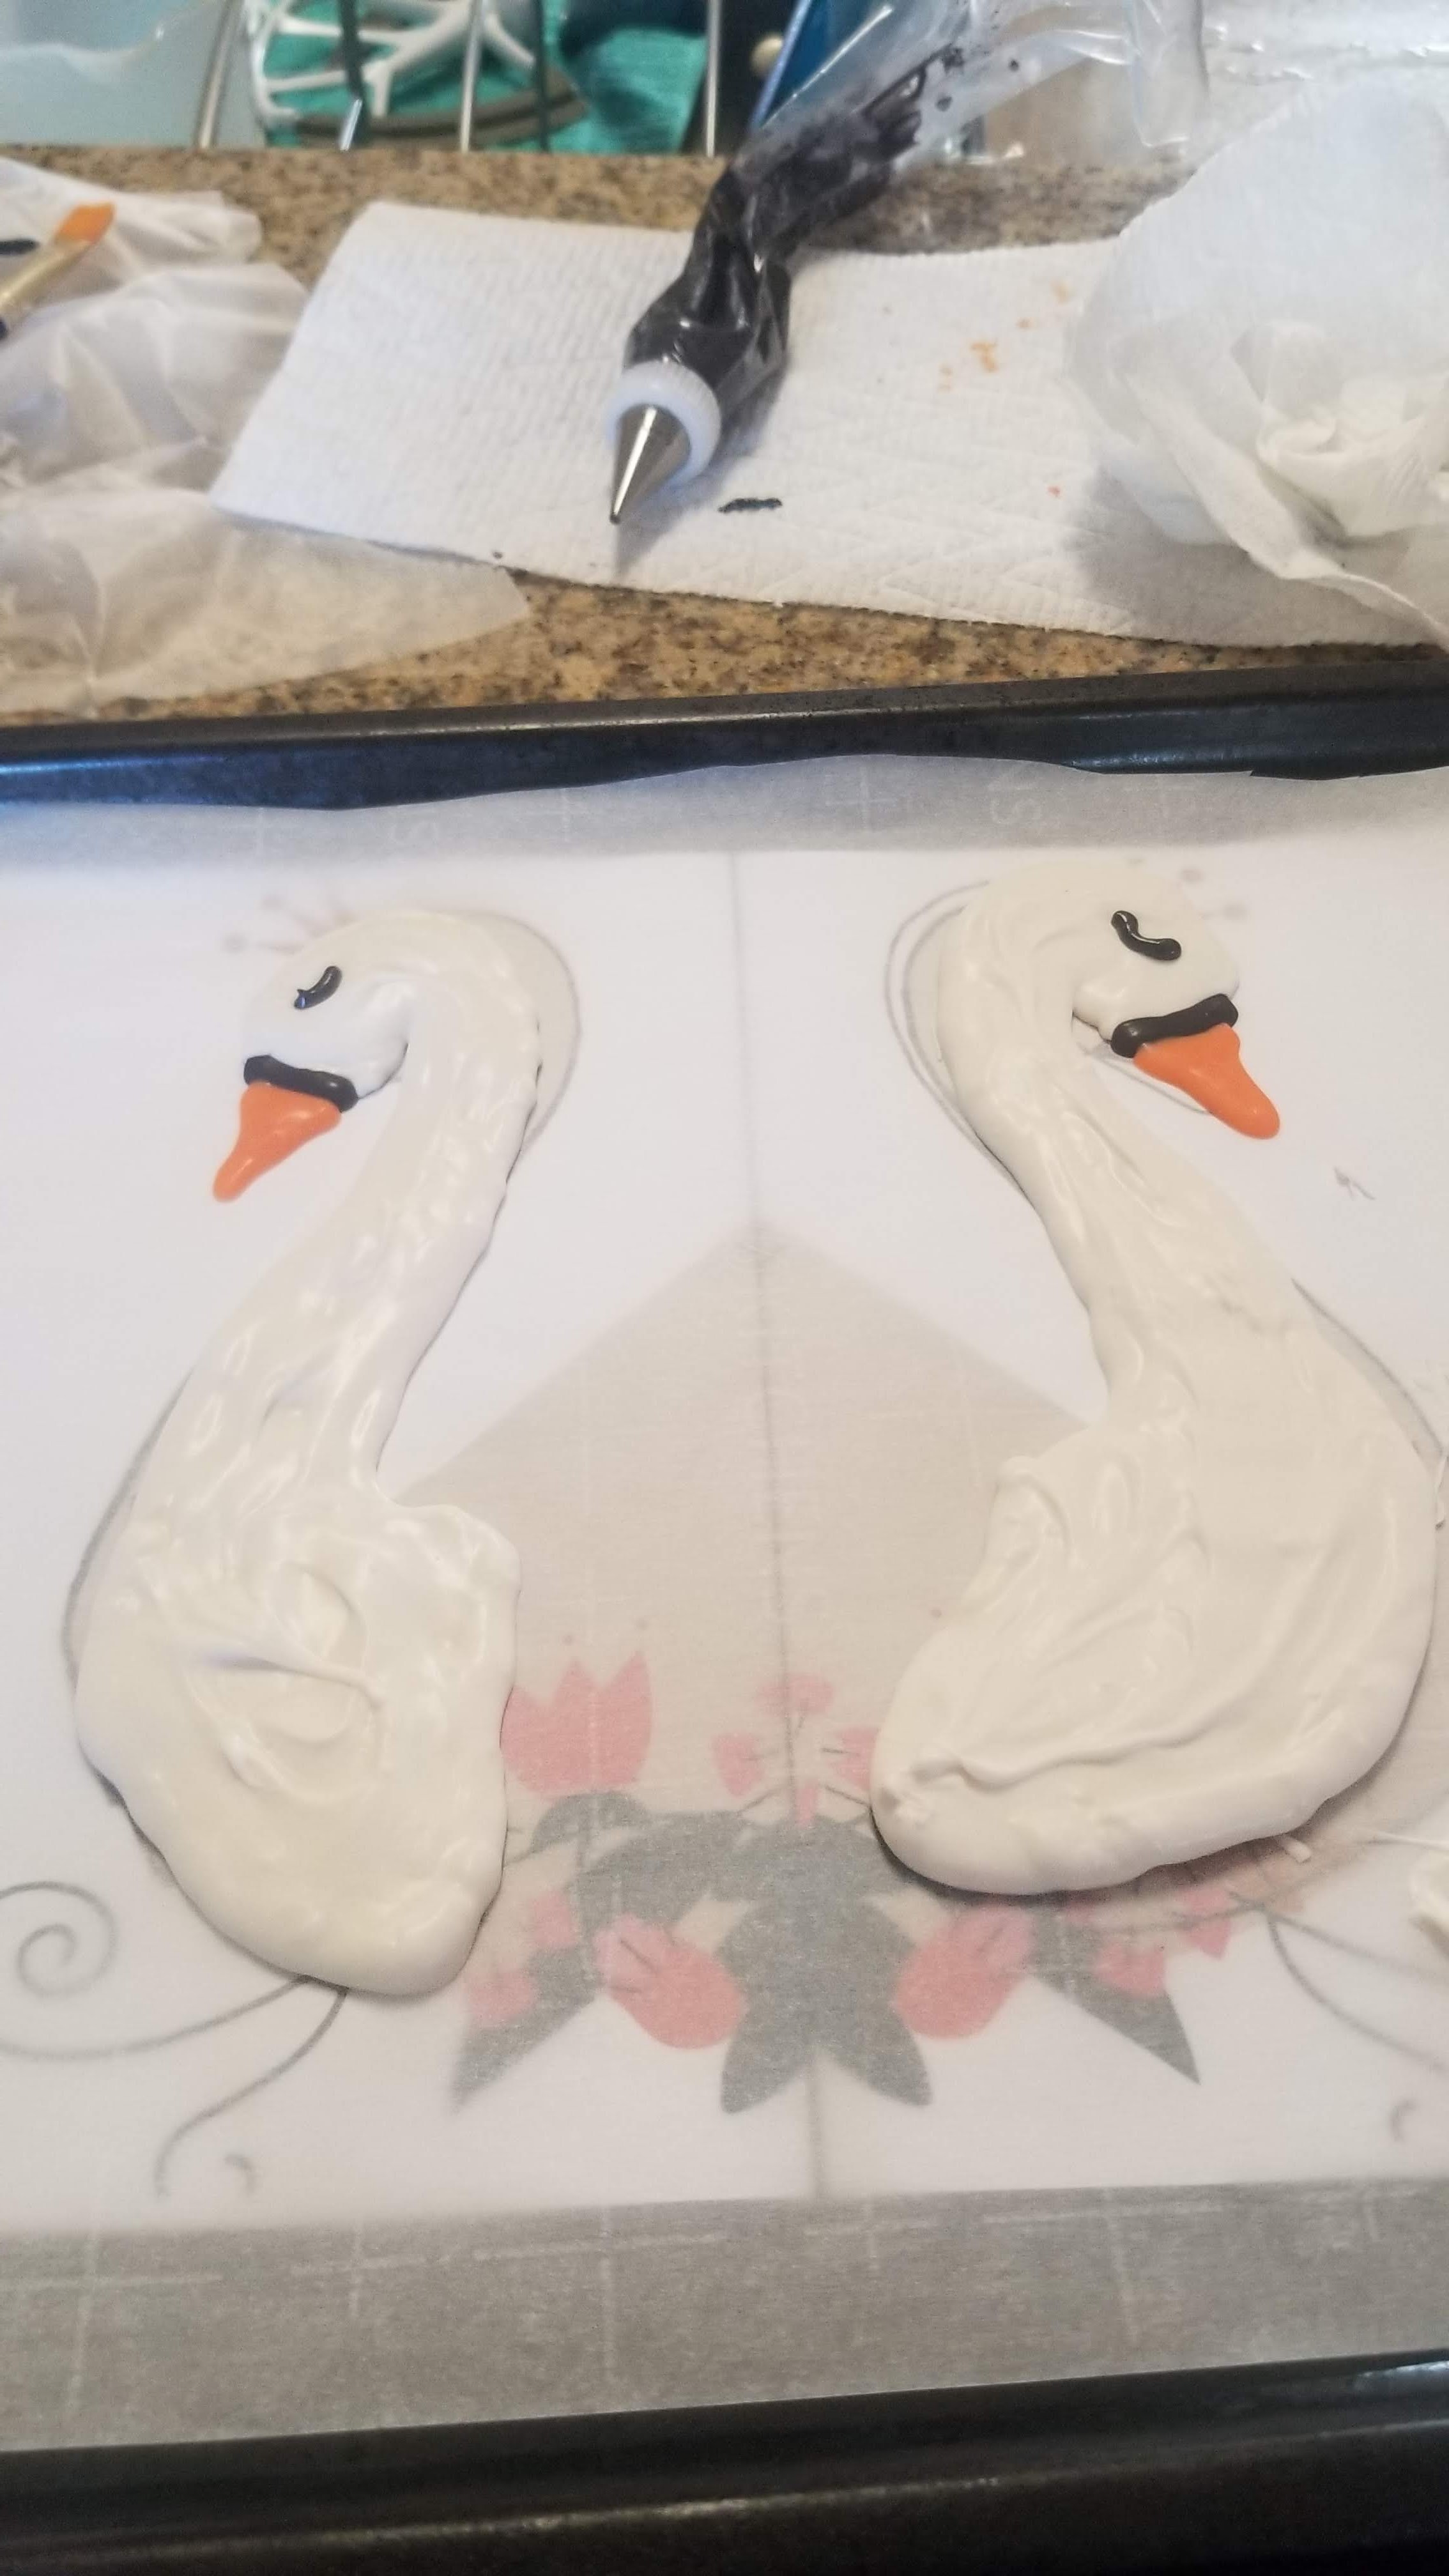
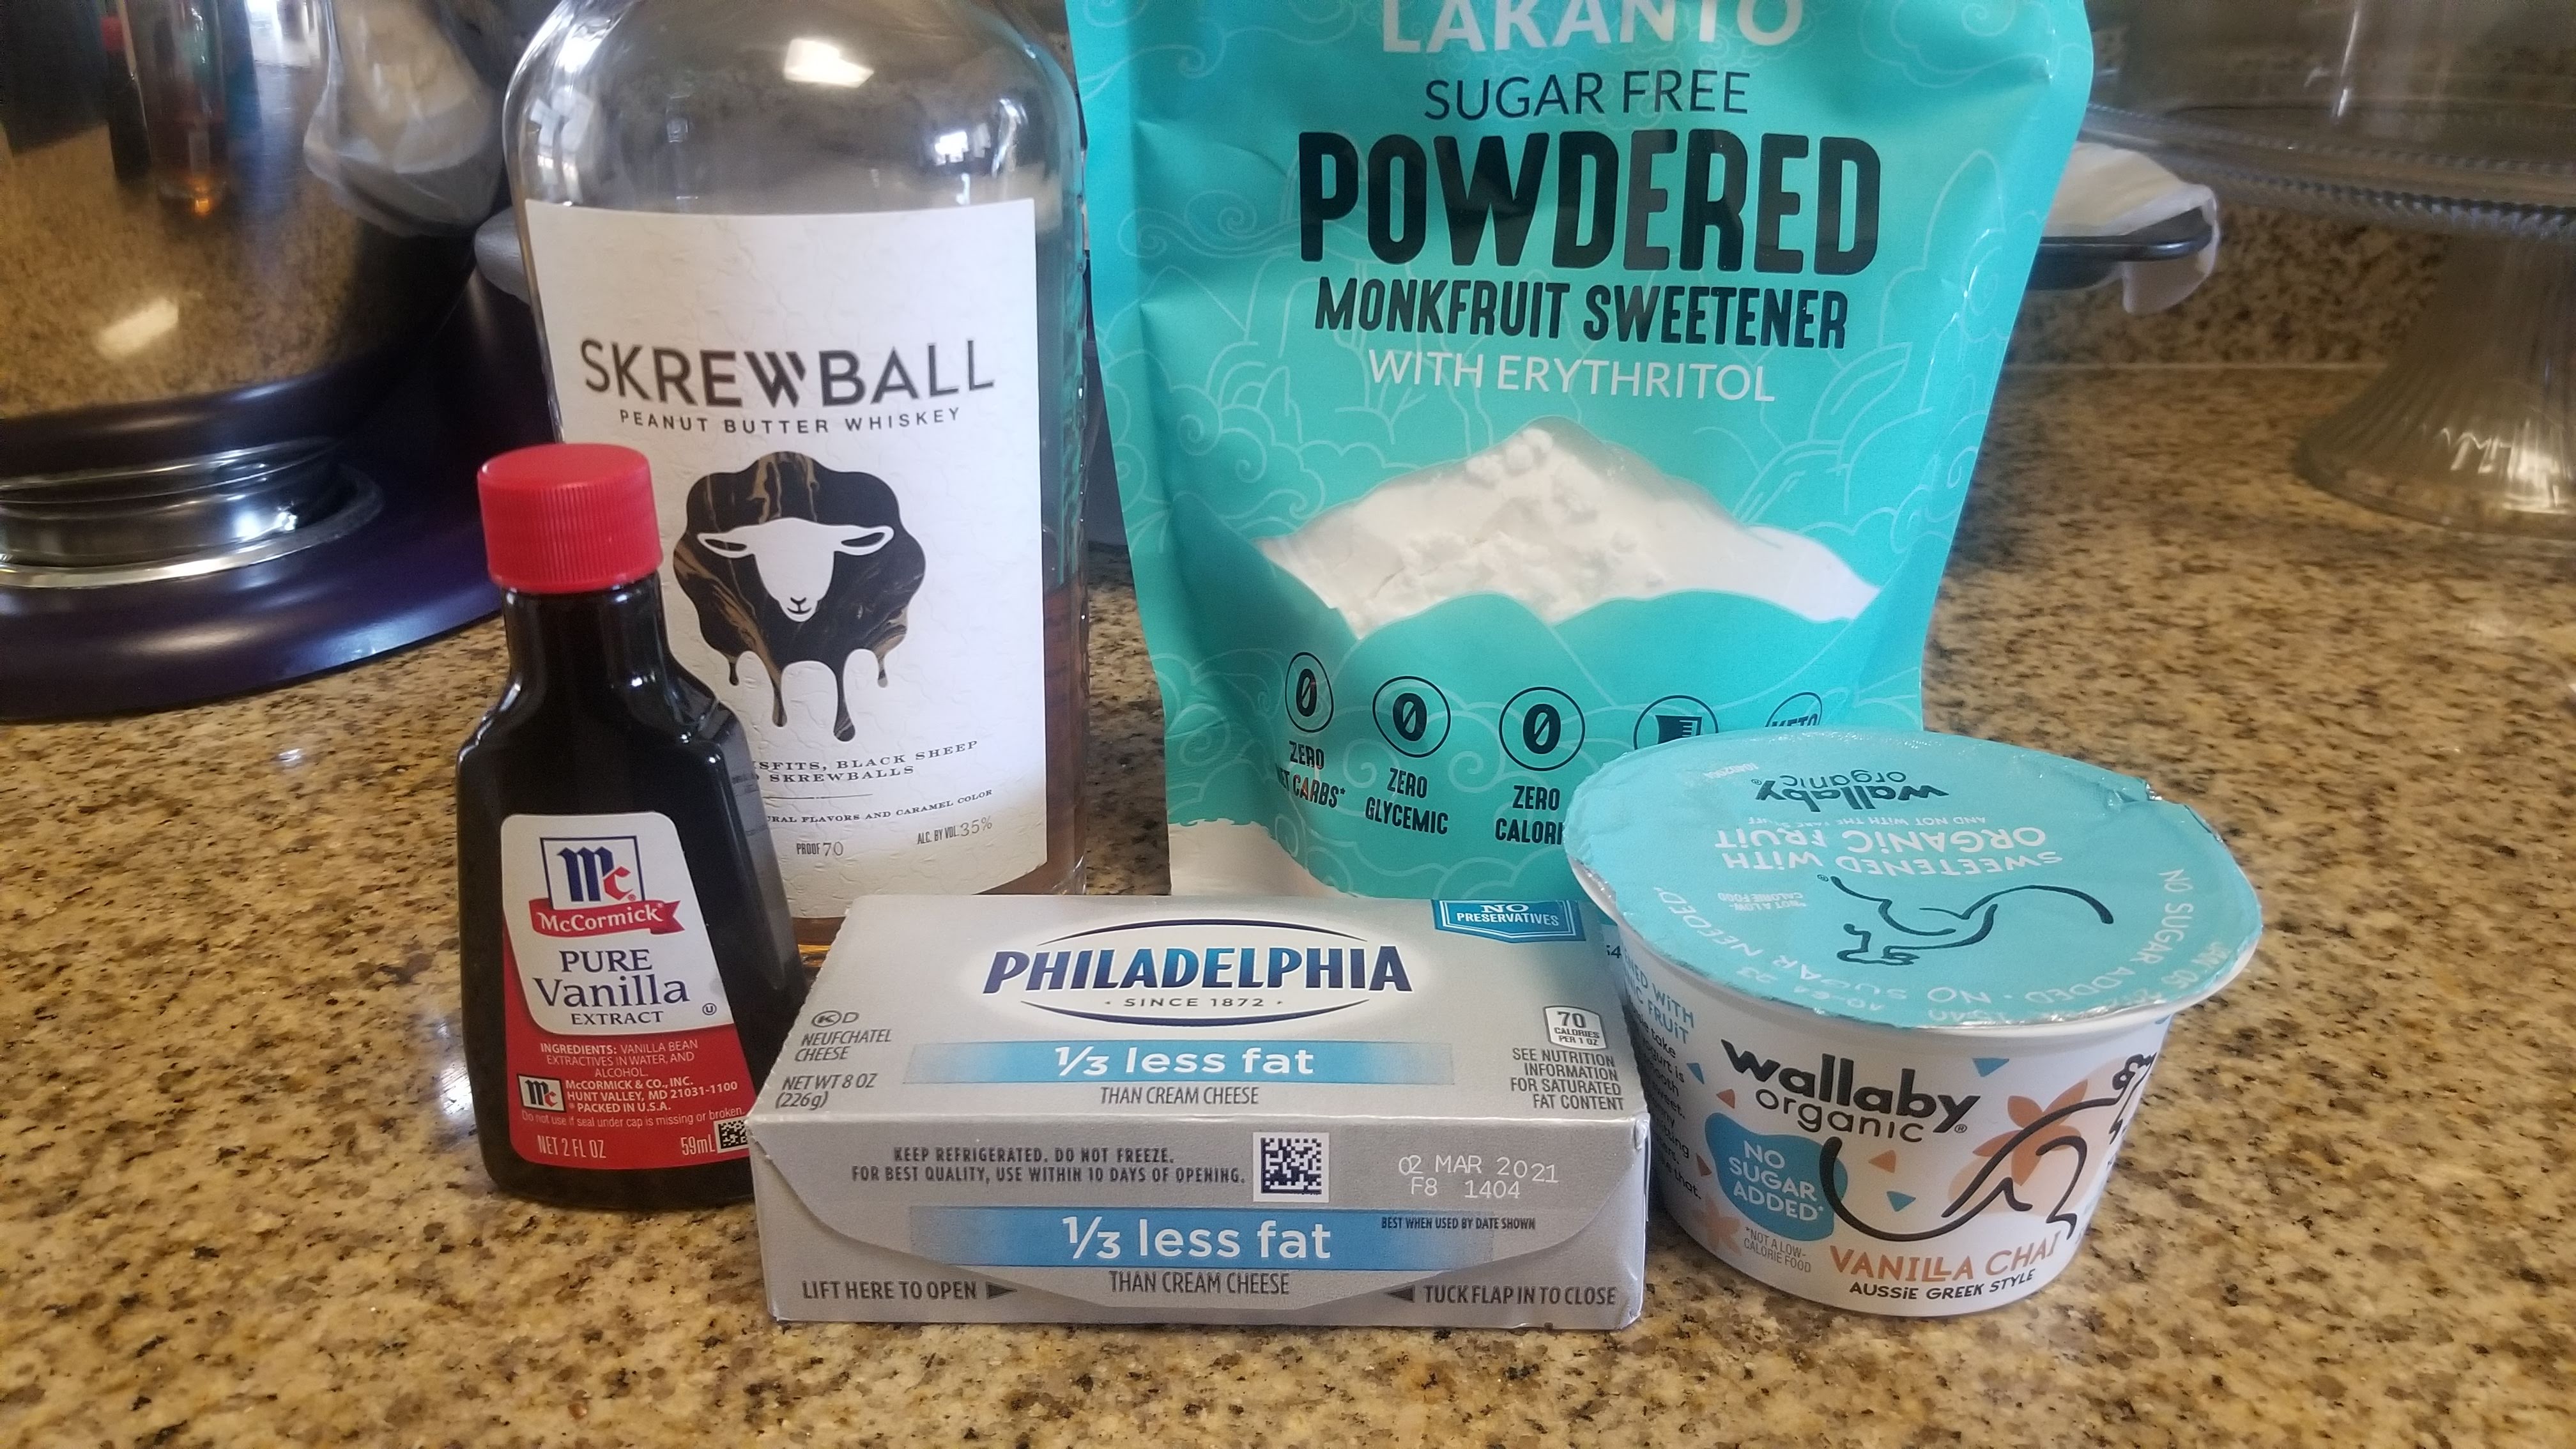

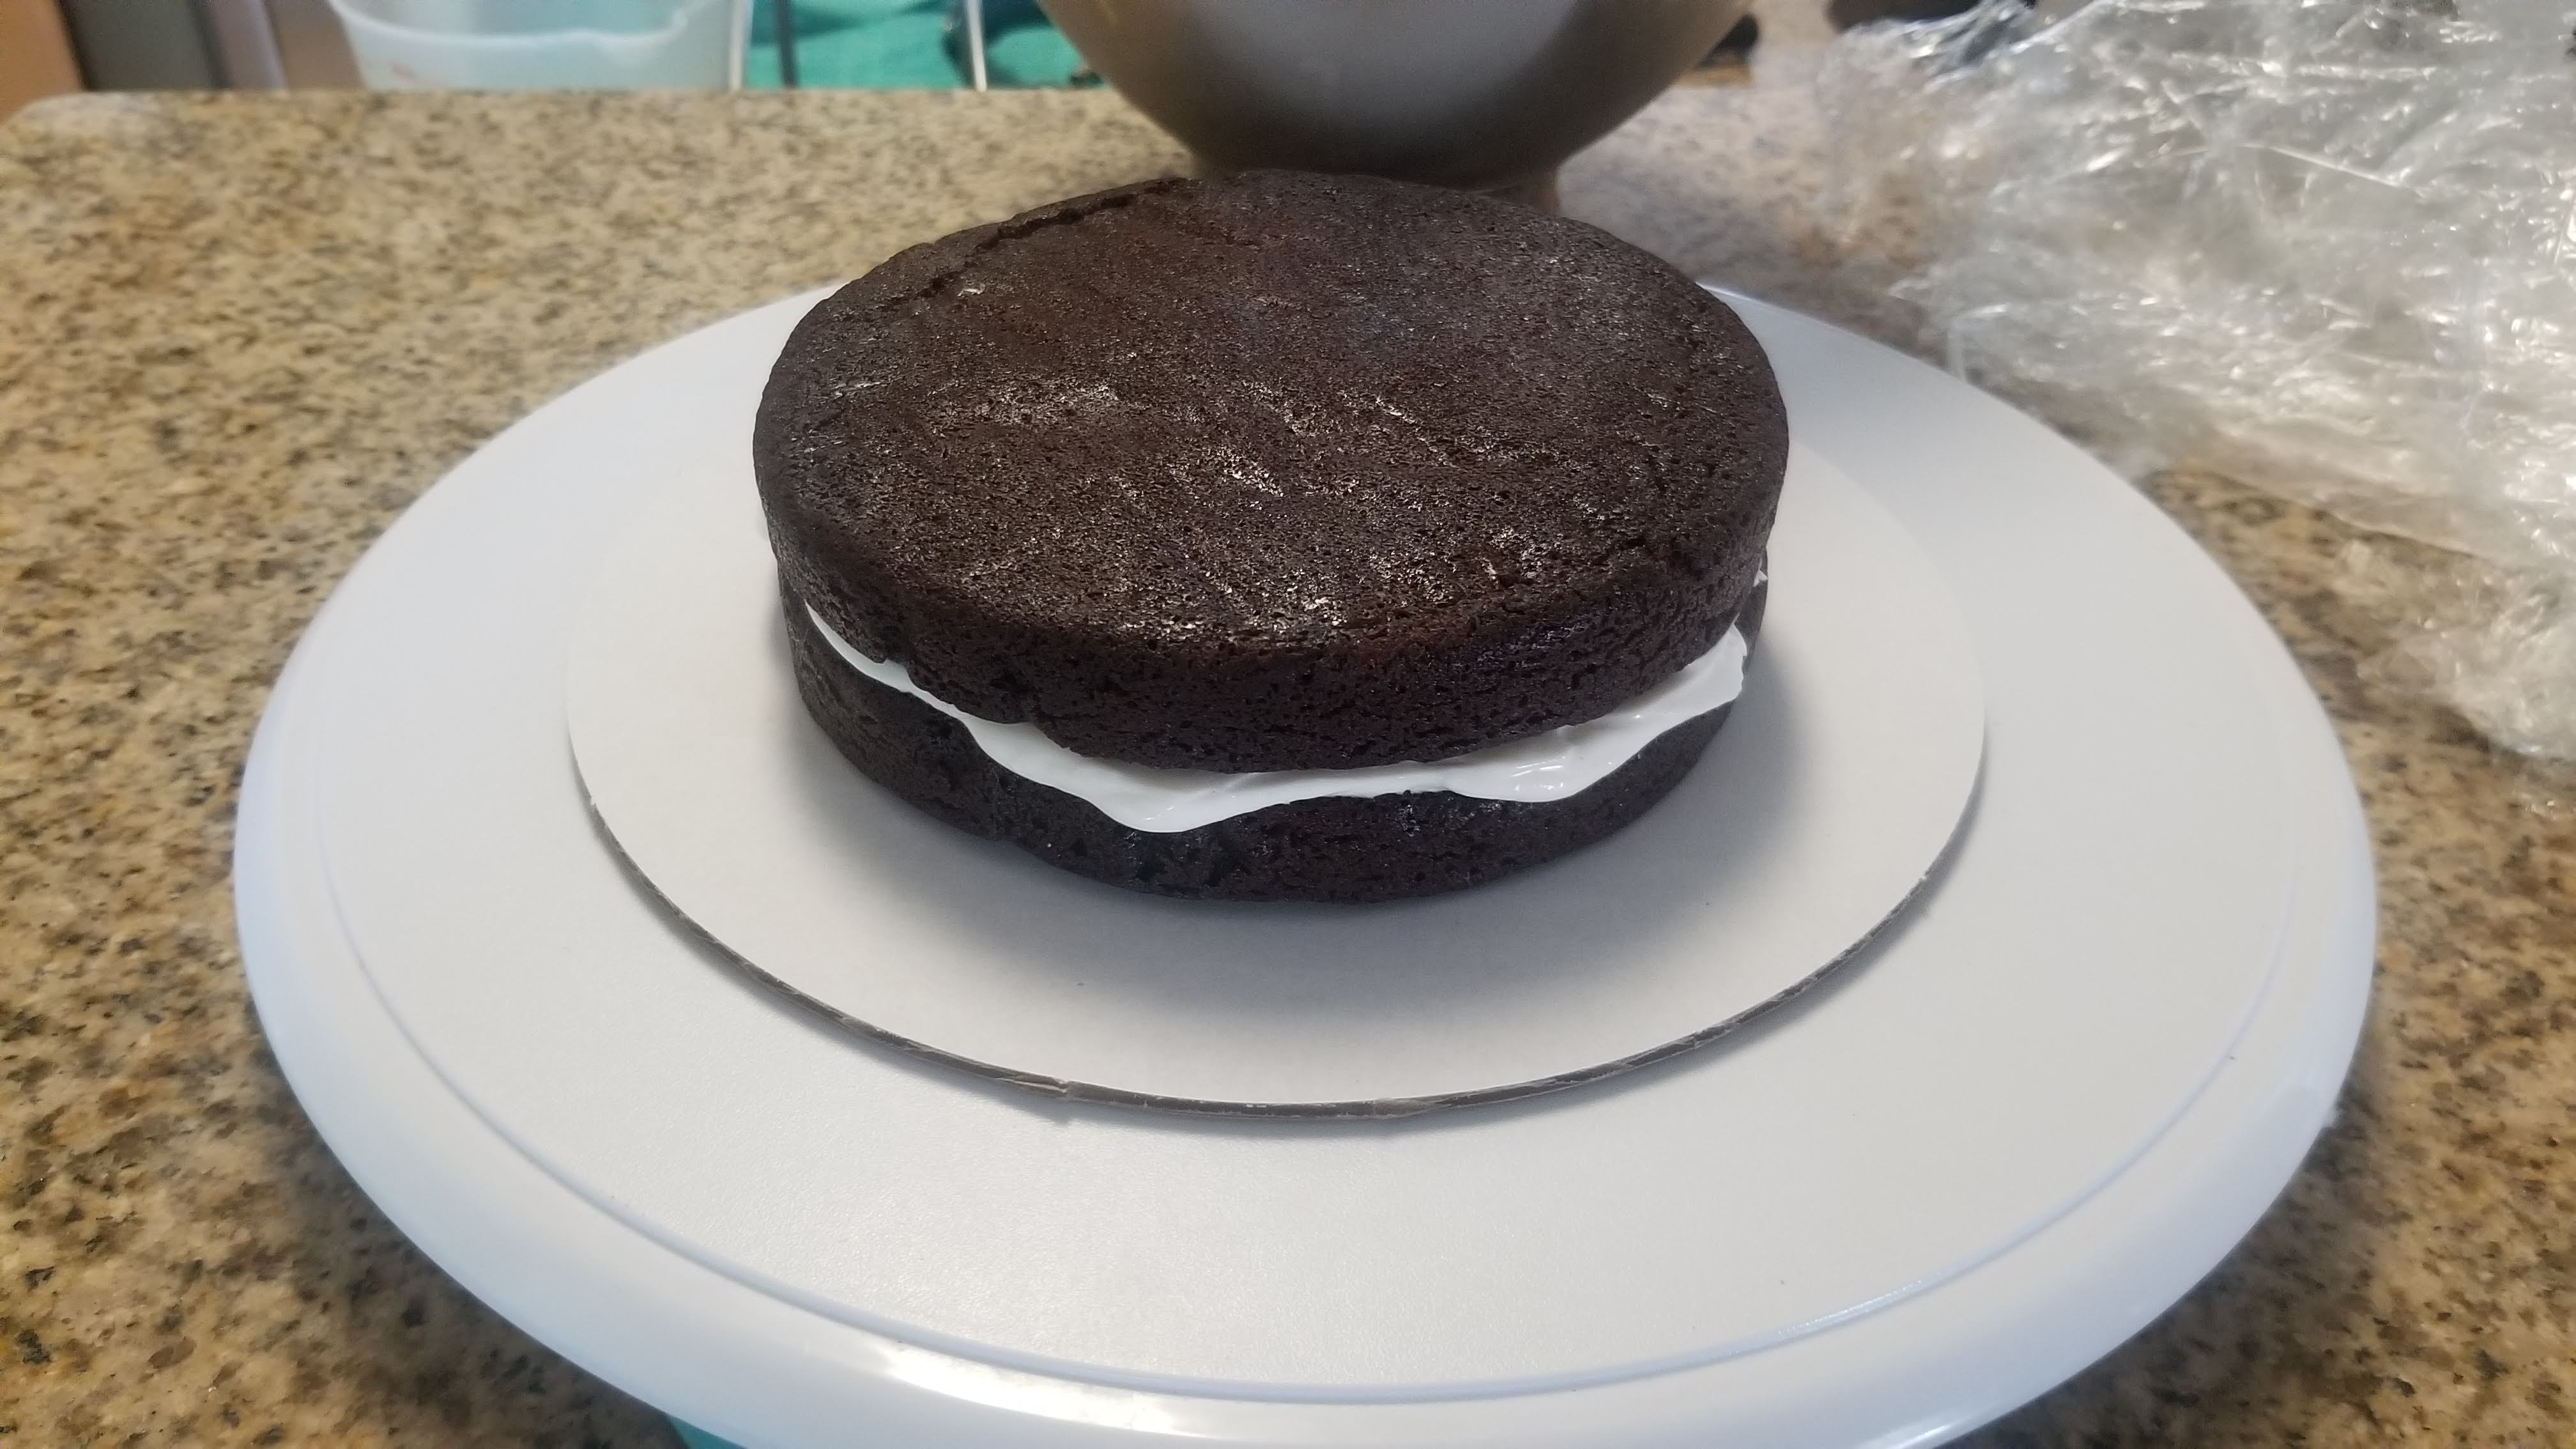
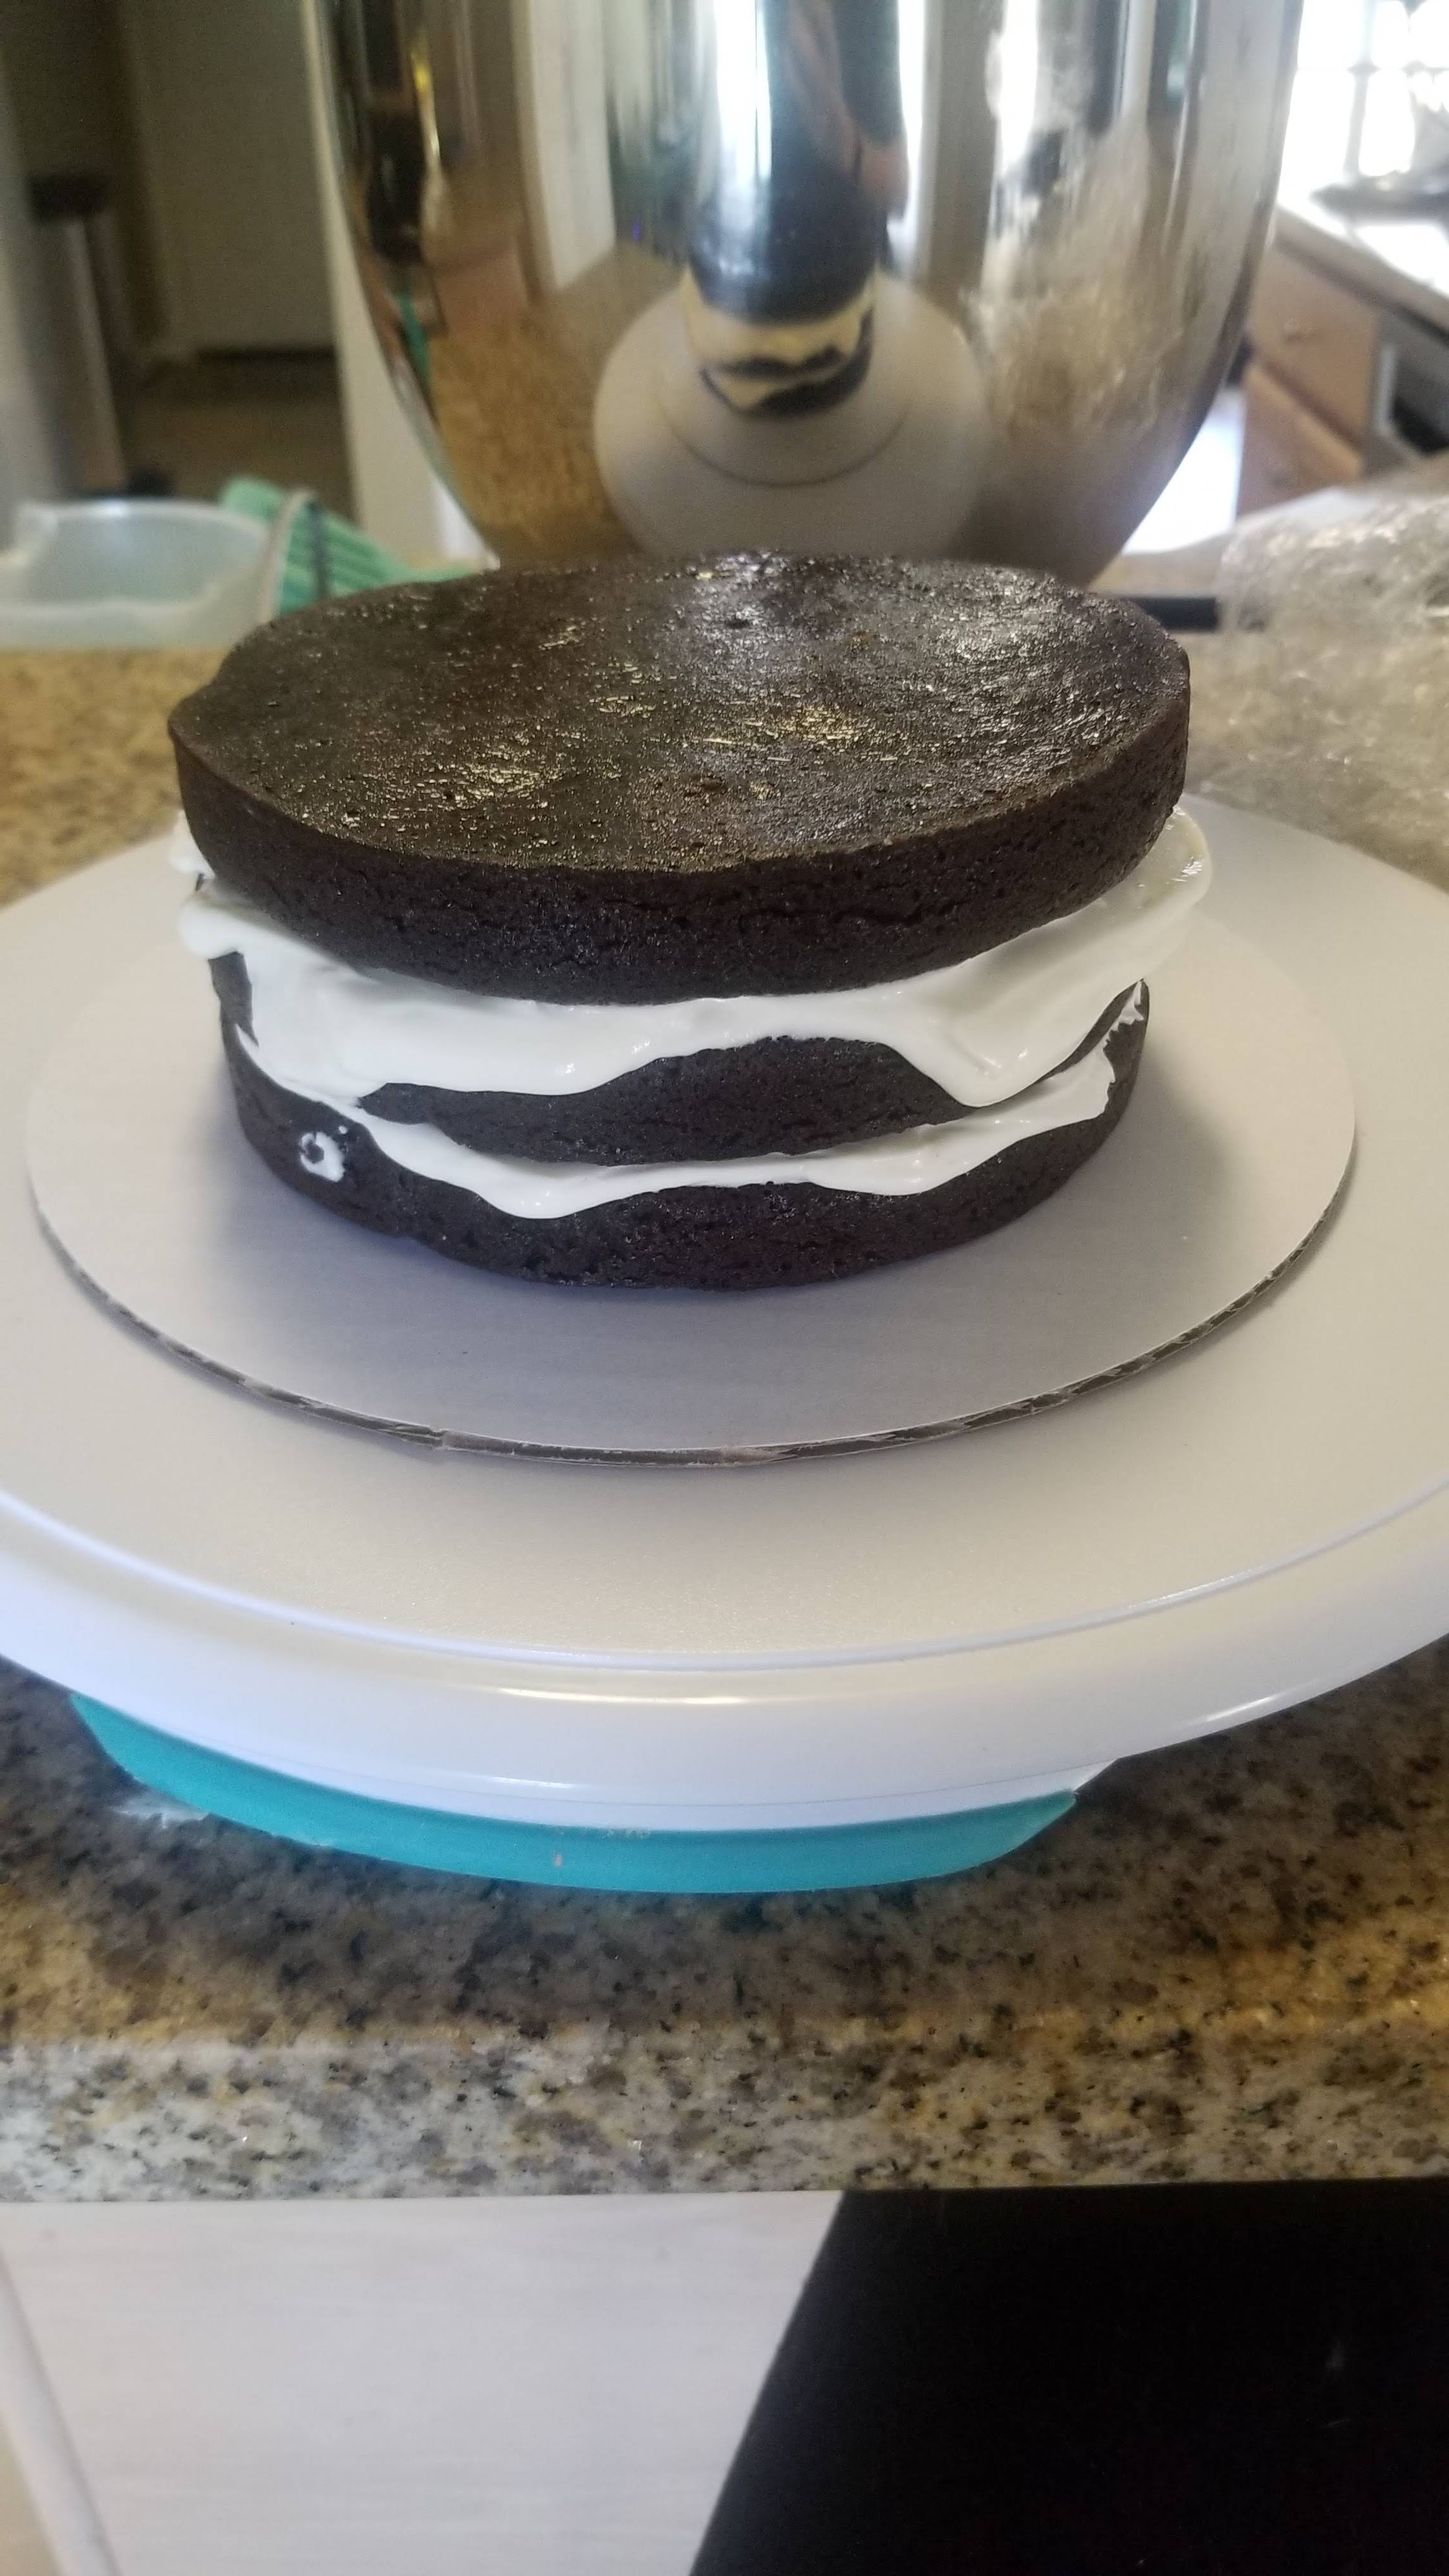

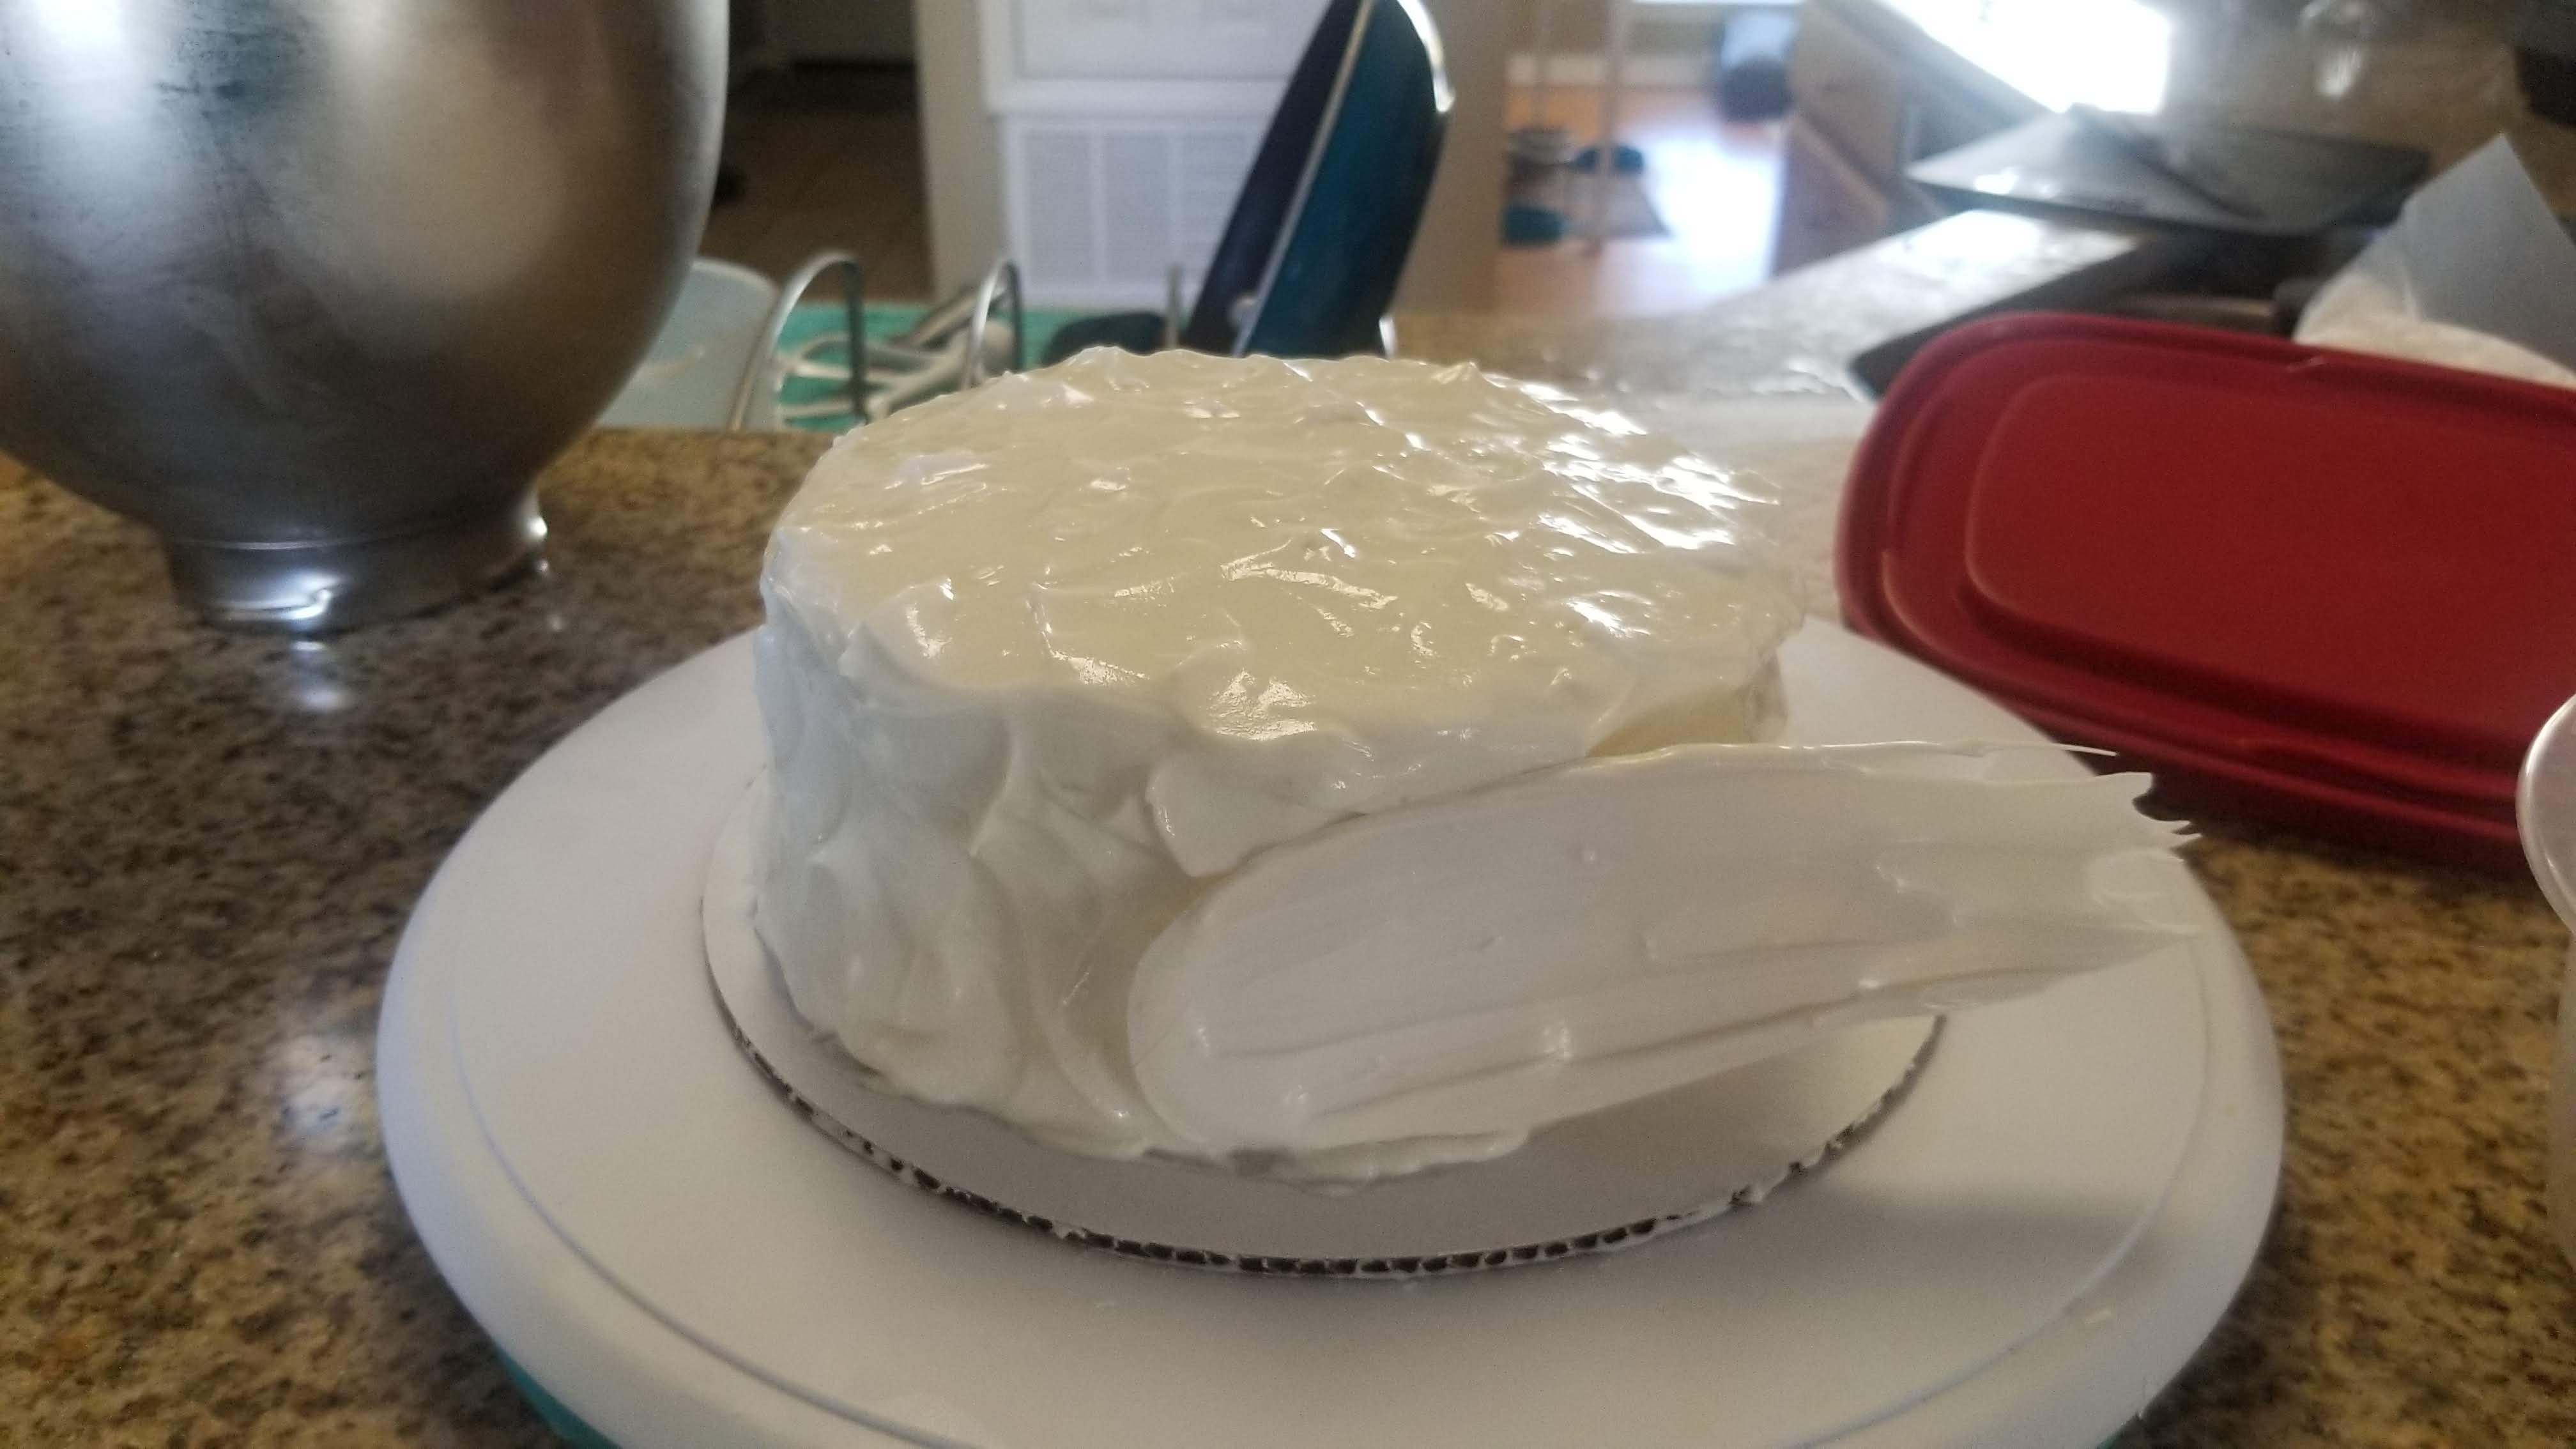

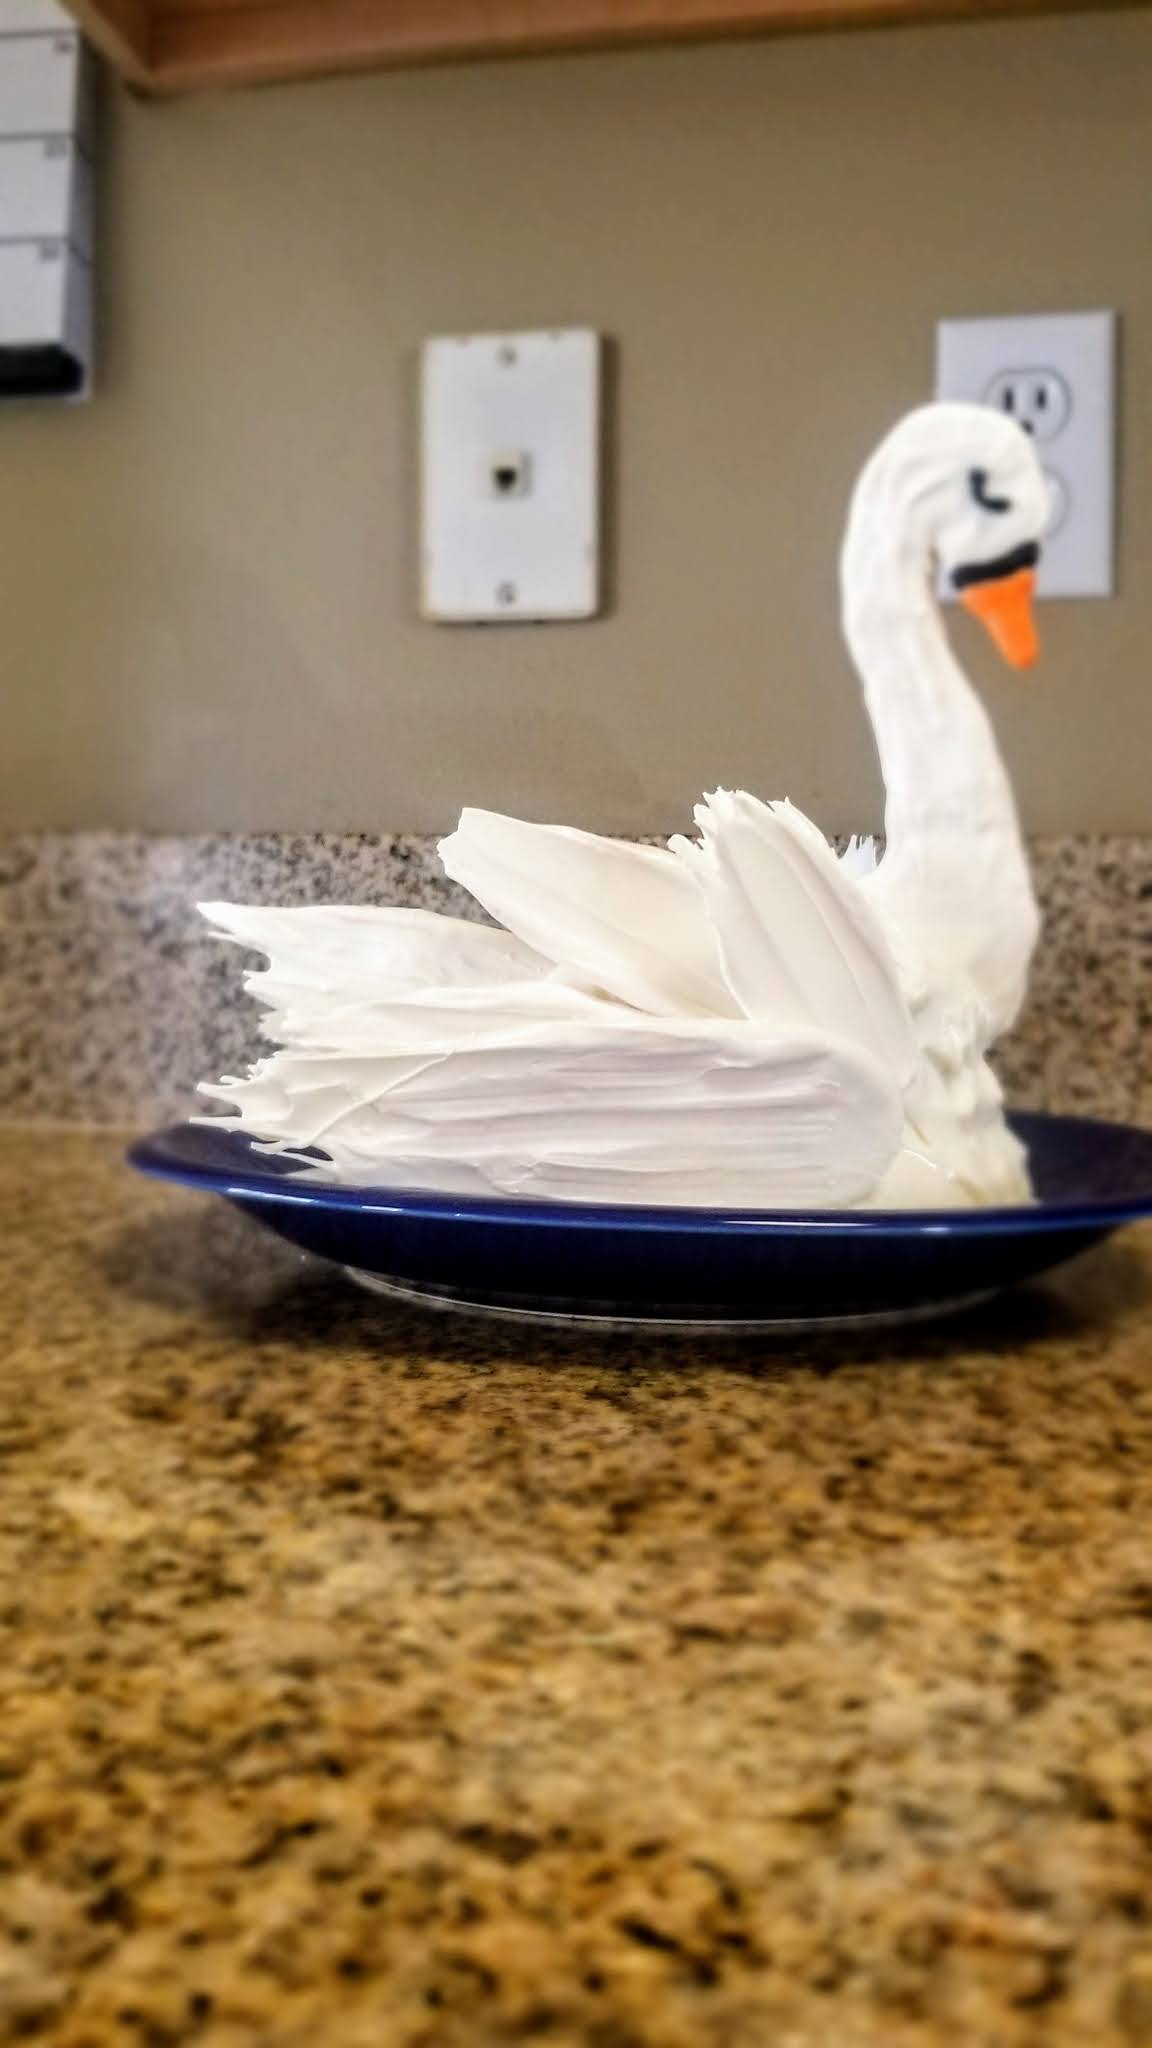

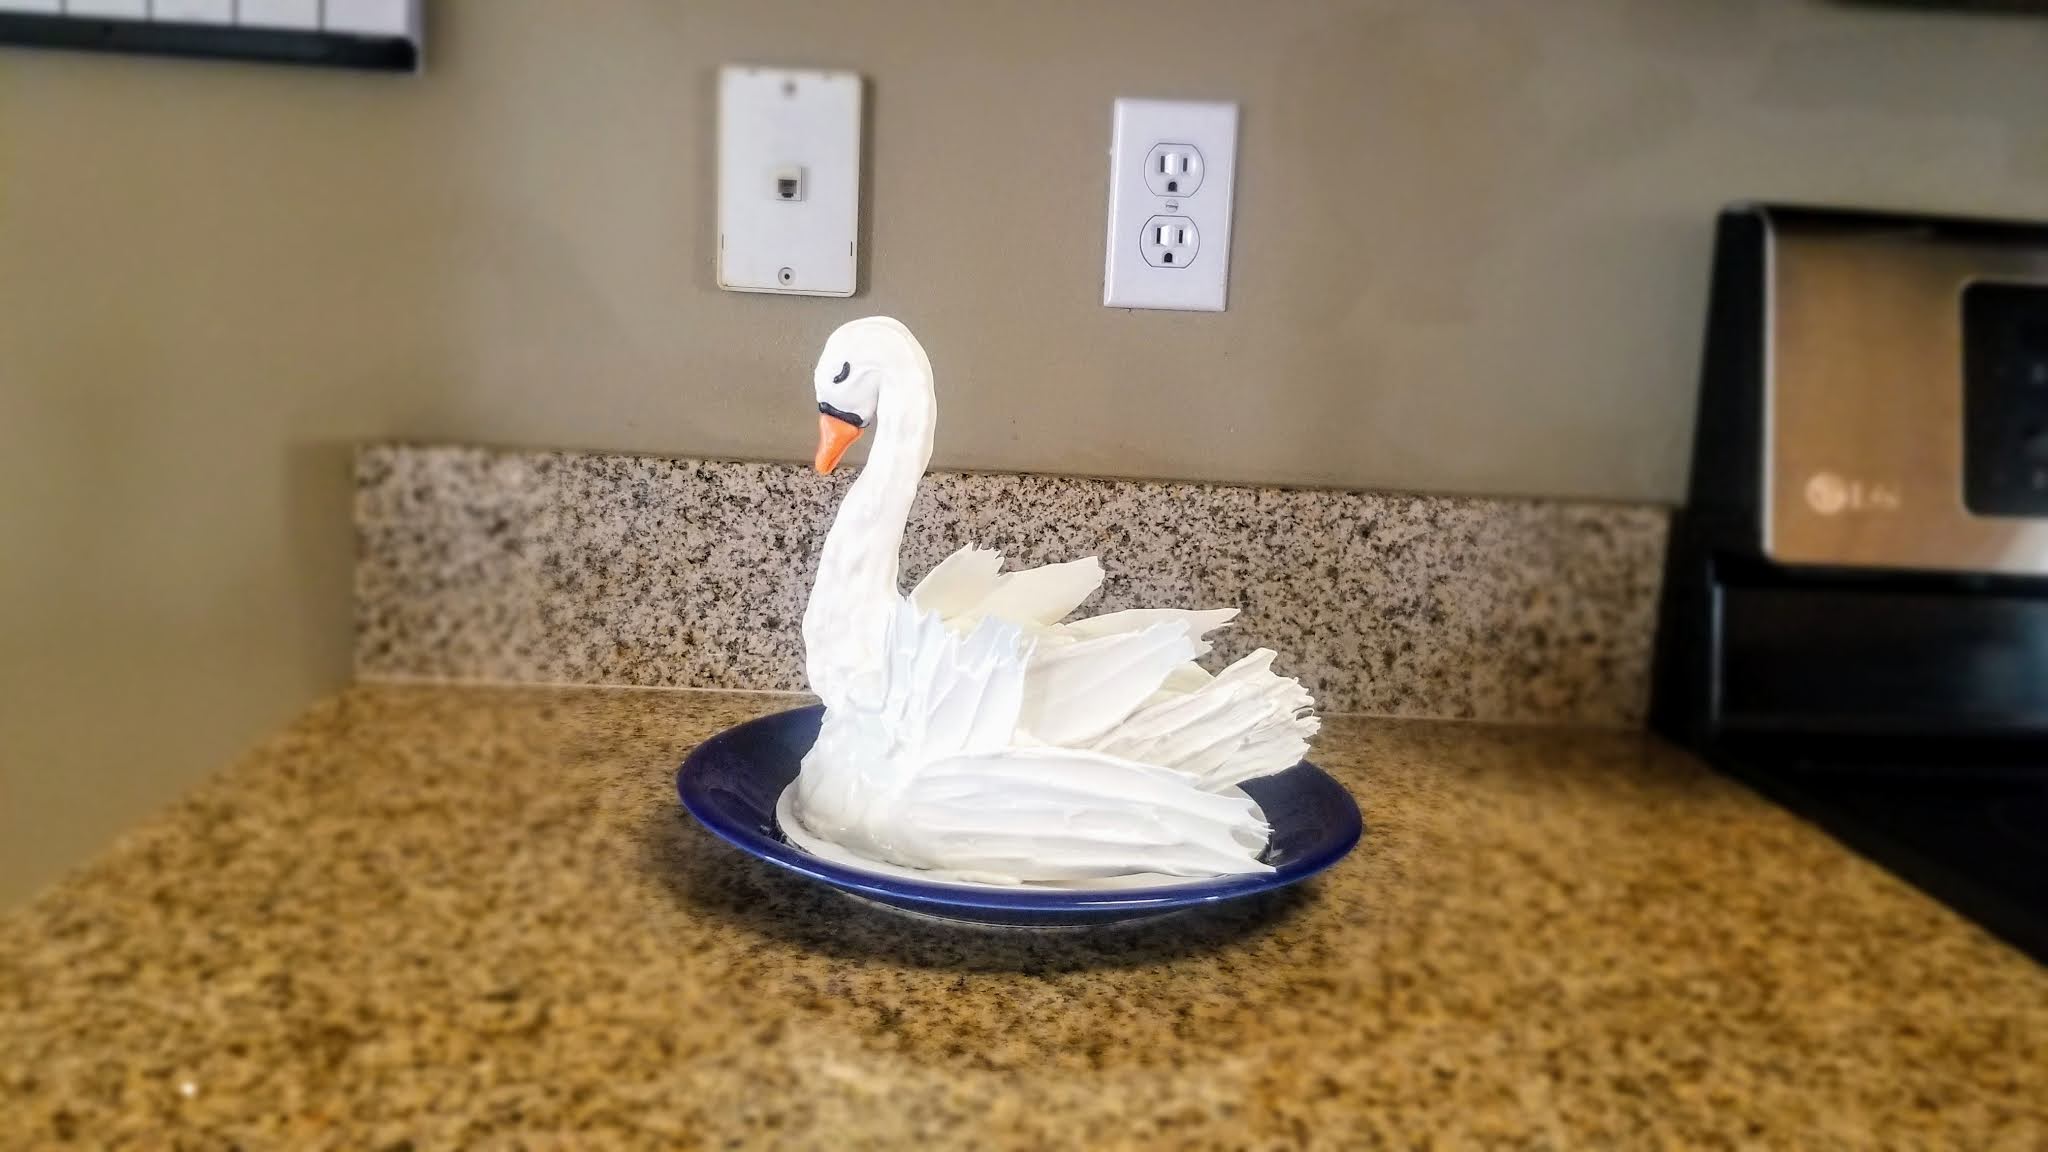
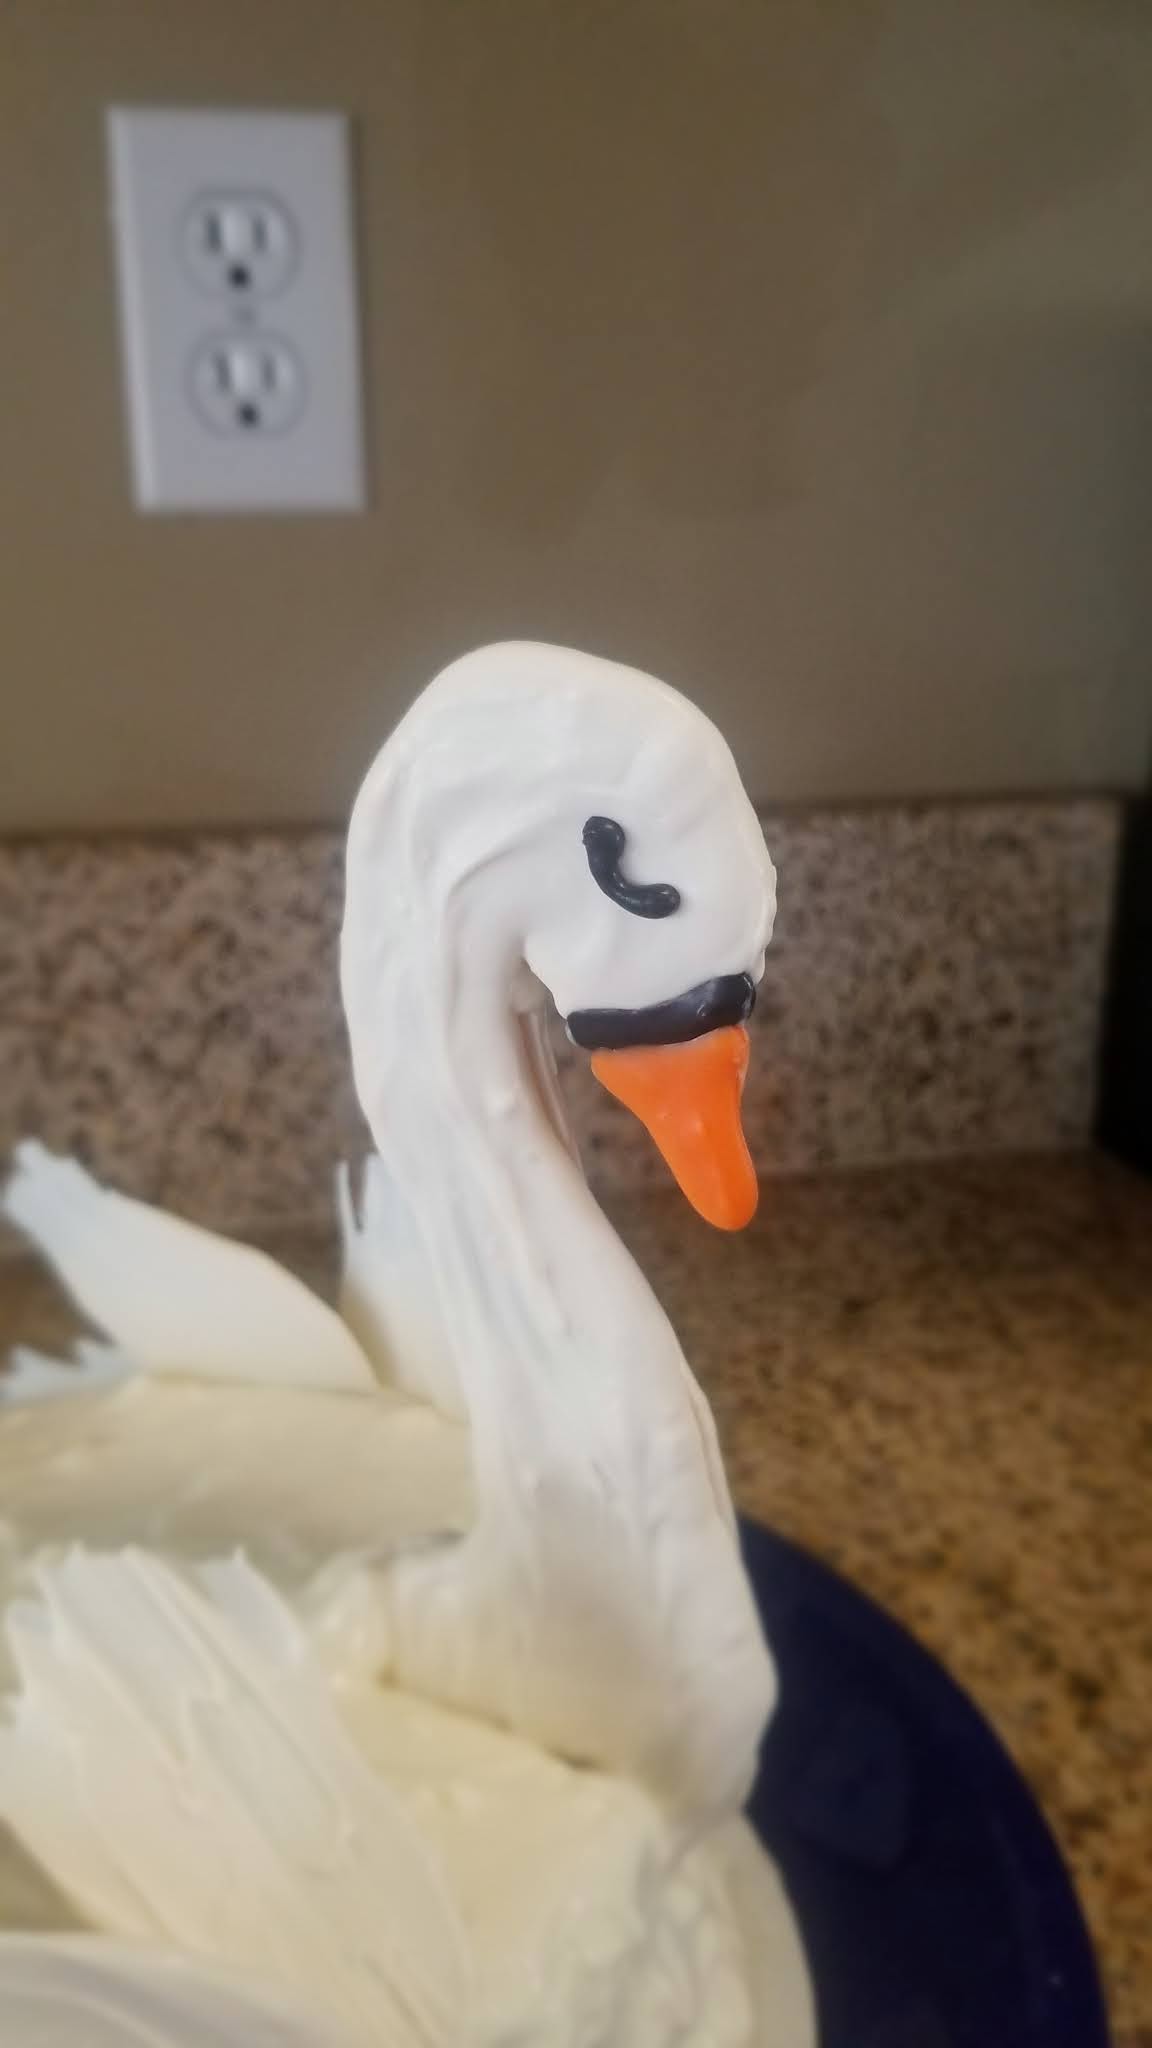
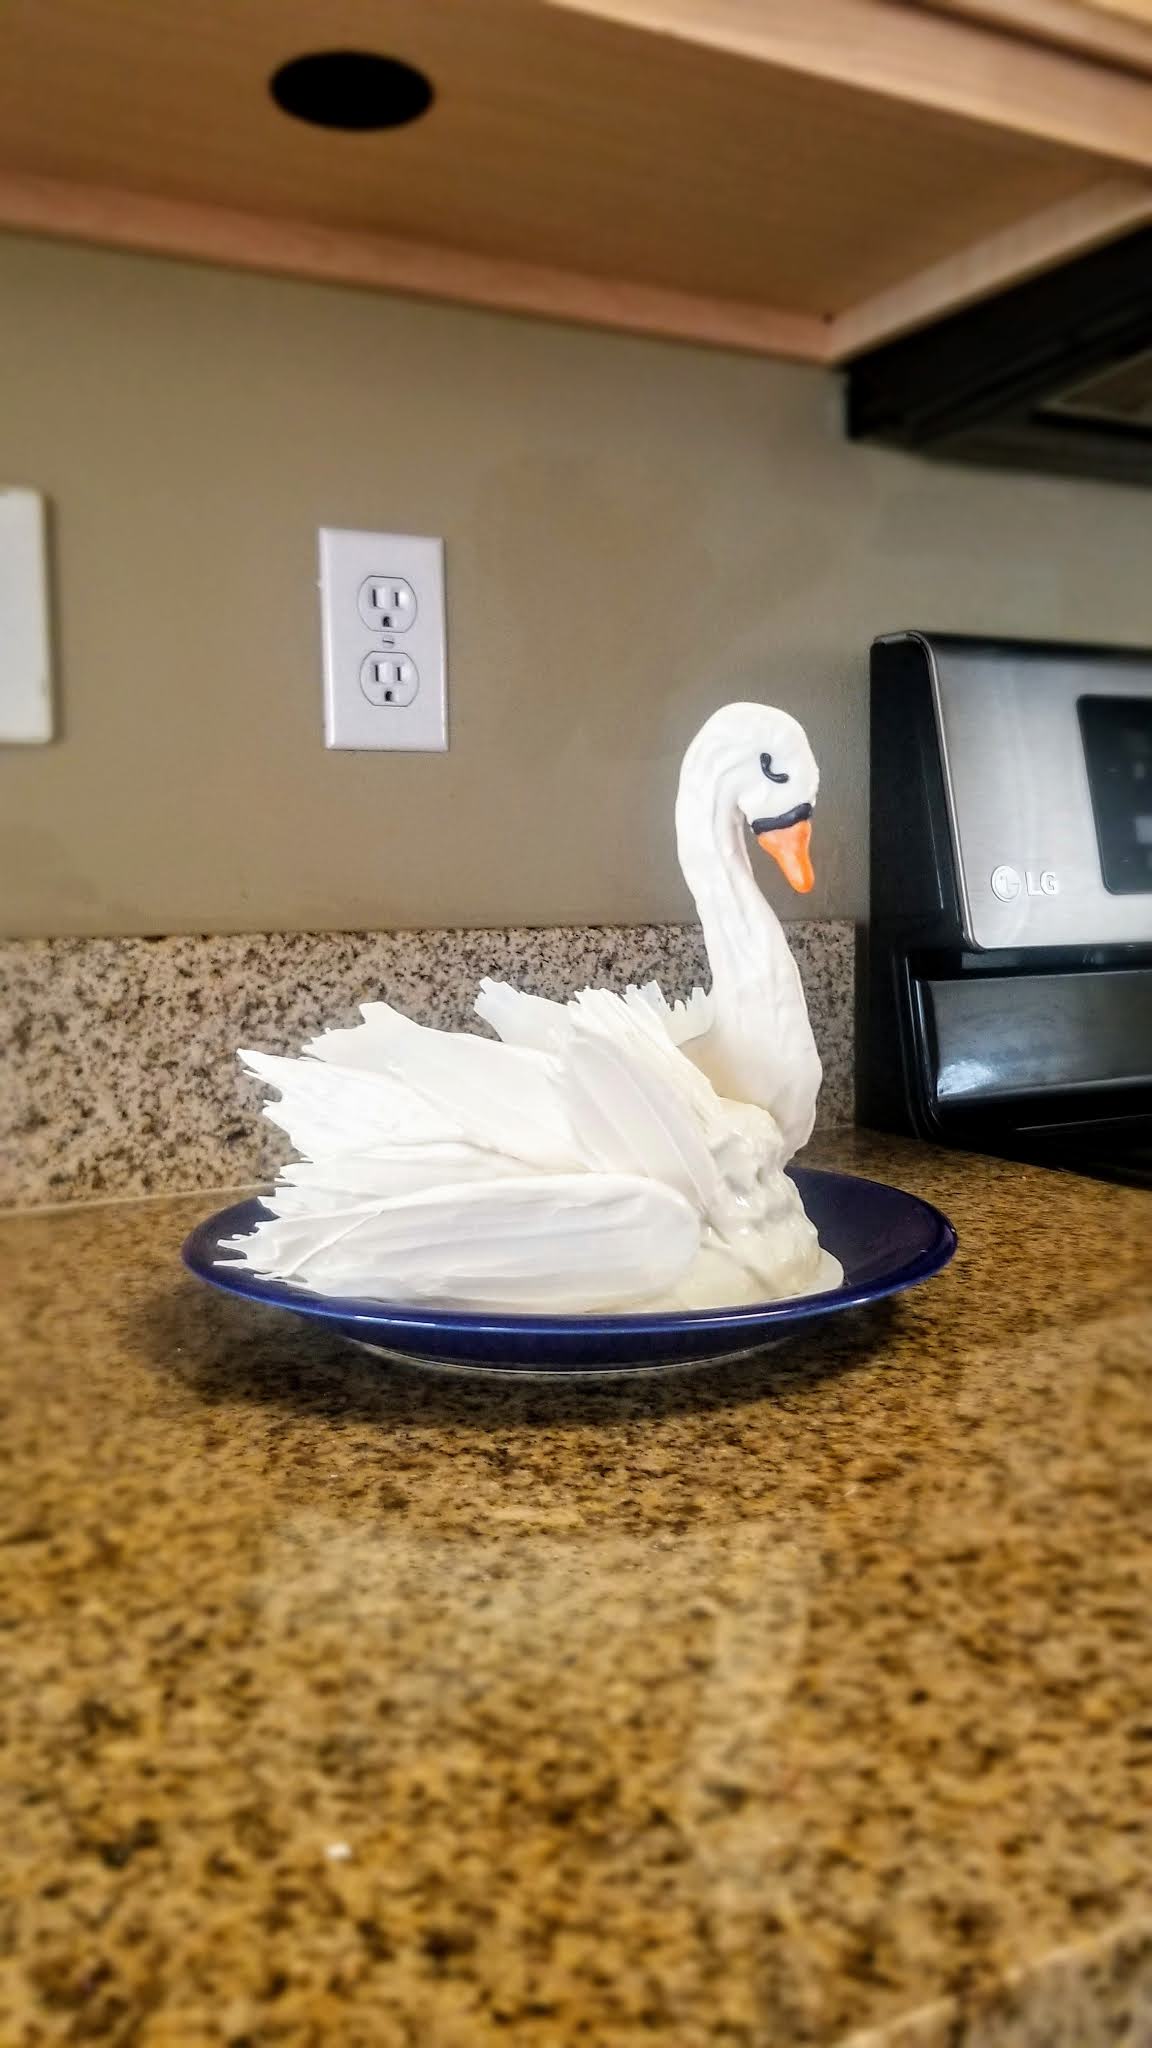


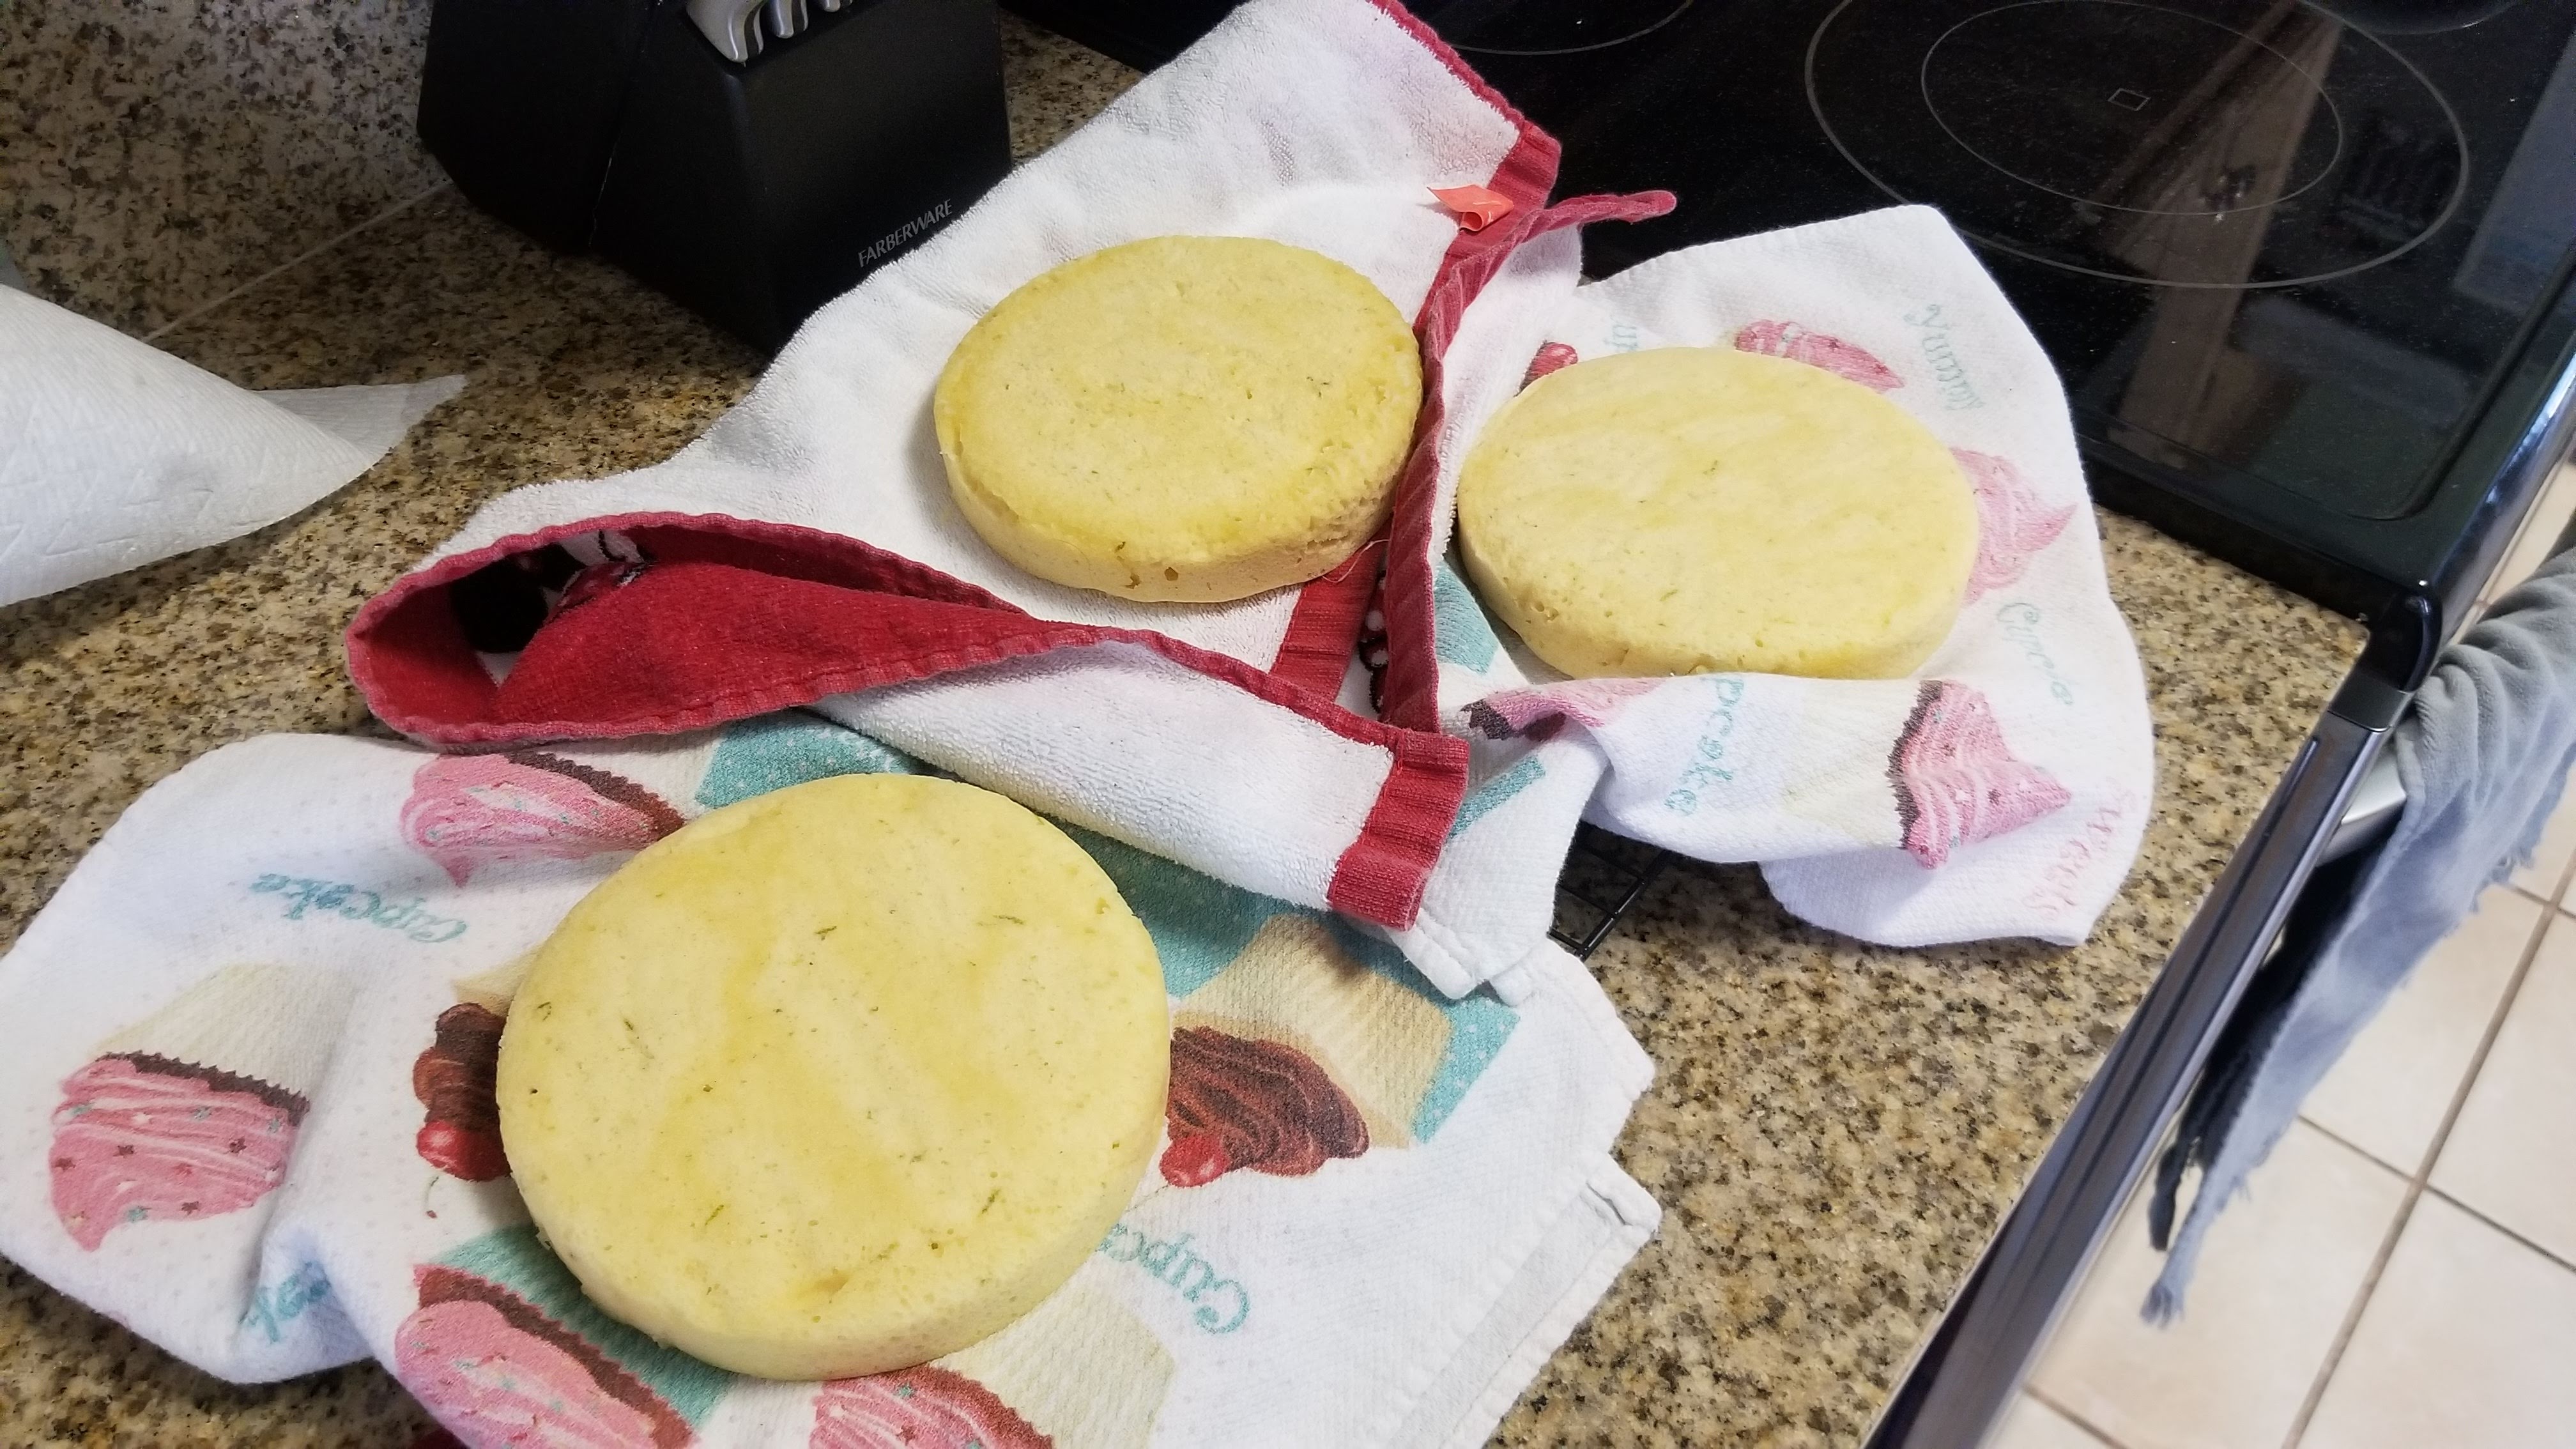

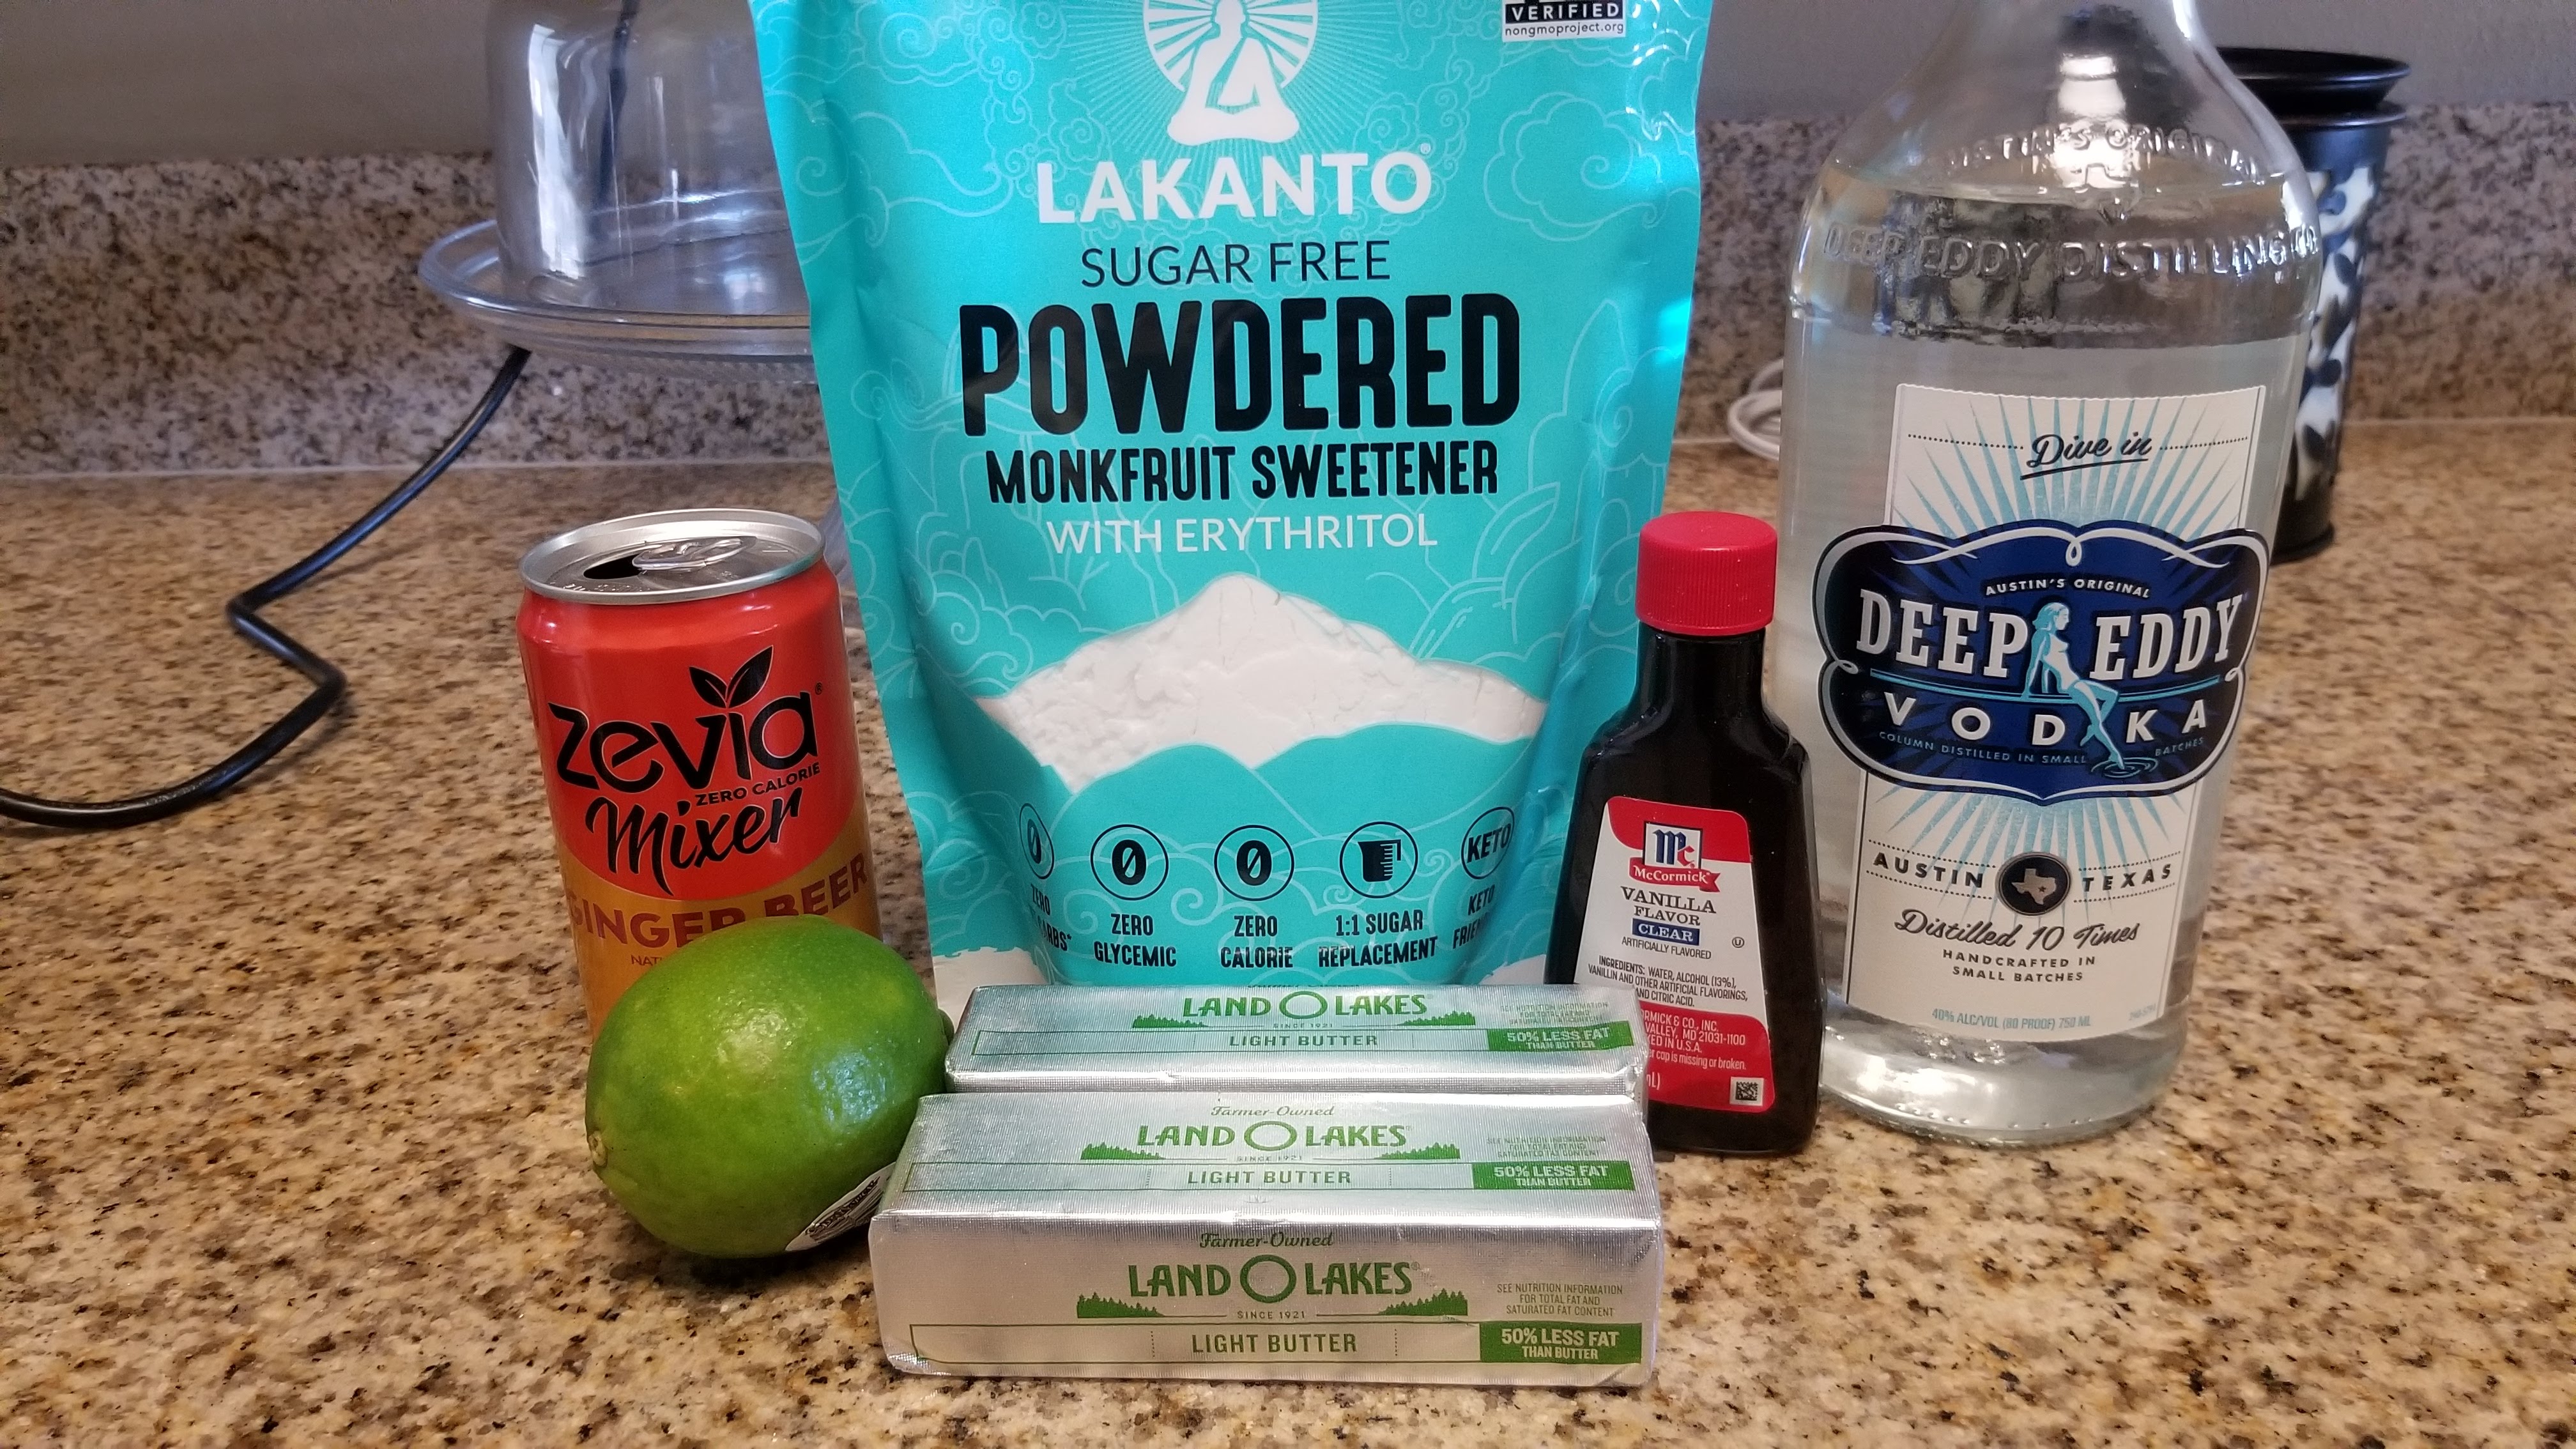
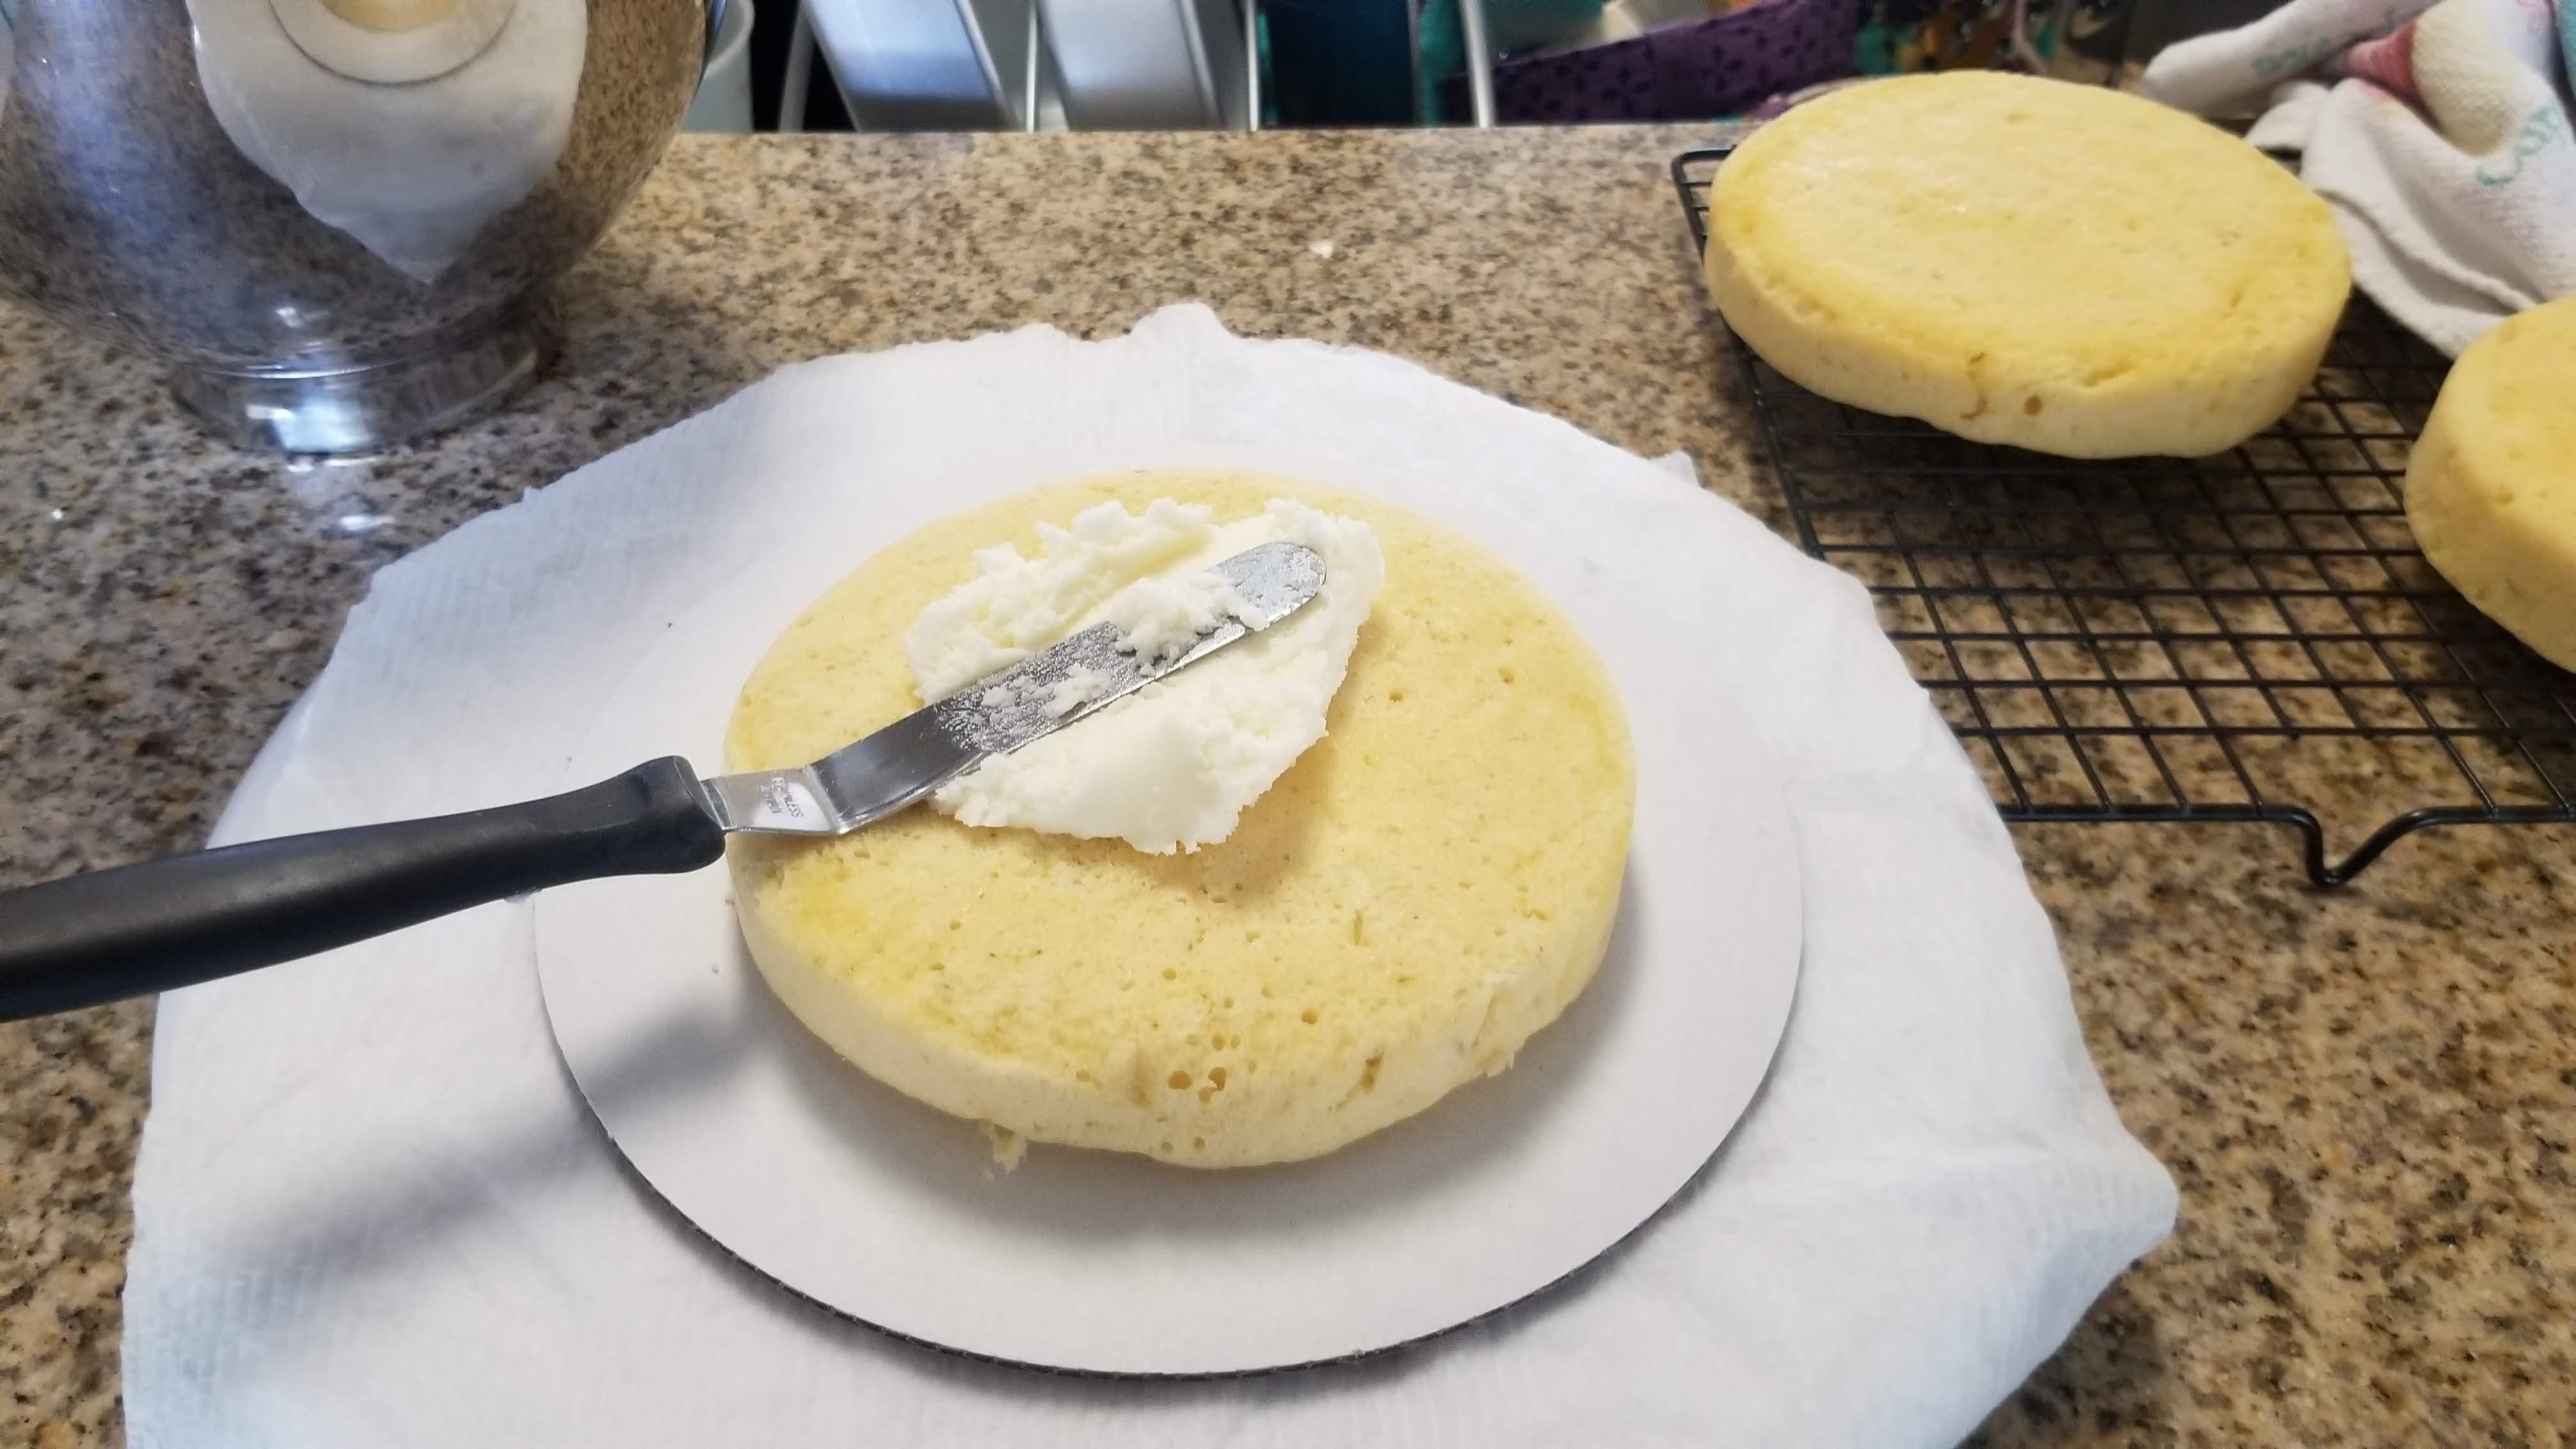

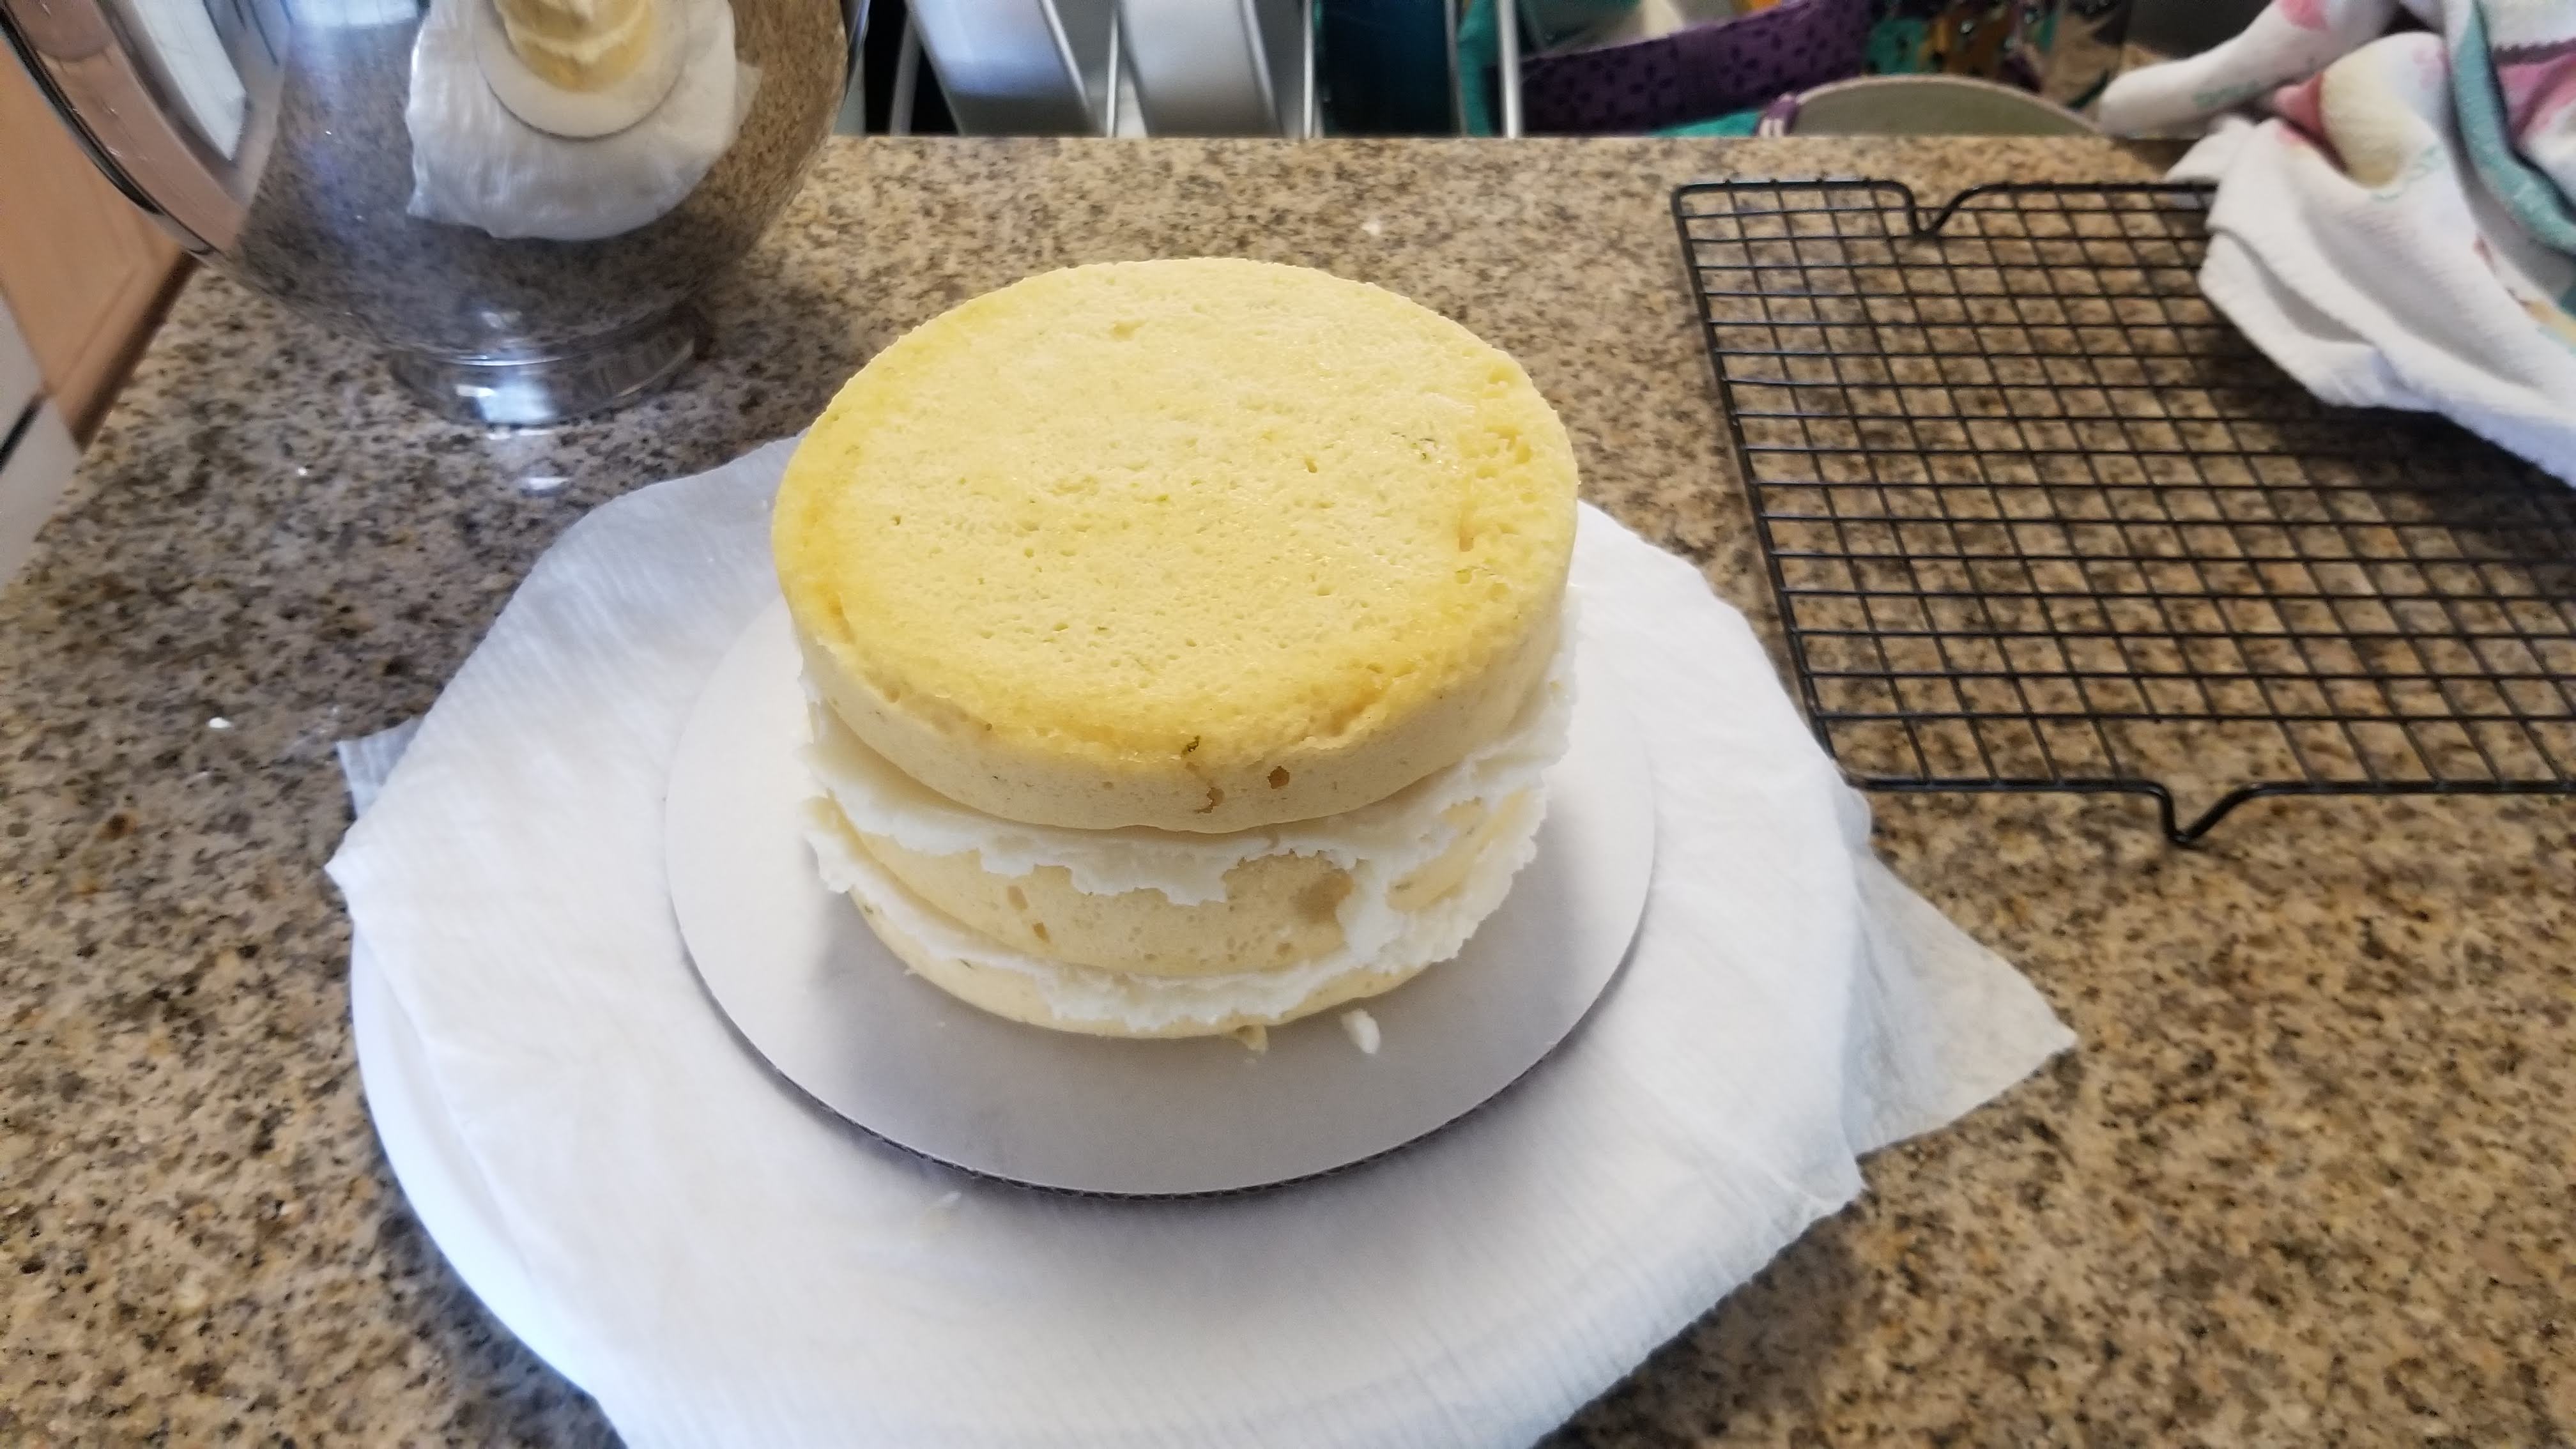


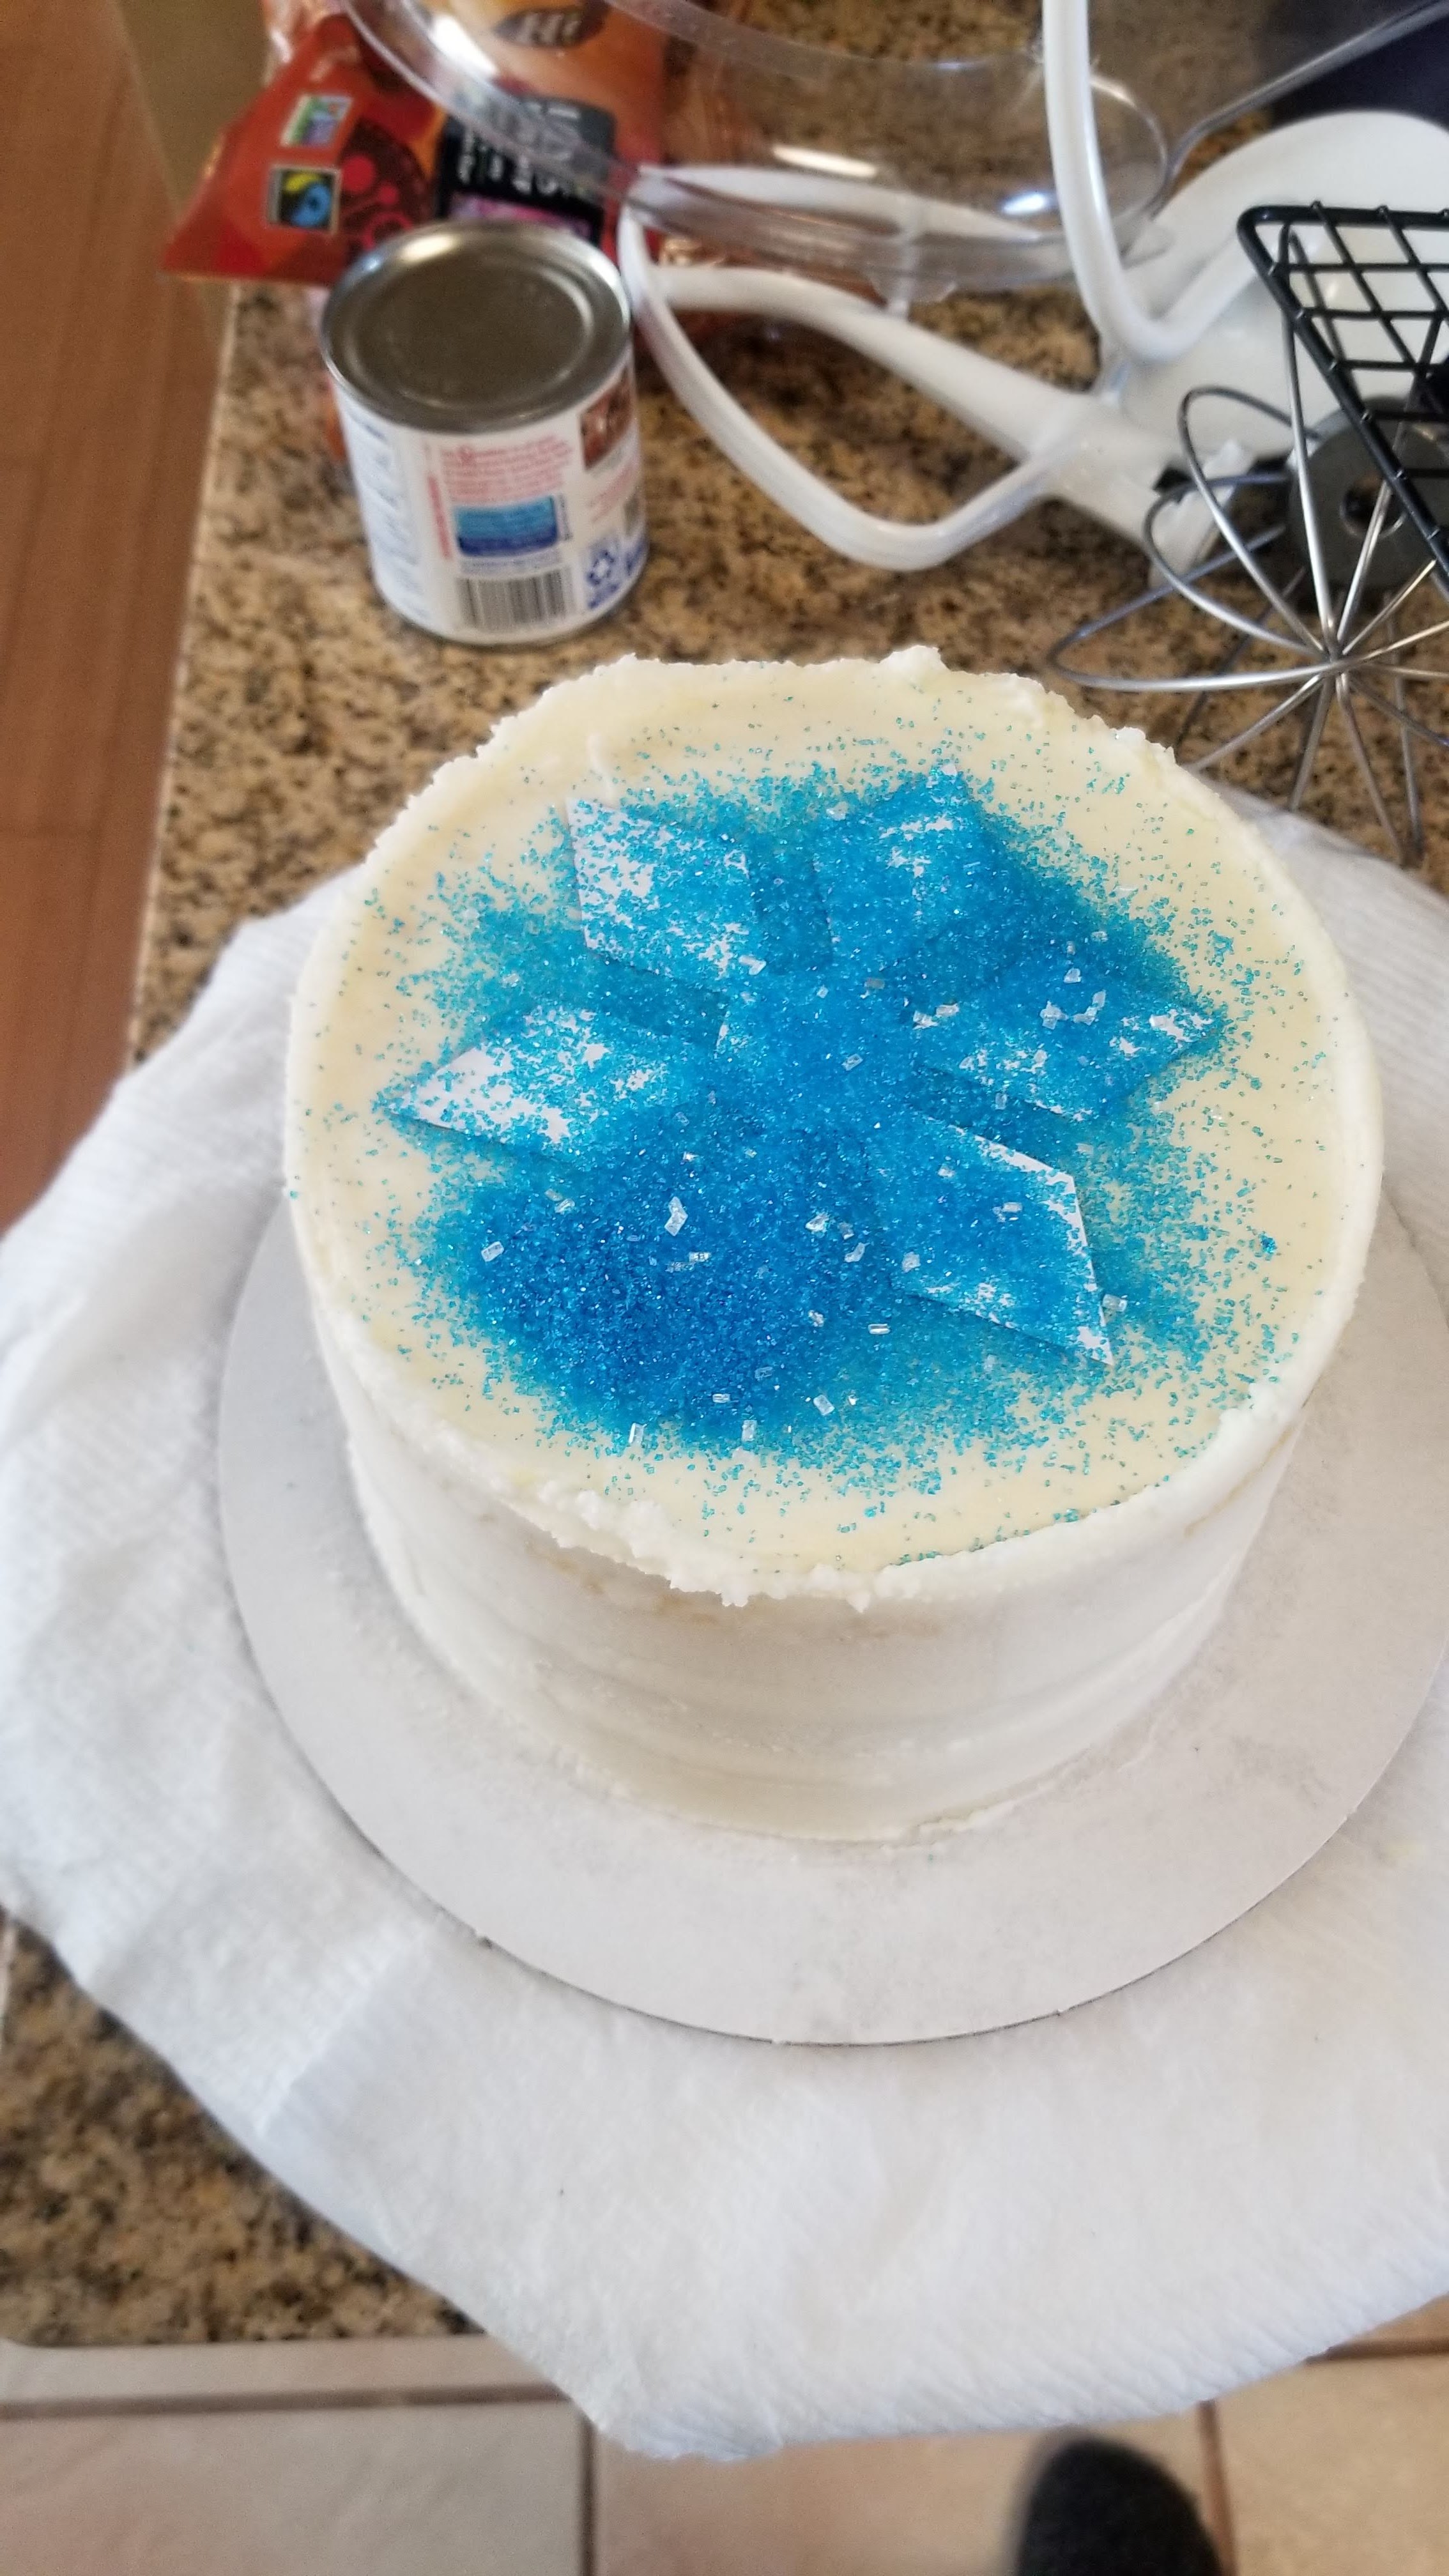
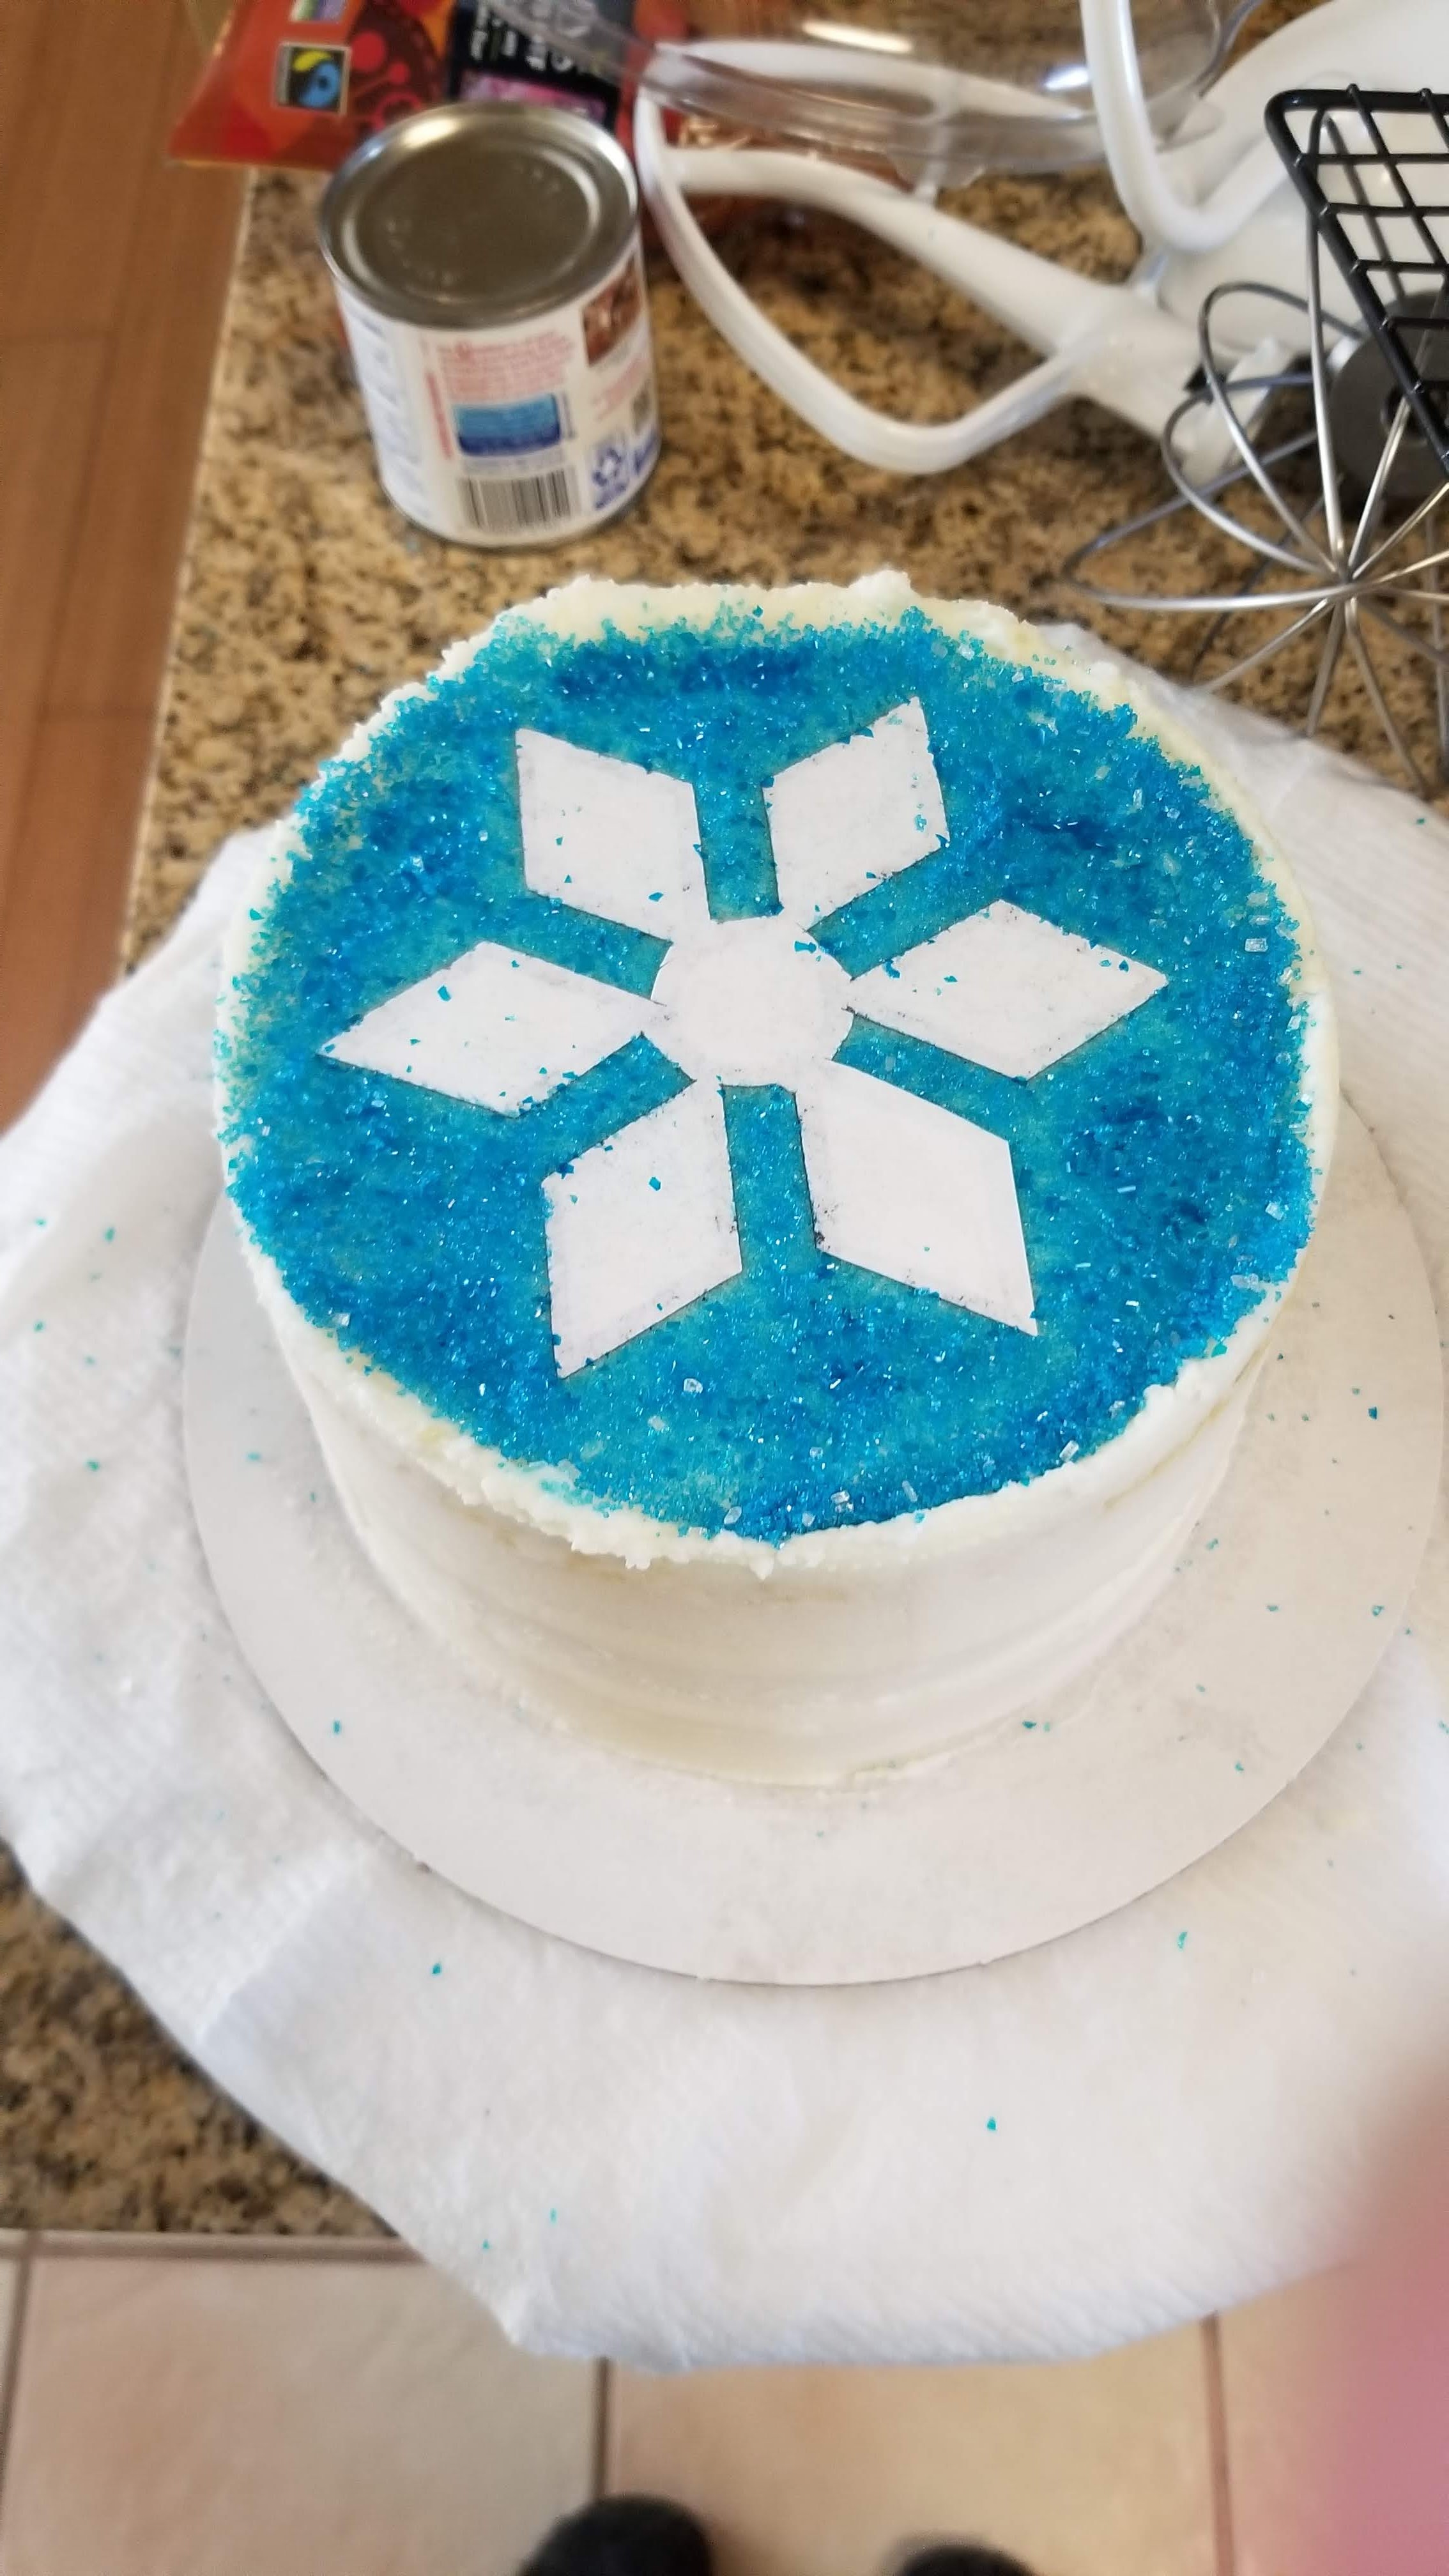

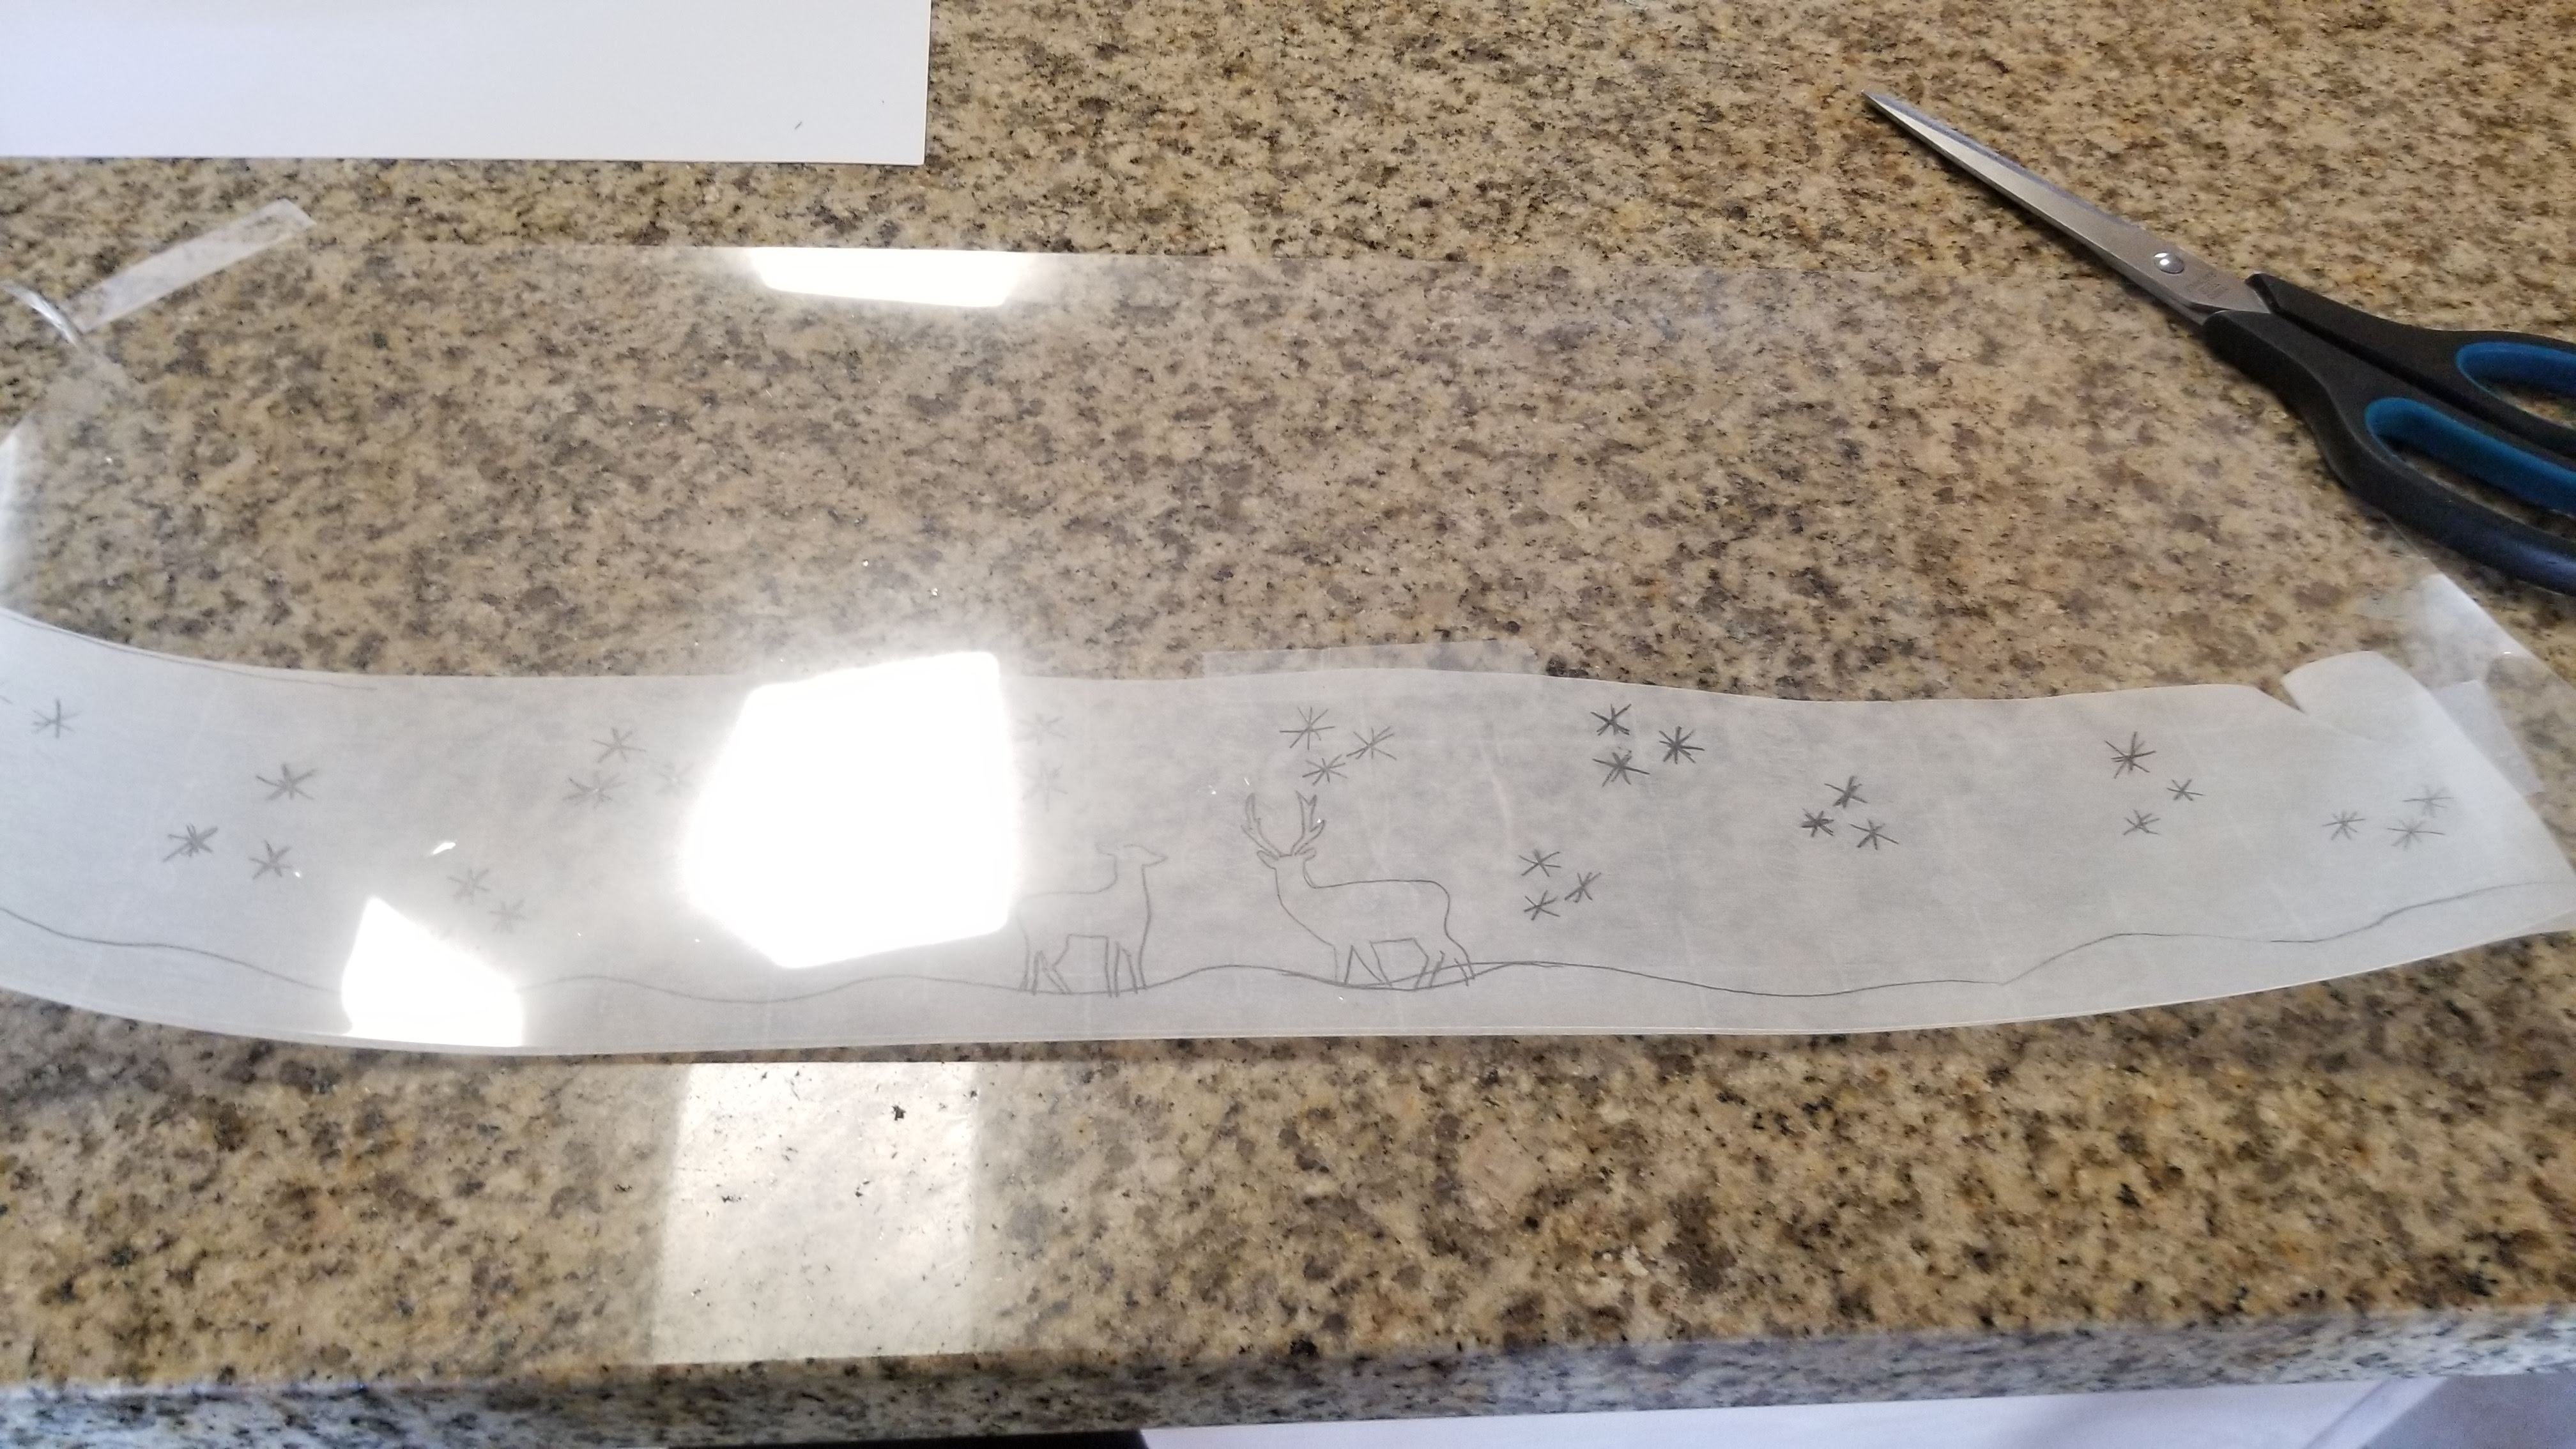


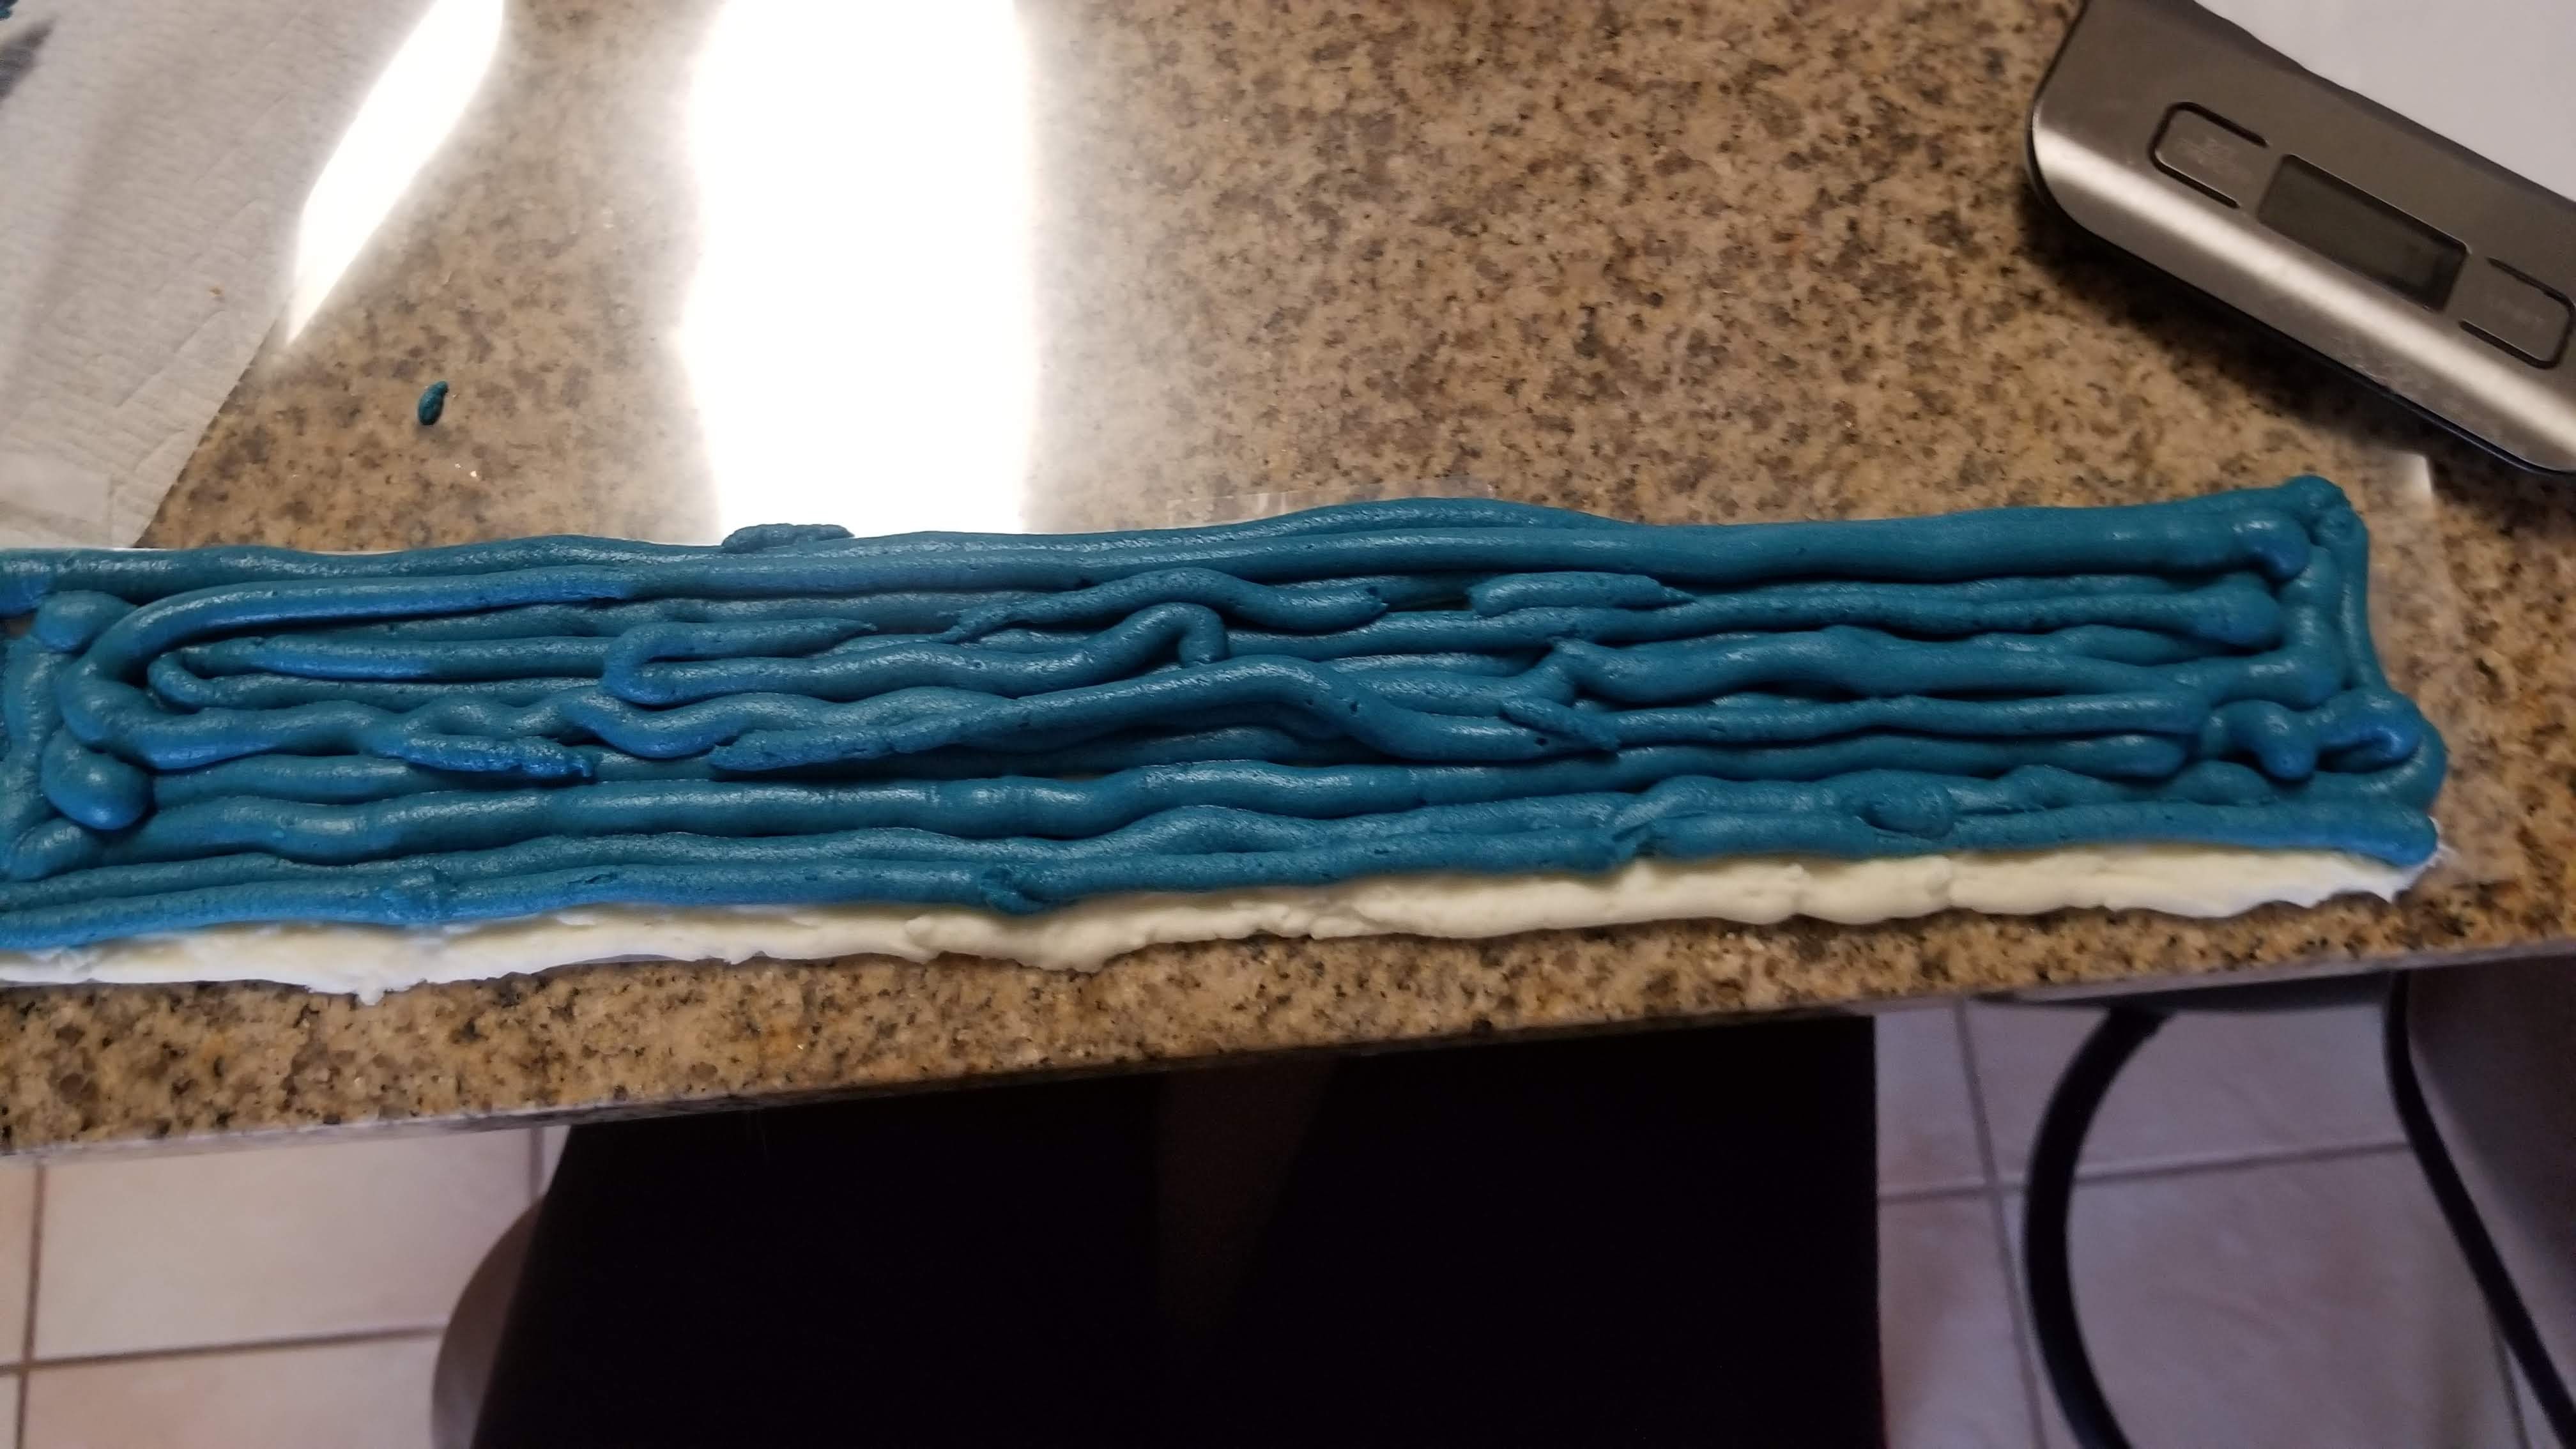
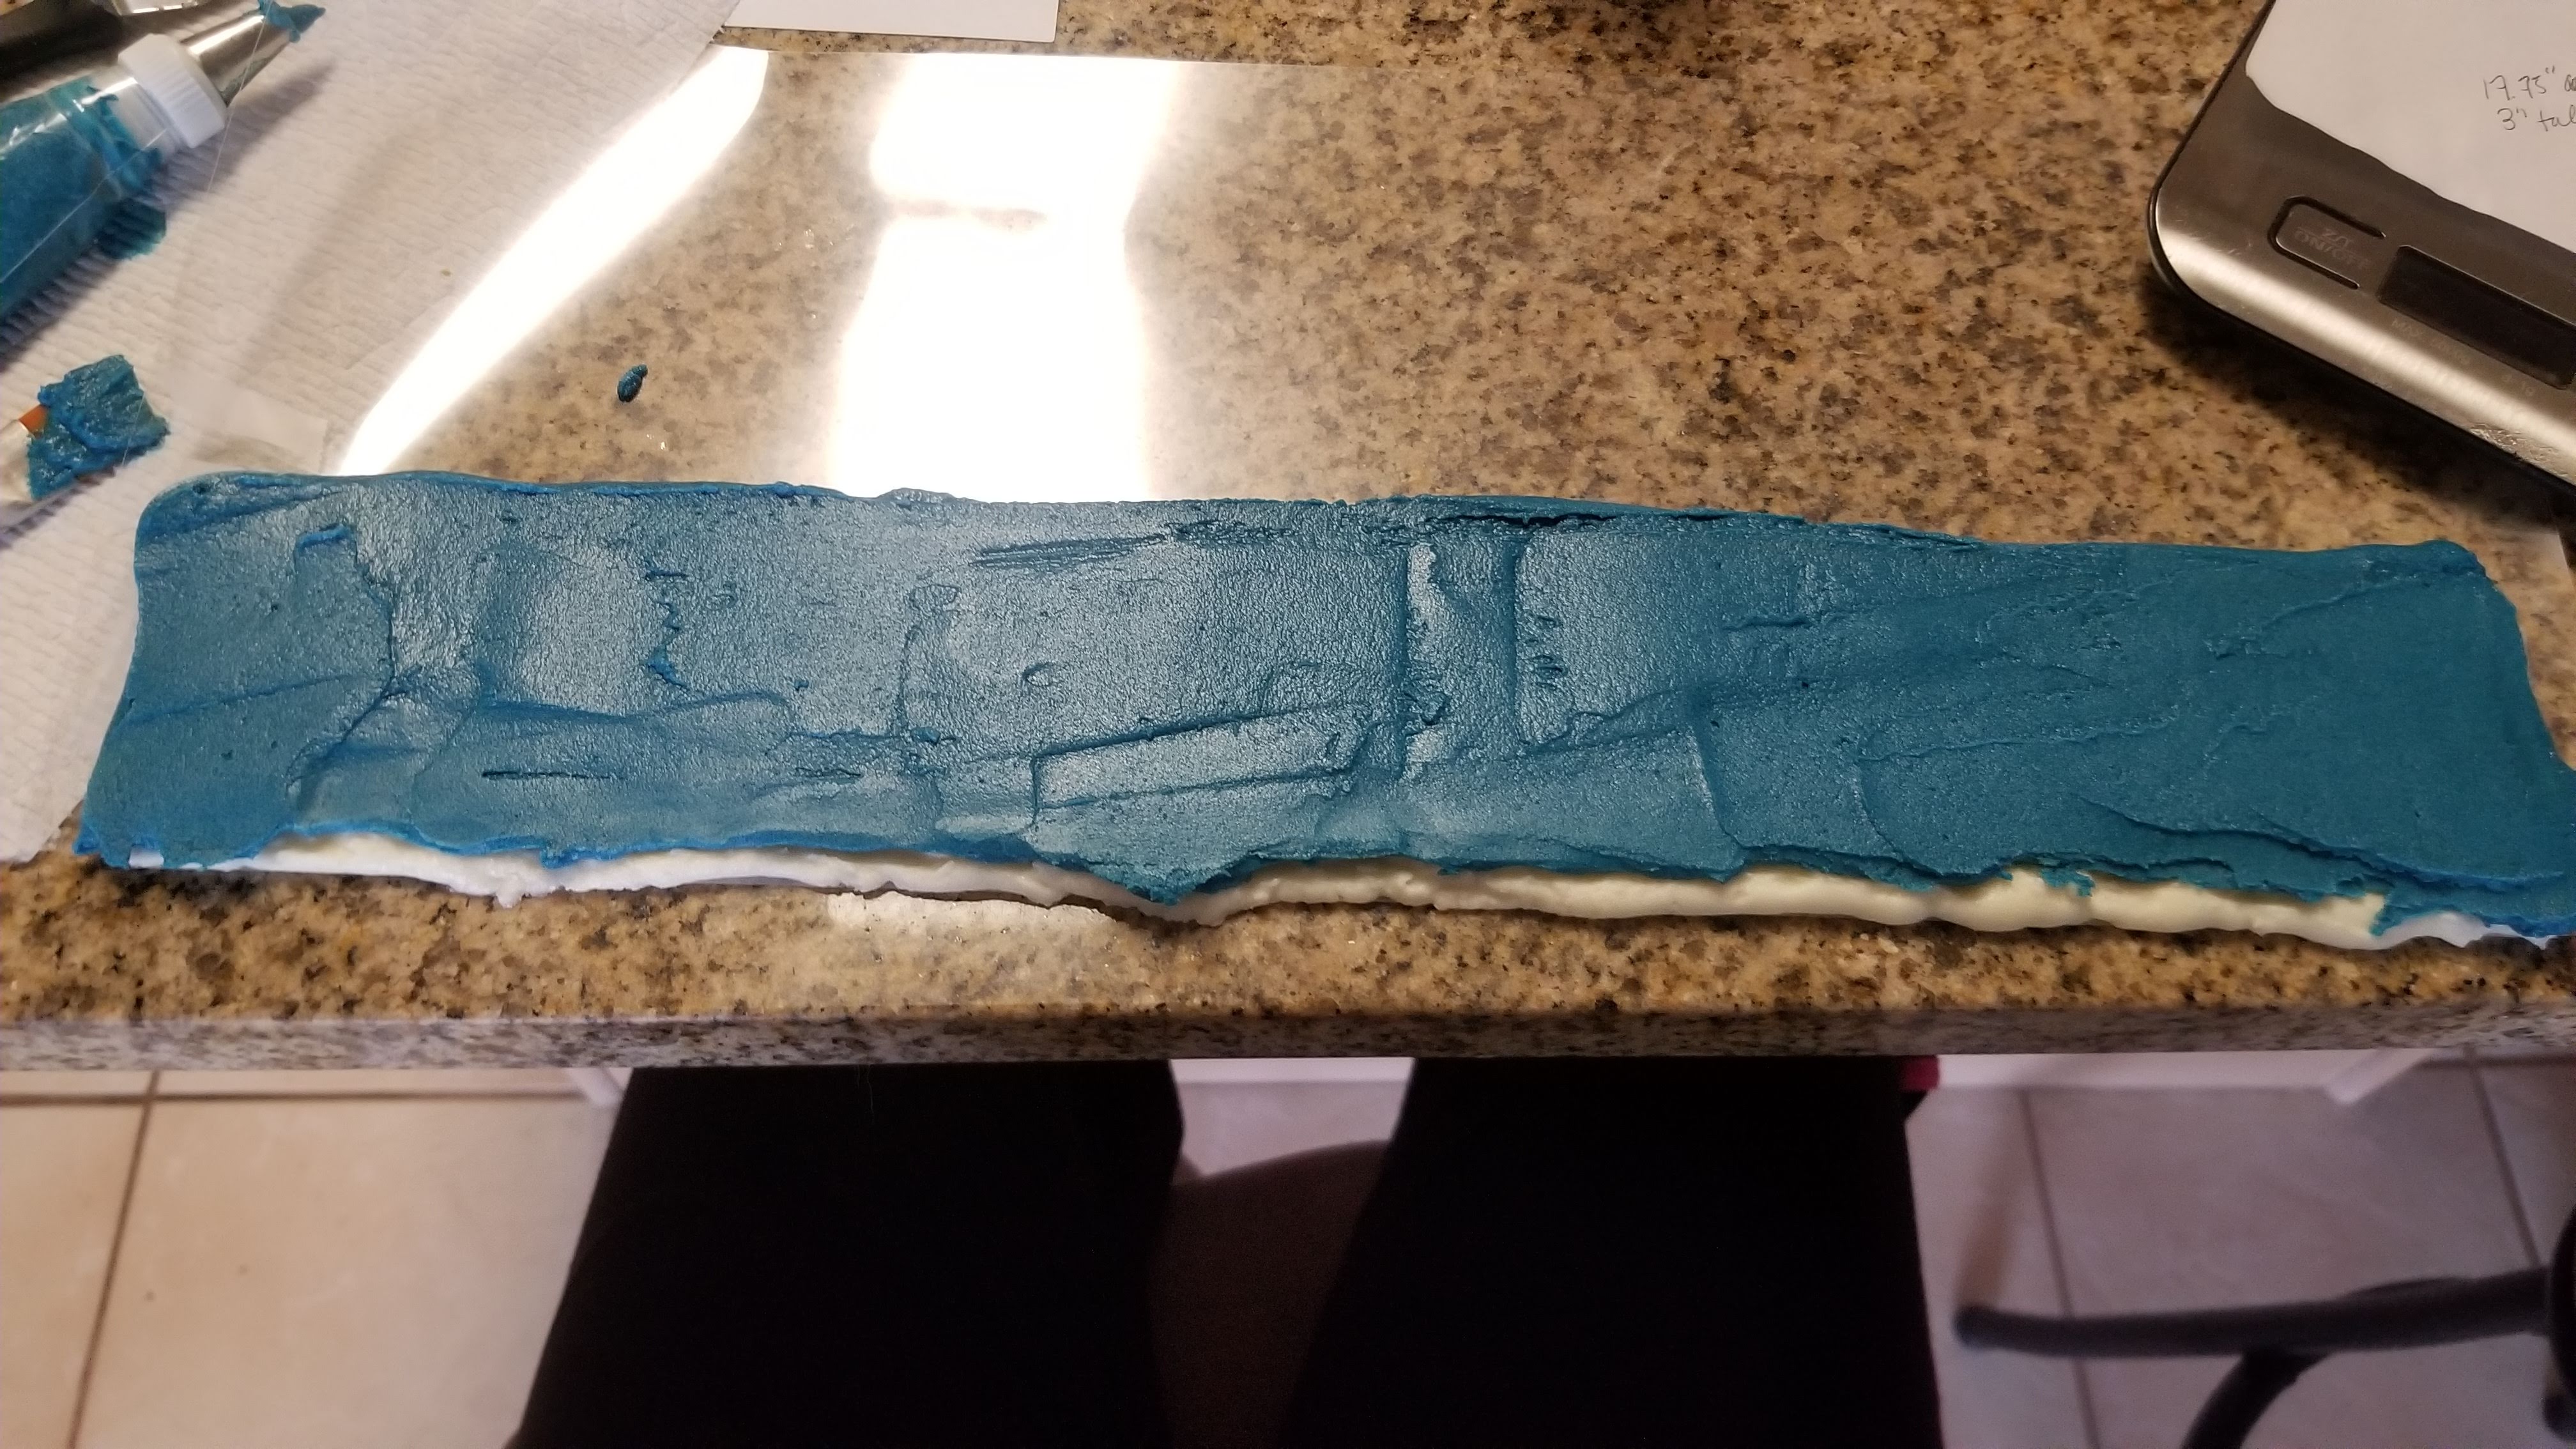
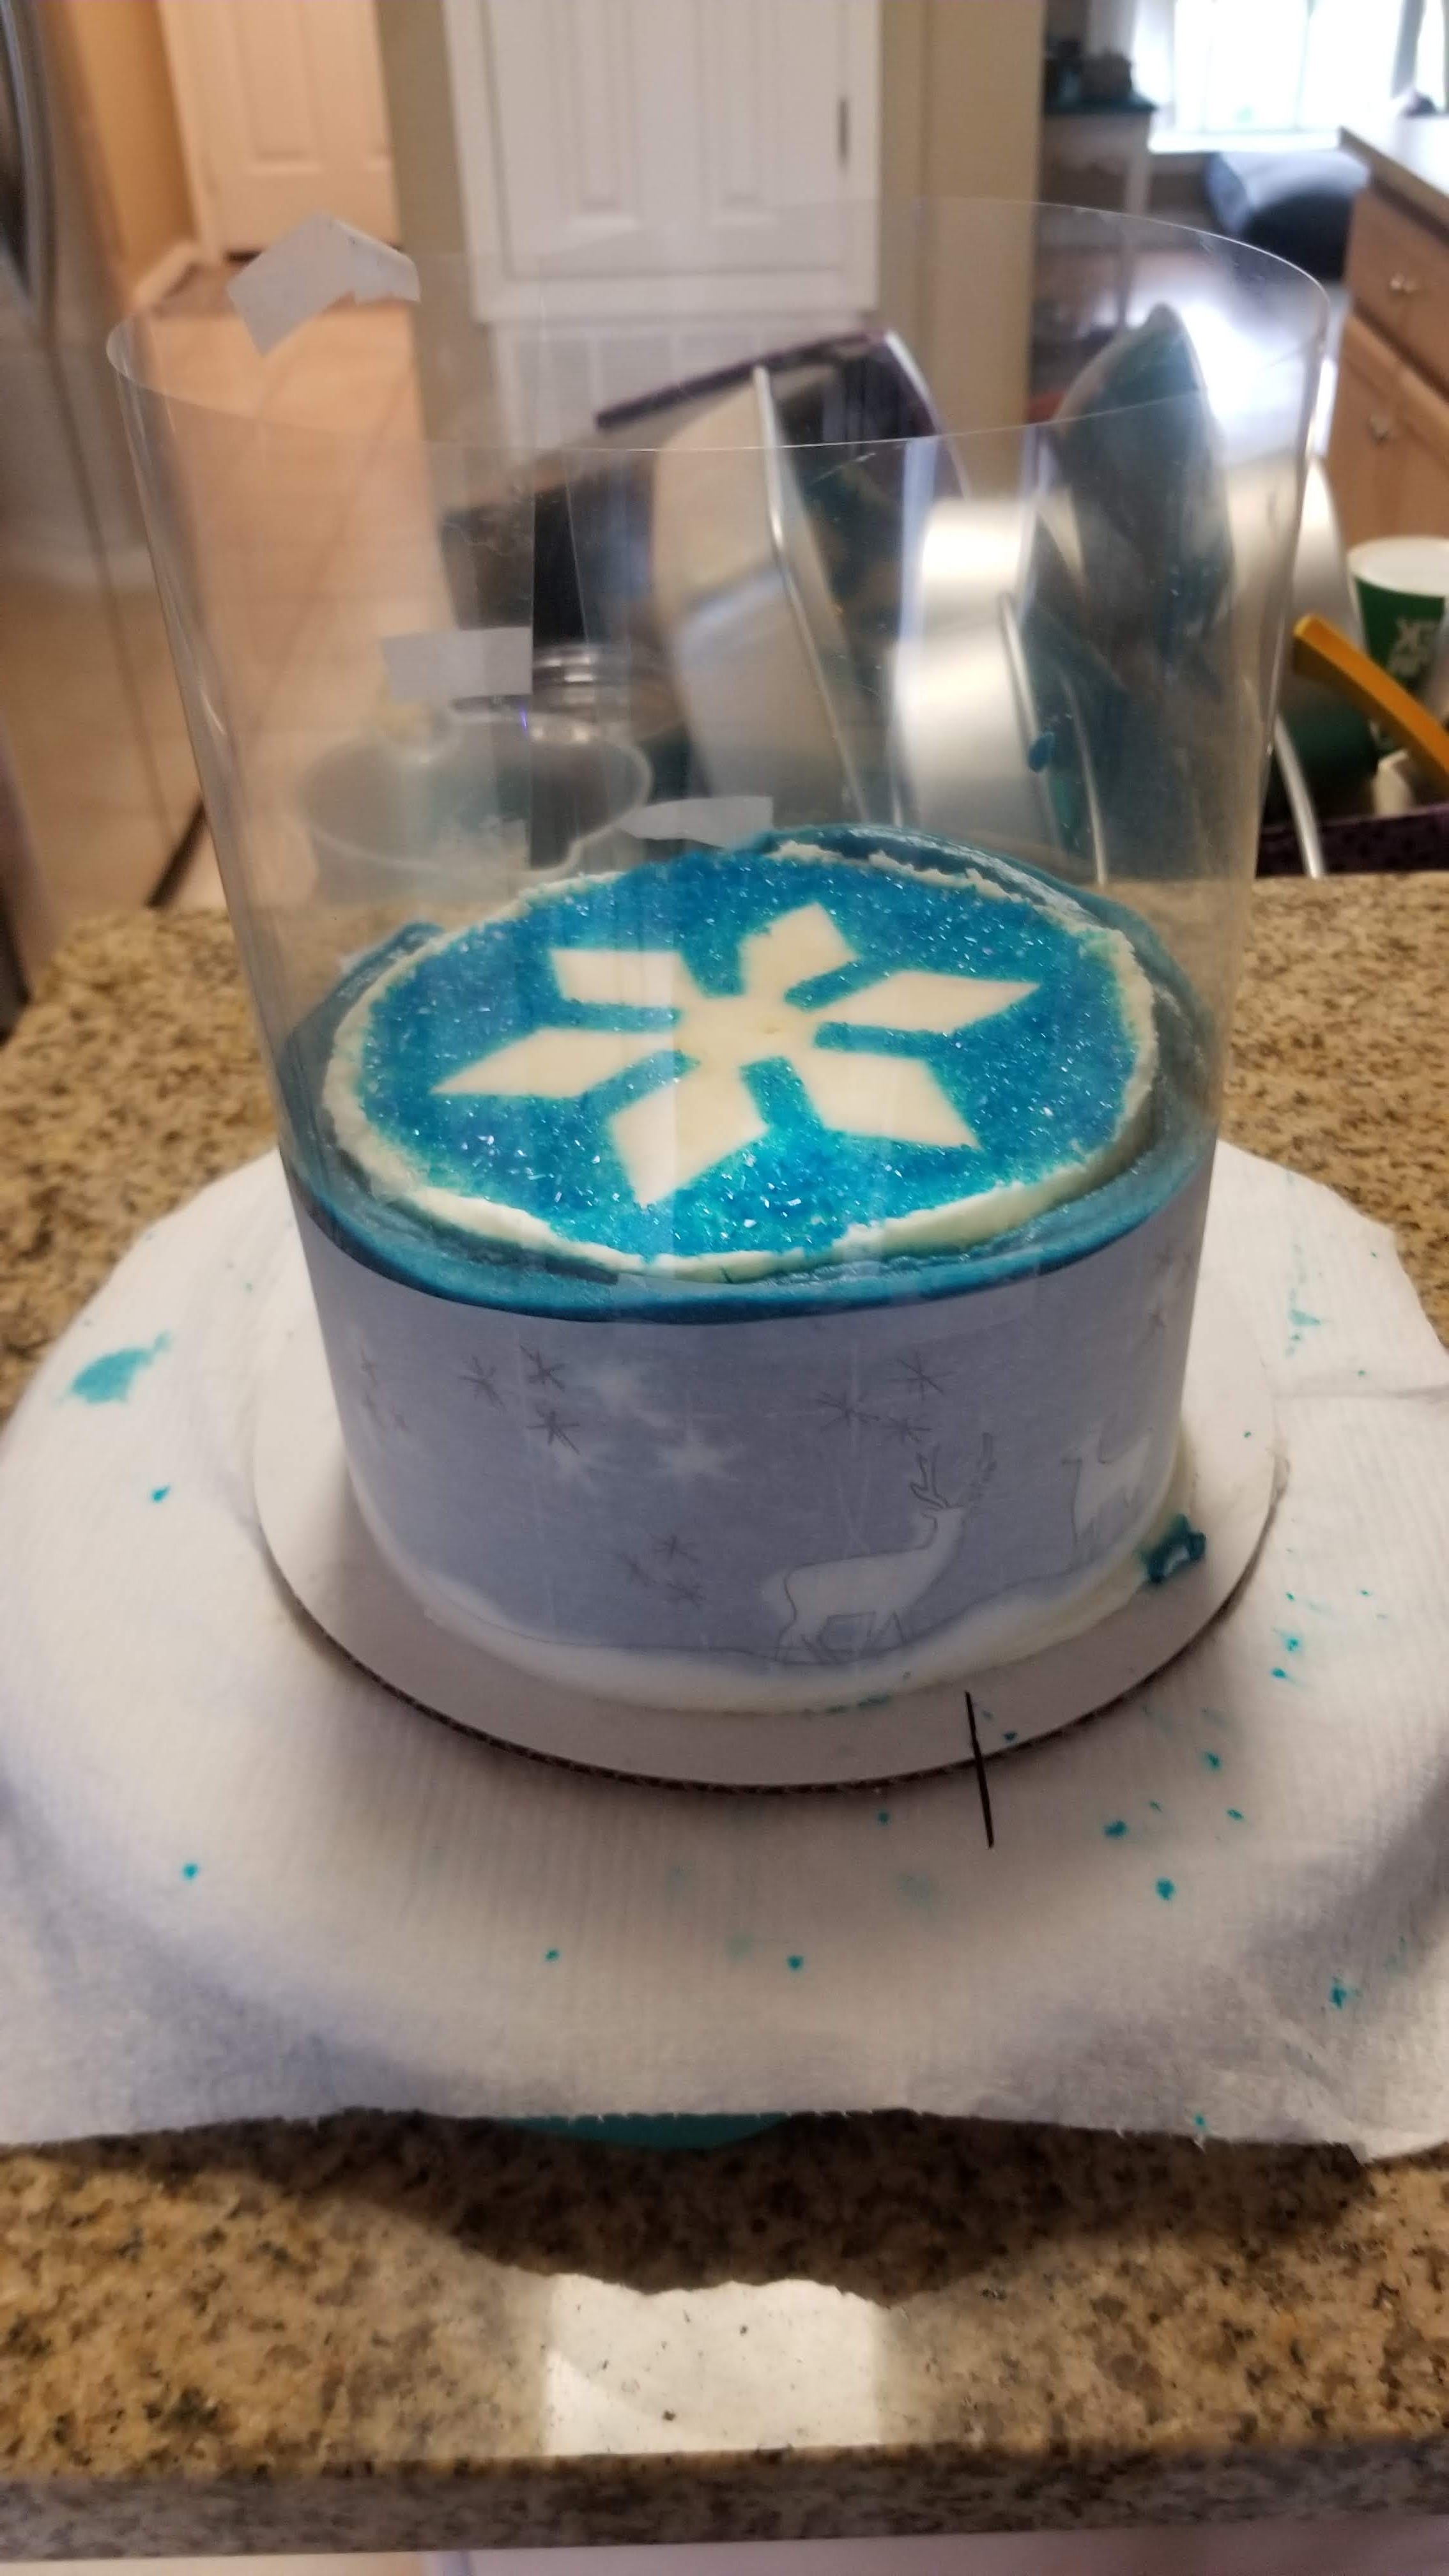


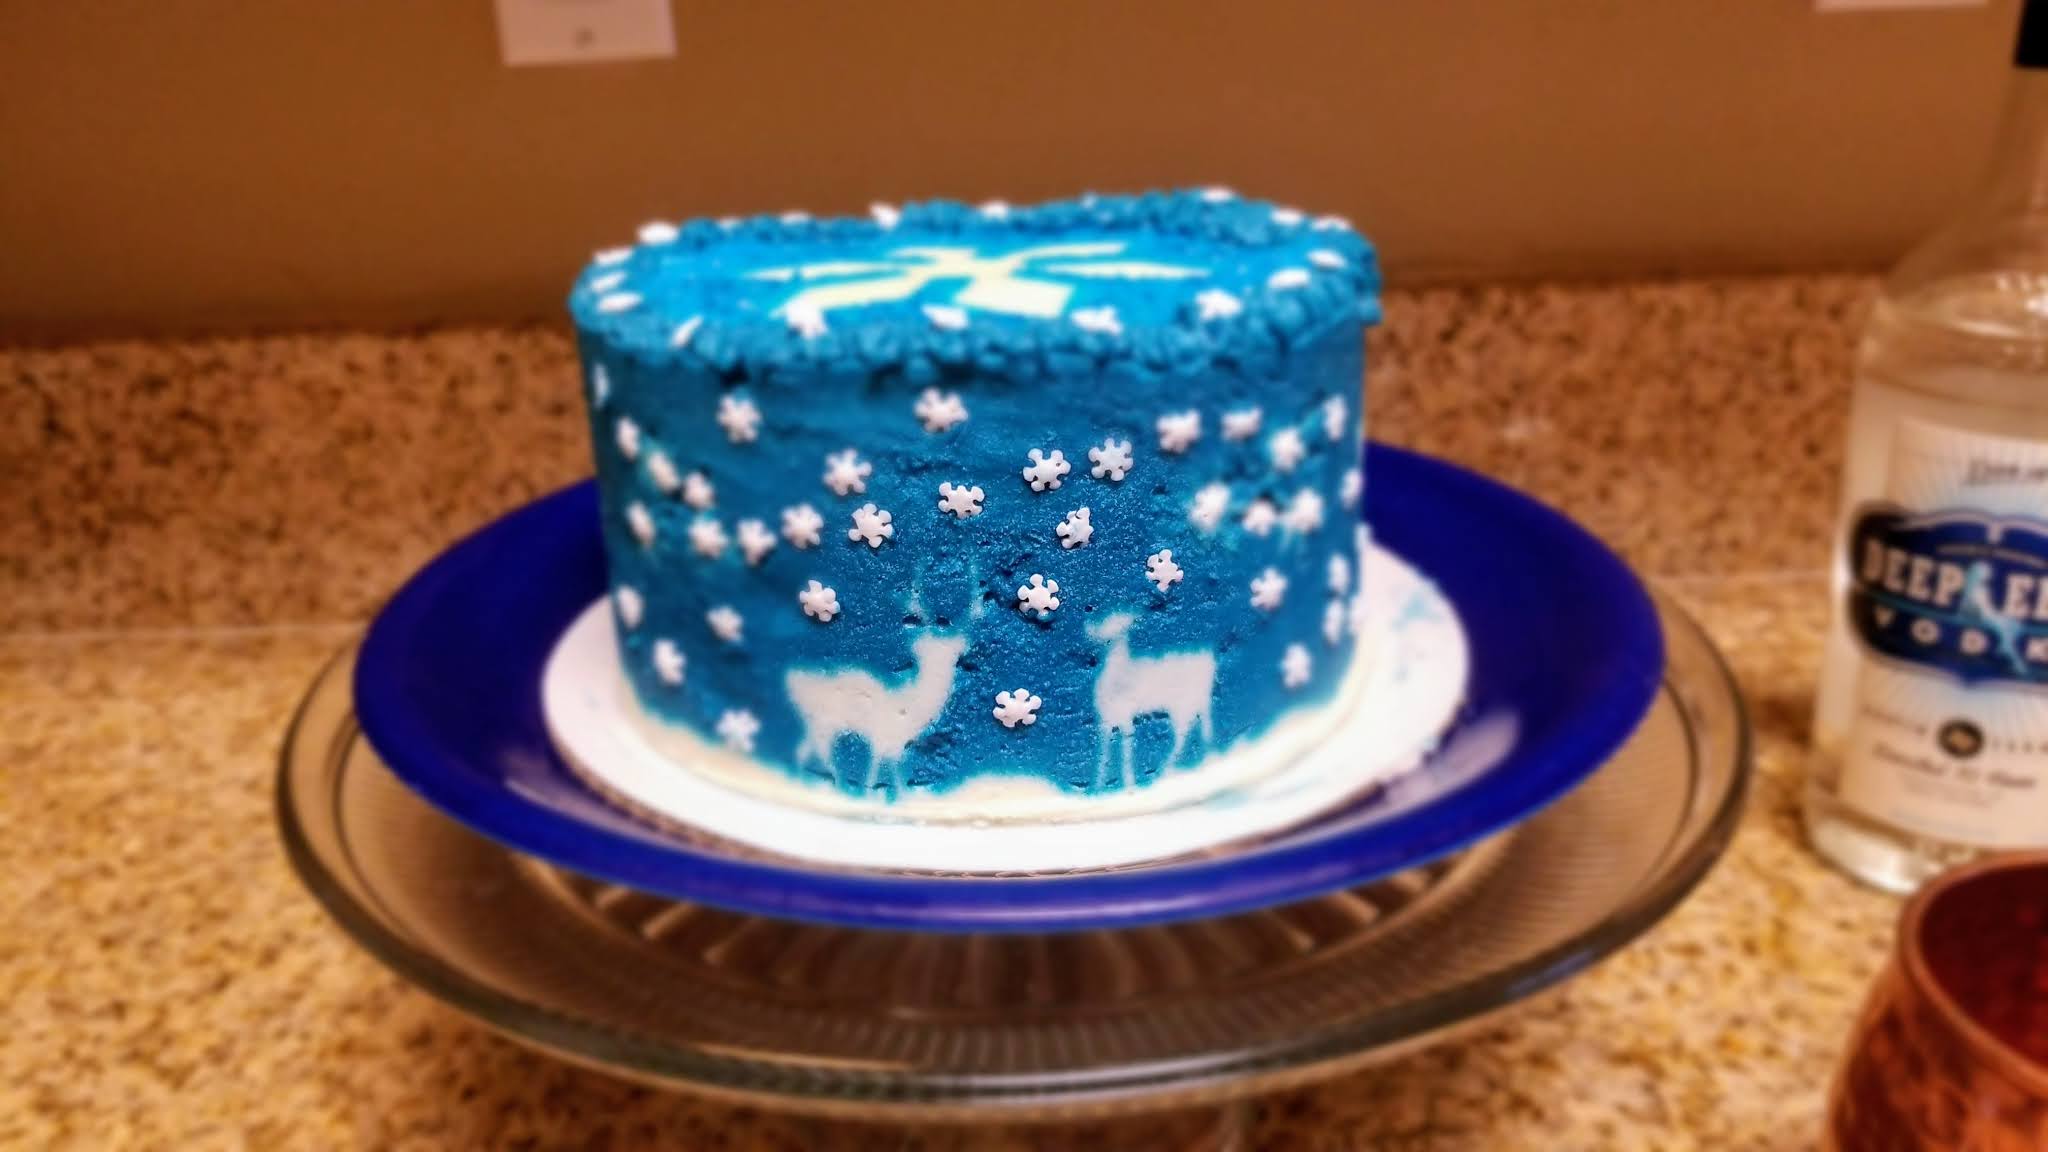
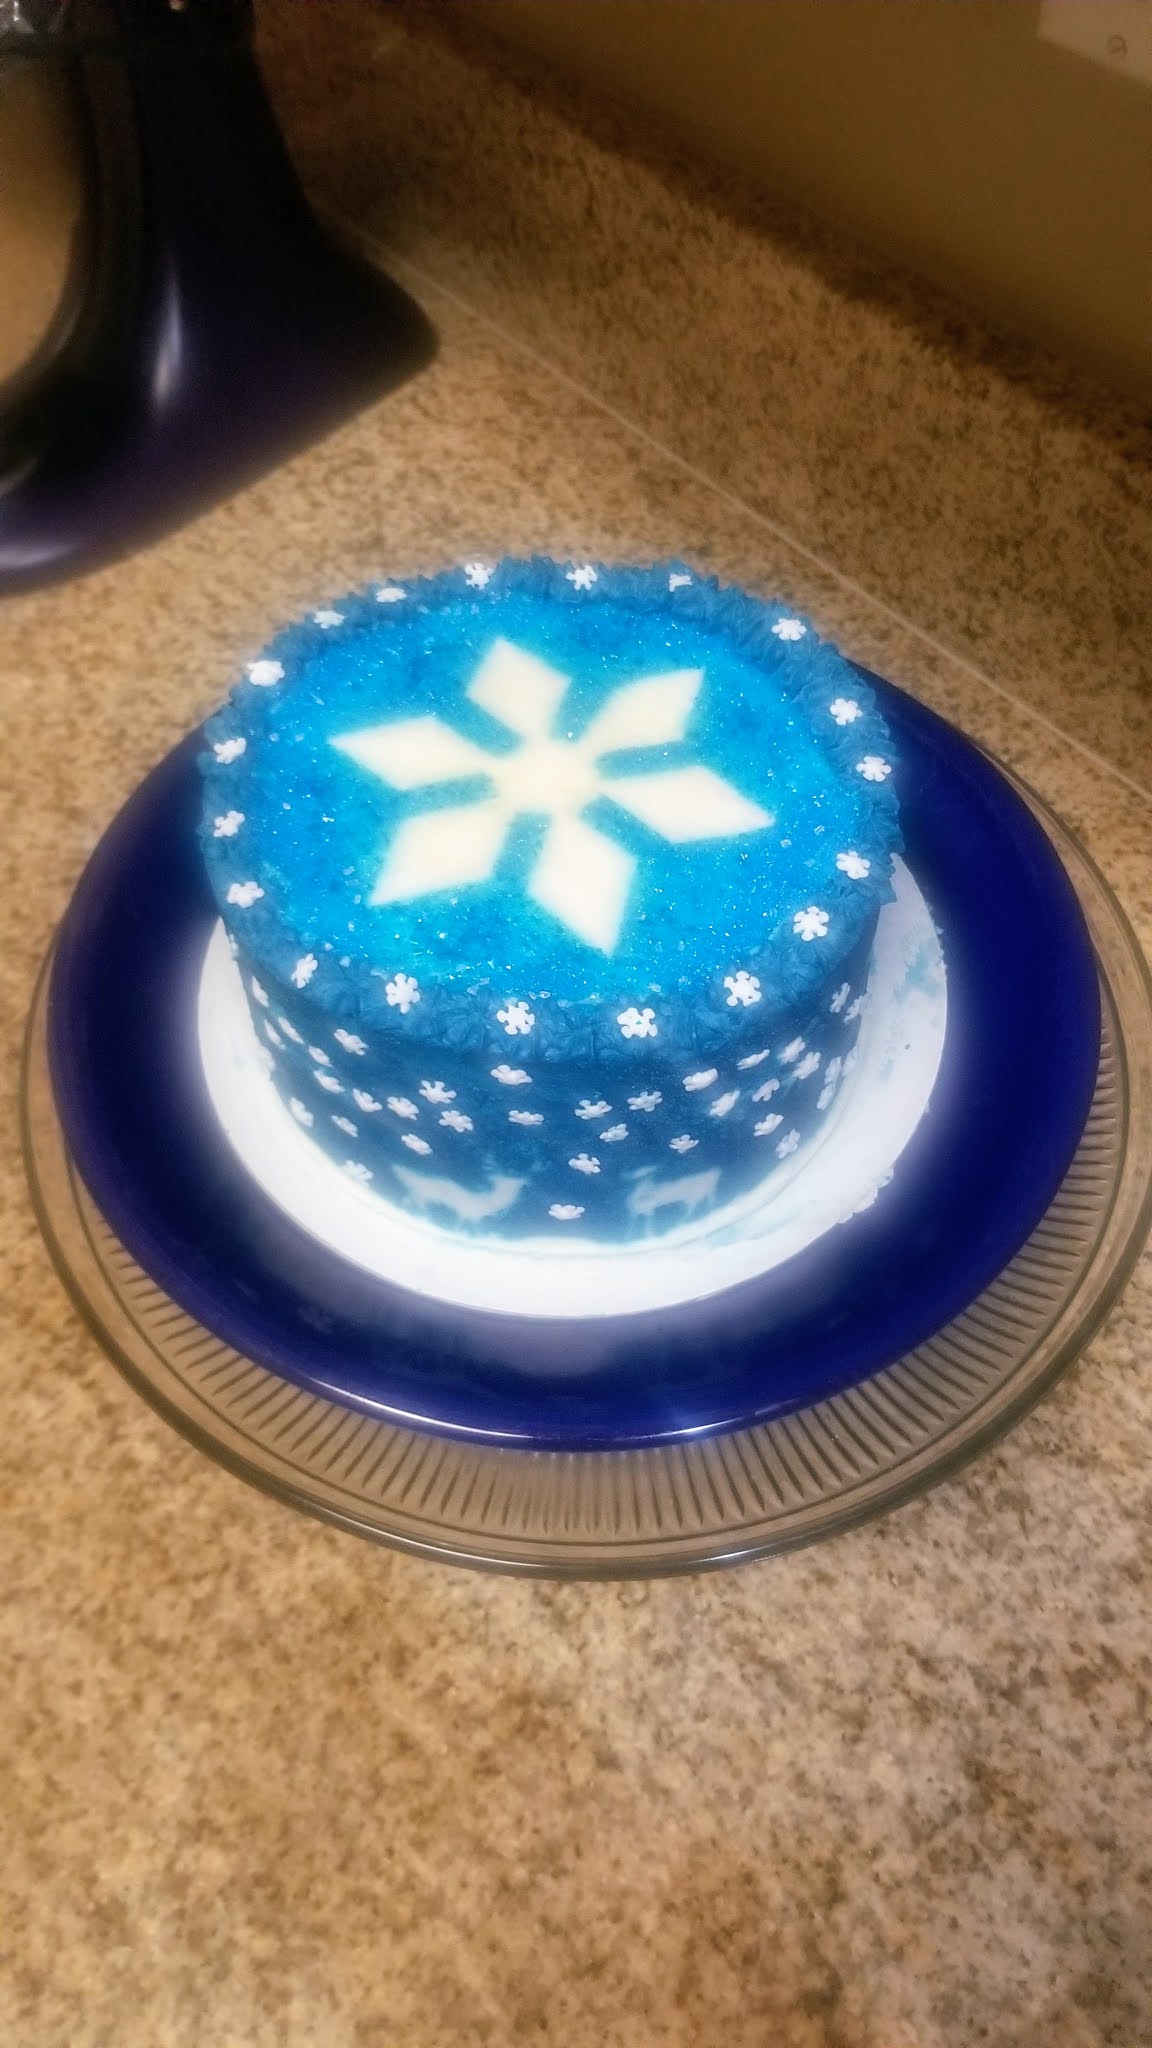


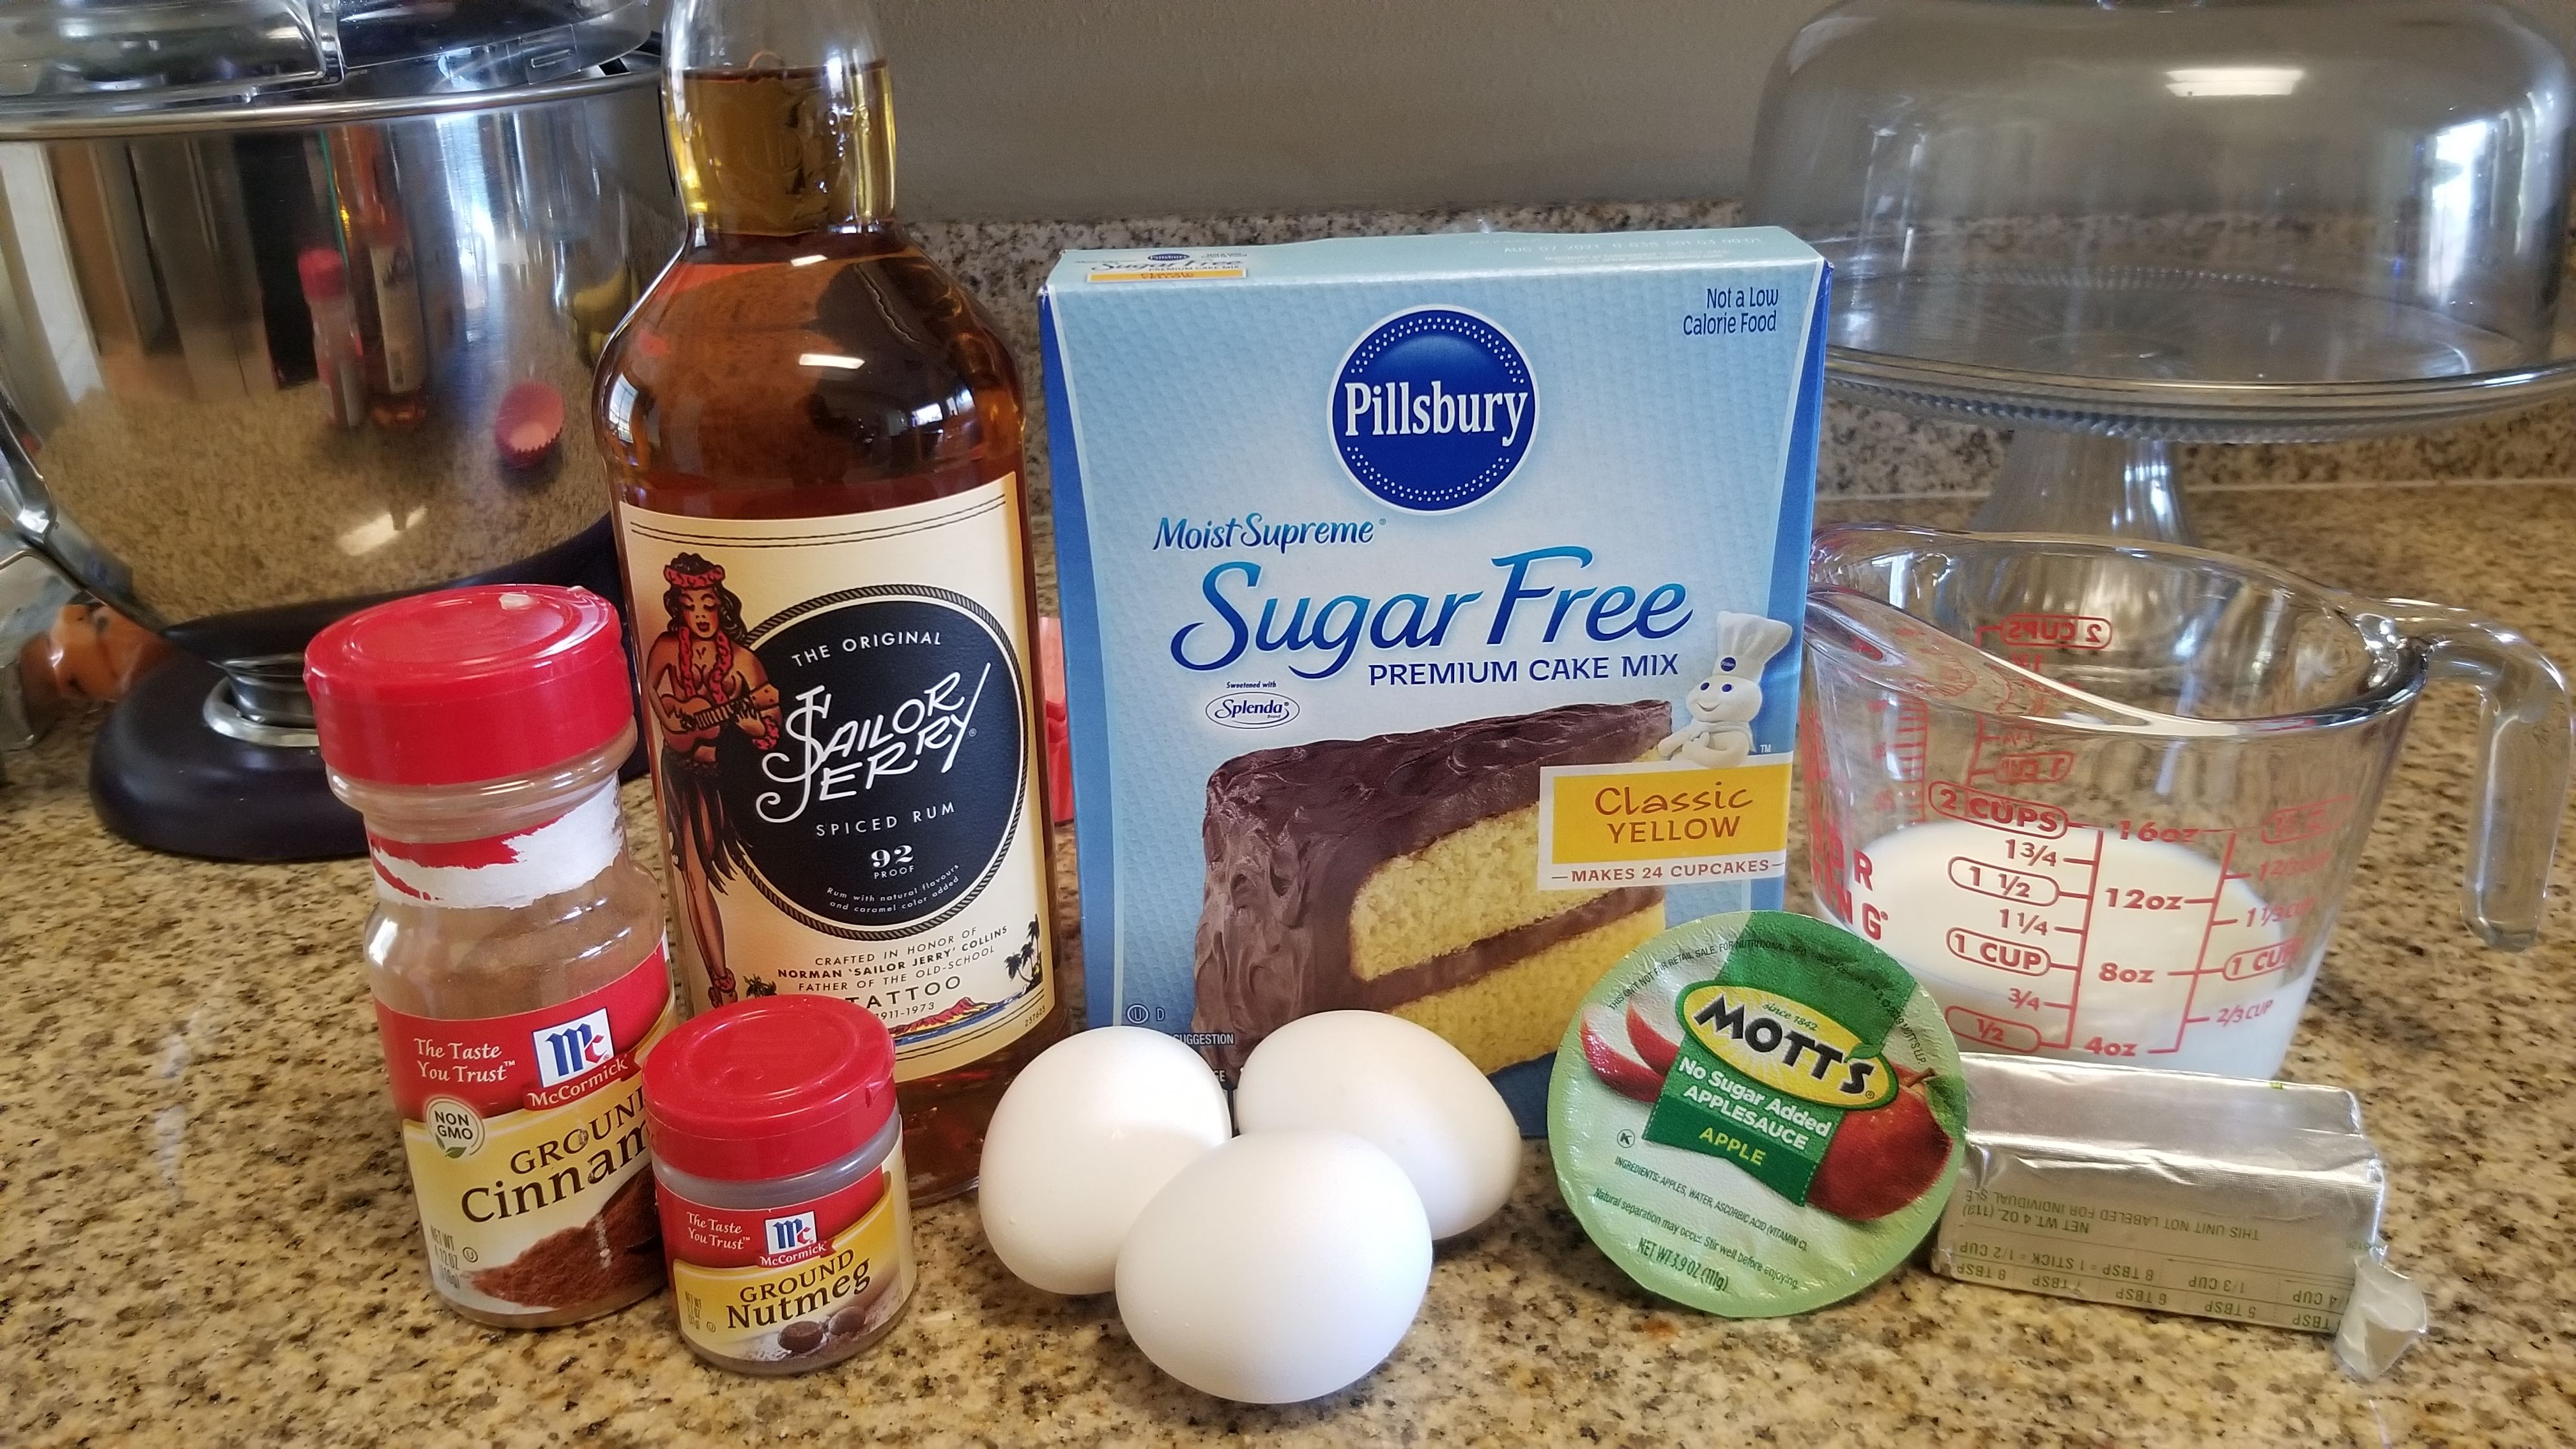

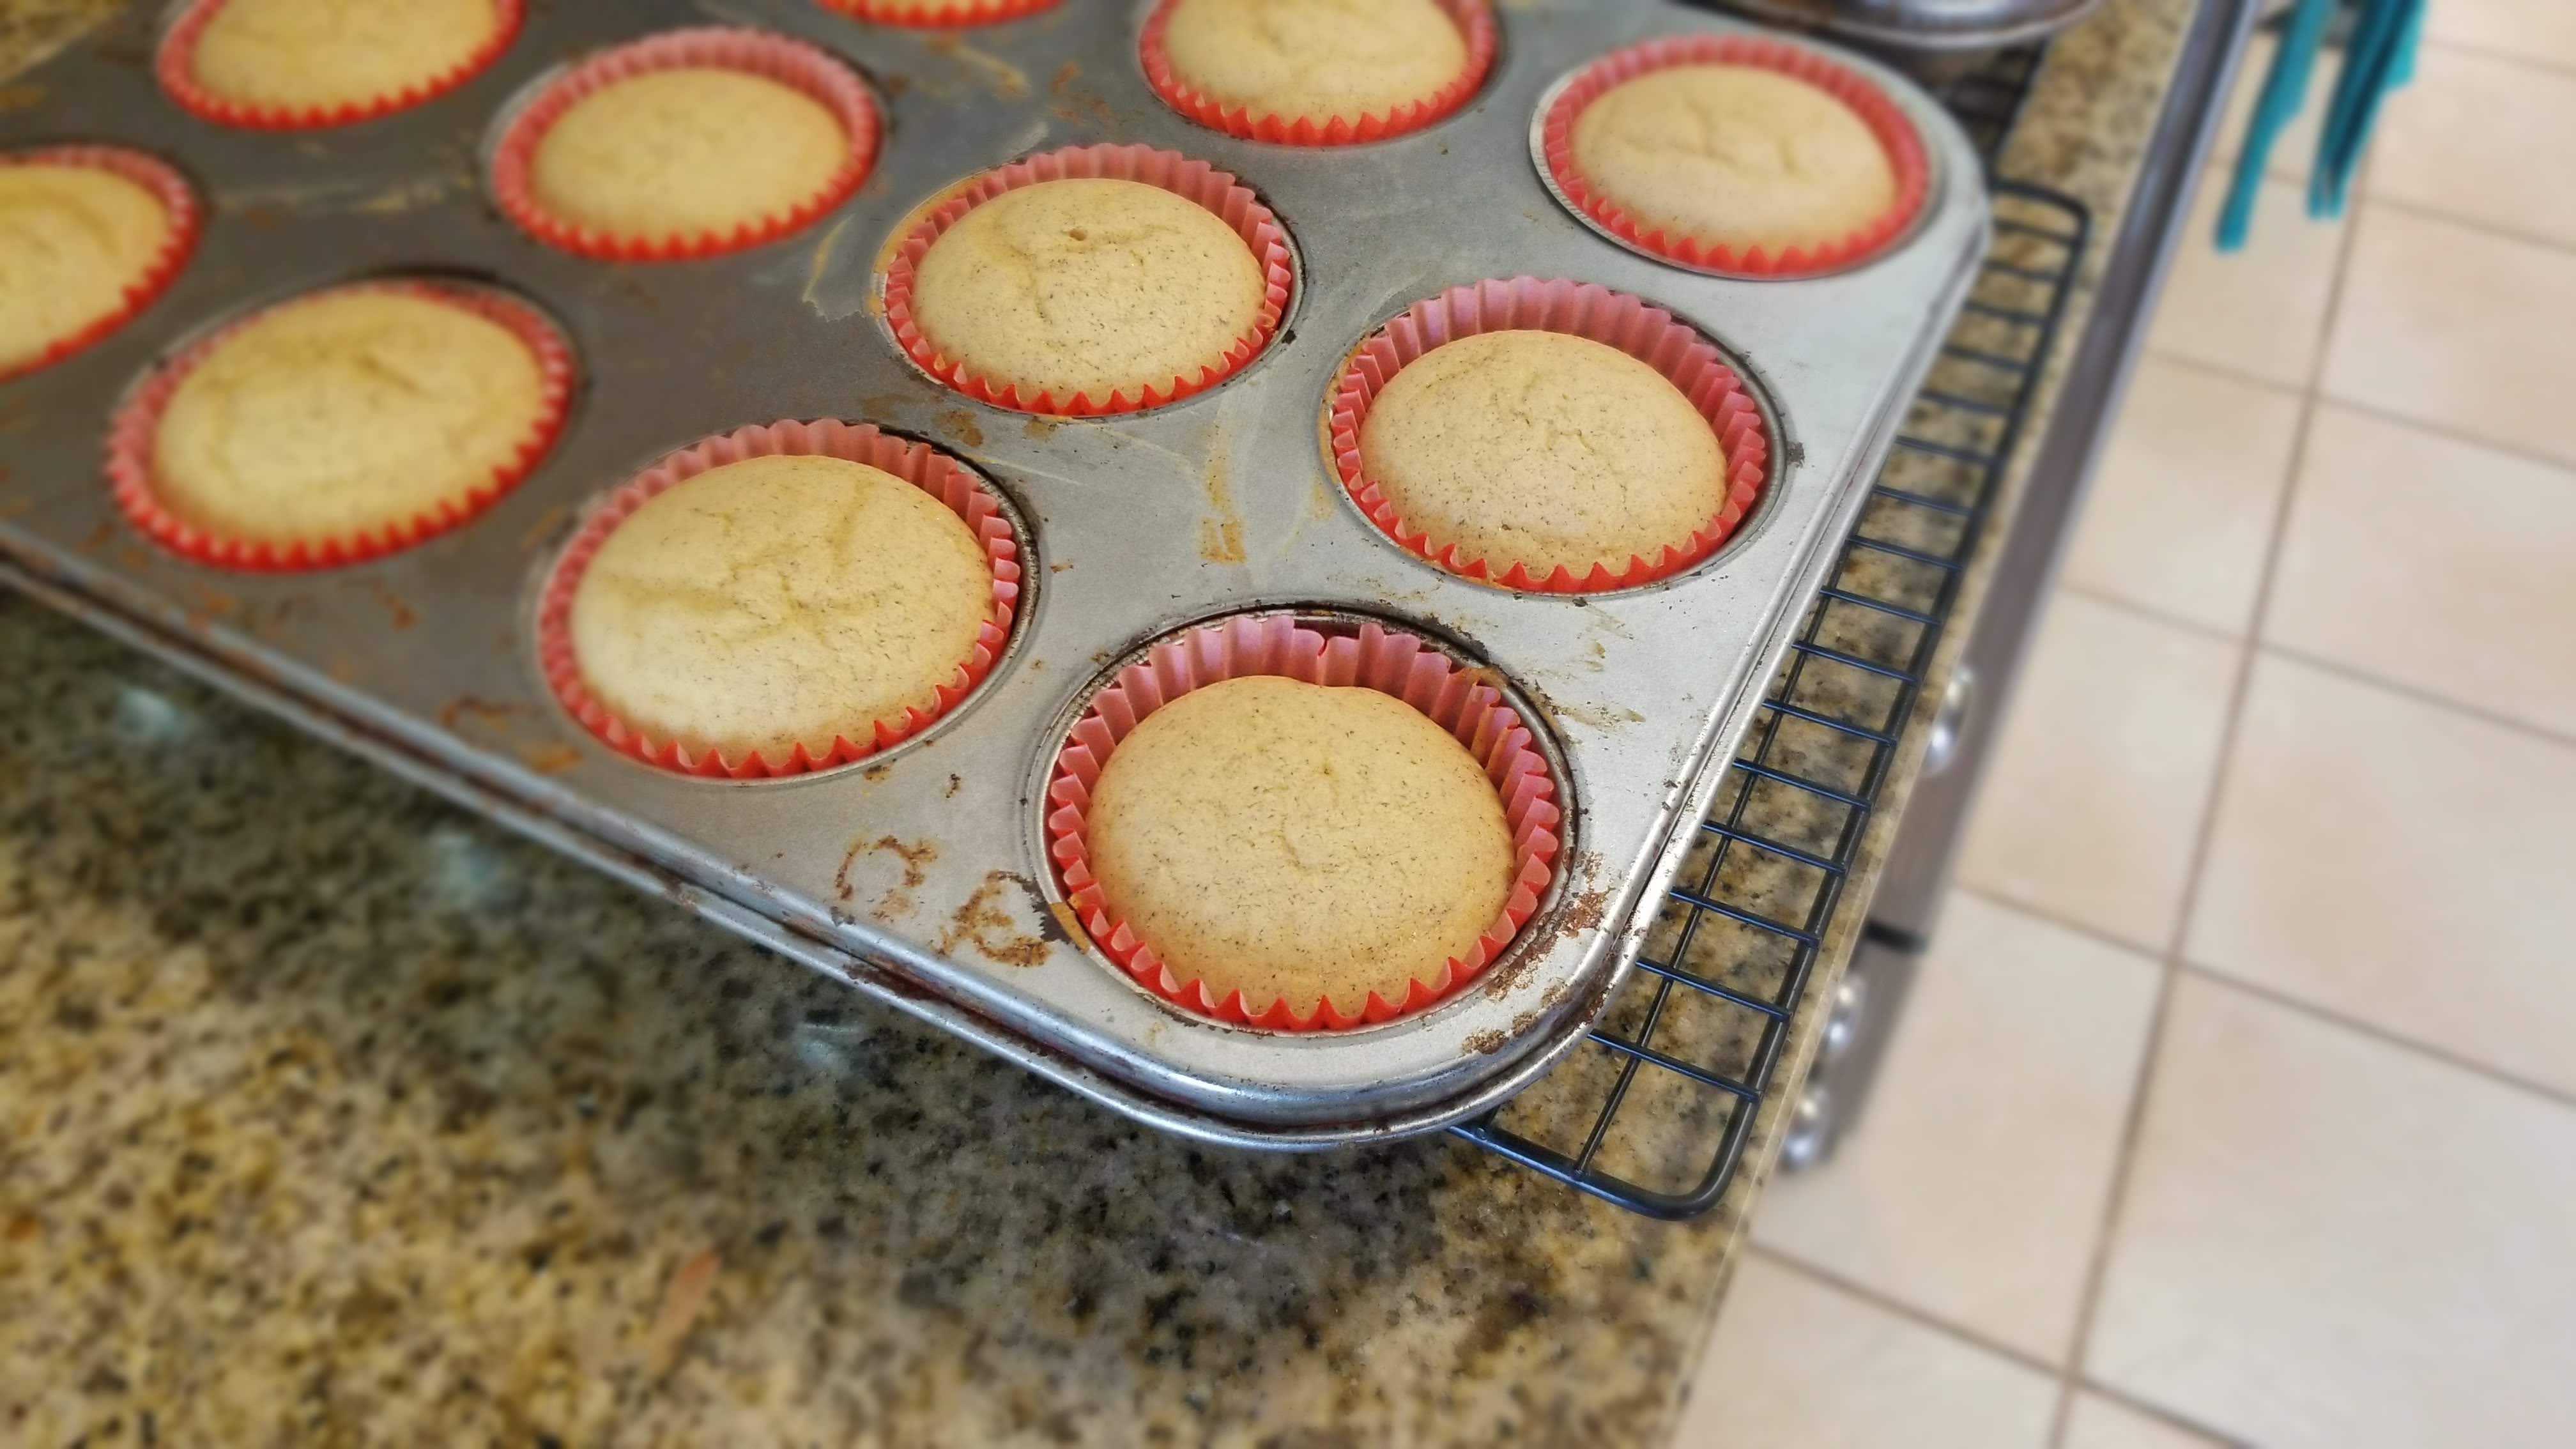


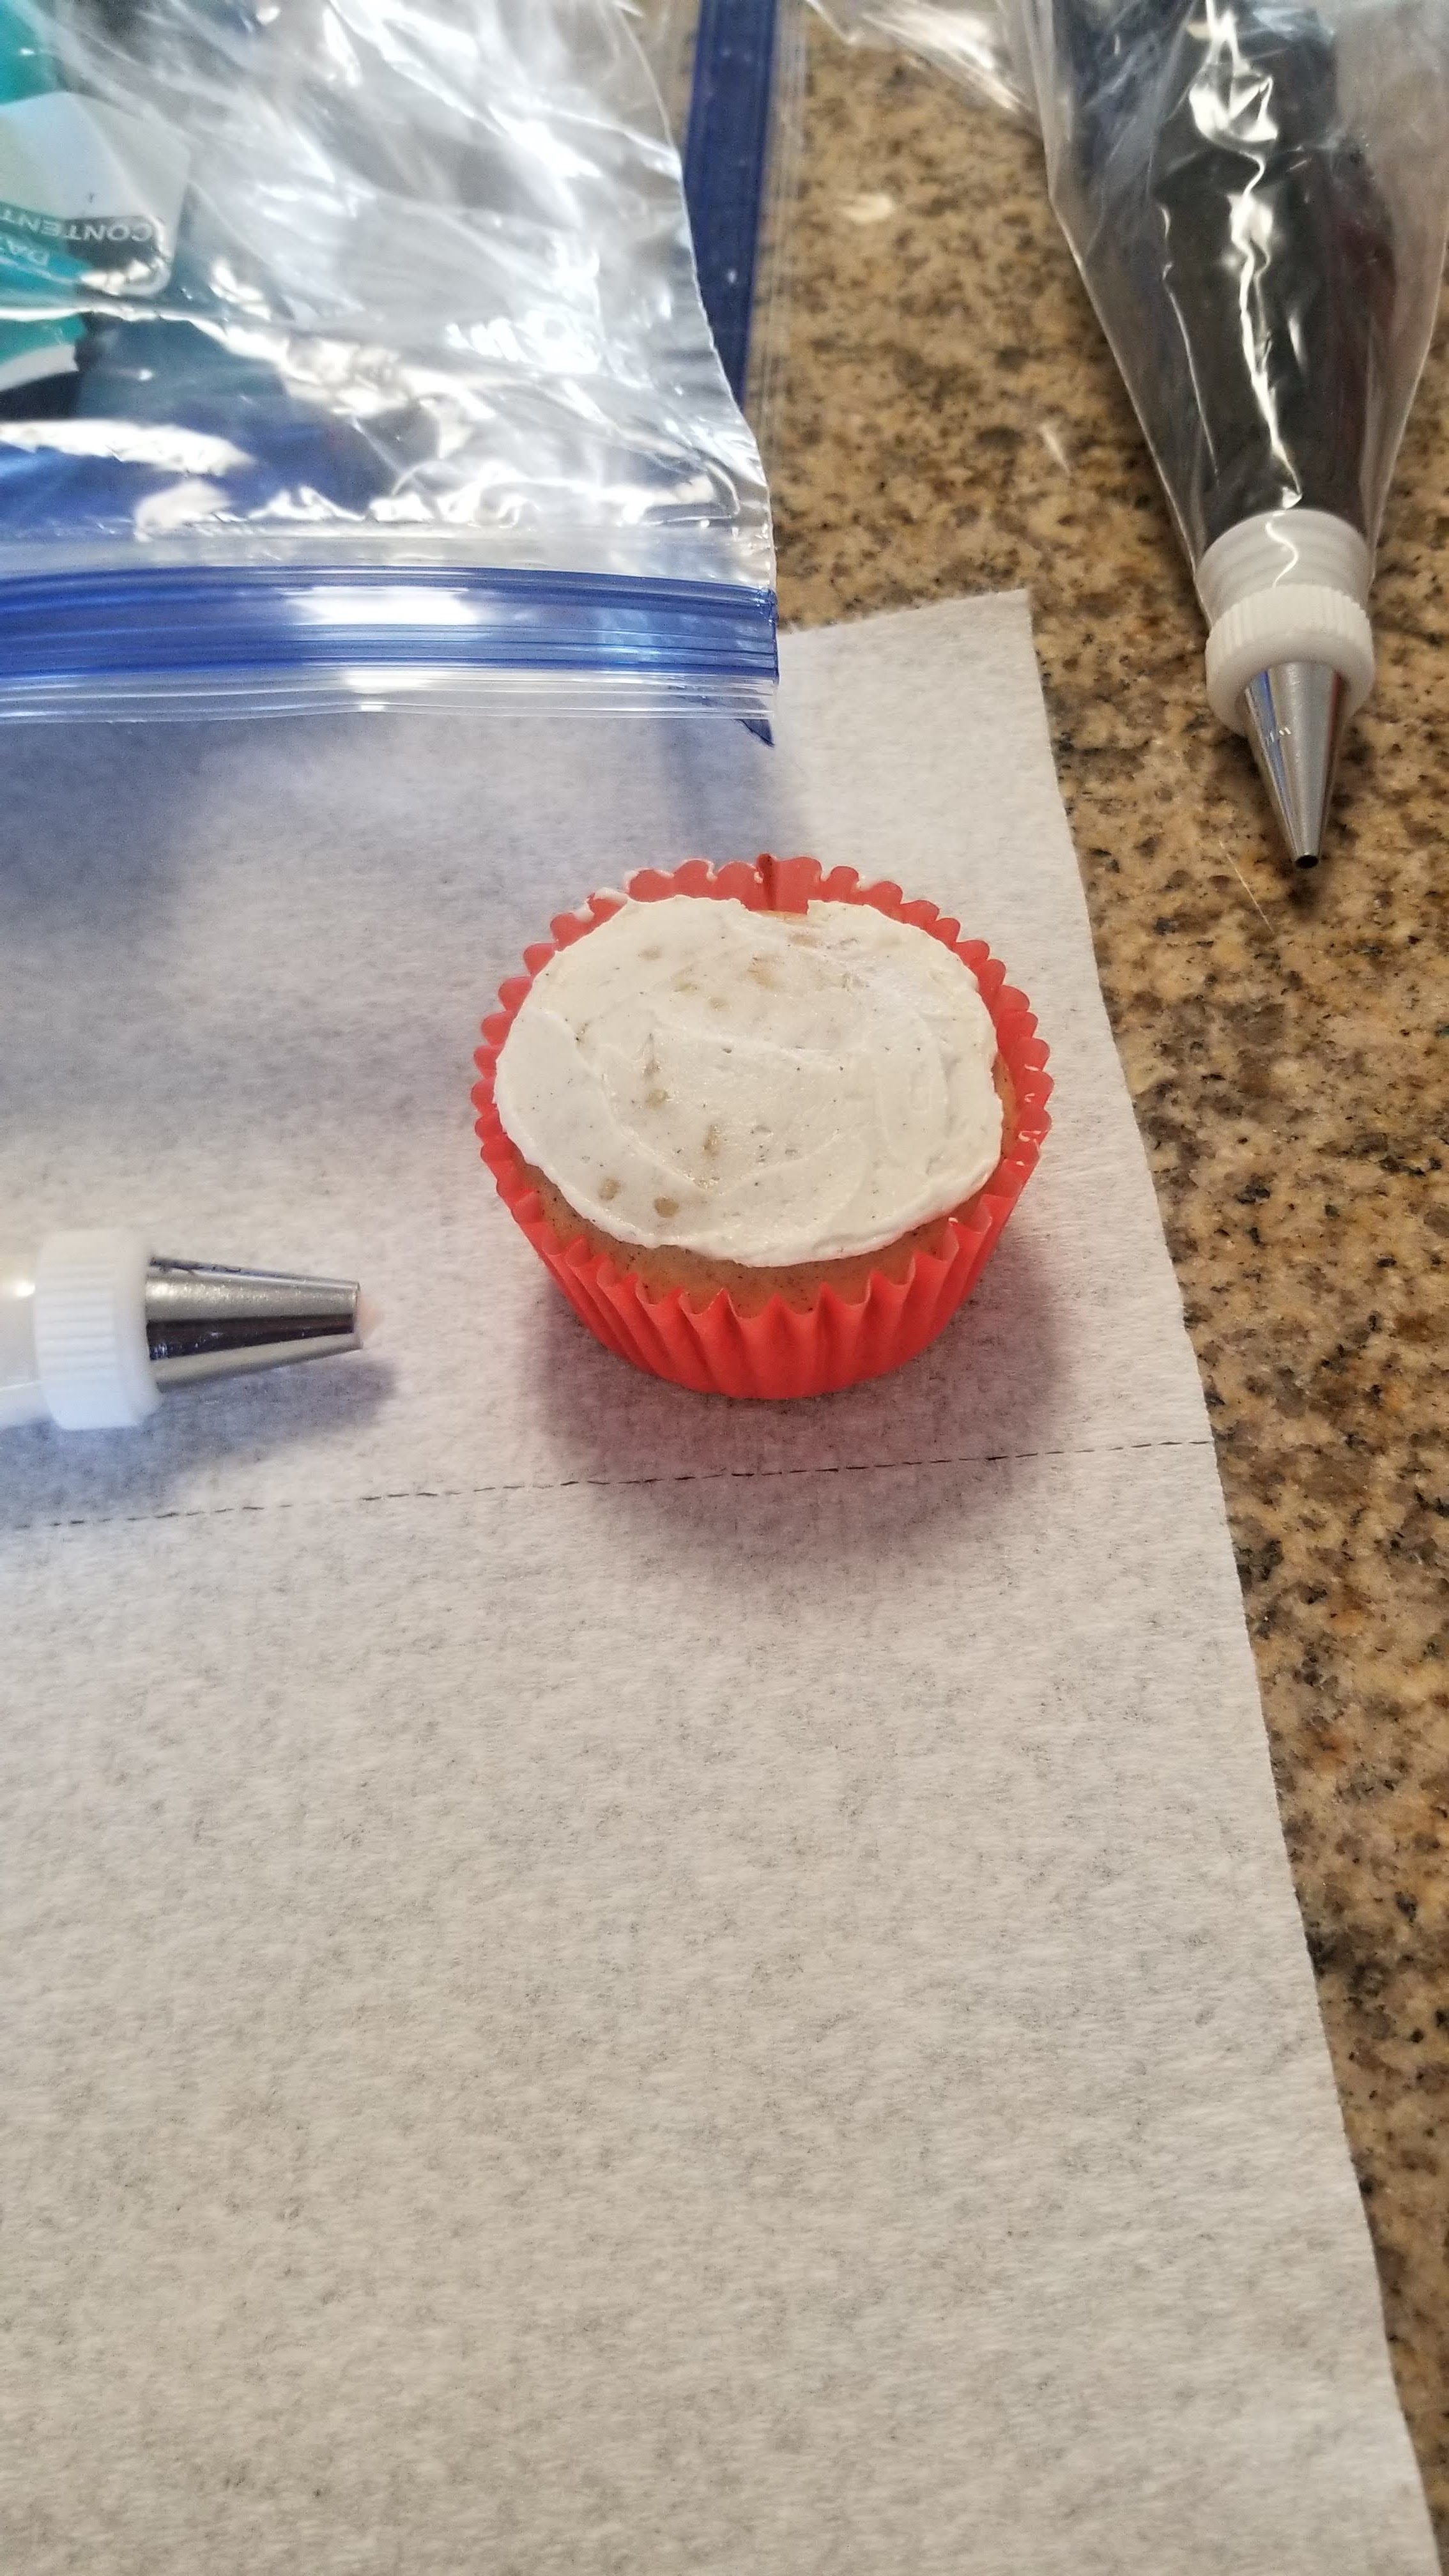
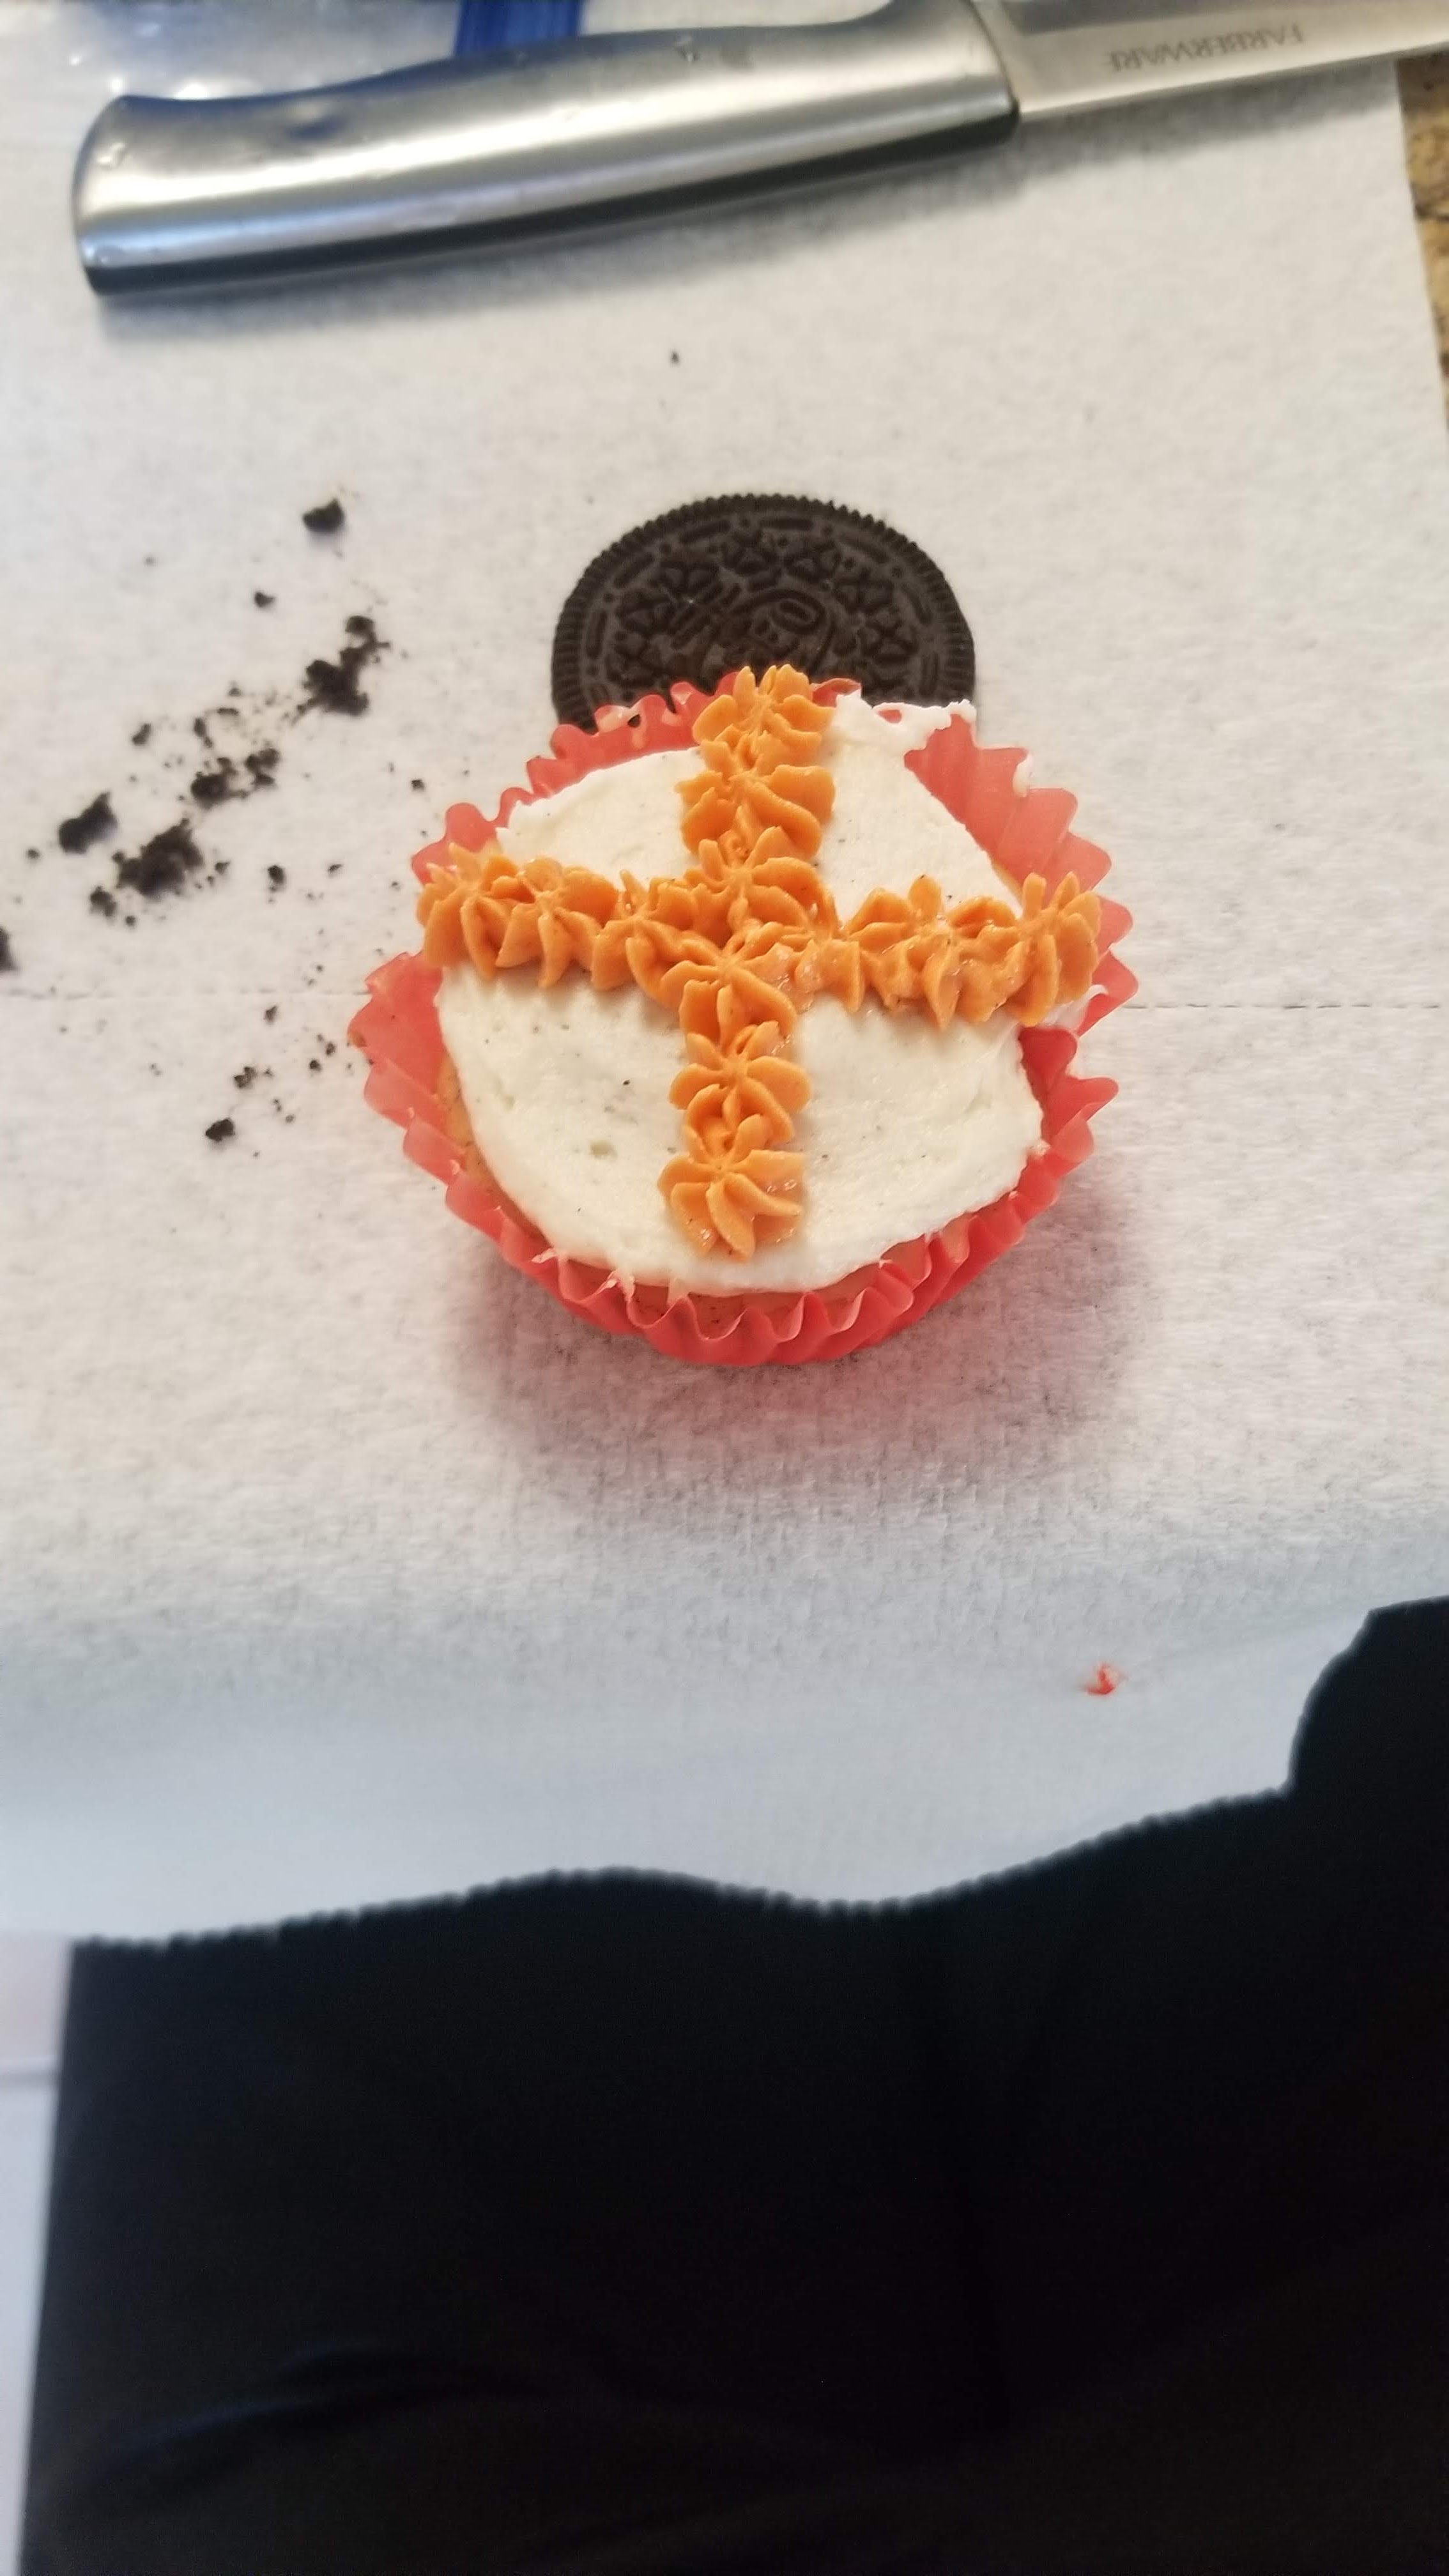
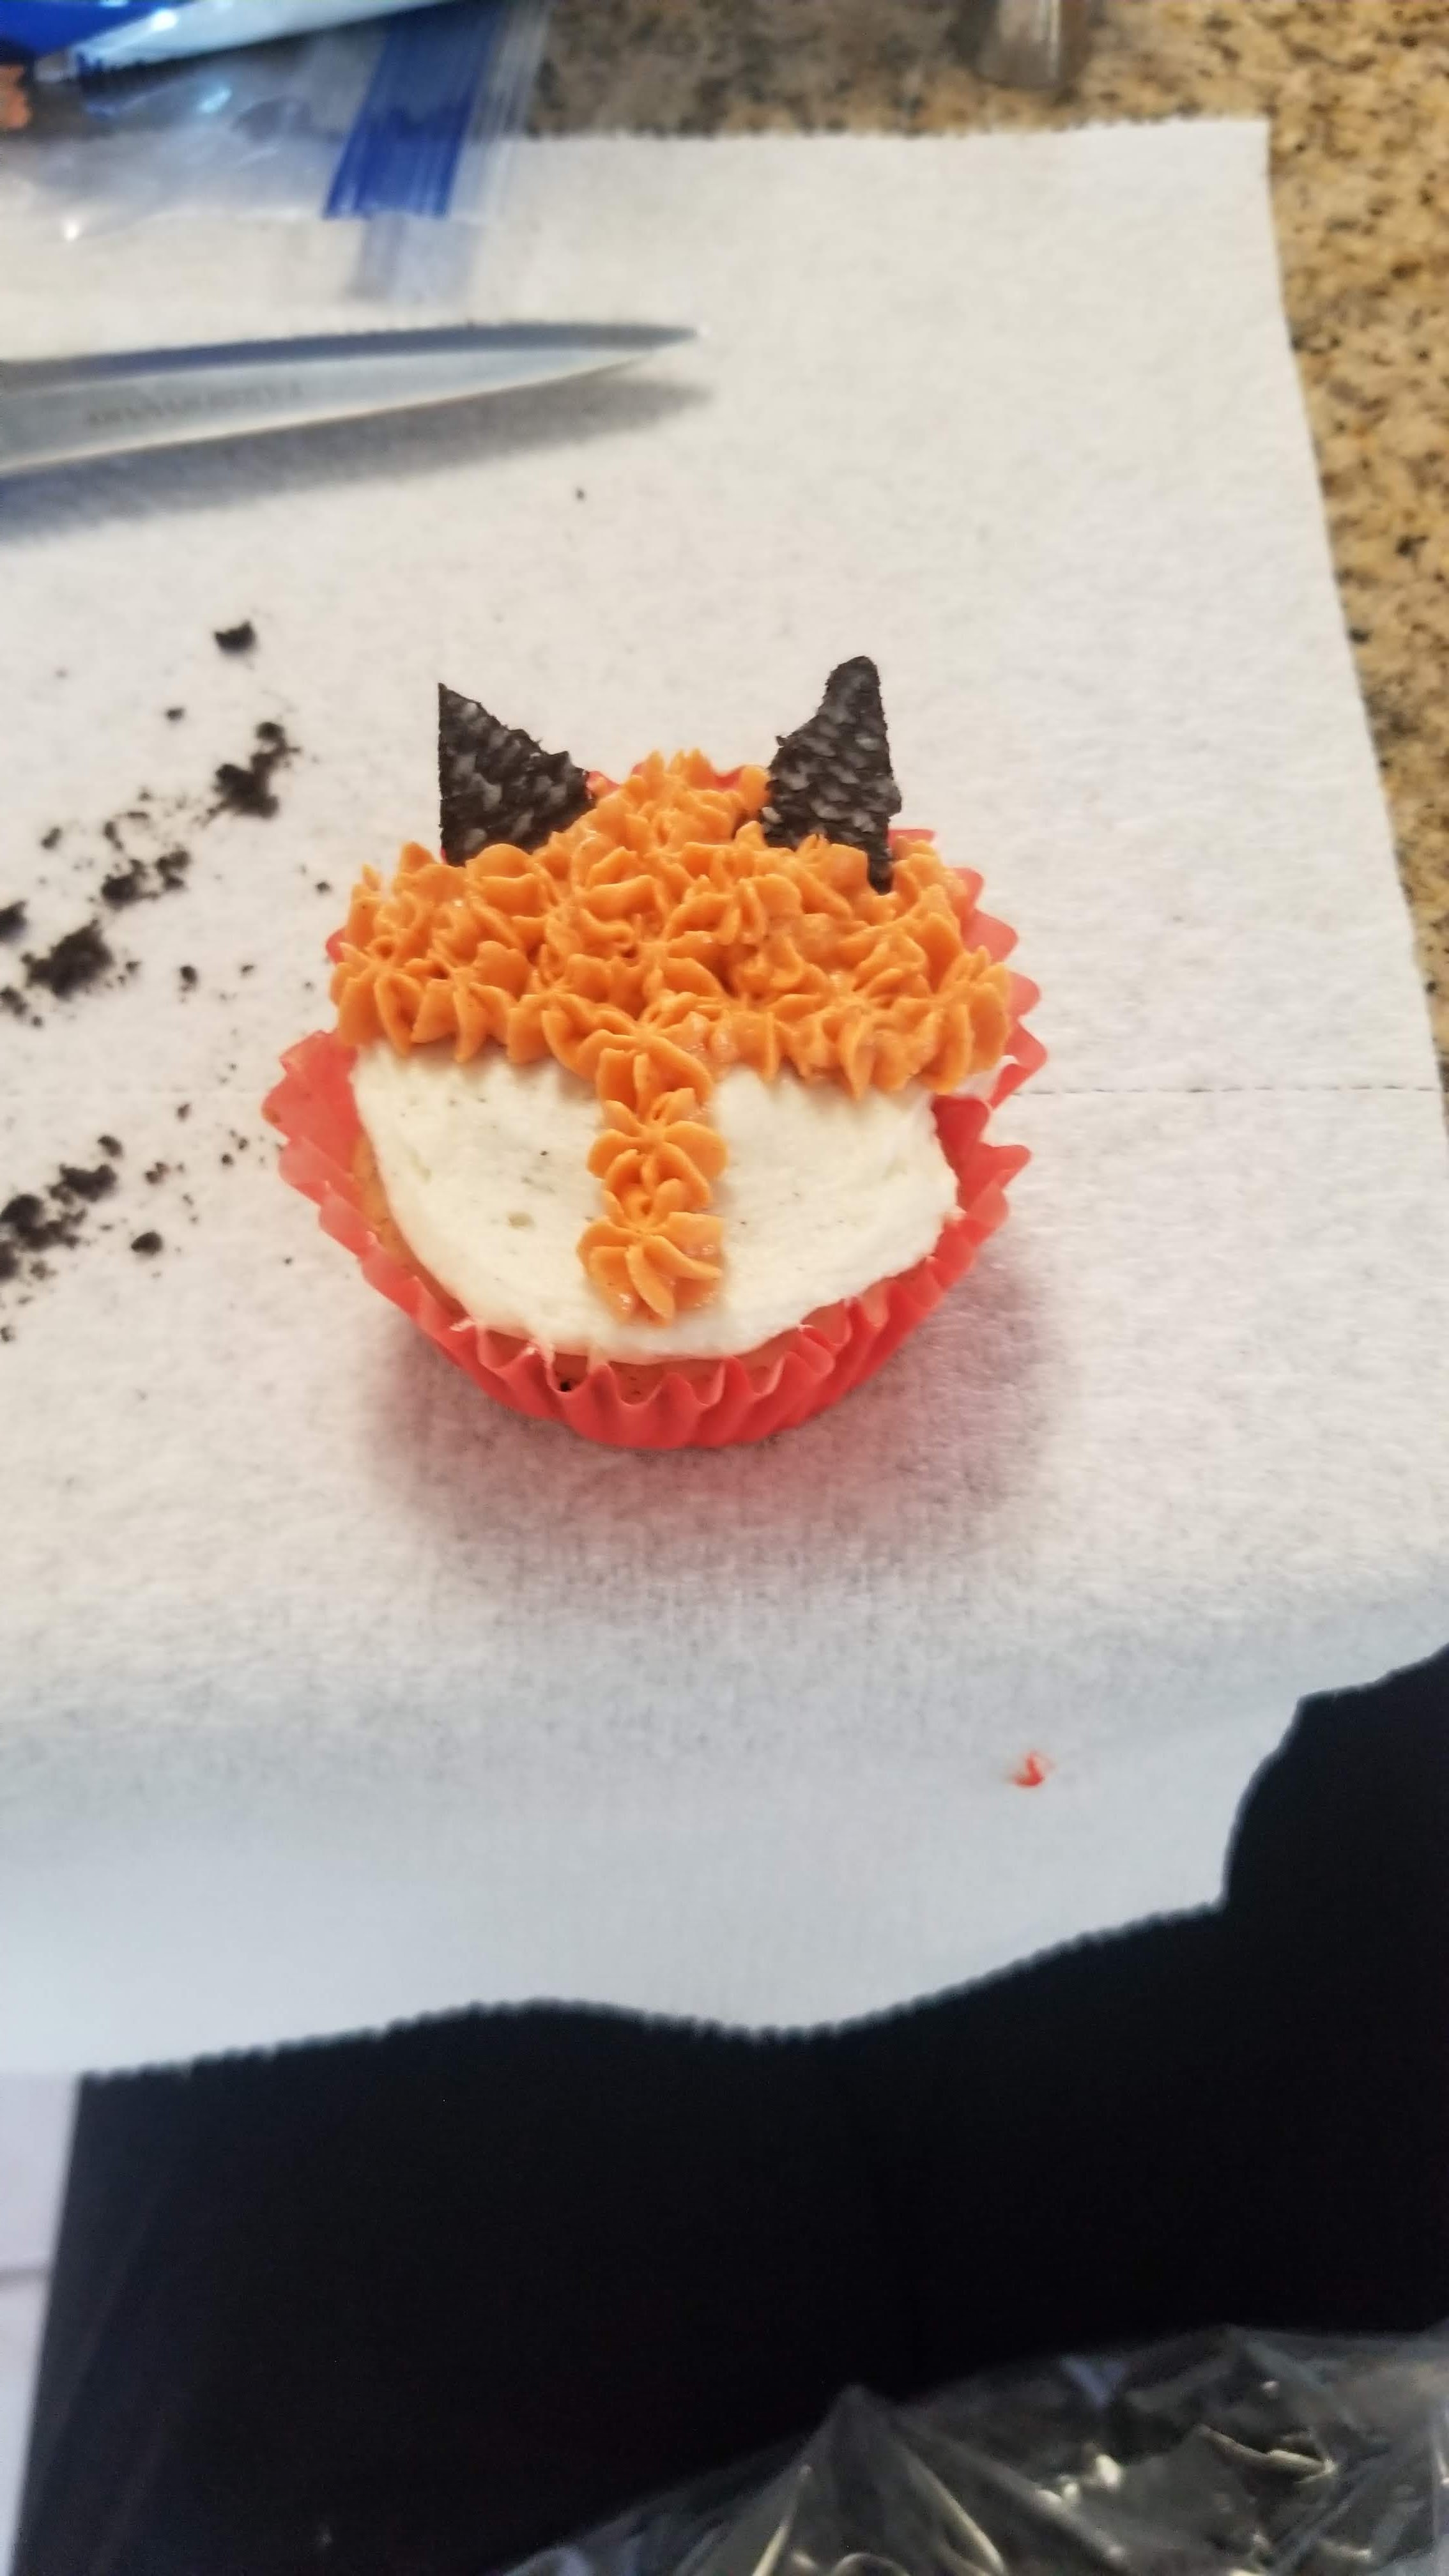


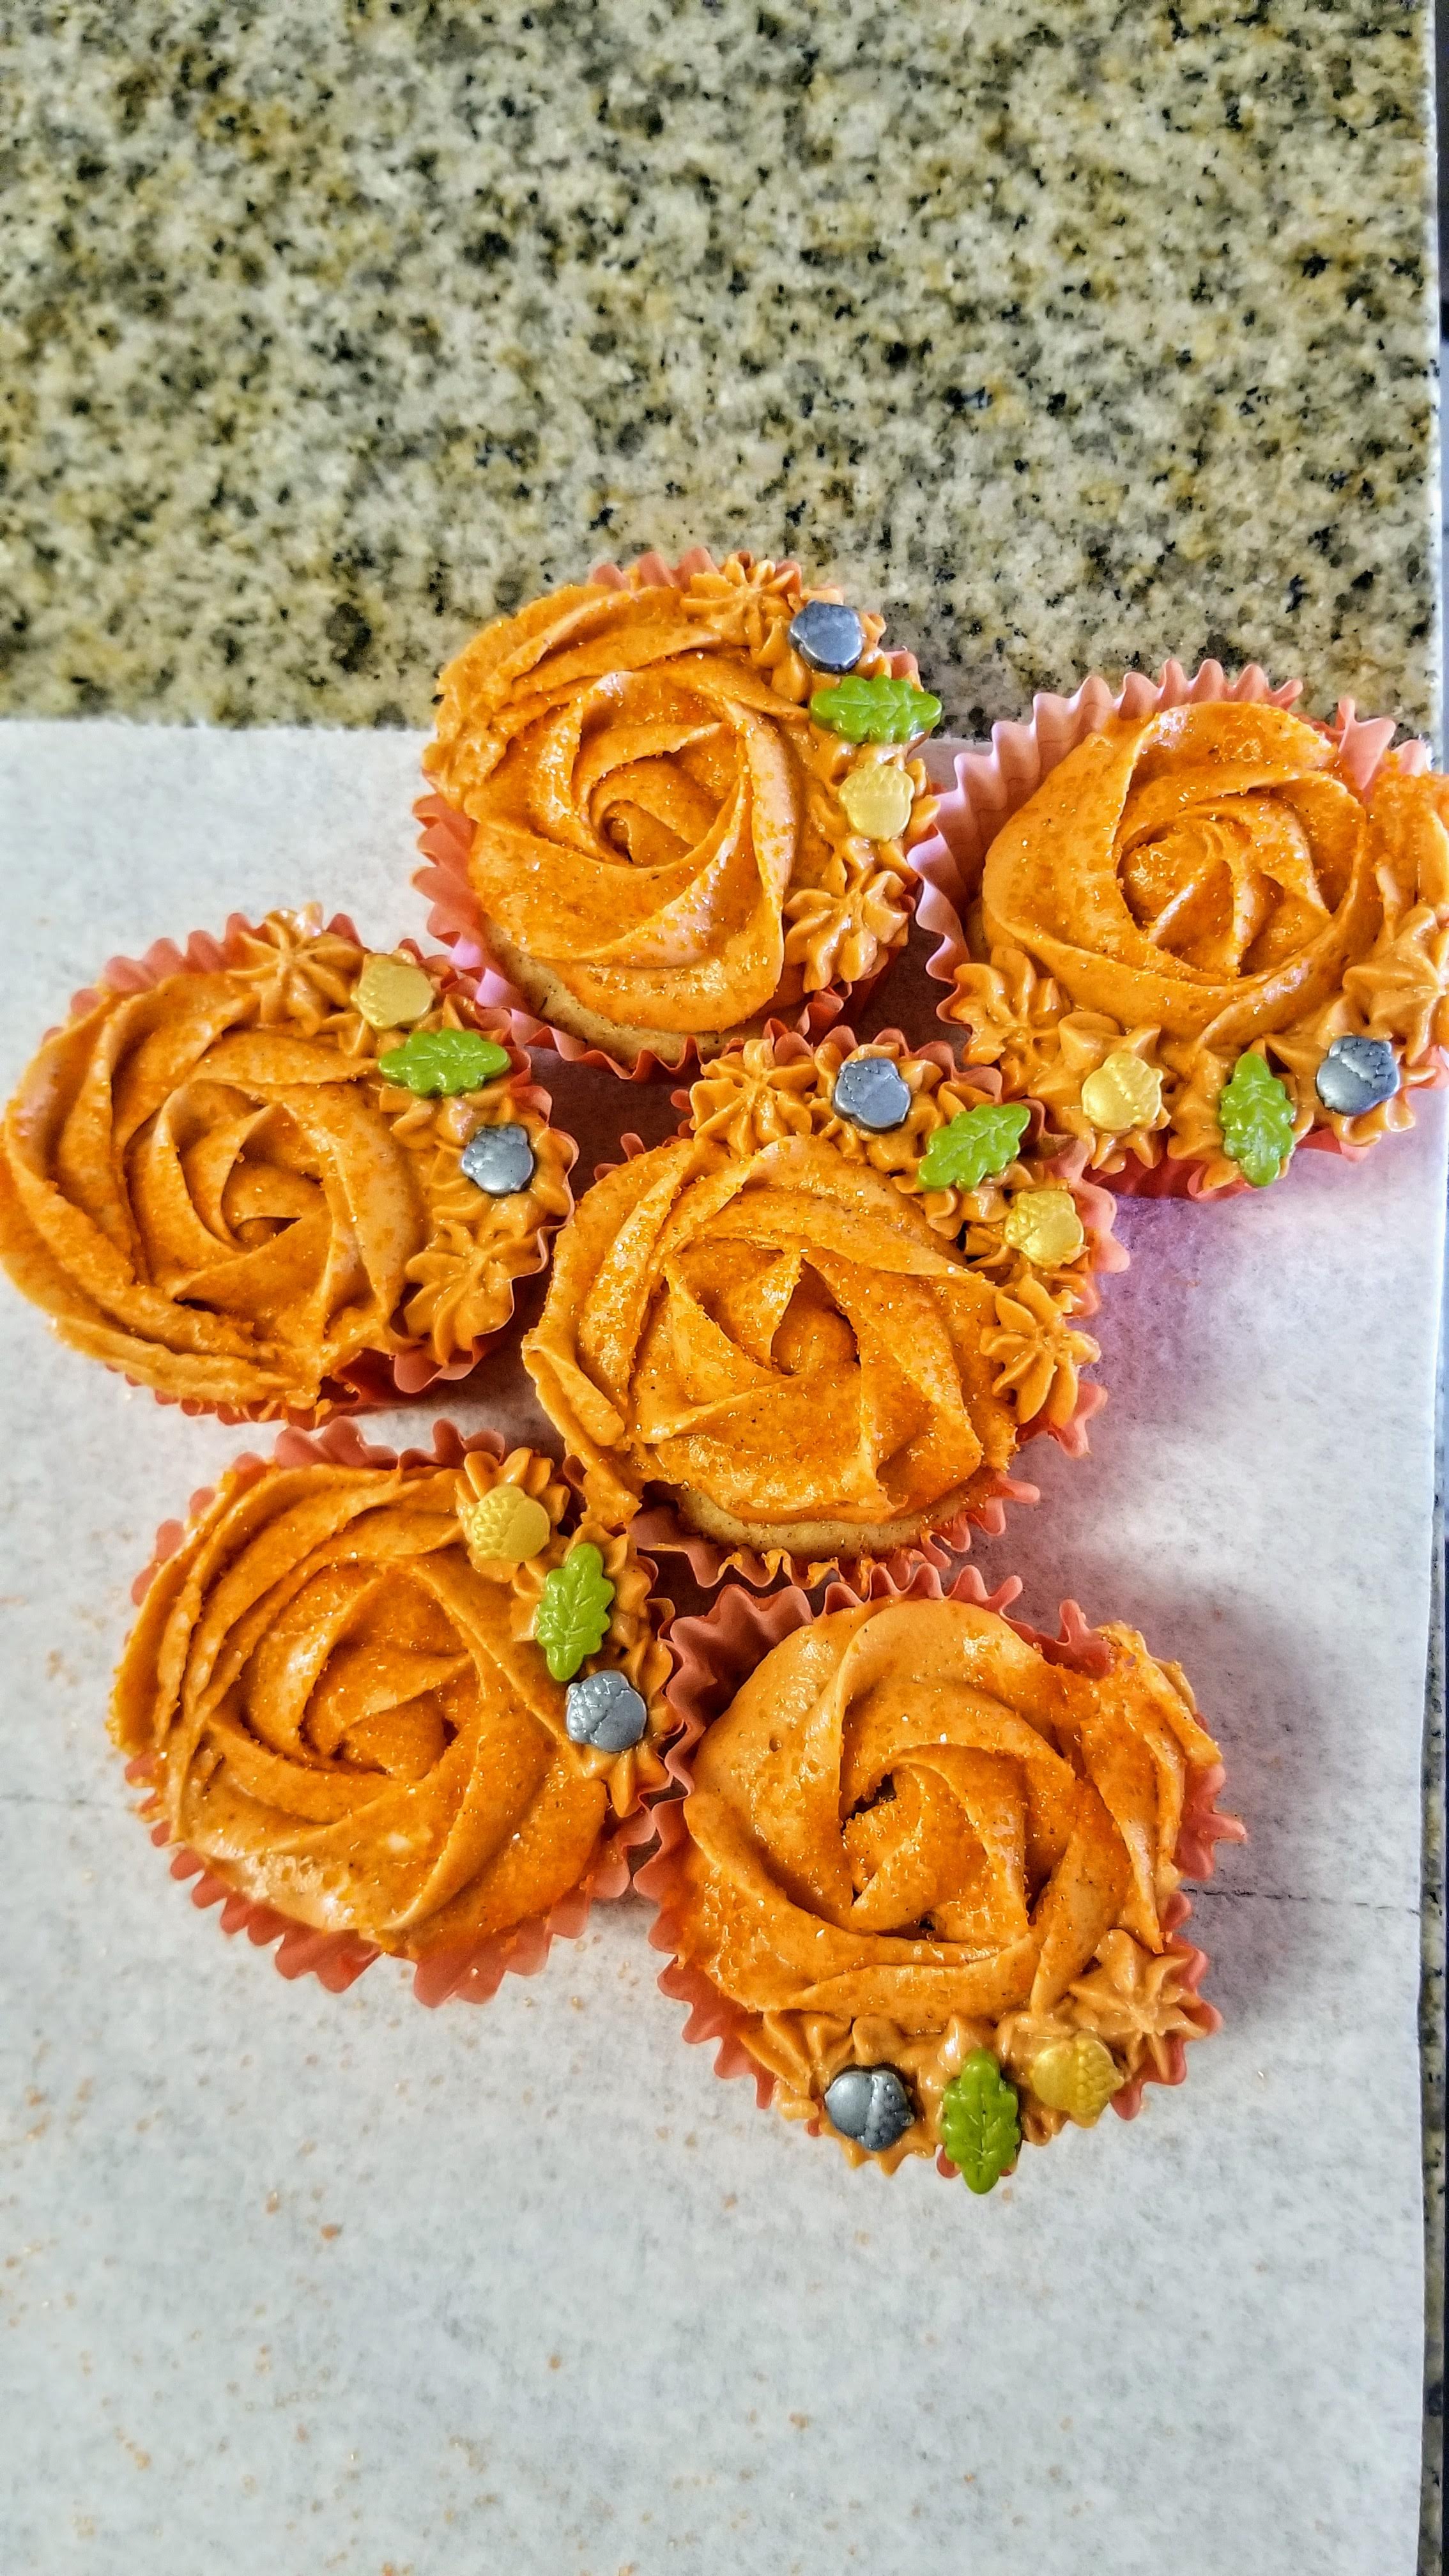
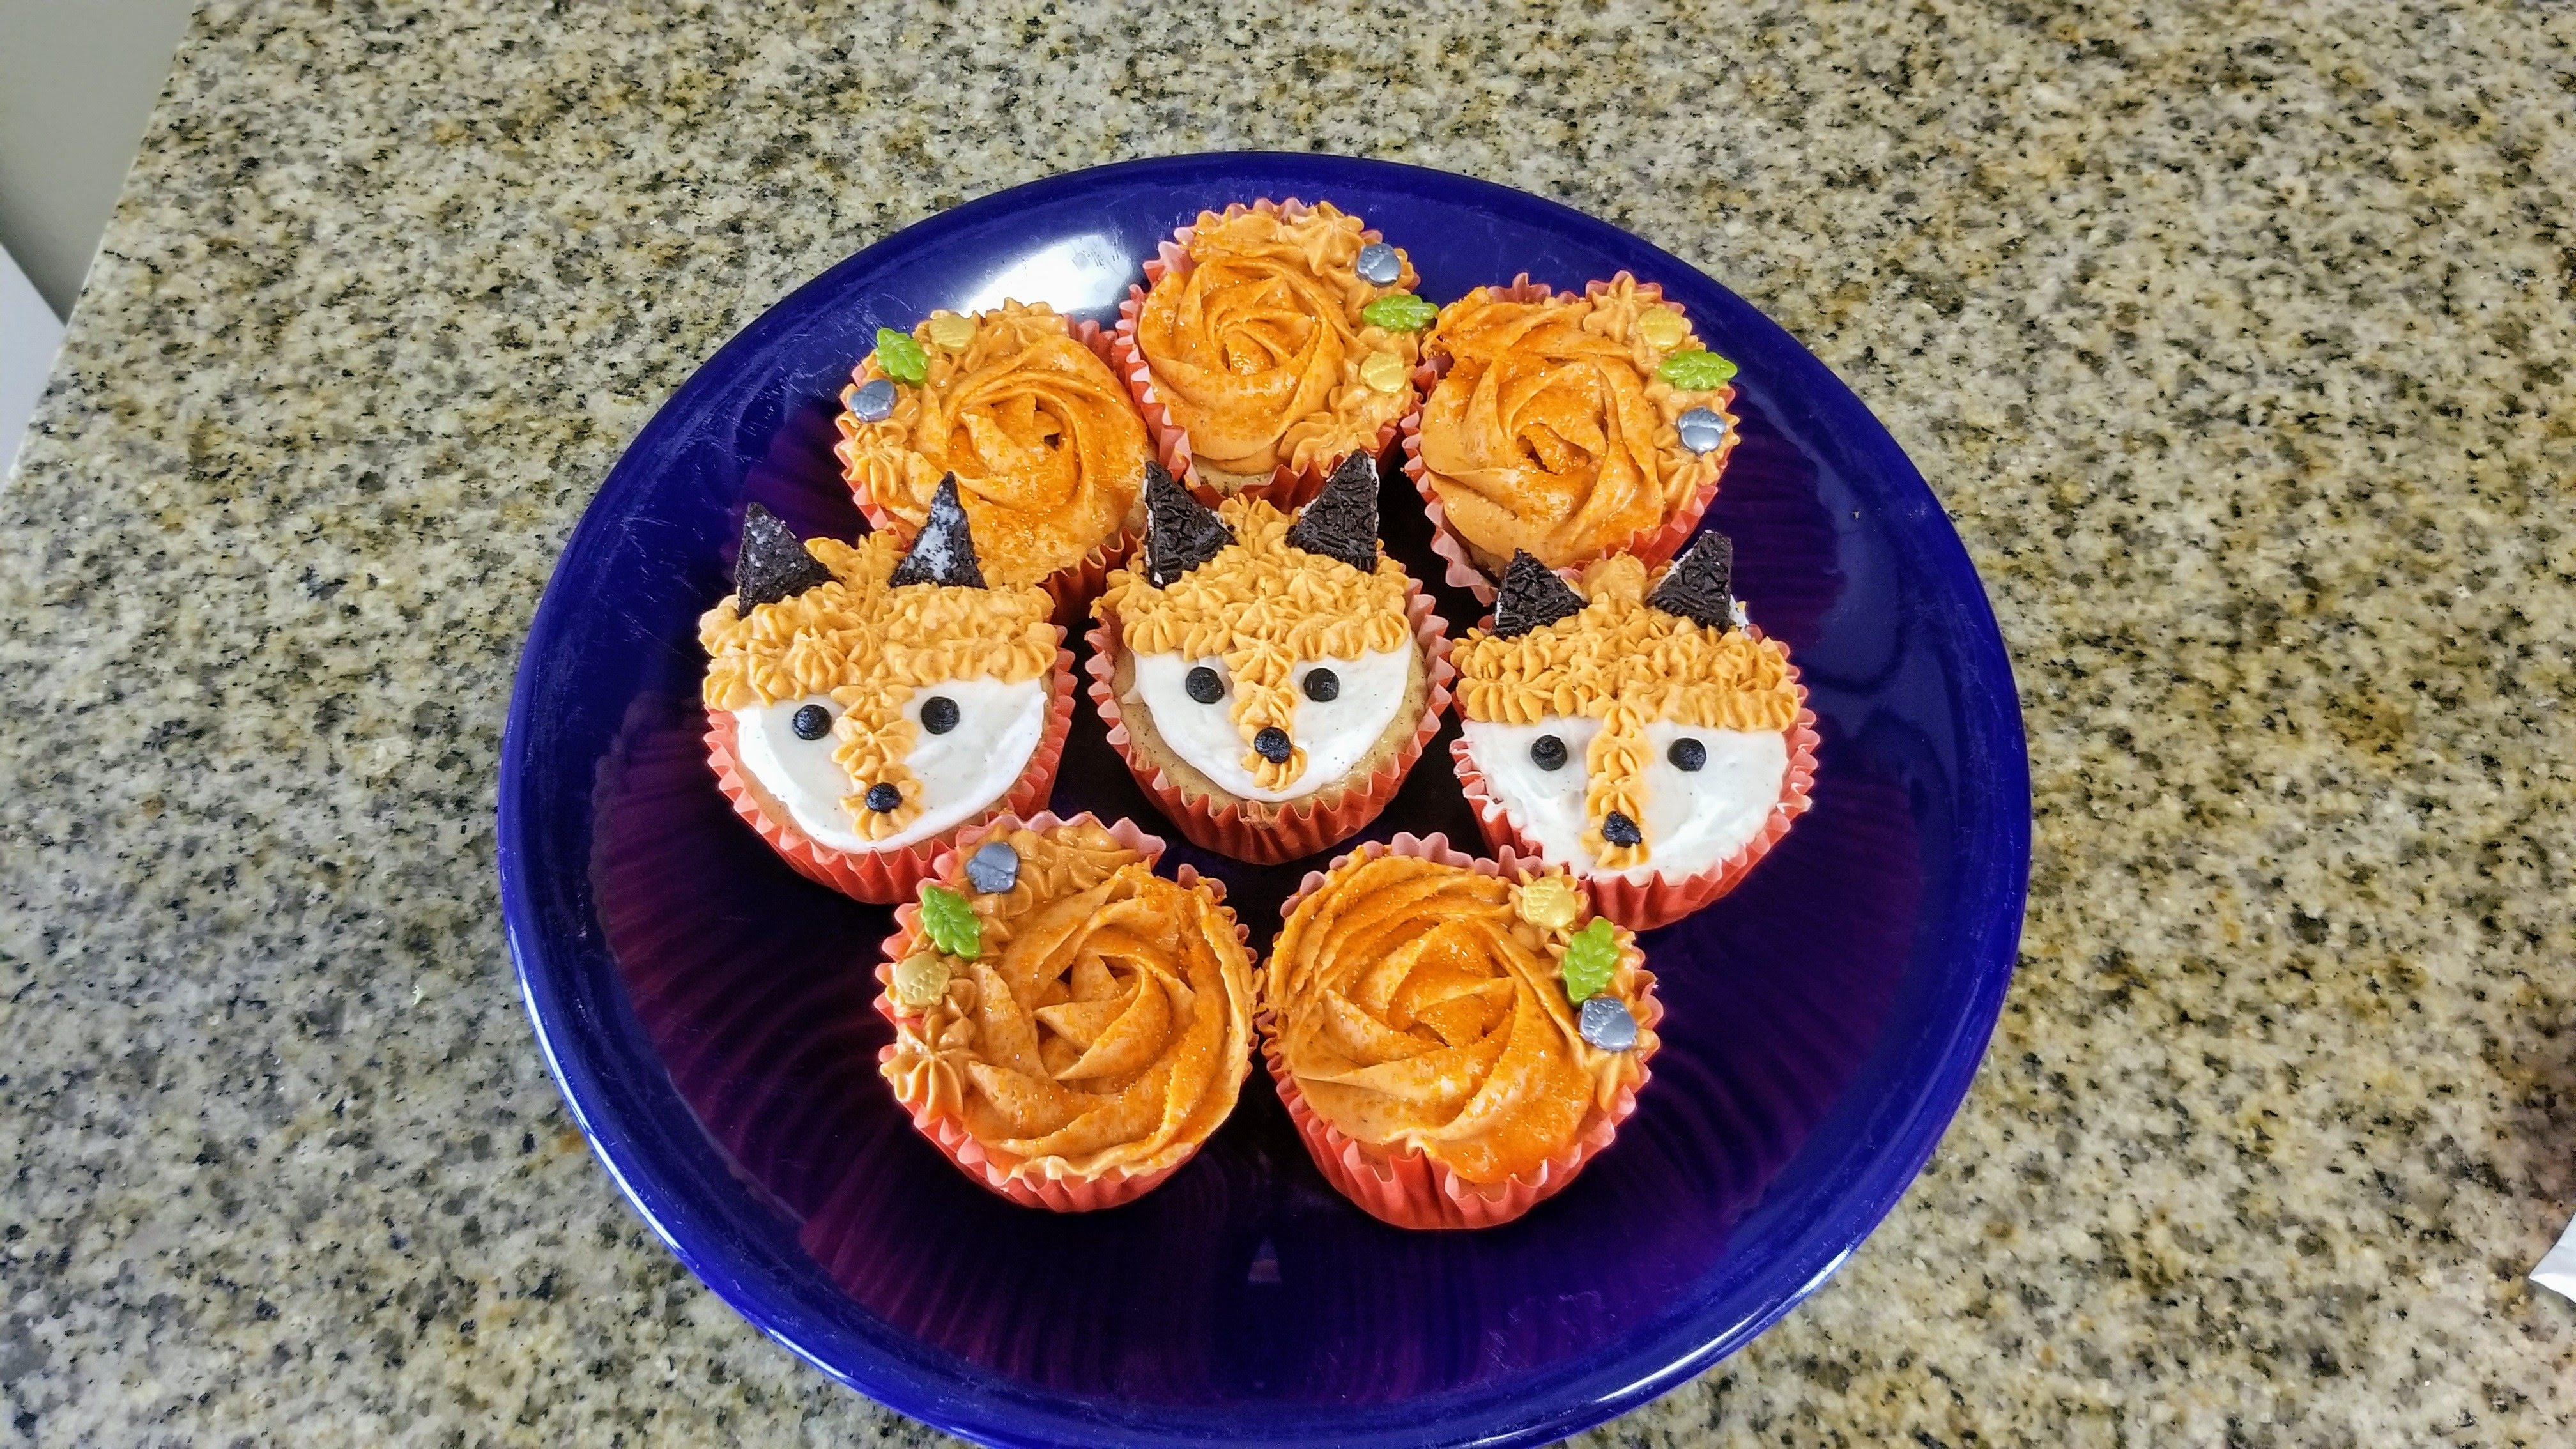


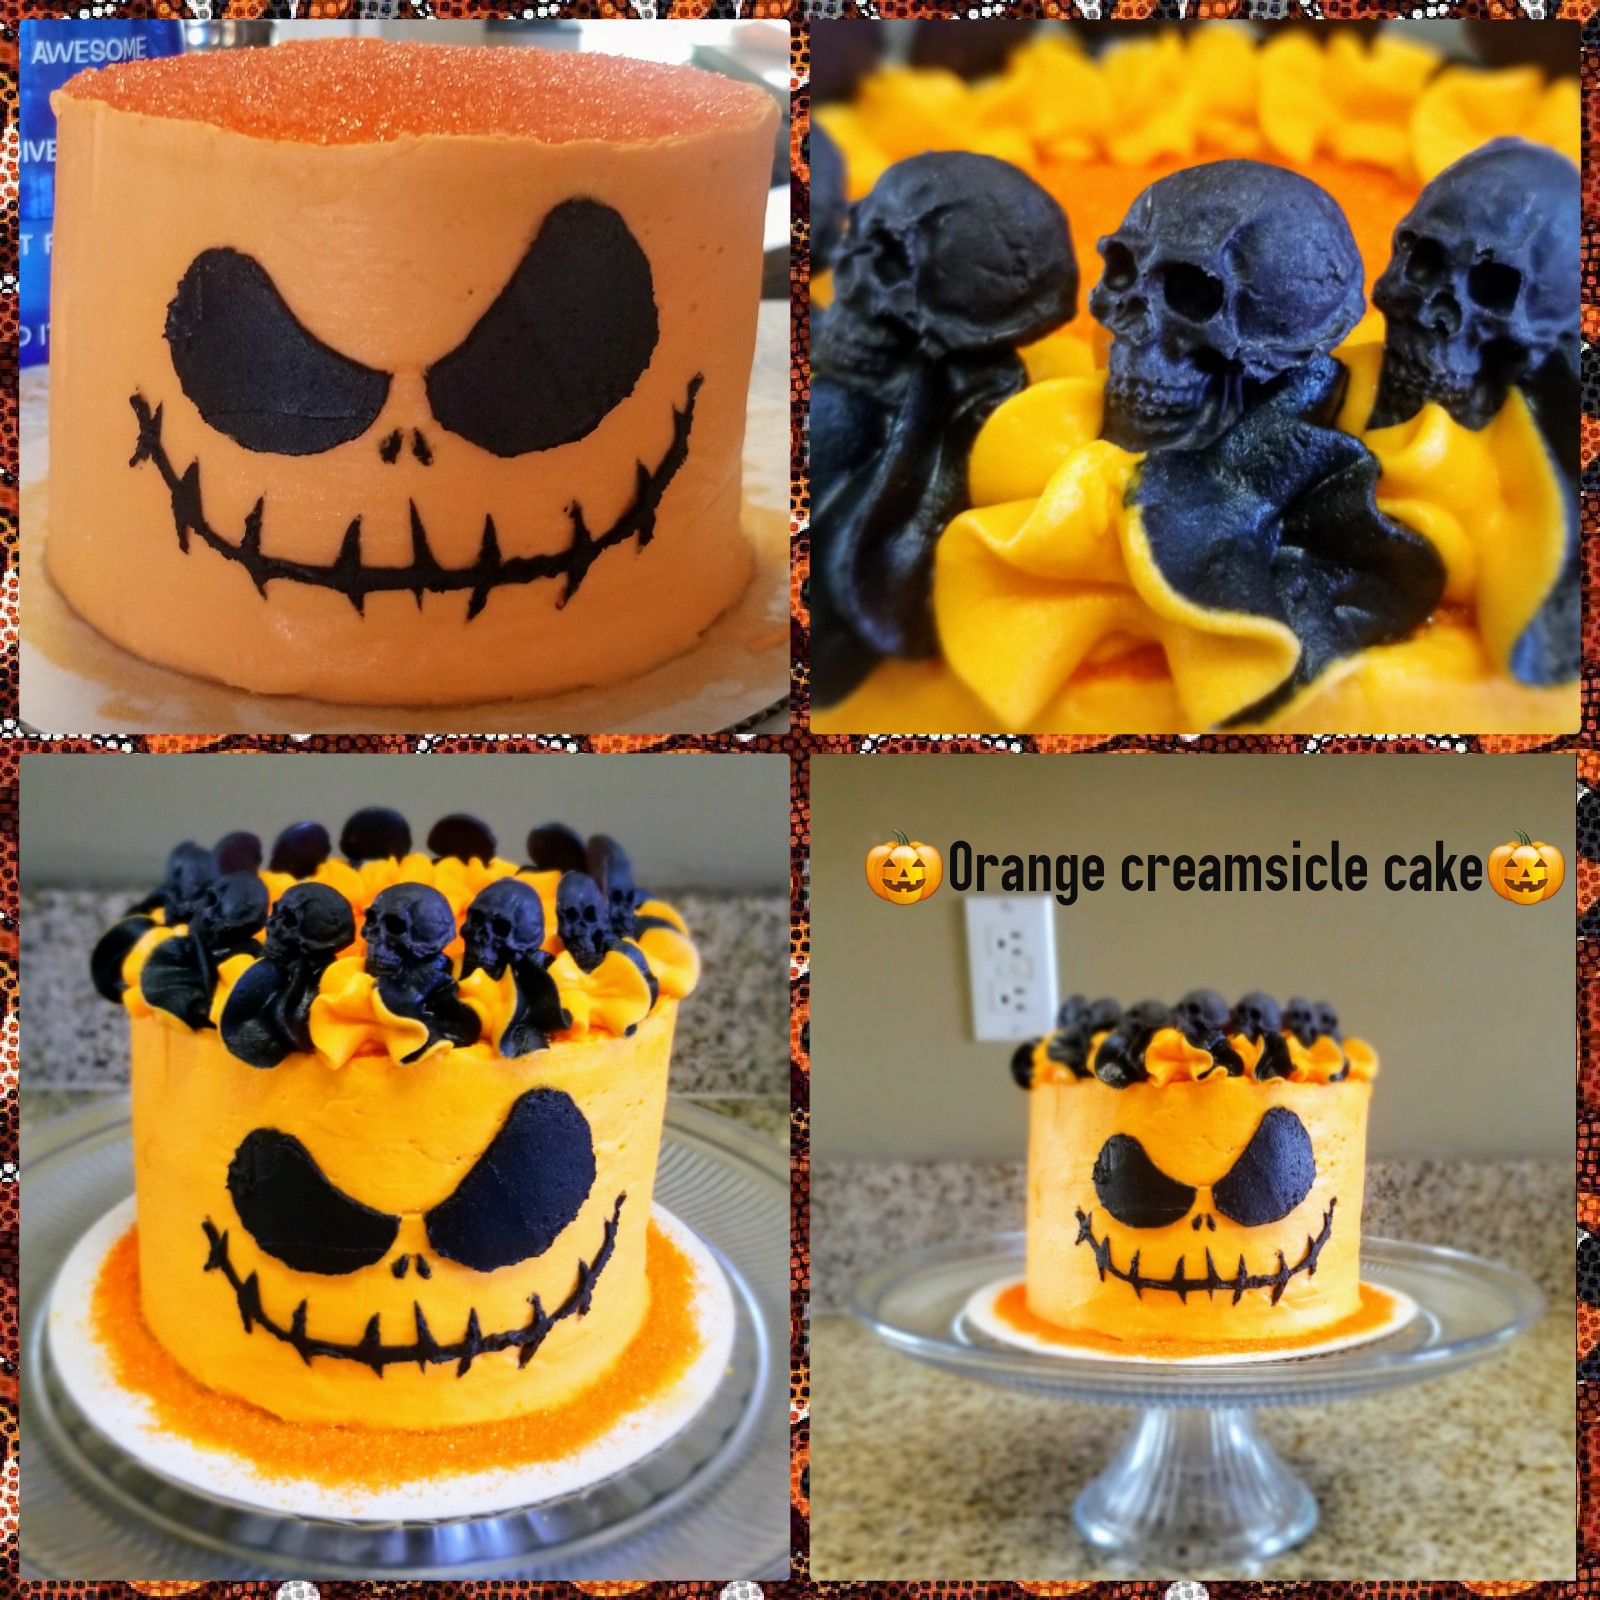
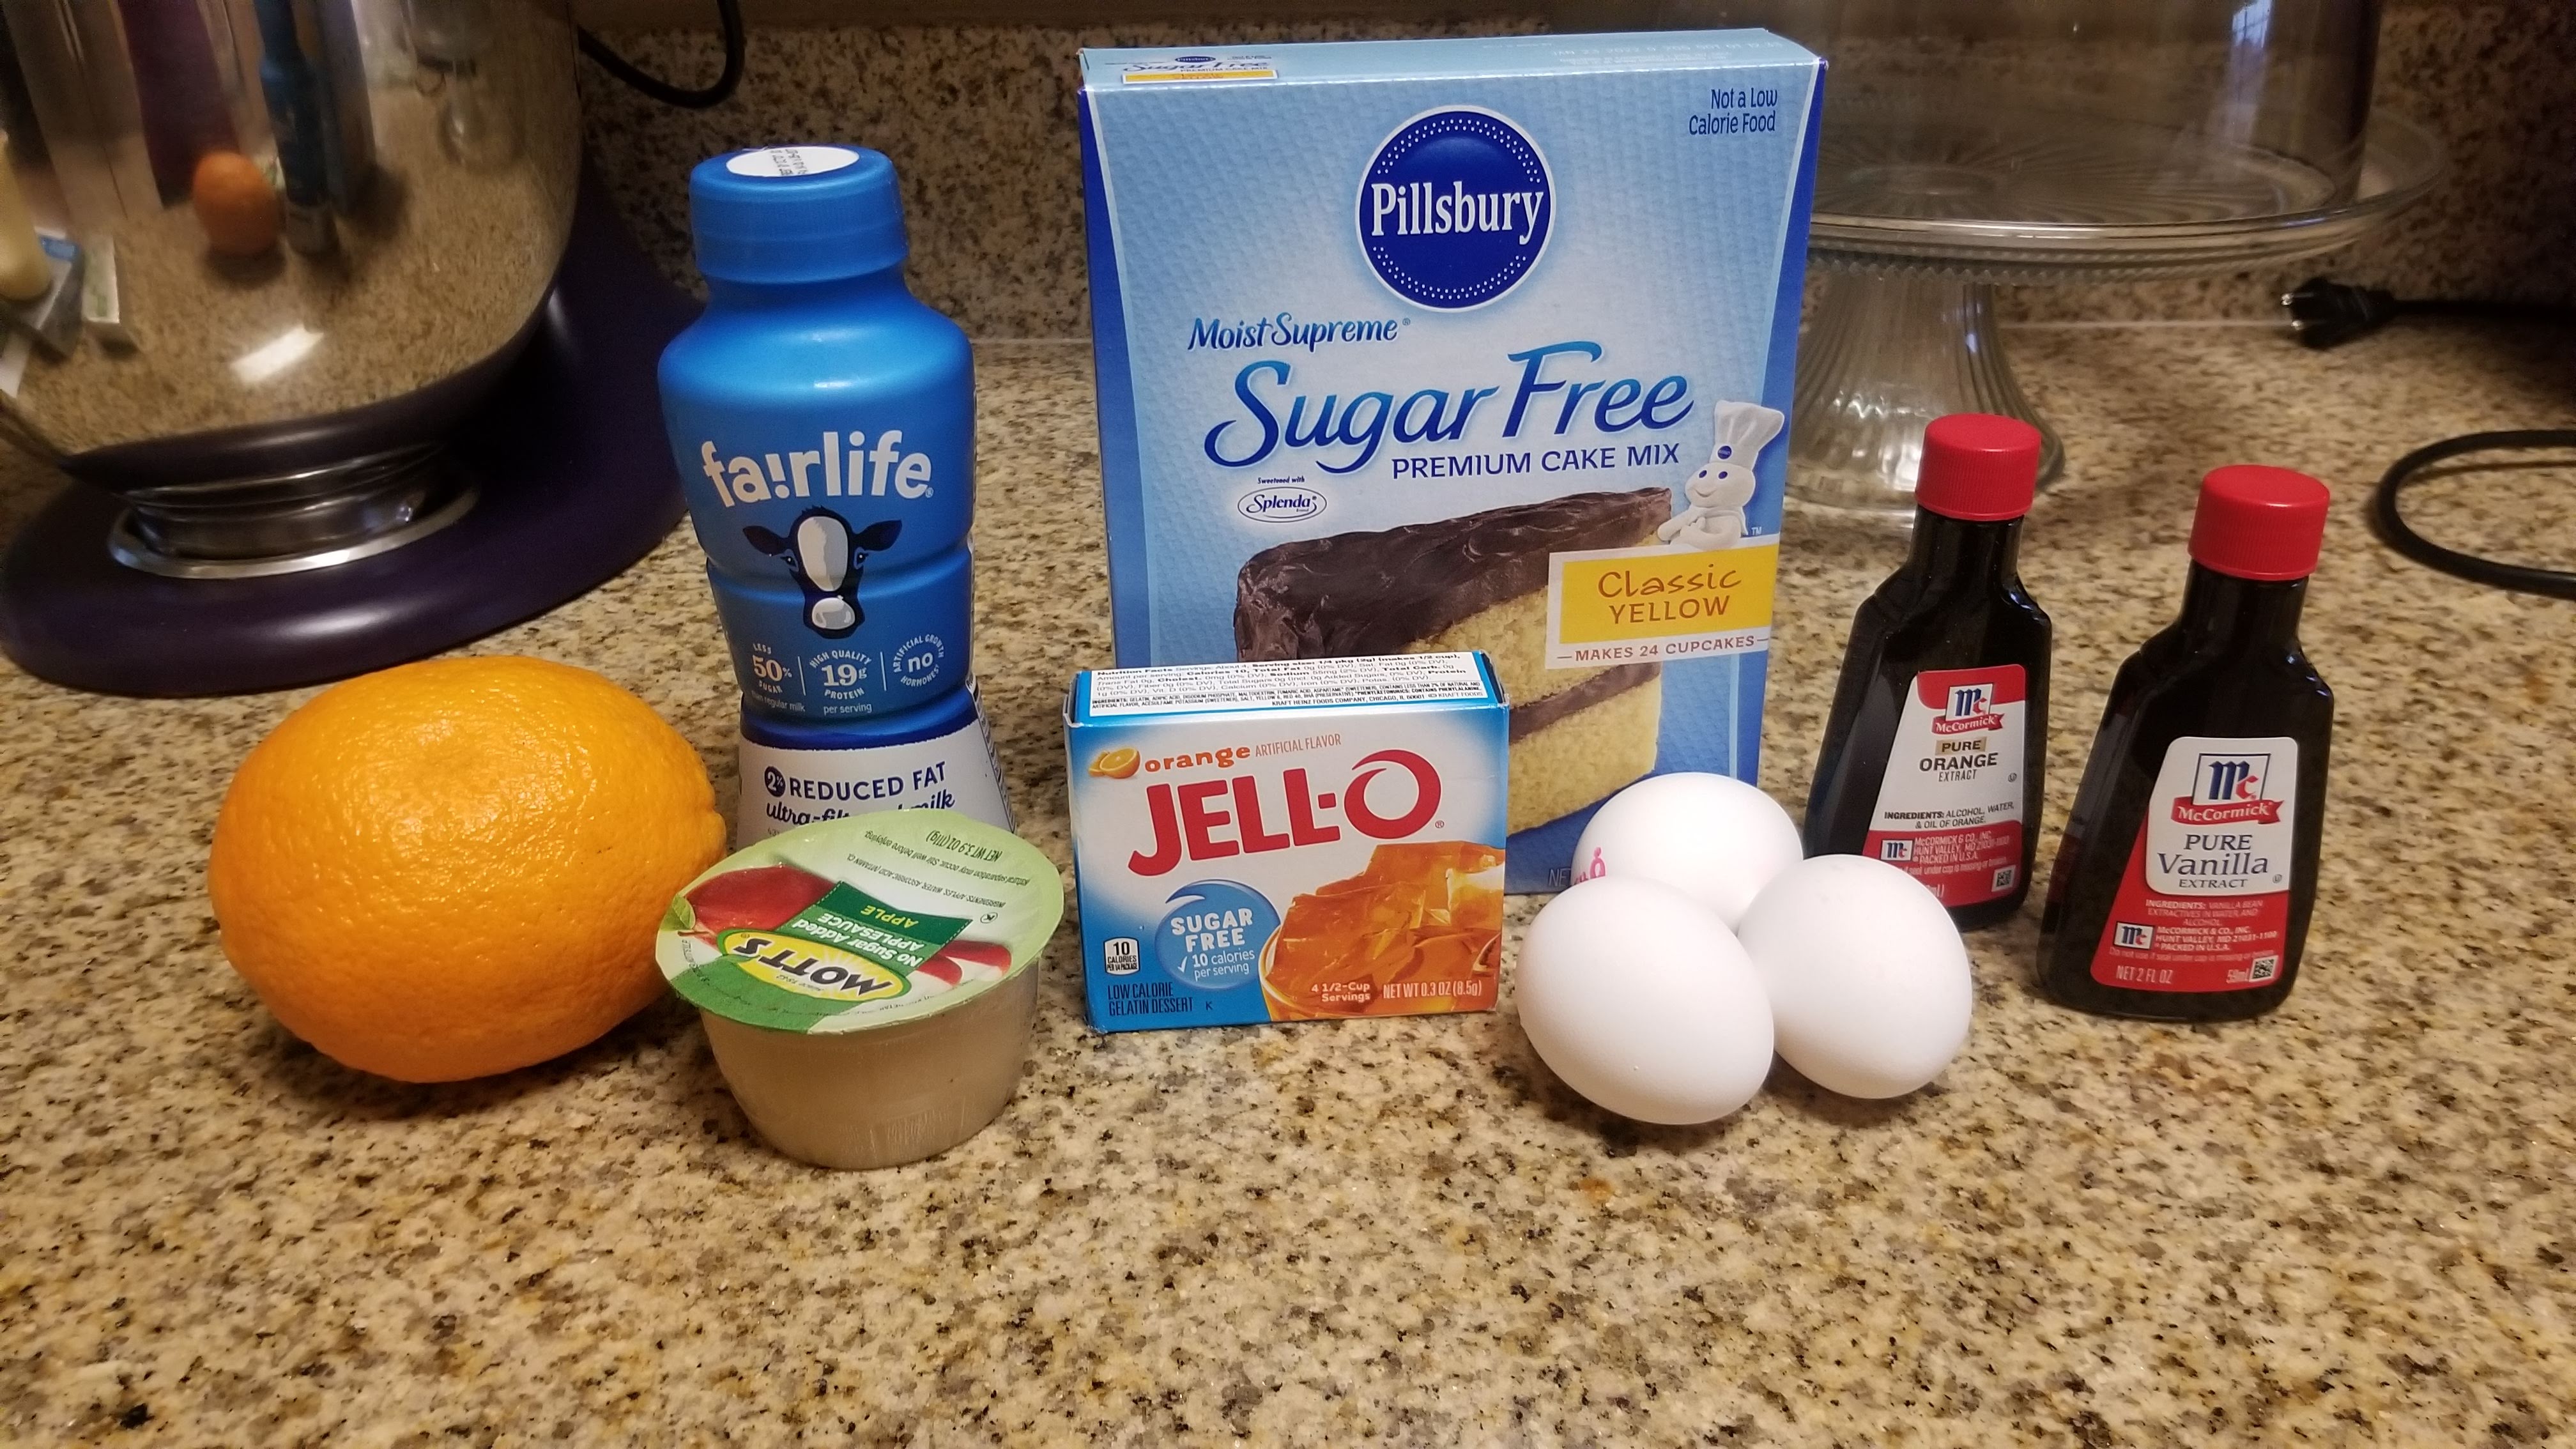


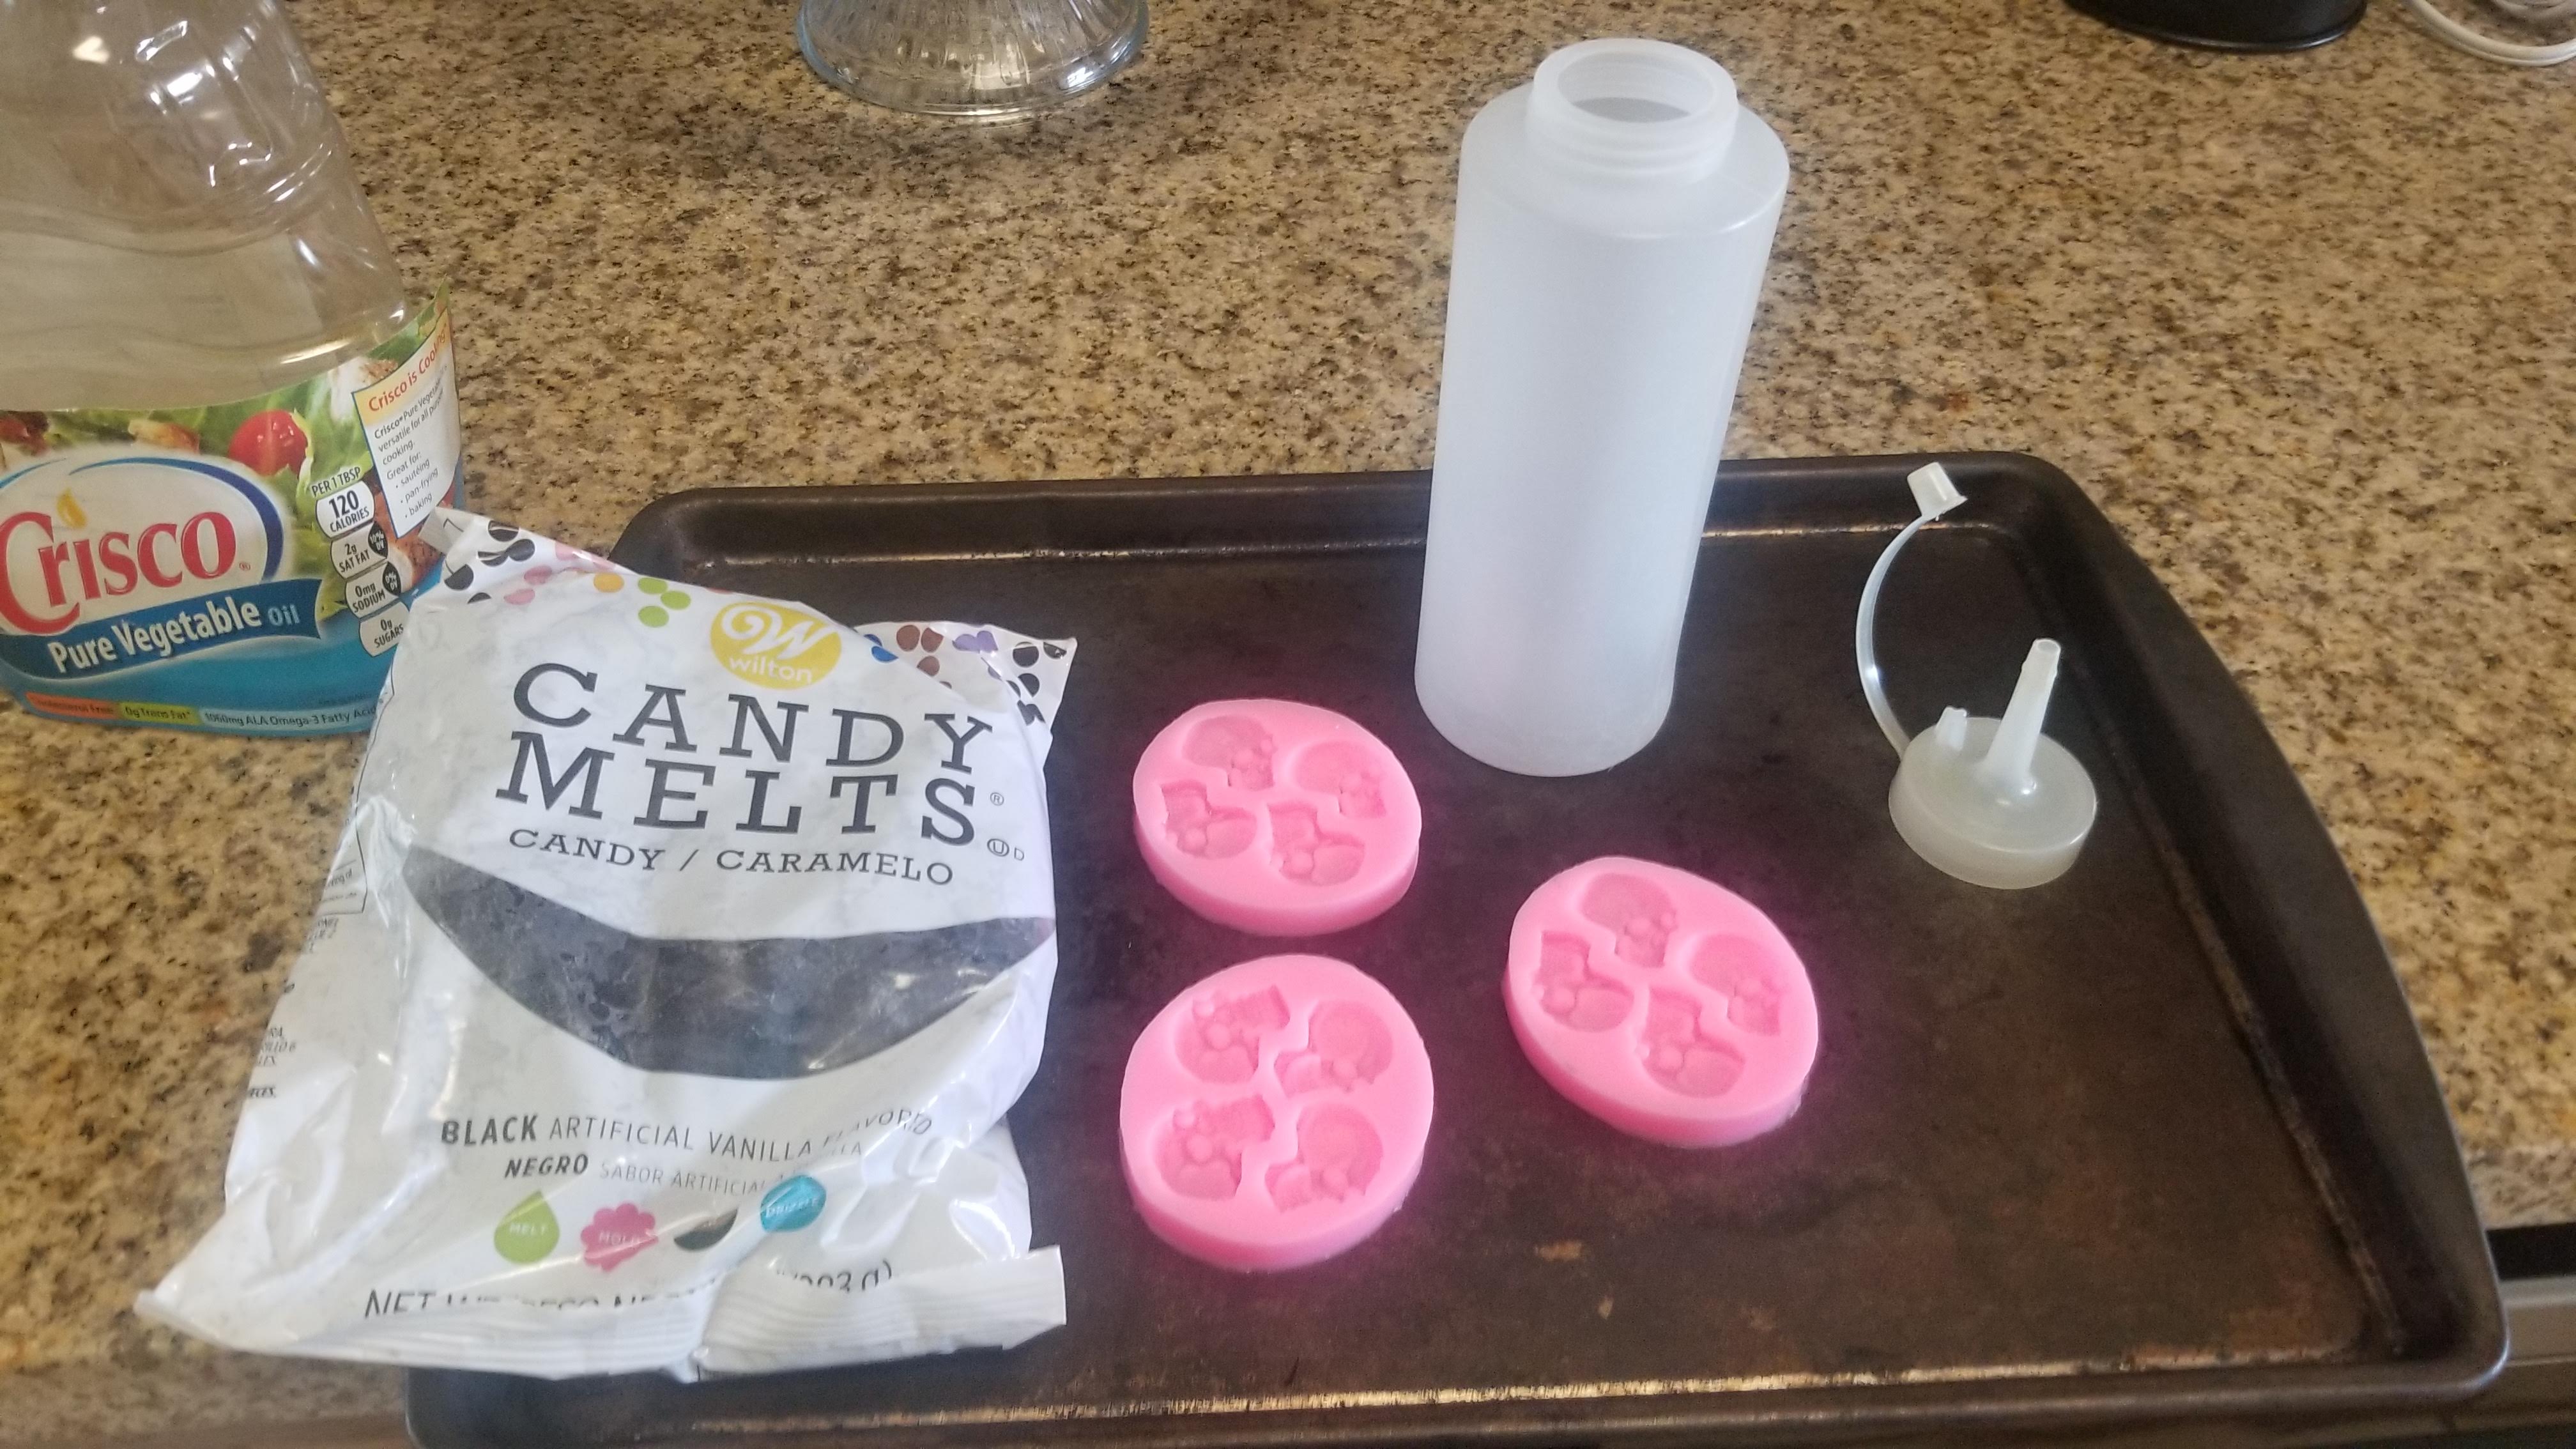

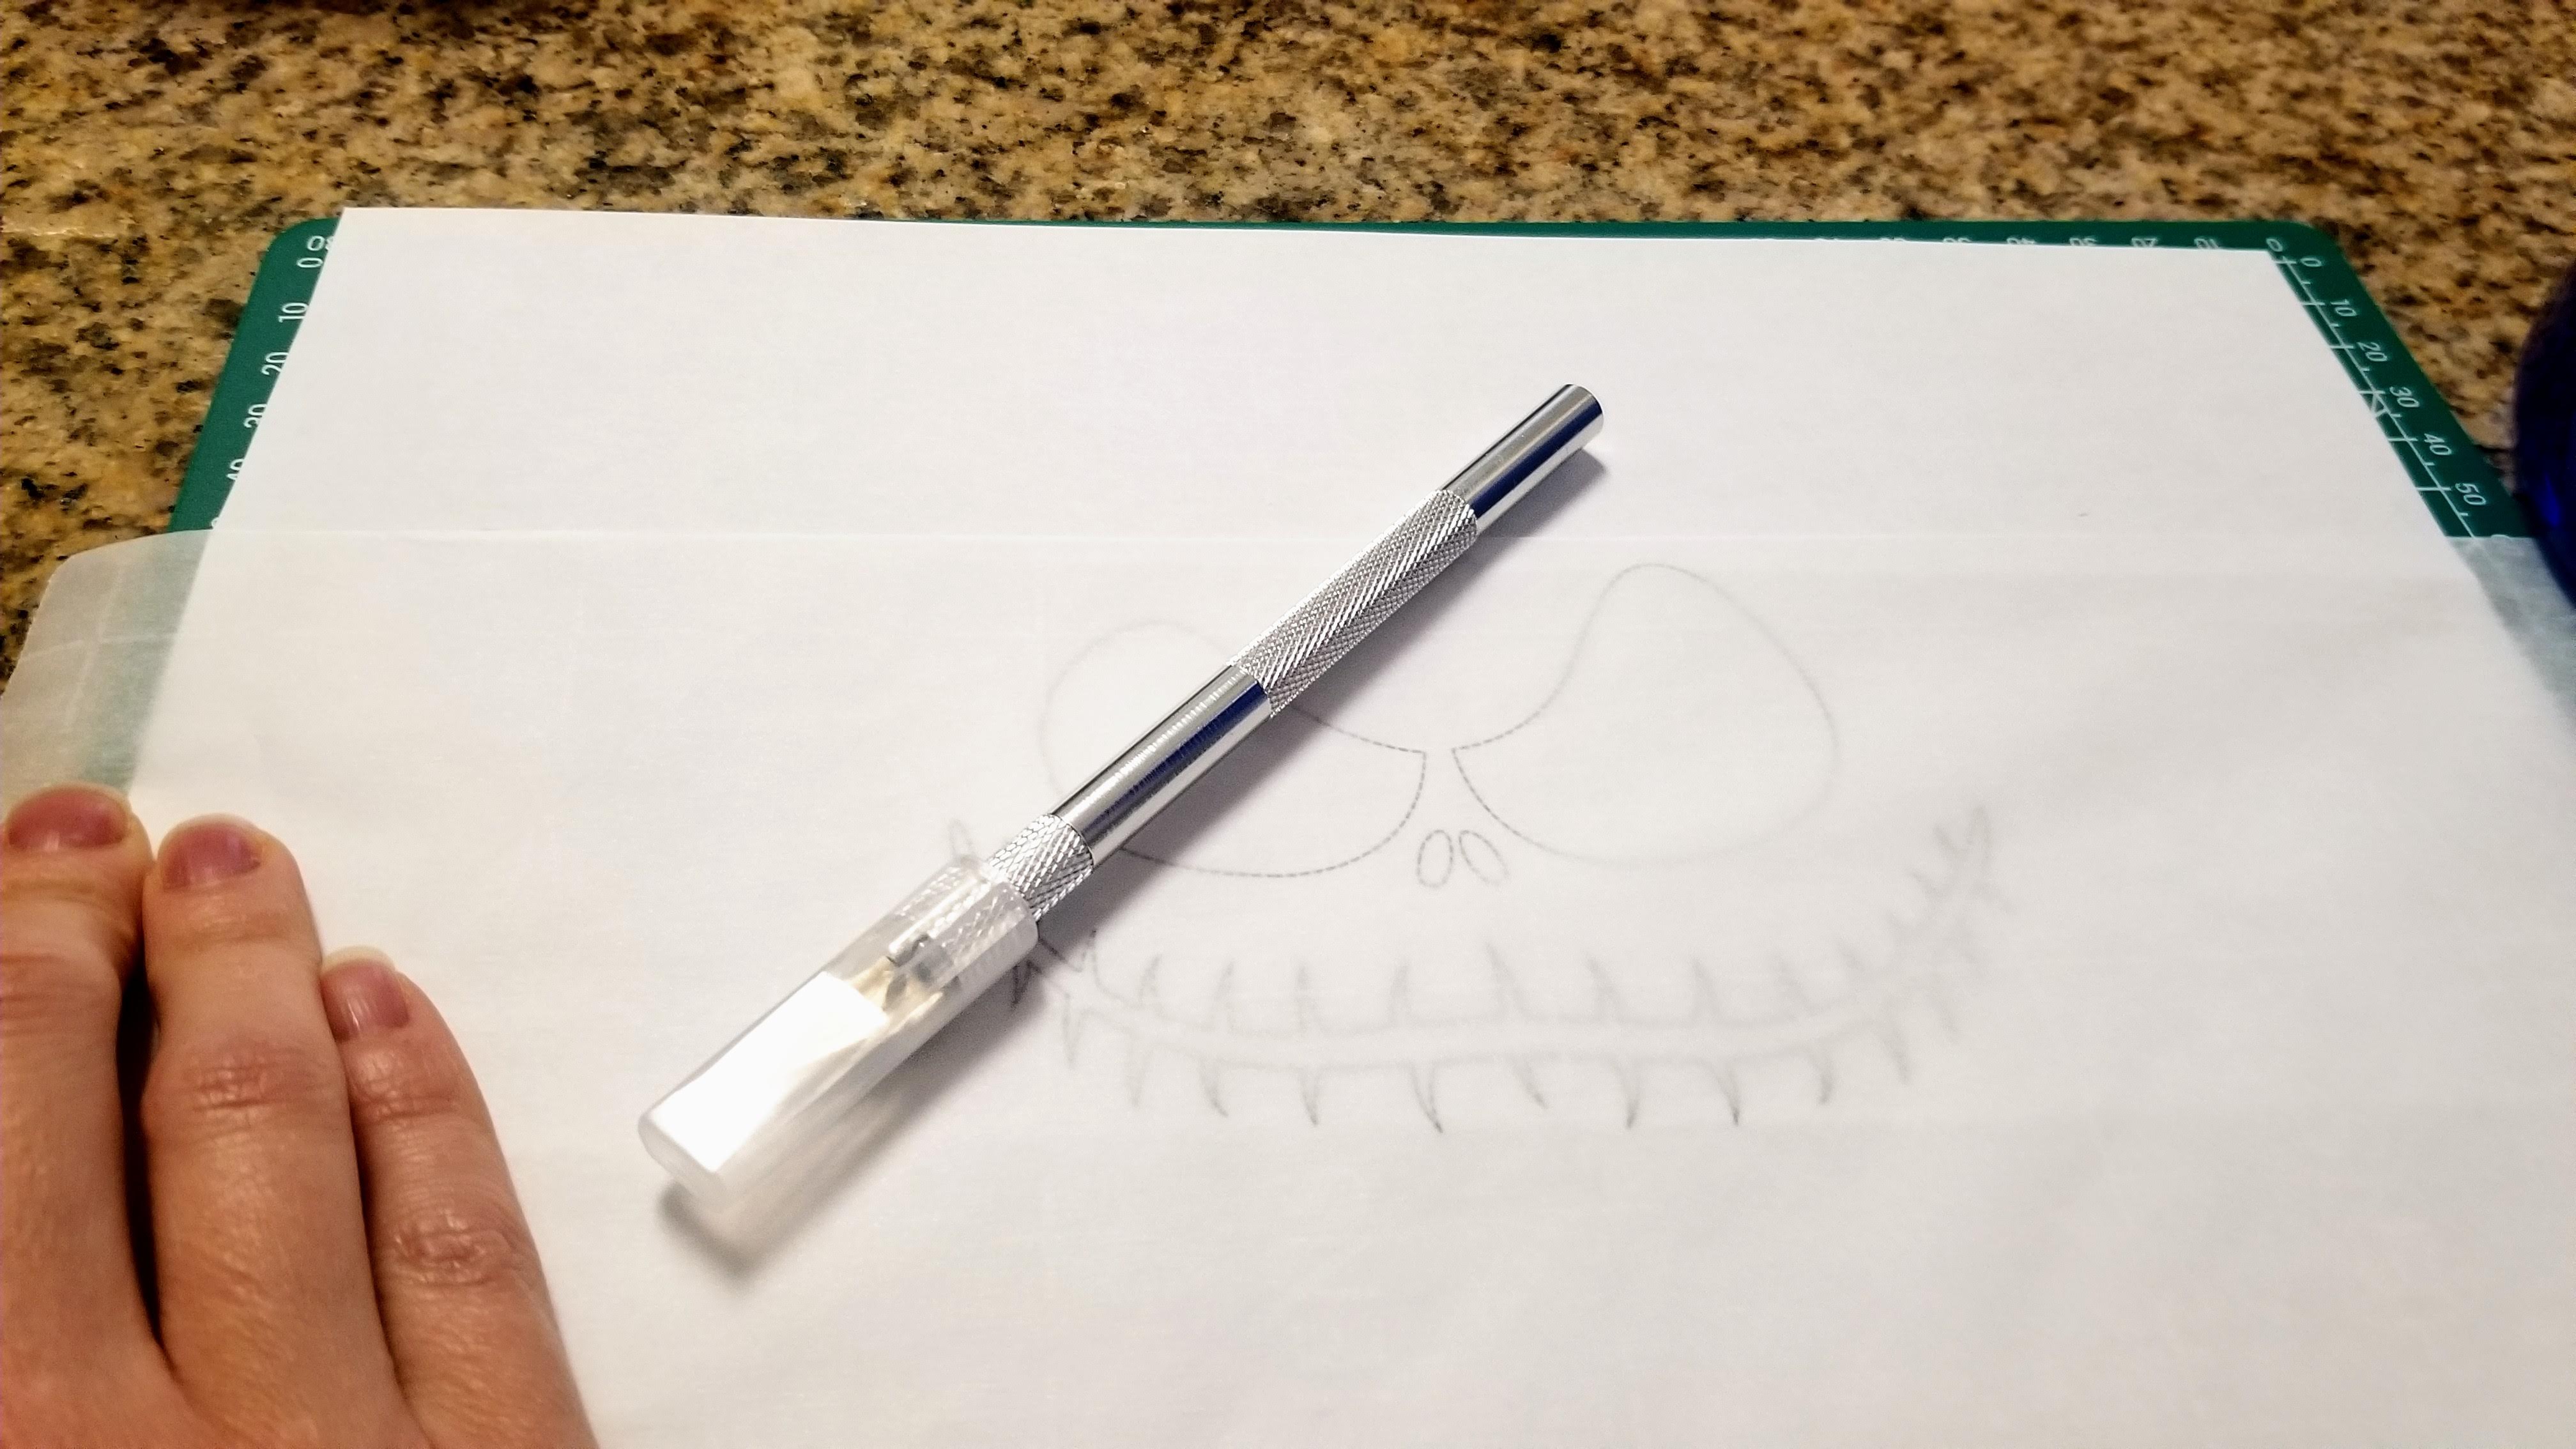
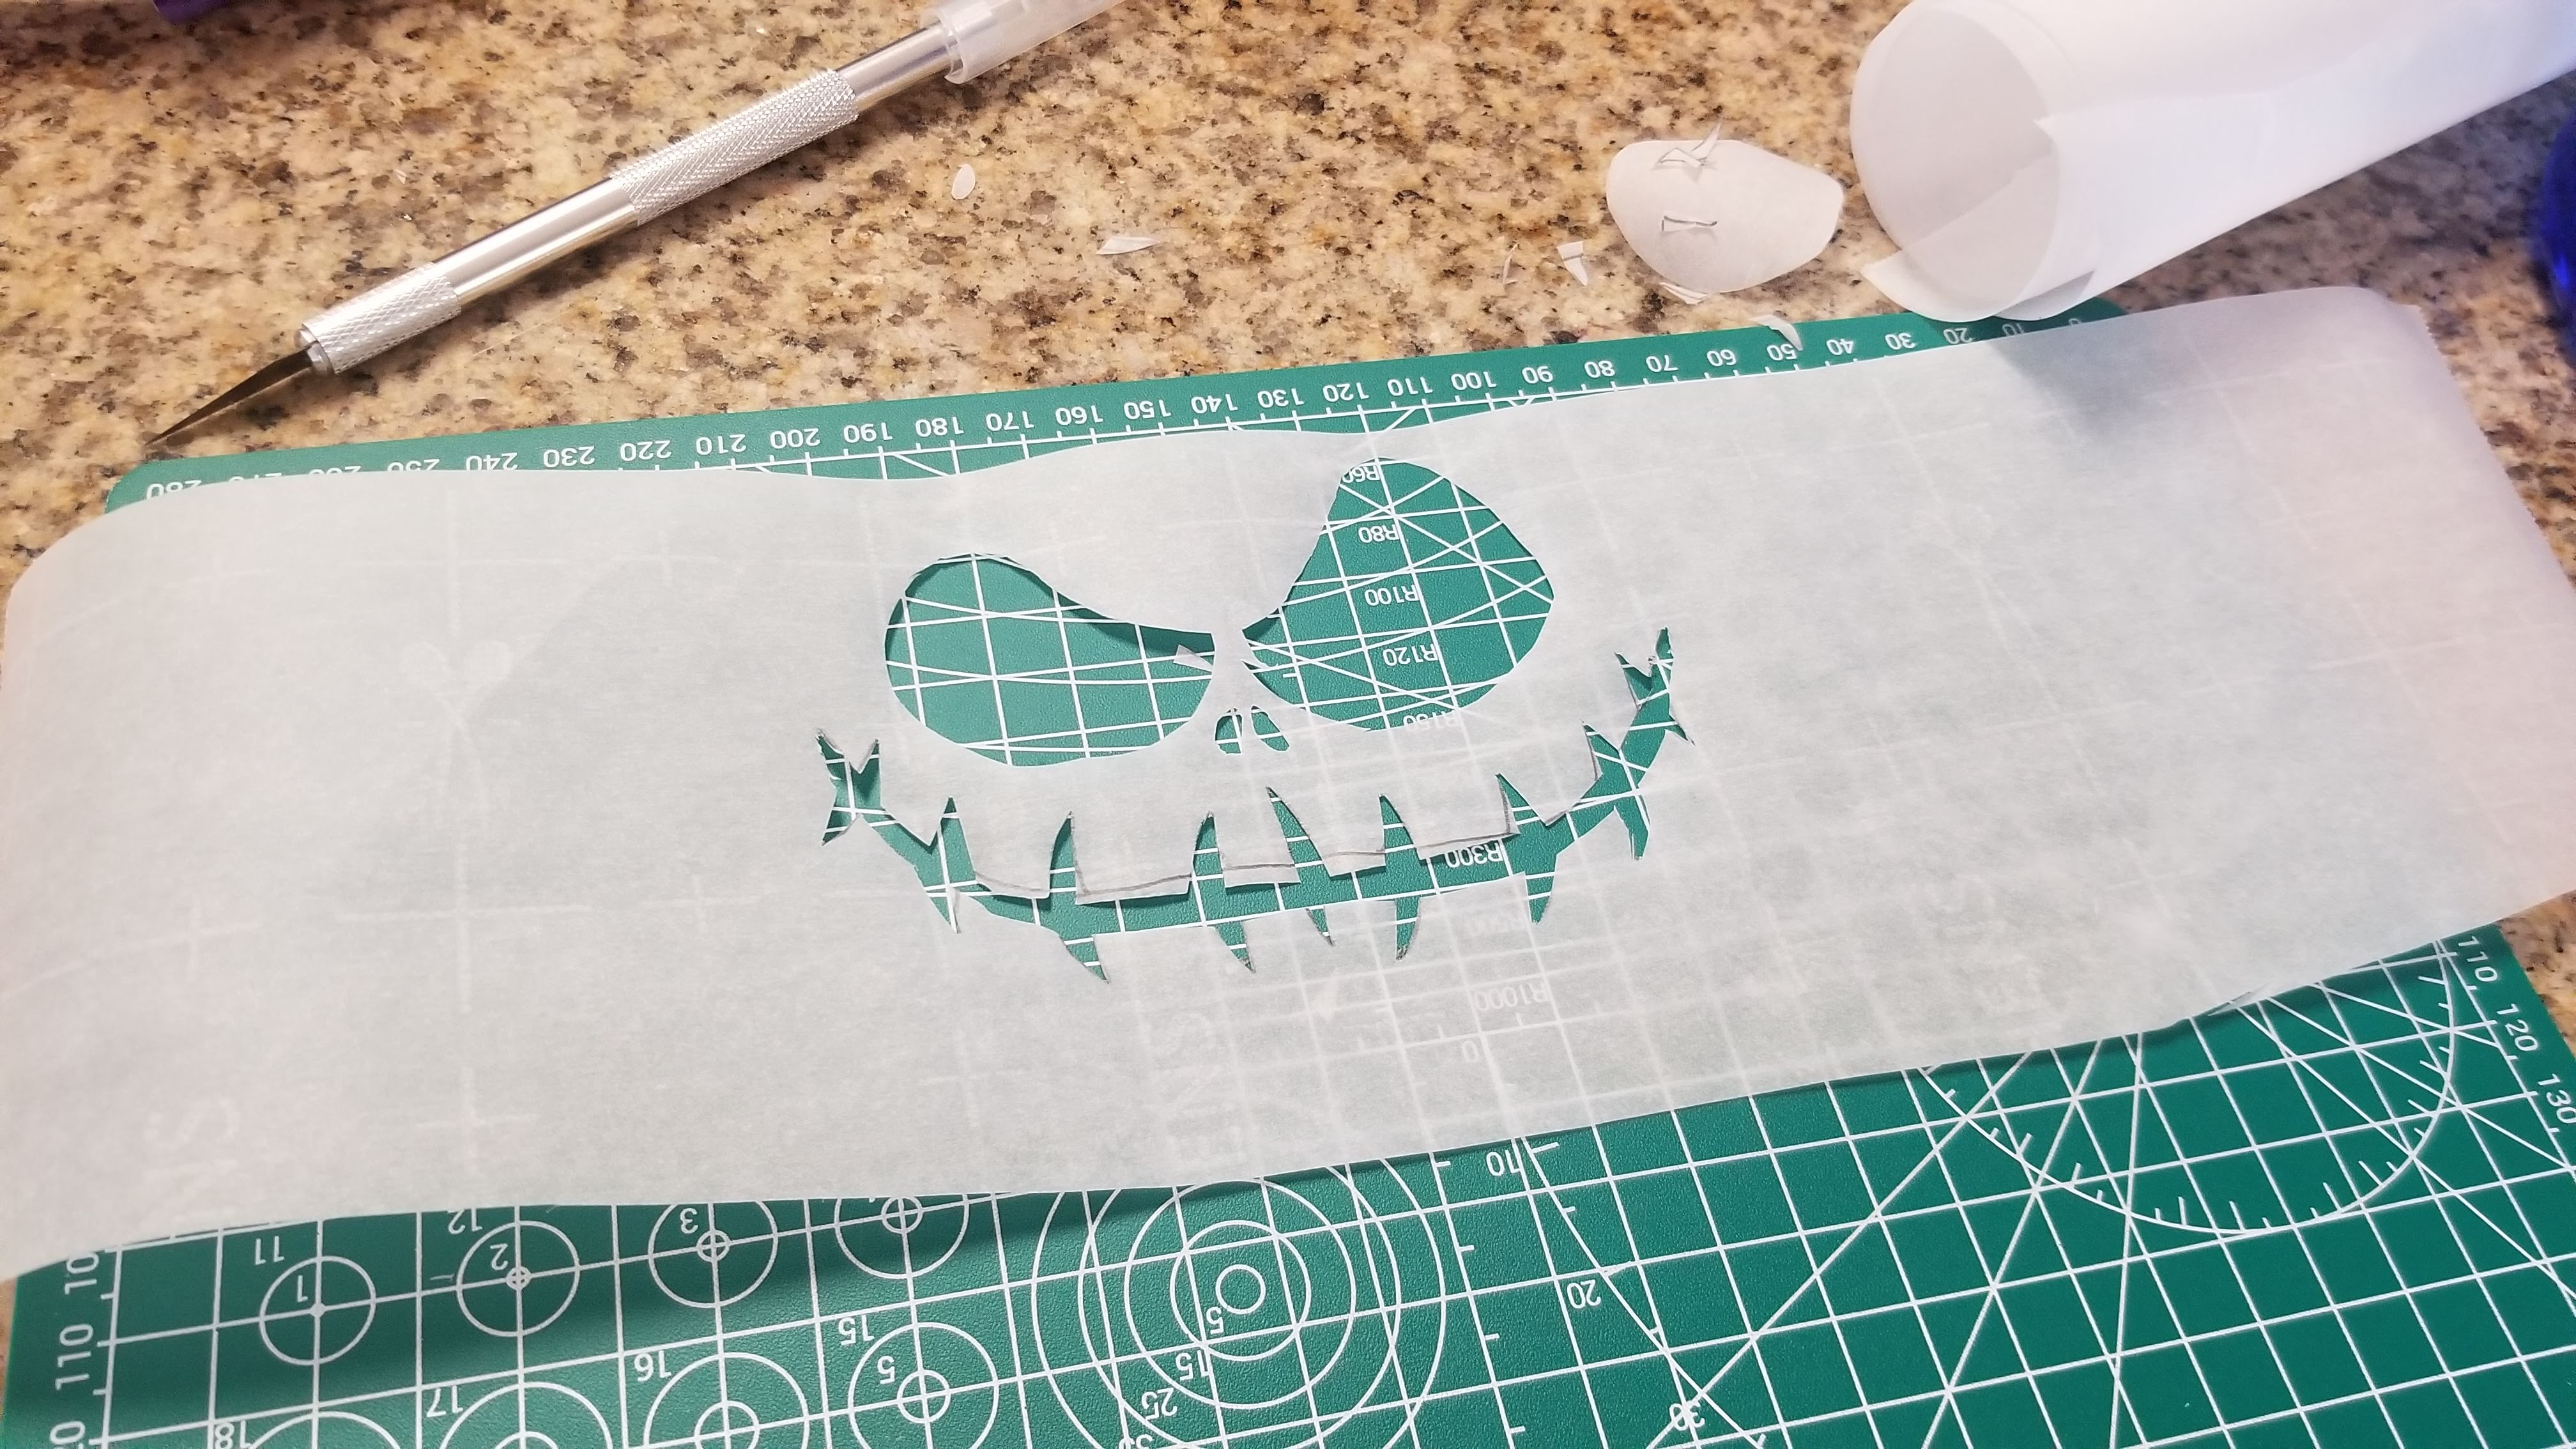

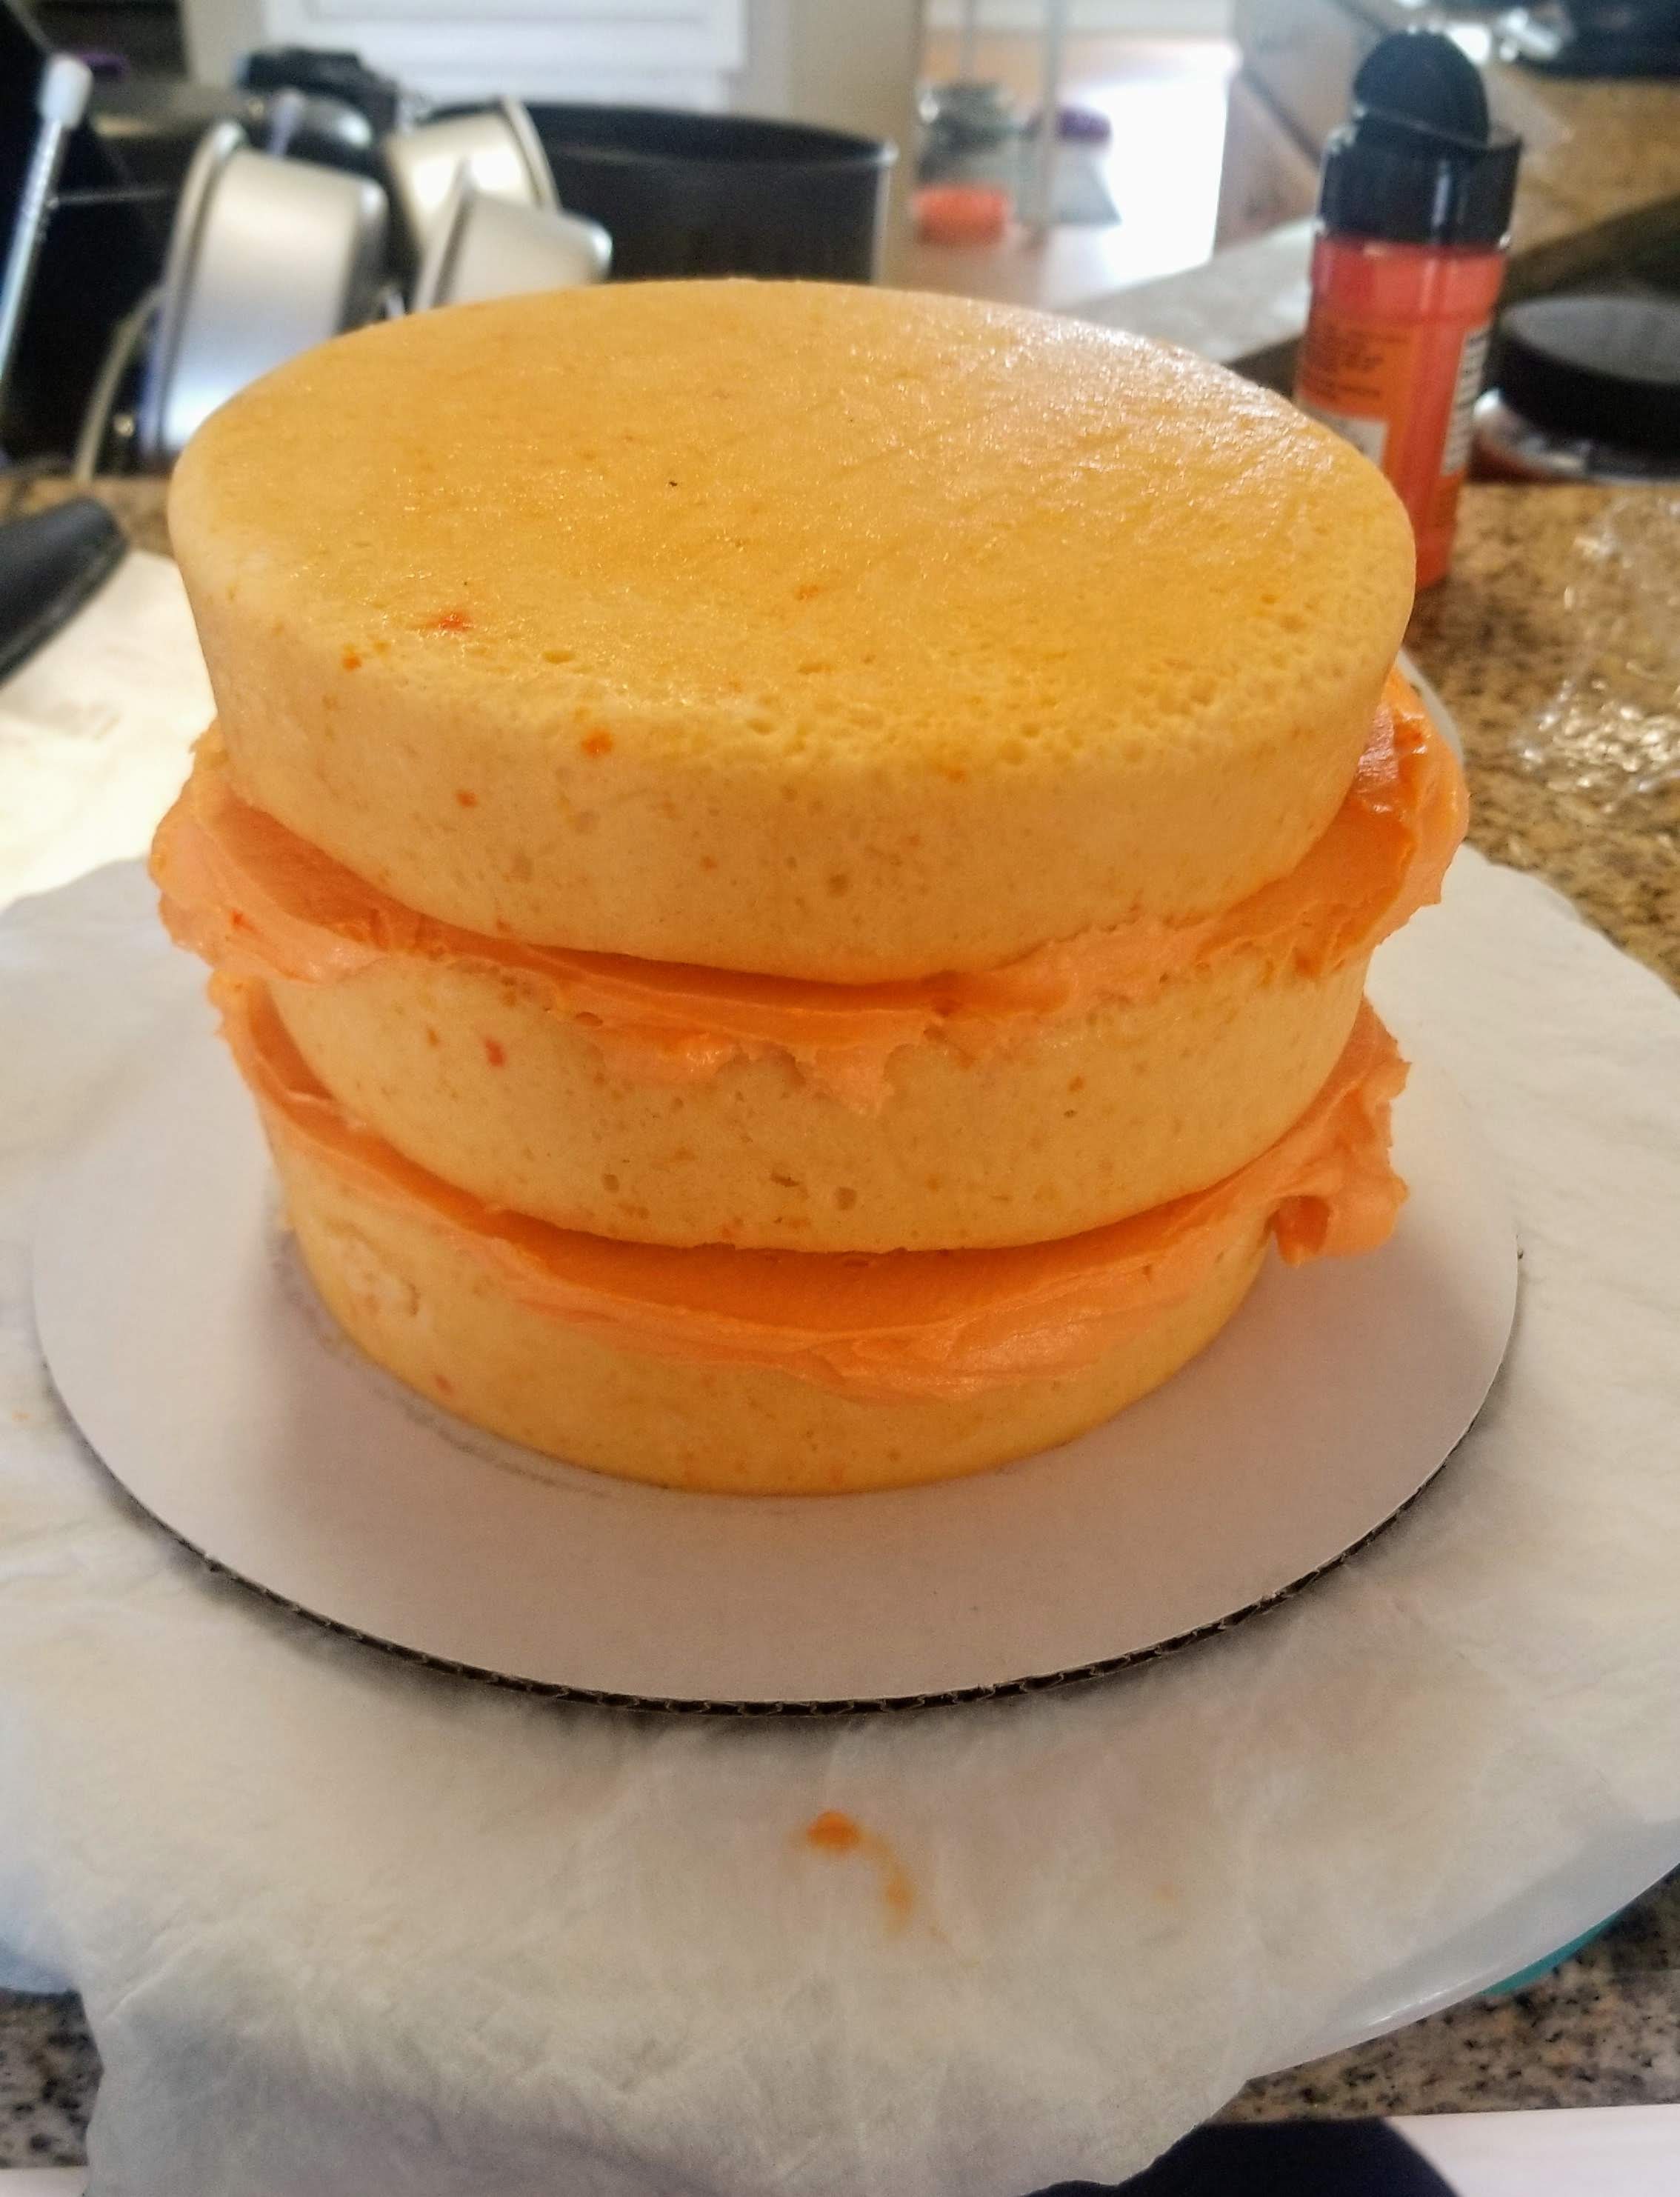

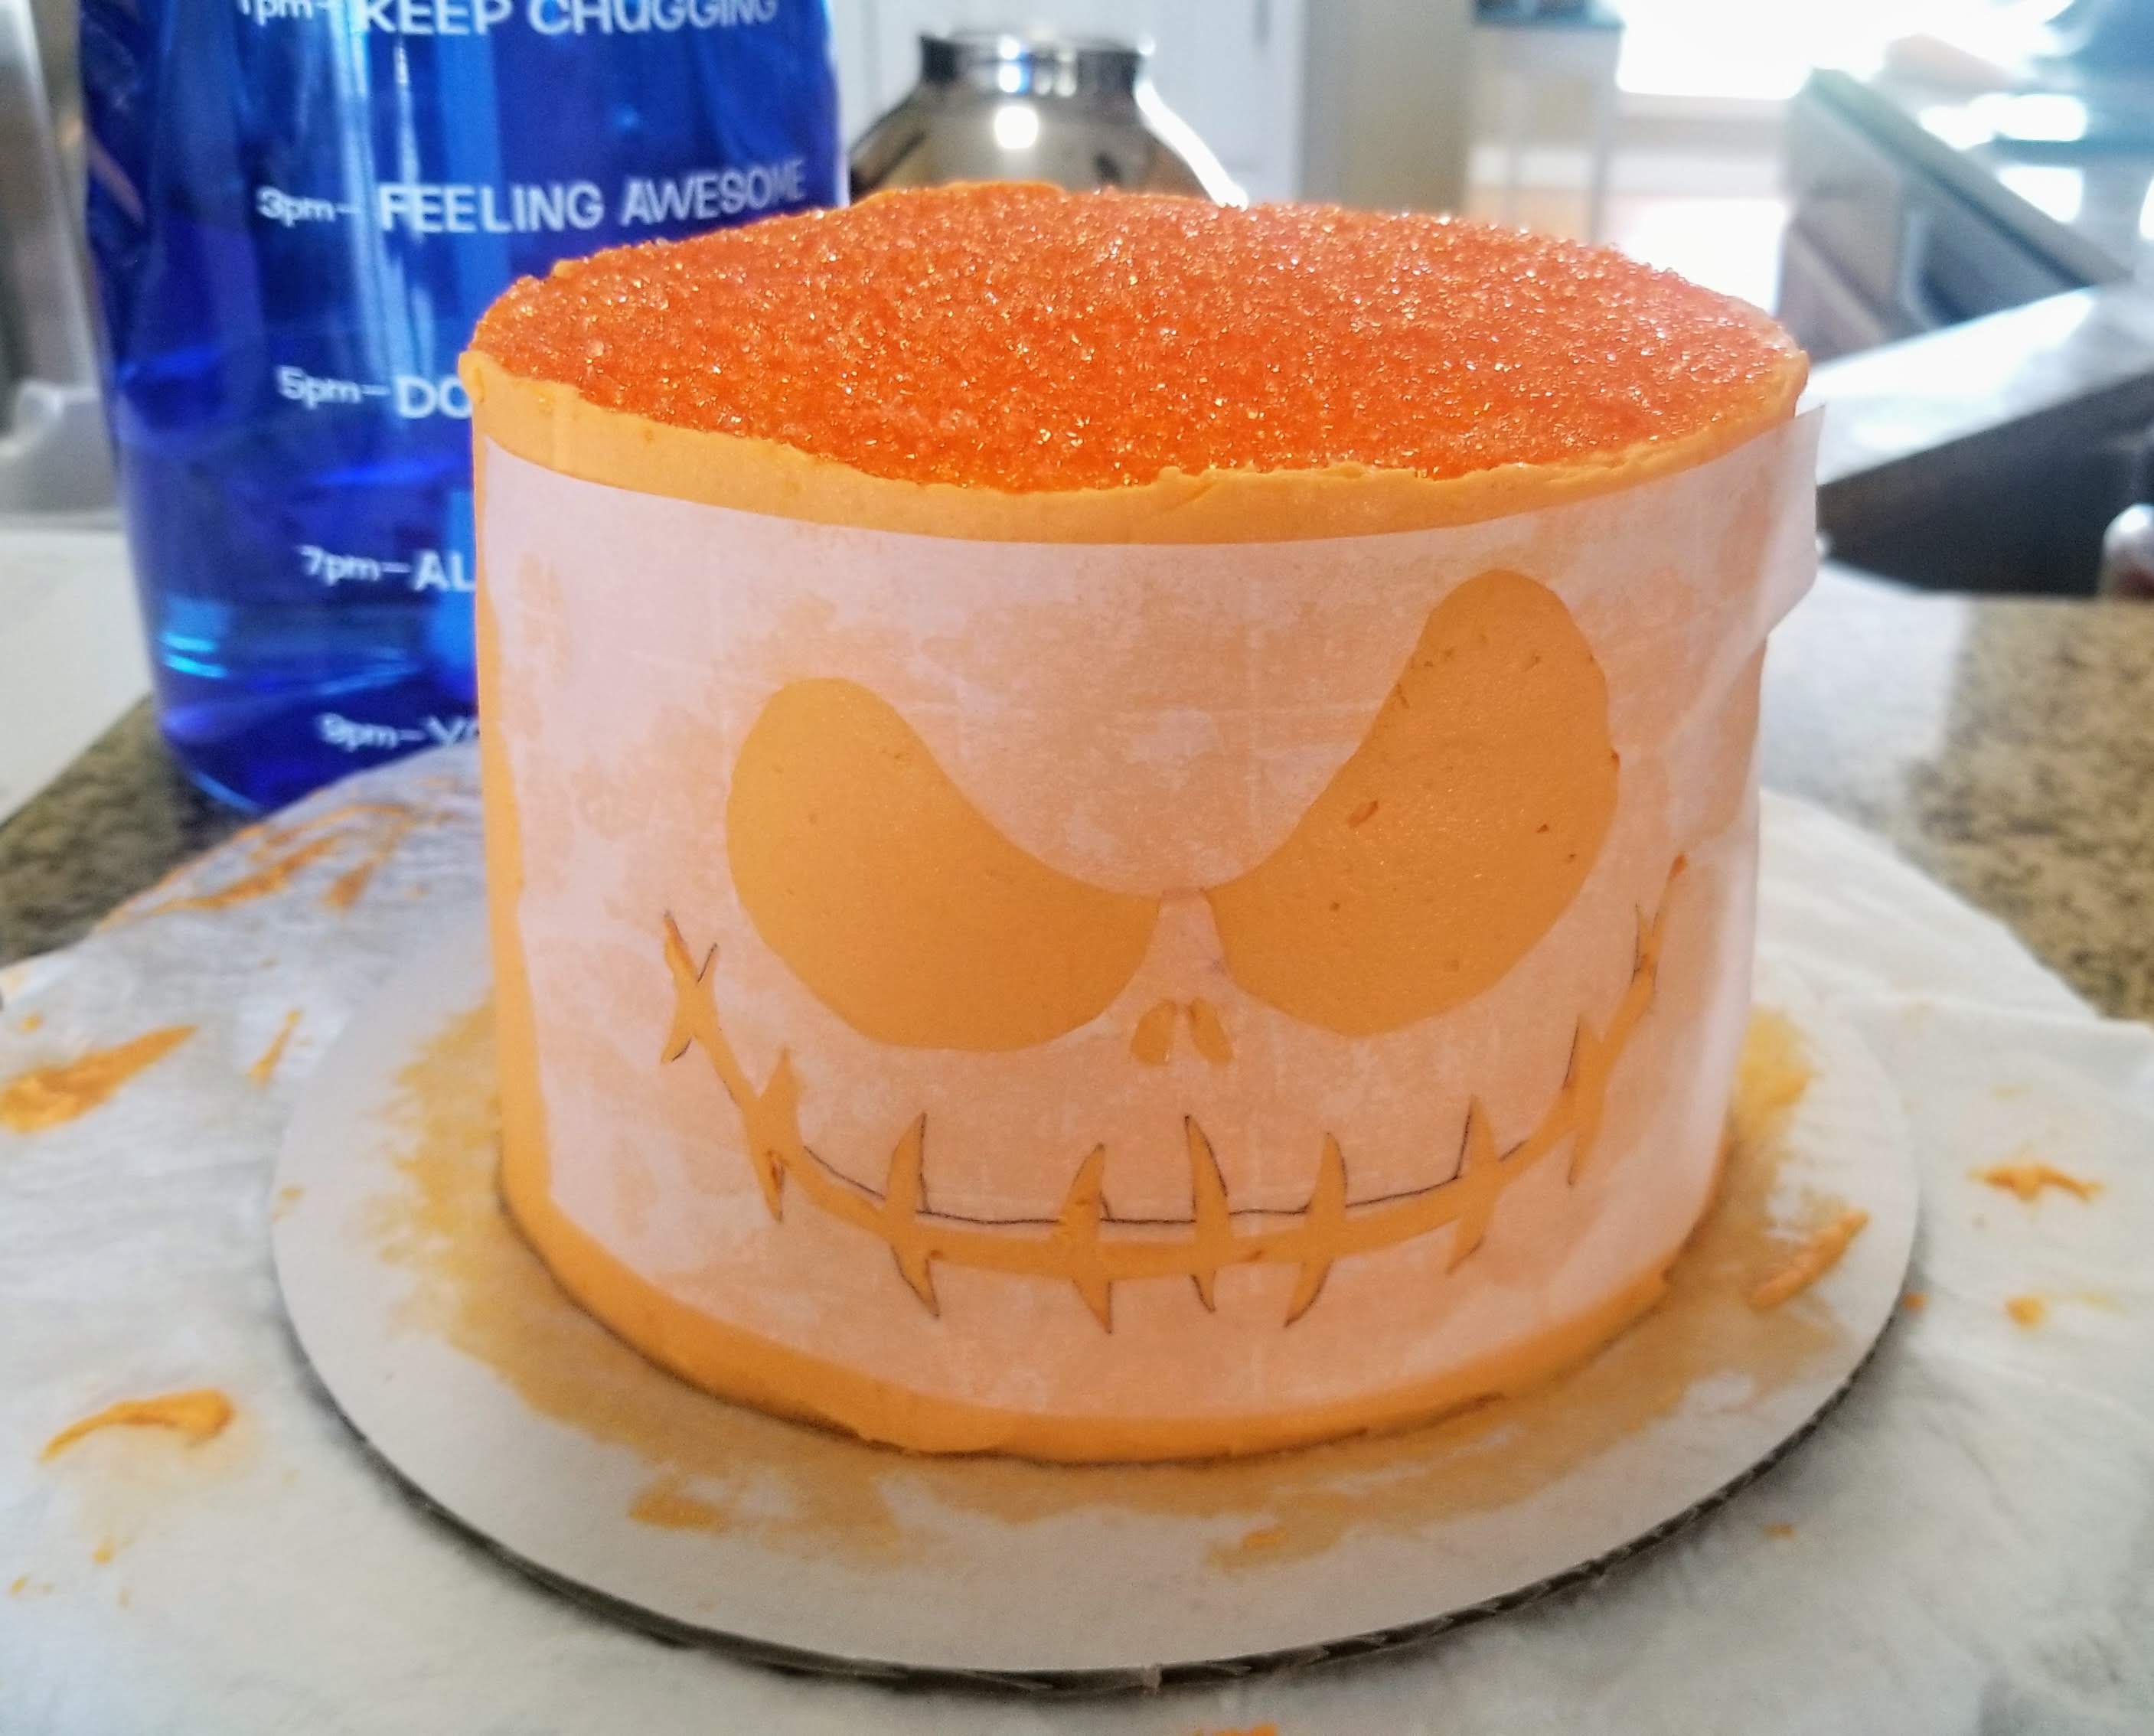
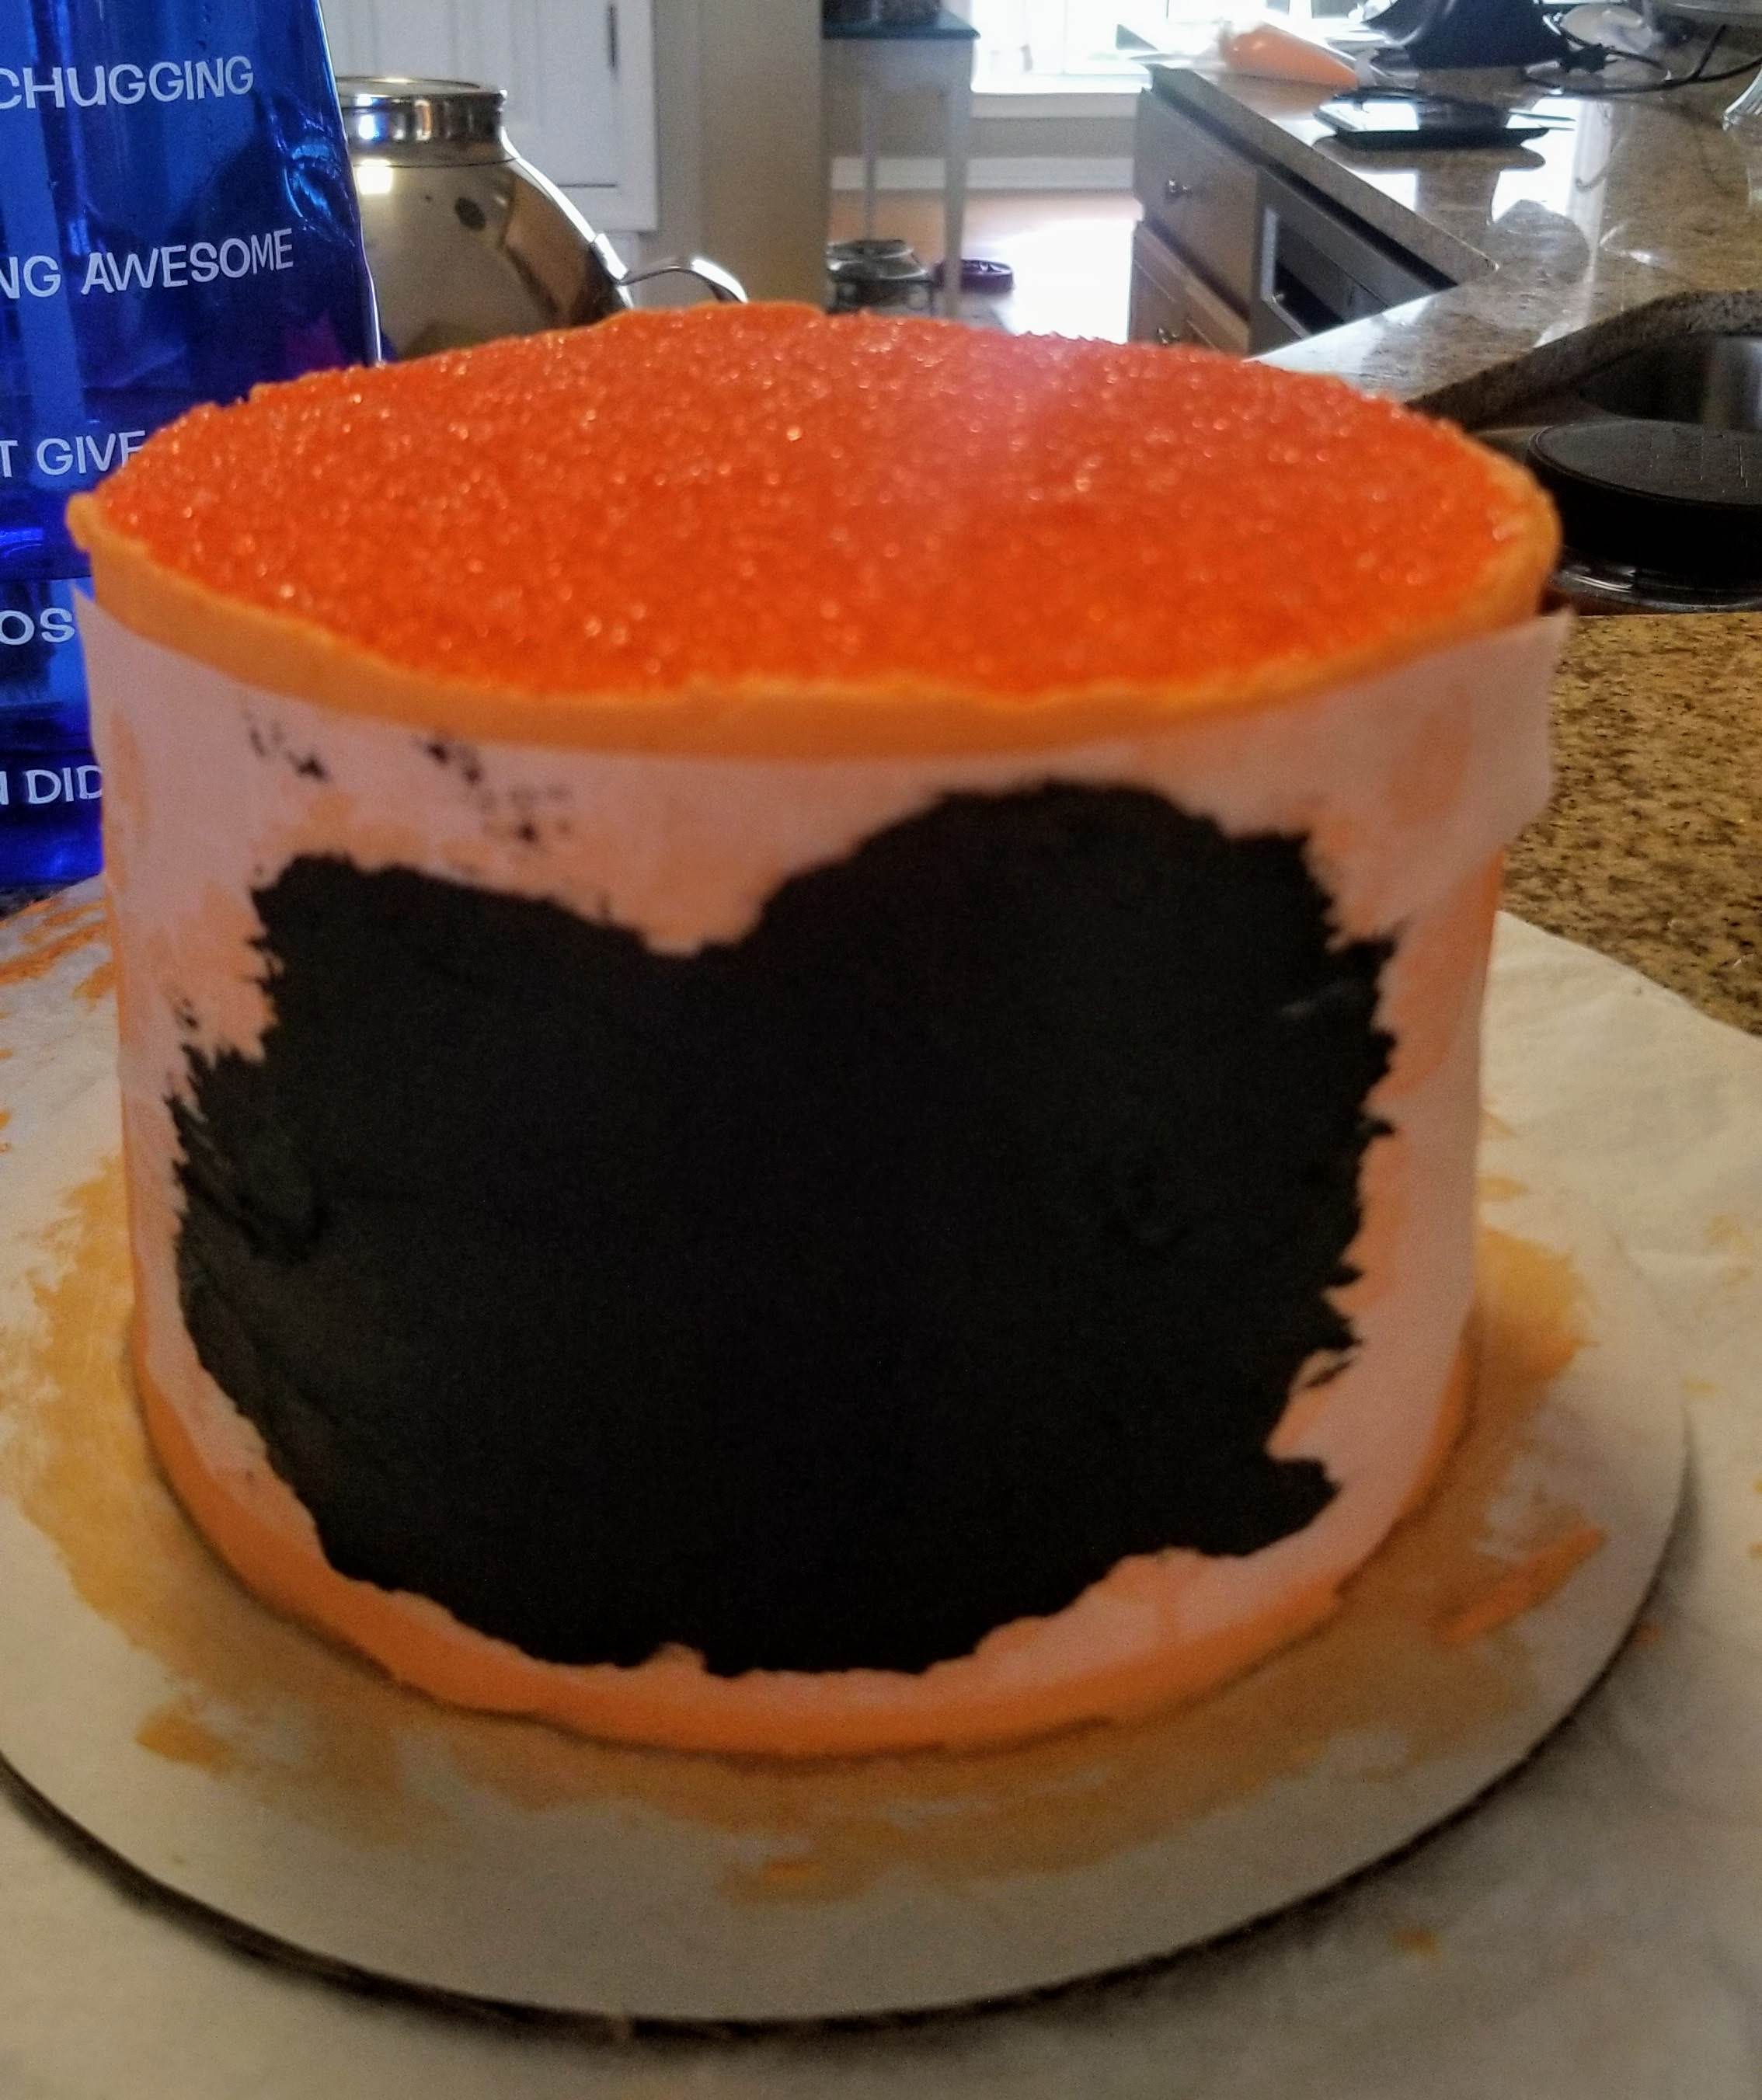
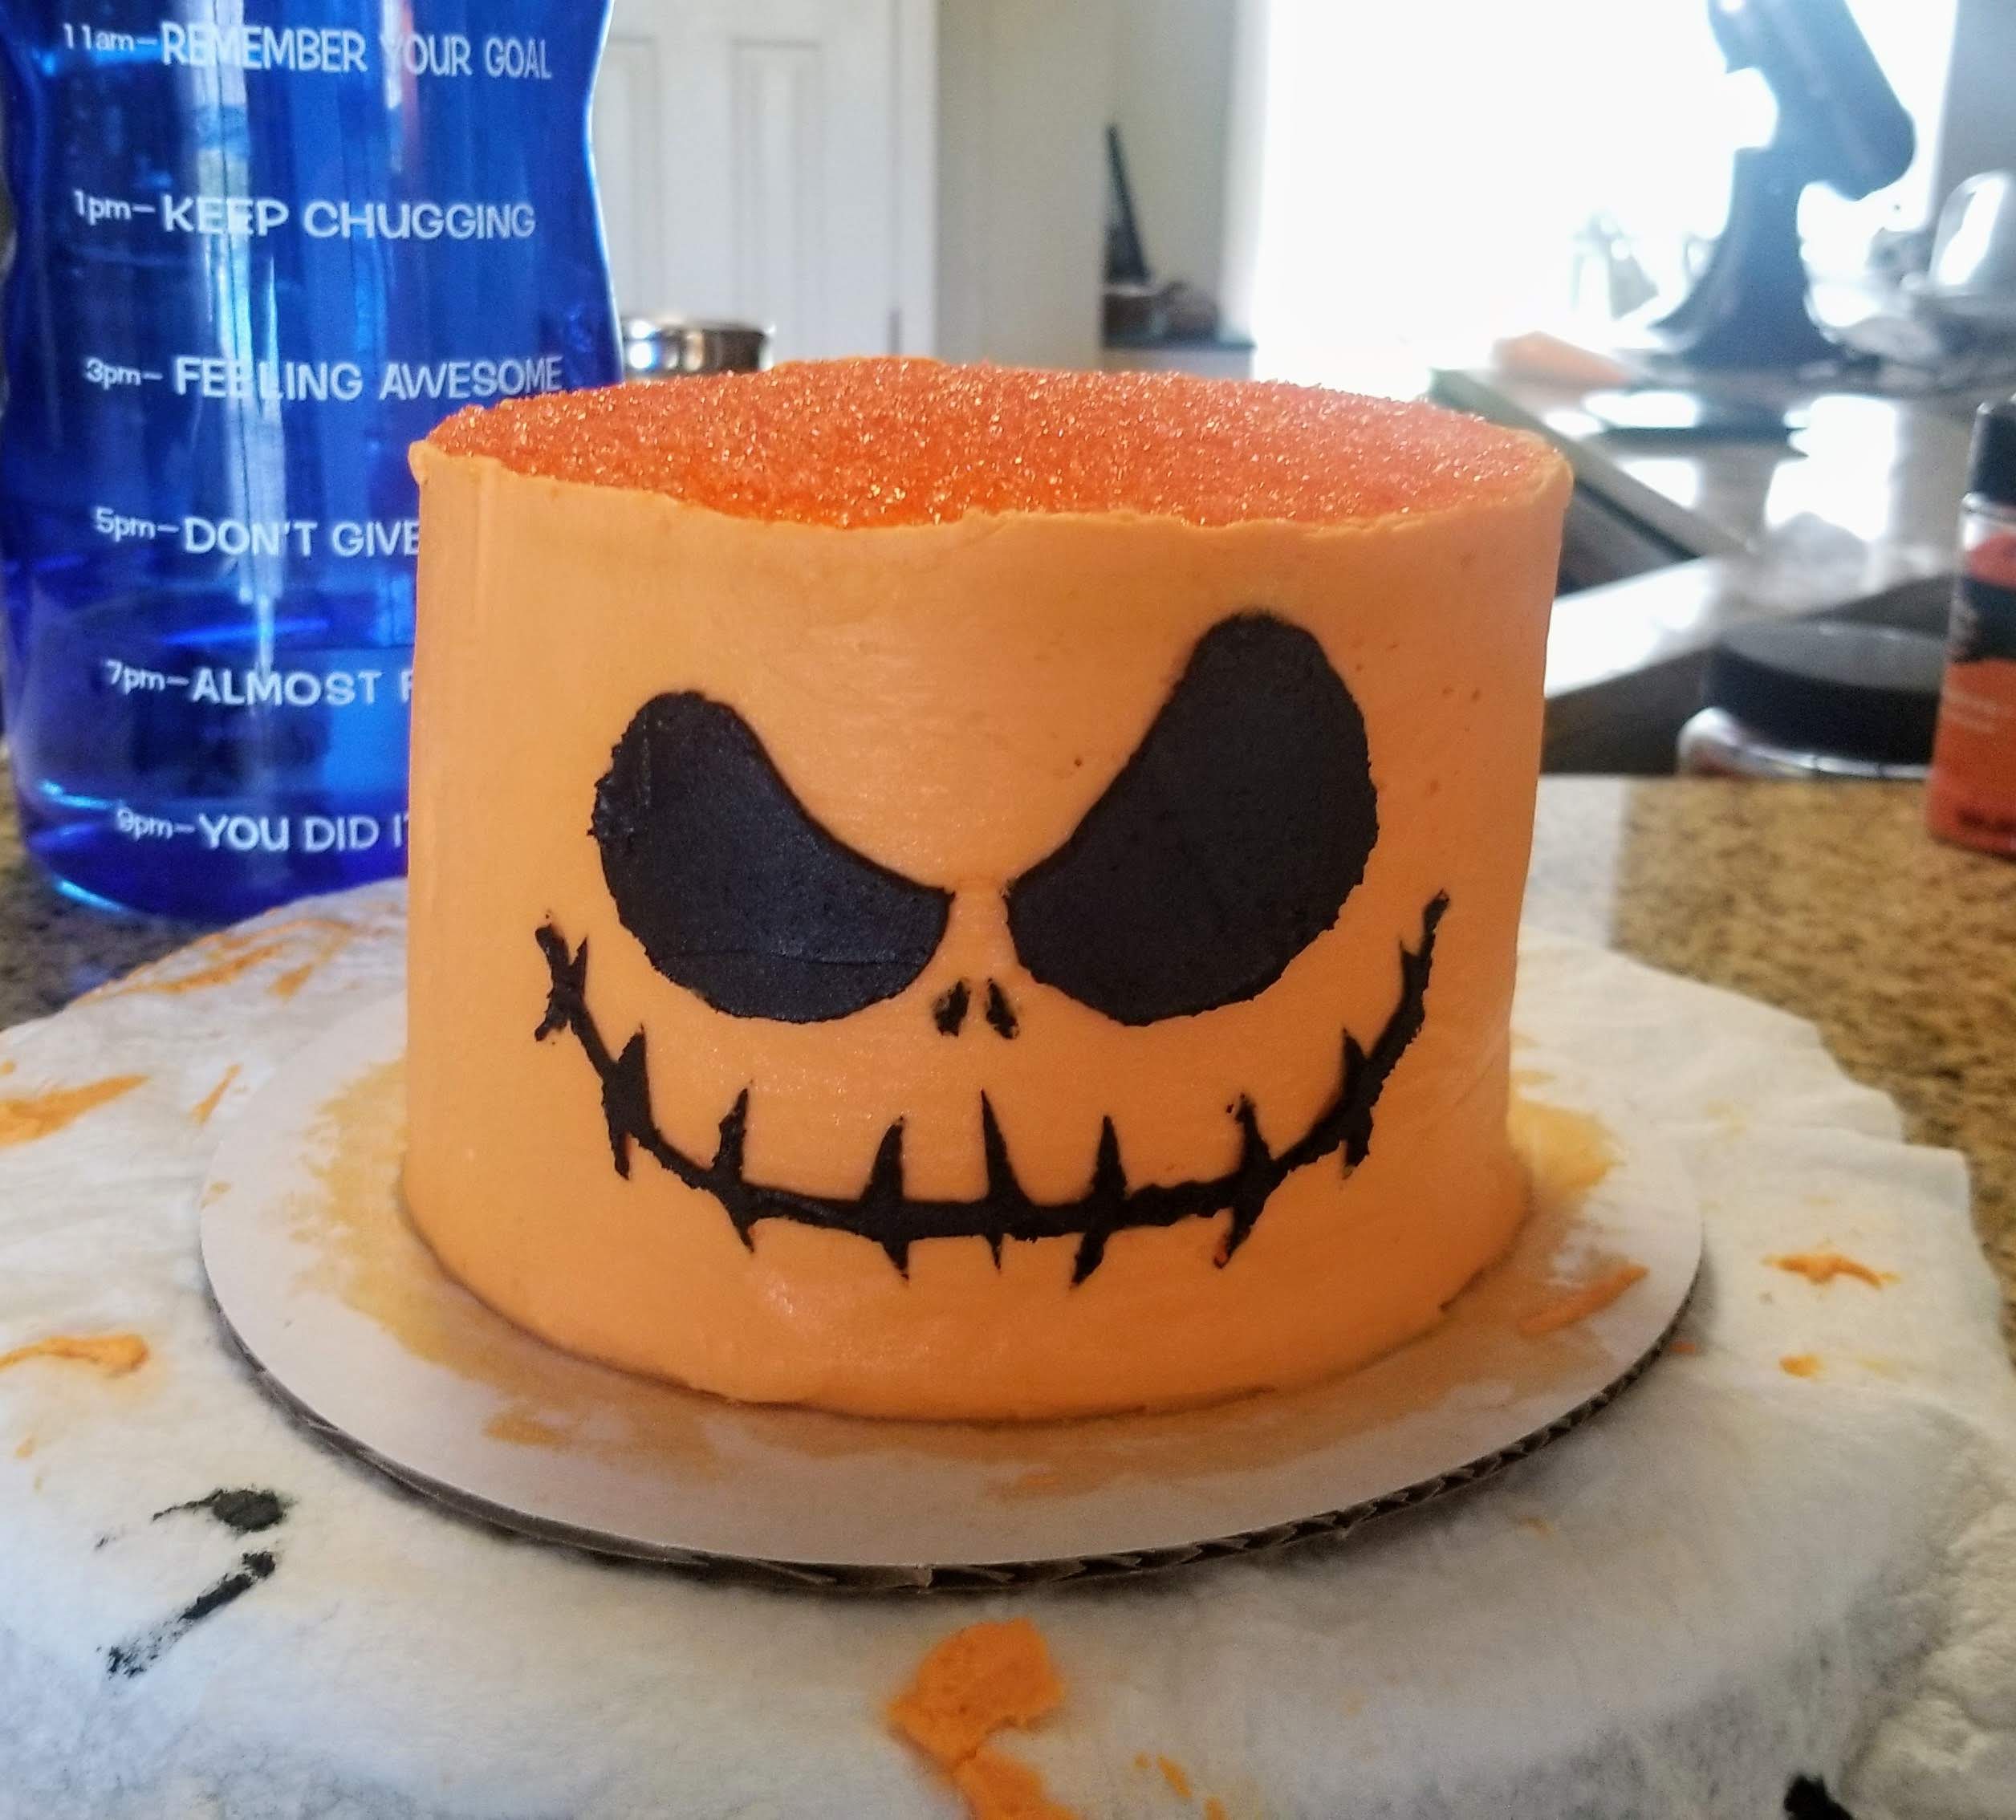


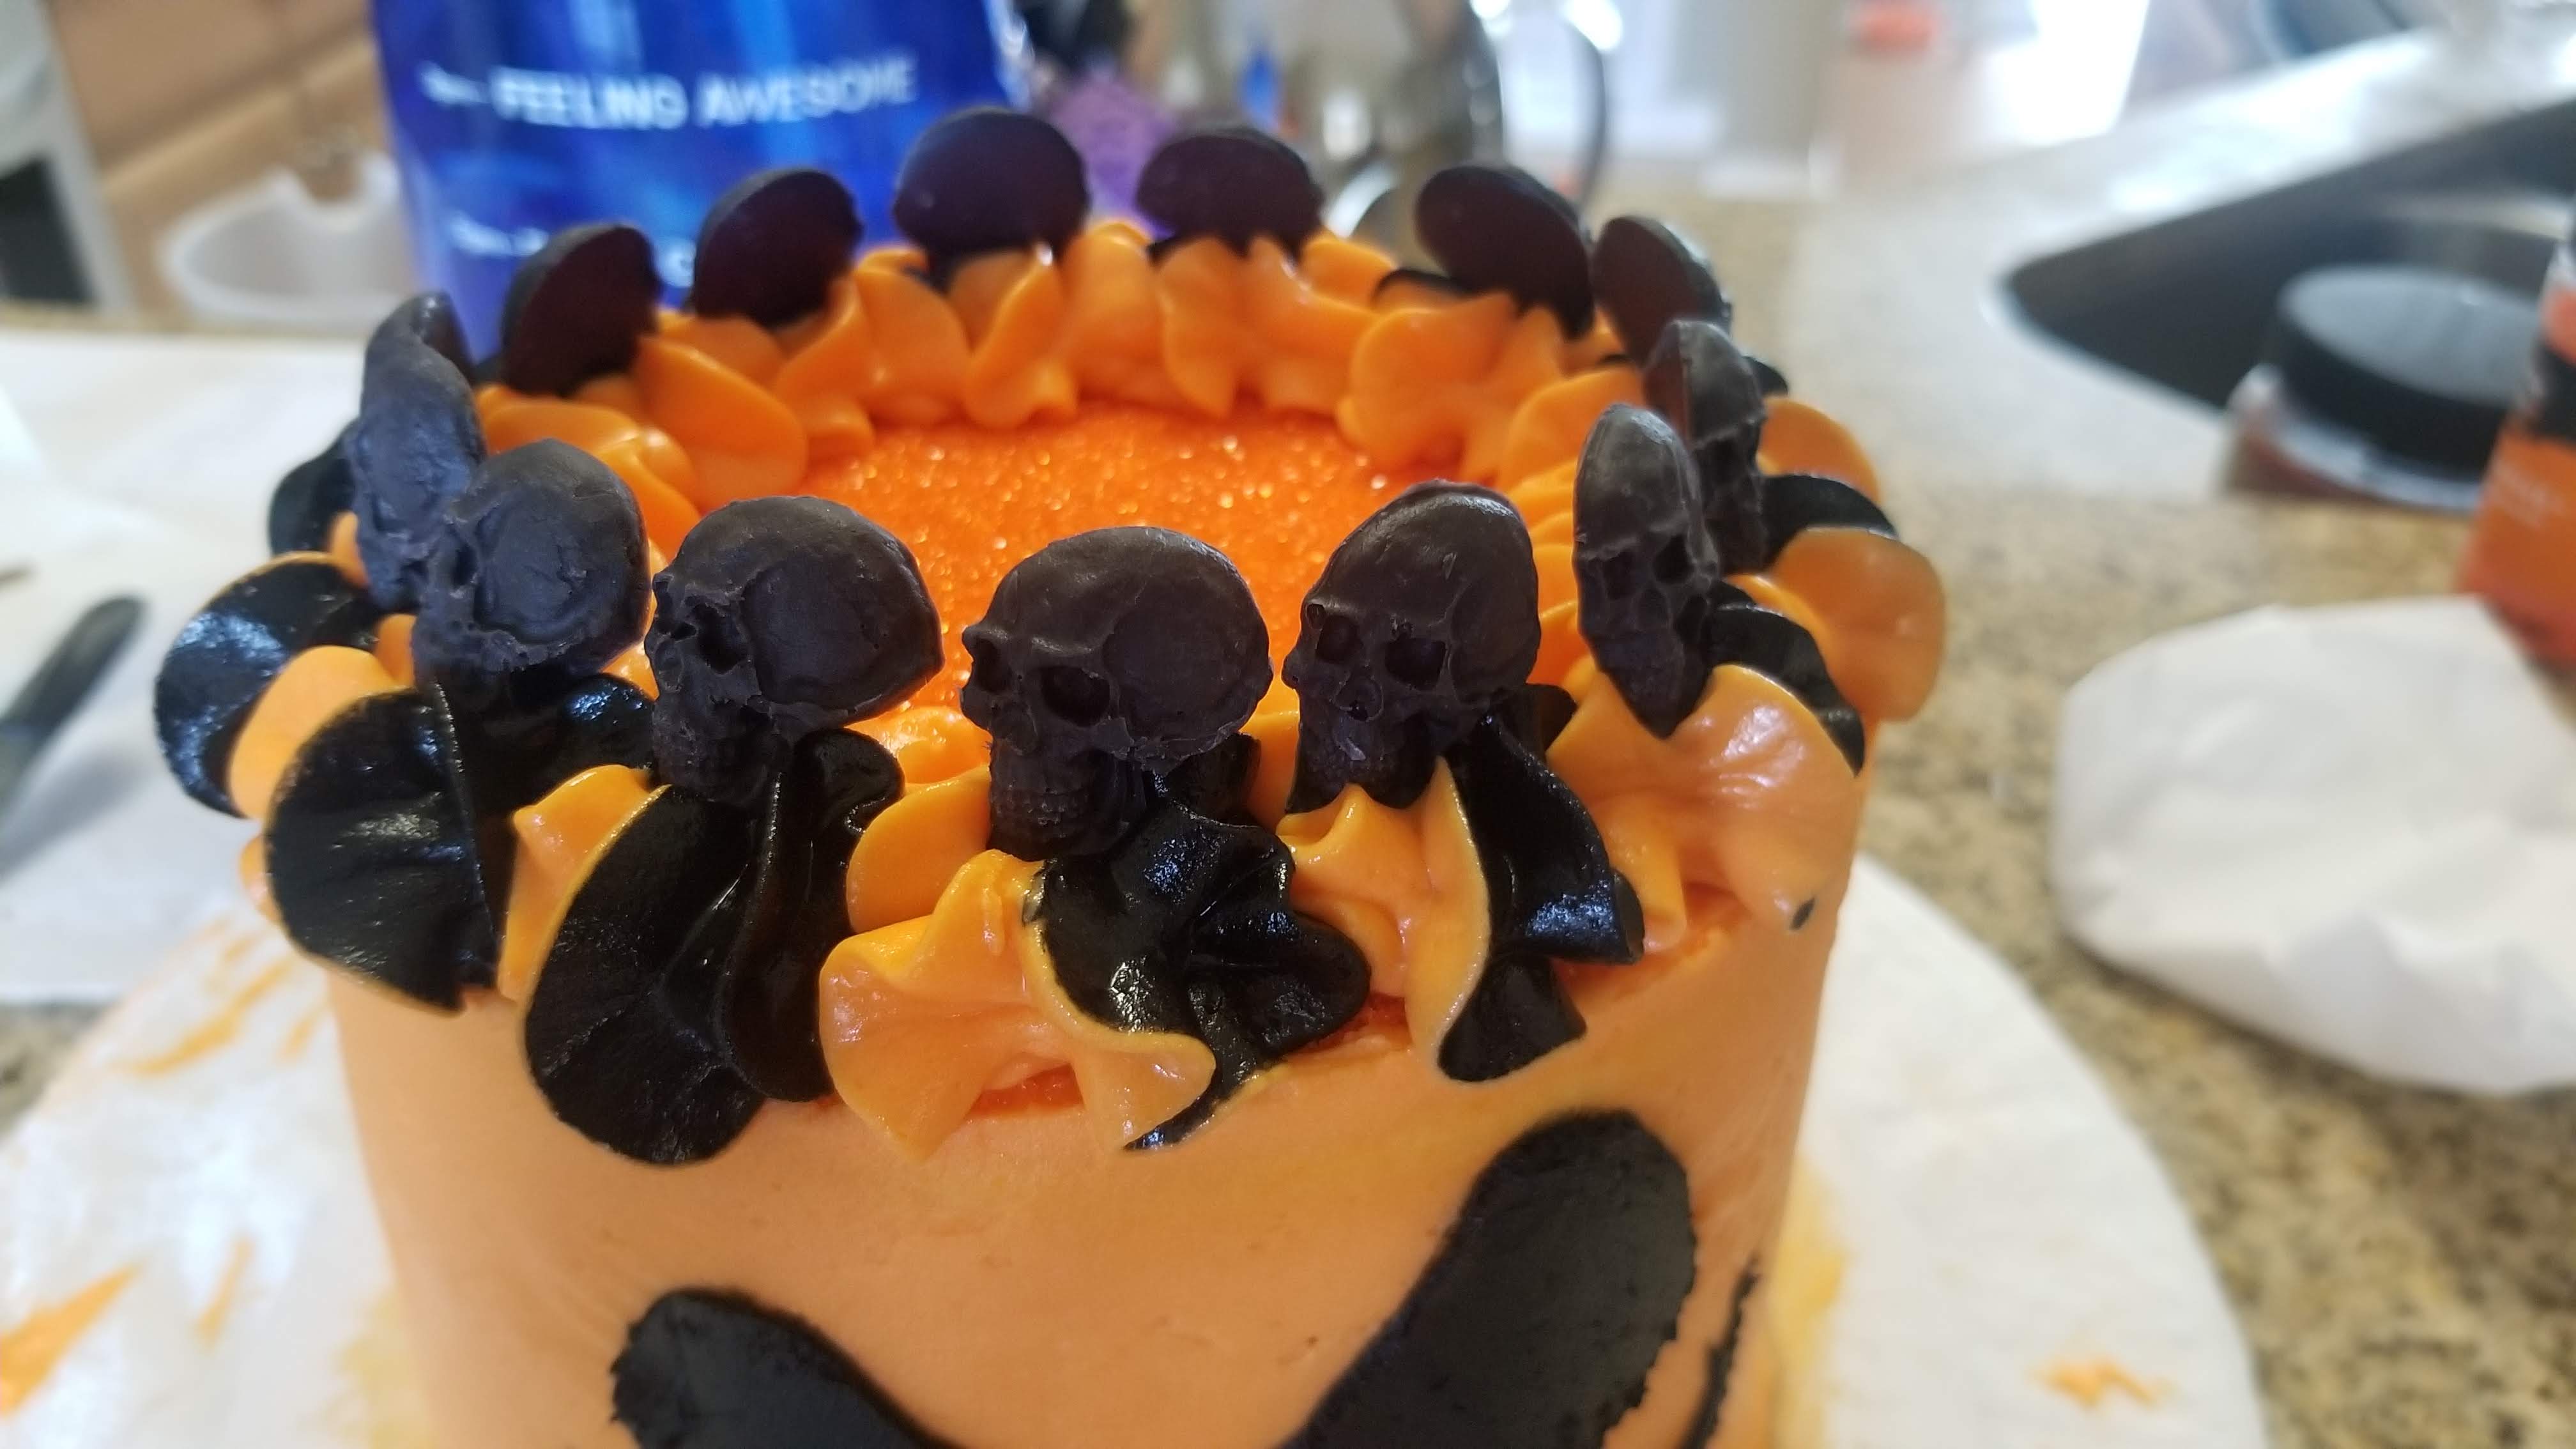
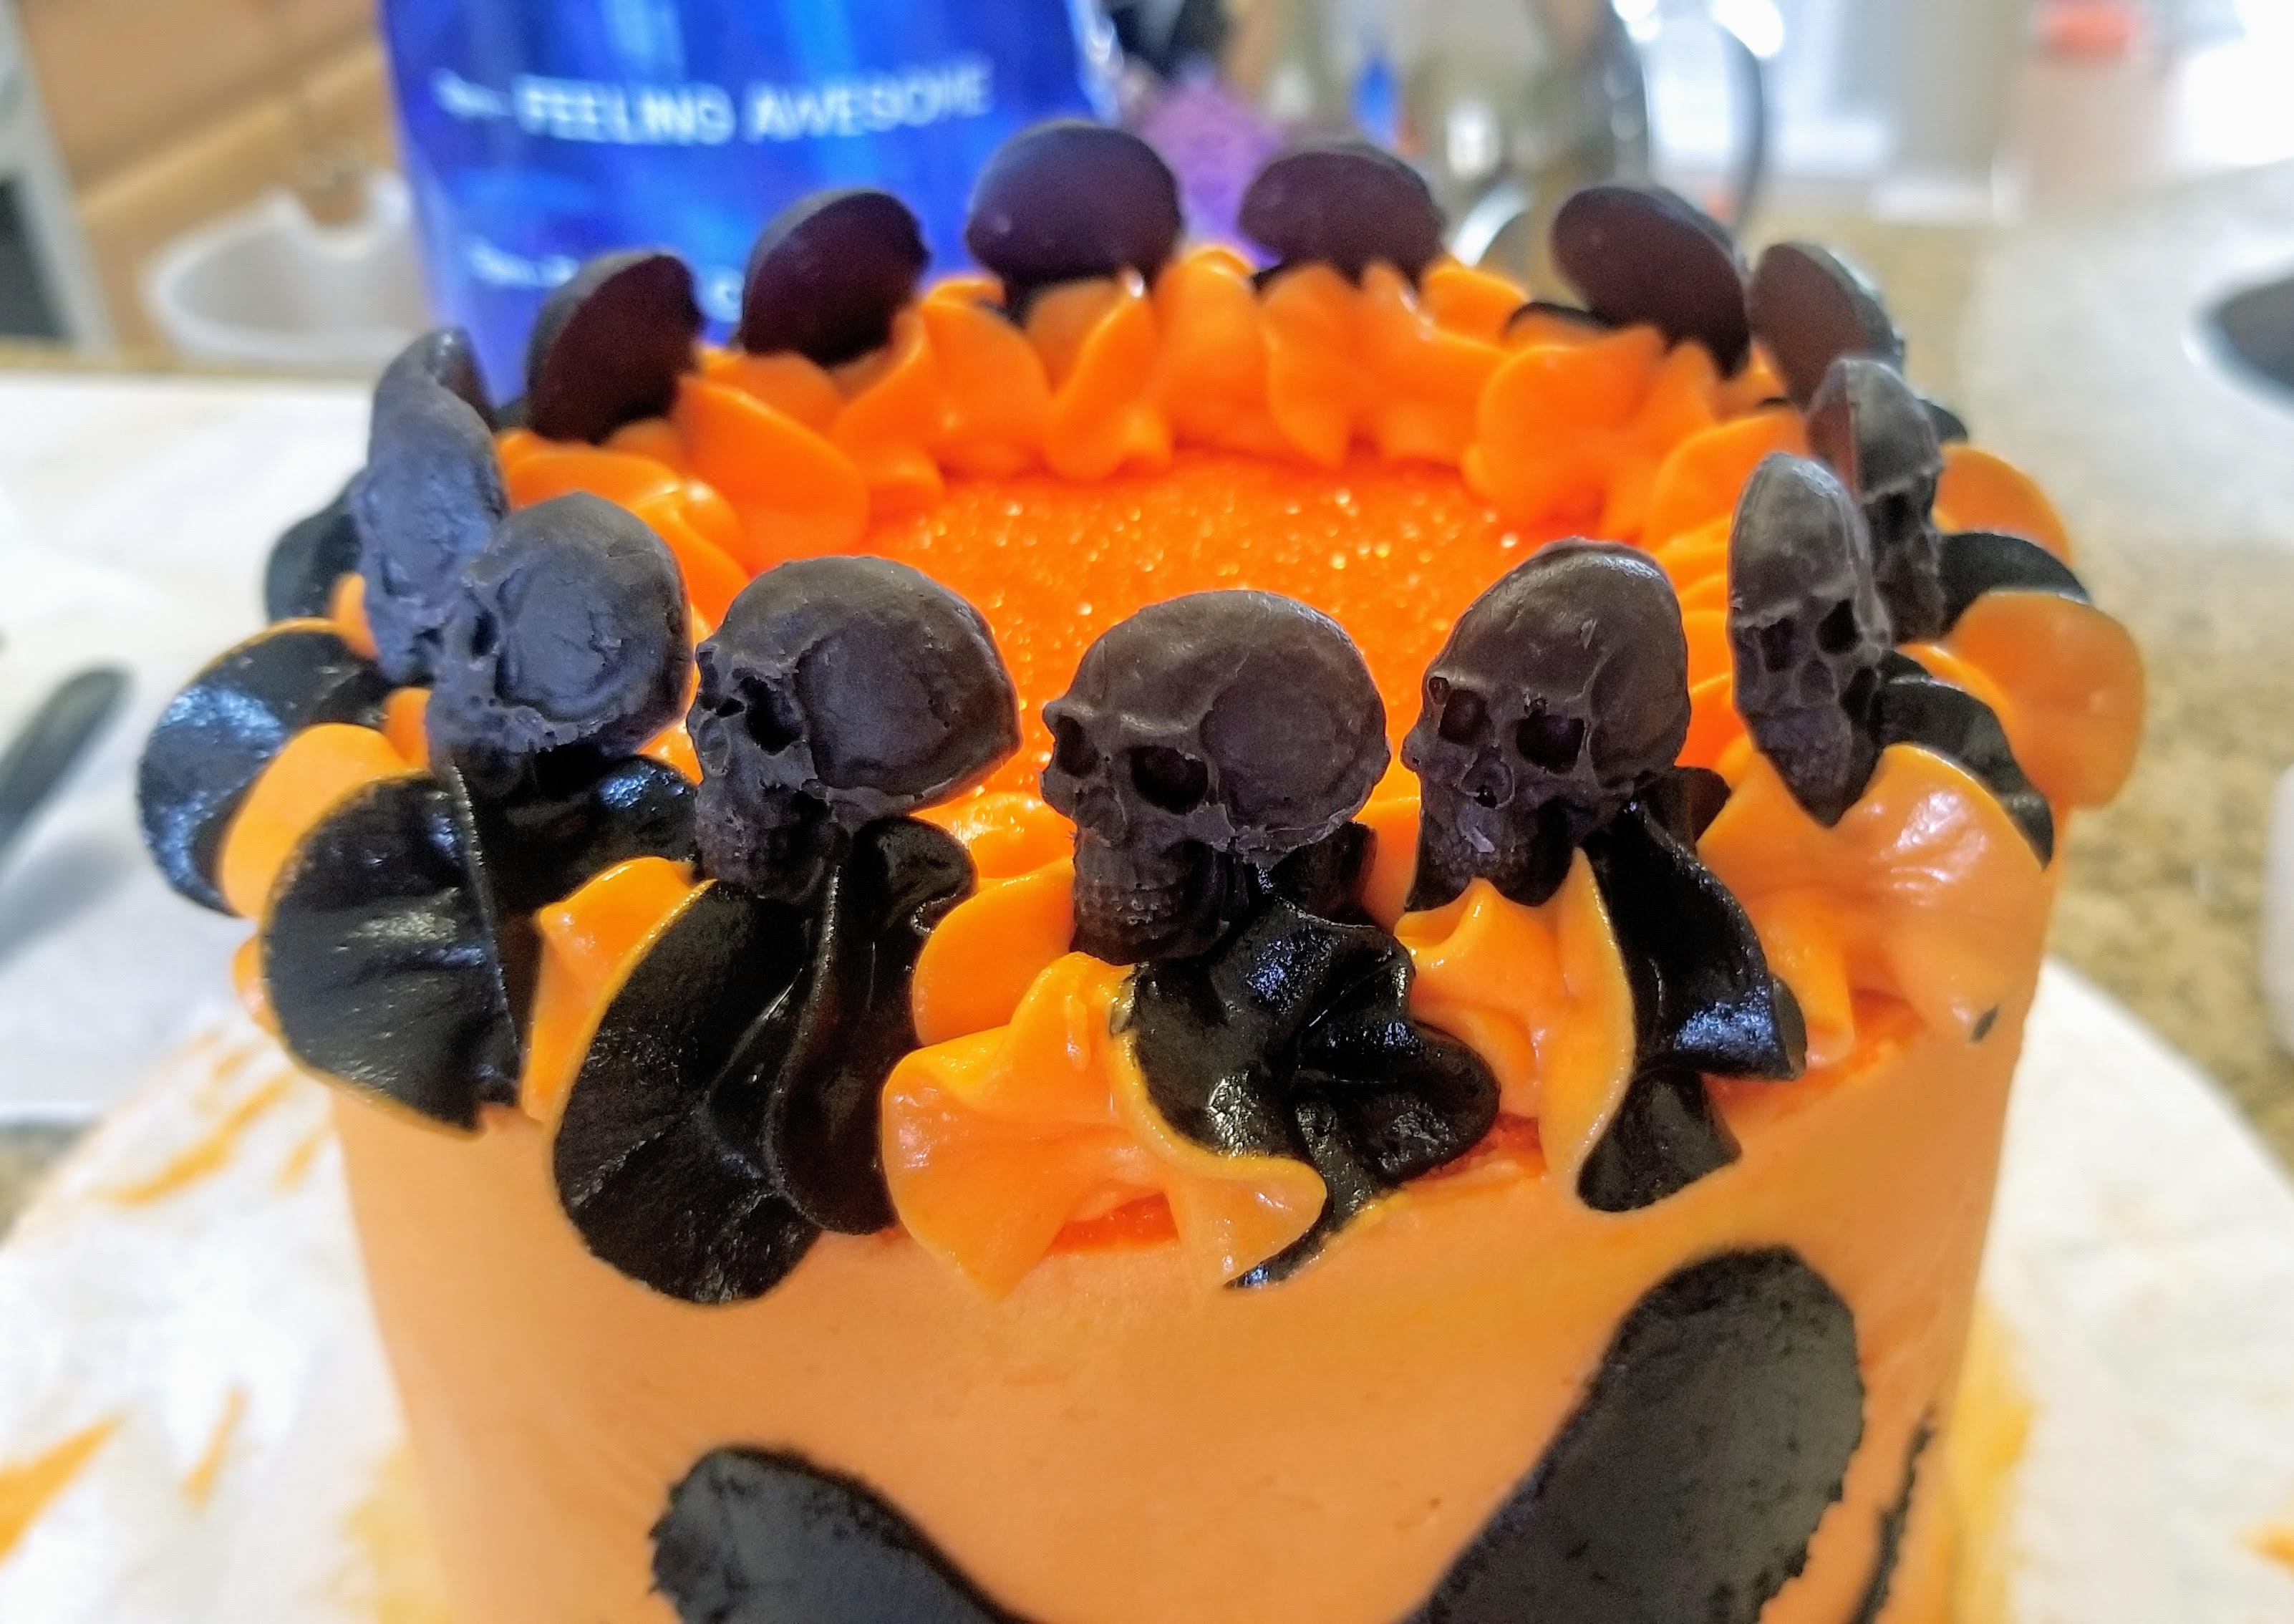
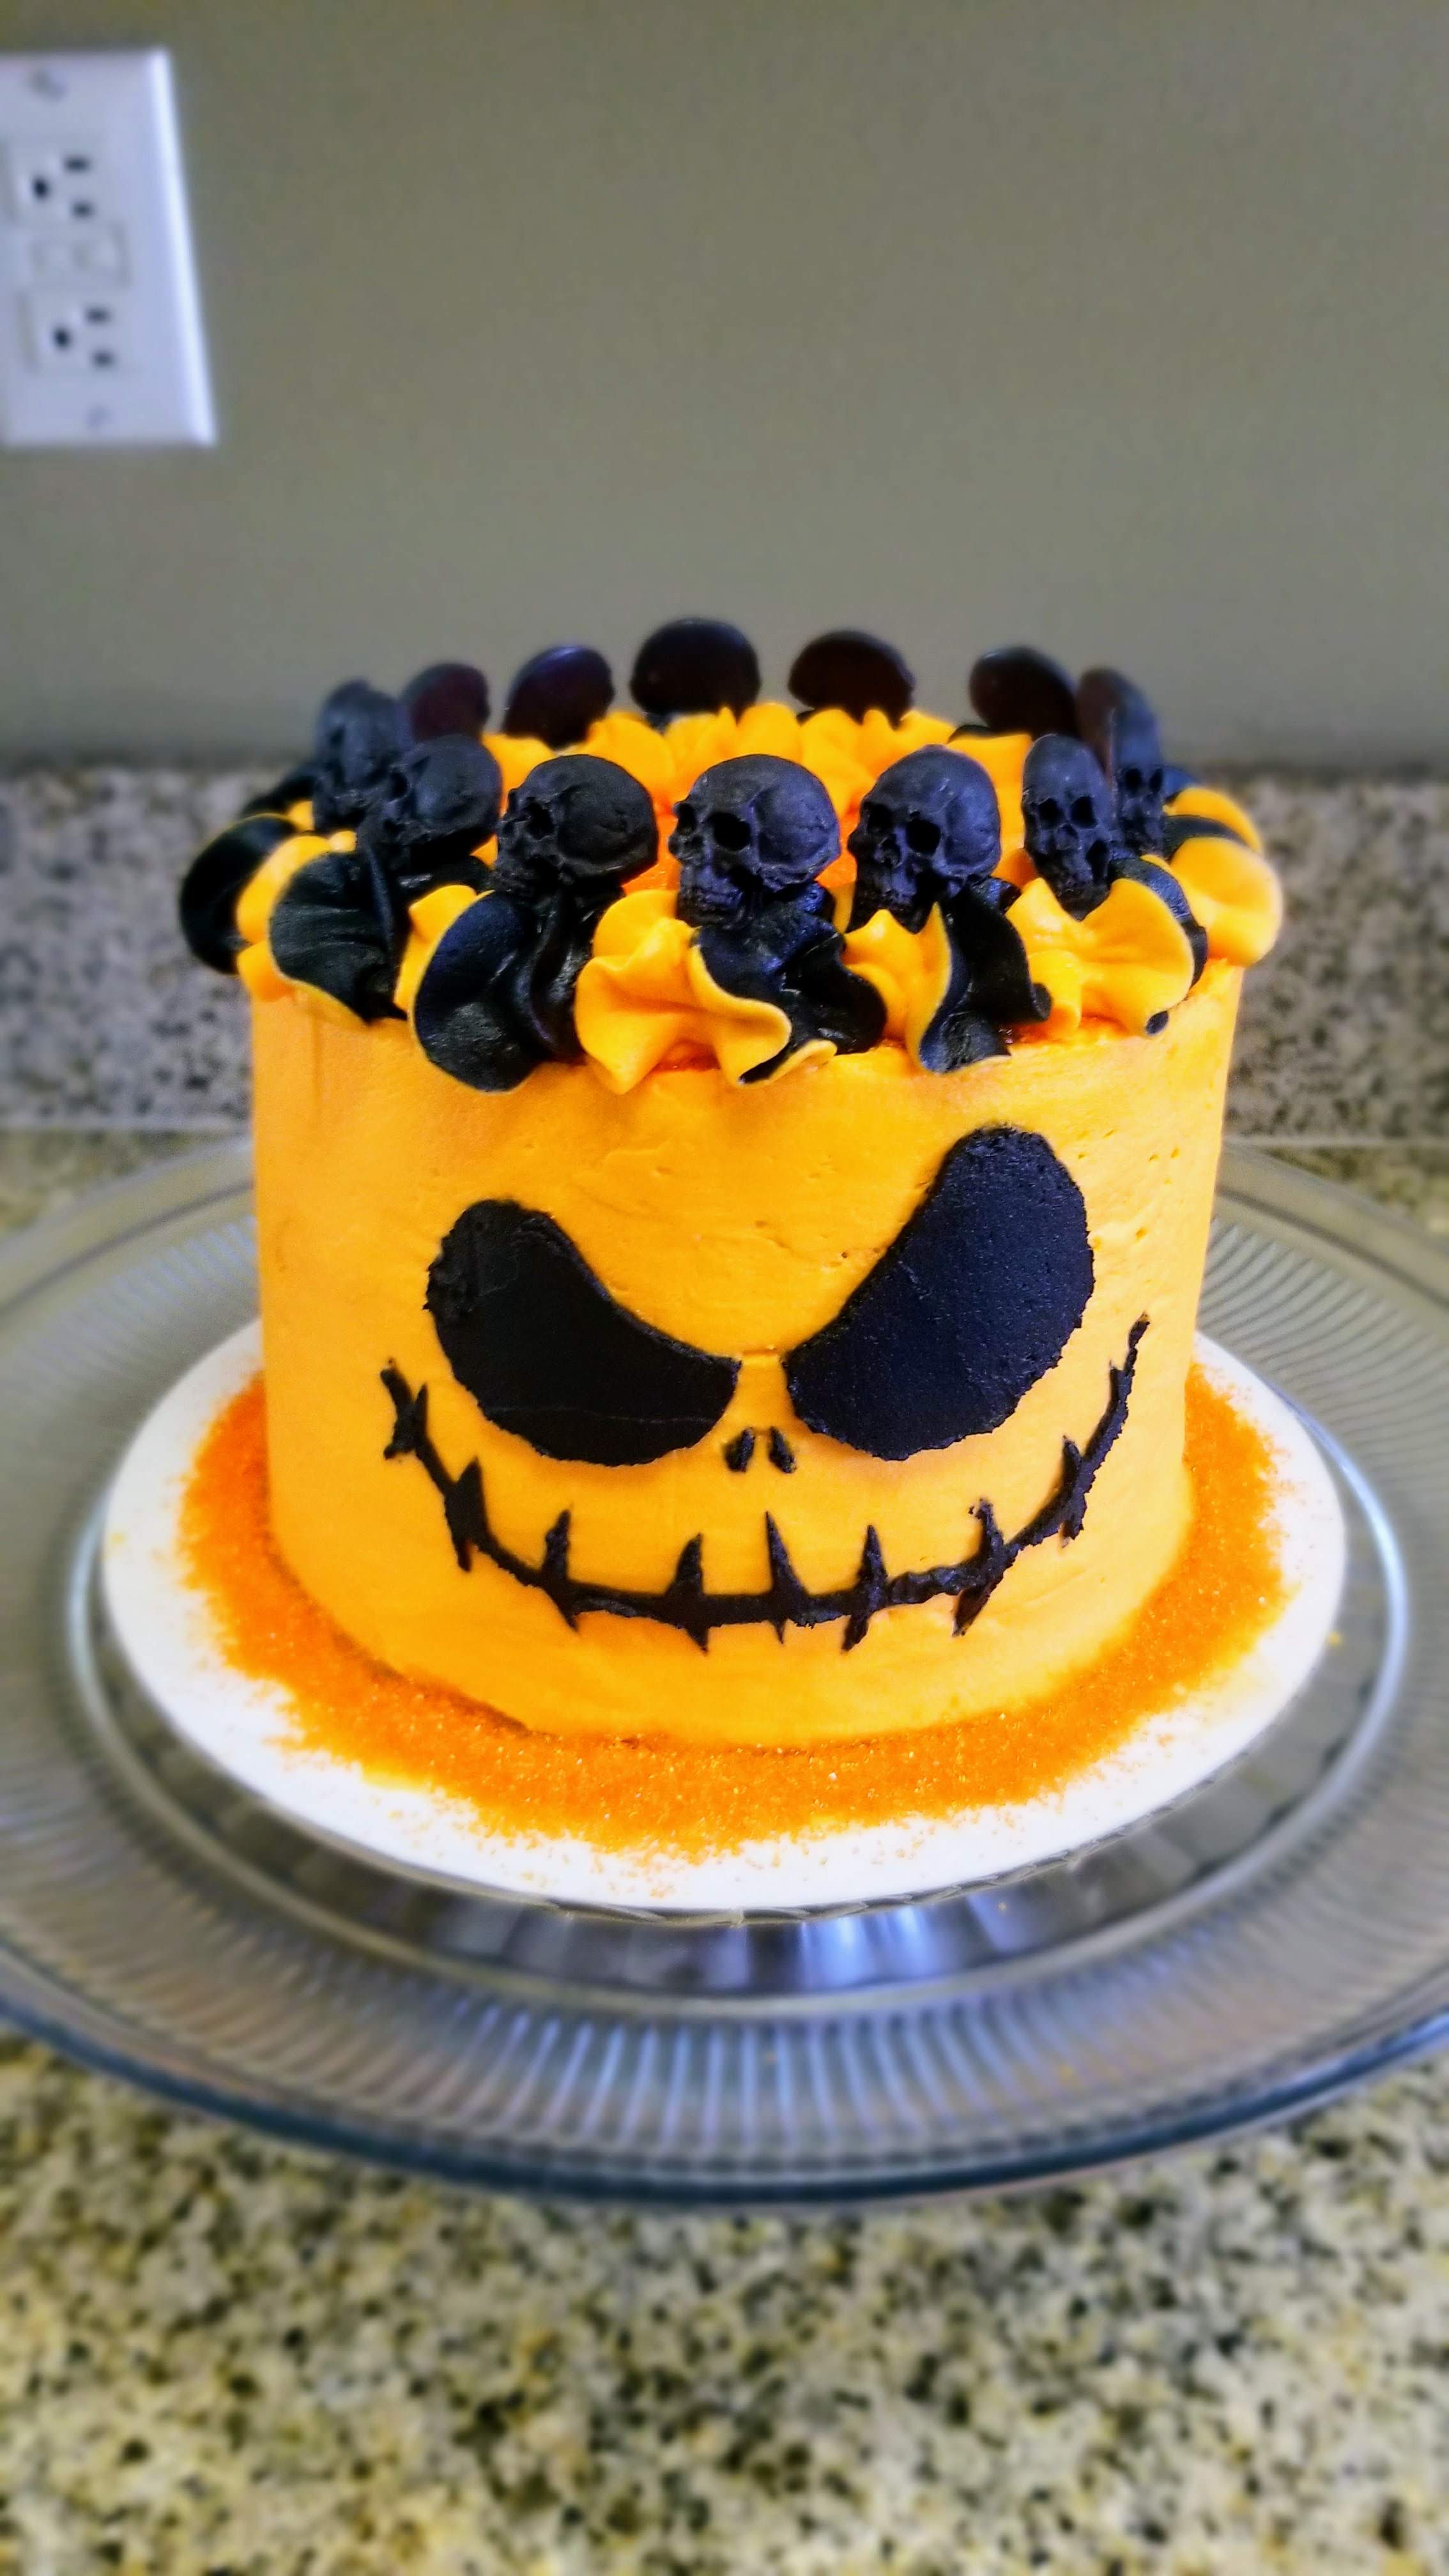
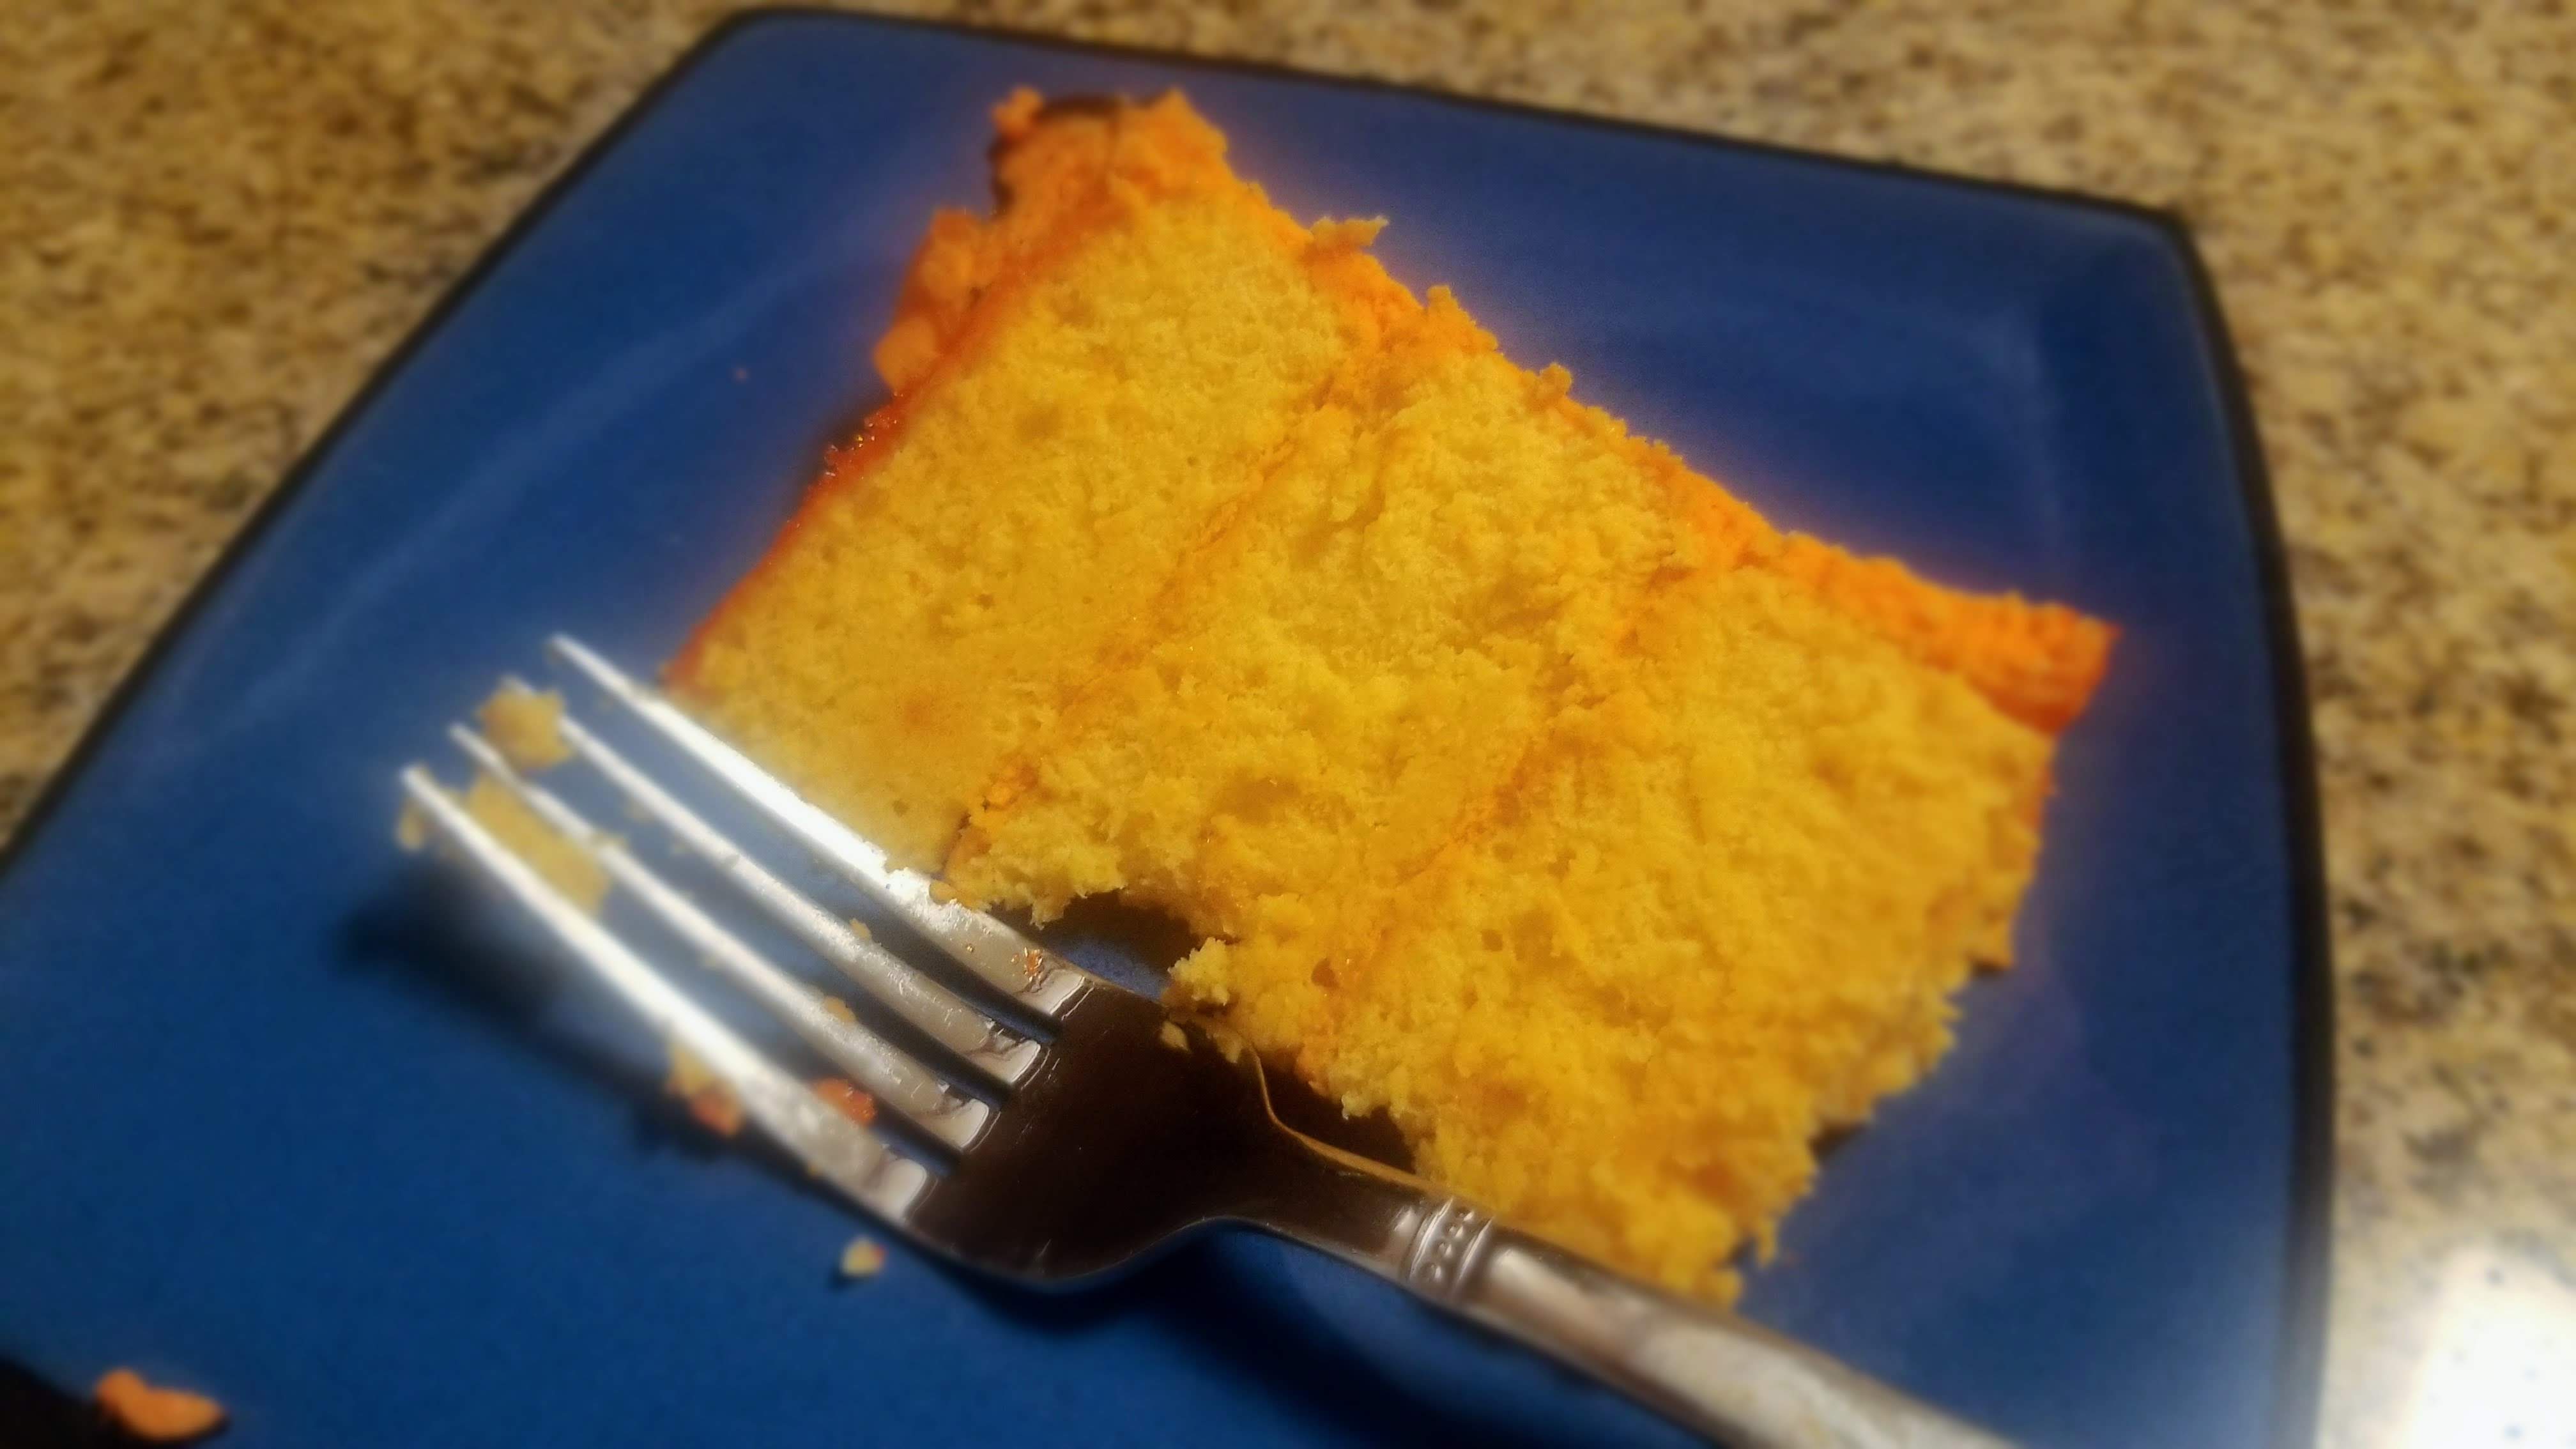
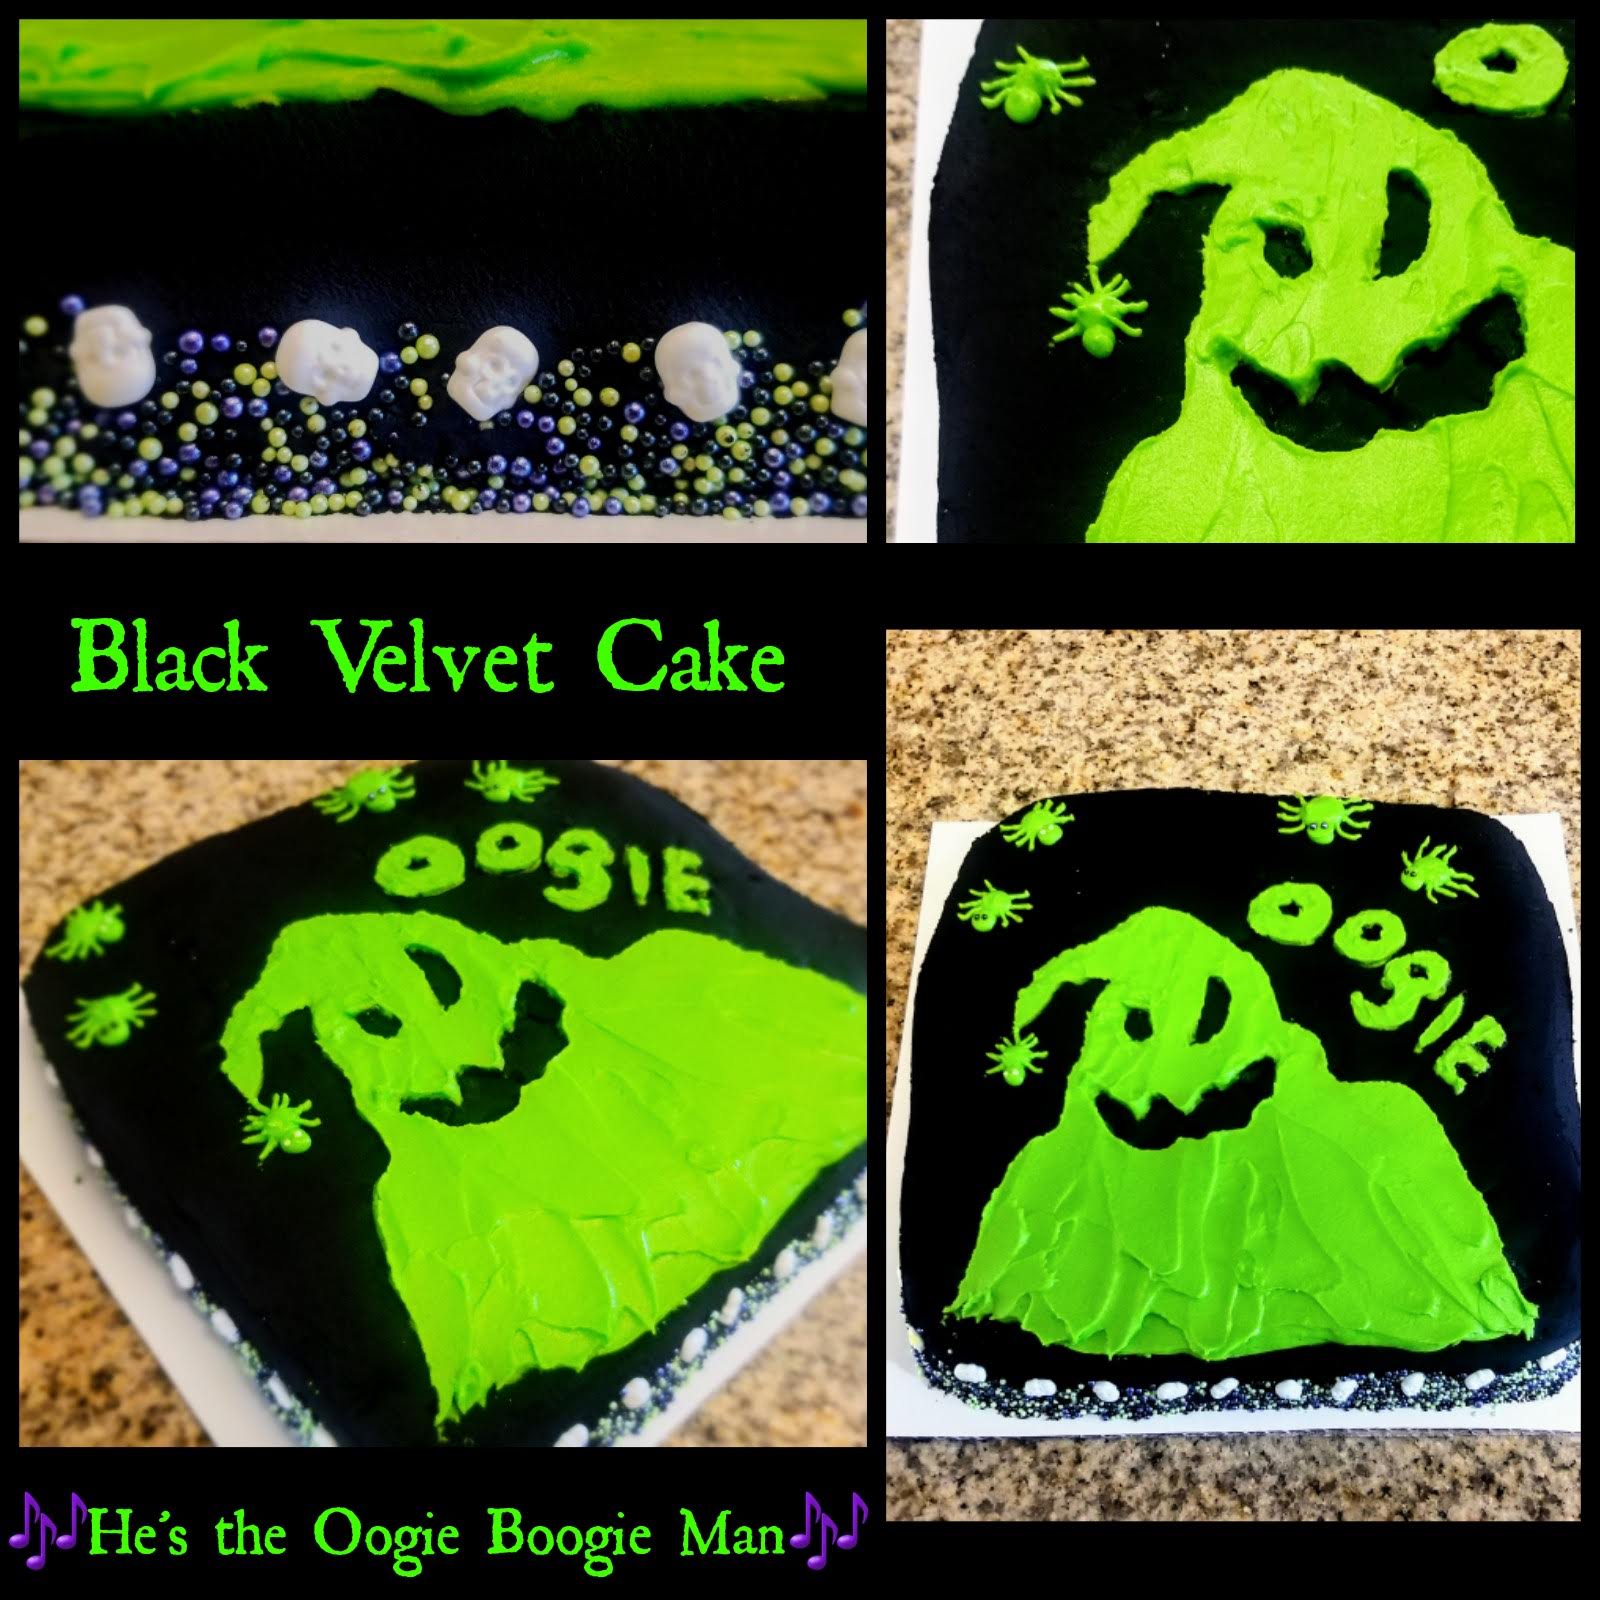
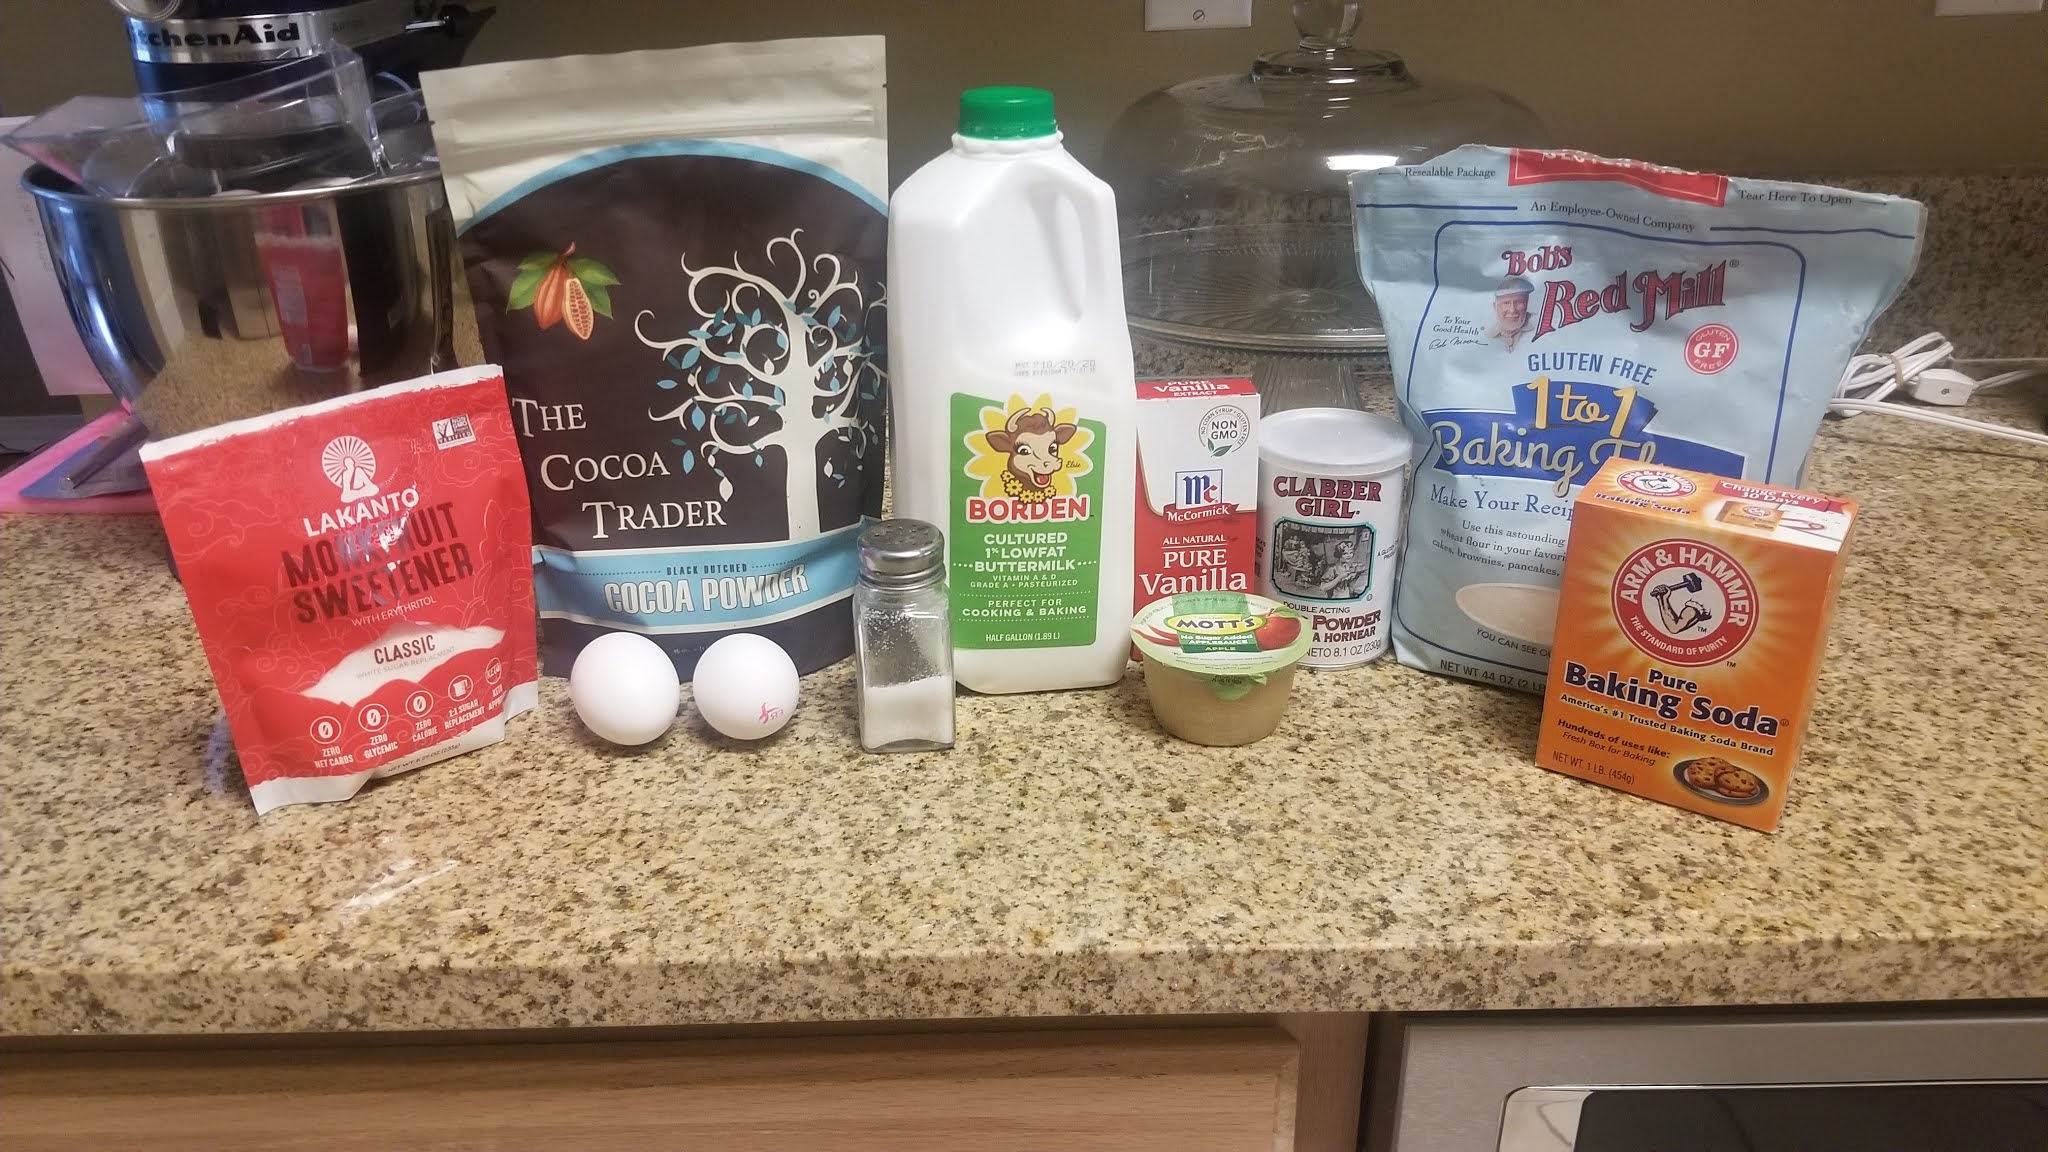
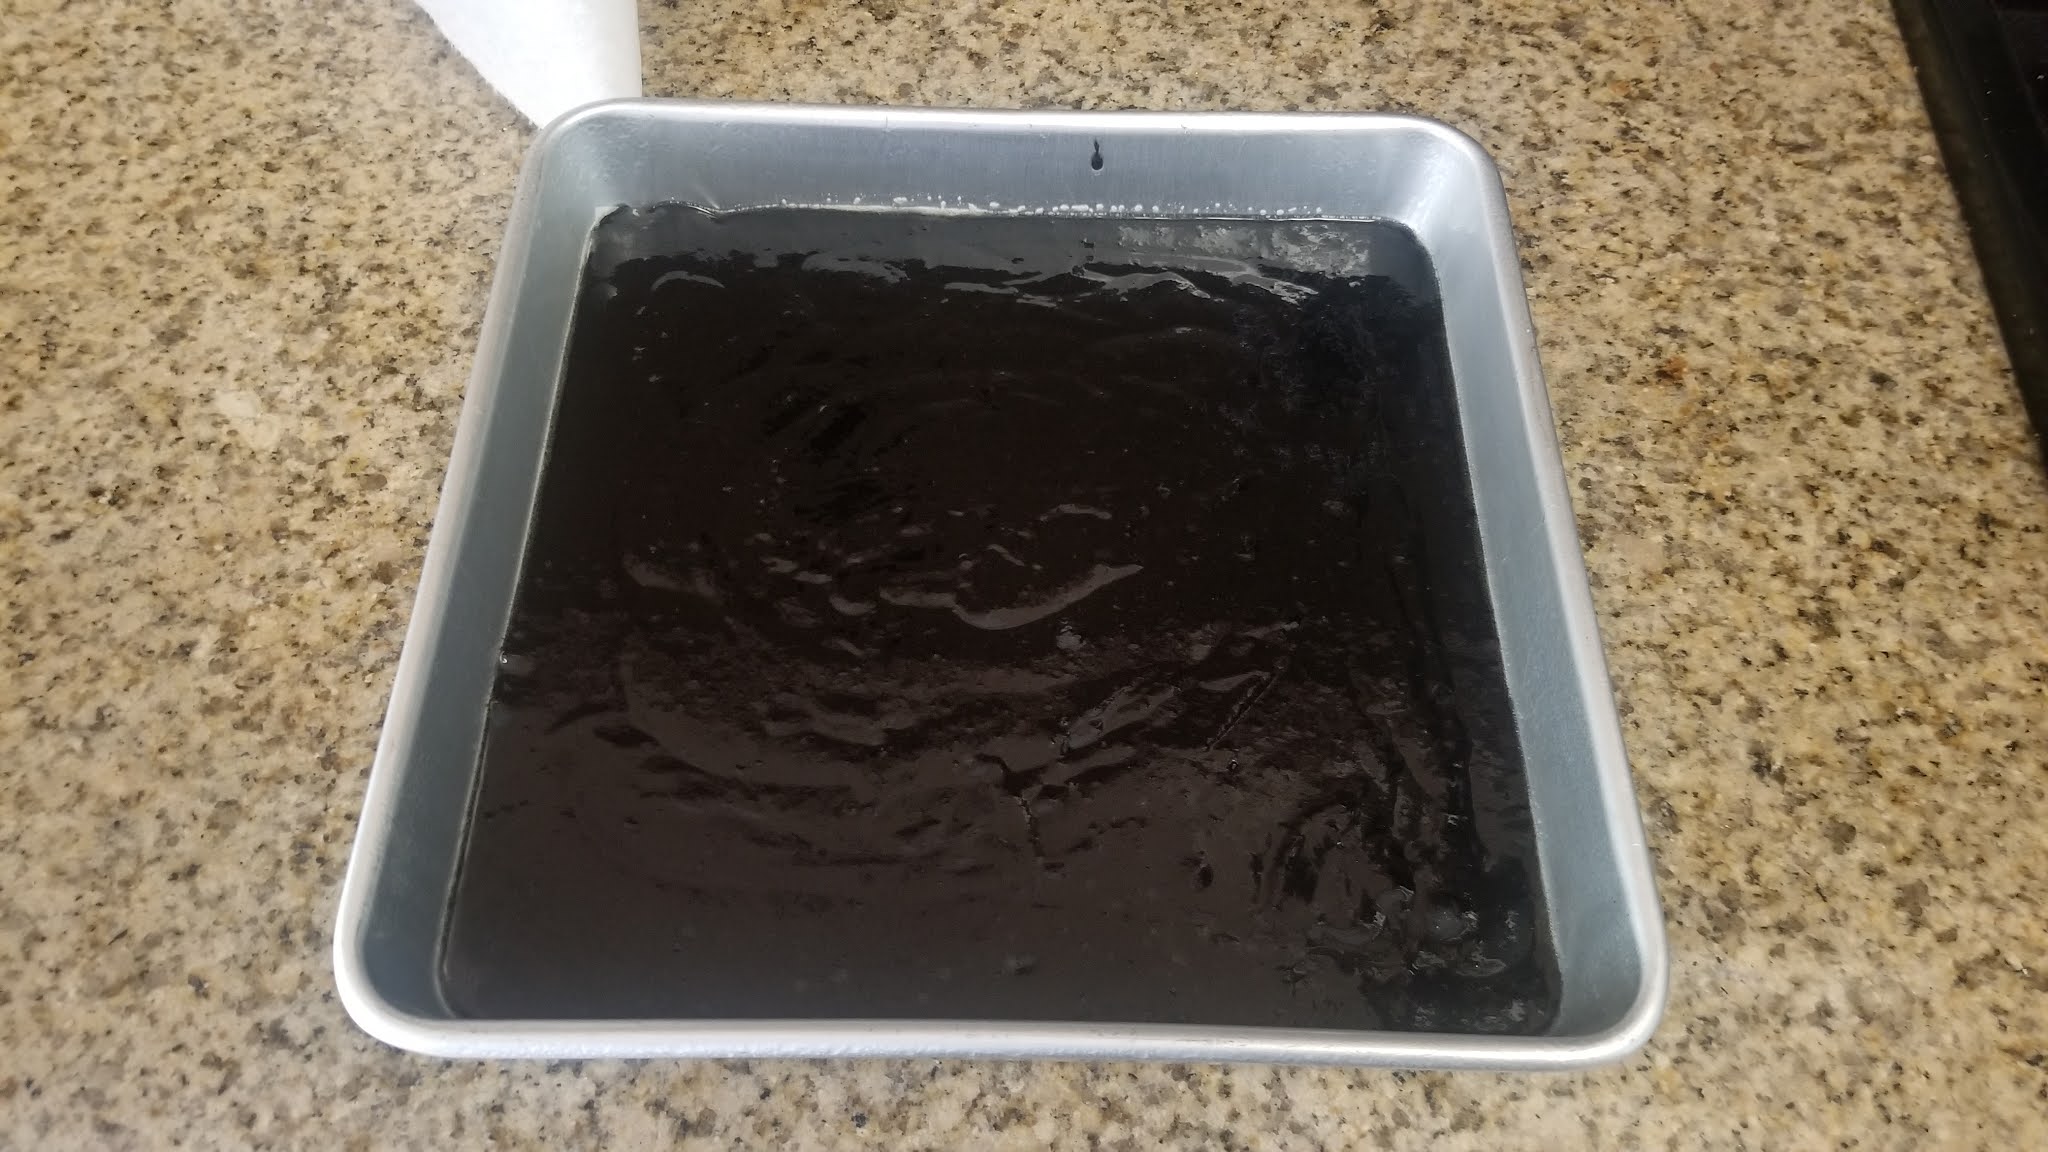


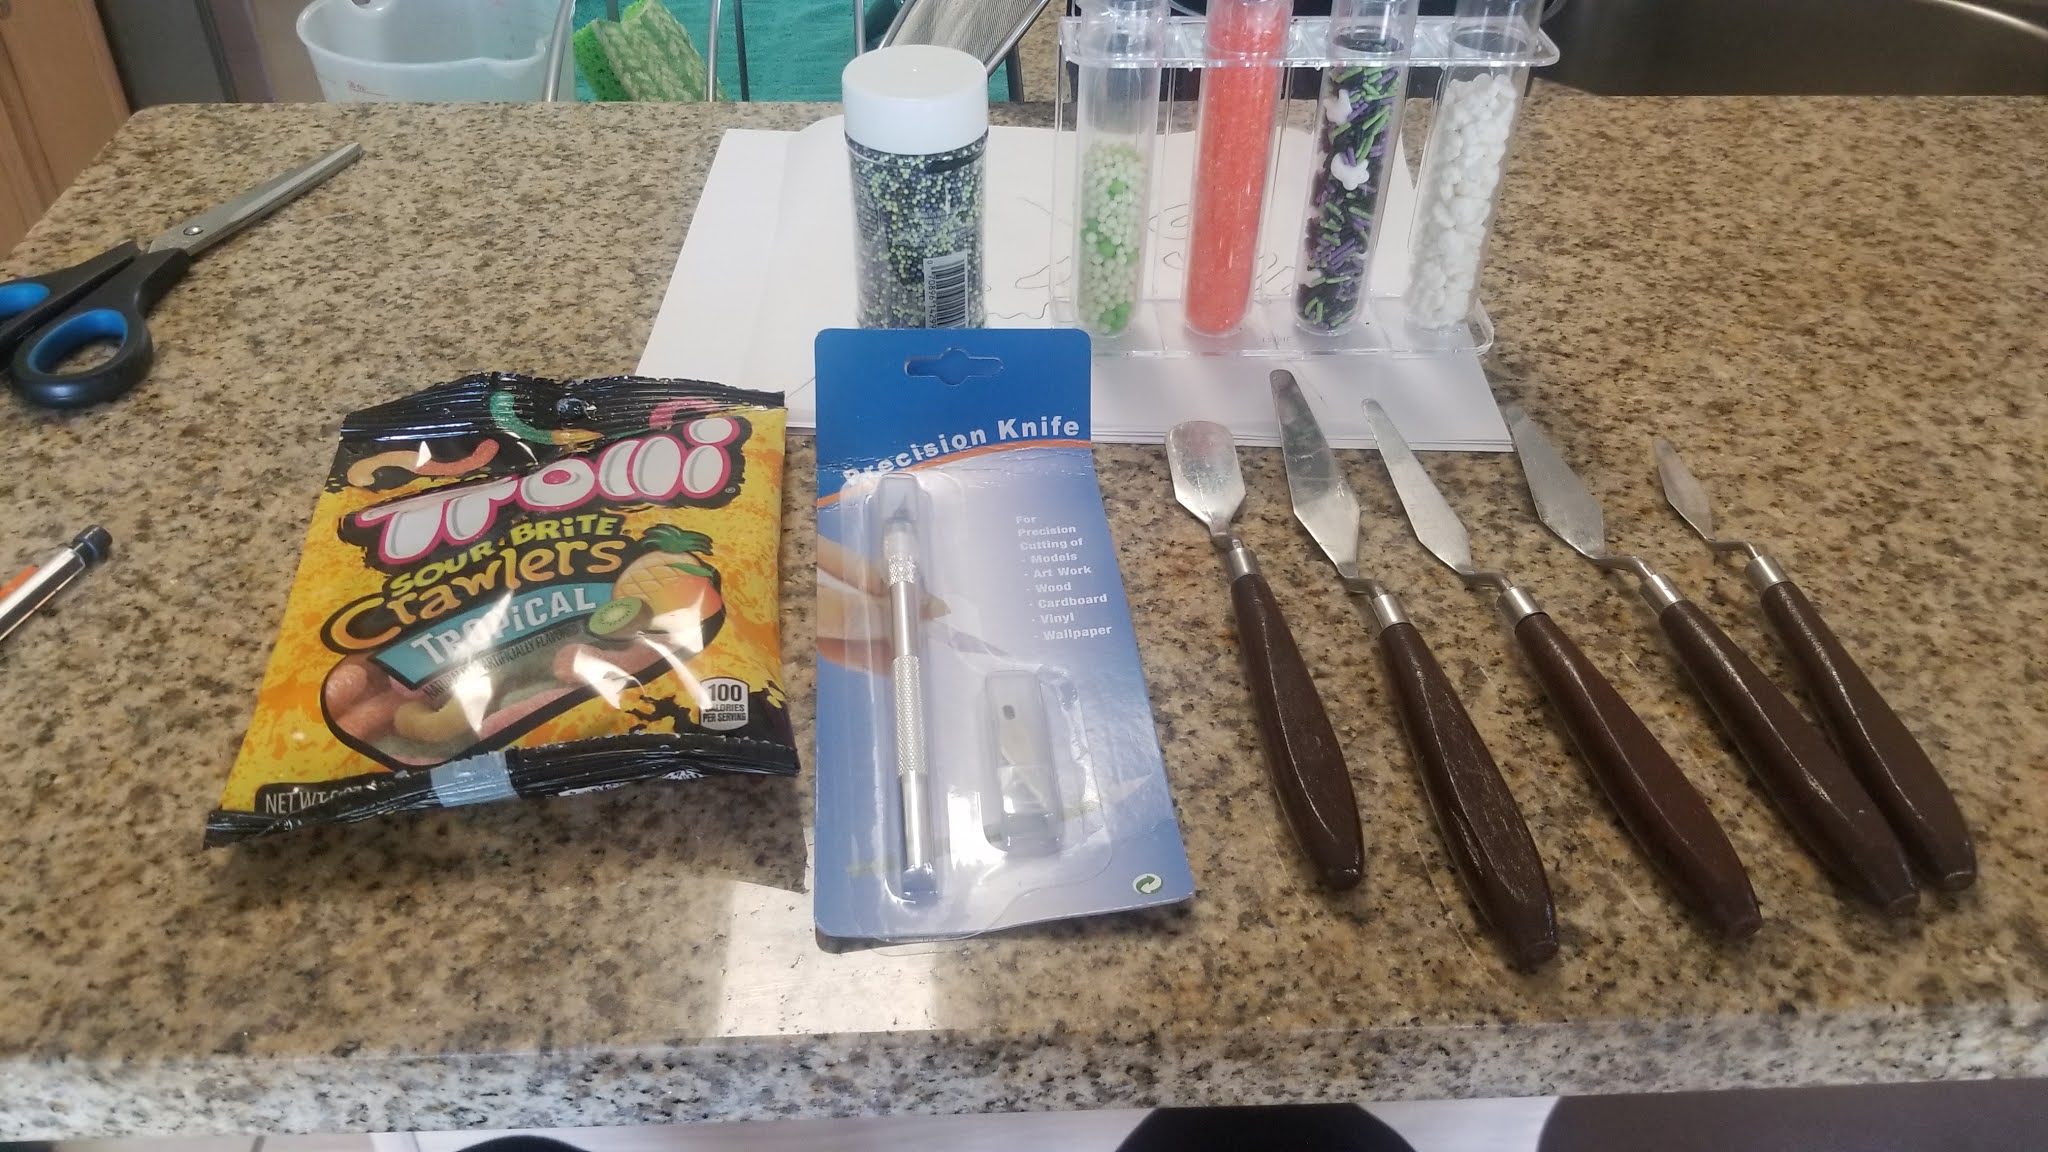
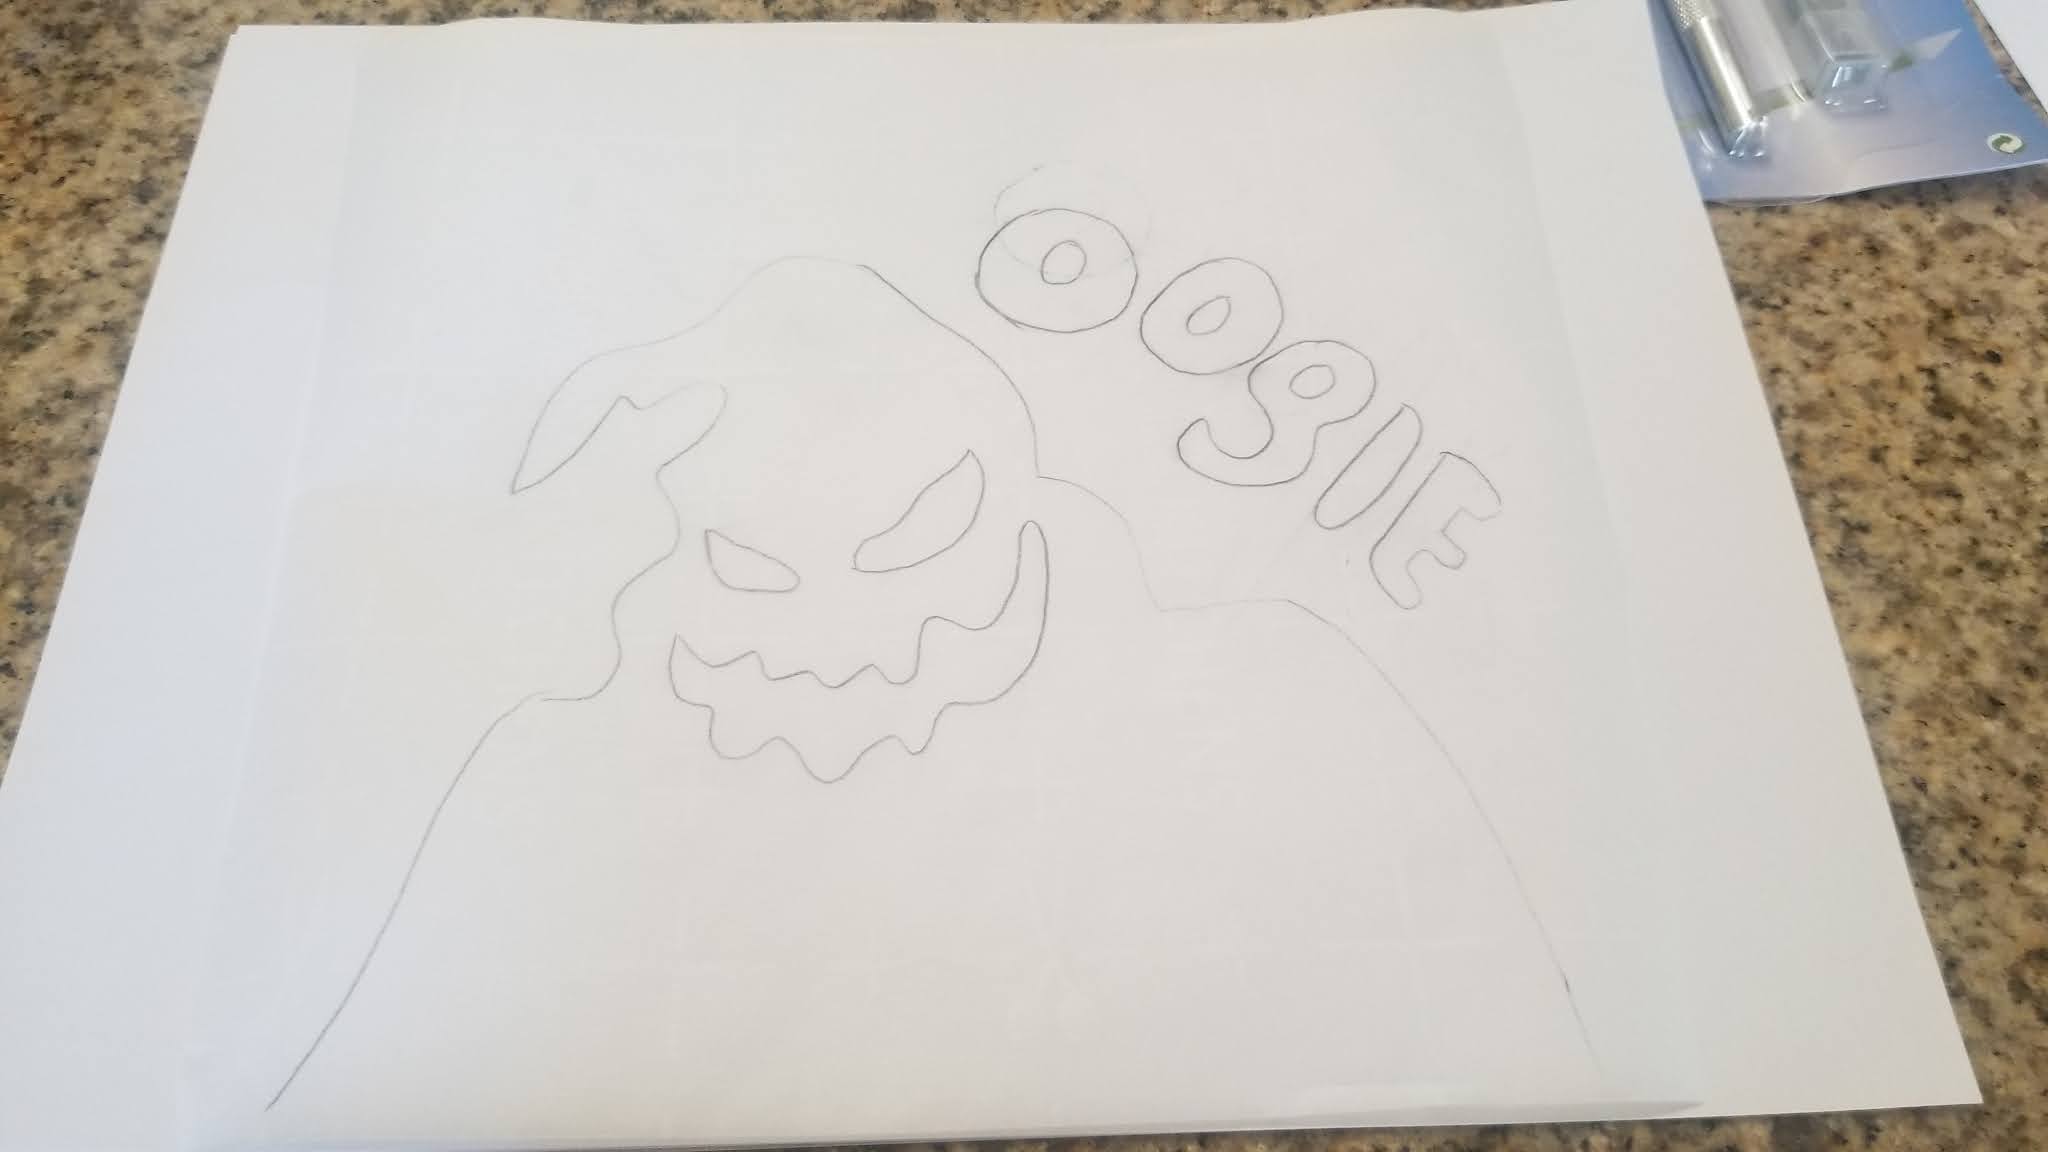

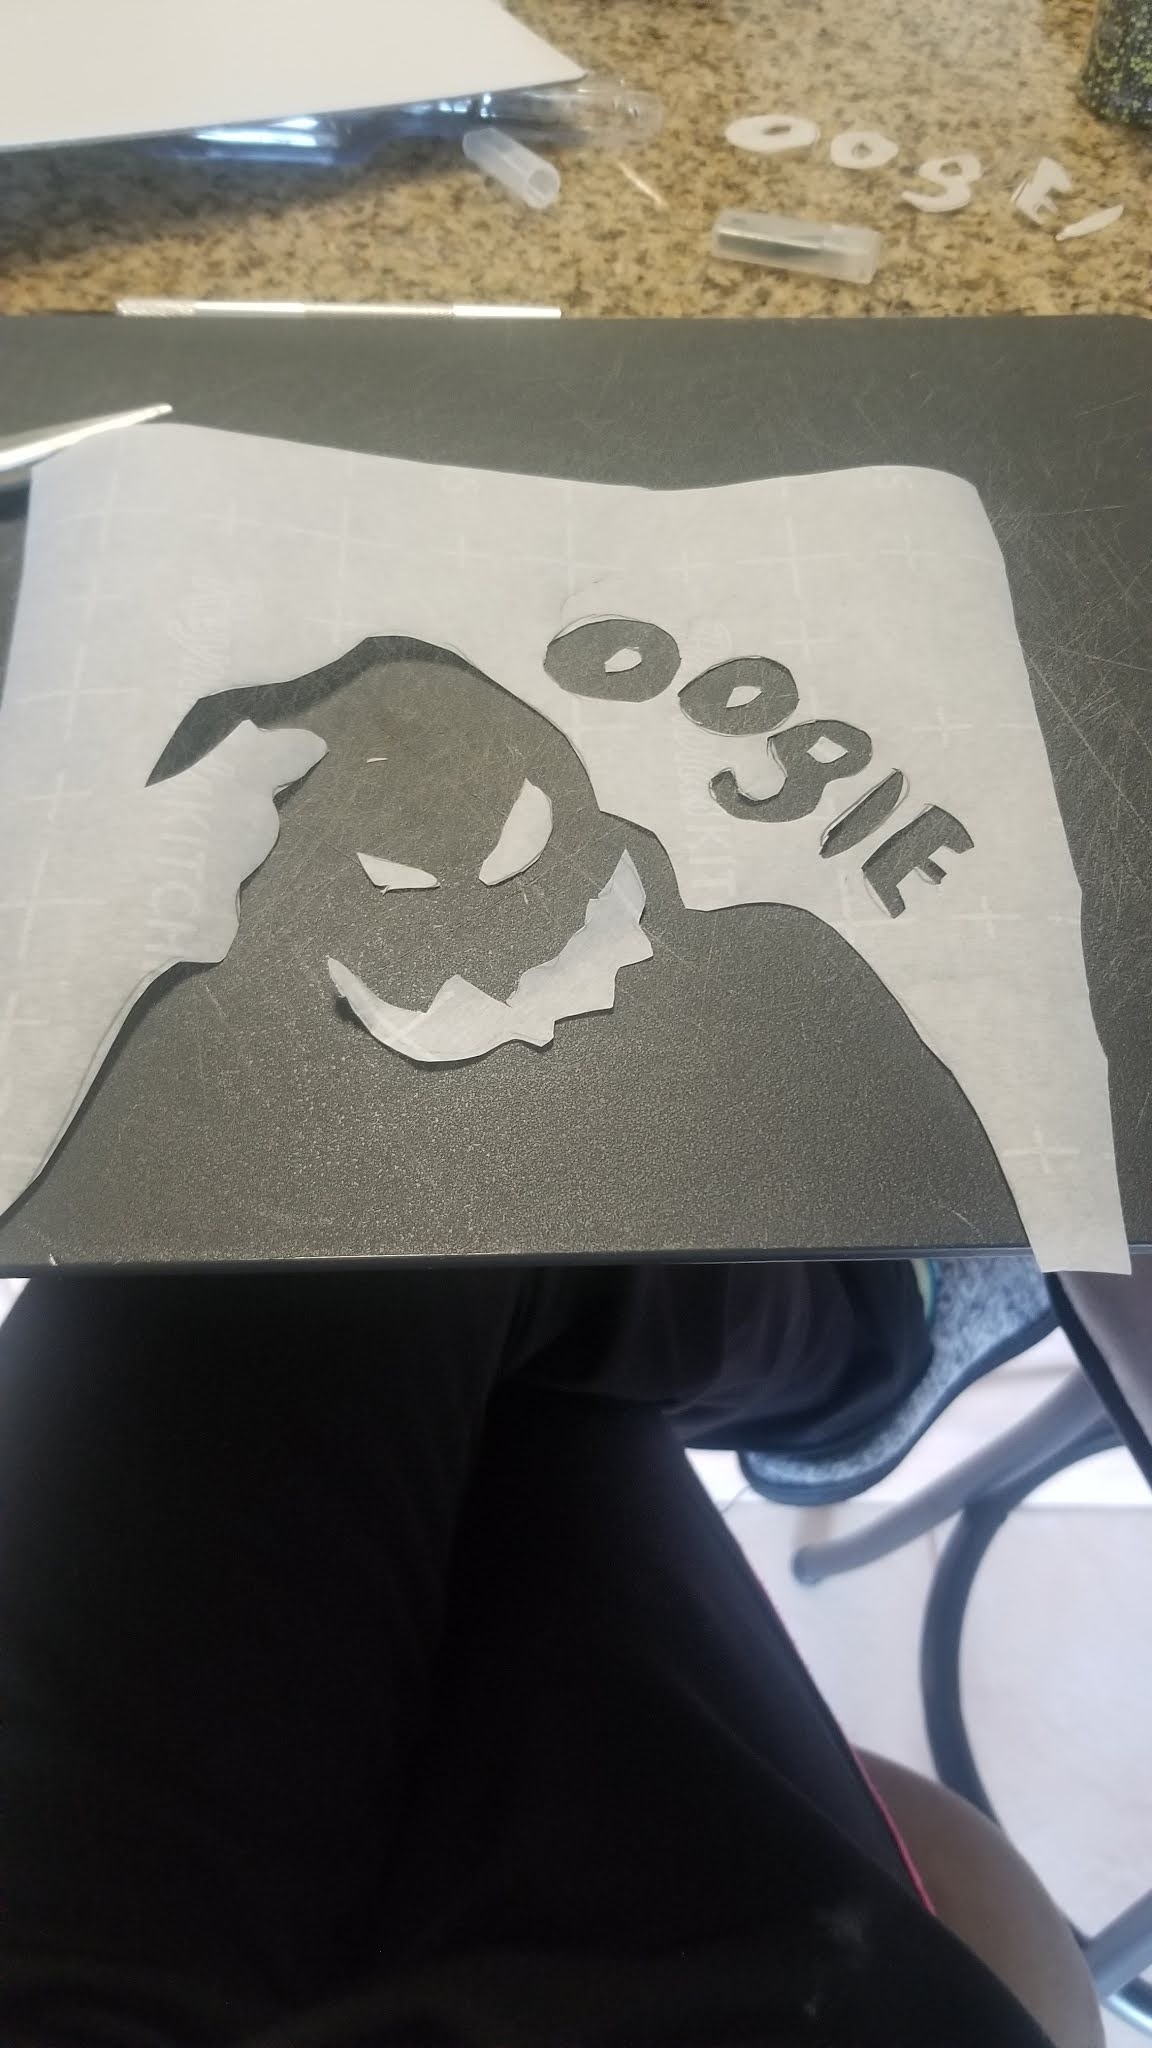
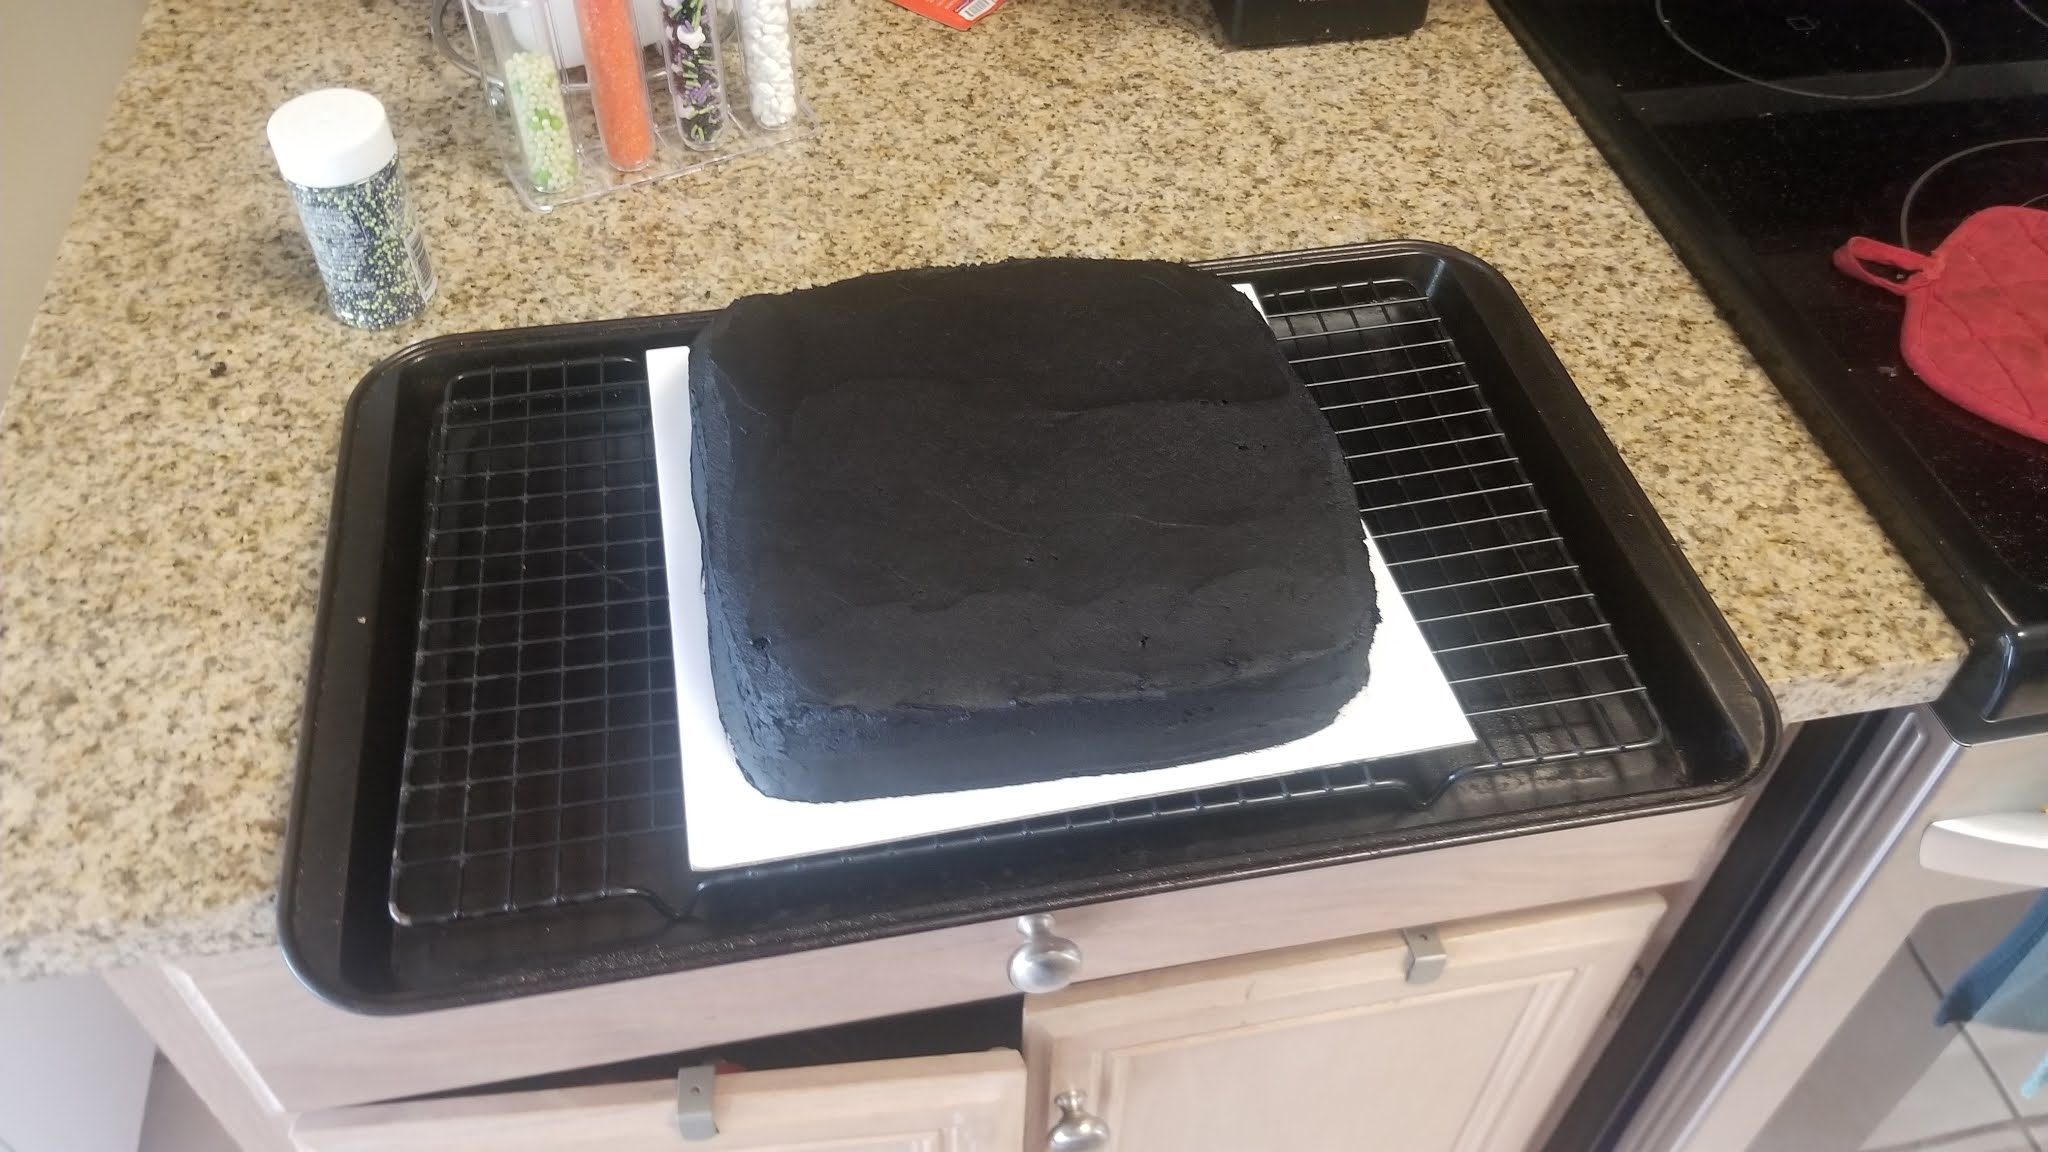

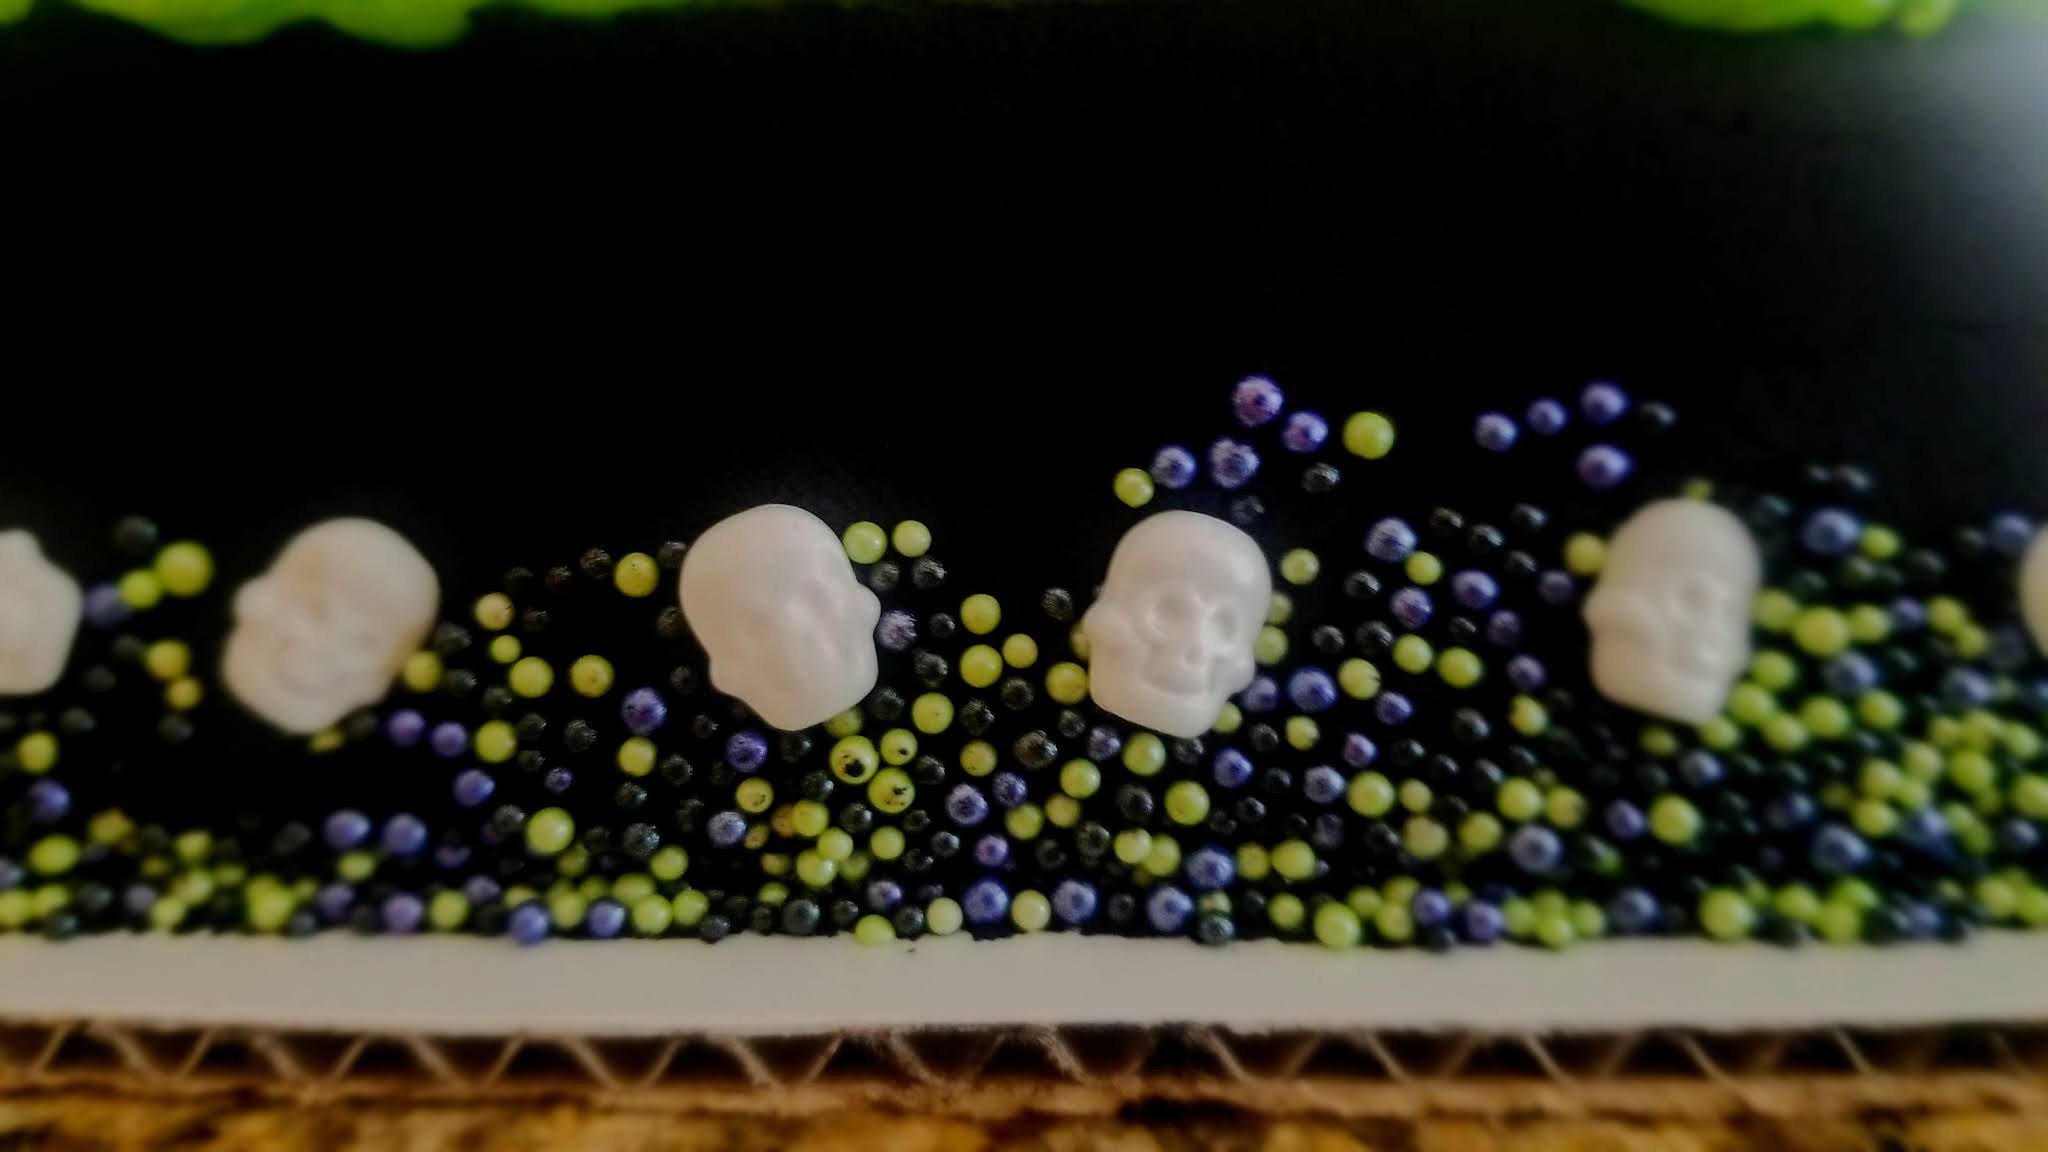

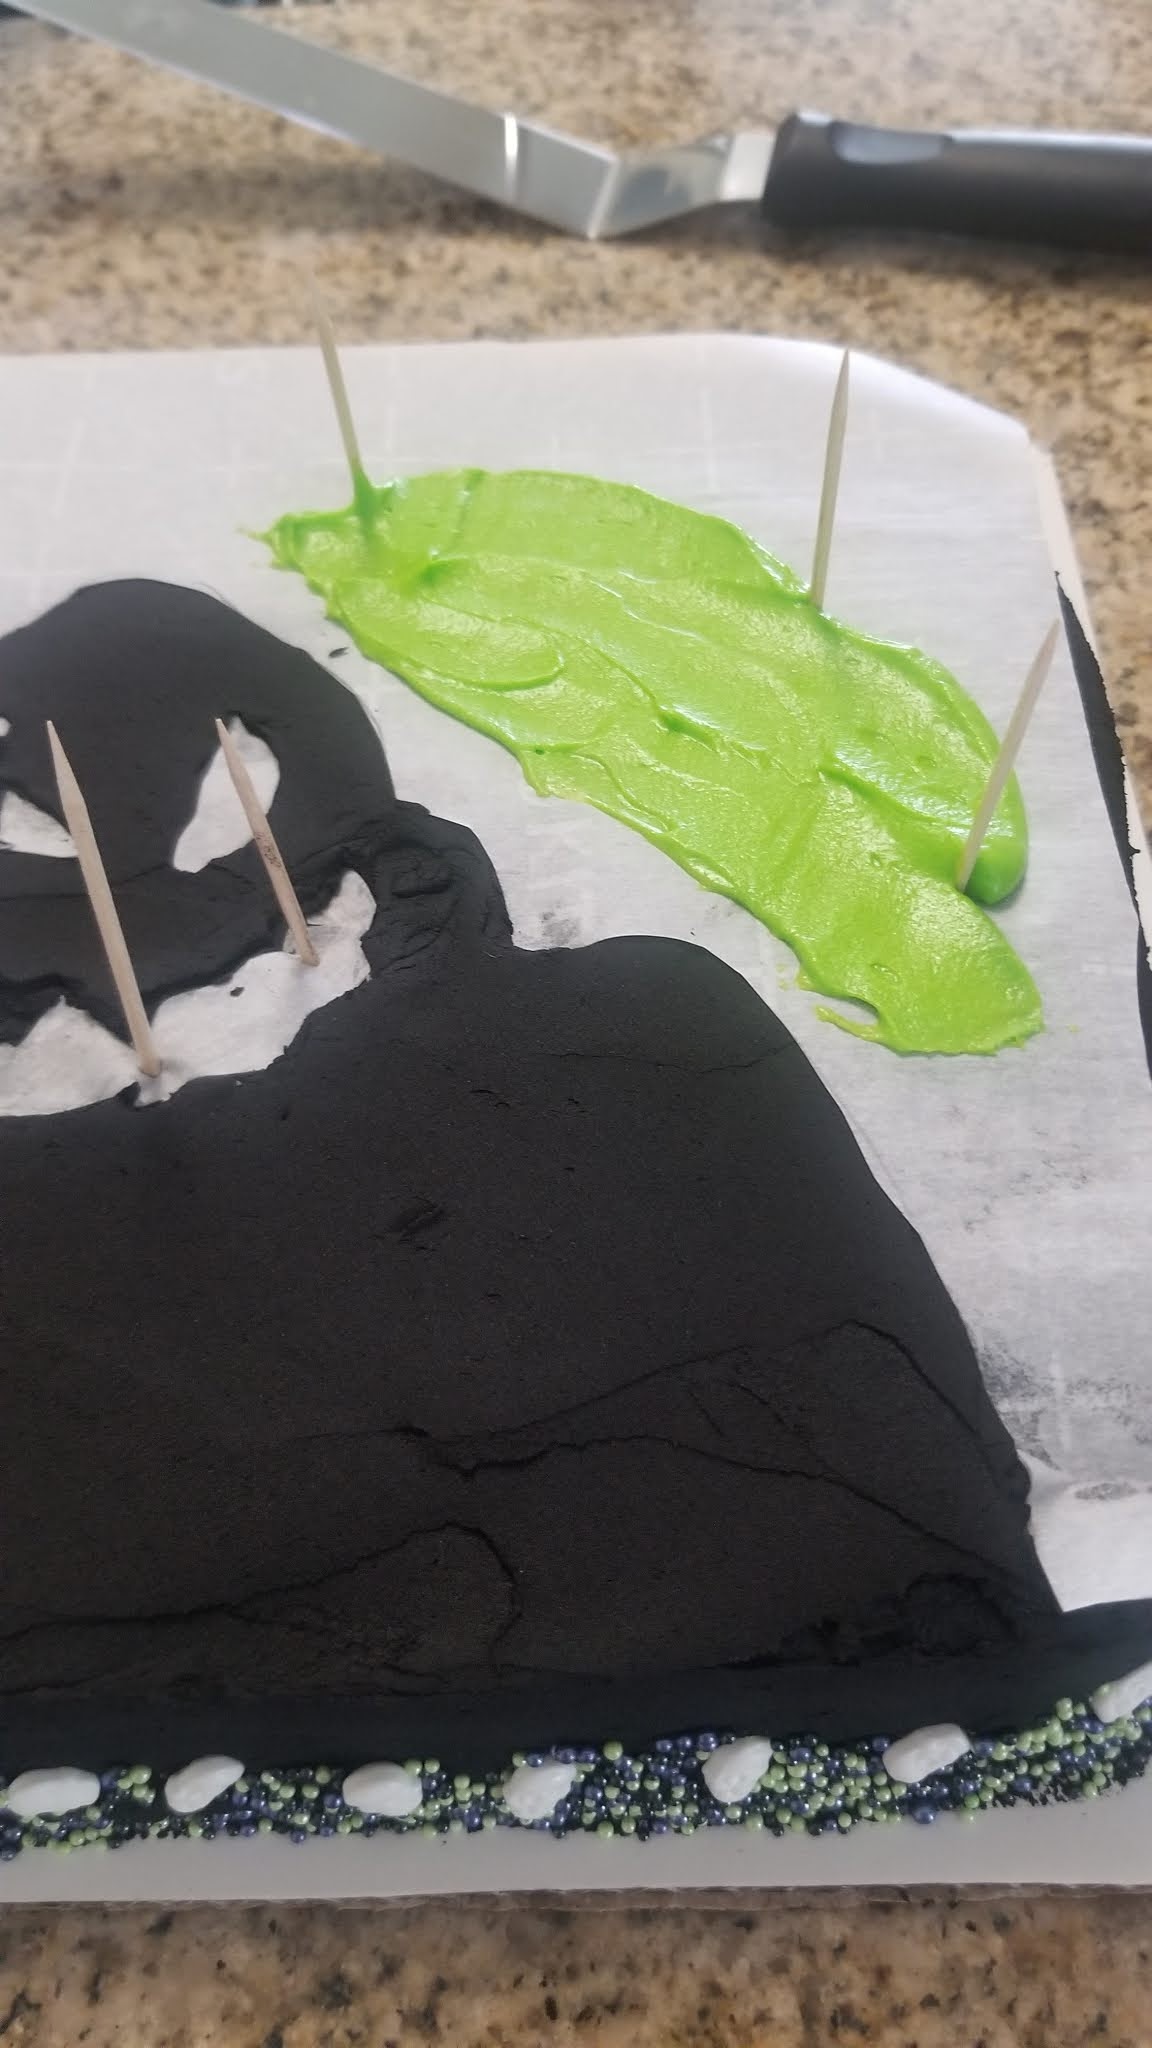
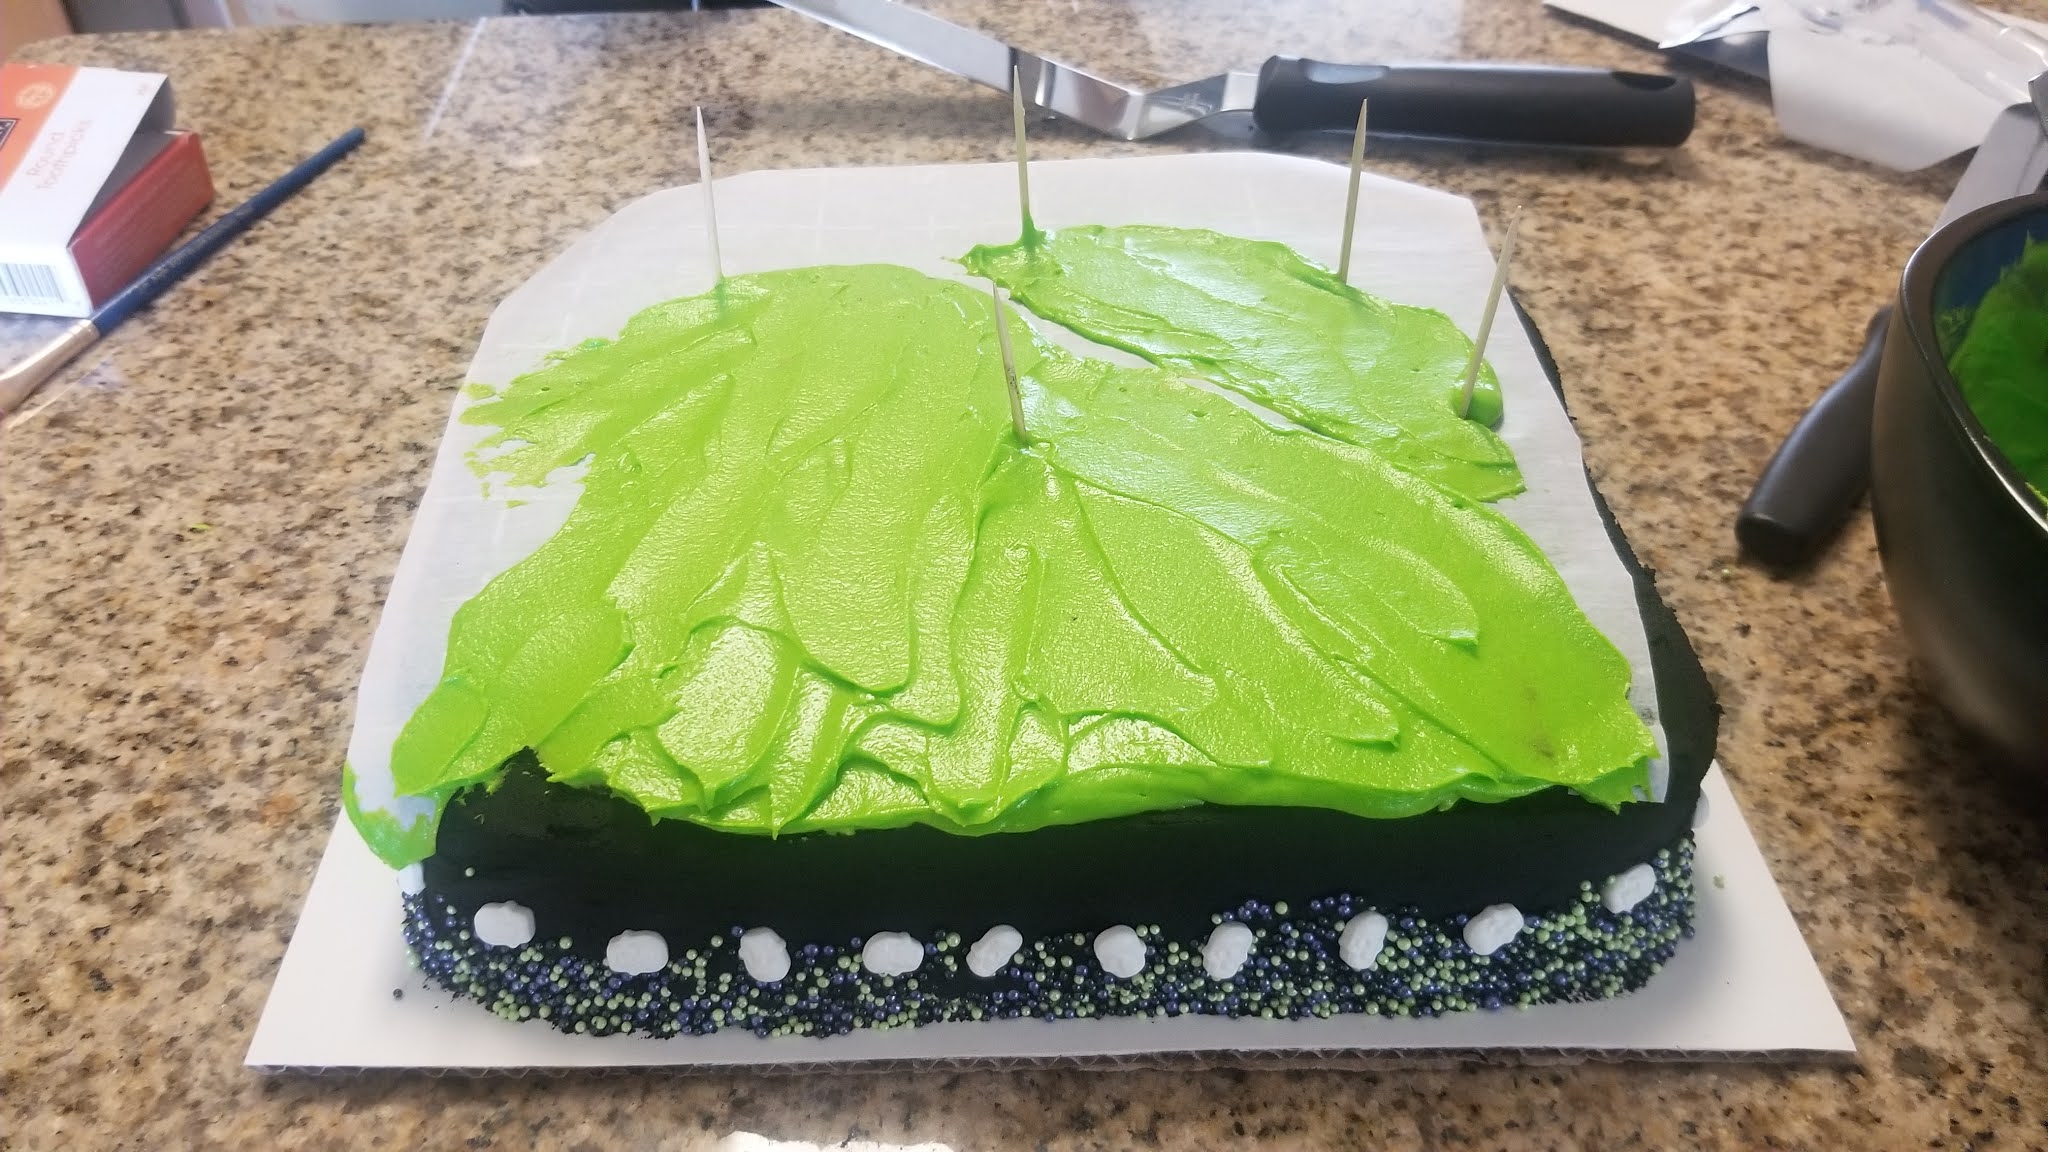


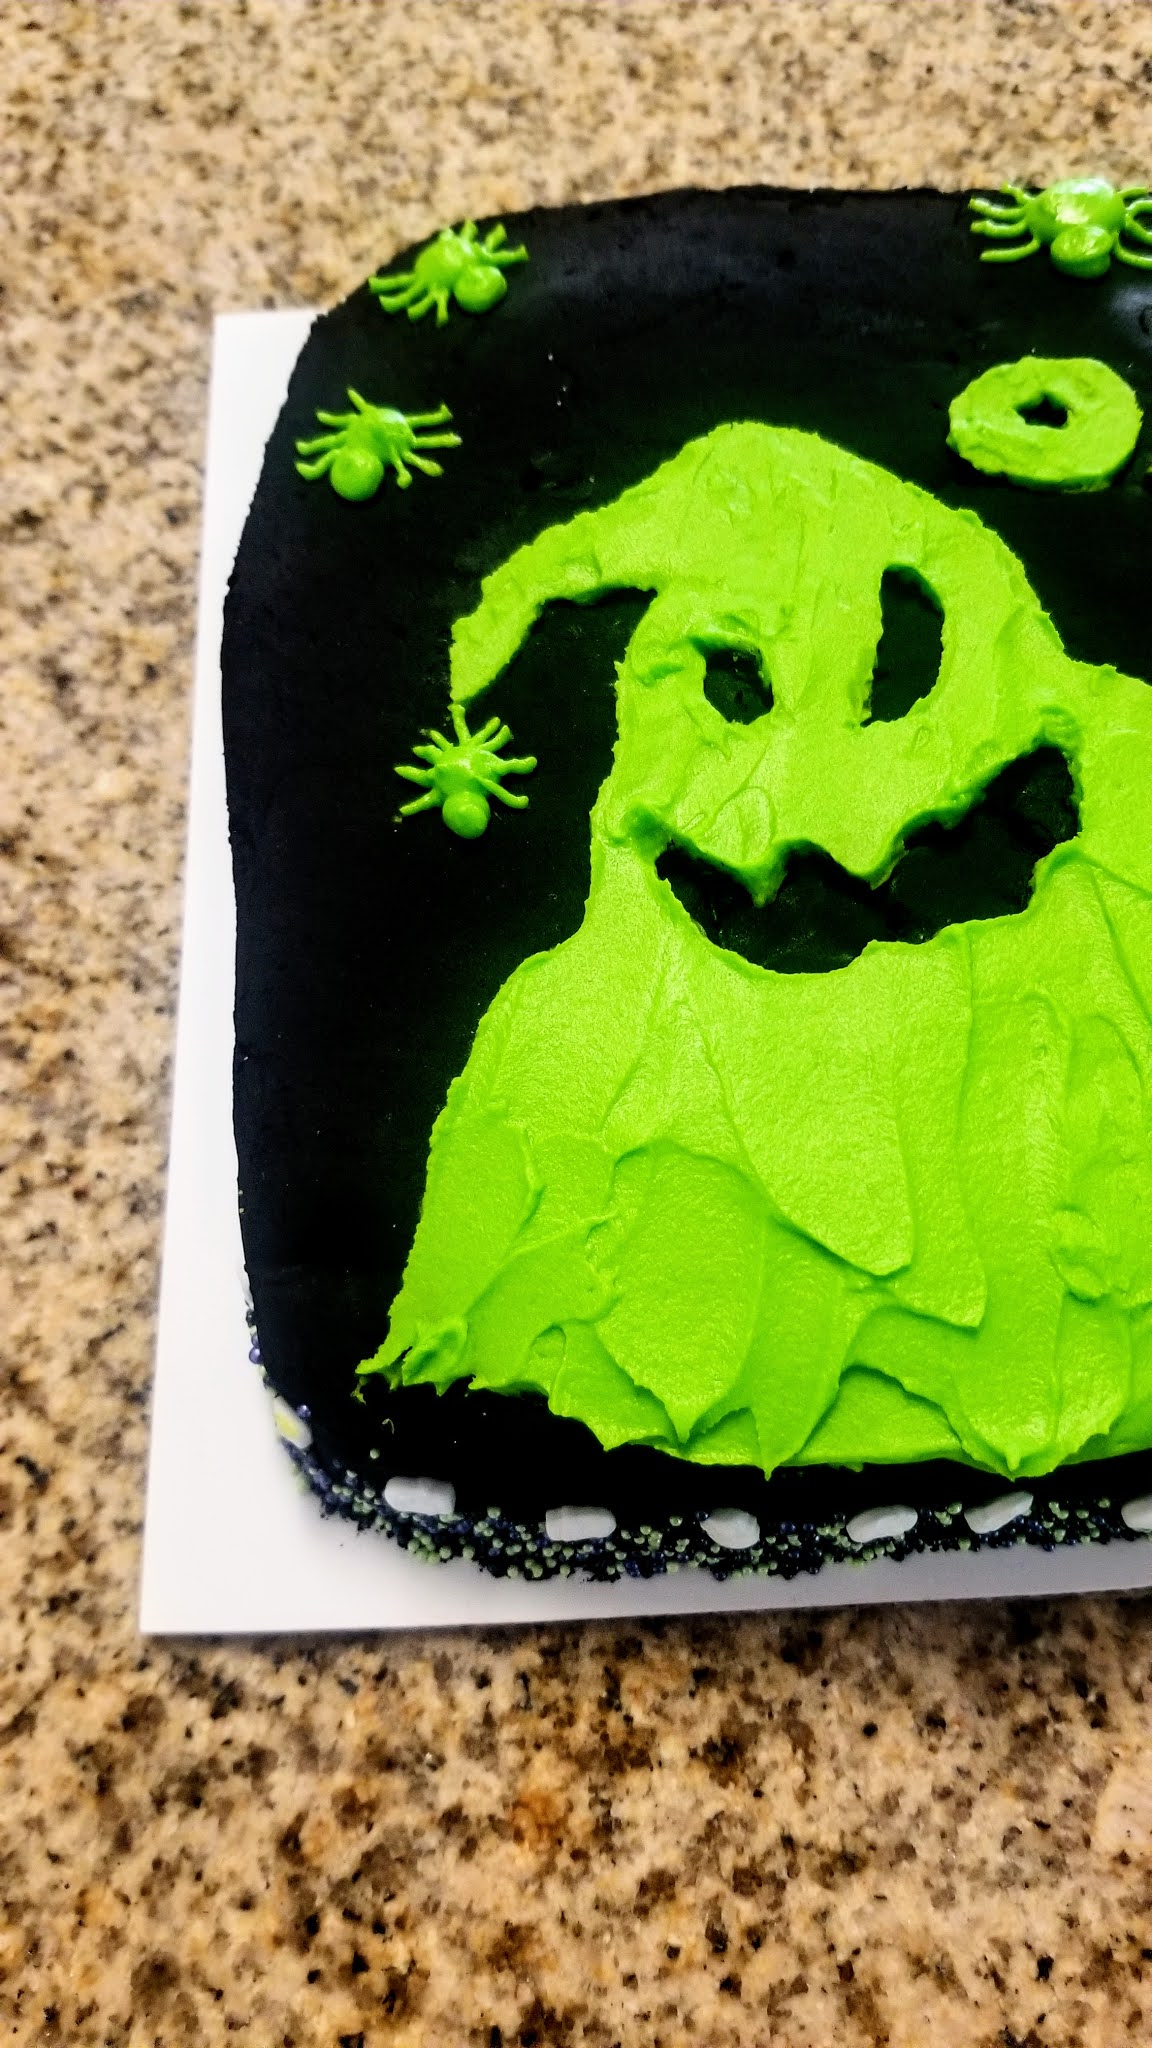
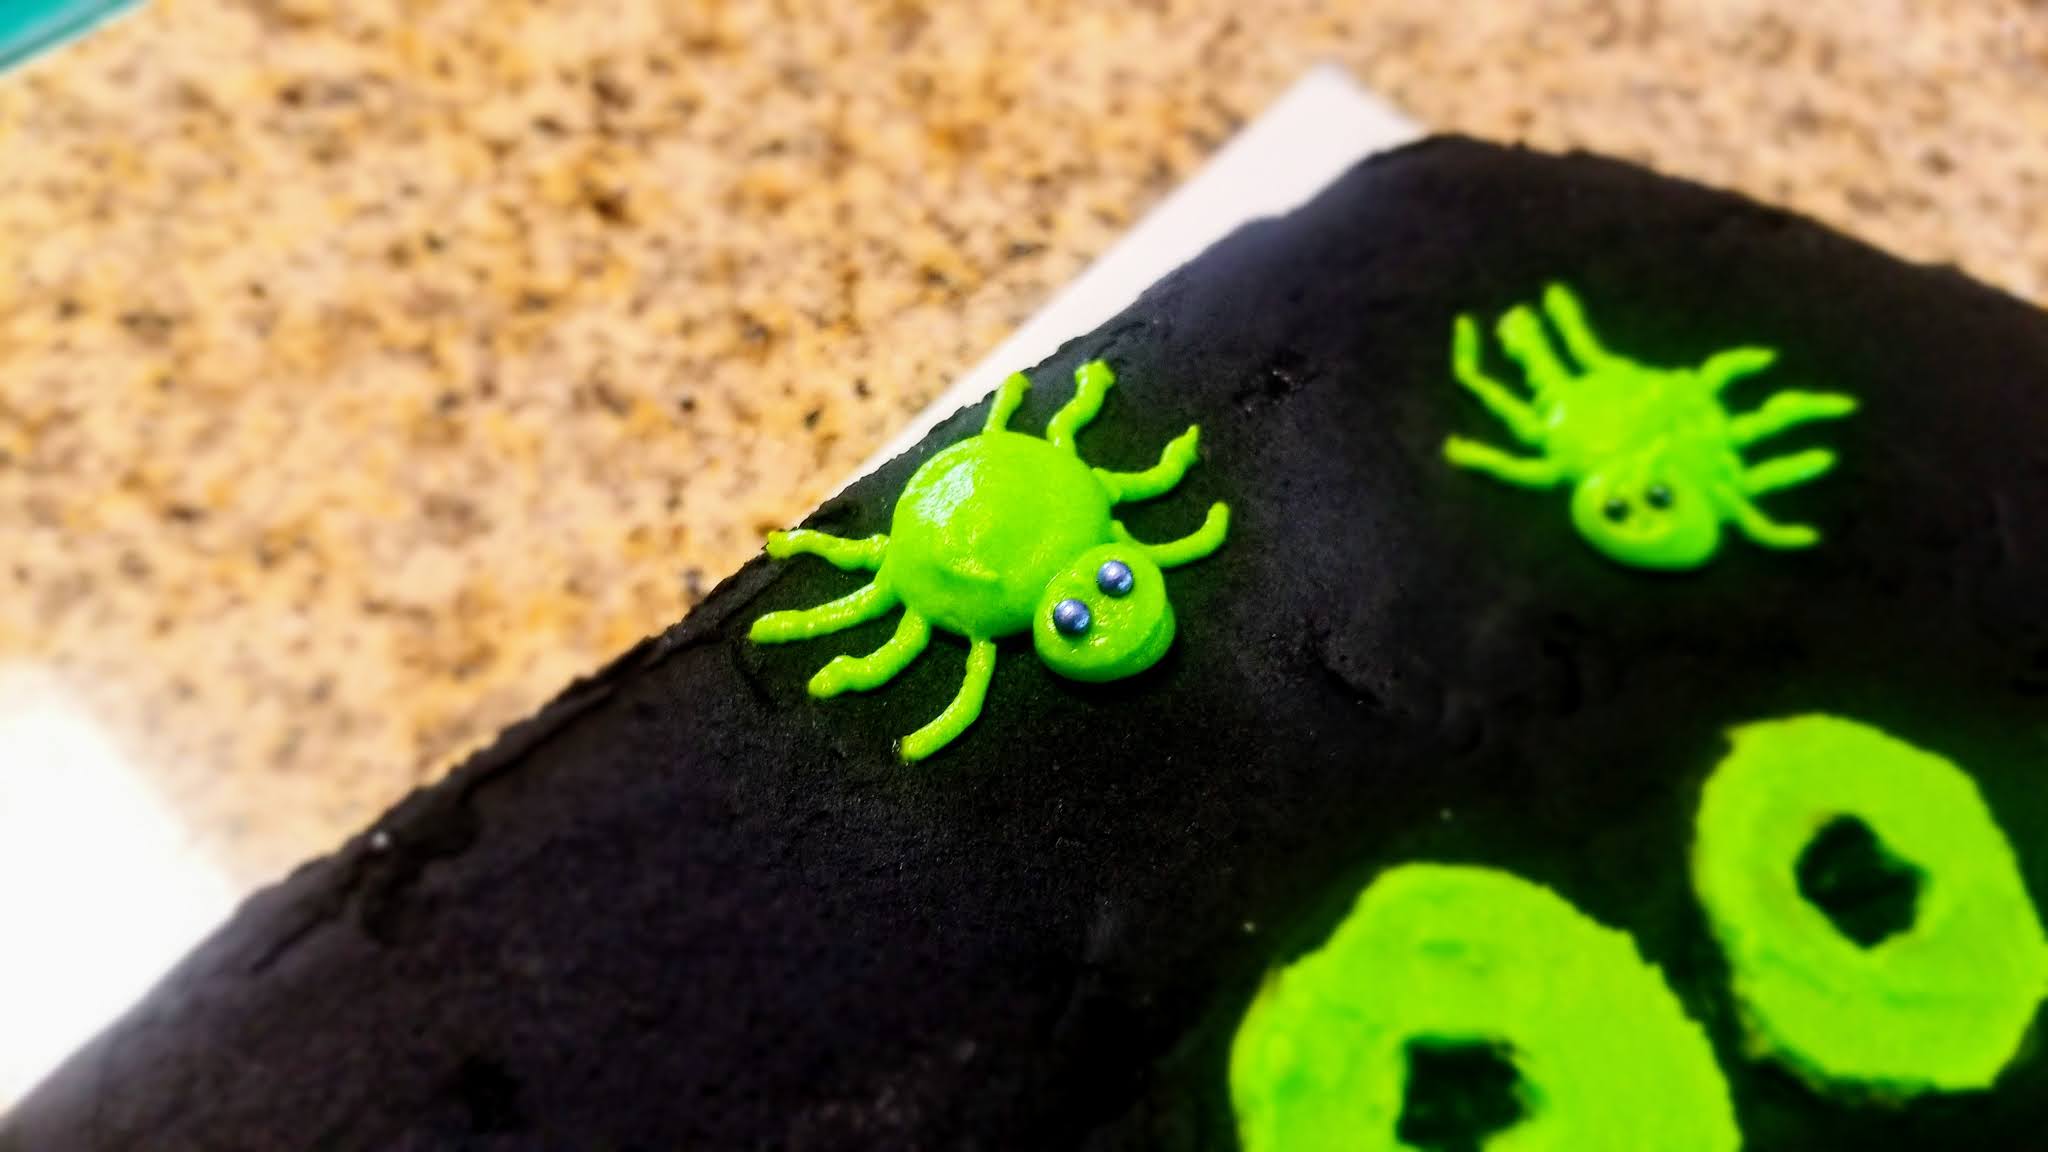
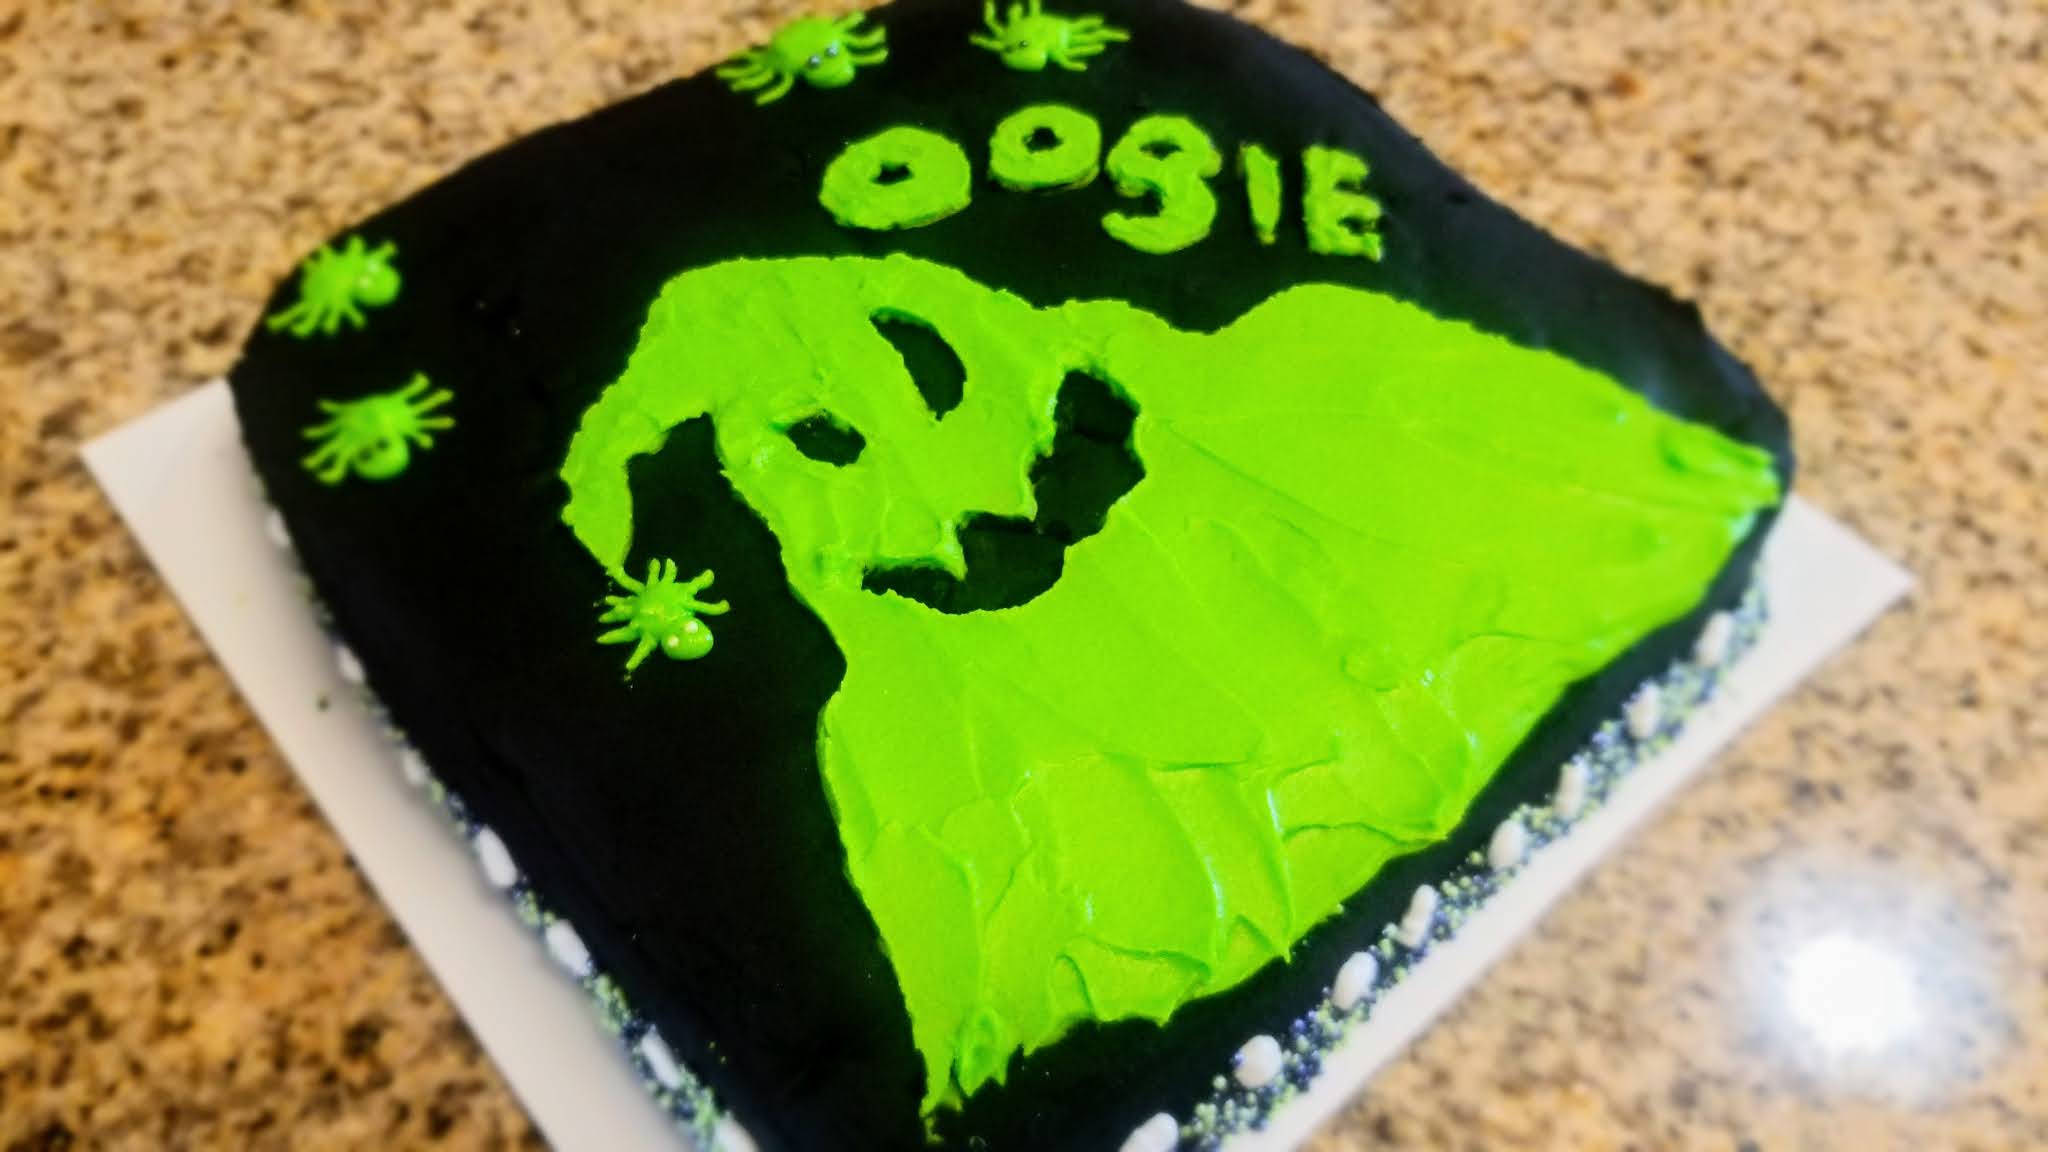
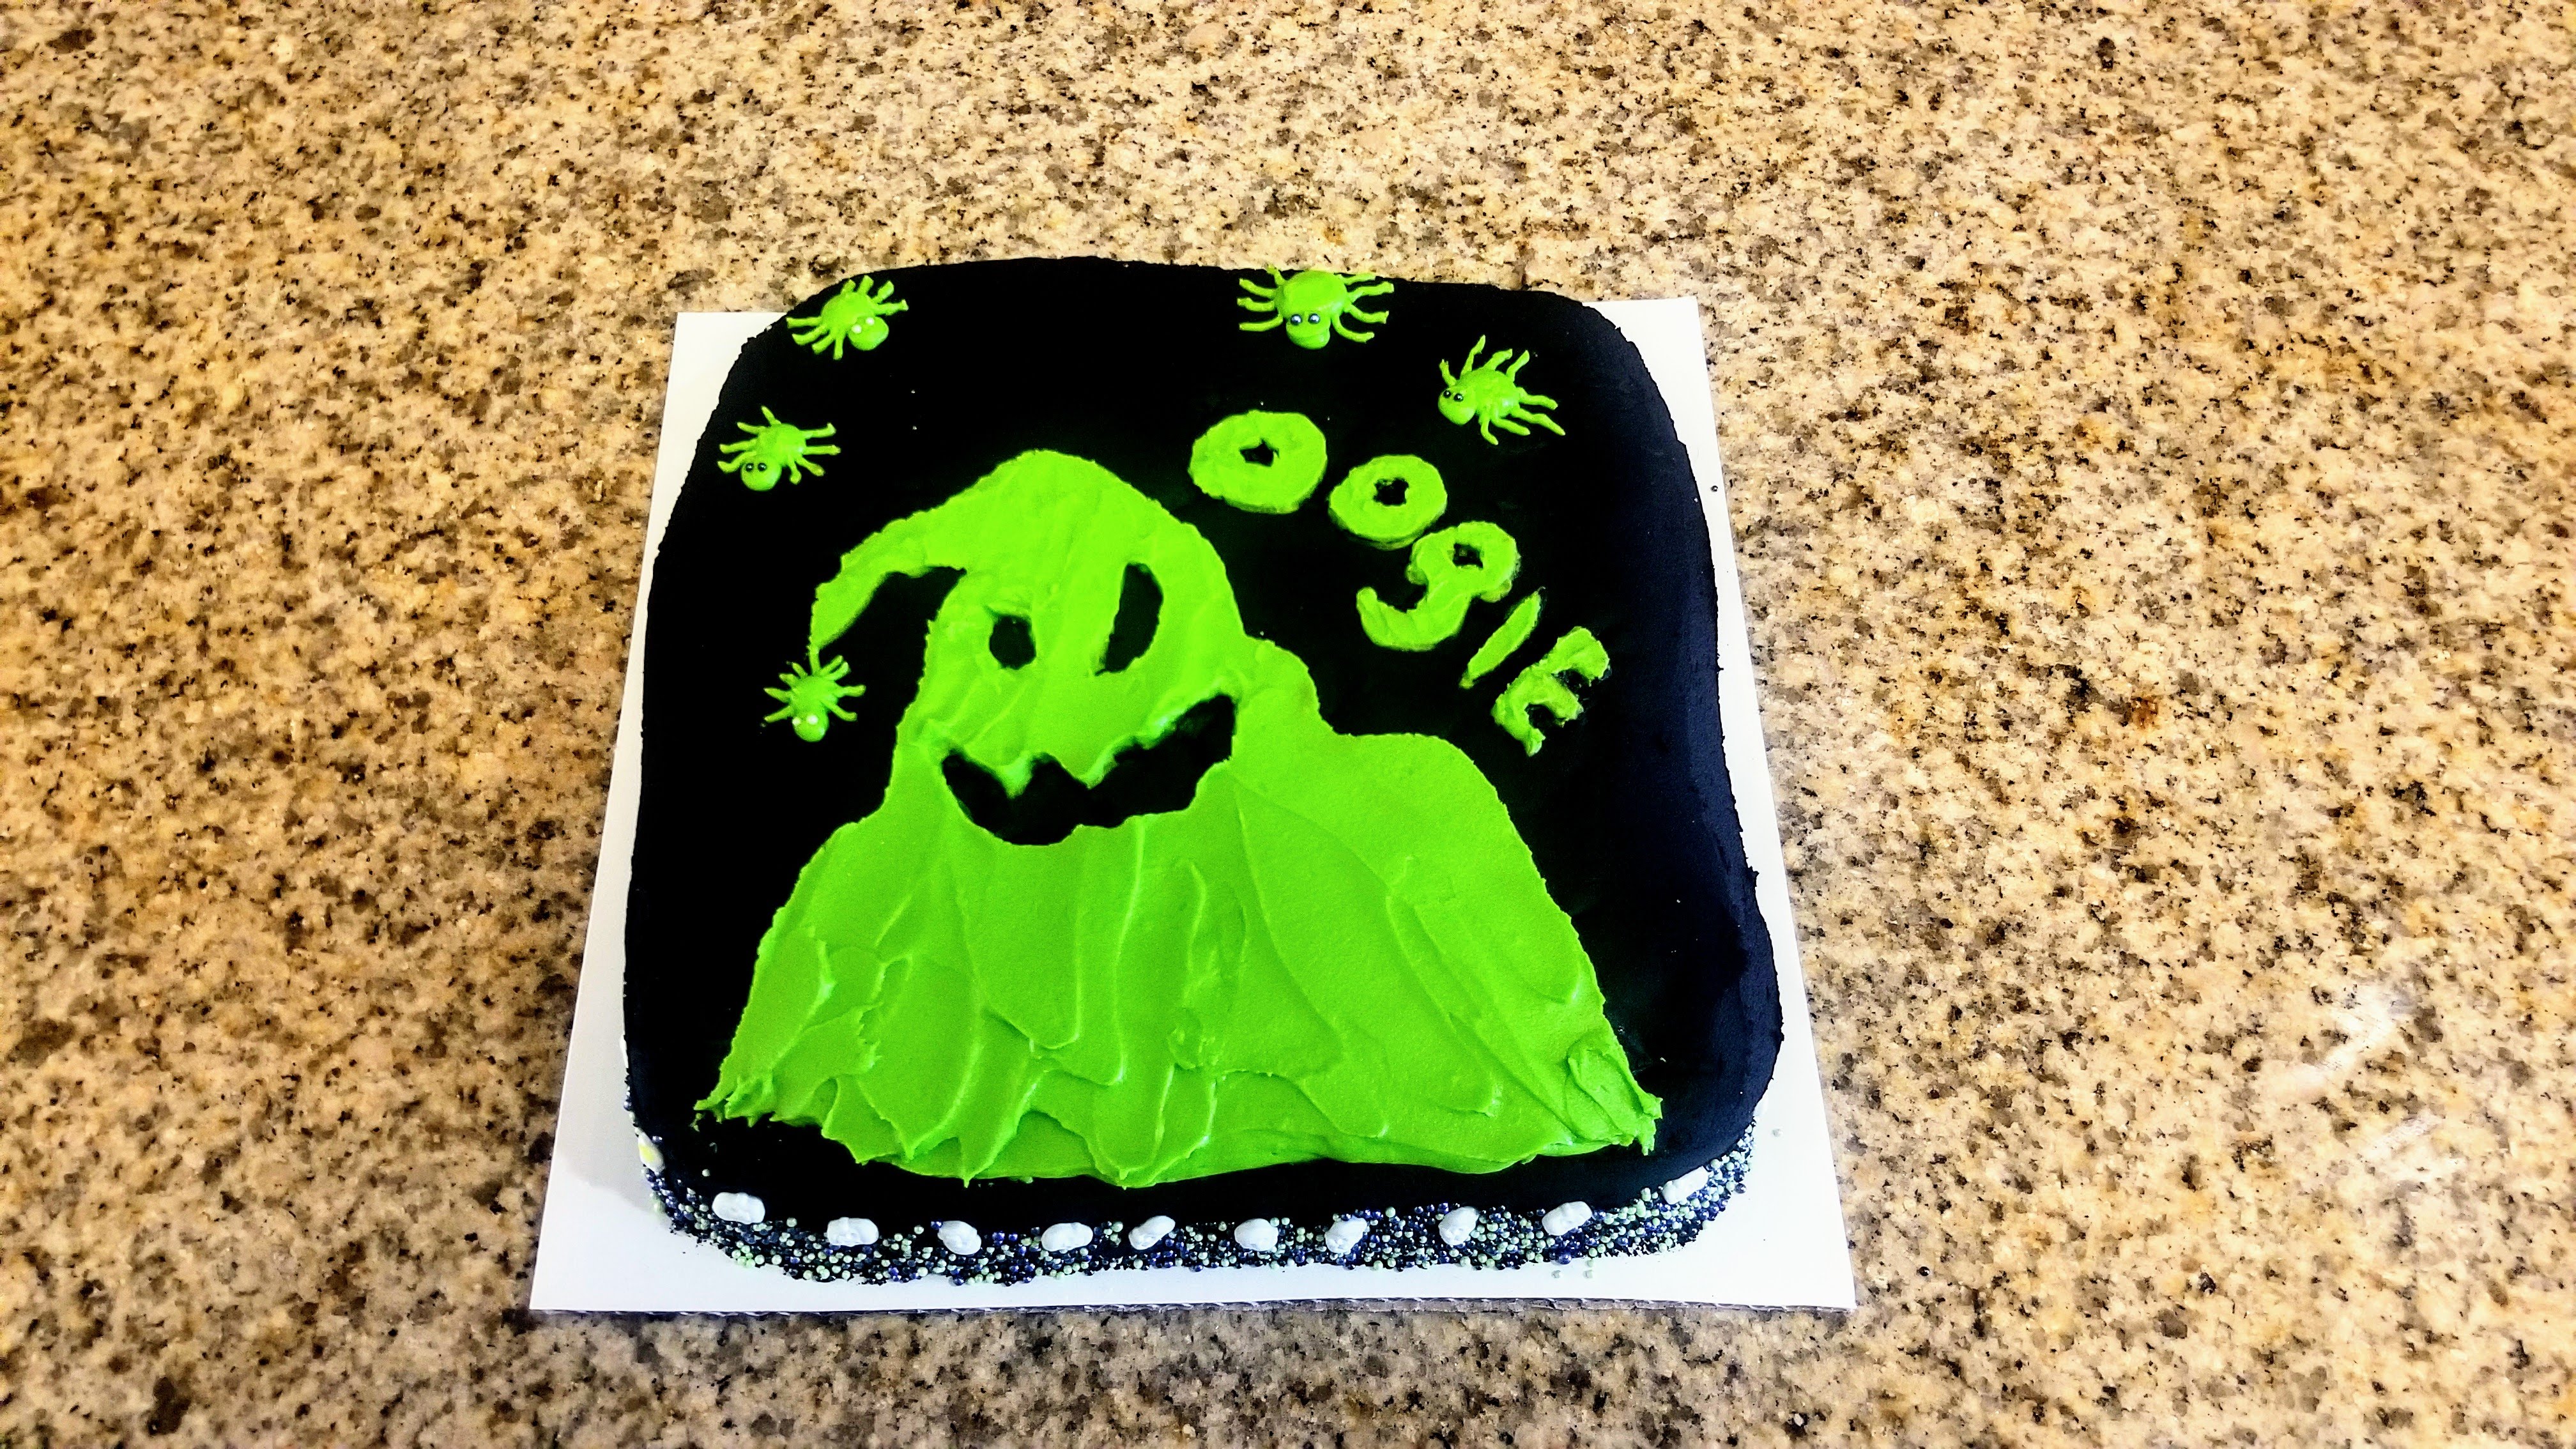


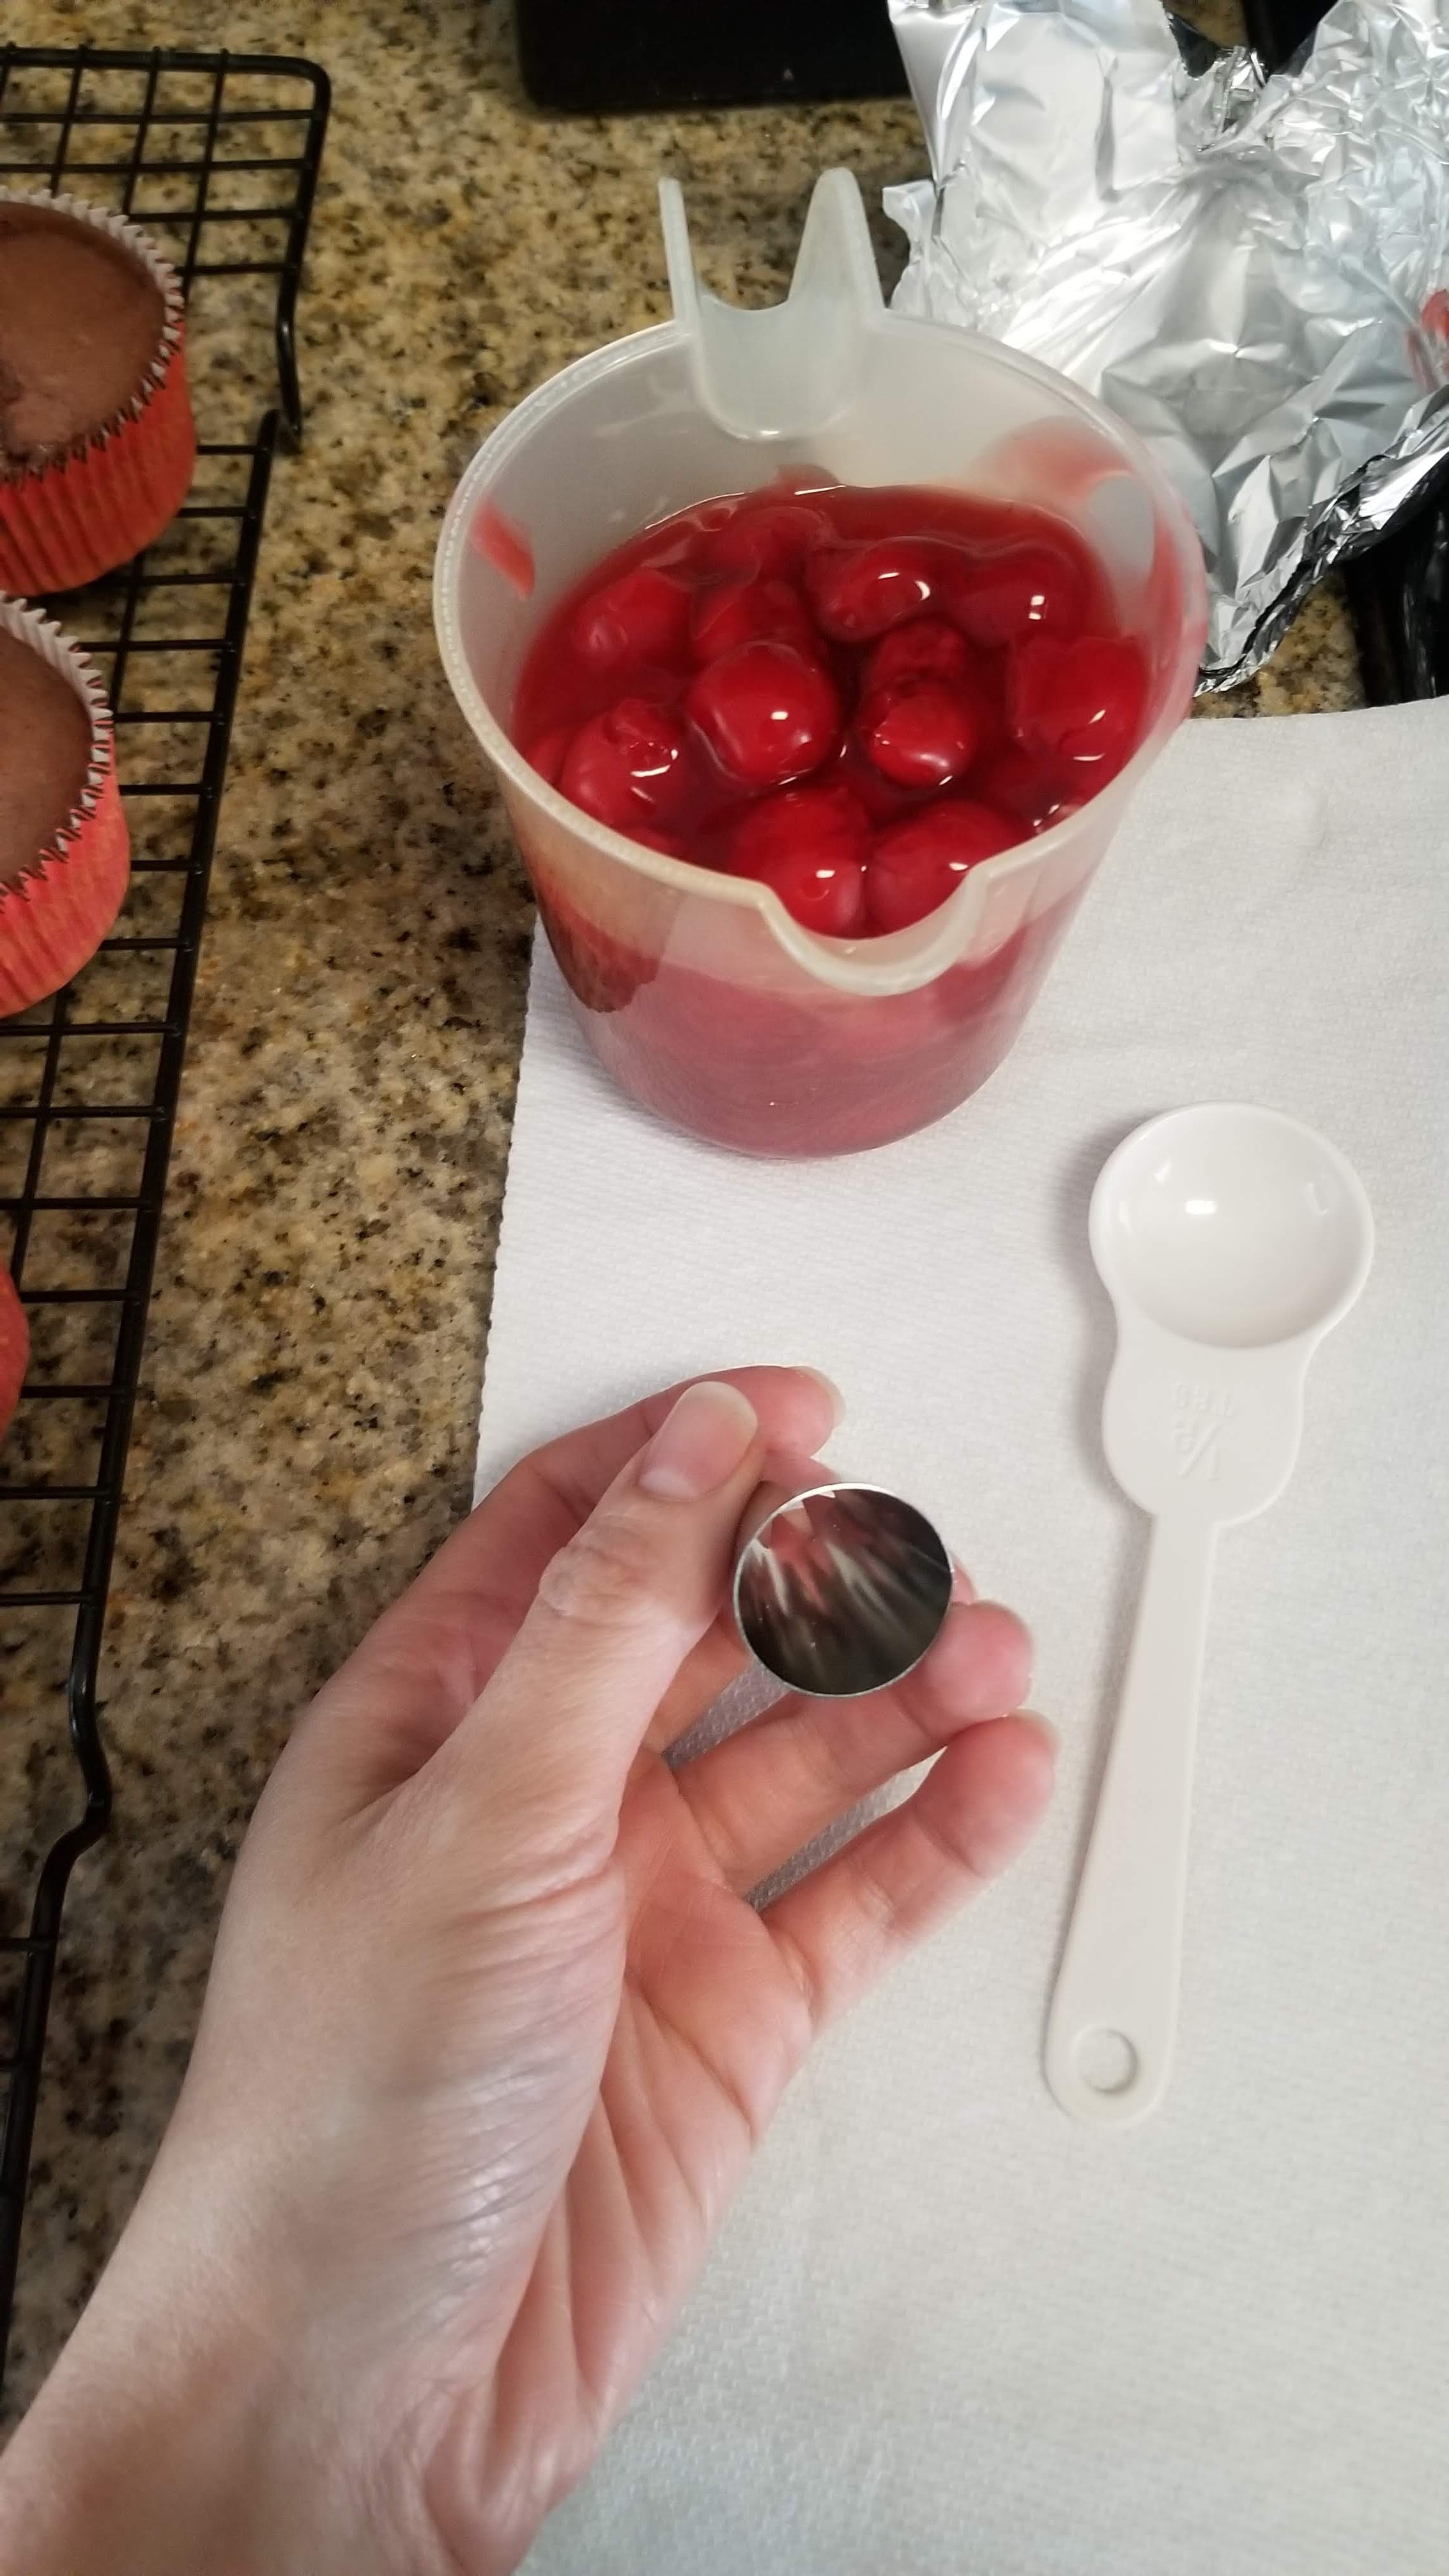
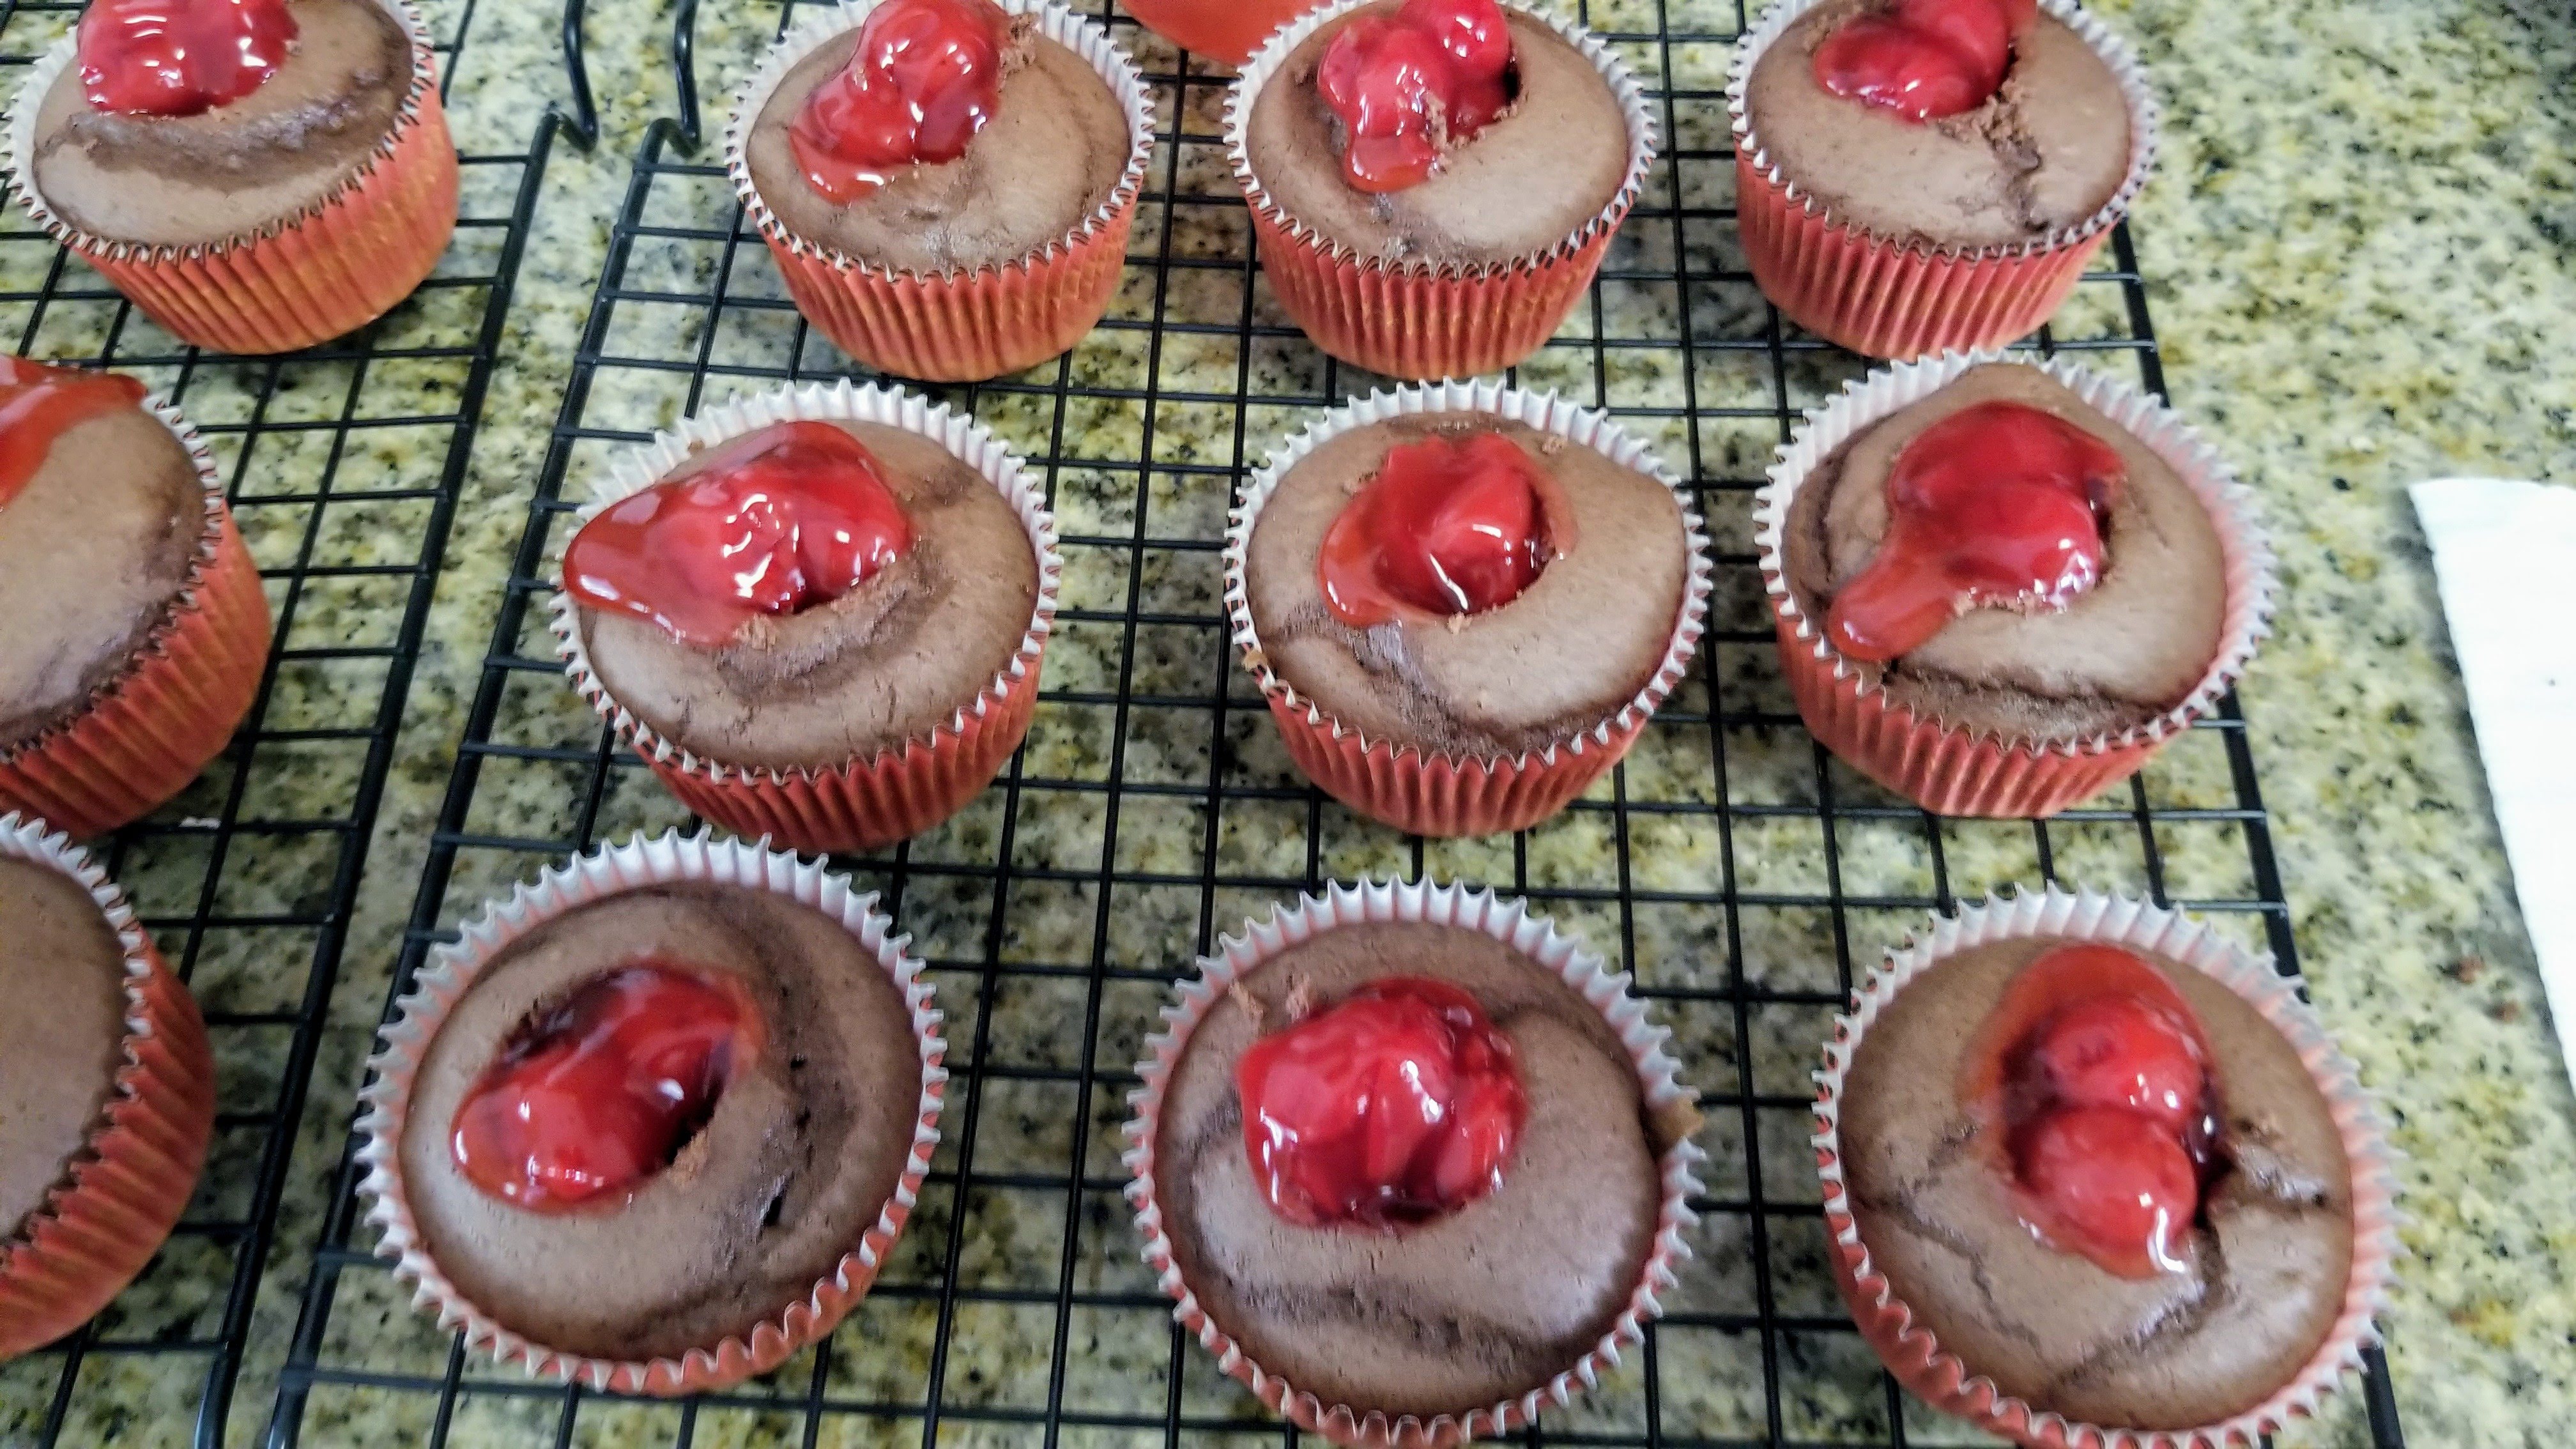
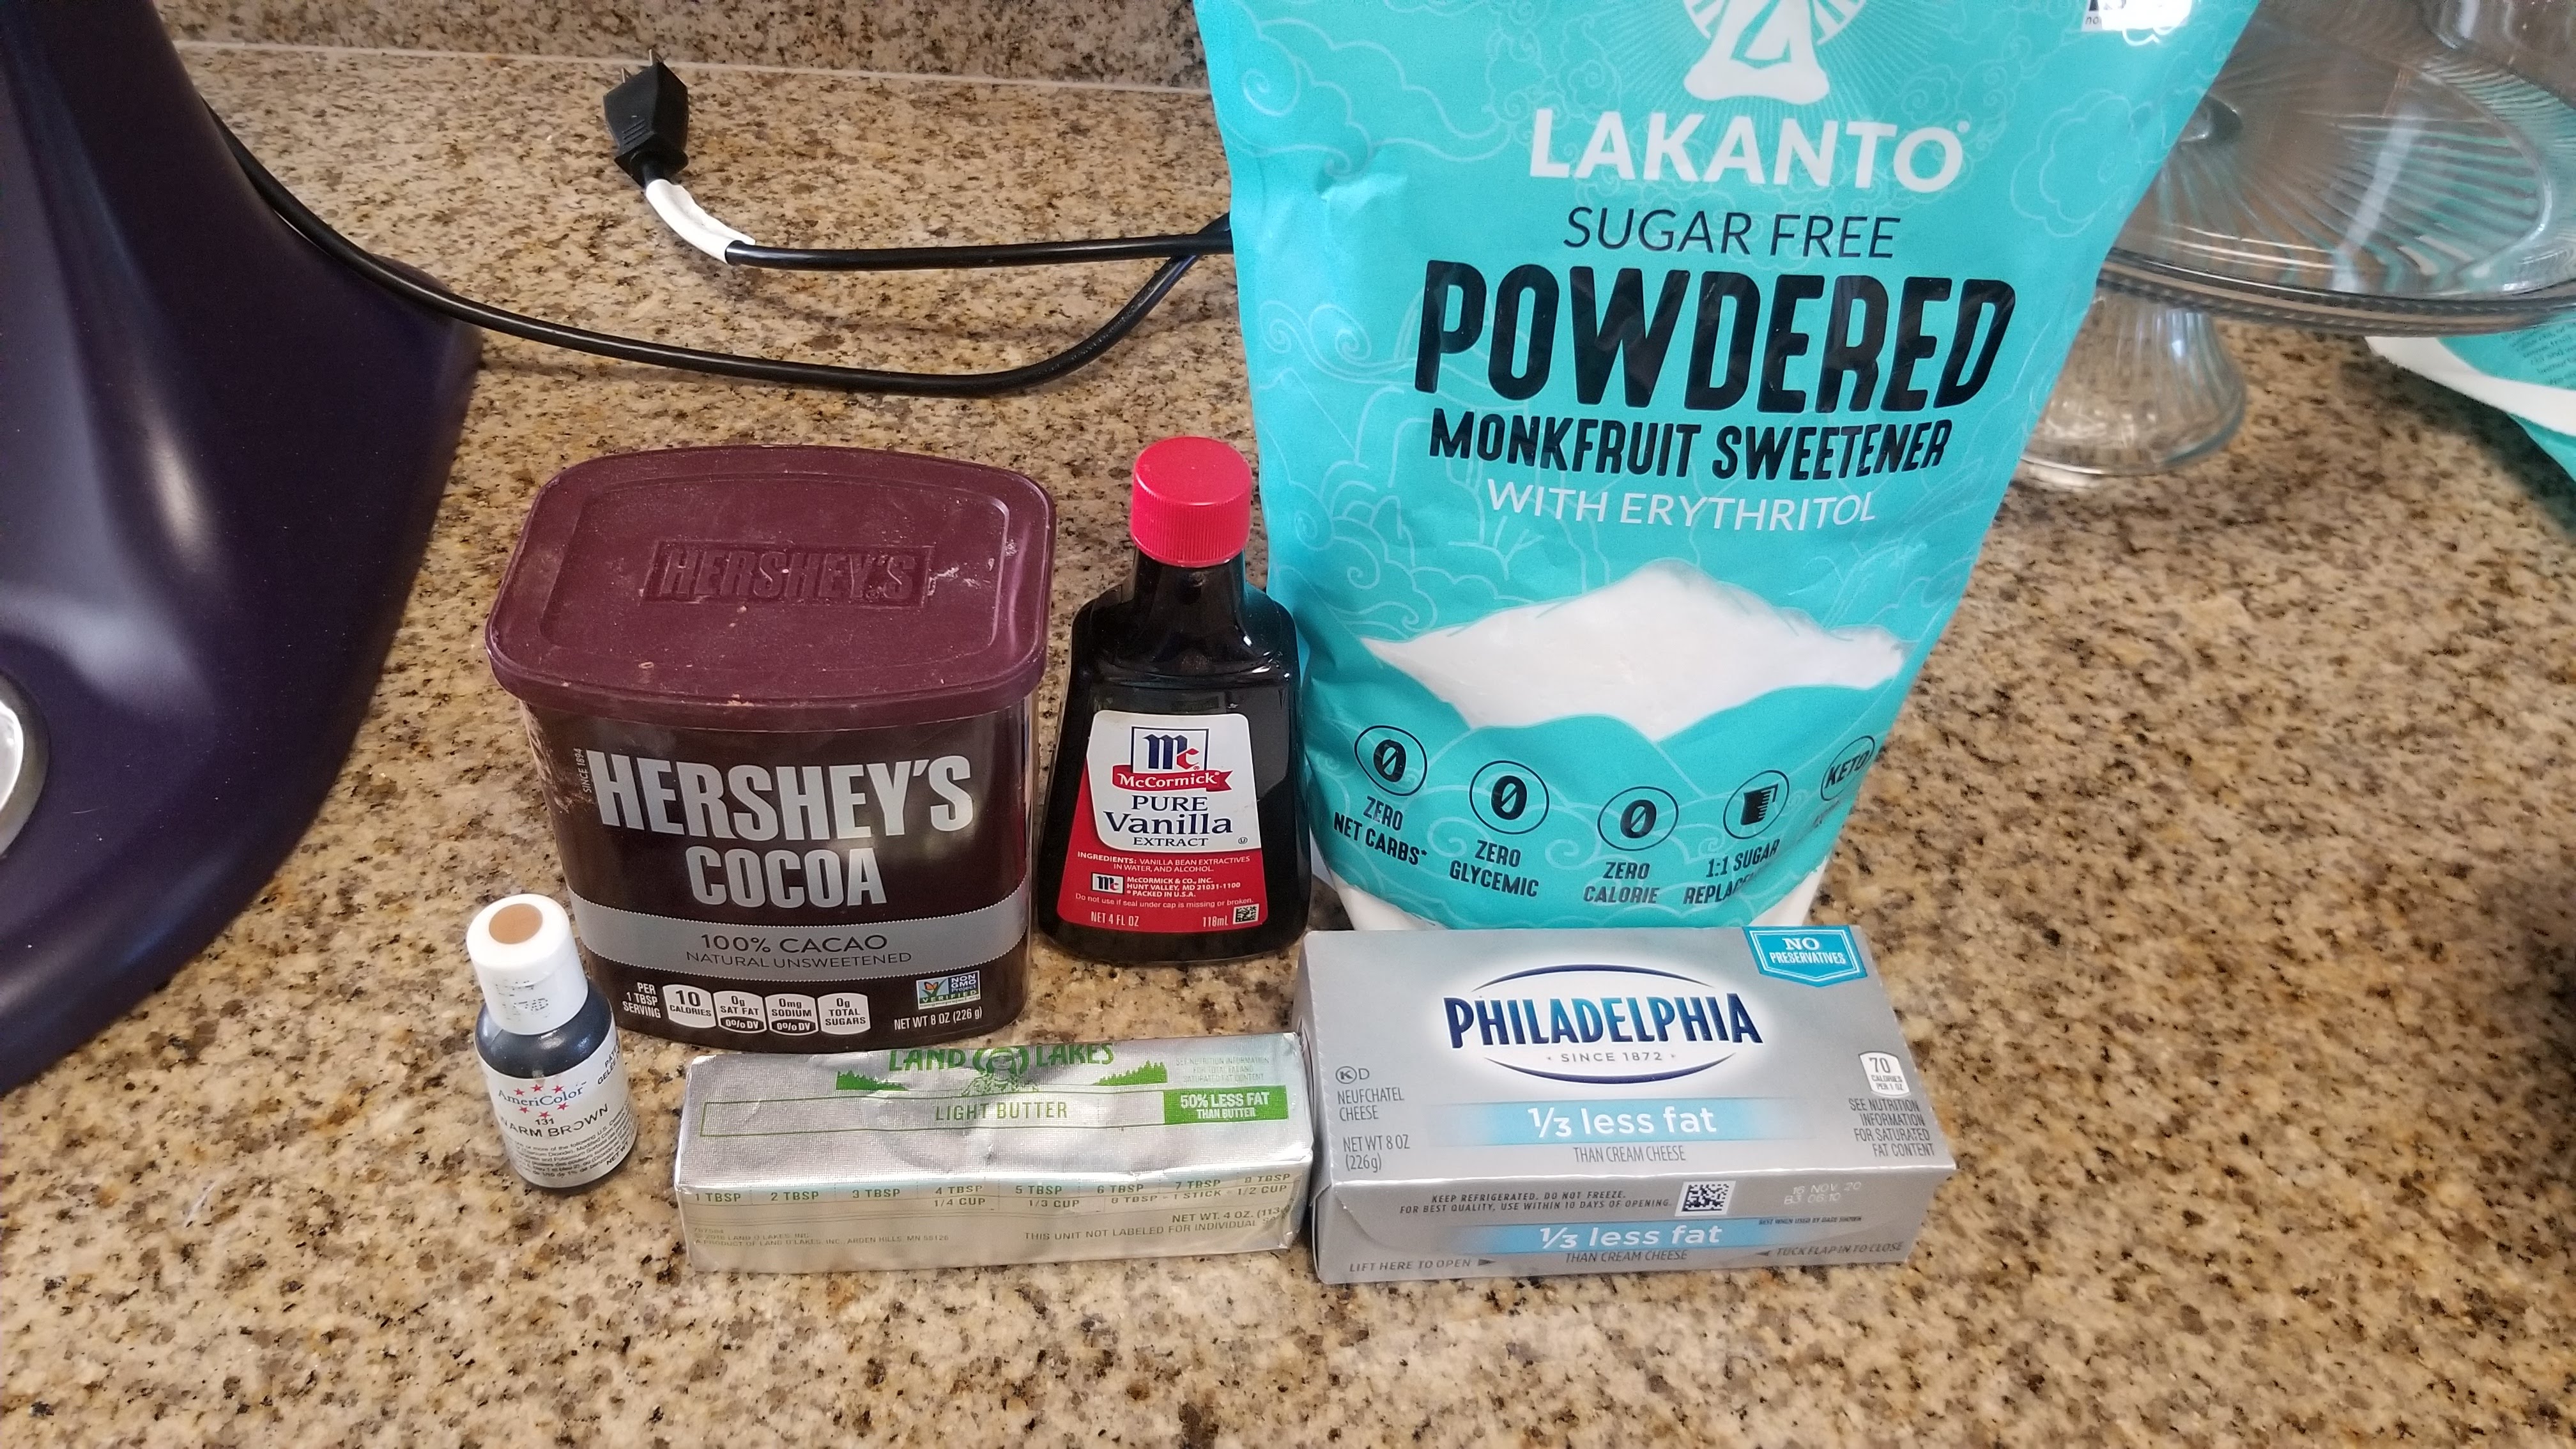


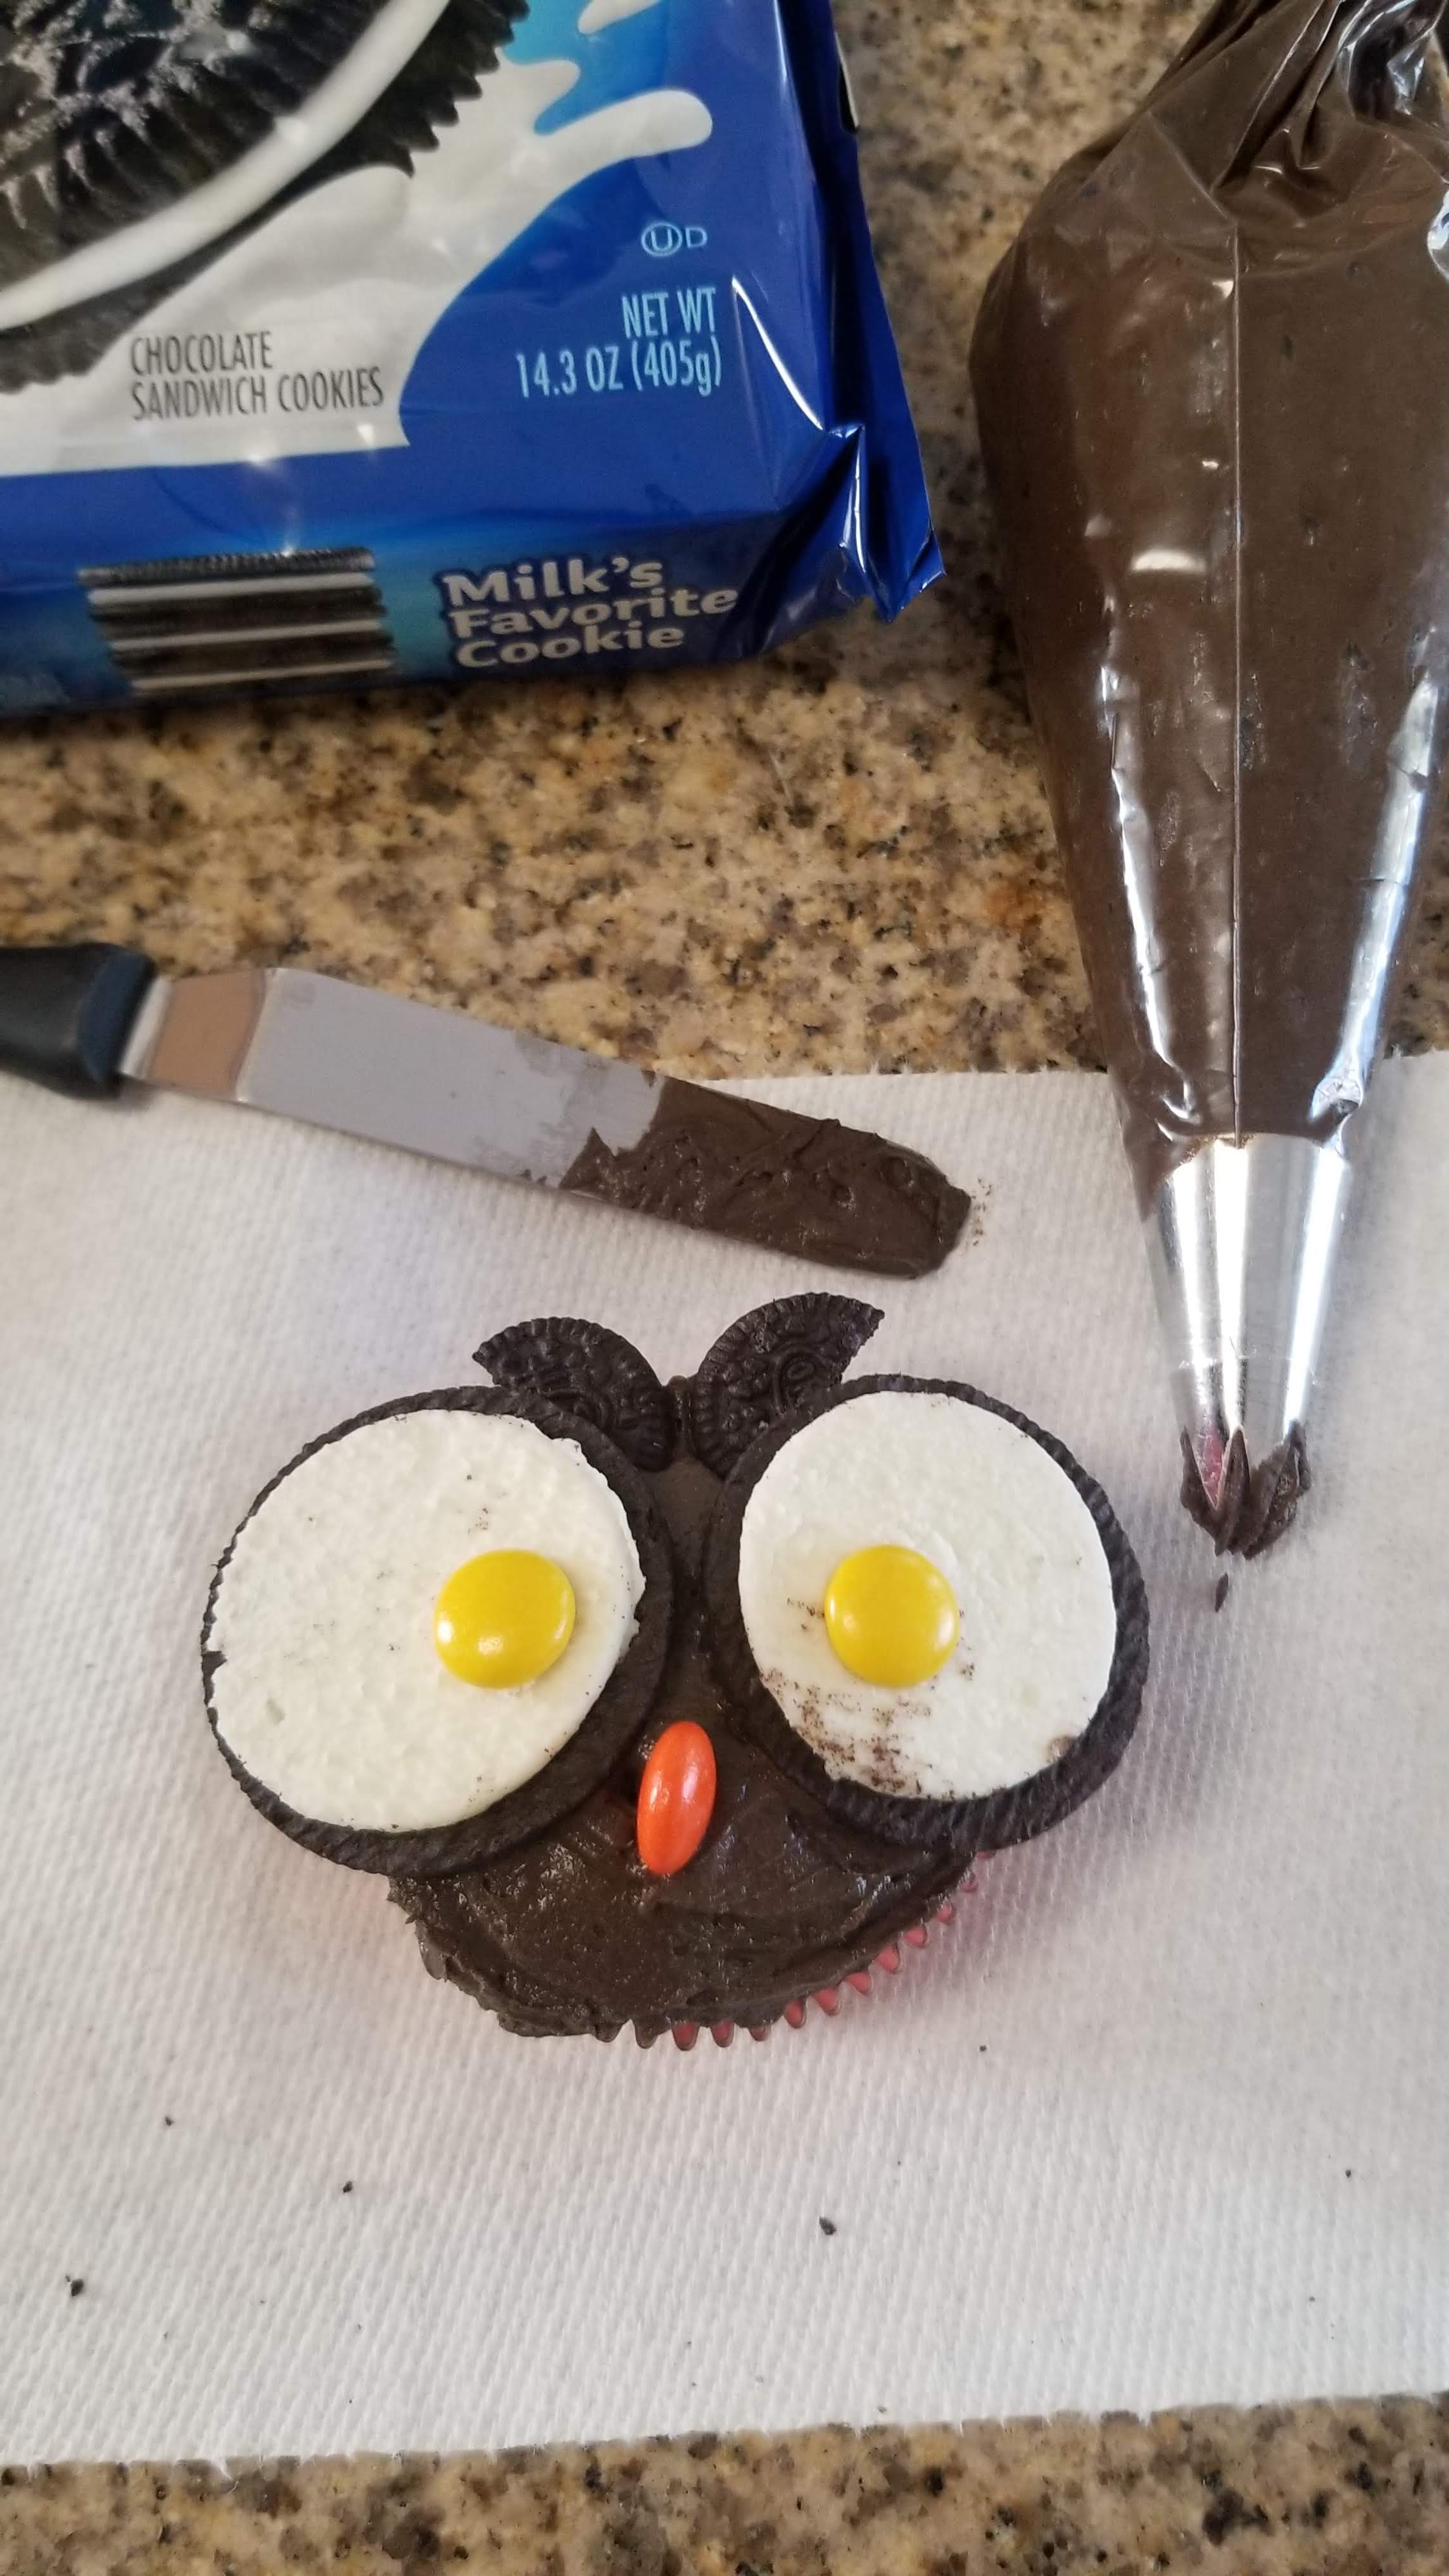

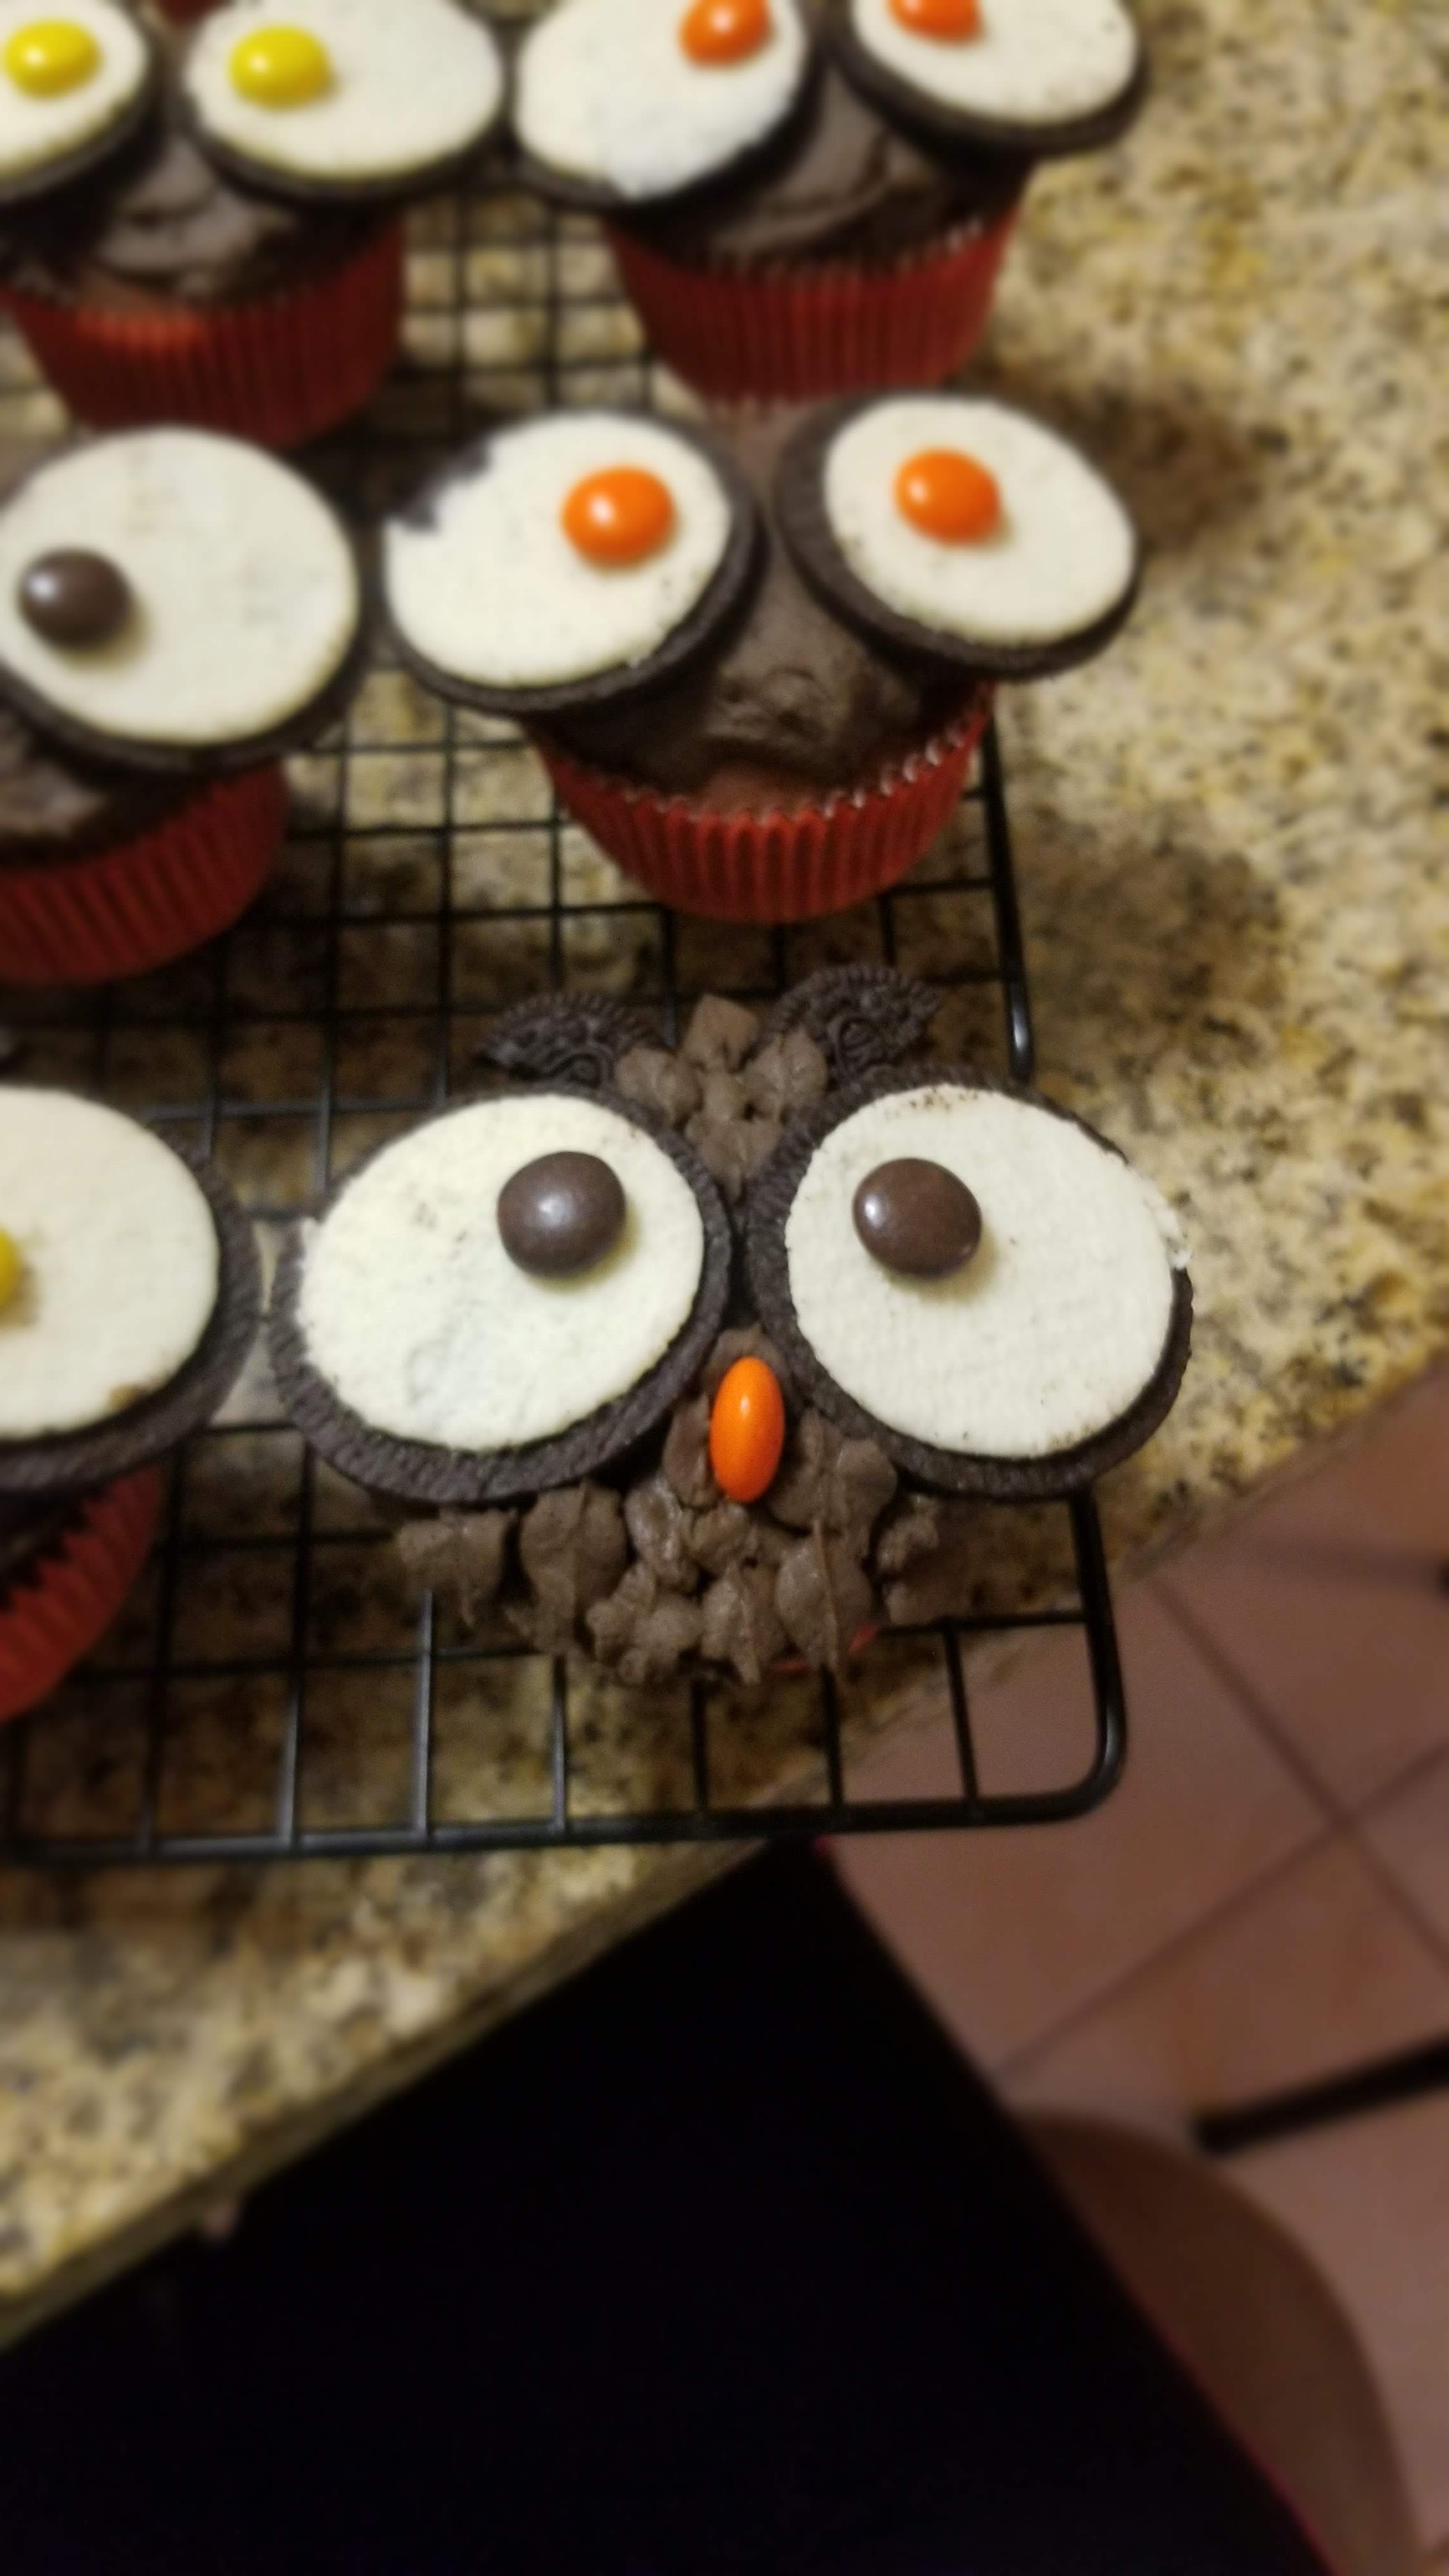
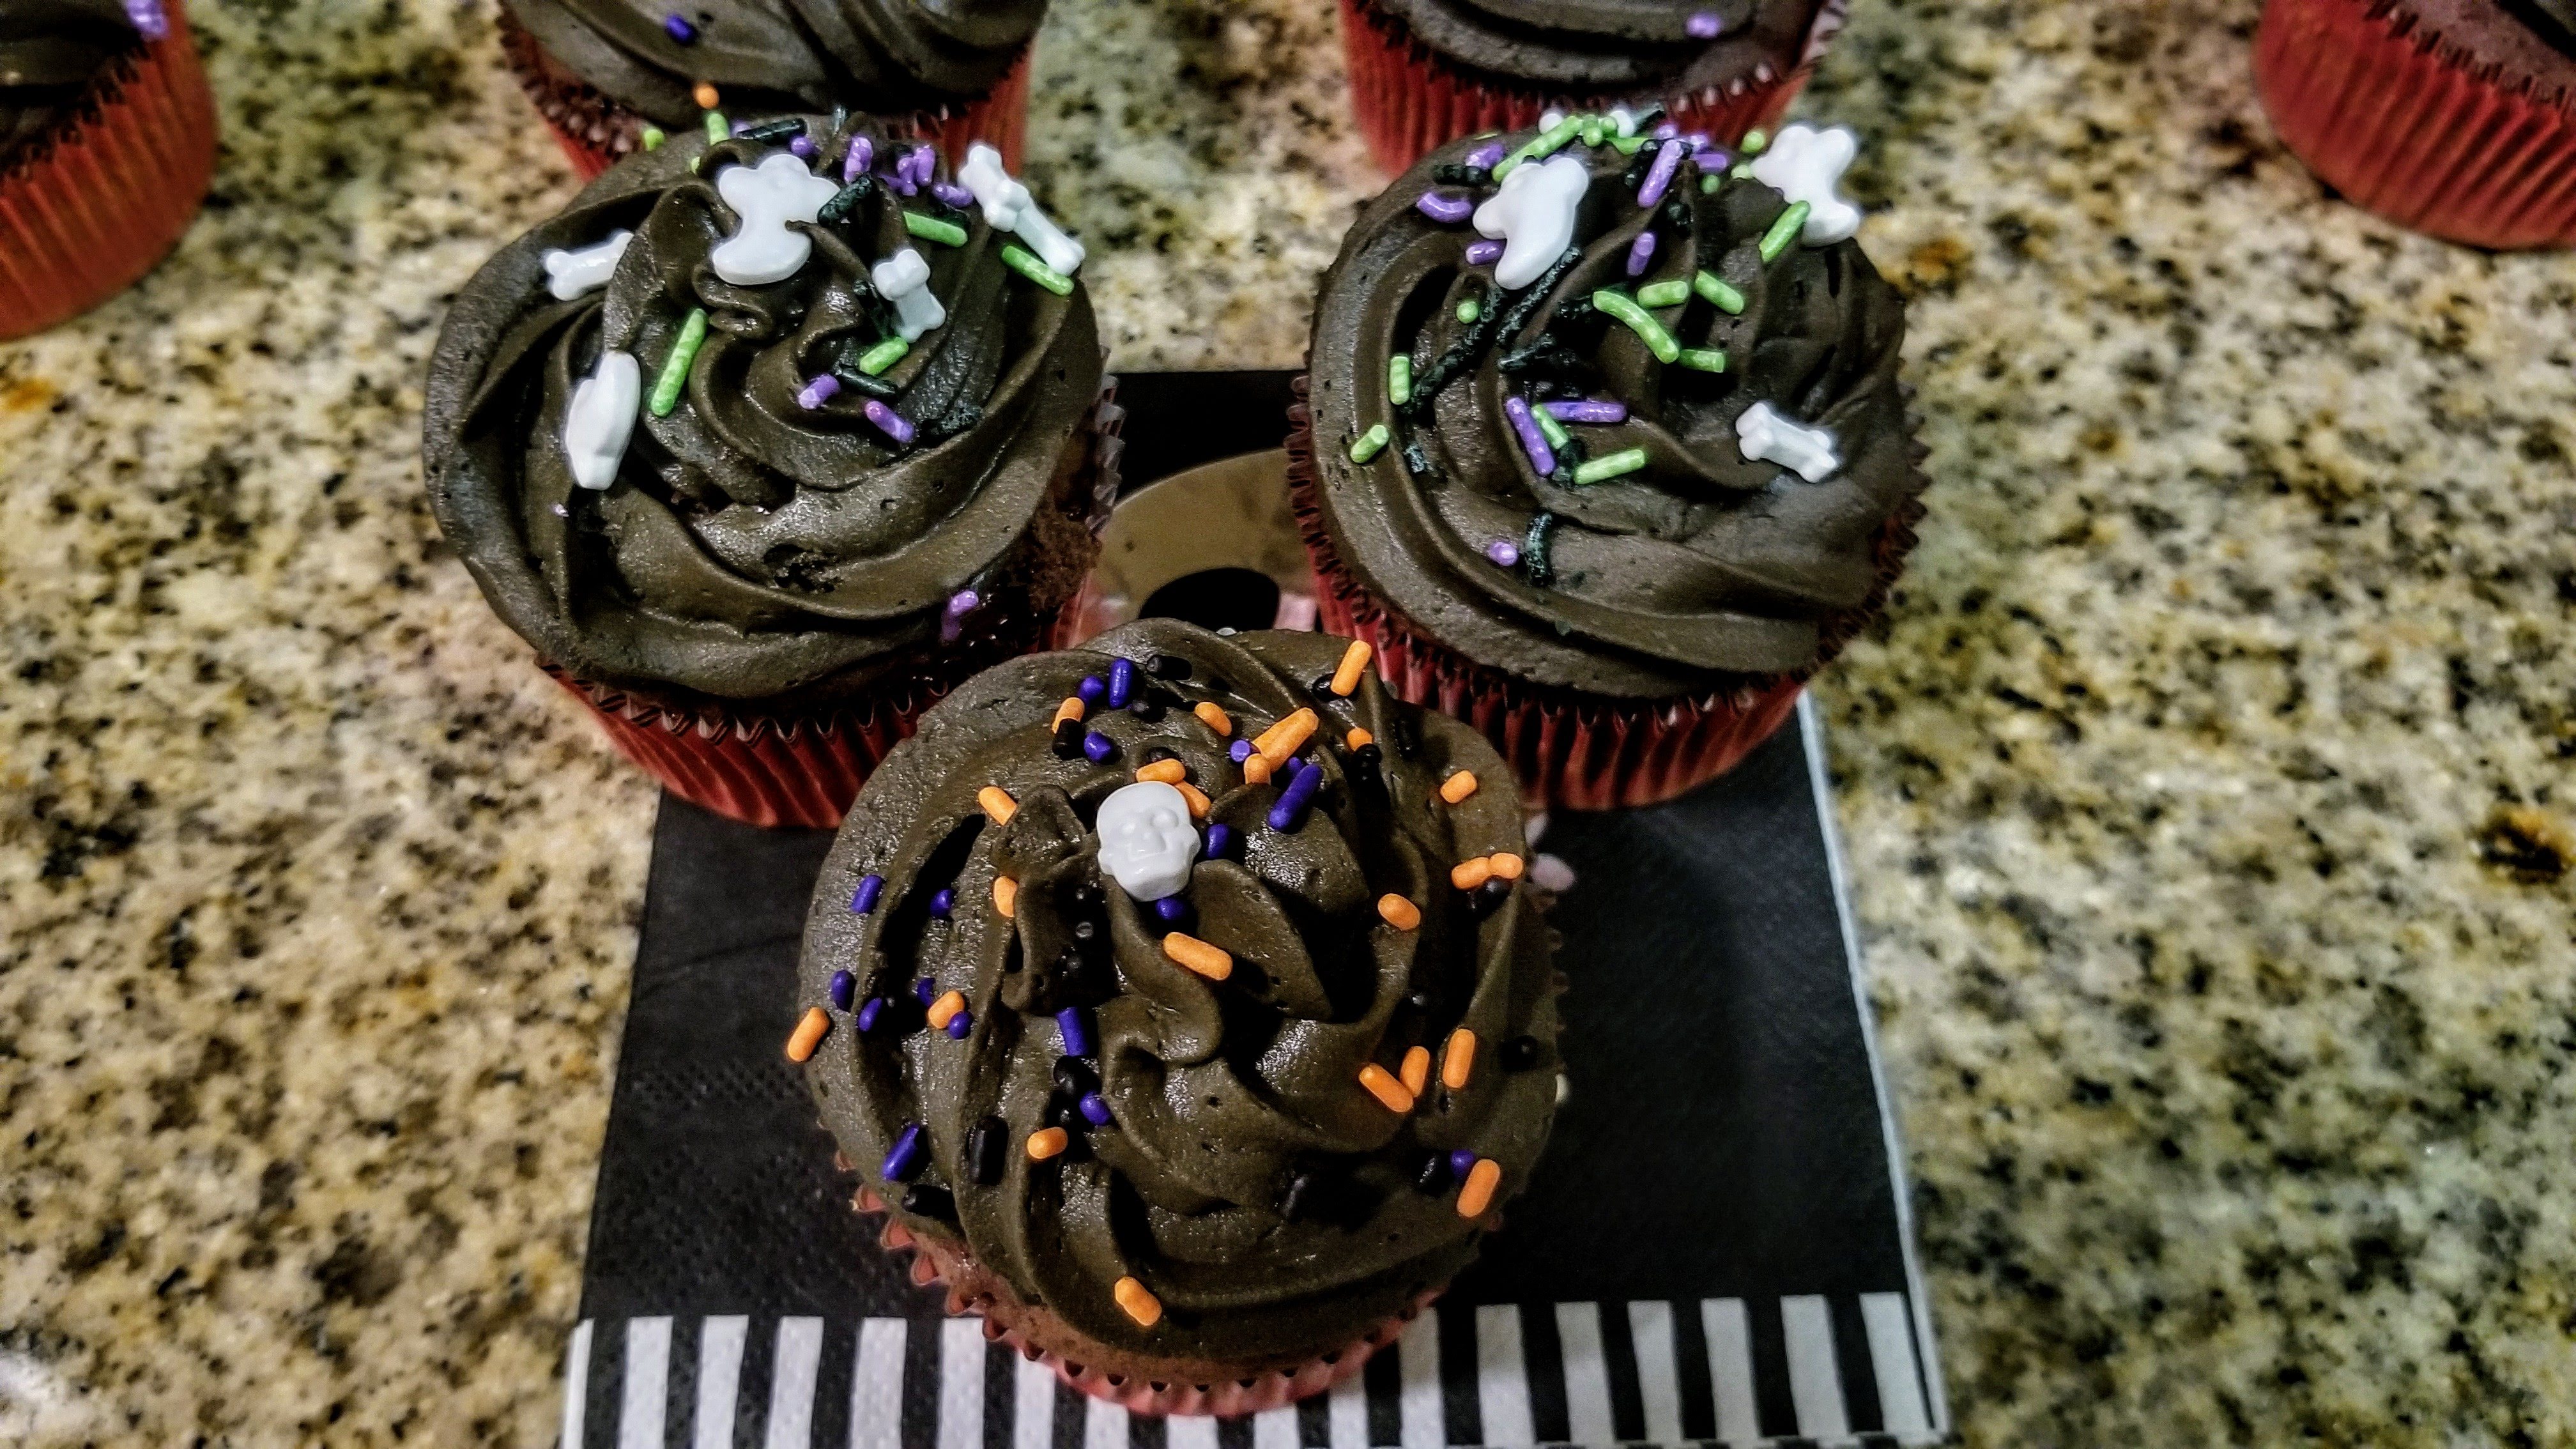

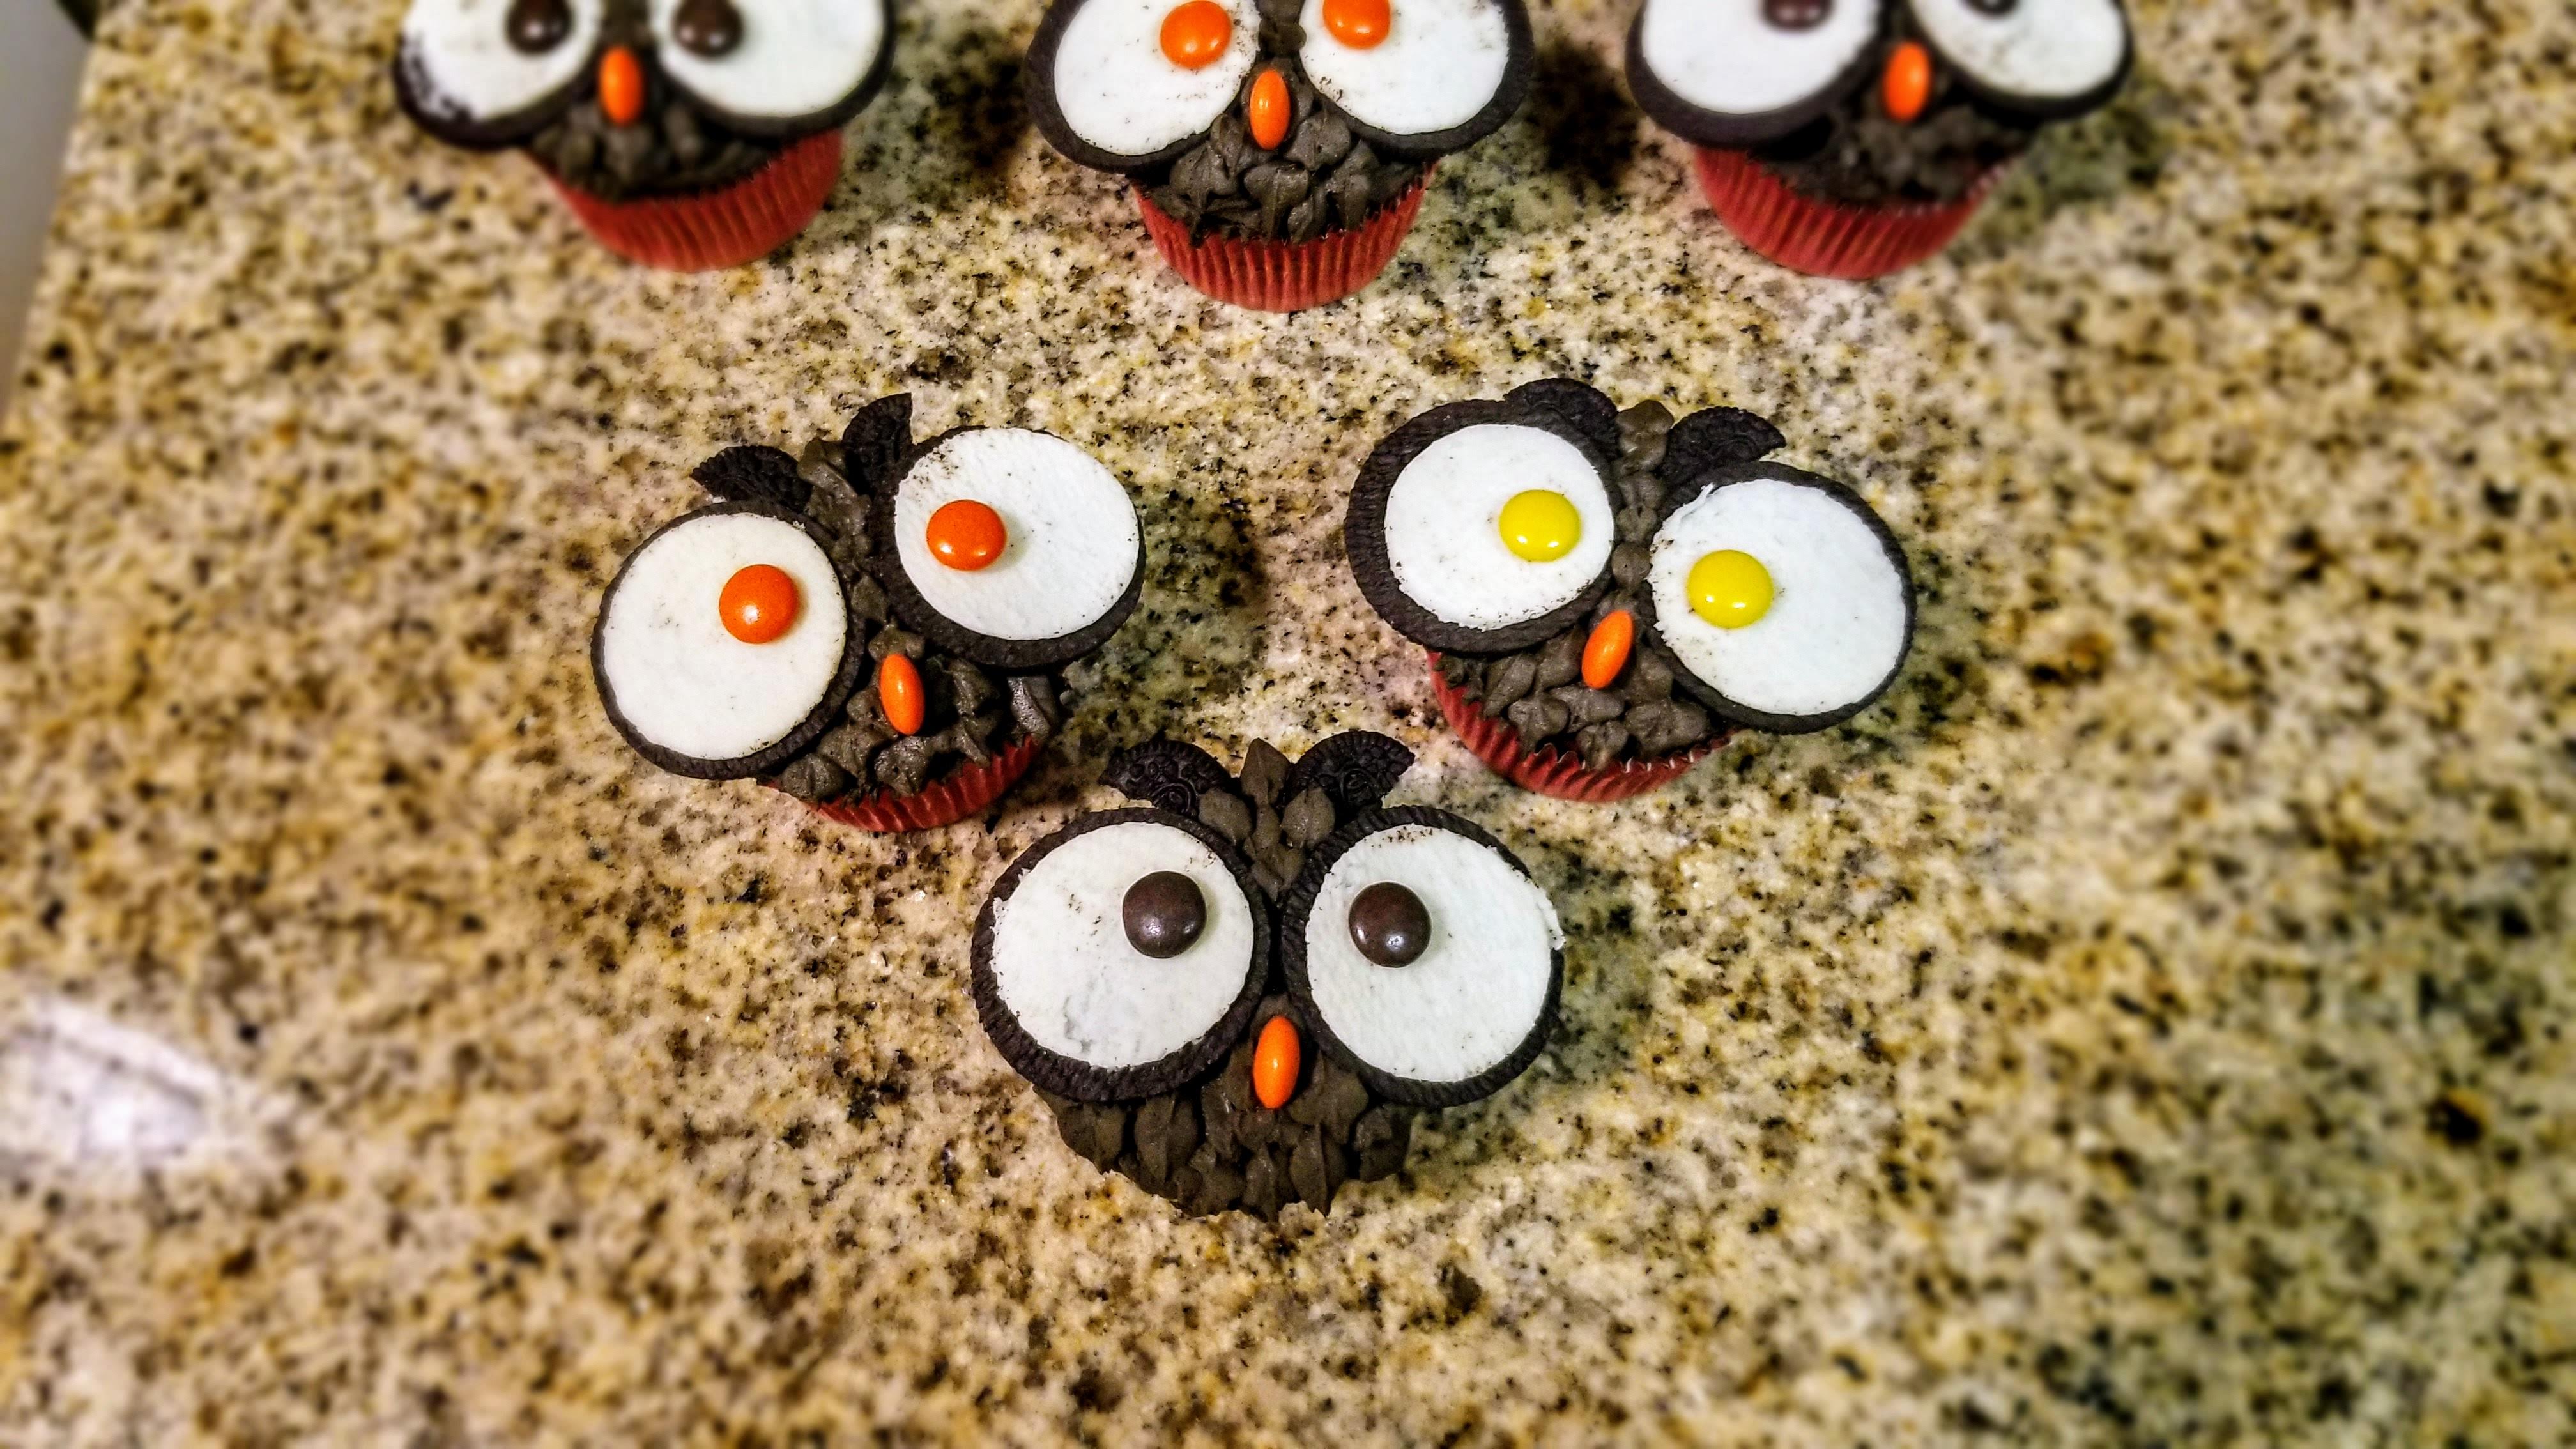


