-
This Dessert Brought to You By Another Hurricane
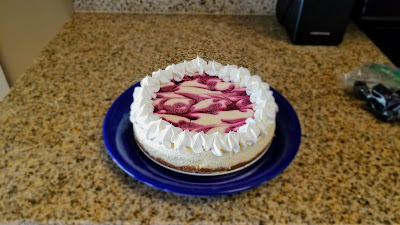
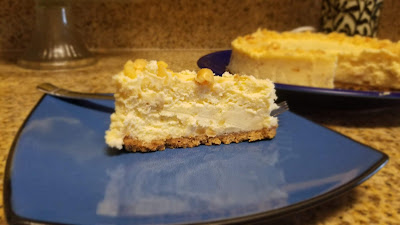
Well, it appears my baking schedule has aligned with yet another hurricane, so I’m either slowly gaining control of the climate or 2020 is still just ripe with unlimited possibilities when it comes to disasters. Baking allows me to go to my happy place, where Pandora’s Box, 2020 Edition, is not allowed to be opened. I decided it was time for another cheesecake because baking in my happy place also allows me to partake in my favorite time of the day: when dessert is served. Since we’re still very much in the middle of summer temps here in Florida, I wanted a light, fruity cheesecake, and so I mashed up two fruits that hardly ever get to shine center stage together: lemon and blackberry. I find blackberries to be a highly underrated fruit (and cell phone…RIP easiest texting capabilities ever), and I am constantly finding new ways to add them to cupcakes, cakes, and now cheesecakes:

Swirl patterns similar to that of a hurricane. I do see the irony, yes. This is THE cheesecake of my dreams. It’s tart, it’s creamy, and unlike most things in 2020, it isn’t actively trying to kill me. It starts with a buttery gluten free graham cracker crust and ends with a melding of citrus and berries. It isn’t too sweet; it leans more toward the sharp side thanks to the lemon, and in a testament to my will to eat dessert nightly, it’s only 244 calories a slice (10 servings total). A piece of cheesecake for fewer calories than a granola bar, people! It’s also a straightforward bake minus some citrus zesting (my poor knuckles).
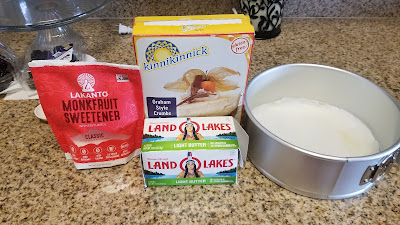
I still think Kinnikinnick is the most ridiculous brand name I’ve ever seen. Before we do anything else, we better start with the crust. You could bake it without one, but that would just be sad and weird, and I’m pretty sure we’ve had enough of sad and weird at this point. So, for the crust, you need:
- 3 TBS low fat butter, cut into chunks (cold)
- 2 TBS Lakanto monkfruit sweetener or Swerve granular
- 1 cup of Kinnikinnick or other gluten free graham cracker crumbs (if not gluten free, use 1 cup of regular graham cracker crumbs and add 1 TBS of water to your crust ingredients)
Preheat your oven to 375, blend all ingredients together in a food processor, then line an 8″ springform pan with Parchment paper and spray with cooking spray. Press the crust evenly into the pan…this isn’t a huge amount of crust, so if you like a cheesecake that has crust all the way up the sides, double the recipe. Bake for 10-12 minutes until nice and golden. Set this in the fridge to cool and turn your oven down to 350 degrees.
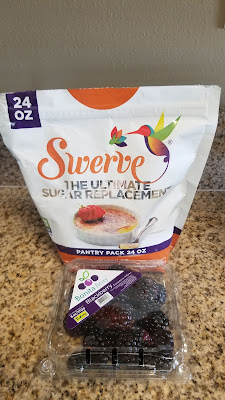
And now, to make puree! Admittedly, you could probably thin out some blackberry jam with a few teaspoons of water, but making puree from scratch isn’t super tricky. Start by dumping 6 ounces of blackberries, 1/4 cup of water, and 1/4 cup of Swerve granular or Lakanto monkfruit sweetener into a small saucepan. Bring to a low boil over medium heat, stirring often for 10 minutes, until the berries are pretty much falling apart.

Steamy! Then, place a strainer over a bowl, and pour your berry mix on top. Use a spoon or spatula to press the berries down and drain the juices. Things will probably be pretty watery, but if you want a thicker consistency for your swirl, pour back into the saucepan and bring to a boil again for a few minutes. You can also make a slurry with 1/2 TBS cornstarch and 1/2 TBS of water mixed together, then added into the berry mix while boiling to thicken. You don’t want to make it too thick, or your swirl will sink into the cheesecake. Think honey/syrup consistency at most, and egg white consistency at least to find that happy medium between the two. Set this in the fridge to cool.

And now for the magic. For the cheesecake itself, you need:
- 16 ounces of reduced fat cream cheese at room temp
- 1/2 cup Swerve granular or Lakanto monkfruit sweetener
- 1 TBS lemon zest
- 1/2 cup reduced fat sour cream at room temp
- 1 tsp vanilla
- 3 eggs at room temp
- 2-4 TBS fresh lemon juice to taste (if you want a sweeter cheesecake, go with less lemon juice)
- For topping: Cool Whip Free and 4 ounces of blackberries
With the paddle attachment on your stand mixer, blend the cream cheese and sugar replacement on medium-high until fluffy, about 3 minutes. Add in the zest, extract, and sour cream, and blend well. Then, on low speed, add each egg, one a at time, totally blending in one egg to the batter before adding the next. Do not mix at a high speed; this adds air with the egg whites and could cause cracking and deflated cheesecake sadness later. Finally, add the lemon juice to taste. I happen to still love eating things like Warheads, fresh limes, and Sour Patch kids, so I went with the full 4 tablespoons–this was the perfect amount of lemon juice for me and my also sour-obsessed husband. If your idea of a sour food is a bag of Skittles, don’t use this much lemon juice. Go with 1 tablespoon at a time, tasting after you mix in each to get things to your liking.

Ah yes, the classic tinfoil hat. Once your batter is made, grab your crust out of the fridge and tie a crockpot liner around it. Then wrap the pan in several layers of foil…this will all prevent any water from the water bath getting into the pan and sogging the crust.
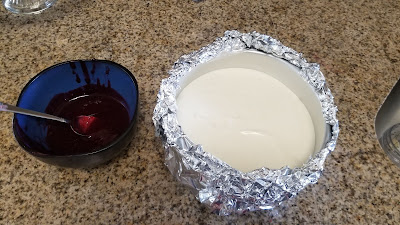
And then pour in the cheesecake batter! Now comes the absolutely fun part where you get to pretend you’re an abstract painter. Take the cooled blackberry puree and dollop spoonfuls over the top of the cheesecake batter:

Not blood. Just wait…October is around the corner… Now, use a knife to gently trace through the blackberry puree in an S pattern:
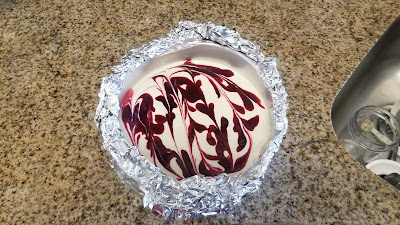
Things still look spooky at this point, and I’m more than okay with it. Don’t swirl too much, or you risk spreading the puree too thin. Now, grab a roasting pan and put your cheesecake inside it. Fill the pan with VERY HOT, STEAMING water. I use 6 cups of water.

The water should come about halfway up your springform pan. Bake the cheesecake in the middle of the oven at 350 degrees for 1 hour and 5 minutes. The center will still be wobbly, but the sides should very clearly be set. If you poke at the roasting pan with a pot holder and nothing shakes but the middle of the cheesecake, it’s done. Now, turn off the oven and crack the door. Let the cheesecake finish baking with the oven door cracked for 1 hour.

Okay, now it’s less spooky and more ohhhhh-y. After that hour, remove from the roasting pan and place on a cooling rack. Run a sharp knife around the edge of the pan to loosen any bits of the side that might be stuck to the sides. Let this cool to room temp before placing plastic wrap on top and refrigerating for at least 4 hours in the pan if not overnight. I always let my cheesecakes set overnight, so good rule of thumb is to make this a day or two ahead of when you need/want it. Which is kind of a Catch-22 because when don’t you need/want cheesecake, really?

If I could only eat one dessert for the rest of my life, cheesecake just might be that dessert. The next day, remove the springform pan and place on your preferred serving plate. You could call it a day here because really, it’s a very pretty and delicate-looking cheesecake, but when have you ever known me not to add sprinkles or swirls to the top of a dessert?!

It’s like lip gloss and eyeliner, but for dessert. I used 40 grams of Cool Whip Free, placed into a piping bag fitted with a 2D tip, simply piping stars around the border of the cheesecake:
It does hide a little of the swirl, but I needed a platform in which to add MORE BLACKBERRIES. 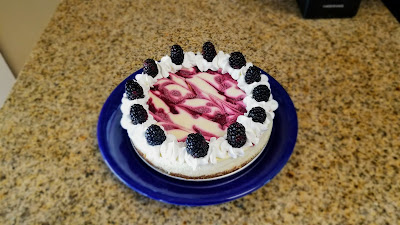
And I did just that. 
Because even on their own, blackberries are also really quite cute. Like a little connect the dots of deliciousness. Pretty? Pretty fruity? Pretty yummy? All of the above. This strikes the right balance of how creamy and smooth a cheesecake should be while the blackberry swirl gives a hint of tart and sweet that blends with it perfectly. I will say the creaminess of this cheesecake is really the thing that stands out the most, even over the lemon. It is still a nice tart zip at the end of each bite, but if you need MORE lemon, you could definitely serve this with a spoonful of lemon curd on each slice as well. I think that might just be the most perfect thing ever…which we all truly deserve due to *gestures wildly* all this. Don’t forget to treat yourself. You’ve made it 9 months into a year that is going to make any company that publishes history books absolute trillions. If that hasn’t earned you a slice of cheesecake, I don’t know what does. ‘Til next time, my fellow eaters!

I long for the days when I could eat dessert without using it as a coping mechanism… -
Tropical Storms Mean Tropical Cupcakes
Well, in an act that is just so 2020, the Gulf of Mexico has not one, but two tropical storms brewing right now. I’ve lived in Florida long enough to know we’re fine in tropical storms or Category 1 hurricanes as long as we have plenty of water, toilet paper, and alcohol. In my case though, I need the alcohol to be combined with dessert since I don’t drink much. I took this as the perfect opportunity to try a very festively summer boozy cupcake concoction because tropical storms mean tropical cupcakes.

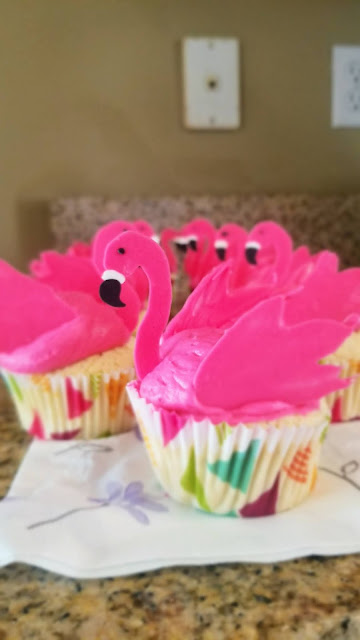
It’s a flamboyance of cupcakes! Did you know the official cocktail in the country of Mexico is the Paloma and not the margarita? Margaritas were actually invented in Texas, like all of the best food and drink concoctions (see also: Bluebell Ice Cream, Shiner Beer, and Julio’s Chips y Salsa to verify this fact). I happen to be absolutely wild about both drinks, but in my old age, less sweet drinks equals less terrible next morning, so I’ve been leaning toward the Paloma as my favorite tequila-infused adult beverage. I knew I wanted to create a cupcake that was citrus-y, light, and had a zip of smooth booze infusion, so the Paloma cupcake came to be. I’ve also been dying to make a fun-themed cupcake because it’s been ages since I did some whimsical decorating, so flamingos seemed a natural fit. Anything that flocks together in a group called a “flamboyance” is clearly winning in life, and so do these cupcakes. At only 196 calories a flamingo (130 calories if you find the chocolate flamingo heads and wings too cute to eat), these are also as guilt-free as they are festive and fun. They’re also deceptively easy to create, so let’s flock on down to the recipe…
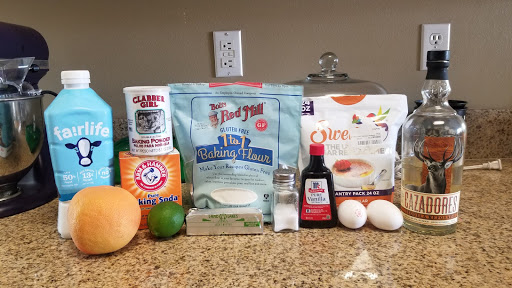
Cupcakes of a feather stick together after all. I hadn’t baked from scratch in like ten years either, and I really wanted to get a base gluten-free, sugar-free cupcake recipe figured out. You could very easily use a box mix and replace the liquid called for with grapefruit juice, tequila, and milk, but these are so simple to throw together and excellent for people in your life that can’t have real flour and avoid sugar because their digestive track is shot from eating nothing but McDonald’s in their youth (oh, hi!). I also didn’t need 65 cupcakes, only 12, so making from scratch seemed a better idea. To make a dozen flamingo cupcakes, you need:
- 1/2 cup low fat butter at room temperature (I use Land O Lakes light butter)
- 1 cup of granular Swerve
- 1 TBS fresh grated grapefruit zest
- 1/2 TBS fresh grated lime zest (takes about the whole lime)
- 2 large eggs at room temp
- 1 tsp vanilla extract
- 1 1/2 cups of Bob’s Red Mill Gluten Free 1:1 Baking Flour (can find at Amazon or Target) or regular All Purpose Flour if you’re not gluten intolerant
- 2 tsp baking powder
- 1/2 tsp baking soda
- 1/4 tsp salt
- 1/4 cup really delicious, smooth tequila (recommend Cazadores)
- 1/4 cup skim milk
- 1/3 cup fresh squeezed grapefruit juice (1 grapefruit will yield enough for the cupcakes AND two actual Palomas, so, thanks, grapefruit for being comically large)
- 2-6 tsp fresh squeezed lime juice (see note below)
- A note on gluten free baking: gluten free flours suck up moisture like a cactus in the dead of summer. To keep your cupcakes from getting too dry, you’ll need to add a few extra teaspoons of the liquid of your choice (milk, tequila, grapefruit or lime juice) to get the batter thinned out to a regular cake/cupcake consistency. The batter should not be so thick that it doesn’t easily fall off the scoop when you’re putting it into the cupcake liners.
The most difficult part of this recipe is zesting the fruits. Seriously. Preheat your oven to 350 and line a muffin tin with cupcake papers. In a stand mixer, whip the butter, Swerve, and zests on medium-high until very fluffy, about 3 minutes. While this is mixing, in a medium bowl, stir the flour, baking powder, baking soda, and salt together. In a glass, mix the tequila, milk, and fruit juices together (don’t drink this, it will ruin your life). Let this curdle for 5 minutes. Don’t worry, it’ll come back together later.
Once your sugary butter is whipped, add the vanilla and one egg at a time, mixing the egg in completely before adding the next. Then, take a third of the flour mix and a third of the world’s worst mixed drink, and pour into the mixing bowl. Blend on low until totally incorporated; repeat this until you’ve mixed everything together. Stop, scrape the bowl, and mix on medium-high for 1-2 minutes. I find the gluten free flour is extra grainy, and this will help break that down a bit.

Oh yes, so dangerously full to the brim. These don’t rise a ton, so take a cookie scoop and plop two scoops of batter into each paper. Bake at 350 for 20-22 minutes, until a toothpick comes cleanly out of the center. When the actual alcohol bakes out of these, it will leave this amazing sticky, crunchy crust on the top of the cupcake–don’t worry, the insides are still completely soft and not over-baked, but the top part of the cupcake is almost like a streusel texture and it is absolutely divine with the Paloma cream cheese frosting.
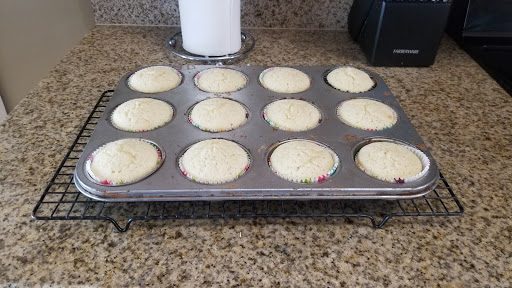
Plus, they obviously don’t look burnt, so you’re good to go. Let these rest in the pan on a cooling rack for 5 minutes. Then turn out to completely cool while you make your flamingos and frosting.

I also think my cupcake wrappers take these to the next level of flamboyant dessert-ery. 
Templates make life better. Ahhh, organized creativity. Wilton actually has a pink flamingo template and super detailed step-by-step instruction, but I did things a little bit differently from their tutorial to help prevent major disaster. Definitely download the template, but follow along back over here from a normal person who’s actually done this. Print out as many templates as you need. I only made 12 cupcakes and didn’t care if the “back” of the flamingo’s head was blank since no one was going to see it, so I only needed one template. If you’re showing these off at 360 degrees, you’ll need two heads glued together with a little melted chocolate, so double the amount of templates needed. Put the template down on a cookie sheet and place Parchment paper on top.

Picture bottom right: a nosy kitchen helper with four legs. You need white, black, and hot pink candy melts as well as hot pink gel dye (this is only for the frosting). You need three piping bags and three #2 or #3 open round decorating tips for piping the chocolate. I melted 30 grams of white chocolate and 30 grams of black chocolate in separate small Tupperware bowls for 1 minute at 50% power in my microwave. Give each a good stir until totally melted, then load each into their own piping bag. You will have a lot of leftover melted chocolate if you’re only making 12 heads, just FYI.

Start by piping the black tips of their noses. You’ll want to use a toothpick to help smooth out the chocolate and move it around until you get the shape just right. Stick your pan in the fridge for literally 2 minutes to harden the chocolate. 
Once firm, come back in with the white chocolate and pipe the bands of the beak. Use a new toothpick and manipulate the shapes as needed. It helps to push down the chocolate gently so everything will be uniform and flat when you flip these over later. Put back into the fridge for 2-3 minutes to firm up. 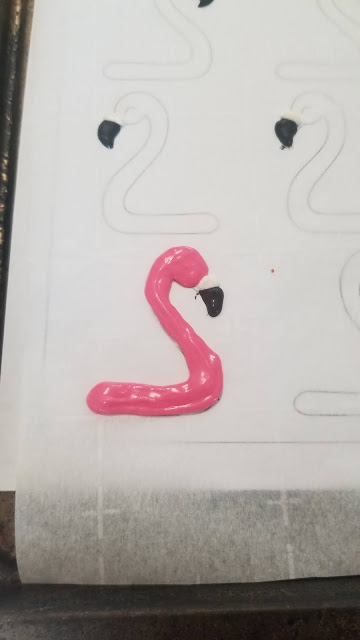
While the white chocolate sets, melt about 30-60 grams of the pink chocolate melts for 1 minute at 50% power. Stir until totally melted (I had to add a little Crisco to my pink melts, they had just arrived the day prior and were messed up from melting/rehardening after shipping). Grab your tray and finish piping the flamingo outlines. Definitely use a new toothpick to swirl around the melted chocolate and get the shapes of the heads correct. 
Adorable even without eyes. At this point, Wilton added 9,000 pink sprinkles to the flamingos, but I skipped that part and put everything into the fridge to firm up for 15 minutes. Then I took a tiny bit of melted black chocolate and using a toothpick, put a dot for each flamingo’s eye before putting back into the fridge while I made wings. 
Grab the bag of pink candy melts, if it’s gotten too firm, remove the tip and reheat in the microwave for 30 seconds at 50% power. Lay out a large sheet of Parchment paper and then pipe about 1-2″ dollop on the sheet. Take an angled spatula or palette knife, and swipe the blob in one direction, then feather out these swipes in the same direction but up 45 degrees and another swipe down 45 degrees to make wings: 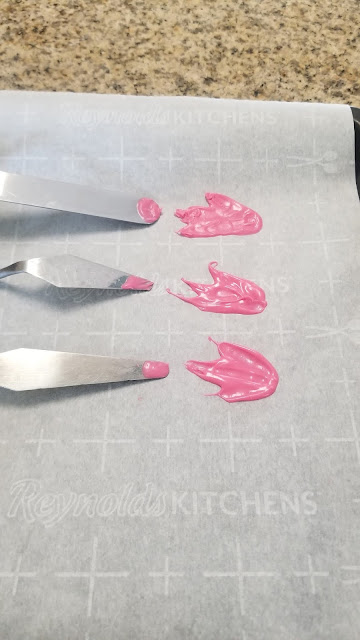
This is the difference between the shapes an angled spatula and smaller palette knives will give. I went with the palette knife on the bottom for the rest. 
Now, pipe out 24 wings. You’ll want to swipe 12 going left and 12 going right so they sit on each side of the flamingo and don’t look too funky. Let these harden for 20 minutes before manipulating. Everything will get flipped over, so you’ll have the smooth sides out on the cupcakes and the messy sides will be inside. Same goes with the flamingo heads. 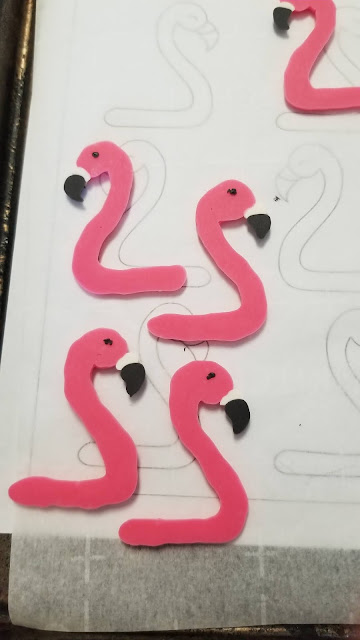
So that is why you want to use the toothpick to smooth out the chocolate…when you flip these over, everything will look nice and uniform, and so cute you want to die a little. 
Now, back to that tequila! While your cupcakes are cooling and flamingo body parts are setting, it’s time to bust back into the booze and make some frosting! For the Paloma cream cheese frosting, you need:
- 1/2 cup light butter at room temp
- 8 ounces 1/3 less fat cream cheese at room temp
- 3 cups Lakanto powdered monkfruit
- 2 tsp fresh grapefruit juice
- 1 tsp tequila
- 1 tsp fresh lime juice
- 1/2 tsp grapefruit zest
- 1/2 tsp lime zest
- Hot pink and pink gel dyes
Whip the butter and cream cheese together on medium-high in a stand mixing bowl for 3 minutes. Add in the 3 cups of powdered sweetener, zest, tequila, and juices. Blend on low until things start coming together, then beat on high to get everything mixed. Now, you want to add enough hot pink and pink gel dye so that your flamingo head and wings match their body.

Patience is required. I used about 6-7 drops hot pink, and 4-5 drops of regular pink to achieve this. This will also make enough frosting for 24 cupcakes and not 12, so you can freeze the leftovers or eat the frosting straight out of the bowl. It is divine, so don’t share if you don’t have to…

Flamingo butts! Load up a piping bag with a large round tip (I used Wilton 1A), start by piping a mound of frosting in the middle of the cupcake. Don’t move the tip, just let the frosting form a nice round blob. Once you’ve covered most of the surface of the cupcake, take the tip and pull up and away in one direction. This will form the tail feather.
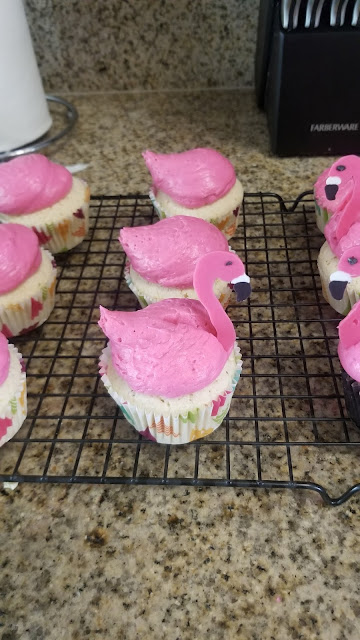
Then gently slide a flamingo head on the opposite end. It might be a little wobbly at first since this cream cheese frosting isn’t super firm, but you can straighten them out later after sitting in the fridge for a half hour. 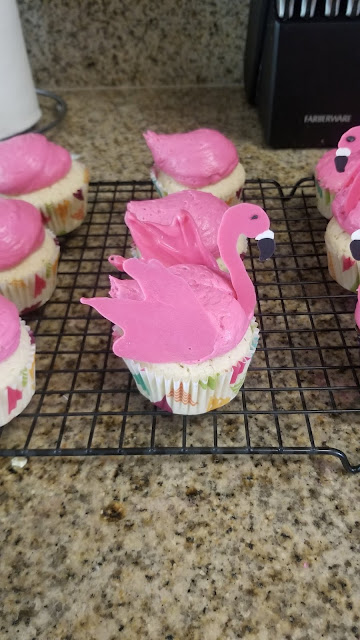
Then take a left wing and right wing (refrain from political jokes), and gently place on the sides of the mound of frosting. Repeat for all cupcakes, and your tequila flock is complete!

It absolutely does not get any pinker than this. Or cuter, for that matter. I was giggling like an idiot while I put these together, and I swear, I had zero ounces of tequila in me while I was assembling them. They turned out even better than I had hoped. They most definitely resemble flamingos, so, point made. You could also do these in white to make swans, which I will try at a later date with what I assume has to be a recipe with classier booze considering swans strike me as the type that would only drink a cocktail with Vermouth or angel tears in them.
Flamingos are always down to party though, so tequila was a great choice. These taste even better than they look, so that’s saying something. They aren’t too dense, and they have that nice tart pack of grapefruit that blends perfect with the sweetness of the cream cheese frosting. Everything is totally complimented by that tequila, though, so Mexico definitely knows what’s up with it’s drink of choice. You could say they’re flocking fabulous. This is an adult cupcake flavor trapped in a child cupcake decoration, and it was exactly what I needed to lift my spirits (both the boozy and metaphorical ones) after a year that seems to be a never-ending car crash of epic proportions.

More like fun-mingo, amiright? These would be excellent additions to backyard barbecues or pool parties if we could ever do those things again, so definitely save this one for a time when you’re allowed to be within six feet of people again to fla-mingle. Or don’t. Make them now, eat all 12, and conquer the world while you’re drunk off delicious cupcakes. Absolutely nothing you can do this year will surprise anyone at this point, so reap the benefits of Corona crazies and go for broke. I’m wondering if I ate all 12 at once, could I become the next Florida (Wo)Man? Perhaps, but I’ll leave it to the professionals (a.k.a., native Floridians). ‘Til next time, my fellow eaters!

These cupcakes are best enjoyed, of course, with a Paloma cocktail to wash them down. Flamin-go for it. Okay, I am done with flamingo puns. Seriously. -
Back to Boozy Basics
This summer, we’ve decided our cocktail of choice is the French 75. Parallels from current political and social climate aside, I swear we didn’t pick this one because I’m French and feeling revolution-y. Truly, it’s because I’m on a gin kick. If you’ve never had a French 75, it’s champagne, gin, simple syrup, and lemon served over ice. It is insanely refreshing; therefore, it’s the perfect summer drink between the fizzy bubbles, tart lemon, and smooth gin finish. If you hate gin, chances are, you’re just not drinking the right gin. A good gin shouldn’t leave you wondering if you just drank Lysol or a liquefied Christmas tree. A good gin should leave you wondering if it’s time to buy a new car or invest in a better 401(k). Basically, it should leave you feeling like a very classy adult with very excellent taste. Since I wanted to be able to achieve this feeling more than once every 7 days for my weekly scheduled single Saturday night cocktail, I decided to turn the French 75 into edible form.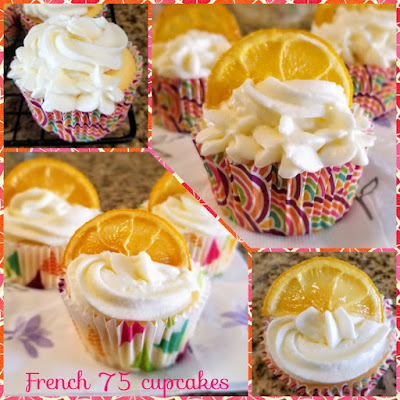
Summertime, and the livin’s gin-y. Topped with candied lemons and filled with plenty of alcohol, these French 75 cupcakes allow me to achieve peak adulthood while still being able to enjoy myself like a child. It’s a magical balance, thanks largely in part to the champagne and the champagne cream cheese frosting coming together to create a dessert that’s as classy as it is fun. The texture is light and airy thanks to the bubbles, and the lemon give a nice zip of tartness to a sweet and smooth flavor left by the gin. I’m having a hard time eating them in a single serving. Especially since I chose low calorie boozes and these cupcakes are only 129 calories a piece (24 total). A wise Ron Swanson once said, “Clear alcohols are for rich women on diets,” and I simply couldn’t agree more. They’re also deceptively easy to make, even the candied lemons! I found a strategy to candy them that is both quick and foolproof, so get ready to whip up a batch of these magnificent, tasty cupcakes in like an hour and a half total.

Ryan Reynold’s Aviation Gin is as much a Canadian treasure as the man himself. Along with a quick prep time, the ingredients list is also extremely straightforward. You need:- 1 box of sugar free yellow cake mix (or sugar free white cake mix if you can find it! This would let the flavors of the alcohol shine through more)
- 3 egg whites
- 1/2 cup of unsweetened applesauce
- 1 tsp of lemon extract or juice from 1/2-1 lemon to taste
- 1 cup of a sweeter champagne (I used Martini & Rossi Asti)
- 1/4 of good gin–Aviation, Hendricks, or the Botanist. Stay away from Bombay and Tanqueray. These are inferior gins!
To make, preheat your oven to 350 and line two muffin tins with cupcake papers. Mix together all ingredients in a stand mixer on medium-high for 2 minutes.
Soon, you will be perfect. I use a cookie scoop (a little larger than a tablespoon), and plop two drops of batter into each cupcake liner. This is the easiest and least messy way to deal with cupcakes. Bake for 20 minutes, or until the cakes have a nice blonde color to them and a toothpick comes out of the center clean. At this point, turn the oven off so it can cool down enough for the candied lemons.
I wish I looked this good after a 20-minute prep time. Let your cupcakes cool in the pan for 5 minutes, then remove to completely cool on a cooling rack. Admire them from afar as you make your frosting and candied lemons.
This really could not be any easier, I swear. For the candied lemons, you need a couple medium-sized lemons and some lemon drop candies. Preheat your oven to 275.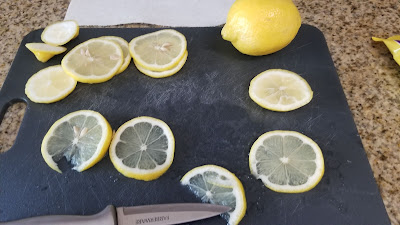
Slice each lemon thinly until you have at least 12 slices. Cut these slices in half for 24 slices total. Now, the fun part. Take about 10 lemon drops, and smash them up! I used a Ziplock and my meat tenderizer, crushing into fine pieces. Then I placed Parchment down on a large baking sheet and placed all my lemon slices in a single layer. I sprinkled the crushed candy on top of each lemon, rubbing in the pieces and ensuring the rinds got plenty of candy on them.
It looks weird, but it works. Now, bake this for 45-50 minutes at 275. Check on them around the 40 minute mark–if you’ve sliced them super duper thin, they won’t take that long for the candy to melt and, well, candy the lemons. The rinds should be soft, and the middle of the lemon should be almost transparent. Remove these from the tray right away so they don’t get stuck to the paper. I let mine cool off on a cooling rack until completely hardened. These are still quite tart compared to a traditional candied lemon, but those take about 3+ hours to make, so pick your battles. I will say the lemon drop melted on the lemon adds a nice bit of sweetness to the point that it feels like you’re having a glass of lemonade when you eat one. You could also try doing this with 1/4 cup of regular sugar in lieu of the crushed candies for an even sweeter result.
Plus, they’re super pretty. The thinner the slices, the more crunchy and candied they will taste. Everything is completely edible, even the rind, this way.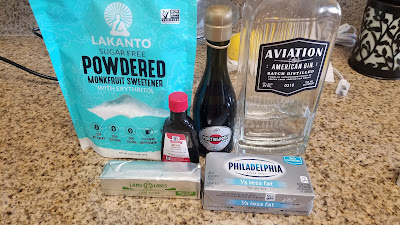
Champagne pairs surprisingly well with cream cheese. Thanks, science experiment gone right! I wasn’t sure if cream cheese and champagne would work together. Sure, a glass of champagne with a charcuterie board is my idea of a perfect meal, but I’m talking Gouda and Havarti, not soft and tangy cream cheese. Thankfully, my original opinion needed not apply because these two make an amazing frosting. For the champagne cream cheese you need:- 8 ounces of 1/3 fat cream cheese at room temp
- 1/2 cup of reduced fat butter at room temp
- 4 cups of Lakanto powdered monkfruit sweetener
- 2 tsp champagne
- 1 tsp lemon extract
- 1 tsp gin
This is not a stiff frosting; if you’re looking for something that will crust or pipe in very intricate shapes, you’ll want to add in 1/4 cup of shortening or 1/2 cup of additional butter. This is a nice, smooth frosting that will pipe simple shapes (see below), but needs to be kept in the fridge.Start by whipping the butter and cream cheese for 2 minutes, until light and fluffy. Add in half the Lakanto and the champagne, mixing well. Add in the rest of the Lakanto, the gin, and the lemon extract, mixing well. If you’re simply slapping on the frosting and calling it a day, go ahead and frost the (completely cooled) cupcakes. If you want to pipe a simple design, put the frosting (still in the bowl) into the fridge for about 15-20 minutes to firm back up.
Swirls and flowers can be achieved if the frosting is cold. After letting it firm back up, I loaded half my frosting into a piping bag with a 1M tip. I left the other half in the fridge. I piped a simple small traditional whirl on about 3/4 of the cupcake’s surface, then piped three little flowers in the leftover surface. I did about half this way. I reloaded my bag and finished the other half with larger traditional whirls only. Once piped, take a cooled candied lemon slice and wiggle into the center of every whirl: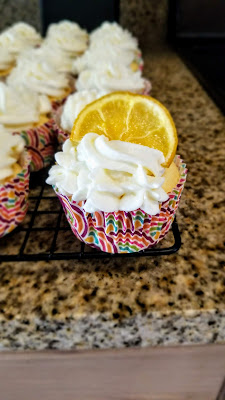
*Chef’s kiss* 
So, so summery! 
I really like how both designs turned out. 
But this right here, is absolutely the most perfect whirl I have ever made in 5+ years of cake decorating. LOOK AT IT! Adorable, summery decorations aside, these are the most refreshing cupcakes I’ve ever tasted. I know I’ve been bagging on anything that isn’t a cheesecake lately, but these turned out so much better than I imagined they would in initial recipe creation phase. The cakes are so light and fluffy, and the frosting is the perfect balance of sweet meets tart and refreshing thanks to the lemon extracts and champagne. Everything finishes with this insanely smooth, mellow flavor blend thanks to the gin. With good gin, all things are possible. Plus there’s a nice little kick from that candied lemon to boot. It had been awhile since I spent the afternoon baking, and it was a welcome change to unplug from *gestures wildly* all of this, and just focus on doing something I absolutely love and enjoy. 2020 may be a giant dumpster fire, but I’m gonna keep things as classy as I can with the help of the liquid and solid forms of the French 75. Mais oui! ‘Til next time, fellow eaters.
French 75 cocktail? Check. French 75 cupcake? Check. I am having my cake and drinking it, too! -
Cakes/Cheesecakes/Cupcakes
Cakes/Recipes/Tutorials:
- Cherry Limeade cake (low cal!)
- Carrot cake (low cal!)
- Strawberries and cream cake (low cal-ish)
- Peanut butter galaxy cake (low cal!)
- Chocolate pumpkin cake with black cocoa cream cheese frosting (low cal!)
- New Mexico sunset-inspired cacti cake with Churro cake recipe (low cal!)
- Shark stencil cake tutorial with Oreo cake recipe (low cal!)
- Pineapple cake with coconut cheesecake filling and coconut cream cheese frosting (low cal!)
- Lemon cake roll with yogurt cream cheese frosting (low cal!)
- Baileys salted caramel rainbow bundt cake (low cal!)
- Skrewball peanut butter whiskey chocolate cake with Greek yogurt cream cheese frosting (low cal!)
- Moscow Mule cake with acetate collar transfer tutorial (low cal!)
- Orange creamsicle cake with Jack Skellington template tutorial (low cal!)
- Black velvet cake with Ooogie Boogie template tutorial (low cal!)
- Peach Bellini cake with watercolor and glass candy bowl tutorial (low cal!)
- St. Patrick’s Day chocolate mint chip cake with Baileys mint buttercream and chocolate shamrock with cake comb/stripe tutorial (low cal!)
- Blackberry cake with whipped mascarpone frosting and chocolate decorative bowl (low cal!)
- Peppermint vanilla cake with peppermint buttercream and painted Christmas trees (low cal!)
- Skull faultline cake with bloody glass shards and Ermine frosting tutorial
- Witches’ brew cupcakes (Guinness chocolate cupcakes with Baileys frosting- low cal!)
- Mini skull lava cakes with cheesecake filling (low cal!)
- Painted buttercream mountain caramel cake tutorial (low cal!)
- Lumberjack plaid cake tutorial (low cal!)
- Peach Fireball bundt cake with Fireball butter sauce and glaze
- Caramel cake with Baileys Swiss meringue buttercream and green mirror glaze for Saint Patrick’s Day (low cal!)
- Swiss meringue buttercream and chocolate cage tutorials
- Rumchata cake and buttercream frosting with chocolate snowflakes, meringue, and ombre frosting (low cal!)
- Halloween vertical layer cake with zombie fingers
- Apple cider cake with cinnamon apple cider buttercream and cinnamon ganache (low cal!)
- Coconut blue ombre vertical layer cake with orange flavored buttercream (layers and watercolor painting tutorials included) (low cal!)
- Lightened up red velvet cake with watermelon/buttercream painting tutorials (low cal!)
- Margarita cake with tequila lime buttercream frosting and Fallout Vault Boy transfer tutorial (low cal!)
- Low calorie lava cakes for two
- Chocolate chip Kahlua bundt cake with Kahlua ganache
- Fudge-filled vanilla bundt cake with chocolate fudge ganache (low cal!)
- Grand Marnier orange cake with blueberry filling and Grand Marnier orange buttercream (somehow still low cal!) Russian piping tips included.
- Yellow amaretto cake with amaretto Vikings buttercream transfer (Swerve and cake freezing tips included)
- Pineapple upside down cake (low cal!)
- Naked gingerbread cake with cinnamon cream cheese frosting and chocolate Christmas trees (low cal!)
- Pumpkin angel food cake with cinnamon ganache (low cal!)
- Semi-naked dark chocolate cake with chocolate amaretto buttercream, chocolate amaretto ganache, and swirled chocolate bark (Truvia Baking Blend tips included with tutorials)
- Ghastly slime cake (low cal!)
- Apple pie dump cake (low cal!)
- Boston cream angel food cake (low cal!)
- Galaxy swirl mirror glaze cake tutorial
- Peanut butter chocolate fudge cake(lower cal!)
- Apple cake(low cal!)
- Lemon and blueberry low cal poke cake
- Shamrock surprise cake with low cal cream cheese frosting
- Lemon lava cakes
- Bewitching swirl Halloween cake with poisoned Baileys chocolate buttercream roses
- Chocolate orange cake with chocolate orange buttercream
- American flag berry tie-dye cake
- Legend of Zelda 8-bit cake
- Big 3-0 birthday cake
- Pirate ship cake
- Jeep birthday cake
- How to make cakes in a jar
- Baileys chocolate cake
- Penguins of Madagascar cake
- Champagne cupcakes
- Peppermint chocolate cupcakes
- Black and orange polka dot Halloween cake topped with spiders and spiderwebs
- Graveyard cake
- Campfire cake/marble cake recipe
- White cake with lemon filling and gumdrop flower tutorial
- Mad Max themed cake
- Zombie cake/red velvet cake recipe
- Decadent dark chocolate cake
- Ace of Spades birthday cake/buttercream transfer tutorial
- Pistachio cake recipe/two-toned hydrangea tutorial
- Angelfood cake with lemon glaze
- My famous Guinness chocolate cake with Baileys frosting
- Valentine’s heart cakes
- Minion cake tutorial
- Nightmare Before Christmas cake tutorial
- Sock money cake tutorial
- Dia de los Muertos skull cake, Jack O’Lantern, and Jack Skellington cake pop tutorials
- Blue velvet cake and cornelli lace tutorial
- Pumpkin bundt cake recipe
- Basketweave cake tutorial
- American flag cake tutorial
- Adorable tiny cakes tutorial
- Classic birthday cake decoration tutorial
- Cookie monster cake tutorial
- Chocolate ruffle cake tutorial
- Pressed petal cake tutorial
- Rosette cake tutorial
Cake pops:
- American flag made of sparkly cake pops
- Easter egg cake pops
- Football cake pops
- Ornamental cake pops
- Dia de los Muertos skull cake, Jack O’Lantern, and Jack Skellington cake pop tutorials
Cupcakes:
- Carrot cupcakes (low cal!)
- Pistachio Grinch and Whoville Christmas tree cupcakes (low cal!)
- Dia de los Muertos sugar skull sopapilla cupcakes with honey buttercream (low cal!)
- Black cherry monstercakes (low cal!)
- Pie cupcakes (low cal!)
- Buttered rum cupcakes (low cal!)
- Black forest cupcakes (low cal!)
- Pink flamingo Paloma cupcakes (low cal!)
- French 75 cupcakes (low cal!)
- Cranberry-filled vanilla cupcakes with whipped cream cheese frosting (low cal!)
- Piña Colada cupcakes (low cal!)
- Spiked pink lemonade cupcakes (low cal!)
- Chocolate pumpkin cupcakes with cinnamon cream cheese frosting and chocolate leaves (low cal!)
- Disaronno yellow cupcakes, Baileys chocolate cupcakes, respective frosting recipes, and galaxy swirl tutorial
- Lemon cream filled lemon cupcakes (low cal!)
- Carrot cake muffin-cupcakes (low cal!)
- Mini chocolate Coke Zero cupcakes with peppermint buttercream Christmas trees
- Malibu Rum cupcakes
- Reese’s stuffed chocolate cupcakes with peanut butter buttercream
- Lemon cupcakes with raspberry filling and lemon raspberry swirl cupcakes
- White almond wedding cupcakes
- Shamrock shake cupcakes
- Bloody brains cupcakes
- Boozy root beer float cupcakes
- Churro cupcakes
- Coffee cupcakes with chocolate coffee buttercream
- Green velvet cupcakes
- Strawberry margarita cupcakes with lime buttercream
- Apple cider cupcakes (spiked)
- Homemade white cupcakes
- S’mores cupcakes
Cheesecakes:
- Lemon cheesecake (low cal!)
- Mini pumpkin cheesecakes with gluten free Oreo crust (low cal!)
- Mini red, white, and blue cheesecakes (low cal!)
- Chambord cheesecake with Chambord gelatin topper (low cal!)
- Mini Andes mint cheesecakes (low cal!)
- Layered strawberry cheesecake (super low cal!)
- Blackberry lemon cheesecake (low cal!)
- White chocolate macadamia nut cheesecake (low cal!)
- Mini Reese’s stuffed peanut butter cheesecakes with peanut butter Oreo crusts (low cal!)
- Dulce de leche swirl cheesecake with fudge brownie crust (semi low cal!)
- Chocolate Kahlua cheesecake with Kahlua ganache
- Strawberry daiquiri cheesecake (low cal!)
- Dark chocolate cookie cups with Baileys cheesecake filling (low cal!)
- Cherry almond cheesecakes with cherry whipped topping and buttery crust (low cal!)
- Mini Salted Caramel Baileys cheesecakes (low cal!)
- Pumpkin cheesecake lasagna (low cal!)
- Low cal peanut butter cheesecake bars with chocolate crunch crust
- Chocolate-covered cheesecake bites
- Low cal chocolate chip cheesecake
- Baileys mint cheesecake shooters with Baileys fudge sauce
- Pumpkin cheesecake with spiced rum whipped cream
- Key lime cheesecake
- Sopapilla cheesecake
- Cheesecake shooters
-
Birthday…Cheesecake? Yep, It's a Thing.
Birthdays…I tend to avoid mine like I owe them money. I was pretty much born a 40 year old mentally, but each passing year that brings me closer to one physically (The wrinkles? Things hurting for no reason?), gives me the desire to completely ignore my birthdays still exist. My husband, on the other hand, approaches birthdays fearlessly and with a zest for life, like he does everything else (I’m pretty sure the only thing in this world he fears and avoids are my freezing cold feet touching him in the middle of the night). Because of this, I like to top myself each year with his birthday dessert. We knew he would be gone for work on his actual birthday, and I made his annual birthday treat early so we could enjoy it all week long while basking in the glory of all that is Derek! Since I’ve been knocking the cheesecake game out of the park recently, I am sure it will come as absolutely no surprise to you that he requested a cheesecake instead of a traditional birthday cake. As someone who’s trying to give Cheesecake Factory a run for their money, I took this opportunity and went as decadent as I could.
*Macadamia nut heeeeaaaveeeennnn.* So we all know the only thing white chocolate belongs in is a white chocolate macadamia nut cookie, until now. I absolutely abhor white chocolate–I find it to be a travesty to actual, real chocolate, parading around calling itself chocolate when it’s really just made of cocoa butter. But pairing a cocoa butter interloper with a buttery macadamia nut–this is the only reason white chocolate should exist. This is my husband’s favorite cookie, and I was hoping I could transition it into his favorite cheesecake…because as much as I love him, birthday cookies are not a real thing. Birthday cheesecakes, however, totally legitimate. While it isn’t exactly low in the calorie department at 370 calories a slice for 12 slices total, consider for a moment that one slice of white chocolate macadamia nut cheesecake from the Cheesecake Factory is 1,540 calories, 370 seems pretty darn low. I didn’t even have to sacrifice flavor. A golden graham cracker crust sits below a silky and sweet cheesecake filled with chopped macadamia nuts. And if I do say so myself, it looks incredibly classy in comparison to the Cheesecake Factory’s tower of calories.
And it’s gluten freeee! To begin the journey to guilt-free cheesecake bliss, start by making your crust. I make a graham cracker crust that comes together in seconds and is insanely easy. You need:- 3 TBS reduced fat butter (cold from the fridge)
- 2 TBS Swerve granular
- 1 cup of graham cracker crumbs–I use Kinnikinnick (say that three times fast) gluten free graham crumbs, purchased on Amazon
Preheat your oven to 375 and dump everything into a small food processor and blend until the crumbs are wet. Spray an 8″ springform pan with cooking spray, line with Parchment paper, and spray that for good measure. Press the crumbs into the pan using the bottom of the measuring cup you used earlier to measure your crumbs. I spray this with cooking spray as well. This makes a nice thin crust, so if you’re looking for one of those over-the-sides crusts, you’d probably need to double this recipe. But why allow graham crackers to cover the side of your beautiful cheesecake? I’ve always wondered this. I want to see what’s inside!Bake your crust for 10-12 minutes at 375, until nice and golden:
More on the liners and gobs of foil later. Now, place your crust on a cooling rack and shove this in the fridge to cool off quickly. Reduce your oven temp to 350.
And prepare for greatness. While the crust cools, it’s time to make that wonderful white chocolate macadamia nut cheesecake filling. You need:- 4 ounces of macadamia nuts (crushed with a mallet or chopped in a food processor); plus 1 additional ounce for topping
- 16 ounces of reduced fat cream cheese at room temp
- 1/2 cup of Swerve granular
- 1/2 cup of light sour cream at room temp
- 1 tsp vanilla extract
- 1 cup of quality* white chocolate chips, like Ghirardelli brand, melted according to package directions and cooled for about 10 minutes (*Don’t use wafers or candy melts. Ew.)
- 3 eggs (I know, I’m missing an egg in this picture. I’m sure I was distracted by something shiny.)
Start by beating the cream cheese and sugar together in a stand mixer on medium high until light and fluffy, about 3 minutes. Then add the sour cream and vanilla extract, mixing on medium high until well blended. Pour in the melted white chocolate and mix on medium high 1-2 minutes until blended in. Now, turn the speed to low and add the eggs one at a time, ensuring they are completely mixed in before you add the next egg. Finally, pour in the macadamia nuts and mix on low until distributed throughout the batter.
Back to all that foil… Now, remove your crust from the fridge. Wrap the bottom and sides of the pan in a crockpot liner, tie this up, and then cover the bottom and sides with several layers of overlapping foil. This will prevent water from getting into your pan and soaking the crust. Foil alone is not enough–the crockpot liners are GOLD.

Looks like a bad science experiment, I know. Now pour your cheesecake filling on top of your crust. Put your pan into a large roasting pan and fill this with about 4-6 cups of VERY HOT, STEAMY, BURN-Y water. The water bath prevents the cheesecake from cracking in the oven, so don’t skip this part since this cheesecake doesn’t get a ganache on top to cover up any mistakes. I’m not asking for a lot, just perfection…

At this point, I still hold my breath and hope for the best. Place into the oven at 350 and cook for 55 minutes. Around this mark, see if the sides of your cheesecake have set but the middle is still wiggly like Jello (I usually gently poke the roasting pan to do this). If it is, fantastic, you’re almost done! If the sides are also still very wiggly, try cooking at additional 5-minute intervals. I clocked 1hr5min as the perfect time in my oven. Once sides are set, turn the oven off, crack the door a bit, and set a timer for another hour. Leave your cheesecake to finish making cheesecake magic as the oven cools down.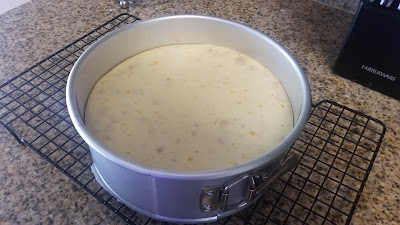
Not. A. Single. Crack. After the hour, remove your cheesecake from the oven and roasting pan and onto a cooling rack. Run a very sharp knife around the edges of the pan to ensure the sides aren’t stuck to the pan. Then let this sit out for a bit until it’s at room temperature. At this point, cover with plastic wrap and place into the fridge to set for at least 4 hours if not overnight. I always bake a day ahead so the cheesecake can firm up in the fridge and removing the sides of the springform the next day don’t cause the cheesecake (or me) to fall apart.
Smoooooth like buttah. When you’re ready, remove the sides of the springform pan. Since you lined the pan with Parchment, it’s super easy to take a large spatula or even your hand and remove the entire cheesecake from the base of the pan and place on your plate of choice.
There always has to be a topping! Take that leftover crushed ounce of macadamia nuts and sprinkle around the edges of the cheesecake, gently pressing into the cake to stick. You could also add more unmelted white chocolate chips, or melt more white chocolate chips and drizzle on top before you place the nuts on. I went for a simple look:

Mostly to save on calories. *Shrug* Since this was a birthday dessert, I knew I was going to add this cute topper I found on Amazon (I spend way too much time and money on Amazon):

But so festive! Is it my cheesecake or my husband that is the star of his birthday? Both. I was so happy at not only the overall look, but THE FLAVOR. Sweet baby cheesecake Jesus, this is absolutely divine. The white chocolate + cream cheese come together in a way that is so silky and such an excellent mix of sweet and tangy meeting that it’s a wonder we don’t put white chocolate in all cheesecakes, and remember, this is coming from someone who loathes white chocolate. And those buttery macadamia nuts? They may be terrible for you calorie-wise, but this flavor adds so much to the cheesecake that the flavor is next level. As far as assembly and baking go, this was one of the easiest “fancy springform” cheesecakes I’ve ever made. It took me a couple hours on a Saturday, and we were enjoying the heck out of it the next day.
Every forkful is bliss. Sadly, the cheesecake is all gone now and so is my husband. I am happy to report he absolutely adored this cheesecake (clean plate club all the way, which never happens with him). We had a nice early celebration, and since his birthday turns into what he calls “Derekpalooza,” I am sure the festivities will continue through July 4th (those fireworks are for him AND freedom). When he does return in a few days, I’m wondering if I should have another of these cheesecakes waiting. Or maybe make one again tomorrow so I only have to share like two slices? It could be for my very merry unbirthday celebration… ‘Til next time, my fellow eaters!

I could eat this entire cheesecake by myself. No regrets. -
Mini But Mighty!
…this is also one of the fifty-seven potential names I have for my autobiography. It’s a pretty boring book altogether considering my full name should be Kate “Rules Are Made to Be Followed” Fox, but damned if I don’t throw caution to the wind when it comes to crazy dessert concoctions. I mean, I have been an insane cheesecake making machine these past two weeks…I’m turning into Kate Bakes Cheesecakes almost exclusively. I feel like I have to admit now that I believe cheesecakes are far superior to cakes. The irony is not lost on me, the Kate who Bakes Cakes, but as I age (shudder), they just seem to be a more delectable dessert than an overly-frosted, super sweet cake. Between last week’s dulce de leche swirl cheesecake with fudge brownie bottom, and this week’s ultimate PB & C mashup (that C stand for ‘chocolate’ for you normies that aren’t obsessed with dessert), I’m gonna convince you to come to the dark side. I promise there’s no PowerPoint presentation involved with this argument. Just really terrible, potato-quality cell phone photos:
It’s pretty much the best thing to happen to peanut butter since sliced bread, really. Handheld, portable, crowd-pleasing, oh, and absolutely delicious, these small but mighty peanut butter cheesecakes are stuffed with a tiny Reese’s and held together by a single peanut butter Oreo crust. I brought these to work for my boss’s birthday, an avid PB&C lover, and took them to *another* birthday party for a friend who also happens to love the PB&C flavor combo. Surround yourself with friends like this; they’re good people, PB&C lovers…they almost always share dessert, unlike those snobby Crème Brûlée folk (all those accent marks, and they still won’t share). I have to admit, these little cheesecakes aren’t terrible for you! With a few small adjustments, these are only 204 calories per cup. And while you might think, “But they’re small. I wanna eat like 10 at a time,” (I won’t stop you), the richness of the cheesecake, peanut butter, and chocolate all coming together makes one serving absolutely satisfying to the ole’ sweet tooth; but don’t let that stop you from getting seconds (it didn’t stop anyone else).
There’s a whole lotta Reese’s action here. These are EVEN EASIER to make than last week’s cheesecake; no water baths, no baking things one at a time, sorry, I sorta lied last week…for a full-fledged cheesecake, that really is a pretty simple recipe, but for mini cheesecakes, this is easy as pie…which is appropriate since pies are cheesecake-adjacent. This recipe makes 40 mini cheesecakes, so by all means, cut it in half for a more reasonable amount. I was feeding the masses and wanted a couple leftover to freeze for us. You’ll need:- A whole carton of Peanut butter Oreos (I also used Glutino’s gluten-free sandwich cookies to make 10 safe for me to eat)
- 40 Reese’s Minis (get the kind that are already unwrapped; save a TON of time and annoyance)
- 20 ounces of cream cheese at room temp (I was still stuck with the awful full-fat kind for this; use the 1/3 fat kind to reduce calories even more)
- 2/3 C creamy peanut butter (I use JIF Natural PB)
- 1 C Swerve granular
- 1/2 C low fat sour cream (not pictured, sorry!) at room temp
- 2 tsp vanilla extract
- 4 eggs at room temp
- 2/3 C sugar free chocolate chips, like Lily’s brand
- 1/3 C Reese’s peanut butter chips

It’s a good thing there’s extra Reese’s Minis leftover with this recipe. They’re as addictive as they are adorable. Start by preheating your oven to 350 and grabbing two muffin tins. Line each with cupcake papers, plop one Oreo into the bottom, and place a Reese’s Mini in the middle. Then beat your cream cheese for 3 minutes on medium-high (using a paddle, not a whisk) in a stand mixer until it’s nice and fluffy. Add in the peanut butter, mixing for another 2-3 minutes until things are fluffy again. Then add the sugar, blending well so the batter isn’t gritty (2-3 more minutes). Mix in the sour cream and vanilla until incorporated. Now, turn the mixer to low and add each egg, one a time, making sure the egg has completely mixed in before you add another.

I have never been able to fill a muffin tin without it turning into a small overflow disaster. Using a large spoon or a 1/4 measuring cup, carefully drop batter on top of each Mini Reese’s. You want the cupcake liners pretty much all the way full. Things will expand a bit in the oven, but they will cool back down to normal size. Smooth out the batter with the back of a spoon. Bake for 17-18 minutes at 350 degrees; a toothpick should come out mostly clean when these are finished. Edges will be golden but not browned, and everything will be firm.

It will also look like each cheesecake has an outie belly button thanks to the Reese’s in them. Let the cheesecakes cool in the muffin tin on top of cooling rack for at least 15 minutes. These are soft and hard to handle without crushing, so I recommend putting them, still in the tin, in the freezer for 15-20 minutes before removing from the pan to finish cooling completely on a cooling rack. You can also speed this part of the process up by putting them back in the freezer for 30 more minutes. You could call it a day here and eat up, but I require MORE PB & C. Gather up those chocolate and peanut butter chips!

Things are about to get messy. In the best way, though. I poured my 2/3 cup of chocolate chips in a bowl and heated for 1 minute on 70% power in my microwave. I gave them a stir and added another 30 seconds on 70% power before they were nice and melty without getting scorched. I poured this into a piping bag (a large plastic baggy works, too). I put down Parchment paper, grabbed my cheesecakes from the freezer, and then snipped the tip of the piping bag off. I literally just drizzled back and forth several times across ALL cheesecakes (quick, extremely messy, but you get to eat dried chocolate when you’re cleaning up later).

*Mmm, chocolaty drizzle.* Now, take the 1/3 cup of peanut butter chips, dump into a clean bowl, and heat for 1 minute at 70% power in the microwave. Since this is a smaller volume, 1 minute should be plenty to melt everything down. Put into a clean piping bag or baggy, snip the tip, and drizzle, drizzle like your life depends on it (your taste buds’ lives do, really).

I mean…putting the yum in da-yum. Let these set for about 30 minutes until the chips all harden back up. I put my cheesecakes into a few 9×13 trays, all covered with lids, and kept in the fridge until ready to roll out and deliver unsuspecting birthday gals and guys with tiny little disks of PB&C happiness. I defy you to have a bad birthday when you can double fist handheld cheesecakes into your mouth with reckless abandon.

It simply isn’t possible. 
Especially when the cheesecakes are this adorable. 
And truly filled with joy…aka, serotonin-releasing chocolate. These are quick and a total sinch to make, but they taste like something that takes ages to put together. However, unlike any other cheesecake in existence, these go from oven to eating in under 3 hours. And they will go quick. The peanut butter cheesecake itself is nice and airy but still full of flavor. It’s light enough that even by adding in a whole peanut butter Oreo AND a Reese’s Mini, it somehow still manages to be perfectly balanced and doesn’t come across as way too rich or overindulgent. I’m trying to ration my leftovers by keeping them in the freezer until I need to pop one in my mouth, but I’m failing miserably because they’re just too yummy. At this point, I realize it’s for the best that 30 of these went to live in other homes and bellies. ‘Til next time, my fellow eaters!
I may never bake a regular cake again…
Okay, that’s a total lie. Next blog is gonna be suuuuuper cakey. -
Why Not Both?
I love when you can pair two things together that are absolutely fantastic on their own to make one substantially amazing thing that brings you unbridled joy…you know, like adding bacon on top of Poutine, or Cinco de Mayo falling on a Taco Tuesday, or your favorite song coming on the radio AND you hit every green light on the way to your destination. Life can be good, but pairing a few key elements together can make it friggin’ magical. So the other day I wanted brownies, but then I also kinda wanted cheesecake. Instead of having an internal debate about dessert hierarchies, in a moment of sheer brilliance, I thought to myself, “Why not both?” This wonderful thought led to a beautiful, perfect-in-every-way dessert mashup: a dulce de leche cheesecake with a fudge brownie crust. The heavens parted, angels wept; there’s talk I may even win a Nobel Peace Prize because of this amalgamation of scientific baking excellence.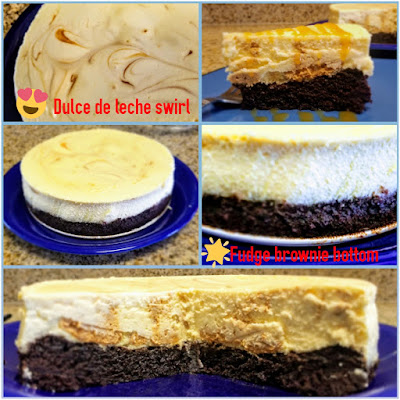
It really is THAT good. It may not look like much, but I can say with certainty it is (cue Chris Traeger voice) *literally* the best cheesecake I have ever made and/or eaten. Fudgy brownies are one of my all-time favorite, O.G. desserts, but I have a weakness for cheesecake like most men have for blondes (in both instances there’s usually a lot of drooling). Is it low calorie? HA! Well, sort of. It’s 374 calories for one slice (12 slices total), which, all things considered, is way less than two bites of ANY cheesecake from Cheesecake Factory, so it’s got that going for it, too. And it is worth every single calorie. Amazingly decadent chocolate base? Check. Creamy cheesecake batter? Check. Sweet swirls of dulce de leche in each bite? That’s a Texas-sized 10-4. And in the realm of difficulty, this is probably one of the easiest cheesecakes I’ve ever made to boot. Well, what are you waiting for? Bust out the springform pan and get to baking!
Oh yes, it’s even GLUTEN FREE. Gluten is evil and tries to kill me even when I just *think* about smelling a slice of bread. Thankfully, I am way late to the game with going gluten free (I was admitted to the club in December), so wonderful things like gluten free fudge brownie mixes exist already. I scooped this brand up at Publix, and it is now the only brownie mix I am ever using for the rest of my life. It is perfect in every way if you’re into a super chocolatey and moist fudge brownie (it even has recipe options for those that prefer them drier and cakier). All you need:- 1 box of King Arthur Flour gluten free fudge brownie mix
- 2 eggs at room temp
- 1/2 cup of low fat butter, melted and slightly cooled
- 2 TBS water
Preheat your oven to 350 and line an 8″ springform pan with Parchment paper and spray generously with cooking spray. In a medium bowl, dump the three wet ingredients and whisk together until mixed. Then add in the brownie mix and whisk until completely incorporated. Pour this into your prepared pan and tap on the counter to release bubbles: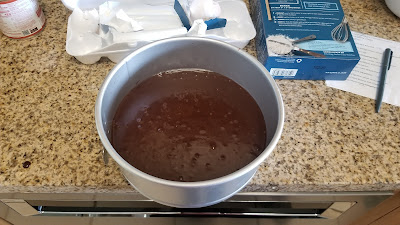
Of which there will be plenty, as you can see. Now, bake in the middle rack of your oven for 30-35 minutes. You don’t want the brownie completely cooked since it will go back into the oven for more cook time with the cheesecake batter. Underbake by about 5 minutes. I believe the box recommended 35-40 minutes, and in my oven, 35 left some good crumb action on my toothpick, so I removed it then. I placed on a cooling rack in the freezer while I made my cheesecake batter. Once cool enough, wrap the pan in a crockpot liner (trust me) and place a few layers of foil over this to keep the water bath from leaking in later. No one wants a soggy bottom.

Simple, but effective. I absolutely HATE full fate cream cheese. In my first return trip to the commissary since March (base gates were closed, things were weird, thanks, COVID), guess what they didn’t have? Yep. Not a single brick of reduced-fat cream cheese. This is what I get for trying to save some money (I love you, Publix, but hot damn you’re expensive). I severely reduced the amount of cream cheese in my batter because of this, so here’s how it would’ve been made in a perfect world:- 16 ounces 1/3 fat cream cheese at room temp (I used 12 ounces of full fat, more on that later)
- 1/3 cup of Swerve granular
- 1/2 cup of light sour cream at room temp
- 1 TBS vanilla extract
- 1 tsp caramel extract (forgot to put in the recipe picture!)
- A pinch of salt
- 3 eggs at room temp
- 1/2 cup of God’s Nectar (a.k.a., dulce de leche), set aside
Dump the cream cheese into your stand mixer bowl and beat on medium-high until fluffy, about three minutes. Then add in the sugar, mixing on medium high until things are light and airy again, two or so minutes. Add the extracts, sour cream, and salt, mixing on medium high for 1-2 minutes until fully incorporated. Now, with the mixer on LOW, add in the eggs one at a time, making sure each egg is fully mixed in before you add another. Keep the speed at low so you don’t whip your eggs and cause extra air to get added into your cheesecake batter…this will make it crack as it bakes. Reserve 3/4 cup of cheesecake batter and pour the rest into your springform pan on top of the brownie crust.
Don’t worry, I didn’t forget about the best part. Now, take that 1/2 cup of dulce de leche and place in a medium bowl. Add in 3/4 cup of your prepared cheesecake filling, and mix until magic happens:

Caramel magic. So here’s where my skimping on the cream cheese became a problem…my dulce cheesecake batter was now way heavier than my regular cheesecake batter. So, when I took my dulce mix and dropped it by the spoonful into the regular batter….

Before I realized my crucial error. I swirled the dulce cheesecake blobs around with a knife, but after a swirl or two, most of my dulce filling sunk below the surface of the lighter regular filling.

Sigh. *THISCLOSE* to perfection…visually, anyway. I still maintain a better cheesecake you have never eaten. Sad but still very much aware the end result would be cheesecake (so not too sad), I took my cheesecake and put it into a large roasting pan. I filled this with very hot water to about halfway up the sides of the pan; a water bath will help keep cracks from forming. Bake for 50-55 minutes at 350. The center will still be very jiggly (like Jello) but the sides will be set. At this point, turn the oven off, crack the door, and leave the cheesecake to finish setting for 1 hour in the cooling oven.

Some subtle, sexy swirl action going on. Once that hour has lapsed, remove the cheesecake from the roasting pan, ditch the foil and crockpot liner, and place on a cooling rack. Use a very sharp knife to run around the edges of the springform pan and release any of the cheesecake that will be sticking to the side of the pan. At this point, place into the fridge to set for at least 4 hours if not overnight (I ALWAYS go overnight, adding a layer of plastic wrap on top after about 4 hours in the fridge). A good rule of thumb is to make a cheesecake like 3 days before you actually want cheesecake, and then the timing is absolutely perfect.

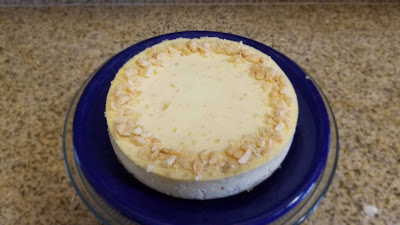
Of course, when it looks this amazing, the wait no longer matters one iota. When you’re ready to go to town, carefully remove the sides of the springform pan and transfer to a serving plate. I was itching to take photos, so my springform bottom is still in these shots.

Doesn’t matter…still looks edible. So my swirls weren’t very pronounced, but it’s got a mesmerizing visual effect going on anyway:

You’re getting hungry… Serving this cheesecake can be a bit of a beast since the fudge brownie and soft cheesecake filling don’t yield nice crisp, clean slices straight out of the fridge. If you’re looking to serve slices that could be featured on the cover of Good Housekeeping, throw your cheesecake in the freezer for 2 hours, then slice and serve. I did this in order to remove the springform pan bottom and Parchment paper without the cheesecake falling apart as well.

Oh hey there, playing peekaboo, I see, dulce! So my swirls may have sunk into the cheesecake, but my swirls sunk into the cheesecake...this makes eating a slice like a magical treasure hunt where you get to strike gold with literally every forkful. I love a happy accident. The ratio is pretty much 50:50 brownie base to cheesecake, and to me, that’s just plain spellbinding. Every bite gives me a chocolate to creamy caramel ratio that is absolutely the greatest thing my taste buds have ever been privileged to experience. Add some melted dulce de leche on top of each slice to take things to what some might consider hedonistic, but what I call, “The best thing that will ever happen to you…especially during quarantine.” I’m not kidding- I have never been more proud to have my inner fat kid come up with a dessert mashup like this. I plan on making this for every major holiday, social gathering, and Tuesday from now until I die of sugar shock. If you have leftovers (ha), be sure to keep them in the fridge. They won’t last long, though because this is a pairing that will bring you much needed bliss. ‘Til next time, my fellow eaters!

Happiness is a 10 pound brownie cheesecake combo. -
Peach Dreams Are Made of This
Day 967? of quarantine: days of the week no longer exist. I now understand why the dogs get so excited when a squirrel runs by the front window. I find myself wanting to wear cocktail attire to the grocery store because wearing yoga pants for weeks on end no longer brings me joy. The one thing that still gives me hope is making dessert. They make take our lives, but they’ll never take our
freedomcake!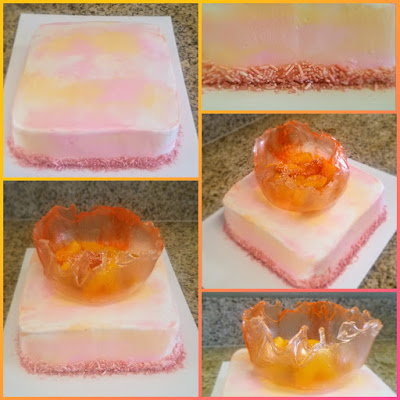
Petition to remake Braveheart but call it Cakeheart. It’s a film about one baker’s revolt against everyone hoarding baking supplies during quarantine because they’ve all been streaming too much Great British Bake Off. I apologize if you can’t buy flour anywhere because everyone thinks they’re gonna start baking during quarantine but won’t ever actually get around to it–lucky for you, this peach Bellini cake with watercolor Bellini cream cheese frosting and handmade candied bowl is made with box cake mix because I’m lazy, and because I prefer a low cal, sugar-free option for dessert. At only 212 calories a slice for 12 slices, this cake will ensure you can still fit into a real pair of jeans when the inevitable return to the real world commences. I think we all miss wearing real clothes at this point.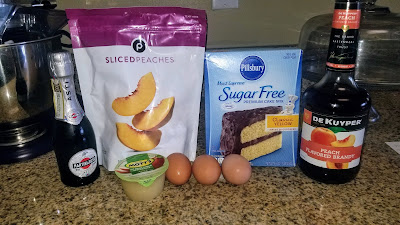
If it takes longer than expected, at least you’ll have leftover booze. I actually made this recipe as muffins about a year ago, and I really wanted to try pairing it with cream cheese frosting to take it to the next level. Lucky for you, I’ve got nothing but time to experiment in the kitchen these days. Happy to report the cake and icing are incredibly simple to make. All you need are items that can actually be found on grocery store shelves these days:- Sugar free vanilla or yellow cake mix
- 3 egg whites
- 1/2 cup unsweetened applesauce
- 1 cup of sweet champagne (go for sweet and not brut or dry since this is dessert)
- 1/3 cup of Peach Schnapps (you have some hiding in a cabinet leftover from college, probably)
- 1 cup of frozen peaches, thawed and diced (or 1 real peach, diced)
- Optional: peach gel dye for coloring
Start by preheating the oven to 325 degrees and greasing two 8-inch square pans. Mix everything but the peaches together in a stand mixer on medium for 2 minutes. Champagne will make things bubbly, so don’t go too high on the mixer speed or you’ll end up wearing some of your batter (lesson learned the hard way). Fold in the peaches and a couple drops of peach gel dye if using. Pour into prepared pans and bake for 28-30 minutes, or until a toothpick comes out of each cake completely clean.

Just call me Princess Peach. Let youR cakes cool in the pan for about 10 minutes on top of a cooling rack. Then turn out onto the racks to cool completely before frosting.

Looks peachy keen, alright. Ok, I’m done with peach puns. For now. Level your cakes before frosting. I have two 8-inch pans from different companies. Both cakes were completely different sizes…8 inches to Wilton means something completely different to Farberwear, apparently. I had to trim the edges of my larger cake, but this was also a small blessing because it meant I got to eat cake scraps!

Which paired excellently with the leftover champagne. I wanted a cream cheese frosting that would crust like a buttercream in order to pull off the watercolor design I had imagined in my head…it might be a scary place up there, but it’s at least visually appealing. To do so, I had to add Crisco/shortening to my usual cream cheese recipe. If you hate the taste of shortening, you can omit this and replace with butter. To me, it does give the frosting less of a creamy taste than you’d expect with a cream cheese base, but it’s still most definitely edible. You need:
- 1 stick reduced fat unsalted butter at room temp
- 8 ounces of 1/3 less fat cream cheese at room temp
- 1/4 cup of shortening at room temp
- 1 lb./1 bag of Lakanto powdered monkfruit sweetener
- 1-2 tsp champagne (to taste)
- 1 tsp Schnapps
- 1 tsp vanilla extract
- Optional: gel dyes in coral, orange, and pink, plus these absolutely fabulous sprinkles
Cream together the butter, cream cheese, and shortening for 2-3 minutes until fluffy. Add in the bag of sweetener, champagne, Schnapps, and vanilla. Blend on low until incorporated, then switch to medium-high for 4 minutes, until the frosting is extremely fluffy, or as we refer to it, has added the “Quarantine 15” to its volume.
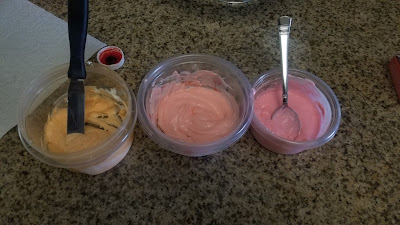
Now, take three small bowls and add a large dollop of frosting to each. I ended up having a LOT of leftover frosting, so don’t worry about running out for two 8-inch cakes. I dyed one bowl with a drop of coral + pink (in the middle above), another bowl just pink (on the right), and another bowl a drop of orange + coral (on the left). I then put all my frosting into the fridge to crust up for about 15 minutes so it wouldn’t be so thinned out and liquid-y that it just slid right off the cake. This also helps in order to keep the darker colors from just bleeding into everything and taking over when it’s watercolored together.
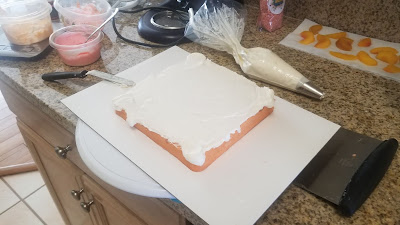
Sorry for the blinding whiteness. This is usually something I have to say when wearing shorts, but it still is the case here, too. I loaded up a large piping bag with a large round tip and placed a smattering of frosting on my first layer, smoothed it out, added my second layer, and then used my piping bag to run around the sides of the cake.

Seriously, squint or shade your eyes. I promise there’s a cake in this picture. I used an angled spatula and a bench scraper to smooth. You don’t need to make things perfect yet if you’re doing the watercolor painting.

Finally, a break for those poor eyes. Now take a dab of each color and layer it on the cake in a random pattern. I did this staggering in vertical columns on the sides of the cake, and then just haphazardly on the top. Take your bench scraper or angled spatula and run along the sides and top of the cake, allowing the coloring to blend together with each pass. You can do one or two passes to keep the coloring still somewhat separate and more of stark contrast. I wanted to pass over about 4-5 times to really blend things together and make it look more like a nice glass full of peach Bellini in cake form. Practicing what I peach, if you will.

If you see any areas where you want different contrast, come back in and add more color before giving a few swipes to smooth. 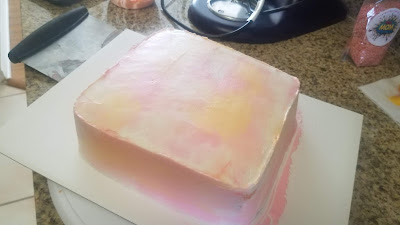
I love how well these colors played together. I kind of want a Creamsicle dipped into a Bellini now. You can now put the cake in the fridge to crust up for about 15 minutes, then come back in with a Viva paper towel to smooth out any rough edges. I have a horrible time trying to make the corners on square and rectangle cakes look nice, so this paper towel trick is an absolute must to make my cakes look nice. After smoothing out a bit, the frosting had become malleable again, so I placed it on a large baking sheet and then pressed handfuls of sprinkles into the sides of the cake for a border: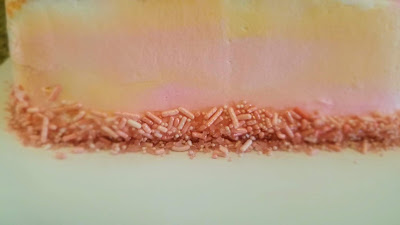
Nothing is ever finished without sprinkles. 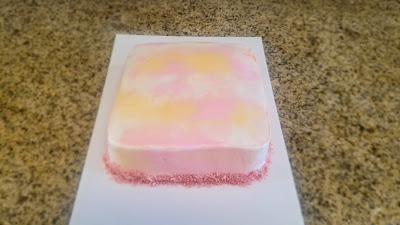
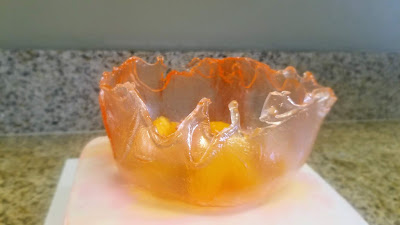
I mean, especially sprinkles that are so complimentary in color! Now, put your cake in the fridge and get ready to make magic! I have made these bowls twice now–I had way better luck the first time, you know, the one where I didn’t blog about it…so I will tell you the only two things I did differently this time that, in my opinion, made my bowl end up looking like a giant hot mess.
Finding balloons that weren’t water balloons was honestly the most difficult part of the entire process. This isn’t a tricky creation, really, it’s just very messy and you have to work FAST. I recommend making sure you have EVERYTHING ready to go before you even think about heating up your syrup. You need:
- 2 balloons (NOT water balloons)
- 1/3 c water
- 1 1/3 cup sugar
- 1/2 cup corn syrup
- Gel dye if coloring and a toothpick to swirl in the color
- A large baking tray lined with foil
- Two ramekins or small bowls to hold your balloons set on top of the foil-lined tray
- Olive oil to grease the balloons and bowls
- Candy thermometer
Fill your balloons up with water…I wanted LARGE bowls, so I filled the ballons with a lot of water this time. This was my first mistake. You want the balloon to still have some give so when it expands due to heat, it doesn’t pop…I lost one balloon this way. Fill them to the point where they are firm but still have a lot of give when squeezed. Now, make sure all the air has been let out of the balloon by allowing a little bit of water to pour out before you tie and secure the end of the balloon.
You will need to grease the bowls that will hold the balloons before you put the water-filled balloons into them. My second mistake was using vegetable oil. It refused to let the candy mix stick to the top of the balloon the way it needed to, so the base of the bowl was incredibly flimsy. The first time, I used olive oil and it was perfectly strong. You really want to grease the sides and bottom of the bowls you’re using so the candy mix doesn’t cement to it. I really recommend using a ceramic bowl to also help with this–my bowls weren’t ceramic and I had to chip away to get the candy to detach.
Once greased, place the balloons in the bowl and give them a thin coating of oil as well:

It’s gonna look like some weird balloon fetish thing at this point, but just work with me here. Now, dump your sugar, water, and corn syrup into a medium sauce pan. Working at medium-high temperature, whisk together your ingredients then let it heat up to 305 degrees. This part takes 12 minutes, but you don’t need to stir continually. I had a timer going so that I whisked the mix every two minutes. Keep a very close eye on your temperature the last two minutes…it can go from 250 degrees to 305 VERY fast, and you don’t want to burn the mixture. Once it hits 305, remove from heat and stir in the gel dye with a toothpick. I swirled so it wasn’t totally mixed into a solid color but instead had streaks of peach.
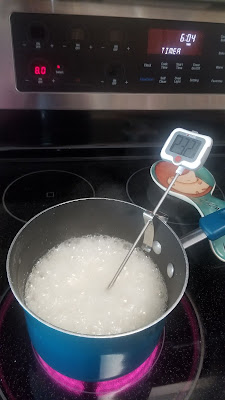
The candy thermometer is the MVP here. Pour the mix right away on the top of each balloon. If you’ve remembered to let any air out and didn’t fill the balloon too much, they will not pop.

Streaks of color! Let these set up for at least 30 minutes. Then very carefully pry the balloon out of the bowl. Like I said, I had to chip away at the candy hardened onto my bowls to get the balloon out. If you use a ceramic bowl that’s oiled, you probably won’t have this problem. You will want an extra set of hands (wearing gloves or holding wax paper so there’s no moisture) to gently cradle the balloon while you very carefully pull the tied end of the balloon tight and snip with scissors to create a small slit for the water to slowly drain out of…hold the balloon at an angle so the candy doesn’t get wet. If it gets wet, it will get tacky and start to break apart.
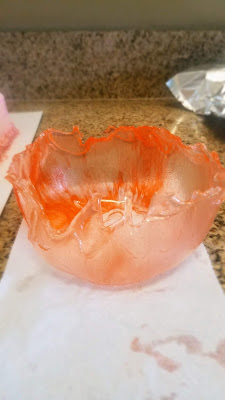
So. Demanding. The dismantling of the balloon is not easy, and it is a tension-filled minute while the water drains. But the end result is a pretty nifty looking bowl for you to put on top of your cake and add more peaches and sprinkles to. You could eat it if you wanted to, but I imagine it just takes like pure sugar and nothing else, so that’s a hard no from me. You can see my edges are pretty jagged from having to chip away to remove the bowl from the balloon, so I am definitely trying this again with ceramic to see if that achieves a cleaner look. It’s still pretty awesome with the swirled peach dye in there. As for clean up, let your kitchen sink run hotter than the surface of the sun as experienced from Florida, and place all your tools into the saucepan you used to make the candy syrup. For 5-7 minutes, run water in the saucepan, and under all that heat, the tacky candy will pretty much just melt right off. Small miracles.
And every cake needs a topper, right? 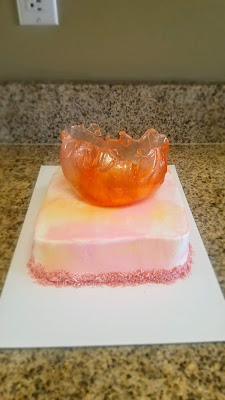
It takes it from a pretty cute cake to a pretty awesome cake…you might say, it’ll leave people s-peach-less when they see it. What? You want a peach of me? I’ll make terrible peach puns all day, people. I mean, eventually you have to remove the bowl to slice the cake, but as far as presentation goes, this candy bowl idea is a showstopper. And now you have a cake to eat that tastes exactly like a peach Bellini. You can even drink a peach Bellini while you’re eating a slice to have, what I assume, would be a transcendental moment. The cake itself has a really smooth flavor and those tidbits of peach are absolutely amazing. The cream cheese frosting isn’t too tangy with the incorporation of the Crisco, but the sweet champagne flavor lingers after each bite. It’s pretty much the perfect cake for spring quarantining because, mentally, it takes you to a place where you forget that you’ve been trapped inside your home for over a month with no end in sight. And to me, that’s absolutely magical…I’ve got 99 problems but a peach ain’t one. Okay, I am finally done with terrible peach puns. ‘Til next time, my fellow eaters!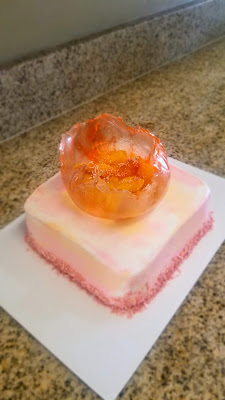
Don’t mind staying at home if I get to eat cake! -
A Dose of Good Luck
Let me interrupt your social media feed to remind everyone that good still exists in this world..and it’s in the form of cake. This mint chocolate chip cake with Baileys mint buttercream frosting and handmade solid chocolate shamrock may not solve a crisis, but it is an excellent way to take your mind off the outside world. Considering we’re all supposed to be social distancing and self quarantining, you can make this cake and not even have to share a single slice. Leprechauns don’t share their gold, and you don’t have to share your cake–true St. Patrick’s Day spirit!

It may not be as pretty as a fully-stocked toilet paper aisle in these trying times, but it is super festive, so this cake has that going for it. I adore St. Patrick’s Day celebrations, but they’ve all pretty much been canceled this year, so let’s meet up again in April and drink green beer and eat Irish food for Saint Paddy’s Day Part Two: Greener and Cleaner. I realize COVID-19 isn’t something to take lightly, but as a seasonal allergy sufferer, I am tired of people looking at me like I’m Typhoid Mary every time I sneeze…thanks, pollen. I’m indoors today and marveling over how delicious this cake is…stuffed with Andes mint chips, complimented by Baileys and mint extract, this is like the chocolate version of a Shamrock Shake, but even better because you don’t have to find a McDonald’s with a functioning ice cream machine to get it (plus, booze). And at only 323 calories a slice for 10 slices or 269 calories a slice for 12 slices, it’s even healthier than a Shamrock Shake…Baileys included. And I feel like in times of panic, everything needs a Baileys chaser.
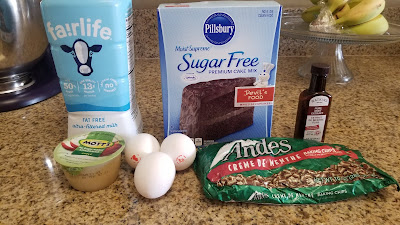
Plus so simple to make! Since most grocery aisles are bare, I hope you have a lot of this stuff on hand already. As someone who drinks lactose-free milk, doesn’t eat gluten, and bakes sugar-free, I’ve gotta say all these weird digestive issues that force me to eat this way have helped ensure what I need is always in stock at Publix. Mostly because no one else wants to touch it, so there’s that. To make this cake, you need:
- 1 box Devil’s Food cake mix (I used sugar free–it’s amazing)
- 3 egg whites (could attempt with flax eggs to make vegan)
- 1/2 cup unsweetened applesauce
- 1 1/4 cups skim milk (can use dairy free or vegan varieties)
- 1 1/2 tsp mint extract (not peppermint)
- 1/2 cup Andes baking chips or chopped mint chocolate baking bar
Preheat your oven to 350, grease three six-inch round baking pans and use bake even strips to finish pan prep. Dump all ingredients except for the mint chips into a stand mixer and blend on medium-high for 2 minutes. Add the mint chips and mix on low until totally folded in.
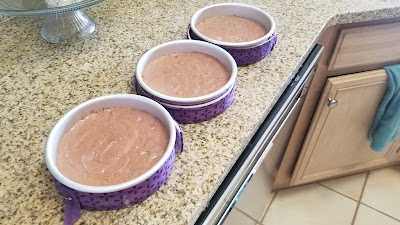
Bake even strips are a godsend. Pour batter evenly into prepared pans and bake for 25-30 minutes. Since there’s chocolate chips in the cake, it’s harder to get a good read with a toothpick on doneness. The cake shouldn’t be jiggly at all when it is done cooking, and the top should spring back quickly when gently pressed. Place cakes, still in the pan, on cooling racks for 10 minutes.

Dotted with chocolate mint chip goodness. After 10 minutes, remove from the pan and let cakes cool completely. I give it a good thirty minutes, then I level my cakes. With the stripe technique I used here, you want cakes that are uniform and completely level. Plus, this way you get to eat the cake scraps, and they are delish. While the cakes cool, you can make your frosting and the chocolate shamrock.

And maybe drink some Baileys. The frosting needs to be thick and firm for this stripe technique, so I had to make a regular American buttercream instead of the nice, light, whipped buttercream I’ve been fan-girling over. You need:
- 1 cup of butter at room temp (I used 1/2 cup regular and 1/2 cup 50% reduced fat butter from Land O’ Lakes because it was the only thing left at my commissary…hoarders..)
- 4 cups of Lakanto powdered monkfruit sweetener or Swerve confectioners (Lakanto doesn’t have the weird cooling effect Swerve does, so this is my new secret weapon in sugar-free frosting)
- 1 tsp clear vanilla extract
- 1 tsp mint extract
- 4 TBS Baileys
- If frosting is too thick and you want it to be whiter for stripes, use a TBS of skim milk or so; otherwise, if coloring isn’t an issue, use more Baileys until it’s smooth enough to frost
Whip the butter until fluffy, then add in half the sweetener and the two extracts. Blend on low until well mixed, then add in the remaining sweetener and the Baileys. Add more milk or Baileys as needed until you get the consistency you’re looking for. I needed something sturdy but spreadable, so I did end up adding 1 TBS milk in at the end.
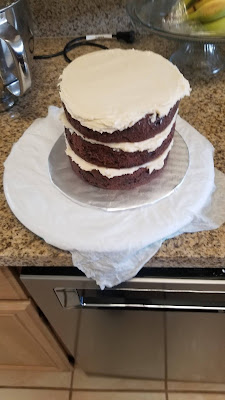
Like a Baileys-filled Oreo dream. Assemble your cakes, taking time to make sure everything lines up just right so your edges aren’t overhanging anywhere and everything is level. Stripes will show any weirdness, so I took longer than usual to place a layer upside down, slather a thin layer of frosting, place another layer upside down and take time to center, etc. until I finished with a thick layer of frosting on the top final layer.

Crumb coat-shrum coat. I’ve not crumb coated a cake in eons, which is terrible, but I didn’t have much issue with chocolate crumbs here, so I forged on. You want a layer of frosting as thick as the teeth on the cake comb you use to make the stripes, so this has a LOT of frosting on it, which did help cover crumbs. You don’t need to worry about smoothing the sides out too much since the cake comb will do this for you.
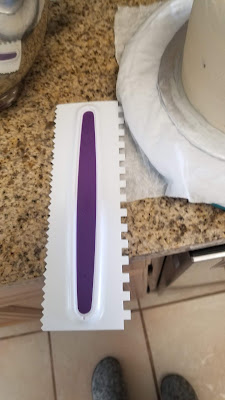
Speaking of combs, I found this Wilton cake comb on Amazon. It came in a pack of 3 different combs with 6 sides total, so this is how I do cakes from now until I’ve tried every combination. I used the right side of the comb for this cake. 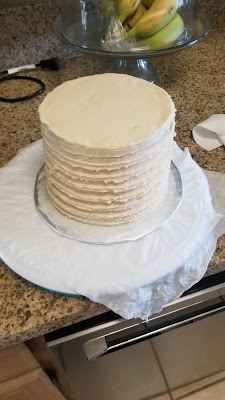
Swipe, swipe, and swipe again. Like Tinder, but for cakes. Make sure you have your cake on a turntable and slowly glide the comb around the cake until you get deep grooves. I passed over my cake about 3-4 times before I ended up with the above result. It doesn’t need to look pretty or smooth yet since you’ll take care of that when you add the second color. But once you have your cake completely frosted, set it in the fridge for 30 minutes to firm up the frosting and prevent color bleeding from the green lines. I put mine in the freezer and took a nap, and that was WAY too long…everything was frozen and nothing would smooth out, so once it thawed enough to smooth, I had some color bleeds because of it. I’d say no longer than 15 minutes in the freezer. Now is a great time to make that solid chocolate shamrock…
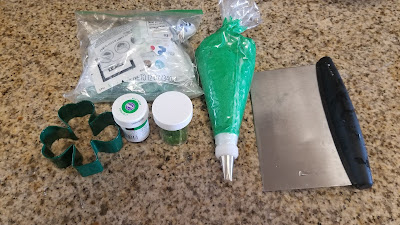
All green, all the time. Dye your remaining frosting green with a Kelly green gel dye and set aside. You’ll need green chocolate melts, a shamrock cookie cutter, green sprinkles, and a really good bench scraper or cake scraper to finish this entire cake. I melted a few tablespoons of green chocolate melts according to package directions in a small bowl. I added a little bit of oil to thin it out, and then I put a layer of wax paper down, placed my shamrock cookie cutter on top, and poured the chocolate inside of the cookie cutter. I used a spoon to even things out, then I carefully transferred to the fridge to set for 30 minutes. I used a sharp knife to cut around the edges of the cookie cutter, but I did have a crack form right down the middle of the whole thing (naturally). I used a lighter to melt the crack and swiped it with an angled spatula to smooth out the broken piece, and it was good as new.

Mmm, melty chocolate. 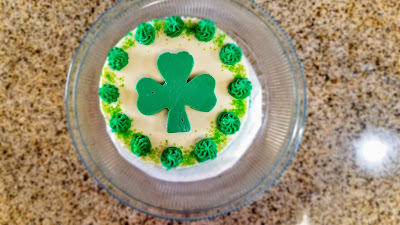
It is a BRICK of chocolate, and I LOVE it. Now, grab that cake and the green frosting. There are two ways to do this: smother the entire outside of the cake with green frosting and swipe off until you have clean lines, or the beginner’s way. I chose the beginners way since I had never done this before. I put my green frosting into a piping bag fitted with a small basket weaving tip. I then piped the green frosting into the indentations left by the cake comb:

It gets prettier, I promise. Then I took one swipe around the entire cake with my bench scraper. It left me with this:

Do not freak out and panic. Save that for the Corona Virus. The more passes you take around the cake, the more even the coloring will get. I probably went around my cake 7 or 8 times, scraping once, removing excess frosting from my bench scraper, and then scraping again. You will have a ton of leftover frosting because of this, but save some for cake borders or topping decorations. This is after the final pass:
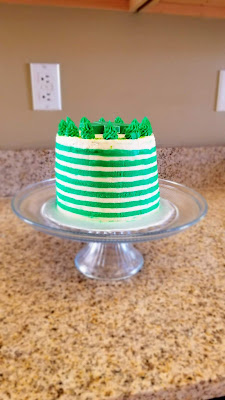
A little wonky, but still much, much better. I was pretty pleased with how this turned out for a first attempt. If I hadn’t over-frozen the cake, I wouldn’t have had such issues with bleeds or uneven lines in a few places. But overall, you can tell there is a clear delineation and a pretty snazzy green and white stripe pattern. Kind makes me want an after dinner mint. The green kind are superior to the red ones anyway.
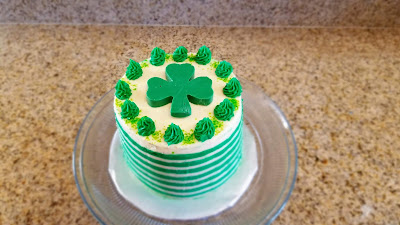
It’s not finished if there aren’t sprinkles. To finish, I placed my shamrock on center stage and then switched to a #21 open star piping tip to pipe little green swirls around the top of my cake. I dusted in between each swirl with green glitter flecks. I am so happy with how seasonal and celebratory this cake looks. It’s a different kind of March Madness out there these days, so it was good to put the massive amount of worry and stress that working in the tourism industry during a virus outbreak is making me feel right now and focus on something completely within my control. There was Love in the Time of Cholera, and now there’s Cake in the Age of Corona Virus. And with a cake like this, I truly believe there’s still good in the world. A testament to the delicious powers chocolate + mint chips + Baileys possess. This isn’t a very dense cake, but it is solid, and every forkful has a burst of mint chip that works with Baileys in a way that should probably be illegal. At least I don’t have to feel badly for refusing to share with any of you right now, but I’m telling ya, make this cake, and you’ll still have a reason to celebrate St. Patrick’s Day. If Saint Patrick could rid Ireland of snakes, you can survive the craziness out there, too. ‘Til next time, my fellow eaters!
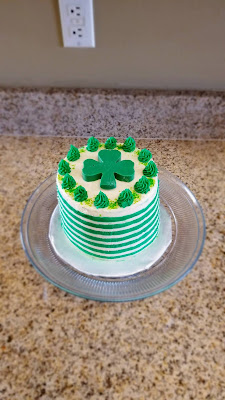
A little extra luck never did hurt, after all. -
Berries as Black as My Heart
I realize that most normal people celebrate Valentine’s Day, but I have never been on board. I’m a “Day-After Valentine’s Day Chocolate Sales” celebrator. So don’t take what looks like a romantic, berry-laden cake as a sign I’m jumping on the Valentine’s Day bandwagon. After all, I made this cake with berries that are as black as my heart.
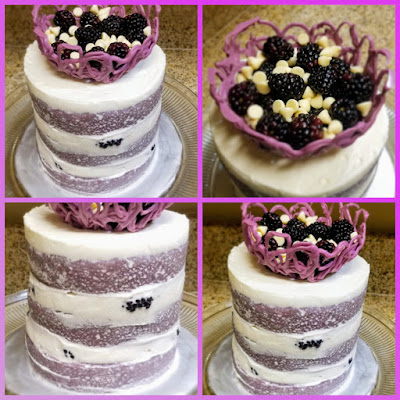
No matter how romantic it looks, I swear the timing was purely coincidental. So, this is actually the third time I tried making this blackberry cake with whipped mascarpone frosting and chocolate bowl topper. I’ve gone gluten free, so I was trying to make this fit my diet. Gluten-Free Attempt #1 wouldn’t fully bake in the middle no matter how long it was in the oven. Gluten-Free Attempt #2 baked but tasted like it was made solely of chalk. Attempt #3 said, “You know what, the digestive distress is worth it for cake,” and not a single attempt at removing gluten was made. Every single bite is absolutely amazing. It’s got a sweet, slightly tart flavor thanks to a combination of fresh blackberry puree and blackberry preserves, and it is an incredibly light cake. As someone who had never really had mascarpone cheese before (tiramisu is an insult to all desserts), I can say with certainty I’ve pinned at least 50 new recipes. Why did no one tell me how amazing this stuff is? I just want to live in a tub of it. It’s also not as calorie heavy as you’d think, and because of that, you can eat a slice of this cake for only 275 calories (10 slices total). No box of Valentine’s Day chocolates can say the same thing.

Don’t worry, there is chocolate involved though. Just later. The hardest part of making and decorating this entire cake is making the blackberry puree, so it’s *literally* a piece of cake to create. You only need:
- 1 box of Pillsbury sugar free yellow cake mix
- 3 eggs
- 1/3 cup of unsweetened applesauce
- 1 cup of skim milk
- 4 ounces of fresh blackberries, pureed and sieved
- 2 ounces of blackberry preserves
- Optional: purple gel dye
Start by preheating your oven to 325. Using a blender or a food processor, puree the blackberries until liquid. Strain the puree over a bowl with a mesh sieve and discard the seeds. Add the blackberry puree and all the other ingredients into a stand mixer bowl. Blend on low for a few seconds then switch over to medium-high for 2 minutes. I added a few drops of purple gel dye since I wanted to make this a naked cake with a vibrant hue, but without the dye, it’s a nice lavender shade.
Prepare 3 six-inch round baking pans with cooking spray and bake even strips. Bake in the oven for 30-35 minutes, or until a toothpick comes out of the cake completely clean. Set on cooling racks while still in the pans for 10 minutes before turning out on the cooling racks. Level your cakes with a leveler while they’re still somewhat warm, but don’t frost until they are completely cool to the touch. I throw my cakes in the freezer for a half hour to speed this up.

Mascarpone, you complete me. I adapted my whipped cream cheese frosting from last month to try out mascarpone, and I am absolutely thrilled, perhaps for the first time ever, that I branched outside of my comfort zone. It’s sinchy recipe, and you only need:
- 4 ounces mascarpone cheese at room temp
- 1/2 cup of Lankato sugar free powdered monkfruit sweetener (or Swerve confectioners)
- 1 tsp of vanilla
- 1 1/4 cup plus 2 tablespoons heavy whipping cream COLD
- Extra blackberries for layering and adding to the chocolate bowl (I used 8 ounces)
Whip the mascarpone for a minute or two in your stand mixer before adding the vanilla and the powdered sweetener. I switched over to the Lankato because it doesn’t have as much of a cooling effect aftertaste that Swerve does. I got it from Amazon, and I highly recommend it for sugar-free frostings. With the mixer on low, take the cold heavy whipping cream and add very slowly to the bowl. Once it is completely added and mixed in, switch to a whisk attachment and beat on high for 2-3 minutes, until stiff peaks form. Stop mixing the second those peaks form so the frosting doesn’t deflate. Place your bowl of frosting into the fridge until the moment you’re ready to frost.

Purple is just the best color. I wanted a fun, cute chocolate topper for this cake. I tried a few variations with balloons that failed spectacularly, so I ended up covering a small bowl with wax paper, melting a third of a bag of lavender chocolate melts, and placed them into a piping bag.

As an added bonus, you can squeeze any leftover chocolate straight into your mouth from the piping bag! Then I just swirled squiggles and lines all over the wax paper to make a whimsical bowl:
Or something like that. I’m not 100% thrilled with the result since I had something completely different pictured in my head, but it worked for it’s given purpose: to hold fruit and chocolate. I placed this in the freezer to harden while I assembled my cakes.
Publix has literally the best blackberries. Take a cake layer, flop it upside down on a cake board, and then slather a decent helping of the whipped mascarpone frosting on top. Add a large handful of berries to this. Go heavy on the berries–since this is a whipped frosting, it doesn’t provide much structure between layers. The berries help support each cake layer. Repeat for the second layer, and finish the top layer with a thick layer of frosting on top. I used about 3/4 of my frosting. If you don’t want a naked cake, there’s definitely enough frosting to completely cover the cake. But I’m using my leftover frosting each morning at breakfast with berries or in yogurt because it’s flippin’ fantastic.

Not enough purple! So this is what it looks like before scraping a bunch of frosting off. I love the blackberries poking out, and I wish I had put more closer to the edges to peak out and add a little more purple color to the cake. I took a large angled spatula and swiped off a bunch of excess frosting until you could clearly see all three purple layers:
Because it’s the best color–and it’s not a Valentine’s Day color, so there’s that. Now, take that chocolate bowl out of the freezer and carefully remove the bowl from the middle. Then very gingerly remove the wax paper from the chocolate. You’ll be left with a device to hold more chocolate, and that’s about as romantic as it gets in my book.
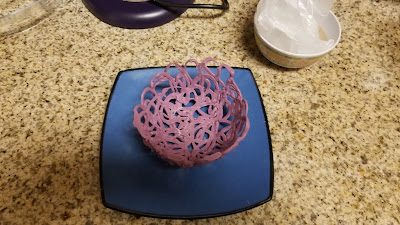
Hey there, good lookin. Now, add more blackberries, white chocolate chips, fancy chocolates, strawberries, whatever you want to this cute little bowl.
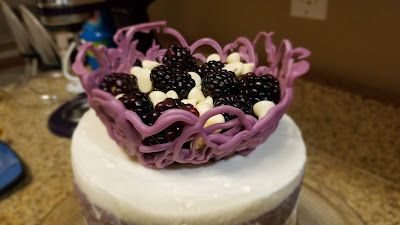
Think of it like sprinkles, but better, because…chocolate. You don’t want to make it too heavy since that whipped frosting doesn’t hold up very strongly. I recommend placing some wooden dowels in the cake to help support the weight of the bowl, or remove it until you’re ready to put the cake out for the “ooh and ahh” moment before serving immediately.

It really is a showstopper. I am so glad the third time was the charm with this cake. It is everything I was hoping it would be in the flavor department. I feel like blackberries always get pushed aside for blueberries or strawberries, but to me, they’re the best berry. Not too sweet, not too tart, just right–the Goldilocks of berries, really. This cake gives them an excellent opportunity to shine, and it’s so delish that just thinking about it makes me happy. That light sweetness from the mascarpone whipped frosting is the perfect addition to this cake, and yeah, it definitely looks like something you’d want to serve for a romantic date night, I’ll give it that. But since this is the kind of yummy cake you’d want to eat multiple fist or shovelfuls at a time, it kind of ruins that moment, so eater beware…you also won’t feel much like sharing a slice after you’ve had a bite either, so things could go from blissful romance to Thunderdome really fast. I pray you come out victorious, because this cake is definitely worth it. ‘Til next time, my fellow eaters!
The truest love known to man…a really great cake.

Healthy-ish cake, cupcakes, pie, and cheesecake recipes and decorating tips


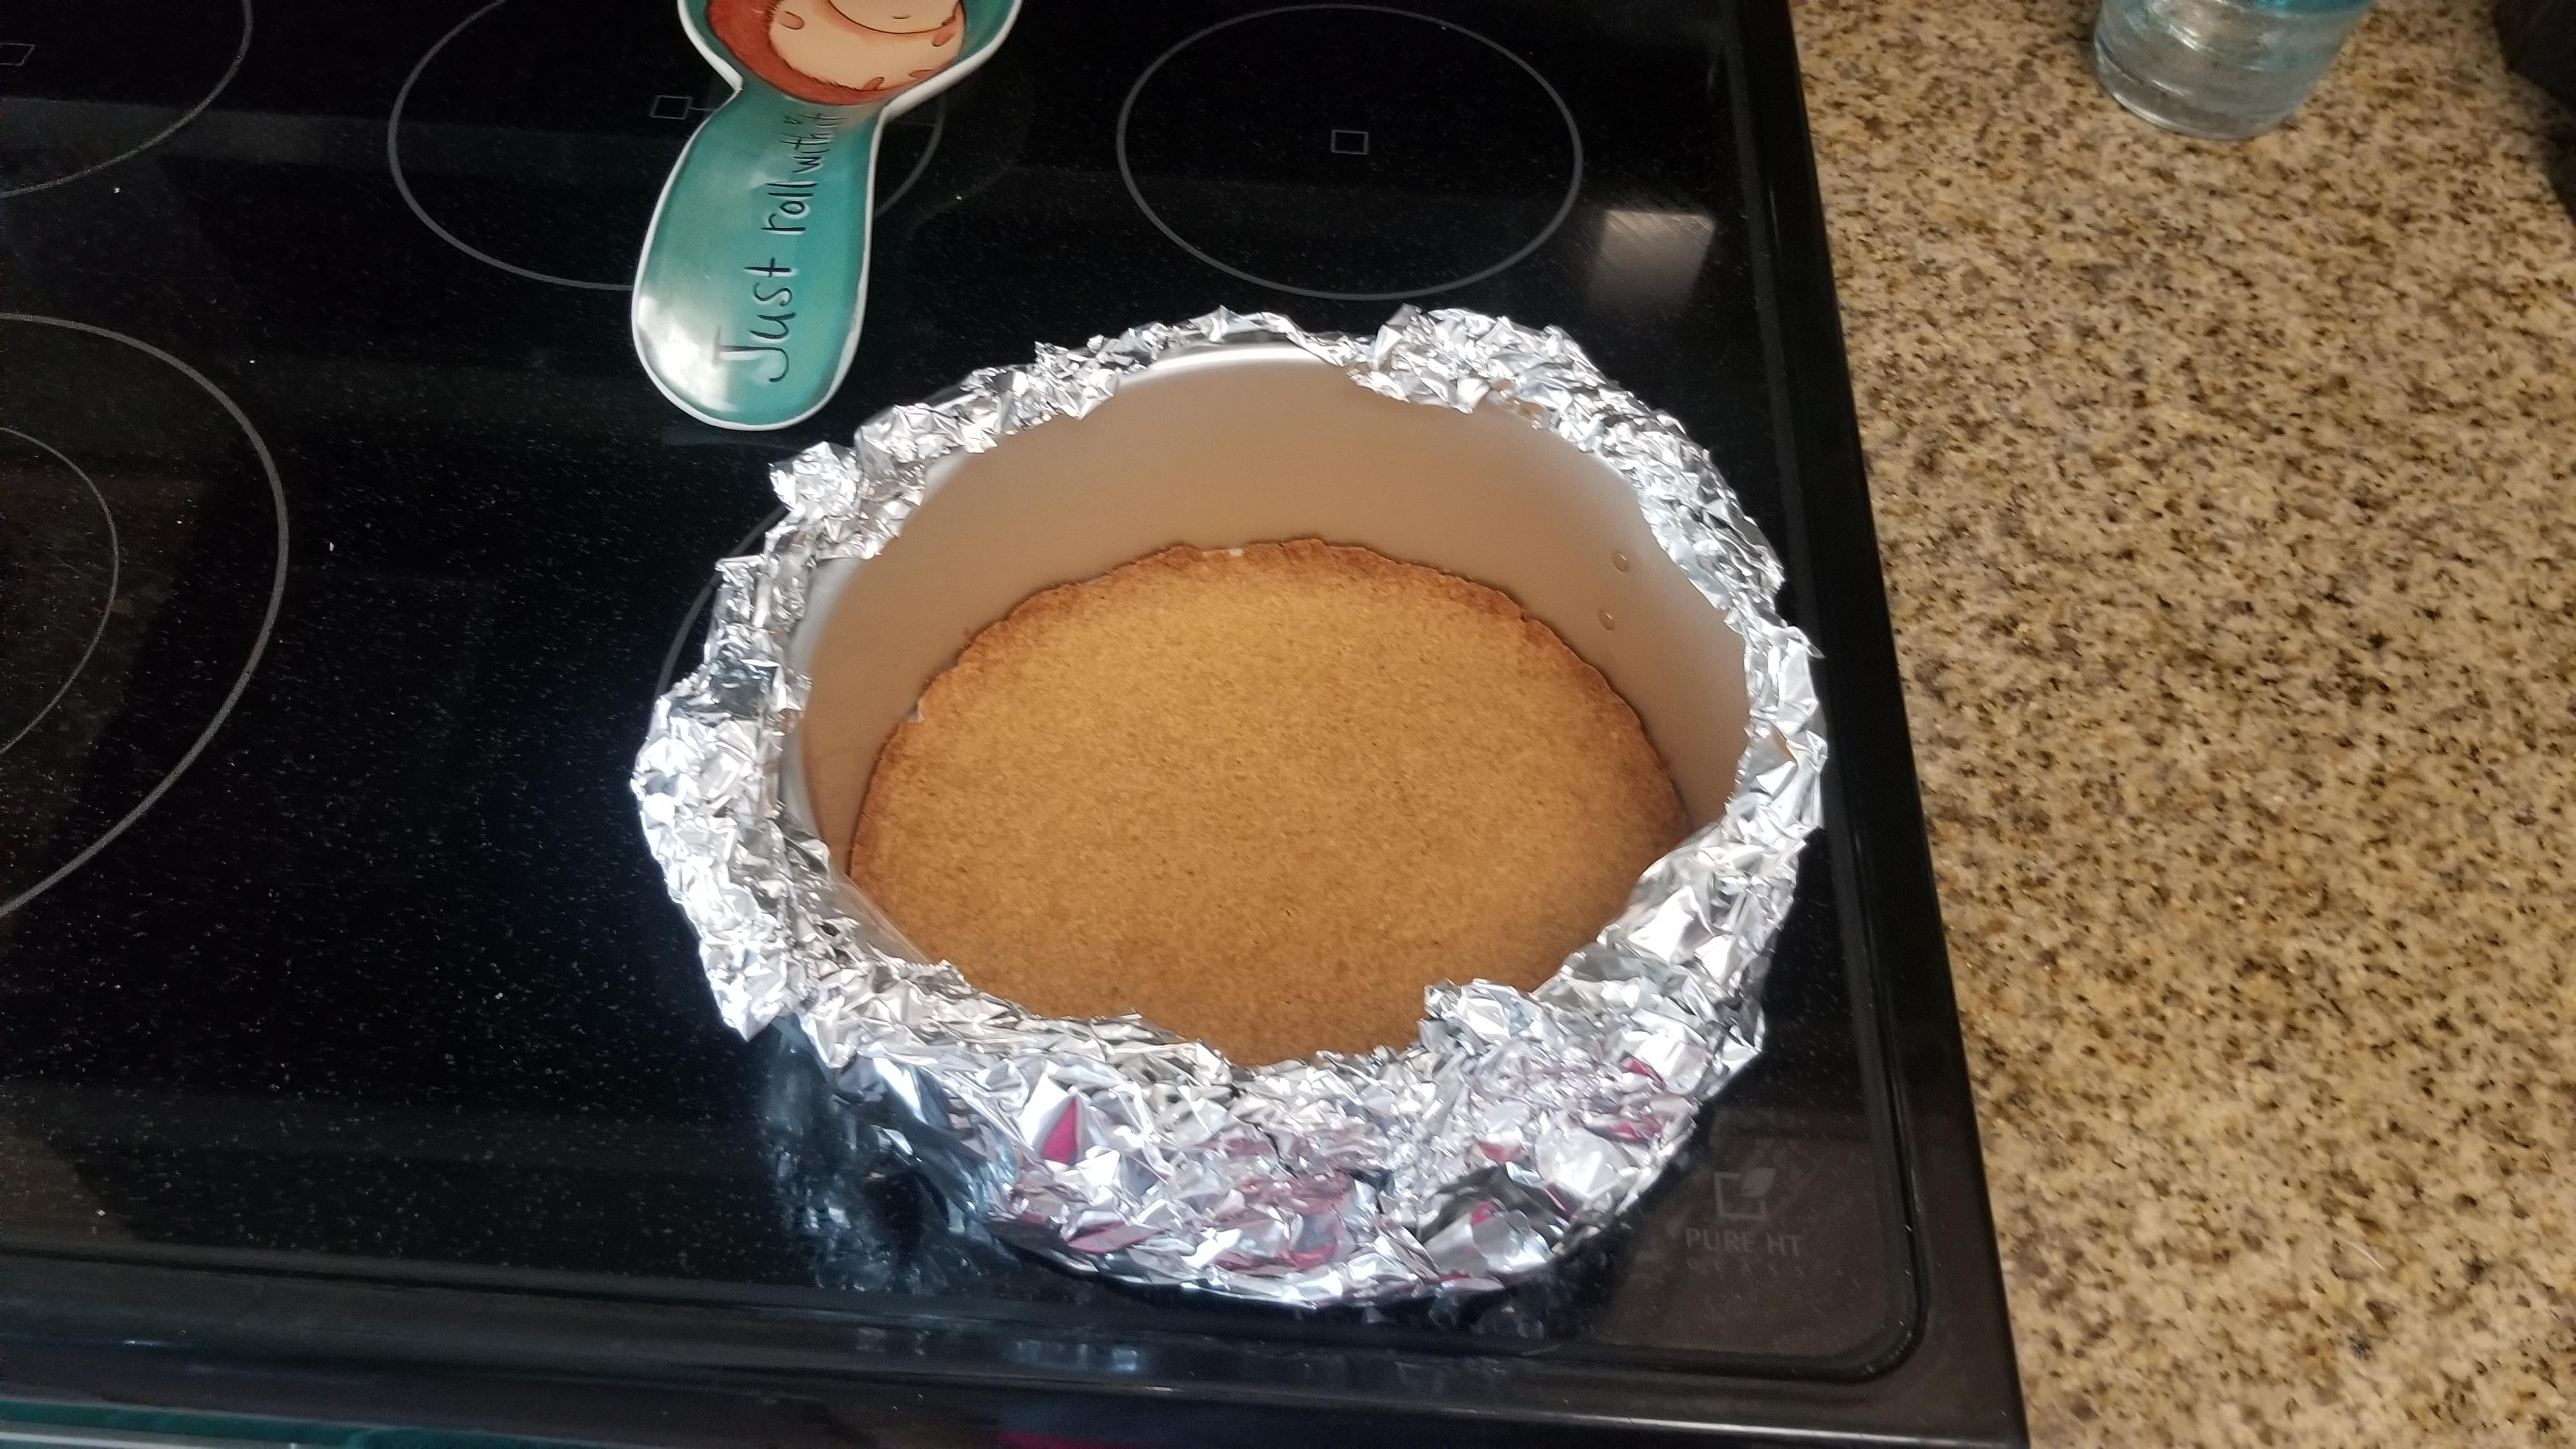


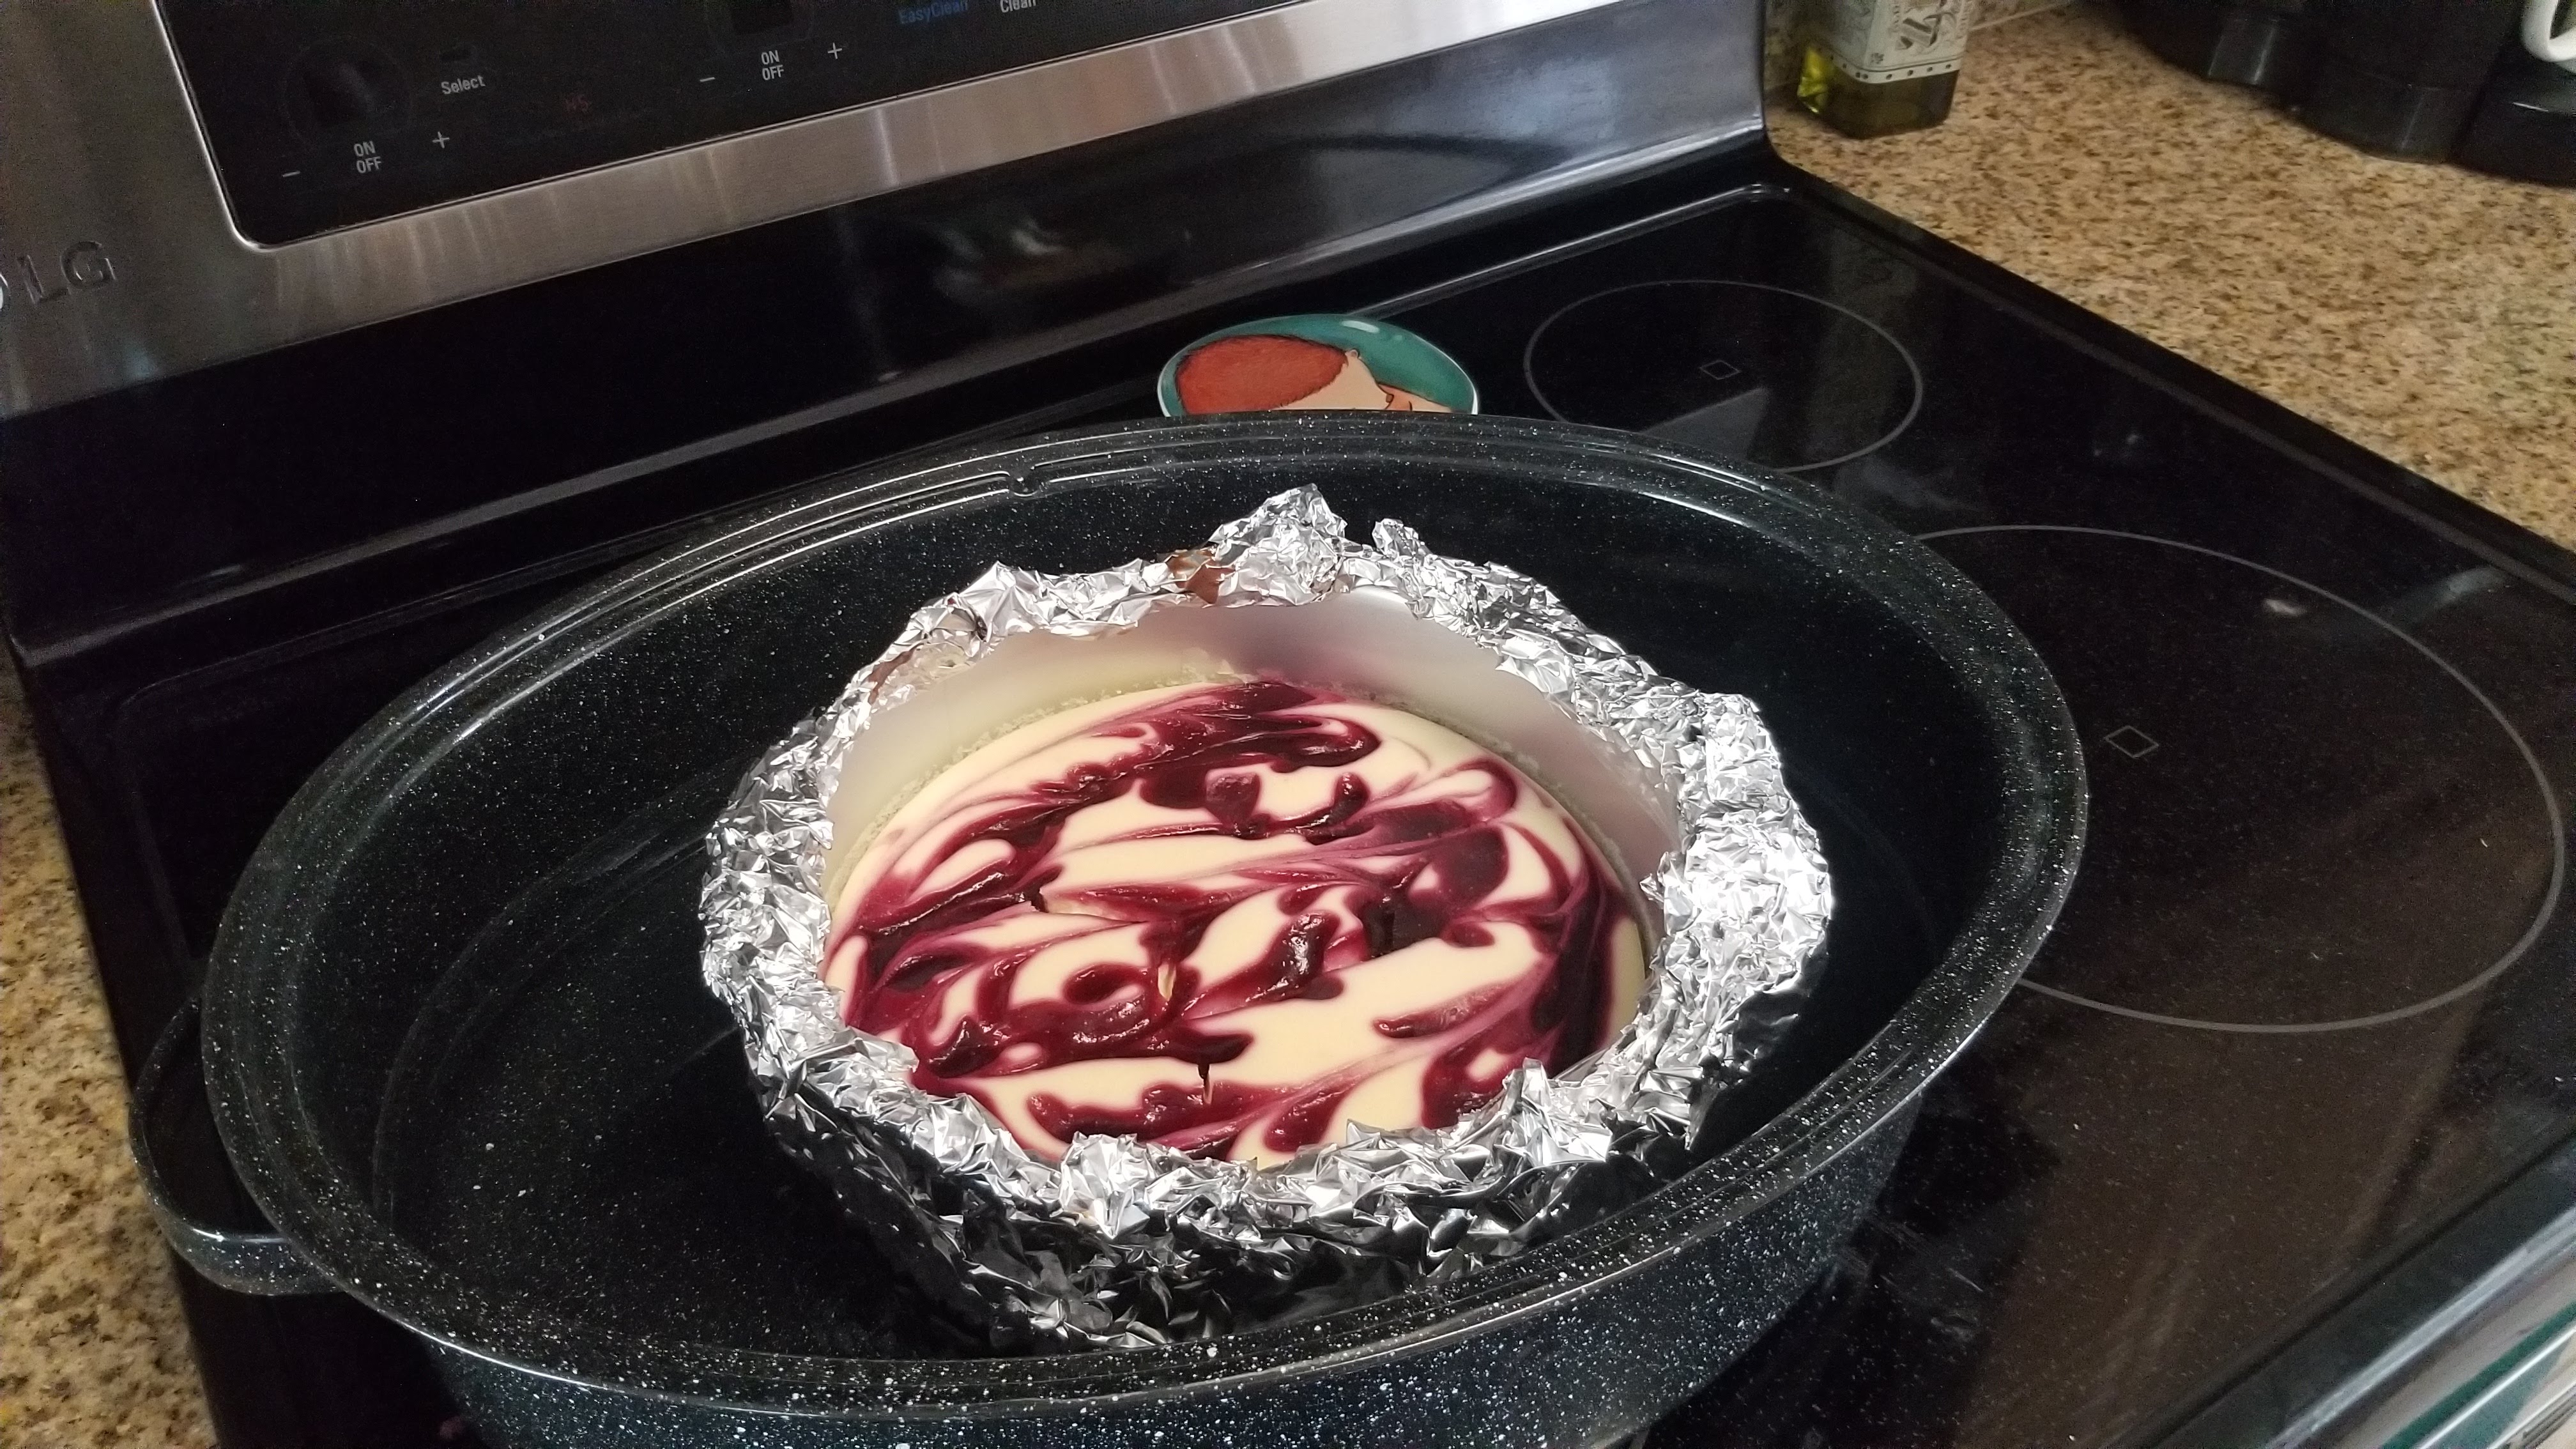
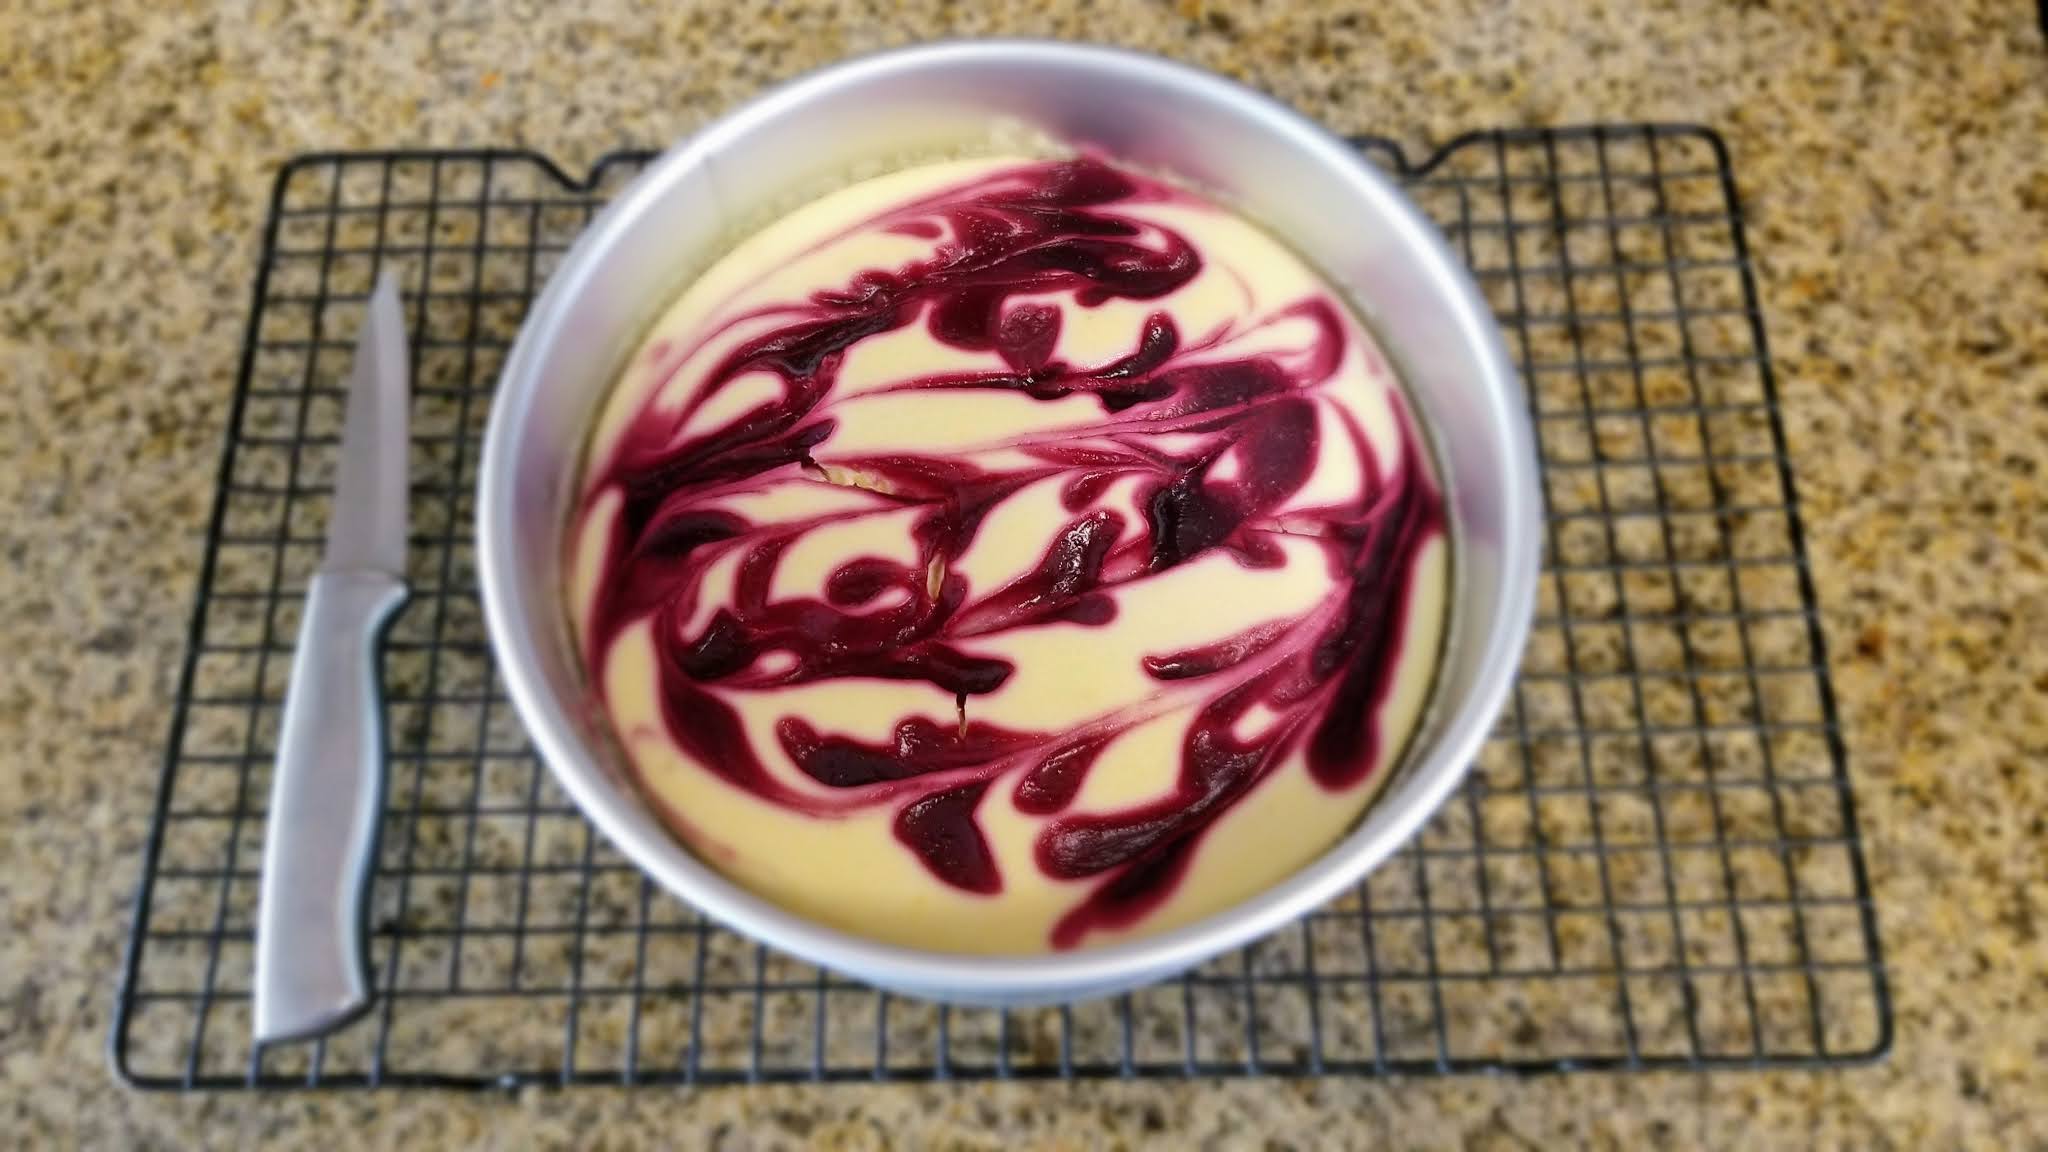
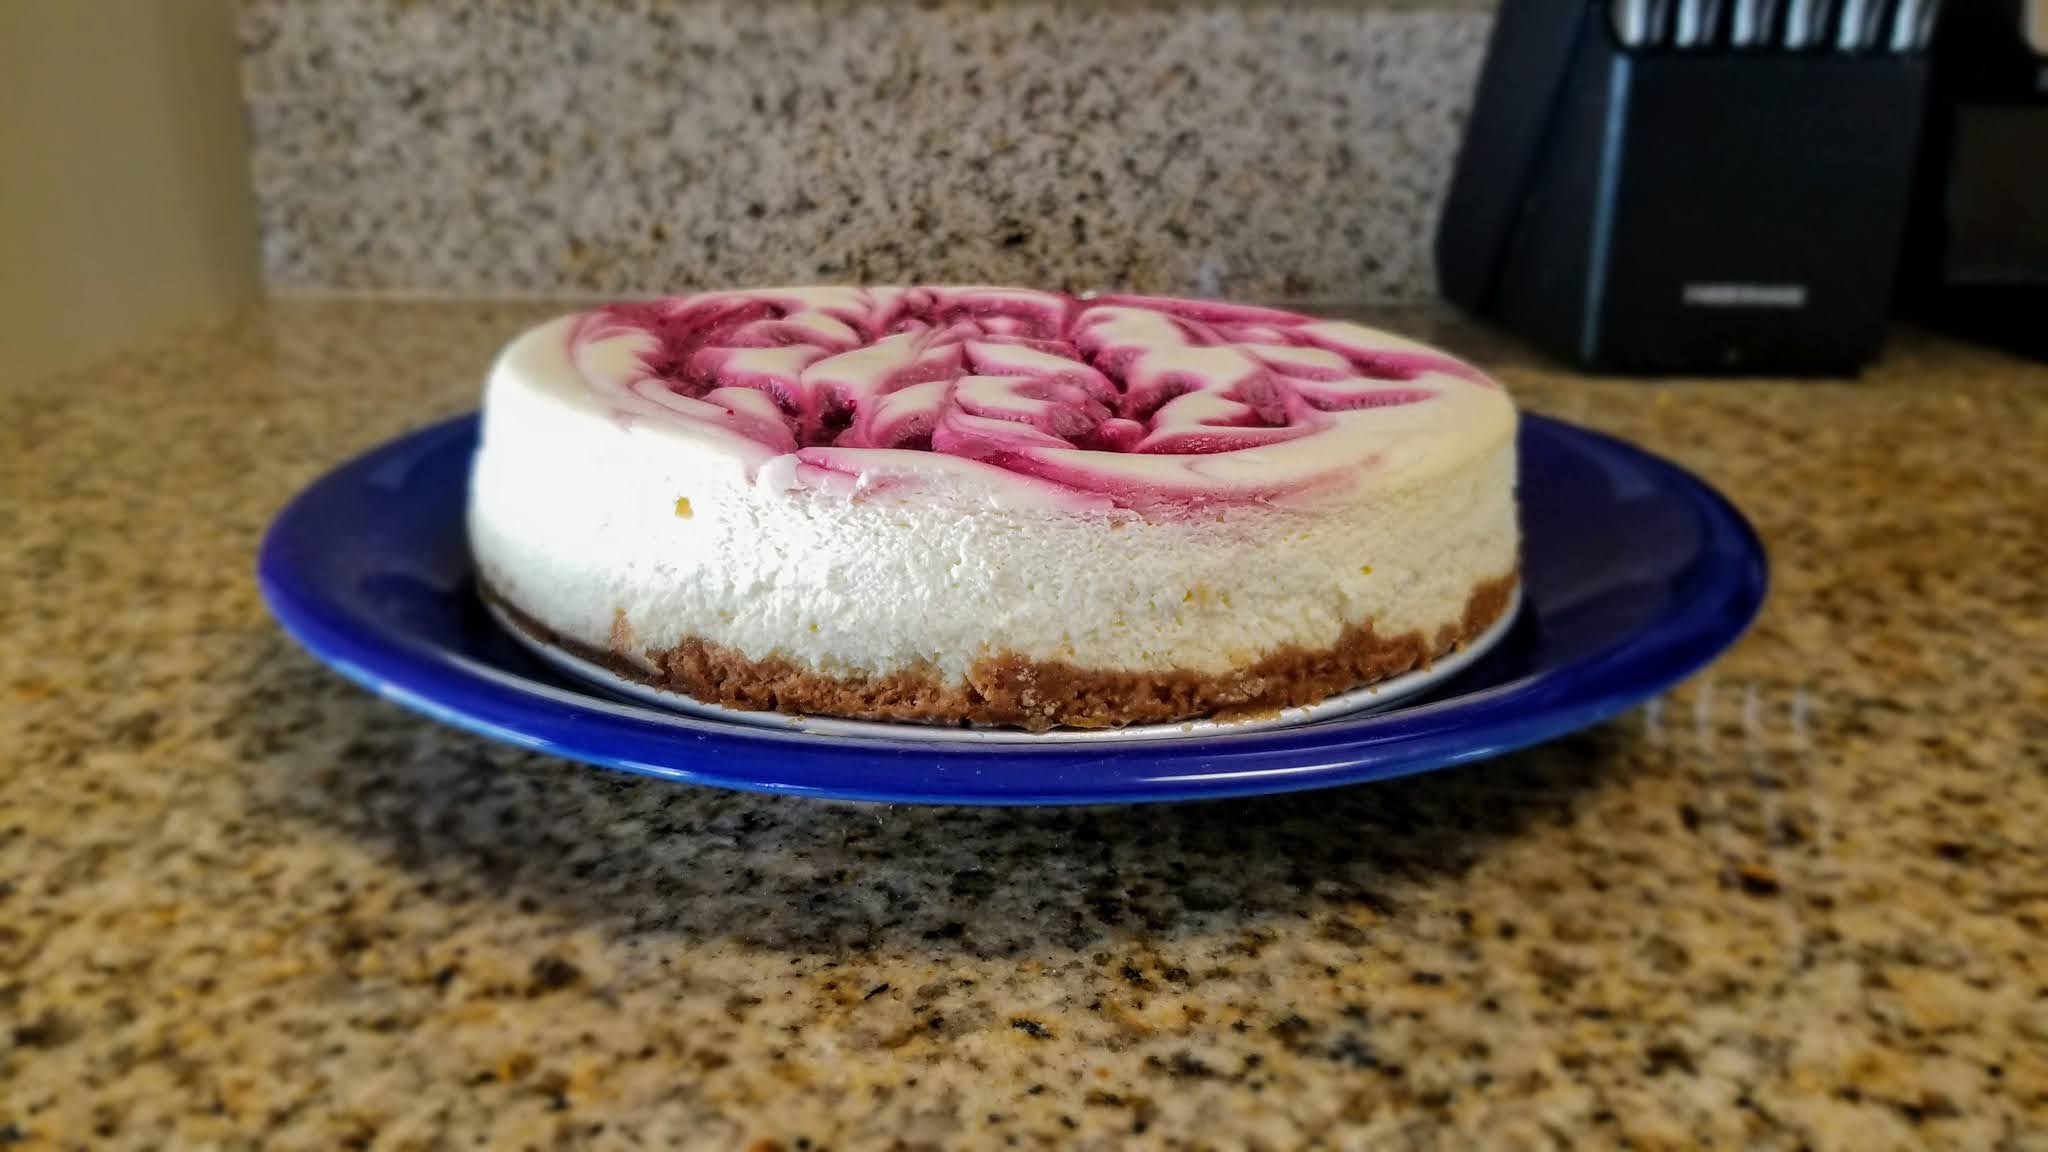

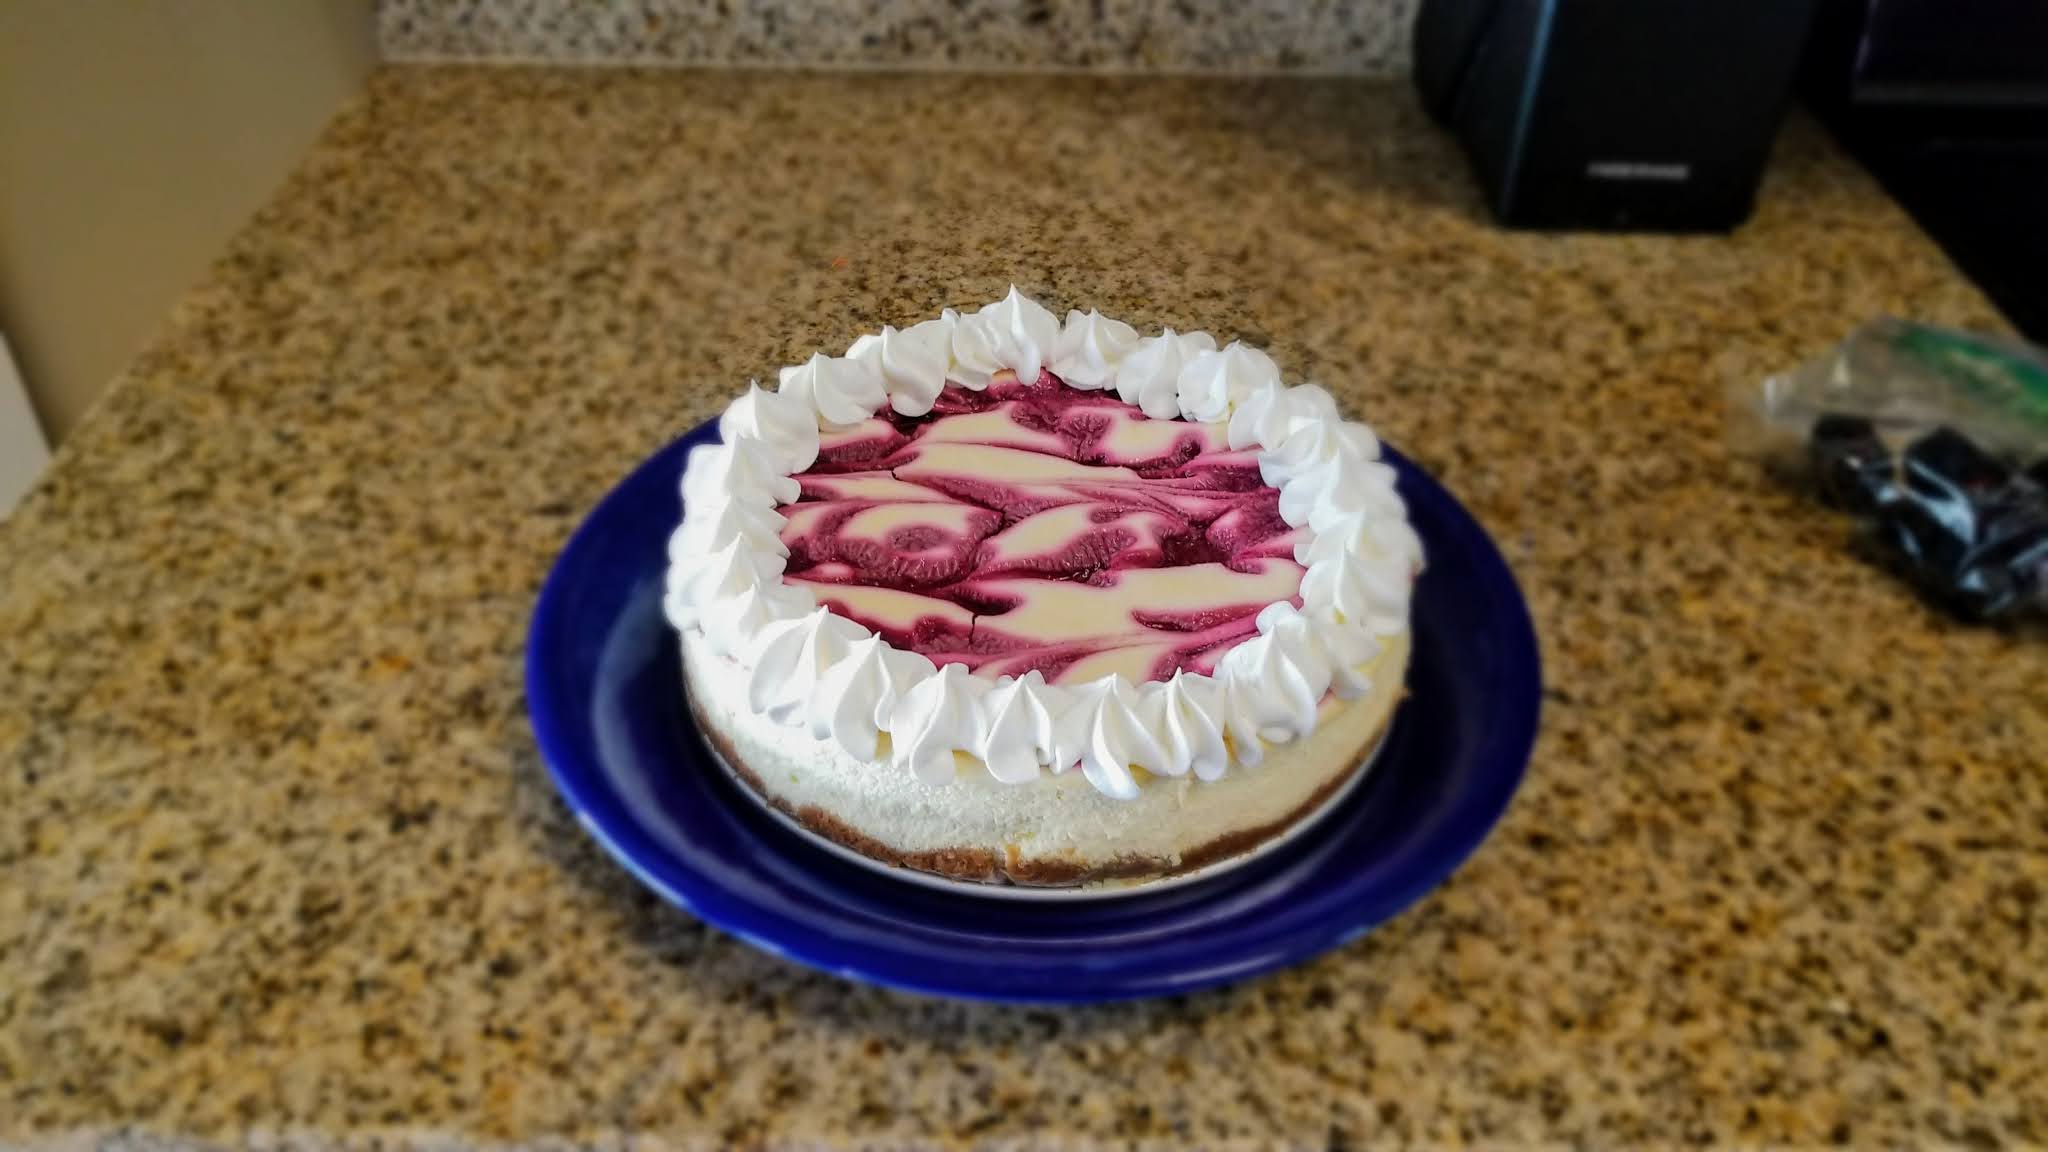


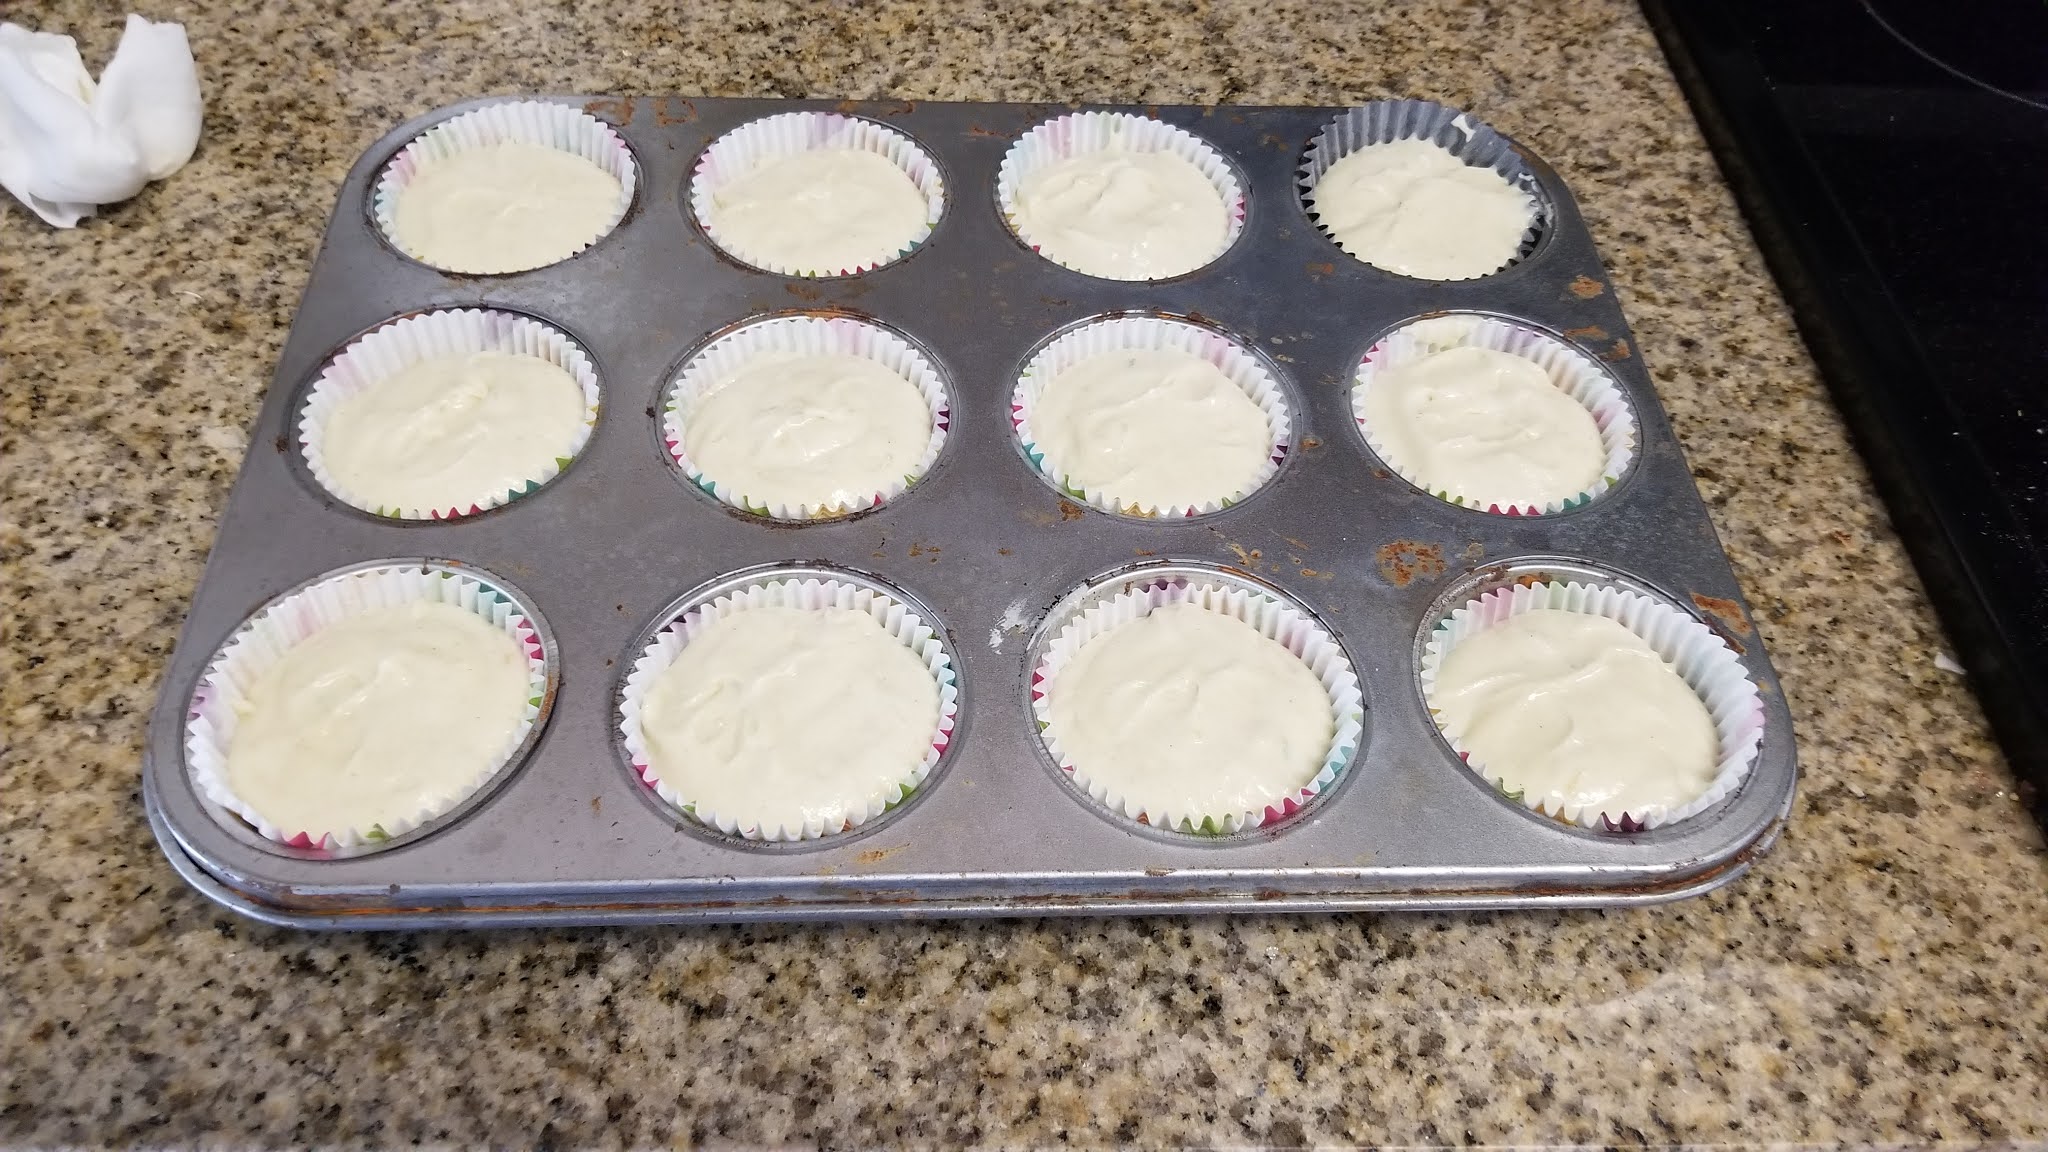


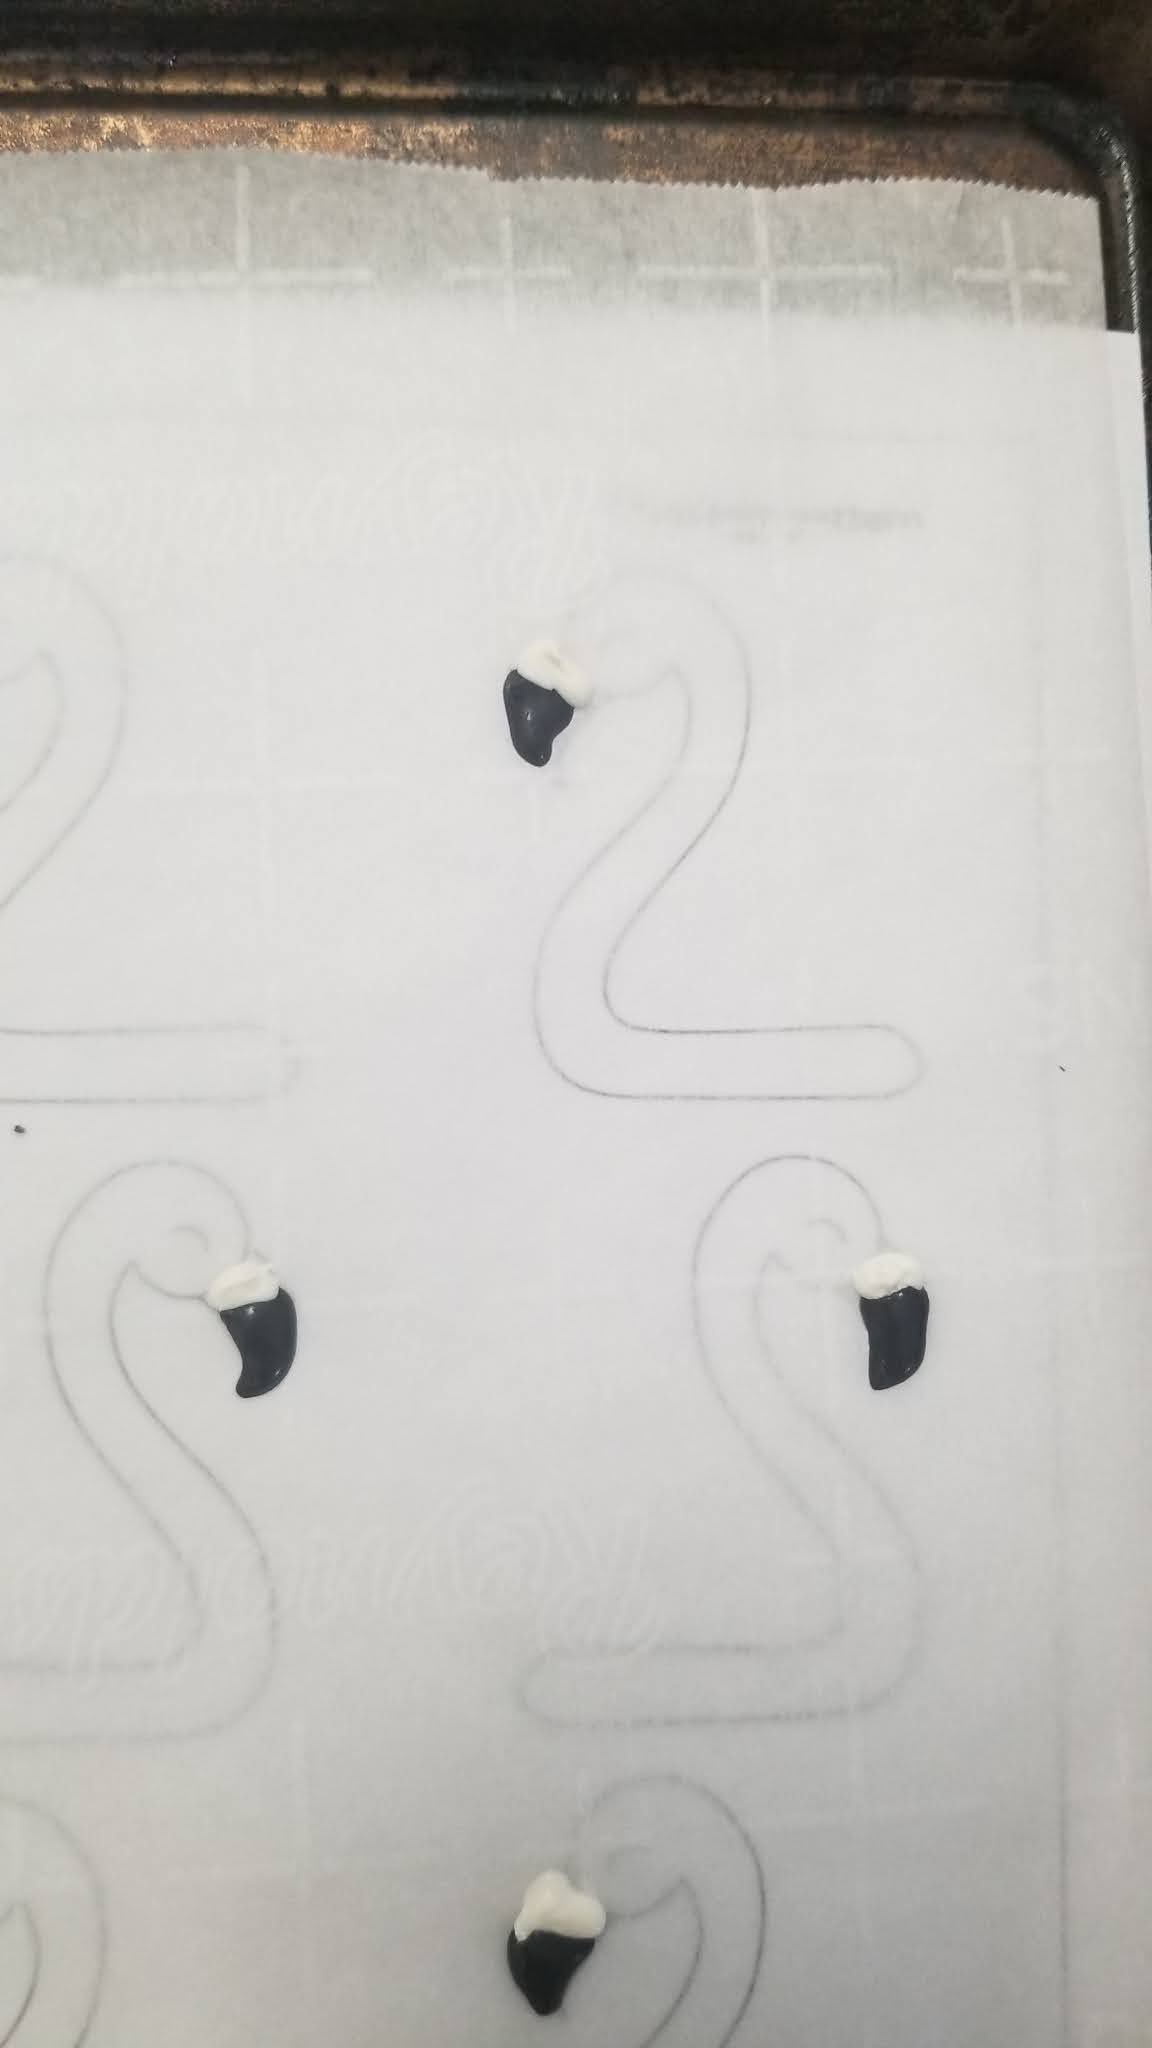


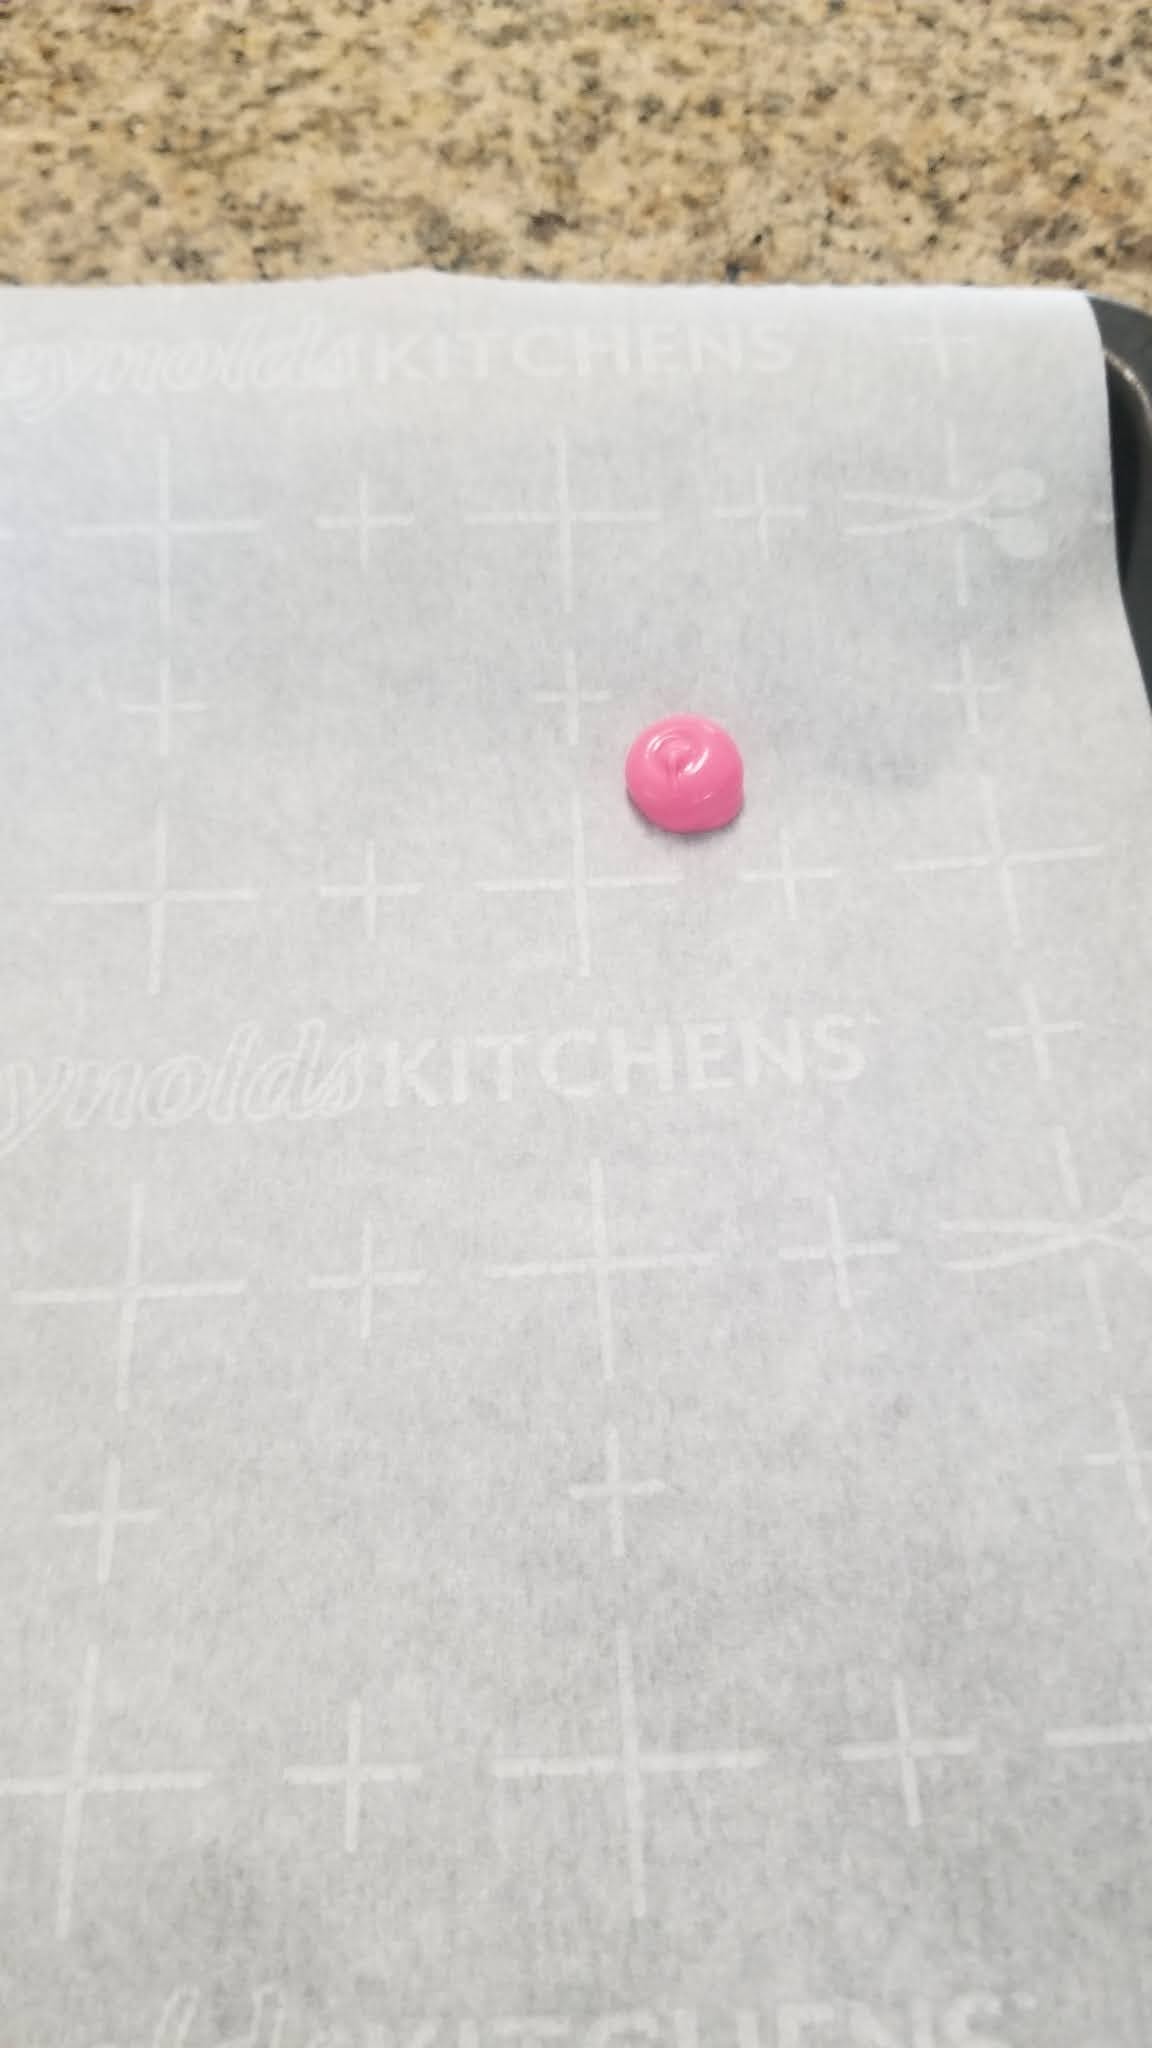
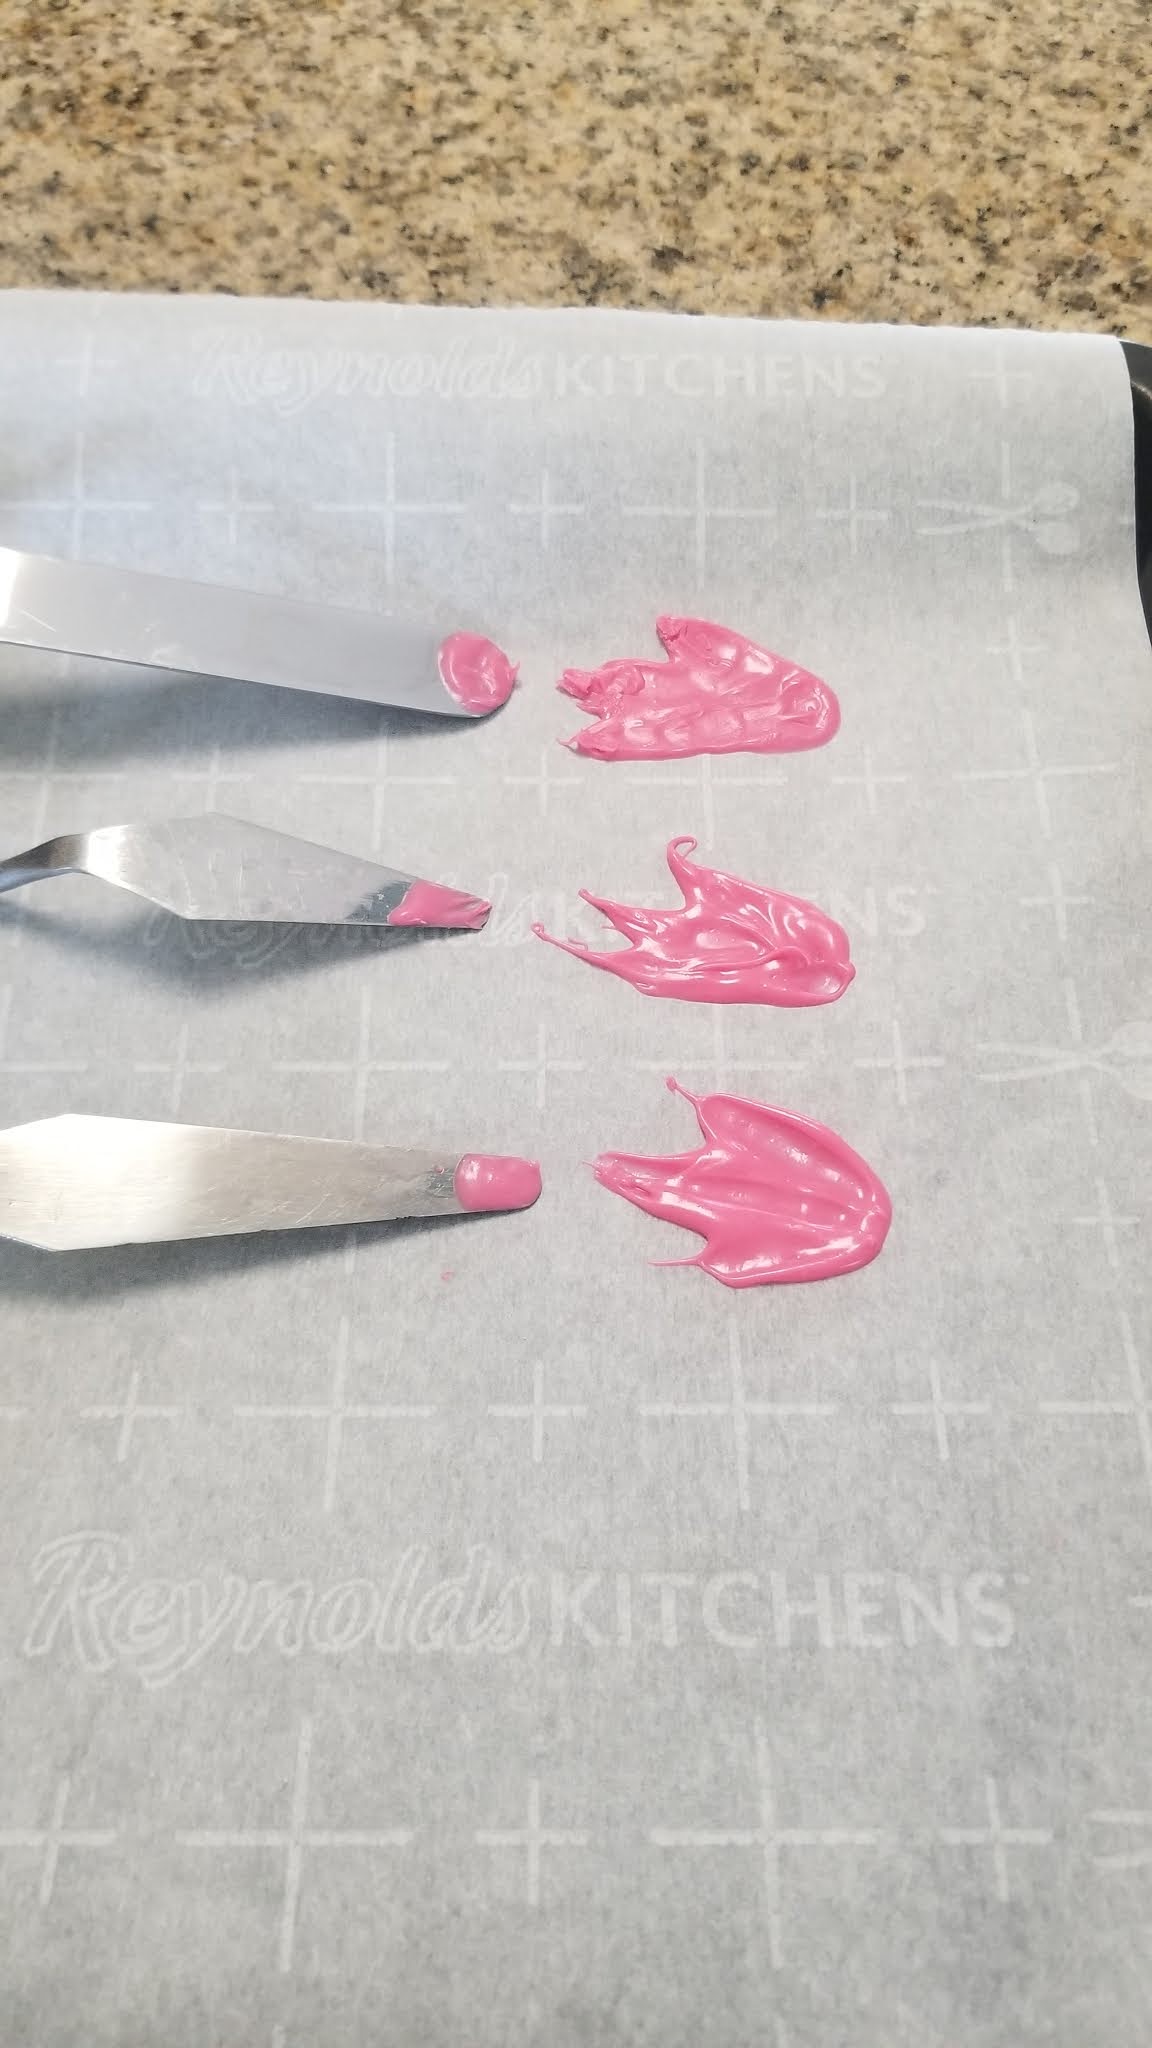
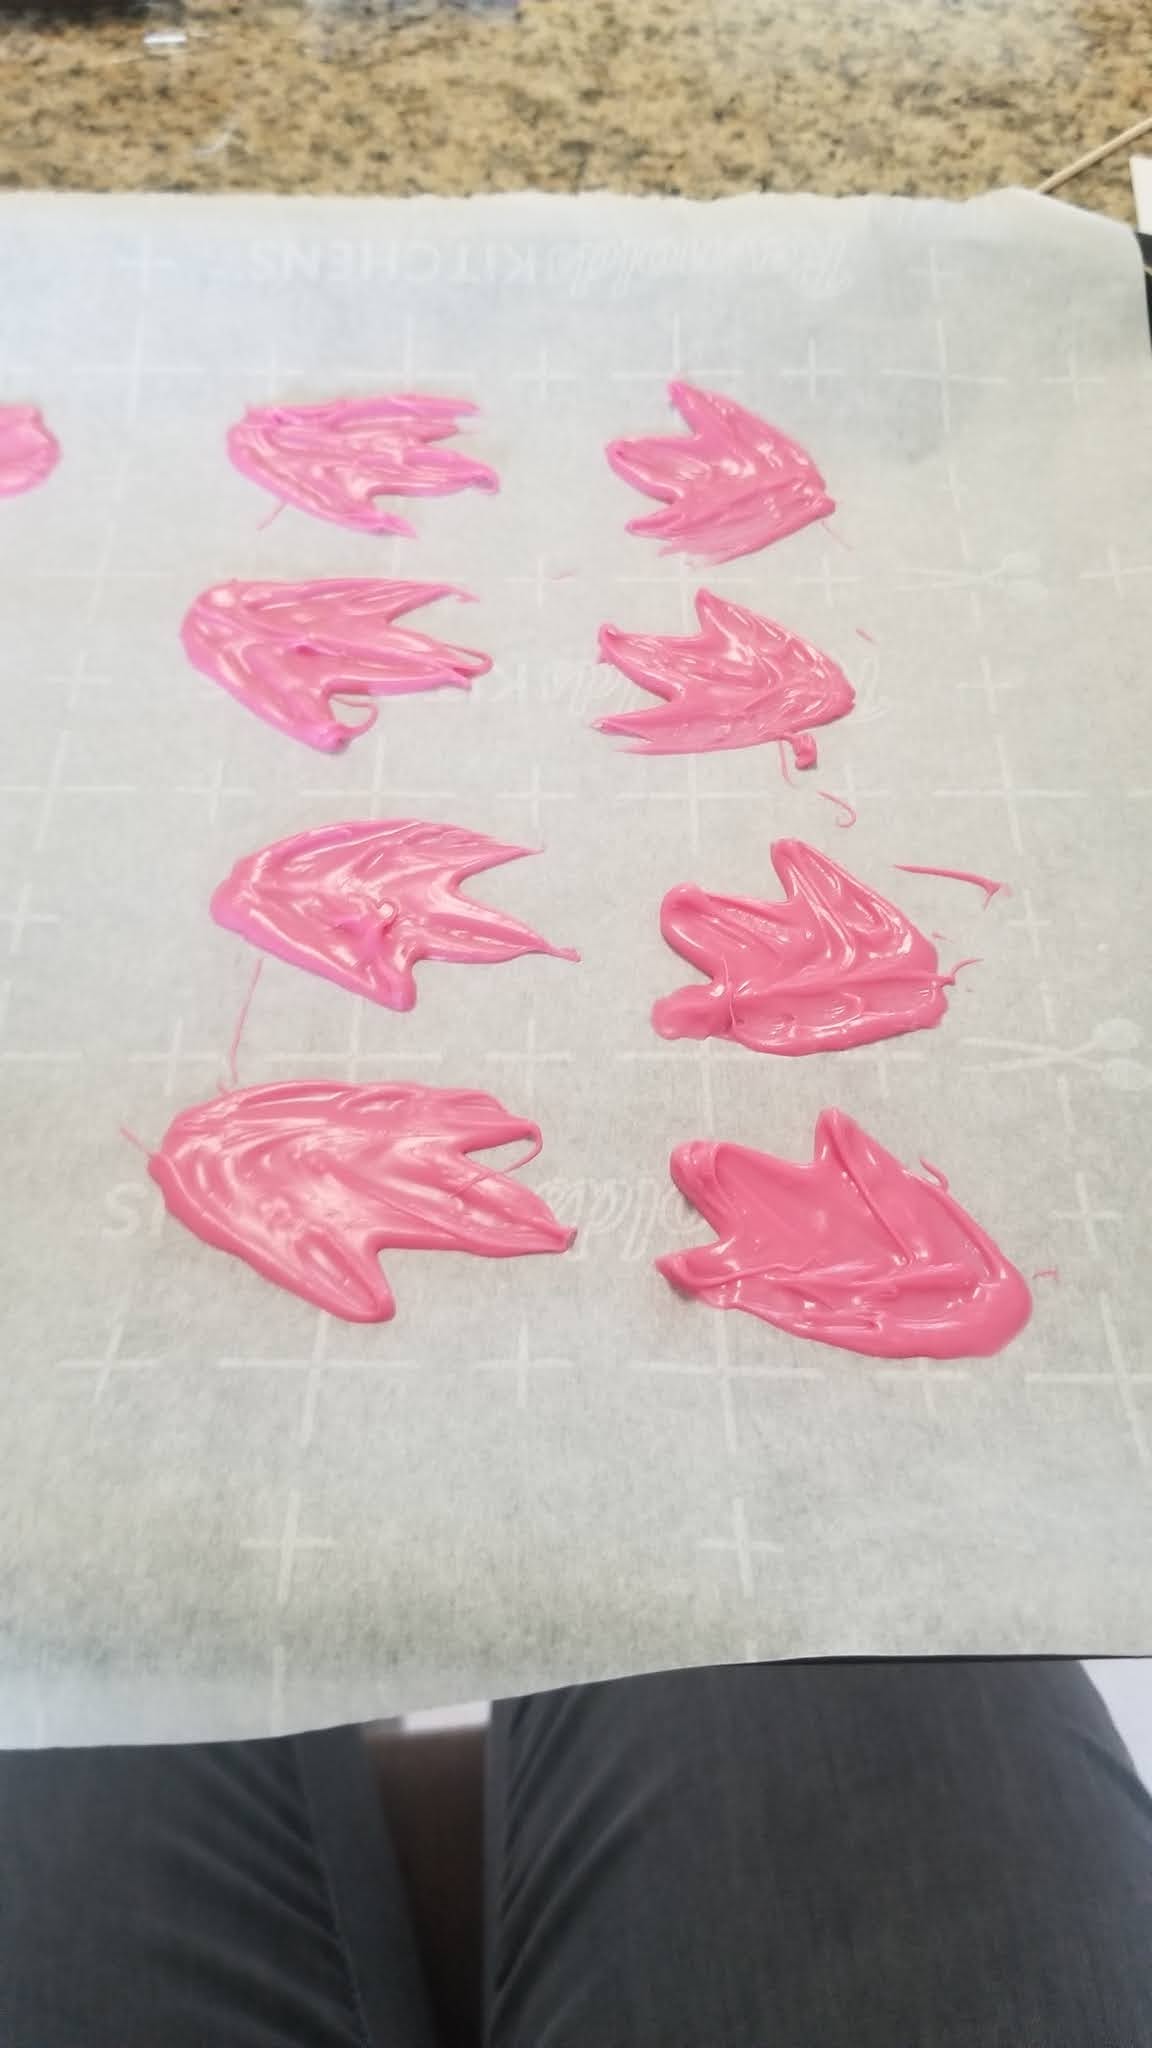
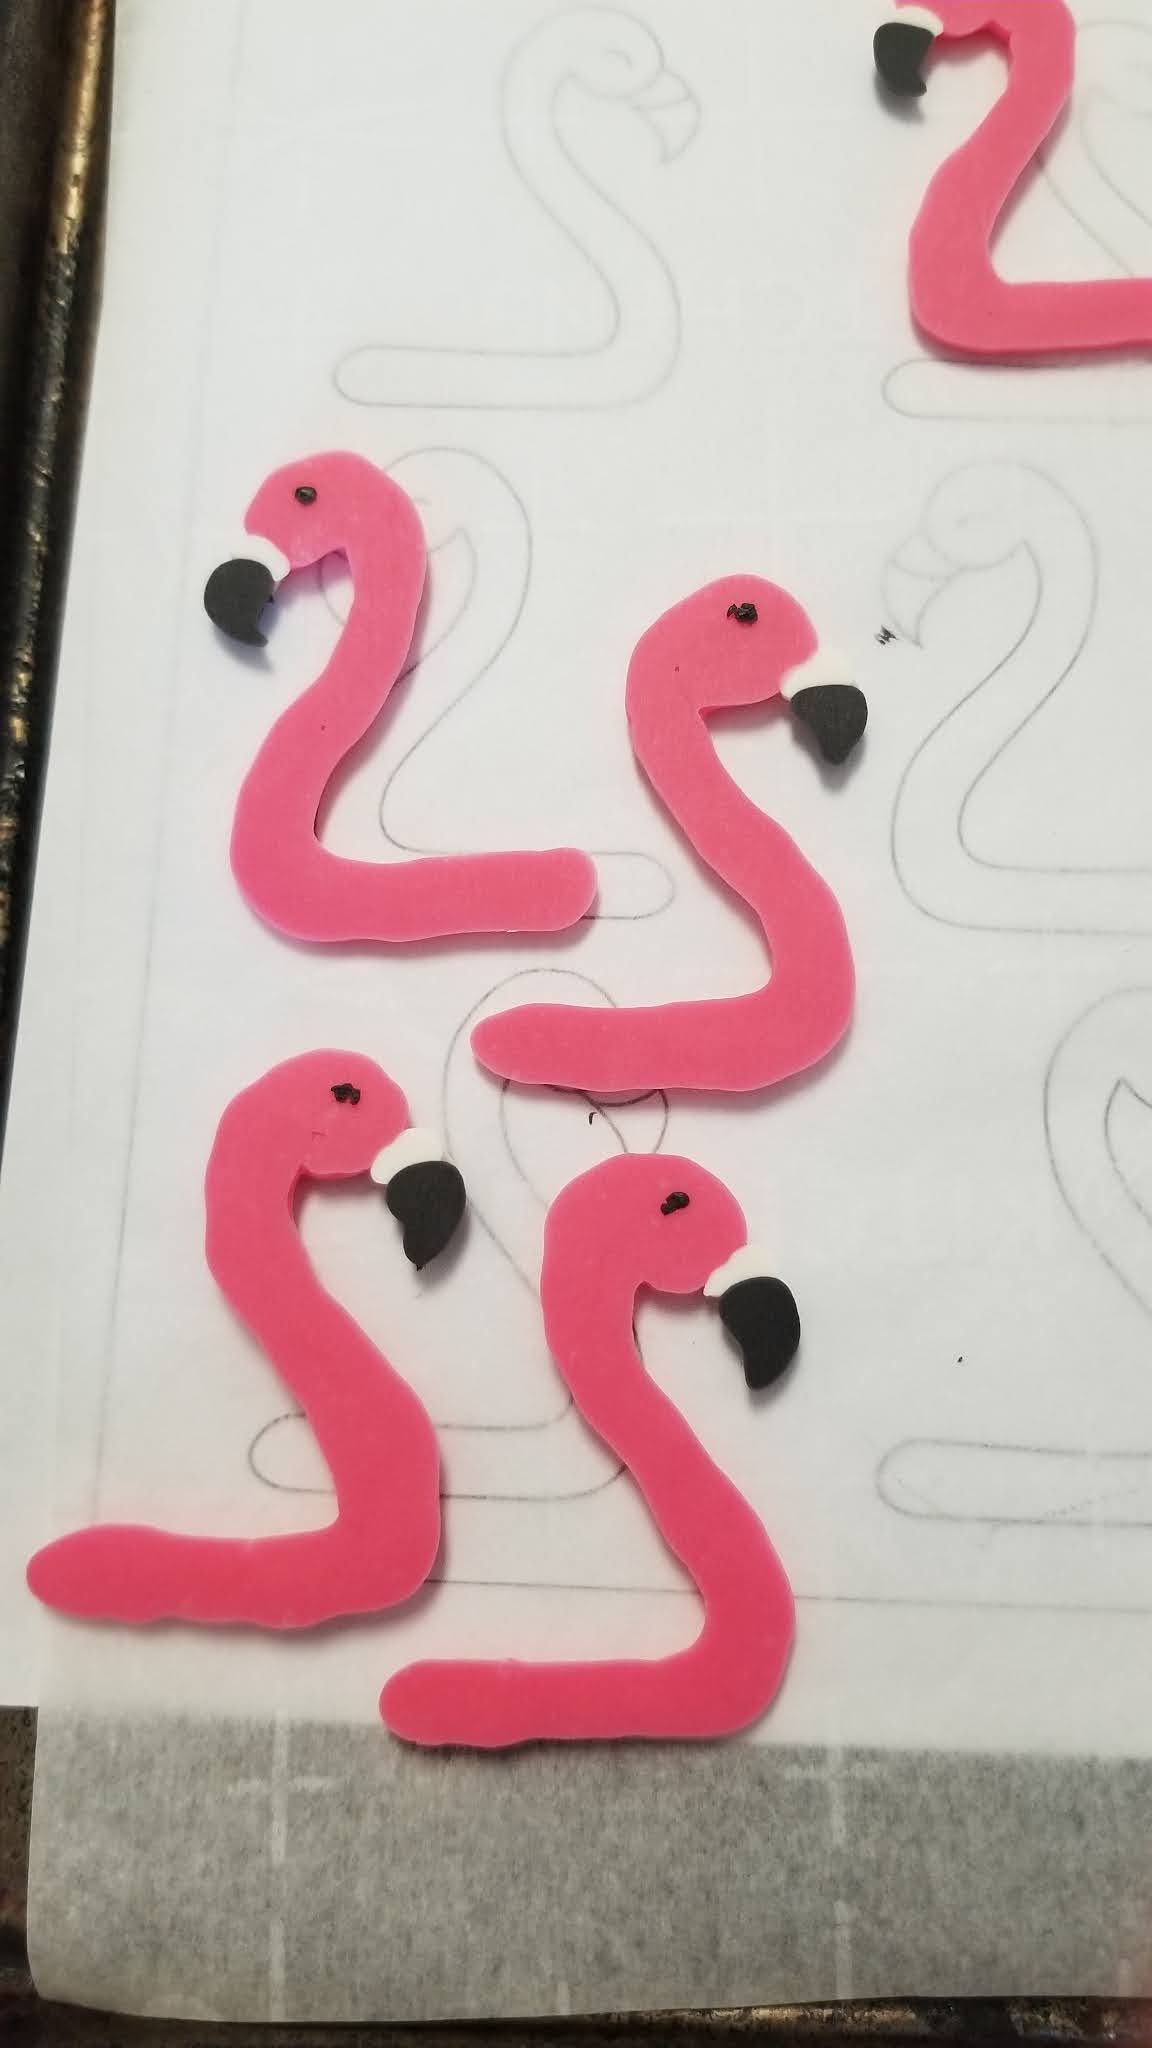
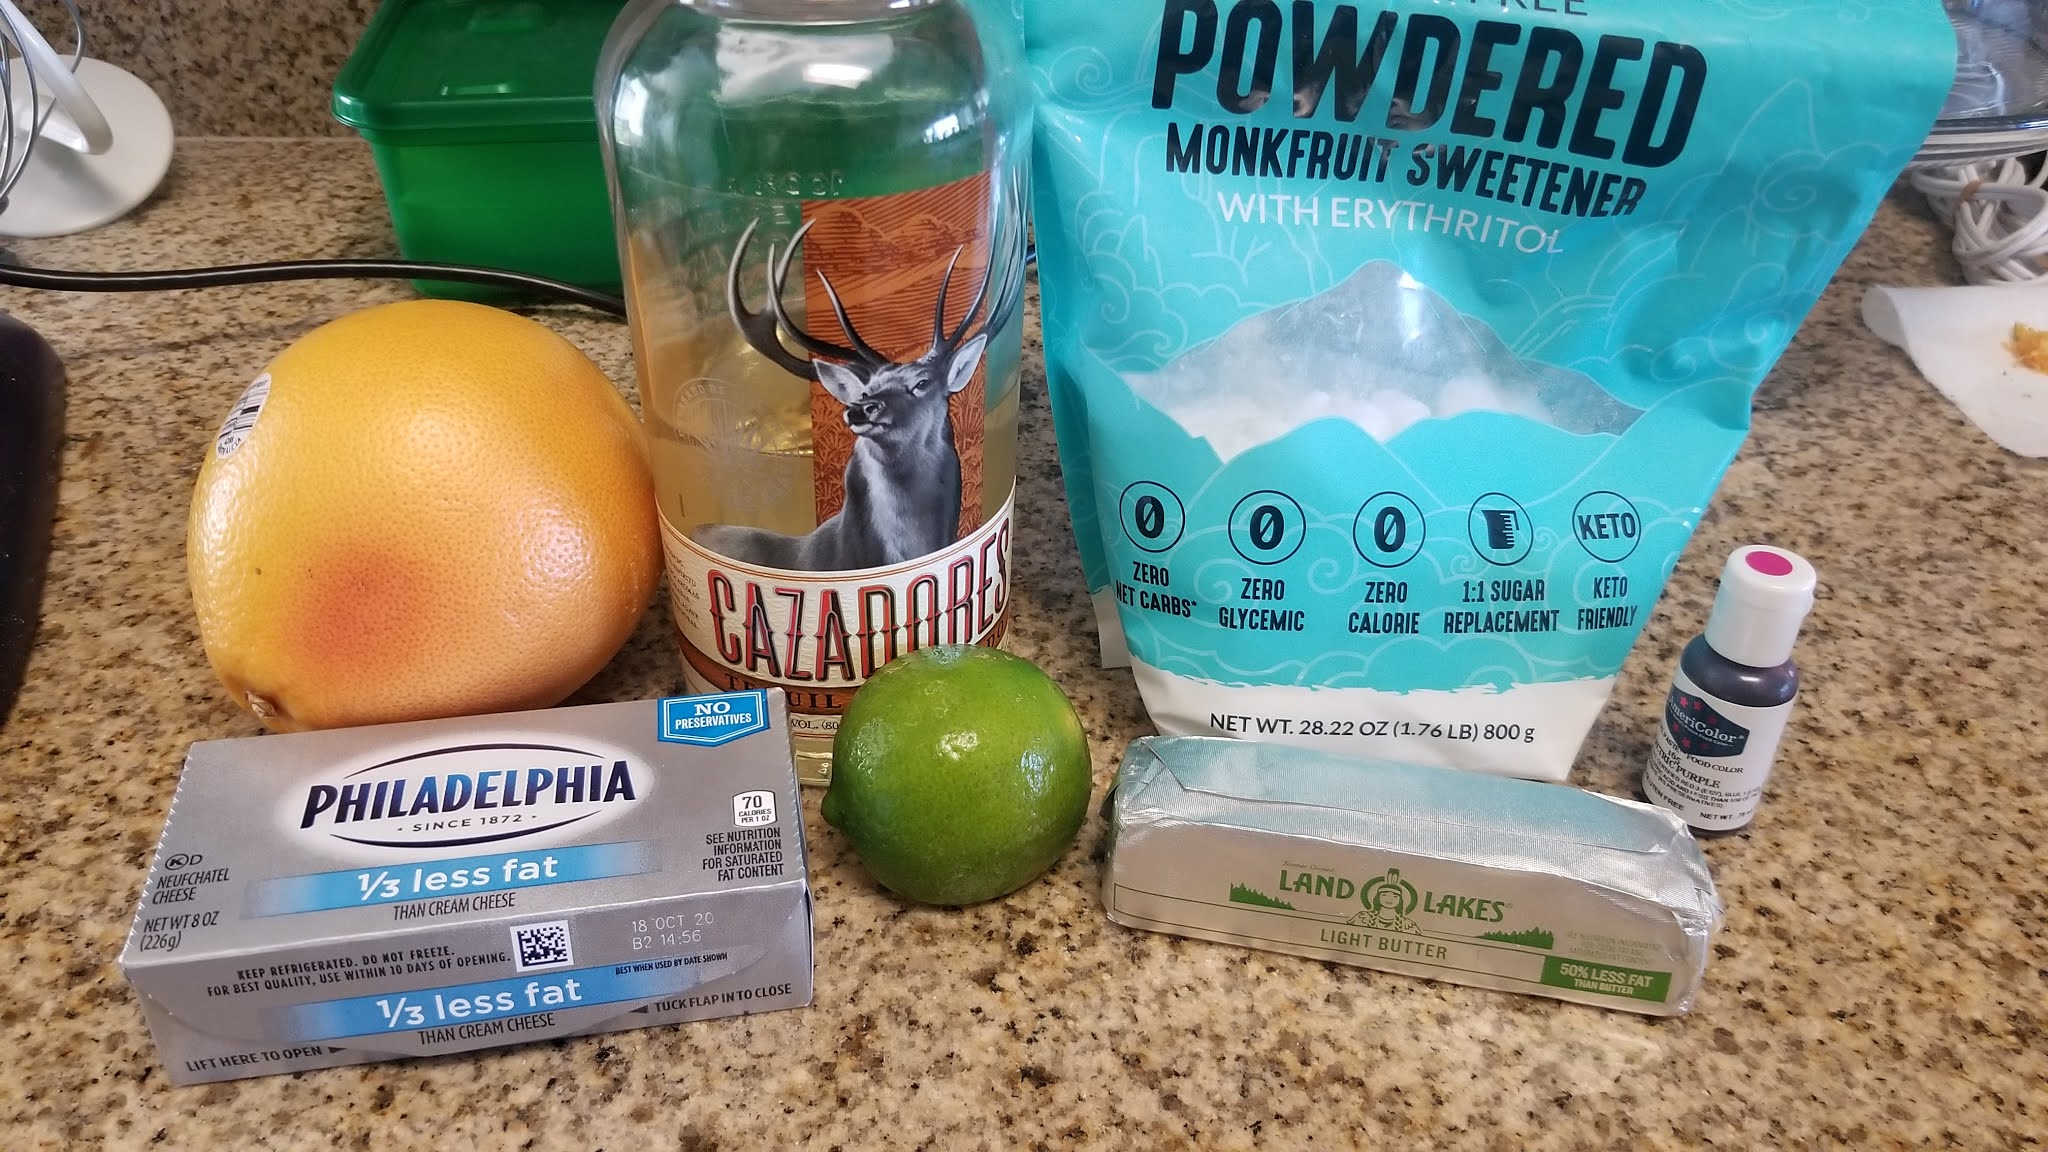


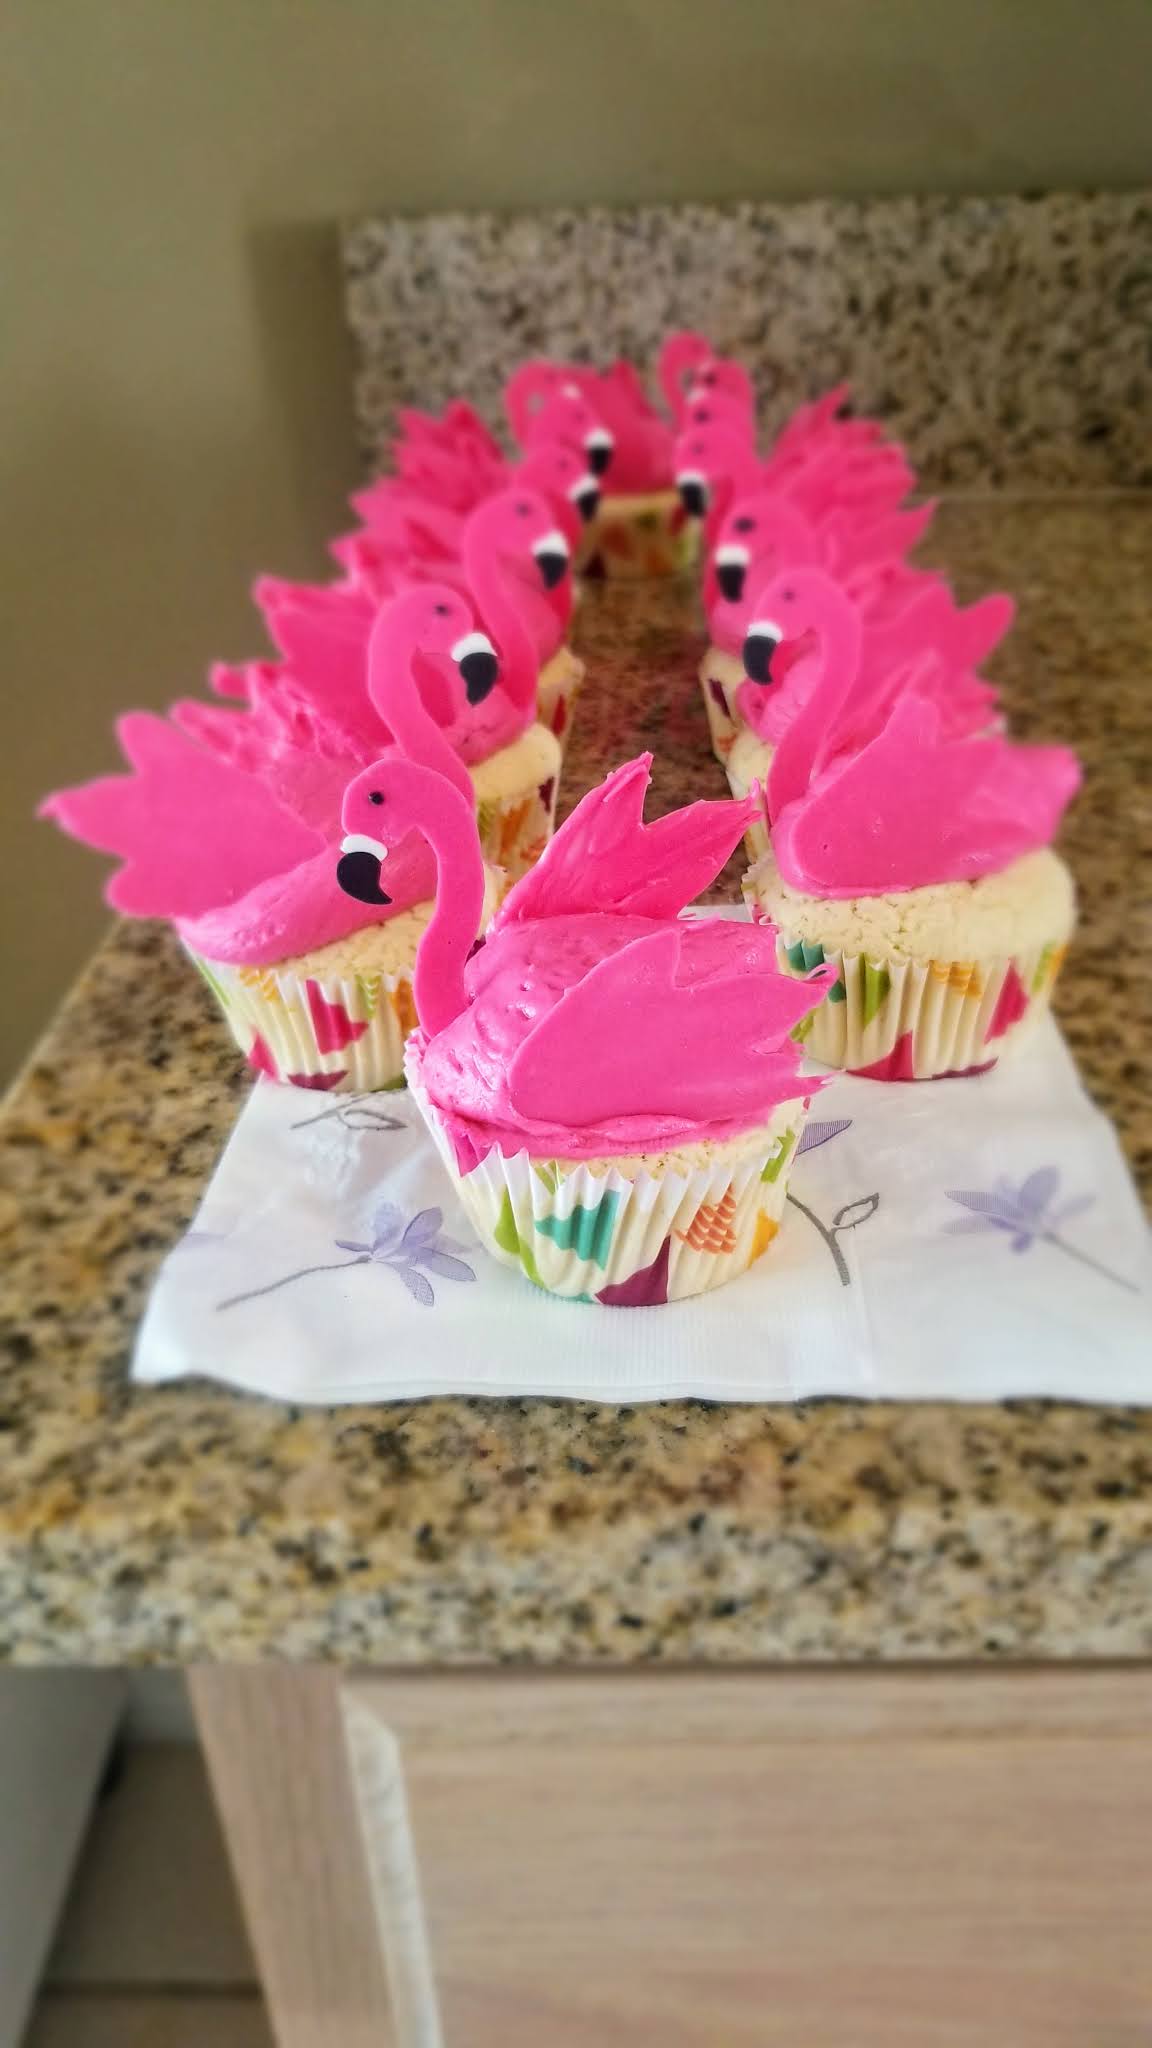

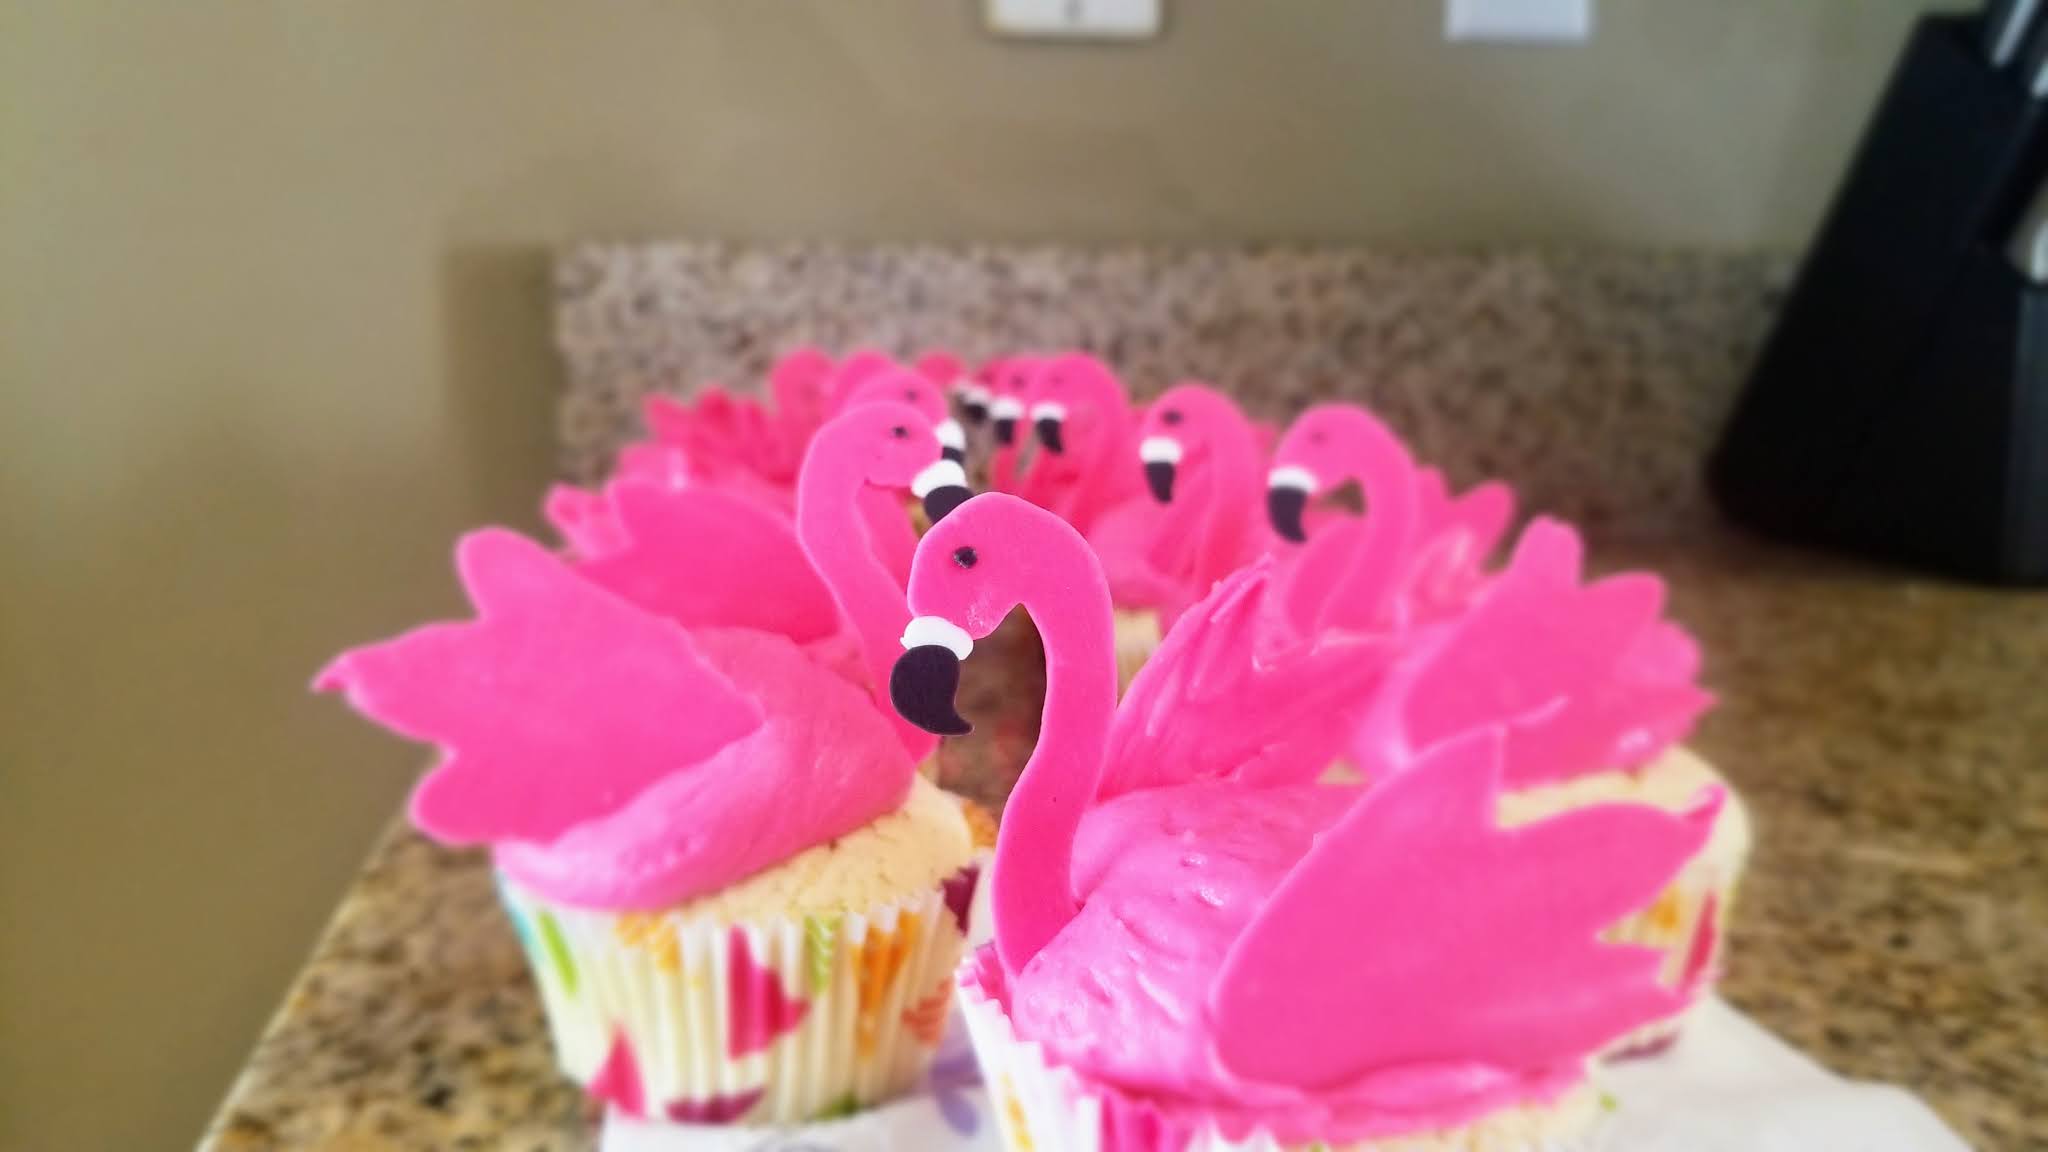
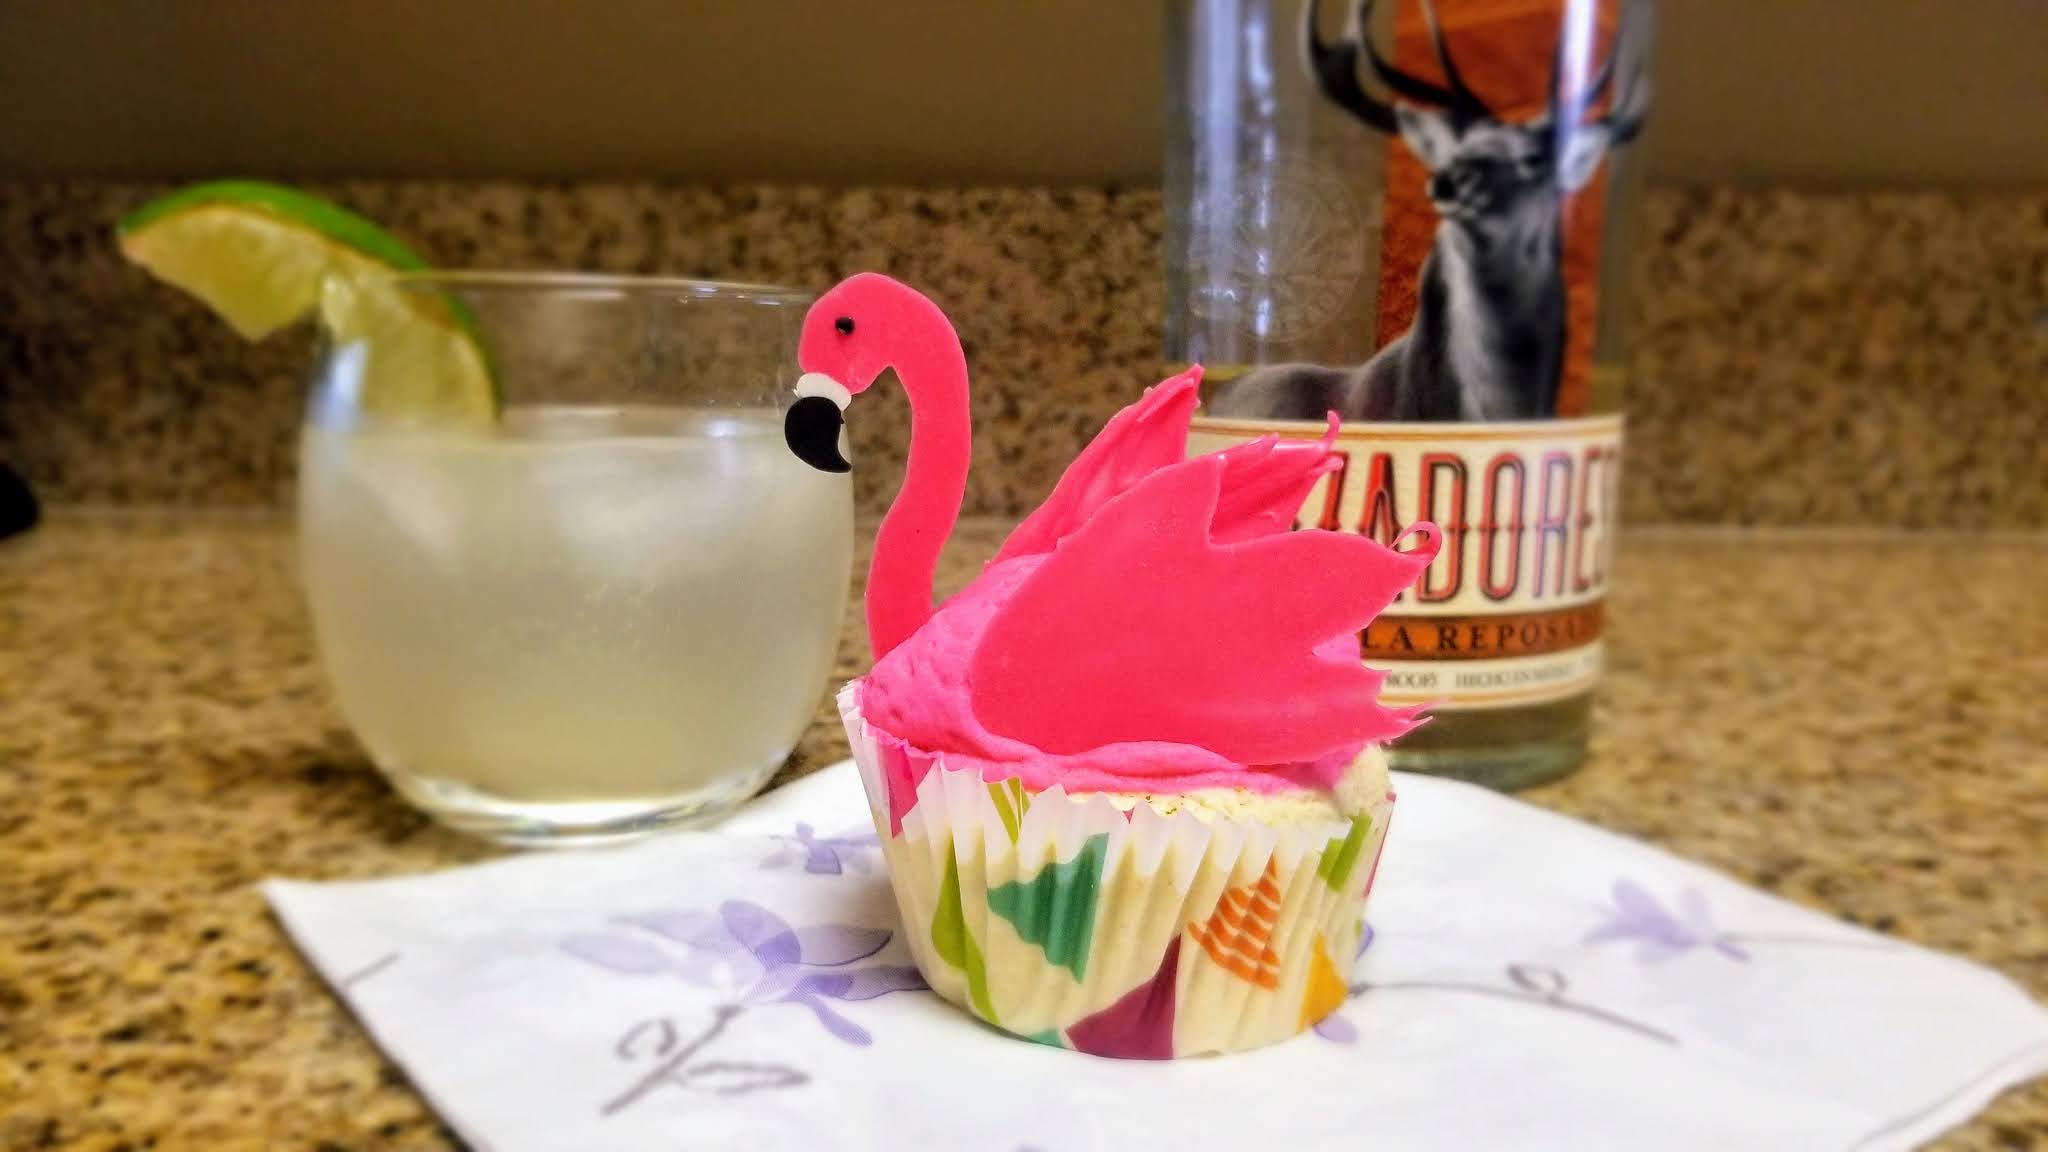

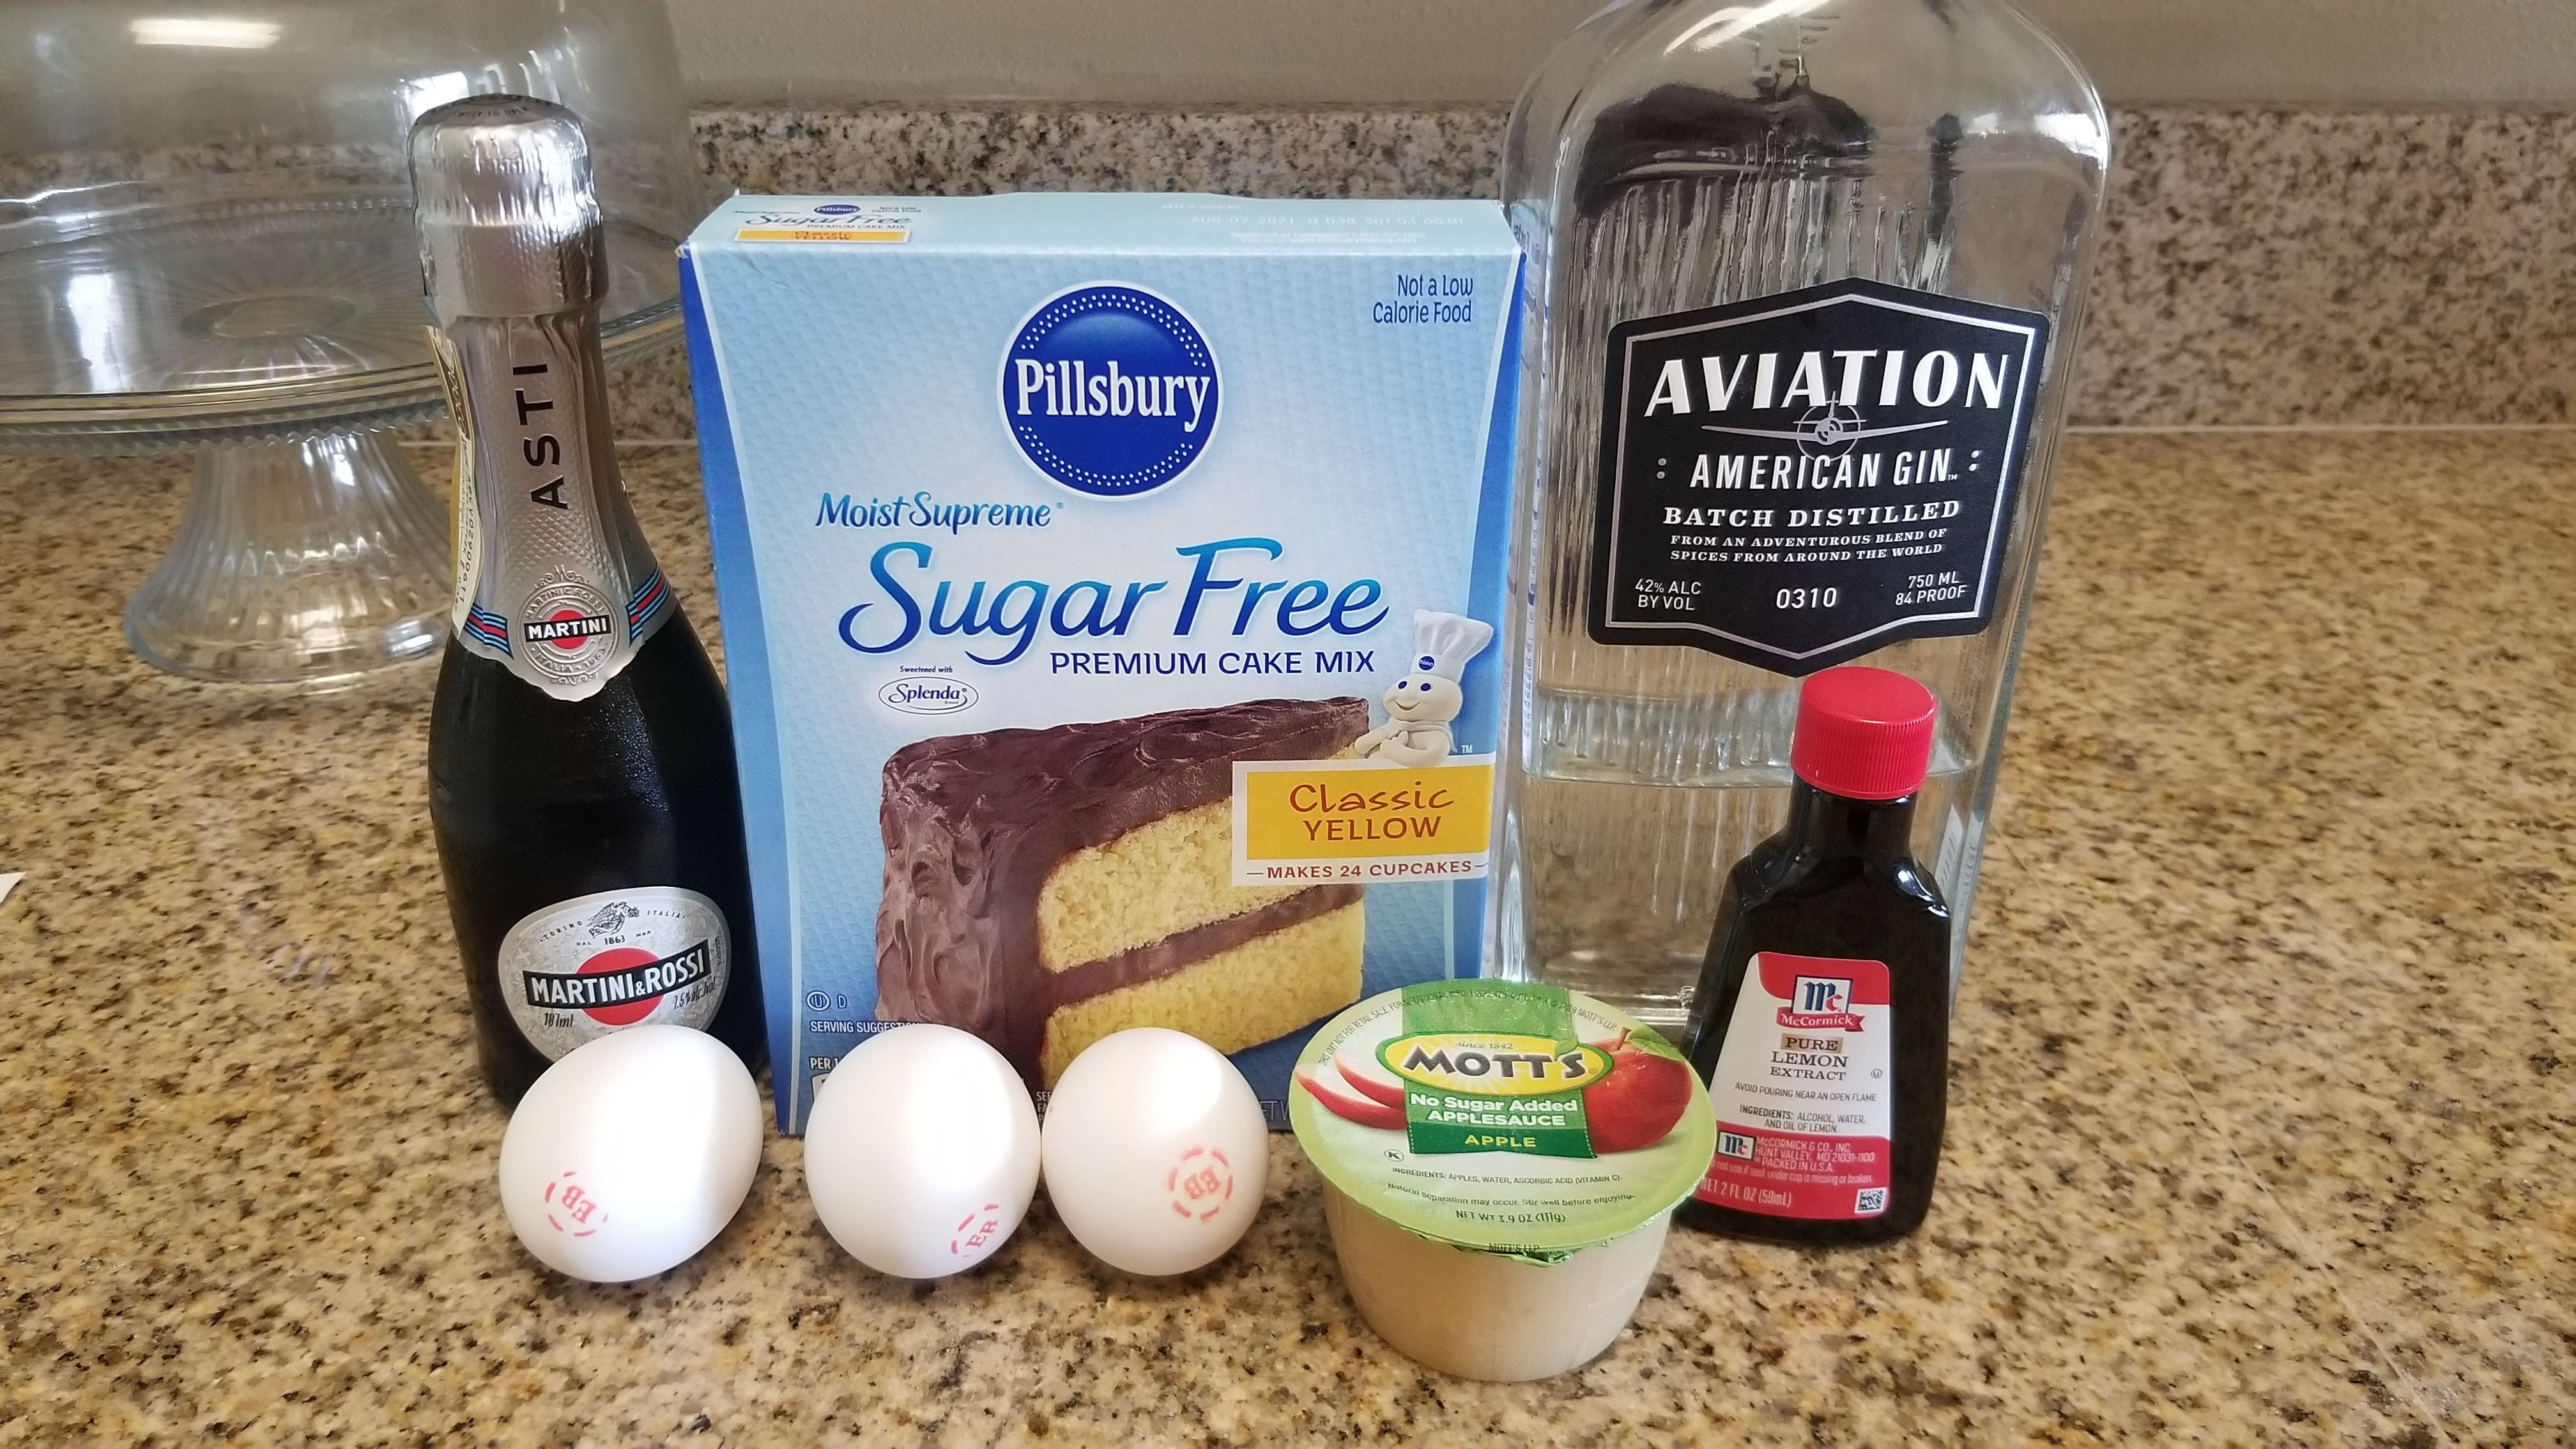
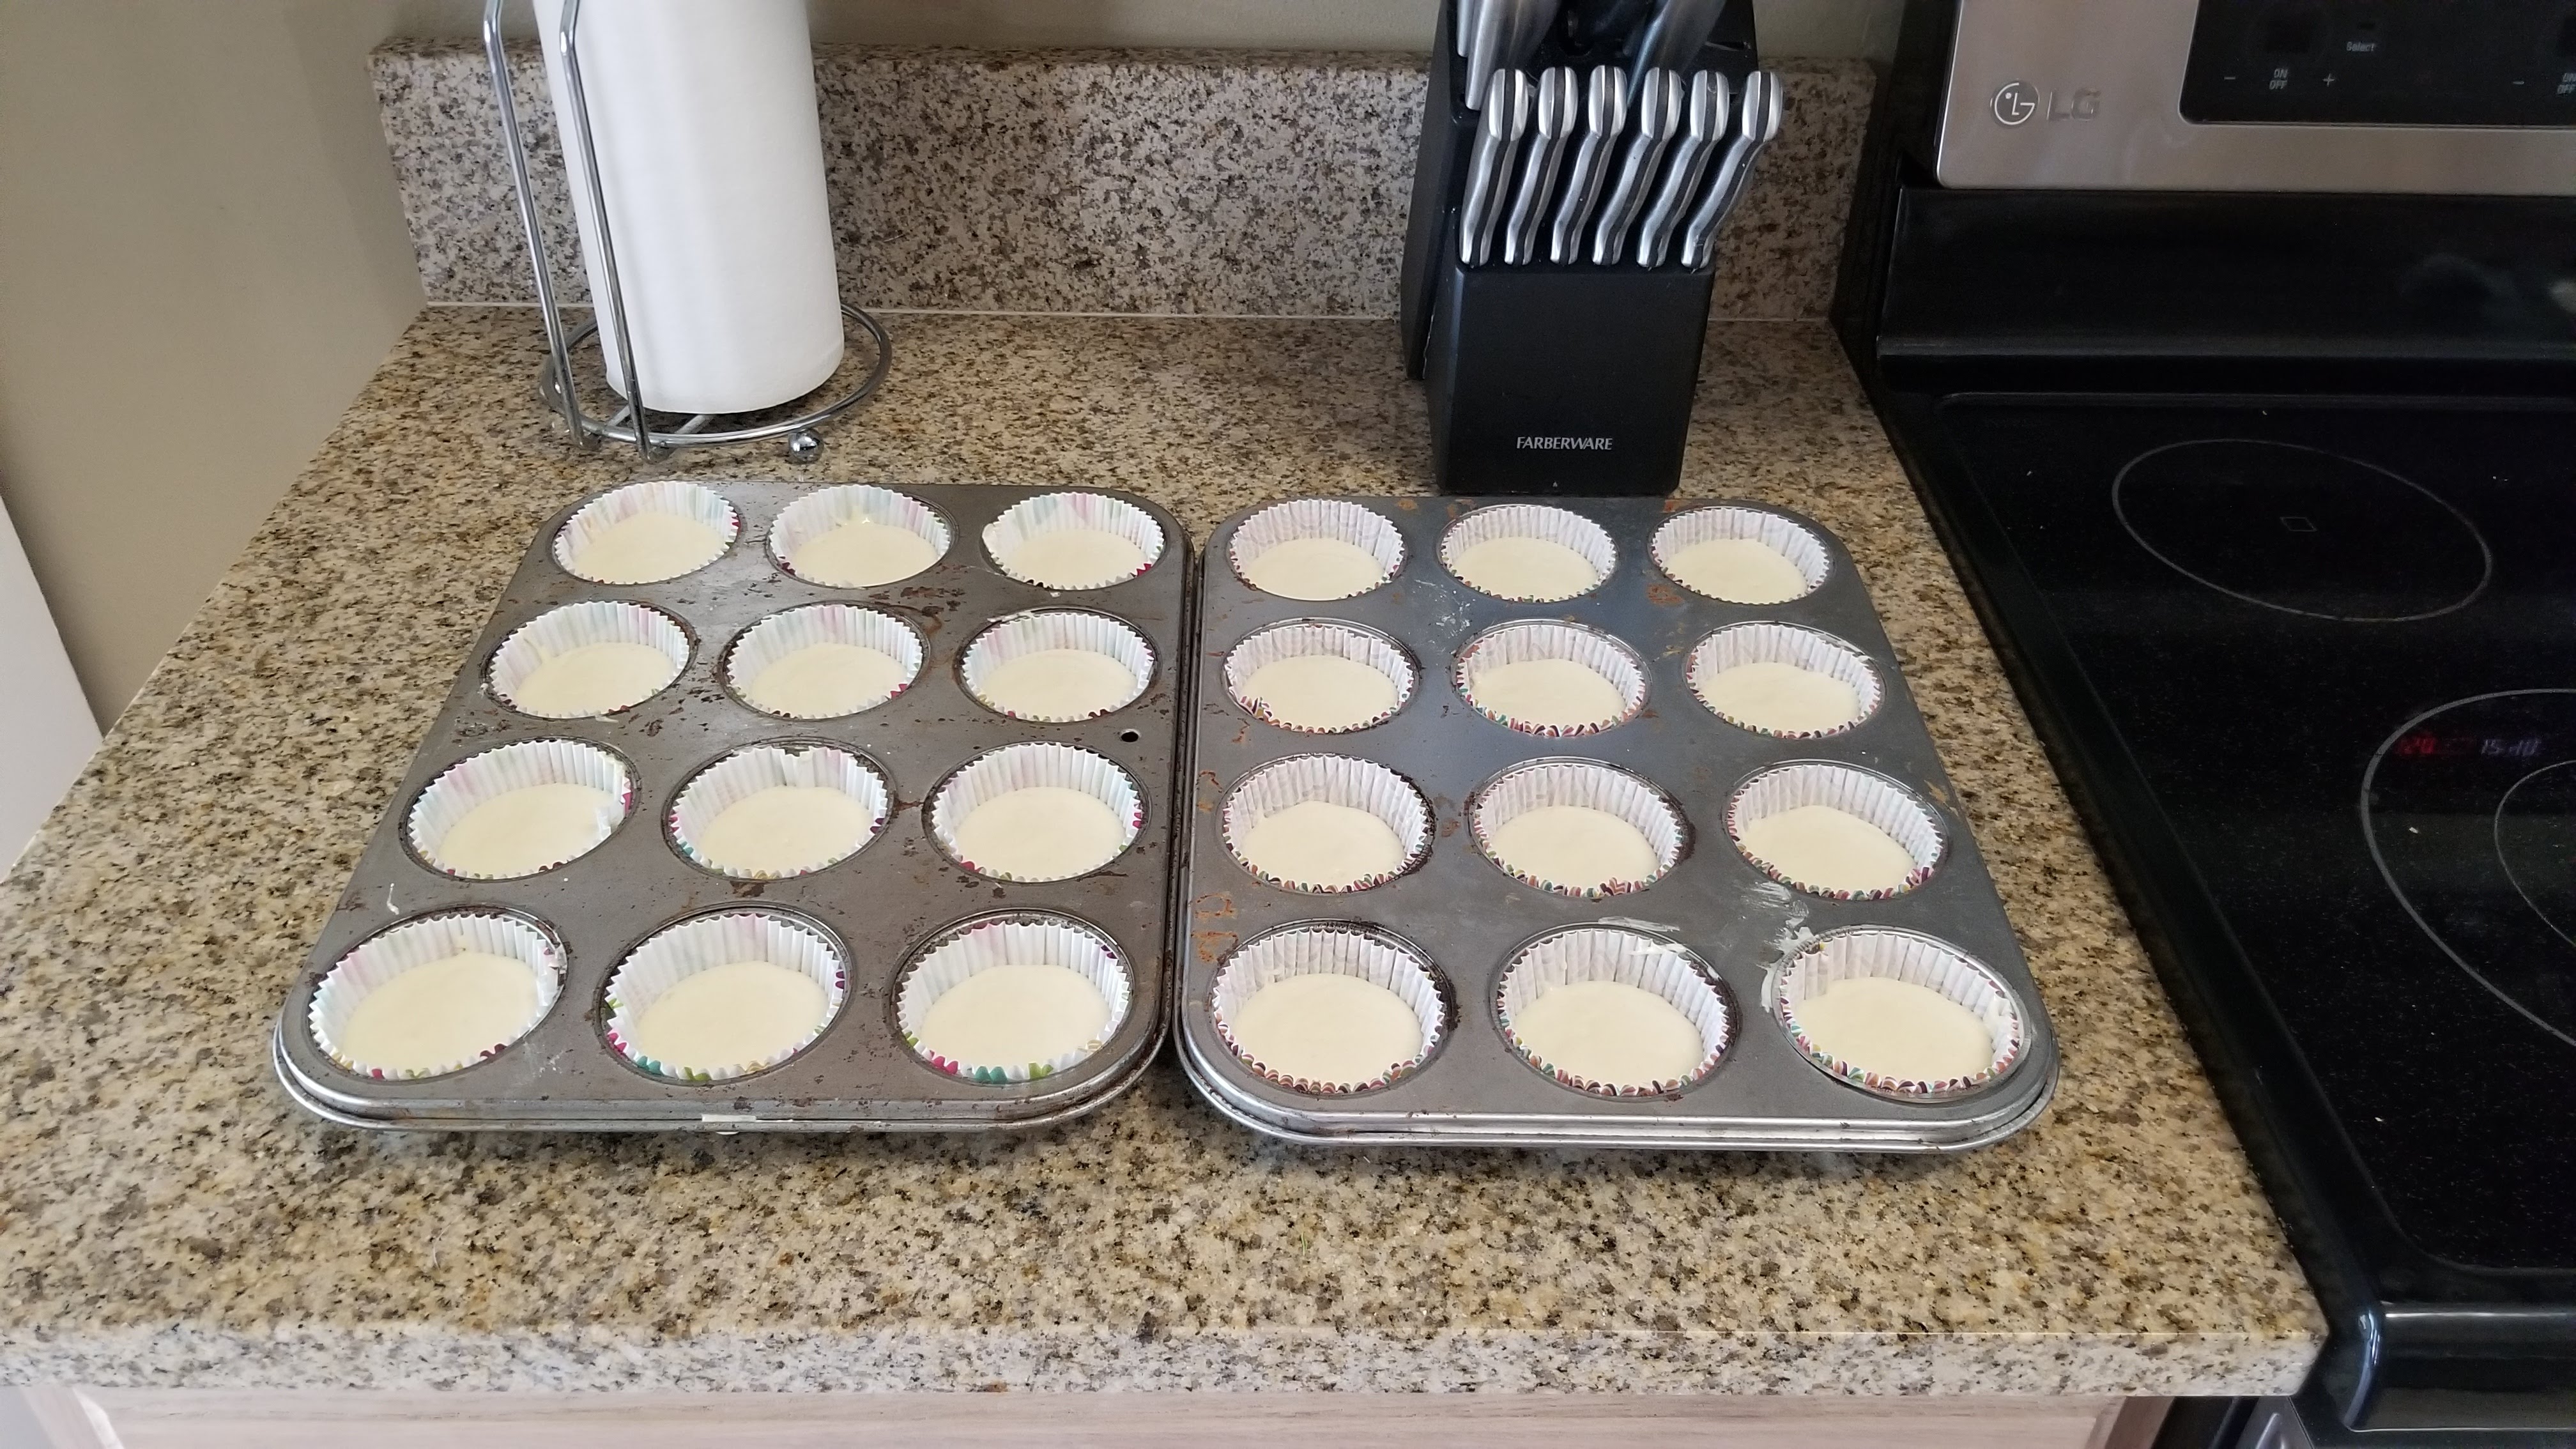
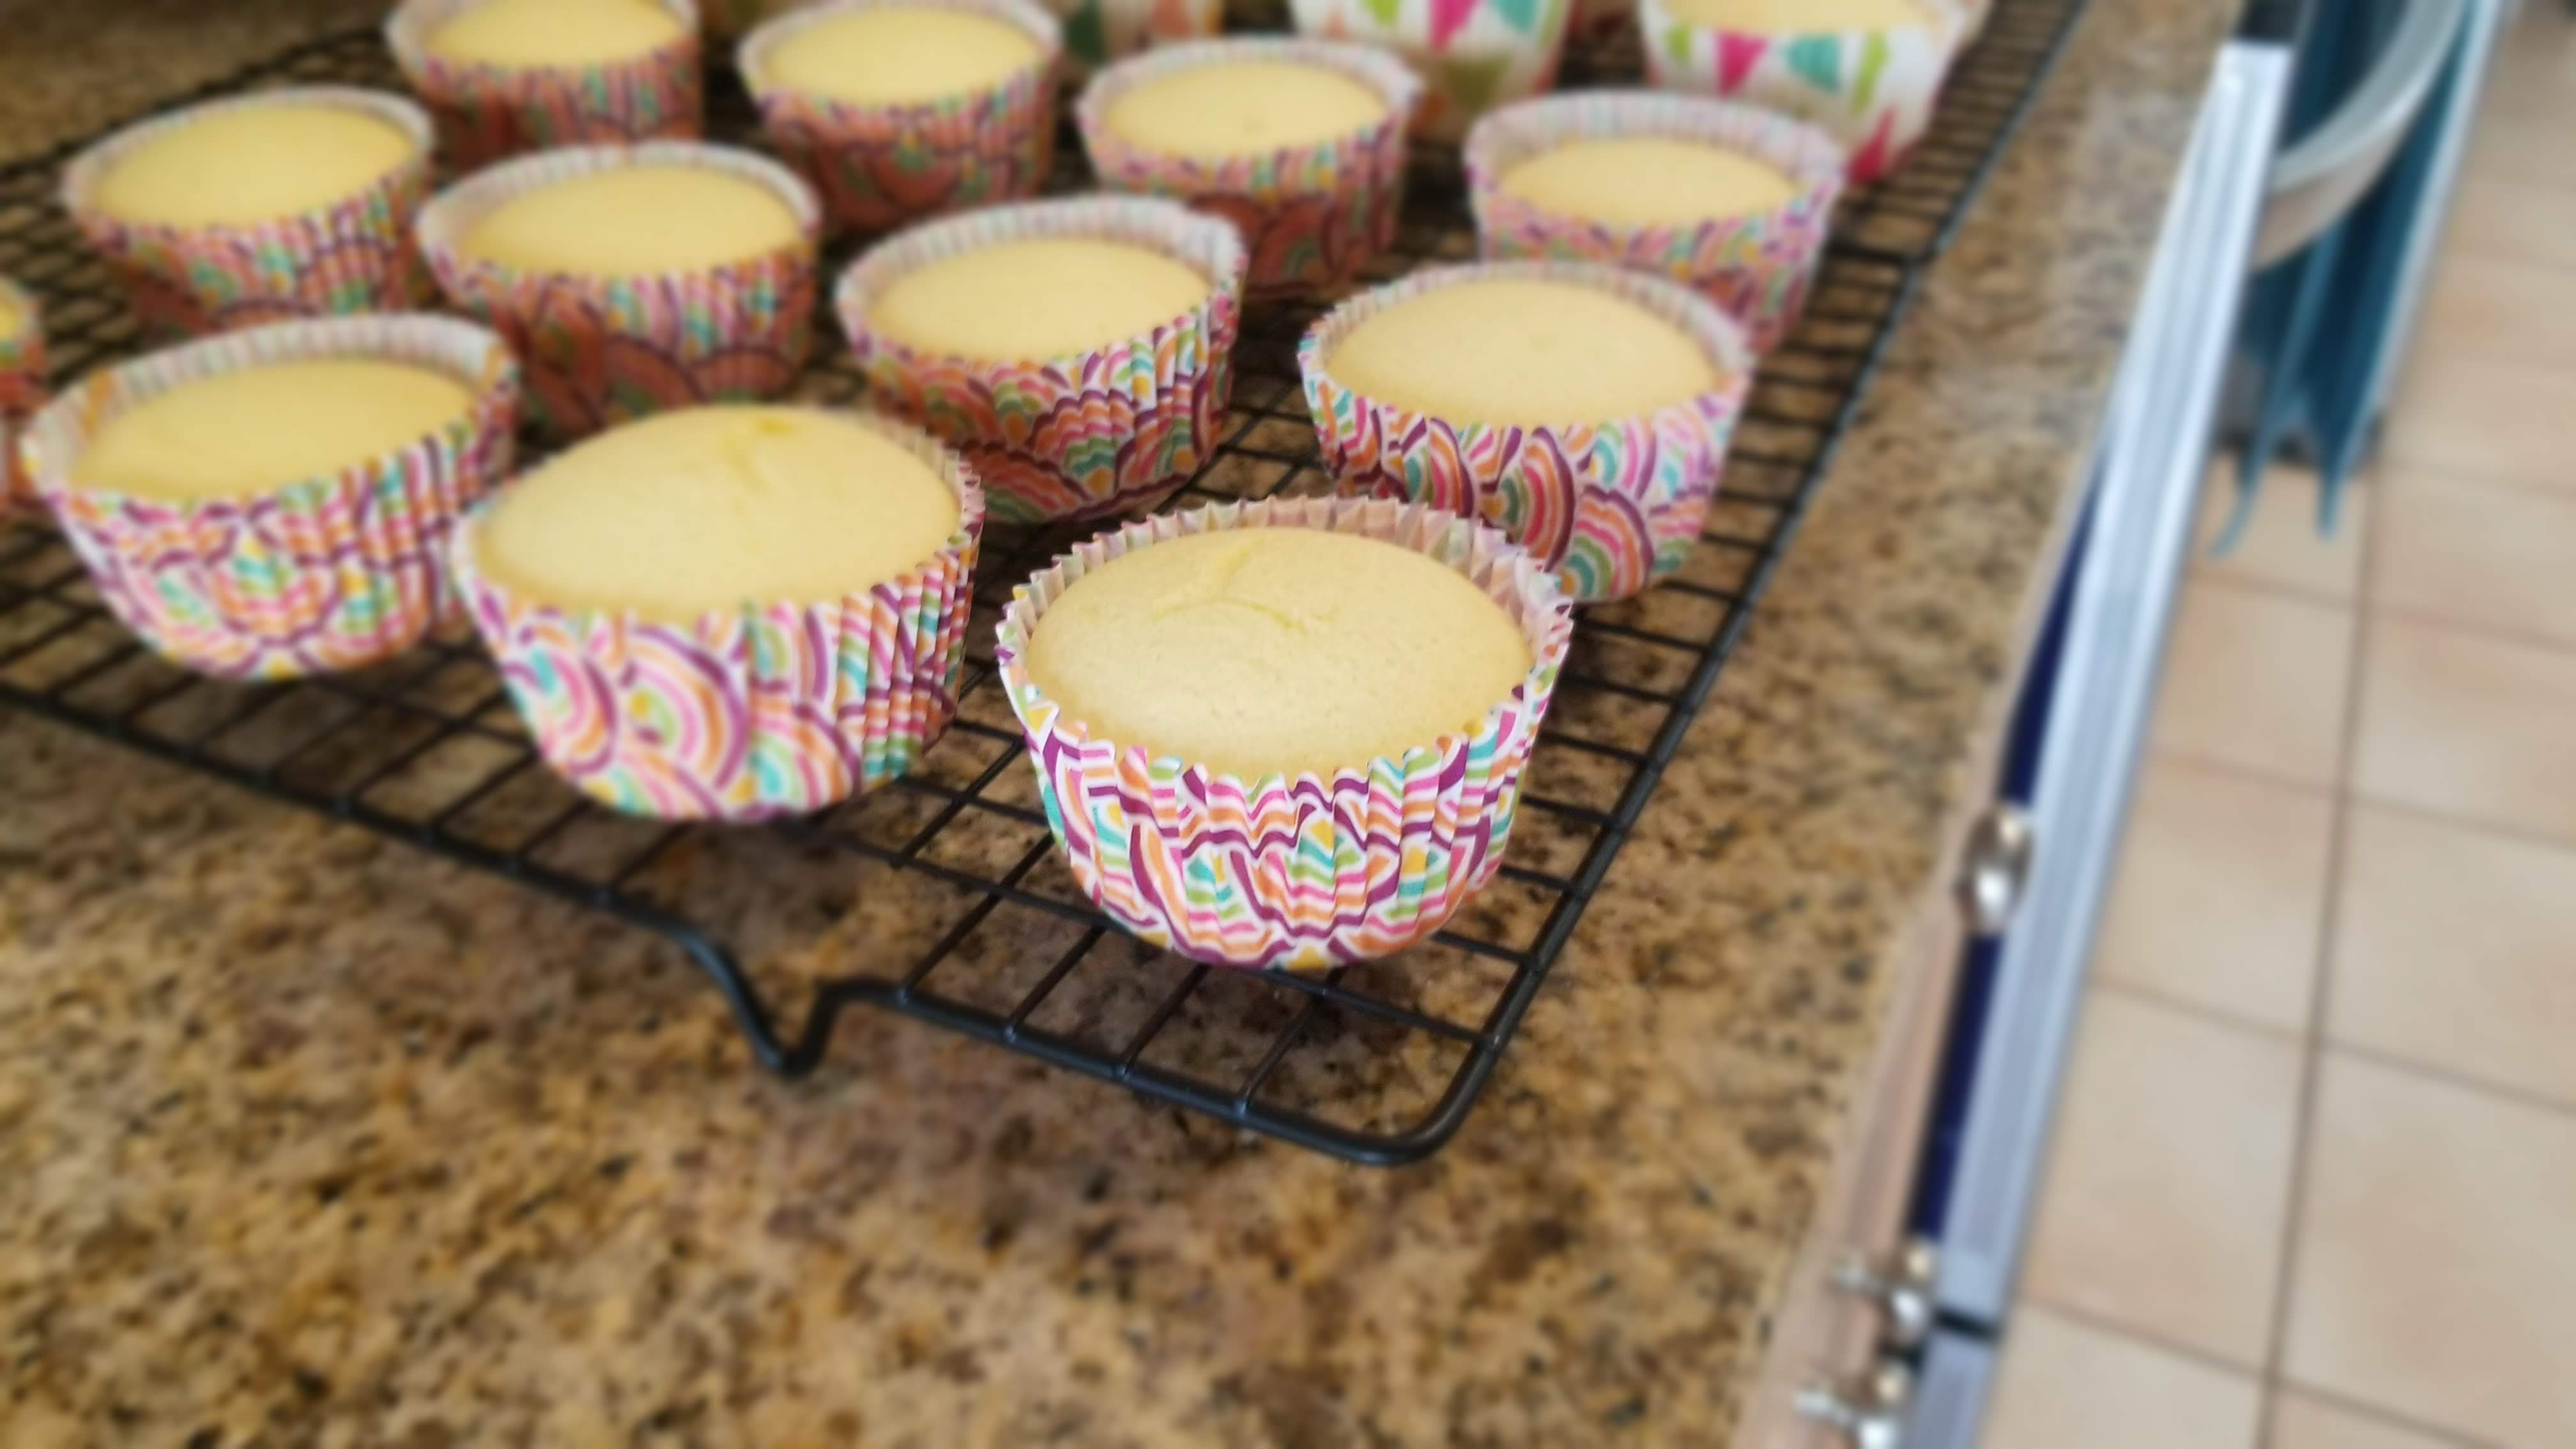
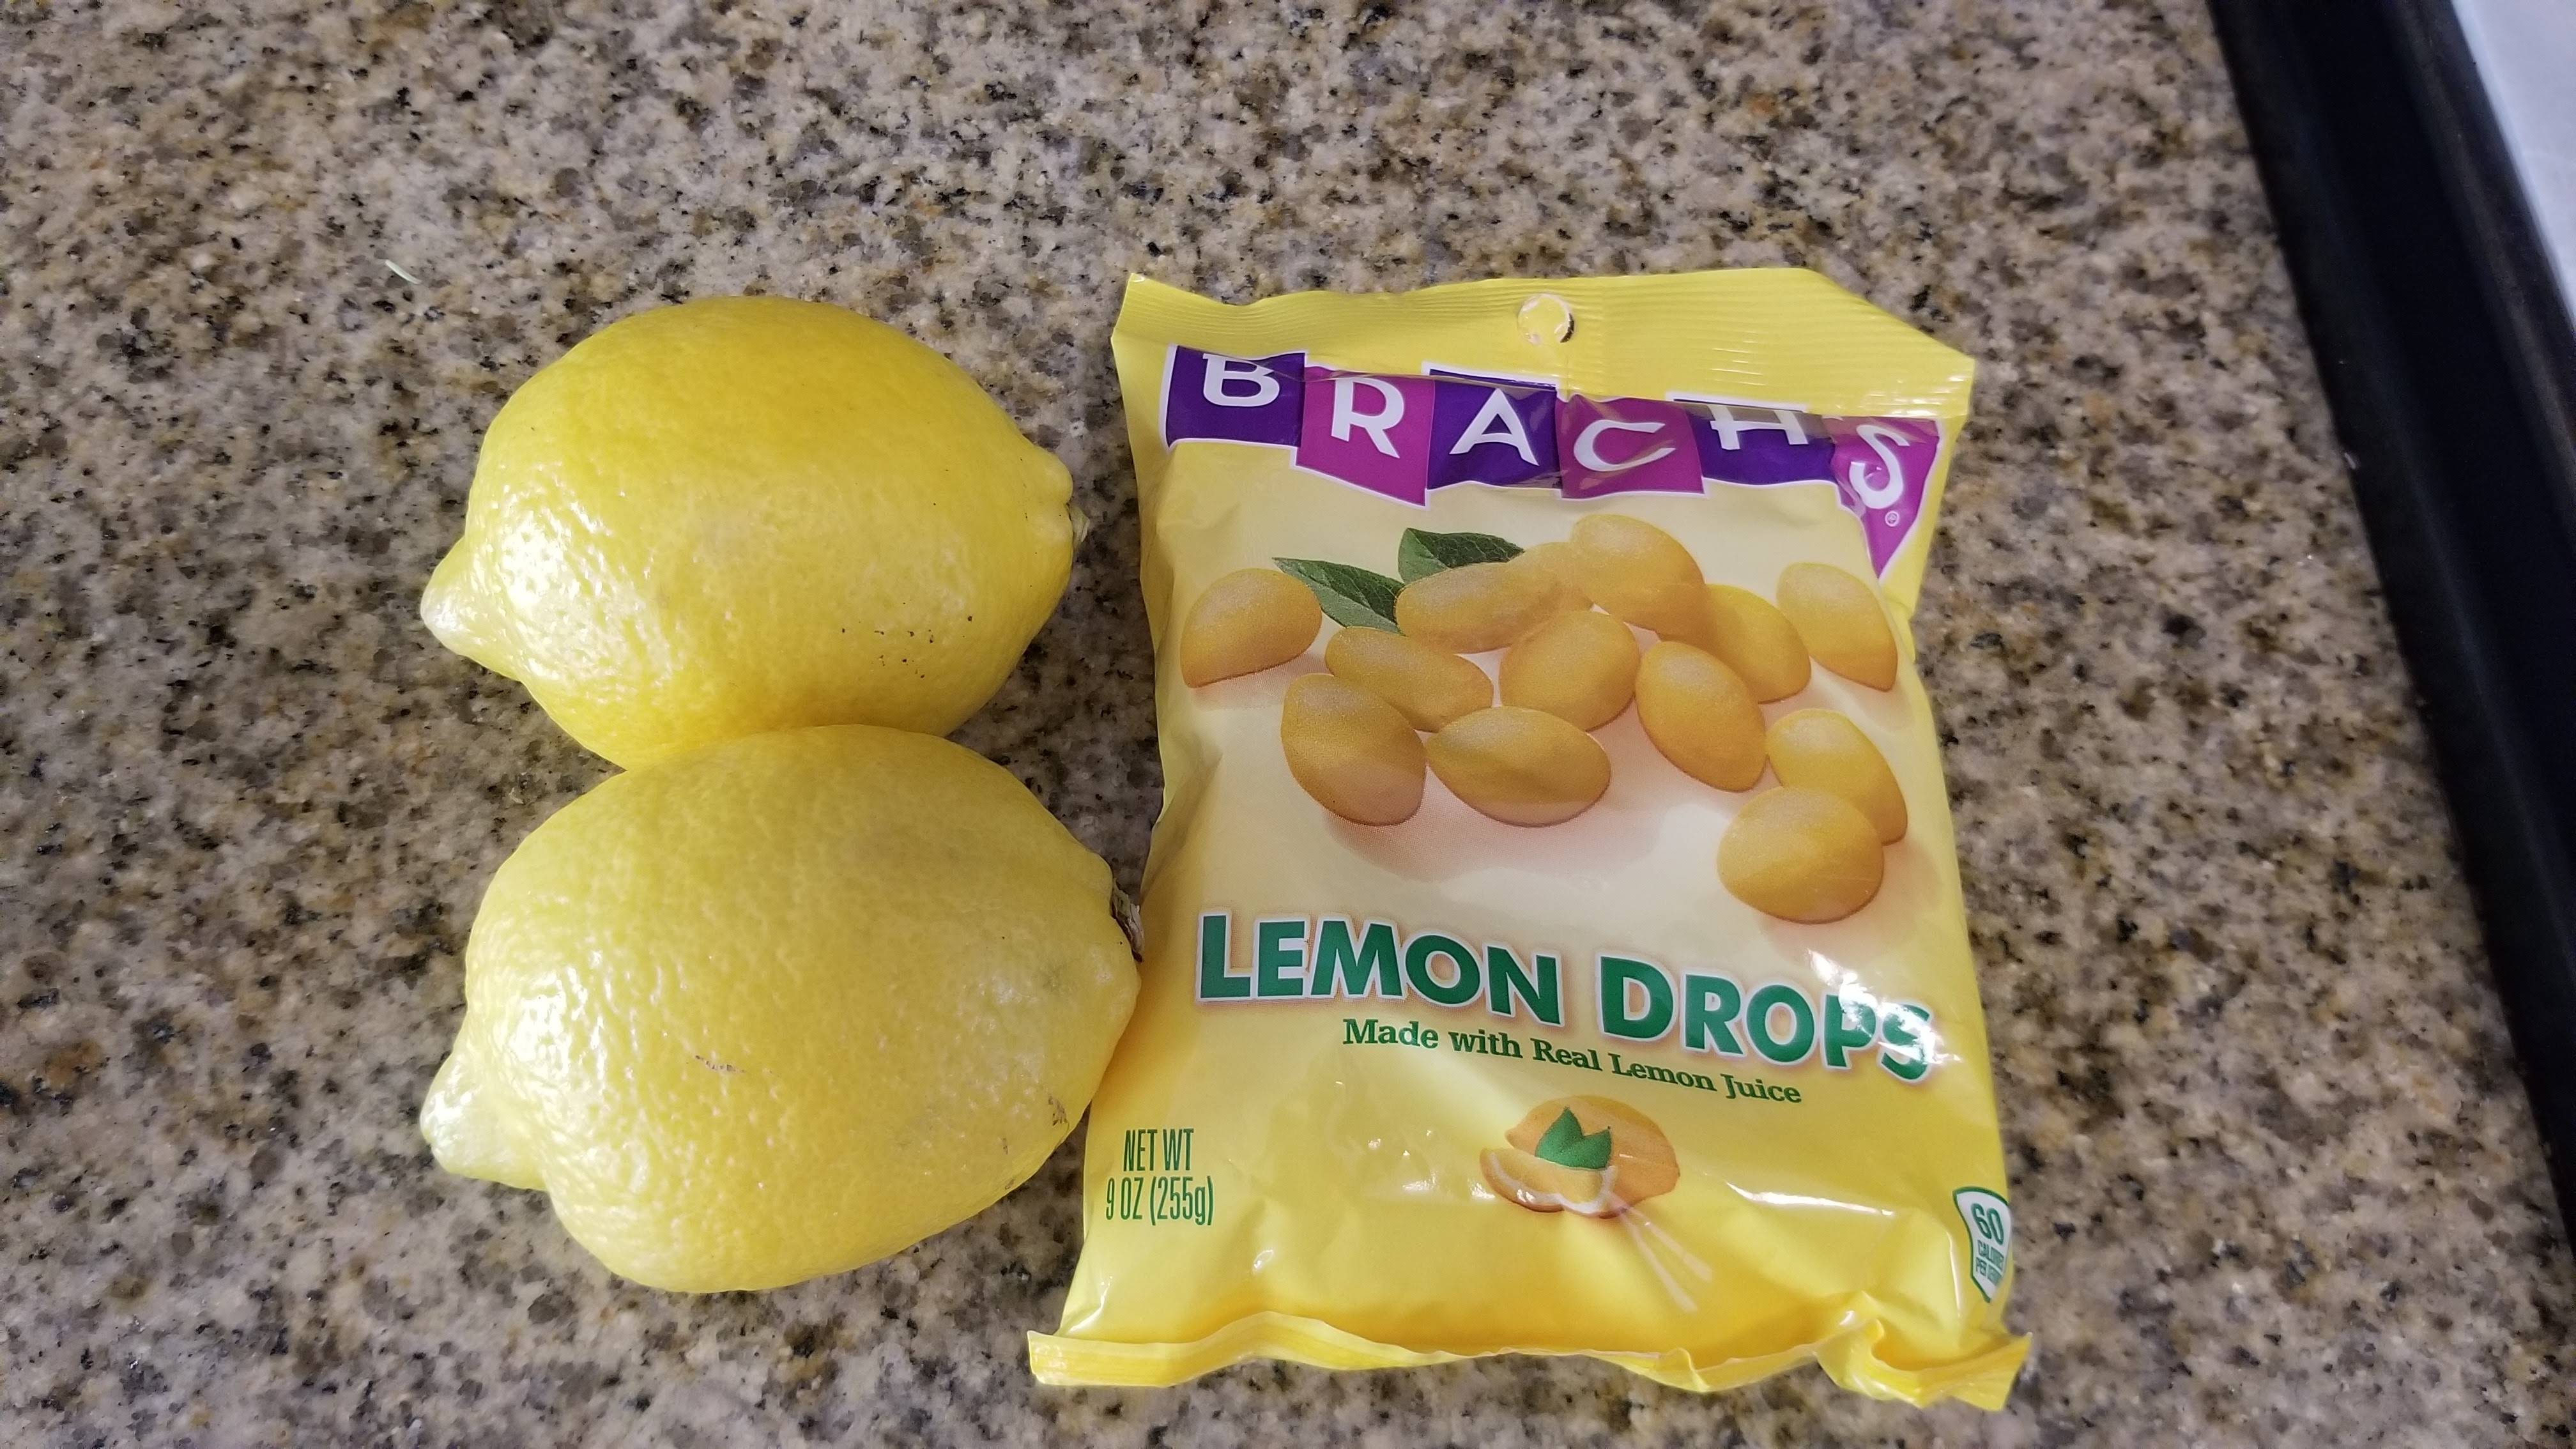

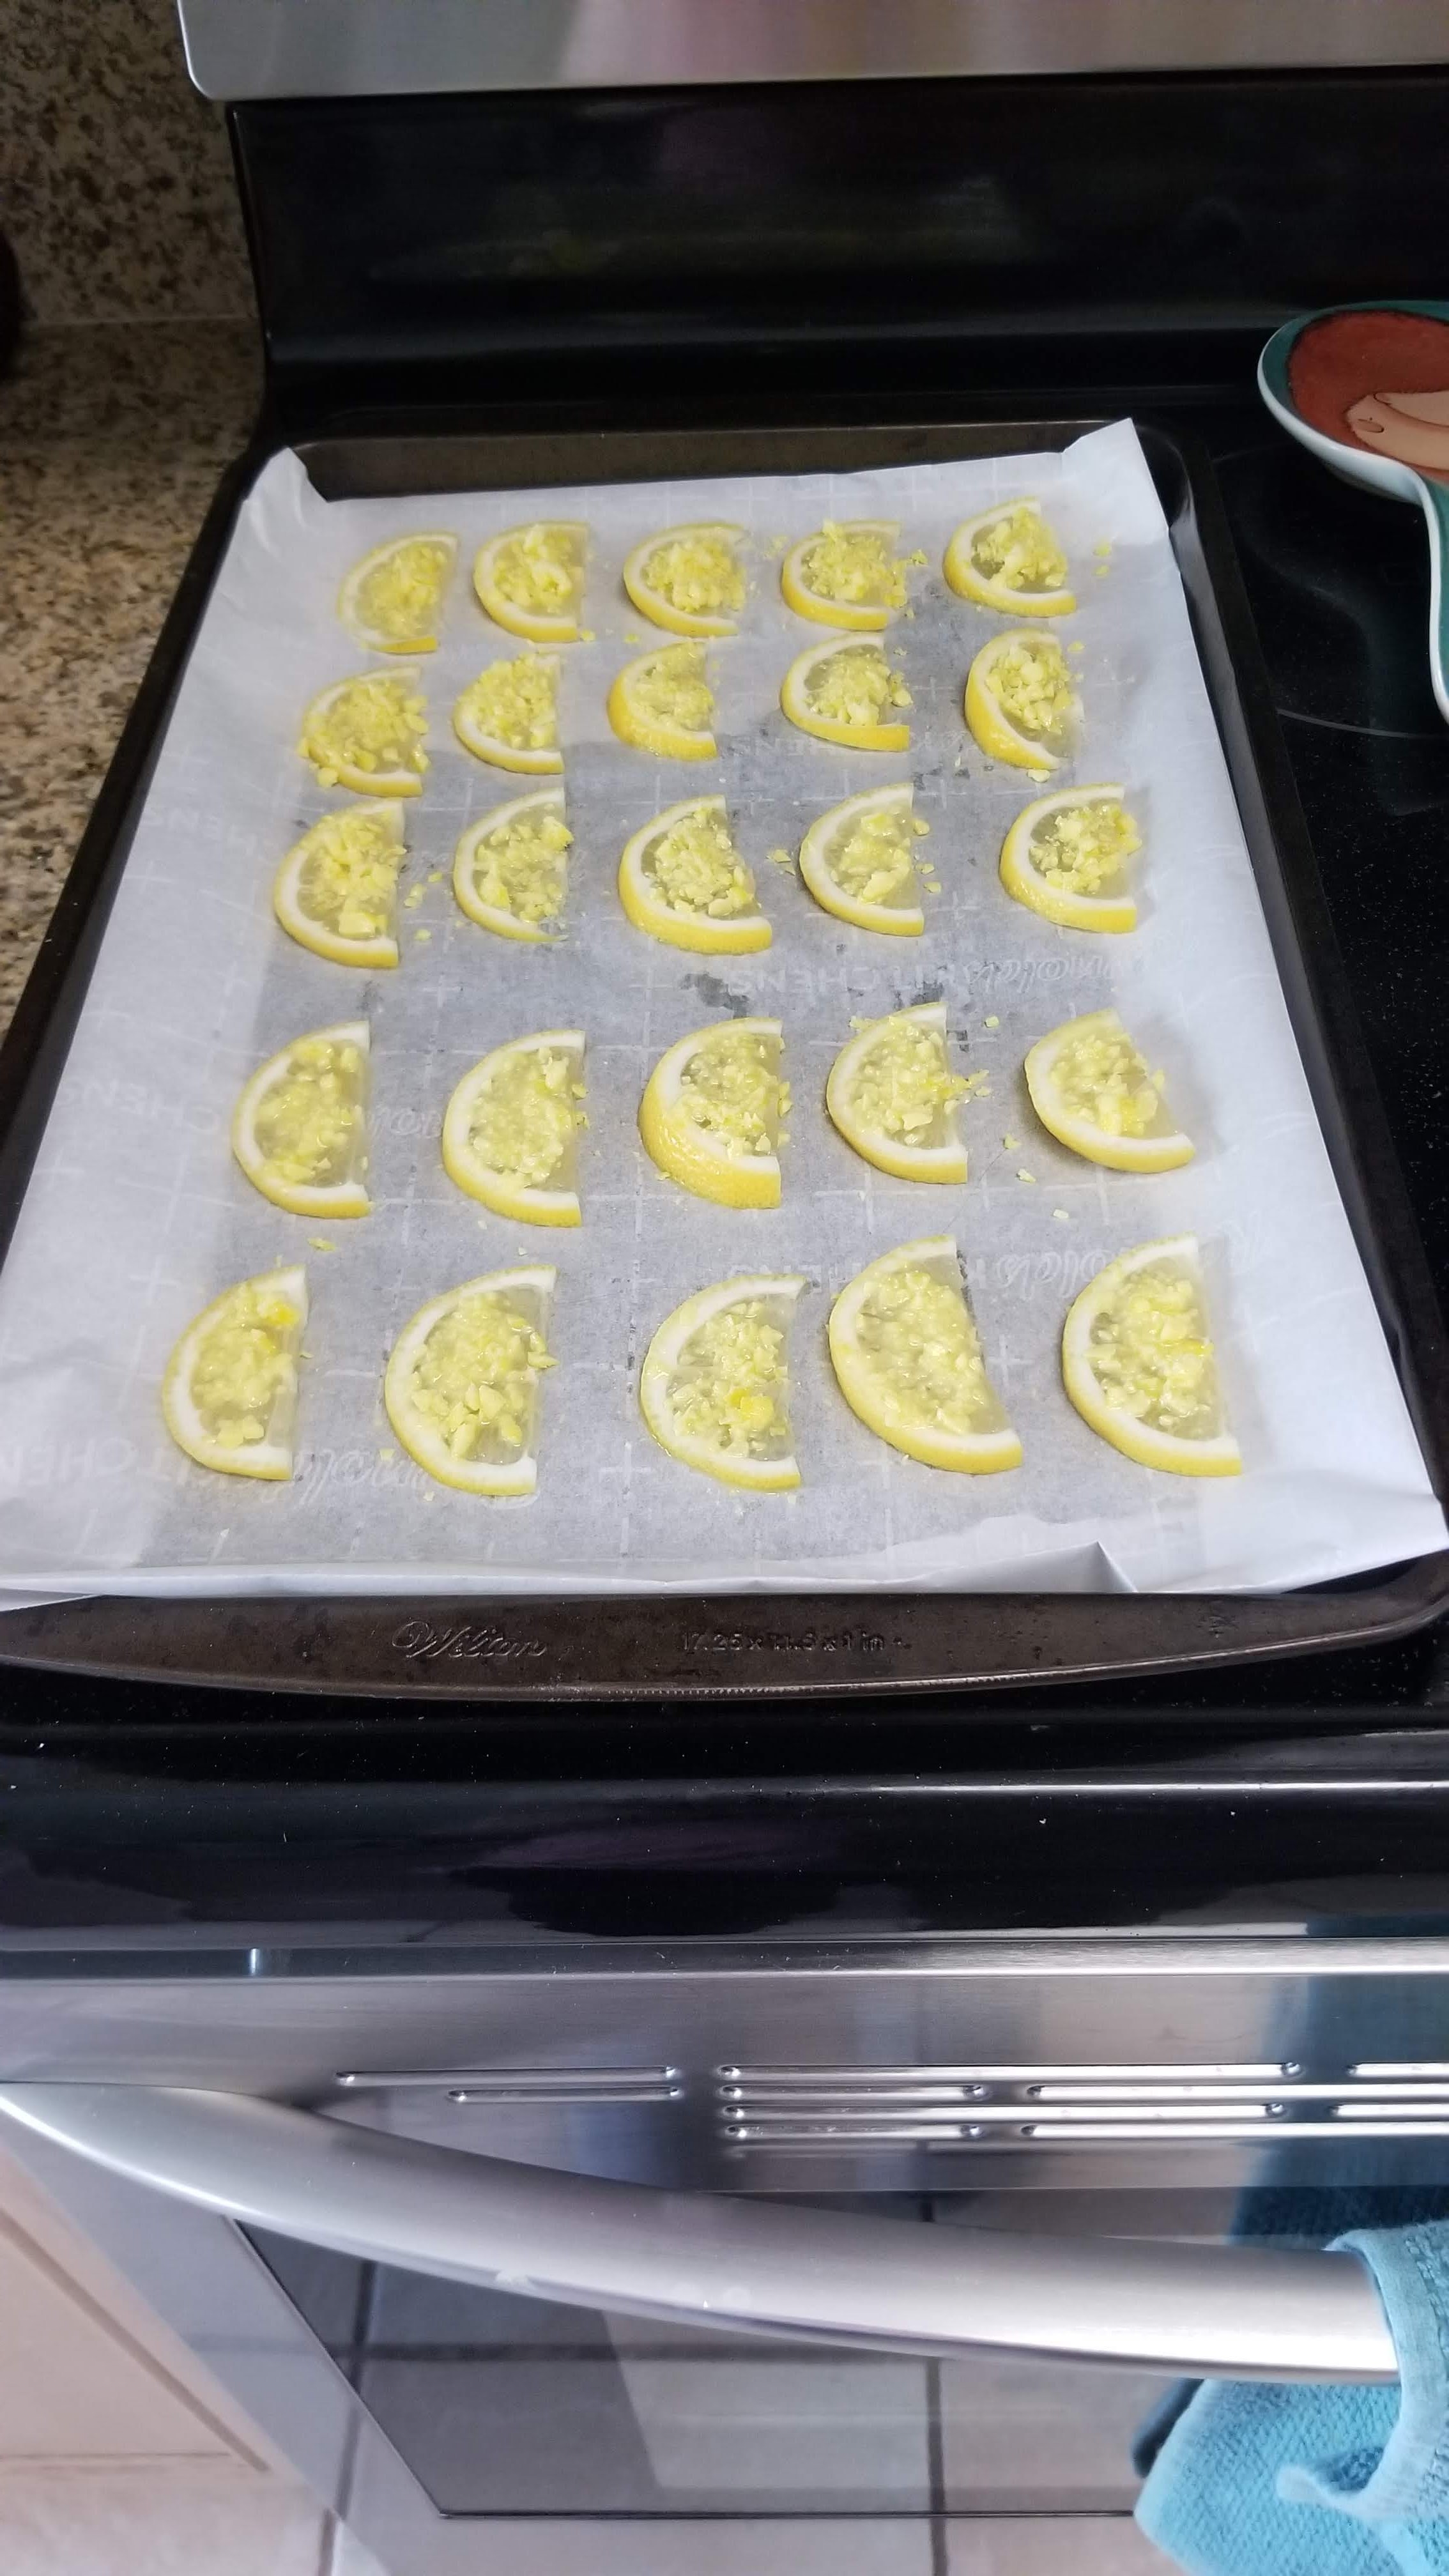
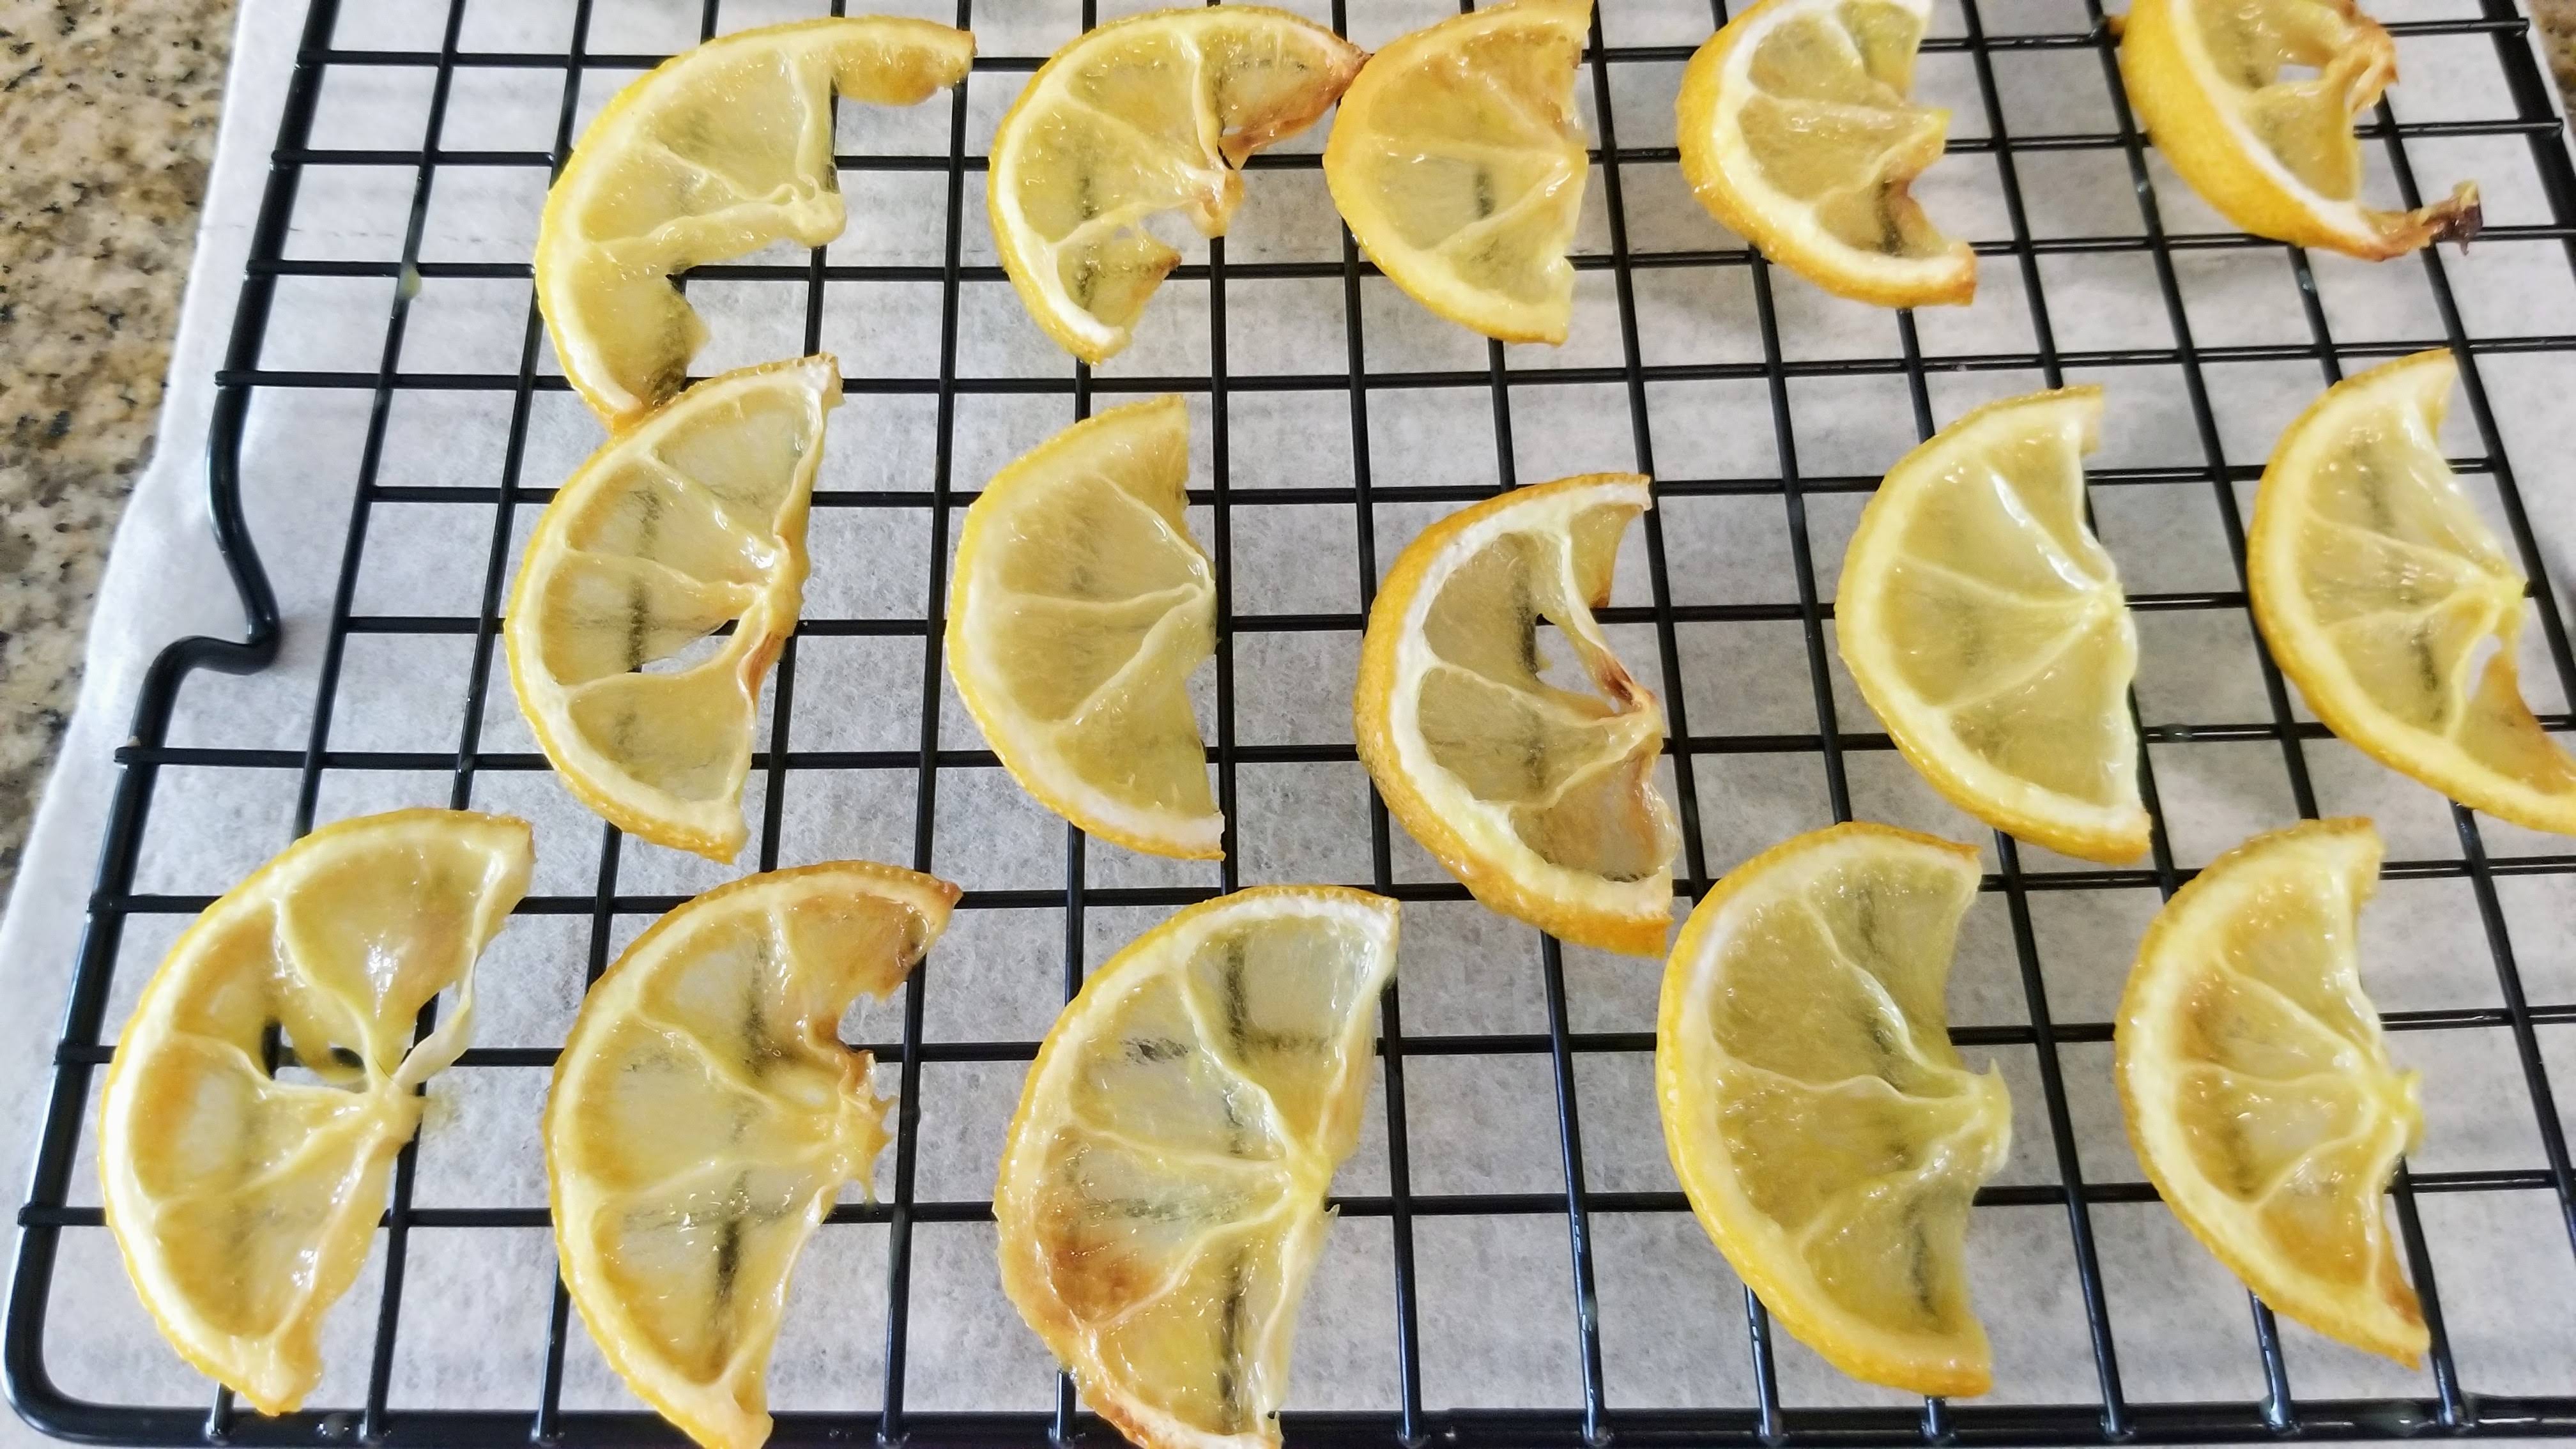
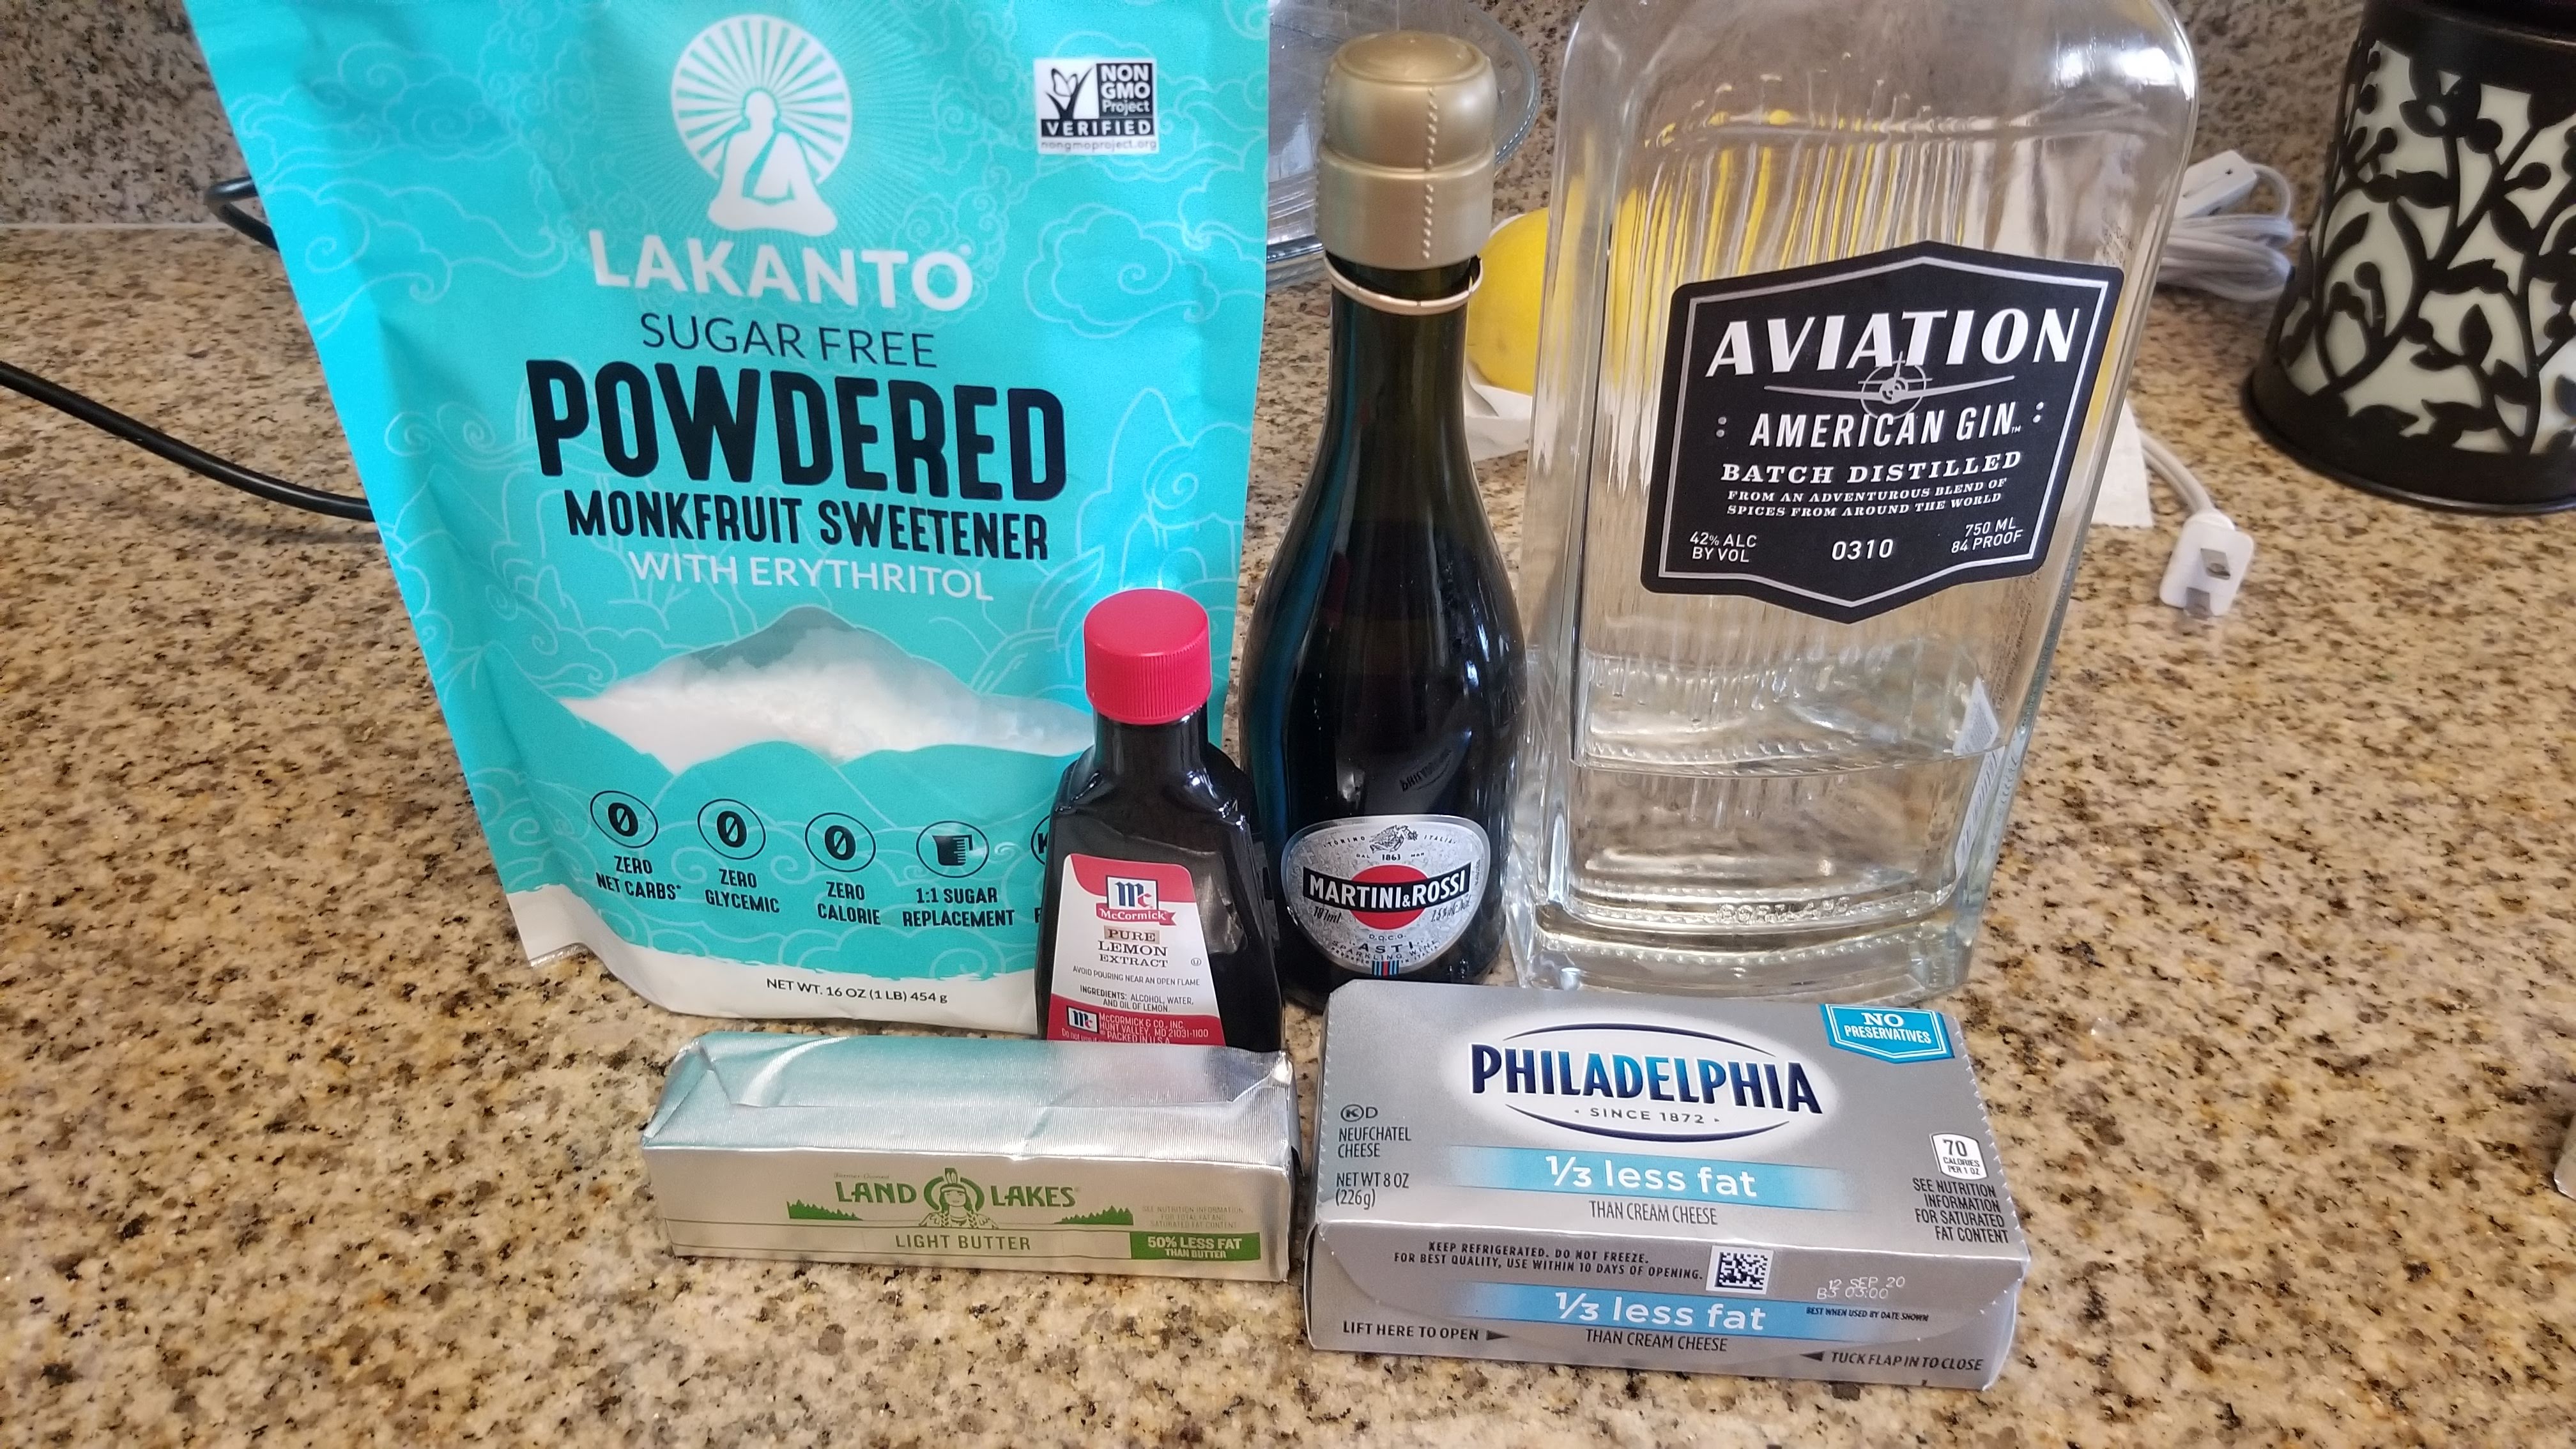
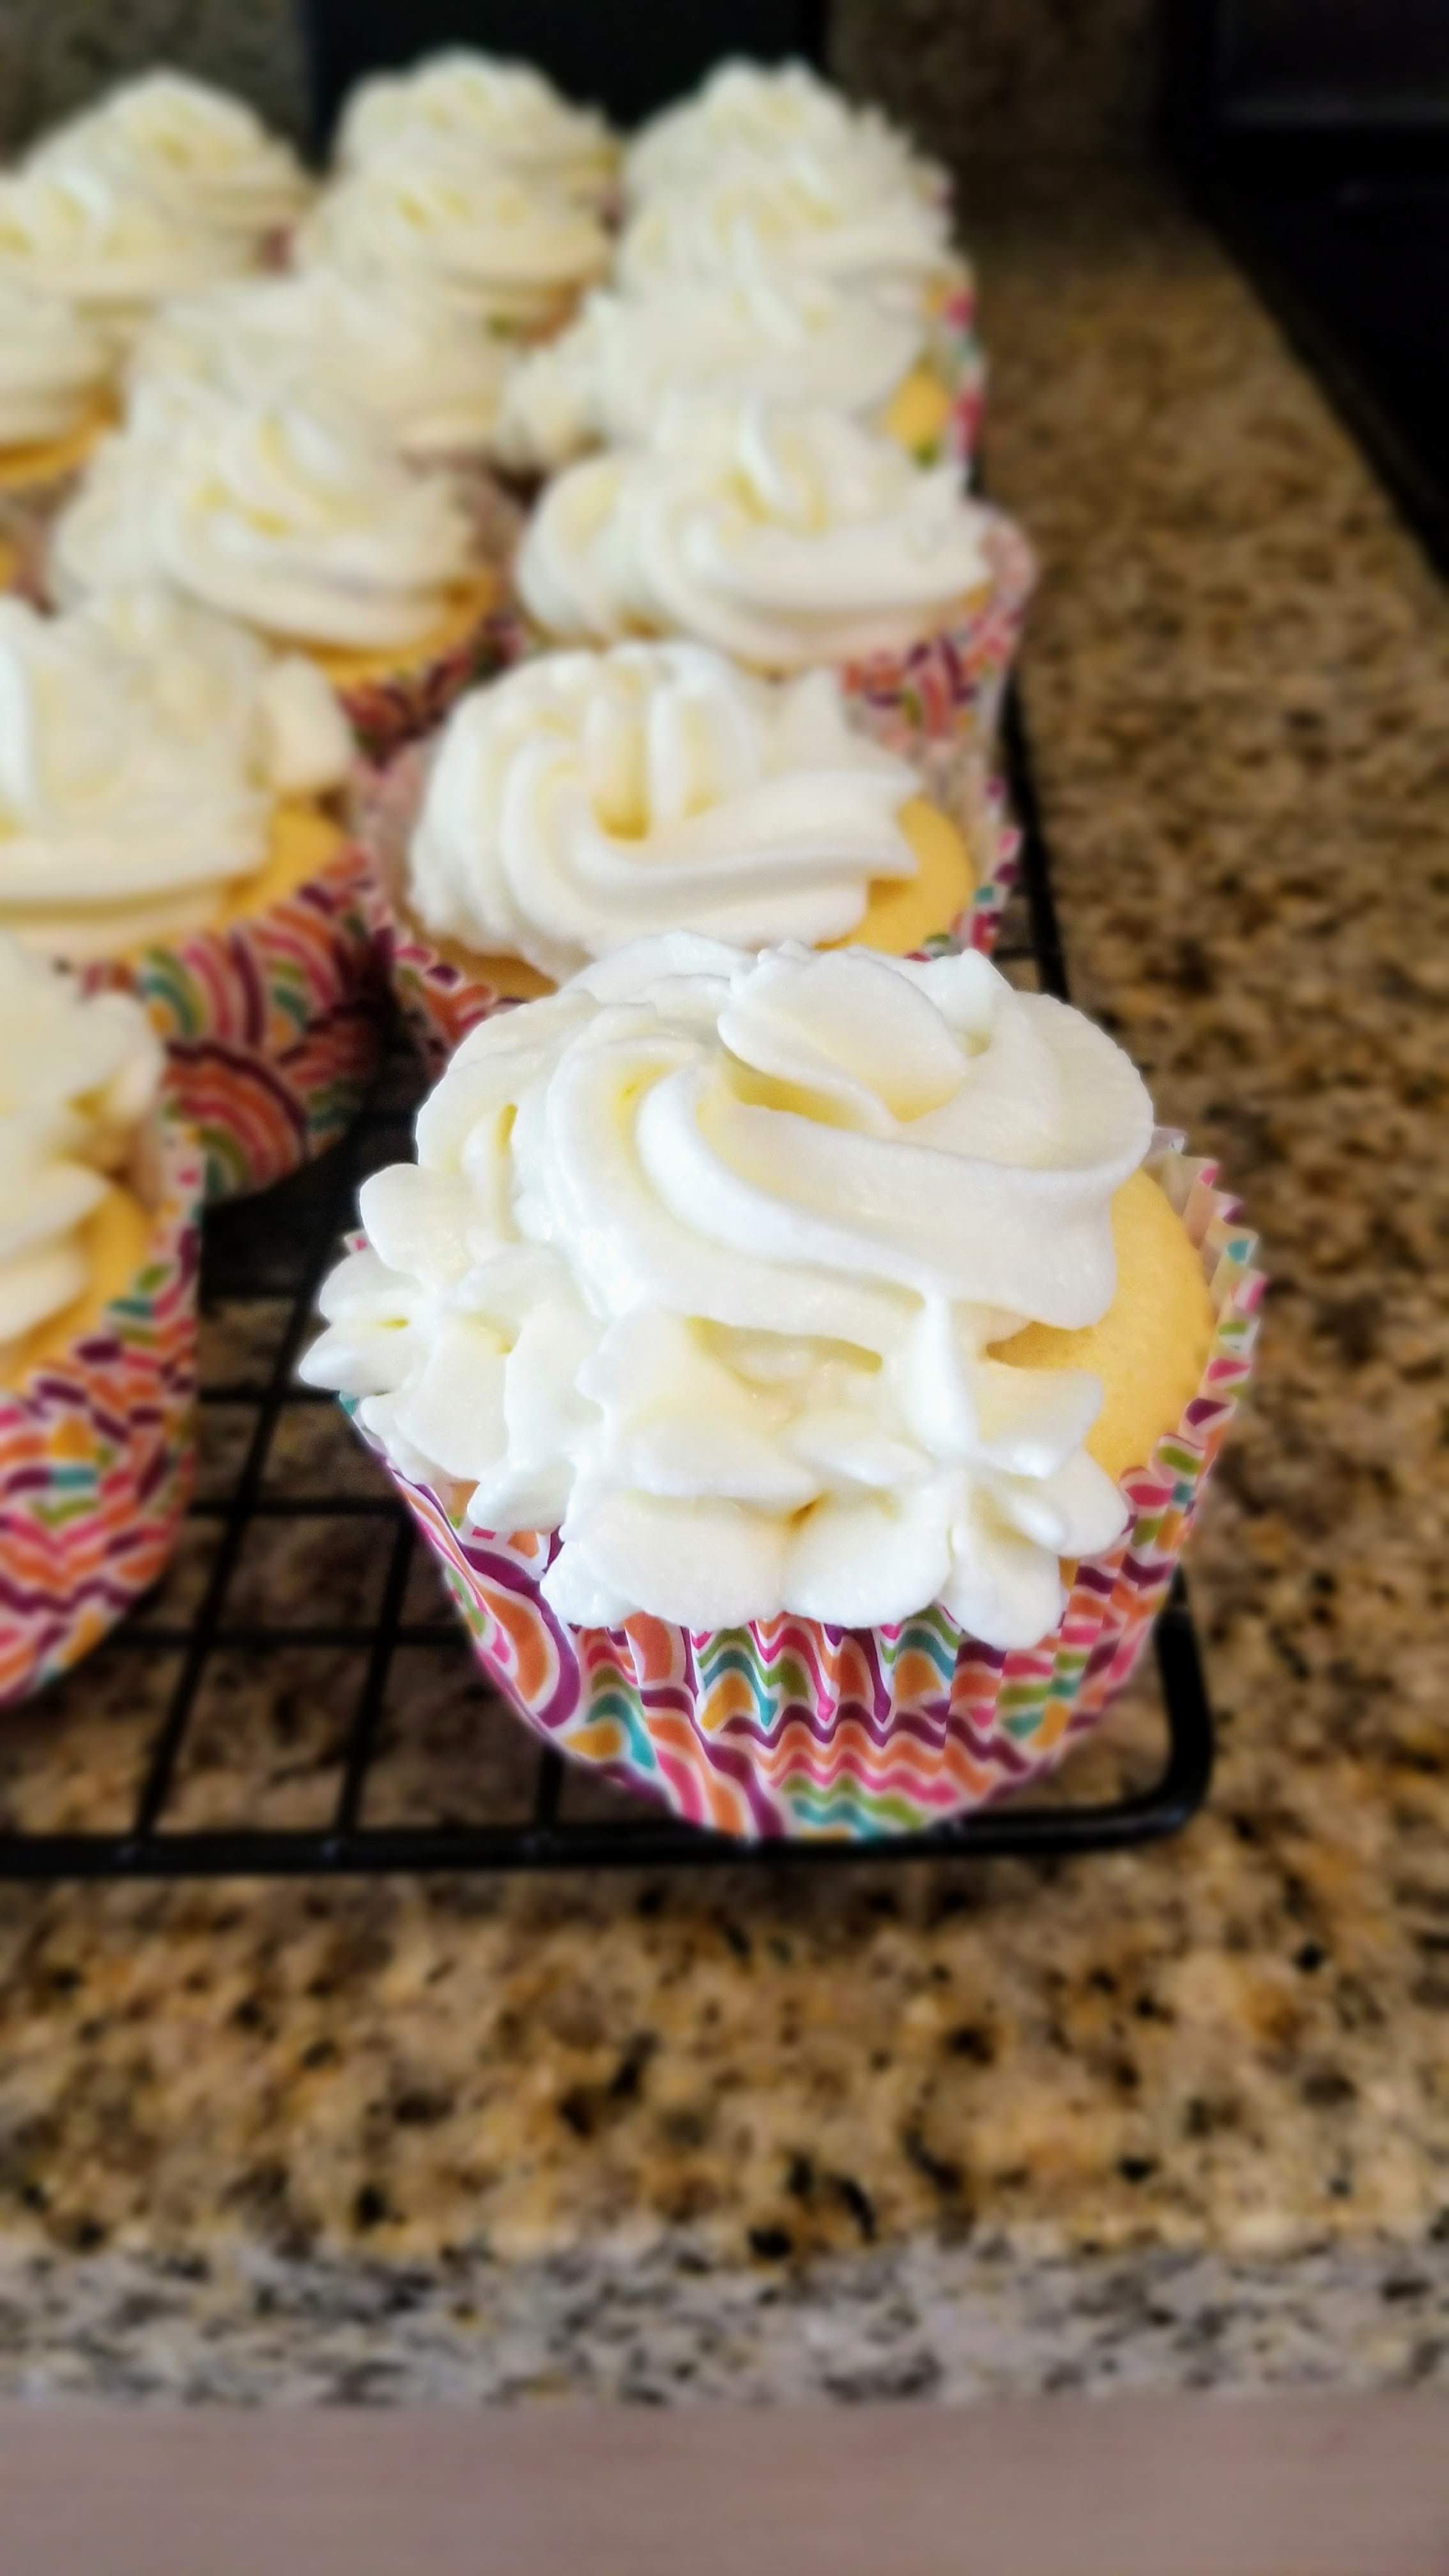

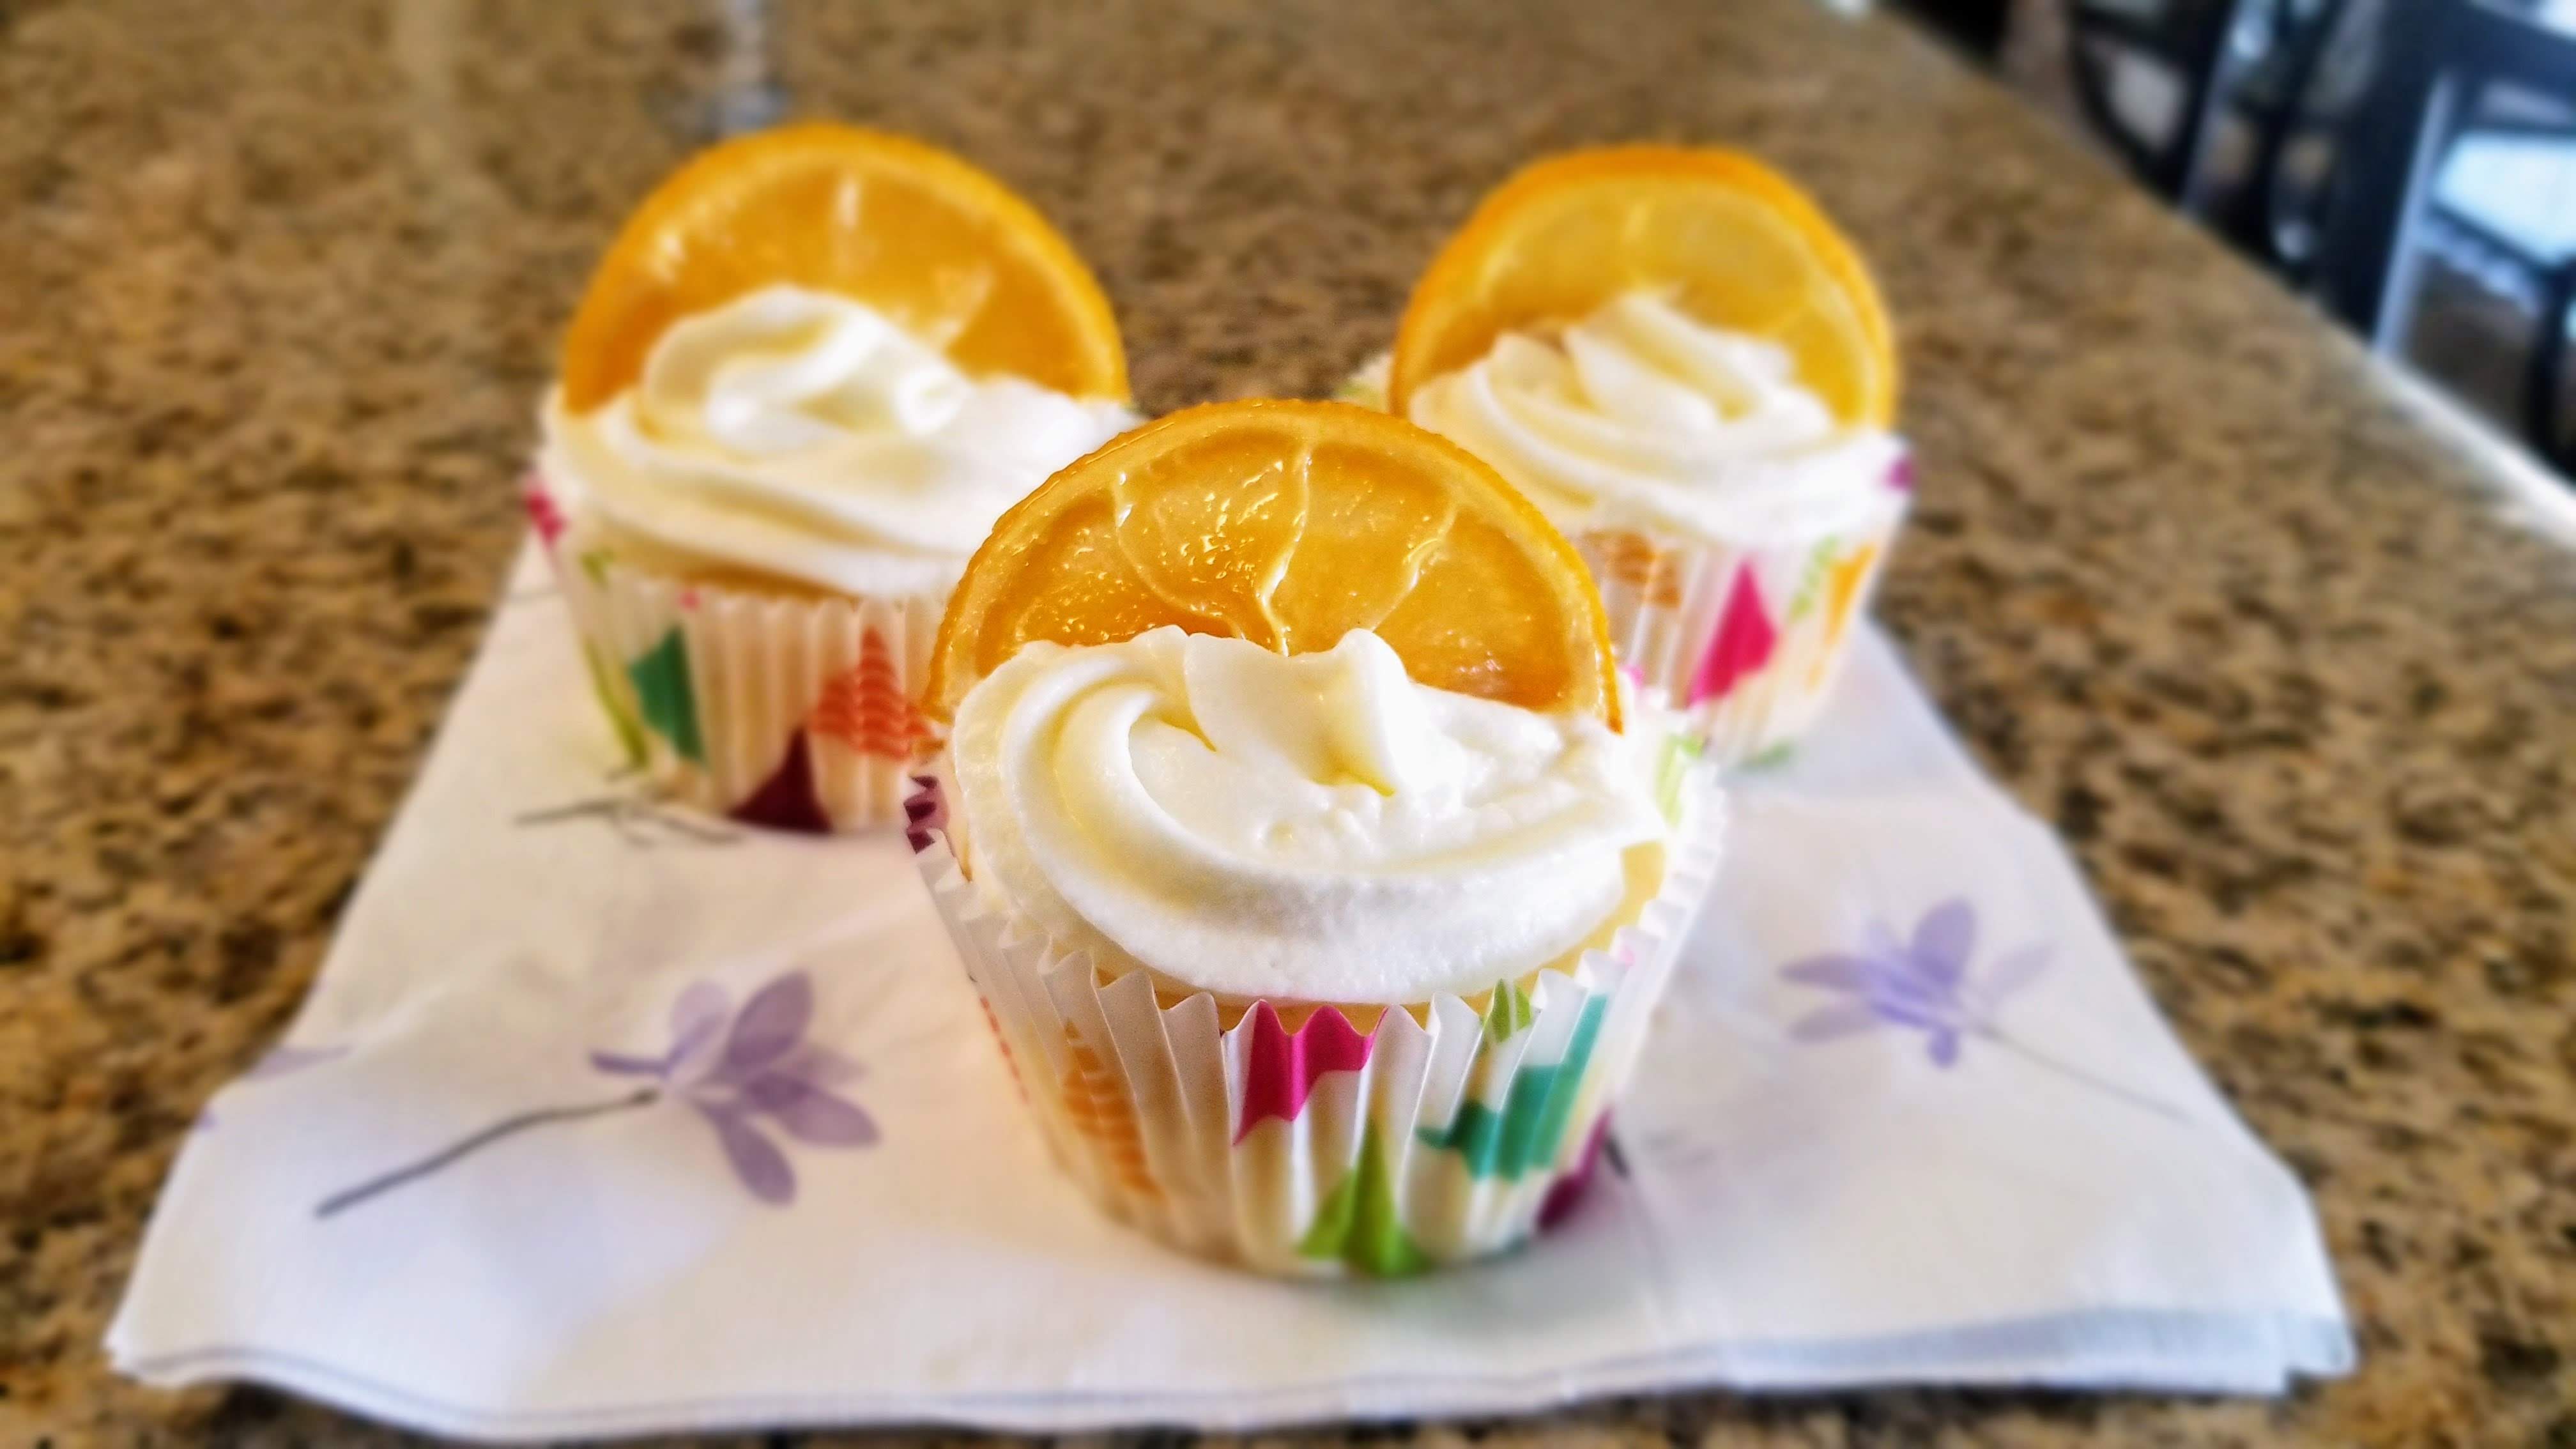
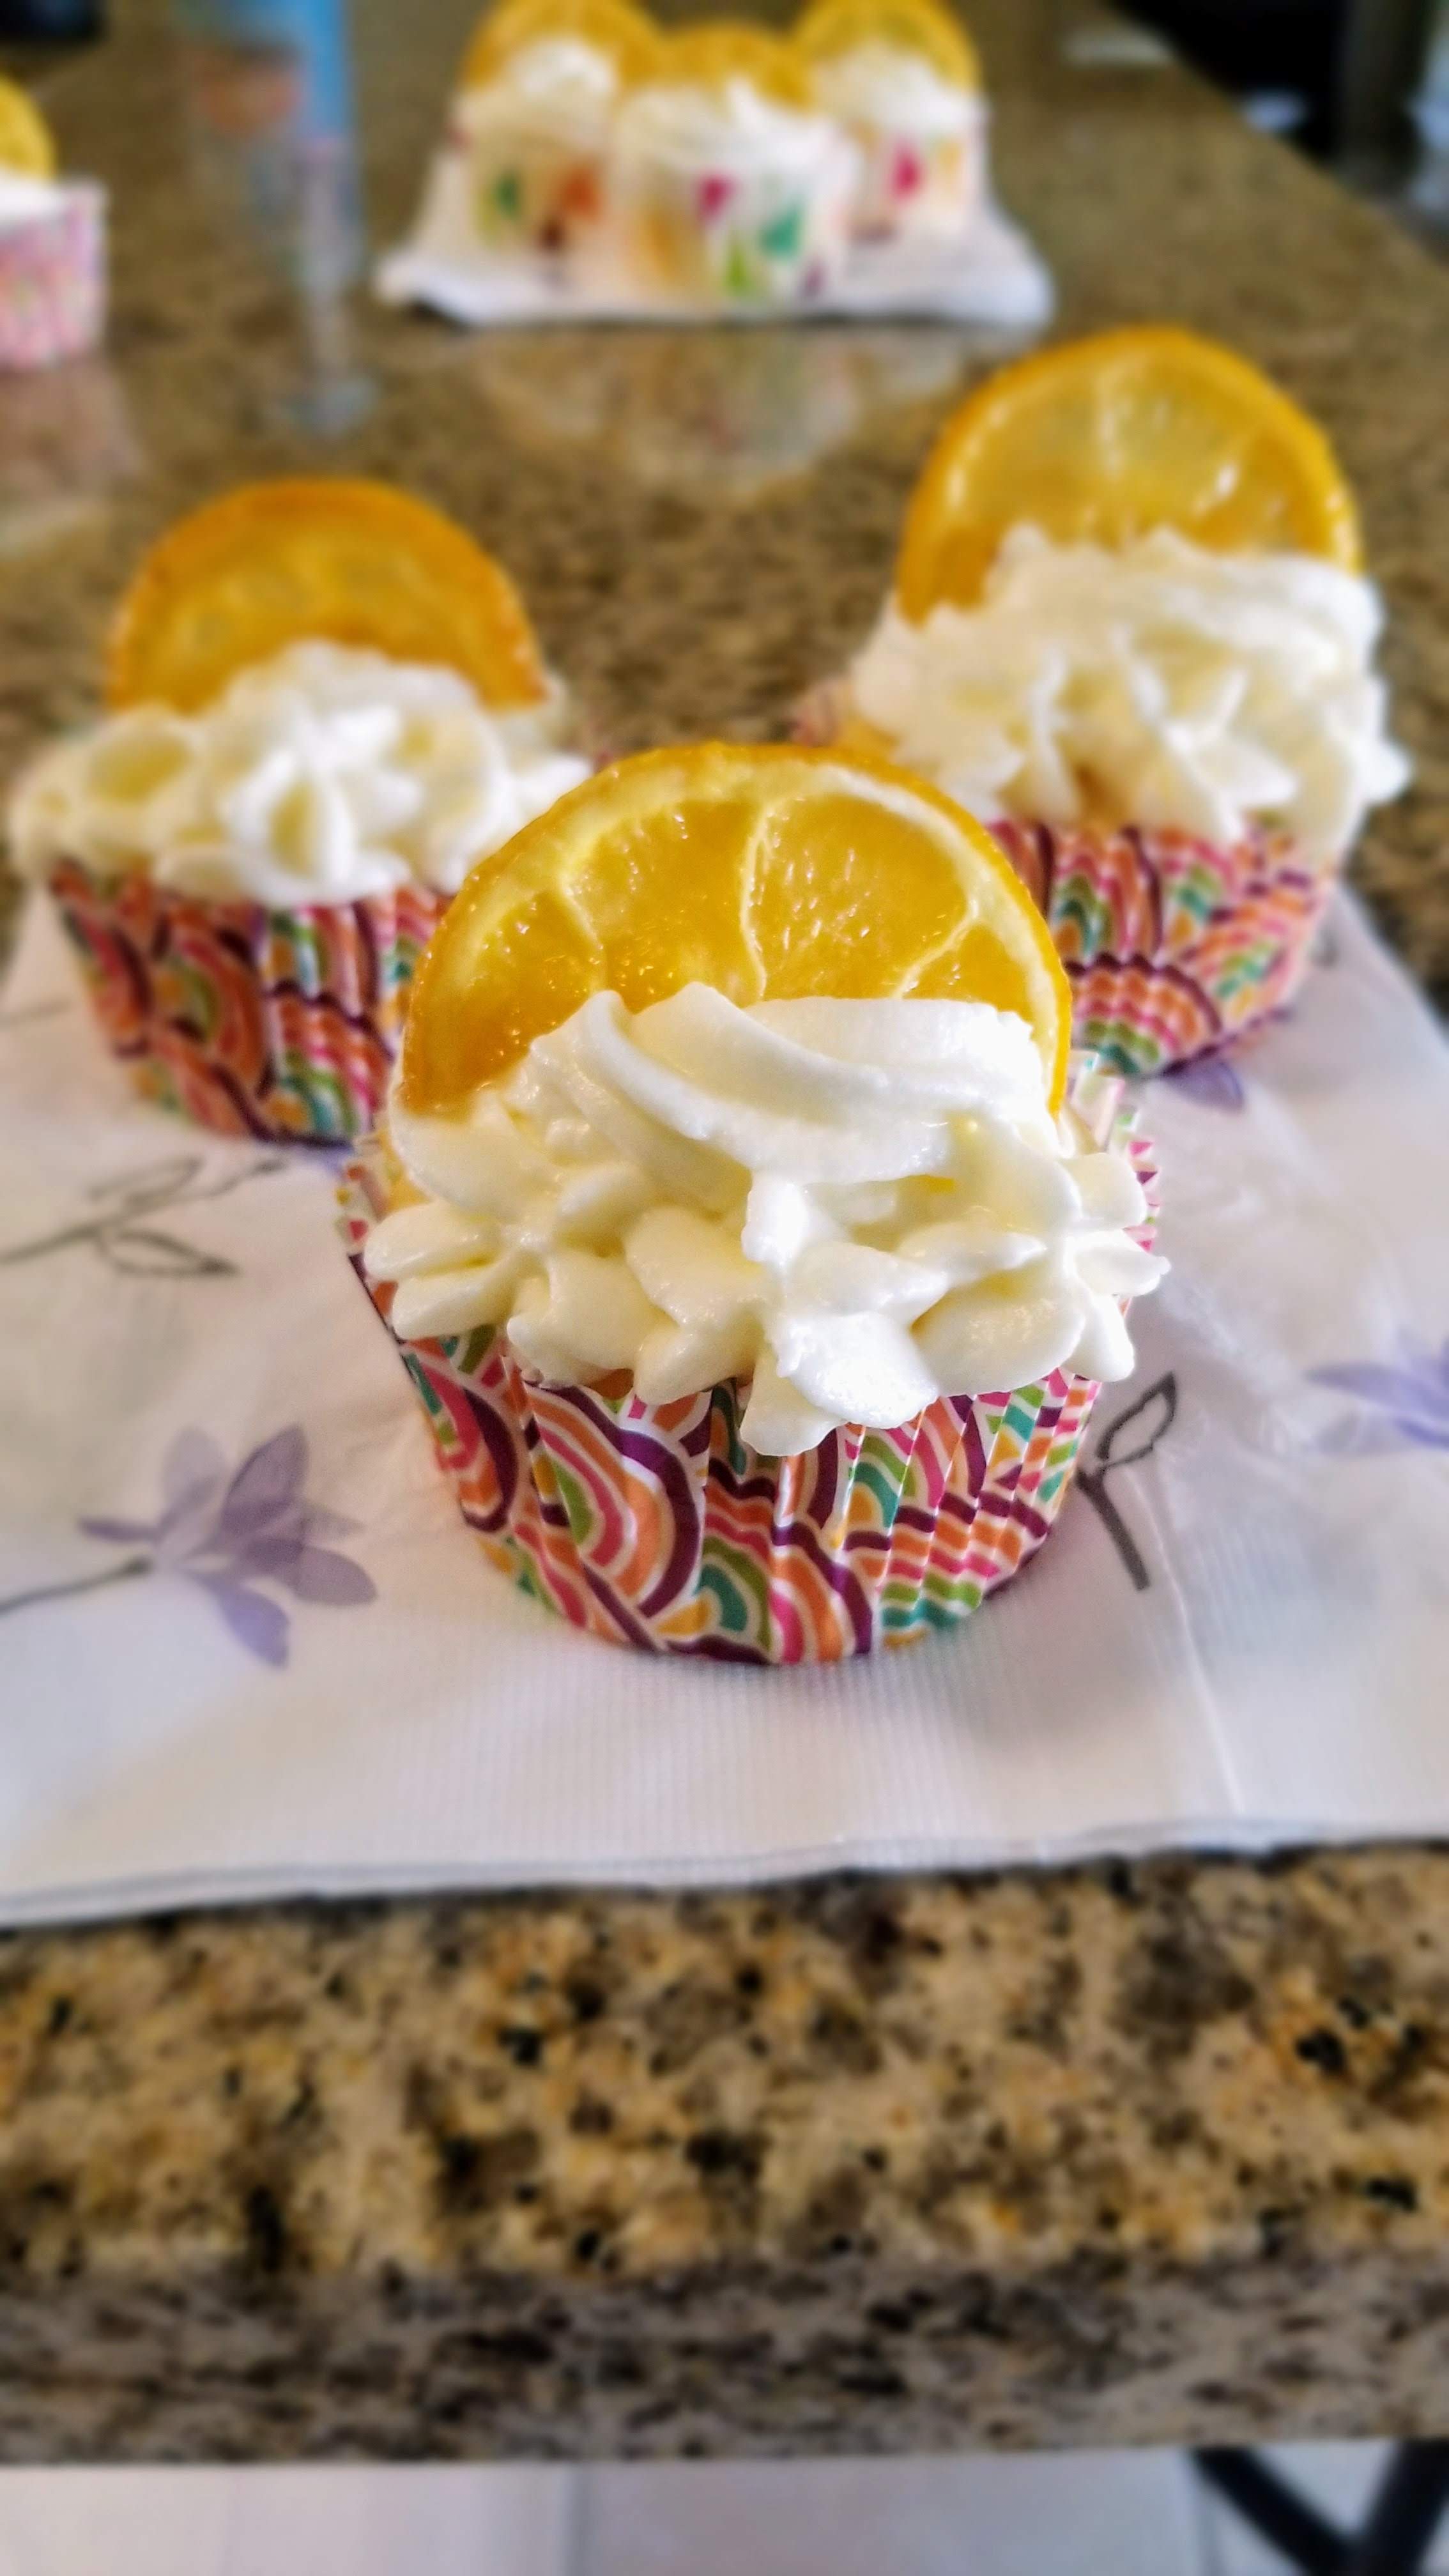
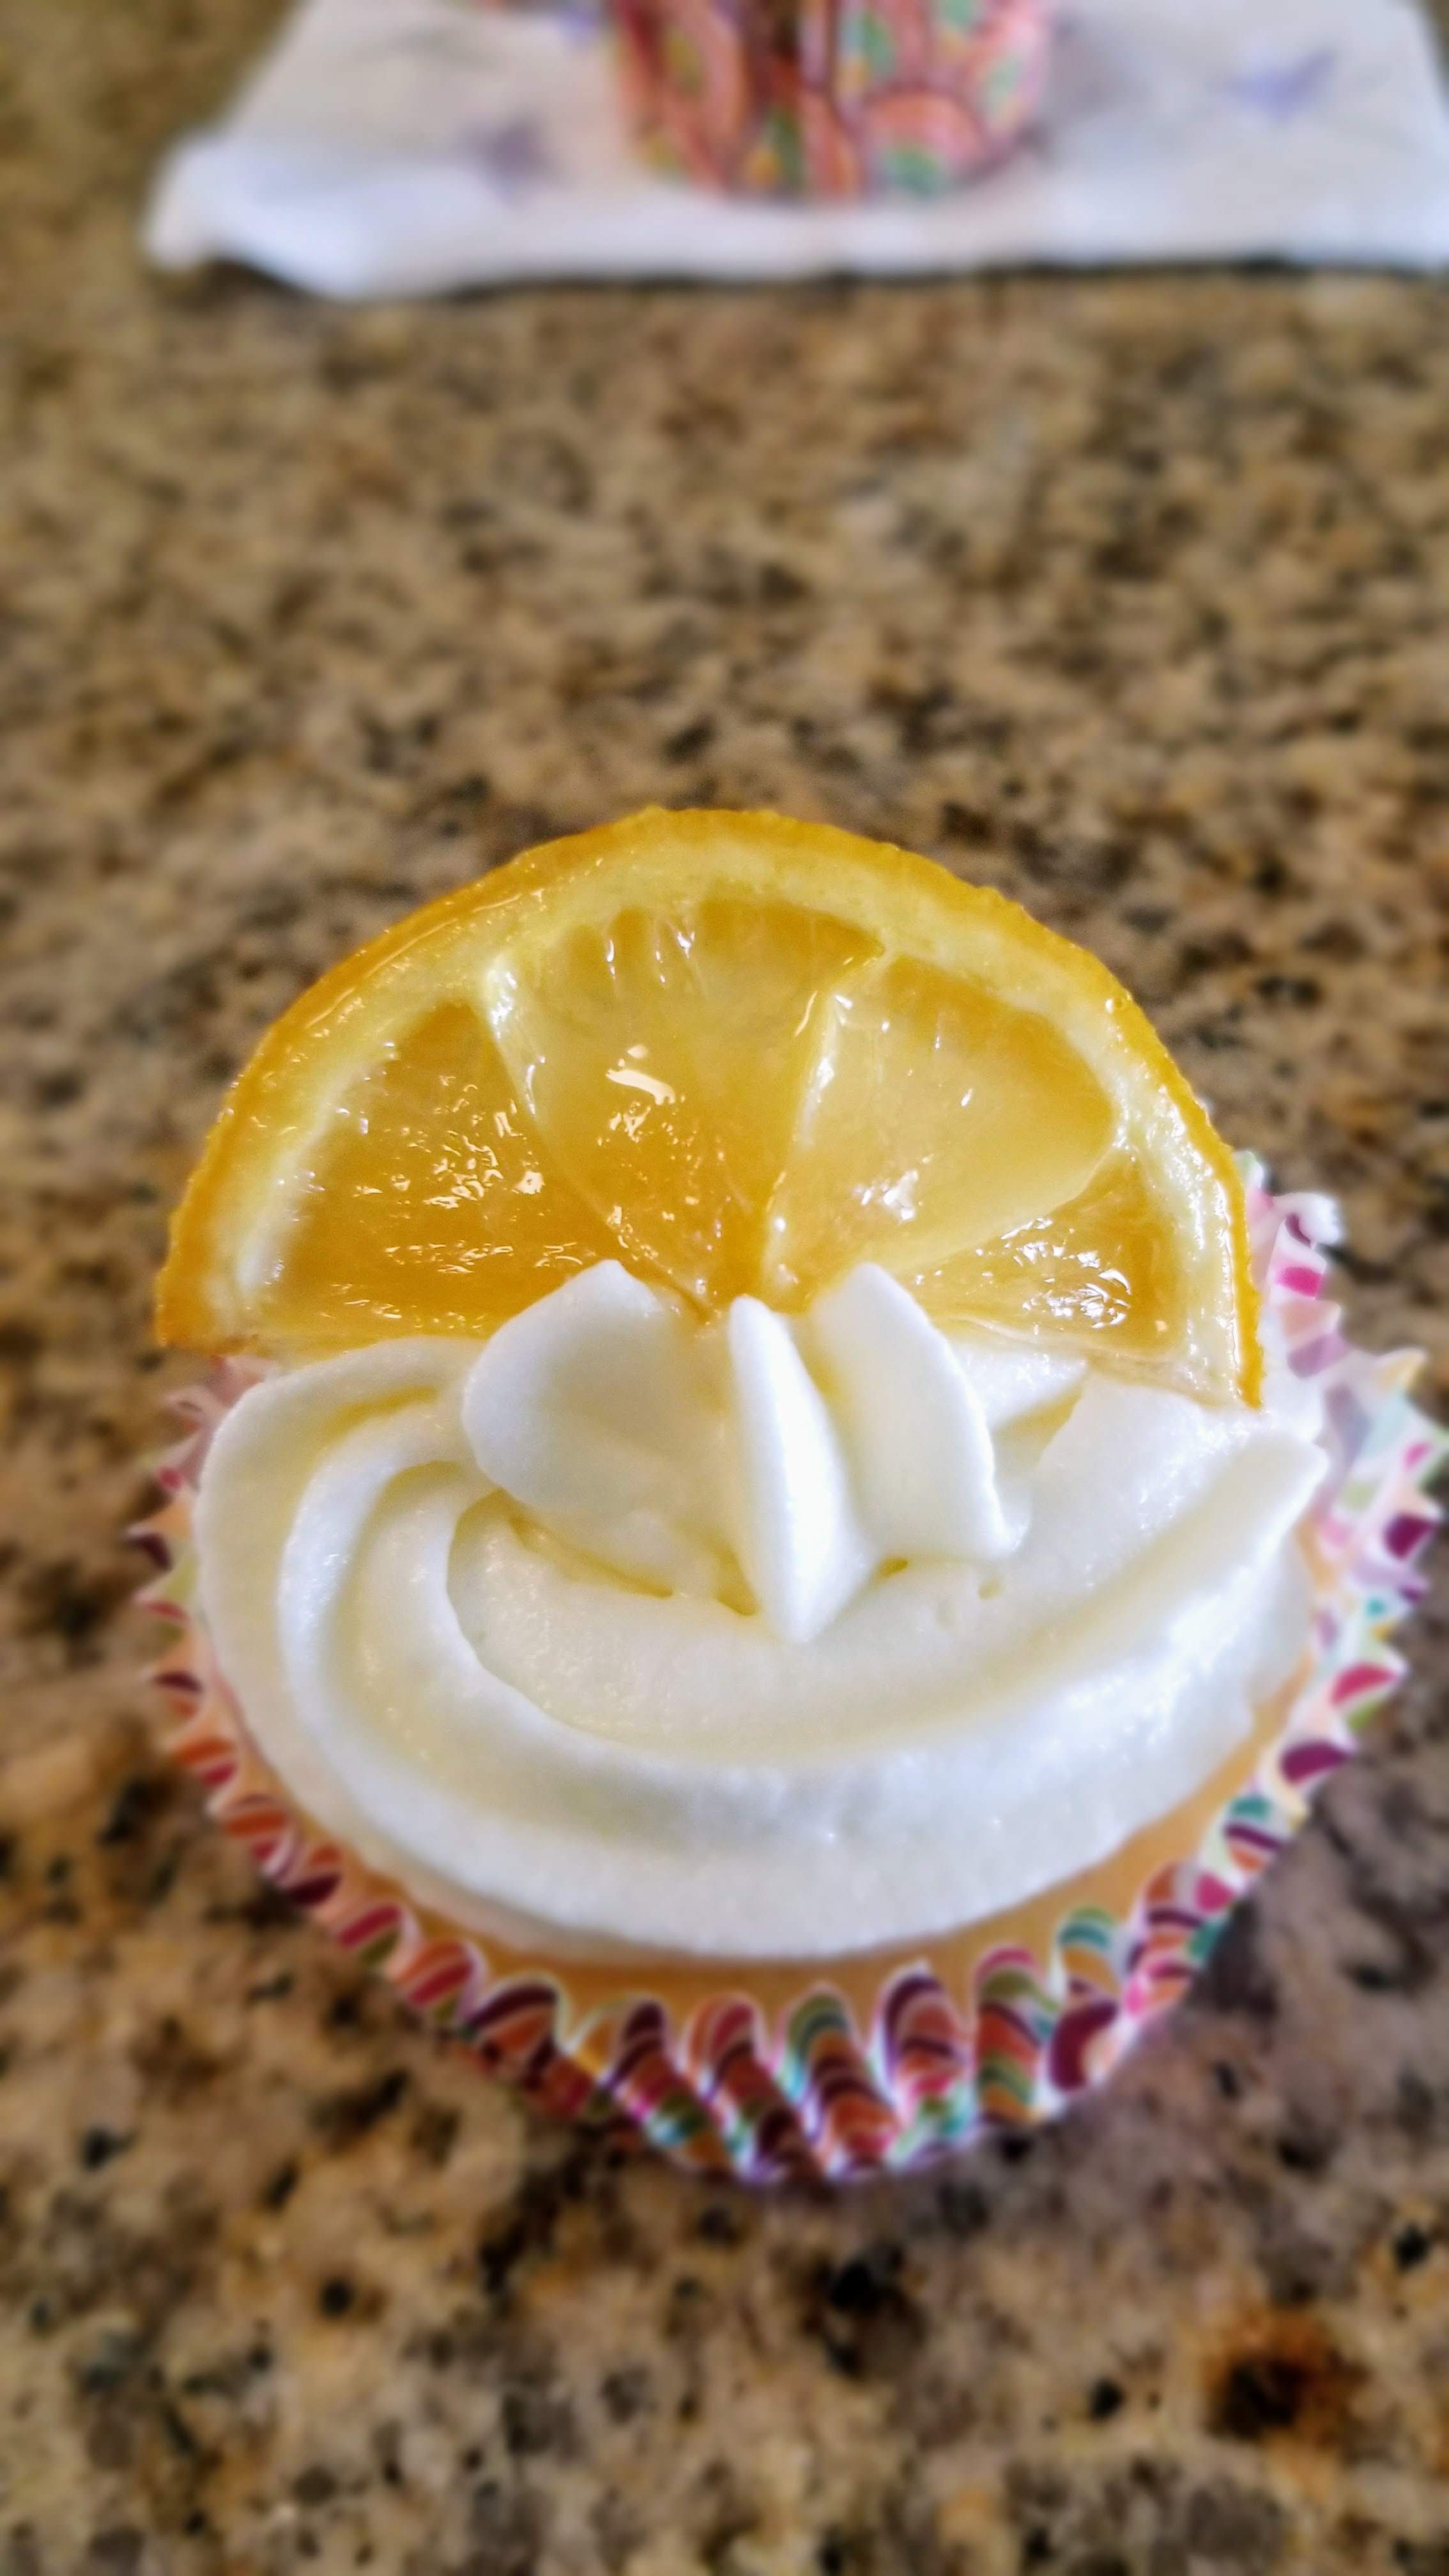

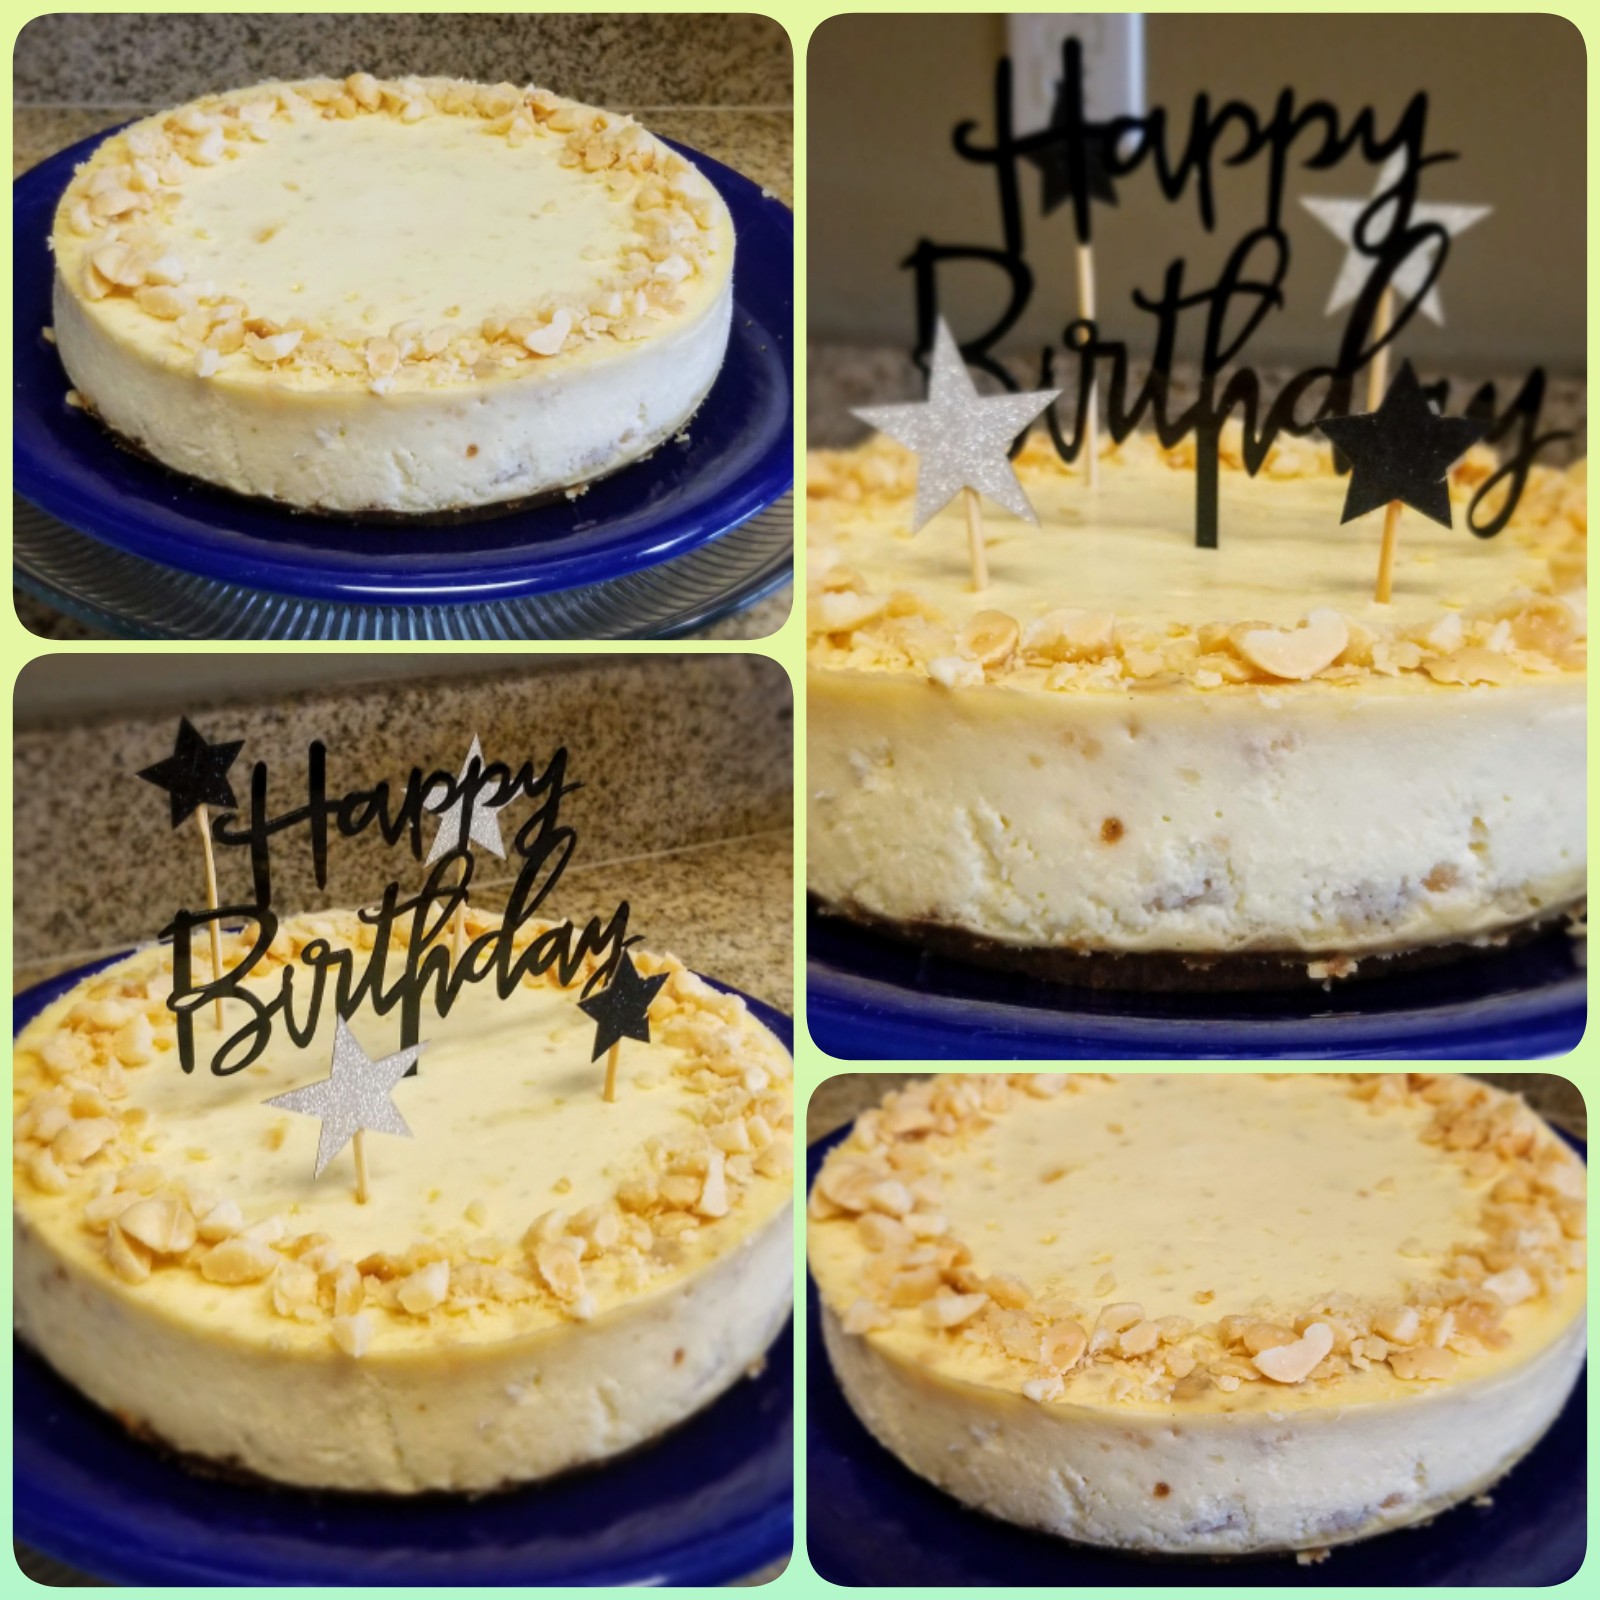


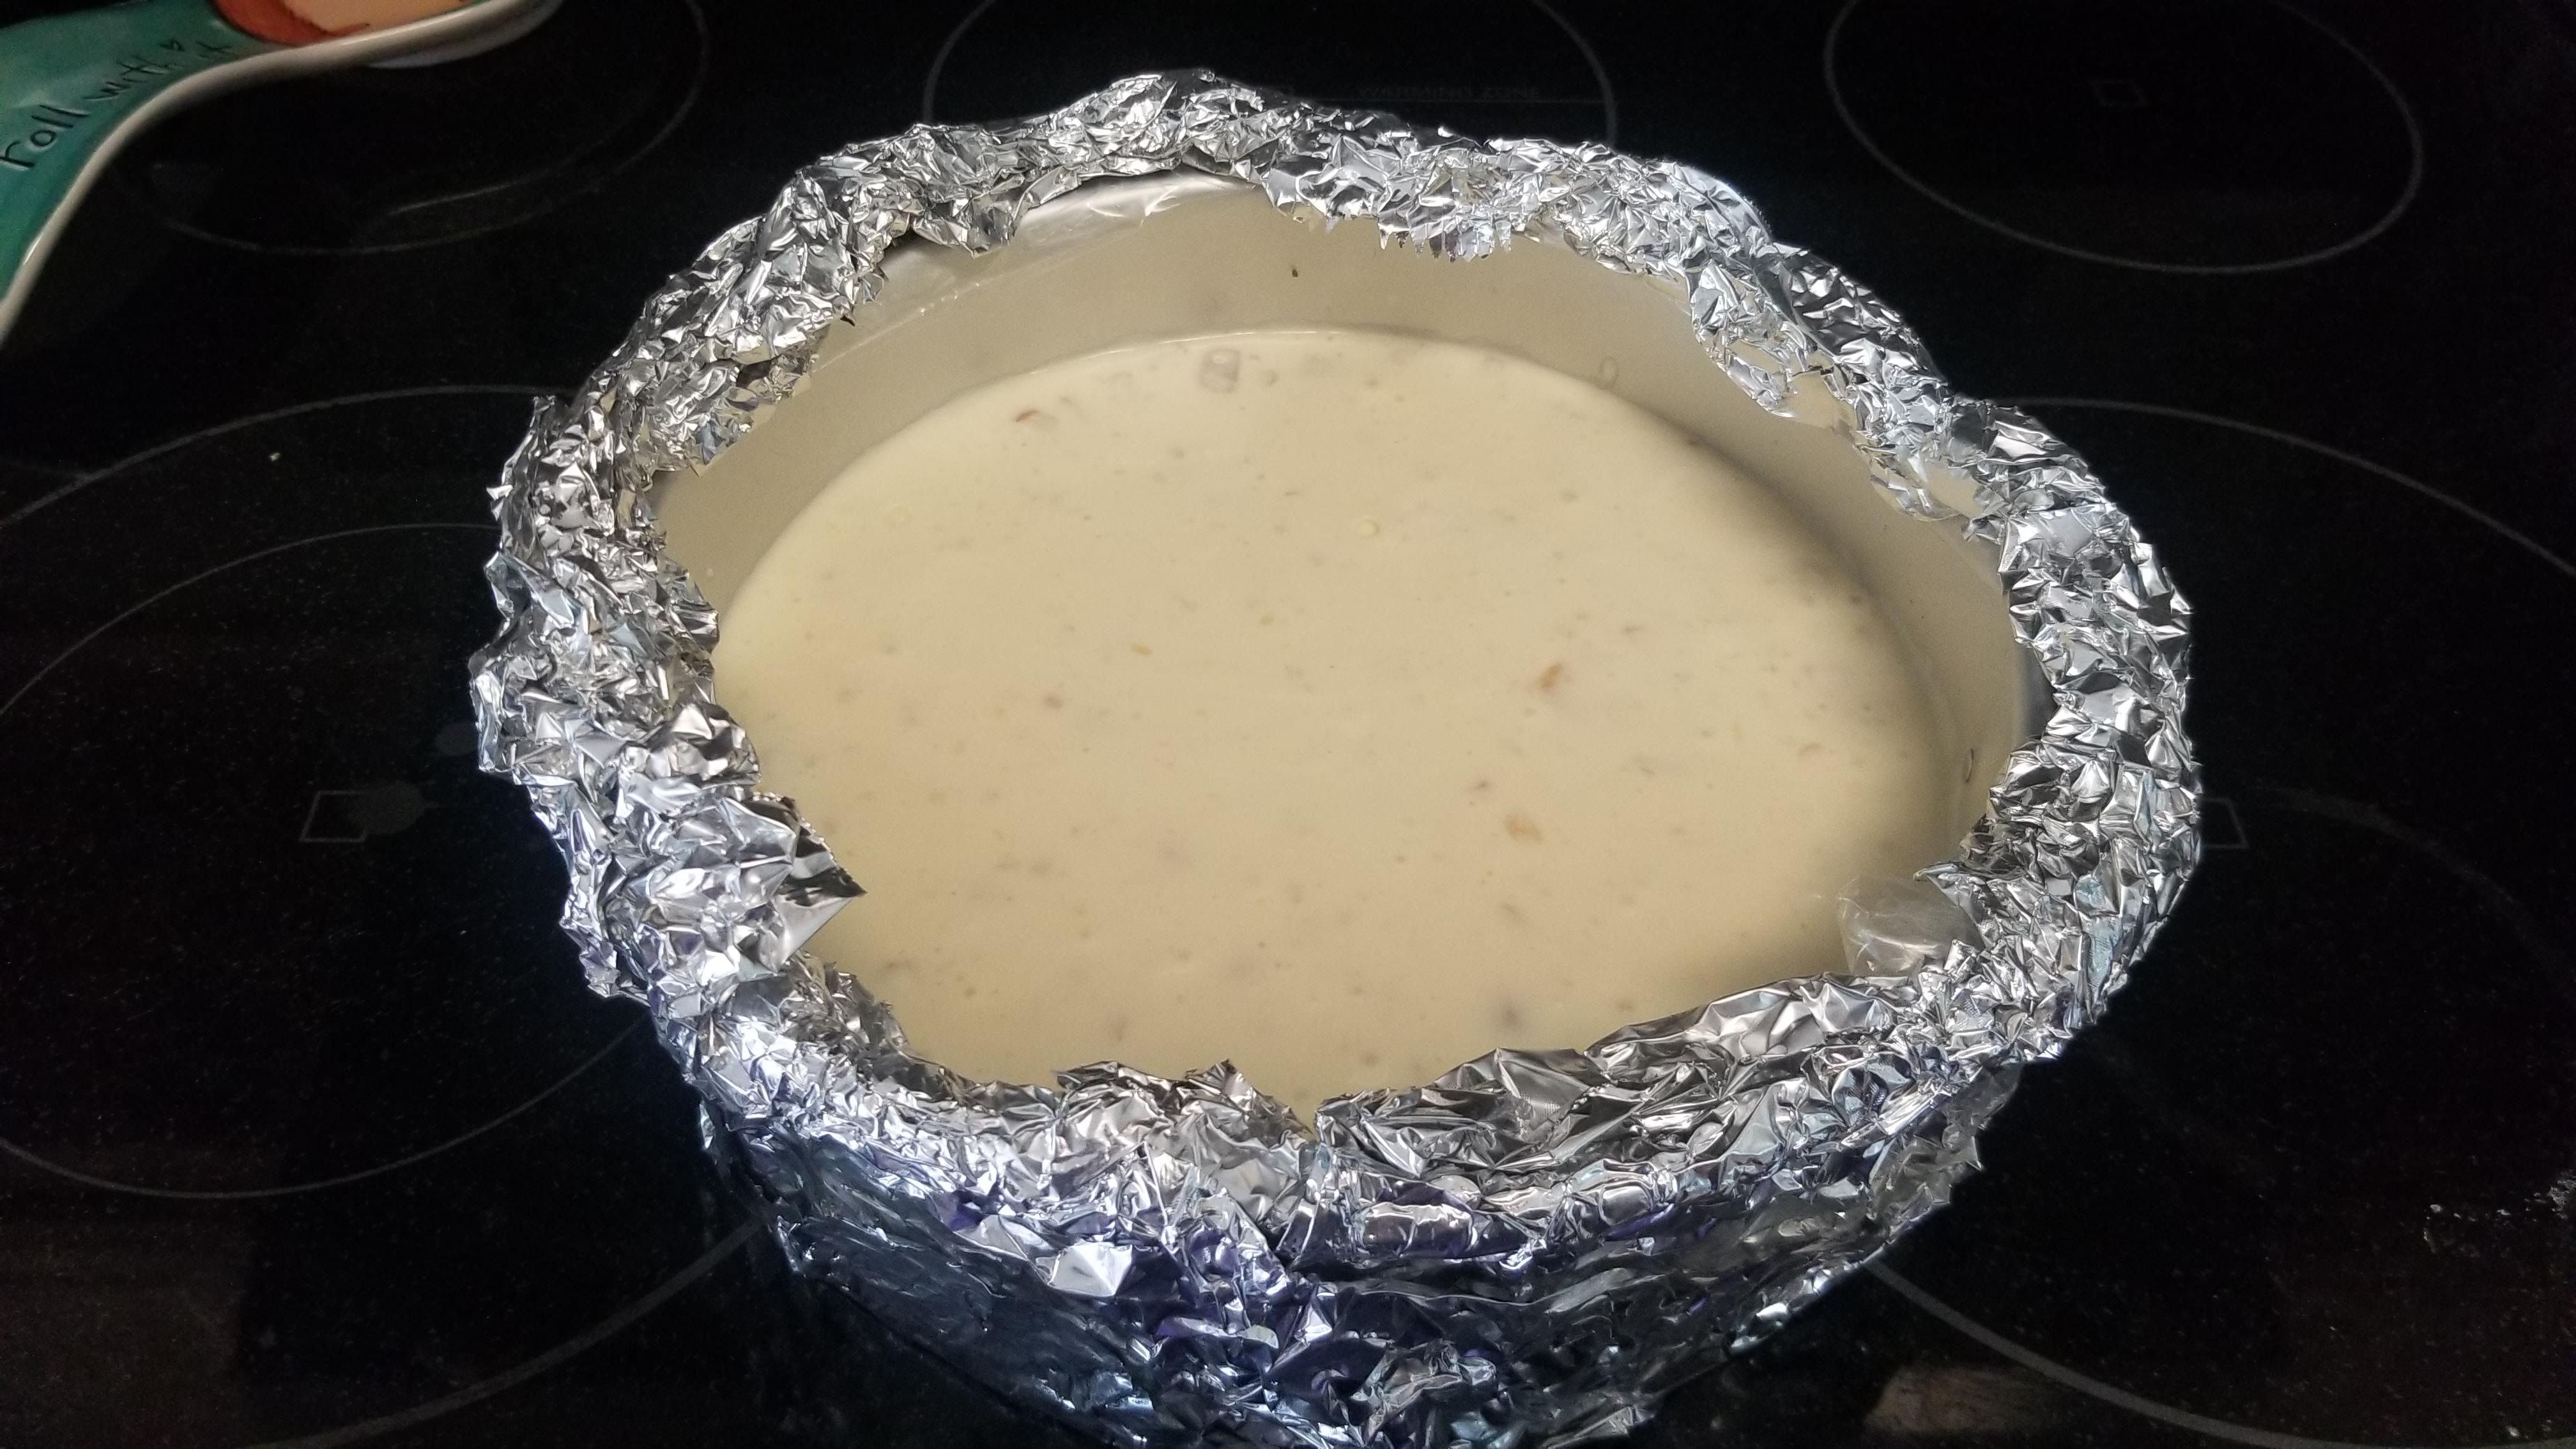

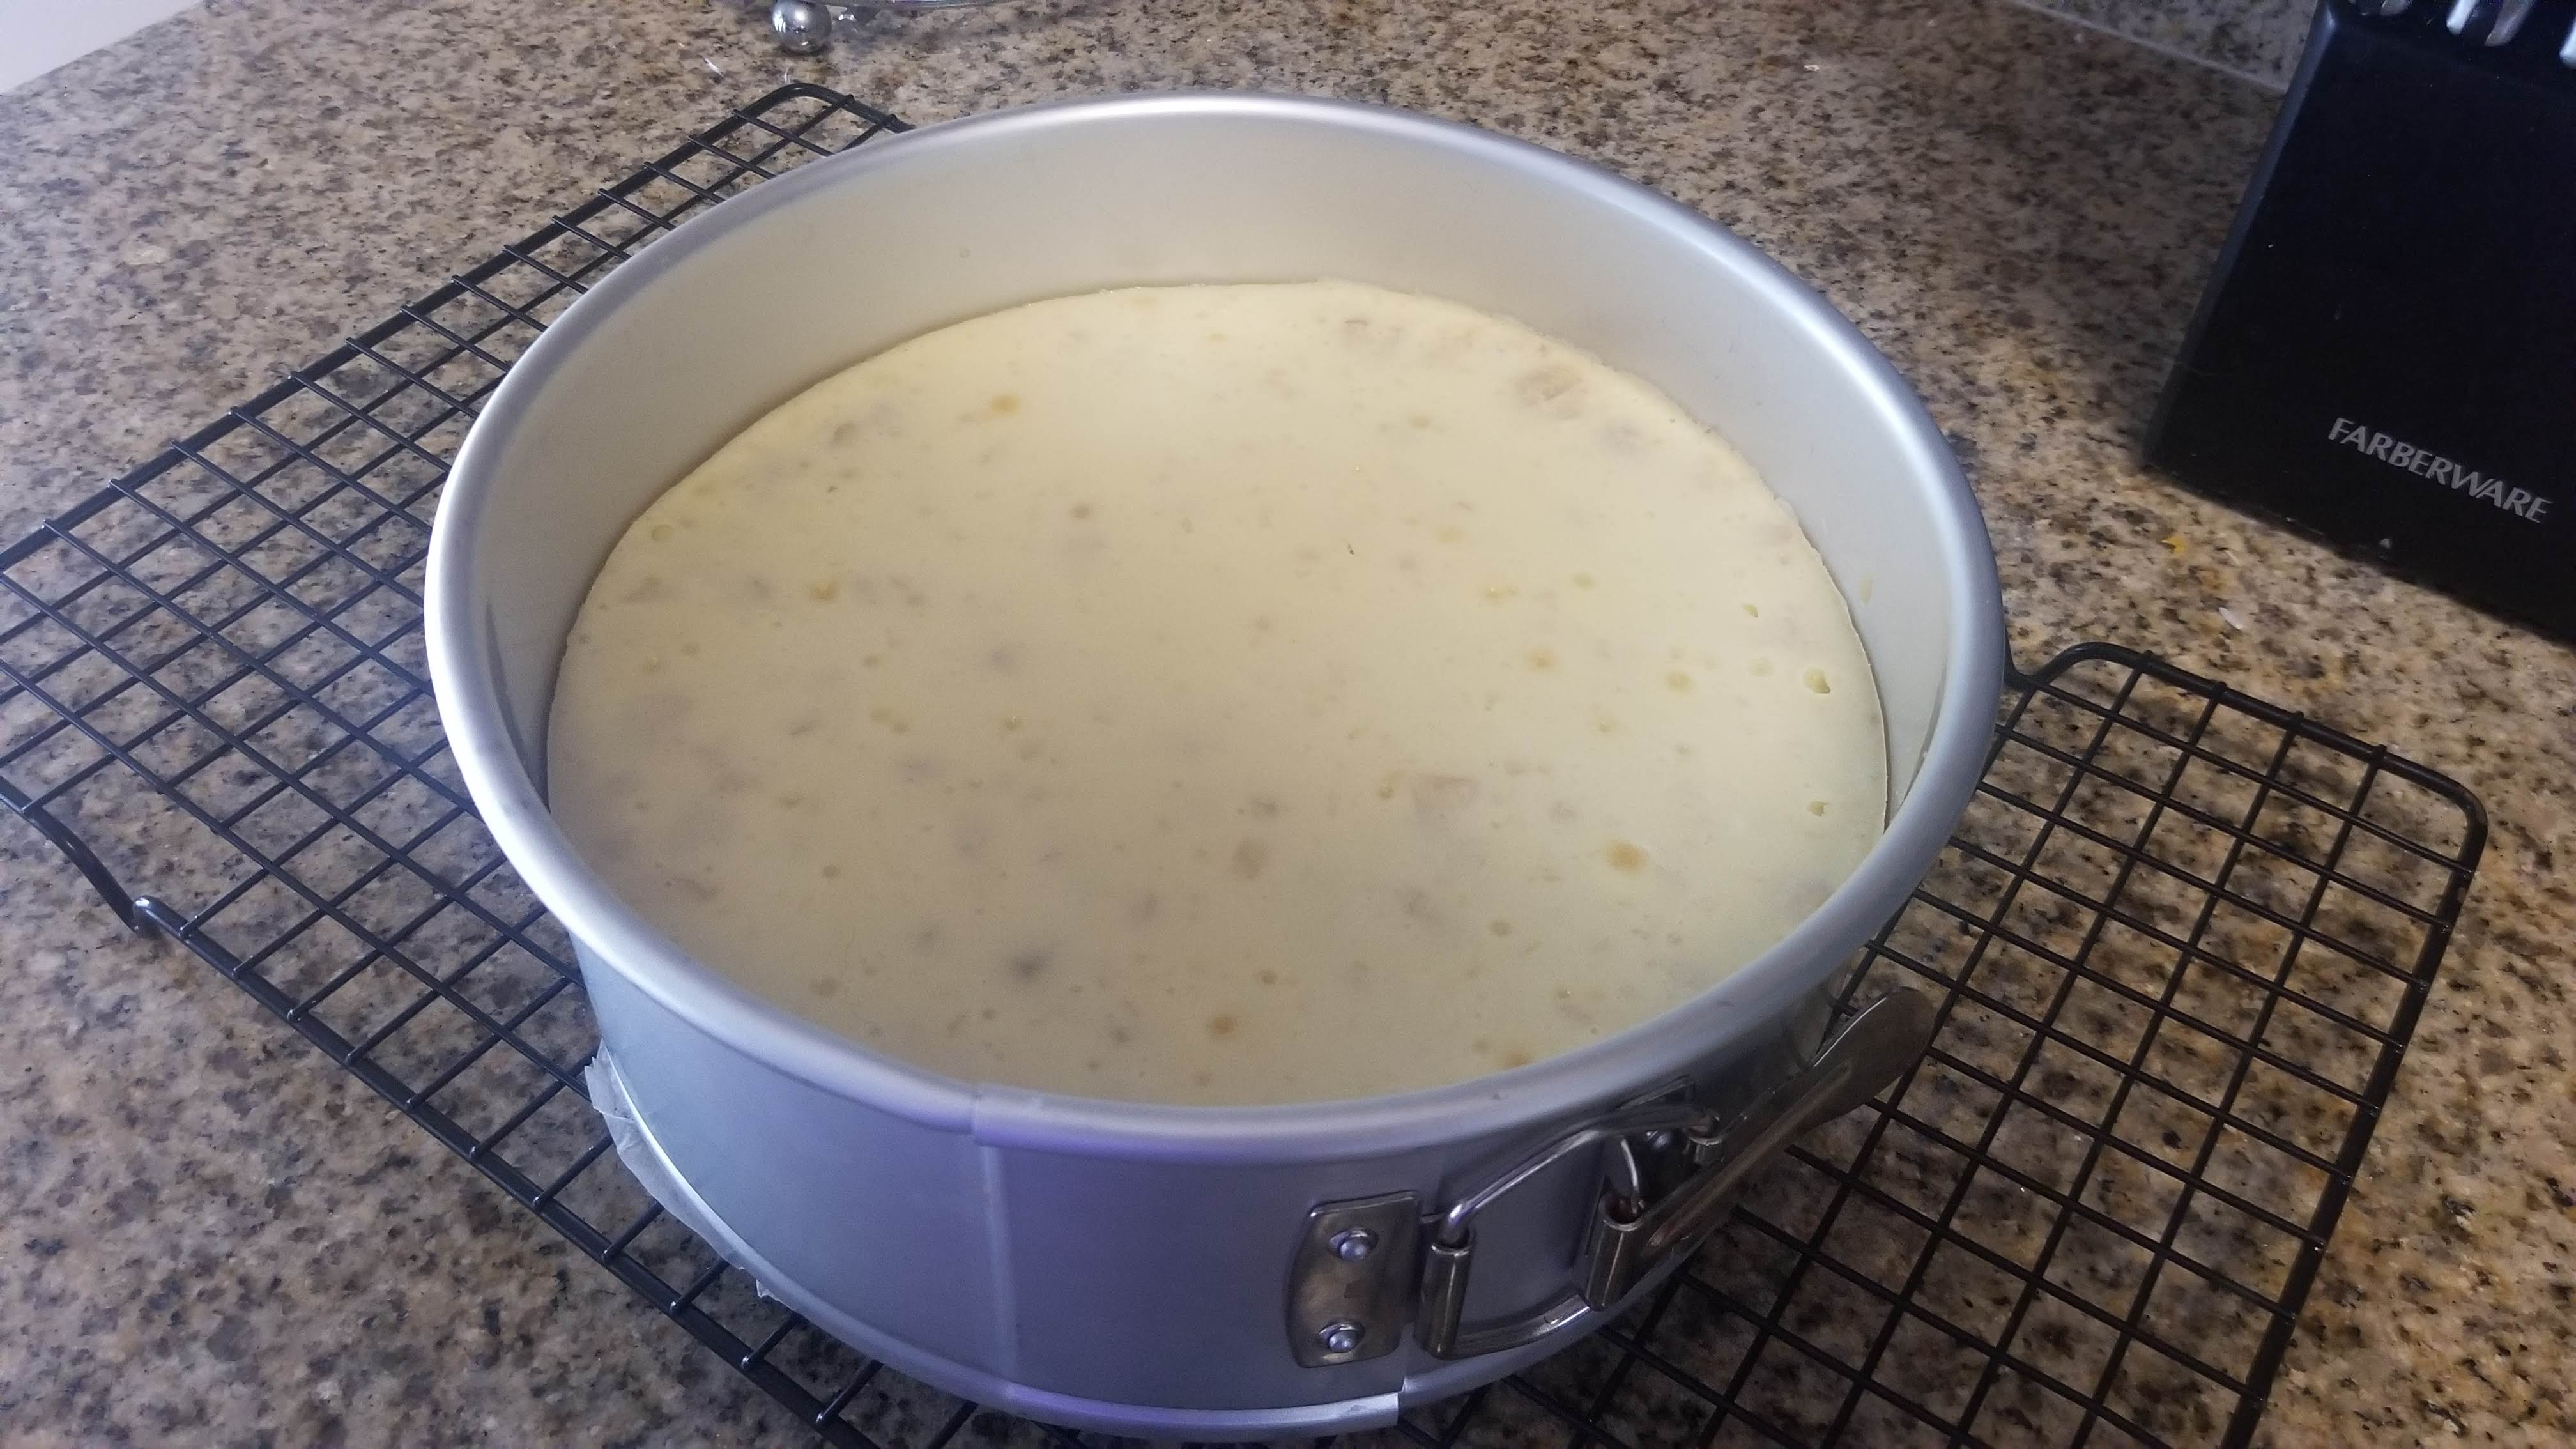
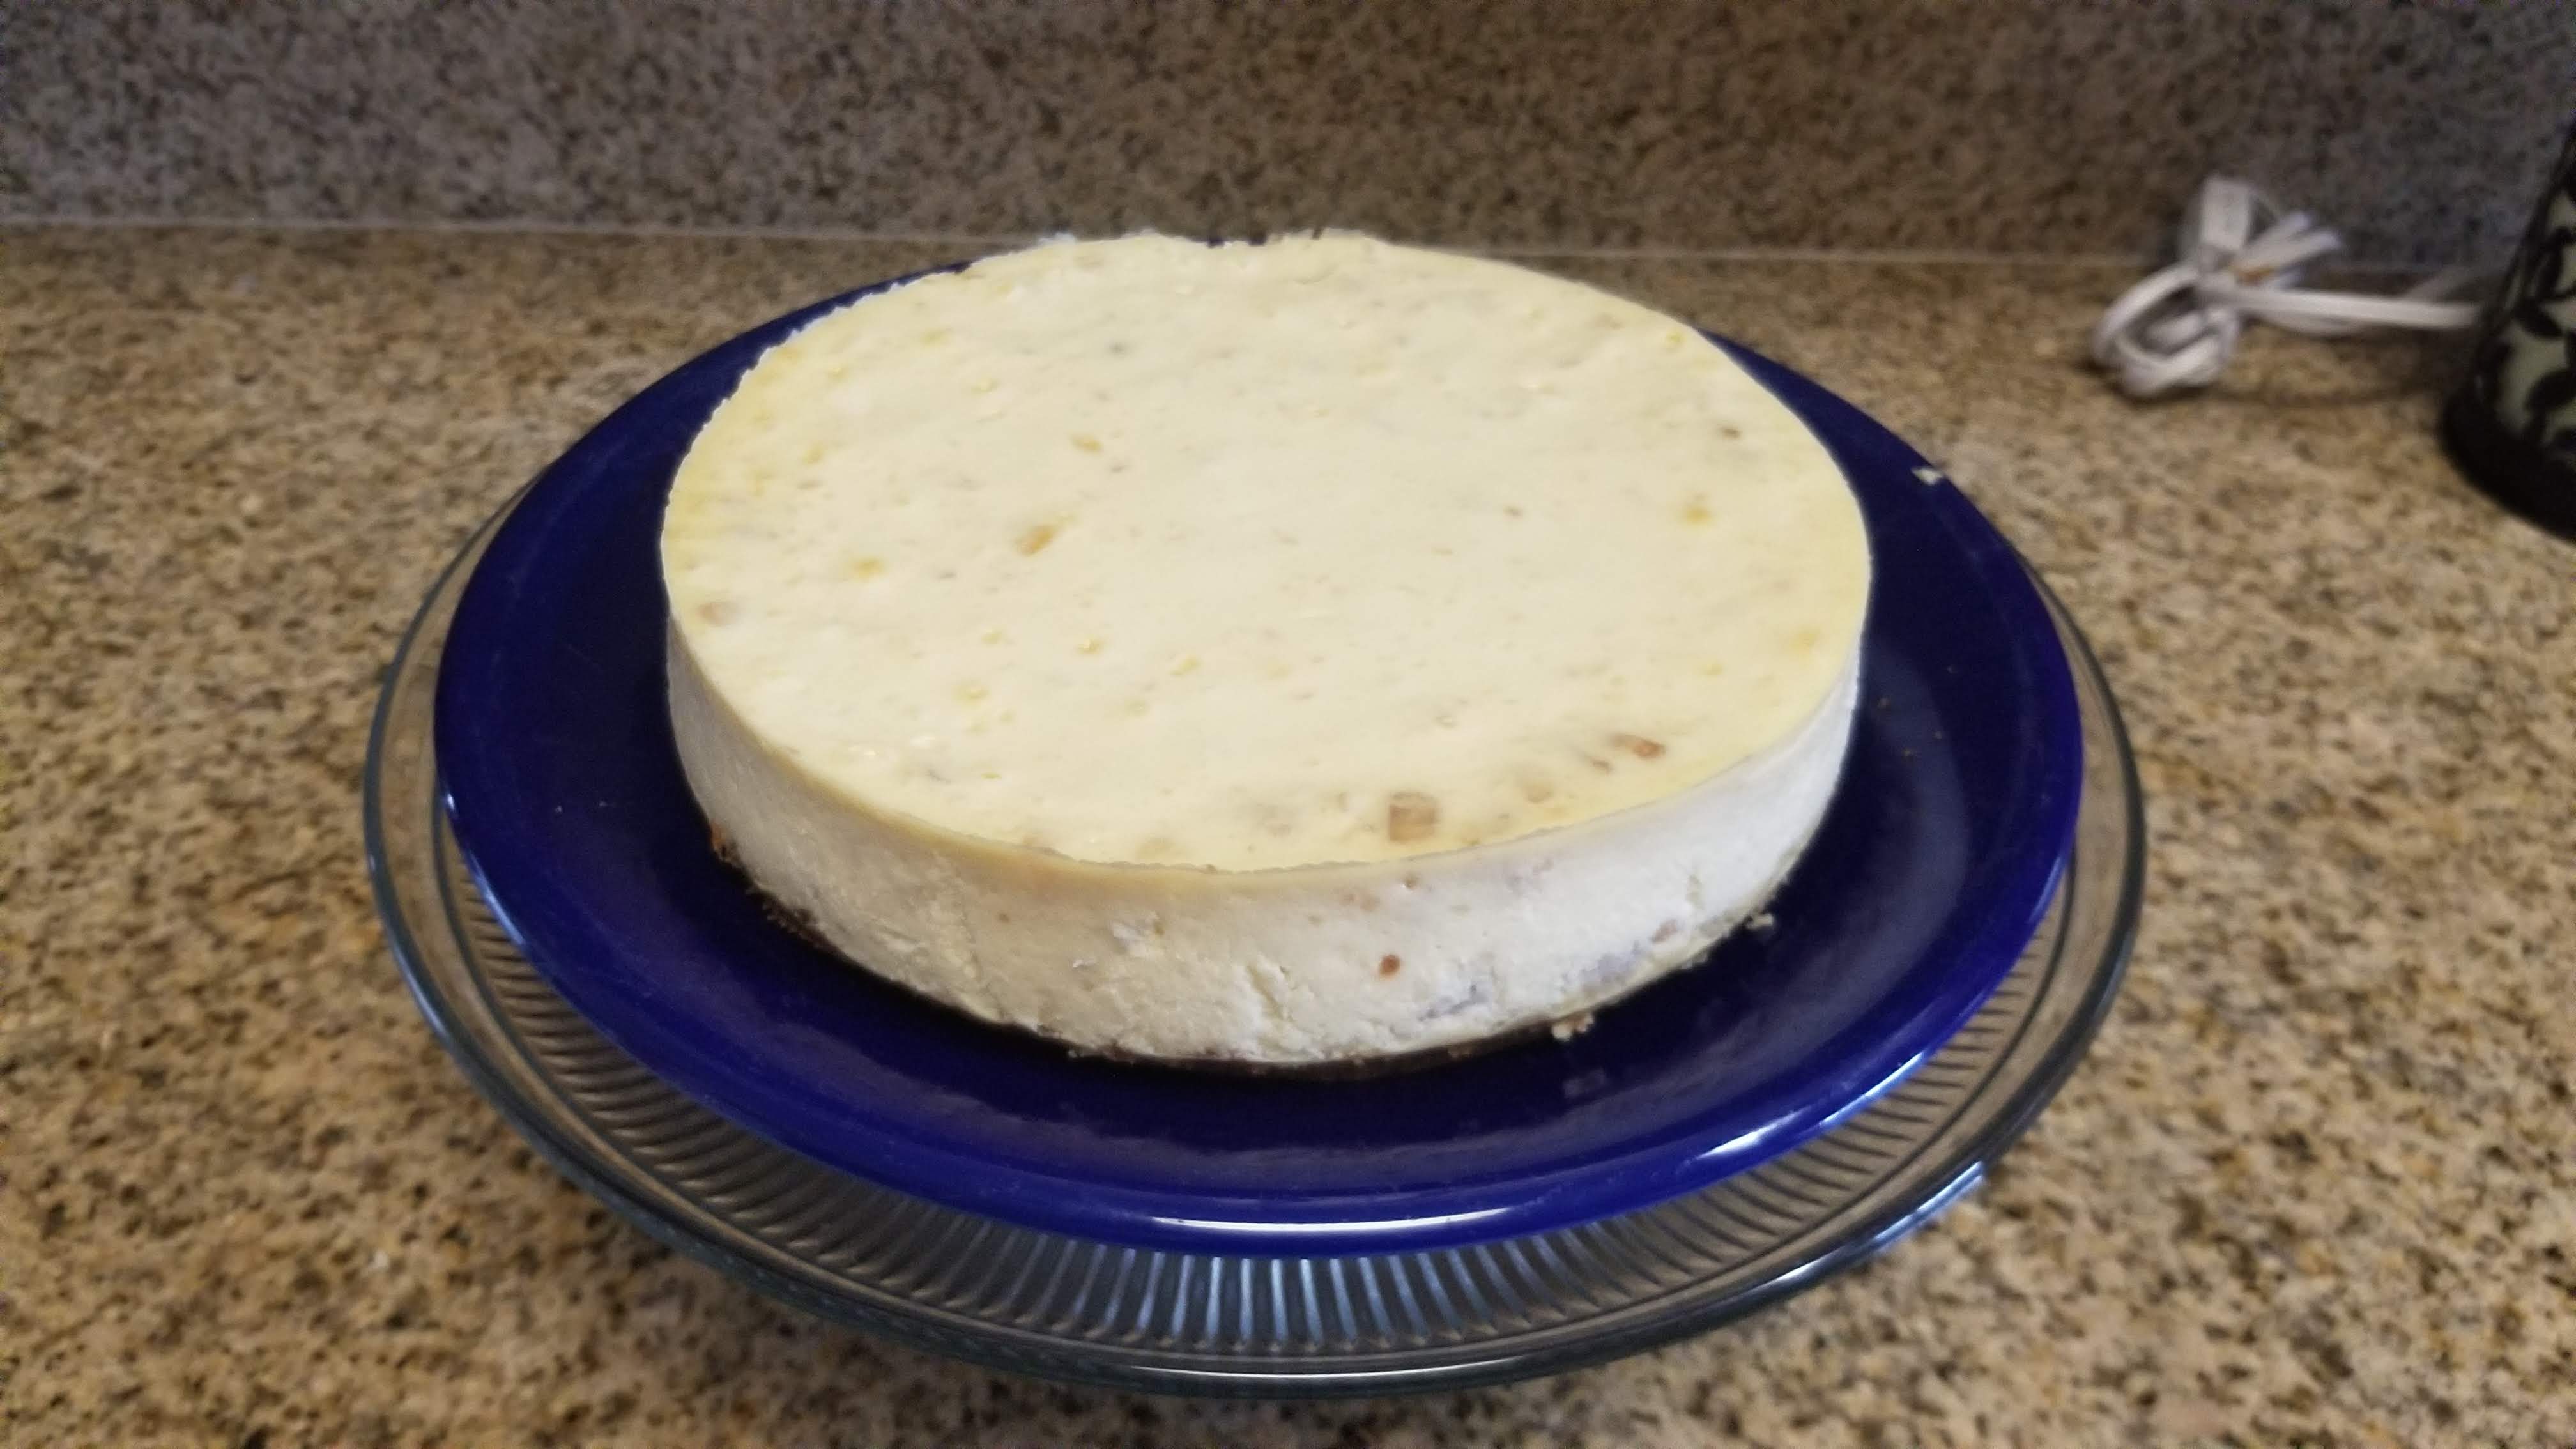


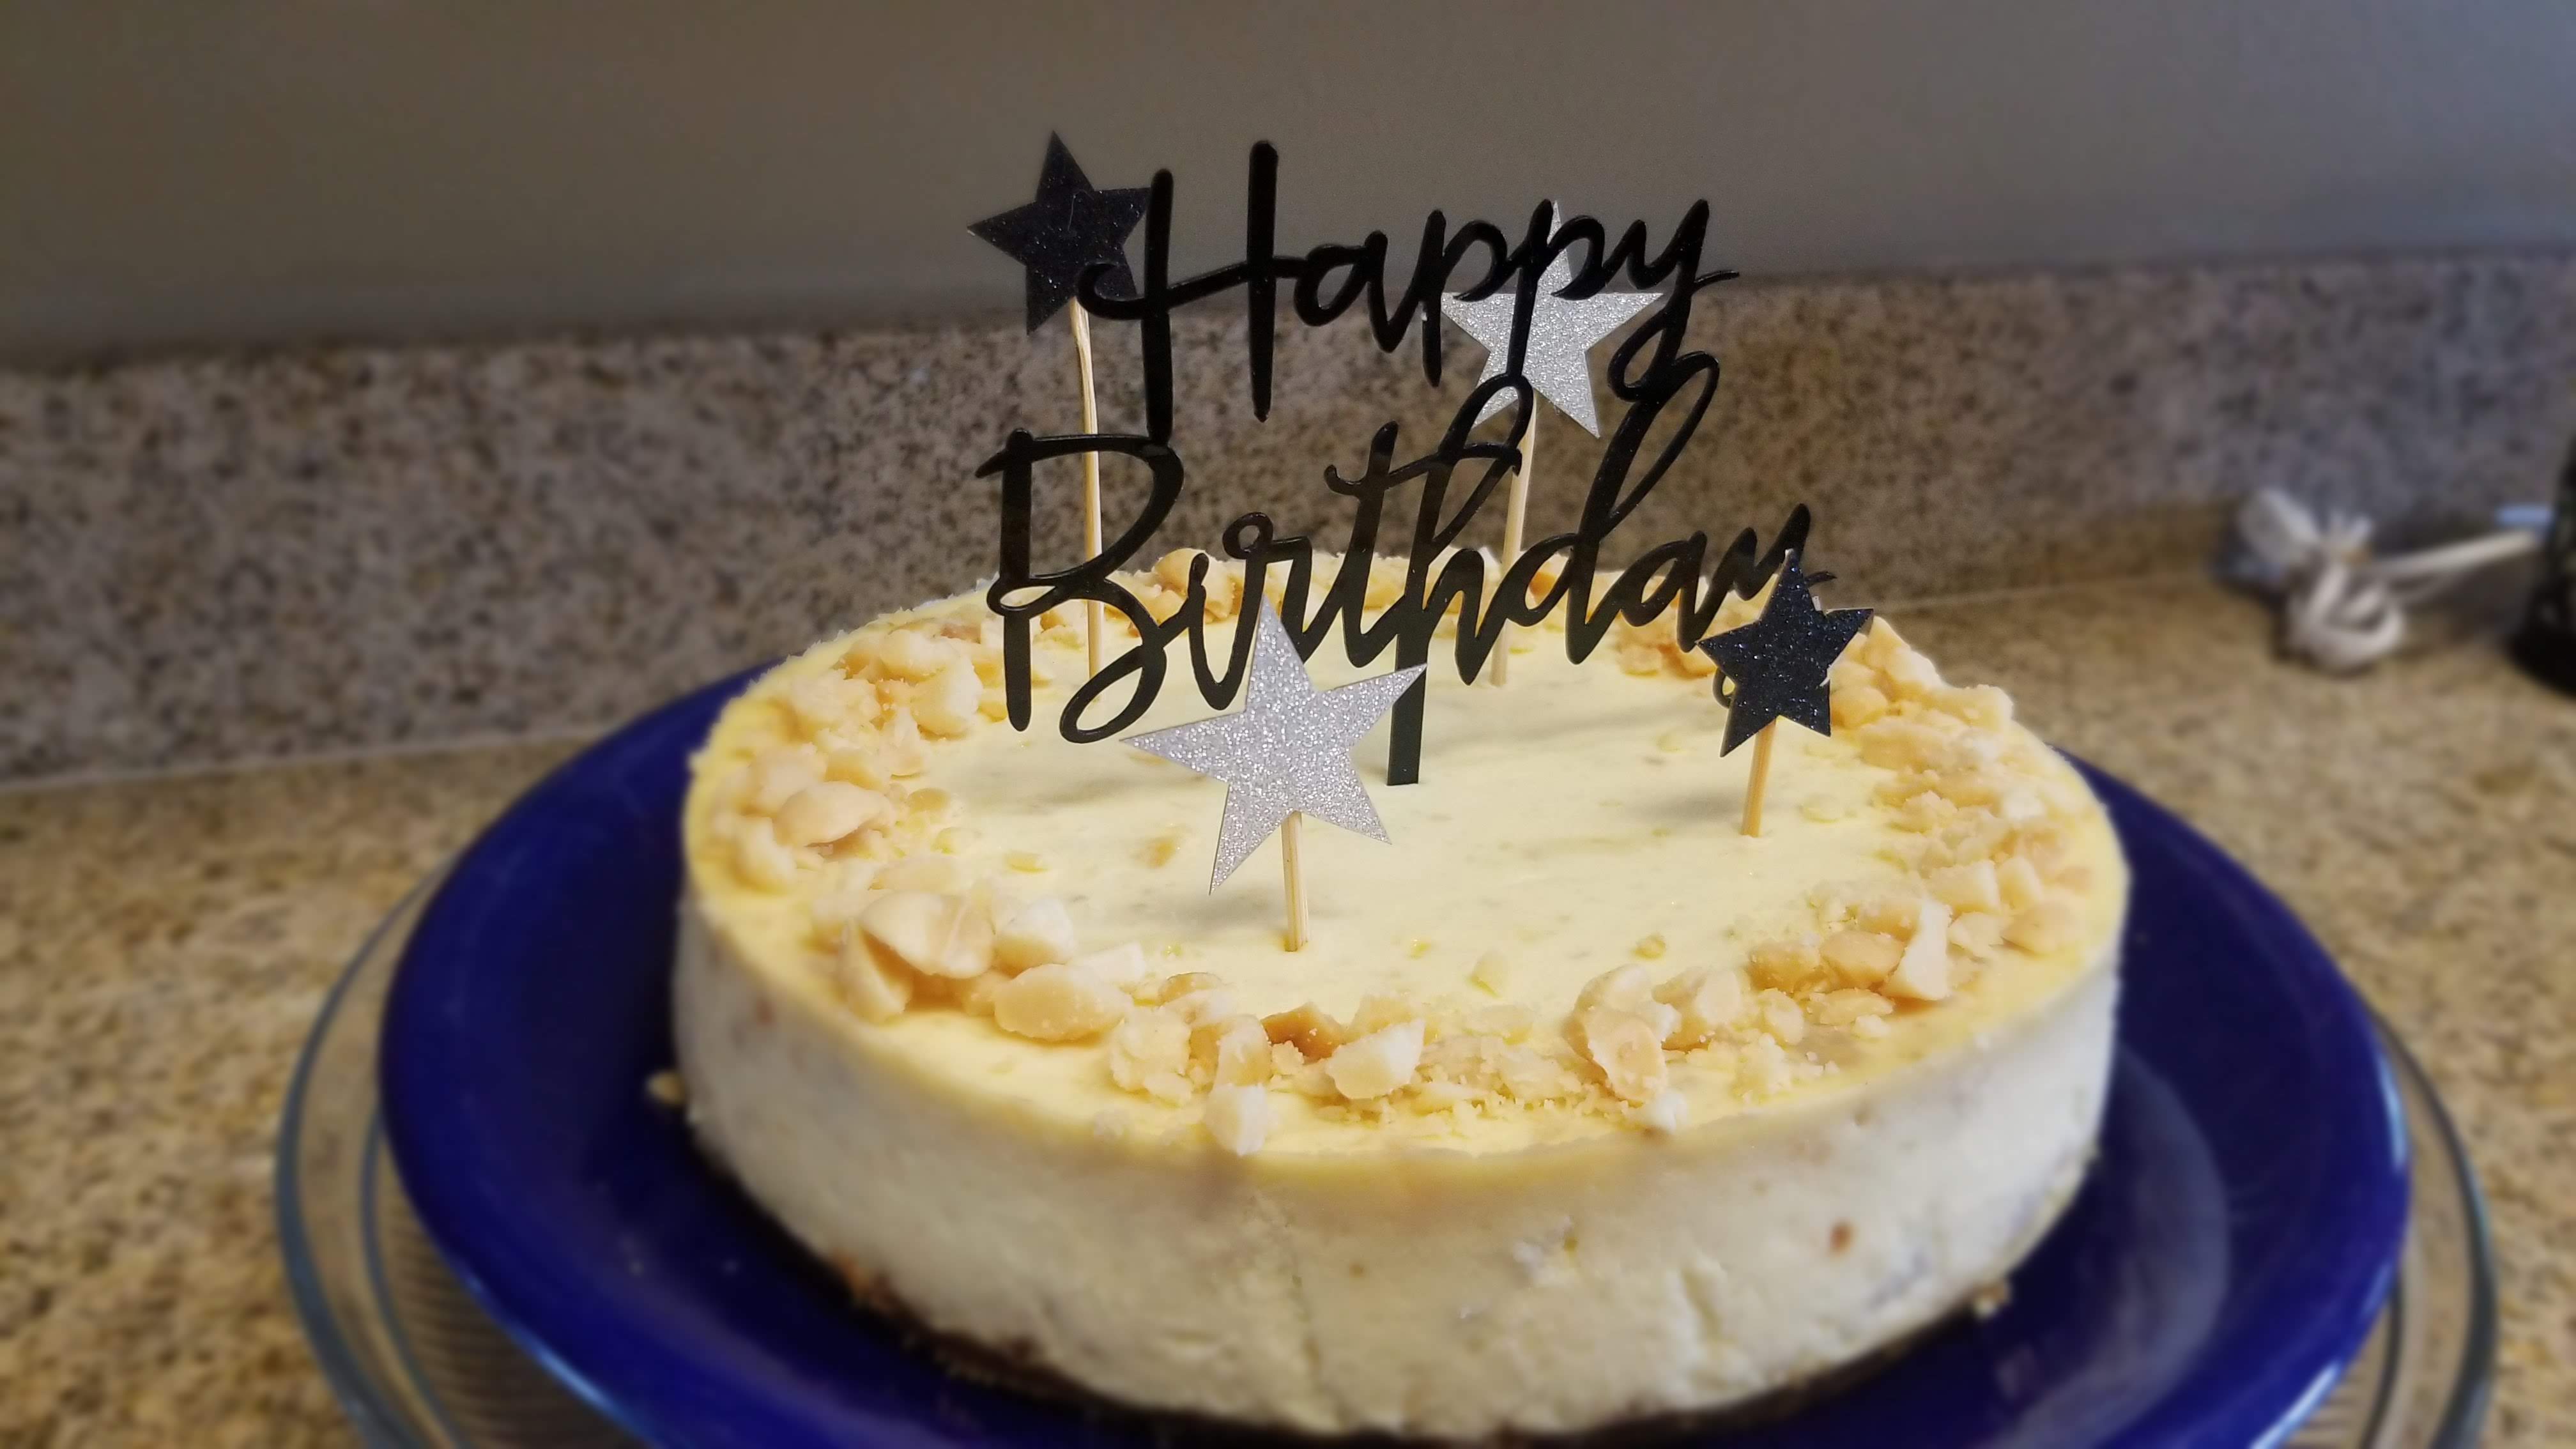


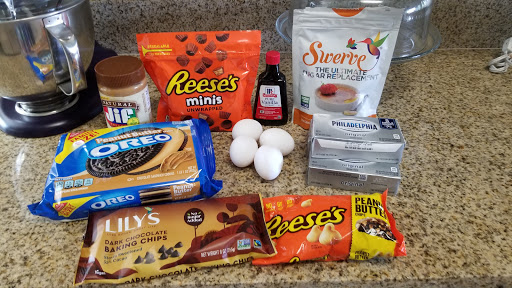
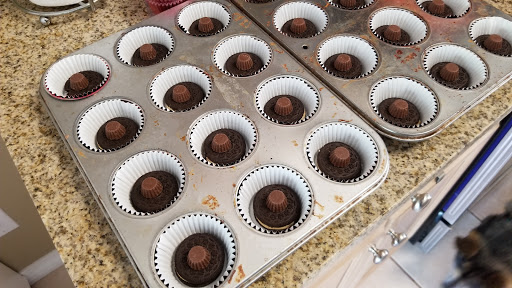
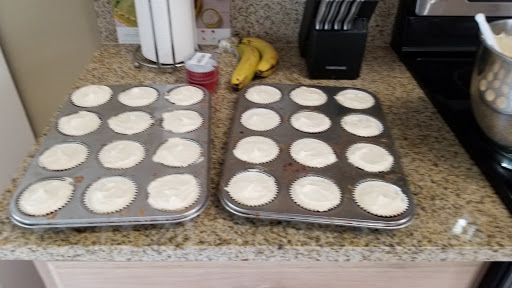
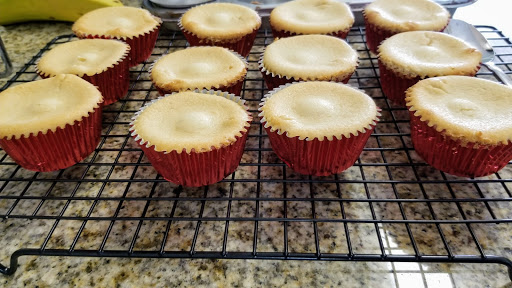
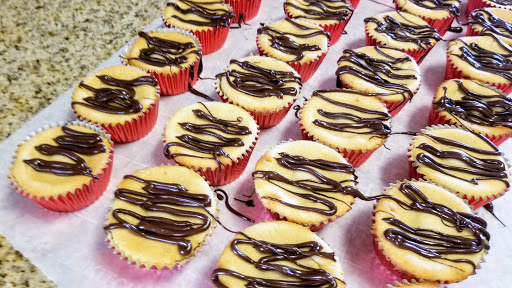

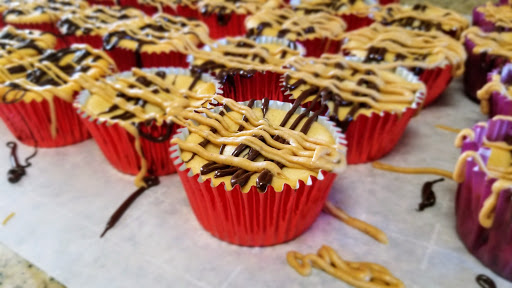
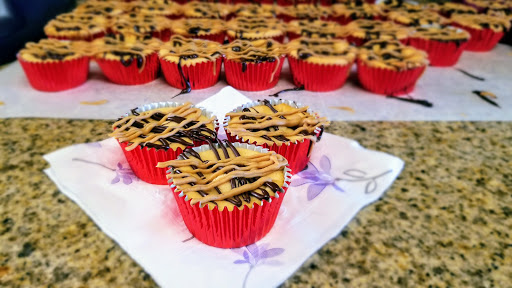
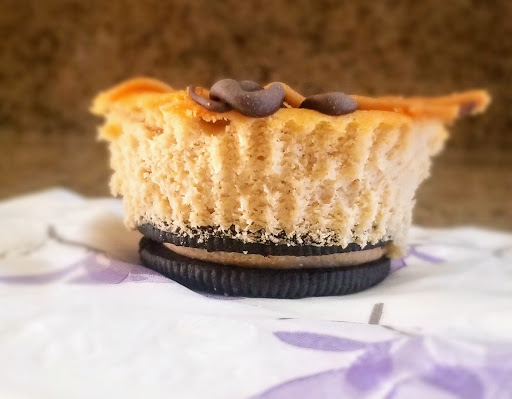

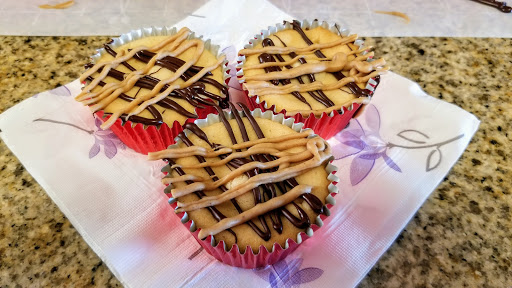


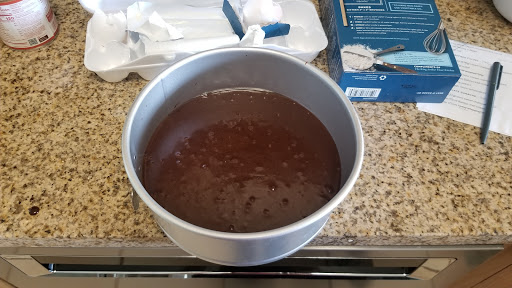
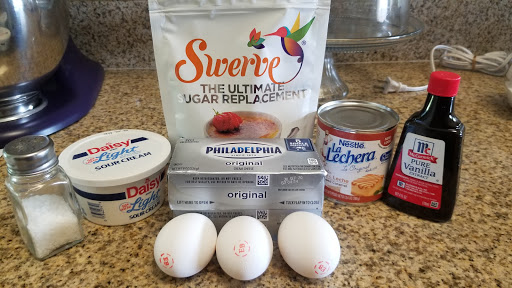
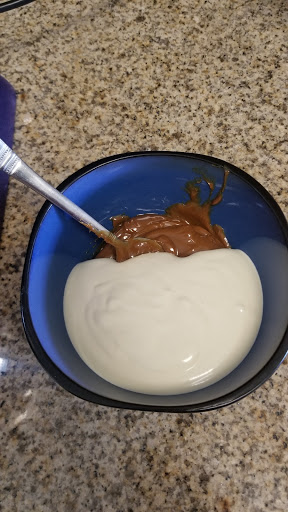

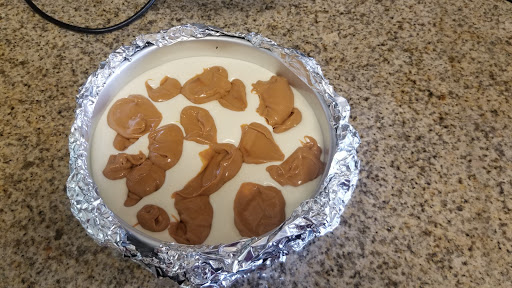
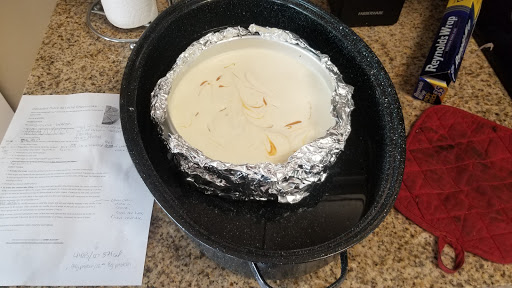
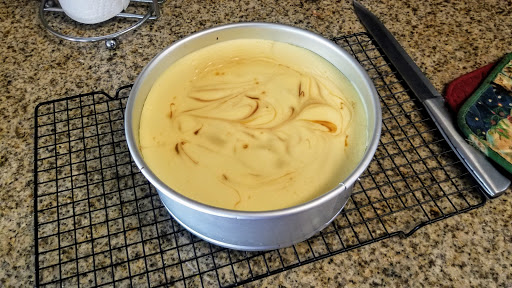
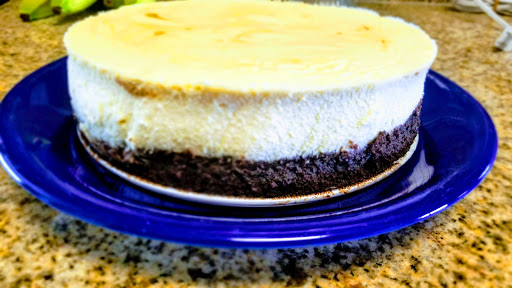
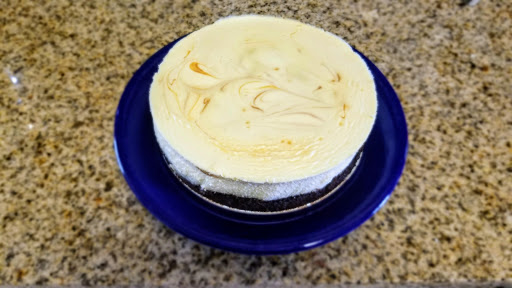
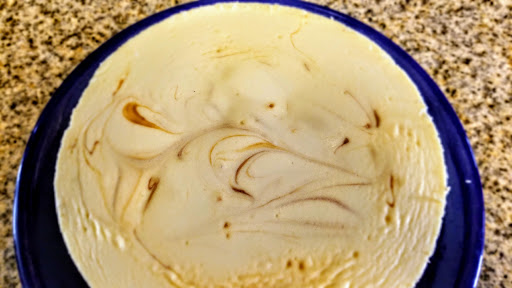
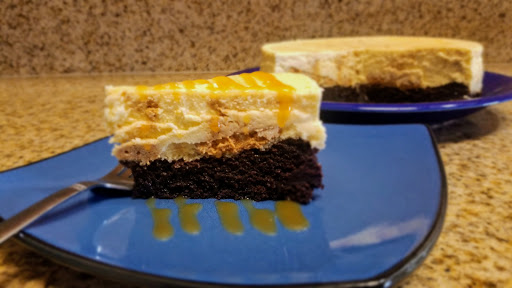
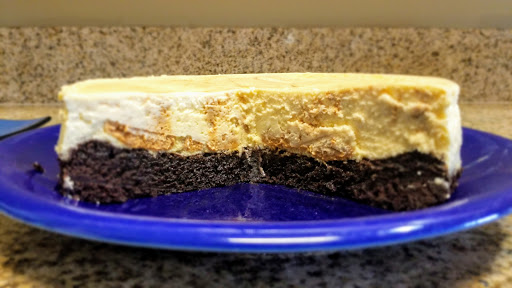


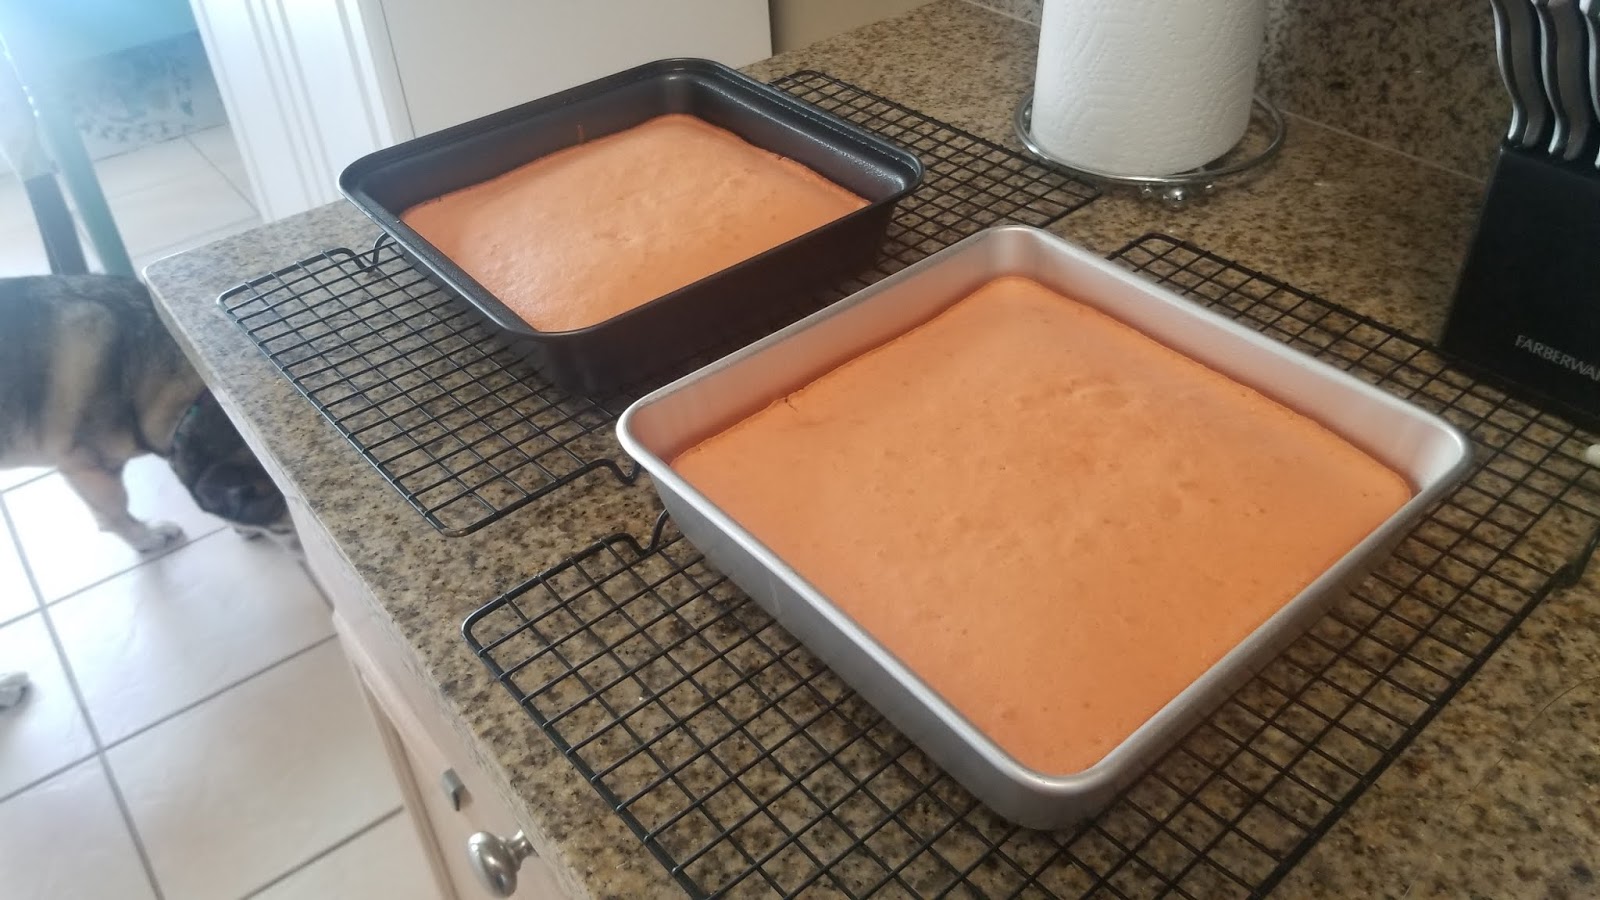


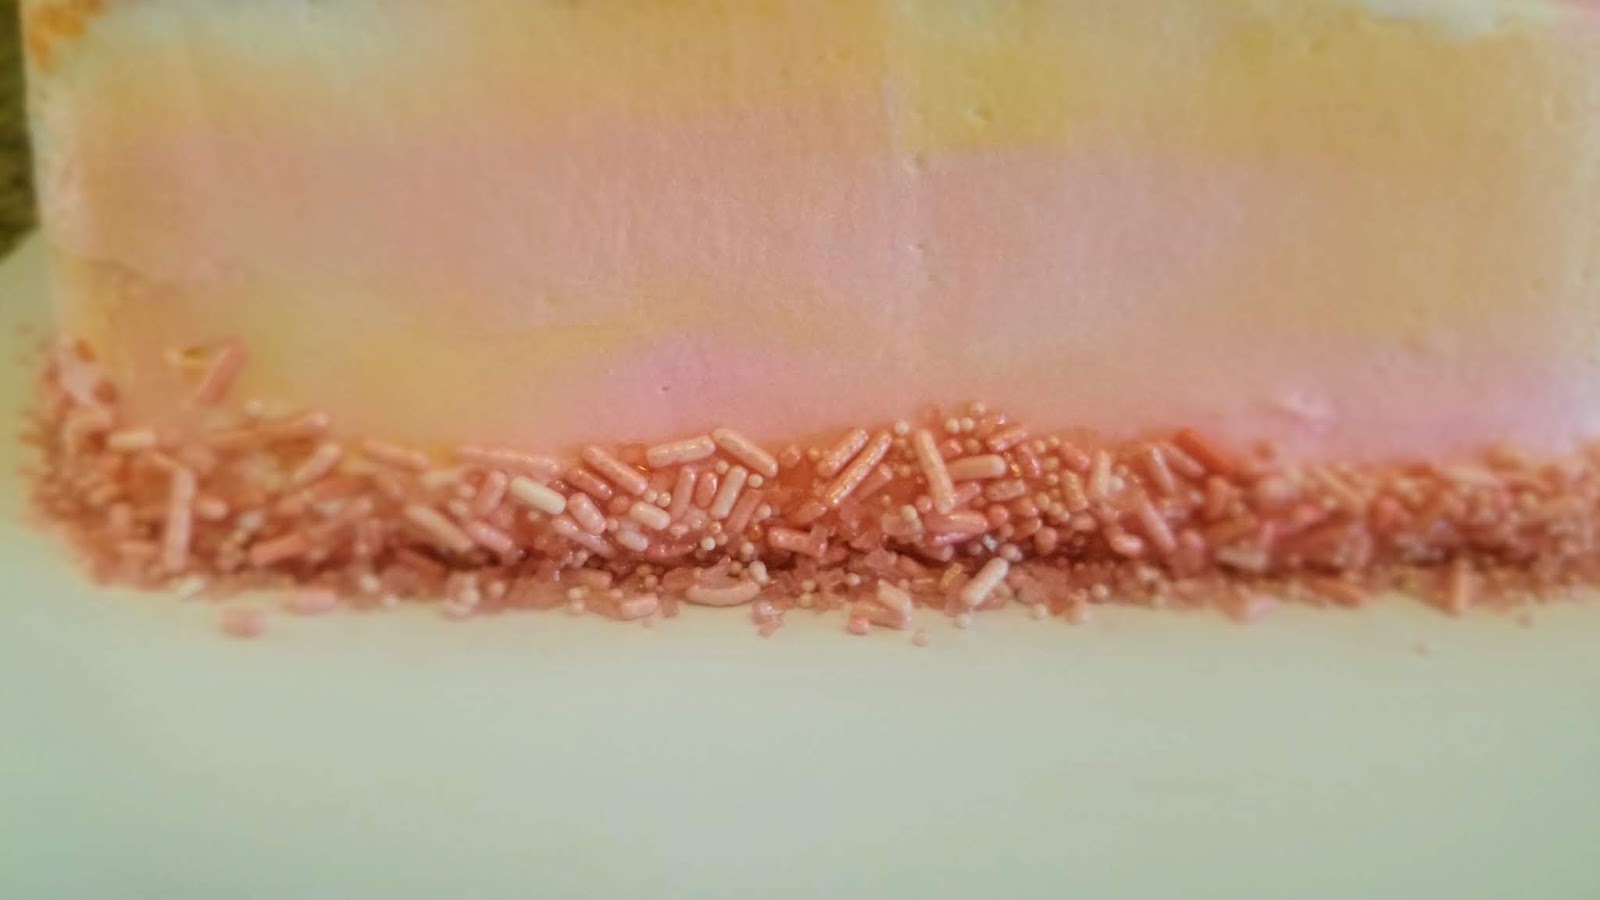

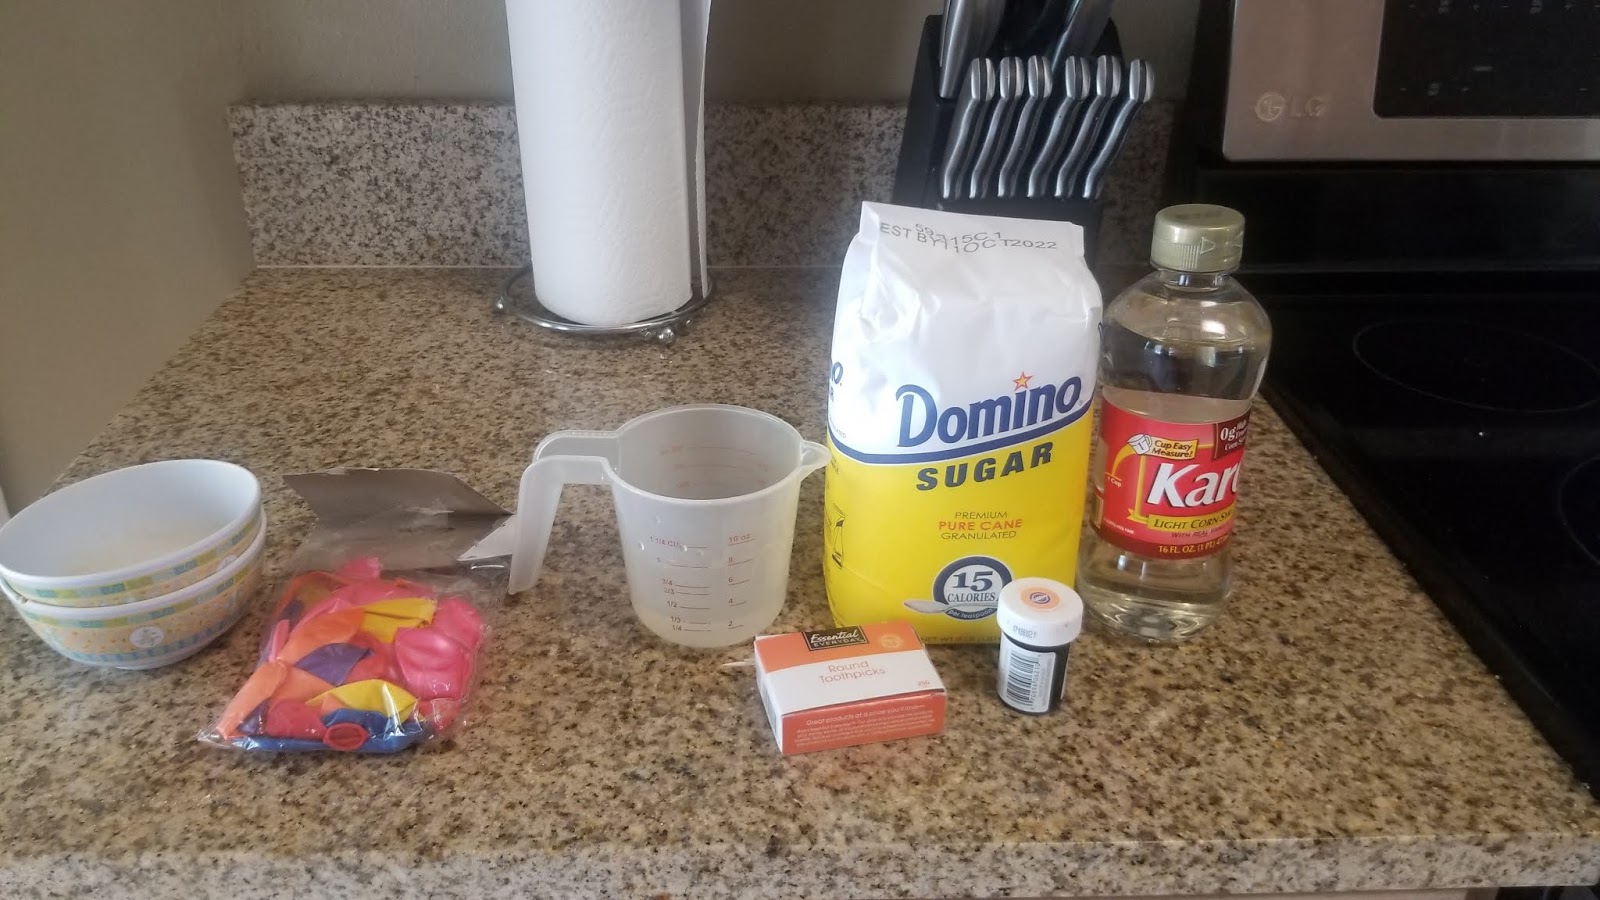
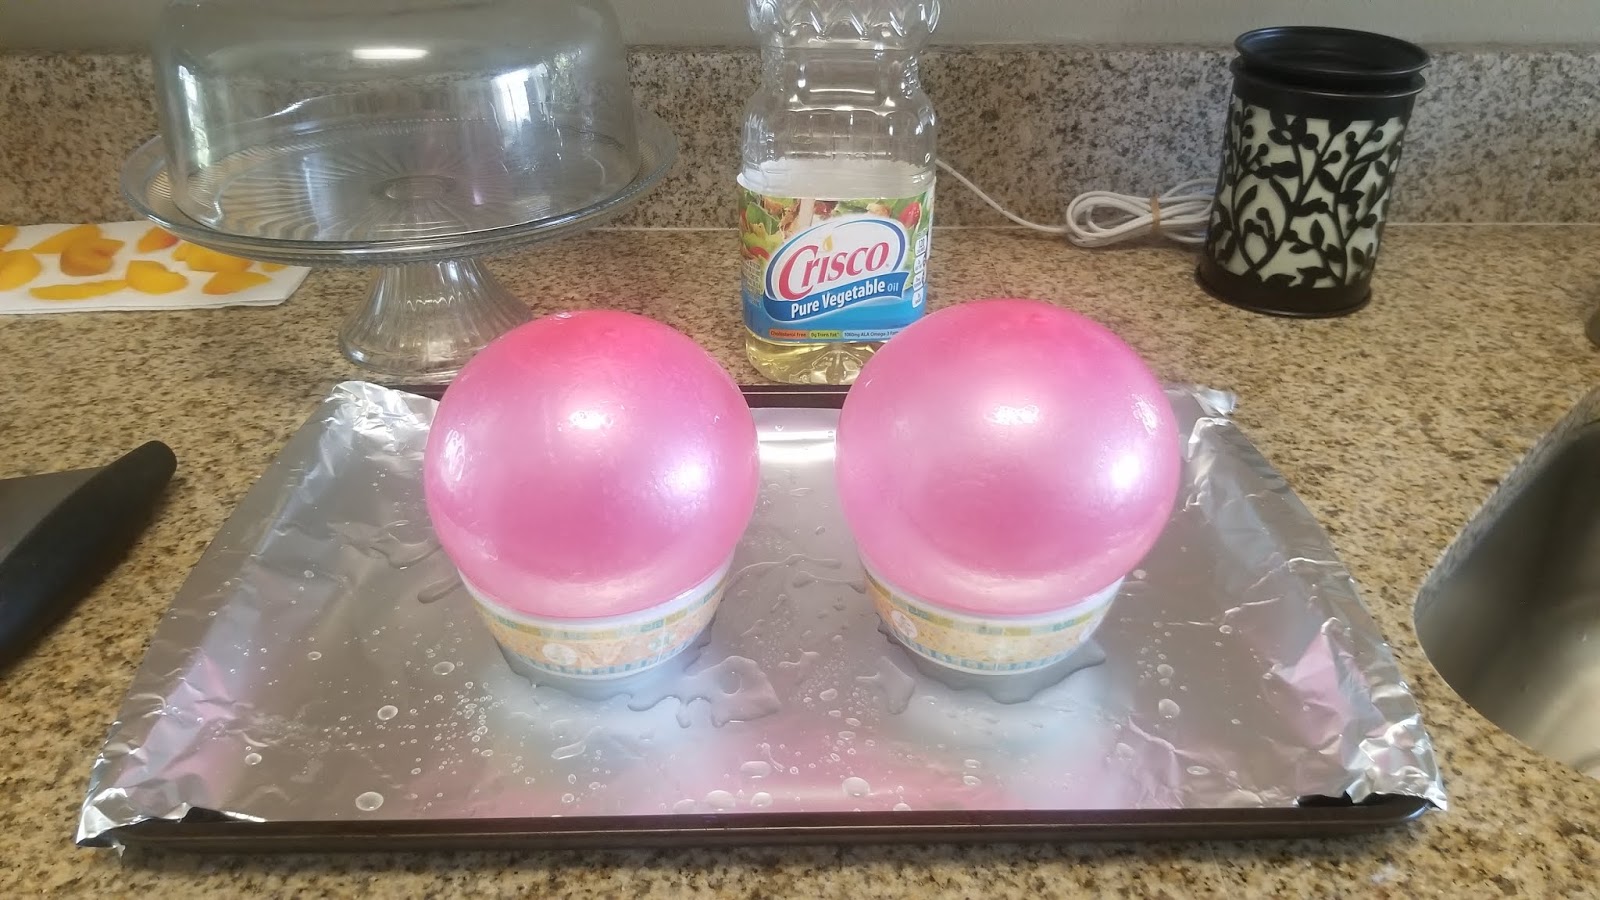
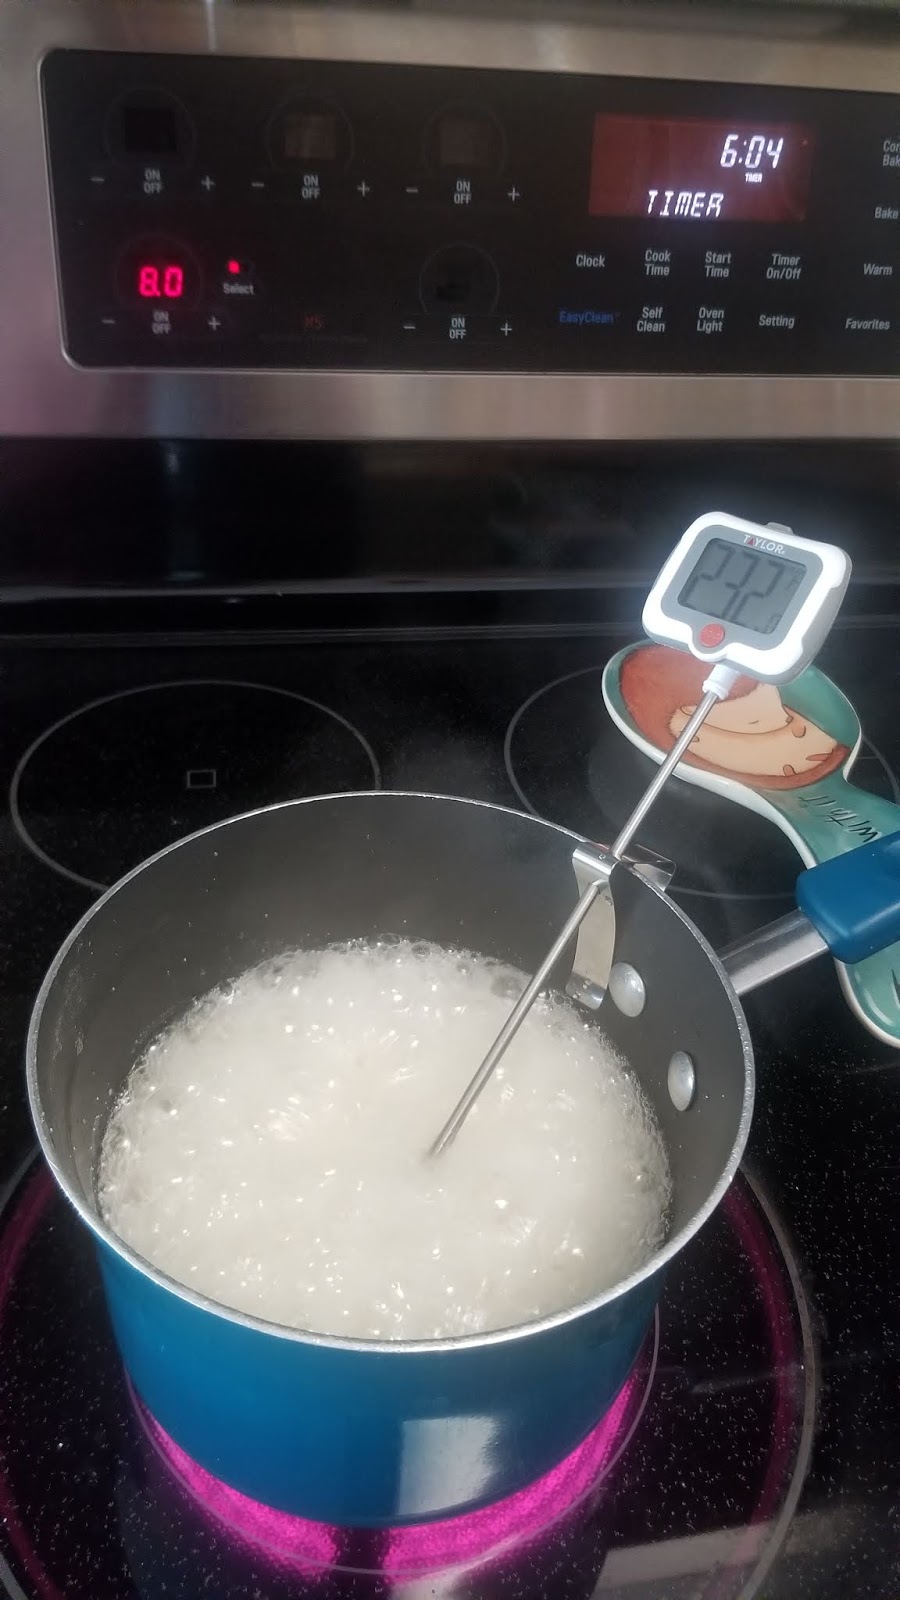


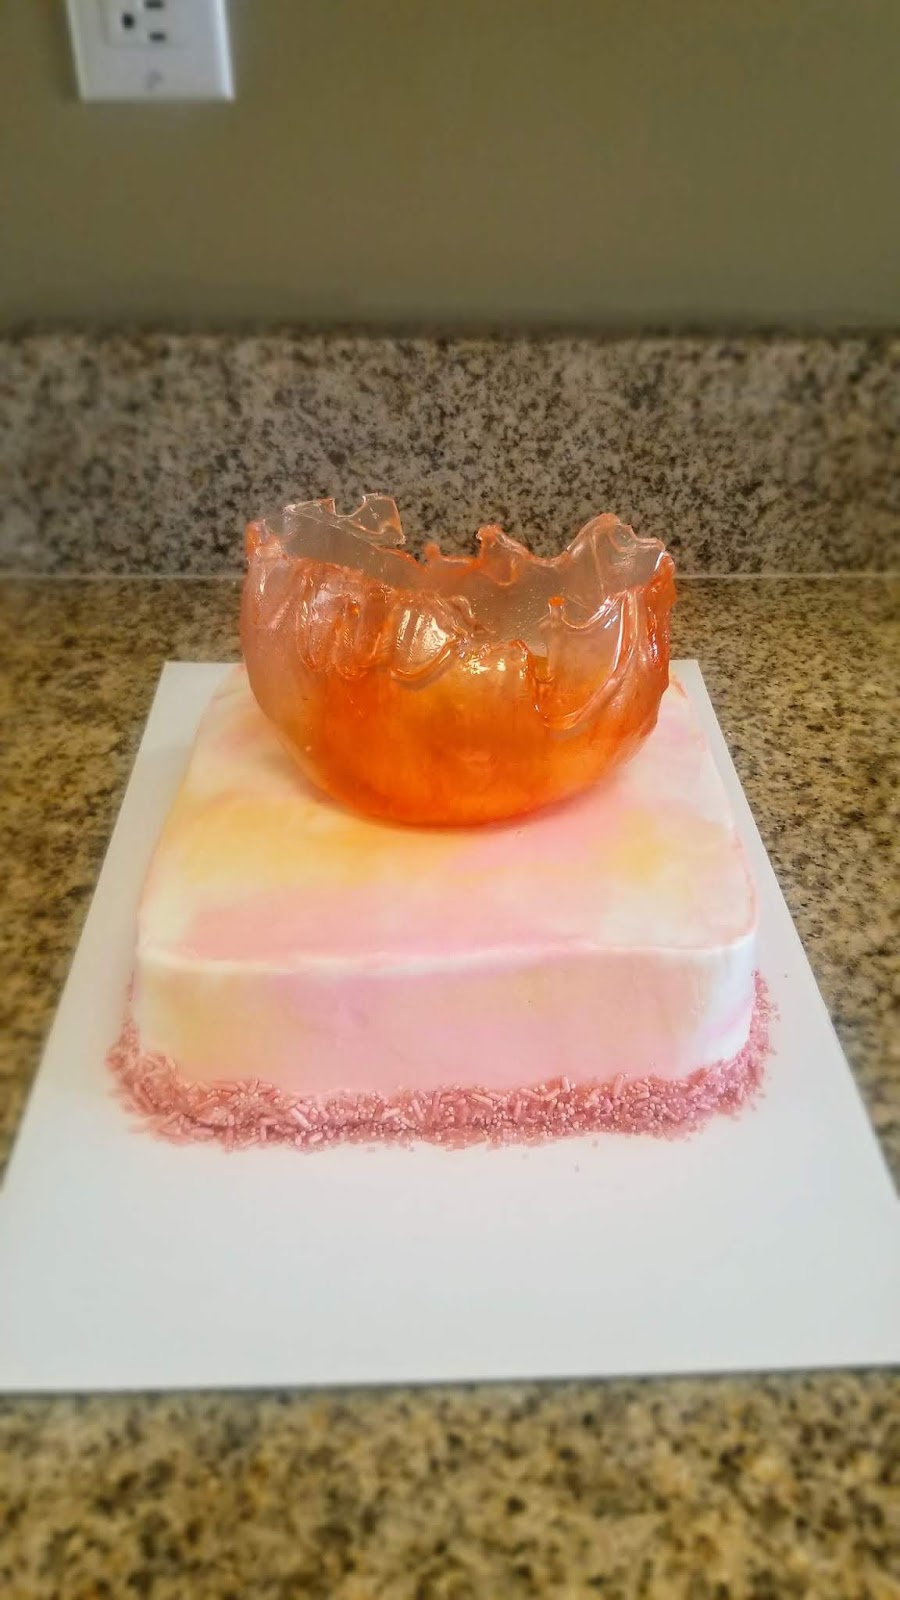


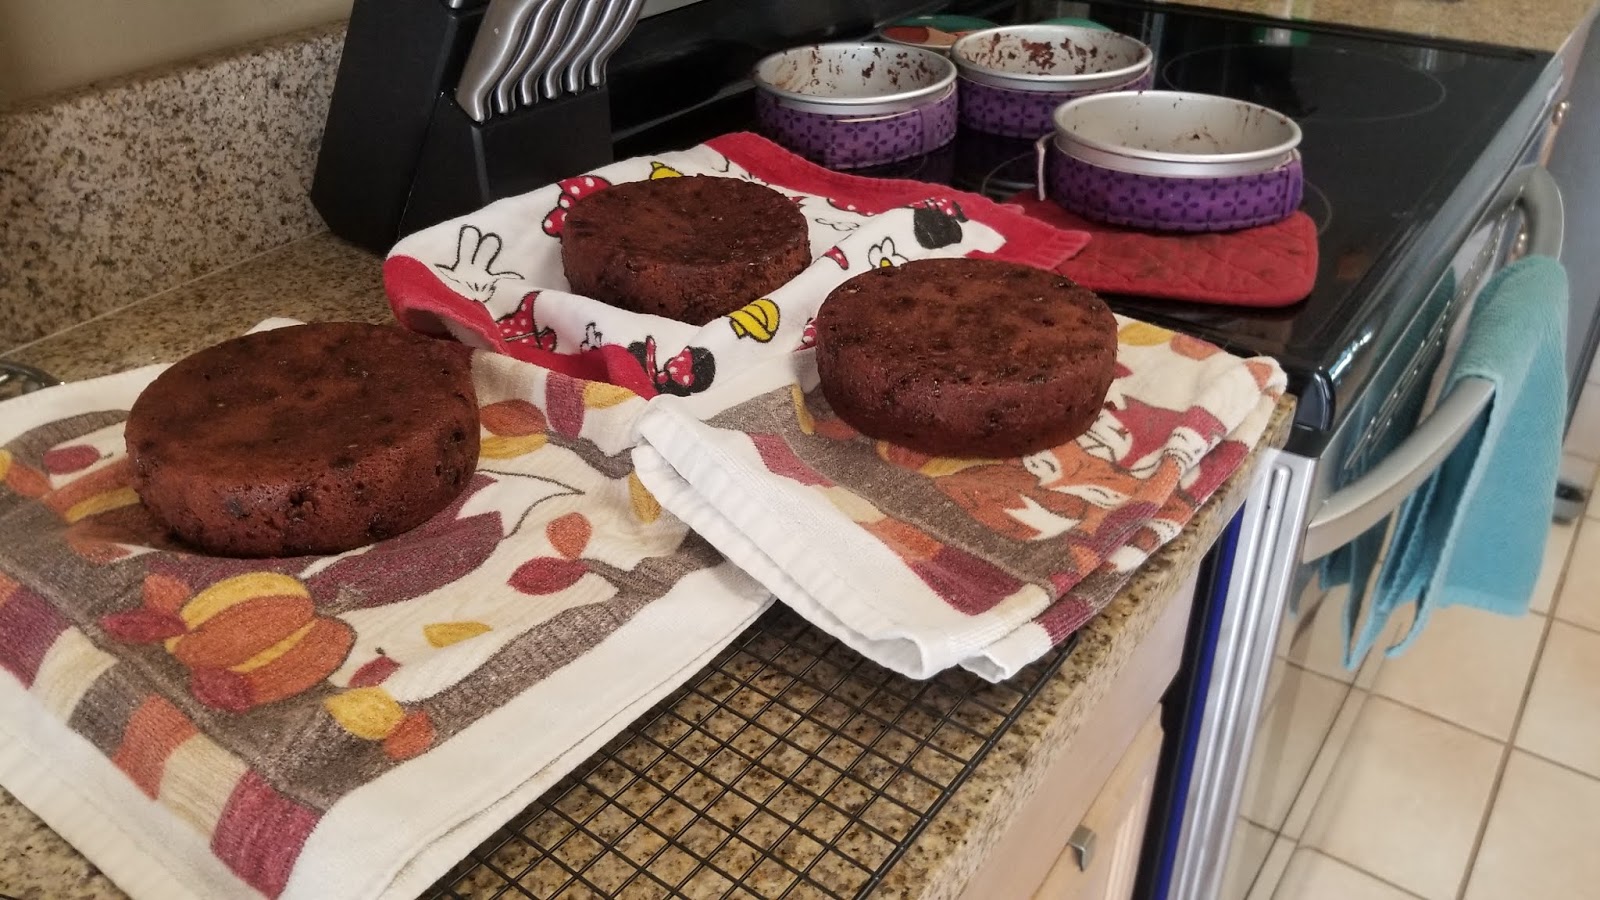


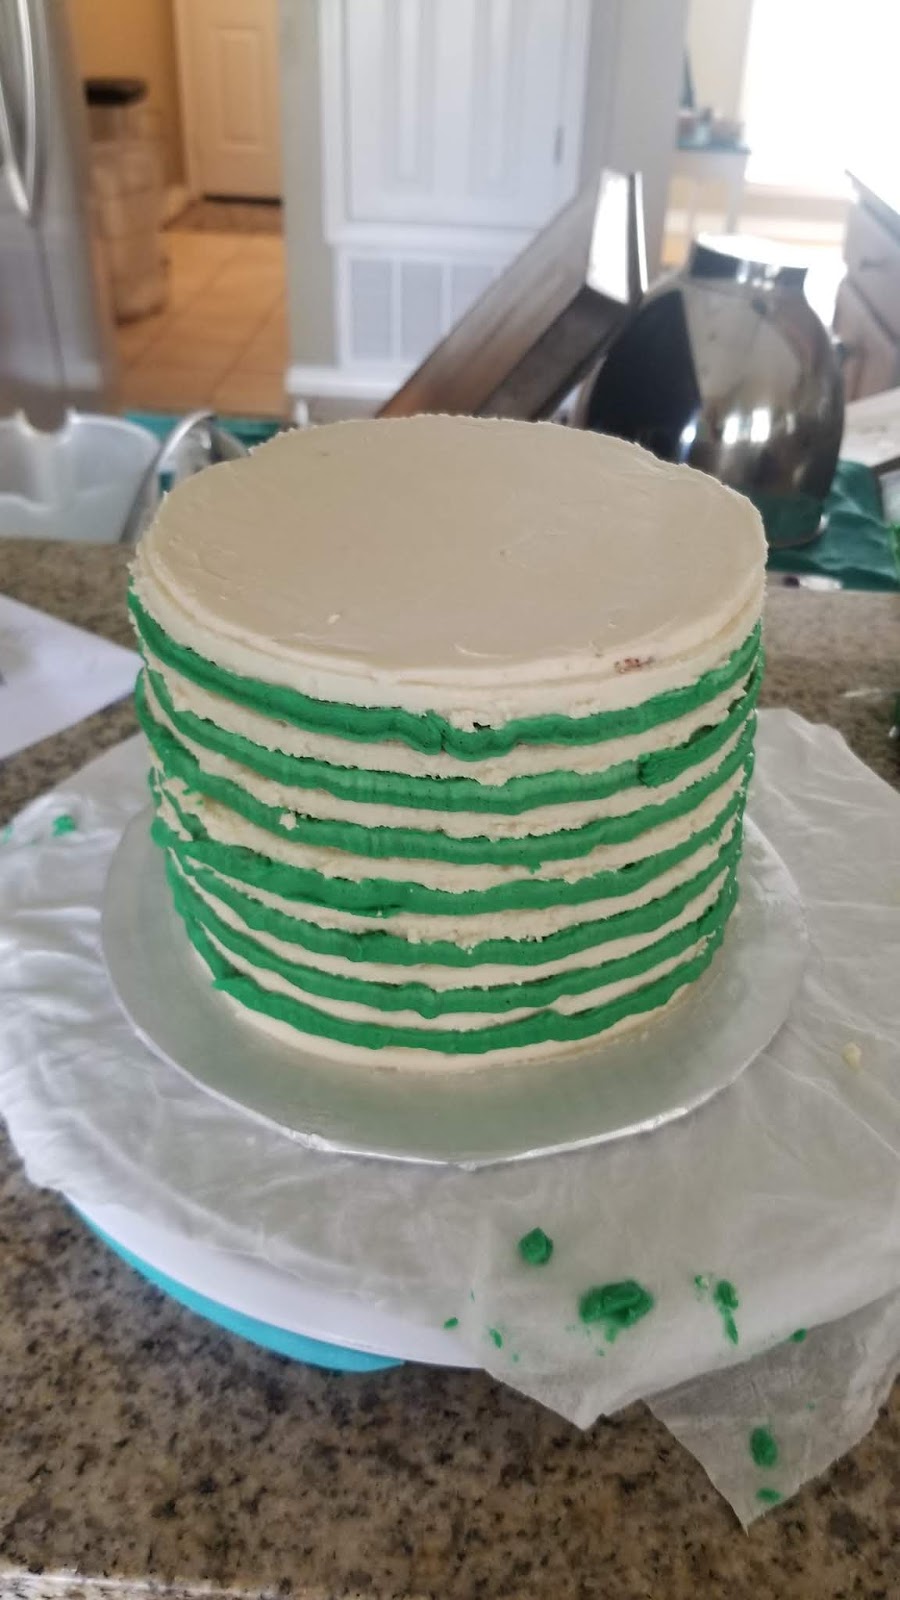
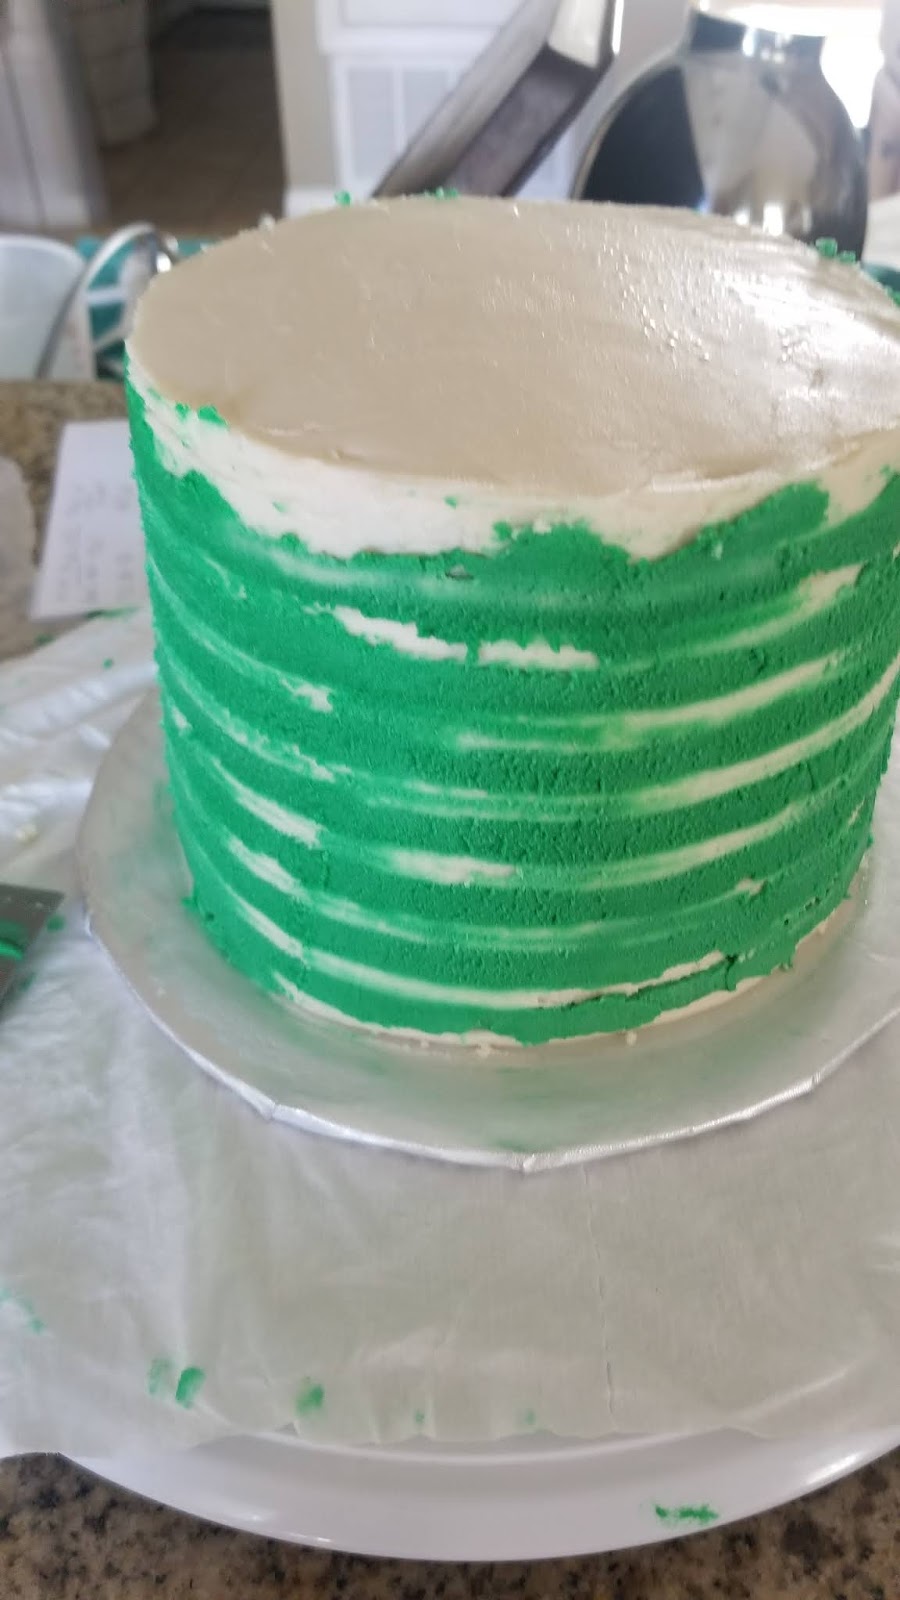
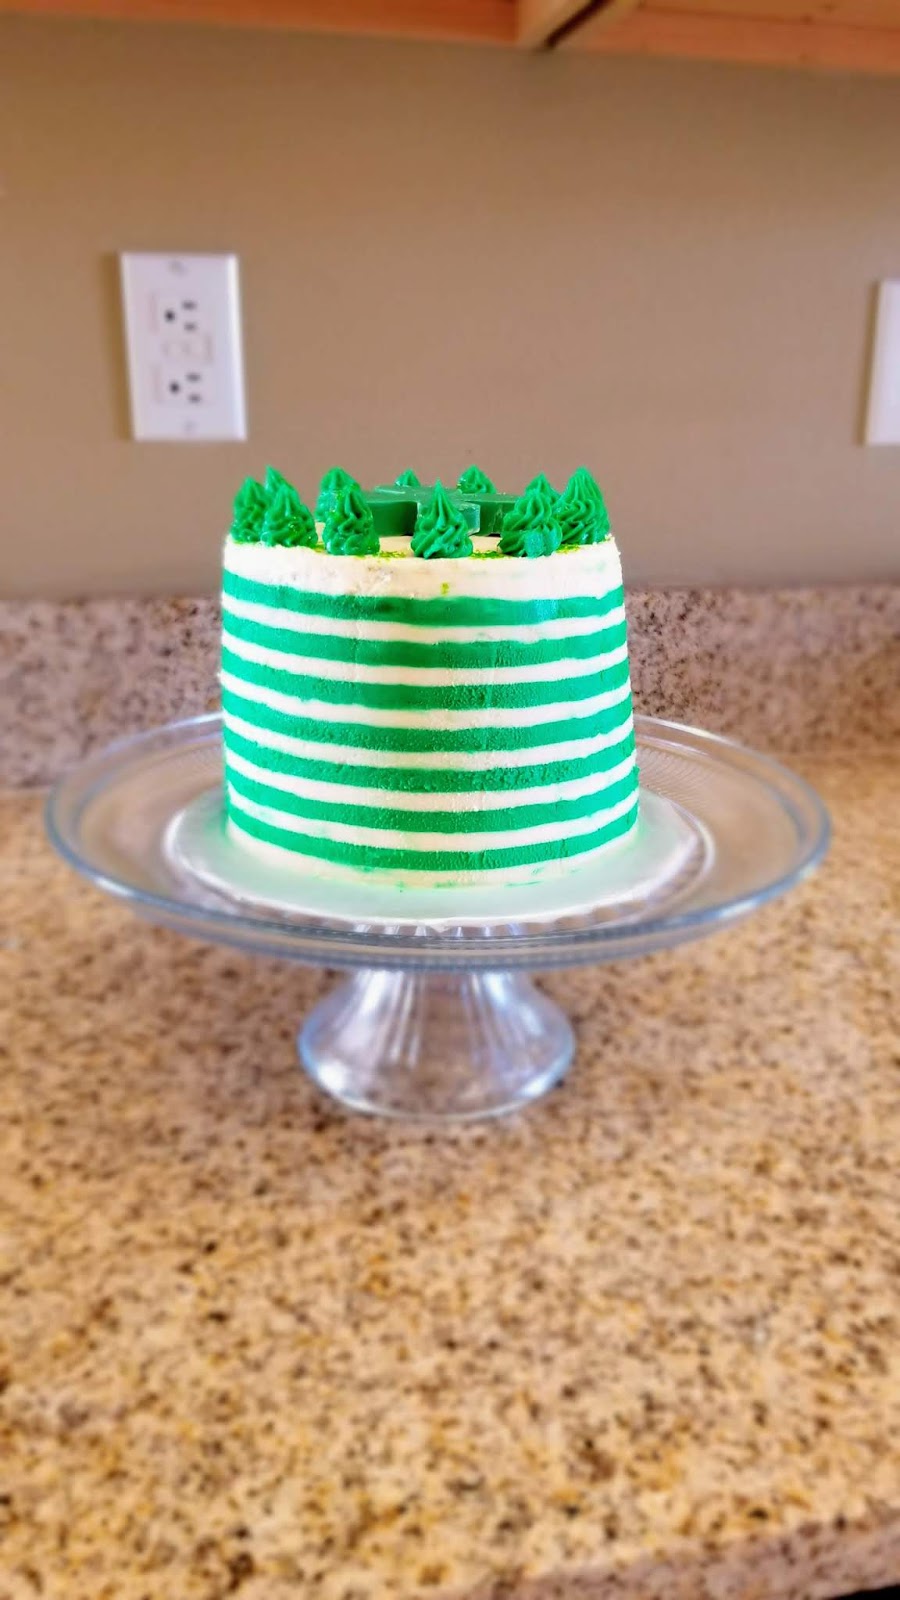


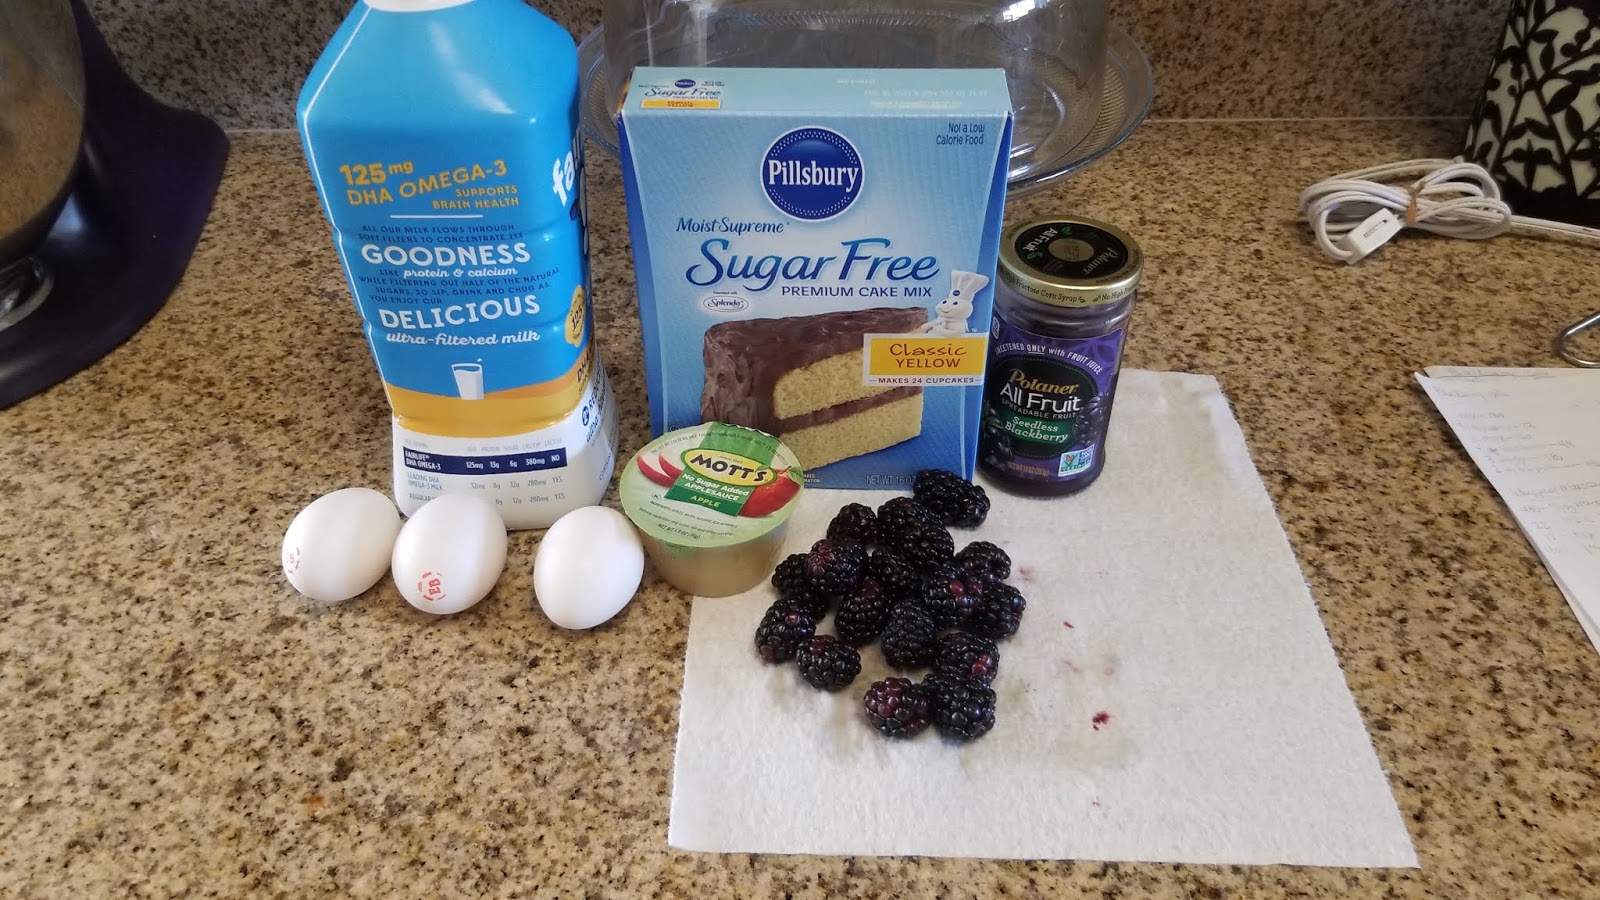

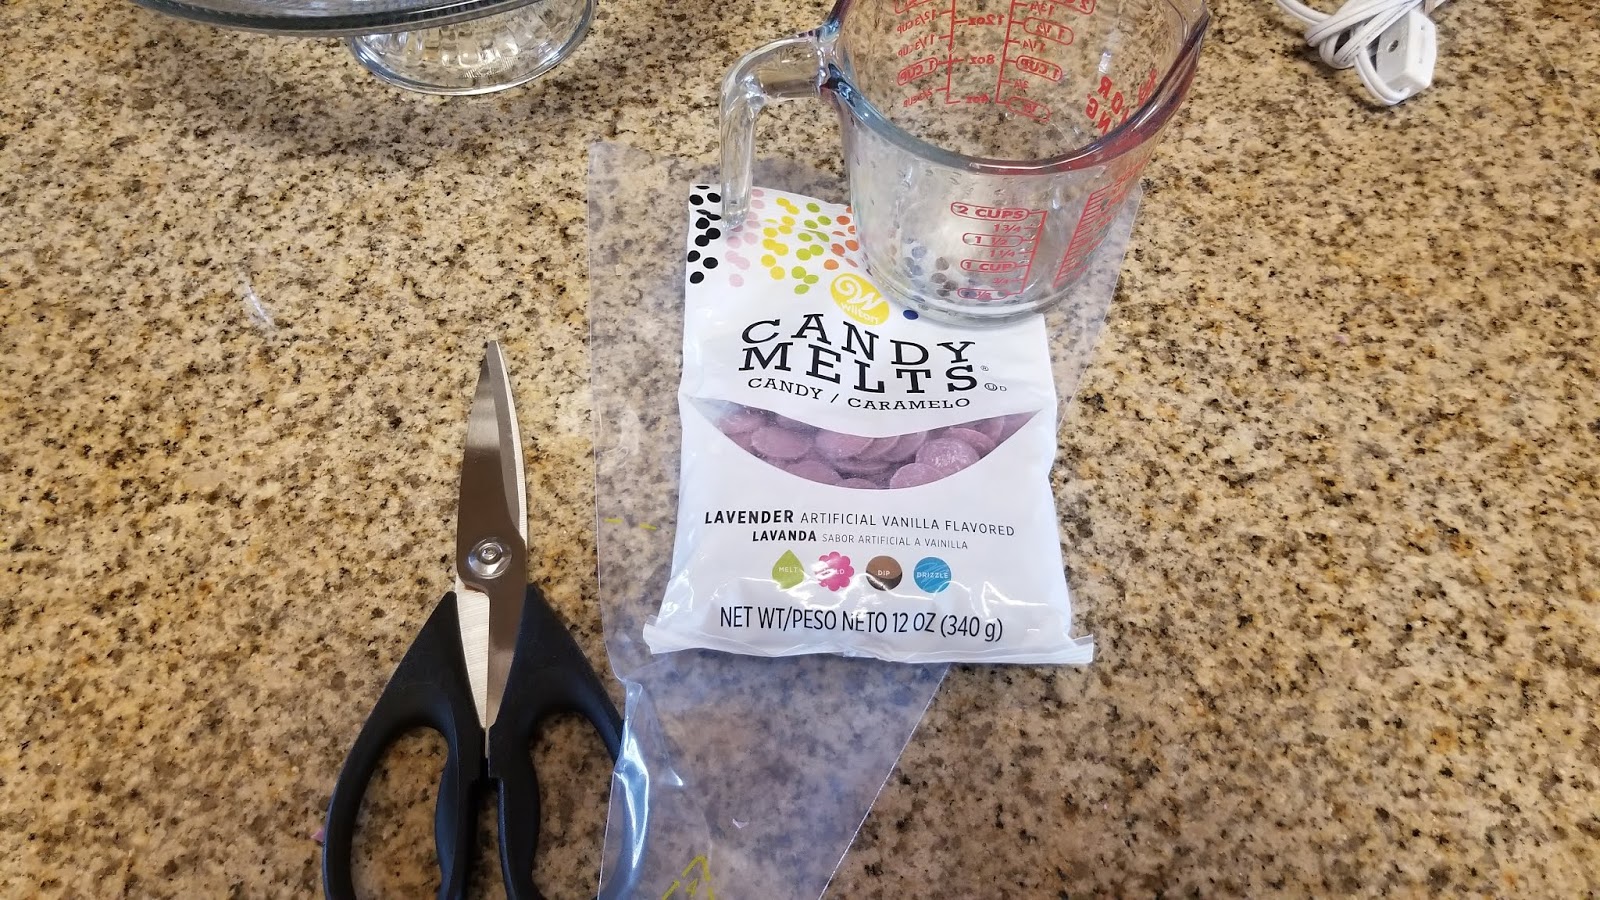
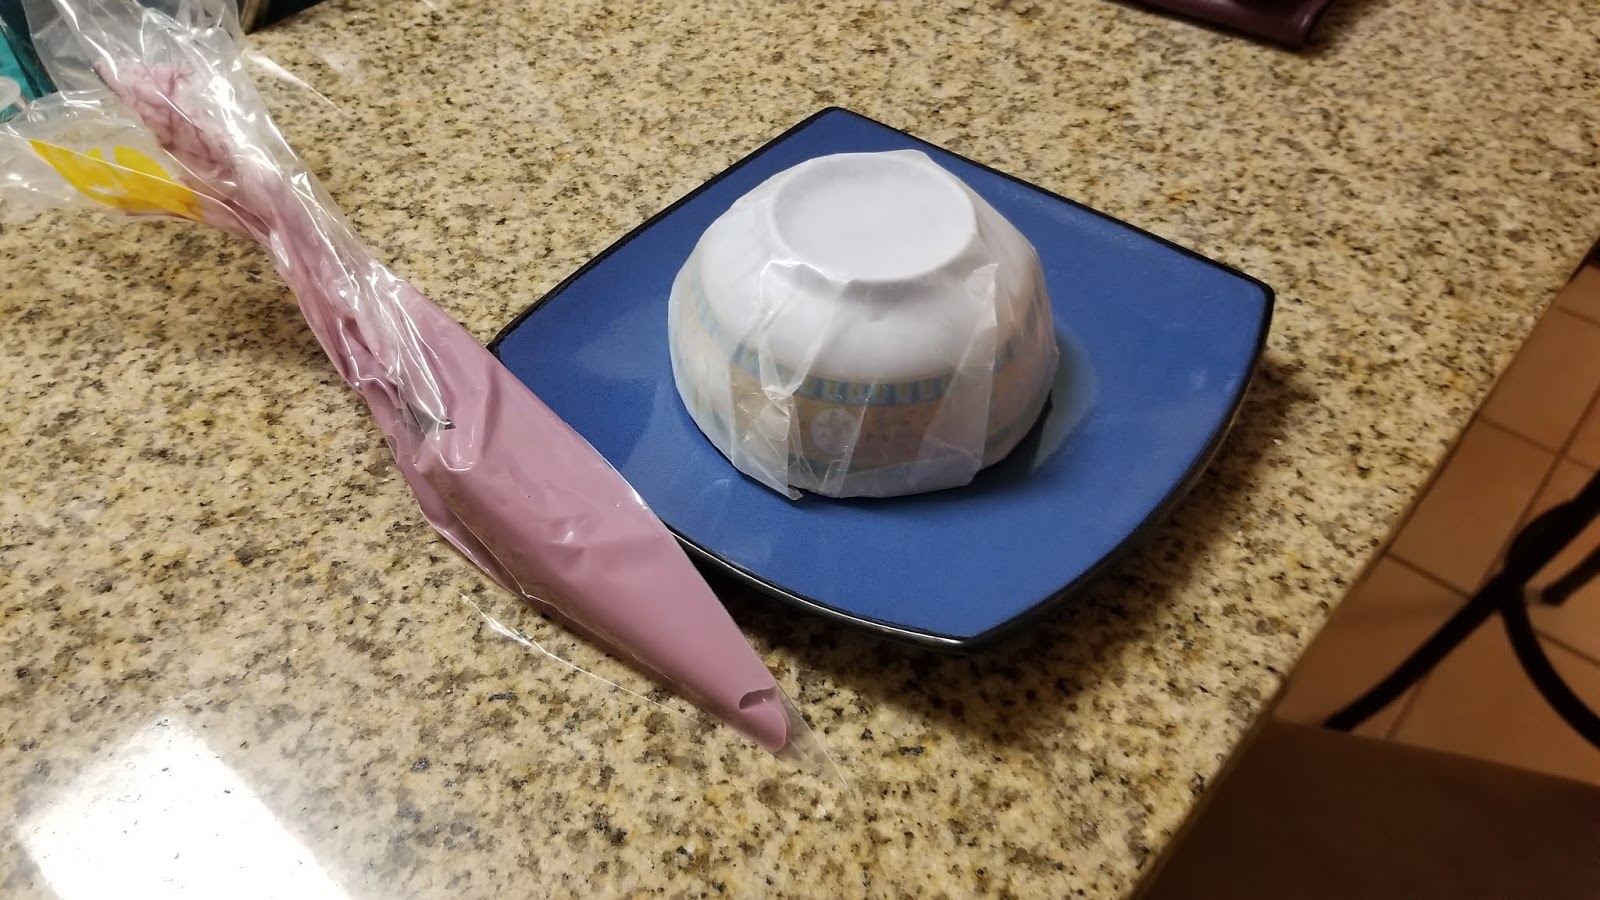


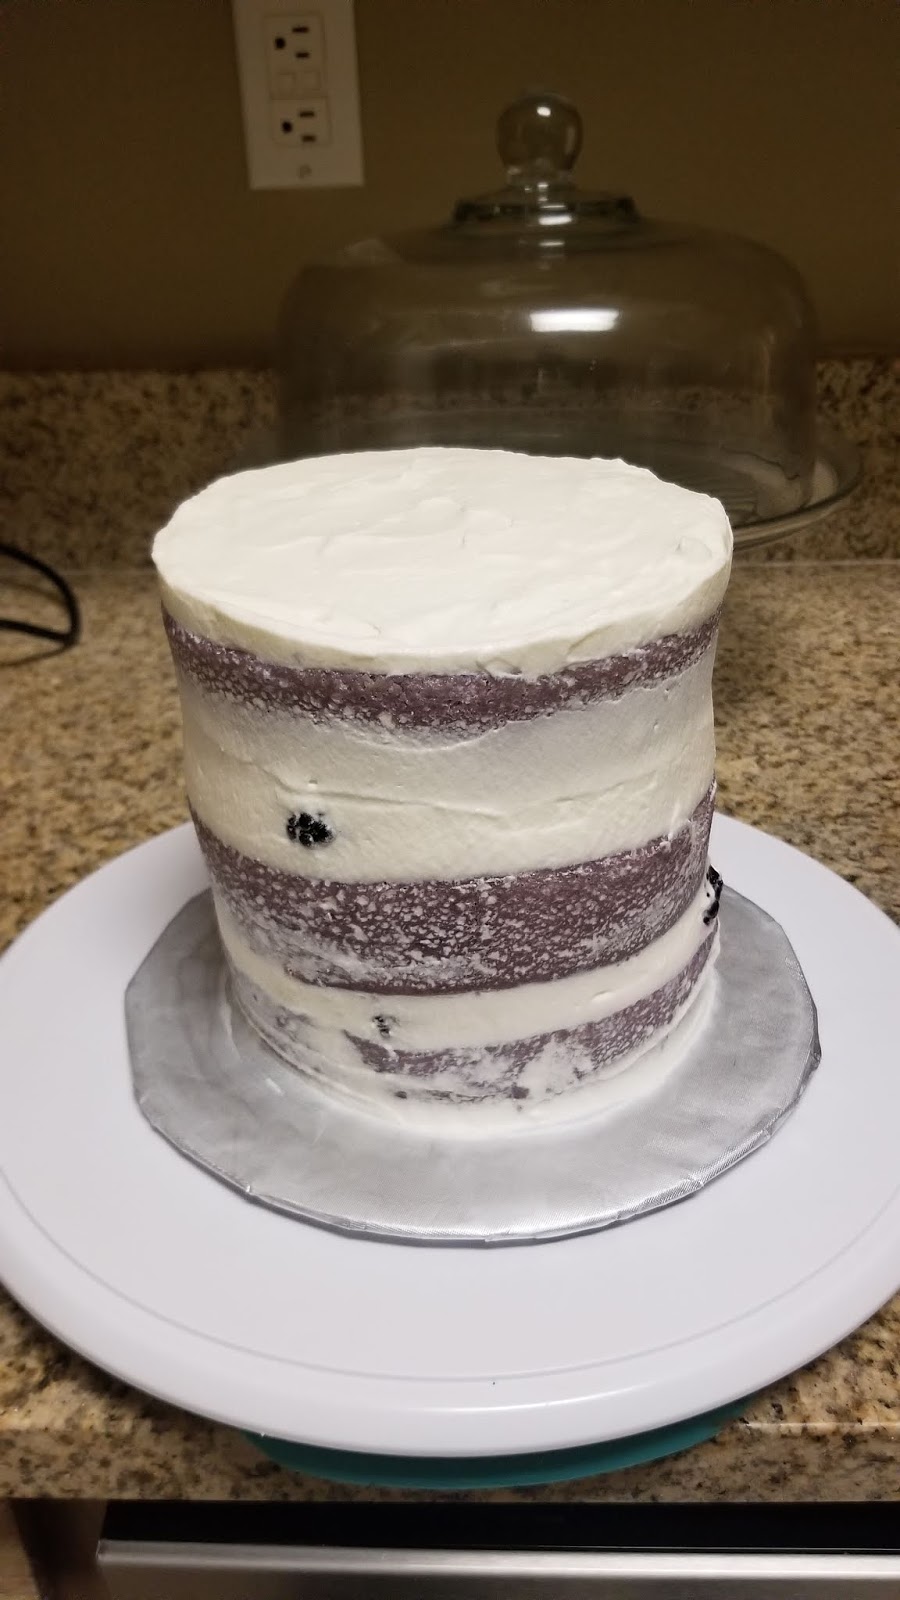
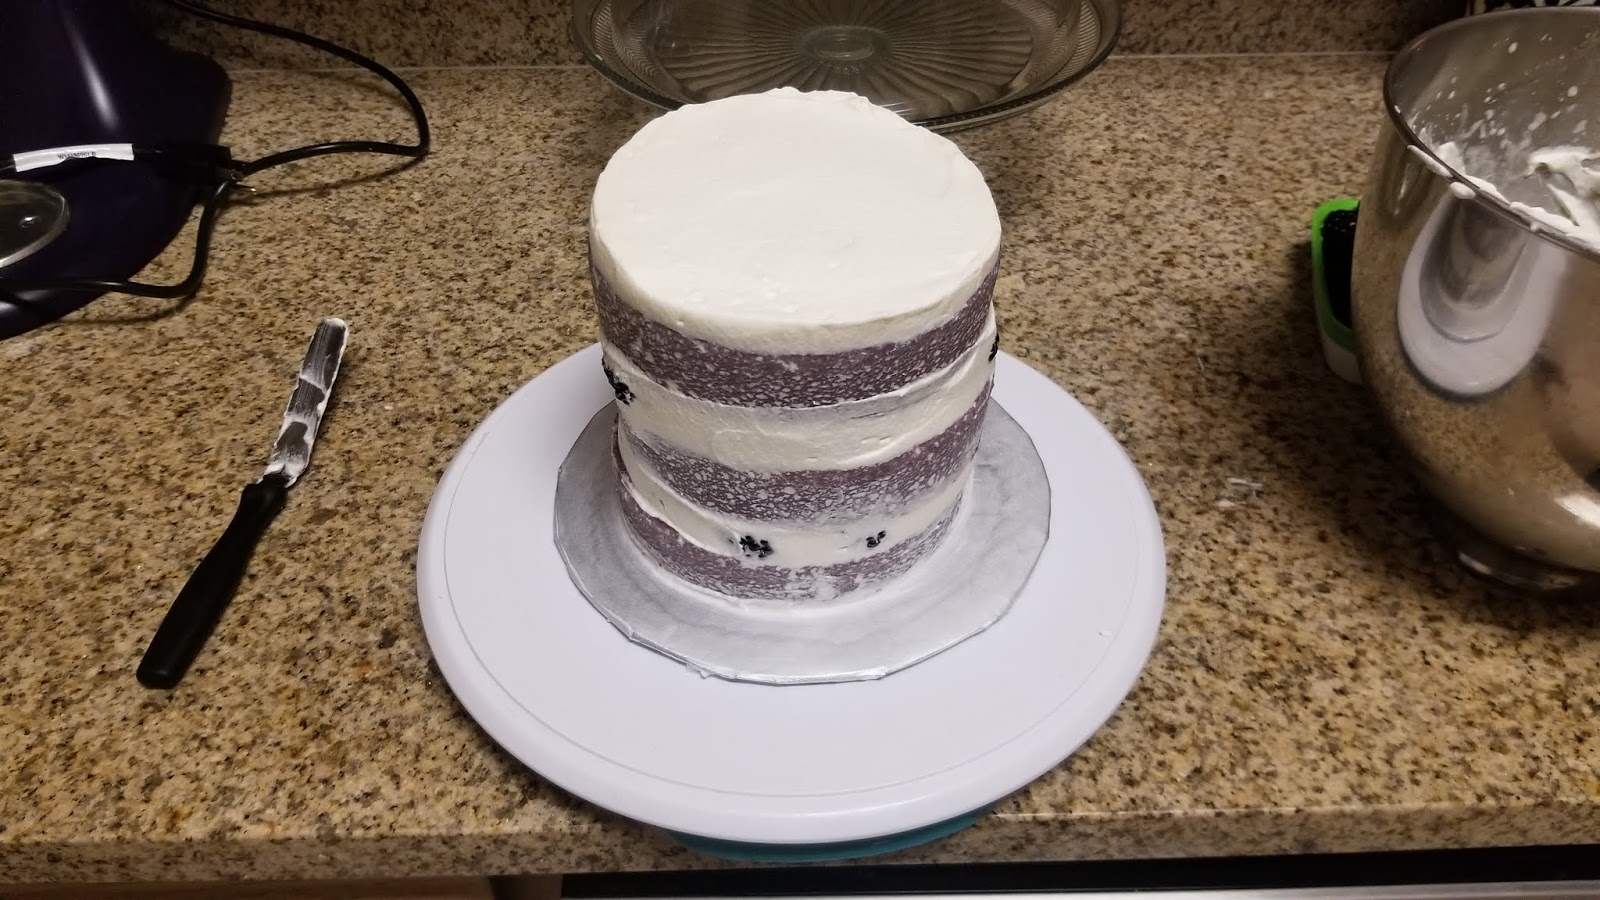


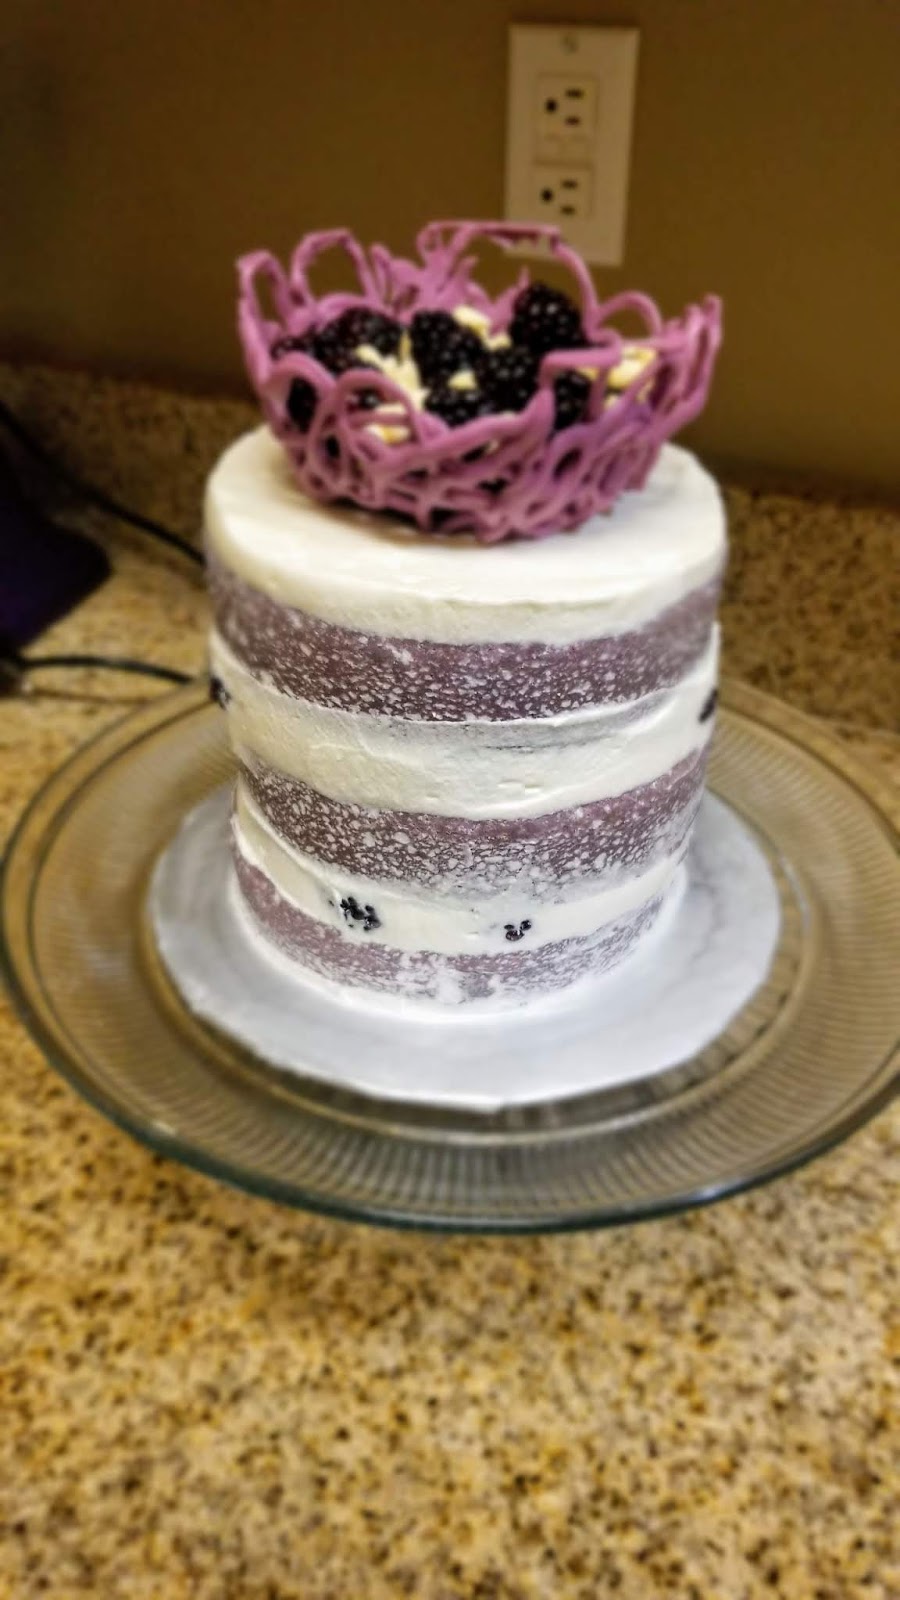

