-
Cookies/Brownies/Handhelds
Brownies:
- Hocus Pocus Boooook! gluten free brownies
- Buckeye brownies
- Bewitching fudge brownies with captivating cream cheese swirls (Halloweeny AND low cal!)
- Cookies and cream Oreo-stuffed brownies
- Chocolate peanut butter brownies (low cal!)
- Rolo stuffed brownies with Baileys frosting
- Brownies stuffed with Baileys cream cheese filling
- Baileys brownies with Guinness ganache
- Mint swirl brownies with mint buttercream
- Chocolate chip cookie dough layered brownies
Bars:
- Pistachio sugar cookie bars (low cal!)
- Pumpkin toffee bars (low cal!)
- Orange Creamsicle bars (low cal!)
- Low cal peanut butter cheesecake bars with chocolate crunch crust
- Healthy lemon bars (low cal!)
- Blueberry crumble bars
- Toffee s’mores bars
- Cinnamon chip pumpkin cookie bars
Cookies:
- Dark chocolate cookie cups with Baileys cheesecake filling (low cal!)
- Cranberry white chocolate chip cookies (low cal!)
- Bewitching pinwheel cookies
- Lazy cake mix cookies (low cal!)
- Pumpkin whoopie pies with pumpkin cream cheese filling
- Witch hat cookies for Halloween
- Texas sheet cake cookies
- Boozy mint and chocolate whoopie pies
- Mint chocolate chip cookies
- Peanut butter kiss cookies and caramel bars
- Cinnamon roll cookies
- Peanut butter cookies and lemon cookies
- Cookies that will stay fresh for weeks
Fudge/ice cream sandwiches:
-
Chocolate- for Survival!
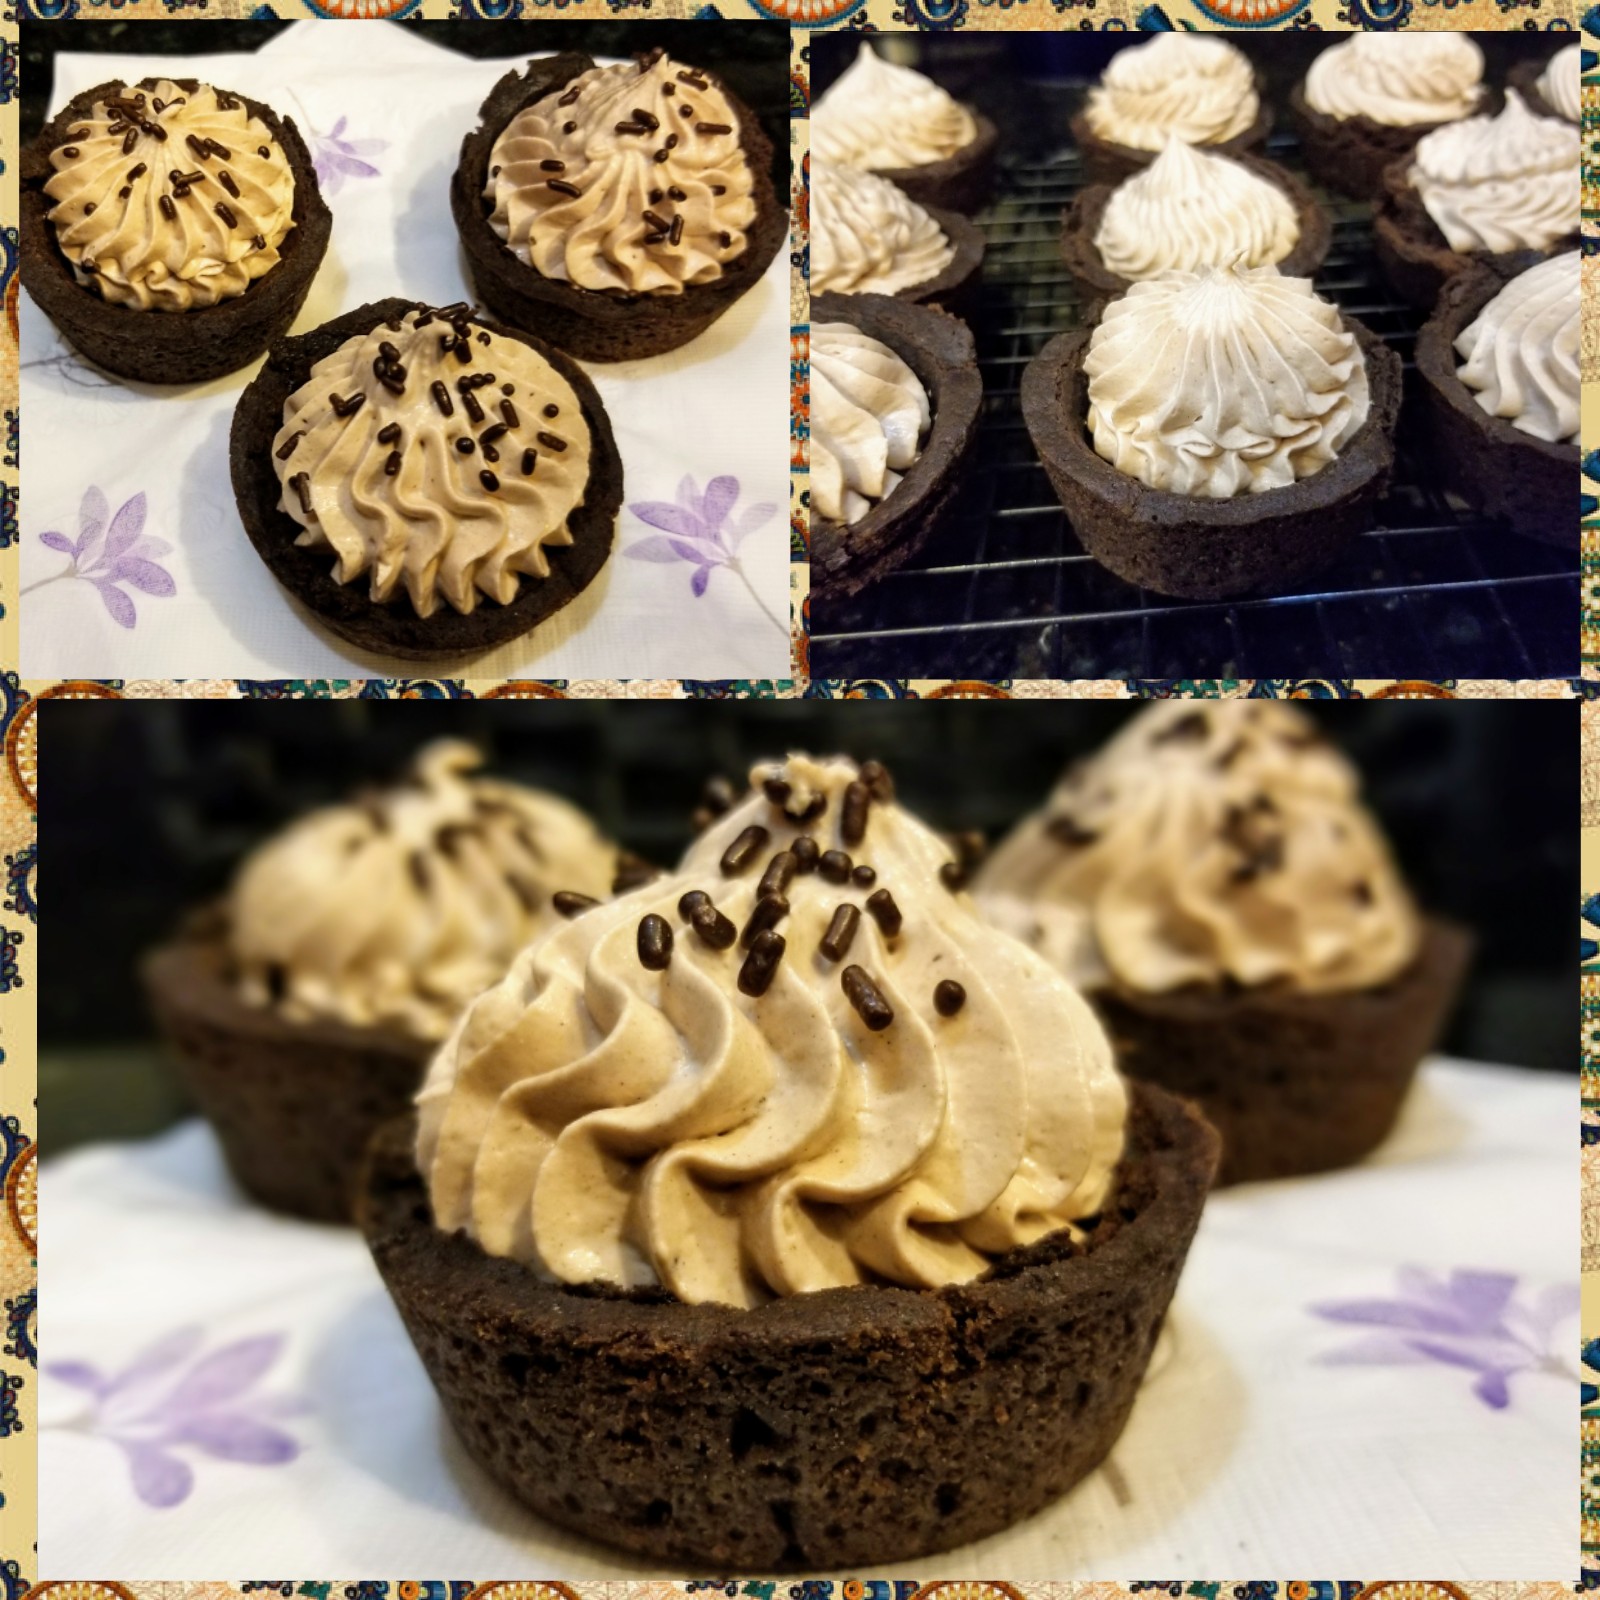
I work in a museum, which means during the summer, things get a little intense what with the bajillion tourists, kids being out of school, Florida being hotter than the surface of the sun and us having A/C, etc. As most of you with children know, school is back in session in many places this week, including the county I live in. So I am breathing a deep sigh of relief that I might have a work week where I don’t have to tell a child not to: feed our exotic animals french fries, run at a full sprint by expensive exhibits, try to pocket gift shop items, scream at the birds…The list is long, and I am tired. So tired. As someone who never wanted children, summertime in the museum industry only reaffirms I have made the right life choice for me and my sanity. So to celebrate my bravery for not spending half of summer hiding under my desk from children (think Mad Max: Toddler-dome), I brought together two of my favorite things: chocolate and Baileys. I know…I make a chocolate-Baileys-something at least once a month (I have to cope somehow; it’s this, or I run away to Canada), but this is a brand new combination: a sinfully delicious dark chocolate cookie cup filled with Baileys chocolate cheesecake.
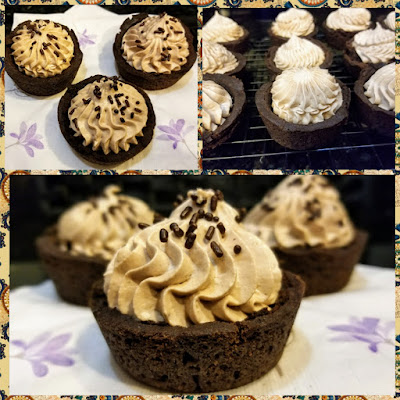
I mean, damn. A single bite of one of these cups, and I forget all my troubles. Well, most of them. I’m still generally tense when I hear the sound of a child’s laughter, but that will pass in a few week’s time. These. Cups. Way more than one bite (trust me, I tried), and so yummy it’s almost a transcendental experience to eat one. The dark chocolate cookie cup is so divine, and the lighter flavor of the Baileys chocolate cheesecake is the perfect pairing–it starts off decadent and finishes on all the right notes. Rich, but not too bold. Boozy, but not too overwhelming. If you’re celebrating your children going back to school, or if you’re a teacher, and the above hot mess I described is now your problem instead of mine, do yourself a favor and make these cups to either celebrate or cope. Dealer’s choice. Did I mention they’re only 230 calories a cup? And the recipe makes 20 cups–plenty to share with your celebrating MOPs group or shell-shocked fellow educators.
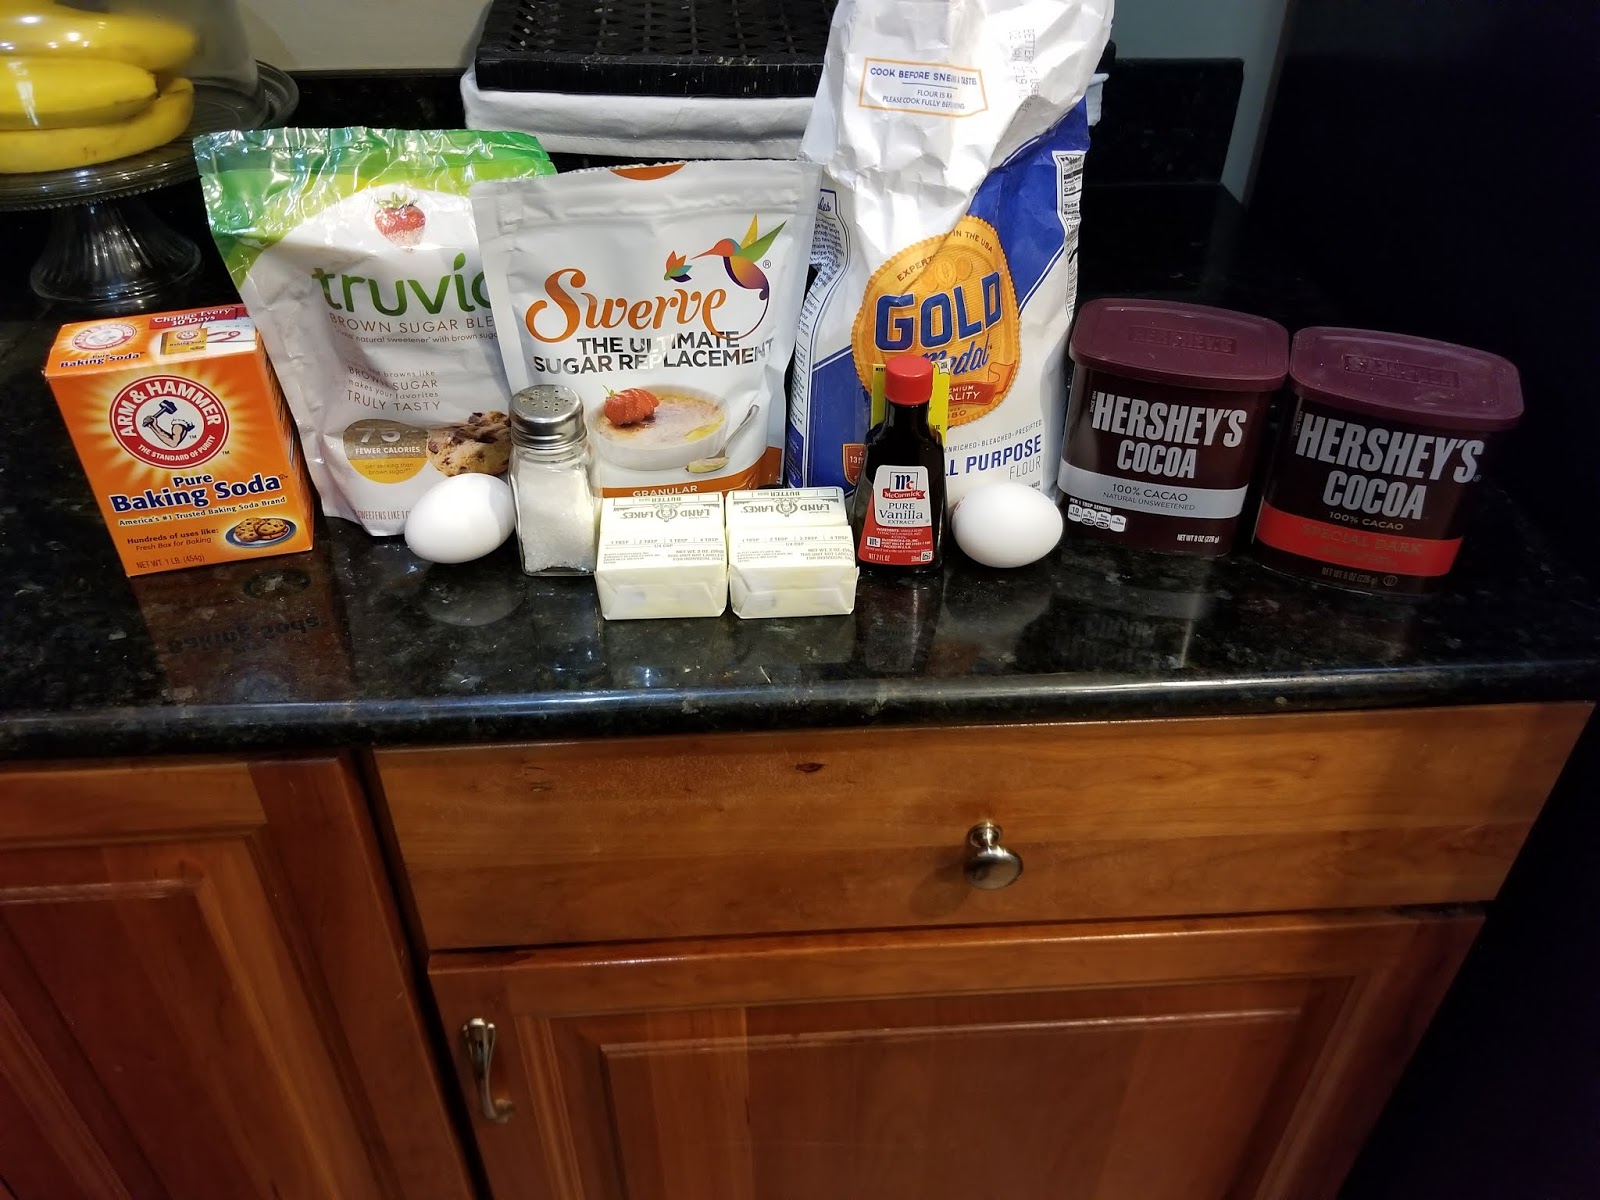
Everything starts with butter. With a few easy ingredients, these cookie cups come together in no time flat. You’ll need:
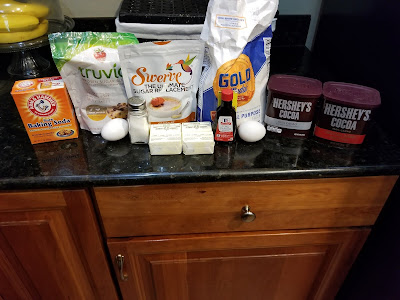
- 1 cup of butter at room temp
- 1/2 cup of Swerve granular
- 1 cup of Truvia brown sugar blend
- 2 cups of All Purpose flour
- 1/4 cup of regular cocoa powder
- 1/4 cup of dark cocoa powder
- 1 tsp baking soda
- 1/2 tsp salt
- 2 eggs
- 1 tsp vanilla
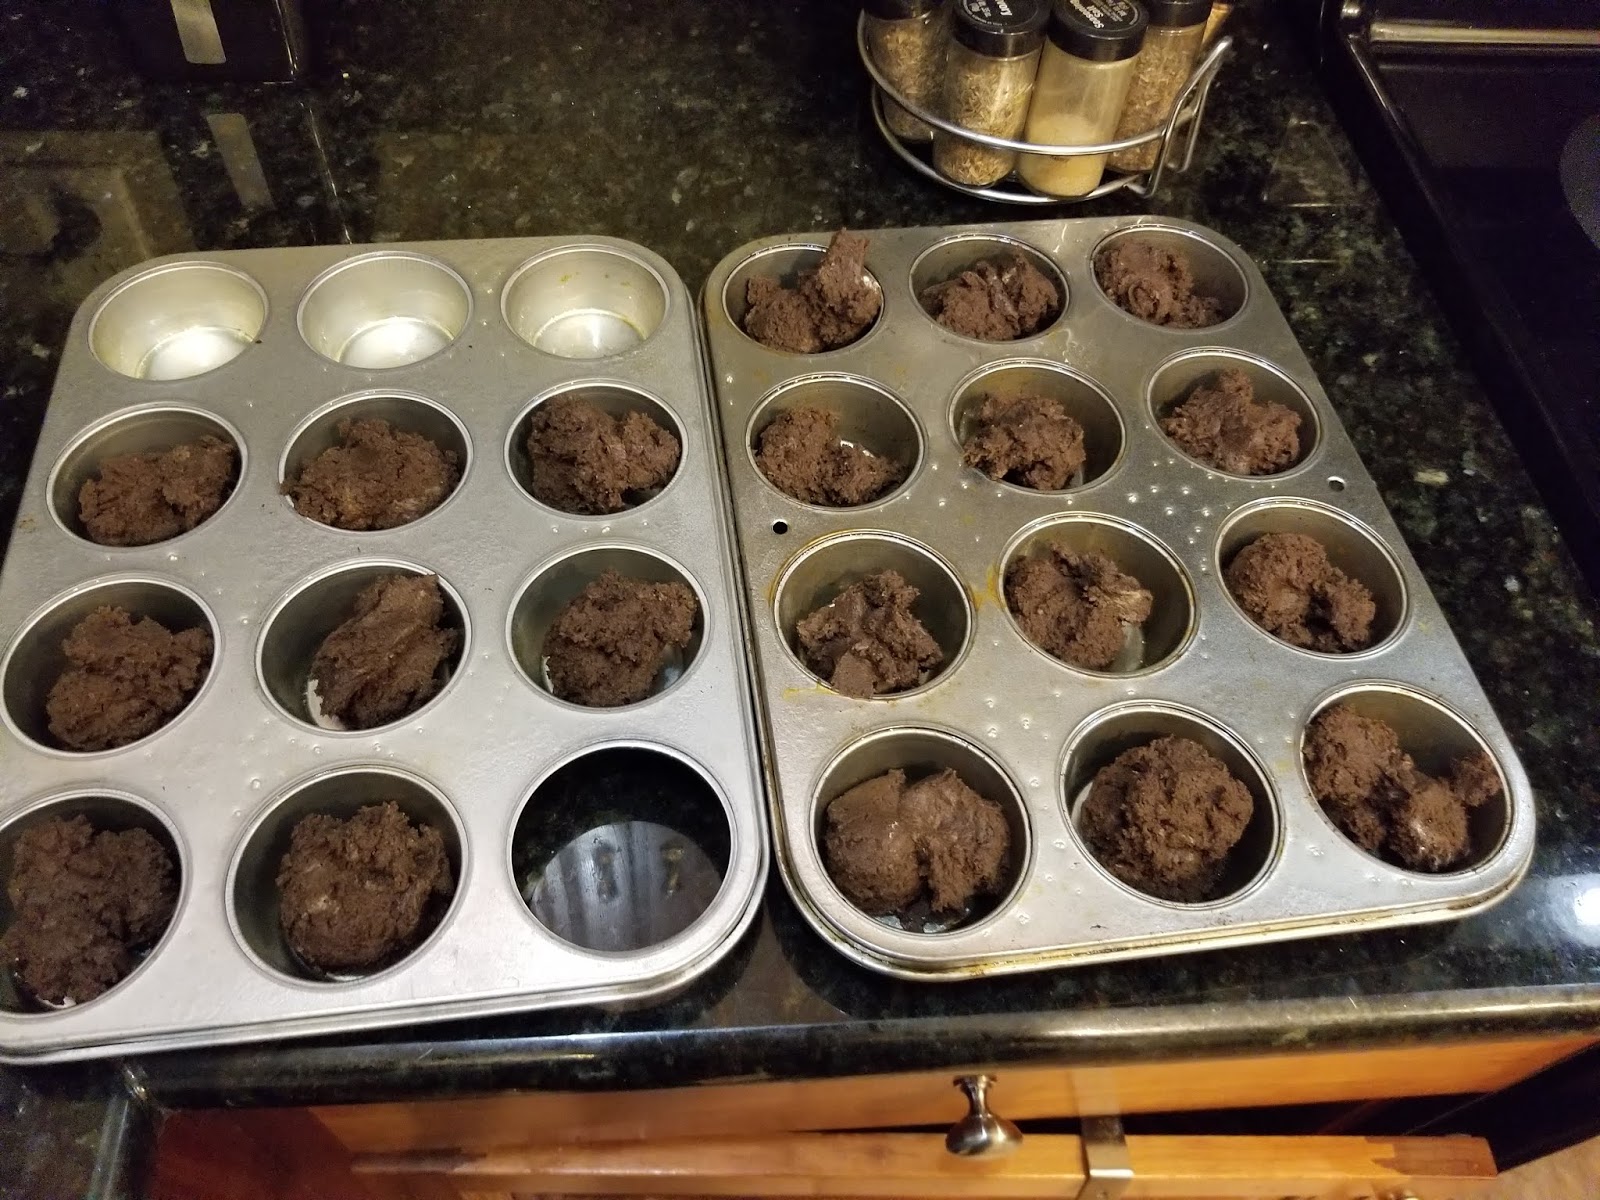
Preheat your oven to 350 and grease the hell out of two muffin tins (regular size). Cream the butter and sugars for 3-4 minutes until light and fluffy. While your stand mixer is earning its keep, sift together the flour, cocoas, salt, and baking soda in a large bowl. Once your sugar/butter magic has happened, add in the eggs, one at a time, mixing well and scraping the bowl between each. Add the vanilla and a third of the dry mix you set aside. Blend until just incorporated, scrape the bowl, and add in another third of the dry mix. Repeat one last time.

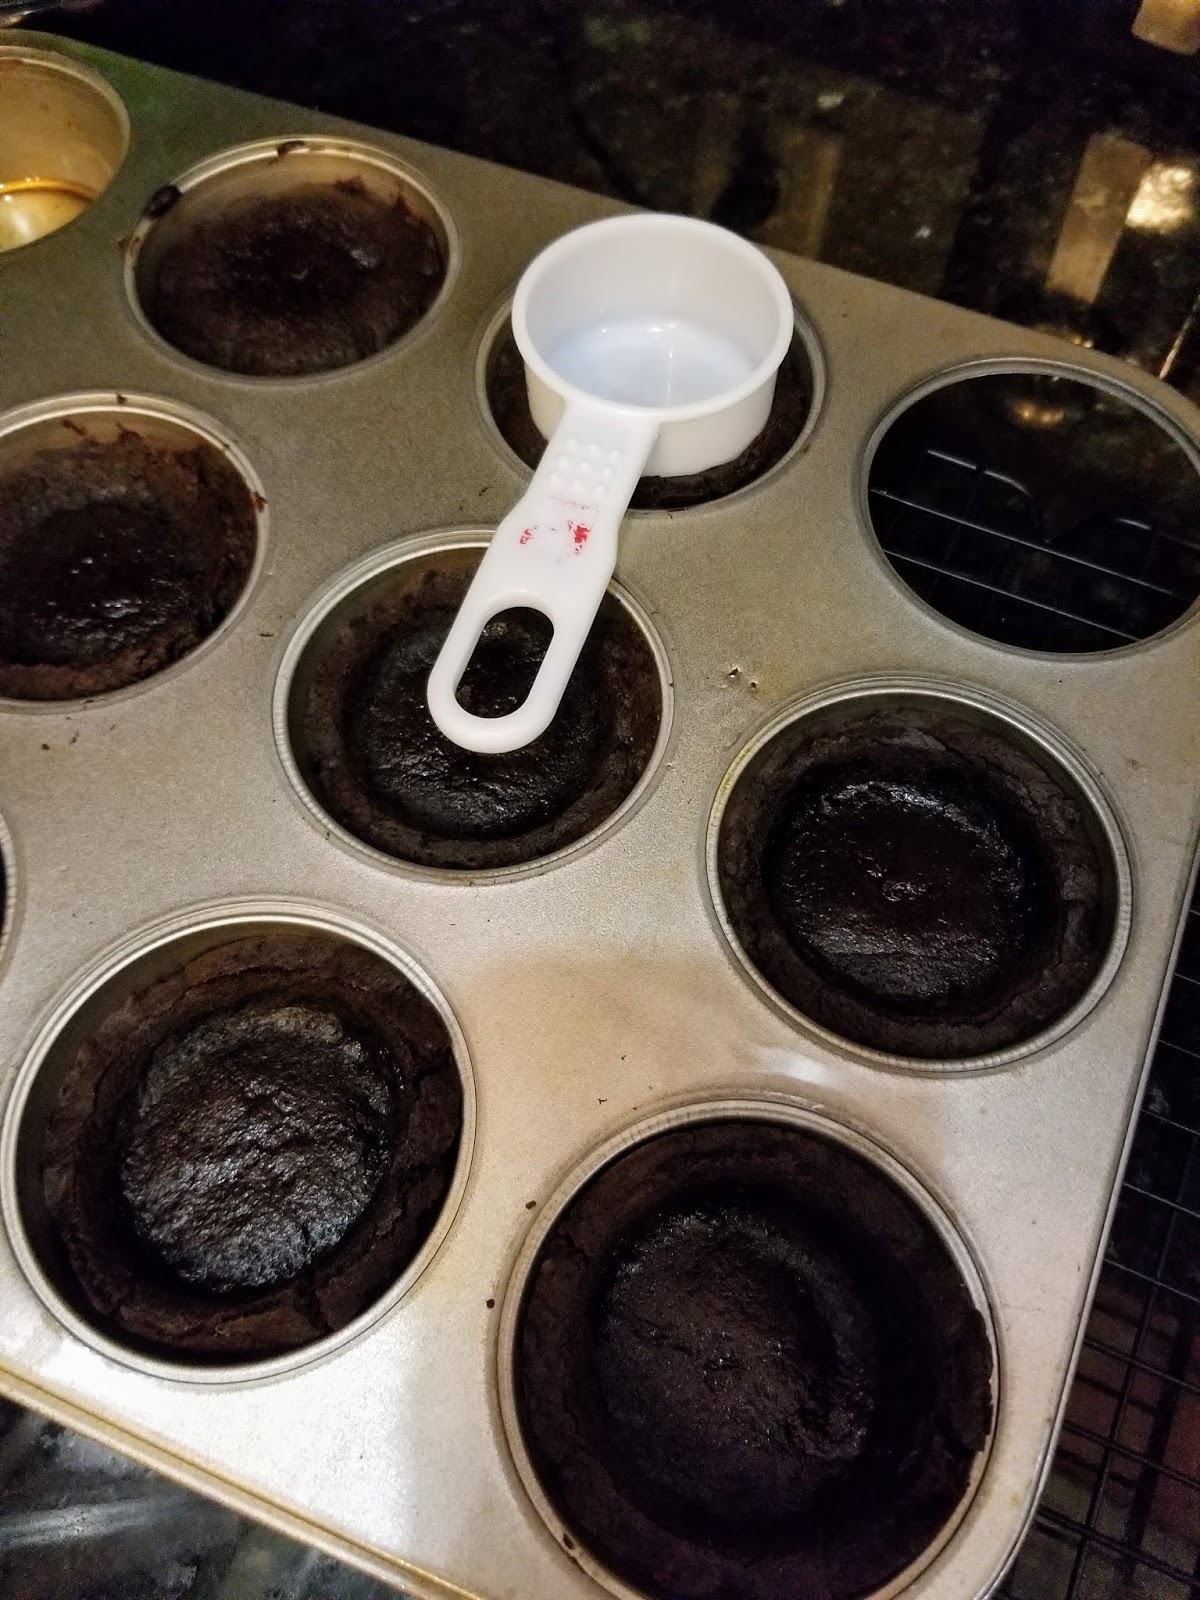
I just wanted to eat the cookie dough all at once…that’s how broken my spirit is after summer. Take a cookie scoop, grease it, and then drop two scoops into each muffin tin to make 20 cups.

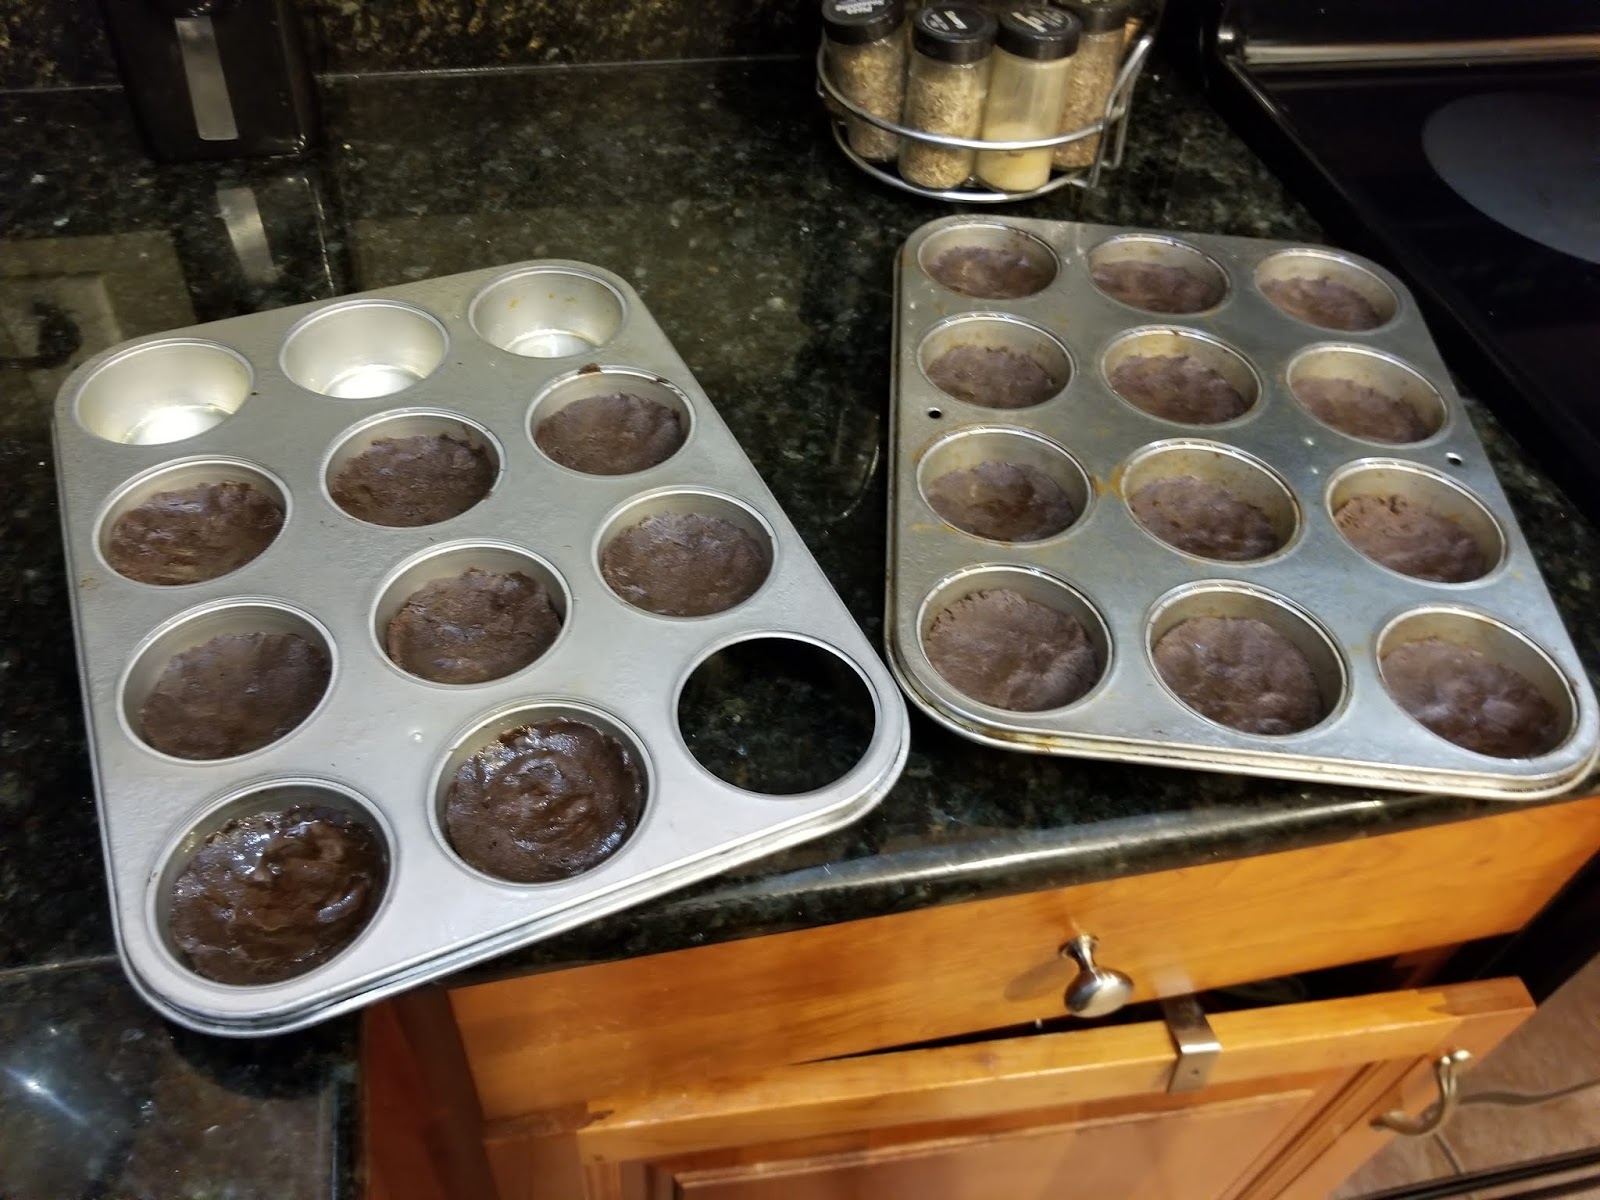
Instead, I used my stress to fuel the flattening process. Coping! Then flatten out each cup, ensuring they are relatively uniform and evenly flattened out. You don’t want the sides/edges to be too high up from the rest of the dough or they will cook too fast and burn by the time the rest of the cup is ready. We’ll indent later! Bake for 12 minutes at 350. The center will still be very soft and not all the way set; this is a crucial component in order to shape the cups, so don’t over bake!
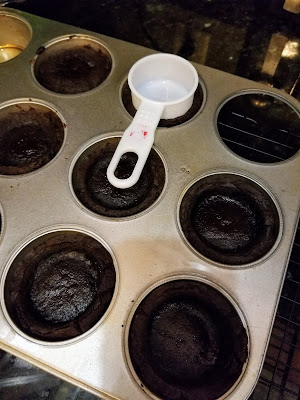
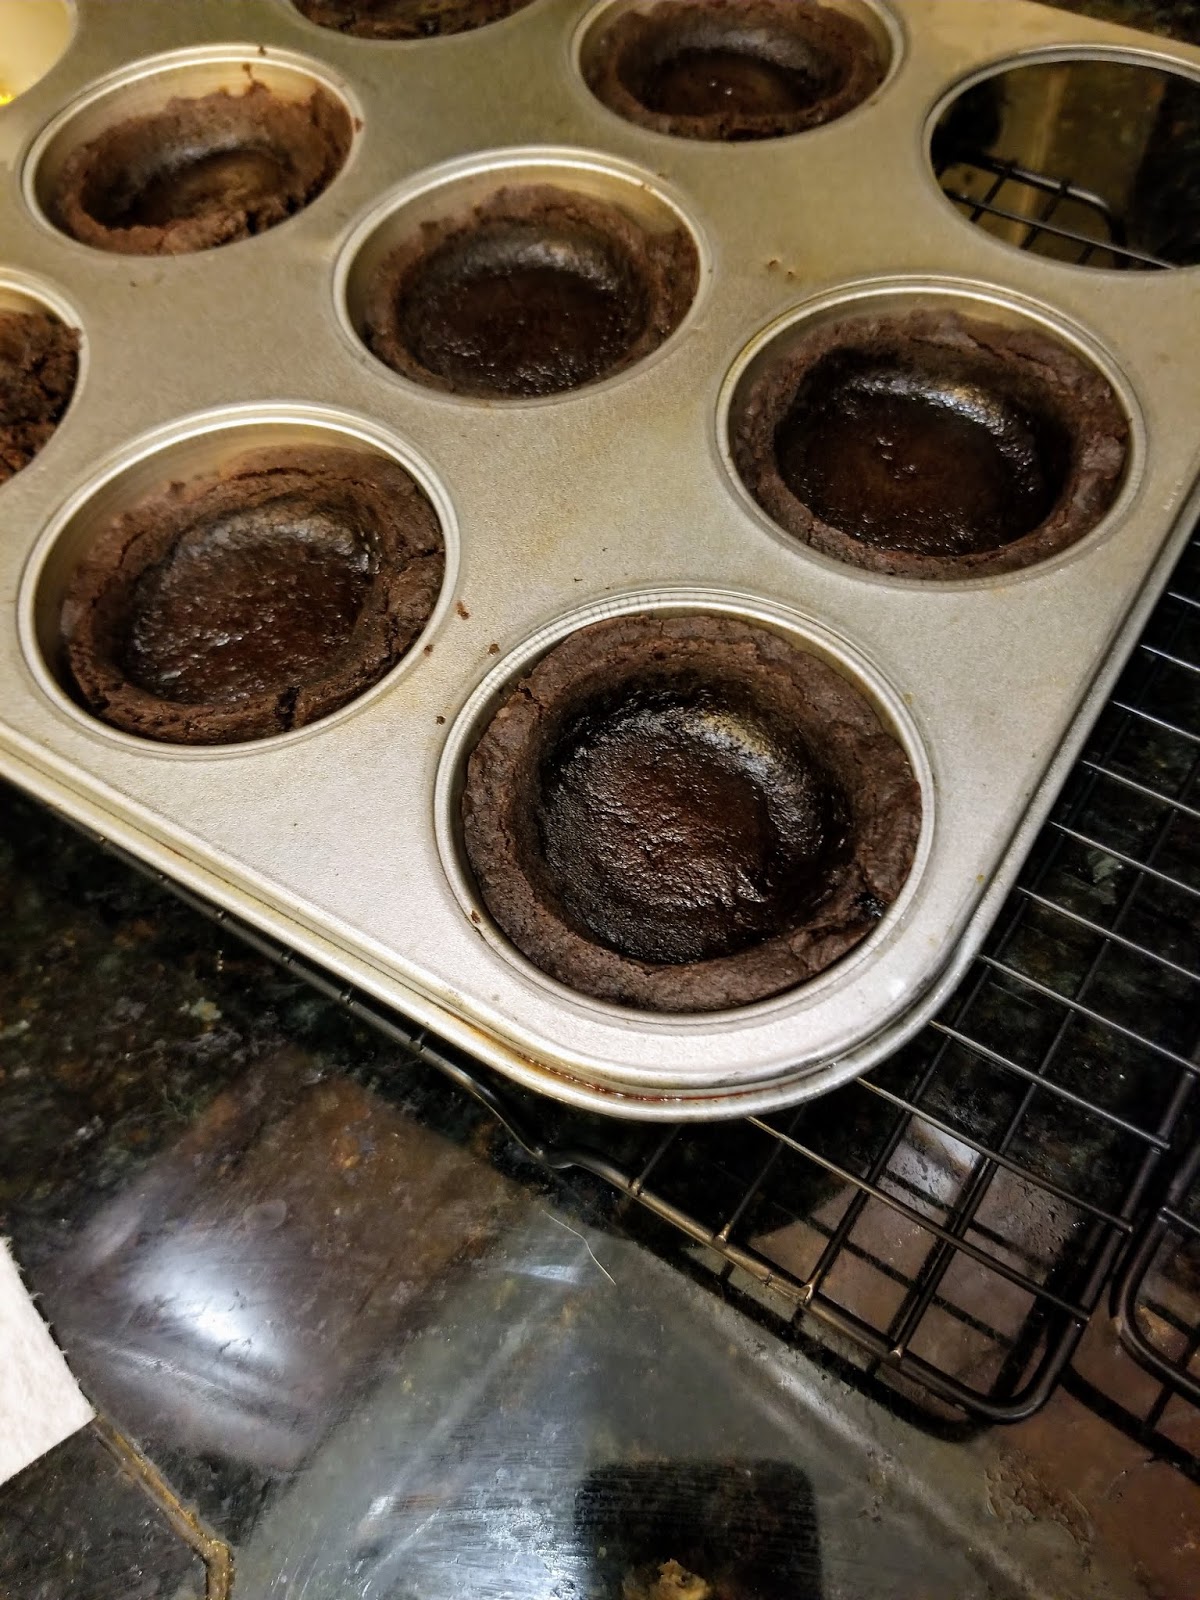
1/4 cup scoop, the perfect fit. After you remove from the oven, place the muffin tin on a cooling sheet and get a 1/4 measuring cup out. Use it to gently but firmly press into the top of each cookie to create a well. I sprayed my measuring cup with cooking spray to keep it from sticking and ruining the cups. Repeat for all 20 cups, and then leave them alone. Walk away! No touchy! Let these cool off for 10 minutes, then use a dull butter knife or angled spatula to loosen the edges of the cups from the side of the tin. Once none of them are sticking, let these cups continue to cool off in the muffin tin until completely room temp. The residual heat from the pan will help the centers firm up.

Real tempting not to dig in with a spoon, though. 
But worth the wait. Edible cookie bowls are the best kind of bowls. Deal with it, burrito bowls. You’ve had your moment. Once fully cooled, finish removing from the pan and leave on the cooling rack. Time to prep that cheesecake filling! –Best prep work there is!
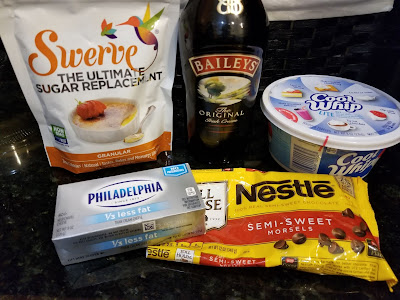
Because, booze. This cheesecake filling is pretty light and fluffy, which goes against my general cheesecake belief that it should be so rich and so heavy that I need both a shovel and an iron will to eat it. But, considering how absolutely decadent the chocolate cookie cups are, a lighter cheesecake filling is necessary to offset the texture and balance out the flavors *just* right. You can always use less Cool Whip if you still prefer a heavier cheesecake, but I honestly think the cheesecake has the perfect amount of density to pair with the cookie cups. Any heavier and I might have trouble finishing a whole cup…and this is coming from the queen of eating her body weight in dessert, so heed my advice. For optimum cheesecakery levels, gather:
- 8 ounces of 1/3 less fat cream cheese at room temp
- 1/2 cup of Swerve granular
- 1/4 cup of Baileys
- 1/4 cup of melted semisweet chocolate chips, cooled
- 8 ounce tub of Cool Whip Lite (why can’t I find Cool Whip Free anymore?!)
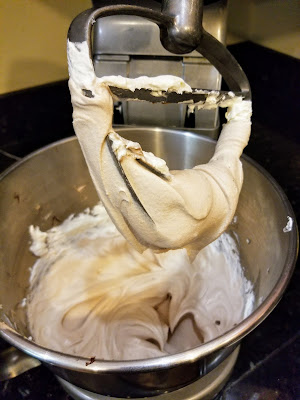
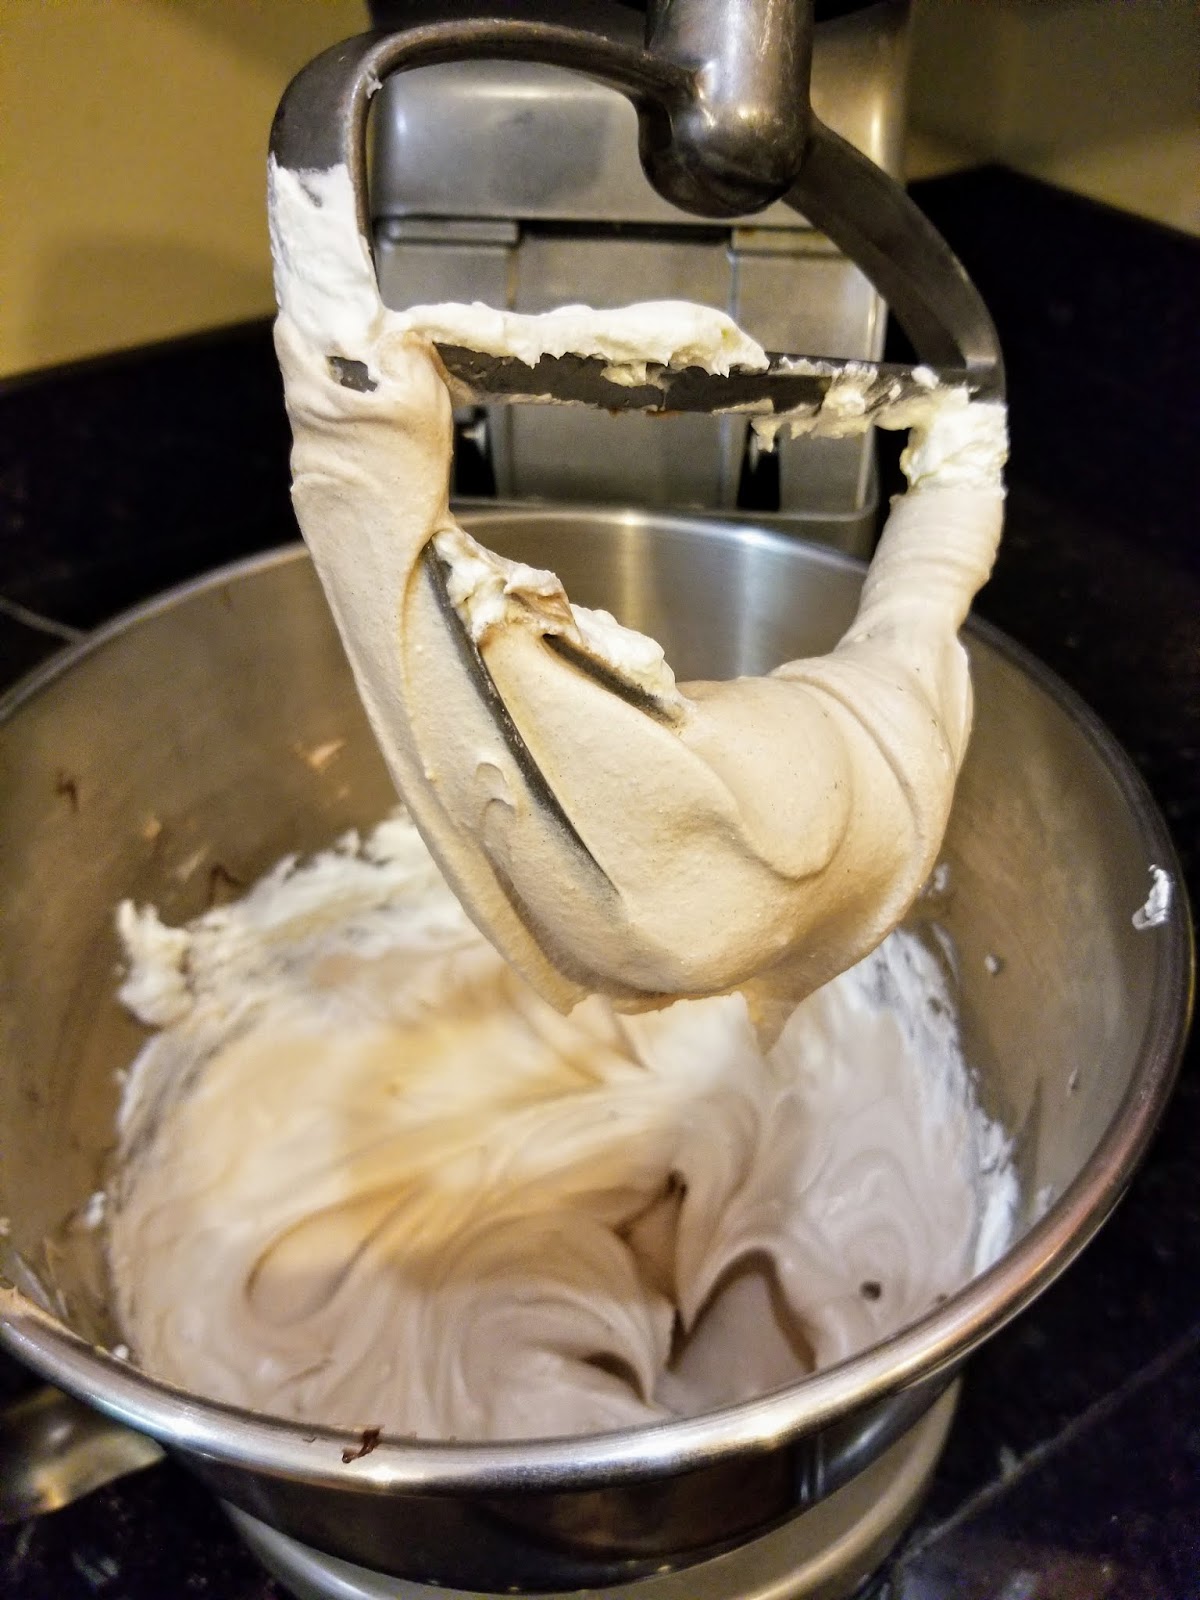
You are perfect in every way, fluffy filling. Like a Wendy’s Frosty with Baileys. Mmm. Start by blending the cream cheese and Swerve for 2-3 minutes until well mixed and not grainy. Add in the melted chocolate and Baileys. Mix very well. Drink with a straw for…reasons. Or don’t. I don’t know how rough your summer was, so I won’t judge you if you actually drink this with a straw (it’s delicious). Either way, finish up by gently beating in the Cool Whip. I put my filling into the fridge to firm up for 30 minutes because I wanted a nice piping texture; alternatively, you could just spoon the filling into the cups then chill and set for an hour. I’m a glutton for punishment, so I waited before loading up a piping bag with a large French tip by Ateco and the cheesecake filling.
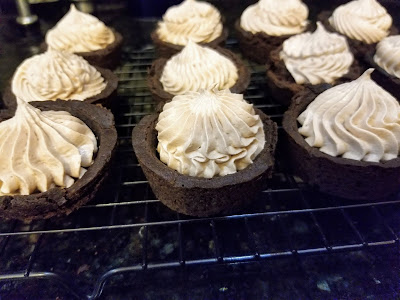
Pipe away! I piped mounds, rounded twists, whatever I felt like for each cup. Not completely uniform but fun and carefree…two words I generally do not associate with myself (unless Baileys is involved). But because I’m also vain and a perfectionist (yep, those are the right adjectives), I finished off these beauties with a pièce de résistance: sprinkles.
Everything is better with sprinkles. These cookie cups chocked full of boozy brilliance do need to live in the fridge during their very brief survival time before total consumption occurs. I do, however, nab a couple to sit out for 10 minutes so the cookie cups soften up before inhaling. Worth it. I have had these on my Pinterest board for months–waiting, not so patiently–for summer museum season to end so that I could bake these beauties and celebrate my survival. I’d say I’m also celebrating for my sanity, but that’s checked at the Florida state line until we move. ‘Til next time, my fellow eaters!
-
Coping with Summer, the Cake Edition.
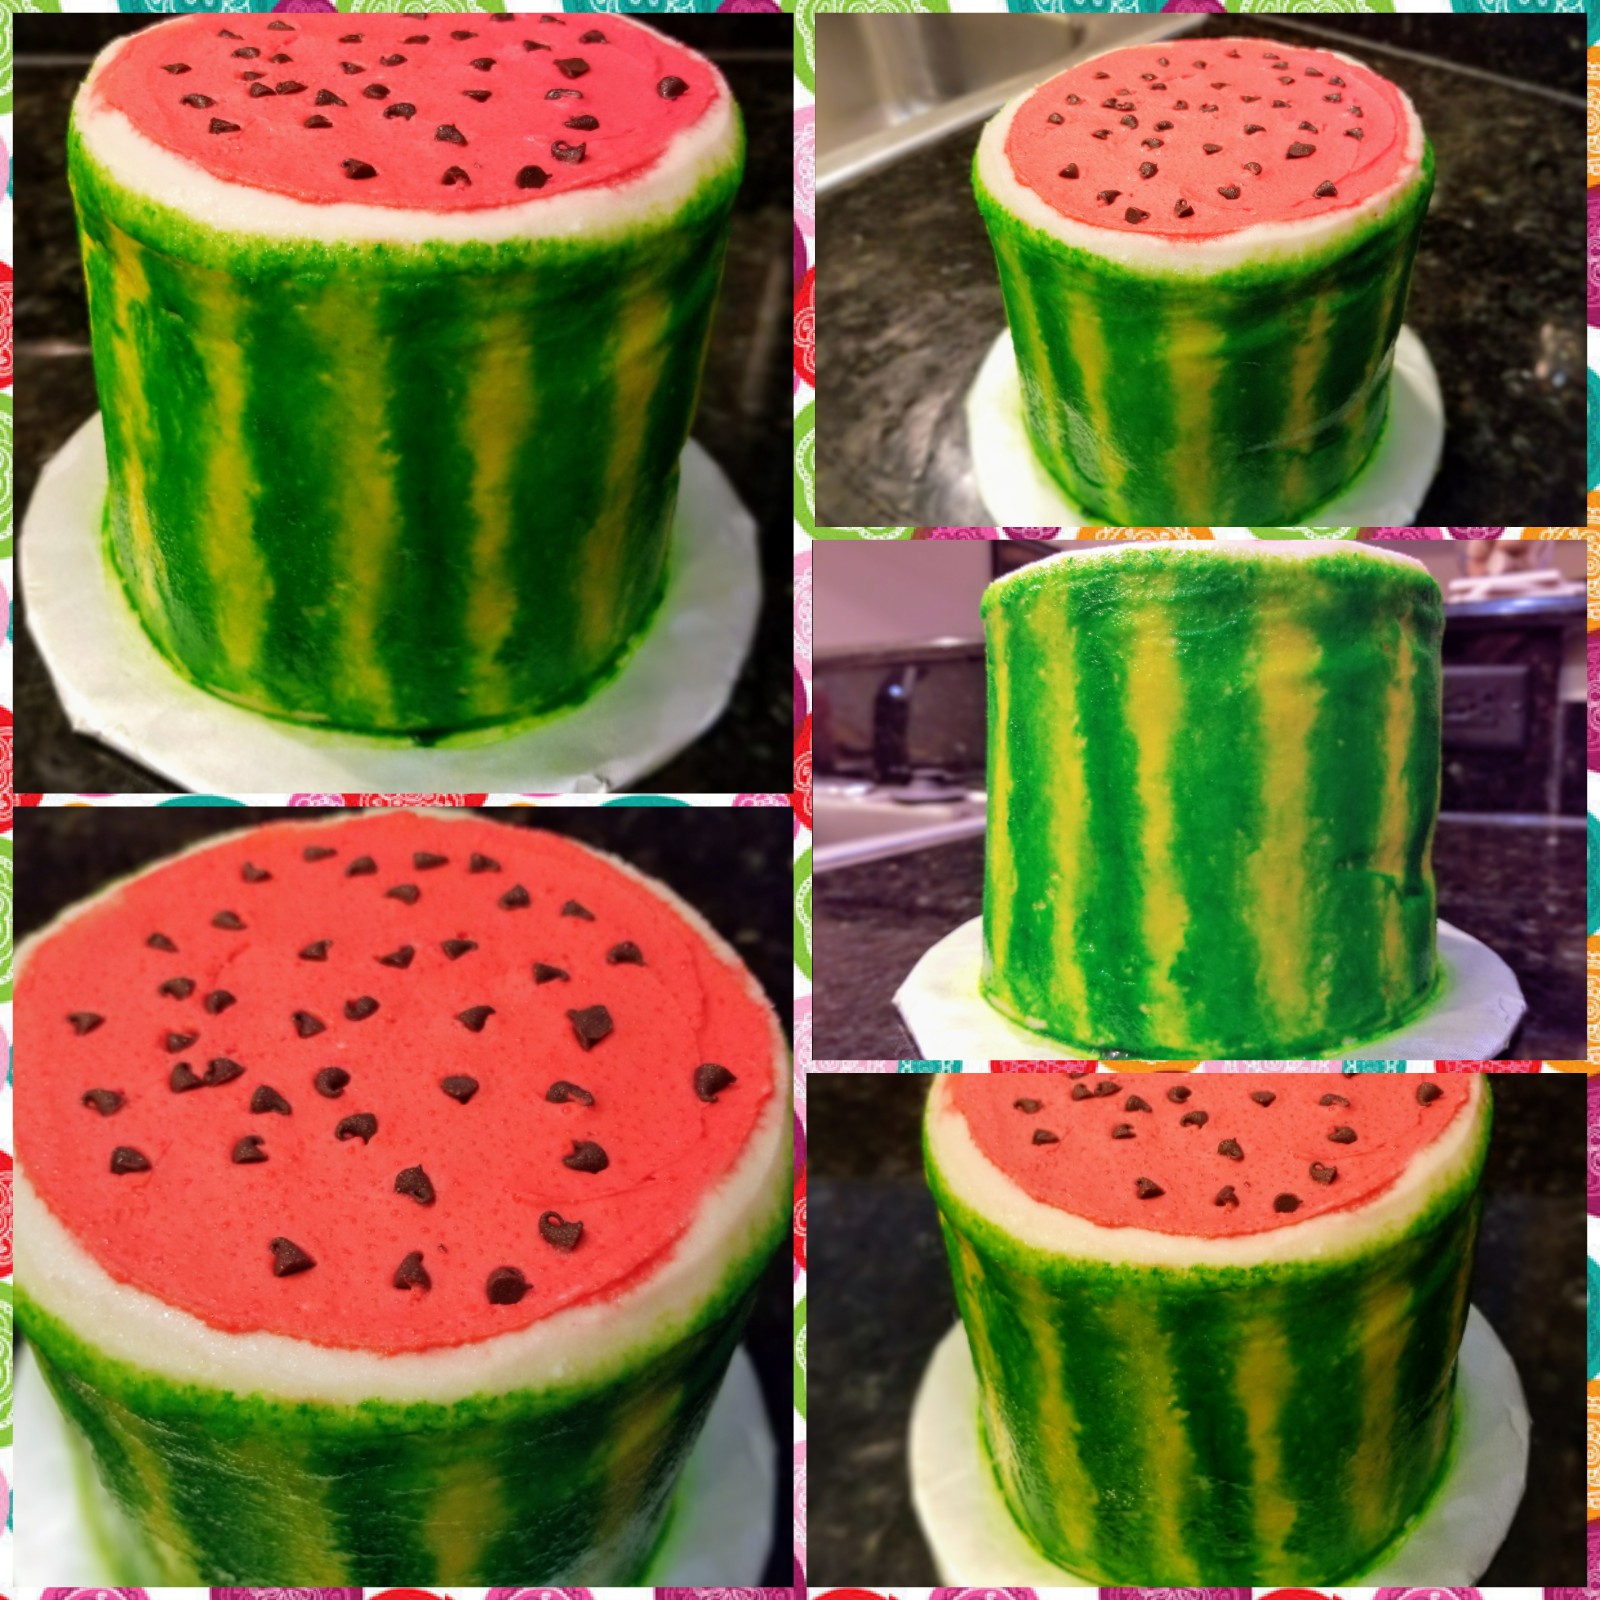
If there is one thing I actually do enjoy about living in Florida, it is having Publix grocery stores. More specifically, Publix grocery stores’ watermelon. I’m not sure if they’re injecting it with pure cane sugar, unicorn tears, or drugs, but the stuff is absolutely magical and without a doubt the best tasting watermelon I’ve ever eaten, every time. I’m leaning towards the drug hypothesis because it would explain every “Florida Man” headline you see in the press and the sense of euphoria I feel while eating it. I eat a lot of fruit to satisfy my sweet tooth…there’s no way I could remain in shape if I grabbed a donut to curb my sugar cravings as often as I do chunks of watermelon, bananas, mango, or grapes. But since I’m a fat kid at heart, I saw this Delish video making the rounds on Facebook. A giant cake in the shape of a watermelon?! Eating my fruits and cakes at the same time?! I must have been high on Publix watermelon because I totally went for it, in an ode to summer (or my inability to cope with it), I present the cake edition of everyone’s favorite melon (sorry, honey dew):

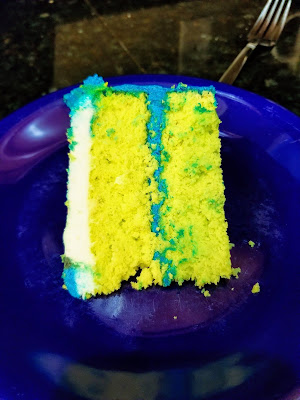
I’m not sure if my mouth is watering for cake or melon. Does it matter? Now, the Delish recipe used TWO cake mixes, all of the calories (I do not exaggerate–16 servings for 750 calories a piece), and maybe was meant for sharing (Share cake? What are we? Peasants?). I wanted to scale this cake down to a reasonable size and weight–I did not need it to be as heavy as an actual watermelon, and I also did not need to feed an army, just my husband and my insatiable dessert stomach. I also live in a region of the country where less still feels like more when it comes to clothing in the summer time, so keeping exposed flesh in mind, I opted to make this as low cal as I could while also still being decadent cakey goodness. Sadly, not as low calorie as a slice of *real* watermelon or one of those “looks like a frosted cake but is just an actual watermelon hiding under whipped cream” creations (the horror), but this three-tiered, 6-inch round cake makes 12 servings for only 383 calories a slice. A tall order of buttercream, chocolate chips, and red velvet cake that tastes so amazing, I don’t even mind the humidity sweats. Coping with summer, the cake edition!
Four ingredients for an entire cake! I’m usually not a huge fan of red velvet cakes because they are dense, like a brick in the stomach (meat is the only food that should be heavy- I am a Texan after all). I do love the flavor though, so I wanted to try lightening up the typical just-ate-a-bowling-ball feeling that comes with a standard red velvet cake. You could also use a white cake and dye it red to make your watermelon cake (and add in sugar free watermelon Jello for maximum melon cake), but I knew I was going to need a lot of dye to decorate, and didn’t want anything to taste funky like it does when you use too much dye, so I went with a cake that didn’t need any extra gel dye. I used:
- A super moist red velvet cake mix so things didn’t taste to dry or heavy
- 2 egg whites
- 10 ounces of diet creme soda
- 5 ounces of mini chocolate chips because this is a watermelon cake and watermelon cakes should also have seeds. Delicious, edible chocolate seeds.
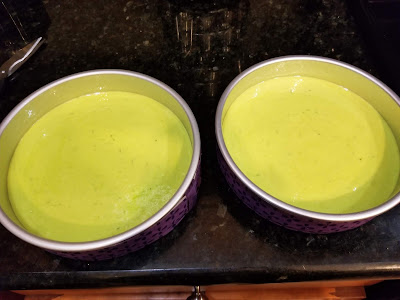
Without heavy oils, butters, or buttermilk, this exponentially helped make a springy, lighter version of a red velvet cake that still tasted perfect. Start by preheating the oven according to package directions and preparing three 6-inch round pans with cooking spray. Blend the cake mix, soda, and egg whites together for 2 minutes on medium high. Place the mini chocolate chips in a bag with a tablespoon of flour and coat so they won’t sink in the batter. Stir in the mini chocolate chips by hand. Evenly distribute your batter in the prepared pans (don’t forget the bake even strips!!) and bake for 25-28 minutes at 350. Let cool on a cooling rack in the pans for 10 minutes once done in the oven, then turn out on the cooling rack to cool completely. I froze my cakes overnight in plastic wrap so I wouldn’t have to crumb coat my cake and worry about bits of red velvet poking out of my frosting. Level your cakes before freezing!
Oh yes, look at that “seed” distribution. My bake even strips work miracles, so I only barely had one cake top to level. I needed to eat the scraps to ensure I had made a tasty cake, you see. Research…

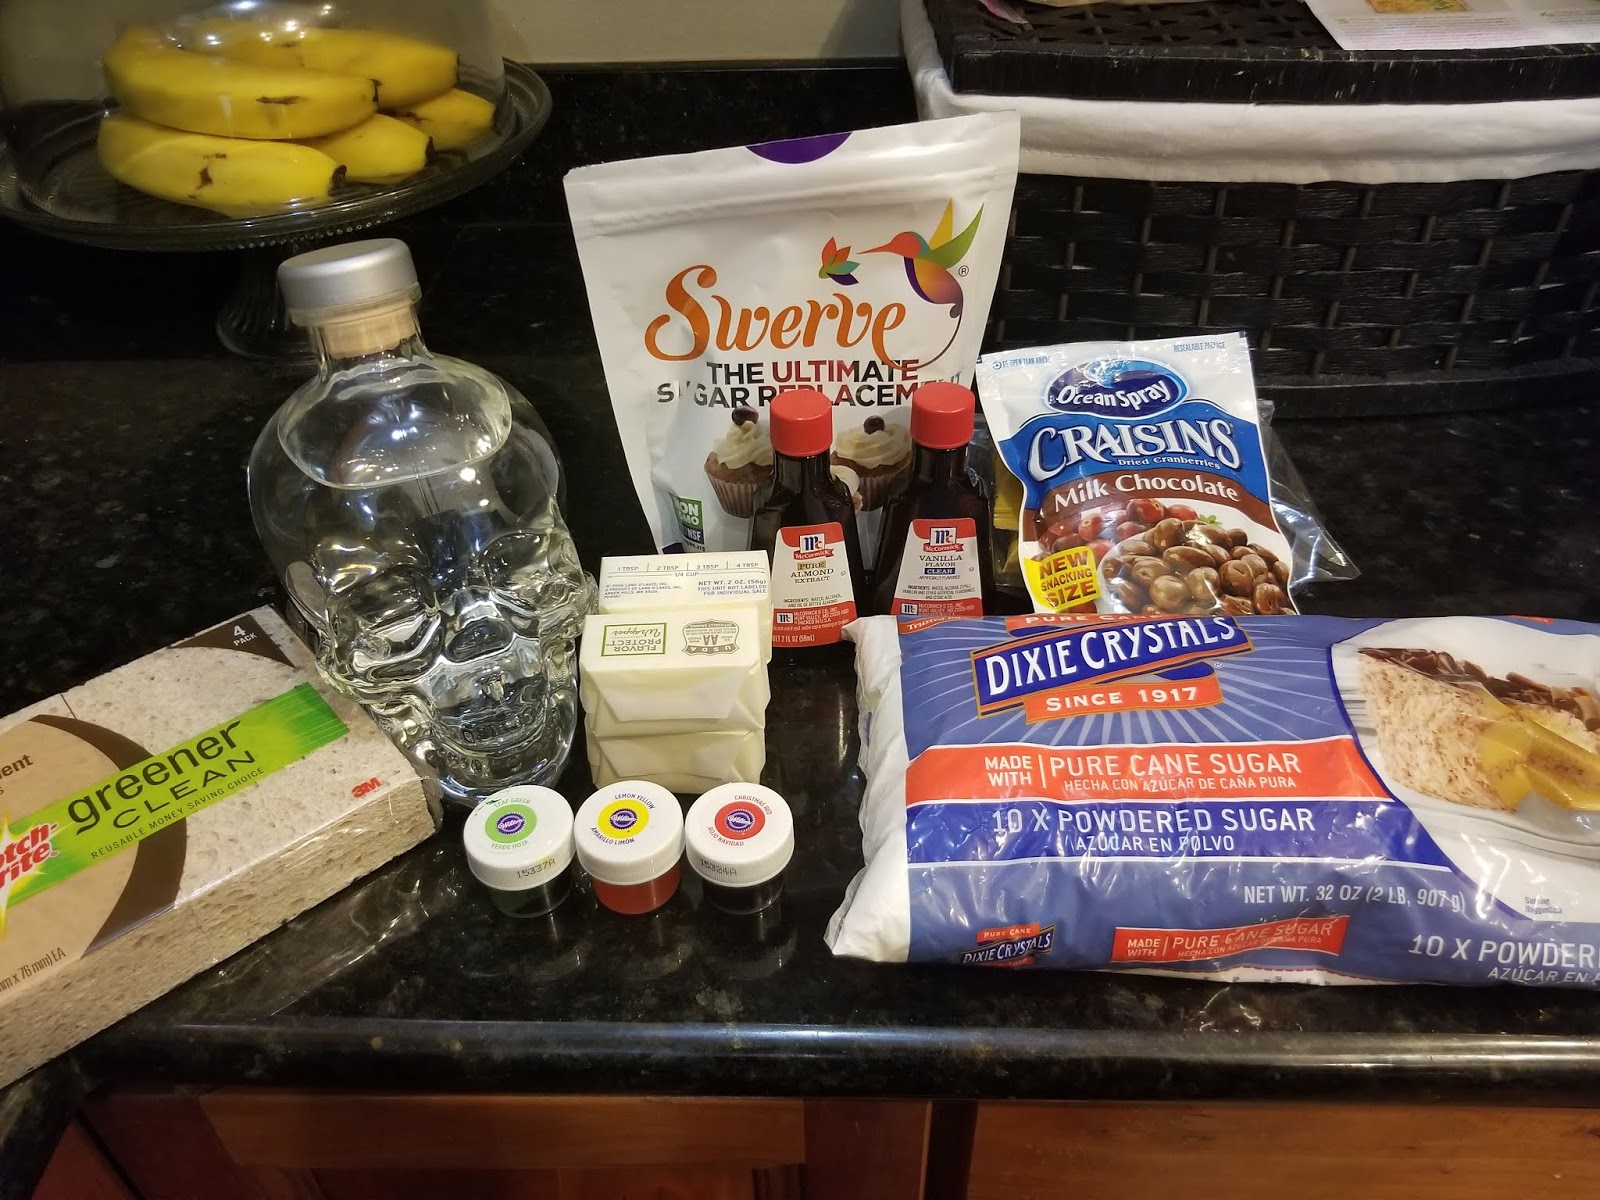
Look, let’s not pretend we’re surprised my vodka is in a skull bottle. I am weird. I am macabre. I am Wednesday Addams. Yeah, this seems like the world’s weirdest grocery list, but to make the watermelon cake happen, it’s worth it. For the frosting, you’ll need:
- 1 cup of butter at room temp
- 3 cups of Swerve confectioner’s sugar
- 2 cups of regular powdered sugar
- 1 TBS clear vanilla
- 1 tsp almond extract
- 5 TBS skim milk
- New, unused sponge
- Some vodka (for decorating or drinking)
- Green, yellow, and red gel dyes
- Black jelly beans, chocolate covered-raisins, or more mini chocolate chips (I used 1/2 TBS of the mini chips to make “seeds” on top of my cake because my husband is averse to black jelly beans. My mother and I just might be the only people in the world that seek them out on purpose. Yum.)
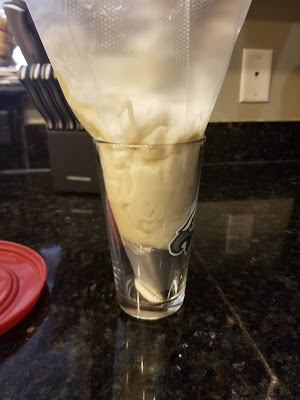
Start by creaming the butter until fluffy, 2-3 minutes. Then add in the 3 cups of Swerve, almond extract, vanilla, and 2 TBS of skim milk. Blend well, then add in the 2 cups of regular powdered sugar and 3 TBS of skim milk. I like to use real powdered sugar mixed with the Swerve because it prevents the frosting from tasting grainy or give off a weird cooling effect that Swerve can have in large quantities. Swerve also masks the extracts, so definitely use a ratio of real powdered sugar to Swerve. I love this almond buttercream recipe, and it is the perfect flavor to go with the red velvet. To paint on frosting, you need a crusting buttercream, so this is why I didn’t go with a traditional cream cheese frosting on my red velvet cake.

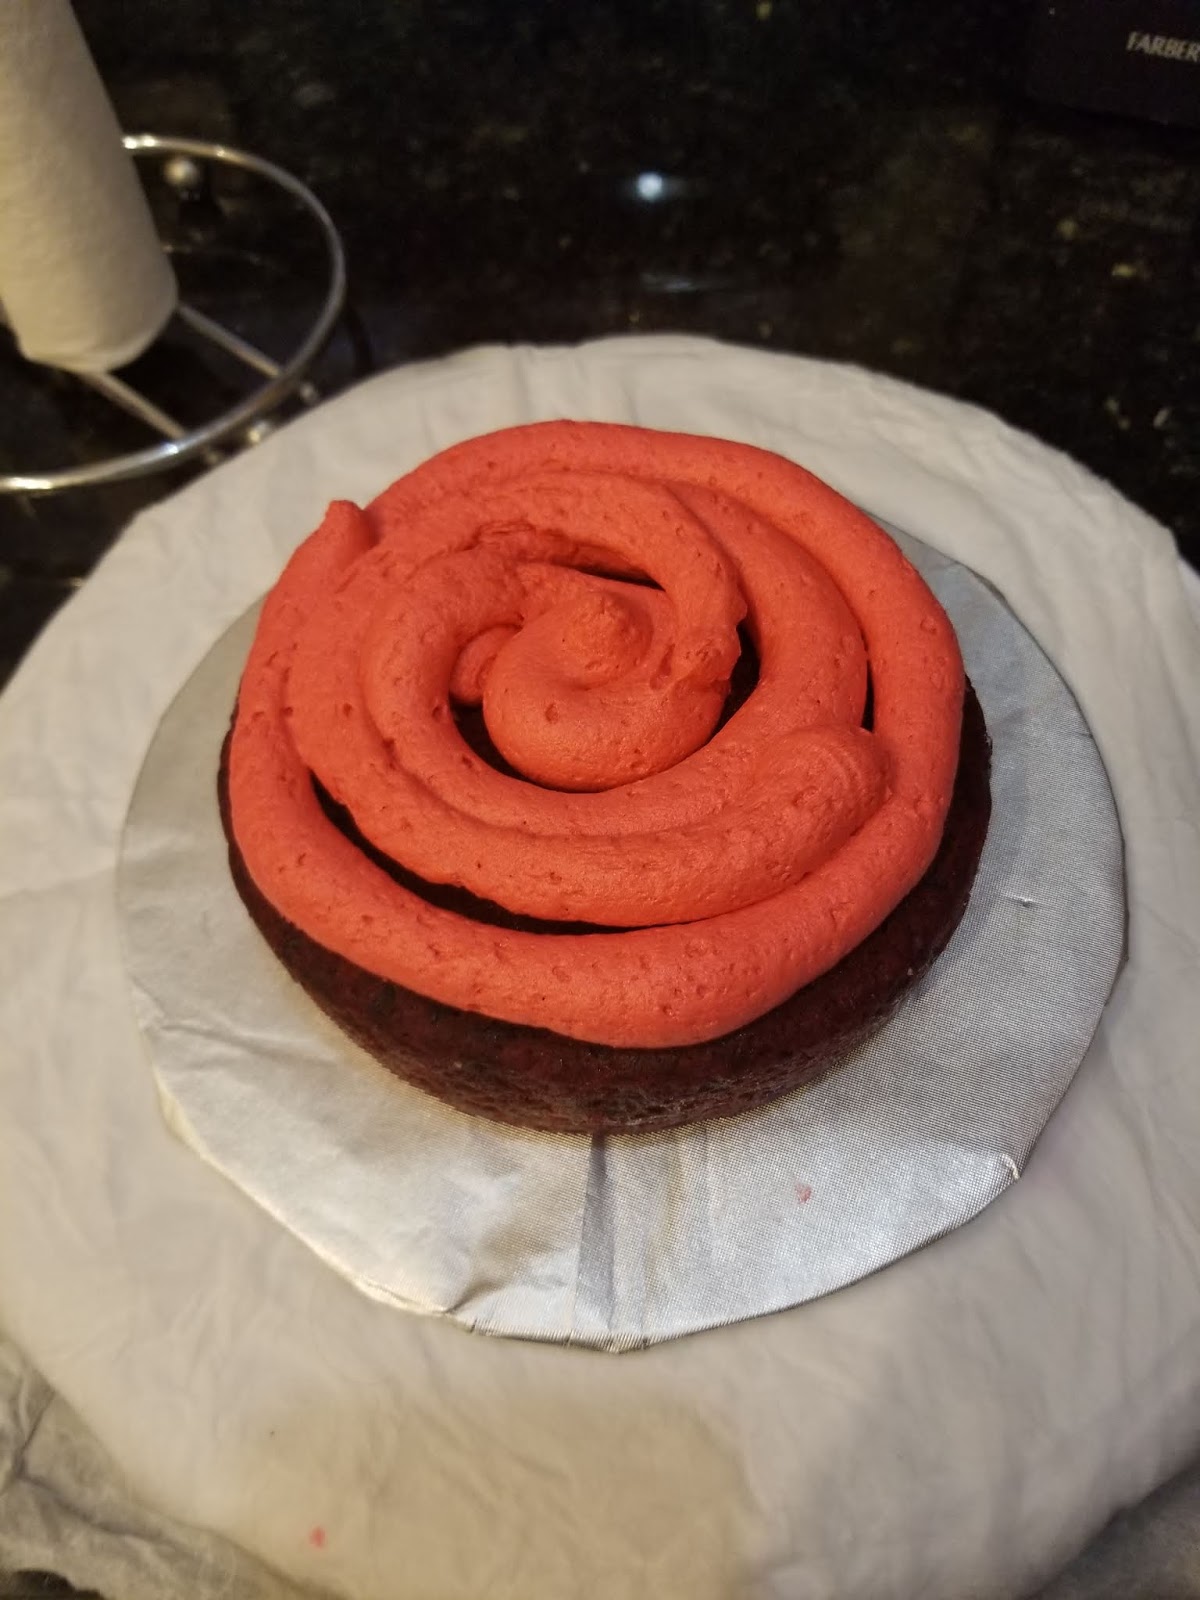
So not red enough… Split your frosting in half. Dye half red, and leave the other half white. I ran out of red gel dye and had no black dye, so I totally didn’t get to achieve a deep enough red to match my red velvet cake. Thankfully, this is the inside of the cake. And when it comes to cake, what’s on the outside is really what matters. Cake, a dessert for vain people! Prepare a cake board and place one layer, top face down, on the board. By placing the cake so the bottom is on top, you’ve got a totally flat surface to start stacking on. I put my red frosting into a large piping back with a large round tip (#12) and piped a thick layer of frosting on top of the cake.
I used an angled spatula to even things out Before stacking another layer on top… 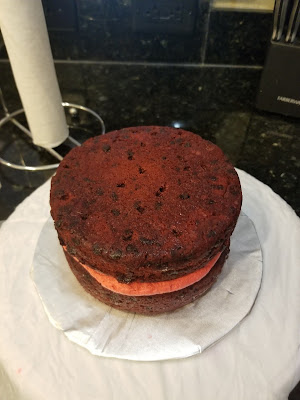
Like a Red Velvet Oreo. Repeat for the final layer: 
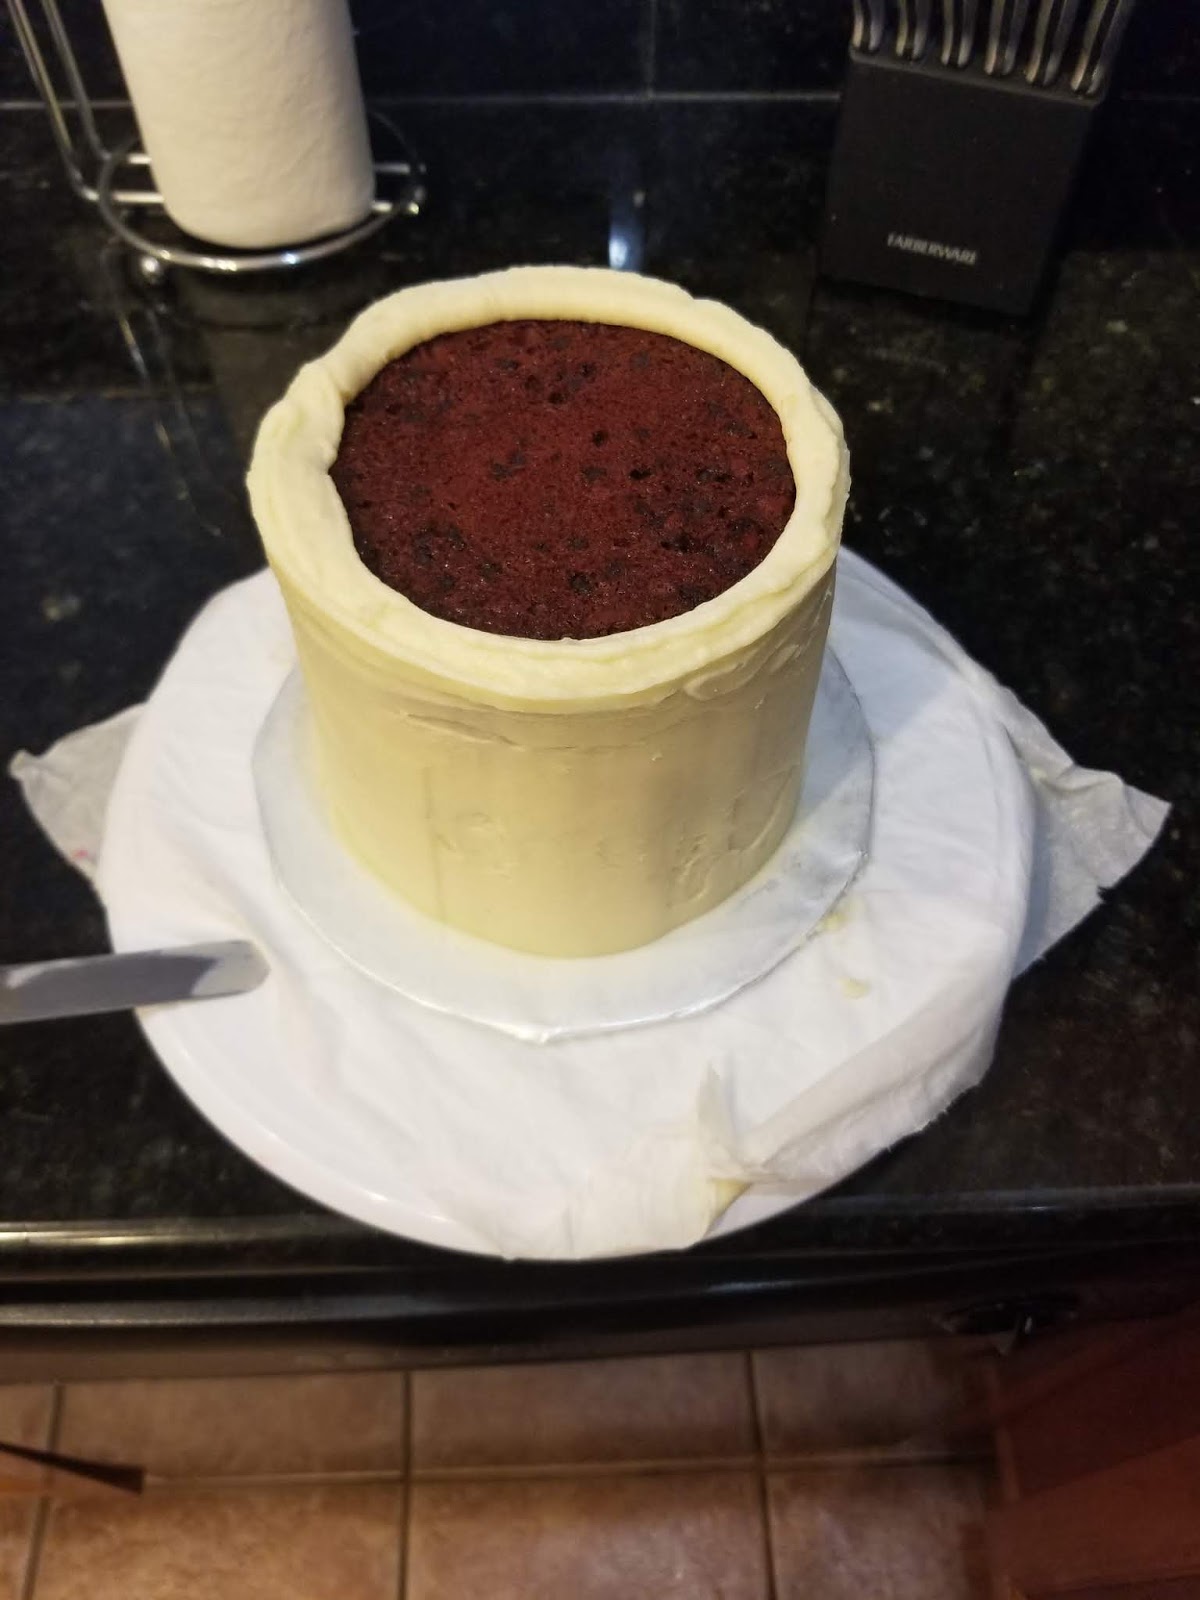
It will at least be as tall as a real watermelon. Now, place into the freezer for 30 minutes to let the red frosting crust up so it won’t bleed through later. I used this time to load up another large piping bag with my white frosting and a cake icer decorating tip. I’ve literally had it since the day I decided to start baking/blogging 4 years ago and have used it exactly no times. I forgot I had it, and as it turns out, it’s literally the greatest piping tool to ever exist. I would probably be light years ahead of myself in skill and precision if I had been frosting my cakes with it since 2014. I’m too proud to express the level of shame I feel over this, so let’s skim right over to a crappy photo montage!
Experiencing yet another new Shame Level: using a Philadelphia Eagles cup to load my frosting bag as a gentle reminder that they smoked my team in the playoffs. Skol one for sadness, Minnesota Vikings. 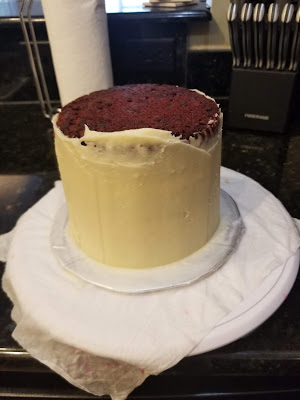
In approximately two to three seconds, I used the icer tip to pipe flat layers of frosting all around my cake while slowly rotating the turn table it was on. I used a large angled spatula and a bench scraper to completely smooth my sides. Five minutes, tops, to achieve damn near perfection. 
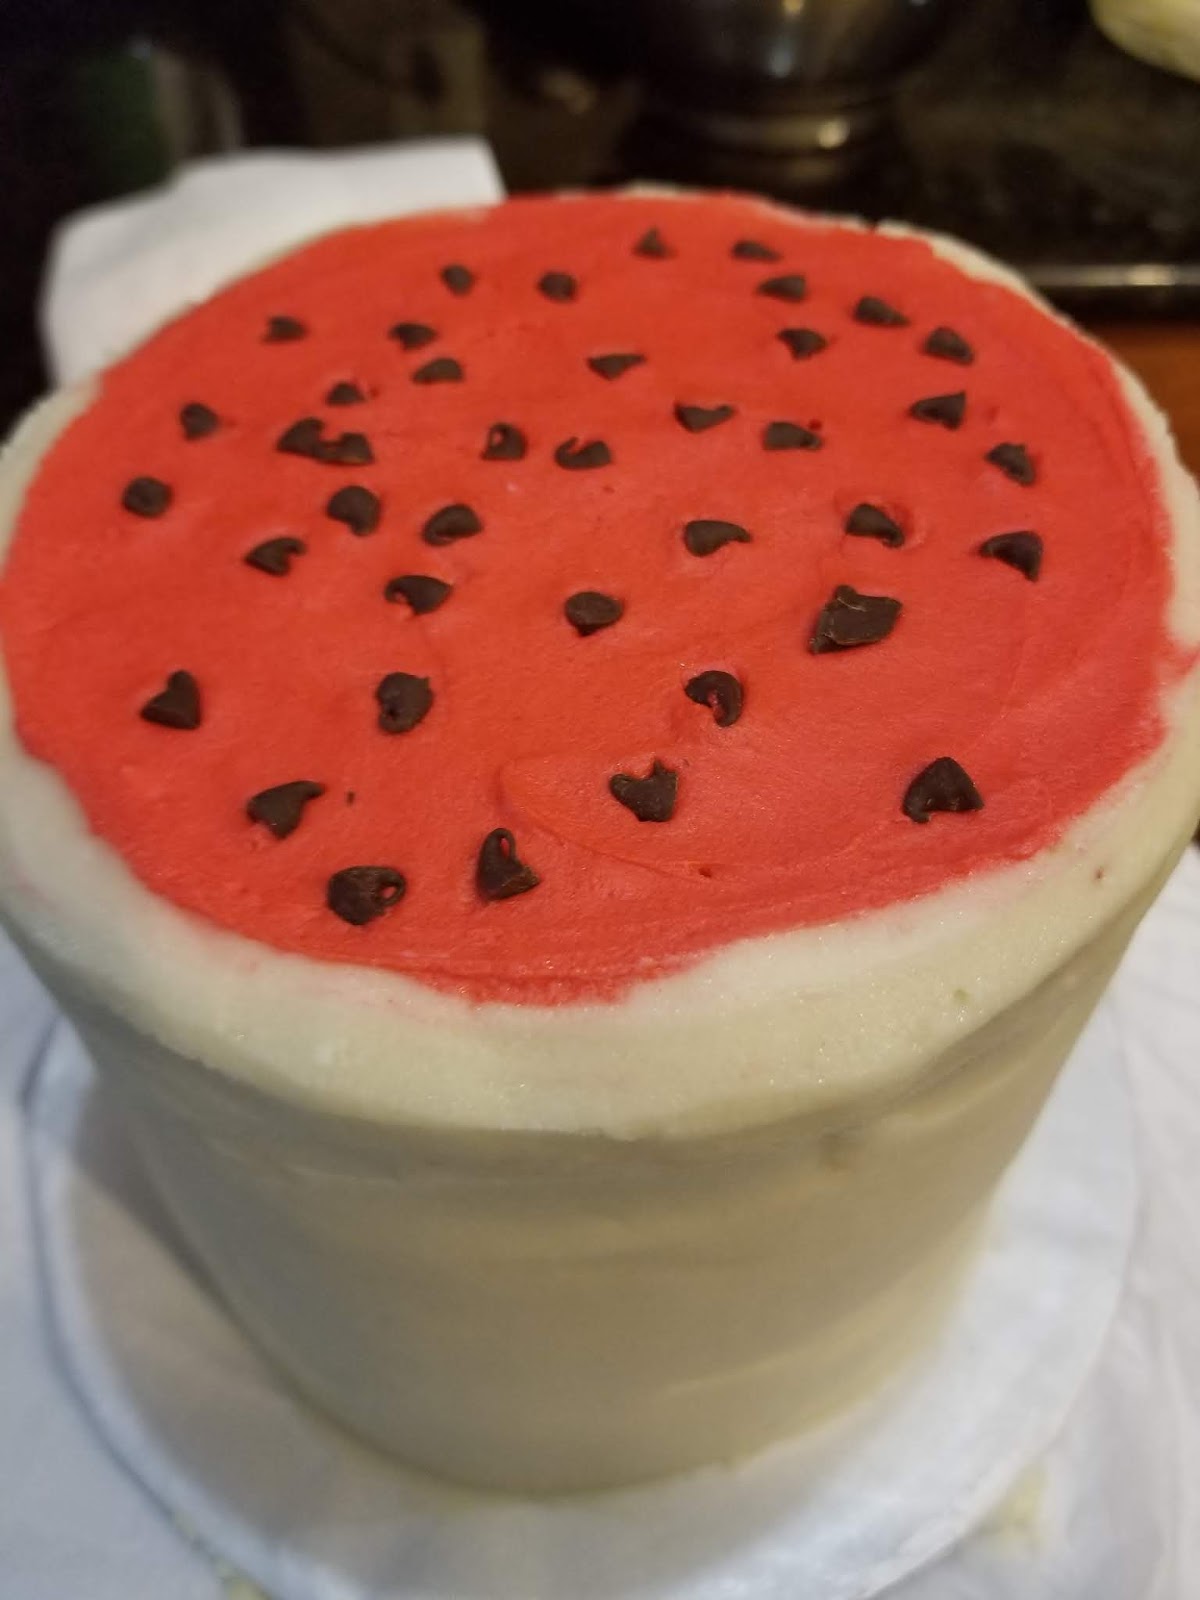
Now, using another round #12 tip, pipe a circle of white frosting around the very top layer of cake. This creates the rind of the watermelon. Stick your cake in the freezer for 15 minutes to let this set up. Then you can come back in and smooth out any uneven edges on the sides of your cake with a Viva paper towel since this is a crusting buttercream recipe. But really, all flaws will get hidden when you paint the cake in a moment. 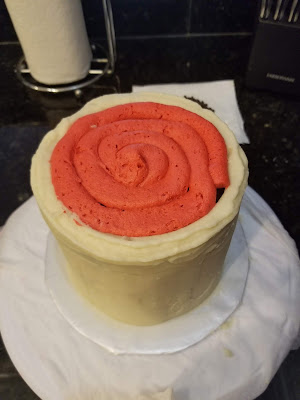
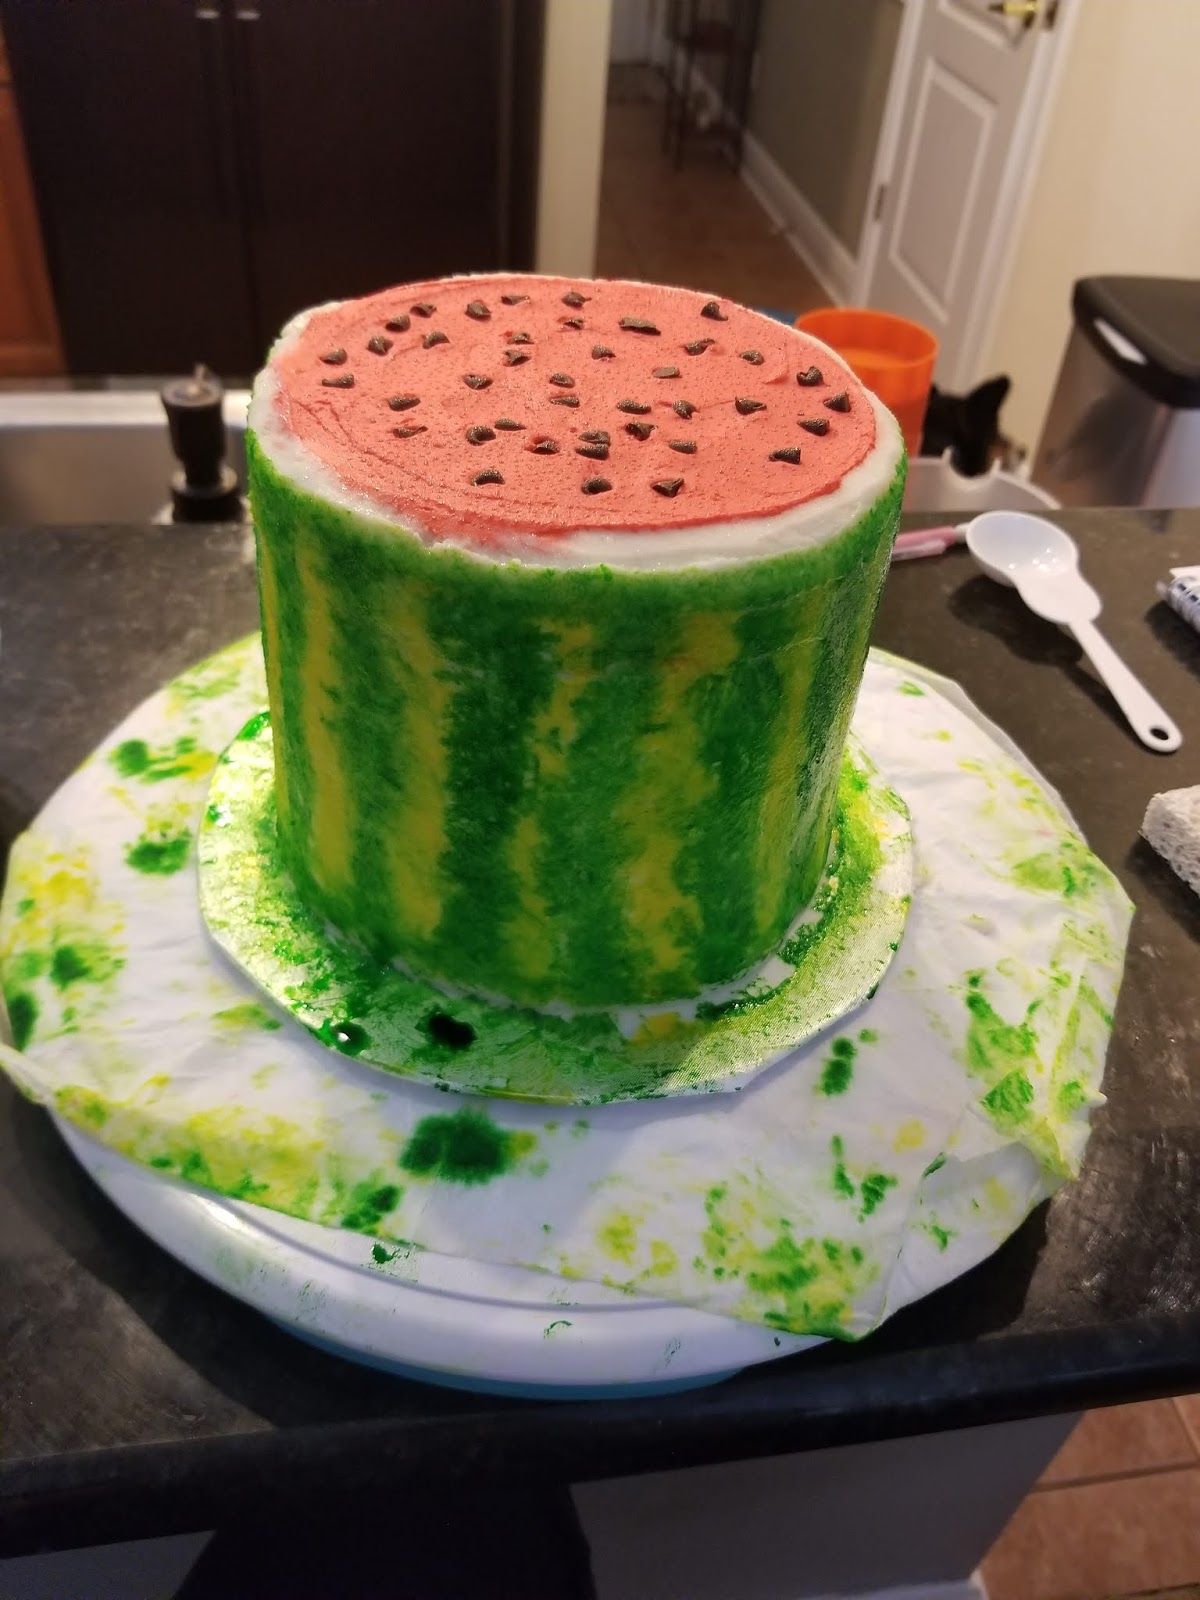
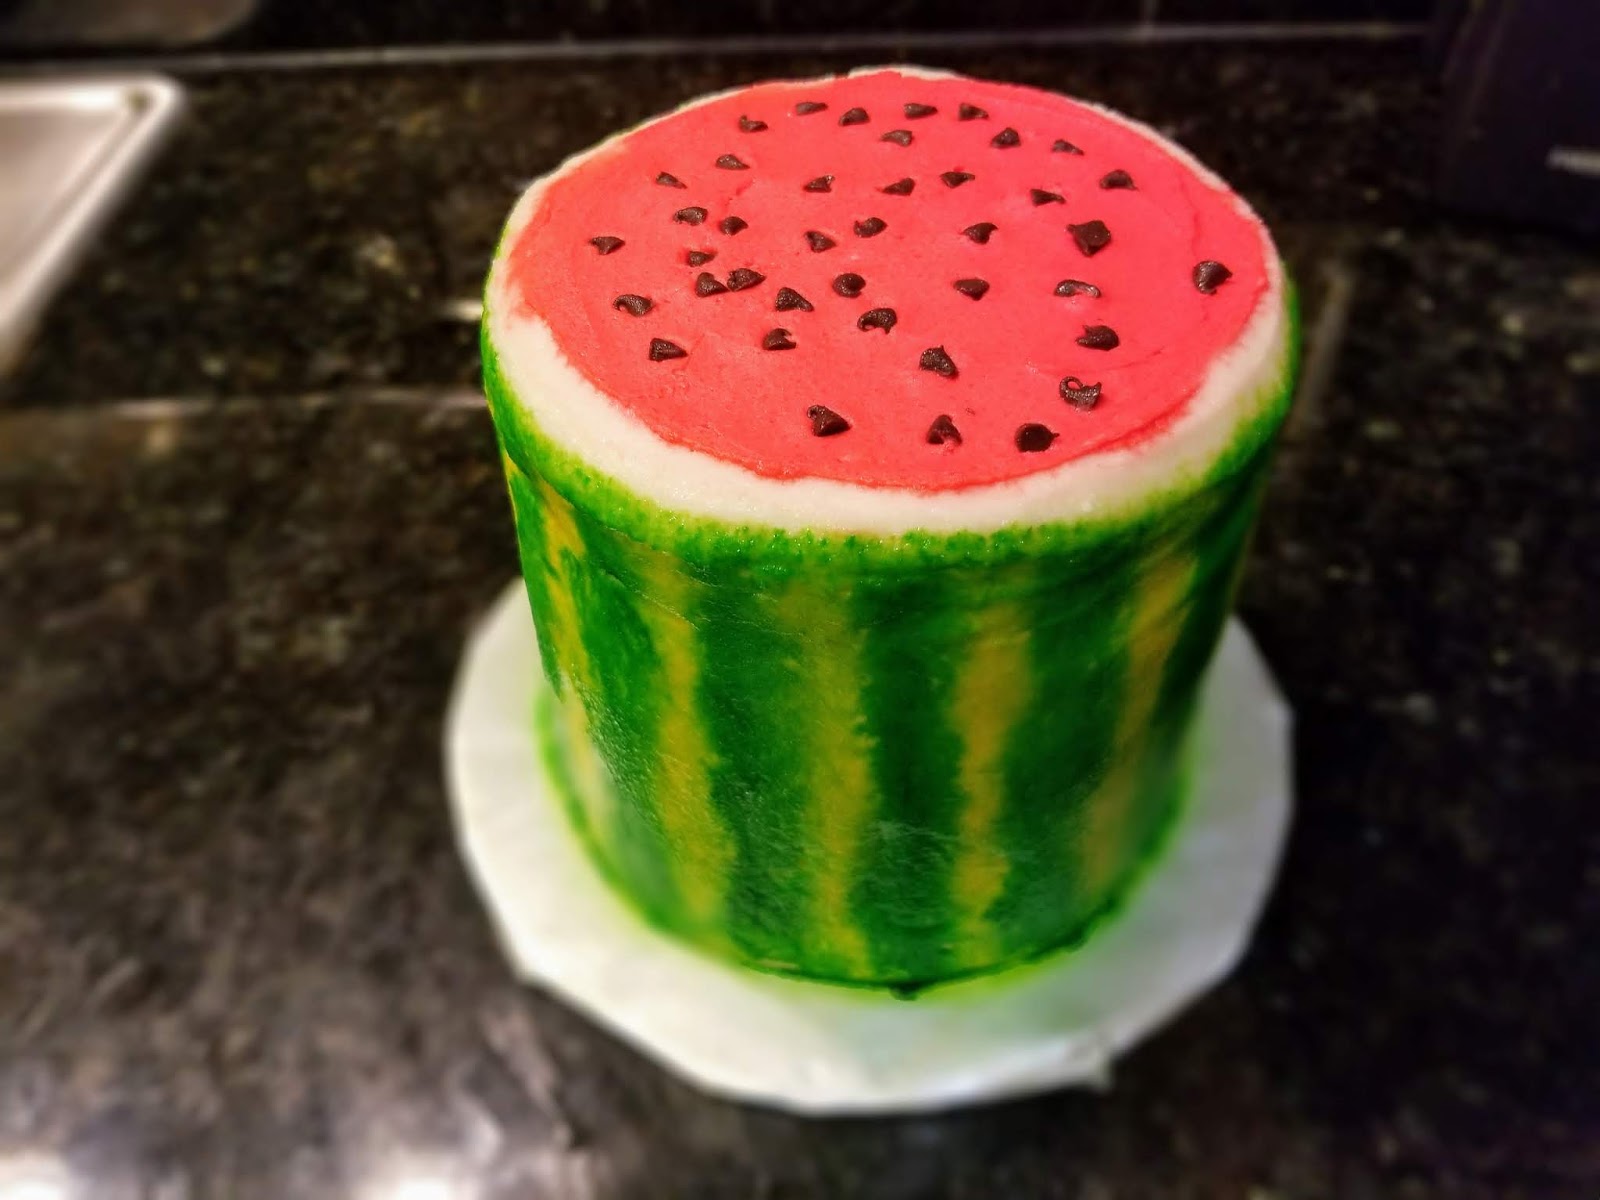
Take the very last of the red frosting (I actually had quite a bit leftover) and fill in the top of the cake. 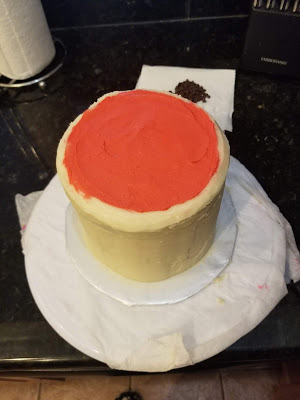
Use an angled spatula to smooth out, blending in the edges with the white rind very gently to give it a natural look. 
Add in whatever you’re using to make your watermelon seeds on top of your cake. Press in gently. Now, to paint on your cake, you want that bad boy FROZEN. Like, colder than my heart. So let it sit in the freezer for at least 90 minutes. I watched Shark Week episodes on DVR, and my love of both cameraman Andy Casagrande and Great White Sharks passed the time super quickly. I live every week like it’s Shark Week!
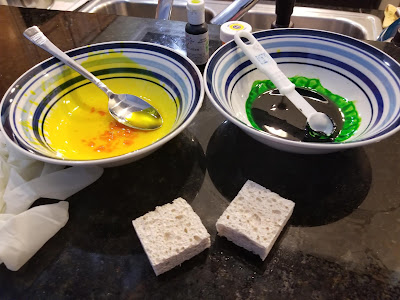
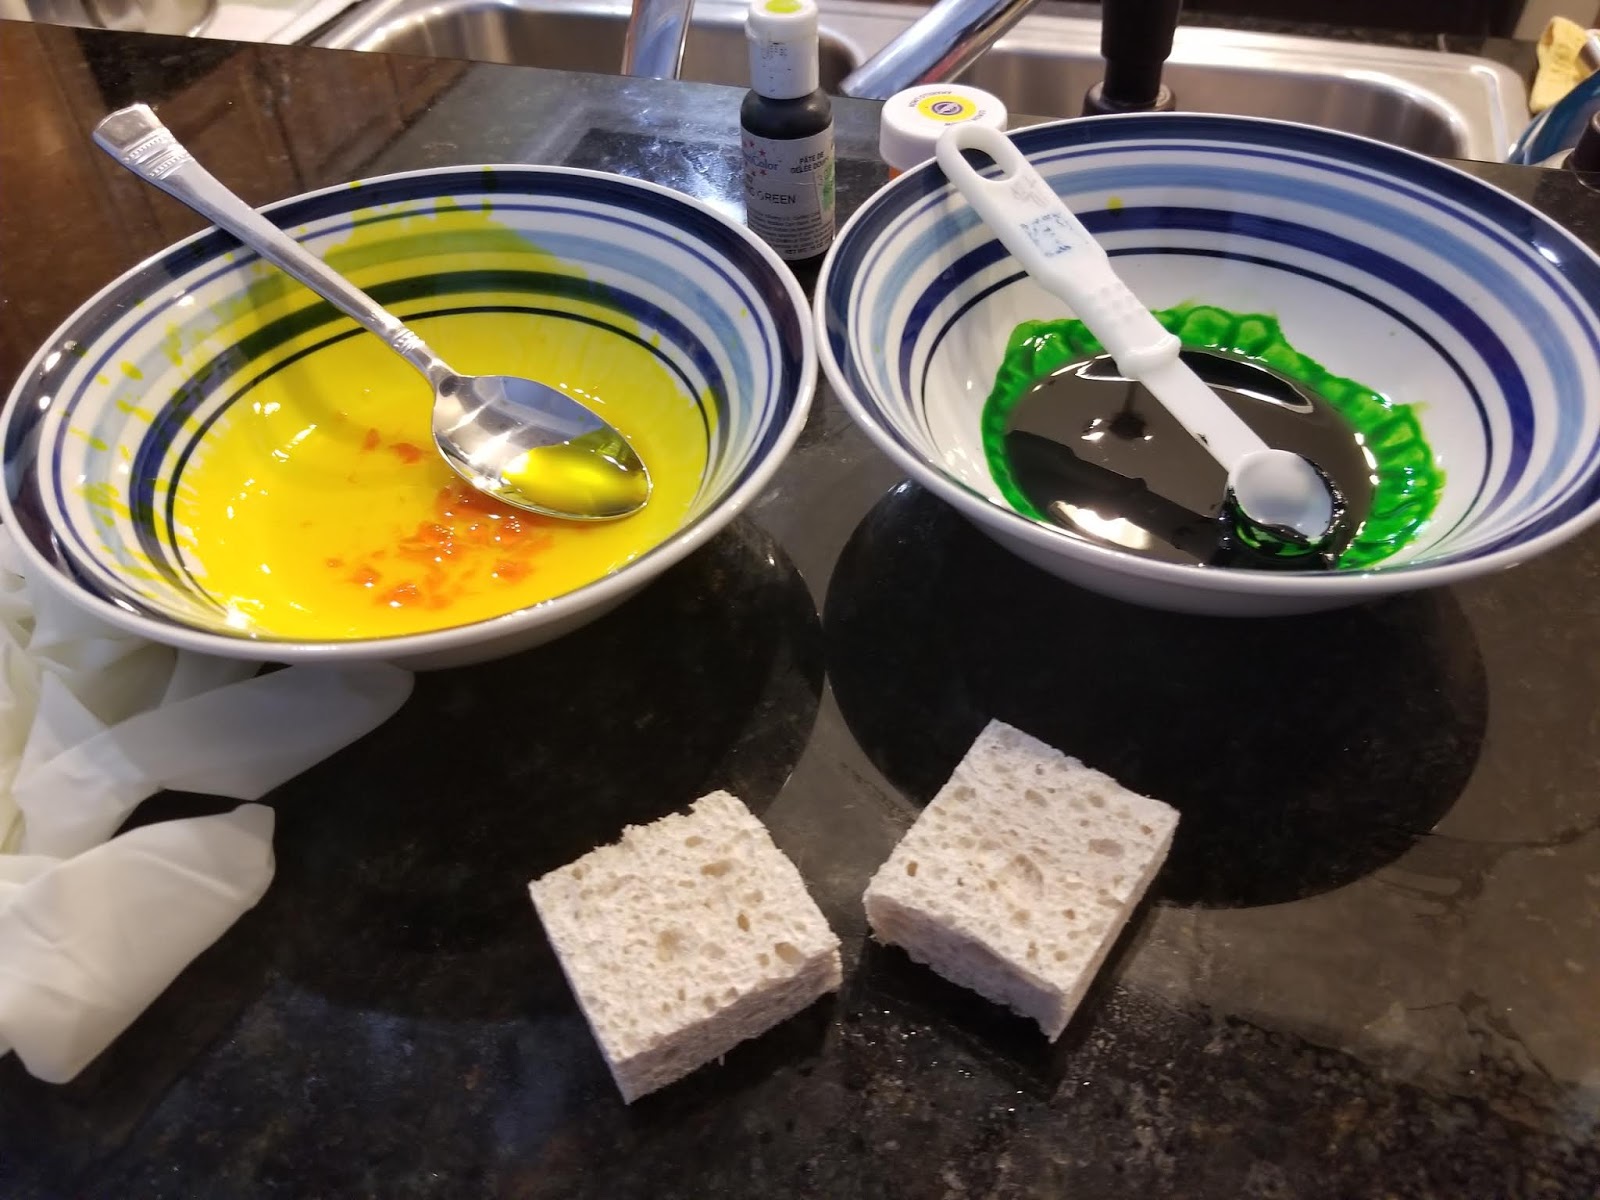
And now I have a set of baking sponges! That’s a thing, right? It is now. I took a sponge and cut it into small squares. Small enough that I could roll them in half and easily hold them (Think mini taco or flauta. Sorry, I’m super Texan today). Then I took a teaspoon of yellow gel dye, dumped it in a bowl and mixed it with a tablespoon of vodka (don’t worry, the flavor completely evaporates). I repeated in a second bowl with green gel dye. Wearing gloves (unless you’re super into dying your hands green or playing the Grinch in an upcoming community theater performance), take one sponge, dip it in the green dye mix, squeeze out any excess, and paint uneven lines on the side of the frozen cake:
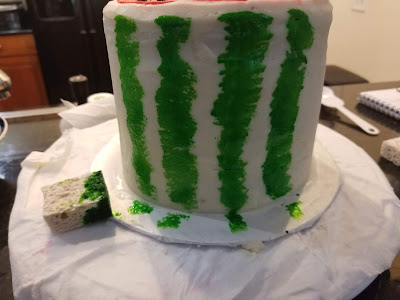
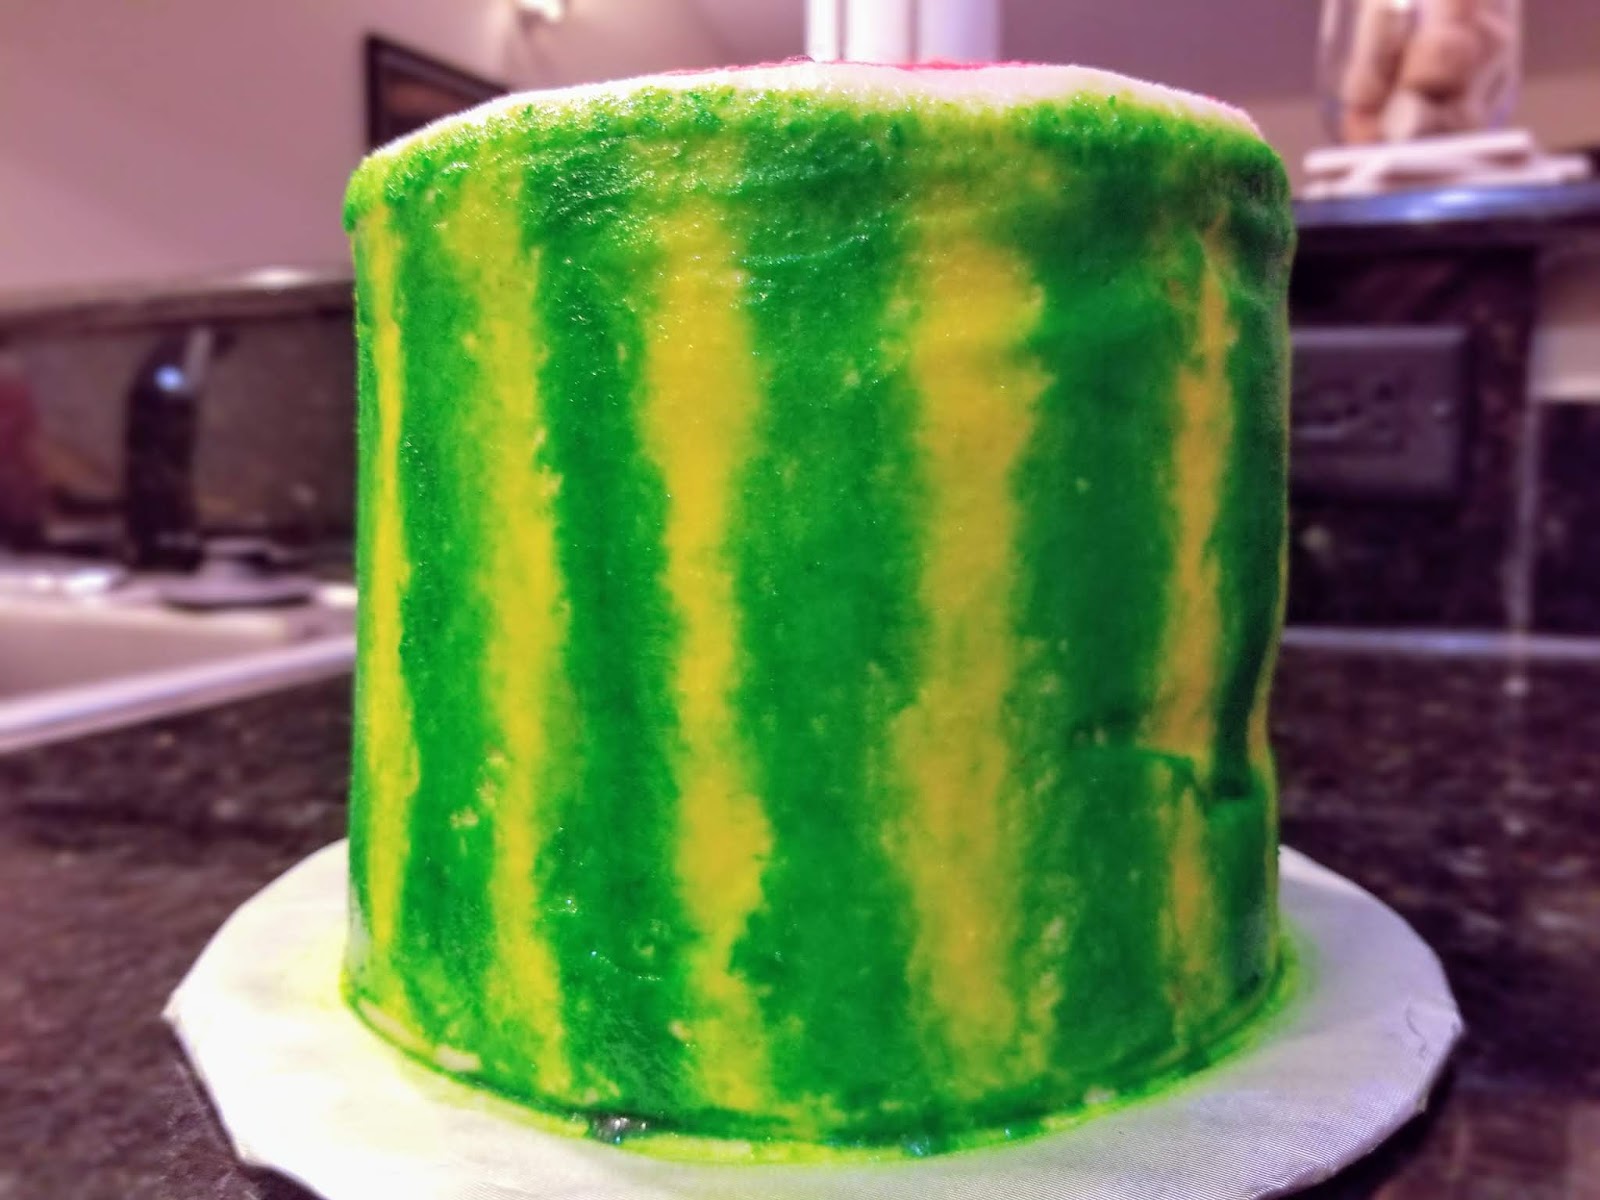
This was one pass with a sponge. I did all my green lines for my watermelon first, then I came in with a new sponge and yellow dye mix. Once I had all my cake covered, I came back in in various spots, blending the yellow and green together all over, making the green darker in some places, the yellow darker in others, etc. to give the random appearance of the outside of a watermelon:

It was suuuuper messy. But it was also a ton of fun to do–watermelon rinds aren’t precise at all, so have a blast painting it how your heart desires. Clean up your cake board before removing your gloves, then set into the fridge to let the vodka evaporate and the dye settle for a few hours.

In hindsight, Florida’s humidity levels make sponge painting a cake a dangerous game. Thankfully, since this cake is living in the fridge, the humidity doesn’t make the dye sweat and bleed all over the place.

Suck it, summer! If you live in an environment where the humidity level is less than “let’s make the windows cry,” you could probably leave this in a cake safe at room temp. I am so happy with how cute this cake turned out, and I am excited that I learned quite a few new skills thanks to this cake. I had no idea how breezy it was to frost a cake with that icer tip and that painting buttercream is totally a thing you can do without being a Level 99 Cake Wizard. Watercolor cakes, here I come…

Plus, the eating it part is a lot of fun, too. While my red frosting was more of a sunburned pink that didn’t match the cake’s color, it was still obviously a watermelon on the outside at least. I’m calling it a victory, which is exactly what I needed after a week that pretty much beat me up and took my lunch money every day. I was reminded very much so of the happiness baking and decorating cake gives me; creating something out of nothing is a satisfying feeling. I then realized my stress and anxiety levels hadn’t been kept in check without my hobby to occupy me–it had been a full MONTH since I baked a cake (there was this Butterfinger pie though that I’m still dreaming about). As a result, I’ve made it a priority to bake and decorate one awesome cake a month–because cake is so much cheaper than therapy or running away to Canada. I’m also not sure, but I highly doubt a therapist wants you eating cake for half of a session, and I know TSA would take it and eat it, so there’s that, too. And this cake is simply way too delicious to give up. The fact that it’s also positively adorable (but not too adorable to be safe from my sweet tooth) would brighten up even the grumpiest of grumps (Hi.). ‘Til next time, my fellow eaters!

All the vibes of a real watermelon, but without any of the nutritional benefits! -
A Shot of Tequila and a Dose of Delicious
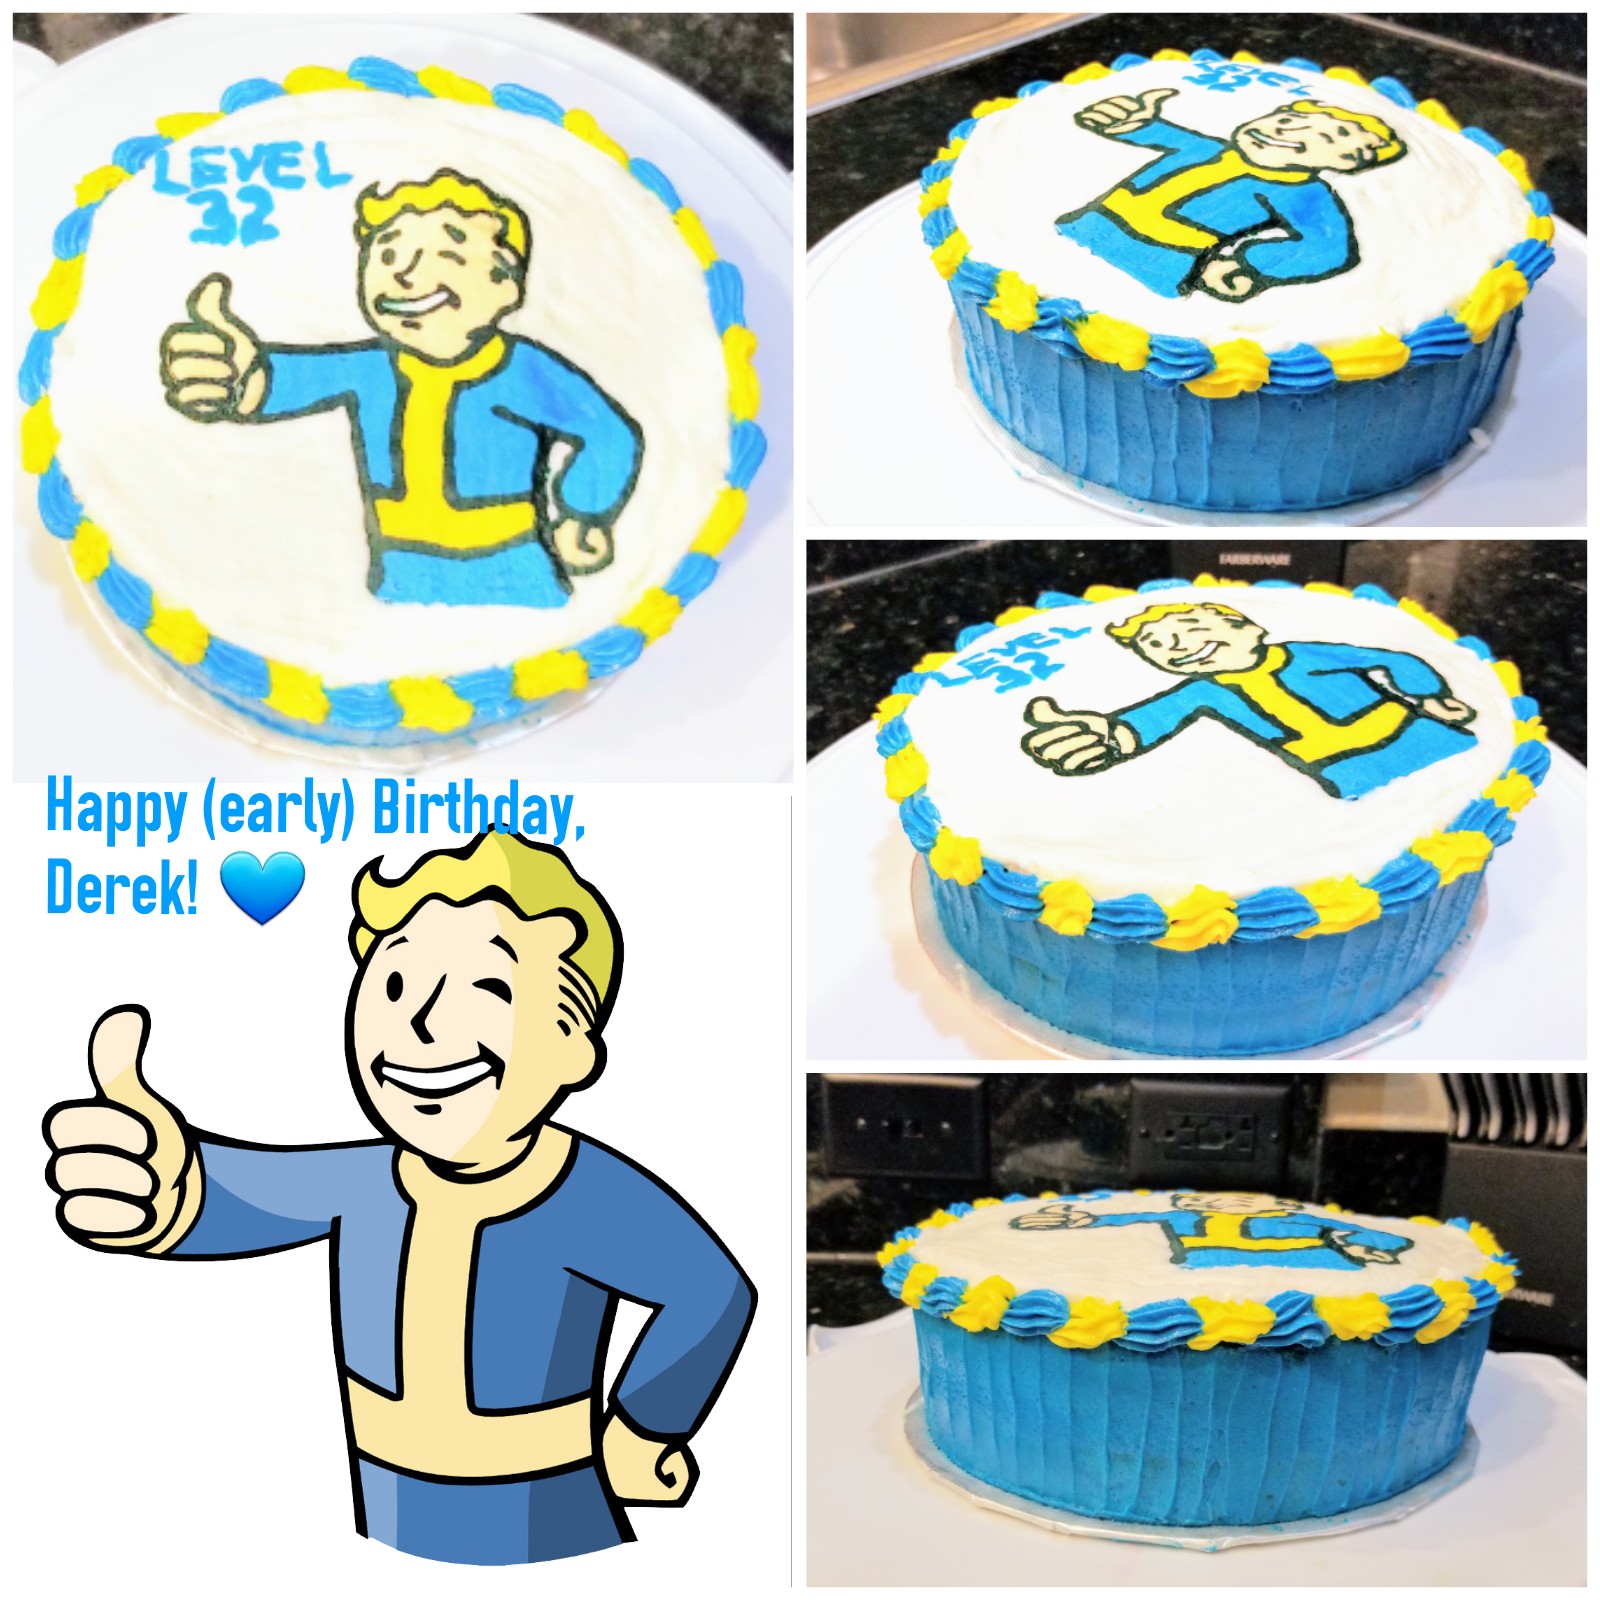
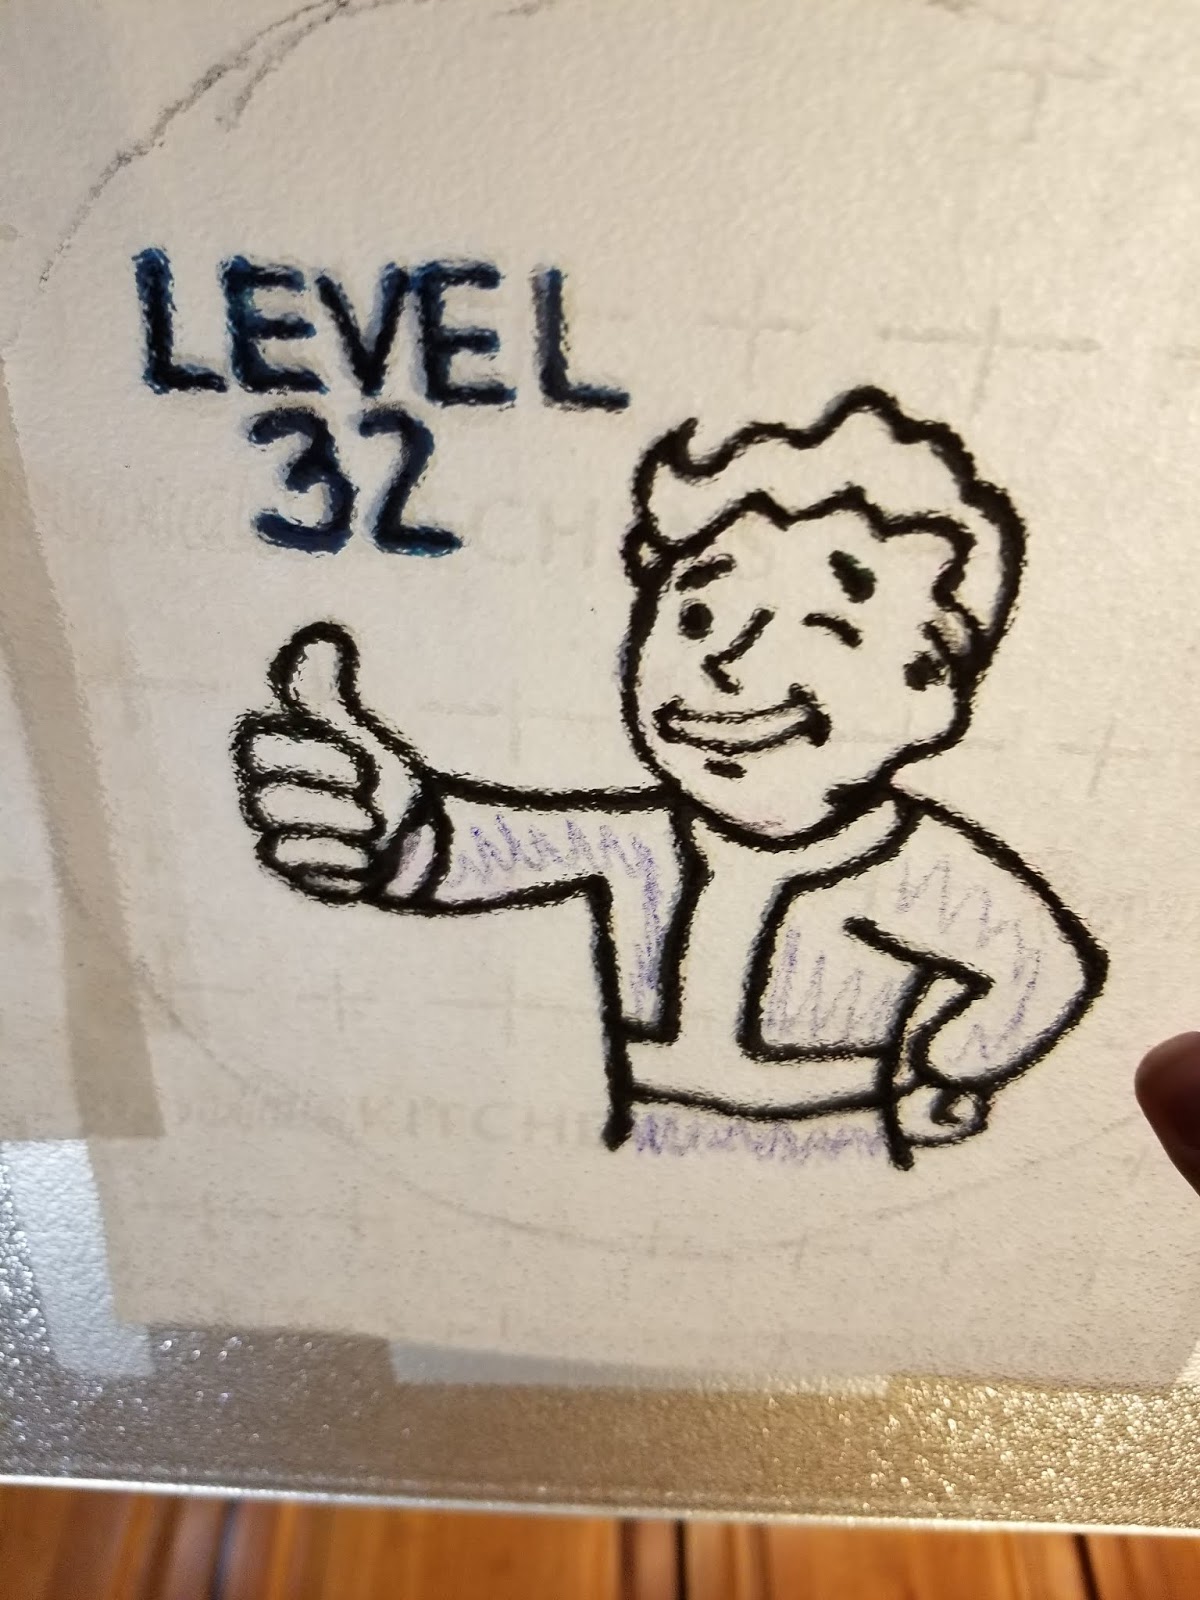
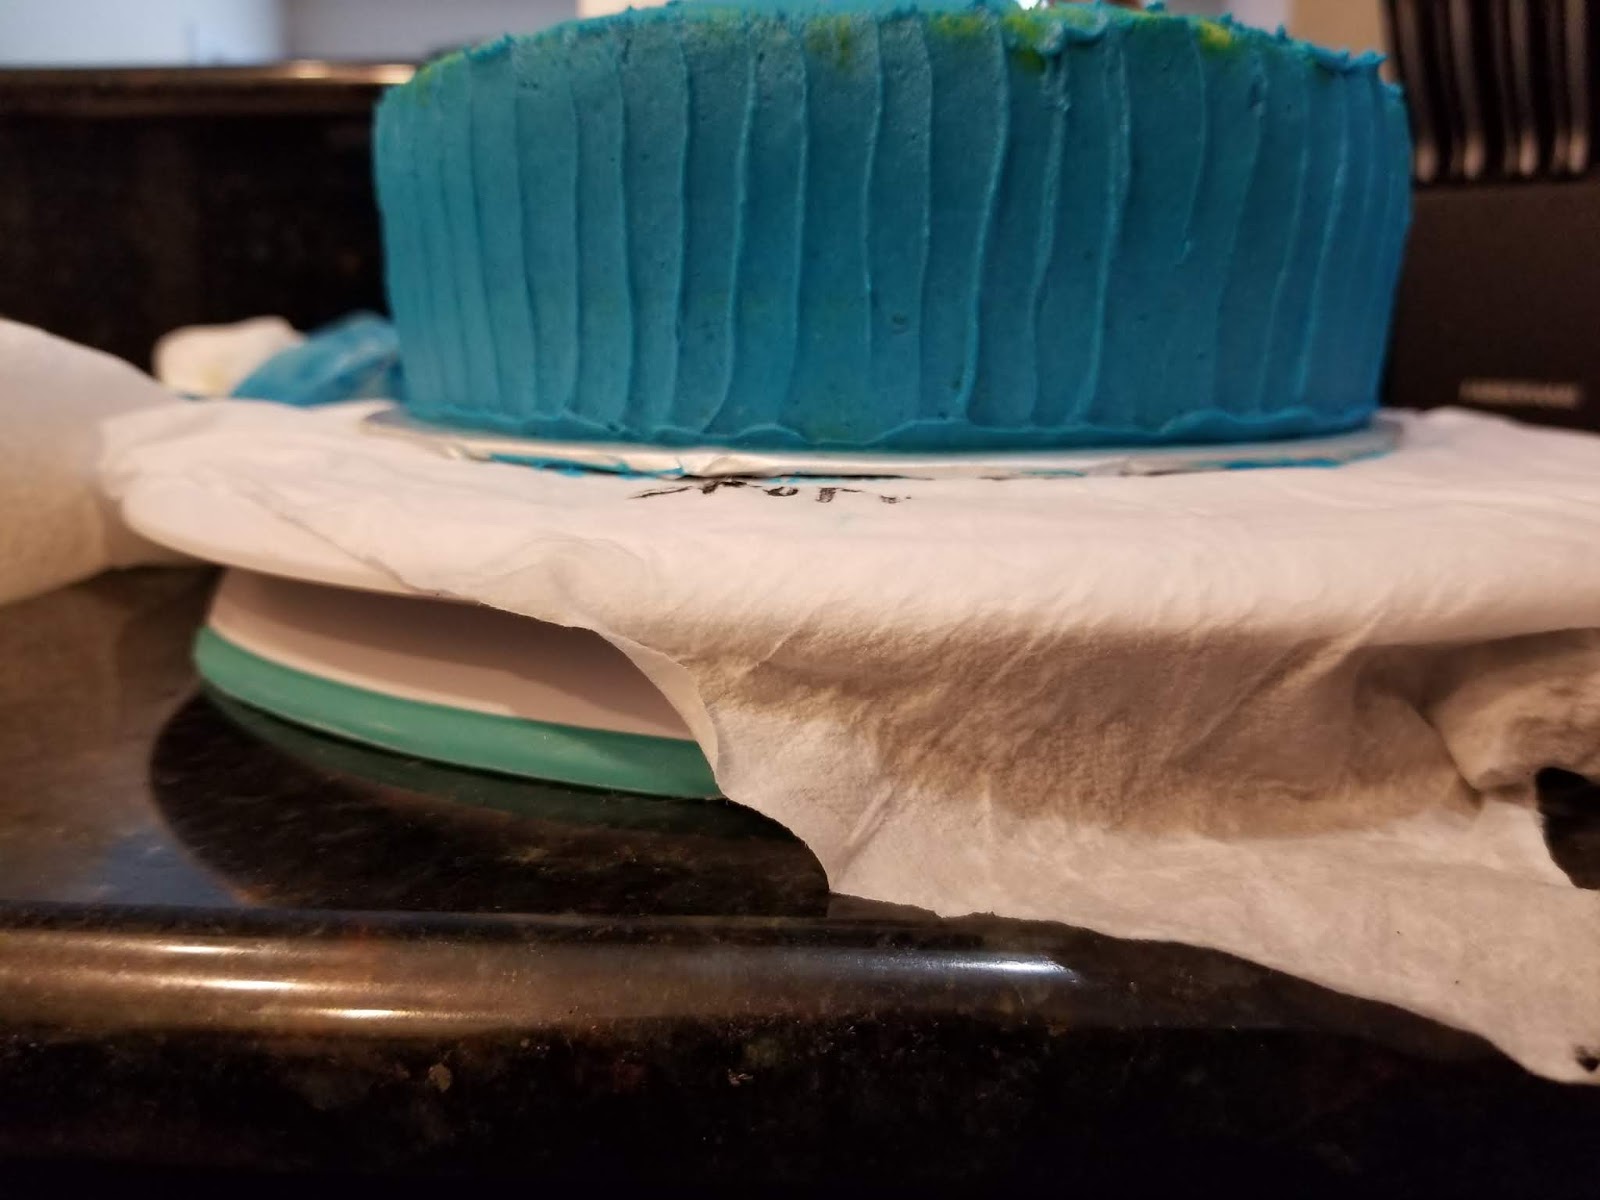
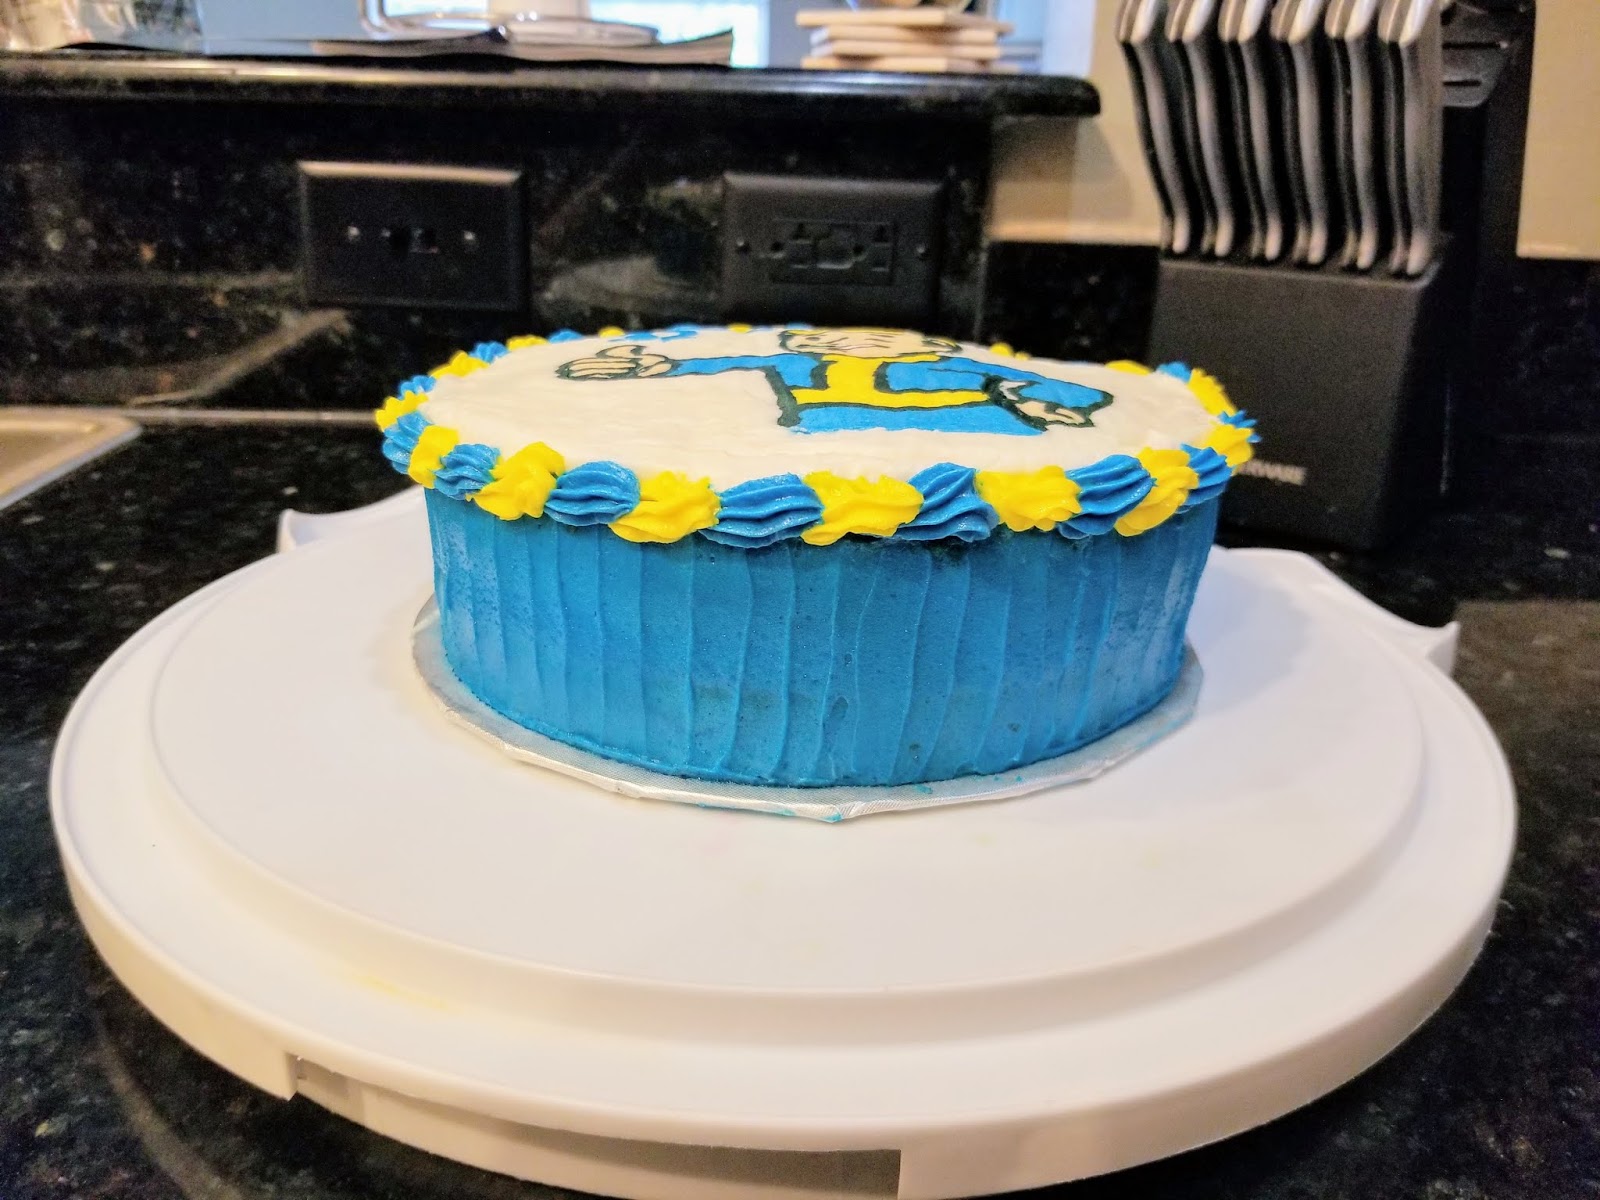
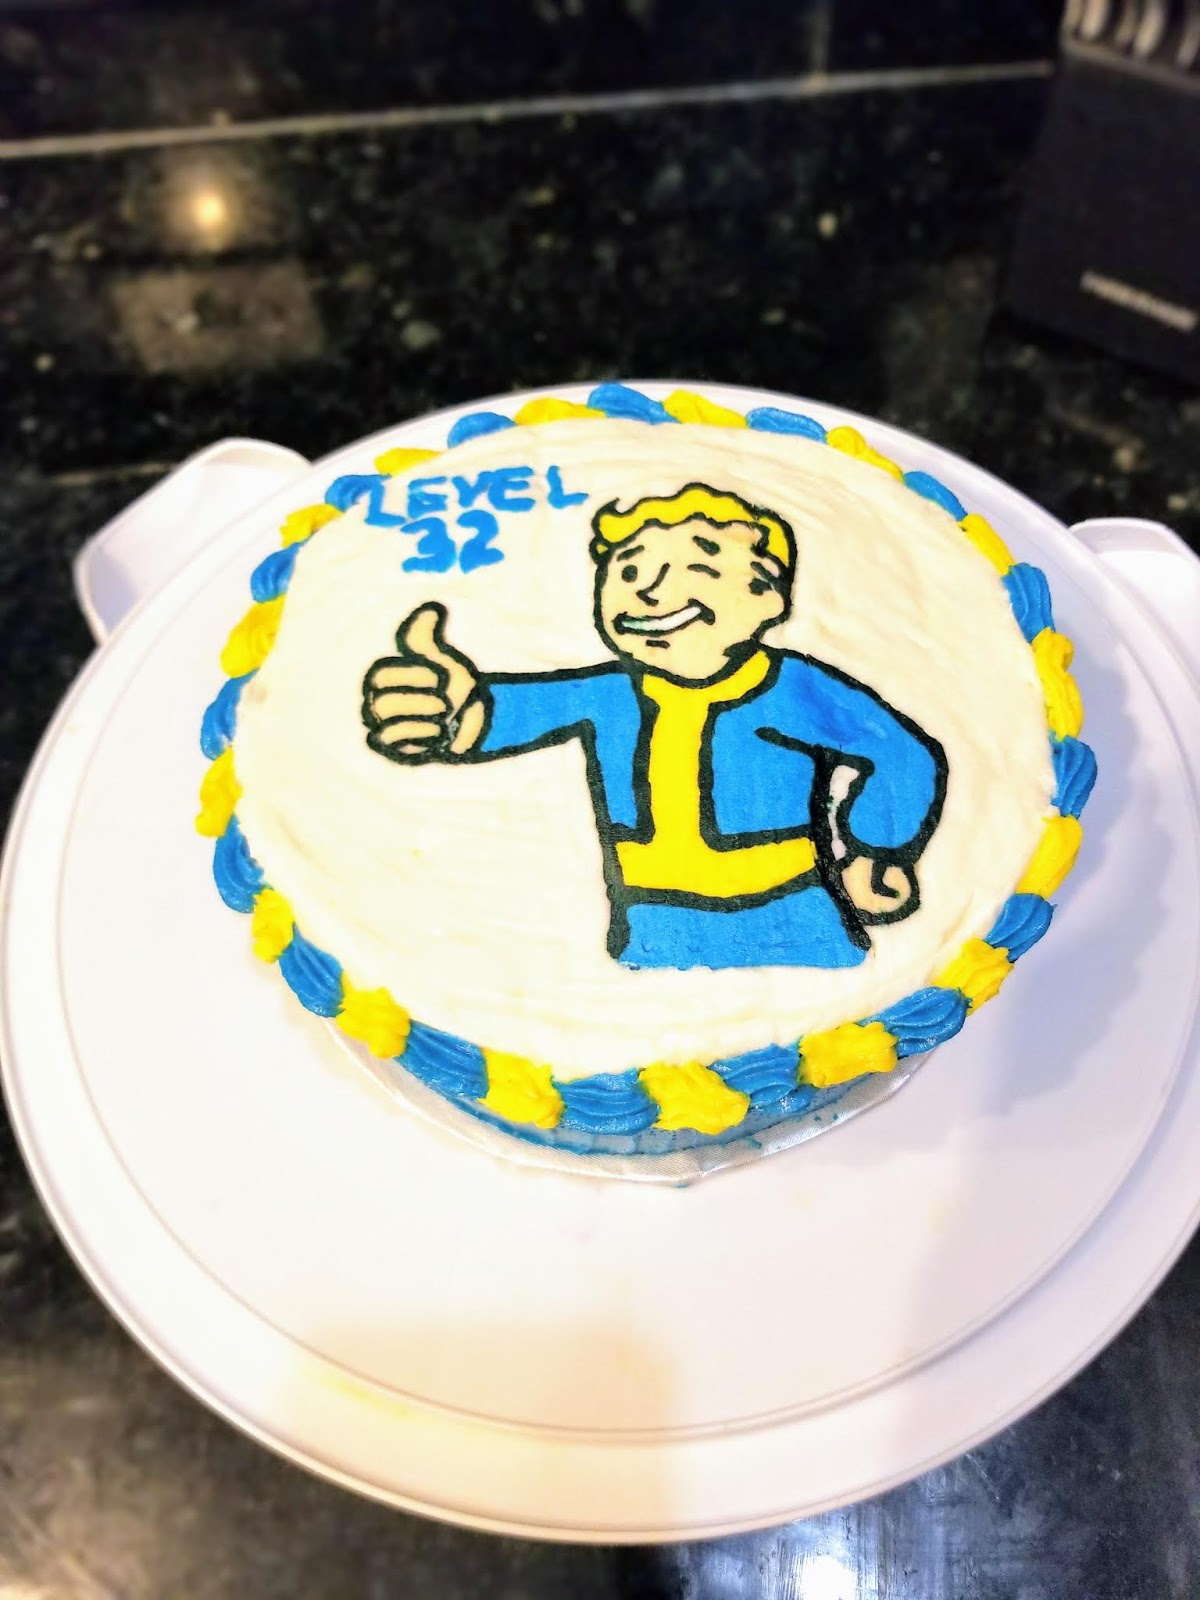
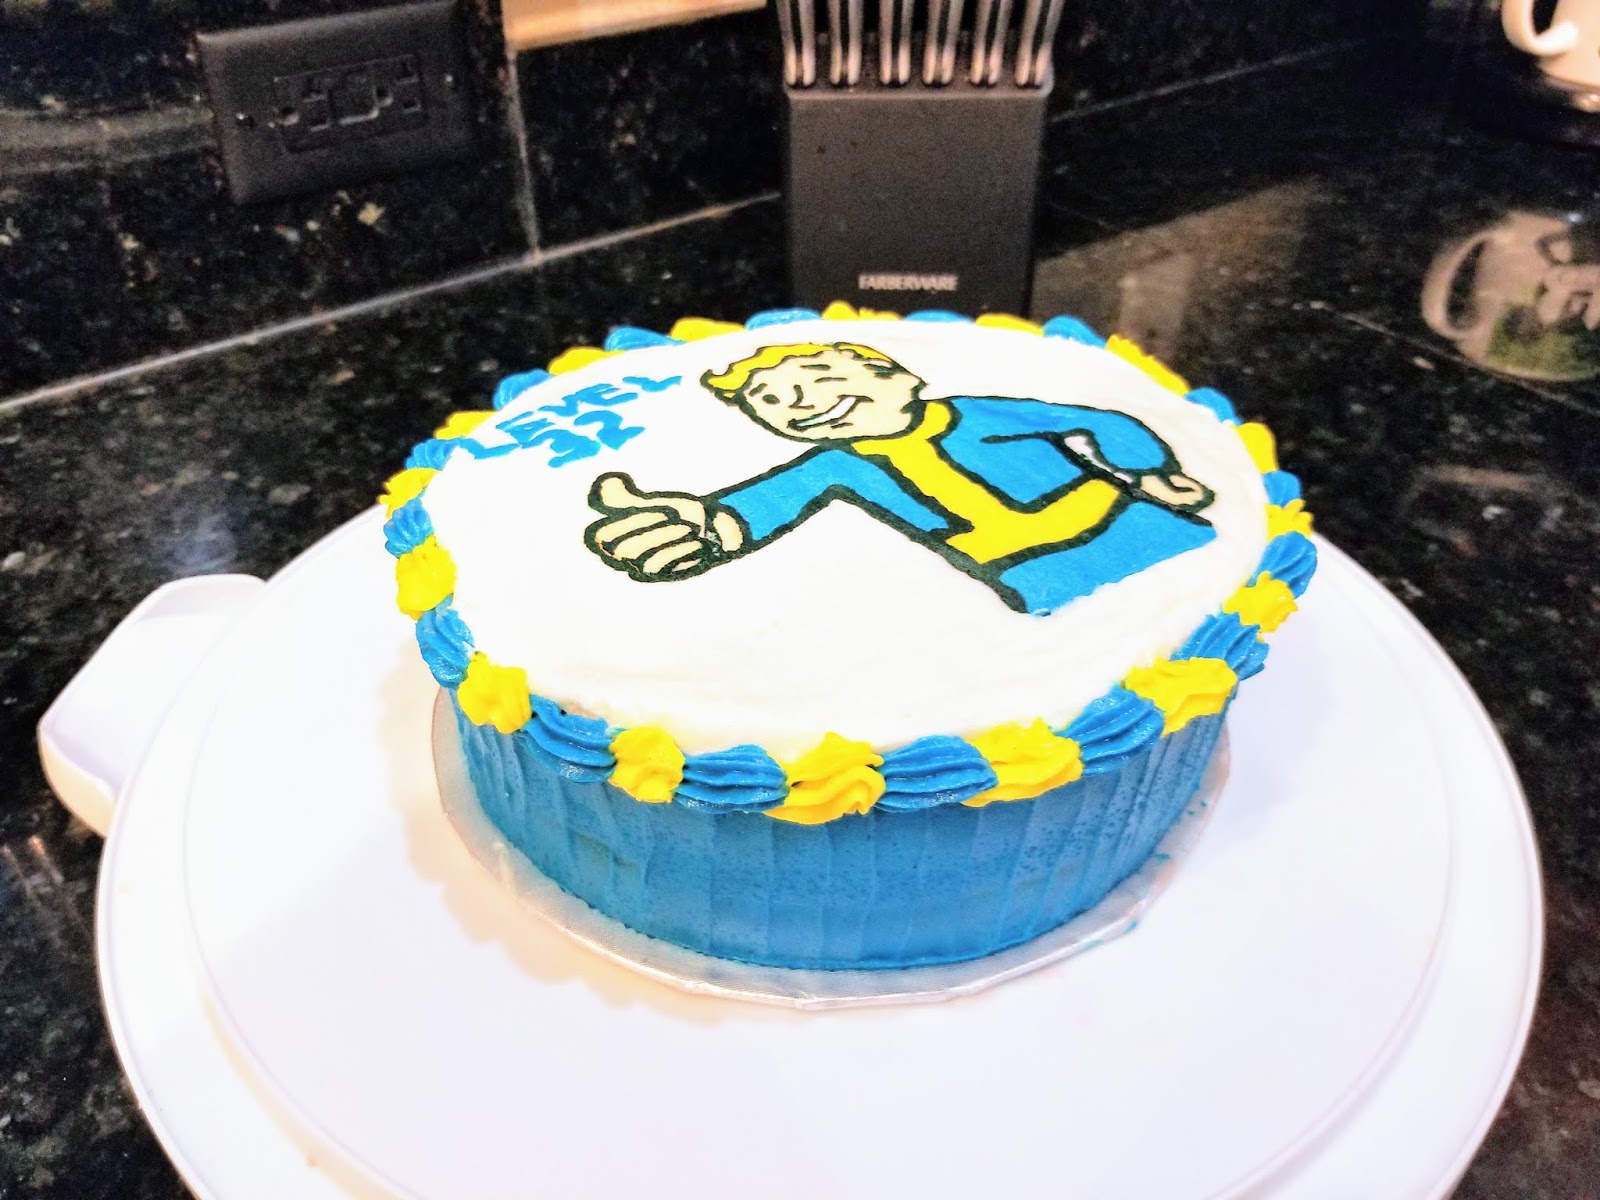
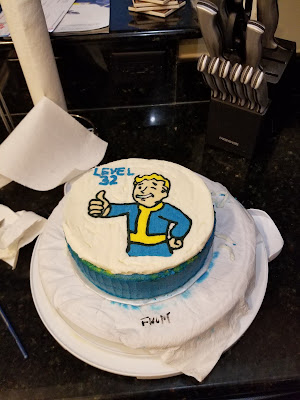
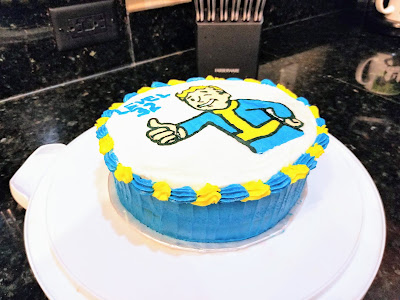
One of my husband’s (and my) favorite video game series is Fallout. I got to thinking about it the other day, and there are quite a few parallels between the post-nuclear world of the Fallout series and the state of Florida (go with me on this, it’s worth the ride). In Fallout, radioactive bugs the size of children exist. In Florida, the cockroaches are easily larger than a toddler. In Fallout, you’re not *quite* sure, but everyone seems crazy and like they *may* be trying to kill you. In Florida, you’re *definitely* sure that everyone is crazy and they are *definitely* trying to kill you. In Fallout, areas of toxic clouds hang around and really ruin your day. In Florida, we call these “tourists.” See? Eerily similar. Maybe the game creators were from here. This would make a lot of sense because the entire state is already in the throws of total chaos, so it’s an easy jumping off point creatively. We’re not bartering for bottle caps (yet) like in Fallout, but Disney Dollars are currency here, so yeah. I swear all of this relates to cake. We’re celebrating my husband’s birthday early since we’ll be traveling on his birthday, so I made him a Vault Boy birthday cake to celebrate making it to Level 32:
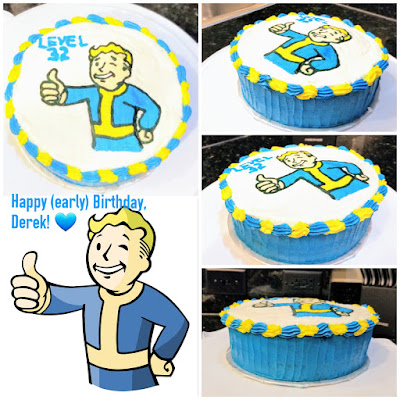
Surviving the last two levels in post-apocalypse Florida has been no easy task. Right, so it’s a birthday cake with everyone’s favorite post-nuclear poster boy, but it’s also a birthday cake filled with everyone’s favorite summer booze: tequila! This is a margarita cake with tequila lime buttercream, and it is the best parts of summer (get out of here, child-sized mosquitoes!) all in one slice. Tart, tangy, sweet, and packing a punch of cool flavor, I wish I could tell you it’s super low cal, but it’s just regular low cal (all things margarita are worth a few extra calories). For 12 slices of an 8-inch cake, 1 serving is 428 calories. If you serve 16 slices, you hit the super low cal territory for 321 calories a serving. Not bad either way you slice it (sorry, I had to). It is fun and flavorful and also very easy to throw together. Whether or not you choose to adorn your margarita cake with Fallout decor is totally optional, but I’d like to think a booze-laden cake would be a delicacy people would pay thousands of bottle caps for in a post-apocalyptic universe.

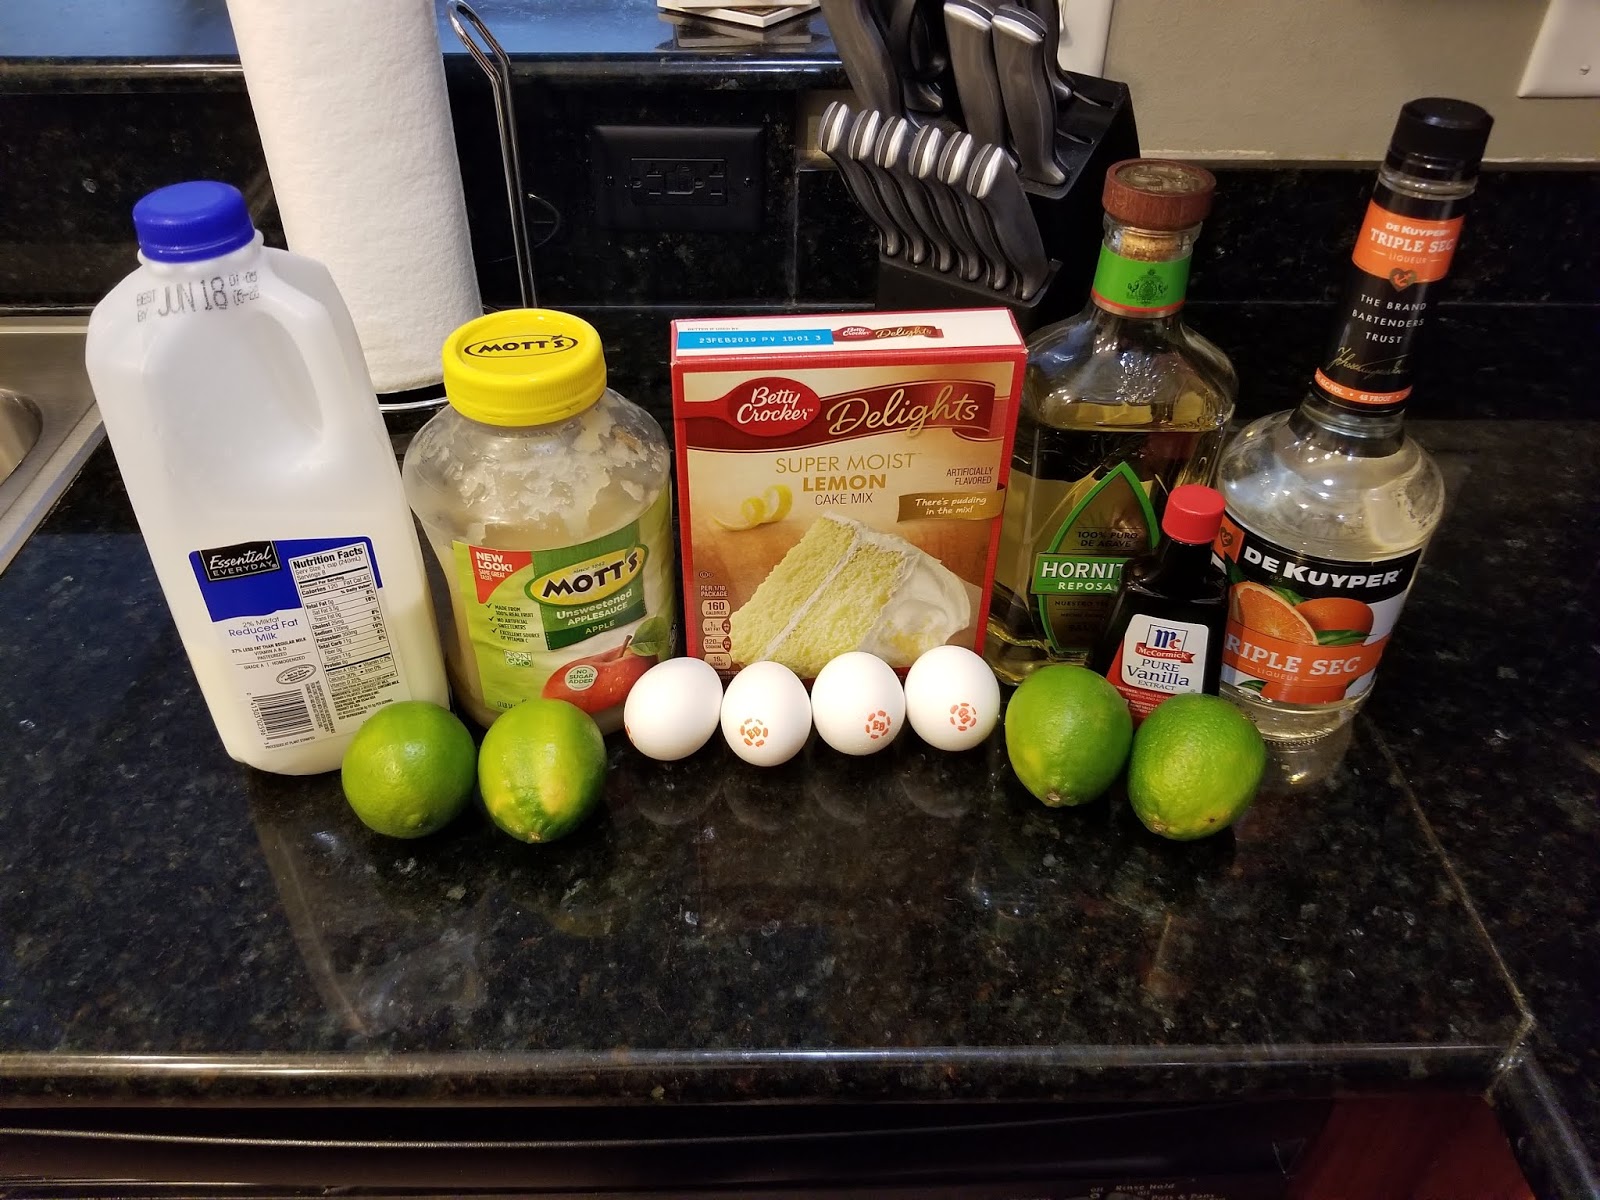
You’re gonna juice a lot of limes, so it’s a good thing there’s tequila nearby. With booze, all things are possible–in this case, I mean via baking a damn good cake, not waking up in strange land with really freaky people everywhere (Is she talking about Florida or the Fallout series?). This is actually an easy cake to put together, minus zesting the limes. I’ve never met a grater I liked that didn’t try to snatch off my knuckles, but maybe your kitchen accoutrements are kinder than mine. For the margarita cake, you need:
- Lemon cake mix
- 4 egg whites
- 1/2 cup of unsweetened applesauce
- Lime zest, to taste (I’d recommend 2 tsp to 3 tsp max, or your cake might pack *too* much of a punch. If you don’t like sour, nix altogether or use 1 tsp max for flavor.)
- 1/2 cup of skim milk
- 1/4 cup of lime juice (about 3 large limes)
- 1/4 cup of *good* tequila (like, it costs more than 7.99 at Walmart)
- 2 TBS of triple sec
- 1 TBS vanilla extract
- Optional: a drop or two of green food coloring
Start by preheating your oven to 350. Add the mix, eggs, apple sauce, and lime zest to the bowl of your stand mixer. Give a quick whirl to barely blend ingredients together, and then add in the milk, lime juice, tequila, triple sec, and vanilla (and green dye if adding) and blend on medium-high for 2 minutes. Prepare two 8-inch cake pans with Parchment paper and cooking spray.
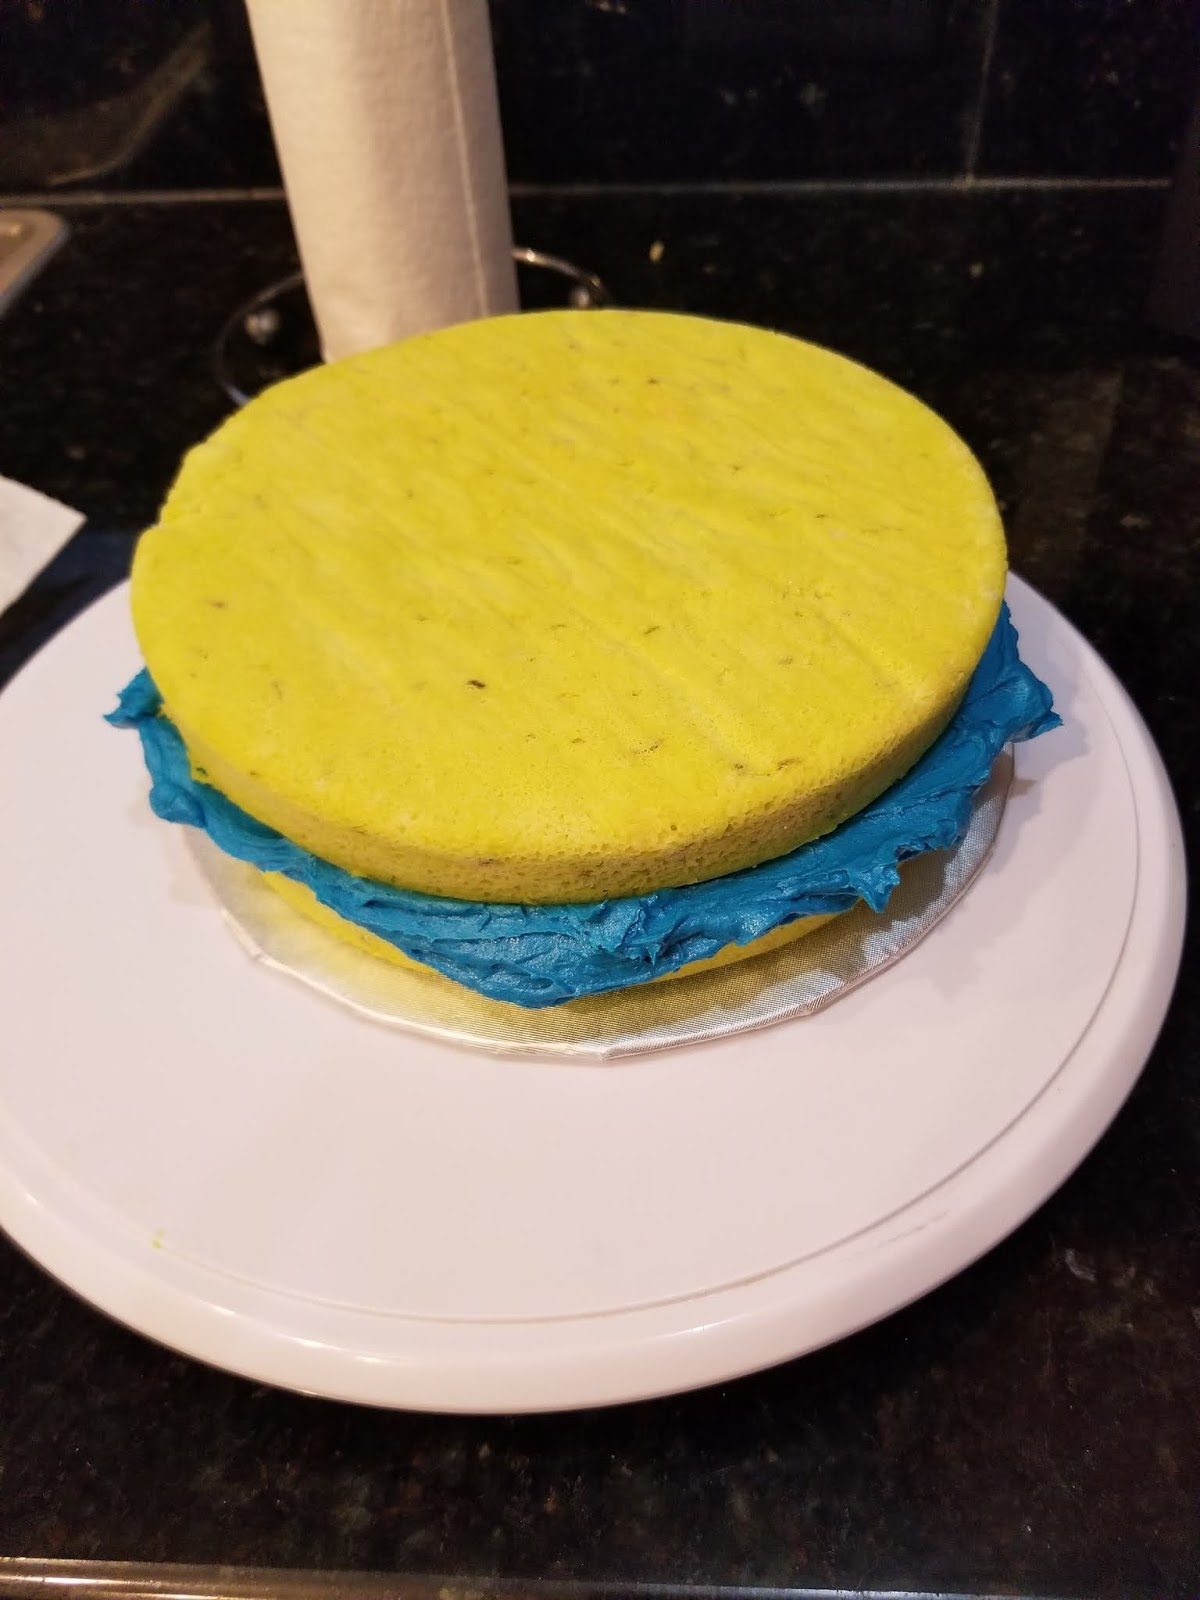
I want to drink you with a straw. Pour your batter into your prepared pans, tap on the counter to release air bubbles, and bake at 350 for about 25-28 minutes until done. Place cake pans on a cooling rack for ten minutes before turning out onto the cooling rack to finish cooling completely. Once my cakes were cool, I measured out the size my buttercream transfer needed to be, and then a wrapped each round in 3 layers of plastic wrap. I put each round into a gallon Ziplock and left in the freezer for later in the week when I’d decorate and assemble everything. I knew I’d need a few days for my buttercream transfer, but I wanted it properly sized to the top of the cake, so I needed to bake my rounds first. This method of wrapping and freezing cakes works extremely well–each slice tastes like it was baked yesterday and not last Monday.

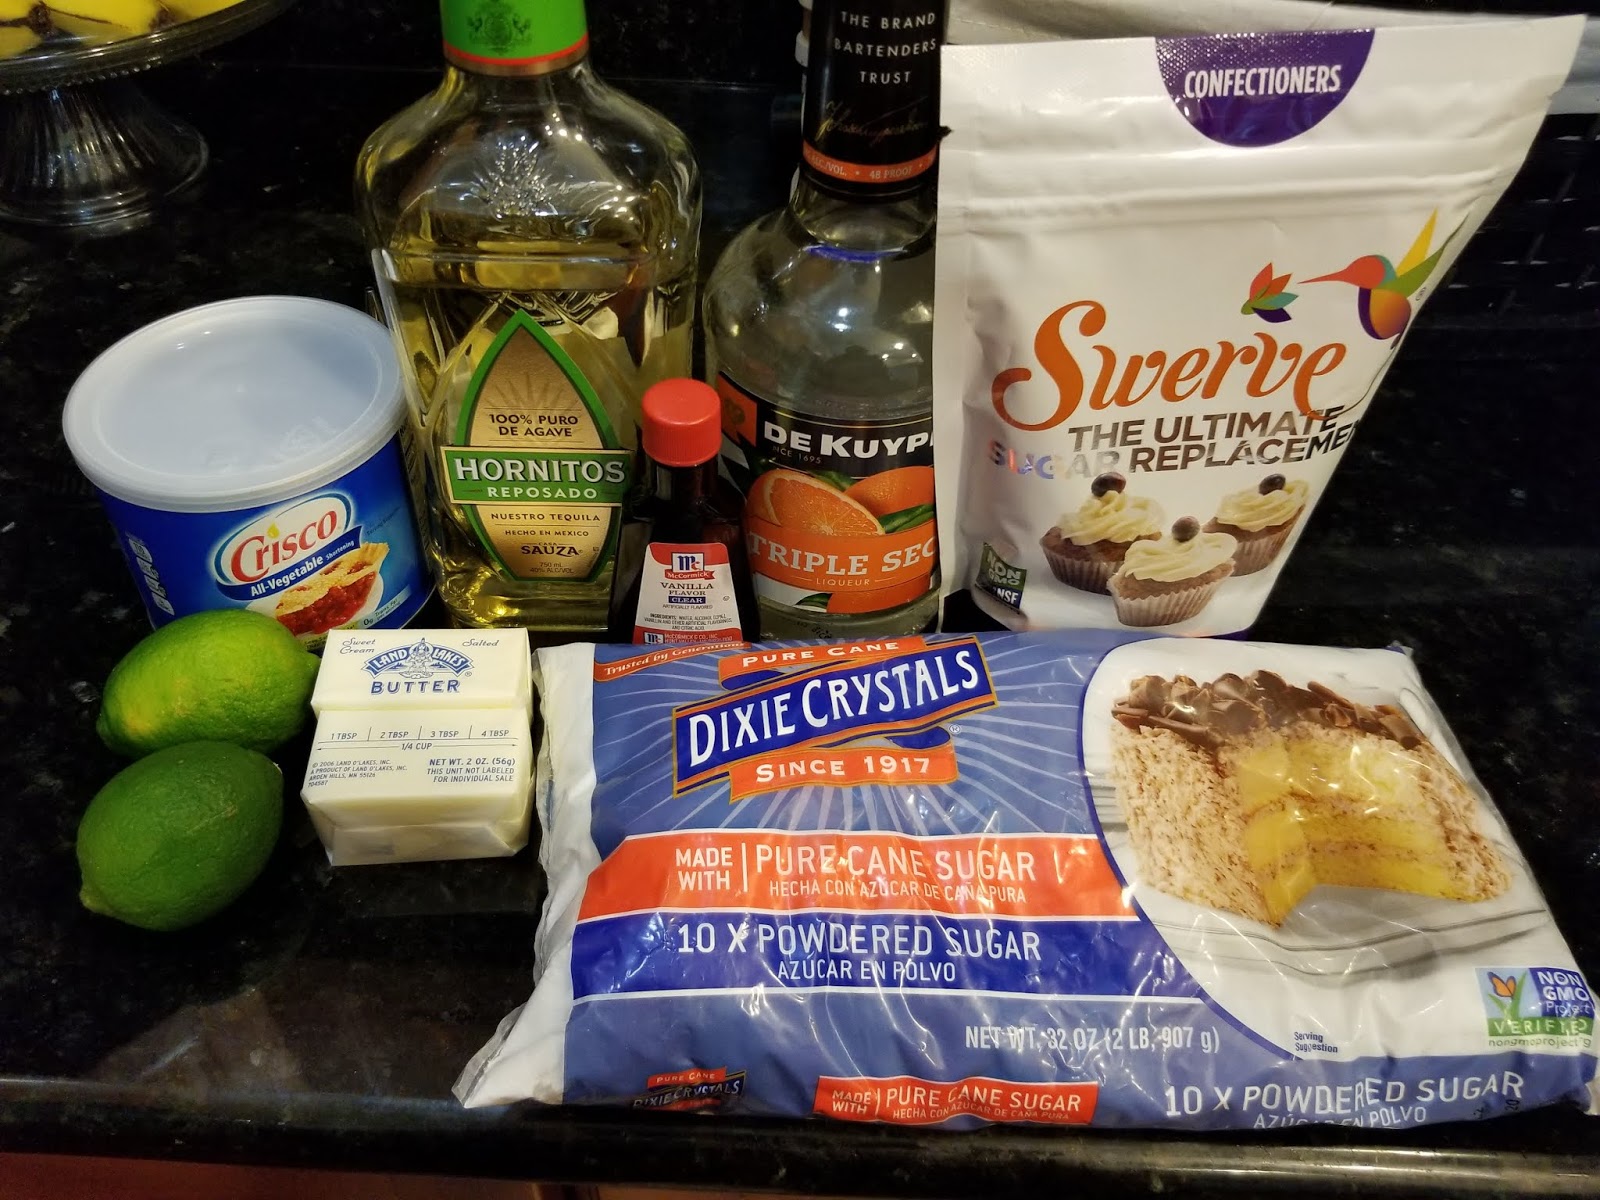
Mas tequila! Full disclosure, this is *not* a good frosting for buttercream transfers (but dear GOD is it delicious) because the citrus in the lime keeps the buttercream from fully crusting. I did not know this when I made it, so thankfully I was able to hobble together a decent-looking transfer even with this problem. I had to make some alternate decoration plans, but more on that later. Remove the citrus if you’re doing a transfer so it will crust. If you’re not doing a transfer, this is still stiff enough to pipe with and tastes like the first sip of an ice-cold margarita. The heavens will open, you’ll hear mariachi music, and you will be transported to the best Tex-Mex restaurant of all time with each bite. To make this margarita magic come to life, get:
- 1/2 cup of butter
- 1 1/2 cups of Crisco (if not making a transfer, use 2 cups of butter and nix the Crisco for richer flavor)
- 3 cups of powdered sugar
- 3 cups of Swerve confectioners
- 1 TBS clear vanilla extract
- 2 TBS lime juice (I recommend milk instead if you’re making a transfer)
- 1 TBS tequila
- 1 TBS triple sec
Mix the butter and Crisco in a stand mixer until fluffy. Add in the 3 cups of powdered sugar, vanilla extract, and lime juice. Blend well on medium before adding in the 3 cups of Swerve, tequila, and triple sec. Frost whatever designs your heart desires on fully cooled cakes or cupcakes. If you’re interested in transfers, feel free to read my extremely detailed transfer tips and instructions, but I’ll also cruise through how I made Vault Boy come to life for this birthday cake.

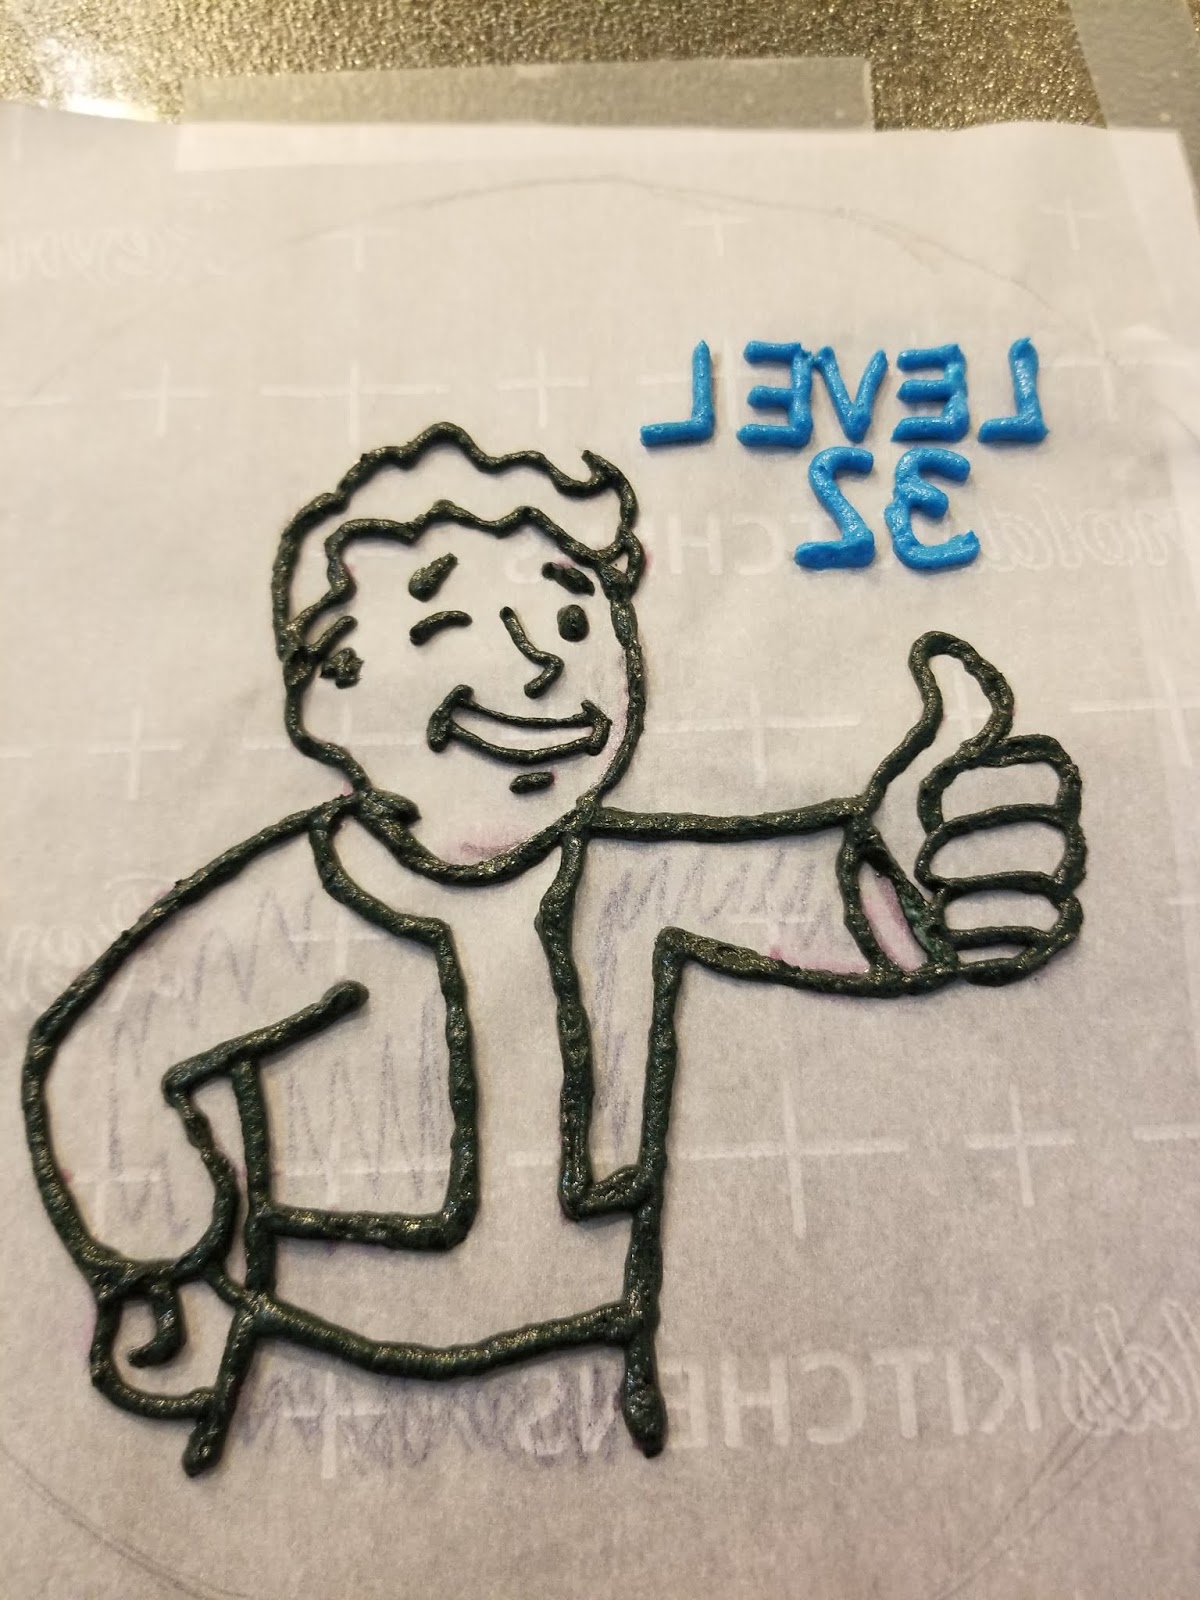
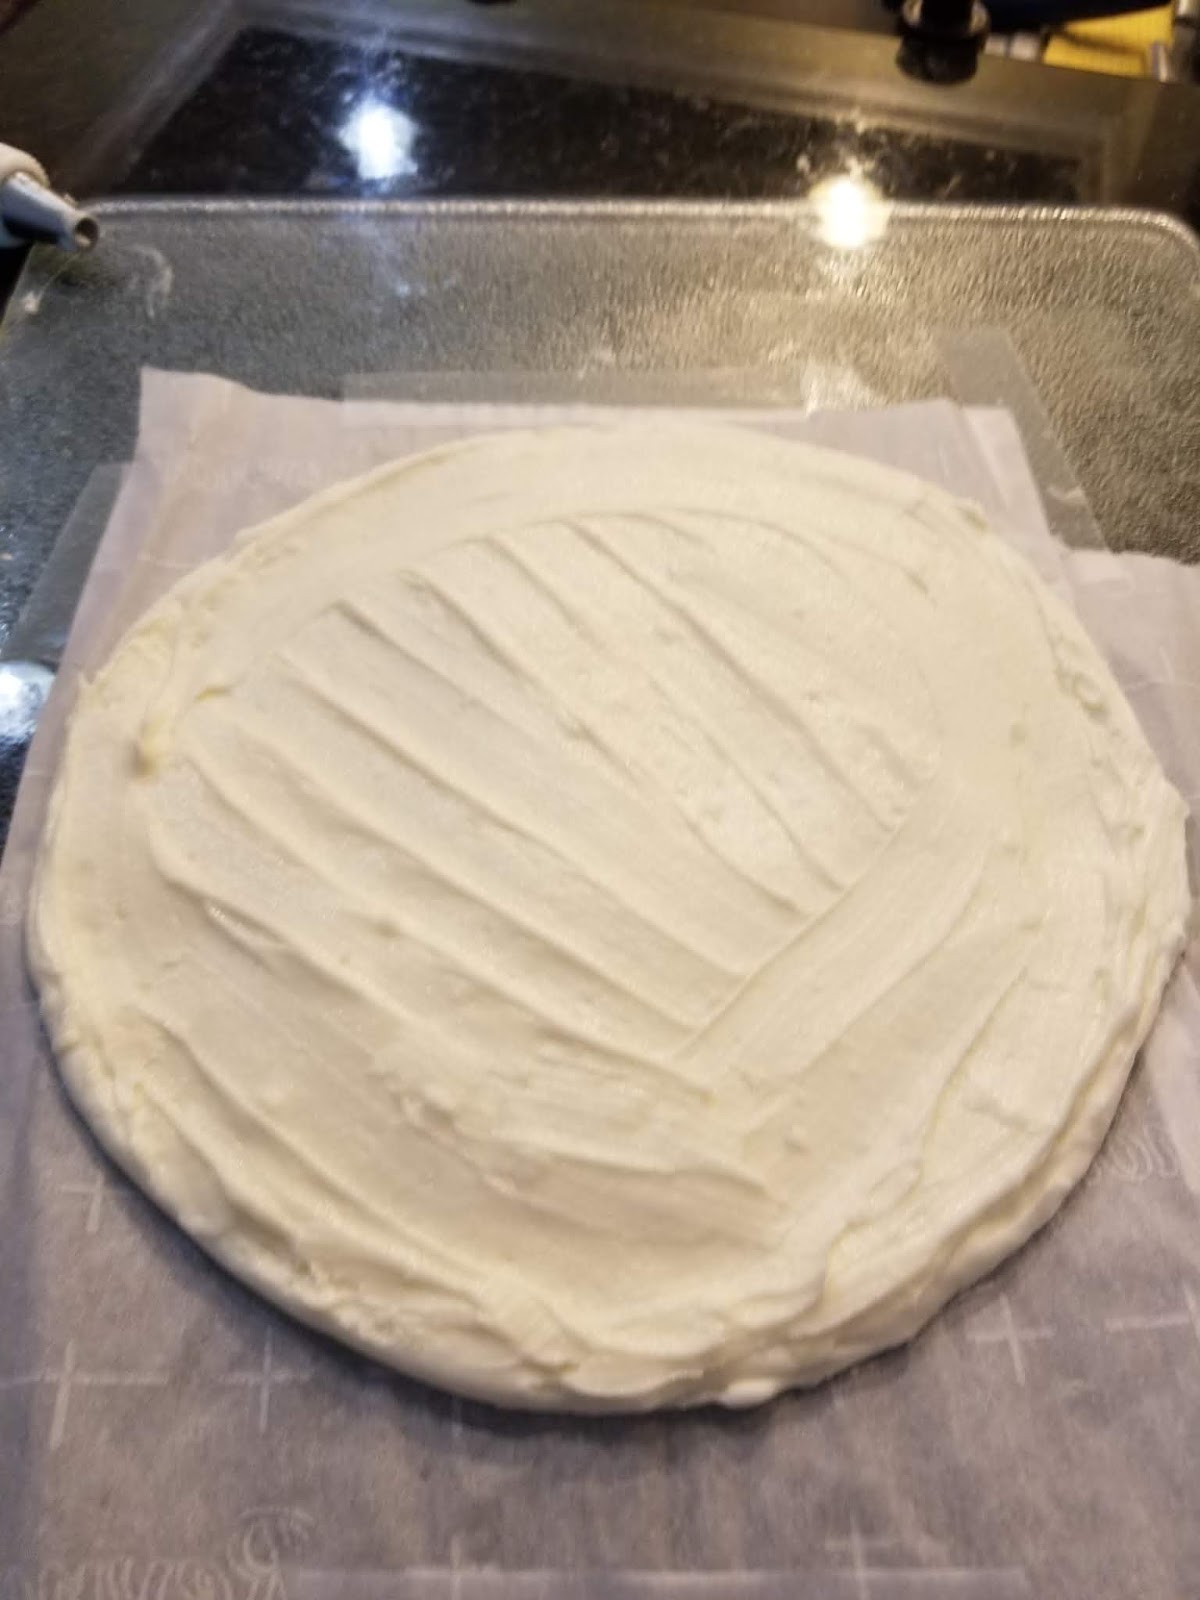
Vault Boy does not wear mauve. My printer was out of blue ink. I always print out whatever my transfer design is going to be, sized exactly how I need it for the top of my cake because being a perfectionist comes in super handy when you bake. Being neurotic has to have the occasional perk. I then trace my design on Parchment paper, flip it over, and tape it to a clear cutting board. For this design, I dyed and divvied my frosting up into a tiny amount of black in one piping bag with a #3 round tip, a tiny amount of beige in another with a #2 round tip, a large amount of royal blue in another bag with a #5 tip, a medium amount of yellow in a bag with a #3 round tip, and the rest of my frosting stayed white. I put a large amount into a bag with a #12 tip (for the background) and a tiny amount into a bag with a #2 tip (for the mouth). I worked on this over the span of a few days, so my frosting lived in the fridge while it was between uses.

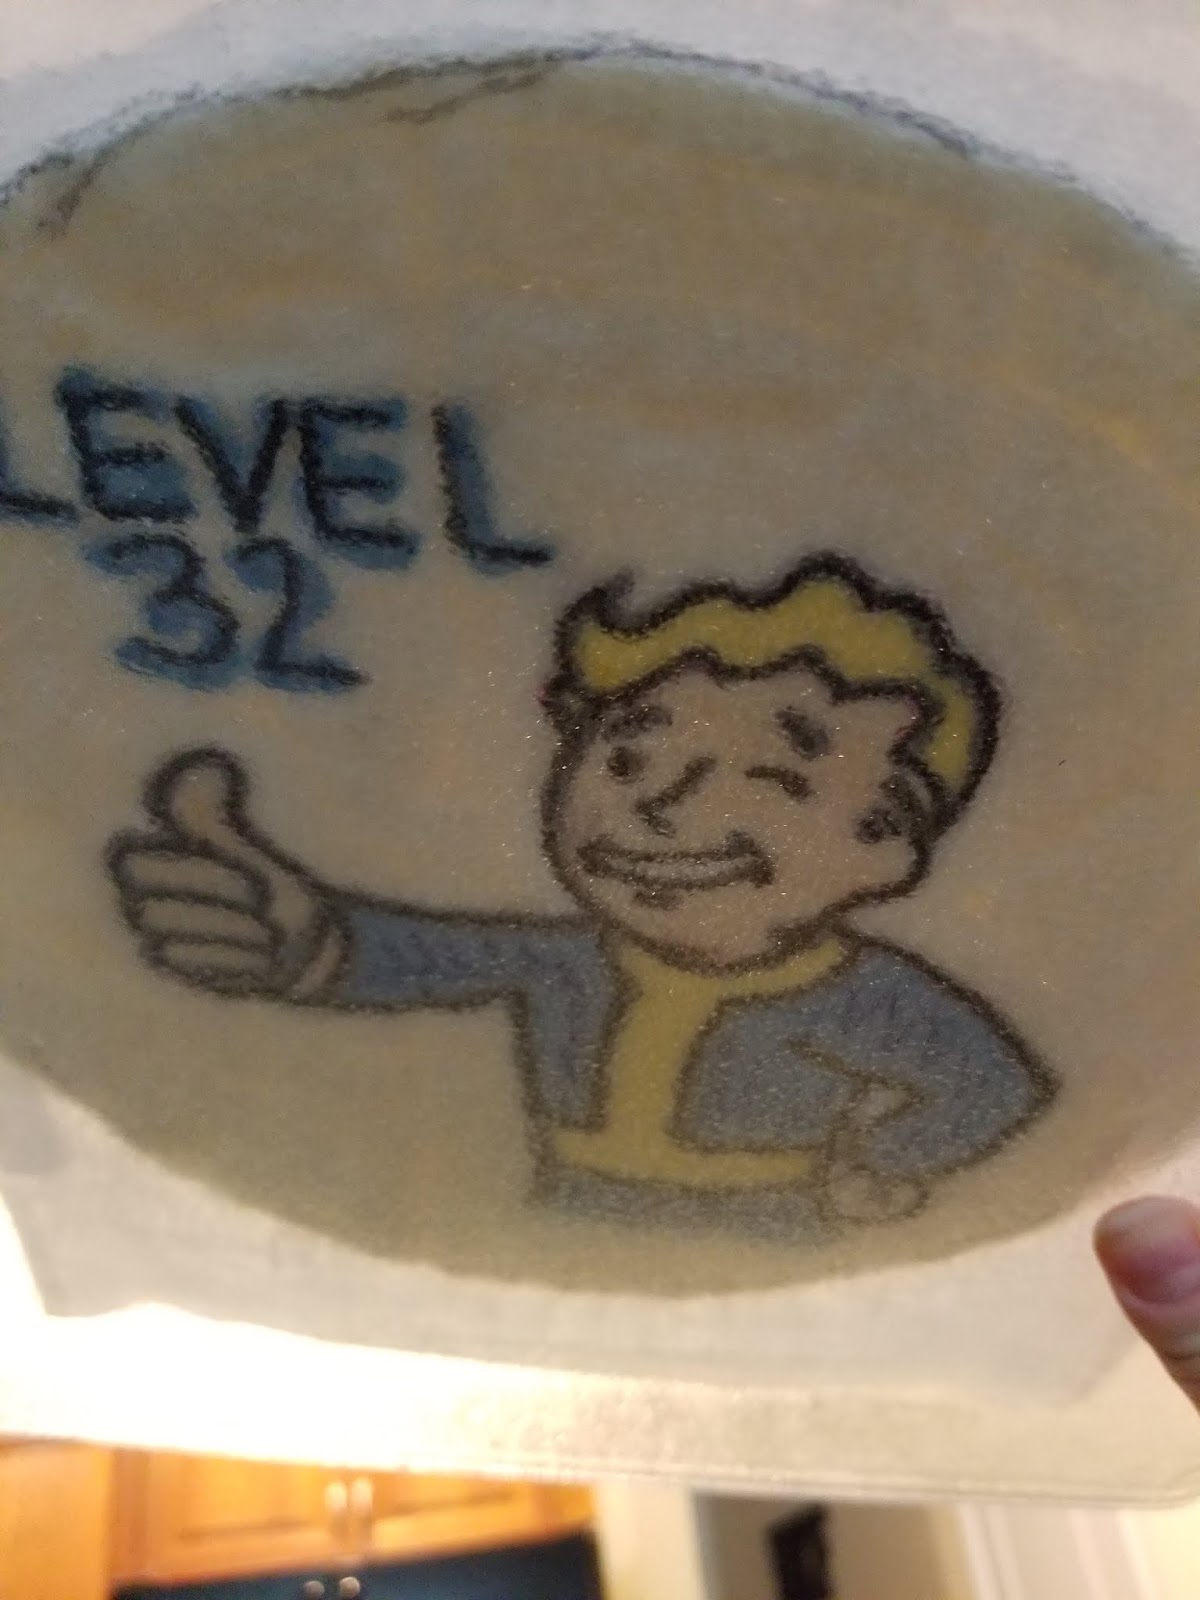
He’s not so much winking at you as he is making sure he’s a safe distance from nuclear radiation. I outlined Vault Boy, clearly way too cheery considering his circumstances, and wrote in my LEVEL 32 before peeking at my work up to very bright kitchen lights:

Also, I was spell-checking. If you see any bits of light poking through what you’ve piped, come back in with a small paintbrush and press your frosting together. You want to make sure there are not tiny gaps anywhere, so I pretty much take a paintbrush to the entire outline and make sure it is smooth and even. Black frosting runs terribly, and since I knew it would be next to white, yellow, and beige, I left my transfer in the freezer overnight to set as best as it could. But it refused to fully set; proving anything with tequila in it is bound to cause you grief eventually.

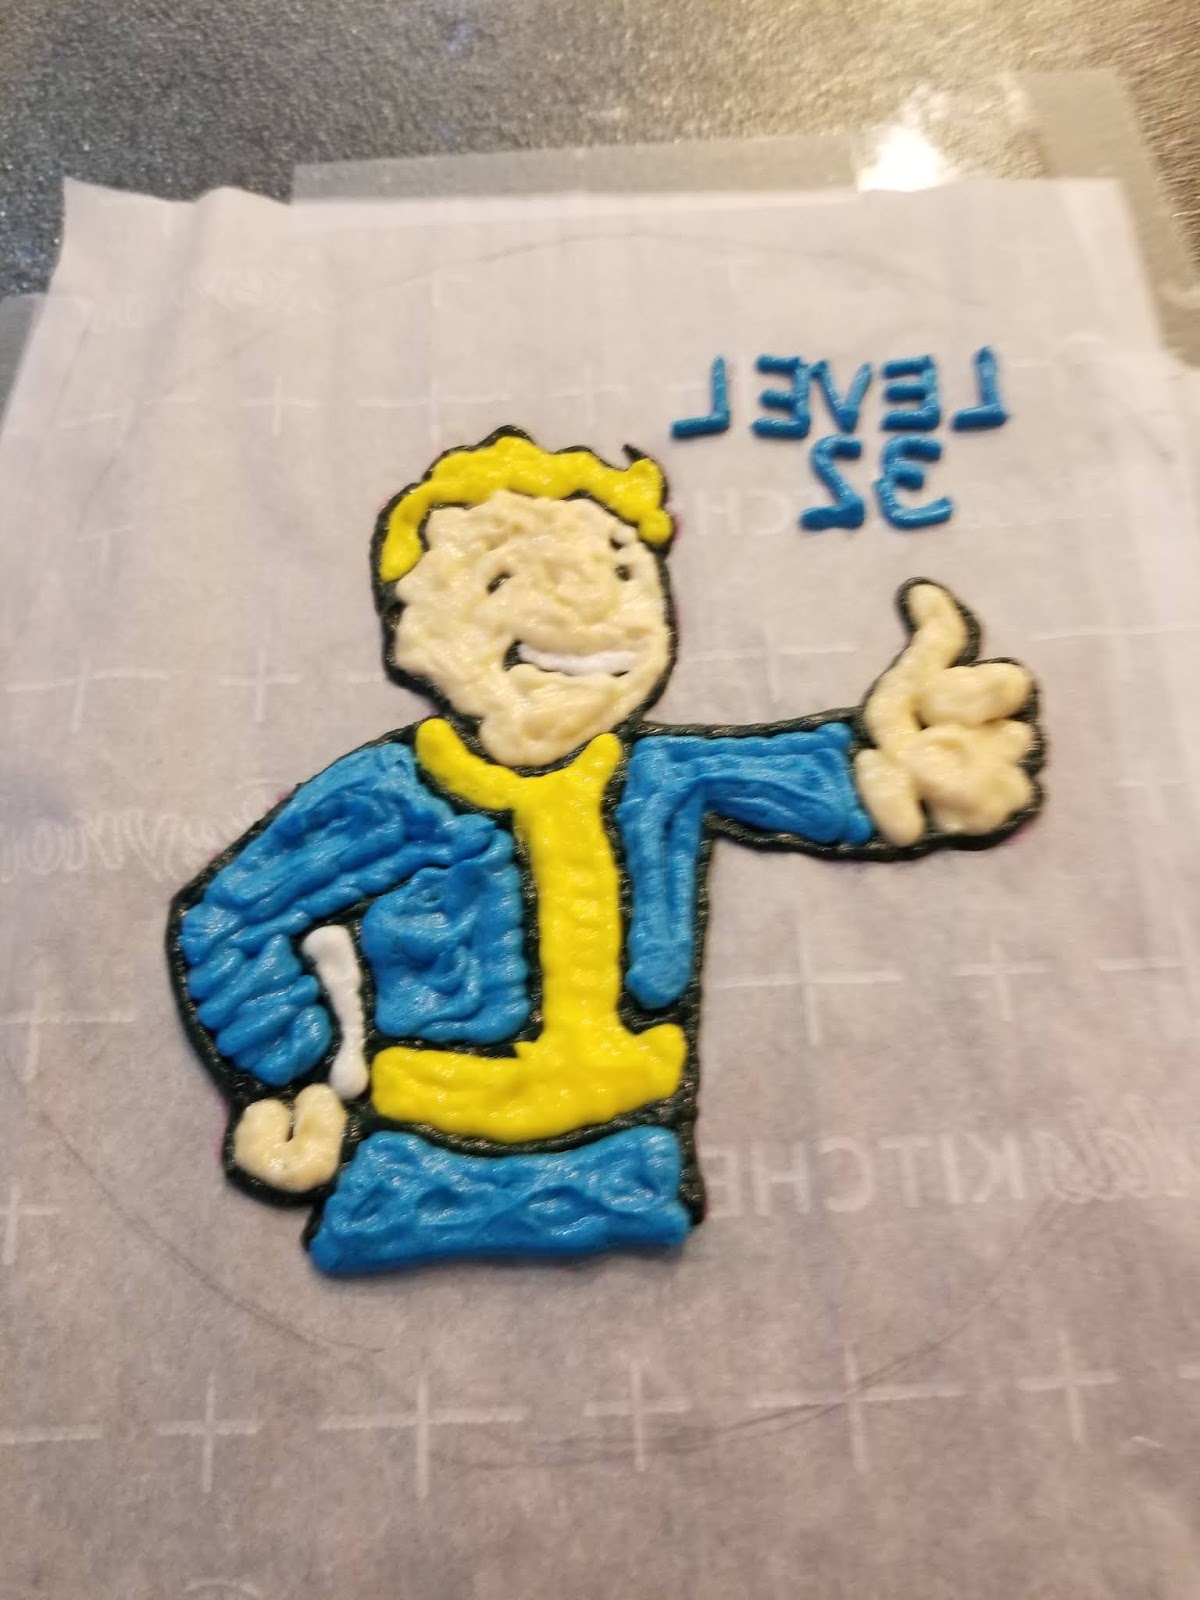
Stop smiling, it isn’t funny, Vault Boy! Frustrated and eagerly eyeing the frosting I could potentially use to eat this problem away, I soldiered on and piped in his teeth, the white in the crook of his arm, and all the yellow my transfer needed. I was hoping he wouldn’t end up looking like he was a Fallout ghoul that didn’t make it to his vault in time before war were declared (yep, I can put a Futurama reference into anything). I held up to the light and used my paintbrush to push frosting in to any tiny open spaces, cleaning the brush between each swipe/press. I froze this for two hours before coming back in.

Oh yeah, he’s definitely got some nuclear fallout effects from this angle. Bubbling skin? Nose fell off? Missing an eyebrow? This poor boy. Get him a Stimpak and RadAway, stat! I piped in his blue jumpsuit and gave the man some skin (only ghouls need to exist skinless in this and any universe).

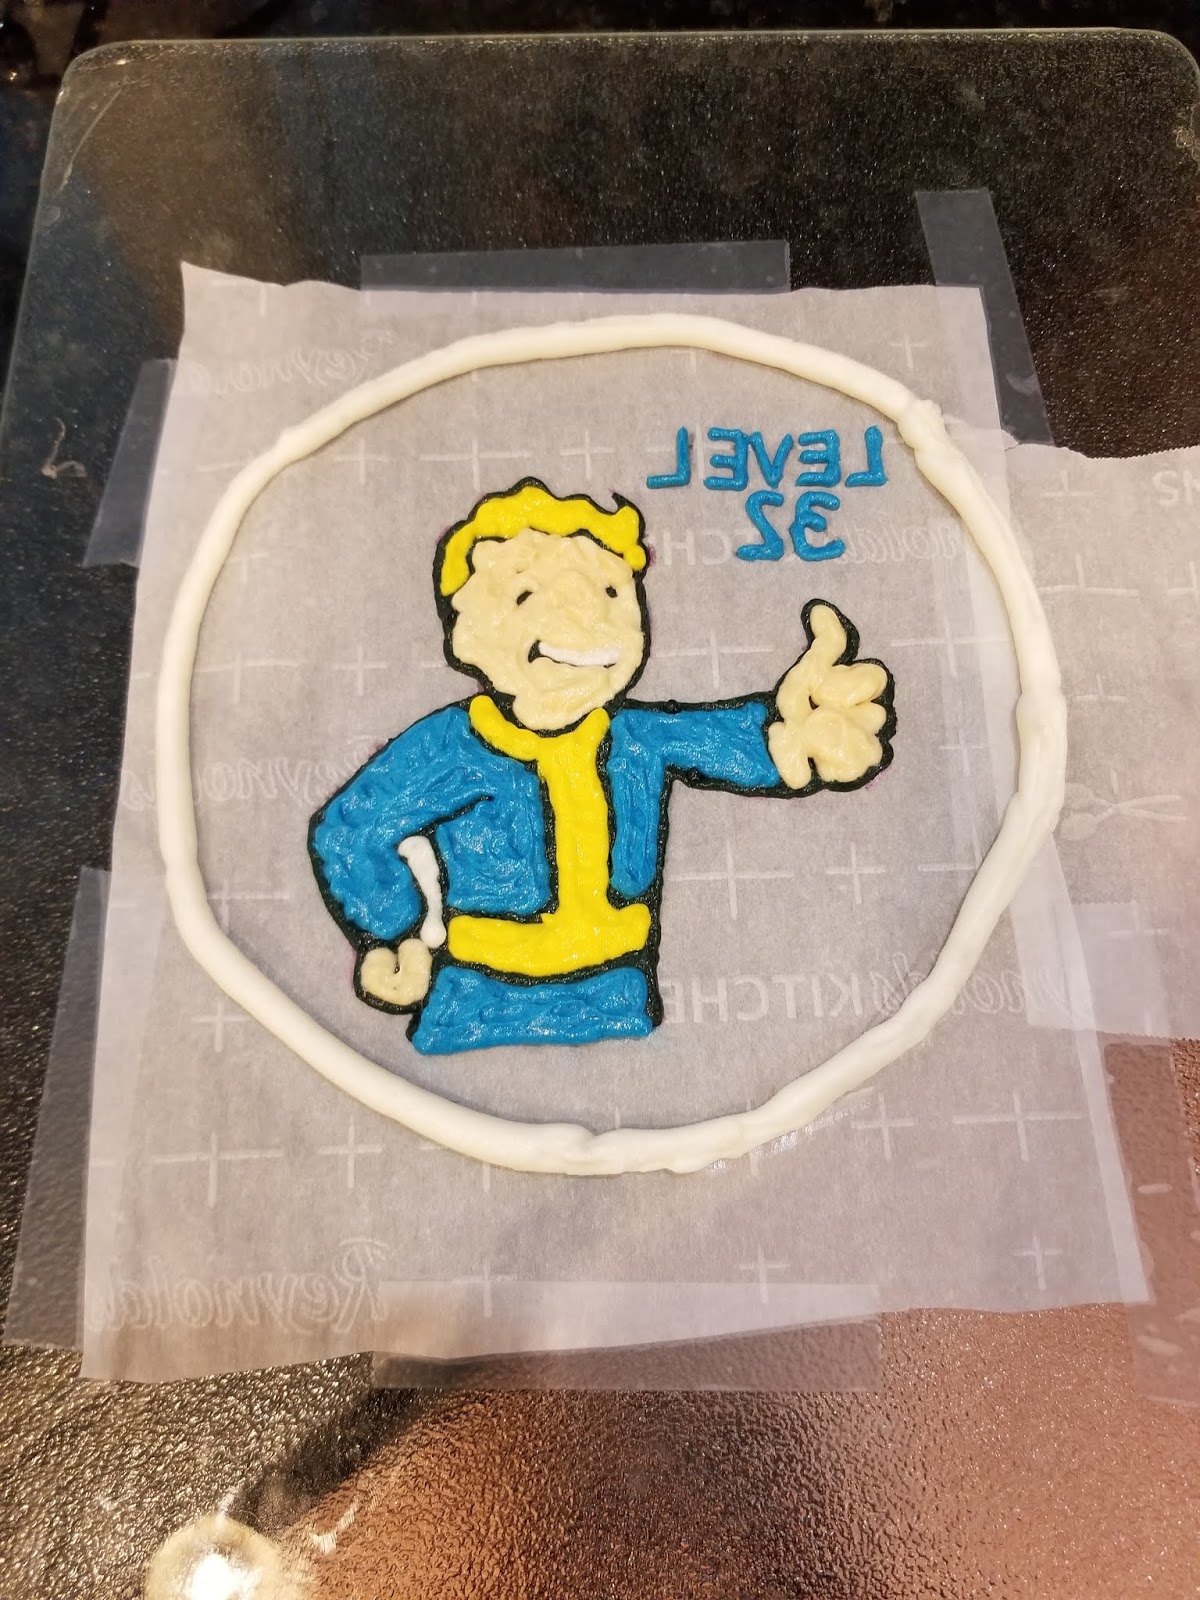
Yet, through all this, he remains smiling. That’s courage. I finished up this day by piping a border around the entire design and placed the transfer into the freezer overnight. I had to work quickly and carefully since this would not fully crust, so there was a lot of breaking for freezing.

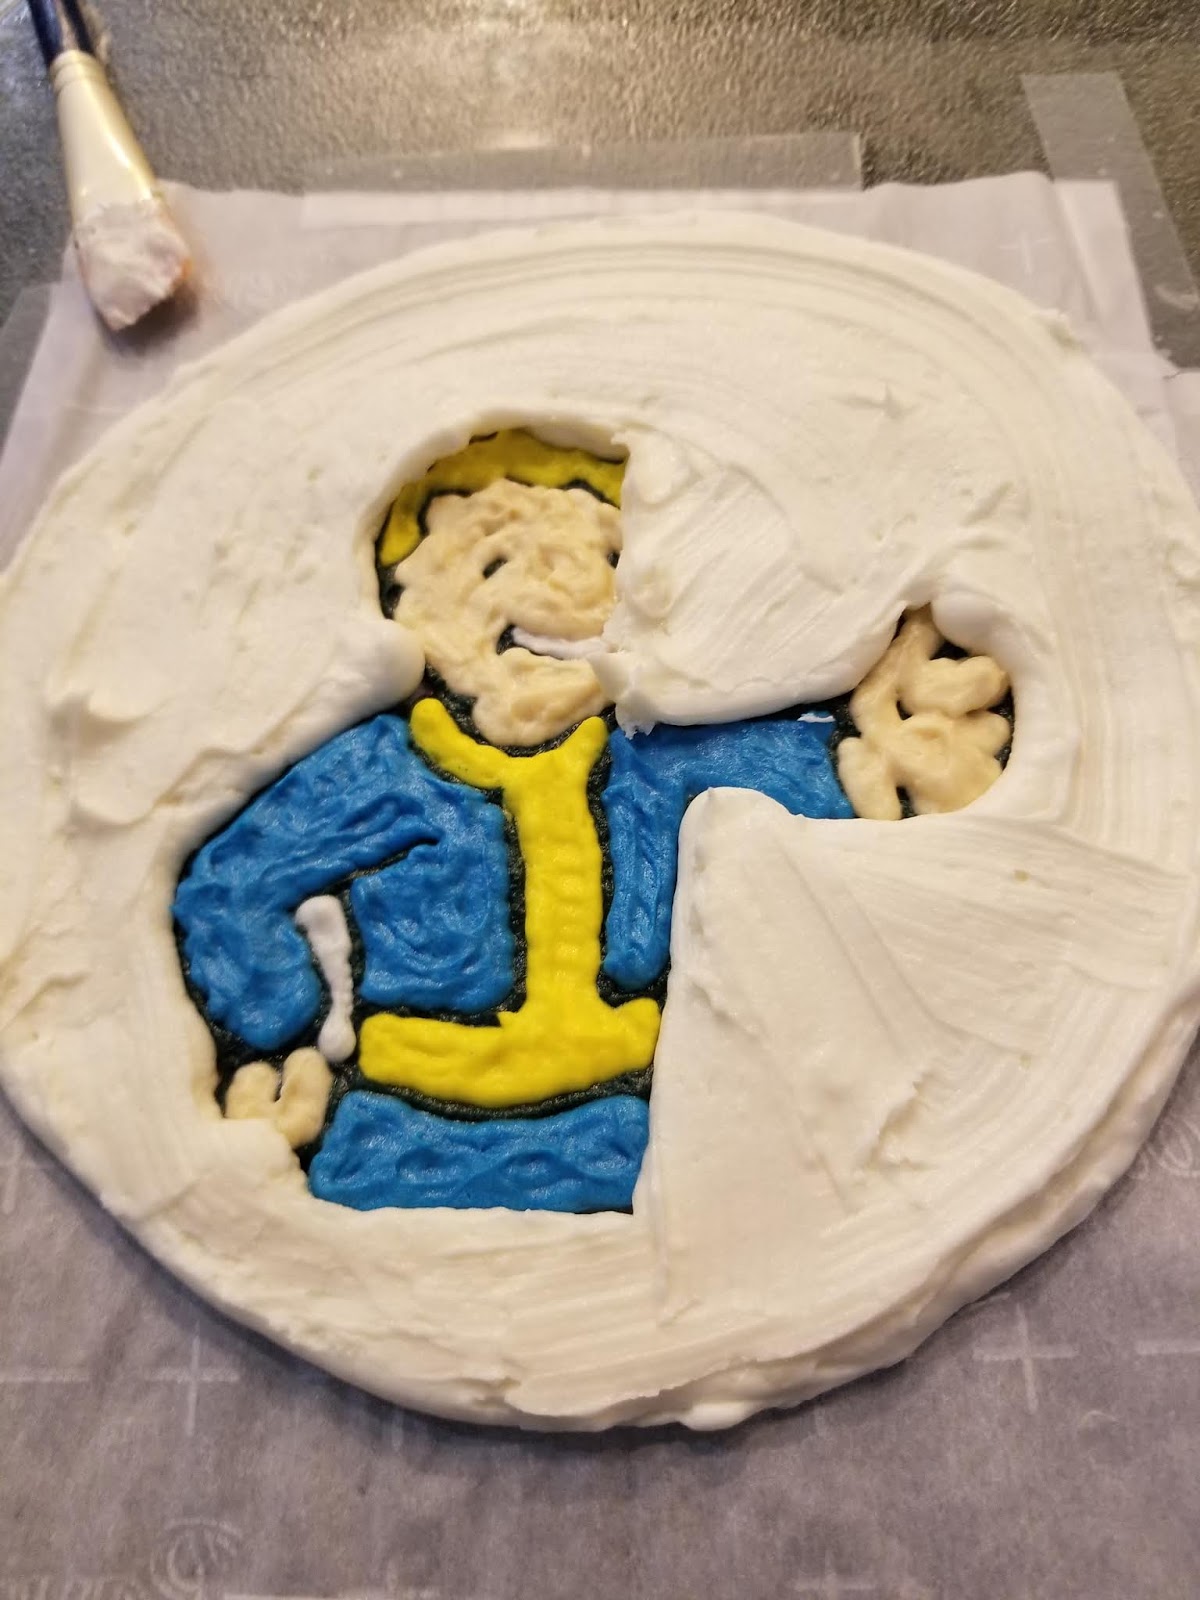
Now he’s being eaten by a cloud of frosting. Still clearly happy about it, though. The next day, or as I was calling it, “Day 3 of the hostage situation,” I came back in with my large white frosting with #12 tip and traced all around Vault Boy, using a larger paint brush to press in any gaps.

And then he vanished, like the mysterious stranger…Wait, is Vault Boy actually the mysterious stranger character in Fallout? Did I just jokingly stumble upon some deep, dark secret? I finished up by cover him up with frosting, smoothed things out, and did a check for gaps:

See top right where there are lines of light oozing through? That’s what I’m talking about. Use a paintbrush to fix those! Once all gaps were smoothed, it was time for my transfer to go live in the freezer for a full 24-hours. I had leftover frosting of all colors, but I only needed my blue and yellow to finish the cake. I used almost all of both of these colors to finish assembling. I did not crumb coat since I was trying to save some calories, but definitely had enough frosting to do so if you need a thicker base. I may or may not have mainlined my beige frosting from the bag straight into my mouth because as someone who doesn’t drink, I really needed a stiff margarita after working on that transfer for three days straight.

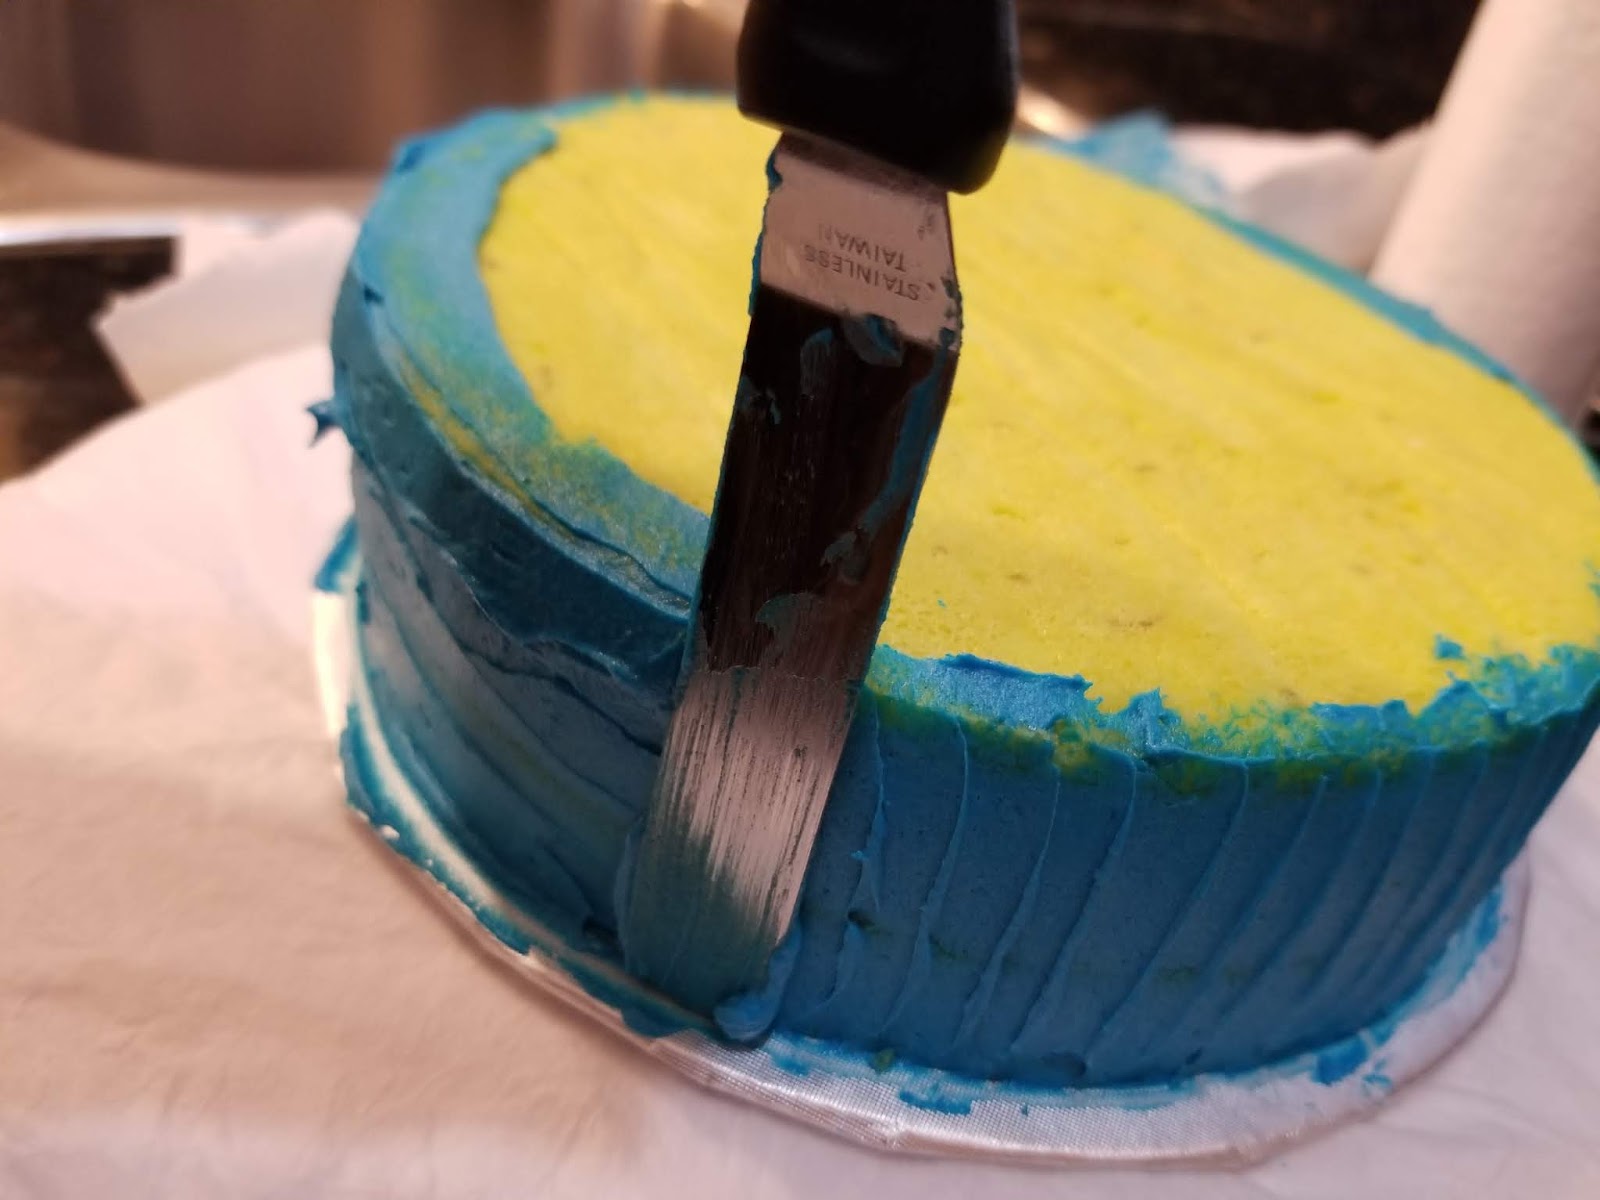
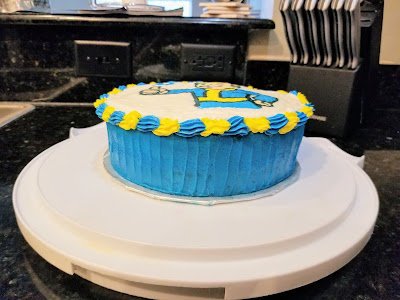
Like a giant, radioactive Oreo. After completing my transfer, I opted to stop eating bags of frosting and instead assemble the rest of the cake. I took a large amount of blue and filled the middle of my cake. I came back in and applied a thin layer of blue to the rest of the sides. Since this frosting would not fully crust, my dreams of using the Viva paper towel trick to smooth it out before slapping a giant Vault 86 sign for Derek’s birth year on the side of the cake were dashed. Instead I used my angled spatula to create a pattern around my cake:

I placed my spatula on the cake and quickly swiped up before setting it down close to where I just swiped and repeated. 
It gave a nice, festive edge to the cake. Kinda like a giant cupcake wrapper in what I call “Radioactive Blue.” I put this into a cake safe and placed into the fridge until my transfer was as frozen as it was gonna get the next day.
Thank God, he wasn’t lost in the blast. I carefully took the tape off of my transfer to remove it from the cutting board before flipping over and so, so gently placing on the top of my cake. I slowly removed my Parchment paper to reveal the transfer it all it’s glory. Thankfully it actually was glory and not horror. No Vault Boys were harmed in the making of this cake. I let this sit out for about 5-10 minutes before coming in with a Viva paper towel to attempt to smooth out. It just wasn’t crusting, so I ended up using a small paintbrush to try to smooth out major roughness.
So bright! So cheery! So the opposite of my personality! I then placed #21 tips on my yellow and blue frosting bags and piped a simple border around the edge of my transfer to cover up the edges.

On Day 4, Kate Created Birthday Cake. It may have taken most of a week and all of my sanity, but we do crazy, inexplicable things for the people we love. I knew Derek would see this cake and immediately be happy, and he was thrilled. I also let him mainline some of the extra frosting, so this was an extra birthday bonus. I am always happy to come up with birthday cake ideas for him. He’s a fun guy with a ton of cool, nerdy interests, so this yields some epic cakes.
So green! I promise, non-toxic and no need for RadAway to eat a slice. Minus the salted rim, this cake really does taste exactly like a margarita in food form. I thought I might have pushed the boundaries of boozy cakes too far this time, so I am really happy with how delicious this cake turned out to be. A margarita is still the only stiff drink I will have on occasion anymore because I fully believe that although the calories may be empty, a good margarita fills you with enough joy that it kind of evens out. Now that I’ve turned my favorite drink into my favorite dessert, I’m feeling unstoppable! That also might be because of our impending trip to Texas this week, where the ‘ritas are plentiful and delicious. And while everything may be bigger in Texas, including the bugs and heat index, at least I never confuse it for a post-apocalyptic wasteland. The people are way too friendly and the driving not nearly Mad Max-y enough. ‘Til next time, my fellow eaters!
Thumbs up to another year of greatness! -
Pies/Cobblers/Crisps
Pies:
- Strawberry cream pie (low cal!)
- Tart lemon cream pie (low cal!)
- Root beer pie (low cal!)
- Boozy grasshopper pie (low cal!)
- Pineapple pie (low cal!)
- Boozy key lime pie
- Dulce de leche pie (low cal and full fat versions available)
- Boston cream pie bites
- Chocolate salted caramel pie
- Oreo pie
- Mini apple pies
- Chocolate chip cookie pie
- Ma’s cherry pie
Cobblers:
Crisps:
-
Pie: Miracle Worker
When I think of Jell-o, it hurts my teeth. As anyone who has had braces or had their wisdom teeth removed can tell you, there are times when your diet consists only of the softest, most easily swallowed foods to avoid having your teeth come within a millimeter of food particles, triggering *all* of the pain. I vividly recall my diet consisting primarily of ramen noodles, scrambled eggs, and Jello for quite some time in my teen years (coincidentally, also in college, but mostly just because I was more interested in spending money on shoes and not food). Because of these memories, I don’t usually make many desserts that feature Jello as the main ingredient. But it’s hot in Florida, like the surface of the sun is having summer vacation here right now hot, so I wanted to make a dessert without the word “lava” in it. I wanted something that could work miracles and help me cool off while also delivering something sweet and delicious, so this was definitely a job for pie. A strawberry cream pie, specifically:
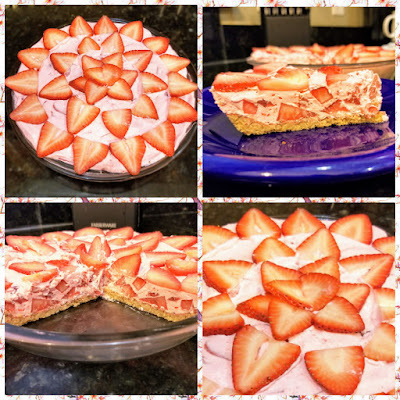
It screams summer in all the right (non-sweaty) ways. It’s a strawberry cream pie, but I’ve been referring to it as a strawberry dream pie because: 1. I am a huge dork, 2. Not only is it a fantastic combination of light, airy filling, but it also packs a nice blend of tart, sweet bite from the strawberries, and 3. Because it’s only 129 calories a slice. A friggin’ steal! I mean, you could eat half the pie in one sitting if you wanted to and still be better off than eating that one so-so hamburger at your neighbor’s backyard barbecue. Also with the added bonus that this pie doesn’t require you to stand anywhere near an open flame when it’s 6,000 degrees out while making lame jokes about someone leaving the heat on outside. Stay inside, enjoy air conditioning, eat pie, and thank yourself for being able to avoid pretending to like people for another day. That’s pretty much what the weekend is made for anyway, right?

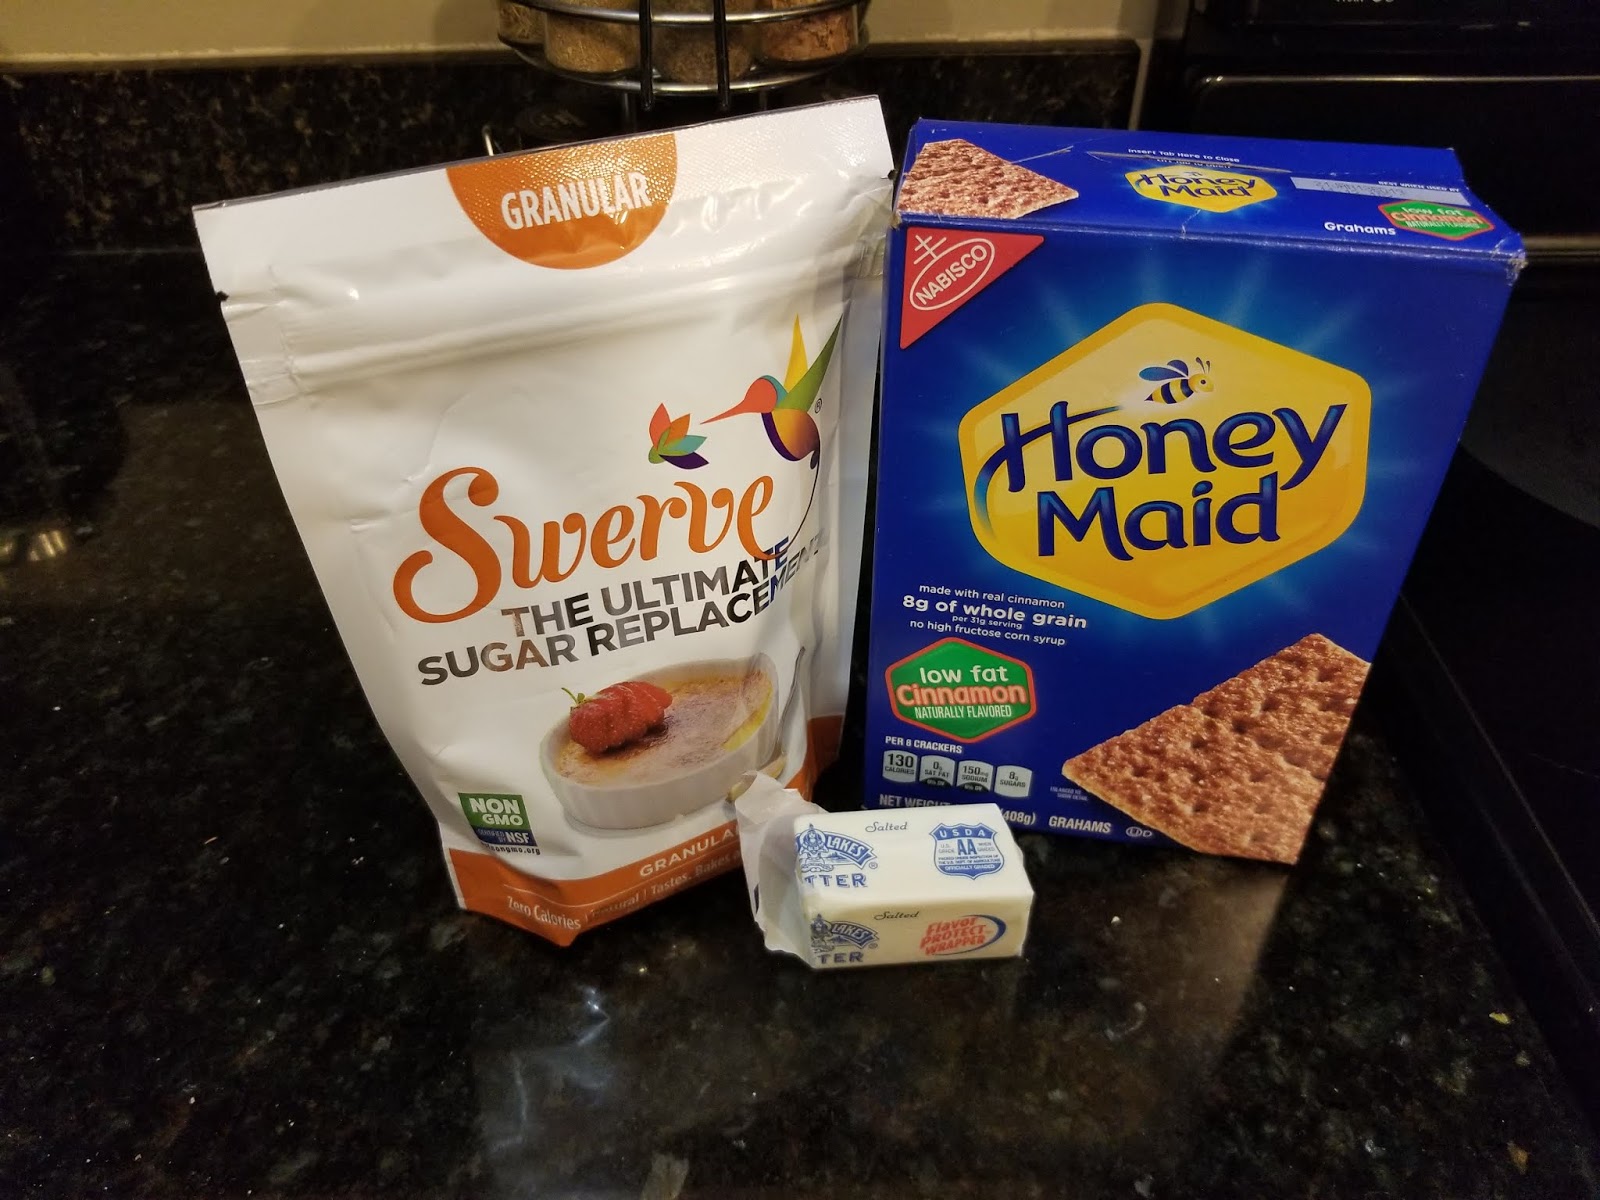
That and finding sneaky ways to eat butter in all your meals, including dessert. I’ve mentioned my easy and low-cal pie crust recipe before, but it was ages ago, so we’ve all promptly forgotten about it by now because the internet has given us the gift of a goldfish-adjacent attention span. To make your pie crust, you’ll need:
- 3 tablespoons of butter, cut into small chunks
- 2 tablespoons of granular Swerve
- 6 sheets of cinnamon graham crackers
- 1 tablespoon of water

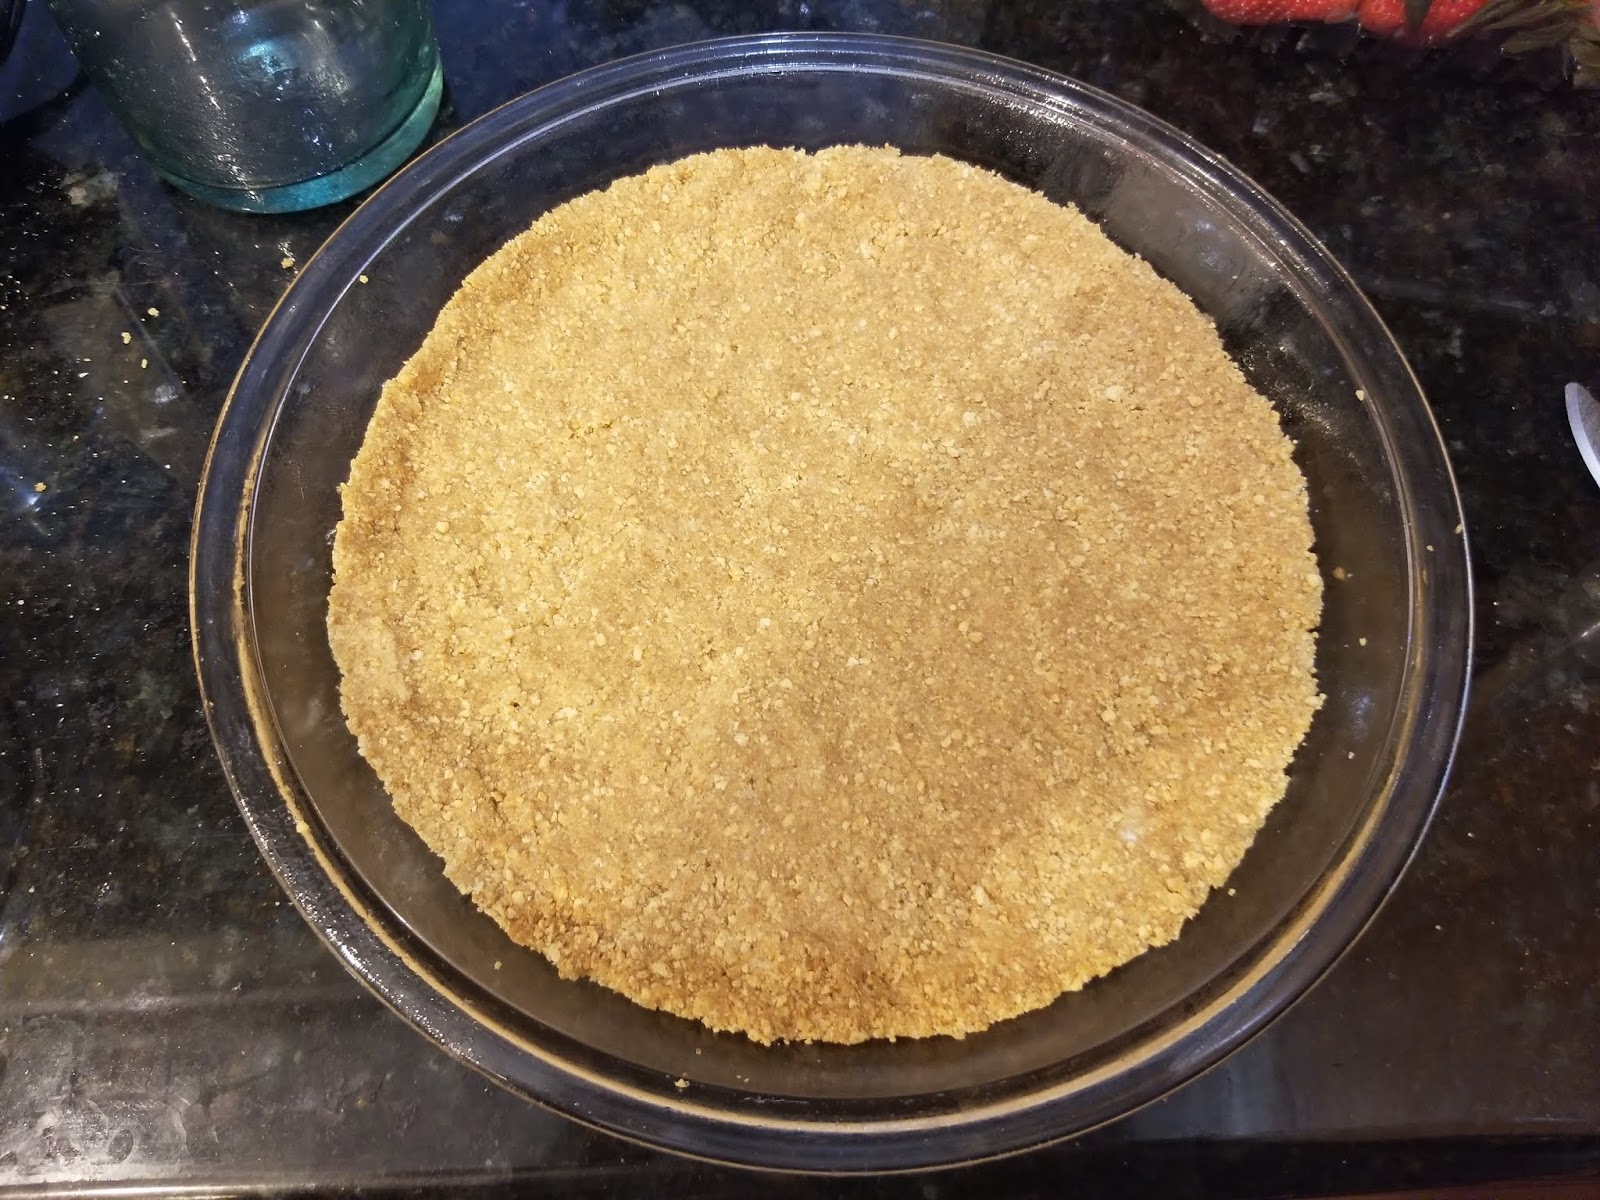
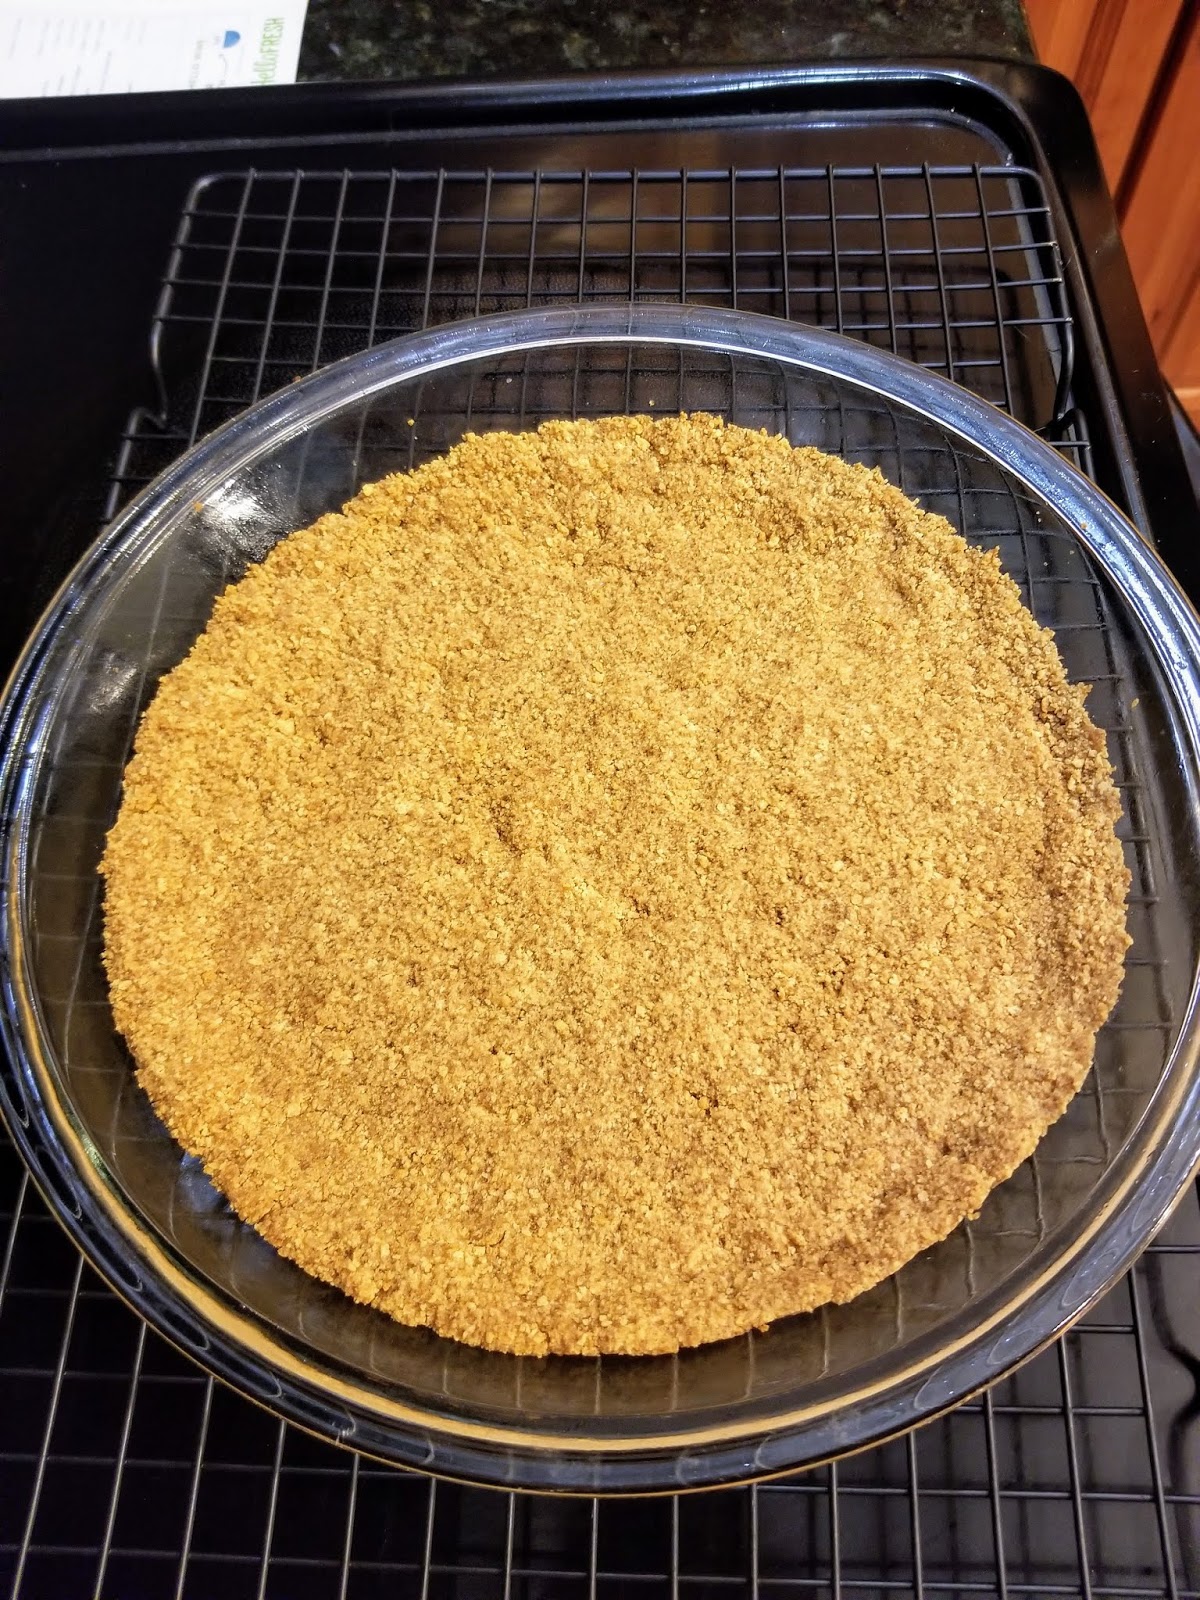
Invest in a small food processor, and you can make all the pie crust in the world! Dump the butter, Swerve, and graham crackers in a food processor and grind until smooth. Then, add in the tablespoon of water and mix everything together til a wet crumb is formed.
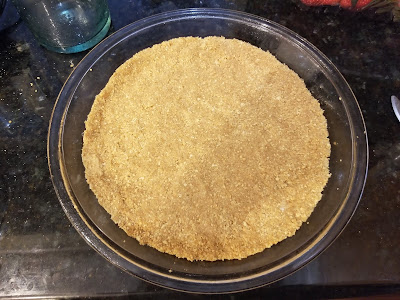
Good things start with graham crackers. Press your crumbs into a pie pan and then place into the freezer to set for 30 minutes. I only have a shallow pie pan, and I ended up making wayyyy too much filling, so the recipe below for the filling will work for a deep dish pie crust. I’ll give tips for what would work better for a shallow pie pan as well for all my fellow shallow (pan) people. Once set, remove from the freezer, preheat your oven to 375 and bake for 10-12 minutes until golden. Place on a cooling rack and set in the fridge while you make your pie filling.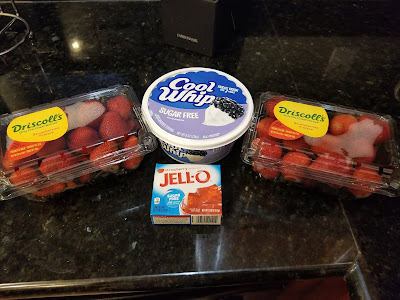
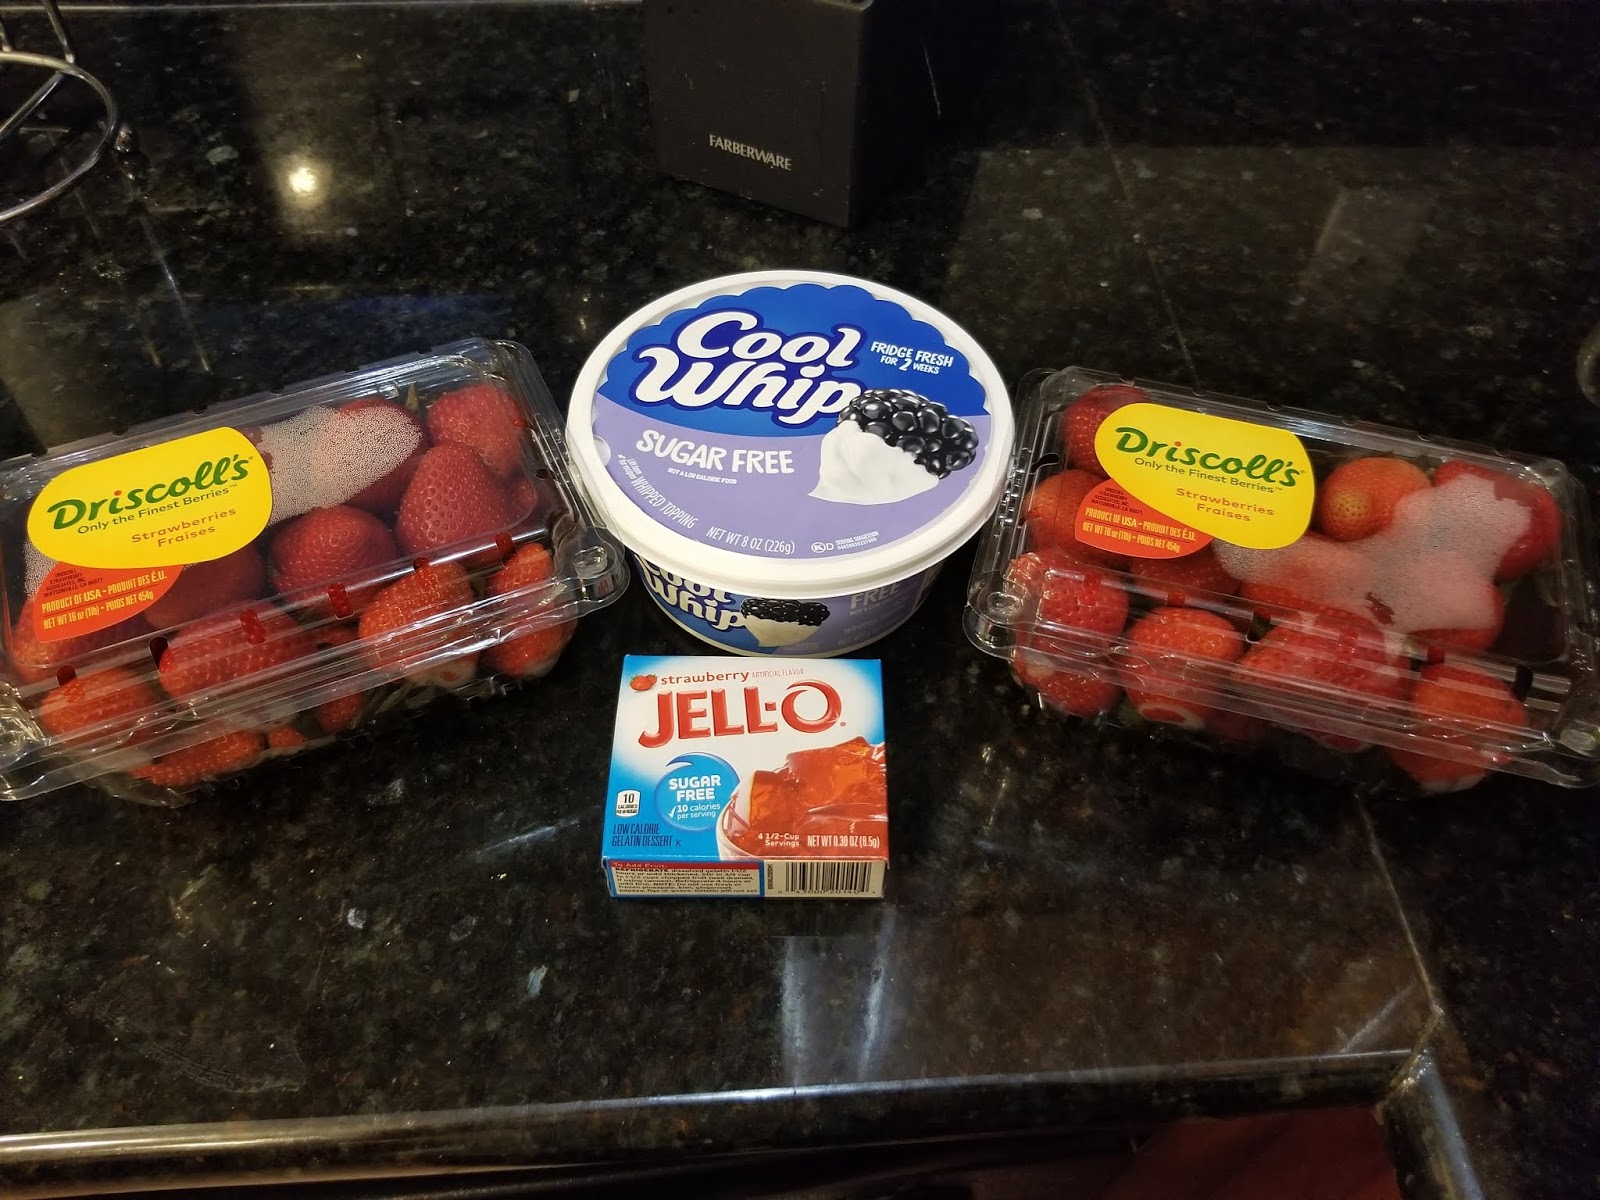
Jello, you were there for me when I could eat literally nothing else. Thanks, braces. To make the filling, you’ll use:- 1 8 ounce tub of Cool Whip Free
- 1 small package (0.3 oz) of sugar free strawberry Jello
- 2-4 cups of strawberries, reserve 6 for topping, sliced*
- 2/3 cup boiling water
- 1/2 cup cold water
- 1/2 cup ice cubes
*For a deep dish pie, use 4 cups of strawberries. For a regular, shallow pie pan, use 2 cups of strawberries. In either case, reserve a few for garnish. I had about 1/3 of the filling leftover when I used 4 cups of strawberries, and I think one pack (2 cups) of strawberries would’ve been the perfect amount for the filling instead. I did get to enjoy leftover filling with graham crackers though, so, no complaints either way.
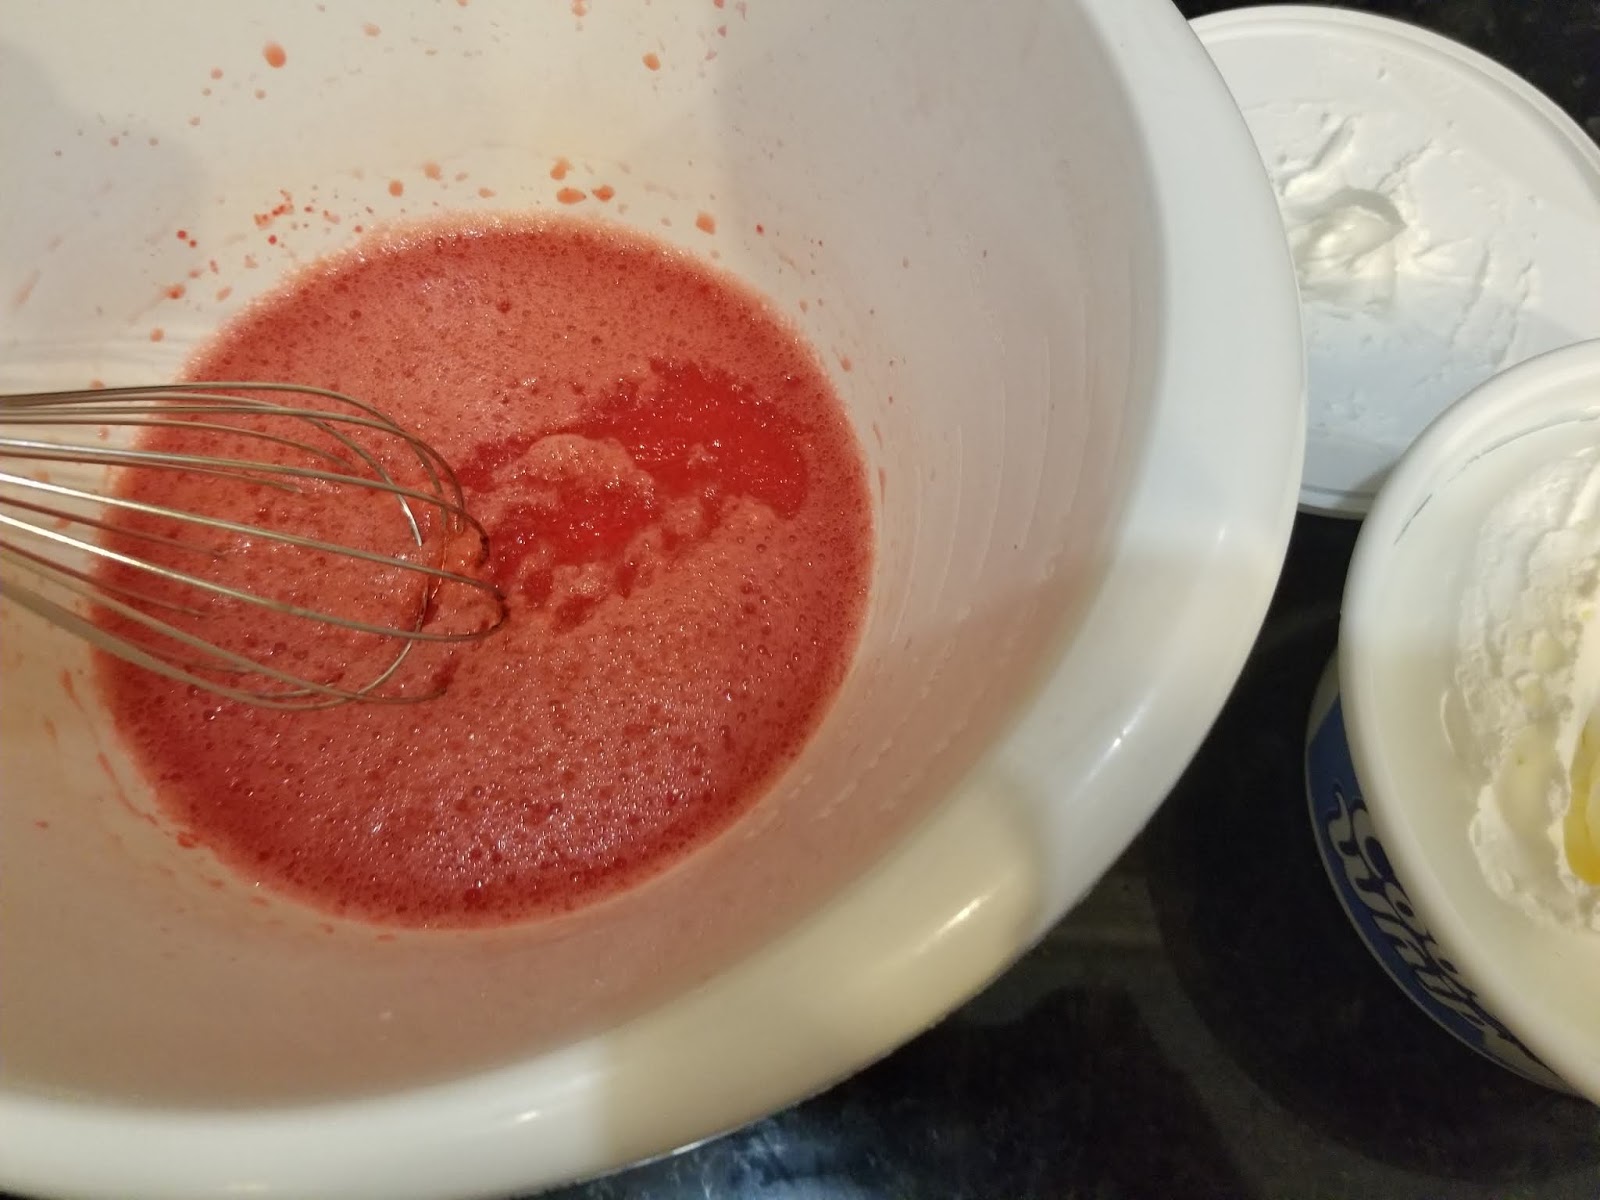
Boil your water, and mix it with the Jello in a medium-large bowl until the Jello is completely dissolved. In a measuring cup, measure out 1/2 cup of cold water, and then dump in ice cubes until your water reaches the 1 cup measuring line. Throw this in with your boiling Jello mix and whisk until the ice is completely melted:

I say large bowl because I clearly whisk with the speed and grace of a tornado. Your mixture should thicken a bit while whisking, but set aside completely for 10 minutes to firm up and keep your filling from being a soupy mess (outside is enough of a soupy mess–don’t let your pie follow suit). I took this time to remove the tops and slice all my strawberries into small chunks, and then took my remaining six strawberries, chopped the tops, and very thinly sliced them vertically. Yes, I did all this in ten minutes. I am wise with time. Thanks for noticing (she types while still in pjs at 3 p.m.).

Jello abuse! When I poked my mixture with a whisk after ten minutes of setting, it was nice and firm. The whisk didn’t sink to the bottom of the bowl, and the Jello gave some resistance (futile!). Now, we’re ready for Cool Whip. Then again, we’re never not ready for Cool Whip during summer, really.

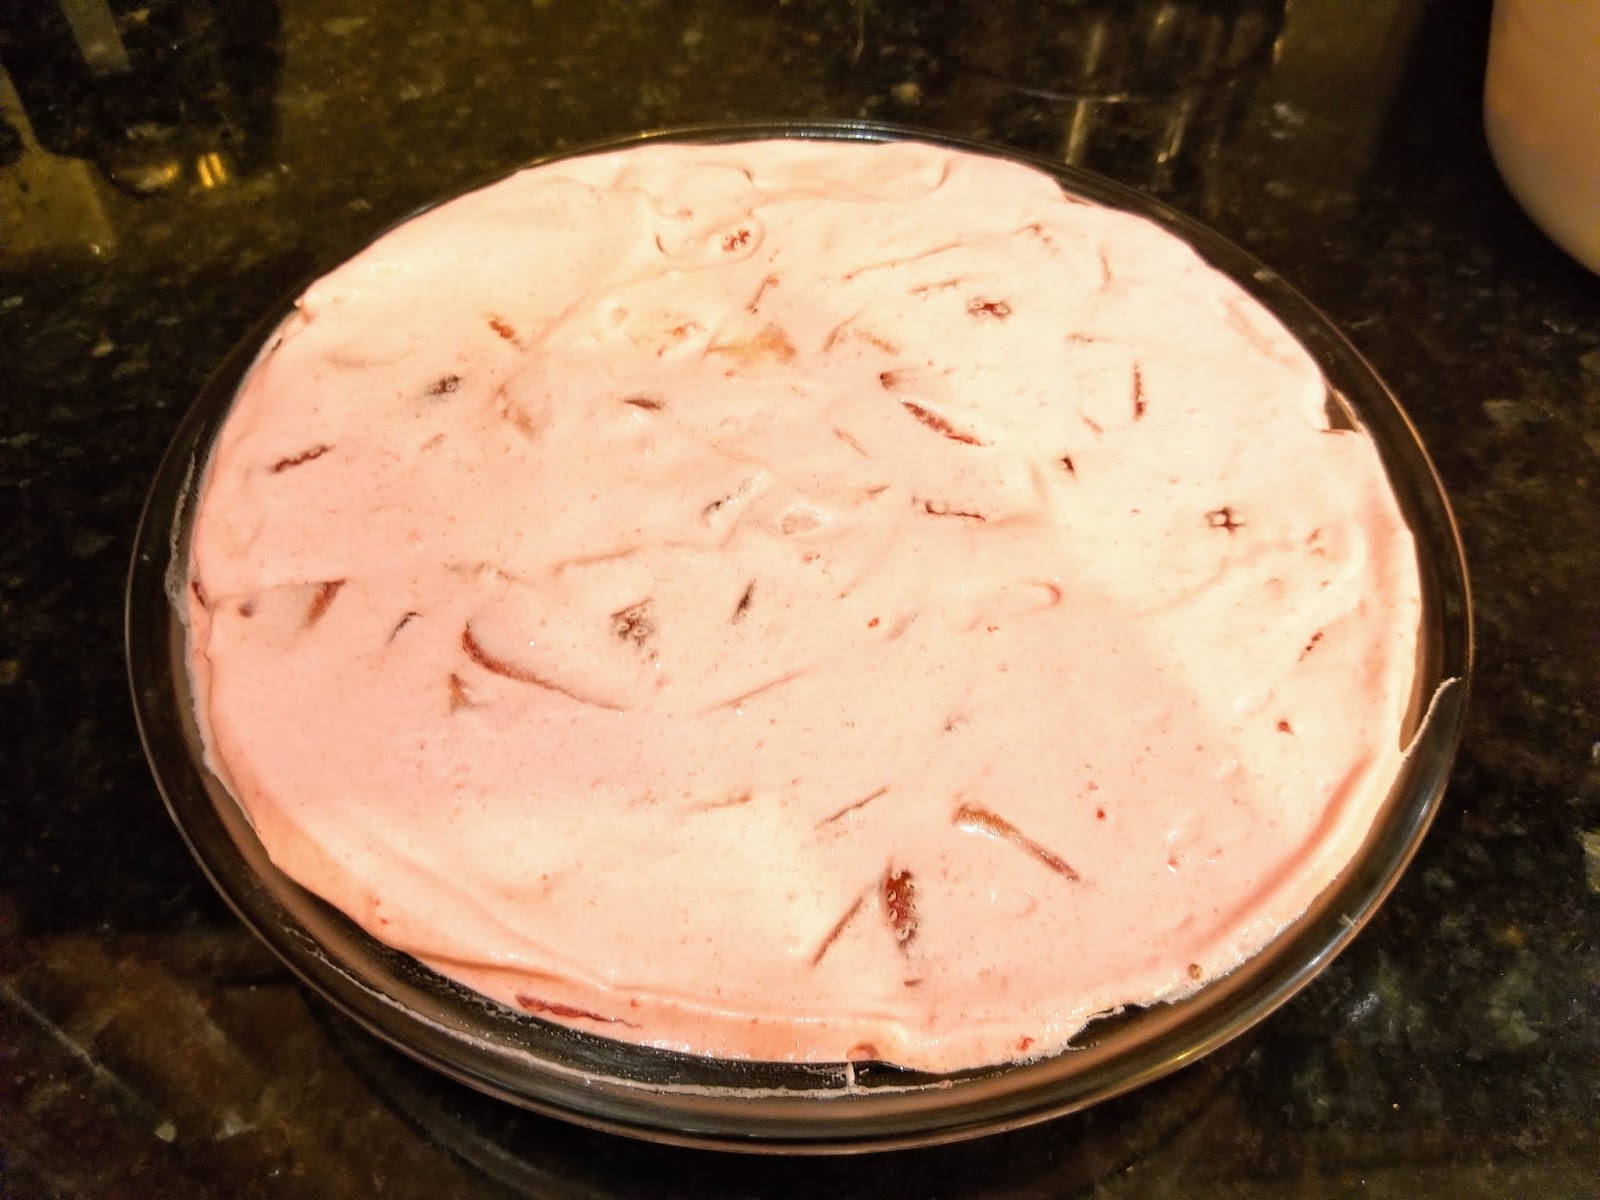
Mix in the Cool Whip until you have a beautifully smooth, pink bowl of pie filling. 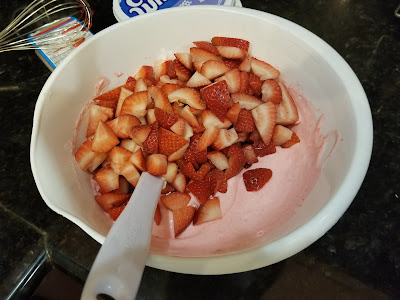
Now add in however many strawberries as your pie pan will allow. Give a good stir until everything is well mixed, then top your bowl with plastic wrap and place your pie filling in the fridge to firm up for thirty minutes. Once the filling is firmed up, time to make the magic happen.
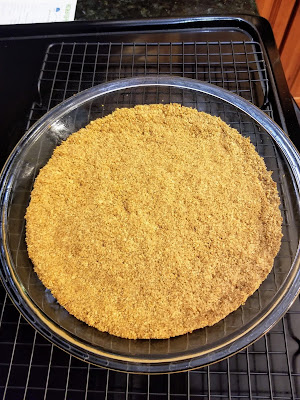
Get that gorgeously tanned (consider my pasty body jealous) pie crust. 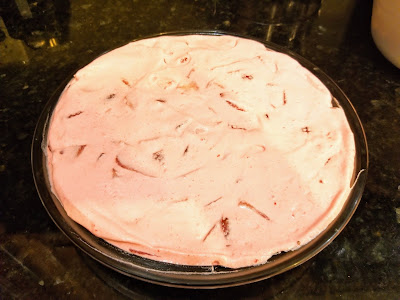
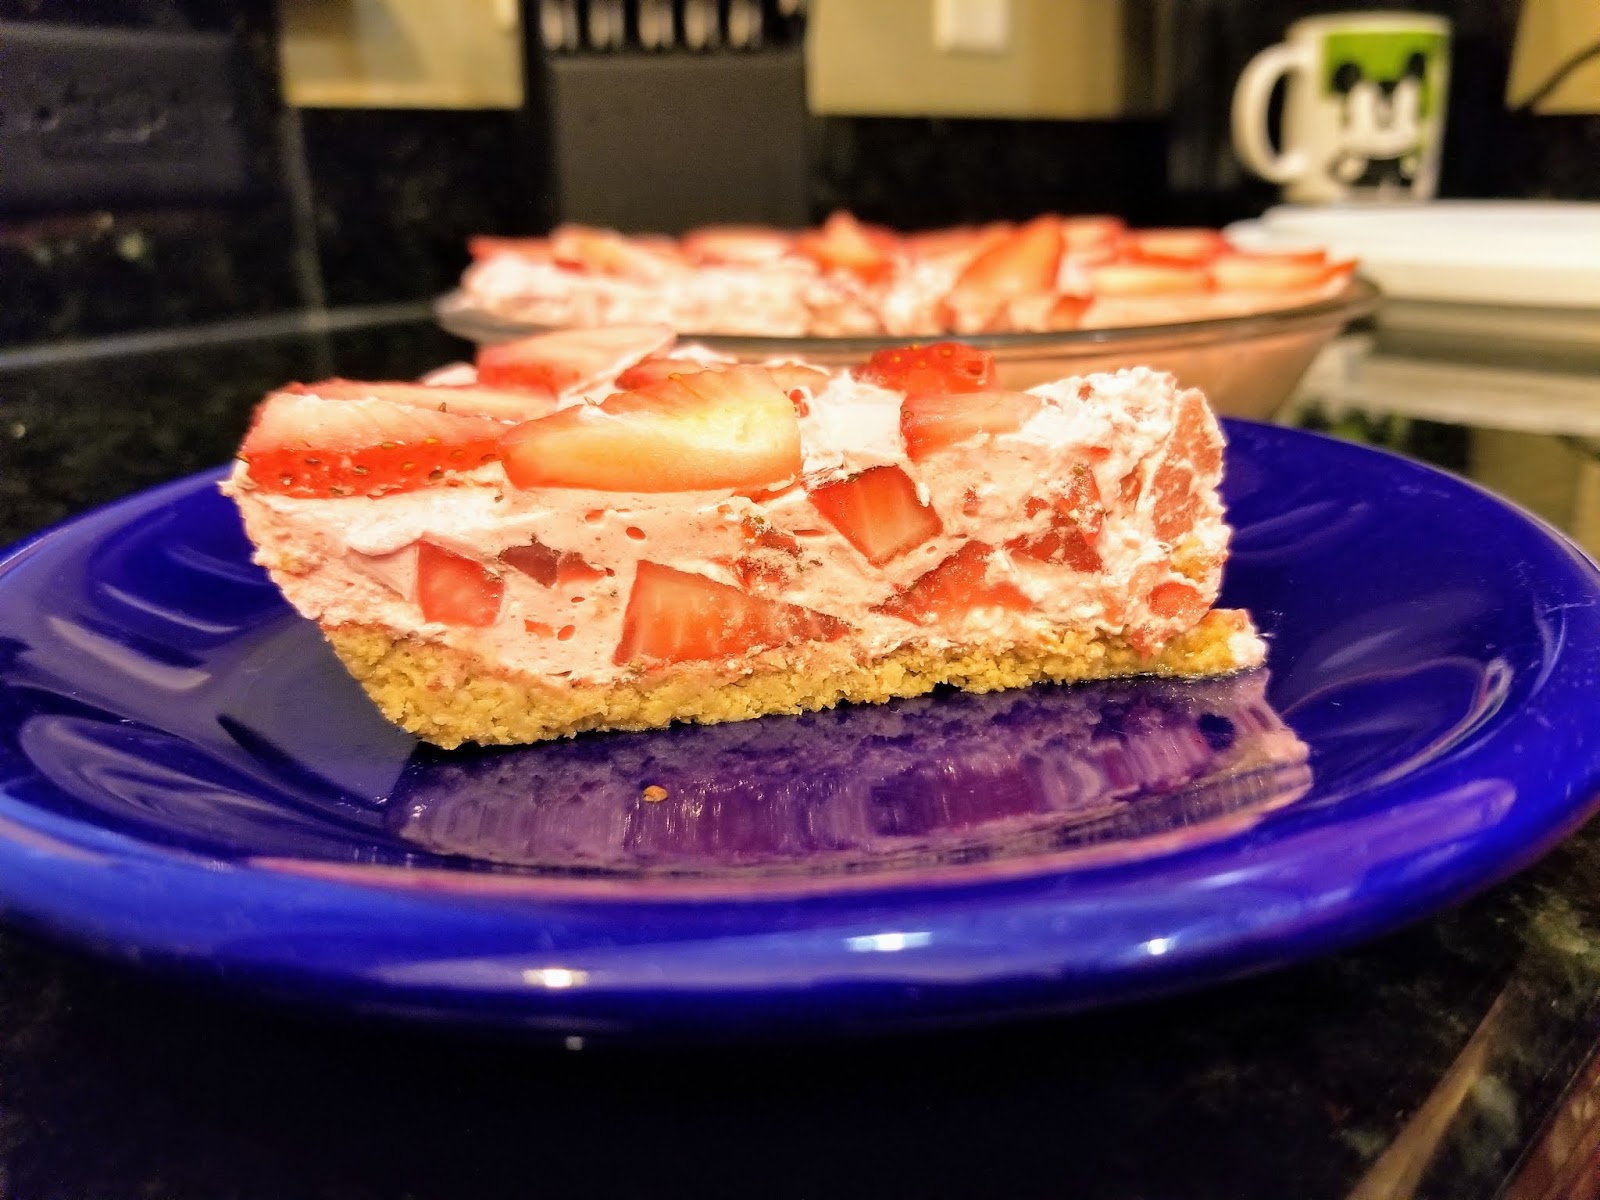
Turn out your filling into the cooled crust, and smooth with a spatula. Now, take those thinly sliced strawberries and create whatever decoration your heart desires on top of your pie. I went with a sunburst pattern because it’s summer, and I like constantly being reminded that the sun is trying to kill me during this season.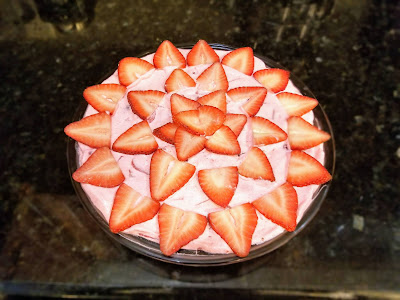
Plus, sunburst patterns just look pretty. Now, much like all things that have Jello in them, you must do the unimaginable: put your pie into the fridge to set for at least 4-5 hours. I know. I saved this painful tidbit til the end because the pie is most definitely worth the wait. The irony–the pain of waiting for the pie that is there to solve the pain of summer. The longer you let it set, the easier it will be to slice and serve, so make a day ahead if you have time.
A beautiful color contrast. Pictured on top: me after 5 minutes in the summer sun. Pictured on bottom: a normal person’s tan after being outside all summer. 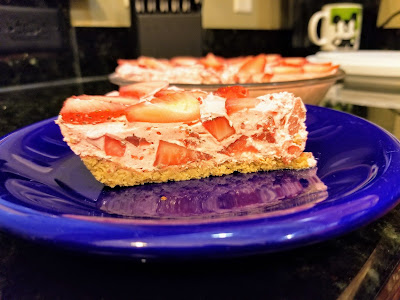
Worth. the. wait. After those long, grueling hours of wanting to eat pie and not being able to, the time has finally come. Slice up, enjoy, repeat. Low calorie, but not low flavor. The cinnamon crust and the sweet filling are a combination so great, you will forget you live on the surface of the sun. It’s nice and cool while also being delicious and satisfying. I sincerely enjoyed this pie, and my Jello-tooth-PTSD was a non issue since it’s mostly there to add some extremely yummy strawberry flavor to the pie.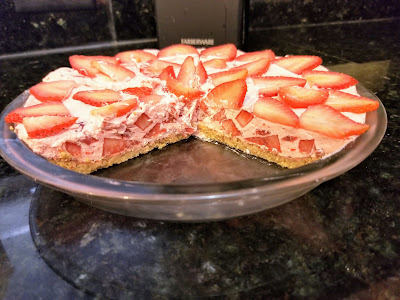
The chunky texture of the strawberries also helped. Definitely keep leftover pie (yes, this is a thing) in the fridge. I made this pie last weekend and had a few slices (and a massive bowl of leftover filling) before saving the remaining slices for my husband to enjoy with me now that he’s back from his work trip across the pond. I am told it was hot there, too, but not “Florida hot.” This is a real thing. The kind of heat that singes the skin while the humidity simultaneously makes you sweat even at a standstill. Magical! The pie has kept excellently though, and leftover slices are going very quickly because it most definitely it an excellent remedy for the heat. I truly believe if world peace is ever found, it will be through someone’s pie recipe. Praise pie, and it’s curative deliciousness. ‘Til next time, my fellow eaters!Pie: solving problems for centuries. -
Liquid Hot (Dessert) Magma
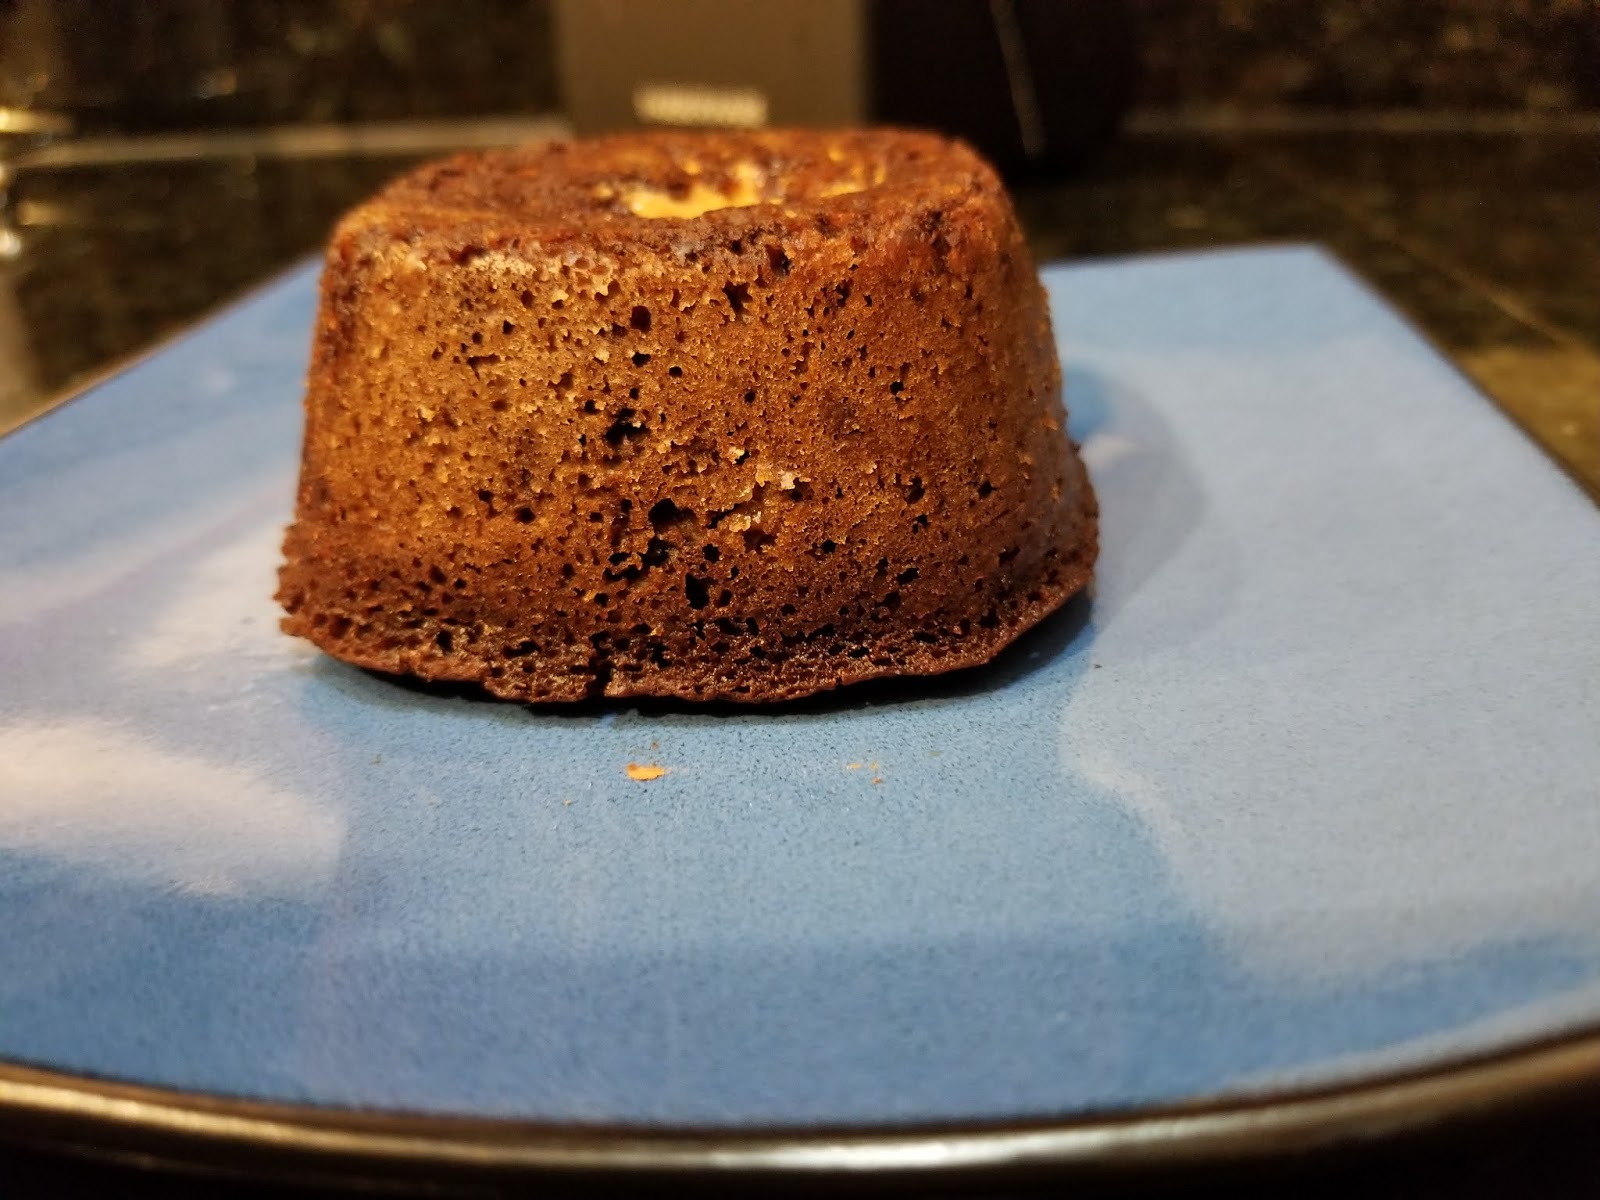
I am super excited because I finally bought a set of ramekins (your 30s are wild, man). I’ve always wanted a set because single-serving dessert ideas are a necessary evil when your husband travels for work, like, a lot. When he goes, I’m usually in need of cake or pie to cope. But when my eyes and my stomach see cake, it’s viewed as a hearty challenge to see how big of a slice I can eat in one sitting. Enter the ramekin, and I can eat like an actual 31 year old and instead of a 13 year old. Adulting is mostly about learning portion control and how to do your taxes, and I kind of suck at both. What I lack in typical adult capabilities, I make up for in the fact that I clean a mean house and can bake my way out of most adult situations. Need to make a phone call? Sorry, I’ve got cookies in the oven. Have to answer the front door? Nope, covered in cake batter. I’m starting to realize it might not be adulting that I’m not good at but simply socializing…it’s a good thing I can cram my mouth full of cake and not have to talk about this any further. Thanks, ramekins! You made my dreams come true (both the antisocial and pro-dessert ones) with the amazing capability to bake tiny, delicious lava cakes in you:
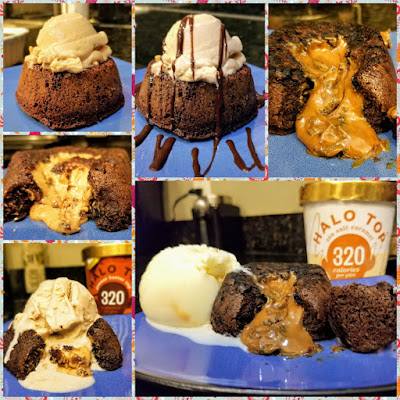
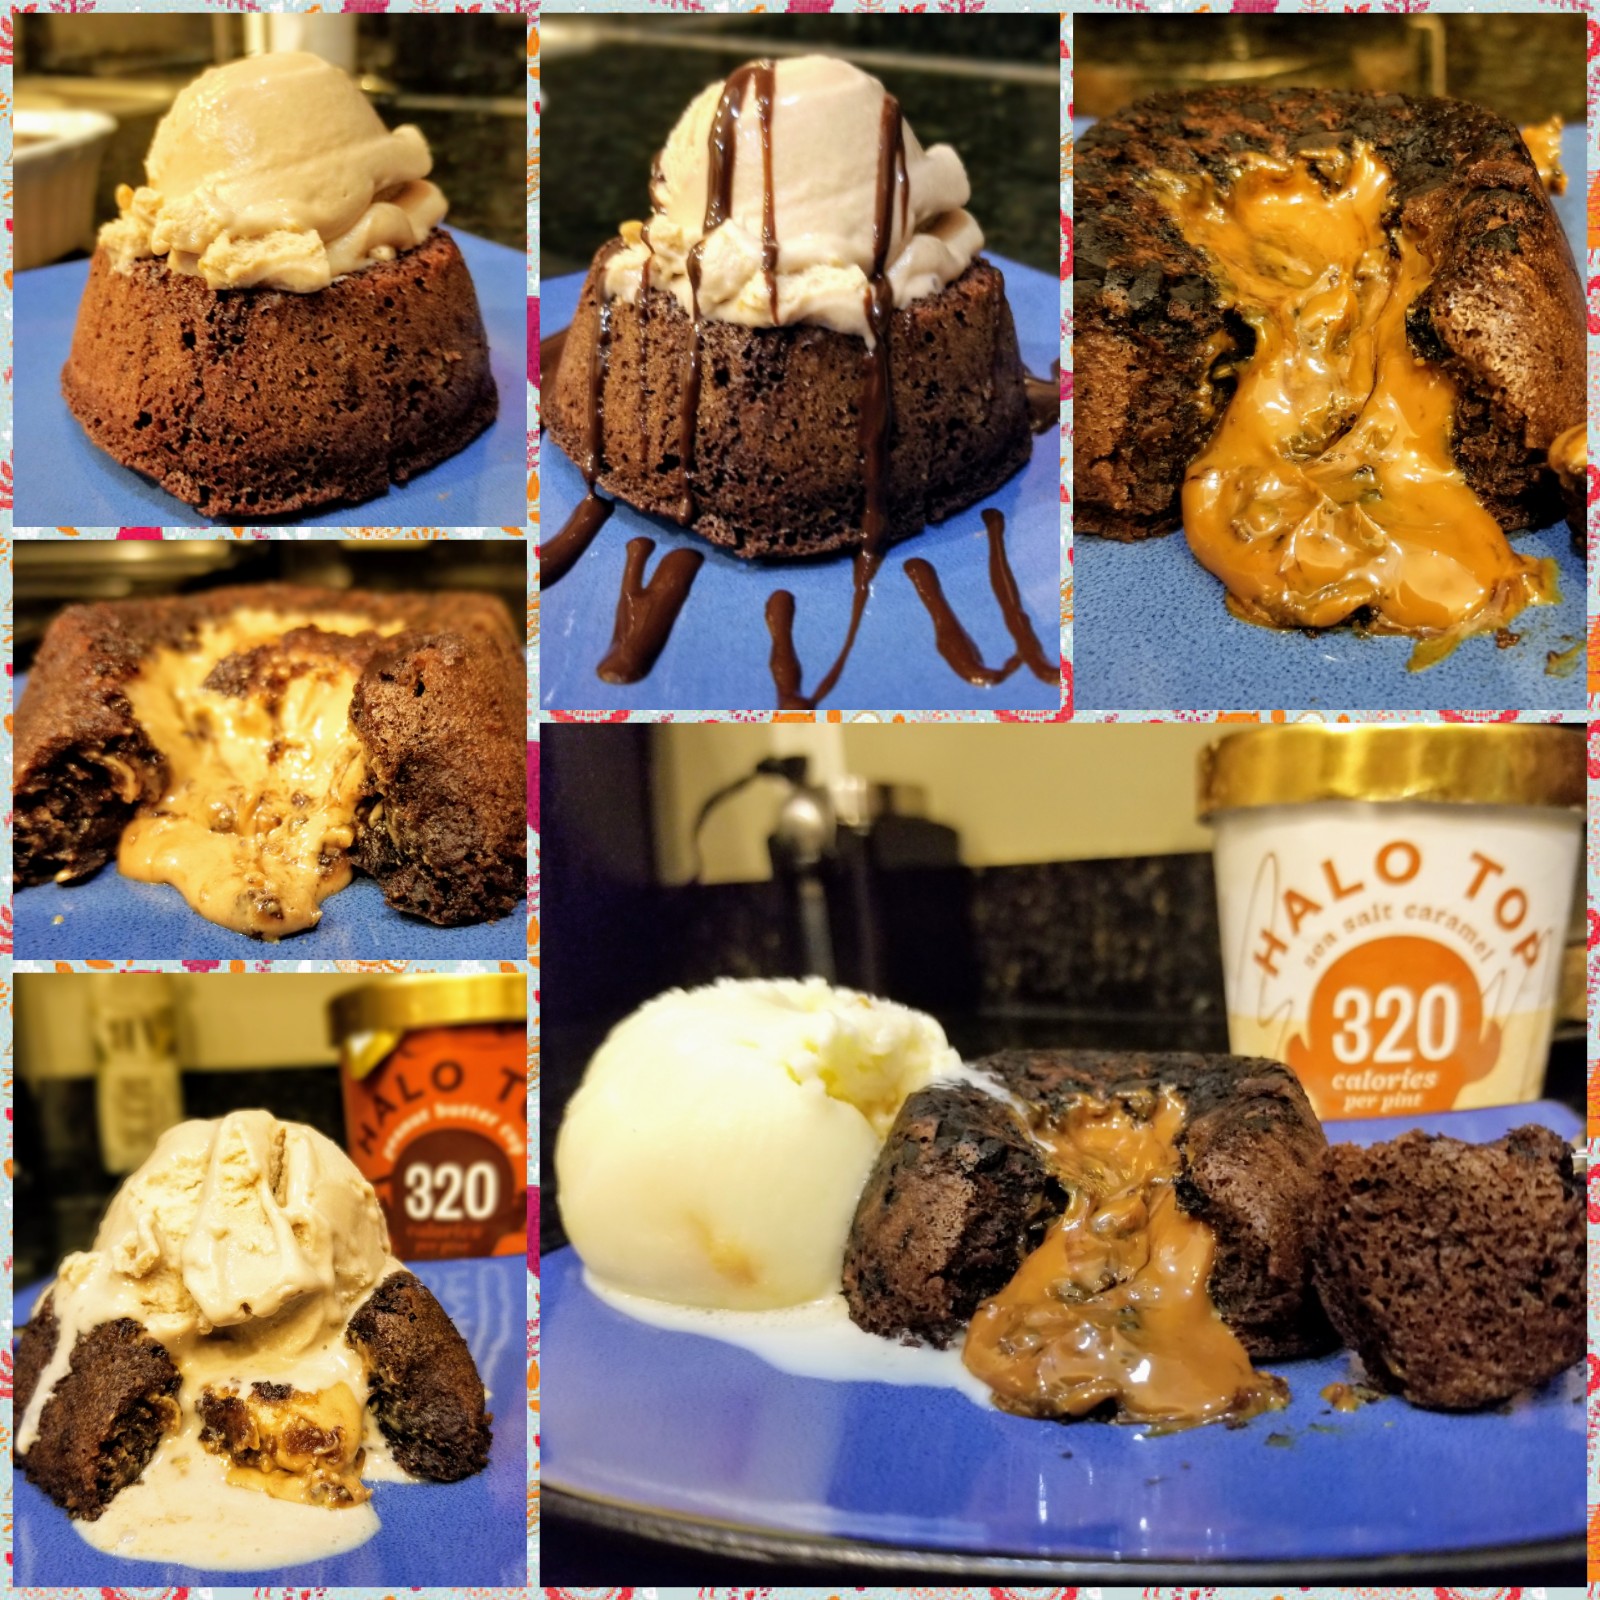
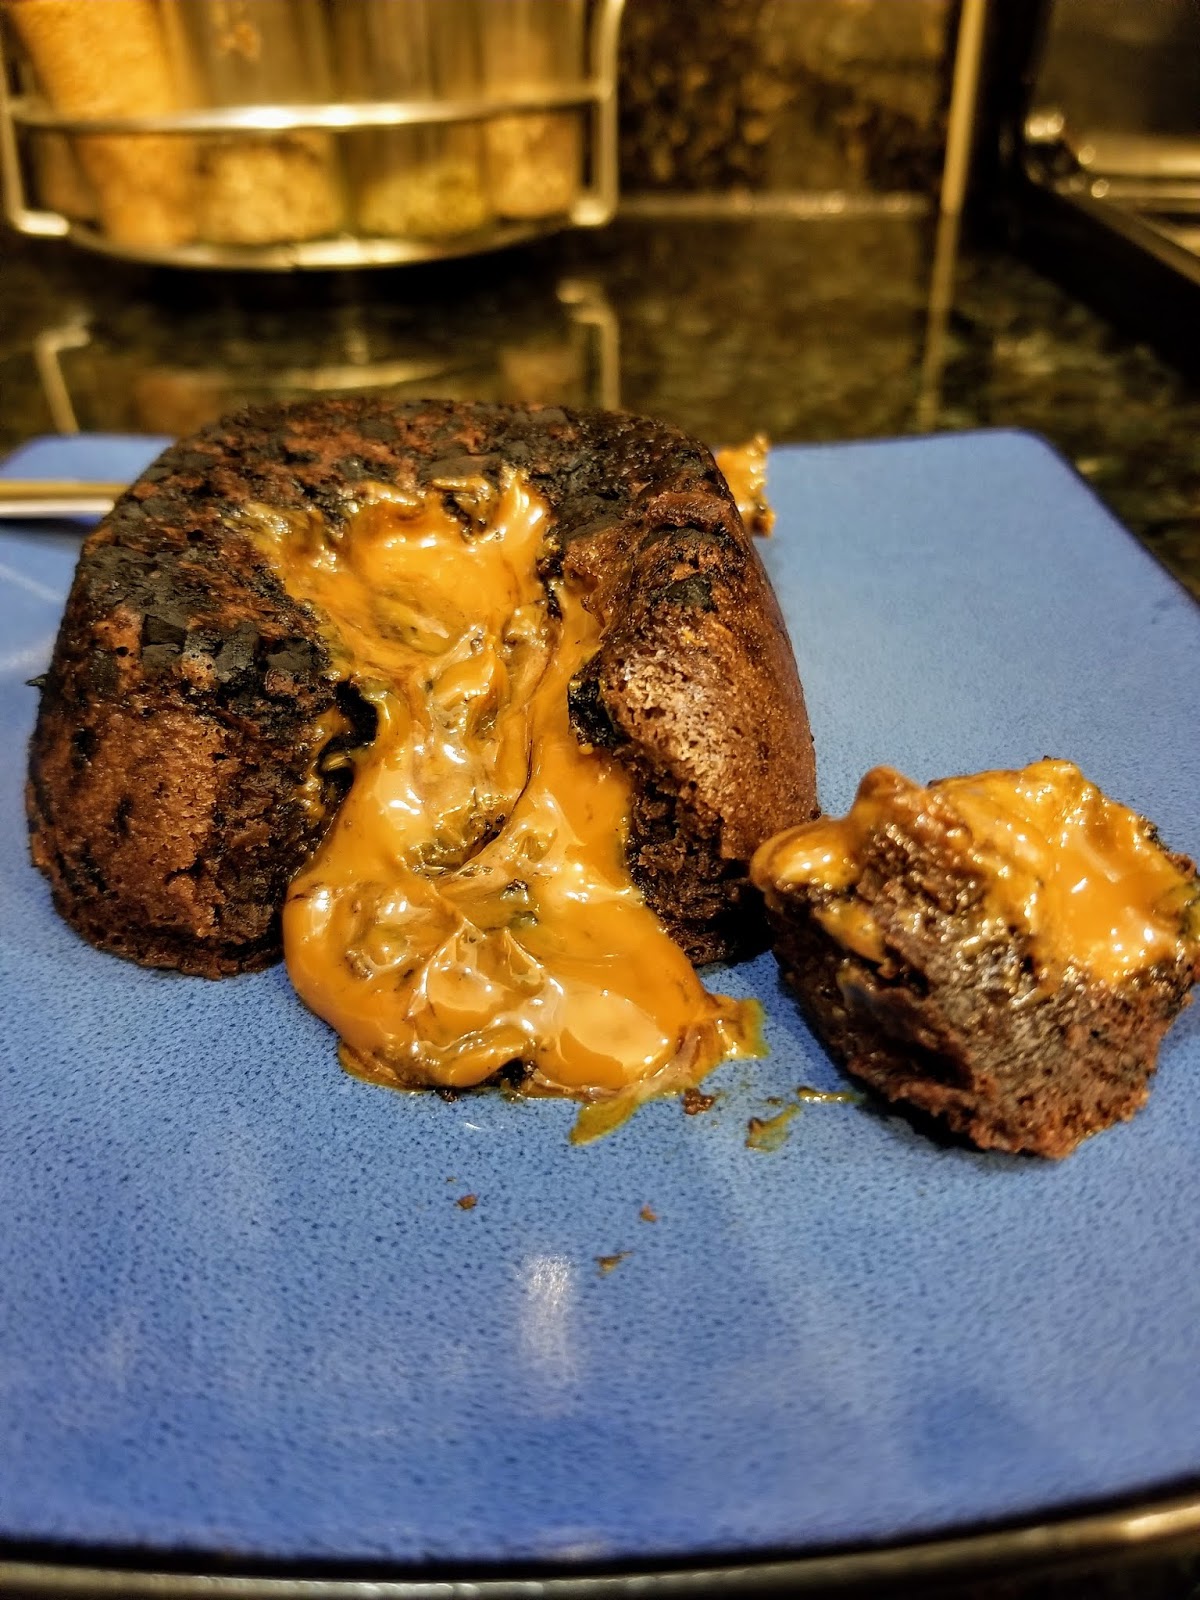
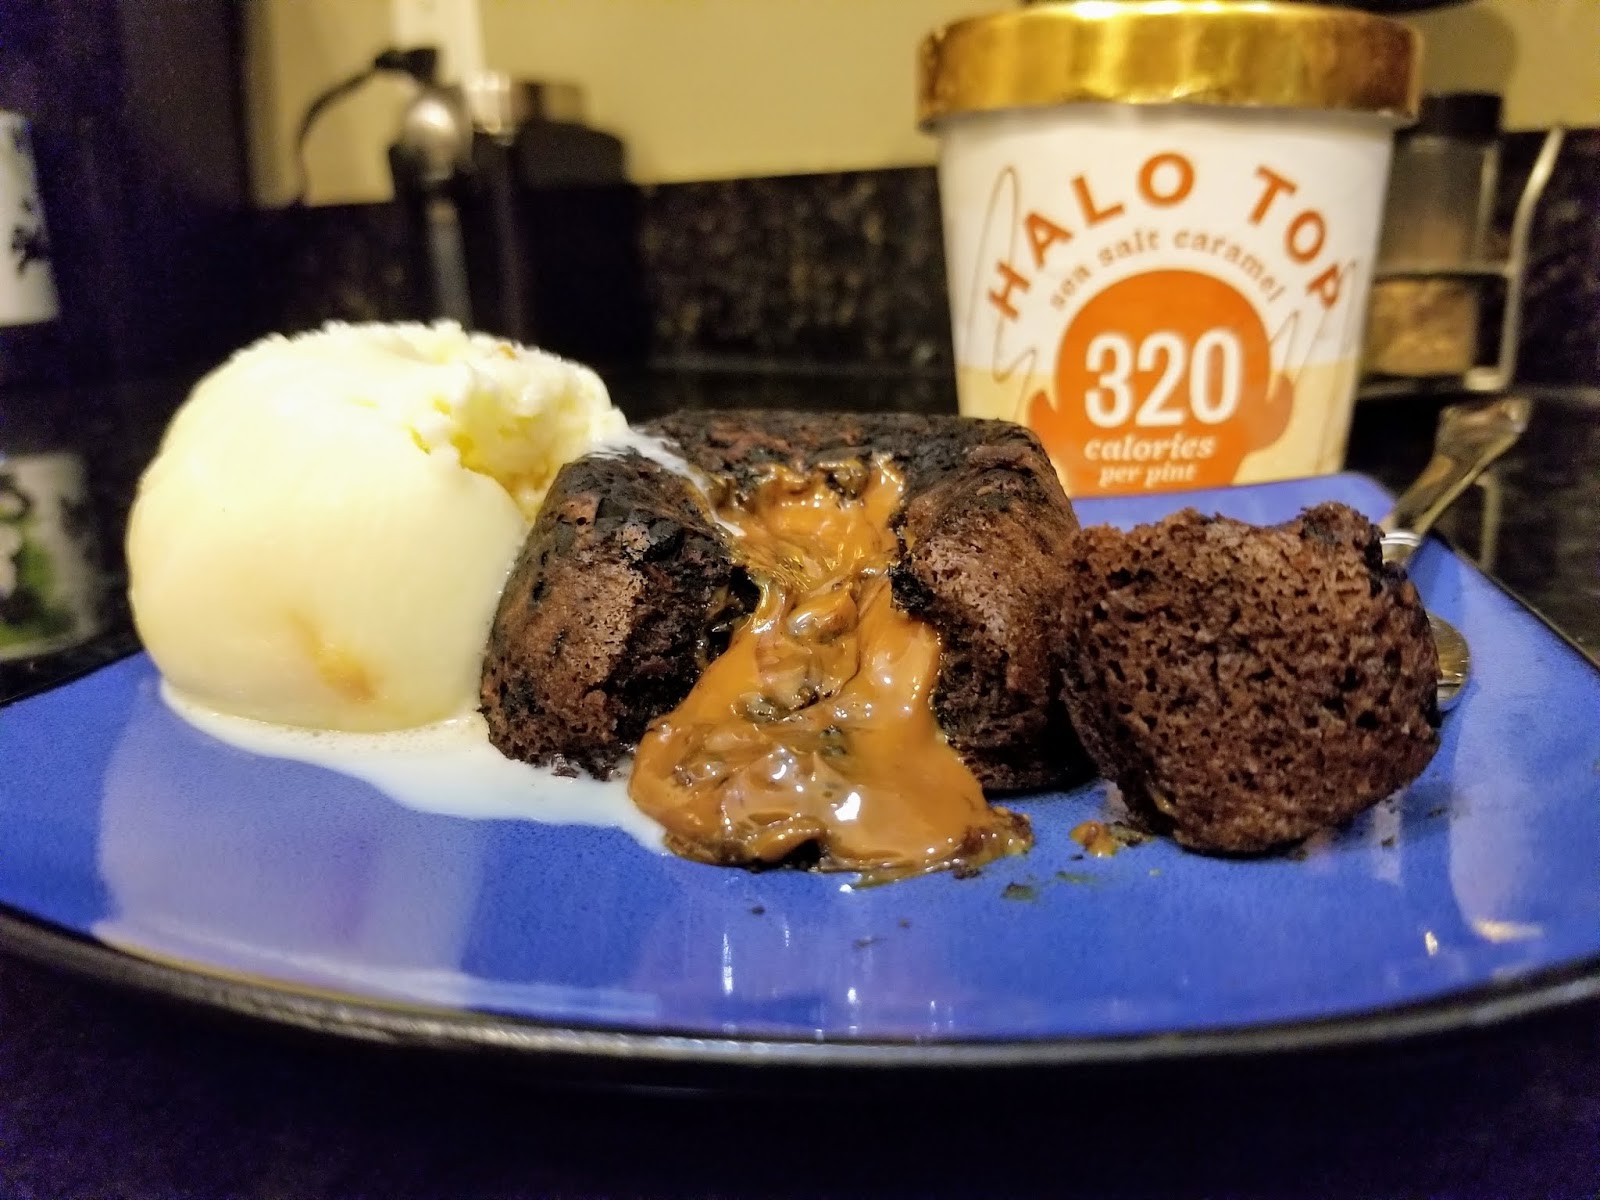
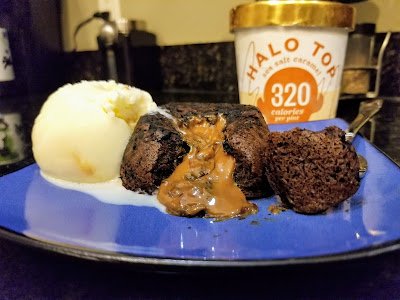
Liquid hot dessert magma: peanut butter (left) and dulce de leche (right) editions. Did I also mention owning ramekins makes having several different flavors of cake possible in one week? The versatility is thrilling! I would’ve been just as jazzed about this at age 18 as I am ate age 31 because I simply appreciate being able to eat as many different cakes as possible in an average week. Variety is the spice of life (says the woman who plans out outfits in advance and keeps a written weekly planner). But the bottom line is this: chocolate peanut butter lava cakes and dark chocolate dulce de leche lava cakes will change your life. But not in the, “They’ve made my pants fit tighter” manner, because these are guilt free even with ice cream on top! The peanut butter lava cakes are only 206 calories a serving (add a scoop of peanut butter Halo Top for 80 calories) and the dulce de leche lava cakes are only 171 calories a serving (add a scoop of sea salt caramel Halo Top for 80 calories). Even if you don’t like peanut butter or caramel (we can’t be friends, but…), you can fill your cake with a traditional fudge or try something fun like a raspberry coulis. Whatever your poison, the base chocolate cake recipe is to die for. It is so decadent and delicious you’d never know it was only going to set you back as far as a salad calorie-wise. Perhaps the best thing about these cakes (aside from being able to top them with a ludicrous amount of ice cream with no guilt) is that the lava cake should be eaten fresh, piping hot from the oven. That’s right, NO WAITING TIME! My impatient little heart could burst (it would burst caramel and peanut butter, at this point). These cakes come together and get inhaled in under 30 minutes, so if I haven’t sold you on all the benefits by now, you probably don’t like dessert, so I’m not sure what you’re even doing here.
Maybe you just enjoy a cleverly written blog. Good for you. I made these cakes in a medium bowl, starting with my dry ingredients. This makes two cakes (my ramekins are 7 ounces each). You’ll need:
- 1/4 cup + 1 TBS All Purpose flour
- 1/4 cup Swerve granular
- 2 TBS cocoa powder (if you want a dark chocolate cake, use 1 1/2 TBS regular cocoa powder and 1/2 TBS dark cocoa powder)
- 1/4 tsp baking soda
- Dash of salt
Mix these together in a bowl and preheat your oven to 425, then grab the wet ingredients.
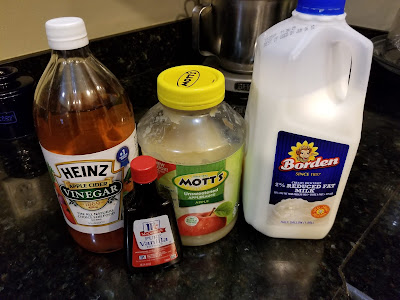
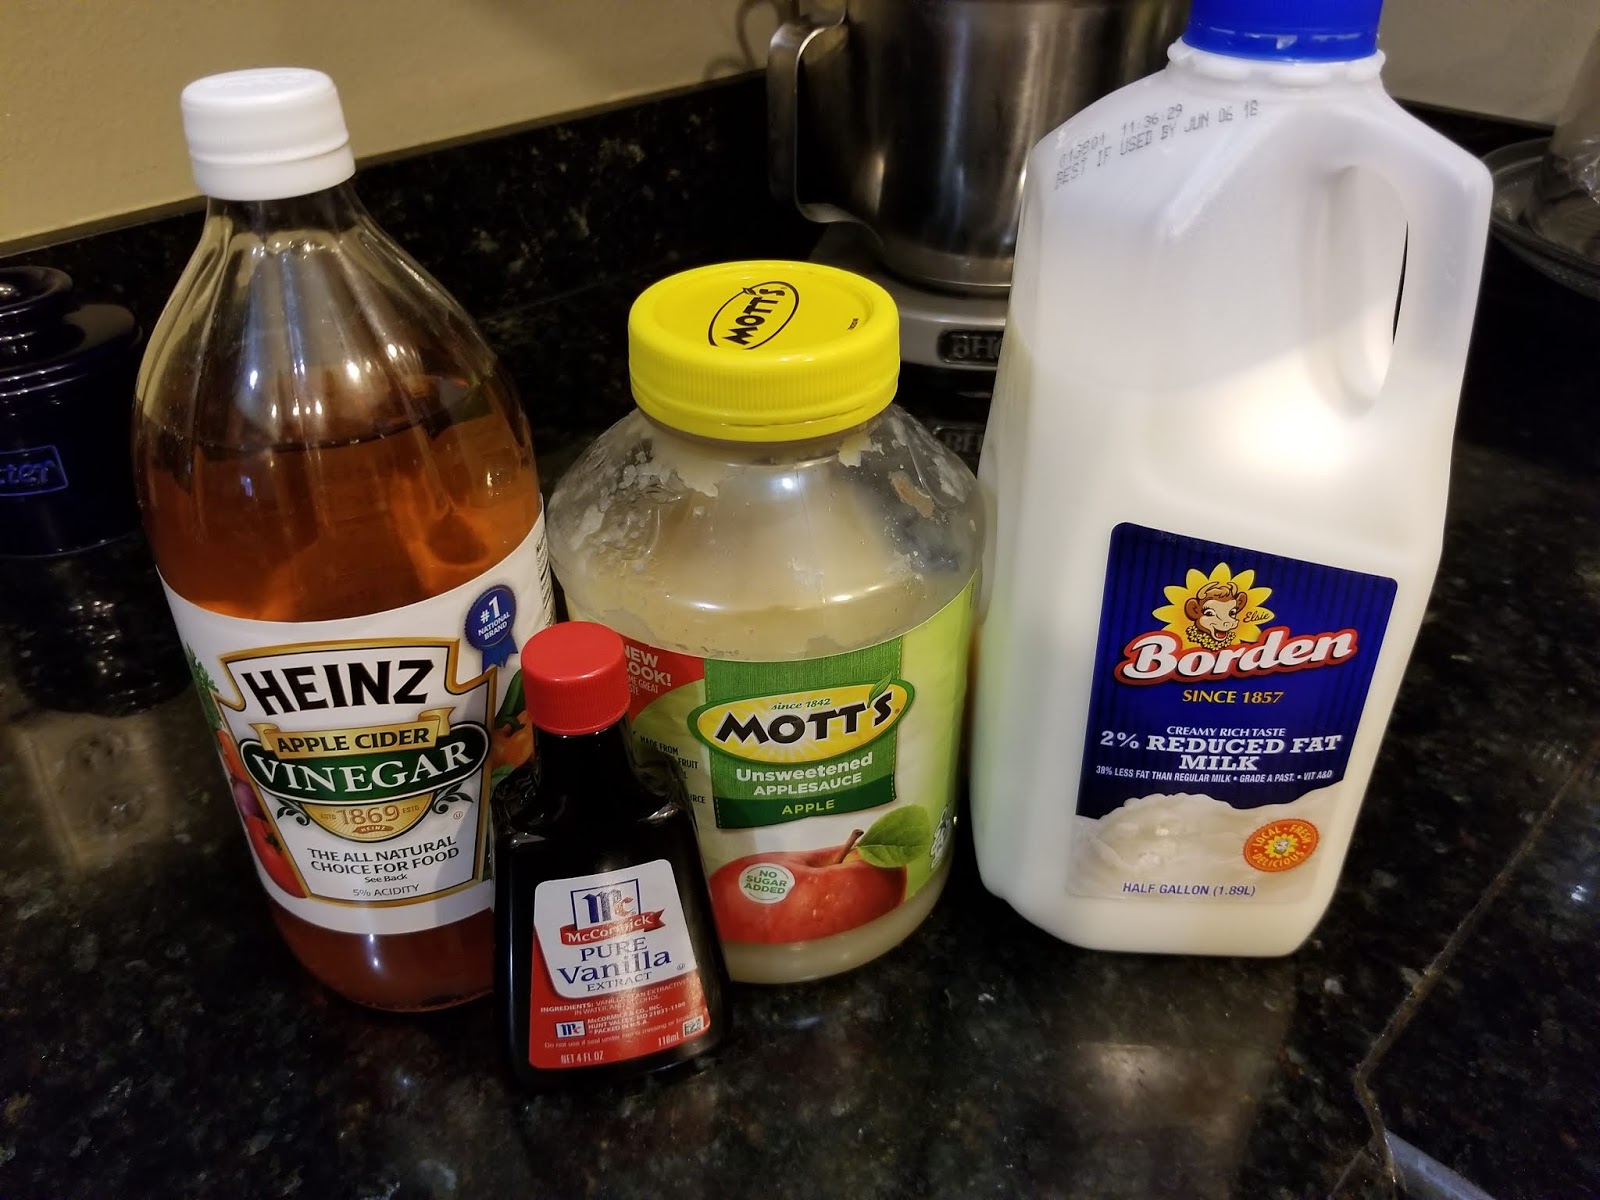
Where would I be without unsweetened applesauce… In the same bowl as your dry ingredients, add:
- 1/4 cup + 2 TBS skim milk
- 2 TBS unsweetened applesauce
- 1/2 tsp vanilla extract
- 1/4 tsp apple cider vinegar (works with the baking soda to puff up your lava cakes)
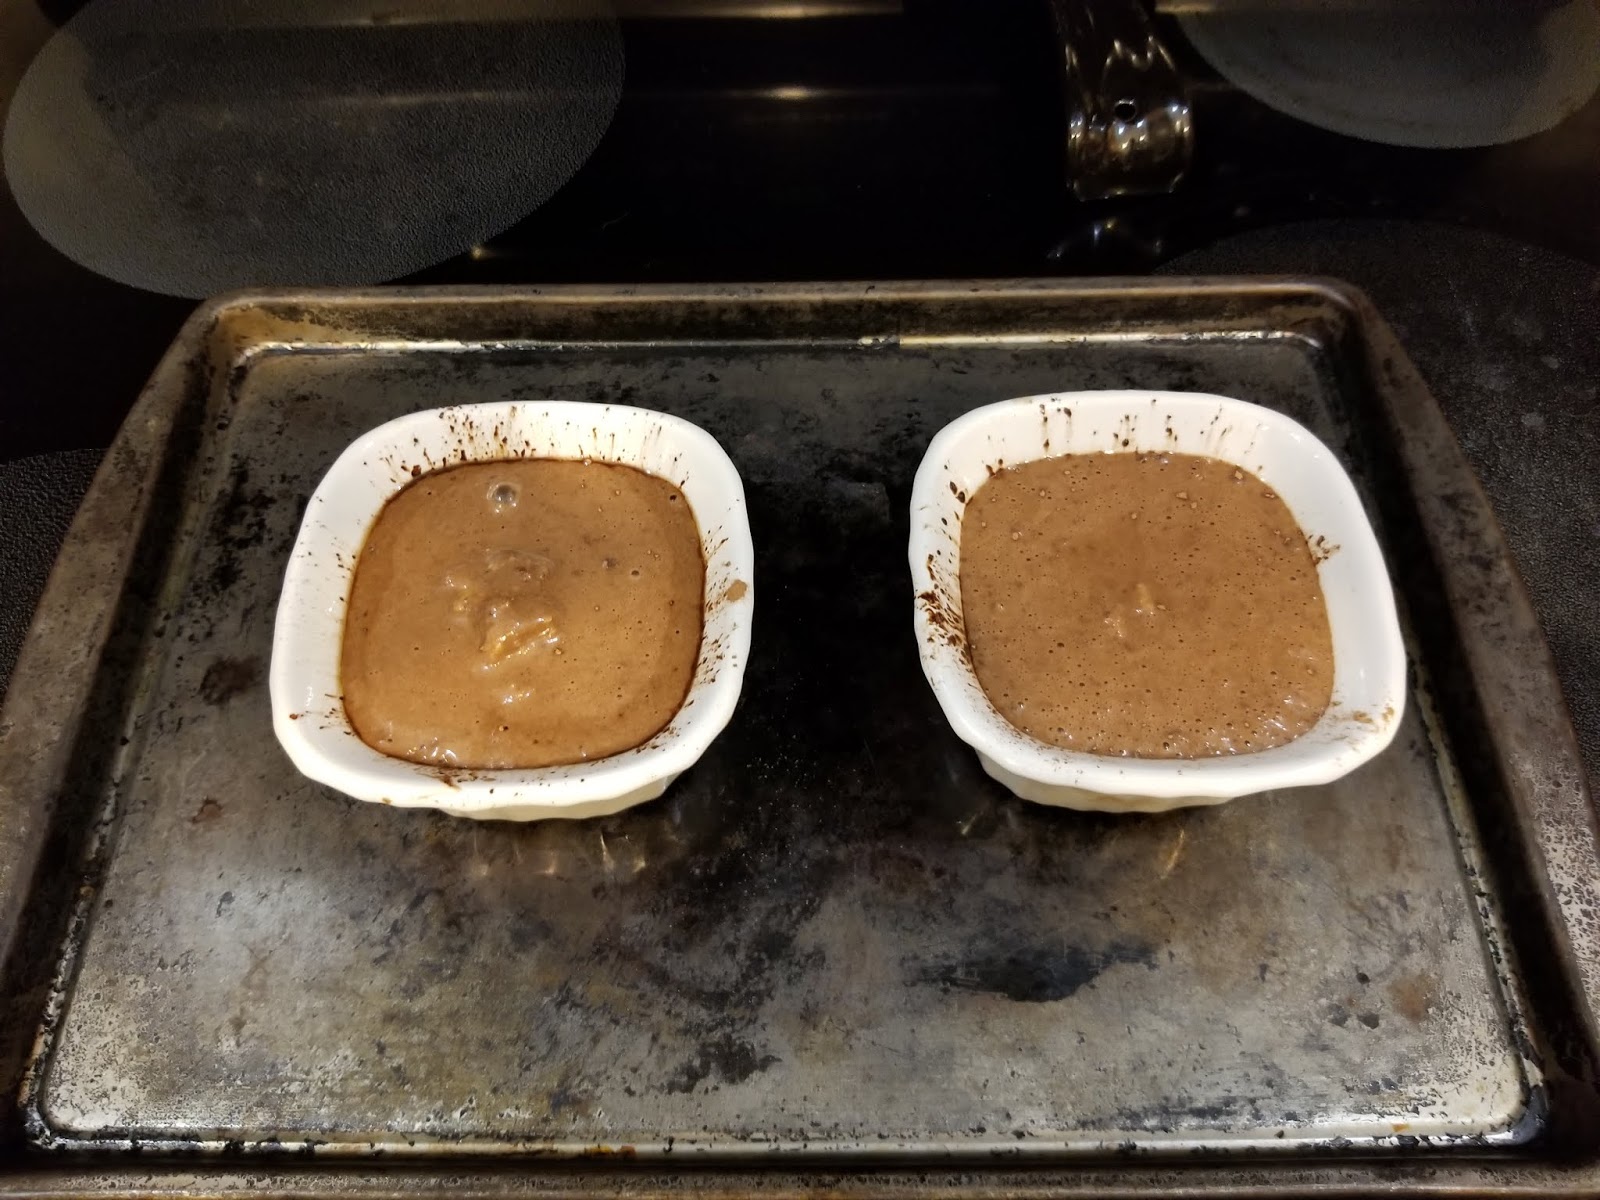
Mix together until your batter is nice and smooth. Prepare your ramekins with cooking spray and dust with more cocoa powder. Pour 1/4 of the batter into one ramekin, 1/4 of the batter into another ramekin, and then find your center of choice (fudge, peanut butter, dulce de leche, fruit filling, etc.).
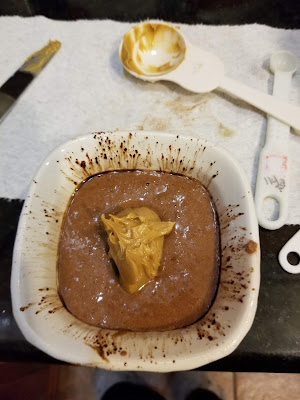
Place 1 TBS of your preferred yummy center into each ramekin. Pictured here is creamy Jif–accept no peanut butter substitutes. Jif will make magic happen. 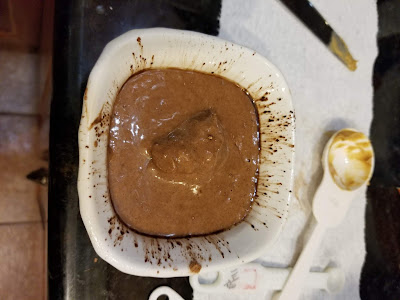
Then take 1/4 of the cake batter and drop on top of your filling. Repeat with the other cake. Your filling might stick out a bit like the world’s strangest belly button (pictured above, if you tilt your head..sorry), but it will melt down as your cake bakes, so don’t worry. 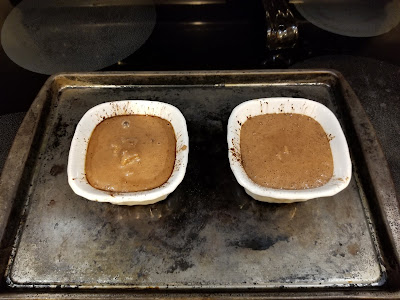
Things turned out juuuust fine in the end. Place your ramekins on a baking sheet and bake at 425 for 12-15 minutes. You want the sides completely cooked, but the top will still be a little underdone. My oven cooks hot, and my cakes were ready at 13 minutes.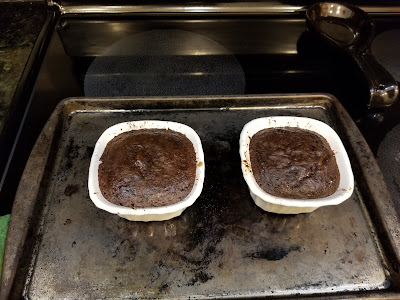
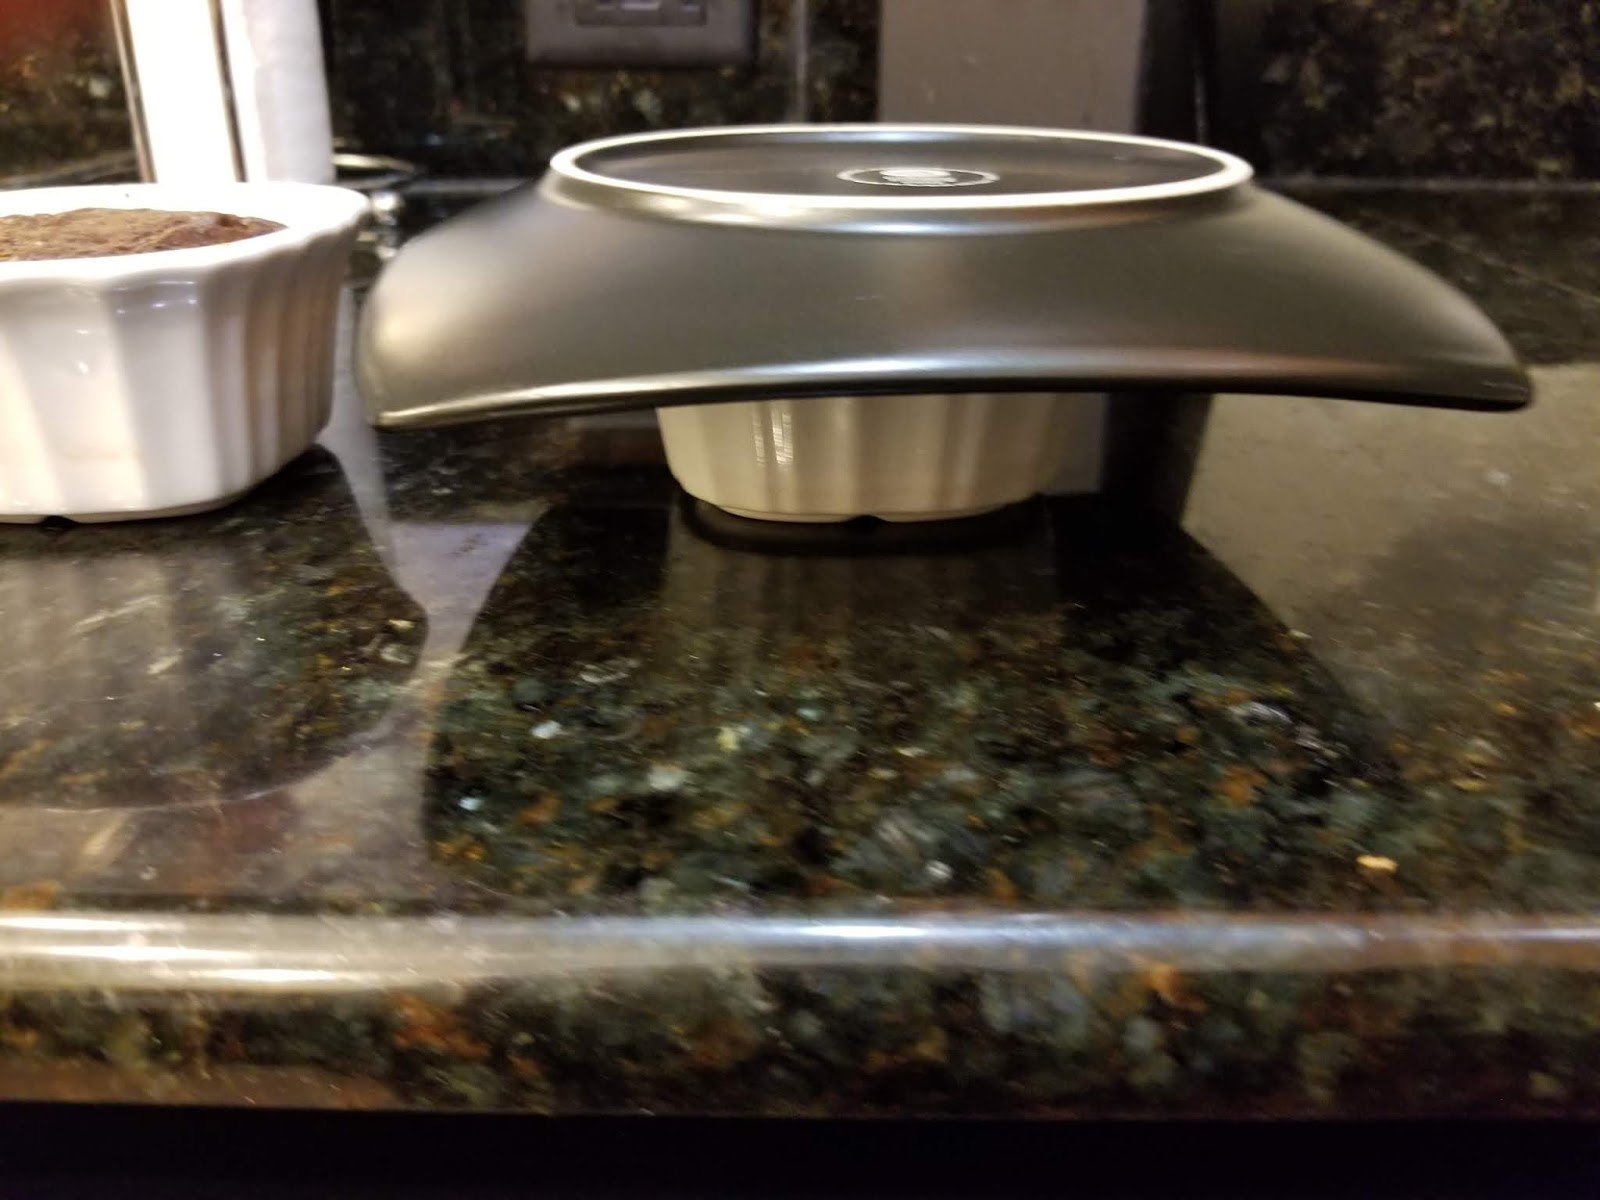
Tops not totally set, but the sides are–this is what you’re looking for. Give the cakes just a minute or two so that the ramekins don’t burn off your fingertips when you handle them. This will be one of the longest minutes of your life.
Kinda looks like the Pizza Hut logo. I’d still recommend using oven mitts unless you’re looking to remove your finger prints so you can rob a candy store (or a bank if you’re an adult). Run a dull knife around the edges of your cake to completely loosen the sides from the ramekin. Place a serving plate on top of your ramekin, and then invert:

And pray you’ve used enough Pam. Tap the ramekin a few times until you feel the cake release. My peanut butter cakes came out easier than the dulce de leche ones because the caramel is so deliciously sticky that it didn’t want to let go of the ramekin where it had leaked out a bit. Things should still come out nicely with just a small indent in the bottom/top of the cake where your filling is:

So chocolatey. Don’t worry about that tiny imperfection though. That’s what the ice cream is for: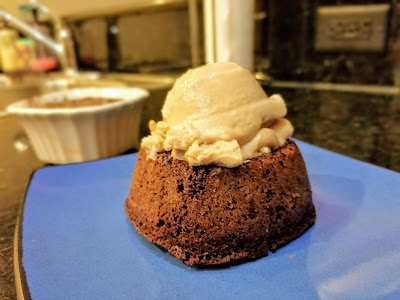
Hellllooooo, gorgeous! You could call it a day and devour here, but I went for broke and added chocolate sauce on top of my peanut butter lava cake.

Yep, worth it. With my other cake, I did a small dissection/science experiment for photo purposes. I had to get a photo of that peanut butter ooze:
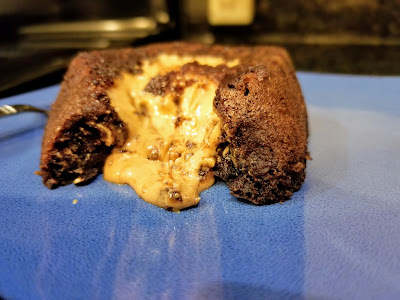
Yep, that’s the stuff. What? My husband is gone. Maybe I wanted to eat both cakes in one sitting since I didn’t have to share with anyone. The dogs can’t have chocolate! In all honesty, I saved this one for the next day. I swear. With my dark chocolate dulce de leche cakes, I remembered to take a photo of the caramel oozing across the plate before topping with ice cream and scarfing down in under 15 seconds.

Dulce de leche is arguably the sexiest of all dessert toppings. Just check that lava flow! Having to pick a favorite lava cake flavor is like having to pick your favorite child…you all secretly have one but don’t want to say which. Look, they’re both absolutely amazing depending on your flavor palette. As a Texan obsessed with dulce de leche, the dark chocolate lava cake with caramel-y center was hands down my favorite. It was so delicious I felt like there was no way in hell it was actually under 200 calories, and I even checked my math five times to be sure. It is, and dear sweet baby Jesus is it good. With my leftover lava cake, I left it in the ramekin topped with foil and saved for the next day. If you have leftover lava cakes, reheat in the microwave for 45 seconds (without the foil, obviously, unless you like blowing up your microwave). This gets the center nice and melty again. Whatever you do, whichever amazing flavor you prefer, do not forget the ice cream! Lava cakes are like the world’s most delicious edible ice cream bowl.
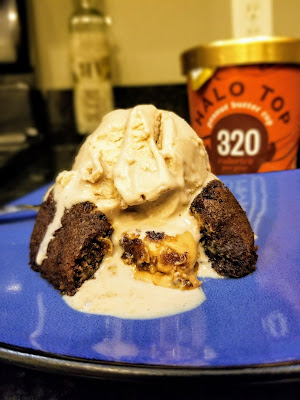
The cake soaks up the melty ice cream, keeping you from becoming a giant sticky mess. I mean, check that peanut butter ice cream melt into the chocolate cake into the melty peanut butter center. Meltception! I think I need to go make one of these right now…that photo is making my tongue feel things. I’m a huge fan of Halo Top ice cream because it’s on the healthyish side but still tastes so creamy. Let it sit out to soften for 30-45 minutes to reach maximum flavor potential. I’m still really patting myself on the back for coming up with a single serving dessert featuring cake, melty, gooey center, and ice cream for fewer calories than a handful of potato chips but still tasting like it should be at least 1500 calories (looking at you, Chili’s molten lava cake). Where there’s a gluttonous will combined with bikini season, there is most definitely a way. Bottom line is it won’t give your bottom anymore lines, so make the cake, devour the cake, and remind yourself that every once in a while, being an adult is actually pretty damn fun. ‘Til next time, my fellow eaters!
Fun because you can totally eat this for breakfast if you want to. Adulting! -
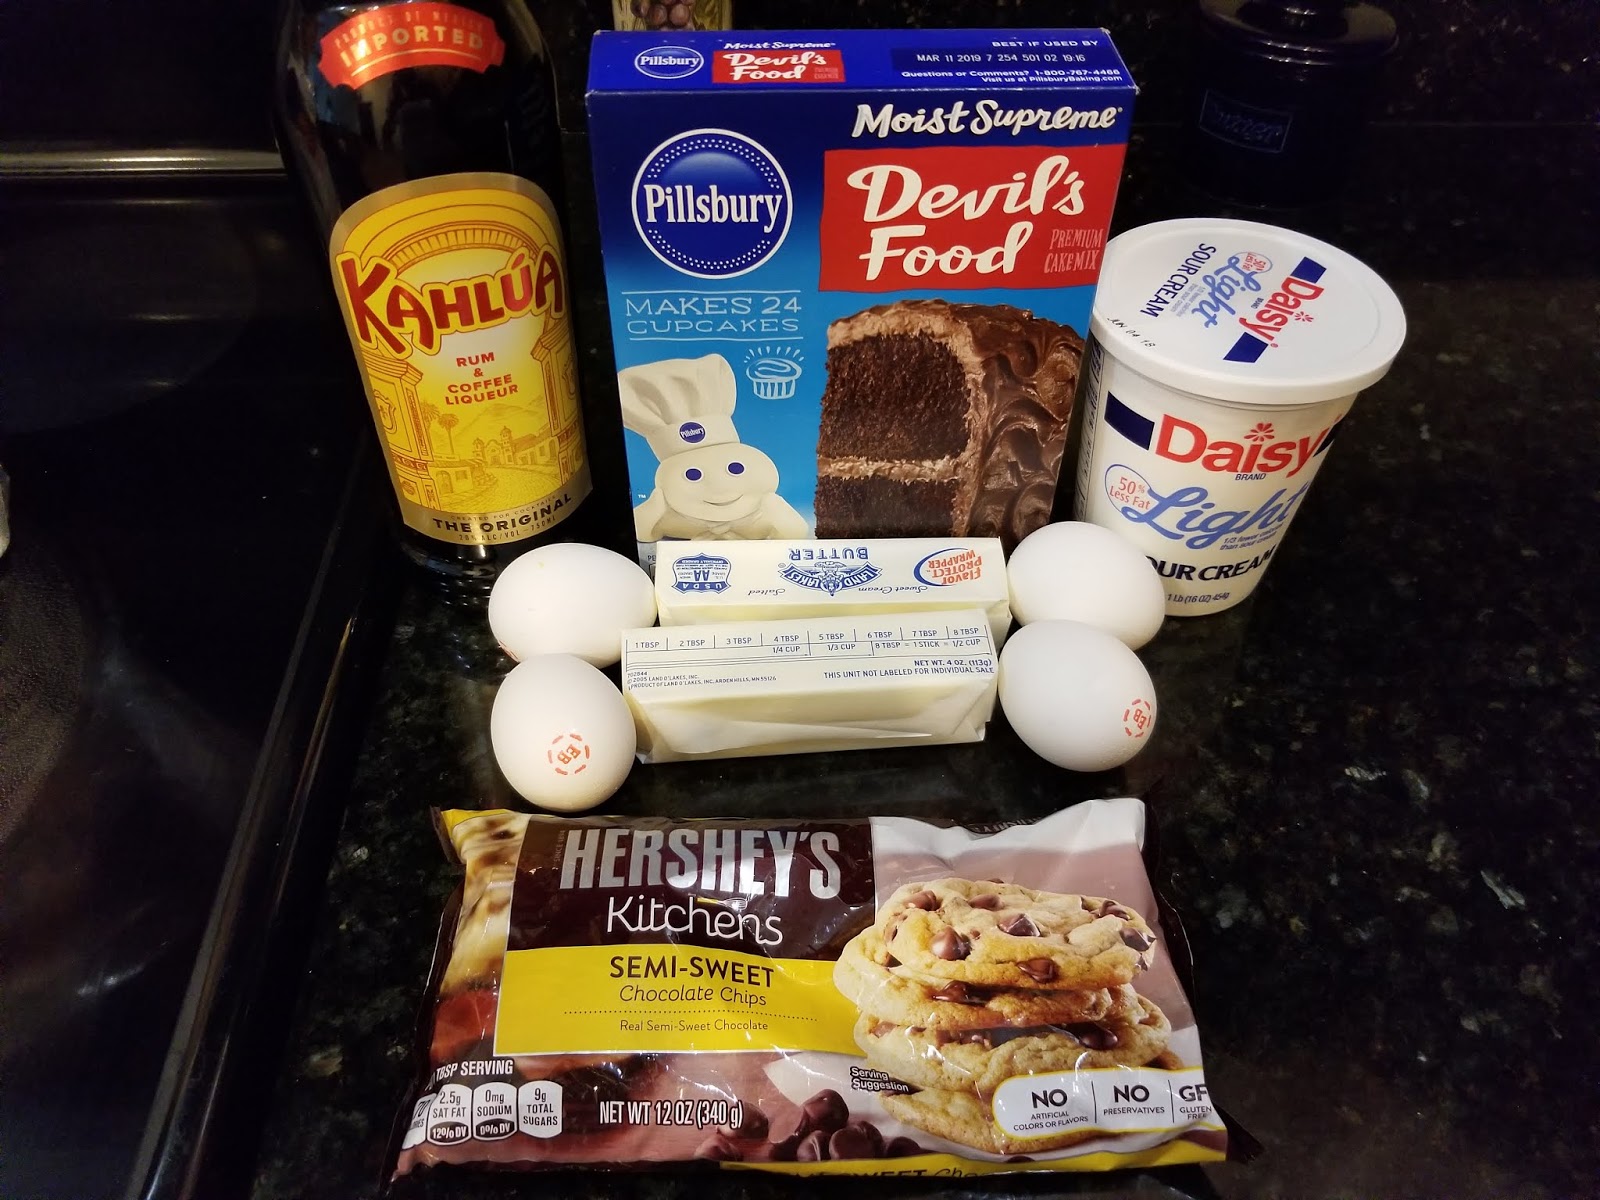
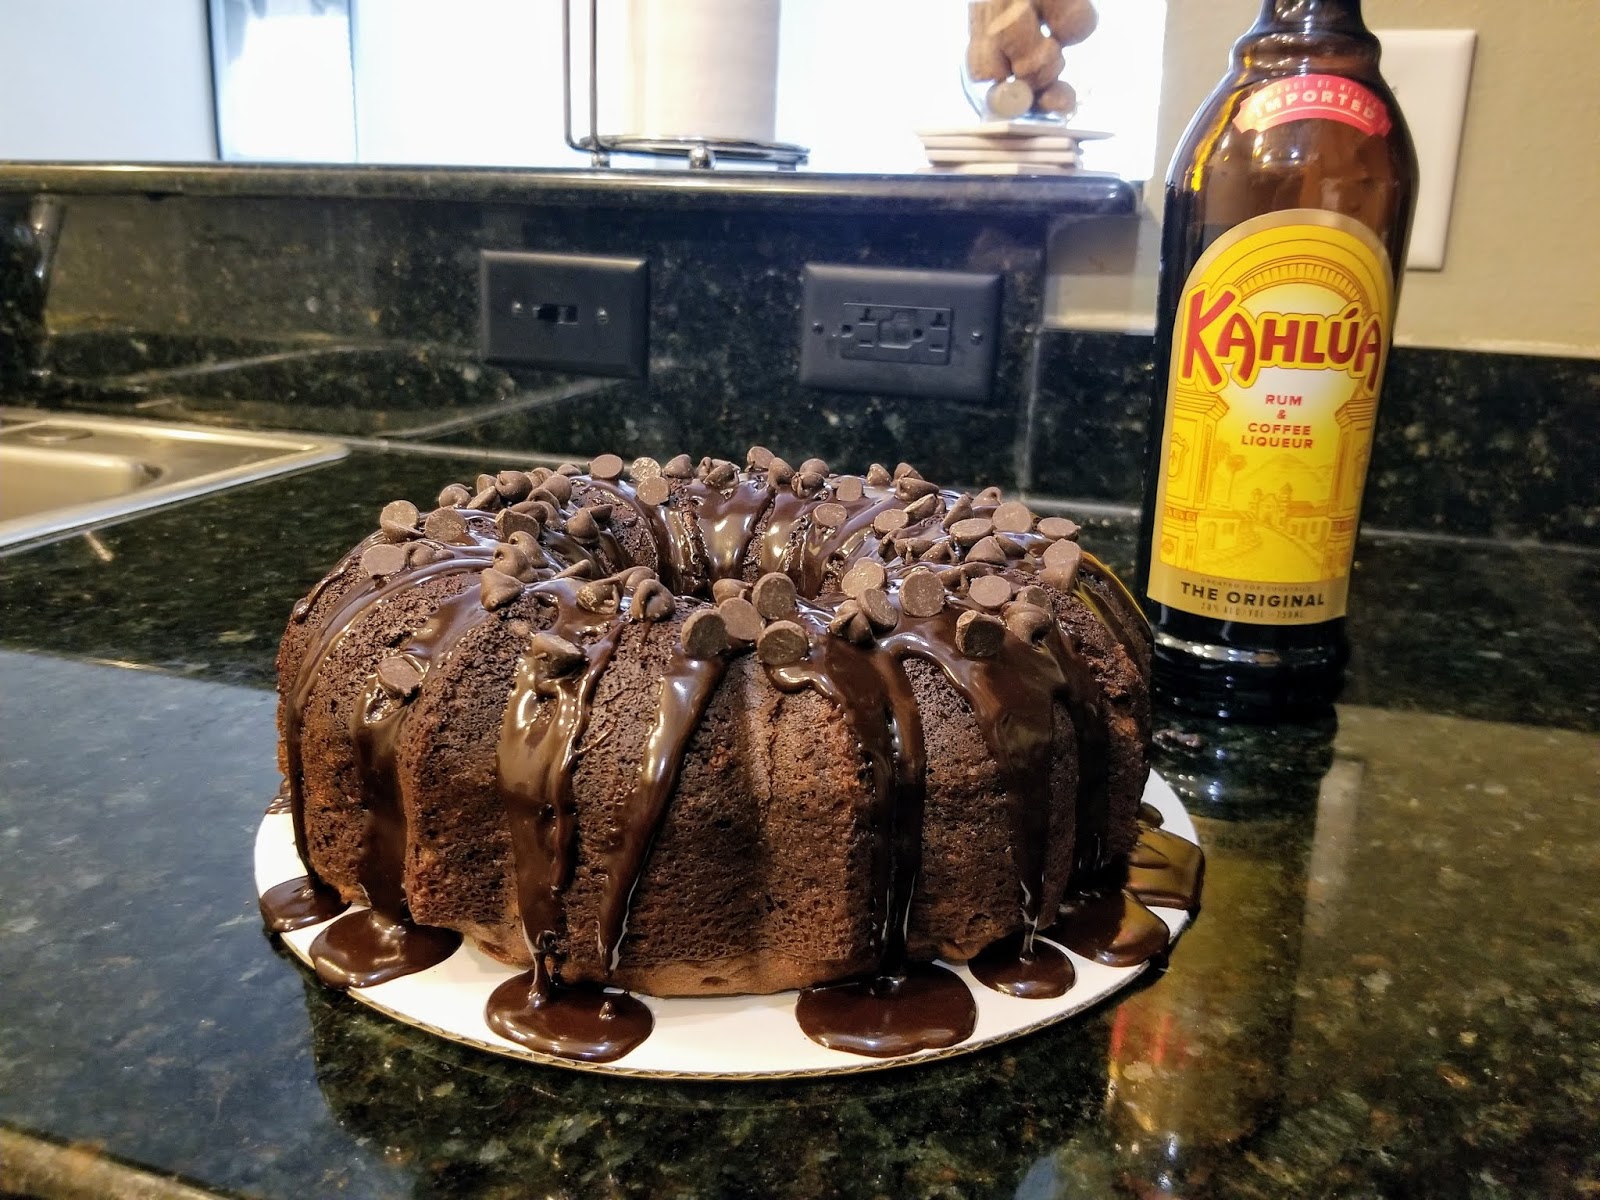
Kahlua Cake: Worth the Calories
My weekend started off with a Mud Dauber wasp stinging me when I opened my front door and is going to end with a tropical storm tomorrow. “Florida: the Murphy’s Law of States.” But painful wasp stings and flash flooding can’t bring me down because I just made what I consider one of the best chocolate cakes I’ve ever baked and/or eaten in my entire life! I’ve always been a firm believer in the mood-lifting power of chocolate, and it certainly doesn’t hurt that the other star ingredient in this cake was booze (Kahlua, specifically). I had my doubts about this cake because I am not a fan of coffee at. all. Turns out to make coffee flavor bearable, you only need to add rum to it. God Bless the good folks at Kahlua for figuring that one out. I don’t think I’m going to be picking coffee up anytime soon outside of cakes, though. I’m one of those obnoxious morning people that wakes up ready to take on the day’s obstacles (thanks, high-functioning anxiety!). I actually made this boozy chocolate confection for my boss’s birthday. She is both a coffee lover and a chocolate lover and once mentioned Kahlua being one of her favorite liquors, and this steel trap mind of mine held on to that information (yet, I have to meet a person ten times before I remember their name, so…my mind is more like a rusty steel trap in need of WD-40, but a steel trap nonetheless).

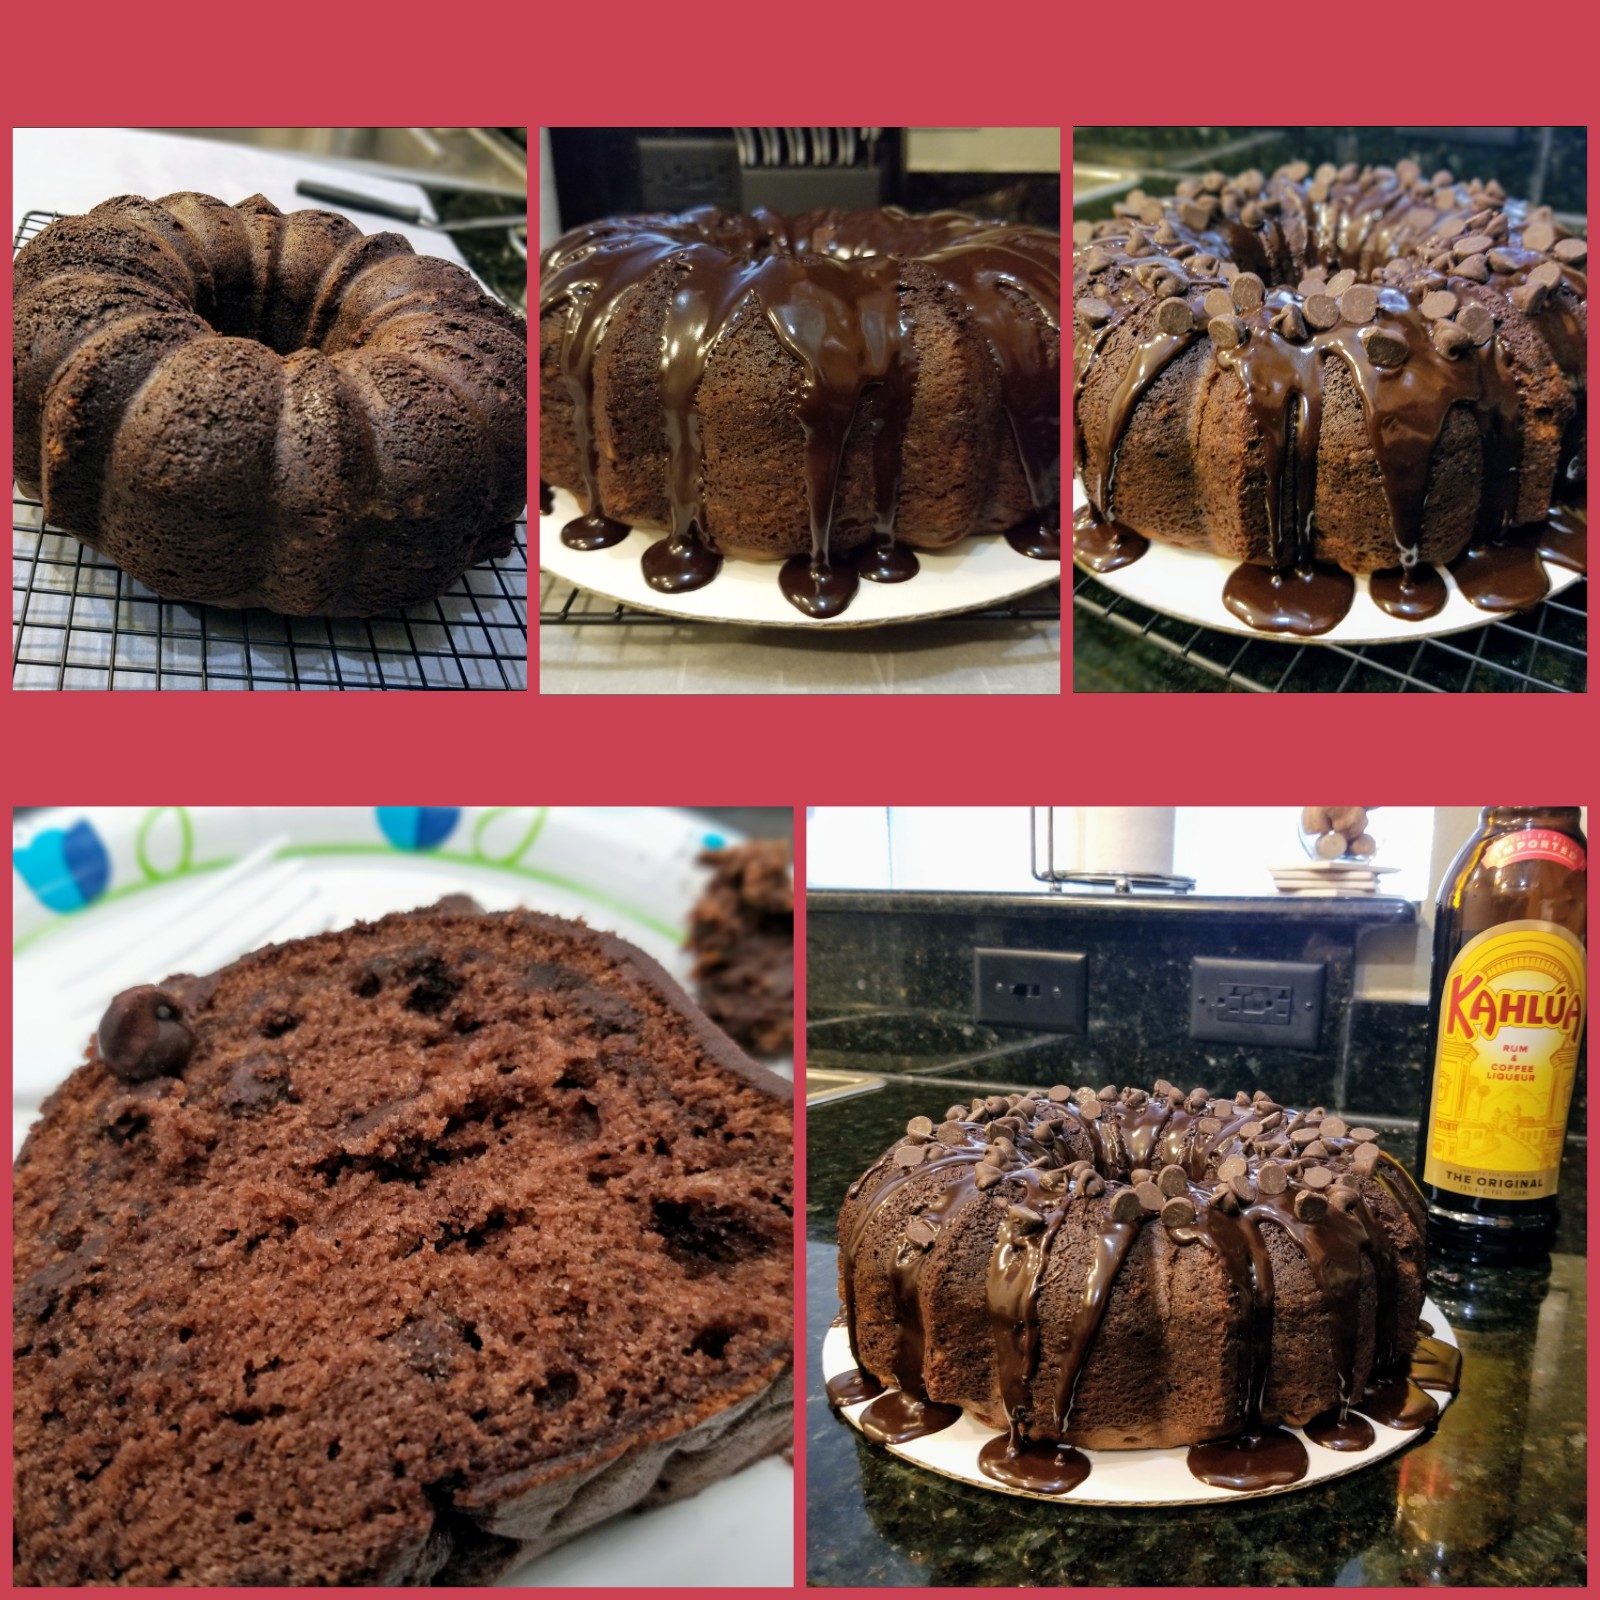
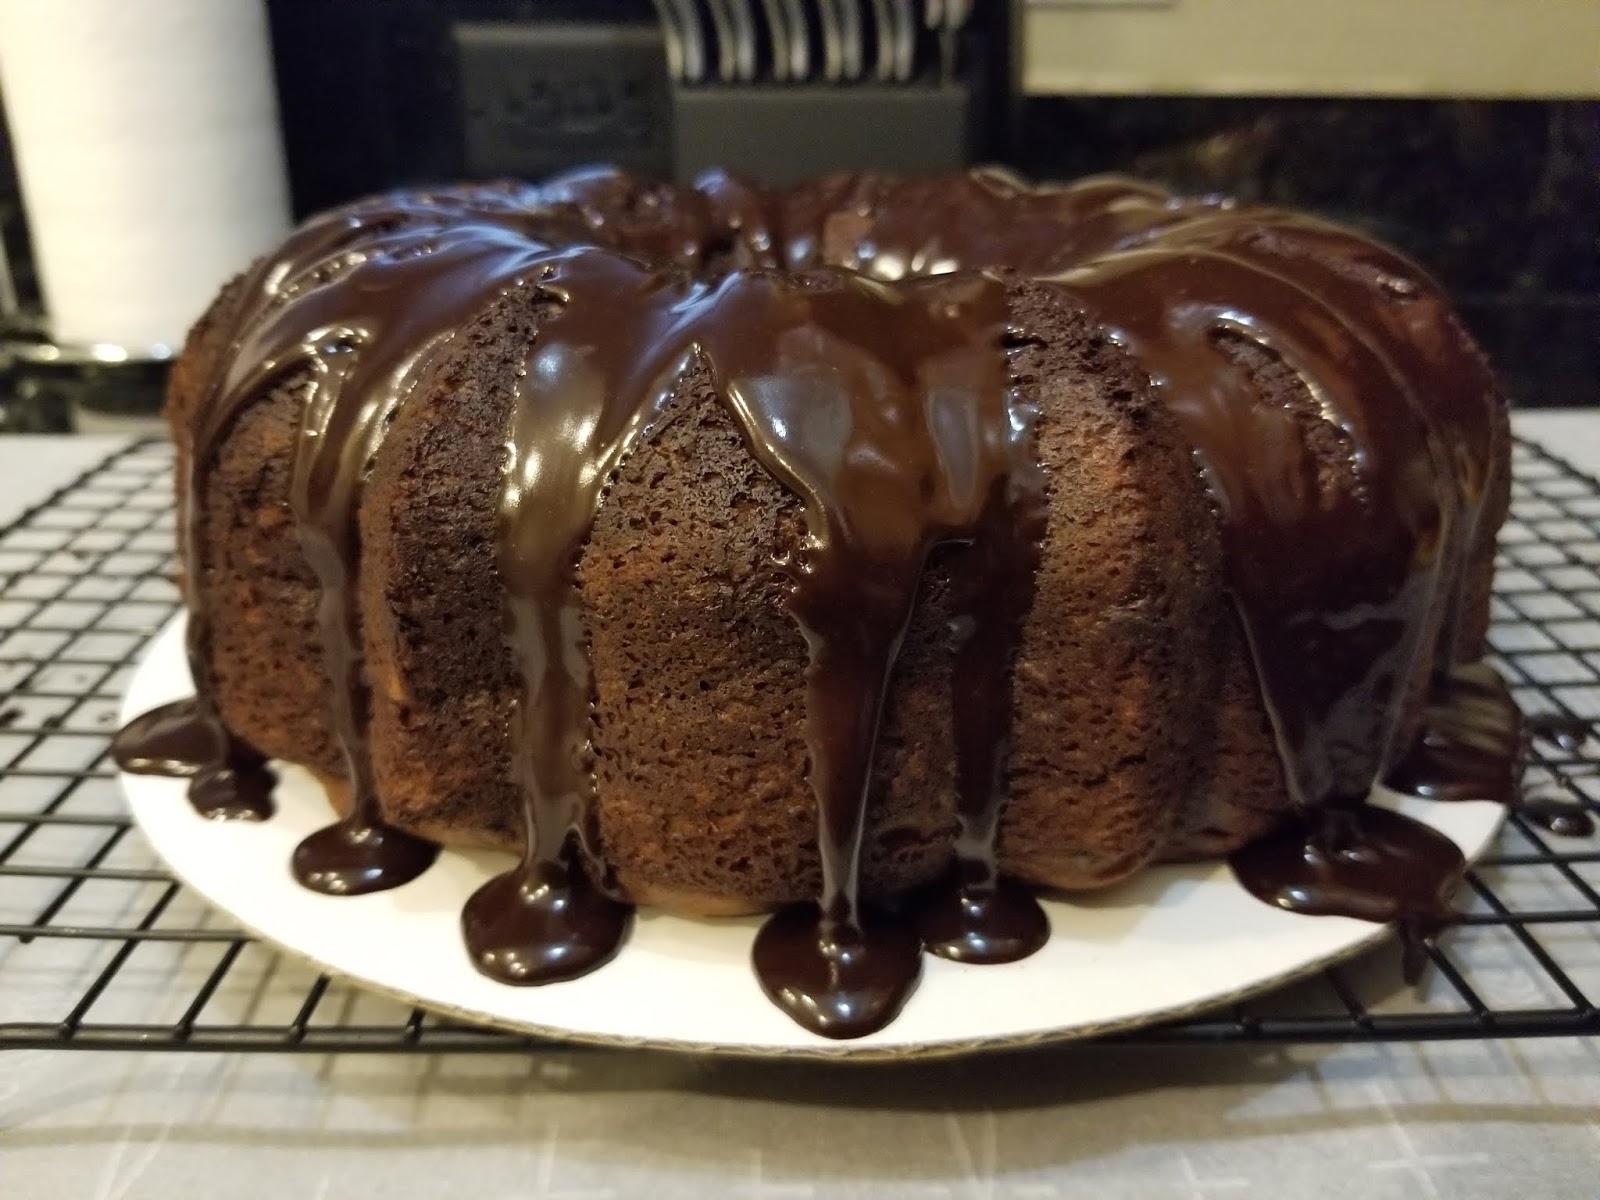
And it will never forget how good this cake was. I have been crazy about bundt cakes recently. When you have to bake on a tight schedule and know there’s not much time for decorating, the bundt pan takes care of the heavy lifting for you with its intricate design. So, if you’re a lazy baker, bundt pans are your bestie. This chocolate chip Kahlua bundt cake with Kahlua ganache in no way comes across as a lazy-looking or tasting bake by any means. It has the right balance of dark chocolate, booze, and sweetness. I really hate the word, but moist is literally the only way to describe the texture. It practically melts on your tongue. So it’s great if you’re even feeling to lazy to chew! …we’ve all had those days. I wish I could tell you I somehow managed to make this cake low cal, but that would be a lie. Birthday calories don’t count, you see (and other lies I tell myself) –an additional working title for my autobiography. If you make this into 20 servings, each slice will knock you back 358 calories. Not terrible by any means, but a typical bundt cake’s 16 servings is 448 calories a slice, which fills me with an urge to go run five miles before I eat it, and I’m not even a runner (I’m told running from your problems does not count). In the end though, this cake is worth any and all calories because it holds within it the power to provide the eater with a solid 1-hour post-cake euphoria.
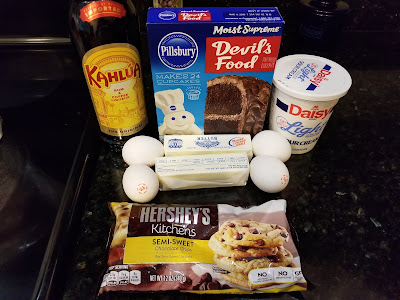
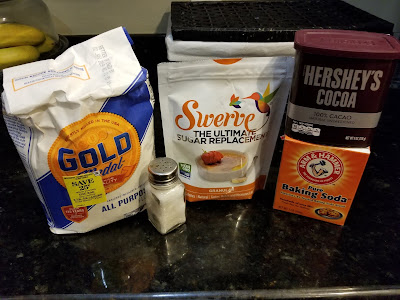
And you only need six ingredients! …plus my two secret weapon ingredients. No one, and I mean no one, will believe this came from a box mix. I indulged that fact to coworkers, and they were stunned. By adding in a few crucial extras, you can take a simple cake to the next level with ease. So easy, a kid could do it! Although letting your child bake a booze cake is probably frowned upon? I don’t know much about kids, but I have a solid inkling they shouldn’t be left alone with booze or an oven. To bake this boozy beauty, you’ll need:
- 1 Devil’s Food cake mix
- 3/4 cup of butter, melted and cooled
- 4 large eggs at room temp
- 1 cup of Kahlua
- 1 cup of light sour cream
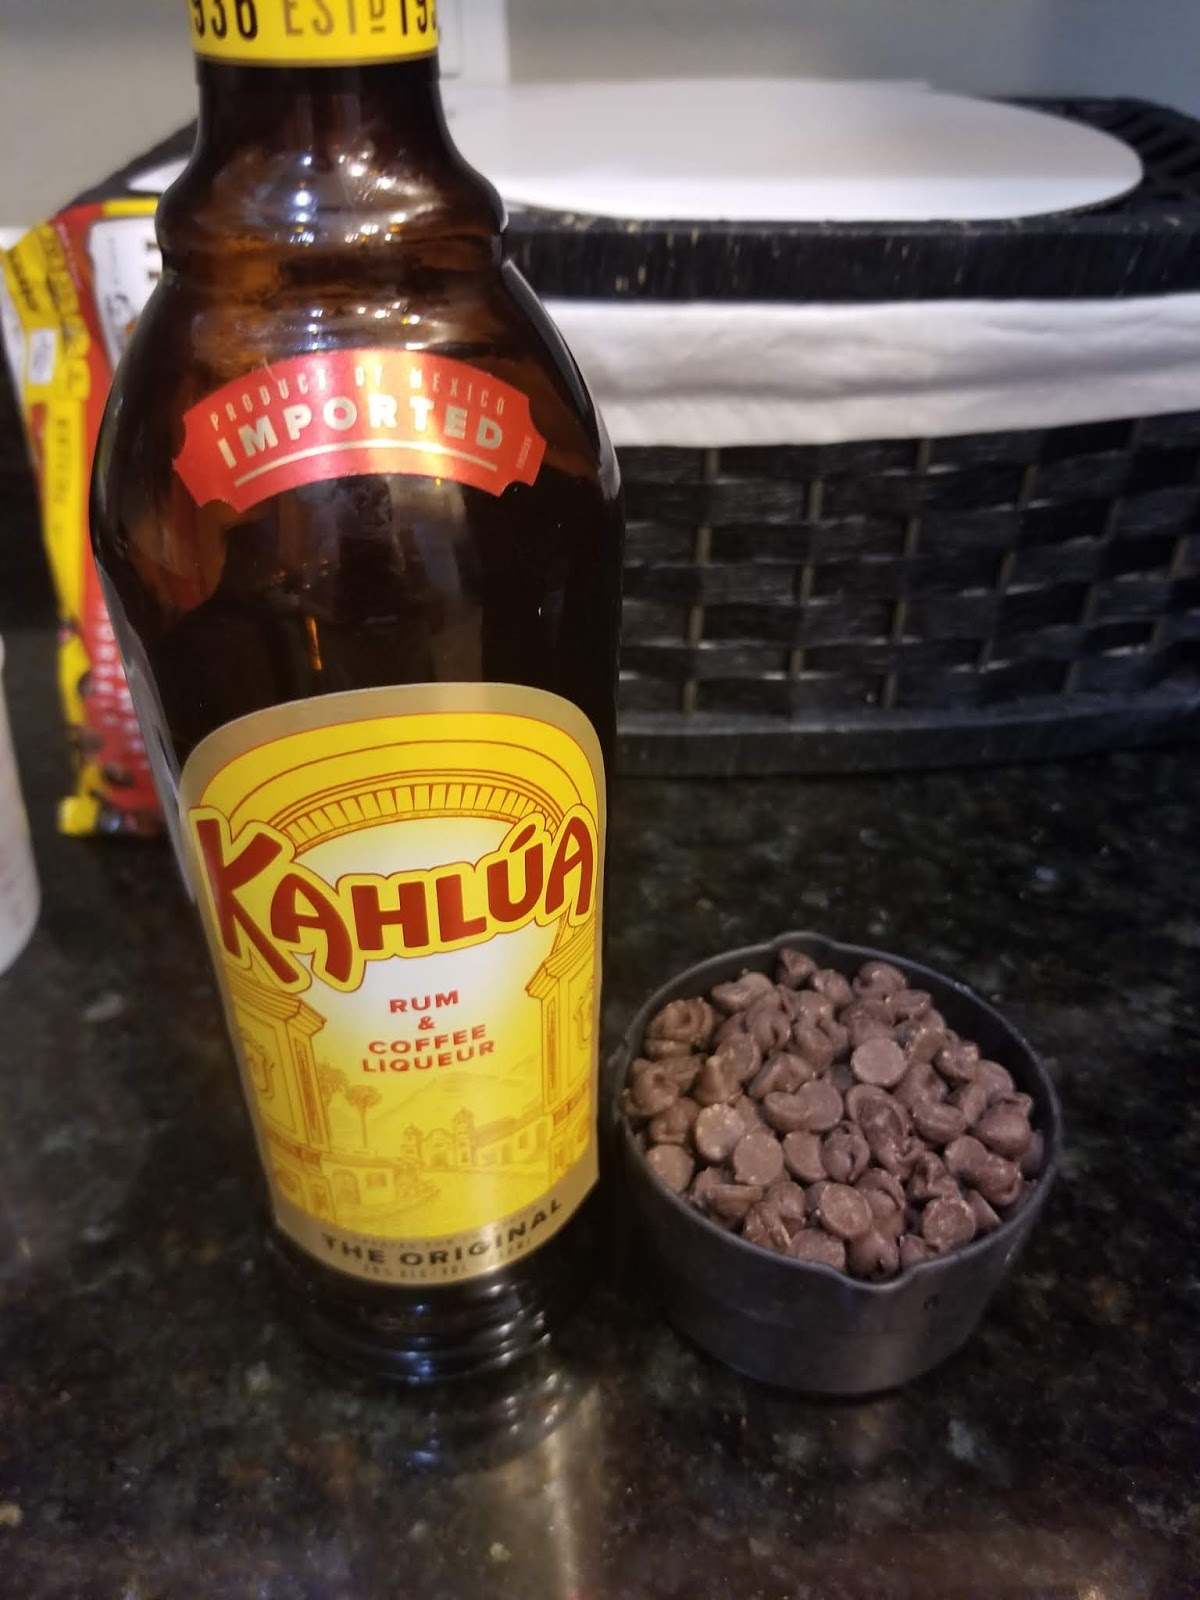
- 1 1/2 cups of semisweet chocolate chips
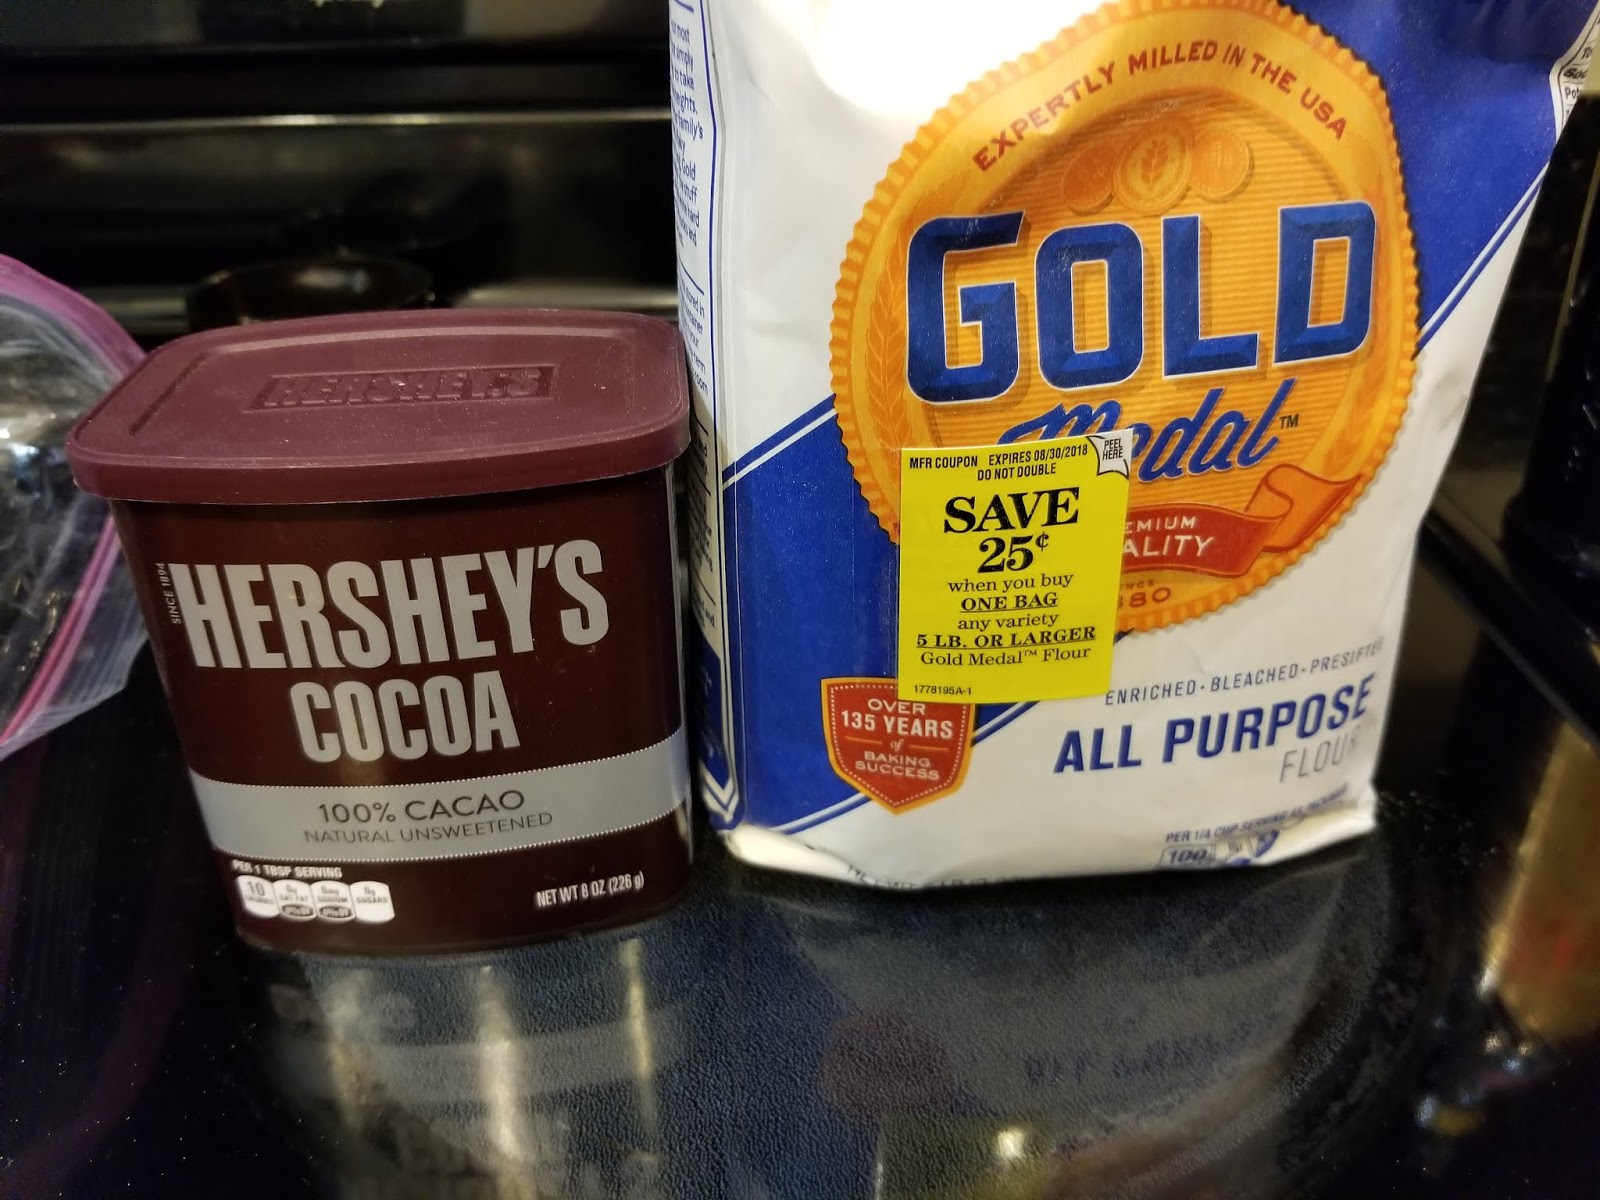
Preheat your oven to 350, and get out the two secret ingredients to your cakey success:

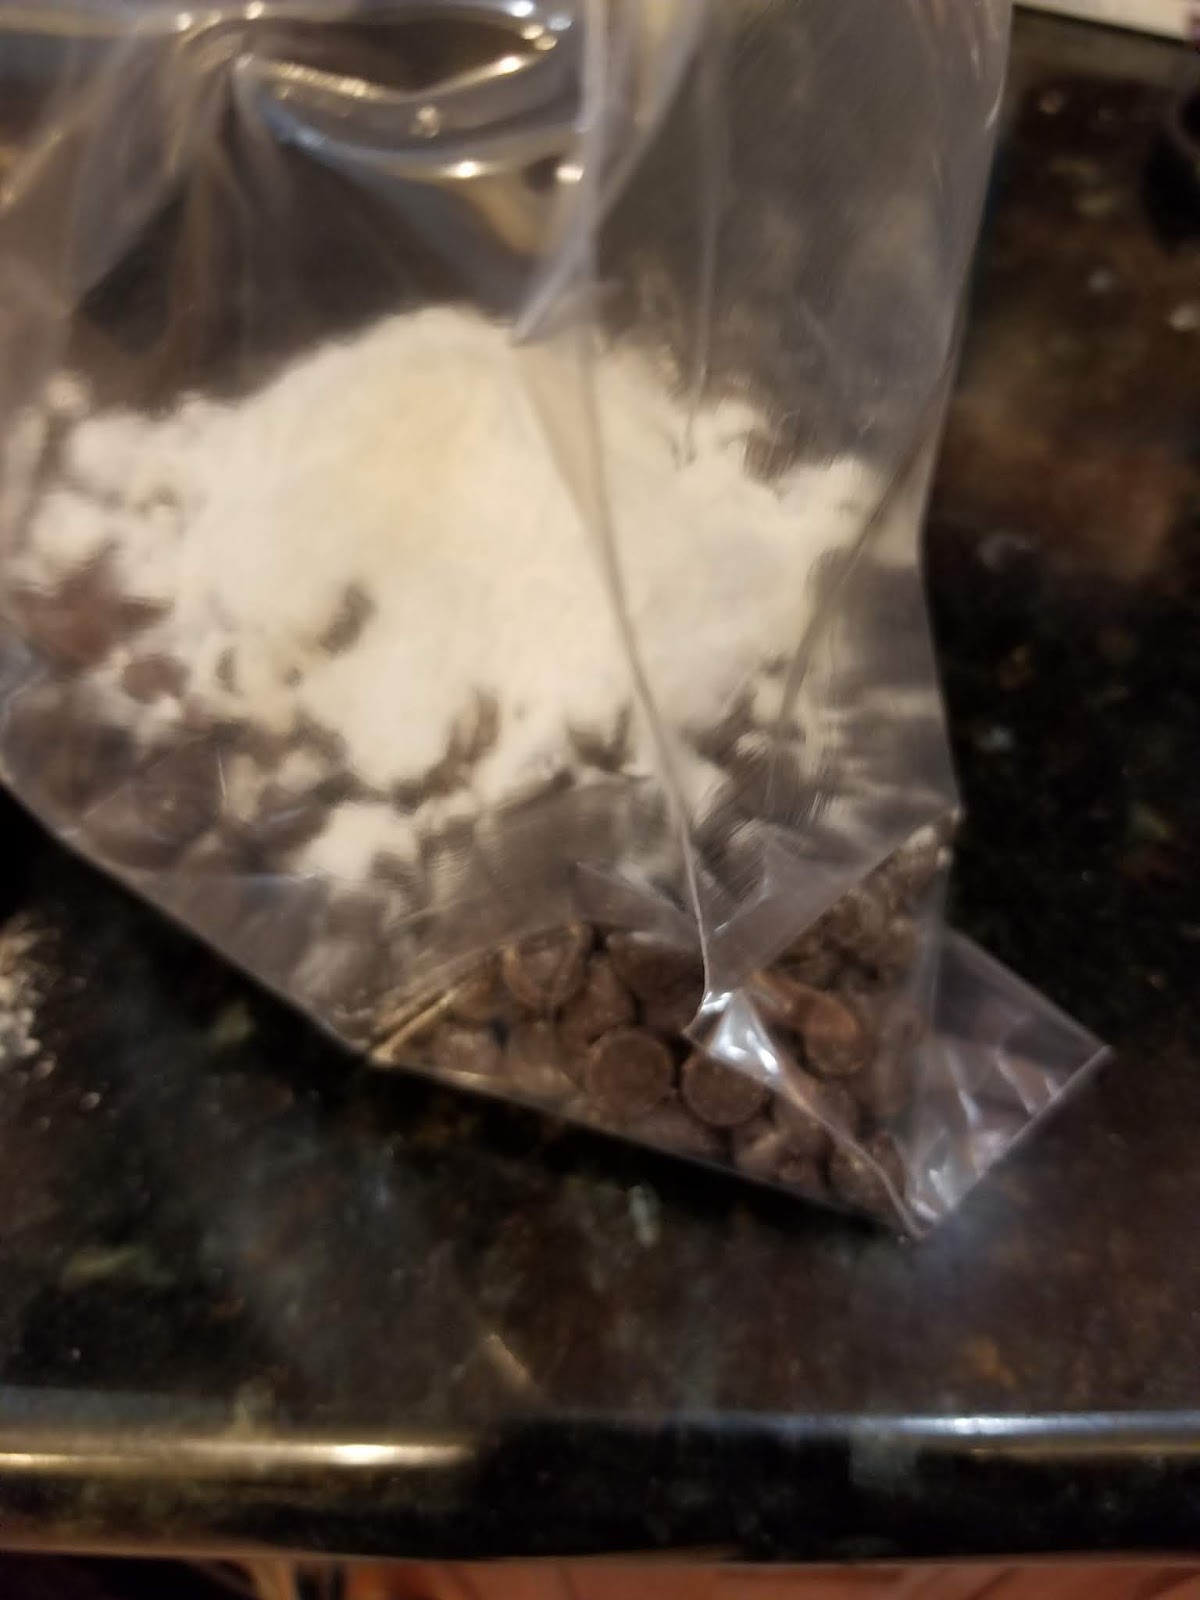
You know what makes chocolate better? More chocolate. Get out your bundt pan, and spray it with cooking spray. Use so much cooking spray your kitchen could turn into a slip and slide (it still won’t be enough cooking spray), and then dust the pan with cocoa powder to help ensure your cake comes out in one piece with a nice dark coloring. Now, as for my second secret ingredient: flour. I’ve heard time and time again to coat things in flour if you don’t want them to sink to the bottom of your cake. I wanted to give this science experiment a shot.

I was apprehensive to say the least. I figured adding flour to my chocolate chips would take away from their chocolate chippiness (this is a thing), but I’m happy to report this is a baking hack that actually works. I placed my 1 1/2 cups of chocolate chips in a large baggie and dumped two tablespoons of flour on top and a tiny drizzle of Kahlua to give it something to stick to (and because, well, more booze). I zipped up the bag and gave it a good shake, coating the chips completely. I set aside, getting back to my main ingredients.

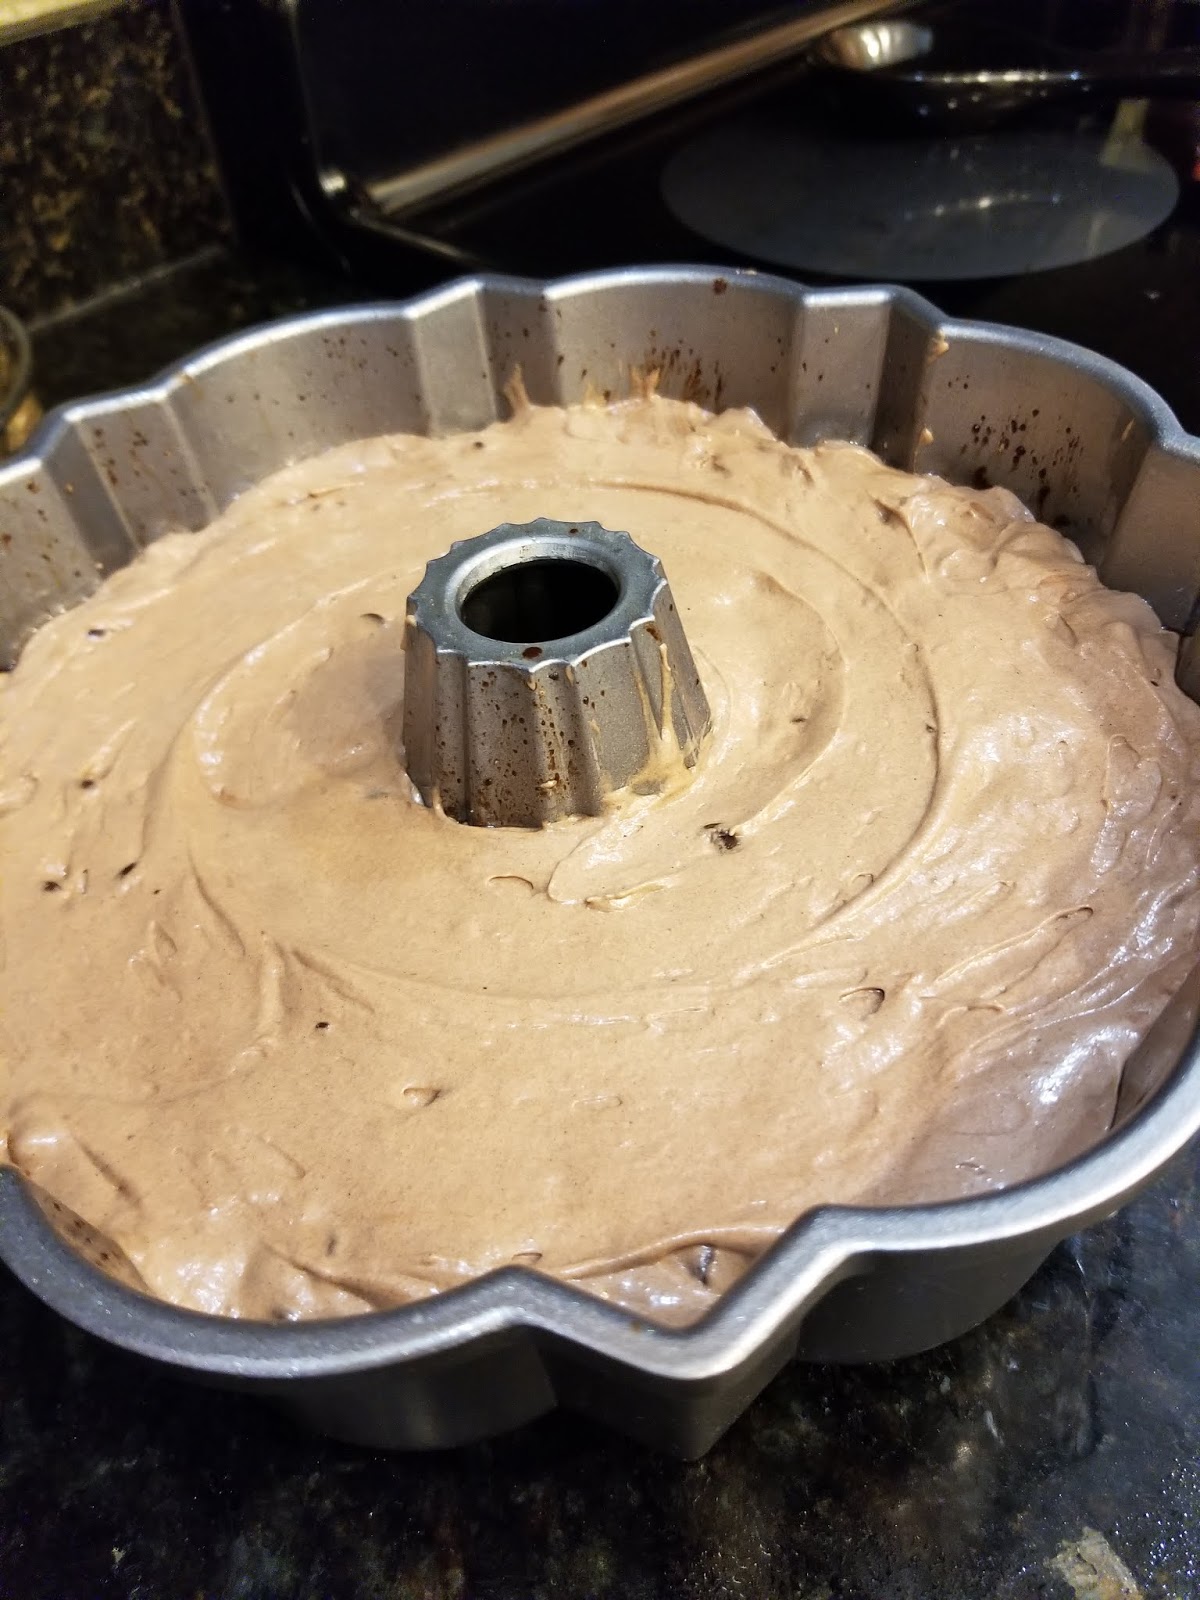
Mmm, Kahlua-y goodness. In my stand mixing bowl, I placed my cake mix, eggs, cooled melted butter (don’t curdle your eggs and sour cream!), sour cream, and Kahlua and mixed for 4 minutes on medium-high. The batter is light and super fluffy, and you will have a hard time restraining yourself from licking the beaters, so save those for later. Dump your baggy of chocolate chips in with the cake batter and give a good stir. Turn out your batter into your prepared bundt pan and bake for 45 minutes at 350. Don’t forget to lick the beaters while you’re looking for something to do in those 45 minutes.
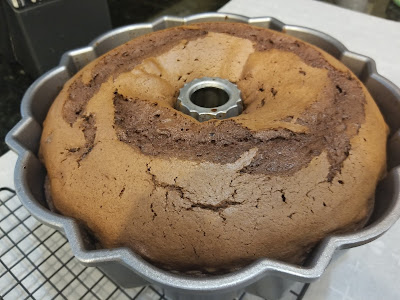
So fluffy, you’ll also want to dive in fork-first. Remove from the oven and let your bundt cake cool on a cooling rack for 30 minutes. After 30 minutes, take an angled spatula or a butter knife and run it around all the ridges and edges of your bundt pan to ensure the cake isn’t sticking anywhere.
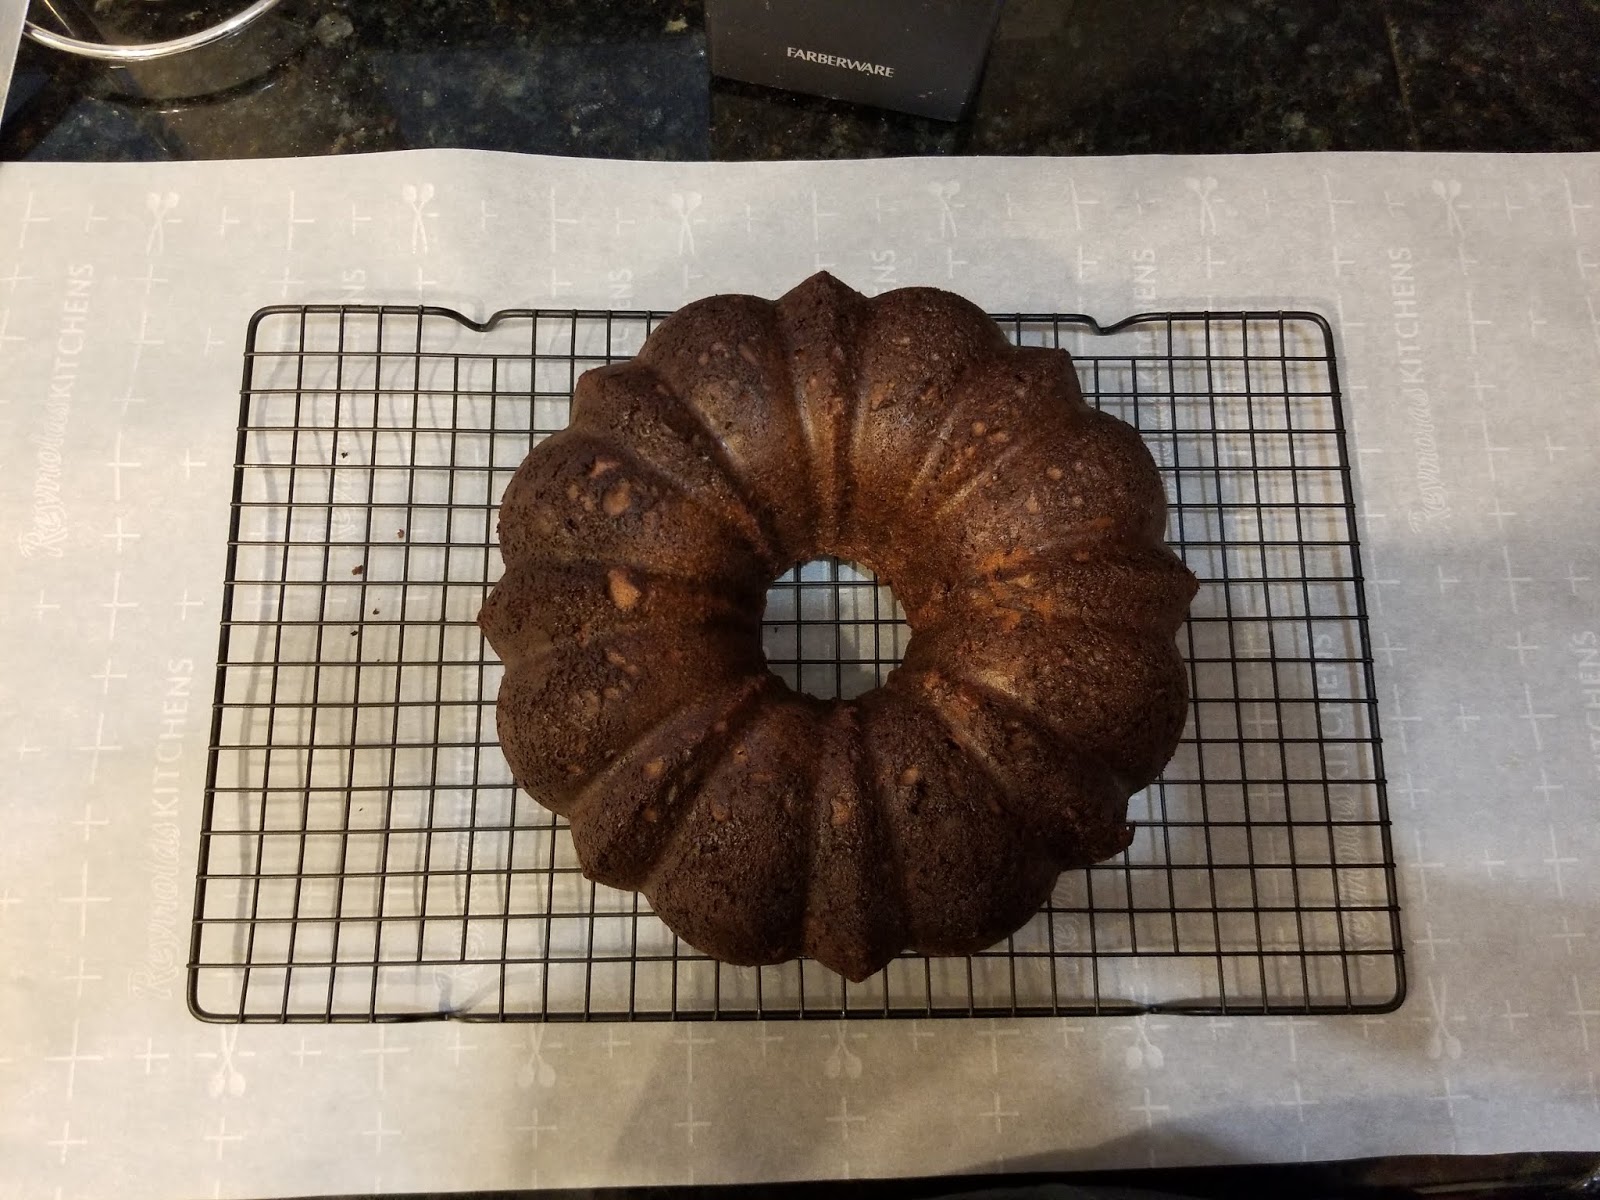
Then, flip everything upside down! Invert everything so that your cooling rack is on top and the bundt pan is on the bottom.

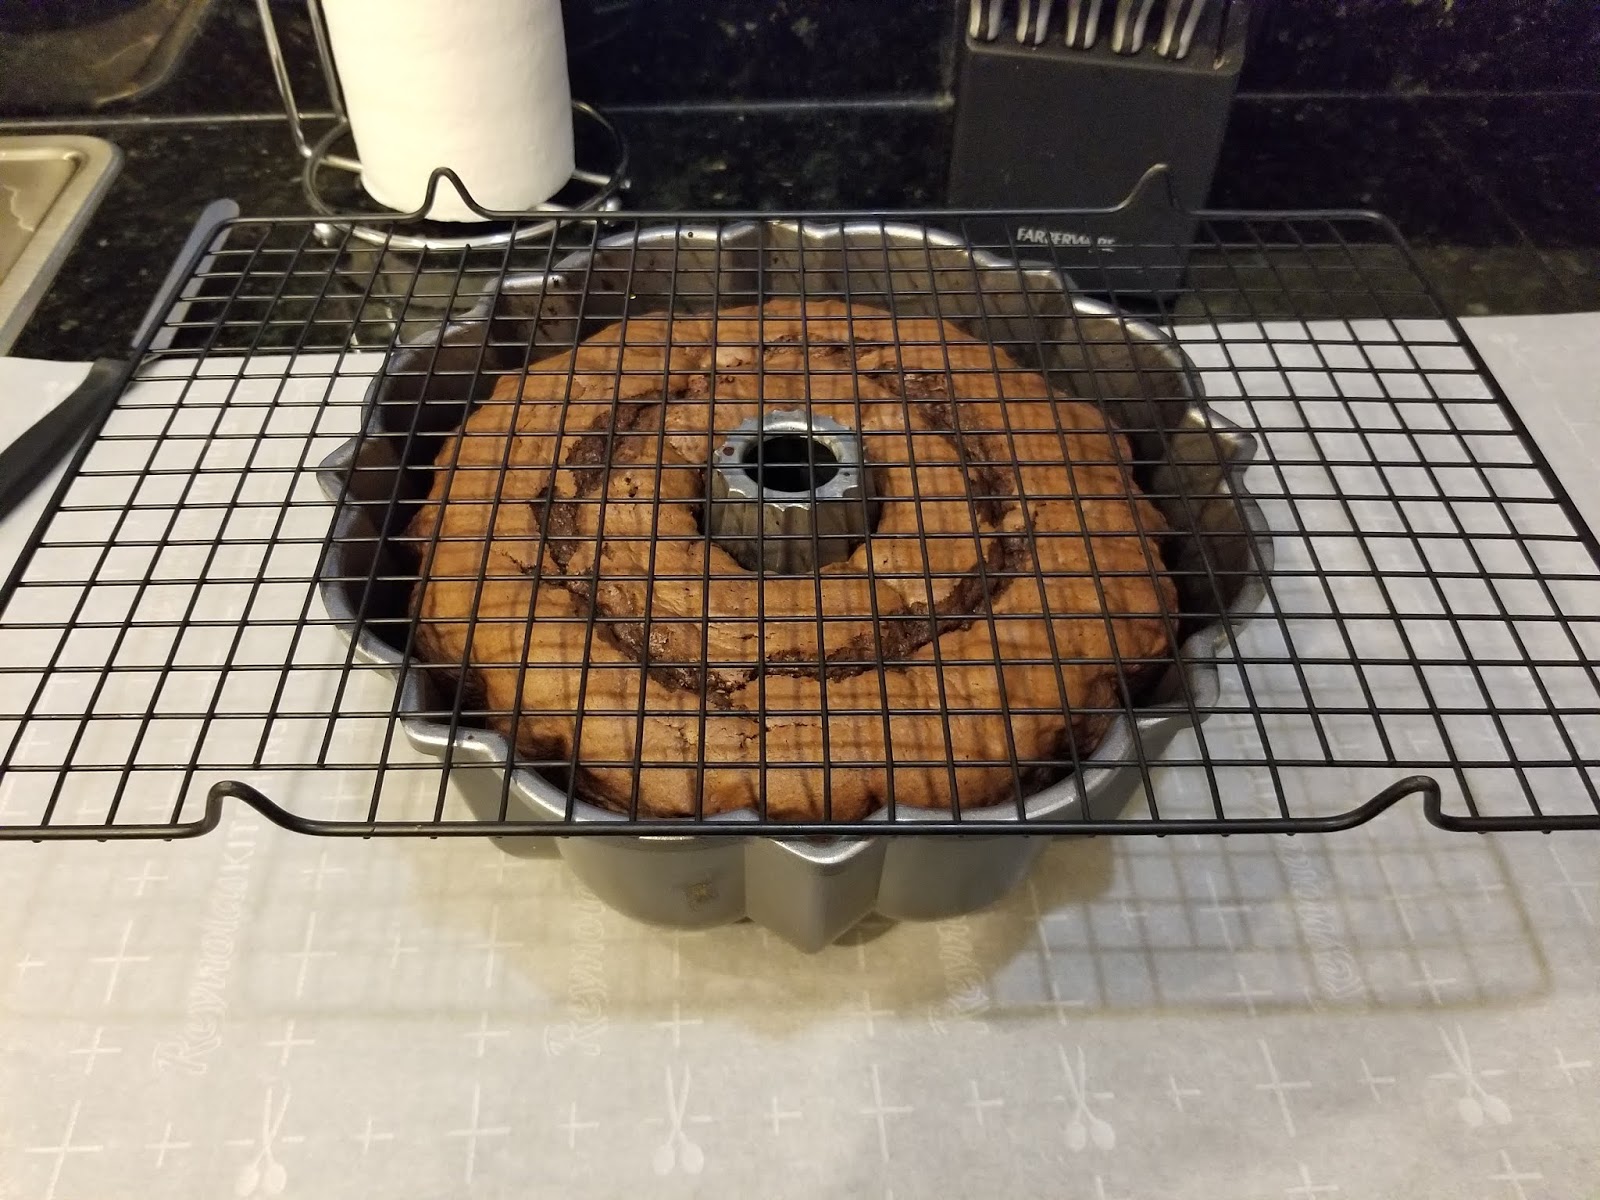
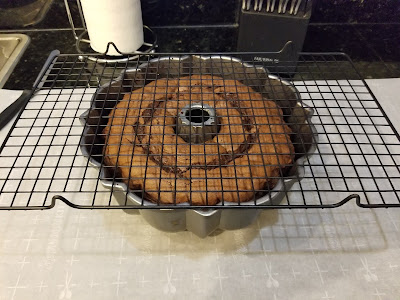
And release! Then flip again so your pan is on top of the cooling rack. Gently remove from the top of the cake. As you can see, even with all that Pam and cocoa, I still had a piece or two that stuck to my bundt pan, proving even seventeen layers of cooking spray just weren’t enough. Don’t worry, ganache is like a delicious concealer for any cake impurities. Place in the freezer to cool completely for 30-60 minutes before ganaching.

Doesn’t get much simpler than this. Dump one cup of chocolate chips and 1/4 cup plus 2 tablespoons of Kahlua into a microwave safe bowl. Nuke for 30 seconds, then whisk together until the chocolate is completely melted and the ganache is silky smooth. Dump into a measuring cup for easy pouring, and let firm up for 10-15 minutes. You want it to stick to the cake and not all run off…that would be a tragic waste of chocolate and alcohol.

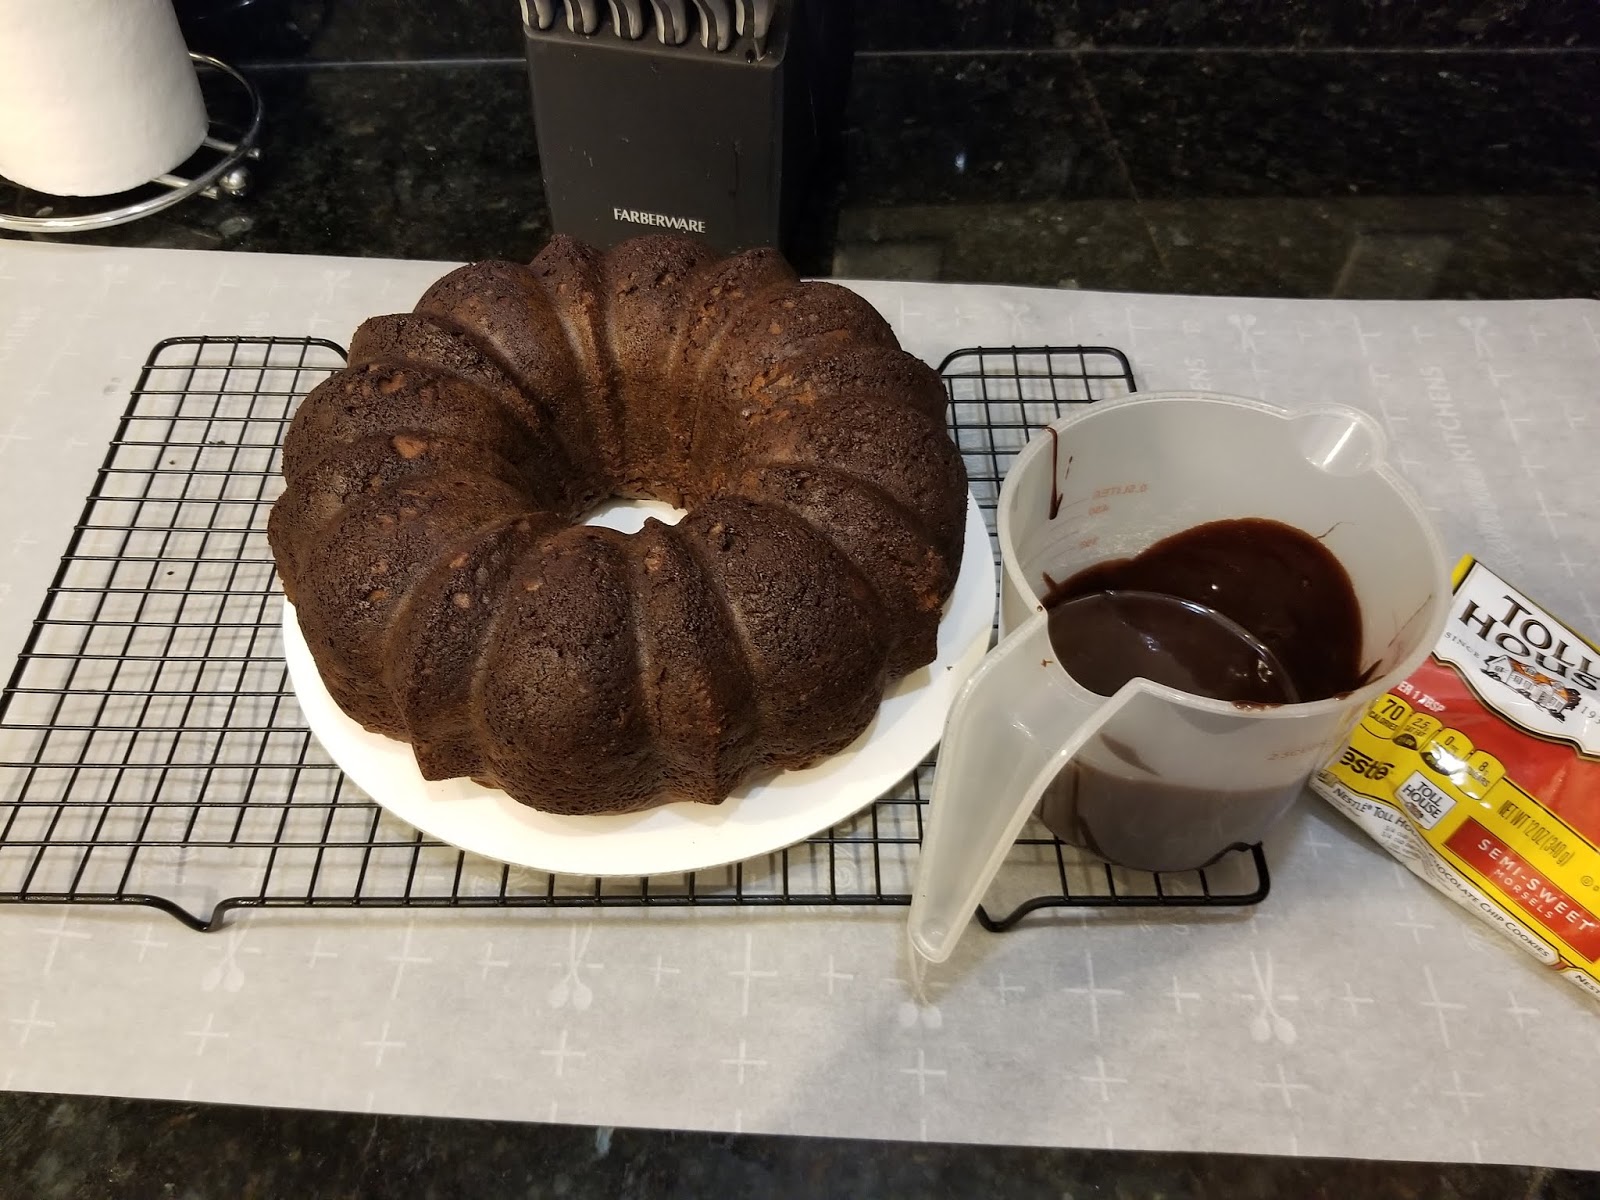
I was tempted to just pour the whole thing into a mug and calling it adult hot chocolate. Take your bundt cake out of the freezer and place on a cake round or cake plate on top of a cooling rack. I placed a layer of Parchment paper under my cake round so I could control the messy chaos. Once my ganache had firmed up, I slowly drizzled it back and forth over the top of my cooled cake.
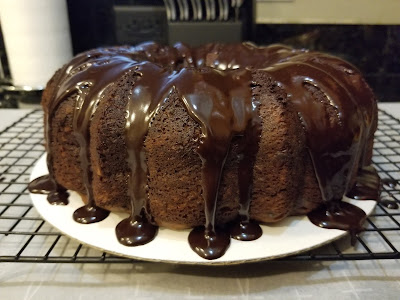
Check out that chocolatey goodness. And because there’s no such thing as too much chocolate, I threw a few handfuls of extra semisweet chocolate chips on top (it’s akin to satisfying my need to put sprinkles on top of everything, what can I say).
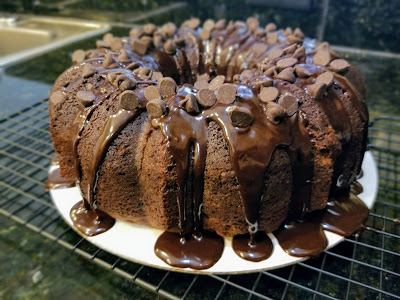
It does make it pretty! I then placed this into a cake box and let it set up overnight before taking to work with me the next day. Since the ganache is all booze and the dairy is all baked, this one is best at room temp where the moistness (sorry) is at full wow-factor.
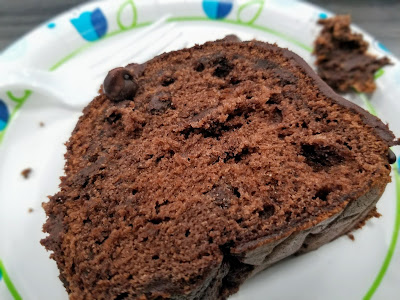
Look at that chip distribution! Happy to report that my chocolate chips did not all sink to the bottom! The flour trick will be reused for all fruit or chip cakes to come. I always know a recipe is good when the room falls completely silent when people are eating. Especially since most of the time my office is a buzz with chit chat and laughter–to keep us quiet, you really do have to give us a darn good reason. And a chocolate cake full of booze and more chocolate is apparently the best way to do that. The birthday boss enjoyed it, so that was a win in my book, as did the rest of my coworkers. Spirits were high for the rest of the day, but when the cake is high in spirits, I suppose that’s only the natural order of things. And now I know how I like my coffee–with a helping of booze and chocolate cake. Thanks, Kahlua! ‘Til next time, my fellow eaters!
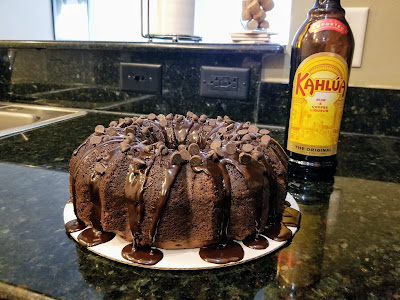
I could make at least 6 more of these cakes with that one bottle alone…. -
Dog Treats/Miscellany
For your dogs:
- Mini blueberry pupcakes
- Apple cheddar pupcakes
- Milkbone doggy birthday cake
- Pumpkin dog treats
- Dog treats
- Pupcakes
Miscellaneous desserts:
- Churro cheesecake dip with dulce de leche topping (low cal!)
- Reese’s peanut butter dessert dip in the shape of a football
- Dunkaroo dip
- Turtle cheesecake and chocolate chip cookie dough dips
- Homemade Shamrock Shake recipe
Home crafts:
Decorating tips (more found on CAKES page):
-
Less Complications, More Churros!
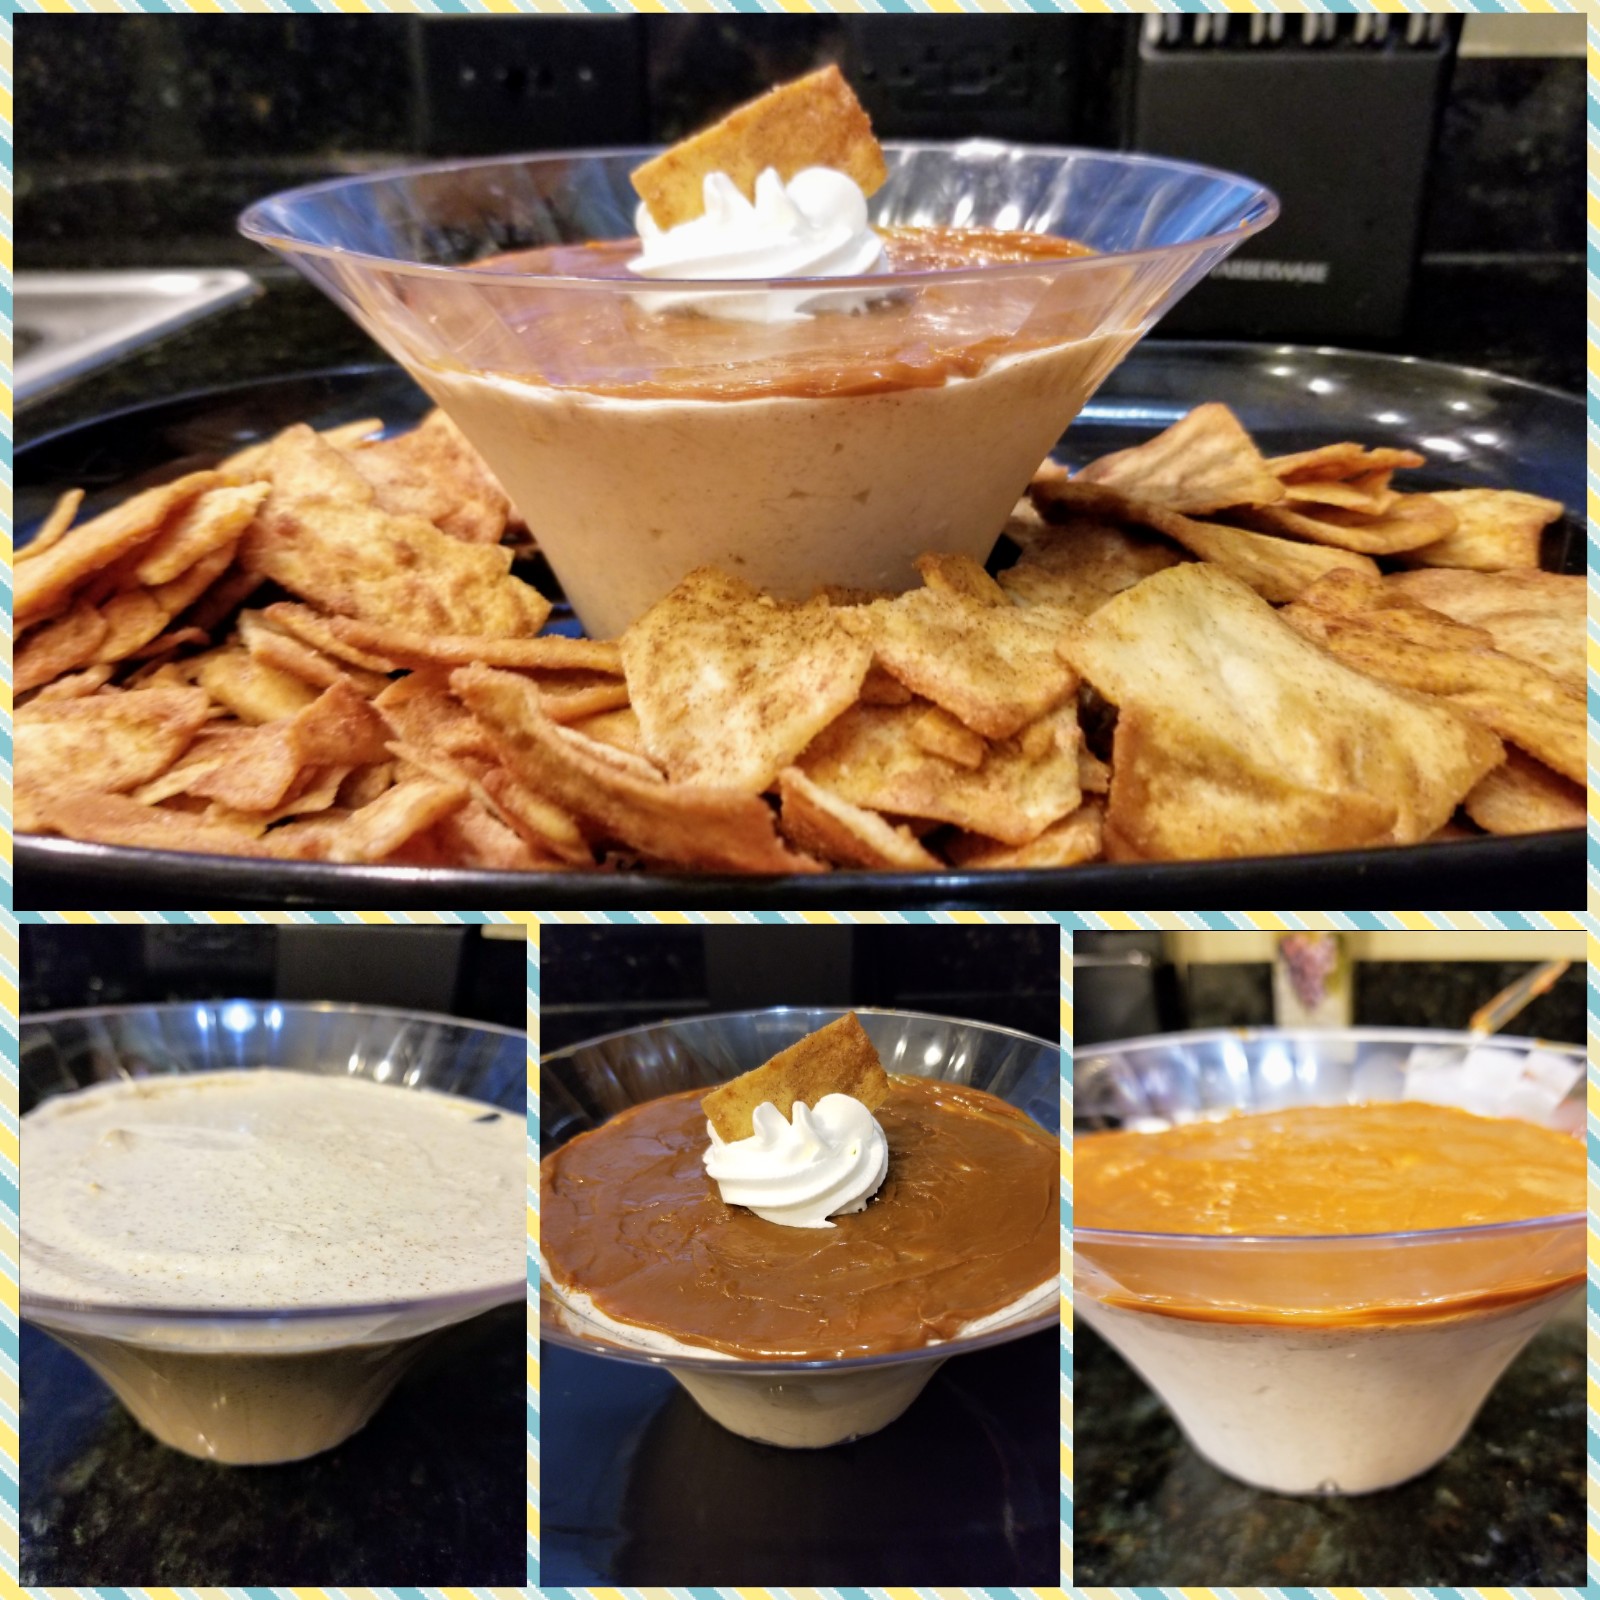
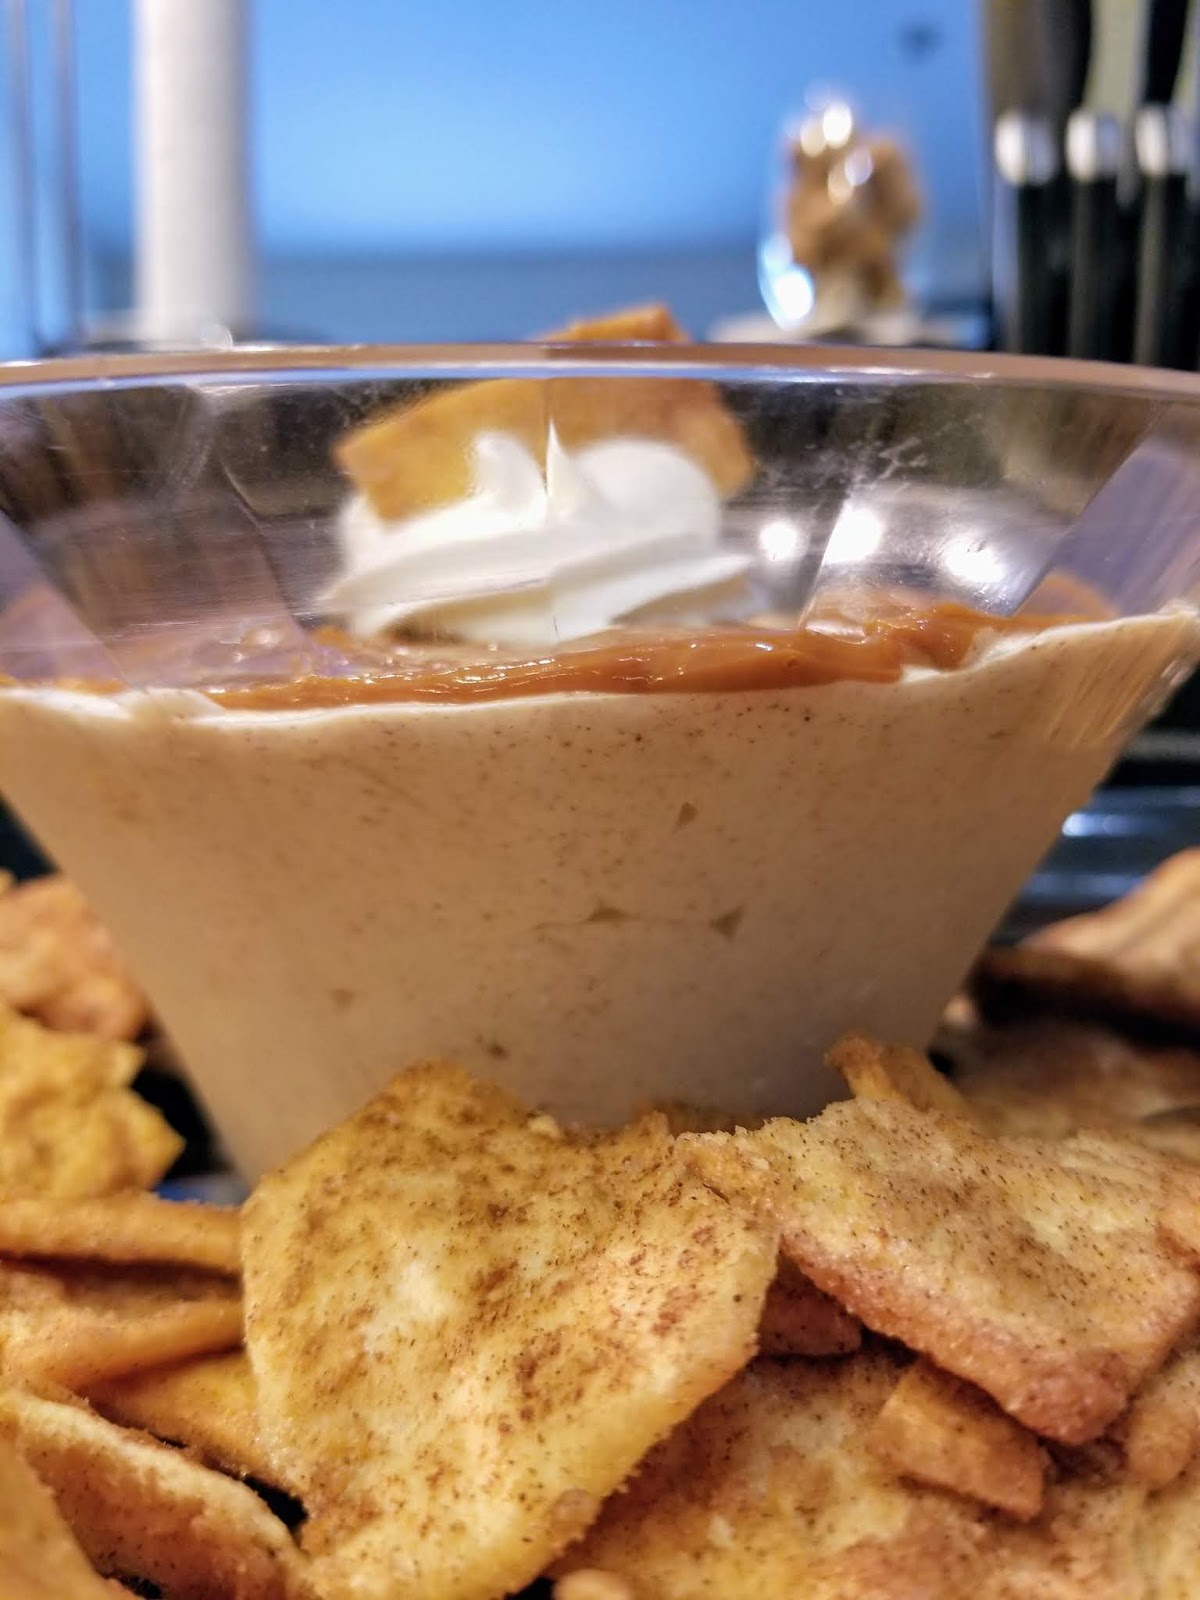
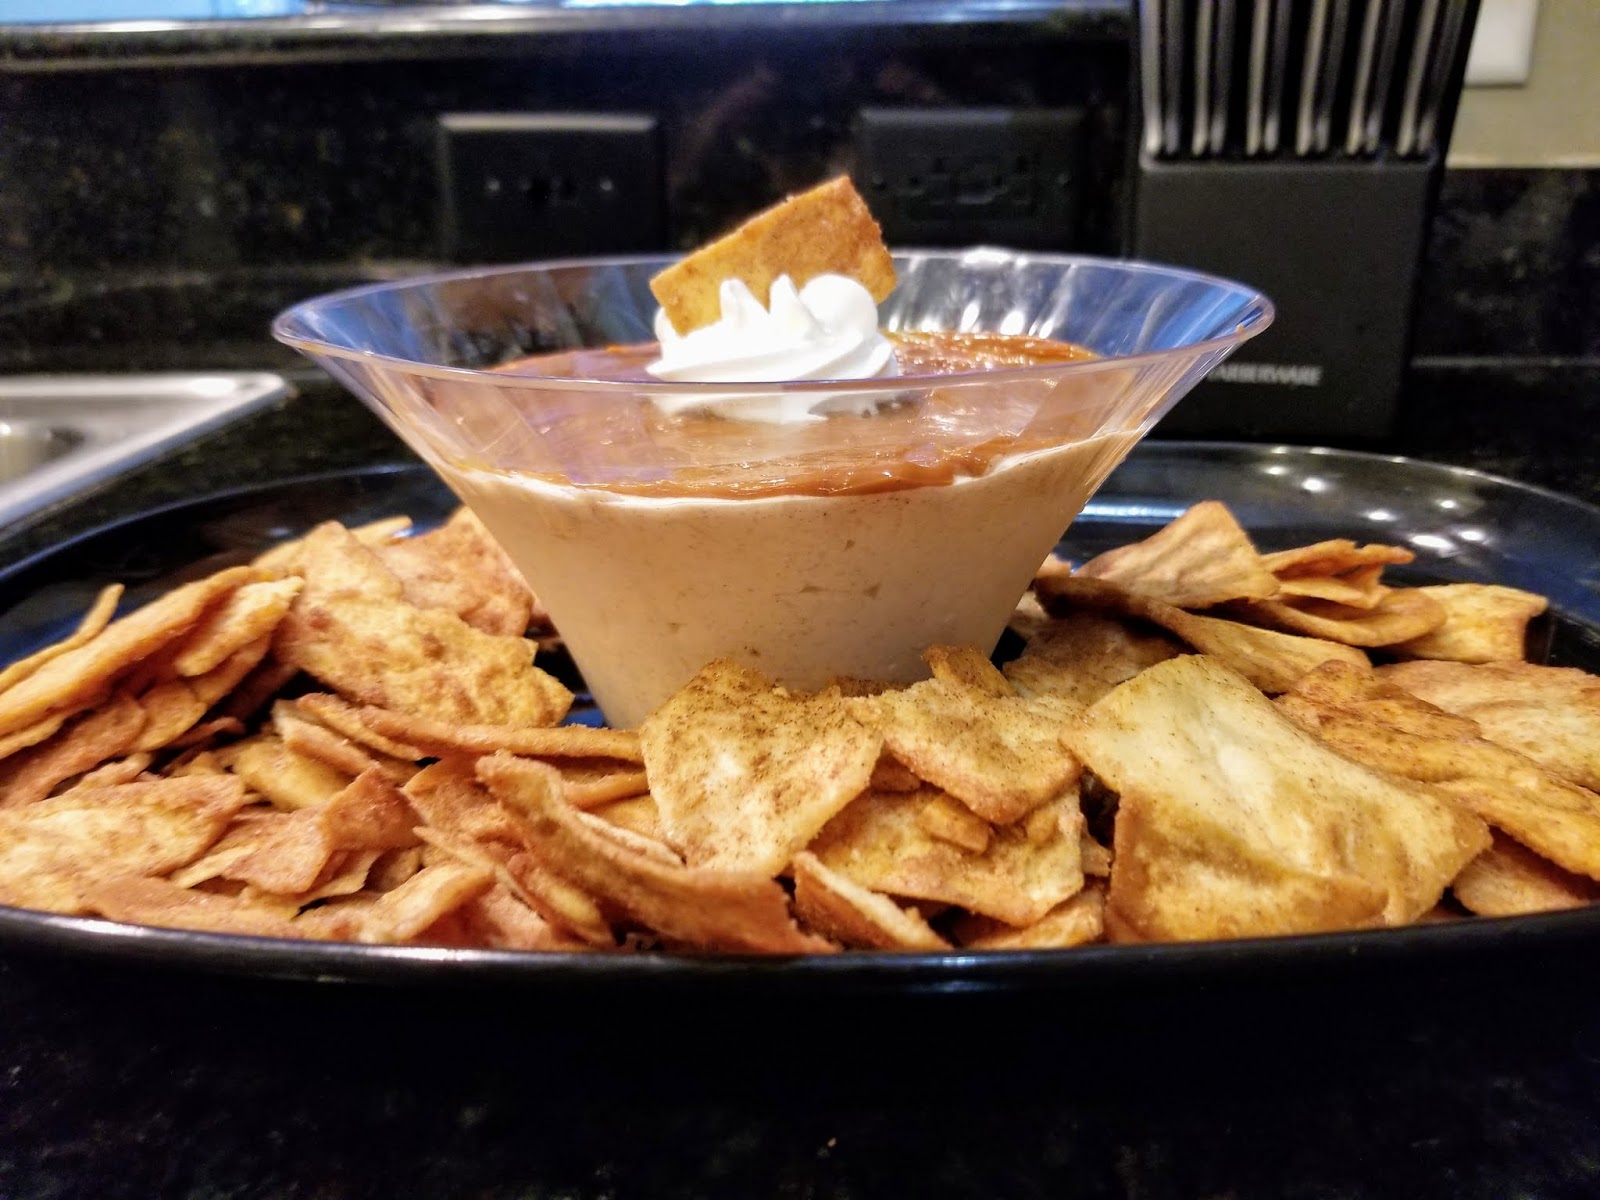
I have a tendency to make things way more complicated than they need to be. But I do consider it both a strength and a weakness that in most situations I’m able to leap to the worst possible conclusion in under five seconds. This way, I’m prepared for most curve balls, but sometimes, I have to be reminded that the best things are life are simple. The best things in life are also usually desserts, and it is nice to be able to throw together something yummy in under 10 minutes….you know, compared to my usual half-day forays into baking and decorating (did I mention the complicated thing?). Since I was having what I will refer to as “a week,” and had a potluck party to get ready for, I wanted a dessert that was quick, easy, and complimentary to my stress eating. This meant it needed to be sweet and able to be inhaled in mass quantity with minimal swimsuit season damage. And so, churro cheesecake dip with dulce de leche topping was born:

It might not look like much, but what it lacks in beauty it makes up for in personality. And by personality, I mean flavor. Look, I love cheese. At this point, my body is probably made of at least 15% Gouda. And I love cake. I’d aim to venture my cake-to-body percentage is ridiculous. So the only way either of my food vices could possibly be any better is by combining them together to form cheesecake. I should know, I’m still noshing on those cherry almond cheesecakes from last weekend. At this point, I’m going to go out on a limb and say if cheesecake were a drug, I’d probably need to go to meetings to deal with my addiction. I was totally flying blind while making this recipe, on a cheesecake high most likely, but I knew I wanted churros, and I knew I still somehow had dulce de leche leftover from Cinco de Mayo. I also knew I was so, so very tired and so, so very lazy, so an easy dip it was. Since I have a regular supply of Cool Whip Free and reduced fat cream cheese on hand, I knew I also was going to make this so, so very low in calories. The ENTIRE bowl of dip is a little over 1,000 calories, so depending on how many servings you want to divvy up (read: people will bogart the dip…it was referred to at one point as “cheesecake crack”), you’re still going to be on the low end calorie wise if you’re feeding a small gathering and not just yourself. I won’t blame you if you don’t want to share. This is hands down the best dip I’ve ever made, appetizer or dessert wise. And you’re talking to a dip connoisseur here; Texans don’t mess around with whatever tops their tortilla chips, people.
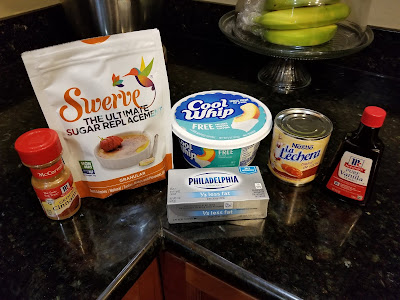
Six ingredients from cinnamon bliss! This is not complicated by any means, but I’m still glad I wrote down how I made this churro cheesecake dip because I was totally making things up as I went along. End result: cinnamon + dulce de leche = my new drug of choice. To make this amazing goodness, gather:
- 8 ounces of 1/3 fat cream cheese at room temp
- 1 1/2 cups of Cool Whip Free
- 2 tsp of cinnamon
- 1/4 cup Swerve granular
- 1 1/2 tsp vanilla extract
- 3 TBS of dulce de leche
- Optional: additional 2 TBS Cool Whip to decorate
There are minimal steps here, which is good when you’ve been up since 5 a.m. on a Saturday and can’t remember how to tie your own shoes let alone mix things together (I can sleep when I’m dead. Or when I make it to the padded cell of my dreams). Blend the cream cheese in your stand mix until fluffy, then add in the cinnamon, Swerve, and vanilla. Blend on medium high until things are nicely mixed. Add in the Cool Whip Free and blend on low until everything has been incorporated.

A bowl full of dreams. Dump into a serving bowl and place into the freezer for 45-60 minutes, just until things are firm. If you *don’t* want to top with dulce de leche because you hate enjoying life or just don’t have time to resist the urge to dive into this, you could call it a day here and eat the dip. But take the hour. Relax. Read a book. Take a nap. Read a book while taking a nap. Just remember, the name of the dip dessert game is simplicity.
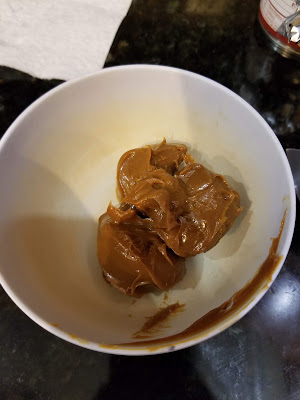
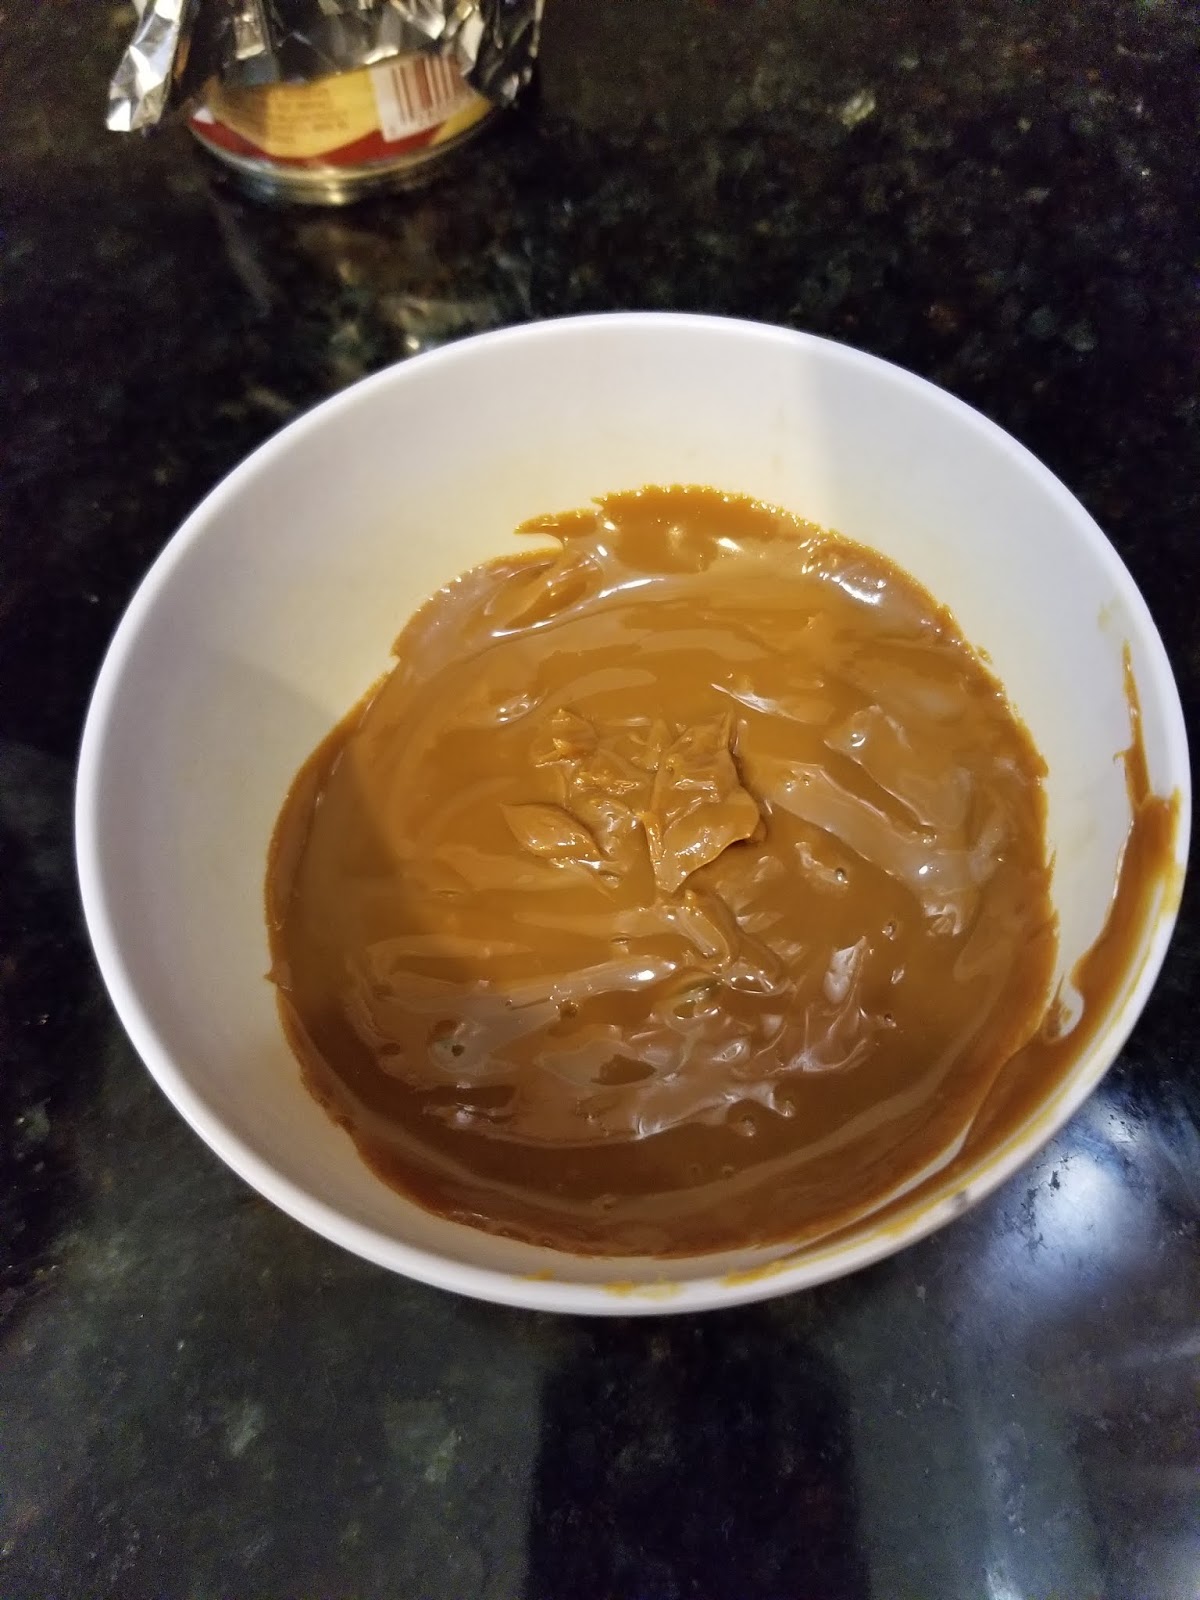
And also, hella good yumminess. Dump three tablespoons of dulce de leche in a small bowl and microwave for 30 seconds:

Do not lick–will be hot. Stir until smooth, and then use an angled spatula or small knife to spread across the top of your firmed up churro cheesecake dip:
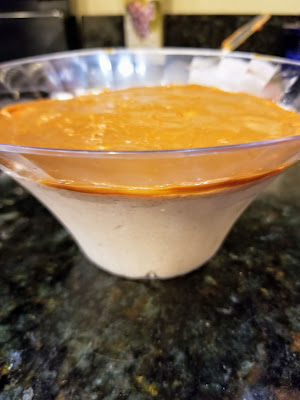
There’s a fine line here, and it is make of sticky, sweet caramel. You could also call it a day here and place into the fridge to finish setting, but I prefer to garnish dip. Jazz things up a bit. Make them slightly complicated and a bit pretty (side note- this is now my new name for my autobiography).
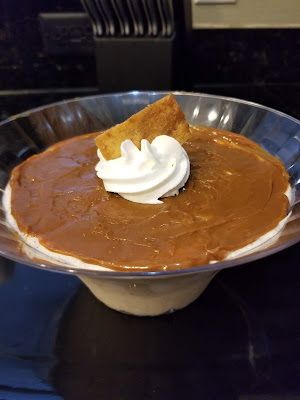
She was a complicated woman, but she loved dessert. I used a 1M tip to create a quick swirl of Cool Whip Free in the middle of my dessert and finished things off by placing a Stacy’s Cinnamon Sugar Pita Chip in the center.
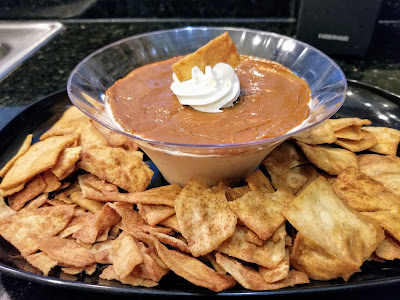
I am now also obsessed with dessert pita chips. I did not know such a thing existed. Place back in to the fridge to let set for a few hours (mine sat in the fridge for about 4 hours until we were ready to go to the party this dessert was debuting at). Plate and serve with cinnamon sugar pita chips, cinnamon graham crackers, Nilla Wafers, apple slices, etc. You really can’t go wrong.

Because, churro. To paraphrase a friend after she tried a bit: this stuff is legit. It is so creamy and sweet, but the cinnamon gives the cheesecake the perfect balance. The dulce de leche layer on top makes it absolutely irresistible. A few people had never heard of churros or dulce before at this party (because sadly, not everyone can be a Texan), but said it didn’t matter because whatever it was, that dip was damn good. So the moral of the story here (aside from the magic that is Tex Mex anything) is that a simple dessert you throw together on a wing and prayer that it won’t suck can sometimes turn out to be the biggest crowd pleaser you’ve ever made. Does this mean I’m going to start trying to make things less complicated on a regular basis? I’d like to say yes, but my Level 99 anxiety is already laughing in the back of my head, so, we’ll see. In either case, I have literally one spoonful of this dessert leftover from the gathering we went to last night (I wasn’t even letting a milligram of this awesome stuff go to waste), and I’m saving it in the event of an emergency (a.k.a., Monday morning). ‘Til next time, my fellow eaters!

Gonna need another cheesecake fix real soon, though.

Healthy-ish cake, cupcakes, pie, and cheesecake recipes and decorating tips