-
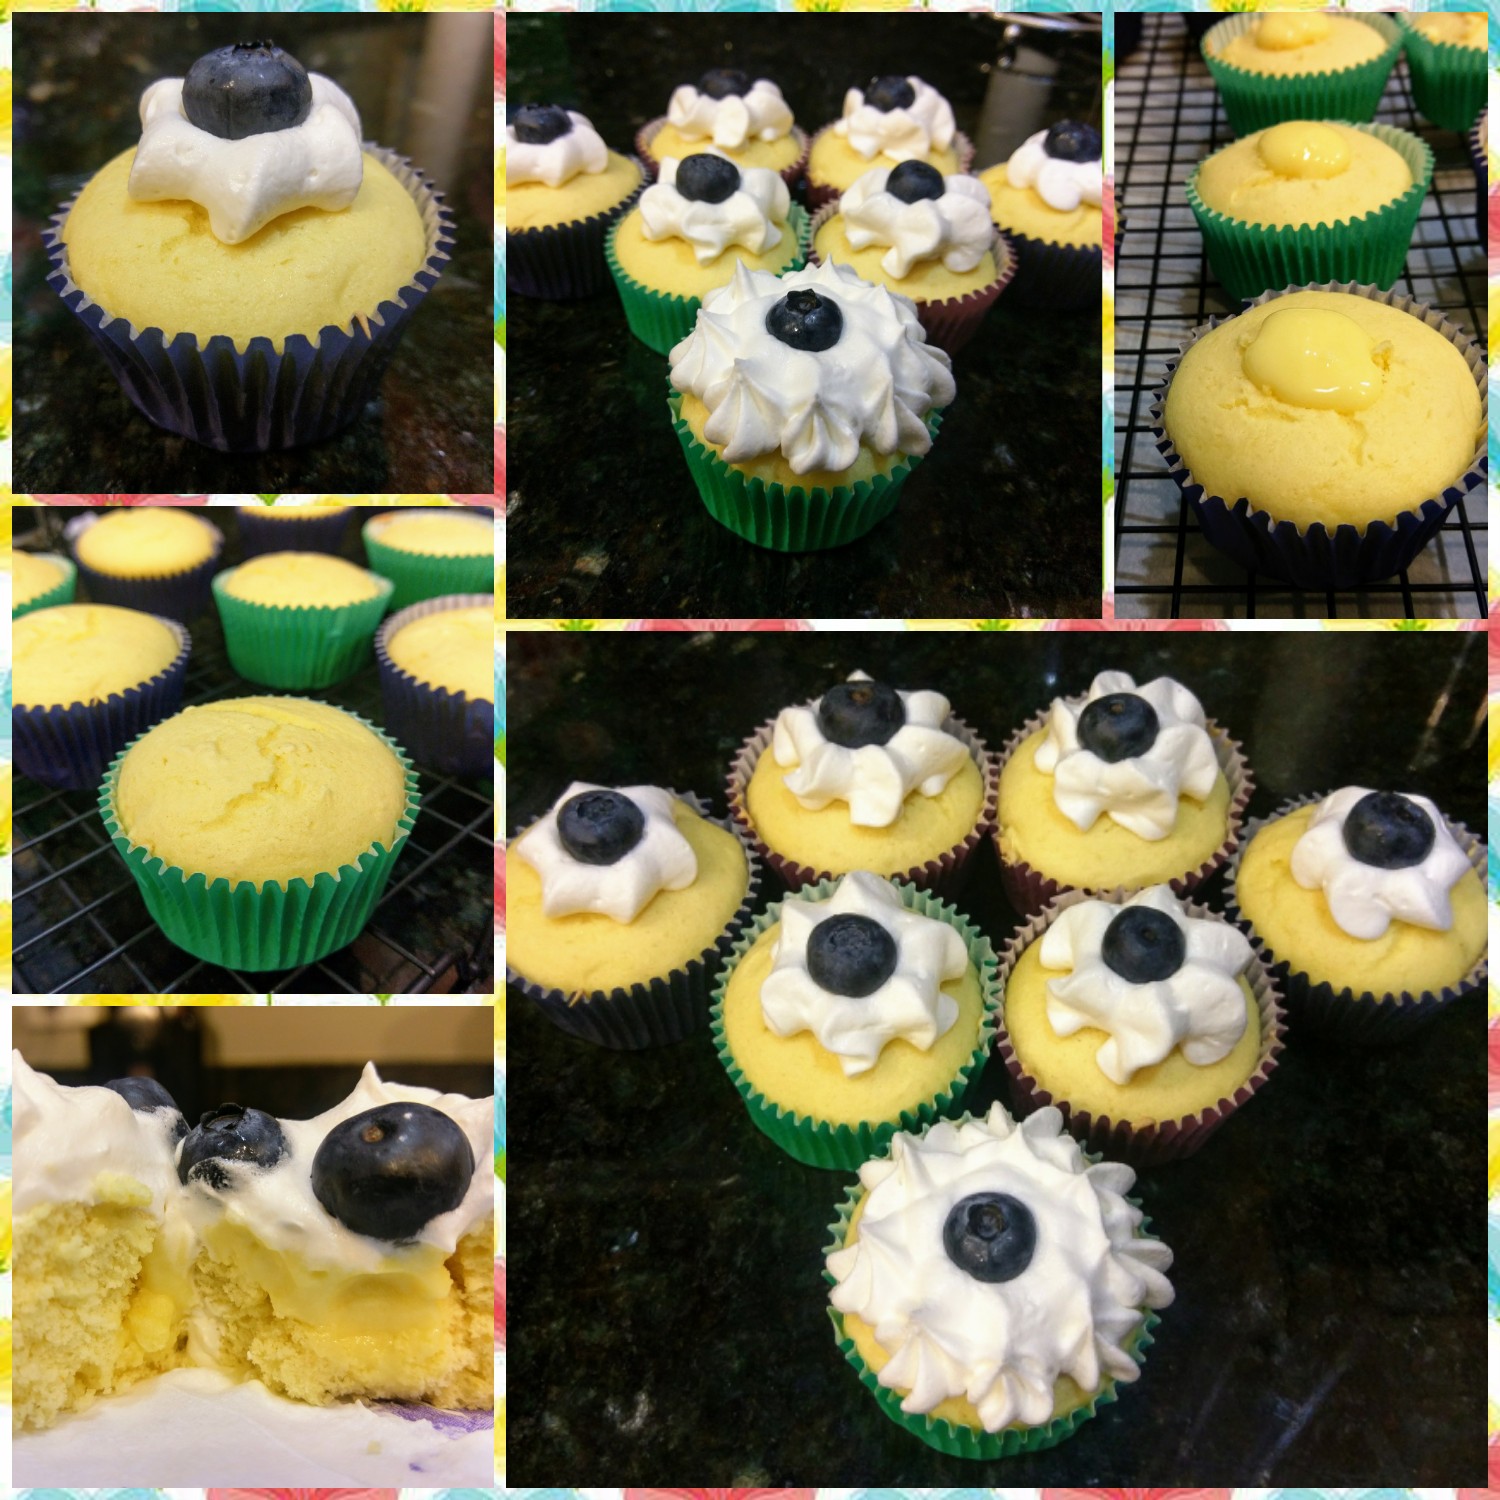
C'est la Lemon
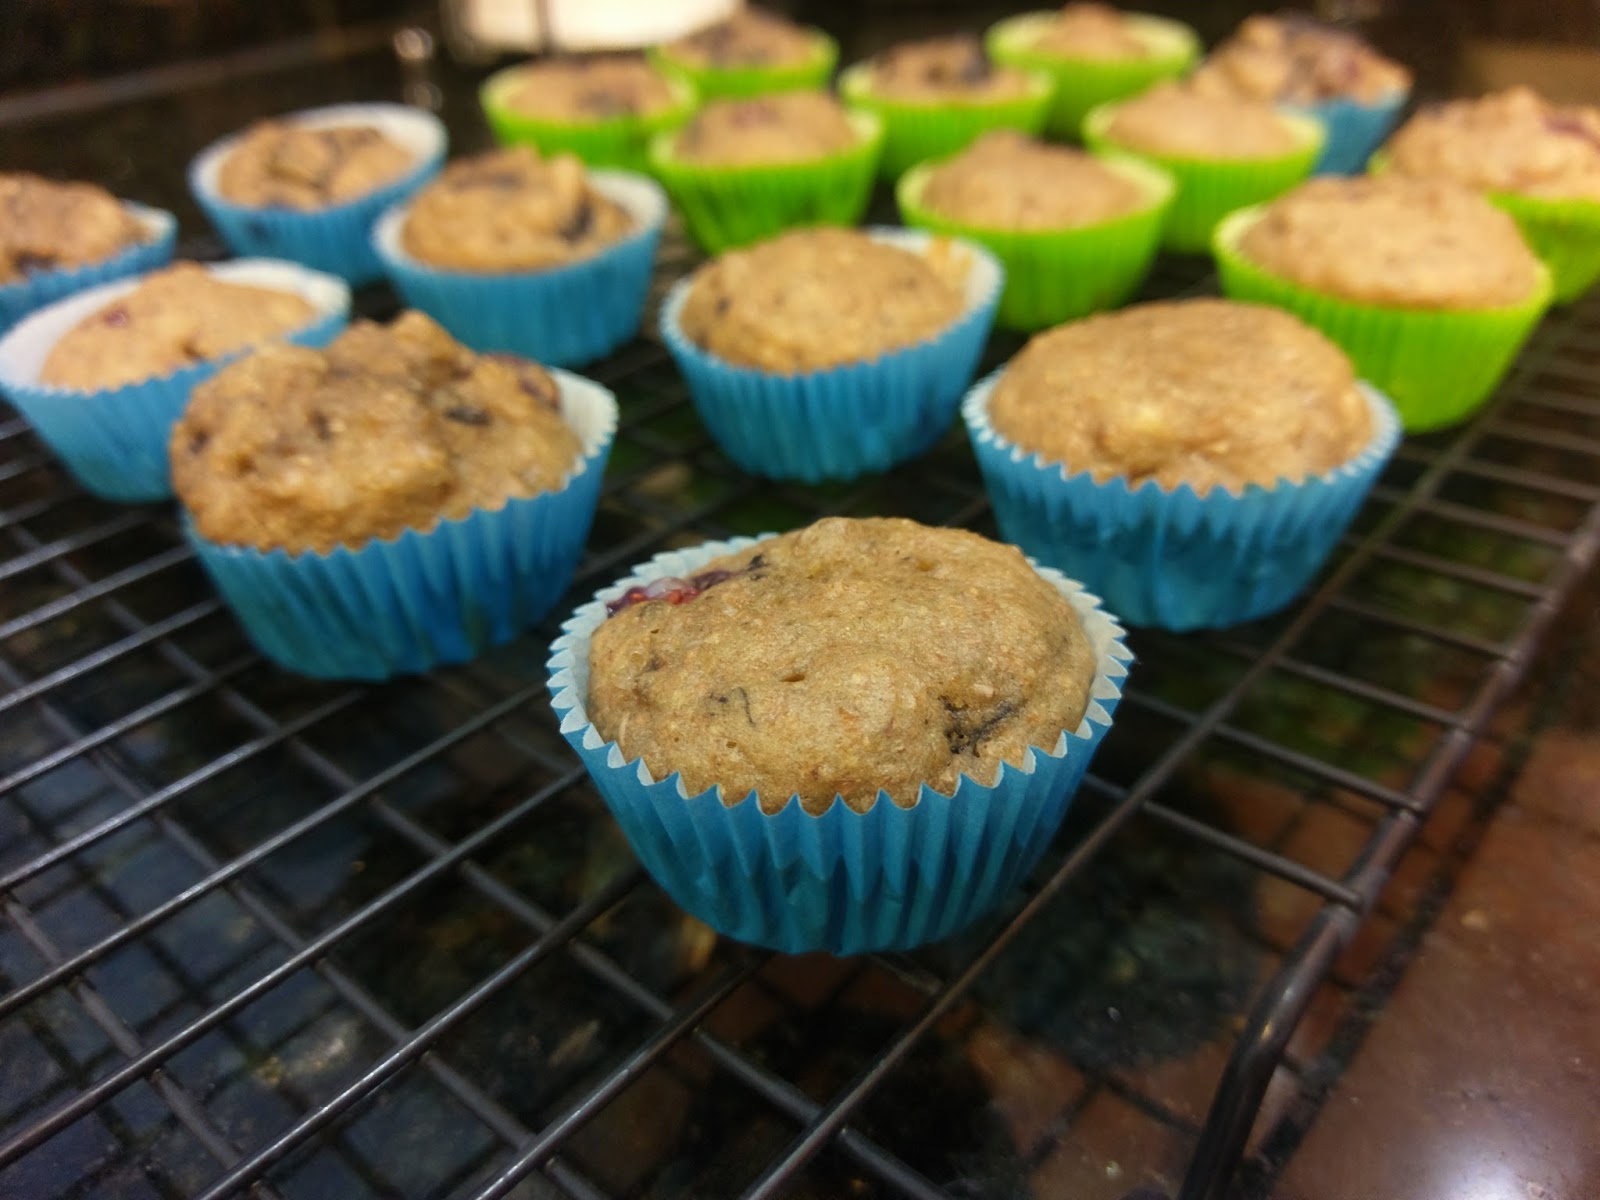
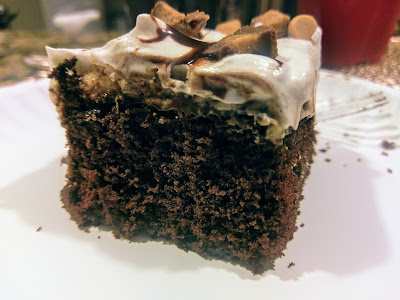
There were a few blissful mornings last week when the humidity was below “tropical jungle” level and a nice chill swept the air on my early morning dog walks. Hocus Pocus and the Addams Family movies were playing on Freeform in the evenings, August had dawned upon us, and it finally felt like we might be moving into fall. After those lovely 48 hours, Florida punched me in the face with high temps, even higher humidity, and essentially sucked my will to live away from me–much like Winifred Sanderson sucking the soul out of a small child to live forever (I make a reference to Hocus Pocus at least once a day, so just deal with it). Summer still has me in its evil, sweaty clutches, and there’s no end in sight. I decided that just to spite it (and because I like cupcakes), I was going to make the most summery dessert I could think of–lemon cream filled lemon cupcakes with Cool Whip and blueberries on top. I promised my husband to at least wait until September to unpack the Halloween decorations and start putting pumpkin into everything we eat. But know that I’m positively dying to put up my new Dia de los Muertos decorations while smelling the sumptuous scents of pumpkin and cinnamon wafting through my house. Summer, you will always be my least favorite season, but damned if I don’t also love lemon as much as pumpkin spice.

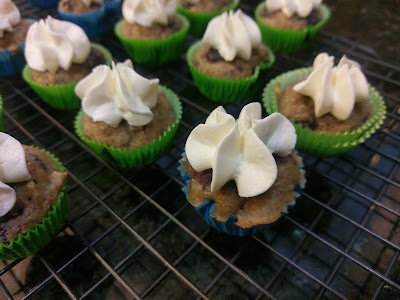
It’s just so zesty. Since I want to be able to maintain my competitive eater level of appetite whilst still being able to rock a bikini year round (thanks, Florida), each lemon cream filled cupcake is only 100 calories a cupcake. In my head, this means I can eat three of them and still be eating fewer calories than a regular, sugar-laced cupcake. For people who don’t have impulse control issues, this means you can eat a very lemony, very creamy, very delectable cupcake with literally no guilt. And dear sweet baby Jesus are these ever amazing. Try to eat just one…I dare you. I made a whole batch of 24 and froze half “for later.” Later in this context probably means this weekend.
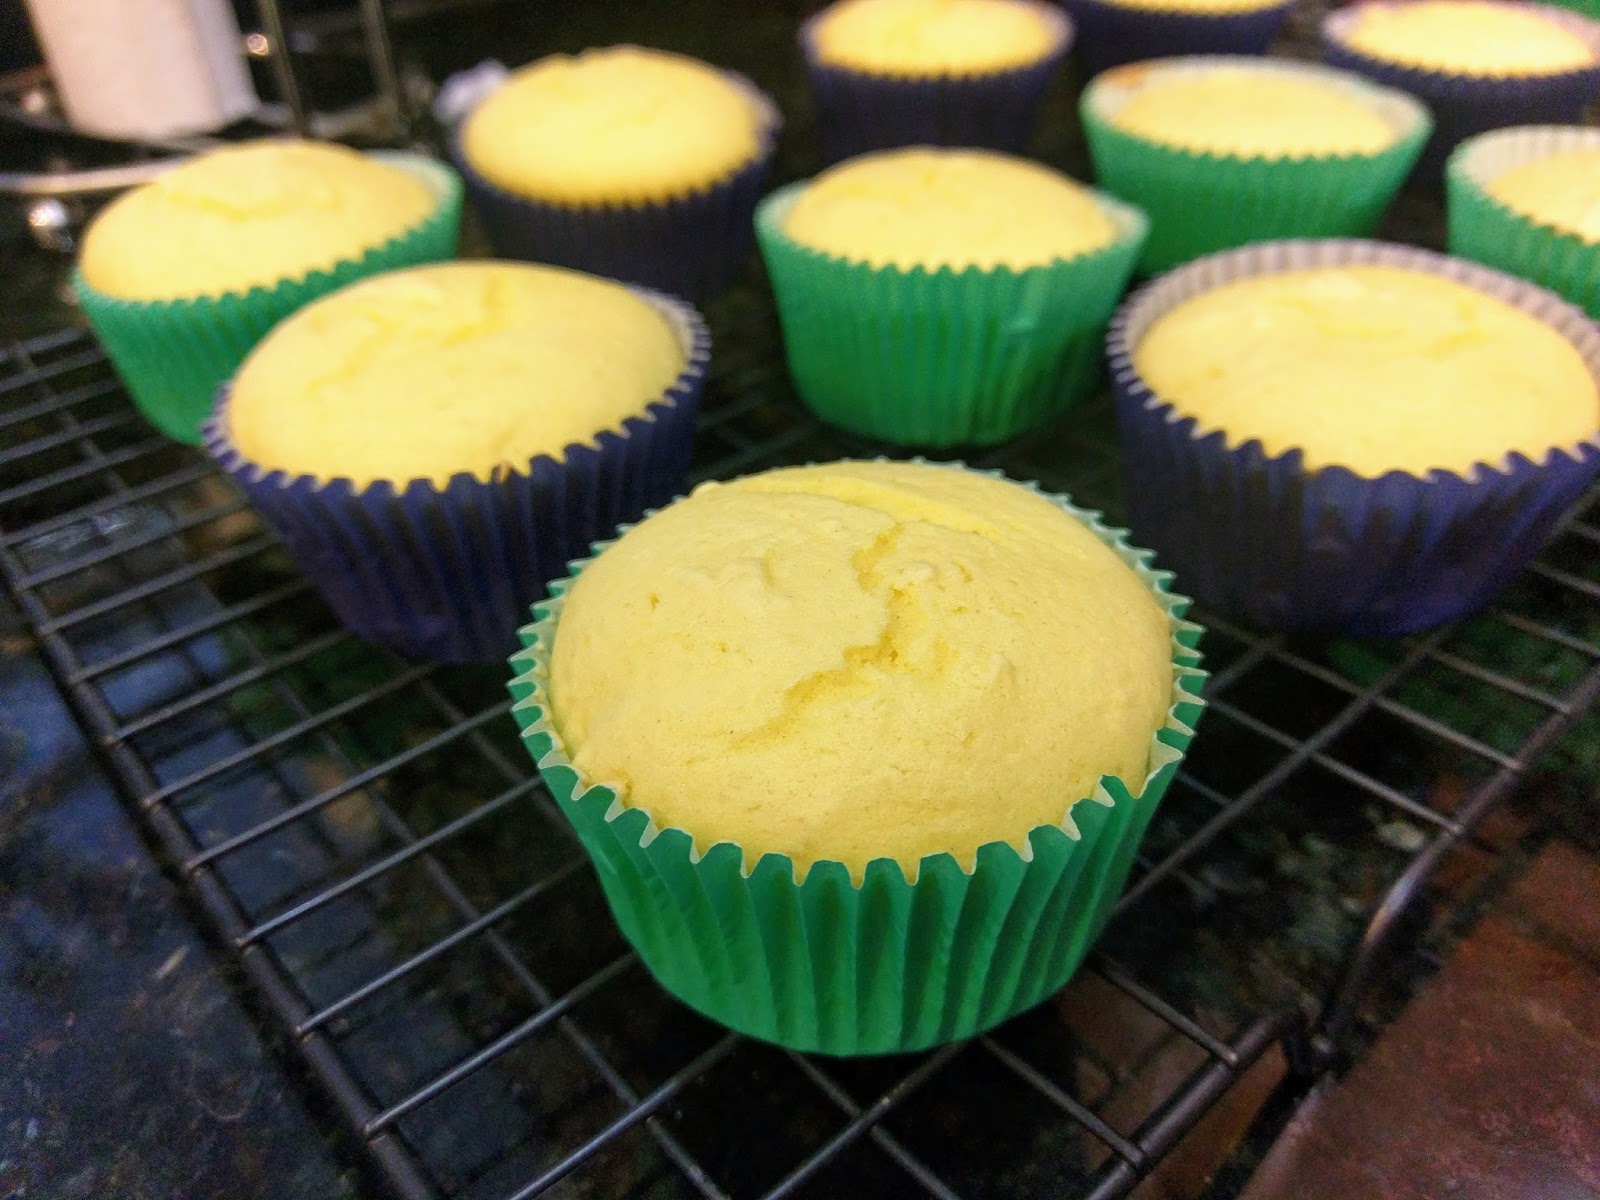
I’d like to thank the good folks at Coca-cola for making this possible. To make the cupcakes, all you need is a box of lemon cake mix, 2 egg whites, and 10 ounces of Sprite Zero or other diet citrus soda. Preheat your oven to 350 and line a muffin tin with cupcake papers. Mix together the egg whites, soda, and cake mix for 2 minutes on medium-high. Take a cookie scoop or a tablespoon and plop the cupcake dough into your liners, filling 2/3 of the way full. Bake for 12-15 minutes until a toothpick comes out clean.

They will both look and smell lemony. 
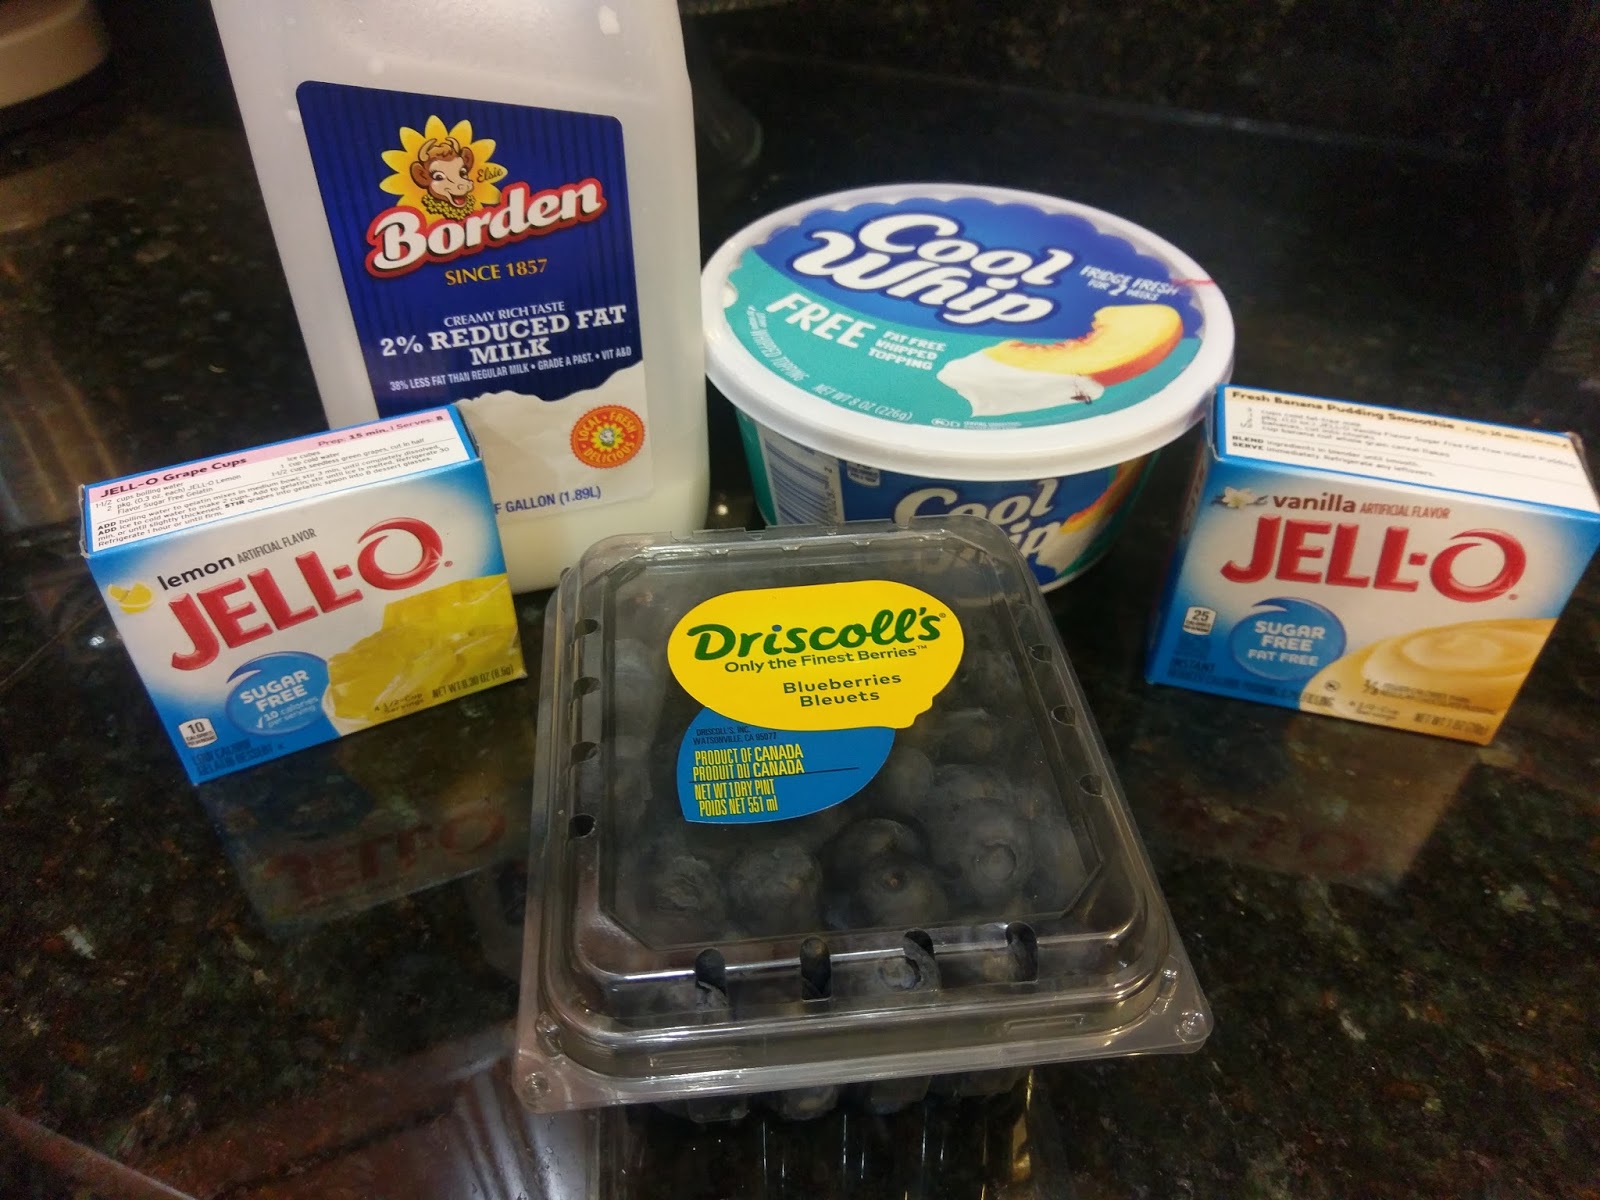
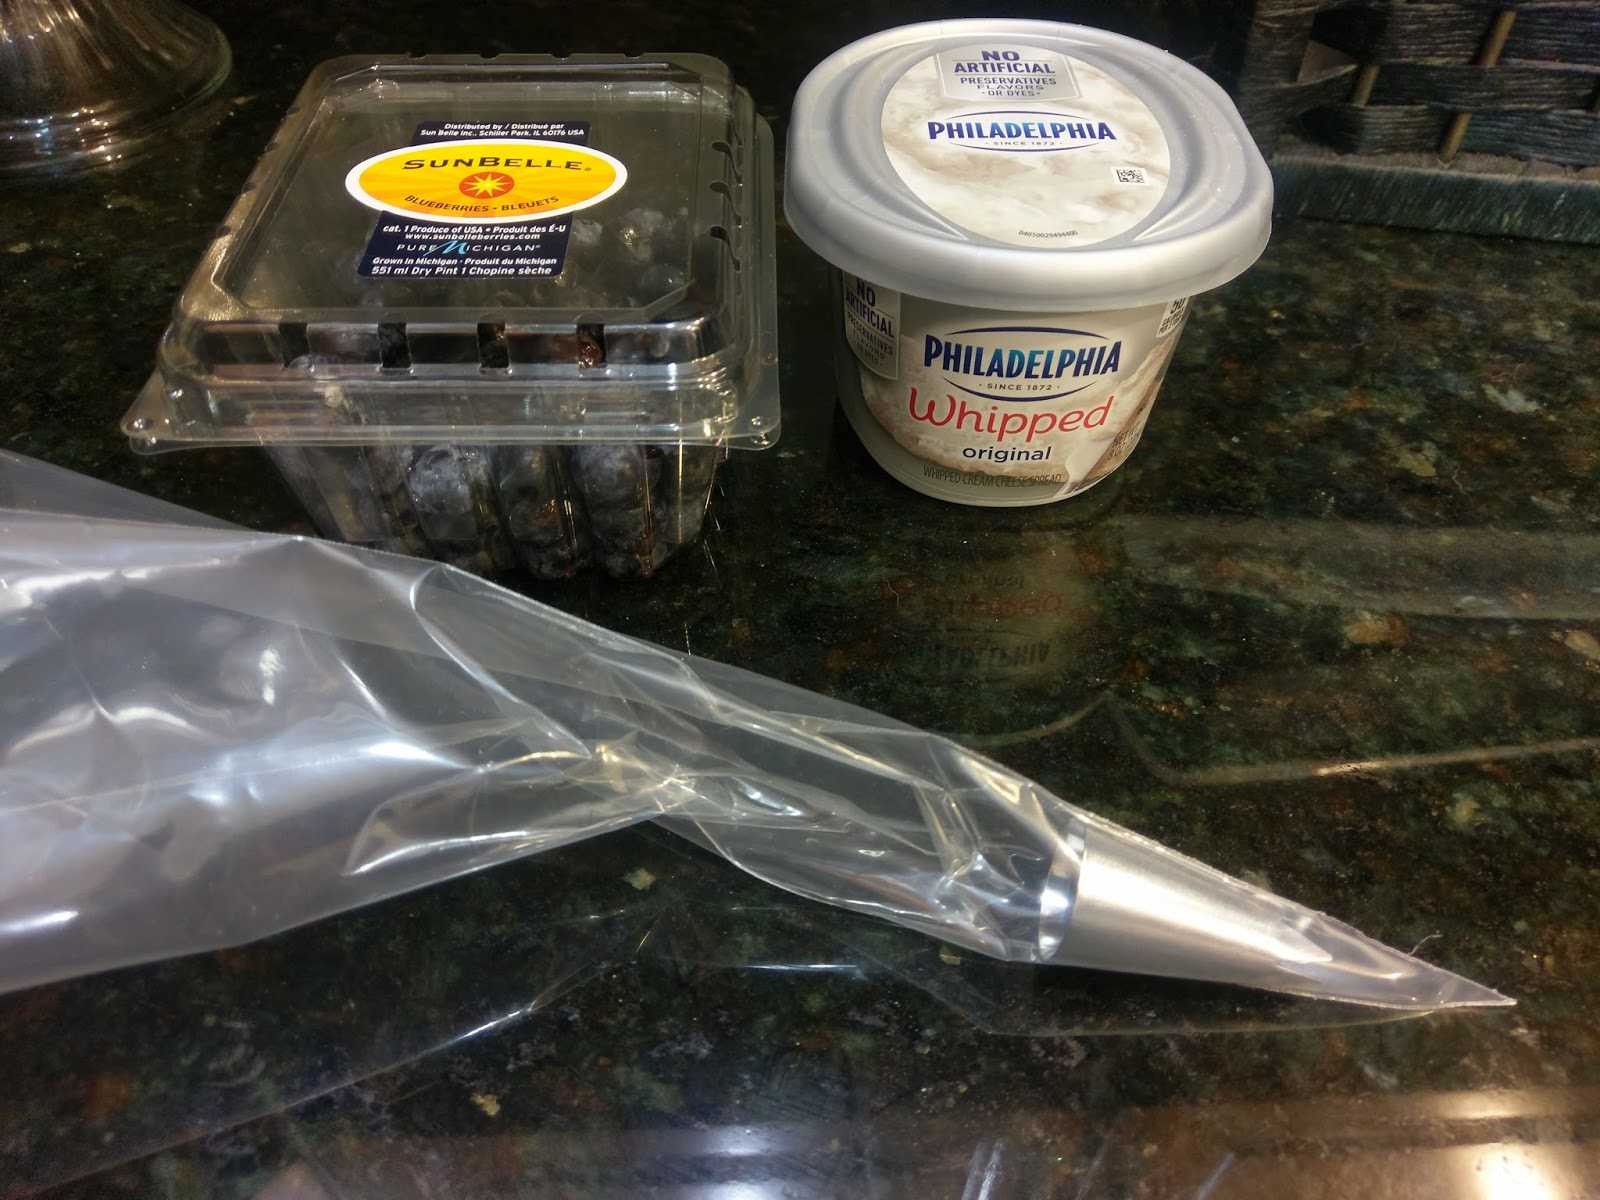
Fattest. Blueberries. Ever. Let your cupcakes rest in your pan for 5 minutes and then remove to a cooling rack to allow to fully cool. Meanwhile, you can gather up the filling ingredients:
- 1 cup of skim milk
- 1 box of sugar free vanilla pudding
- 1 box of sugar free lemon Jello
- 24 blueberries
- 4-6 ounces of Cool Whip Free
I had to do some mad science because I couldn’t find sugar free lemon pudding; if you can, omit the lemon Jello and make the pudding following box instructions and ingredients. But because I could not obtain lemon sugar free pudding, I had a hypothesis to test–can Jello and Jello pudding be mixed together? Differing temperatures, differing consistencies…it was risky, but ultimately, the answer is a resounding hell to the yes. Go, Science!
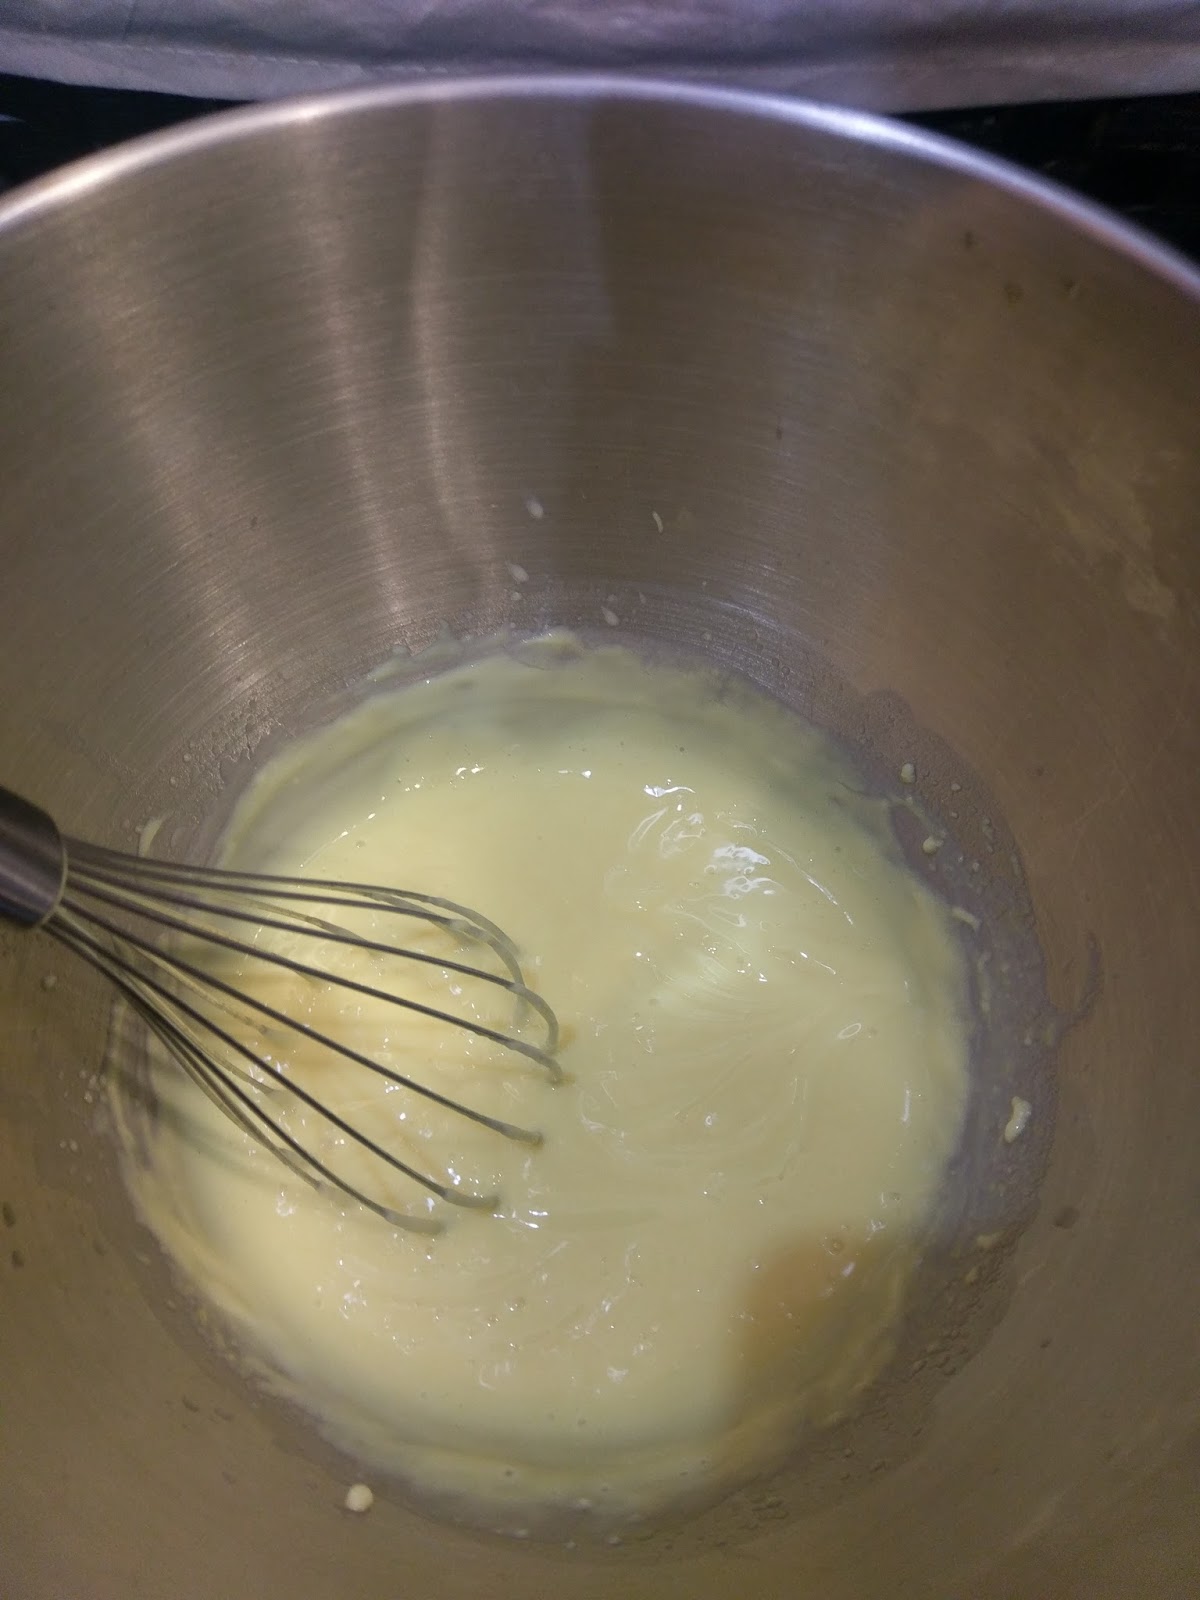
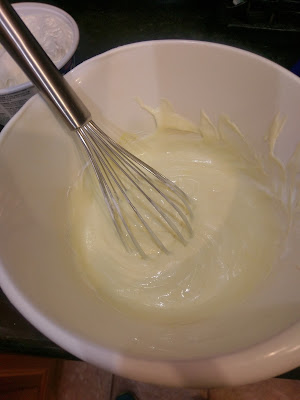
Not urine. Promise. I brought two cups of water to a boil and then turned off my burner. I stirred in the lemon Jello for 2 minutes with a whisk. I then placed this in a measuring cup and put it in the freezer to cool. You don’t want the milk in your pudding mix to curdle, so definitely let this cool to a little above room temperature.

My whisk was working hard that day. Then I dumped my vanilla pudding mix and one cup of skim milk into a cold mixing bowl. I whisked until my arms almost fell off. I’m told by box instructions and a kitchen timer that 2 minutes of pure cardio whisking is about all my fragile, bird-like limbs can handle.

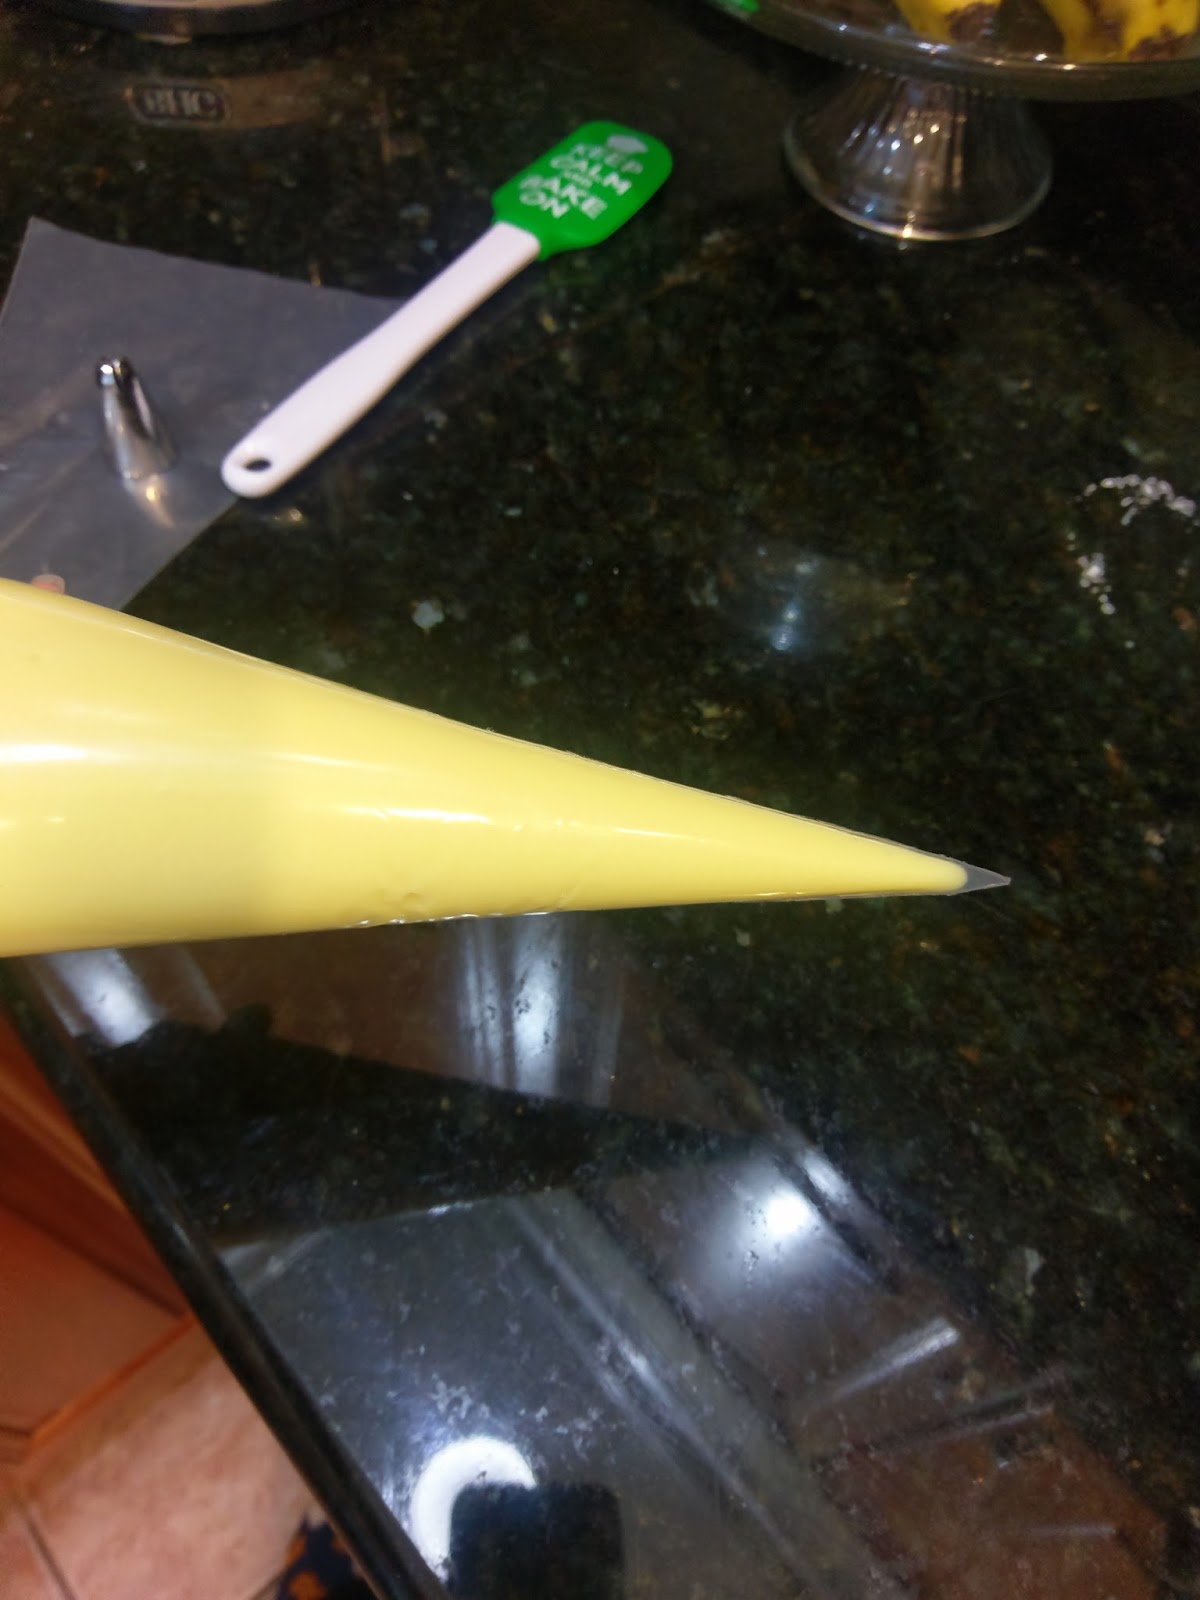
Worth it. Once my Jello had cooled in the freezer, I poured a half a cup into my pudding mix, whisked until incorporated, and then poured another half a cup into the pudding mix, blending well again. You will have another cup of lemon Jello leftover, so pour this into a bowl, cover with plastic wrap, and enjoy the feeling of eating hospital food at home and have it with your lunch. Let your lemon Jello/vanilla pudding mix rest for about 10 minutes to firm up and then place into a piping bag or a Ziplock bag. Wait to snip the end off for right now.
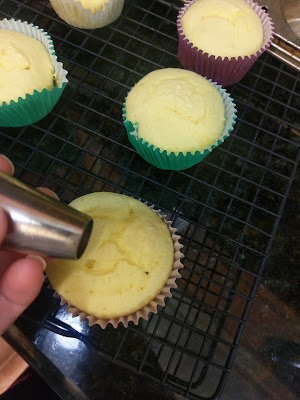
Now, back to the baked goods. Once your cupcakes are completely cool, take a cupcake corer, apple corer, or be janky like me because I don’t have these things and use a large round frosting tip to core out the middle of your cupcake and make room for that delicious science experiment we just successfully implemented in the previous steps. I wiggled my piping tip halfway into the cupcake and gently pulled it out of the cupcake to remove the center:
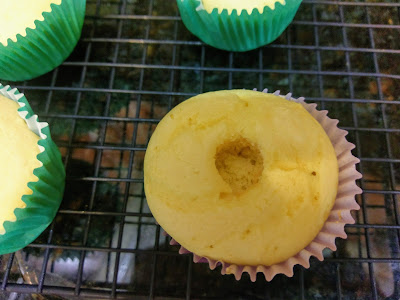
Excellent reservoir for pudding filling. Then I grabbed my piping bag of filling, snipped the end off, and filled each of my cupcakes to the brim!

And I was so, so happy there was leftover filling. Much like the lemon Jello, you’ll have some leftover filling. Works great after lunch with a dollop of Cool Whip Free, or straight out of the piping bag and into your mouth. I’ve tested both options out, and personally, I love it either way. Definitely classier to eat it out of the bowl. Place your filled cupcakes into the freezer for an hour to firm up.

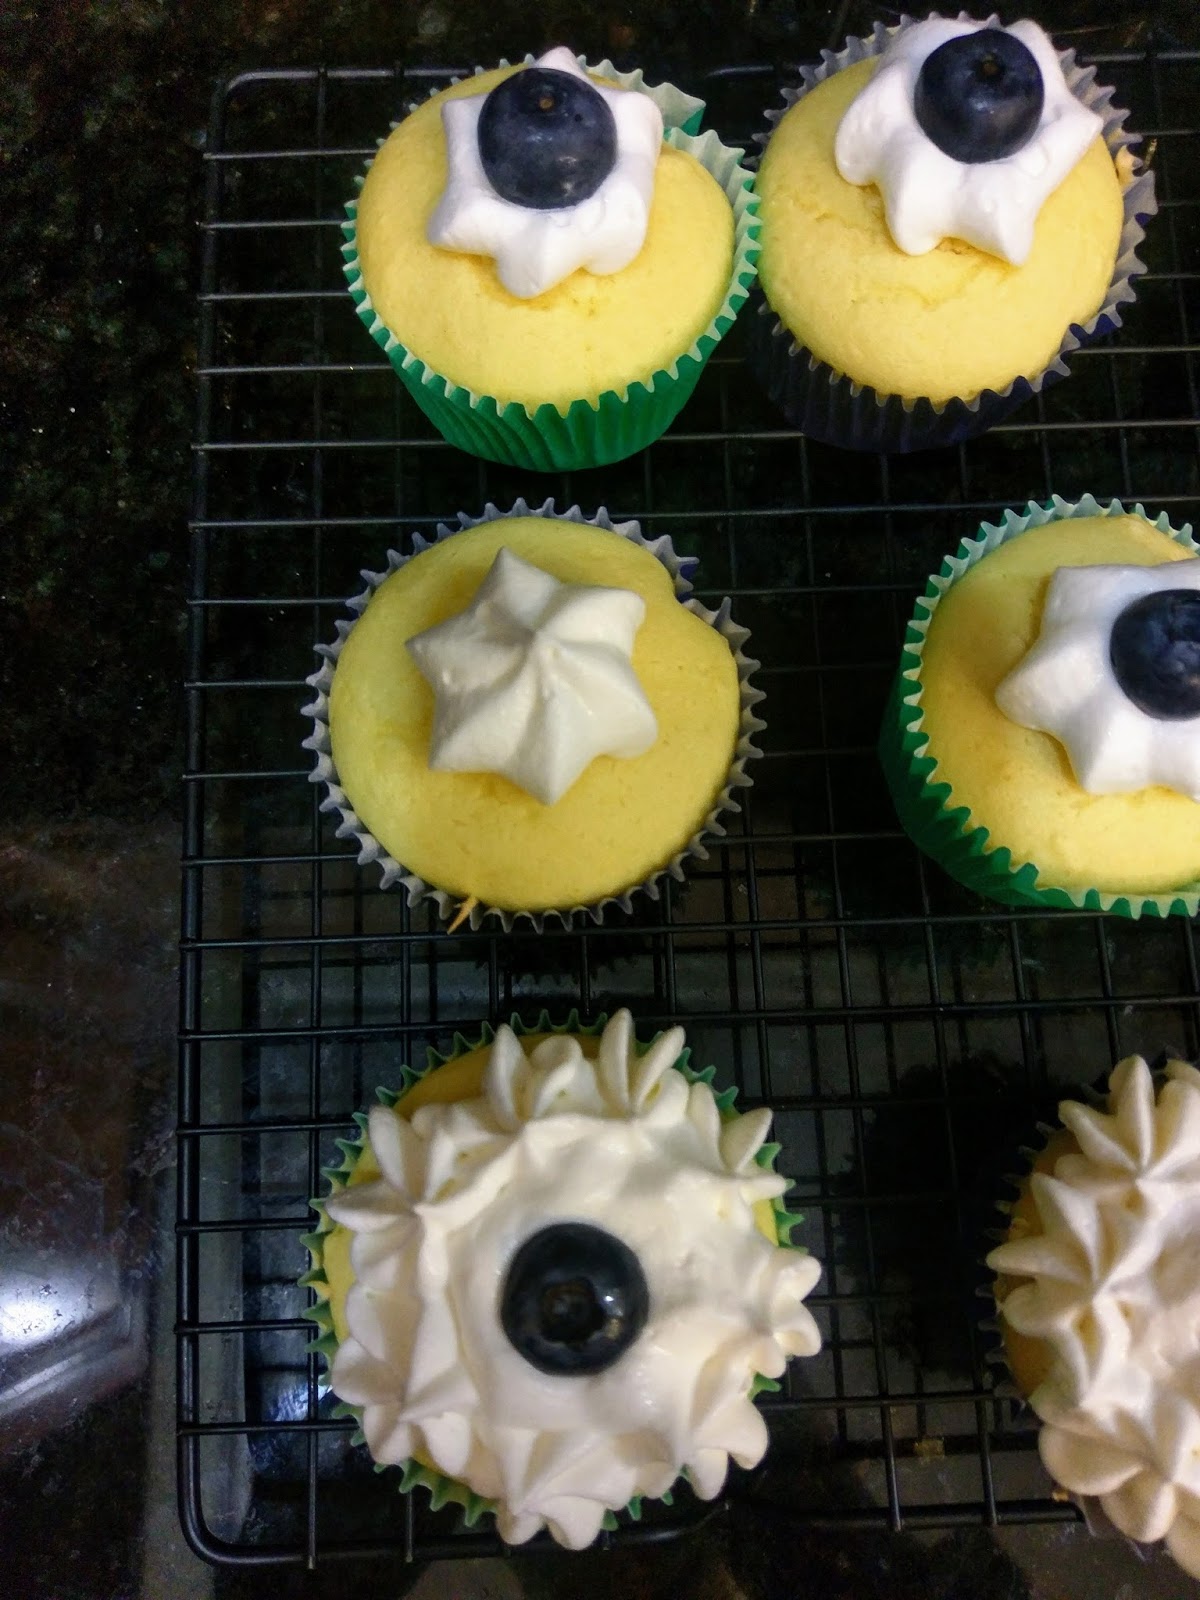
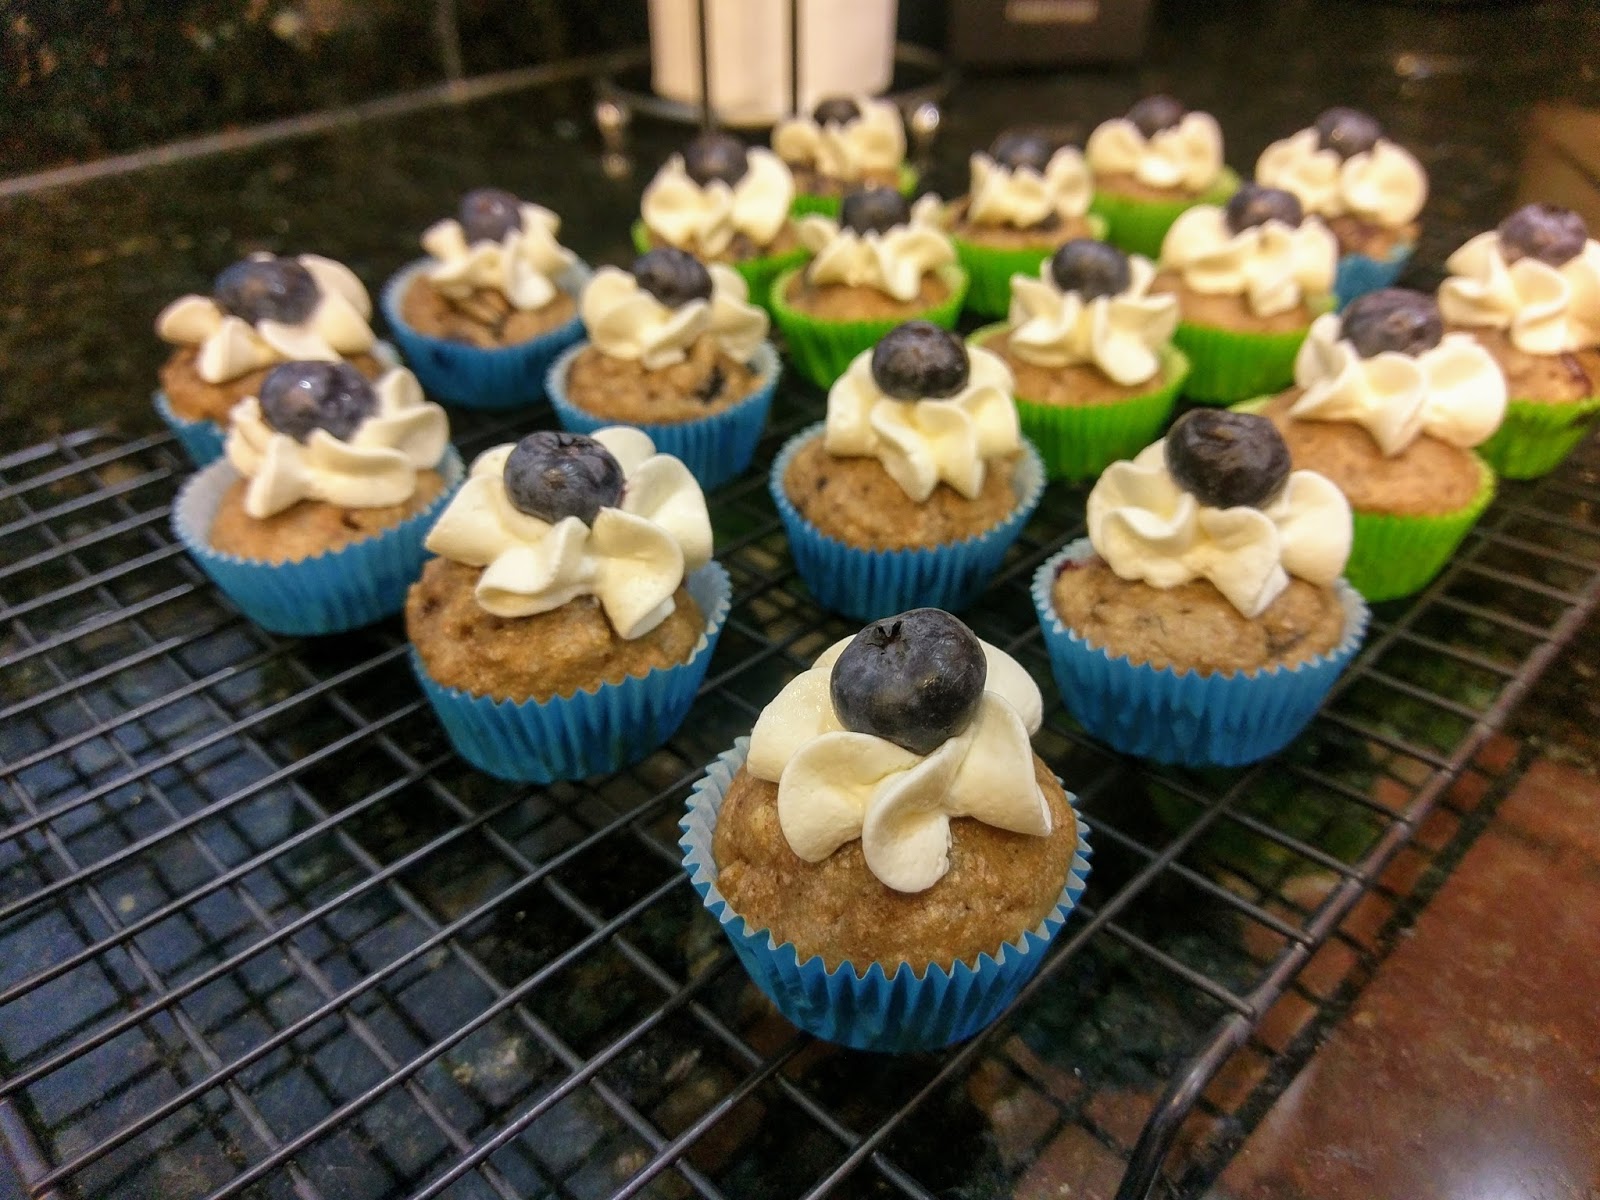
No method to this madness, however. Once your cupcake centers have set, load up a piping bag with a piping tip and Cool Whip Free. If you can find the sugar free lemon pudding mix, you can always blend your Cool Whip Free with another 3.4 ounces of sugar free vanilla pudding and a bit of milk. I used a 2D tip to just randomly pipe stars, hydrangeas, whatever my little heart desired in the moment, and finished up with a blueberry on top of each cupcake. I really, really just wanted to see how my lemon cream filling turned out…
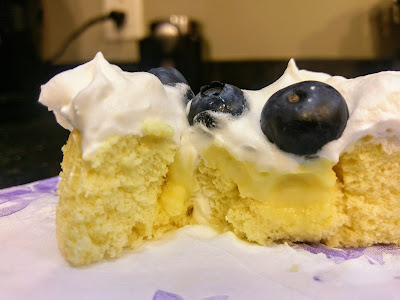
Mmm, lemony center… Oh yes, it was the perfect consistency after these sat in the fridge for a half hour to thaw out from their trip to the freezer earlier. Thick, but still liquid in consistency. Like a Boston cream filled donut, but in lemon form. I’m not lying when I say I feel like something that rich should be way more than 100 calories a pop, but I’m so happy they aren’t because I can shovel them away with reckless abandon. I love lemon flavoring, and these cupcakes are the best way for me to grin and bear the remaining days of summer. Hard to complain when you’ve got a mouth full of cupcake, after all. ‘Til next time, my fellow eaters!
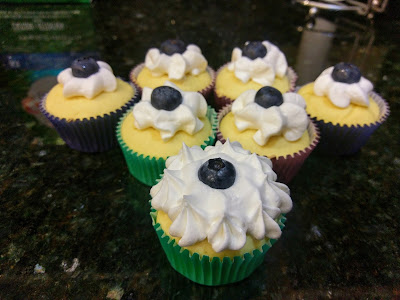
I could eat all six right now, just sayin’. -
Must Love Pupcakes
Did you know that dog food gets taste tested by humans? I start this blog off with that particular tidbit of information because the recipe I’m about to show you is definitely for dogs, but it looks good enough for human consumption. I’m not gonna judge you if you make these for your beloved pooch and accidentally snag a bite. Your dog might though. I always make my dogs a special treat for their birthday, whether it’s cookies, cakes, or pupcakes, Hank and Freyja probably get more decadent treats than most people do on their special day…considering my husband and I belong to the generation of Millennials that bought a house just to have dogs, this really isn’t all that surprising. I love my dogs and spoil them accordingly. I will show you photo after photo of how adorable they are, clog up your news feed with said photos, and continue to remind you regularly that dogs are the best thing to ever exist. But no, in return, I really don’t want to look at your actual baby’s photos. Unless your baby has 4 legs. And cute snout. And is definitely a dog. Then we’re good. Remember, your kids are only adorable to you and your immediate family, but dogs are adorable to everyone. I will, however, also accept photos of your kids with dogs; this is the one exception to the rule.
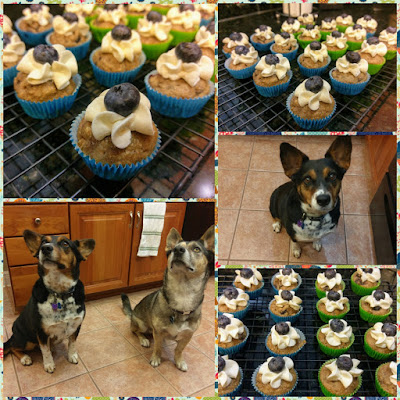
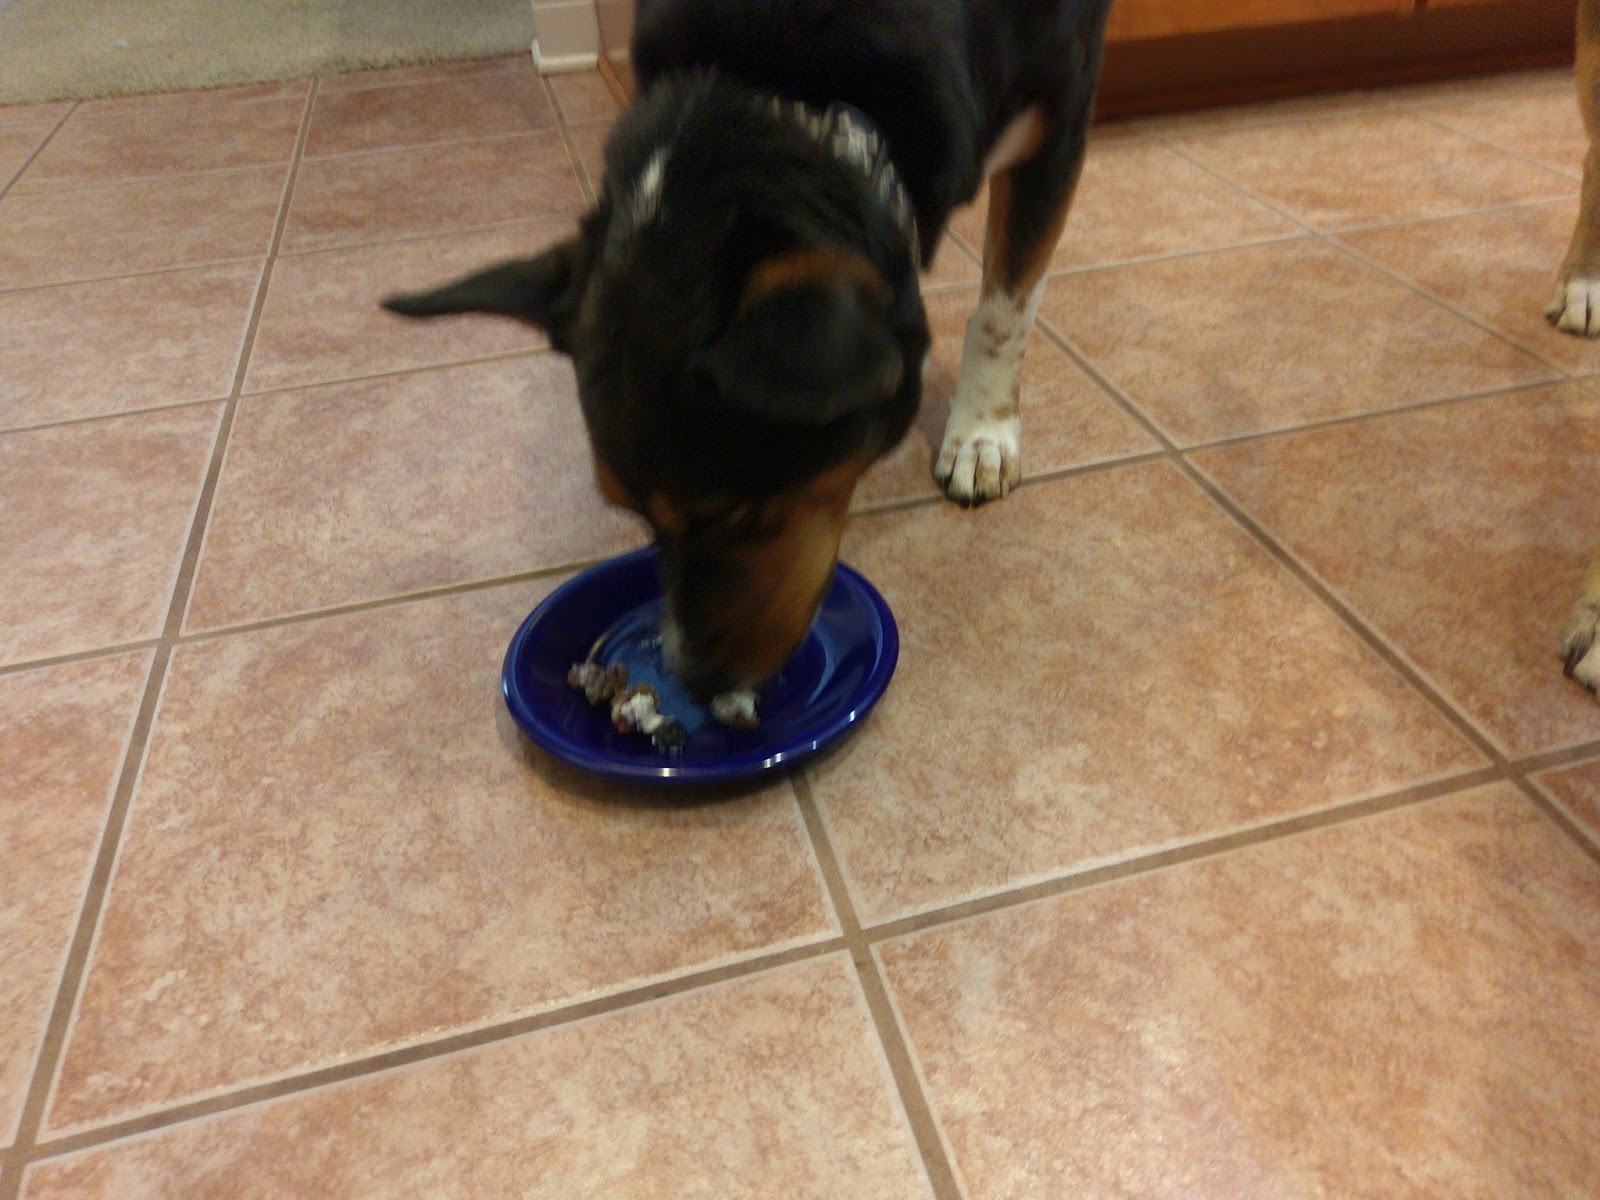
I just hope your child’s ears aren’t as big as my kiddos are. Blueberry mini pupcakes–the dogs essentially told me these were a hit by devouring a few in under 15 seconds. I had them each try a blueberry before I made these to make sure they’d like them. Hank inhaled it. Freyja looked at me like I had betrayed her with this tiny sour ball that most definitely was not the peanut butter she was hoping for, but ultimately, she ate it. While I don’t do calorie counting for dogs (yet…), I limit these to 1 and 1/2 pupcakes per dog, per day, mixed in with a little less kibble for dinner. The recipe yields 18 mini pupcakes total and is an absolute cinch to throw together for your four-legged companions (or yourself…).

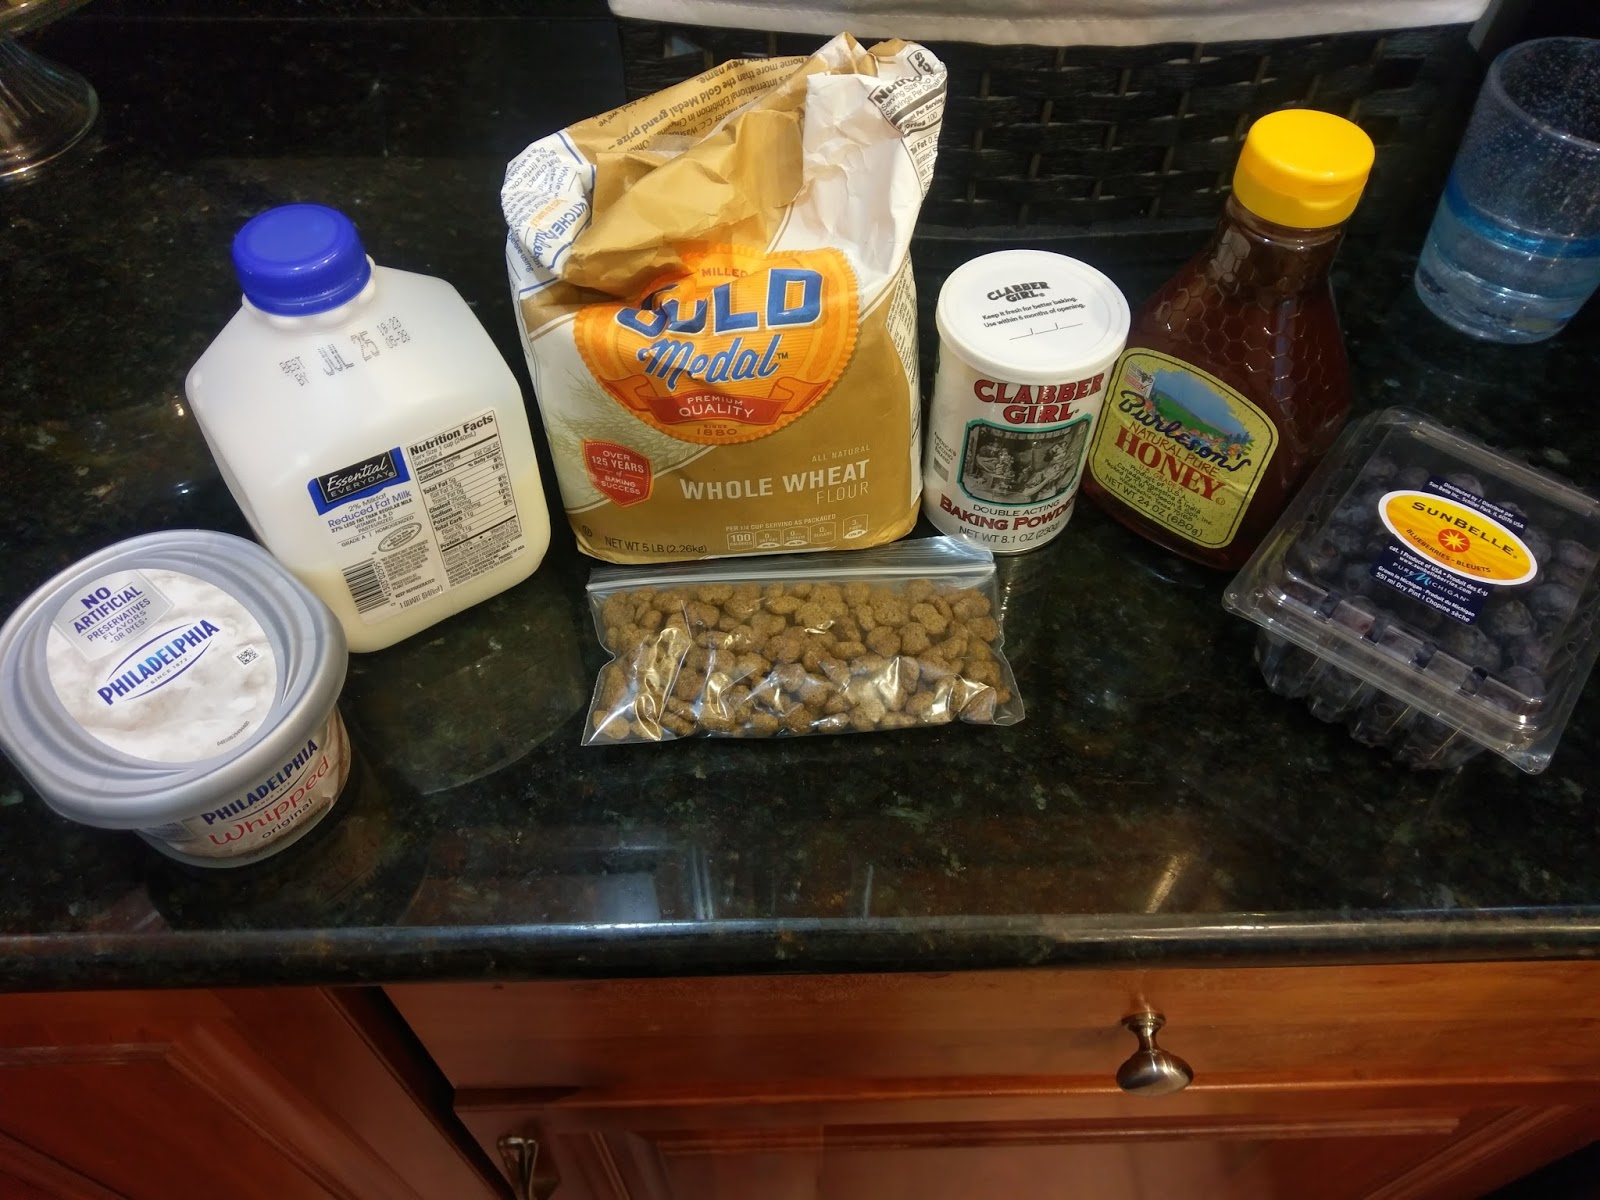
I mean, minus the dog food, this is all good stuff to eat! You only need a few staple pantry items and some blueberries to make these. I adapted this recipe. Round up:
- 3 tbs crushed dog kibble
- 1/3 cup plus 3 TBS whole wheat flour
- 1 tsp baking powder
- 2 tsp honey
- 1 egg
- 1/3 cup skim milk
- 2/3 cup fresh blueberries + 18 blueberries for garnish
Start by preheating your oven to 350 and line a mini muffin tin with mini cupcake papers. Lightly grease your cupcake papers. Alternatively, you could reaaaallly grease up your mini muffin tin and skip the liners all together.

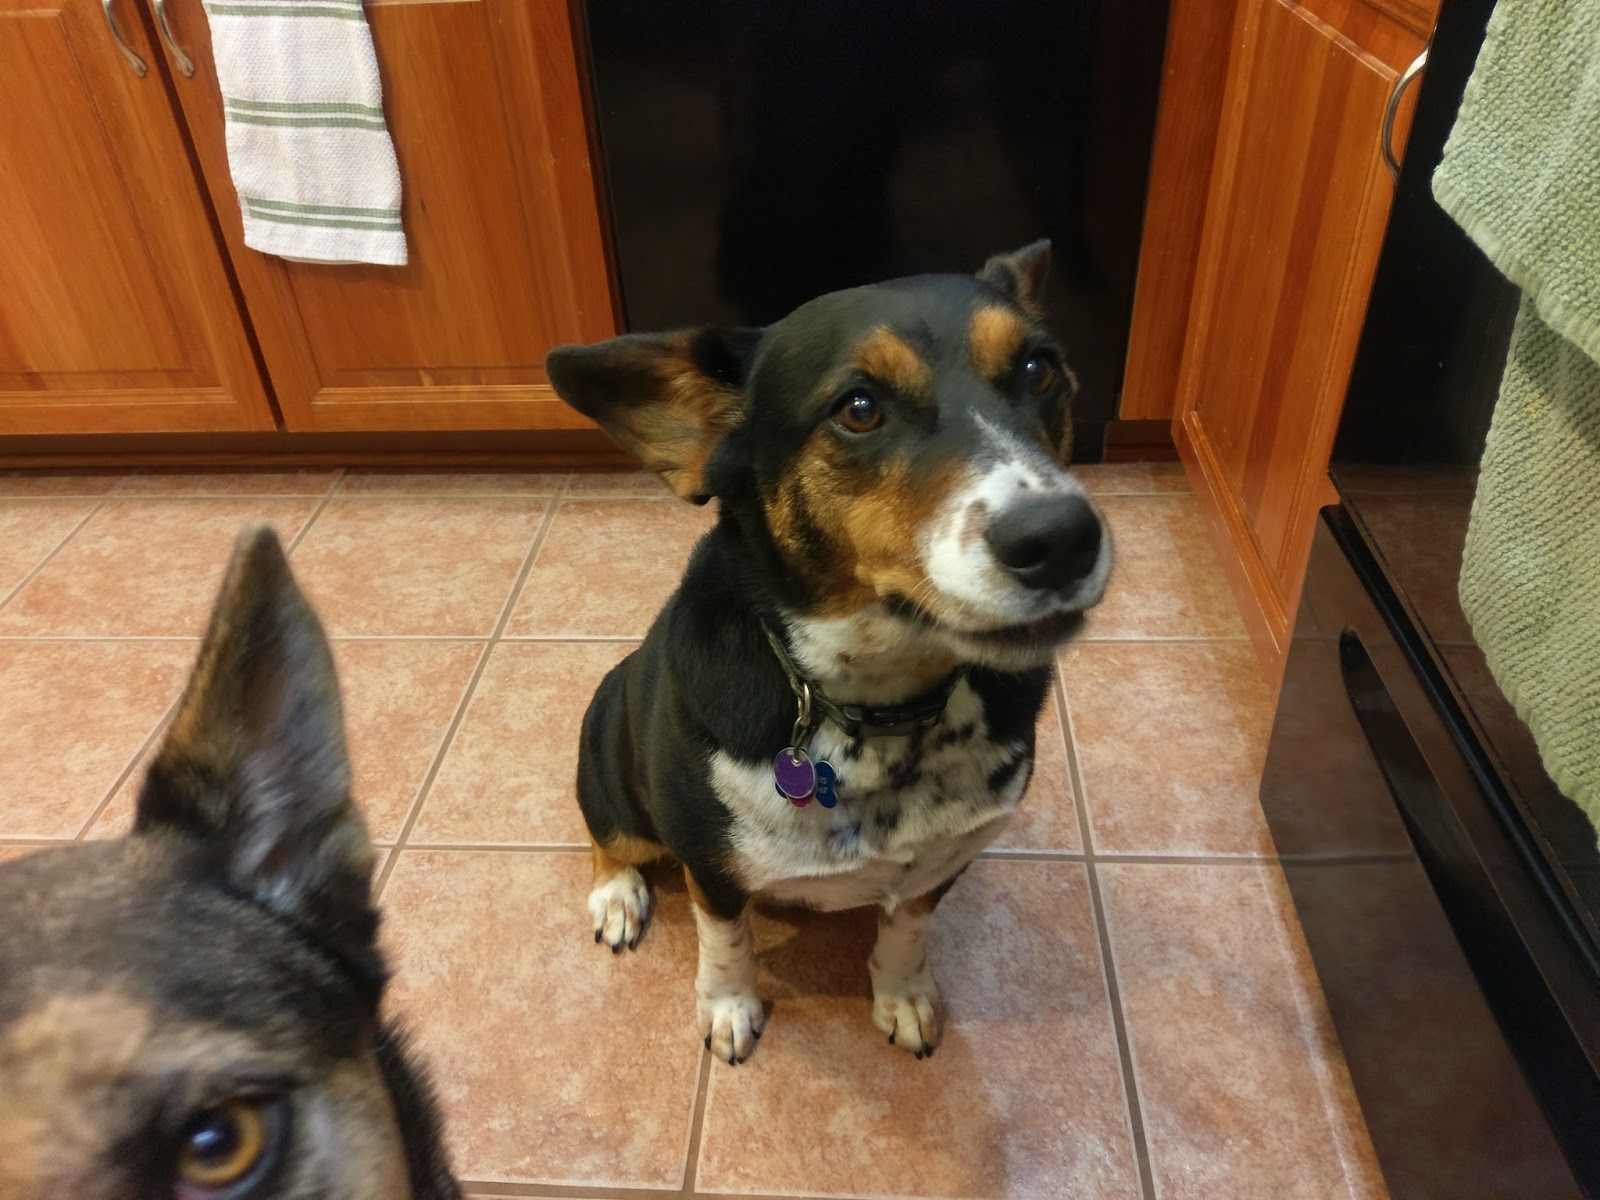
Ensure you have a good buddy on hand to clean up any floor spills. Mix together the crushed kibble, flour, and baking powder in the bowl of your stand mixer. I turned around after doing this to see Hank (as pictured above) and knew in that moment he had figured out whatever I was making, it was definitely for him. He’s smarter than most of the people I know, I swear. Dump in the milk, egg, honey, and blueberries to the dry mix and blend for a minute on medium high. You want the berries to break up a bit so the doggos can chew them easily.
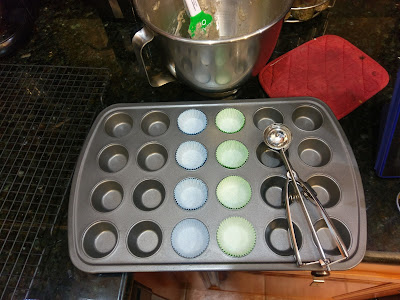
Now, take a cookie scoop, and grease it well. 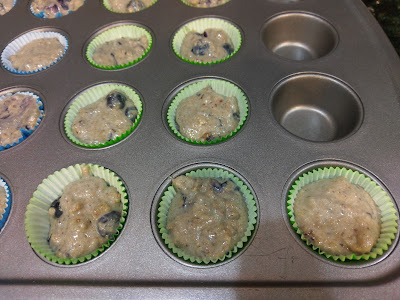
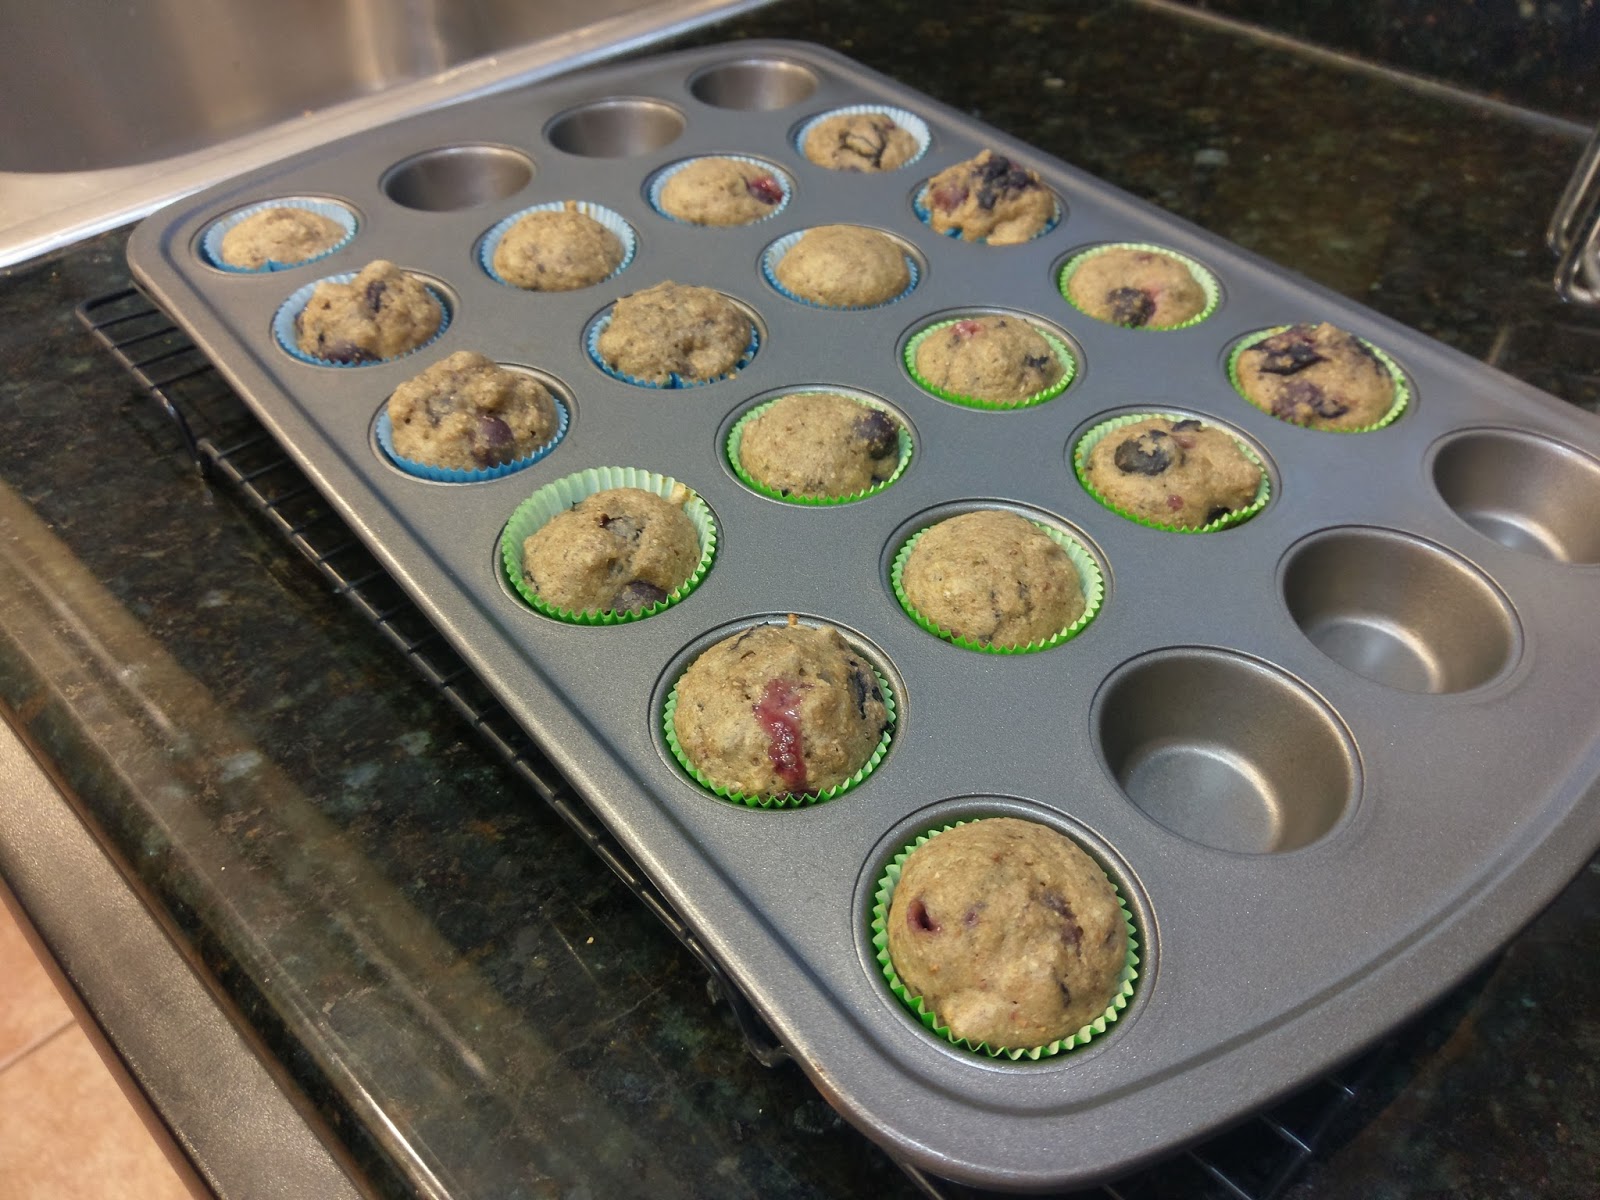
These don’t bake up much, so fill a little over 2/3 full with the help of your cookie scoop or a tablespoon scoop. Since these mini pupcakes are, well, mini, they only need to bake for about 10 minutes in the oven. Test with a toothpick–you shouldn’t have any batter come out on a cooked pupcake. Avoid aiming for a blueberry cluster when you test though. Unless you like to lick blueberry juice off a toothpick. And I do. So I may have done this “test” a couple times.
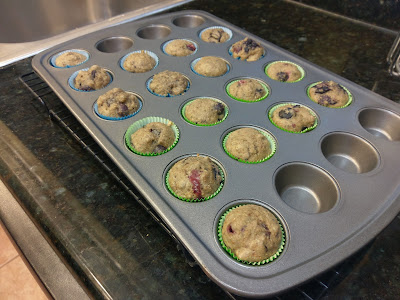
Let rest on a cooling rack for 10 minutes. 
Then remove and allow 30 minutes to fully cool, all the while marveling that these look like tiny blueberry muffins and definitely something you want to try a bite of. 
These are definitely safe for your consumption. To frost your pupcakes, fit a piping bag with a 1M tip, and load the bag with a little bit of whipped cream cheese. I simply piped little stars on top of my pupcakes by holding the bag directly over the pupcake and piping a small mound on top:
And they were super tiny and super adorable. I could probably fit four of these in my mouth at one time. I know my dogs would double that. 
Finish off by gently pressing a blueberry into each star. 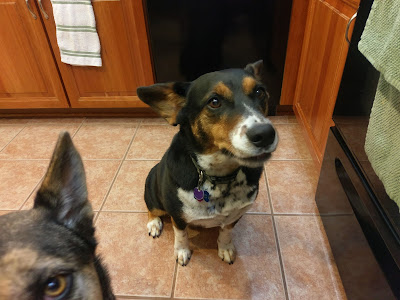
“Mother, I am hungry.” Once frosted, keep these in the fridge until ready to serve at your dog’s birthday party, obedience school graduation, dog wedding, or whatever other ridiculous shindig we dog folk continue to come up with every year to celebrate our beloved canines. Be sure to unwrap these before serving to your pup. They definitely aren’t discerning when it comes to eating paper…I mean, they kinda have a reputation for it. No one ever said their cat at their homework, after all. But I promise you they will love them, and they will show this love by burping in your face directly after eating them and then licking you to death with blueberry kibble breath. And it will be wonderful, because dogs just are.

It’s blurry because he was wolfing them down like he hadn’t eaten in days (it had literally been an hour since his last meal). Hank turned six(ish..rescue dogs don’t come with birth certificates!) today, and I just want to stop time. No matter how many years I get with this dog, it will never be enough. He is my soul mutt, and when he looks me in the eye, my icy cold heart turns into complete mush. There is nothing I wouldn’t do for my dogs, including but not limited to: waking up at 5 a.m. to walk them 7 days a week, bake them fancy treats, brush their teeth every few days to recover from said treats, cuddle them with reckless abandon, let them sleep on me and refuse to move for fear of waking them, and basically give them more love than I ever knew I had in me. That’s the great thing about dogs–they are steadfast in how much they love you. A crappy day is always ended quickly when wagging tails and cold noses are there to greet you at home. The least I can do in return is spoil my dogs to what may seem a borderline ridiculous amount to some, but not to me–or to Hank and Freyja. ‘Til next time, my fellow eaters! Go cuddle your pups!
-
A Piece of Cake the Size of My Head
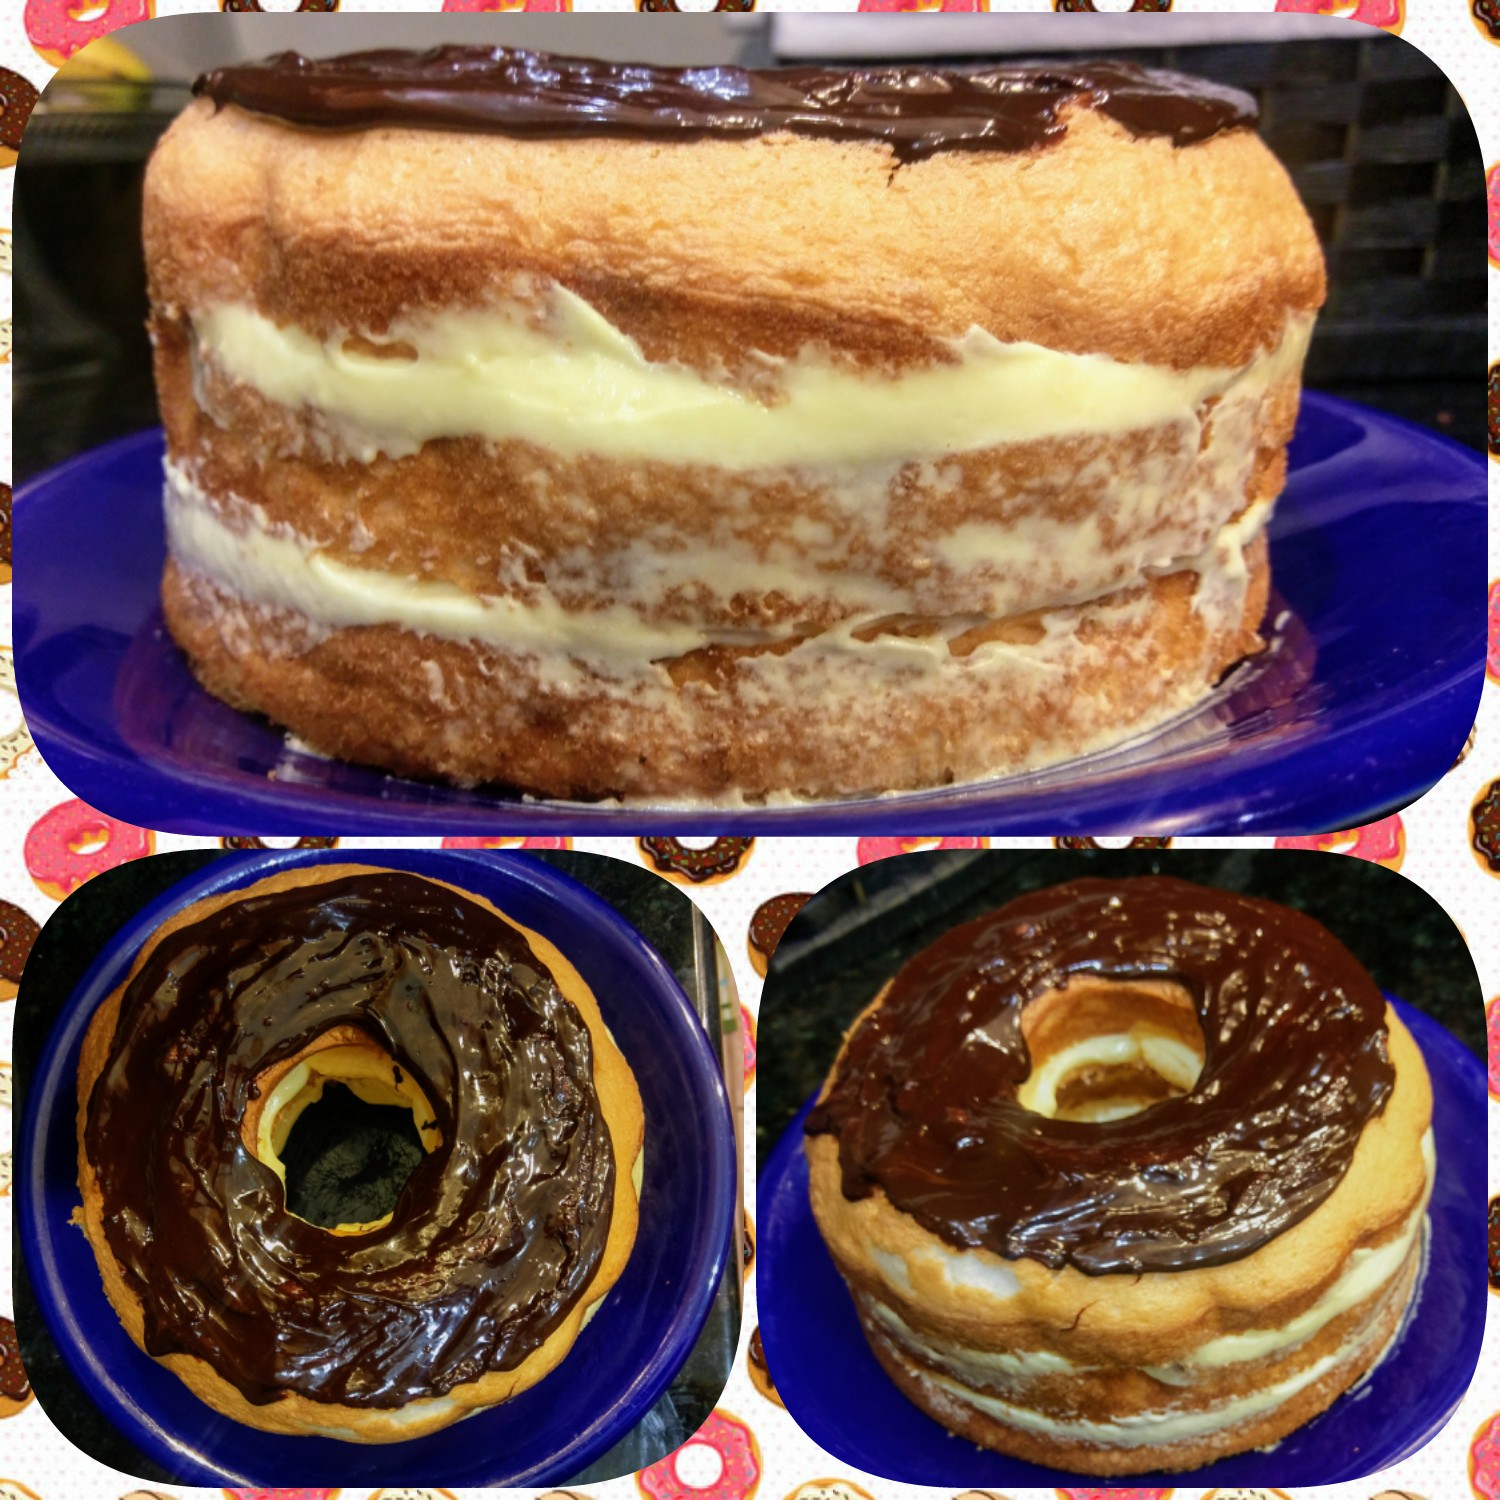
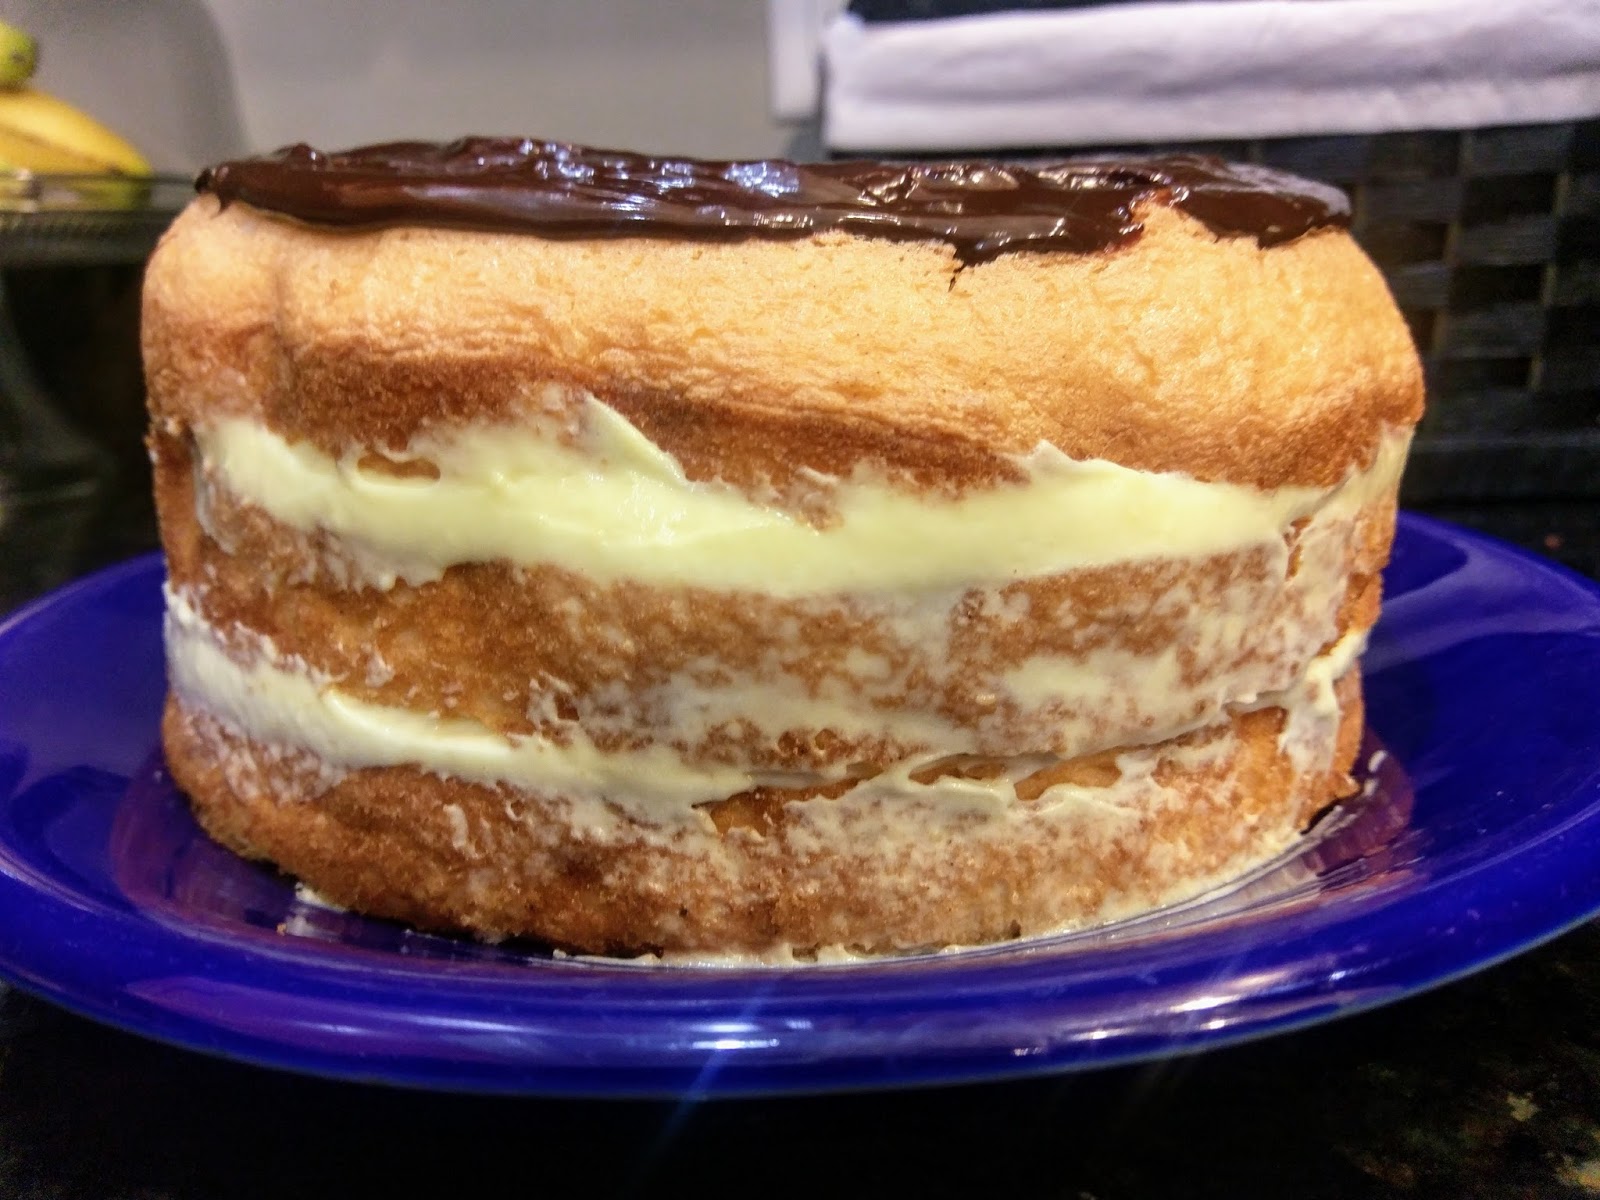
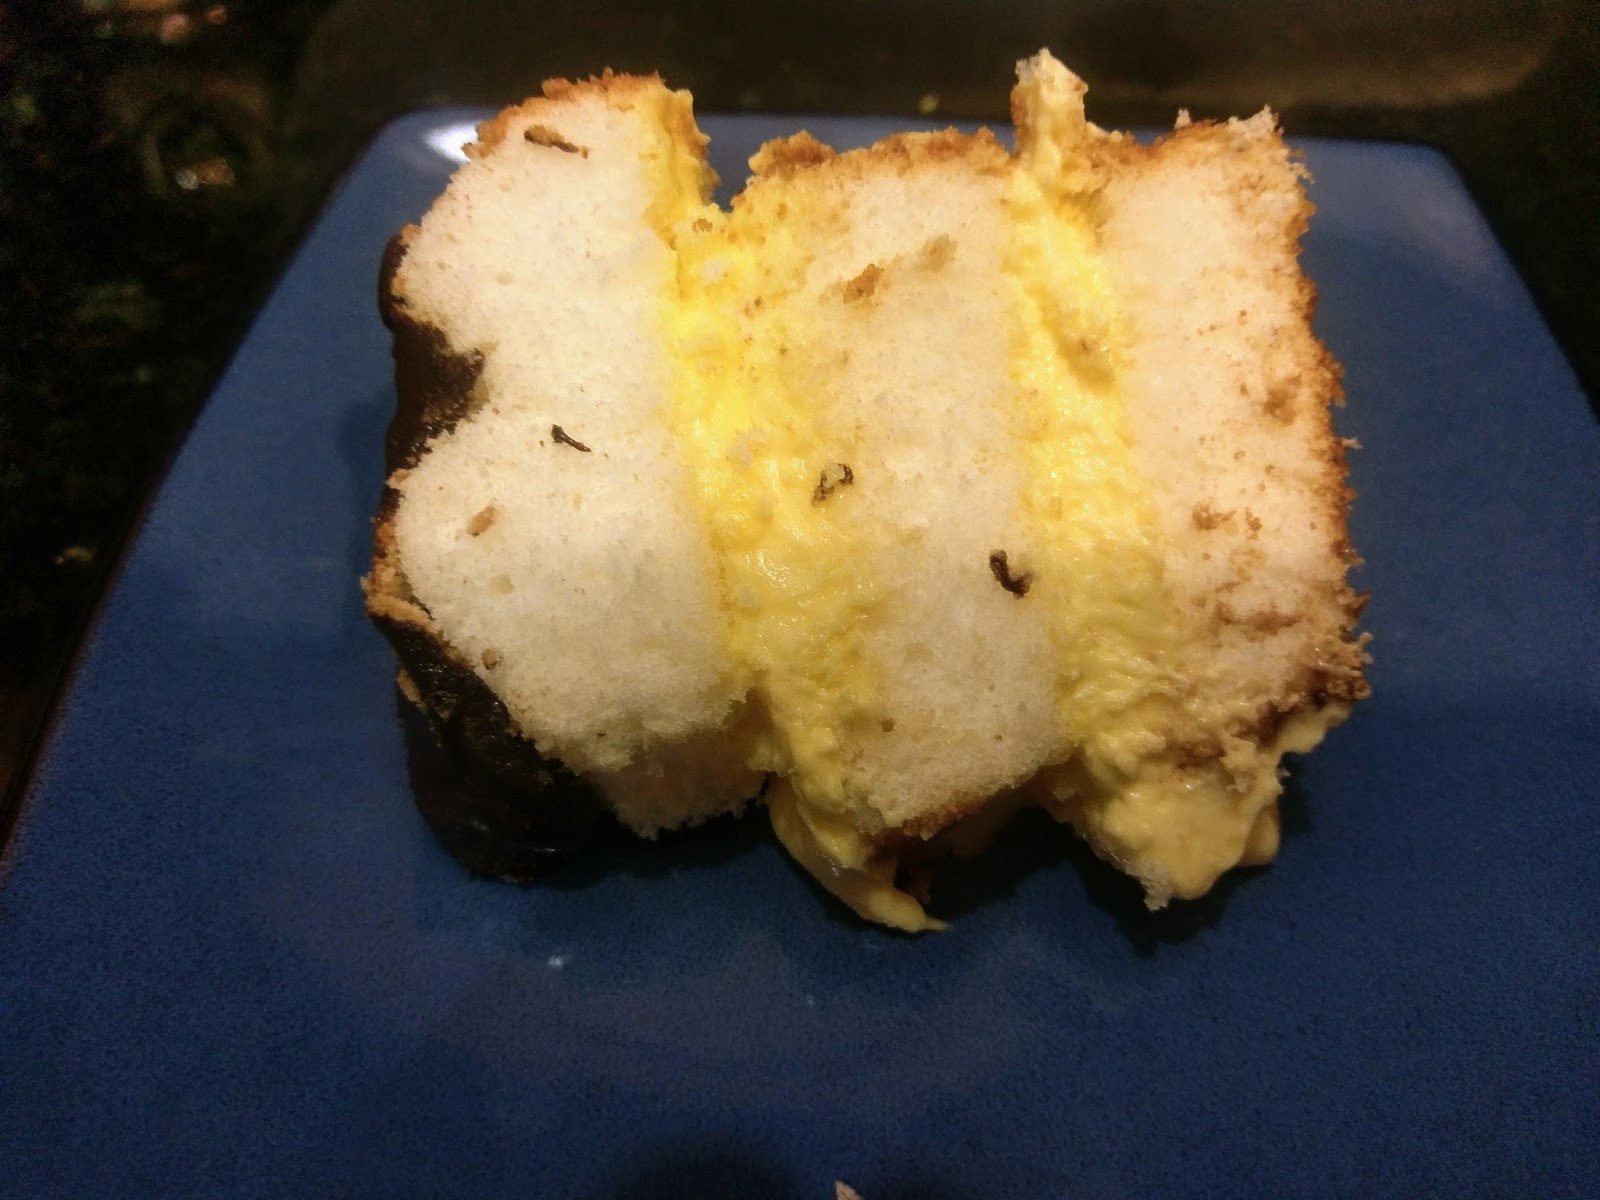
When I was but a wee child, I had an insatiable sweet tooth. I realize the irony in typing that as at the age of 30, I sit here eating cinnamon Graham Crackers topped with peanut butter. If you had told me when I was five that I’d still be eating the same lunch over two decades later, I would’ve been thrilled considering both my love of peanut butter and hatred of change. But the only thing I loved more than routine was eating donuts the size of my head or pancake stacks taller than me. Come to think of it, this still applies. The only thing different now is that I’m familiar with the concepts of guilt and feelings-eating (oh, the parallels!). Ah, to be an innocent, gluttonous child once more. I may still have the metabolism of a hyperactive child in a sugar-fueled rampage, but I try my best to eat healthy. I have been craving a Boston cream donut to the point where I get a little drool-y when I drive by a Dunkin’ Donuts, and I knew my sweet tooth/inner child was going to win out eventually. It was just a battle of wills between satisfying my donut lust while simultaneously still fitting comfortably into skinny jeans. In case you were wondering, yes, it is positively exhausting being this crazy. But the insanity sometimes results in pure genius–like this Boston cream angel food cake.

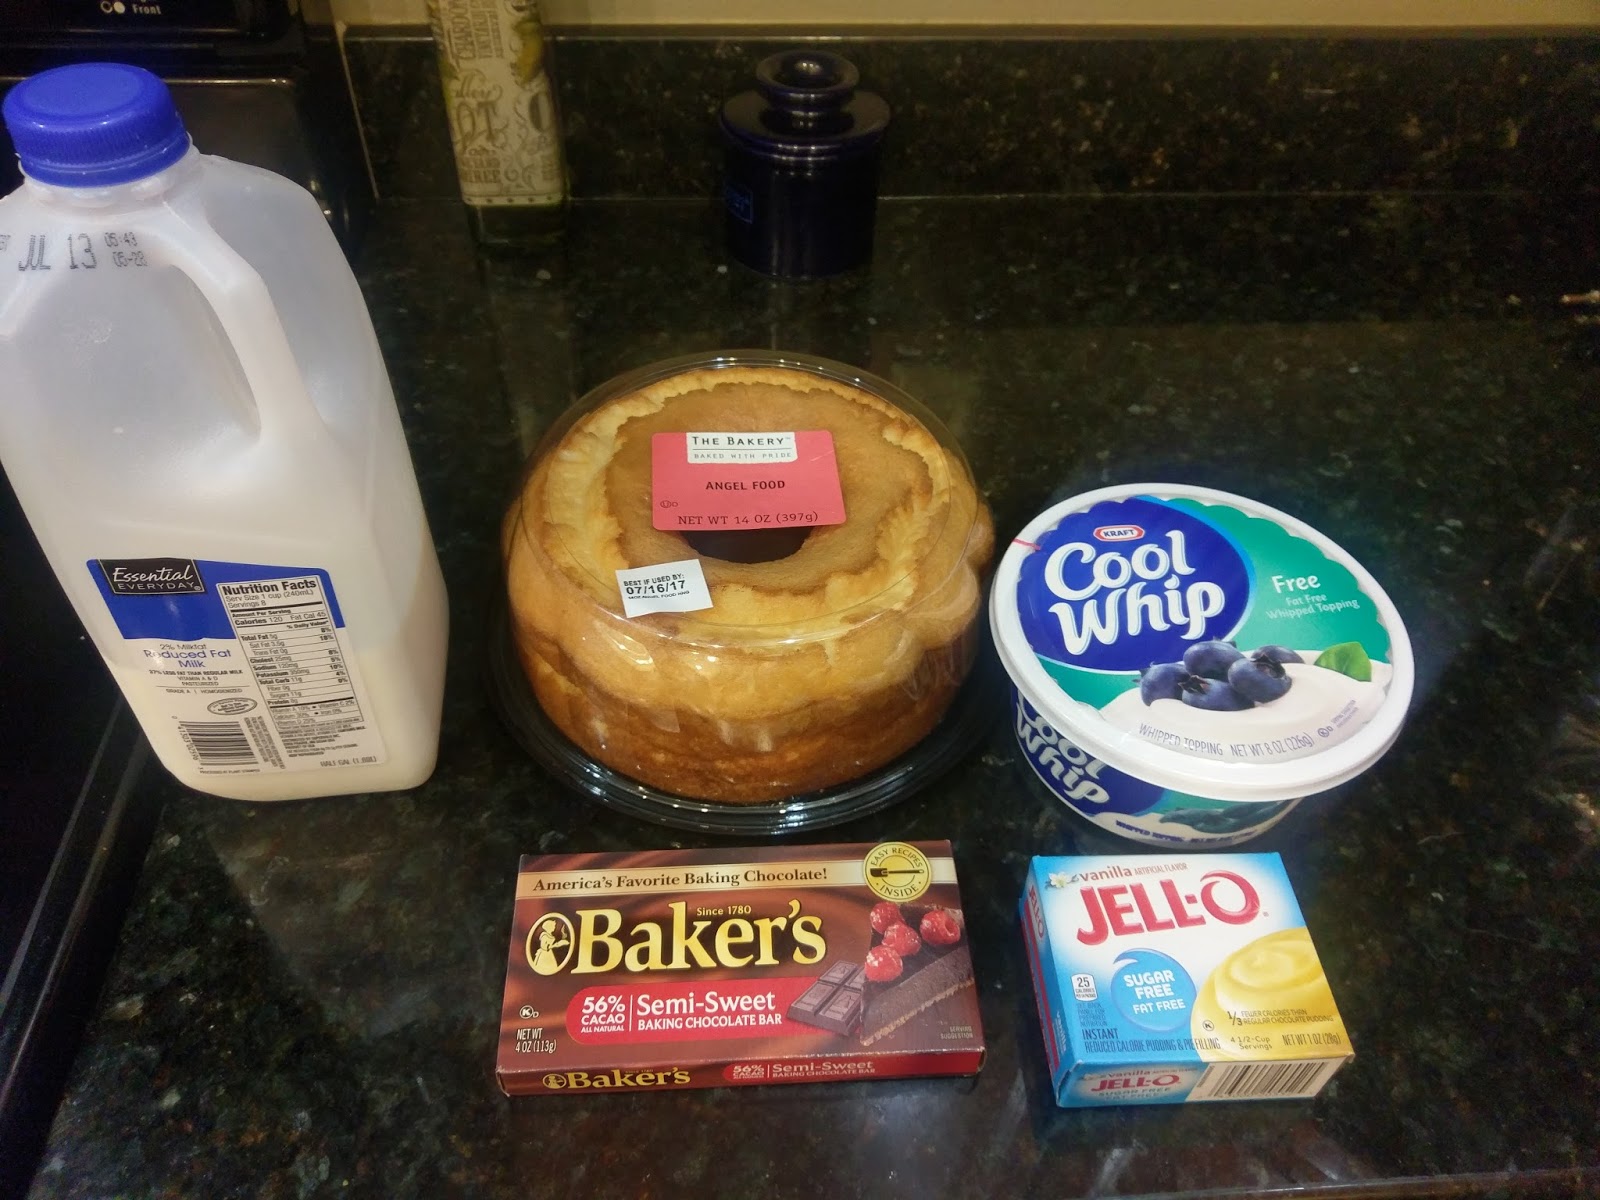
Even topped with chocolate glaze. I love angel food cake, but it is a nightmare to make. I don’t own a tube pan, so I have to make angel food cakes in my bundt pan. It is possible, and the experience will definitely make you believe in said angels when it turns out right, but sometimes, a quick trip through a bakery is all you’re willing to put up with. If you’re looking for the easiest thing you’ll do in your kitchen all week that results in cake, buy a premade angel food cake for this recipe. The other great thing about angel food cake is that it is unabashedly low in calories. By swapping out a few other ingredients, this cake is only 160 calories a slice for 10 slices total. What donut in the world can say the same? I mean, a slice of this equates to a piece of cake the size of my head–thus satisfying my inner child. And unlike eating a donut the size of my head, a slice of this cake doesn’t leave me praying for death or an unlimited supply of Tums after I eat it. What you might call a win, win.

Oh yeah, and only five ingredients to make! A lazy win, win. The worst part about making this Boston cream angel food cake was having to step foot inside of a Walmart to get a premade angel food cake. Thankfully, having to avoid being touched and/or breathed on by anyone else inside of a Walmart only occurs about once a year instead of weekly now that we don’t live in Clovis. Small sacrifices. To make this heavenly (see what I did there) angel food cake, you need:
- 1 angel food cake
- 1 package of sugar free Jello instant vanilla pudding
- 1 1/2 cups skim milk
- 1 cup of Cool Whip Free, divided
- 2 ounces of Baker’s Semi-Sweet Chocolate

And prepare for a photo montage! Mix the milk and pudding together with a whisk in a medium bowl for two minutes. I consider myself to be in really good shape, but my biceps were so, so happy after these two minutes were over. Mad props to my stand mixer for taking care of my dessert needs because if I had to whisk my desserts every week, I’d never eat any baked goods.
Whisk in half a cup of Cool Whip Free and set aside. 
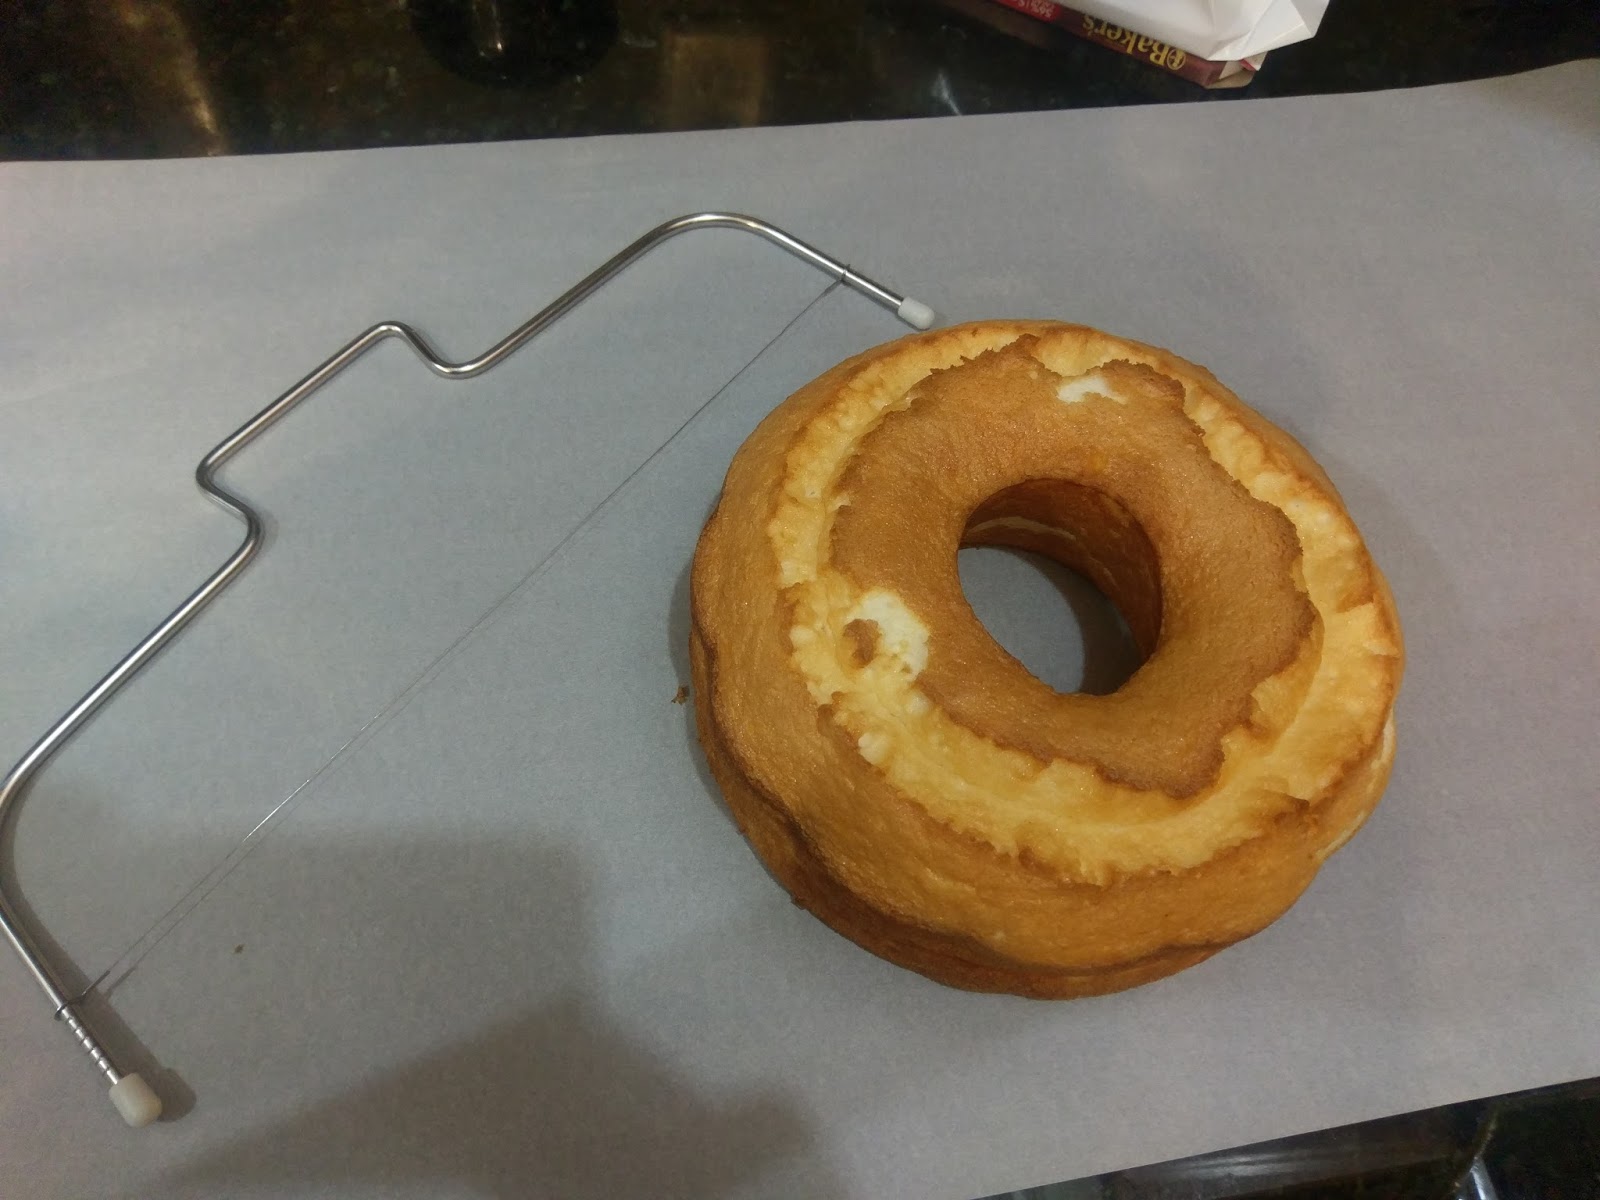
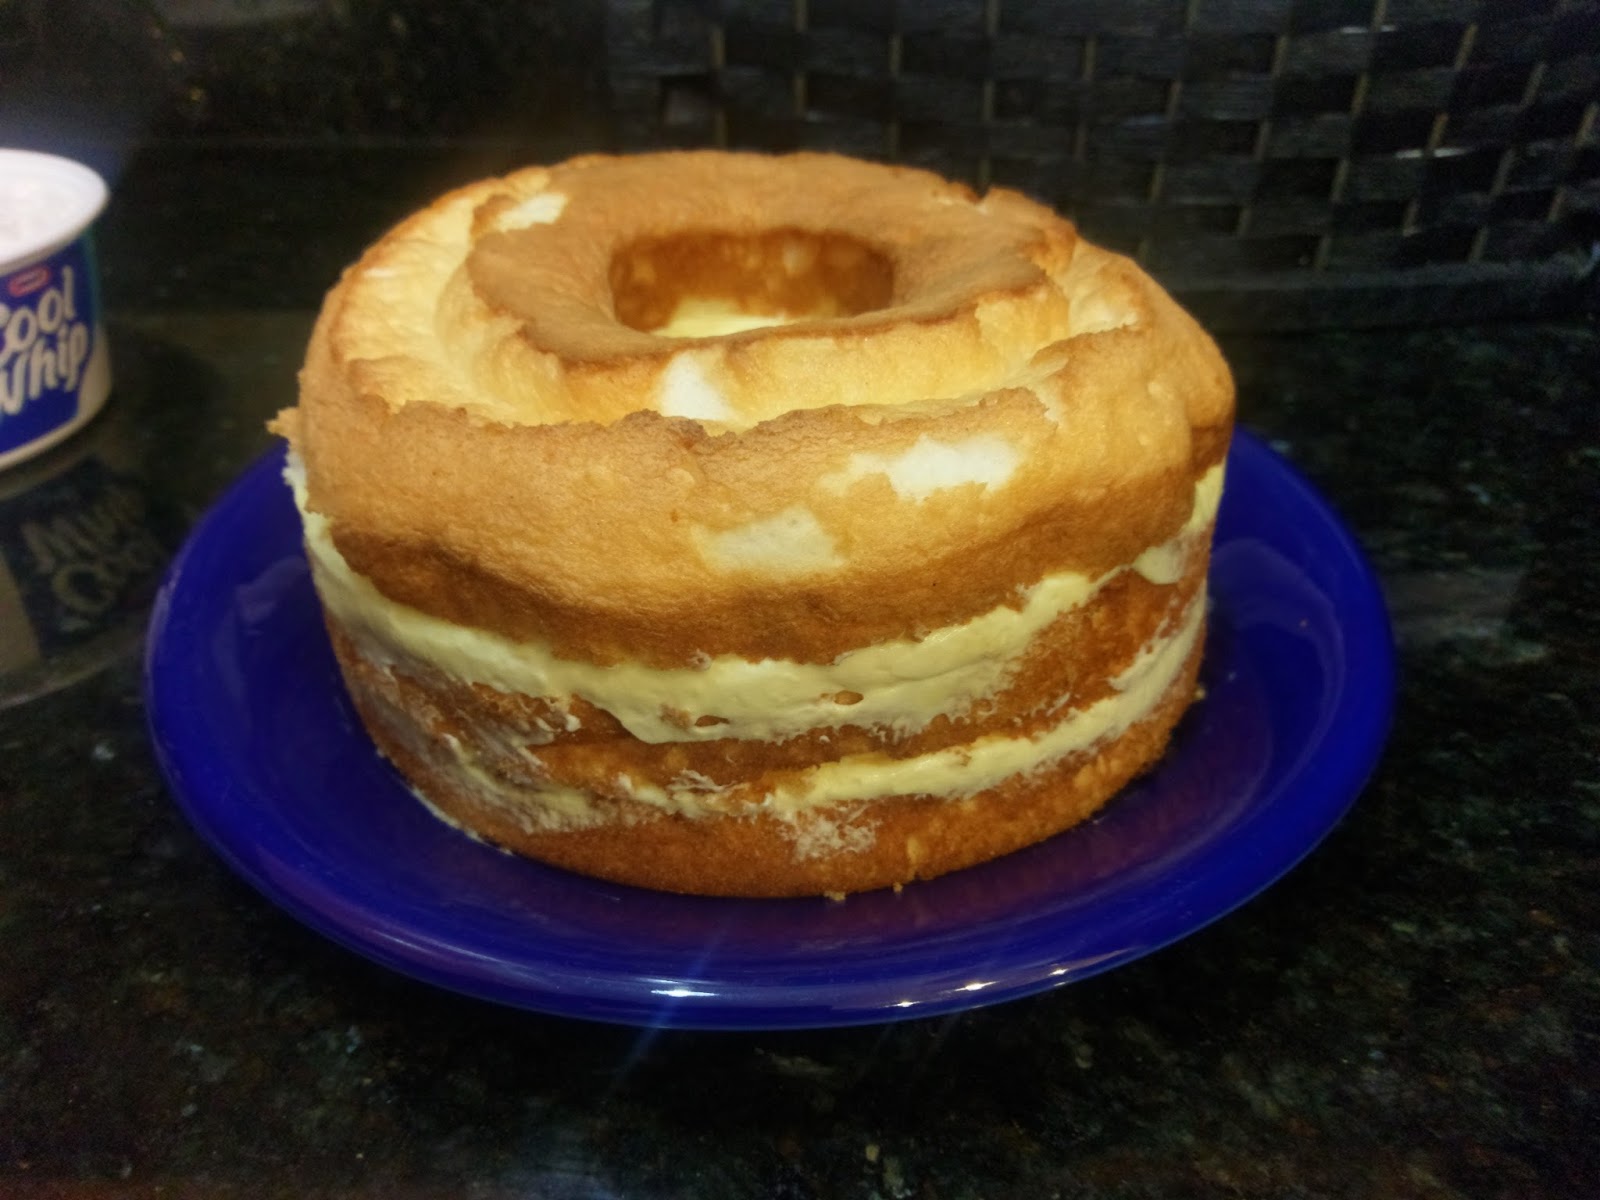
Ahh, the cake garotte wire returns. You will need to tort your cake into three layers. I use my cake leveler, but a long serrated knife would also work if you don’t enjoy the feeling of using garotte wire to mutilate a cake. It’s a lot more fun than it sounds, I promise.
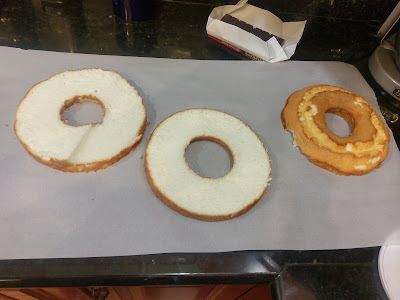
Once torted, set the top two layers aside. Place the bottom layer on a large plate. 
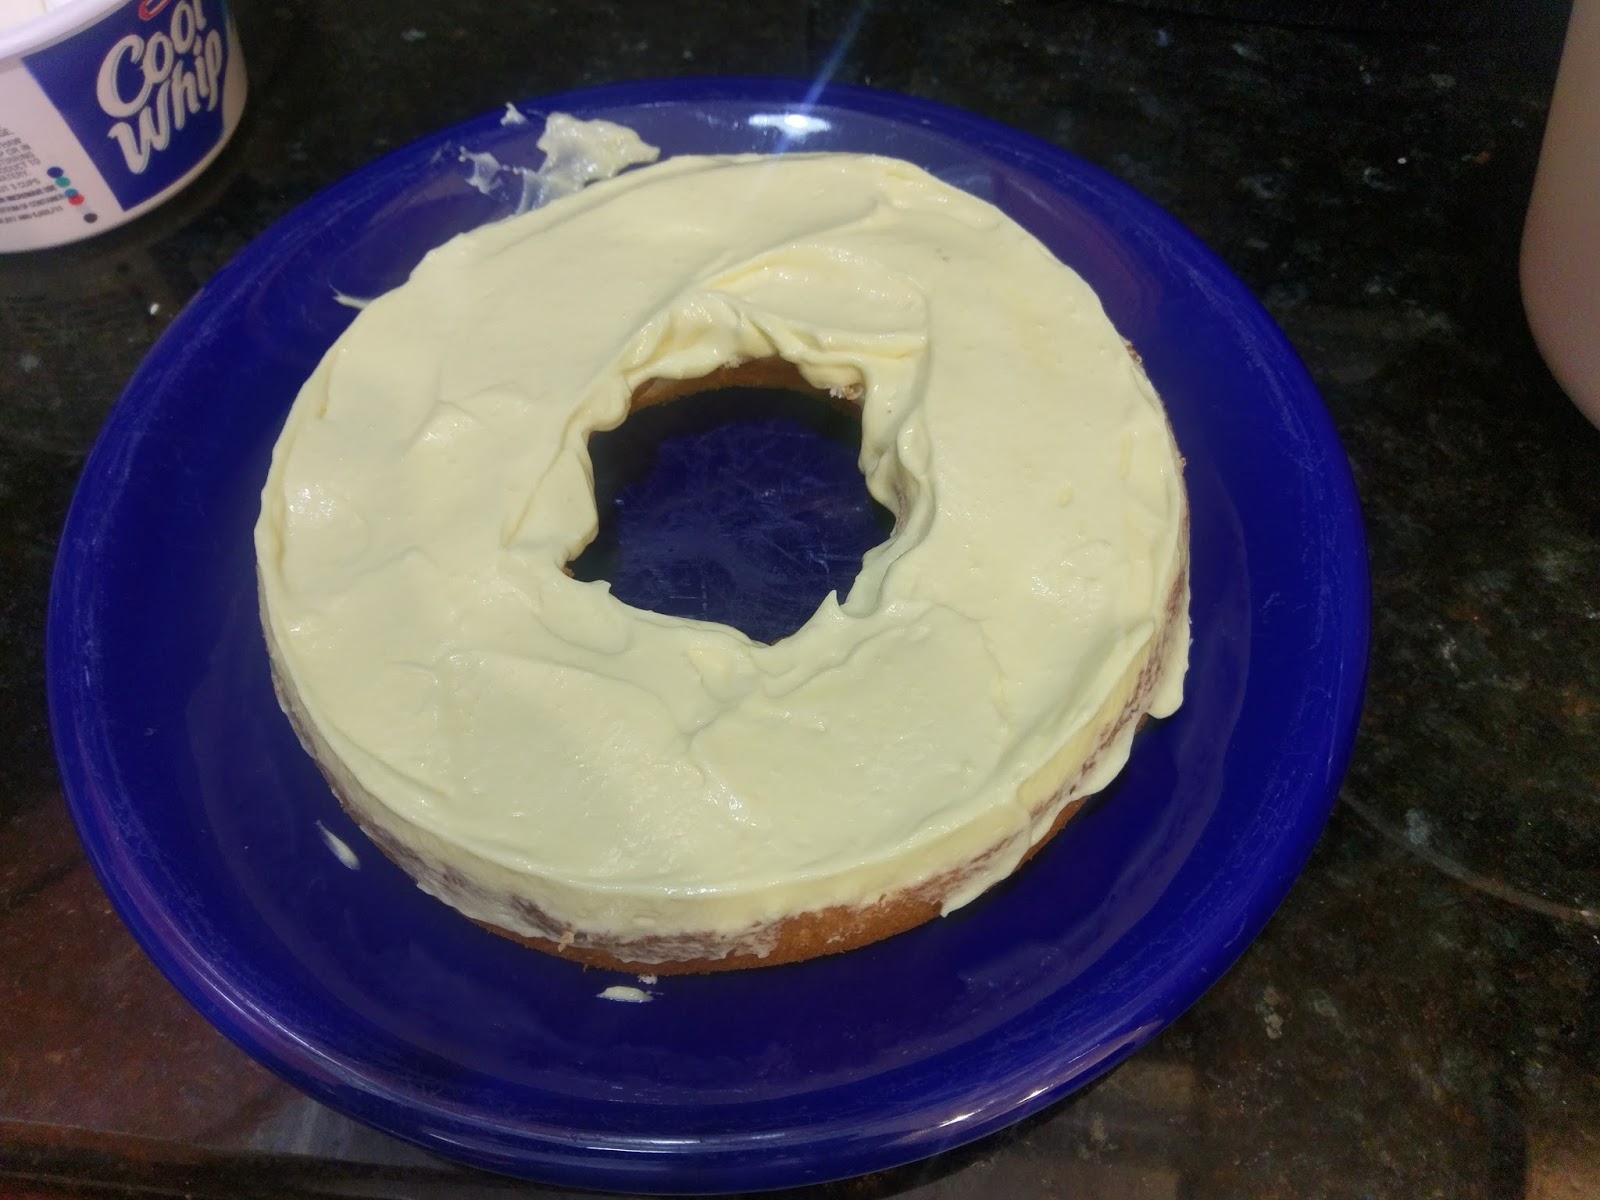
And then add a thick layer of the Boston cream filling on top of it. I used an angled spatula to even out and smooth. Not that it really matters, because you’re just going to put the middle layer of the cake on top of this, and repeat with another layer of Boston cream filling. 
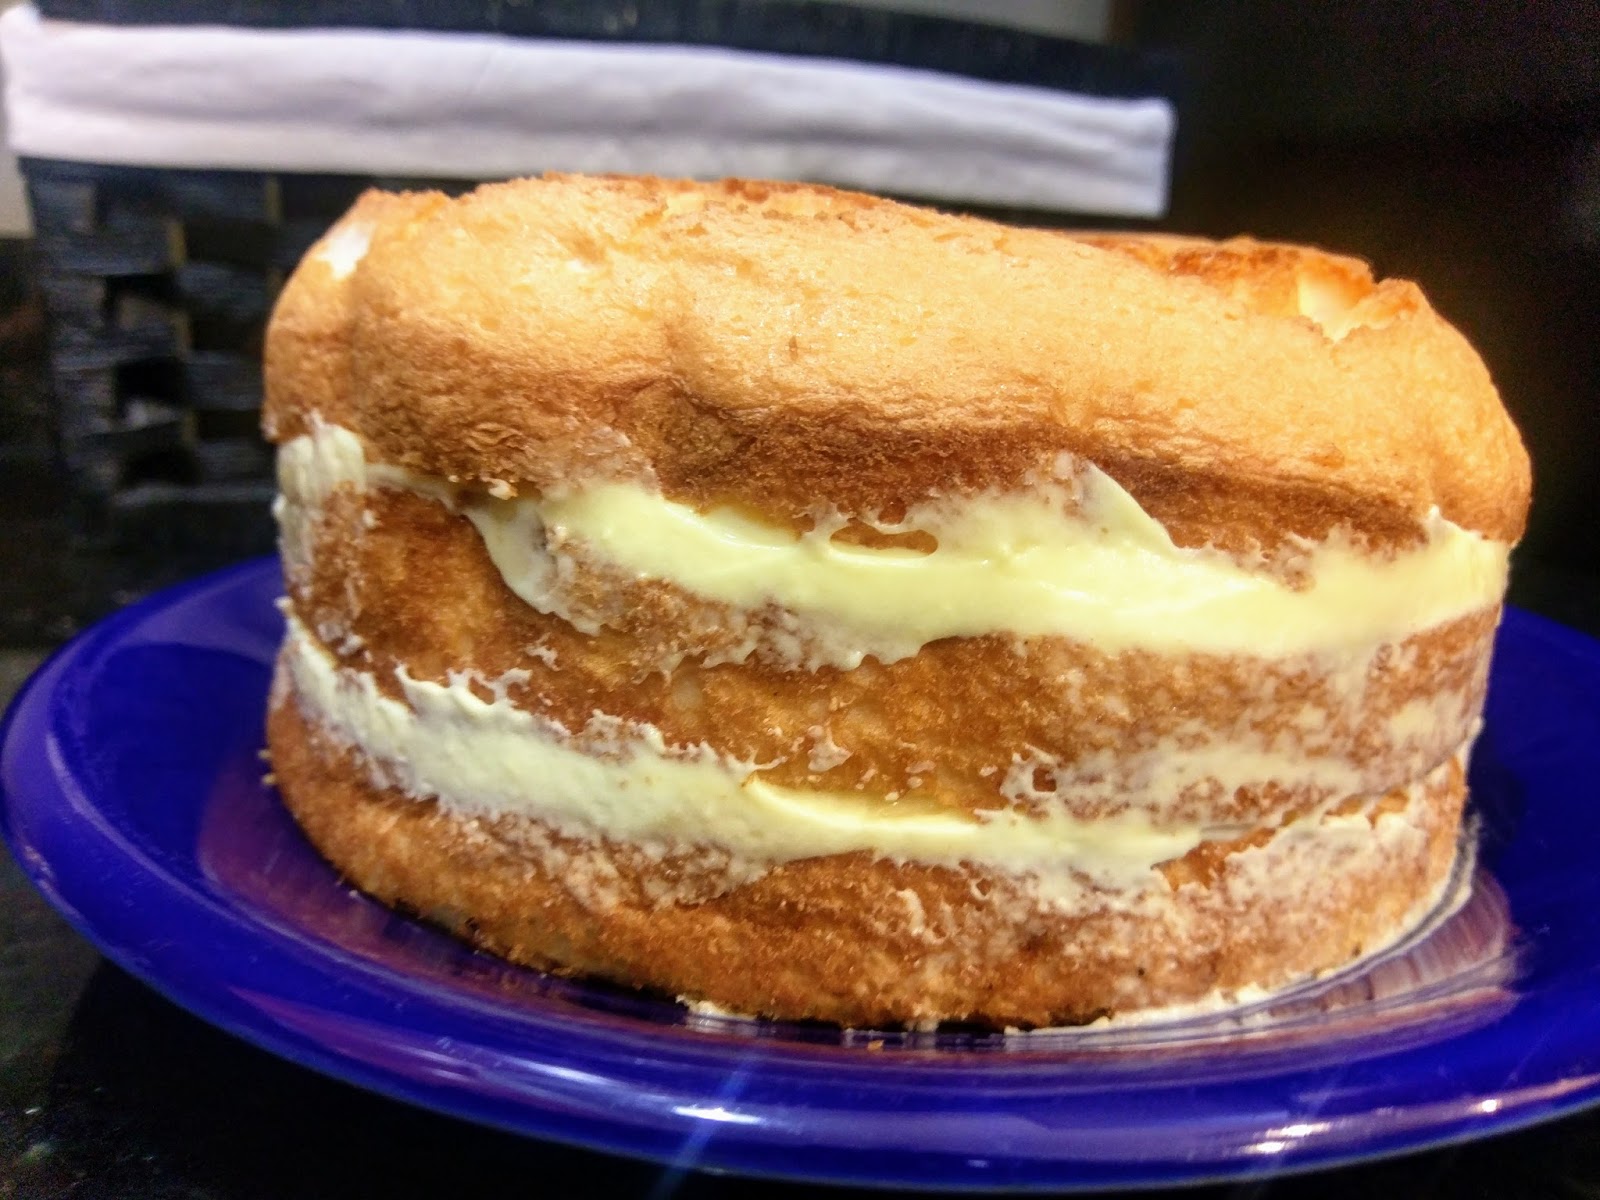
Finish off by placing the top piece of cake on top of the last layer of Boston cream filling. You may have some oozing out of the sides, but you can achieve a cool “naked cake” look if you take your angled spatula and swipe it around the side of the cake: 
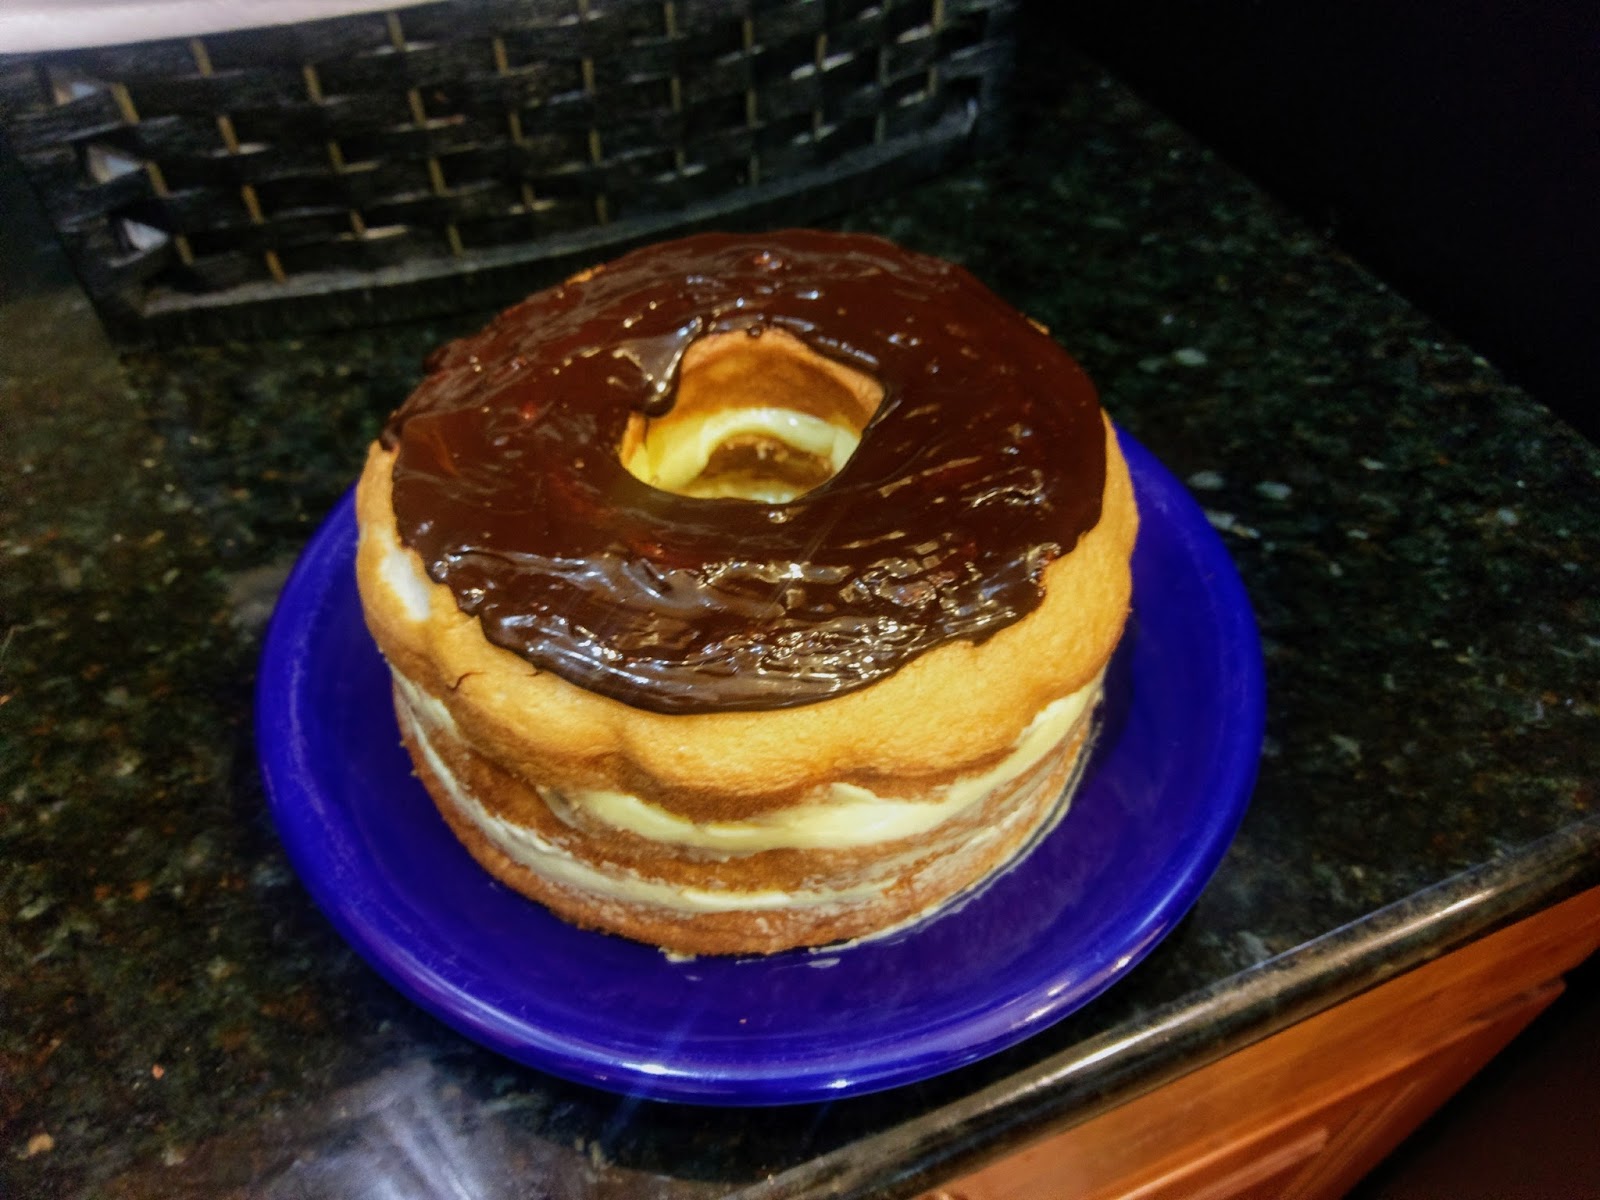
It’s messy, but in a really chic way. Gotta love trends. Now, take 2 ounces of the chocolate baking bar and hack it up into tiny pieces. Sorry, this blog is sounding way more murdery than I intended. Dump into a bowl with the other half a cup of Cool Whip Free. I cleaned out and reused the same bowl I used to mix my Boston cream filling (I wasn’t kidding last week with that lazy but efficient business). Microwave on high for 30 seconds, and get ready to whisk those biceps back into shape, baby! You should be left with a nice, thick chocolate ganche. Dump small spoon-fulls on top of the cake and smooth out with a spatula:

Ohhh yeah, look at that little drip of chocolate glaze in the middle…mmmmmmm. Sorry, I may need a moment to recover from that photo. The glaze might run a little down the sides of your cake, but it’s still going to look absolutely spectacular, like the world’s largest donut:

Or what I imagine the world’s largest donut would look like. I’d probably have to go to the Minnesota or Texas State Fair to figure it out for real. …that’s it. All you have to do now is let your cake set in the fridge for an hour, and then you’re ready to serve it up. Do leave any leftovers in the fridge to keep the Boston cream layers firm. Y’all, seriously, this was so easy that I figured it would only be an “okay” substitute for my Boston Cream donut craving. I have dreams about how good this cake is. I stare at it longingly every time I open the fridge. The angel food cake is the perfect amount of sweetness to complement the Boston Cream layers, and the chocolate glaze is the perfect finishing touch. It’s the classy, adultier version of a donut. My inner child also appreciates this because I was born feeling like a 45-year-old in most regards. Now if you’ll excuse me, I’m off to go sit on my couch in scuffies and pj’s for the rest of the day, because whether your 10 or 60, it’s just a good way to spend a Sunday. ‘Til next time, my fellow eaters!

Size. of. my. head. -
Shockingly Simple Sweets
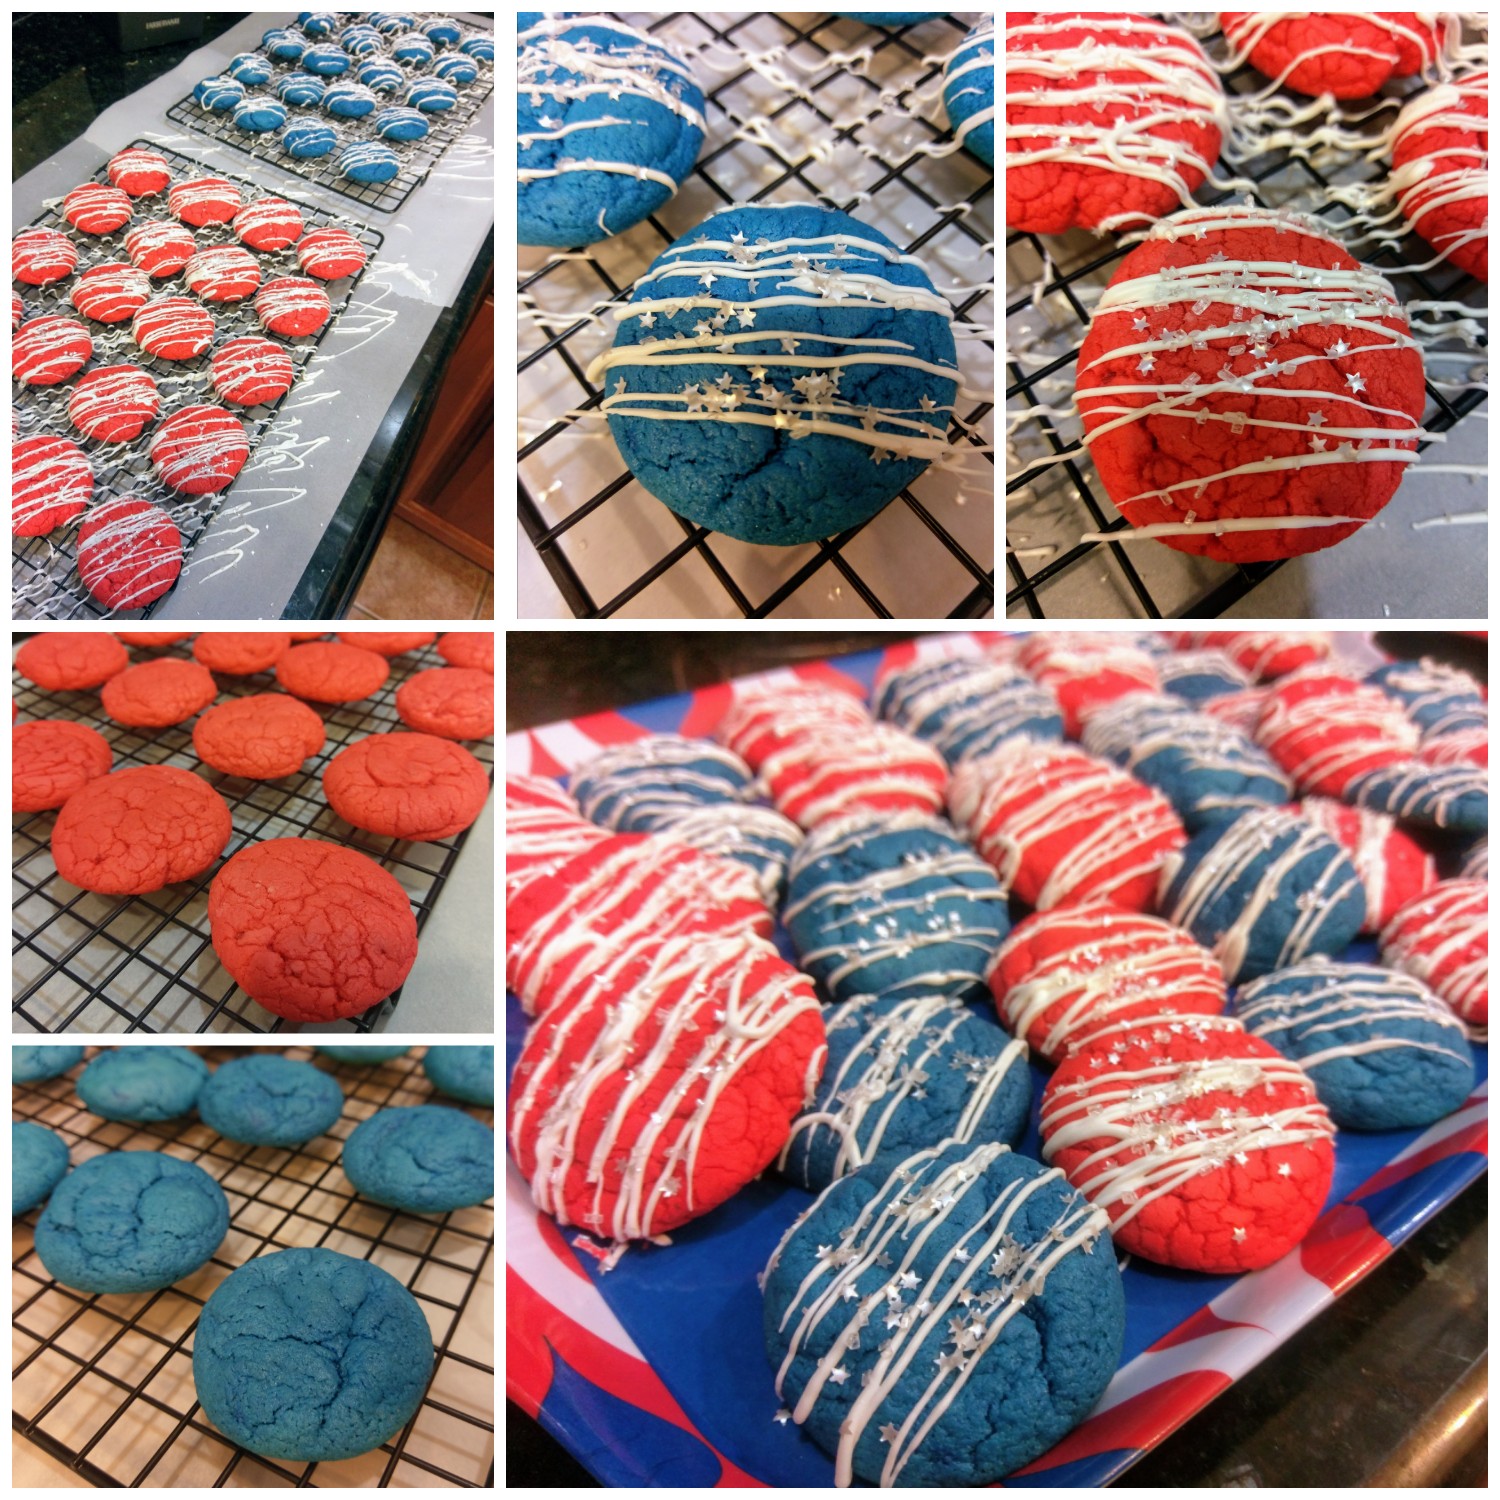
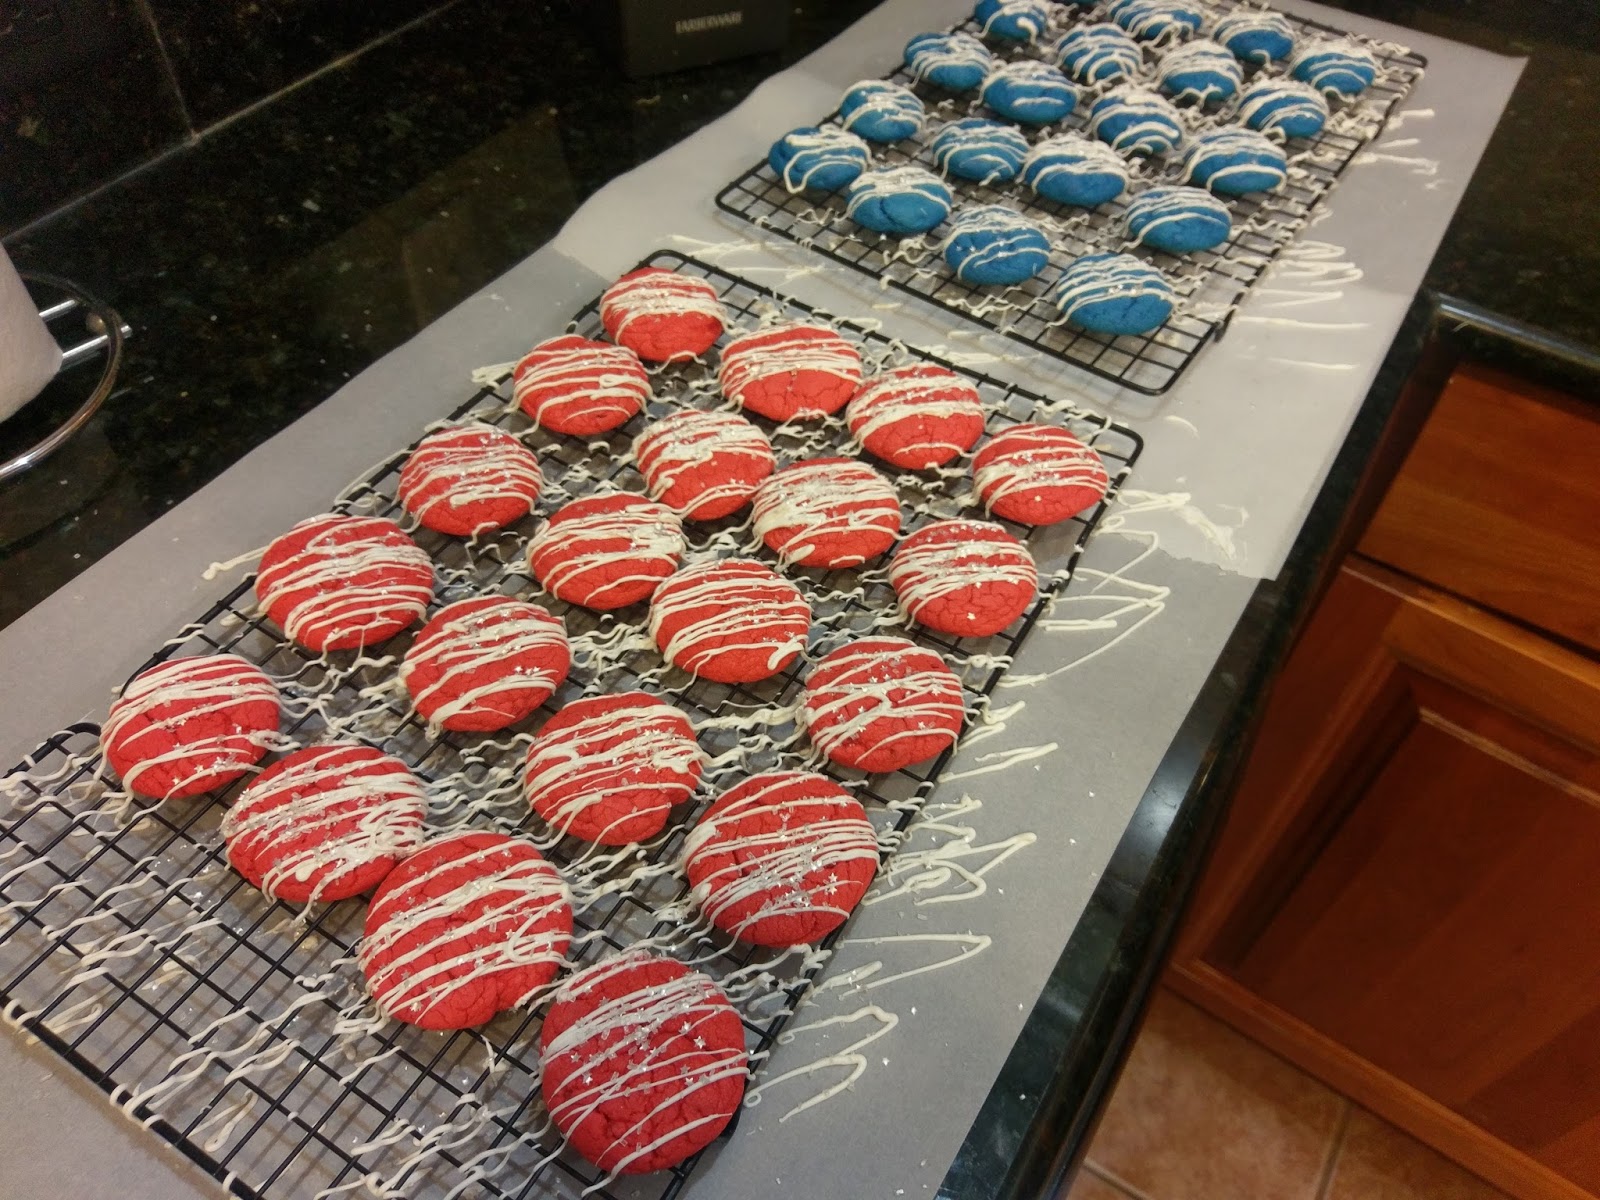
I’m an efficient person–organized, put together, “on the ball,” you might say, so what I’m about to admit might come as a bit of a shock. I’m also extremely lazy. Like, I don’t even waste the energy to turn my socks right-side-out before wearing them lazy. So lazy that even the mere idea of having to get off my couch and do anything on the weekend makes me a little grumpy. I’ve spent decades somehow calculating a way to live my life to maximize my productivity while also maintaining my optimum level of laziness. My credo most certainly is to work smarter and not harder. I’m the human version of a cat in a sunny spot–I can’t be bothered with much unless movement ends in food or praise of some sort. Needless to say, after the harrowing adventure that was mirror glazing my husband’s birthday cake, I wanted to make a dessert for a 4th of July cookout that was child’s play to put together but still looked like a million bucks (I also follow this same pattern when it comes to hair and makeup–efficient, I tell you). I’m going to let you in on a great baking secret–you can throw together cookies that are so soft and stay so fresh forever in 30 minutes from start to finish. And that includes decoration! Because everything should be topped with a layer of chocolate and sprinkles. My friends, let me show you the path of least resistance–the lazy cake mix cookie.

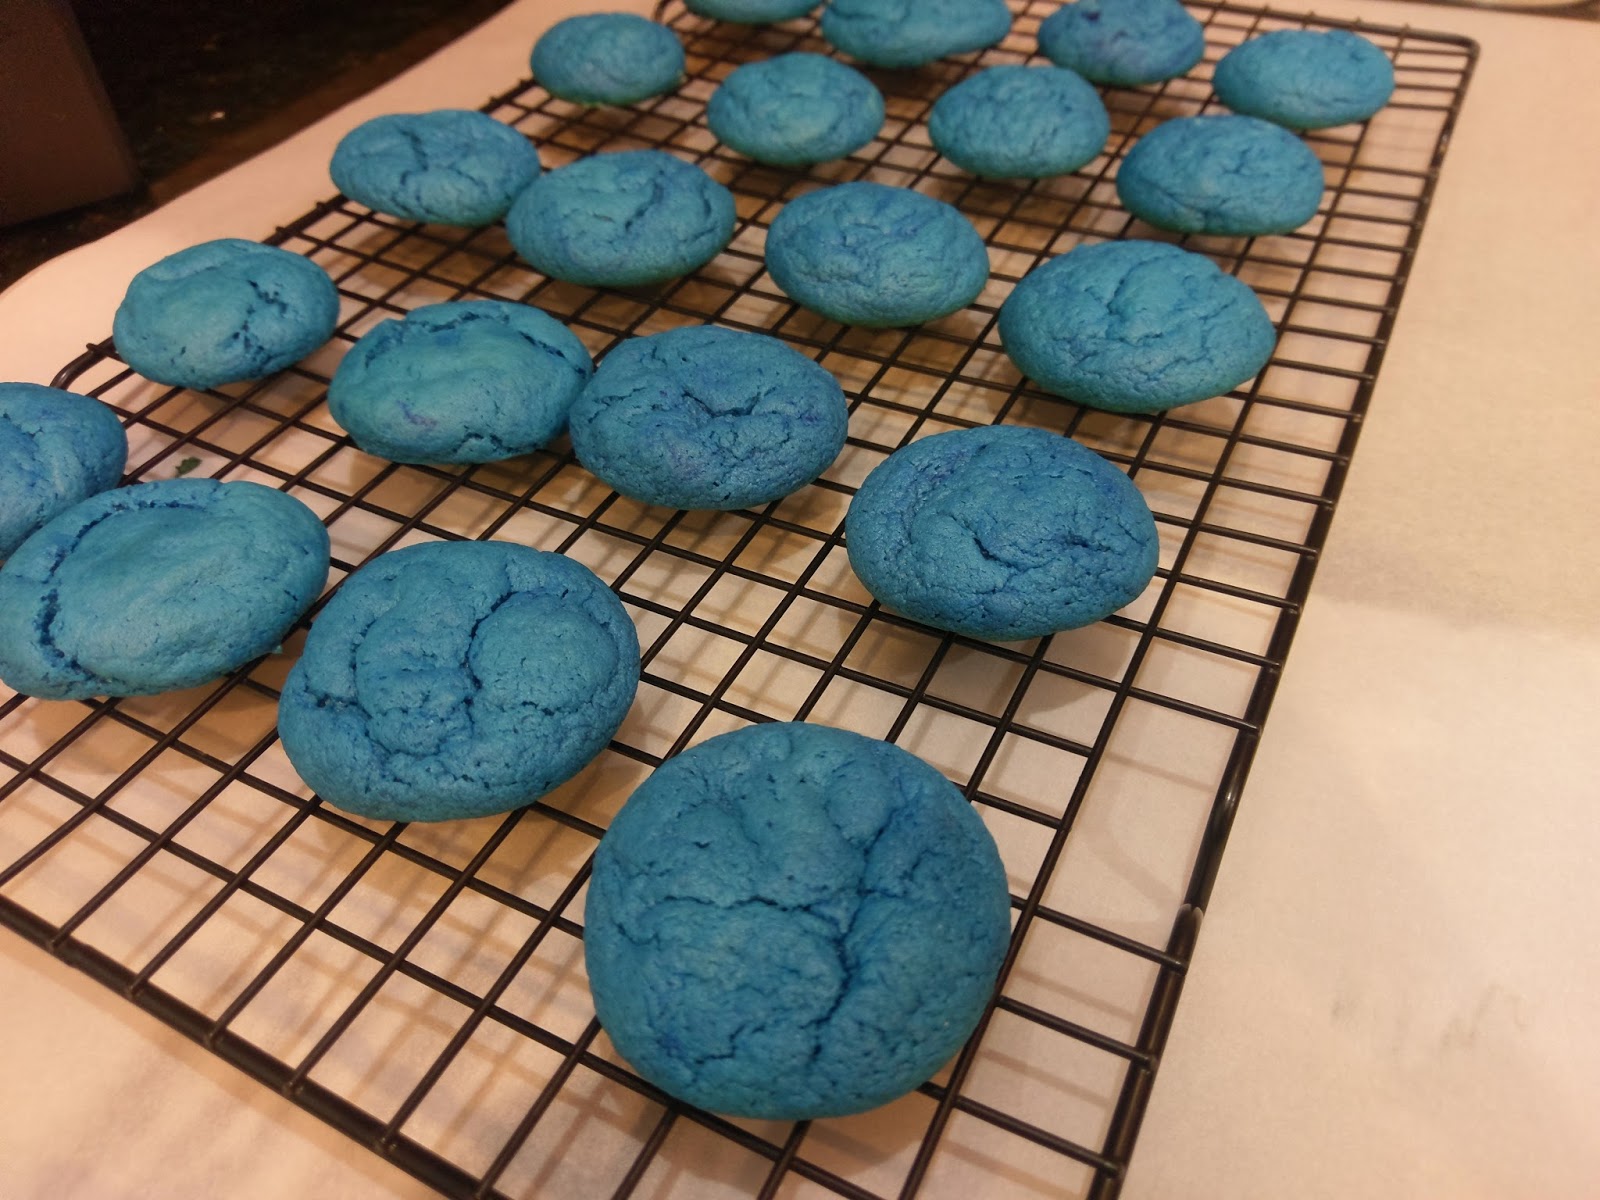
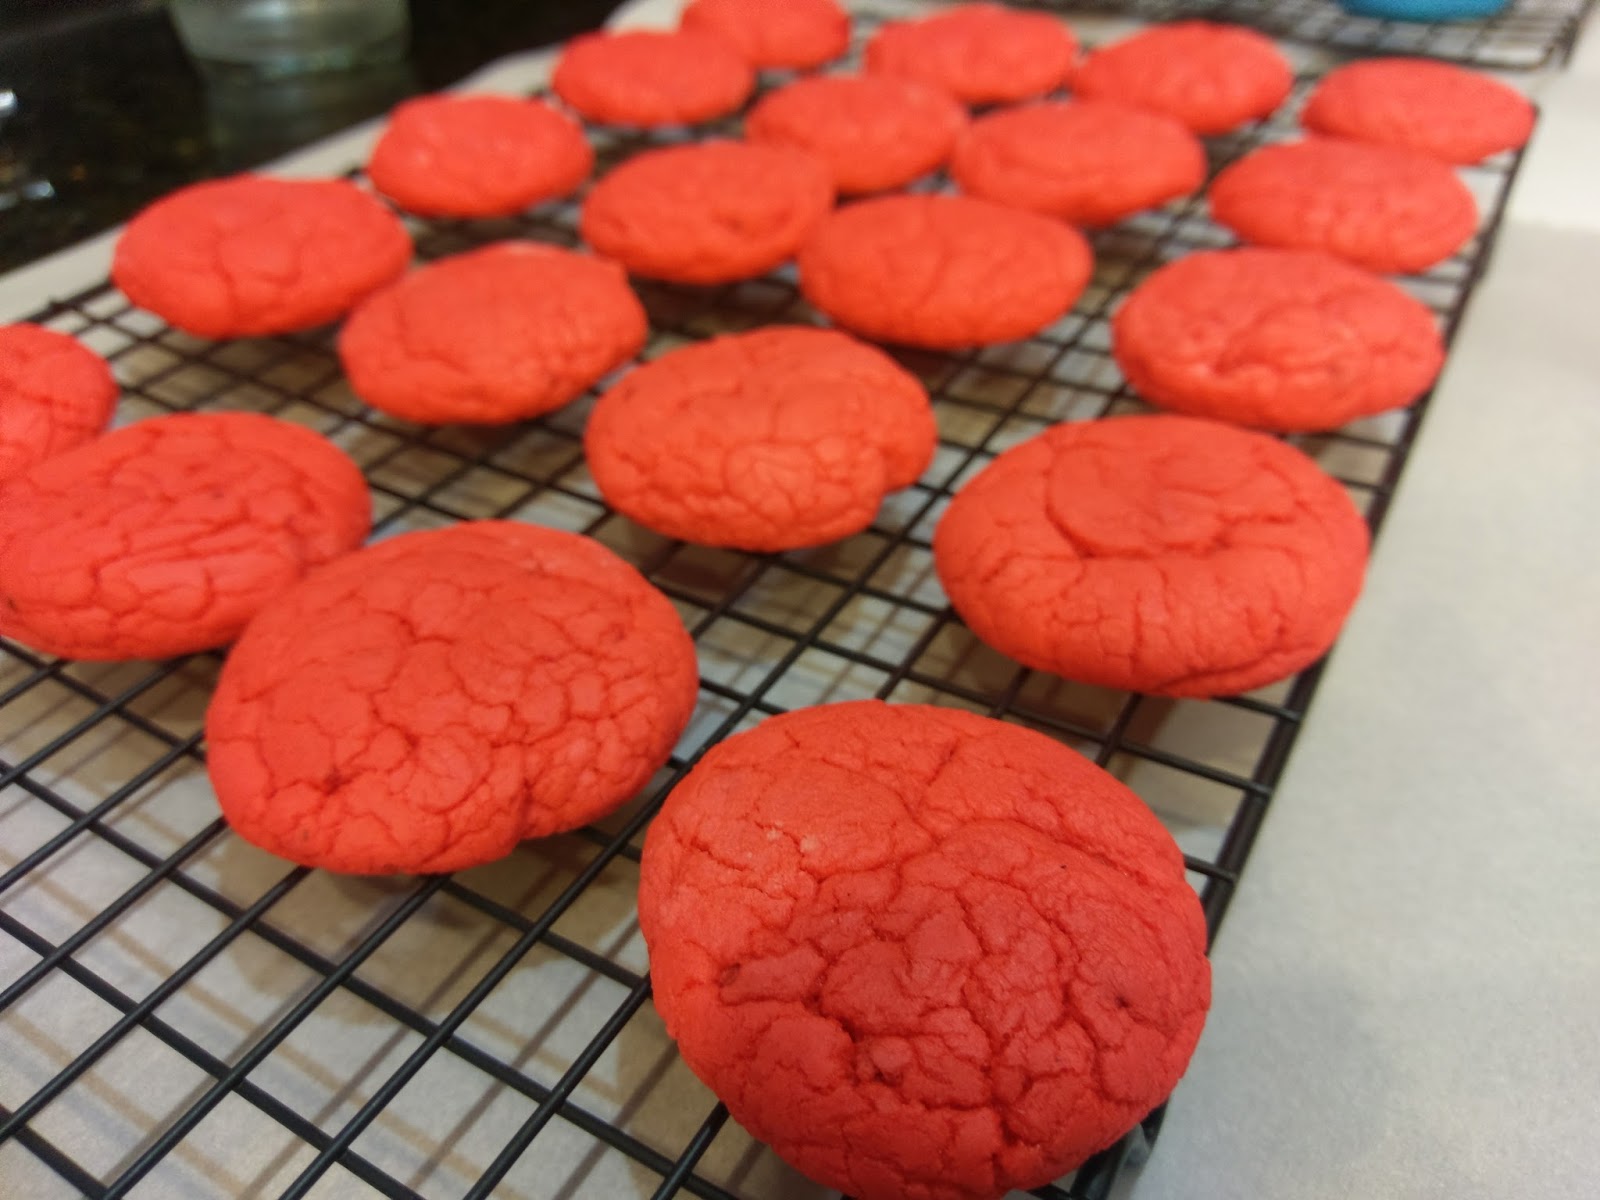
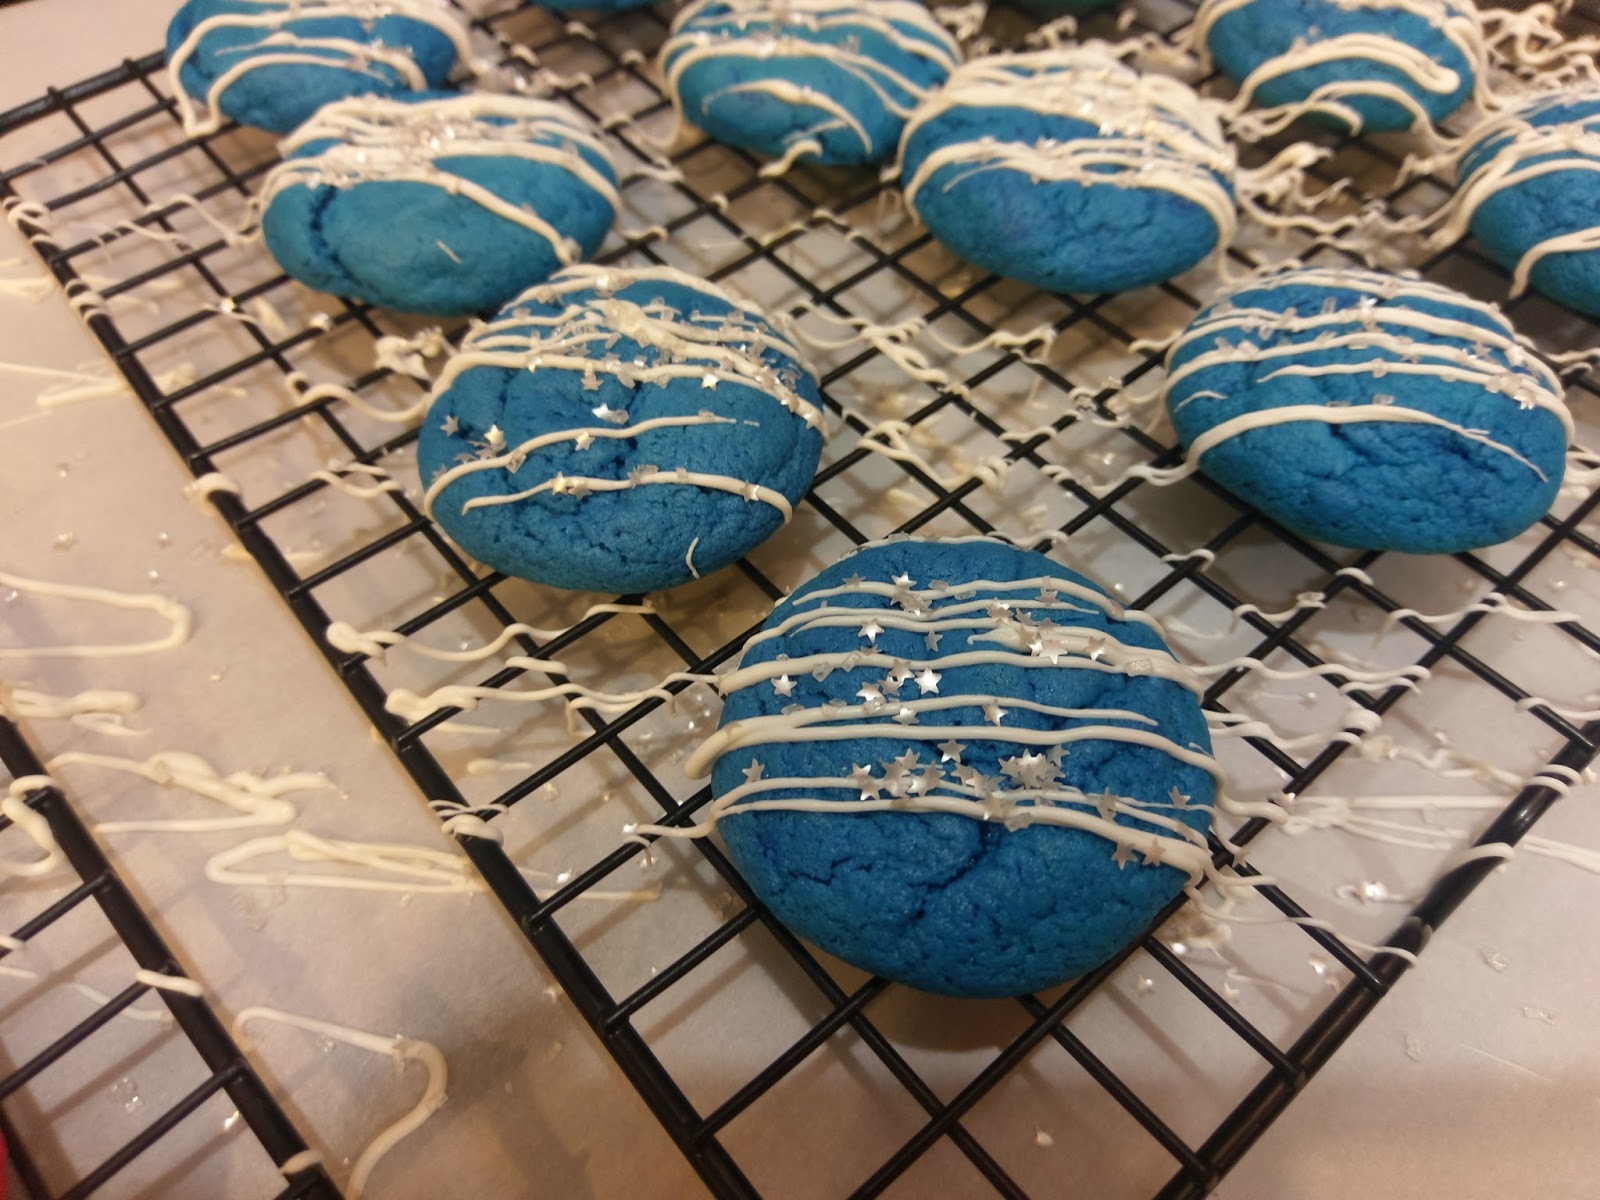
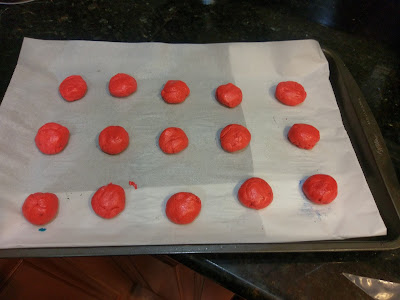
The patriotic edition! I know, usually my 4th of July creations range anywhere from extremely American to Abe Lincoln riding a bear level of patriotism, see: American flag cakes, American flag cake pops, and tie-dye American flag berry cakes. But these cookies are fun, festive, and so, so low in calories. At only 80 calories a cookie (for a total of 40 cookies), you can shove fistfuls into your mouth like the true American you are. Now, if you’re an extreme American, I expect you’d dye these red and blue and top with white chocolate glaze and star sprinkles all year round. Otherwise, you can literally make these cake mix cookies with any flavor of cake mix and/or gel dye to achieve whatever coloring you’d like. The hardest part about these cake mix cookies is figuring out what flavor you want to eat.

Which, in all fairness, is a great problem to have. I just so happened to have half a box of vanilla and half a box of strawberry cake mix leftover from said mirror glazed galaxy swirl cake from my husband’s birthday. I told you–lazy, but systematically so. You can make the 40 cookies with a full box of cake mix and the combined amount of eggs and butter below if you’re not trying to clean out your pantry. But here’s how I made my red and blue cookies:
- 1/2 box vanilla cake mix
- 1/4 cup butter, melted and cooled
- 1 egg
- Blue gel dye
- 1/2 box strawberry cake mix
- 1/4 cup butter, melted and cooled
- 1 egg
- Red gel dye
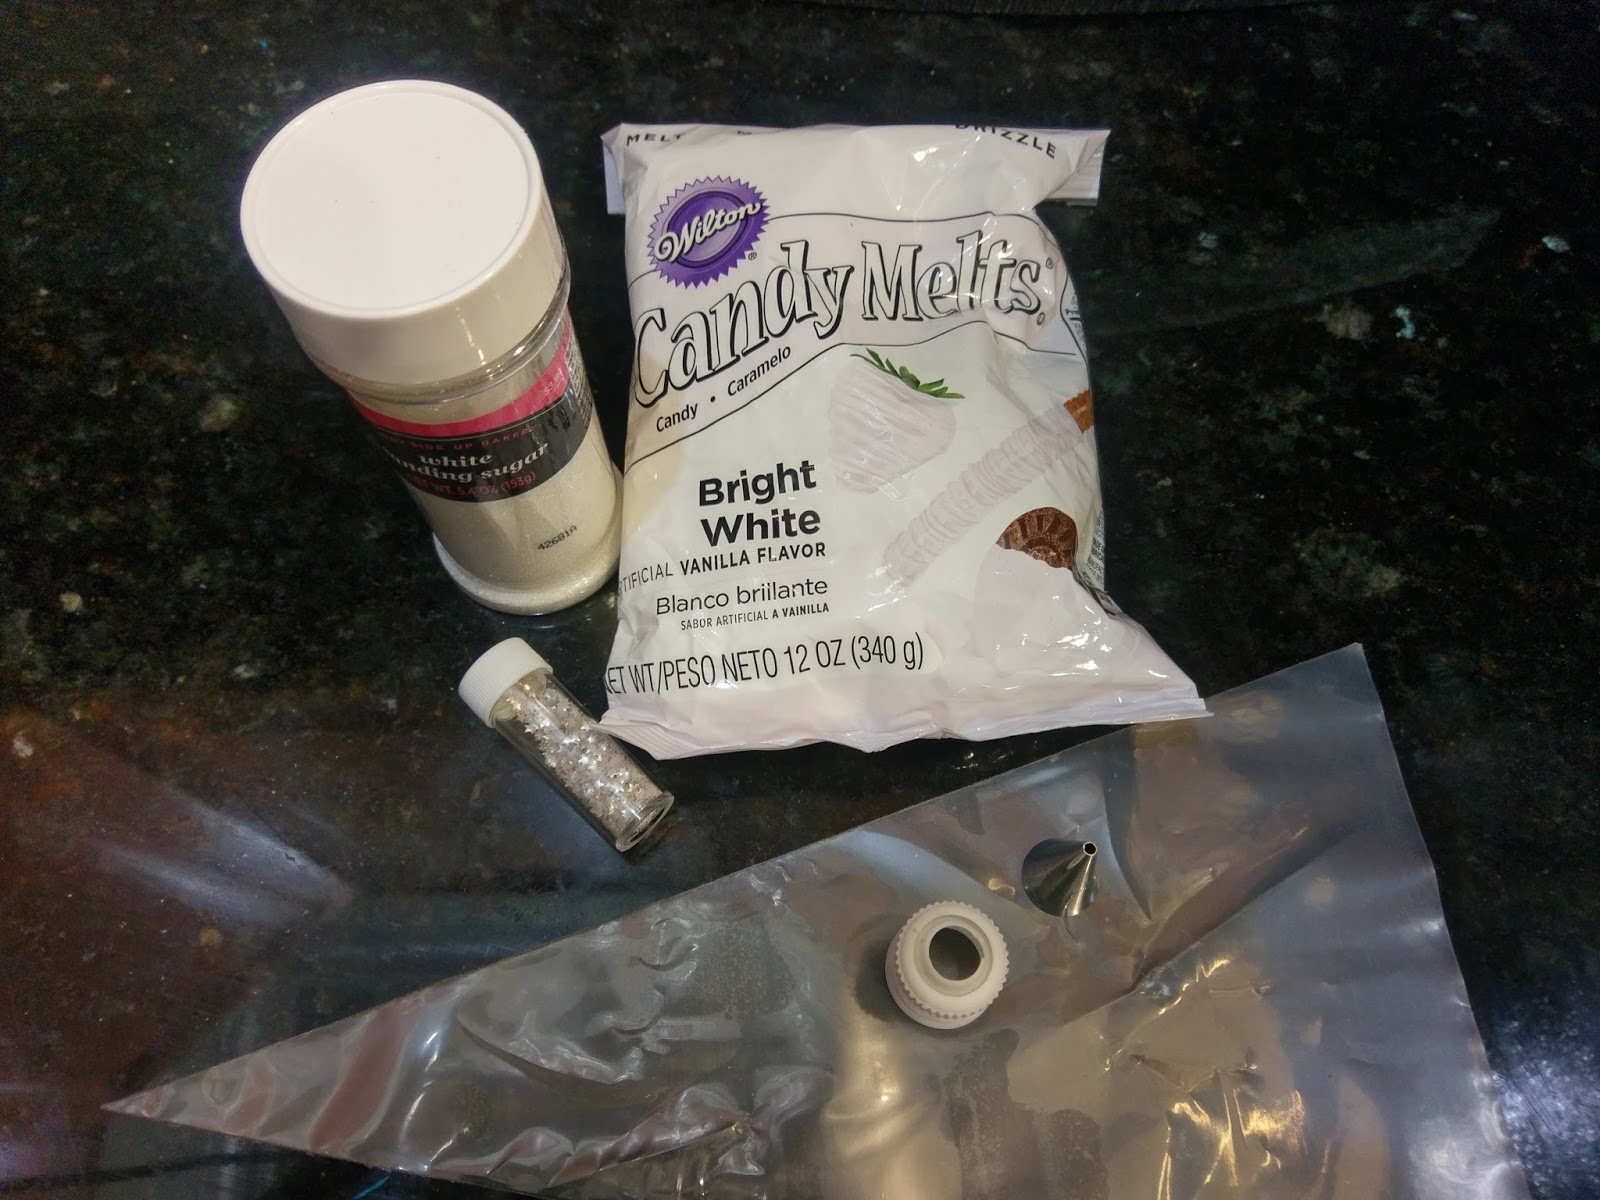
- 1/2 an 8 ounce bag of white chocolate melts
- Star sprinkles and white sanding sugar
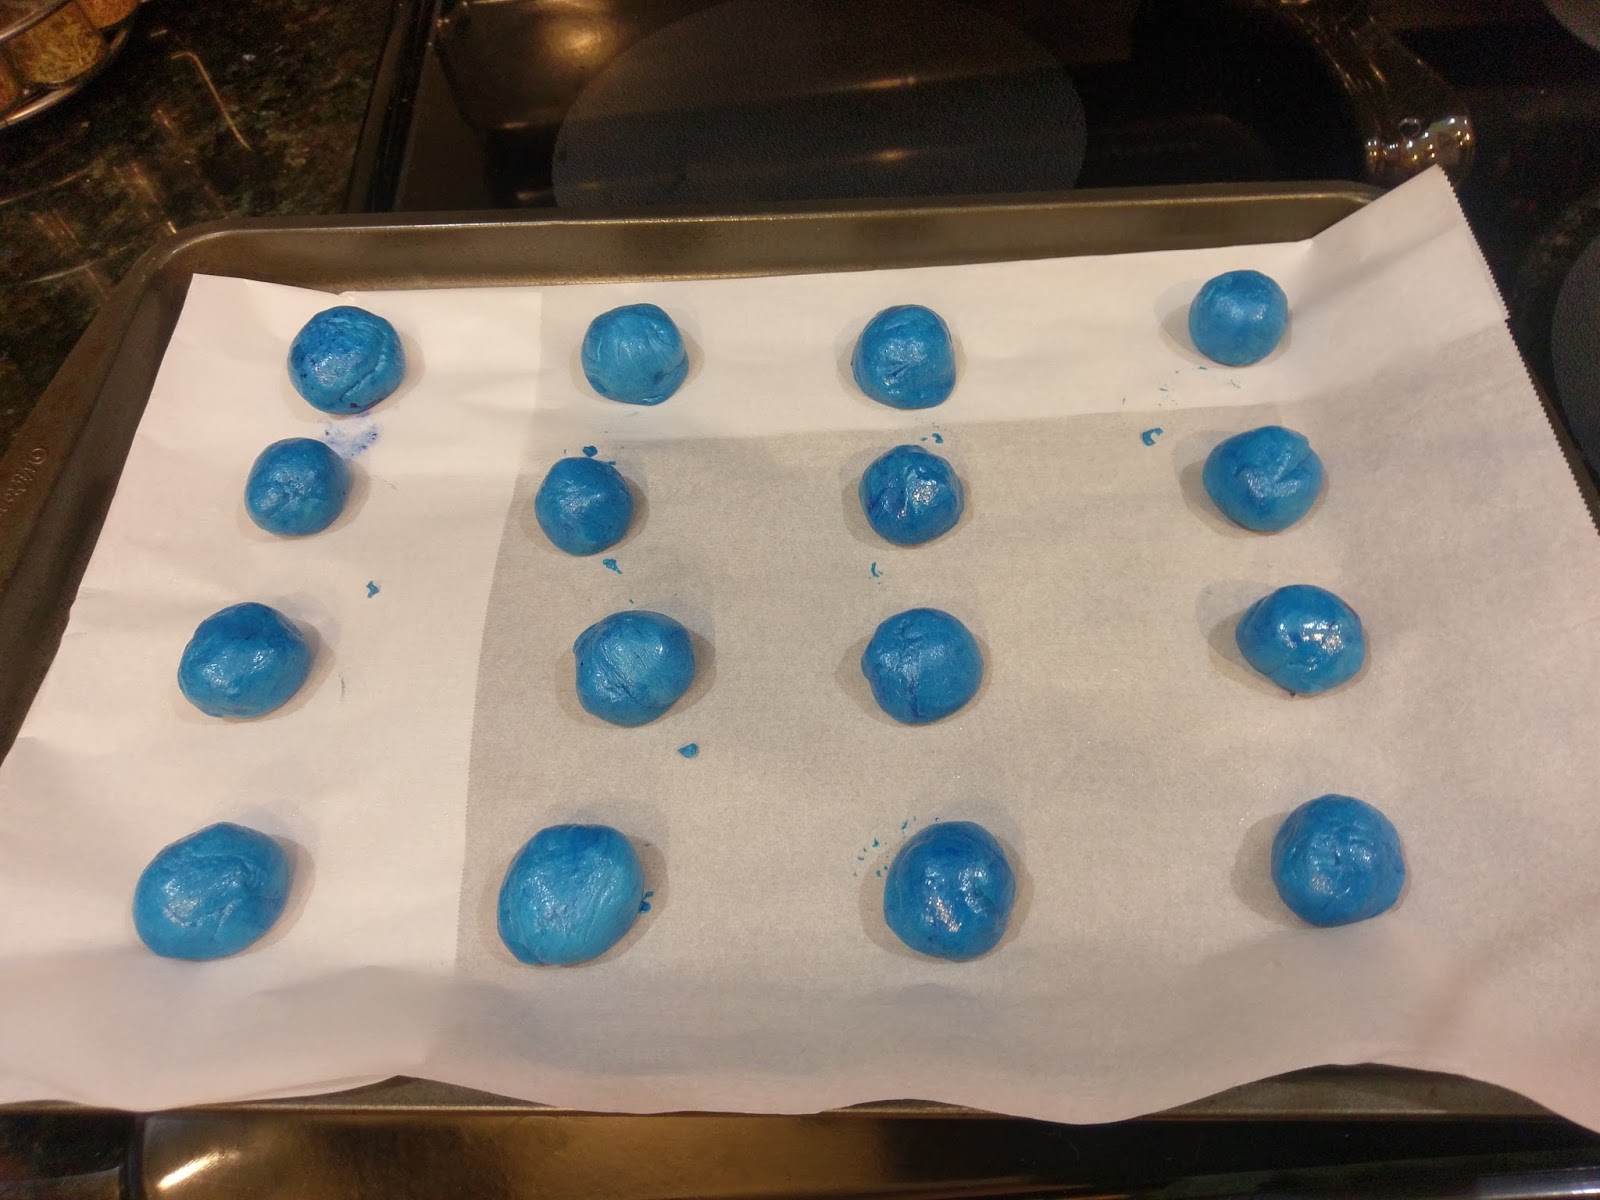
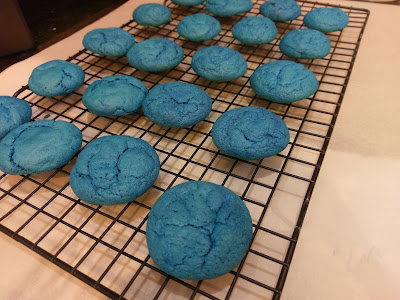
Preheat your oven to 350. Mix the melted butter, egg, and white cake mix together for 2 minutes. Add several drops of blue food color to achieve a nice hue. **You must, must let this mix rest for about 10 minutes.** This allows the dough to firm up a bit so it is easier to handle and shape the cookies. Use a 1/2 tablespoon measuring spoon and scoop out 20 balls of dough. I spray my 1/2 tablespoon with cooking spray to help release them, and then give a quick swirl in my hands to round them out and flatten them a bit:

Like so. Load up a cookie sheet with your rounds, and bake them for 10 minutes, tops. These cookies will be soft, but shouldn’t look shiny when they’re cooked through. Allow them to cool for a few minutes on the cookie sheet before moving to a cooling rack.
Temptation to eat raw cake batter at an all time high. For my strawberry cookies, I followed the same process: mix butter, egg, and cake mix for 2 minutes, add red gel dye, mix, and let rest for 10. Scoop, shape, flatten, and bake for 10 minutes. Let cool on a cooling rack.
Your house will smell friggin’ wonderful. 
Like a cloud of vanilla topped with fresh strawberries. 
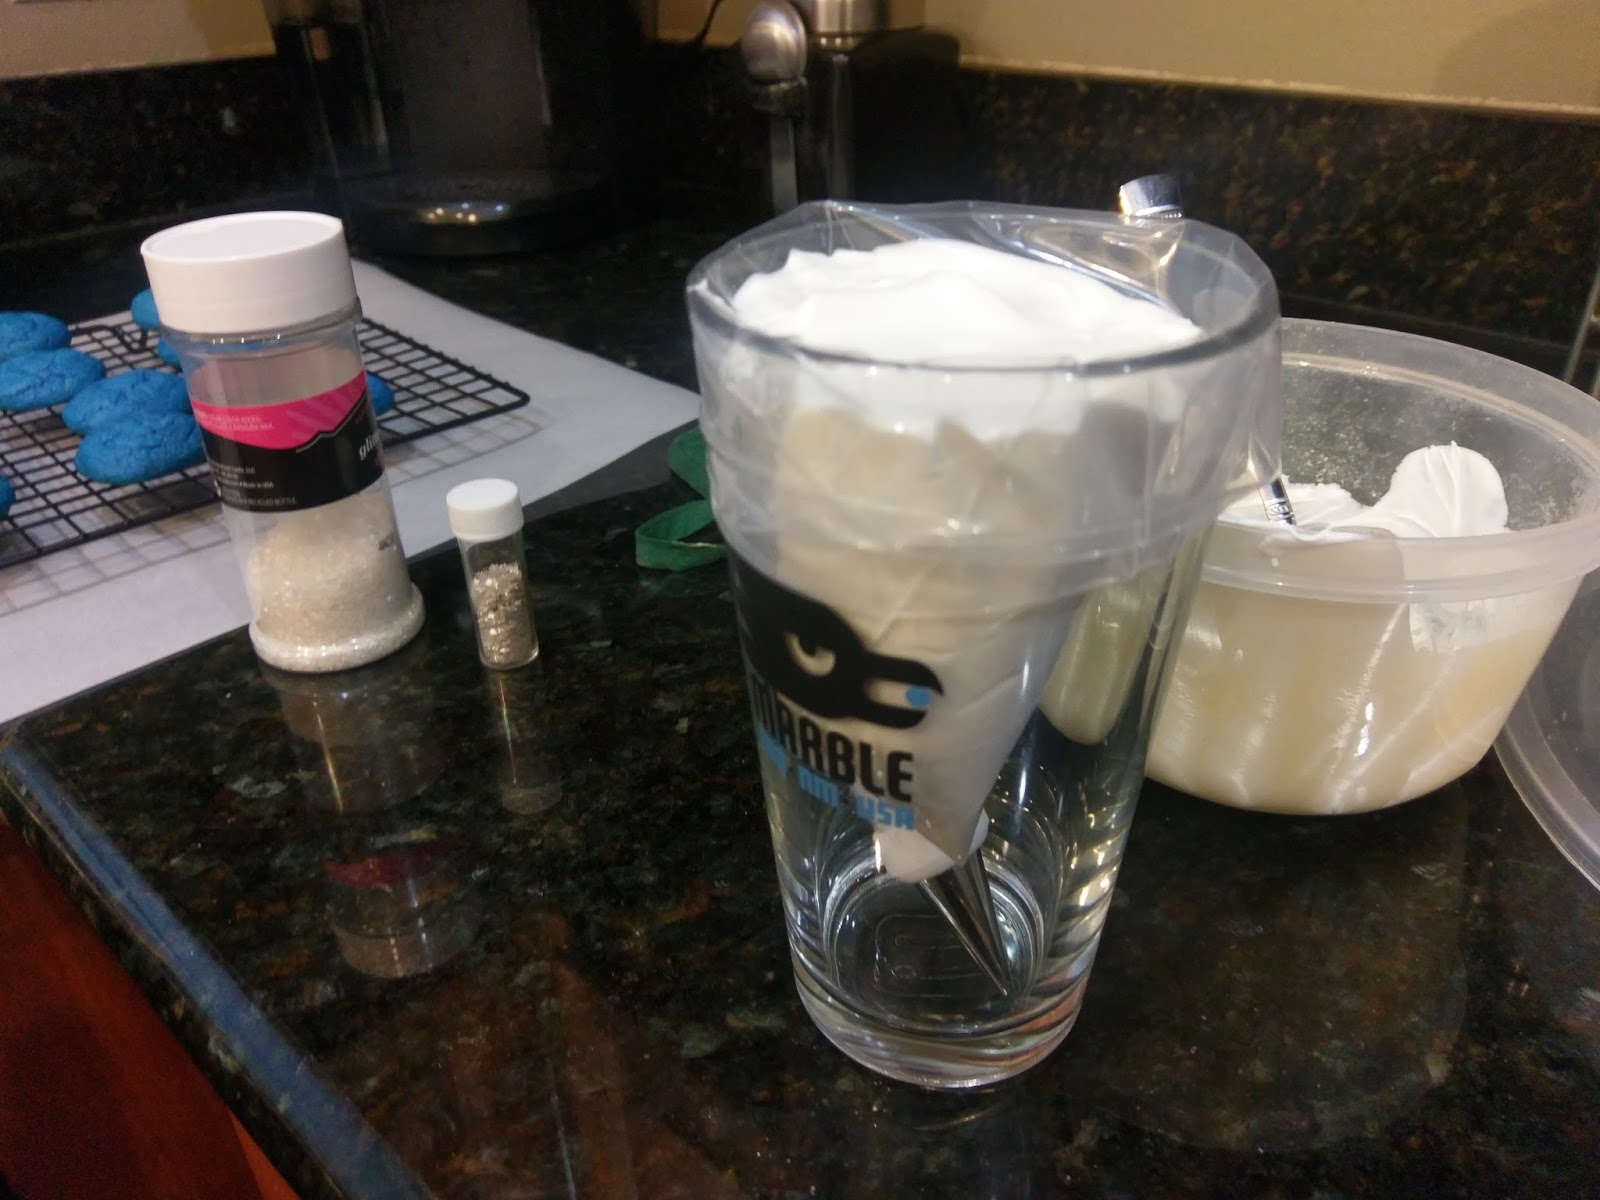
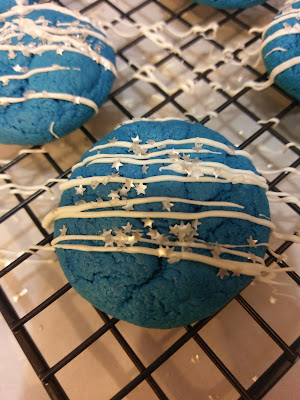
It has taken me three years, but I’ve finally used the 10 tubes of star sprinkles I bought at Hobby Lobby (impulse buy gone sort of okay). Oh yes, remember last week when I told you I bought my weight in chocolate melts? Well, surprise, surprise, I also used chocolate melts to give my cookies an extra kick of sugary deliciousness. Melt half a bag of chocolate melts in a microwavable bowl for 30 seconds at a time on 50% power, stirring after each time until smooth. Prepare a piping bag with a small round tip. I used a Wilton #3 tip. You can also just get a plastic baggy ready and snip a corner; same thing, but even more efficiently lazy because you don’t have to do any dishes to clean it up!

Tricks of the trade. I always put my prepared piping bag in a glass and fold the plastic over the edges–easiest way to load up frosting and chocolate melts. Pour the melts into your bag and then let them cool for 2-3 minutes. Use this time to put Parchment paper down and place your cooling racks on top of this. Space your cookies out, and then grab the piping bag.

And get messssyyyy. There’s no wrong way to do this, so with a ton of gusto, I drizzled my piping bag of chocolate melts back and forth over all my cookies. Work quickly; while the chocolate is still wet, you then need to add whatever sprinkles you want on top of your cookies so they will stick.

There will be chocolate everywhere. So don’t forget the Parchment paper, or you’re gonna go from lazy clean up to “I’m going to find sprinkles and chocolate in my kitchen until 4th of July 2030.” 
Which may still be worth it. Because these cookies are soooooo gooooood. You might think 40 cookies are a lot of cookies. You may not be wrong. But when you bring 40 cookies to a 4th of July cookout, they reduce in number drastically faster than you can say, “Hold my beer and watch this,” before shooting your best friend with a Roman Candle (accidentally, of course). I love that these cookies are so simple to make and taste like a cross between a cookie and a cupcake. They’re soft, and they definitely melt on your tongue. I’m tempted to throw in M&M’s or Reese’s Pieces to chocolate cake mix cookies the next time I whip up a batch. The possibilities are endless–but they’re also incredibly easy. Welcome to my world. A world where you look like you clearly know how to adult, but you really just excel at corner cutting. It’s a great time to be alive and lazy, people. ‘Til next time, my fellow eaters!
As easy to make as they are to eat–that’s how I roll. -
Some Cakes Are out of This World
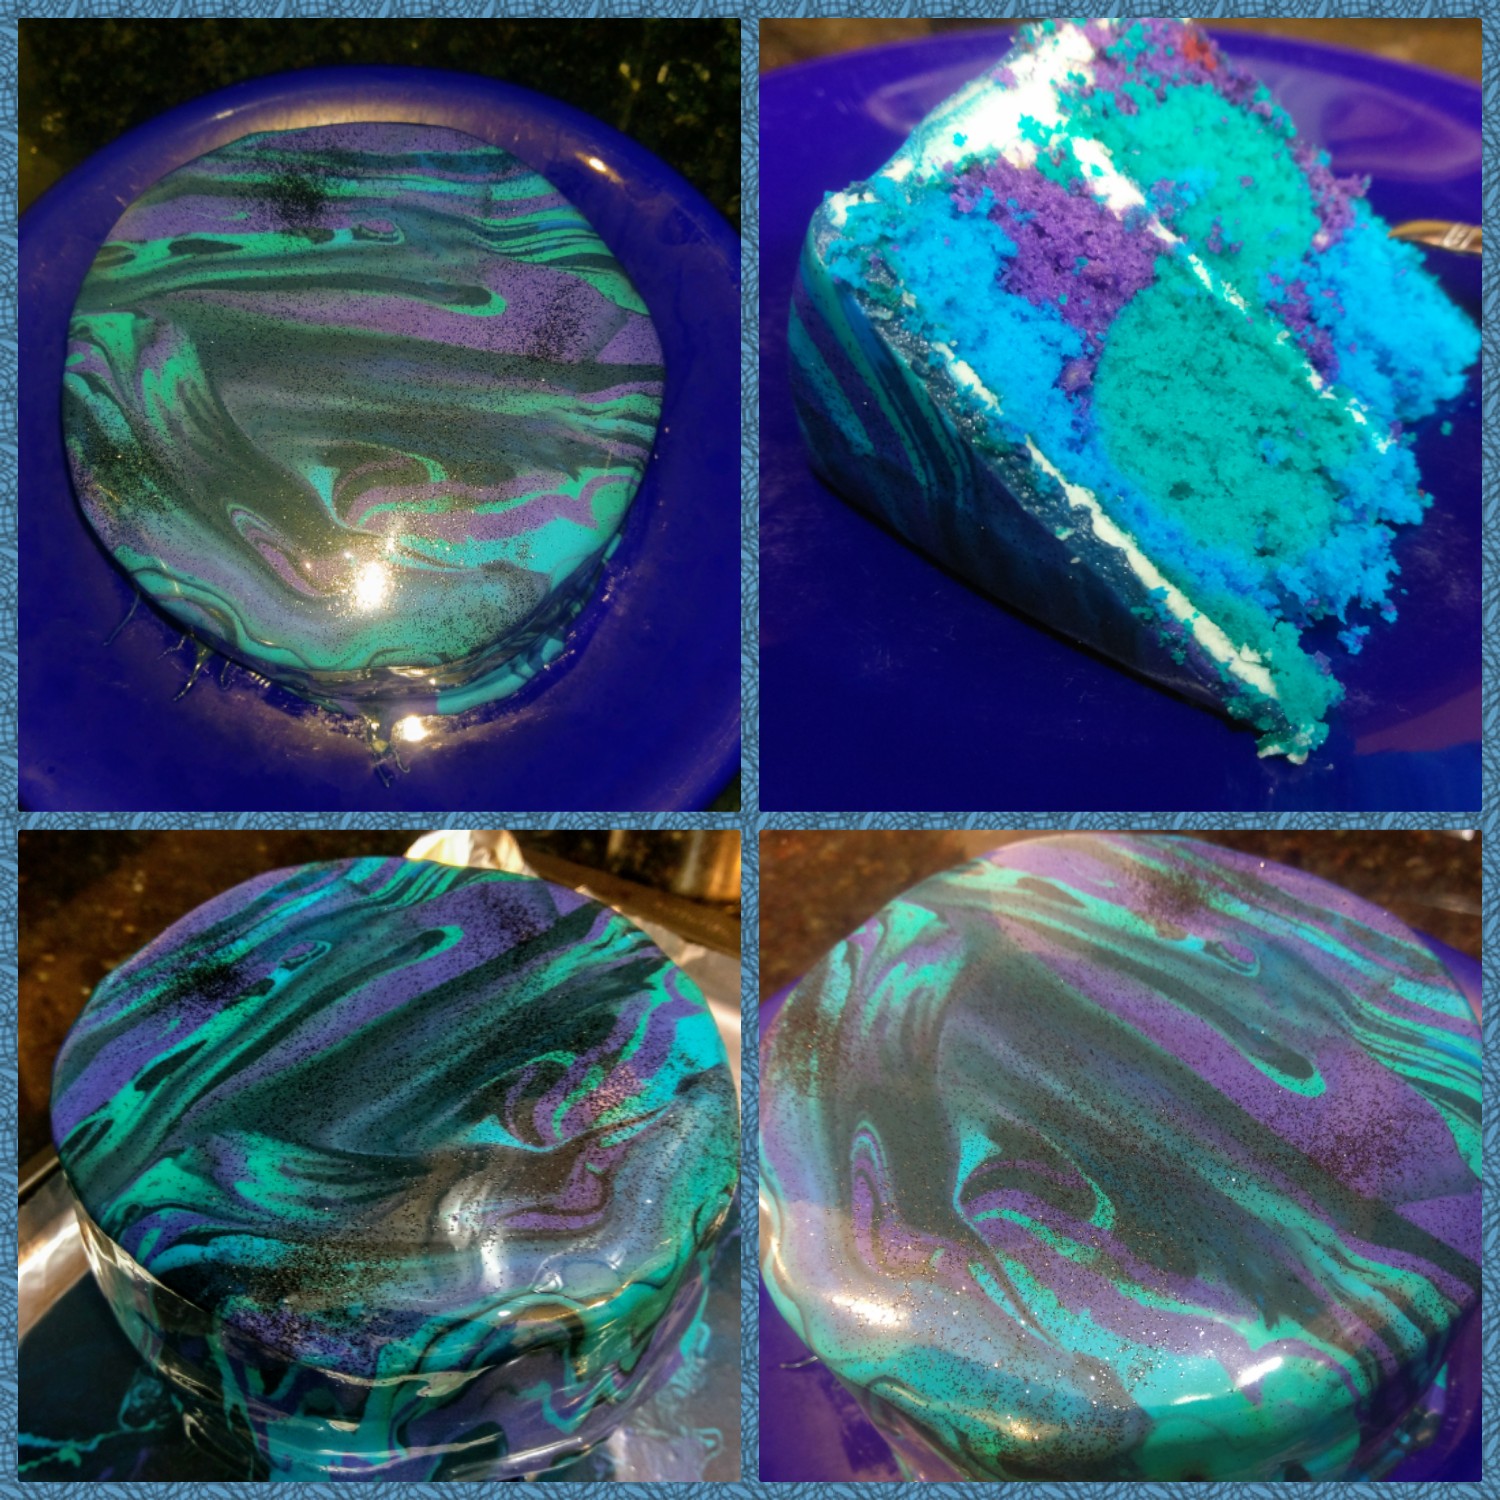
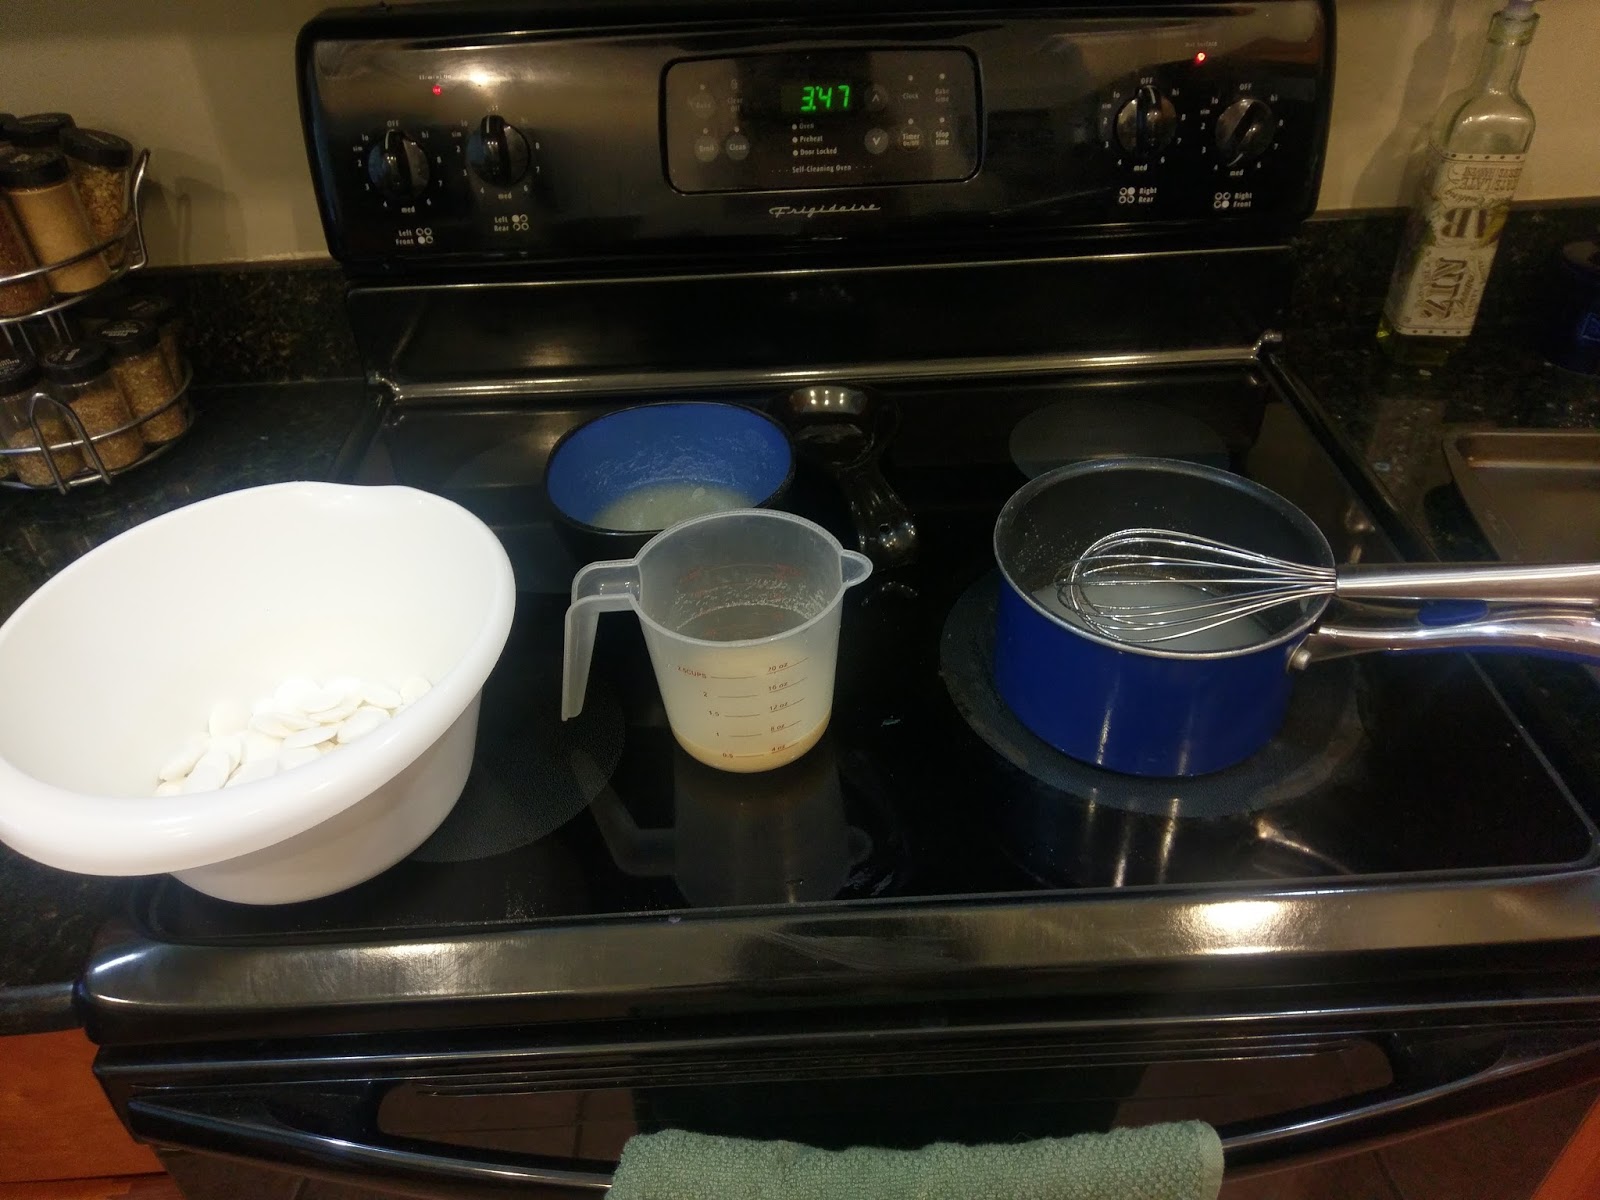
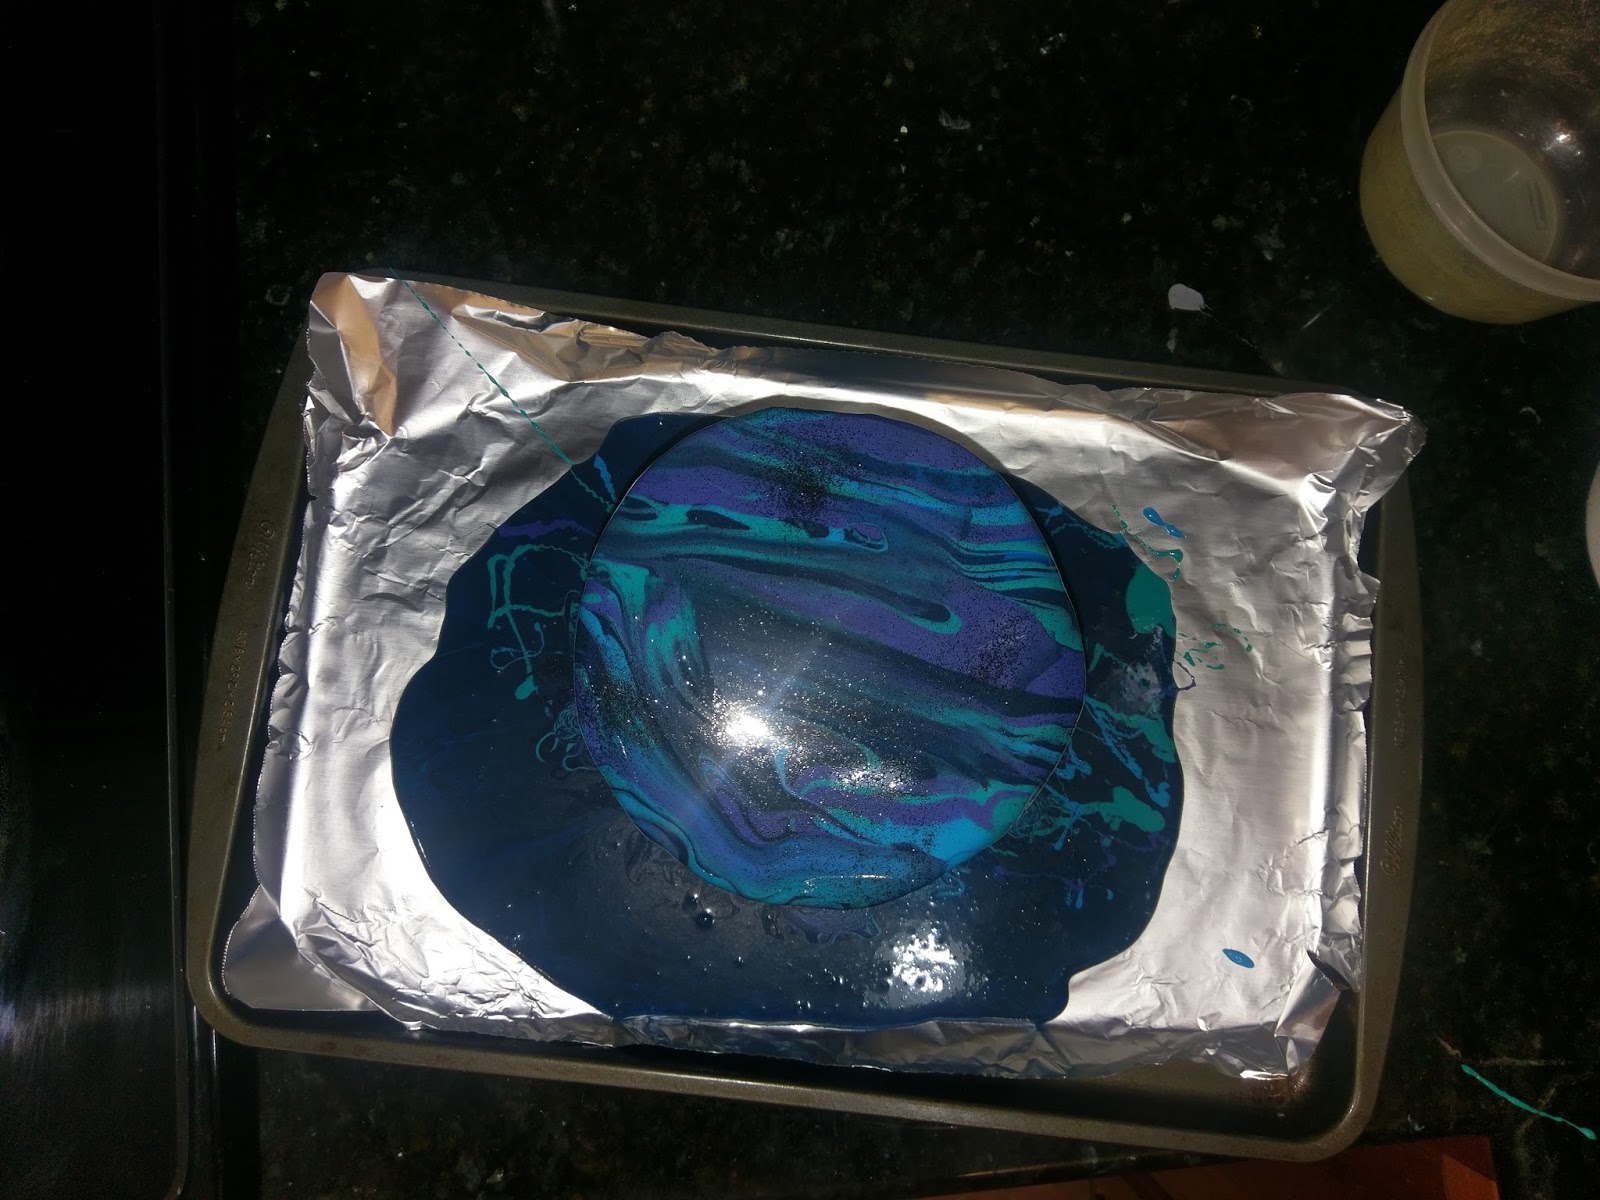
I tend to go above and beyond when it comes to making my husband’s birthday cakes. I try to outdo myself every year, which has helped me to come up with some gems like this zombie birthday cake, a Cookie Monster cake, this giant 3-0 birthday cake, and my personal favorite, this 8-bit Legend of Zelda birthday cake. But when we’ve taken to calling the week of his birthday “Derekpalooza,” it’s kind of a big deal to make a cake that is even half as awesome as the man himself. I knew this year was going to be the year–I was going to make a mirror cake. I’m sure you’re familiar with this trend…a cake so shiny you can literally see your reflection in it as you inhale slice after slice. When I write it out, it seems like the kind of thing you’d actually want to avoid, but thankfully this didn’t stop me. My husband not only tolerates but also embraces the entire crazy package that is me, so to celebrate his birthday (and extraordinarily high level of patience), I was determined to make this cake the most spectacular thing I’ve ever decorated. A cake that was out of this world…and thus, the galaxy swirl mirror cake was born amidst a Big Bang level of kitchen mess.

Worth it. Do you see how unbelievably shiny that cake is?! And swirly? And downright friggin’ awesome?! I’ve done a lot of things in my life that I’ve considered milestone moments–getting my Master’s Degree, getting married, buying a Camaro, rescuing the world’s cutest dogs, and this cake is officially added to the list. I literally almost cried when I was done with the mirror glazing because I was so happy it turned out and didn’t end in a disaster and very quick trip to the nearest bakery for something I could stick a candle in and call it good. To say this mirror glaze process made me anxious is like saying Jupiter’s a sorta big planet…a massive understatement on all accounts. But I did it. With tons of emotional bargaining, a lot of cursing, and so much breath holding I nearly fainted, but I did it. And you know what? It was so much easier than I thought it would be. So this pretty much means I’m going to mirror glaze everything from now until the end of time. But I’ll let you in on my secrets and the whole process in a crappy photo montage bigger than planet Pluto (it will ALWAYS be a planet to me).
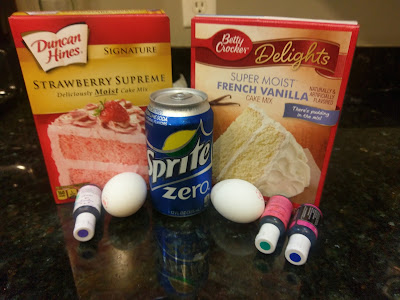
Yeah, I’m a rebel…rival cake mixes and all. I did want to cut as many calories as possible since this cake was getting topped with a layer of buttercream and an additional layer of mirror glaze. Since a lot of the glaze ends up dripping off the cake, two 6″ rounds stacked with buttercream and glaze ended up being 400 calories a slice for 12 very tiny slices. It wasn’t my birthday, so calories unfortunately and inevitably still counted. To make the galaxy swirl cake, you’ll need:
- 1 can of Sprite Zero, divided
- 1/2 a strawberry cake mix
- 1/2 a vanilla cake mix
- 2 eggs, divided
- Blue, turquoise, and purple gel dye (or whatever colors you want your cake to be)
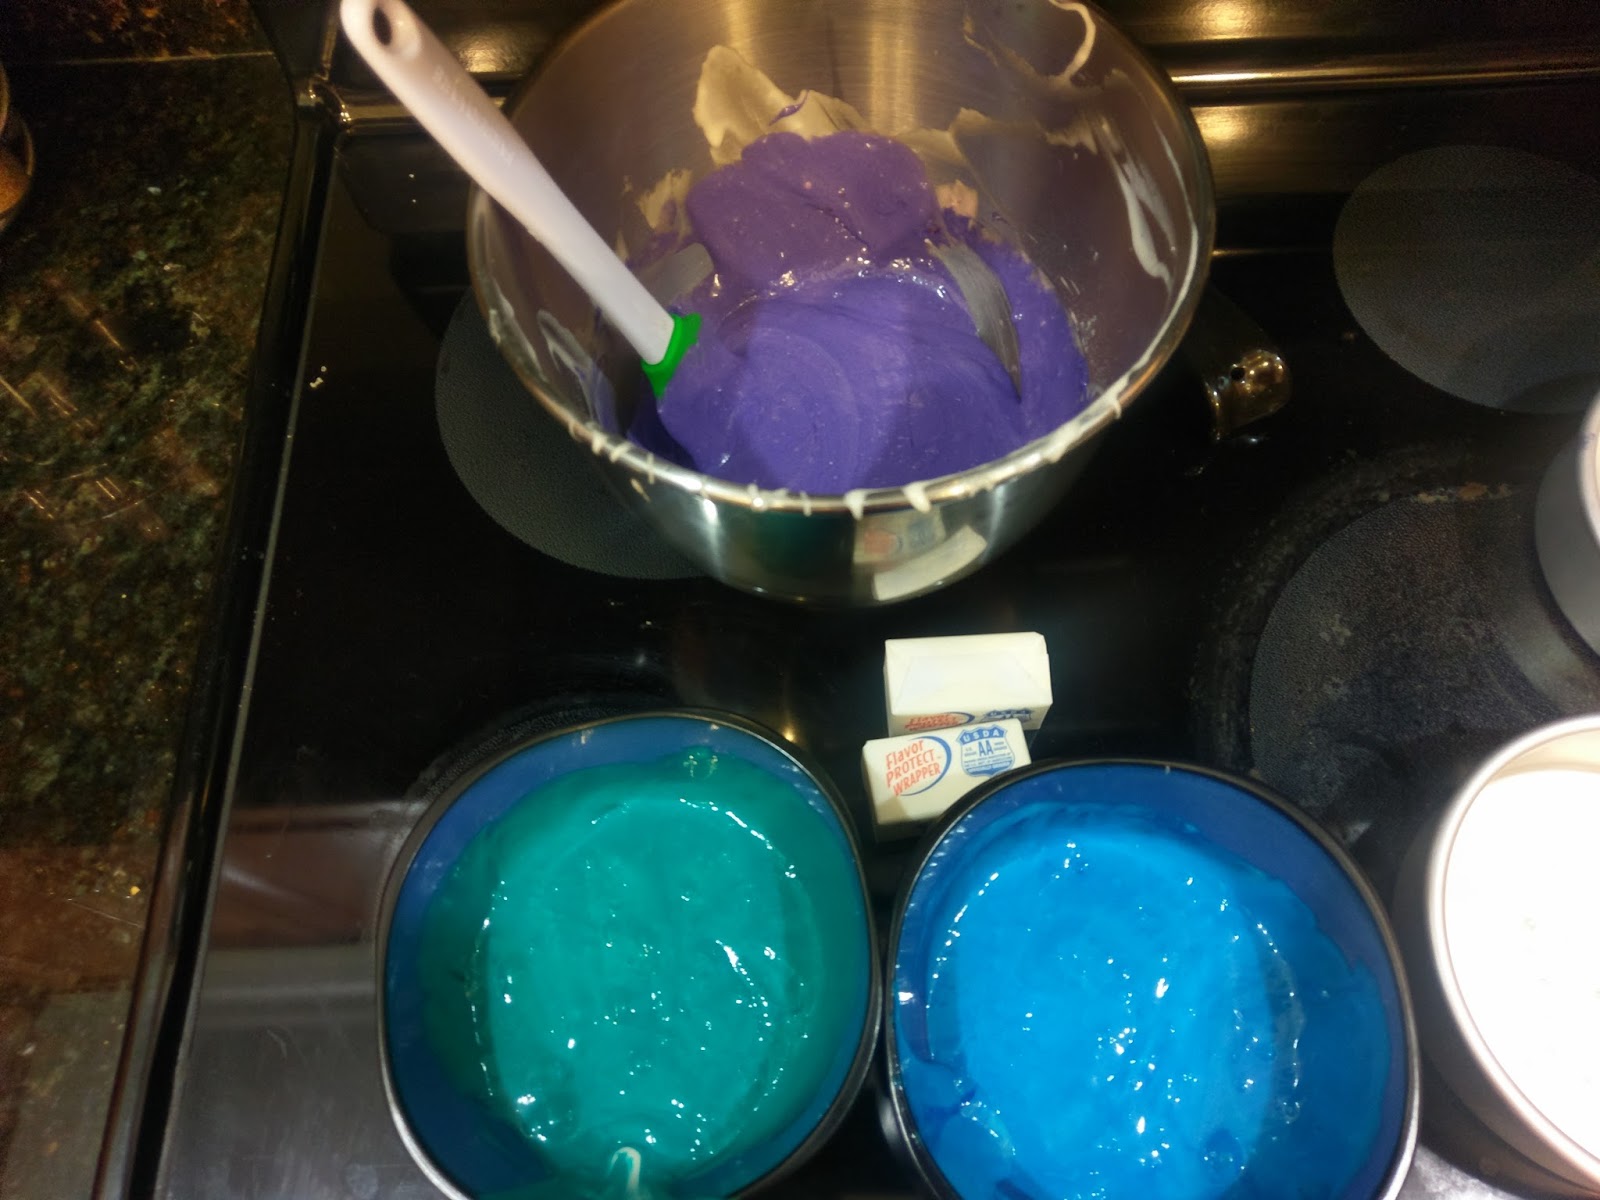
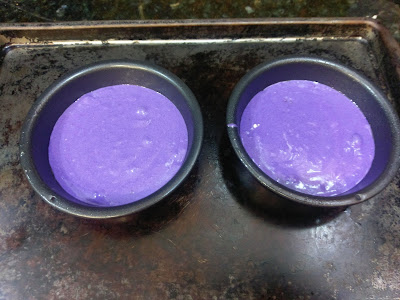
Preheat your oven to 350 and grease your pans (this will make enough batter for two 8″ rounds or two 6″ rounds and two additional mini 4″ rounds). Take half of the box of vanilla cake mix, one egg, and 5 ounces of Sprite Zero and blend well in a stand mixer for 2 minutes. Divide this into two large bowls. Dye one bowl of vanilla cake mix blue and the other bowl turquoise. Clean out the stand mixer bowl and then add half the box of the strawberry cake mix, one egg, and 5 ounces of Sprite Zero. Mix well for 2 minutes and add in the purple dye.

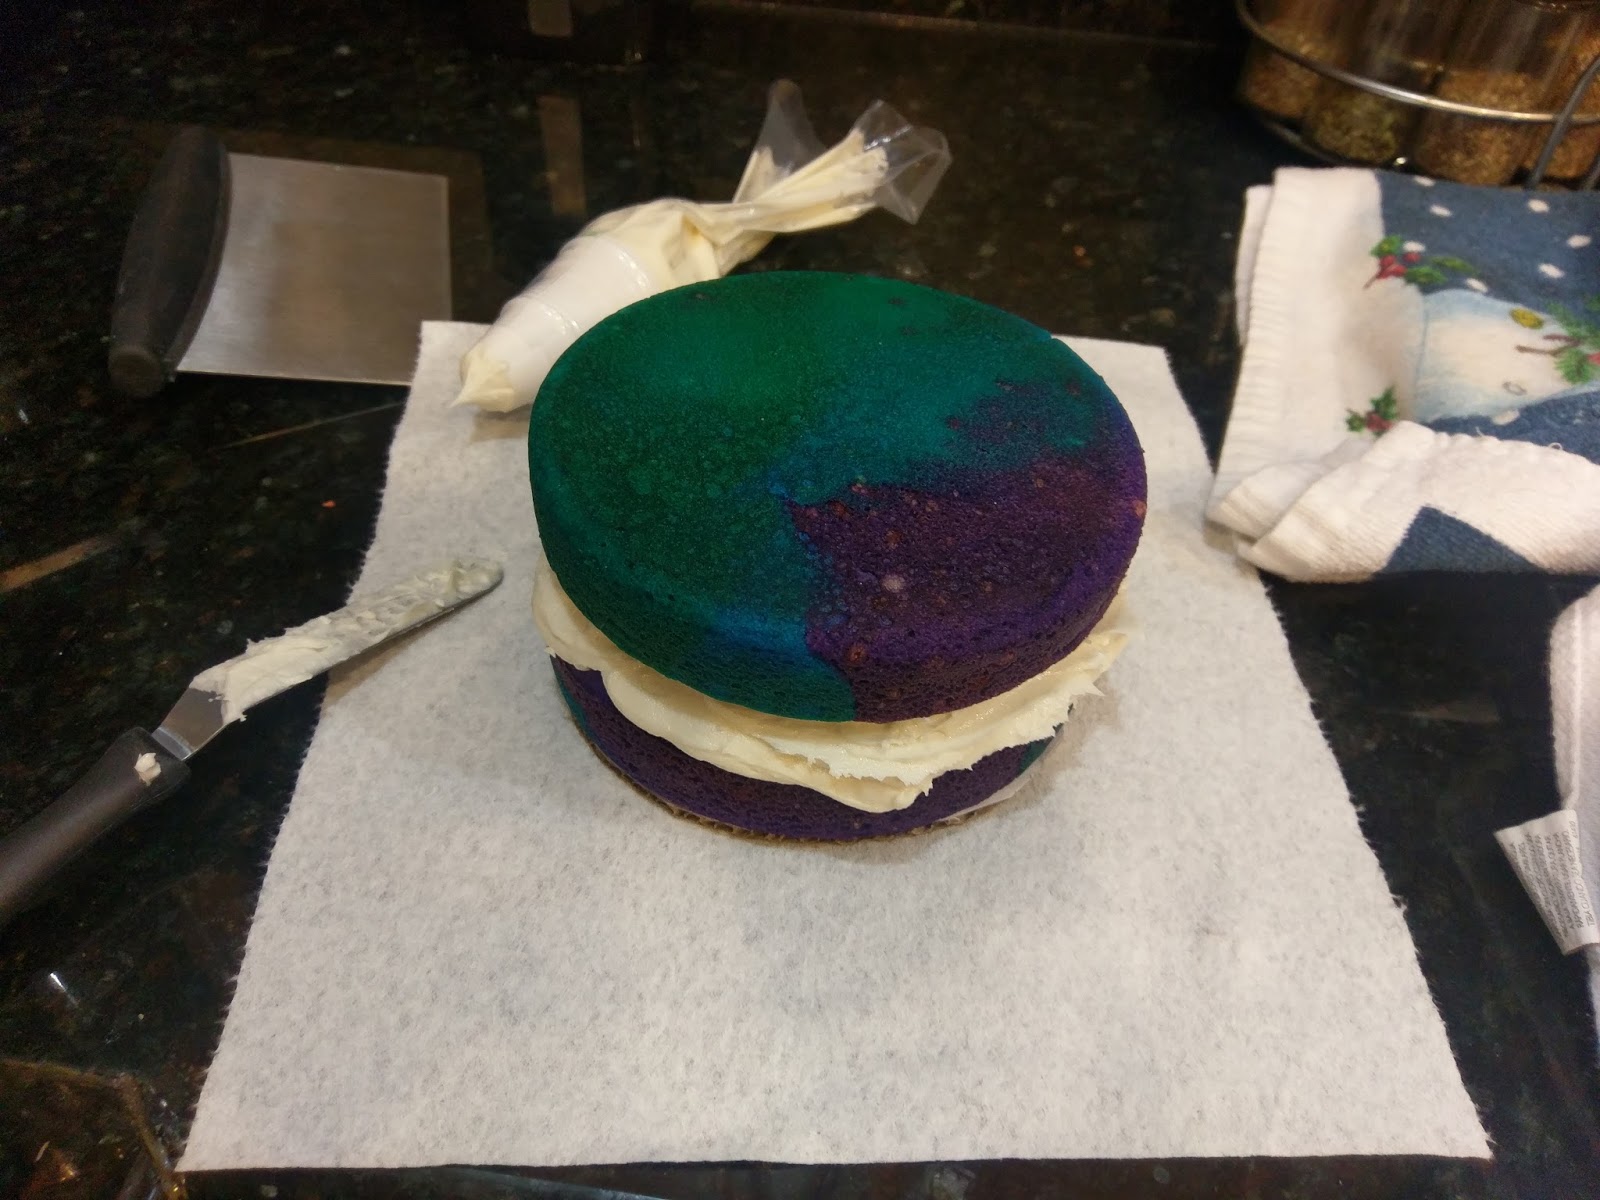
Things are about to get fun. Now, gather up three spoons. Take a spoonful of purple batter, plop it into each of your cake pans, grab another spoon, take a spoonful of turquoise batter, plop it into each of your cake pans, and finally take the last spoon and gather a spoonful of blue batter, and plop it into each of your cake pans. Continue plopping random spoonfuls of each color so they’re overlapping and each color is getting distributed on top of another:

Will look like you’ve mixed Play-Doh. You’ll have about half the purple/strawberry cake batter left if you’re using 6″ rounds.
But they work out great a single serving pieces! These only need to bake for 10 minutes. Now, you can gently tap each pan on the counter to get out any air bubbles. To create an even trippier effect, take a knife and gently swirl (don’t stir!) the batters to mix the colors in a swirling fashion. I meant to do this…and I promptly forgot because I was simultaneously making dinner, proving once again, there’s not enough hours in the day for me to kick all the ass that I want to. Still, the cakes looked other-worldly after baking at 350 for 20 minutes and letting cool on a rack:
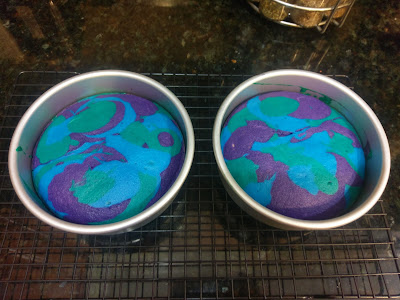
Definitely spacey. Like my head after a long day… Be sure to cut a cake board to the exact size of your cakes while they cool in the pan for 10 minutes. Then turn them out on a towel on top of the cooling rack to finish cooling.

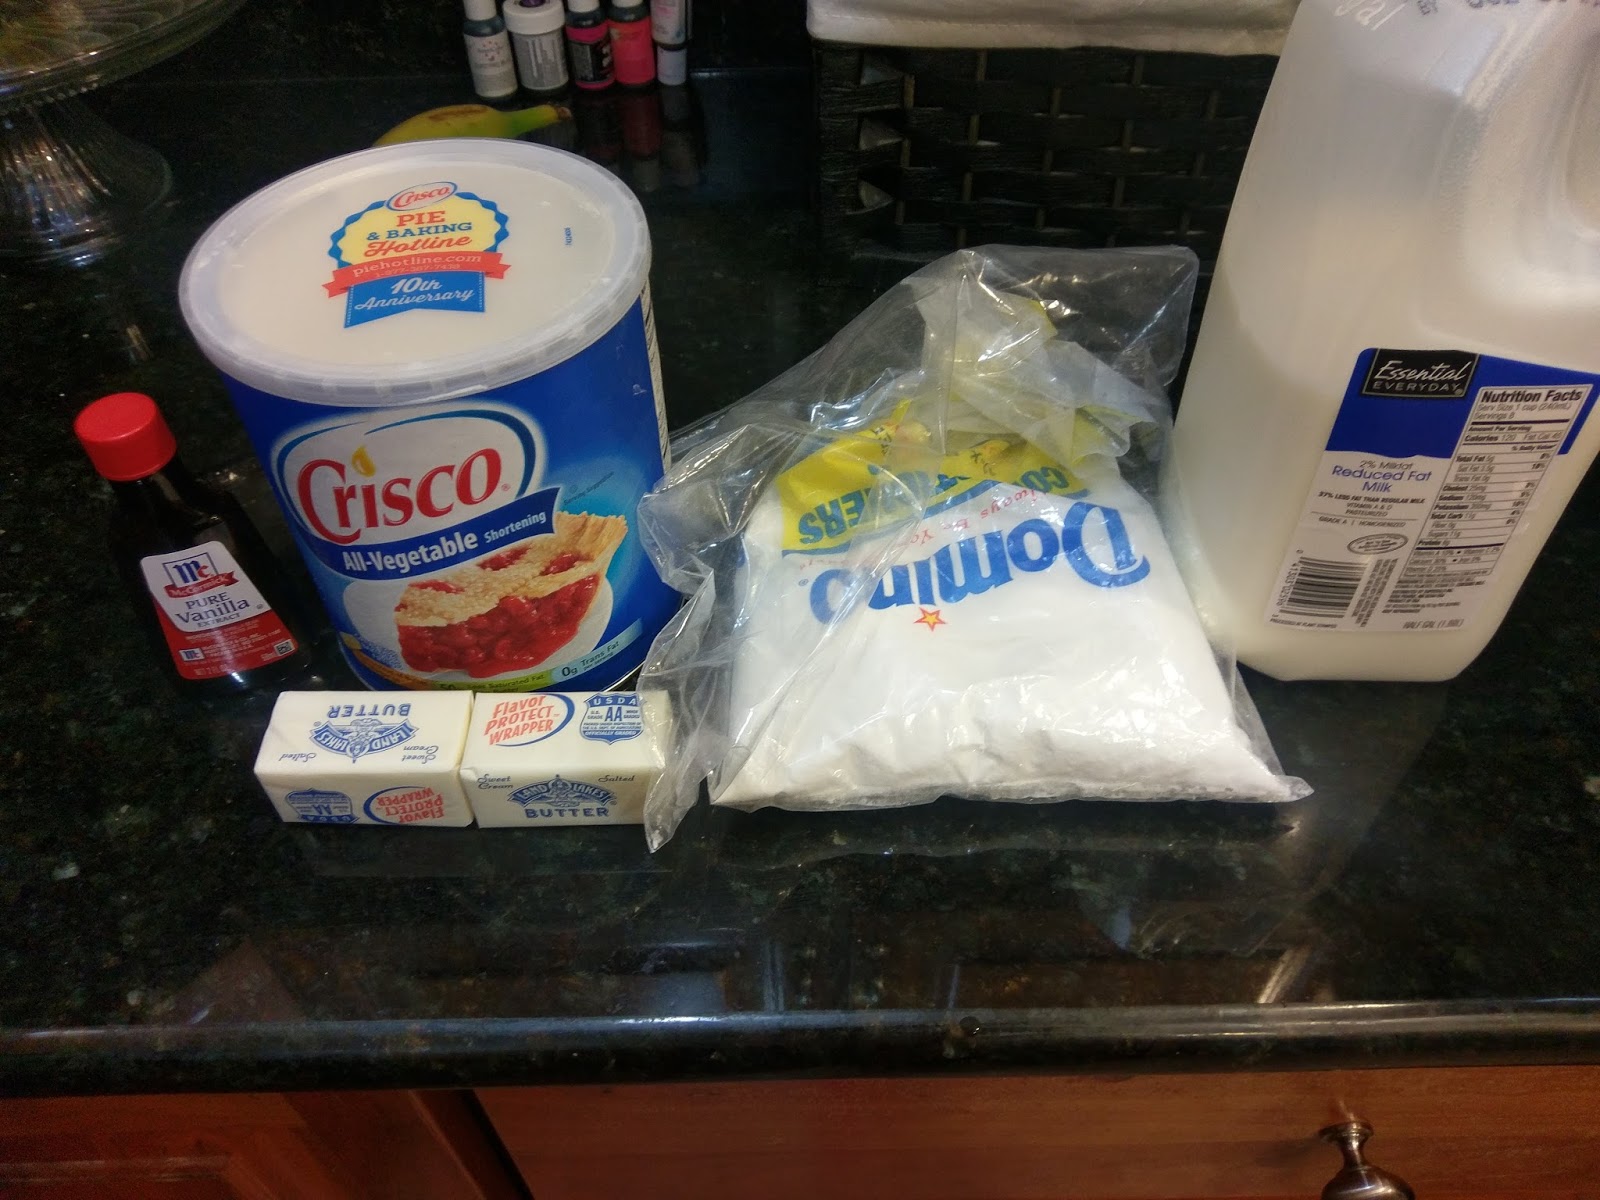
Oh yeah, the good stuff… I haven’t had buttercream frosting in a very, very long time. I had long since forgotten that wonderful, make-your-teeth-rot sweetness that comes with a perfectly crafted buttercream. Dear God, did I miss it. To make my buttercream that works with the Viva paper towel trick, you’ll need:
- 1/2 cup of butter, softened
- 1/4 cup of Crisco
- 3 1/2 cups powdered sugar
- 1 TBS vanilla extract
- 3 TBS skim milk
Blend the butter and Crisco together, then add the vanilla extract, a tablespoon of milk, and two cups of powdered sugar. Slowly blend together, and then add the last cup and a half of sugar and last tablespoon of milk. Blend, and then scrape your frosting into a piping bag with a large open coupler or open round tip.

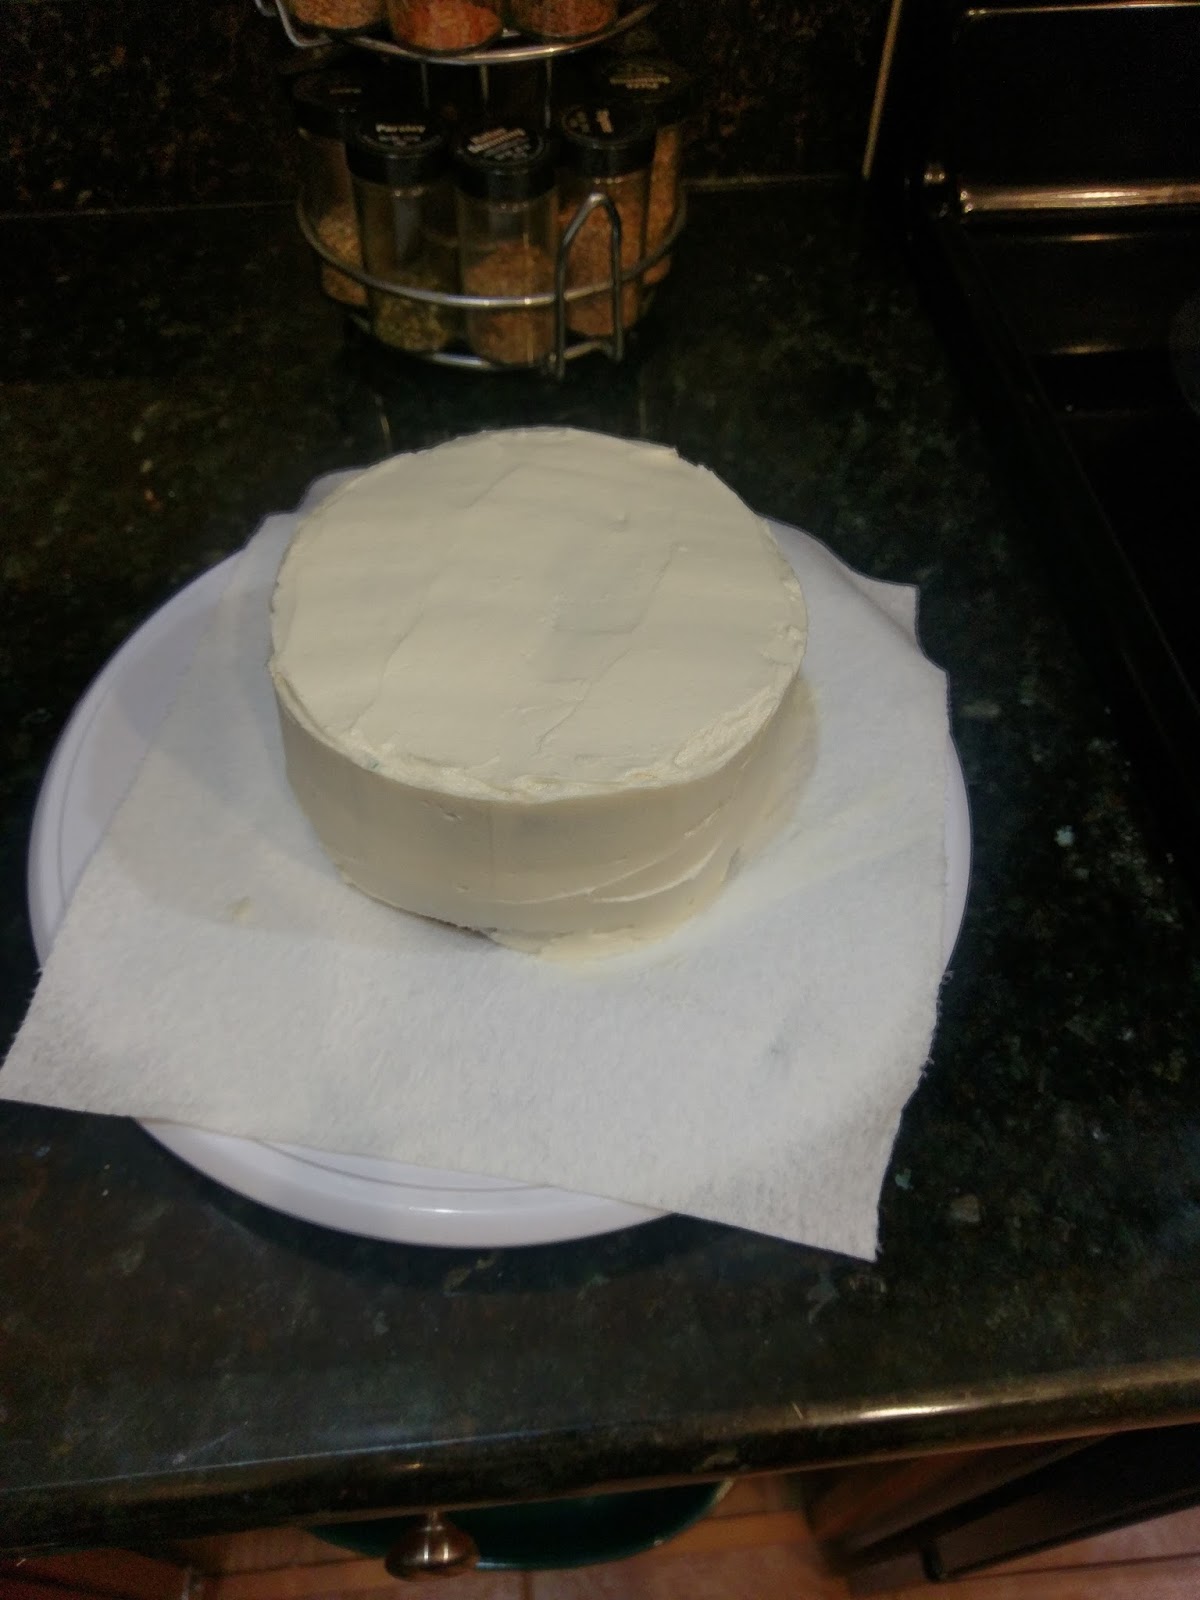
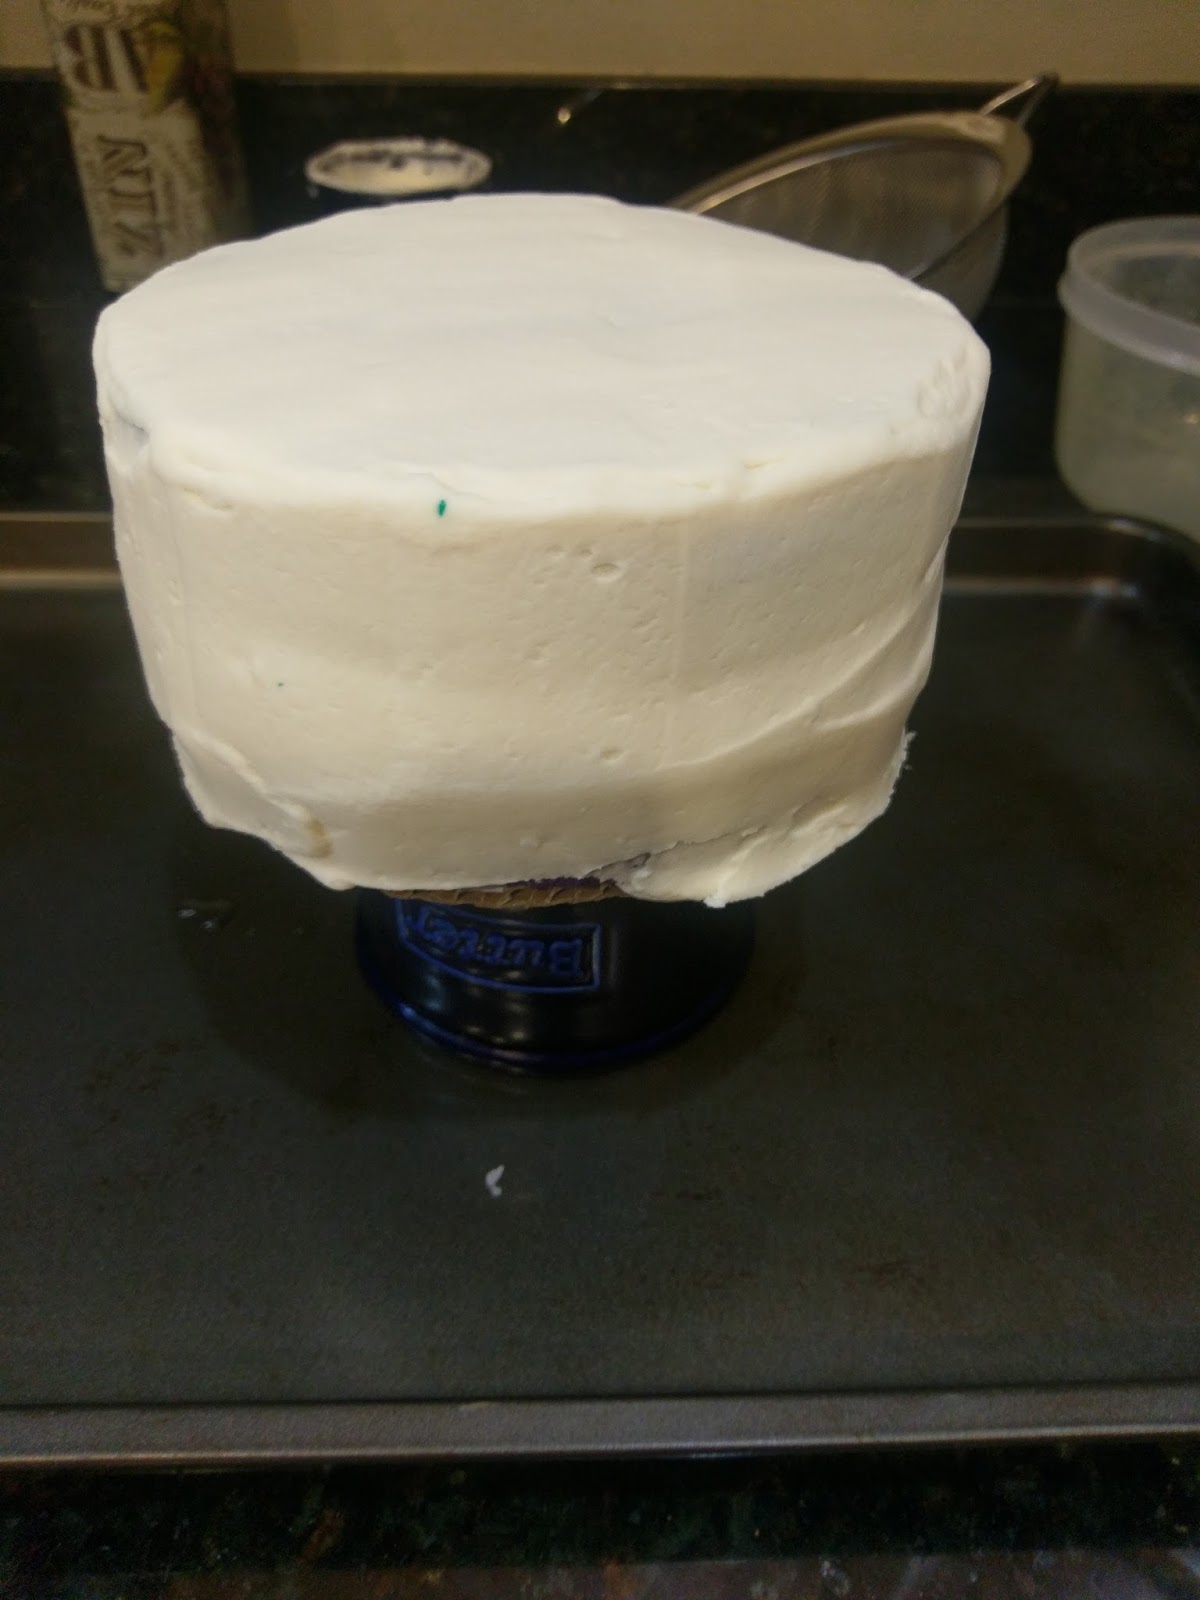
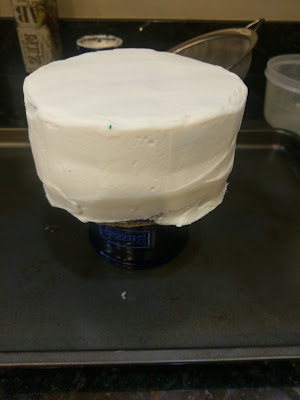
Like the world’s coolest Oreo… Take the completely cooled cakes and place one round on your prepared cake board. Pipe a circle of frosting around the edges and a bit on the middle of the cake. Use an angled spatula to evenly distribute, then take the other cake round, and flip it upside down so the bottom of the cake is facing out (you want a smooth surface for your glaze later).

Admittedly, also been a long time since I smoothed a cake.. Use the piping bag to pipe up and down the sides of the cake and circle around the top. Use a large angled spatula to spread the frosting out and get it as smooth as possible. Place your cake in the freezer for 15 minutes, then take it out and use a textureless paper towel to smooth out any imperfections. The glaze will show any uneven spots, so work carefully to smooth out. You will want your frosting to be frozen before you pour molten hot chocolate on top of it, so place in the freezer for at least 4 hours.
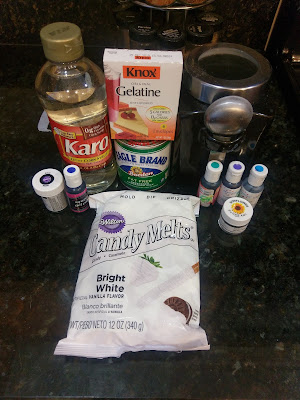
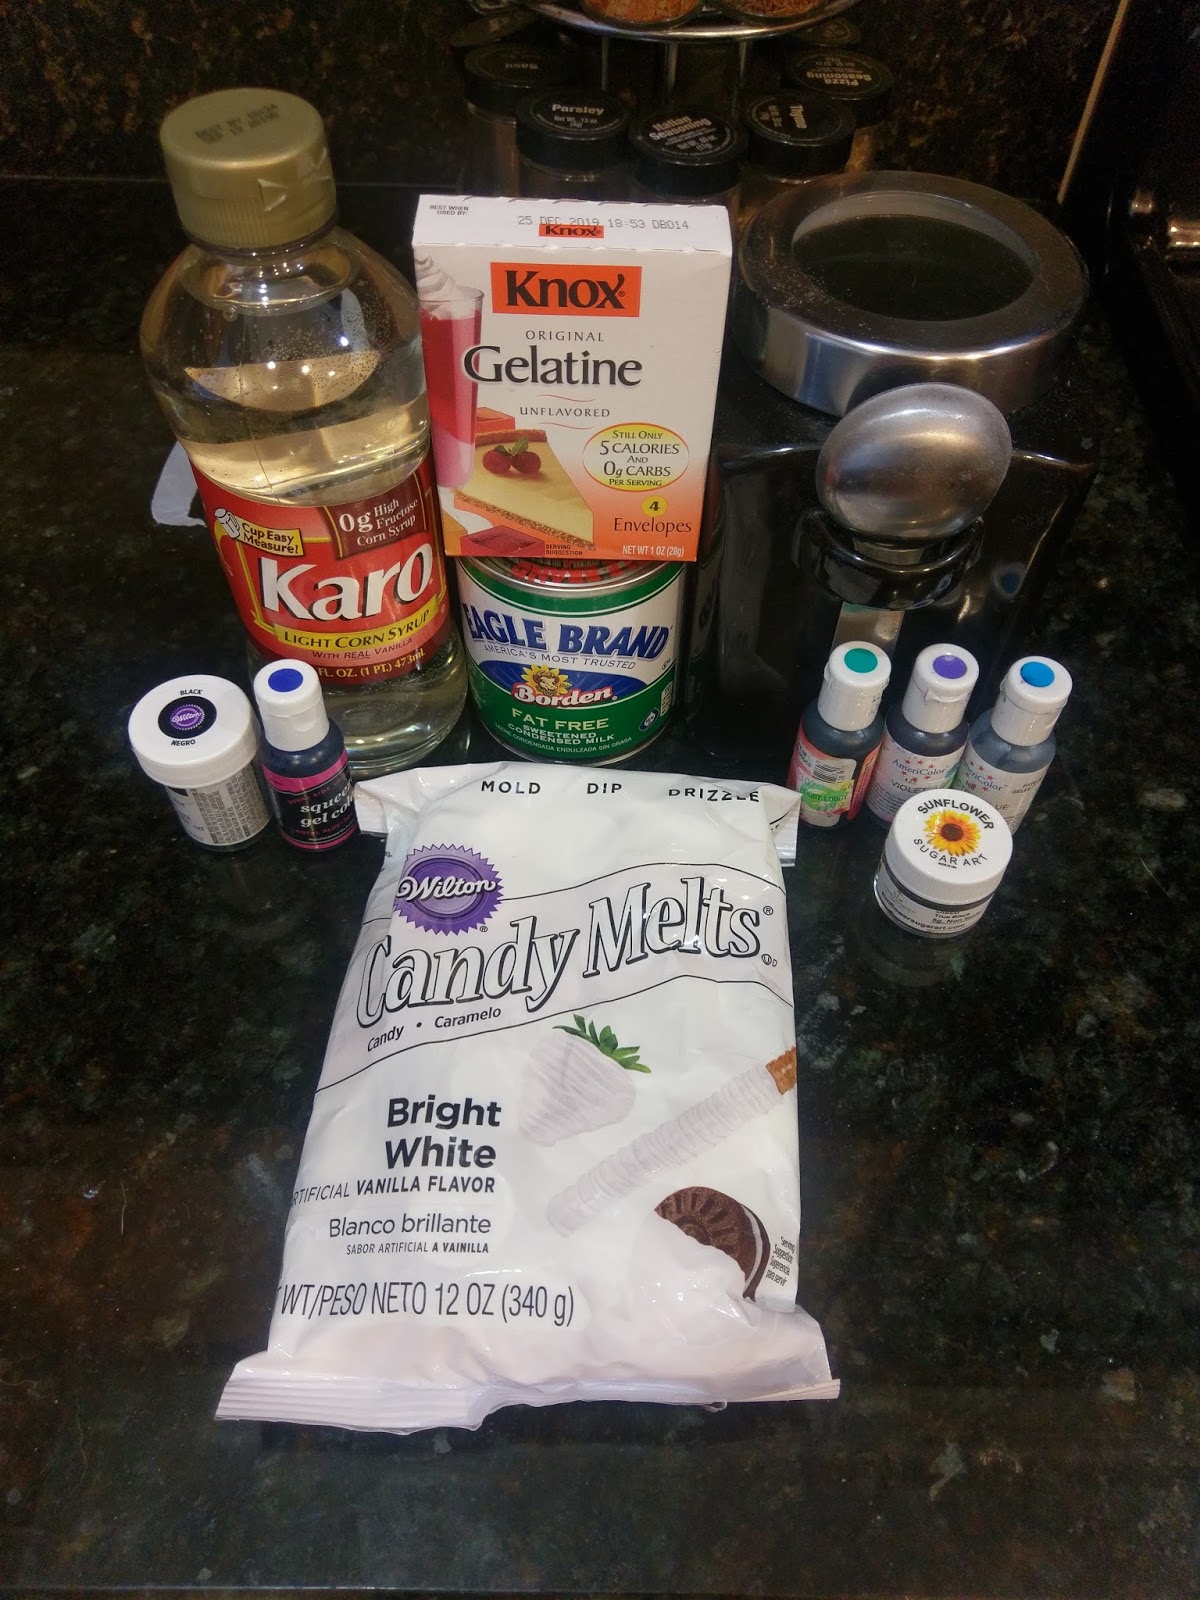
I bought three bags of chocolate melts in case I screwed up. I’m now rich with chocolate melts. So this glaze doesn’t require anything out of the ordinary to make if you’re close to a Hobby Lobby or Joann Fabric or Michaels. Guess who does not live close to any of these? Mhm. So I bought three bags of melts on my excursion to JoAnn’s in case I ruined everything and had to start over or attempt to eat my weight in chocolate melts to cope. I found this tutorial (and aside from how annoyingly chipper the girl is) it is quite useful, but I like my instructions in the written form, so I’ll walk you through how I made my glaze. To make, you need:
- 8 ounces of white chocolate melts
- 5 teaspoons of plain gelatin
- 1/2 cup of water
- A separate 1/4 cup of water
- 1 cup of sugar
- 1/2 cup of light corn syrup
- 1/2 cup of fat free sweetened condensed milk
- Gel dyes in black, blue, turquoise, bright electric blue, and purple
- Black edible disco dust

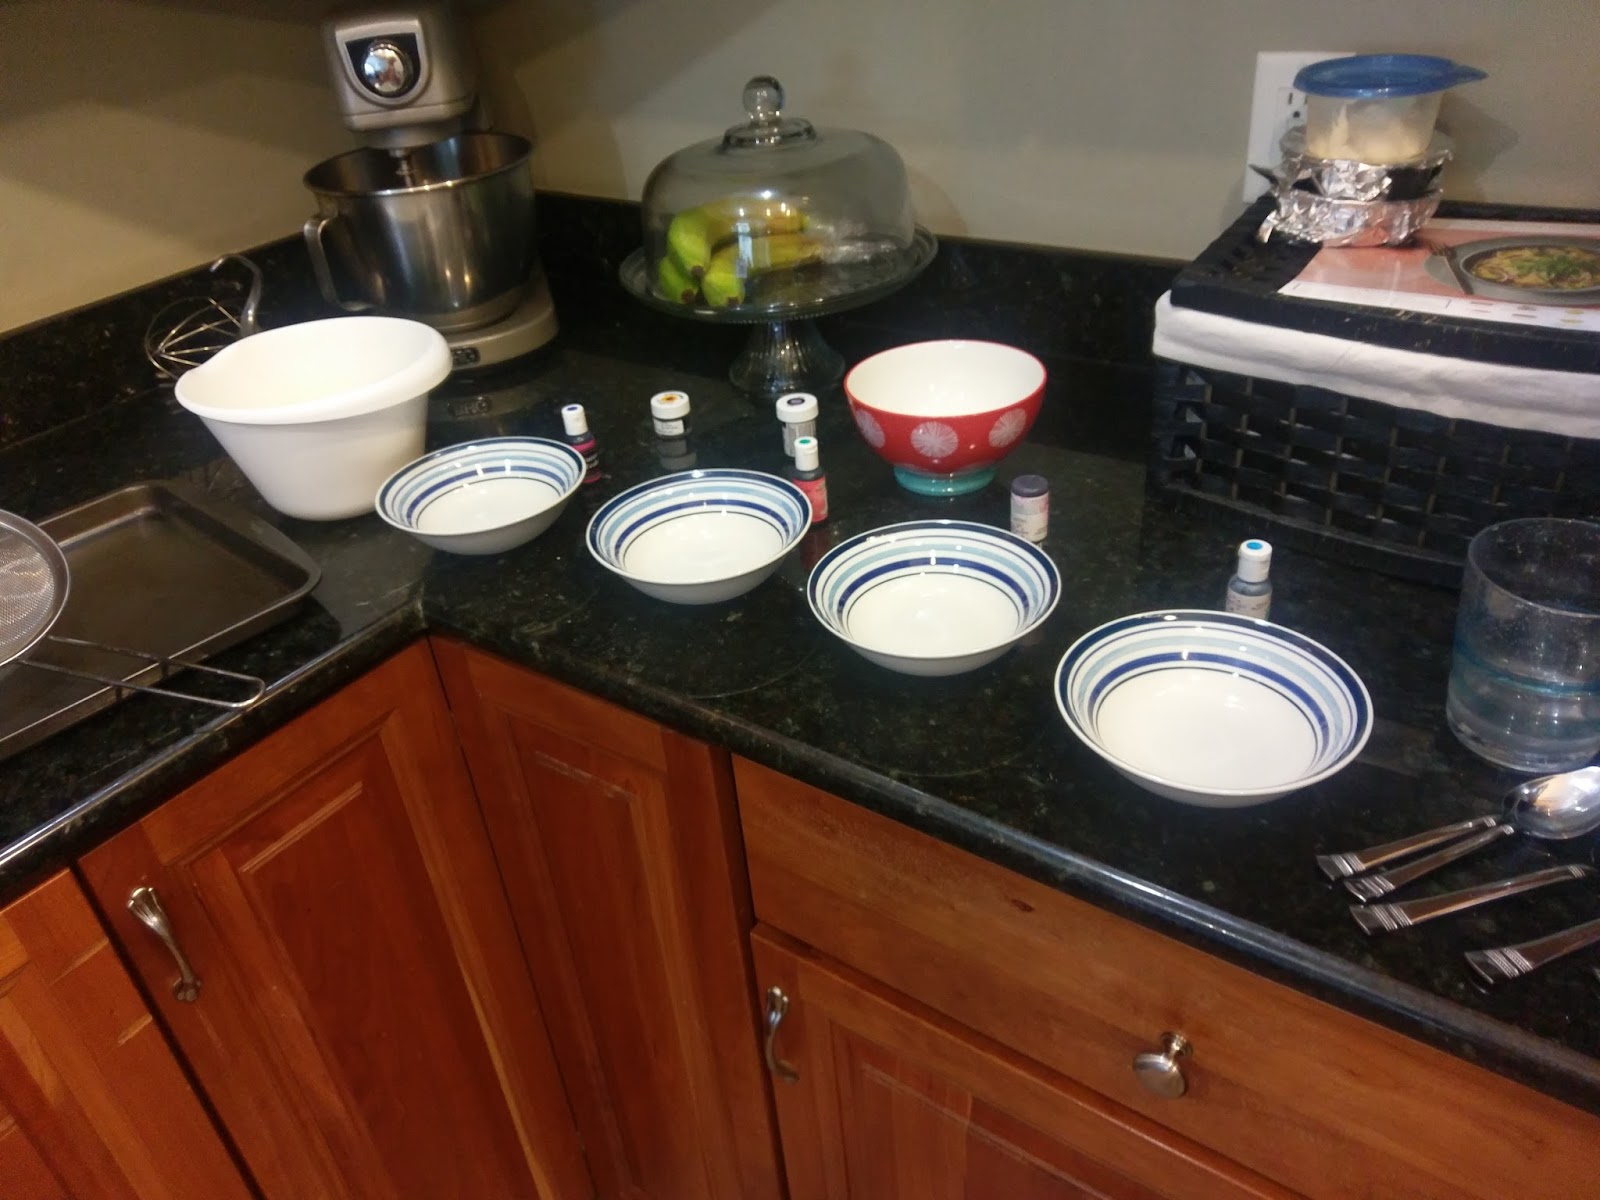
And every pan, bowl, and utensil you have. In a bowl, dump the 1/2 a cup of water and measure out and add 5 teaspoons of gelatin. Whisk together until it starts to thicken and bloom and look like the world’s grossest applesauce. Set this aside. In a sauce pan, whisk the 1/4 cup of water, sugar, and corn syrup together and heat on medium to a low boil. Boil for 7 minutes, until the sugar is totally dissolved. Remove from heat and whisk in the bloomed gelatin followed by the sweetened condensed milk. Take a large bowl and dump in your chocolate melts. Pour the mixture you just made on top of the melts, and let this sit for 4 minutes.

Gather the rest of your entire kitchen at this point. While the chocolate melts…melt…get out 5 more bowls (one larger than the rest), 5 more spoons, the gel dyes, a strainer/sieve, and a hand mixer or whisk. Take the cake out of the freezer and place on a baking sheet covered with foil or Parchment paper. Elevate your cake using a vase, large mug, container, etc. so the chocolate mix can drip off the bottom. Now, mix the chocolate melts/gelatin goop together with the hand mixer until no lumps remain. Take the largest bowl you just set out, and place the strainer on top of it. Dump the chocolate melt mixture over the strainer to get rid of bubbles and any small clumps. Split the chocolate between the 5 bowls and work quickly to dye each bowl one of your colors of choice. I used:
- In the largest bowl where I strained my chocolate, 5 drops black and 5 drops blue
- 6 drops of electric blue and 2 drops of blue to another bowl
- Several drops of turquoise to another bowl
- Several drops of purple to another bowl
- Several drops of just electric blue to another bowl
Yep, that’s the bottom of my butter bell under my cake. 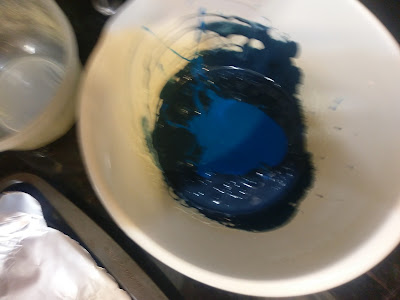
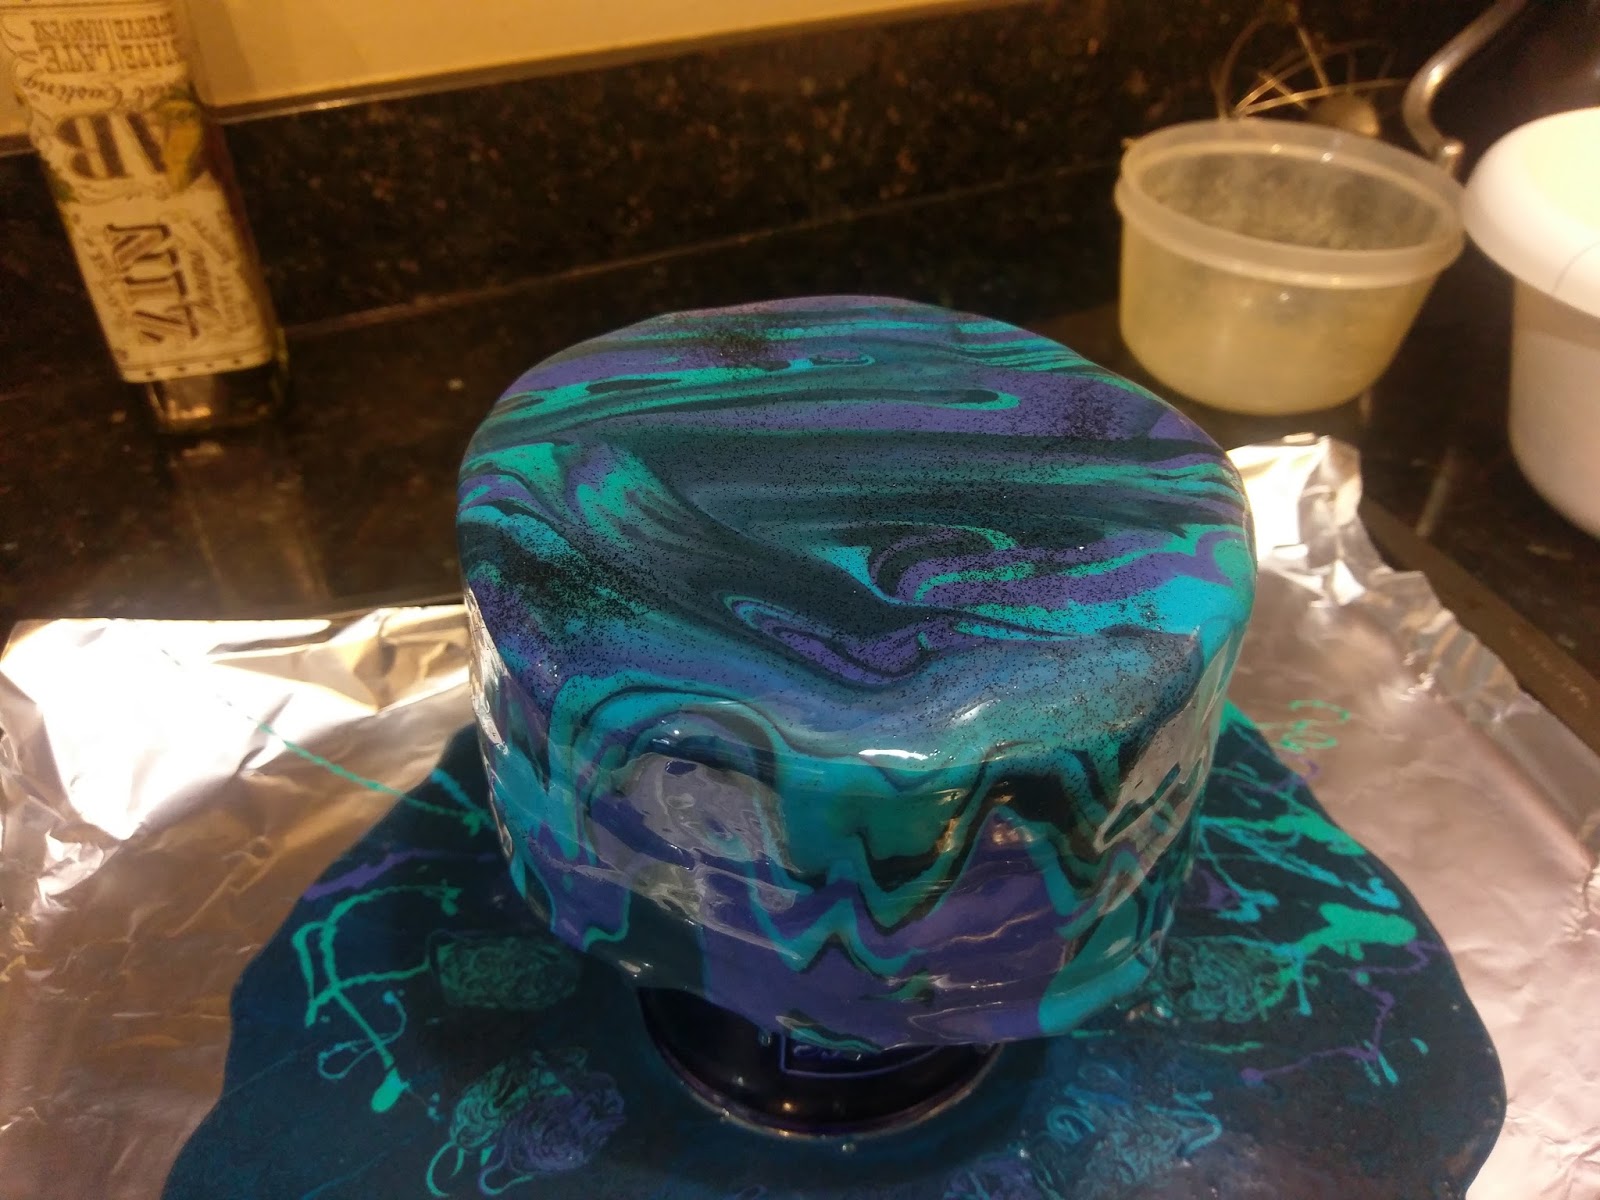
Shaky cam to show my rush and high level of anxiety best described as “human treed by a bear.” In the largest bowl that I dyed the darkest color of black and blue together, I dumped in the bowl that I had dyed electric blue mixed with a few drops of blue. DO NOT MIX, but gently swirl these two together in that large bowl. This creates a really cool two-toned effect. Hold you breath, pray to whatever deity you believe in, and dump this bowl on top of your frozen cake.
Things will be okay, I promise! The great thing about this mirror glaze is that you can see your entire life flash by in it while you hope it turns out alright. It will drip off and ooze, but the entire cake should be covered. To complete the galaxy look, drizzle spoonfuls of the remaining three colors on top randomly:
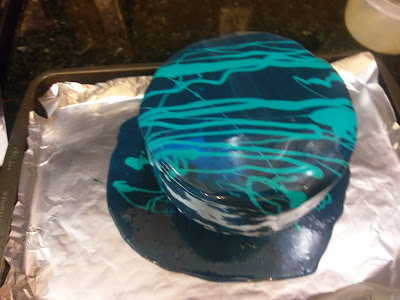
All the while making a glorious mess. 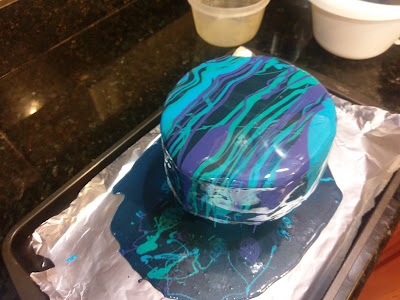
Like melting crayons. To meld the colors together, take a large angled spatula and very gently smooth in one direction. To finish, sprinkle the black disco dust on top:

Because nothing I make can be void of glittery sparkles. 
But really, it the galactic sparkling cherry on top. Let your cake continue to ooze for 20 minutes. Prep whatever you’re going to keep your cake on, and get ready hold your breath all over again.

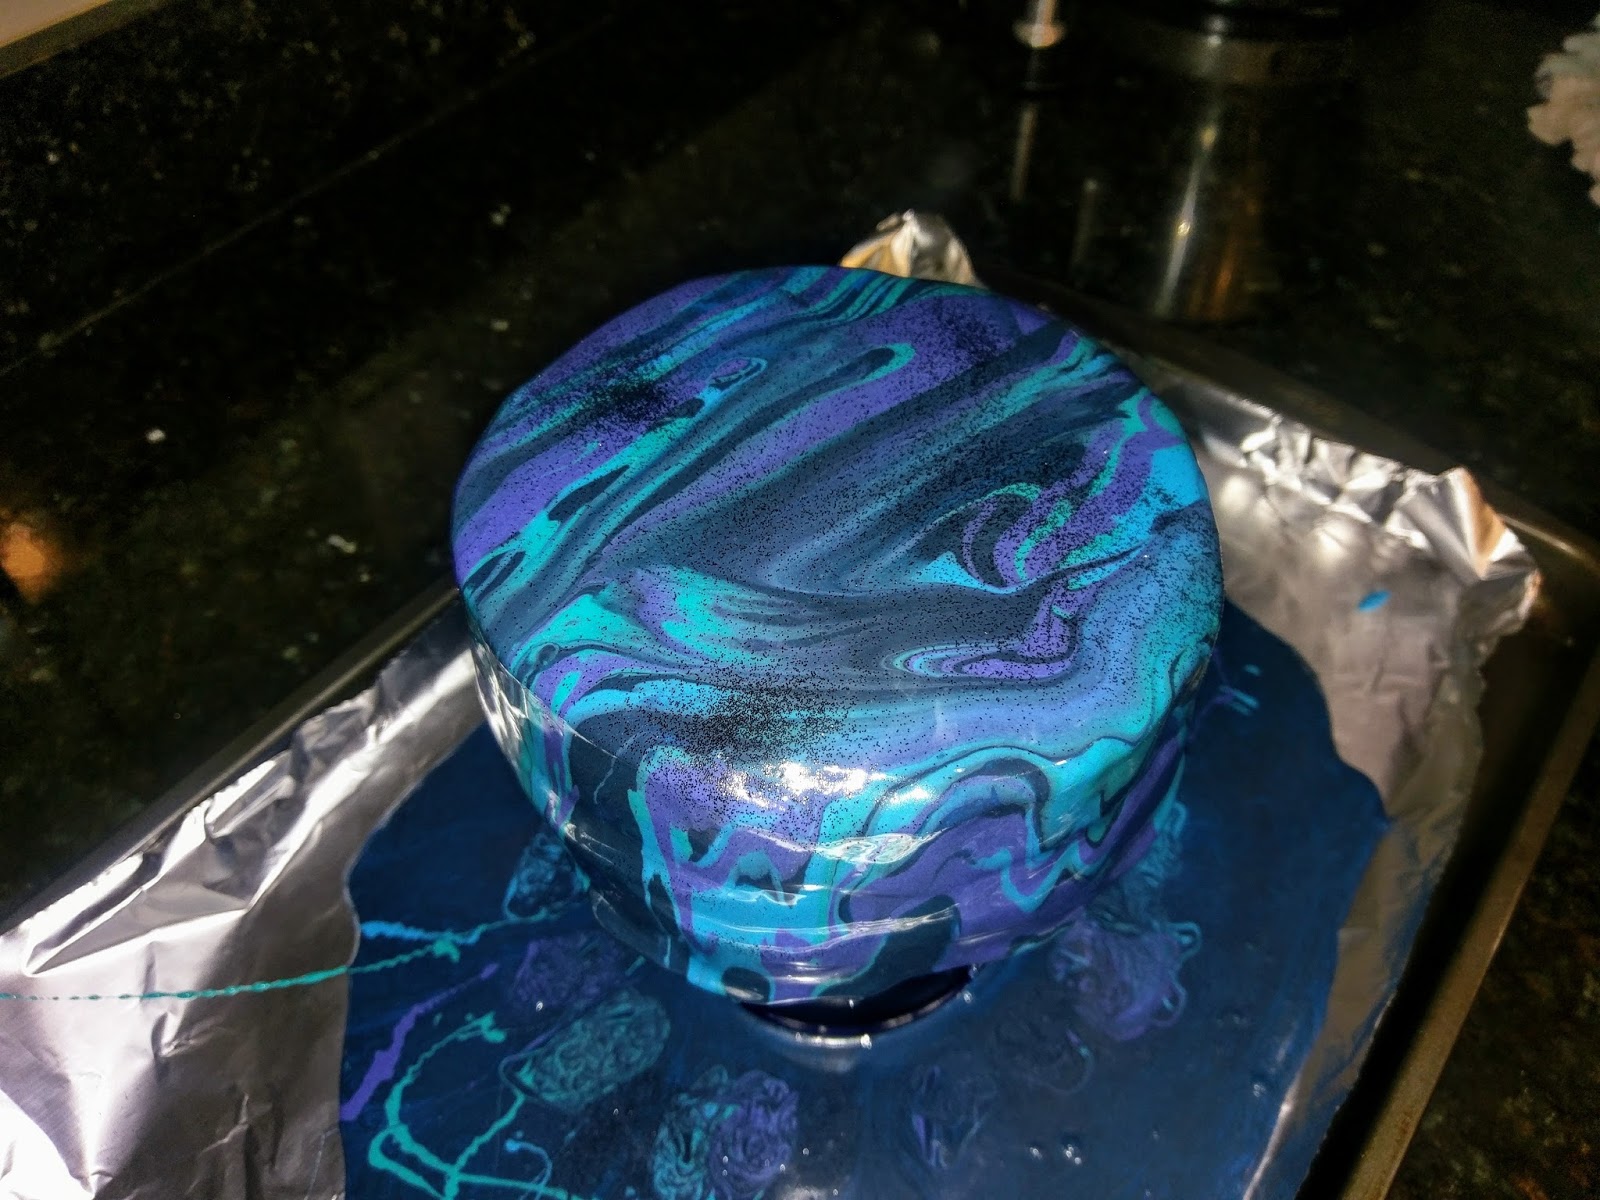
Because now you have to move this without ruining the glaze. Like the world’s stickiest game of hot potato. Since I used 6″ rounds, my cake fit on a large dinner plate. I very, very carefully and very, very aware of how uncoordinated I am, placed my fingers under the cake board to transfer the cake from the top of my butter bell to the plate it would call home. Moving it from one spot to the other felt to be about six light years long.
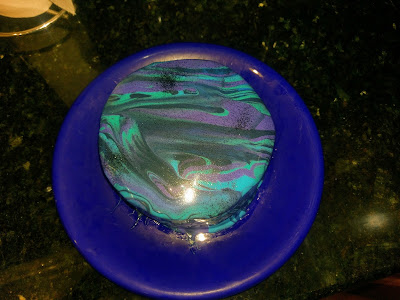
Stars were born in the time it took me to plate this. But I did it without ruining everything in the end. A cake so shiny, you can literally see the reflection from my flash bulb. I’m thrilled with how this turned out, but even more so, so was the birthday boy.

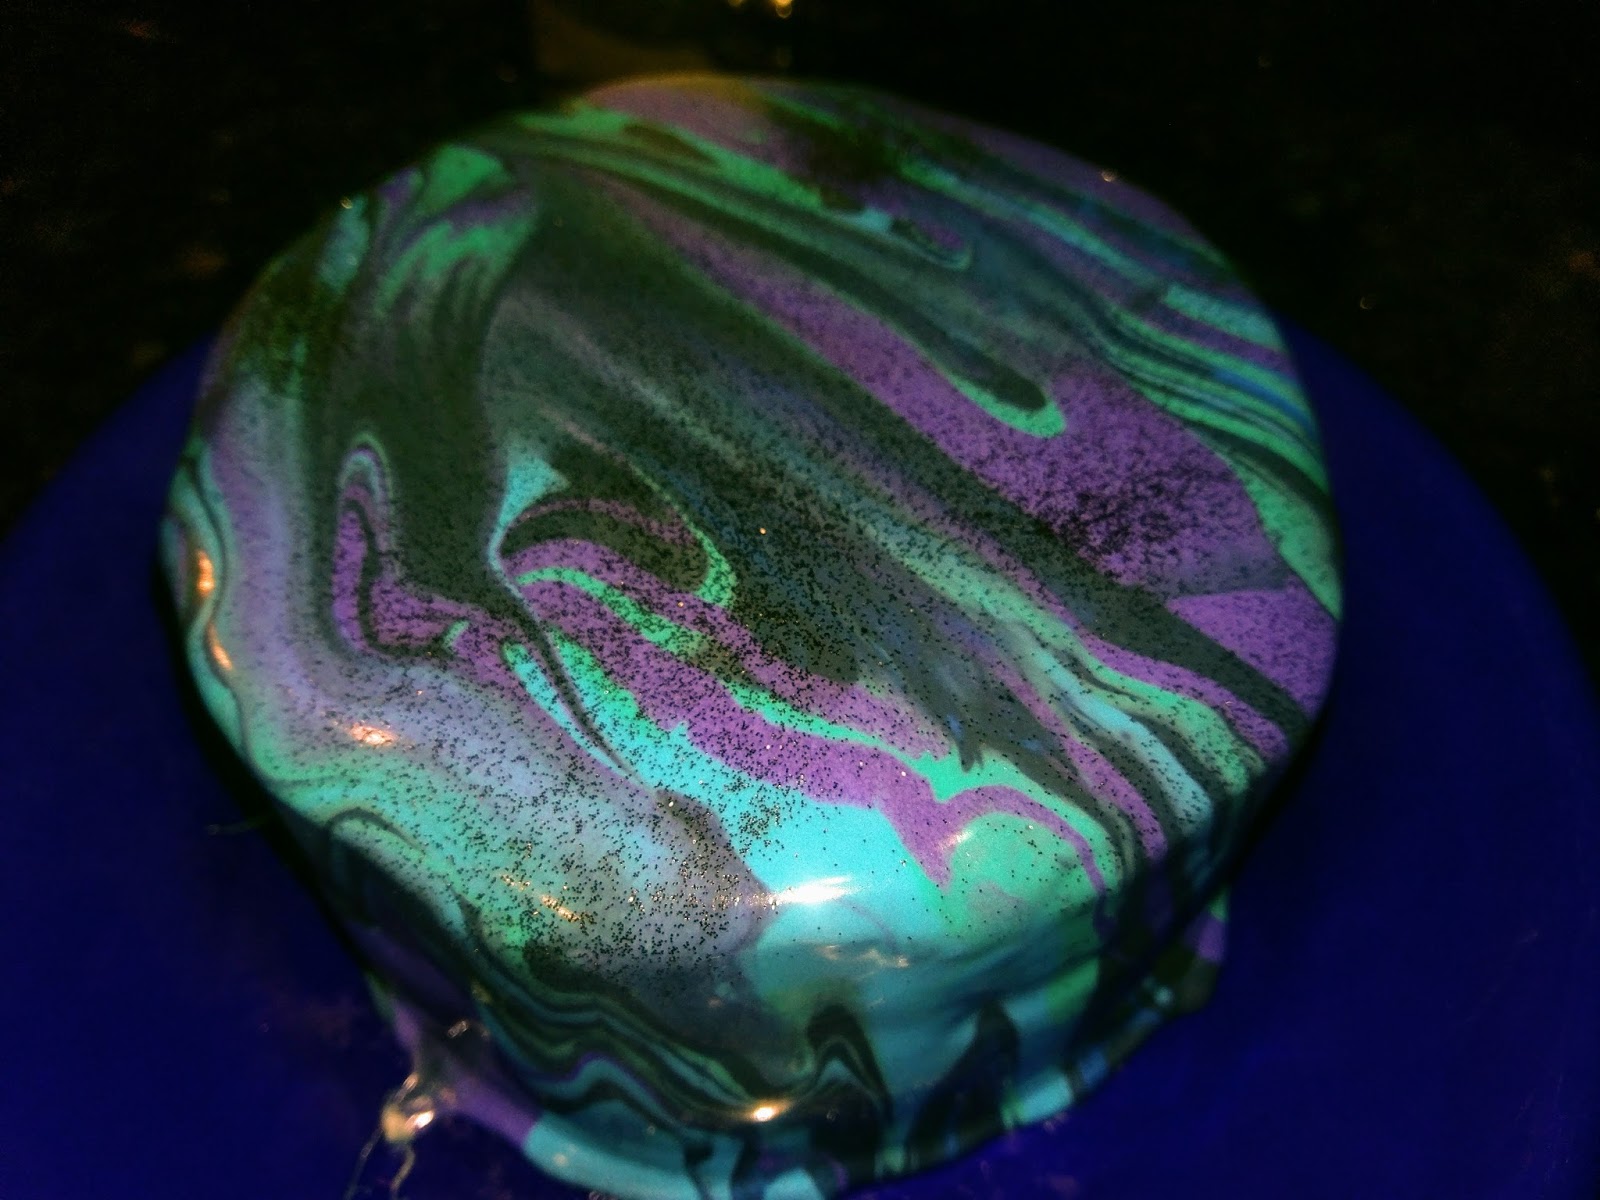
I think he was happy I didn’t use any hot pink dye, too. I honestly wasn’t sure how great the mirror glaze itself was going to taste. My doubts were met with what could best be described as pure tasty bliss when we each had a bite. This mirror glaze is like Magic Shell for cakes…it’s a top layer of slightly hardened chocolate that tastes like a sugary sweet dream. Not to mention it has a full layer of vanilla buttercream to back it up. It’s definitely a decadent and savory cake, and cutting into it was an insanely thrilling moment:

Kate, creator of (cake) worlds! I’ve been too busy to really spend a lot of time baking lately. I managed to cram in baking and decorating this cake over two evenings, and although I was so, so tired, I was also so, so happy with how it turned out. It was a great reminder of why I started baking in the first place–to challenge myself to learn something new and find a way to express my creativity. And to boot, it bears tasty outcomes for me and my loved ones. Derek and I had a wonderful day in Pensacola for his birthday, eating delicious Irish pub food, sampling beers from a local brewery (him, not me, all those calories were saved for dessert!), and later having our cake and eating it, too. Thirty-one looks great on him, and hopefully this cake will fair as well on my hips, too. Totally worth it for an intergalactic dessert experience! When in doubt, you can make a mirror glaze cake without going completely mental–I mean, I was half mental when I started, and still just about as crazy when I finished, so anything’s possible. There are worse ways to lose my sanity than trying to make my wonderful husband the best birthday cake ever. ‘Til next time, my fellow eaters!
-
Orange You Glad it's Summer?
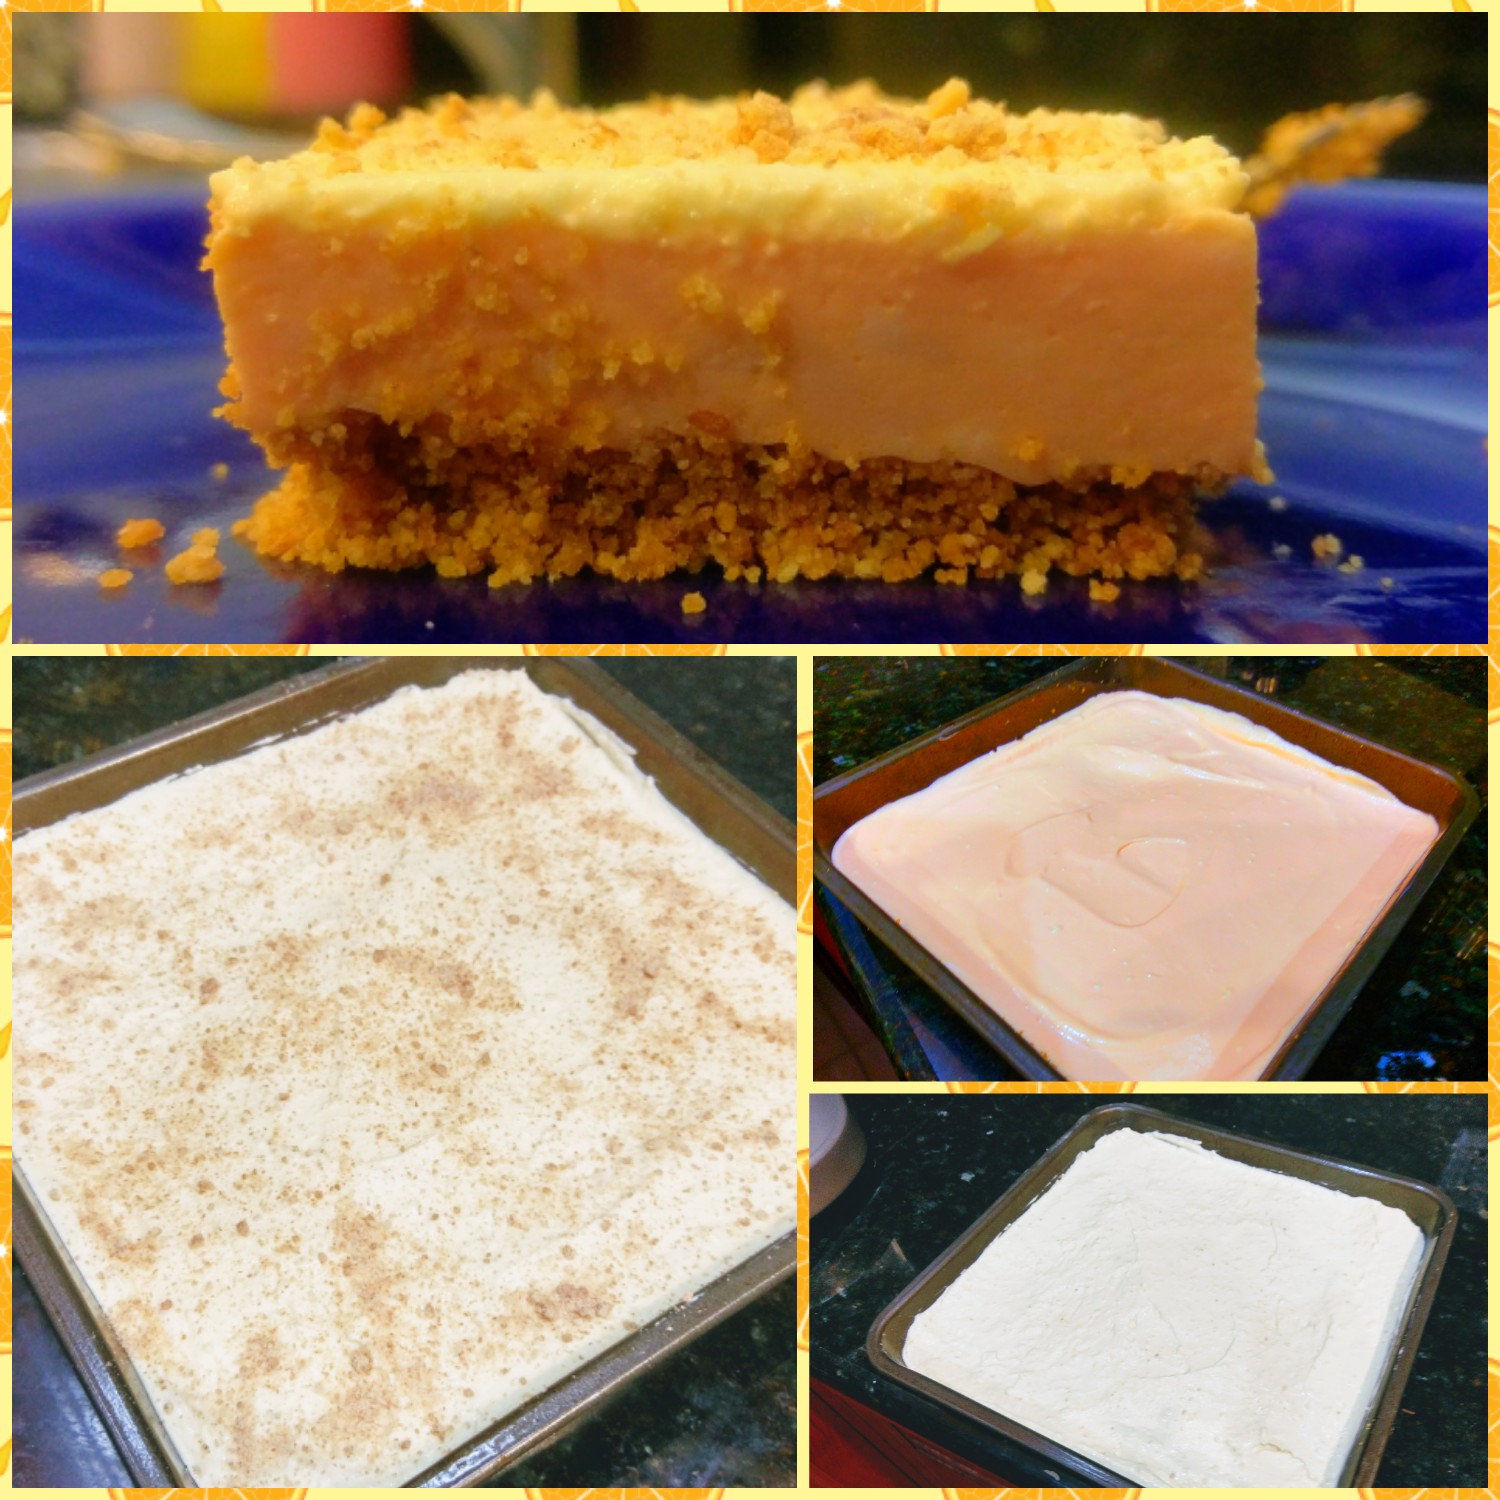
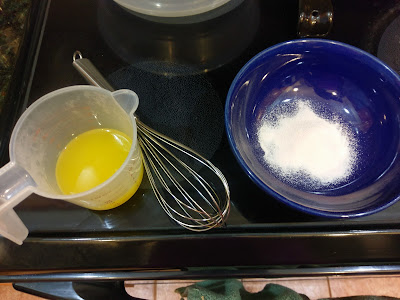
It’s the time of year when I frequently have Wicked Witch of the West moments because I literally feel like I’m melting every time I set foot outside. When it’s 6 a.m. and the real feel is 90, you know it’s gonna be a long day. I try to combat the heat by complaining about it as much as humanly possible while simultaneously thanking the inventor of air conditioning and counting down the days until our Alaskan cruise. Let’s face it–while I may be from Texas, I’m about as well equipped to handle heat as a pint of Blue Bell. The only thing that summer is good for as far as I’m concerned is delicious, fruity desserts to help deal with the misery that is sweating while standing perfectly still. When I looked at the forecast for the week (and stopped crying), I decided it was time for a creamy, light-as-air dessert. I wanted something that would give me a respite from the heat, so immediately, I thought citrus fruits. And when you live in a state that’s kind of known for one in particular, it seemed only natural to base my dessert around the tasty and ever-so-hard-to-peel orange. Although, my childhood soccer games would’ve been woefully incomplete without orange slices at halftime, so I’ll give them a pass on having an exterior more difficult to crack than most safe vaults. Say hello to the Orange Creamsicle Bar…
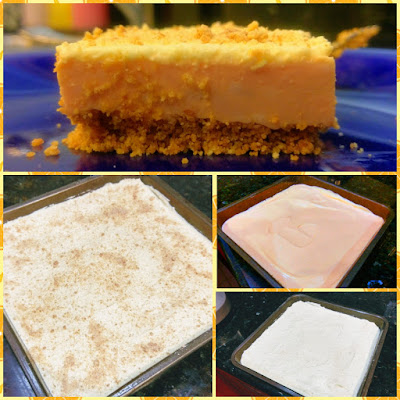
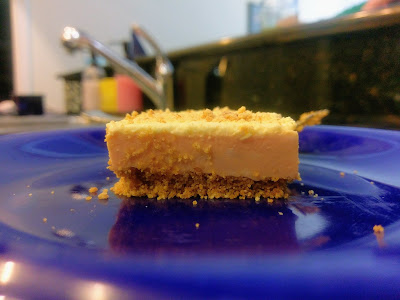
Orange you glad to see me? I’m going to have a hard time resisting play on words with the word “orange” in this blog, and I’d like to apologize, but I’m not in the least bit sorry for these terrible puns. Besides, I am sharing a ridiculously amazing and simple dessert recipe with you, so I feel like I’ve earned the right. Soccer games aside, these squares also remind me of my childhood because they taste like a cross between a Flinstone’s Push Up and a nice glass of Sunny D (purple stuff is still for chumps). With a crumbly graham cracker crust, mouth-watering orange Jello layer, and creamy pudding and Cool Whip topping, there’s nothing to hate here unless you’re allergic to oranges. Which I’m sure probably is a thing, so there’s that. They’re also guilt-free! An 8×8 pan can either yield you 12 bars at 118 calories a piece or 8 squares (in which case, I’m going to need you to call these Orange Creamsicle Squares for posterity) at 157 calories a pop. I obviously went for bar servings because these are literally the only kind of bars I’m interested in at my old age of 72. Or 30. Close enough.
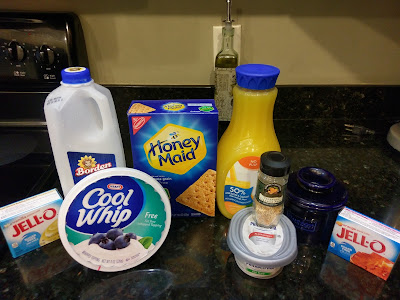
I feel like 72 is more accurate, because at 30, I should be able to drink a glass of OJ without getting acid reflux. Sigh. This recipe is actually a Kraft recipe that I completely tweaked to lower the calorie count from 310 calories a serving. To make the lightened-up version, you’ll need:
- 6 1/2 sheets of reduced fat Honey Maid Graham Crackers (save the half a sheet for later on in the recipe)
- 2 tbs of melted butter (I used one tbs of butter and 1 tbs of butter spread to reduce calories. You could opt totally for the spread, melted to save even more, but I like the real butter flavor in a crust)
- 1/2 a cup of Trop50 no pulp OJ
- 1 box of Sugar Free Orange Jello
- 8 ounces of fat free cream cheese spread, divided (leave out for an hour prior to making so it is soft but not runny)
- 8 ounces of Cool Whip Free
- 1/2 cup skim milk (plus a splash or two to get to the right consistency)
- 1 box of Jello Sugar Free Instant Vanilla Pudding
- 1/2 tsp of dried orange zest (or 1 tsp of fresh orange zest)
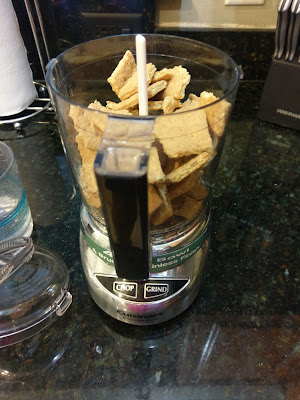
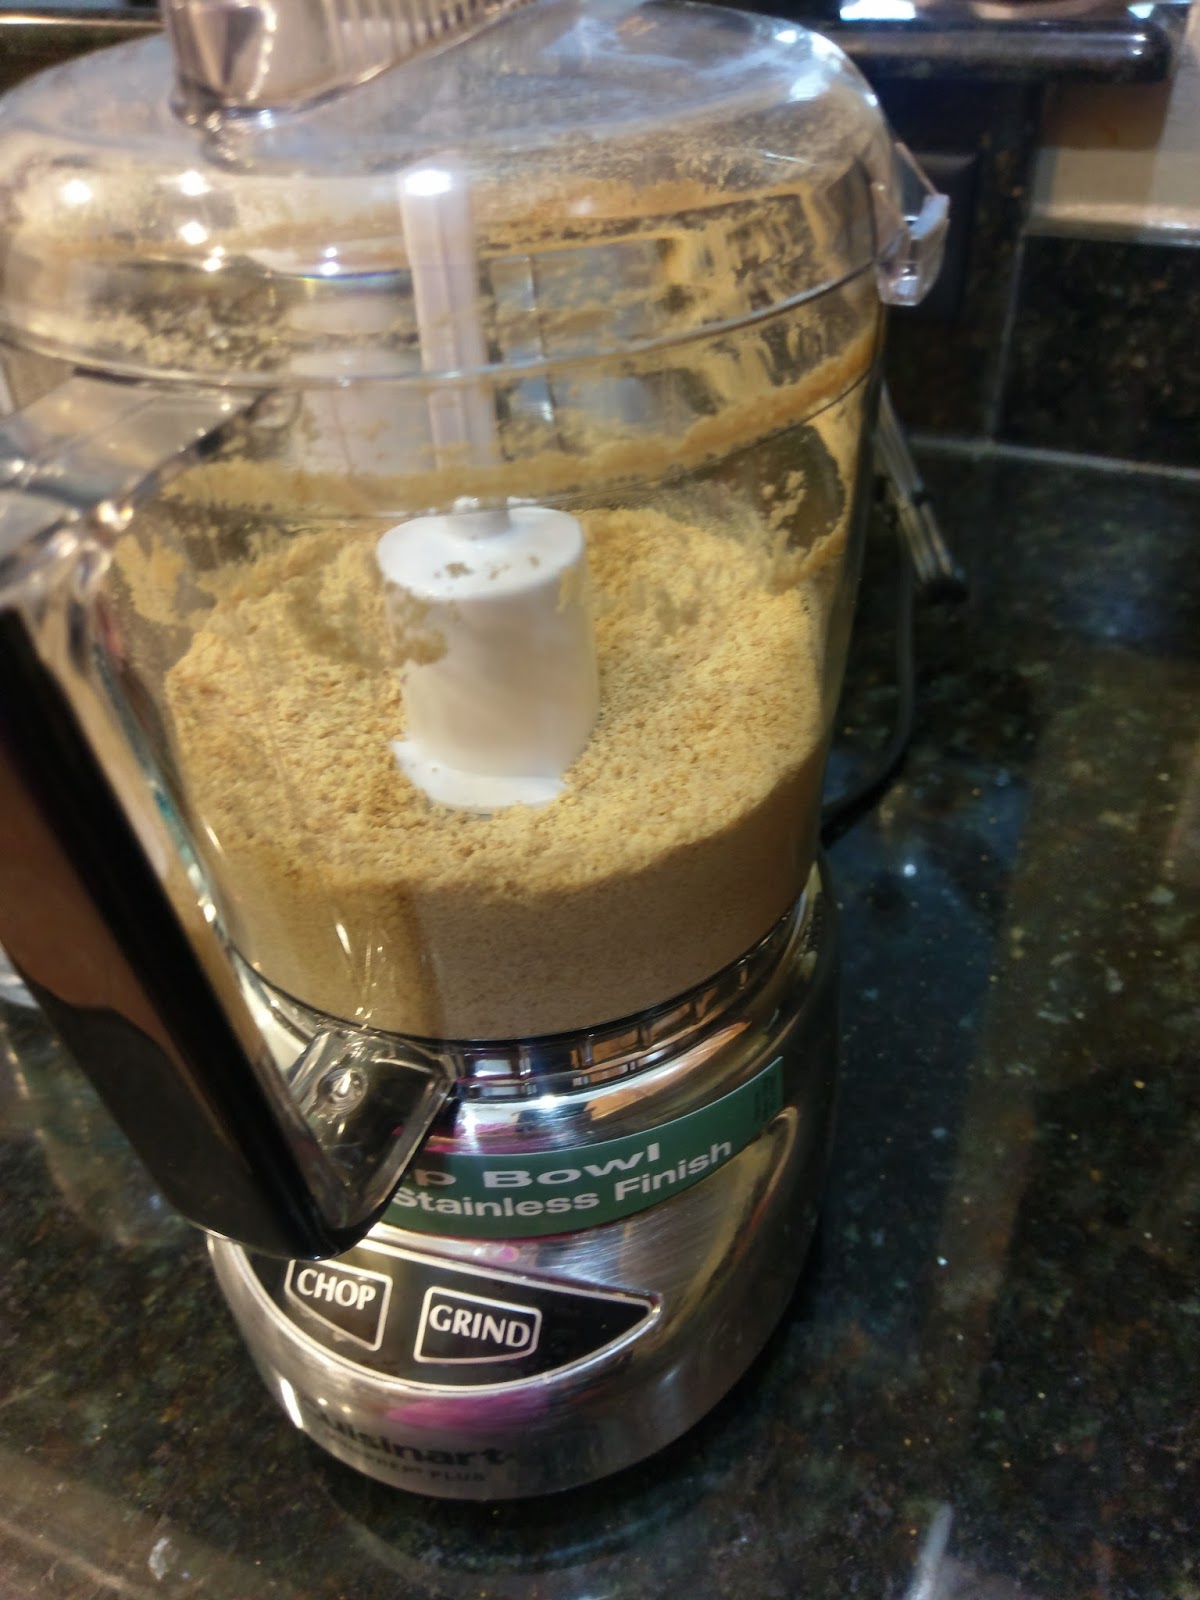
Tiny food processor, you are so useful. I have a 4-cup food processor that has saved my recipes from becoming a giant messy disaster time and time again. Either crush or process 6 sheets of graham crackers into a fine crumb.

Like so. Seriously, just buy a food processor. Melt your butter in small bowl for about 25 seconds. While this is nuking, cut a sheet of Parchment paper to fit an 8×8 pan. Mist the paper and the edges of the pan with cooking spray.
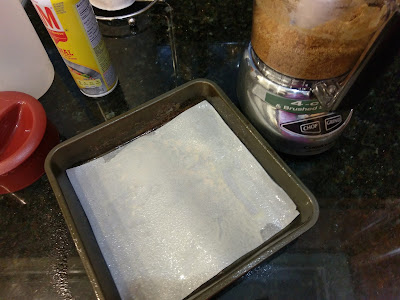
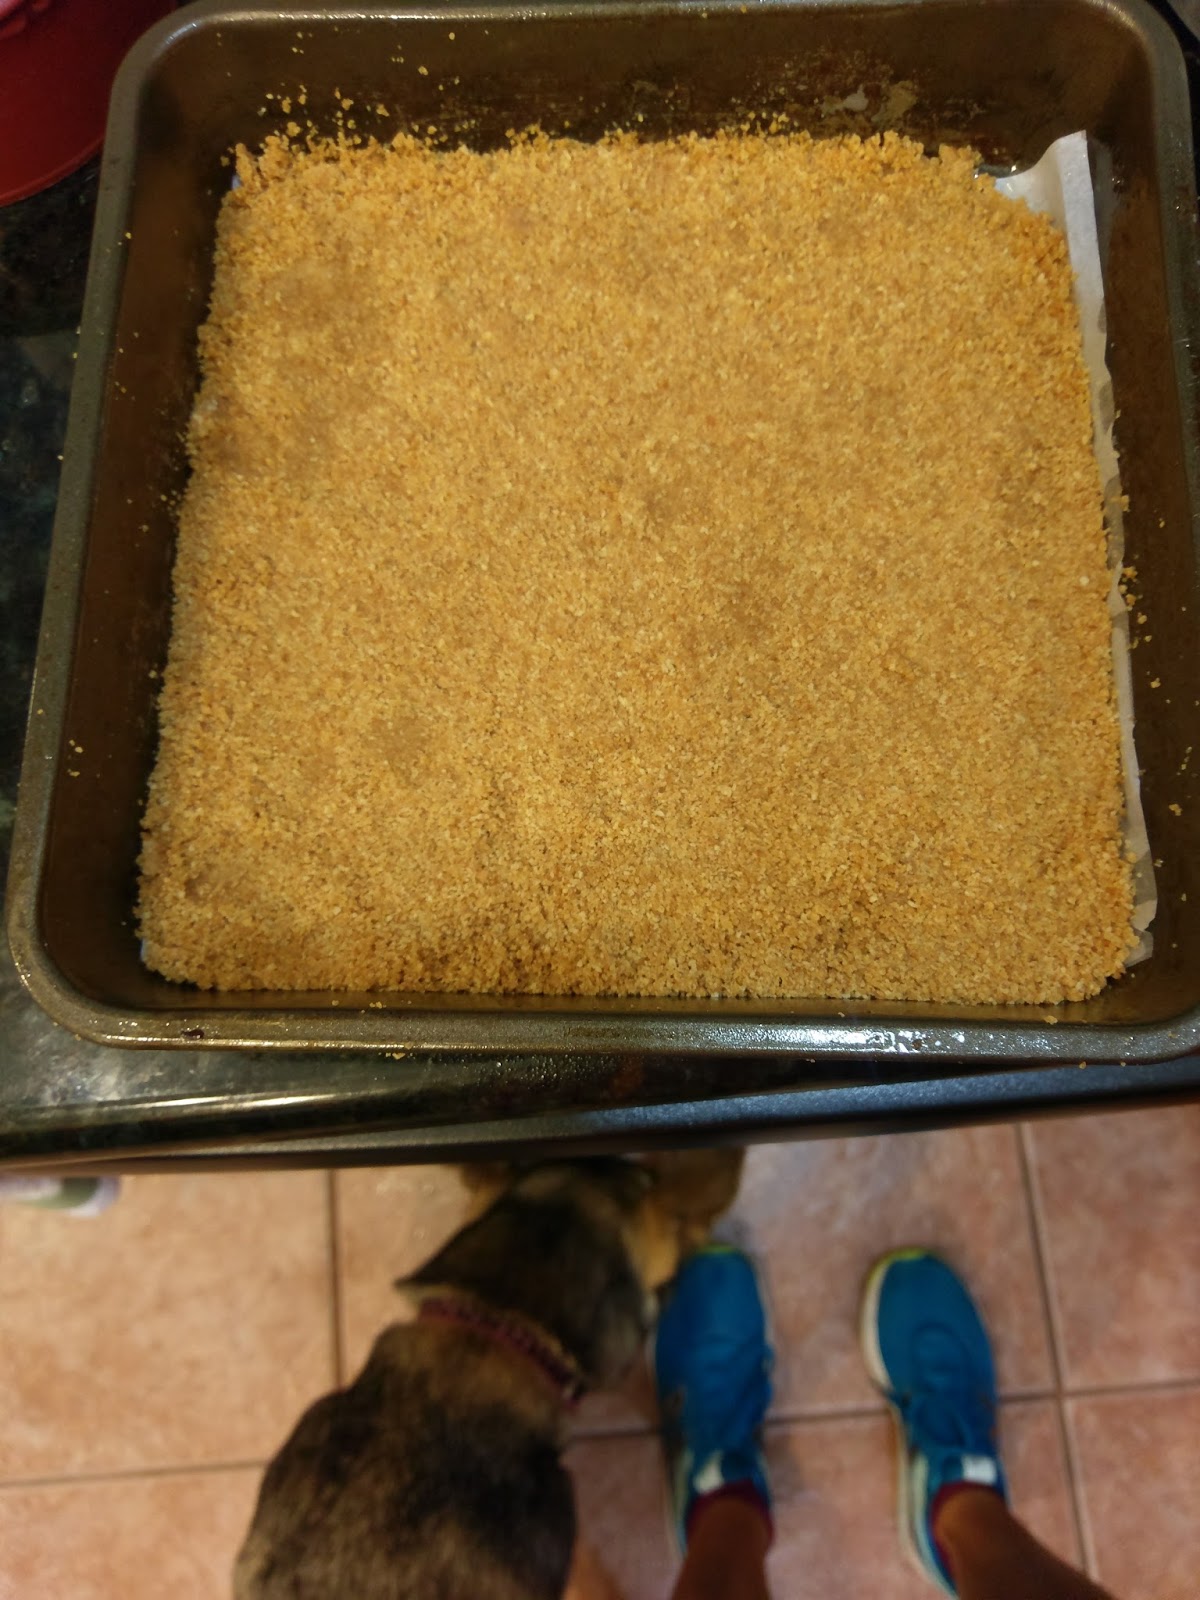
There are few things more annoying than crumbling dessert because it is stuck to the pan. 100% humidity in June is one of them. Once the butter is melted, dump in with the graham cracker crumbs and blend well. The crumbs should be wet. Turn this mixture into the prepared pan and press to distribute the crust evenly:

Bonus, have your dog handy for the mess you’re making. Set your crust in the freezer so it can firm up while you prepare the first layer of the bars.
A piping hot cup of…juice? Find a microwaveable liquid measuring cup and measure out the 1/2 cup of OJ. You’re going to heat this in the microwave for 1 minute. While it is getting warmed up, dump the orange Jello mix into a bowl. Pour in the hot OJ (weird) and whisk for 2 minutes. There should be no clumps.
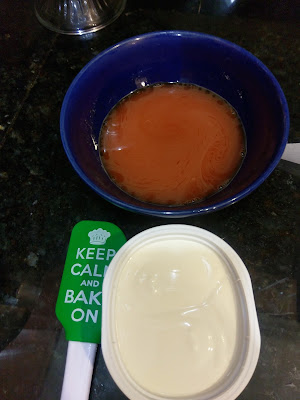
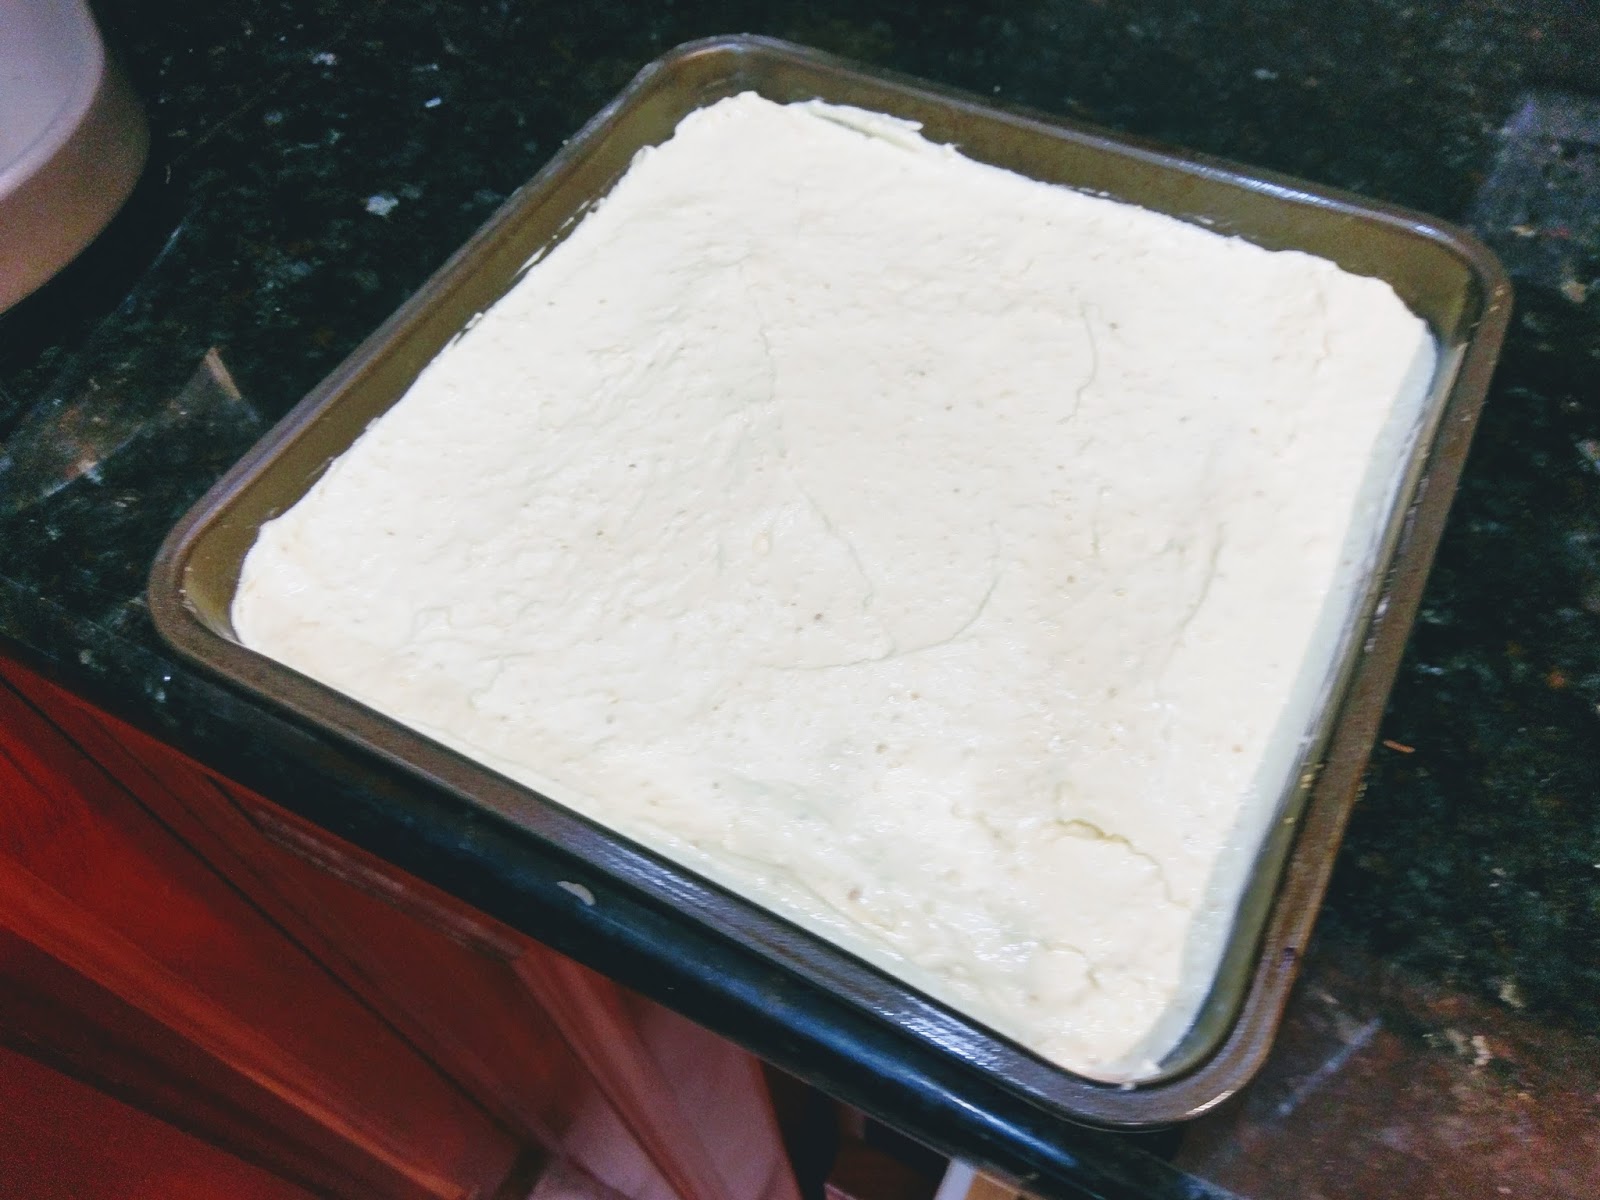
And it should be a shade of orange best described as “Cheeto-nian.” In the bowl of your stand mixer, take HALF the fat free cream cheese spread and give a quick stir. Then add in half of the orange Jello mixture. I found it easier to whisk by hand otherwise things got sloppy. Like, accidentally soaked my phone in orange Jello juice sloppy (and yet, to my chagrin, my crappy phone is still just fine). Once sorta blended, add in the remaining orange Jello mixture. Take one cup of Cool Whip Free and plop into the bowl with the cream cheese/Jello mix. Now it’s safe to use the actual mixer to blend together.
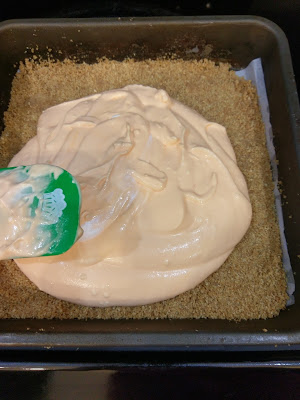
Pour this mix onto your crust and smooth out. 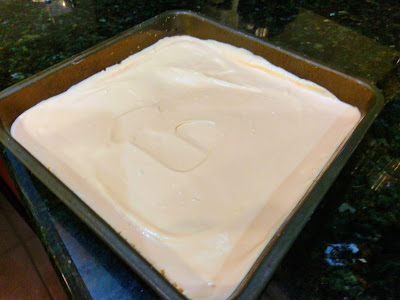
Lick the spatula when you’re done to immediately be taken back to the last time you had an orange push up ice cream. Place this into the freezer to set for about 15-20 minutes. When the time is almost up, prepare the topping layer by first cleaning your stand mixer bowl to simply turn around and get it dirty again (ah, the joys of baking). Whisk the rest of the cream cheese and the milk together by hand until smoothed out. Then add in the vanilla pudding mix and beat with the stand mixer until well incorporated. Add in the remaining Cool Whip Free and the orange zest. My mixture was quite thick, and since I knew I wanted to be able to spread my topping on with ease, I added in a splash of milk (about 1 tsp) to give it a looser consistency.

And it spread like buttah. Take the topping and evenly frost the top of your bars/squares with it. Smooth out as best as you can, and then find that half a sheet of graham cracker I told you to save awhile ago. Did you eat it? Yeah, accidents happen. Just grab another half sheet then and crush it into a fine mixture. Sprinkle this on the top of your bars to complete the recipe and make it look pretty. Everything looks better with a fine coating on top (this is precisely why I wear makeup).
Crushed graham crackers–like Bare Minerals foundation for desserts. Now, these do need to set in the freezer for about 2-3 hours. I’d err on the side closer to 3 because my hungry, ravenous, dessert-crazy stomach wanted these at the 2 hour mark, and they were very tricky to get out of the pan. Set a timer and walk away. Do something constructive like try to drink a glass of orange juice at the age of 30 without dying of reflux. Whatever you need to do, just give these bars time to set up. Like anything good in life, they are totally worth waiting for. They’re dripping with so much orange deliciousness that they can probably prevent scurvy, making them safe for both pirates and your waistline! Derek and I each had a bar yesterday, and it has literally been the only thing I’ve wanted to eat all day even though we had steak kebabs for dinner (and you never get in the way of a Texan and her cow). For one brief moment in time, bite after bite, I forgot that it’s hot enough to bake cookies on the dash of my car outside and more humid than an Amazonian rainforest in the midst of monsoon season. I would live in a pan of these Orange Creamsicle Bars if it were feasible. It might still be a little sticky, but at least it would be tasty. While I complain to my steak kabobs about this oppressive heat, I’m going to be counting the minutes until I get to sink my teeth into these amazingly light and flavorful bars. ‘Til next time, my fellow eaters!
Because the only way to get me to stop complaining about the heat is to shove you in my mouth, Orange Creamsicle Bar. -
Brownieception
I knew I wanted to make brownies for a coworker’s going away party last weekend. Chocolate helps me cope, and thankfully, I work in an office with like-minded individuals who also appreciate the therapeutic effects of sweet, delicious chocolate. So to say I wanted to find a way to make the chocolatiest brownies ever was a massive understatement (we’re really, really gonna miss that coworker. We really, really needed a lot of chocolate to deal with it). I decided to go with fudge brownies stuffed with Oreo’s and topped with cookies and cream frosting. Essentially, a chocolate-in-chocolate, topped with more chocolate, inception-type situation, or a brownieception, if you will. I don’t believe that time heals all wounds–but an artfully crafted chocolate dessert certainly is the first step in the right direction.

If tasty is a direction… There were two things that made these brownies nearly impossible to make. The first being the fact that I had literally no idea there are now over 30 flavors of Oreo’s. I lived in a world where I was only aware of the existence of regular Oreo’s, Double Stuff’s, and Mint Creme Oreo’s. Needless to say, when I turned down the cookie aisle at the commissary I was immediately flabbergasted. Red Velvet Oreo’s? Cake batter Oreo’s? Oreo’s that aren’t even chocolate? Blasphemy. So imagine my reaction when I found out Cookies and Cream Oreo’s are a thing. Think about that for a minute–yeah–those are Oreo’s, stuffed with other Oreo’s. The people at Nabisco clearly need to be stopped. They’ve taken this way too far. After I was done having a small meltdown over what kind of Oreo I wanted my brownies to be filled with (I settled on the classic Double Stuff after staring longingly at the Peanut Butter Oreos for a solid two minutes), another conundrum smacked me in the face when I looked to the right only to see Chips Ahoy has clearly followed the Oreo-every-flavor-we-can-think-of marketing strategy. My childhood is officially in the dust. I carried my head lowly and wondered if opening and eating half a sleeve of Oreo’s would be frowned upon while I finished grocery shopping.

Although, probably still worth it. The second thing involving these cookies and cream brownies that made me weep was calculating the calorie count. I didn’t take any healthy shortcuts since I was going to be feeding normal people who aren’t obsessed with health food like I am. It’s all fun and games when you’re baking a 9×13 pan of chocolate on chocolate when you’re leaving them in someone else’s home, but if they were staying at home with me, I would’ve subbed a few things (notes below) to cut calories. But like I said, we were all sad and in desperate need of a real, no-applesauce/honey substitutions brownie. I still wanted to deliver some nutritional tidbits on the blog since I’ve gotten used to bequeathing you the unfortunate calorie count of everything you love to devour post-dinnertime. A 9×13 pan made as directed below will run you 293 calories a cookies and cream brownie for 20 servings total. You could be like me and have a sliver of one piece to indulge with minimal guilt…I ended up cutting these in smallllll pieces not just for that fact but also because they are very rich. I’d estimate I ended up with 36 actual servings for 163 calories a brownie (which is wayyyyyy better).
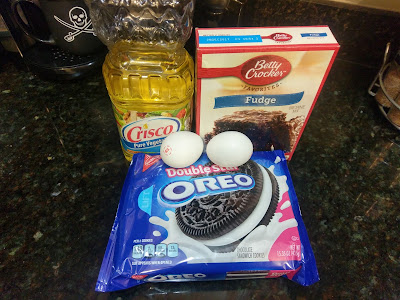
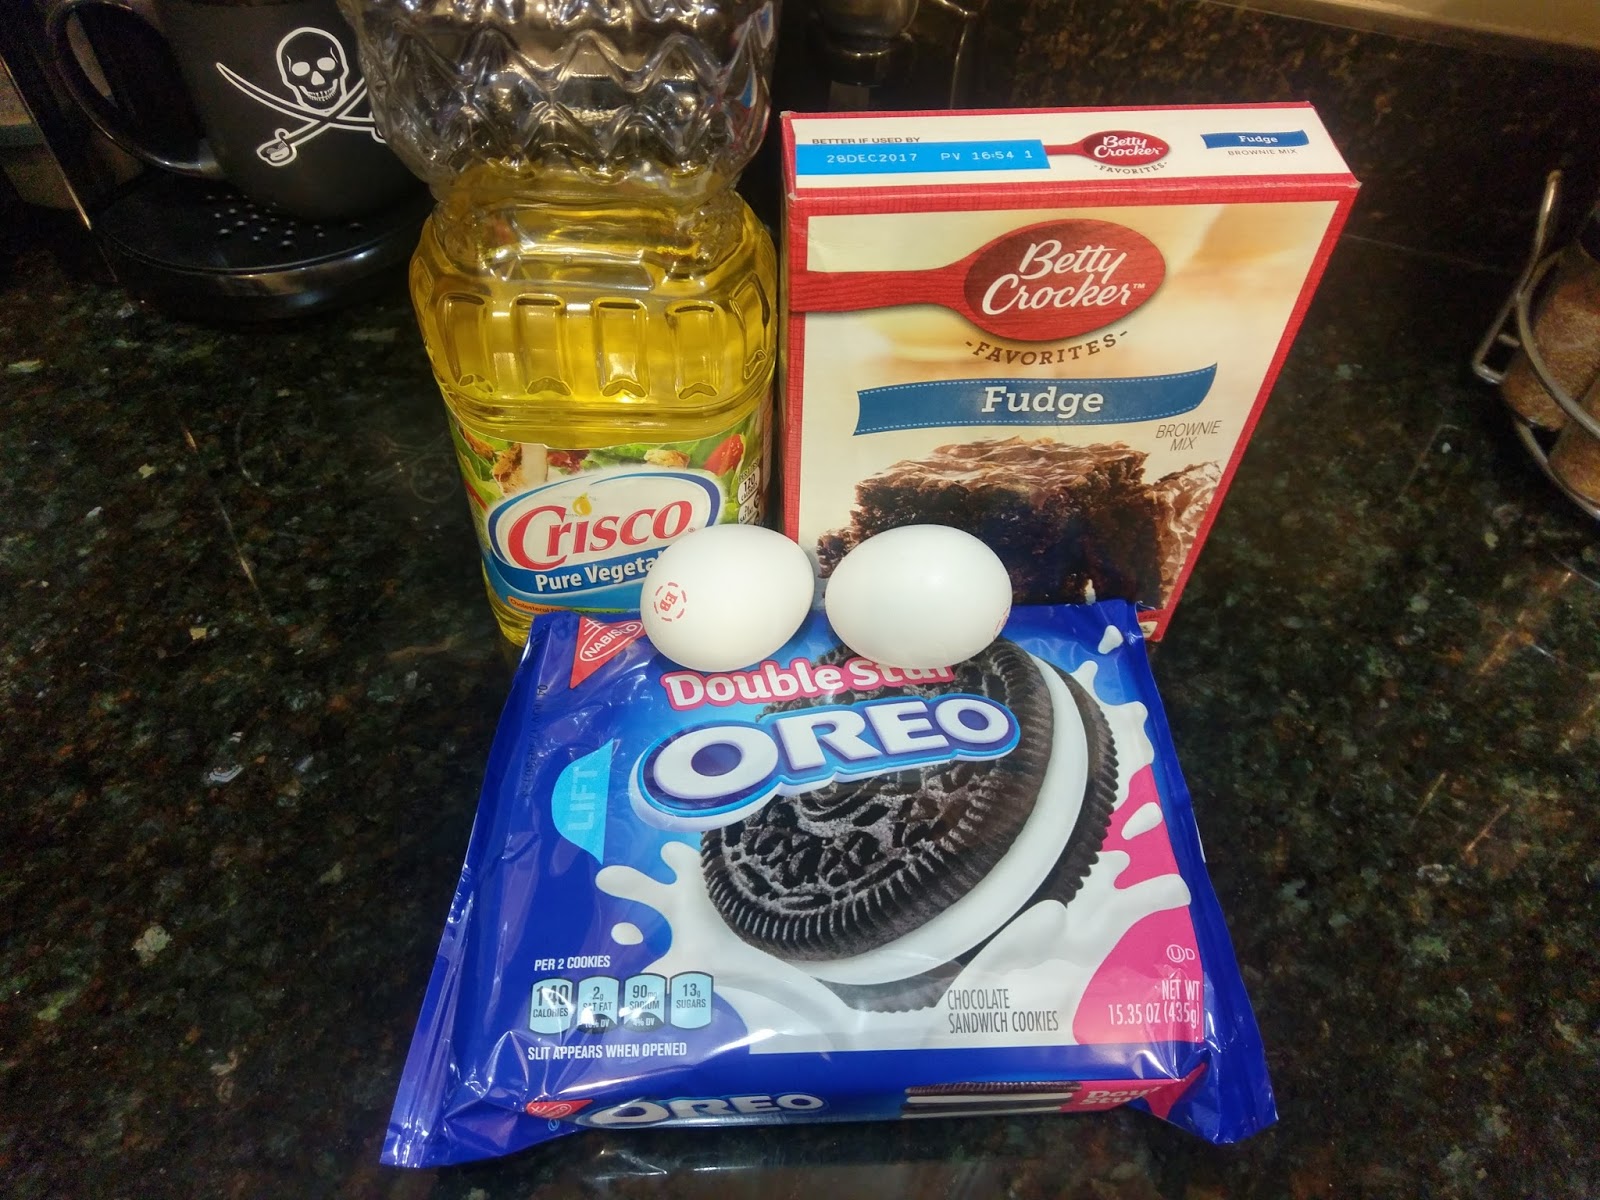
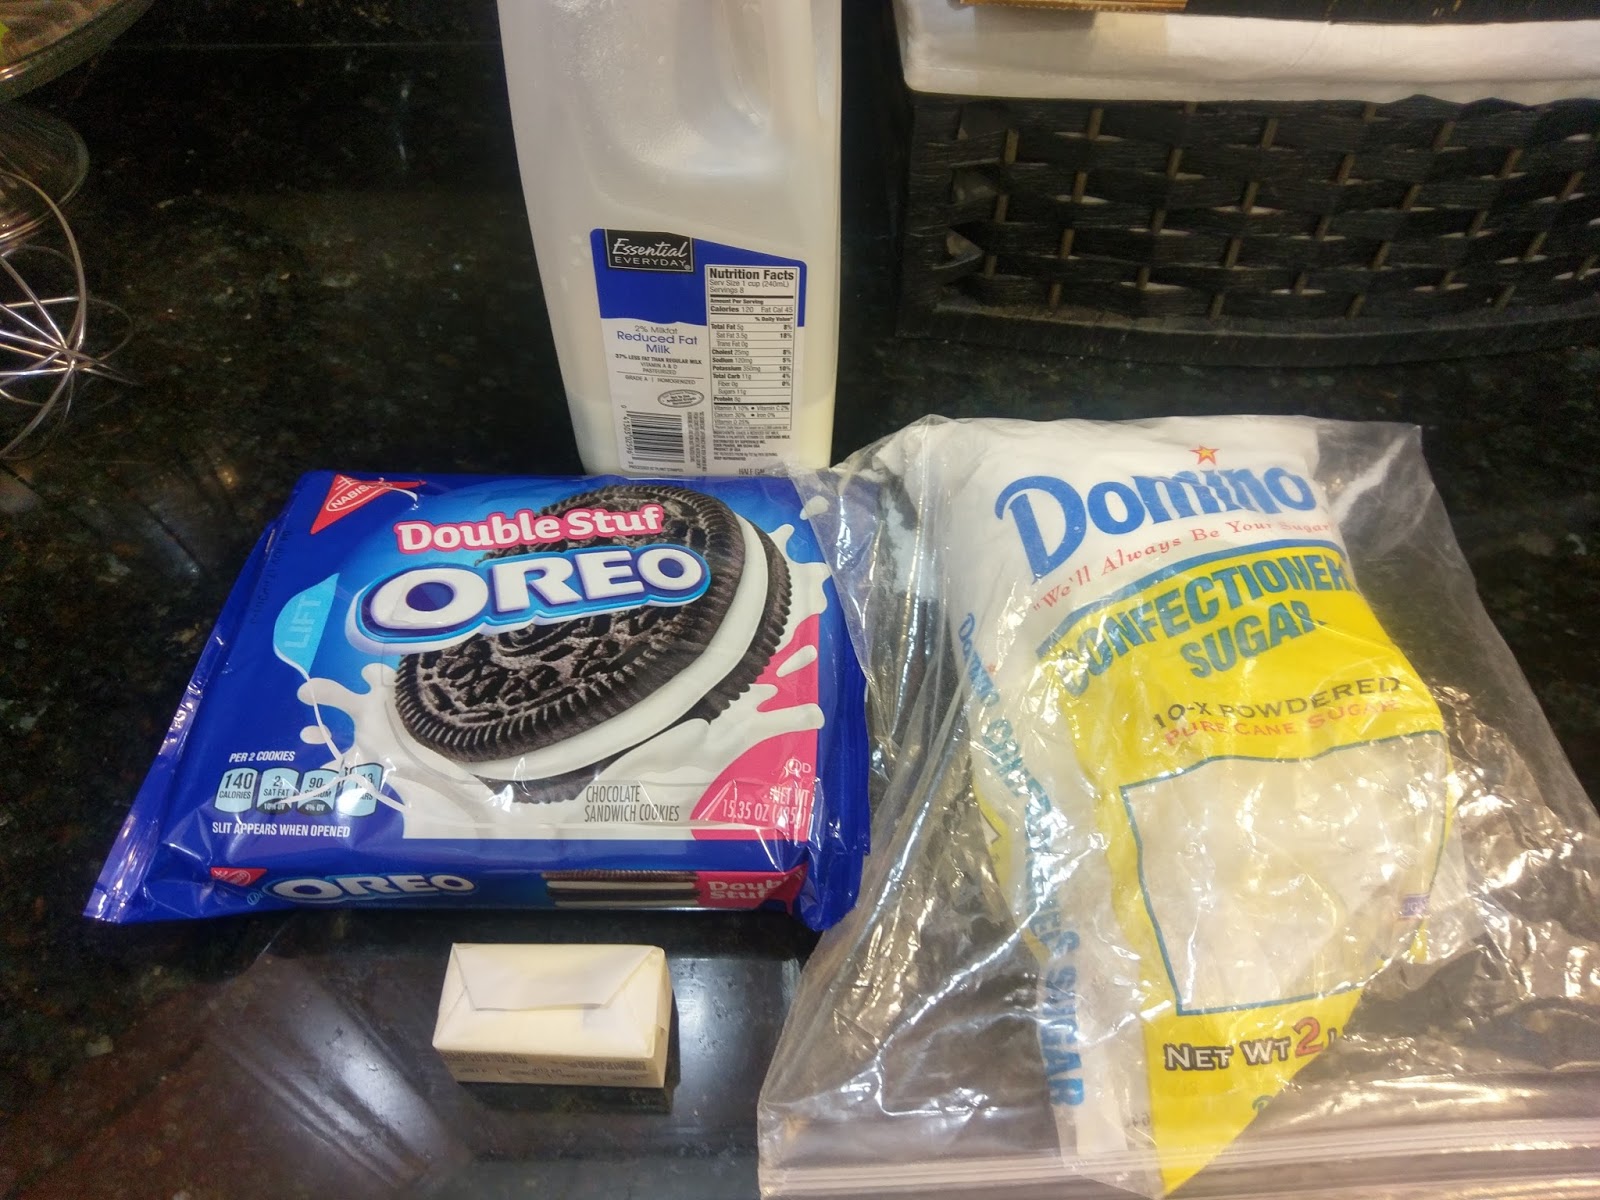
Spot the pirate! I took ALL of the shortcuts with this recipe, down to a box mix instead of my fudgy homemade brownie recipe because, let’s face it, I wanted to take a nap since 1. I have to wake before the sun to walk the dogs or we’ll all melt, and 2. Having human emotions is absolutely draining (which is why I avoid them in most cases). To make the simplest, yet most delicious cookies and cream brownies ever, all you need is:
- 1 box of Betty Crocker Fudge Brownie mix
- 2 eggs (can use just egg whites to lower calories)
- 1/2 cup of veggie oil (can sub applesauce to lower calories)
- 3 TBS of water
- 10 Oreo’s (can use Oreo Thins to lower calories)
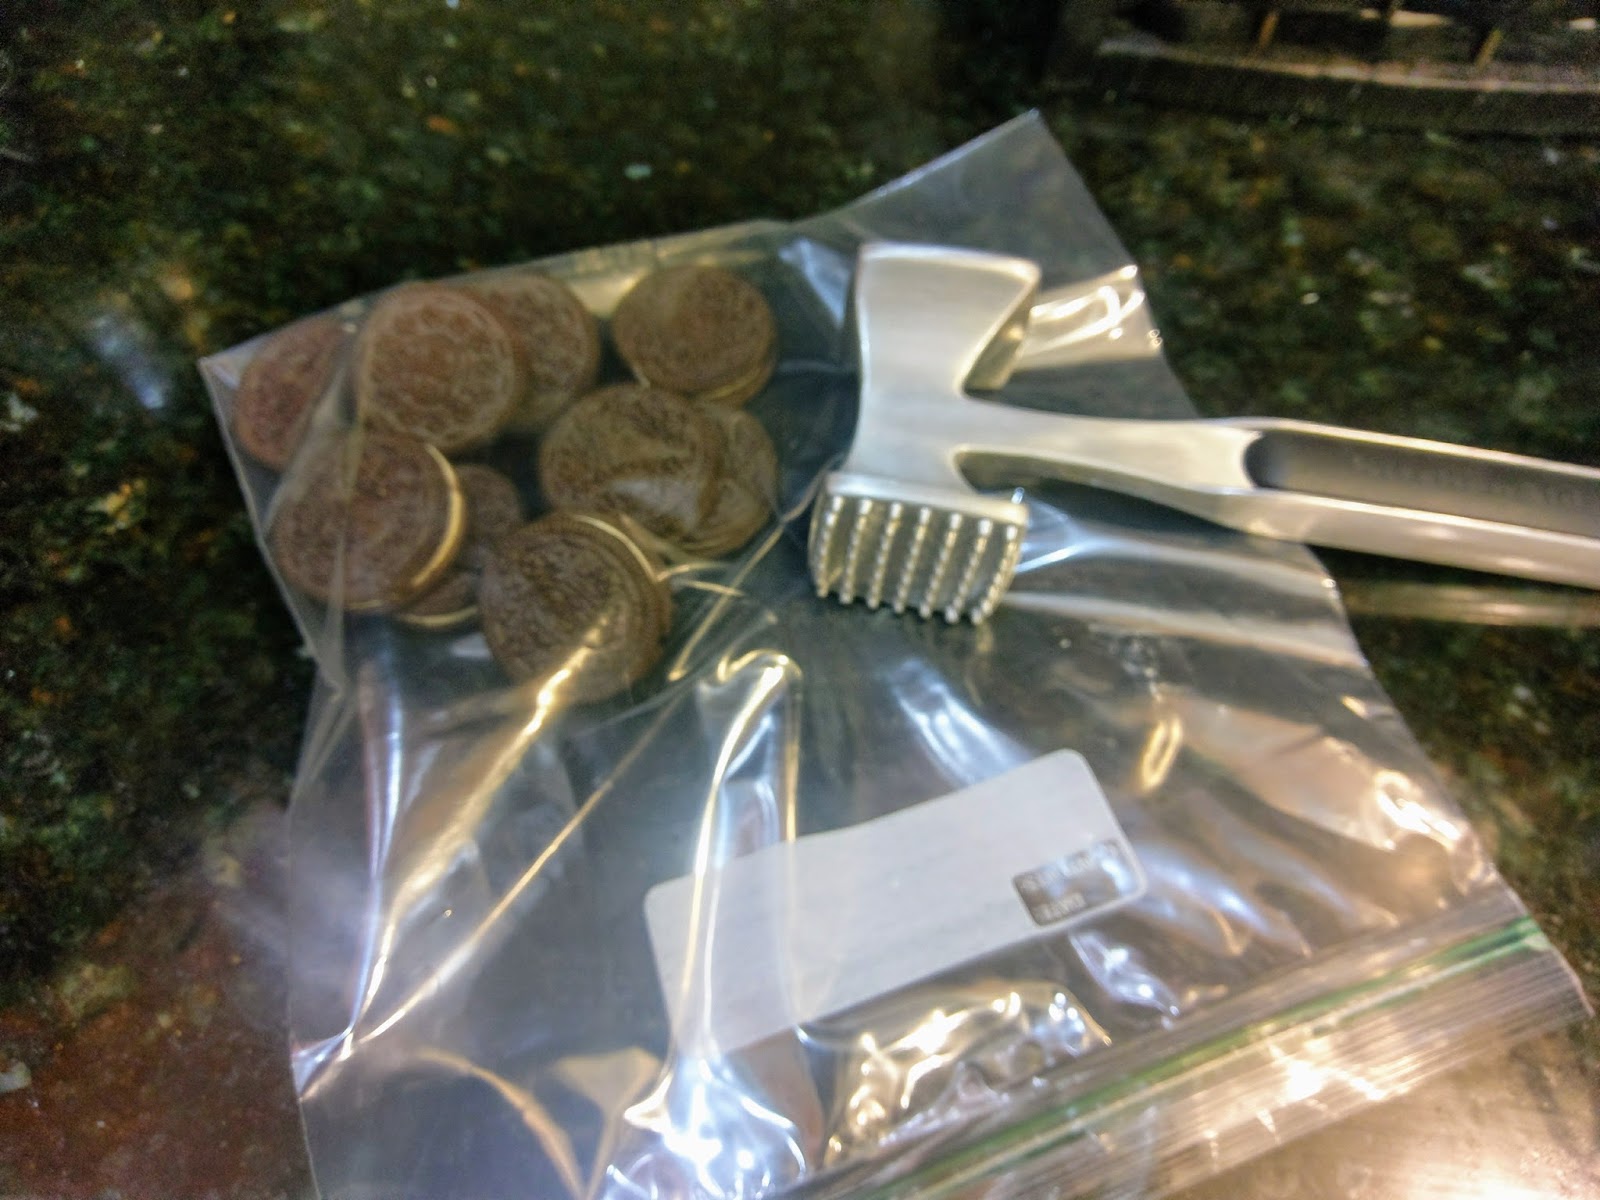
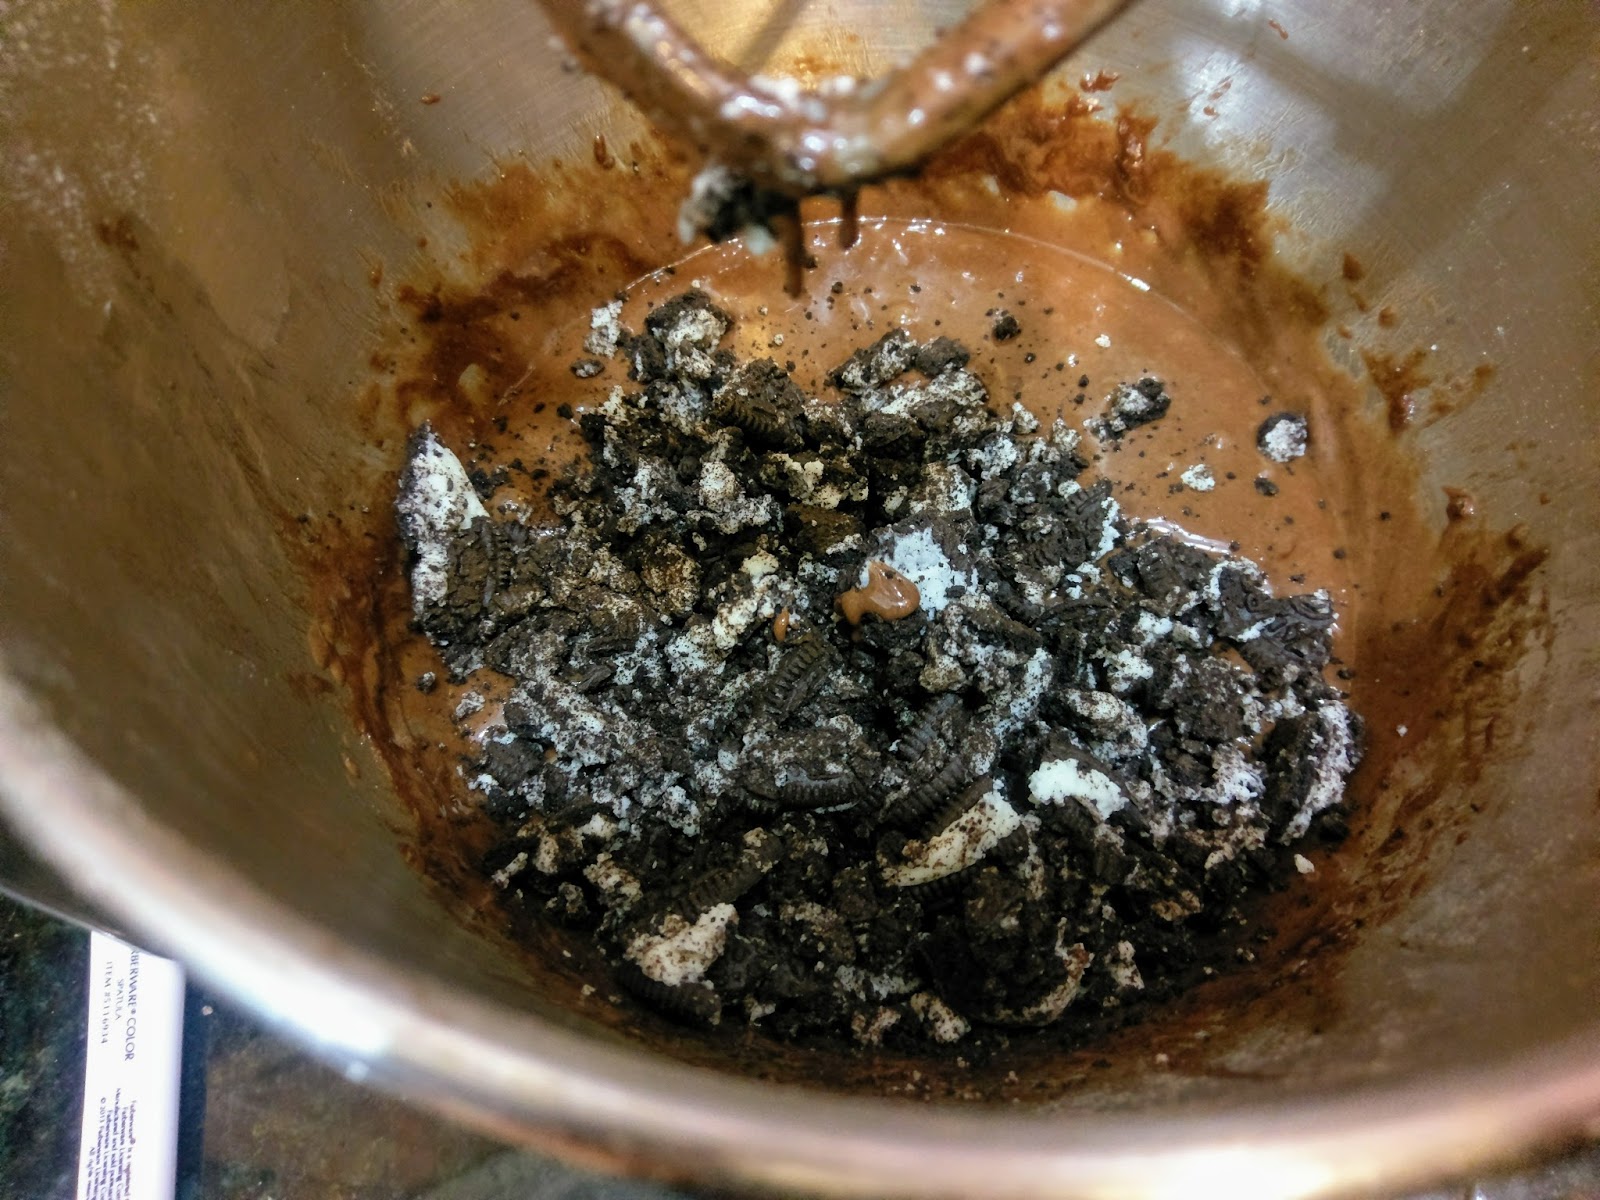
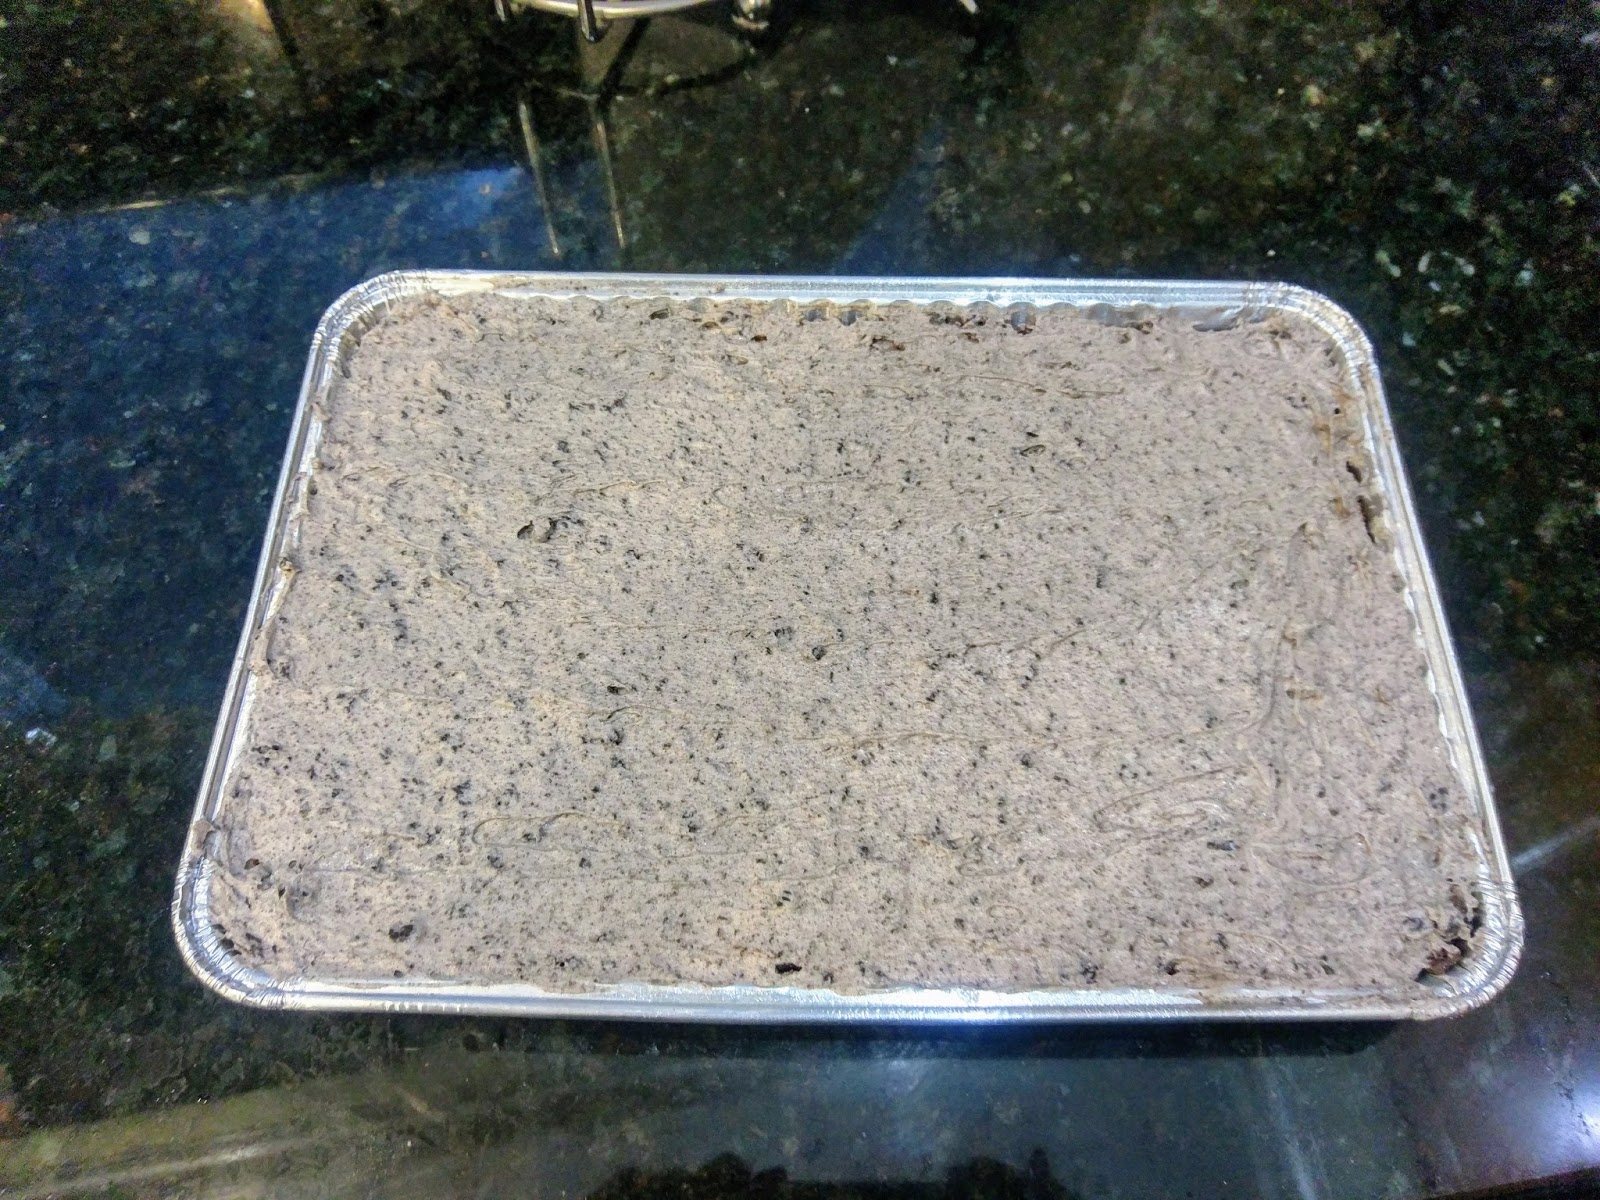
Preheat your oven to 350 and grease a 9×13 pan. Mix together the brownie mix, eggs, oil, and water for 2 minutes on medium speed in your stand mixer. Take this time to count out 10 Oreo’s, think about eating a few, suffer that moral dilemma, and then turn off the mixer.

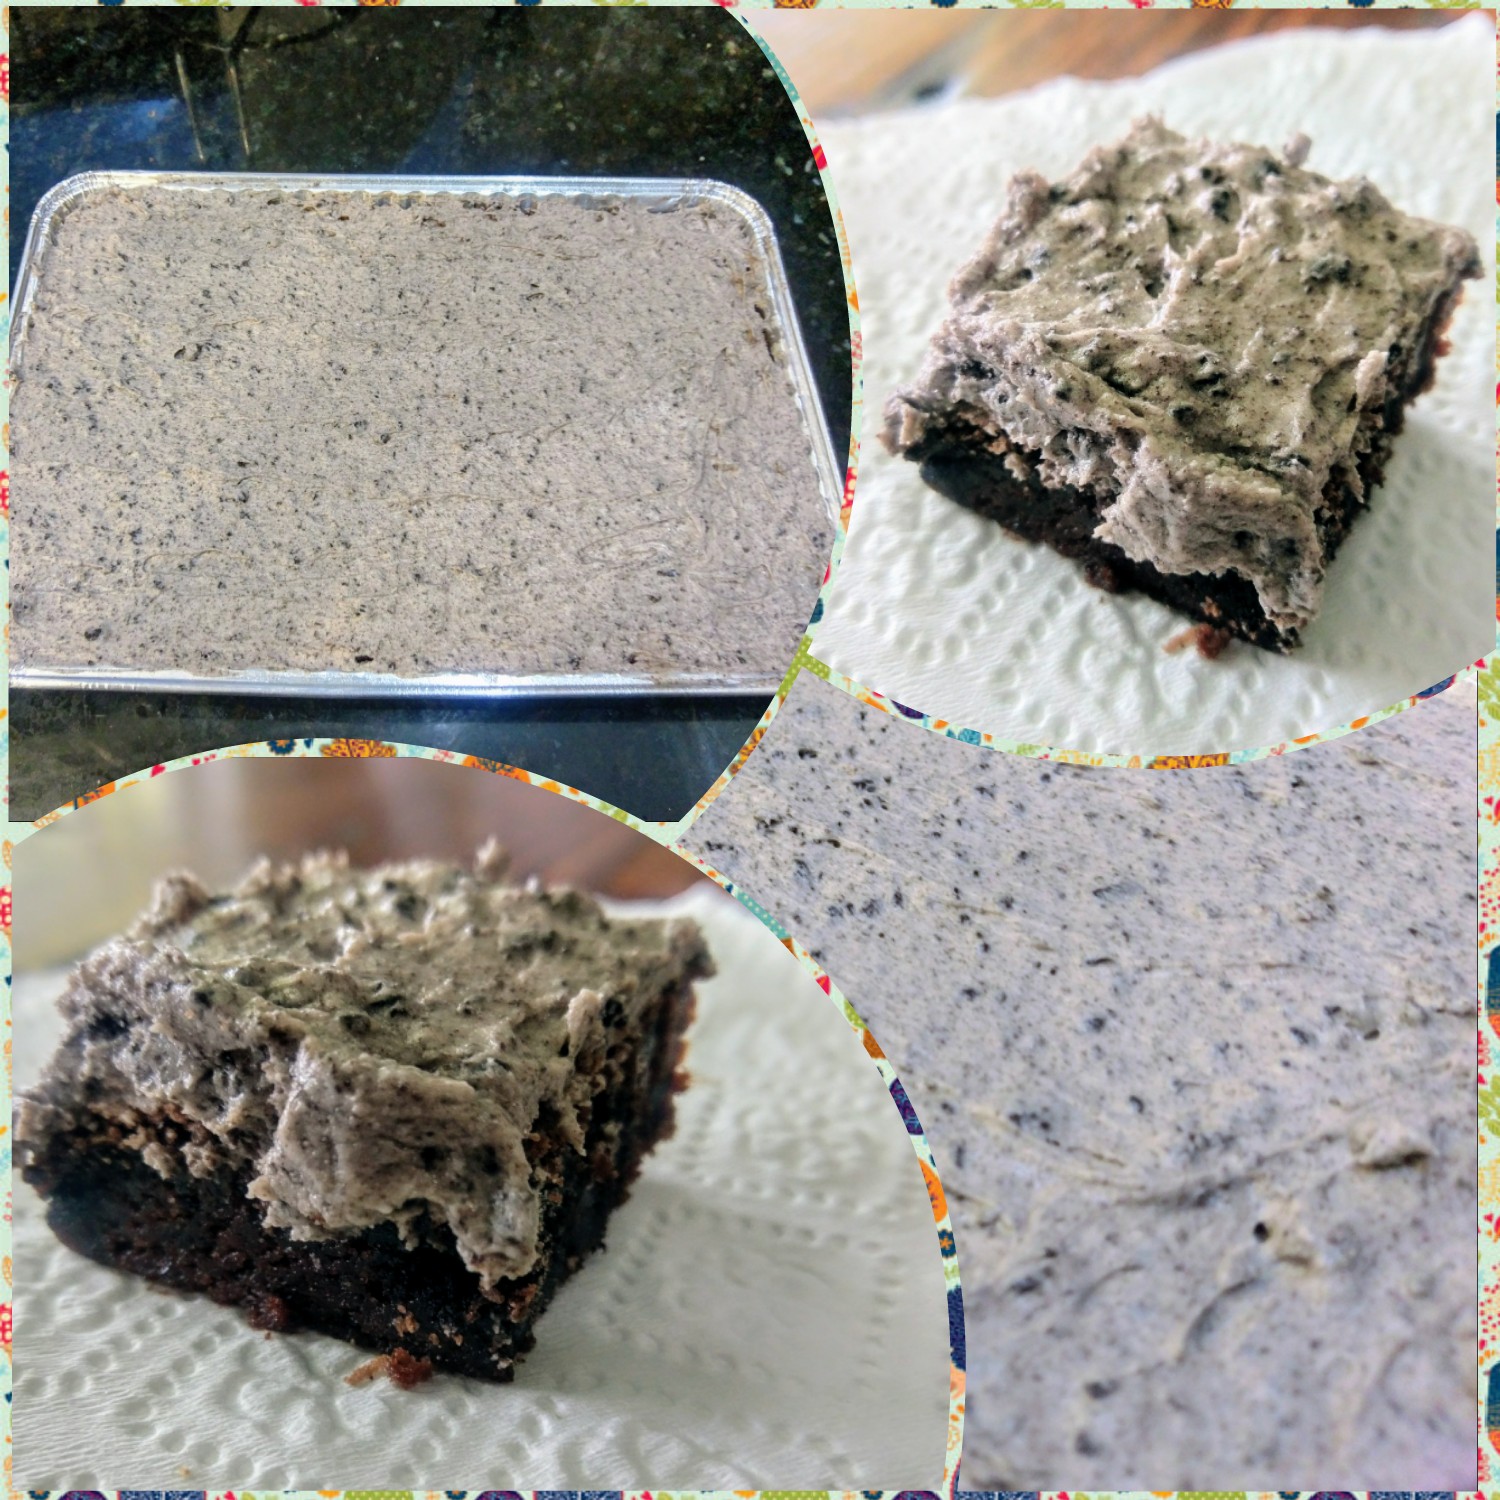
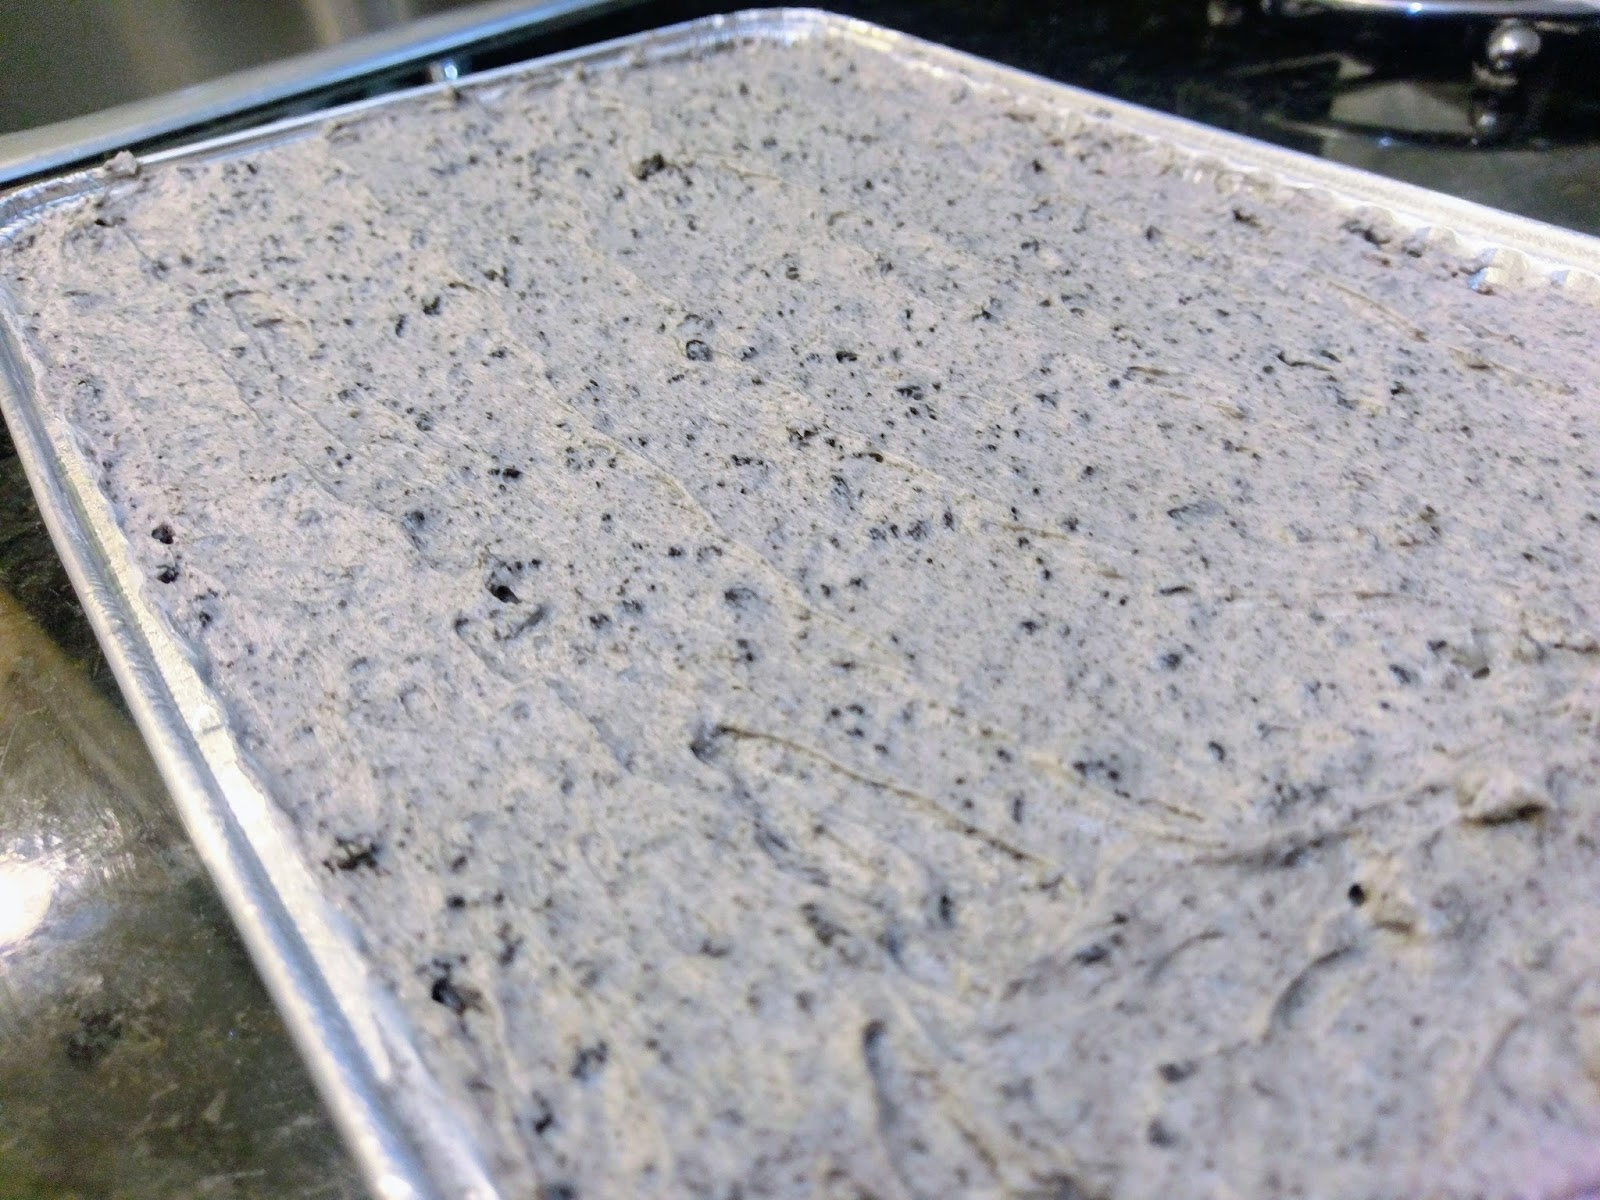
And get ready to get hammered. I’ve recently acquired a meat tenderizing mallet, which I loving call “The Pulverizer.” I placed my 10 Oreo’s into a plastic bag and, well, pulverized them into chunks. Dump this into your brownie mix and give it a good stir.

After you admire your handy work. Thanks, Pulverizer! Take your batter and turn it out into the greased pan. Be sure to smooth out the batter and tap the pan on the counter a few times to get out any air bubbles. Place into the oven and bake 22-27 minutes. With the addition of the Oreo’s, my mix took a little longer than the box directed.

I had forgotten how messy powdered sugar is…the benefits of eating healthy-ish, I suppose? Let your cookies and cream brownies cool off on a cooling rack either on the counter or in the fridge depending on how impatient you are. While you’re resisting the urge to dive into the pan, get out your frosting ingredients:
- 4 TBS butter at room temp (can sub with reduced fat cream cheese to lower calories)
- 2 cups of powdered sugar
- 2-3 TBS skim milk
- 8 Oreo’s (can use Oreo Thins to lower calories)
Mix together the butter, sugar, and 2 TBS of milk until smooth. Really grind up the 8 Oreo’s to a fine pulp and then add them to your frosting and mix. Depending on the consistency you’d like, either add a half to another whole tablespoon of milk after you’ve added the Oreo crumbs. I went with another 1/2 TBS (for a grand total of 2 1/2 TBS) to get a smooth enough frosting that was easy to spread but would still set.

And look pretty. This is important. Simply frost the brownies once they are fully cooled and place them back in the fridge to let the frosting set up for an hour or two. You could also crush up more Oreo’s to sprinkle on top, cut Oreo’s into halves and place a half onto each individual brownie, etc. I went for classic and plain, and that did not disappoint. These are soooooo good (thanks, butter!), and I am so very happy the whole pan is not sitting in my house, or I would’ve eaten them all in one sitting. I adore cookies and cream ice cream (Halo Top or Blue Bell–they know what’s up), and these brownies are a great take on what typically gets eaten as a frozen dessert. Not to mention they require about as much effort to make as a bowl of cookies and cream ice cream. Easy, quick, and delicious–all prerequisites when it comes to feelings eating. Or just regular eating, I suppose. A magical thing happens when Oreo’s get cooked into brownies, so needless to say, I’m going to brave the Oreo aisle again soon to try the peanut butter version of this. Do I need to be stopped? Probably. But you better be one brave individual to stand between me and a pan of brownies…’Til next time, my fellow eaters!
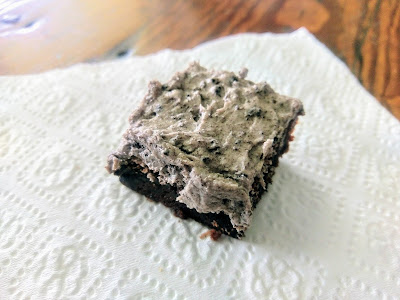
Can you blame me? I mean, these are drool-worthy. -
Just Add Jif
When I really like something, I tend to go a bit overboard with it. For instance, if I find a cute top that fits me perfectly, I have to go back and buy it in every color available. There was also the time I figured out I liked avocado and decided it had to be put in every meal I ate for a solid month. Oh, and there’s my collection of hedgehog-related merchandise ranging from socks to hedgie salt and pepper shakers. I guess what I’m trying to say is that when I make the decision to fall in love with something, I believe only in whole-assing it; there’s no half-assing allowed. I’m a woman of few feelings, so when I commit to actually experiencing a modicum of pure joy, I tend to zero in on my poor unsuspecting subject with a laser-like intensity best described as “shark at a feeding frenzy.” It’s been no secret to many that I’m simply nuts about peanut butter (see what I did there?), and I am still relatively new to mixing peanut butter and chocolate, so it has been my go-to dessert flavoring in recent months. I’m nothing if not efficient in making up for lost time. So when a friend of ours who is even more obsessed with PB&C than I am had a birthday party, it was pretty much a given that I’d be bringing some form of chocolate-peanut-buttery goodness with us. Enter the chocolate fudge peanut butter cake…
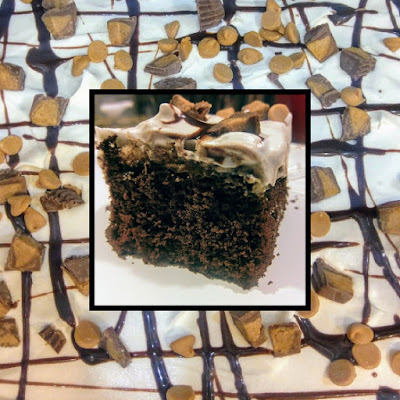
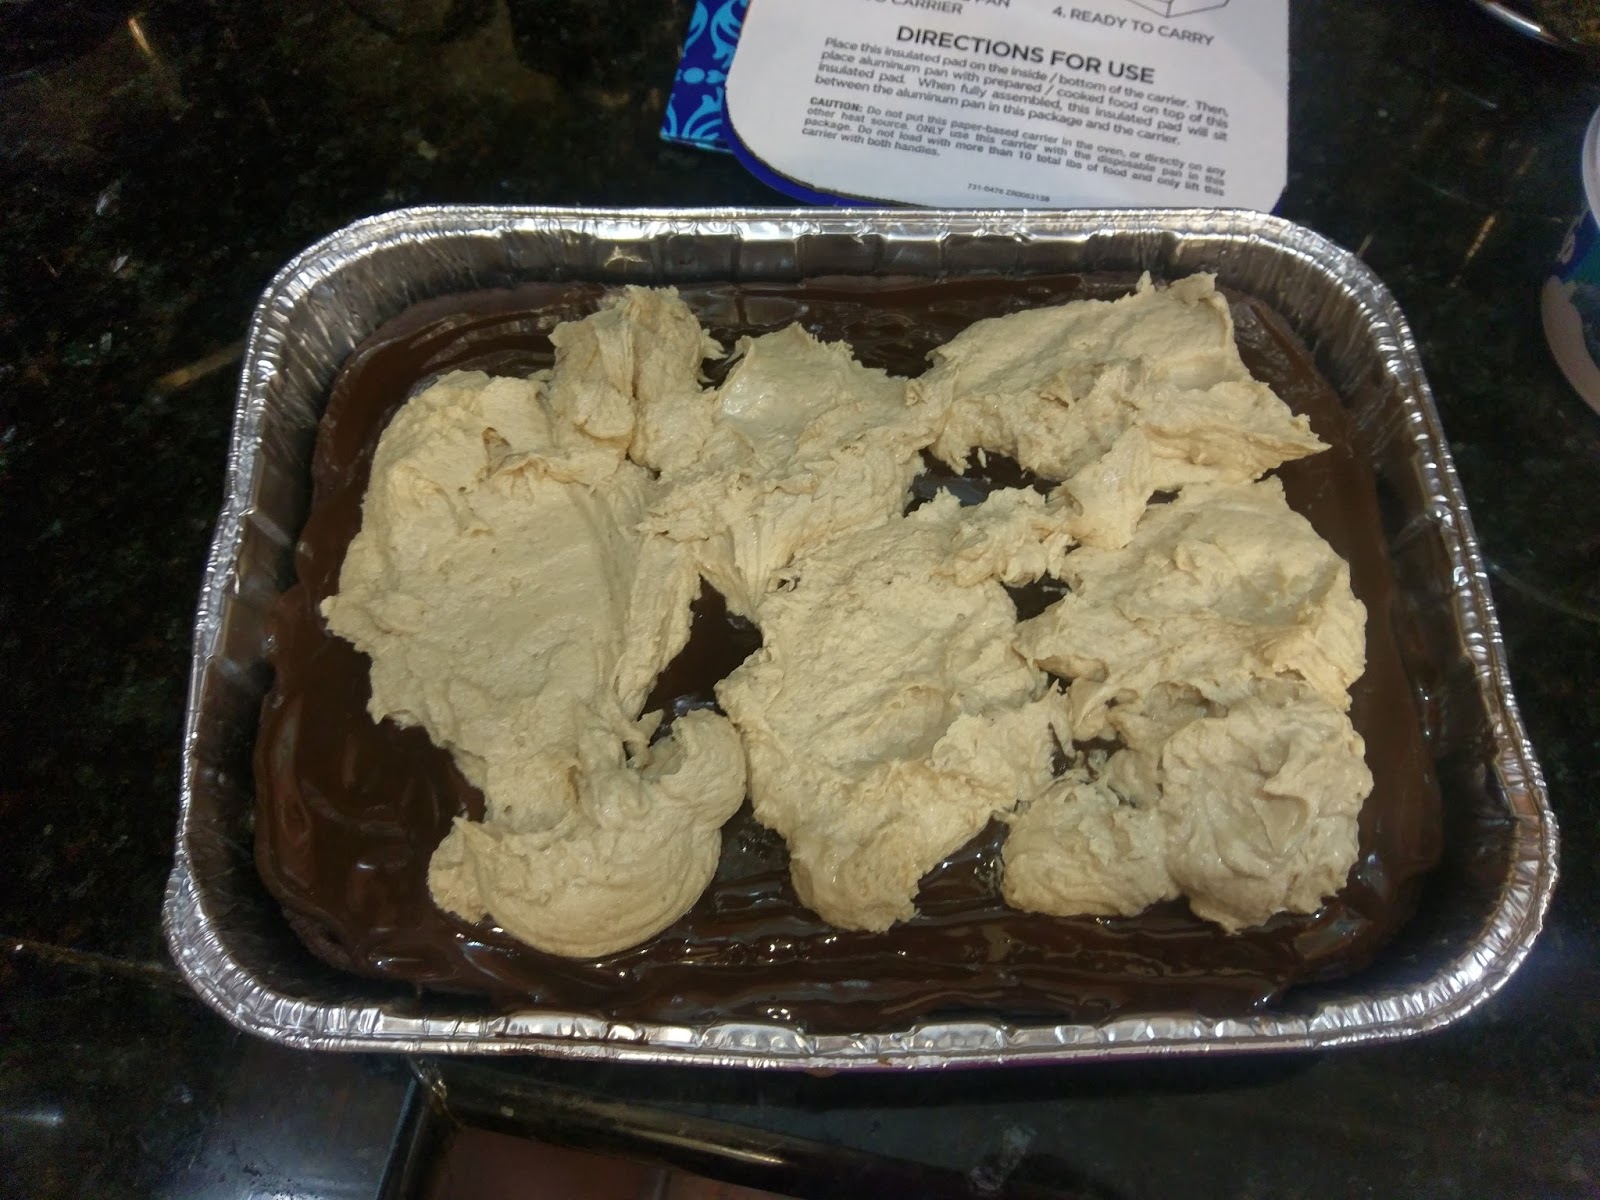
I’ll take this time to also mention it is topped with both Reese’s Minis and Reese’s Peanut Butter Chips. Like I said, feeding frenzy. There is both a layer of fudge and a layer of peanut butter cream cheese resting comfortably between the dark chocolate cake and Cool Whip topping layered in more fudge and what some people might consider enough peanut butter toppings to incite a peanut allergy simply by looking at it. And yet, still under 300 calories a slice. I’m a really efficient glutton. I knew I was going to want room in my food log for both appetizers and dessert, so I opted to make this as low in sugar as humanly possible. Funny thing about that sugar–the stuff is just loaded with calories; so by lowering the sugar in the recipe, I was able to take this from over 600 calories a slice (even for 20 slices!) to 276 calories a slice (for 20 slices total). You know, so you can have your seven-layer dip, enough tortilla chips to hate yourself, a main course, and a slice of cake without having to run a 5k before eating to your heart and/or stomach’s content. I won’t lie to you–my favorite part of the day is anytime I’m eating.
Needless to say, Betty is my homegirl. I’m still sticking with the diet soda/cake recipe that I’ve found to be tried and true, and most importantly, delicious. Now, your cake won’t have a bakery-level of density to it this way, but like I said, I want to be able to have my ten pounds of Tostitos and enjoy some dessert, too, so having a chocolate cake that isn’t as hefty as an actual brick is helpful in that regard. I save those dense chocolate (and possibly booze-filled) cake days for rough times when I want to eat something as heavy as my soul feels, like NFL Sundays when my team goes from a 35-point lead to somehow losing in the last two minutes. As a Vikings fan, this happens with a little too much frequency. I digress…to make the cake, all you need is:
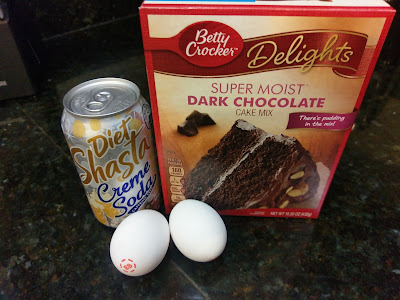
- 10 ounces of diet soda (Coke, root beer, creme soda, something non-citrus)
- 2 egg whites
- 1 box of Betty Crocker chocolate cake mix of your choice. I like the pudding in the mix cakes because they are quite moist (even if I hate the word moist).
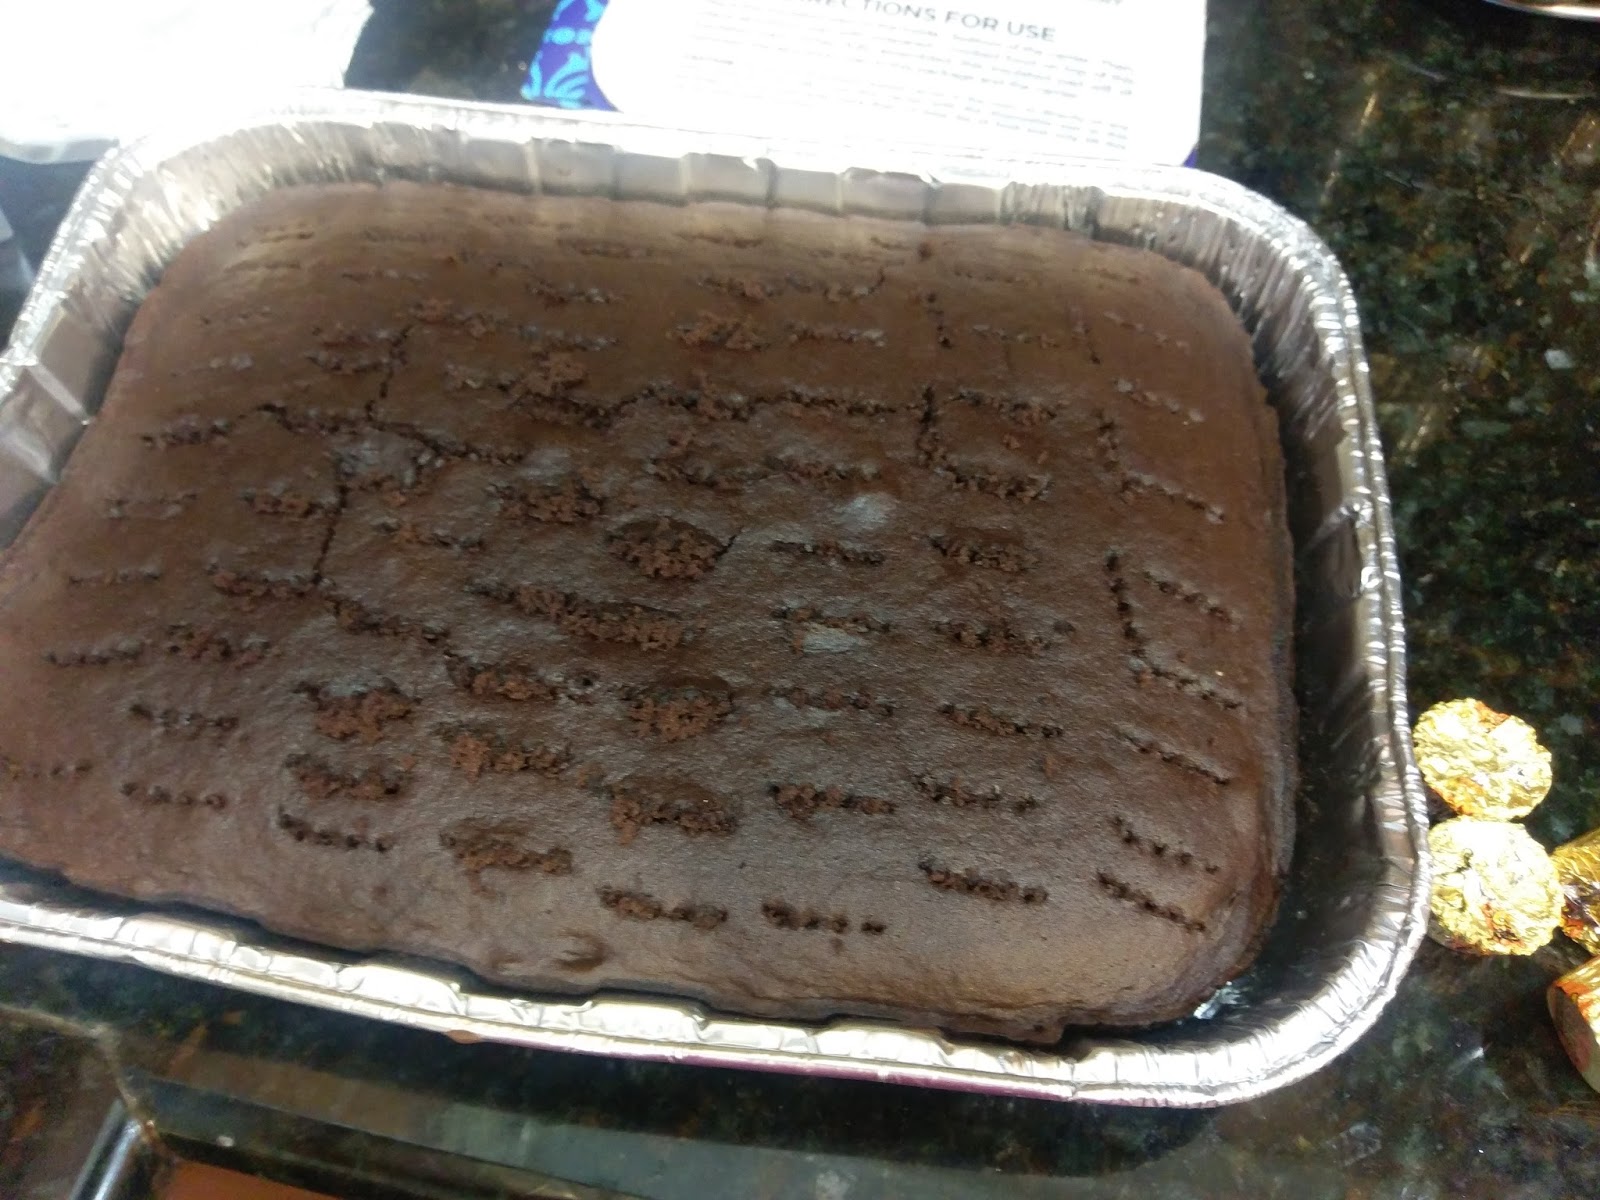
Grease a 9×13 cake pan and preheat the oven to 350. Mix all ingredients in a stand mixer for 2 minutes and turn into the pan. Bake for 22-25 minutes, or until a toothpick comes out cleanly. Baking with the soda always speeds up whatever the cook time on the box is by 5-10 minutes, so keep that in mind. While baking, lay out the rest of your ingredients…

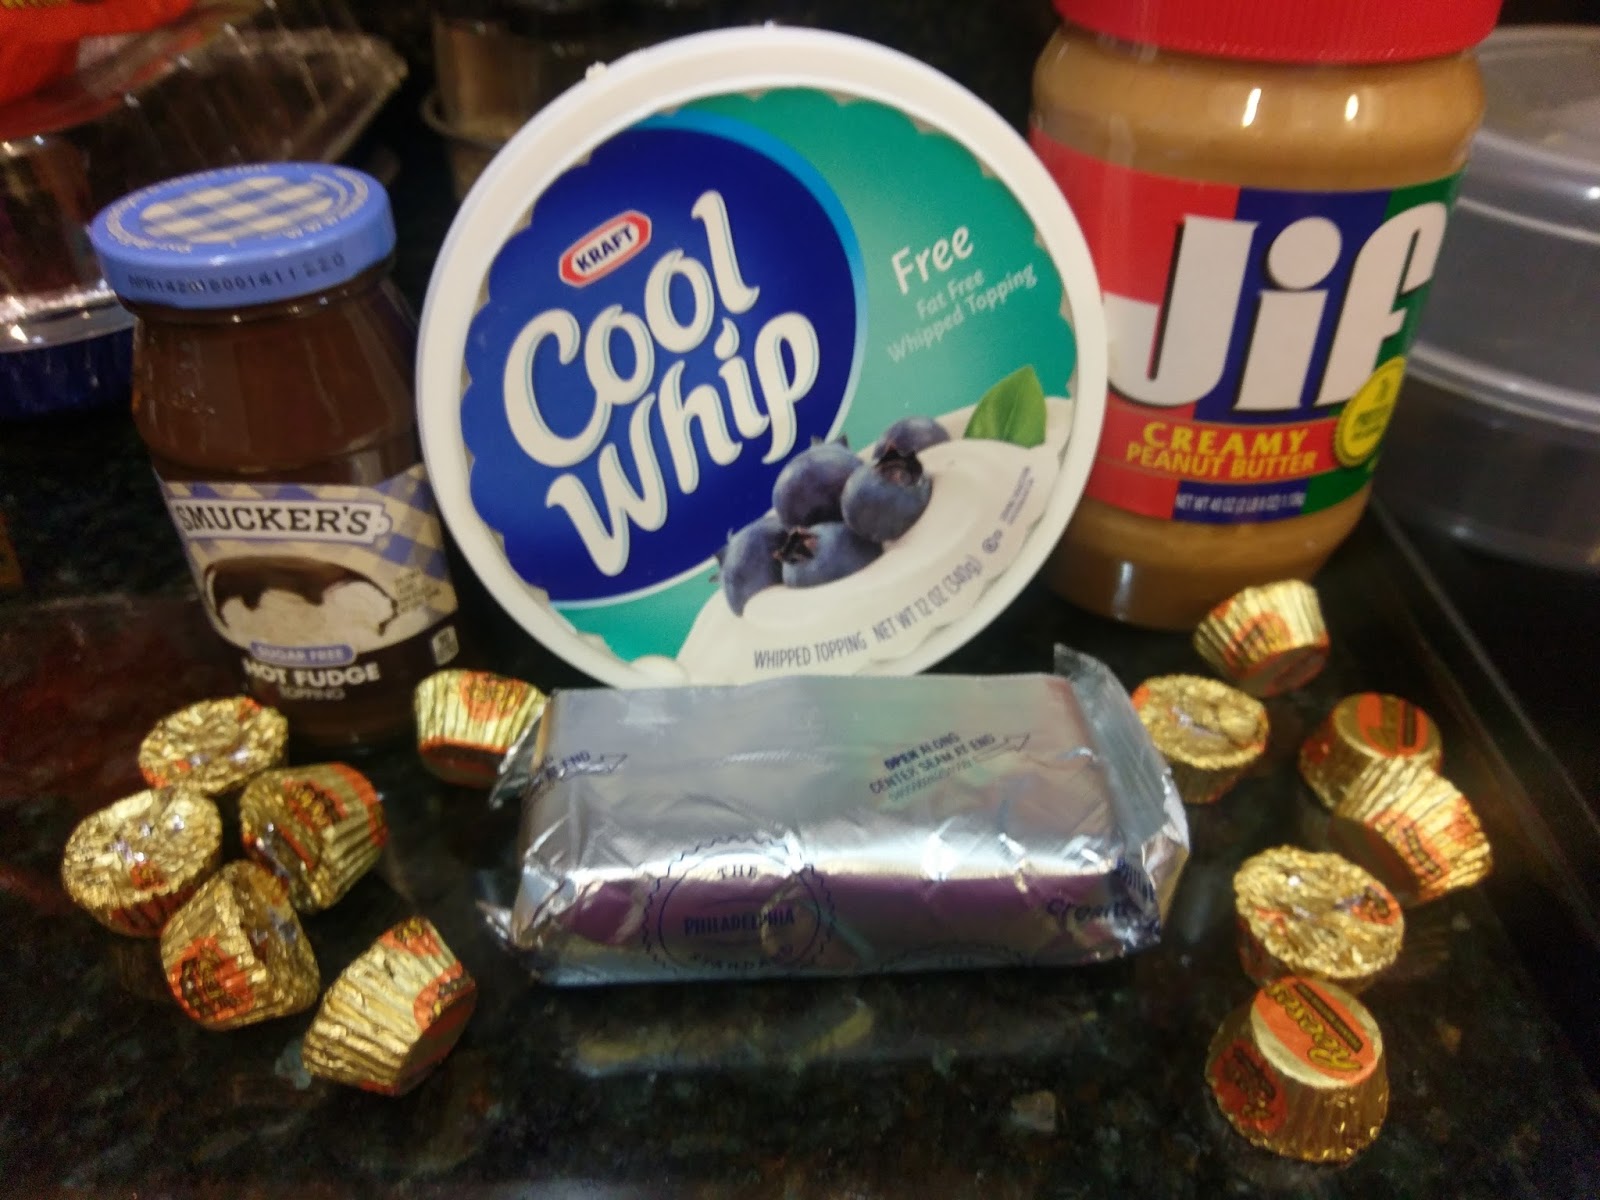
I accidentally ate a few of these Reese’s Minis. I had literally no control over what was happening. They just somehow ended up in my mouth. You’ll also need:
- 12 ounces of Cool Whip Free, divided
- 12 ounces of sugar free hot fudge sauce
- 8 ounces of reduced fat cream cheese, softened
- 1 cup of creamy JIF (there are literally no substitutes. Get your life together and just add Jif.)
- Reese’s Minis, chopped (I used 8)
- Reese’s Peanut Butter Chips (a small sprinkling)
- 1 tablespoon of Hershey’s lite chocolate syrup

Things got stabby. Let the cake cool completely and then poke some holes into it with a fork. Nuke your hot fudge for 45 seconds, stir like crazy, and dump the whole bottle over the cake, spreading it out so it fills in the holes. Technically this makes this a poke cake, but adding another word to an already really long cake name felt unnecessary and cruel, like having to share a Reese’s Mini.

I would’ve eaten it as is, but there were two more layers to go. Take your cake and put it in the freezer to let the fudge set while you make your peanut butter cream cheese. In your stand mixer, blend the softened cream cheese with the peanut butter until totally incorporated. Then add in 8 ounces of Cool Whip Free and mix well. At this point, I’m surprised the good people at Cool Whip haven’t contacted me about a sponsorship opportunity because I use this stuff almost as much as I use toothpaste. Yes, that means multiple times a day, every day. Whole-assing, people…
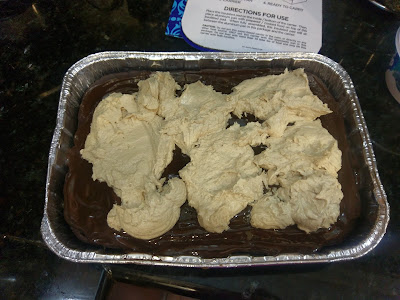
Dump your peanut butter cream cheese on top of your set fudge layer (I froze my cake for 15 minutes). 
Spread evenly over the cake; be sure to wait to lick the spatula clean until after this has been taken care of. Place your cake back into the freezer for an hour to let the peanut butter layer firm up. I used this time to hop online and try to find more peanut butter Halo Top. It’s my all-time favorite ice cream now, so naturally it’s become my White Whale, and I can’t find it in stock anywhere. I assuaged my sadness with another Reese’s Mini. I get the feeling you all understand how hopelessly obsessed I am with peanut butter by now. I’d like to thank my dogs for constantly needing walks, my elliptical, and Jillian Michaels for making my fat kid eating habits possible.
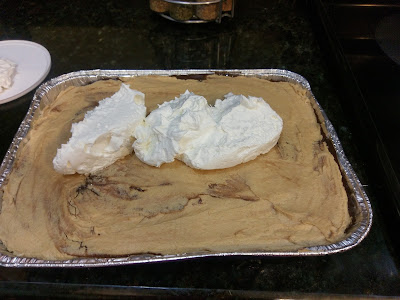
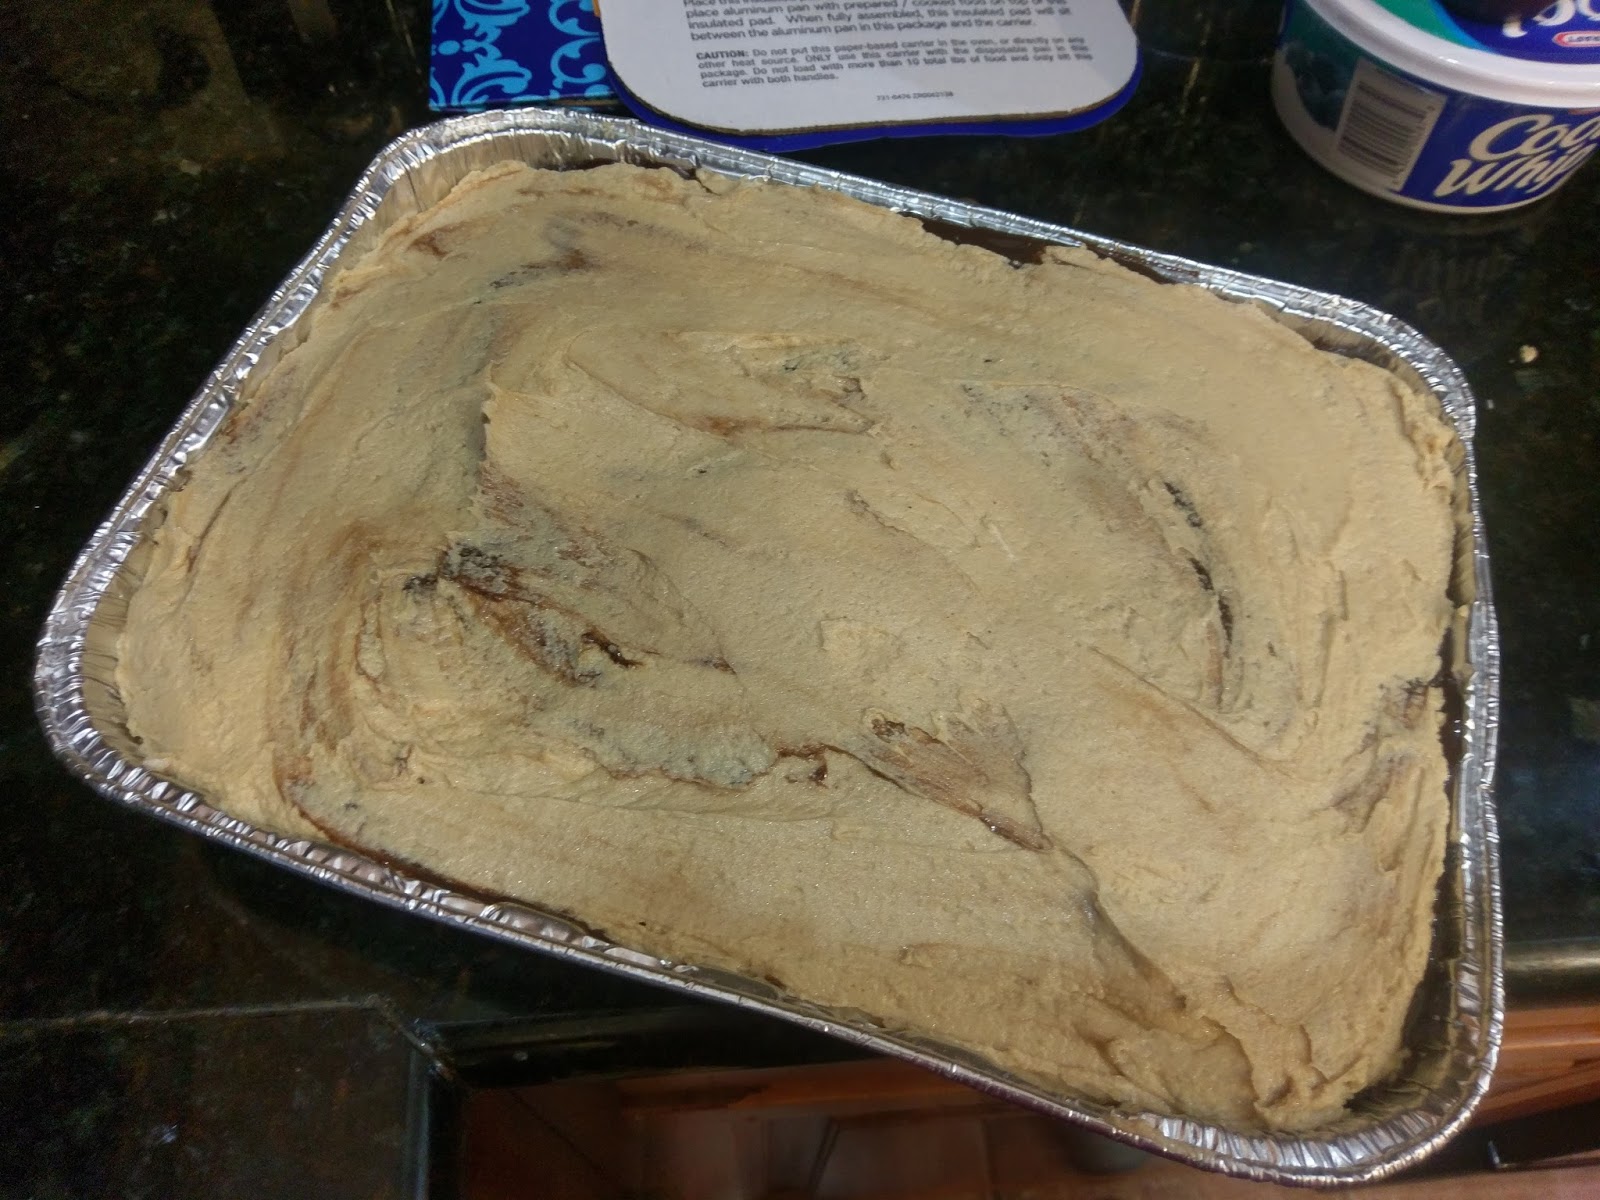
And to the good people at Cool Whip… Once firmed up, spread the remaining Cool Whip Free on top of your cake. I promise you, this is the final layer. So if you’re looking at the depth of your pan and wondering if this cake is going to have a muffin top situation, rest easy. You’ll be able to mostly close the lid on your pan. Mostly.

Worth it. 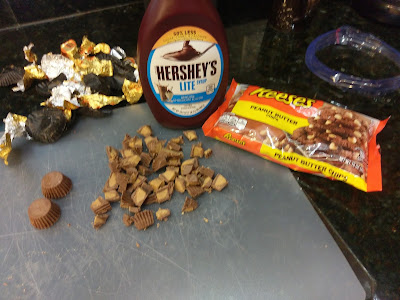
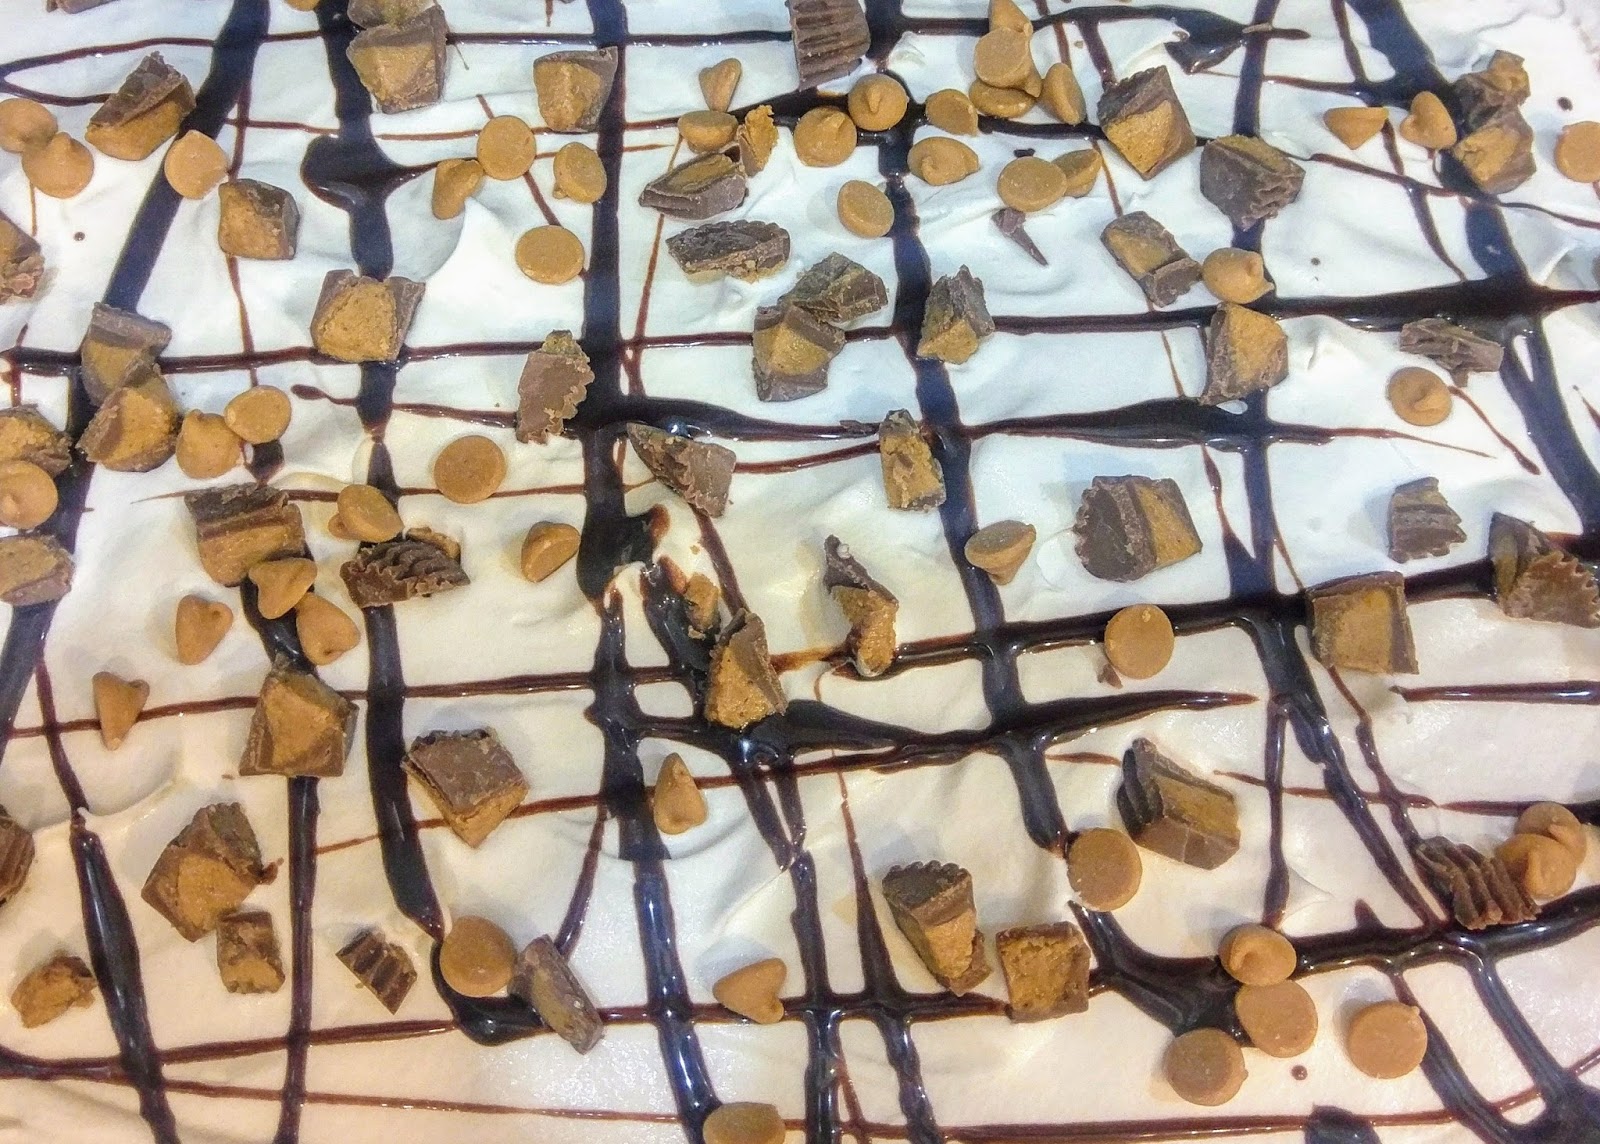
Pictured top left: what the desk looks like at my home office when I have a grant to write. Set your cake aside and chop up 8 Reese’s minis. I was intending on using 10, so I unwrapped 10, but then I realized I didn’t need that many and made the ultimate sacrifice and ate 2 more Reese’s Minis. They were unwrapped…what was I gonna do? Throw them away? Share them with my husband? I’m only human.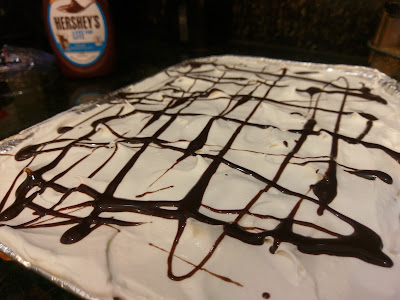
Drizzle the chocolate syrup on top of the Cool Whip layer. No rhyme or reason to my pattern here. I call it, “Chocolate sauce meets left-hander.” 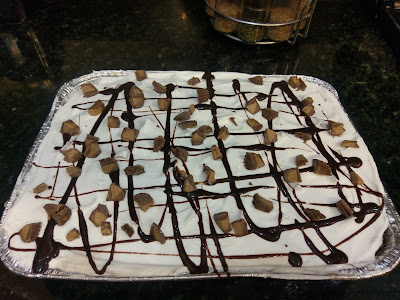
Then sprinkle the chopped up Mini’s. 
And finish with a smattering of the PB Chips. End result: a beautiful mess of Cool Whip, chocolate syrup, and several varieties of Reese’s: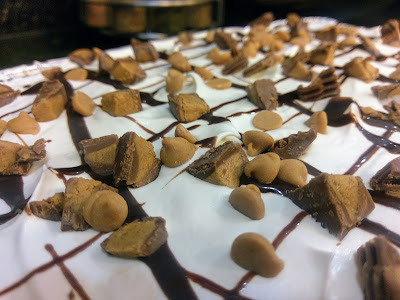
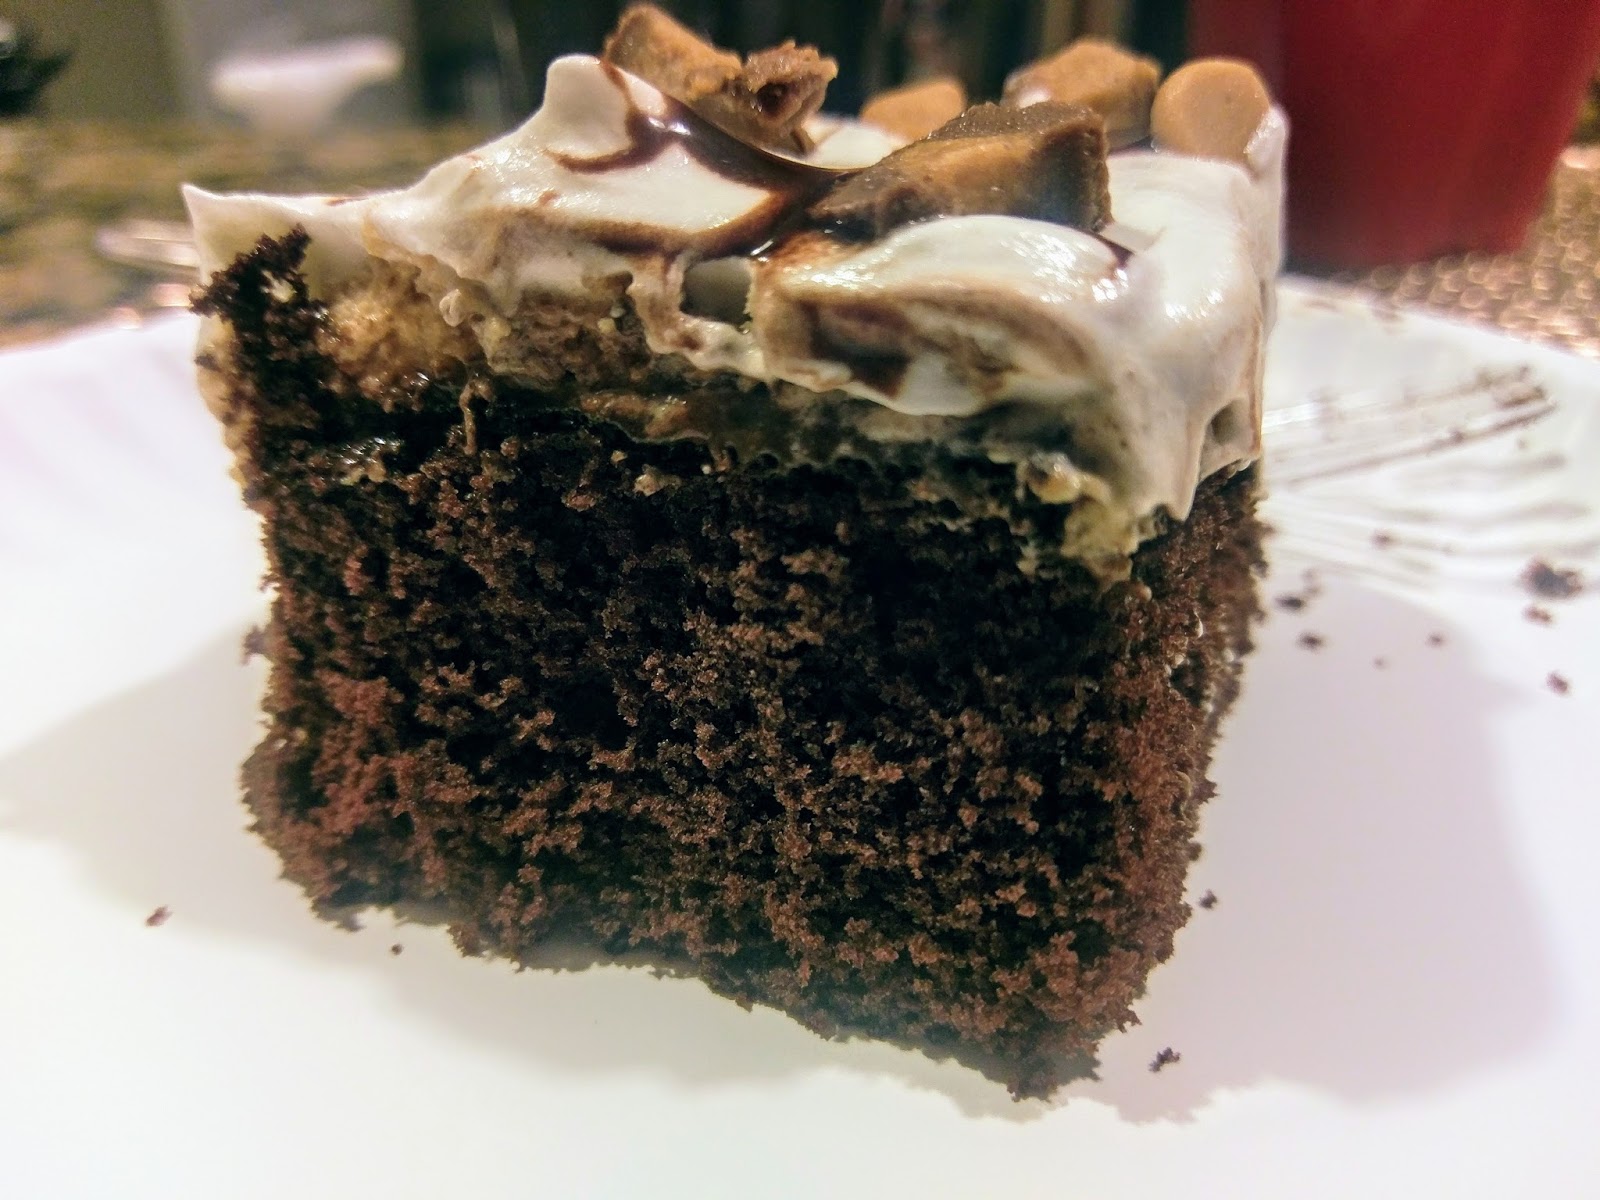
And it took my breath away. Well, there was some wheezing and a little drooling. This did not disappoint. While the cake and Cool Whip are light and airy, it is definitely needed thanks to the indulgence that is not one, but two layers of extra chocolate and peanut butter amazingness. Each forkful was met with the perfect ratio of Reese’s toppings, peanut butter cream cheese, and insanely gooey fudge. I was seriously busy this week, so I didn’t have a lot of time to spend on baking (which is both good and bad…good: I don’t get to pig out; bad: I don’t get to pig out). This cake comes together with total ease and not a ton of time constraints. Baking is quick, decorating simple, and the end result is worthy of anyone who appreciates peanut butter. Thanks to the folks at Reese’s for coming up with a ridiculous amount of peanut butter and chocolate dessert offerings, I’m already wondering if it’s possible to make a pie crust out of mostly peanut butter cups. Clearly, I’m gonna have to find out. ‘Til next time, my fellow eaters!
Peanut butter and delicious. -
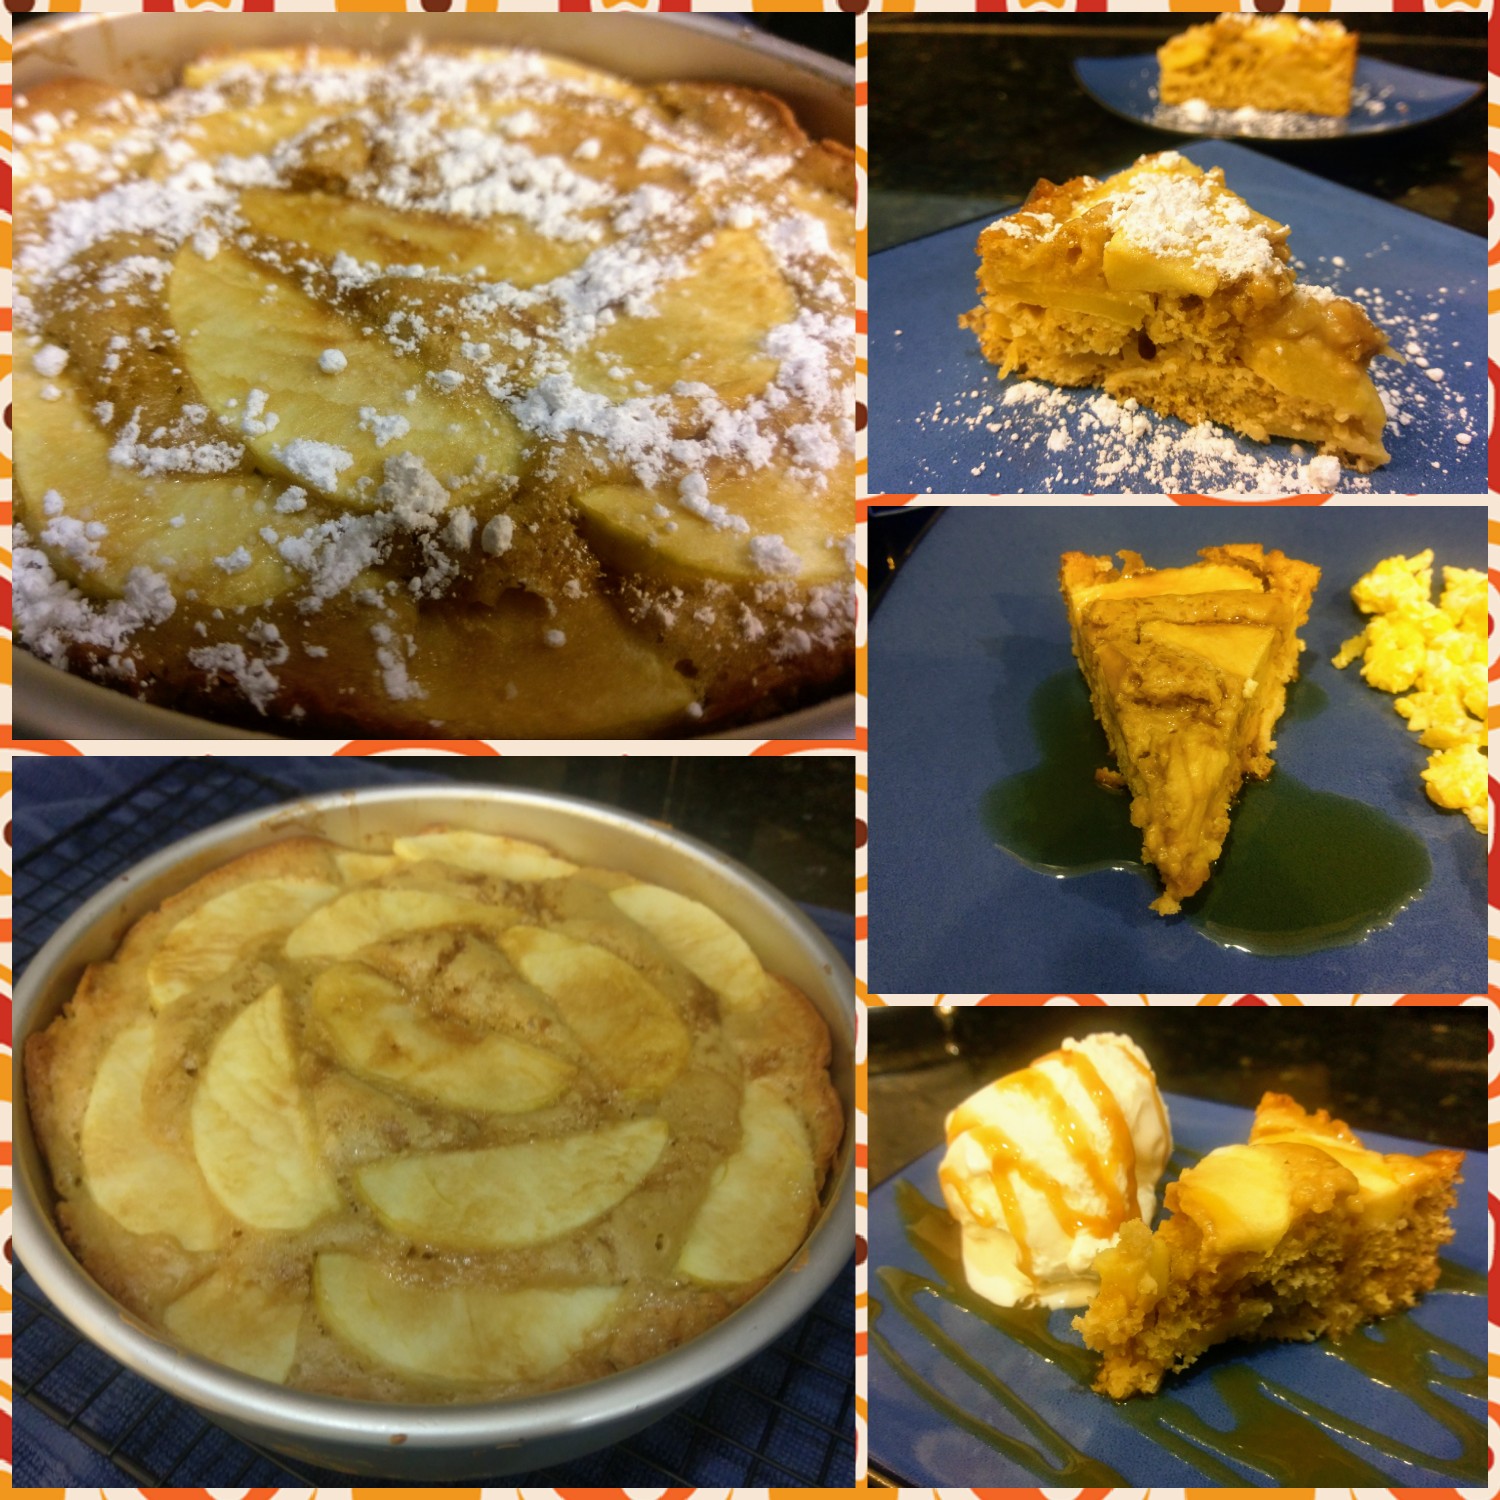
An Apple Multiple Times a Day?
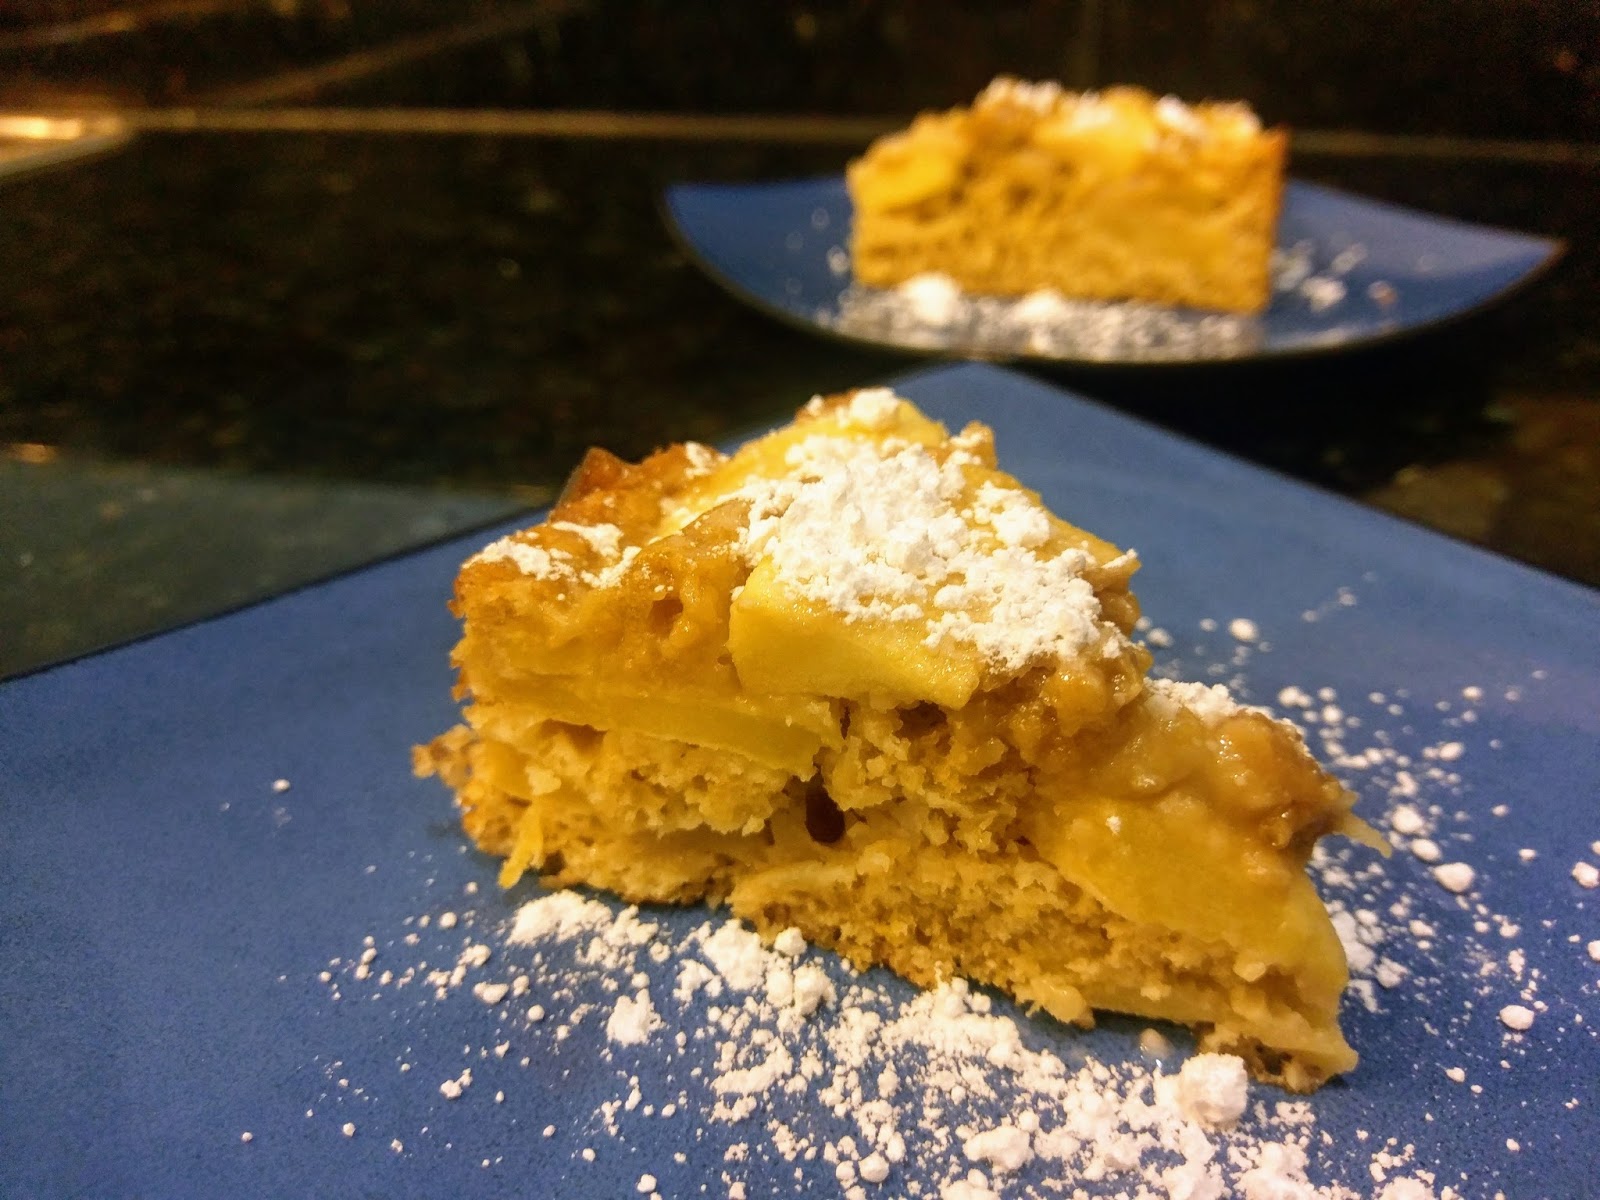
I eat an apple every day either with my lunch or for a snack, and I can confirm that the adage is true–an apple a day does keep the doctor away. This could also be due to the fact that unless one of my appendages is falling off, I refuse to step foot in a hospital…but I’d like to thank the apples first and foremost. It had been awhile since I had eaten or even made an apple-based dessert, but I wasn’t jonesing for a pie since we had that last week. This then led me to ponder one of life’s great mysteries–why aren’t there more apple desserts? Why must it just be the pie where we let apples shine? Why do I think this is one of life’s great mysteries? Do I care too much about dessert? Does one bad apple really spoil the whole bunch? Somehow the answer to all of these questions was yes, even where it didn’t make any sense. But I took that yes and I turned it into a cake. A delicious, apple-filled cake. A cake so good it can stand on its own, or be served a la mode, or even become a syrup sponge for breakfast. A shining example of how you can eat an apple a day, multiple times a day! Take that, healthcare industry.

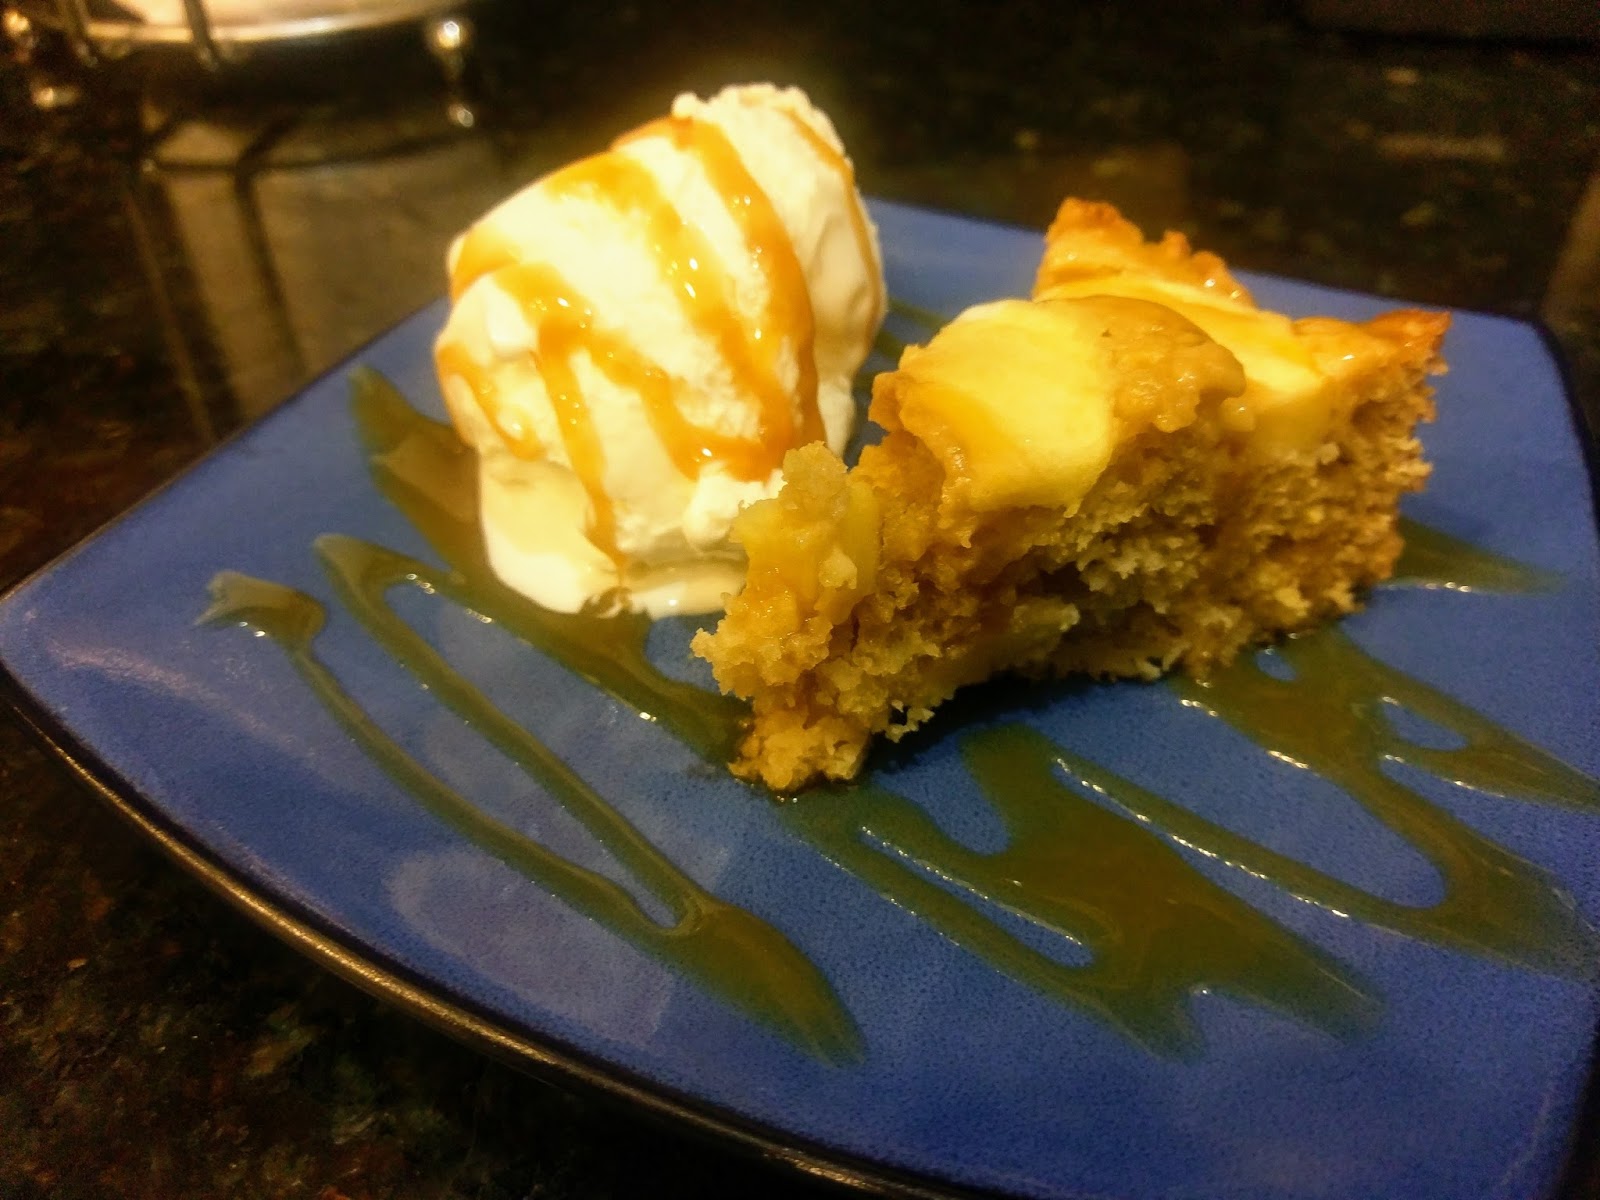
It’s also pretty! And although that does nothing for taste, it still accounts for something. And now’s the part where I get to boast that you get to top the cake with ice cream, syrup, or powdered sugar because one slice is only 170 calories. A slice of apple cake a day will also keep the stretchy pants at bay! This is an 8″ round cake, but it is a bit tall, and I knew there was no way I could eat it without trying it with ice cream and caramel drizzle at some point, so this whole cake breaks down into 170 calories per slice for 10 slices total. And now I’m doing apple math. Something I haven’t done since elementary school where I always questioned why one person would have 15 apples and if another person took 4 of those apples how many person one would have left…like I would ever share my apples with anyone. I might need them all for snacking. Kate doesn’t share food!

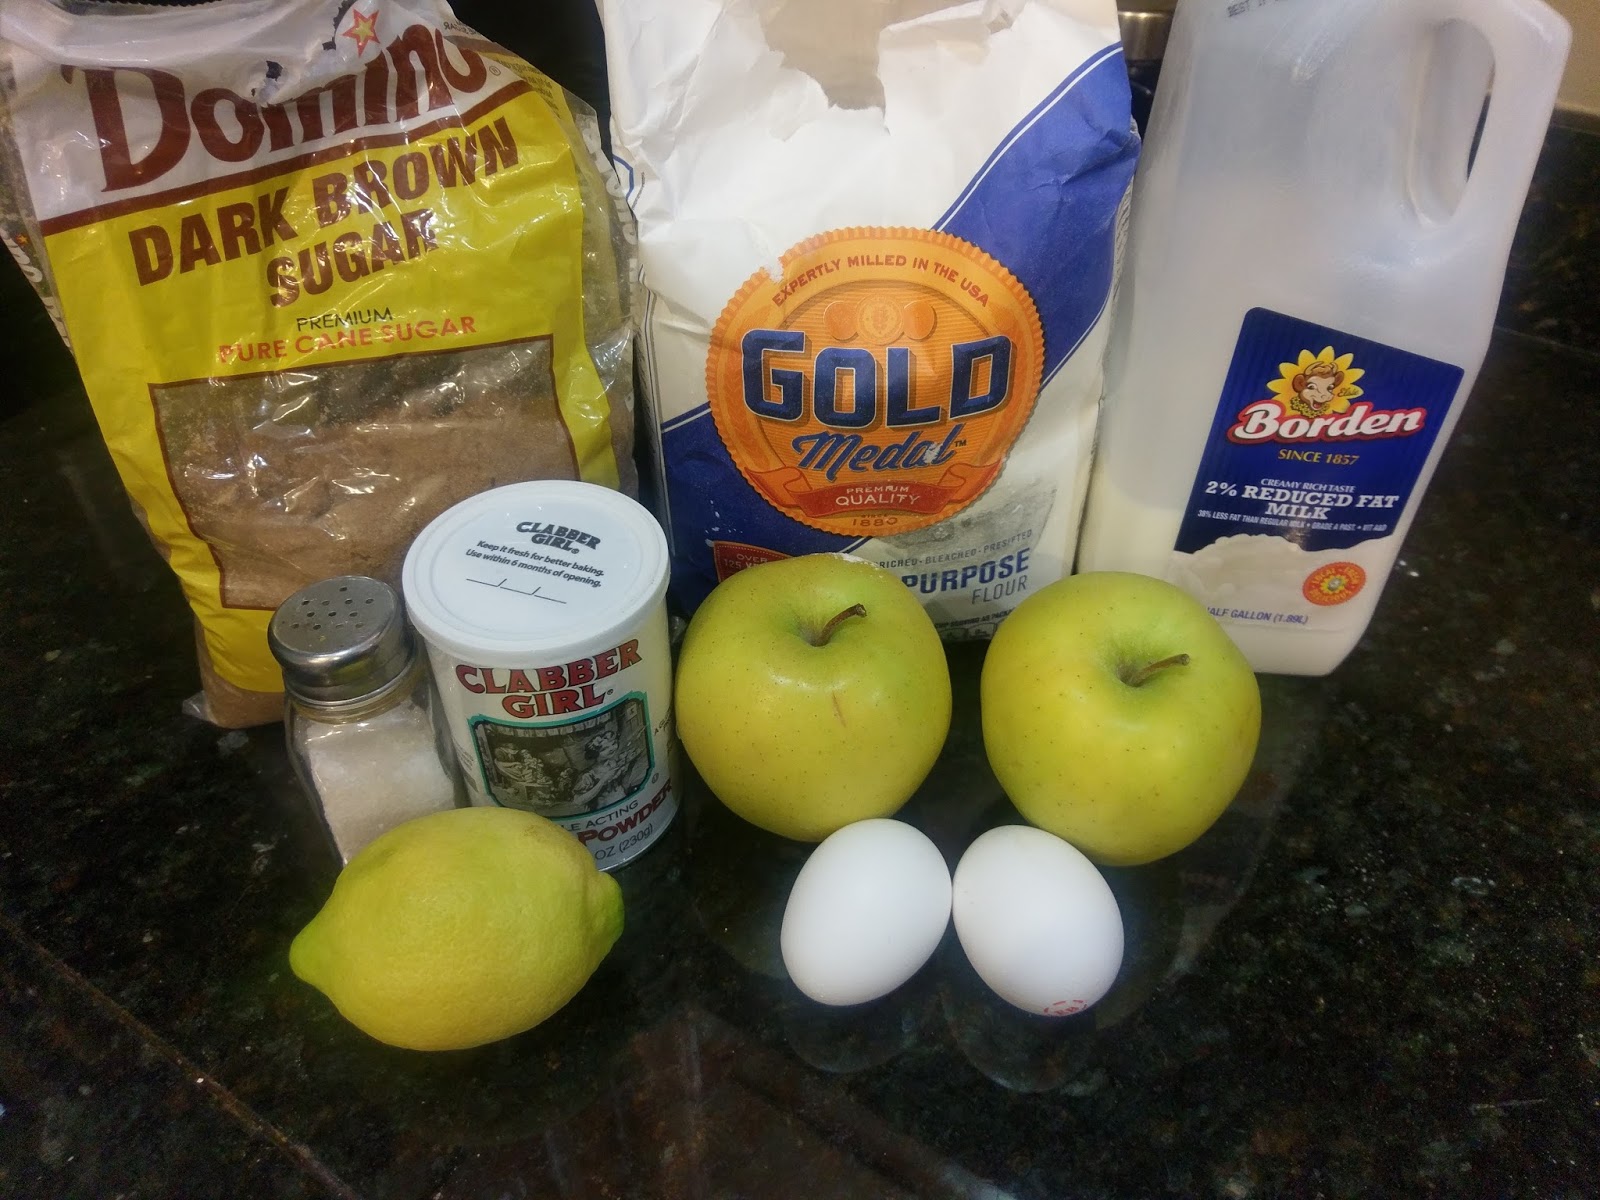
Especially if it contains brown sugar. This cake does not require any crazy ingredients; hell, it barely even requires any sugar. Which is sometimes a cautionary tale in how to dessert properly, but I promise you this is plenty decadent thanks to lemon zest and Golden Delicious apples. To make this culinary masterpiece, gather up:
- 2 large Golden Delicious apples (~1.5 lbs)
- 1/3 cup brown sugar (I like the taste of dark better than light since it has more molasses in it and packs more flavor)
- 2 eggs
- 1 large lemon
- 1 cup of loosely packed flour
- 1/8 tsp of salt
- 3 tsp baking powder
- 1/4 cup + 1 TBS skim milk
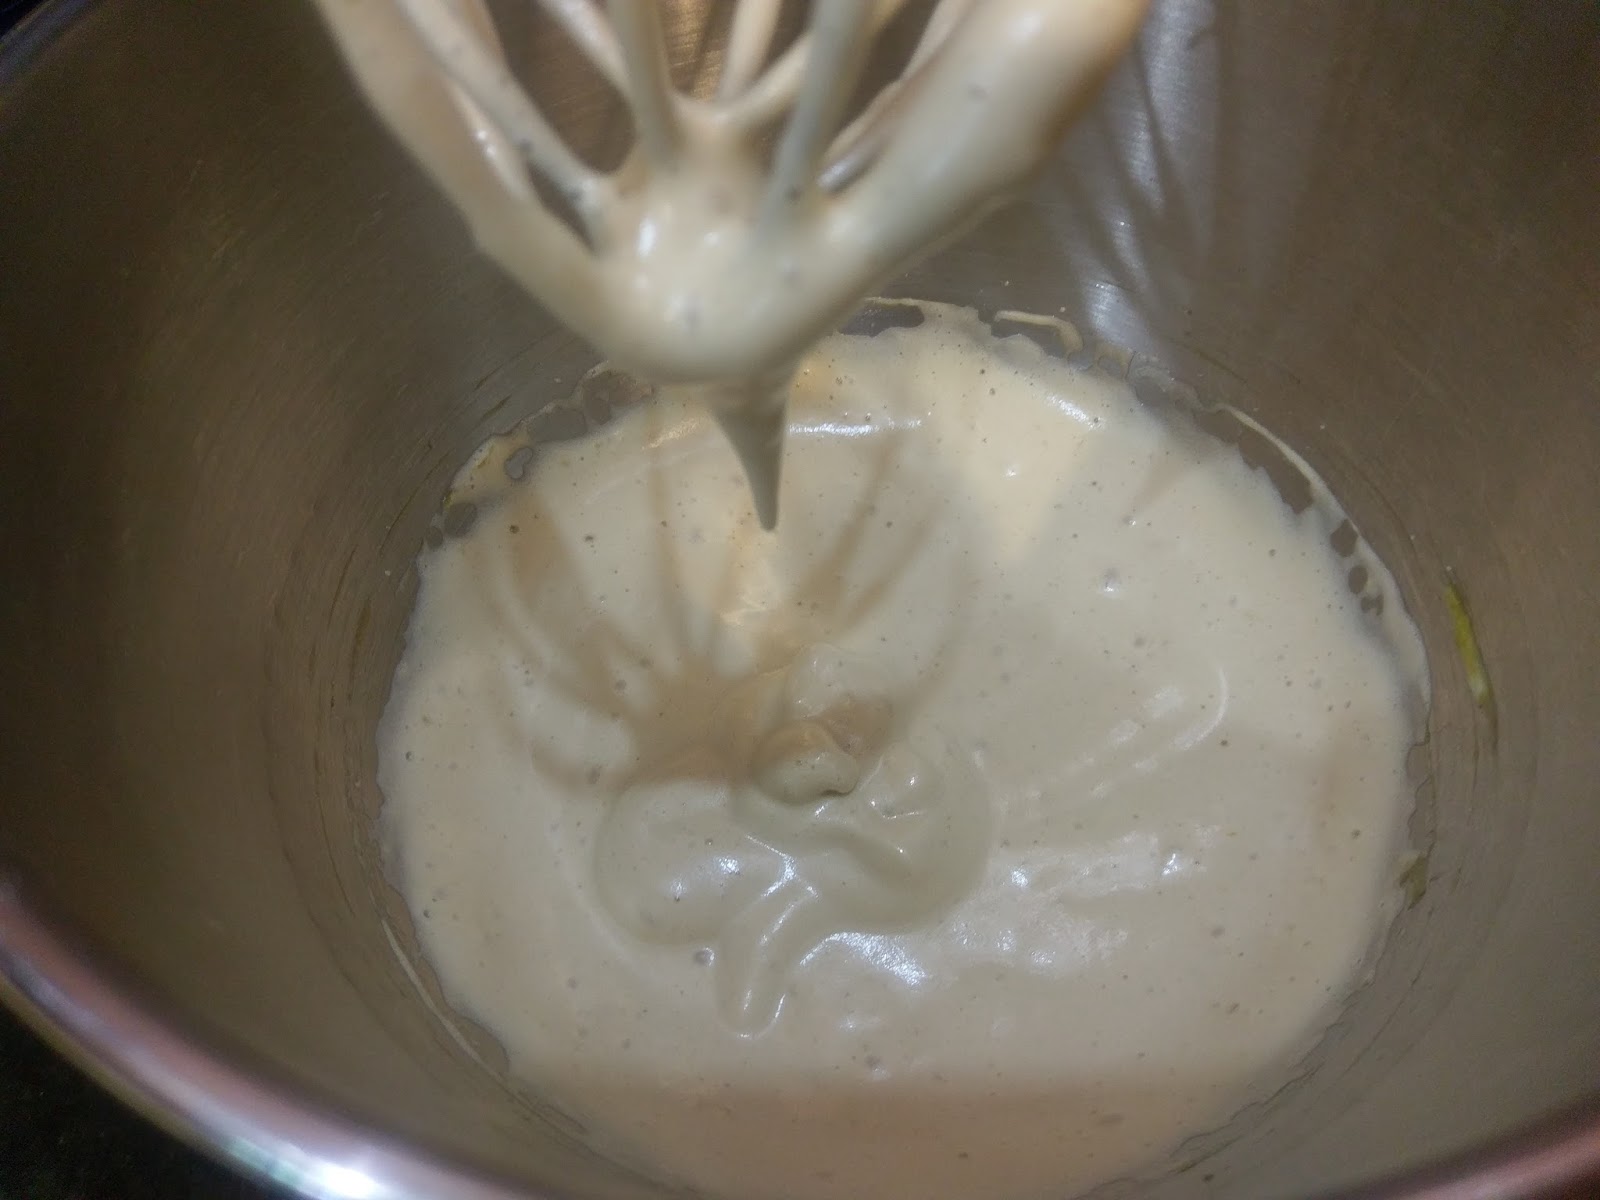
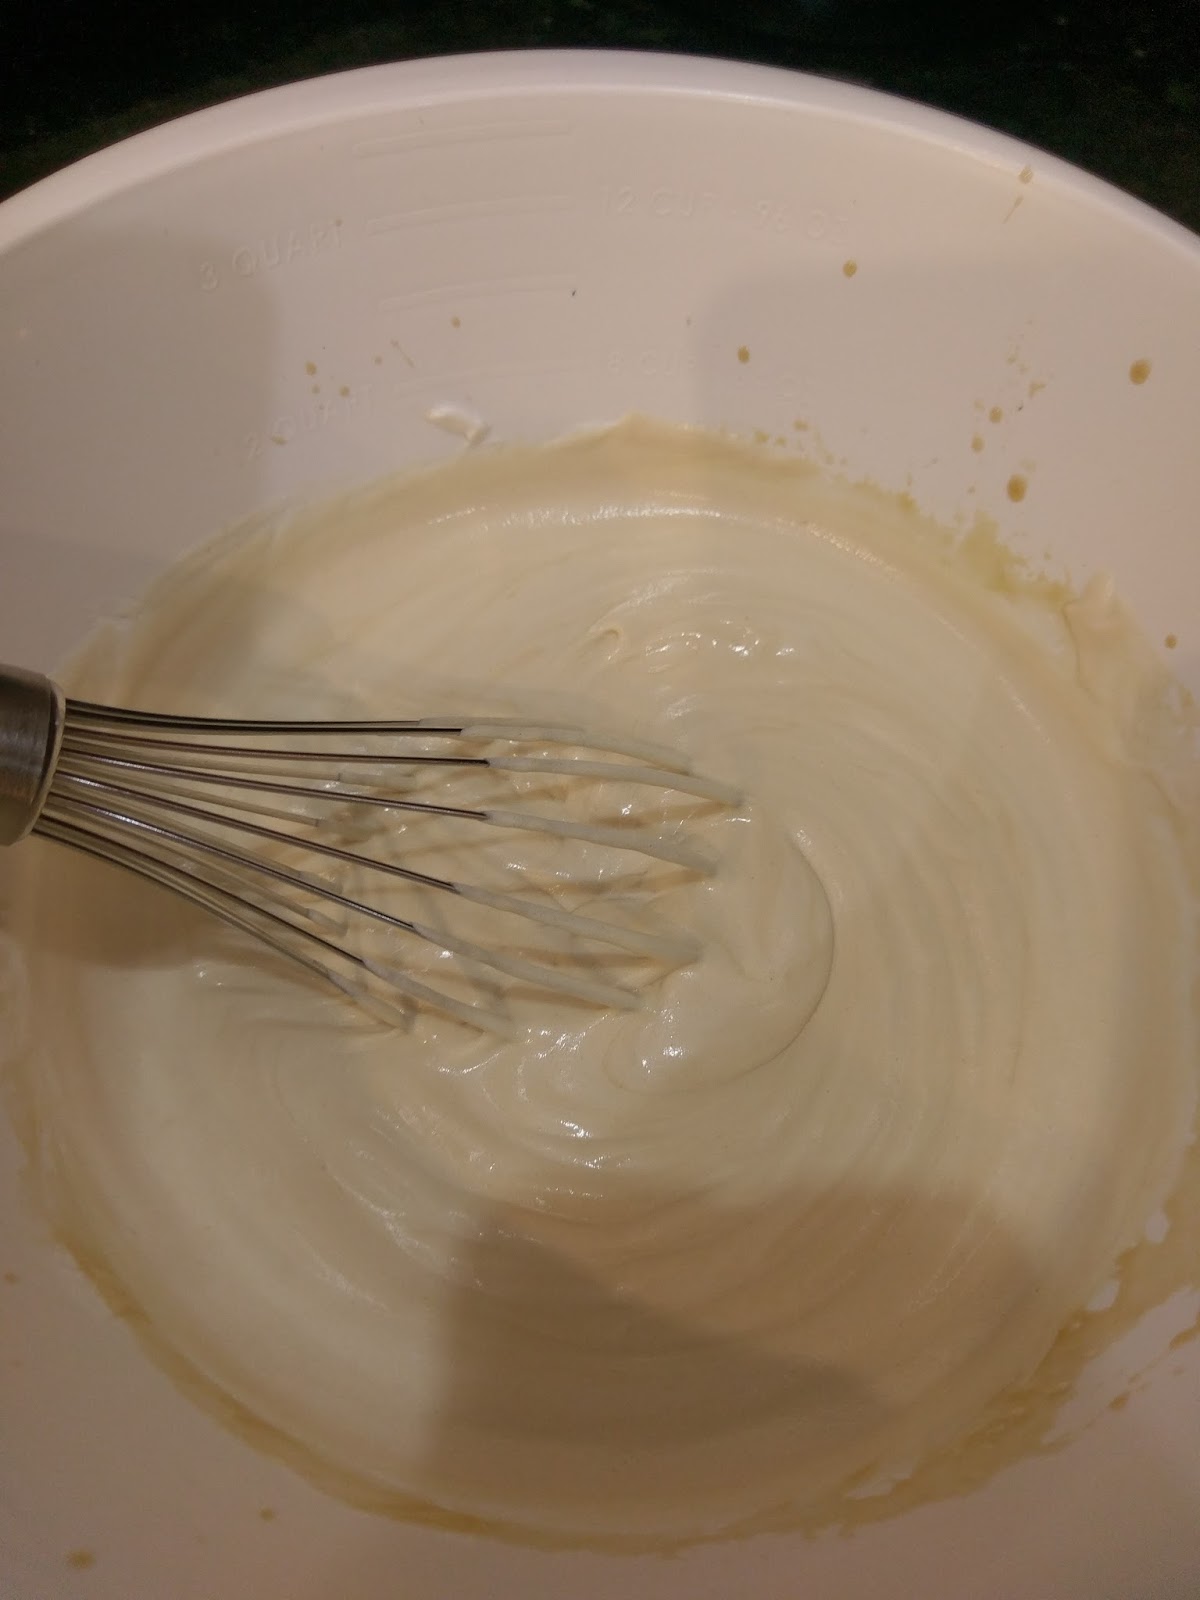
Start by greasing an 8 or 9 inch round cake pan and preheating the oven to 350. In your stand mixer bowl, dump the eggs, sugar, and zest of the large lemon. Save the rest of the lemon…you need it in a minute! Whip on medium high for 5-10 minutes, until your mixture goes from looking like this:
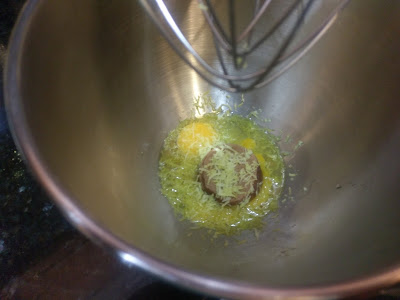
Sad and not at all appetizing. To this:
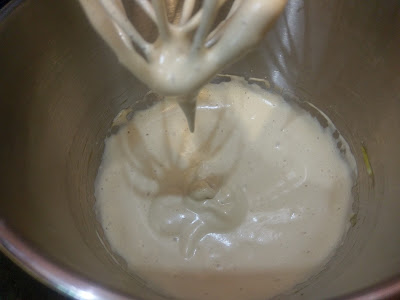
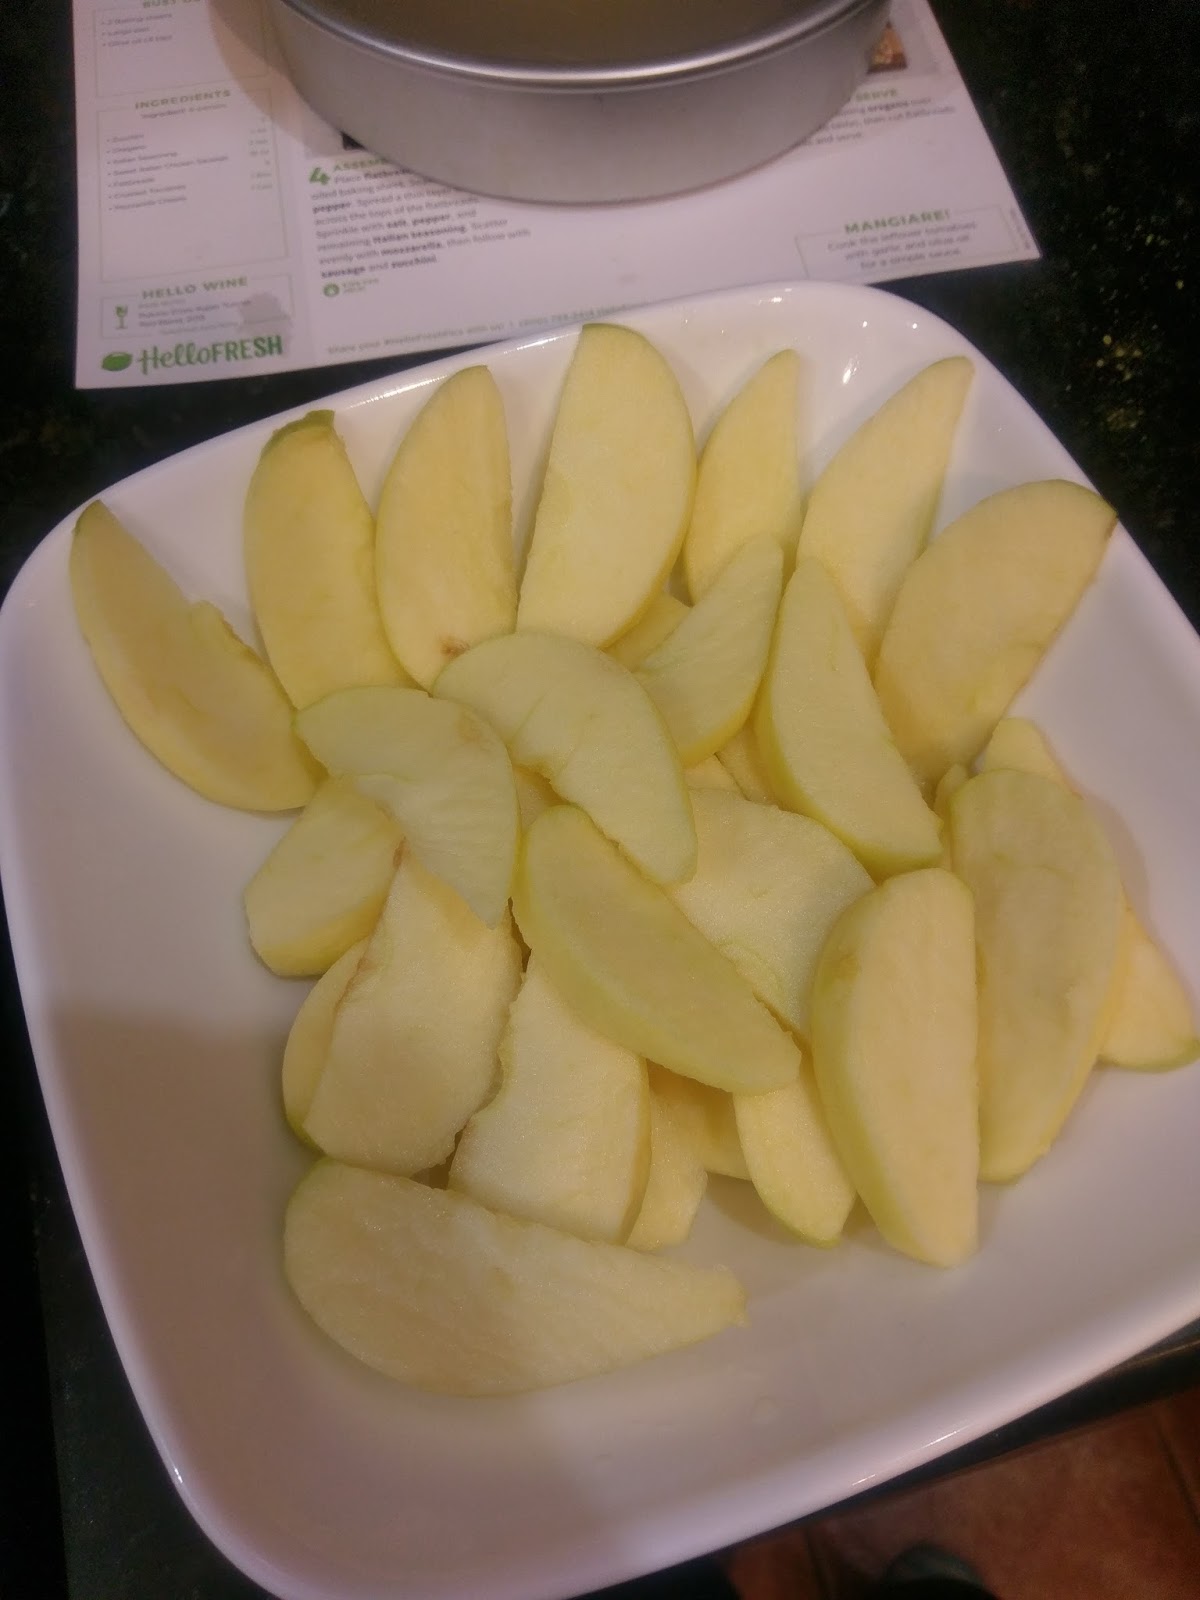
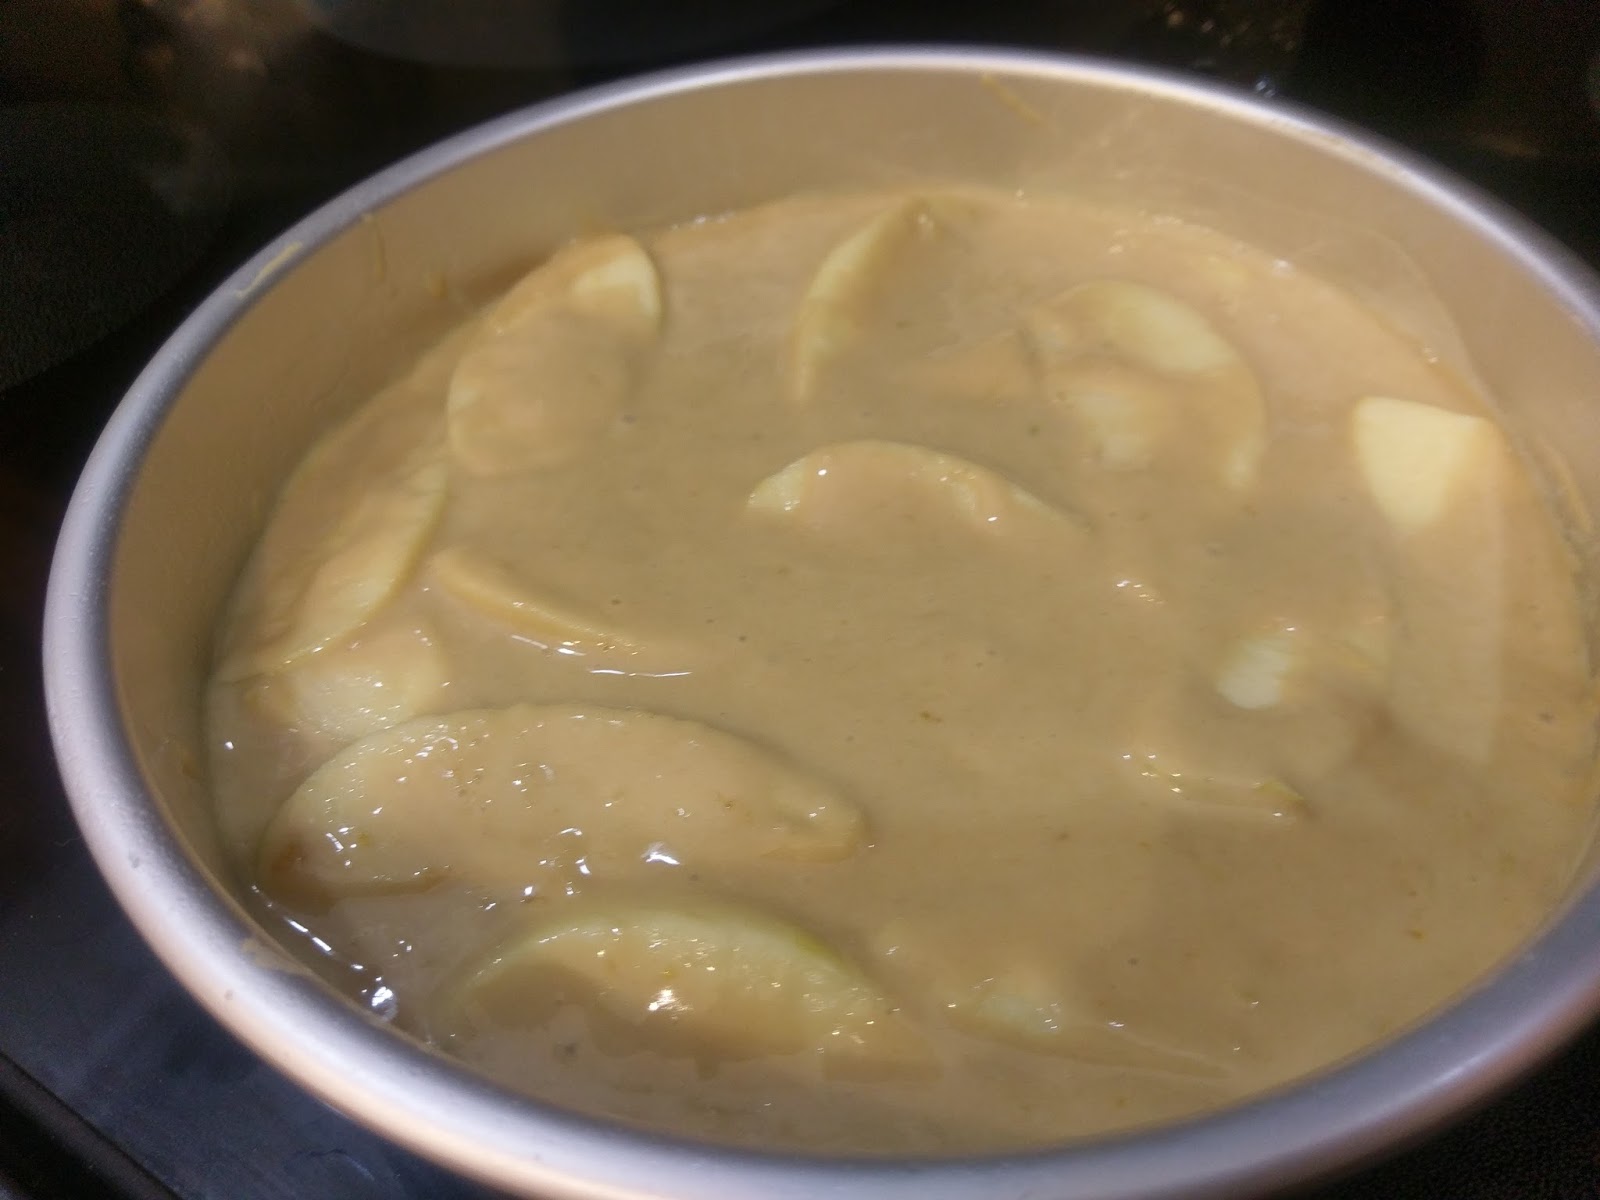
Fluffy and downright tasty-looking. While your mixture is getting all poofy and delicious in the mixer, peel your apples and core them. Slice into thin, uniform size:
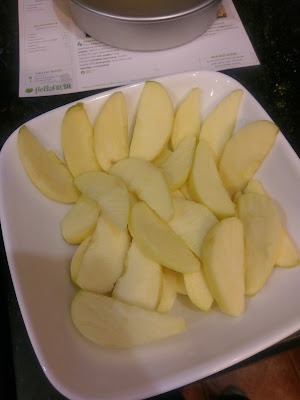
Saving some of the prettiest slices for the top of the cake, naturally. Take your lemon, cut it into slices, and squeeze over your apple slices to keep them from getting that weird brown funk that normally occurs when apples sit out for too long. No one wants to eat a cake with funky apples. Once you’re done mixing the eggs, sugar, and lemon zest, dump in the flour, salt, and baking powder. Blend on low while pouring in all the milk. Up the speed on your mixer a bit and blend until everything is nicely incorporated. Finish up by folding (by hand!!) in all but about 12 slices of apple into the cake batter.

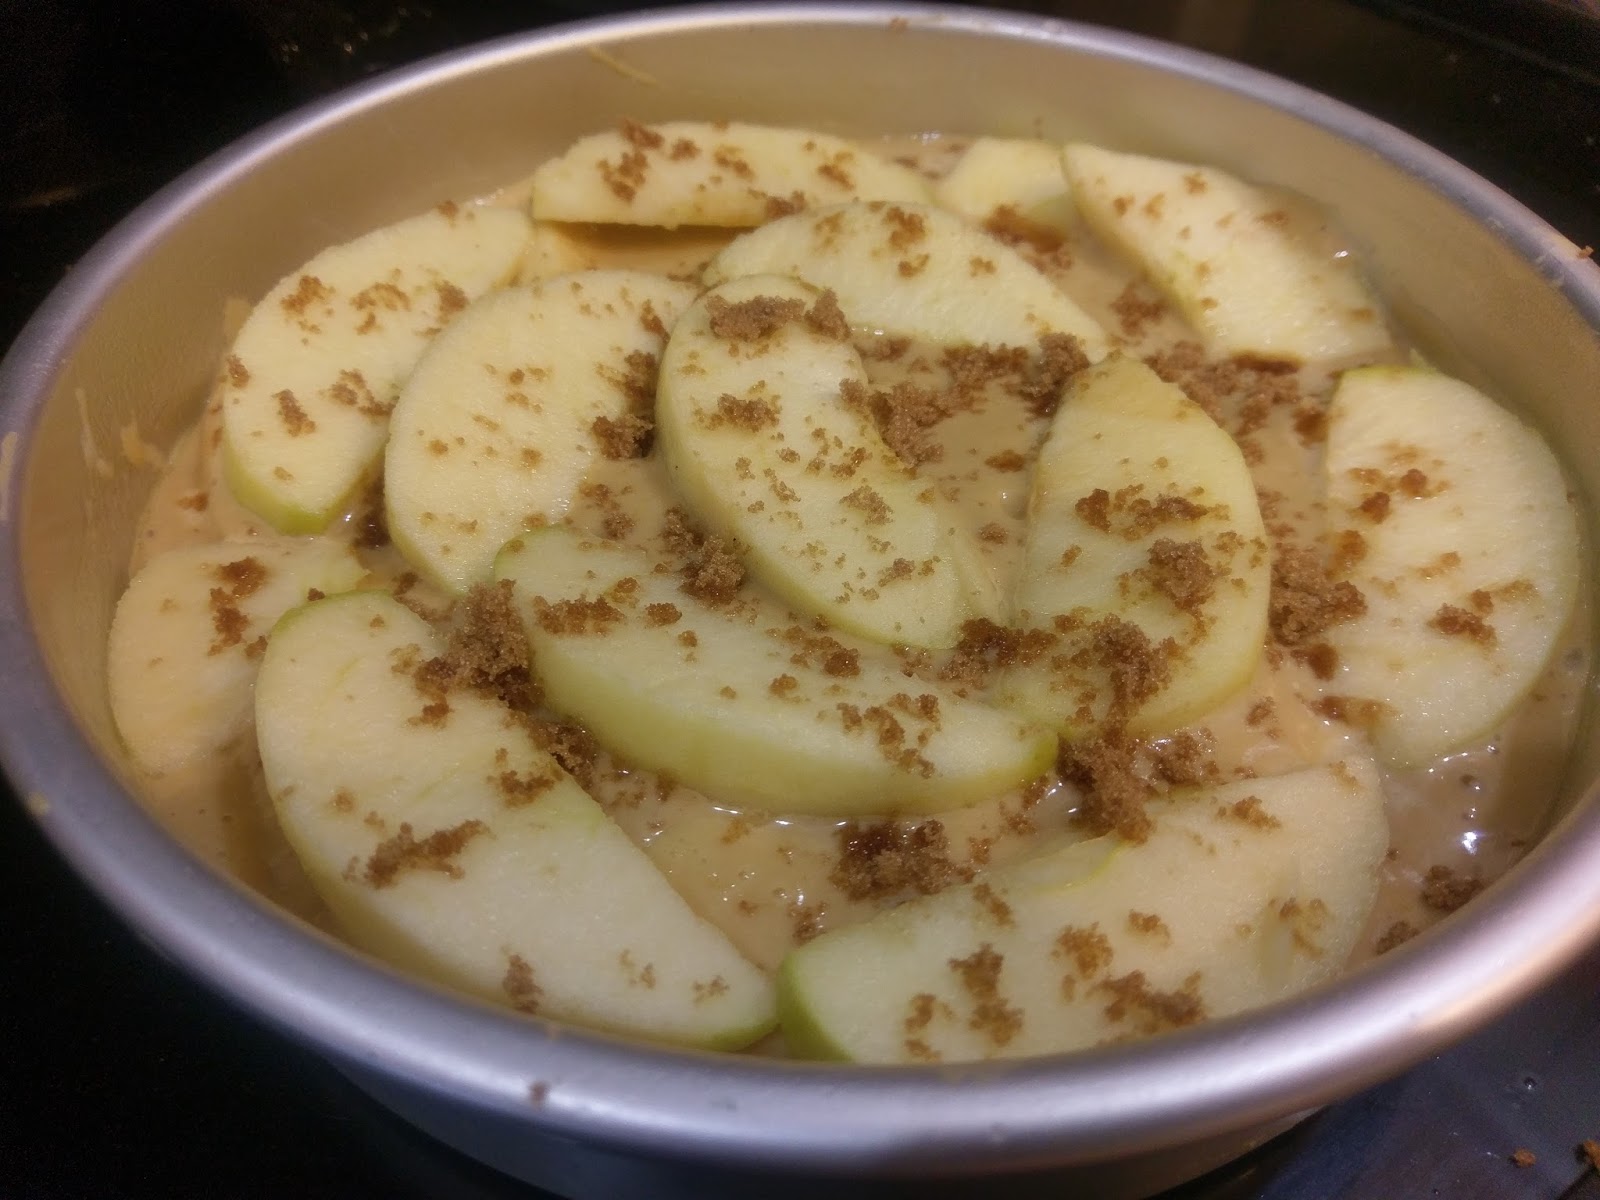
Would eat with a spoon. Bang your pan on the counter to distribute batter and apples evenly throughout the pan. Then take the apple slices you set aside, and place them into the top of the batter. I just made a simple circular pattern, but feel free to get crazy with it and make a work of art. I was getting too hungry for cake at this point to channel my inner Van Gogh.
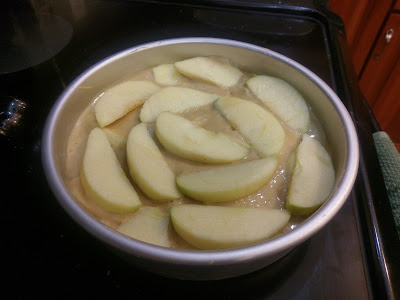
Plus I thought this looked pretty in its simplicity. That’s also what I’m going with. 
And brown sugar sprinkles make everything look 10 times more appetizing anyway. I sprinkled an additional tablespoon (included in calorie count) of brown sugar on top of everything because it was either that or the tablespoon of sugar was going directly into my mouth. I told you, I was hungry. Now, bake in the center of your oven for 30-35 minutes, or until a toothpick comes out of the cake cleanly.

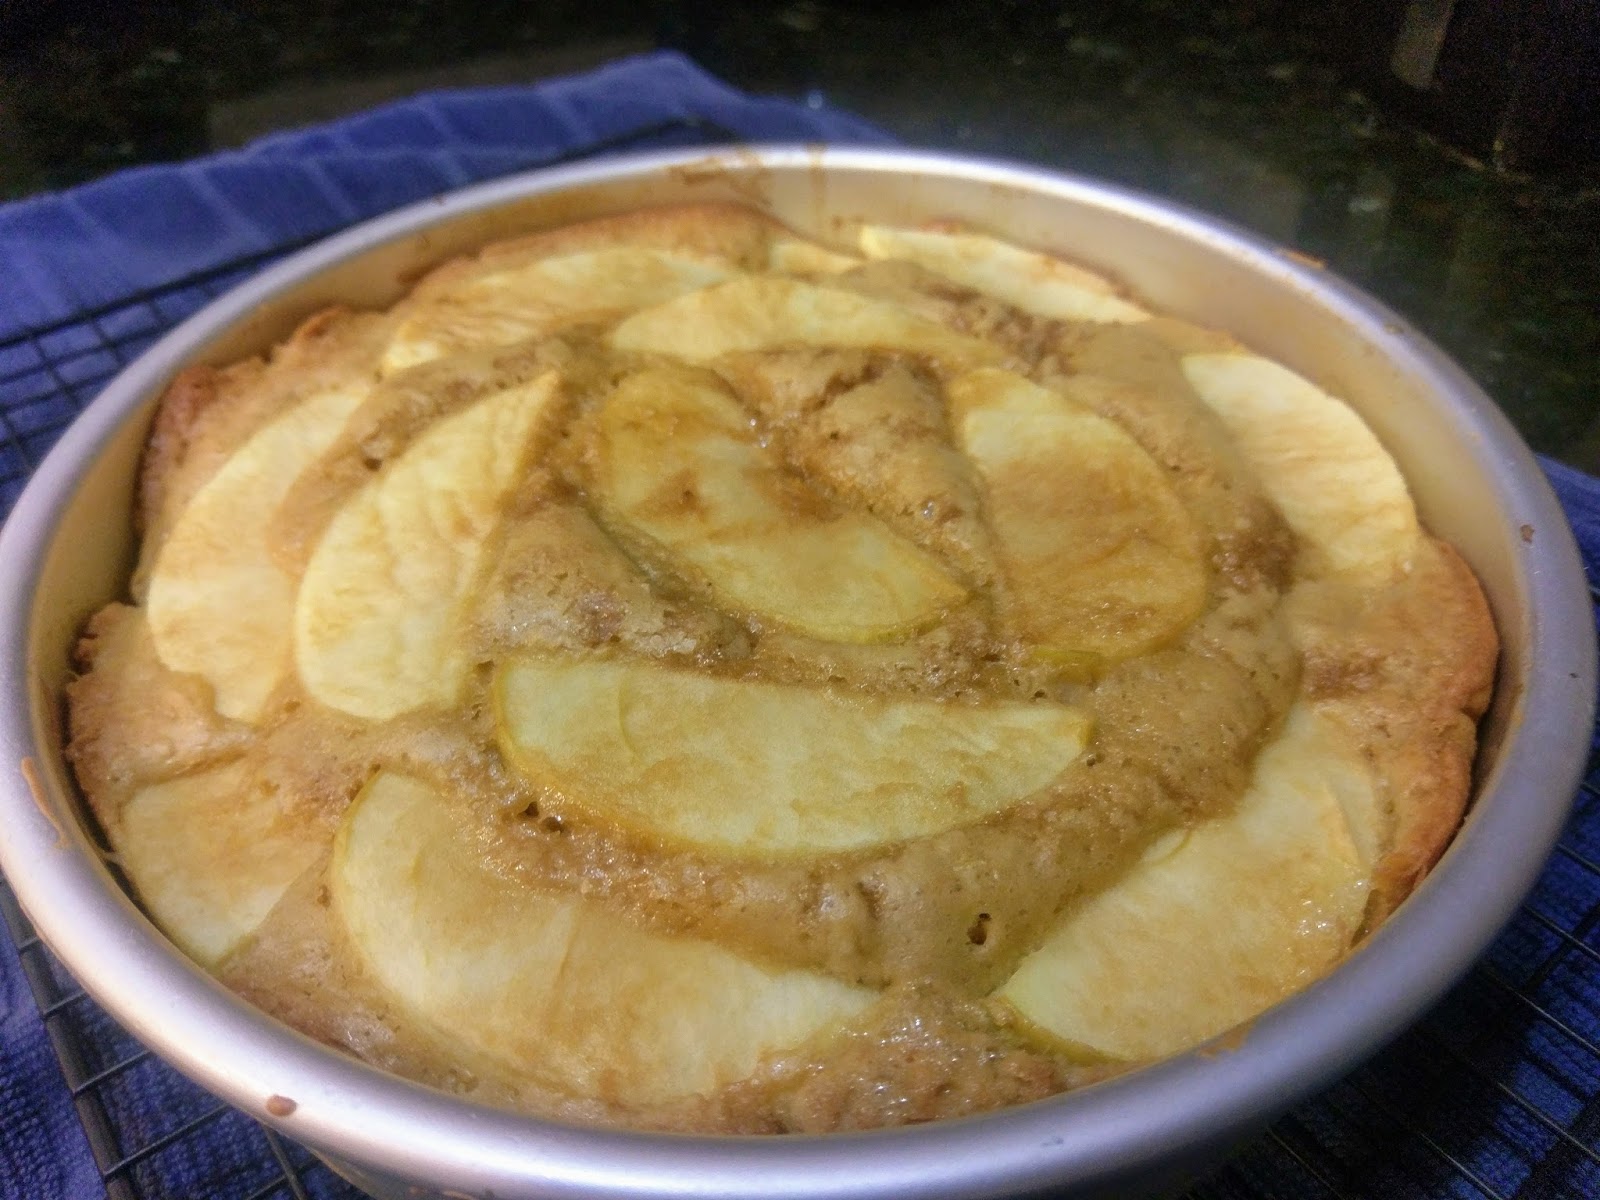
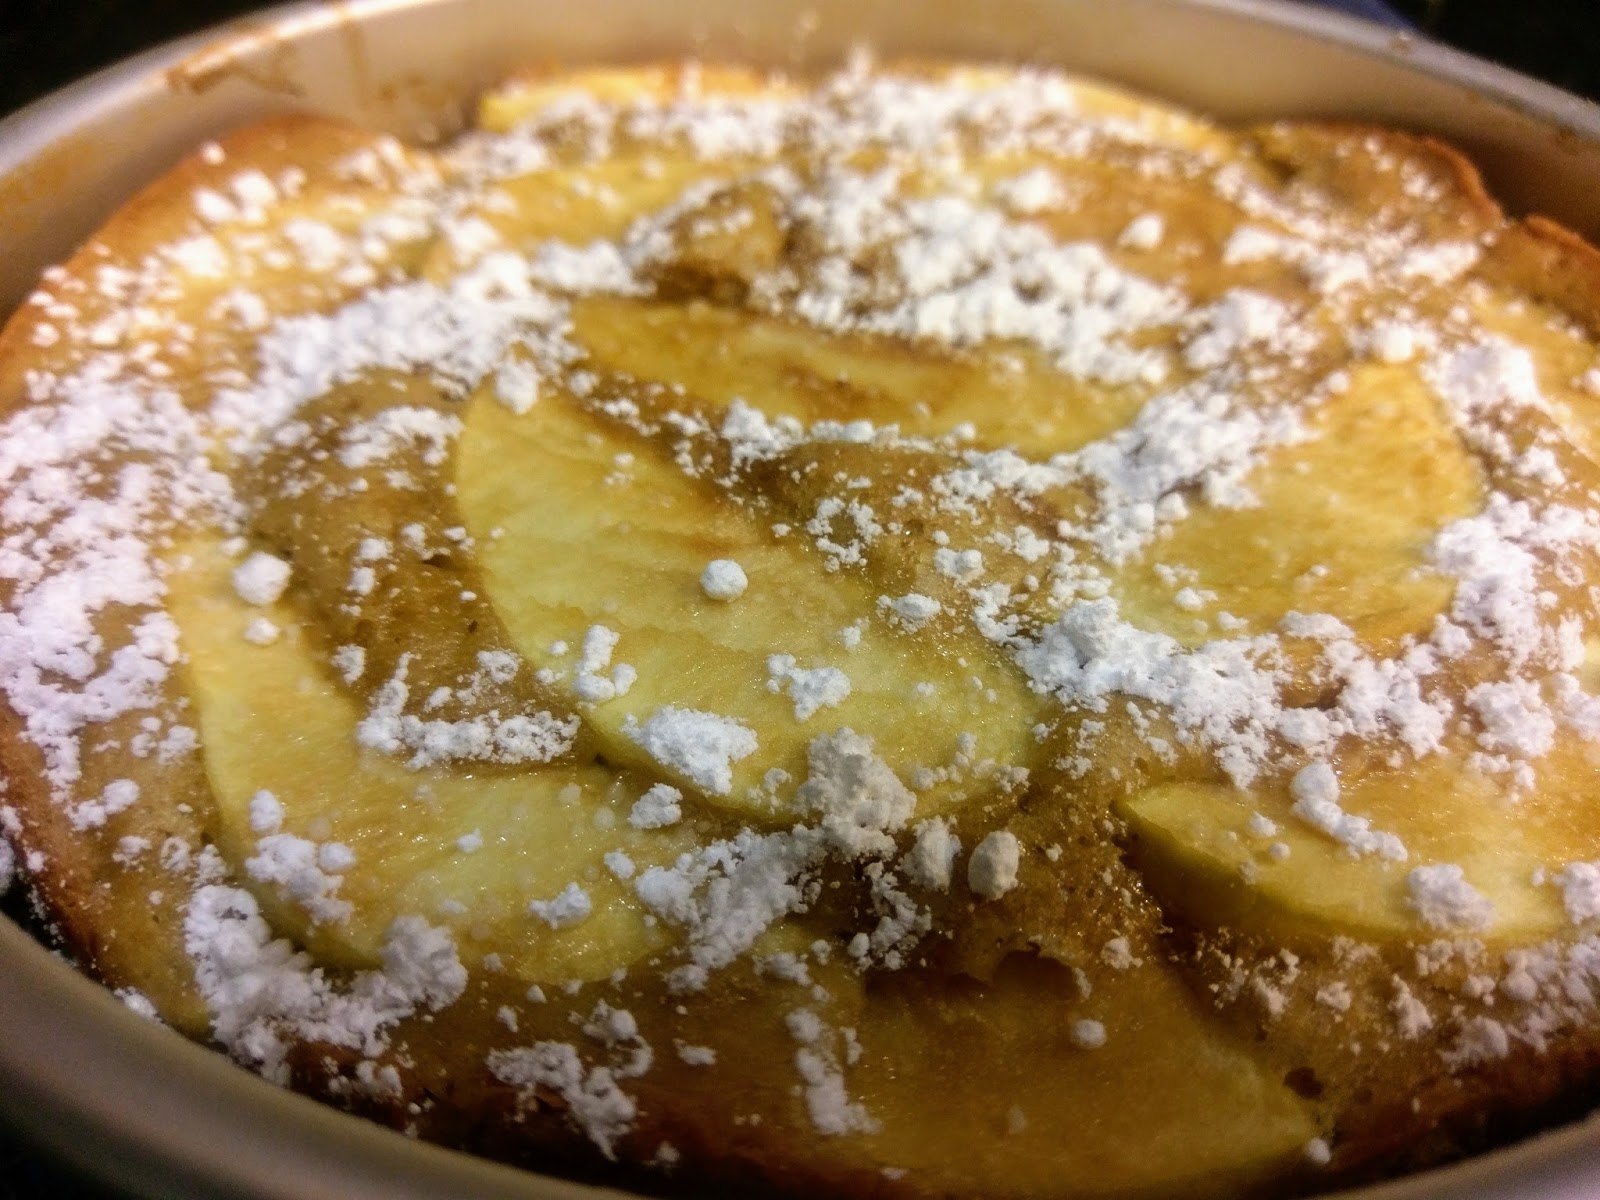
Your house will smell like the most American of dreams. So apple pie fresh out of the oven is such a quintessentially American smell…but I just out-America-ed apple pie. My house smelled so deliciously apple-y, George Washington would have been proud. Or at the very least, mildly amused by my steadfast determination to enjoy apples. Let your cake cool on a cooling rack for about a half an hour, then, find some powdered sugar and dust a bit on top:

Much like brown sugar sprinkles, this is mostly just to make the cake even prettier. Serve yourself a slice after you dust it with sugar and it is still fresh from the oven. It will change you as a person, I promise. The lemon zest mixes with the apples and hint of brown sugar to create a taste that is leaps and bounds above a simple apple pie filling. Not to mention its ensconced in cake and not pie crust. Unfortunately, cake can’t stay piping hot out of the oven forever, but luckily, there is this wonderful invention called the microwave. I see you’re familiar with this concept. I’ve been storing my cake in the fridge and reheating for 30 seconds a slice.

You can’t even tell its microwaved! Is it still good? You bet your apple-bottomed jeans they are. Want to make it even better? Add apple’s best friend, caramel, to the top of the cake with a nice drizzle of caramel syrup. If it’s before 11 a.m. and you feel like someone might judge you for using caramel syrup that early in the day (maybe it’s been a rough morning and you just need it, okay?!), you can always opt for a nice drizzle of maple syrup instead. Not gonna lie, we’ve been feasting on this for brunch all weekend, and it pairs perfectly with a cup of hot tea and some scrambled eggs…also swimming in syrup. Just the eggs though. My tea gets honey. I’m not a total heathen. I’m trying to decide which way I enjoy eating this cake the most…plain, for brunch, or for super dessert with a scoop of vanilla ice cream, and I really can’t decide. I’m simply bananas about apples, so clearly I could eat this with every meal of the day and be one happy, apple-filled camper that never caps out her health insurance premium. Who said eating healthy had to mean giving up taste? Not I. So go forth and make this apple cake! Ditch the pie! Save comparing apples to other apples for another day. ‘Til next time, my fellow eaters!

The apple of my eye is made of cake, and that is in no way surprising. -
Floats and Dreams
If any of you were chronicling my weekend updates on Facebook, you already know I spent Saturday in what I would consider to be my most massive cheat day since college when I ate and drank with the reckless abandon only a 20-year-old’s metabolism can survive. Ten years later, eating like this occurs once every equinox or solstice. Between nearly licking the plate clean for brunch, eating my Texan, cattle-loving heart out at a burger battle, and polishing the day off with a pound of froyo with all the fixins, I thought surely I wouldn’t grow hungry for at least 48 hours. Imagine my surprise when I awoke at 5 a.m. the next morning to feed the dogs and was immediately met with the pangs of hunger rumbling forth from my apparently insatiable stomach. I’ve known since I was a child that I’m the only person in the world whose eyes are actually smaller than their stomach. Although I could probably still polish off eight pancakes before becoming physically ill, my adult forethought keeps me from rehashing childhood mistakes. If only my adult body could figure out how to utilize motor functions better than my childhood one…baby steps. Literally. So I spent Sunday making good choices (well, dietary ones anyway) and decided to stop the insatiable stomach growling with hearty, healthy foods that wouldn’t require stretchy pants or ten hours of circuit training to recover from. One of those choices even included pie. My will to treat myself while also not requiring a two-person team to fit me into my skinny jeans has caused me to craft another low calorie delight: root beer pie.
Solids are usually more satisfying than liquids. I saw this recipe on a Buzzfeed Tasty video and decided I could hijack the original and make it much, much lower in calories with a few simple tweaks. When I asked my husband if he wanted root beer pie for dessert this week, he was both confused and extremely delighted that this could possibly be a thing. There’s this magical occurrence at the bottom of a root beer float; the ice cream has melted and mixed in with the root beer, creating an amalgamation of hopes, dreams, and deliciousness. That is exactly how this pie tastes. It is cold, refreshing, and tingles the taste buds for only 170 calories a slice for 8 servings. Any time I can eat a slice of pie with fewer calories than a mini muffin, it justifies why I believe in eating pie for breakfast. Give it a chance. The only thing stopping pie from becoming a breakfast food is people’s inability to think outside the box! I also feel strongly about eating breakfast for dinner, so I’m all about squashing food norms.
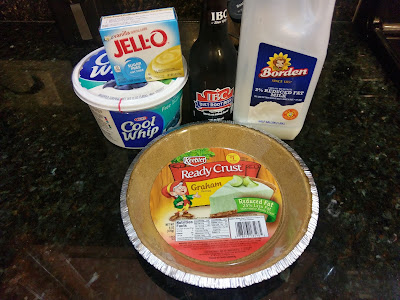
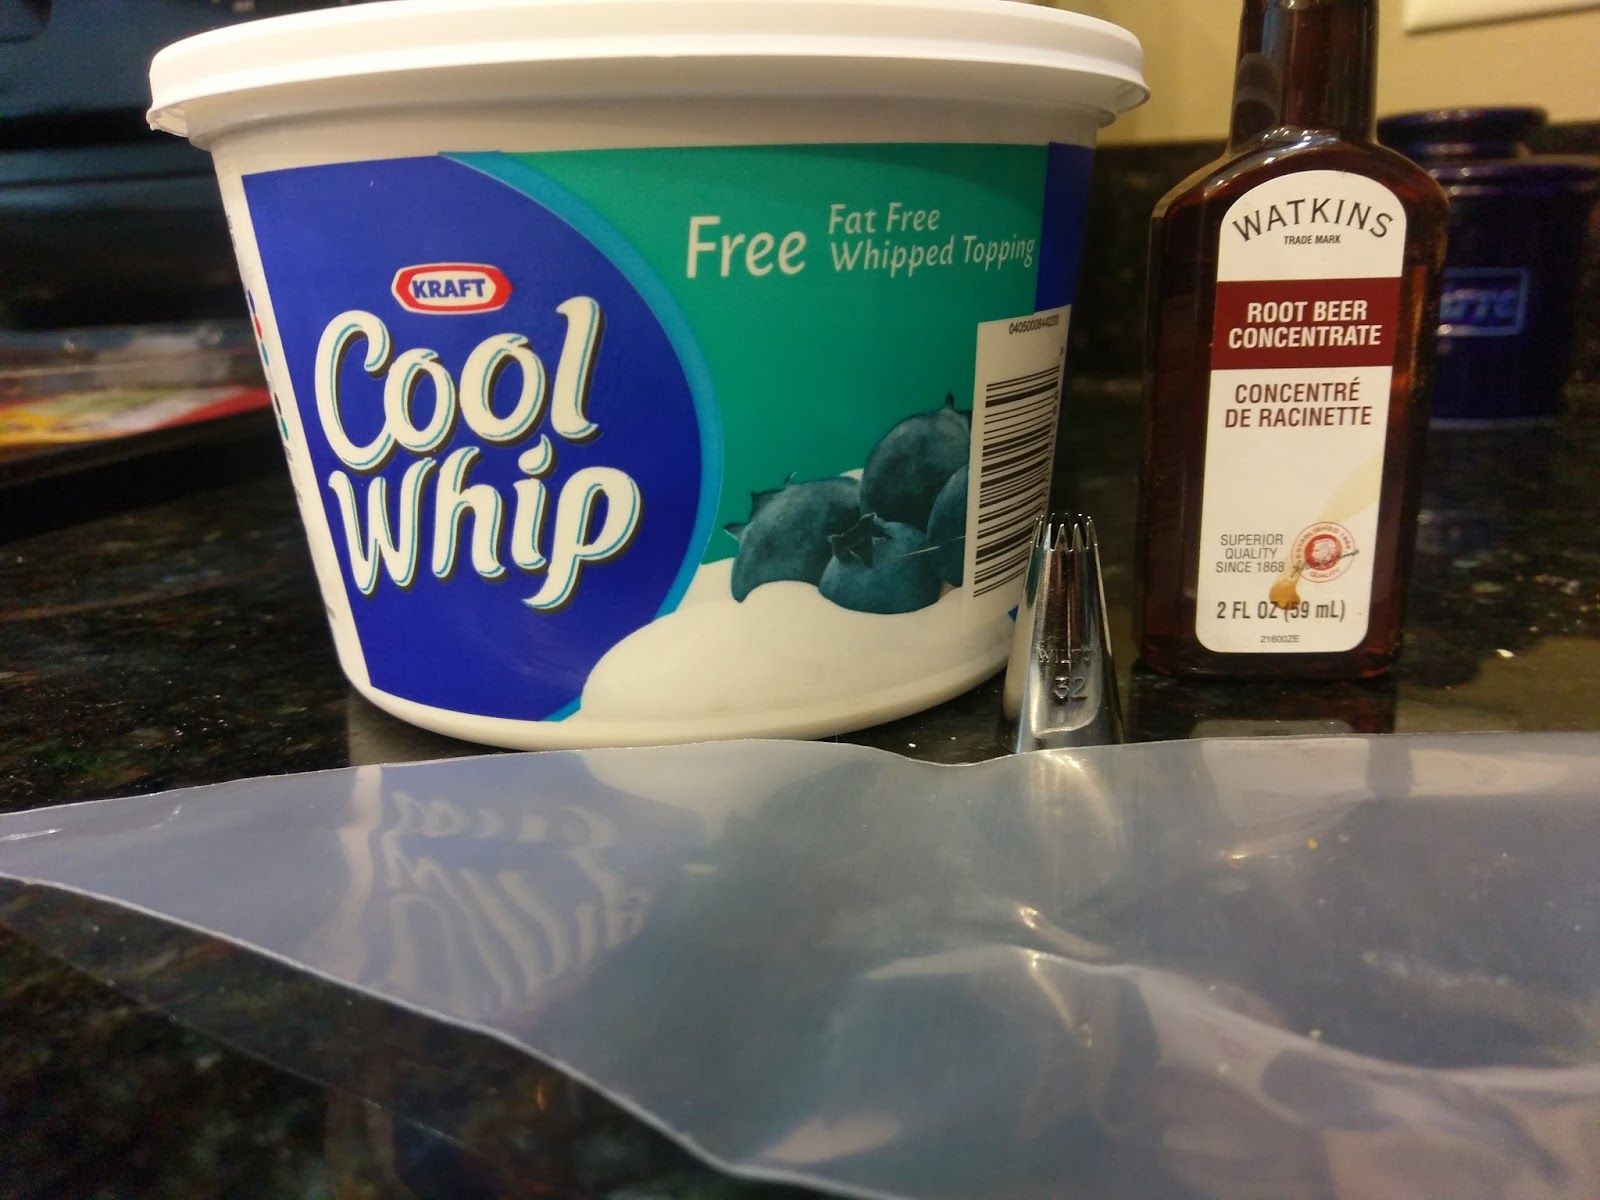
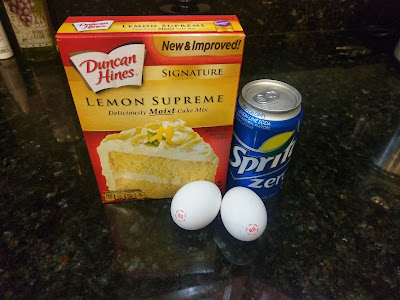
It also has fewer ingredients than a mini muffin. Five minutes is all that stands between you and the creation of this pie. It is the easiest thing you can make all week, and apparently in the world I live in, appropriate for every meal. All you need for life-changing root beer pie is:
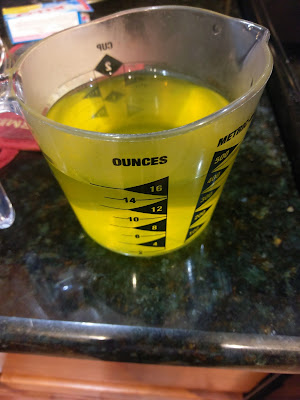
- 12 ounces of diet root beer
- 1/4 cup skim milk
- 1 package Jello sugar free instant vanilla pudding
- 8 ounces of Cool Whip Free
- 1 reduced fat premade pie crust
- Optional: root beer concentrate to add into piping Cool Whip
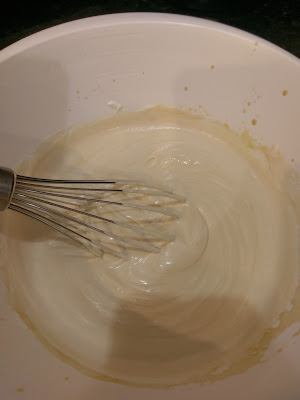
Whisking is a good bicep workout.. Start by adding the root beer, milk, and pudding mix to a bowl. Whisk for 2 minutes until the pudding mix has started to thicken. Then, dump in the 8 ounces of Cool Whip and stir. Things will taste plenty root beer-y, but if you’re crazy into root beer for some reason, you could always add a 1/4 tsp of root beer concentrate to the pie mix for extra oomph. Pour the filling into the crust:
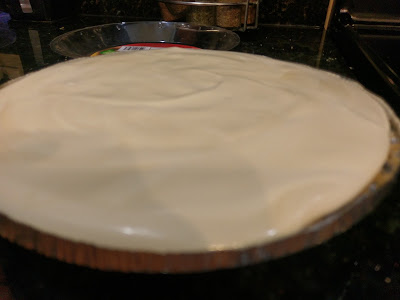
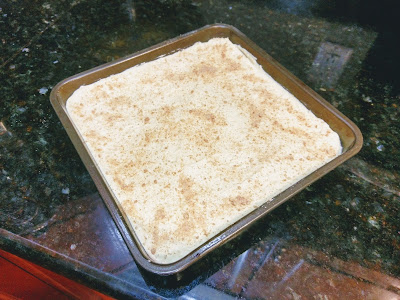
Alllllmost spilled over. Would’ve cleaned up. With a straw. This was a very full pie, so I placed a baking sheet underneath it before putting it into the freezer to chill for 4 hours. Literally does not get any easier than that. It’s more difficult to drive to the store and buy a premade pie in its entirety. There’s traffic, trying to find parking, and don’t even get me started on generally having to interact with the public.
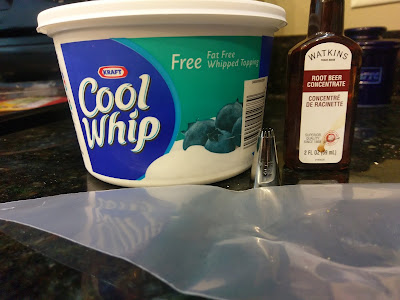
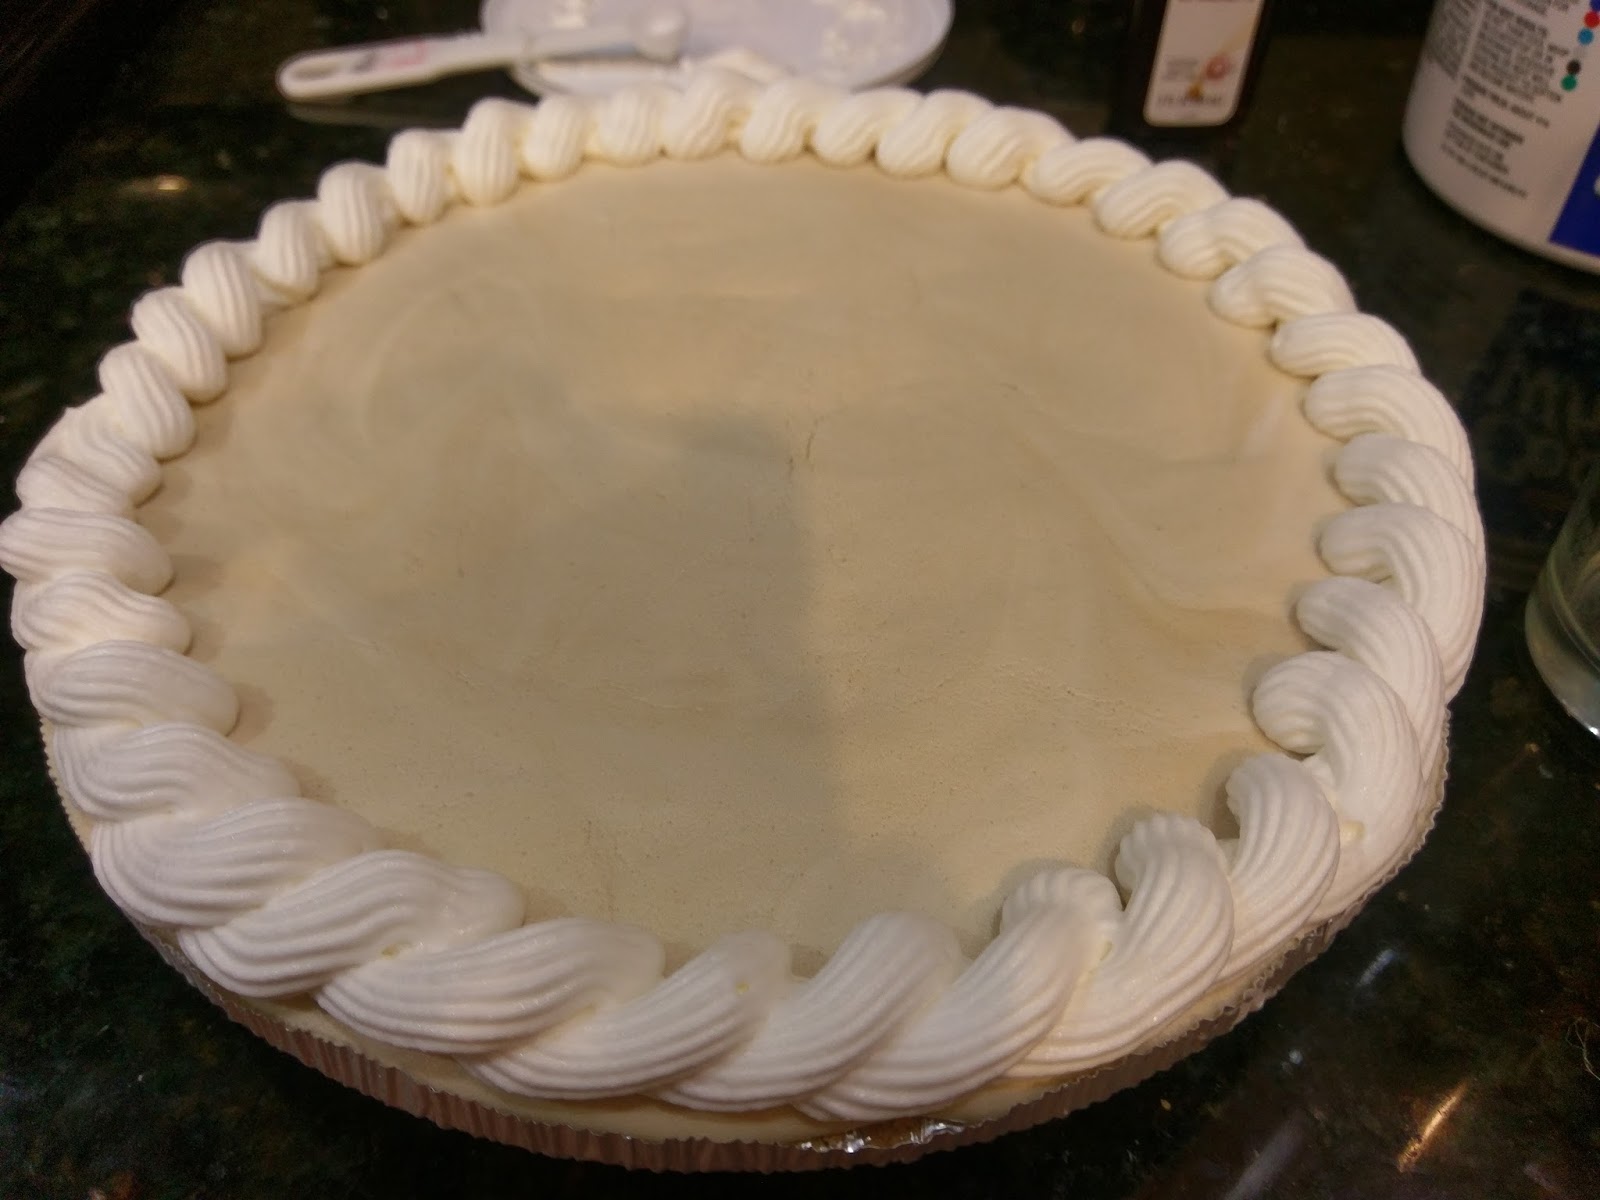
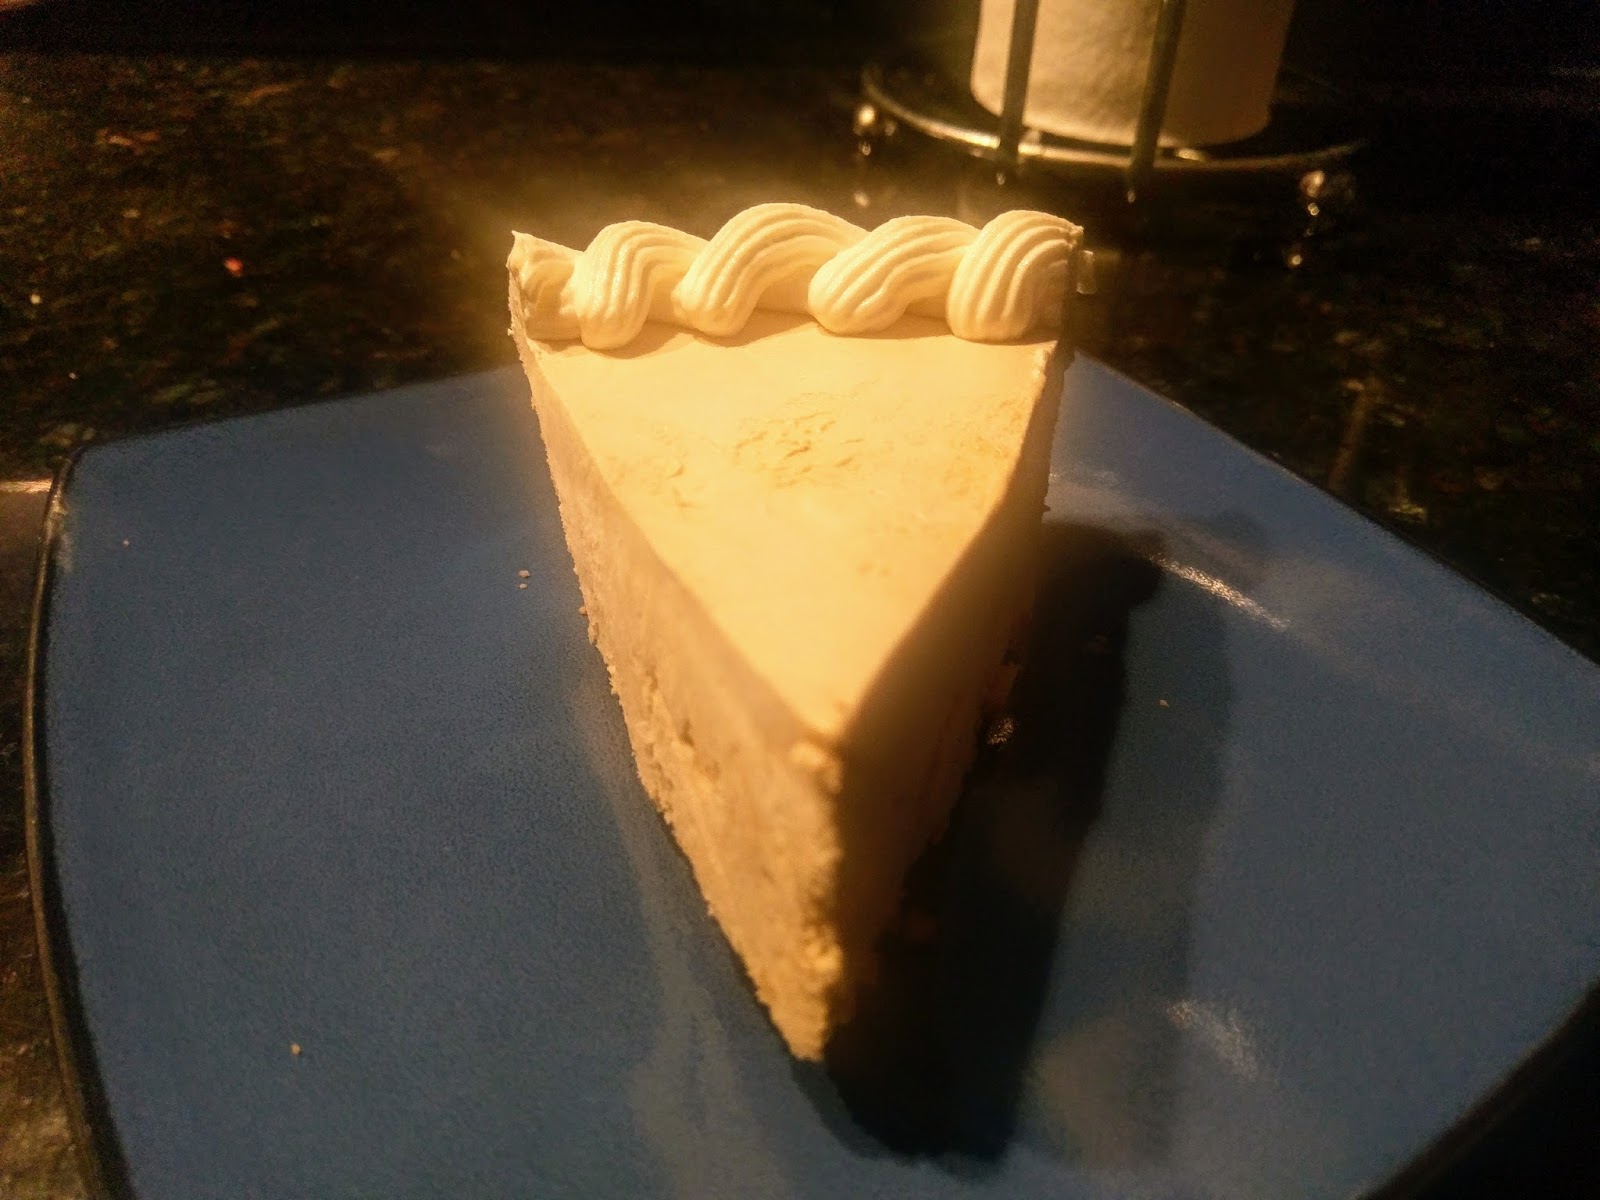
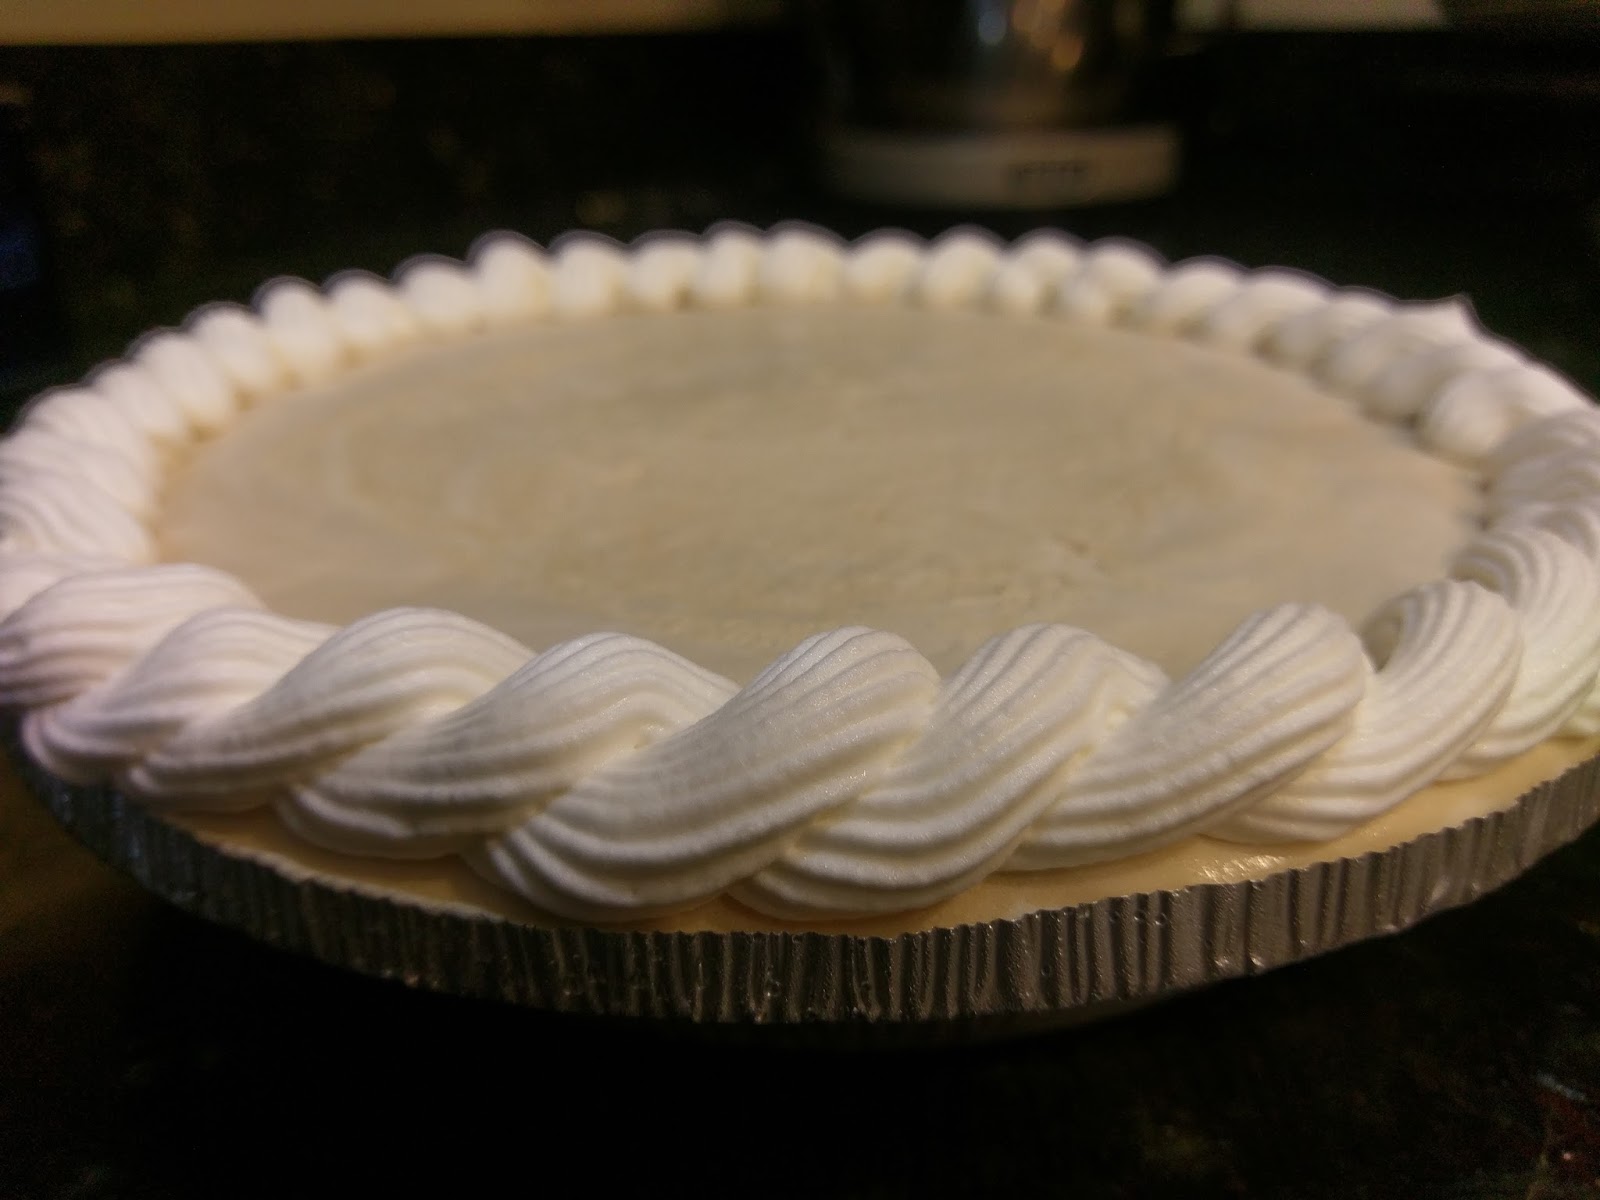
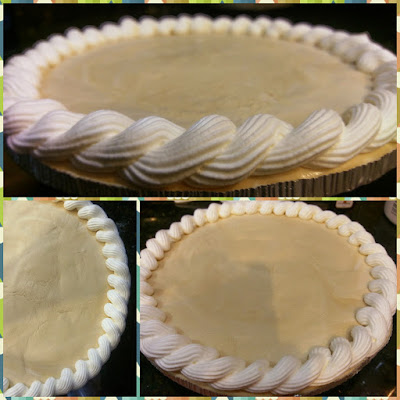
See, root beer concentrate is totally a real thing. Photographic proof that it is not the Sasquatch of extracts. Once my pie had frozen through, I mixed a small amount of Cool Whip Free with 1/4 tsp of root beer concentrate and loaded up into a piping bag fit with a #32 tip. I wanted to create a fancy-looking border that wasn’t the standard 1M star border or 2D rose border I usually do with pies. I’m trying new things here, people. For someone who plans out an entire week in advance down to the outfits I’m going to wear, this is a small step towards rebellious behavior for me. I realize my OCD planning makes me about as exciting as watching paint dry, but I’m the person you go to when you need a good plan or a good pie, so I got that going for me.

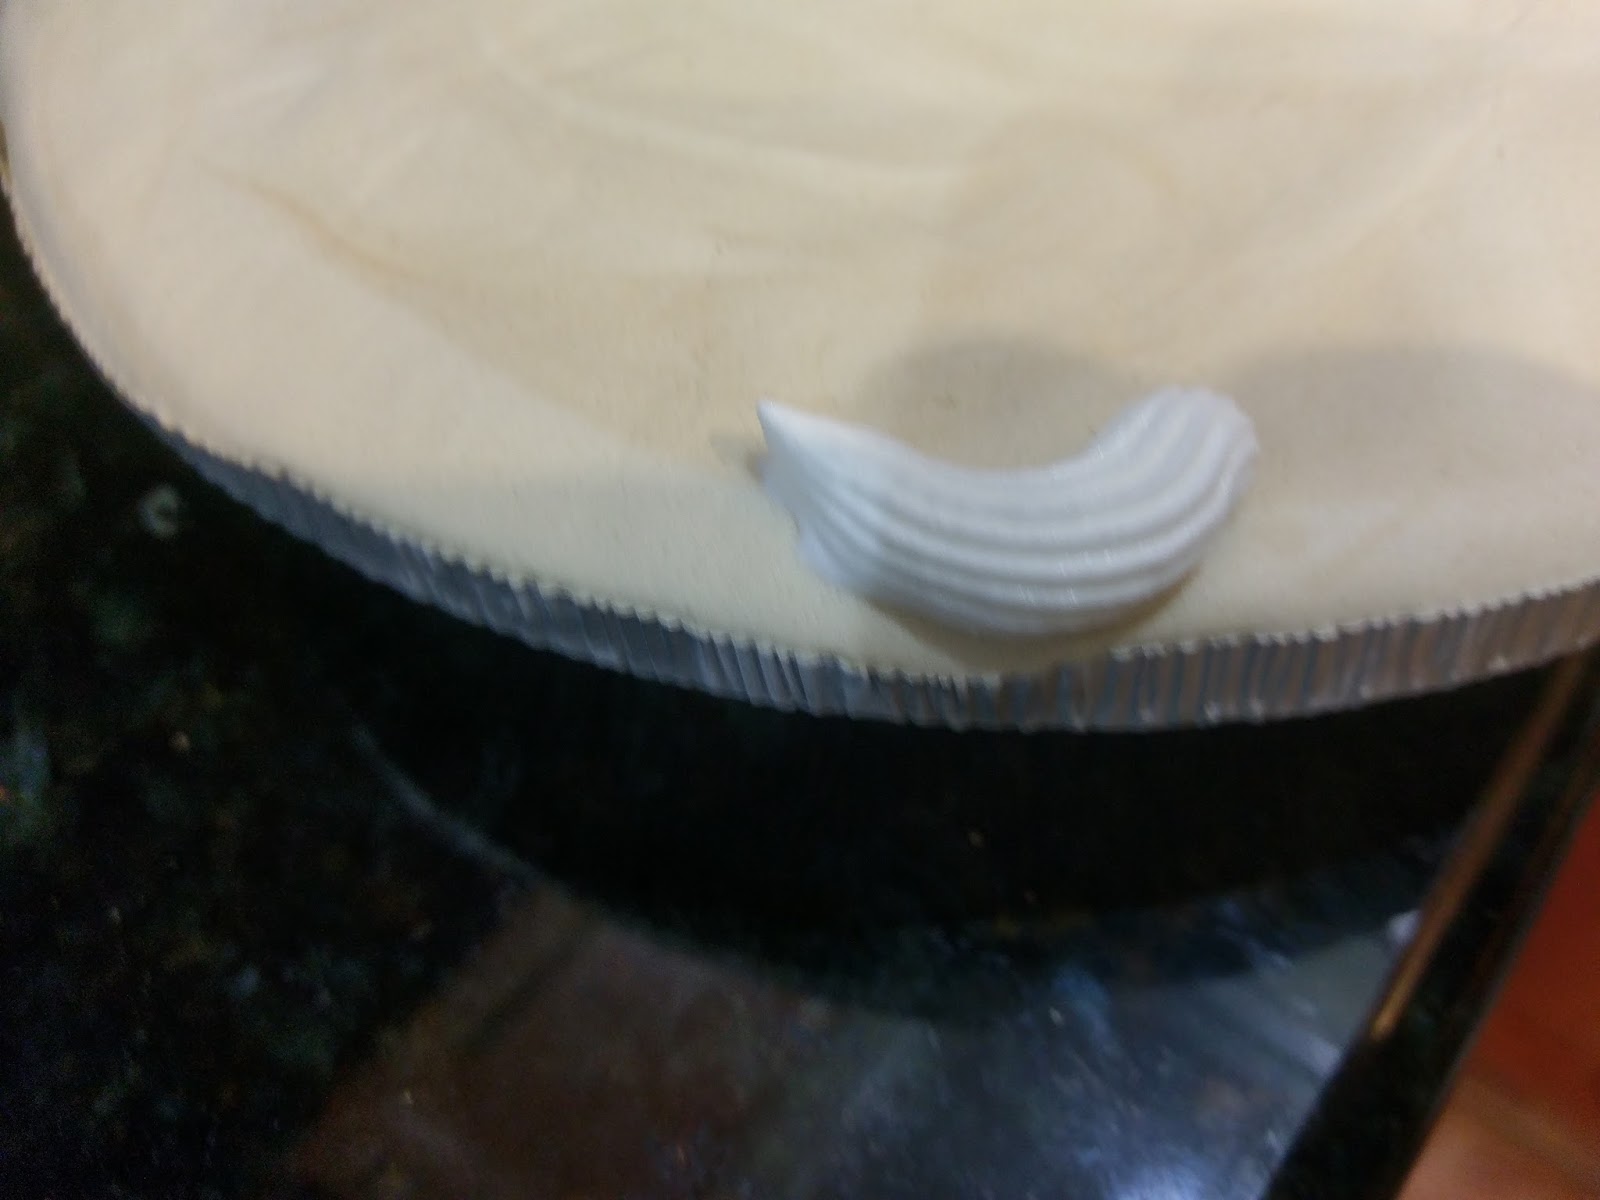
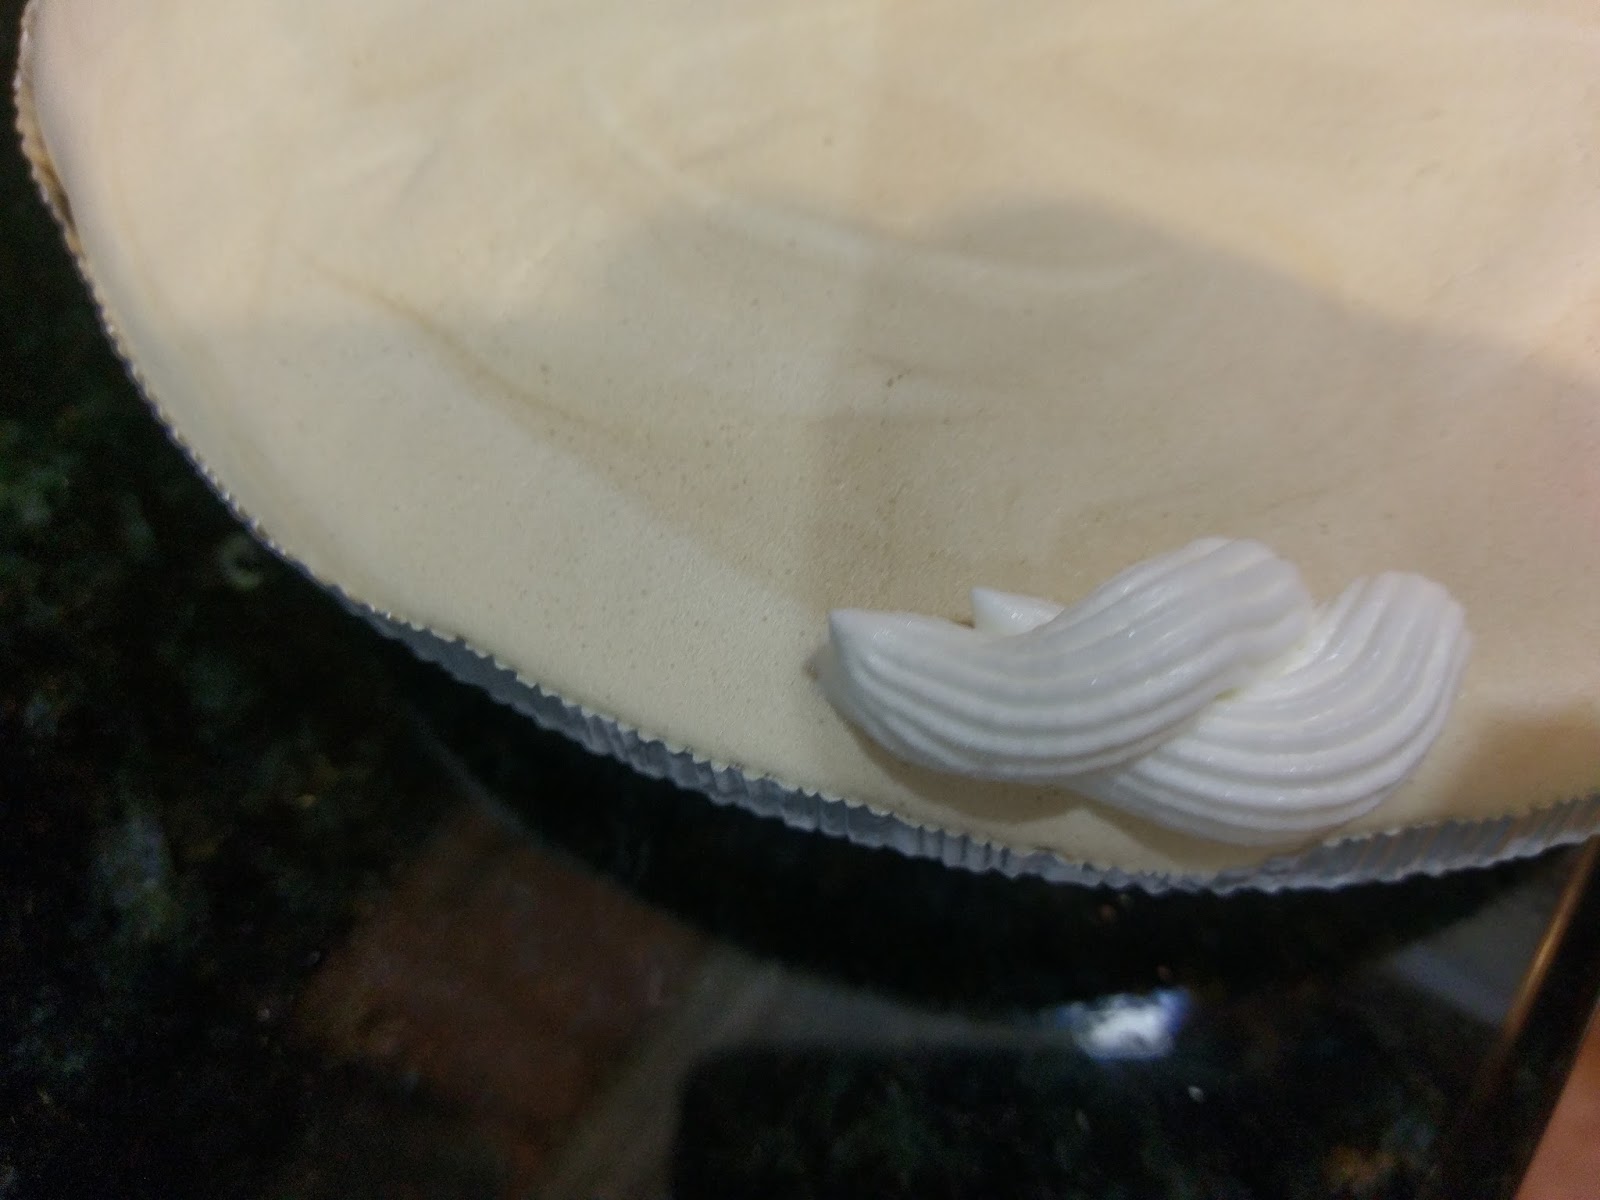
To make the braid, start by piping a small parenthesis –> ( 
Take your piping nozzle and place it in the middle of the parenthesis. Pipe an overlapping parenthesis that covers half of the one on the bottom. 
Repeat for the entire pie. The ending can get tucked away and hidden on the edge of the pie. I do love being able to cover up my mistakes. I mean, who doesn’t. It’s kinda this thing called human nature, I suppose. 
It’s glowing for a reason. A pie so good, it is actually heavenly. You will want to keep this pie in the freezer until you’re ready to serve. About an hour before you might want pie (this is literally every hour of my life), cut your slice and place into the fridge to soften. I made the mistake of cutting our pie last night right after dinner and promptly forgot to put it in the fridge (Bob’s Burgers was on. I already told you how much I love things relating to cow). When I went to grab our pie an hour and a half later, it was mostly melted but still tasted absolutely amazing. I consider this to be a testament to the recipe itself. I enjoyed this pie so much I had an actual dream about it; so naturally I woke up really hungry again and wondering when my next chance would be to eat a slice. My husband is working tonight and I don’t want to short him on pie servings (I may be boring, but I am at least considerate), so it will be a day sans pie for me. But it doesn’t have to be for you! Make the pie and awaken your inner root beer lover. It’s still in there–buried since childhood, waiting to relive the glory of root beer float magic. ‘Til next time, my fellow eaters!
It will make all your floats and dreams come true. If they involve root beer, anyway.

Healthy-ish cake, cupcakes, pie, and cheesecake recipes and decorating tips