-
Where Have You Been All My Life, Carrot Cake?
A few weeks ago I was perusing the grocery store for some brunch eats. I stumbled upon a mix of half a dozen cranberry mini muffins mixed with half a dozen mini carrot cake muffins. I bought them because I’m absolutely obsessed with cranberry muffins and figured I’d just feed the carrot cake muffins to my husband. He instead got sent on a TDY, so there I was, face to face with half a dozen muffins that I couldn’t bring myself to throw away. To me, carrot cake has always been a large joke that I feel like other people didn’t realize was being played on them–there’s vegetables in your dessert, people!! But since I’m on this whole kick where I try things I used to hate as a child (I believe this is called “adulthood,” but not 100% certain), I decided to eat a damn mini carrot cake muffin. I figured if it was as terrible as I remembered, it could at least be finished in one bite. Flash forward to me eating them by the handful and wondering why my childhood taste buds hated me so much. I mean, McDonald’s for every meal, tiny Kate? Intense hatred of avocado? Refusal to eat hibachi? I had issues, man. And now I try to make up for lost time by piling avocado on everything, munching on salads with ginger dressing at least once a week, and, apparently, eating carrot cake like it’s going out of style. It has only been two weeks since the mini carrot cake muffins changed my life, but like any grown woman with a bank account and no one to enforce rules about boundaries (I believe these are called “parents,” but not 100% certain), I decided it was time to make my own. A twist on a traditional carrot cake muffin, these are filled with Craisins instead of raisins because like I said, hugely obsessed with cranberries, and, naturally, super low cal and delish.
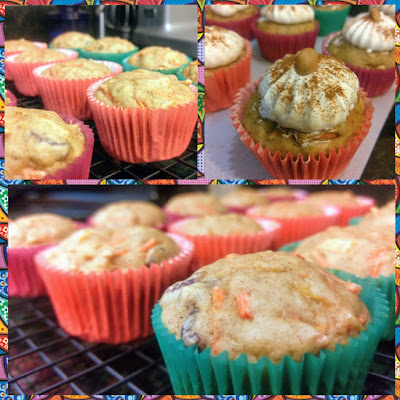
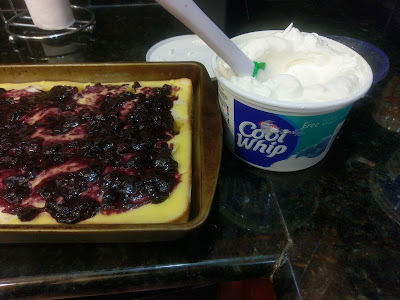
But they don’t look it, and that’s what matters. This recipe makes a baker’s dozen (that’s thirteen muffins for those of you who somehow managed not to become a foodie as an adult), and they’re each only 110 calories a pop…and that’s with some extra toppings!! I thought perhaps my head was imploding after I did the math, but it turns out I was just on day four of a sinus headache and my brain was responding to the pain of slowly turning into a balloon too large for my cranium. I rechecked my math to be certain (thankfully calculators are still a technology not too advanced for a thirty-something to use). Number crunching aside, I recommend making these due to the sheer fact that they make your home smell like a maple-cinnamon wonderland. And they taste like one, too! I had originally intended for these to be cupcakes, but honestly, they are perfect for brunch. They’re not too sweet, but with the addition of crushed pineapple, maple syrup, and Craisins, they just scream breakfast decadence. I topped them with Cool Whip Free, cinnamon, and a caramel-covered raisin. I’ve never been more eager to get up in the morning as I am now that these are waiting for me to eat (trying not to do that by the handful).

It’s a large line up. I’ve yet to make any claims about low ingredient numbers because it’s rather obvious this is an “everything but the kitchen sink” kind of recipe…which is totally fine because you can add or adapt these to fit your taste preferences. As long as the carrot is still in there, it’s technically a carrot cake muffin, so have a little fun breaking the rules for once (this is more a reminder for me than you. Breaking the rules makes me twitchy). To make these round up:
- 1 1/2 cups All Purpose flour
- 1 1/2 tsp baking powder
- 1/2 tsp baking soda
- 1/2 tsp cinnamon*
- 1/2 tsp ground ginger
- 1/2 tsp nutmeg
- 1/2 tsp salt
- 2/3 cup cinnamon applesauce*
- 2 eggs
- 1/3 cup sugar free Hungry Jack maple syrup
- 1 1/2 tsp vanilla
- 1/4 cup crushed pineapple
- 1/4 cup reduced sugar Craisins (can replace with regular raisins)
- 2 cups shredded carrots
*If you only have regular applesauce on hand, use a tablespoon of cinnamon.
Start off by preheating your oven to 350. Line a muffin tin with liners and spritz with Pam. Applesauce makes for a dense muffin/cupcake, so if you’re not using foil liners, the cooking spray will be needed unless you enjoy ingesting tiny scraps of cupcake liner that won’t peel off the muffin. I’m not judging…maybe you just really like fiber. Mix together the flour, baking soda, baking powder, cinnamon, ginger, nutmeg, and salt in a large bowl and set aside.

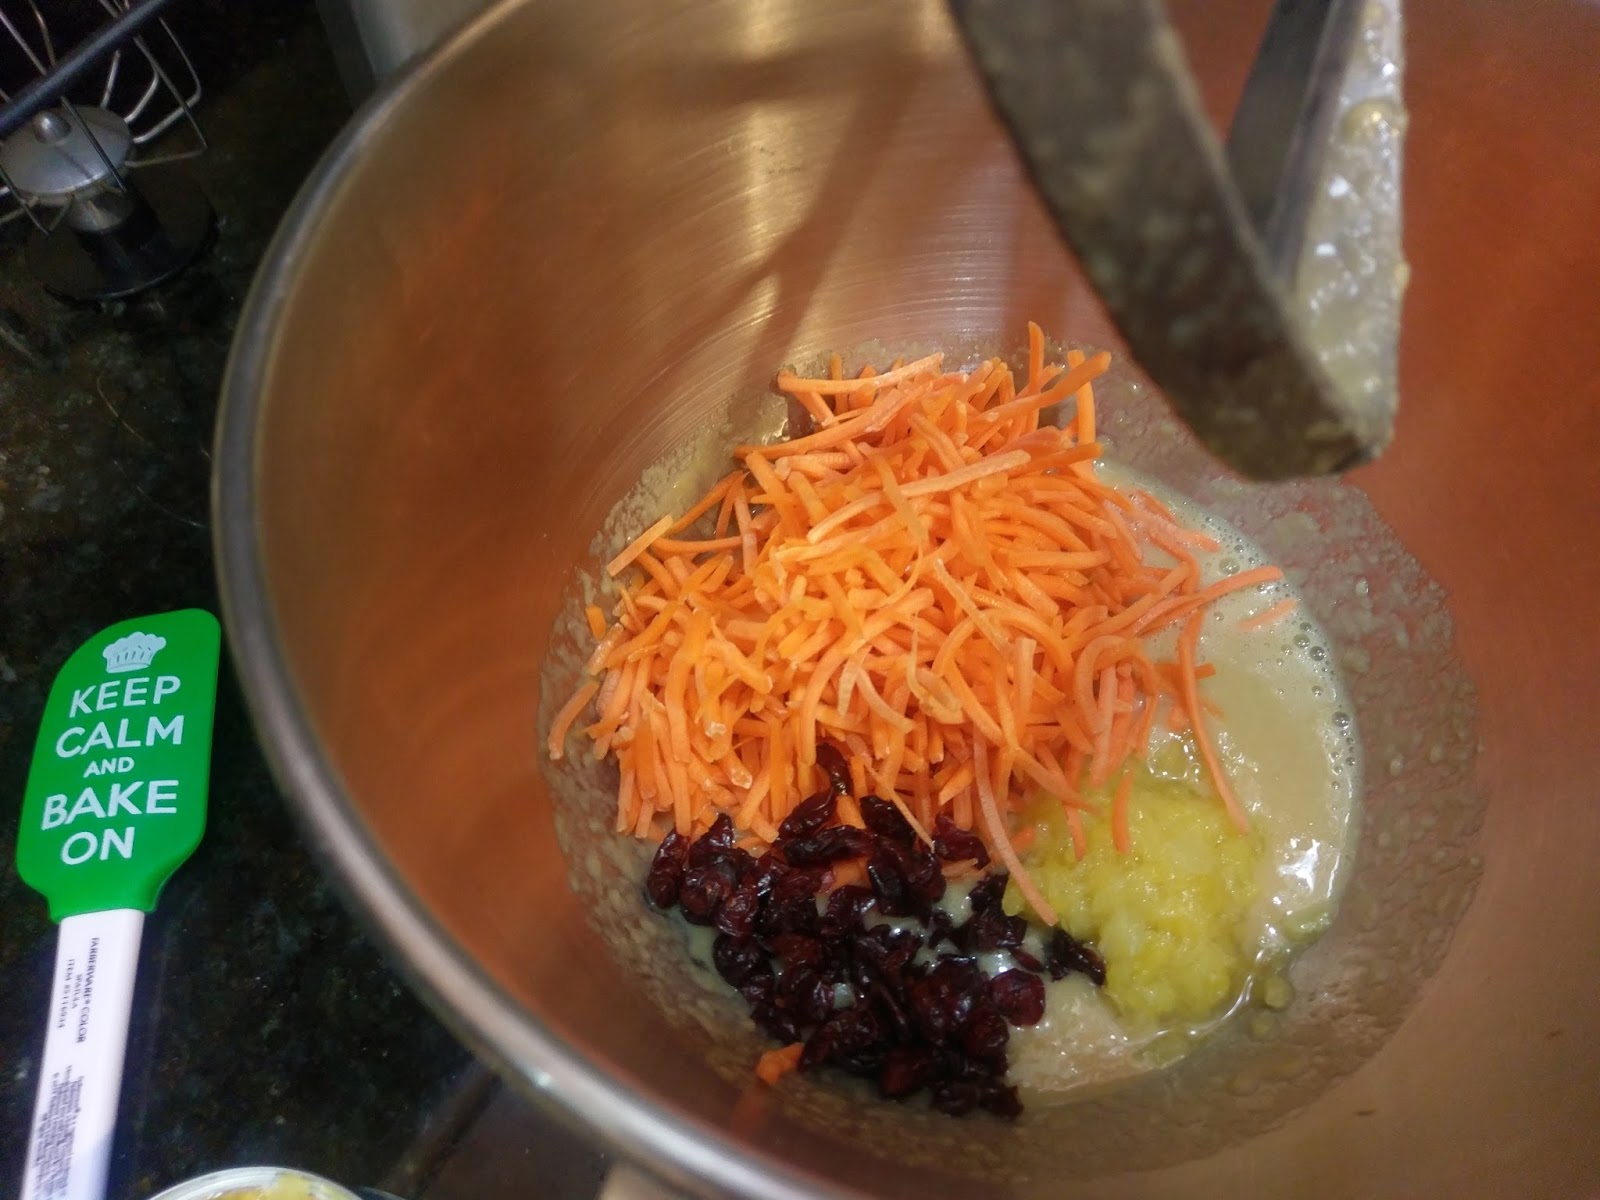
I’m still getting used to carrots mingling freely with pineapple and cranberries. In a stand mixing bowl, blend the applesauce, eggs, syrup, and vanilla until you’ve got a nice sloshy mixture. Add in the Craisins, pineapple, and carrots. Blend well in short bursts so the Craisins stay…craisiny. Dump half the dry mix in with the wet and blend well, scraping the bowl before you add in the rest of the dry mix. Don’t over mix, but make sure your ingredients have all be incorporated nicely.

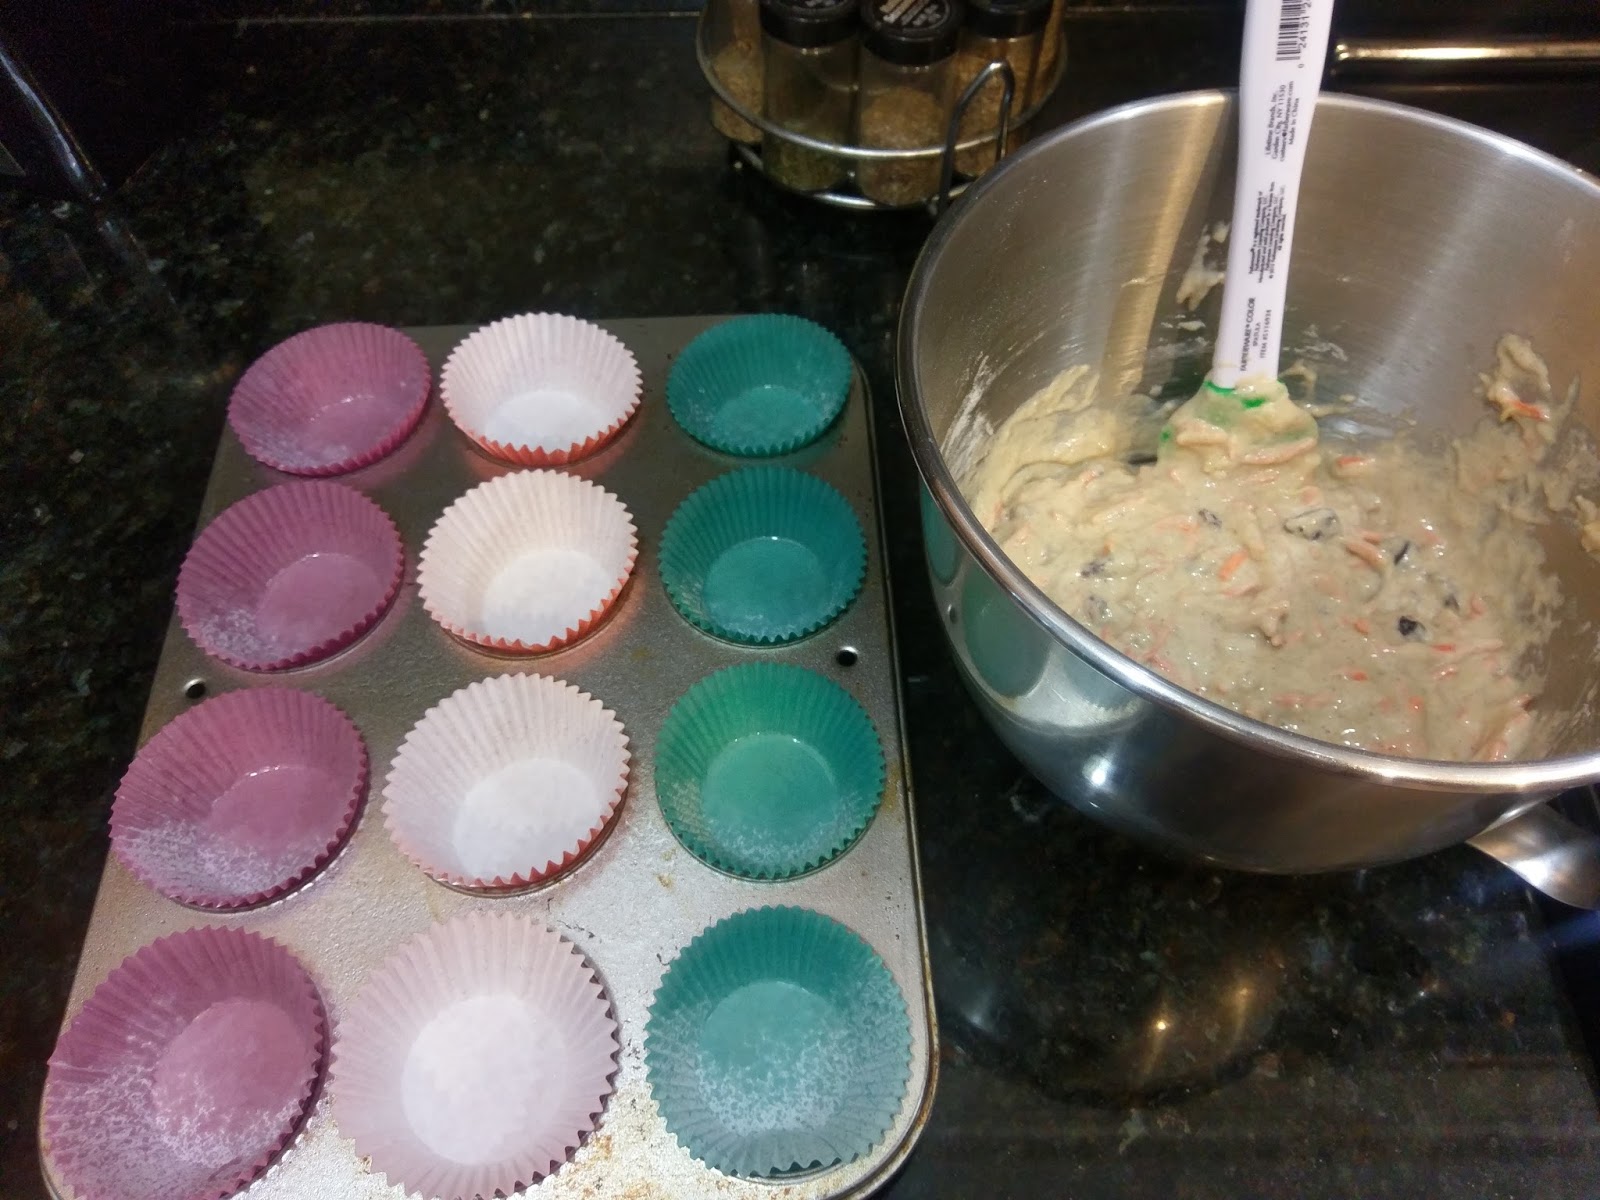
Things will be chunky, and that’s okay. I’m still getting used to experimenting with textures and food. This was why I hated avocado, mashed potatoes, and carrot cakes until recent years. Foods that look lumpy but taste smooth in texture really freaked out my childhood sense of reasoning, apparently. I used a cookie scoop to plop my muffin mix into the cups so they were 3/4 full:
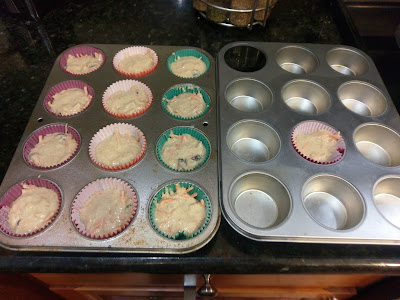
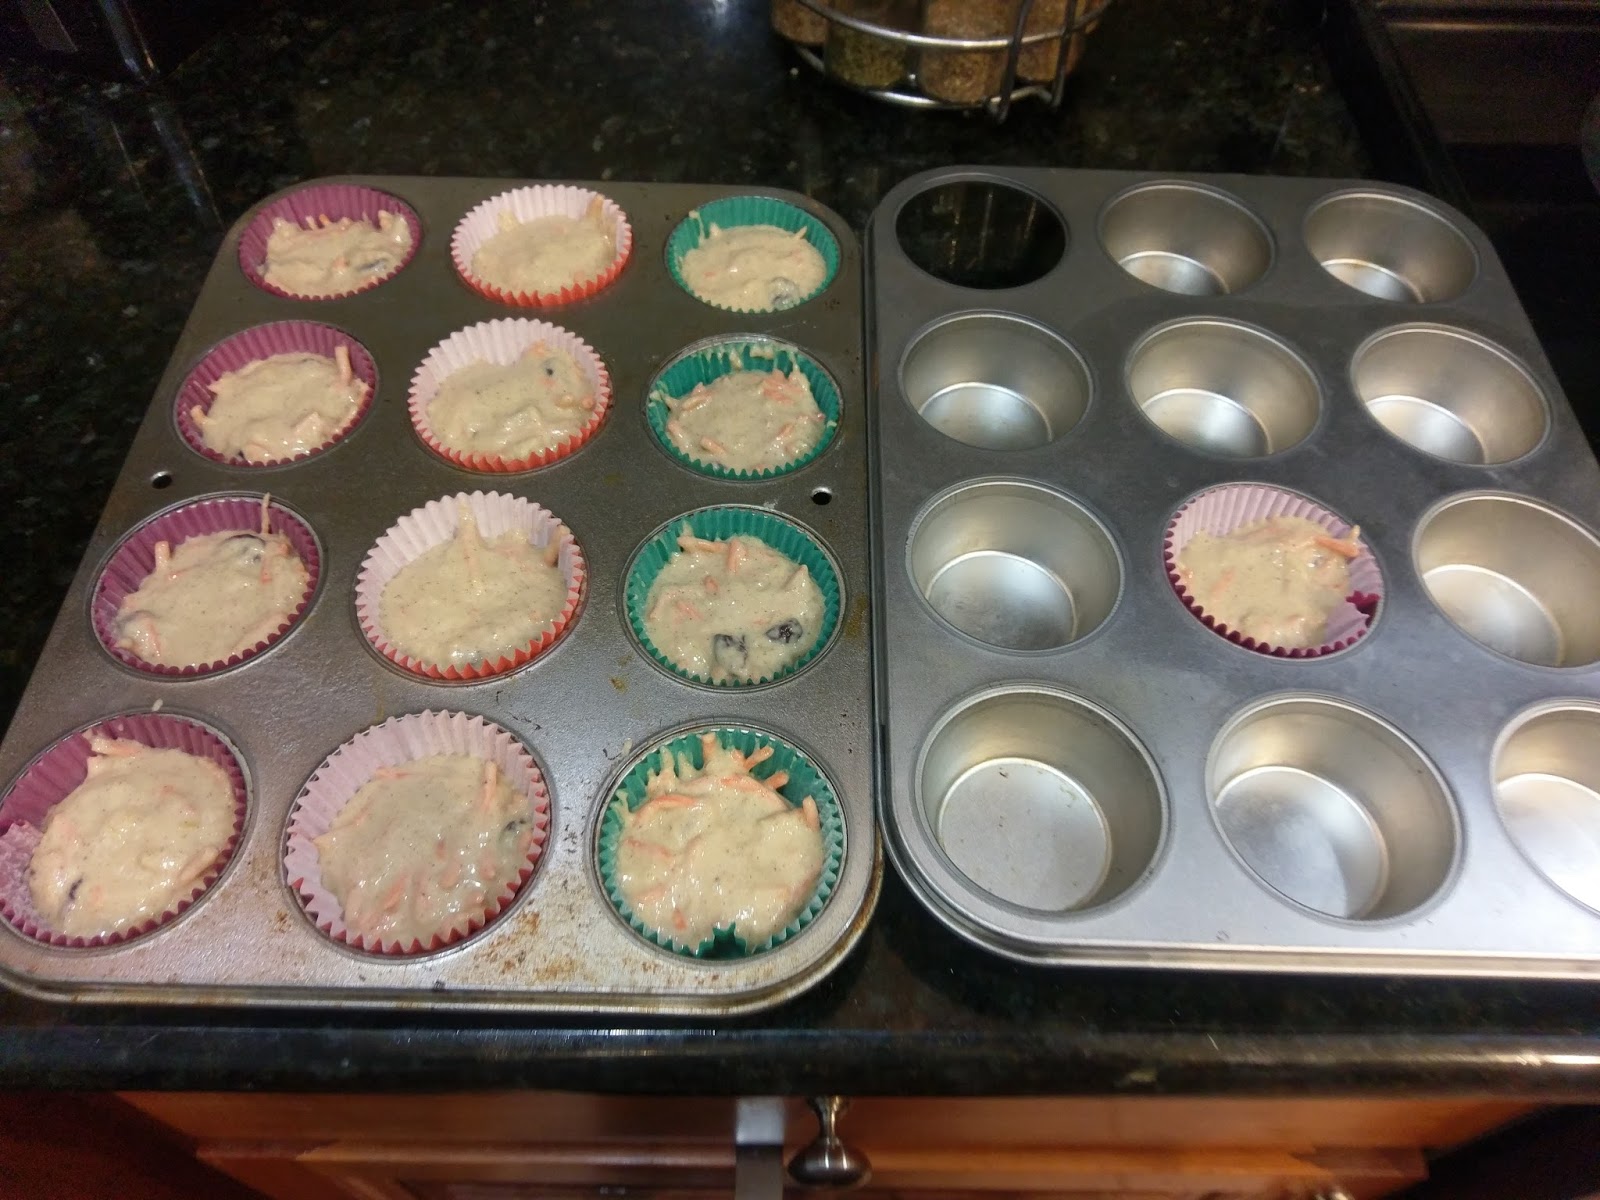
Pay no mind to my disgraceful muffin tin on the right. I smoothed out the tops of these muffins with a spoon so they would at least look pretty and not lumpy. I baked until a toothpick came out clean, and this hit at the 20 minute mark. Let them cool on a rack in the tin for 10 minutes before you remove them and allow them to finish cooling.
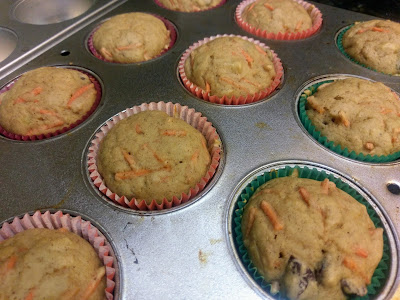
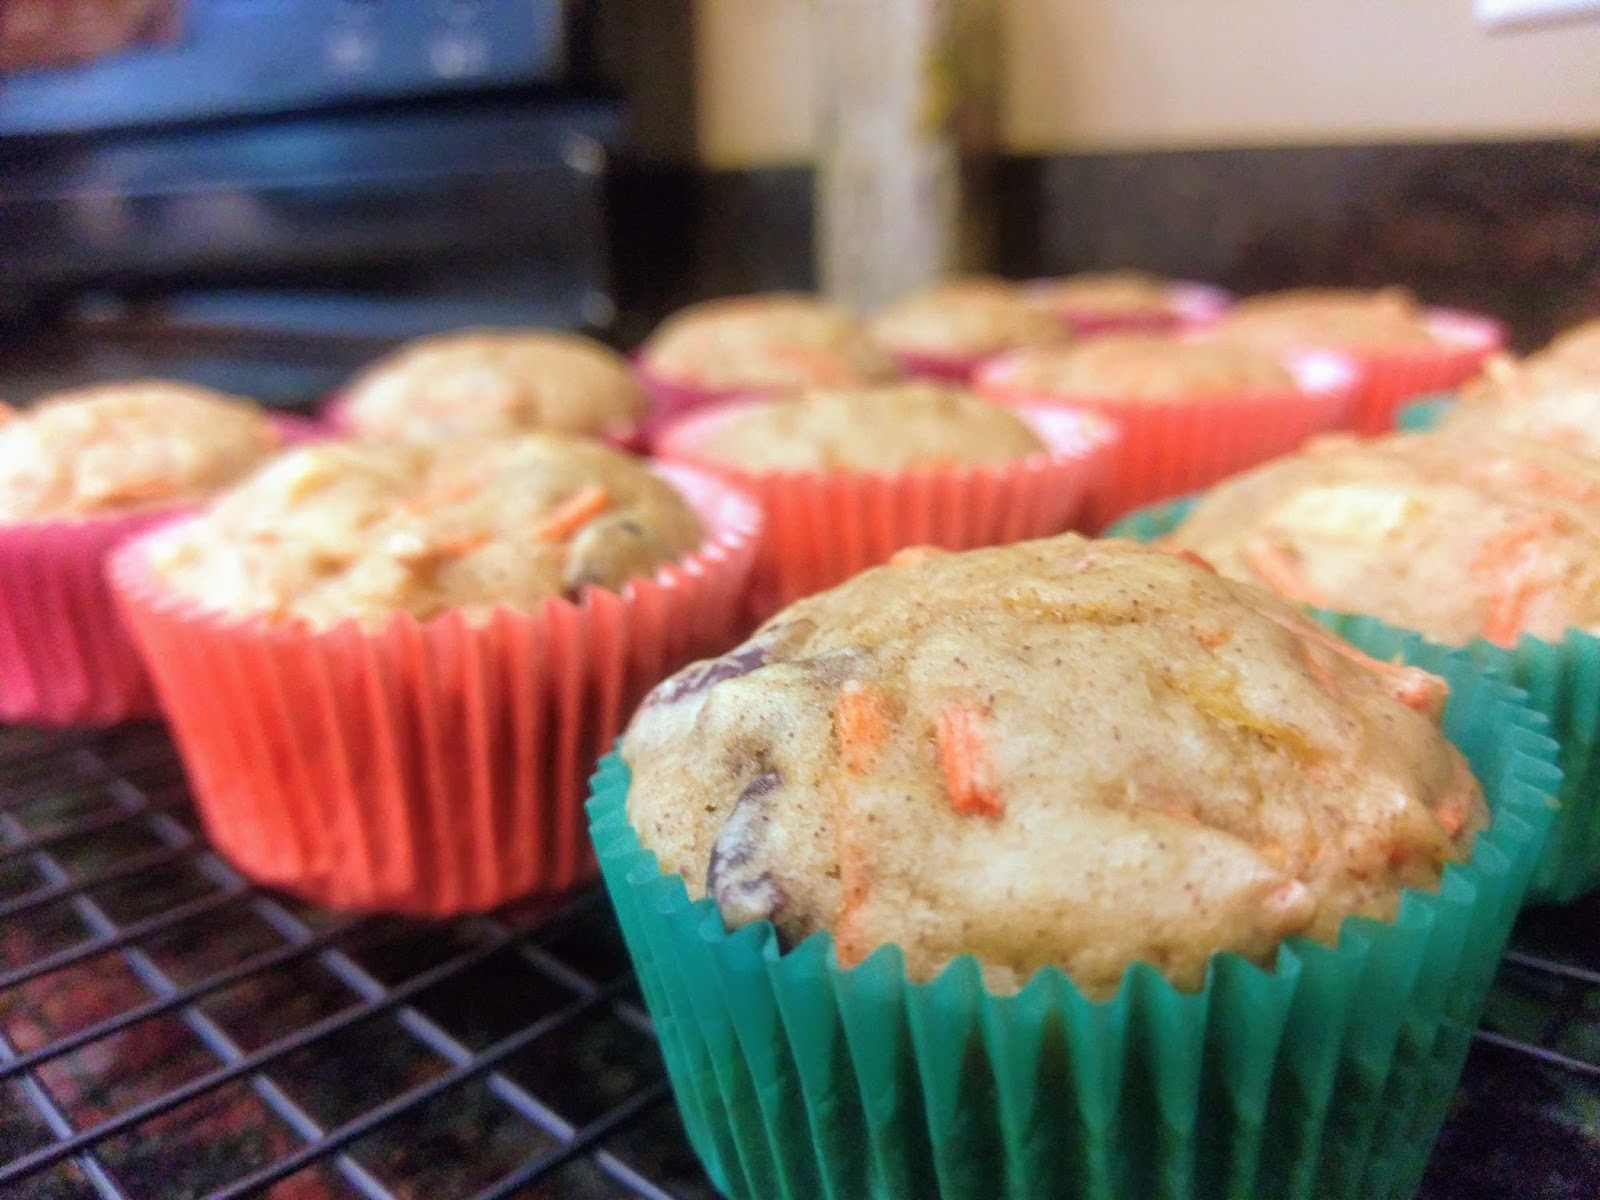
This will be tricky. Because they will smell like an absolute dream. My house has never smelled more distinctly Canadian than the moment these cinnamon and maple-syrup infused muffins came out of the oven…and this is coming from a woman who regularly uses maple syrup wax melts. I really love maple, okay? And Canada. I’m obsessed with Canada. From its beautiful landscape to its equally beautiful people and prime minister, it’s a fine place to be. Both literally and figuratively, eh.

I hear Justin Trudeau’s smile can cure cancer, just sayin’. Let these muffins cool in the fridge for a half hour before frosting. You could call it a day here and have a muffin distinctly for breakfast, but since I’m trying to blur the lines between brunch and dessert so that I can have more of both, I went with a simple cinnamon whipped topping. Added sweetness appropriate for a.m. or p.m. time frames! Bless the versatility of the carrot cake and my overarching desire to always be full of cake.
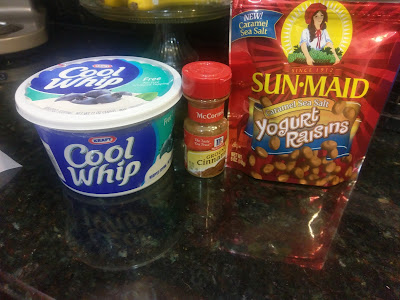
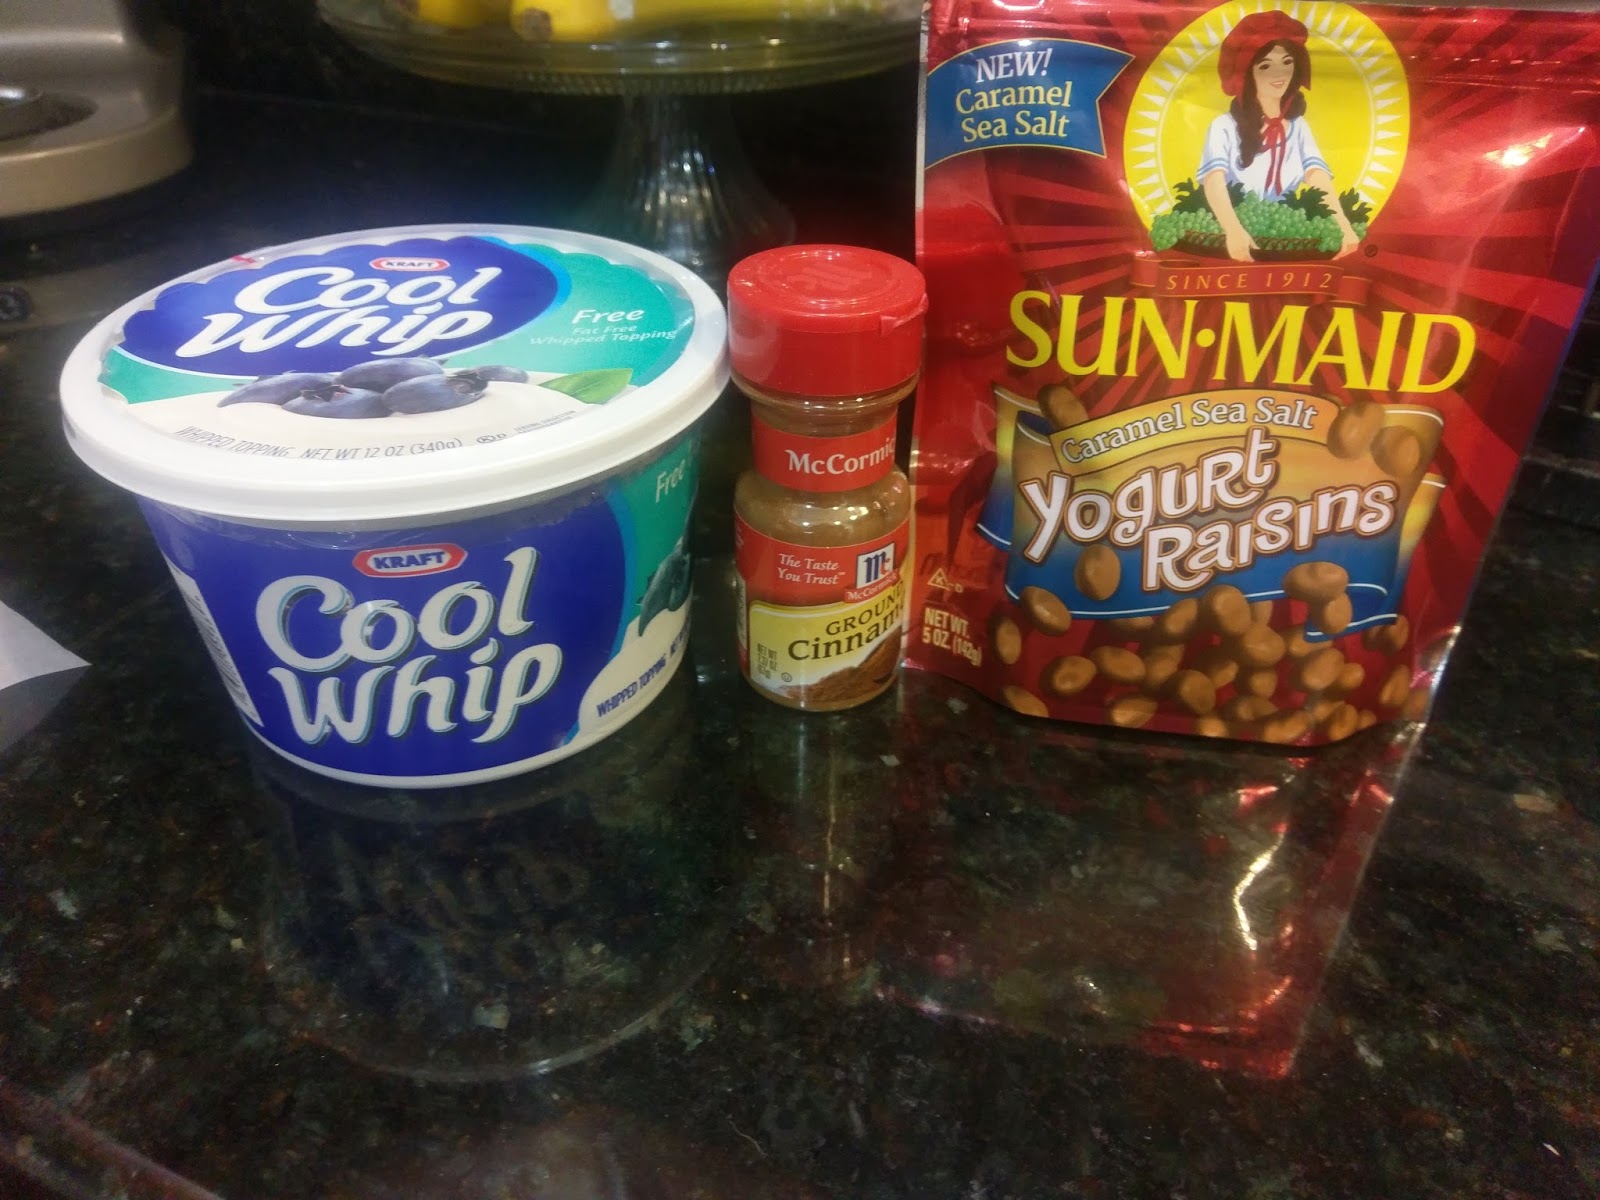
Cake and Kate go together. Just ask the name of the blog. To frost, I used half a large tub of Cool Whip free, a dusting of cinnamon, and single Sun-Maid caramel salted yogurt raisin. I don’t care who you are or how much you hate raisins (which I assume would be most people between age 5 and 75), these yogurt-covered raisins are literally the best thing to ever happen to raisins since someone figured out how to turn them into wine. Buy them; love them.

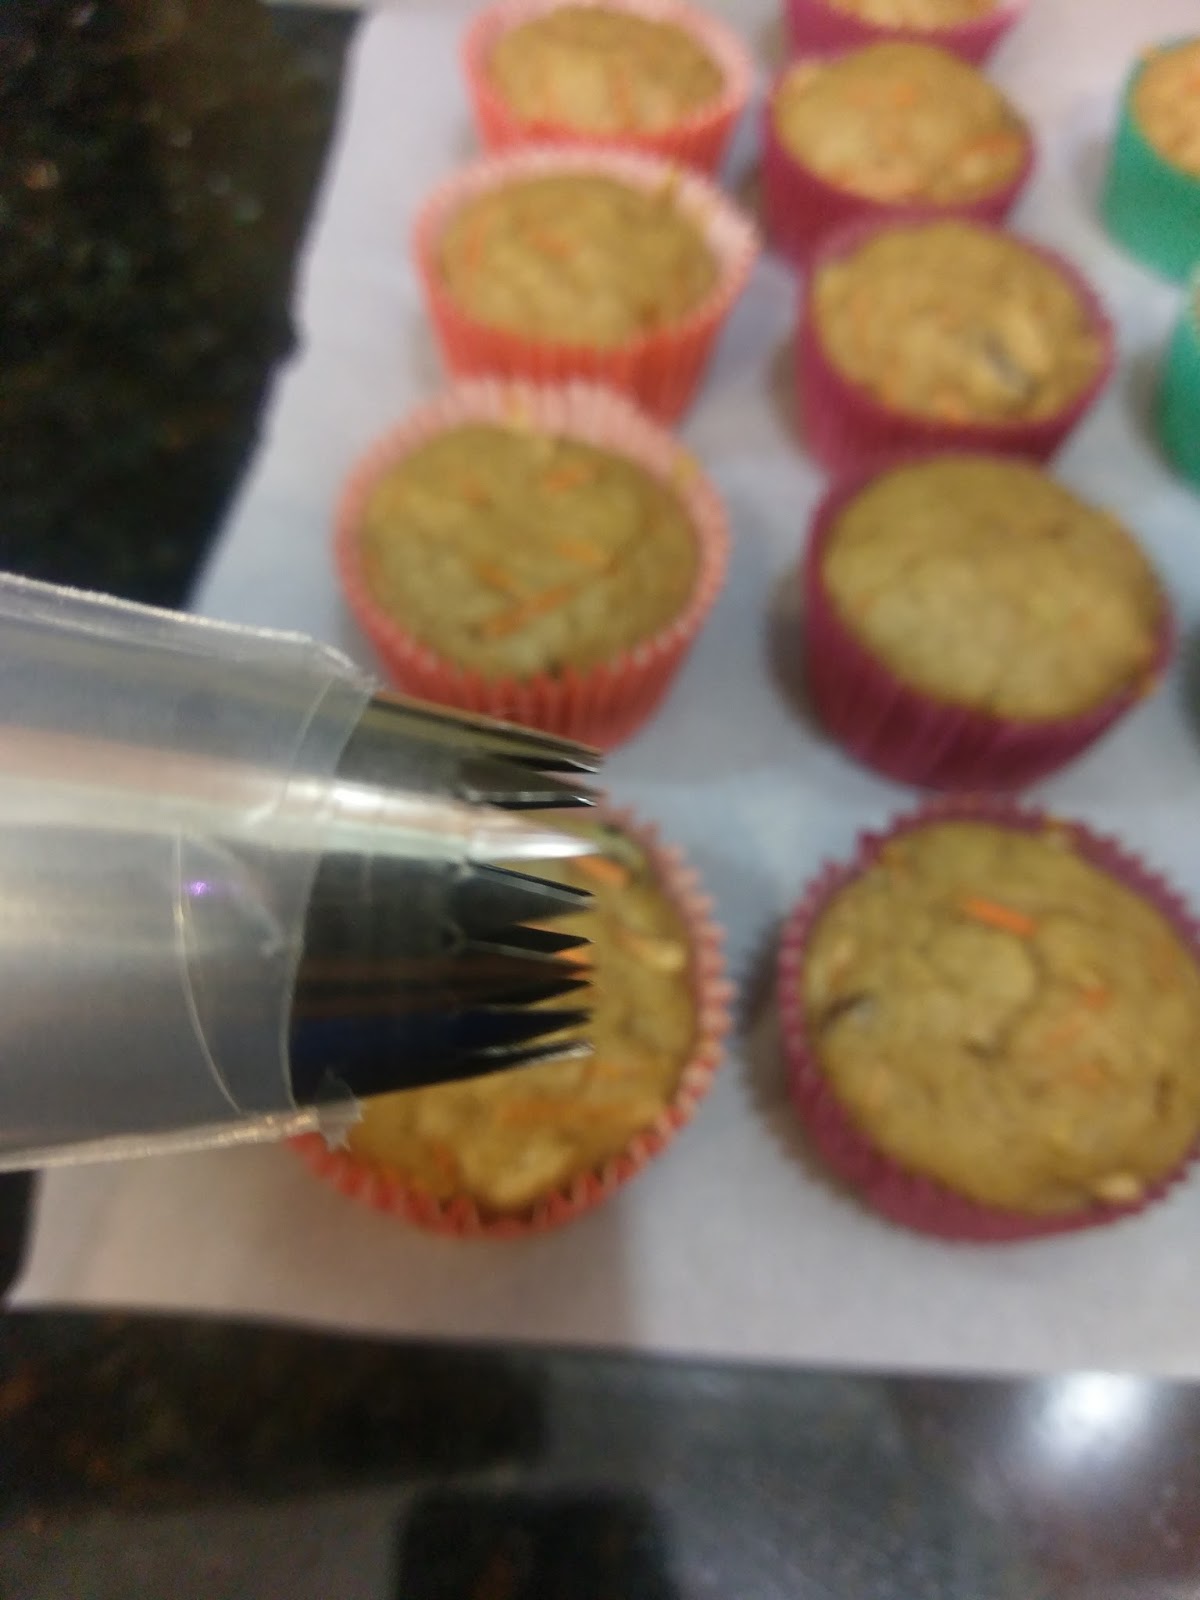
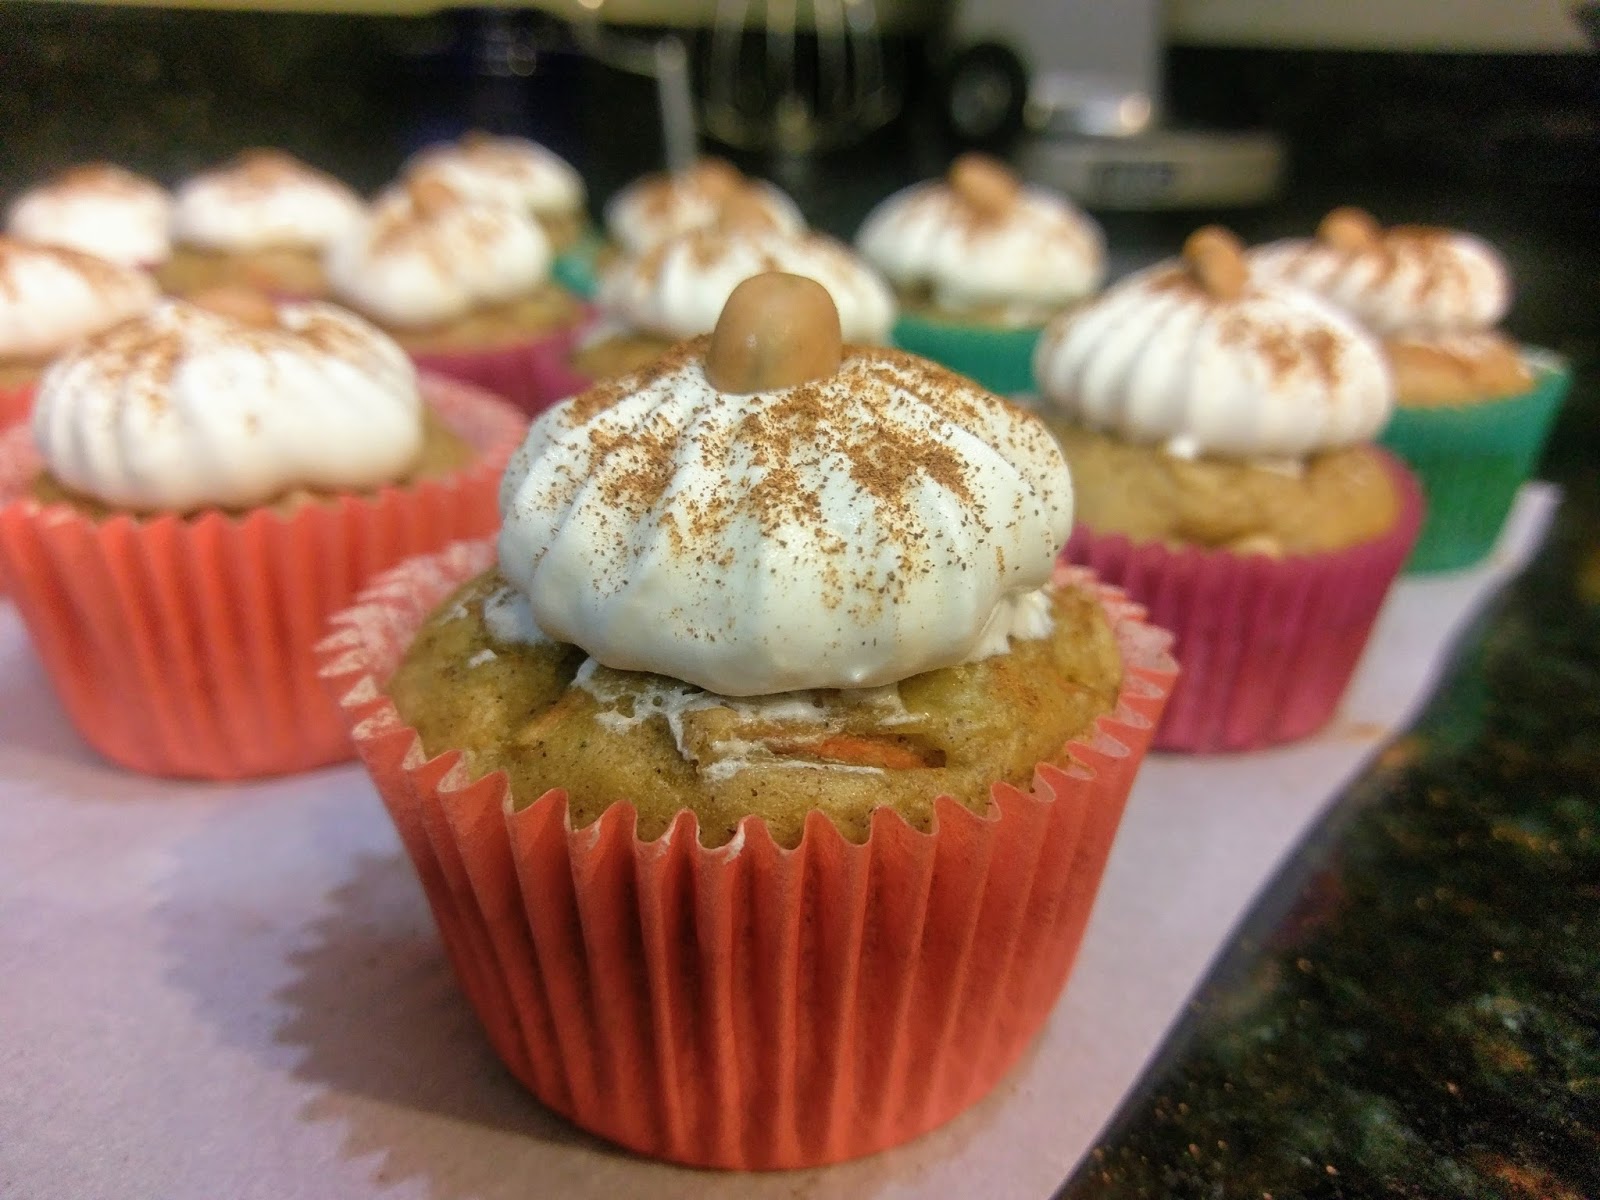
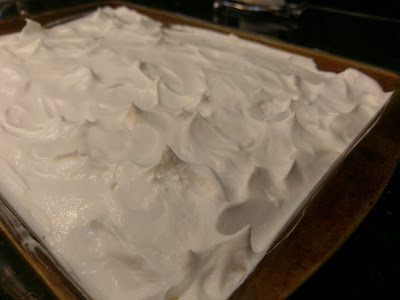
Along with this giant French decorating tip. My tub of Cool Whip was somehow partially frozen even after sitting out for like two hours. This meant the not frozen part had gotten a little soupy, so my French tip decorating ideas didn’t really hold up well (literally). Things started to get a little soggy and melty, but thankfully the cinnamon covered most of that up. I used a large Ateco French tip and piped a large mound in the middle of the muffin-cupcake. When I had a substantial puff of Cool Whip, I pushed my tip down into the mound and pulled away quickly to create a little pillow puff lined with greatness:

And finished off with said life-changing raisin on top and a sprinkle of cinnamon. Had my Cool Whip been less temperamental than me after not eating for more than three hours, this would’ve looked prettier, but still, I couldn’t wait to get my hands on one or five. Seriously–I’m probably turning my skin orange by sheer amount of carrot products consumed. I absolutely adore the flavor mix between the pineapple and the Craisins. It’s a great, soft texture that bursts with flavor. And when you finish eating one, your hands will smell like maple and cinnamon. I defy you to be in a bad mood when your fingers smell like Cinnamon Toast Crunch. It simply isn’t possible. This is probably why Canadians are so damned friendly. If I always smelled of maple syrup, cinnamon, and could eat poutine whenever the hell I wanted, it might not cause me physical pain to smile daily or even hourly. Lofty goals, but with carrot cake, all things are possible. ‘Til next time, my fellow eaters!

I’m only smiling now to practice unhinging my jaw to eat these in one bite… -
Peanut Butter is My Life Force
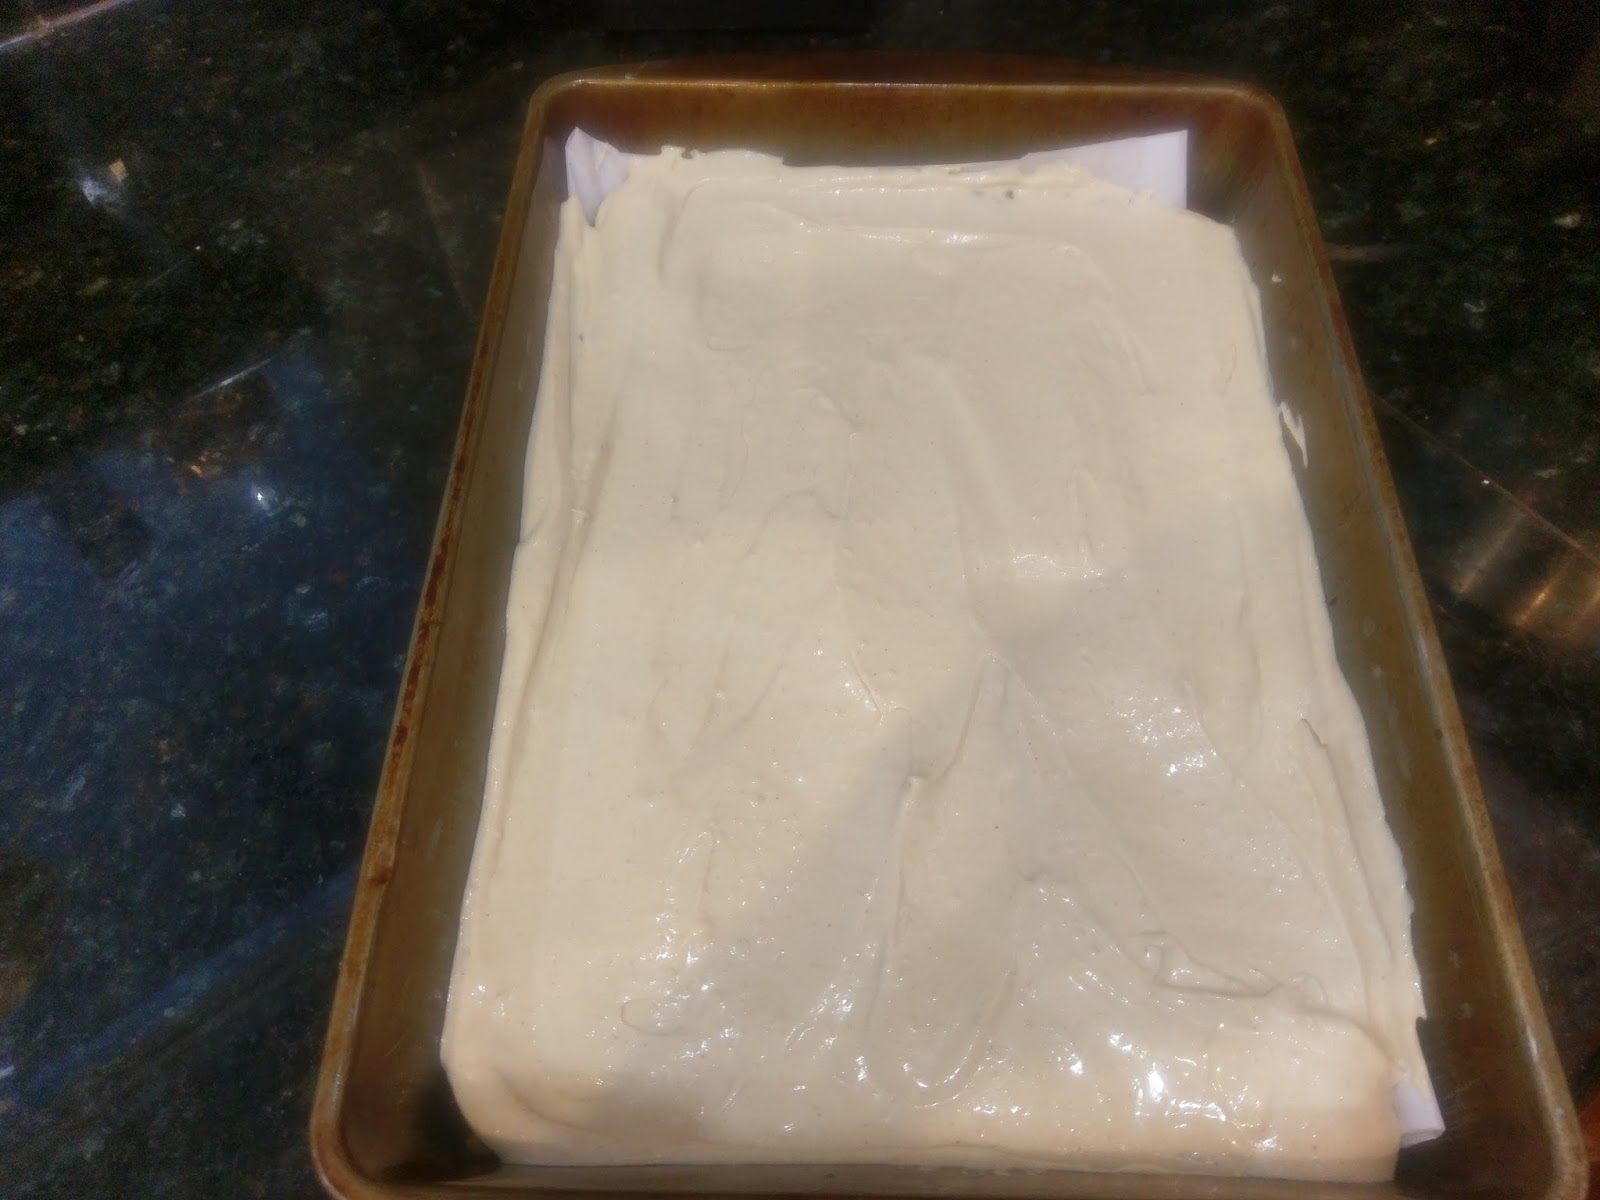
I eat an abnormally large amount of peanut butter for a grown woman. Seriously, I eat an average of three and a half PB&J’s a week (I share with my dogs). Is it healthy? Sorta. Better than nachos every day. Do I have issues coming up with creative lunches? Obviously. But I eat lunch at work and hate drive-thru’s. My peanut butter consumption tends to skyrocket to epic, dare I say, nutty proportions during Lent. It’s my go-to Friday protein. I had peanut butter on graham crackers for dinner last Friday (in my defense, my husband was gone, and I clearly need adult supervision). I divulge all this not because I think I have a problem (I know I do) but because I was hit with a massive craving for a peanut butter and chocolate dessert last weekend. And when you eat several gallons of Jif in a week, a craving like that is both insane and insatiable. I’ve been seeing far too many Reese’s chocolate egg commercials and Tasty videos using them lately, and apparently I’m susceptible to advertisements. Who knew? …I ask as I sit wearing Adidas track pants, a new Fitbit adorning my wrist, drinking Coke Zero, eating only the finest of name-brand cheesy crackers (Cheezits, clearly, because Cheese Nips are for plebeians). I needed to make a dessert that was dripping with peanut butter and drenched in chocolate yet also kind on the hips. While most would say this is an impossible feat, I saw it as a challenge. And as literally the most competitive person on the planet (I dare you to say otherwise), I knew I had to come up with the perfect treat. And like any Type-A person, I did, and then I even rubbed my own face in it. Told you..so competitive I even mock myself. Good thing I had these peanut butter cheesecake bars with chocolate crunch crust to soothe my self-inflicted jeering.

Shut myself right up, I did. I know in no way does it seem remotely possible by looking at them, but at 158 calories a bar, these are completely guilt free. I even used incredibly limited amounts of sugar because now I’m watching my sugar intake since apparently I was enjoying life too much so I had to find some other habit to cut back on. Catholic guilt is real, y’all. Just ask all those poor fish I’ve been consuming the past five Fridays. I wasn’t sure how cutting back on the sugar was going to impact the cheesecake layer, but thankfully it turned out okay. And by okay, I mean these are literally the best dessert bars I’ve ever eaten in my entire life. I love Nestle Crunch bars. I feel like they’re extremely underrated. So if you’re like me, the chocolate crunch crust is going to make your taste buds quite happy. And if you also inhale peanut butter at a rate some people might find “mildly startling,” you’re going to be pleased with the cheesecake layer, too. Oh, and these are no-bake and can be thrown together in ten minutes. Did I mention I’m the laziest Type-A person ever? Because I am.
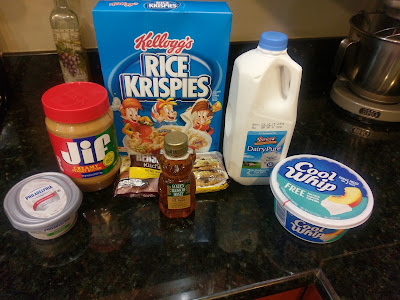
What? You don’t buy your peanut butter by the pound? I’m fairly certain that Rice Krispies hasn’t changed their cereal box since the year I was born. I’m as classic as a box of Kellogg’s, baby. These bars are quick to make and require only a short list of ingredients. If you buy Jif in ten-pound jars and always have Cool Whip handy for those moments when a spoonful of sweetness means the difference between utter meltdown and total sanity, you’re already there (and my kind of person). To make, gather up:
- 1 cup of semisweet chocolate chips
- 2 TBS skim milk
- 3 TBS honey
- 1 cup of creamy Jif, divided
- 3 cups Rice Krispies
- 1 8-ounce tub of fat free cream cheese spread at room temp
- 1 8-ounce tub of Cool Whip Free
- 2 TBS sugar
- 1 tsp vanilla extract
Start by lining a 9×13 pan with Parchment paper and lightly misting with cooking spray. Honey and peanut butter are about sticky as a standard four year old, so don’t skimp on the cooking spray or these bars will be glued to the paper. Then prepare yourself for a crappy photo montage!

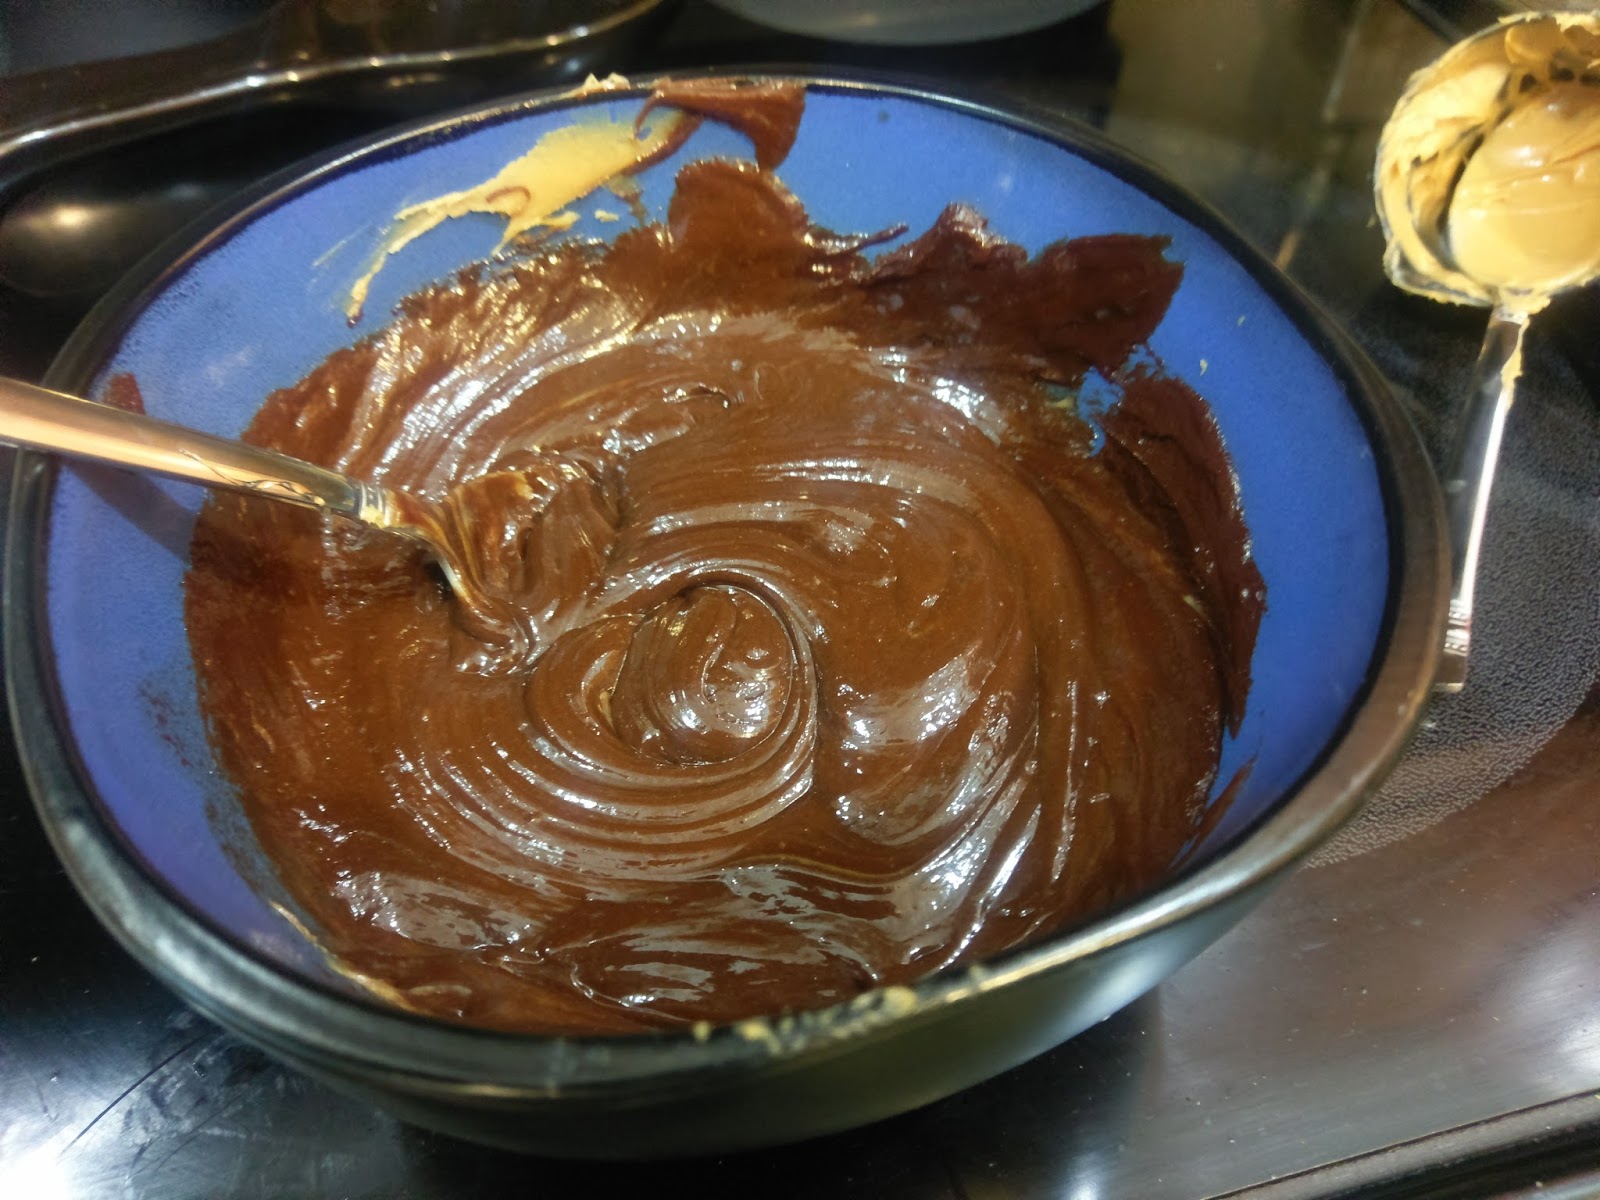
So many spoons were used in the making of this dessert. In a bowl, dump the chocolate chips and milk and heat in 30 second bursts at 50% power in the microwave. Stir each time to avoid scorching. Burnt chocolate is my mortal enemy. Once completely melted and no chunks remain, add in the 3 TBS of honey and 1/4 cup of Jif. Blend well!
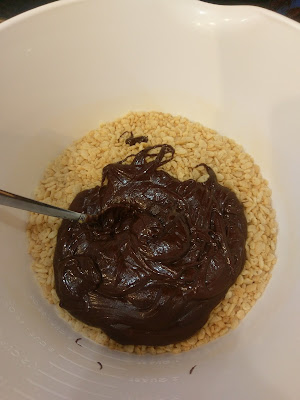
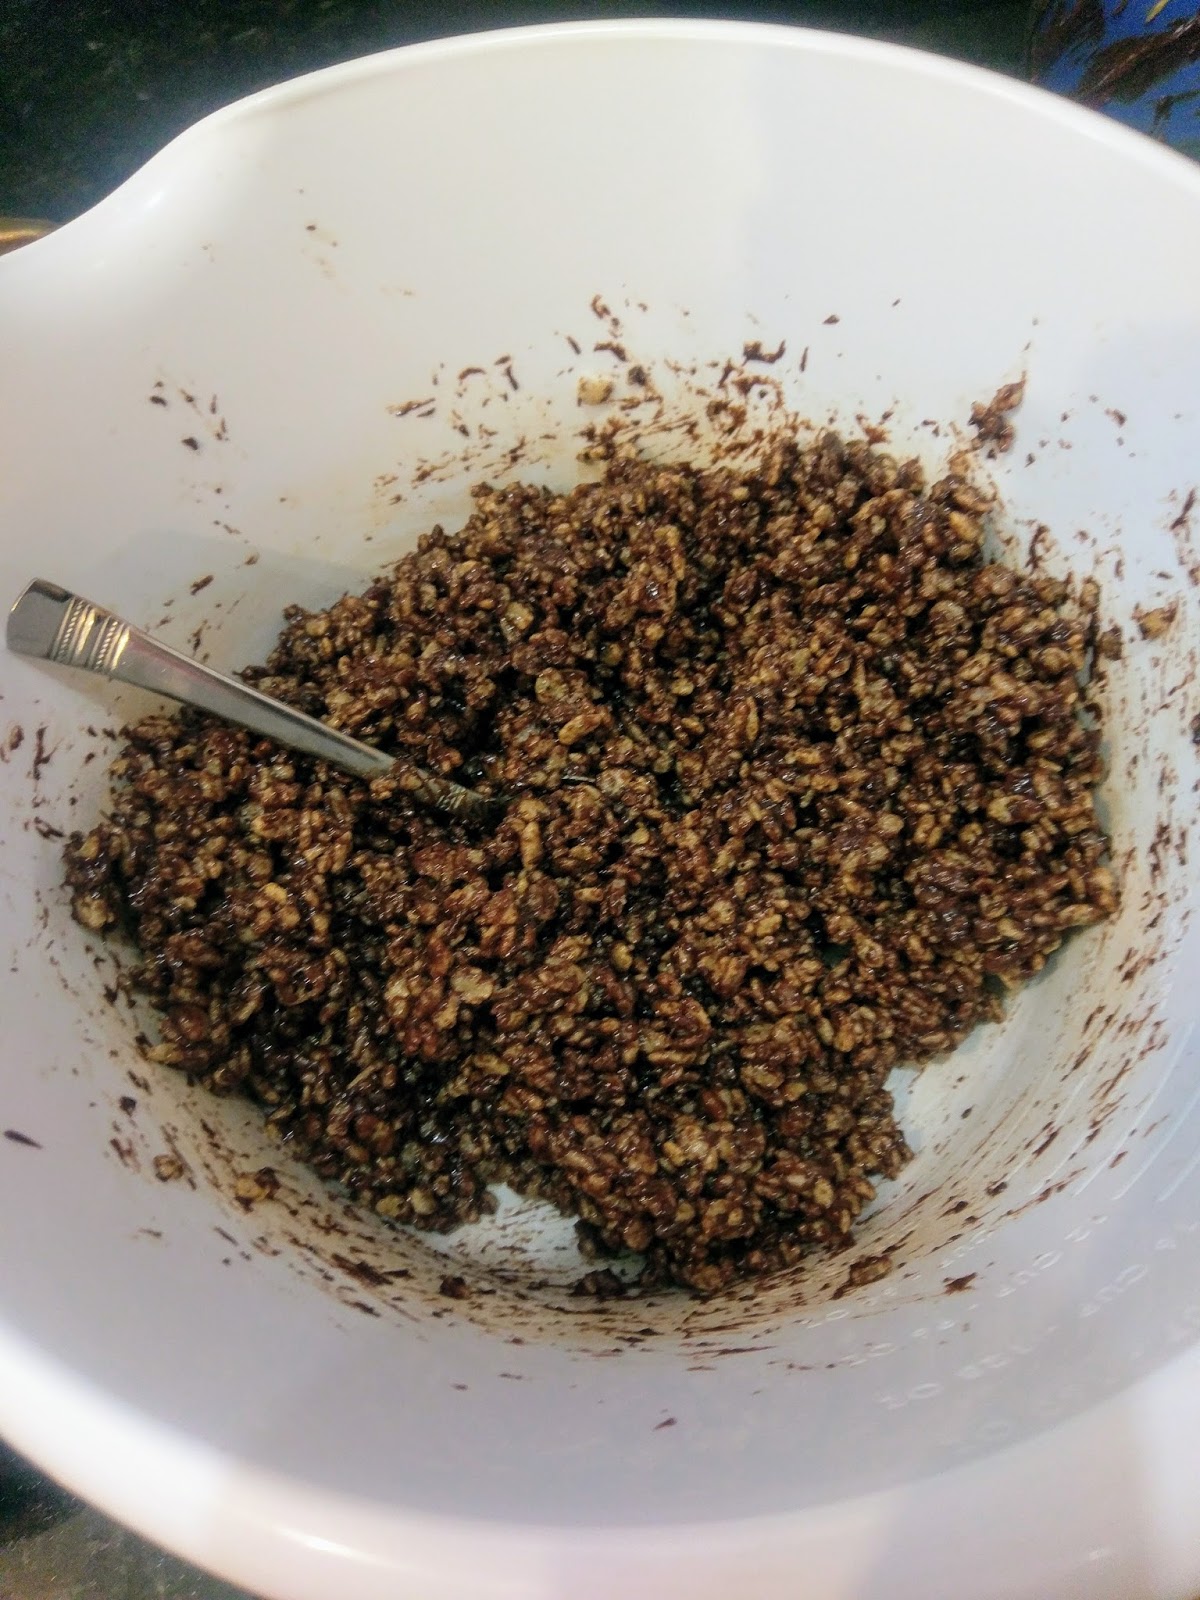
This is the only way I’m eating Rice Kripsies ever again. Dump 3 cups of Rice Krispies in a large bowl, and then pour the chocolate mix on top. You’ll get a nice bicep workout blending this thoroughly.

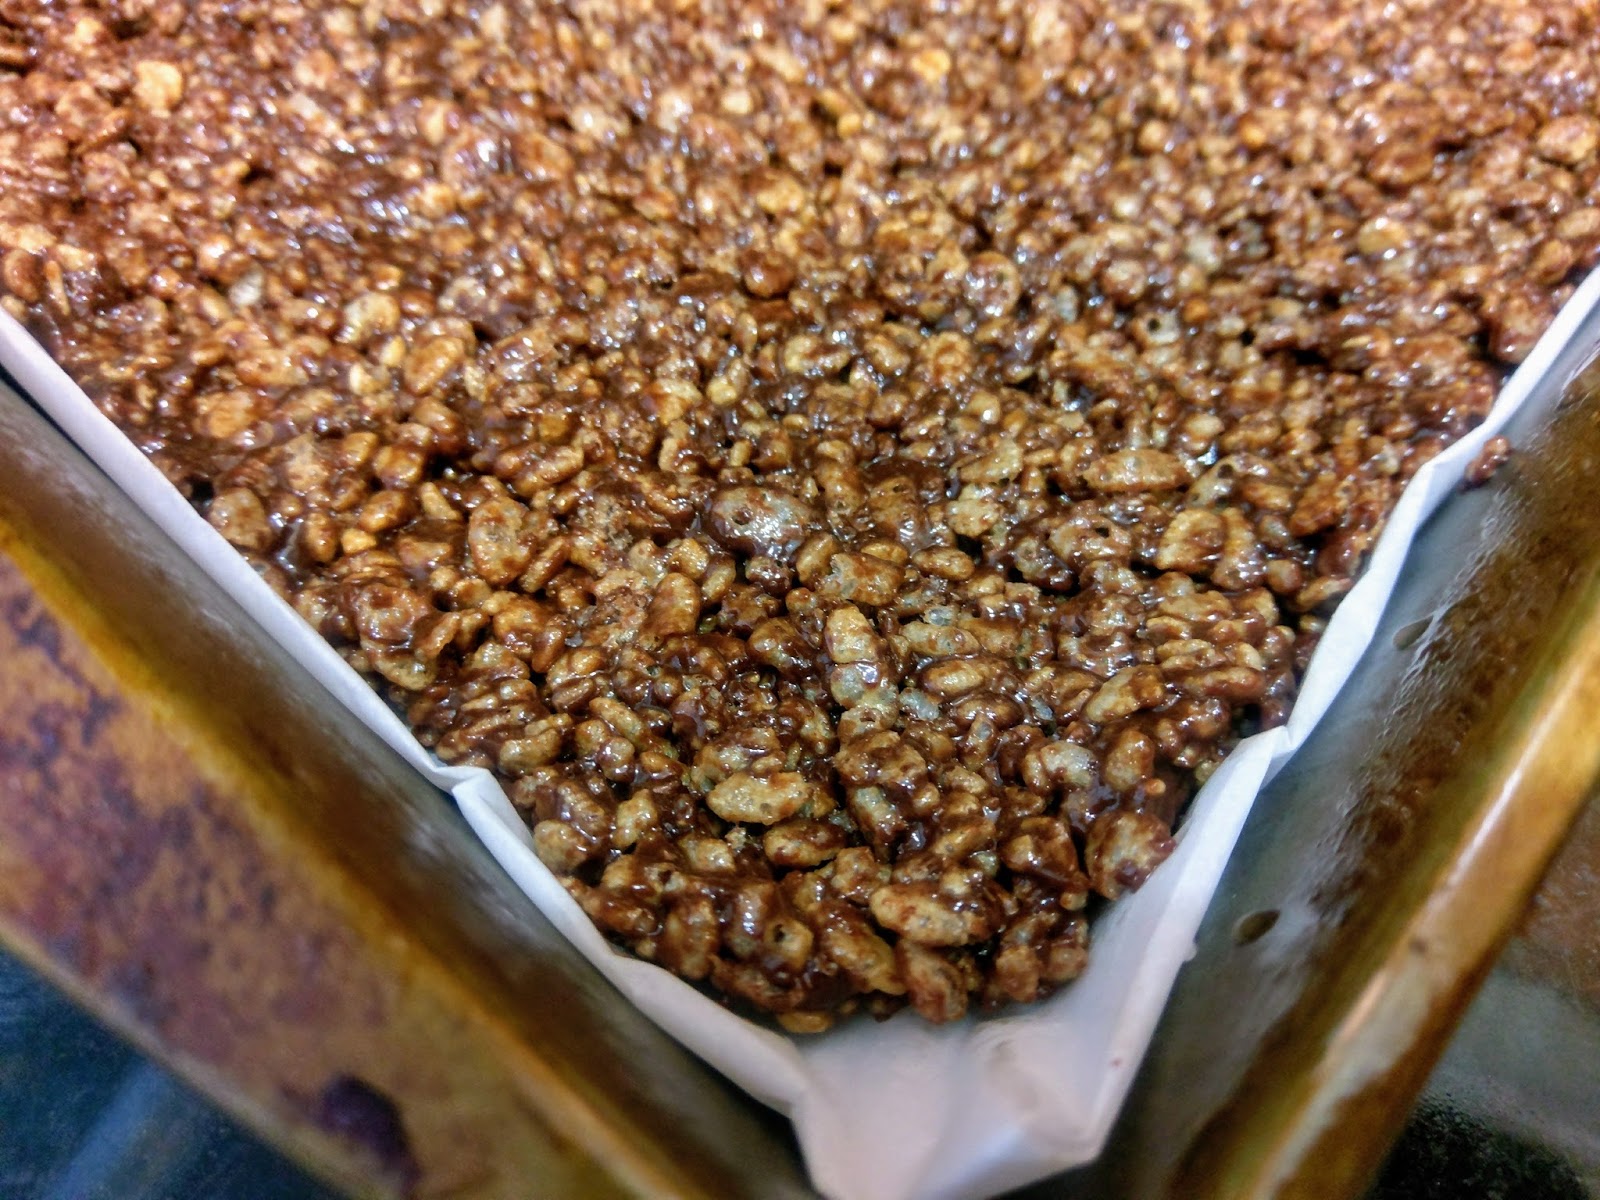
Worth it. Turn into the prepared pan. I highly advise also spraying your hands with cooking spray at this point to keep the crust from sticking to you. Not that that’s a bad thing considering you then get to eat it off of your hands, but you want the majority of the crust to end up in the 9×13 pan:

Like so. You will need to press and smooth out the crust to evenly distribute it across the pan. Hold off on eating the crumbs off your finger until you’re done with this part.

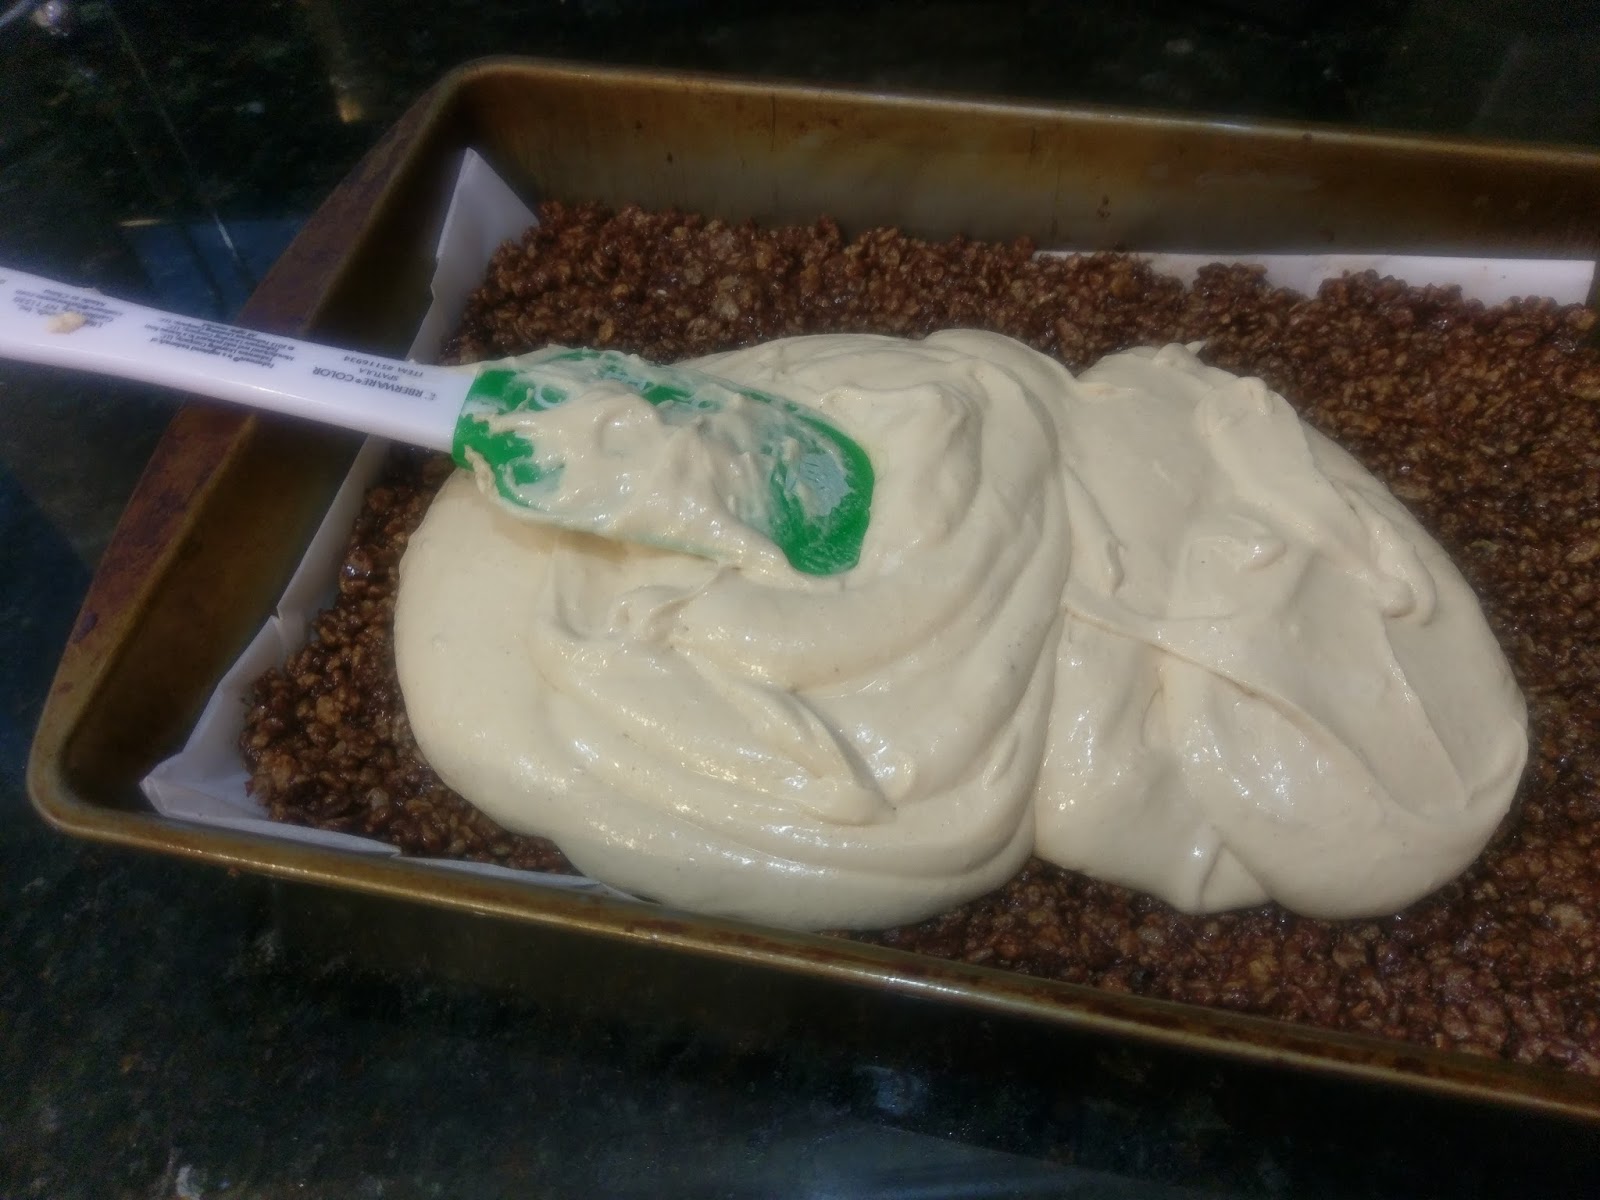
Hmmpphhhyum. No English words accurately describe this photo. Set aside and avoid the temptation to just eat all the crust. To make the filling, mix together 1/2 a cup of Jif and the tub of fat free cream cheese in a stand mixer until light and fluffy, about 3 minutes. Scrape the sides of the bowl and then add the 2 TBS sugar, 1 tsp vanilla, and tub of Cool Whip Free. Blend until well incorporated.

Sweet dreams are made of cheese(cake). Take this delicious blob of peanut butter wonder and dump on top of the crust. I’d like to tell you the crust lust and desire to eat it gets covered up by this cheesecake layer, but that would mean my pants would burst into flame.

And I really like these Adidas track pants. Smooth out the cheesecake layer, and then take the final 1/4 cup of Jif and melt it in the microwave for 30 seconds. Literally the only way peanut butter tastes any better is when its melted (see apple nachos).
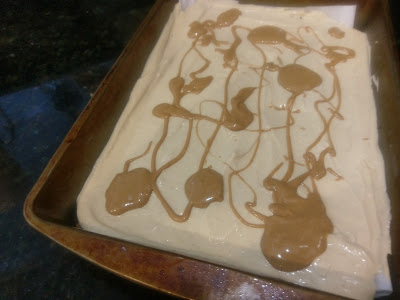
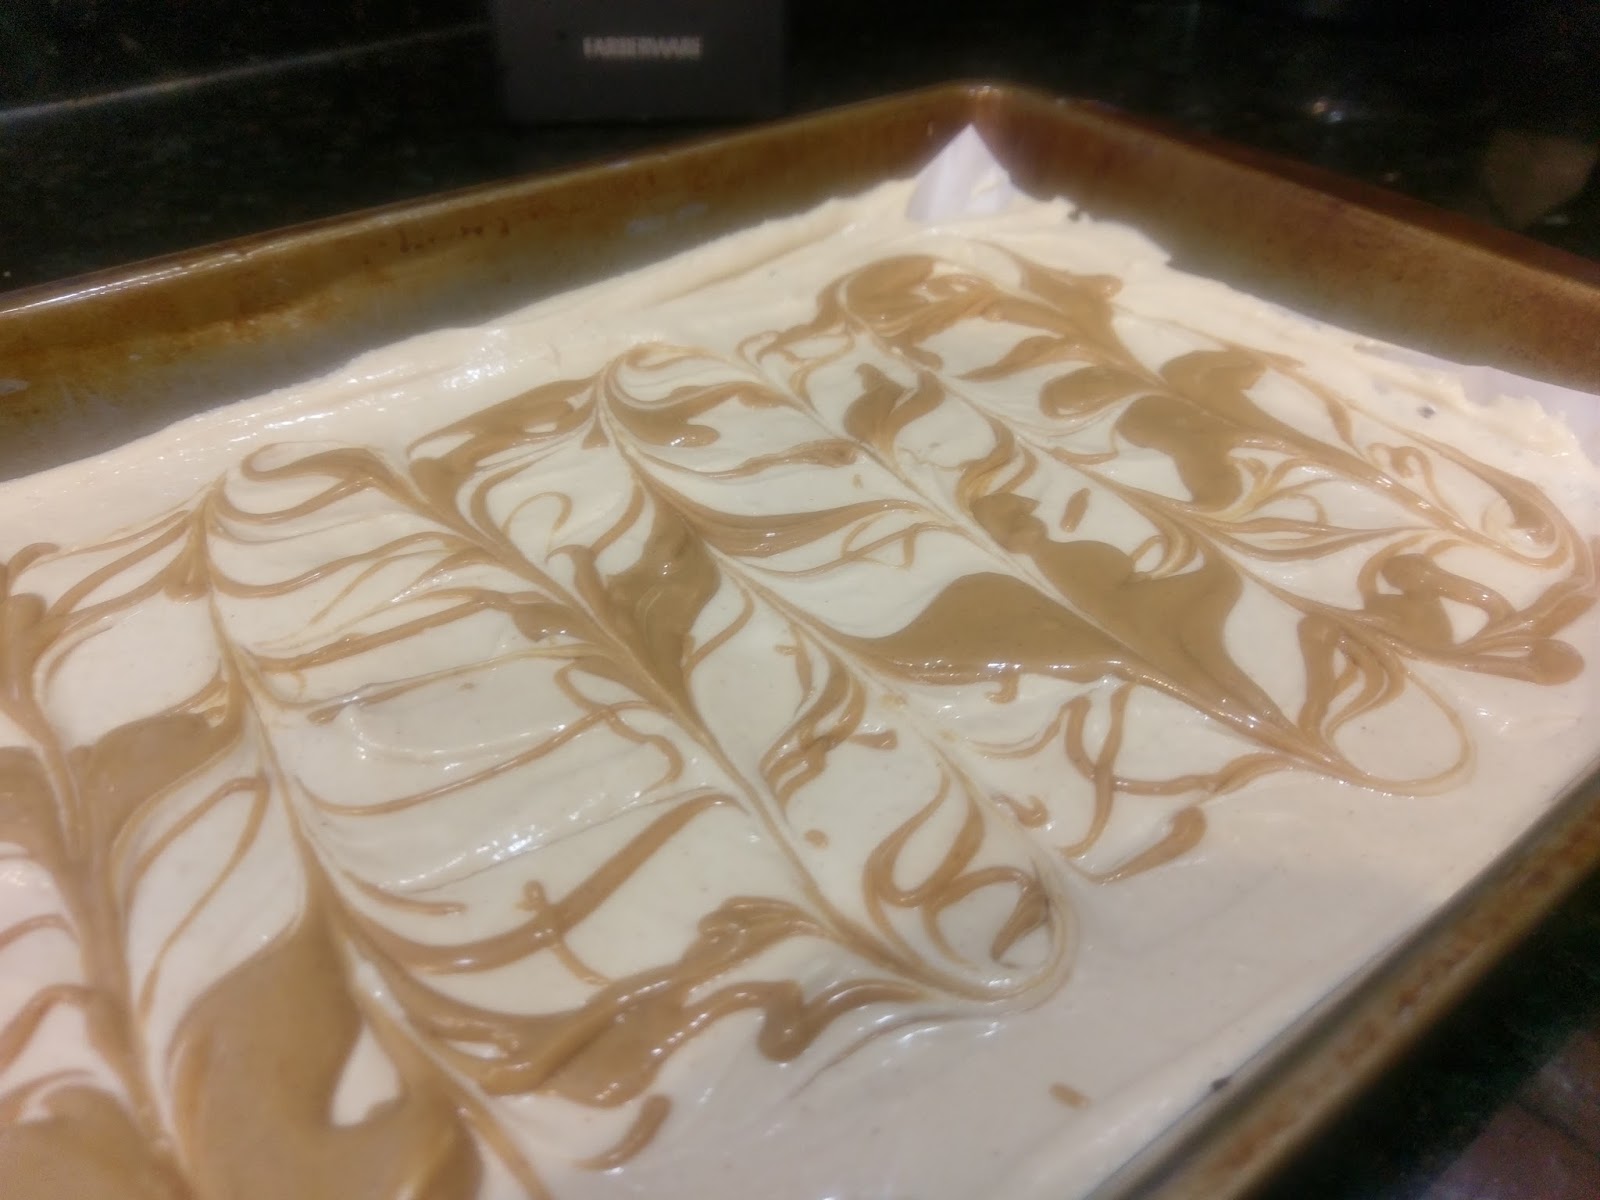
I’m the Jackson Pollock of peanut butter paintings. By the spoonful, plop the melted peanut butter randomly on top of the cheesecake layer.

And also the Salvador Dali, apparently. Take a butter knife and slowly drag in back and forth lines to create pretty swirls with the peanut butter in the cheesecake. To avoid diving mouth first into the pan, cover and place into the freezer. Let these set overnight if possible. If you’re in an extreme PB&C emergency, check to see if they’re set around the 5 hour mark. Waiting, always the hardest part.
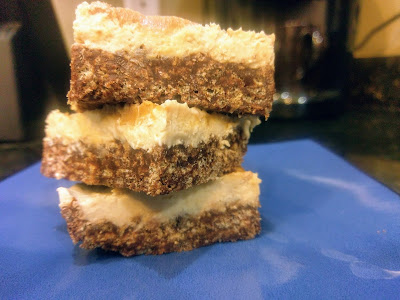
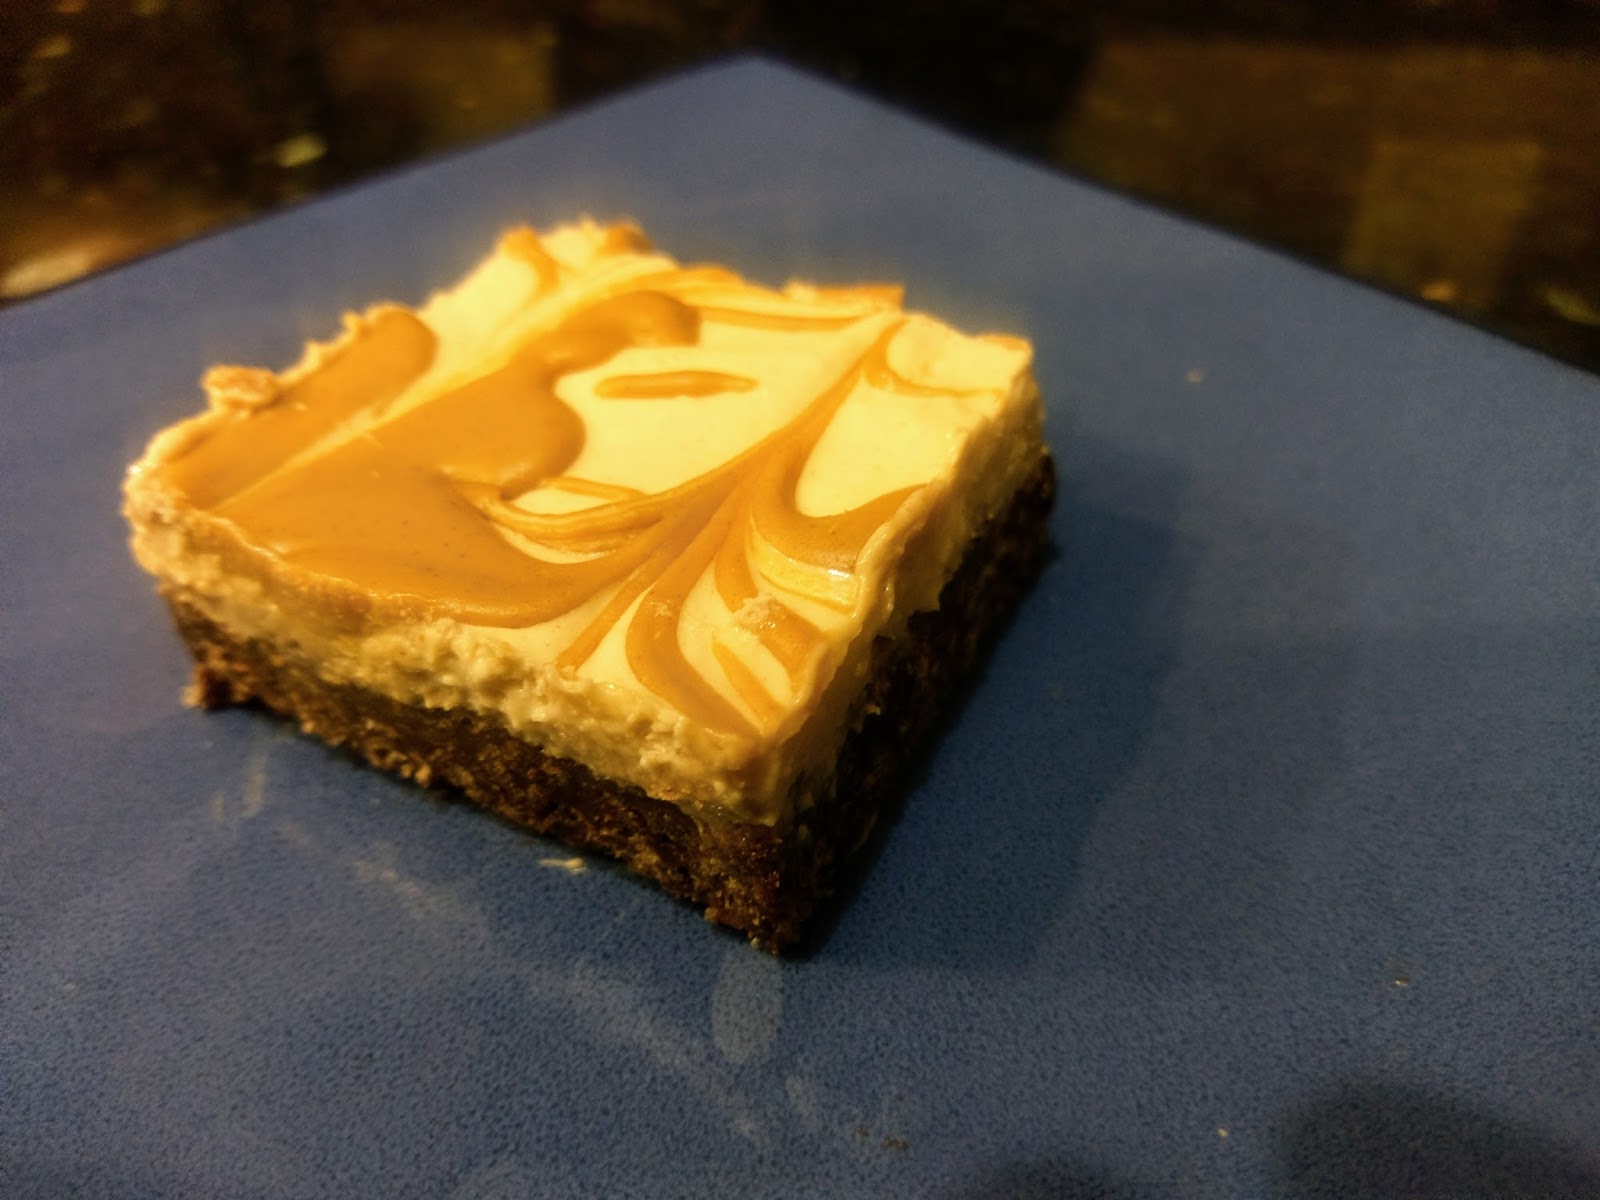
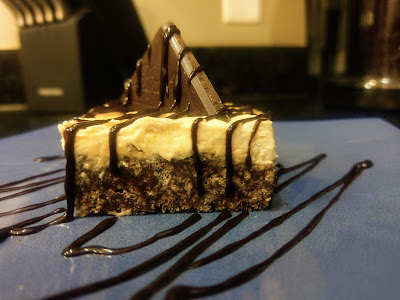
And yet always so, so worth it in the peanut buttery end. Once these are set, you can either lift the whole slab out by the Parchment paper or cut in the pan. I divvied these up into 20 squares to equate to 158 calories a square.

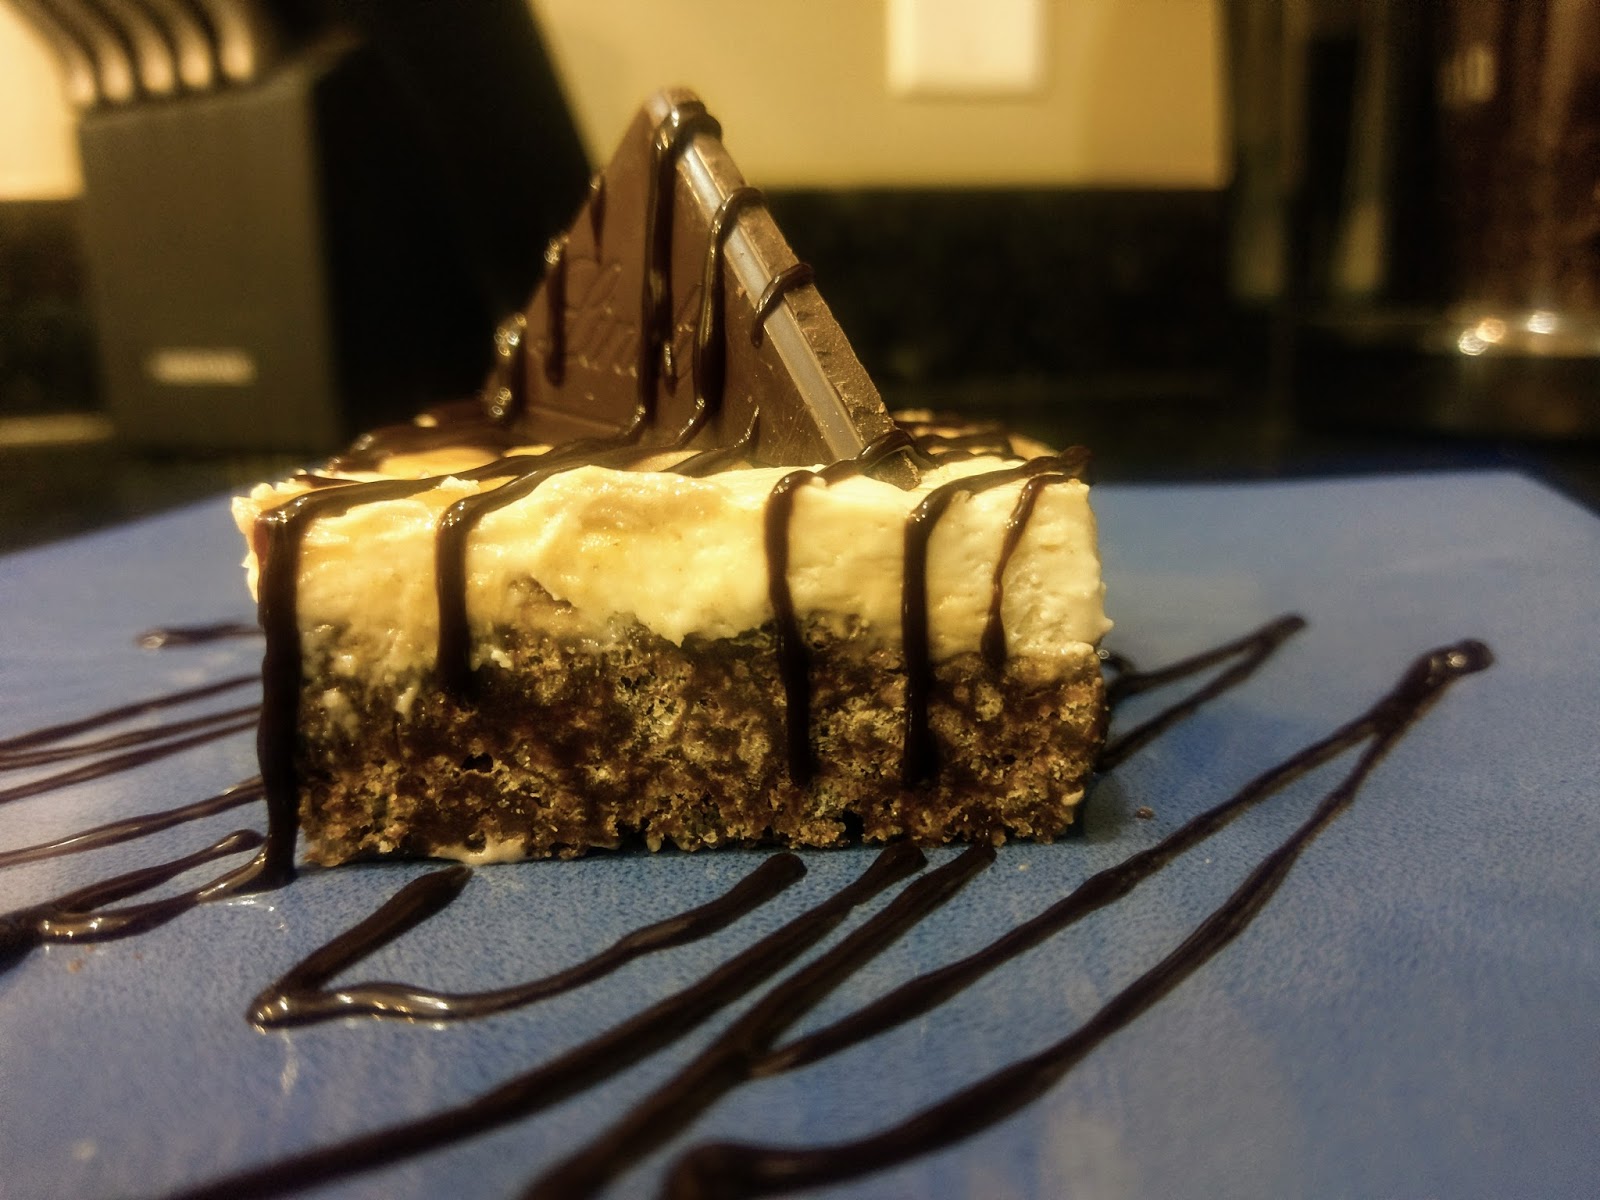
And clearly, size was not skimpy. Only way to make these even better? A drizzle of sugar free chocolate sauce and half a square of insanely rich Lindt dark chocolate with sea salt affixed to the middle. I happened to have these Lindt chocolates on hand because my husband loves me and even though I begged for a Fitbit for our anniversary on the 7th, he still felt it was weird to give his wife a fitness tracker for an anniversary. So to remind me I asked for the Fitbit and he thinks I am in no way out of shape, said chocolate bar was found along with my present. Smart man. I’ve been eating the bar one square at a time, but when I wanted a square AND a peanut butter cheesecake bar for dessert (dream big), I checked with my Fitbit to make sure such luxuries were affordable, and they so were. I realize one day when Google Skynet takes over, I’ll be the first in line to welcome our new robot overlords because they make my life easier and less guilt-ridden. And I won’t have to share my dessert with them which is great because an entire pan of these bars simply isn’t enough. They’re so good I’d like to be buried with the recipe and embalmed with peanut butter. Although, if I keep eating the stuff at this rate, I’ll do that on my own. ‘Til next time, my fellow eaters!
I’m probably 40 percent peanut butter at this point anyway. -
Lemon and Blueberry Bliss
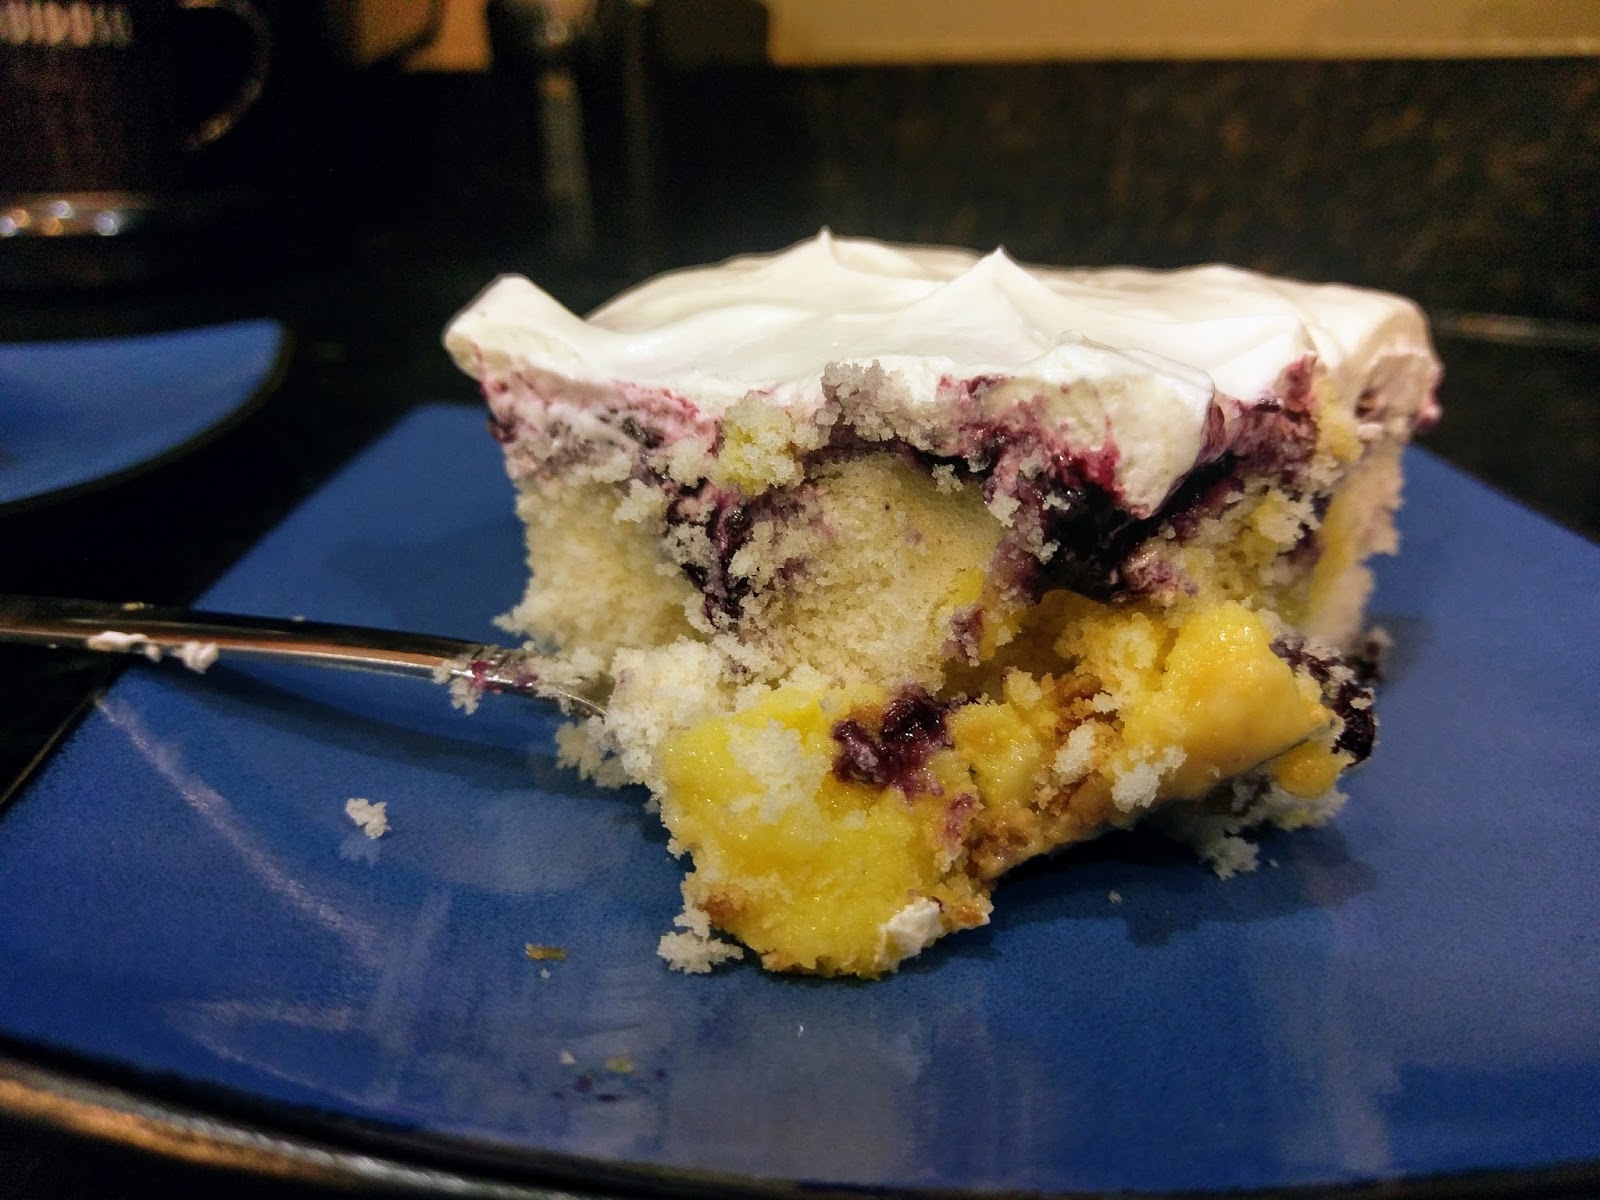
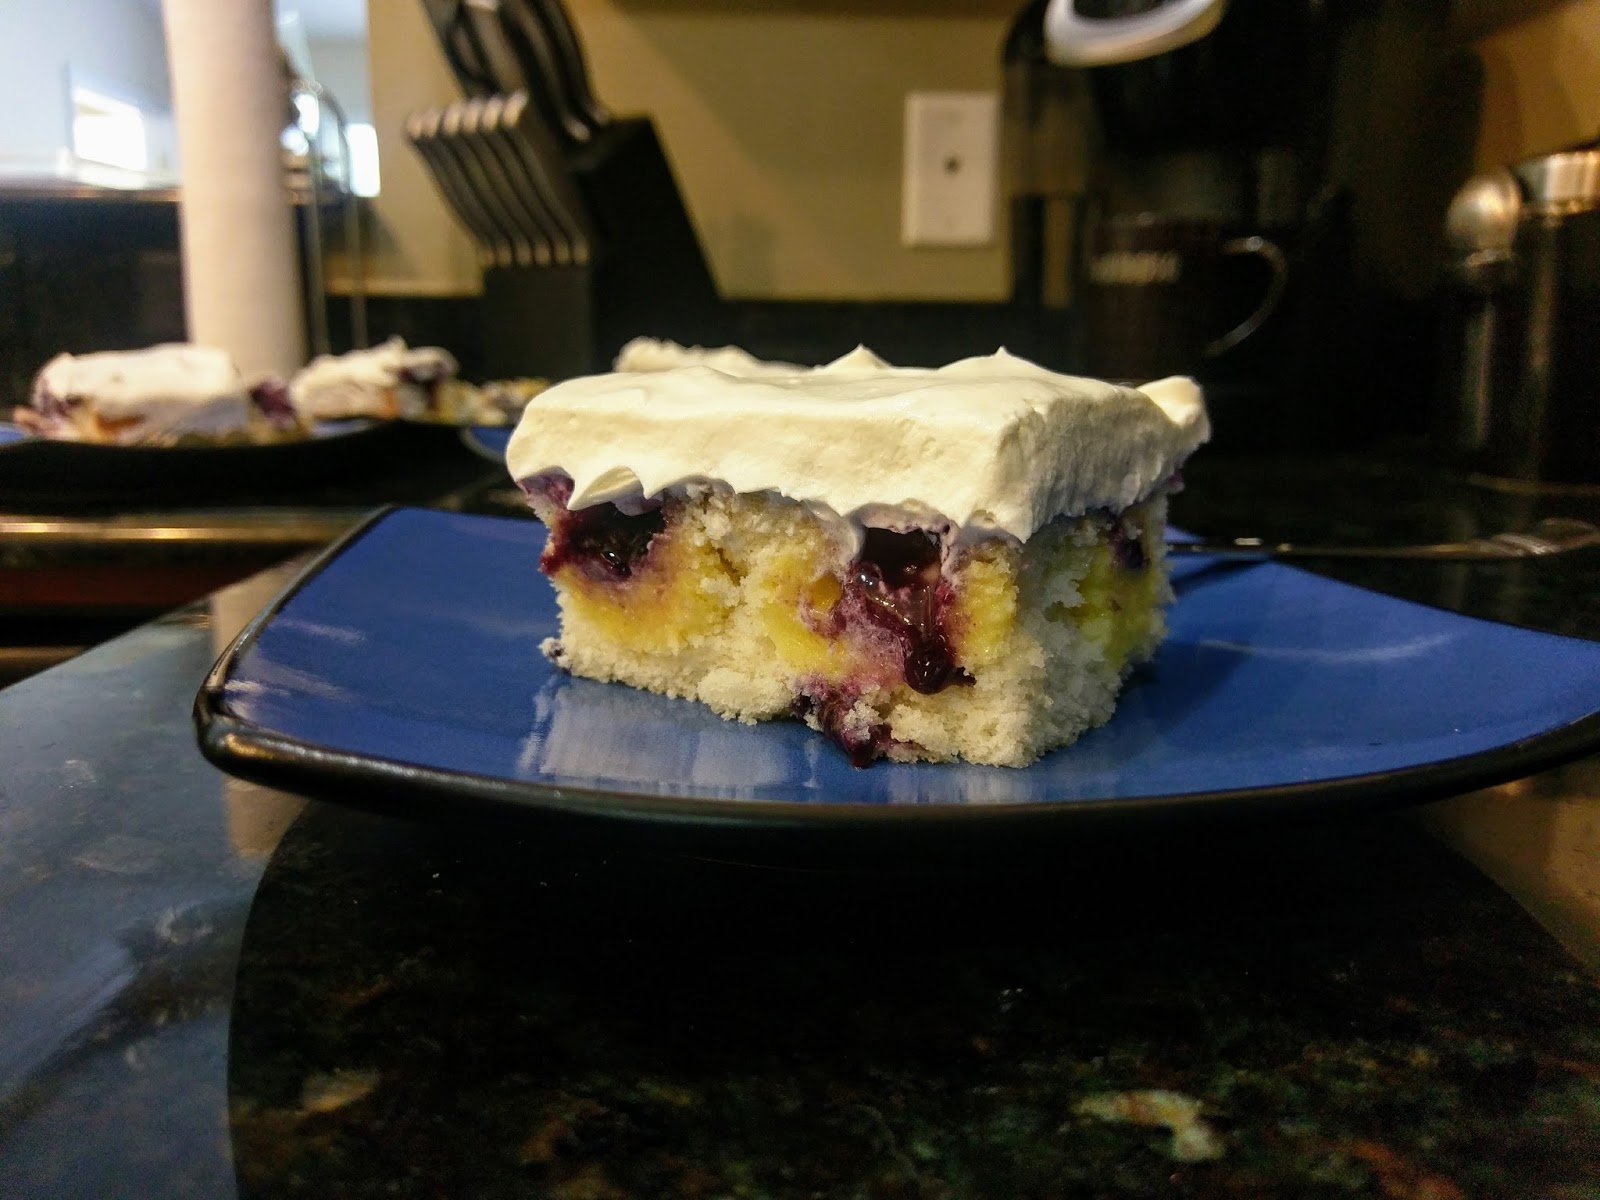
Nothing says “Springtime!” quite like constant tornado watches and getting hit in the face with ten pounds of pollen every time you leave your house. I will say that I was pleasantly surprised what with this being our inaugural spring in Florida that it bears a remarkable resemblance to springtime in West Texas. I’ve yet to see how locals react to a tornado warning though. If I walk outside to find several neighbors also looking for said tornado instead of seeking shelter, I’ll really feel like I’m home! What? We don’t have basements in Texas…if a tornado is going to take us out, we at least want to witness the awe of its indestructible force in action. Sheltering in place is for the timid! We can huddle in the closet for safety later. And when we do, I’ve found the perfect cake to encompass the feeling of spring exuberance, but with minimal guilt for those of us that also realize the month of April is on the precipice of swimsuit season. Behold–the skinny lemon blueberry poke cake!
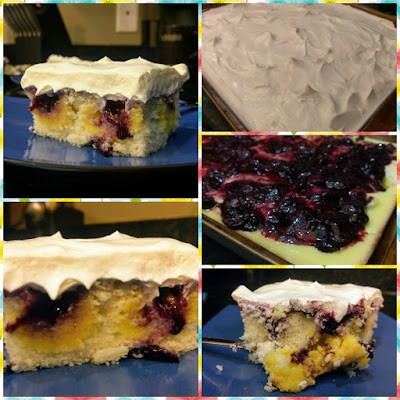
You can also witness the awe of my sheer force of will to eat dessert and stay thin. Say goodbye to simple lemon poke cakes–layer them all with blueberries! I took a more is more approach with this cake; what can I say, I relish the opportunity to outdo myself culinarily. At only 204 calories per 12 slices, I’ve also outdone myself in the flavor to calorie ratio. I’d let you congratulate me, but clearly I’m still too busy patting myself on the back for coming up with this idea. I did, however, fail epically at remembering to take photos while making parts of this cake. I was trying to clean the house, do laundry, make dinner, and prepare for my in-laws to visit all in one evening. Even I have my moments. I will say it was totally worth all the effort and slight delirium. Not only did my husband’s parents get treated like they were in the finest of cozy hotels, they even got cake. When was the last time Hilton did that for anyone? Exactly.
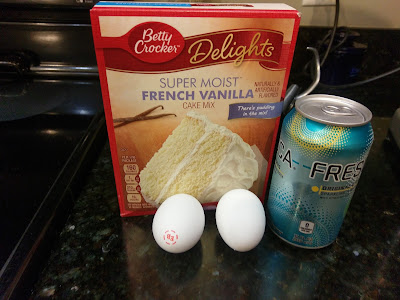
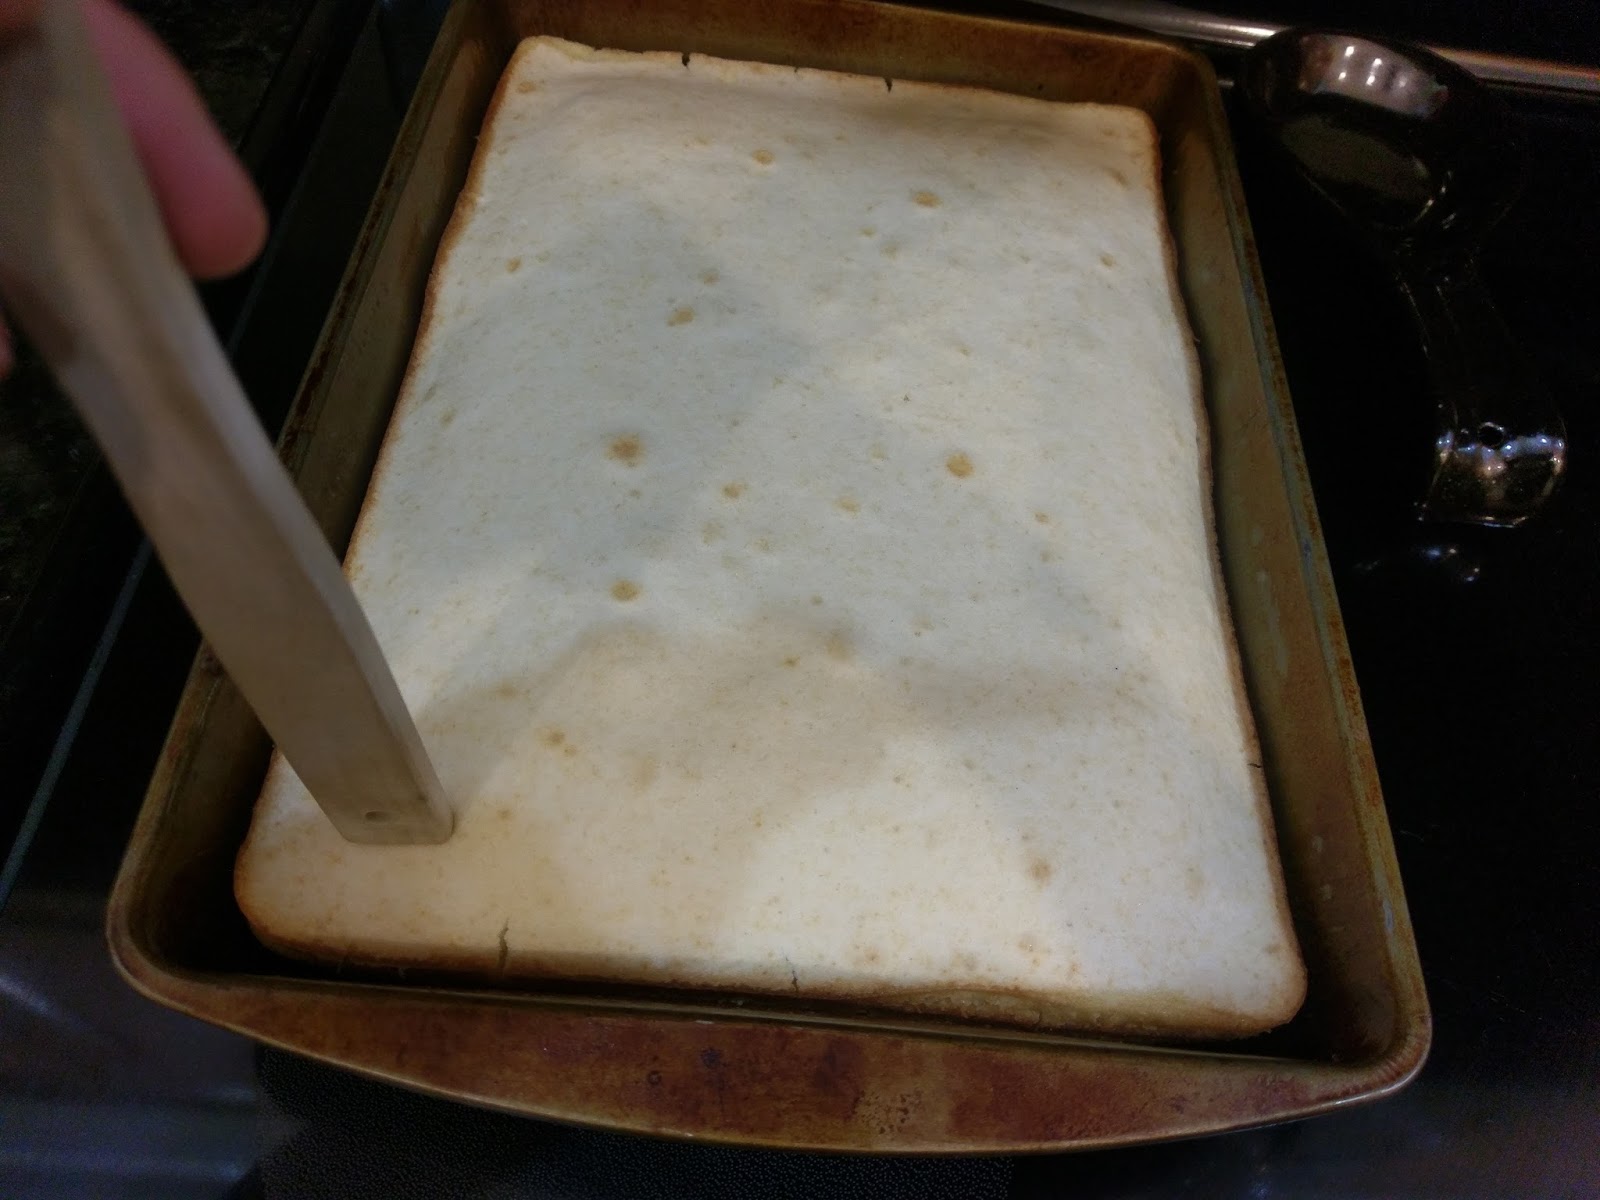
Yes, there are people in this world that drink Fresca. To make the low cal cake, grab a box of vanilla or white cake, two egg whites, and 10 ounces of diet lemon-lime soda; I used Fresca because I’m 87 years old and enjoy drinking Fresca, but Diet Sprite would work just fine as well. Mix all three ingredients together for 2 minutes, preheat your oven to 350, and grease a 9×13 cake pan. Pour your batter into the prepared pan and bake for about 23-25 minutes (remember, cakes baked with soda cook faster than the times on the box).

After the cake has cooled about 20-30 minutes, take the end of a wooden spatula and poke holes in your cake. 
This part always hurts me a little…I hate ruining a smooth cake, but in the end, all that delicious lemony blueberry goodness has to go somewhere! At this point, you can make both the lemon and blueberry fillings. Totally remembered to take photos of the lemon filling ingredients, but I did not remember to take photos of the blueberry sauce ingredients, so bear with my failure…you’re actually going to have to read and not just look to figure it out. I apologize for causing your brain any undue trauma.

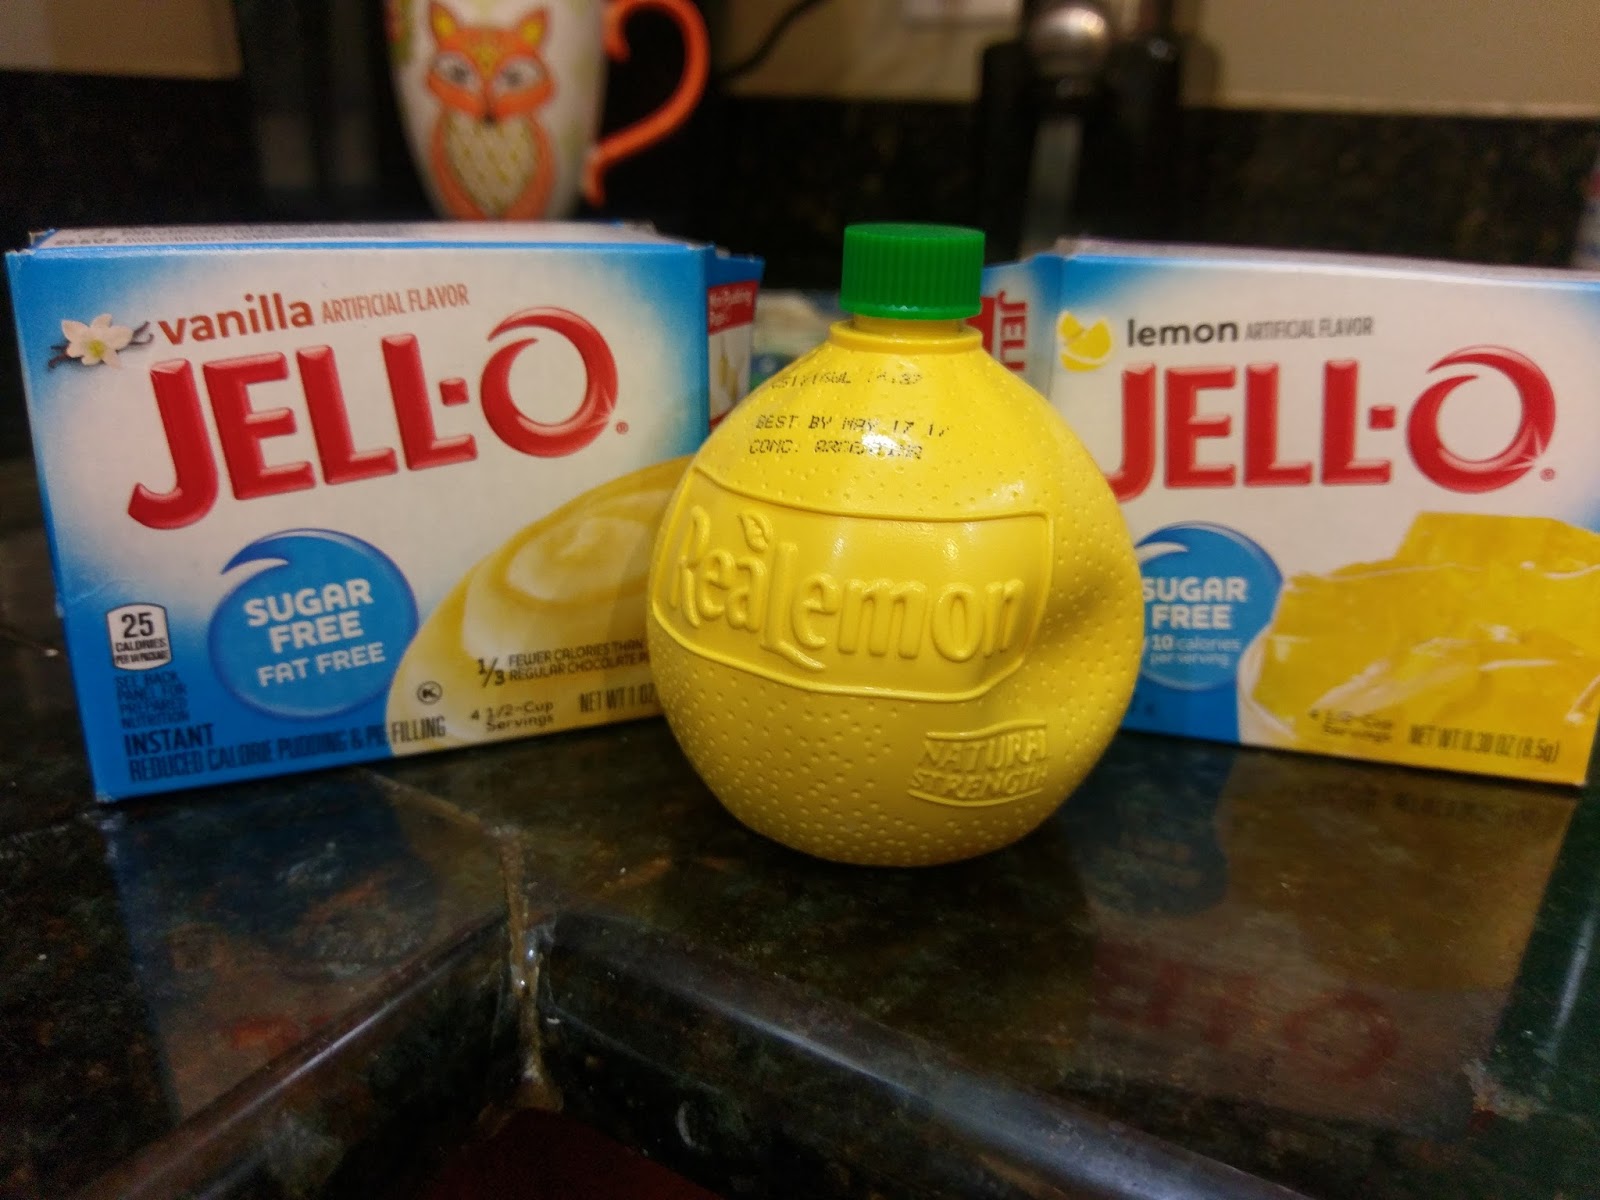
I always feel like it should say “Real” Lemon. To make the lemon filling, you’re gonna need to do some Googling. Sugar free lemon Jello is surprisingly not stocked at every grocery store in the land. The Jello website can tell you where to find it though. Trust in Publix–they saved me all the calories by having this in stock. Publix is probably my favorite thing in Florida. It’s like the Floridian equivalent to an H-E-B. Granted, no grocery store (except maybe Meijer’s, bless you, Michigan) could ever come close to rivaling the greatness that is H-E-B, but Publix doesn’t make me feel sad inside like Walmart, so it’s got that going for it. I digress. To make the lemon filling you need:
- 1 package of sugar free lemon Jello
- 1 package of sugar free instant vanilla pudding
- 2 1/3 cup water
- 1/3 cup lemon juice
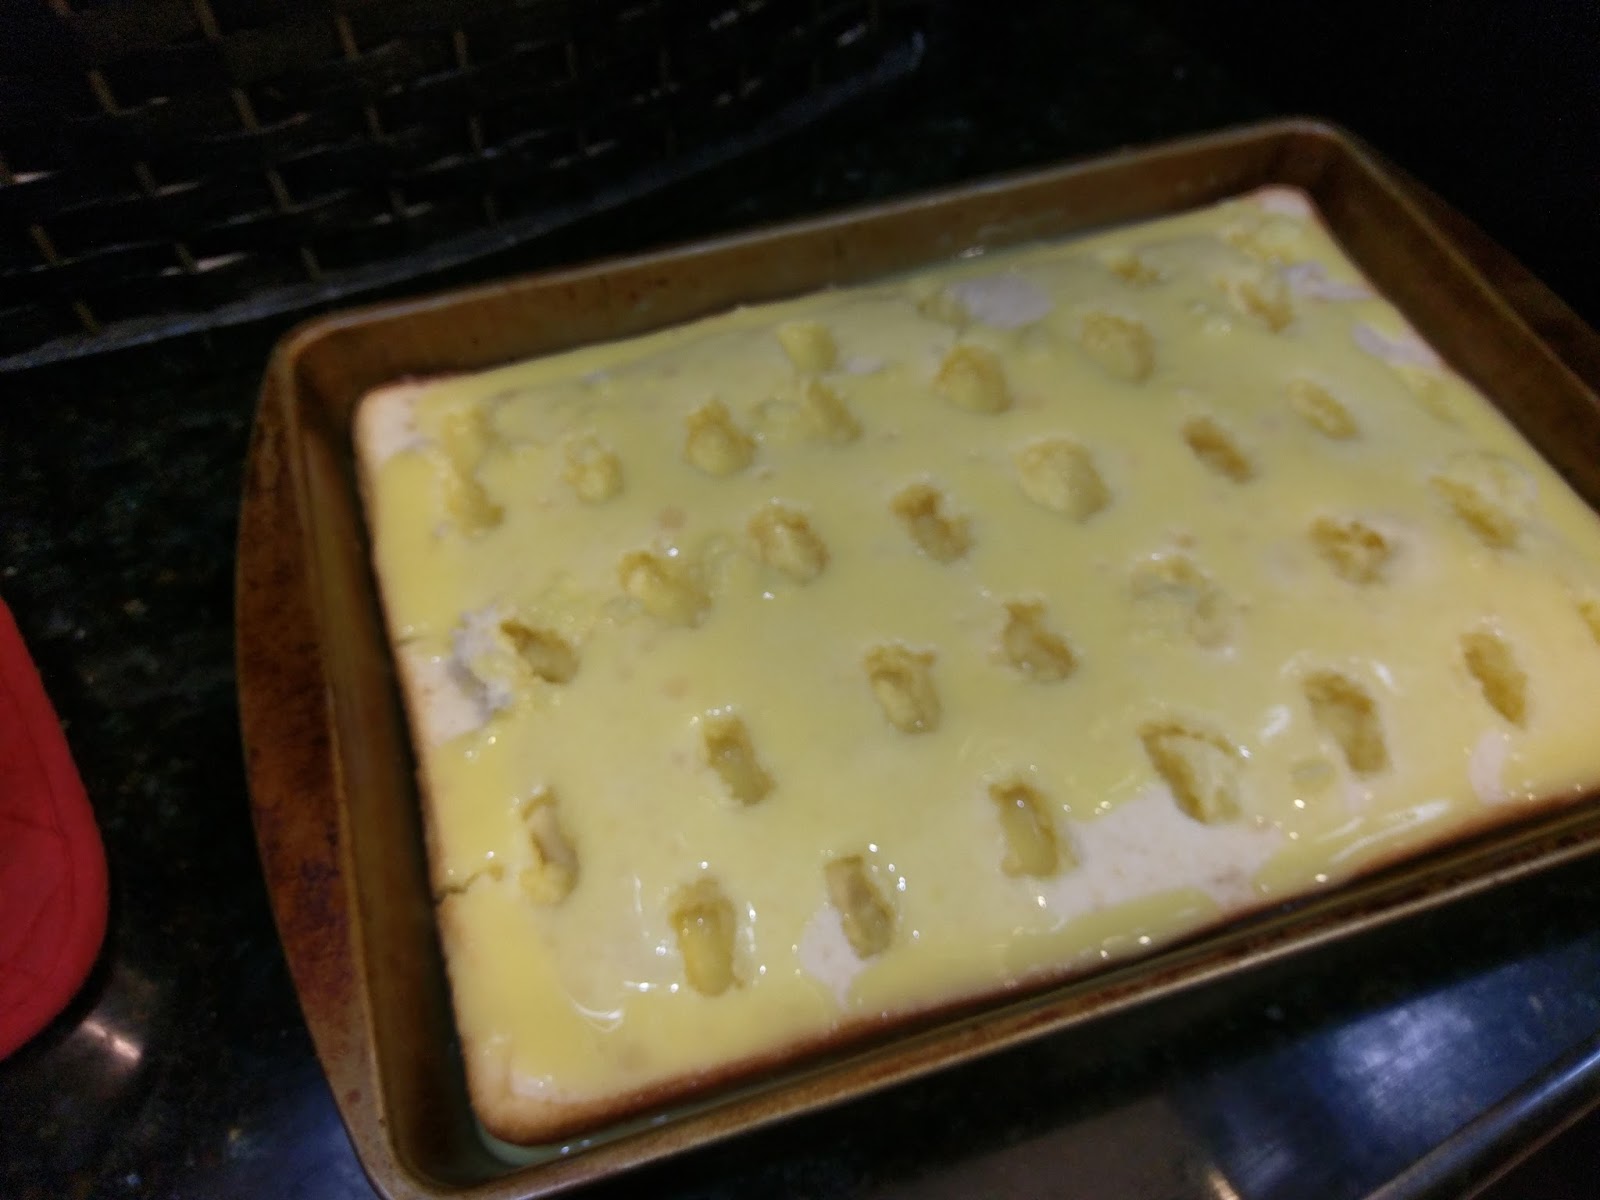
To make, mix all ingredients together in a medium sauce pan. Cook while continually stirring until the mix comes to a boil. Continue to stir and cook for an additional minute before removing from heat. Allow about ten minutes to cool and thicken up. This is a thinner consistency, but you also need to have room for the blueberry portion of the poke cake, so this works well for that.
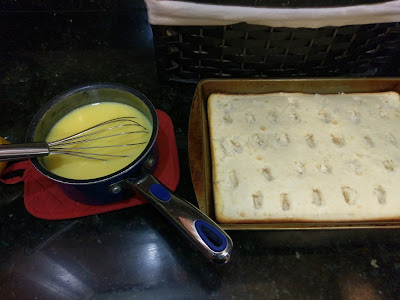
And you get to lick the whisk with no calorie guilt! Once cooled off a bit, slowly and carefully pour the mix into all the holes you poked in your cake earlier.

Inset Homer Simpson drooling noises here. So messy, yet so perfect. Place into the freezer while you make your blueberry mix. For this, feel slight annoyance there’s no photo and gather:
- 1 1/2-2 cups of blueberries (I used 1 1/2 cups or 12 ounces, and it was plenty)
- 3 tbs sugar
- 1 tbs water
- 1 tbs flour
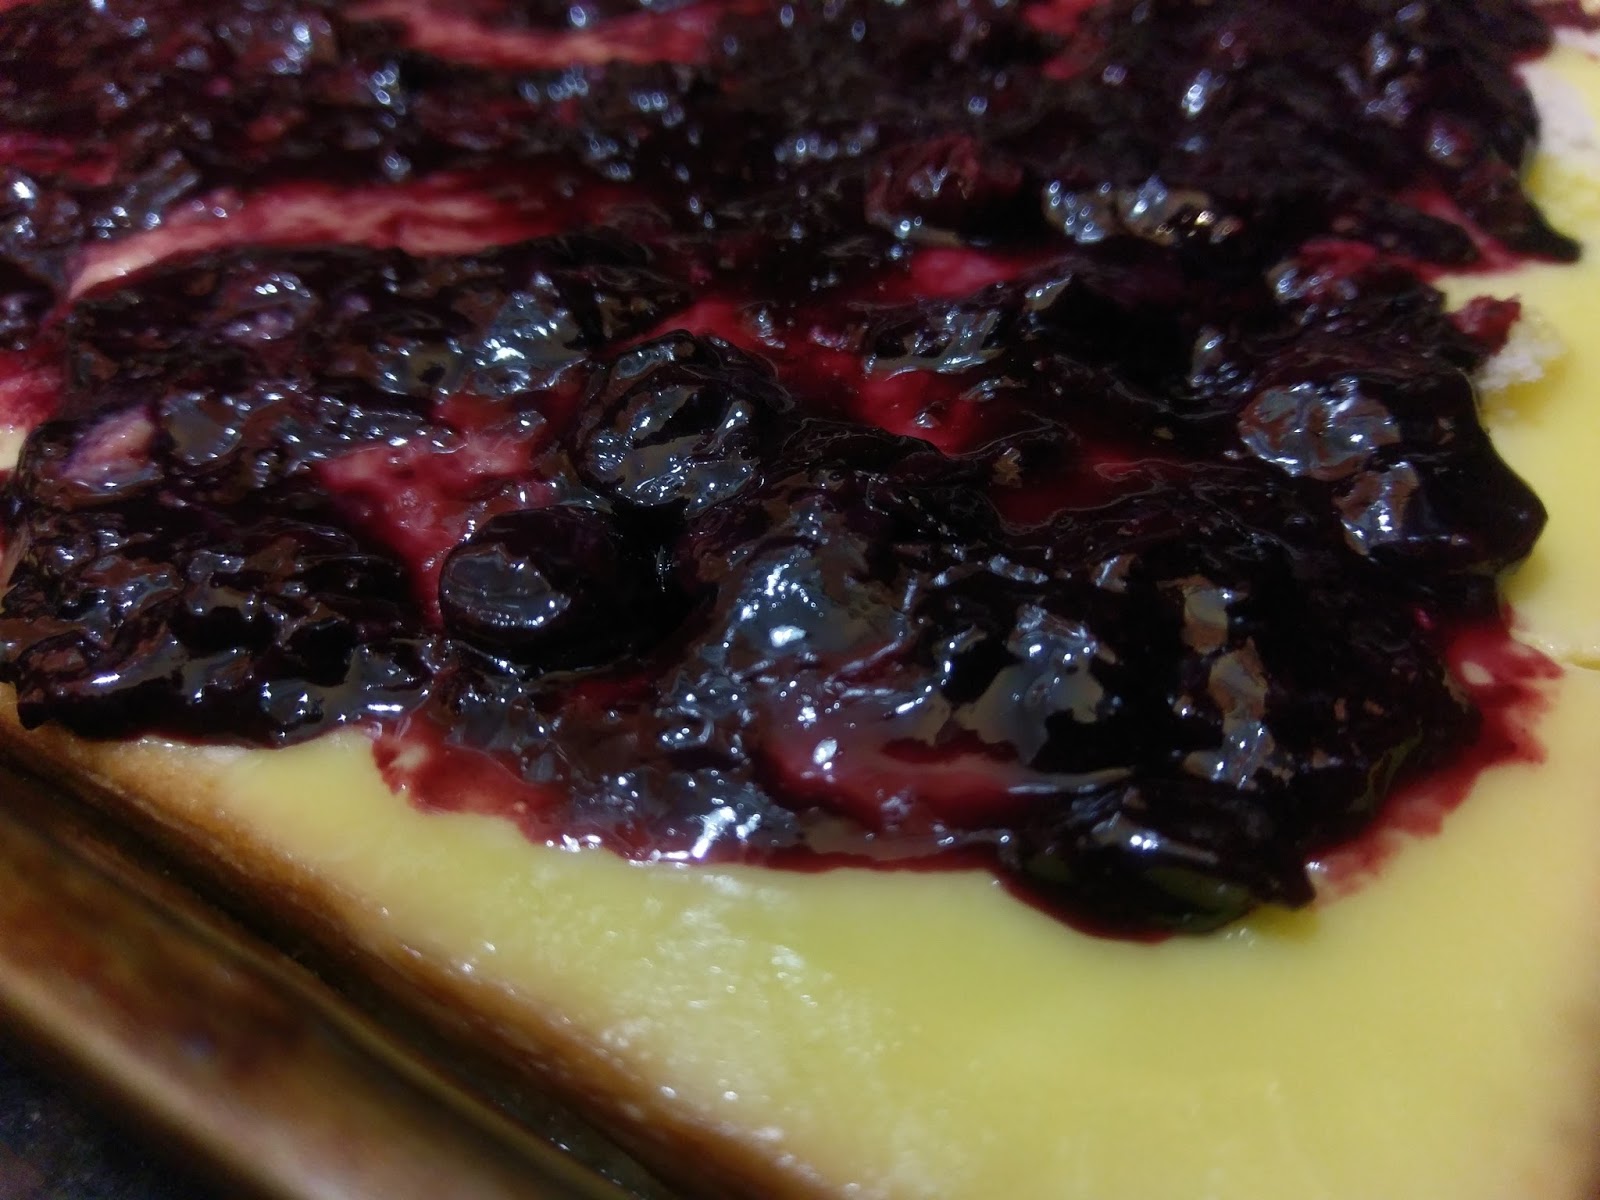
Dump all ingredients into a small or medium saucepan and stir well. Bring to a boil and continue to occasionally stir and cook the sauce for 20 minutes. Things will be mushy and delightful. Allow the mix to cool for 10 minutes, and then grab your cake out of the freezer.
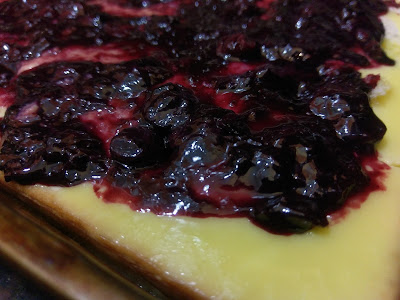
Even the colors complement each other. As a Vikings fan, purple and yellow just feel right together. Carefully pour the blueberry mix a little at a time on top of the pudding layer. Use a spatula to help you spread it out evenly. Some of it will spread into the poked holes while the rest creates a thin layer on top of the cake. Either way, it’s going to amount to a perfect forkful with each bite. Now, place into the freezer for at least two hours to set.
I’ve become addicted to Cool Whip Free. I used to HATE Cool Whip. It was a poor substitution for real frosting in my greedy, sweet-toothed opinion. As I’ve adjusted my eating habits, I find Cool Whip honestly adds the right amount of sweetness to certain desserts. With all the fruit in this cake, a standard buttercream would simply be way too much sugar. Once your cake has set, top it off with about 8 ounces of Cool Whip Free. I can only ever find these in the large tubs, so I had plenty leftover for future late night snacking.
Also, I can get Cool Whip to make these wicked awesome peaks. So it’s got that going for it, too. I just used a spoon and the swirl and lift method to make my peaks. Then I placed my glorious creation into the fridge to allow the cake to set overnight, and, mostly, so that I wouldn’t eat it before my in-laws arrived. People like you more when you don’t eat cake without them.

Worth the wait. So this cake has a lot of filling and getting slices onto the plate without a mess simply wasn’t possible. But I really didn’t care because look at it. It’s beautiful. Full of bright lemony goodness and deep blueberry amazingness.

It’s even more drool-worthy up close. This was a big winner. It’s a light and fluffy cake, but the addition of both the tart lemon and sweet blueberry fillings were a perfect balance in decadence and flavor. The airy addition of Cool Whip was, literally, the icing on the cake. I love an accurate metaphor! We just finished the last two slices with lunch today, and I already can’t wait to make this again. It has so many elements to it that you don’t even realize you’re eating a cake with minimal calories. I already have designs on a lemon raspberry or a strawberry lemon skinny cake for the summer. But this lemon and blueberry bliss is a perfect springtime cake. Great for those moments when the pollen count is too high and the tornado watches are driving you inside. Grab a slice of this, and it feels like you can actually be at peace with the season that tries its damnedest to kill you. ‘Til next time, my fellow eaters!

I miss you already, cake. -
No Grasshoppers Were Harmed in the Making of This Pie
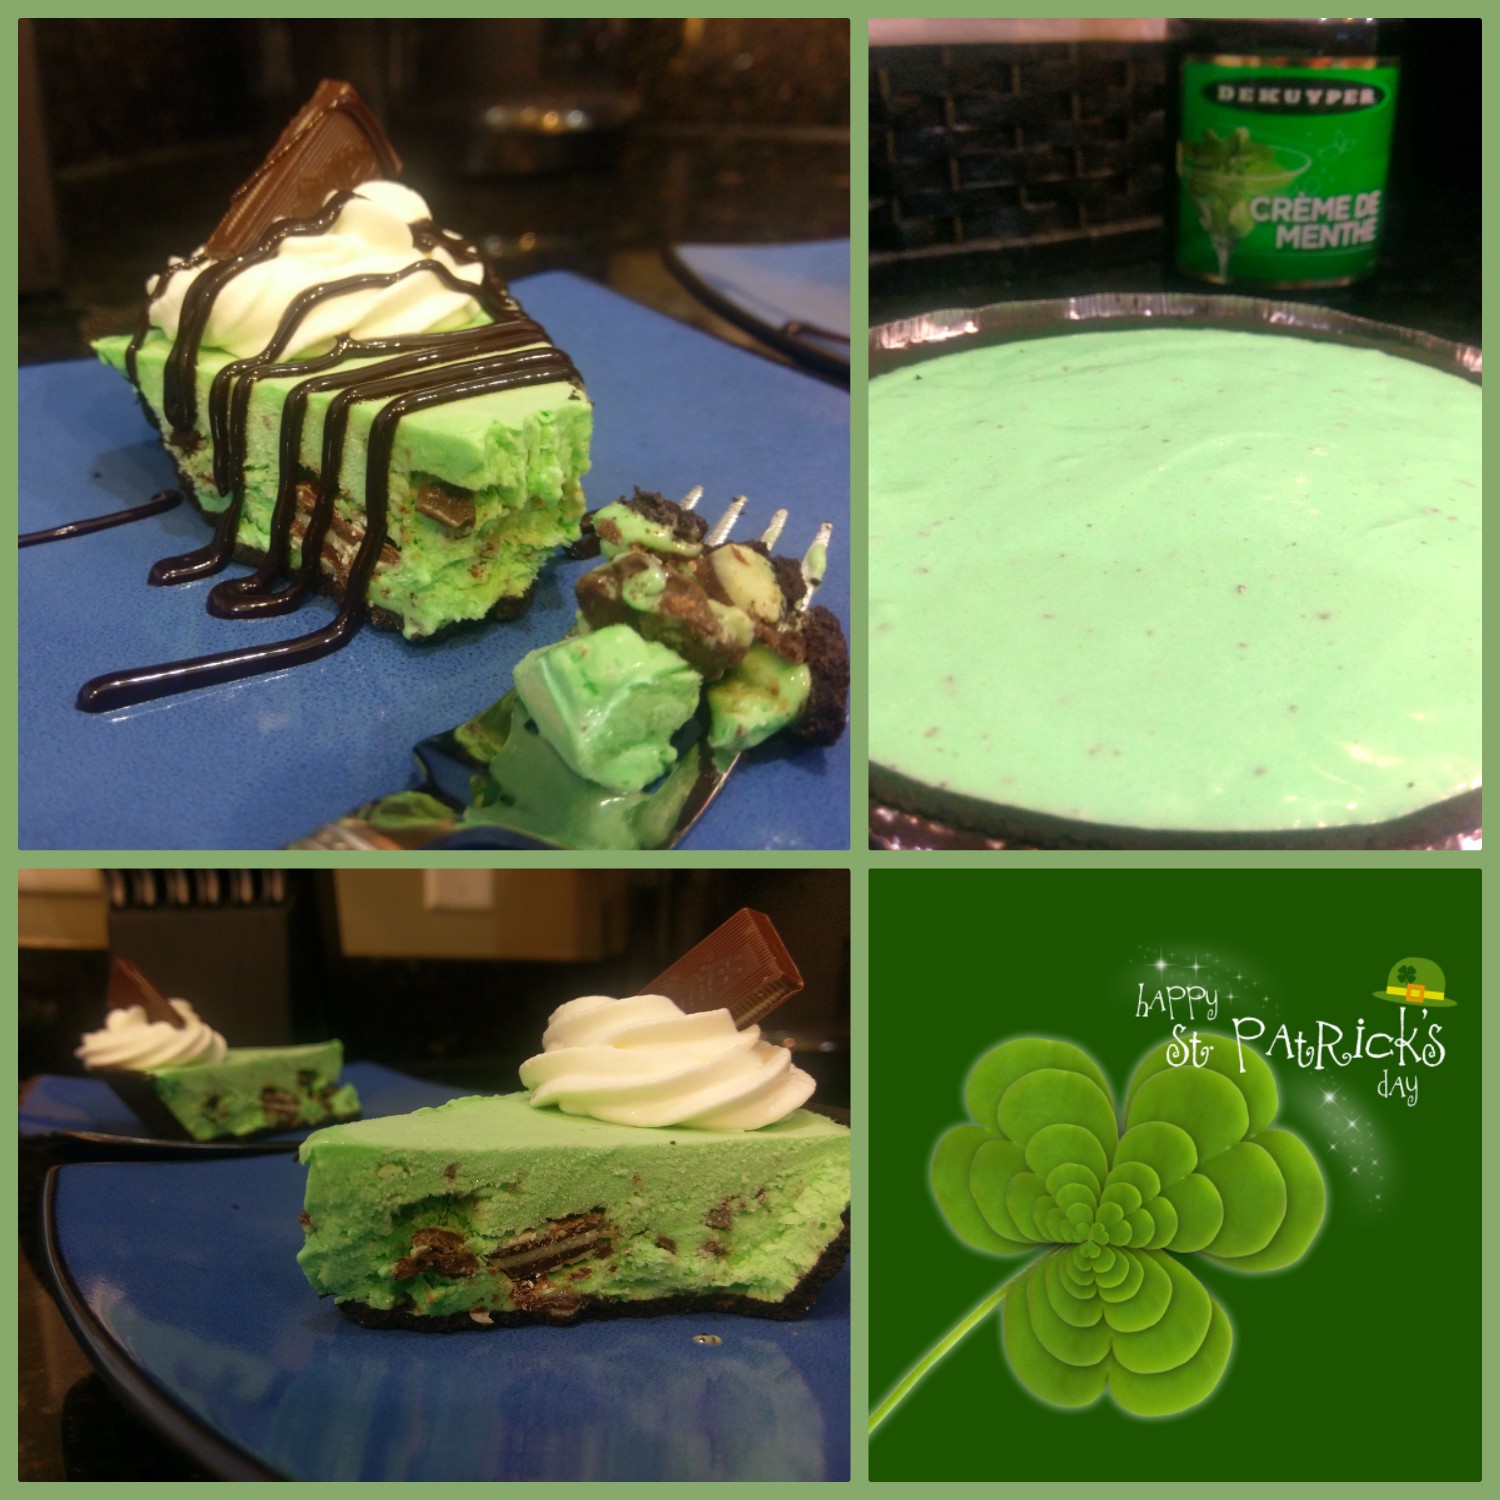
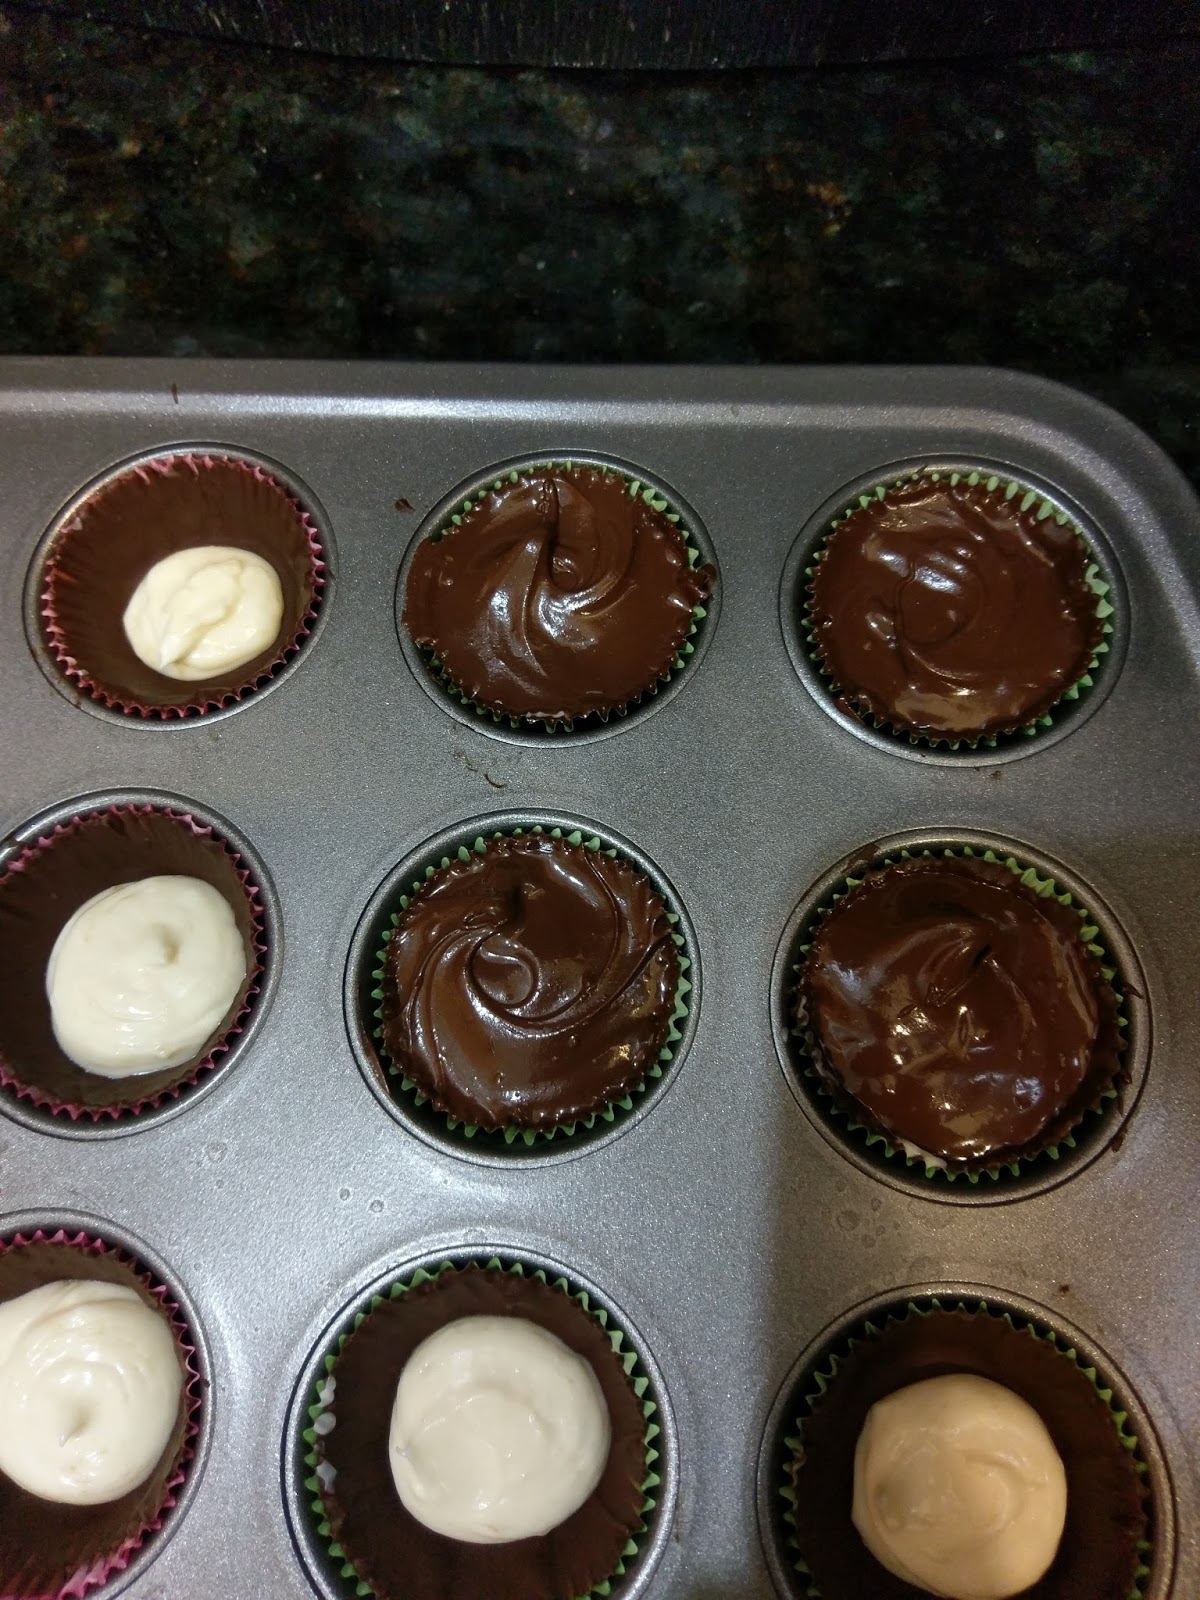
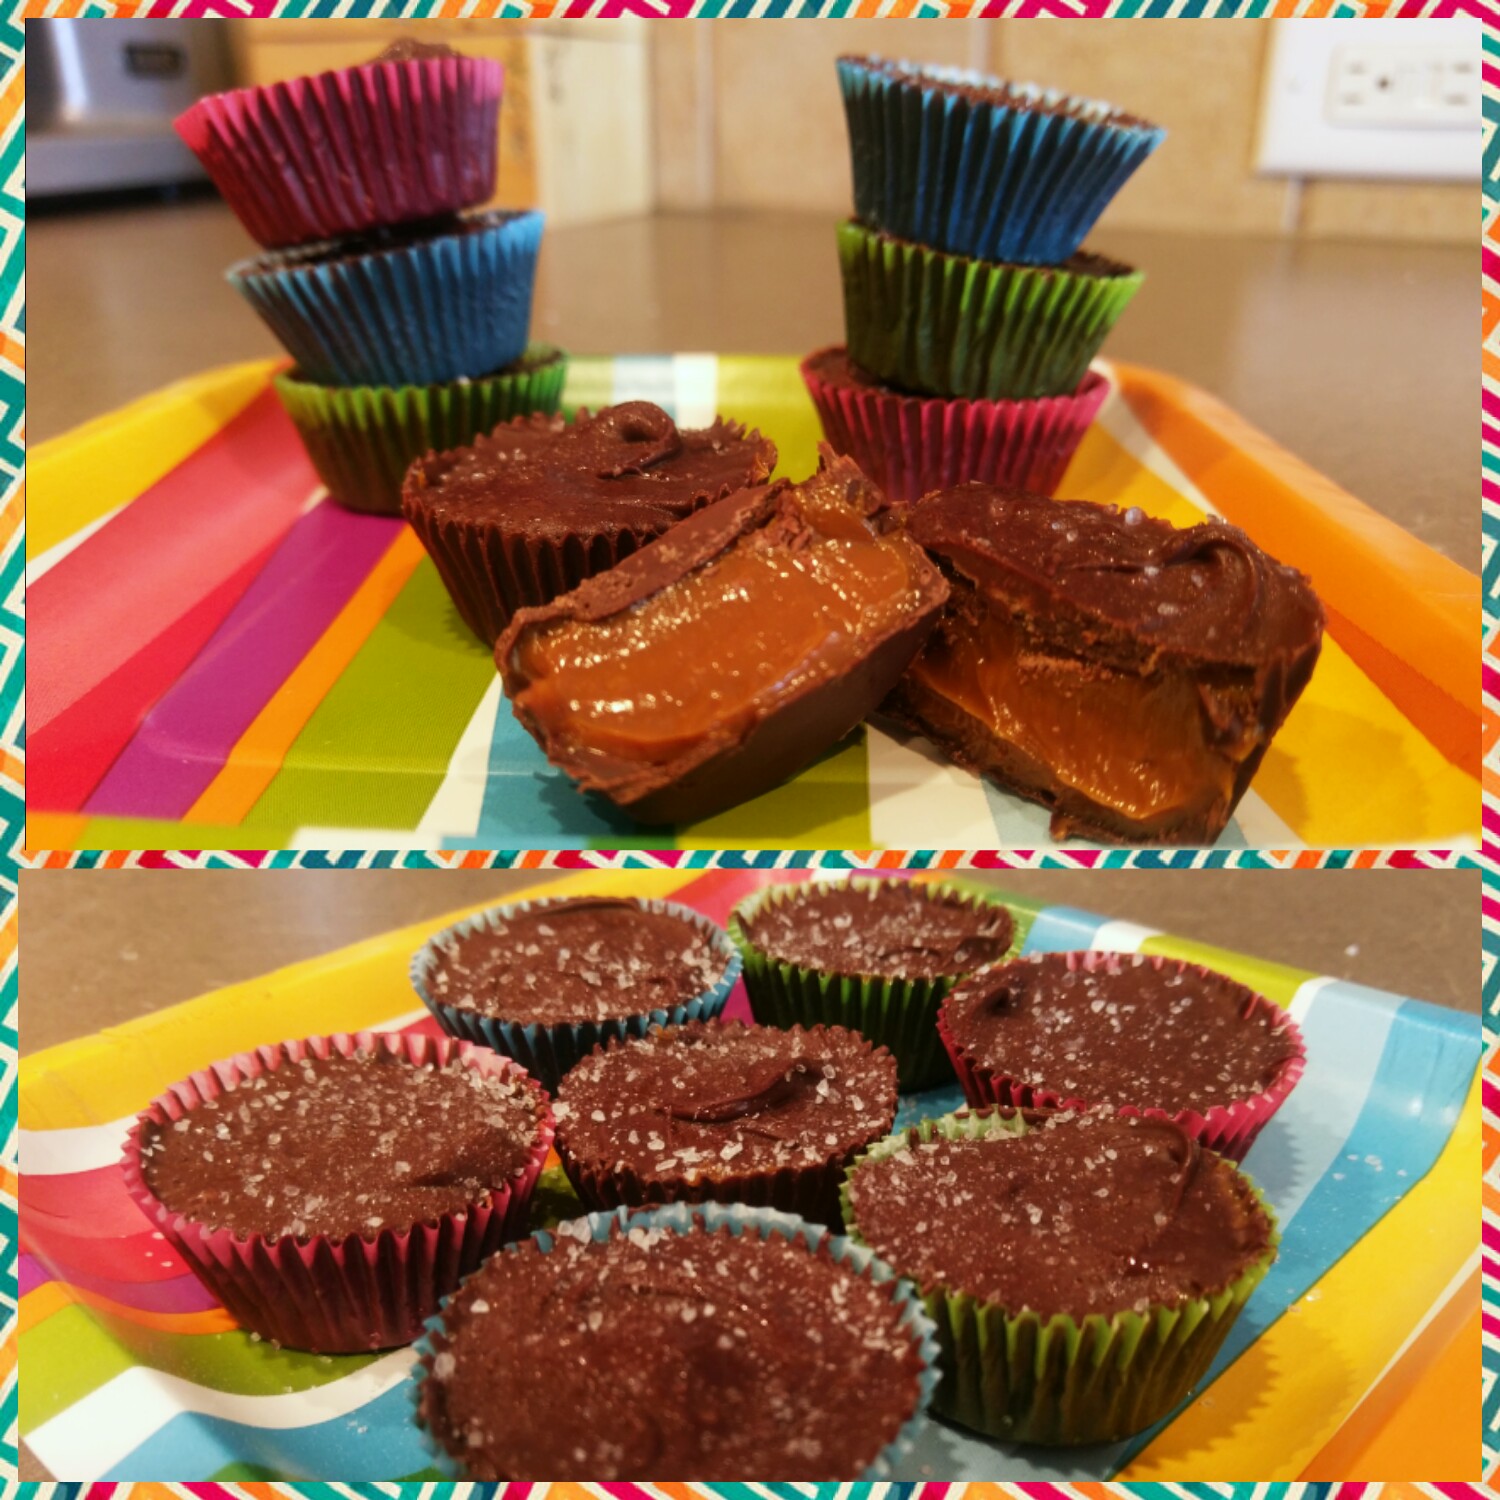
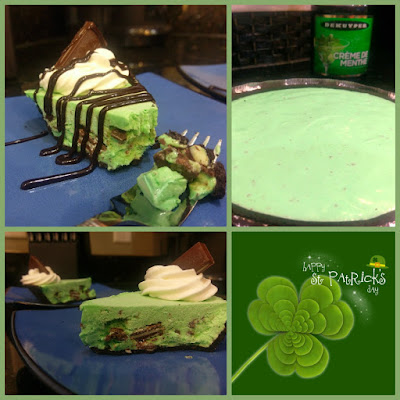
The week of Saint Patrick’s Day is nearly upon us. And while you’re foggily scratching your head today and wondering to yourself, “Did my phone clock really update last night, or am I completely unaware of the actual time?” thanks to Daylight Savings Time, don’t forget later that along with copious amounts of green beer go copious amounts of green desserts. Luckily, I’ve constructed a dessert that takes only ten minutes of your time, and it is so easy to throw together I have full confidence you could do so after your fifth Guinness with little to no issues. I’ve basically drunk-proofed this recipe in a sense that you can’t really screw it up and no heavy machinery is required. It does, however, contain a massive amount of booze within it, so just remind yourself that drinking straight creme de menthe is like downing a shot of mint Scope. It doesn’t sound like a bad idea in theory because everyone likes minty fresh breath, but remember–straight alcohol, much like mouthwash, tends to burn just a smidgen. I’m not sure I’ve ever had to preface a blog with a warning before, but there’s a first time for everything. Like for instance, I’ve never tried a grasshopper cocktail, and now that I’ve figured out how to turn it into a pie, I probably don’t need to. Chock-full of chocolate, Andes mints, and creme de menthe, I fail to see how the beverage could come anywhere as close to satisfying my taste buds as this low cal, boozy grasshopper pie can. To put it bluntly, this pie…sham-rocks. I’m sorry. I even hate myself a little for that pun, but you’ll forgive me when you make this pie yourself and see how accurate that terrible pun really is.
Another brief warning…this pie will get you drunk. Fun fact! I quit drinking for Lent last year, and I was amazed by how much better I felt and looked after only 40 days. I won’t bore you with a soapbox speech, but I only allow one glass of wine a week in my diet now. For whatever reason, I never feel bad about baking with booze because it usually does such a nice job of enhancing the flavoring of the rest of the ingredients. If you don’t believe me, try making a chocolate cake with Guinness instead of milk and get back to me. But since I no longer drink on a regular basis, I have the alcohol tolerance of a very small house cat. I didn’t think I put that much creme de menthe in the pie, but a few minutes after I ate it, I was feeling rather euphoric. So it’s either just that good of a mint chocolate pie, or it’s just that boozy that I would not recommend letting your small house cat near it. And even though creme de menthe is absolutely terrible for you, I made a ton of other calorie cuts so that one slice of this pie will only run you 264 calories. That’s right, you can have pie, Guinness, and your fish and chips this Friday. A Saint Patrick’s Day miracle! Well, considering this holiday began as a religious feast, most of us Catholics would just call this a typical Lenten Friday, but instead of surviving off grilled cheese or tuna, we go big with fried cod. Save the Filet ‘o Fish for a week when the sight of peanut butter and jelly makes you break down in tears.

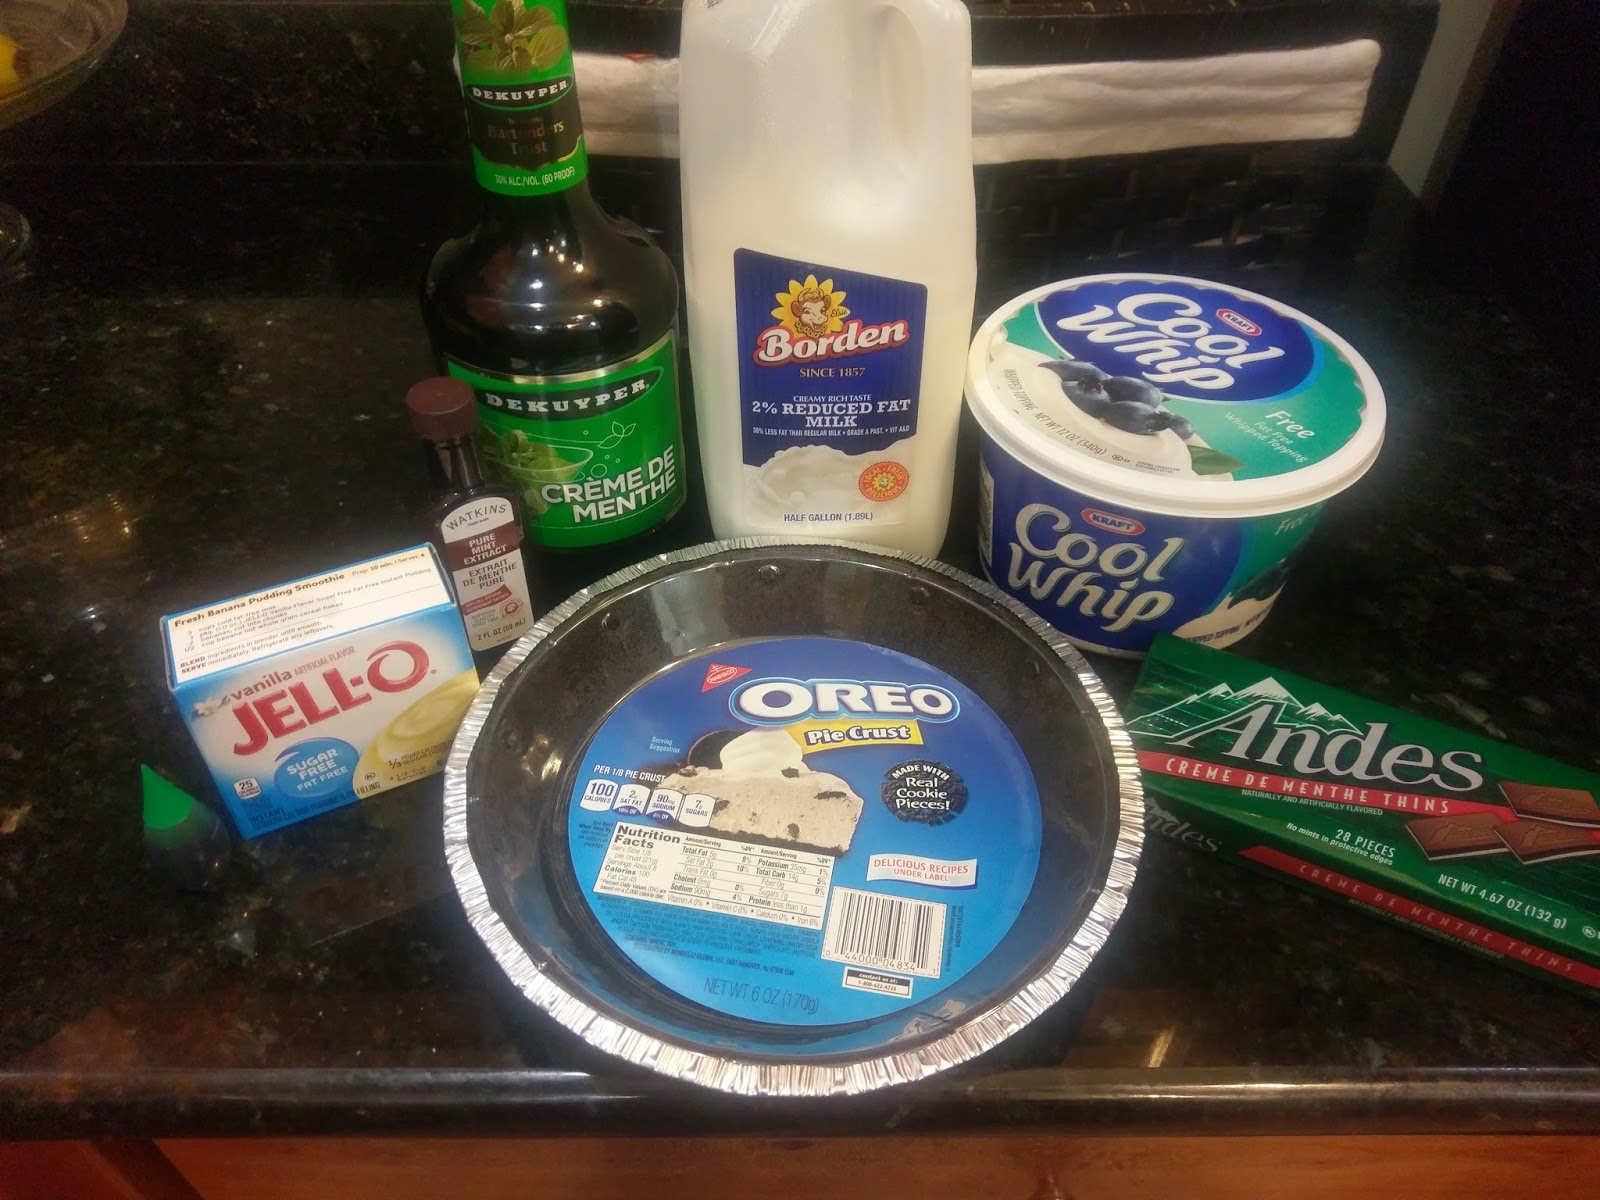
It really is easy as pie. I know..premade crust is not typically my thing. But low fat chocolate Graham Crackers are, to my knowledge, not a thing, so there was practically no difference between a homemade crust and an Oreo crust in the calorie arena. Plus, I told you this could be done in under ten minutes, and that isn’t possible with homemade crusts. Just try your best when taking photos of your pie to keep the aluminum edges of the pie tin hidden, and no one has to know! To make your very own drunken grasshopper pie, gather:
- 1 Oreo pie crust
- 1 package of sugar-free vanilla instant pudding
- 1 cup of skim milk
- 1/2 cup of creme de menthe
- 1/4 tsp pure mint extract
- 2 cups of Cool Whip Free, divided
- 15 Andes mints, smashed into pieces
- Optional: 2-3 drops green food coloring, additional Andes mints for topping

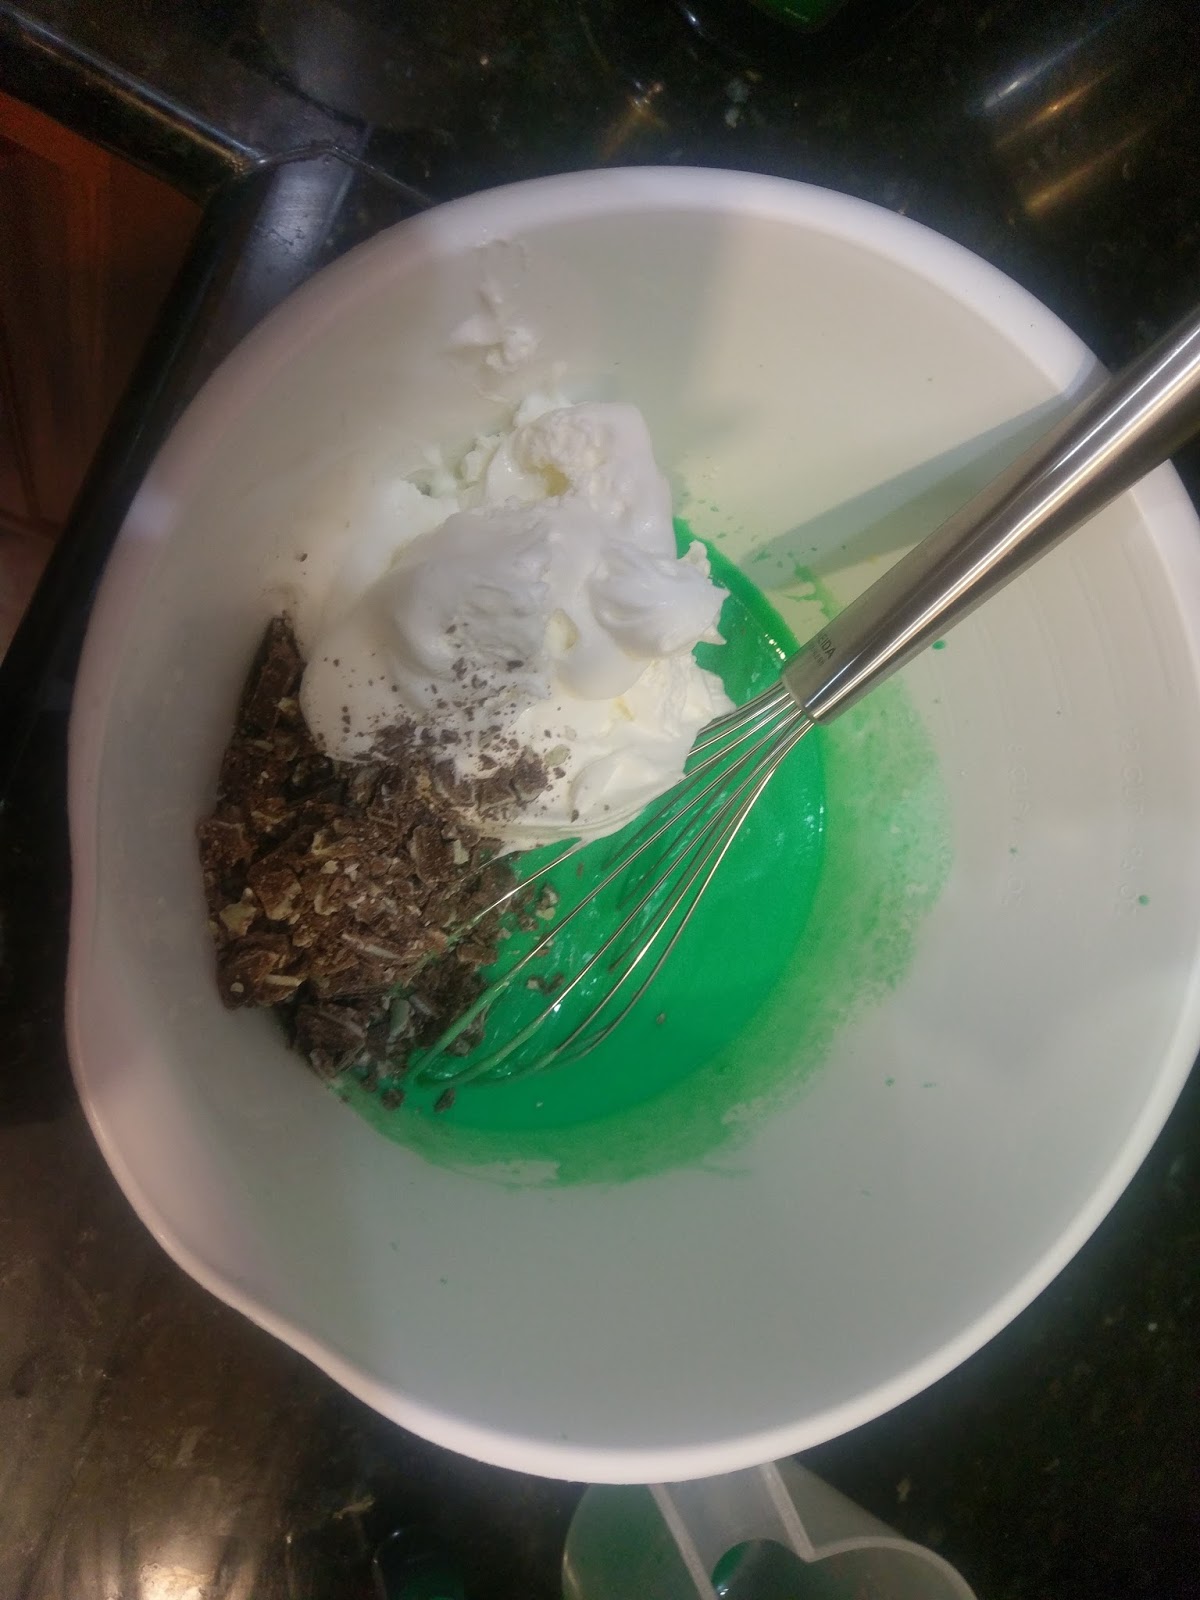
I’ve spent more effort into putting on shoes than it did to make this pie. Start by mixing the booze, milk, and pudding into a large bowl for 2 minutes with a whisk. Your biceps will appreciate the small workout. Then, add 1 1/2 cups of the Cool Whip, the crushed Andes mints, and 2-3 drops green food coloring. Mix together, and then see if the pie is minty enough for you. I wanted to be smacked in the mouth with wintergreen freshness, so I added an additional 1/4 tsp of pure mint extract. Much like time spent around other people’s children, a little goes a long way, so increase the amount of extract you want in small increments until it meets your taste preferences.
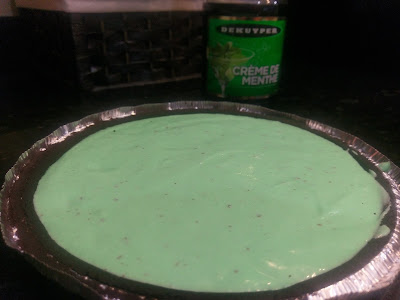
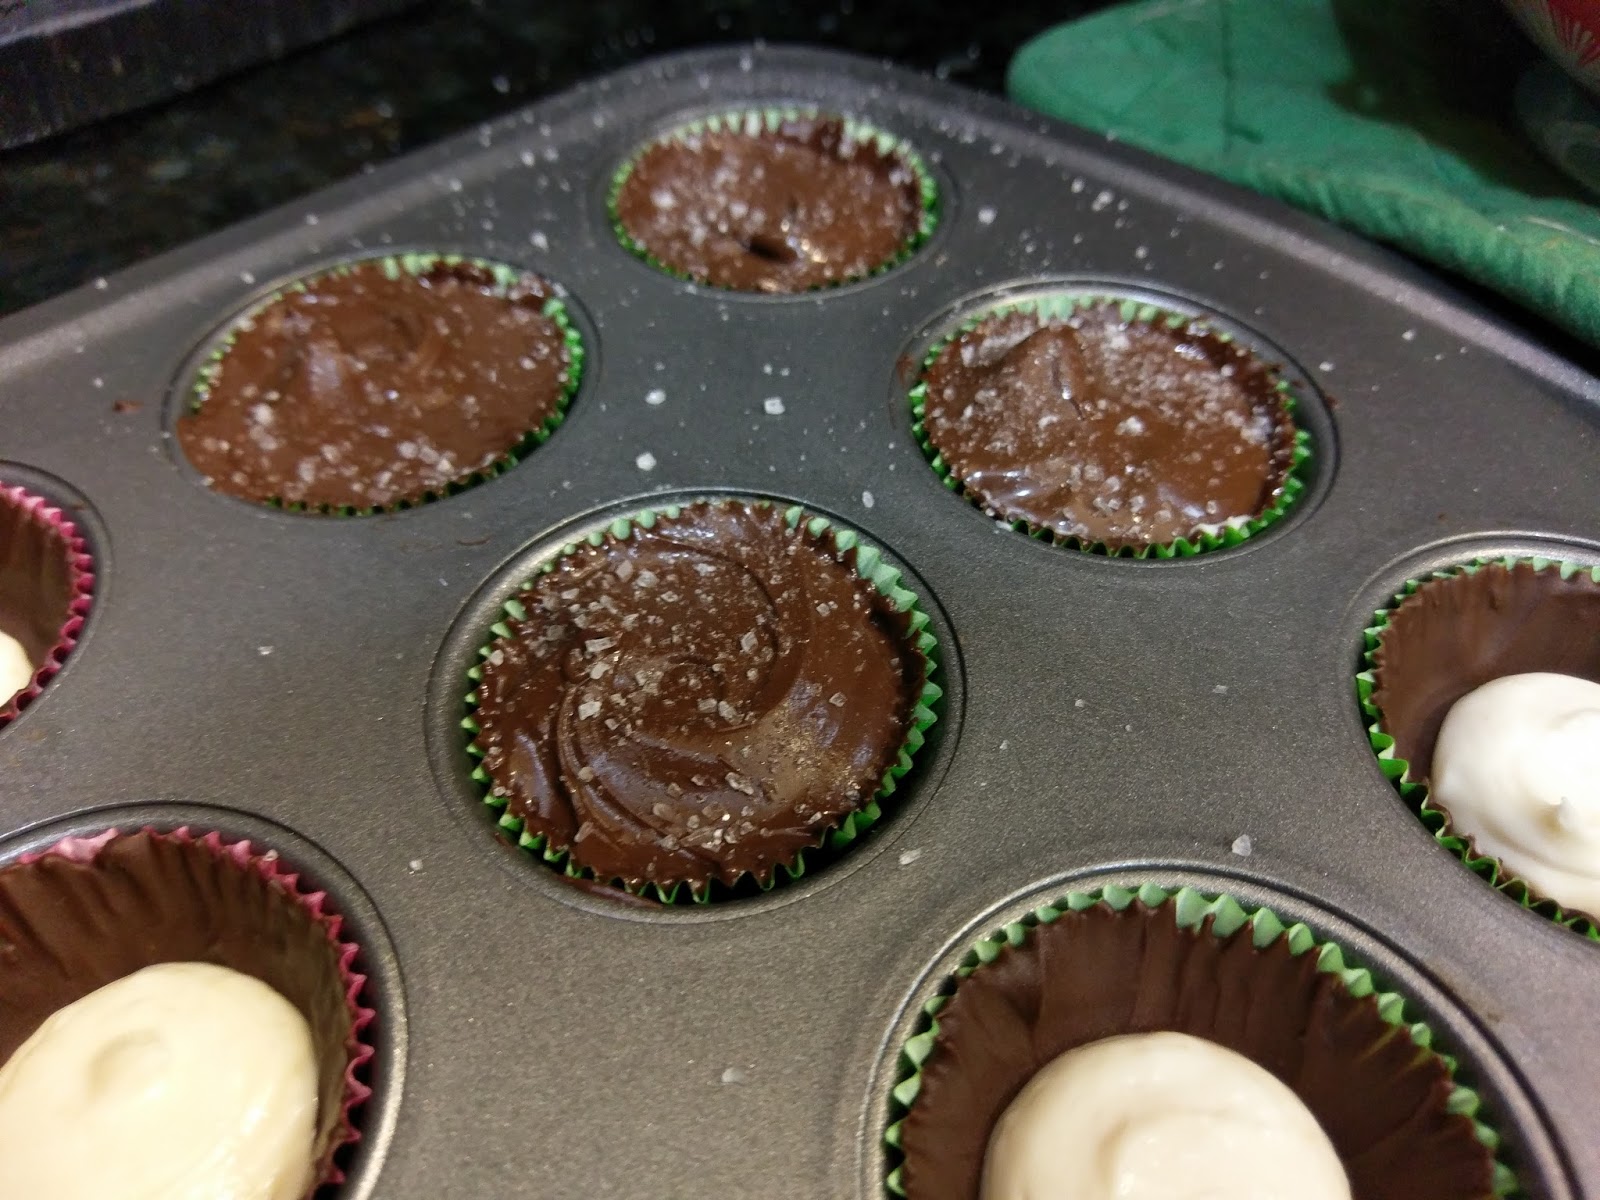
And come up with a list of possibilities on how to kill a bottle of creme de menthe. I think boozy Shamrock Shakes are in our future. Once mixed and minty enough, dump your pie filling into the Oreo crust and smooth out. Place into the freezer for at least two hours to set. I left mine in the freezer overnight, and it sliced through perfectly:
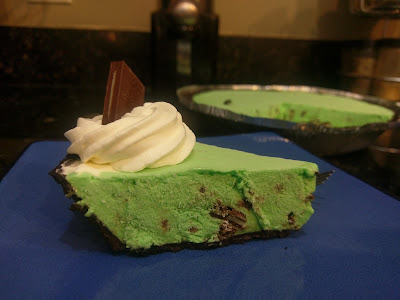
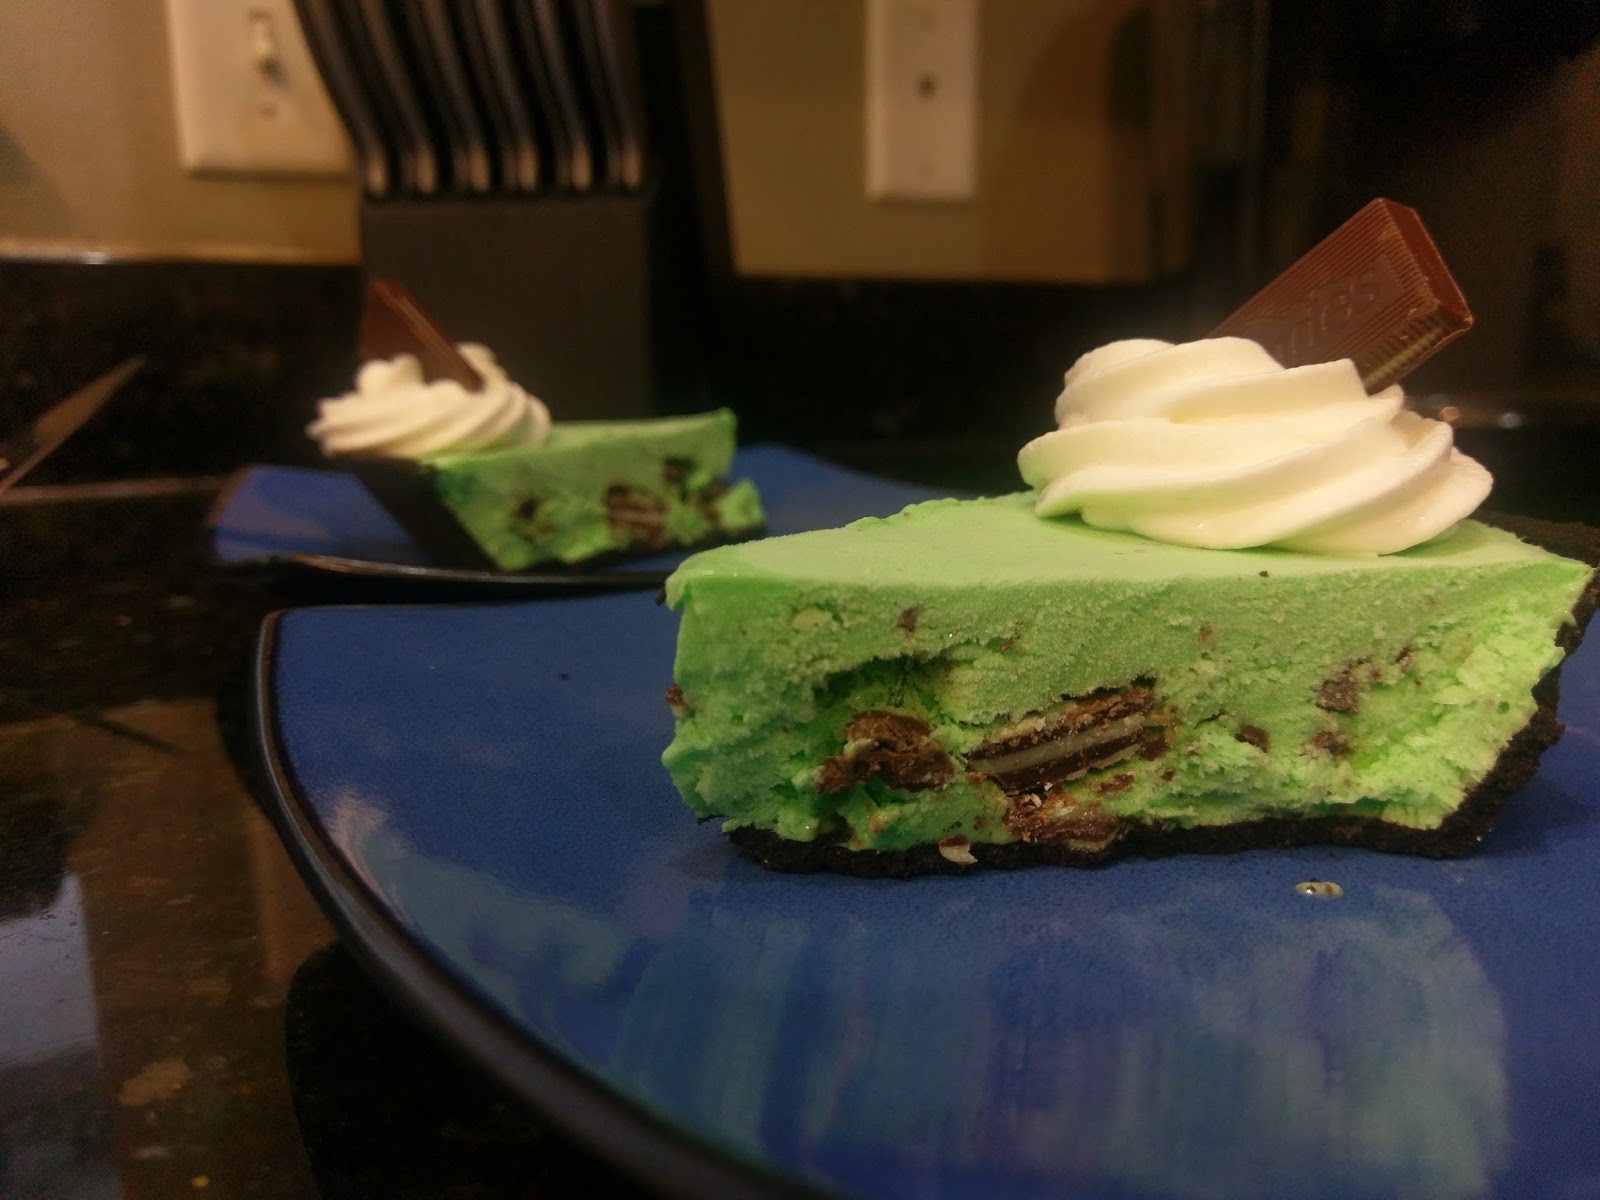
Like buttah. Once your pie is cut, serve your slices and let them thaw out for about 20-30 minutes. Garnish with the remaining Cool Whip Free (I used a 1M tip and simple swirl technique), and if you’re feeling fancy, stick another Andes mint on top. If you’re feeling super extra fancy, drizzle some low cal chocolate sauce on top.
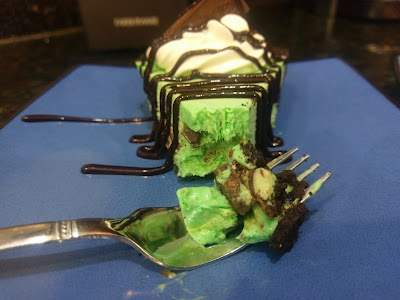
I mean, it does make for great presentation. I loved this pie cold, like my heart or a pint of Killian’s Irish Red, and it certainly didn’t disappoint in the taste department. The Andes mints were a great way to add both texture and additional mint flavor that most grasshopper pie recipes are missing. By nixing the traditional marshmallow creme for pudding mix and skim milk, you can add in the creme de menthe with minimal guilt concerning your waistline. It’s basically the perfect pie, and your Saint Patrick’s Day festivities would be woefully incomplete without a slice! I recommend leaving in the freezer until it’s time to serve it, but if you like a softer consistency of pie, leaving it in the fridge would be fine. Just don’t leave it out on the counter (especially near small house cats, for obvious aforementioned reasons) so it won’t turn into a mushy puddle of minty booze pudding…although honestly, that still sounds delicious, and I’m pretty sure that’s not just the pie’s creme de menthe talking. But enjoy the joyous festivities this week, wear green so strangers don’t try to pinch you (why this is an acceptable thing I do not know), and embrace the camaraderie Saint Patrick’s Day always brings out in people. ‘Til next time my fellow eaters, and slainte!

I’m sure this pie would go great with some Jameson, if you’re into that sort of thing. -
Trial and (Baking) Error
Although I do a good job of covering it, I am actually human, and I do sometimes, on very small, tiny, few and far between occasions, make mistakes. For some reason, when I make mistakes while baking, it literally upsets me more than anything else…except for maybe when I make a typo in an email or text message. I will find the nearest rock and crawl under it when that happens. But I feel like my creativity and my very own favorite hobby in the world betray me when I commit a baking fail. Thankfully, even when things go wrong, they still end up being edible so I can drown those weird emotion things back to a more neutral, sarcastic state where they belong. I must preface this blog with the aforementioned information so that I can, 1. Show you my triumph over adversity (I live a sheltered life), and 2. Show you that even a baking fail can be turned into a baking win with the right level of creativity. This blog is a giant “learn from my mistakes,” post, so prepare yourself for plenty of self-deprecating wit and chances for you to sit back and feel better about yourself at my expense..but just remember, at the end of this post when you’re feeling all high and mighty, I’m the one with all the cake.
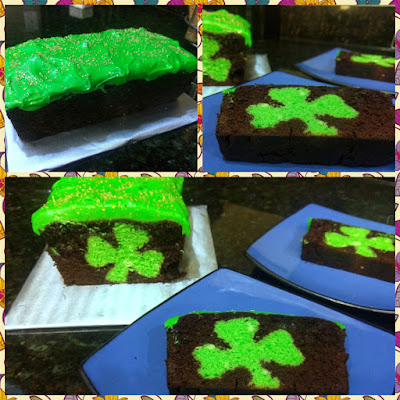
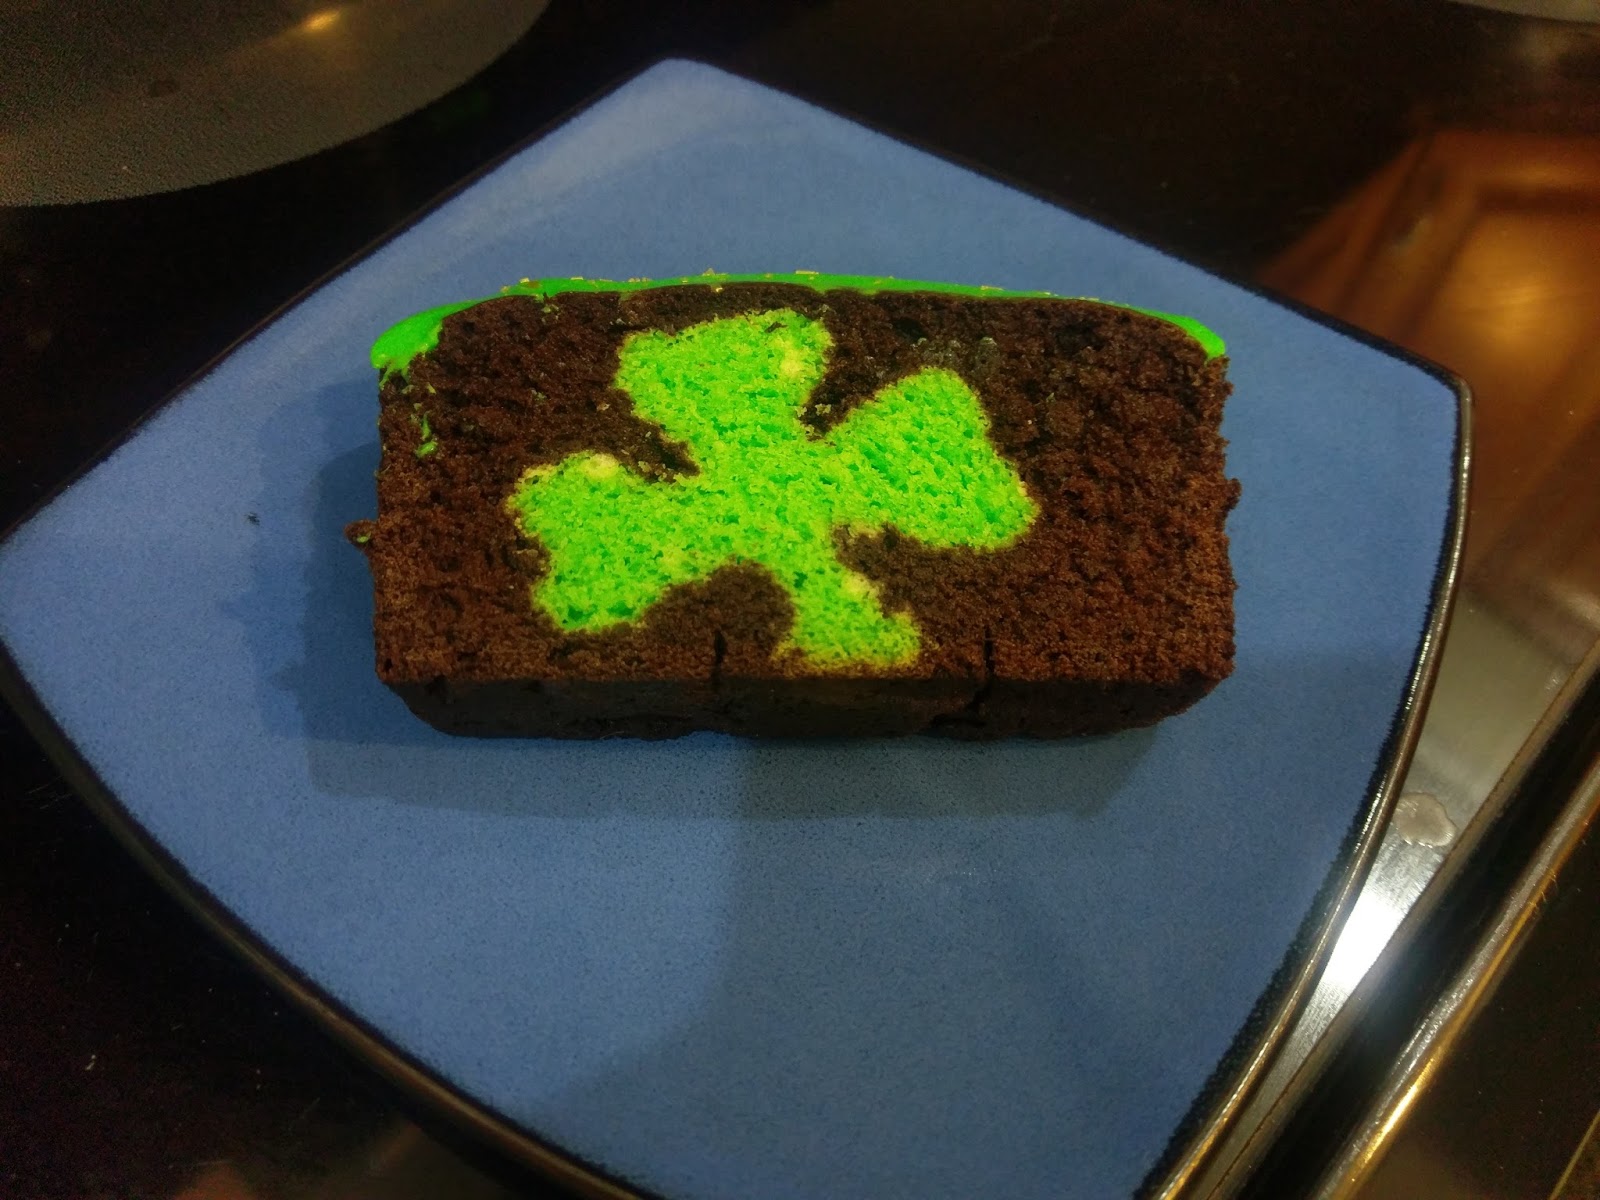
And fail or no fail, it looks and tastes like a winner. I am not Irish. My husband is, and he’s also the one with all the luck, so maybe I should have had him at the ready while I was making this clover surprise cake. You may be wondering, “It’s clearly a cake. Looks fine. Where’s the fail so I can laugh at your misfortune?” Don’t worry, we’re getting there. I love Saint Patrick’s Day. It affords me the opportunity to bake mint chocolate everything, and don’t even get me started on Shamrock Shakes. I die. I actually didn’t add mint to this cake, but I thought long and hard about it and opted not to because I’m a crazy person (clearly there was no other reason). This is actually a chocolate cake with white cake shamrock center and light cream cheese frosting dyed a color best described as “green highlighter.” And while this cake almost didn’t come to full fruition, I did manage to make it low calorie. With cake and frosting combined, 12 servings amounts to 250 calories a slice. Still under 300 calories with real frosting…a feat in modern baking! Remember that later while I regale you with how it all went wrong.
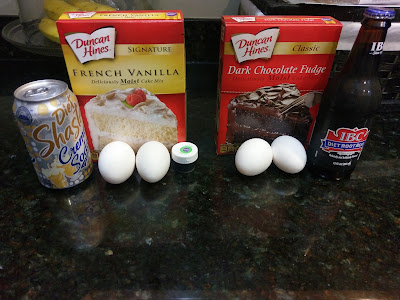
Duncan Hines…how dare you. So it all began when I bought the wrong brand of cake mixes. I am through and through a Betty Crocker baker, but in my mad sprint through the grocery store, I nabbed Duncan Hines mixes because I swear they didn’t use to also be in red boxes. For whatever reason, these mixes have a higher calorie content even when just using the dry mix. So kudos to you if you buy Betty’s box cake, and knock an extra ten calories off each serving. But as far as ingredients go, you need:
- 1 box white cake mix
- 2 egg whites
- 10 ounces of diet creme soda or diet Sprite/7up
- 1 box chocolate cake mix
- 2 egg whites
- 10 ounces diet root beer or Diet Coke
- Green gel dye
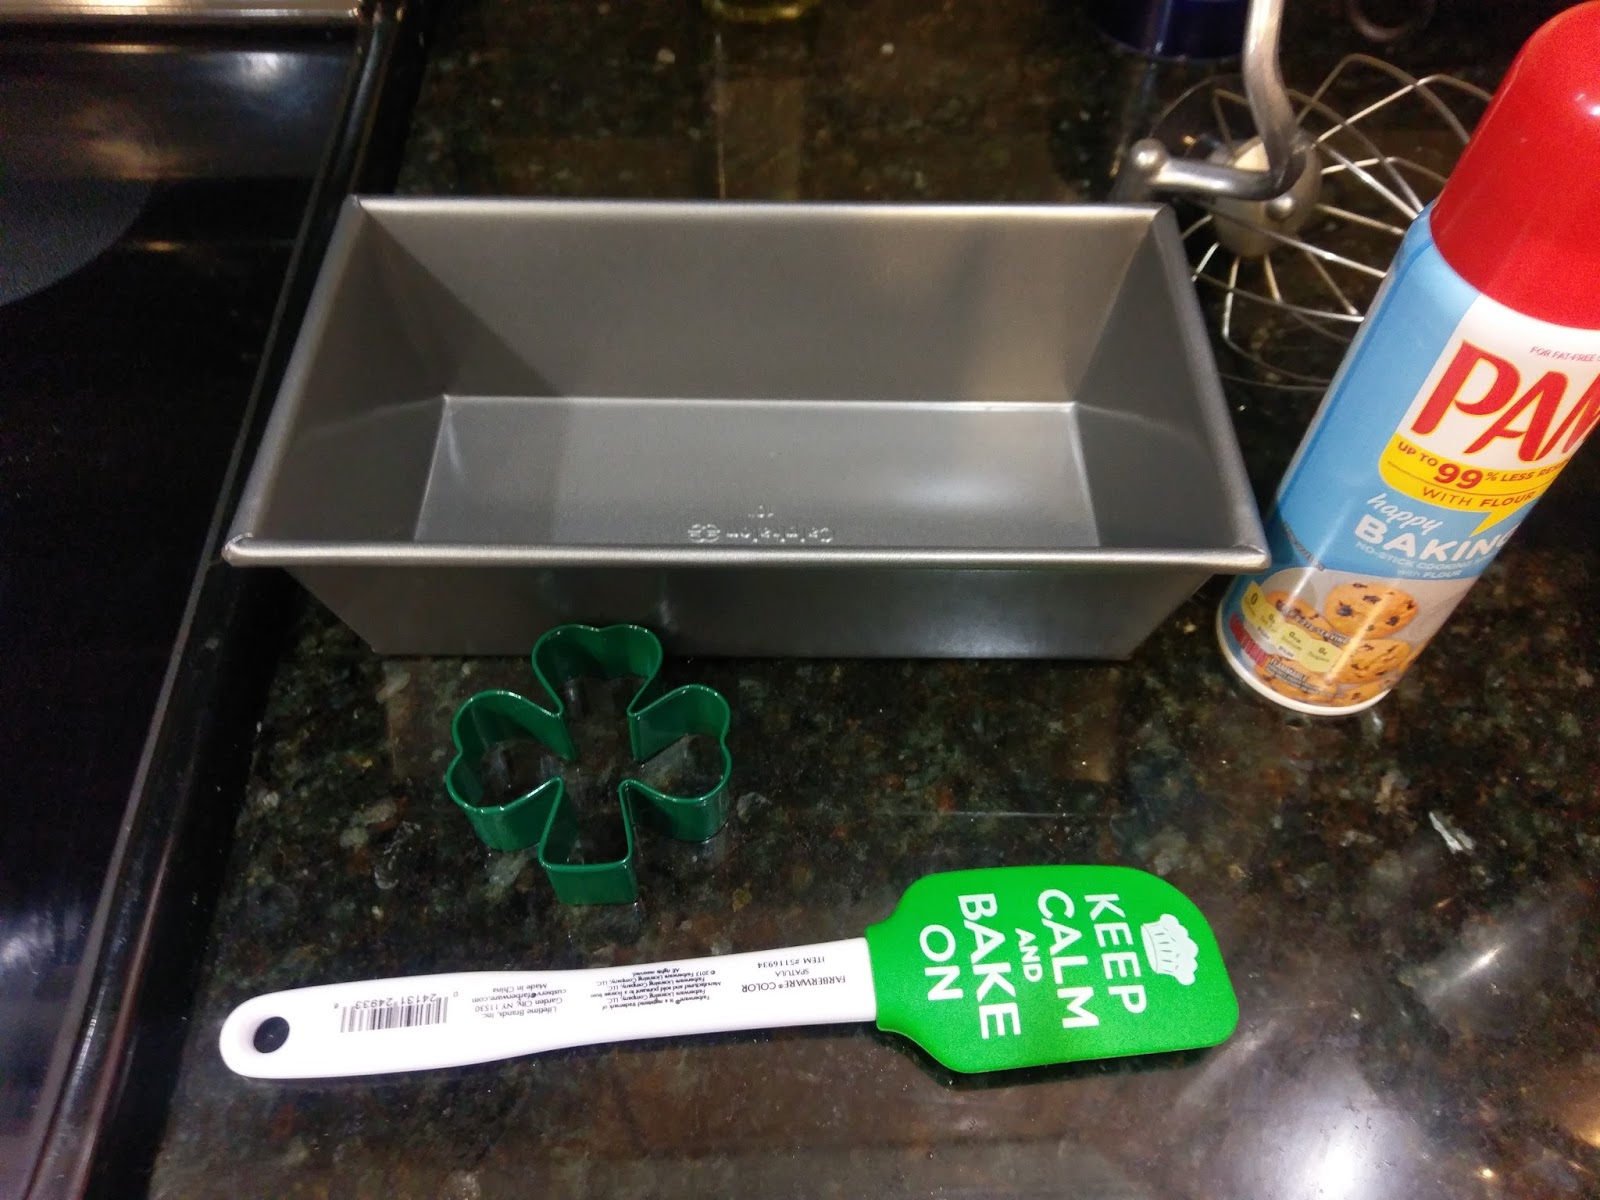
- 1 10×6 loaf pan and other-sized pan for white cake (more on this in the fail section later)
- Shamrock cookie cutter (…for reasons to be explained shortly, check the sizing to make sure it’s not taller than your loaf pan. Figured out where I’m going with this yet?)
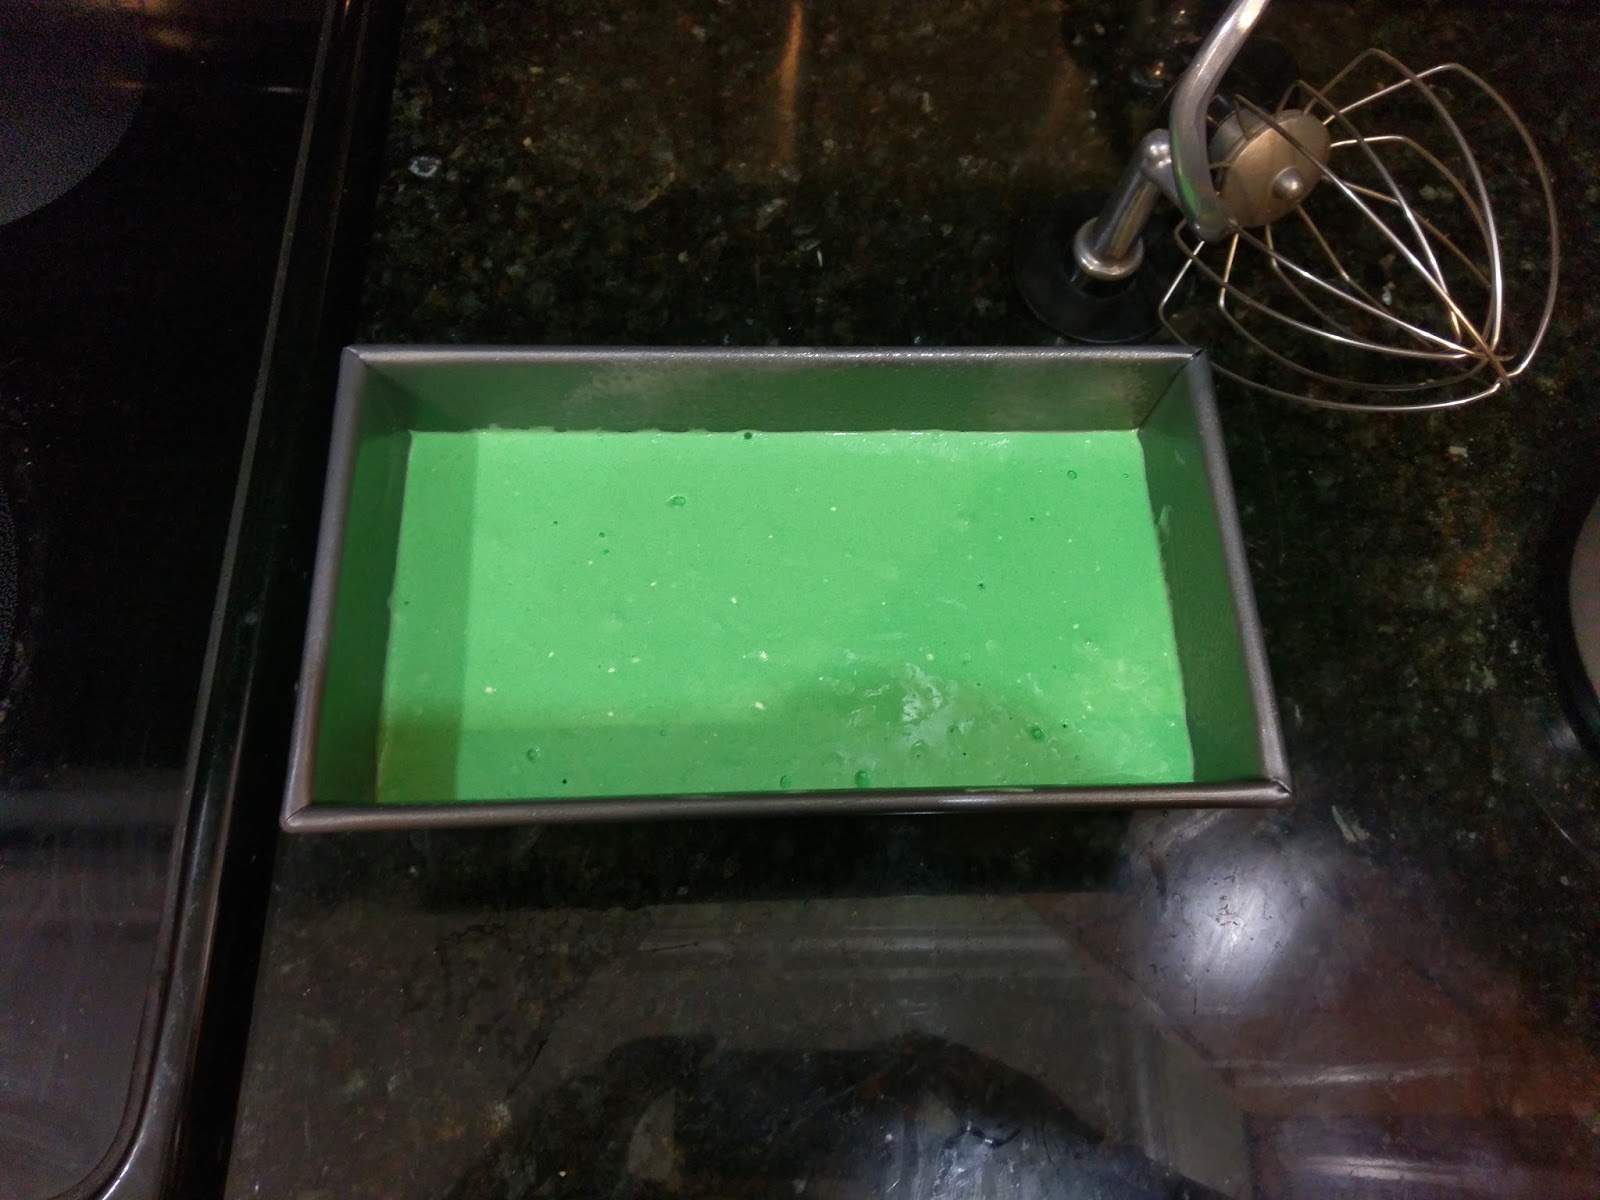
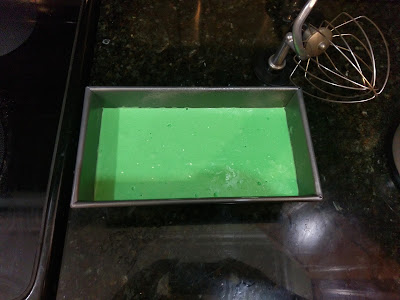
Start by baking the white cake mix. Preheat your oven to 350 and blend the white cake mix, egg whites, and creme soda for 2 minutes. Add a large heaping amount of green gel dye to this mix and blend. Now let me tell you about the type of pan you SHOULD use and not the one I used.

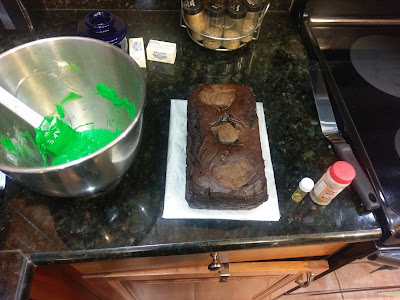
Oh look, a brand new, unassuming loaf pan. I also did not heed my spatula’s mantra. This 10×6 pan was not the right size loaf pan for my green cake. When my cake baked, it was shorter than my shamrock cookie cutter. Since every Pinterest tutorial ever told me, “Oh, just cut your cake into loaves, and place your cookie cutter into each loaf to cut out the shape,” Kate Panic Stage One (also known as the “I’ve made a huge mistake” stage) began immediately upon noting the first loaf I cut only came halfway up the height of my cookie cutter. To prevent your very own personal panic stages from commencing, use a pan that’s going to give you more surface area to cut into, like a 9×13 pan, a jelly roll pan, or maybe even a 9×5 loaf pan that would bake up higher. Grease your pan of choice and dump your batter in. Bake for the required amount of time the box states, give or take 5 minutes. When I bake with soda, my cakes always seem to finish up 3-5 minutes before they would with the standard butter and milk.
I was still so full of hope at this point. 
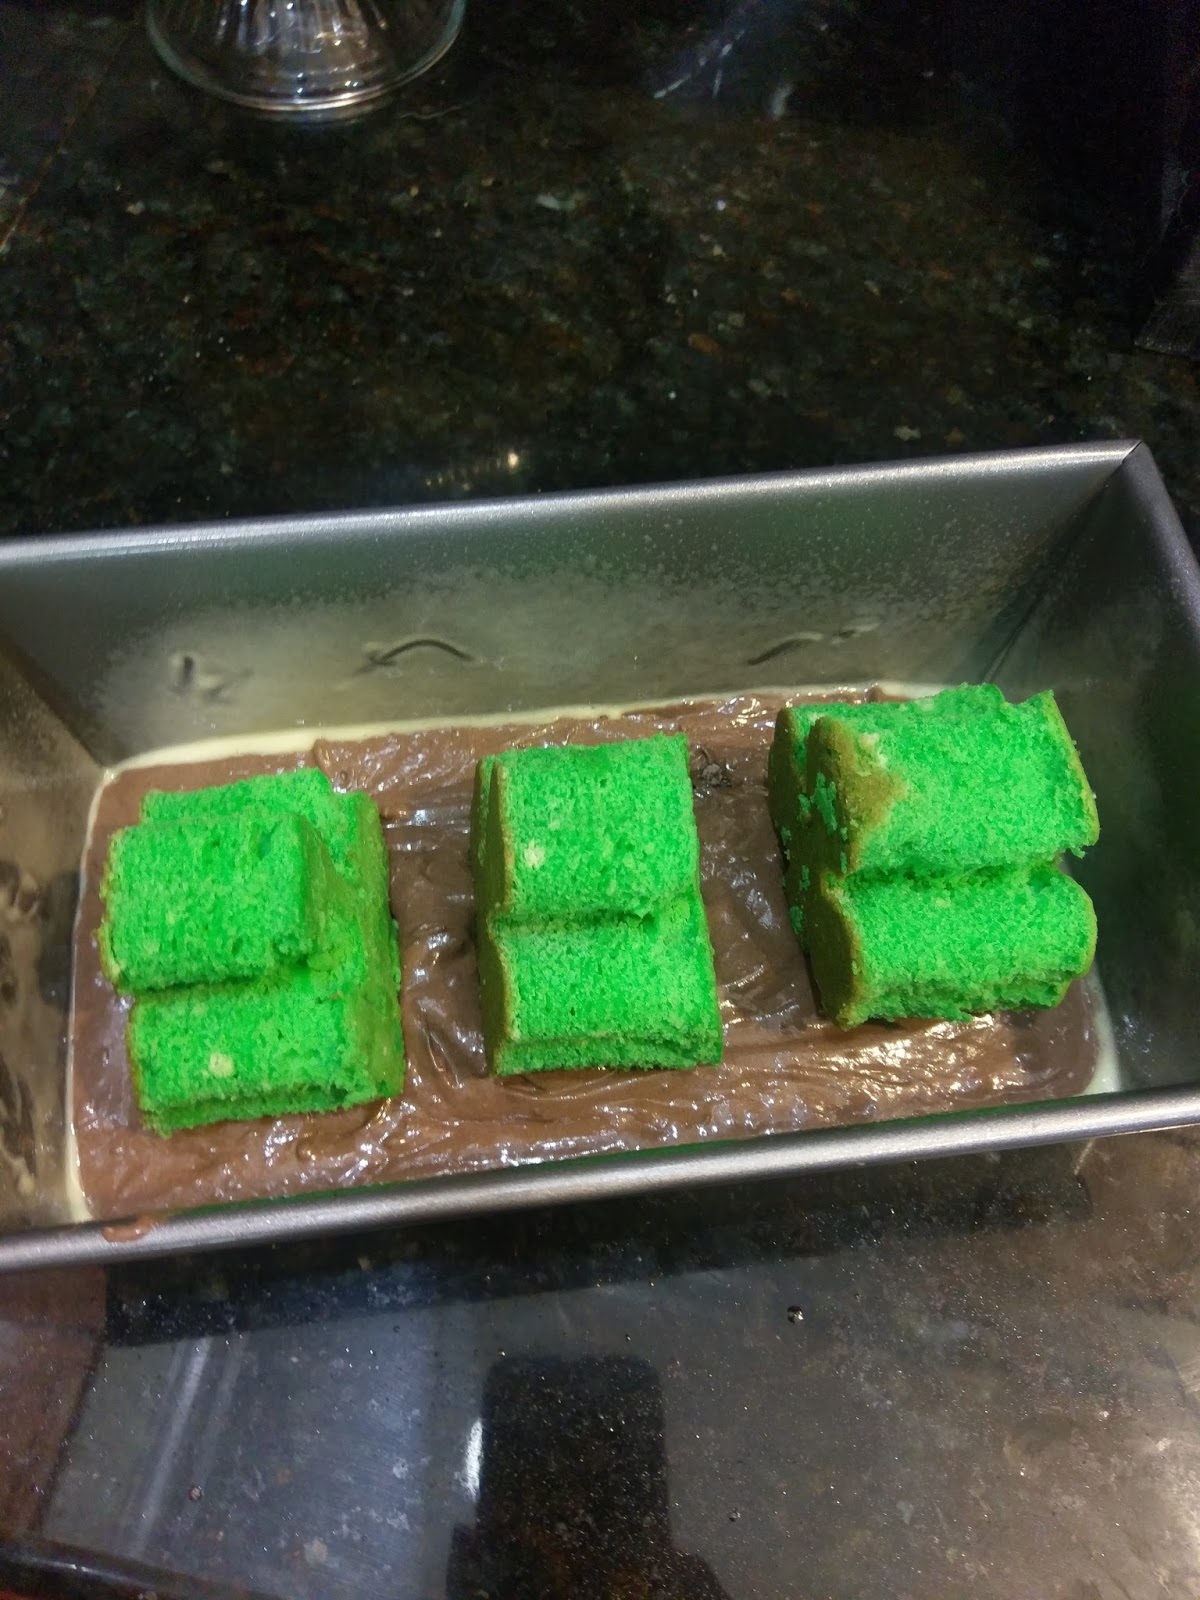
Even here, when I was delighted by how easily my new loaf pan released such a heavy cake. I was so happy I was considering writing a review for it on Amazon. That unbridled enthusiasm has since waned. Let your cake cool in its pan for 10 minutes, then remove to a cooling rack. I highly recommend placing the cake in the freezer for an hour. The firmer the cake, the easier time you’ll have not necessarily for the cookie cutting, but for removing the cake pieces from said cookie cutter without them breaking. When your cake is fully cooled and partially frozen (also the working title for my autobiography), take your shamrock cookie cutter and cut out enough shamrocks to line up end to end in your 10×6 loaf pan with a little room on each end of the pan for the chocolate cake batter to cover them up.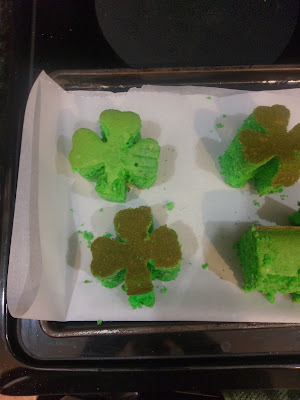
Not pictured: Kate Panic Stages 2-4, more commonly referred to as the “cursing, crying, and bargaining” stages. I was only able to yield 3 very fat clovers from my green loaf cake. I ended up having to stamp my cookie cutter down in the actual middle of the cake instead of cutting into loaves since my cake, much like its baker, was vertically challenged. My Wilton shamrock cookie cutter (obtained from Amazon) was only 3 1/2 inches high, and I mistakenly thought it was going to end up being too short. Oh to go back to that wonderful ignorance. After I yielded my three fat clovers, I placed them on a Parchment-lined baking tray and put them in the freezer overnight. Kate Panic Stage 5 then came to pass. This stage of panic is known as the “acceptance and eating of all the cake remnants” stage because nothing says “I’ve got this” quite like a grown woman eating cake scraps at 10:00 p.m on a Saturday night.
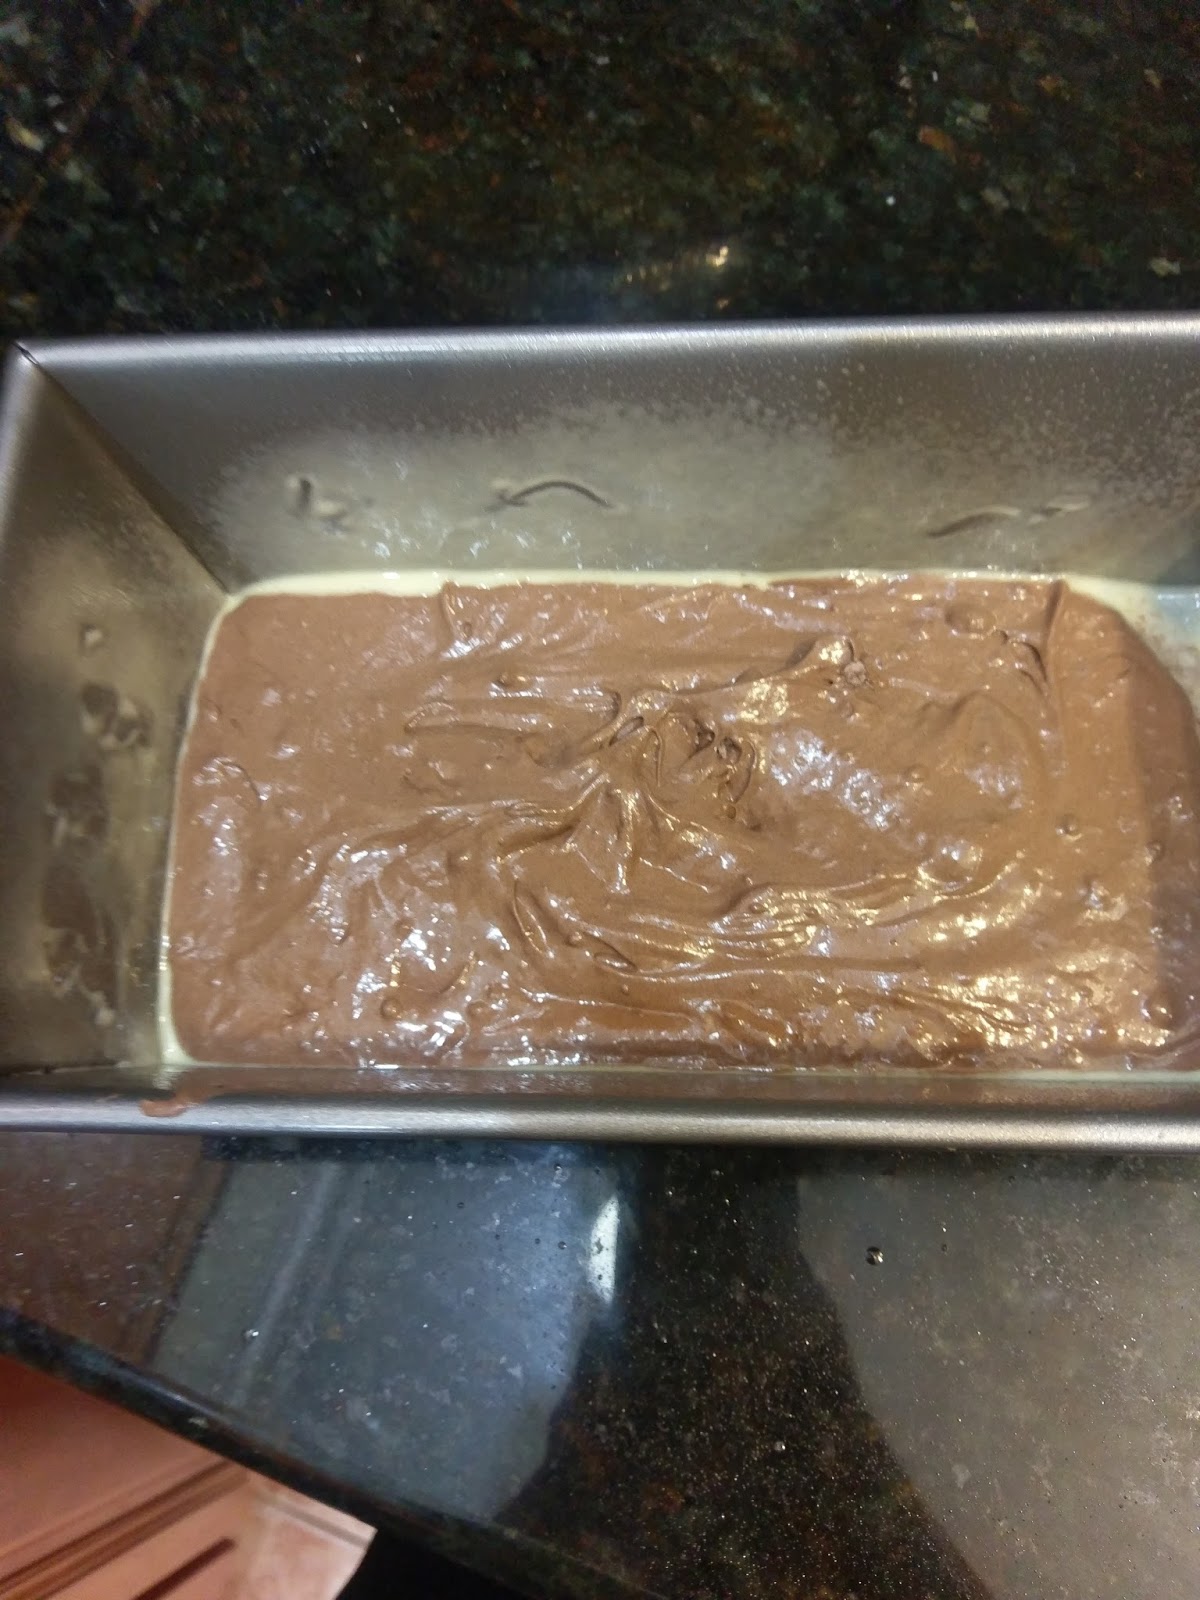
At this point, I was more or less trying to finish this cake in spite of my new loaf pan. I recommend letting your clovers freeze completely to avoid over baking, so if you can’t leave them in the freezer overnight, at least let them freeze for a few hours. Once frozen, ensure your oven is set to 350 and begin making your chocolate cake. Mix together the soda, cake mix, and egg whites for 2 minutes. Pour about 1/2-3/4 of a cup of batter on the bottom of your very well greased 10×6 loaf pan. Save the look of scorn and betrayal as you know eventually you’re gonna make one hell of a banana bread in this pan no matter what it does to this cake.

At least two pieces of this cake will not include a shamrock surprise. So I guess the surprise is that there isn’t a surprise in those slices. Irony. Now, place each shamrock into the cake batter layer. This will help you stabilize and space them evenly, so you won’t have two massive gaps in the middle of your cake like I did. Learn from my inability to think ahead and measure properly. In my defense, I never leave my small measuring tape in the same place. Either way I shake it out, I suppose this was my fault and not the fault of the pan or the cookie cutter or Amazon for somehow not reading my mind and letting me know my Pinteresty baking plans needed work and recommending a smaller cutter or something. It’s 2017, and I think I no longer have the ability to live my best life without Amazon recommending me the right products for my existence.
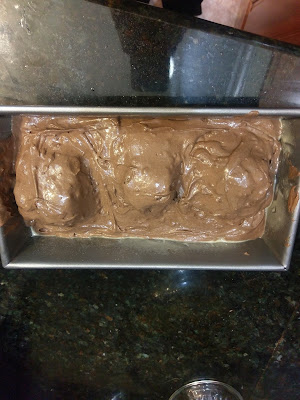
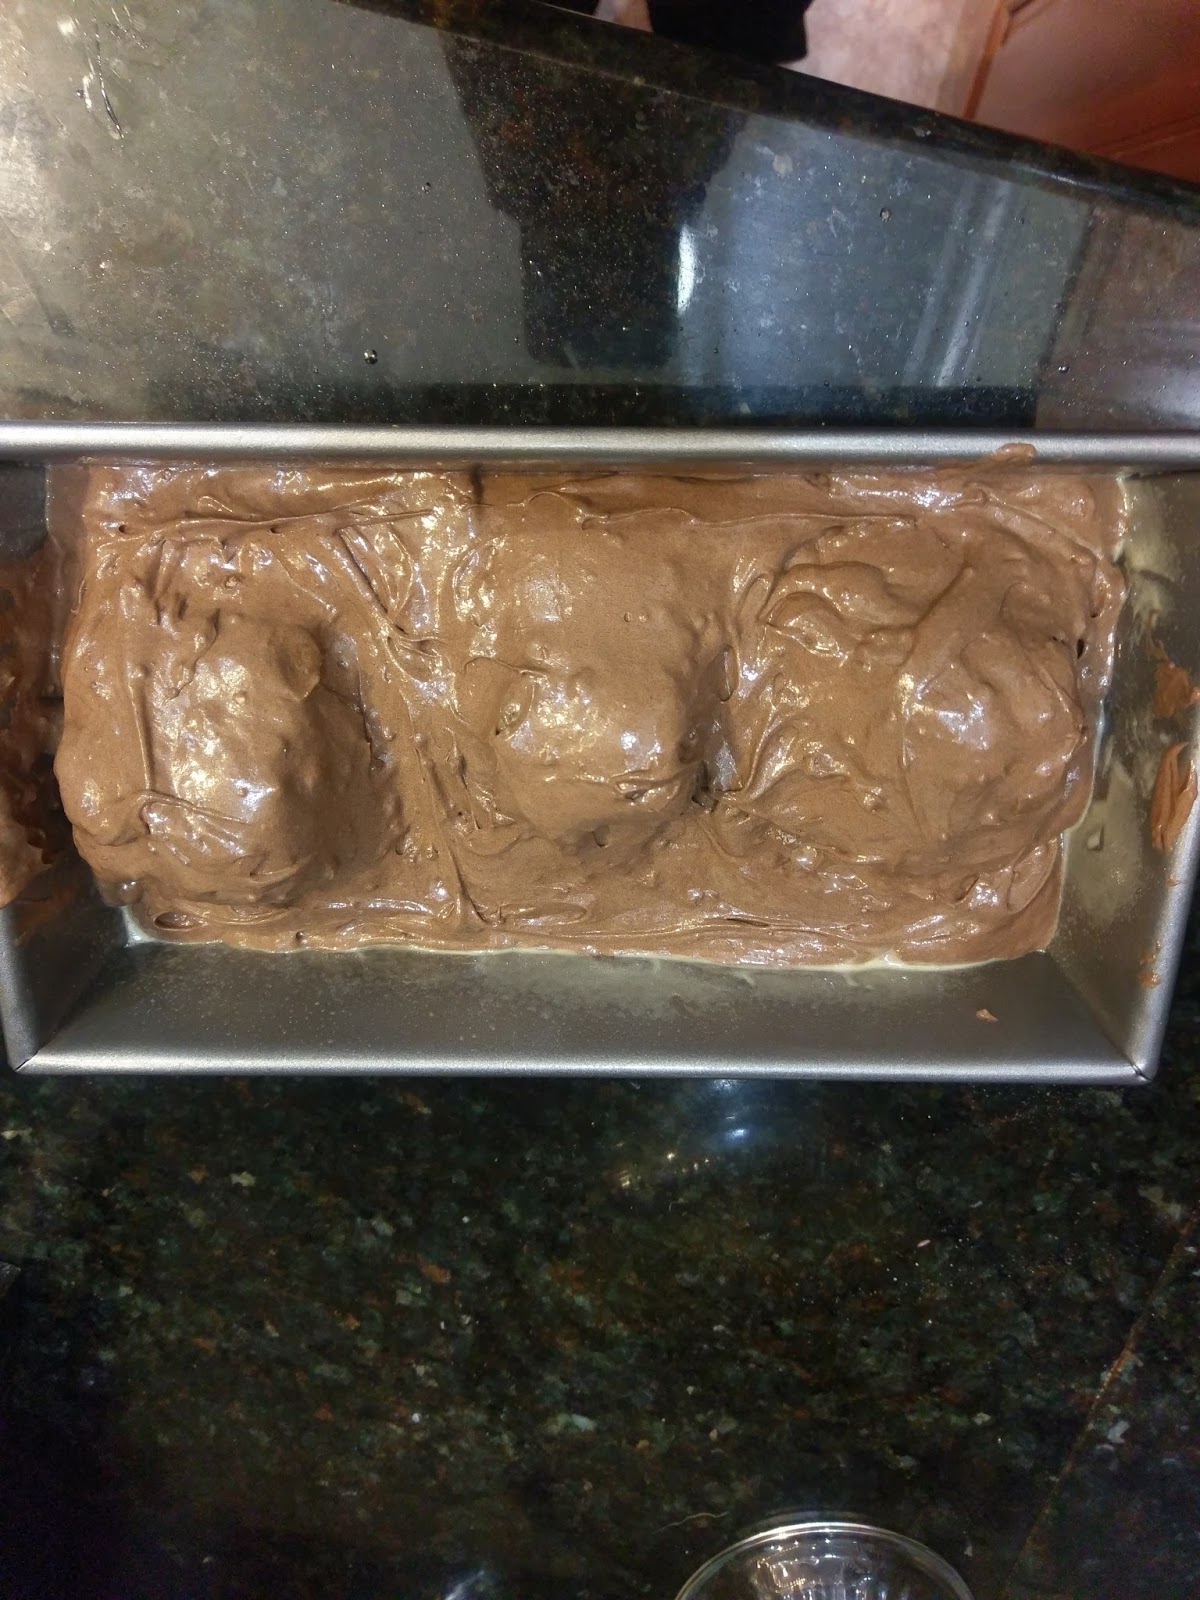
I don’t have a panic stage past level 5, but if I did, I’d call it the “heavy sighing and reluctance” stage. Once you’ve lined up your shamrocks, gently deposit the rest of the batter on top of the shamrocks and around the sides of the pan. Things definitely won’t look even or pretty, but the main goal here is to completely cover the shamrocks with chocolate cake batter so that you can’t see any green poking out anywhere. Now, bake for about 50 minutes or until a toothpick comes out mostly clean from the chocolate portion of the cake.
You can run, but you can’t hide, clovers. So it’s gonna be pretty obvious where your clovers are inside of your cake thanks to the indentations, but this is what frosting is for. And at this point, I was just surprised when I opened the oven and the cake didn’t sink in entirely because that would’ve been par the course. Let your cake cool in the pan for 10 minutes, then remove to a cooling rack and place in the freezer for 30-60 minutes until fully cooled.
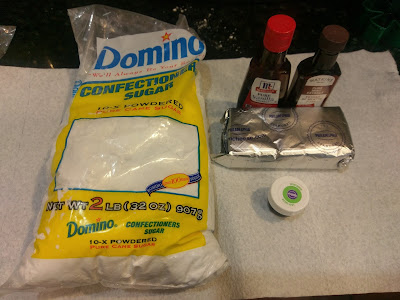
Hindsight: the mint extract would’ve been good. I found a Weight Watchers cream cheese recipe, and I’m at the point in this blog where I’m not even ashamed to admit they’ve got some really great ideas for low calorie baking. Nothing like a baking fail or twenty to humble me. To make this frosting, you need:
- 1 brick of Philadelphia reduced fat cream cheese at room temp
- 1 heaping cup of powdered sugar
- 1 tsp vanilla extract
- Green gel dye
- Decorative toppings: Gold sprinkles, gold stars, white and green sprinkles, etc.
- Optional: 1/4 tsp mint extract. Still kicking myself for not adding this in. It would’ve made things even more festive for the season.
Mix together the cream cheese, sugar, extract, and gel dye for a minute until smooth. This is not a thicker consistency frosting, so I don’t recommend piping with it. It will make enough to cover the entire cake, but I chose just to cover the top since the rich chocolate color on the sides of the cake was too pretty to cover.
Also, you don’t have to make your frosting greener than a John Deere tractor. 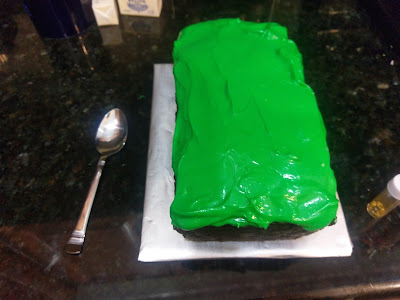
I just slathered all my frosting and distributed it evenly on top. 
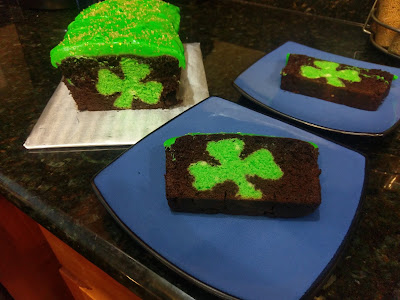
Then I used a spoon to make circular swirls in the frosting before, of course, topping with gold stars. Gotta make those leprechauns jealous, you know. My husband said he liked the swirly, messy look of the frosting because it was an appropriate decorating technique for a drunken Irish holiday where the more Guinness made available, the less able anyone would be to frost a cake smoothly. I felt like I was taking the lazy way out since this cake had crushed my will to live, so that lifted my spirits to the point where I was ready to slice this cake open and see the level of failure I was working with.
In your face, loaf pan, cookie cutter, and Amazon. I was pleasantly surprised when I cut into the cake to see that it looked exactly like it was supposed to when I envisioned it. See, sometimes you just have to have a little faith that you can turn a potential nightmare into an aesthetic dream. My struggles were real(ly silly), but I’m glad I didn’t scrap the idea and just make shamrock cookies. Anyone can do that; I’m here for the wow factor, not the meh factor. If going big or going home was an actual sport, I’d never be home, and well, then I wouldn’t be able to bake anything because that’s where my kitchen is. And after living through Kate Panic Levels One through Five, it was great to sit down and eat a cake with actual frosting and not just Cool Whip. It was my finding the pot of gold over the rainbow moment. For not having a ton of sugar, this was still a delectably rich frosting that went so well with the dark chocolate cake that resulted from the mixing of root beer and cake mix. Things may have been super dicey there for awhile, but Kate Bakes Cakes because Kate knows good flavor combinations. And I promise you this–my next one will be minty, and it will be chocolatey because everyone needs more Saint Patrick’s Day dessert ideas for celebratory purposes. ‘Til next time, my fellow eaters!
So now that you’ve laughed at my strife, I get to go eat cake. She who has the cake gets the last laugh! 😉 -
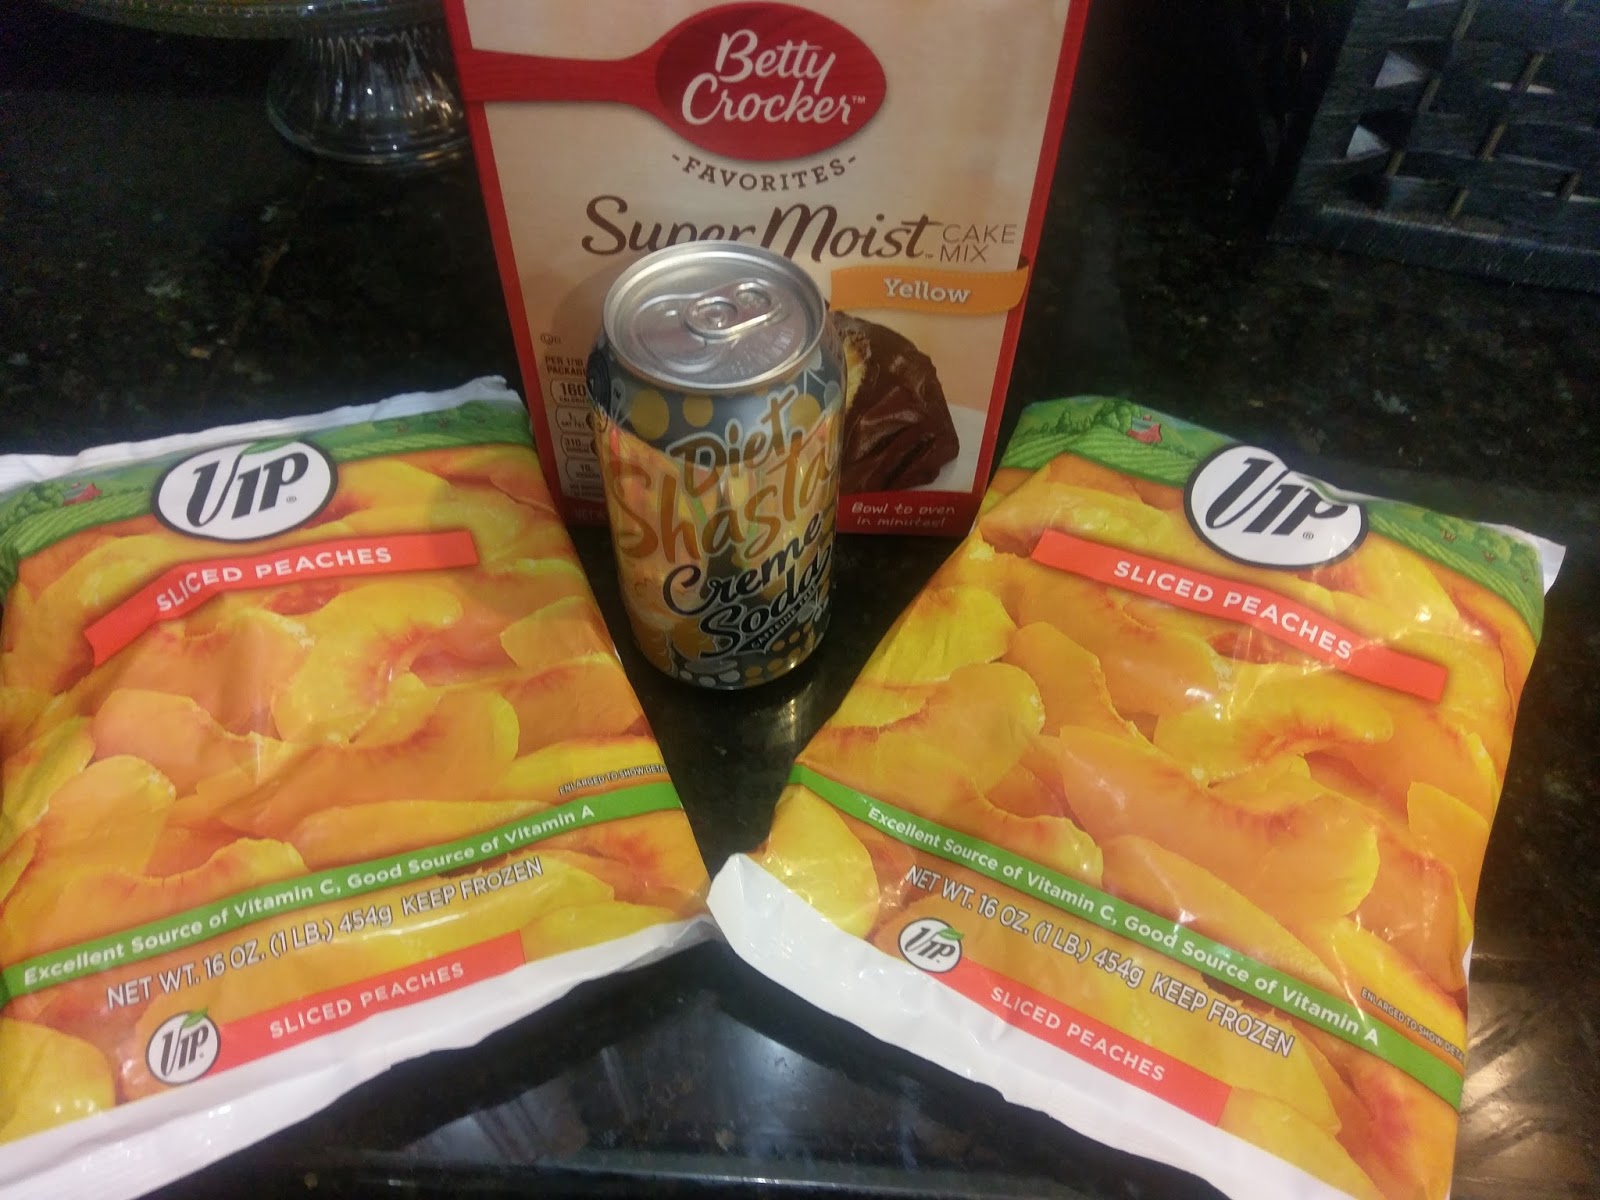
Life is Peachy.
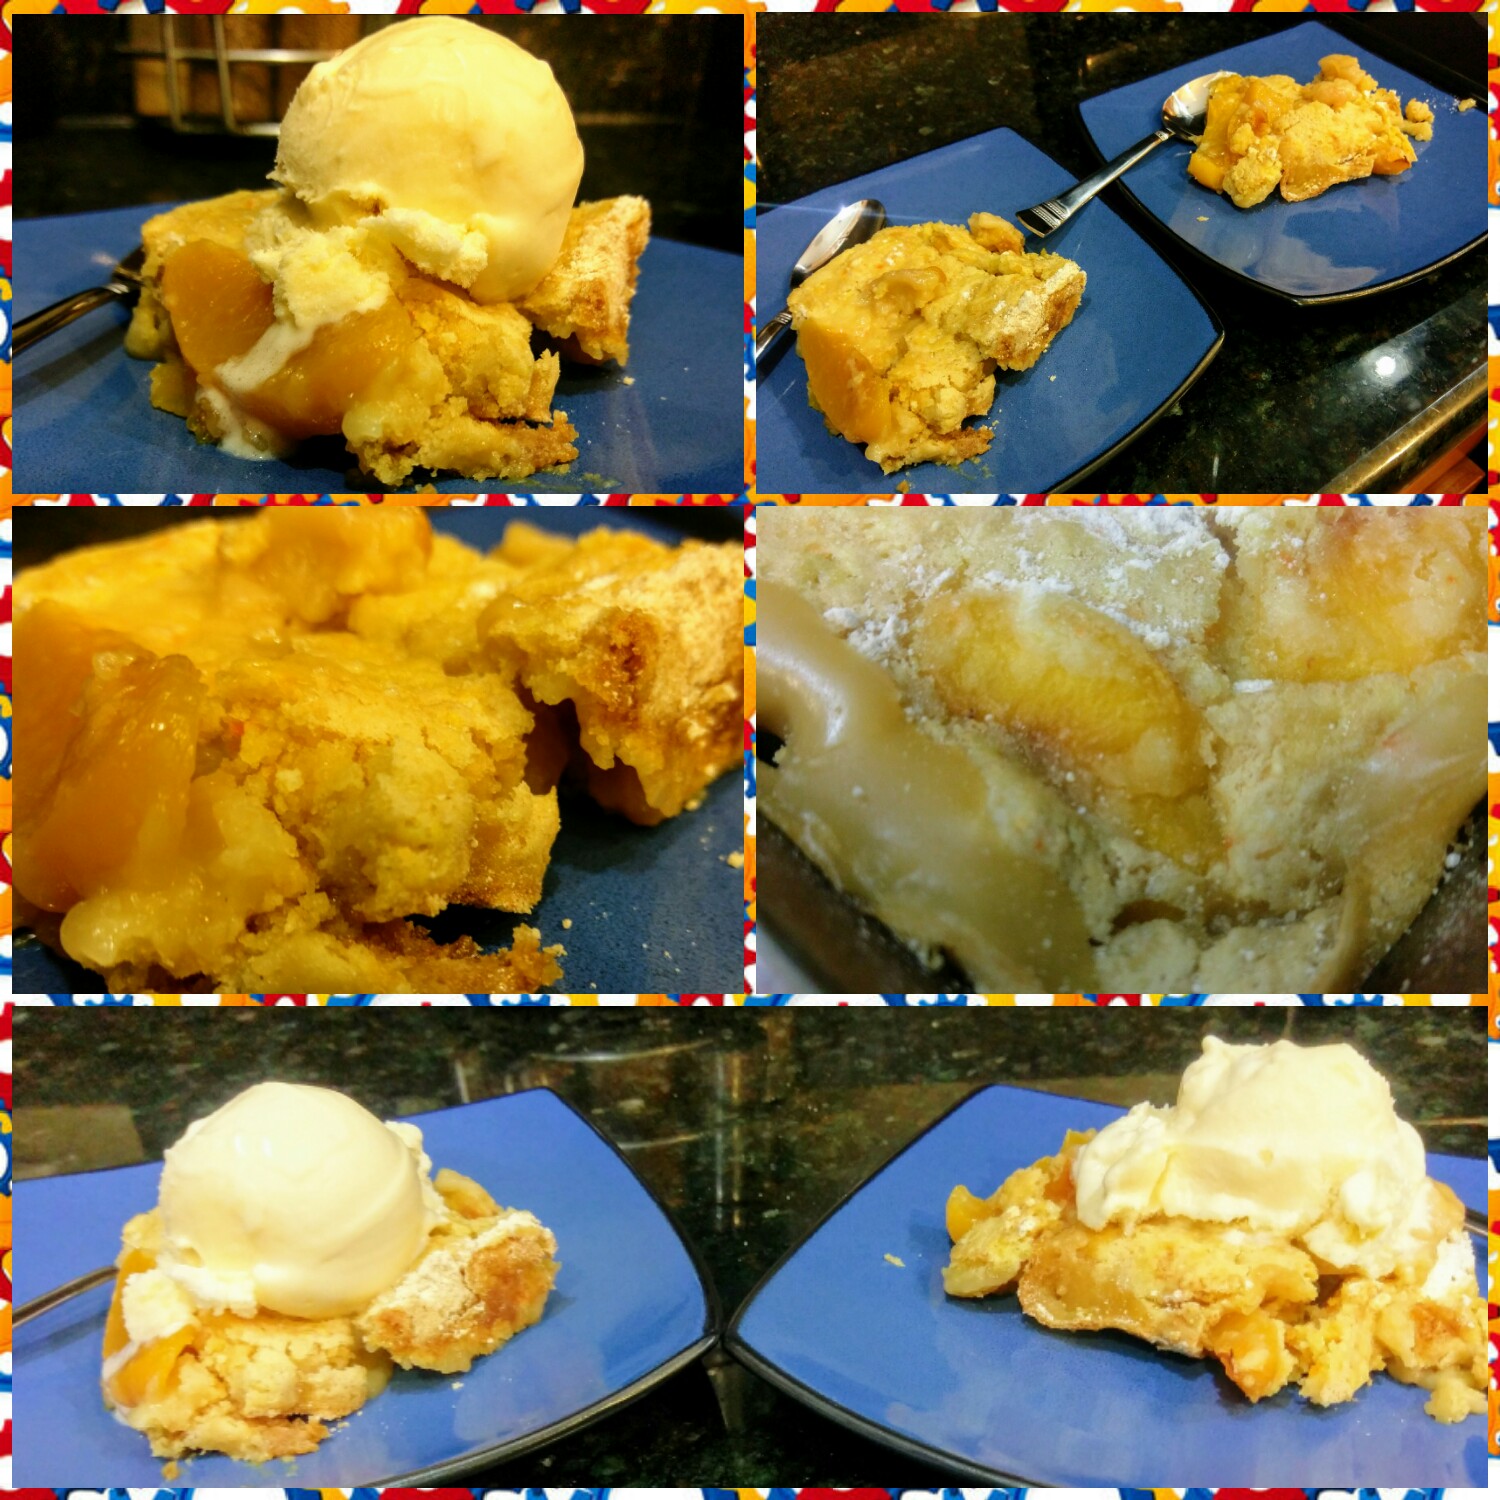
I was talking about the visual superiority of Texas sunsets the other day (as you do when you’re a Texan), and I was immediately met by the pangs of homesickness. I know everyone experiences a longing for their home state from time to time, but when we say everything is bigger in Texas, we’re also talking about feelings. Don’t believe me? Google Friday Night Lights or football in West Texas, and you’ll see what I mean about the unwavering passion that emanates from most Texans. I was so hard up to experience home again that I begged my husband to drag me to the nearest Chili’s so I could get Tex-Mex food…you know, where the meat actually gets seasoned and marinated and the guacamole doesn’t look like soylent green paste. Clearly you all know by now my emotions are best described as “awake” or “asleep” with the occasional hunger-anger thrown in, and this is because instead of experiencing a wide array of exhausting human emotions, I just eat my feelings instead. The world would be a better place if we all ate more cake and didn’t get so upset about things in my opinion. And since I was allowing my homesickness to meander, it took me to the next logical step: making a traditional Texas dessert but with my usual flare for health consciousness. My Texas-sized eating habits are constantly at war with my desire to stay thin, so you gotta do what you gotta do to stay looking sharp in a pair of tight jeans. Enter skinny peach cobbler:

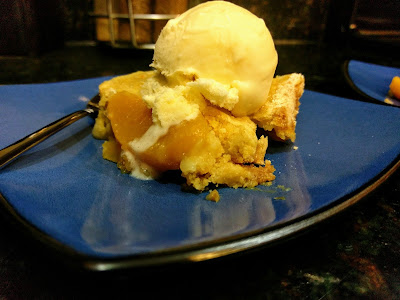
It looks deceptively fattening, I know. This is the lazy cook’s approach to skinny cobbler. It literally takes two minutes to throw together, and then you get to reap the benefits of healthy dessert eating. This entire 9×13 pan of peach cobbler amounts to a total of 1900 calories…I’m pretty sure just looking at a normal cobbler will cost you about the same, and then you can divvy up your servings. I found 12 servings to be the perfect size since I knew we couldn’t very well eat cobbler without a heaping of vanilla froyo on top of each piece, so before the addition of milky frozen goodness, each chunk of cobbler is only 158 calories. You can’t even eat a bowl of cereal for 158 calories, people. This is the real deal, but thankfully, it doesn’t taste like 158 calories of thin air. Oh no…peachy, vanilla, creamy…this is everything you want in a cobbler minus the muffin top. While it lacks the intensely crispy crust that results from ample amounts of butter and sugar in a regular cobbler, it’s still got a nice, crumbly crust that gives way to luscious peach chunks…and it is most definitely a cure-all for a homesick Texan. The first bite was met with images of bluebonnet fields and clear blue skies. Definitely a “died and gone to Texas” moment.

With only three ingredients!!! I wasn’t kidding when I said it was a lazy cook’s cobbler. You only need:
- 2 16-ounce bags of frozen peaches (still frozen and not thawed)
- 1 12-ounce can of diet creme soda or diet citrus soda
- 1 box of yellow cake mix. You could cut calories even further by using a sugar-free cake mix.
Hold on to your butts, here comes a quick crappy photo montage:

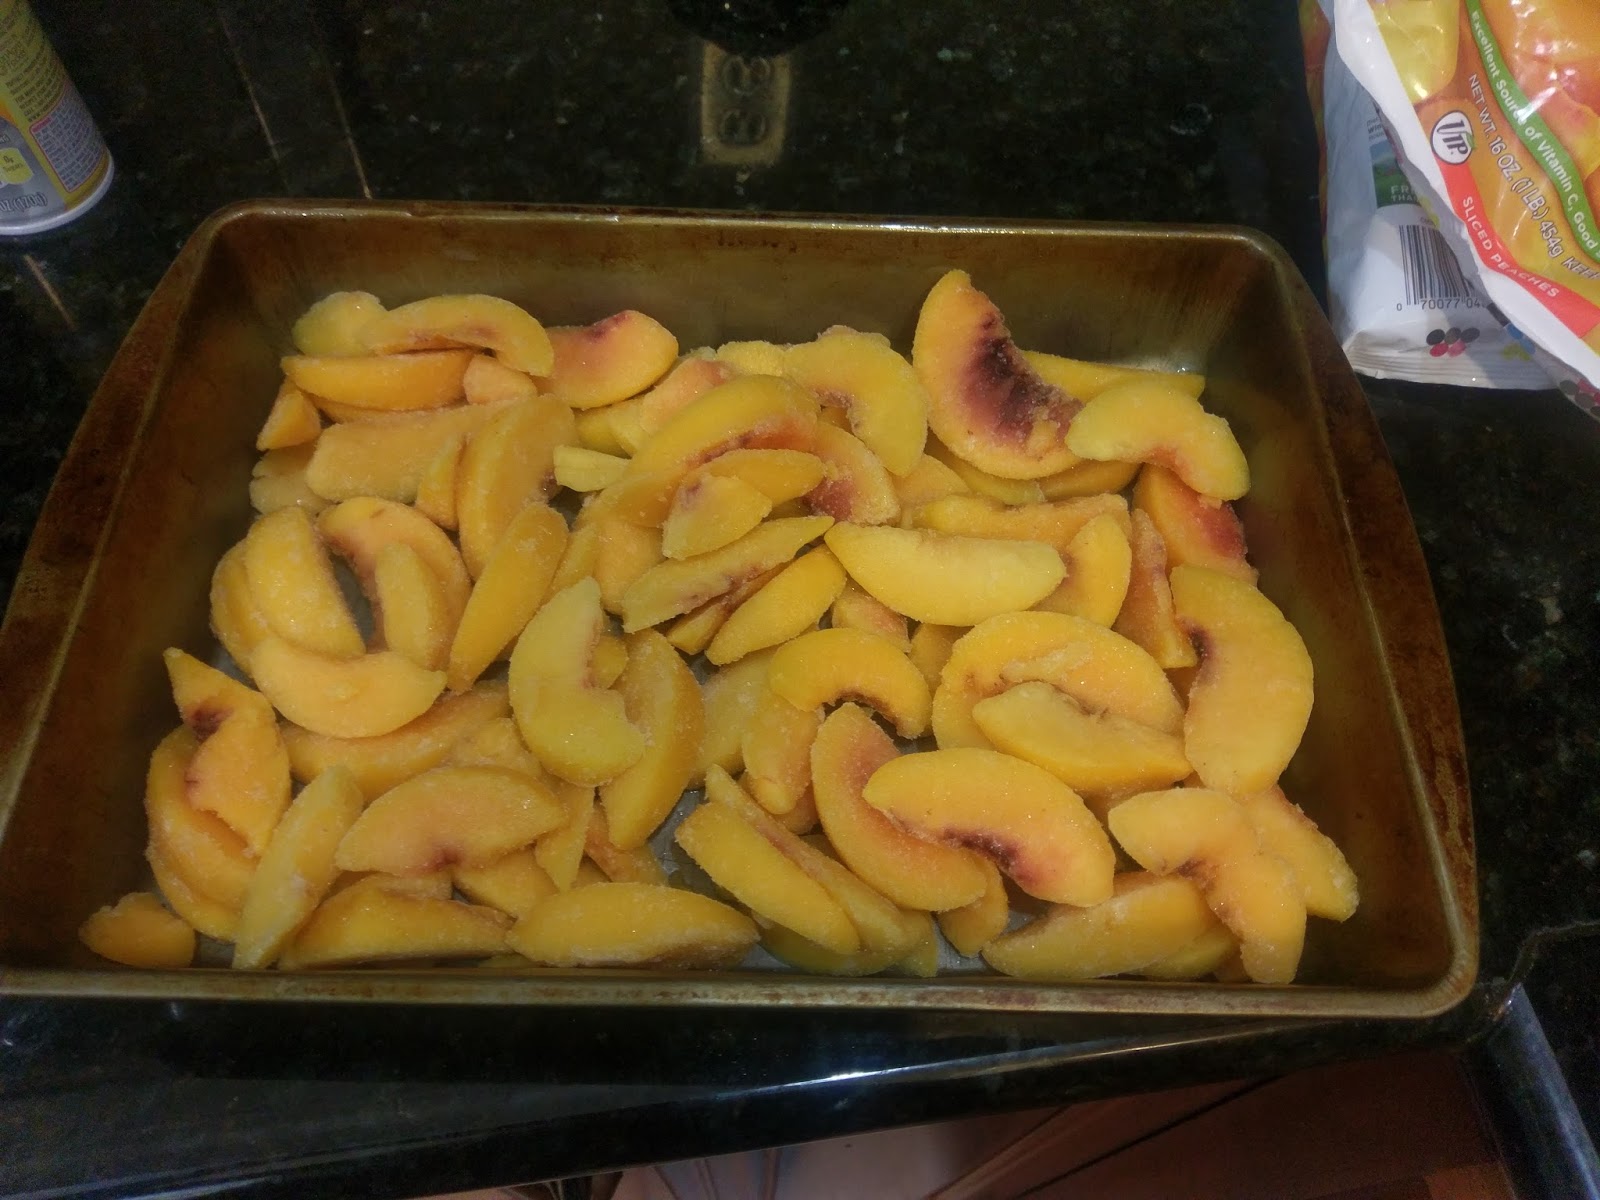
“Movin’ to the country, gonna eat a lot of peaches.” While your oven preheats to 350, grease a 9×13 baking pan. Take both bags of frozen peaches and dump into the pan. Try to spread these out to form even layers without any empty spaces.

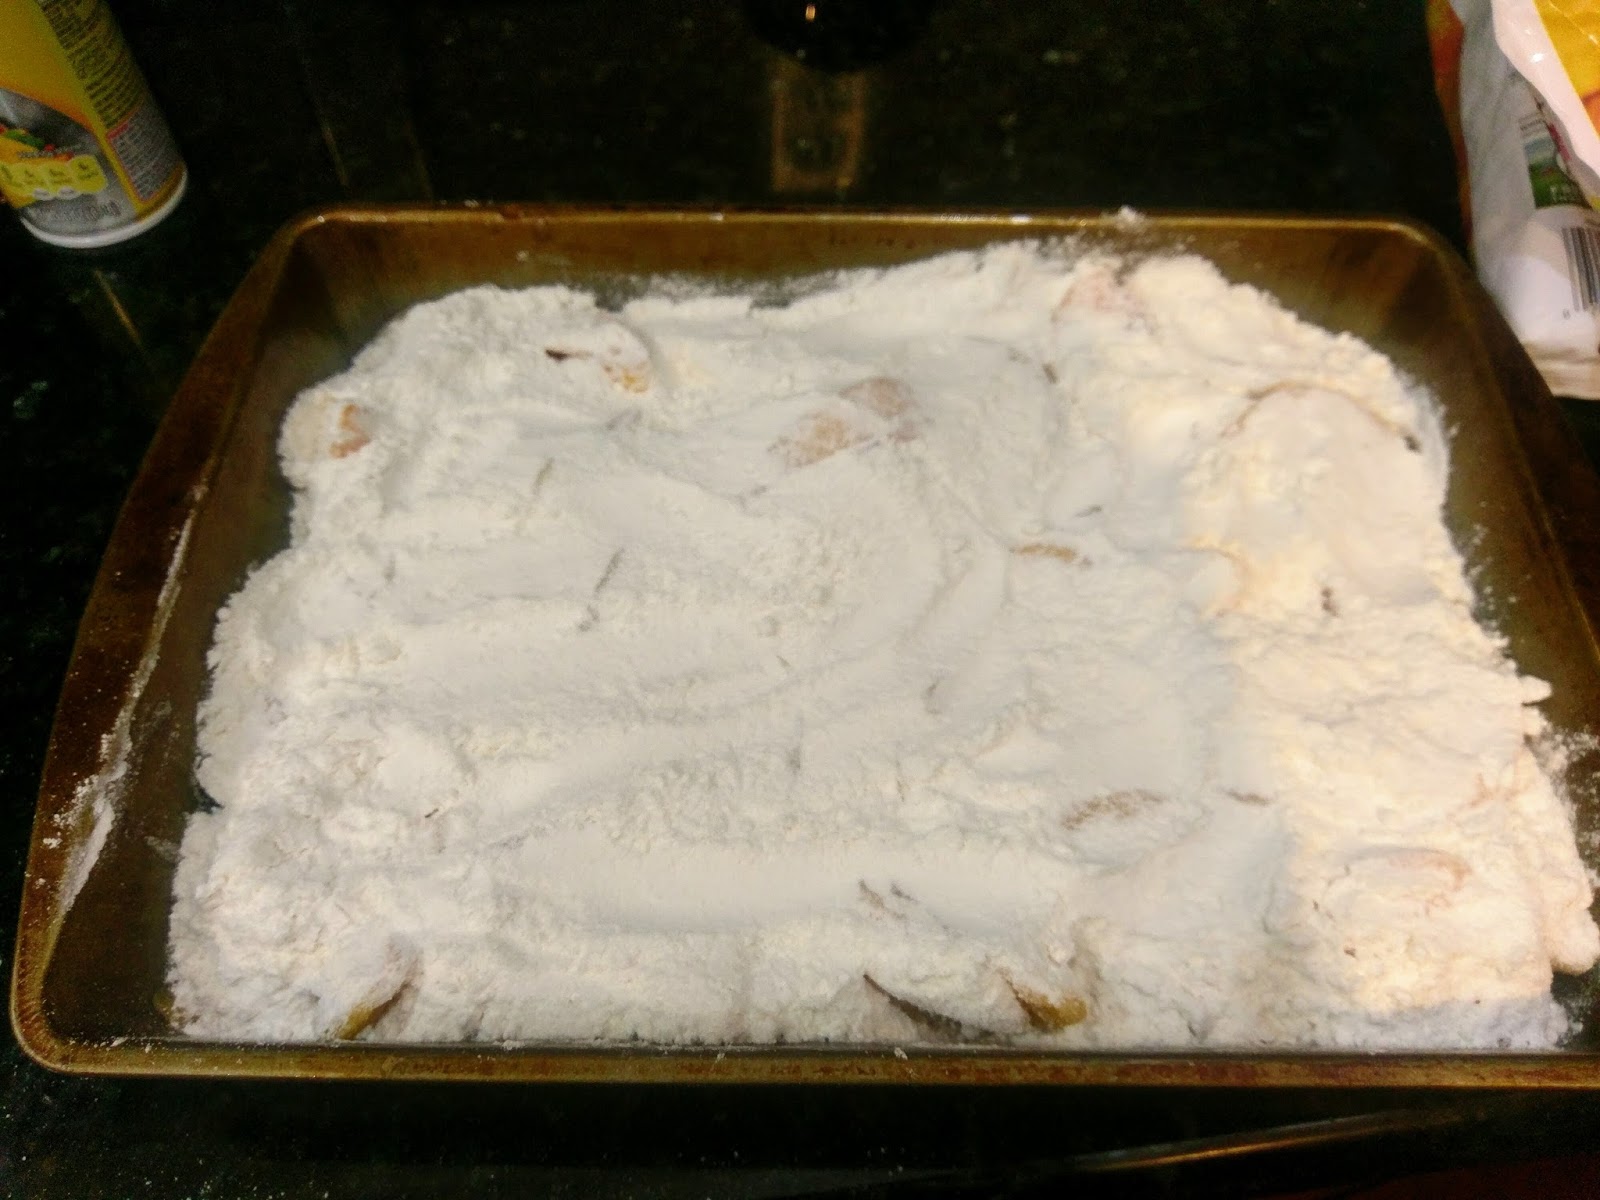
Don’t sneeze. I decided to be supremely lazy and dump the cake mix on top of the peaches with a few dusting motions of the open cake mix bag. Later, I decided I should have mixed together the soda and the cake mix first to ensure even baking. So don’t be Kate-lazy. Mix the cake mix and the soda together in a bowl and then pour it evenly over the peaches.

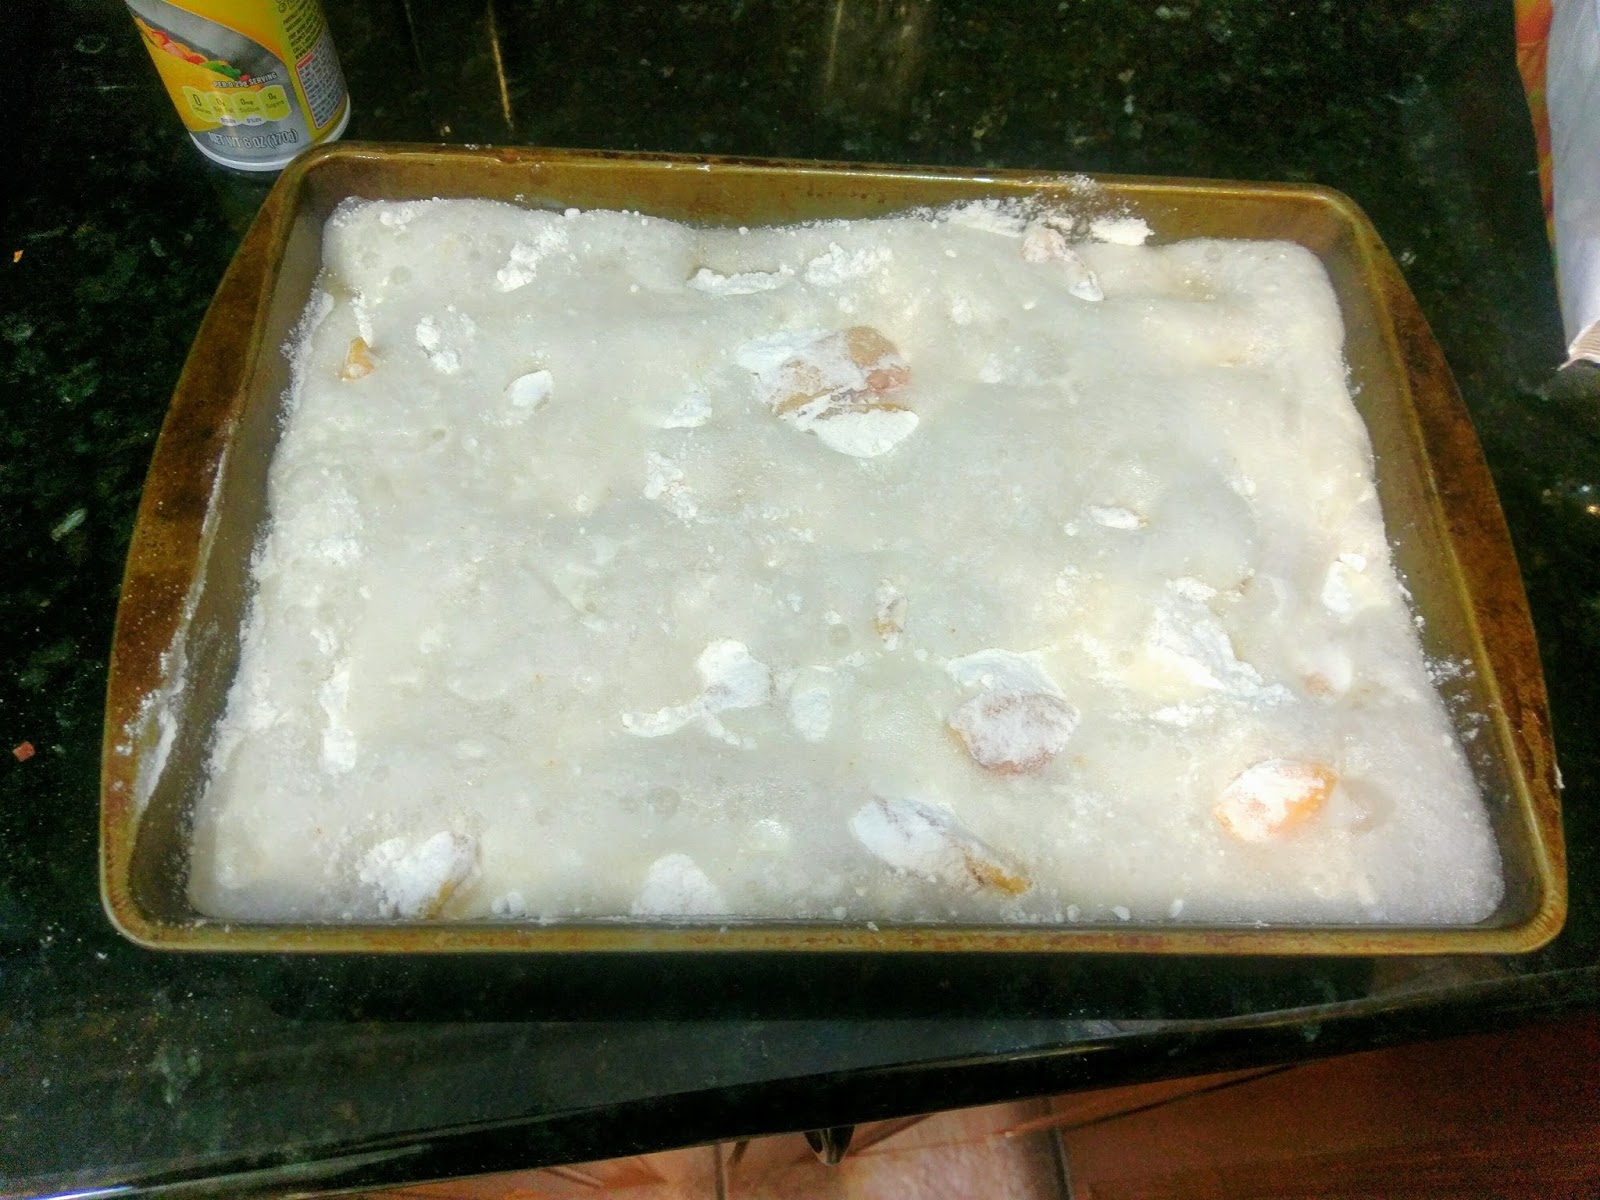
See those extra white spots? Yeah, I didn’t have enough soda to cover all the cake mix, so those white spots stayed as is…dry and dusty. Take the extra thirty seconds and mix your ingredients so your cobbler looks pretty. Cover it with foil and bake for 20 minutes in the middle of your oven. Then, remove the foil and bake for 40 more minutes.
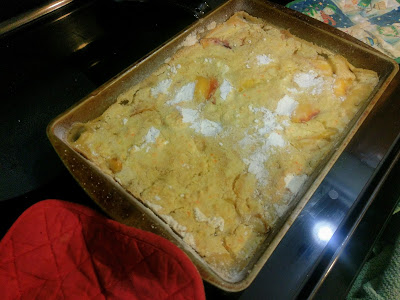
See, these white spots won’t mock you and your baking abilities if you just mix… I had some spots of dry cake mix, but Dear God, my house smelled like the inside of what I imagine Texas heaven smells like. It took the personal restraint of knowing (again, as you do when you’re a Texan) that cobbler requires a 30-minute window to properly set up to keep me from taking a pint of frozen yogurt, dumping it directly on top of the pan of cobbler, and eating the entire thing in one sitting. Thank those lucky stars at night that are big and bright (Deep in the heart of Texas!) I was able to squash my ravenous hunger with that preexisting knowledge.

Because I mean, really, look at that oozy goodness. Take heed to my warning–you do want to let it cool and set for a bit. Cobbler should be a little messy, but it should not burn the inside of your mouth off. And while those peaches went into the oven frozen, one hour at 350 turns them to peachy molten magma.
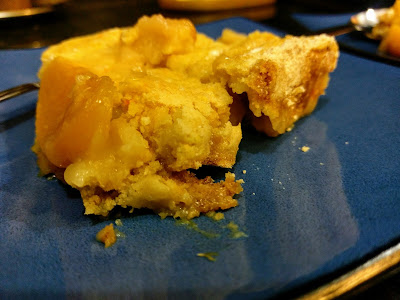
Still weighing out whether or not the medical bills would be worth it, though. Once you’ve let your cobbler set for a half an hour, slice it up and serve! I told you, extremely lazy and easy. As lazy and easy as it is delicious and low cal. If you prefer, you could also top this with something a little healthier like fat free Cool Whip, vanilla bean Halo Top, or even a few extra slices of peaches. I have a steady supply of Kemp’s frozen yogurt on hand for those days when I want to eat like a monster, but a monster with a nice physique. And as a Texan, I don’t believe cobbler is really cobbler until it’s topped with ice cream or frozen yogurt. Instead it’s just crumbly cake with fruit. Not that that’s a bad thing, it just doesn’t meet the fervent criteria of proper Texan-ing.
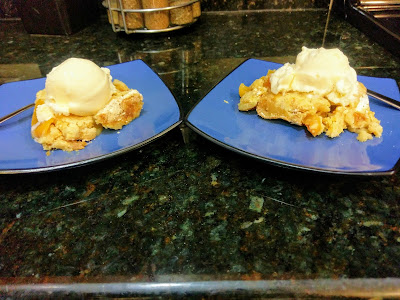
Also, presentation is key. I miss home a little less with each helping. I imagine if I actually ate this while standing in the state of Texas, I might have a small aneurysm experiencing so much happiness and joy all at once. But I’m stoked I tried out this lazy cobbler route because it made me realize there are actually endless possibilities for when I’m not homesick and just want a damn good crumbly cake with fruit. You could dump raspberries together with chocolate cake and Coke Zero, or cherries together with chocolate cake and Cherry Coke Zero. You could use strawberries with strawberry cake and fruity diet soda. Blueberries, raspberries, and strawberries with white cake and diet Sprite…seriously, the possibilities are limited only to the kind of cake mixes that exist in this world, so if you’ve ever wondered why boxed carrot cake mix exists, throw it together with some walnuts and diet creme soda and get back to me. As for now, I’m gonna enjoy this until my baking pan is licked clean. And then I’m going to gear up for one of my favorite baking months of the year: everything is literally going green for March and Saint Patrick’s Day!!! Top o’ the baking to ya, and ’til next time, my fellow eaters!
I may even try to make a green cobbler. Who knows. -
Lemon is for Lovers
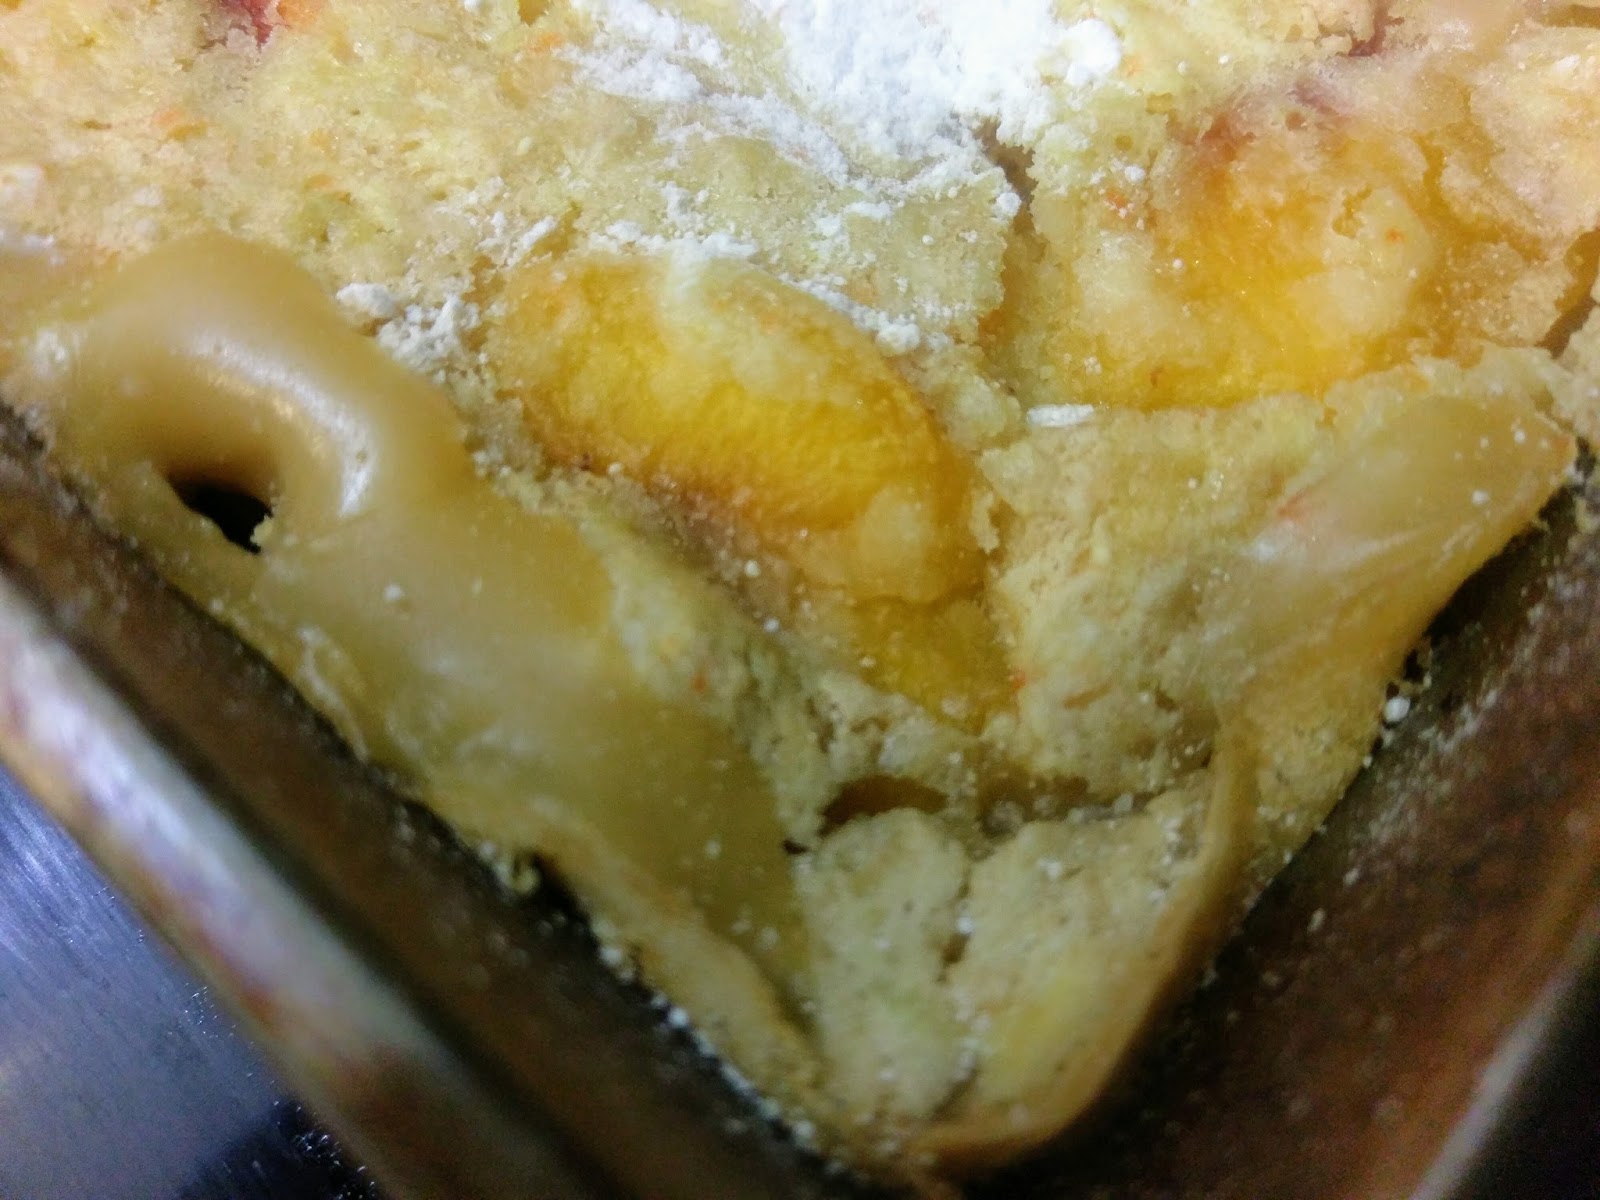
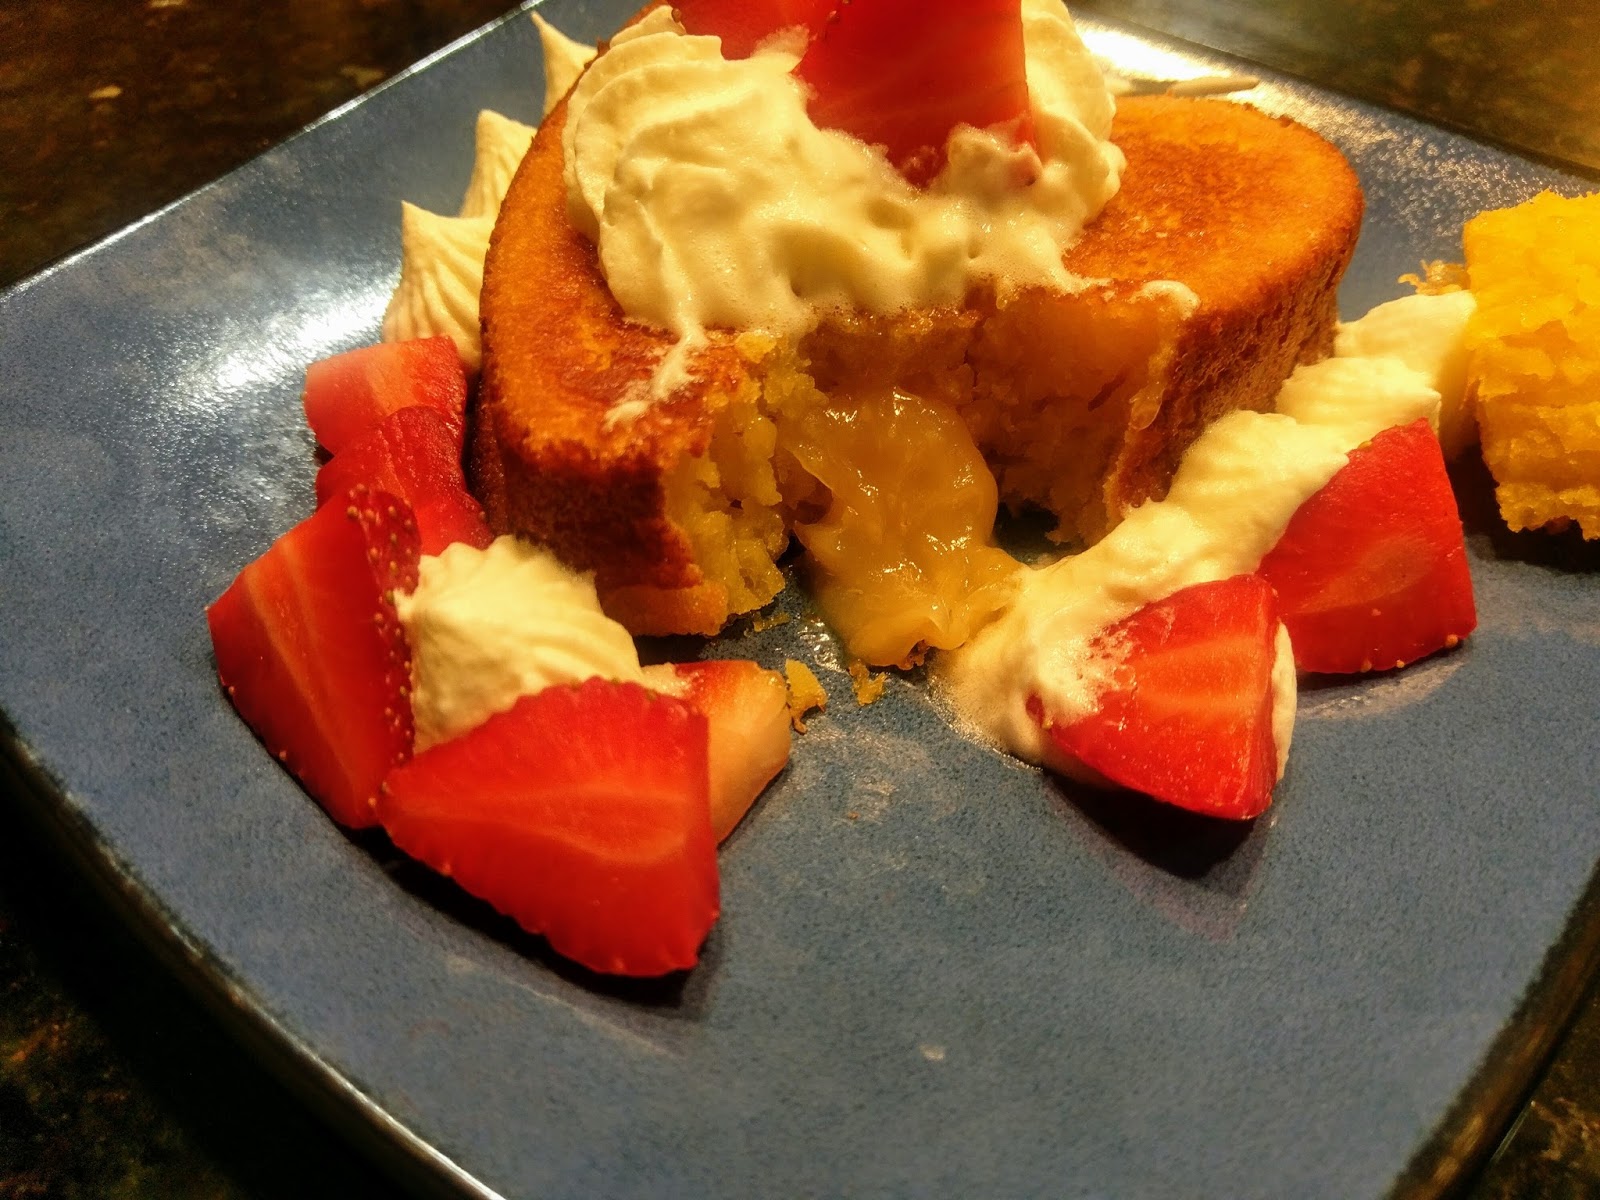
I know I’ve told you all plenty of times that I’m not into Valentine’s Day. So when you see that I’ve created heart-shaped cakes this week, I don’t want you to question your (or my) sanity. You see, today, February 15—the day AFTER Valentine’s Day—marks eight years since my husband and I started dating. I figured this was a fairly large deal worthy of celebrating because for eight consecutive years, I’ve thoroughly enjoyed his company and the adventure my husband brings into my life. I haven’t even liked myself for eight consecutive years, so he is owed some cake for both the putting up with and actual enjoyment of my insanity.I refuse to celebrate Valentine’s Day to the point where I’ve even fudged our dating anniversary date slightly to the right a few hours. How we started dating is a gaggingly romantic story, really. We happened to run into each other by complete accident on Valentine’s Day…in the same bar where we met for the first time at a friend’s going away party the previous August. He was calling me (see, so dated people still used phones for talking) as I was walking into the room; I took it as a sign considering he had moved away for pilot training several months prior and just so happened to be literally standing right in front of me. But if you ask, I’ll tell you this happened after midnight on February 15 because otherwise it sounds like a chick flick plot.I’m not a normal woman—romance is for the birds. I mean, the moment I knew I fell in love with my husband was at a McDonald’s in Corpus Christi. I stood there, pumping ketchup into five or six tiny little cups, grumbling about the lack of space for burger dipping. I turned around to see Derek, a large drink lid in hand that he had flipped upside down, filling the giant surface area that created with ketchup. My heart skipped a beat, and my head exploded a little—I had found a logical, creative man who loved ketchup as much as I did. The rest, as they say, is history.Moral of the story ladies—love doesn’t always come in grand, sweeping gestures or diamond-encrusted jewelry. Don’t be mad at the man who waited to buy your flowers or chocolates until the day after Valentine’s Day when they were all on sale for dirt cheap. He could be saving up to buy something better, like a car or a house or a cruise to Alaska you’ve been begging him to go on because you crave to surround yourself with a tundra as frozen as your heart (thanks, lovey!). Instead, make him cake to let him know you get it, but you don’t have to make a big deal about it or anything. Let the sweet delicious taste flow where words would otherwise fail you…these lemon lava cakes can do just that.
I only get the warm fuzzies when cake is involved. I have wanted to make lava cakes for ages. But surprisingly, I don’t own ramekins. Not a one. Instead of buying a set, I just wanted to wait until it was appropriate to test out my four cavity heart-shaped pan I bought back in 2015 and haven’t used since then when I made heart cakes (and my views on Valentine’s Day very clear). Whoops. Two years I could’ve had ramekins or come up with an excuse to use this pan for lava cakes, but I’m stubborn and my personal symbol should probably be a stick in the mud. It’s most definitely not a heart. Anyway, the pan worked OK for lava cakes, but my two 6-inch cake pans definitely worked better. So I’ll use those in the future or perhaps become a real girl and buy some damn ramekins.
This is about as romantic as I get with minimal self loathing. Y’all. These. Cakes. They aren’t too terribly sweet, but the lemon ooey gooey goodness that slowly pours out of them is to die for. I’m honestly scared to make the dulce de leche lava cakes I’ve been crafting a recipe for because it may actually kill me. I did try to make a few adaptations to make this a healthier cake, but the calorie content still comes in a little on the high side. You must spoil yourself and the ones you love on occasion, though. This makes 4 large heart cakes (definitely cannot eat one heart alone–these babies are 2 servings per heart!) and an additional 2 individual servings for a total of 10 servings at 308 calories a piece. Adding on a few slivers of strawberries and fat free Cool Whip will only add about another 10-15 calories, but it is totally worth it. You go could extra fat kid and add a drizzle of warm lemon curd on top. Just don’t accidentally eat half a jar of lemon curd if you go that route because it is dangerously enticing.

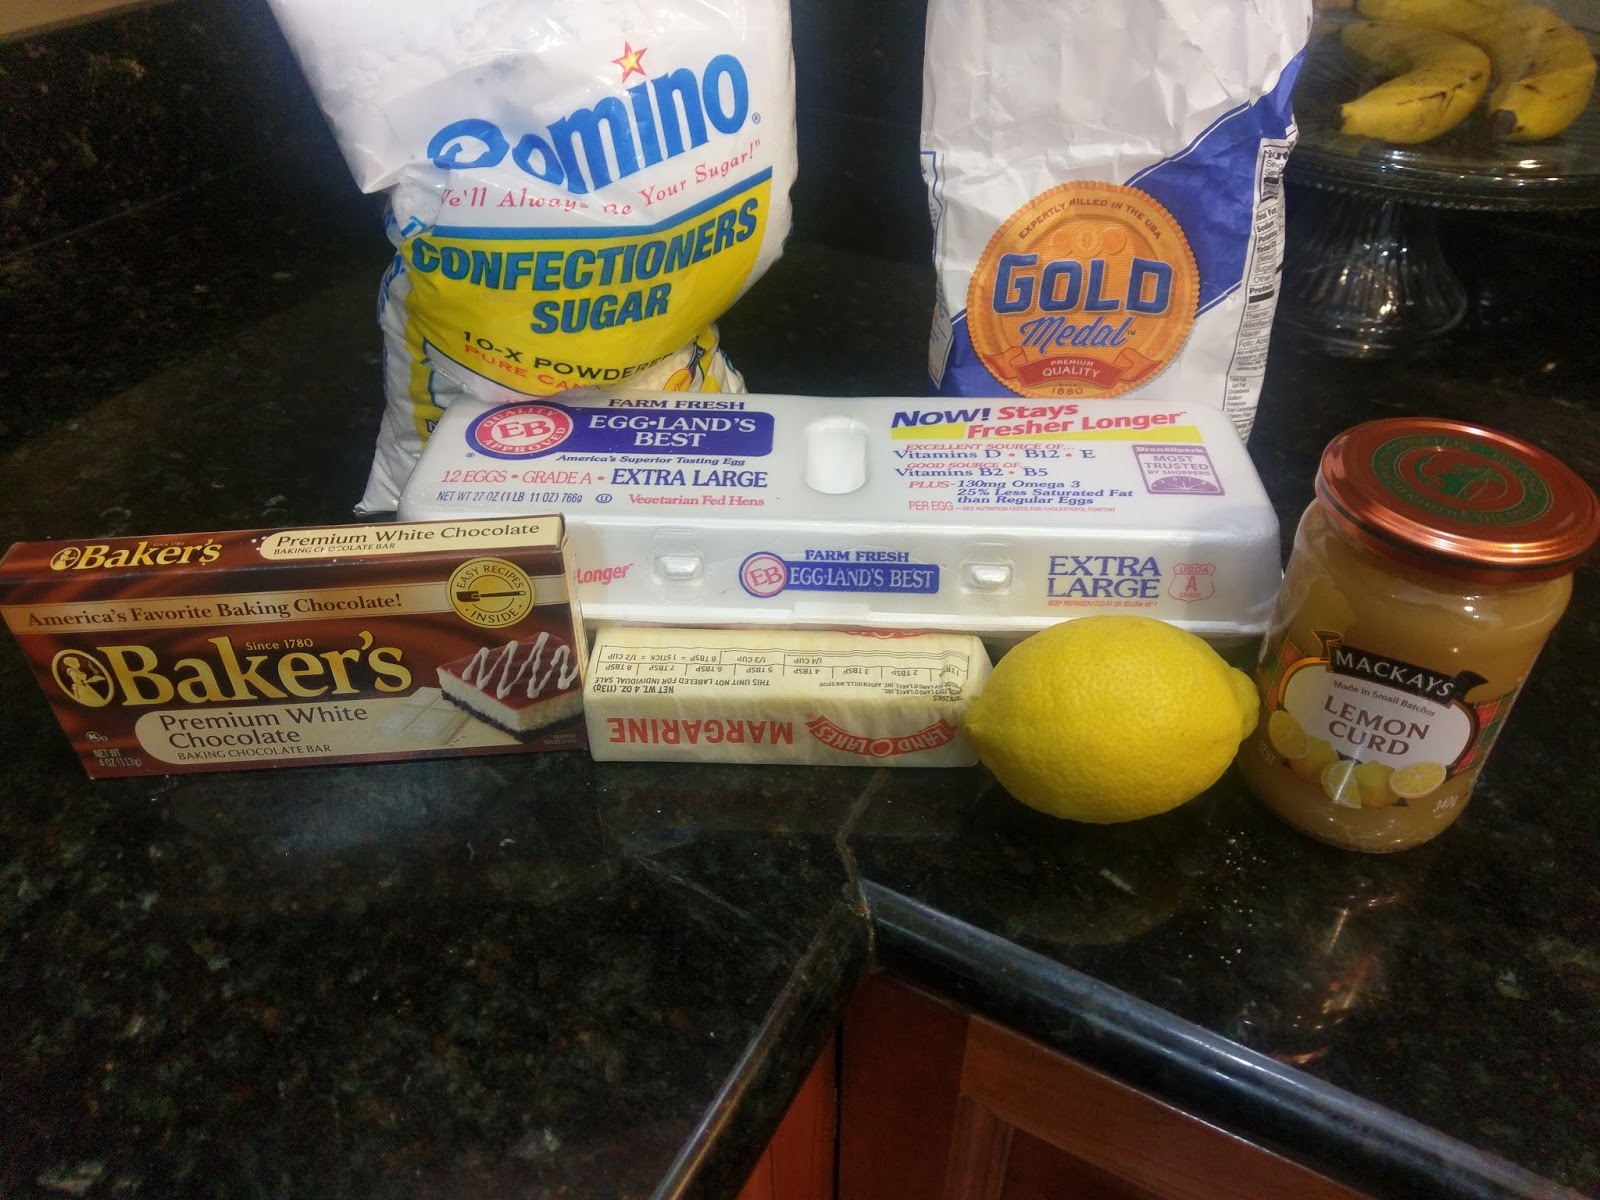
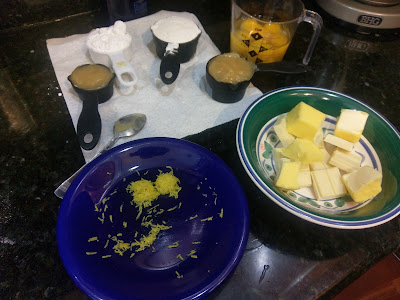
Yet it looks so unassuming in that little jar… This is a Land O’Lakes recipe that I adapted to make heavier on the lemon flavor. To make, you will need:
- 1 stick of cold butter
- 1 4-ounce Baker’s white chocolate bar
- 2/3 cup flour
- 1/2 cup powdered sugar
- All. of. the. eggs. Seriously:
- 4 whole eggs
- 4 separate egg yolks
- 3/4 cup lemon curd (I usually use Dickinson’s brand, but now that I’m living in Florida, this was not a brand I could find. Apparently, Mackay’s corners the panhandle market)
- 2 heaping teaspoons of lemon zest
- 1 teaspoon of vanilla extract (not pictured)
- 1 1/2 teaspoons of lemon bakery emulsion. If this is not something you have, I find it at Hobby Lobby or Walmart. Also, you could try replacing this with juice from a lemon.
- Optional toppings: Cool Whip Free, strawberries, raspberries, blueberries, lemon curd, powdered sugar, etc.
I own four sets of measuring spoons, so this was easy for me. Let me give you a few life-saving, patience-making tips about this recipe. You gotta move fast. So you want everything measured out and ready to roll. Once you add the chocolate and the flour, things get really thick, really fast, so having the rest of your ingredients at the ready will keep this batter from turning into concrete. Also, don’t make these cakes until you’re just about ready to eat them. Like, “I could go for cake in a half hour” ready. Otherwise, if you make them ahead of time and put them in the fridge or let them cool too long, you’re gonna lose your ooze. No one wants that. I actually made my batter and then left it in the fridge all day until we were ready for cake. I did make all mine at once last night (and we totally ate at least one), but we’ll see if I can heat them up and maintain some ooze in the microwave later. But for two people, you could just try making two ramekins at a time so the cakes are hot and fresh and save the rest in the fridge.

Such fickle, yet delicious, cake. If you’re going to make these right away, preheat your oven to 425 and grease the bottom and sides of your pans or ramekins. Get a medium bowl and break up the chocolate bar and cube the cold butter. Melt at 30 second intervals, stirring between each session, until everything is fully melted. This took me about 2 minutes total. While the chocolate and butter are melting, measure out the rest of your ingredients and gather a large bowl. Dump the flour and sugar into it. Once the chocolate is done, let it cool off for a few minutes (hot batter + cold eggs = breakfast, not cake). Dump the melted chocolate and butter in with the flour and sugar mixture and whisk well. Once this stiffens up, dump in the lemon curd, lemon zest, extract, emulsion/juice, and all the eggs and egg yolks. Whisk until smooth and runny like it is above.

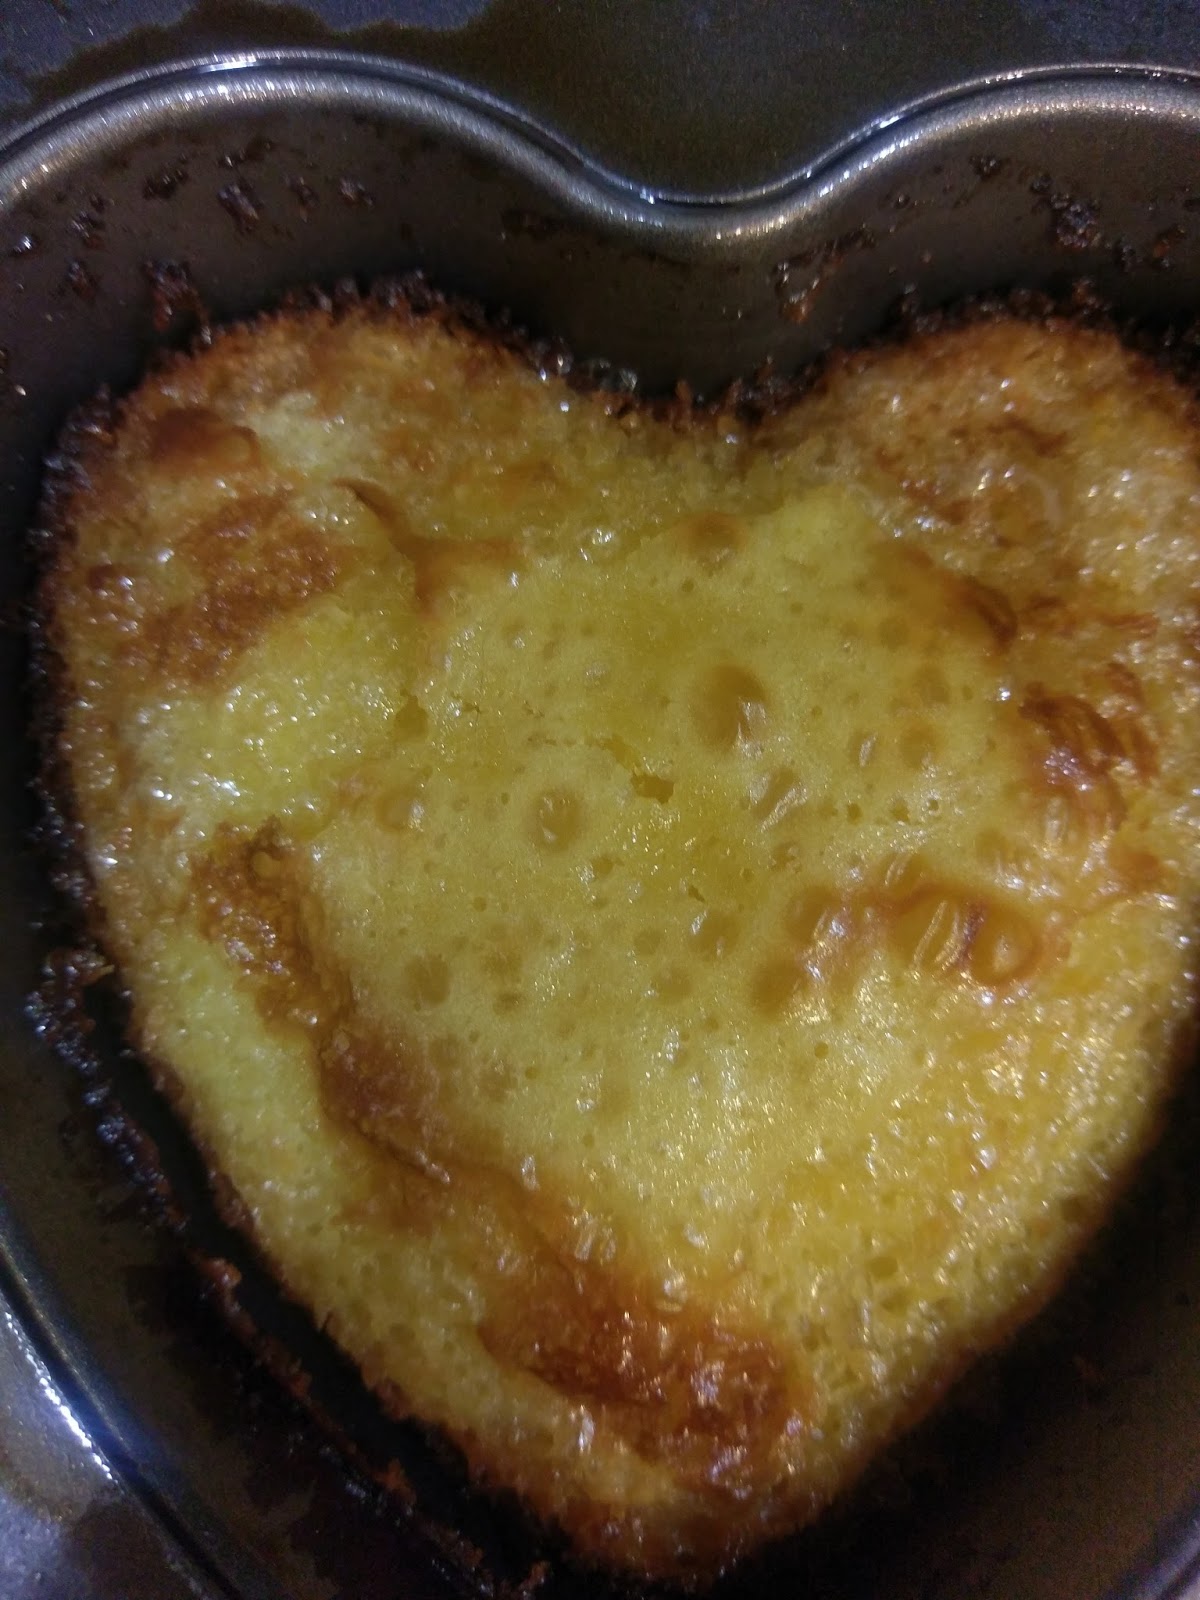
Literally the worst impulse purchase I’ve ever made. Stupid heart pan. Once you’re ready to bake, fill your ramekins or pans 2/3 full. I was able to place a little less than a cup of batter into each cavity and then each small baking pan. Since I wasn’t using ramekins, I literally stood in front of my oven and watched cakes bake to ensure they weren’t going for too little or too long. I will now no longer use the phrase “like watching paint dry,” but instead, “like watching cakes bake.” I’m almost positive that would cure even a severe case of insomnia. If you use ramekins or small pans, place them onto a baking sheet before they go in the oven. Cooking time will vary from 12-18 minutes…the key to knowing when these are done is in the edges. Once the edges of the cakes start to turn golden, they’re pretty much there. As long as the tops are not completely runny but instead slightly jiggly, your cakes are complete.

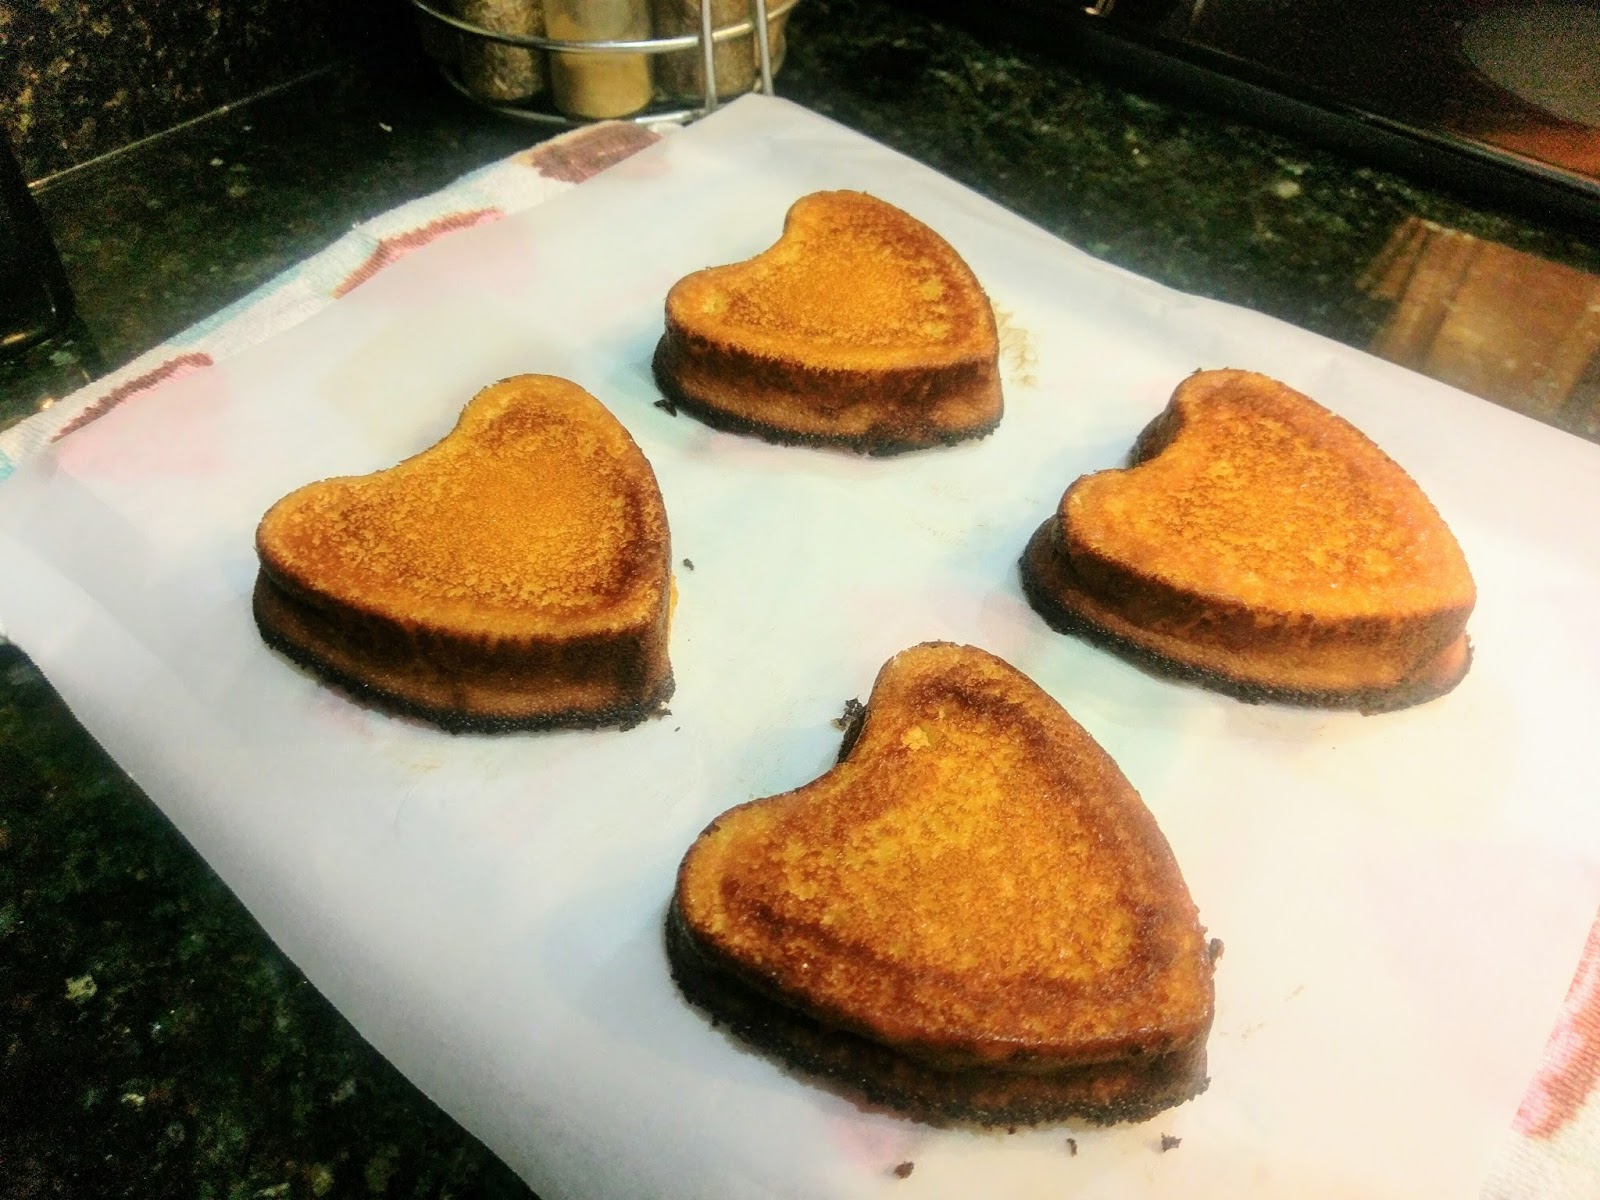
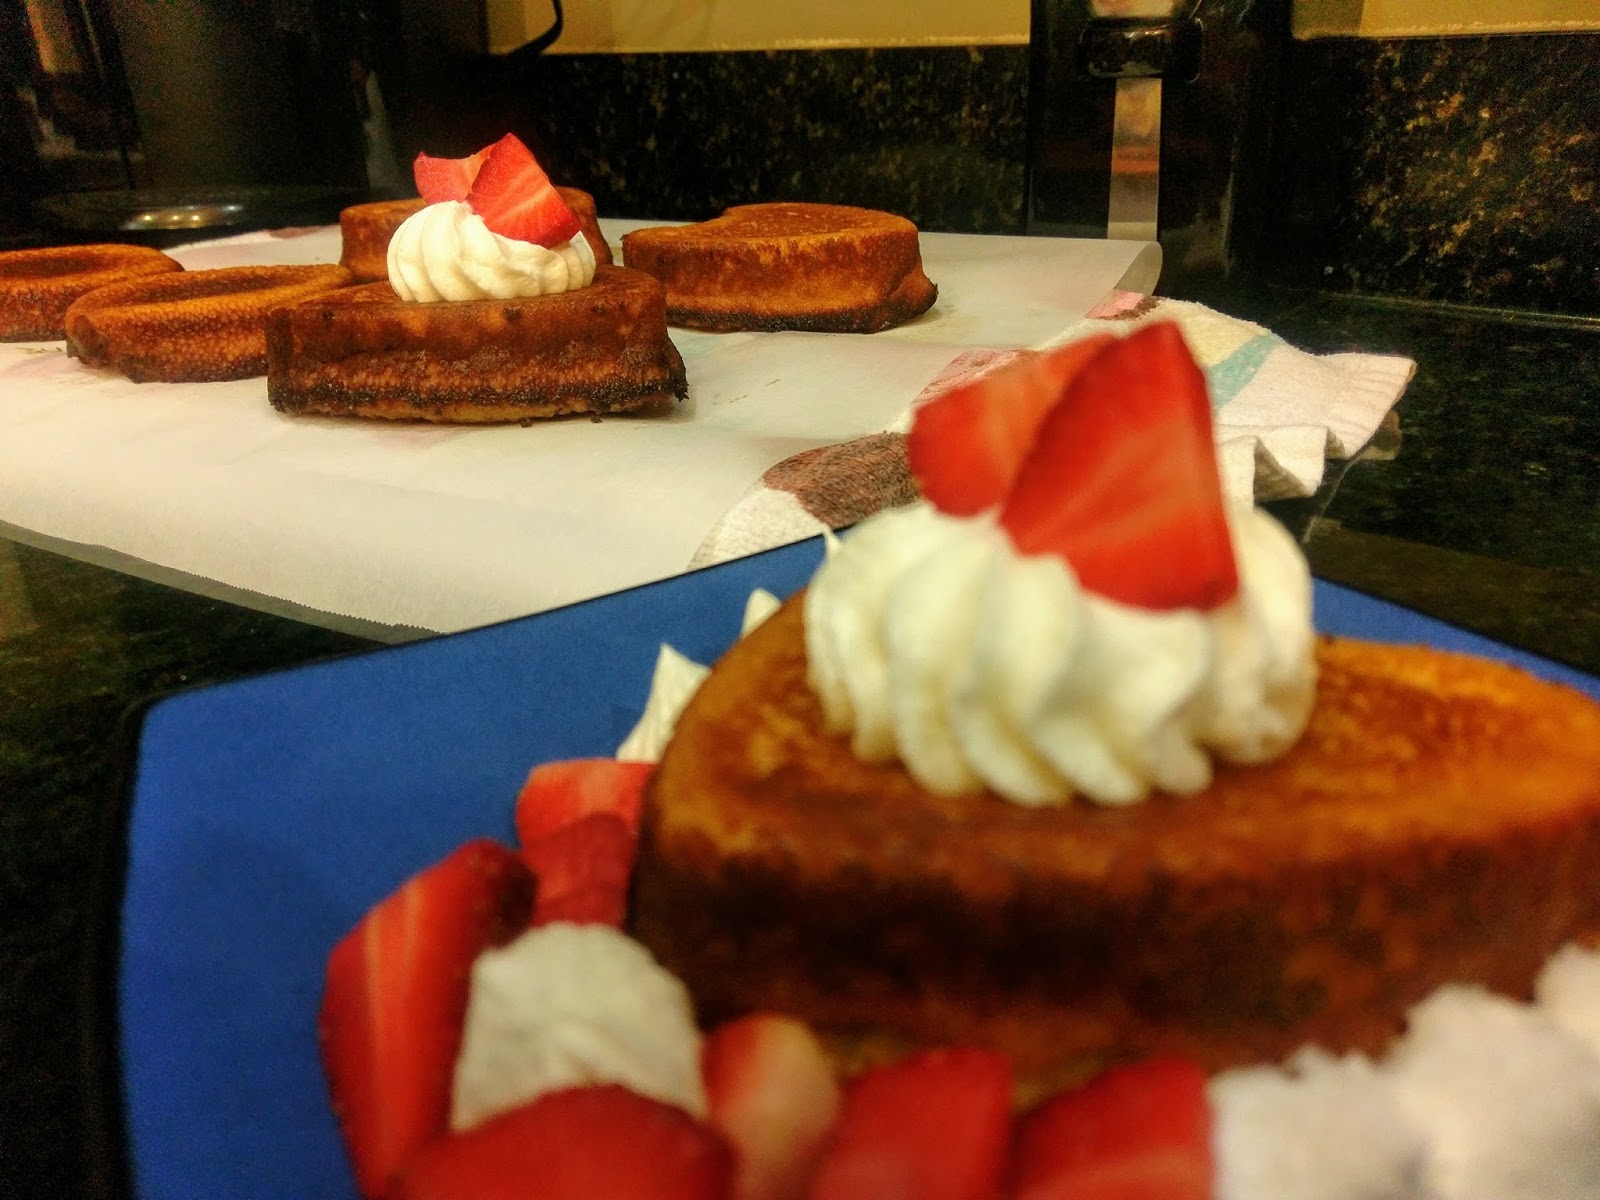
See, jiggly. I used way too much Pam and my edges got super dark because of it…but live and learn (or throw away the heart pan), I suppose. I ended up baking these for 16 minutes, but to be honest, I should have pulled them out at 14 minutes. I was just nervous the tops weren’t set enough, and something between the 14 to 15 minute mark happened (I probably fell into a brief coma or something shiny distracted me), and by the time minute 16 hit, they were cooked a little too long.
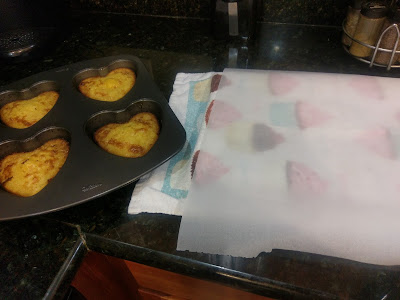
Nothing like the sweaty terror of trying to remove four cakes from a pan at the same time. Let these cool in the pan for 10 minutes before you even think about looking at them, let alone removing them. When 10 minutes have passed, use an angled spatula or a butter knife and run it along the edges of the pan or ramekins. Once you can successfully wiggle these away from the edges of the pan, they are ready to come out. I placed a towel on top of my cooling rack and then a sheet of Parchment paper on top of the towel to catch any leakage (such appetizing word choice). I then placed this set up on top of the pan, and slowly inverted until the rack was on the bottom and the pan was upside down on top. Thankfully, I didn’t pass out while I held my breath the entire time, and all the cakes came out without issue. This would be way easier to do with individual servings. When my smaller pans were done in the oven, each was easy to flip over and remove the cake from.

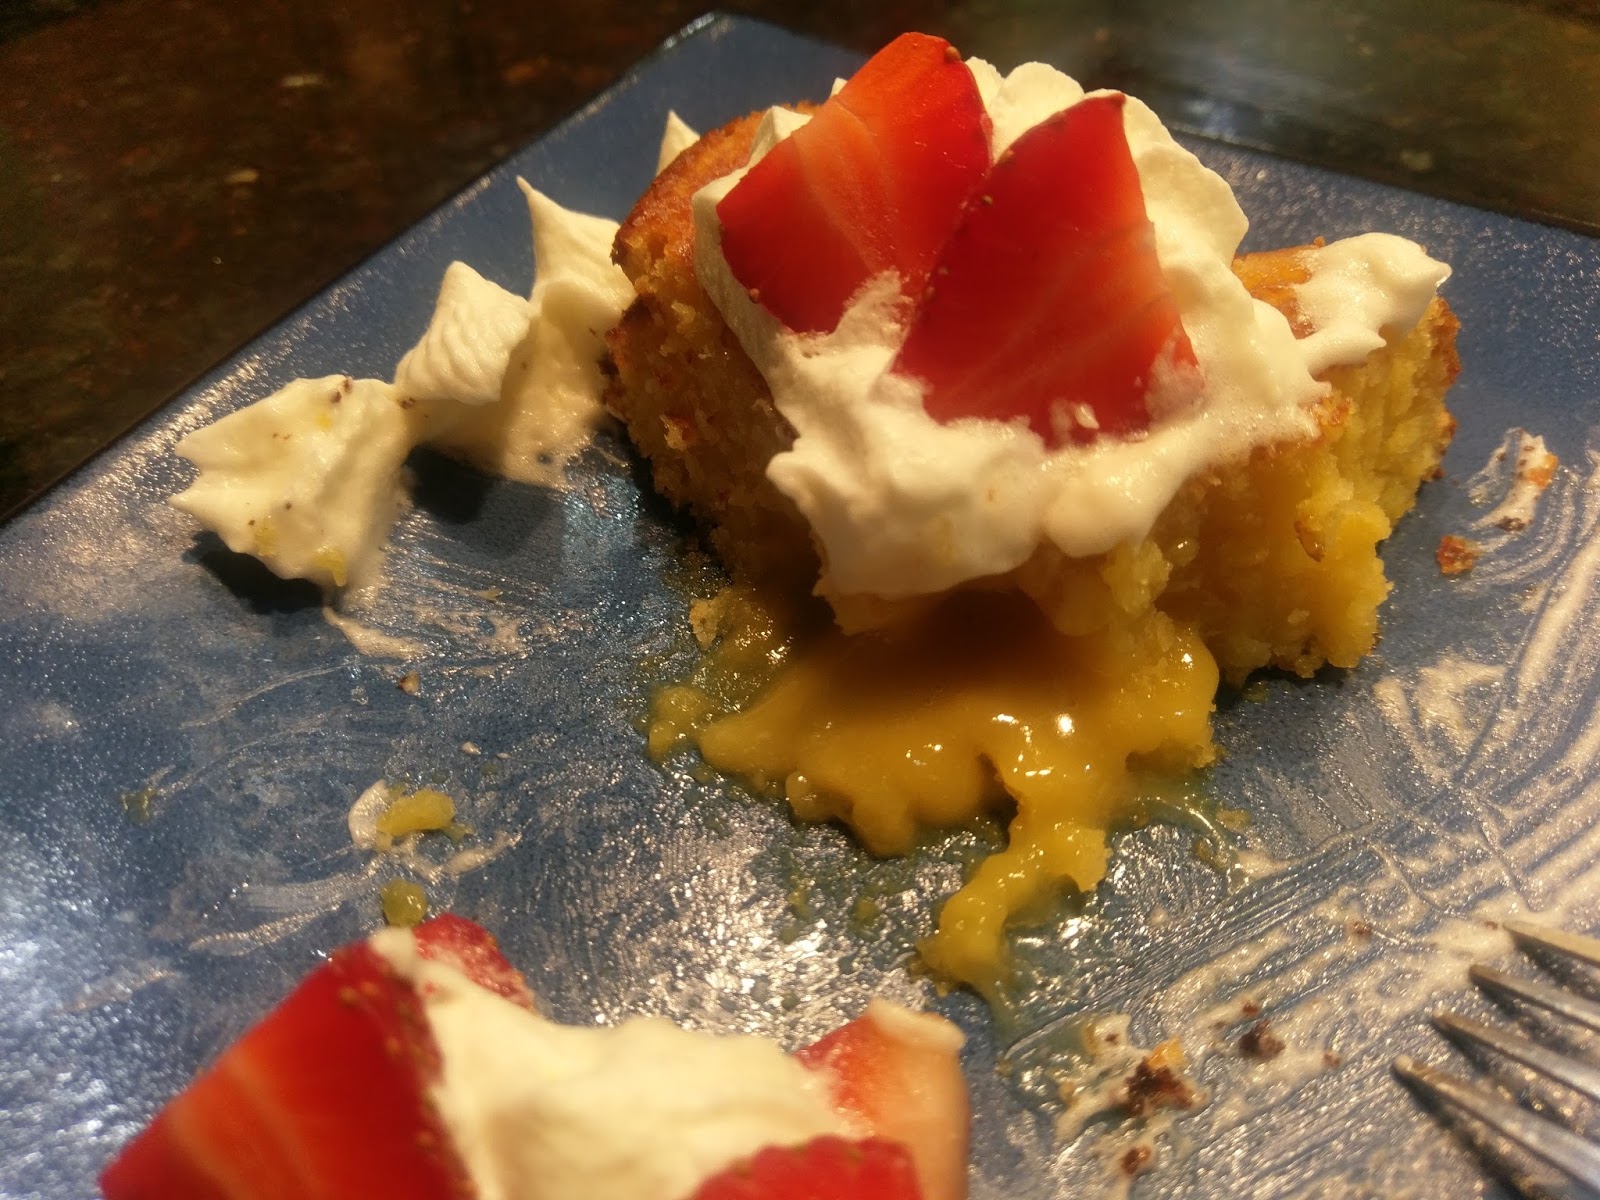
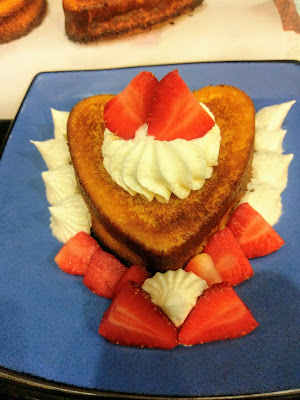
Slightly burnt, like me after five minutes outside. Like I said, for my oven, 16 minutes was literally just a minute or two too long. So they were a little dark, but what had me worries was whether or not they’d have any molten lemon lava inside because of it. Then I would have had to come up with an entirely different blog or eaten all 10 servings in a quiet, social media-free zone. I let the cakes cool for about 20 minutes before adding my toppings. If you’re going topping free or using something simple like additional lemon curd and powdered sugar, by all means, eat fresh from the oven. Since I was using Cool Whip, I didn’t want it to get melty and weird. For my garnish and decorations, I used an Ateco 879 tip and pipped a mound of Cool Whip Free on top of a few cakes. Then I garnished with thinly sliced strawberries. And then, I prayed for the first time in my life that hot lava would pour out of something inside of my very own home. Dante’s Peak pretty much ruined volcanoes for me…I see the words “magma,” “eruption,” or “molten,” and if they aren’t immediately preceded or followed by the words “cake” or “chocolate,” I get a little twitchy and panicked.

Literally the only time I’ve ever been happy to see lava. At first, there was only a small ooze. I thought I had ruined them for sure. Even if I had, at least the screw up was a damn tasty one. But the further in we excavated with our forks, the more lava kept pouring out:

This is still the only lava I want to come this close to. And then there was lava all over the plate. And we licked up every last bit. Best experience I’ve ever had with lava. Chili’s molten lava cakes are pretty good, but last time I checked (which now that we don’t live in Clovis where this was our only dining option, is never), they weren’t offering me a lemon version. While I’m okay with chocolate molten lava, I wasn’t making these cakes for me (okay, so a little was for me); I was making them for my husband–my devout sour dessert lover. So much so that I let him have the last bite. Of dessert. Willingly. Because this is what you do when you’re incapable of public displays of affection or showing romance worthy of a Shakespearean sonnet. You bake. And you bake what you know your loved one likes best. And you let said loved one have the last bite. Because Lord knows, without them, you’d be a ship in the night with 10 servings of lemon lava cakes to eat all by yourself, and you’re not familiar with the idea of portion control, so there goes at least 4 servings in a single sitting. Basically, you’d be a giant disaster of a human being. So bake cakes for the person you love that accepts you in all of your disastrous, somehow endearing to them, glory. Remember, flowers and diamonds aren’t edible, friends. ‘Til next time, my fellow eaters!

Something tells me no one ever looked at Mount Vesuvius this longingly. -
Say Aloha to Flavor
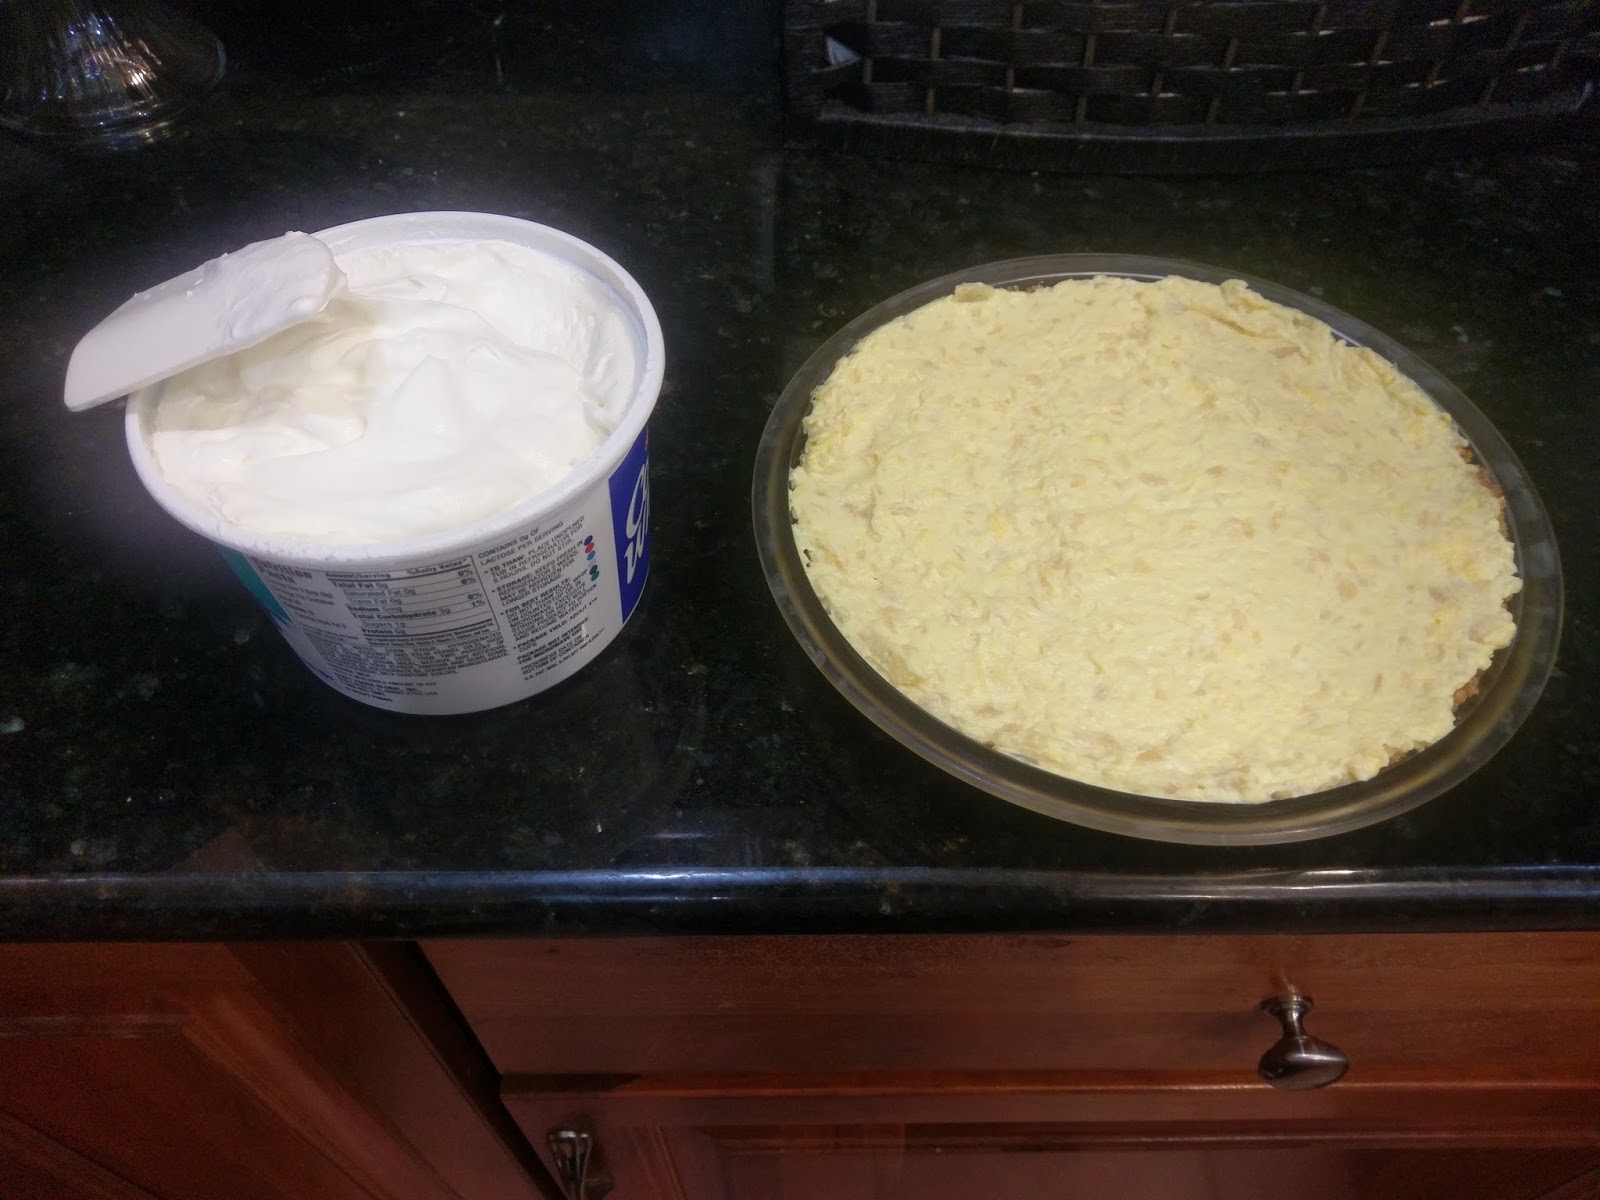
I’m a huge fan of fruit-based pies. Mainly because you can eat them for breakfast because there’s literally no difference between a slice of cherry pie or a cherry turnover. I like my desserts versatile, and I may or may not have any control whatsoever over my sweet tooth. And much like my sweet tooth, I also have literally no control over the weather here in Northwestern Florida. It’s February 12 and currently 75 degrees outside. I was outside for two and a half hours yesterday at my husband’s rugby game, and my body is rocking a love shade of crimson today because of it; mind you, I even had on SPF 8000 made for kids because my skin is pasty and translucent and burns even if you just look at me for too long. It’s full on spring merging into summer down here, but instead of pitching a fit, I’m trying to adapt the best way I know how: culinarily. You see, youthful 20-something Kate may have moaned, groaned, and pulled the shades shut, but older, wiser, 30-something Kate has decided to turn those lemons into lemonade, or in this case, fruit-based pie. Maybe moving to Florida in our 30s was a good plan. AARP jokes aside, I see why people might want to retire here. It’s literally so warm and humid year round that it preserves you from the inside out. Perhaps it should be called the self-preservation state instead of the sunshine one. All this talk of preserves leads me back fruit and, in turn, fruit pies. I decided our warmer weather warranted a delightfully light and fluffy summery pie. And where there’s a will, there’s a Kate, and she’s almost always baking desserts…this time in the form of a pineapple pie with homemade graham cracker crust.

A new favorite, thankfully appropriate all year around here! So some of you might be experiencing snow, cold, blustery winds, etc., all the joyous aspects that come with winter that I miss terribly. But do you have pineapple pie?! No. No you do not. But you can. Quite easily, might I add…this is about as simple as it gets in the dessert department. And then you, too, can at least eat a slice and let your mind drift into warmer, sea-breezy climates where drinks come with umbrellas and skin is a lovely shade of bronze (or red, if you also suffer from an inherent Canadianesque inability to tan). If you’re worried about winter weight, I’ve even figured out how to make this pie health conscious. It’s only 240 calories a slice. Considering a slice of most pie will set you back anywhere from 500-800 (get it together, pecan pie) calories, this is minuscule in comparison. But it is certainly not lacking in flavor. We’ve been nibbling on this pie for a few days now, and each plate is served with a side of satisfied ooh’s and aah’s. It is light, the topping is heavenly, and the crust melts on your tongue. We adore the sweet tang of pineapple, and when you top it with a thick layer of Cool Whip, it only gets better.

I own the world’s most adorable food processor. Real talk, you could make life even easier and buy a low-fat premade crust, but my husband bought me a 4-cup food processor I had been eyeing for ages for my birthday, so I wanted to make my own pie crust. It’s a super easy process, still, so if you are interested in a low-fat pie crust recipe, gather up:
- 6 sheets of low-fat graham crackers
- 3 TBS of butter (still cold and cut into chunks)
- 2 TBS of sugar or sugar substitute
- 1 TBS water
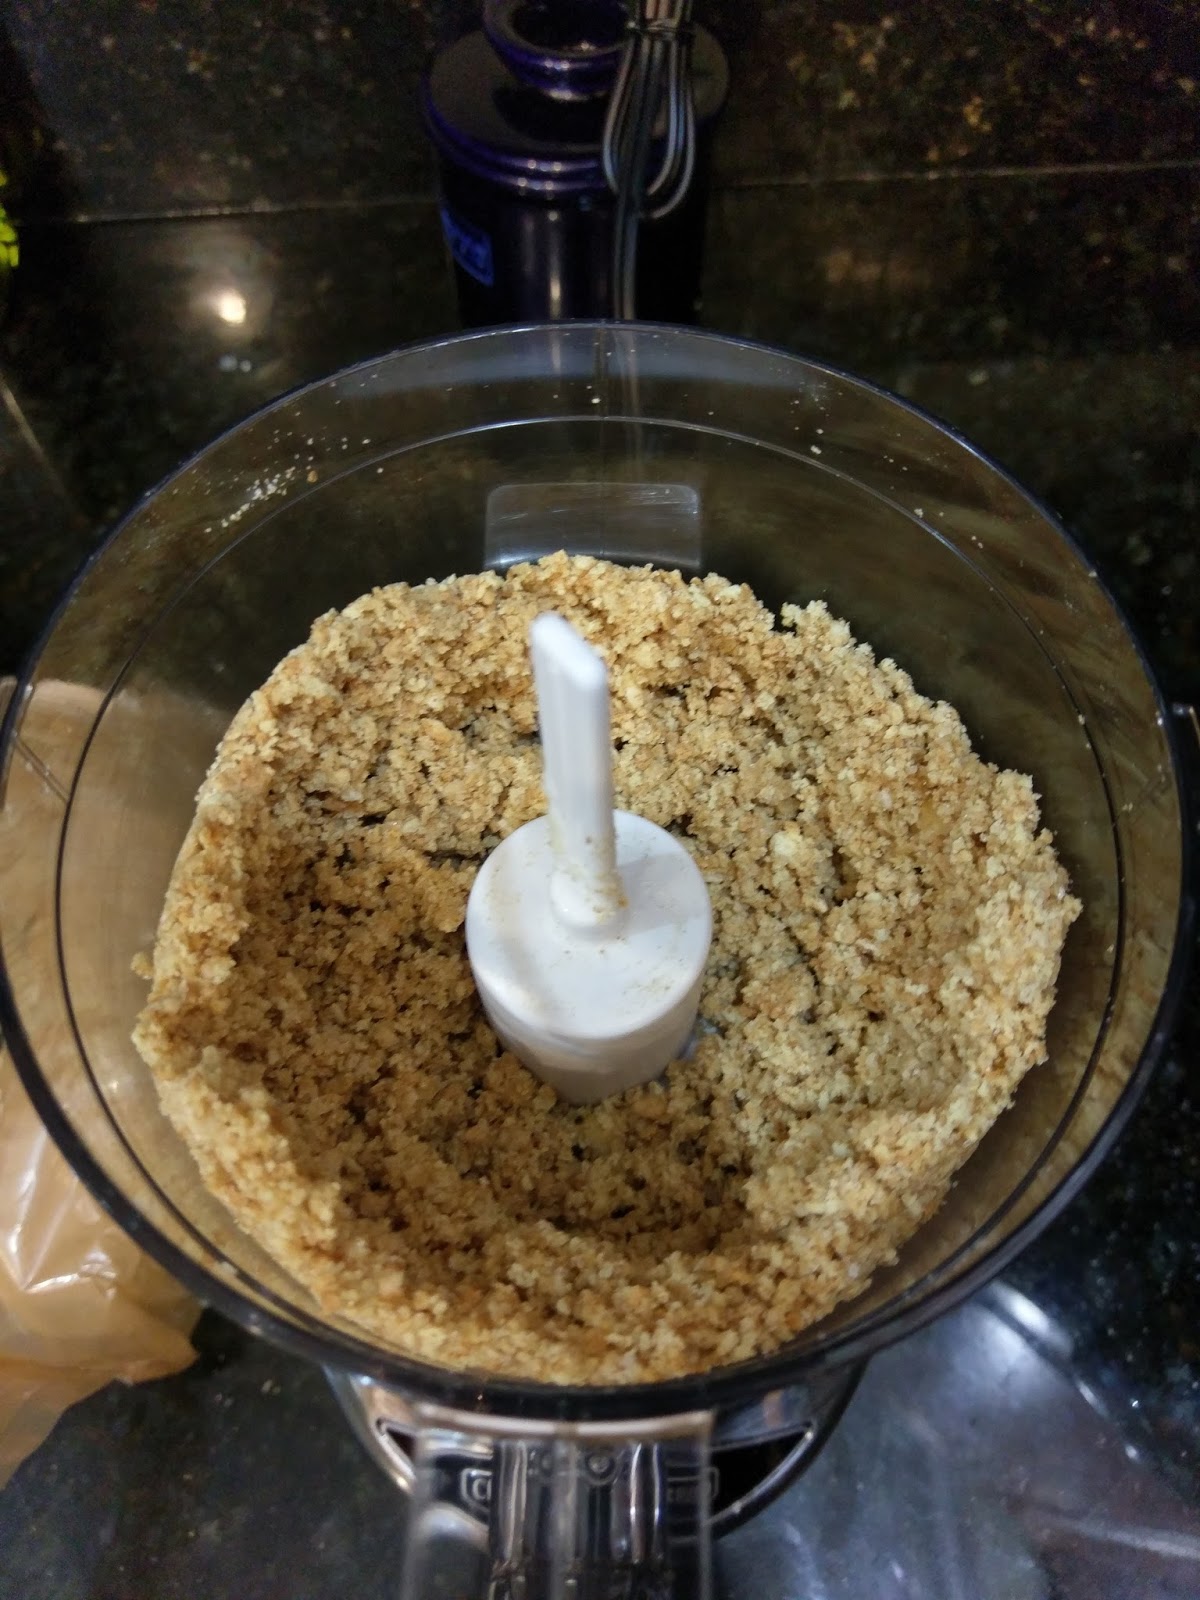
Otherwise, feel free to skip to the filling recipe below if you buy a premade crust. For you diehard food processor owners, start by pulsing together the graham crackers, butter, and sugar until it forms a nice crumb. Then add in the the water and pulse until you’ve got thick crumbs:
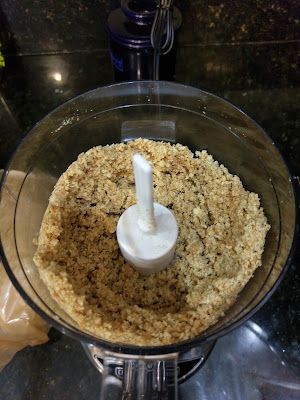
Like so. Love the wonder that is the tiny food processor. 
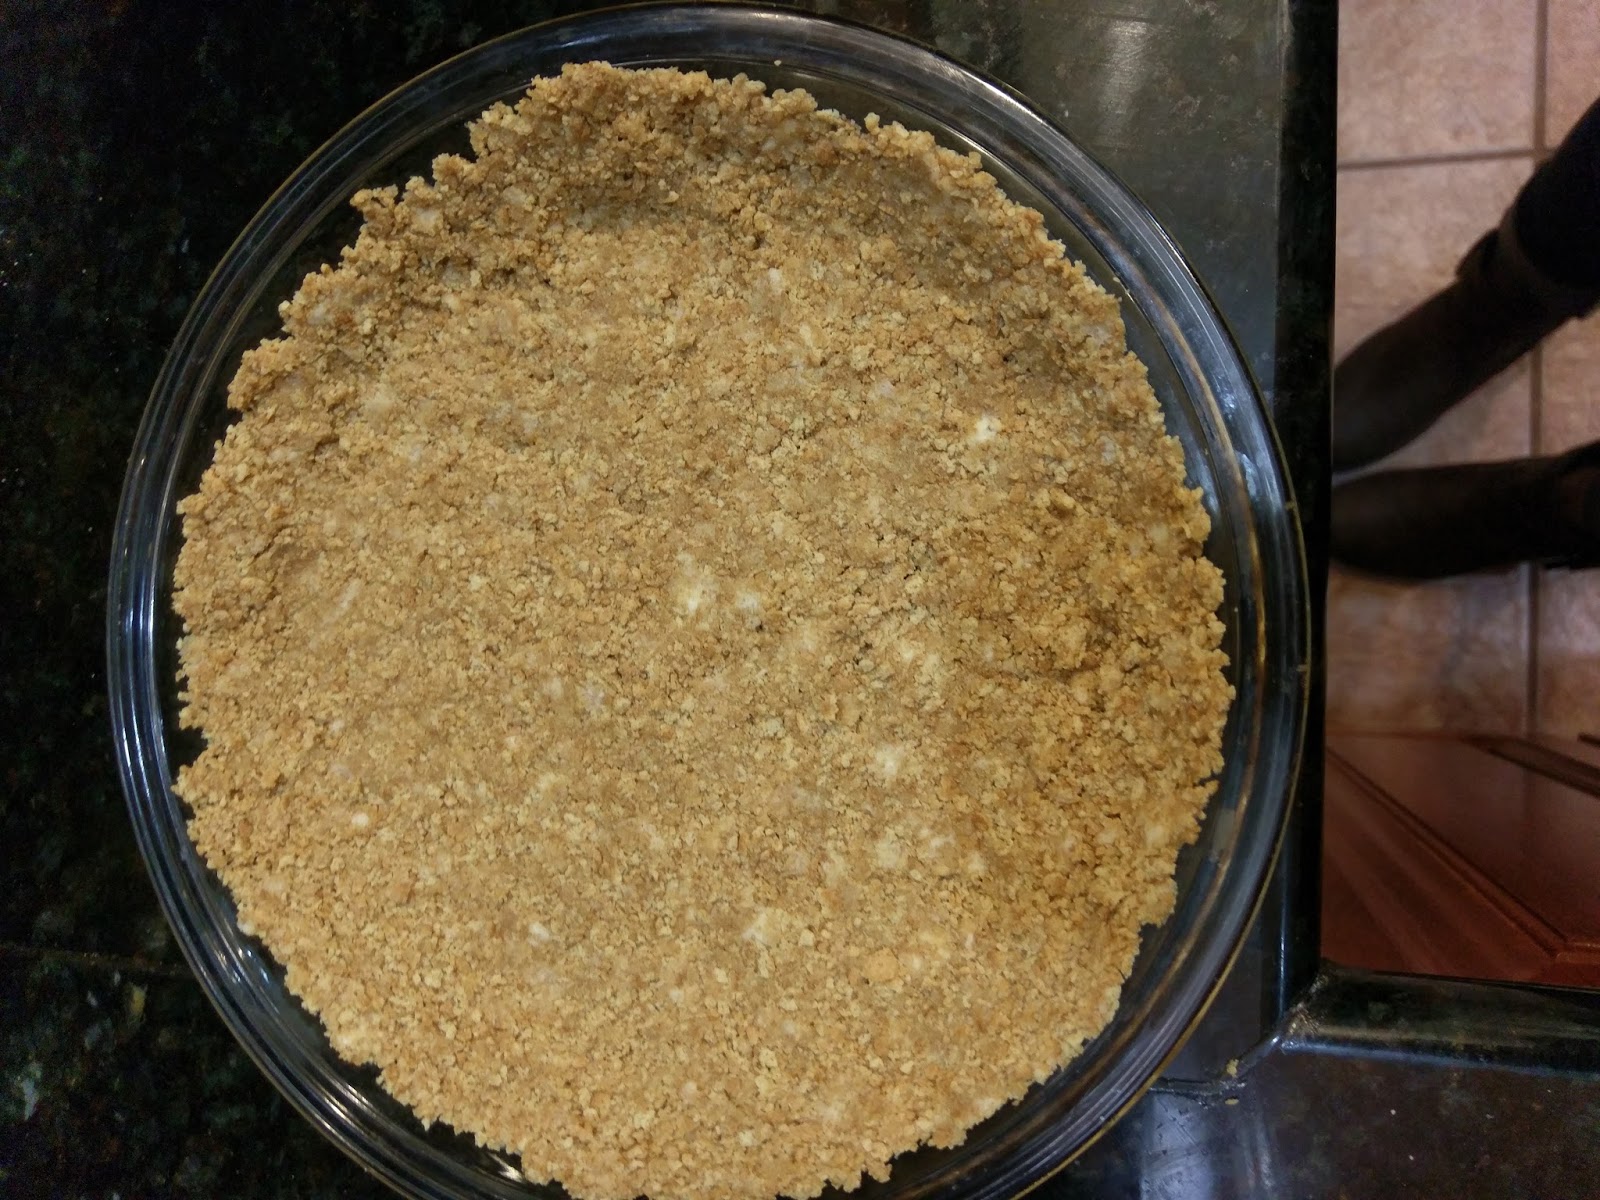
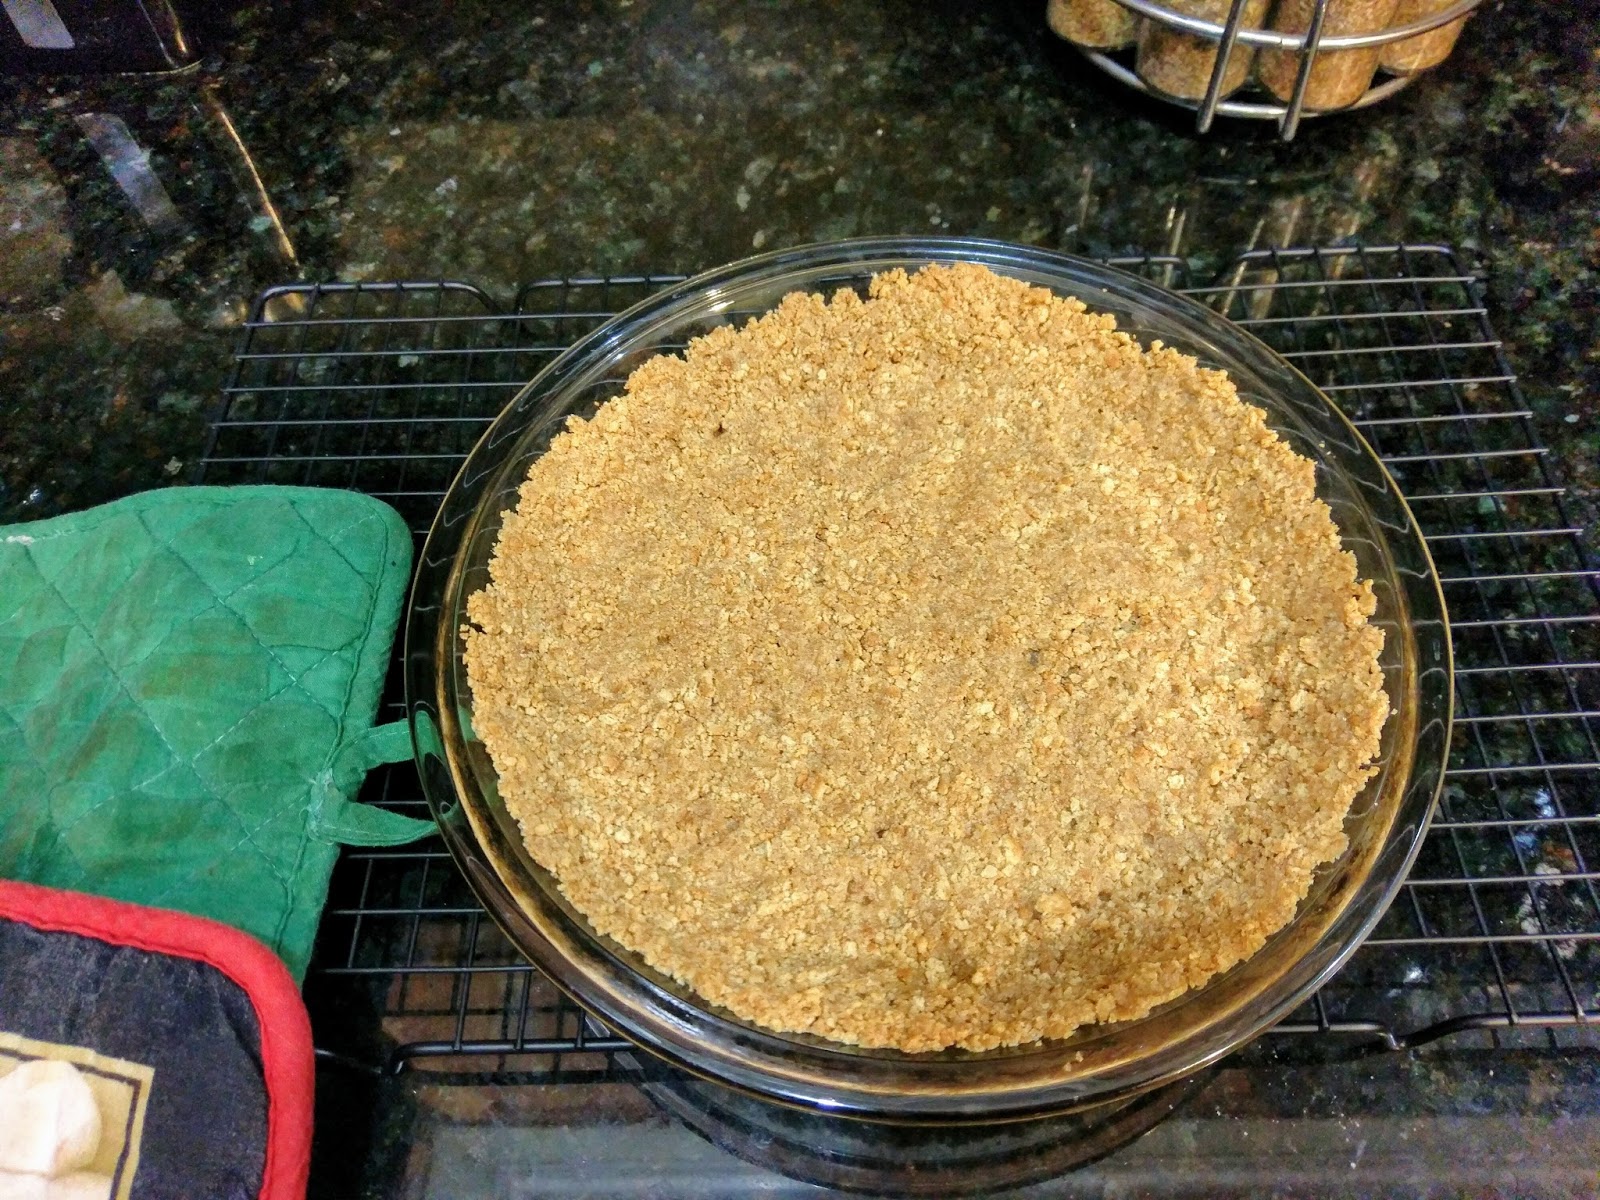
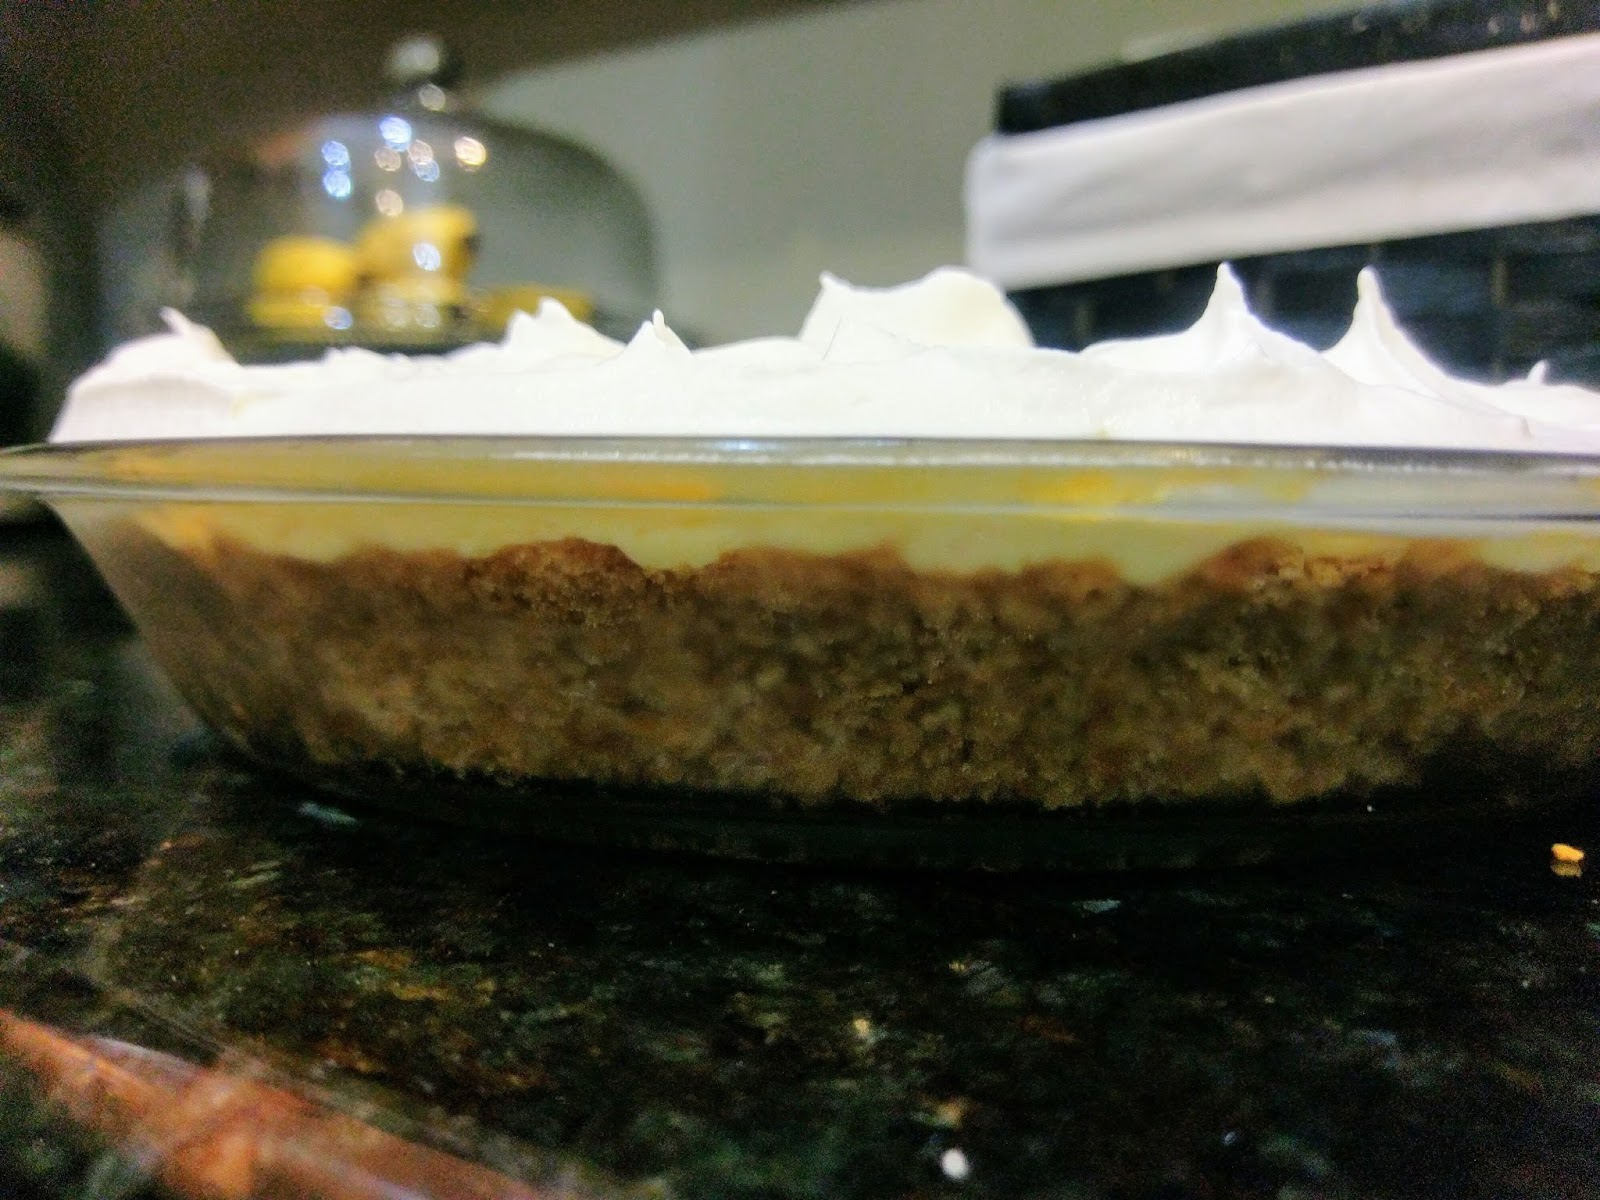
Then press into a 9-inch pie pan. I am marveling at the fact that it was cool enough to wear ankle boots when I made this crust. It must have been a chilly (65 degree) day. Now, to prevent the crust from crumbling when you serve it, place it into the freezer for 15-30 minutes to firm up. I went for the full 30 just to be safe. When time is almost up, preheat the oven to 375. Bake your crust for 10 minutes; it should be a nice shade of golden…you know, like the color I wish I could tan to without the help of sunless tanner:
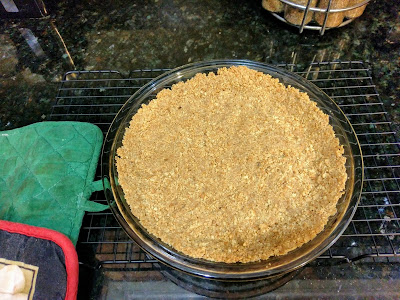
“I wish I had a skin tone best described as freshly baked pie crust.” Now, let your crust cool fully before adding in the filling. I placed it on a rack and put it into the fridge for a half hour. Literally the most annoying thing about making this pie is that the actual time spent in the kitchen making it is about ten minutes, but when you add in all the time to chill and set, it’s more like four hours. The price to pay for tasty dessert is a minor inconvenience, so it’s still a winner in my impatient book.

Yep, this is really all you need. So, this is an extremely lazy pie. Like, wearing pajamas in the airport level of lazy. All you need for the filling is:
- One 20-ounce can of crushed pineapple (reserve a tablespoon of juice)
- One 8-ounce tub of light sour cream
- Two packages of sugar free/fat free vanilla instant pudding
- Whatever size tub of Cool Whip Free you feel is necessary to top your pie. I just happened to have a 12 ouncer in the freezer in the event of a dessert-related emergency.
Buckle up, here comes the hard part:
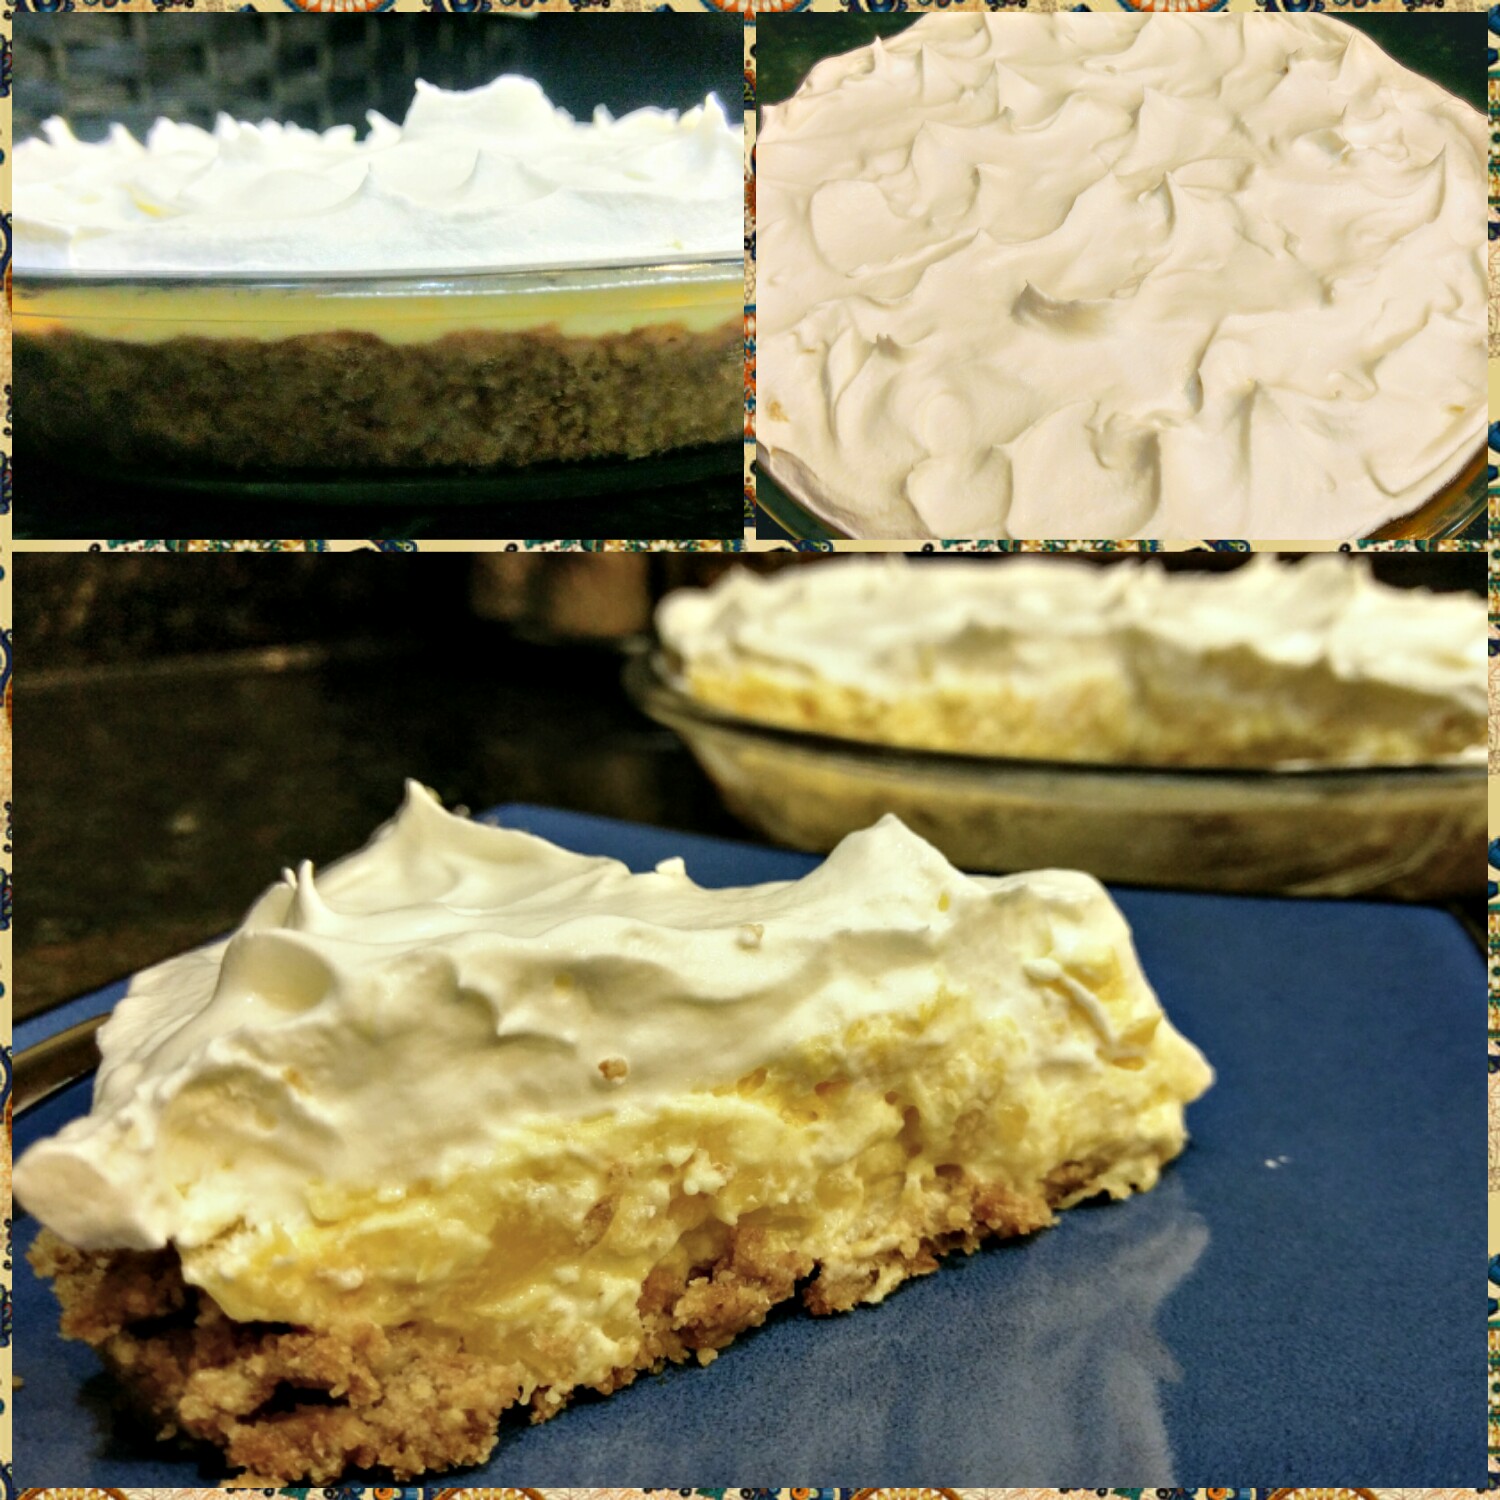
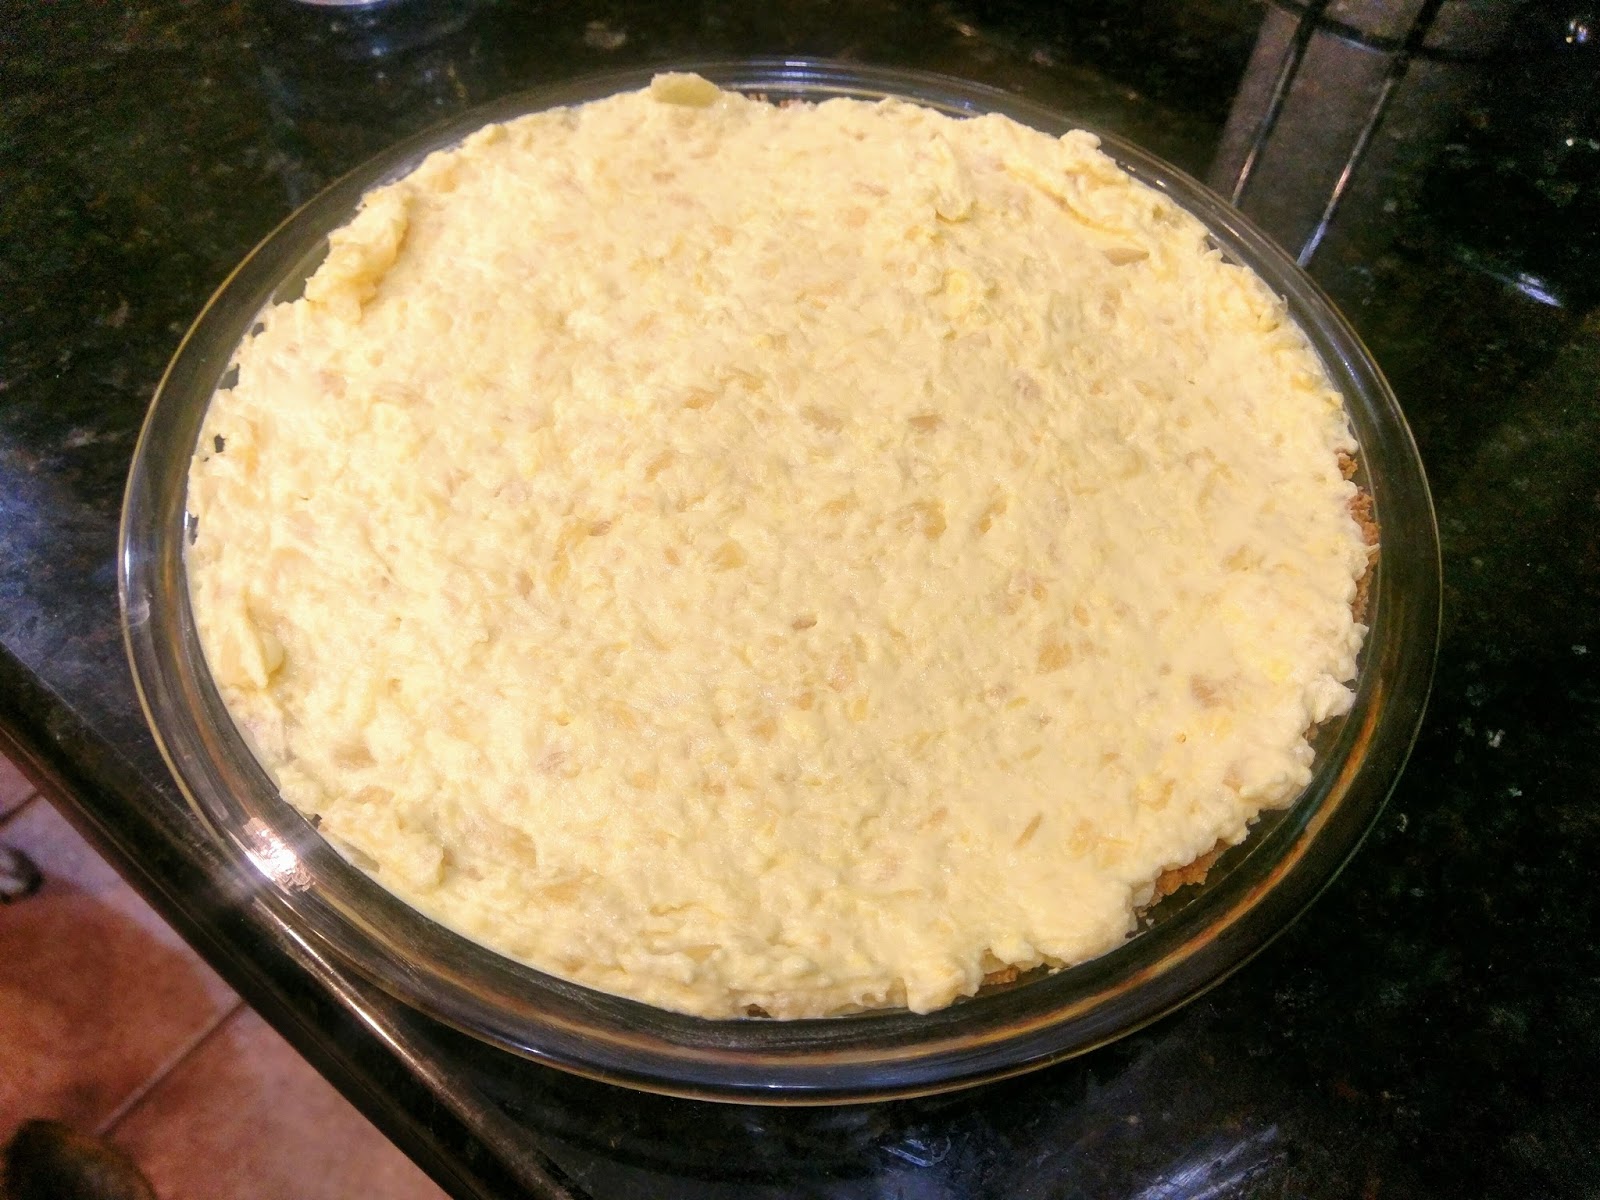
Dump the pineapple, reserved juice from the can, sour cream, and pudding mix in a bowl. Blend until everything is mixed together and a lovely shade of yellow…think “Easter” yellow. Then dump this into your chilled pie crust or premade crust and smooth out.
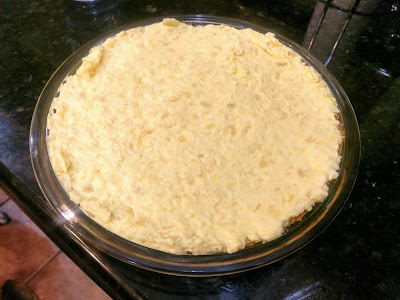
Kinda looks like potato salad. Now, take your pie and place it into the fridge to set for two-four hours. You just want it firmed up enough that spreading a layer of Cool Whip on top isn’t going to interrupt the settling process. Alternately, you could place it in the freezer for an hour if you’re in more of a hurry.

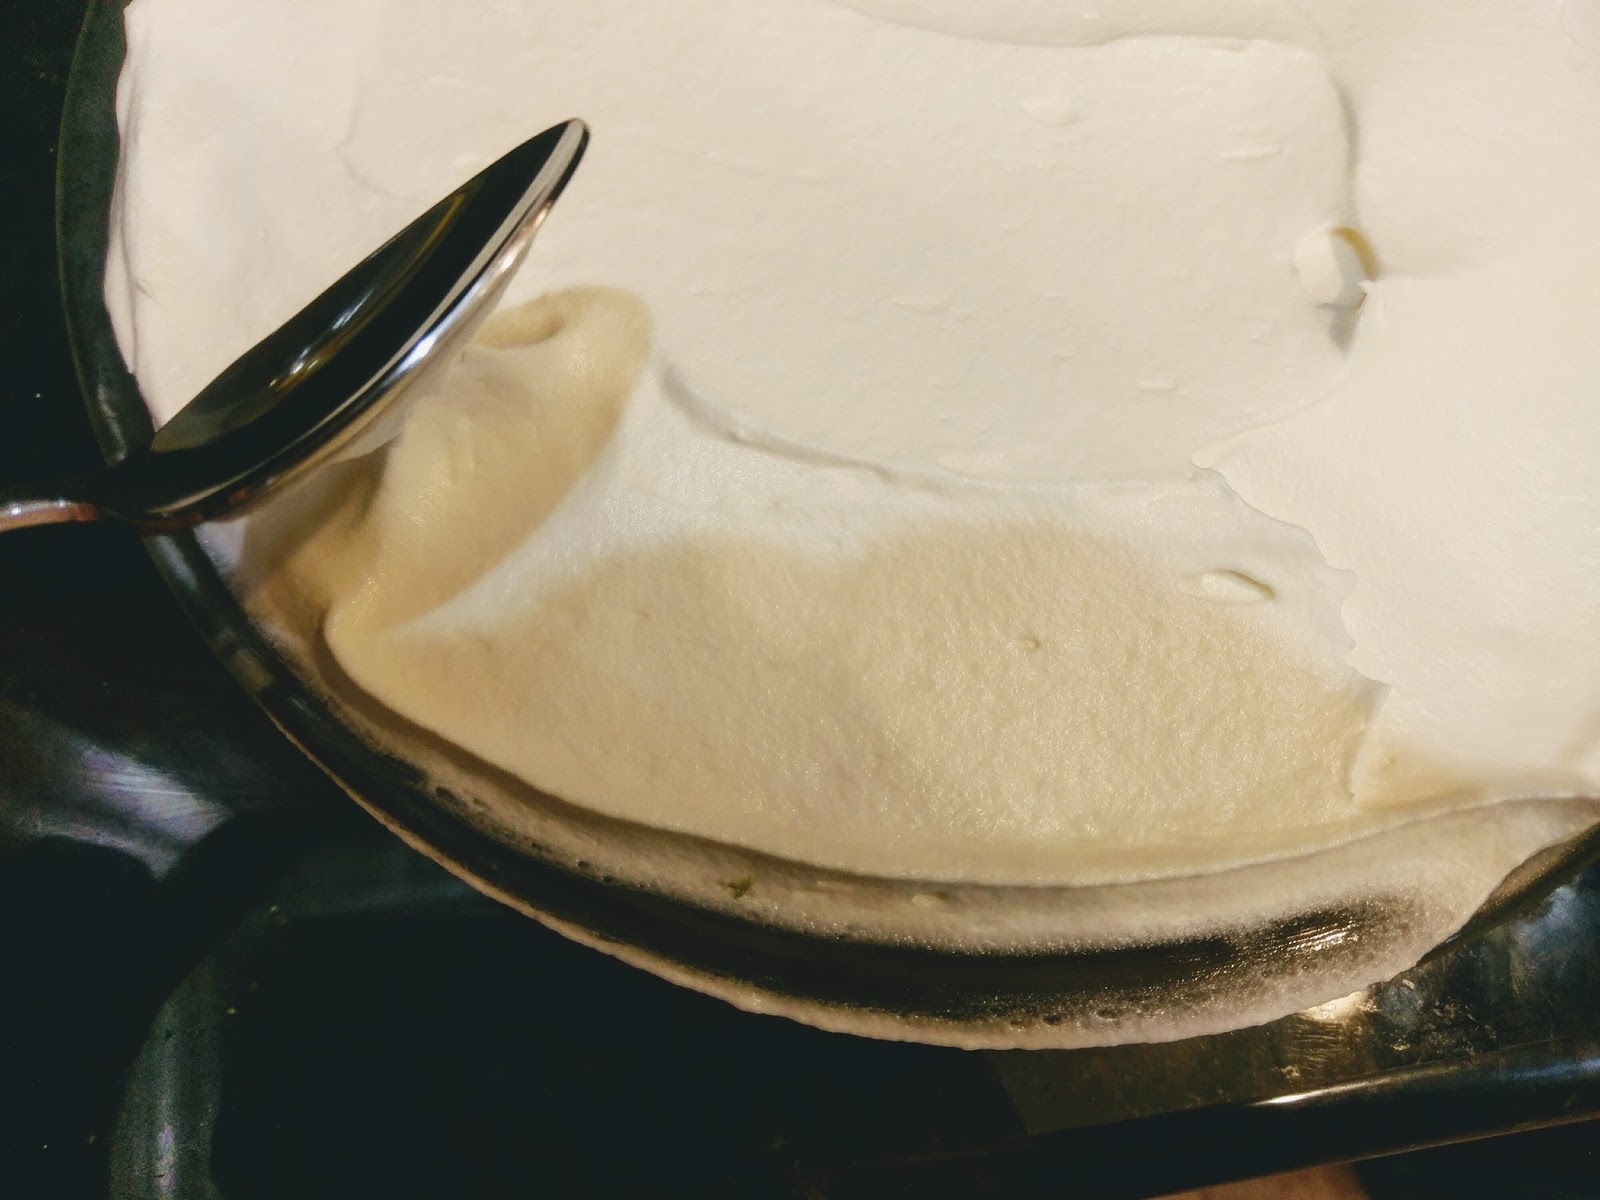
I enjoyed several spoonfuls of Cool Whip to help pass the time. Now, you can slather on the Cool Whip however you like. You could use a 1M or 2D tip and pipe stars on the top of the pie in Cool Whip or use the same tips to make rose swirls. I decided to go for a more classic and meringue look. It was effortless to achieve. I simply plopped a large mound of Cool Whip on top of the pie and smoothed it out with a spatula.

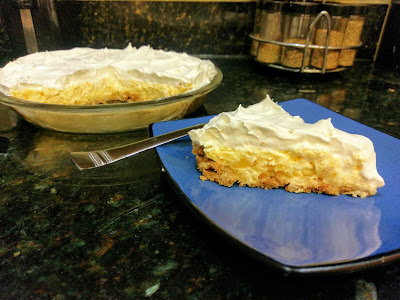
This was not an easy photo to take one-handed. Then I took the back of a spoon and swirled it around a few times and pulled up and away quickly. Repeat this all over. This forms the circular, peaked look of a meringue pie.

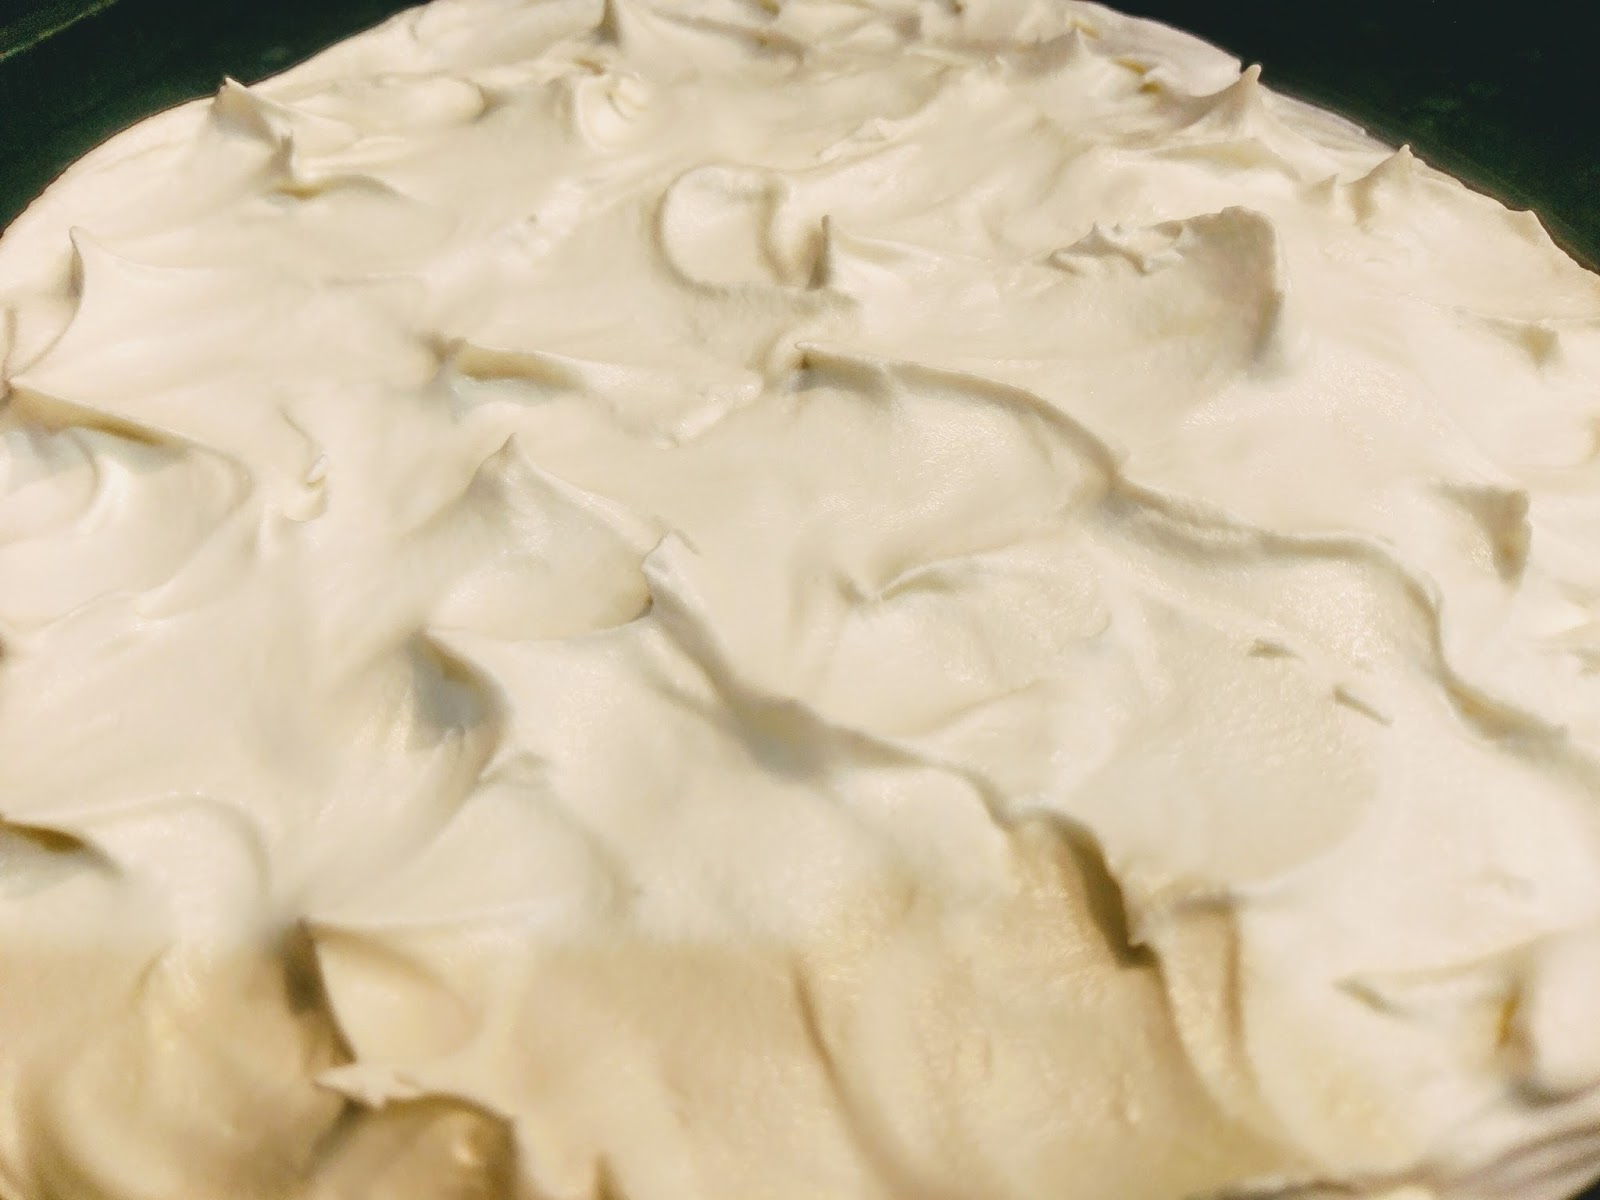
And it’s pretty awesome. 
I mean, check out those peaks! At this point, you could cut and serve if you’ve left your pie in the fridge or freezer long enough to set. I ended up placing my pie back into the freezer for two hours in order to make really clean slices for photo ops. If you’re not a food blogger, this is not something you need to worry about…but remember, it is a sacrifice I make for you every week. Feel sorry for me while you eat your pie. This is definitely a pie you want to keep refrigerated for the very short while it survives before it is completely devoured. I promise you it won’t last long. It’s simply too good. The sweet-to-sour ratio is absolutely perfect with this pie. It reminds you if you’re stuck in winter that warmer temperatures are on the horizon. It reminds you if you’re stuck in permanent summer that one of the few benefits of an 80-degree day in February is that frozen drinks and cold fruit pie are a benefit you get to experience 365 days of the year. It’s literally the most optimistic dessert I’ve ever made. It’s bordering on divine. Even if you’re not a fan of pineapple, you could easily sub any other can of fruit your taste buds prefer. Adaptable and easy…I’m really serving this one up for you (literally). Now I’m off to slather myself in aloe vera and dream about a day when my skin is pie-crust bronzed and not sea-crab red. ‘Til next time my fellow eaters!
Thankfully this pie also soothes the pain of a sunburn! -
An Exercise in Yumminess
Ahh the wonder that is Super Bowl Sunday, or as I lovingly refer to it, “America’s Cheat Day.” Between fistfuls of food smothered in cheese or chocolate, there’s yelling at the TV like a crazy person over a game that literally has no impact on your day-to-day life (Hi, I’m a Vikings fan. I don’t even know what this…Super?…Bowl? is). Since I limit myself to junk food very sparingly, I won’t lie, I went very kid-in-a-candy-shop over what is most definitely the only day of the year I put away the food journal app and just live. You’ve never felt truly alive until you’ve inhaled half a bag of Doritos followed by immediately using more chips as a rudimentary plate to transfer a ten-layer dip into your pie hole. Perhaps this is because right after, you kind of want to die a little due to gastrointestinal distress coupled with shame. But c’est la vie! Those greasy football foods don’t eat themselves! And naturally, I had to make sure I really, truly lived up to my stretchy pants’ expectations and ate at least five pounds worth of food in one night–to include a massive amount of dessert. I tried my best to make dessert at least a little “light,” but let’s face it, even I didn’t count calories with this recipe. Instead, I counted blessings that Target’s jeggings allowed me to breathe after eating half a football. Let me explain…
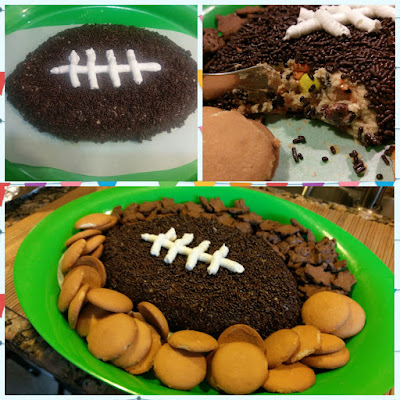
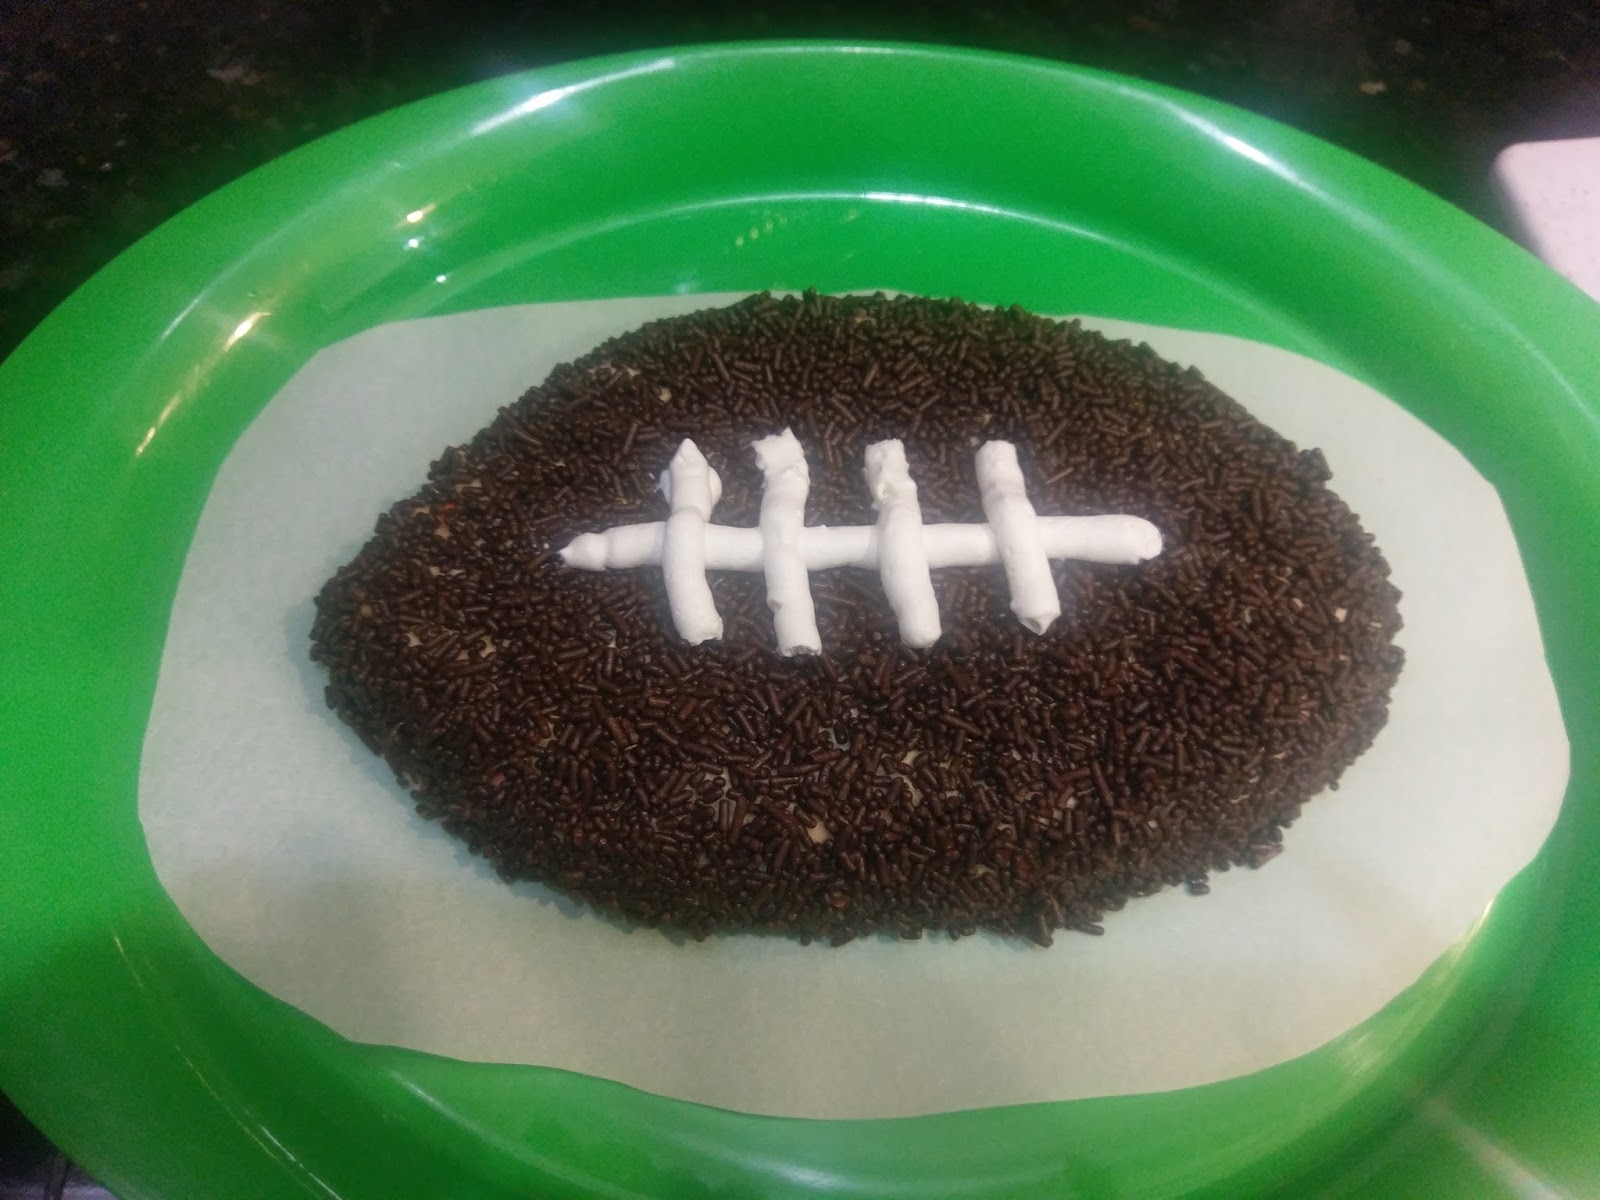
It was clearly edible. This cute, somewhat deflated (probably a Pat’s fan) football is actually made of Reese’s Pieces peanut butter dessert dip…while I will try to respect the fact that the Pat’s won the game last night, remember, the keyword there was try. I mean, as divided as this country is on most issues, I think we can all agree it’s hilarious watching Tom Brady go boneless to avoid a sack. That was more entertaining than most of the commercials. I mean, did companies everywhere just decide, collectively, that America has literally gone too dark for stupid Super Bowl commercials anymore? Have we lost the ability to laugh at Doritos? I was alarmed by the amount of adverts for freemium games, and I was saddened that only the Christopher Walken and the Melissa McCarthy ads were worthy of an actual laugh and not a disgruntled chuckle. You know, the kind of chuckle full of equal amounts disappointment and hope…the next one has to be funnier, right? Wrong. It wasn’t. So it was a good thing I had a giant football made of peanut butter and chocolate to drown my sorrows in. Let’s just say my football fandom has taught me a thing or two or thirty about dessert-based coping.

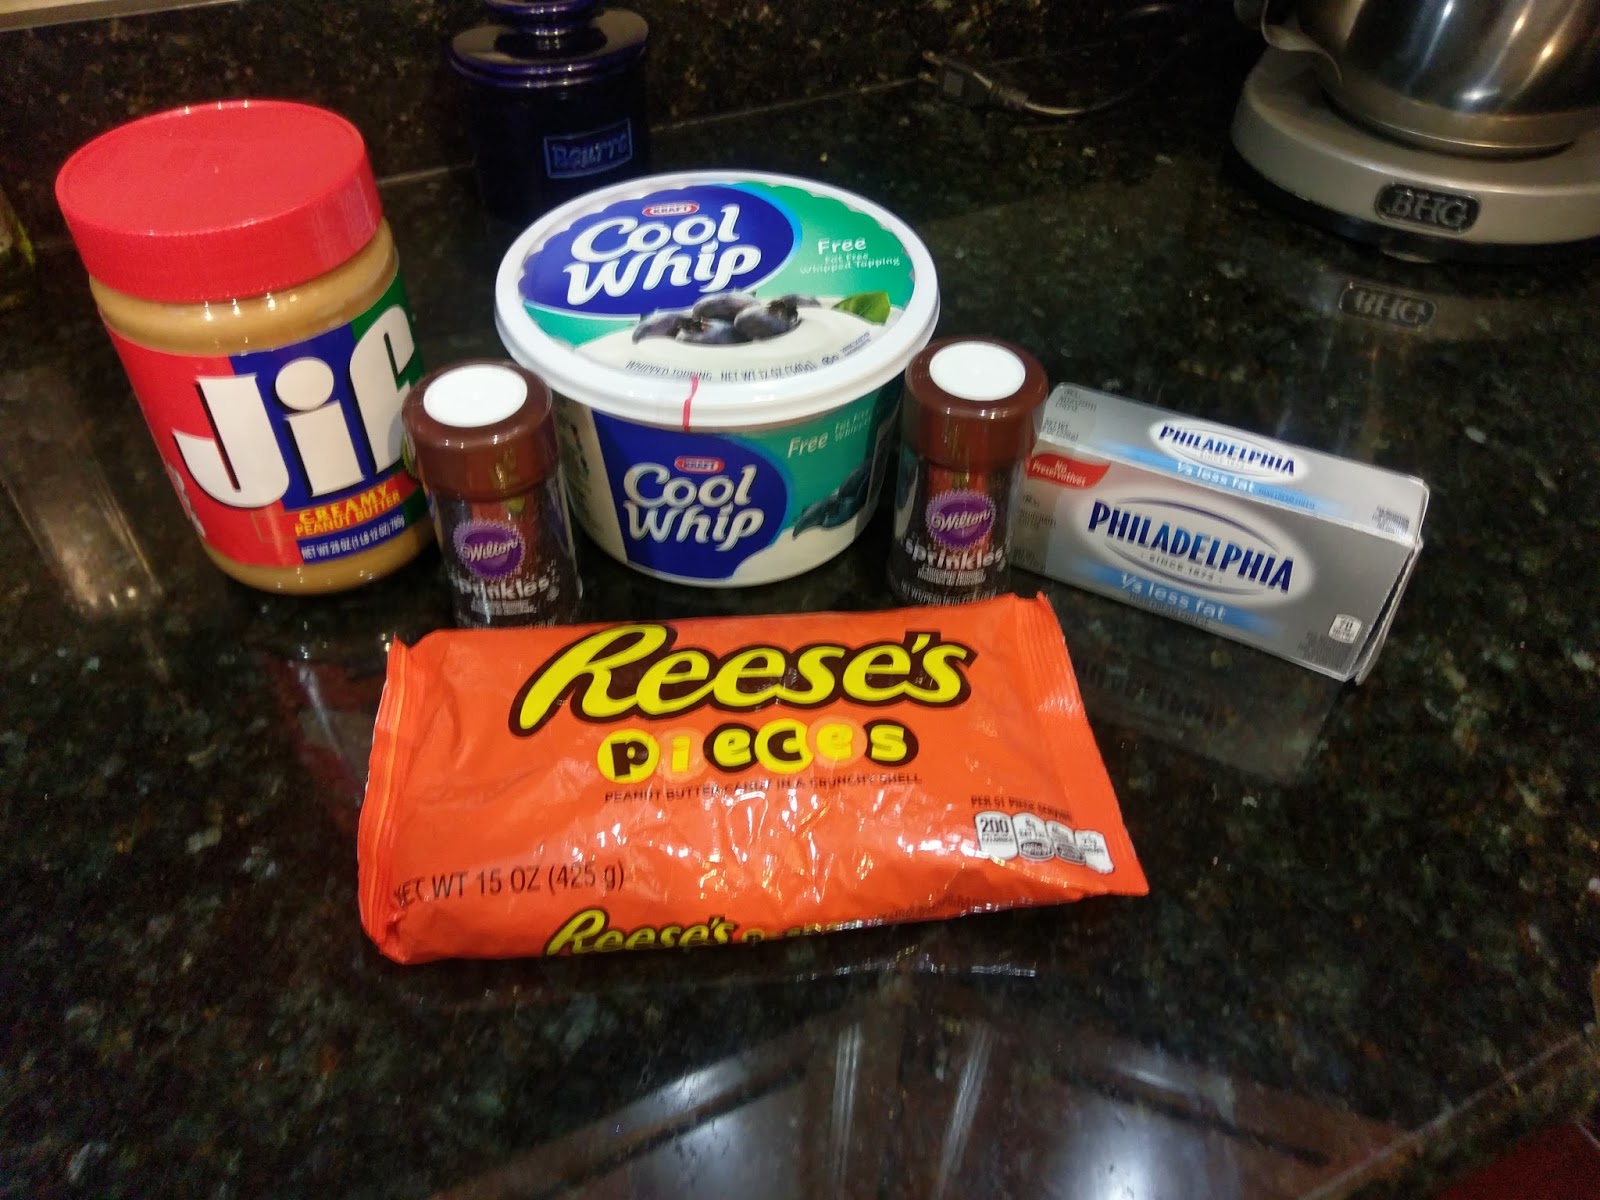
As an added bonus, you’re gonna have leftover Reese’s Pieces hanging around. I realize the football season is over, but this dessert dip was just too damn good not to share. Besides, there are other sports (yes, America, it’s true), so you could easily mold a hockey puck, a basketball, a baseball, tennis ball, etc. by using the right colored sprinkles. Or you could make life even easier on yourself and just make the dip in a bowl and be done with it all. And after last night’s game and the first thirty-some-odd days of 2017, I feel like that’s the appropriate level of “trying.” So to make the dip, gather up:
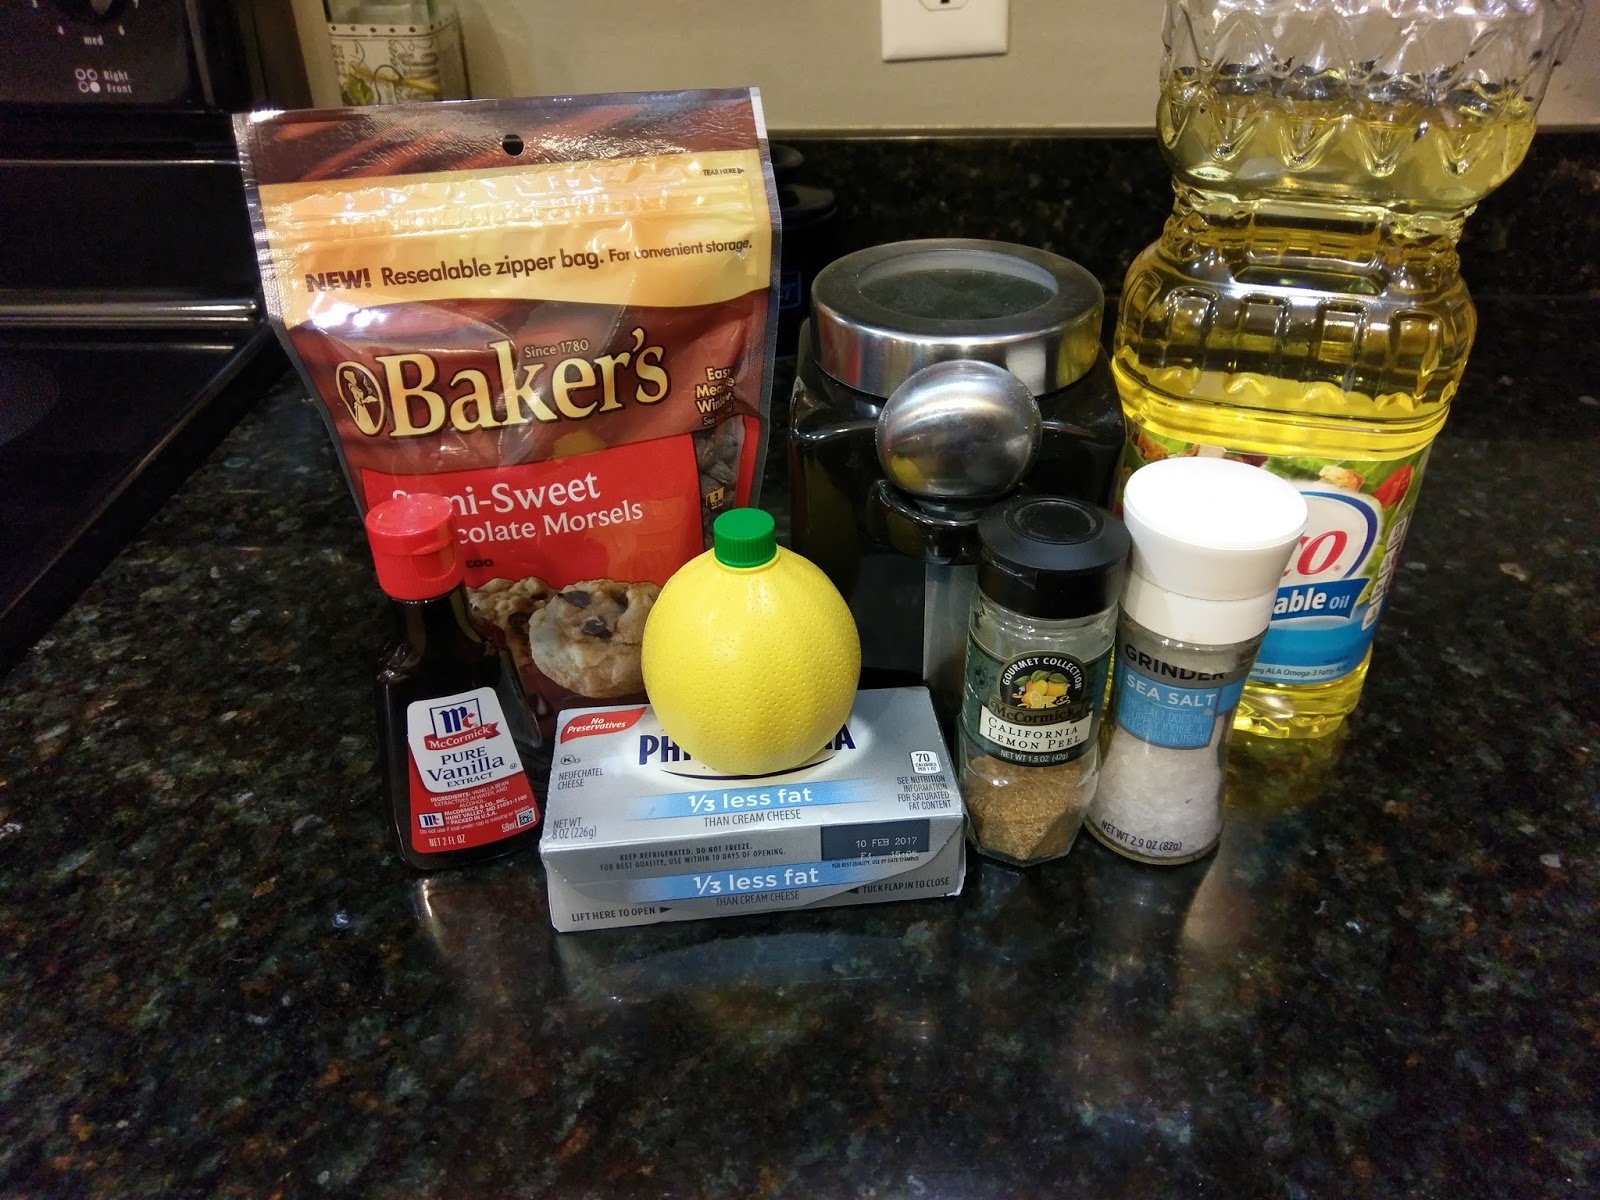
- 1 cup peanut butter of choice (gonna judge you though if it’s not JIF. Get your life together!)
- 1 8-ounce block of reduced fat cream cheese at room temp
- 8 ounces of Free Cool Whip (this is the insanely good fat free version)
- 1 cup of Reese’s Pieces
- 1 1/2 containers of Wilton’s chocolate sprinkles
- For eating: a spoon, preferably, or graham crackers, Nilla Wafers, Teddy Graham’s, pretzels, etc.
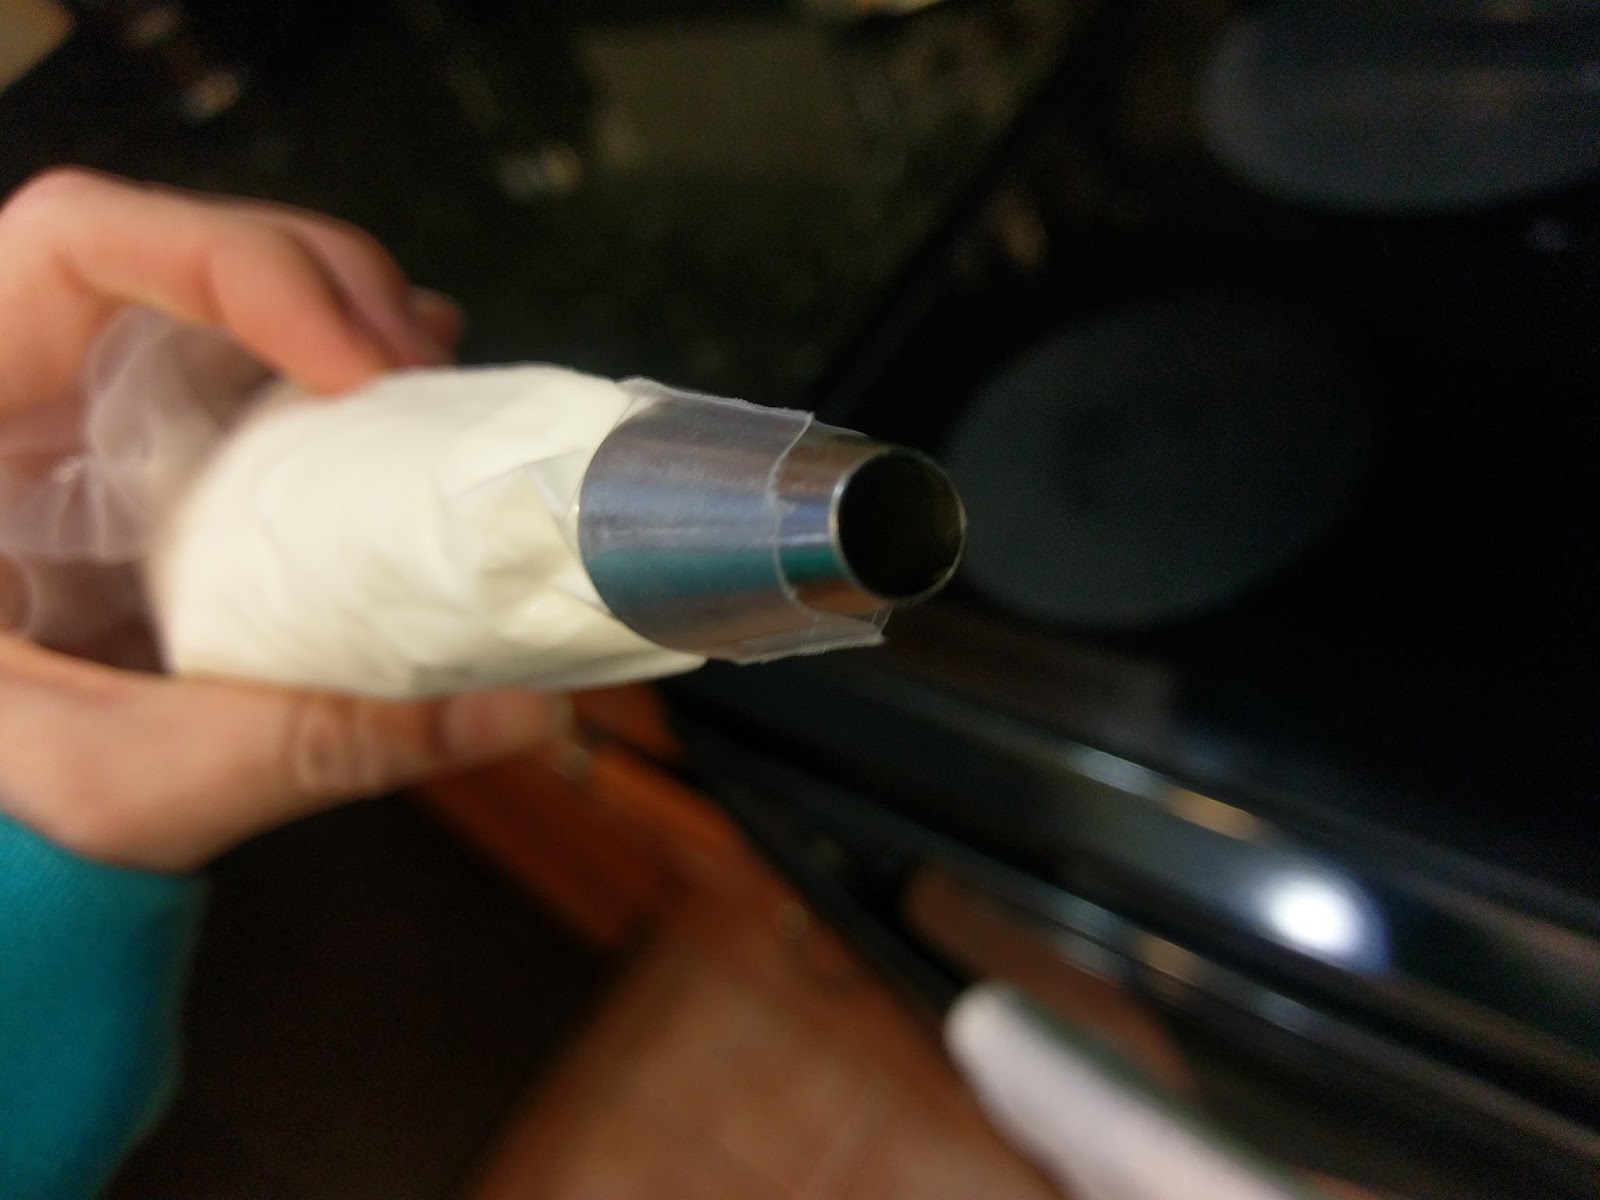
To start, cream the peanut butter and cream cheese for a few minutes in a stand mixer. While this is taking place, take a few spoonfuls of Cool Whip and place into a piping bag fitted with a large round tip:

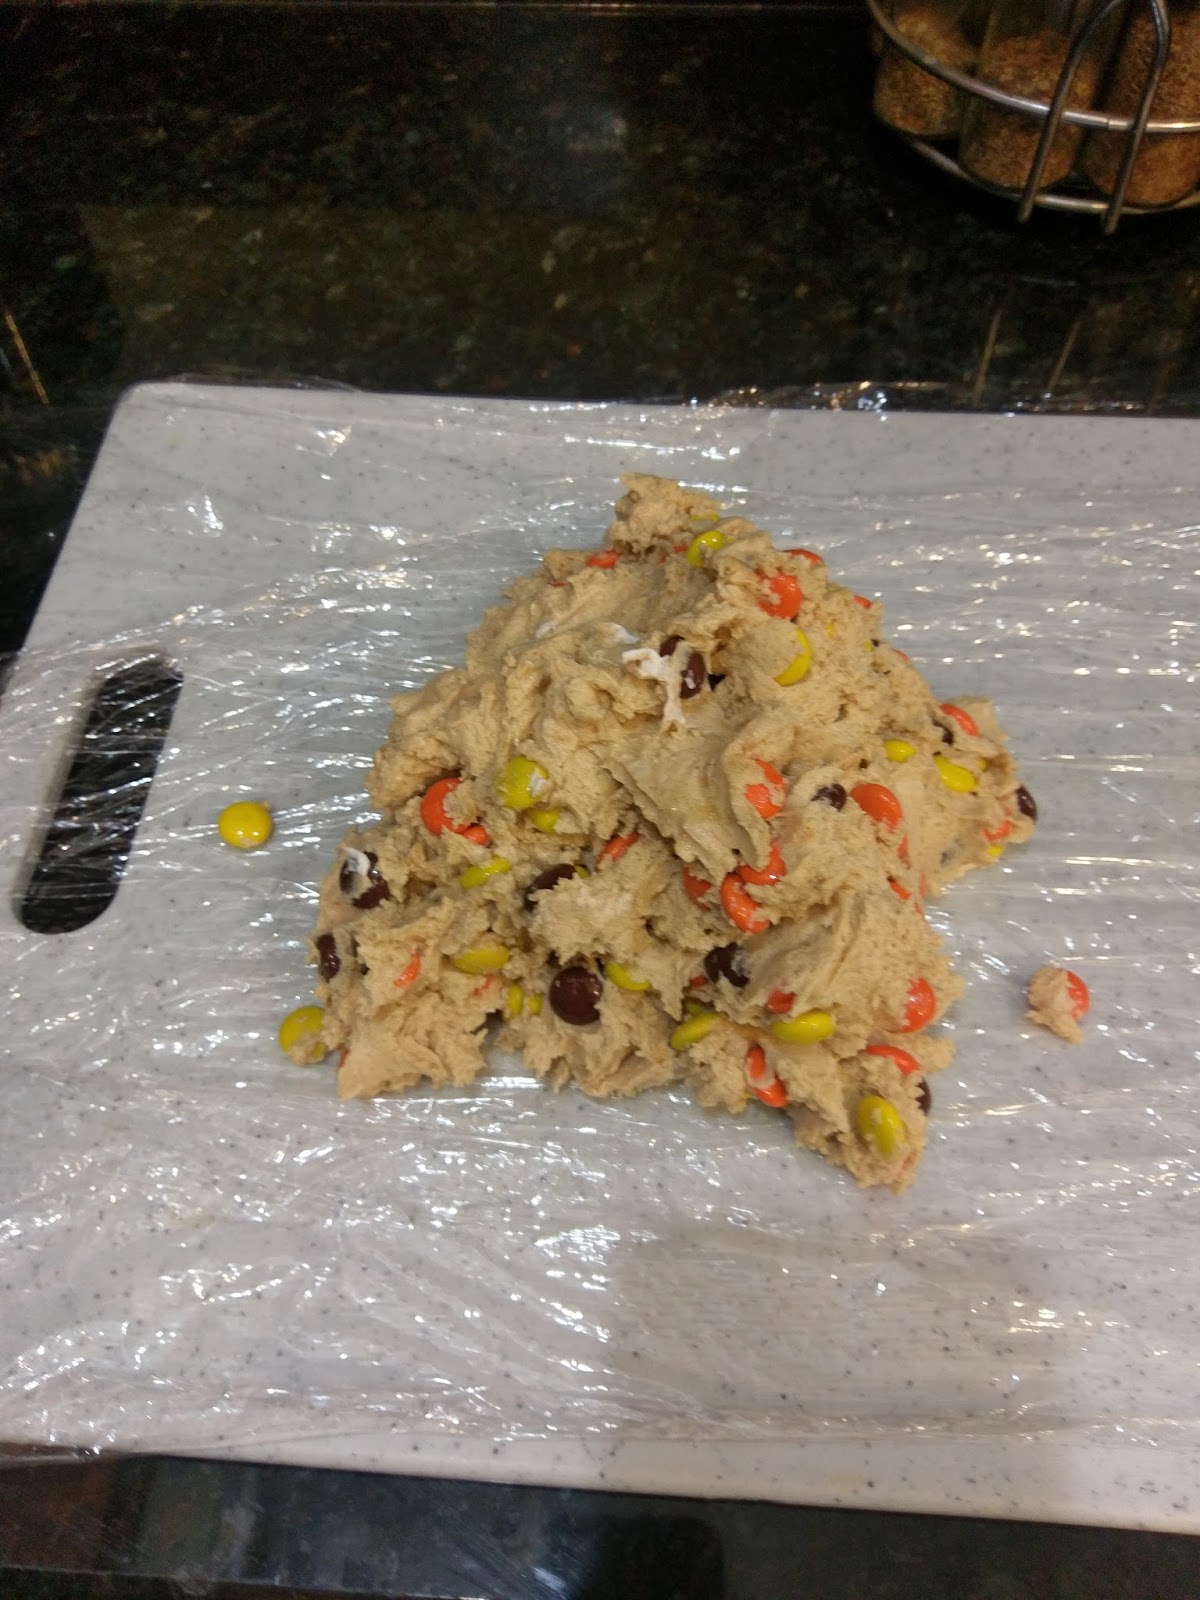
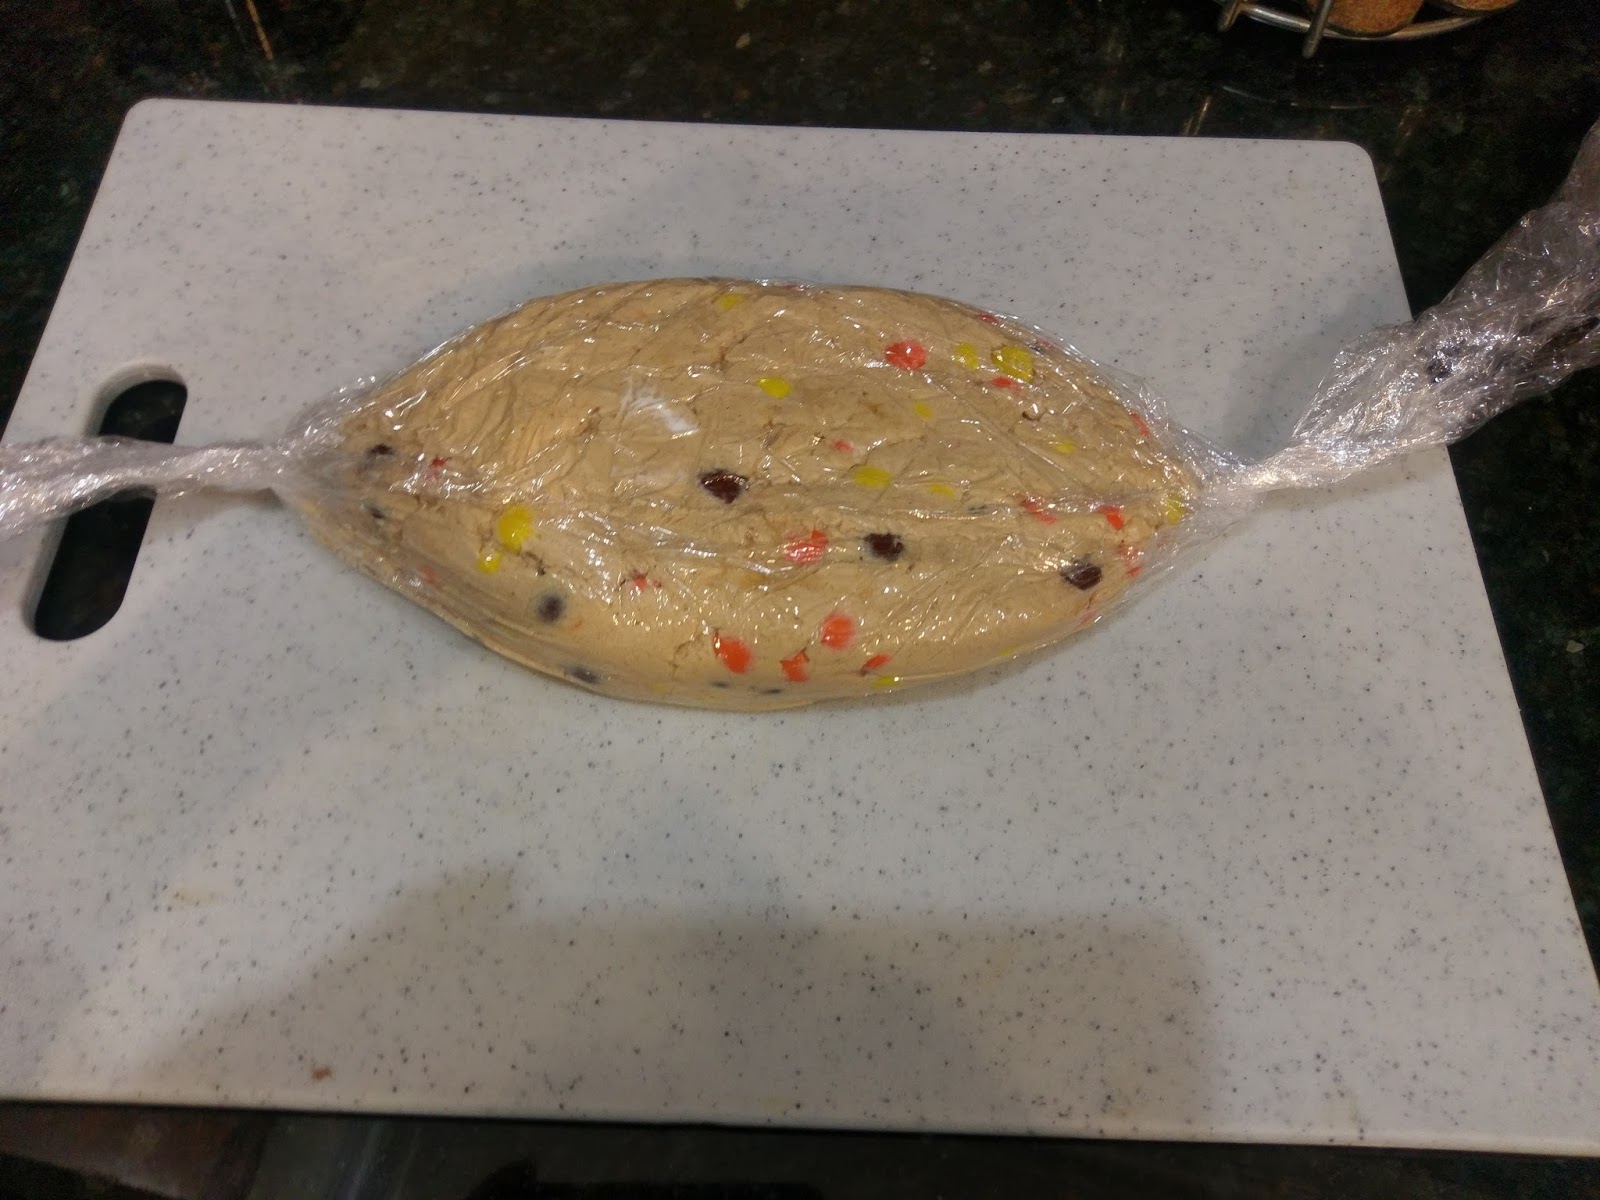
I used a #12. If you don’t have a piping bag or round tip, just place the Cool Whip into a plastic baggy and snip the corner. Put this into the fridge for later. Dump the remaining Cool Whip into the peanut butter and cream cheese mixture. Mix until incorporated, and then add in the cup of Reese’s Pieces and mix slowly. Once everything is blended nicely, grab a cutting board or large tray/plate and line it with cling wrap…that is, if you’re making this into a ball of some sort. If not, congratulations, you’ve made the world’s easiest dessert. Dump into a bowl, chill for an hour in the freezer, and enjoy the fact that small miracles really do exist, and they always include chocolate. If you’re making the football, however, you’ve got some legwork left…but if you’re as vain as I am, presentation is key!!!

At this point, I may have tried a spoonful for myself. You want enough plastic wrap that you can easily plop the ball of dip into the middle and wrap it up.
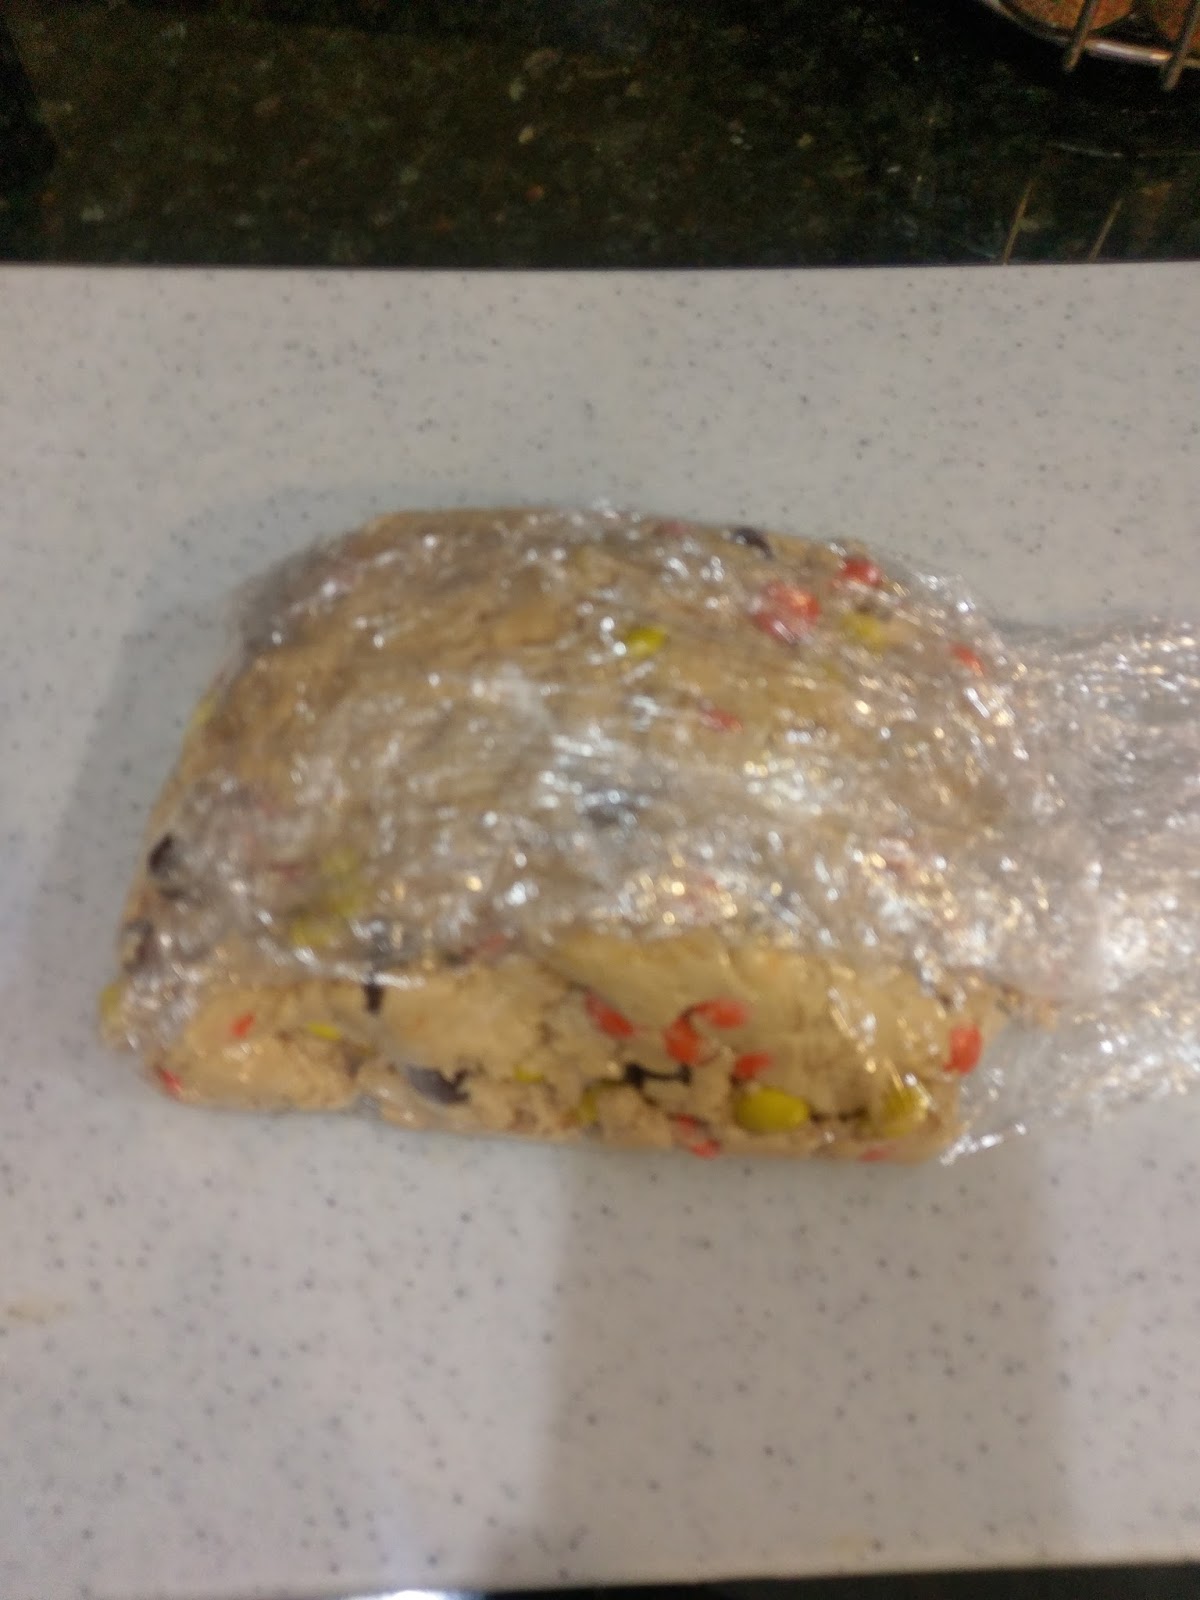
Like so. Once you’ve folded the plastic wrap over the dough, flatten it out with your hands, or if you’re feeling particularly fiesty, a rolling pin. You want to make the layer about an inch thick.
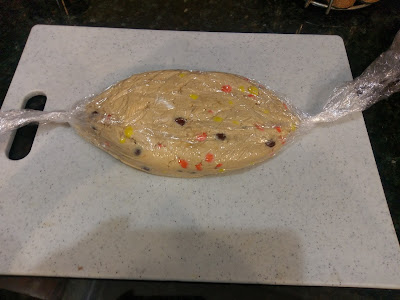
I have a love/hate relationship with cling wrap. Nine times out of ten, it leaves me perturbed about it’s overall inability to cling to what I want it to. But this was the one instance it worked in my favor. Once you’ve got the dip flattened out, take the edges of the cling wrap and spin them shut to the point where it will take your rectangle of dip and smoosh the edges into a point to form your football. I also used my hands to help shape the edges. Now, place the football into the freezer for an hour to harden up and keep its shape.

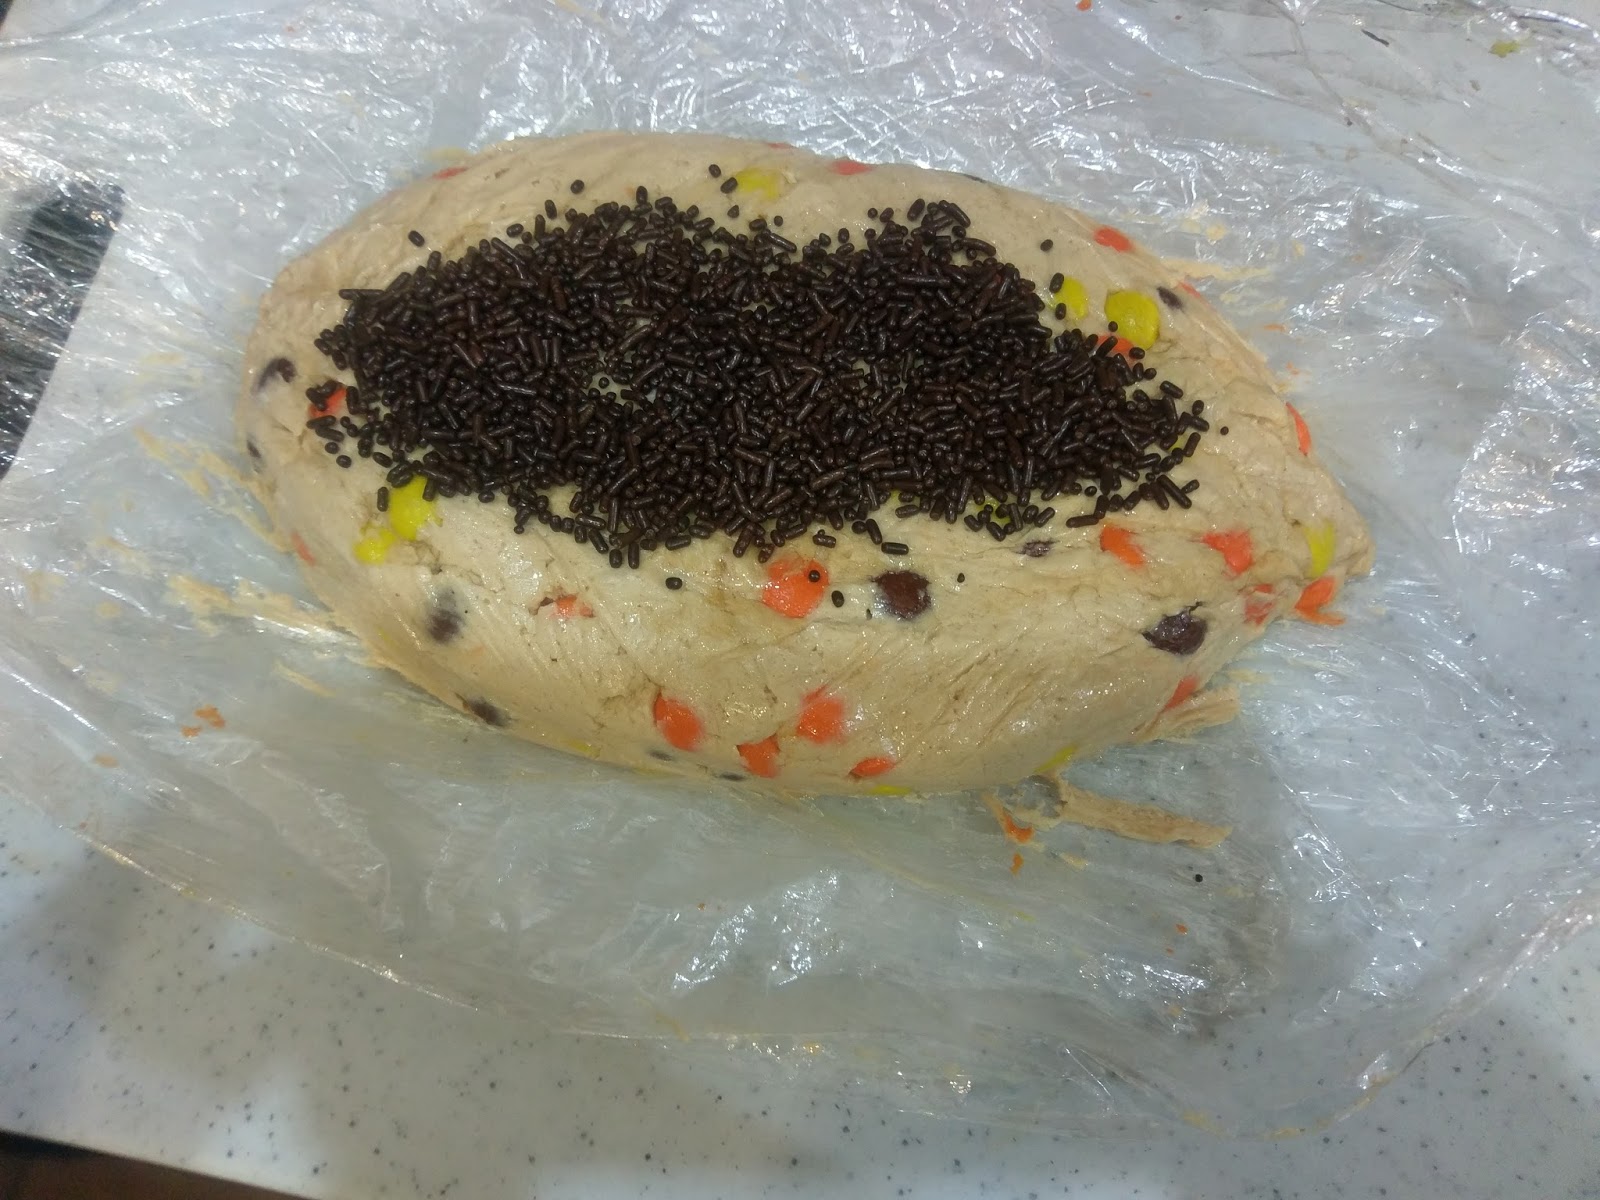
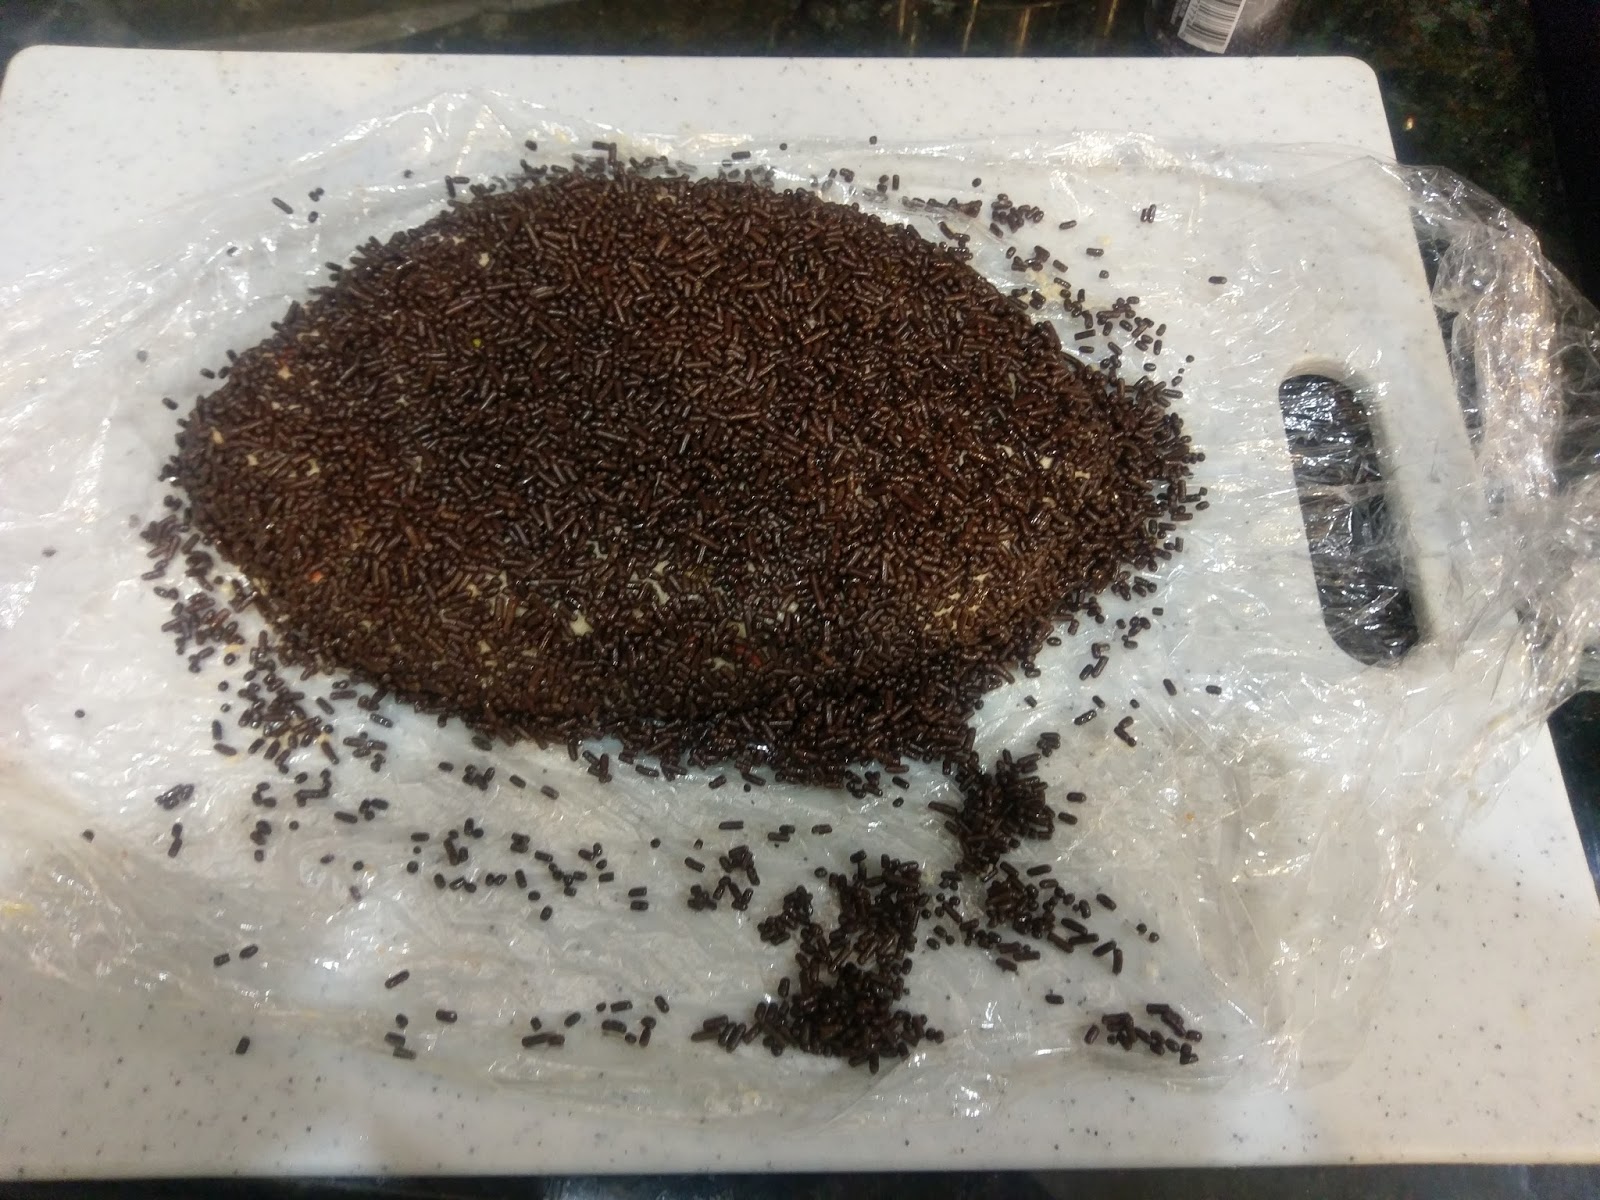
And prepare for chocolate sprinkle explosion in your kitchen. Once the dip has solidified enough to where it will retain shape but is still tacky to the touch, unwrap it all the way, but leave your plastic wrap under it! Take the chocolate sprinkles and dump them all over the top of the football. Use your hands to press the sprinkles into the dip.
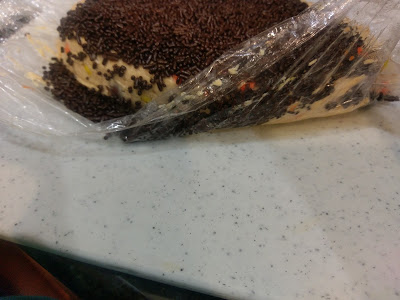
And thank God for cling wrap for the first time in your life. To cover the sides, dump a bunch of sprinkles on the side of the football, and then lift the plastic wrap up the side of the football. Press the sprinkles into the side gently with your hands over the cling wrap, all the while using it as a guide.

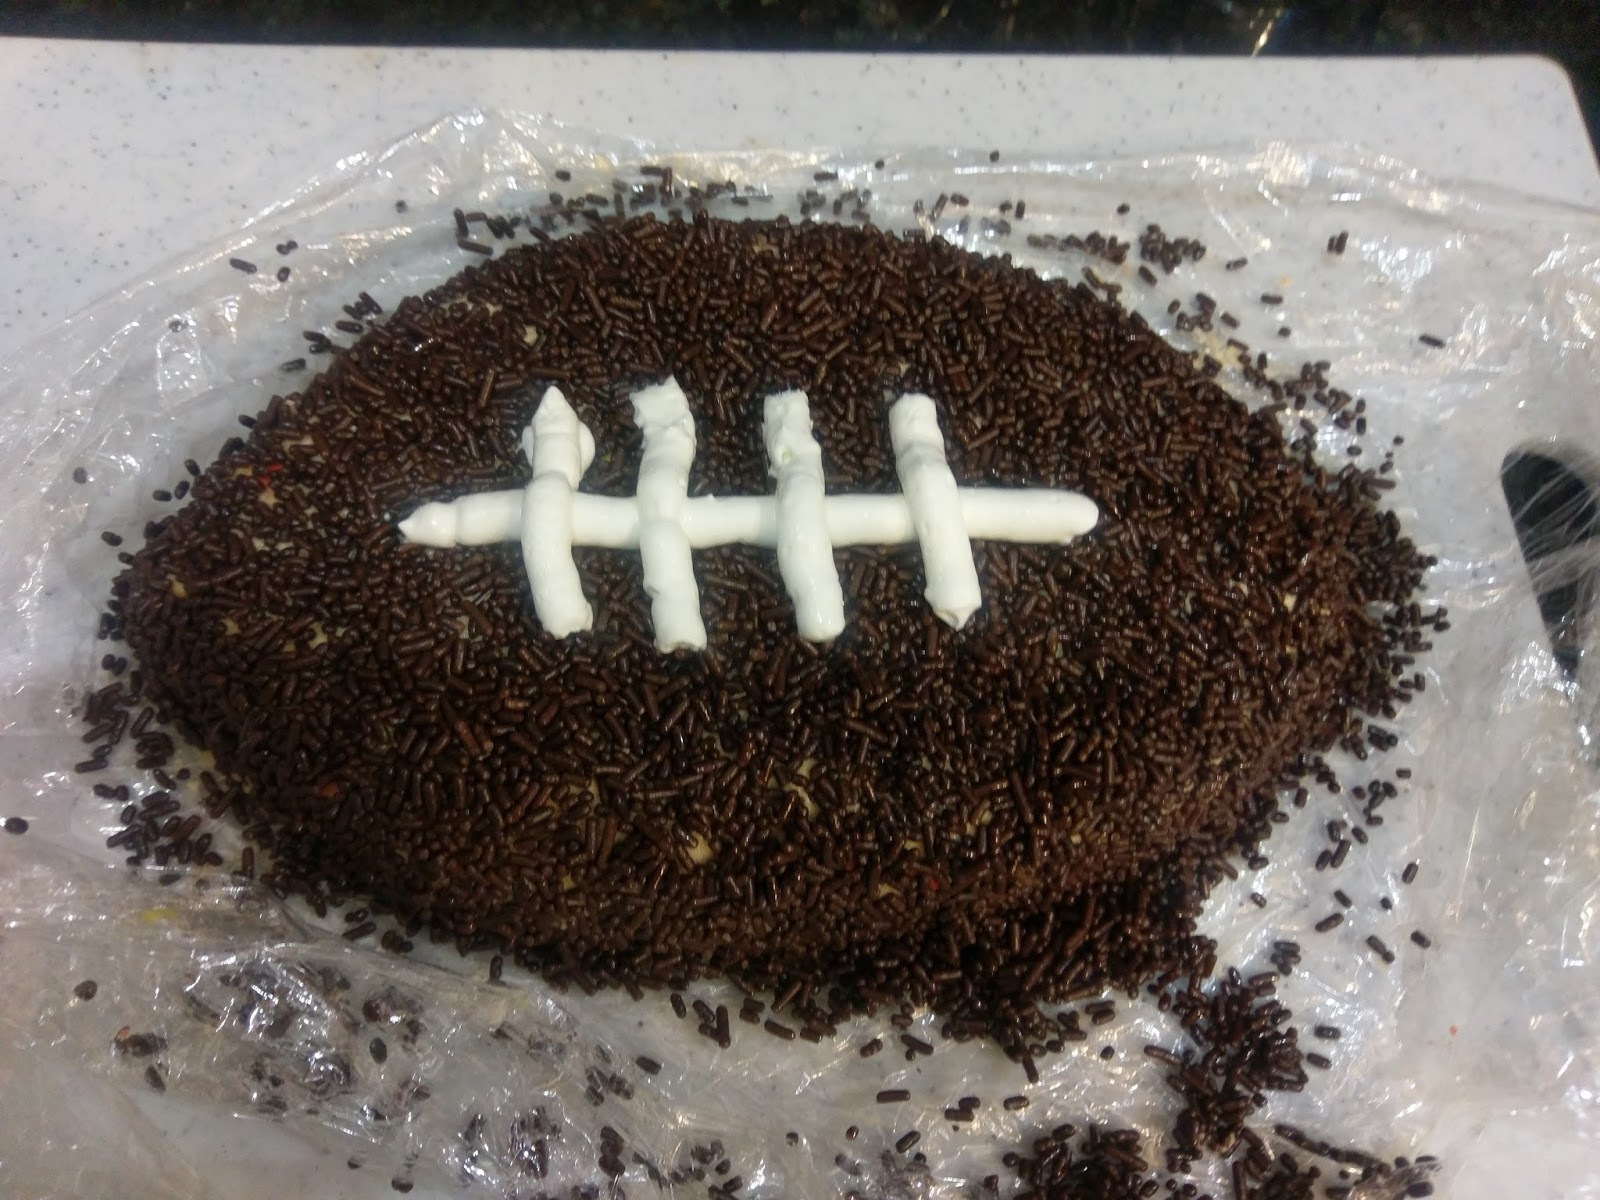
Kinda looks like a major ant problem from this far away. Now, remember that Cool Whip from a million years ago? Grab that out of the fridge. Use your piping bag or plastic bag to draw a line down the middle of the football and create vertical laces:
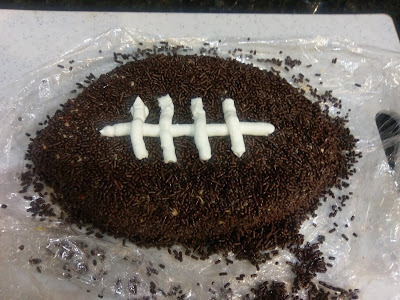
LACES OUT!!! Once you’ve covered your football in sprinkles and created laces, it’s freezer time again. I would NOT skip this part because otherwise transferring it to a serving plate will be nearly impossible due to the dip not being frozen. I left my football in the freezer overnight because I’m the queen of prepping the day prior, but if you’re in a pinch, I would think two-four hours would allow enough time to freeze to where you can handle it without issue. But again, think was the keyword there. I’ve been entertaining third graders all day at work by collecting creepy-crawlies and categorizing them, so my brain is about as mushy as a common garden slug. Mmm.

Back to a much more appetizing image. Once the football is frozen, remove from the plastic wrap/cutting board and place on your serving tray. Since peanut butter is always a little greasy and/or buttery (totes appropes), I placed Parchment paper on my serving tray first. I then left it in the fridge for the entire day to soften up. If your football is totally frozen and you needed it sooner rather than later, your Hail Mary pass here would be to leave it on the counter at room temp. Things will soften up in an hour or two, much like Atlanta’s defense…
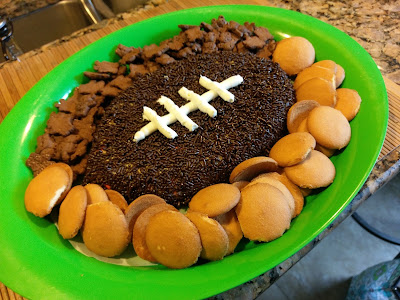
Resist urge to make reference to this dip being a touchdown when it comes to flavor… Finish off by adding in your favorite spoon-like dessert devices to your tray, and you are ready to enjoy a dip that was more enchanting than Lady Gaga’s Spiderman interpretation at half time. If you’re even remotely interested in chocolate + peanut butter, you will love this dip. It’s light and fluffy but still packs a wallop of flavor. It was so delicious that unlike the actual footballs being thrown around, it was finished during regulation playing time. Much like Eli Manning to Tom Brady, this dessert was my kryptonite…it weakened my ability to make sound choices about portion sizing and control. Seriously though, the moment Manning left that stadium after receiving his award was the moment Brady actually started playing football. Say what you will about his derp face, but old Eli’s got his number. And while your team may or may not have won or even made it to the big game, I think we can all come to terms with the fact that the greatest cheat day of the year should include copious amounts of chocolate. So make a big bowl of this Reese’s Pieces dessert dip to deal with the fact that we have to wait til September to (most likely) be utterly disappointed by our favorite teams again. ‘Til next time, my fellow eaters!
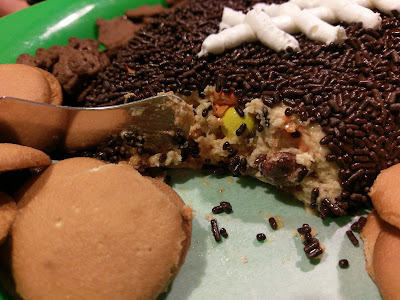
The Vikings made me do it. -
Sweet (Cheesecakey) Relief
Welp, this blog post finds me another week into my thirties, and I still know how to use a computer! I only on occasion have referred to myself as Grandma, so I think I’m adjusting pretty well. Because you know what I have? A gift for baking myself any coping mechanism my taste buds desire. You can’t be sad about being older when you’re eating chocolate. This is just plain true. I decided after inhaling all that creme soda birthday cake that I wanted my next dessert to be mostly chocolate, but I also wanted some added sweetness and saltiness (I’ve got a complicated coping mechanism). The other trick in this hankering was, of course, that I could shovel said dessert into my mouth with reckless abandon because calories weren’t an issue. I spent so much time coming up with a dessert that met all of these criteria only to be reminded by my husband that what I was actually craving was a chocolate-covered pretzel. Gotta hand it to men and their ability to simplify practically every convoluted thought process that spews out of the mouth of their wives. At least this is the case with my husband anyway. When the Thought Train starts rolling out of the station and makes its way to Mouth Central, my ideas are usually so complex that hidden within them is a functioning plan for world peace, so I need to be reminded that sometimes, the easier, the better. But if I had explained myself upon first dessert craving, I never would have come up with the following chocolatey, sweet, salty dessert: mini chocolate-covered cheesecake bites!

Don’t let their size fool you; they are big on flavor. Oh yes, that ooey gooey center is cheesecake filling, surrounded by a wall of chocolate with sea salt sprinkles (everything needs sprinkles. If you’ve read even just one other blog post of mine, you’d know this is my baking mantra). And no, I’m not lying when I tell you one cheesecake bite comes in at only 130 calories. Call it sorcery, witchcraft, or just my sheer will to eat dessert every night and still fit into my swimsuit, but I made sure it was possible to eat two of these bad boys at once without topping 300 calories. I’m seriously taking that with age comes wisdom bit in stride. I’m not going to lie to you, making your own chocolate candy is messy. But in a good “lick your fingers and reap the tastiness” kind of way. Will things be sticky? Most likely. Will they be melty? Most assuredly. Will it be drool worthy? Most definitely.

Bonus: you already have these things in your pantry! When I said I spent forever coming up with a recipe for something chocolate, salty, and sweet, I mostly wanted to use a brick of cream cheese that had been staring me in the face every time I opened my fridge. Sometimes I’m not as complicated as I like to think I am. The ingredients here are quite basic:
- Half an 8 ounce brick of reduced fat cream cheese at room temp
- 2 TBS sugar
- 1/2 tsp lemon zest
- 1 tsp lemon juice
- 1/2-1 tsp vanilla extract (I opted for 1 because I like a sweeter and less sour cheesecake)
- 2 1/2 cups semi sweet chocolate chips, divided
- Sea salt
- Optional: *2 tsp veggie oil to make the chocolate melt smoother. I didn’t use it because, well, calories.
Now, you will also need a mini muffin pan, mini cupcake liners, and a paintbrush safe for using with food (a.k.a., not dripping with lead paint or anything). I’ve always been bothered by the fact that it’s called a mini muffin pan, yet the liners are called cupcake liners. Shouldn’t it be a cupcake pan? Or muffin liners? Maybe not the latter because that sounds like it’s bordering on NSFW. Anyway…start by lining the cupcake pan and then measure out 1 1/4 cups of chocolate chips. Place in a microwave safe bowl and heat for 30-second bursts at a lower power level like 5 or 6. Stir after each interval until chocolate is smooth and no lumps remain. *If you are using the vegetable oil to help you smooth out the chocolate, be sure to add it in at the beginning of the microwaving process.
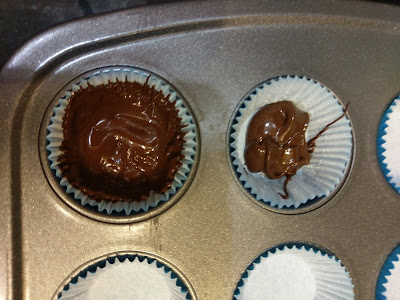
Since I’m just now mentioning this a no-bake recipe, I suppose I could clue you in on the upcoming crappy photo montage. Take a 1/2 a teaspoon (literally, use a 1/2 teaspoon scoop) of the melted chocolate and plop it into the bottom of one cupcake liner. Then, using the paintbrush, paint the chocolate up the sides of the liner until it reaches the top. Try to work in batches so you’re efficient, speedy, and don’t need to reheat the chocolate to get it melty and risk burning it. Chocolate is as temperamental (seriously) as it is delicious. I poured chocolate into 4 cupcake liners at a time, then I came back in and painted the chocolate up the edge of each cup.

Repeat this process until all 24 liners have a bottom and sides brushed with sweet, sweet chocolate. Now, take your pan and place it in the freezer for a half an hour. You want the chocolate to be completely set before adding in the filling and placing more melty-hot chocolate on top.

But by all means, use this time to make filling so you can lick the spatula. To make the filling, simply take the cream cheese, sugar, lemon zest, lemon juice, and vanilla, and mix together in a medium bowl. Place this filling into a piping bag or plastic baggy. Snip the very tip of the bag and then set aside. Piping will be easier if you keep this filling at room temperature while the chocolate shells cool.
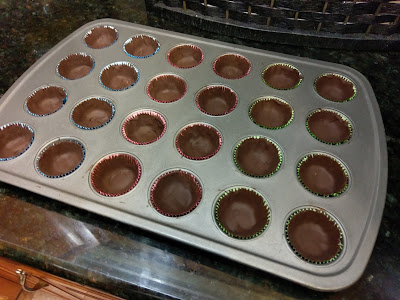
So smooth. So beautiful. But wait, don’t eat these yet. We need to make it even dessertier. 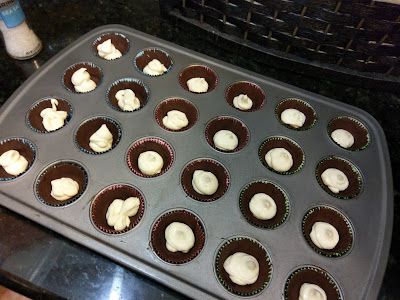
Still not done making it more dessertier. Once the shells are completely solidified, pipe a small mound of cheesecake filling into each chocolate liner. Things will be a bit of a shapeless mess, but a solid tap or two on your kitchen counter with the pan will even things out:

Like so. Now, take the remaining 1 1/4 cup of chocolate chips and melt using the technique I mentioned above but am too lazy to type again.

So swirly. Kinda makes me want a chocolate dip cone from DQ. Texas problems. Once your chocolate is melted, take the 1/2 teaspoon scoop and plop 1/2 a teaspoon of chocolate on top of the cheesecake filling. Again, it is easier to work with these 4 at a time. Use your 1/2 teaspoon scoop to spread the new layer of chocolate completely over the top. You can finish up by swirling the teaspoon toward the center to create a nice little flair. Once you’ve swirled the tops of 4 chocolates, sprinkle with sea salt to your liking. I went with a level of sea salt best described as, “I want it to taste like chocolate and french fries at the same time.” Repeat on all remaining candies until done!

Chocolate and salt: because if you’ve never dipped your fries at Wendy’s into a frosty, you’ve never really lived a day in your life. This is a little time consuming since you have to work so quickly and with so much chocolate. But once you’ve topped all your cheesecake bites, place them back into the freezer for an agonizing 30 minutes (unless you have those chocolate-covered pretzels to tide you over).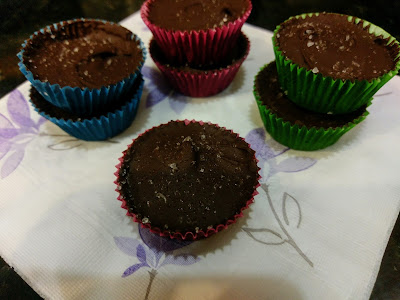
It’s going to be the longest half an hour of your life. Once the chocolate has totally set, pop these out of the pan and place into a Tupperware. You will want to keep these in the fridge for their very short lifespan (you’re going to devour the entire batch of 24 mini cheesecake bites in a startlingly swift amount of time). I recommend letting a few sit out at room temp for 10 minutes before eating so the chocolate isn’t too hard and the filling is just starting to get gooey. And now you know how to make your own chocolate candies with assorted filling! I actually first tried out a chocolate candy recipe but with dulce de leche filling when I was still back in Clovis last year:
Back when I had poor plebeian Formica counters. If memory serves me, I didn’t want to share these with my husband. Or apparently anyone else because I completely forgot to blog about them. I just wanted them all to myself. So you see, you can choose whatever filling in the world you want, maybe a mini Reese’s cup, some egg-less cookie dough, the tears of your enemies…it’s a winning chocolate candy recipe no matter how you shake it. But as for me, right now the cheesecake filling is hitting all the right taste buds. I’ve got my chocolate, sweet, salty trifecta, and boy do these babies ever make chocolate-covered pretzels look rather silly (but I’d totally still eat them, too). Leave those little logs of chocolatey pretzel for holiday gifting; you’ve got an ace up your sleeve, now. ‘Til next time, my fellow eaters!
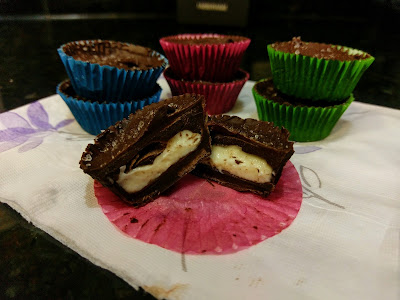
And that ace is filled with cheesecake.

Healthy-ish cake, cupcakes, pie, and cheesecake recipes and decorating tips