-
Twenty-Nine for the Second Time!
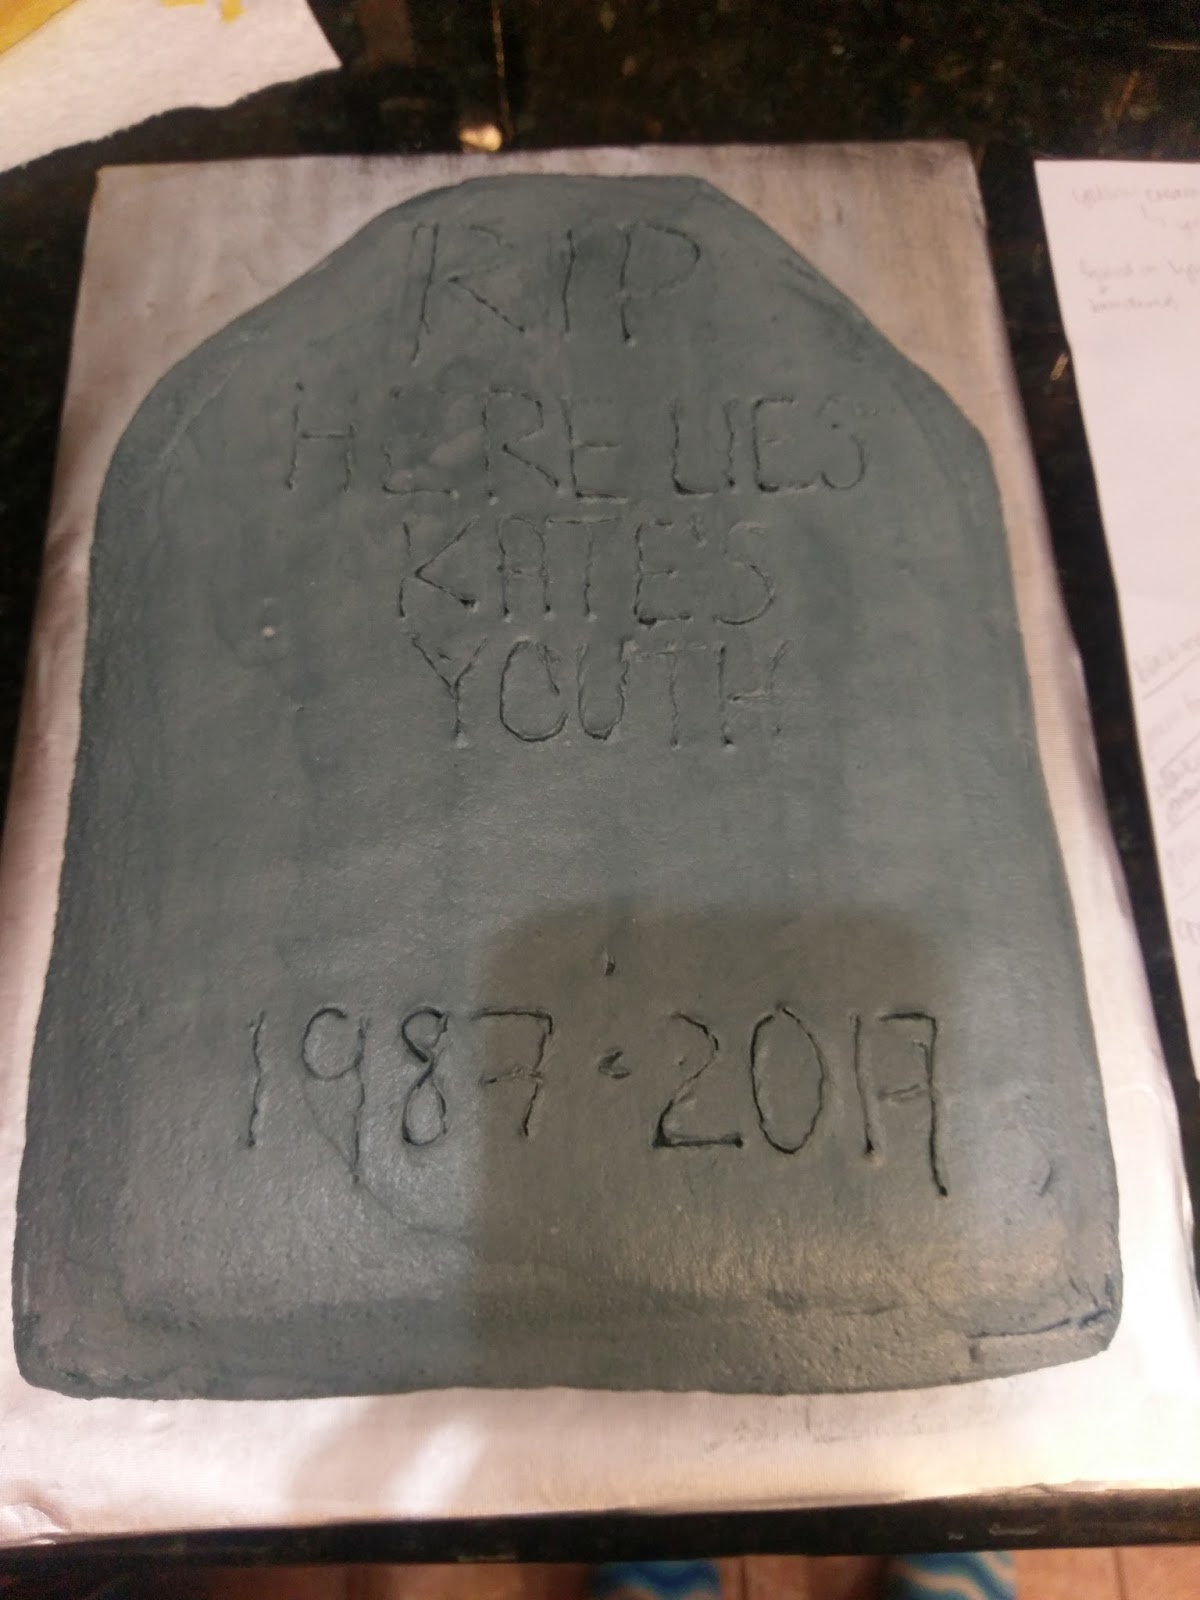
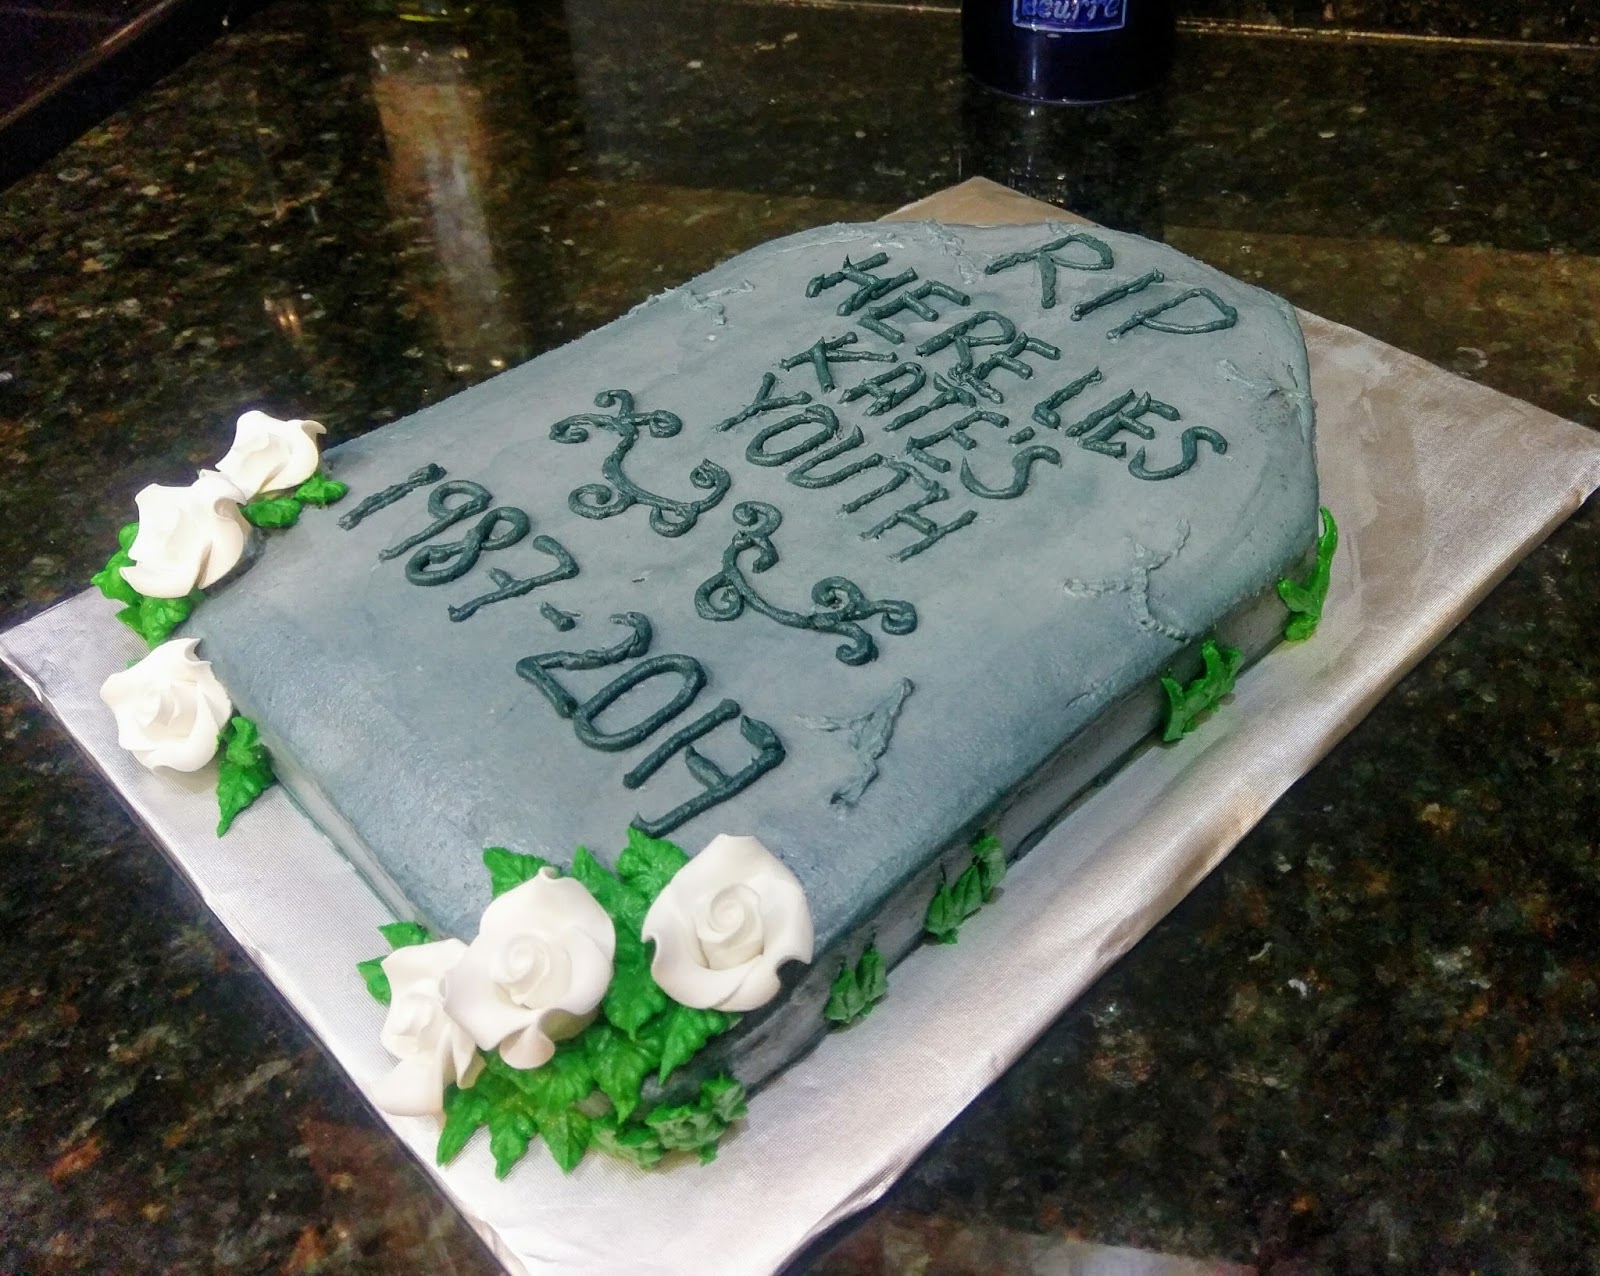
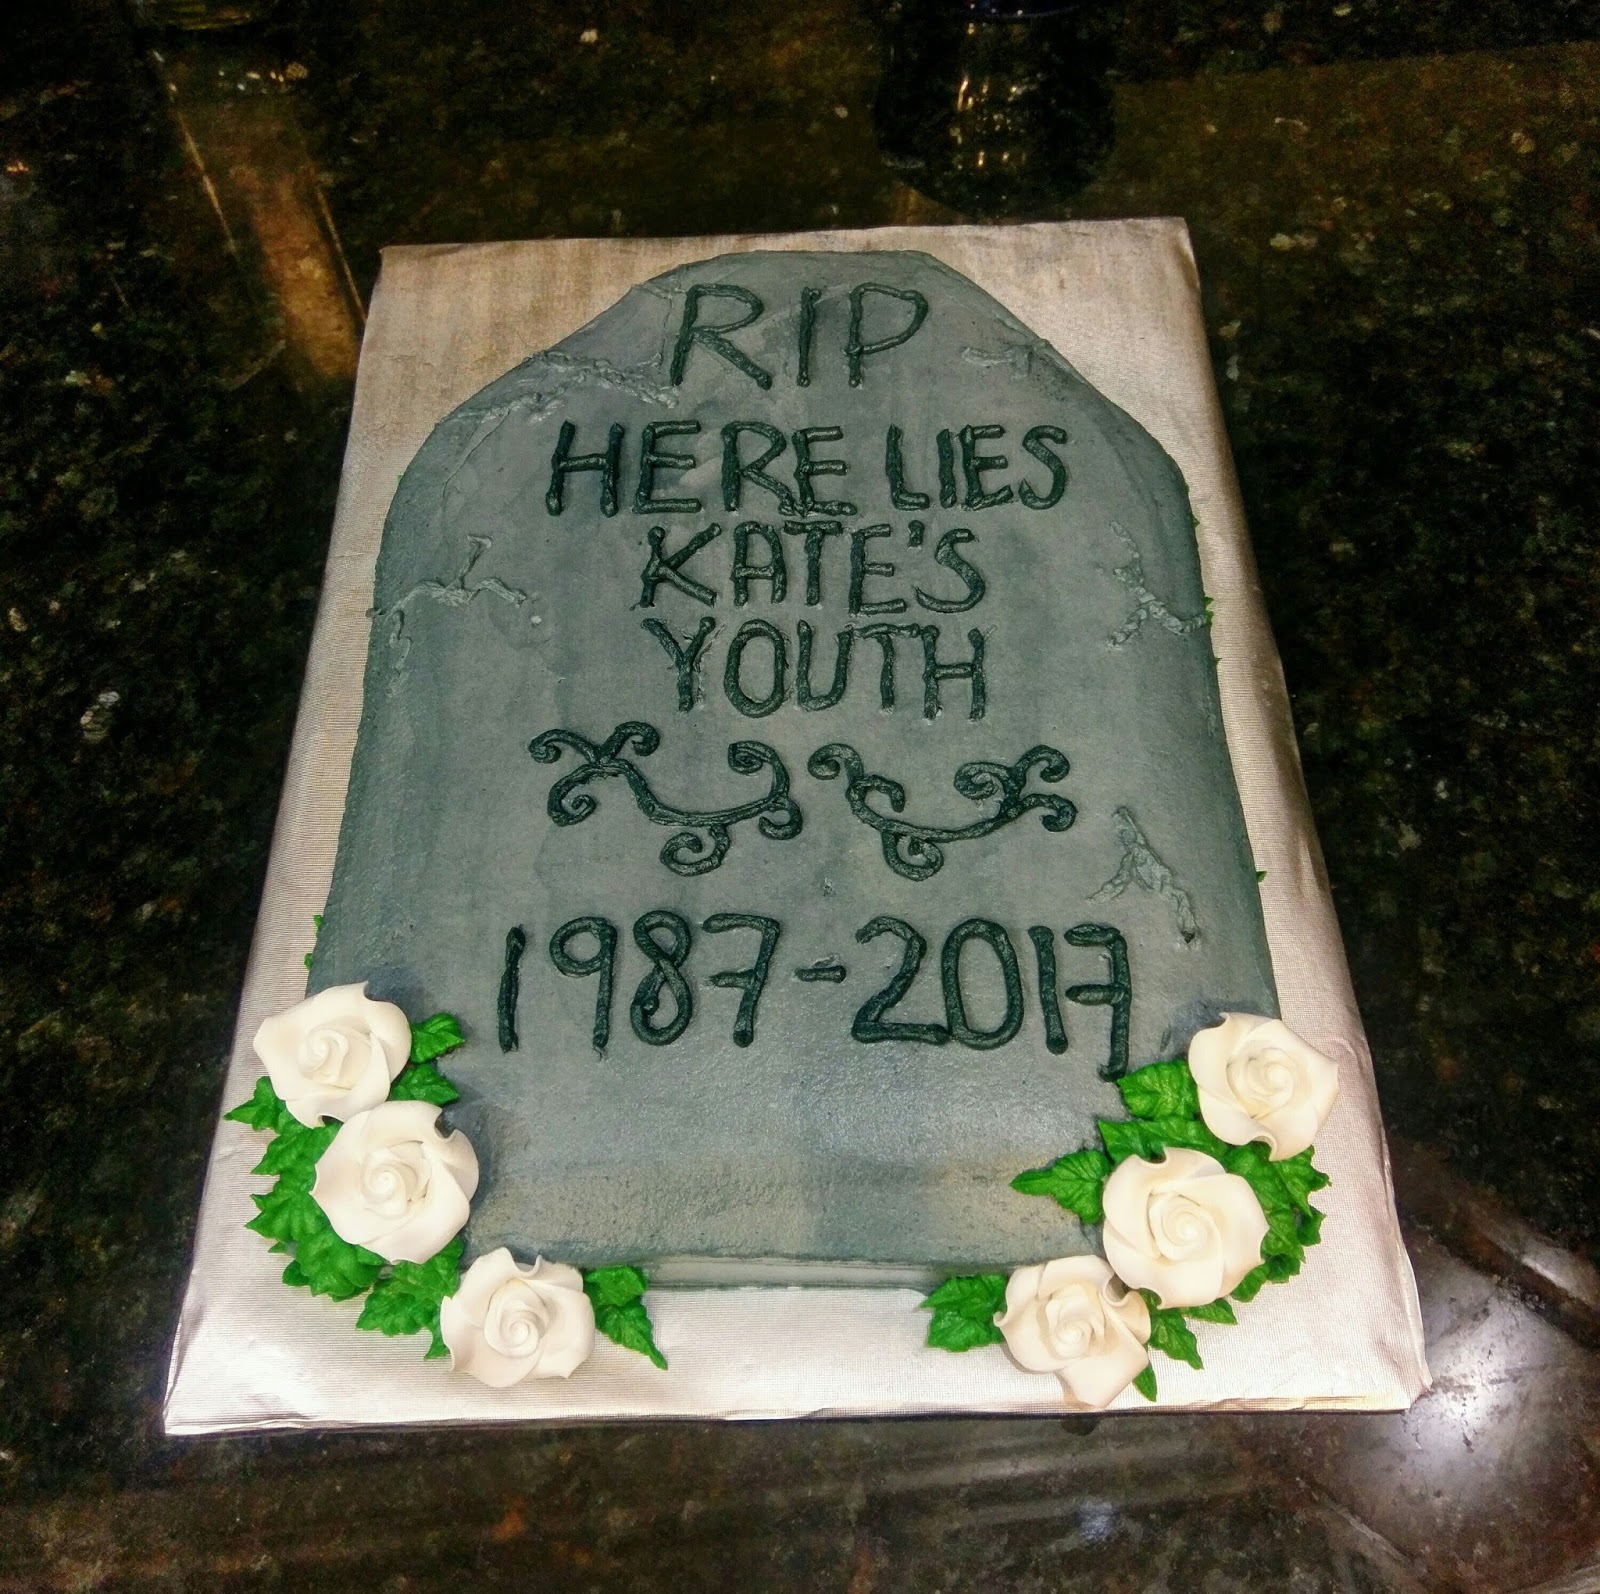
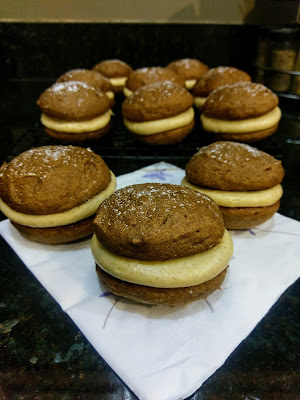
Imagine my surprise when I awoke the morning of my thirtieth birthday to find my hair had not turned completely gray, my girls were not sagging slightly above my navel, and my retinol creams were still working at keeping evil wrinkles at bay. After several brief once overs in the mirror (a typical morning for my level of narcissism) and a realization that it was definitely time to touch up my roots, I accepted that I’m okay with turning 30 as long as I still look 29. Much like a child who finally succumbs to taking a nap after spending an awkward and annoying amount of time resisting, I too have have stopped fighting the fear of turning 30. I spent my early twenties being a total hot mess of blonde hair and really poor fashion choices (ugh, mid 2000’s trends–looking at you body glitter), and my mid-twenties cultivating who I wanted to be when (or if) I finally grew up. So now I actually get to be that adult. Or adult adjacent. I still laugh at fart jokes and wear ridiculously fuzzy and usually unmatching socks, so some parts of me will always maintain a youthful jubilance. But once you’ve been regularly filing your own taxes and held a mortgage payment and non food service related employment, it’s simply time to realize age is not really the number itself, but how you feel. Kind of like mileage on a car–there’s city miles versus highway miles, and while my city miles may be racking up, my highway miles are barely registering. And even though I had this enlightening epiphany about age and life, I’m still insanely self-deprecating and needed to make a birthday cake to poke fun at the moratorium on my 20s. I’ve literally been planning this cake since the moment I turned 29, and now that I’ve done it, I can clearly say I put up a damn good fight while finding the most morbidly original way to deal with the death of my youth:
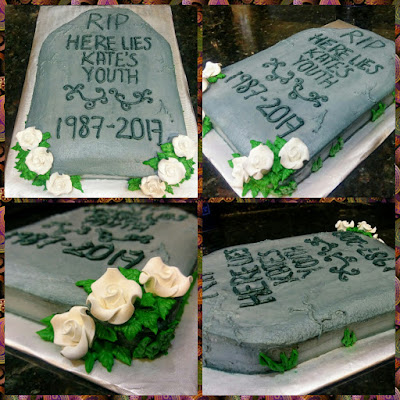
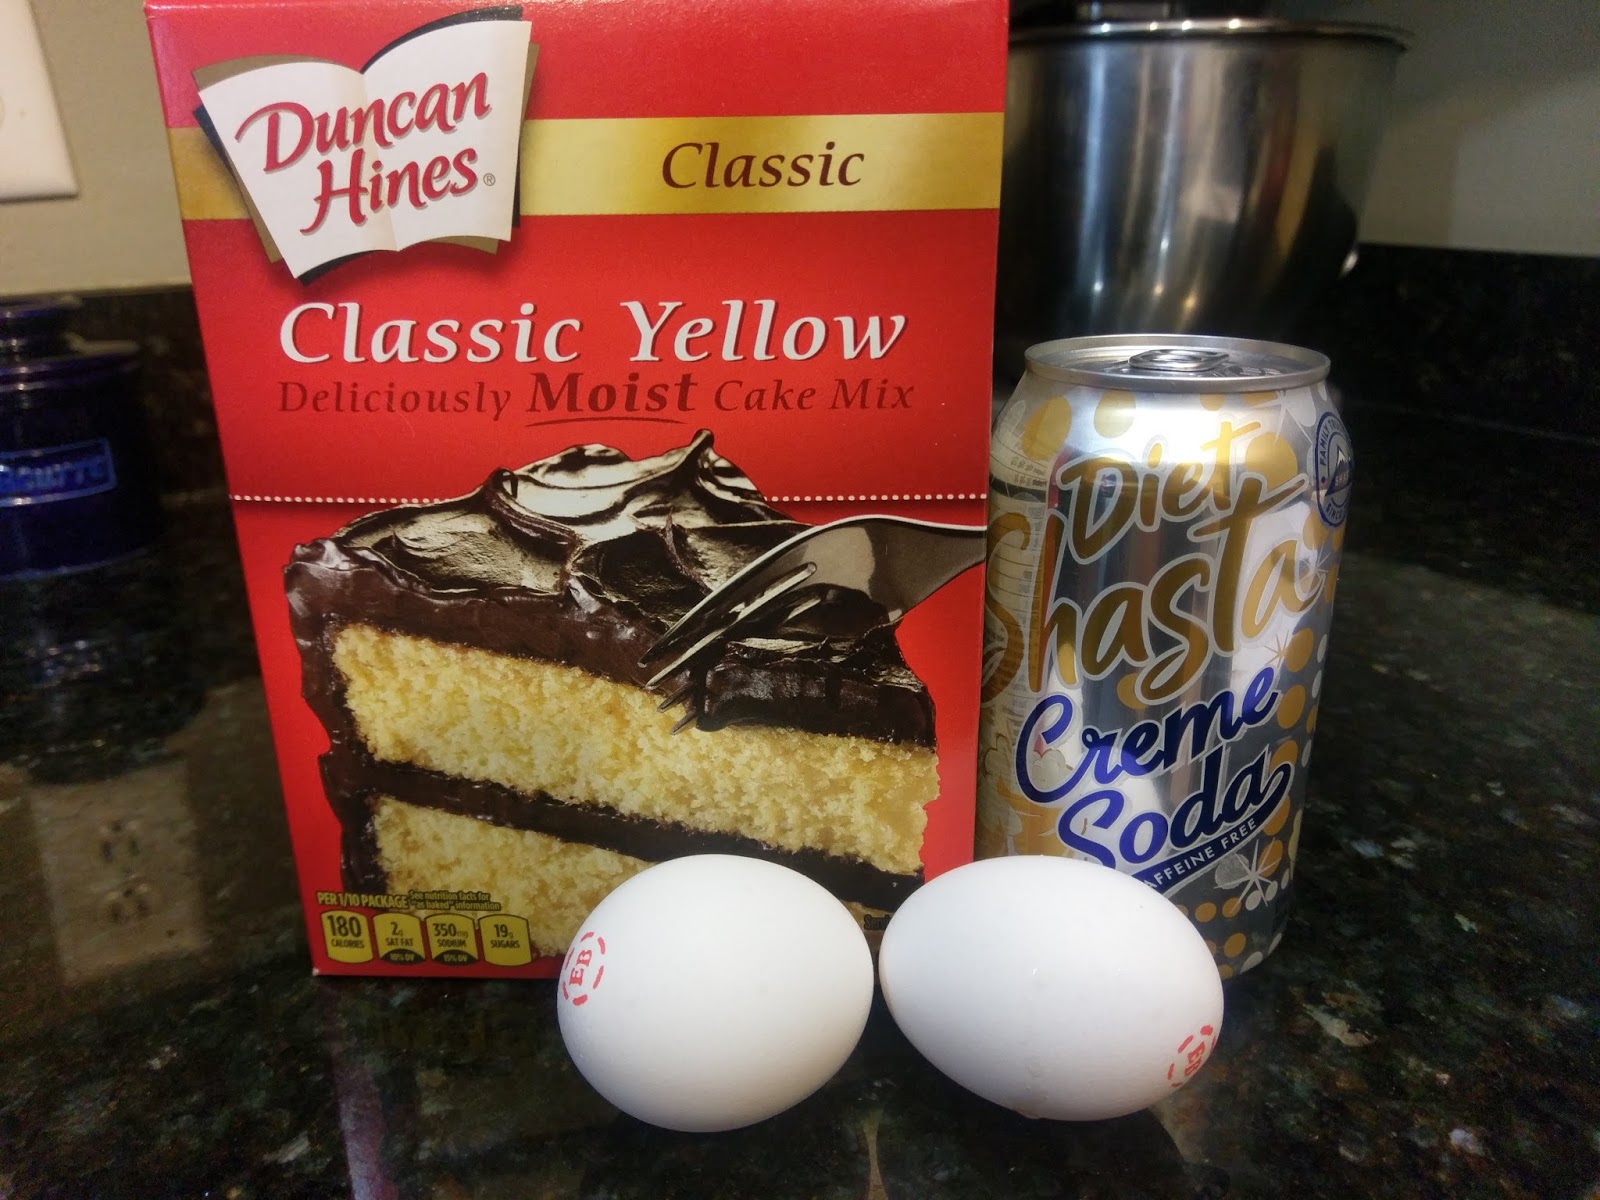
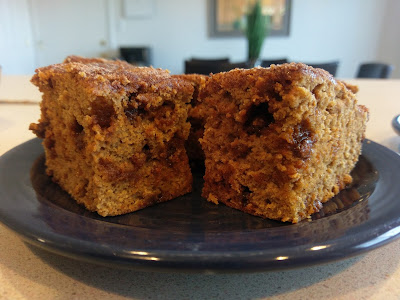
Buried in this cake is a ridiculous amount of booze. Because the best way to deal with turning a new decade involves both cake AND alcohol. Only I could ensure my youth’s final resting place is made of cake. See, I told you, I lack the ability to become a serious, credentialed member of adulthood (although still looking into AARP…). Even though this was a monumental (see what I did there) cake and birthday, I still wasn’t willing to throw caution to the wind and invite all the calories to slumber beneath this tombstone. I created a yellow creme soda cake with amaretto buttercream frosting that clocks in at only 293 calories per slice (15 slices total). I know, a slice of cake for under 300 calories almost seems too good to be true, like all those wrinkle creams resting in the bottom of my bathroom drawer, mocking me, but it really does taste like cake. More importantly, it tastes like Disaronno…because classy 30 year old’s drink things like Disaronno on the rocks. And less classy 30 year old’s eat things like Disaronno buttercream frosting because childlike joie de vie simply can’t allow them to not eat all the cake. But thanks to my recipe tweaking, I’m at least attempting to wrangle that exultation for dessert into a mere mild excitement regarding baked goods. Thirty year old’s should know how to compromise, I suppose.

Ah yes, Shasta and eggs, a traditional Southern combination. Y’all, I haven’t made an actual cake since Halloween. HALLOWEEN. It has been MONTHS. I’ve made cookies, cupcakes, assorted desserts, but no full-fledged caking has taken place since we left Albuquerque. Perhaps I was protesting my ability to accept I was homesick for a state that usually smells like cattle, and I was expressing this by my refusal to really get creative. I mean, they say with age comes wisdom, but damn, I am really firing on all cylinders since hitting the big 3-0. I have always been (a) wise (ass). It felt good to throw together a cake and prepare for decoration, so if you’re in a funk might I recommend scooping up a box of yellow cake mix, a slightly chilled can of diet creme soda (measure out 10 ounces), and two egg whites at room temp. Throw all of these together and mix for 2 minutes while you preheat your oven according to box instructions and grease a pan of your choosing.

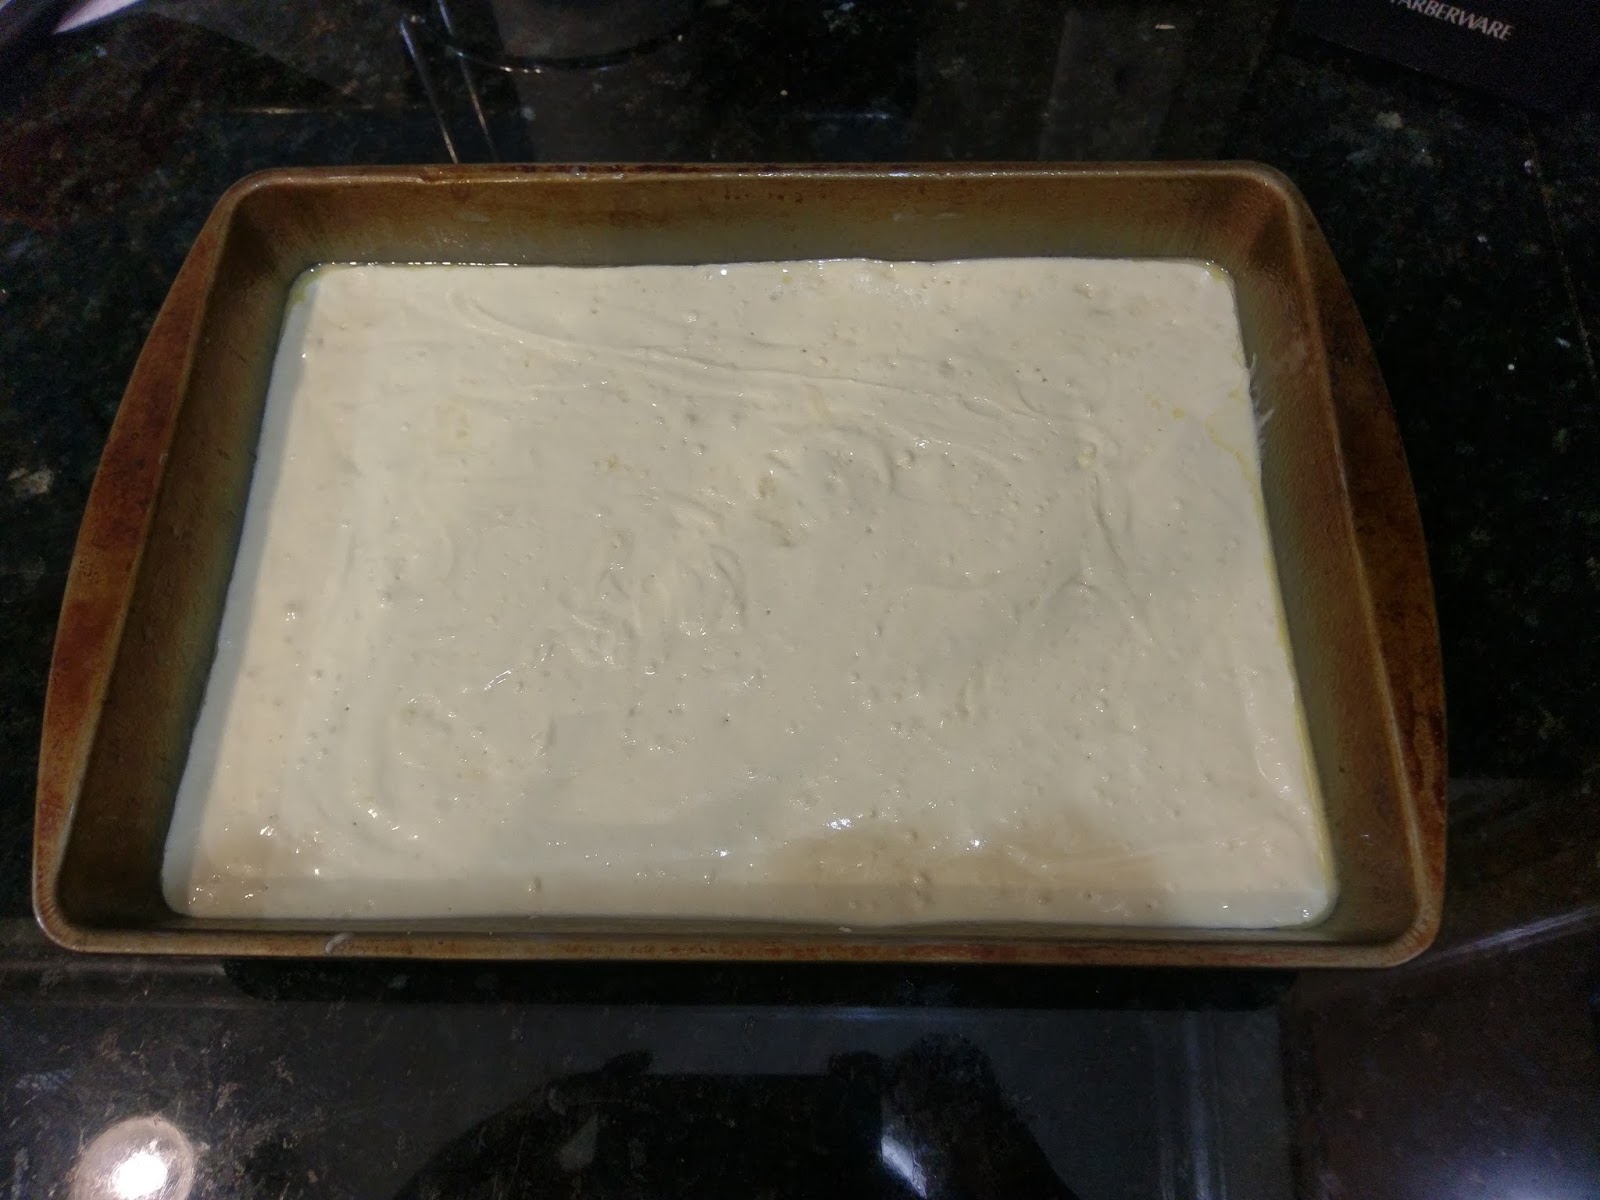
There will be bubbles thanks to the soda’s effervescence, so don’t break your counter top slamming the pan to try to get the bubbles out. For a tombstone cake, use a 9×13 pan, greased very well. The soda will help everything bake faster, and the egg whites will help the cake remain springy. I ended up baking this cake for 20 minutes until a toothpick came out clean, so start testing your cake about 5 minutes before the box instructions say it should be done. Remove from the oven and let cool in the pan for 10 minutes before removing to a cooling rack.
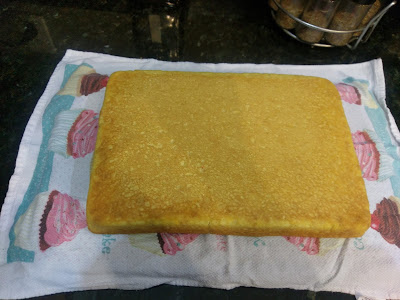
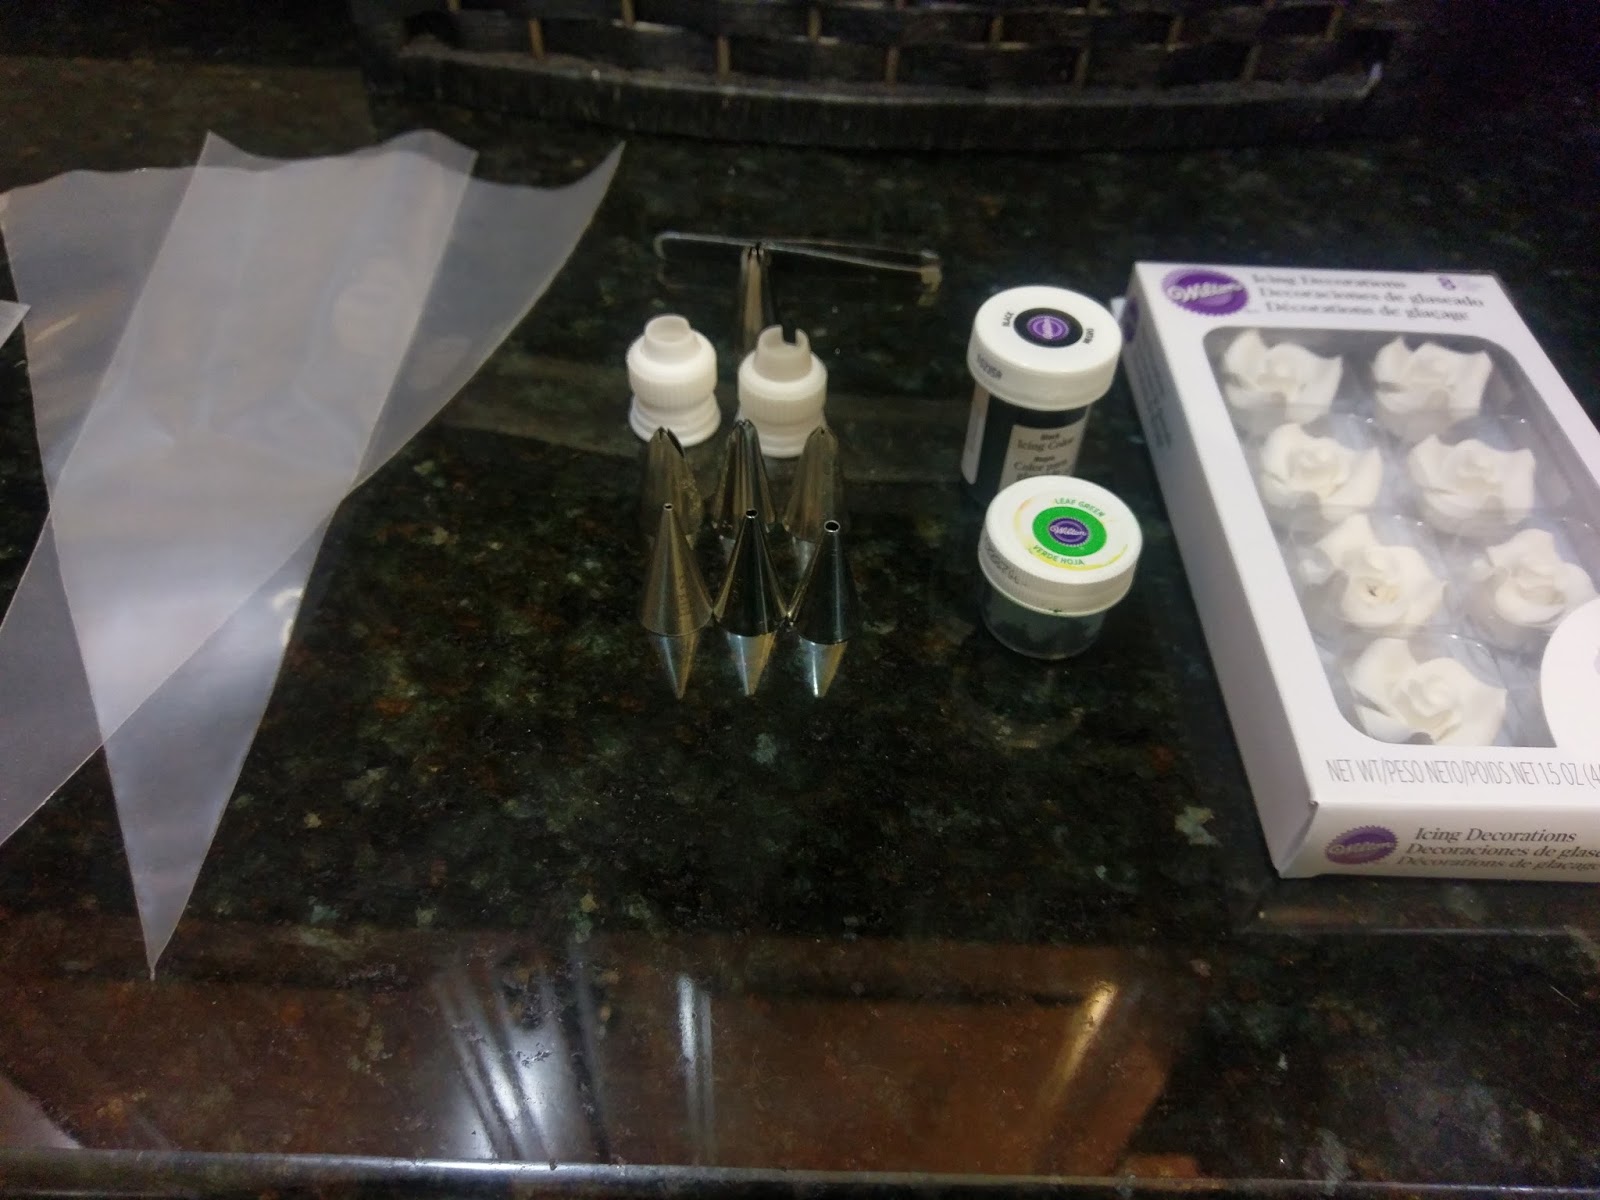
Be gentle, as these cakes seem to crack quite easily compared to a dense, dairy-heavy cake. But when you’re done frosting, this cake won’t weigh sixteen pounds, so that’s nice. Prepare a cake board while your cake is cooling on the rack, and the place the board on top of the cooling cake bottom and flip the rack over so you have the top of the cake now facing you. Place into the freezer so trimming it into tombstone shape is easier. While it is cooling, prepare for a crappy photo montage and gather up:

Three piping bags, small round tips (I used a 3 and a 5), leaf tips (I used a 352), black gel dye, green gel dye, and edible rose decorations. No one makes these in black, and I wasn’t going to do it myself because I do, sort of, have a life outside of cake decorating. 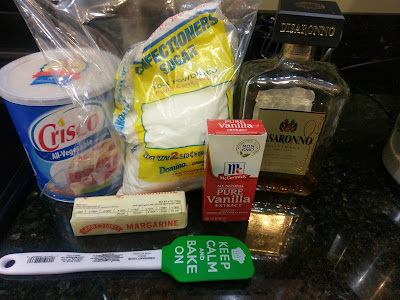
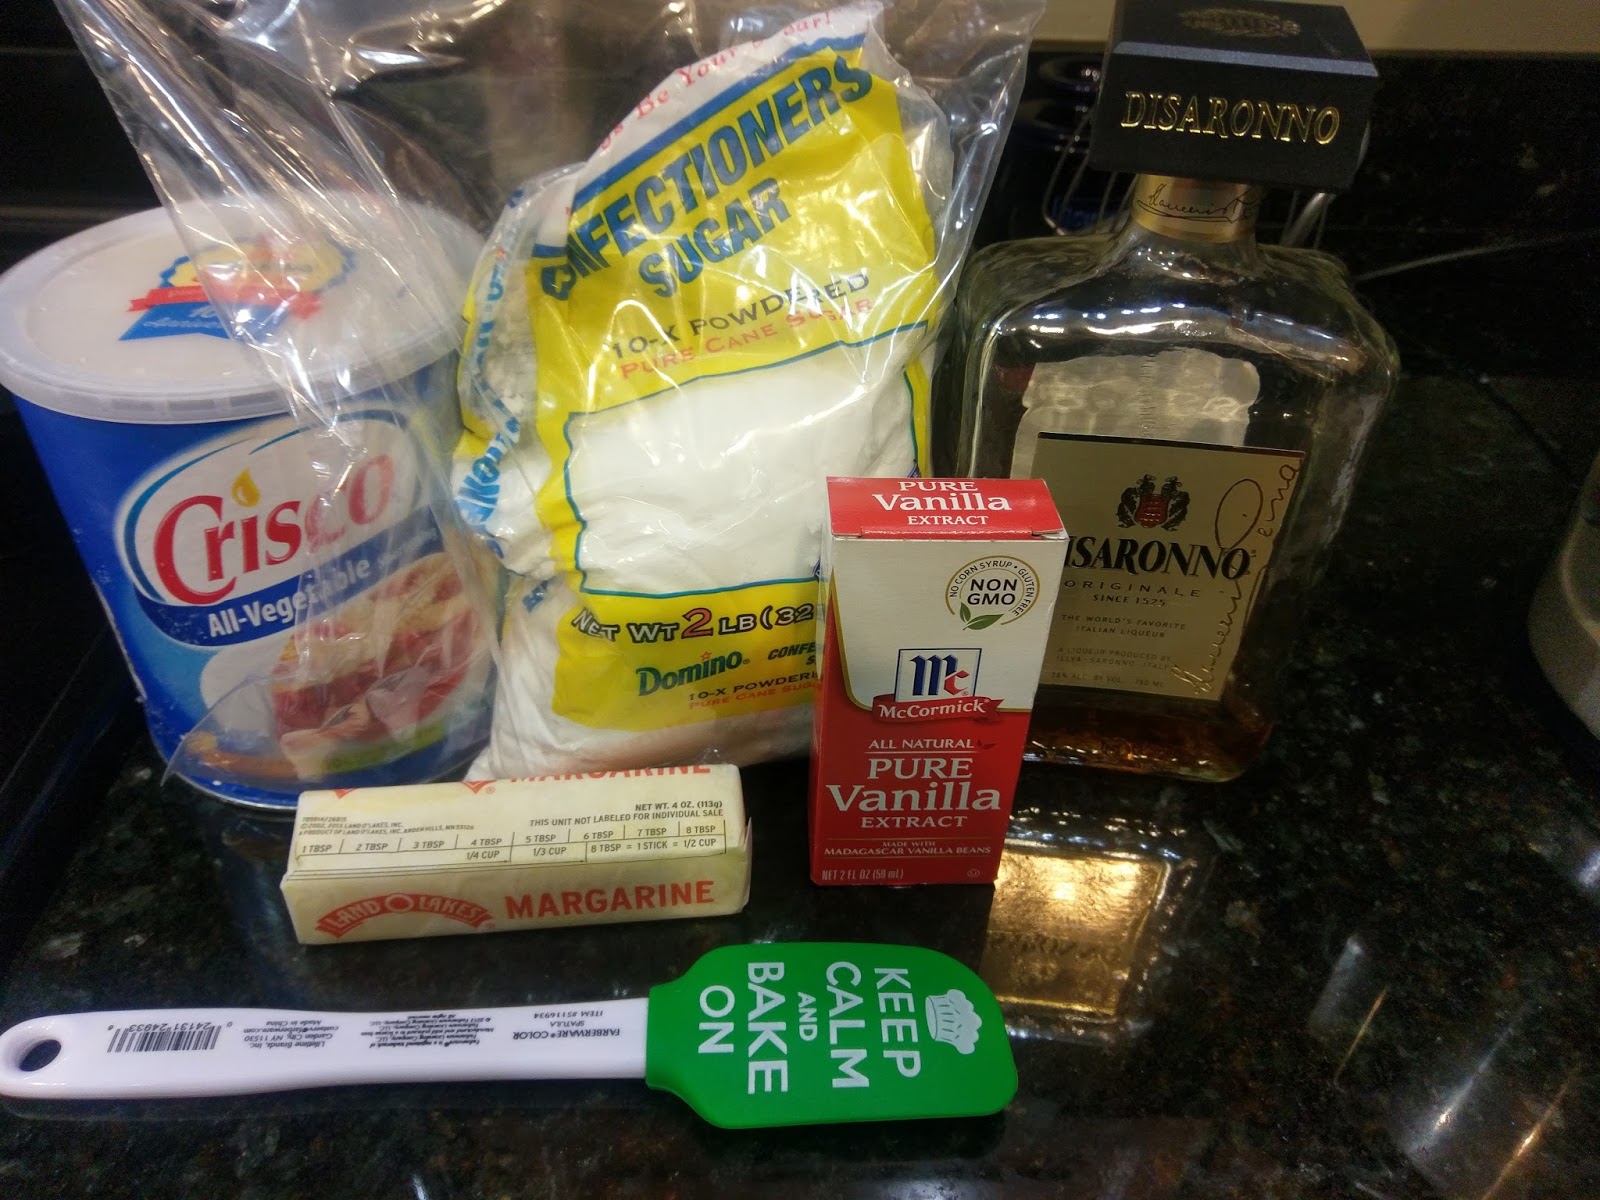
Oh Disaronno, you are simply my favorite. Once you’ve got your materials ready, you can start making your frosting. This frosting is SWEET with the addition of amaretto, so while I made a full recipe, I probably barely used 2/3 of it, if even that much, so this is reflected in the calorie count. If you use it all, you’ll have a 4-inch layer of frosting on your cake, making it a double decker of awesome, but also, calories. Boo. Feel free to adjust as needed, but throw together:
- 1/2 cup room temp butter
- 1/2 cup of Crisco
- 1 TBS vanilla
- 4 cups powdered sugar
- 4-5 TBS Disaronno
You could cut this recipe by a third and probably still have a little leftover. But blend the butter and Crisco until well mixed and then add in the vanilla, half the sugar, and half the Disaronno. Blend well and add in the rest of the sugar and Disaronno until you get a smooth consistency.

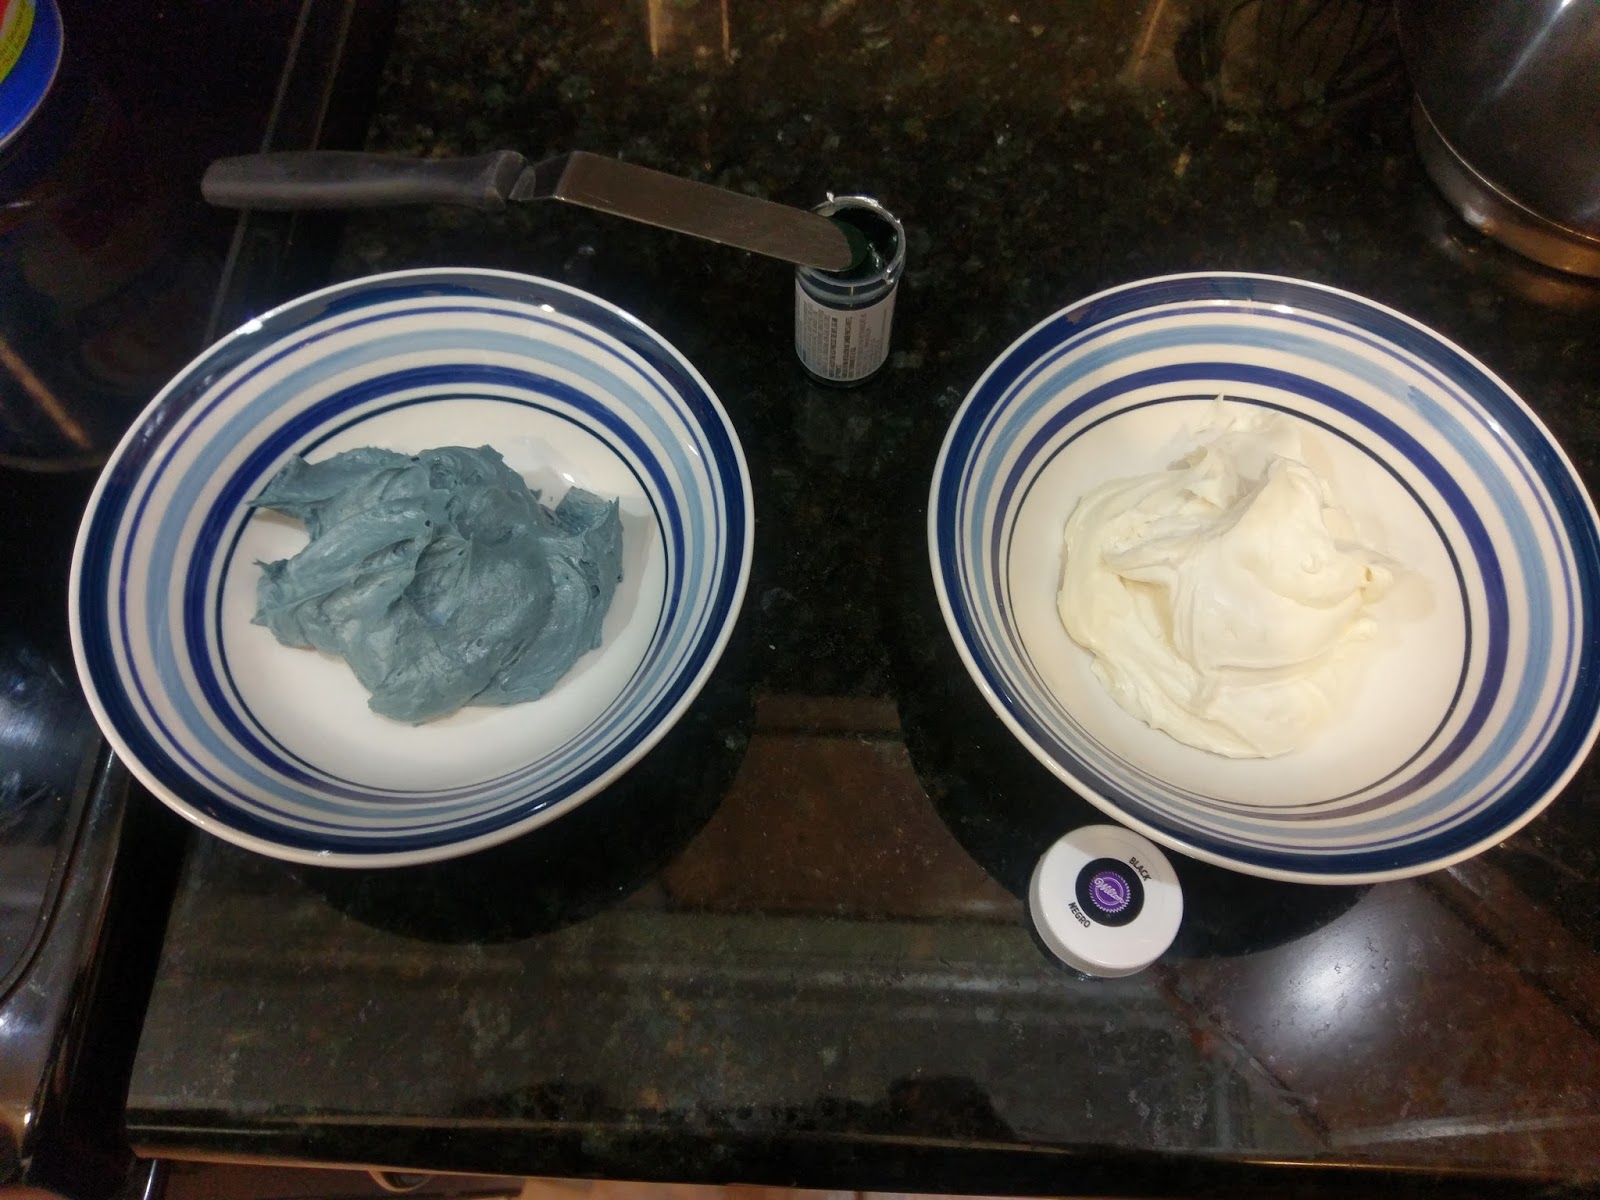
Such an appetizing color. At this point, get out two small bowls and add about a heaping 1/4 cup of plain white frosting to one of them. Now, dye the remaining frosting still in the stand mixer gray by adding a dollop of black gel dye until you get the shade of gray you like. I didn’t use much at all. Then take another heaping 1/4 cup of the gray dye and plop it into the other bowl. Add another smidgen of black dye to this to make it a shade or two darker than the base frosting. This will be for the tombstone’s engraved message. Cover these two bowls with dampened paper towels, and get ready to be slapped in the face with another montage!

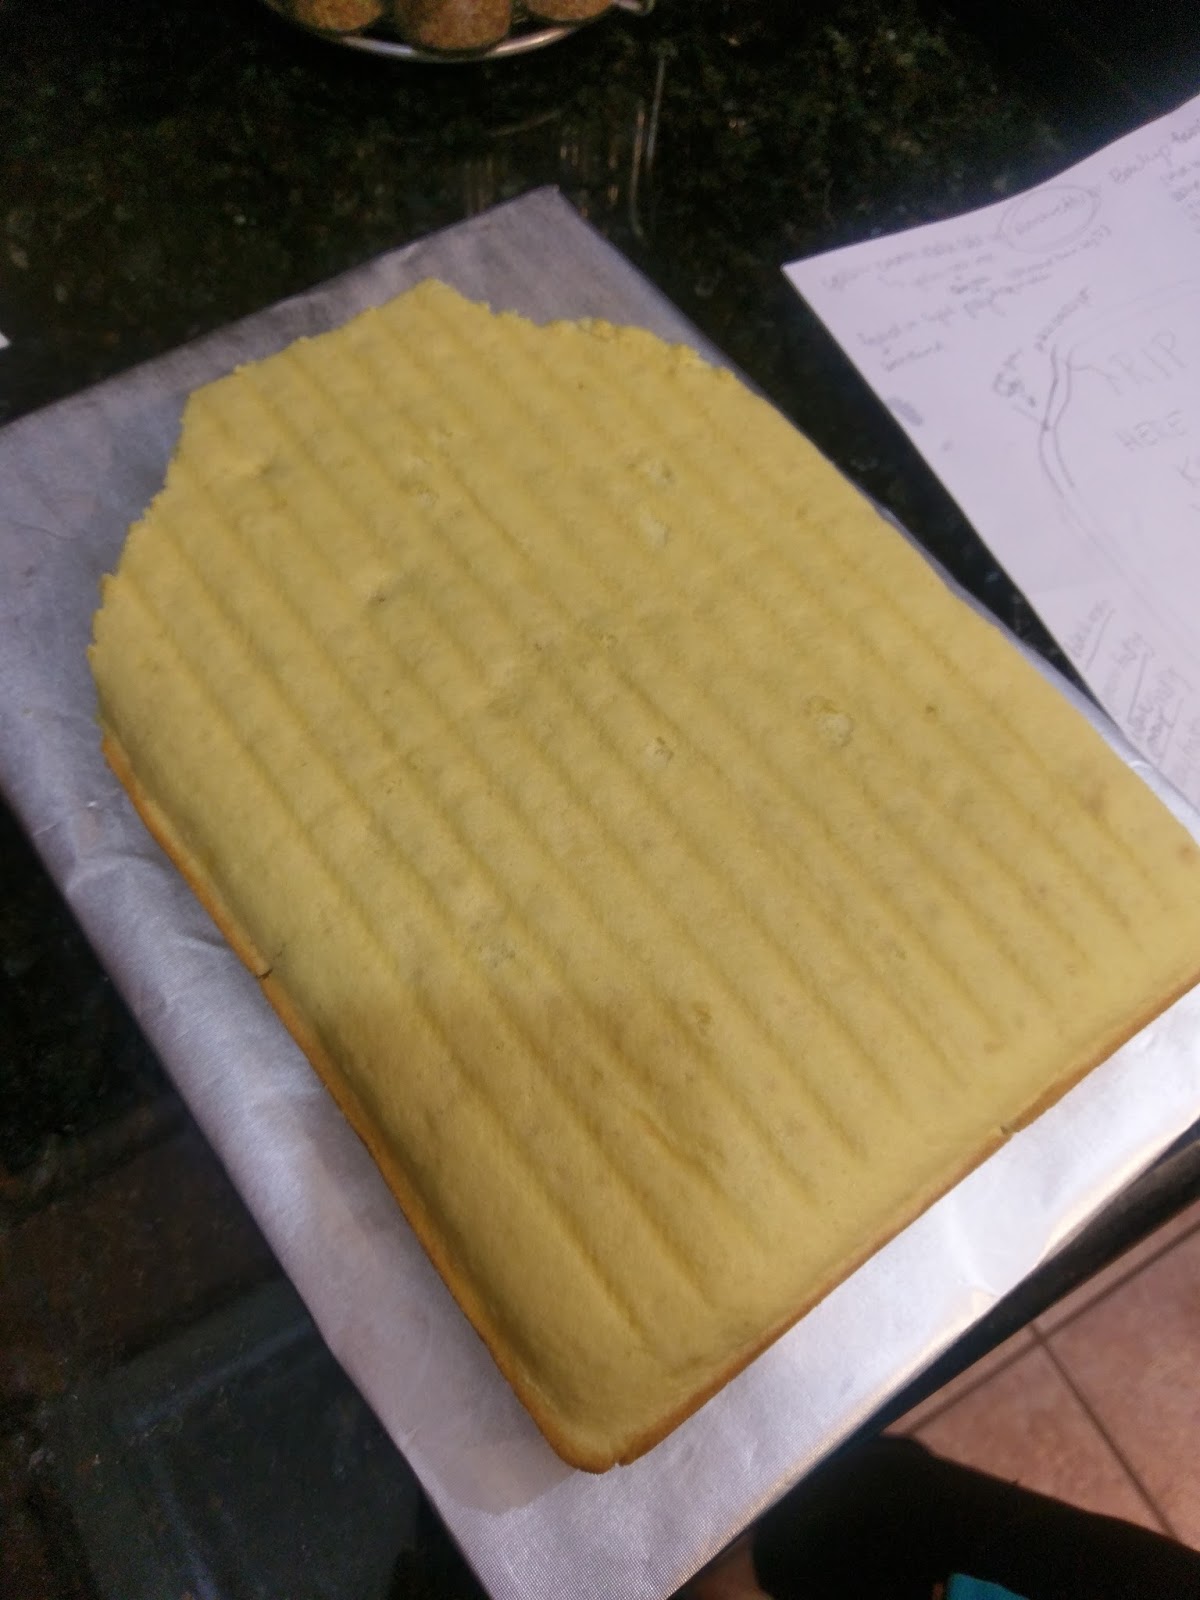
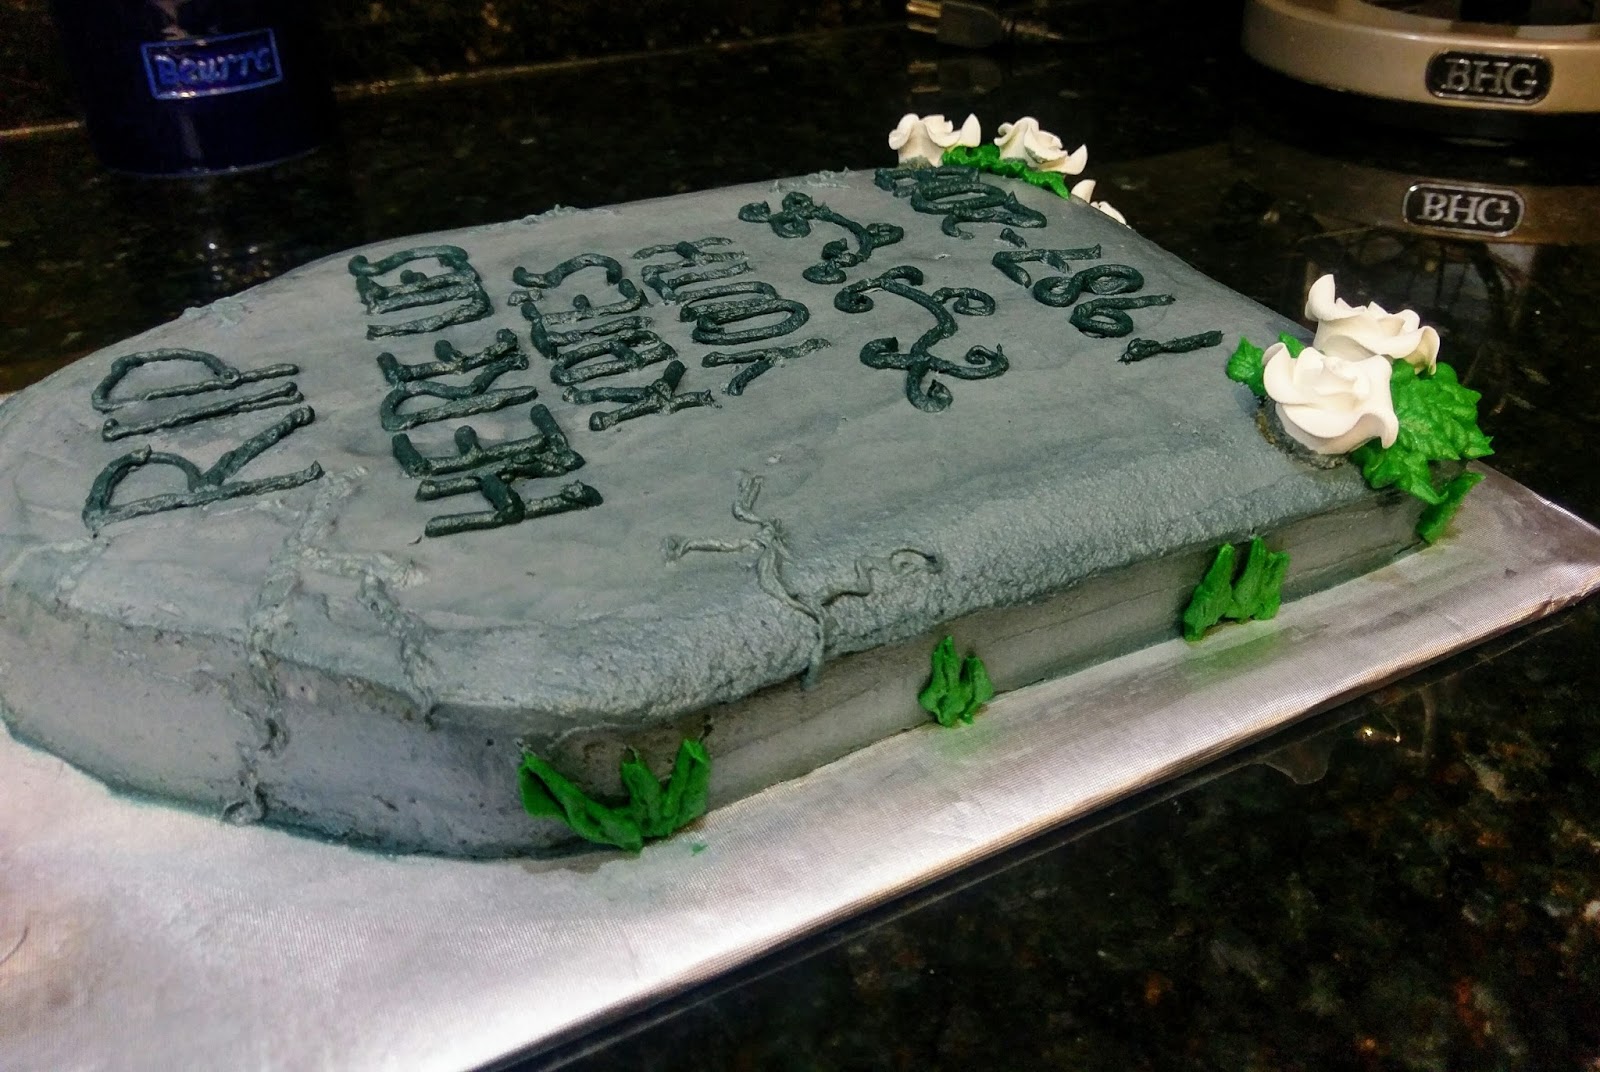
Note to self, use thicker towel on cooling rack to avoid dreaded cake lines. Take your cooled cake and trim the edges to achieve a tombstone shape. 
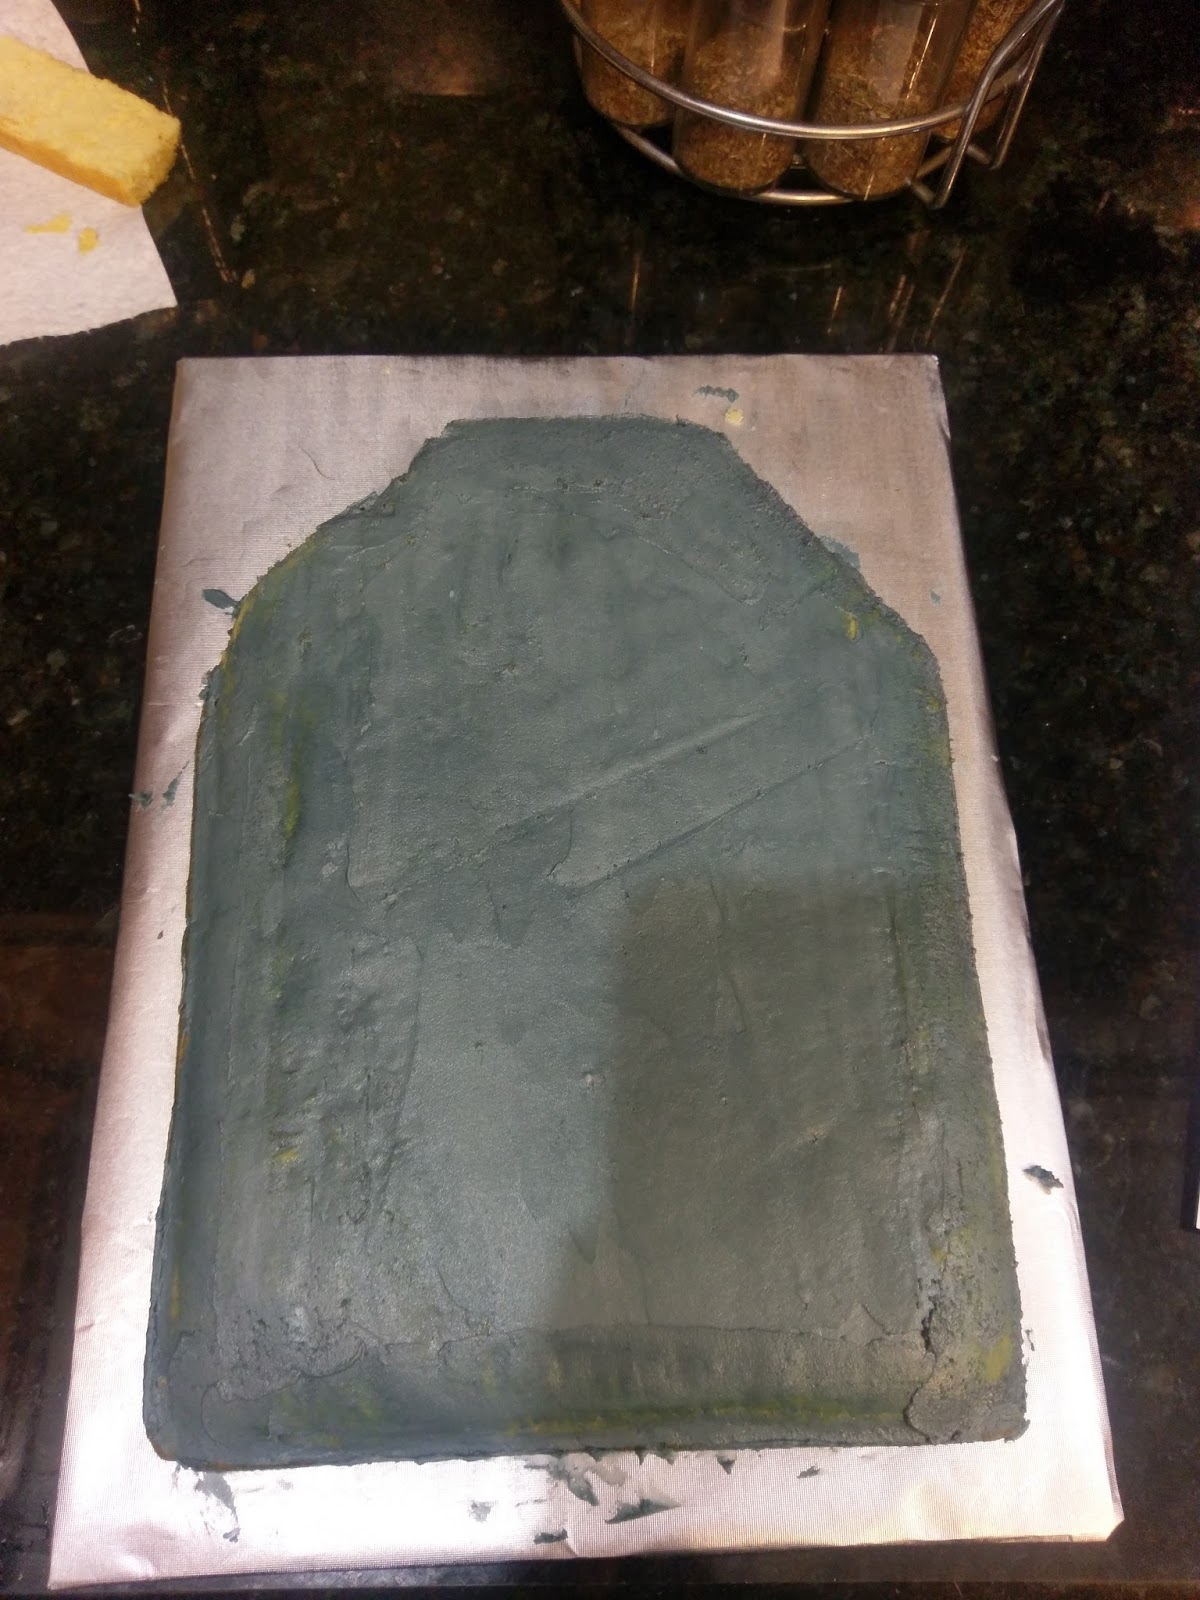
Then add a very thin crumb coat. Take an angled spatula and run it under HOT water. Like, steaming hot sauna water. Wipe it dry, but use the heated spatula to spread frosting easily on those crummy areas that resulted from shaping the cake like a tombstone. This will save you a lot of time if you spread using a heated spatula, so reheat it after you finish crumb coating section by section. You can also use the steam to open your sinuses! Bonus! Place your cake back into the freezer for 15 minutes/the amount of time it takes to do a load of laundry. That’s my scientific measurement, anyway. 
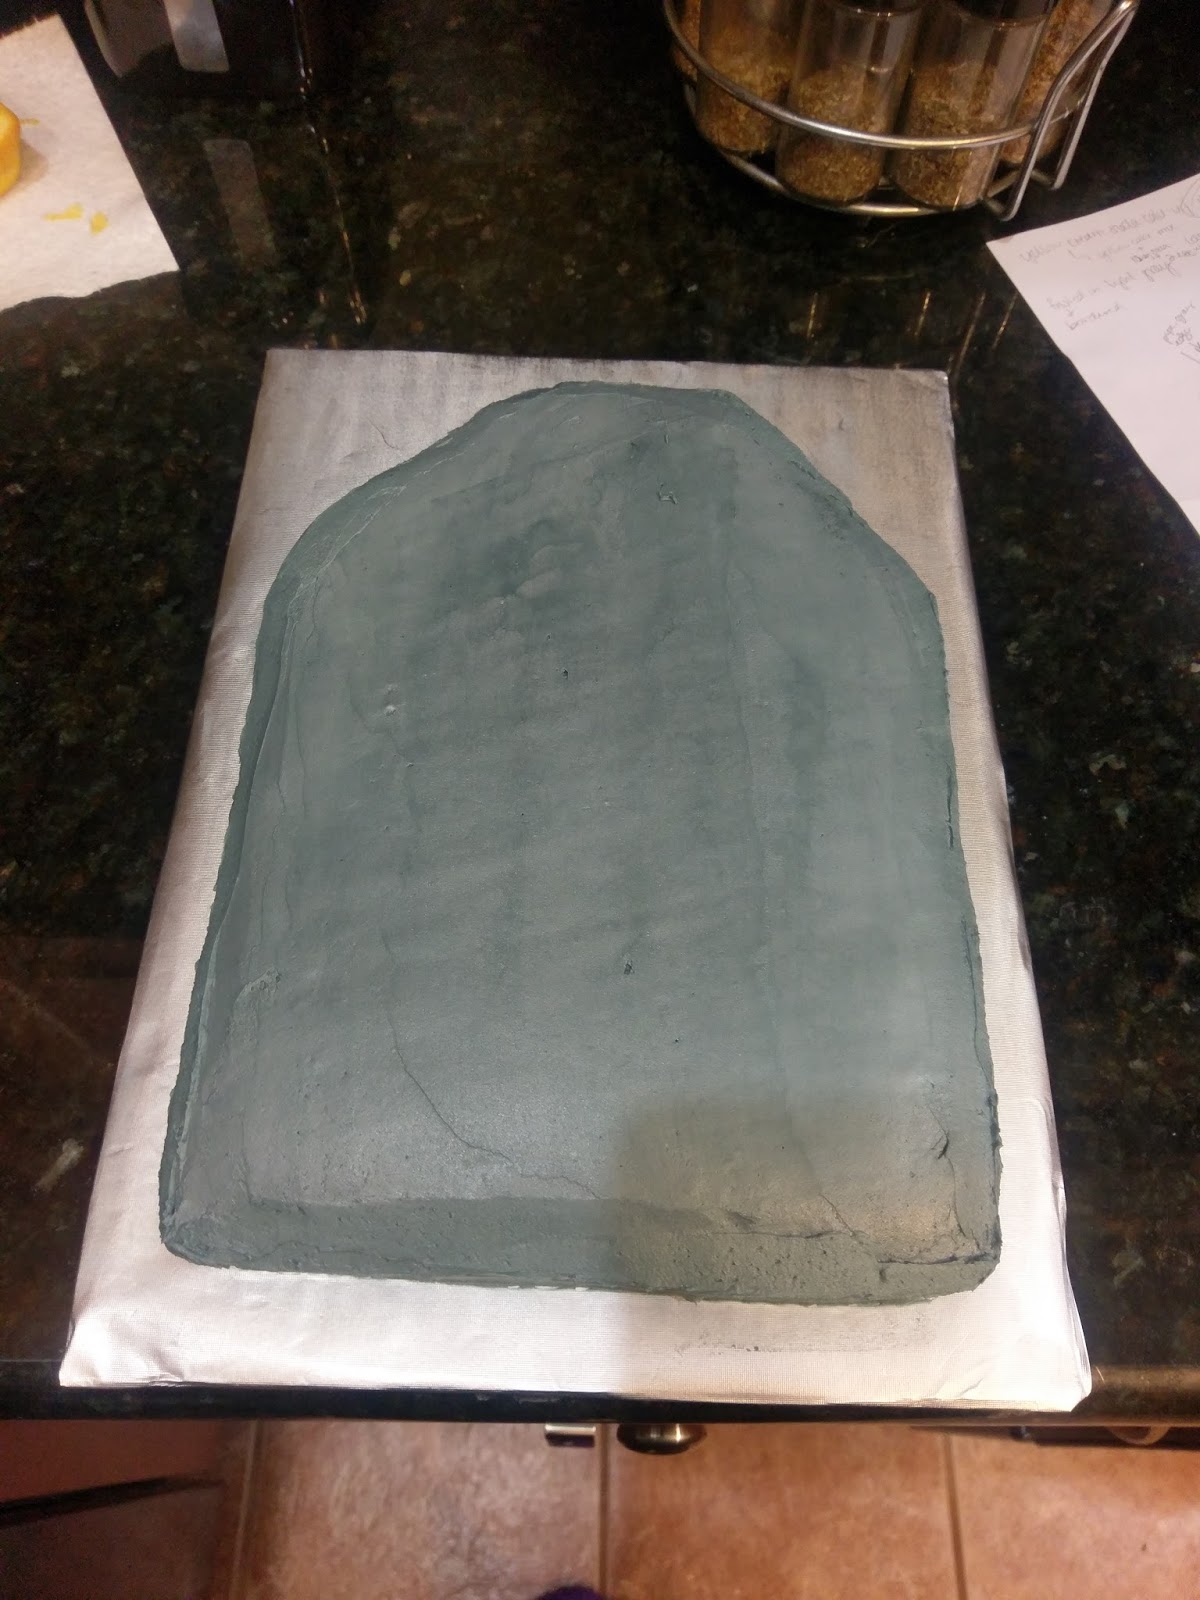
Using the heated spatula trick, add a final thin layer of frosting. Let set in the freezer for 15 minutes, and then use the Viva paper towel trick to smooth out your frosting. But honestly, keep it a little messy. It’s a tombstone, so you want it to look a little rough. I mean, if your cake looks like a tombstone from the Middle Ages, keep smoothing. Think Roaring 20s gangster tombstone–slightly riddle with holes but not entirely dilapidated. 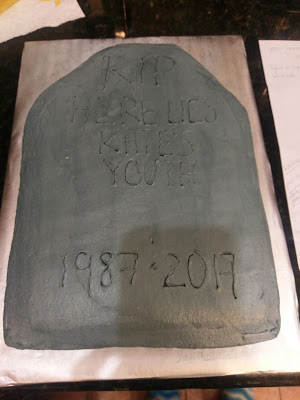
Using a toothpick, scrawl your message out on your cake to act as a guide. 
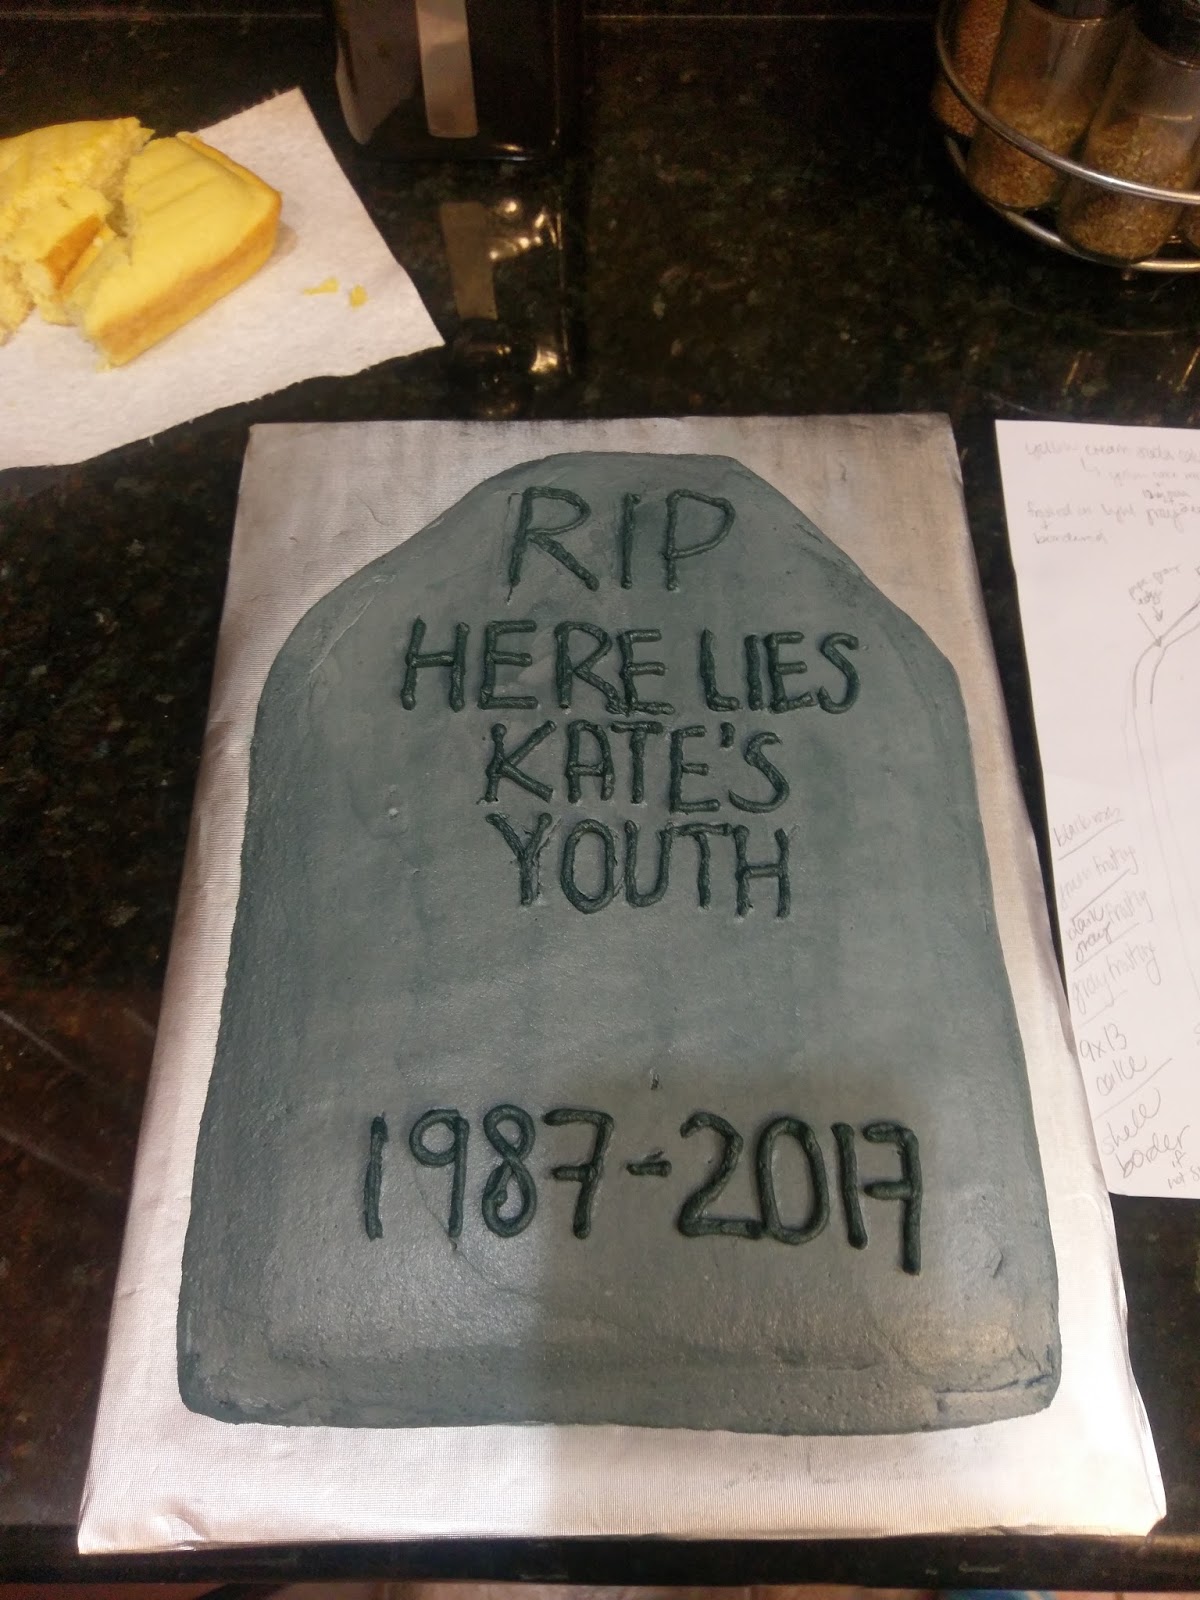
Then load up a piping bag with a #5 tip and the darker gray dye you set aside earlier. Slowly and carefully trace the outline and write out your message. 
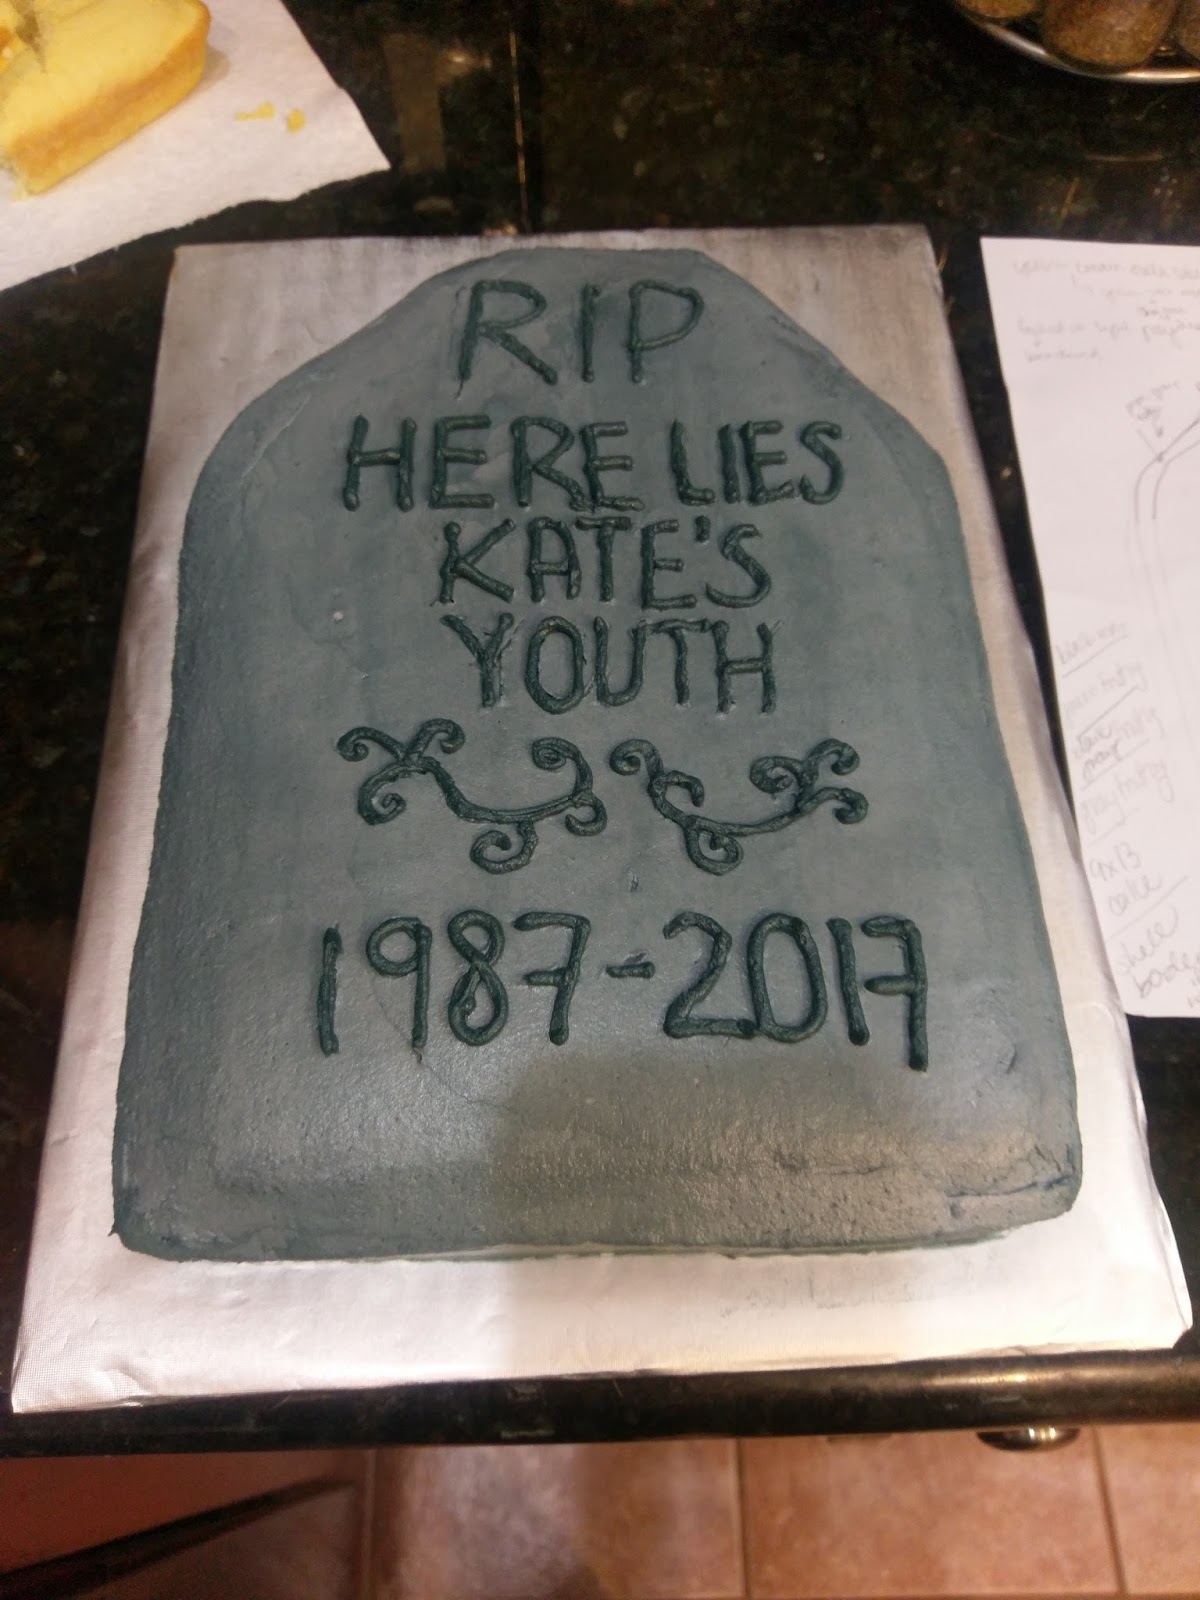
You can leave it plain, or get creative and add scrolling or a cross to your tombstone in any blank space. 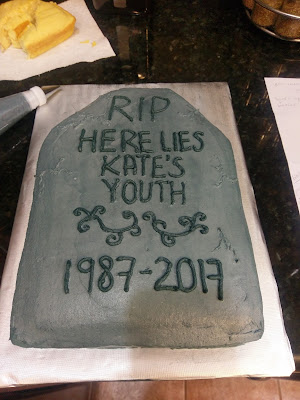
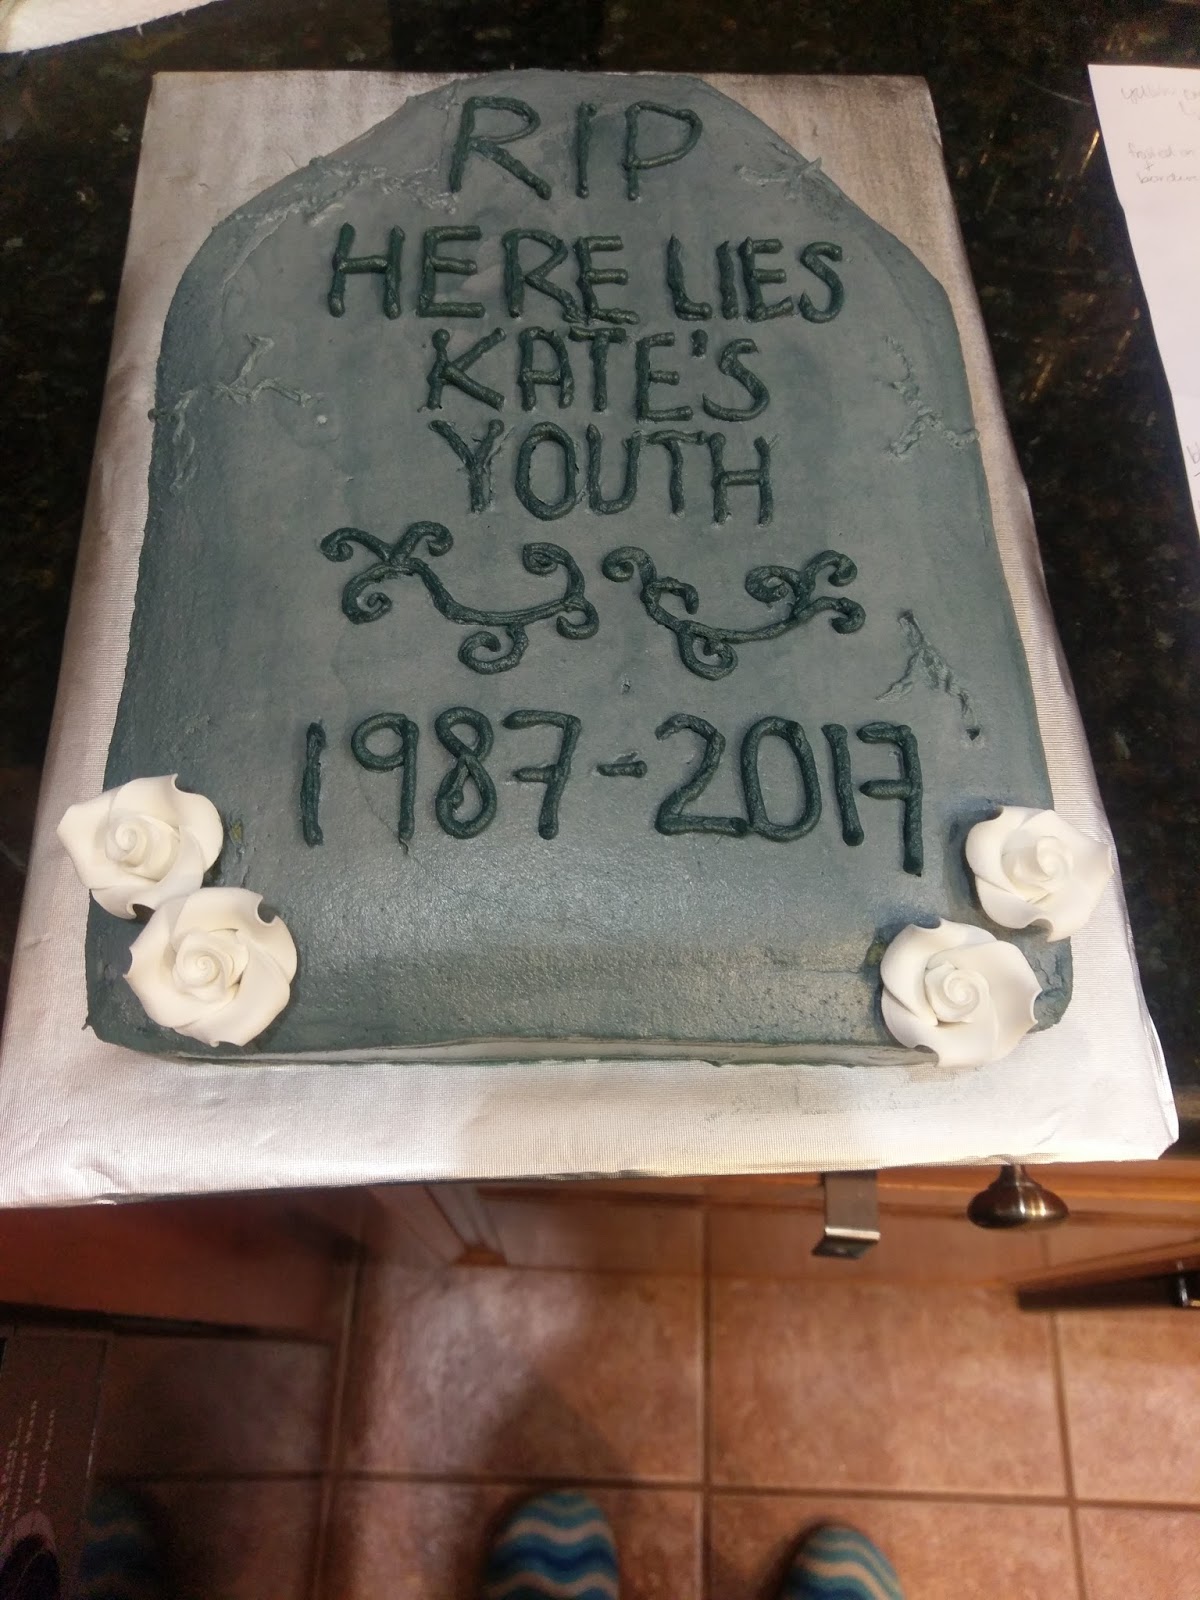
Then take another piping bag and add the leftover gray frosting you used to frost the actual cake with. Fit it with a #3 tip. Now you can add “cracks” to your tombstone by taking the #3 tip and burying it in your frosting layer. While keeping it buried in the frosting layer, squeeze frosting out of the bag while slowly wiggling and drawing lines/cracks of various length and shapes into your cake. I focused on creating most of my cracks at the edges where they would occur on an actual tombstone. Trust me, as a Halloween expert, I know what I’m talking about. 
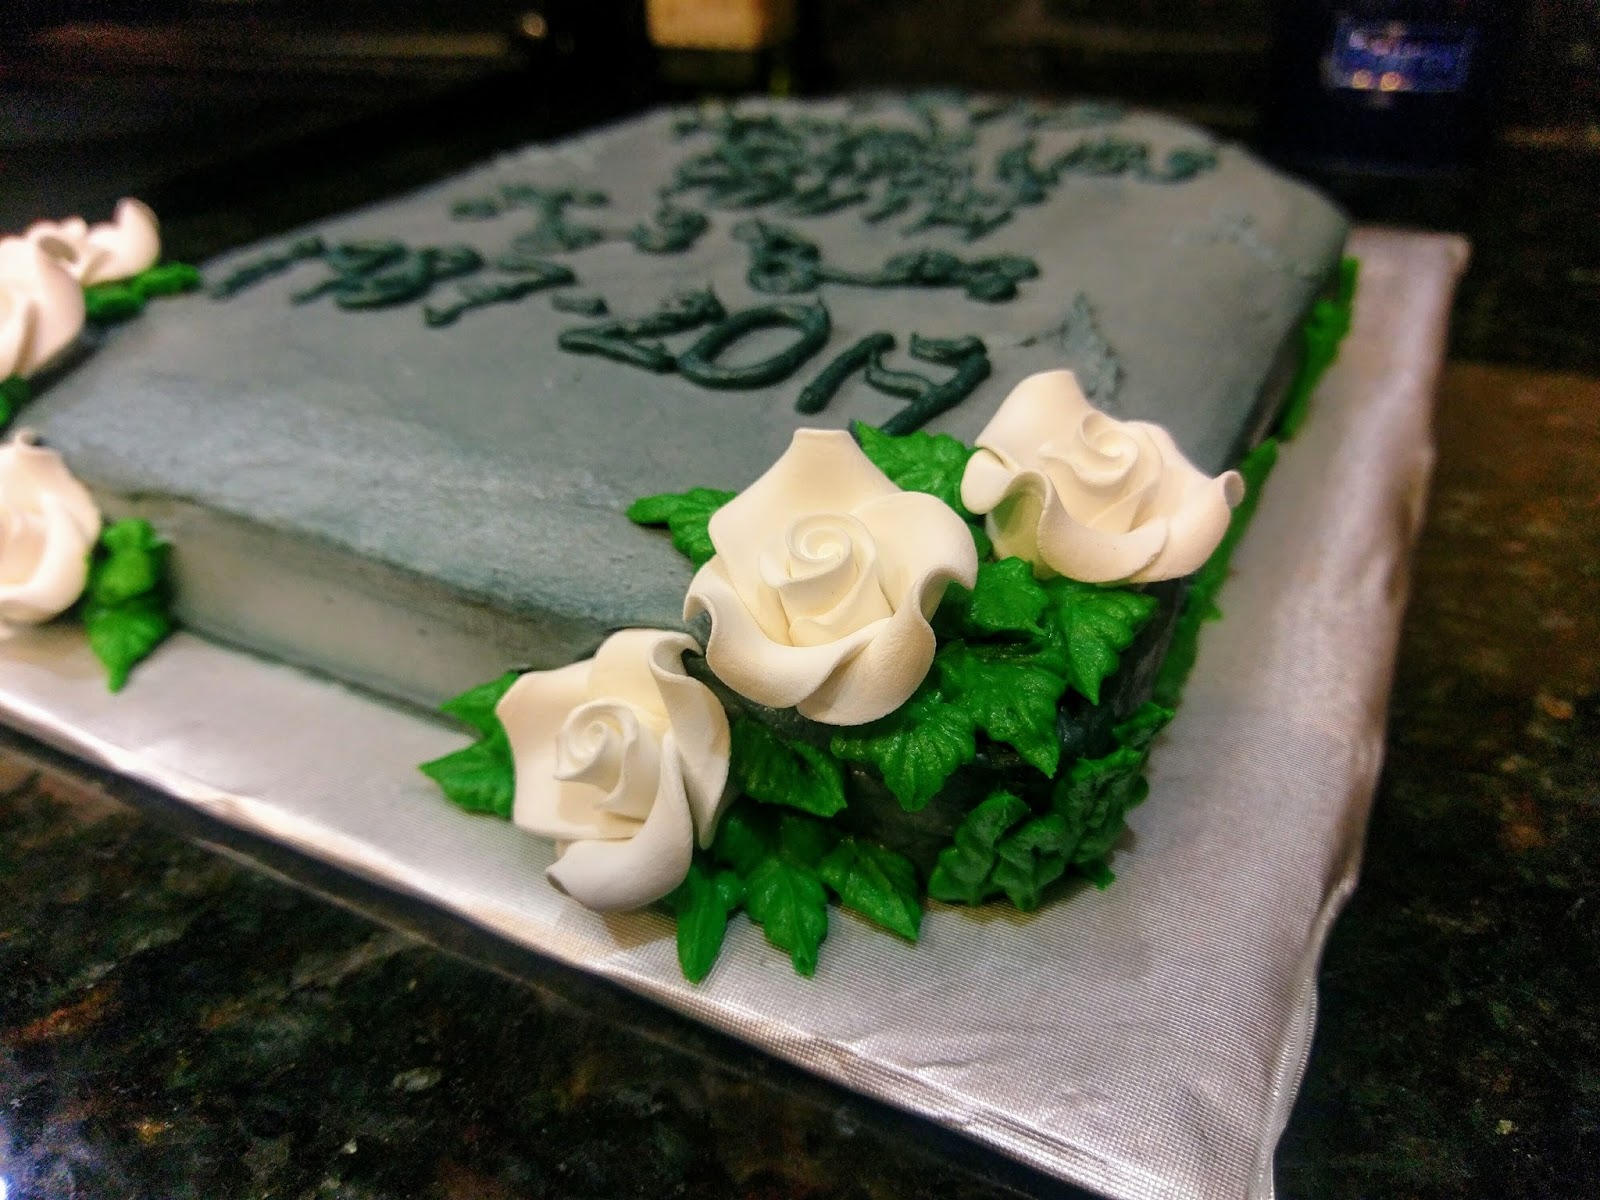
Now, take a few roses and pipe a small glob of frosting on the bottom. Press them gently into the cake to adhere. 
Take that bowl of plain frosting we forgot about years ago and hopefully didn’t eat. Dye it green–tip, add in a little brown dye if you have it so the green is duller. Take this frosting and place into a piping bag with the #352 tip. Now, to pipe leaves, hold the tip sideways and let a mound of frosting continue to pipe out. It will pretty much automatically make a leaf shape, but for further instruction, check this video out. 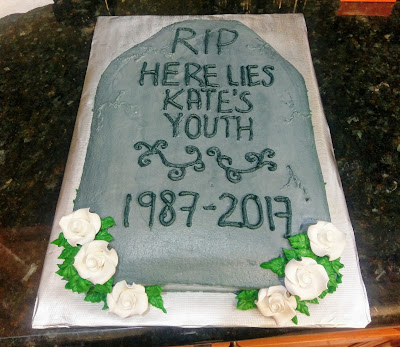
Add in the remaining roses on the bottom of the cake and finish piping leaves as you like around them. You could stop here, but if you want to, follow my instructions below for further tips. 
Use the rest of your green frosting to create blades of grass and leaves on the sides of your tombstone. Use the same technique, just pipe UP the side of the cake instead of out. 
Take the bag of regular gray frosting and continue the cracks you started down the sides of your cake as well to really finish the look of decay and macabre to truly mirror how you feel about turning 30. 
Additional photo of leaves because they turned out so fantastically. I’m a leaf tip idiot, so finding this 352 tip to make foolproof leaves has been a lifesaver. I am honestly not sure there has ever been a time when I was happier with how a cake turned out. In true OCD, Type-A fashion, I sketch out every cake before I make it. This cake turned out even better than the sketch, so on some level, it gave me the will to turn 30 simply so that I could post this tutorial (and so that I could dazzle you with my wit and creativity. Narcissism is a real diva. The Mariah Carey of flaws.). But as happy as I am with the decoration, I am truly slapping myself upside the head every time I take a bite–WHY did I never think to add amaretto to cakes?!? This is the true hidden gem and best birthday present I could ever give myself. I love Disaronno so much that simply drinking it isn’t enough. I must find all ways possible to ingest amaretto. This frosting is so delectably sweet that a little really does go a long way, but it pairs perfectly with a creme soda cake (ahem, and also in liquid form with creme soda. I had to taste test, you know). I’m thinking a naked cake made of Disaronno is going to happen really, obnoxiously, I-can’t-believe-I’m-already-making-another-cake soon. If this is what turning 30 involves, bring it on new decade because I got a head full of crazy cake ideas, and I’m only getting started. Thanks to all of you that reached out to me yesterday to wish me a happy birthday (if you didn’t, you get a pass for reading my blog). I had a wonderful day filled with love, laughter, bitchin’ presents, and tons of joy (and sequins. Thanks, Rent the Runway!). ‘Til next time, my fellow eaters!

Just wait til you see what I have planned for my fortieth birthday cake… -
A Twist on a Classic Christmas Dessert
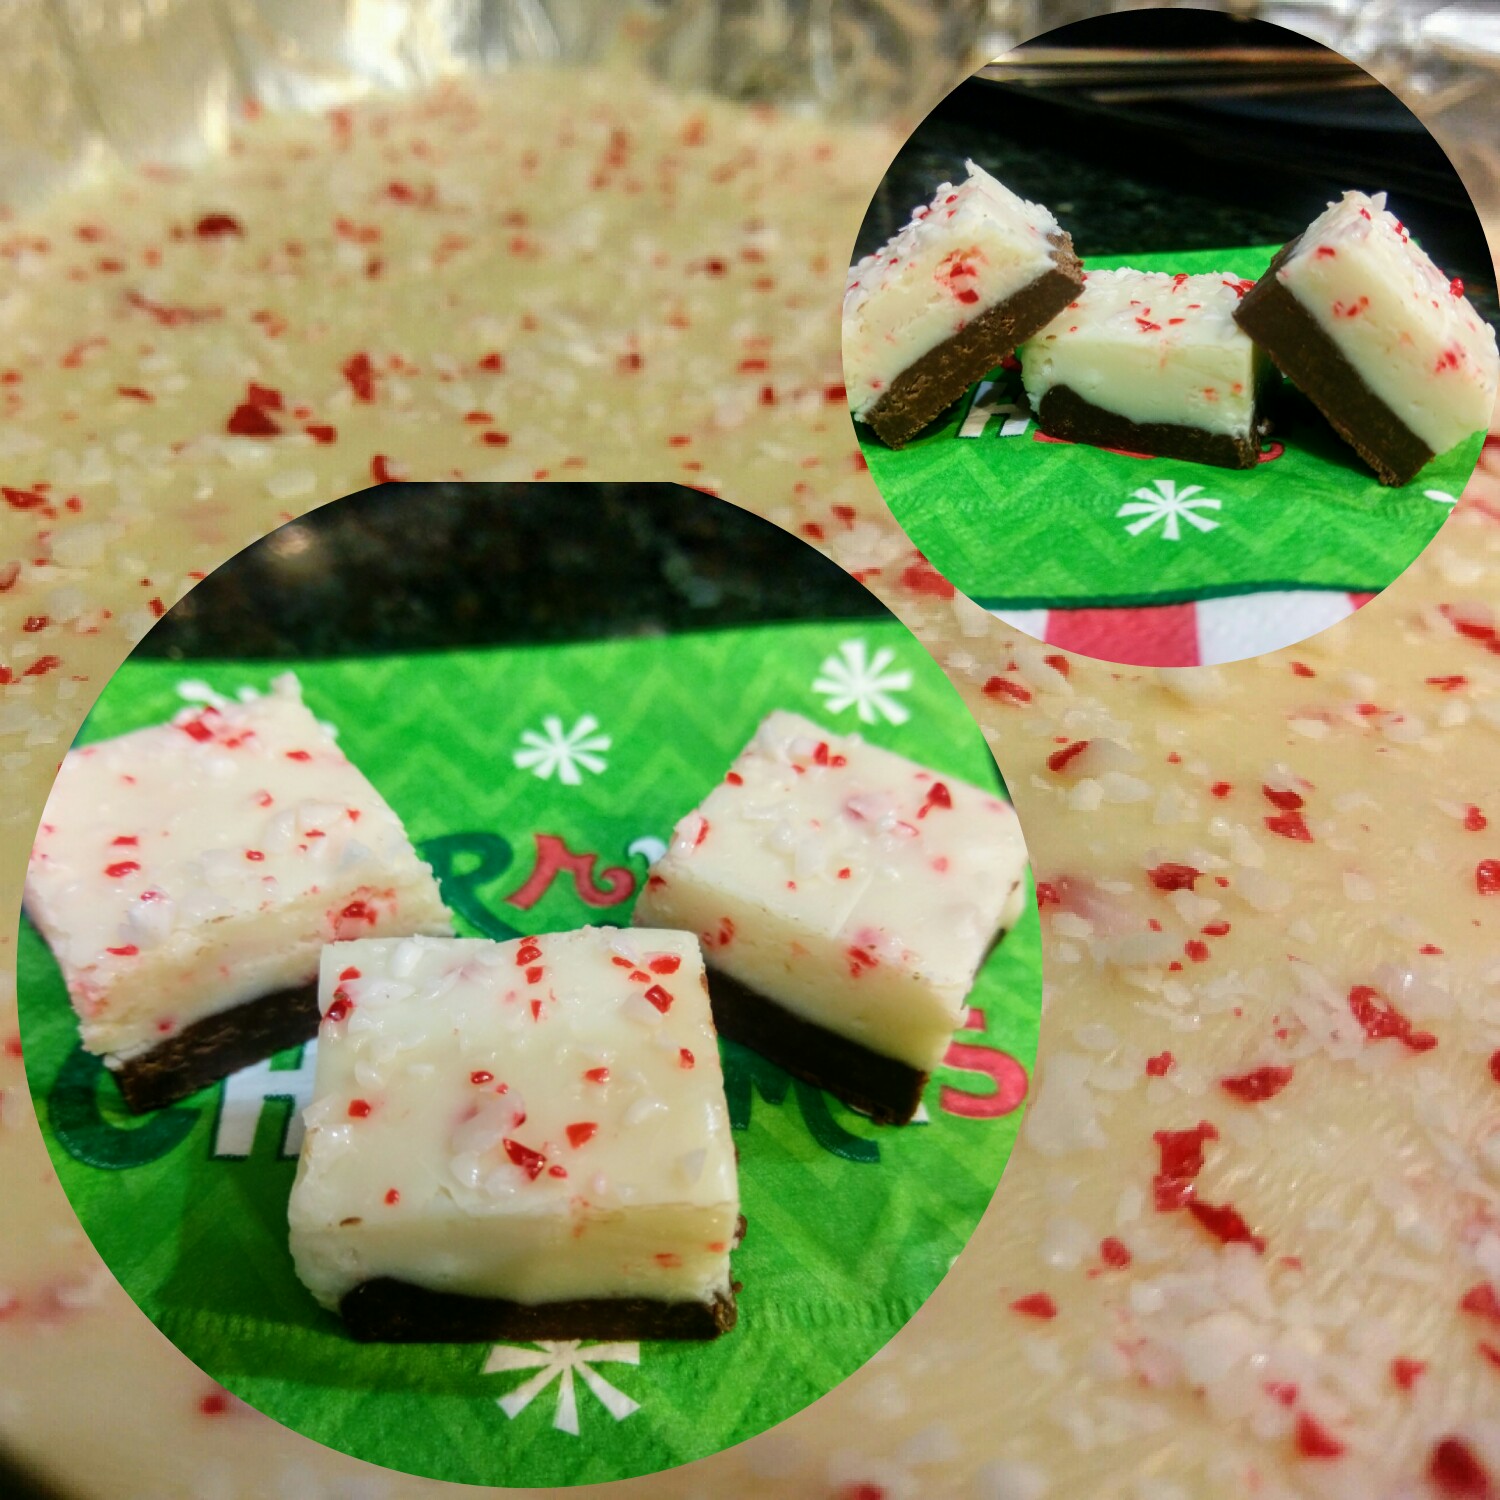
I’ve noticed over the past few days and reversion to 80 degree weather that Florida tends to do Christmas a little differently than I’m used to. While there are still neighborhoods full of lights and decorations, many houses are “Under the Sea” themed with rows of blue-lit waves or green-lit algae. Santa Claus is frequently seen in festive holiday…Hawaiian…shirts with sunglasses and a general “I’m sure I have something more important to do, but I’m on island time” attitude. Even the snowmen aren’t made of snow around here. I mean, obviously they’d melt in record time and turn into a splash pad, but even inflatable snowmen aren’t safe from the beachification of Christmas around here. They’re the sandcastle equivalent of a regular snowman. It’s kitschy. But it’s fun. And also incredibly alarming–literally. Last night we were watching The Santa Clause (because bad 80-90s Christmas movies are the best), and suddenly lights were flashing and firetruck sirens blaring on our street. I thought to myself, this is it…it finally got so hot that Florida set itself on fire. But no, there was no cause for actual alarm now that we know the local fire department decks out their trucks with lights and garland and parades around each neighborhood with Santa on one of them to deliver gifts to children. And for the moms standing outside waiting with their children, there’s hot firemen. This is a tradition I can get on board with. You can catch me standing curbside next year with the dogs, “waiting for dog treats,” just so I don’t look too obvious. All this twisting of tradition had me in the mood to take a classic holiday treat, peppermint bark, and put my own spin on it. Naturally, this meant adding even more chocolate. May I present to you peppermint bark fudge:

I will hold for applause. So now comes the part where I tell you that once again my sheer brilliance (or overwhelming desire to fit into my 30th birthday party dress) has allowed me to craft a fudge that is only 70 calories per square. I give you a moment to digest this while I digest the fudge, and then I explain how this is possible. Still with me? This is how we’re doing things around here from now on. I promise to deliver calorie content because I am so tired of finding the “holy grail of low fat desserts” on Pinterest only to calculate calories and realize whoever blogged it was a big fat liar, maybe even literally, because it’s still a 500 calorie dessert. I want to be the exception to the “too good to be true” rule. This entire 8×8 pan of fudge comes out to 2,492 calories. I cut this into 36 decent chunks to equate to 69.22222 calories. My father always used to tell me it’s all about math, and damned if he wasn’t right. Don’t tell him that though, or I’ll never hear the end of it. I became an English teacher for a reason, alright. While I have cut calories, I have not cut down on taste. This is still fudge. It is melt-on-your-tongue chocolate and peppermint bliss. It’s the flavor of the season for a reason!

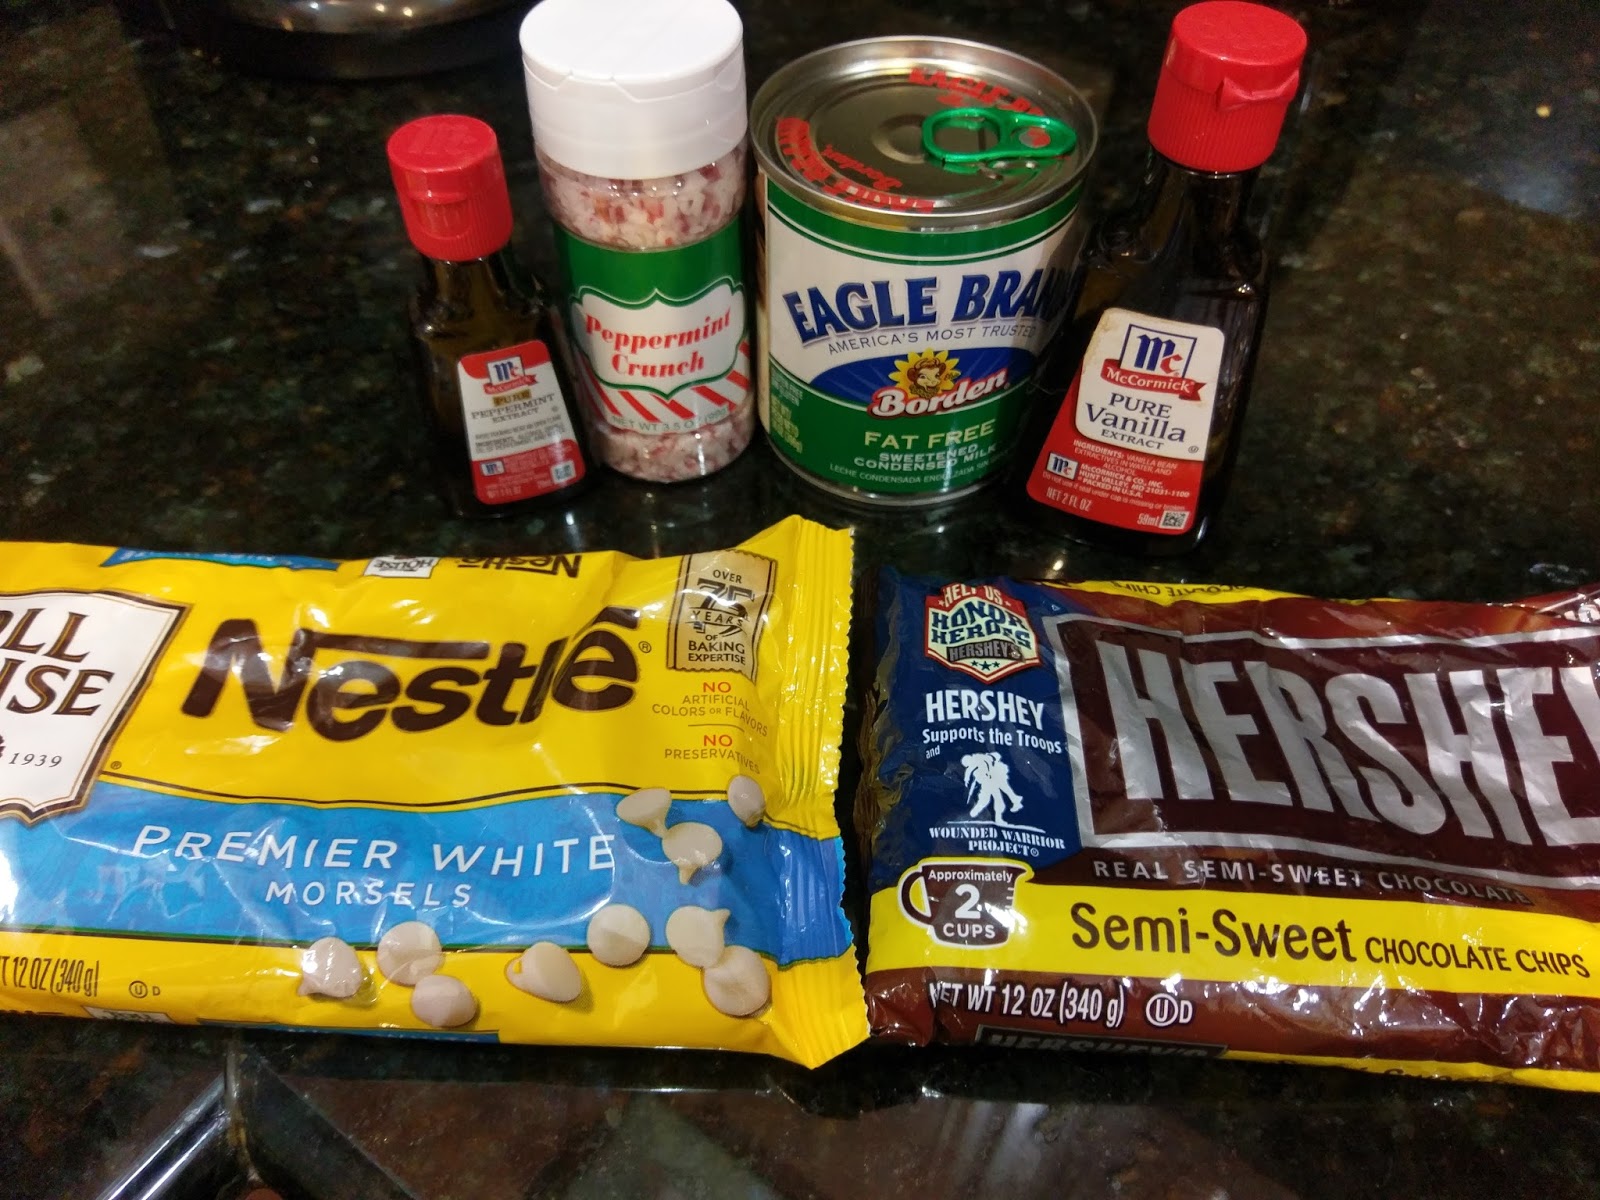
Yes, fat free sweetened condensed milk is actually a thing. Who knew? Thanks to my manly biceps and linebacker shoulders, I was blessed with the ability to make really great fudge. Since 98% of making fudge is the continual laborious process of stirring chocolate until it melts or your arm falls off (whichever comes first), make the strongest member of your family your sous chef. You can executive chef your way to a bar stool to supervise. To make this perfectly Christmasy peppermint bark fudge, you need:
- 1 can of fat free sweetened condensed milk, divided
- 1 1/2 cups semisweet chocolate chips
- 1 1/2 cups white chocolate chips
- 1 tsp of vanilla
- 1/2-1 tsp peppermint extract (if you like a normal amount of mint, go for 1/2. If you are someone that likes to eat toothpaste or are just generally really into candy canes, go for 1.)
- Crushed candy canes (1/4 cup) or 1/4 cup peppermint crunch (found at, where else, Target…because I live there now).

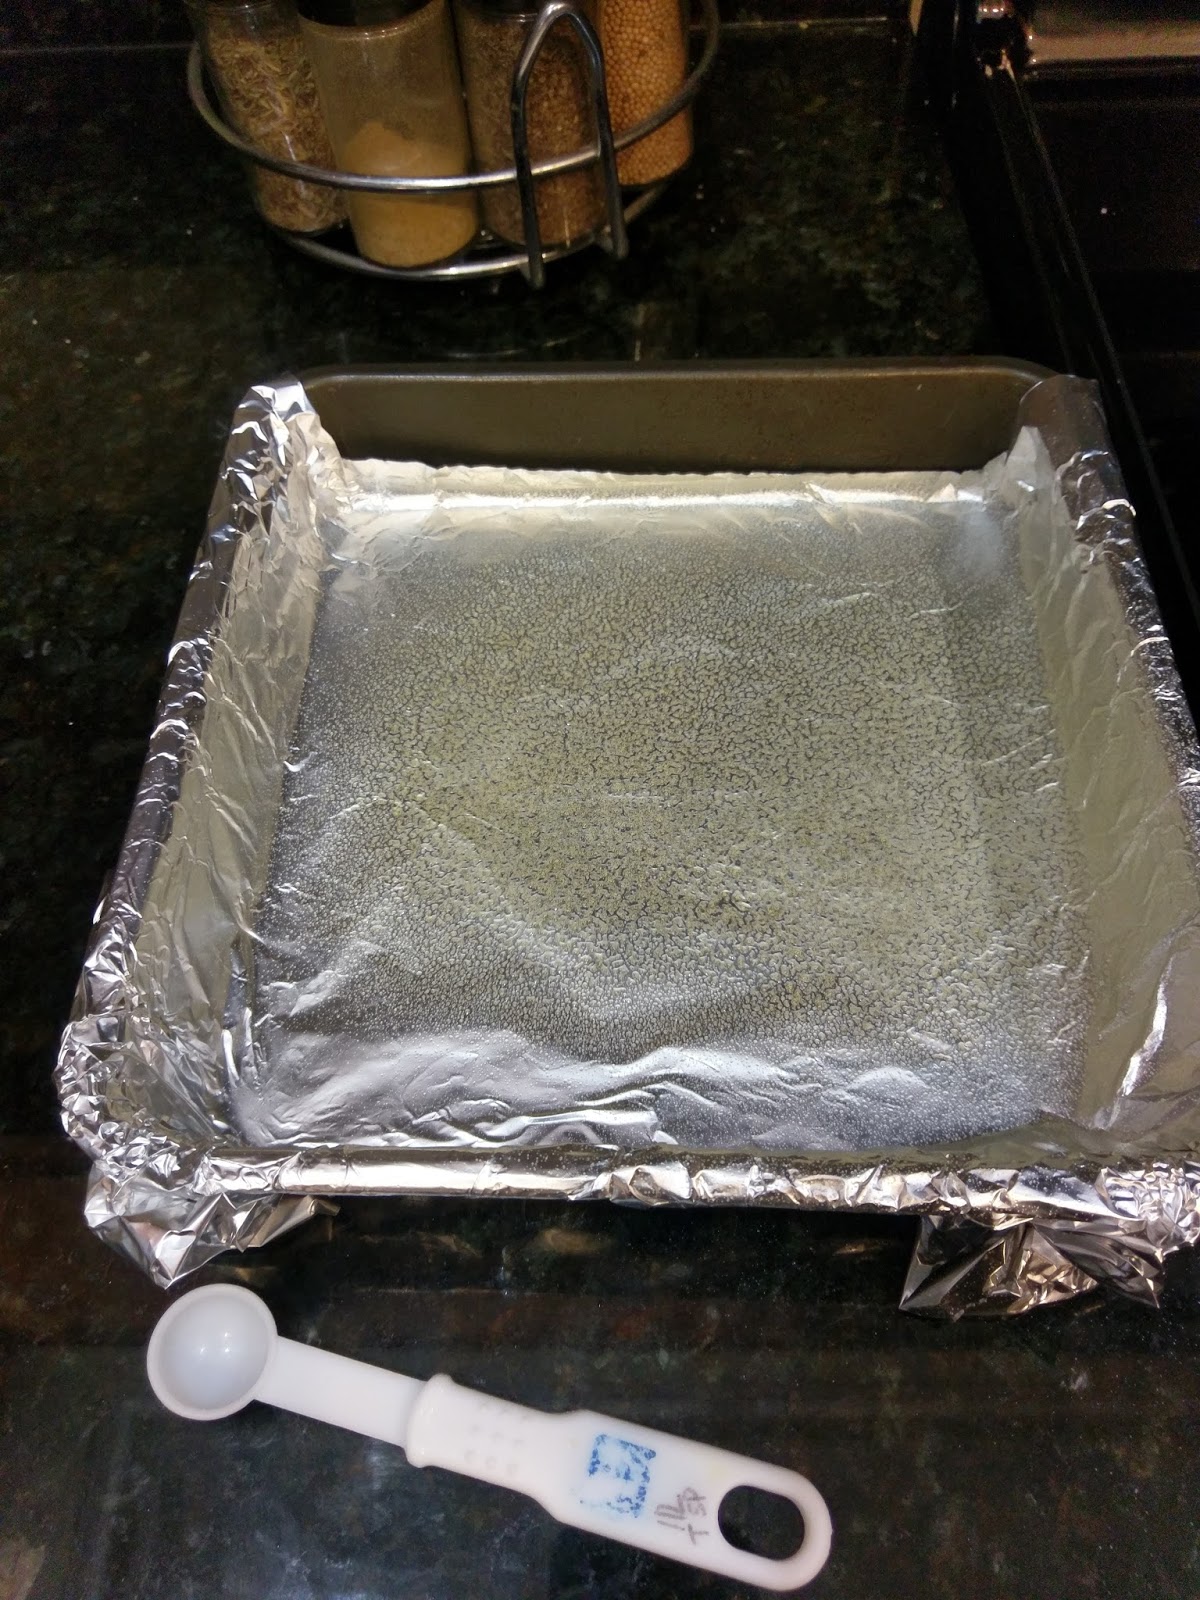
Also needed: cooking spray and foil, or you will have to employ your sous chef to scrape and scour the pan. Before you begin, line an 8×8 pan with foil overlapping the edges and spray with cooking spray. With fudge, time is certainly of the essence, so be sure you’ve got all your ingredients measured out and ready to go. I started out by measuring 1/2 a cup of the condensed milk and 1 1/2 cups of chocolate chips. I made the chocolate the bottom layer, but you could get crazy and switch it up, or do an extremely thin layer on the bottom and another extremely thin layer on the top to create a peppermint bark fudge sandwich. That would look really cool, but the beauty of fudge is that it should be quick to throw together, and that sounds time consuming. Like, I could watch Christmas Vacation at least twice in that time. So if you’re into complicated desserts and kinda hate yourself, go for it. As Ellen Griswold would tell you, “I don’t know what to say, but it’s Christmas and we’re all in misery.”

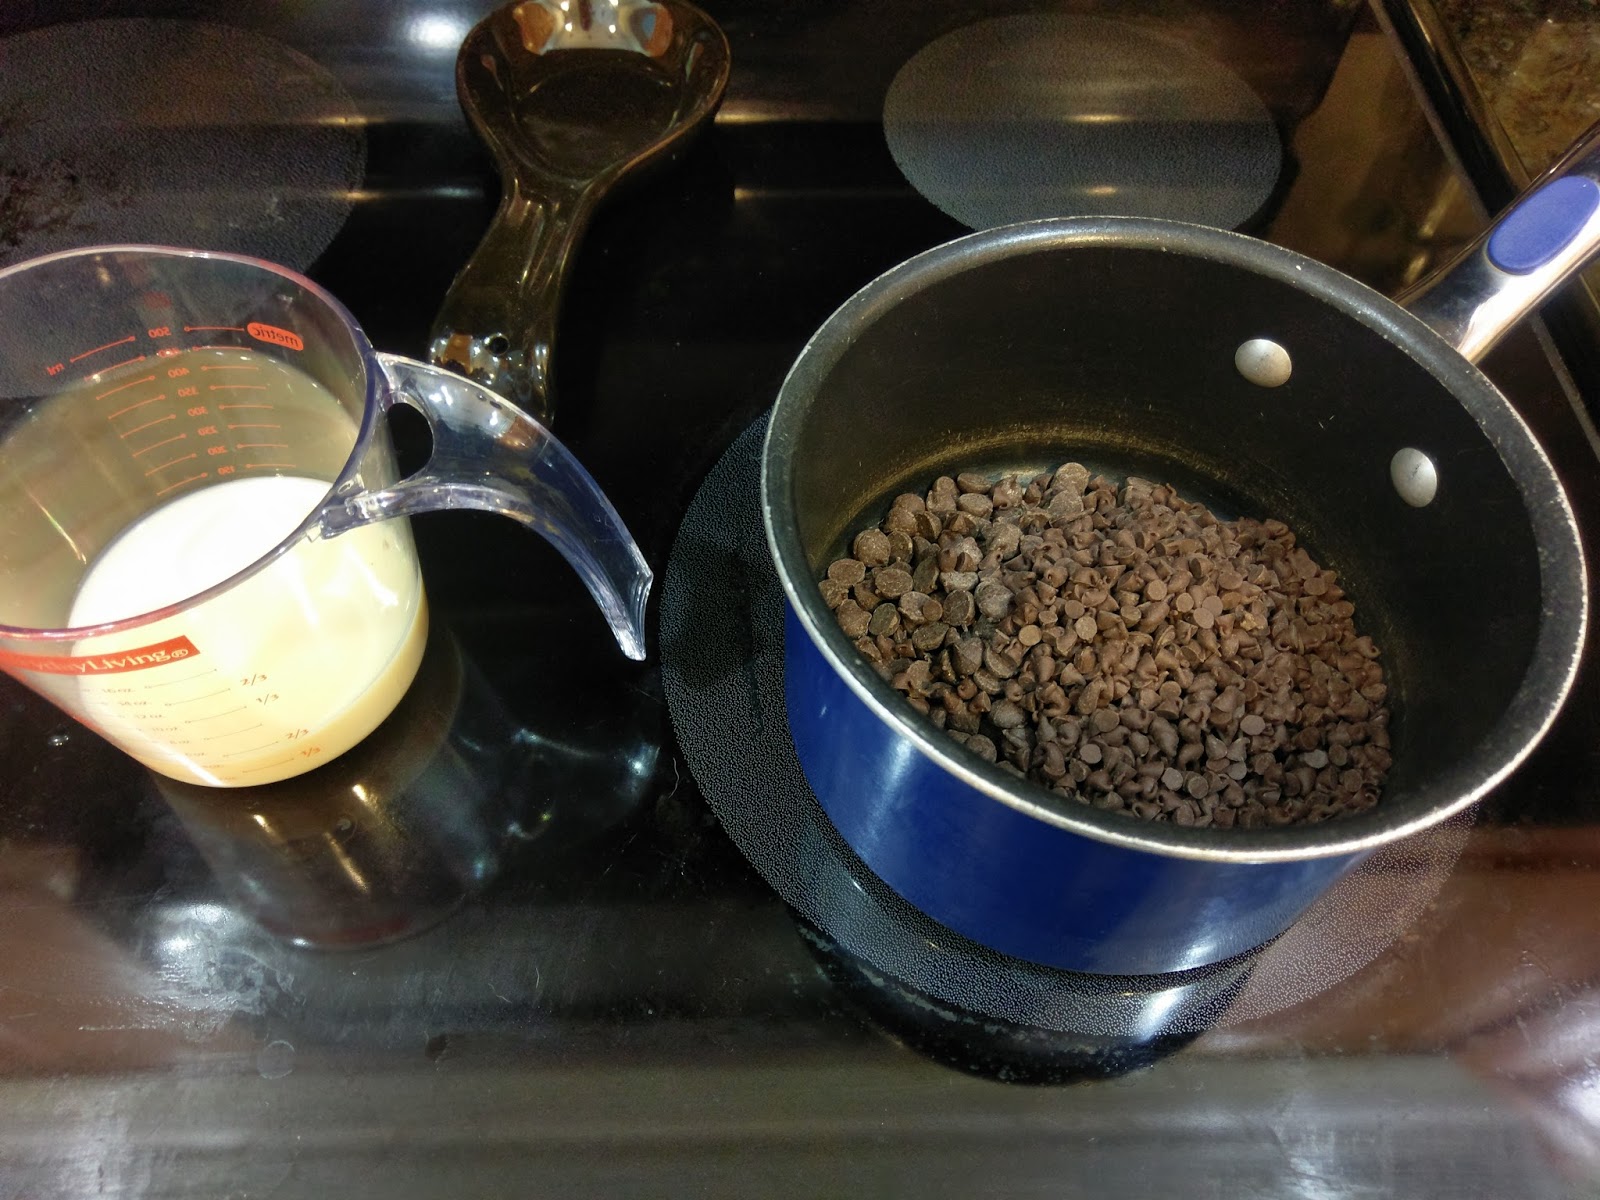
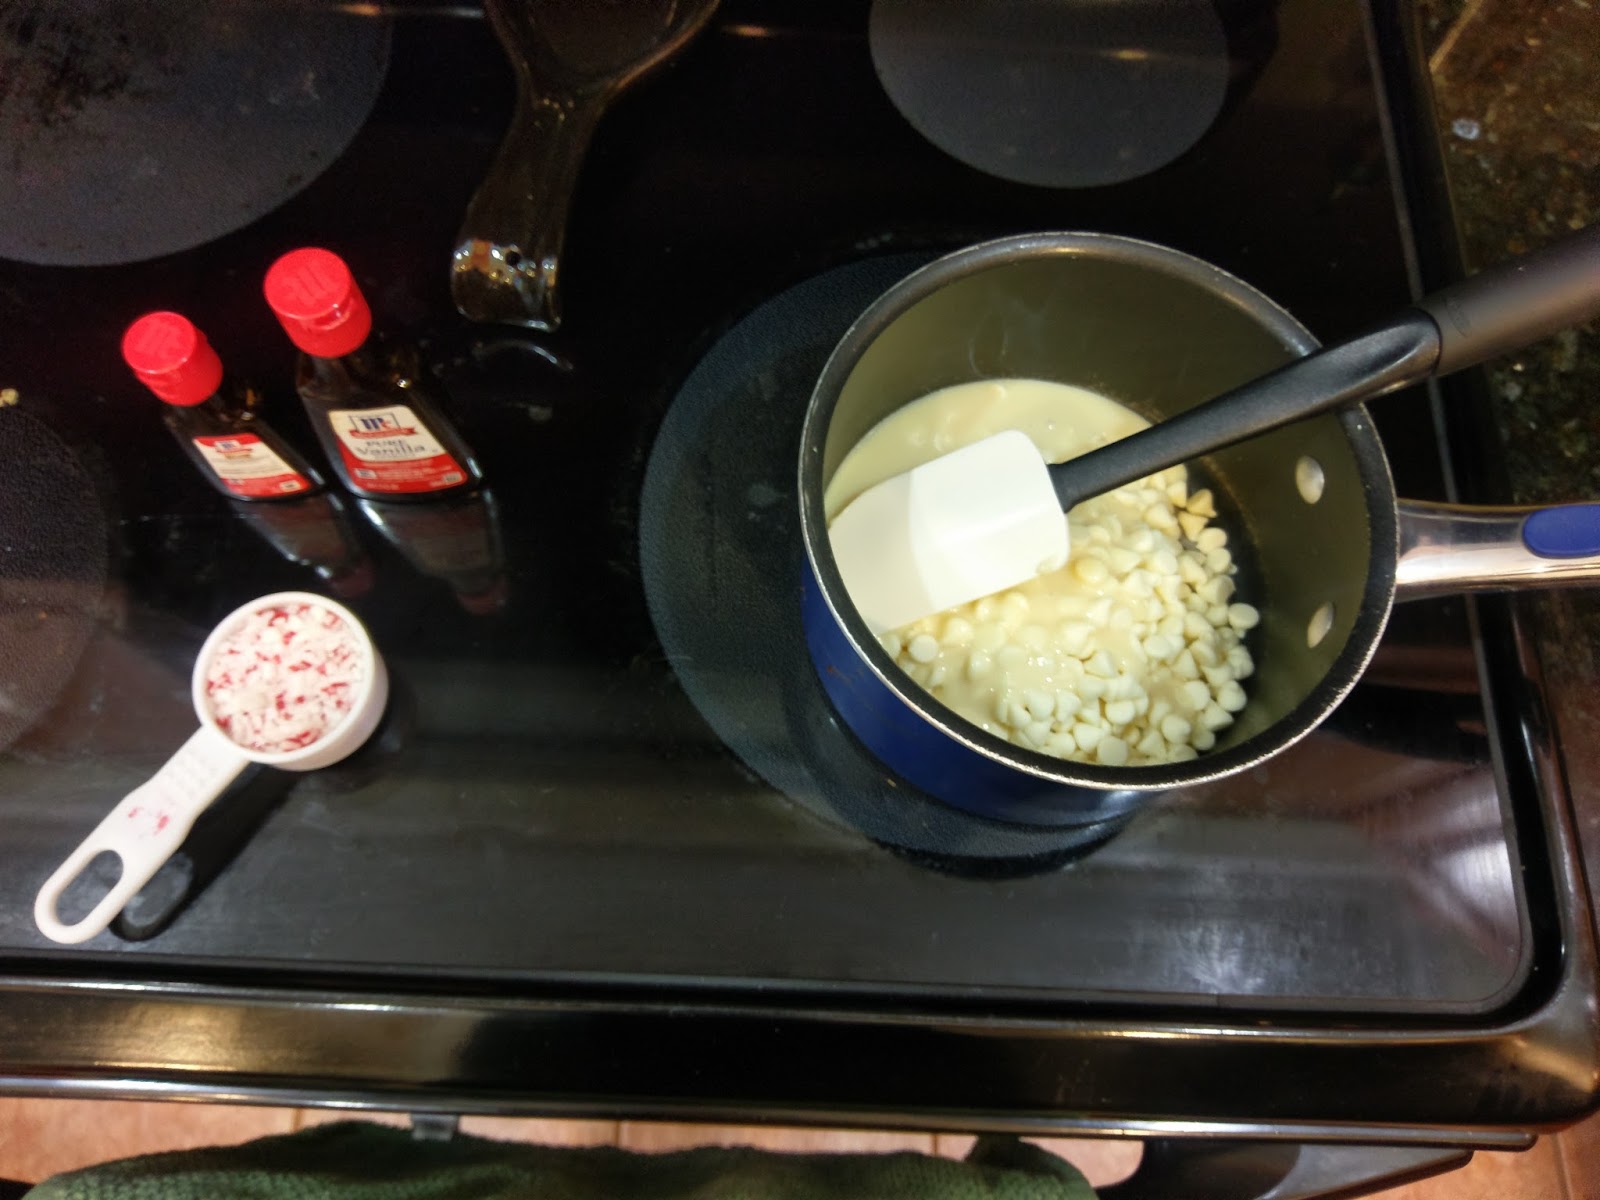
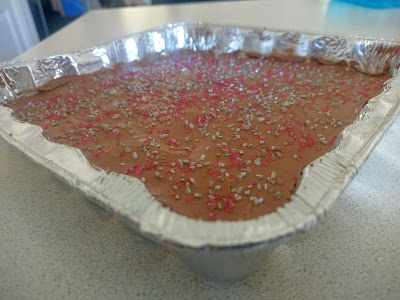
We’re at the threshold of deliciousness. When you’ve got half your milk measured out, place the chocolate chips into a medium pan and stir in the milk. Heat on medium while continually stirring with a rubber spatula. Be careful to scrape all the sides of the pan and keep any chocolate from resting on the bottom of the pan too long so it won’t scorch. I’d still eat burnt fudge, but I have a dessert problem. Once all the chocolate is completely melted, pour in 1 tsp of vanilla extract. Stir to incorporate, then dump into your lined pan.
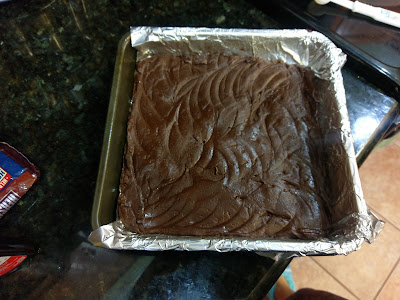
This is what happens when you don’t work quickly enough. I took like 10 seconds to sneeze or something and already my fudge had hardened up a little, so it require a lot of pressing, nay, slapping, with my rubber spatula to smooth out into an even layer. Thanks to those muscly arms I was telling you about, it left a lasting impression. Now, place this into the fridge for 10 minutes so that it is firm enough to pour and smooth the peppermint layer of fudge on top.

This photo was blurry because my arms hurt too much to hold the camera still. Labor of love, that fudge. When there’s about 4 minutes left on the fridge fudge, measure out the white chocolate chips, and dump that in the cleaned and totally, 100% dry (or it will ruin your chocolate) pan along with the rest of the condensed milk. Measure out 1/4 cup of peppermint pieces and have the peppermint extract at the ready. Melt the white chocolate and milk on medium, continuing to stir constantly until no lumps remain (take a 5 second breather and remove the pan from the fridge). Then add in the peppermint pieces and peppermint extract and stir well.
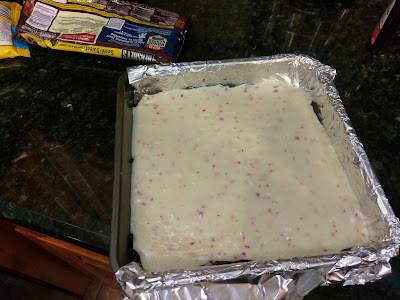
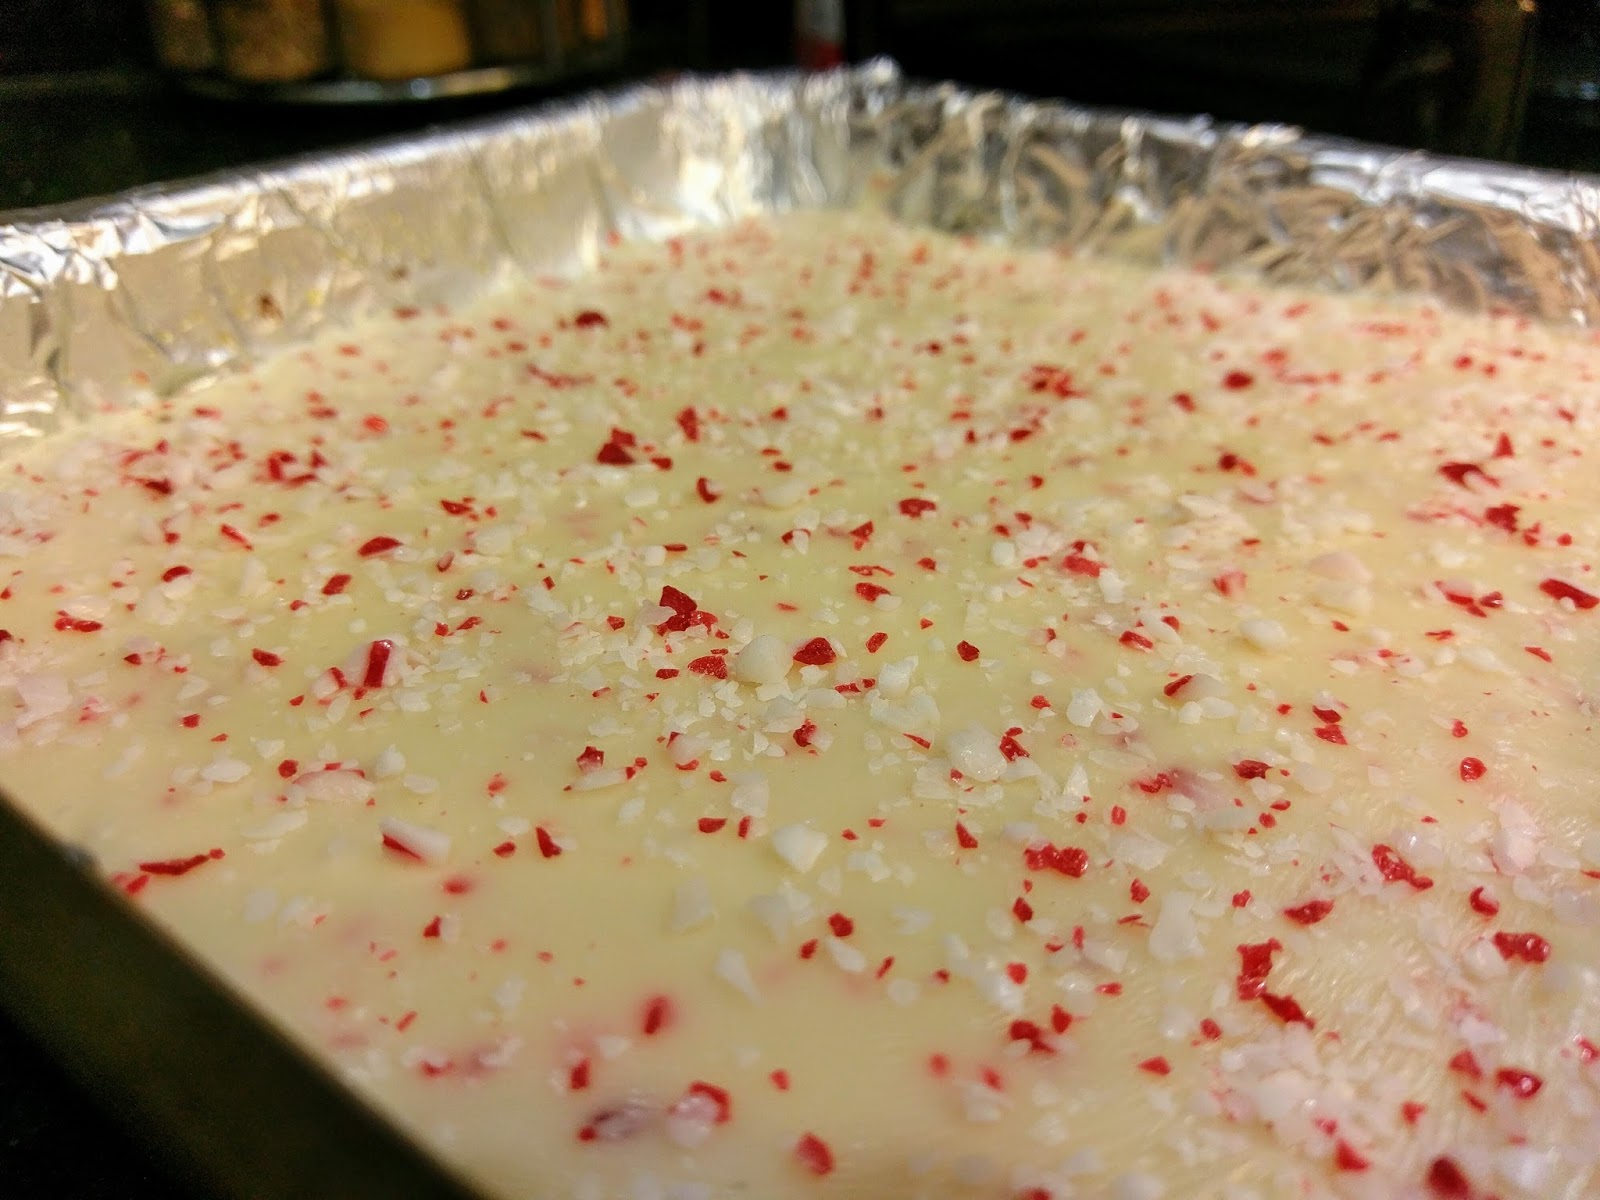
Don’t take time to sneeze or anything before layering. This should be able to pour on nice and smoothly if you don’t waste any time. You can use a spatula to smooth out a bit, but I just tilted the pan back and forth until the top layer was even. While the white chocolate was still wet, I sprinkled extra peppermint on top. Because nothing can be too minty! Or pretty. You can recall last week and my sprinkle addiction. Everything should have a topping!

It just looks prettier that way. Now comes the unbearably hard part…put the fudge into the fridge or freezer to set. I placed mine in the fridge for four hours, but you could probably cut that time in half in the freezer if you’re in a hurry. When you gotta eat fudge, you gotta eat fudge. No judgement here.

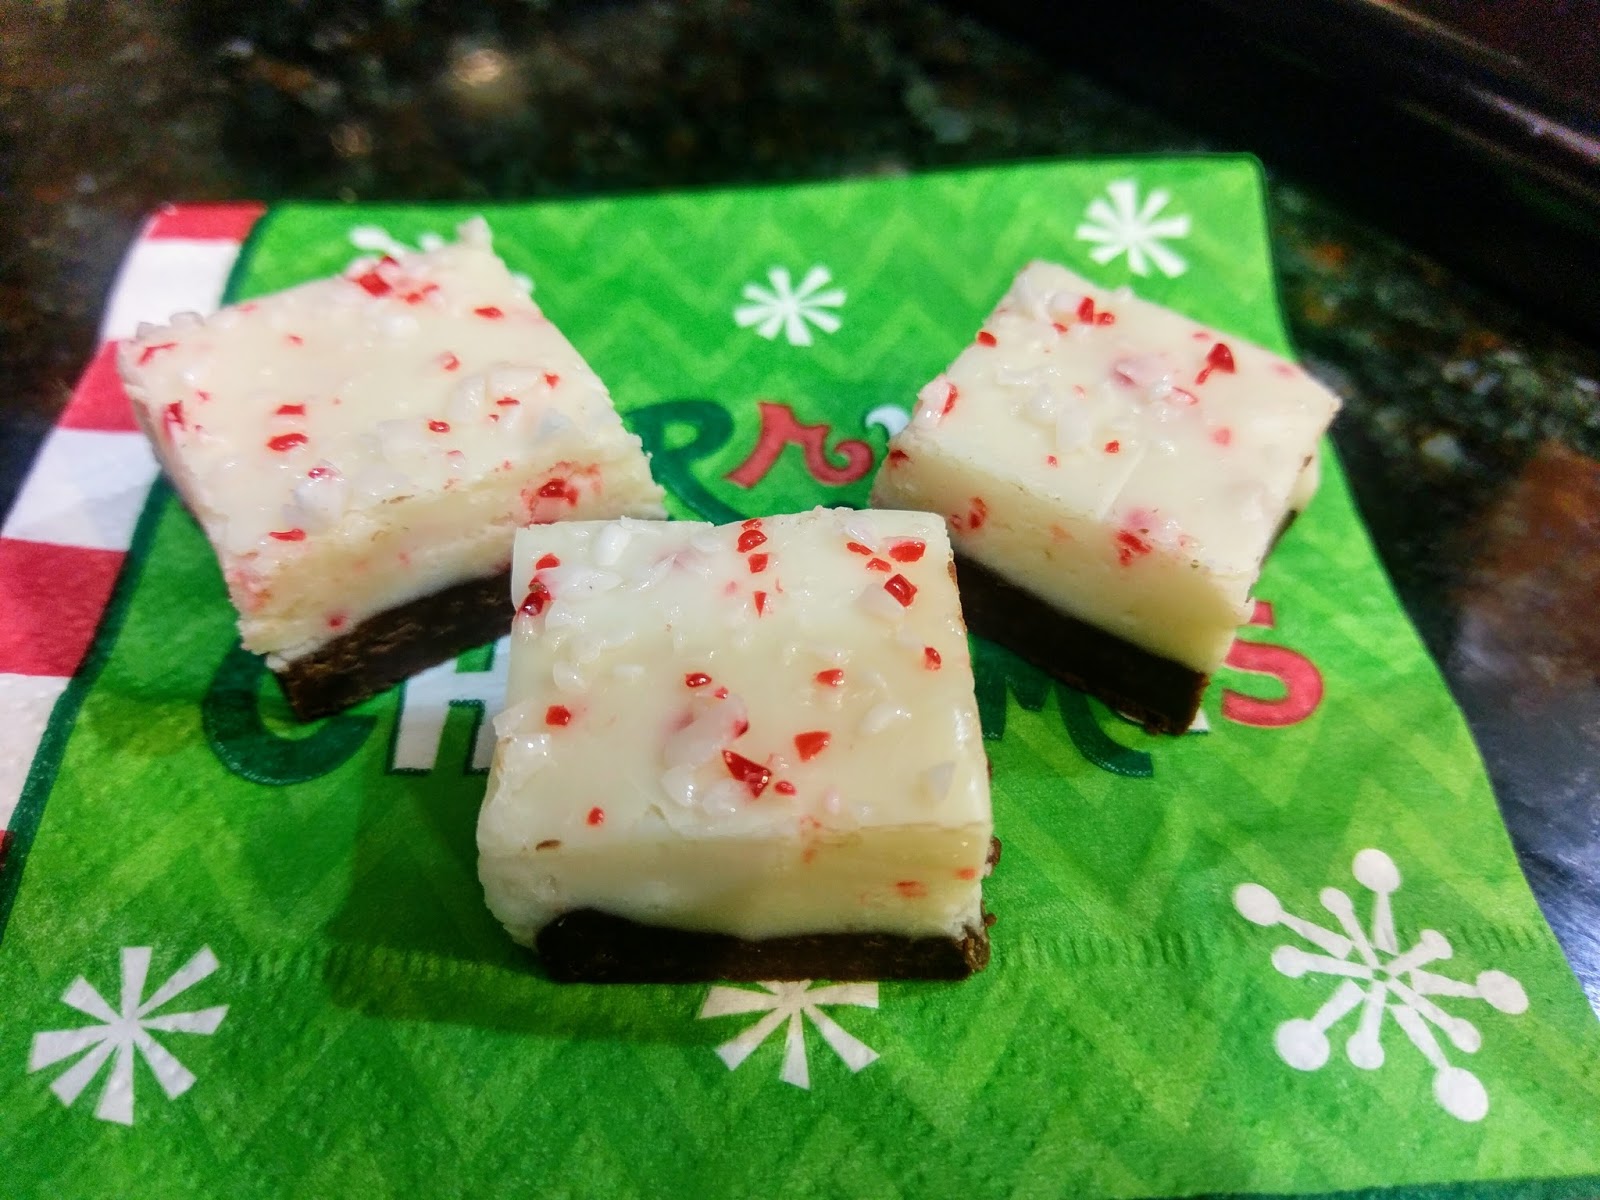
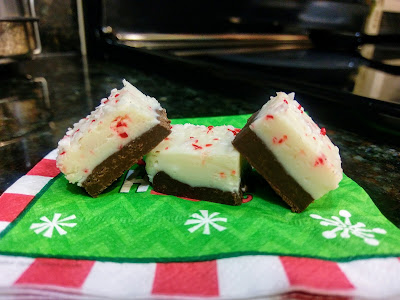
No sane person would blame you; just look at the stuff. Now that the Pavlovian response of delicious dessert and drooling is out of the way, once your fudge is set, cut into squares. You can leave in the pan or lift out the foil and cut on a cutting board. I measured out even squares because OCD is one of the myriad of mental disorders I suffer from (I put the fun in dysfunctional), but it does lend itself to some perfectly crafted and portioned food, so there’s that. Once cut, you’re ready to serve! If you’re making your fudge ahead of time, still cut and portion the way you’d like. You can place back into the pan and cover with foil, or you can place into a Tupperware with a layer of Parchment paper in between each row of fudge. In either case, put in the fridge or freeze until the day you’re ready to serve. I mean, down here in Florida if I left fudge out on the counter for more than five minutes, it would turn into a small lake of chocolate. Would still eat. Too good not to. The only thing peppermint bark was ever lacking for me was more chocolate, and this totally solves the problem. It’s got the right ratio of chocolate to mint layering so no flavor overwhelms the other. Basically, it’s a Christmas freakin’ miracle. And all thanks to Florida’s weirdly beachy Christmas for showing me that sometimes the best way to celebrate is by bucking tradition and doing whatever the hell you want. Even if that includes wearing flip flops and shorts while you go caroling. Tis the season! I’ll be back next year with more treats. Enjoy your Christmas, have a happy New Year, and I’ll begrudgingly meet you back here for my 30th birthday cake in January. ‘Til next time, my fellow eaters!
It’s a good thing I have this fudge to help me cope. -
Edible Trees That Aren't Broccoli
For 72 hours, I have been in pure winter bliss. I am sure this is some sort of Floridian record, and I greatly appreciate the weather gods for listening to my (annoyingly) relentless pleas for cooler weather to get into the Christmas spirit. When approaching the eve of my 30th birthday, it is shocking to watch How the Grinch Stole Christmas as an adult and realize I wholeheartedly understand the titular green creature whose heart is three sizes too small because I am him. I’ve always hated popular, lyrically-sappy Christmas music, Santa Claus is a creepy old guy with a B&E record that could circle the North Pole a million times, and if I see one more child pitch a fit in the aisles of Target only to be rewarded with a toy, I might lose it and start decking someone’s halls. As it stands, I’m wearing Halloween socks today. So it really, really takes a lot to get me into the spirit of Christmas…but when the temps drop below freezing and Jack Frost is actually nipping at my nose, I’m all in. I want to listen to “Carol of the Bells” for five hours straight while baking every Christmas treat known to man directly followed by eating most of them while driving around looking at Christmas lights, full of splendor and uninhibited hope for the season. I really am all or nothing when it comes to life. But since I’ve actually been able to bust out the gloves and boots and get into the Christmas spirit, the oven mitts and baking equipment came out with the cold weather, too. Peppermint is the essential oil of Christmas, and I’m going to go full steam ahead with it in my baking this week. I can’t let that zest for the holidays leave when its 75 again tomorrow. Peppermint will help me limp through the week before its time to travel off to much colder parts of the world. And since I never got into gear early enough to put up our Christmas tree, I decided to decorate a whole bunch of tiny ones instead to keep me inspired:
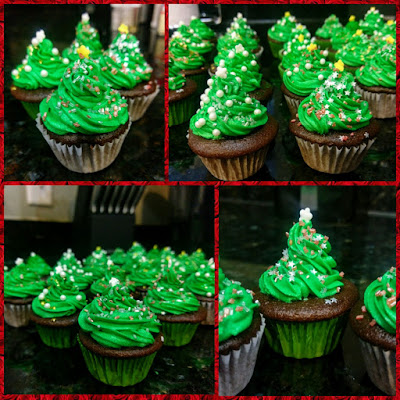
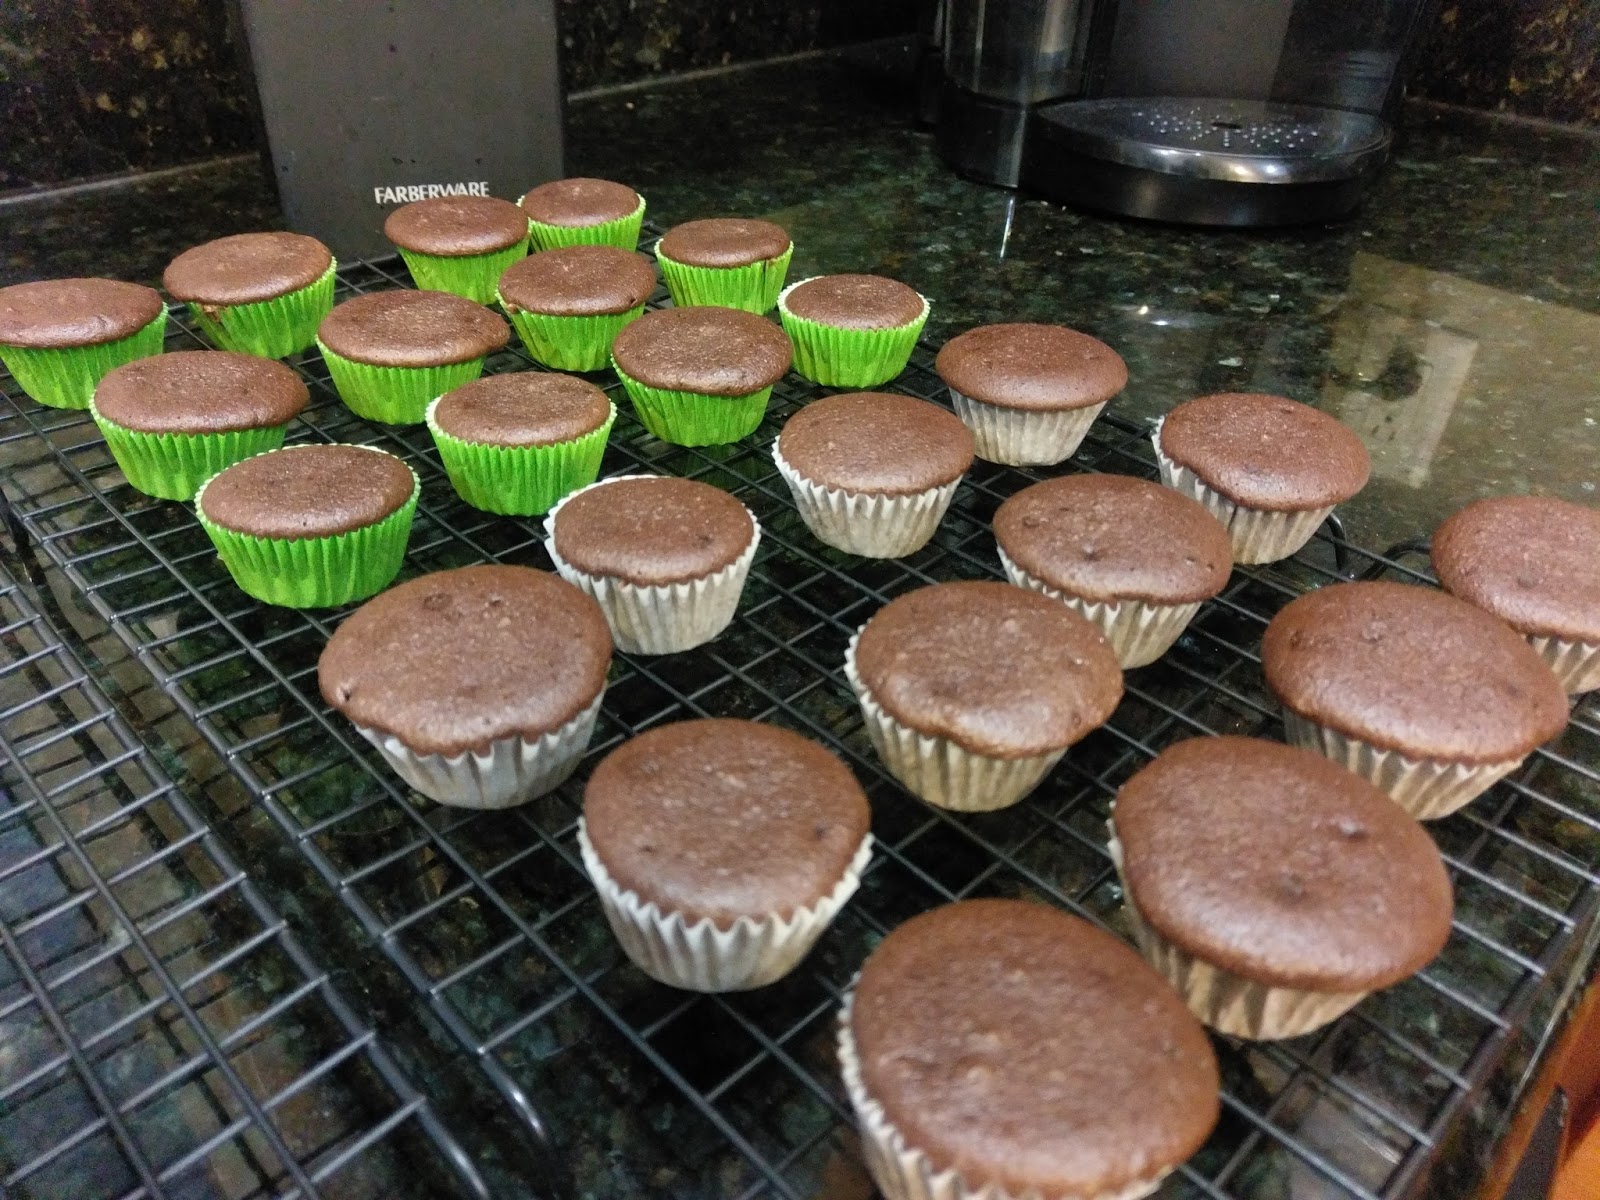
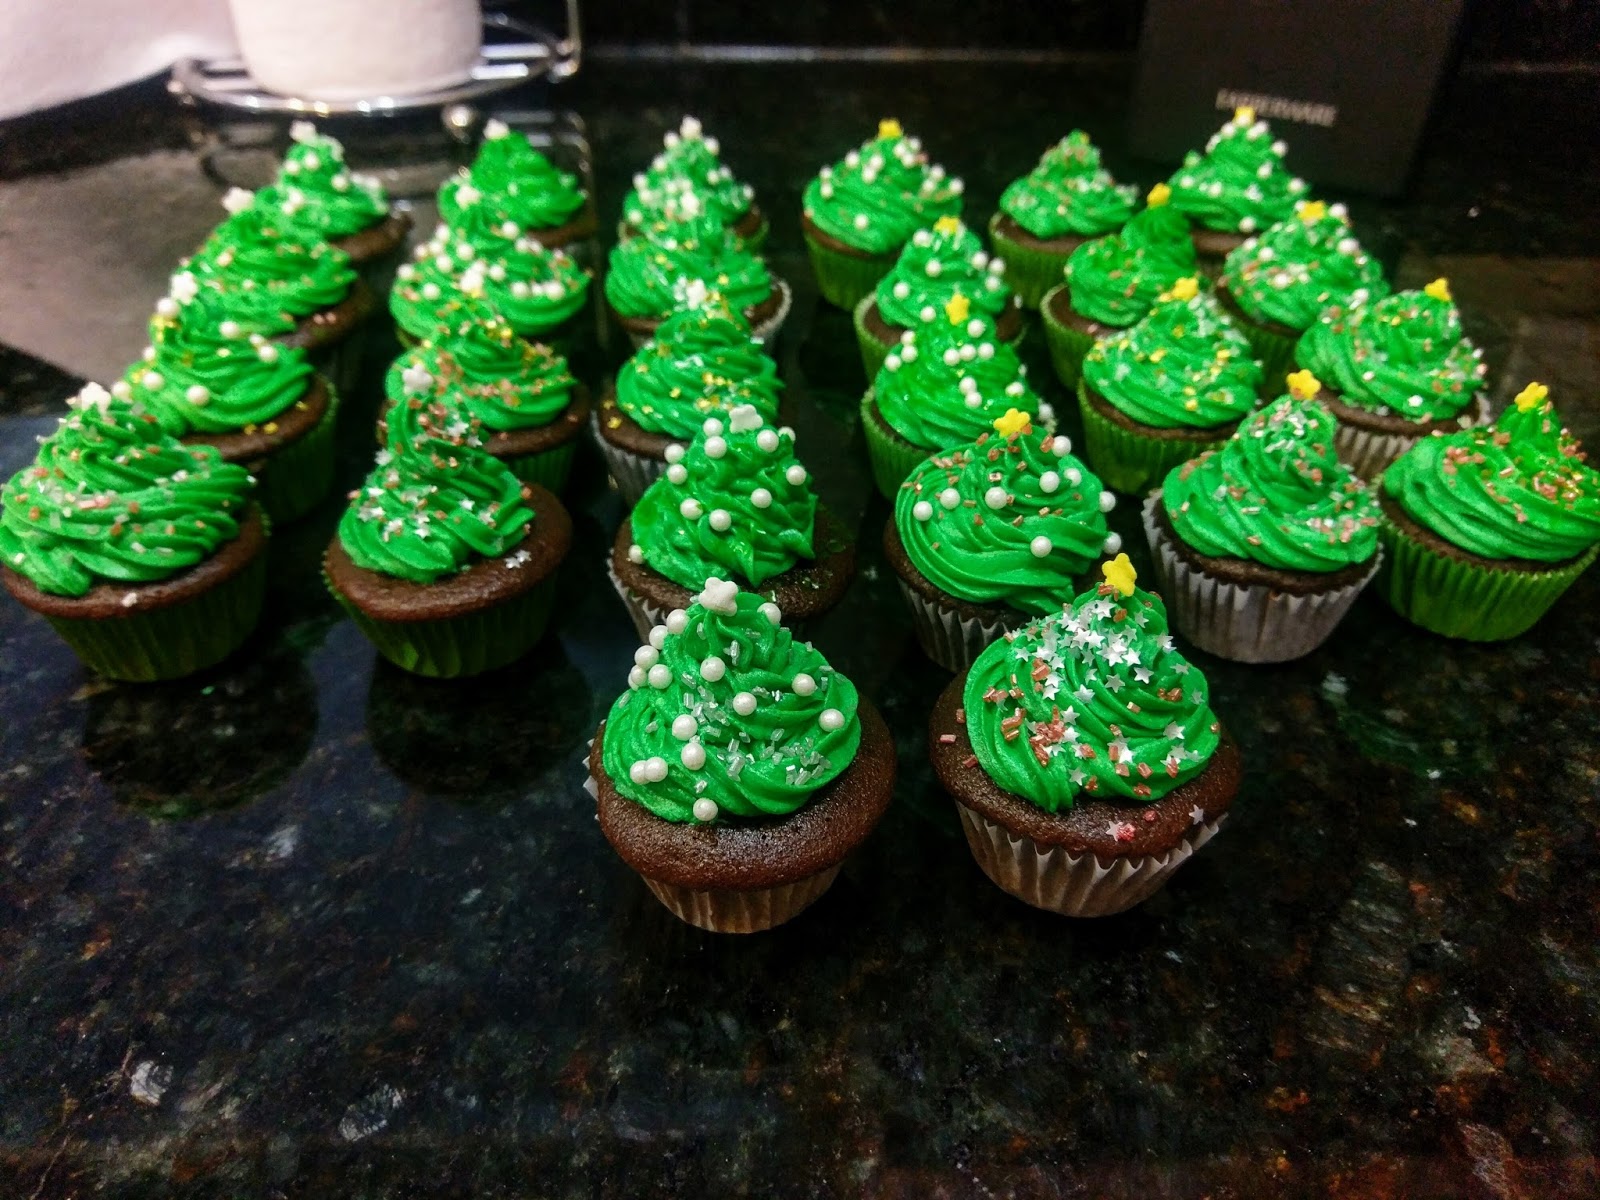
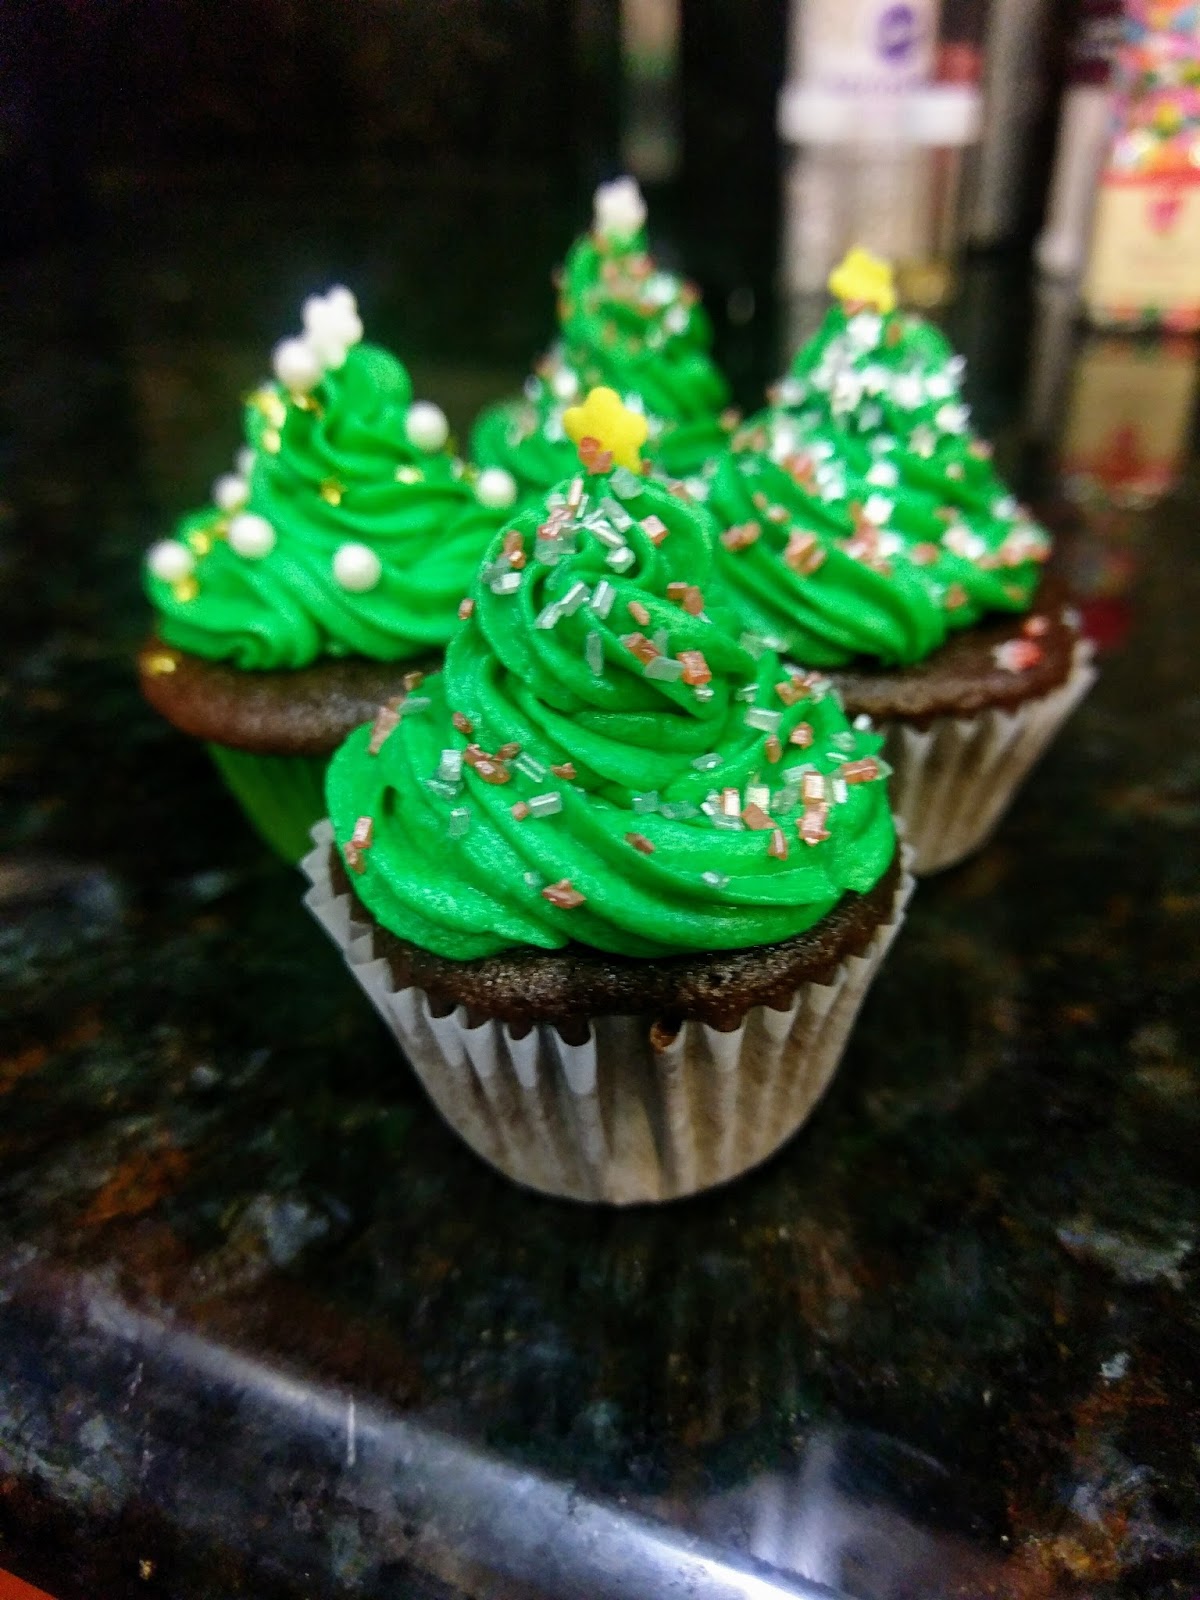
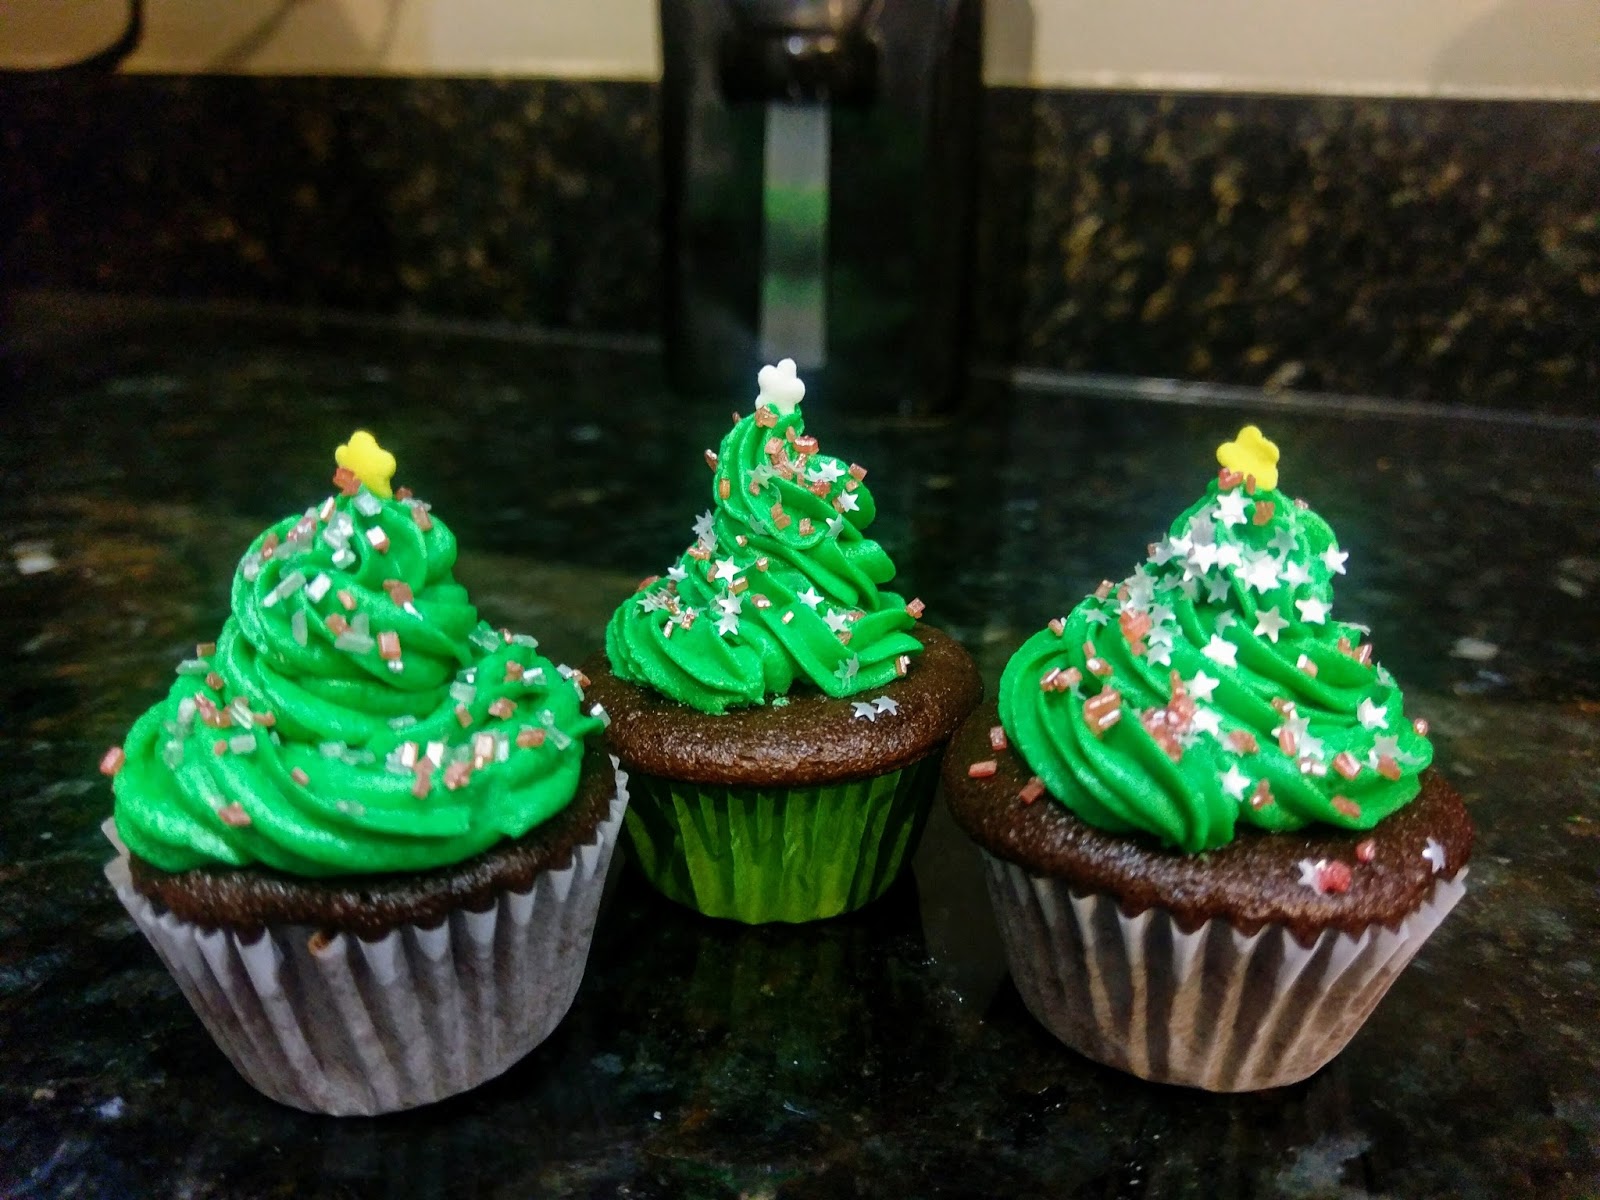
Edible trees that aren’t broccoli…a Christmas miracle!! These mini chocolate cupcakes with peppermint buttercream Christmas tree decorations were so unbelievably fun and festive to make I almost forgot I’m a curmudgeonly grump that hates everything except dogs (another thing I have in common with the Grinch; it’s a startling resemblance, really). I am still on a mission to make Christmas healthy and not the season of the bulging waistline, so I tried another science experiment in the way of the actual cupcakes themselves: they’re made out of only chocolate cake mix, one egg, and Coke Zero. That’s it. I thought for certain they’d be a puddly mess or just taste like Coke and not chocolate, but the Coke Zero doesn’t lend any taste here once baked; it evaporated like alcohol would and instead left an incredibly springy and moist cupcake in its wake. If you didn’t frost these, each mini cupcake is only 64 calories! So eating a normal serving size of two would only set you back less than 130 calories. If you omitted the egg (I might try this to see if the cakes still hold together) and didn’t frost them, they’d be practically zilch. But I like frosting. Nay, I feel the way for frosting most people feel for the holiday season: can’t get enough of it. I want it inappropriately early in the day like Christmas lovers want the holiday to continue coming inappropriately early in the year. So a mound of delicious peppermint wonder adds on an additional 63 calories per cake for the grand total of 127 calories per mini cake. Still not bad for a 2 serving deal, and certainly way less than when prepared the traditional way with butter, more eggs, and milk.Don’t say I never did anything nice for anyone trying to battle the bulge this Christmas!
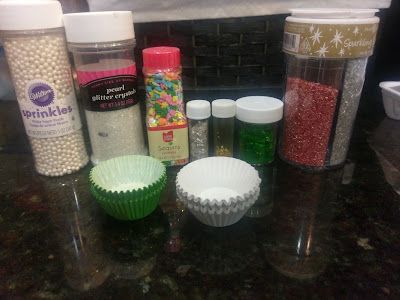
Pictured: sprinkles I already had on hand. I have a problem. I love sprinkles. I always stop to peruse when I see nonpareils because they’re tiny, adorable, and usually sparkly, like the gemstones of baking. I have an entire cake safe packed full of sprinkles and edible glitter. I knew with these Christmas tree cupcakes, it was literally time to let my massive sprinkle collection shine. I used white and yellow stars as tree toppers, and a variety of green, silver, red, and white sprinkles. I added white pearls and silver and gold stars as ornaments as well. The key was to mix and match. As much as I wanted to add all the sprinkles at once, I knew that would end up looking more like a Jackson Pollock painting than a cupcake, so restraint was needed. Gather up mini cupcake papers and sprinkles in your preferred Christmas colors before you set off on a mission to don we now our sprinkly tree apparel.

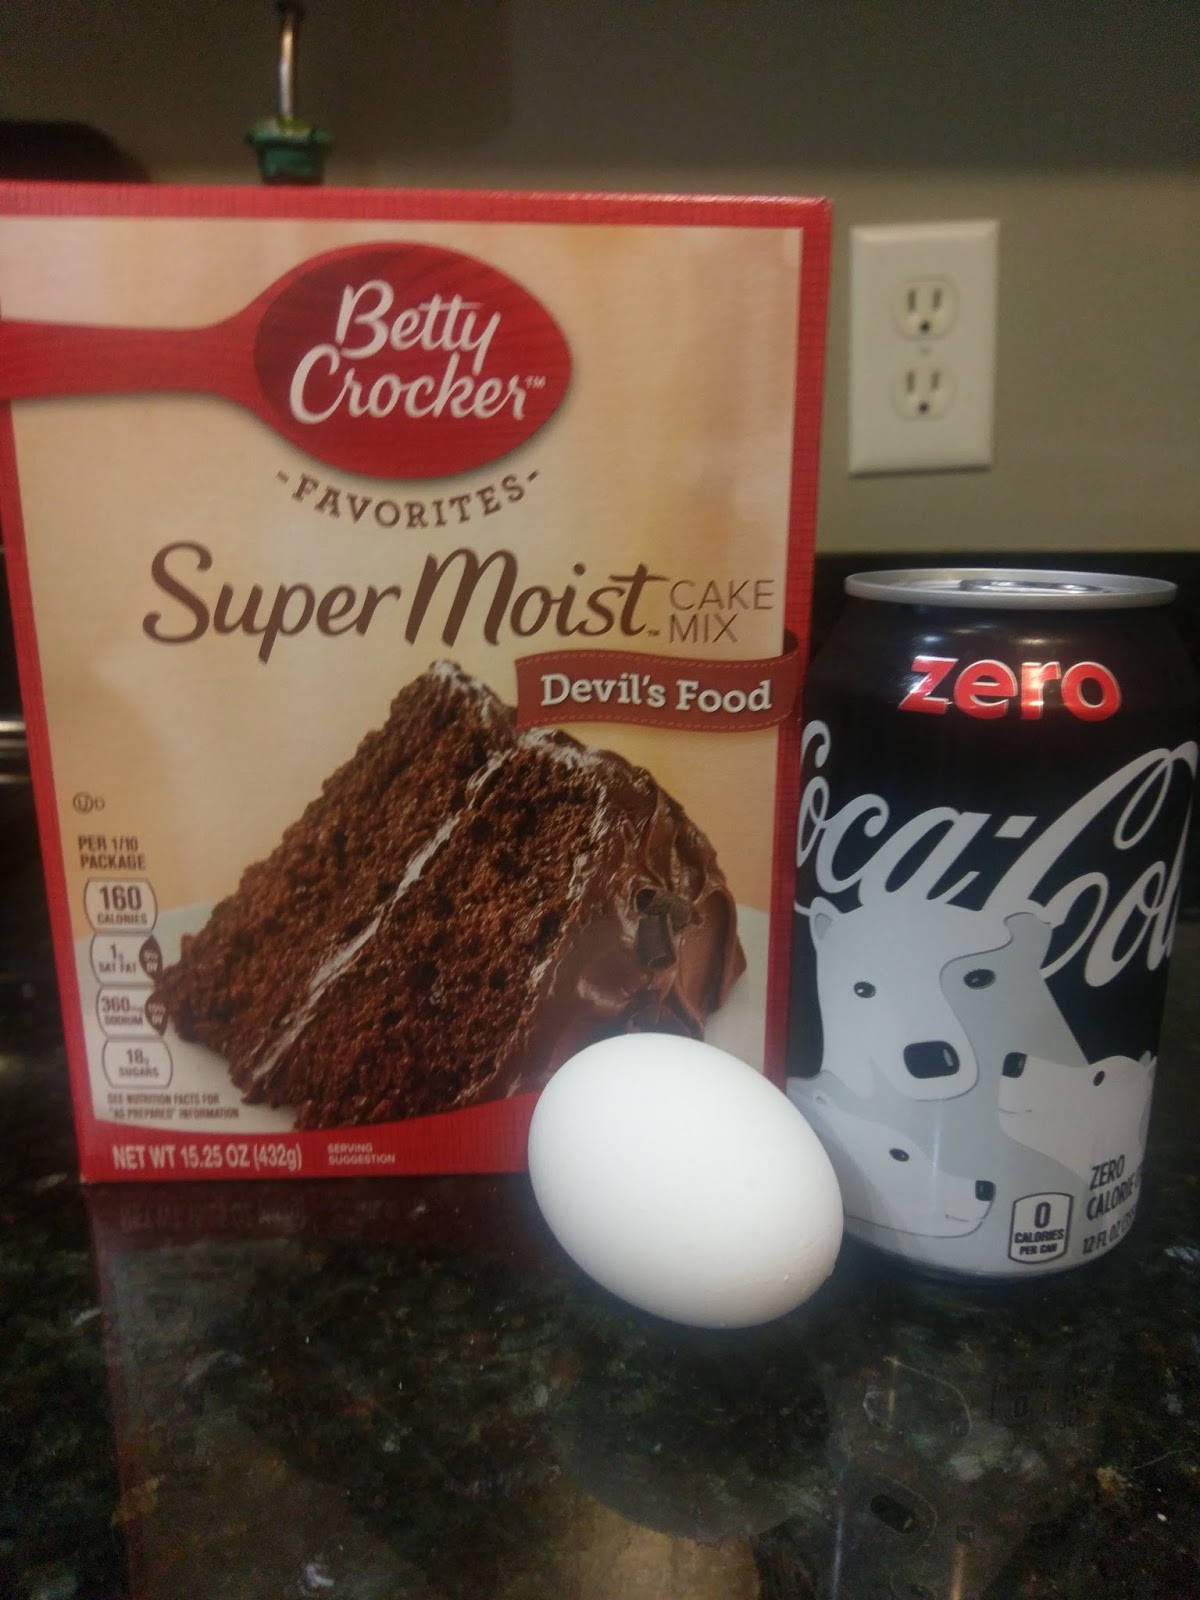
Ugh, even Coke cans are more in the spirit of Christmas than I am. I only used HALF my box cake mix, one whole egg at room temp, and 5 ounces of Coke Zero (still chilled) to make 26 mini cupcakes. This would probably yield 13 regular cupcakes or one 8-inch round cake. To double, simply use the whole box of mix, two eggs, and 10 ounces of Coke Zero. If you want to omit eggs, use the full 12 ounces of Coke. Follow baking temperature recommend on the box and preheat your oven. Dump the egg, mix, and soda into a mixing bowl and blend on high for 2 minutes.
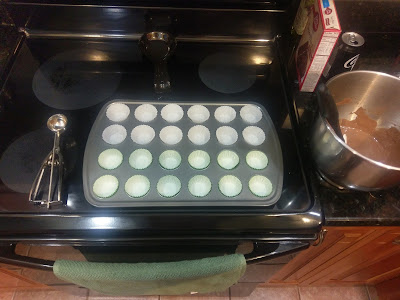
‘Cookie scoops are versatile!’ I justify to myself for spending more than two dollars on one. Line your mini muffin tin, gather up your batter, and scoop a cookie scoop a little over half full. Use this to quickly and less messily dump your cake batter into the liners:
Such precision! Your dish soap and sponge will thank you. Once all liners are 2/3 full, tap the pan gently on the counter to remove bubbles. These suckers bake fast, so only cook for 10 minutes before toothpick testing. Mine were ready to be removed from the oven and cooled on a cooling rack after 9-10 minutes.

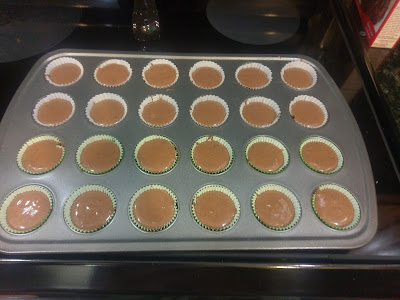
They look like cupcakes… At this point I thought for sure after they cooled they would cave in and implode because I still couldn’t wrap my head around Coke working well enough to hold something together when I’ve seen it dissolve a penny with my own eyes (I type as I drink one…). Some people might gripe diet colas are terrible for you, but so is butter and a ton of sugar. You’re reading a baking blog, what exactly were you expecting? When someone finally comes up with a healthy way to eat baked goods that doesn’t potentially embalm me from the inside out, I’ll totally follow along. Until then, I’m gonna have my cake and eat it too, but in a way that doesn’t cause an extra hour on the elliptical every day.

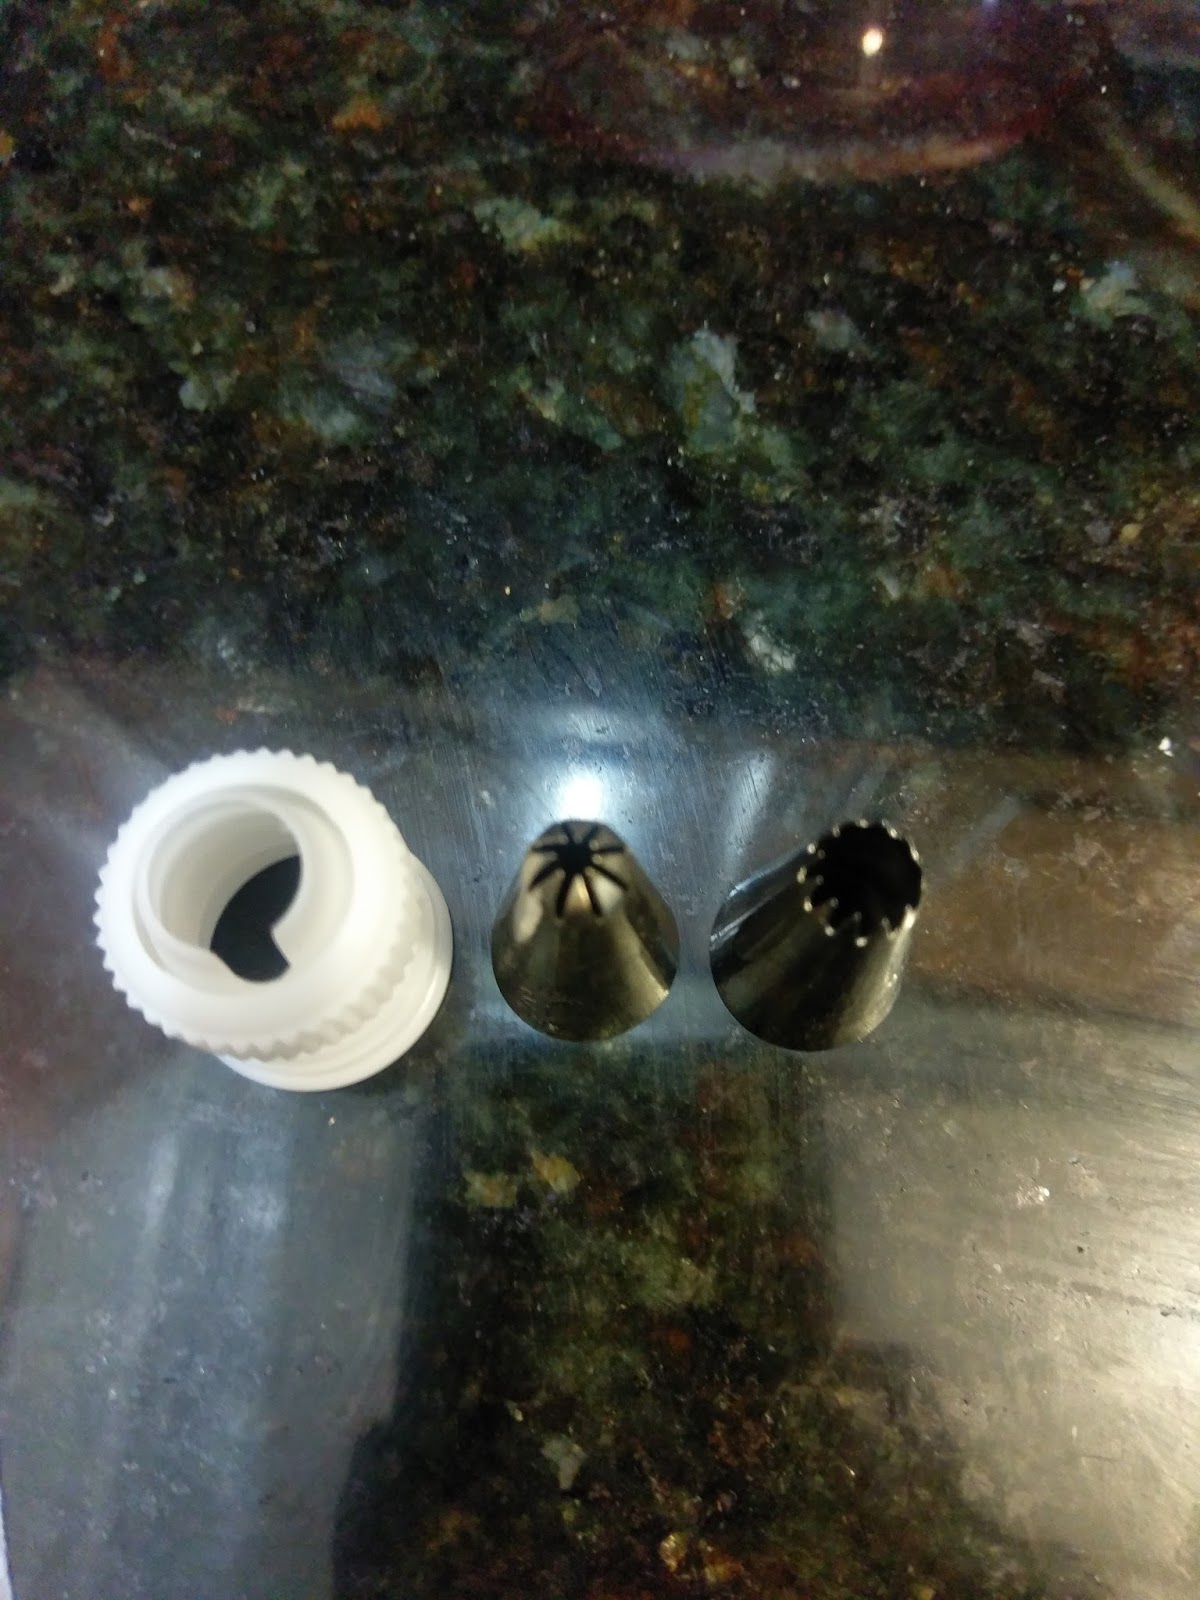
I also have way too many choices when it comes to decorating tips. Awesome thing about mini cupcakes (other than being able to fit an entire one in your mouth at once), is that they cool off incredibly fast. I spent a few minutes weighing out which tips I wanted to try for my trees, and after that agonizing ten minute assessment (I’m really thorough), they were already cool on the cooling rack, so I set aside my #21 and #32 Wilton tips and got down to business. Frosting business.

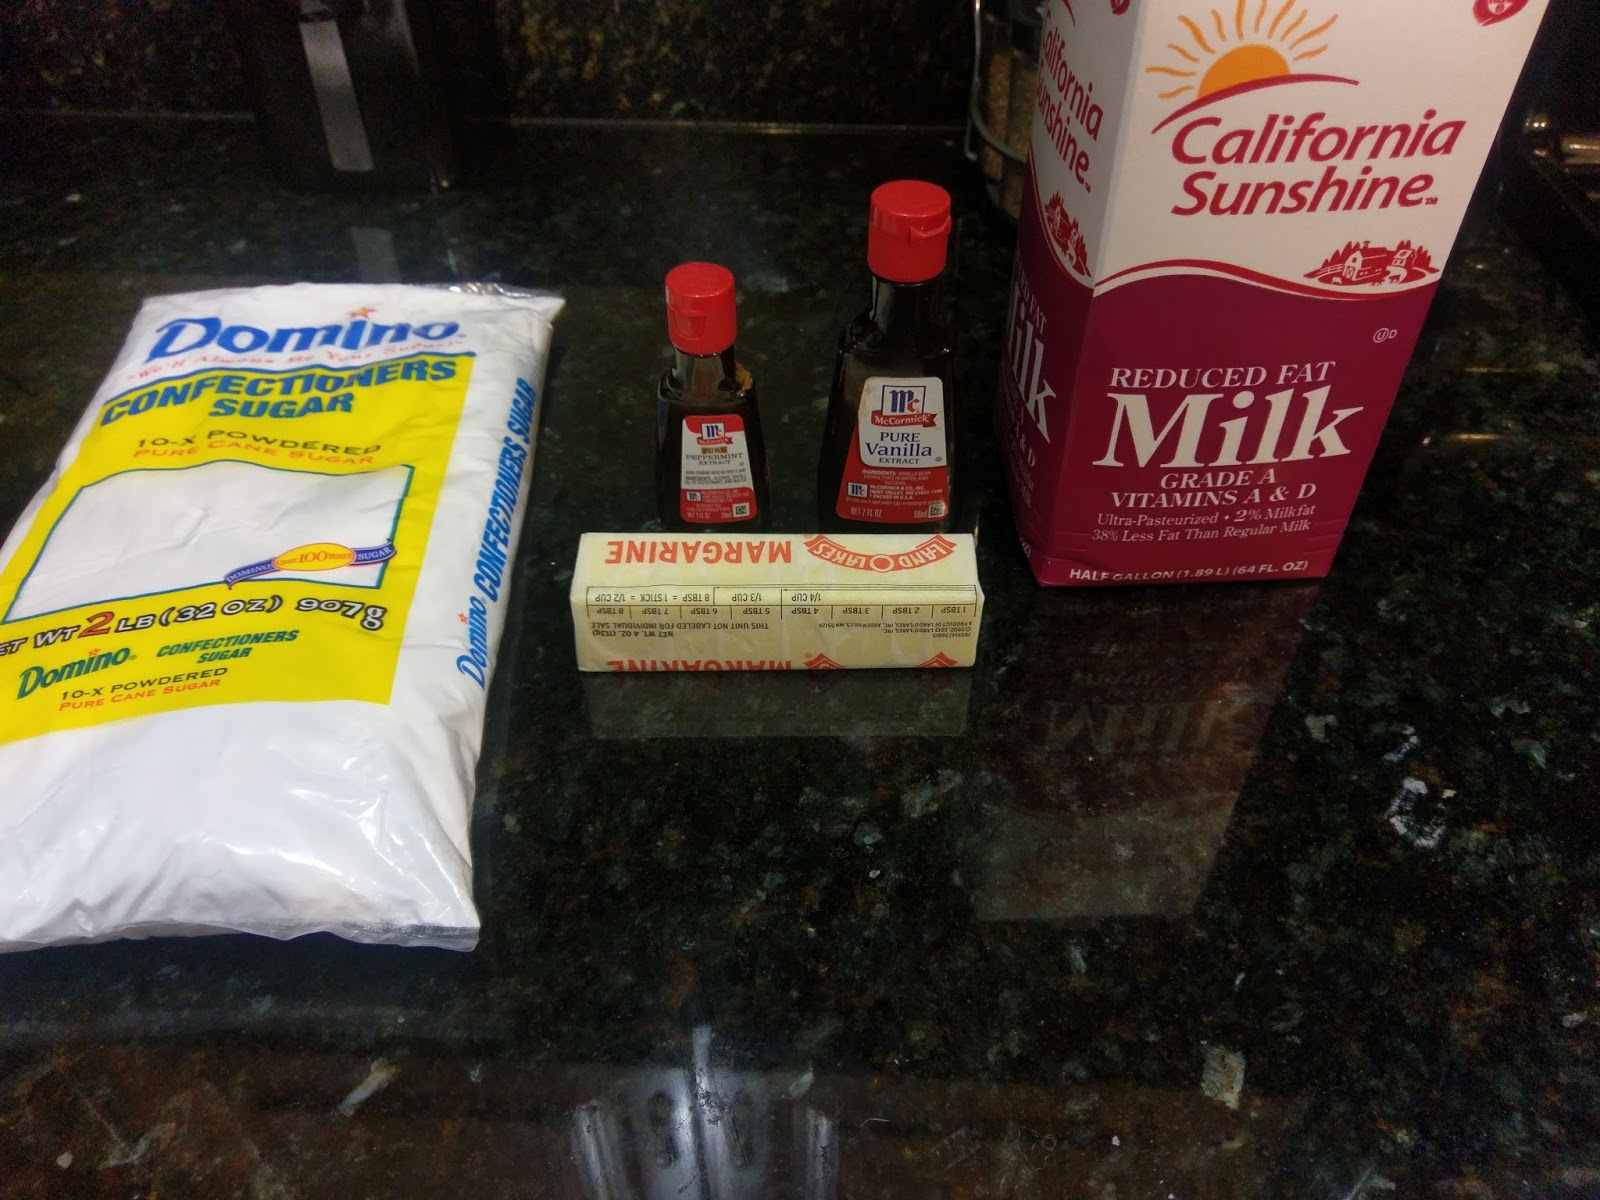
I’m still wondering why in Florida, my commissary milk brand is named California Sunshine. These mini cupcakes don’t need a ton of frosting, so this is a half batch of my peppermint buttercream. I didn’t even use all of it, and I could’ve easily frosted 5-6 more mini cupcakes with it. To make, you need:
- 1/2 cup room temp butter
- 2 1/2 cups powdered sugar (2 might even suffice)
- 1/2 tsp peppermint extract
- 1/2 tsp vanilla extract
- 2 TBS skim milk
- Green gel dye
Cream the butter until fluffy, then add in the extracts and sugar. Blend on low while adding in enough milk to get things into thinner piping consistency. Once this is done, add in the green dye until you get a nice festive green. Load up into a piping bag fitted with a #21 or #32 tip. If you’re frosting regular sized cupcakes, use a 1M tip. Ensure all the lids are off your sprinkles for quick access, and you’re ready to roll.
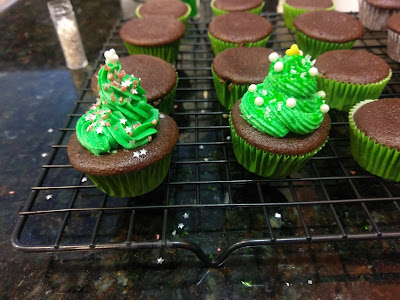
On the left: the #21 tip. On the right: the #32. To make a tree, start on the edge of a totally cooled cupcake and make a ring. While continuing to pipe, slightly overlap that bottom ring with another ring on top of this. Continue ringing-around-the-cupcake until you have a tall mound of frosting. Pipe a little extra on top while gently pulling away to create the top of your tree. Now, I thought the #21 tip did a better job of looking like an actual tree, but you can use either tip here for this look. You could also try using a 1M tip while simply piping a large mound of frosting for one uniform tree. Whichever tip or method you choose, only frost 3-4 of these at a time because you have to work fast to get your sprinkles on each tree before the frosting sets up and things will just roll off–like water off a duck’s back or your Christmas spirit off my cold shoulder.

A tiny field of glee! I frosted 4 cupcakes at a time, then topped each one with a star sprinkle before adding either pearls, various glitters, sprinkles, etc. The combinations here are pretty endless as you can tell above. I made most trees completely different from one another, but a uniform style for all 26 would’ve been pretty as well. I finally felt the Christmas spirit, so I was like a kid in Santa’s Workshop just going for it, no holds barred with reckless delight. Similarly, my fingers were also sticky like that of every child I’ve ever come into contact with. Go figure.

Pictured: my missing Christmas spirit. Baking has, and will always be, a cathartic experience for me. When I am sad, it cheers me up. When I am happy, it fills me with hope. When I am still wearing Halloween socks in December, it gets my butt into gear. Upon glancing my creations, I was positively giddy and filled with a month of missing Christmas spirit all at once. If I had a Santa hat, I would’ve put it on. Maybe I should just start small and find some Christmas socks. Either way, I knew exactly what the Grinch felt like when his heart grew three sizes. Thankfully this was just a metaphorical and not physical experience for me, or, you know, I’d be dead and all and unable to eat these delicious cupcakes. That would be the real tragedy. I’ve got enough juice (of the peppermint extract variety) left in the tank and a few days before we head off, so I’ll be back in later in the week with my next great experiment: peppermint bark fudge. But as for now, I’m going to find appropriate sock wear and giggle with delight at the field of Christmas trees in my kitchen. ‘Til next time, my fellow eaters!

Oh Christmas tree, oh Christmas tree, how tasty are your branches. -
Leftover Pumpkin Has Met Its Match
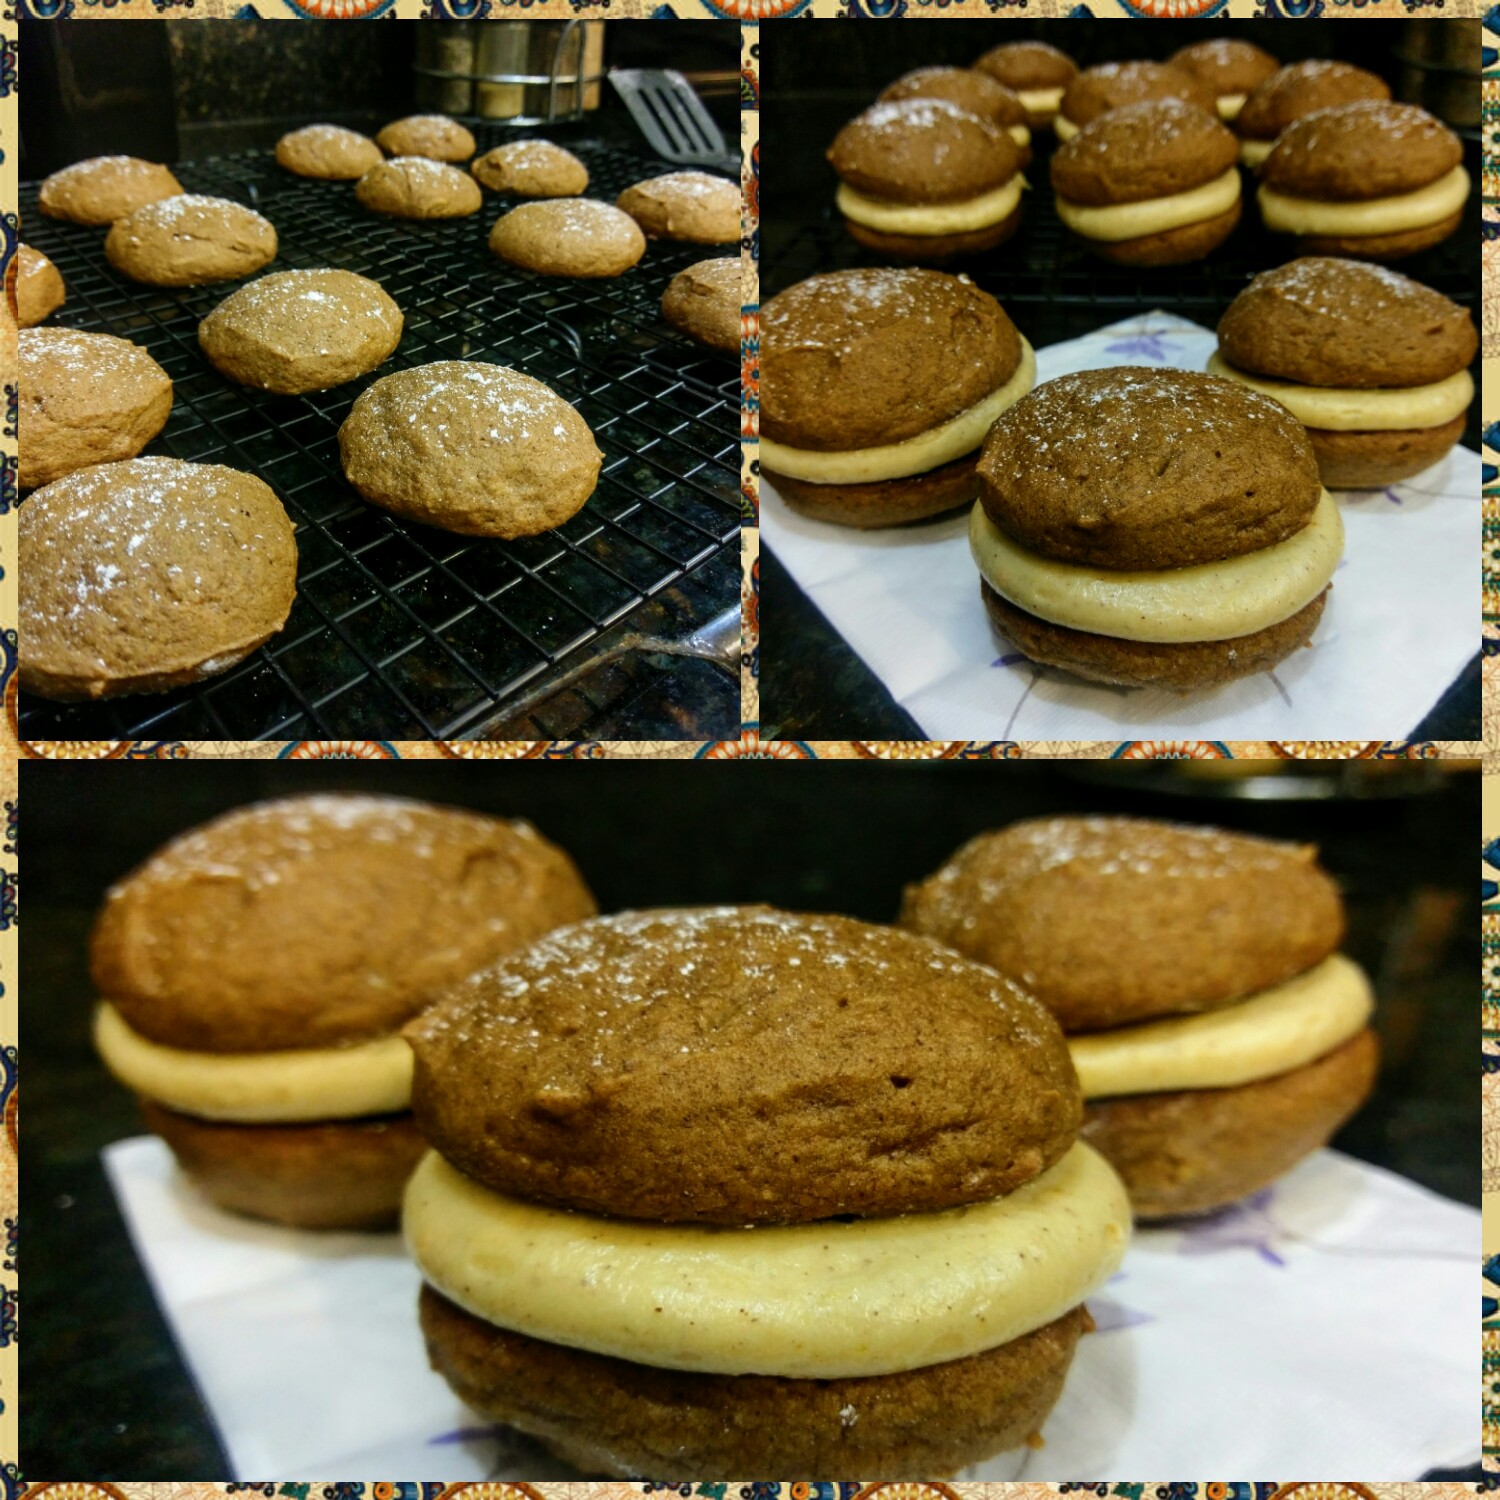
“…hello, it’s me. I was wondering after all these weeks if anyone still reads these?” Sing that in the tune of Adele’s “Hello,” and you’ve got one catchy ear worm about how long it has been since last I blogged. We’ve been a little busy. You know, moving across the country and unpacking and eating all the Thanksgiving and what not. But we’re finally settled in, and after over four months without it, yours truly finally got reacquainted with her stand mixer. I will never take that particular piece of kitchen equipment (see also, a cheese grater) for granted again. Florida’s been nice. If you’re into 80 degree weather while putting up your Christmas lights, this is the perfect place for you! I, on the other hand, happen to love being so cold my nose might fall off, so I’ve been a bit of a Scrooge (if he also suffered from humidity-related hair issues, even better comparison). Large dandelion-esque locks aside, being able to breathe in moist air and walk down to the beach every morning with my dogs has been a bit of a dream. The dogs love the water, so much so that Hank tries to out drink himself every time we go for a walk, truly making him a salty dog. We’ve been reunited with friends, furniture, and my closest Target is only ten minutes away. I really, really miss the mountains though. And Florida sunsets could learn a thing or two from Texas and New Mexico. Don’t get me wrong, trees are nice and all, what with the life-giving oxygen they provide me, but damned if they don’t ever get in the way of that feeling of vast expanse as the sun sets and the stars take over the sky. I sometimes somberly hum “Deep in the Heart of Texas” to get me by. At least I have my mixer back to bake away the homesickness and whip up some pumpkin whoopie pies. Bury me with a tombstone that reads, “You can’t be sad when you’re eating dessert.” You also really can’t be sad when you’re eating a whoopie pie because the name alone is absolutely ridiculous.

At least they also taste absolutely delicious. Buy a lot of pumpkin puree for Thanksgiving and forget to make the pumpkin pies? Living your best basic white girl life and keep a stock of pumpkin puree handy? Relocated to a region where “fall weather” hasn’t even occurred yet and it’s almost Christmas but you’re soooo not feeling it? Going against all of humankind this time of year and watching what you eat? You need these pumpkin whoopie pies with pumpkin cream cheese filling because they taste of pumpkiny goodness without killing the calorie count. I found and heavily adapted a few recipes in order to cut down the average 600 calories per whoopie pie (that’s a damn double cheeseburger and some, y’all). My whoopie pies clock in at only 315. That’s almost half the norm. And in a world where said double cheeseburgers do exist, slicing dessert calories is a hard truth and a must. I knew bikini season would start early here in Florida, but I did not realize it would be starting so early because it never actually ends. So badly I want to wear winter boots and sweaters, and I have thus far refused to wear shorts outside of dog walks, so swimsuits are not happening until the next calendar year.
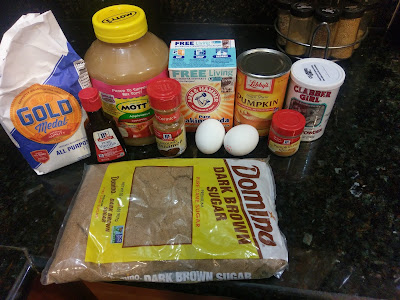
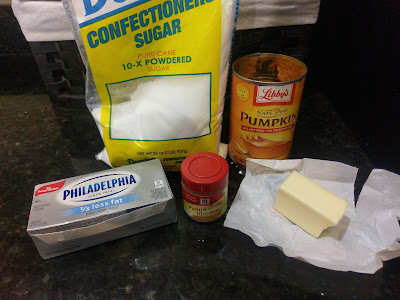
Where’s the butter? So remember those other 285 calories (or something close. I teach English for a reason) I saved? That’s because I passed on oil on the pies and harshly cut down on butter in the icing recipe. It was hard, downright sad, and resulted in lots of praying and finger crossing that my pies would still bake up enough and taste delicious. Either the praying or finger crossing worked (depending on who you do or do not pray to) because hot damn these babies are tasty! So, to make this recipe that yields 10-12 pies, gather up:
- 1 1/2 cups flour, packed (I used All-Purpose. You could try wheat to cut down more calories.)
- 1/2 teaspoon salt
- 1/2 teaspoon baking powder
- 1/2 teaspoon baking soda
- 1 TBS cinnamon
- 1 TBS pumpkin pie spice
- 1 cup dark brown sugar, packed
- 1/2 cup cinnamon applesauce (regular would also work)
- 1 cup pumpkin puree
- 1 egg at room temp (I realize there’s two in the photo, but seriously, just use one. I was having a blonde moment.)
- 1 teaspoon vanilla
Preheat the oven to 350 and line a few cookie trays with Parchment paper. I gave a light mist of Pam to these. In a medium bowl, mix the flour, salt, baking powder, baking soda, cinnamon, and pumpkin pie spice together and set aside. In your staaannnd mixxxerrrrrr (sung like the Goldfinger theme song) that you’re not nearly as excited about using as I was, mix the brown sugar and applesauce until combined. Dump in the pumpkin, egg, and vanilla and blend well. Take half the dry mix, add it in to the wet mix, and blend well. Dump the rest of the dry mix in and blend well but don’t over mix.
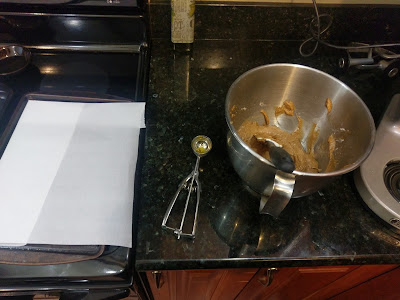
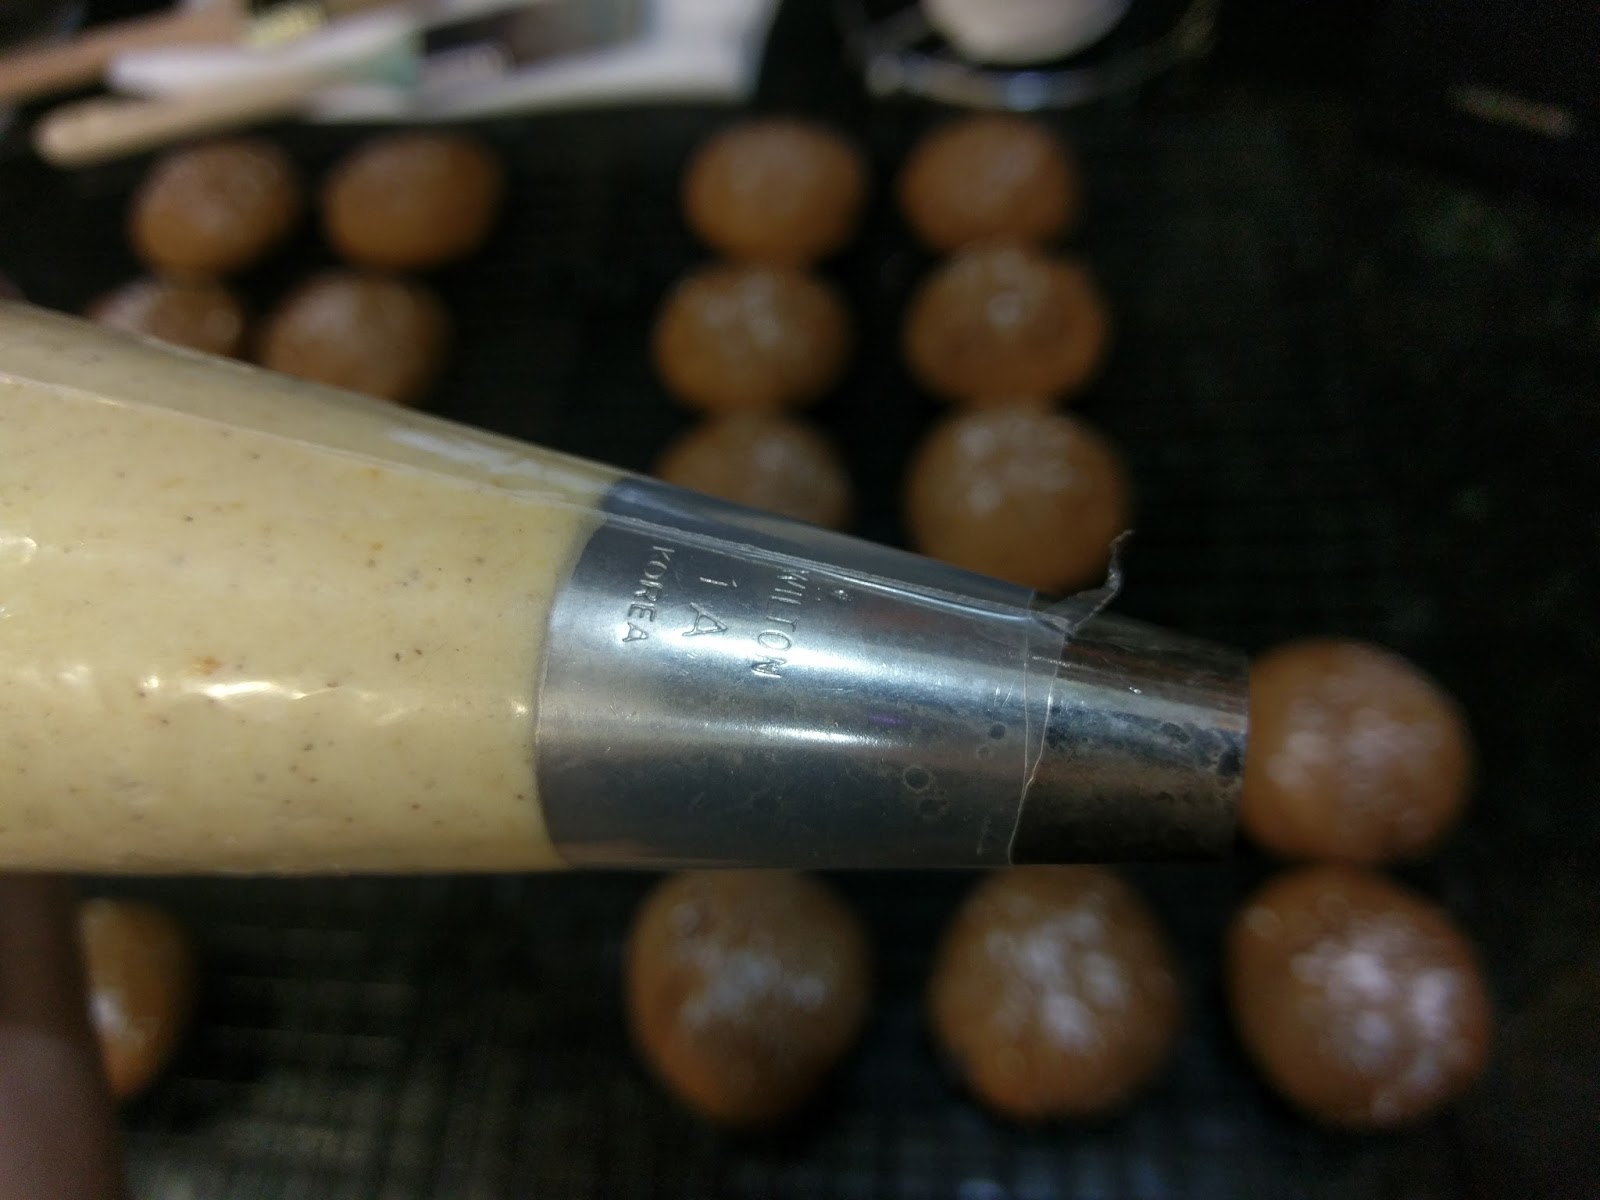
Yes, I finally graduated to granite counters. My life is complete. Take a cookie scoop and mist with cooking spray. Plop each ball of scooped dough on your Parchment paper; try to get these an inch or two apart since they expand while baking. Once you’ve finished scooping, come back in and try to smooth out any misshaped blobs with your fingers. We’re looking for uniform roundness. I also tapped my sheets on the counter a few times to even things out.
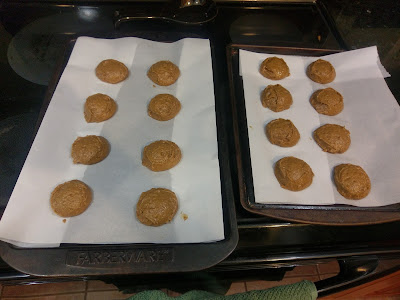
Left: tapped. Right: untapped and kinda wonky. Makes a difference. Pop into the oven and bake for 12-15 minutes. They should be springy, the tops might crack a little, and a toothpick should come out clean. Thirteen minutes seemed to, ironically, be the lucky number for me when it came to timing. Now, let these cool for a minute or two on the cookie sheet. If you want to get fancy, dust the tops with powdered sugar at this point. Then remove to a cooling rack.
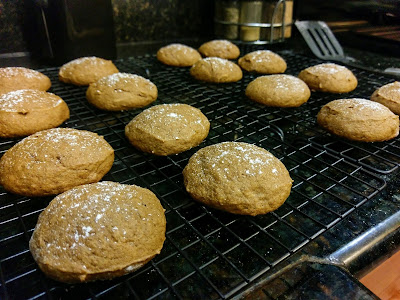
I got fancy, mostly so I could take more photos of my granite counters. These don’t take long to cool, maybe a half hour or so. You can speed things up and put them in the fridge. I was trying to do a science experiment where I made cream cheese icing without any butter and failed horribly. So in that amount of time, these cooled off and were ready for filling. On the plus side, I now have a lot of pumpkin cream cheese in a jelly consistency for bagels! Happy accidents. Also during this time, ensure you match up your whoopie pie…shells? so they each have a mate of equal sizing and shape.
Hello butter my old friend.
If anyone can tell me how to make a low calorie icing that still holds shape, tell me and become my new savior. I wanted to knock off even more calories, but butter said otherwise. To make the pumpkin cream cheese filling, you’ll need:- 3 TBS butter at room temp
- 3 ounces reduced fat cream cheese at room temp
- 1/4 cup pumpkin puree
- 3-4 cups powdered sugar
- 1 teaspoon pumpkin pie spice
You shouldn’t need to use milk or anything to get the piping consistency right, but if you find you’ve put in way too much sugar, add a tablespoon or two of milk to thin. All I had to do was cream the butter and cream cheese together for 2-3 minutes until fluffy, then dump in the pumpkin and 3 cups of powdered sugar. This was stiff enough on all its own.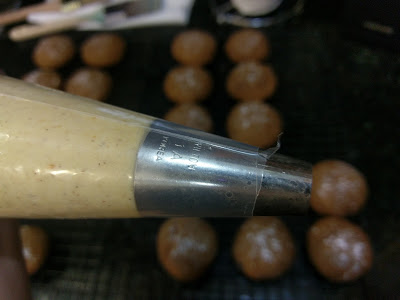
It felt so nice to hold a piping bag again. Baker withdrawals are real. You could use a plastic bag with the tip snipped off to fill, but I loaded up a piping bag with a 1A round tip. This is a nice, large tip, so it was easy to pipe a circle around the edge of the pie and then fill in the middle.
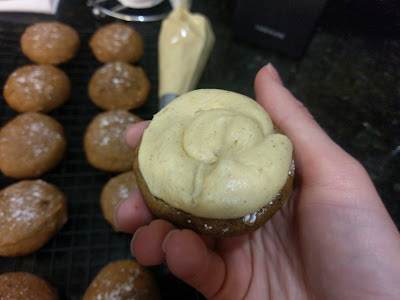
Start by working your way around the edge. Leave a little space between the edge and the frosting…the frosting will get smooshed down and out when you place the top on. If you want a lot of frosting in the middle, pipe a mound after you’ve outlined a circular border and use the tip to blend things in. I made a circular motion with the tip placed in the frosting in order to smooth things out and ensure the circle around the edge didn’t have a seam where I started/stopped frosting.
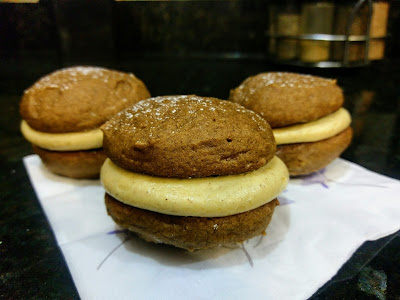
Technically winter isn’t until December 21, so eat all the pumpkin you can stand. Place the top on the frosting mound, and gently press together; you’re set! Repeat for all your pies. Marvel at the wonder that is home baking. I really missed it. Minus throwing a pecan pie with a premade crust together for Thanksgiving, it has been since HALLOWEEN that I did any baking. Criminal! I missed the entire month of November! I mean, we did end up eating that cake for what felt like a month, but in the meantime it’s been a lot of Skinny Cow and Nutella (separately. Although…). When I asked my husband what to bake this week, he was the one who offered up the idea of something pumpkin flavored. It’s like he knew how badly I needed to do fall baking since I missed the season entirely. Thank God for understanding spouses, and thank God for grocery stores selling pumpkin puree year round. Biting into one of these makes me forget that it was 80 when I walked the dogs earlier. It takes me to a place where leaves are falling, hoodies are worn, and heaters are permanently switched over for the year. I’m still running my A/C, so you can see why this brief respite a la pumpkin whoopie pie is needed. I promise I’ll actually give December a fair shake after this week and come up with some Christmas desserts. But unlike the rest of you heathens that started celebrating Christmas the day after Halloween, I am still giving Thanksgiving its time in the spotlight. ‘Til next time, my fellow eaters!
You can’t sing Christmas carols when you’ve got a mouth full of pumpkin whoopie pie. -
A Wicked Good Cake
A recent self inventory has led me to believe I’m utterly obsessed with Halloween for one of three reasons:
- I’m really a demon. Makes sense. I’ve never taken a flash photo without red eye. This would clear a lot of things up for me, really.
- I enjoy the thought of being scared but not actually being scared. Horror movies, cheesy blood and gore, it’s all good during Halloween. But pop out from around the corner in front of me the rest of the year, and I will deck you.
- As someone with intense OCD, being able to organize and create a theme for my food is an utter delight. I enjoy coming up with creepy desserts more than normal people enjoy eating them. I also really enjoyed creating this list.
In all honesty, unless someone throws Holy Water on me and I burst into flame (I do sunburn easily though…), it’s probably a combination of all three. I’ve been regularly bursting into a medley of Halloween songs ranging from Nightmare Before Christmas to humming the theme from Halloween. You know the one. It’s pretty damn motivating when you walk the dogs at 7 a.m. and feel sluggish. Try it sometime and tell me you don’t feel like you’re being followed. Anyway, I wanted to cap off my Halloween baking a little early this year since we’re getting ready to move again, and I refuse to throw away dessert if it isn’t finished before we leave. I would eat half a cake in one sitting, so I prepared early in order to avoid an inevitable decline in willpower and expansion in sweatpants size. It’s been awhile since I’ve made a cake. A real, buttery, drool-inducing, frosting-laden cake with all the delicious fat in the world. Attempts were made at healthy switches. And then I made Baileys salted caramel chocolate frosting and all of the sudden calorie counting went out the window. Funny how that happens…

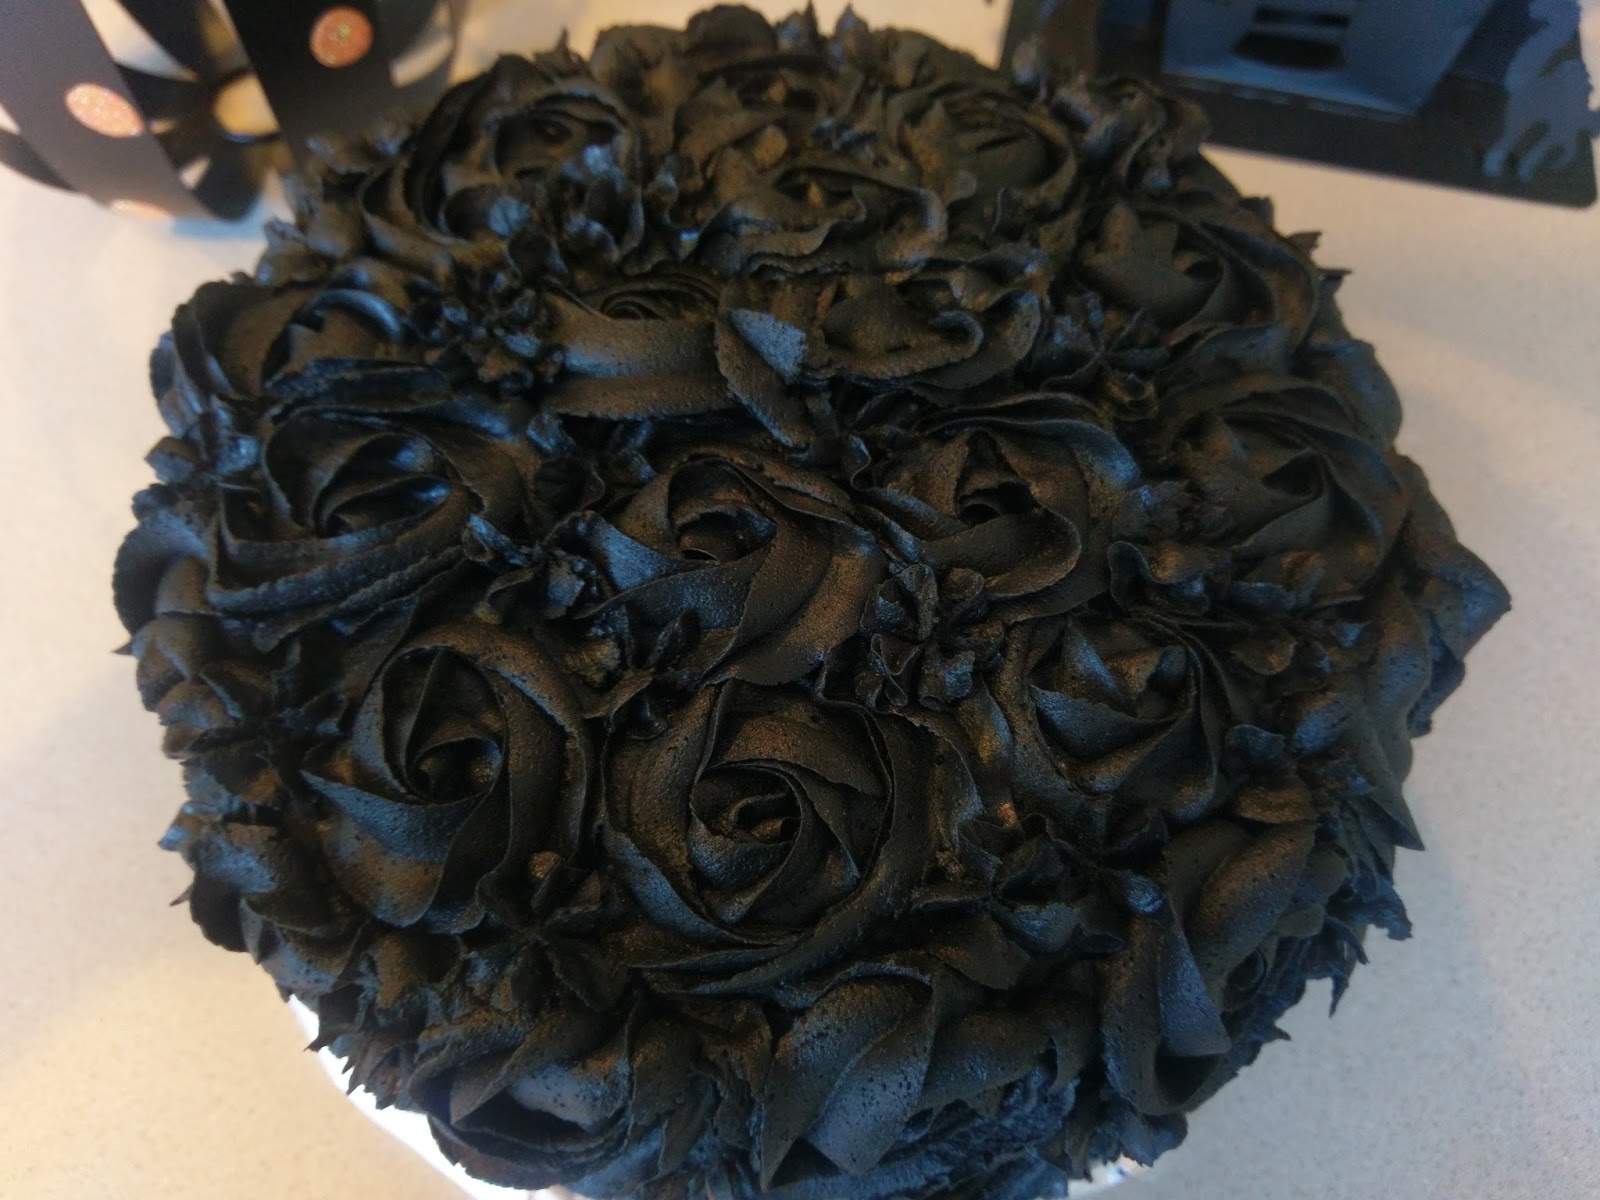
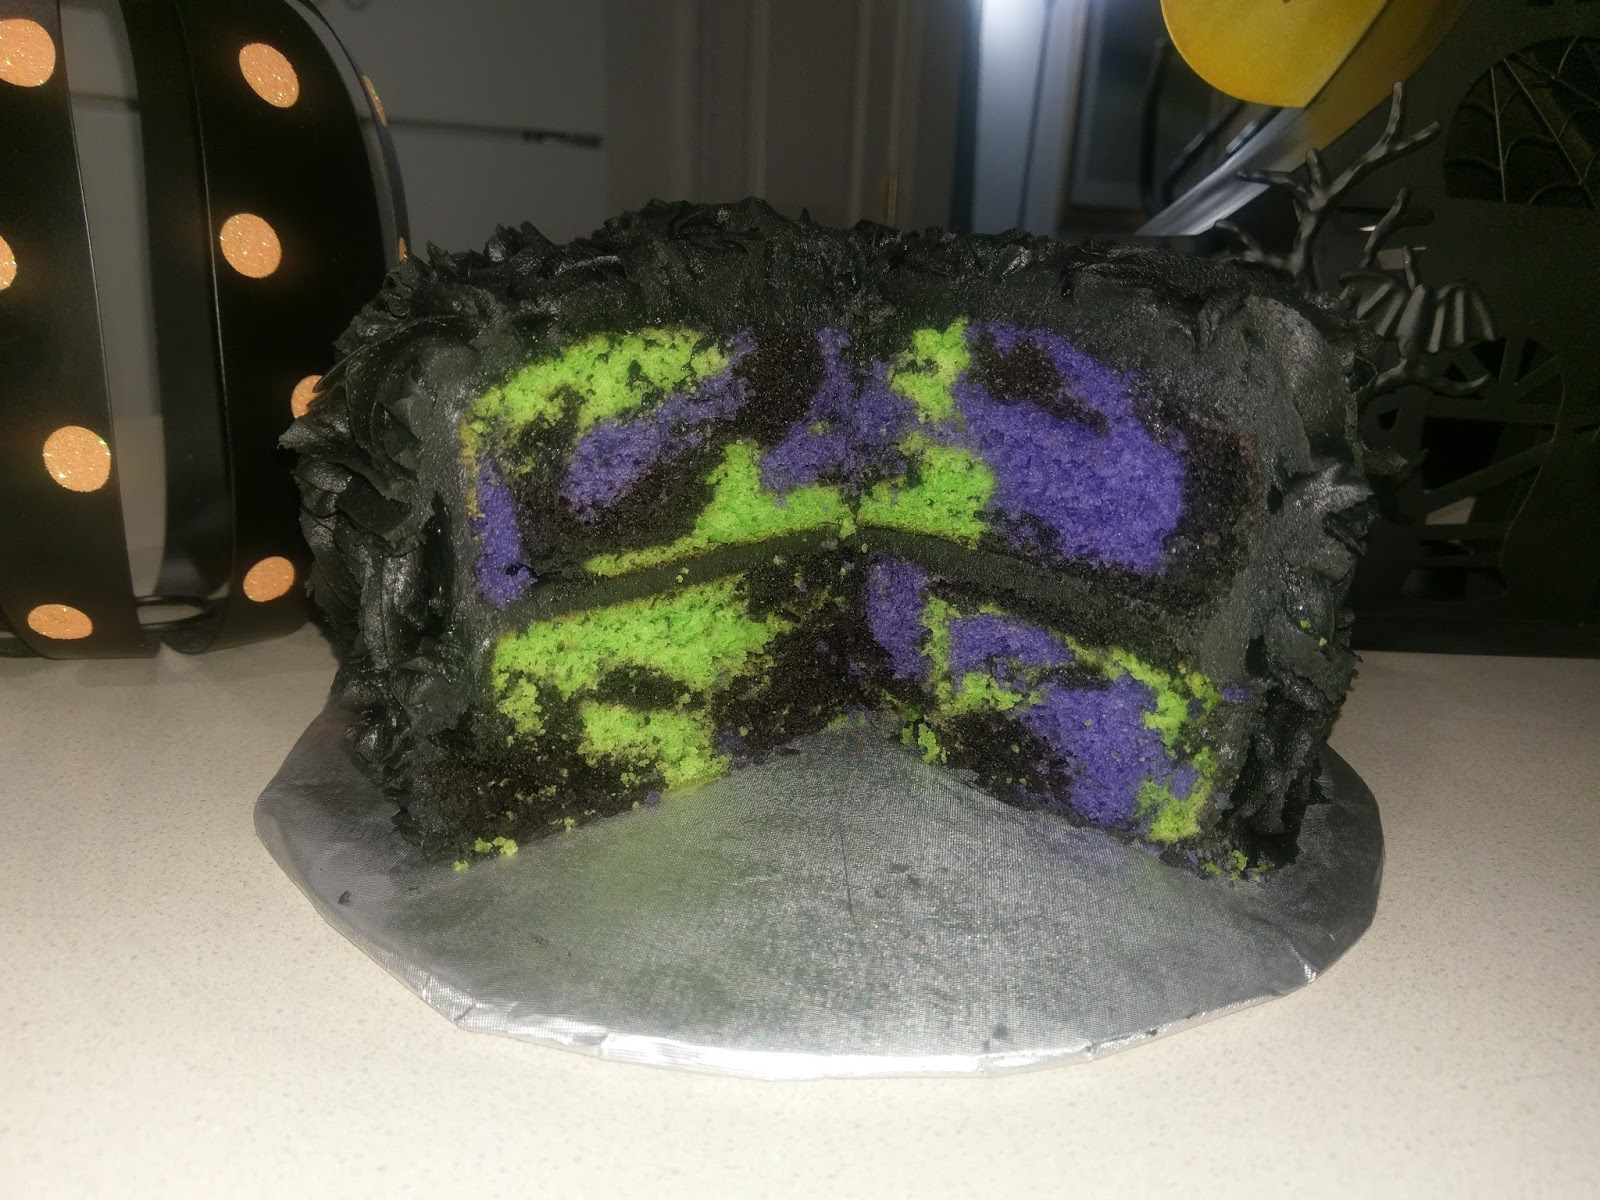
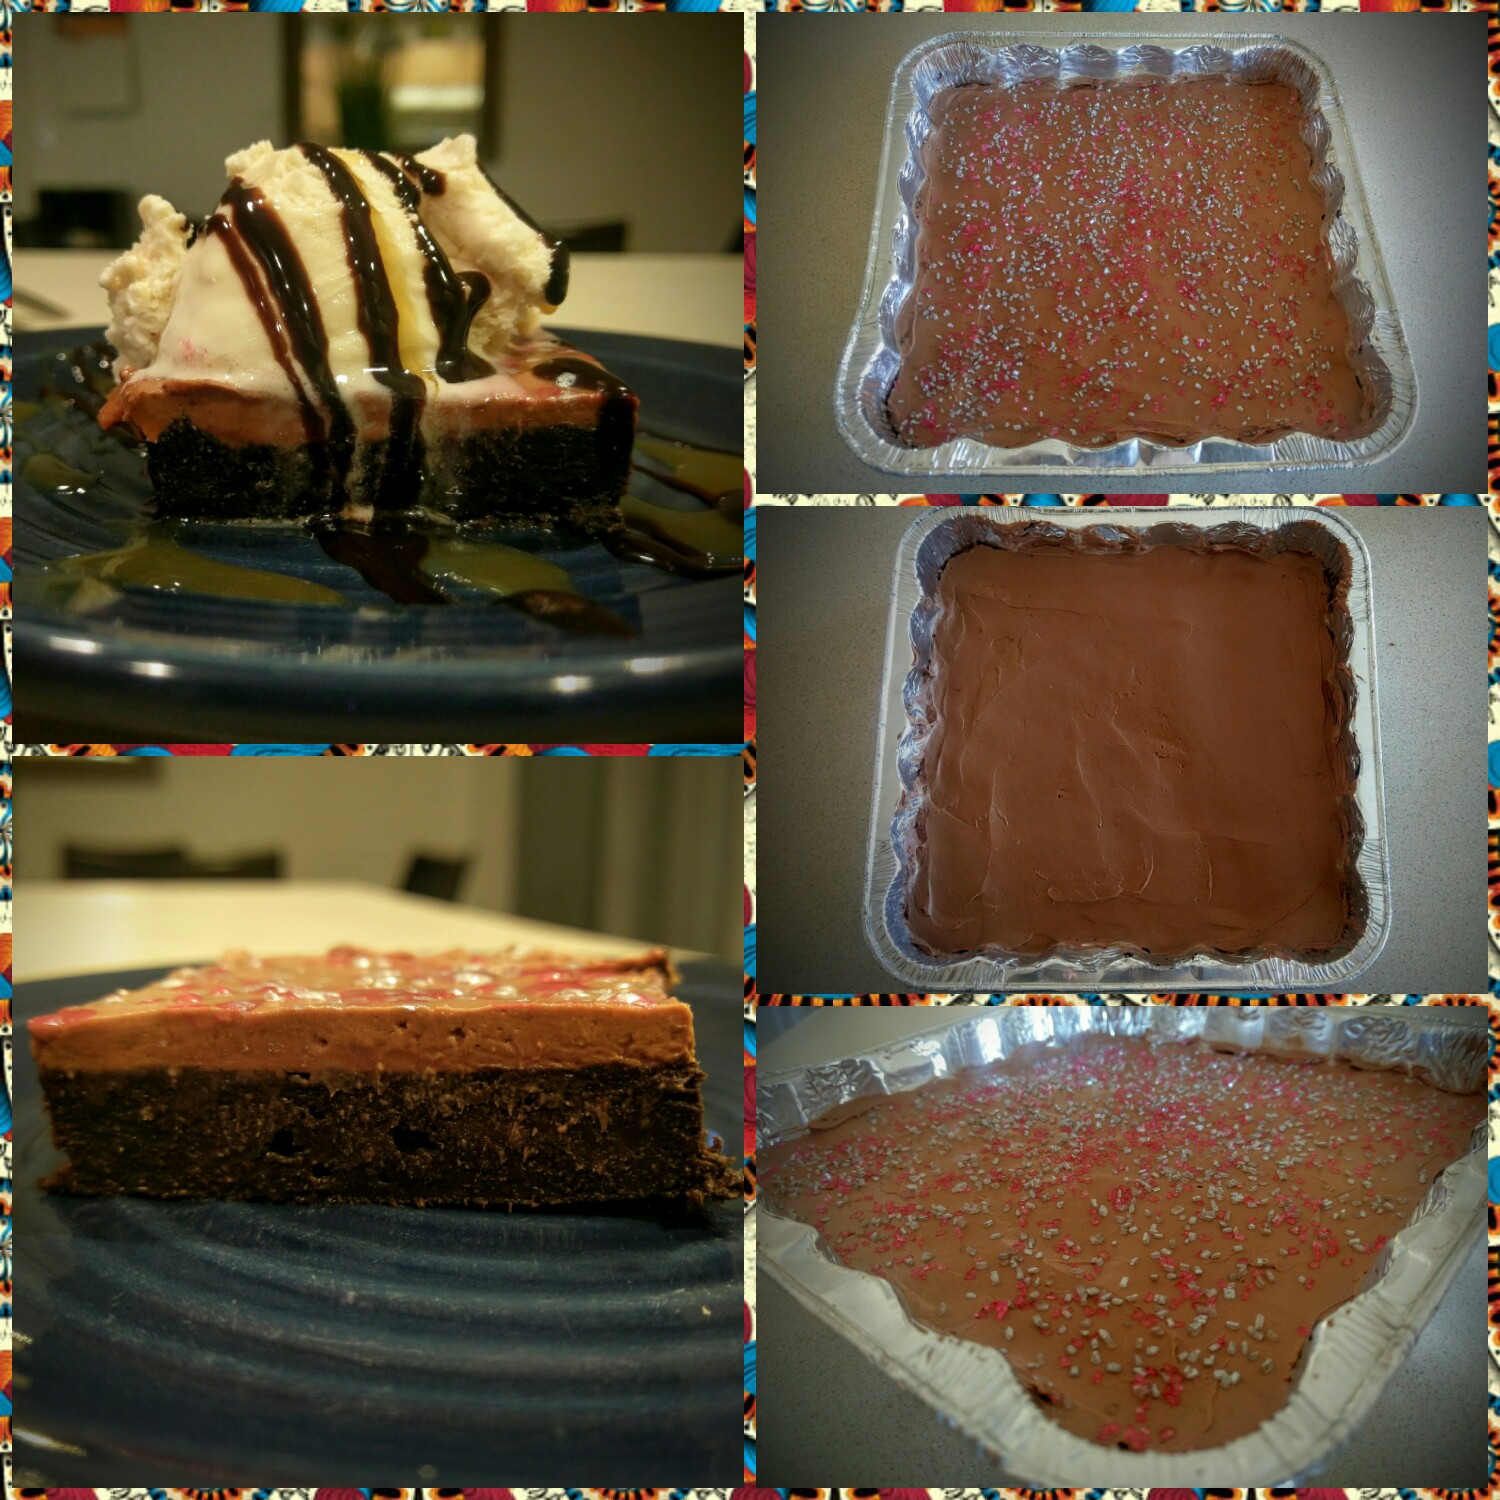
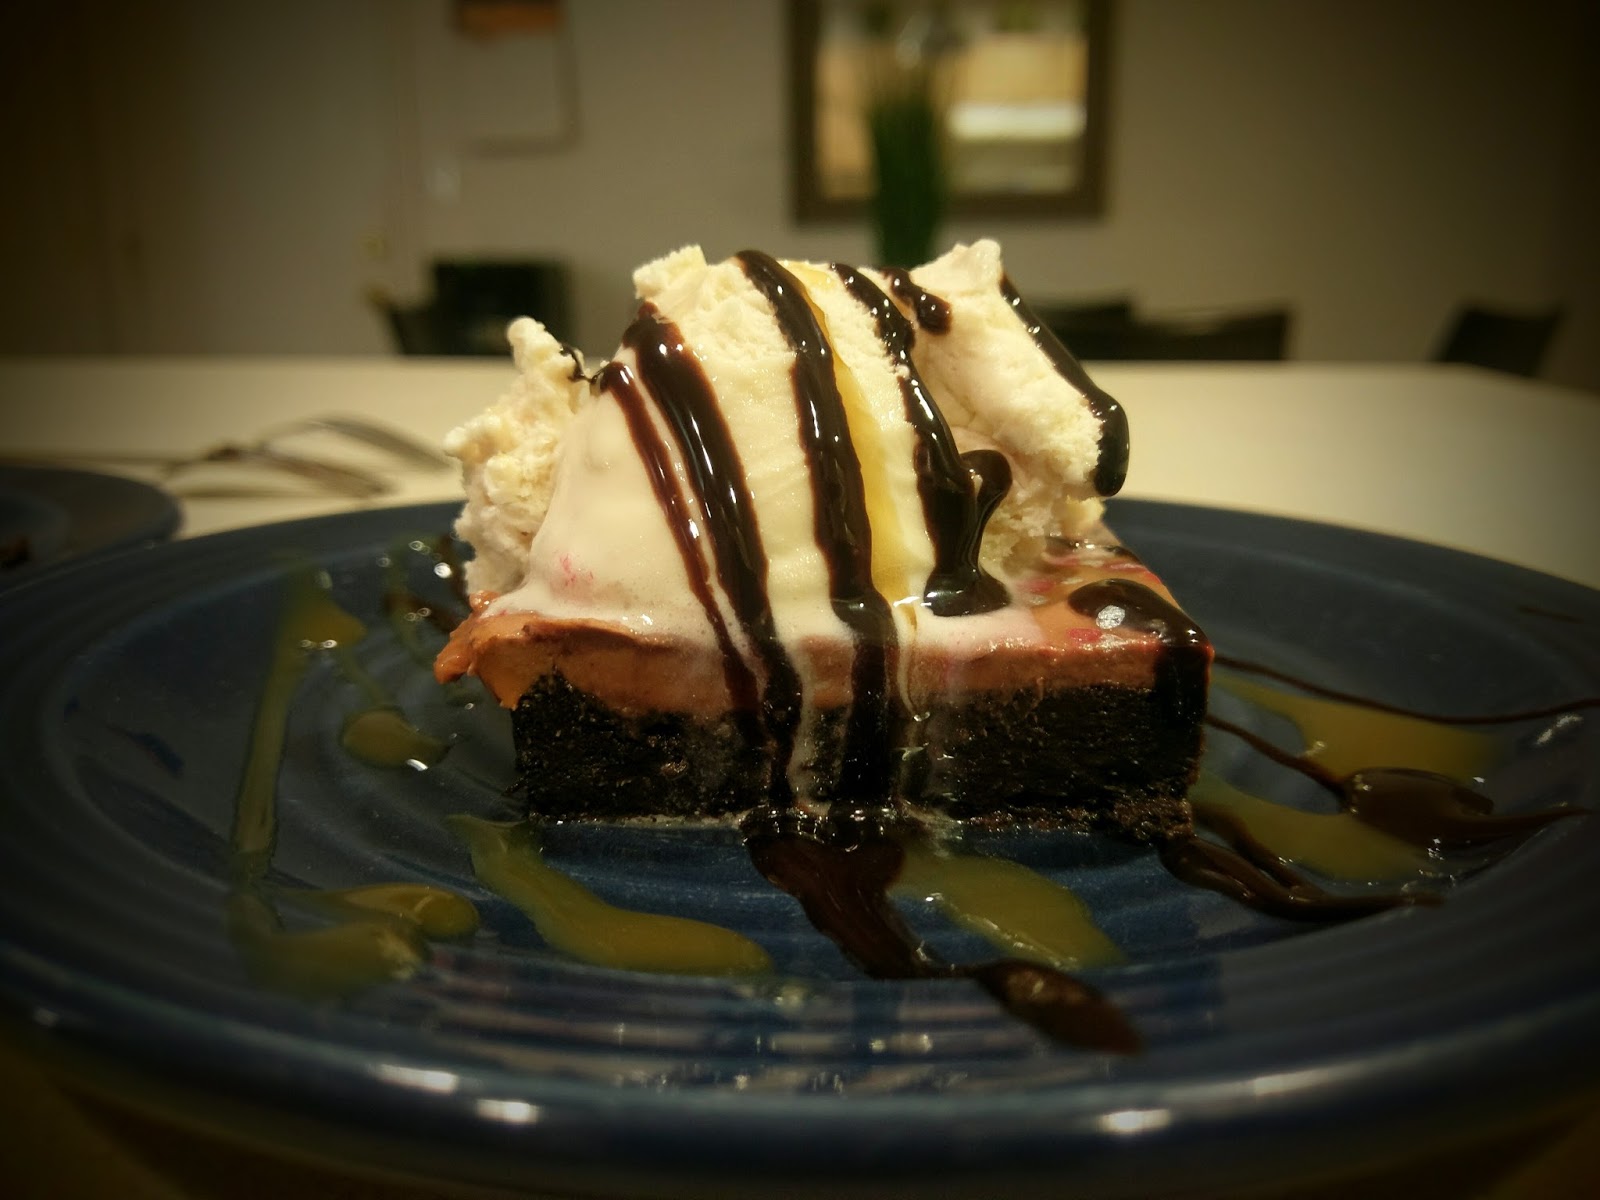
How spellbinding! This bewitching swirl cake with “poisoned” roses (don’t worry, poison is code for Baileys) is a stellar food rendition of the best parts of Halloween: macabre and death with a delightful color scheme! What? That’s not why you like Halloween? Well, you weirdo, you can still make this cake yourself to be the hit of your costume parties. It looks really hard to make, but trust me, even if you don’t know your way around the kitchen, I can guide you. Think of me as your fairy cakemother, or whatever the evil equivalent of that might be. Soul-sucking pastry demon? Either way, I’m here to help. I had a blast making and decorating this cake and turned half my fingers black in the process. If I want to go as a decaying zombie for Halloween, I’m already set! This is actually a cake and a half, chocolate and vanilla mix, with salted caramel Baileys chocolate buttercream. It is to die for.

Yes, I snuck pumpkin into this. No surprise. So remember last week when I used half a cake mix to make witch hat cookies? Good. If you don’t, shame on you; you need to read my delightful scrawlings more. Well, I’m happy to report the other half of the mix gets used this week. I may be evil, but I’m evil and conscious about wasting food. I’ll laugh at your ugly children, but I will reel in horror if you throw away food. Priorities. To make this bewitching cake, you need:
- One white cake mix
- You can make this with box ingredients, but to get a moister, richer cake, use melted butter in place of oil and milk instead of water. Extra egg for density not needed since the chocolate cake is heavy.
- Half a box of chocolate cake mix
- I tried a thing here: replacing eggs with pumpkin puree. Since the recipe is halved, three eggs is not a thing I’m willing or sure how to cut in half. Instead, use 1/4 cup of pumpkin puree per egg, so in this case, 1/4 cup plus 1/8 cup. This cuts about 20 calories per egg, and you cannot taste an ounce of pumpkin, I promise.
- Also, use melted butter in place of oil and milk for water.
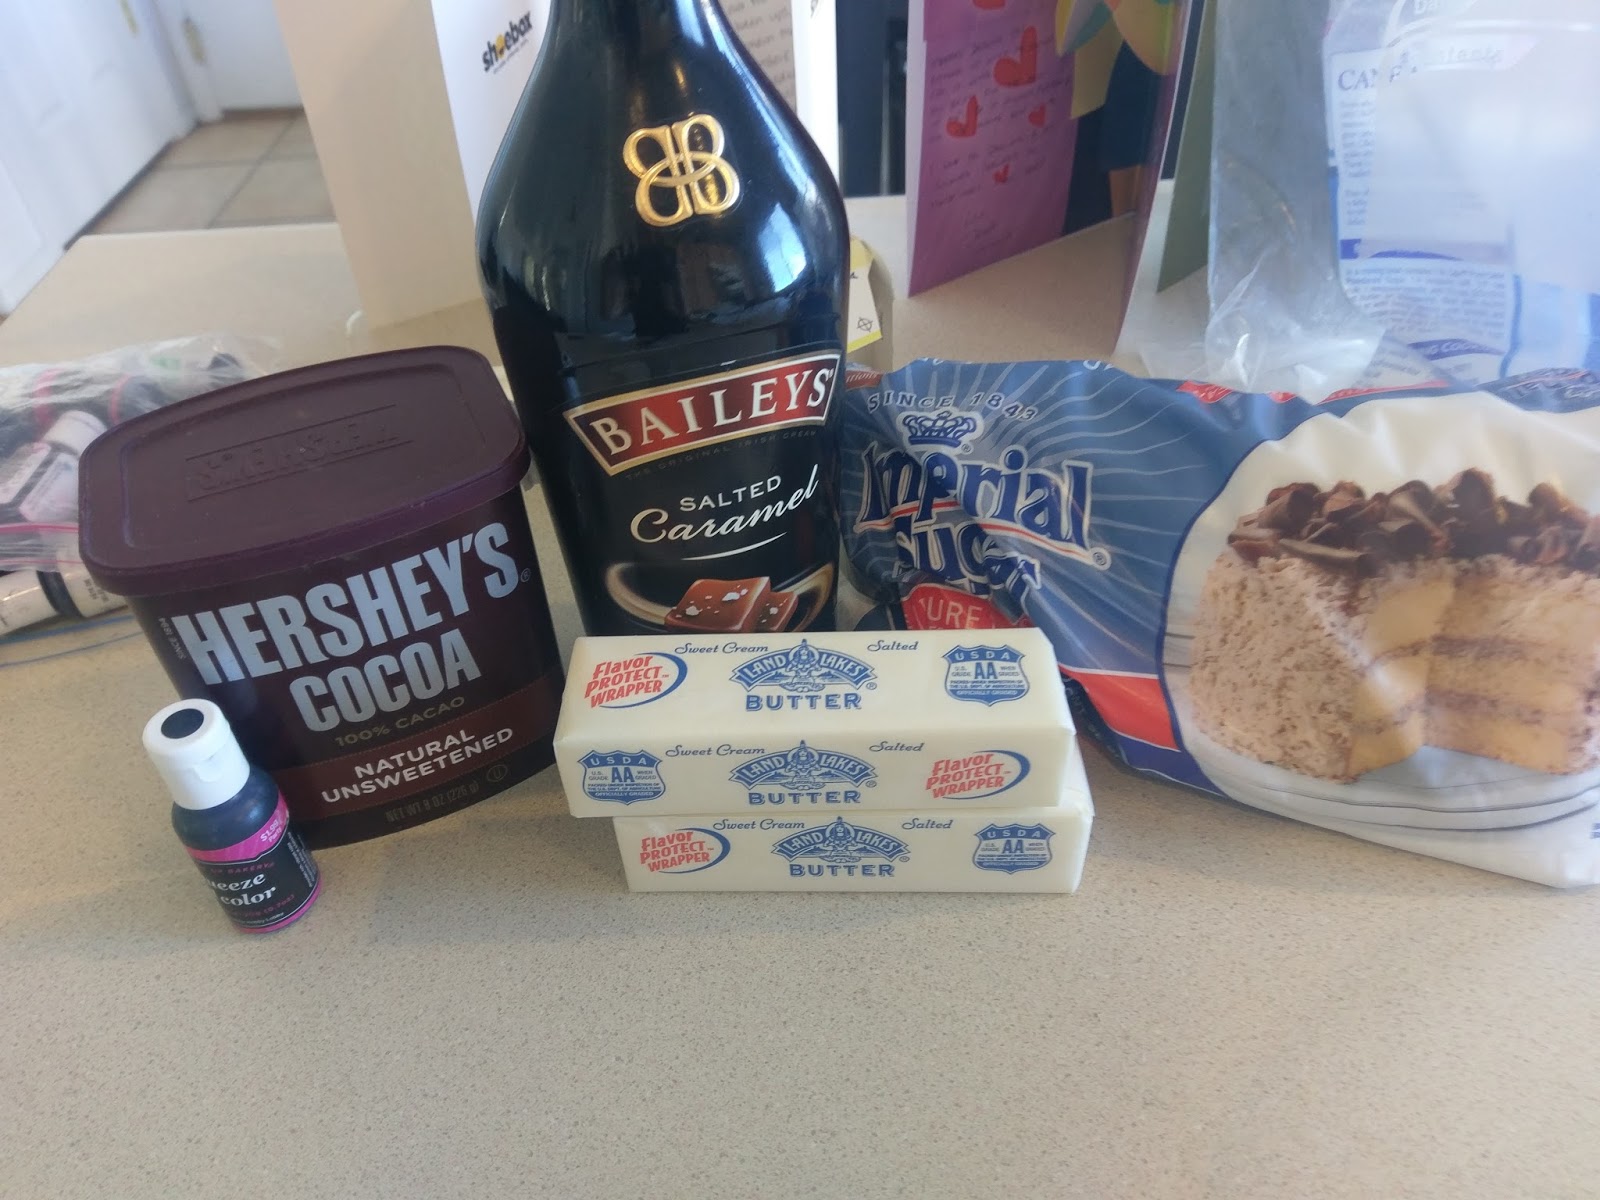
- Gel dyes in black, bright purple, and neon green
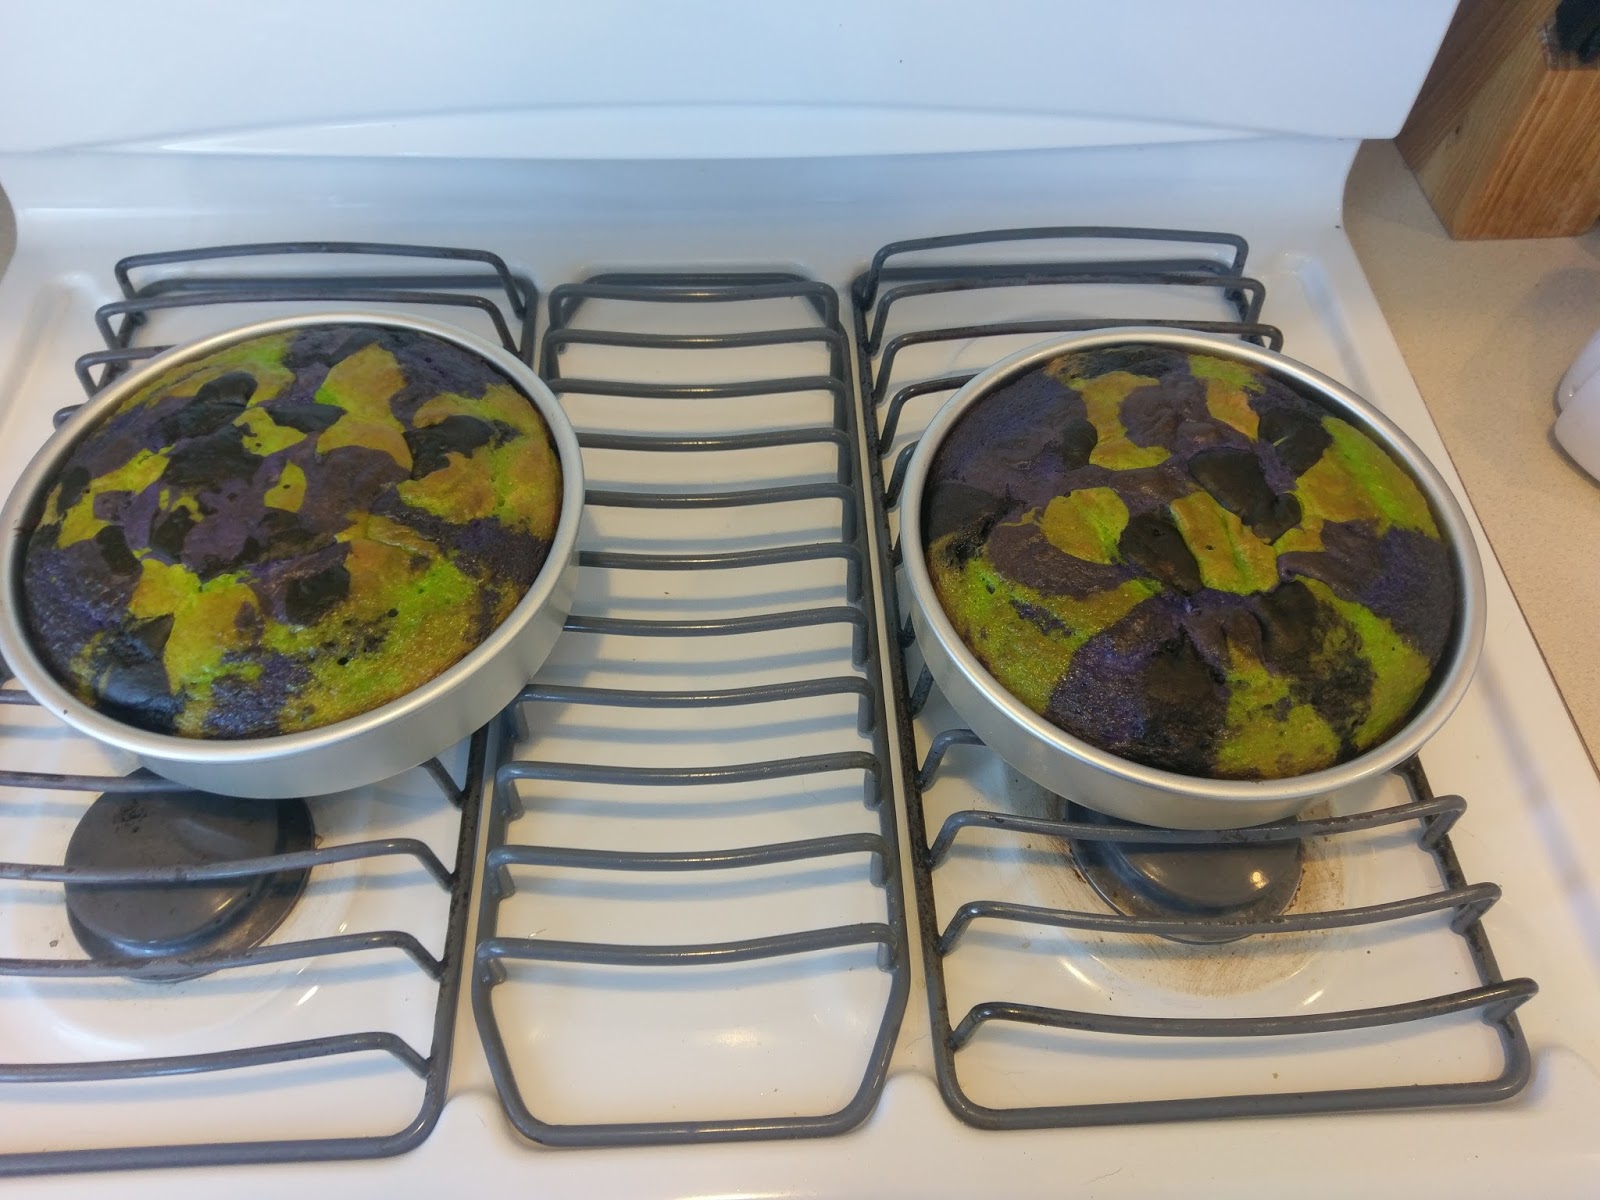
Start by preheating your oven to 350. Grease two pans (either 8×8 or 9×9). Begin by making your chocolate cake mix with the ingredients of your choice, following package directions. Once the batter is mixed, add in enough black dye to your liking. Set this aside. In another bowl, mix your white cake mix with the ingredients of your choice, following package directions. Now, take half of your white cake mix and place it into a new bowl. Dye one bowl lime green and the other bowl of batter purple:

Also needed, more spoons than you’d use in the average week. Now, this is where things get fun. There’s really no method to the madness here, so room for error is exponential and will still yield an amazing cake. Simply scoop up a spoonful of one color batter, plop it into one of the greased pans and repeat with the other pan. Take a spoonful of another color, plop it in to one of the greased pans and repeat with the other pan. Take a spoonful of the the final color, and plop, plop away. You want to try to overlap each spoonful with a different color of batter. Keep layering and plopping all over each pan to ensure you’ve got semi-even layers of colors.
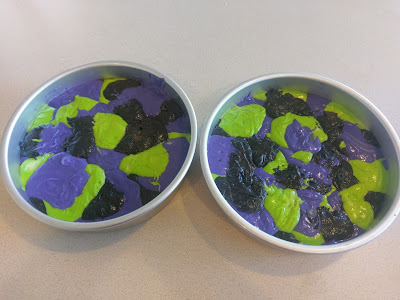
So it should look like a hodgepodge of Playdough, really. To even out your layers, tap each pan on the counter firmly until everything looks smooth. Bake for 35-40 minutes or until a toothpick comes out clean. My two 8×8 pans took 39 minutes to cook since this is more batter than usual.
*Cue evil laughter and/or cackling* Trust me, things may look like the world’s strangest camouflage right now, but the inside of this cake is BRIGHT. Let your cakes cool in the pan for 10 minutes before removing to a rack to finish cooling. When you remove these cakes from the pan, take an angled spatula and separate the edges of the cake from the side of the pan by scraping the edges gently in a sawing, circular motion. Then use your spatula to gently push the sides of the cake away from the edge. This is a heavy cake with so much batter, so getting the edges free will ensure your whole cake makes it out of the pan, and you don’t end up with some deformed monstrosity you have to try to pass off to your family or coworkers as “melted Frankenstein’s monster.”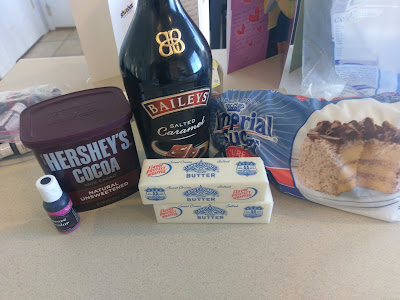
And then you’d just get drunk on the Baileys and cry. There’s no winners in that situation. While your cakes are cooling, FULLY, in the fridge or freezer for an hour or thirty minutes respectively, it’s time to make the frosting. I haven’t baked with Baileys in ages, and the lid was nearly glued on. I was moments away from desperately trying to gnaw the lid off or breaking the neck off bar-fight style on the counter. Thankfully, tapping the lid with a spoon worked. Who knew I’d get so much use out of spoons today? To make the Baileys salted caramel chocolate buttercream, gather up:- 2 sticks of room temperature butter
- 1 2lb. bag of powdered sugar
- 3/4 cup Hershey’s cocoa poweder
- 1 TBS vanilla extract
- 6-8 TBS Baileys salted caramel flavor
- Literally the rest of your bottle of black gel dye.
I made a TON of frosting because this is a very TALL cake and I wanted all of the ROSES. I ended up not using all of it, so I’d venture to guess you’d be okay with 6 cups of powdered sugar and 6 tablespoons of Baileys for a thick piping consistency. Cream your butter and add in two cups of sugar, the cocoa powder, vanilla extract, and two tablespoons of Baileys. Blend on low and blend well. Add in two more cups of sugar and two more tablespoons of Baileys. Repeat until you have enough frosting and a smooth enough consistency for piping–firm but shiny. Now, add in the black gel dye. I wasn’t kidding when I said use the rest of the bottle. You want people to ask, “How much more black could this be?” and the answer is “None. None more black.” If you did not get this reference to Spinal Tap, I am painfully ashamed for you. You go get on Netflix right now and watch it.

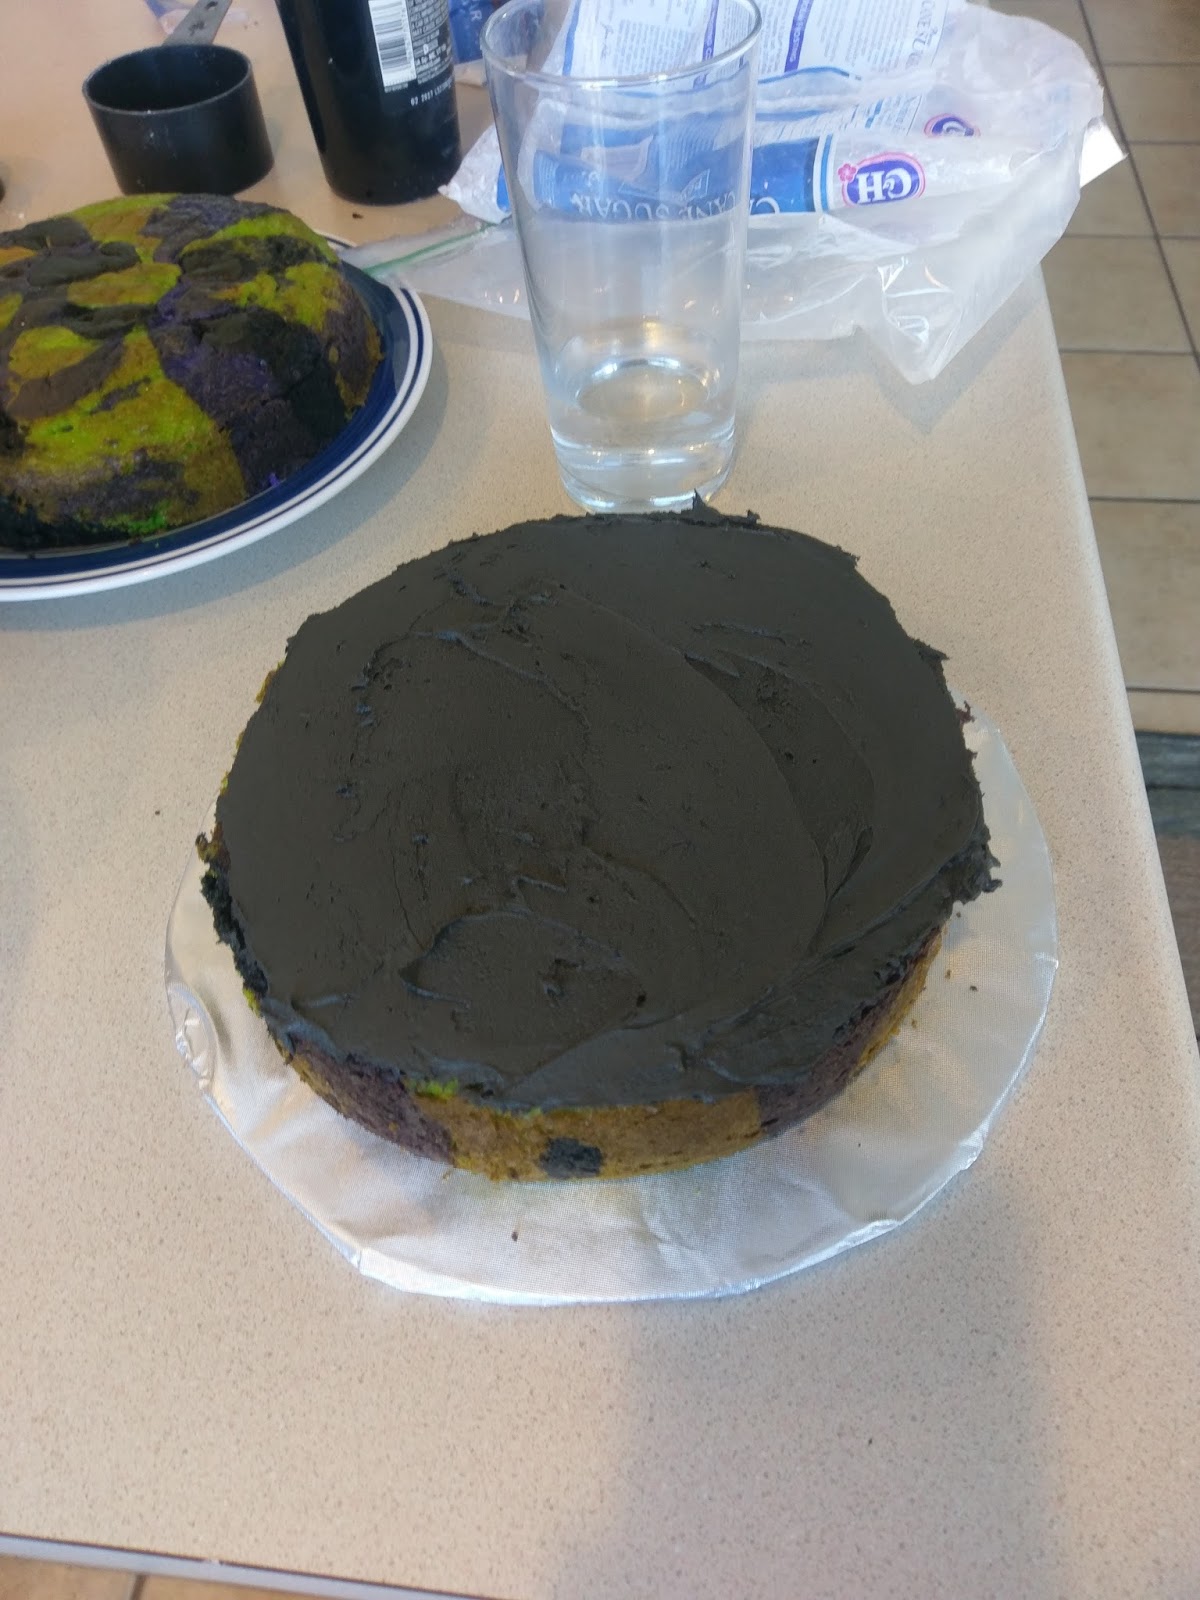
I wanted this cake to be as black as my soul. Start by placing a thick layer of frosting on top of one of the cake rounds, and then place the other cake on top of this and crumb coat your cooled cake in order to keep any “show through” happening when you pipe your roses on later. Let this set for 15 minutes in the freezer.

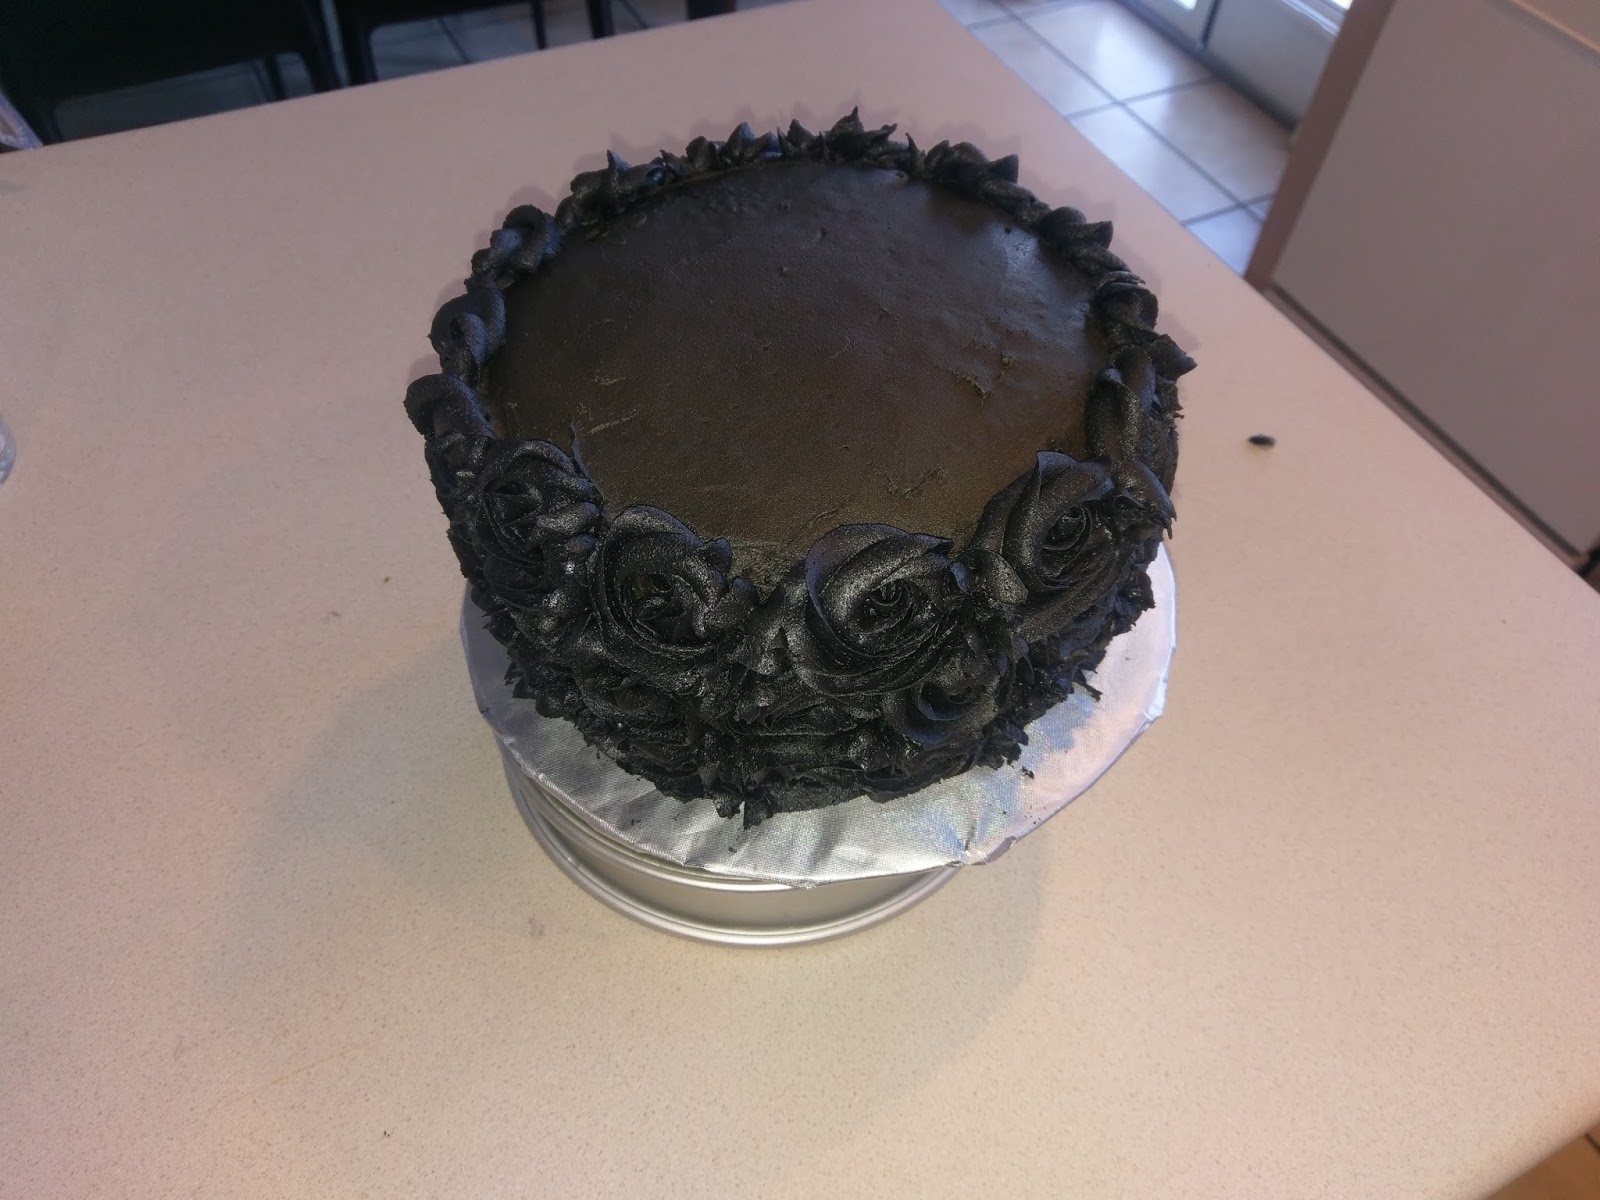
While your crumb coat sets, place the remaining frosting into two bags loaded with a 2D tip. 1M tips will also work, but won’t yield as detailed of a rose. 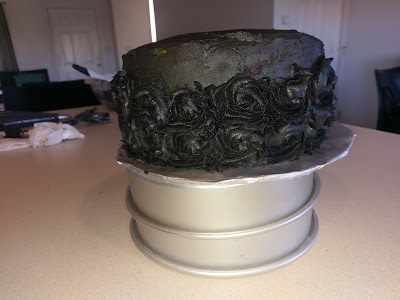
Guess who needs a tall cake stand because she’s tired of MacGyvering kitchen utensils? Starting at the bottom of your cake, pipe roses all the way around the entire cake. To pipe a rose, start with your frosting tip about half an inch up on the cake. Start piping a small mound and swirl out and around until you complete one circle. Try to go around twice. Here’s an amazing video to help. Once you’ve created the first row of roses, start immediately above. You’ll have three layers total on the sides of the cake. If you see blank or open spaces, pipe small stars in them by gentle pushing on the piping bag and pulling away quickly.

Honestly, another way to not use SO much frosting would be to layer the top of the cake in orange or black sprinkles when the frosting layer is still wet. But I like what is traditionally known as a “buttload” of frosting on my cake. 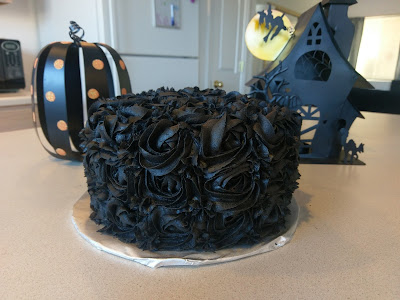
Buttloads never looked so good. Finish off by piping roses on the top of your cake. Again, any areas where you have weird space or can’t fit an entire rose, feel free to pipe little stars or overlap roses on top of one another. This design is incredibly forgiving, but it still turns out to be breathtaking:
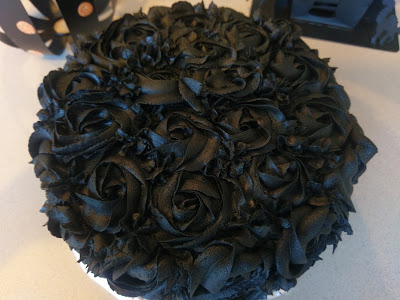
Just call me Wednesday Addams ’cause I would love a bouquet of roses this color. Lest we forget, the real magic of this cake is on the inside. Now, depending on how you make the cake and what healthy substitutions you make will account for your calorie content. But if you made it (strangely) exactly as I did, count about 400 calories a slice. I will gladly skip an afternoon snack to accommodate this cake. Baileys chocolate buttercream people. This doesn’t come for free, but it is delicious. Plus this is a huge cake, so it will yield 16 slices easily. Unless your goal is to Homer Simpson it up for Halloween or go as a bloated corpse, I recommend the 16-slice ratio for this cake.

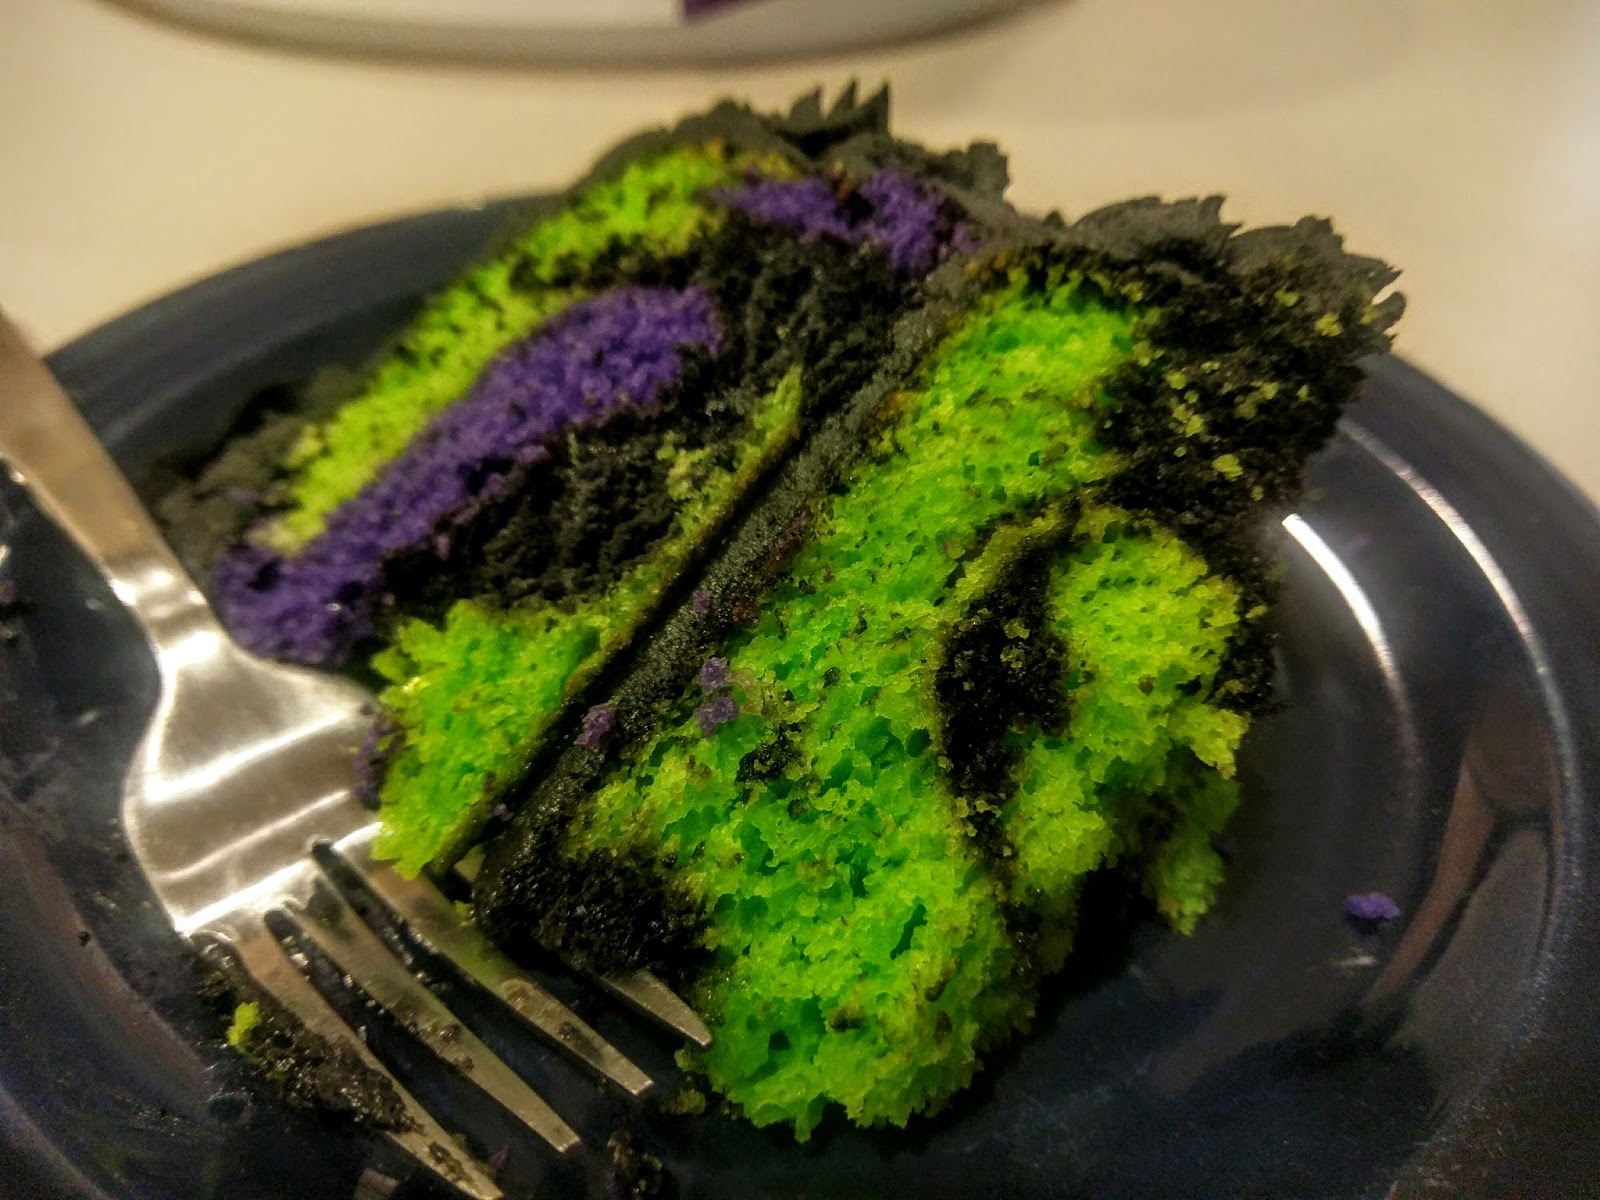
IT’S ALIVE! …with color. I was so giddy with delight when cutting into this cake. I probably shouldn’t be that happy when wielding a large knife, but it is what it is. This cake looks so freakin’ Halloween-y on the inside I died. But then I came back to life because that’s what demons that have an entire cake to eat do. It’s not all stealing souls and bargaining, there is actual work on occasion. Clearly it’s been awhile since I made a regular, full on cake with little care about caloric intake. When I ate a slice of this, I was reminded why chocolate + vanilla + boozy frosting = the greatest gift to taste buds next to ice cream. You know what would go great with this cake? Ice cream. Yep. Try it. Tell me how good it is because I’m still in a land Blue Bell forgot. Either way, this cake looks beautiful as a party centerpiece before you cut it open to receive massive amounts of applause. I know I called it a bewitching swirl cake with poisoned roses, but this could just as easily be called “Leftover Frank” or “Frank’s Remains.” You know, because the color scheme accurately reflects the cartoonish rendition of Frankenstein’s monster. I say go big or go home with the ghastly, ghoulish delight you can only pull off on Halloween because the other 364 days of the year if you want to wear a witch’s hat and say things like, “I smell children” when you’re in a shopping mall, people will judge and/or commit you. But enjoy your Halloween celebrations! We’ll be doing it up big here in the ABQ for our last weekend here. So I’ll be taking a break from blogging until mid November when we’re settled in Florida. If I’m melting from the heat, butter for baked goods will be, too, so I’ll see you back here then ‘Til next time, my fellow eaters!

…Frankenstein’s monster, is that…is that, you?
Oh hush, don’t be surprised the English teacher obsessed with Halloween knows Frankenstein was the doctor and not the monster. I told you, you need to read more… -
Just What the (Witch) Doctor Ordered.
My family’s zest for Halloween can probably be traced back to the 1993 classic, Hocus Pocus. I’m sure this is the same for just about any kid that had the privilege of growing up in that era. Although we were supposed to fear them, the Sanderson sisters were actually pretty bitchin. They had amazing clothes, wicked brooms (or vacuums in some cases), and the hair…well, the whole reason none of them wore hats was because of the works of art occurring on their heads. Namely, Bette Midler’s coif. I’m fairly certain her hair actually has a supporting credit role on IMDB.com. It was just that iconic of a ‘do. So I don’t blame them for not wearing hats. You don’t spend six hundred years perfecting a style so bold only to cover it up. But for standard witches, the images conjured up consist of green skin, noses that make Barbara Streisand’s quiver in fear, and, of course, the pointy hats. A witch may only be as evil as her hat is pointy, so they need to make them count. I was having a wicked time (see what I did there) coming up with a few desserts to begin the celebration of Halloween in our house. For some of you, it’s only a night…for me, it is a month-long endeavor culminating in over-the-top costumes, enough candy to murder a horse, and decorations so creepy no one will come to your front door. Really, minus hiding from children in a dark house, it’s perfect. I have never made anything witchy themed, so I decided this was the year. I didn’t want to bring out the big guns yet (a.k.a., cake), so I settled on yet another handheld dessert. It is the season of handhelds here on the blog, apparently.
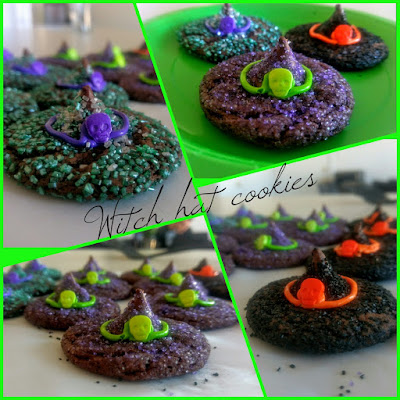
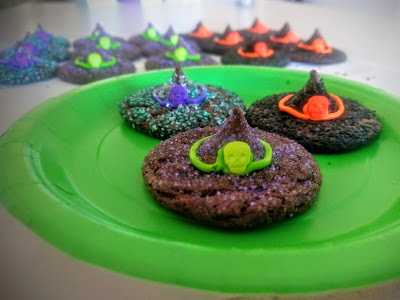
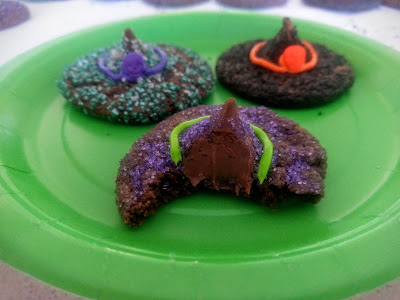
But so delightfully evil and appropriate. While they look sinful(ly delicious), these little chocolate witch hat cookies only knock you back about 60 calories per cookie. What sorcery is this? Well, it’s all about the ingredients. Simplicity is key here, but we’ll get to that in a moment. These are a lot of fun to make. Start to finish it took me just a hair over two hours. If you get the whole family on board, you can churn these out in half the time. Just watch out for thieves that eat raw cookie dough. They’re the real menace. Burn them at the stake. A little too far? No one gets between me and a completed dessert. Not only are they a fun addition to any Halloween party, gathering, festival, or in my case, just for the Hall-o-it, they’re devilishly good. Any cookie with a base of Devil’s Food cake is going to turn out just fine in my book.
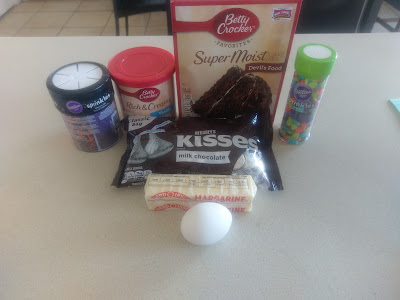
Bonus: tons of leftover Kisses! Seriously, the recipe here is ridiculously simple. I could tar and feather myself for not realizing how unbelievably easy it is to make cookies out of cake mix. The possibilities are endless!! But for these witch hats, gather up:
- 1/2 a box of Devil’s Food cake mix
- 1/4 cup of margarine, melted and cooled
- 1 egg at room temp
- 3 tablespoons of vanilla or white-colored frosting (out of the can is actually okay for once)
- 21 Hershey kisses
- Gel dyes in purple, lime, and orange or whatever spooky colors you prefer
- Small glittery sprinkles in purple, green, and black or whatever spooky colors you prefer
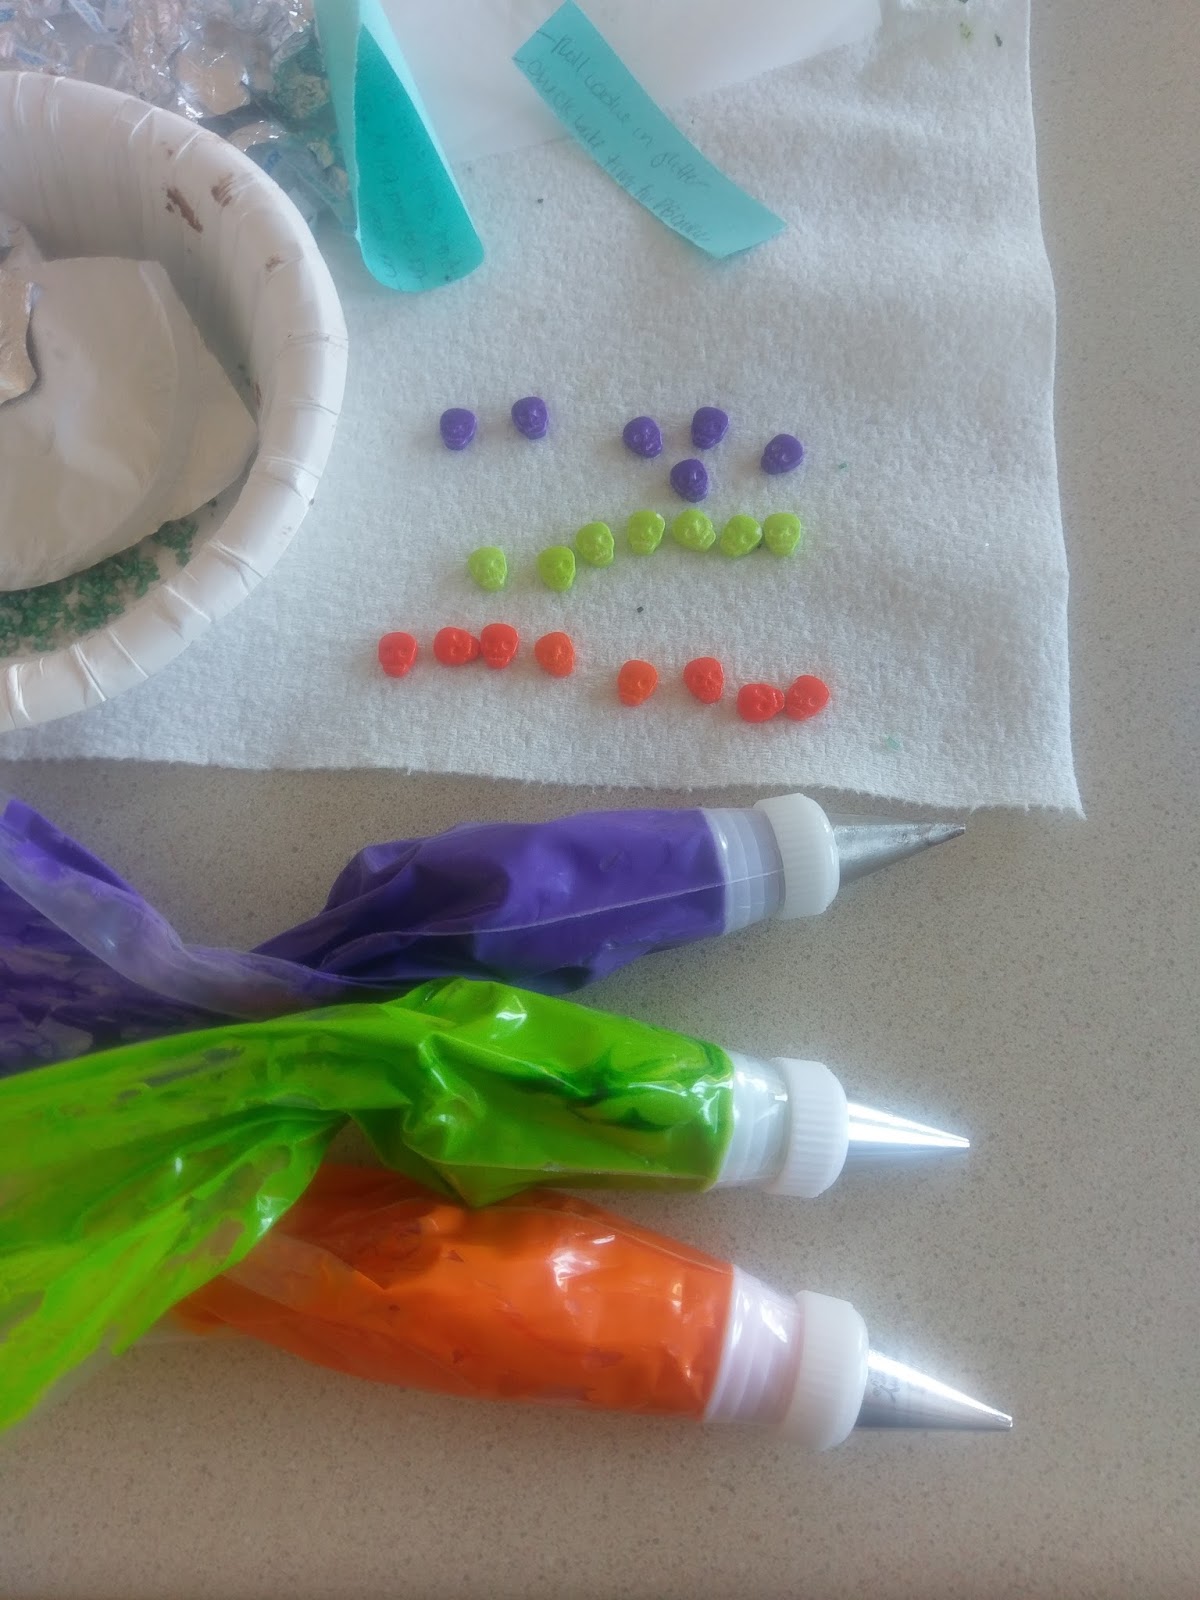
- For the hat buckle I used skeleton sprinkles found in the seasonal aisle at Smith’s/Kroger
This recipe makes 21 cookies.You can easily double the recipe to make 42 cookies if you’re actually trying to lure children to your home to suck out their souls and retain everlasting youthful beauty, and I mean, who isn’t these days.
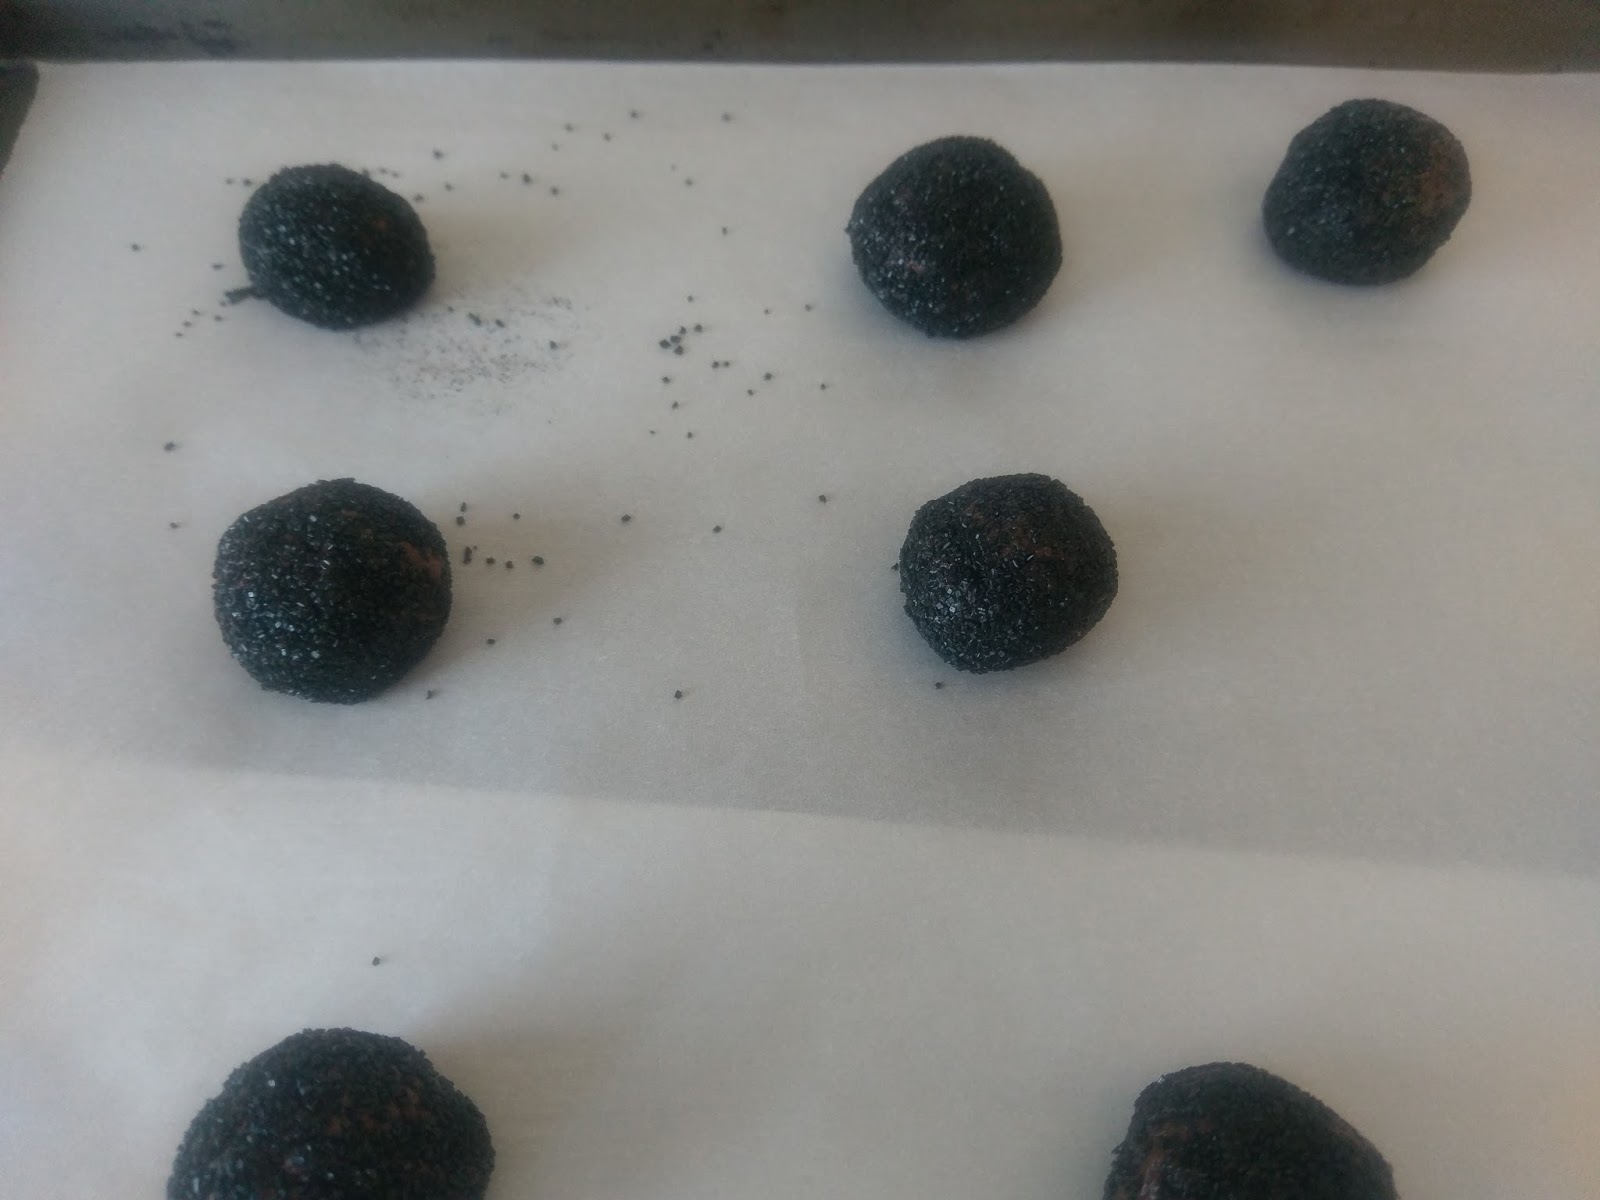
Start by preheating your oven to 350 and lining a baking sheet with Parchment paper. Dump the egg, melted and cooled margarine, and half the box of cake mix into a medium bowl and blend well. Let your cake/cookie mix rest for 10-15 minutes in the bowl. Otherwise, it will be way too sticky to handle right away. Use a half tablespoon scoop (these suckers expand in the oven big time), and scoop out 7 balls of dough.
I still would recommend dousing your hands in Pam. Take a bowl and dump one color of glitter sprinkles into it. Roll each of the seven balls into the one color and set on a baking sheet.
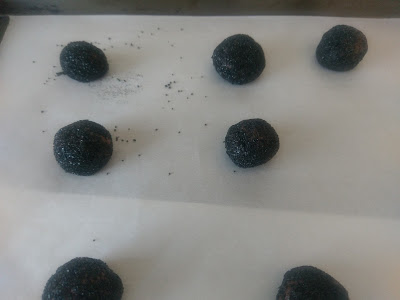
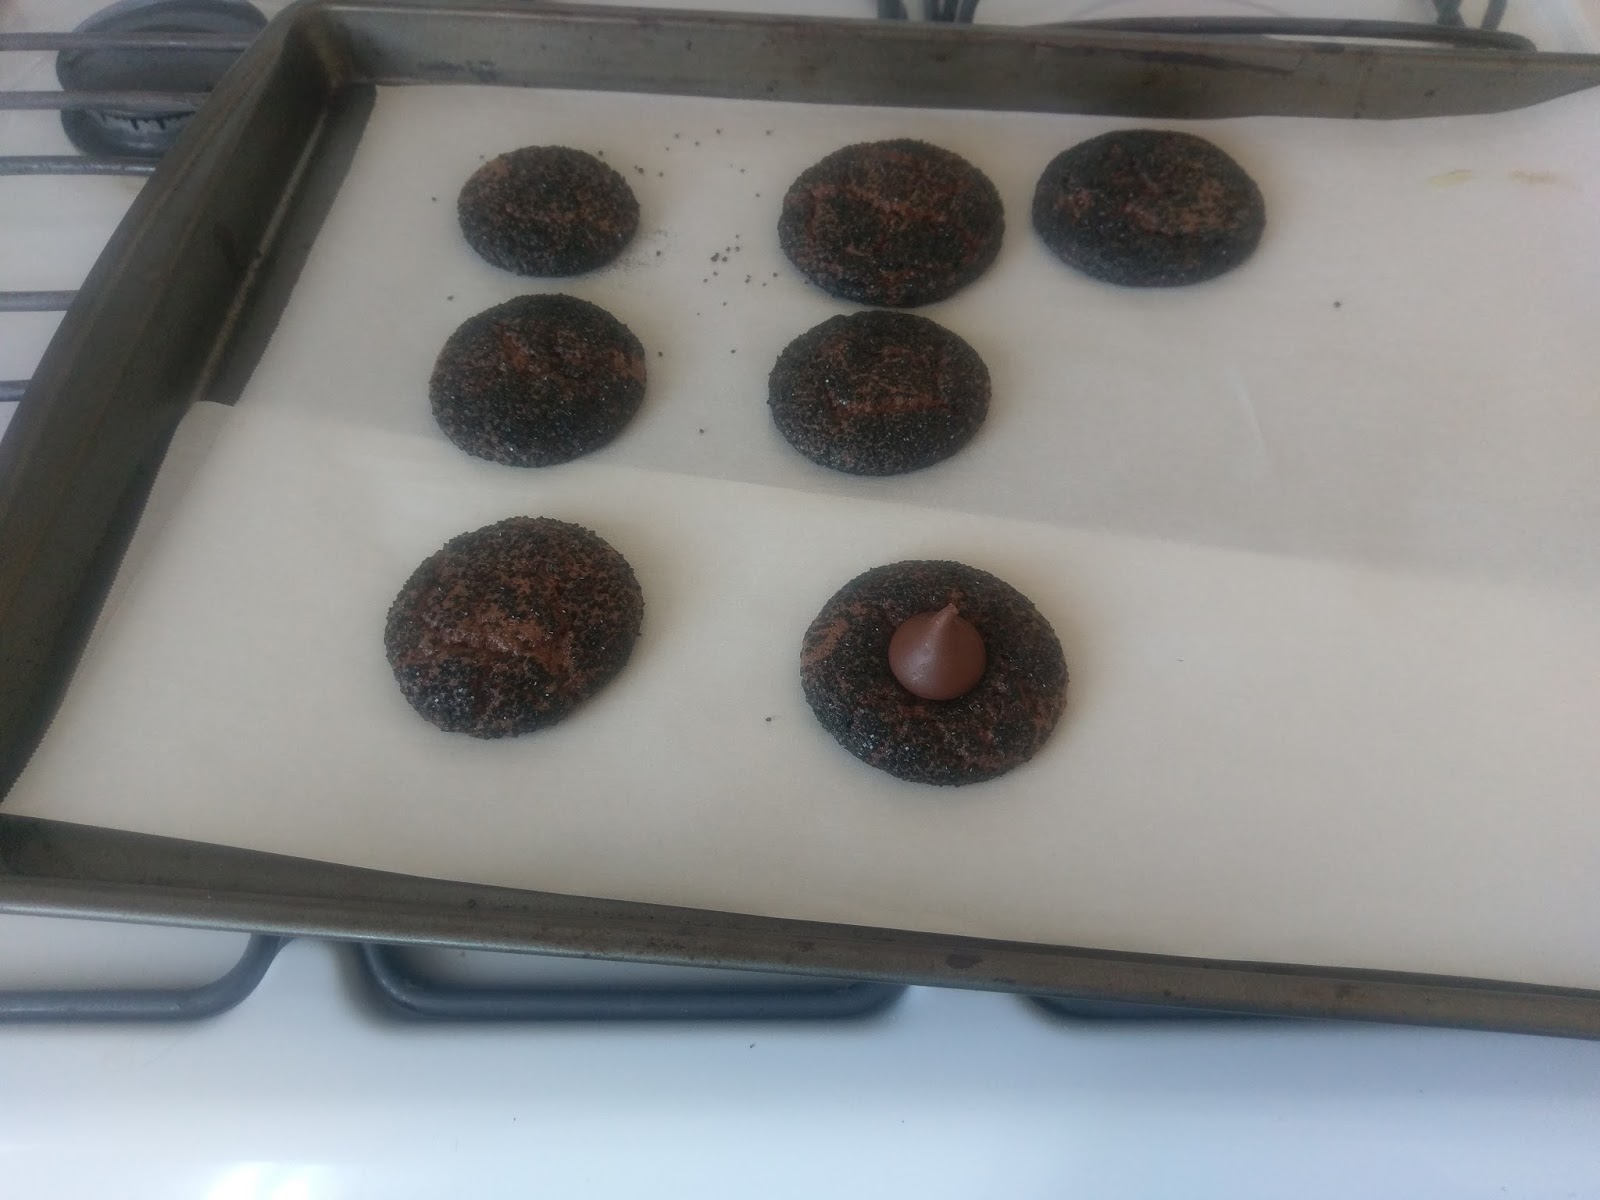
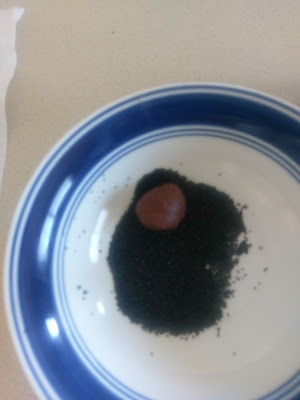
Place far apart so they have room to expand. Evil takes up a lot of space. Once set wide apart on your baking sheet, pop into the oven for 7-8 minutes. Take these 7-8 minutes to unwrap all of the Hershey Kisses to save you time later. I may be evil, but I am efficient.
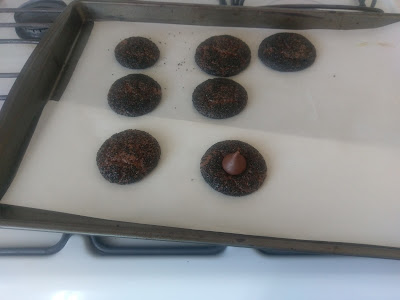
So perfectly round. I was honestly a little worried these would be a goopy mess, but thankfully I was wrong. This is one of the only cases of me being wrong on record that I do not really mind. Carefully remove the tray from the oven and add in one Kiss to the center of each cookie. Place back into the oven for 4 minutes. While these four minutes are taking forever, shape another 7 cookie dough balls and roll into your second glitter sprinkle color choice.
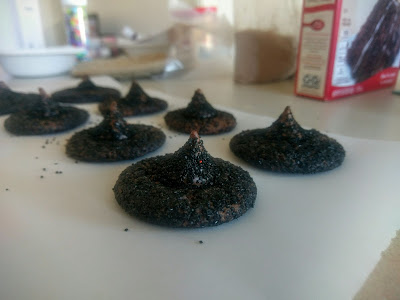
Are my hands still stained black from sprinkles? Yes, but I like the decaying corpse look. Once finished cooking, carefully remove each cookie to a sheet of Parchment paper. Now add the other 7 rolled cookie dough balls back on to your baking sheet and pop into the oven for 7-8 minutes. The second you do that, take your finished cookies and roll the tops of each Kiss carefully into the bowl of glitter again. You could opt for a different color here, but I like the monochrome look. I found the easiest way to top the Kisses in glitter sprinkles was to place them one by one into the bowl and sprinkle glitter on top of the cookie and press it gently into the Kiss to get it to stick. They’re pretty malleable, so no worries if you misshape. Just fix it back in place. By now, you should be ready to roll your final 7 dough balls into the final color of sprinkles.

The purple was my favorite. Vikings, baby. Don’t even get me started. While your final batch bakes, be sure to quickly roll the tops of the second batch in the second color of sprinkles. You want the Kisses to still be a little melty so things will stick. Be sure to dunk your final batch in sprinkles when done baking.

These three colors together make me giddy with spooky delight. While your cookies are all done and working on cooling, whip up your frosting colors. I went with neons that would really pop and match my skull decorations. I took 1 tablespoon of frosting, plopped it in a bowl, dyed it one color, and loaded it up into a piping bag with a small round tip (#3). I repeated for my other two colors. I do suppose a plastic bag with the corner barely snipped would work almost as well in this case if you’re without piping tips.
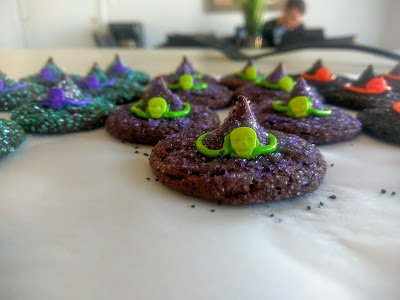
I think Winnifred might actually like these hats. Once COMPLETELY cool, simply hold a cookie in your hand and trace a circular border in your preferred color around the Hershey Kiss. Make a small mound of frosting where you complete your circle. This will work as the glue for your skull buckle. Gently place him, or her, who knows, I’m no anthropologist, into the frosting mound. Repeat with the other cookies/colors and finish up!
Congratulate yourself on not eating any of the raw cookie dough by downing about three of these at once. That’s normal, right? Told ya, easy as pie and just as tasty. Now that I know how to use cake mix to make cookies, I plan on going full mad scientist here in a few weeks when we move. Again. Because this is what happens in the military. Our time in Albuquerque may unfortunately be coming to an end soon, but I still have one crazy Halloween cake up my sleeve before we go, so be on the lookout for that. Until then, I will continue to bide my time by staring longingly at the Sandia mountains out my window and soaking in every ounce of cool weather (along with my inner monologue: “Oh look, another glorious morning. It makes me sick!”). Because when November comes, we’ll be sweating it up in Florida. I’m going to have to continue to watch Hocus Pocus nightly just to remind myself I am not crazy, and fall really is a thing that exists, just not in the south. I also have to remind myself I’m not crazy because Thackery Binx is also McGee from NCIS, and this makes no sense to me. The moment I realized that about ten years ago was a very confusing time for me. I think I need a cookie to soothe the pain. ‘Til next time, my fellow eaters!
“I smell children…” -
PUMPKIN ALL THE THINGS!
I need to be stopped. We’re literally one day into October, and I’ve already crammed as much pumpkin-related food into our pantry as humanly possible. It’s not just a pumpkin spice thing. I refuse to consider myself basic just because I love pumpkin flavor in general. I own no Uggs. I do not wear leggings as pants. Not once in my life have I uttered the phrase, “I can’t even.” I just happen to share one commonality with the aforementioned, usually bleach blonde, vest-wearing basic white girls: pumpkin is life. Fall has always been my favorite season, and I’m practically crawling the walls that all my Halloween decorations are in storage down in Florida while we’re here in Albuquerque. I thought I could manage to go one year without decorating, but if I don’t get to a Halloween store fast, the bloody decorations around my house will be real because my head is going to explode. Since I can’t decorate yet, you better believe I’ve been eating my weight in pumpkin food instead…hence this week’s blog. I figured it would be highly appropriate for me to share my latest creation with you, on this, the first day of October. Such a grand month deserves a grand dessert: the cinnamon chip pumpkin cookie bar.

A mouthful to both say and eat. This glorious creation actually came about as a botched experiment. Like the best mad scientists, I do suffer the occasional pitfall. But instead of my creations becoming feverishly psychopathic monsters, they just turn into alternative forms of dessert. Sugar is still sugar, after all. I was attempting to make actual cookies out of these, but cookies without butter. In my insane quest to make healthy dessert, I opted for applesauce over butter. I figured if I could make brownies out of only bananas, cocoa powder, and peanut butter, I could do anything. Hubris looks about as good on me as Uggs, so when my cookies refused to let go (literally, they were too sticky to roll even with Pam-coated hands), I decided cookie bars are just as good and somehow more appropriate for fall. Possibly for dunking into warmed cider. I don’t know. This was my train of thought, and it’s not always last stop at Logic Express.

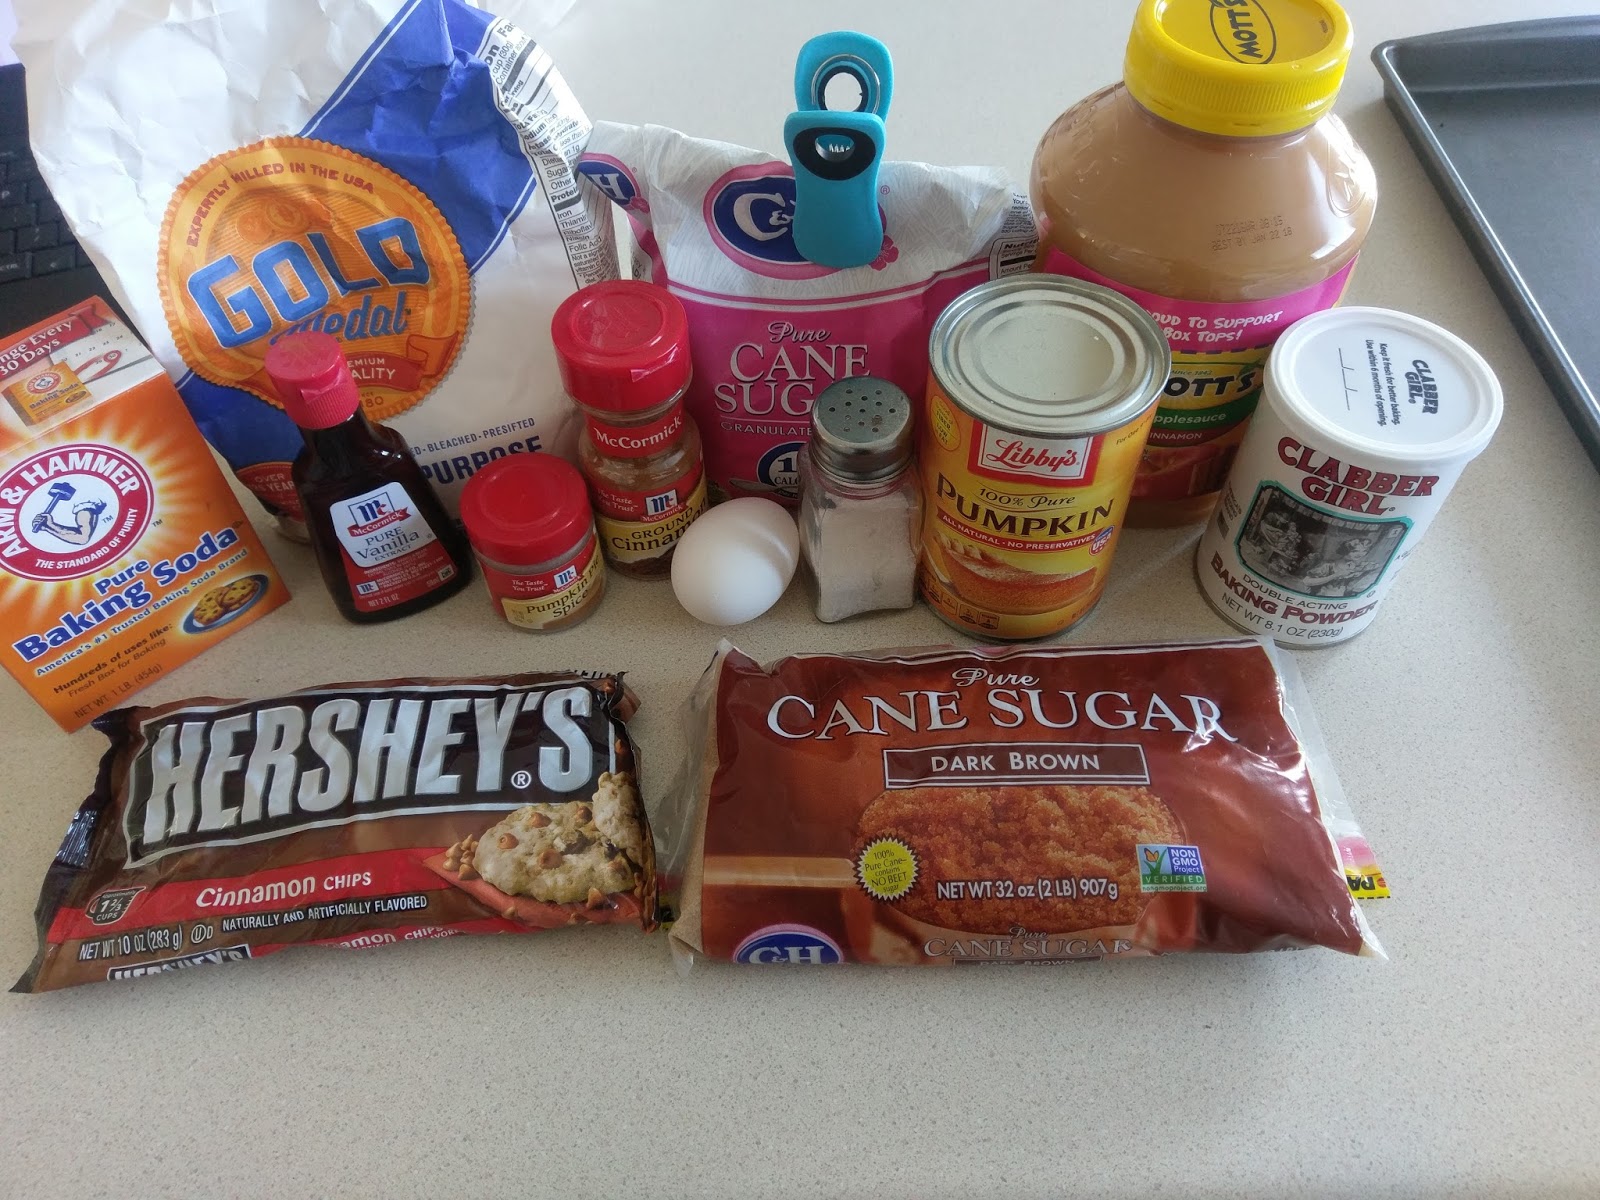
Lots of wonderful things happening here. So yes, the ingredient list is a bit on the longer side here, but I can promise you, totally worth it. I nearly wept because my house smelled so perfectly like fall while these were in the oven. Few things move me to tears: a movie where the dog dies, finding a pair of PERFECT shoes but they don’t have my size, or not being able to access Blue Bell ice cream..that’s literally about it. Trust me when I say these cookie bars can make even the biggest grudge holder against pumpkin (like my husband) crumble under the amazing taste. I found and adapted this recipe to make it healthier. Gather up:
- 2 1/2 cups of flour (you can try whole wheat to make even healthier)
- 1/2 tsp baking powder
- 1 tsp baking soda
- 1/2 tsp salt
- 1 tsp cinnamon
- 1 tsp pumpkin pie spice
- 3/4 cup of applesauce (I used cinnamon for an added boost of fall flavor, I say unironically)
- 1/2 cup of sugar
- 1/2 cup dark brown sugar, packed
- 3/4 cup Libby’s canned pumpkin
- 1 egg at room temp
- 2 tsp vanilla extra
- 1 cup Hershey’s cinnamon baking chips*
- A small bowl of cinnamon and sugar mixed together
*Cinnamon chips are like a white whale…they only exist in the places you refuse to go. Namely, Walmart. Since our closest Walmart is literally one of the most dangerous Walmart’s in the entire country (step it up, Detroit), I opted to order my cinnamon chips from Amazon.
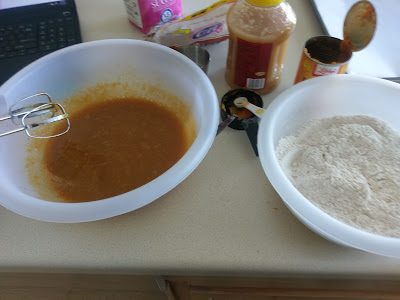
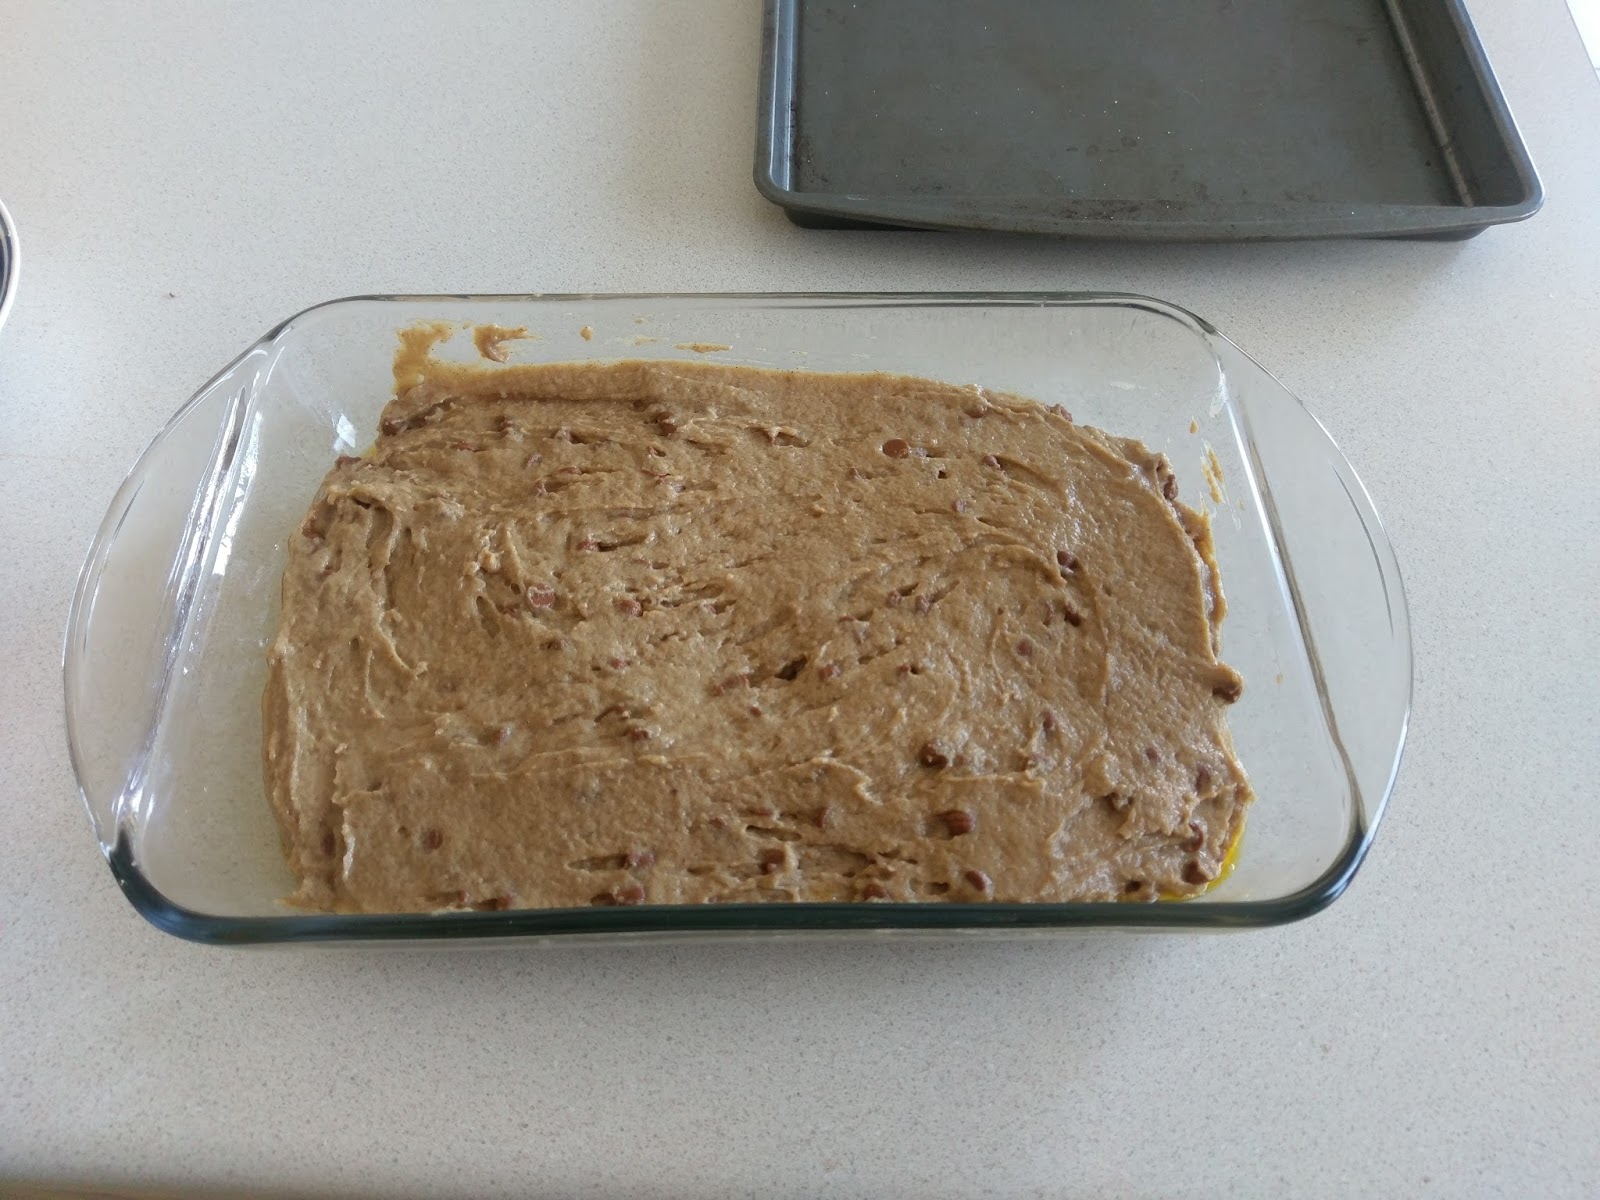
I also contemplated ordering another stand mixer…one month til I’m reunited with my own. Grease a 9×13 or 8×11 pan and preheat your oven to 350. In one bowl, mix together the flour, baking powder, baking soda, salt, cinnamon, and pumpkin pie spice; set aside. In your stand mixer bowl, dump the applesauce and both sugars. Blend for 2-3 minutes. Then add in the pumpkin, egg, and vanilla extra and blend well. After this, dump half the dry mix into the wet and blend well. Add in the rest of the dry mix, and stir until just incorporated. By hand, fold in the cinnamon chips.

Dump your cookie batter into the prepared pan and smooth out. 
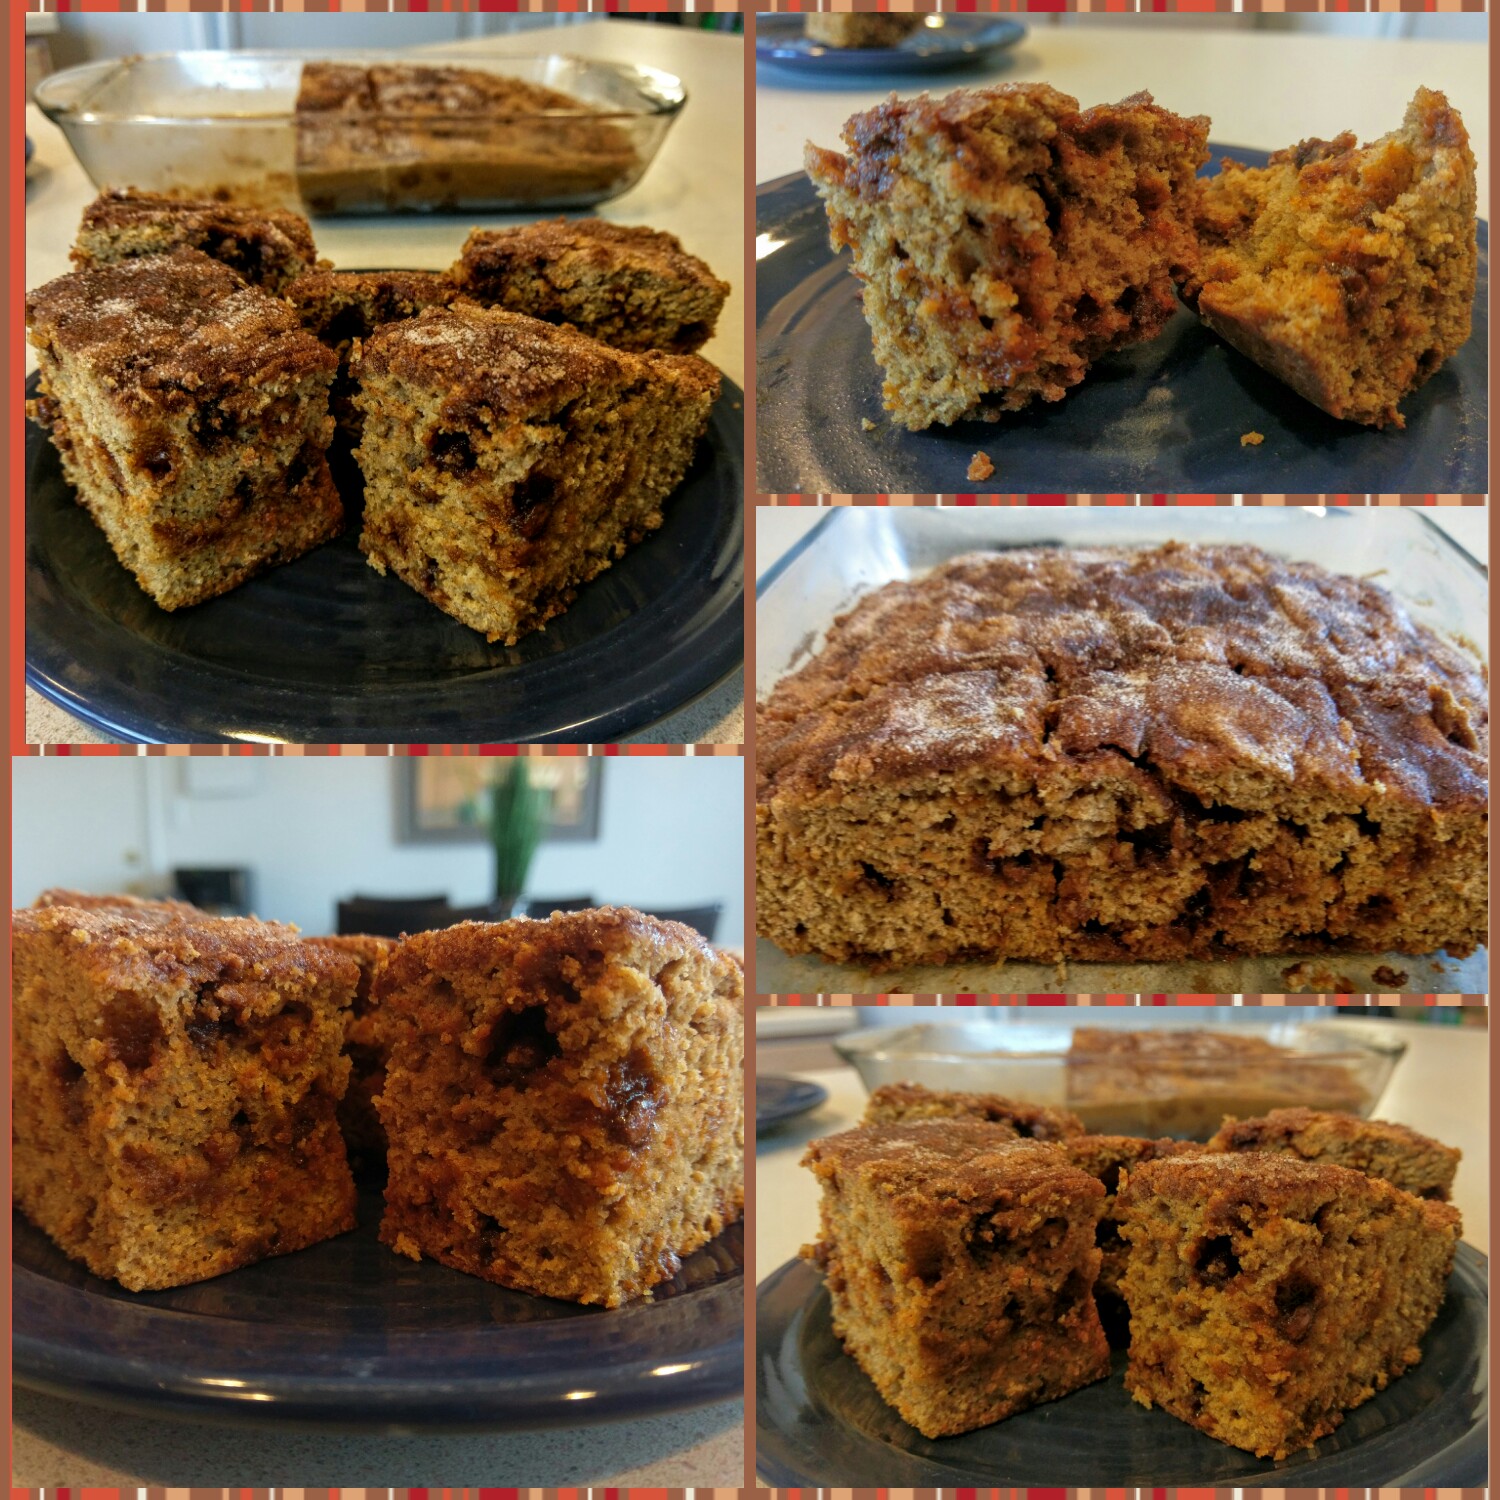
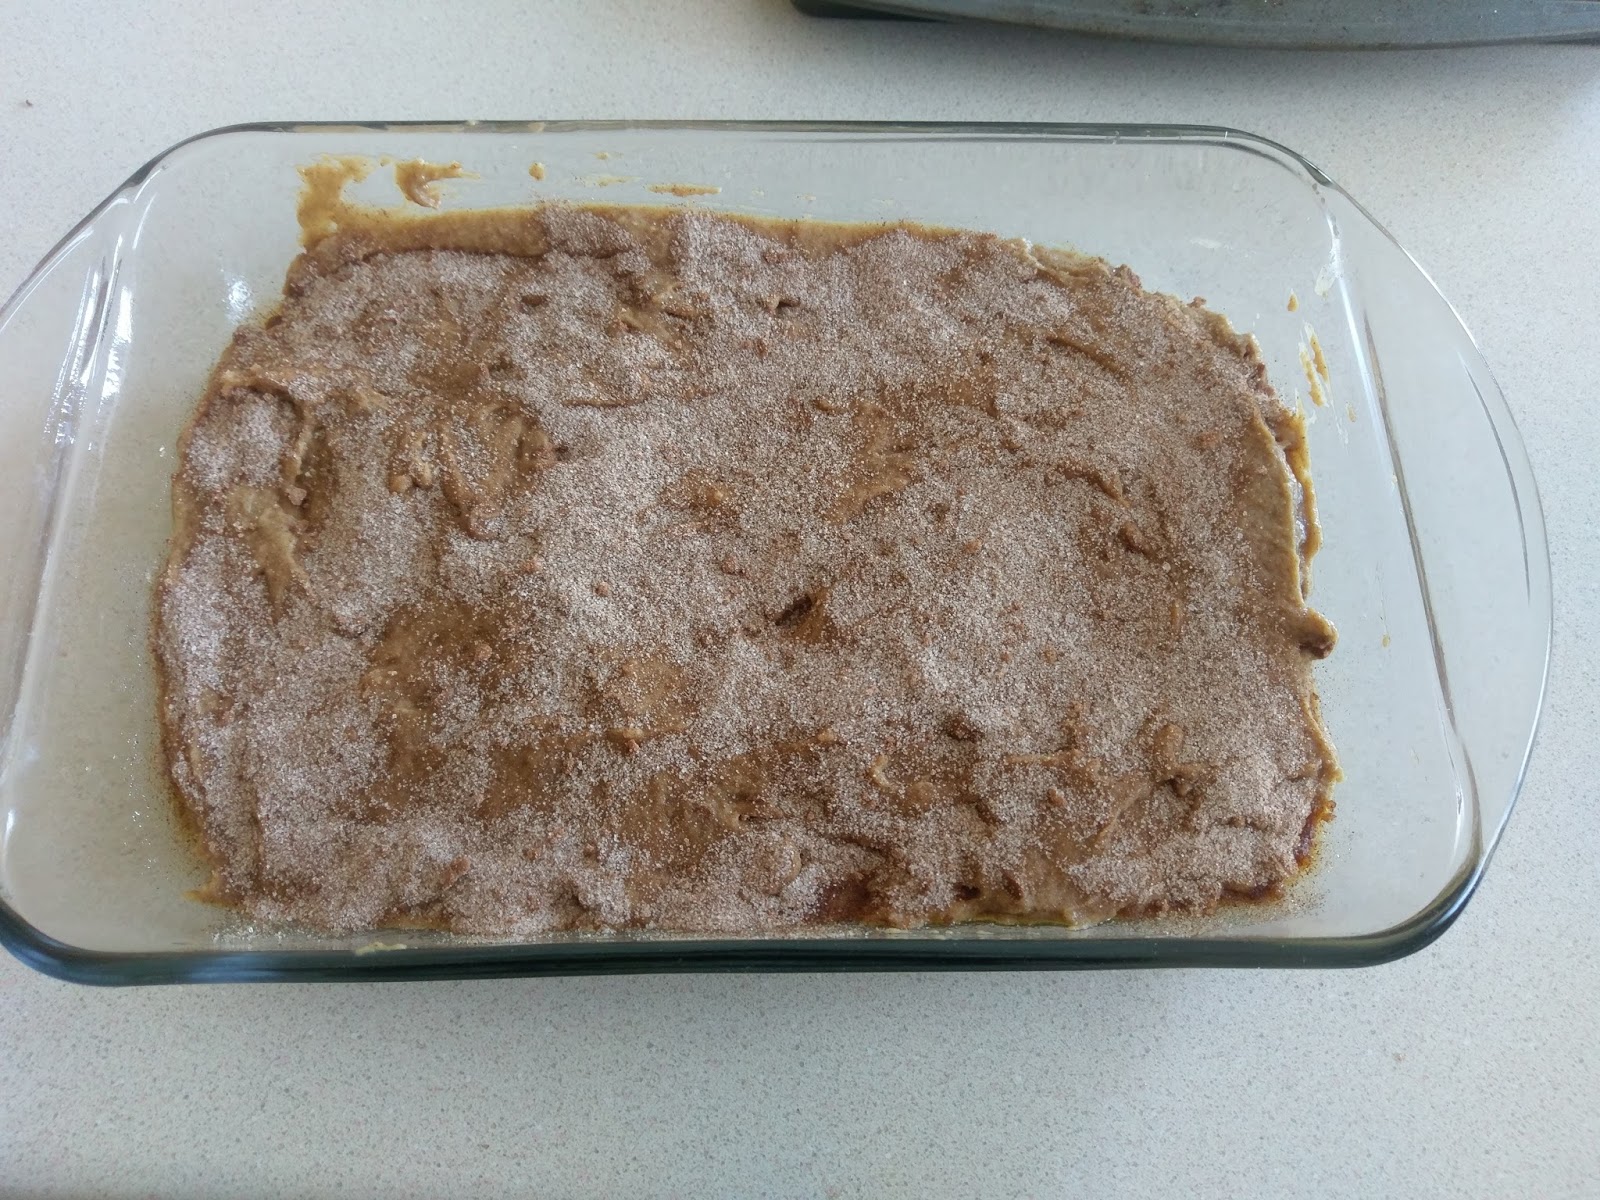
Finally, sprinkle the cinnamon-sugar mix on top. Bake in the oven for 32-35 minutes or until set but the top springs back to the touch. I tried to do the toothpick test here and kept freaking out because it seemed like it wasn’t cooking in the middle…only to realize I had been piercing through melted cinnamon chips. Check me out basic white girls, I’m a natural blonde!! Let cool on a rack completely…I placed my bars into the fridge to set for 2 hours.

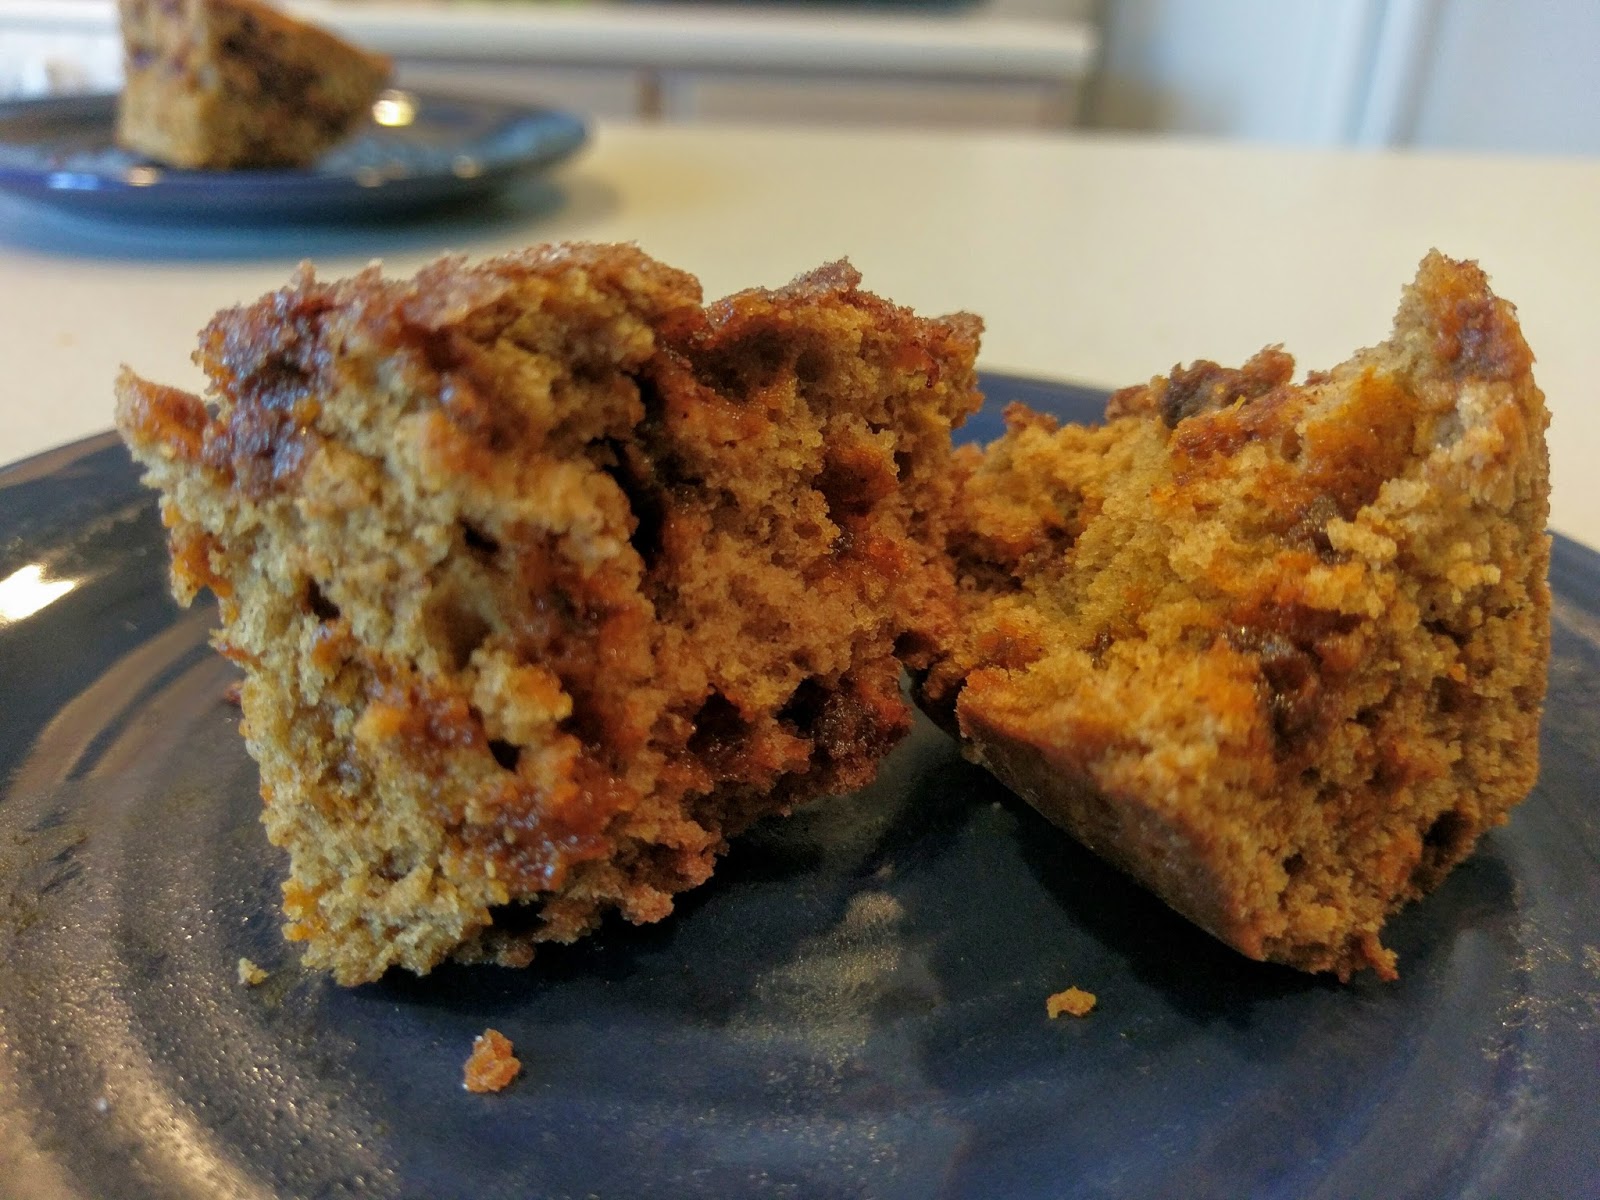
It wasn’t an easy decision, but I wanted to eat them after dinner and not at midnight. While the wait was long and arduous, the smell in my house remained something I will be proud of until the day I die. I ended up slicing these into 16 bars. Each bar clocks in at 180 calories. You could use larger or even smaller slice to adjust the calorie content. But 16 bars are plenty, and this way, we get to warm them in the microwave and top them with vanilla froyo because it’s still a little hot out, but dammit, cold desserts are timeless in my book.
Not pictured: all the froyo. These cinnamon chip pumpkin cookie bars are one of my favorite new inventions. Will I make them again? Probably in November. And again in December before winter solstice. The outside crisps nicely like a cookie should, but cooking them in a pan allows the insides to literally reach new heights and become a fluffy cloud of fall delight. Poetic imagery aside, they are so damn good. The pumpkin flavor is not overwhelming, and the cinnamon chips are totally worth how ridiculously hard they are to find without potentially being stabbed. I’m hoarding away the few chips that remain in the bag like some sort of rare delicacy. No shame. Blended together and baked to perfection, you can’t even tell butter wasn’t a part of the equation. Way to go applesauce, you’re so much more useful than just filler in a 5th graders lunch! I plan to come at you guys with a few more desserts this month to celebrate fall, and of course, Halloween. I’ve really gotta think hard to outdo myself from the past couple years of baking, but thank goodness I have these cookie bars to keep me going. ‘Til next time, my fellow eaters!

Know that my heart will go on. Thanks, pumpkin. -
But Are They Really Brownies?
I, like many of you, used to laugh at everyone that tried to make incredibly good-tasting, bad-for-you foods healthier. Cakes should be dense; brownies should be frosted; ice cream should be topped. How in the world is replacing delicious ingredients with things like fat-free applesauce and bananas ever going to work? But then one day, I decided that perhaps the root cause of never being able to lose those final three pounds (yeah, you know the ones) may or may not have something to do with the fact that I shovel copious amounts of cake, cupcakes, ice cream, and pie into my, well, pie hole. Appropriate nickname for the mouth aside, this obvious correlation was still startling. As much as I hate the meal known as lunch, I figure nixing it in favor of half a pint of Blue Bell after dinner wasn’t something that could ever fall into the “I really know how to adult” category. If you told me as a child that as an adult I could eat all the dessert I wanted to, when I wanted to, I probably would’ve stopped listening after that. Never mind the “obvious consequences” speech. So here we are, years and many pant sizes and Jillian Michaels workouts later, trying to shed the final pounds standing between me and a year-round bikini body. I’ve gone to extreme lengths. Like buying froyo instead of Blue Bell, using calorie-counting apps, and replacing bad-for-you ingredients with healthy ones. That being said, you’d never know by looking at these chocolate peanut butter brownies that there’s anything remotely healthy about them.

But they’re made of stupid healthy ingredients. And only three of them, to boot! That’s right. I don’t even really need to give you an actual ingredient list, although I will because clearly that’s why we’re all here. Or maybe you’re just checking in to make sure I haven’t lost my dessert-loving mind. Maybe I have, but those last three pounds went along with it, so I still consider it a win. Now, do these actually taste like brownies? This is a yes and no answer. They are dense, they are moist, they are sweet, they are chocolately, but they are also peanut buttery, so that makes a bit of difference in flavoring between plain chocolate brownie and chocolate peanut butter brownie, hence the name; if you hate peanut butter and chocolate, I have a substitution for you that will make these taste like plain chocolate brownies. See below. But even WITH the light cream cheese frosting, one brownie tops out at only 200 calories! And that’s for 9 servings in a 9×9 pan. You could totally divvy these up into 12 servings and they’d only be 150 calories! Insanity!

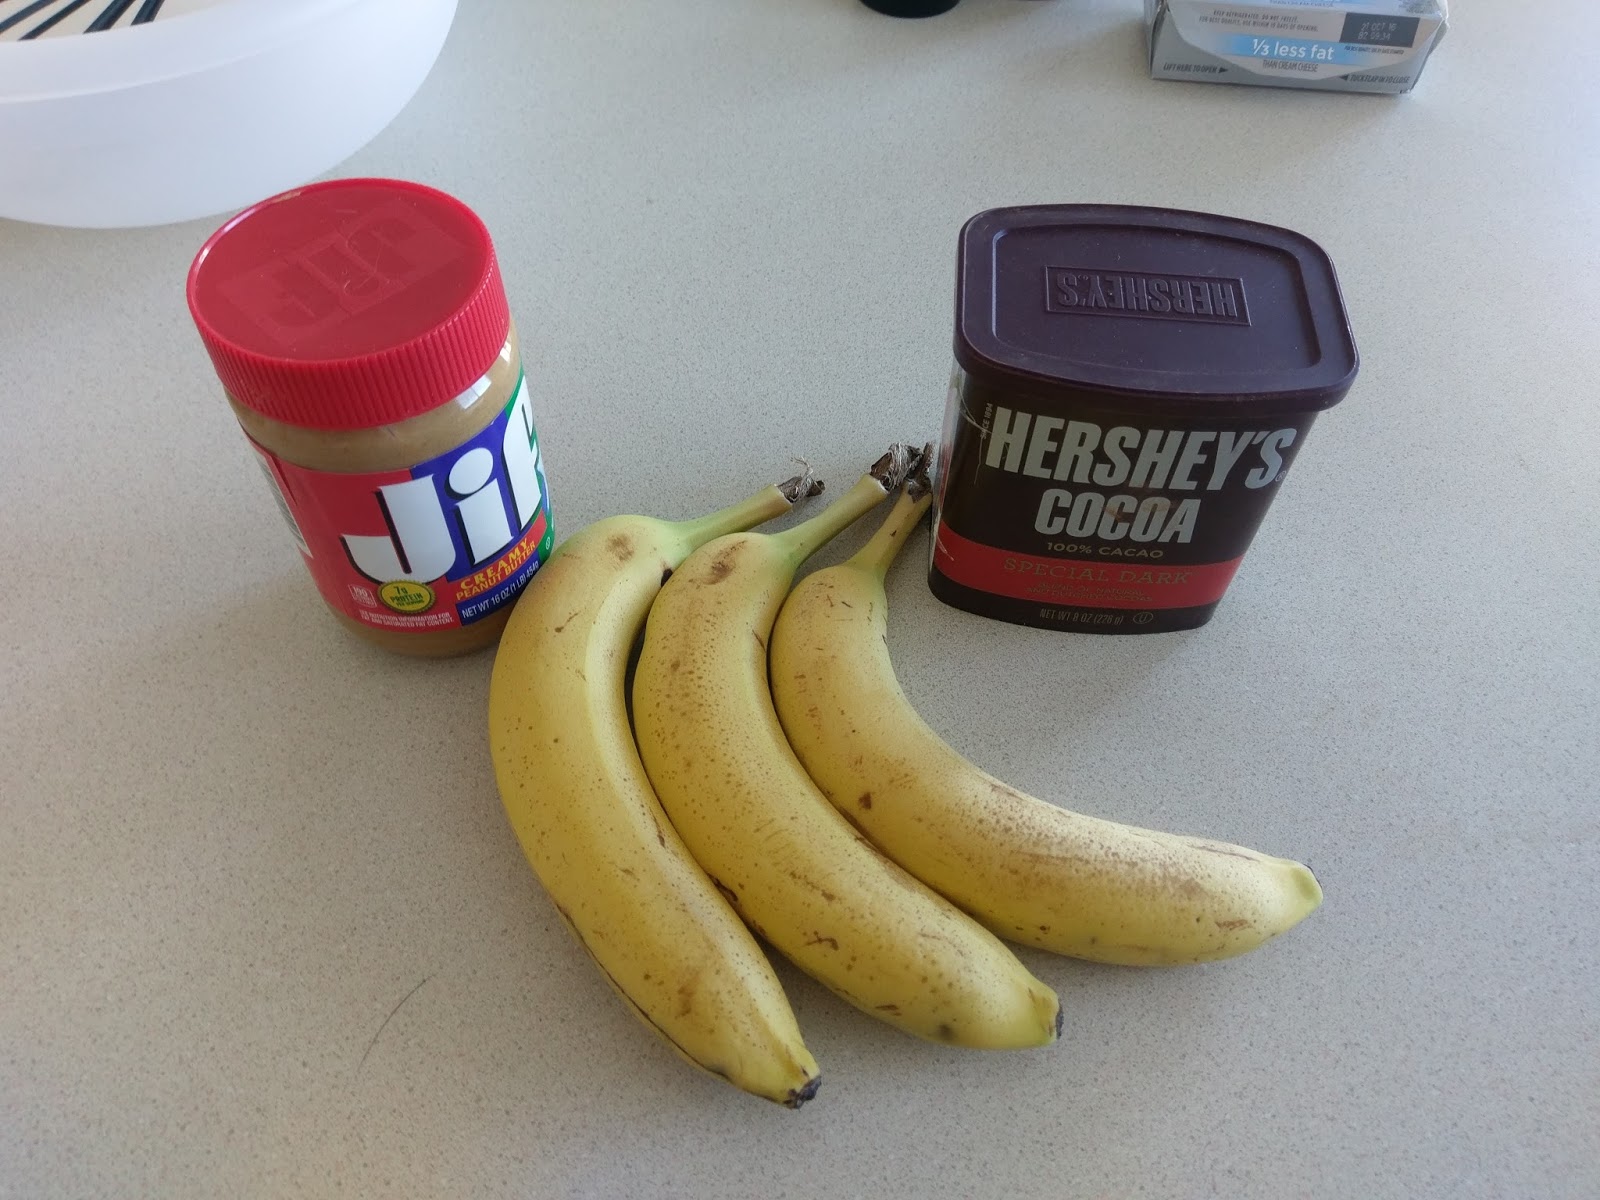
No, this can’t be everything? Oh, but it is. Ha, three whole ingredients. It’s so simple that it’s actually borderline ridiculous. This is hands down the easiest dessert I have ever made, and you all know how much I love a good shortcut. All you need are 3 ripe to overripe bananas, 1/2 a cup of JIF creamy peanut butter (or Skippy if you hate your family), and 1/4 cup of dark cocoa powder.
Now, I’m quite new to the chocolate/peanut butter combo. I hated it throughout my entire youth, and then my taste palette grew into it as an adult. I know, I probably got the ordering there completely wrong, but what are you gonna do. If you have taste buds that die a little at the thought of this flavor combo, replace the peanut butter with almond butter. This will yield a classic brownie taste. I also have to avoid almonds because ingesting them gives me terrible eczema. Isn’t the human body wonderful? I think some itchy elbows might be worth it in this case though. This is definitely a keeper of a recipe, so I’ll load up on lotions and try it this way next time.
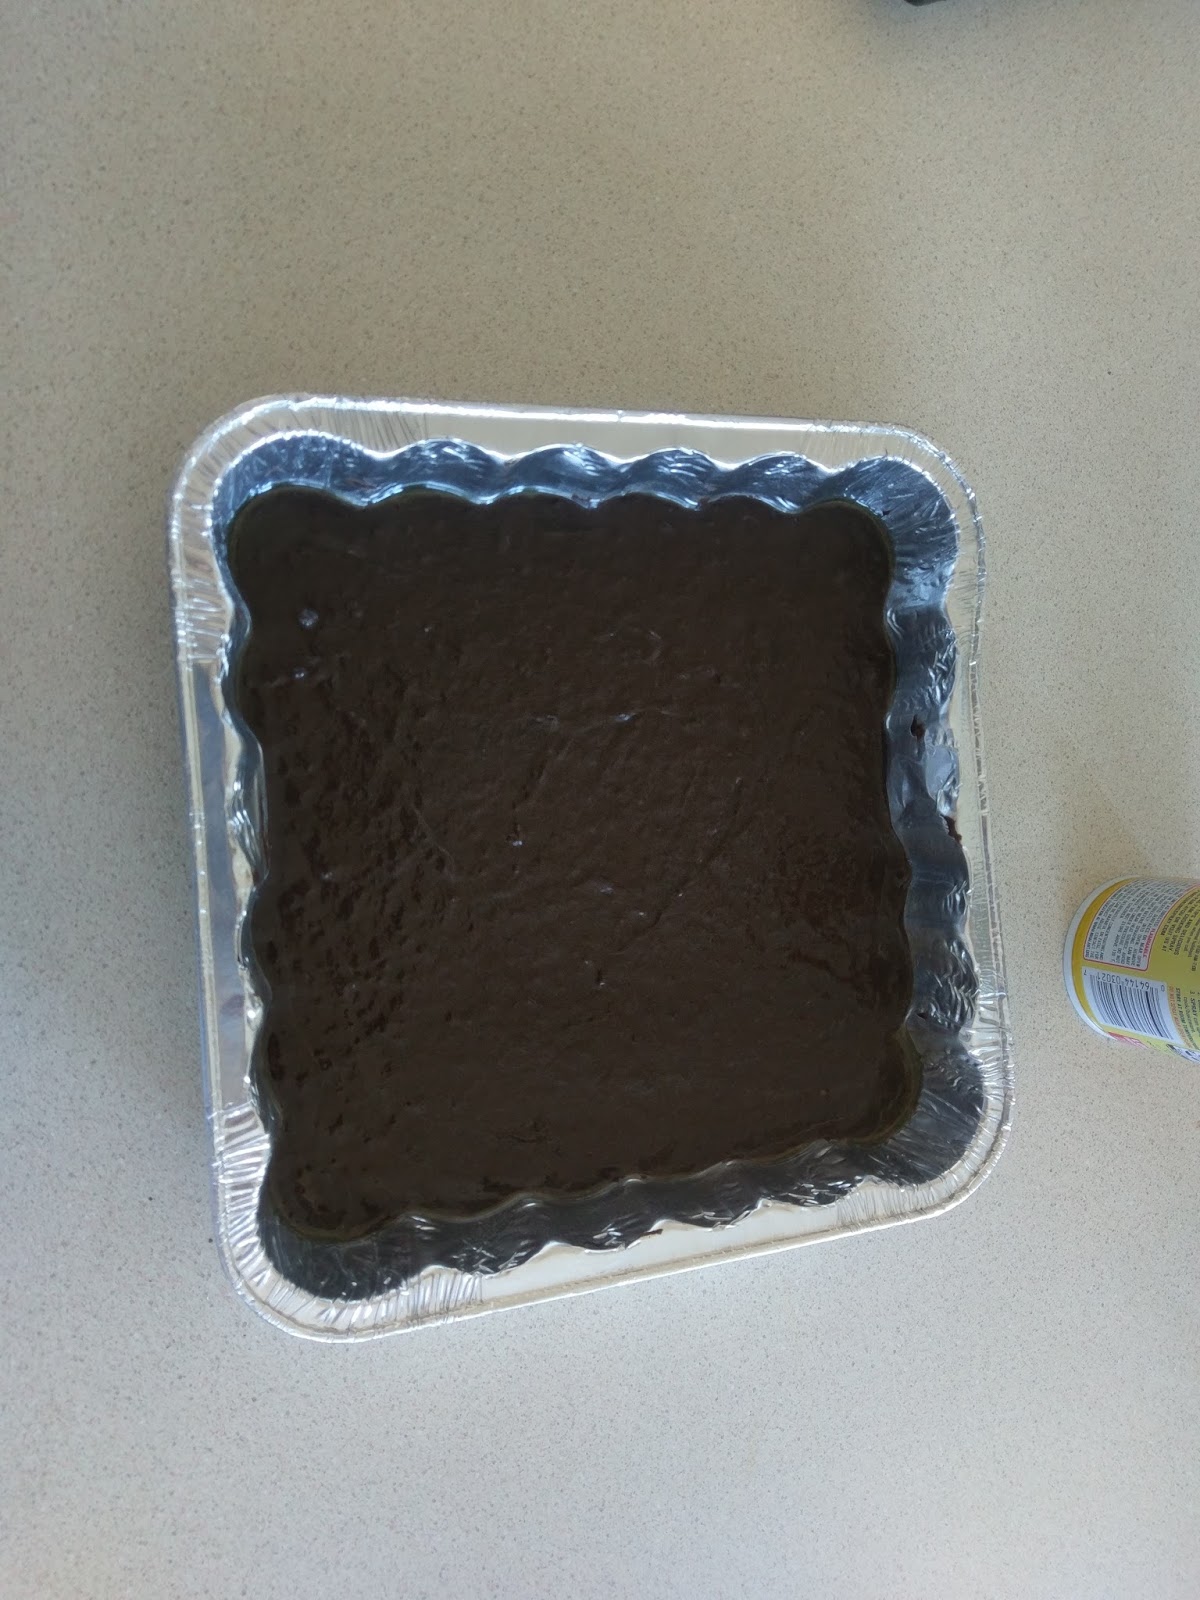
Back to the recipe and far, far away from discussing eczema while trying to sell you on food. Coat a 9×9 or 8×8 pan with cooking spray and preheat your oven to 350. In a large bowl or stand mixer, mash up the three bananas until completely smooth. Add in the cocoa powder and blend. In a small bowl, nuke your peanut butter for 30-45 seconds until melted. Add this to the cocoa powder and banana and mix for 1-2 minutes until completely smooth. Pour into your pan.

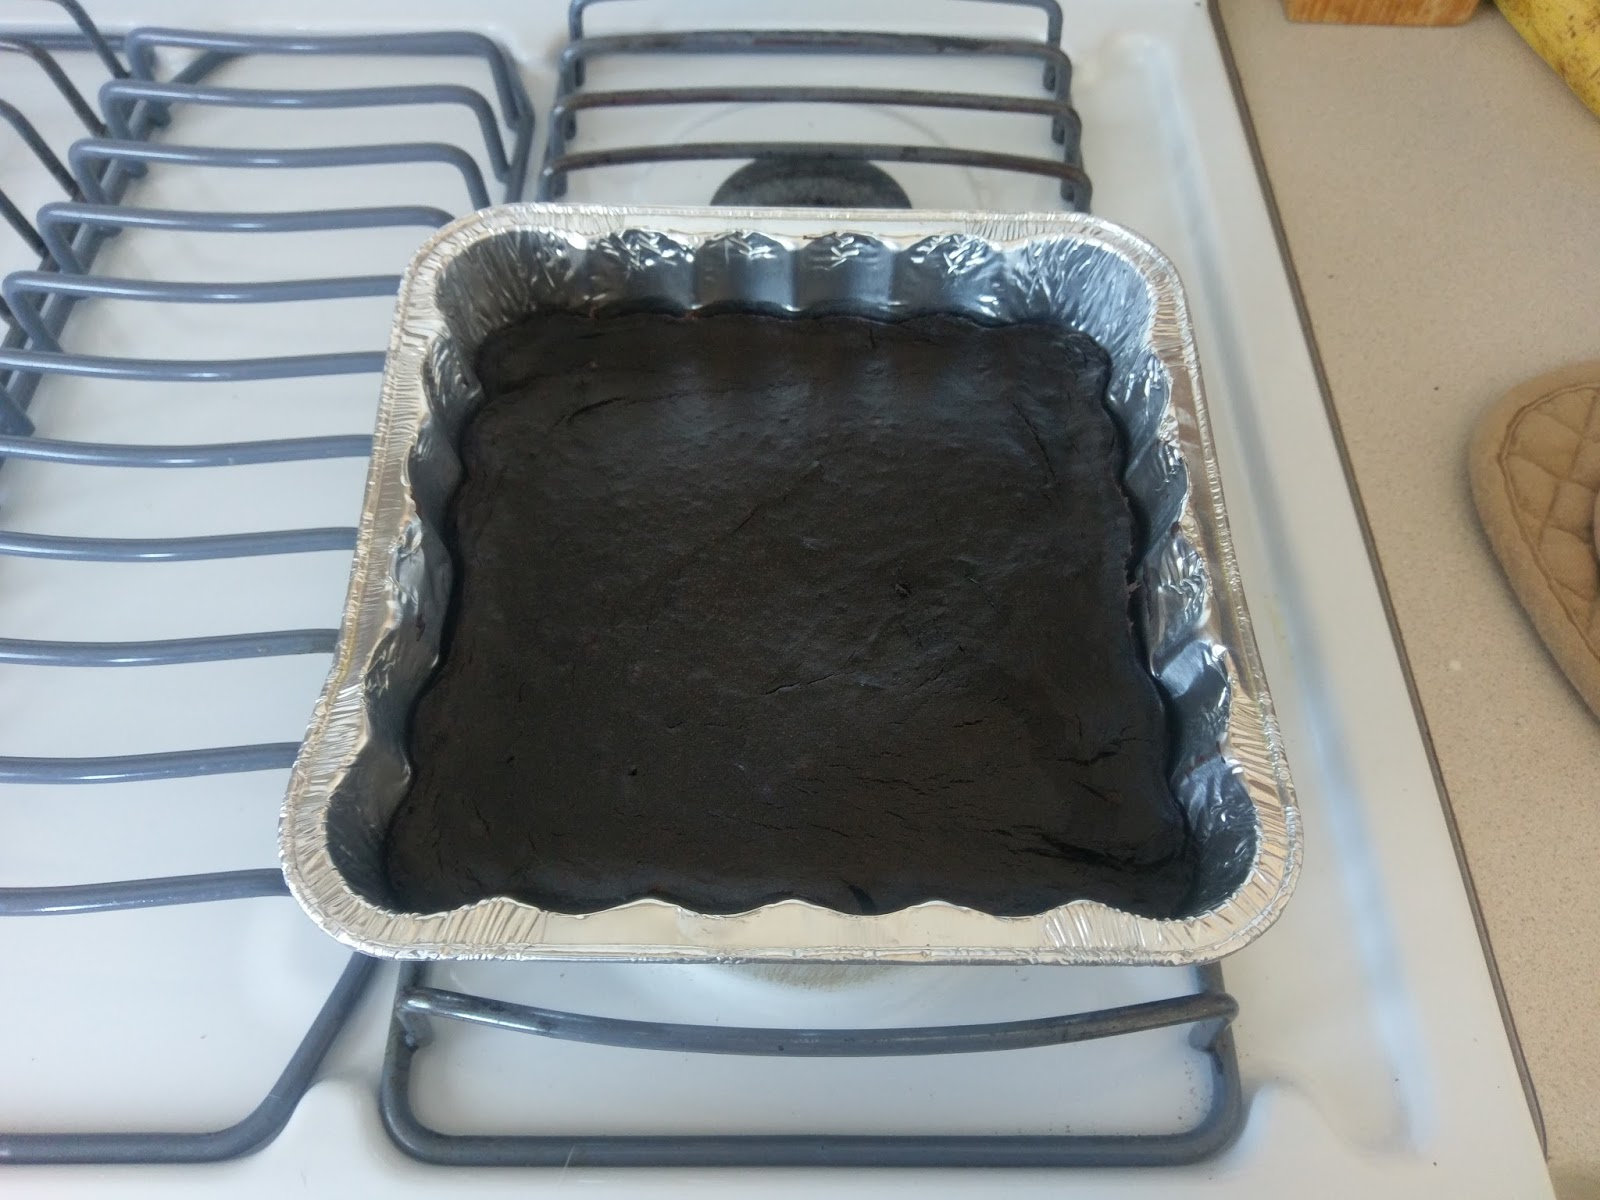
And forget to rotate photo. Bake time is a little harder to gauge here. Since there is no flour or sugar in these brownies, they’re not going to yield to a toothpick test. I baked for 25 minutes, until the top looked firm and set. You know, like my abs thanks to all this healthy eating we’ve been doing. I kid. Once set, I cooled for 10 minutes on a rack before moving to the freezer to finish because I’m impatient.

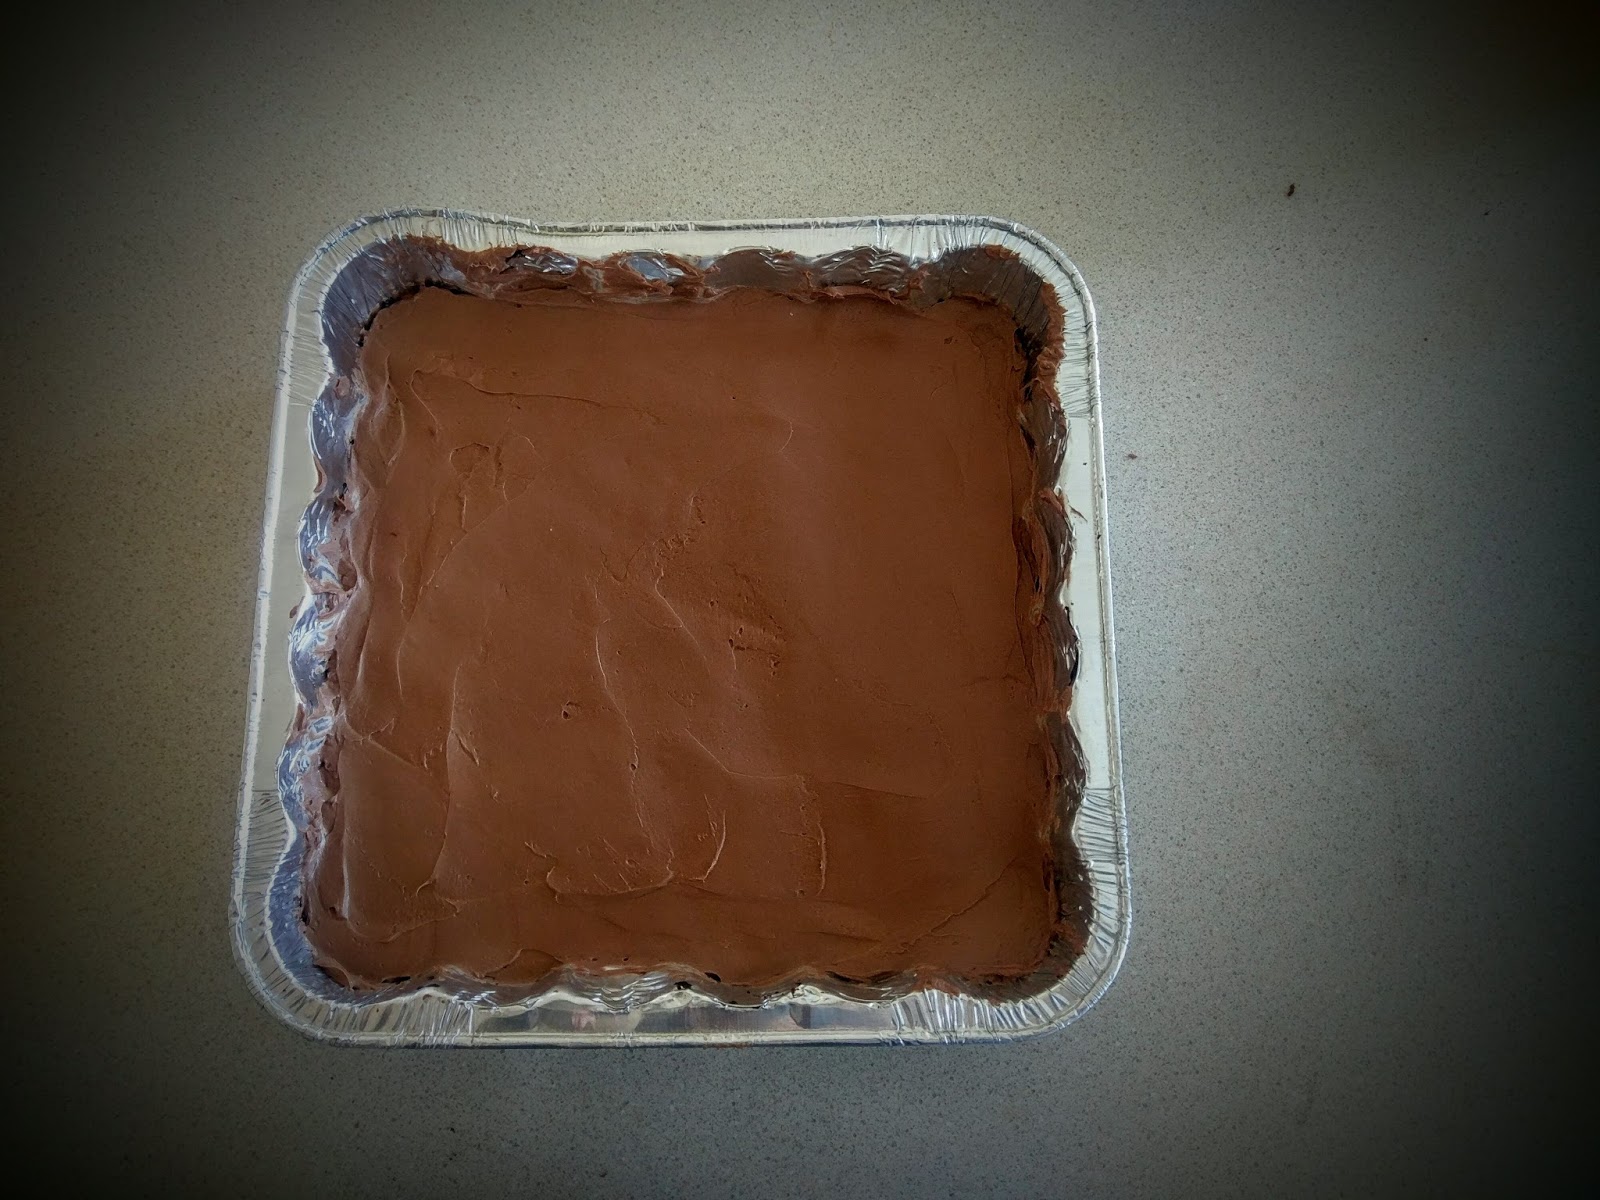
Hello, you firm devil. While the brownies are setting in the freezer, it’s frosting time. Now again, you can make some adaptations to cut even more calories out of this frosting. But even with a full-fledged, fatty fat fat cake, frosting is the most important thing in the world to me, so I refuse to go fat free. For my frosting I used one 8. oz. block of REDUCED fat cream cheese at room temp, 2 tablespoons of regular cocoa powder (not dark), 2 tablespoons of sugar, and 2 tablespoons of skim milk. I simply blended them all together.

Thick n’ creamy. As it should be for frosting, but not your thighs. Once the brownies are totally cool (in temp, not in an 80s reference), get a spatula and go to town. The frosting is thick, so if you need to heat up a metal spatula with hot water to get things smoothed out, go for it. Or, be an adult about it and just use sprinkles to cover up the unevenness.
Like so. Let’s have a talk. I am 29 years old and still not entirely sure what gluten is. I realize a lot of people in this world think they’re allergic to it, so I have good news for you if you’re one of these people. Upon my review, there is literally not a gluten to be found. I almost hate saying this, but if you’re a vegan, you could find fat free/no animal byproduct cream cheese and almond milk for the frosting, and even you could eat these. I will draw the line there and not ask any questions about what it must be like to eat granola for every meal of the day. Just know, here’s an alternative.

Seriously. Don’t actually tell me what a gluten is. Even if I’m allergic to it, I refuse to make anymore changes. Banana-based brownies are all I can handle right now. I love these brownies. But literally, the only thing that makes the dense, peanut butter and chocolate swirl of flavor taste even better? One scoop of salted caramel froyo. Yeah, I didn’t realize froyo could be obtained by the carton. As a lifelong Blue Bell-er, I had never really given it thought. I’ve also recently gotten into smoothies because of this little factoid…take my Blue Bell away, Albuquerque, and you’ve forced me to look into alternatives. Healthy ones. I refuse to give up flavor, though. But now I just find a way to refine it into lower calorie desserts. Because one scoop of froyo a top a chocolate peanut butter brownie is still under 350 calories. I think the simple act of looking at a bakery brownie or glancing a carton of regular ice cream adds up to at least 500 calories, and that’s not even ingesting any of it. So go crazy and try replacing the flours, sugars, and eggs with banana and nut butter of your liking. I promise you won’t regret it. If these brownies aren’t thick enough for you like a fatty brownie, just bake in a smaller pan or stack one on top of another, maybe with a little froyo filling. That’s the great thing about being a health nut. You’ll find the most creative ways to consume fewer calories! ‘Til next time, my fellow eaters!

I shall henceforth just refer to these as ‘weird brownies.’ …not to be confused with weed brownies, of course. They’re really brownies and really special (again, not that kind of special), but I’m still not sure how its possible. -
It's Still Not Technically Fall, so Here's a Final Summery Dessert
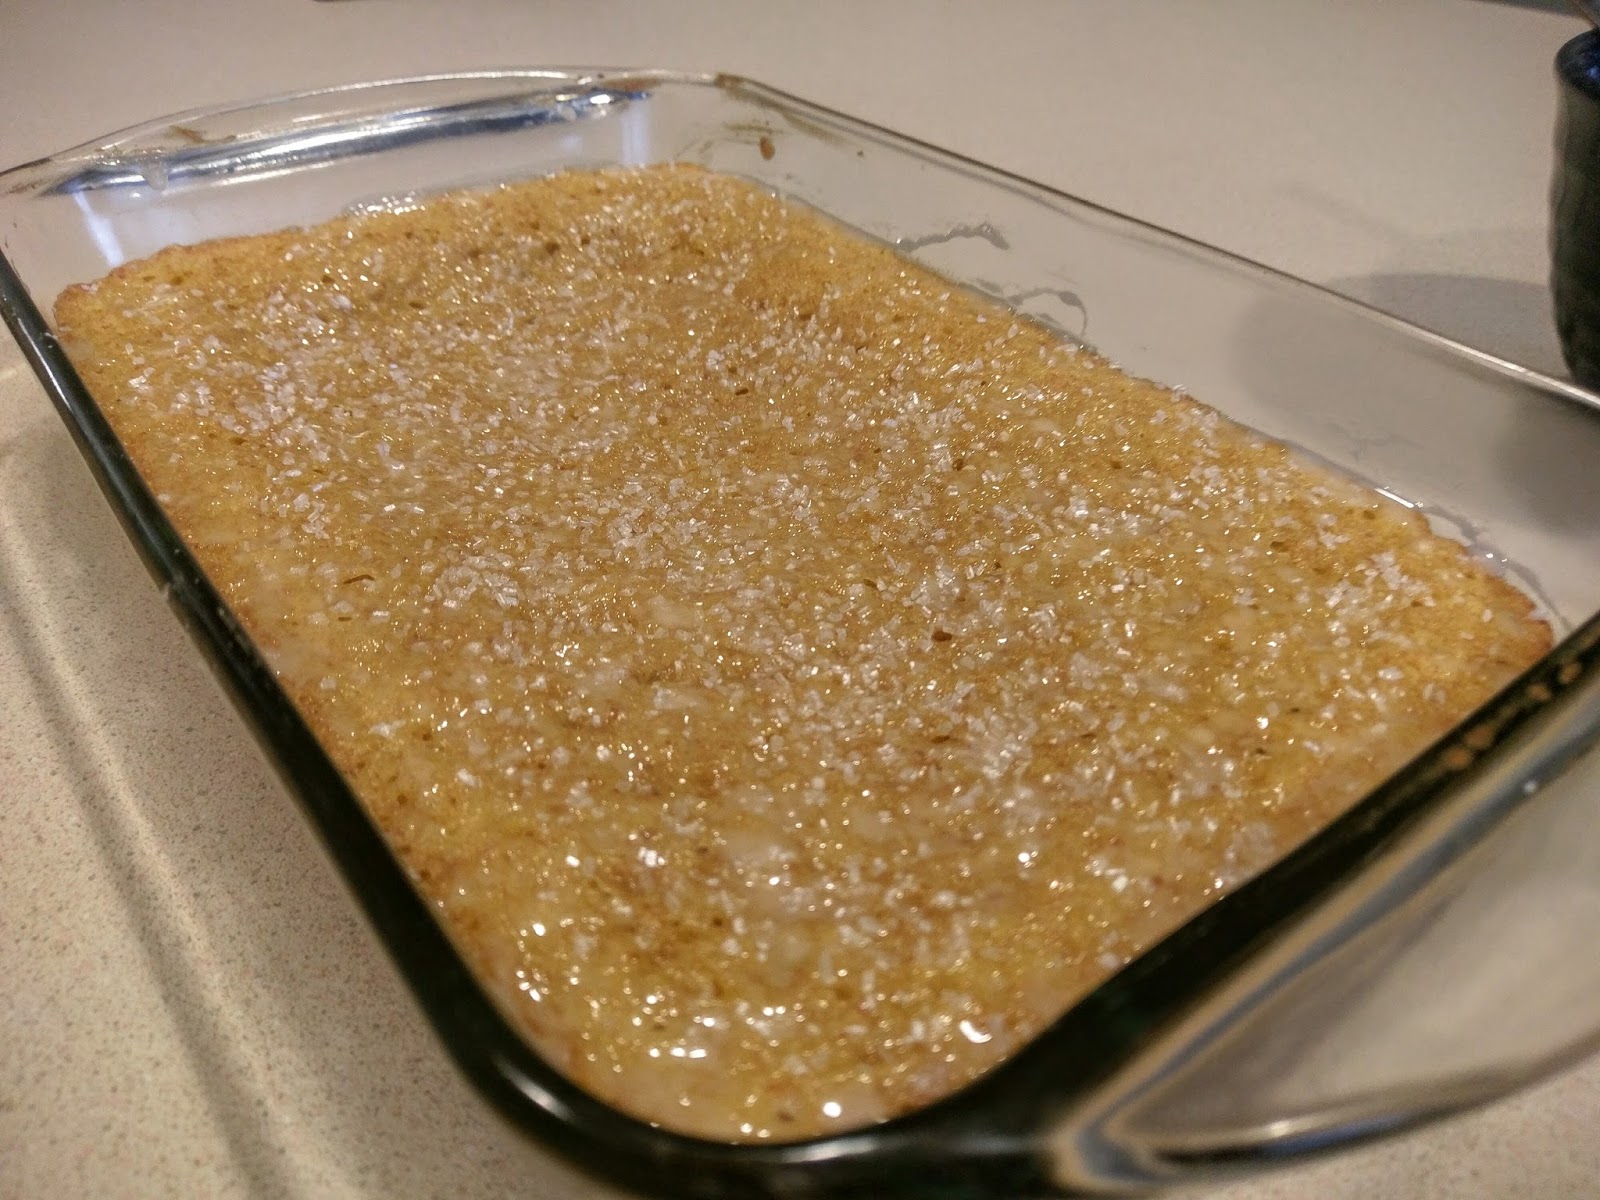
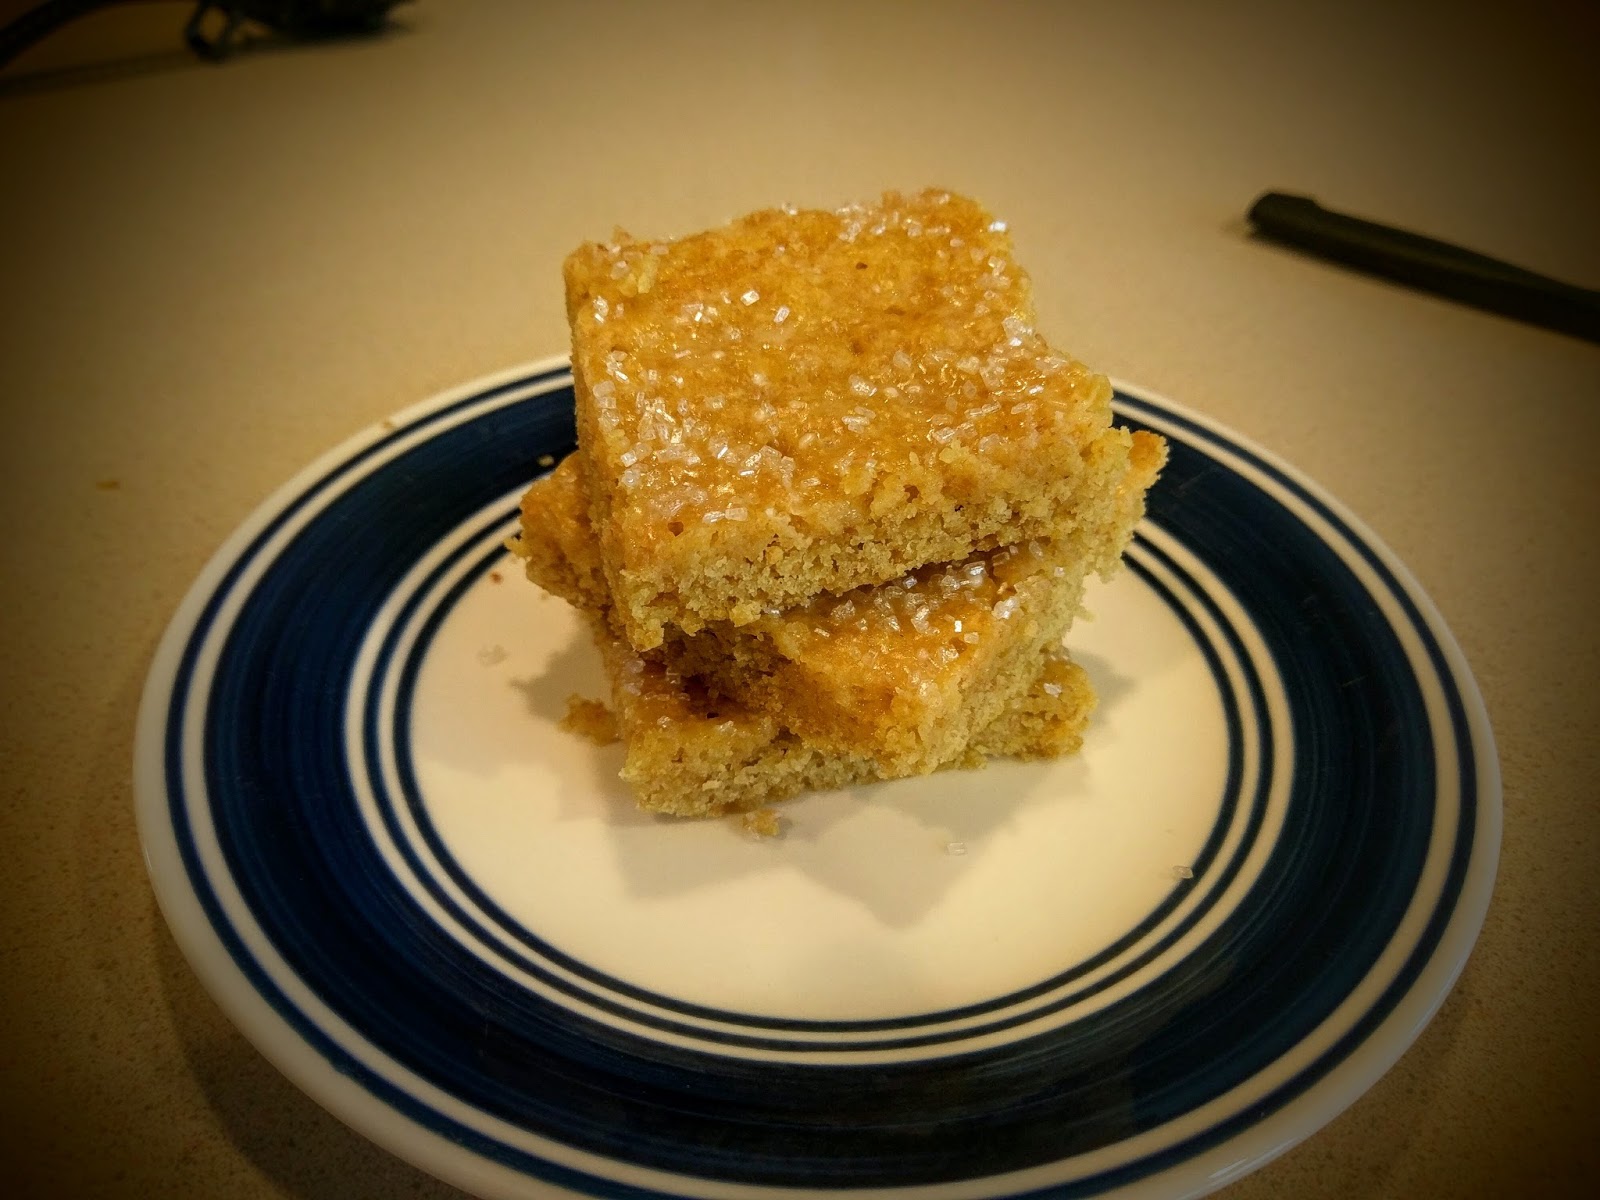
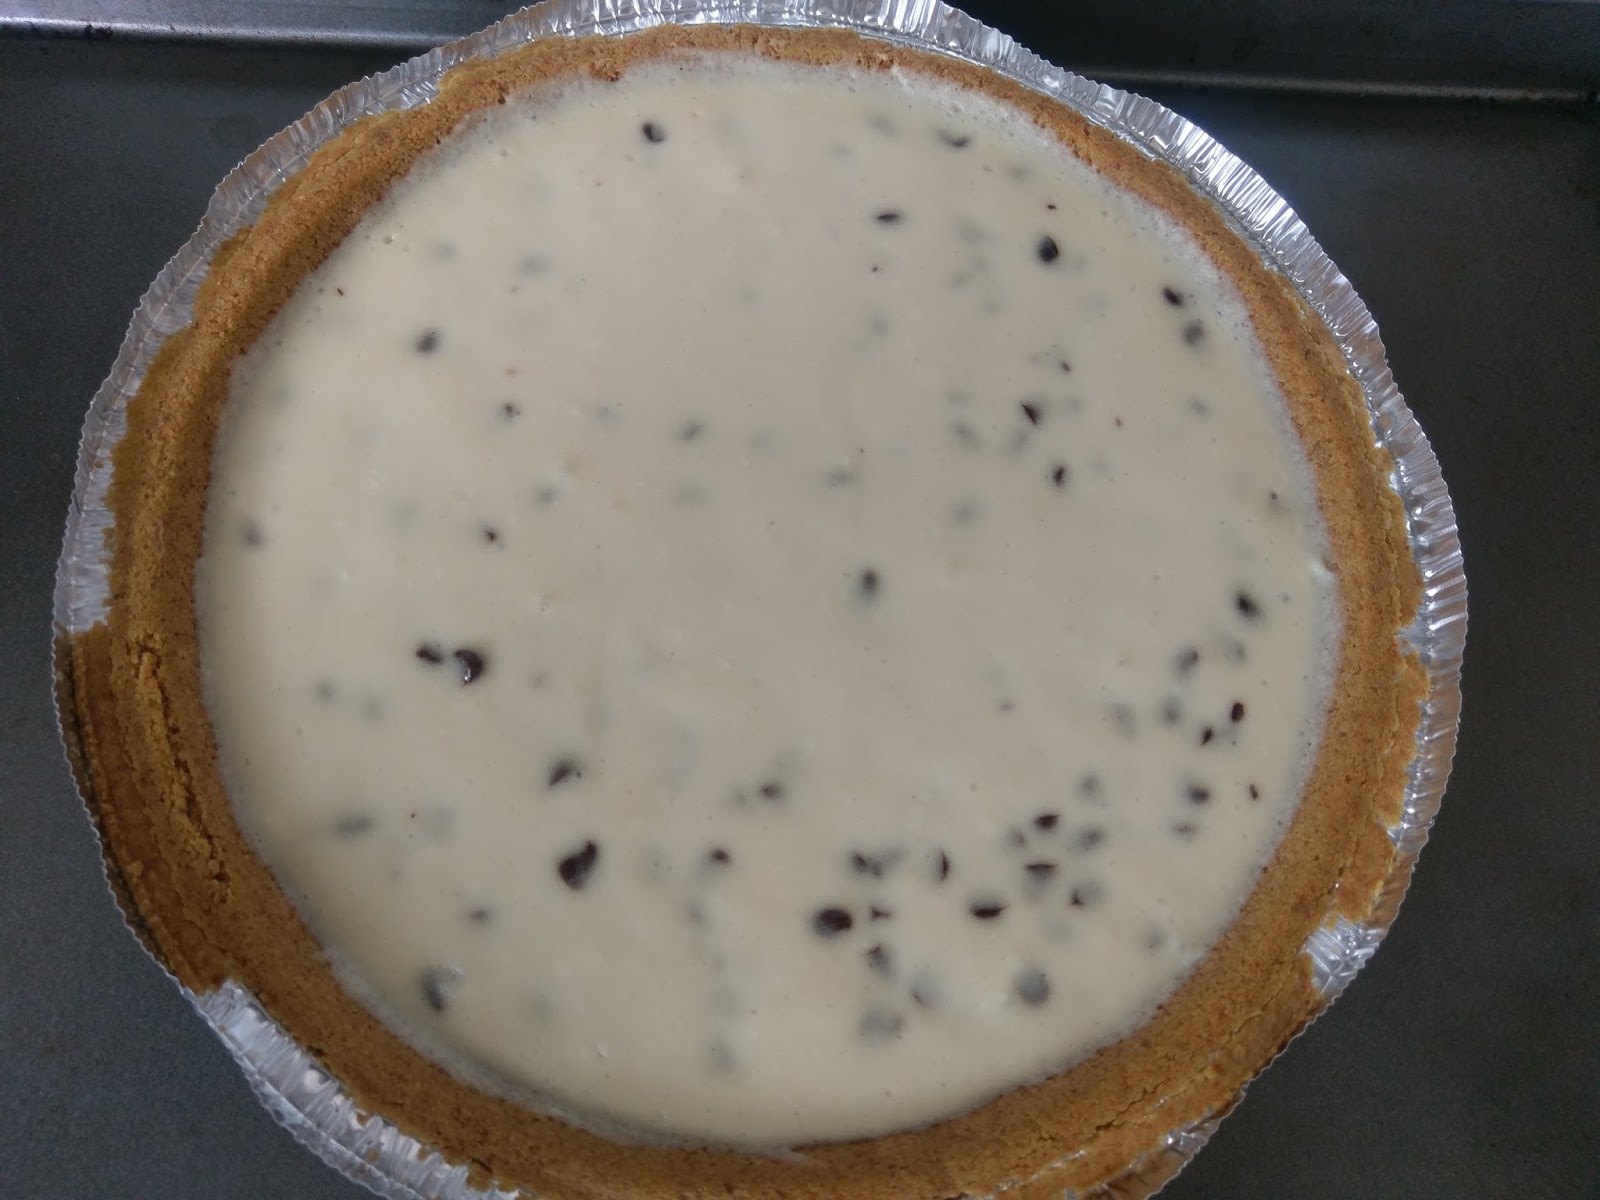
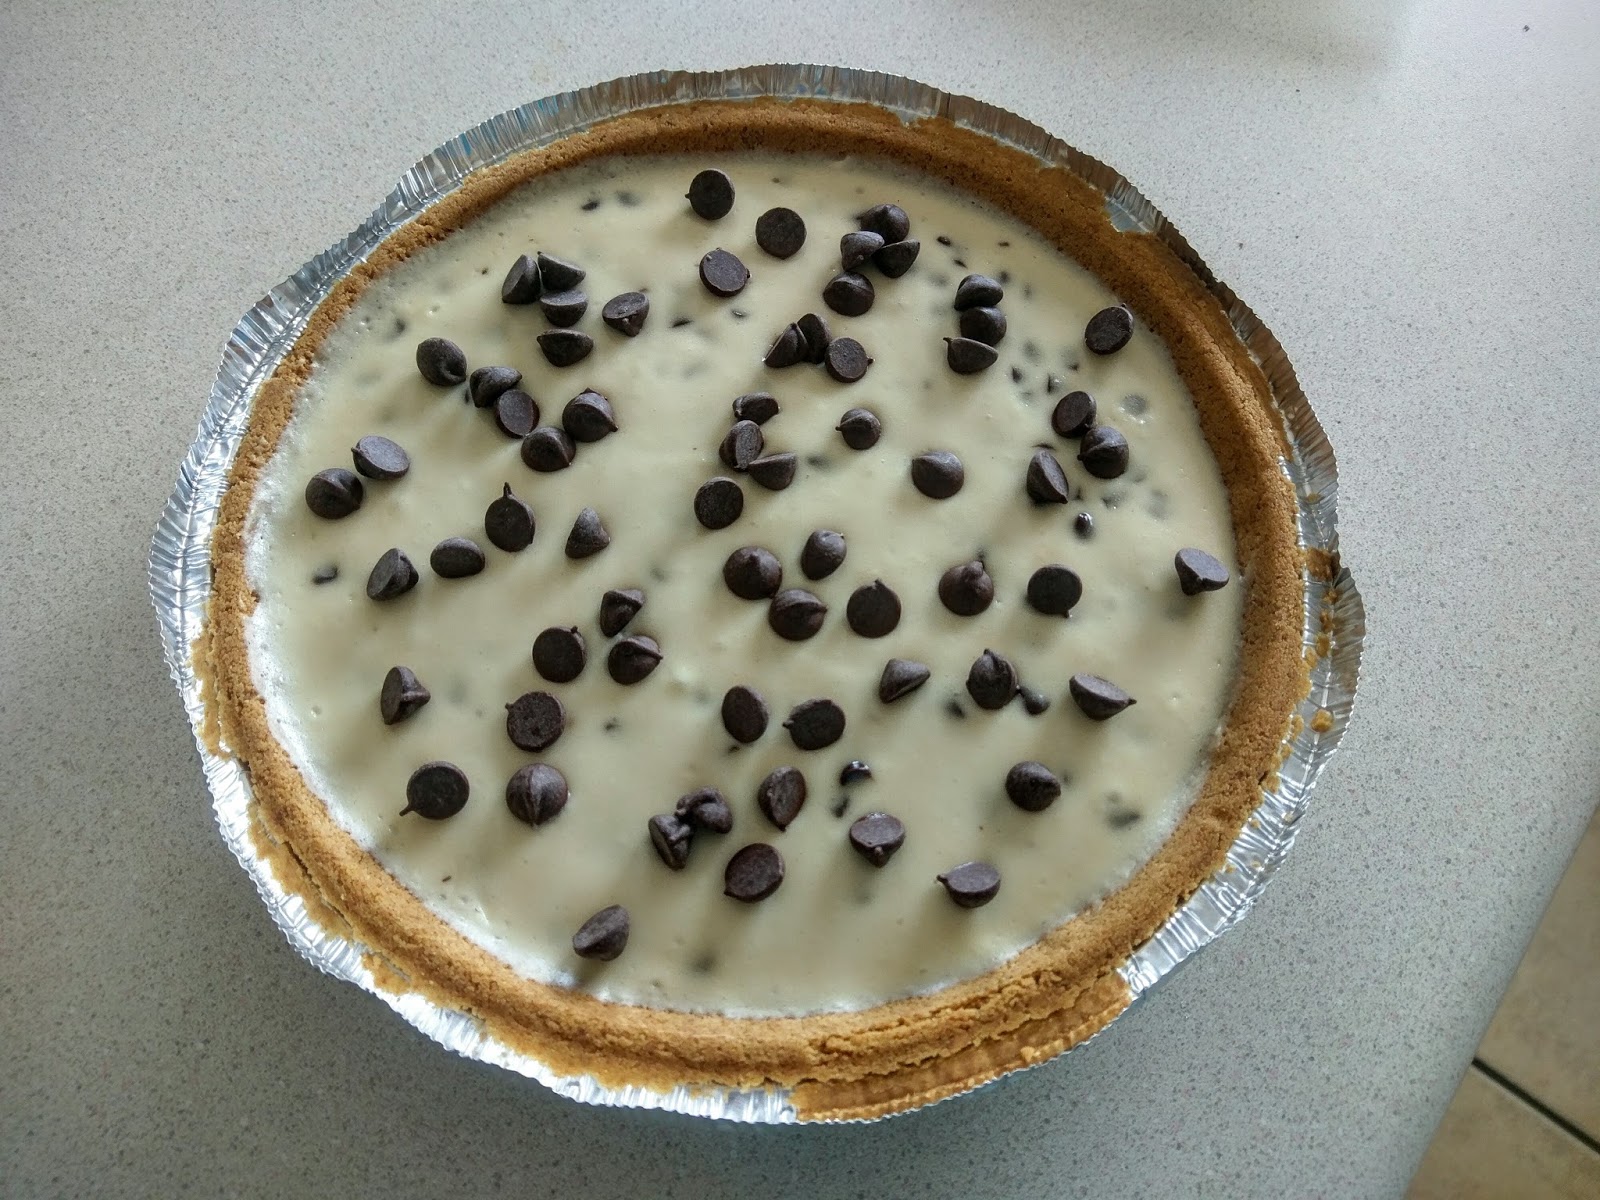
Ahhh inaugural Football Sunday. The air is crisper, the temps..cool..ish (c’mon, I live in the desert), and the mornings smell distinctly like fall. But sadly, it is still not really time for autumn for another couple of weeks. I promised my husband I would wait to go crazy with the pumpkin desserts until fall equinox. But after spending the day clutching my chest, shouting like crazy, and feeling cautiously hopeful (as a Vikings fan, this is just typical Sunday behavior), I really wanted to bake dessert. We’re on the precipice of my favorite season, and dammit, the house should smell like the inside of a Yankee candle store. I’m still trying to perfect a wide variety of healthier desserts because I want to have my cake and eat it, too, without also permanently becoming a stretchy pants person. I feel like pregnant women, competitive eaters, and most dads on Thanksgiving should be the only people allowed to wear such articles of clothing. I also still firmly believe leggings are not pants, but this is a rant for a whole other day. I digress. I’ve still been drooling over last week’s low cal chocolate chip cheesecake, so I’m continuing in the savory direction. I wanted cake-like consistency with a fruity taste and sweet finish that lingers on the tongue. I’ve also decided that my use of adjectives when describing desserts should place me as a front runner should cake sommeliers ever become an actual job. I needed to make a dessert that would give summer one literal bittersweet, final goodbye…so say adieu to a treat that will have you blissfully happy to bear farewell to flipflop season.

Footwear choices aside, I’ll eat any dessert in bar form.
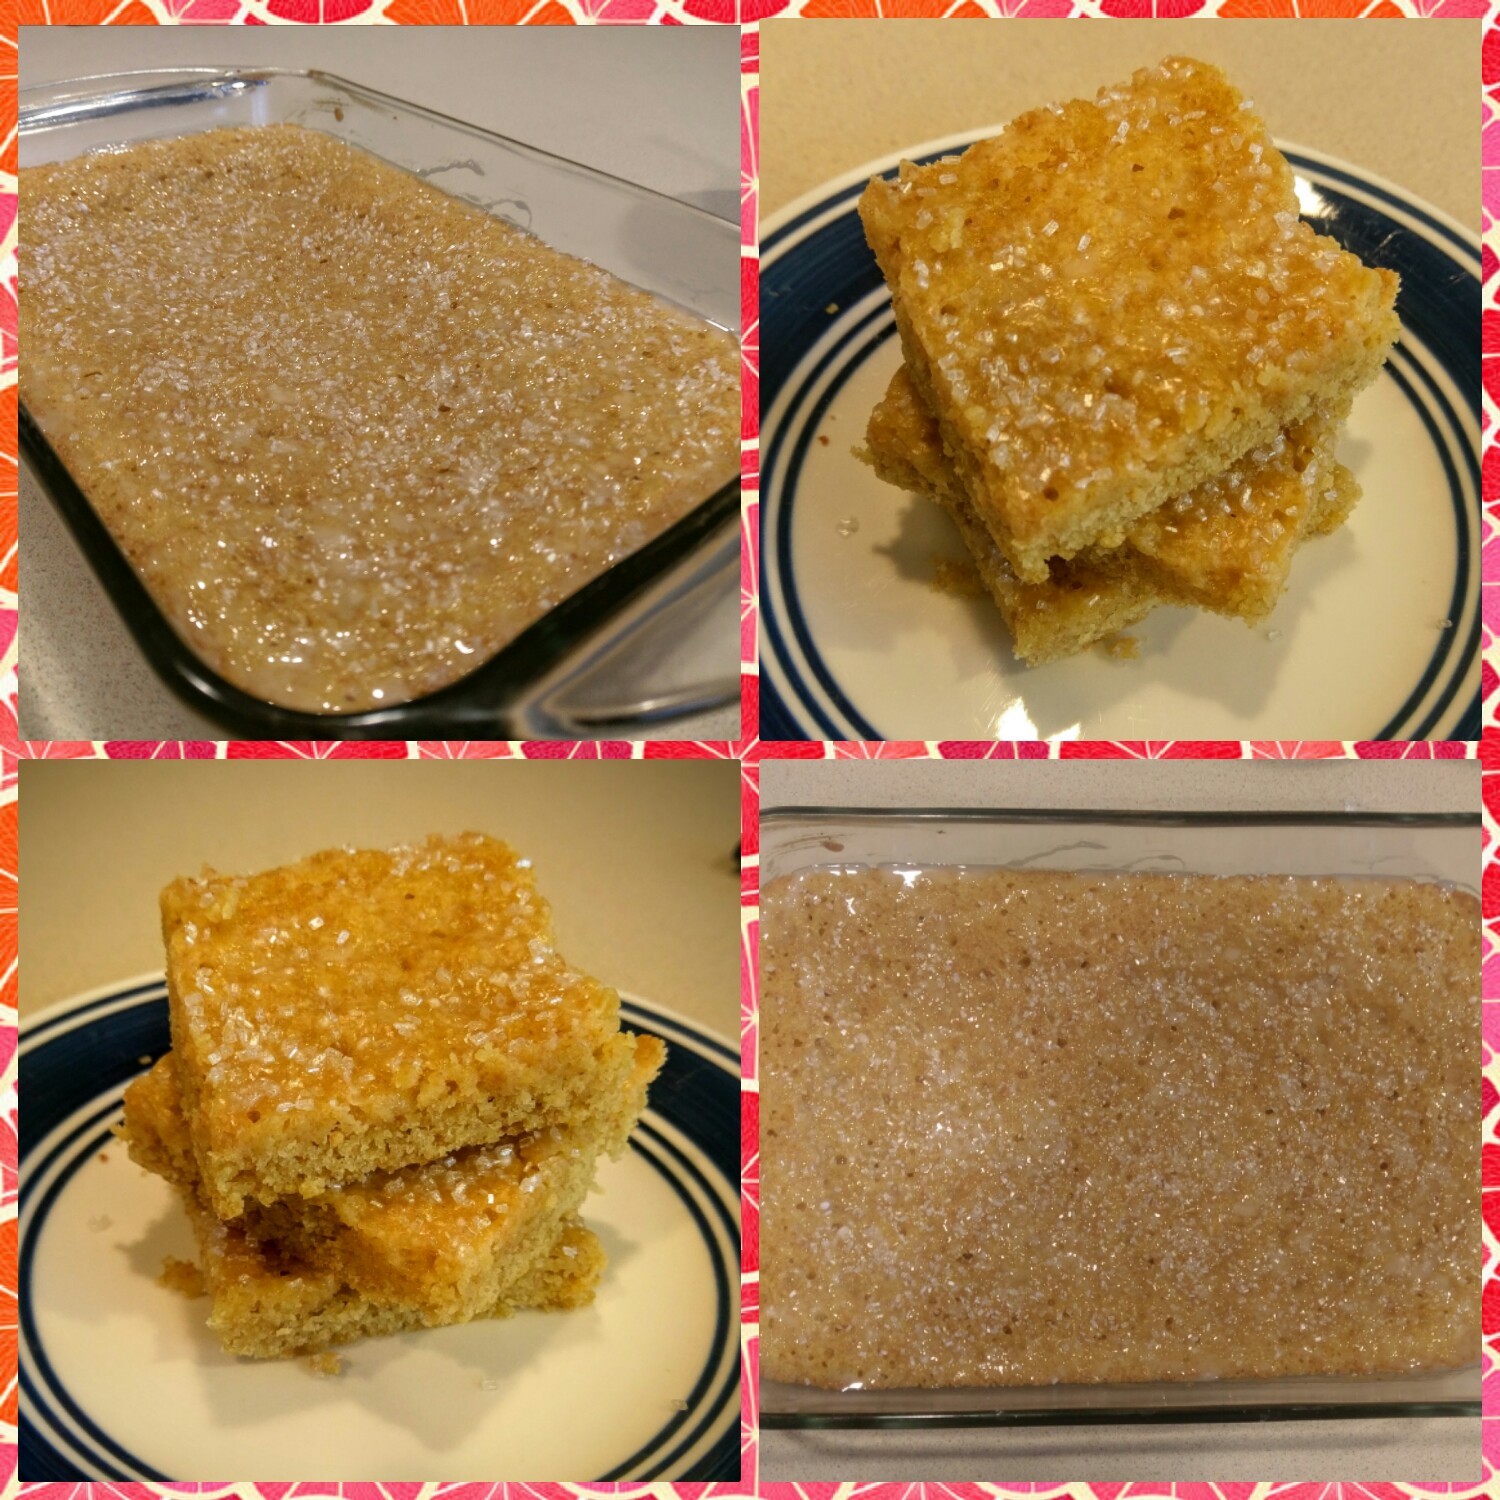
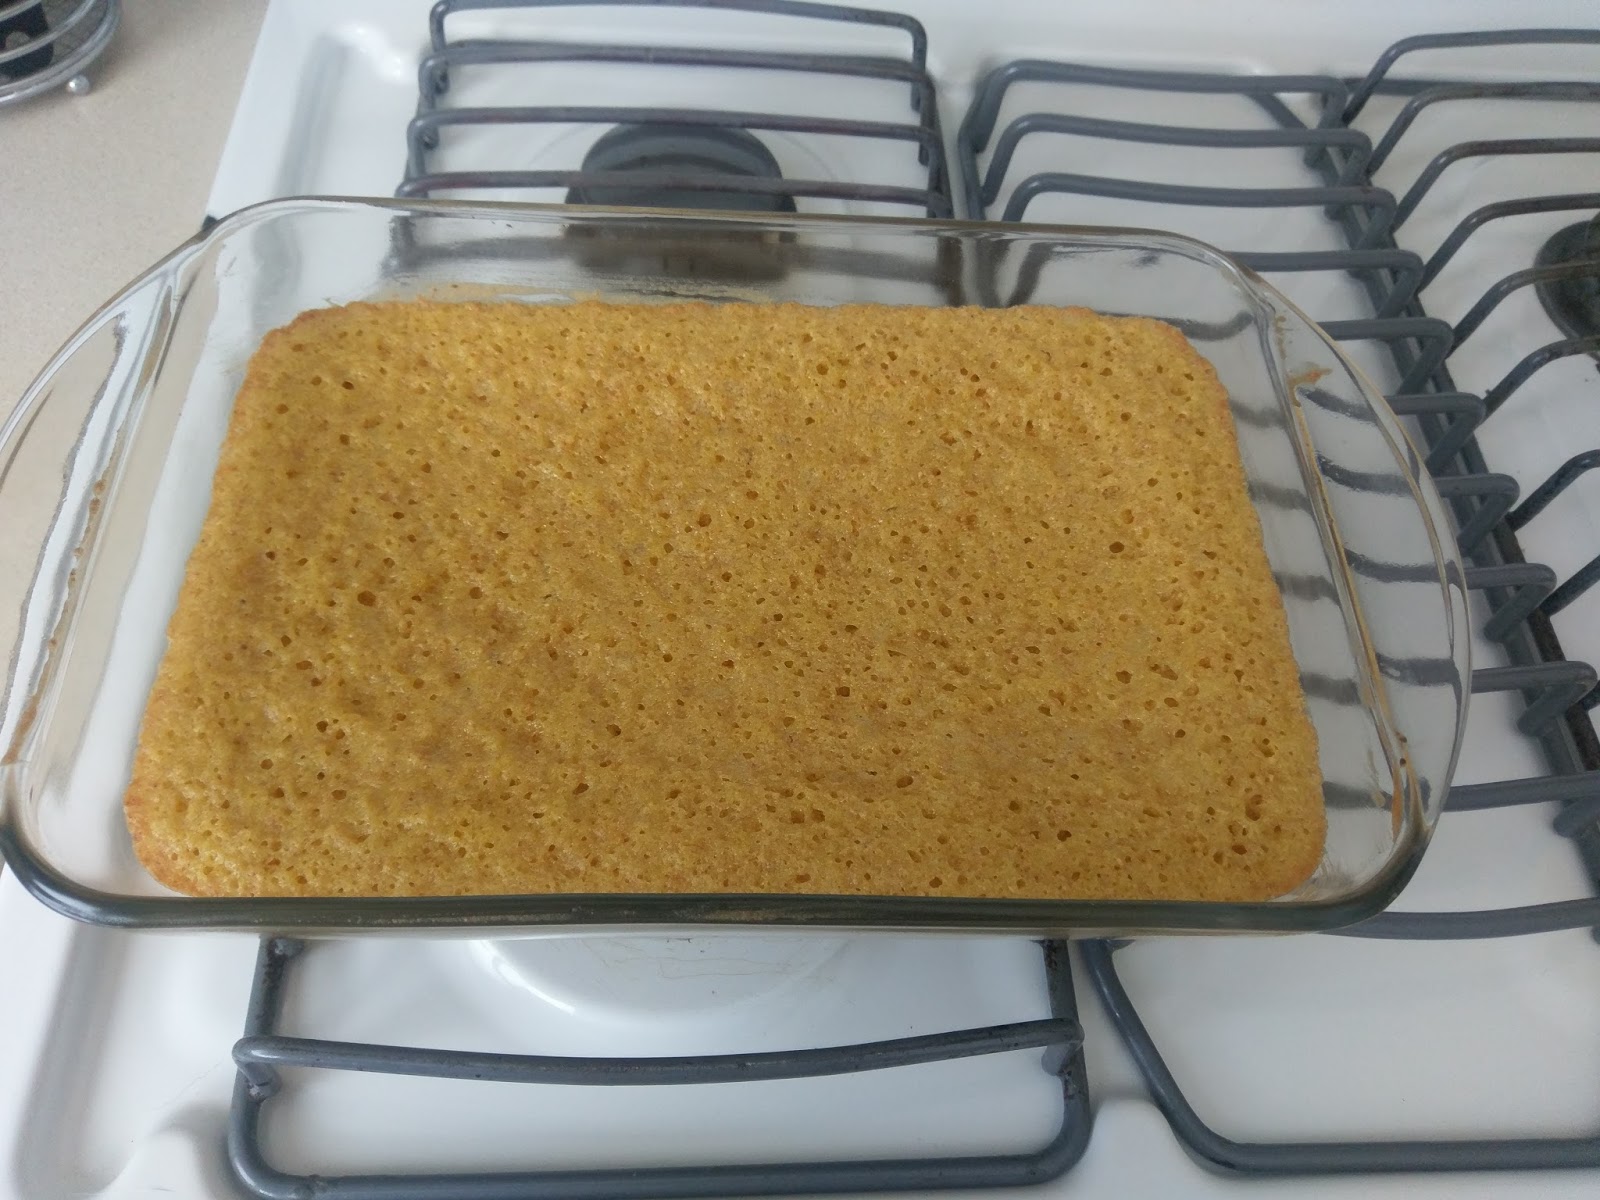
These lemon cake bars pack a punch. They’re tart and mouthwatering, but they leave your sweet tooth satisfied thanks to the lemony glaze on top. Sliced up into 12 bars, they’re only 175 calories a piece. Tell me what pumpkin-filled fall dessert can say the same?! No, literally, tell me because I’ll want to make it in a few weeks. I may be basking in the glow of a Vikings win, but even if we had lost, these bars would’ve had me feeling better in no time. So uh, I guess if you’re a Titans fan, sorry eh, but you could make these to soothe your soul. I promise you making these will be 1,000 times easier than watching your team fall to the Kings in the North. Skol.
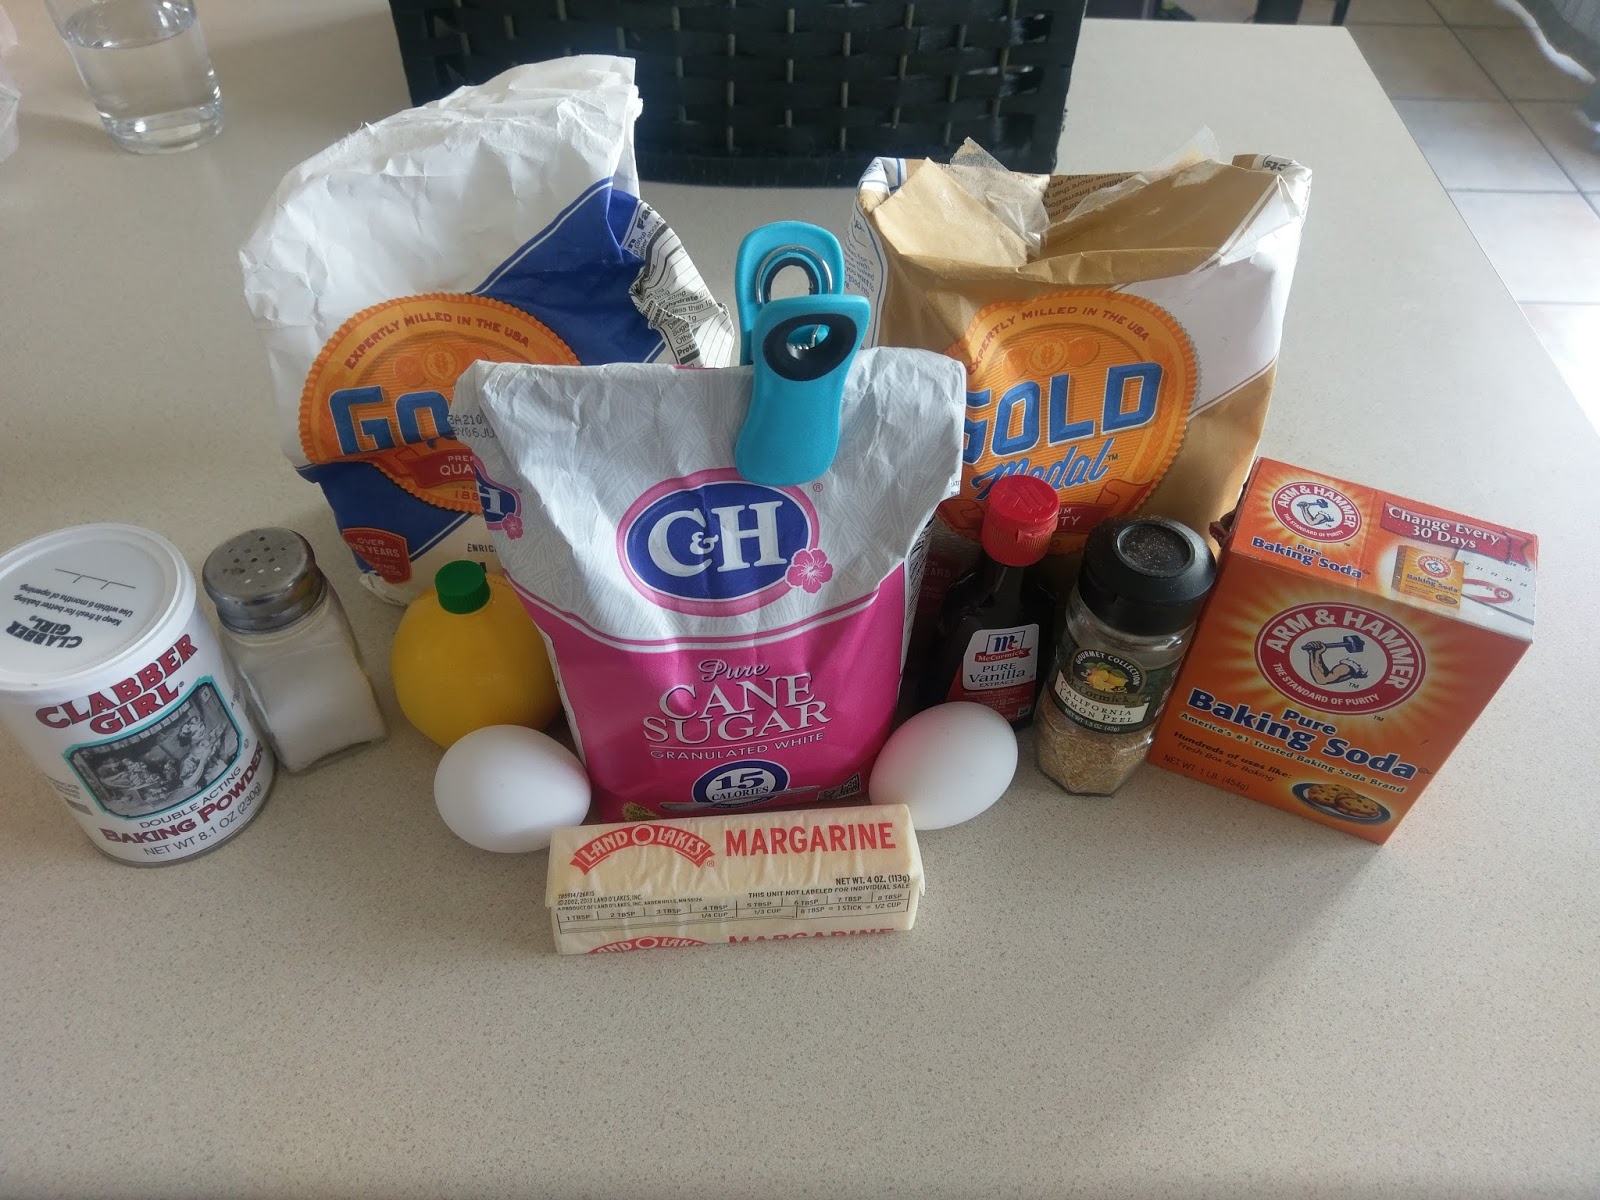
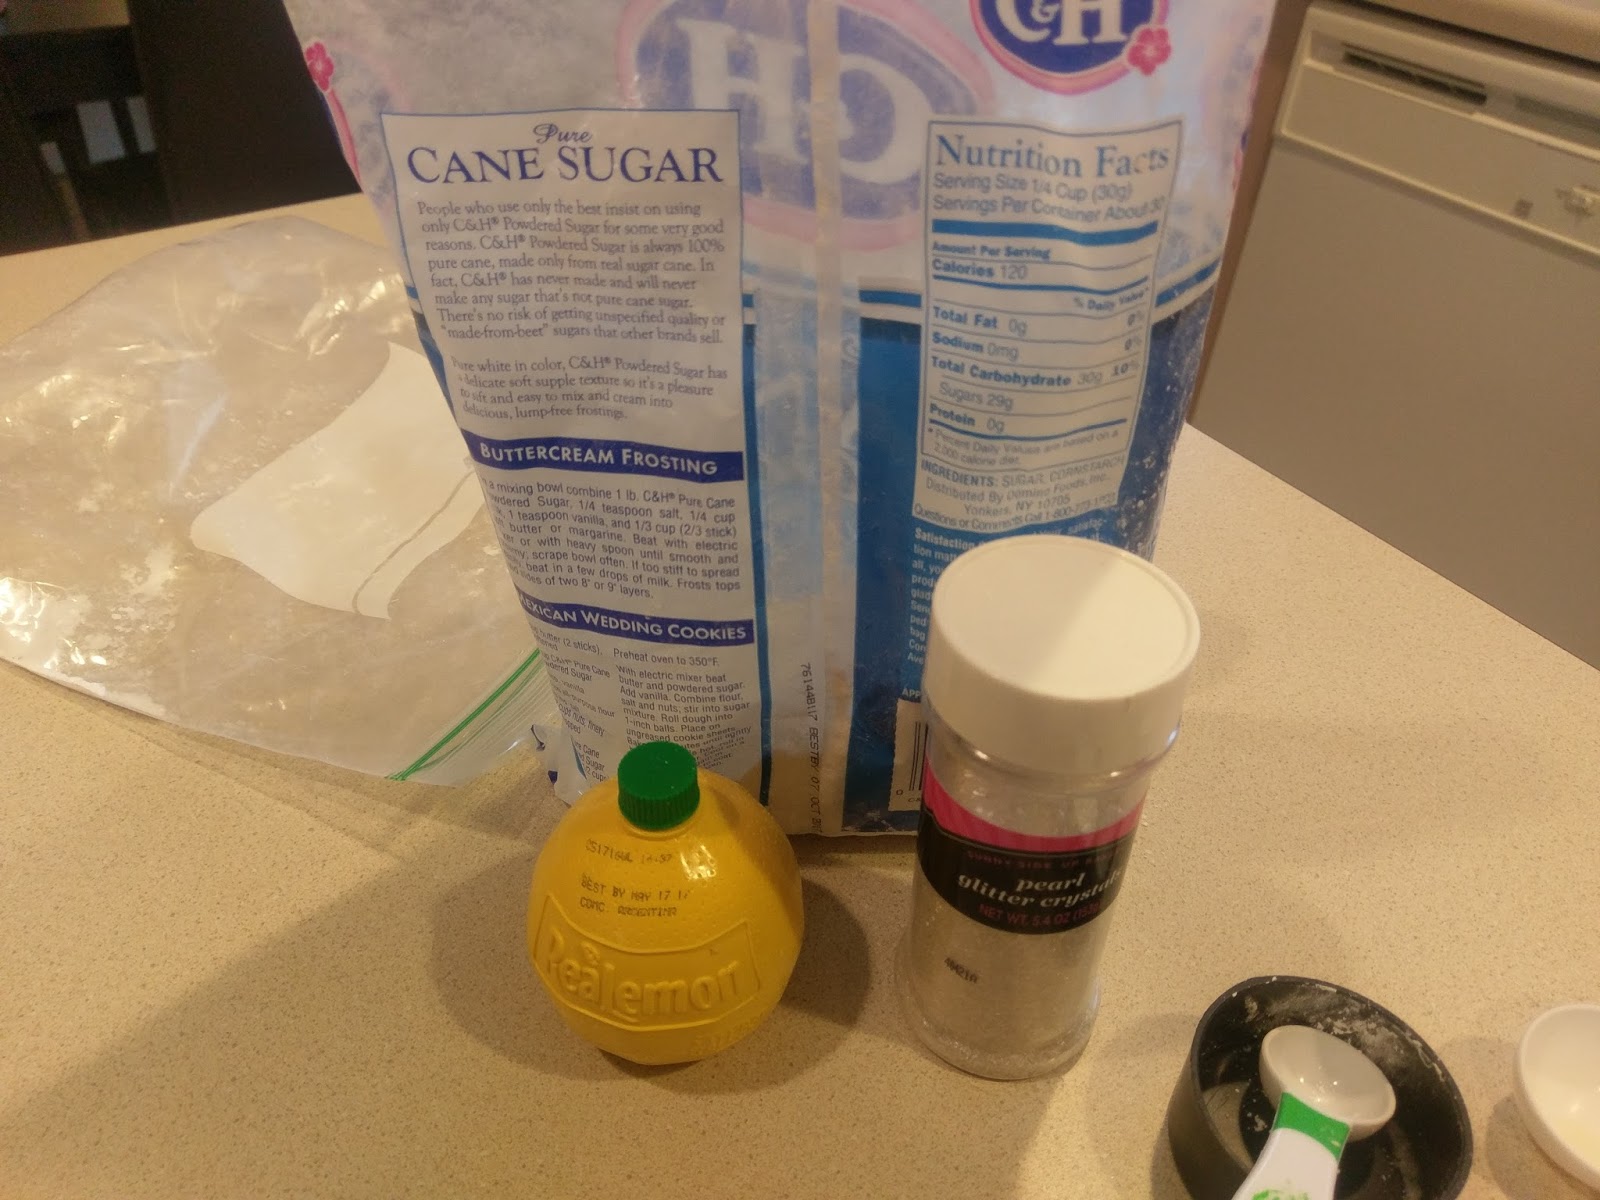
At least the ingredients list isn’t as confusing as our starting roster. I had everything I needed already on hand to make these lemon cake bars, so I consider that another victory. Add one more to the win column today, and I may just go buy a lottery ticket. Chances are you’ll be able to whip these up in under an hour from start to finish as well, so grab:
- 1 stick of butter at room temp
- 3/4 cup of sugar
- 2 eggs at room temp
- 2 tbs lemon juice
- 1 tbs dried lemon jest
- (not pictured) 1/2 teaspoon lemon extract (or you can just double the amount of zest but things may get crumby in texture)
- 1/2 teaspoon vanilla extract
- For healthier bars: 1/2 cup All Purpose flour and 1/4 cup whole wheat flour. Otherwise, use entirely All Purpose but add on a bunch of extra calories (boo)
- 1/4 teaspoon salt
- 1/4 teaspoon baking soda
- 1/4 teaspoon baking powder
- Optional: 4-5 drops of yellow food coloring because things should be pretty, dammit.
Preheat your oven to 350 and coat a 9×9, 8×8, or in my case because our “furnished” condo is lame, an 8×11 pan with cooking spray. In a large bowl or your stand mixer bowl, dump the sugar and butter together and cream until fluffy. Then add in the egg, lemon juice, zest, lemon extract, vanilla extract, and yellow dye. Blend for a minute until fully incorporated. While this is mixing, in a medium bowl combine the flours, salt, baking soda, and baking powder. Dump the dry ingredients in with the wet ones and mix for two minutes. Pour into your prepared baking pan and smooth out with a spatula since the consistency is thick. Bake for 20-25 minutes or until a toothpick comes out with some wet crumbs.

This could definitely be eaten with breakfast, lunch, or dinner. Thanks, healthy food!
Let your bars cool on a rack until they’re at room temp. Or you can speed things up by putting them in the freezer for a half an hour. I had time to walk the dogs and enjoy a thunderstorm while these cooled, like Mother Nature was reminding me the season of pumpkin is nigh.
Of course I’m adding sprinkles. I need sprinkle rehab. The glaze is so easy, even a Raiders fan could put it together! I’m kidding. A little. What good is football season without some lighthearted ribbing, or if you’re an Eagles fan, full-on verbal assault? Simply mix together half a cup of powdered sugar and two tablespoons of lemon juice until no chunks of powdered sugar remain.
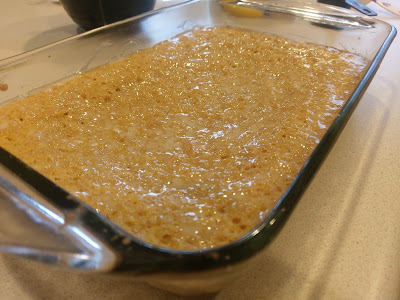
Oh yeah, hit me with the good stuff. Drizzle the glaze on your cooled bars and spread out with a spoon. Top with sanding sugar for extra pizzazz. I like a little sparkle with my desserts, what can I say. You can stick these in the freezer for a half hour so the glaze will set and they’ll be ready for crisp, even slicing and consumption! Or you can leave them out if you’re into teasing yourself that you can handle the pressure until you go crazy. I expect Cowboys fans to take this route.

At least you have Jason Witten? And dessert. When you’re ready to eat, pop these into the microwave to warm them up for a bit. If you’re really feeling indulgent, top them with some sherbet. I imagine this would be insanely decadent and summery. Like a final reminder that sometimes it really does need to be so swelteringly awful outside that the only thing in the world that could satisfy your desert-induced thirst is a huge glass of lemonade. Or in this case, lemon cake bar. I promise you won’t be disappointed when that first tingle of lemon hits your tongue and that glaze reminds you why sweet and sour is a winning combo. I believe some of the best things in life a multifaceted: sweet and sour, chocolatey and salty, winning and rubbing it in the losing team’s face…you get the idea. But now we get to add one more thing to that list: low-cal and delicious. It’s hard to come by (much like winning your division at the end of the season. Deal with it, Green Bay), but when it happens, it’s pure magic. ‘Til next time, my fellow eaters!

Sundays were made for treating yourself. -
A Cheesecake by Any Other Name…
I have a problem. Well, many problems, but for the sake of this blog, let’s just focus on the one. There are millions of delicious desserts out there in this world. So many that I have not one but two dessert boards on my Pinterest account dedicated to them. Where’s the issue, you ask? They’re all absolutely terrible for you. Anything dipped in double layers of caramel and deep fried just can’t be good for the arteries. I’ve been trying my best to come up with desserts that don’t rack up over 500 calories and still look like something you’d actually want to eat and not something you’d find on the bottom of your shoe after leaving a farmer’s market. I had massive success with the strawberry bars from a couple weeks ago, but since I can’t just reblog the same recipe week after week, it was time for experimentation. I decided to take on the cheesecake. Even the name itself sounds completely unhealthy, but there’s nothing I love more than cheese or cake, so it was worth a shot.

And I’m really glad I did. I know what you’re thinking…’It looks like a cheesecake. So it either can’t possibly taste like one or she’s tricking us.’ While I have been known to ramble off a lie so convincing a polygraph wouldn’t know the difference (I’m still aspiring to become either Lucille Bluth or Mallory Archer, so this is a life goal), I promise you that no wool is being pulled over your eyes. Each slice of this decadent chocolate chip cheesecake is only 260 calories. That’s right, it’s pretty much the equivalent of eating a bowl of cereal for breakfast every morning but way tastier, so back away from the Raisin-bran. I have yet to try breakfast cheesecake, but since I’ve found a way to make low cal and delicious cheesecake, anything’s possible. Did I tell you it’s also insanely easy and quick to make? Because it is. There’s even batter licking involved if you’re not afraid of salmonella. It’s good to boost the ole’ immune system now and then.

Still not too good to be true! Anything with premade pie crust cuts out half the battle. To knock off an extra 10 calories per slice, you can use a reduced fat pie crust. Even though I’ve moved to a land with a huge commissary, somehow they did not have reduced fat pie crust but Cannon AFB commissary always did. That’s essentially my life in a nutshell. To make the cheesecake you’ll need:
- 1 premade pie crust of your choice (graham cracker, shortbread, low fat, etc.)
- 1 8-ounce brick of reduced fat cream cheese at room temp
- 2 egg whites
- 1 small container of Yoplait light vanilla yogurt (if you want a different flavored cheesecake like strawberry or key lime, you can always try a container of another flavor)
- 1/4 cup of sugar
- 2 tablespoons of flour
- 1 tablespoon of lemon juice
- 1 tablespoon vanilla extract
- 1/2 cup chocolate chips, mini sized
- Optional: additional regular chocolate chips for topping, chocolate syrup for drizzle
Preheat your oven to 350 and find a tray big enough to hold the pie crust. Dump the cream cheese into a large mixing bowl or your stand mixer (I envy you) and blend until fluffy. Then add in the egg whites, yogurt, sugar, flour, lemon juice, and vanilla. Blend for several minutes until everything is completely smooth. Fold in the mini chocolate chips and pour into the pie crust (smooth out with a spatula as needed):
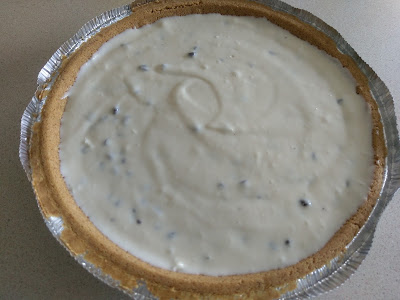
It is now safe(ish) to lick the beater of your mixer. Just, you know, don’t forget to unplug it first. But for scientific tasting reasons, forge on. Bake your cheesecake for fifteen minutes and then cover it with foil to keep it from browning. Continue baking another ten minutes until the cheesecake is mostly set, like so:

There will still be a little jiggle. But if you’ve got Jello level jiggle, bake a few extra minutes. Take the cheesecake off of the pan and let it rest on a cooling rack for 10-15 minutes before topping with additional chocolate chips for garnish.

It really does look prettier this way, and plus, more chocolate. Woo! Once you’ve added the additional chips on top, ignore every fiber of your being and place the cheesecake into the fridge for five hours to set. You could cut the time in half by placing it in the freezer though if your willpower is pretty much nonexistent. Not saying I’ve done this before (but I totally have).
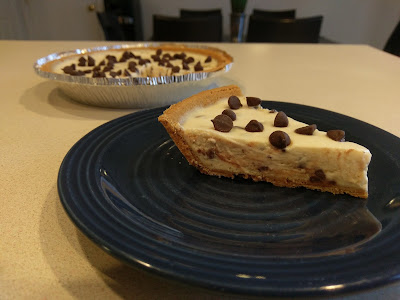
But totally worth it because then you get to take really pretty pictures of a nicely set cheesecake for all your social media needs. You’re welcome. Okay, full confession time. No, it’s not as dense as a full fatty, fat, fat cheesecake. But you won’t care because it is still just as delicious without all the guilt and hemming and hawing that comes with trying to logically reason with your waistline as to why cheesecake is a necessary food item. It’s incredibly decadent, and adding a drizzle of chocolate sauce on top simply throws this recipe into my list of top five cheesecakes Kate’s ever baked. I literally have no regrets with this one. It’s simple to make, and I’ve crafted a cheesecake that per slice has fewer calories than a PB&J. Plus it won’t make you feel like a child while you’re eating it, so unlike the PB&J, the chocolate chip cheesecake is a dessert for adults that suffer from an extreme need to eat dessert but still want to fit into their summer clothes. Vanity, thy name is cheesecake. ‘Til next time, my fellow eaters!

Healthy-ish cake, cupcakes, pie, and cheesecake recipes and decorating tips