-
Guinness Cupcakes with Floral Piping Tutorials

When your mother-in-law swoons over her birthday cake in June, you know you’ve set the bake-bar high… so for my grandmother-in-law’s 84th birthday, I had to brew up something just as special. Enter: my famous Guinness chocolate cupcakes topped with Baileys cream cheese frosting, piped into dreamy two-toned pink and white roses and hydrangeas. These little beauties are proof that beer and buttercream can live in perfect harmony…in a stout-standing flavor. I also say “famous” because for a solid 5 years when I was a newbie baker, all our friends requested this flavor for every one of their birthdays…I always surround myself with people that have good taste, what can I say.
But I’d like to think the real reason the family gathered back here in Albuquerque was not just to celebrate a milestone birthday, but also because everyone loved the strawberry cake so much back in June that they were back for seconds (delusions of grandeur, it turns out, also taste delicious). After the rave reviews from June’s cake, expectations were high, and these cupcakes rose (literally) to the occasion.
Jump to recipe and instructions

This is my kinda Edible Arrangement… These cupcakes are as quick and easy as popping the cap off a bottle of Guinness—no endless mixing, no complicated steps, just pure baking bliss. In less time than it takes to watch the foam settle on a pint, you’ll have rich, chocolatey batter ready to roll. And for my fellow gluten-intolerant pals, here’s the brew-tiful news: Guinness Draught comes in at fewer than 20 parts per million of gluten. While it’s not celiac-safe, paired with a trusty gluten enzyme, it’s the perfect recipe for enjoying dessert without feeling like you’ve taken a hit from a heavyweight stout. The full recipe is below, but here is everything you need to decorate:
- Light pink gel dye
- One or two 2D piping tips
- One or two piping bags
- Angled spatula
Follow along below with both the photo and video tutorials to learn how to decorate!
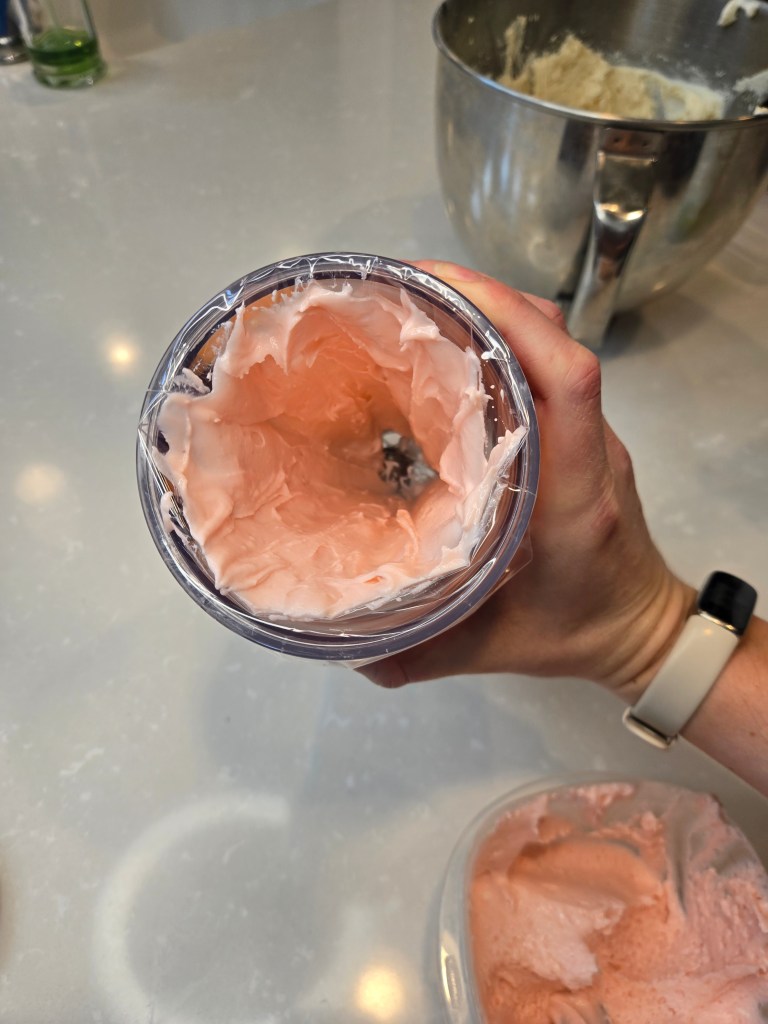
Use an angled spatula to spread pink frosting all over the sides of the piping bag. 
Then gently dollop plain white frosting in the middle of the piping bag. 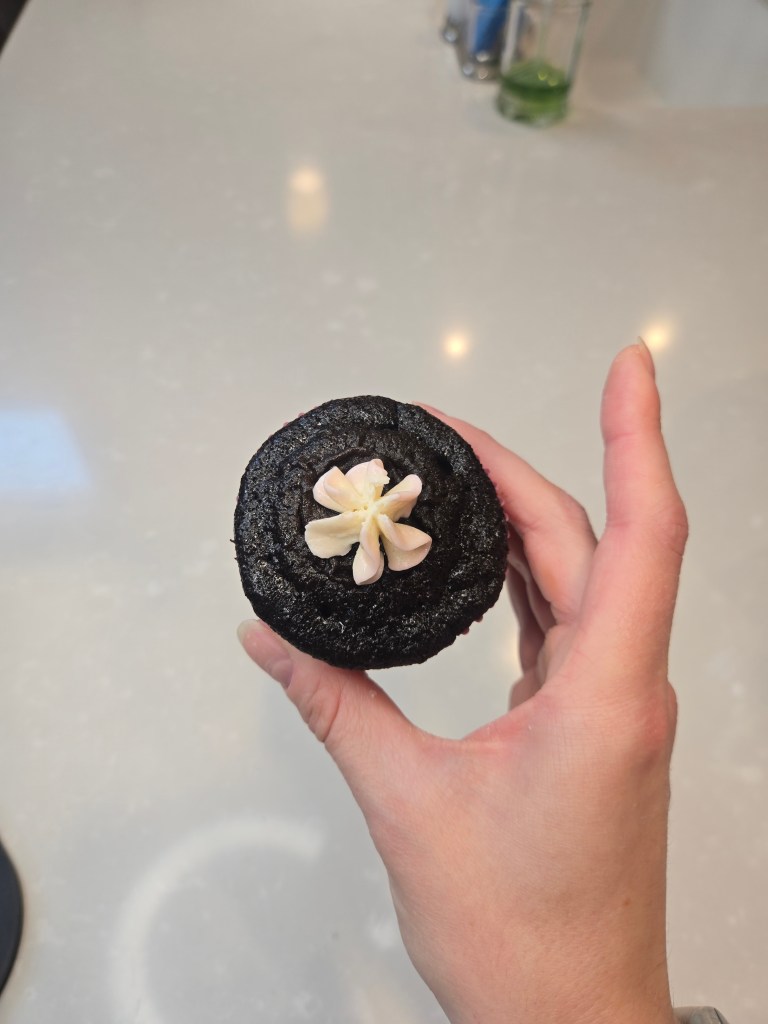
Pipe out a bit of frosting until it starts to come out two-toned. To make hydrangeas, pipe up and away to make each flower. 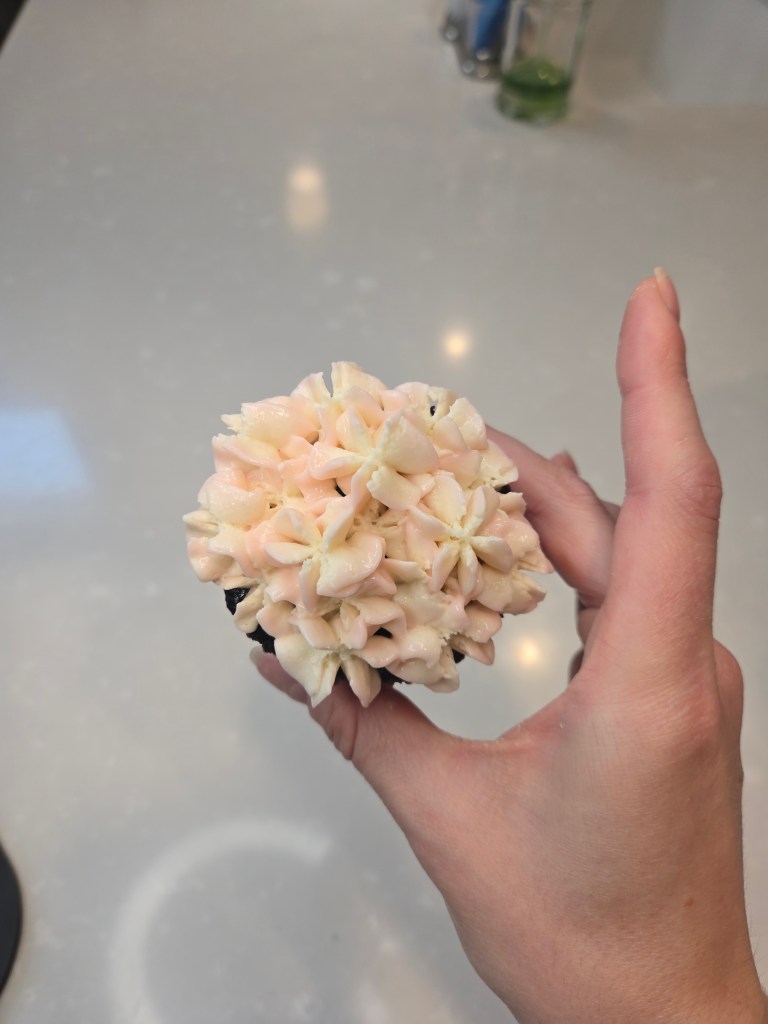
Repeat and overlap where needed to cover the cupcake completely. 
To make roses, start in the center of the cupcake and swirl out and around. 
Take your time to pipe these so they turn out smoothly! Petal to the metal: let’s get piping! Recipe and Instructions
Guinness cupcakes with Baileys cream cheese frosting
A rich chocolate cupcake with creamy Baileys frosting
If not gluten free, use any kind of chocolate cake mix. Monkfruit can also be replaced with regular powdered sugar for frosting. Protein powder can also be replaced with more monkfruit or powdered sugar.
Ingredients
CAKE
*1 box of gluten free King Arthur chocolate cake mix
*152 grams (2/3 c) fat free Greek yogurt
*1 cup Guinness Draught
*1/3 cup milk
*4 eggs
FROSTING
*224 grams (8 ounces) of 1/3 the fat cream cheese, softened
*112 grams (1/2 cup) of butter, softened
*12 oz Lakanto powdered monkfruit
*4 oz Quest vanilla milkshake protein powder
*1/4 tsp citric acid
*5 TBS Baileys low sugar
*1 TBS vanilla extract
Directions
- Preheat oven to 350 and place cupcake liners in muffin tin.
- Whisk cake ingredients together in a stand mixer on low for 30 seconds before switching to medium-high for two minutes.
- Fill each cupcake liner 2/3 full.
- Bake for 18-20 minutes, and allow cupcakes to cool fully before frosting.
- To make frosting, whisk cream cheese and butter for 3 minutes before adding in half the powdered monkfruit, extract, citric acid, and Baileys.
- Add in remaining monkfruit and protein powder and mix fully.
- Take a small amount of frosting out of the mixing bowl and put into a medium bowl; dye this light pink, and set remaining frosting in the mixing bowl aside.
- Place each piping tip into a piping bag, then put the bag in a deep cup, folding the edges of the bag over the side of the cup.
- With an angled spatula, slather the pink frosting all around the sides of the piping bag, evenly coating the sides of each bag.
- Dump the white frosting into the middle of the piping bag; pipe some frosting out until you start seeing the pink mix with the white.
- To pipe flowers, follow along with the tutorials above.
- Keep cupcakes covered and in the fridge. They are best served at room temp, so remove from fridge 30 minutes before eating. Enjoy!
Nutrition
Macros
24 servings
169 cal/22.3 c/6.2 f/6.1 p per slice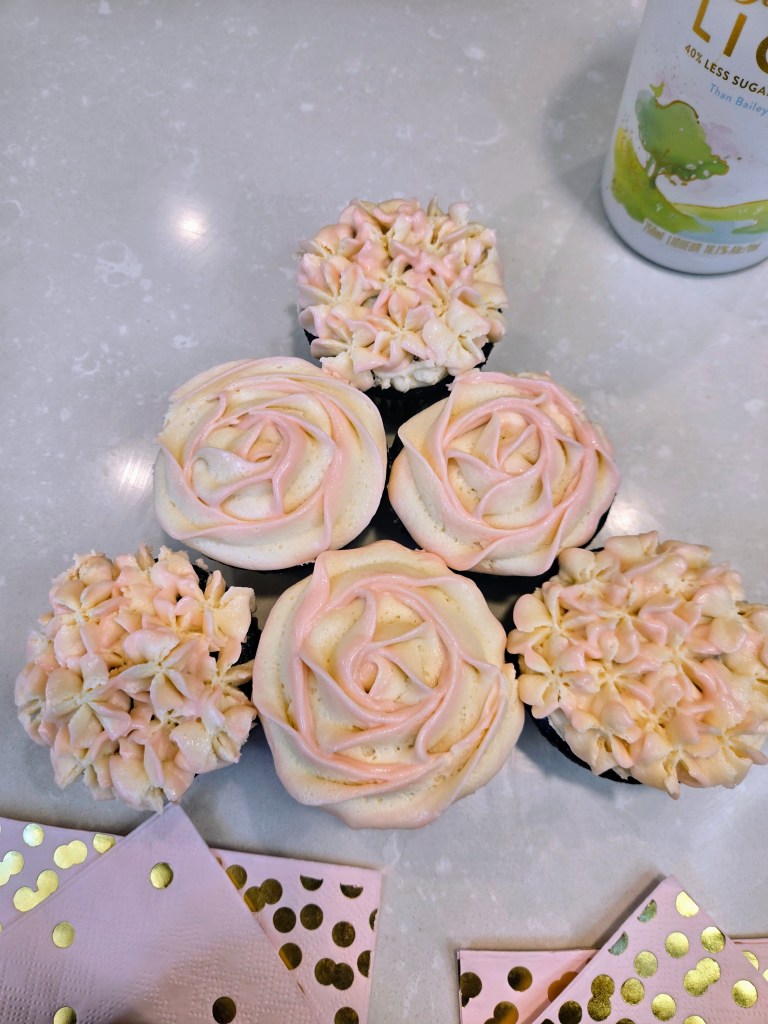
Ale you need is love… and Baileys frosting. 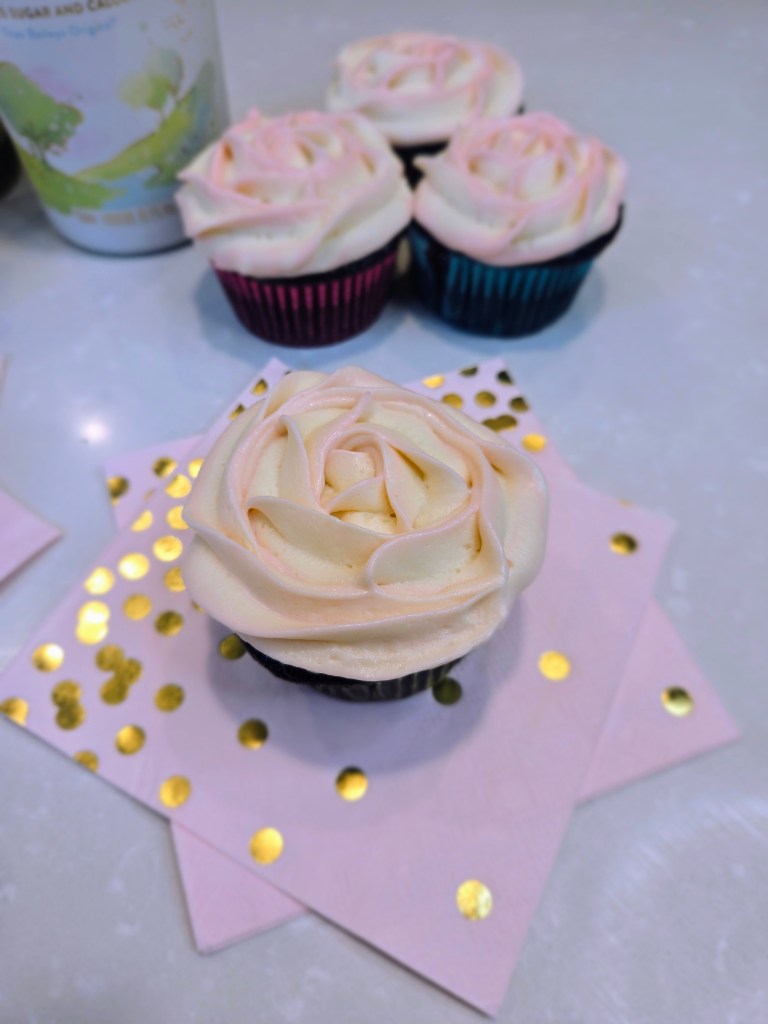
Stop and smell the frosting. -
One Bowl, Gluten Free Oreo Cake
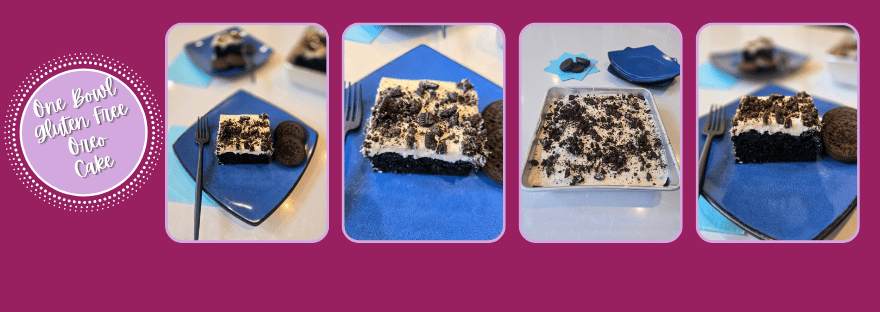
This cake is one-bowl-derful, easy, and dangerously delicious. Meet your new favorite bake: a rich, gluten-free Oreo cake that’s creamy, dreamy, and comes together faster than you can say “Twist, lick, dunk.” And the best part? It all comes together in just one bowl…because I believe the only thing better than eating cake is minimal cleanup. Whether you’re baking for a party, a late-night craving, or because “it’s Tuesday and I deserve joy,” this cake’s got your back. So grab that one trusty bowl, your favorite GF Oreo cookie flavor, and a spoon for ‘quality control’…and let’s get crumb-itted to making magic
The Bowl’d and the beautiful. And here’s the sweetest twist: this indulgent little number is secretly light on the stats. Each slice clocks in at just 137 calories with only 4.3 grams of sugar, which basically makes it the snackable unicorn of the cake world. Basically, you you can have your cookie cake, and eat it, too. Whether you’re watching your sugar or just trying to leave room for seconds (or thirds–no judgment), this cake proves that low-cal and low-sugar doesn’t have to mean low fun. Consider it a guilt-free reason to say “Oreo glad I made this?” Yes. Yes, you are.
Recipe and Instructions
One Bowl, Gluten Free Oreo Cookie Cake
A delicious, chocolatey, creamy treat that comes together in a pinch.
Greek yogurt can be replaced with cream cheese, but it will alter macros significantly. I have not tested this recipe with any other protein powders, so I recommend a whey-based protein.
Ingredients
OREO COOKIE CAKE
*104 g (1 cup) Just add water protein pancake mix (my favorite with unbeatable macros is Empowrd Foods GF pancake mix)
*45 g (1/3 cup) Quest chocolate milkshake protein powder
*1 oz black cocoa powder
*1 tsp baking powder
*1 tsp vanilla extract
*1 large egg
*113 g (1/2 cup) fat free Greek yogurt
*3/4 cup Fairlife fat free milk
FROSTING
*113 g (1/2 cup) fat free Greek yogurt, strained overnight
*60 g (1/2 cup) Lakanto powdered monkfruit
*6o g (1/2 cup) Quest vanilla milkshake protein powder
*2 ounces Quest vanilla milkshake protein powder
*2 TBS milk
Directions
- Grease an 8×8 pan with cooking spray.
- Preheat oven to 350.
- In a large bowl, whisk together yogurt, vanilla, milk, and egg.
- Whisk in until smooth: pancake mix, chocolate protein power, black cocoa, and baking powder.
- Bake for 20 minutes until a toothpick comes cleanly out of the center; remove to cool while making frosting and clean out your bowl.
- Mix together all frosting ingredients in cleaned bowl.
- Once cake is fully cooled, frost fully and then crush 3 Oreo cookies to sprinkle on top.
- Keep covered in fridge until serving.
Nutrition
Macros
8 servings
137.6 cal/12.9 c/2 f/17 p/4.3 g sugar per slice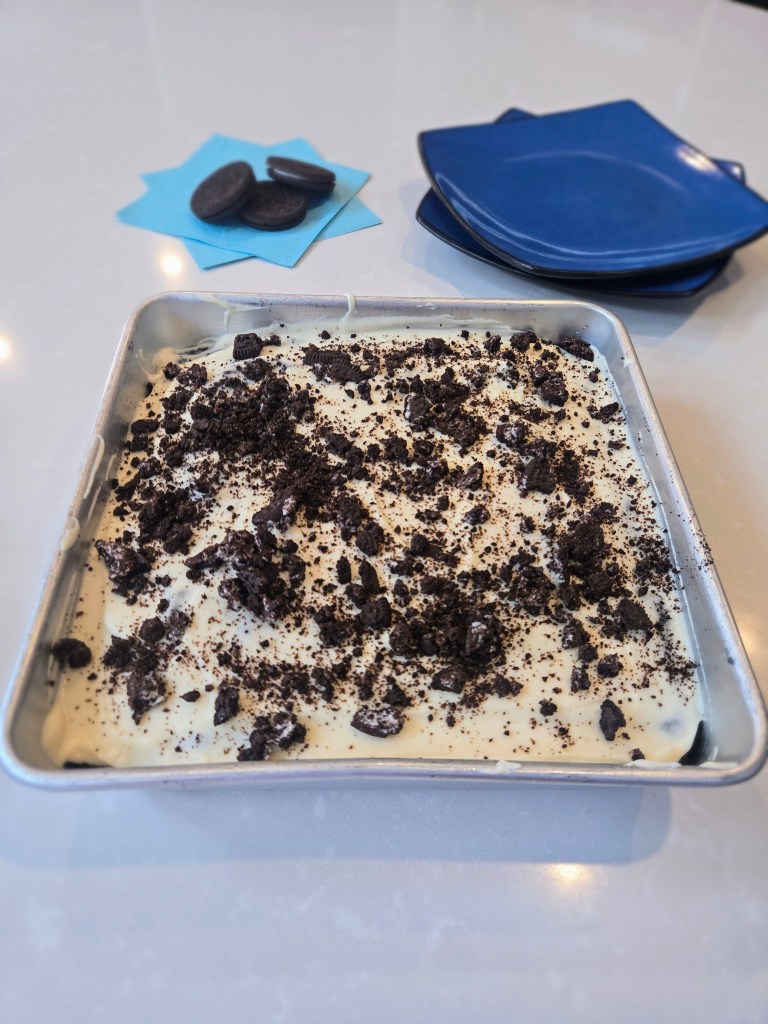
Crushing it—literally...look at all those Oreo crumbs! 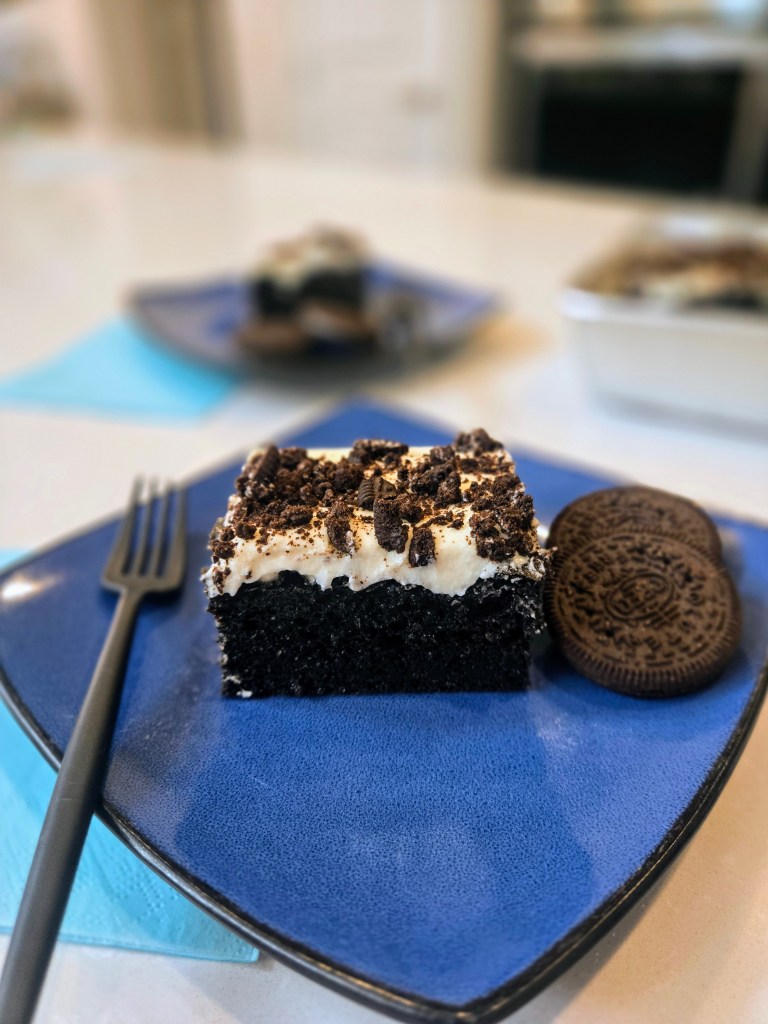
Ore-OMG this is good. 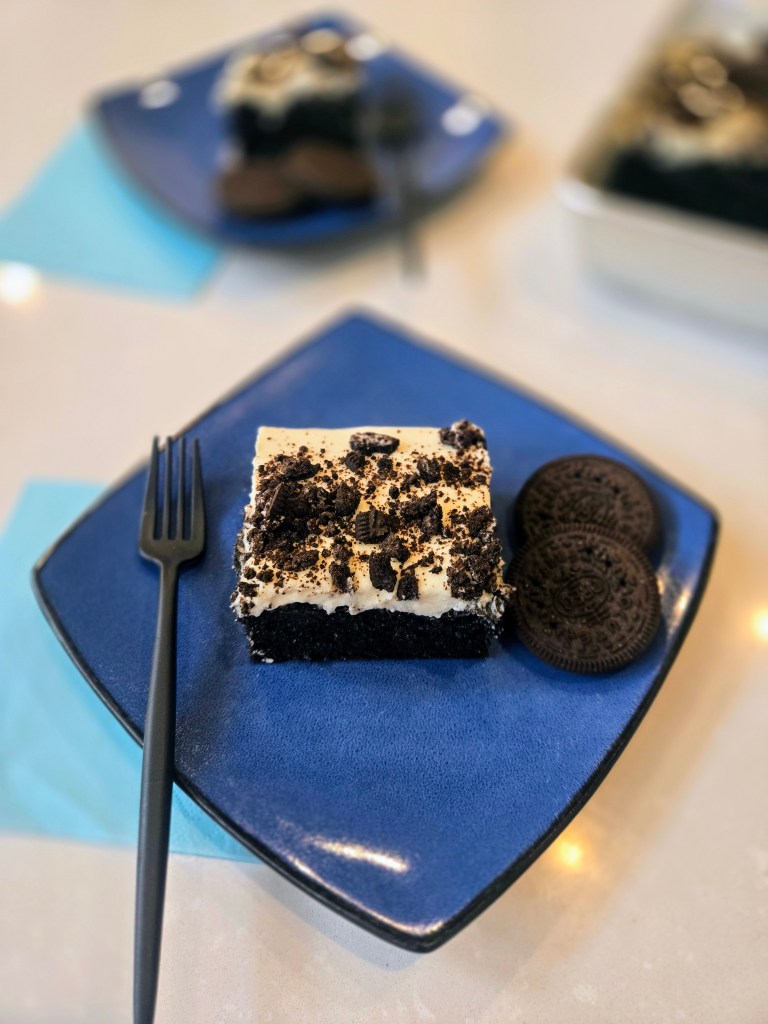
Can you hear that? That’s the sound of a fork approaching. - Grease an 8×8 pan with cooking spray.
-
Shark Week Cookie Cake

Just when you thought it was safe to go back in the kitchen… cue the jaws theme… it’s Shark Week, baby, and this gluten-free cookie cake is making a serious splash! Equal parts chewy, chocolatey, and fintastically festive, this dessert is the ultimate treat for anyone who loves sharks, cookies, and baked goods worthy of a feeding frenzy.
Now, while this cake won’t circle you menacingly in open water, it will disappear quickly if left unattended. Much like the Great White shark, which can detect a single drop of blood in 25 gallons of water, I can detect a cookie cake within a 5-mile radius. True story. And speaking of shark facts: did you know some sharks can live over 400 years? This cookie cake will last maybe 10 minutes. Max. Gone faster than a Mako shark can swim (which, if you didn’t know, is 46 mph…and now you do). With enough gluten-free goodness to satisfy even the pickiest apex predator, this is one Shark Week snack you’ll definitely want to sink your teeth into. So grab your spatula, cue up the documentaries, and let’s dive in: because this cookie cake is jaw-droppingly good.
Just a girl standing in front of a cookie cake, asking it not to bite back. Ready to dive in? Below you’ll find a step-by-step photo gallery that’ll walk you through turning a humble cookie cake into the apex predator of the dessert table. From frosting waves to shark teeth, I’m showing you how to make jaws drop, literally. You’ll need:
- Gel dyes in red, blue, dark gray, light gray, and black
- A food safe pen to draw shark outline (if you’d like)
- Piping tips: #5, #3, #2, 1M
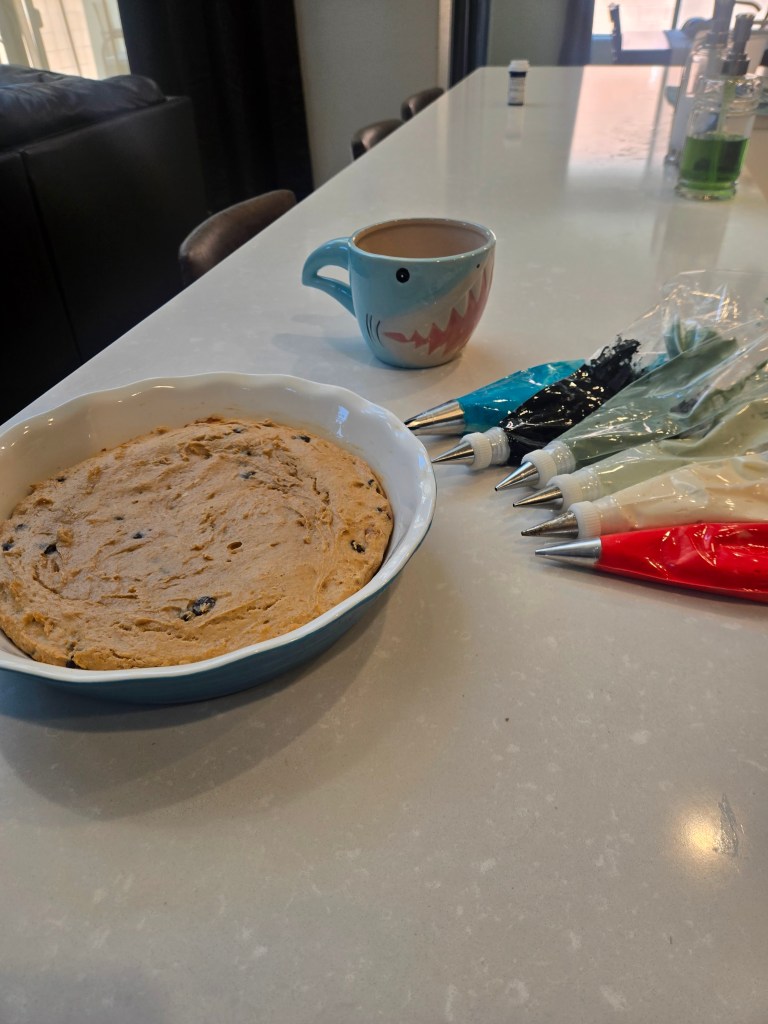
Start by divvying up your frosting…this is truly the hardest part, I promise! 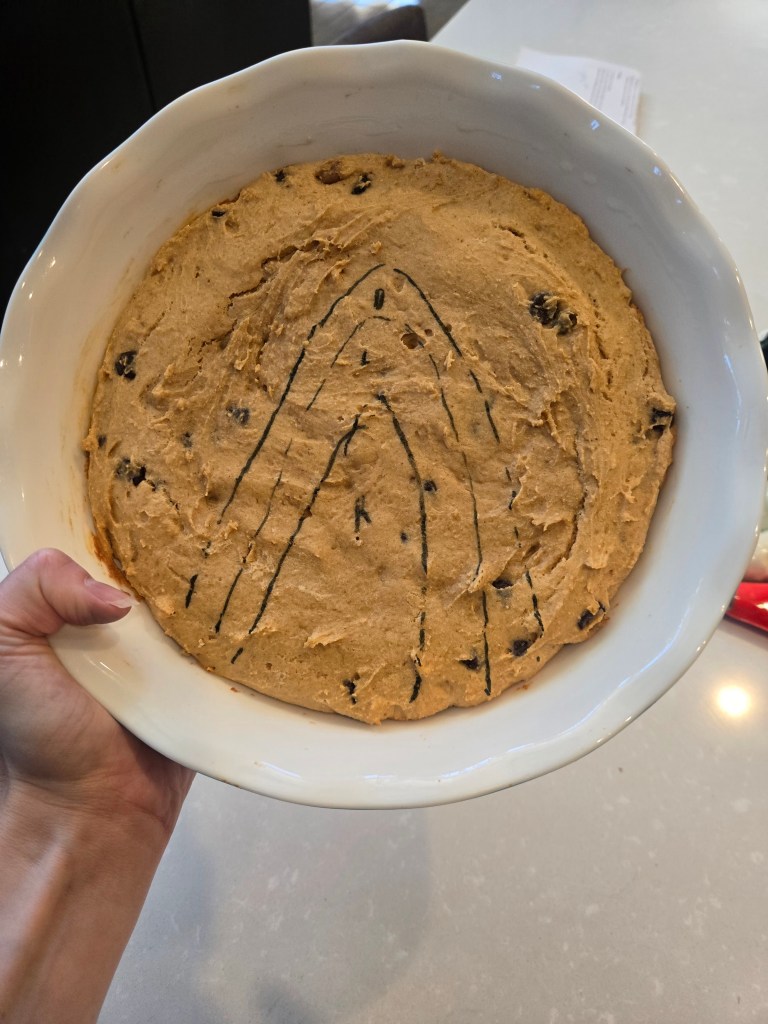
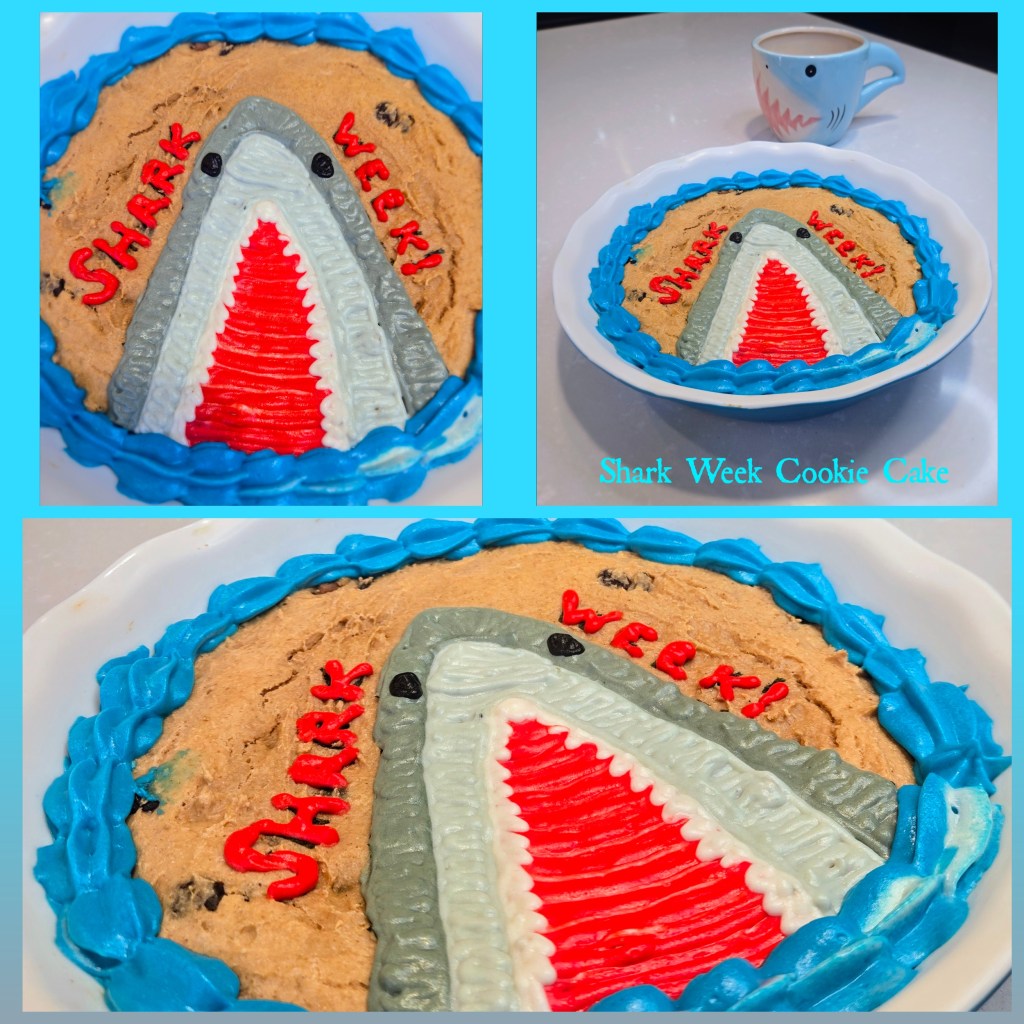
Use the food-safe pen to outline your shark’s mouth, light gray belly, and dark gray face. 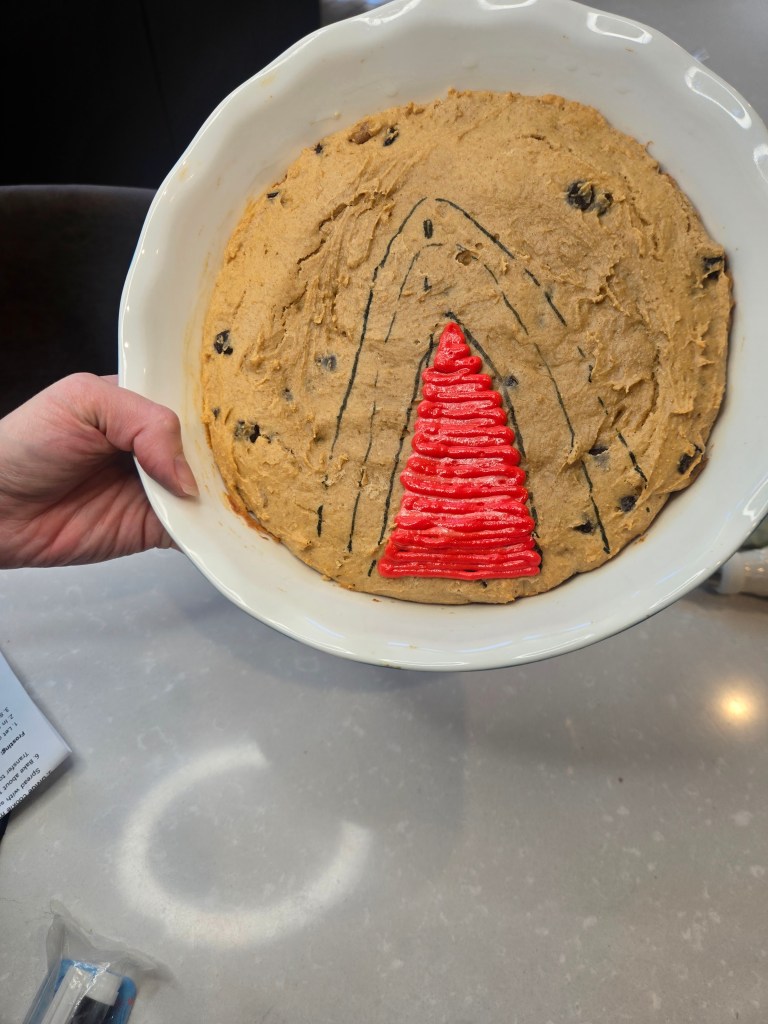
Use a #5 round tip and pipe red for the mouth, going back and forth in horizontal lines. 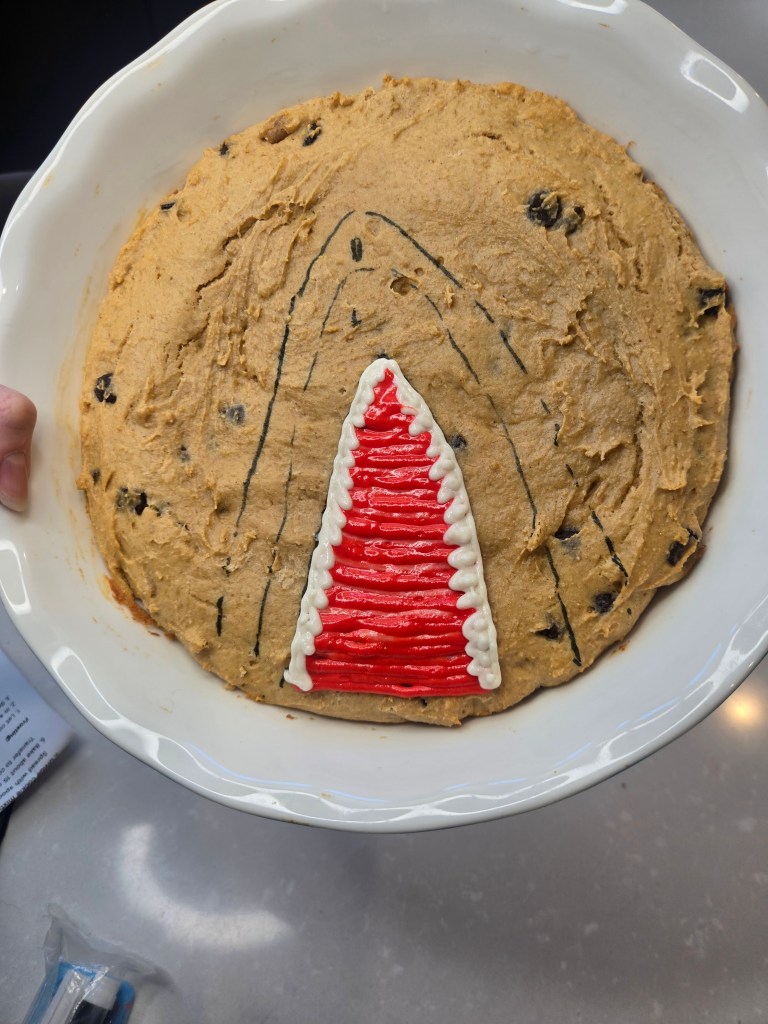
Come in with the white for the teeth using a #2 round tip. Simply draw little triangles and fill them in. 
Use a #3 tip to draw in the belly in light gray. 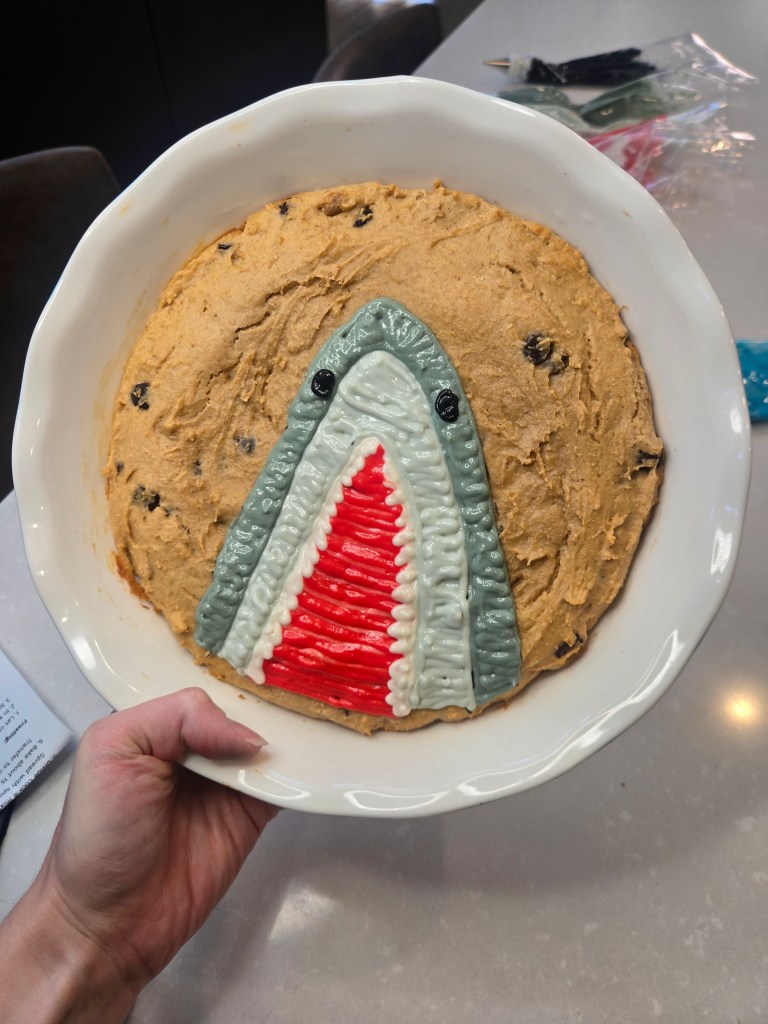
Use a #3 tip in dark gray for the rest of the body and a #2 tip to draw on the eyes. 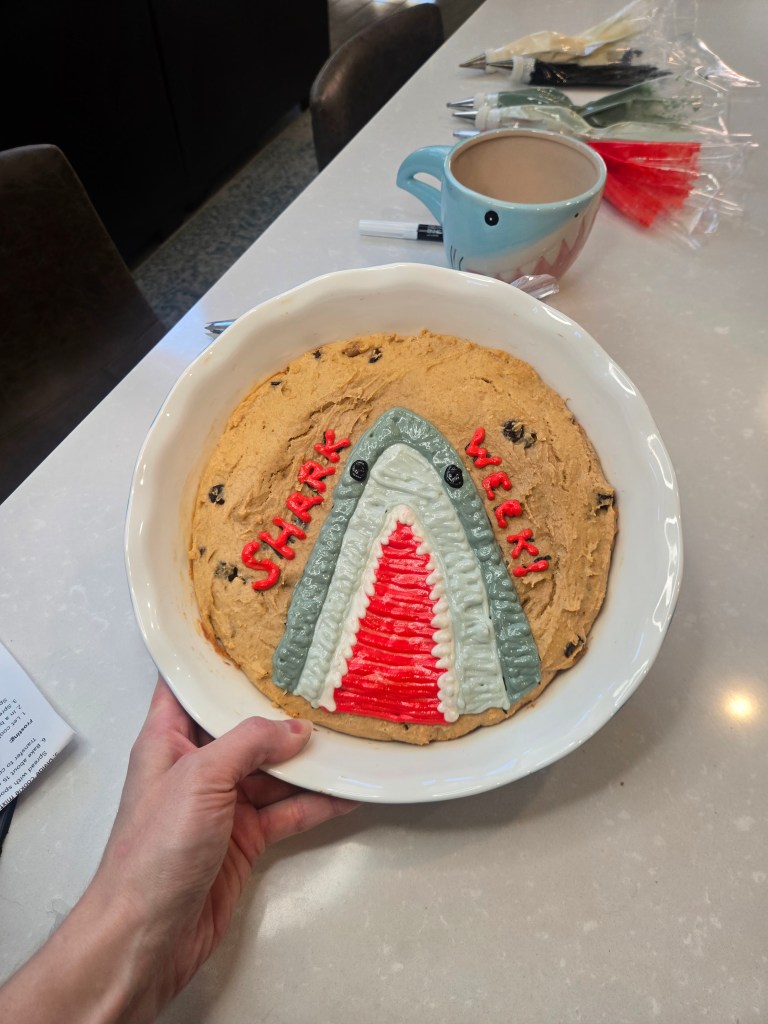
I used the food pen to draw out my letters before tracing over them with the red frosting. 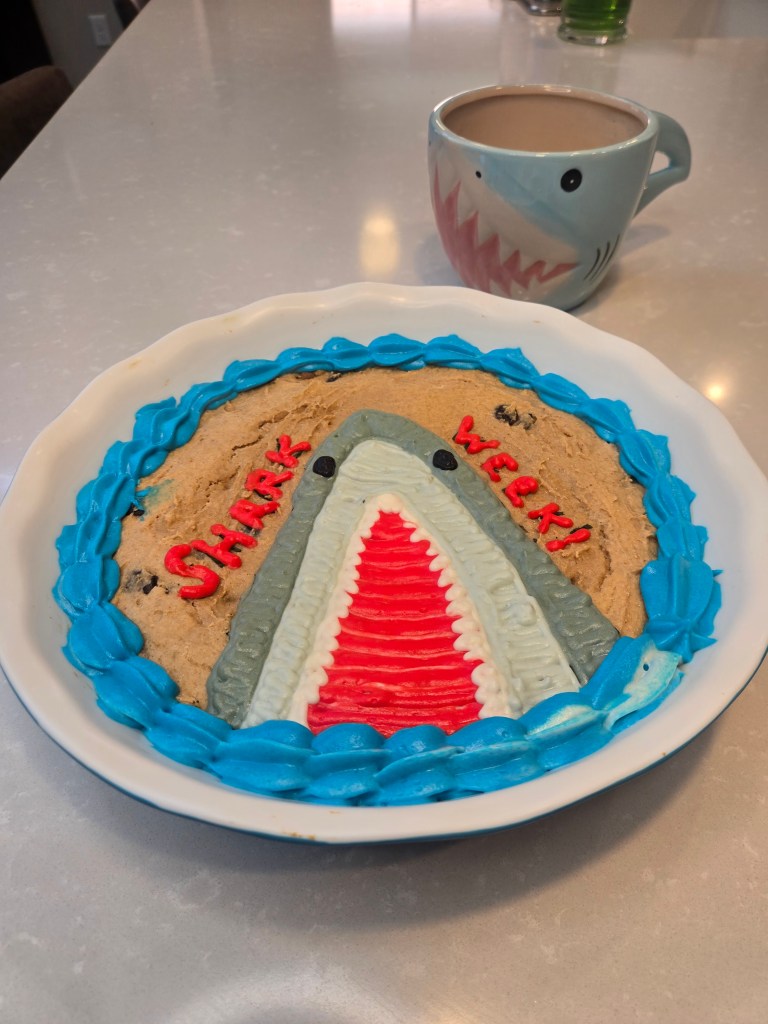
To finish, add those blue waves! I used a 1M tip to pipe my shell border. No chum required to make this bad boy surface! Recipe and Instructions
Shark Week Cookie Cake
A Shark Week treat everyone will love!
Greek yogurt can be replaced with cream cheese, but it will alter macros significantly. I have not tested this recipe with any other protein powders, so I recommend a whey-based protein.
Ingredients
COOKIE CAKE
*90 g (3/4 cup) oat flour
*60 g (1/2 cup) Quest vanilla milkshake protein powder
*32 g (1/4 cup) PBFit peanut butter powder
*1 tsp baking powder
*1 tsp vanilla extract
*120 g (1/2 cup) unsweetened applesauce
*28 g (2 tbs) peanut butter (I like American Dream Nut Butter in Breanne’s Blend flavors)
*1/4 cup Fairlife fat free milk
*42 g Lily’s sugar free chocolate chip
FROSTING
*113 g (1/2 cup) fat free Greek yogurt, strained overnight
*4 ounces 1/3 the fat cream cheese
*6 ounces Lakanto monkfruit
*2 ounces Quest vanilla milkshake protein powder
*2 TBS milk
*1/2 TBS vanilla
*1/8 tsp citric acid if you like less sweet frosting
Directions
- Grease a 9″ pie pan with cooking spray.
- Preheat oven to 350.
- In a large bowl, mix together oat flour, protein powder, peanut butter powder, and baking powder.
- Stir in applesauce, yogurt, vanilla, and milk before folding in chocolate chips.
- Bake for 15 minutes until golden; remove to cool while making frosting.
- Mix together cream cheese and yogurt for 3-4 minutes.
- Add in vanilla, monkfruit, protein powder, and milk, mixing well.
- Divide frosting so you have: 1 bowl red, 1 bowl light gray, 1 bowl dark gray, 1 bowl black, 1 bowl blue, and 1 bowl white.
- Place light gray, dark gray, and black frosting into piping bags with #3 round tip; place red in piping bag with #5 tip, white in piping bag with #2 round tip, and place blue in frosting bag with 1M tip.
- Follow along with video or photos to decorate your shark!
- Keep covered in fridge until serving.
Nutrition
Macros
8 servings
198 cal/16.2 c/5.9 f/20.1 p/4.5 g sugar per slice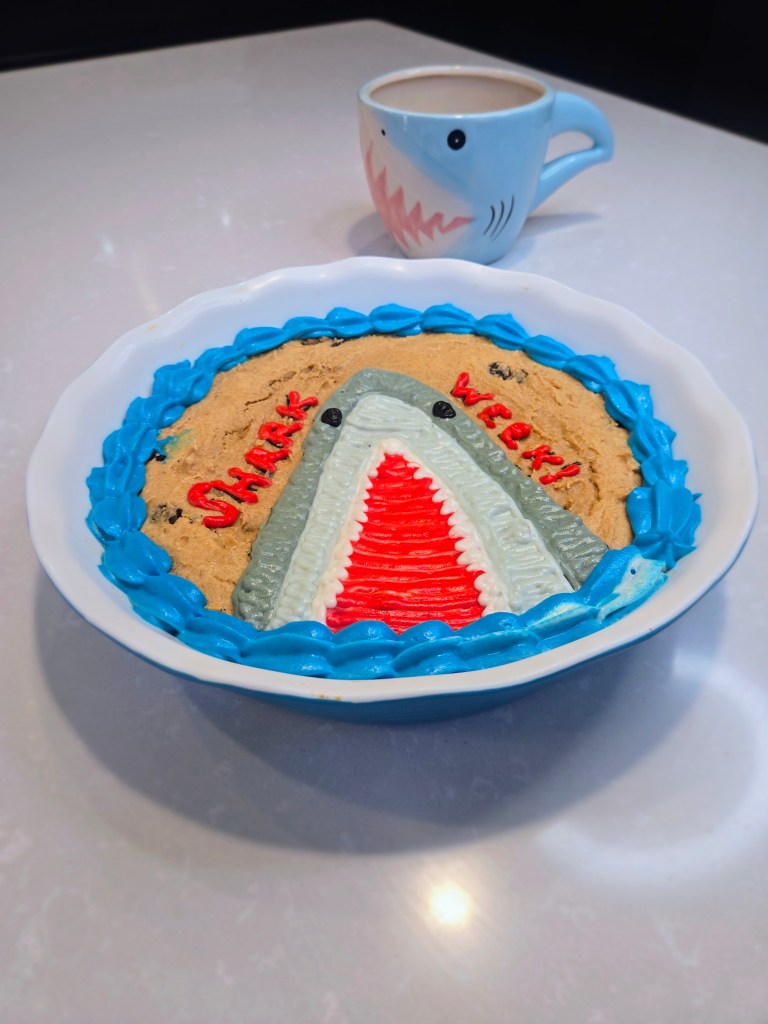
You’re gonna need a bigger plate. 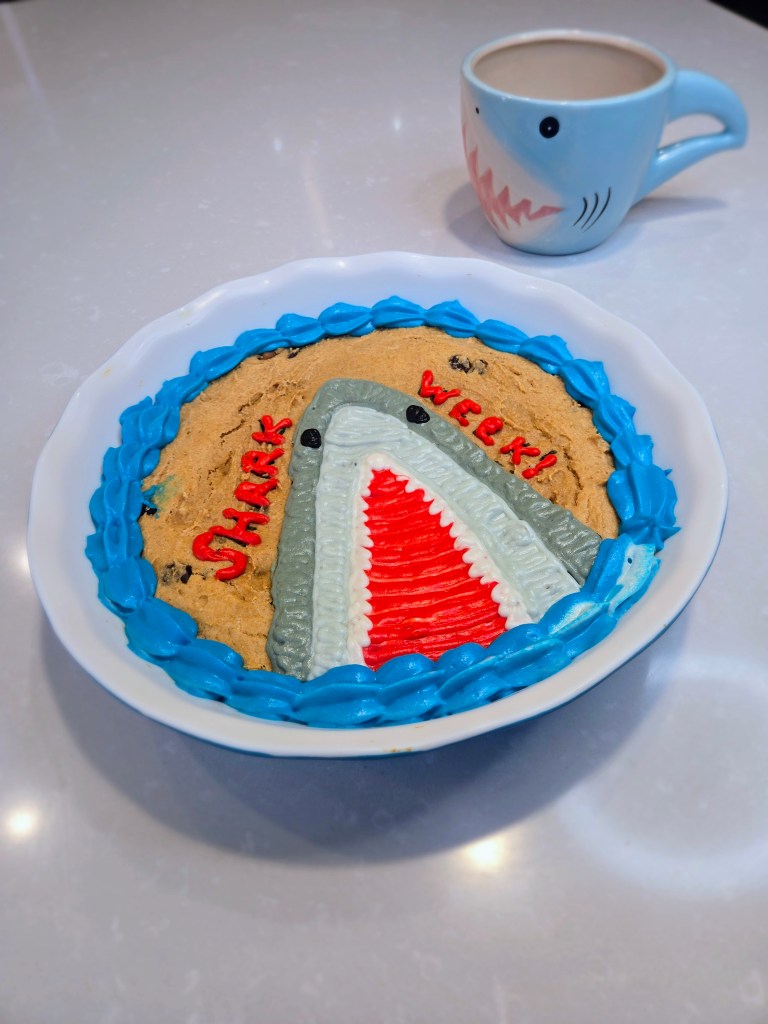
This cake was actually inspired by my shark mug, Sharkira, that I picked up at the ABQ BioPark gift shop. 
Circling the dessert table like it’s chum time. -
Guinness Chocolate Cheesecake
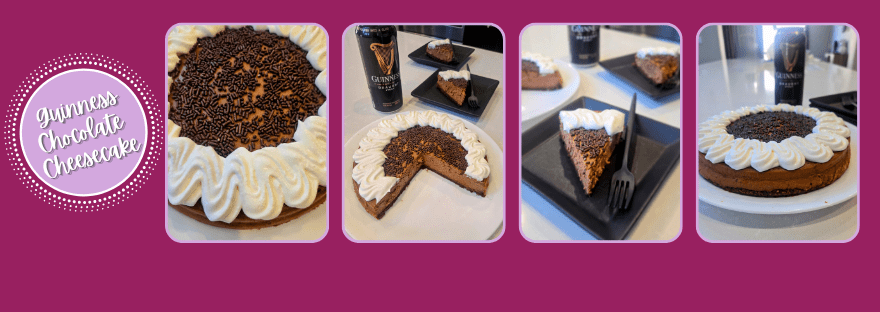
Some couples bond over movies, travel, or DIY projects… but me? I’ve built an entire marriage on sneaking Guinness into desserts so my husband will eat chocolate. And friends, it’s working. This Guinness Chocolate Cheesecake is rich, creamy, and stout-standingly indulgent…with just enough roasted malt goodness to convince even the most chocolate-skeptical spouses to ask for seconds (and thirds). It’s got bold flavor, a dense chocolatey crumb, and the pour-fect balance of bitter and sweet.
Now, for my fellow gluten-sensitive girlies, good news! While not celiac-safe, Guinness Draught clocks in at under 20 parts per million of gluten, which means when paired with a trusty enzyme supplement, this dessert is basically a cheat day miracle. Think of it as a brew-tiful loophole that leads straight to cheesecake heaven. So grab your springform pan, channel your favorite inner Irish person (dibs on Conan O’Brien), and let’s whisk it all for love and chocolate.
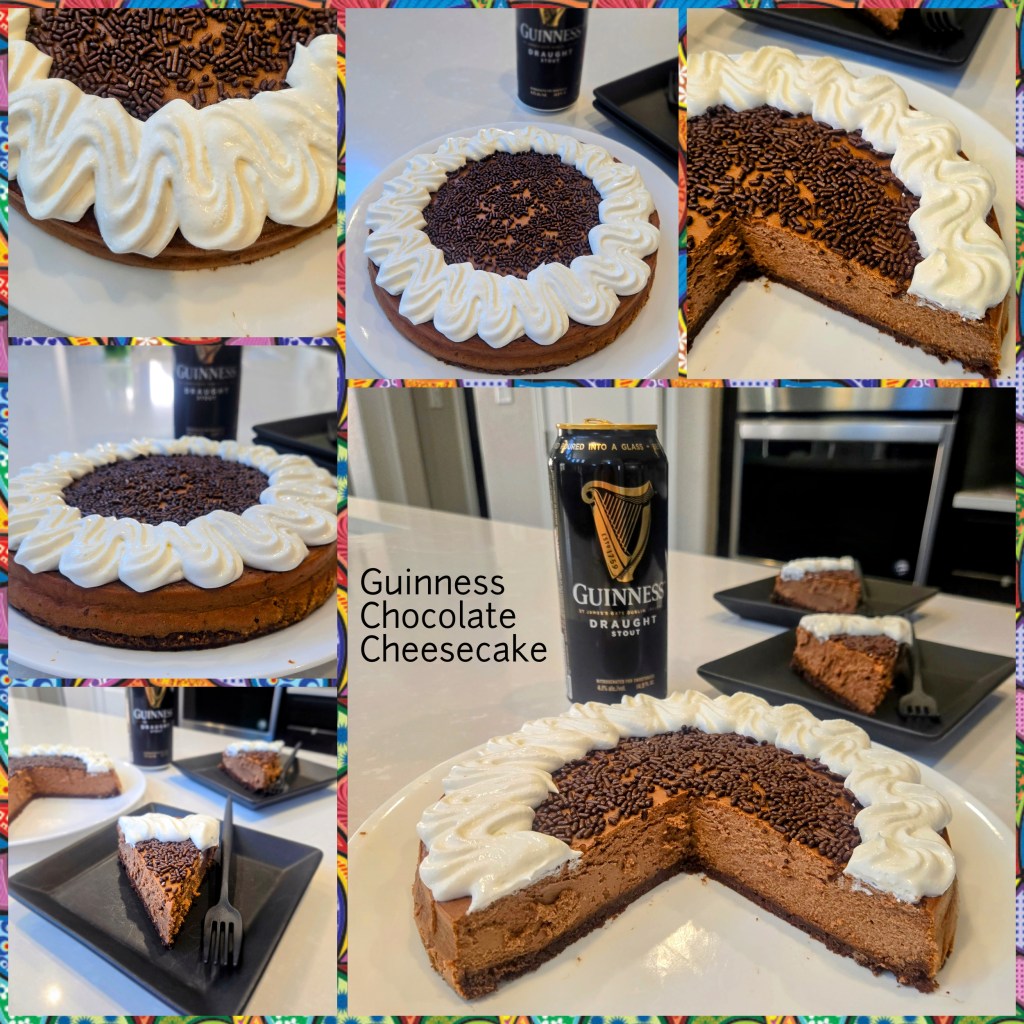
Brewed for dessert. Approved by husbands. Recipe and Instructions
Guinness Chocolate Cheesecake
A stout chocolate cheesecake for even the pickiest of dessert eaters
If not gluten free, use any kind of graham cracker crumbs for the crust. Greek yogurt can be replaced with an additional 8 ounces of cream cheese, and allulose can also be replaced with regular sugar. I have not tested this recipe with any other protein powders, so I recommend a whey-based protein.
Ingredients
CRUST
*150 g Simple Mills gluten free chocolate brownie cookie thins (about 1.25 boxes)
*3 TBS sugar free syrup
CHEESECAKE FILLING
*224 g (8 ounces) 1/3 the fat cream cheese at room temp
*96 g (1/4 cup) allulose
*226 g (1 cup) nonfat Greek yogurt, strained overnight
*60 g (1/2 cup) Quest chocolate milkshake protein powder
*6 ounces Guinness Draught (specifically Draught, since it is lower in gluten; if celiac, you could try brewing 6 ounces of coffee instead or locate a gluten free stout beer)
*1 TBS vanilla extract
*15 g (3 TBS) cocoa powder
*2 large eggs
TOPPING
*Chocolate sprinkles
*Cool Whip Free (I used 63 g)
Directions
- Line an 8″ springform pan with Parchment paper and spray with cooking spray.
- Preheat oven to 350.
- Dump the chocolate crackers and syrup in a food processor and grind until smooth (if mixture is too thick, add additional TBS of liquid).
- Place crust mix into prepared pan and smooth to the edges (I use cooking spray on my hands to make this easier).
- Bake for 10 minutes until golden; remove to cool while making filling.
- Lower oven heat to 325 degrees.
- Using a whisk attachment, mix the cream cheese and allulose in a stand mixer on medium high for 2-3 minutes until fluffy and smooth.
- Add in the yogurt and protein powder mixing well (it will be thick/chunky)
- Add in beer and vanilla, and blend until smooth, 2-3 minutes.
- Switch to a paddle attachment, and on low speed, add eggs, one at a time, mixing until smooth.
- Fill a large roasting pan with 4-5 cups of steaming hot water. Wrap your springform pan in several layers of foil and place into a Crockpot liner, tying the edge up, to keep your cheesecake from getting any water into it during the water bath.
- Pour the cheesecake batter into the prepared pan, and put the prepared pan into the roasting pan with water.
- Bake for 45-50 minutes, until the sides have set but the center is still jiggly.
- Turn the oven off, leaving the cheesecake inside, and crack the oven door to allow the cheesecake to finish baking for 1 hour.
- Remove from the oven and place on a cooling rack to cool to room temp; I like to run a sharp knife around the edges after it is cool.
- Refrigerate cheesecake overnight or place in fridge for 4 hours before removing from springform.
- Top cheesecake with chocolate sprinkles in the middle and add a Cool Whip border (I used a 1M tip to pipe a zigzag/back and forth pattern on top).
- Keep cheesecake covered in fridge until serving.
Nutrition
Macros
8 servings
233 cal/17.9 c/12.4 f/12.5 p/4.7 g sugar per slice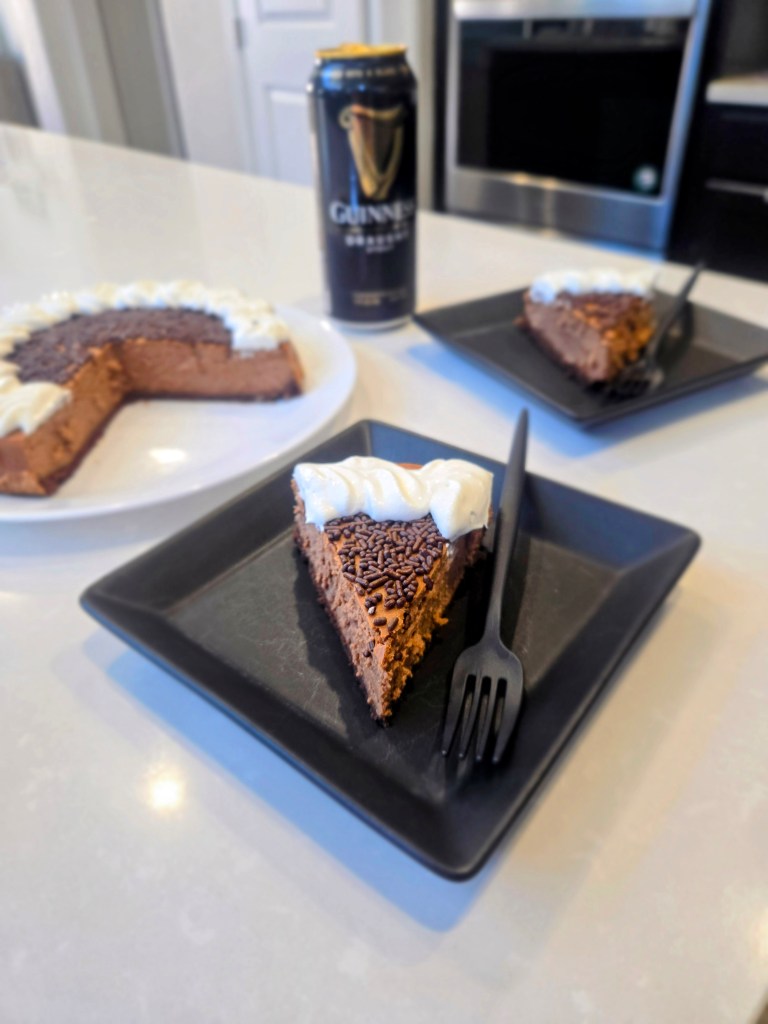
Chocolate, Guinness, and calculated digestive risks. But in all seriousness, with my Nature’s Way gluten enzymes, this did not give me any tummy issues whatsoever, so add Guinness Draught to low enough gluten beers that won’t ruin your day/week if you’re intolerant and not celiac. It joins the ranks of Modelo, Corona, and Pacifico! All beers I have tested with my enzymes and lived to tell the tale. 
Stout, sultry, and totally irresistible. 
She’s dense. She’s dreamy. She’s dangerously good. - Line an 8″ springform pan with Parchment paper and spray with cooking spray.
-
The Berry Best Birthday Cake (For the Berry Best People)

When two birthdays roll around in the same week, you berry well pull out all the stops–especially when it’s for your husband and your lovely mother-in-law! With our in-laws in town, it felt like the perfect excuse to revisit (and seriously glow-up) my strawberry cake recipe from earlier this month (you can tell I take my taste-testing seriously). I gave it the full birthday treatment: gold cake toppers, extra glam, and roses cut straight from strawberries…because nothing says “I love you” like hand-carved fruit flowers, right (as long as the chef doesn’t prick their finger on said carving knife)? Sweet, fresh, and made with lots of care (and buttercream), it was a delicious way to celebrate two very special people in our lives, because you can’t spell “family” without cake…or at least that’s what I tell myself.
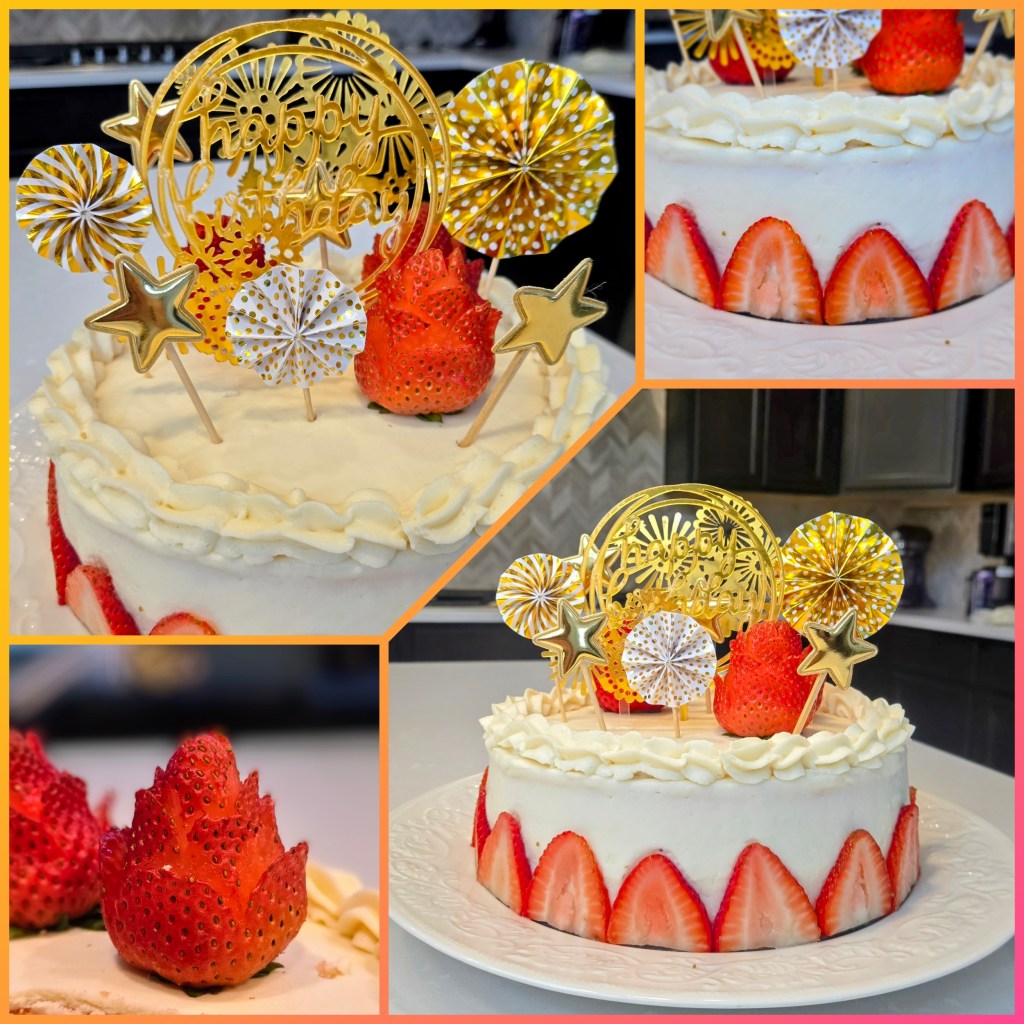
This cake rose to the occasion. Since this was no ordinary celebration, I gave my original recipe a little birthday glow-up. I dialed up the strawberry flavor with a touch more extract in the batter (because more berry = more merry), and I added real butter instead of Greek yogurt to the frosting for that extra indulgence–a little buttery sunshine to balance the sweet. For the finishing touches, I used minimal piping and went full-on fruit florist: I sliced strawberries into delicate little rose shapes that turned out unbeleafably cute and a strawberry border. Add a few gold cake toppers, some edible sparkle, and boom: birthday magic, no fondant fuss required.
Here’s everything I used for this cake:
- 1M Piping tip
- Fresh strawberries
- Birthday cake toppers
Follow along with the photo tutorial below, and I’ve also included a video of how I cut the strawberry roses below.
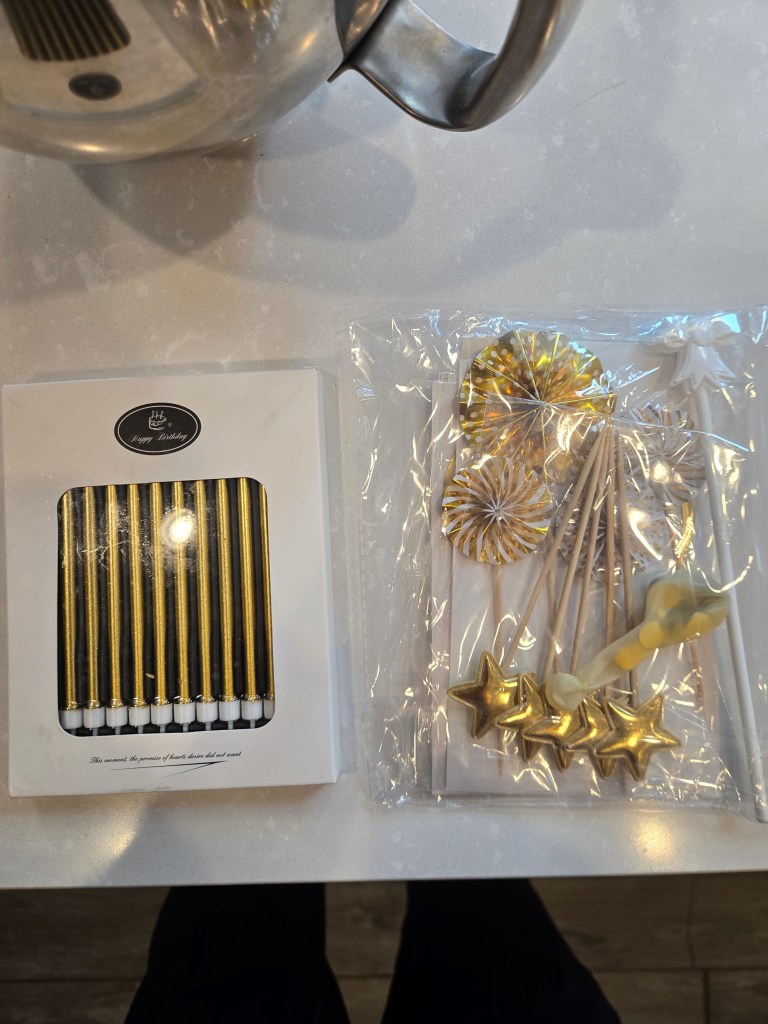
Grab gold candles and cake toppers and set aside. 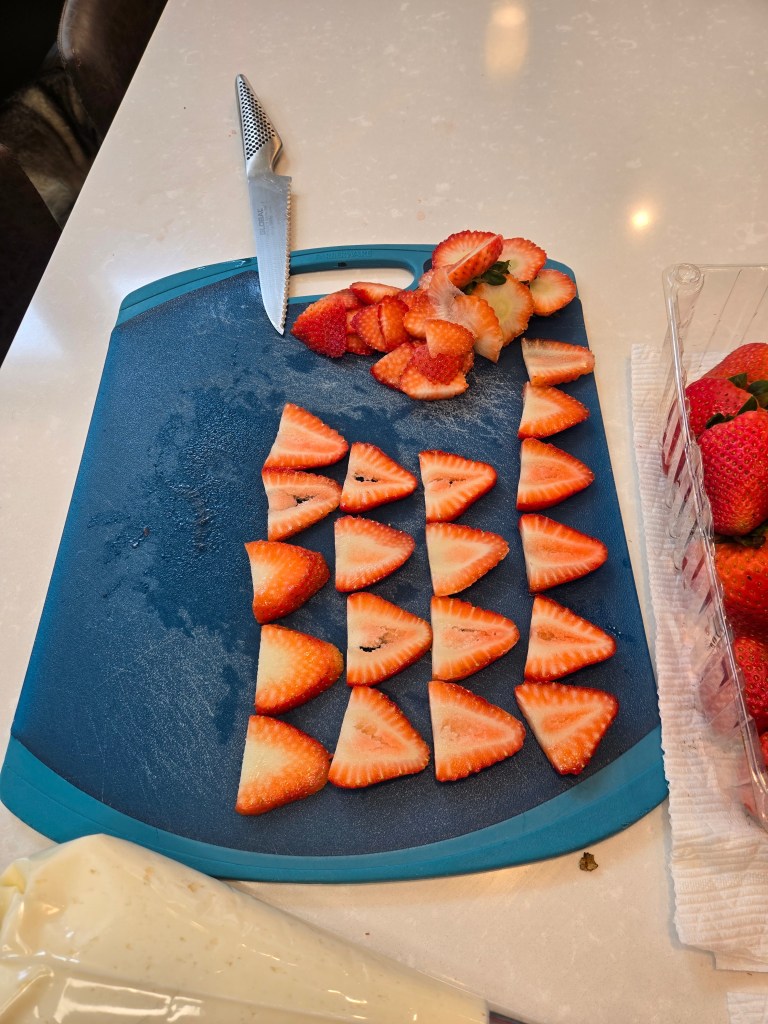
Trim tops so each berry is the same “height,” then vertically slice thin layers. 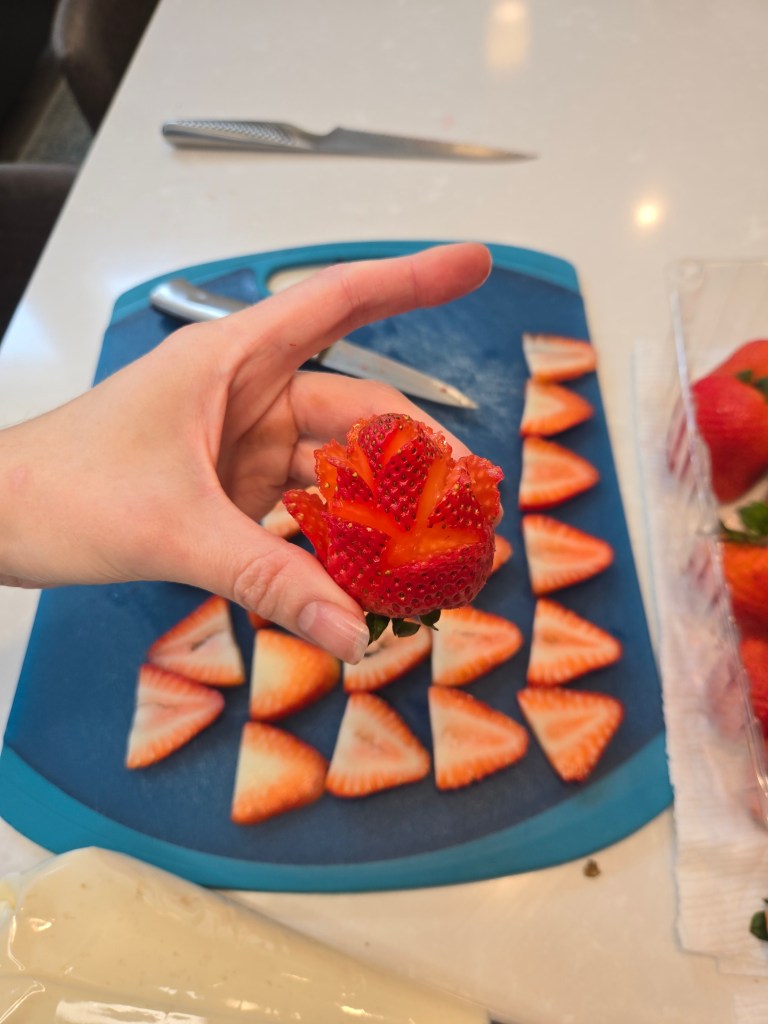
To make roses, see video and written instructions below. 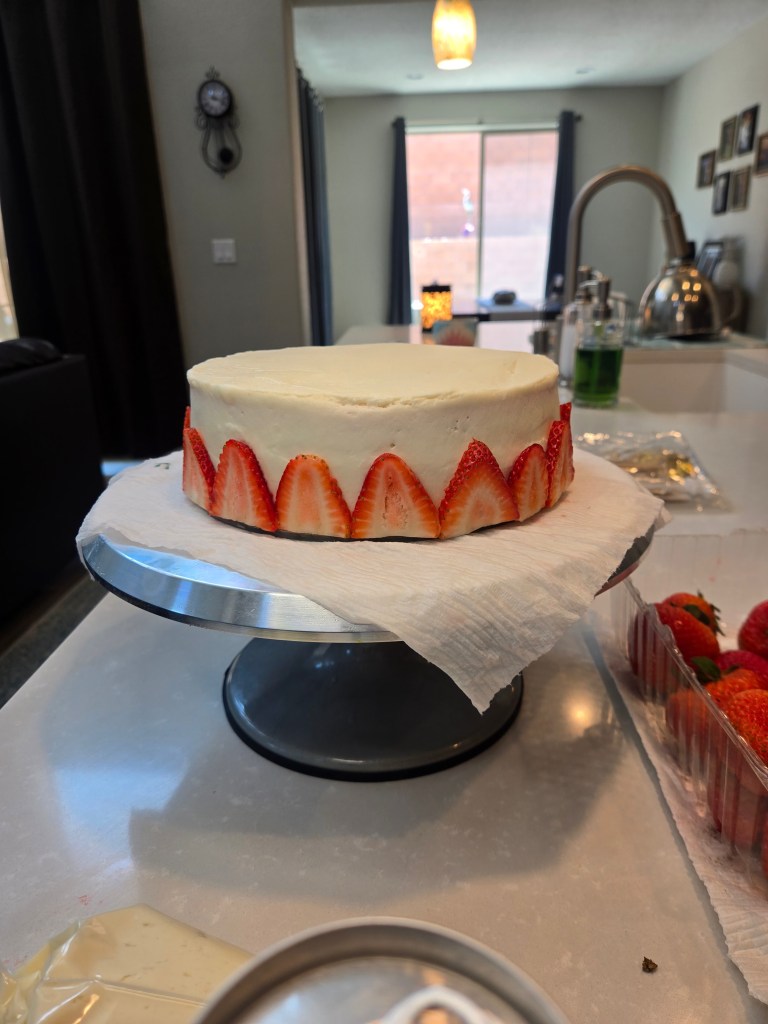
Once fully cooled, frost your cake with a thick layer of buttercream, then gently press the strawberry slices into the side of the cake. 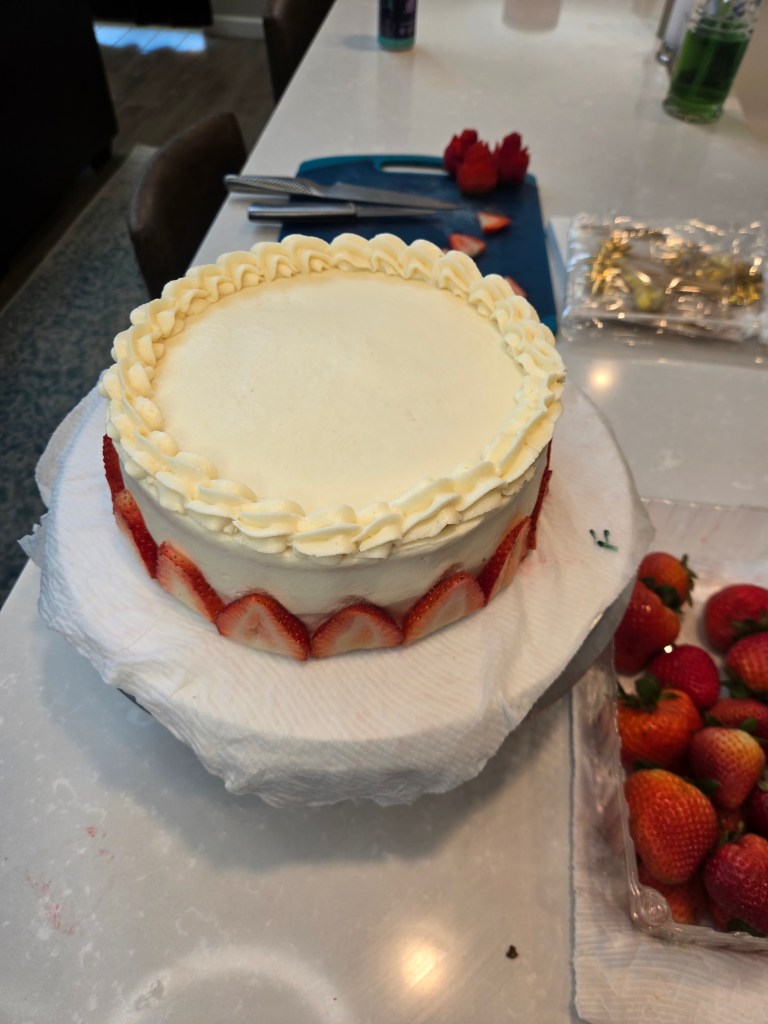
Use a 1M tip with your leftover frosting to pipe a shell border on top. 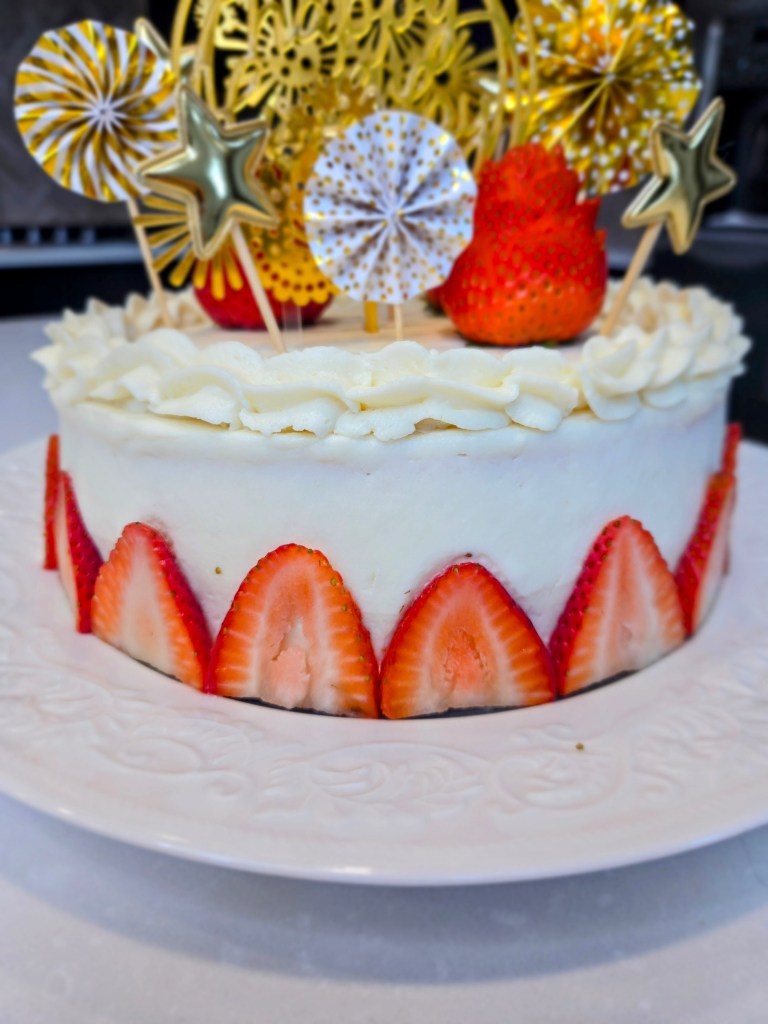
Finish by placing cake toppers and strawberry roses as desired. 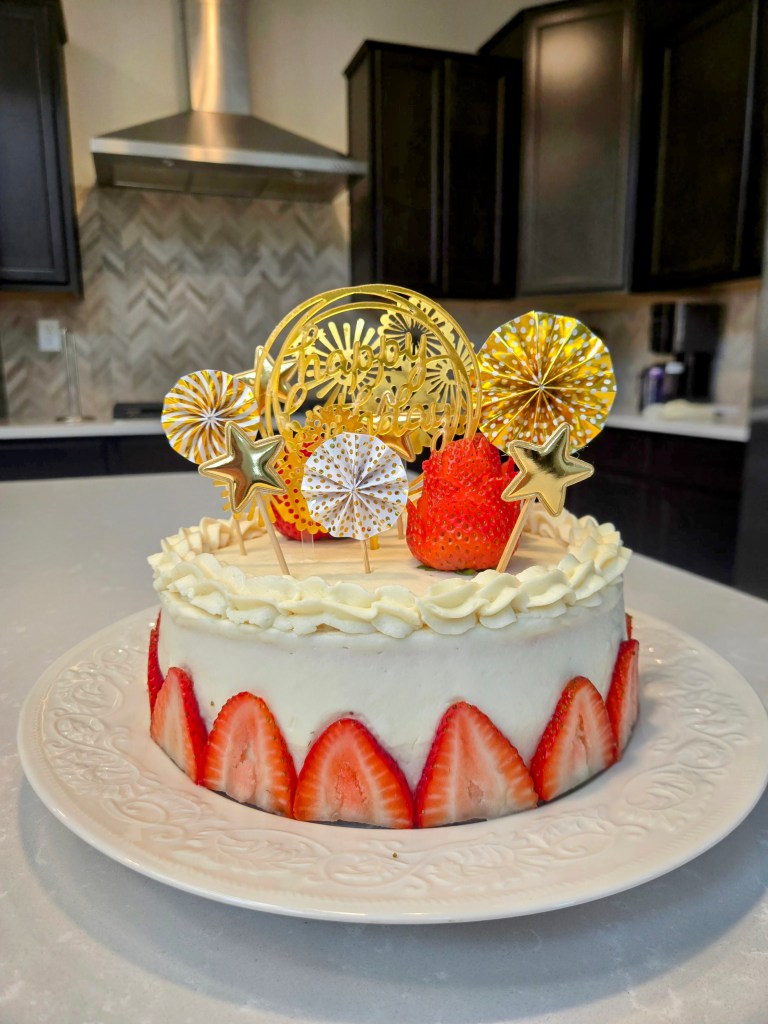
Topped with gold, filled with love. 
Stop and smell the strawberry roses. Then eat them immediately… When life gives you strawberries, make roses. Recipe and Instructions
Gluten free strawberry cake with protein cream cheese frosting
A lush strawberry cake with cream cheese frosting and the cutest daisies ever!
If not gluten free, use any kind of white or yellow cake mix. Monkfruit can also be replaced with regular powdered sugar for frosting. Protein powder can also be replaced with additional monkfruit or regular powdered sugar.
Ingredients
CAKE
*1 box of gluten free yellow cake mix (I used Whole Foods 365 GF cake mix)
*1 packet of sugar free strawberry Jell-o powder (0.3 oz)
*3/4 cup + 2 TBS fat free or skim milk
*113 g (1/2 cup) unsweetened applesauce
*2 eggs
*1.5 tsp strawberry extract
FROSTING
*1/2 cup butter, softened (can use a light butter to cut calories)
*8 ounces 1/3 the fat cream cheese at room temp
*12 ounces Lakanto powdered monkfruit
*4 ounces Quest vanilla milkshake protein powder (cuts the sweetness of the monkfruit and makes a nice, stiff, spreadable frosting; omit and use all monkfruit if desired)
*1 TBS clear vanilla
*3-4 TBS milk
*1/4 tsp citric acid if you like less sweet frosting
Directions
- Preheat oven to 350 and grease two 8-inch pans.
- Whisk cake ingredients together in a stand mixer on low for 60 seconds before switching to medium-high for two minutes.
- Pour batter evenly into pan and bake for 22-24 minutes, or until a toothpick comes out mostly clean from the center.
- Allow cake to cool fully before frosting.
- To make frosting, whisk cream cheese and butter for 3 minutes before adding in half the powdered monkfruit, protein powder, vanilla, and milk.
- Add in remaining monkfruit mix fully. If too stiff, add an additional TBS milk.
- While your cake cools, cut tops off of strawberries and then cut the sides vertically into thin strips to decorate the base of the cake; set aside.
- To make the strawberry roses, use a small pairing knife to cut thin slices at the bottom of the strawberry, cutting and rotating around the bottom. In the middle, cut at opposing sides so your petals will not overlap with the base layer cuts. Finish by cutting small slices into the top of the berry. Use your fingers to carefully peel back each cut/petal.
- Once fully cooled, frost your cake and place sliced strawberries around the bottom.
- Use remaining frosting into a piping bag with a 1M tip to pipe a shell border on top.
- Place cake toppers and roses on top as preferred.
- Keep cake covered and in the fridge. It is best served at room temp, so remove from fridge 30 minutes before eating. Enjoy!

Berry sweet birthday vibes only. 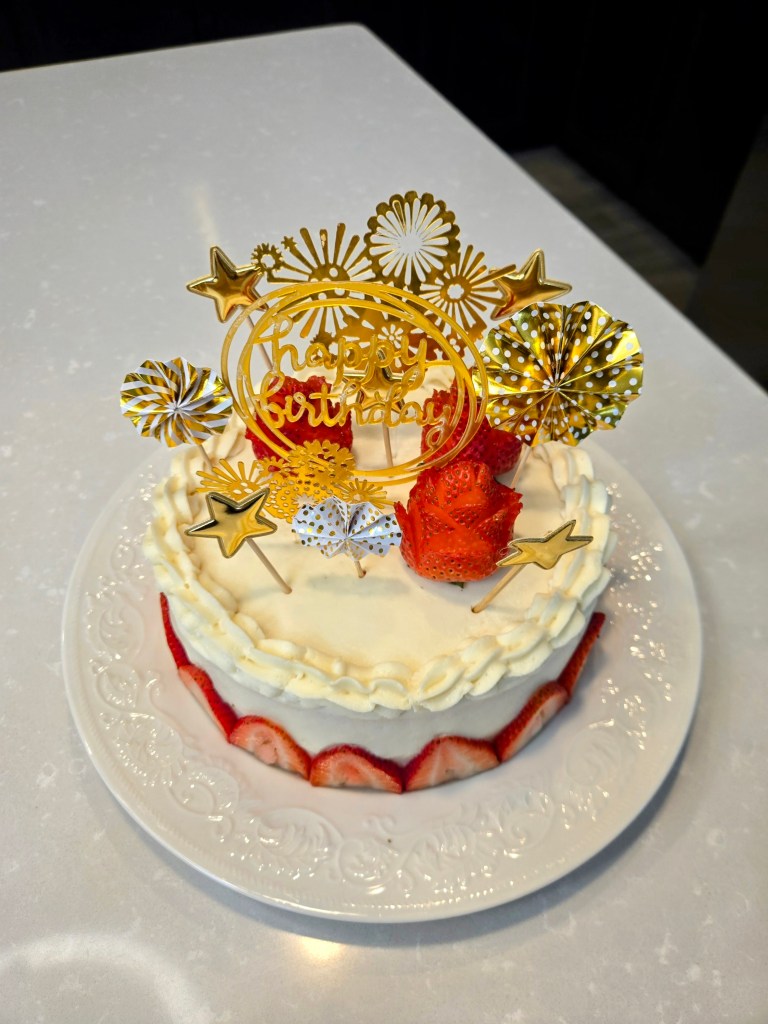
A cake fit for the berry best birthday duo! -
Strawberry Fields and Daisy Feels
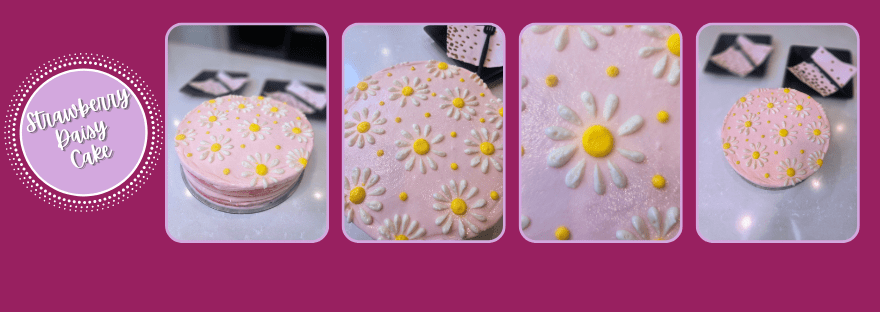
Let’s get one thing berry clear: this cake may be semi-naked, but it’s fully fabulous. Strawberry flavor takes center stage in this gluten free beauty that’s showing just enough frosting to keep things flirty. It’s giving just rolled out of the cake stand and effortlessly stunning. Think garden party goddess meets strawberry shortcake’s cooler cousin…and with a crown of cheerful daisies on top, it’s blooming with personality. Don’t let the lack of gluten fool ya- this cake’s got all the flavor and none of the fuss. So grab your fork and let’s get a little fruit-forward with some flower power, shall we?
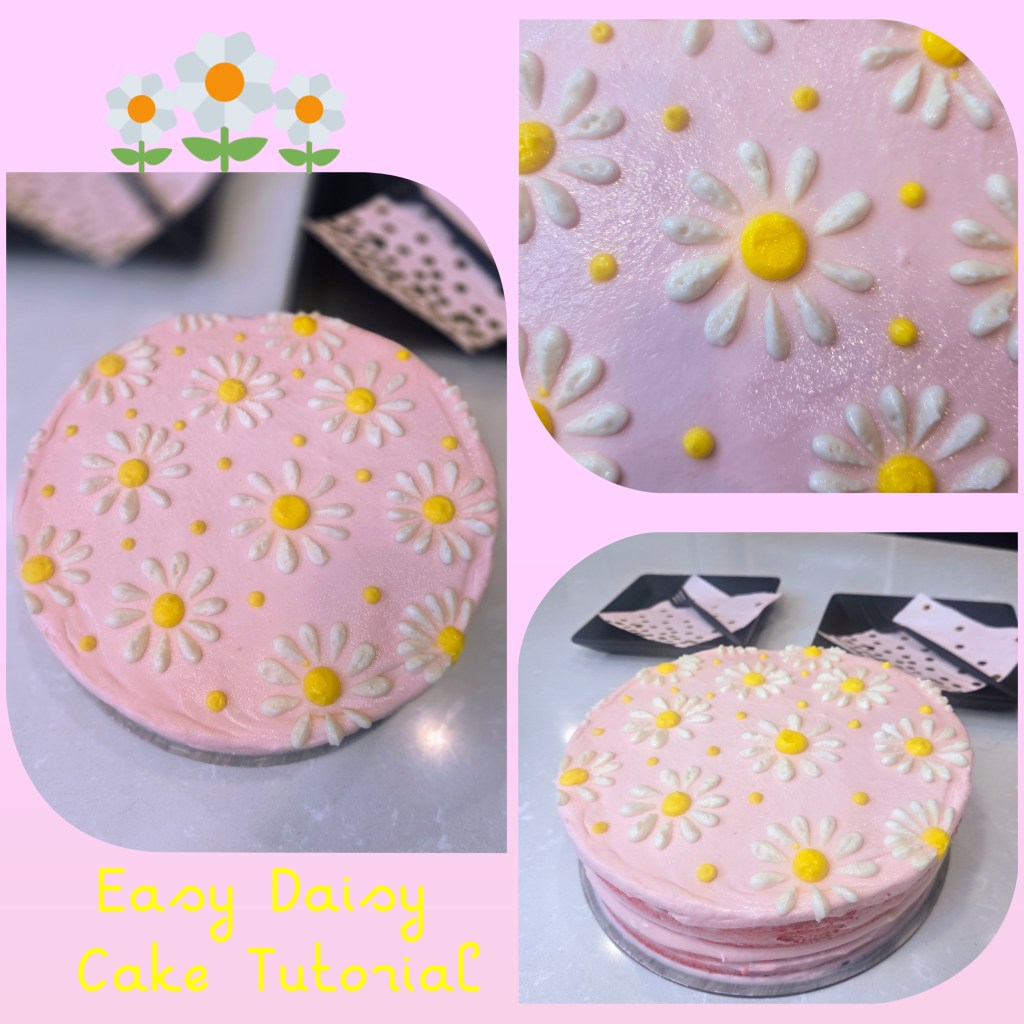
She is both flourless and flower-ful. Now, before you start thinking this cake takes all day to make, it’s as easy as pie (actually, easier, because there’s no crust drama here). This beauty comes together faster than planting actual daisies, I swear. With a no-fuss batter, minimal chill time, and the kind of decorating that involves more flower-placing than piping stress, it’s basically the daisy-chain of desserts: simple, sweet, and totally charming. Oh, and did I mention it’s only 247 calories per slice? My vanity this close to summer requires all the cake I shovel into my pie hole (clearly I gotta make a pie next week) be low in cals so crop top season can be enjoyed to the fullest. No blooming waistlines here!
Here’s everything I used for this cake:
- Piping tips: #5 round, #12 round, #104 petal tip
- Americolor yellow and soft pink gel dyes
- Cake and frosting recipe below
Now, grow some roots and stay put for both a photo tutorial AND video tutorial…better than a bouquet of roses I tell ya!
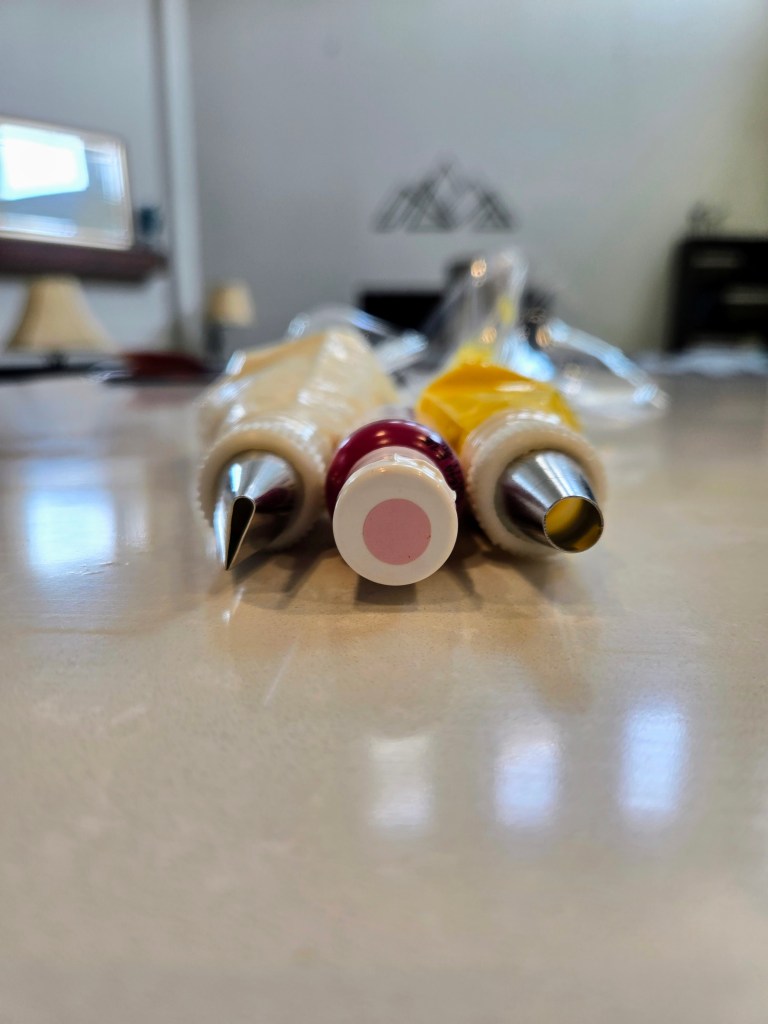
Load white frosting into the bag with a petal tip and yellow into a bag with a round tip. 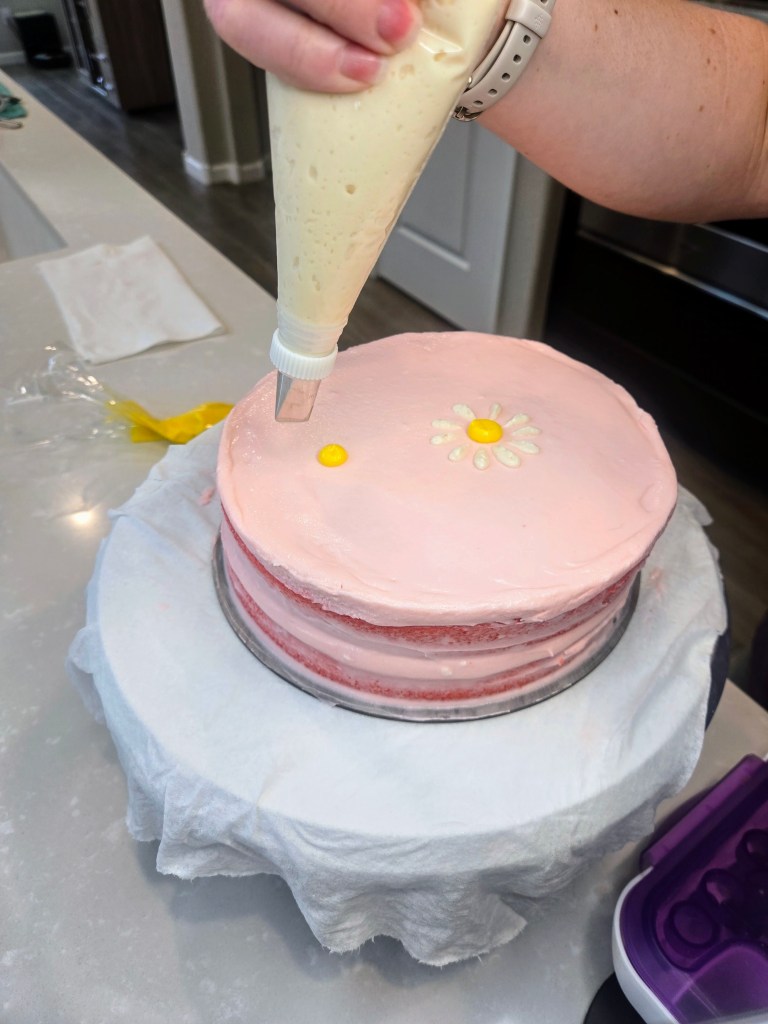
Place a small yellow circle as the center before facing the petal tip with the skinny side pointed toward you. 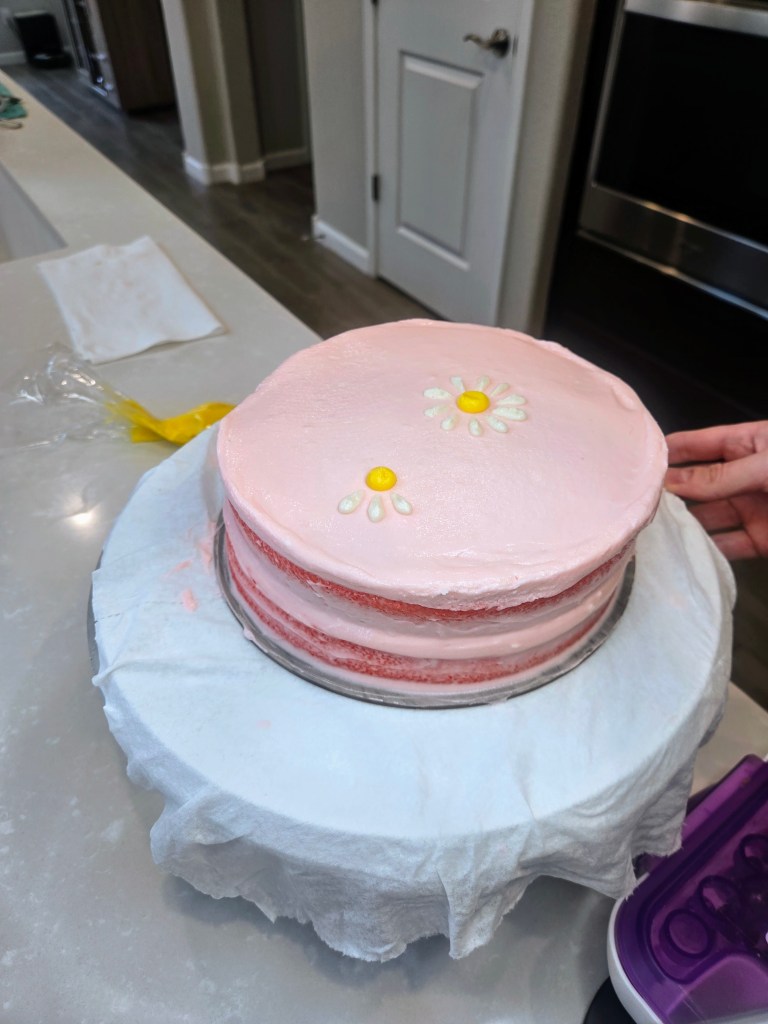
Use gentle pressure on the piping bag and “stamp” each individual petal around the yellow center. 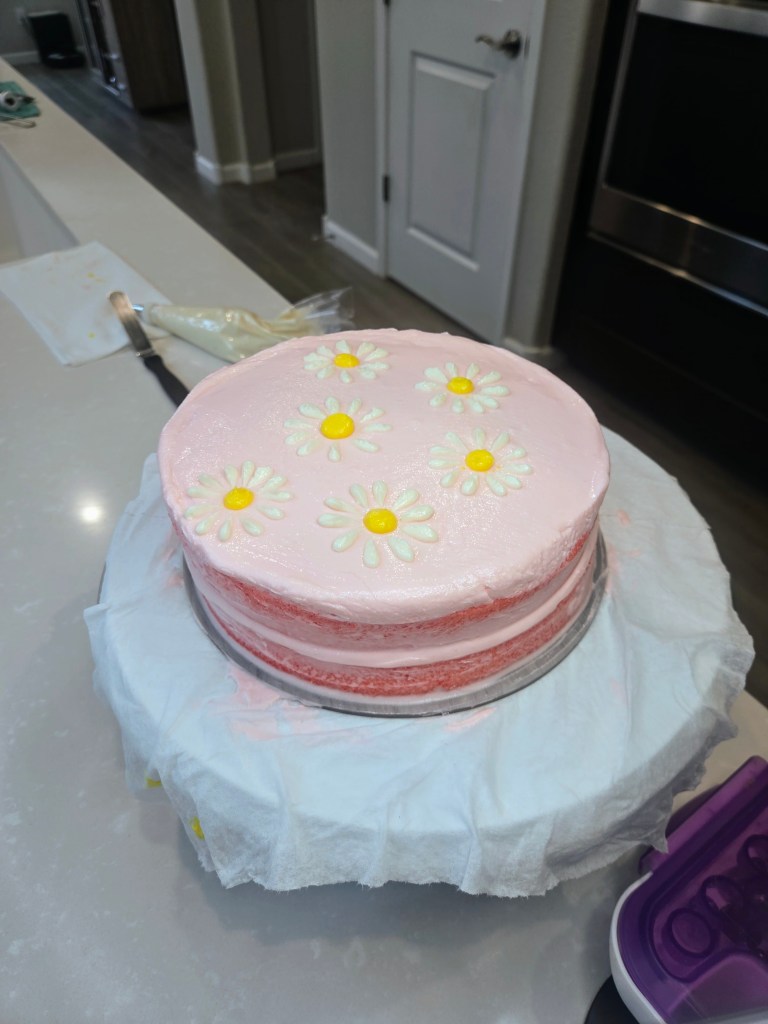
You can put as many flowers on top as you want! 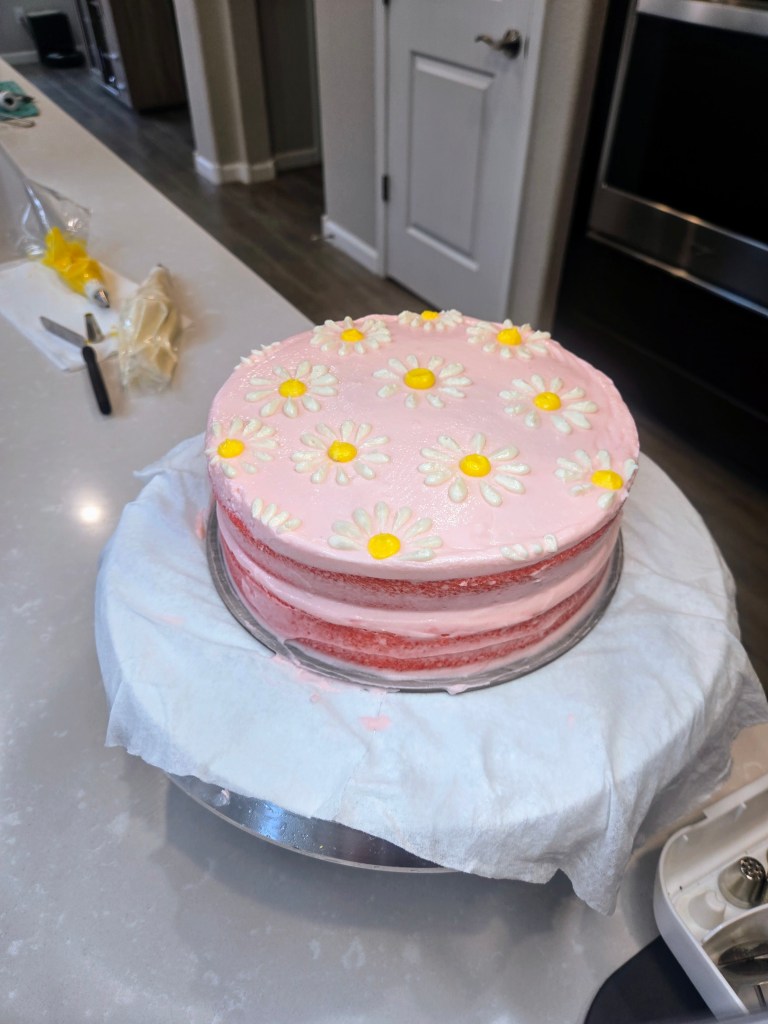
You could also cascade them down the side, but I left mine blank for the sides to remain semi-naked. 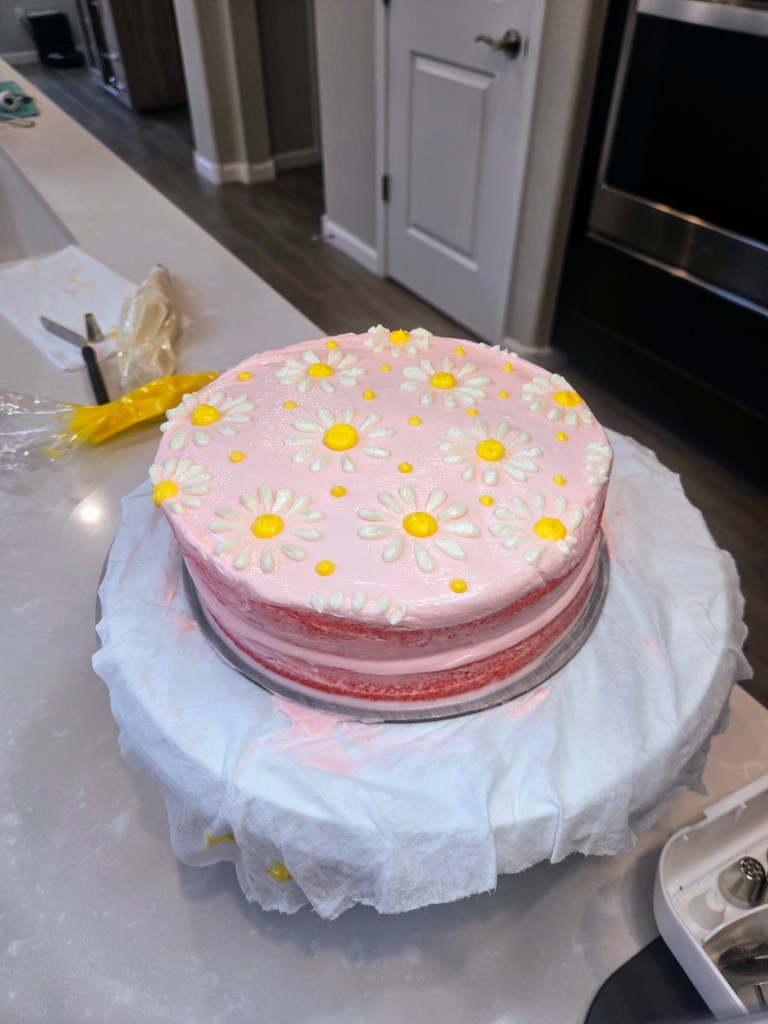
Now we’ve got plenty of pink showing on the sides! Truly, it gets no easier than this when it comes to floral arrangements…. Recipe and Instructions
Gluten free strawberry cake with protein cream cheese frosting
A lush strawberry cake with cream cheese frosting and the cutest daisies ever!
If not gluten free, use any kind of white or yellow cake mix. Monkfruit can also be replaced with regular powdered sugar for frosting. Protein powder can also be replaced with additional monkfruit or regular powdered sugar.
Ingredients
CAKE
*1 box of gluten free yellow cake mix (I used Whole Foods 365 GF cake mix)
*1 family size packet of sugar free strawberry Jell-o powder (0.6 oz)
*3/4 cup + 2 TBS fat free or skim milk
*125 g (1/2 cup) unsweetened applesauce
*2 eggs
*1/2 tsp strawberry extract
FROSTING
*226 g (1 cup) vanilla Greek yogurt, strained overnight
*8 ounces 1/3 the fat cream cheese at room temp
*12 ounces Lakanto powdered monkfruit
*4 ounces Quest vanilla milkshake protein powder (cuts the sweetness of the monkfruit and makes a nice, stiff, spreadable frosting; omit and use all monkfruit if desired)
*1 TBS clear vanilla
*1/4 cup + 2 TBS milk
*1/4 tsp citric acid if you like less sweet frosting
Directions
- Preheat oven to 350 and grease two 8-inch pans.
- Whisk cake ingredients together in a stand mixer on low for 60 seconds before switching to medium-high for two minutes.
- Pour batter evenly into pan and bake for 24 minutes, or until a toothpick comes out mostly clean from the center.
- Allow cake to cool fully before frosting.
- To make frosting, whisk cream cheese and yogurt for 3 minutes before adding in half the powdered monkfruit, protein powder, vanilla, and milk.
- Add in remaining monkfruit mix fully.
- While your cakes cool, you can split your frosting up so you have a small amount of white in a #104 petal tip, a smaller amount of yellow with a #12 tip, and dye the rest soft pink.
- Once fully cooled, frost your cake and use the video and galleries above to decorate those daisies.
- Keep cake covered and in the fridge. It is best served at room temp, so remove from fridge 30 minutes before eating. Enjoy!
Nutrition
Macros
10 servings
247 cal/43.3 c/3.4 f/10.8 p per slice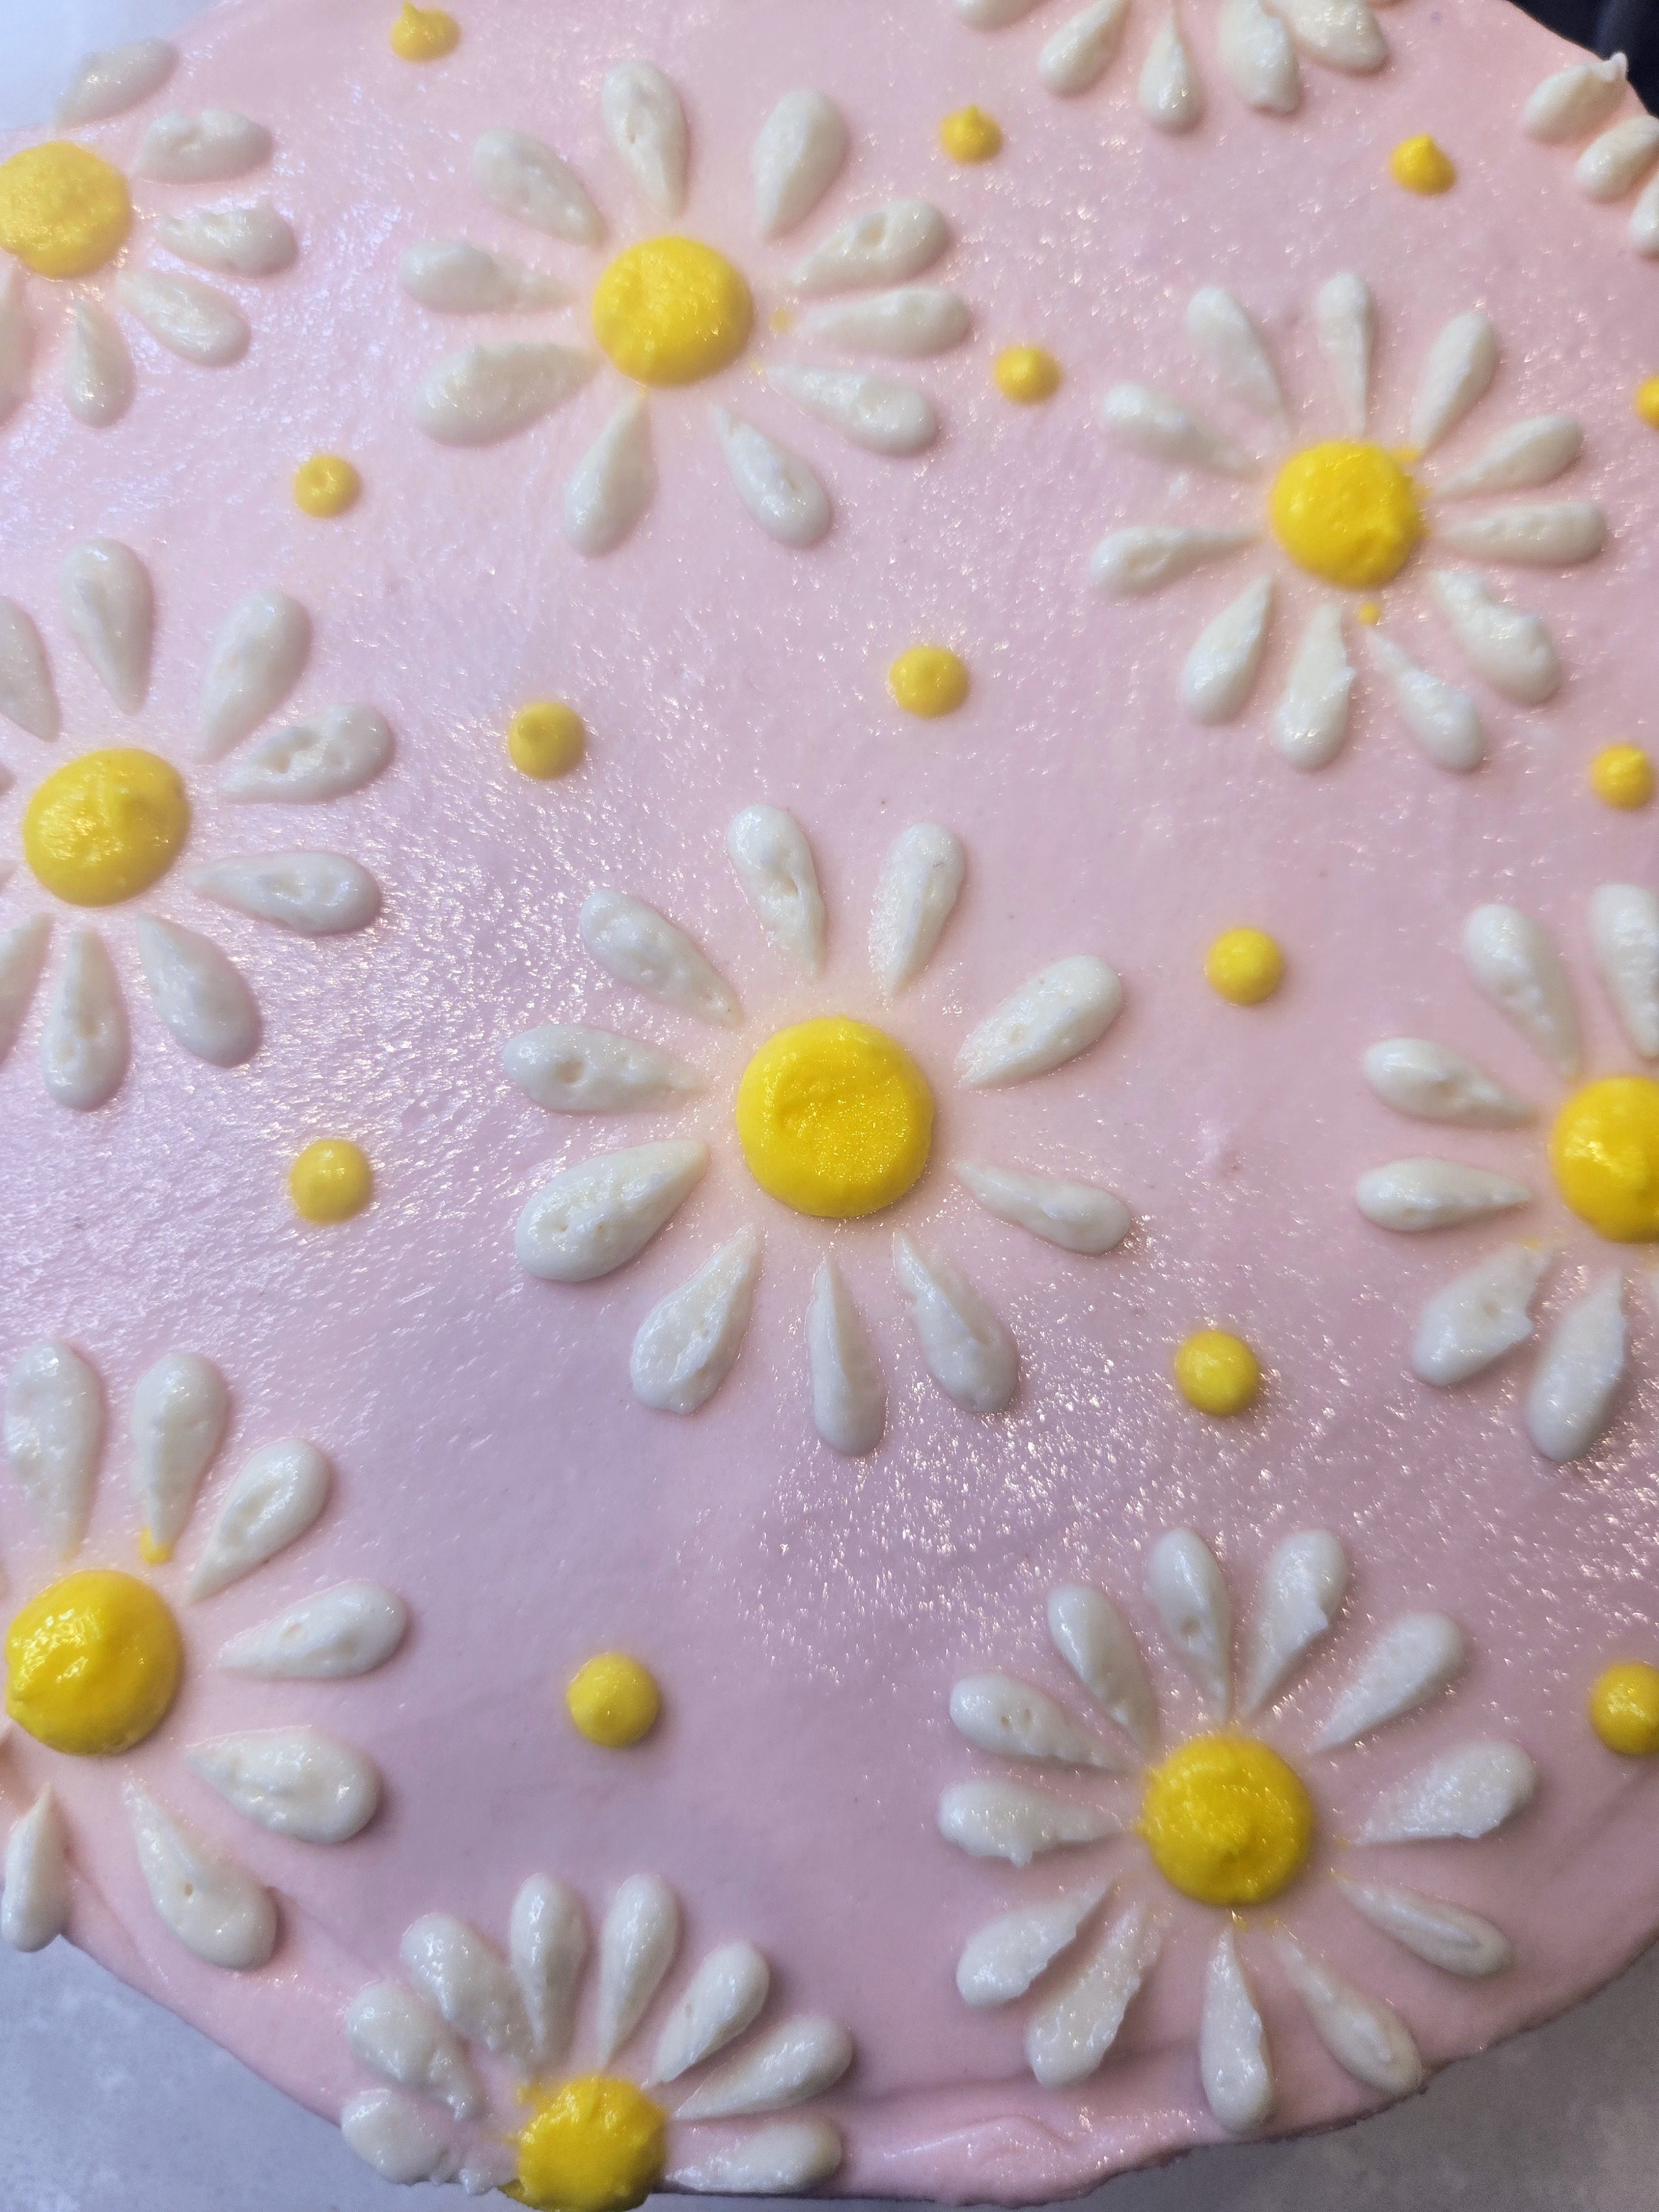
Like a love letter from the garden, in cake form...and sans dirt. 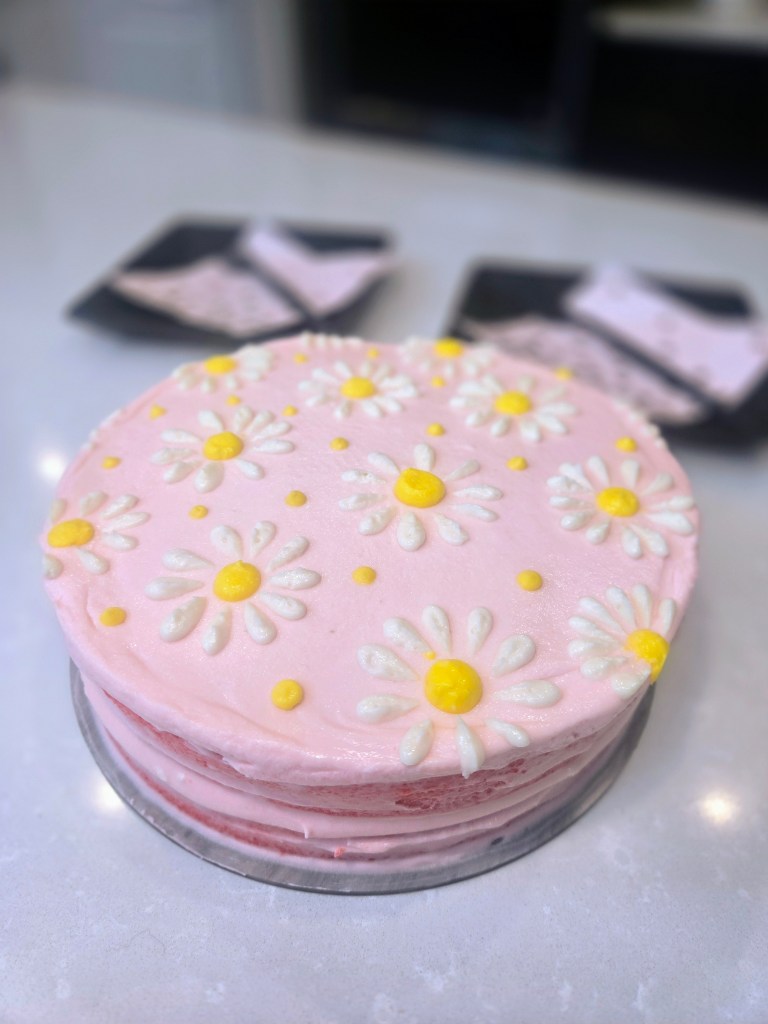
Barely dressed but fully delicious. -
Orange Creamsicle Cheesecake
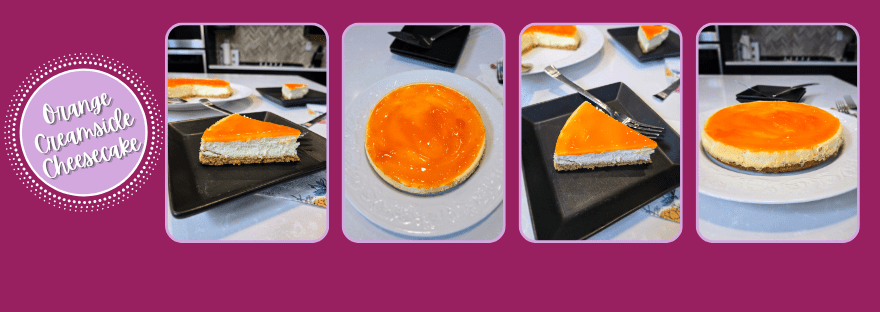
If sunshine had a flavor, this Orange Creamsicle Cheesecake would be it—bright, sweet, and peeling with joy! This springtime showstopper is zest what you need to shake off the winter blues and dive into dessert that’s equal parts creamy, dreamy, and citrusy-sassy. One bite and you’ll be like, “Orange you glad you didn’t skip dessert?” With its nostalgic nod to the classic creamsicle and a fresh twist of orange flair, this cheesecake is the pulp fiction of spring bakes—totally juicy, a little tart, and 100% irresistible. So grab some OJ, and let’s get tangy with it!
Zest in show. Recipe and Instructions
Orange Creamsicle Cheesecake
A citrusy cheesecake perfect for spring celebrations
If not gluten free, use any kind of graham cracker crumbs for the crust. Greek yogurt can be replaced with an additional 8 ounces of cream cheese, and allulose can also be replaced with regular sugar. I have not tested this recipe with any other protein powders, so I recommend a whey-based protein.
Ingredients
CRUST
*150 g Kinnikinick gluten free graham crumbs
*2 TBS sugar free syrup
*If needed, 1 TBS liquid
CHEESECAKE FILLING
*224 g (8 ounces) 1/3 the fat cream cheese at room temp
*48 g (1/4 cup) allulose
*226 g (1 cup) nonfat Greek yogurt, strained overnight
*60 g (1/2 cup) Quest vanilla milkshake protein powder
*6 ounces preferred orange juice (I used pulp free)
*1 tsp vanilla extract
*1 tsp orange extract
*1 TBS lemon juice
*2 large eggs
TOPPING
*6 ounces orange juice
*2 TBS allulose
*2 tsp cornstarch mixed with 2 tsp water
*Orange dye if desired
Directions
- Line an 8″ springform pan with Parchment paper and spray with cooking spray.
- Preheat oven to 350.
- Dump the graham crckers and syrup in a food processor and grind until smooth (if mixture is too thick, add additional TBS of liquid).
- Place crust mix into prepared pan and smooth to the edges (I use cooking spray on my hands to make this easier).
- Bake for 10 minutes until golden; remove to cool while making filling.
- Lower oven heat to 325 degrees.
- Using a whisk attachment, mix the cream cheese and allulose in a stand mixer on medium high for 2-3 minutes until fluffy and smooth.
- Add in the yogurt and protein powder mixing well (it will be thick/chunky).
- Add in OJ, orange extract, lemon, and vanilla, and blend until smooth, 2-3 minutes.
- Switch to a paddle attachment, and on low speed, add eggs, one at a time, mixing until smooth.
- Fill a large roasting pan with 4-5 cups of steaming hot water. Wrap your springform pan in several layers of foil and place into a crockpot liner, tying the edge up, to keep your cheesecake from getting any water into it during the water bath.
- Pour the cheesecake batter into the prepared pan, and put the prepared pan into the roasting pan with water.
- Bake for 45-50 minutes, until the sides have set but the center is still jiggly.
- Turn the oven off, leaving the cheesecake inside, and crack the oven door to allow the cheesecake to finish baking for 1 hour.
- Remove from the oven and place on a cooling rack to cool to room temp; I like to run a sharp knife around the edges after it is cool.
- Refrigerate cheesecake overnight or place in fridge for 4 hours before removing from springform.
- In a small saucepan, bring the OJ and allulose to a simmer, stirring every few minutes (should take a 5-7 minutes to bring to a simmer on medium heat).
- Add in cornstarch mixture and dye (if using) and stir until thickened.
- Let mixture cool for 15 minutes before spreading on top of cheesecake and serving.
Nutrition
Macros
8 servings
233.3 cal/22.7 c/10.1 f/12.9 p per slice
This dessert’s got some serious a-peel. 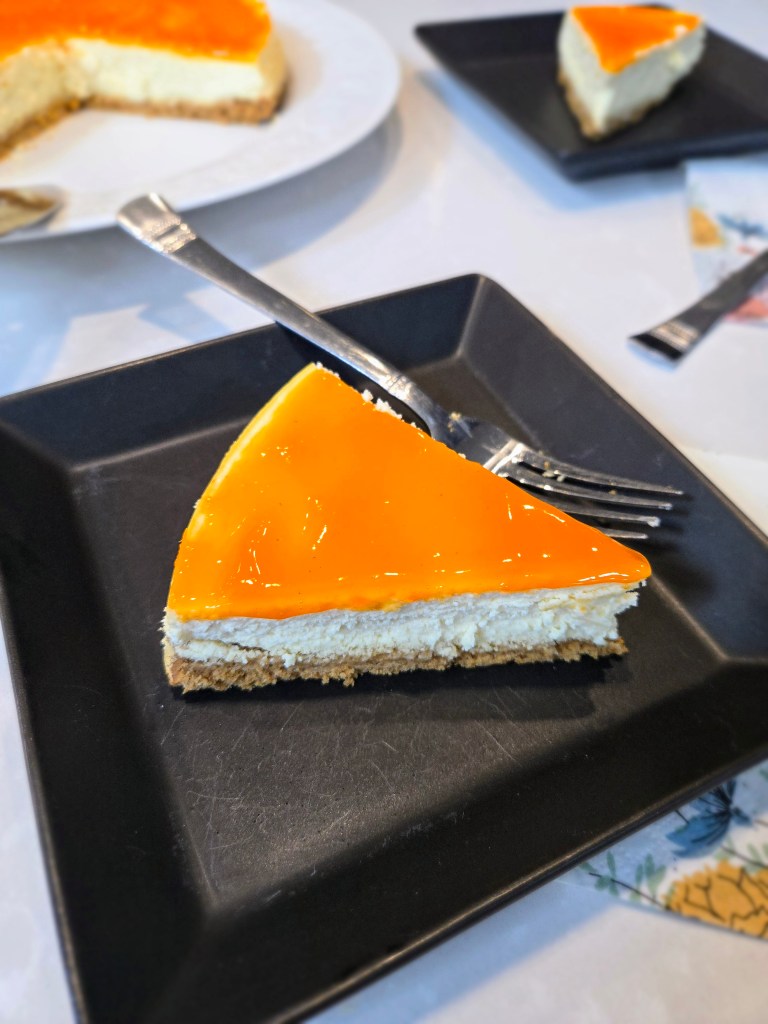
Orange you glad cheesecake exists? Because same. 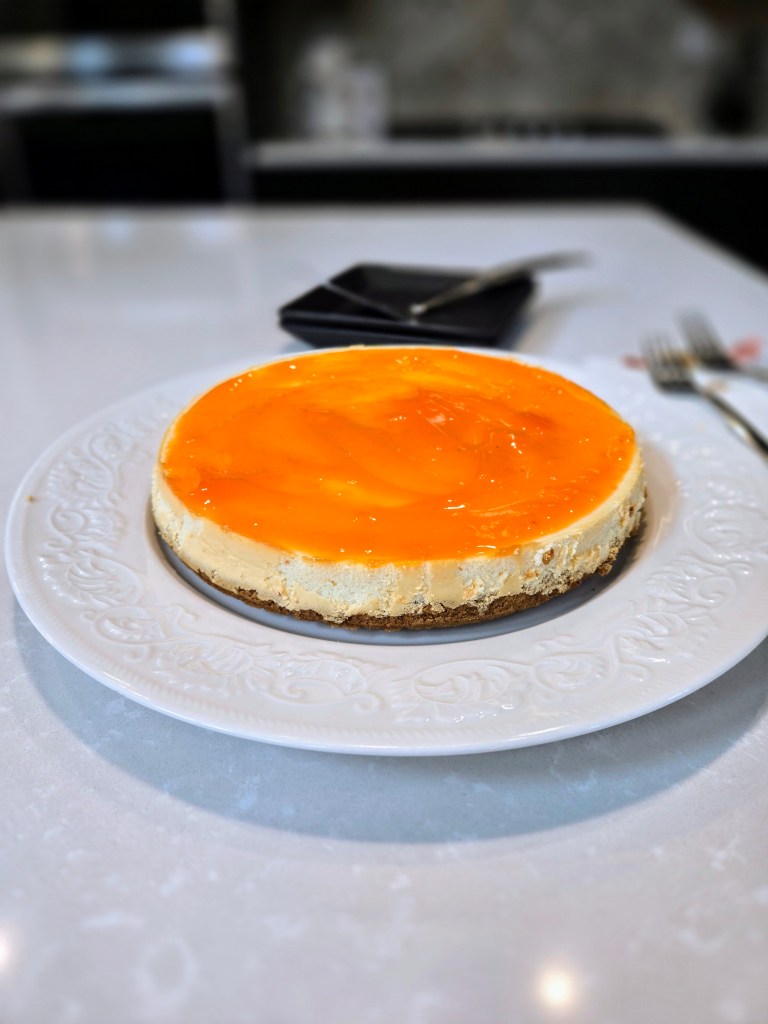
Spring just got a little sweeter (and a lot more orange). - Line an 8″ springform pan with Parchment paper and spray with cooking spray.
-
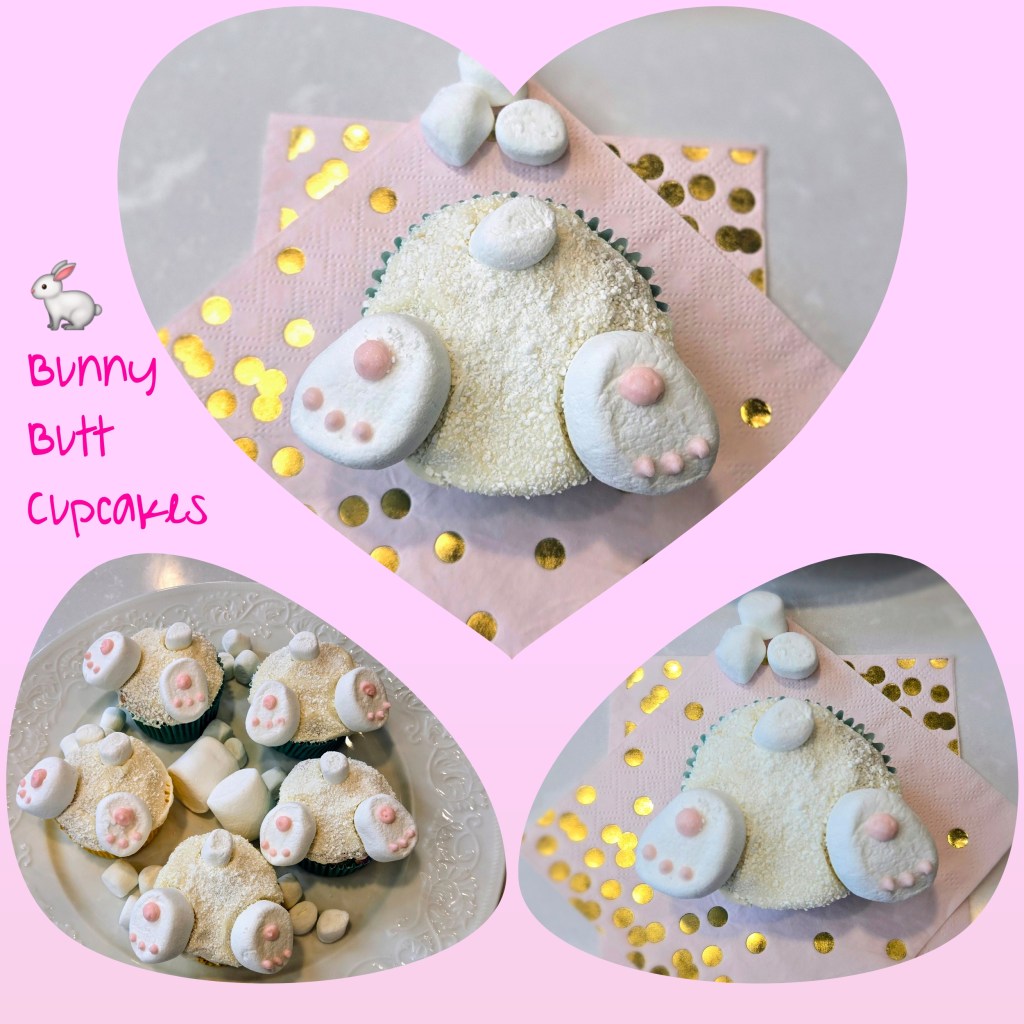
Bunny Butt Cupcakes

Some-bunny got a little too excited for Easter treats and took a dive—right into a cupcake! These Bunny Butt Cupcakes are the ultimate hoppening dessert for your Easter spread, featuring fluffy little cottontails and feet sticking straight up like they’ve gone burrowing for snacks, which, relatable, honestly. They’re almost too cute to eat… almost. So grab your whisk, get egg-cited, and let’s bake up a batch of these sweet little bunny booties before they hop off the table!
Peter Cottontail would be so jealous right now if he were real. I’m so egg-cited and I just can’t hide it…it’s been a few weeks since I’ve done any major baking, so this was a fun one to hop back into. As you can see, my pun game is still strong regardless. I had half a batch of leftover Lucky Charms cupcakes sitting in the freezer along with half a batch of leftover frosting, so I decided to conglomerate Easter with St. Patrick’s Day for this idea, and I am sure that somewhere, a patron saint of something is whipping through an instruction manual to see what rules this breaks, but I’ve yet to be smited (smoted?) while eating one of these cupcakes, so praise be to the Easter Bunny? These are super simple and fun to throw together, and they would be a great Easter family activity to make, eat, and eventually fight over the last one, as is tradition.
Alright, are you all ears? Listen up, because you’ll need:
- A dozen cupcakes of your choice
- Half a batch of plain white frosting (buttercream, cream cheese, whipped, any work!)
- White chocolate, grated into fine bits (you could also use coconut shavings, white sanding sugar, or skinny white sprinkles)
- Pink gel dye
- A #5 round tip
- Large marshmallows
- Mini marshmallows
I’ve got a gallery tutorial and a video tutorial below, so consider this me putting all my eggs into one Easter basket:
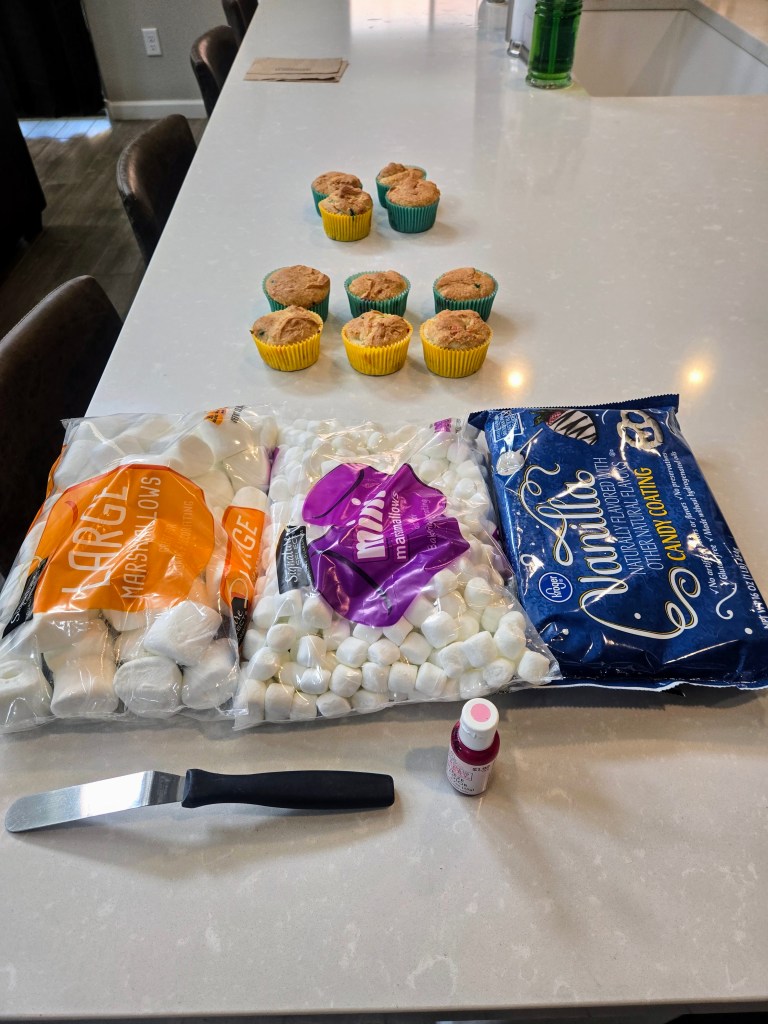
Gather up everything you need! The Easter Bunny demands preparedness. 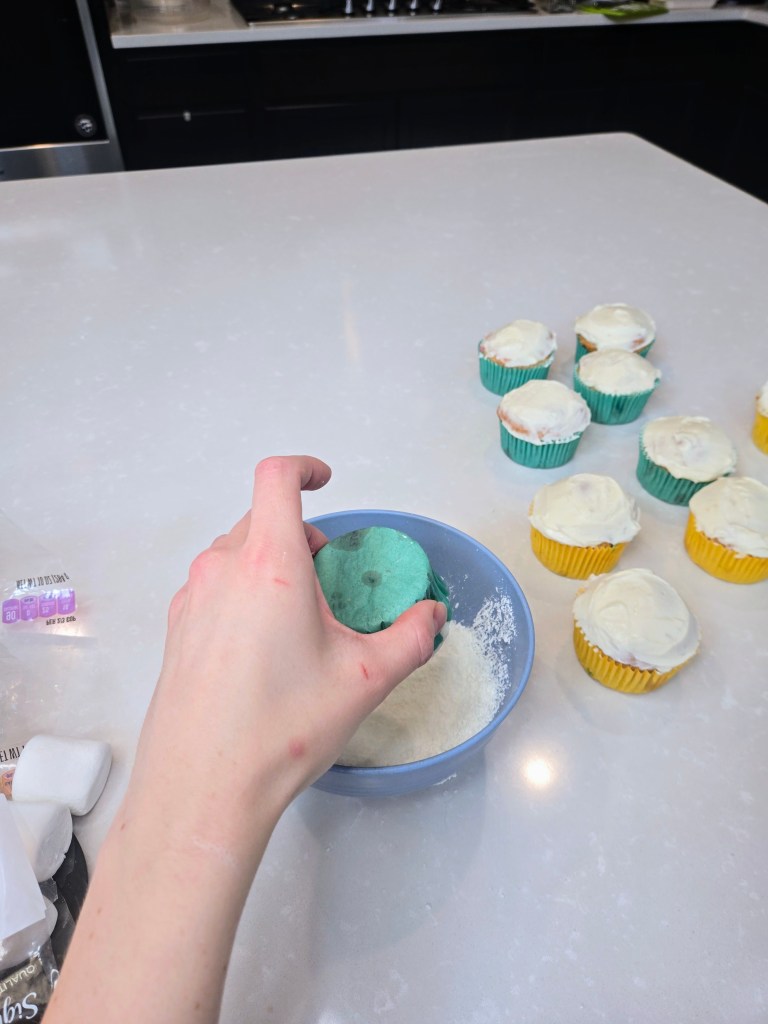
Once you’ve grated your white chocolate, place into a bowl and swirl each cupcake to coat the frosting. 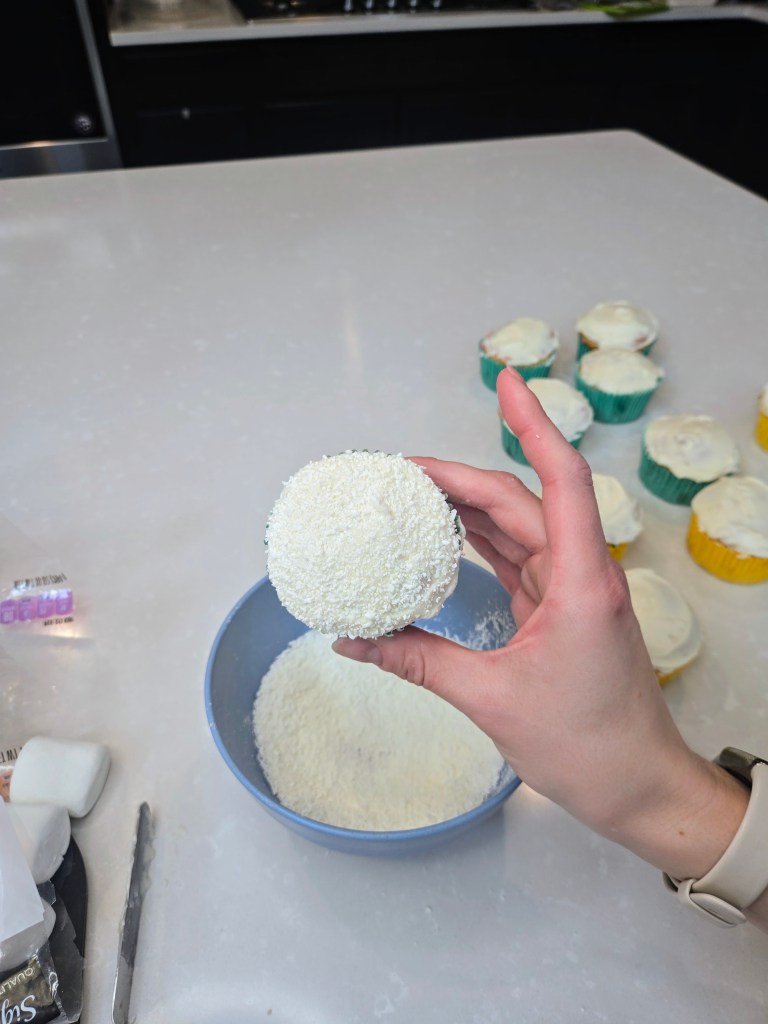
It’s giving ~snowy wonderland~ at this point, but we’ll get there. 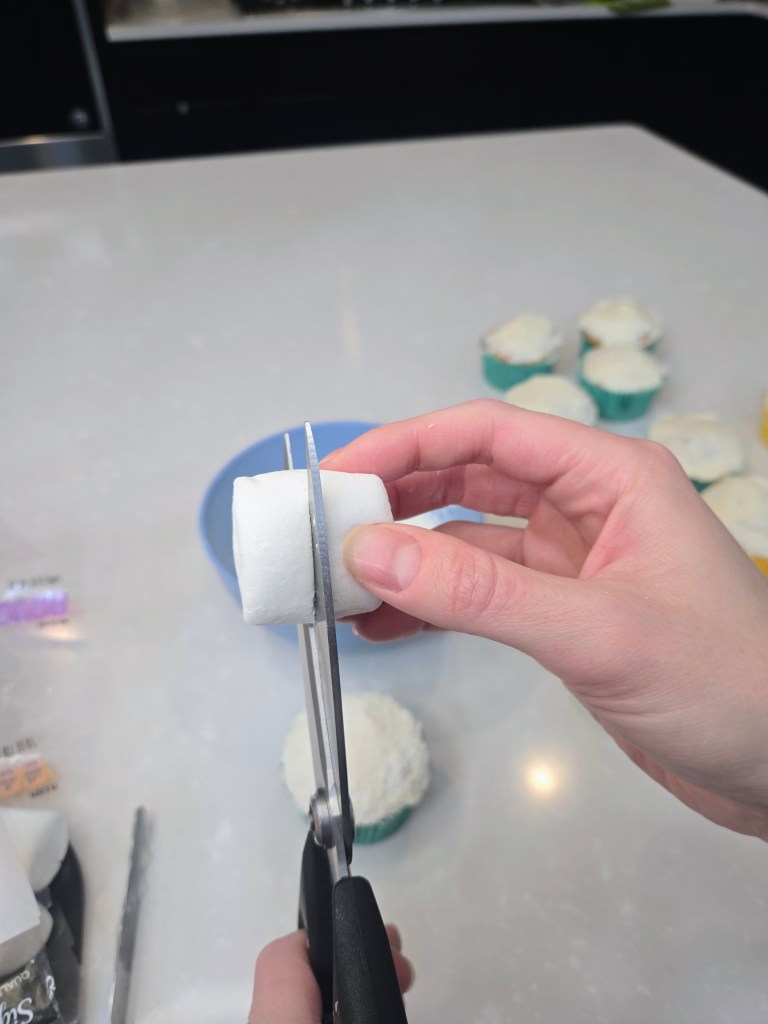
Cut a large marshmallow in half for his Thumper feet. 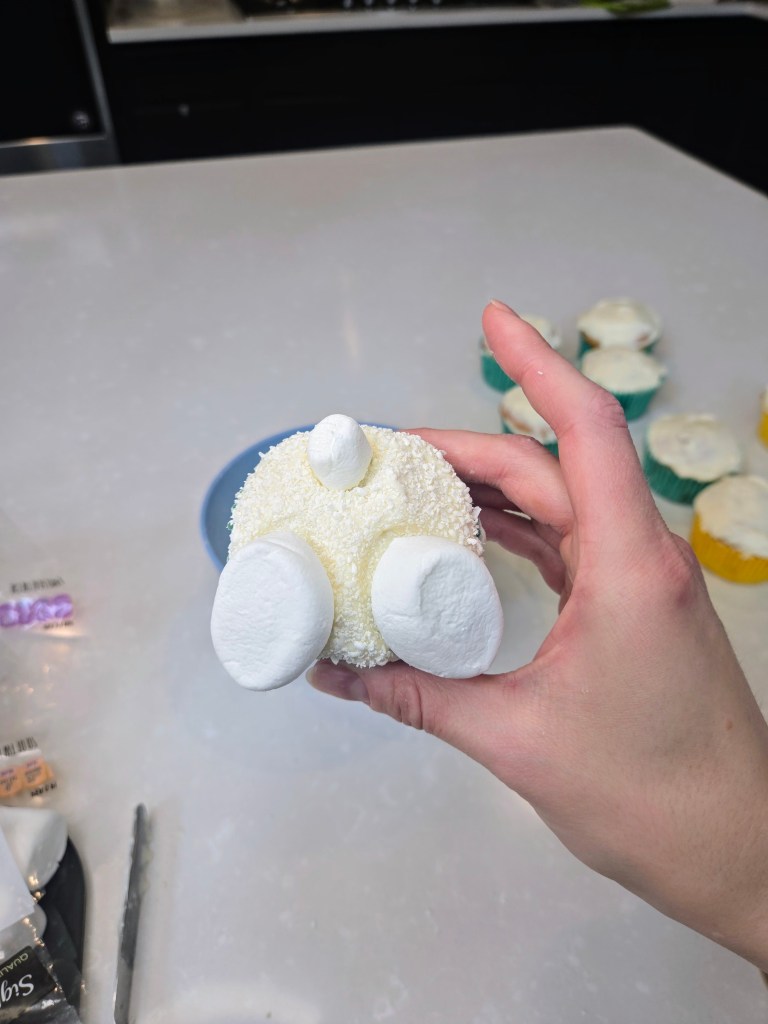
Press gently into the bottom on each side of the cupcake to adhere his feet, then do the same with a mini mallow for his bunny tail. 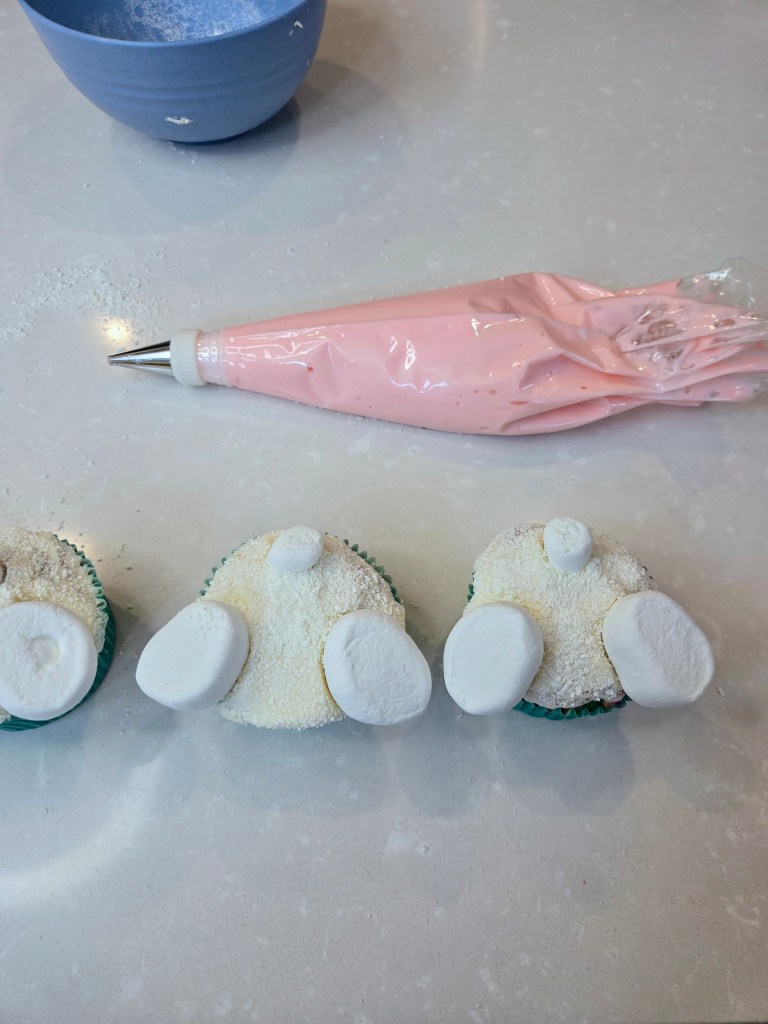
Still giving winter vibes, but now also giving ~trapped in an avalanche~… 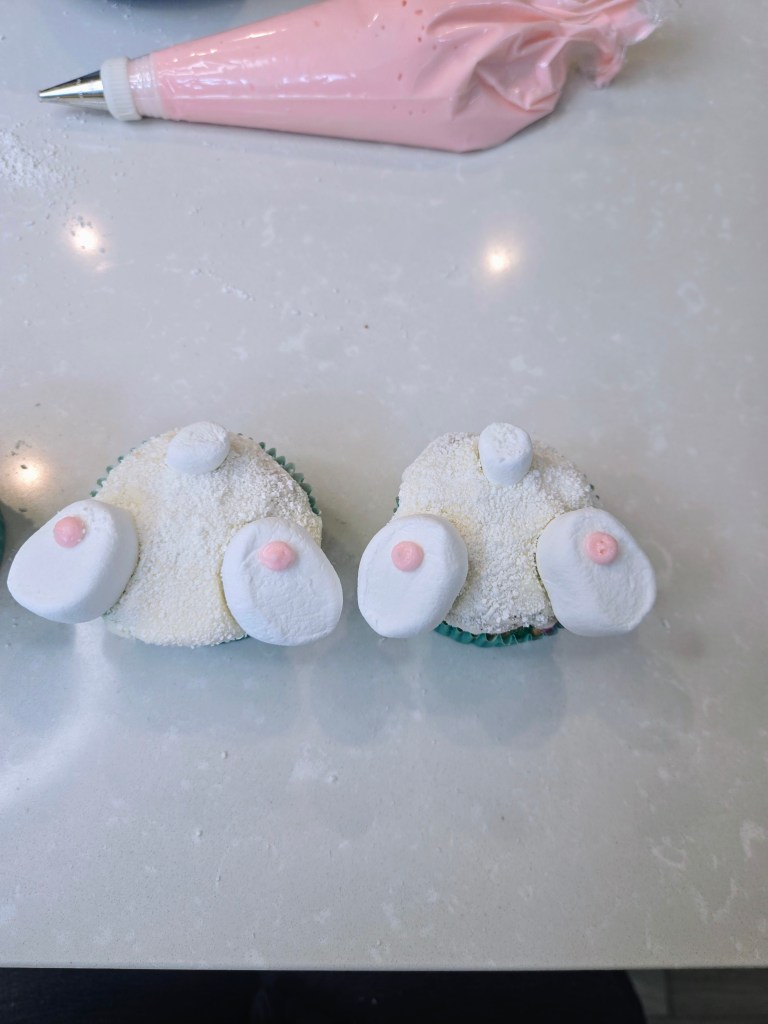
Use a round tip to pipe the largest parts of the pad of his bunny paws at the top of the marshmallow. 
And finish by piping his adorable lil’ bun toesies on the bottom! Hare’s to a sweet celebration! 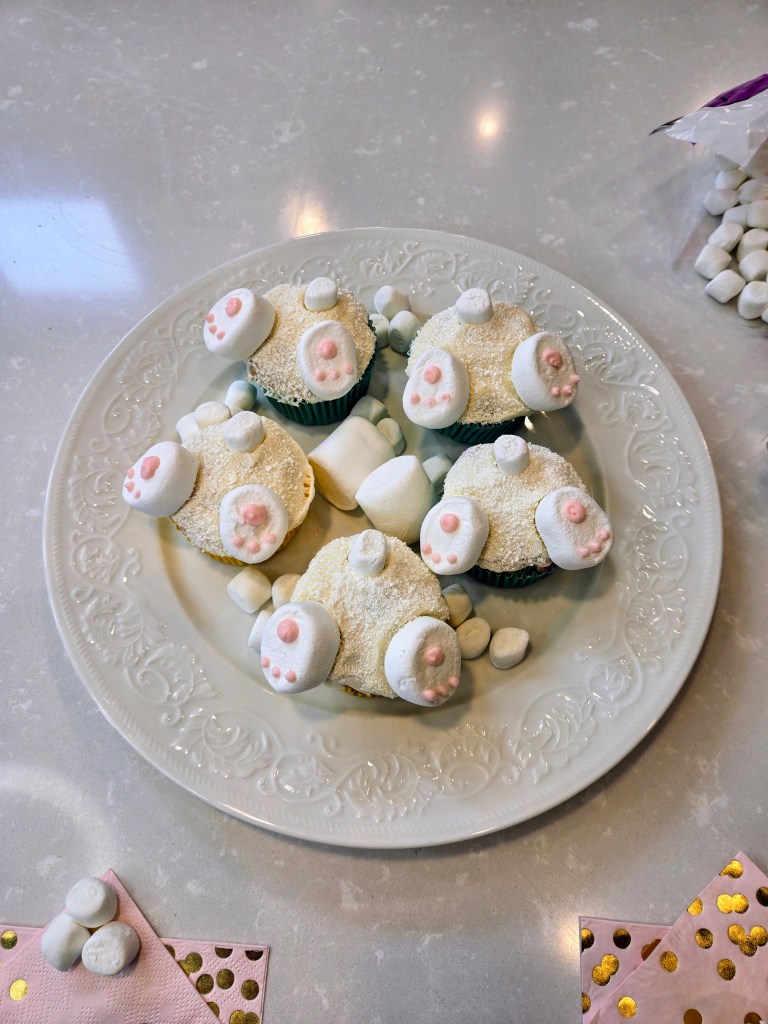
Every-bunny needs a cupcake. 
No bunny compares to you. -
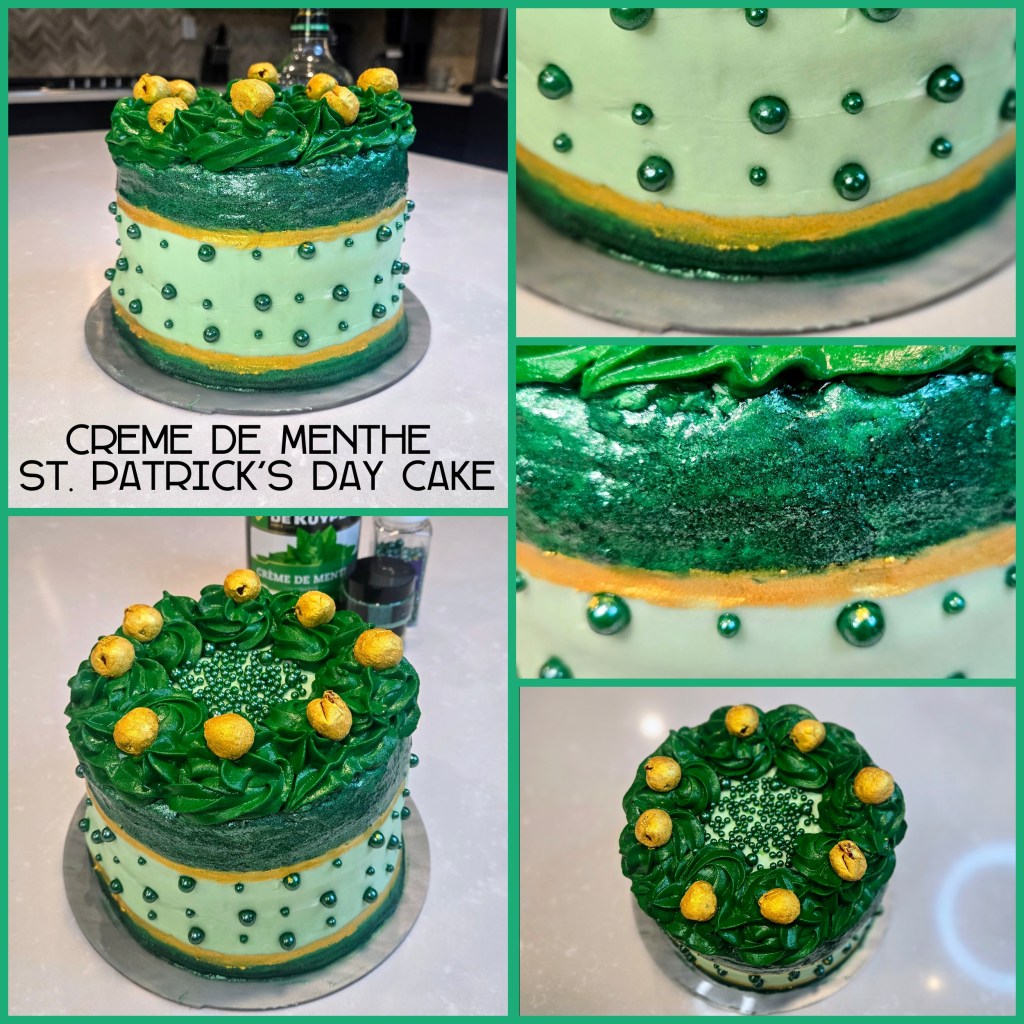
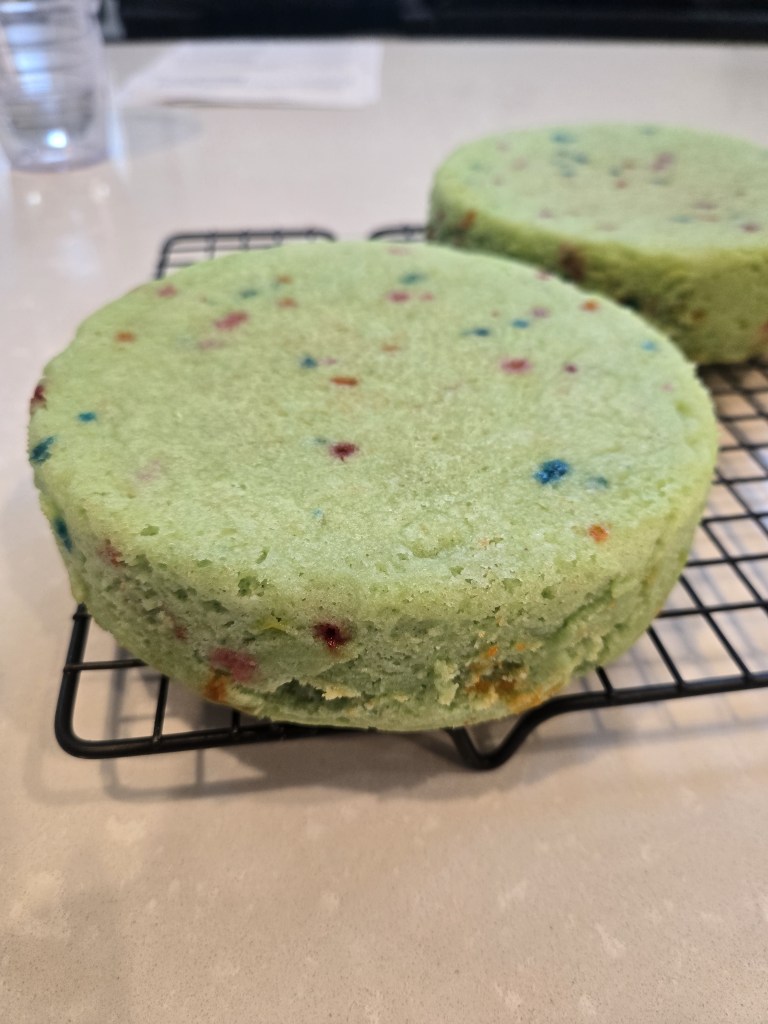
All That Glitters is…Green?

Green–the color of some my favorite things…my eyes, money, and all foods at St. Patrick’s Day. As St. Patrick’s Day approaches, it’s time to shamrock your taste buds with a cake that’s mint to be the life of the paddy. Introducing the Crème de Menthe cake—a dessert so good, it’ll have you Dublin over with delight. Packed with loads of minty, boozy goodness, this cake promises to lift your spirits higher than a leprechaun on a pogo stick. You can keep the pot of gold at the end of the rainbow, I’m hoarding this cake like it’s my lucky charm.
Note: Please enjoy responsibly and keep out of reach of leprechauns...or children. Ah, the road to the perfect Crème de Menthe cake was paved with good intentions…and a whole lot of kitchen chaos. My first attempt? A real sham—rocky disaster. I had this grand idea to coat the top in luscious green chocolate melts for a festive finish, but instead, I ended up with a lumpy, clumpy, leprechaun-cursed catastrophe that looked more like the Blarney Stone than a cake topping. It was a total meltdown—literally. But like any determined baker (or a particularly stubborn Irish grandma), I refused to let the cake luck run out. After a few tweaks, a dash of persistence, and maybe a dram of said Creme de Menthe for morale, I finally found the pot o’ gold—a smooth, dreamy finish that makes this cake worthy of a St. Patrick’s Day celebration. Sláinte to sweet success!
Considering it was an unmitigated disaster and I was flying by the seat of my pants (turns out, those were definitely not my lucky pants), I didn’t film a tutorial for this one, but I did take photos. What you can’t see is the face of pure terror behind the camera, so there’s that. Let me help you strike gold from the get go. Here’s everything I used for this cake:
- Round green sprinkles
- EXTRA sparkly green luster dust
- Gold luster dust from Monegasque
- Americolor forest green and leaf green gel dyes
- Food safe paint brushes
- Maraschino cherries
- Cake and frosting recipe below
I honestly loved the way this looked and wish I had planned for a semi-naked cake, take notes… 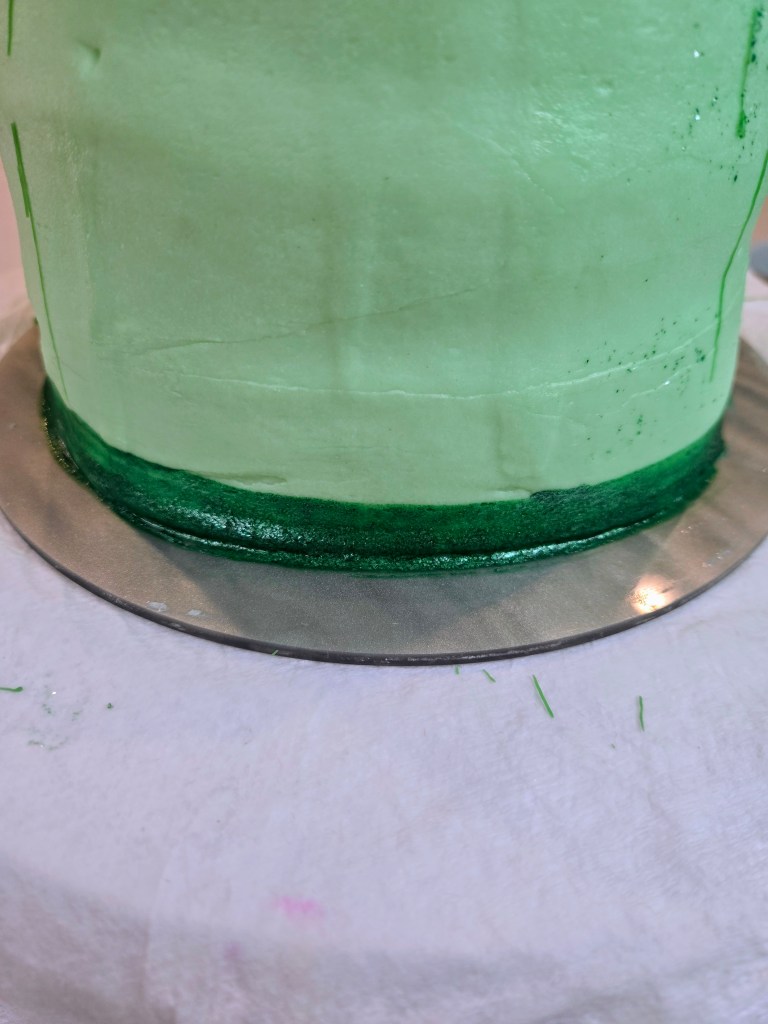
After frosting cake, mix green luster dust with clear vanilla until it forms a thick enough paste to paint around the bottom and top of the cake. 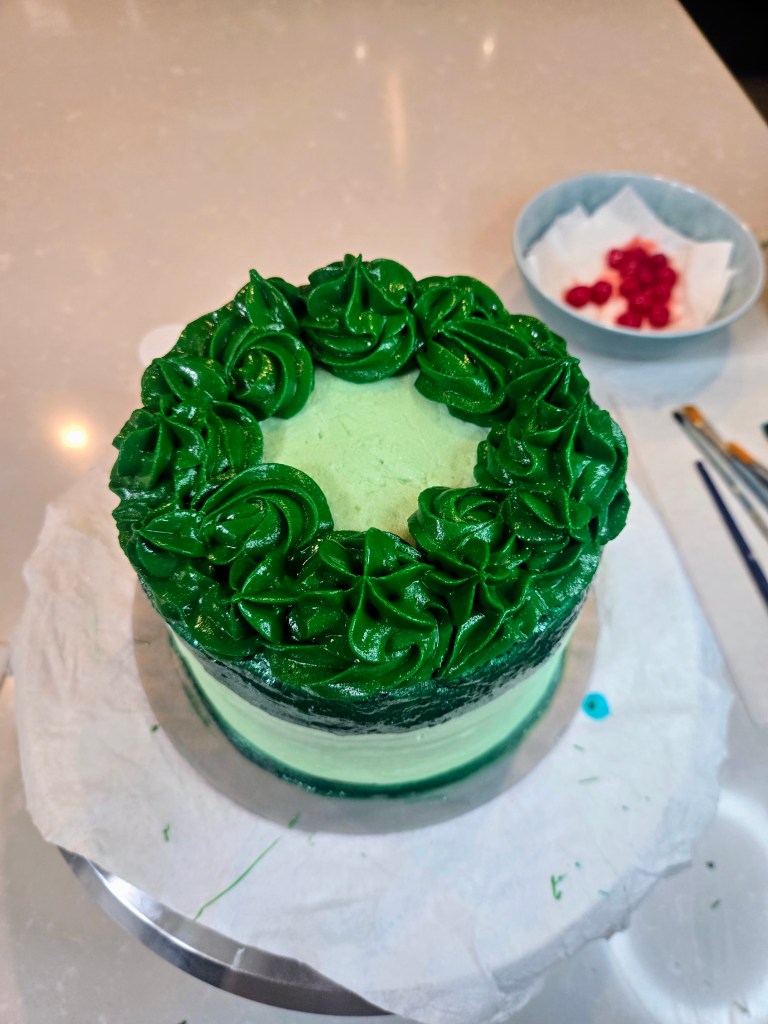
Dye remaining frosting Emerald green by using one part forest green to three parts leaf green and load up a piping bag with a 1M tip. 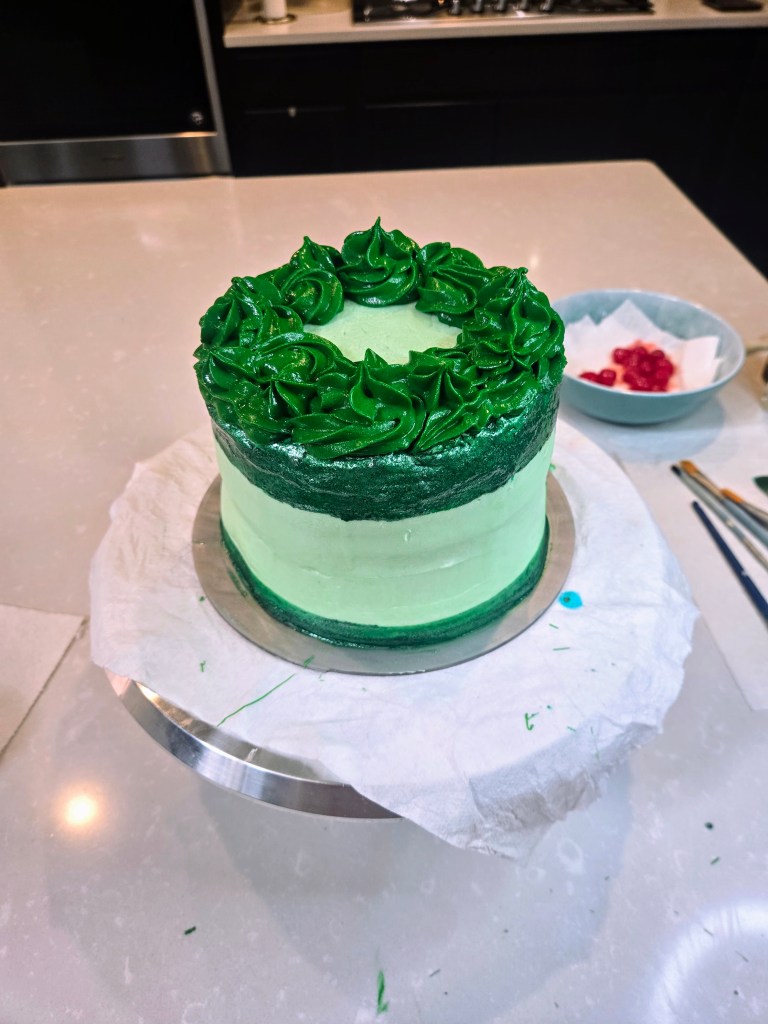
I piped random mounds in 5 places around the cake, then came in and piped a shell border on the outside and rosettes on the inside of each mound, leaving the center open. 
Then I dipped Maraschino cherries in a bowl with plain gold luster and placed on top. I finished by adding the green pearls in the center. 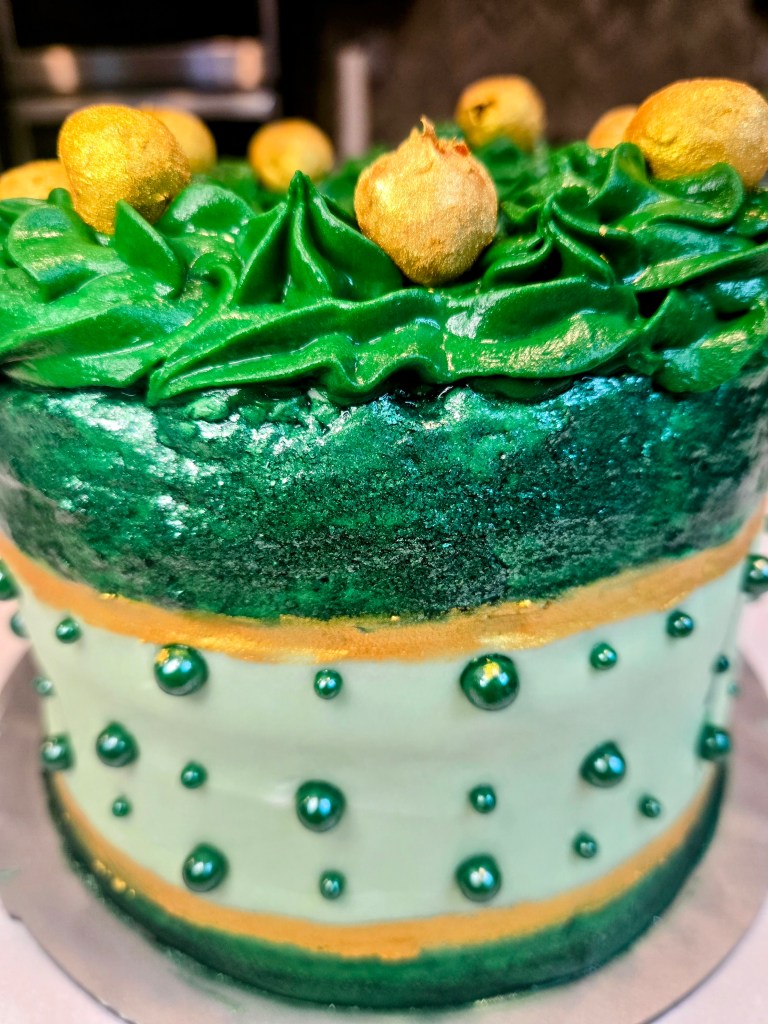
To finish, create a gold luster paint paste to go around the cake as well, and place pearl sprinkles where desired! Recipe and Instructions
Gluten free Creme de Menthe cake with protein cream cheese frosting
A cake fit for all St. Patrick's Day celebrations
If you want to omit the alcohol, add 2 tsp mint extract and use one cup of milk to cake; for frosting, use 1 tsp mint and replace alcohol with more milk. If not gluten free, use any kind of white or yellow cake mix. Monkfruit can also be replaced with regular powdered sugar for frosting. Protein powder can also be replaced with additional monkfruit or regular powdered sugar.
Ingredients
CAKE
*1 box of gluten free yellow cake mix (I used Pillsbury Funfetti)
*2.5 ounces Creme de Menthe
*6 ounces fat free or skim milk
*75g (1/3 cup) unsweetened applesauce
*3 eggs
*1/4 tsp mint extract
FROSTING
*226 g (1 cup) vanilla Greek yogurt, strained overnight
*8 ounces 1/3 the fat cream cheese at room temp
*12 ounces Lakanto powdered monkfruit
*4 ounces Quest vanilla milkshake protein powder (cuts the sweetness of the monkfruit and makes a nice, stiff, spreadable frosting; omit and use all monkfruit if desired)
*1 TBS clear vanilla
*1.5 oz Creme de Menthe
*3 TBS milk
*1/4 tsp citric acid if you like less sweet frosting
Directions
- Preheat oven to 350 and grease three 6-inch pans.
- Whisk cake ingredients together in a stand mixer on low for 60 seconds before switching to medium-high for two minutes.
- Pour batter evenly into pan and bake for 30-35 minutes, or until a toothpick comes out mostly clean from the center.
- Allow cake to cool fully before frosting.
- To make frosting, whisk cream cheese and yogurt for 3 minutes before adding in half the powdered monkfruit, protein powder, extract, citric acid, Creme de Menthe, and milk.
- Add in remaining monkfruit mix fully.
- While your cakes cool, you can make your luster paint pastes in gold and green by mixing a few teaspoons of luster to a splash of clear vanilla extract or vodka. It should be thick enough to paint with but thin enough that it doesn’t tear the frosting. You might have to play with ratios.
- Once fully cooled, frost your cake…you shouldn’t need any dye to begin with since the Creme de Menthe makes a lovely light green.
- Start by painting the green on the top and bottom side of the cake and let freeze for 15-20 minutes before painting the gold border next to it so it won’t bleed.
- Dye your remaining frosting with 1:3 ratio forest green to leaf green and load into a piping bag with 1M tip.
- Create swirls, shells, rosettes, whatever you desire to decorate. I did a combo of all three before mixing my cherries in a bowl of DRY luster dust (they’re already wet, so no liquid needed), and placing on top.
- I did alternating large green pearls to small pearls all around the cake, and sprinkled a few more on top in the middle of the cake where there was no piping.
- Keep cake covered and in the fridge. It is best served at room temp, so remove from fridge 30 minutes before eating. Enjoy!
Nutrition
Macros
12 servings
249.8 cal/38.5 c/5 f/12.7 p per slice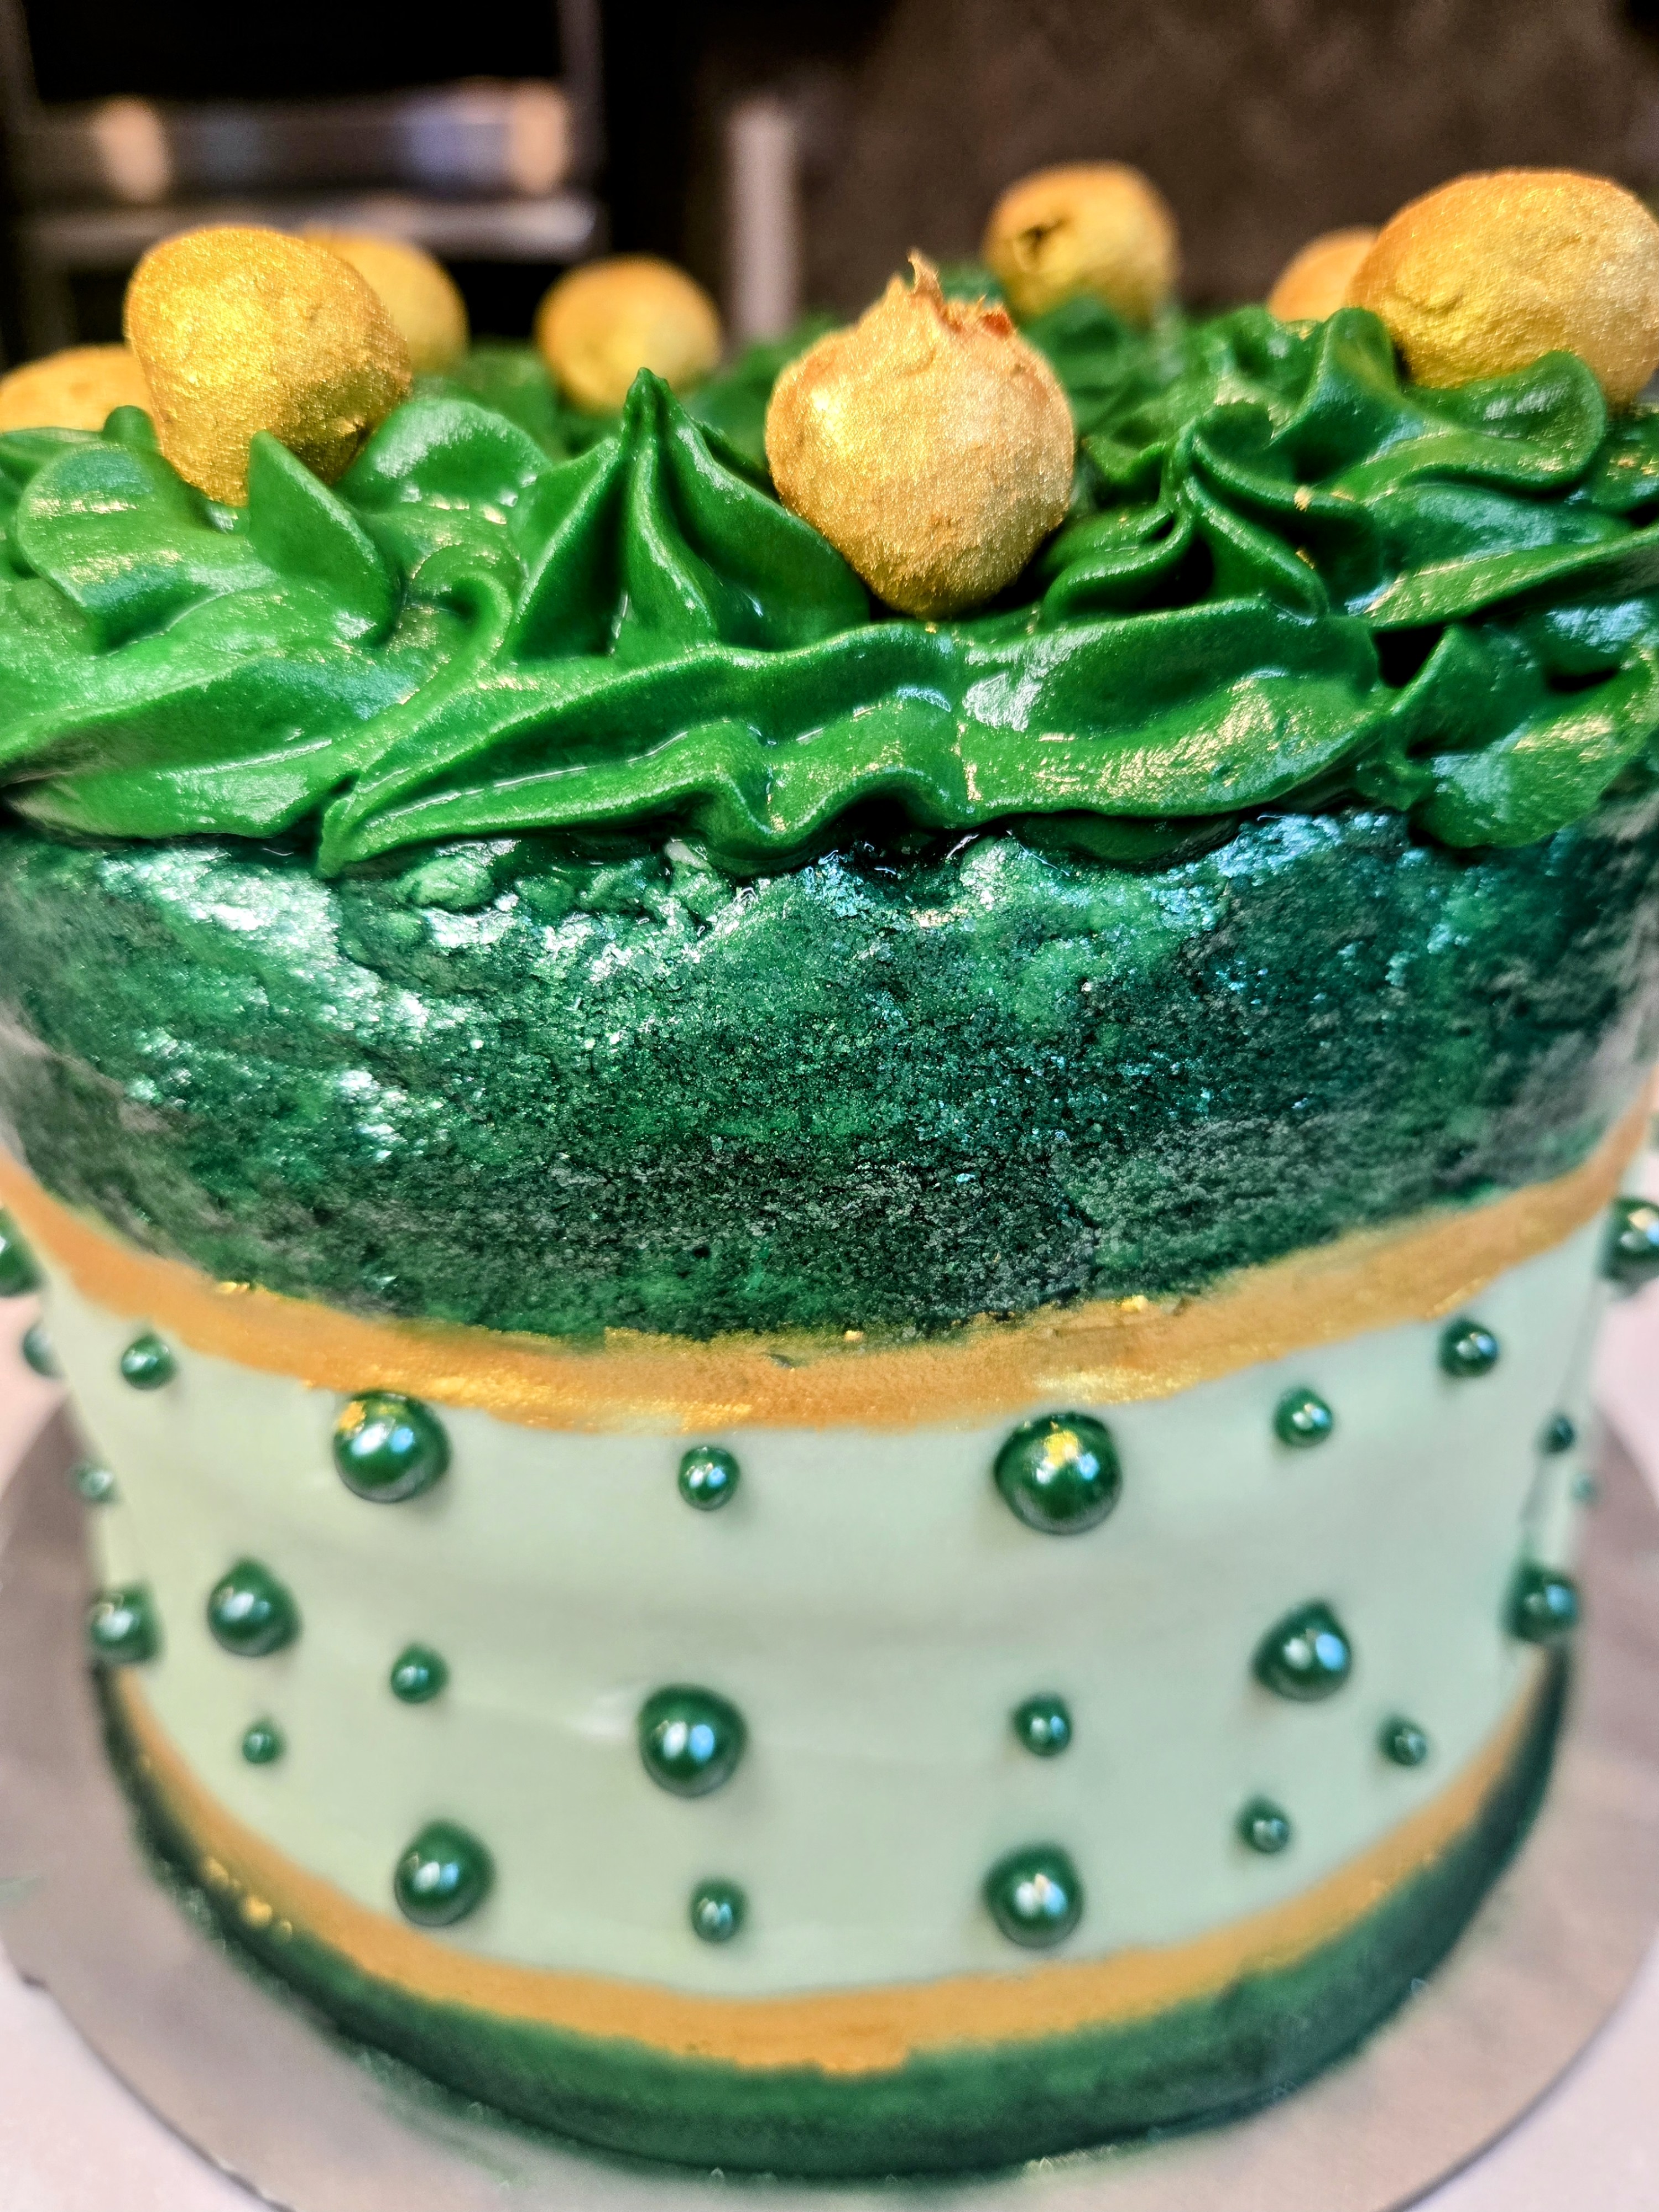
I poured my heart and a whole lot of Creme de Menthe into this… 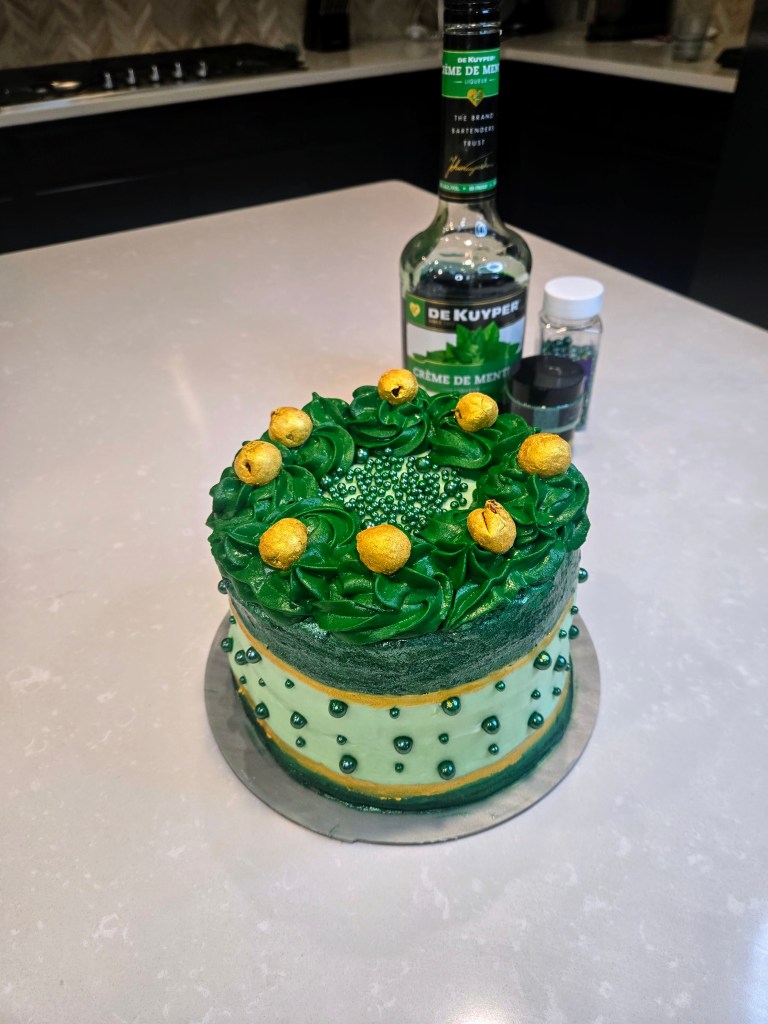
Irish you were here to help me eat all this… but then again, I’m Dublin down! -
Lucky Charms Cupcakes
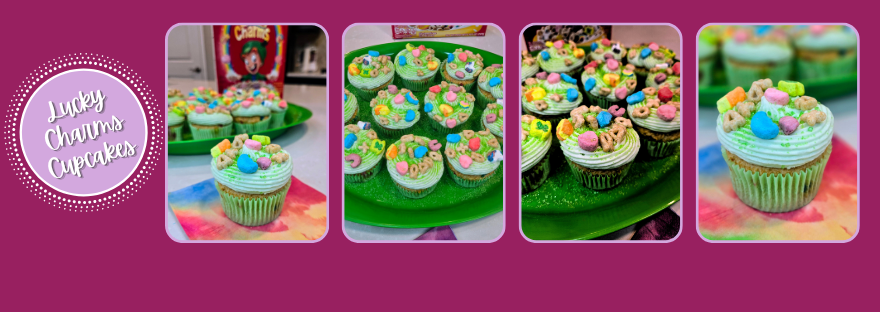
Looking for a way to make your upcoming St. Patrick’s Day festivities magically delicious but also kid friendly? Well, I put away the Baileys for this recipe, so look no further! These Lucky Charms cupcakes are super cute, insanely easy to decorate, and taste cereal-ously delish. While they may not result in finding any pots of gold, I can confirm Lucky Charms are still as good as I remember from my childhood, and in a turn of true luck, also gluten free! Oh Lucky, I thank you and all those charms.
No need to be magically suspicious, all the details are below! I mean, if you want to add Baileys, I’m not stopping you, and Baileys Lucky Charm cereal milk could potentially be the best gateway to happiness as an adult, I’m almost positive. Full of milk, laughs and luck, this is definitely a fun activity to try out at home with the kiddos to get into the spirit. Or if you’re an adult and want to use Baileys in this recipe, get into the spirits.
Lucky you, here is everything you need:
- A dozen Lucky Charms cupcakes with buttercream frosting (recipe below)
- Green sanding sugar and sprinkles
- An Ateco 869 or large French tip
- Green gel dye
- Lucky Charms cereal
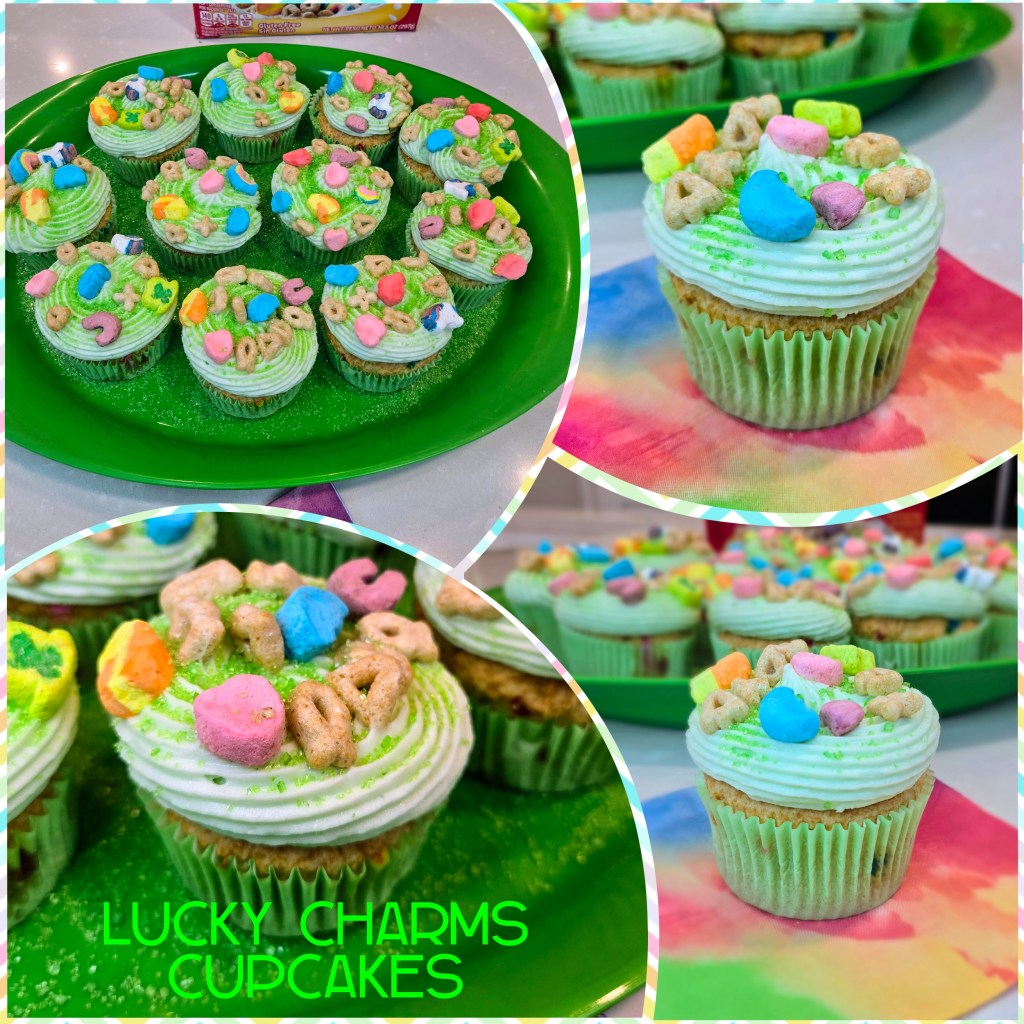
I have a video tutorial below, but here is a step-by-step photo tutorial as well. Extra tips = that pot of gold at the end of the rainbow.
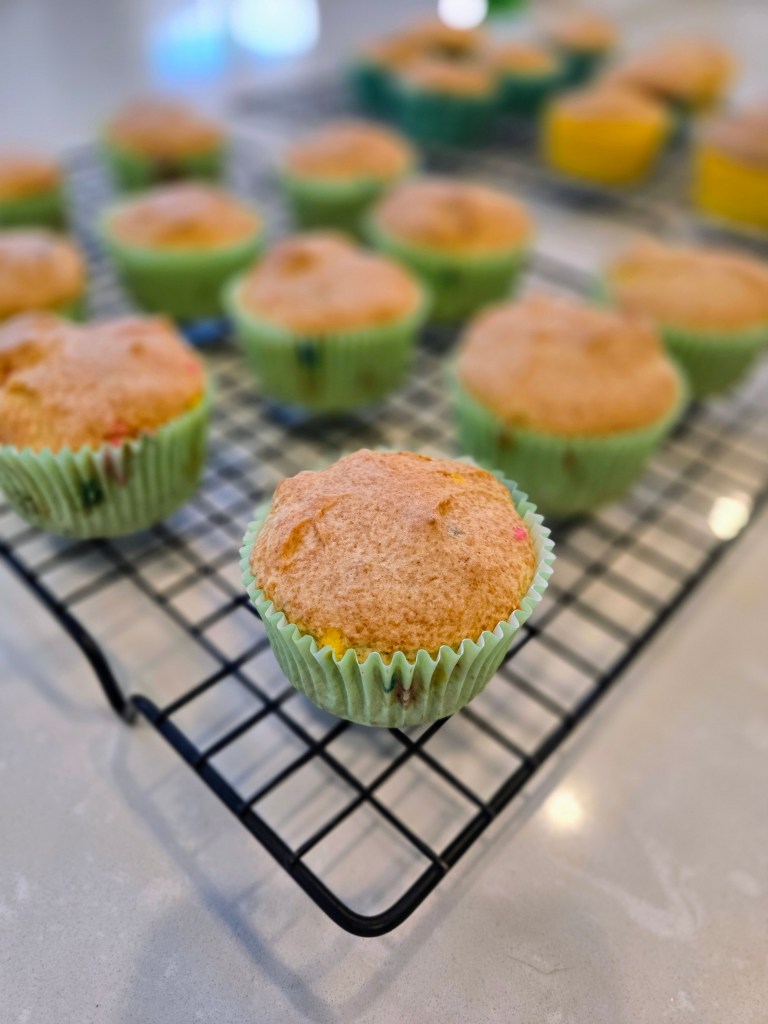
Make sure your cupcakes are totally cooled before frosting. 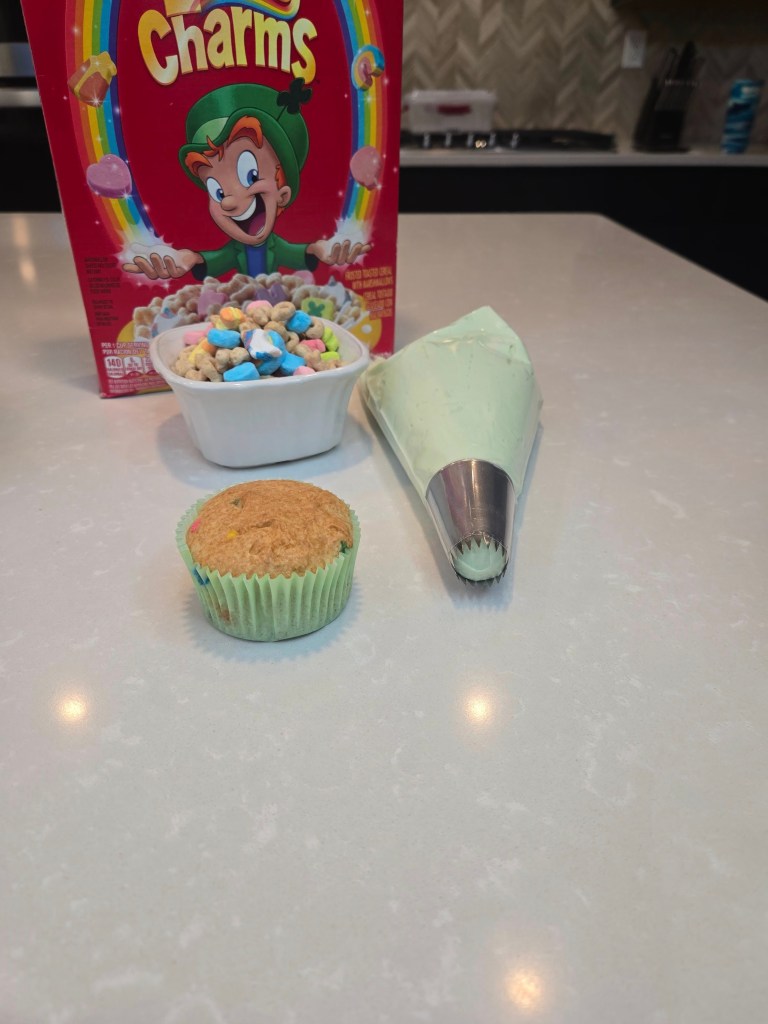
Load up a piping bag with the Ateco 869 tip and frosting. Set aside a serving of cereal to decorate with. 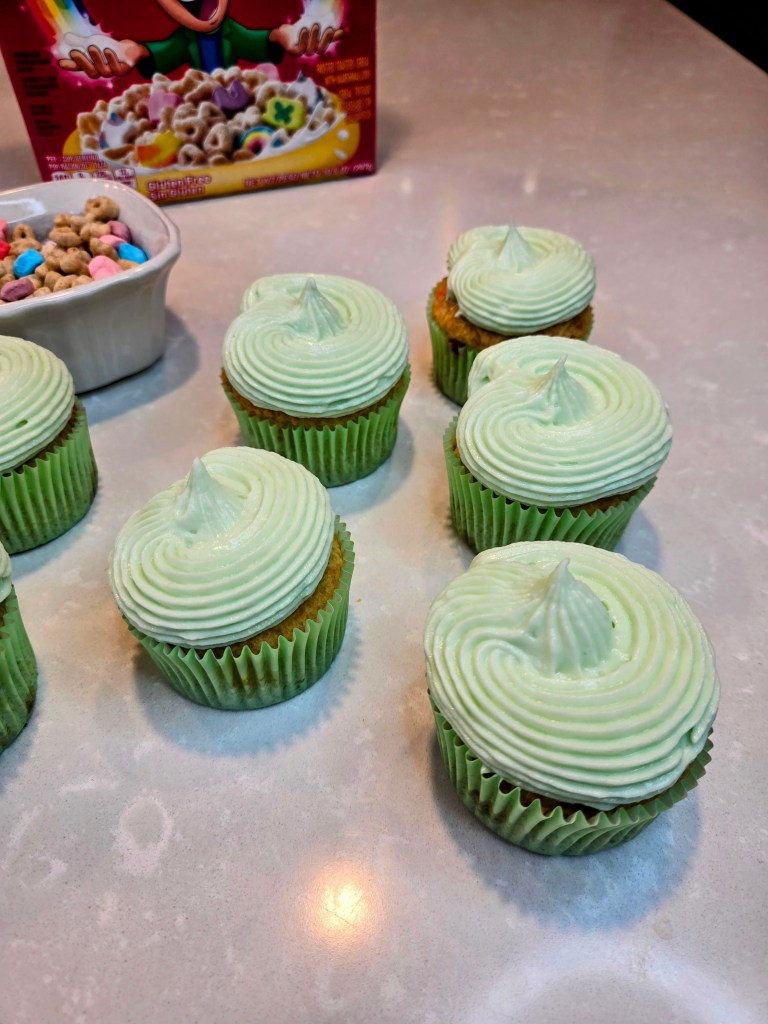
Start on the outer edge of the cupcake, turning slowly while piping a circle. Draw the piping tip inward to the middle of the cupcake to finish. 
Top your frosted cupcakes with as many Lucky Charms as you’d like. 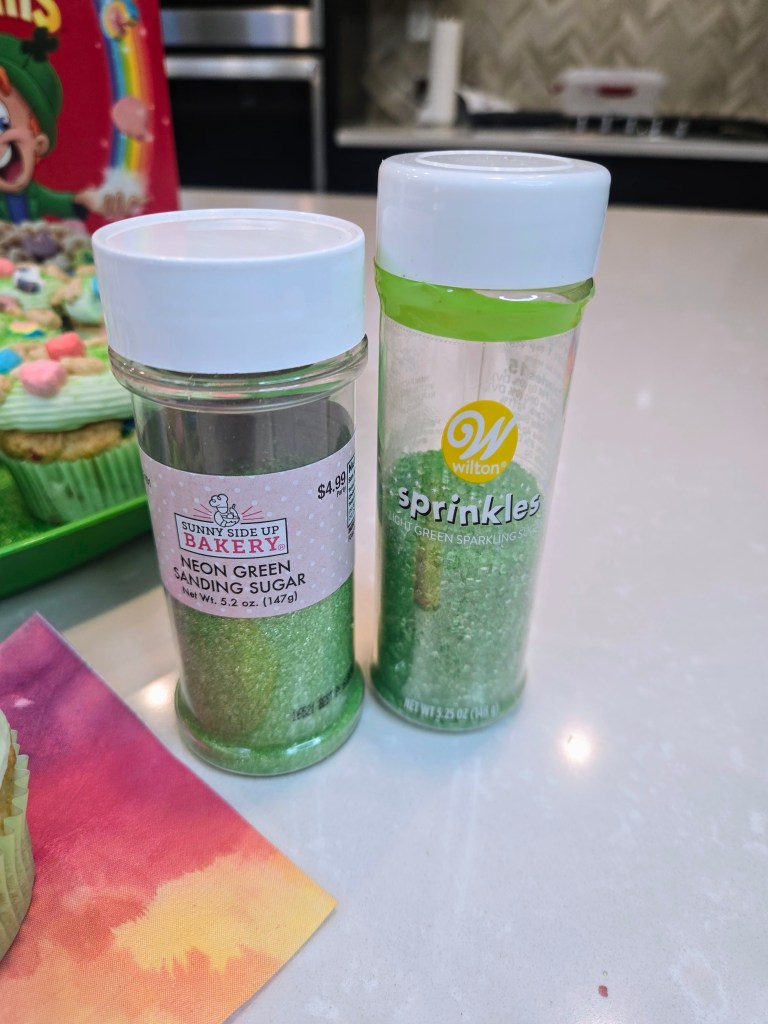
Instead of the sprinkles and sanding sugar, you could also crush some plain cereal without marshmallows to sprinkle on top. 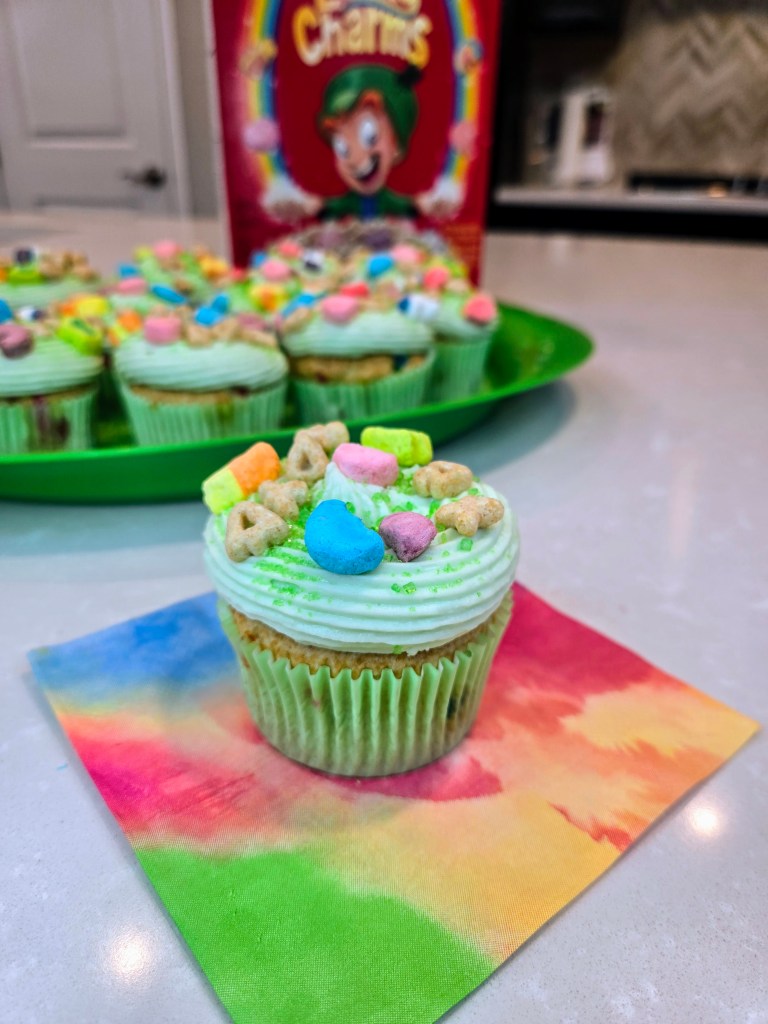
Admire the luck of a dozen of these babies! Get the paddy started with this tutorial! Recipe and Instructions
Gluten free Lucky Charms cupcakes with protein cream cheese frosting
A perfect cupcake collection to celebrate St. Patrick's Day!
If not gluten free, use any kind of white or vanilla or funfetti cake mix. Protein powder and monkfruit can also be replaced with regular powdered sugar for frosting.
Ingredients
CUPCAKES
*1 box of gluten free funfetti cake mix (I used Pillsbury)
*1 cup fat free cereal milk (mix 1/2 a cup of Lucky Charms with a little over 1 cup of milk; let mix together in the fridge for a few hours, strain, and save the milk; do this for the frosting milk, too!)
*1 tsp almond extract
*75 g (1/3 c) unsweetened applesauce
*3 eggs
FROSTING
*226 g (1 cup) vanilla Greek yogurt, strained overnight
*8 ounces 1/3 the fat cream cheese at room temp
*12 ounces Lakanto powdered monkfruit
*4 ounces (112 g) Quest vanilla milkshake protein powder (cuts the sweetness of the monkfruit and makes a nice, stiff, spreadable frosting; omit and use all monkfruit if desired)
*1 TBS clear vanilla
*1/2 tsp almond extract
*1/4 cup cereal milk (see notes above)
*1/4 tsp citric acid if you like less sweet frosting
Directions
- Preheat oven to 350 and line muffin tin with cupcake wrappers.
- Whisk cake ingredients together in a stand mixer on low for 60 seconds before switching to medium-high for two minutes.
- Pour batter evenly into tins and bake for 20-24 minutes, or until a toothpick comes out mostly clean from the center.
- Allow cupcakes to cool fully before frosting.
- To make frosting, whisk cream cheese and yogurt for 3 minutes before adding in half the powdered monkfruit, protein powder, extracts, citric acid, and milk.
- Add in remaining monkfruit mix fully.
- To decorate cupcakes, follow along with the photo gallery or video tutorial above, and view recommended products at the top of the blog.
- Keep cupcakes covered and in the freezer to keep cereal crunchy until ready to serve. They are best served at room temp, so remove from freezer 30-60 minutes before eating. Enjoy!
Nutrition
Macros
24 servings
125 cal/17.5 c/2.9 f/7.2 p per cupcake
I lepre-can’t even right now 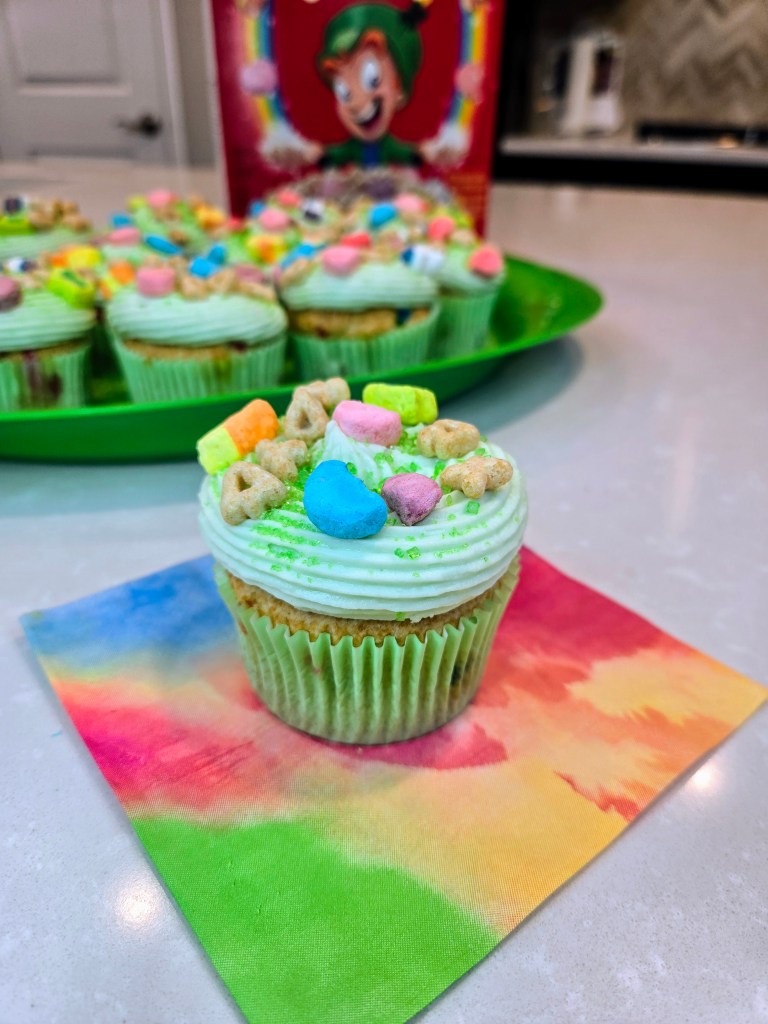
It ain’t clover til it’s clover!

Healthy-ish cake, cupcakes, pie, and cheesecake recipes and decorating tips
