-
Gluten Free Chocolate Fudge Cake
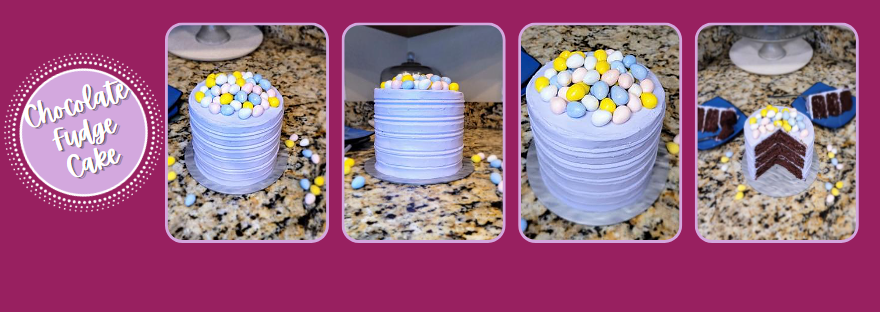
Get egg-cited!!! It’s Cadbury egg baking season! Y’all, mini Cadbury eggs are positively dangerous. It’s a 1-pound bag of M&M’s on flavor steroids, essentially. I knew I wanted to make a few recipes with these delicious little devils, and I figured what better way to start than with the world’s chocolatiest cake? No bunny better lay a finger on this baby; it’s so good, I refuse to share…you’ll just have to whip up your own. If you’re into incredibly tender and moist chocolate cake decadence, grab the details below, and hop to it! This is seriously the softest, most flavorful chocolate cake I’ve ever made without the help of Baileys…
I’m egg-stremely ready for my next slice. Looking for an easy way to make a cake look fancy and neat? Grab some of these Wilton cake combs! I used the second comb pictured, the right side of the comb, to achieve the look above. You should be able to find these at a craft store as well.
Gluten free chocolate fudge cake
Soft, moist chocolate cake for the ultimate chocolate lover
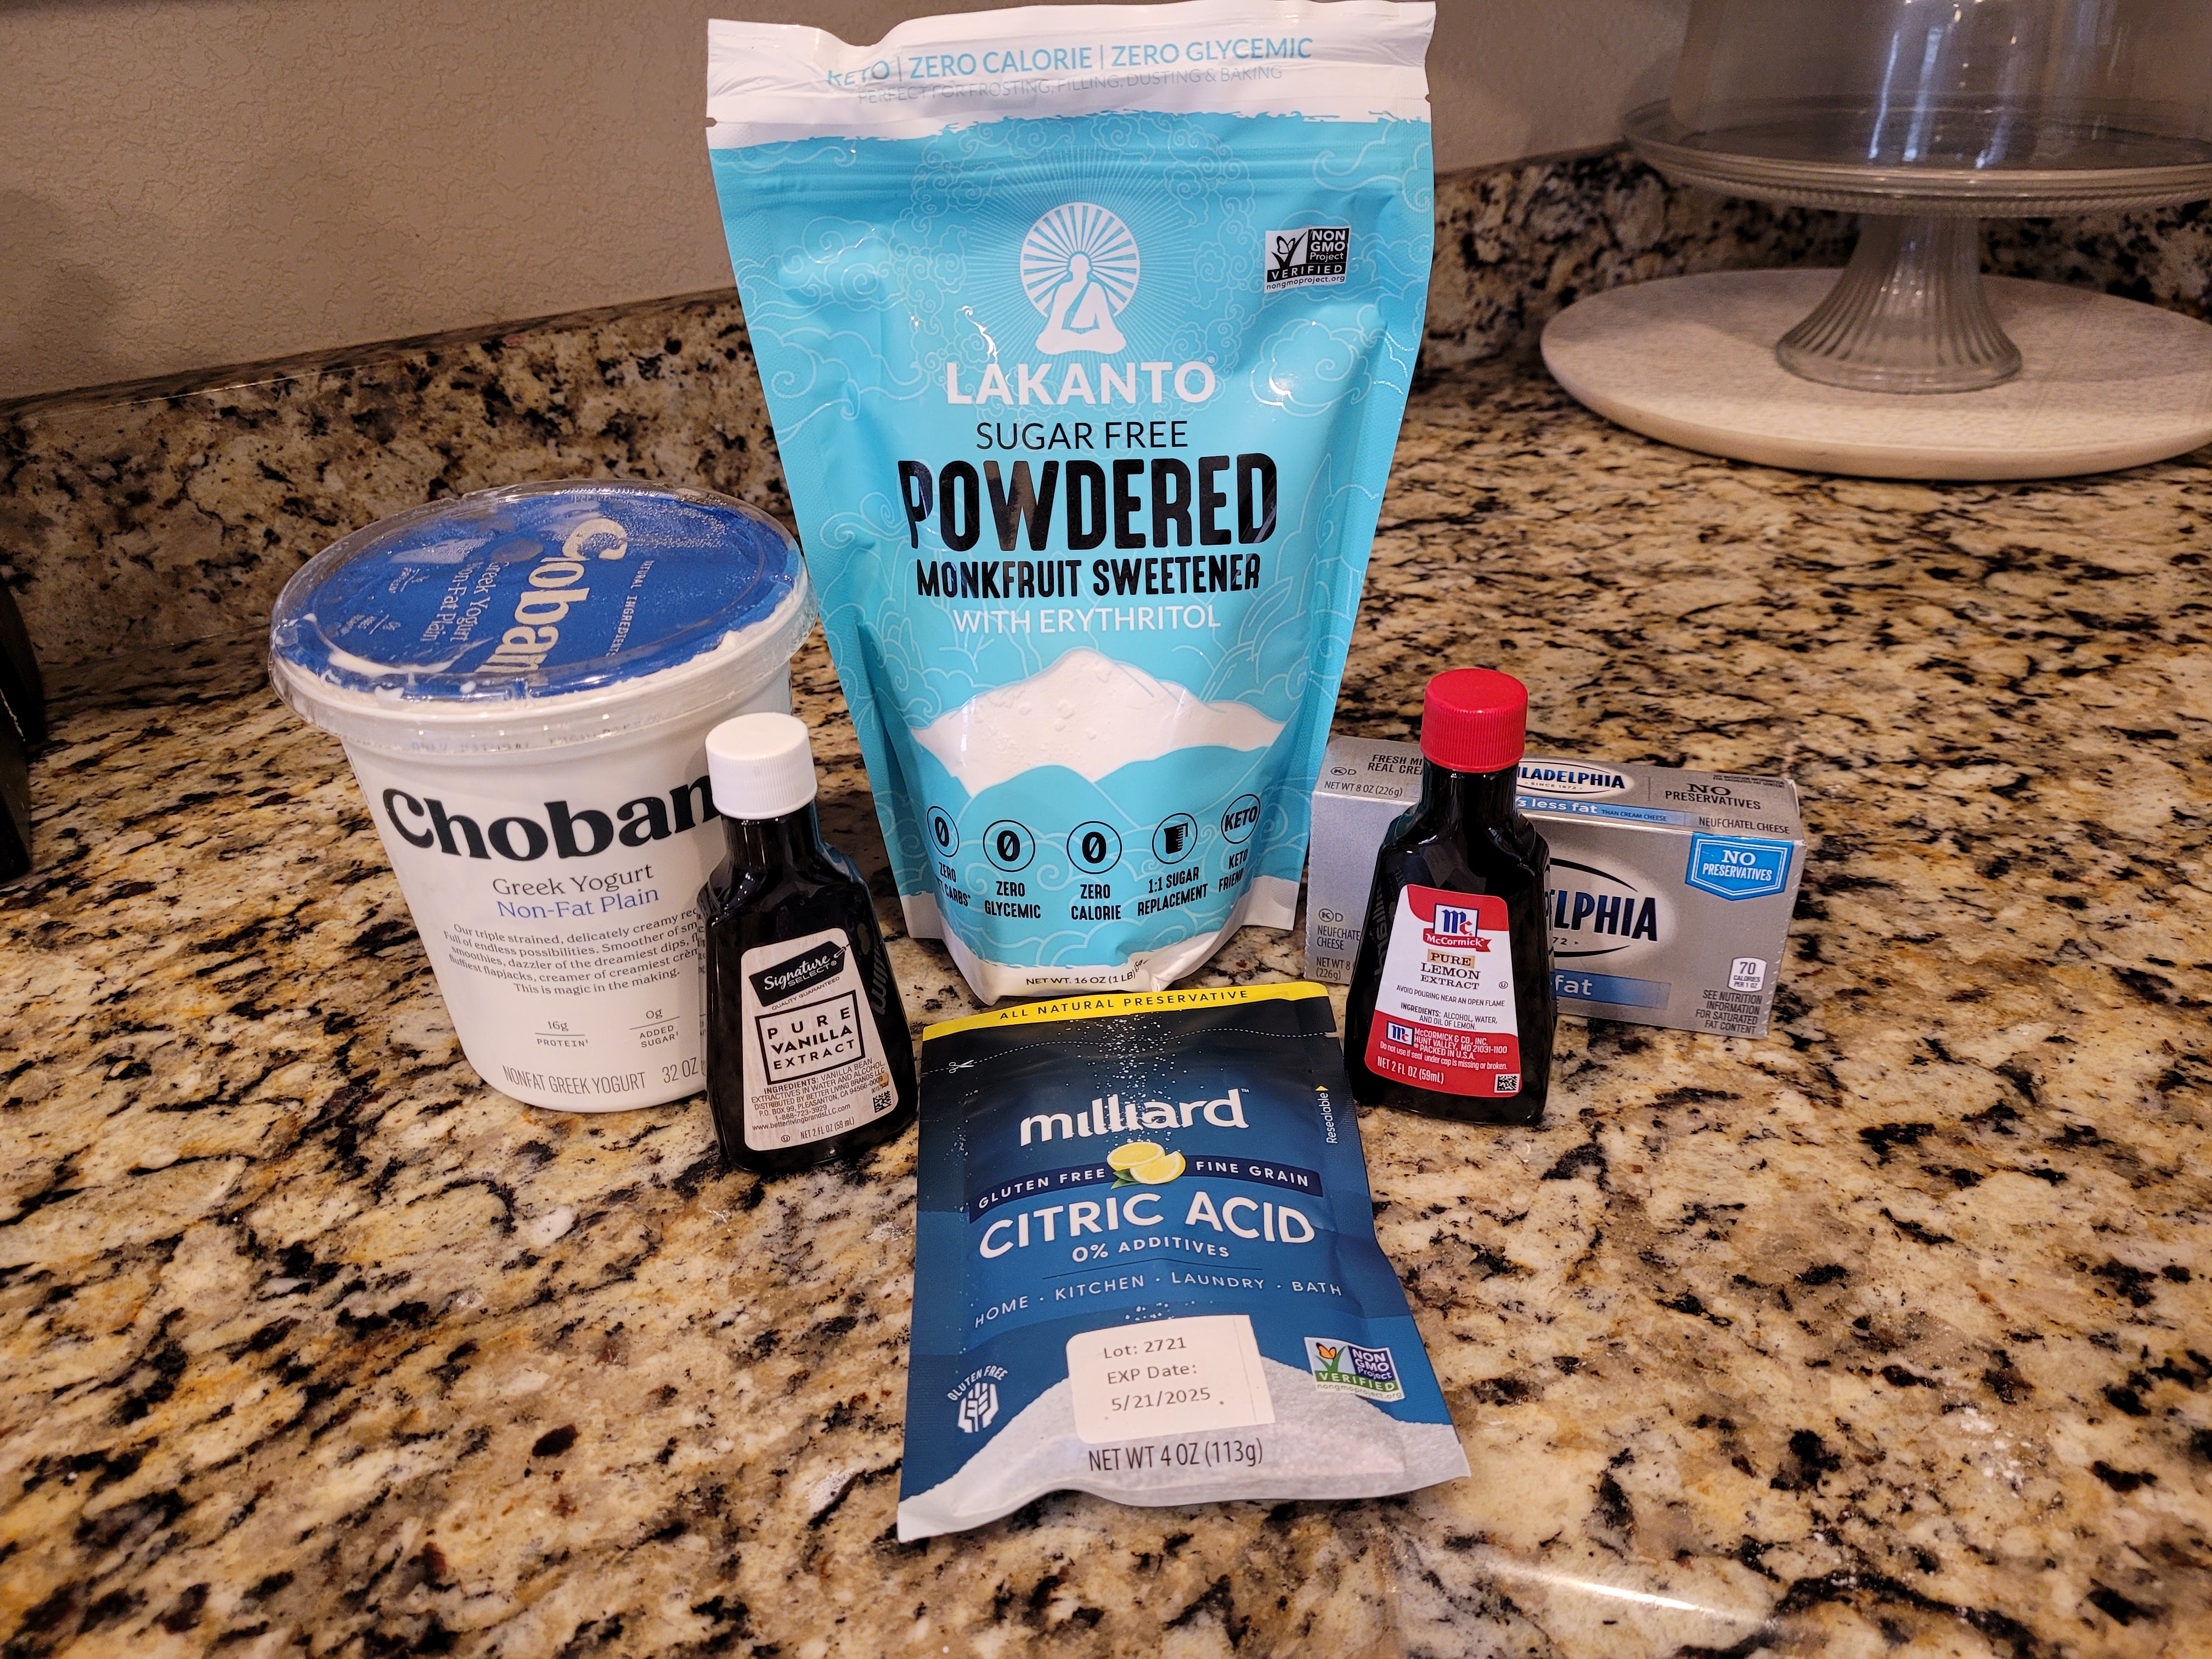
You can use a regular chocolate cake mix (I’d recommend Devil’s Food) if not gluten free. Do not skip the yogurt–this is what makes the cake so moist and enhances the chocolate flavor. Monkfruit can be replaced with regular powdered sugar in the frosting.
Ingredients
CAKE
*One box of Krusteaz gluten free chocolate cake mix (their mix is more like a Devil’s Food than regular chocolate mix)
*111 g (1/2 cup) unsweetened applesauce
*113 g (1/2 cup) fat free plain Greek yogurt *1 1/2 cups fat free or skim milk
*2 eggs
*1 tsp vanilla
FROSTING
*224 grams (8 ounces) of 1/3 the fat cream cheese, softened
*225 grams (1 cup) of fat free Greek yogurt, strained overnight
*16 ounces (4 cups) Lakanto powdered monkfruit
*1 tsp vanilla extract
*1/4 tsp citric acid
*2 TBS milk
Directions
- Preheat oven to 350 and grease three 6-inch round pans and add bake even strips.
- Mix the eggs, vanilla, yogurt, milk, and applesauce together in a stand mixer on medium with the whisk attachment until the mixture gets frothy.
- Add the cake mix and switch to the paddle attachment; blend on medium until everything comes together.
- Pour batter evenly into pans and bake for 35 minutes, until a toothpick comes out cleanly from the center.
- Allow cakes to cool fully before frosting.
- To make frosting, whisk cream cheese and yogurt for 3 minutes before adding in half the powdered monkfruit, 1 TBS milk, and the extract, mixing well.
- Add in remaining monkfruit and 1 TBS milk, mixing well. If making an Easter cake, be sure to dye your frosting with a small amount purple gel dye to achieve a lavender shade during this step.
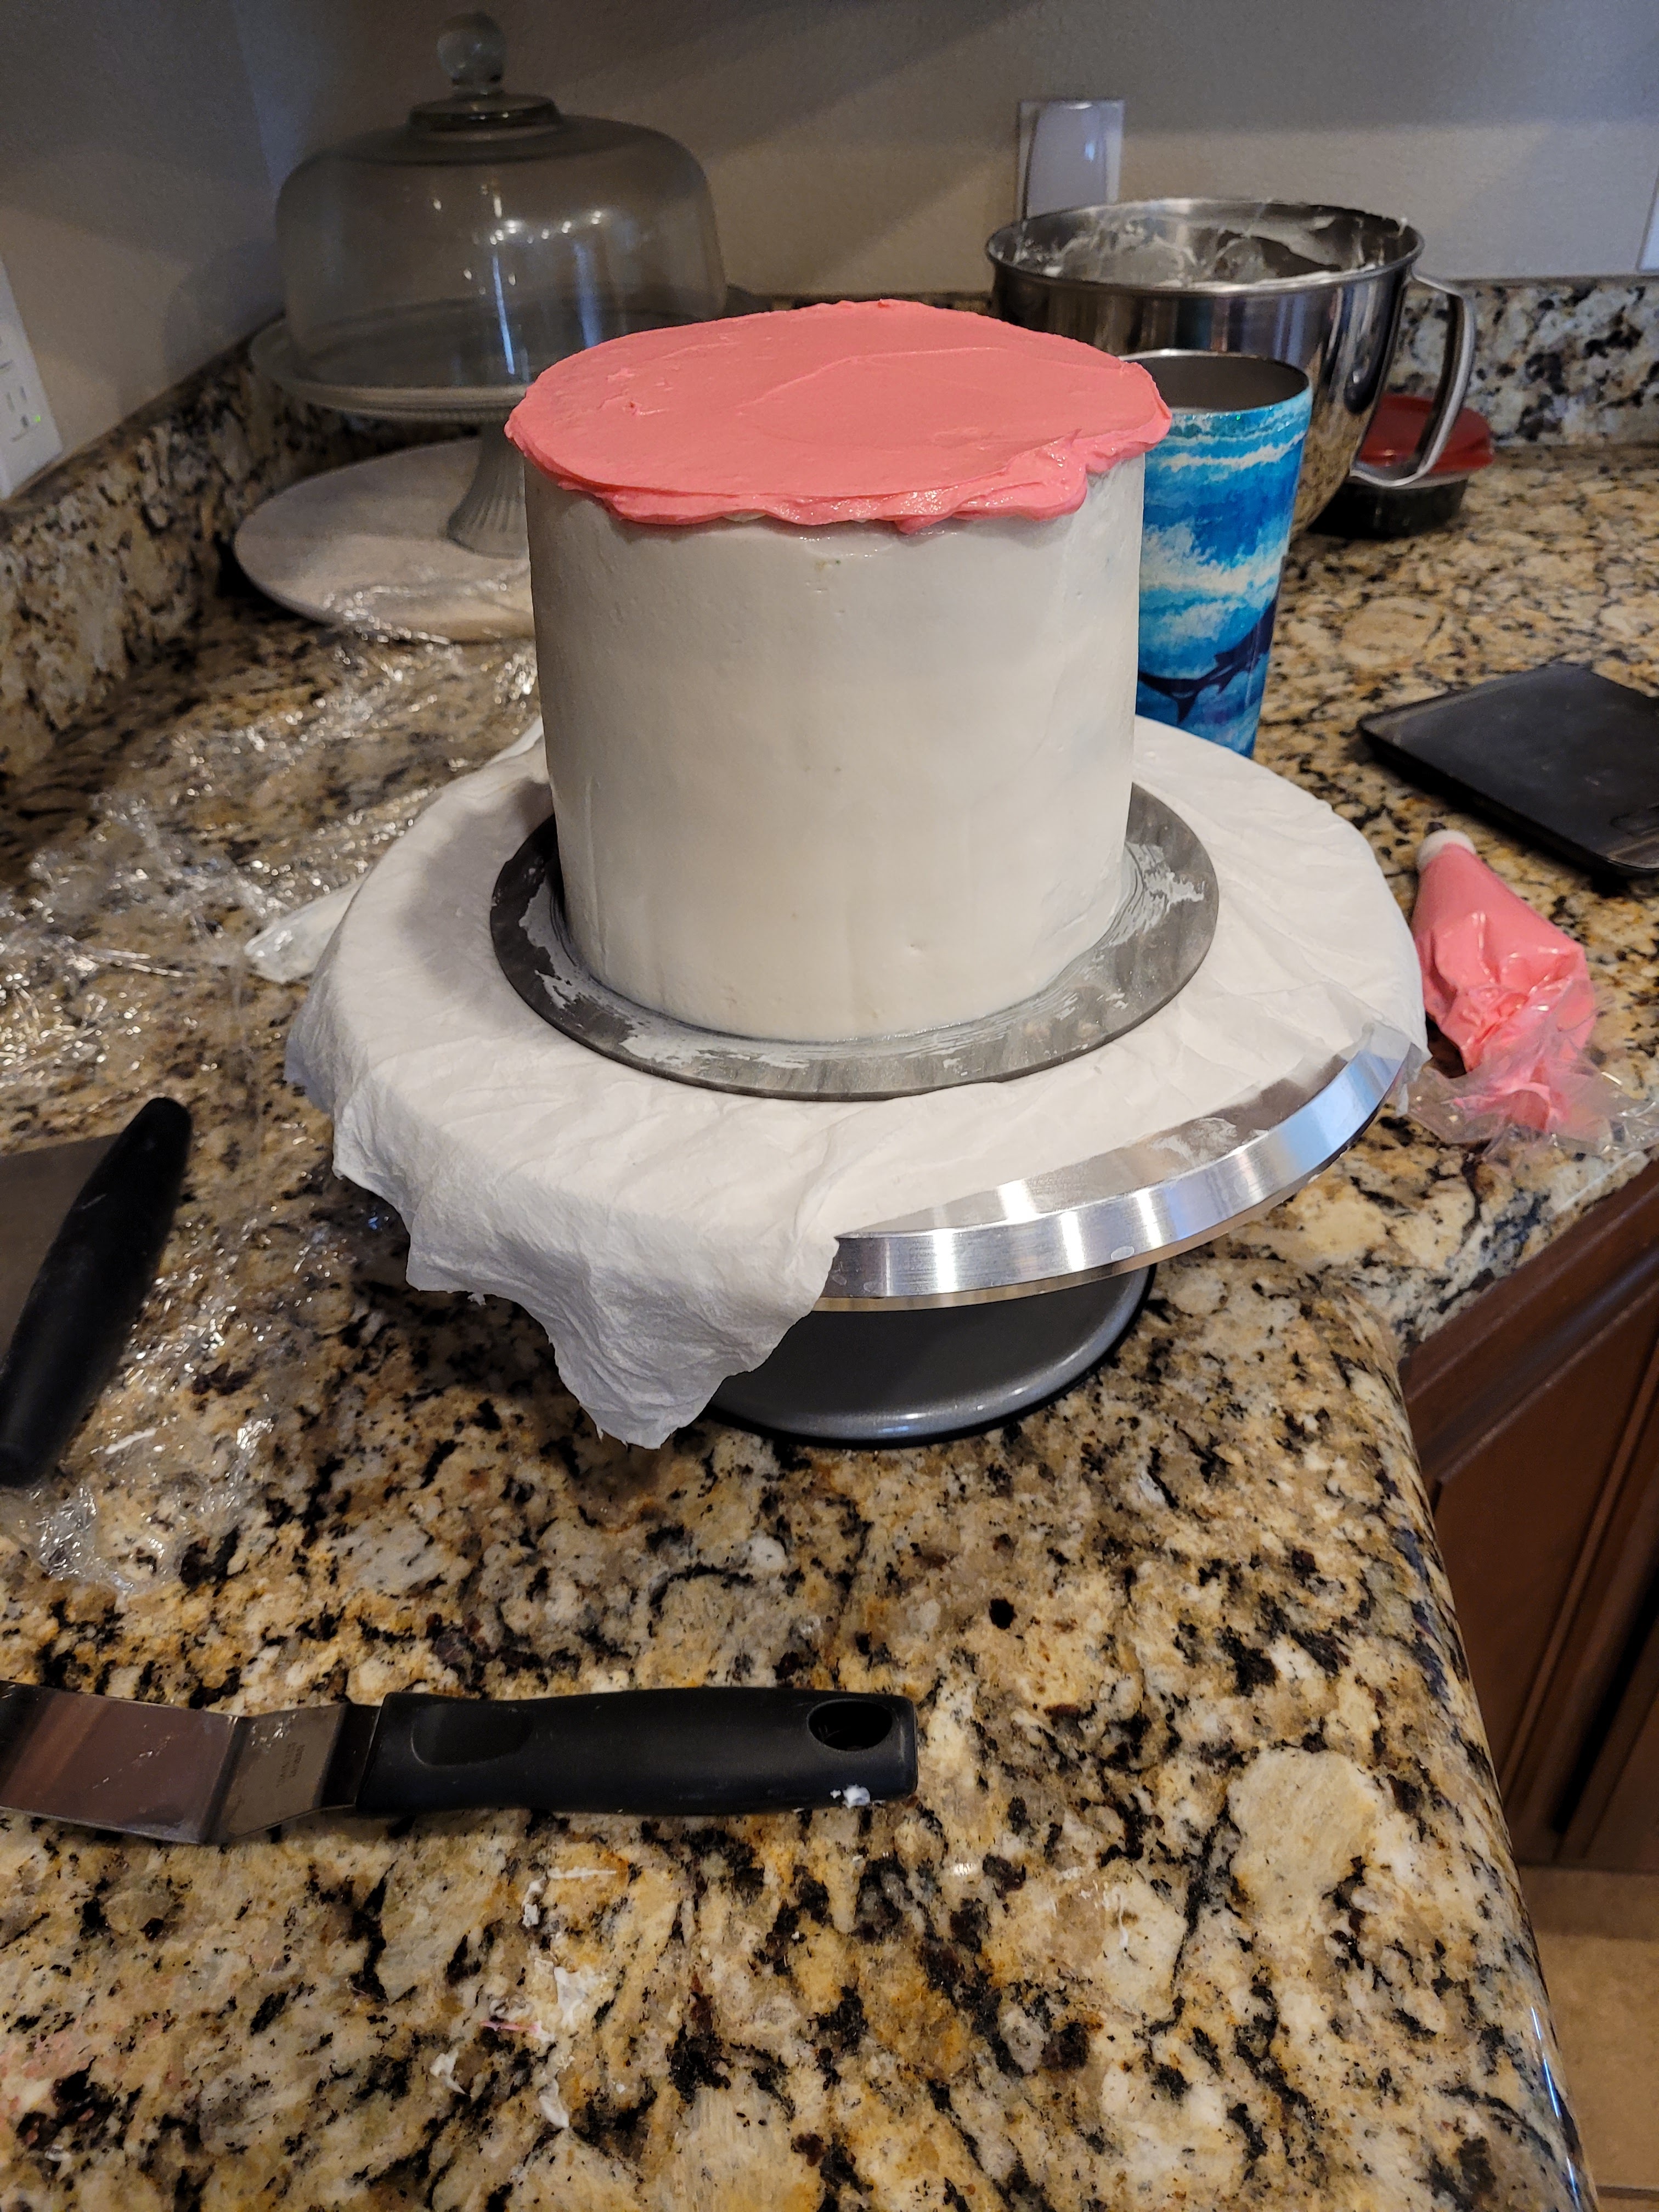
- Frost the cooled cake as desired; to make a scalloped cake, place your cake in the freezer for 30 minutes after you’ve fully coated the cake.
- Using a scalloped cake comb (linked above), gently press the comb into the side of the cake and turn the cake on a rotating cake table while keeping the comb steady.
- Make a few passes around the cake, cleaning off the comb each time you go around the cake.
- Add a handful of mini Cadbury eggs to the top (found at most grocery stores in the seasonal aisles), and you’ve got yourself a gorgeous cake for Easter celebrations!
12. Keep leftovers covered and in the fridge. Cake slices best served at room temp, so remove and slice 30-45 minutes before eating. Enjoy!Nutrition
Macros
10 servings
287 cal/45 c/7 f/11 p per slice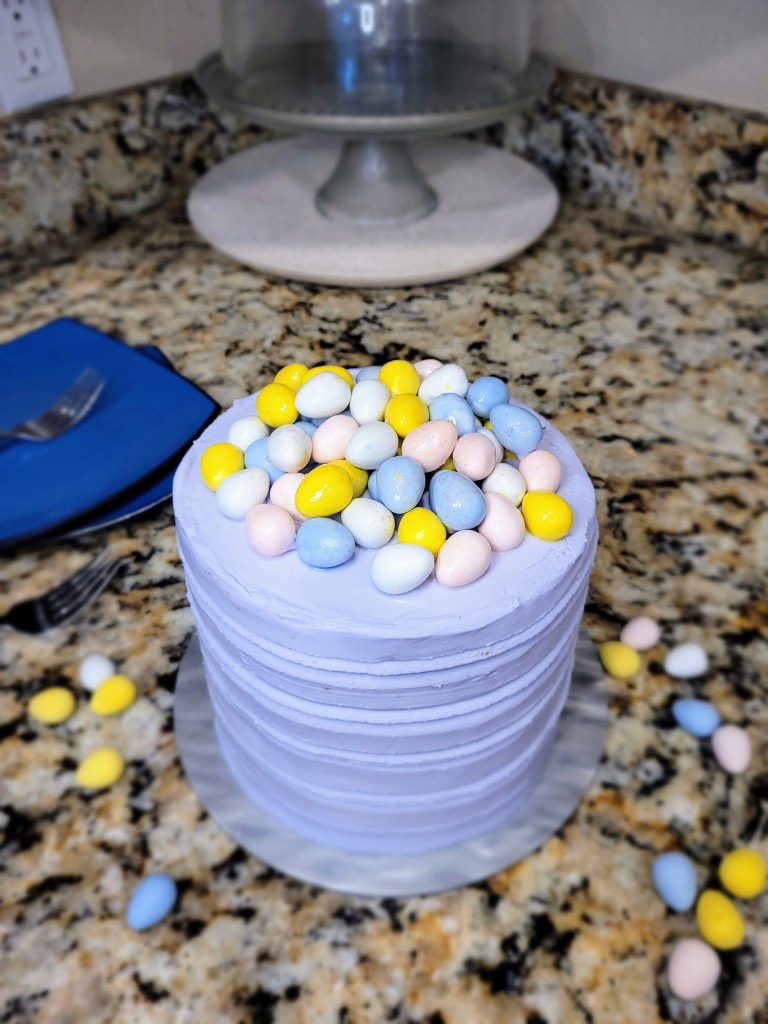
Eggcellent cake toppers, for sure. 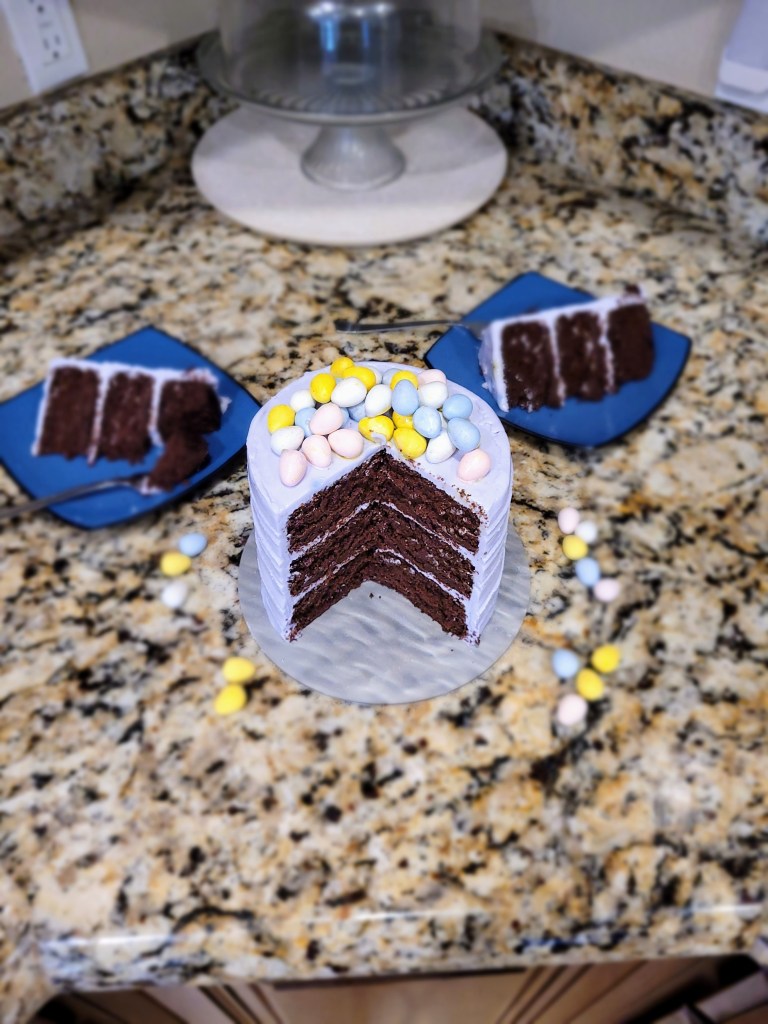
Putting all my eggs in one basket, you could say. - Preheat oven to 350 and grease three 6-inch round pans and add bake even strips.
-
Key Lime Mini Cheesecakes
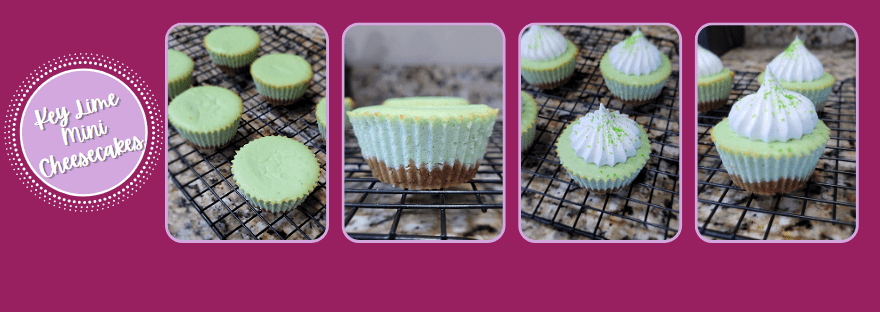
Spring has arrived, and now it’s time to put fruit in all my desserts! Starting off real strong with these mini key lime cheesecakes. They are bursting with citrusy goodness and a nice buttery crust. Bonus- you don’t have to juice 26 tiny limes to make these yummy babies happen either, thanks to some lime Jell-o. These are pretty much perfect additions to any spring events and are so easy to make…at only 133 calories a pop, they’re a guilt-free, amazing dessert option. It’s party lime!
Citrusly delicious. Mini Key Lime Cheesecakes
Citrusy lime cheesecake meets buttery crust
Use can your preferred whey protein; Madhava can also be replaced with regular sugar, but this will change the macros.
Ingredients
CRUST
*64 g (~2/3 cup) graham cracker or shortbread crumbs, pulsed to a fine powder
*30 mL (2 TBS) syrup
CHEESECAKE FILLING
*150 g (5.33 ounces) 1/3 the fat cream cheese at room temp
*150 g (5.33 ounces) nonfat Greek yogurt
*1 egg
*1 tsp vanilla extract
*20 g Quest vanilla milkshake protein powder
*48 g (1/4 cup) Madhava allulose sweetener
*7 g (1 tsp) sugar free lime Jell-o
*1 TBS lime juice (fresh squeezed is better, but bottled will work)
Directions
- Line muffin tin with 7 silicone cupcake liners and preheat oven to 350.
- In a food processor or blender, combine all crust ingredients until sticky.
- Press about 1.5 teaspoon of the crust mix into each silicone liner and press until it begins to run up the edge of the liner.
- Bake for 5-8 minutes, until golden; then set aside on the counter to cool.
- Whisk all cheesecake ingredients together in a large bowl until smooth.
- Distribute batter evenly on top of each crust.
- Bake at 350 for 20 minutes.
- After 20 minutes, turn off the oven and crack the door, leaving the cheesecakes in the oven for an additional 10 minutes to finish baking.
- Place cheesecakes on a cooling rack (to speed up, place this in the fridge for 1 hour or freezer for 30 minutes).
- Once the cheesecakes are totally cool and set, remove from silicone liners.
- If desired, top each cheesecake with 2 TBS of Cool Whip (not included in macros)!
- Keep leftovers in fridge in an airtight container, and enjoy!
Nutrition
Macros
7 servings
133 cal/7.6 f/8.3 c/7.8 p per cheesecake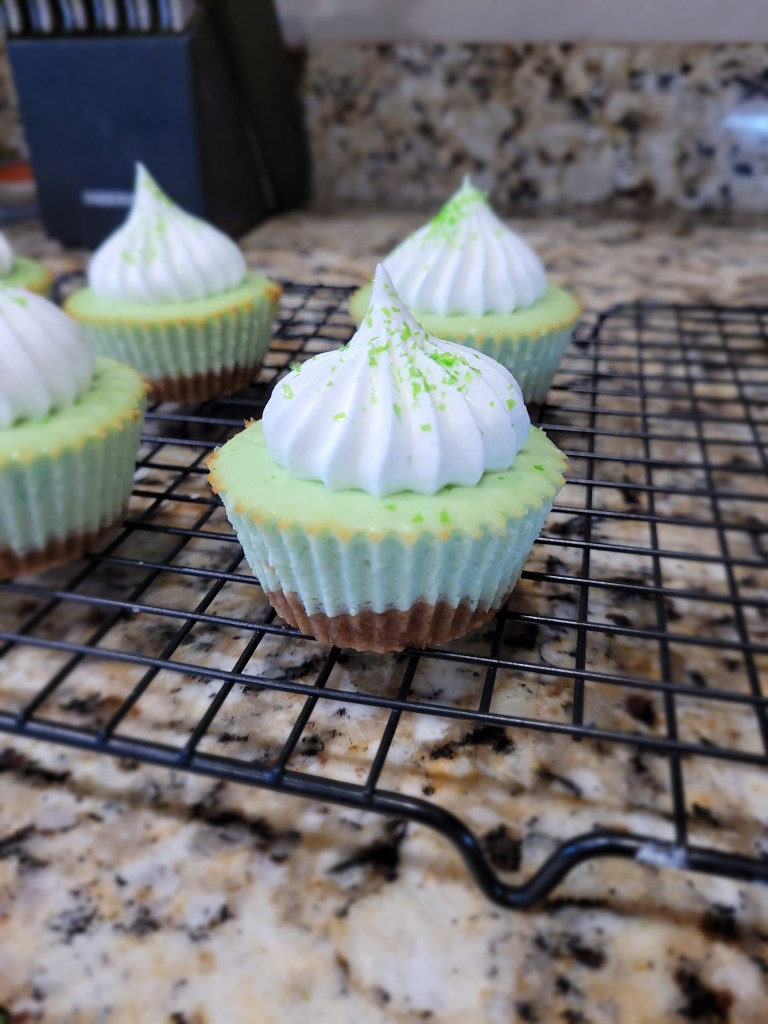
Lime all yours. 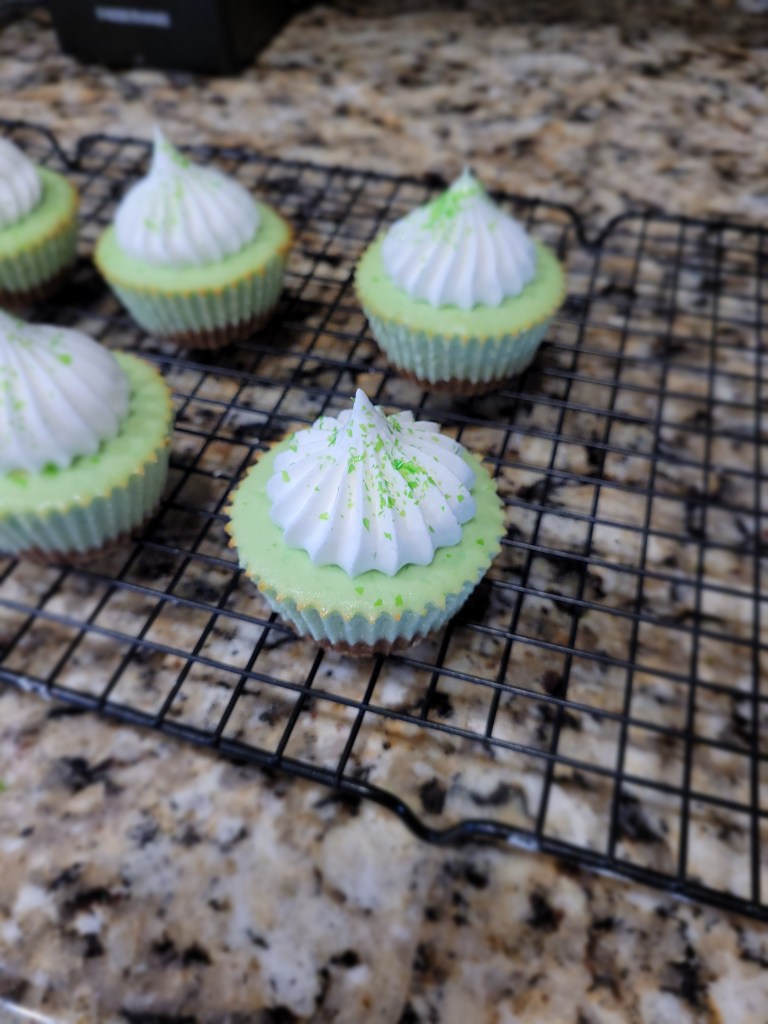
Because you’re the zest. - Line muffin tin with 7 silicone cupcake liners and preheat oven to 350.
-
Baileys: Best Lucky Charm Ever
Jump to recipe and instructions
The vast majority of us have spent the last few days with absolutely no idea what time it is, just experiencing the vague notion that the current time can’t be the right time, can it? Nothing like daylight savings time to absolutely wreck your circadian rhythm if you’re over the age of well, 20. I’ve decided that the only benefit to never knowing what time it is is that this means it’s never the wrong time for cake. Is it breakfast or is it 12:30? No clue, have cake. I am getting ready for dinner or bed? No clue, have cake. Will this feeling of existential dread ever end? No clue, have cake. I feel like DST happens around St. Patrick’s Day every year so that when the holiday finally rolls around, we’re all a bit delirious and totally ready for stiff drinks. Is this big liquor’s way of capitalizing on the holiday like the chocolate and flower industries do for Valentines? I could be mistaken, but I do know for certain a stiff drink pairs really well with a boozy cake…
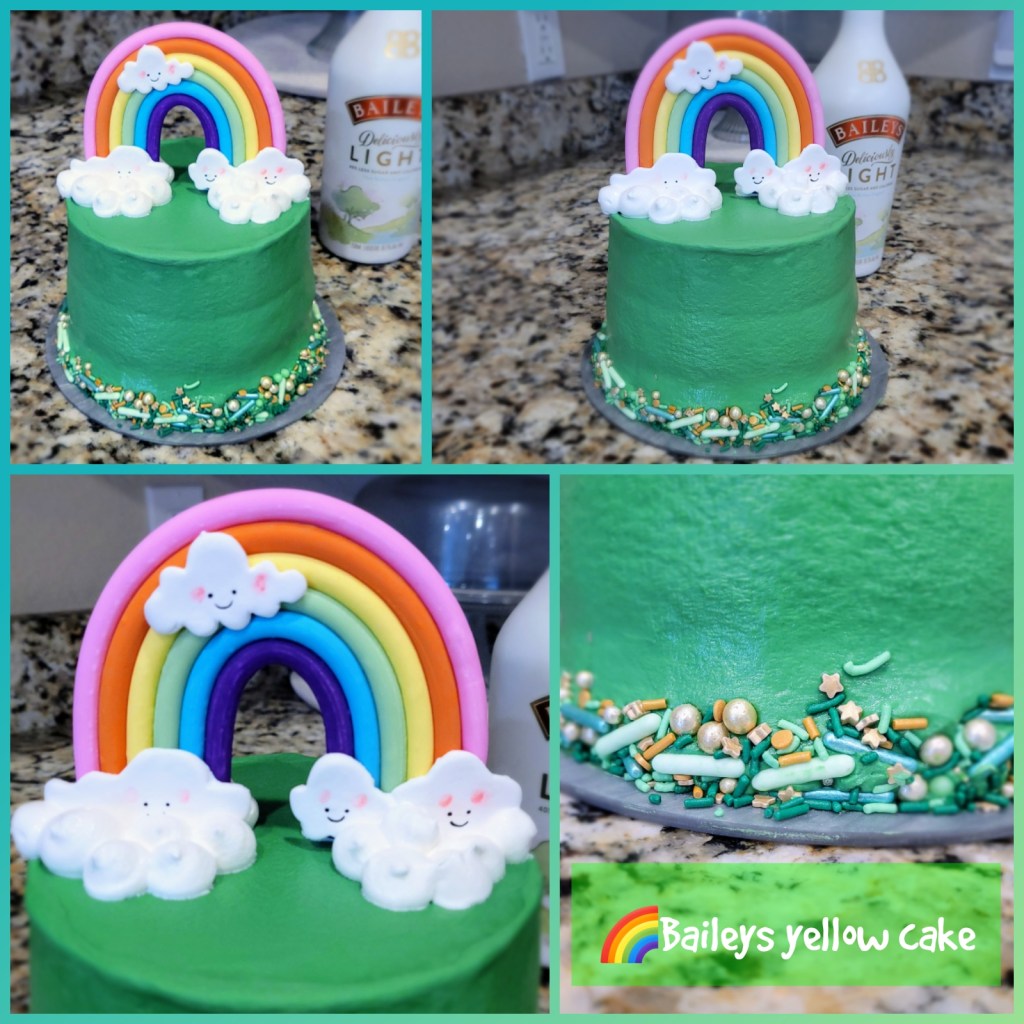
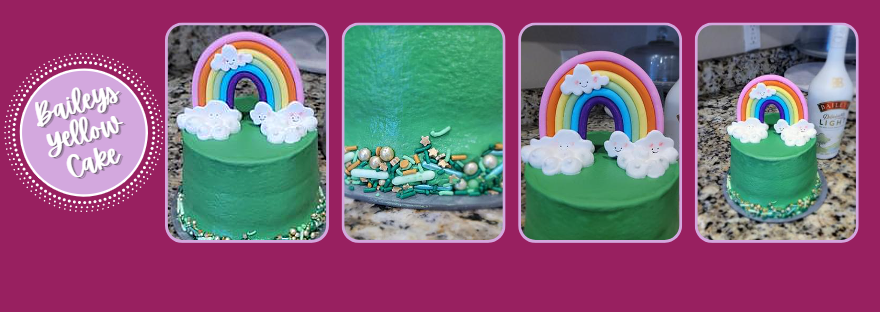
Come and get me lucky charms! I’ve made many a Baileys chocolate cake, but this year, I wanted to try making a Baileys yellow cake for St. Patrick’s Day. Good news, everyone: it’s magically delicious! I’ve decided Baileys can do no wrong; it makes every baked good so soft, and it has such a smooth aftertaste that you no longer care how annoying daylight savings time is because you’ve finally found some delicious, unrelenting happiness. Bonus points? It’s only 264 calories a slice, so you can totally pair it with a Guinness or, my personal favorite, more Baileys.
Do you not also have a bottle of drinking Baileys and another bottle of baking Baileys? This is the best way to live life. I’m actually running dangerously low on baking Baileys this month, and I’d hate to have to tap into the drinking reserves. To make this incredibly delish yellow cake, you need:
- 1 box of gluten free yellow cake mix (or regular yellow cake mix if not gluten free)
- 3 eggs
- 83 grams (1/3 cup) unsweetened applesauce
- 1/2 cup skim or fat free milk
- 1/2 cup Baileys Deliciously Light (or regular, or another fun flavor like salted caramel)
Preheat your oven to 350 and prepare three 6-inch round cake pans with cooking spray and bake even strips. Add all cake ingredients into a stand mixer, blending on low for one minute before switching to medium high for two minutes. Pour batter evenly into each pan and bake for 30-35 minutes. A toothpick should come out of the center of the cake clean. Let rest in the pan for 10 minutes before turning out to cool completely on a cooling rack before frosting.

Of course there are sprinkles. What do we top a Baileys yellow cake with? More Baileys, of course. To make the frosting, you’ll need:
- 225 grams (8 ounces) of 1/3 the fat cream cheese, softened
- 226 grams (1 cup) of fat free Greek yogurt, strained overnight to remove moisture
- 16 ounces (4 cups) Lakanto powdered monkfruit or regular powdered sugar
- 1 tsp vanilla extract
- 1/4 tsp citric acid (helps balance out the sweetness)
- 1-2 TBS Baileys
- This adorable cake topper
- These amazing sprinkles
- Kelly green or leaf green gel dye
- A few tablespoons of Cool Whip

At this point, it’s giving Green Bay Packers vibes, and this Vikings fan can’t even. Whip the cream cheese and yogurt with a paddle attachment in your stand mixer until fluffy, about three minutes. Add in half the monkfruit, citric acid, one tablespoon of Baileys, and the extract. Blend well, then scrape the bowl before adding the remaining monkfruit, green gel dye, and one more tablespoon of Baileys. To assemble, you just need to slather a layer of buttercream on top of a cooled cake layer, then add another layer (I always place them face down so the smooth surface on the bottom of the cake is now on top), then place the final layer on top. Then coat the whole cake in frosting.
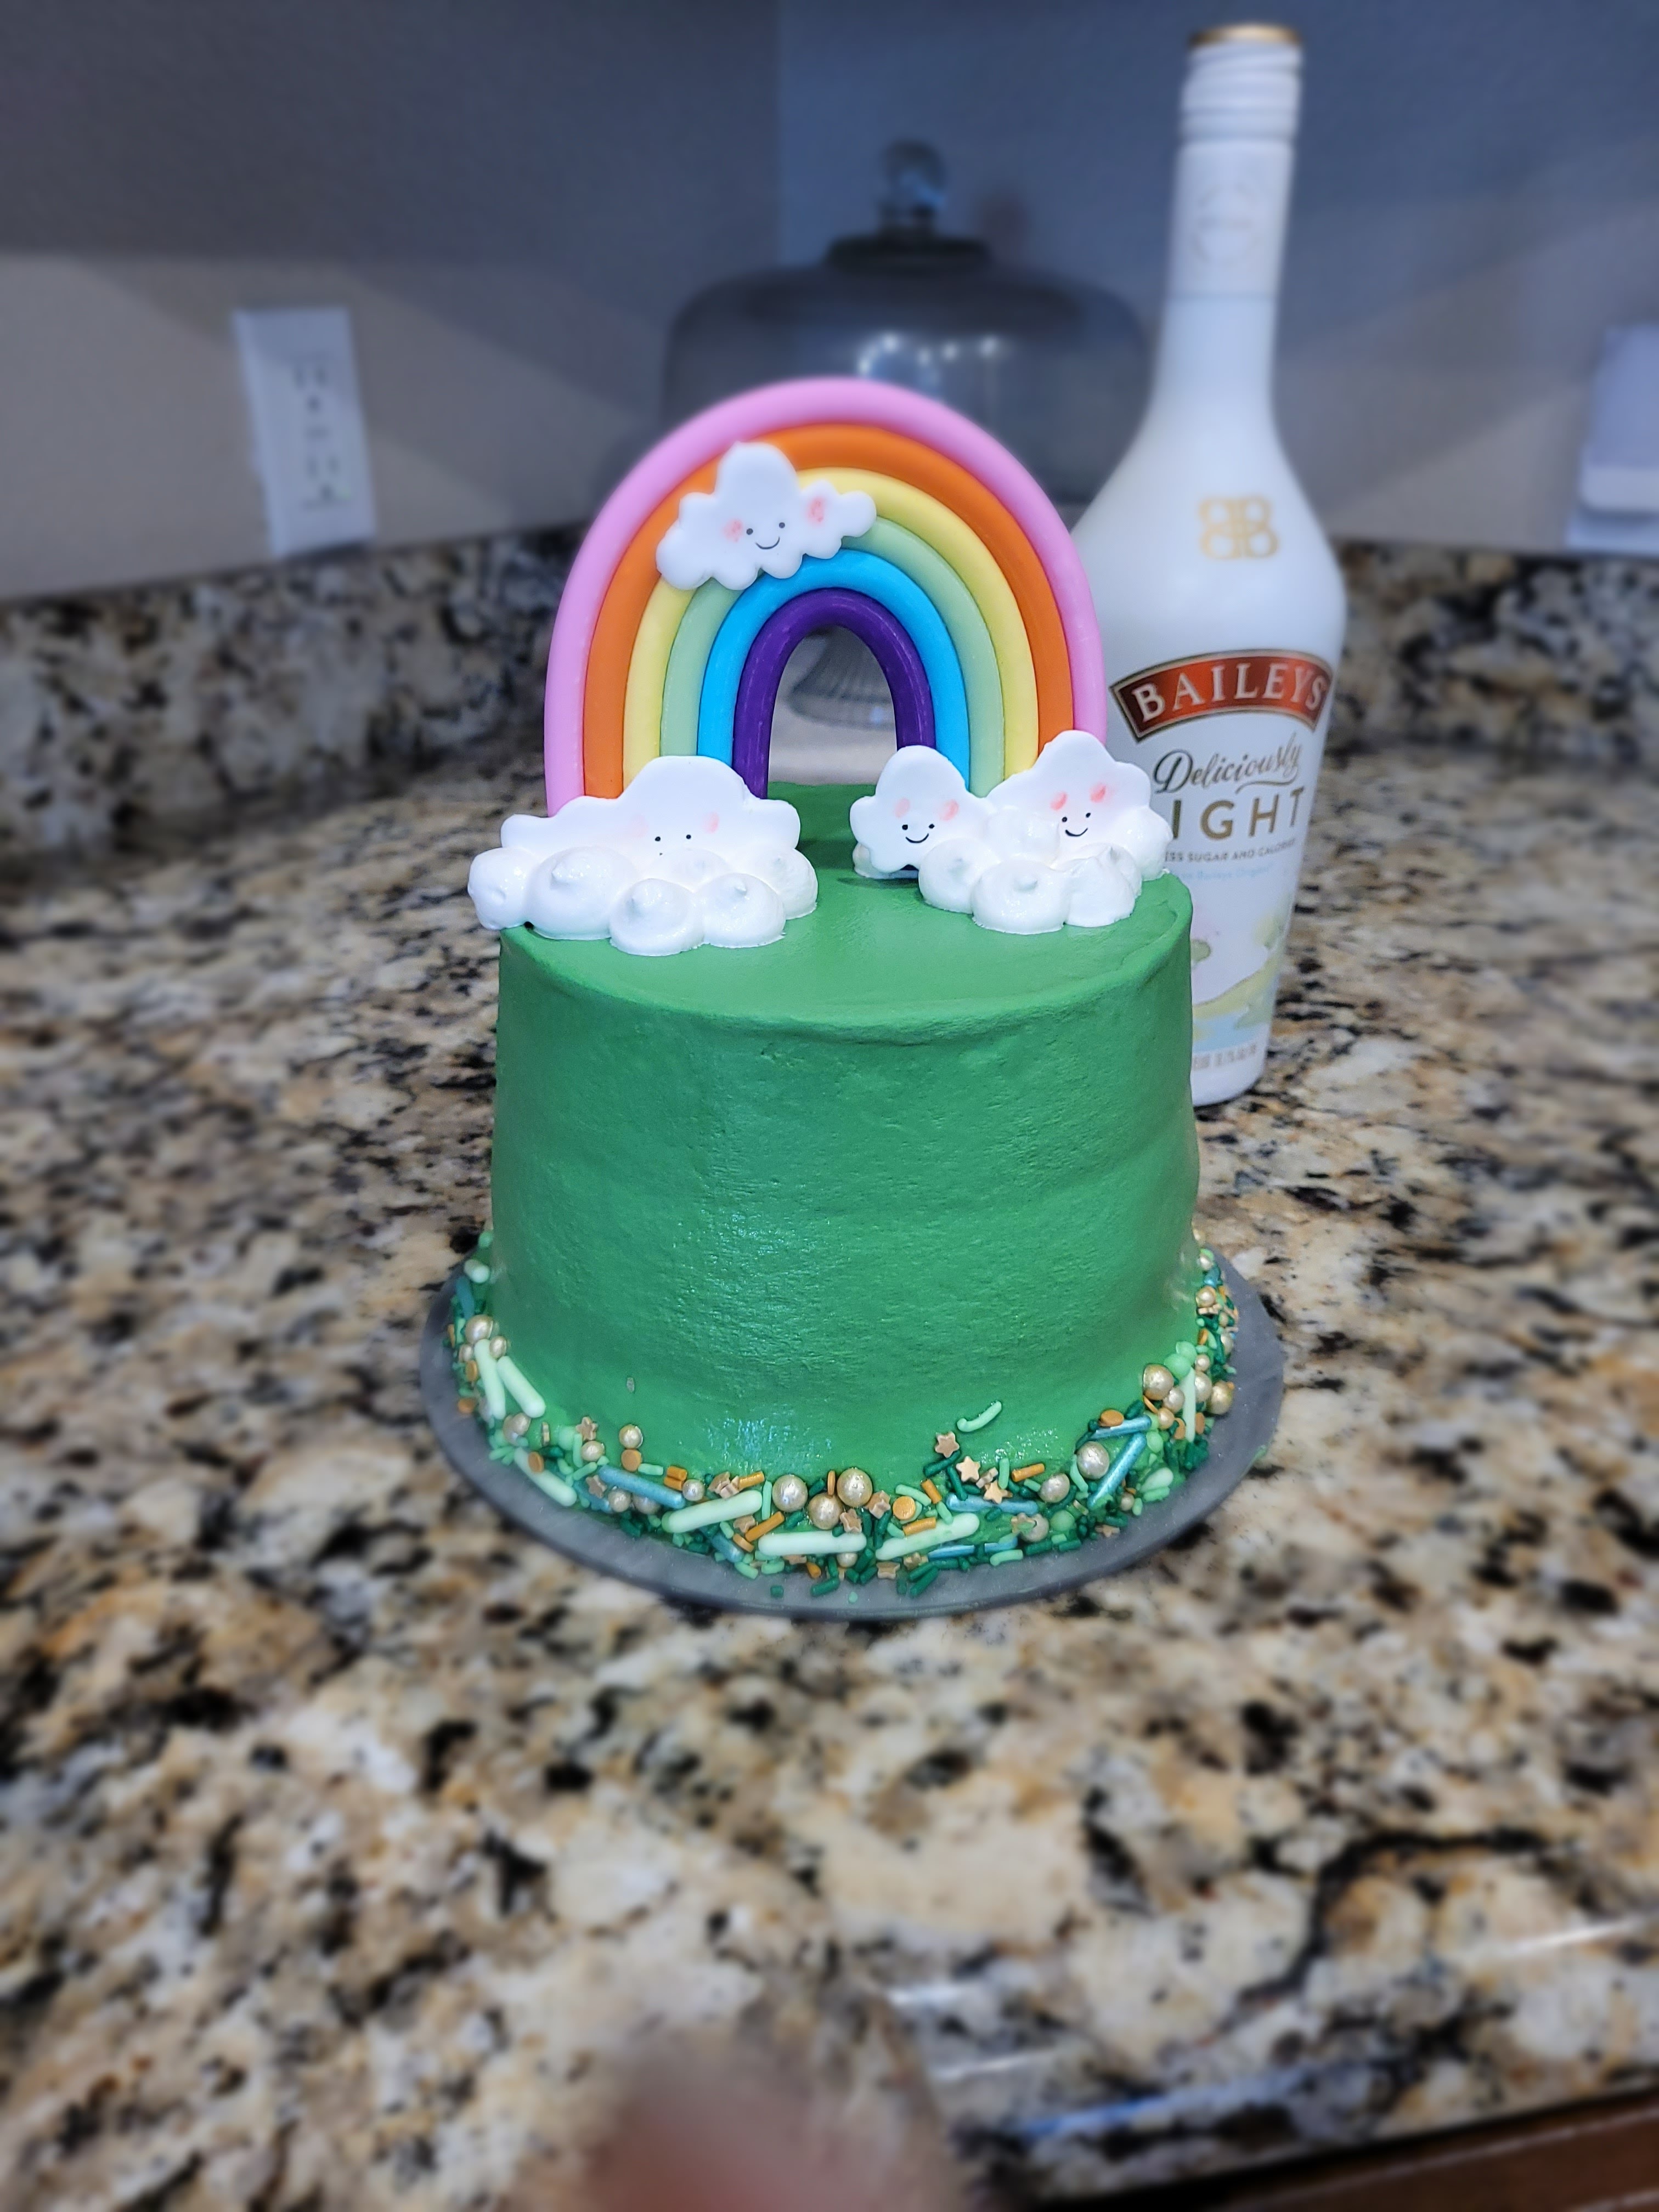
She is greening from ear to ear! This truly could be none more green. At this point, I chilled my cake in the freezer for 30 minutes before smoothing out any lumps or bumps with a plain Viva paper towel. Then I prepared to make a giant, sprinkle-laden mess in my kitchen.
Because every cake deserves a good sprinkle…don’t you a-green? I will not stop with festive holiday puns, so you’re just going to have to get clover it. I like to take a large baking sheet with a rim, placing my cake right in the middle. Then I pour some sprinkles into a bowl so that it is easy for me to grab a handful. Then I just take said handful and pour it carefully on the bottom of the cake to create a sprinkle border, pressing in gently to adhere the sprinkles.

Hearts, stars, clovers, horseshoes, and balloons! Well, not exactly, but these are leprechaun-approved sprinkles. Then, it is easy to pour the sprinkles that completely missed the cake and are just partying together all over the baking sheet back into the bowl, and the bowl back into the bag the sprinkles came in. Because in this house, no sprinkle gets left behind. I absolutely love the various sizes, matte sprinkles, shiny sprinkles, and shapes in this mix. I am what is referred to in the baking community (or should be) a “sprinkle snob.” Your traditional nonpareils are too basic for me.
Now, it’s time to make a rainbow connection. I wanted to do a gold drip on top of this cake, but I ran out of gold luster, so instead I just sadly relented while placing the happiest, smiley-est cake topper on top of my cake. It mocked me so, but I’m a clover not a fighter, so I let it smugly smile at me with a look that said, “We would have remembered to order more luster dust in February, but that’s okay.”
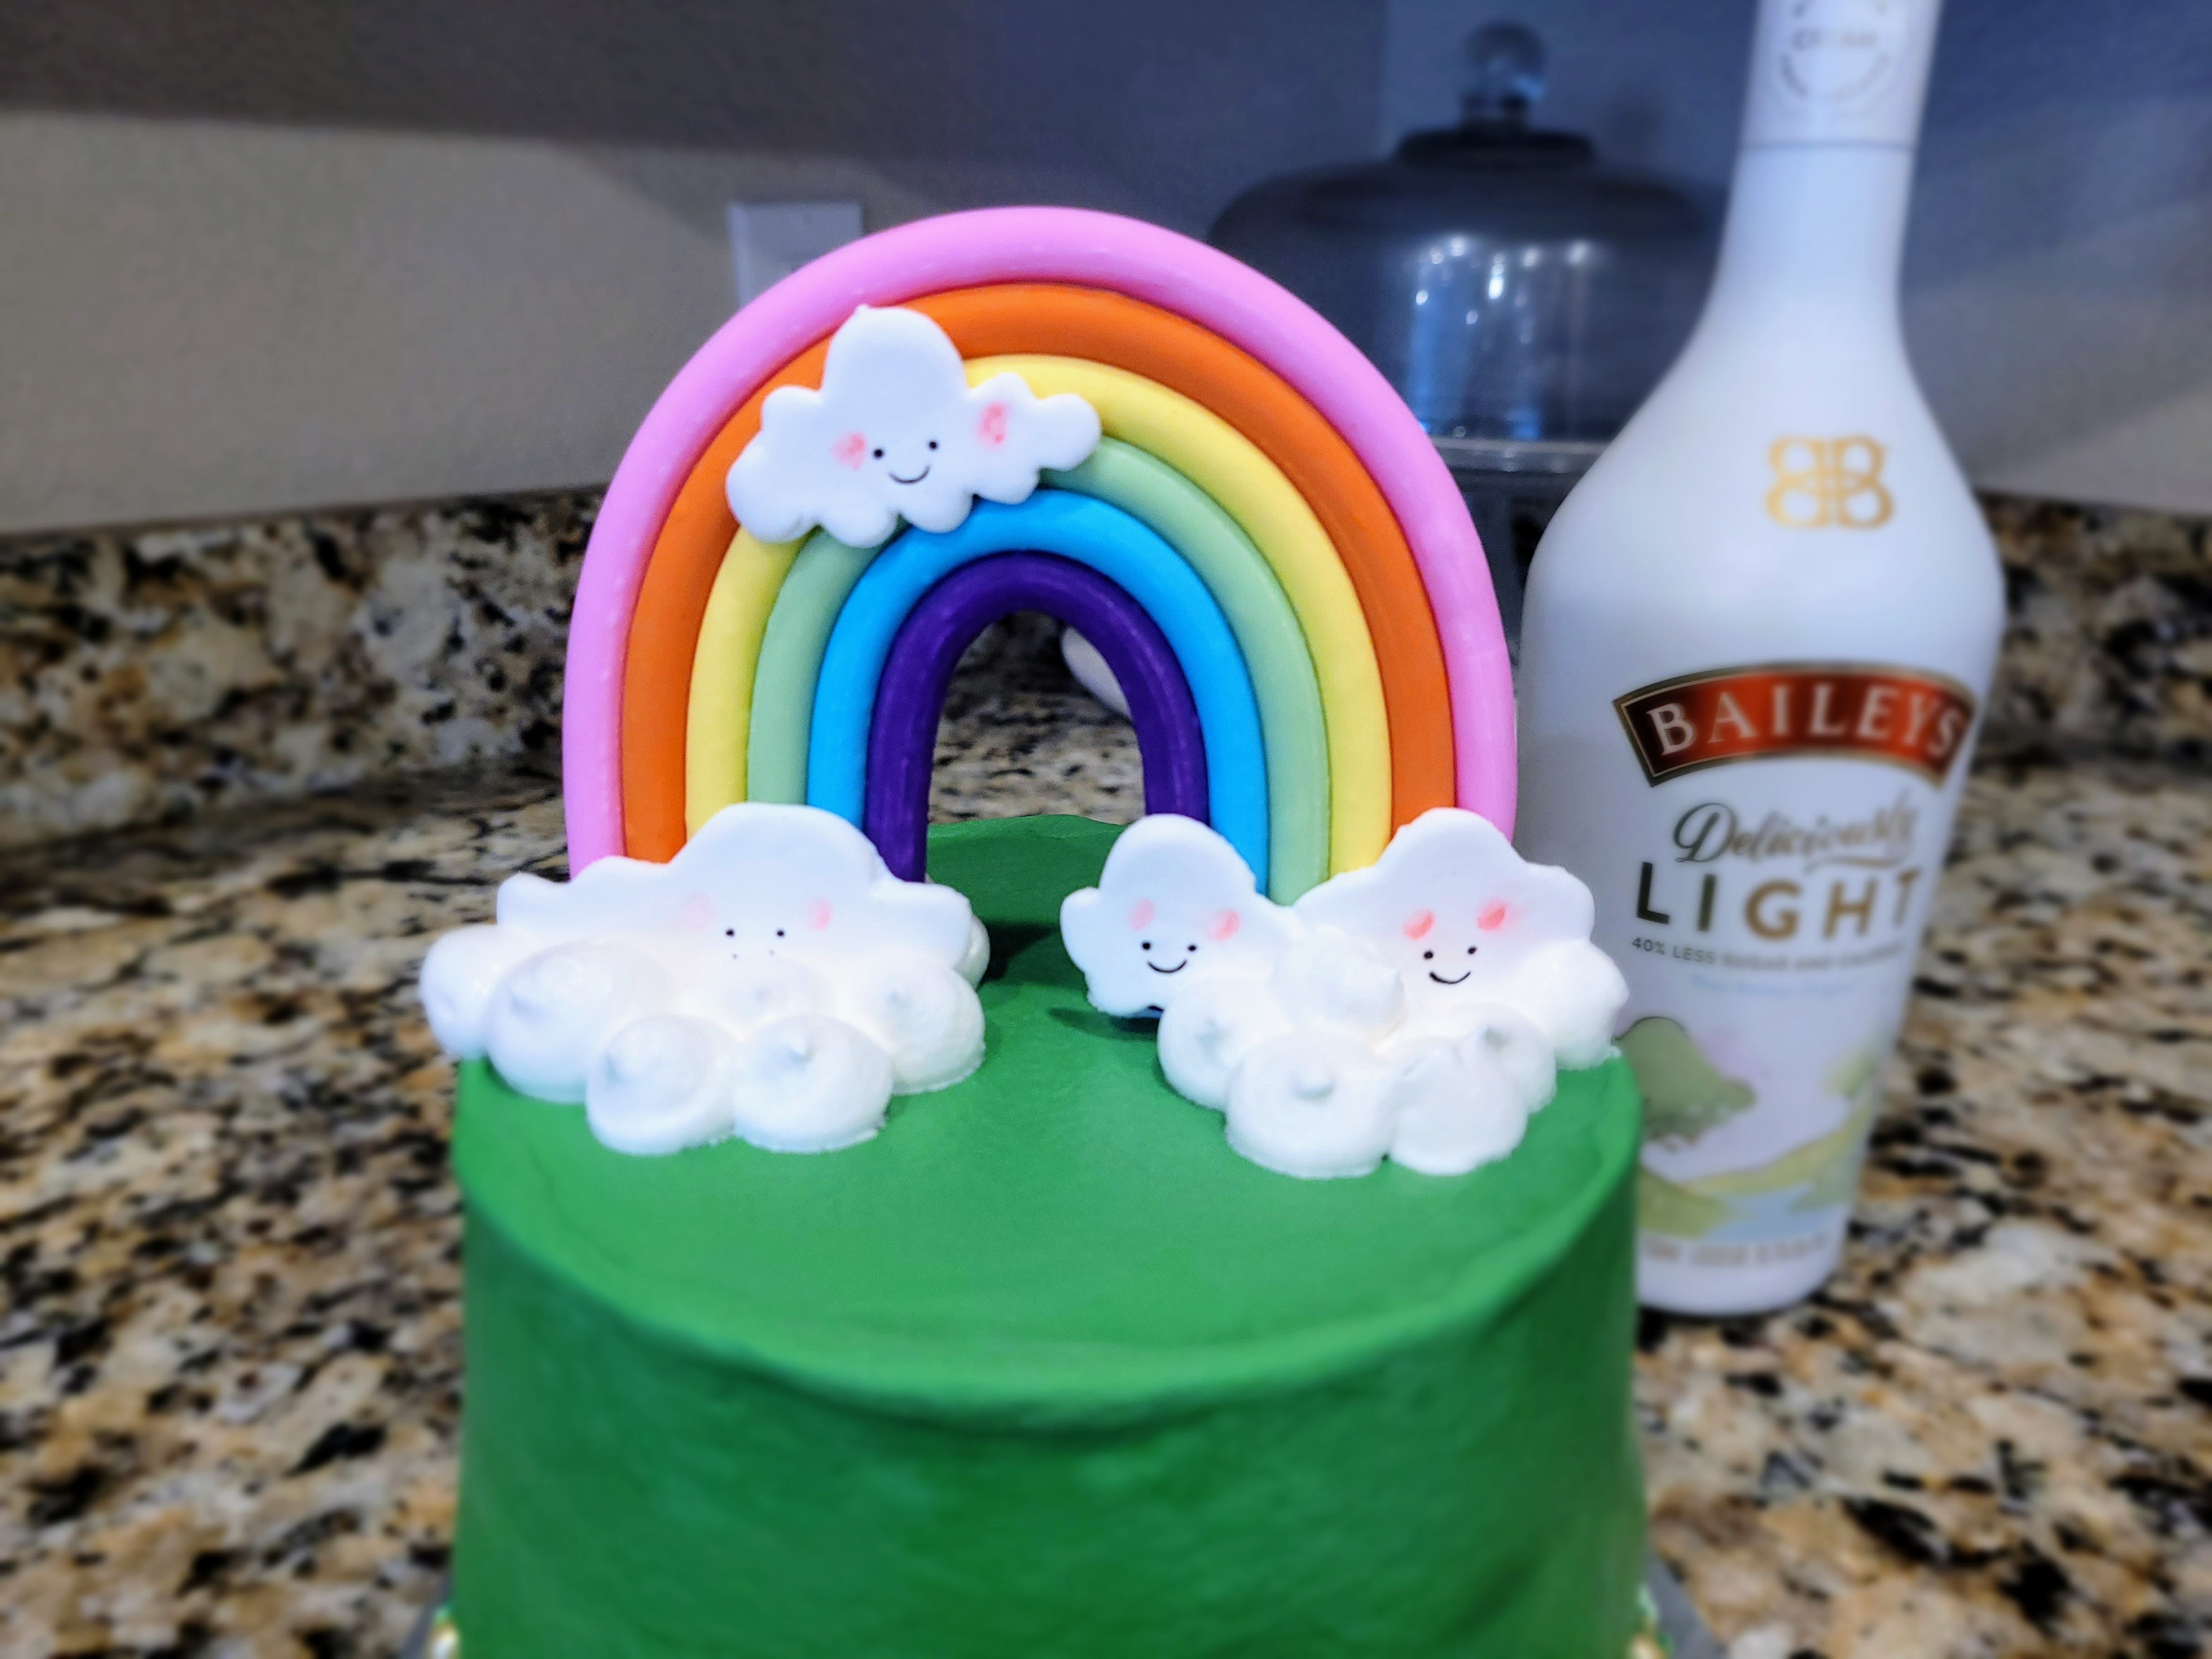
So I tried to cover up their faces with Cool Whip. I simply plopped a few tablespoons of Cool Whip into a piping bag with a #12 round tip and piped little mounds of clouds in front, on the side, and behind the topper to cover up any gaps. And voilà, you’ve got a very boozy cake that deceptively looks safe for children but totally is not. I just now realized this, but you can 100% clean that rainbow cake topper off to use for a less-boozy, child-appropriate cake after one of the biggest drinking holidays has passed. I am not a parent, but I do imagine the joy of not having to share cake with your children because it’s full of alcohol is one of those rare moments that makes parenting worth it?
I mean, I have a hard enough time just sharing cake with a single spouse. Look, the bottom line is this cake is absolutely perfect for St. Patrick’s Day parties…it simply shamrocks (I know, such a clover girl I am). I have yet to meet a baked good that wasn’t improved with the addition of Baileys, that’s all I’m saying. The citric acid in the frosting keeps it from being overly sweet and really allows the Baileys flavor to take center stage. And that yellow cake? Well, we may have painted her green, but danged it she doesn’t taste like the ultimate, buttery, soft yellow sponge to ever exist. Get the paddy started with this cake to properly celebrate Saint Patrick’s Day this week! Trust me, your friends will 100% put up with every terrible holiday pun you can think of if you offer them a slice of boozy cake so good, you lose all concept of time (or is that the daylight savings kicking in again?). Til next time, my fellow eaters!
Recipe and Instructions
Baileys Yellow Cake
Yellow cake bursting with Baileys flavor and delicious frosting
If not gluten free, use any kind of yellow cake mix. Monkfruit can also be replaced with regular powdered sugar.
Ingredients
CAKE
*One box of gluten free yellow cake mix
*83 grams (1/3 c) unsweetened applesauce
*1/2 cup fat free or skim milk
*3 eggs
*1/2 cup Baileys Delicously Light (or any flavor of Baileys)
FROSTING
*224 grams (8 ounces) of 1/3 the fat cream cheese, softened
*225 grams (1 cup) of fat free Greek yogurt, strained overnight
*16 ounces (4 cups) Lakanto powdered monkfruit
*1 tsp vanilla extract
*1/4 tsp citric acid
*2 TBS Baileys
Directions
- Preheat oven to 350 and grease three 6-inch round pans and add bake even strips.
- Mix all cake ingredients together in a stand mixer on low for 60 seconds before turning to medium-high for two minutes.
- Pour batter evenly into pans and bake for 30-35 minutes, until a toothpick comes out cleanly from the center.
- Allow cakes to cool fully before frosting.
- To make frosting, whisk cream cheese and yogurt for 3 minutes before adding in half the powdered monkfruit, 1 TBS Baileys, and the extracts, mixing well.
- Add in remaining monkfruit and 1 TBS Baileys, mixing well. If making a Saint Patrick’s cake, be sure to dye your frosting with green gel dye at this point.
- Frost the cooled cake as desired; to make a Saint Patrick’s Day cake, please see detailed decorating instructions above.
- Keep leftovers covered and in the fridge. Cake slices best served at room temp, so remove and slice 30-45 minutes before eating. Enjoy!
Nutrition
Macros
10 servings
264 cal/44 c/7 f/6.2 p per slice
Irish you knew how great you are, Baileys yellow cake. -
Creme de Menthe Brownies
Score some major brownie points at your St. Patrick’s Day party with a batch of chocolatey, boozy, mint brownies. Given that they’re full of creme de menthe, Andes mint chips, and all sorts of chocolate, they’re actually incredibly macro friendly and low cal…so you can celebrate the holiday with something magically delicious that isn’t a bowl of Lucky Charms. If mint chocolate is one of your OG, favorite flavor combos, you absolutely have to whip up a batch of these! They are so soft and decadent with that nice, tingly mint sensation that it’s like instant therapy in a bite.
Because a brownie a day keeps the frownies away. Creme de Menthe Brownies
Minty chocolate brownies perfect for an adult St. Patrick's Day party
-Don’t like Creme de Menthe? Replace with Jameson, Baileys, Godiva chocolate liqueur, or omit the alcohol altogether and just use milk.
-I recommend using a whey protein powder and not vegan since it would alter the amount of liquid needed. You can replace the cocoa with dark cocoa for a richer flavor, and the allulose can be replaced with granular sugar. Plain cashew, almond, or peanut butter can be used in place of the American Dream cashew butter listed below, but you might want to add 1/8th tsp of mint extract since this flavor is mint-based.
Ingredients
*40 g (1/4 c) cocoa powder
*45 g (~1/2 c) Quest chocolate milkshake protein powder
*60 g (1 1/4 c + 2 TBS) gluten free or All Purpose flour
*48 g (1/4 c) Madhava allulose
*1/2 tsp baking soda
*170 g (3/4 c) fat free Greek yogurt
*56 g (1/4 c) American Dream Shamrockin’ Cashew Butter
*1/4 cup fat free or skim milk
*1/4 cup Creme de Menthe
*1 tsp vanilla extract
*40 grams Andes baking chips
*9 Andes mints
Directions
- Preheat oven to 350 and spray an 8×8 pan with cooking spray.
- In a larger bowl, whisk the yogurt, cashew butter, milk, vanilla, and Creme de Menthe until totally smooth.
- Add the dry mix and whisk just until everything comes together.
- Fold in the baking chips gently as not to over mix.
- Bake for 15 minutes, then remove from oven and gently place the 9 Andes mints on top of the batter.
- Return to the oven and bake for 5-7 minutes more, until a toothpick comes out mostly clean.
- Let cool for at least 30 minutes before slicing and devouring!
- Slice and enjoy! Keep leftovers in the fridge.
Nutrition
Macros
9 servings
168 cal/20 c/5.9 f/8.8 p per slice
These are the fudging best brownies. 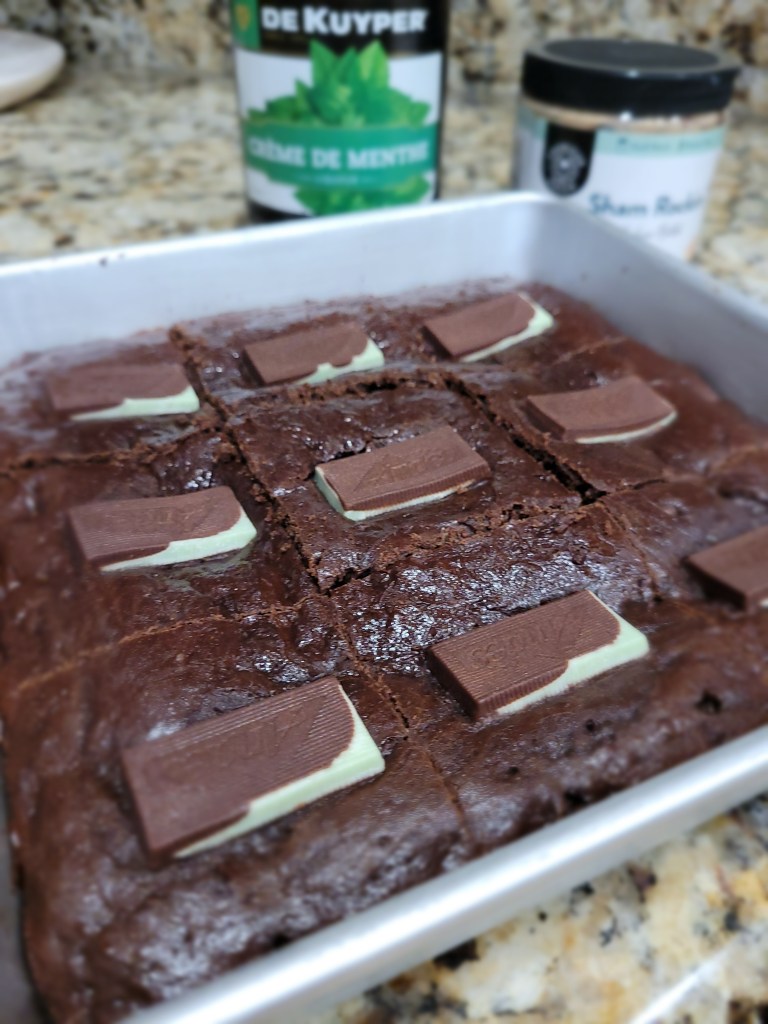
Baked with love. And like, a lot of booze. - Preheat oven to 350 and spray an 8×8 pan with cooking spray.
-
Baileys Chocolate Pie

I have an affinity for boozy baking, and this always ramps up in March thanks to Saint Patrick’s Day. I am regularly trying to fill all baked goods with Baileys, Guinness, creme de menthe…ya know, just trying to pour the luck of the Irish into every bite. Well, March has arrived, and I’m ready to shamrock and roll! I make no apologies for these terrible puns, and instead offer you a no-bake Baileys chocolate pie recipe for your troubles. With a grand total of 6 ingredients, this is insanely easy and fast to whip up. It is 100% the pot of gold waiting at the end of the rainbow. Can a slice get you tipsy? Yes. Do you have to share? Optional. Just guard the fridge so a leprechaun doesn’t take off with this pie because it is dangerously delicious.
My new lucky charm. Baileys chocolate pie
No-bake boozy Baileys pie perfect for Saint Patrick's Day celebrations
-If not gluten free, use any kind of premade pie crust- Oreo would be AMAZING, so would graham cracker. If you use a regular premade pie shell, you will need to bake according to package instructions, but this is the only thing you’d need the oven for.
-You want to use 2 cups of liquid total in this recipe; so feel free to alter the amounts of liquid you use. For example, if you don’t want as strong of a Baileys flavor, use 1/2 cup of Baileys and 1 1/2 cups of milk.
-Don’t like Baileys? Replace with Jameson, creme de menthe, Godiva chocolate liqueur, or omit the alcohol altogether and just use milk.
-If your pie seems like it is too liquid or watery, try whisking in an additional ounce of pudding mix to thicken (I had no issues using the amounts listed below).
Ingredients
*1 gluten free, premade pie crust (follow instructions on the crust packaging if it needs to be baked)
*2 ounces of instant sugar free chocolate pudding mix
*1 1/4 cup fat free or skim milk
*3/4 cup Baileys (I used the Deliciously Light flavor with 40% less sugar)
*1 tsp vanilla extract
*8 ounces/1 tub of Cool Whip Free + additional 40 grams for piping shell border if desired
Directions
- In a stand mixer with the whisk attachment, beat the pudding mix, milk, Baileys, and vanilla for 2 minutes until thick and no lumps remain.
- Add the Cool Whip and whisk on medium just until everything comes together.
- Pour the pie filling into your premade pie crust and smooth.
- To add the shell border, fit a piping bag with a 1M tip and add in 40 grams of Cool Whip and pipe shells (see a video of this on my Instagram katebakescakes87).
- Place in the fridge to set overnight or for at least 4 hours before serving.
- To get super-clean slices, you can freeze this for 2 hours before serving as well.
- Slice and enjoy! Keep leftovers in the fridge.
Nutrition
Macros
8 servings
287 cal/39 c/13 f/3.5 p per slice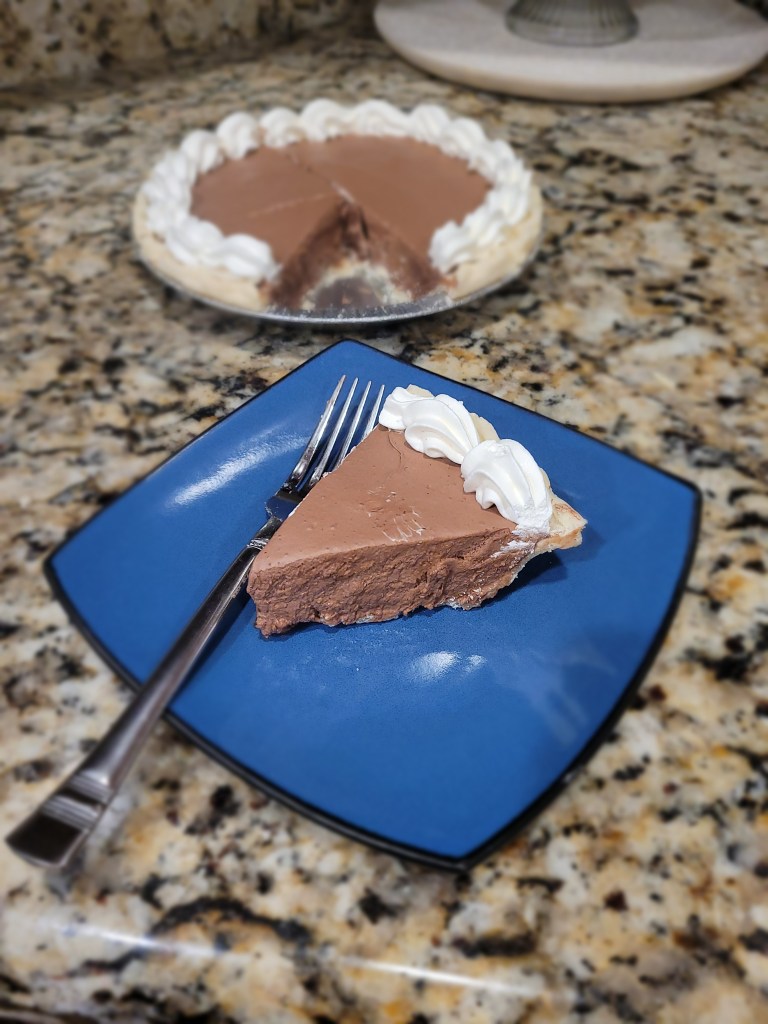
Dublin your fortune with this recipe. 
Un-bailey-vably good pie. - In a stand mixer with the whisk attachment, beat the pudding mix, milk, Baileys, and vanilla for 2 minutes until thick and no lumps remain.
-
Very Berry Blondie Bars
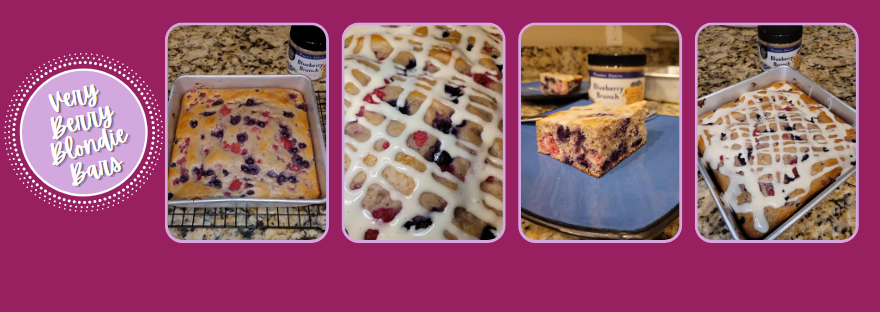
I love alliteration almost as much as I love these very berry blondie bars…they are soft, sweet, sour, and everything you could ever need in a secretly healthy treat with a whopping 12 grams of protein per serving. A berry delicious miracle! They are also gluten free and can be made vegan/dairy free if you substitute vegan yogurt and plant-based milk. I just want everyone in the world to try this recipe because it is absolutely phenomenal!
I love them berry much. Very Berry Blondie Bars
Soft, moist berry blondie bars great for breakfast or dessert (or both)
If not gluten free, use any kind of Kodiak Cakes or just-add water flapjack mix! You can also use your preferred whey protein flavor/brand. If vegan, use plant-based milk and yogurt. Can sub Madhava for regular sugar.
Ingredients
*60 grams (~2 scoops) Quest vanilla milkshake protein powder
*106 grams (1 cup) Kodiak Cakes gluten free flapjack mix
*48 g (1/4 cup) Madhava allulose sweetener
*1 tsp baking powder
*1 tsp vanilla
*113 grams (1/2 cup) Greek yogurt
*60 mL (1/4 cup) sugar free syrup
*1/3 cup fat free or skim milk
*56 grams (1/4 cup) American Dream Blueberry Brunch cashew butter
*75 grams (1/2 cup) frozen blueberries
*70 grams (1/2 cup) frozen raspberries
For the glaze
*15 grams Lakanto powdered monkfruit
*15 grams Quest vanilla milkshake protein powder
*2 TBS water
Directions
- Preheat oven to 350 and grease an 8×8 baking pan.
- Add in the protein powder, Kodiak Cakes mix, allulose, and baking powder, whisking just until everything comes together.
- Pour into prepared pan.
- Fold in most of the raspberries and blueberries, saving a few to put on top of the batter.
- Pour batter into prepared pan and smooth.
- Add remaining berries on top.
- Bake for 28-32 minutes, until a toothpick comes out mostly clean.
- Let your bars cool on a cooling rack in the pan until room temperature.
- Mix together the protein powder, monkfruit, and water until smooth; you want a drippy consistency, so add more water if needed.
- Drizzle over cooled bars.
- Slice and enjoy! Keep leftovers in the fridge. These are great reheated for 15 seconds in the microwave.
Nutrition
Macros
9 servings
132 cal/14 c/3.1 f/12 p per slice
These will disappear right before your berry eyes so fast… 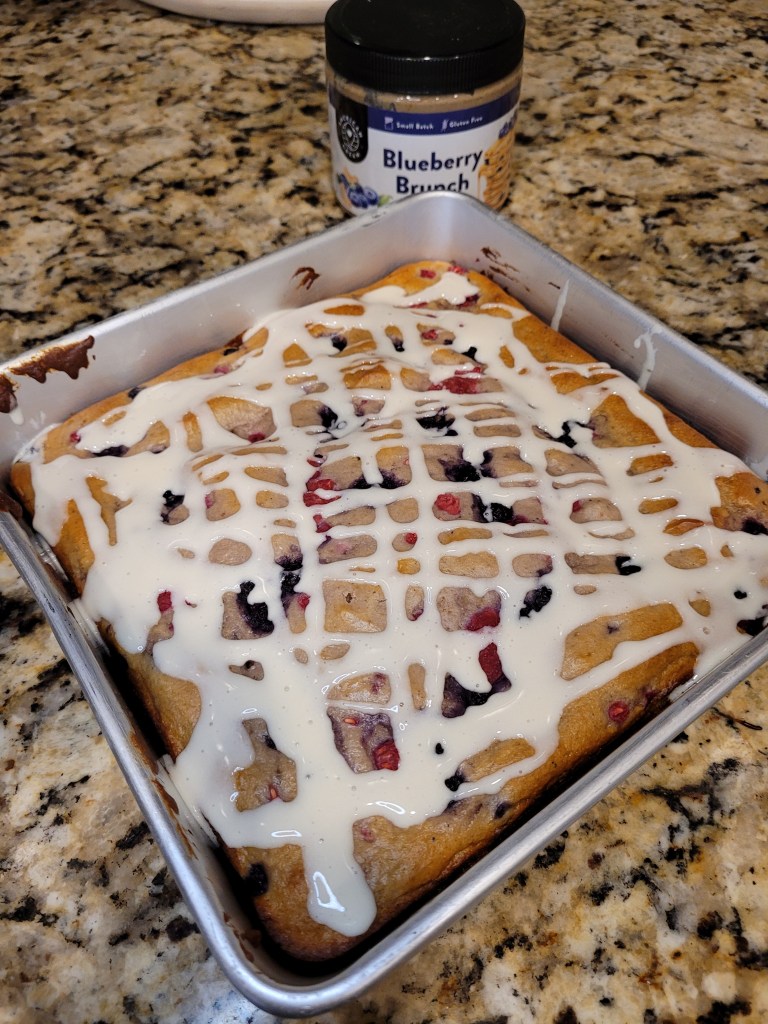
Berry nice to meet you. - Preheat oven to 350 and grease an 8×8 baking pan.
-
Mini King Cake Cheesecakes
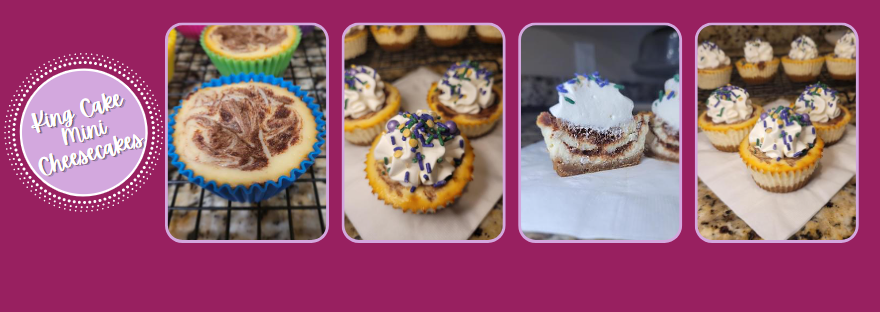
Mardi Gras is just around the corner, and I gotta say, this is really the only time of the year I miss living in the south because boy do they know how to celebrate properly. I had never even heard of King Cake until my 30s when we moved to Florida…but the first time I had some, I was immediately hooked. A cinnamon roll/cake hybrid? Truly, the king of cakes for sure. But since I had to go gluten free back in 2019, I have had nary a slice. I decided to make Mardi Gras magic happen and came up with a recipe for gluten free King Cake mini cheesecakes. This way you can throw beads with one hand while eating dessert with the other. These beautiful little babies are bursting with cinnamon sugar swirls and a soft, pillowy cheesecake.
Be the life of the Mardi when you whip up a batch of these. Recipe and Instructions
Mini King Cake Protein Cheesecakes
Creamy protein cheesecake meets buttery cinnamon-sugars swirl
Use can your preferred whey protein; Madhava can also be replaced with regular sugar, but this will change the macros.
Ingredients
CRUST
*60 g (~2/3 cup) graham cracker or shortbread crumbs, pulsed to a fine powder
*12 g (1 TBS) Madhava allulose sweetener
*21 g (1.5 TBS) light butter
CHEESECAKE FILLING
*150 g (5.33 ounces) 1/3 the fat cream cheese at room temp
*150 g (5.33 ounces) nonfat Greek yogurt
*1 egg
*1 tsp vanilla extract
*20 g Quest vanilla milkshake protein powder
*48 g (1/4 cup) Madhava allulose sweetener
CINNAMON SWIRL
*48 g (1/4 cup) Lakanto golden monkfruit
*1 1/4 TBS cinnamon
*28 g (2 TBS) light butter, melted
Directions
- Line muffin tin with 7 silicone cupcake liners and preheat oven to 350.
- In a food processor or blender, combine all crust ingredients until sticky.
- Press about 1.5 teaspoon of the crust mix into each silicone liner and press until it begins to run up the edge of the liner.
- Bake for 5-8 minutes, until golden; then set aside on the counter to cool.
- Whisk all cheesecake ingredients together in a large bowl until smooth.
- In a small bowl, melt the butter then add the cinnamon and allulose, mixing until a paste forms.
- Distribute 1 TBS batter into each cupcake liner, then top each with a small amount of the cinnamon mix.
- Cover this with another tablespoon of batter, then top this with another small scoop of cinnamon sugar mix.
- Use a toothpick to draw swirls in the cinnamon sugar mix.
- Bake at 350 for 20 minutes.
- After 20 minutes, turn off the oven and crack the door, leaving the cheesecakes in the oven for an additional 10 minutes to finish baking.
- Place cheesecakes on a cooling rack (to speed up, place this in the fridge for 1 hour or freezer for 30 minutes).
- Once the cheesecakes are totally cool and set, remove from silicone liners.
- If desired, top each cheesecake with 2 TBS of Cool Whip (not included in macros) and Mardi Gras sprinkles!
- Keep leftovers in fridge in an airtight container, and enjoy!
Nutrition
Macros
7 servings
153 cal/8.7 c/10 f/6.9 p per cheesecake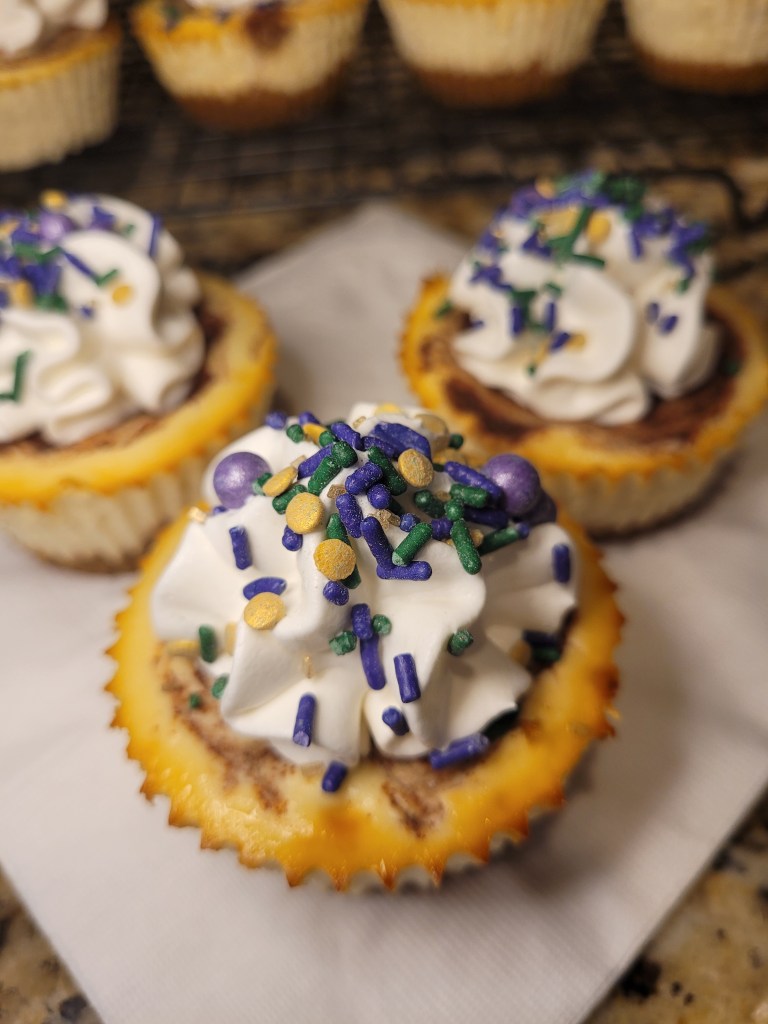
Let the good times (cinnamon) roll. 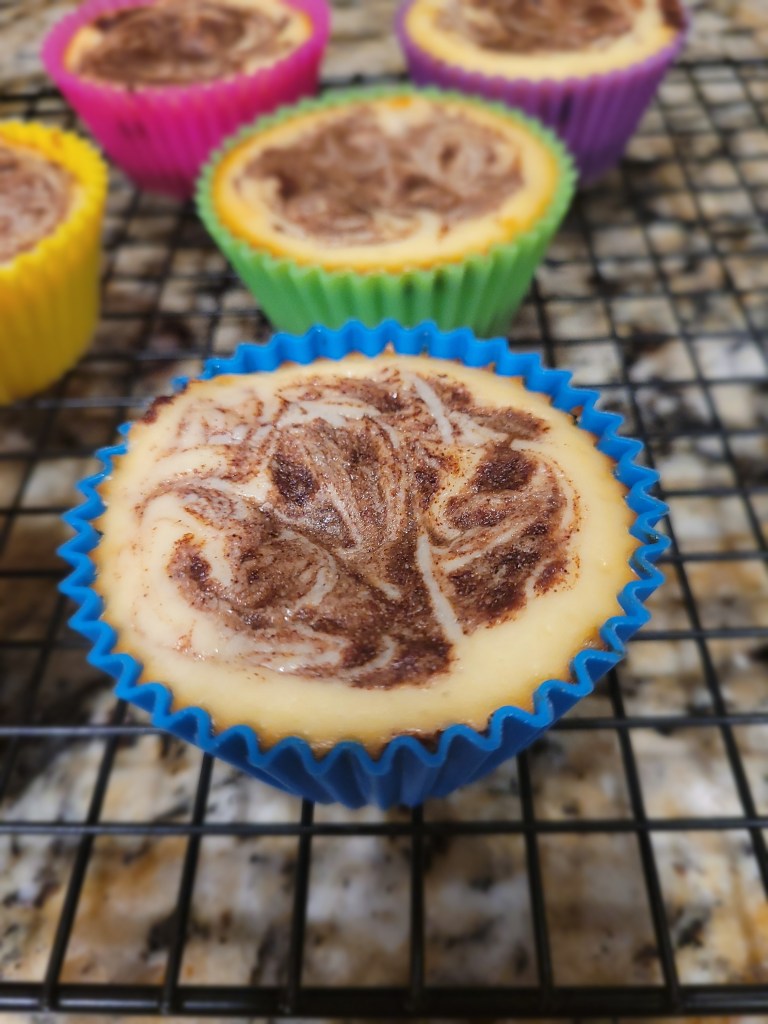
Have your King Cake and eat it, too! - Line muffin tin with 7 silicone cupcake liners and preheat oven to 350.
-
Raspberry Bundt Cake

Looking for a cake to woo that special someone this Valentine’s Day? Or, more realistically, you just want to eat some cake but don’t want to spend the day in the kitchen making one? Yeah, I got you. This super simple raspberry bundt cake requires no pureeing of berries, no adding of various jams…you’ll be in and out of the kitchen in under an hour with a whole cake to call your own (or I guess, share, if you want to keep your Valentine happy). My mom bought me this amazing bundt pan for Christmas, and I’ve been dying to try it out. I was going for a two-toned look, but my red and pink dyes both got a lot darker while baking, so it just looks like a red cake until you cut into it. I recommend keeping half your batter white and dying the other half red to create more of a contrast for the two-toned look!
Thank you berry much for the tip. Recipe and Instructions
Raspberry Bundt Cake
A colorful raspberry bundt with delicious glaze
If not gluten free, use any kind of white or yellow cake mix. Monkfruit can also be replaced with regular powdered sugar for glaze. If you prefer not to use protein powder in the glaze, replace with more monkfruit/powdered sugar.
Ingredients
CAKE
*One box of gluten free yellow cake mix
*70 grams (1/3 c) unsweetened applesauce
*1 cup fat free or skim milk
*3 eggs
*1 TBS raspberry extract
GLAZE
*30 grams Quest vanilla milkshake protein powder
*30 grams Lakanto powdered monkfruit
*1/2 tsp raspberry extract
*4 TBS water
Directions
- Preheat oven to 350 and grease a bundt pan well.
- Mix all cake ingredients together in a stand mixer on low for 60 seconds before turning to medium-high for two minutes.
- Divide batter into two bowls; dye one red and the other pink (or leave this plain white).
- Place the split batters into two different piping bags; snip the very bottom of the piping tip.
- Slowly draw a line of red up one “channel” of the bundt cake; come back and draw a few more lines up the same channel until the entire channel is covered in red. Use an angled spatula or cake skewer to even out the batter; this is the “shell” of the cake.
- In the channel next to it, come in and pipe the pink (or white) batter, repeating until that channel is covered and smoothed out.
- Repeat alternating colors in each channel; you will have two of the same color next to each other to finish.
- Once the “shell” has been piped, carefully pour the remaining batter into the center; it does not need to come all the way up the sides. I alternated pink and red batters, then used a knife to gently swirl the colors without disrupting the shell.
- Bake for 39-43 minutes (a skewer should come out with minimal crumbs).
- Let rest in the pan on a cooling rack for 20 minutes.
- Loosen the edges of the cake with a dull knife, then flip the cake pan over on the cooling rack.
- Give the cake a few minutes to release before removing the pan from the top.
- Once your cake is completely cool, make the glaze by mixing the protein powder, monkfruit, extract, and water in a bowl.
- Place this into a piping bag and pipe the glaze on the cooled cake before topping with pink, red, and white nonpareils.
- Keep cake in fridge until ready to serve; tastes best at room temp!
Nutrition
Macros
10 servings
215 cal/40 c/3.1 f/6.7 p per sliceView a quick video on how I piped up the sides of the cake! 
You could say that raspberries are my jam. 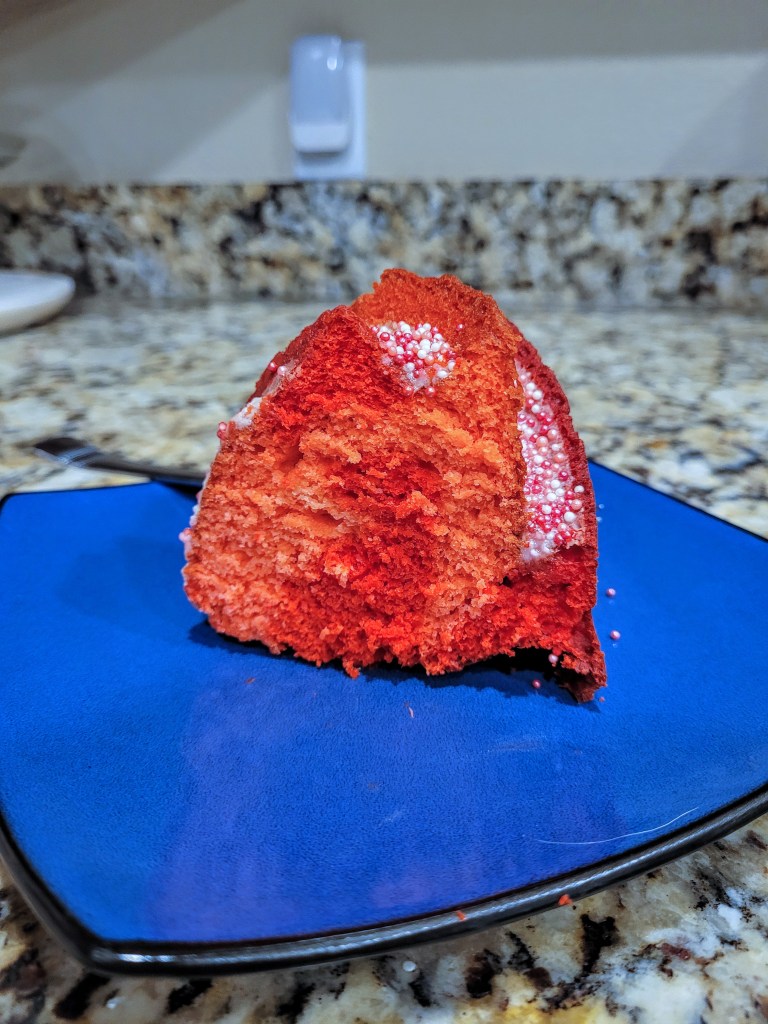
So berry soft and delicious! - Preheat oven to 350 and grease a bundt pan well.
-
Bitter Late Than Never!

Jump to recipe and instructions
Okay, so the cartoon/comic-style cake trend was all over the place in November and December, and has slowed down since the holidays, so I am extremely late to this party. But a cake where you don’t have to worry about precision accuracy, the cleanest of lines, and the smoothest of frostings? I’m in. So I may be late, but bitter late than never. I thought it would be funny to make a lemon cake and design it as a Valentine’s cartoon cake style because I am a bitter human being that doesn’t actually celebrate the holiday (the chocolate and floral industry can’t pull one over on me)…so a sour-flavored cake just rings true to how I feel about Hallmark’s attempts to make me a romantic. Also, my lovely coworkers gifted me with ALL. THE. SPRINKLES. for my birthday, including a large set of V. Day sprinkles, so I figured this was a pretty good use for them. I may hate Valentine’s Day, but damned if I don’t love a good cake sprinkle more than anything else.

Cit-rus got real. If the Powerpuff Girls made a cake, this would be that cake. And Mojo Jojo would spend an entire episode trying to figure out how to steal it because it is DELICIOUS. It’s a Funfetti lemon cake because I wanted both a cartoony exterior and interior, and nothing says comic yum like a Funfetti cake. The lemon cream cheese frosting is also to die for; I used a bit of citric acid to make the frosting less sweet (think Sour Patch Kids meets Dunkaroo Dip- a 90s kid’s nostalgia factory, if you will). Basically, this cake is a lemony burst of flavor that makes my bitter little heart a titch less sour. Every time I open the fridge and see how cartoonish and ridiculous it looks sitting next to regular, real-life food, it’s delightful. And at only 259 calories a slice (10 slices total), you can squeeze the day (and not your waist)!
THREE EGGS? What am I, a millionaire? Okay, rationing eggs in this economy would probably be wise, but then I wouldn’t have cake, so here we are. For the lemon Funfetti cake, you need:
- 1 box of gluten free Funfetti cake mix (or regular Funfetti cake mix if not gluten free)
- 3 eggs (sorry, I know that’s like $50 worth of eggs today)
- 70 grams (1/3 cup) unsweetened applesauce
- 1 cup skim or fat free milk
- 1 tsp lemon extract
Preheat your oven to 350 and prepare three 6-inch round cake pans with cooking spray and bake even strips. Add all cake ingredients into a stand mixer, blending on low for one minute before switching to medium high for two minutes. Pour batter evenly into each pan and bake for 32-35 minutes. A toothpick should come out of the center of the cake clean. Let rest in the pan for 10 minutes before turning out to cool completely on a cooling rack before frosting.
I was a little afraid of the citric acid, not gonna lie. Anything that says it can be used for cleaning and eating gives me pause, but I read that citric acid can balance out the super sweetness of frosting, so I had to try. I figured if it killed me, I’d go out eating cake, which, truly, seems appropriate. While your cakes cool, you can make the frosting. You’ll need:
- 225 grams (8 ounces) of 1/3 the fat cream cheese, softened
- 226 grams (1 cup) of fat free Greek yogurt, strained overnight to remove moisture
- 16 ounces (4 cups) Lakanto powdered monkfruit or regular powdered sugar
- 1 tsp lemon extract
- 1 tsp vanilla extract
- 1/8 tsp citric acid
- 1-2 TBS milk

A tower of FUN! ..fetti. Whip the cream cheese and yogurt with a paddle attachment in your stand mixer until fluffy, about three minutes. Add in half the monkfruit, citric acid, and both extracts. Blend well, then scrape the bowl before adding the remaining monkfruit and 1 TBS milk; if the frosting is too stiff, add another TBS milk. To assemble, you just need to slather a layer of buttercream on top of a cooled cake layer, then add another layer (I always place them face down so the smooth surface on the bottom of the cake is now on top), then place the final layer on top. Then coat the side (but not the top) of the cake with plain white frosting. Citric acid also makes frosting BLINDINGLY WHITE (like ‘my legs in the winter’ level of white), which again, gave me pause, because what is it going to do to my insides if it bleaches my frosting?

The thoughts were terrifying. Instead of wondering whether my intestines and stomach needed to prepare for bleaching, I gathered up some hot pink, red, and black gel dyes and rounded up the Valentine’s sprinkles. I divided my frosting into thirds, a larger heaping to dye hot pink, and two smaller heaps to dye black and red. I loaded my pink frosting into a piping bag with a #12 round tip, my black frosting into a piping bag with a #5 tip (I also had my #3 and #2 tips on hand to swap out), and my red frosting into a piping bag with a 2D tip (1M would also work). That little tool you see in the middle above is a grabber that works EXCELLENTLY to place sprinkles onto a cake; big ups to my boss for sending that in my birthday gift…it is truly my new favorite thing ever. It also works well to threaten husbands out of the kitchen and away from your bowl of frosting, FYI.
Right now I’m getting a Simpsons donut vibe. I topped my cake with a bit of pink frosting, smoothed, and then froze the whole thing for 20 minutes so my frosting would crust. I smoothed out any bumps on the cake with a plain Viva paper towel after this.
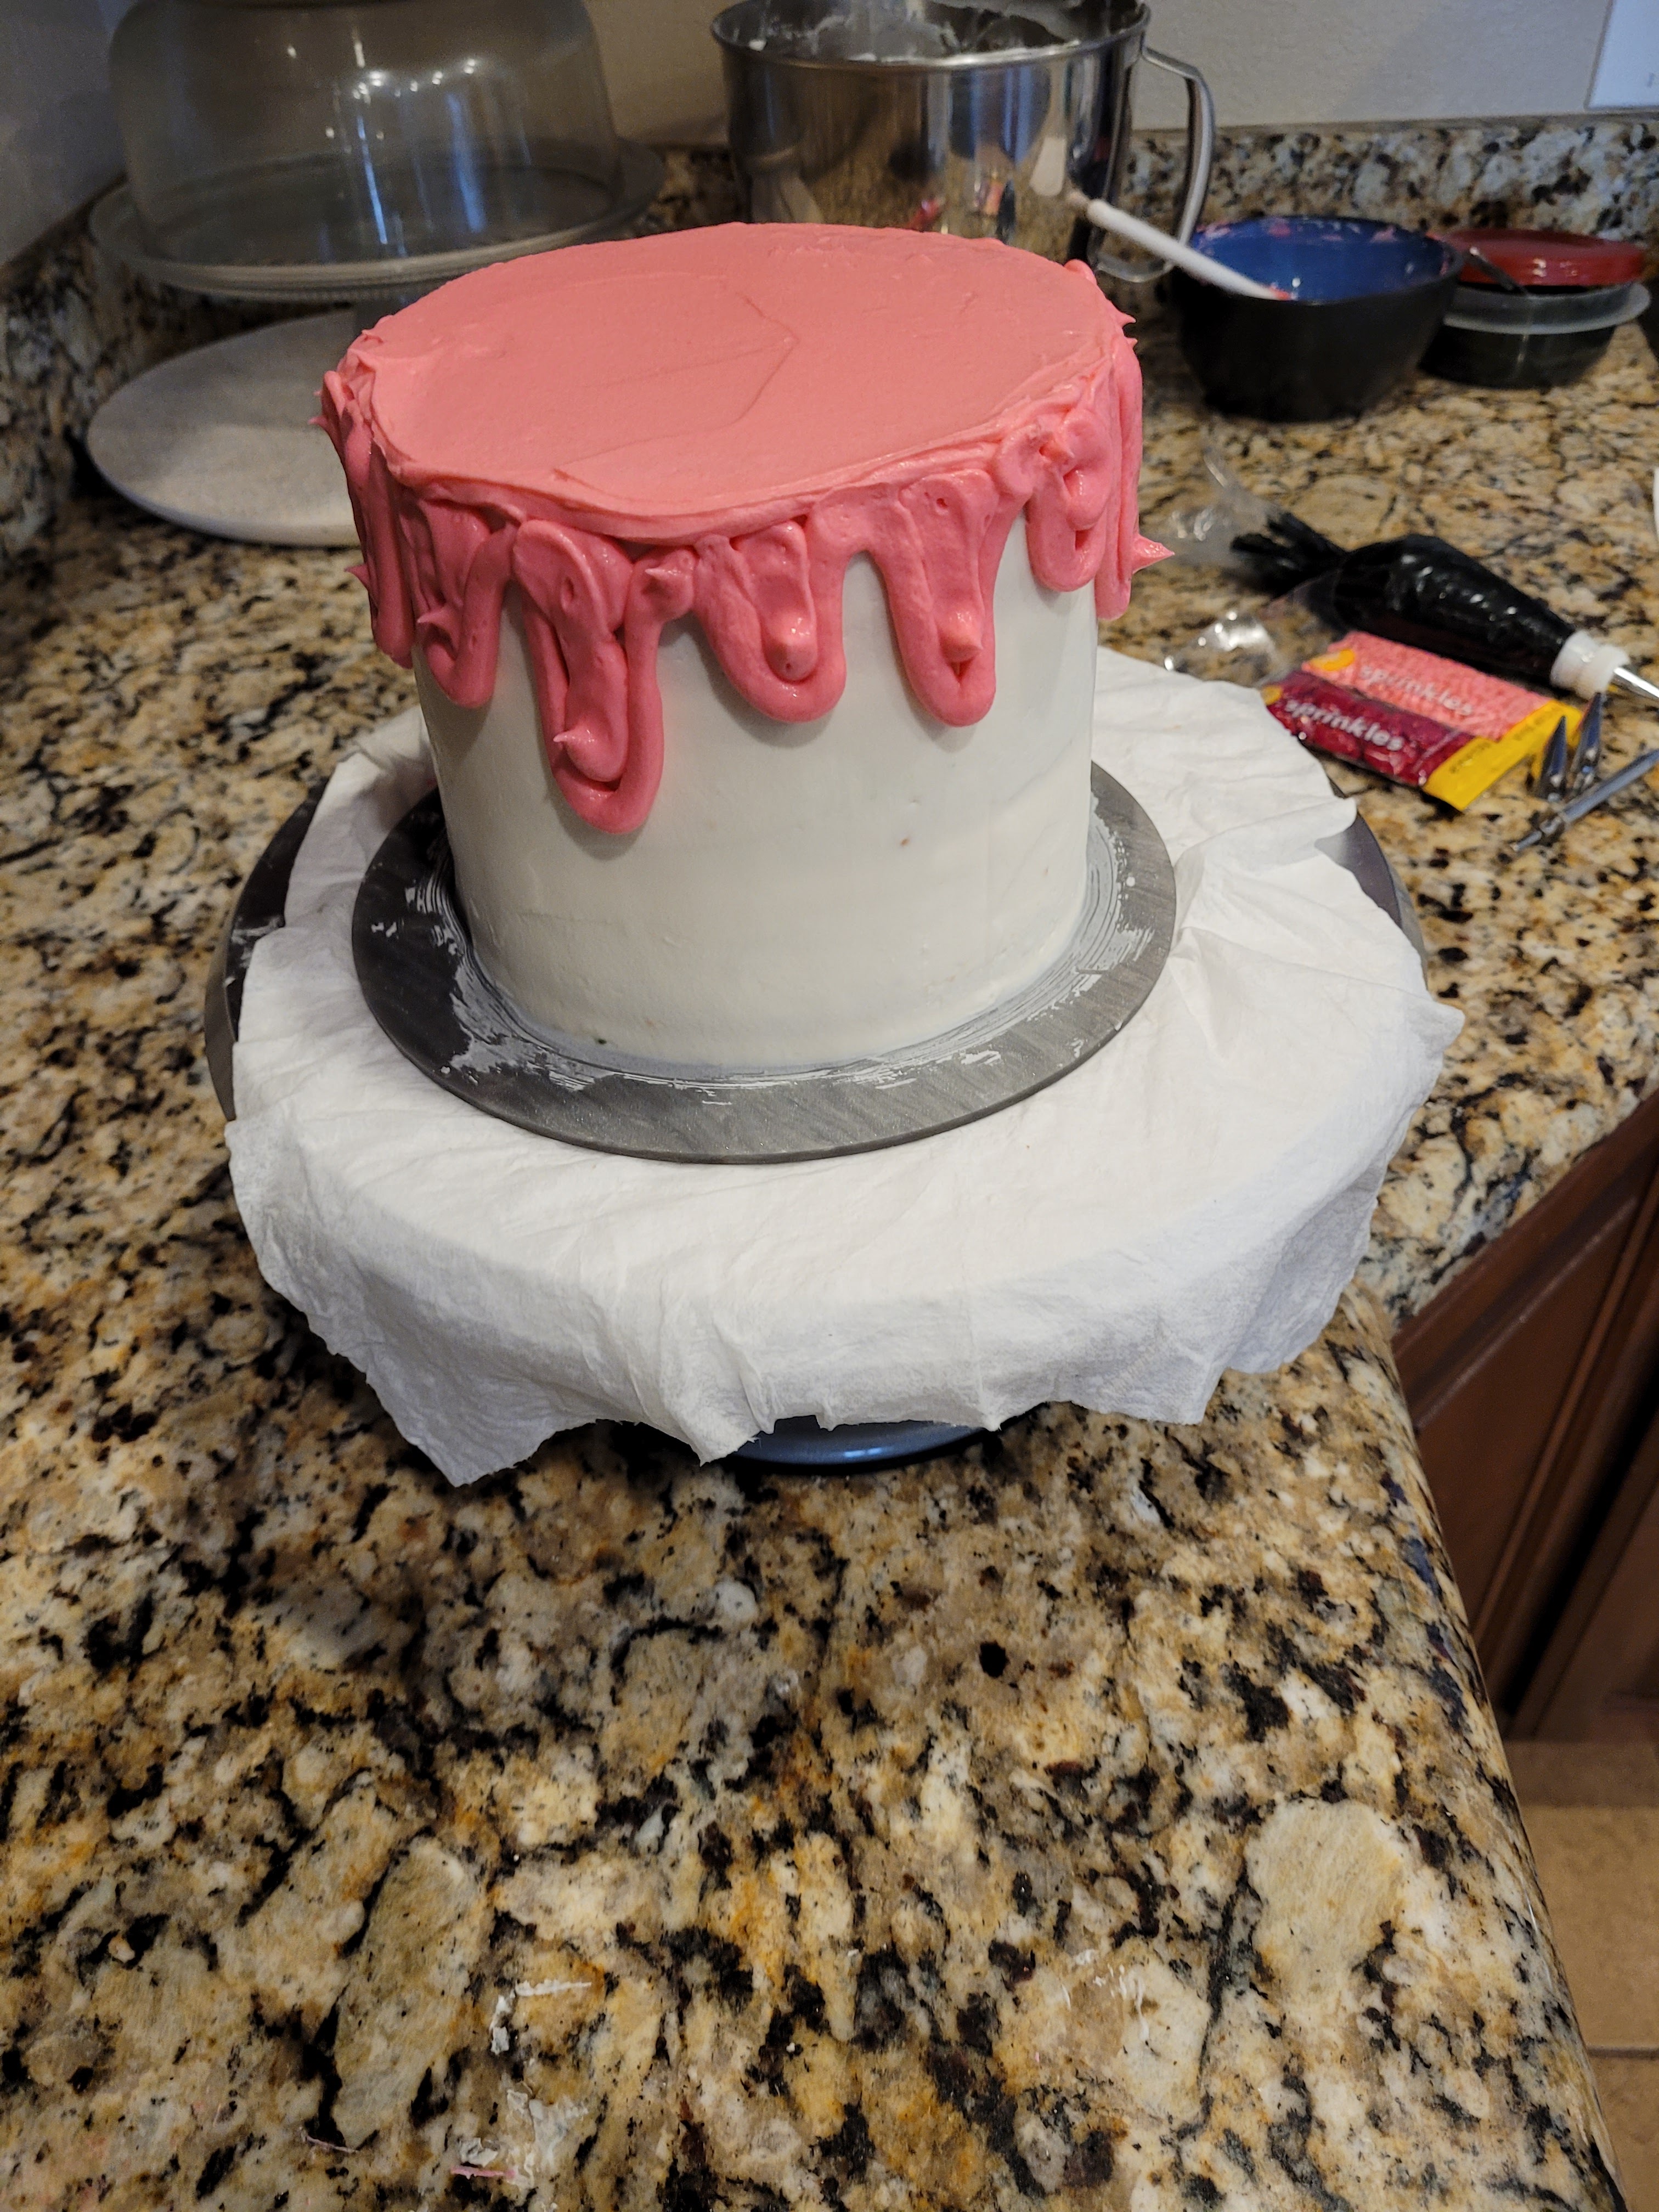
It’s supposed to look like a disaster! Then I came in with the pink frosting and #12 tip, and outlined “drips” down the side of the cake before filling in the outlines with more pink frosting. Then I smoothed out the pink to my liking; some texture makes it look more comical. I added in some black outlining on the top and the bottom around the cake. You don’t need to make a completely connected circle. Breaking it up a little into smaller sections of outlining adds to the cartoon effect.
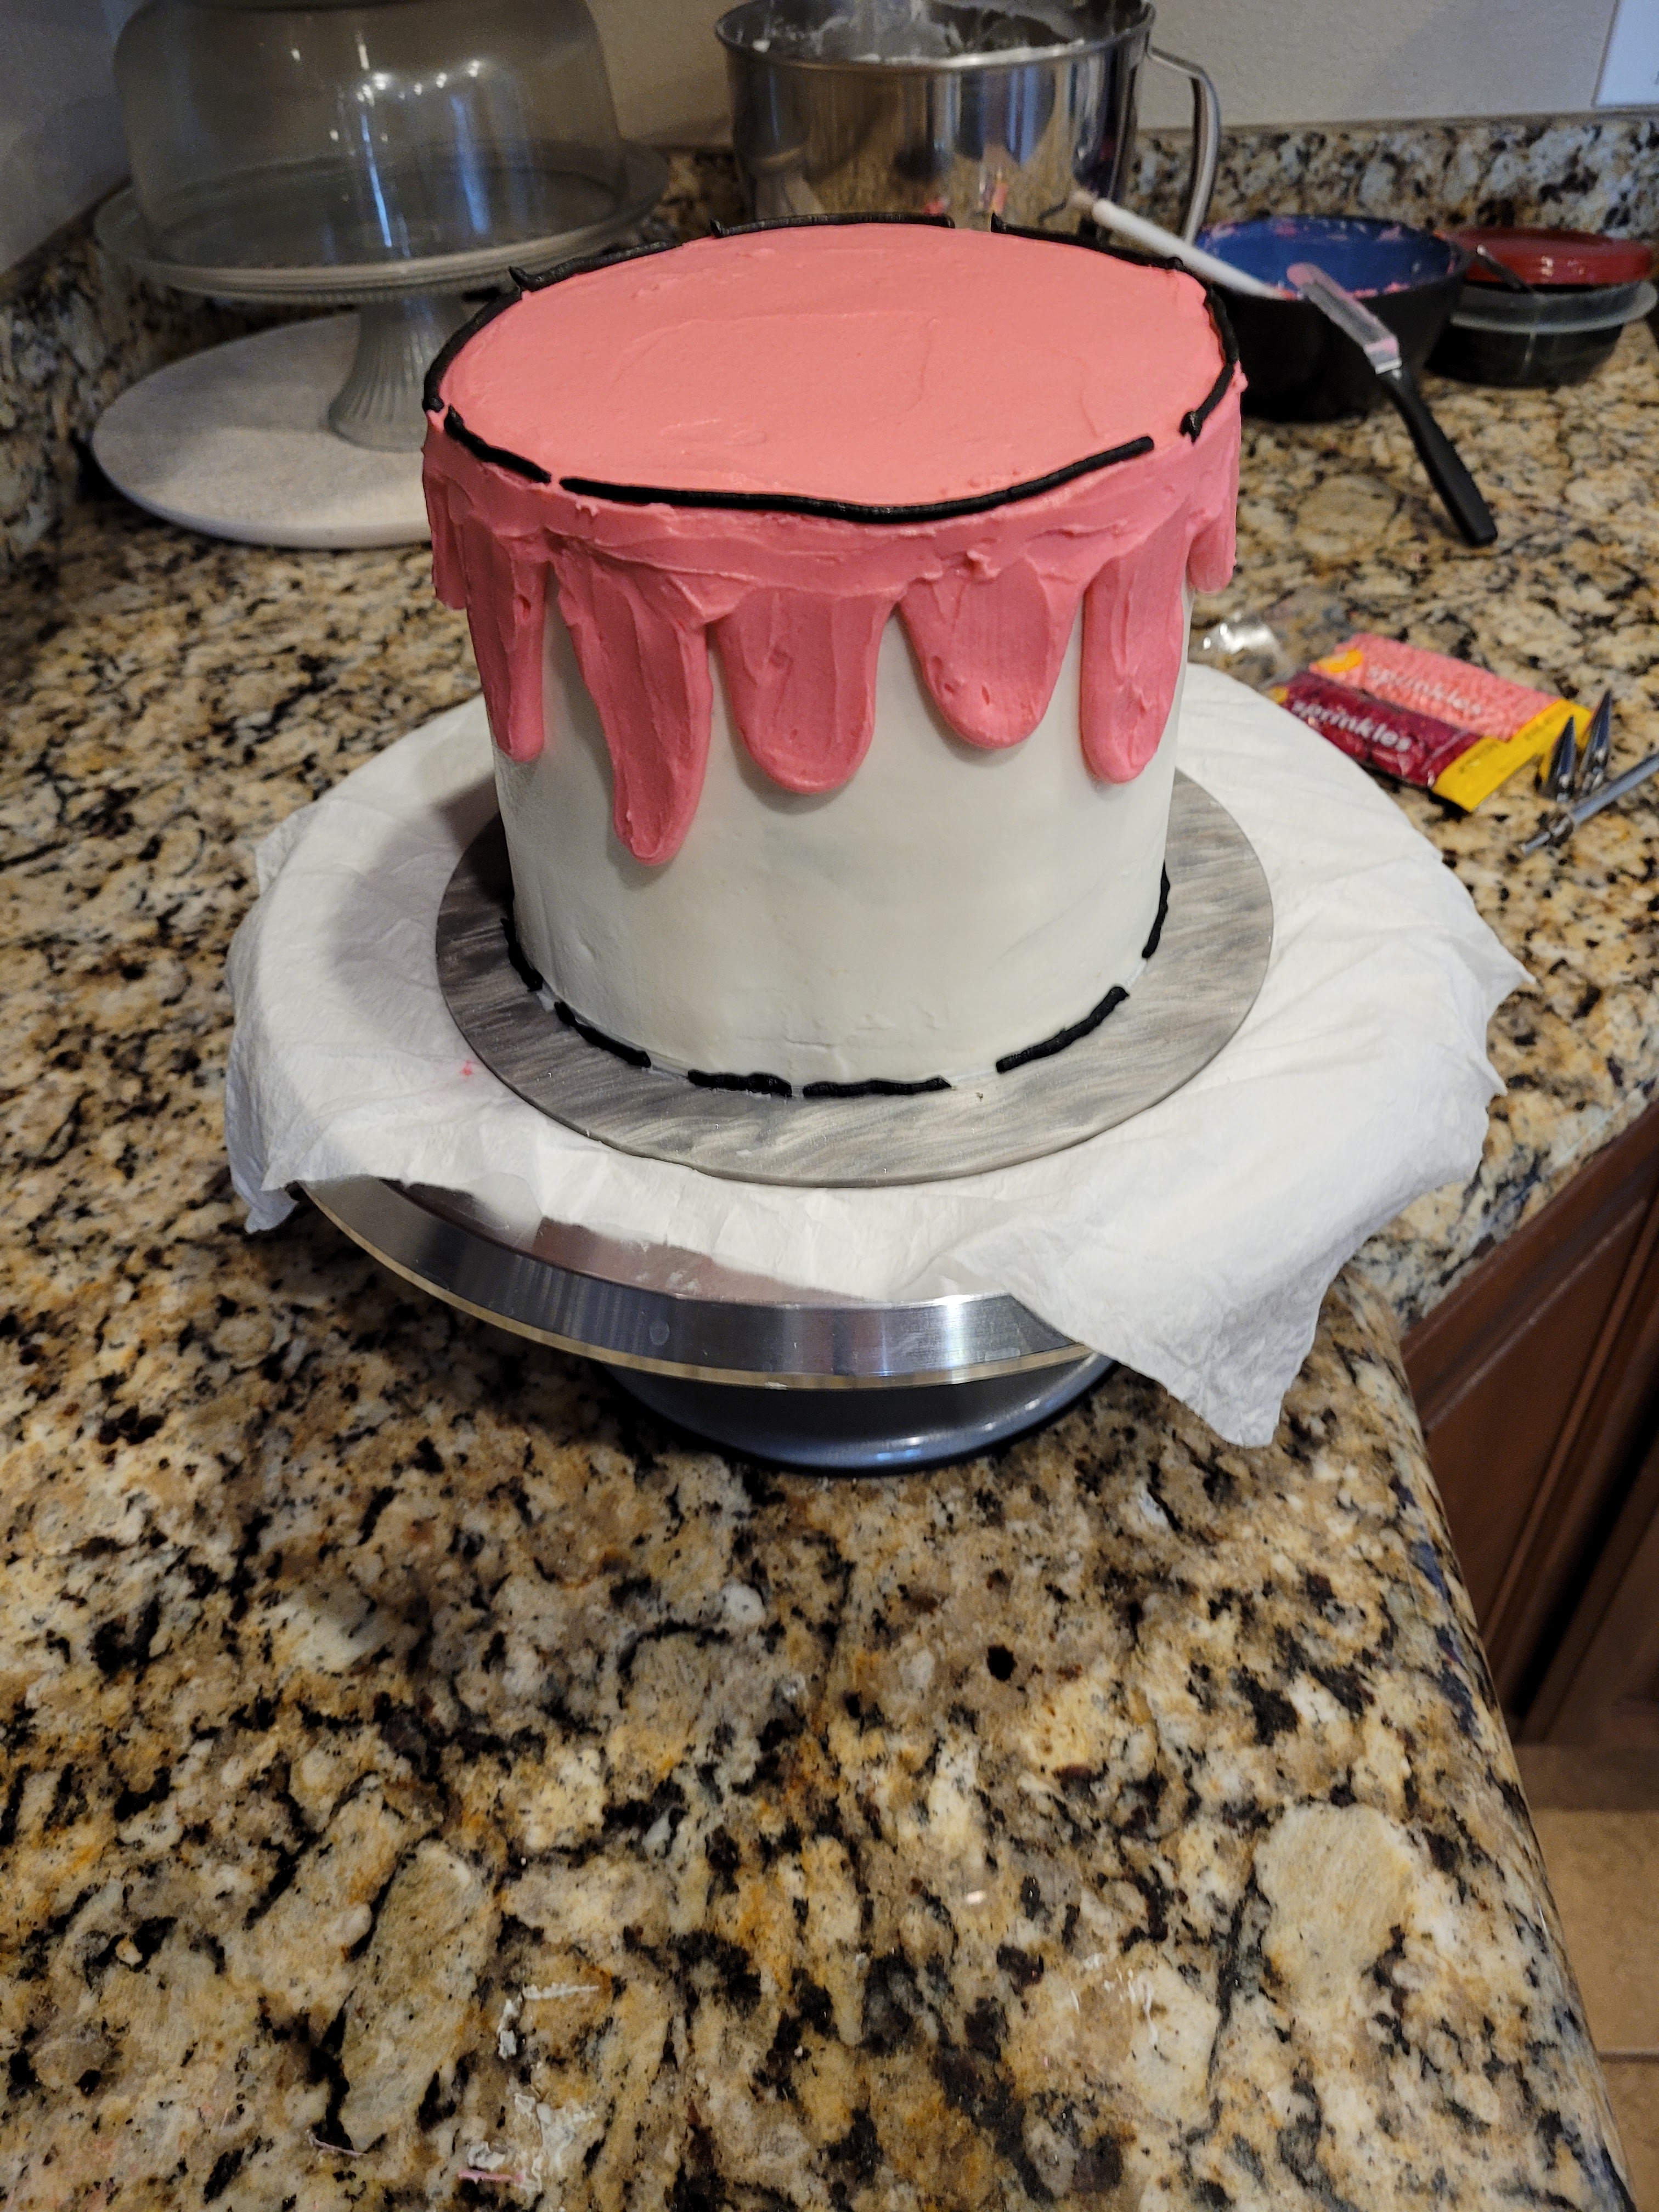
Plus, if the Powerpuff girls really did make this cake, they lacked fingers. It would not be smooth or perfect. *Logic.* Now, outline the drips with more black frosting. I added in a few “shadows” of overlapping black. Then I used my sprinkle grabber to put red hearts all over the side of the cake. I outlined these with a #3 tip in little sections; some went all around the hearts, others outlined in little chunks.
Oh, it’s all coming together now. Once I finished outlining all the hearts, I took tiny pink heart sprinkles and placed them all over the rest of the background of the cake. The sprinkle grabber came in clutch here; if I do have a Valentine this year, it’s that sprinkler grabber…I am in looooove. Then I finished the cake off by drawing little red swirls with my 2D tip on the top of the cake. I froze this for 15 minutes before coming in with black frosting and a #2 tip to outline the waves on the swirls. I do have a quick video on my Instagram of the design process as well.

Playing heart-to-get here, cake. If any at point your frosting starts to get too soft, throw it in the freezer for 5-10 minutes to firm up. But truly, I had this cake decorated in about 10 minutes minus the breaks to freeze sections. It was so easy and SO much fun. I am glad I jumped on this trend before it completely disappeared. I like to think of myself as trend-aware, but I guess I’m slipping in my old age…
This cake is off the c-hearts. 
I can heart-ly wait for my next slice. 
Blossom, Buttercup, and Bubbles really did a great job with this cake. “Good job, girls,” she said in her best Professor Utonium voice. 
Fun on the inside, fun on the outside. This lemon Funfetti cake is living its zest life. Look, I’m not one to heart-iculate my emotions, but I am so grateful my work fam sent me all these sprinkles to use for my bakes for my birthday a few weeks ago. I’ve got some stellar ideas coming up for another Valentine’s bake and some Mardi Gras bakes (we’re here to party mardi!). But right now, I’m just a girl, standing in front of a cake, asking it to let her eat it…because it is so zesty and delicious. Since it’s citrus-based, I’ve also been having it with breakfast. I am excelling at adulthood in my mid 30s, let me tell you. But trust me, if you had a slice, you’d be right there with me on Team Breakfast Cake. As far as I know, the citric acid hasn’t eaten a hole in my gut or bleached my internal organs, so I am definitely using this again to lessen the sweetness of buttercream frostings. I love a good science experiment that doesn’t end in near disaster. You know, like when Professor Utonium mixed sugar, spice, and everything nice but accidentally added in Chemical X and made the Powerpuff girls. Okay, we’ve gone full circle, so… Til next time, my fellow eaters!
Recipe and Instructions
Lemon Funfetti Cake
Funfetti cake bursting with lemon flavor
If not gluten free, use any kind of Funfetti cake mix. Monkfruit can also be replaced with regular powdered sugar.
Ingredients
CAKE
*One box of gluten free Funfetti cake mix
*70 grams (1/3 c) unsweetened applesauce
*1 cup fat free or skim milk
*3 eggs
*1 tsp lemon extract
FROSTING
*224 grams (1 cup) of 1/3 the fat cream cheese, softened
*225 grams (1 cup) of fat free Greek yogurt, strained overnight
*16 ounces (4 cups) Lakanto powdered monkfruit
*1 tsp lemon extract
*1 tsp vanilla extract
*1/8 tsp citric acid
*1 TBS milk
Directions
- Preheat oven to 350 and grease three 6-inch round pans and add bake even strips.
- Mix all cake ingredients together in a stand mixer on low for 60 seconds before turning to medium-high for two minutes.
- Pour batter evenly into pans and bake for 30-35 minutes, until a toothpick comes out cleanly from the center.
- Allow cakes to cool fully before frosting.
- To make frosting, whisk cream cheese and yogurt for 3 minutes before adding in half the powdered monkfruit and the extracts, mixing well.
- Add in remaining monkfruit and 1 TBS milk, mixing well. If frosting is too thick, add another TBS of milk.
- Frost the cooled cake as desired; to make a cartoon cake, please see detailed decorating instructions above.
- Keep leftovers covered and in the fridge. Cake slices best served at room temp, so remove and slice 30-45 minutes before eating. Enjoy!
Nutrition
Macros
10 servings
254 cal/40 c/6.9 f/7.4 p per slice
Be still my cake-loving heart. -
Chocolate Orange Protein Donuts

Many moons ago, when I was a young girl and could still eat all of the gluten, I adored an Orange Milano cookie. The folks at Pepperidge Farm had a sheer moment of brilliance when they thought to combine orange and chocolate into the unsung hero of flavor mashups. We all know about the bliss of biting into a chocolate peanut butter cup or a scoop of chocolate mint ice cream…but do you know of the life-altering goodness of chocolate orange donuts? Because you should. So it’s a good thing I came up with a recipe for them. You’re welcome. Also, if someone could just eat an Orange Milano cookie in front of me for old time’s sake, I’d appreciate it. Stupid gluten.
Choco-lotta flavor here. Recipe and Instructions
Chocolate Orange Protein Donuts
Soft, super fluffy chocolate donuts full of orange flavor
I have not tested this recipe with any other protein powders or mixes, so I cannot guarantee the same results without using the ingredients listed below. You can use dark cocoa powder or regular cocoa powder; I used regular but only because I was out of dark!
Ingredients
FOR THE DONUTS
*1 bag of Empowrd gluten free protein donut mix
*10 grams (2 TBS) cocoa powder
*1 large egg
*4 ounces (1/2 c) unsweetened applesauce
*1 tsp vanilla extract
*1 TBS orange zest
*1/2 c + 2 TBS pulp free orange juice
FOR THE GLAZE
*30 grams Quest chocolate milkshake protein powder
*30 grams Lakanto powdered monkfruit
*5 grams (1 TBS) cocoa powder
*4-5 TBS water
Directions
- Preheat oven to 350 and grease a donut pan with cooking spray (can use a muffin tin if you don’t have a pan)
- Mix all donut ingredients well
- Carefully pour batter into the pan until each cavity is 3/4 full (I used a piping bag with the tip snipped to make this easier)
- Bake for 10-12 minutes, until set and springy
- Let donuts cool on a cooling rack for 15 minutes while you make the glaze
- Mix Quest chocolate milkshake protein powder with Lakanto monkfruit and cocoa. Add water to get a drizzly consistency (about 4-5 TBS)
- Once donuts have cooled 15 minutes, dip into glaze and top with sprinkles
- Donuts are best eaten warm; reheat for 10-15 seconds and keep leftovers in the fridge
Nutrition
Macros
10 servings
111 cal/15 c/1.6 f/9.1 p per donut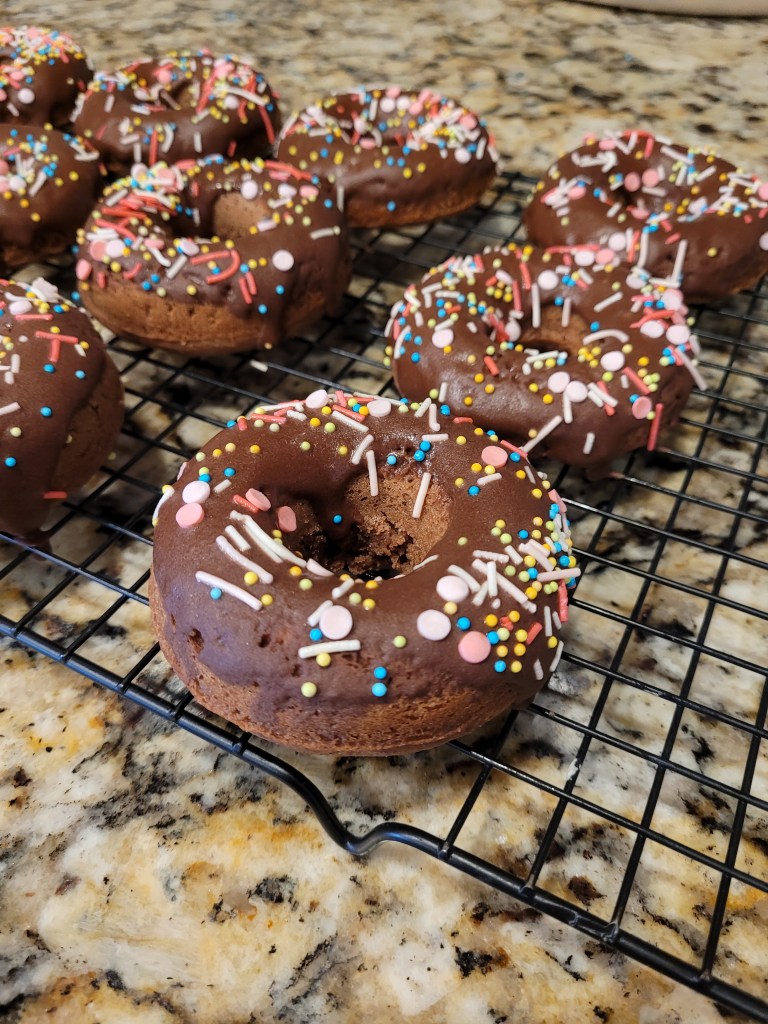
This might be my crowning achievement in donut recipes. - Preheat oven to 350 and grease a donut pan with cooking spray (can use a muffin tin if you don’t have a pan)

Healthy-ish cake, cupcakes, pie, and cheesecake recipes and decorating tips
